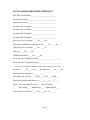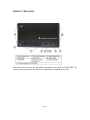
1
OnQ 2x10 KSU/PBX
Telephone System
P/N 364565-01
User’s Guide
P/N 1307724 Rev. A
For information regarding any of the products discussed in this user’s guide,
contact your local OnQ product installer or distributor.
All products sold by OnQ carry a standard 12 month warranty from date of
purchase.
OnQ or its suppliers are not responsible for damage to property or injury sustained
by the improper use or installation of products presented in this guide.
FCC Part 68 Registration
Your 2x10 KSU/PBX Telephone System is registered under Part 68 of the FCC rules. On the bottom of the
unit is a label that contains the FCC registration number and ringer equivalence number (REN) for this
equipment. If requested, this information must be provided to the telephone company.
The REN is used to determine the quantity of devices, which may be connected to the telephone line.
Excessive RENs on the telephone line may result in the devices not ringing in response to an incoming call.
In most, but not all areas, the sum of the RENs should not exceed five (5.0). Because of the OnQ Phone
System’s design, this is not normally a concern. You can contact your local telephone company to
determine the maximum REN in your calling area if such esoterica is of interest to you.
This equipment connects to the telephone network via the following standard network interface jack:
USOC RJ-45. This equipment is designed to be connected to the telephone network or premises wiring
using a compatible modular jack that is Part 68 compliant. This equipment cannot be used on Telephone
Company provided Coin Telephone Service. The 2x10 KSU/PBX Telephone System is not designed to
operate on Party Line Service
If this equipment causes harm to the telephone network, the telephone company will notify you in advance
that temporary discontinuance of service may be required. If advance notice is not practical, the telephone
company will notify you as soon as possible. Also, you will be advised of your right to file a complaint
with the FCC if you believe it is necessary.
The telephone company may make changes in its facilities, equipment, operations, or procedures that could
affect the operation of the equipment. If they do, you will be given advance notice so that you can make
any modifications necessary to maintain uninterrupted service.
If trouble is experienced with this equipment, please contact OnQ Technologies’ Customer Service at 800321-2343 for repair and warranty information.
© Copyright 2004 OnQ Technologies Inc. All rights reserved. All other brands or
product names are trademarks of their respective holders. Please be advised that
technical specifications set forth in this product literature are subject to change by
OnQ at any time without notice.
Page ii
TABLE OF CONTENTS
Installer/Homeowner Checklist
iv
Product Overview
1
Initial Setup
2
Placing Calls
3
Answering Calls
4
Voicemail Operations
5
Advanced Feature Programming
6
Page iii
INSTALLER/HOMEOWNER CHECKLIST
KSU/PBX serial number ____________________________
Firmware Revision # _______________________________
Hardware Revision # _______________________________
In-coming line #1 number ___________________________
In-coming line #2 number ___________________________
In-coming line #3 number ___________________________
In-coming line #4 number ___________________________
Roll-over service activated? ____Yes ____No
Second line disabled for single line service? ____Yes ____No
Caller ID service activated? ____Yes ____No
Time set? ____Yes ____No
OGMs programmed? ____Yes ____No
Extension zone #10 phone location ___________________________
Extension zone #11 phone location ___________________________
Extension #10 and #11 remain usable in the event of power loss
Fax line #3 ____, #4____, ext. #____ detection on? ____Yes ____No
Dial modem on extension #____, ____, ____
Door phone ext. on #18A____, #18B____, #19A____, #19B____
Direct outward dial enabled on ext. #____, #____, #____, #____,
Mode – Day Answering Machine____ / Day Voicemail ____
Auto switch____ / Manual Day ____ / Manual Night ____
Voice mail access code set? ____Yes ____No # 8 __ __
Page iv
PRODUCT DIAGRAM
The drawing above shows the individual components of the OnQ 2x10 KSU/PBX. All
extension zone connections and the line in connection are standard RJ-45 jacks.
Page 1
SYSTEM SETUP (for complete info, consult the Product User Manual)
Initial programming that must be done includes setting the time, programming the
outgoing messages and disabling the second incoming line (only if it is a single line
service).
To set the time: Press *20 D HH MM. (D is the day of the week,
Sunday = 0, Monday = 1, Tuesday = 2, etc.), (HH is the hour, using a 24 hour clock,
6AM = 06, 6PM = 18), (MM is the minutes).
To record an outgoing message (OGM): From any extension Press 53 xx (xx is the
OGM number, see below) and listen for the beep to start recording. When you have
completed recording your message, press #. Your message will be played back to you.
You can always review a recorded message later by: Pressing 52 xx
(where xx is the OGM number you want to review).
OGM-01 is the answering machine style (default) day-mode message, which will play
after your phones ring four times and no one answers. (Example: “Thanks for calling the
Wilson’s. No one is available to help you right now. For info on our party this weekend
press 5. To leave a message press 4.”)
OGM-02 is the voicemail style day-mode message that plays (if you are in that mode)
prior to any phones ringing, that allows outside callers to dial a specific extension.
(Example: ”Thanks for calling the Wilson’s. For Mary dial 11. For Bob’s home office
dial 12. To leave a message dial 4. For info on our party this weekend dial 5.”)
OGM-03 is the unattended style night-mode message that plays (if you are
in that mode or have switched to that mode) that allows night time outside callers to leave
a message without disturbing anyone. (Example: “No one is available to answer your
call right now. Please leave a message after the tone and we will get back to you. If this
is an emergency, dial 12.”)
OGM-05 and 06 are information box messages that you can direct outside callers to as
part of your other OGMs. (Example: “Our party this weekend is on Saturday from 5:00
to 9:00 PM. Please bring a hot dish.”)
If you have a single incoming line you will need to disable support for the second line:
From any extension Press #212. (To re-enable: Press *212)
Page 2
PLACING CALLS (for complete info, consult the Product User Manual)
To call another extension:
Press the extension number (10-19).
To transfer an in-process call to another extension:
Press Flash and the extension number. If the extension does not pick up after four rings
you will hear a busy tone. Pressing Flash again takes you back to the original incoming
call. If they want to leave a voice message for that extension, Press Flash 5 xx (xx is the
extension number).
To ring all on-hook phones: Press 6.
To ring all on hook phones while on a call: Press Flash 6.
To call an outside number:
The default is to Press 9 for an outside line, and dial the outside number.
If Direct Outward Access has been programmed for that extension, just dial the outside
number.
To program Direct Outward Access on a particular extension:
From that extension, press *11. When an extension is in Direct Outward Access mode,
you must Press Flash to gain access to any internal programming functions.
To remove Direct Outward Access on a particular extension:
From that extension, press Flash #11.
To manually select either Line #1 or Line #2 for outward dialing,
Press 81 to select Line #1 and dial the number, or
Press 82 to select Line #2 and dial the number.
If a line is not manually selected, the telephone system will automatically select an
available line. If you only have one incoming line, you should have disabled the second
line as shown on page 2.
To bring another extension into an existing outside call (3-way):
Press Flash, dial the extension and press Flash again.
Page 3
ANSWERING CALLS (for complete info, consult the Product User Manual)
To answer an incoming call: simply pick up any ringing phone.
To answer an incoming call that is ringing on another extension:
pick up any phone and Press 7.
To go to the other call as part of a Call Waiting operation: Press Flash 2. Call Waiting is
a service from your phone company that you must purchase separately. It is used to alert
you (with a click in your earpiece) to the fact that another call is incoming while you are
on an existing call.
To place an incoming call on hold: Press Flash.
To return from hold: Press Flash again.
To park a call for pick up at another extension: Press Flash 4.
To pick up a parked call: pick up any phone and Press 4.
To transfer an in-process call to another extension:
Press Flash and the extension number. If the extension does not pick up after four rings
you will hear a busy tone. Pressing Flash again takes you back to the original incoming
call.
To forward an in-process call to a personal voicemail box:
Press Flash 5 xx (xx = the extension number you are forwarding to).
To place an extension in do not disturb mode: pick up the extension and
Press *12. To remove do not disturb mode from an extension: pick up the extension and
Press #12.
To forward all calls to another number: Press *141xxxxxxxxxxxxxxxx# (xx’s are
outside number you are transferring the call to). This feature requires that you have two
incoming lines in service.
To remove call forwarding: Press #141
To handle a call that was forwarded to your external phone:
After the prompt, press 1 to talk, or press # or hang up to send to voice mail.
To bring another extension into an existing outside call (3-way):
Press Flash, dial the extension and press Flash again
Page 4
VOICEMAIL OPERATIONS (for complete information, consult the Product User
Manual)
There are 10 personal voicemail boxes (one for each extension zone) and
one shared voicemail box in the system.
When someone leaves you a voicemail in either your personal or the shared voicemail
box, and you pick up any handset on the system you will hear a stuttered dial tone.
You can select to hear all messages or just the new messages received since the last time
voicemail messages were checked.
To hear just new shared messages: press 50 0.
To hear all shared messages: press 50 1.
To hear just new personal messages: press 5, extension number, 0.
To hear all personal messages: press 5, extension number, 1.
While you are listening to your messages you can:
Press 1 to skip the message that is currently playing
Press 2 to repeat the message that is currently playing
Press 3 to delete the message that is currently playing
Press 0 to delete all the messages that just played
To create a PIN number for remote access to voicemail messages,
= numbers between 00-99). System default PIN is 888.
press *8 xx (xx
To retrieve your voicemail remotely: Dial your home phone number,
and while the outgoing message is playing,
Press your PIN number and 50 0 (new) or 50 1 (all) for the shared mailbox
or
Press your PIN number and 5, extension number, 0 (new) or 1 (all) for personal
mailbox messages
The shared and private mailboxes must be reached remotely with separate calls.
Page 5
ADVANCED FEATURE PROGRAMMING
To restore OnQ 2x10 KSU/PBX to factory defaults:
Press *28 (recorded OGMs will be retained).
To enable automatic switching between Day and Night mode:
Press *243
To set the time to begin and end auto-switched Night mode:
Press *242 hh mm HH MM (hh mm = begin time for Night mode and HH MM = end
time for Night mode).
To manually select Night mode:
Press *245.
To manually select Day mode (default):
Press *244.
To set Day mode to answering machine style (default):
Press *240.
To set Day mode to voicemail style:
Press *241.
To set first alarm to ring daily:
Press *13 10 HH MM.
To set first alarm to ring one time:
Press *1311 HH MM.
To cancel first alarm:
Press *131.
To set second alarm to ring daily:
Press *13 20 HH MM.
To set second alarm to ring one time:
Press *1321 HH MM.
To cancel second alarm:
Press *132.
Page 6
ADVANCED FEATURE PROGRAMMING continued (for complete info,
consult the Product User Manual)
To put an extension in fax mode: Press *32 xx (xx = the extension number).
To enable automatic fax detection for your fax extensions: Press *231.
To disable automatic fax detection for your fax extensions: Press #231.
To put an extension in dial modem mode: Press *33 xx (xx = the extension number).
To put extension 18 or 19 in door phone mode: Press *31 xx (xx is either extension 18
or 19).
To activate an electronic door strike at the OnQ door phone (sold separately: Press
Flash *. The OnQ door phone provides the signal to the OnQ Door Strike Controller
(also sold separately) which trips a relay to activate an electronic door strike (not sold by
OnQ)
To remove fax, modem , or door phone mode from an extension:
Press *30 xx (xx = the extension number).
To manually set extensions in the ring table:
Press *29 xx xx xx (xx = extensions you want in ring table).
To enable Music On Hold: Press *271. This requires that a continuously playing music
source is attached to the RCA jack on the front of the OnQ 2x10 KSU/PBX.
To disable Music On Hold: Press *272
To enable incoming Caller ID information passing: Press *221
To disable incoming Caller ID information passing: Press #221
Page 7
How to Reach Us
Toll Free Number: (800) 321-2343
Option 1: Technical Support
OnQ Website: www.onqtech.com
OnQ Technologies
301 Fulling Mill Rd. Suite G
Middletown, PA 17057