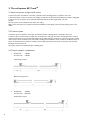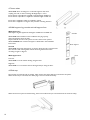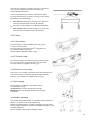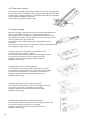
1
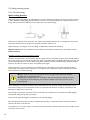
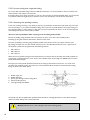
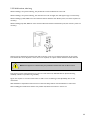
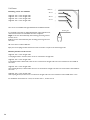
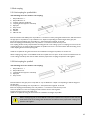
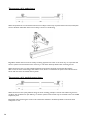
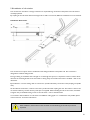
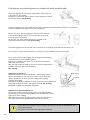
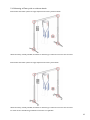
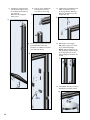
Invacare® RobinTM
Installations Manual &
Technical Description
2
Table of Contents
1.
2.
3.
4.
Preface . . . . . . . . . . . . . . . . . . . . . . . . . . . . . . . . . . . . . . . . . . . . . . . . . 5
General . . . . . . . . . . . . . . . . . . . . . . . . . . . . . . . . . . . . . . . . . . . . . . . . . 5
2.1 Installation . . . . . . . . . . . . . . . . . . . . . . . . . . . . . . . . . . . . . . . . . . . . . . . . . . . . . . . . . . . . 5
2.2 Warranty . . . . . . . . . . . . . . . . . . . . . . . . . . . . . . . . . . . . . . . . . . . . . . . . . . . . . . . . . . . . . 5
The rail system EC-TrackTM . . . . . . . . . . . . . . . . . . . . . . . . . . . . . . . . 6
3.1 Mono-rail system, straight rails & curves . . . . . . . . . . . . . . . . . . . . . . . . . . . . . . . . . . . .
3.2 Traverse system . . . . . . . . . . . . . . . . . . . . . . . . . . . . . . . . . . . . . . . . . . . . . . . . . . . . . . .
3.3 Traverse systems, combinations . . . . . . . . . . . . . . . . . . . . . . . . . . . . . . . . . . . . . . . . . . .
3.4 Room transfer . . . . . . . . . . . . . . . . . . . . . . . . . . . . . . . . . . . . . . . . . . . . . . . . . . . . . . . . .
3.4.1 Room transfer with 2 hoists . . . . . . . . . . . . . . . . . . . . . . . . . . . . . . . . . . . . . . . . . . . .
3.4.2 Room transfer with coupling . . . . . . . . . . . . . . . . . . . . . . . . . . . . . . . . . . . . . . . . . . . .
6
6
6
9
9
9
Rails, Brackets & Accessories . . . . . . . . . . . . . . . . . . . . . . . . . . . . . . 10
4.1 Rail profiles S, M & L . . . . . . . . . . . . . . . . . . . . . . . . . . . . . . . . . . . . . . . . . . . . . . . . . . .
4.2 Curves 30°, 45°, 60° & 90° . . . . . . . . . . . . . . . . . . . . . . . . . . . . . . . . . . . . . . . . . . . . . .
4.3 Ceiling brackets, Quick . . . . . . . . . . . . . . . . . . . . . . . . . . . . . . . . . . . . . . . . . . . . . . . . .
4.3.1 Brackets for traverse system and side hung wall brackets . . . . . . . . . . . . . . . . . . . .
4.4 Ceiling brackets, standard with or without lock . . . . . . . . . . . . . . . . . . . . . . . . . . . . .
4.5 Shim’s . . . . . . . . . . . . . . . . . . . . . . . . . . . . . . . . . . . . . . . . . . . . . . . . . . . . . . . . . . . . . . .
4.6 Wall brackets, end hung . . . . . . . . . . . . . . . . . . . . . . . . . . . . . . . . . . . . . . . . . . . . . . . .
4.6.1 Wall brackets, side hung . . . . . . . . . . . . . . . . . . . . . . . . . . . . . . . . . . . . . . . . . . . . . .
4.7 Insert tubes . . . . . . . . . . . . . . . . . . . . . . . . . . . . . . . . . . . . . . . . . . . . . . . . . . . . . . . . . .
4.8 Wall support leg, console and wall support foot . . . . . . . . . . . . . . . . . . . . . . . . . . . . .
4.9 End stop . . . . . . . . . . . . . . . . . . . . . . . . . . . . . . . . . . . . . . . . . . . . . . . . . . . . . . . . . . . . .
4.10 Trolleys . . . . . . . . . . . . . . . . . . . . . . . . . . . . . . . . . . . . . . . . . . . . . . . . . . . . . . . . . . . .
4.10.1 Hoist trolley . . . . . . . . . . . . . . . . . . . . . . . . . . . . . . . . . . . . . . . . . . . . . . . . . . . . . . .
4.10.2 Traverse trolley . . . . . . . . . . . . . . . . . . . . . . . . . . . . . . . . . . . . . . . . . . . . . . . . . . . .
4.10.3 Room-to-room trolley . . . . . . . . . . . . . . . . . . . . . . . . . . . . . . . . . . . . . . . . . . . . . . .
4.11 Rail end plugs . . . . . . . . . . . . . . . . . . . . . . . . . . . . . . . . . . . . . . . . . . . . . . . . . . . . . . . .
4.12 Pendles, adjustable . . . . . . . . . . . . . . . . . . . . . . . . . . . . . . . . . . . . . . . . . . . . . . . . . . .
4.13 Track switch, manual. . . . . . . . . . . . . . . . . . . . . . . . . . . . . . . . . . . . . . . . . . . . . . . . . .
4.14 Transit coupling . . . . . . . . . . . . . . . . . . . . . . . . . . . . . . . . . . . . . . . . . . . . . . . . . . . . . .
10
10
10
10
11
11
11
11
12
12
12
13
13
13
13
13
13
14
14
3
5.
Installation instructions . . . . . . . . . . . . . . . . . . . . . . . . . . . . . . . . . . . 15
6.
Inspection/check of the rail system . . . . . . . . . . . . . . . . . . . . . . . . . 39
7.
Technical description of the rail system EC-TrackTM . . . . . . . . . . 39
8.
4
5.1 General . . . . . . . . . . . . . . . . . . . . . . . . . . . . . . . . . . . . . . . . . . . . . . . . . . . . . . . . . . . . .
5.1.1 Milling of keyhole . . . . . . . . . . . . . . . . . . . . . . . . . . . . . . . . . . . . . . . . . . . . . . . . . . . .
5.2 Ceiling mounting system . . . . . . . . . . . . . . . . . . . . . . . . . . . . . . . . . . . . . . . . . . . . . . . .
5.2.1 Concrete ceiling . . . . . . . . . . . . . . . . . . . . . . . . . . . . . . . . . . . . . . . . . . . . . . . . . . . . .
5.2.2 Concrete ceiling with suspended ceiling . . . . . . . . . . . . . . . . . . . . . . . . . . . . . . . . . .
5.2.2.1 Mounting with pendling brackets . . . . . . . . . . . . . . . . . . . . . . . . . . . . . . . . . . . . . .
5.2.3 Wooden ceiling . . . . . . . . . . . . . . . . . . . . . . . . . . . . . . . . . . . . . . . . . . . . . . . . . . . . .
5.3 Wall installation, end hung rail . . . . . . . . . . . . . . . . . . . . . . . . . . . . . . . . . . . . . . . . . . .
5.3.1 Rail profile M & L . . . . . . . . . . . . . . . . . . . . . . . . . . . . . . . . . . . . . . . . . . . . . . . . . . . .
5.3.2 Wall bracket, side hung . . . . . . . . . . . . . . . . . . . . . . . . . . . . . . . . . . . . . . . . . . . . . . .
5.4 Curves . . . . . . . . . . . . . . . . . . . . . . . . . . . . . . . . . . . . . . . . . . . . . . . . . . . . . . . . . . . . . .
5.5 Rail coupling . . . . . . . . . . . . . . . . . . . . . . . . . . . . . . . . . . . . . . . . . . . . . . . . . . . . . . . . .
5.5.1 Rail coupling for profile M & L . . . . . . . . . . . . . . . . . . . . . . . . . . . . . . . . . . . . . . . . . .
5.5.2 Rail coupling for profile S . . . . . . . . . . . . . . . . . . . . . . . . . . . . . . . . . . . . . . . . . . . . . .
5.6 Wall support leg . . . . . . . . . . . . . . . . . . . . . . . . . . . . . . . . . . . . . . . . . . . . . . . . . . . . . .
5.7 Mounting traverse system . . . . . . . . . . . . . . . . . . . . . . . . . . . . . . . . . . . . . . . . . . . . . . .
5.8 Installation of rail switches . . . . . . . . . . . . . . . . . . . . . . . . . . . . . . . . . . . . . . . . . . . . . .
5.9 Installation of the Transit coupling . . . . . . . . . . . . . . . . . . . . . . . . . . . . . . . . . . . . . . . .
5.9.1 Adjustment of hole in the wall/door opening . . . . . . . . . . . . . . . . . . . . . . . . . . . . . .
5.9.2 Installation of transit coupling . . . . . . . . . . . . . . . . . . . . . . . . . . . . . . . . . . . . . . . . . .
5.9.3 Installation and connection of control button and power supply . . . . . . . . . . . . . . .
5.9.4 Installation of traverse system with lock fixture for transit coupling . . . . . . . . . . . .
5.9.5 Installation of a mono-rail rail for a coupling system . . . . . . . . . . . . . . . . . . . . . . . .
5.9.6 Mounting the positioning fixtures on parallel rail S-profile and M/L profiles . . . . . .
5.10 Mounting of Gantry with or without wheels . . . . . . . . . . . . . . . . . . . . . . . . . . . . . . .
7.1 The rail system . . . . . . . . . . . . . . . . . . . . . . . . . . . . . . . . . . . . . . . . . . . . . . . . . . . . . . .
7.2 Possible installations. . . . . . . . . . . . . . . . . . . . . . . . . . . . . . . . . . . . . . . . . . . . . . . . . . . .
7.3 Special solutions . . . . . . . . . . . . . . . . . . . . . . . . . . . . . . . . . . . . . . . . . . . . . . . . . . . . . .
7.4 Building dimensions and ceiling height requirements . . . . . . . . . . . . . . . . . . . . . . . . . .
7.5 Building dimensions for different track installations. . . . . . . . . . . . . . . . . . . . . . . . . . .
7.5.1 Mono-rail . . . . . . . . . . . . . . . . . . . . . . . . . . . . . . . . . . . . . . . . . . . . . . . . . . . . . . . . . .
7.5.2 Traverse rail system . . . . . . . . . . . . . . . . . . . . . . . . . . . . . . . . . . . . . . . . . . . . . . . . . .
15
15
16
16
18
18
21
23
23
25
26
27
27
27
28
29
31
32
32
33
34
35
35
36
37
39
39
39
40
40
40
41
Technical description of the ceiling hoist ROBINTM . . . . . . . . . . . . 42
8.1 Mechanical construction . . . . . . . . . . . . . . . . . . . . . . . . . . . . . . . . . . . . . . . . . . . . . . . . 42
1. Preface
This installation manual is intended as a guide when planning and carrying out the installation of a EC-TrackTM rail
system.
2. General
2.1 Installation
All installations must comply with the national rules and standards. Use only approved installation components
At every point of suspension, the roof/ceiling structure must be able to absorb a load of at least 300 kg.
Before mounting a rail system, the roof, walls, and floor must be examined carefully. In connection with the
examination, the exact materials involved in the roof and walls shall be determined. This examination must only be
carried out by a trained professional. The rail system must be mounted only by authorized personnel.
In accordance with the European standard EN 10535, the system shall be stress tested with 300 kg. This should
be done at each fixing point. This test is to be carried out as a testing of the substratum’s ability to keep the rail
system in place. This test shall be carried out by an authorised Invacare® service mechanic.
2.2 Warranty
There is a 3 year warranty on the EC-TrackTM rail system and RobinTM .
5
3. The rail system EC-TrackTM
3.1 Mono-rail system, straight rails & curves
A mono-rail system is suited for cases when a specific number of lifting places is required in the room.
A mono-rail system consists of at least one straight rail. This rail may be mounted parallel to the walls or diagonally
in the room. The rail system can be optionally extended with curves with angles of 30°, 45°, 60°
and 90°.
The rail system can be installed on the wall or the ceiling.
With a mono-rail system it is possible to hide the installation in the ceiling so that only the opening of the rail is
visible.
3.2 Traverse system
A traverse system is suited for cases when an unlimited number of lifting places is required in the room.
A traverse system consists of two parallel rails mounted on the ceiling or the wall. In each parallel rail, a traverse
trolley is inserted witch can travel the full length of the parallel rails, from end stop to end stop. Across the parallel
rails a traverse rail is mounted to the two traverse trolleys. This installation can be carried out in different ways, as
shown in the illustrations in section 3.3. With a hoist trolley inserted in the traverse rail, the hoist can travel the
full length of the traverse rail.
The system permits an unlimited number of lifting places.
3.3 Traverse systems, combinations
1.
Parallel rails:
Traverse rails:
S-Profile
S-Profile
Under-hung traverse.
Between-hung traverse.
2.
Parallel rails:
Traverse rails:
S-Profile
M-Profile
Under-hung traverse.
6
Partly between-hung traverse.
3.
Parallel rails:
Traverse rails:
M-Profile
M-Profile
Under-hung traverse.
Between-hung traverse.
Partly between-hung traverse.
4.
Parallel rails:
Traverse rails:
S-Profile
L-Profile
Under-hung traverse.
PLEASE OBSERVE! Total length of the L-Profile is max. 8 m.
7
5.
Parallel rails:
Traverse rails:
M-Profile
L-Profile
Under-hung traverse.
PLEASE OBSERVE! Total length of the L-Profile is max. 8 m.
6.
Parallel rails:
Traverse rails:
L-Profile
L-Profile
Under-hung traverse.
PLEASE OBSERVE! Total length of the L-Profile is max. 8 m.
Between-hung traverse.
Partly between-hung traverse.
PLEASE OBSERVE! Total length of the L-Profile is max. 8 m.
8
3.4 Room transfer
3.4.1 Room transfer with 2 hoists
Room transfer can be done by using two Robin hoists; one in each room. To ease this operation, an Invacare
room-to-room trolley is used.
Room transfer is possible in both single- or room covering installations. It is important that the rails are located
as close to the doorway as possible. When installing a room covering rail system intended for room transfer, the
traverse rail must be installed perpendicular to the wall with the doorway. The distance between the two end stop
buffers must not exceed 60 cm. To obtain the best possible result during room transfer, there must be a minimum
distance of 185 cm between the floor and the underside of the hoist. This must be kept in mind during installation
of the rail system.
3.4.2 Room transfer with coupling
As an alternative the room transfer can be achieved (remove by) an installated transit coupling.
The coupling can be used to connect either two traverse systems or one traverse system and one mono-rail
system.
The coupling is operated electrically by a control button mounted on the wall.
The coupling is delivered with a standard length of 800 mm.
For further information see section 4.14 and 5.9.
9
4. Rails, Brackets & Accessories
4.1 Rail profiles S, M & L
All rails are available in white or as anodized in natural.
Rail profile S is available in length of max 8 meters (white only 7.8 meters).
Max. width of span is 2 m, without support.
Rail profile M is available in length of max. 8 meters (white only 7.8 meters).
Max. width of span is 4 m, without support.
Rail profile L is available in length of max. 8 meters (white only 7.8 meters).
Max. width of span is 8 m, without support.
4.2 Curves 30°, 45°, 60° & 90°
All curves have a radius of 400 mm.
All curves are supplied as right or left curves, either white or
anodized in natural. Characteristics for right and left, see section 5.4.
Rail profile S with 90° angle. 0.6 m straight rail and 0.6 m of straight rail.
Rail profile S with 60° angle. 0.2 m straight rail and 0.2 m of straight rail.
Rail profile S with 45° angle. 0.2 m straight rail and 0.2 m of straight rail.
Rail profile S with 30° angle. 0.2 m straight rail and 0.2 m of straight rail.
4.3 Ceiling brackets, Quick
Ceiling brackets with hidden fixing parts.
Outer dimensions of bracket (70x68 ), (120x68) and (30x68) x 14 mm.
Used for ceiling installation of single-rail and traverse systems.
(70x68) ordinary ceiling suspension,
(120x68) rail coupling,
(30x68) curves.
To be installed as described in the installation instructions.
4.3.1 Brackets for traverse system and side hung wall brackets
Traverse bracket are used in connection with the assembly of a traverse
system.
The bracket is mounted beneath the traverse trolley, at the underhung
and partly between-hung traverse assembly.
The bracket is also used for side hung installation.
10
S-profil
M-profil
L-profil
4.4 Ceiling brackets, standard with or without lock
Ceiling brackets with visible fixing parts.
Outer dimensions of bracket (70x146), (120x146 ) and (30x146) x 14 mm.
Used for ceiling installation of single-rail and traverse systems.
(70x146) ordinary ceiling suspension,
(120x146) rail coupling,
(30x146) curved rails.
To be installed as described in the installation instructions.
Ceiling bracket, standard with lock screw.
Ceiling bracket with lock screw measuring (70x146).
Used for ceiling installation, with min. 1 per straight rail.
This ensures that the rail is not displaced after installation.
To be installed as described in the installation instructions.
4.5 Shim’s
Shim for ceiling bracket:
Available in the following dimensions for ceiling bracket, quick:
Width 30, 70, and 120 mm
• 1 mm thick
• 3 mm thick
• 5 mm thick
Available in the following dimensions for ceiling bracket, standard:
Width 30, 70, and 120 mm
• 1 mm thick
• 3 mm thick
• 5 mm thick
To be used in installations to compensate for possible differences of
the height in the roof/ceiling structure.
The shim’s are supplied in white or anodized in natural.
4.6 Wall brackets, end hung
The wall brackets are used when mounting rails to a wall.
Can be used when the walls have sufficiently high carrying capacity when
mounting straight and diagonally to a wall.
To be used with insert tubes and console.
To be installed as described in the installation instructions, section 5.3.
The wall brackets are supplied in white or anodized in natural.
4.6.1 Wall brackets, side hung
To be used when installing with side hung brackets.
Can be applied if the wall has sufficient strength.
The bracket can be supplied in both grey and white.
To be installed as described in the installation instructions, section 5.3.
11
4.7 Insert tubes
To be used when mounting M or L rail end hunged to wall, when
coupling two rails, or when mounting rails diagonally in a room.
Insert tube for rail profile M is supplied in standard length of 800 mm.
Insert tube for rail profile L is supplied in standard length of 1000 mm.
Insert tube is supplied in white or anodized in natural.
Insert tube is supplied in arrange for the particular mounting situation.
4.8 Wall support leg, console and wall support foot
Wall support leg
Wall support leg are supplied in the lengths of 2600 mm and 3000 mm.
To be used if the wall does not have sufficient carrying capacity
when mounting the rail to the wall.
May be used for the mono rail systems as well as the traverse systems.
To be installed with console and support as illustrated in the installation
instructions.
Console
Floor support
Console
To be used along with wall support, as the part which the rail is mounted onto.
The console is also used together with the end hung wall bracket when
mounting straight or diagonal.
Wall support foot
Foot
Low foot.
To be used in rooms without skirting along the floor.
High foot.
To be used in a room where there is skirting board pan along the floor.
4.9 End stop
The end stop is mounted at all rail outlets, which ensures that the trolleys do not leave the rail system.
When the end stop is mounted, the rubber plug is to face towards the trolley.
When the traverse system is between-hung, the traverse rails end stop is to be mounted in the traverse trolley.
12
If the rails are mounted to a wall, the end stop is to be placed
so far into the rail that the hoist does not hit the wall
(see installation instructions).
In some countries/local areas there is a demand for double
securing of the end stops. Such extra securing can be acheived
by installing one of the following:
•
Bufab MRX M5x16mm thread forming screw 10mm from
each end of the rail, 25mm from the rail underside
(the screw can be installed in a pre-drilled hole Ø4,3mm).
or
• Bufab R6B Ø6,3x22mm thread forming screw 10mm from
each end of the rail, 18mm from the rail underside.
4.10 Trolleys
4.10.1 Hoist trolley
The hoist trolley is used for individual mono rail systems
as well as traverse systems.
The hoist trolley is used when a RobinTM ceiling hoist is to
be mounted in a EC-Track system.
Hoist trolleys are supplied in white or grey.
4.10.2 Traverse trolley
The traverse trolley is used when mounting a traverse system.
For a traverse system, 2 traverse trolleys are always used.
Traverse trolleys are supplied in white or grey.
4.10.3 Room-to-room trolley
The room-to-room trolley is used in EC-Track where transfer from
one room to another is required, typically through a doorway.
Room-to -room trolleys are supplied in white or grey.
4.11 Rail end plugs
Rail end plugs are supplied for rail profiles of 3 sizes,
as well as white or grey.
To be used at the closure of both ends of all rails.
Mounting: Press into the rail profile after the rail system
is mounted.
4.12 Pendles, adjustable
The pendles will be delivered with an adjustable interval of 20-30 cm,
28-46 cm, or 44-74 cm. All white coloured only.
Pendles are applied if there is a need for installing a lower rail system
than the original ceiling level. Can be used in hidden installation as well
as visible installations.
Must be installed as described in installation manual.
13
4.13 Track switch, manual
The rail switch is manually operated and is installed with a standard ceiling bracket.
The rail switch is used in combination with a ceiling installed single rail system with
S-profile, where a change in direction is required during movement of the patient.
This is installed as described in section 5.8.
Track switches are supplied in white or grey.
4.14 Transit coupling
The transit coupling is operated electrically and mounted with pendles in the
ceiling on both sides of the wall; it has a standard length of 800 mm.
The coupling is used for movement of a patient from one room to another.
The coupling can be used in traverse systems with S-, M,- and L-rails, and in a
mono-rail system with only S-profile rails.
The installation of the coupling is described in the Installation manual
section 5.9.
Control button (for the wall), and a transformer is enclosed, when delivered.
The coupling is available in white or grey.
Coupling lock fixture for rail profile S, to be mounted on the
traverse profile in the end that is coupled.
It is mounted to ensure that the traverse rail and coupling are locked
and connected correctly before room transfer can be done.
Installed as described in the Installation manual section 5.9.
Available in white or grey.
Coupling lock fixtures for traverse profile M/L.
To be mounted on the traverse profile in the end that is coupled,
it is mounted to ensure that the traverse rail and coupling are locked
and connected correctly before room transfer can be carried out.
Installed as described in section 5.9 Installation instructions.
Available in white or grey.
Coupling positioning fixtures for parallel rail S-profile
To be mounted on the parallel rail, close to the coupling, to position
the traverse rail correctly in proportion to the coupling.
Installed as described in section 5.9 Installation instructions.
Available in white or grey.
Coupling positioning fixtures for parallel rail M/L-profile
To be mounted on the parallel rail, close to the coupling, to position the
traverse rail correctly in proportion to the coupling.
Installed as described in section 5.9 Installation instructions.
Available in white or grey.
14
5. Installation instructions
5.1 General
Before installing a rail system, a careful and accurate measuring of the room is essential.
It is equally important to determine the condition of the ceiling, the walls and the floor in order to decide whether
to mount the rails on the ceiling or on the walls.
Next, you need to decide how many lifting places are needed in the room.
When defining the lifting places, an individual assessment is required, which takes into consideration the build
of the individual user and number of nurses.
The following placement of typical lifting places may be used as a recommended guideline:
•
•
•
•
Bed
Toilet
Bathtub
Changing table
1 m from inside of the bed head end.
15 cm from the front edge.
1/3 way up (sitting position), ½ way up (reclining position).
1 m from the head end of the table.
When measuring for the selected rail system, take into consideration a suitable parking place for the hoist when it
is not in use. A suitable spot could be near a wall, where the hoist charger is mounted on the wall.
Check the customized rail as well as the brackets and other accessories against the drawing.
Check that any burrs and metal shavings have been removed from the rails to prevent this debris from getting
stuck in the trolley wheels producing noise and erratic operation.
In case of single rails and curved rails needing coupling, use the enclosed pipe pins. First, push the pipe pins halfway
into the one rail. Holes are drilled to Ø3.2mm in the rail that the previous mentioned rail is to be connected to.
Then the next rail is inserted over the pipe pins. Secondly, push the next rail into the protruding pins. Do not drill
further holes in the first rail. Finally, mount the bracket for rail coupling.
When installing a traverse system where the parallel rails are running from wall to wall, the minimum distance
from rail to wall must be 60 mm, insert the traverse trolley and the rail end stop into the parallel rails before
installation. If not, the parallel rails must end min. 350 mm from the wall to permit subsequently installation of the
trolley.
When installing a mono rail system or a traverse rail in a traverse system, it is important that the rail at one end
stops min. 160 mm from the wall to permit subsequently installation of the hoist trolley.
At secondary installation of Robin Mover, the distance must be minimum 300 mm.
When installing rails with brackets directly on the ceiling, make sure that the ceiling is even and horizontal. (Shim’s
of respectively 1 mm, 3 mm and 5 mm thickness, may be used to level out any unevenness.)
Any EC-Track system must be prepared with an installation point for the hoist.
This installation point appears as a 32 mm round milled groove on the bottom of the rail in which the hoist is to
be installed. This milled groove is called keyhole. When installing the rail system, it is crucial that this installation
point is placed according to the instructions in the section 5.1.1 about milling of keyholes.
5.1.1 Milling of keyhole
Generally, the keyhole must always be placed as close as possible to the end of a rail. However, it must be at least
250 mm away from the rail end. If the rail goes from wall to wall, it should be placed min. 400 mm from the rail
profile end.
If traverse system is mounted, the keyhole should be placed as close as possible across the end of the rail.
However, it must be at least 250 mm away from the rail end. If the traverse rail continues all the way out to the
walls, it should be placed min. 400 mm from the end of the rail.
15
5.2 Ceiling mounting system
5.2.1 Concrete ceiling
Quick ceiling bracket
When using quick ceiling fittings, all ceiling fittings are to be mounted in the ceiling. Then the rail may be mounted
in these. At least 3 ceiling fittings shall be used per rail. There must subsequently be max. 700 mm between each
fitting. There must be max. 200 mm from the end of the rail to the first fitting.
Measure up to all fittings at the same time. It is important that the drilled holes are on a straight line. The precise
marking for the holes is to be carried out using laser technique, chalk line, etc.
When referring to mounting in concrete ceilings, we differentiate between the following:
Massive concrete: (Factory moulded concrete elements, prestressed concrete surfaces, armoured concrete)
Hollow surfaces:
Mounting in massive concrete and hollow surfaces
The holes are drilled with a 15 mm hammer drill to a depth of 54 mm. The holes are blown clean and Hilti HKD-S
M12 stroke anchors are hammered into the holes. When using Hilti running tools HSD-G M12x50, the anchor will
be correctly fastened in the concrete. When using other materials than this, the Hilti fastening equipment shall be
inspected, to make sure these are of the same quality and strength.
When the anchor is correctly mounted, the quick fitting is also mounted by screwing the threaded rod that is
premounted to the fitting in the stroke anchor. It is important that an adhesive is used on a fitting and nut when
the threaded rod is mounted to fitting.
Note! In order to ensure the achievement of max. strength, the threaded rod should be
screwed min. 14 mm into the anchor.
Note! When using HKD anchor in combination with the quick bracket, optimum accuracy
is a requirement. As an alternative, two component adhesive mortar for concrete can be
recommended.
When all fittings are mounted, the hoist trolley is pushed into the rail. The hoist trolley may face both ways. If
the traverse trolley is to be mounted into the rail, it is important that this faces correctly in connection to the
following mounting of the traverse rail.
The end stop is mounted in both ends of the rail. The end stop is pushed into the rail with the rubber plug first,
and fastened initially loosely with your fingers.
Lift up the rail, adjust the length of it and fasten it into all ceiling fittings.
Place the adjustable end stops correctly and tighten appropriately. It is important that the end stop is placed so
that the hoist does not hit the wall.
For parallel rails in a traverse system, it is important that the end stop is placed so that the traverse trolleys hit the
end stop at the same time.
16
Standard ceiling bracket
The ceiling brackets are pushed onto the rail and distributed with max. 2000 mm between each bracket and 200
mm from the last bracket at the end of the rail. Use at least three bracket per rail. It is recommended to use an
uneven number of brackets, if only one person is installing the rail. Thus, one bracket is placed on the centre
creating balance when the rail is hung in the first bolt.
Note! In at least one end of the rail, use a bracket with locking screw to be secured to the
rail.
Measure for the hole for the one expansion bolt of the centre bracket.
Drill the hole to a depth of approx. 80 mm with a 8 mm. impact drill bit. The hole is deeper than the expansion
bolt length to faciliate easy dismounting later on. For dismounting, you can then drive the bolt fully in instead of
pulling it out.
Drive an expansion bolt type Hilti HSA M8x75 in, leaving sufficient room for the bracket thickness (6 mm), the
locking washer (2 mm) and the nut (7 mm) plus a little allowance. When you have driven in the bolt, remove the
nut and the washer.
Insert the hoist trolley in the rail. The trolley can be oriented in both directions.
If you are installing the traverse trolley, make sure that it is correctly oriented for the subsequent installation of
the traverse rail.
Install end stops at both ends of the rail. Insert the adjustable end stops in the rail with the rubber plug side first
and the steel plate towards to the bottom of the rail. Finger tighten the screws.
Lift the rail in place, mount the washers and nuts and tighten them lightly. Adjust the rail lenghtwise and angle wise,
and tighten the nut.
Drill the hole for the bracket in the one end of the rail but on the opposite side of the rail. Drive in the expansion
bolt, make the final adjustments and tighten.
Next, drill the remaining holes at one end of the bracket slot. If the drill bit hits a reinforcement bar before the
hole is (50 mm) deep, simply drill at the other end of the slot. If the drill hits the reinforcement bars again, move
the bracket approx.. 20-25 mm along the rail. The bracket will then cover the failed holes.
Note! If the hole depth is between 50-70 mm, use a Hilti HSA M8x57.
Drive in the remaining expansion bolts, place the washers and nuts and tighten.
Position the adjustable rail stops correctly and tighten. Make sure to position the end stops so that the hoist does
not hit the wall.
When installing parallel rail in a traverse system, be sure to position the end stops at the exact same points to
ensure that the traverse trolley hit the end stops simultaneously.
Installation of the hoist: See the user’s manual.
Installation of the charger: See the user’s manual.
17
5.2.2 Concrete ceiling with suspended ceiling
For rooms with suspended ceilings which are difficult to dismount, it is recommended to choose a solution with
wall-mounted or wall support mounted rails.
If the false ceiling can be easily removed or in case of a new mounting of a fixed suspended ceiling, we recommend
an installation with lowering brackets for aesthetic reasons. For this solution, use the lowest rail profile S.
5.2.2.1 Mounting with pendling brackets
In the case of ceiling mounting, it may often be necessary to pendle the rail downward. This need may arise in the
even of mounting in a room with a suspended ceiling, where you have to pendle between the original ceiling and
the suspended ceiling, or if the ceiling is so high that you have to pendle the rail down in order to ensure that the
hoist’s lifting intervals are used as well as possible.
There are more possibilities when carrying out an mounting with pendles:
The first is pendling using threaded rods and round spacer pipes, cut on-site at the installation place.
Mounting by using this method is described in detail in section 5.2.2.
The other possibility is mounting using adjustable pendles. This pendle consists of an upper and lower part.
By pushing the upper part onto the outside of the lower part, the adjustable pendle may cover a given interval.
As standard, a pendle can be supplied with the following intervals:
•
•
•
200 - 300 mm
280 - 460 mm
440 - 740 mm
When the correct pendle spacing has been determined in connection with the assembly, the pendle is pulled out
to this length, and fastened with a screw. Then a hole is drilled all the way through to an M8x65 bolt to lock the
pendle in the desired length.
The upper part of the pendle should be mounted in the ceiling as described in section 5.2.1 or 5.2.3 as when
mounting with standard bracket. The lower part of the pendle should be attached to the final standard ceiling
fitting, as shown in the sketch below:
1.
2.
3.
4.
5.
Pendle, upper part.
Pendle underpart.
Spacer pipe through lowered ceiling, Ø15.
Standard ceiling bracket.
Through locking bolt, M8x65.
The pendle may also be supplied with predetermined dimensions, avoiding adjustment on-site. When using this
method, 2 weeks delivery time must be expected.
Note! Remember also to order ceiling brackets when ordering pendle.
18
Removable suspended ceiling
In case of a removable suspended ceiling, the space above the suspended ceiling is accessible and pendle brackets
and rail can be installed at the same time.
1.
2.
3.
4.
5.
6.
7.
8.
9.
10.
11.
Concrete ceiling.
Expansion bolts M8x75, 2 pcs.
Yoke (Steel plate for even installation surface), 1 pcs. 3mm.
M8 nuts, 4 pcs.
M8 coupling nuts, 2 pcs. (Collecting sleeve).
M8 locked nuts, 2 pcs.
Aluminium pipes Ø40, 2 pcs.
Ceiling bracket (standard), 1 pcs.
Removable suspended ceiling.
M8 threaded rods, 2 pcs.
Locking washers, 2 pcs. 11x35x2.
(A HKD anchor can be used as an alternative, which the rods are fixed directly into).
To get the right length of the pendling brackets, use the distance between the concrete ceiling and the lower face
of the suspended ceiling as your starting point.
This distance is used to determine the length of the pendle bracket pipe and the threaded rod. Their length must
equal the previously measured distance described above.
When installing, first install the yoke for the centre ceiling bracket. To do this, follow the instructions for the
installation directly in a concrete ceiling. In this case, however, the holes are drilled for both expansions bolts at
the same time.
When driving in the expansion bolts, leave approx. 15 mm protruding below the nut, so that you can screw the
coupling nut onto it to half its length. Counter-tighten the coupling nut against the expansion bolt nut.
Measure for the hole in a suspended ceiling and drill/cut this hole to Ø40 mm.
Attach a M8 nut onto the threaded rod (approx. 20 mm onto the rod) and screw the rod into the coupling nut
until it hits the expansion bolt and counter-tighten the nut.
After completion, push the two aluminium pipes into the holes and fasten the rail as described in the usual
instruction instructions.
Note! The distance between the suspended ceiling and the ceiling bracket must be min. 1-5 mm
to prevent damages to the false ceiling.
19
Fixed suspended ceiling
In case of a fixed suspended ceiling, the rail installation is carried out in two steps. Therefore, the lowering bracket
needs to be secured without the support from the ceiling bracket.
1.
2.
3.
4.
5.
6.
7.
8.
9.
10.
11.
12.
Concrete ceiling.
Expansion bolts M8x75, 2 pcs.
Yokes, (Steel plate for even installation surface), 2 pcs. 3mm.
M8 nuts, 6 pcs.
M8 coupling nuts, 2 pcs.
M8 locking nuts, 2 pcs.
Aluminium pipes Ø40, 2 pcs.
Distance pipes Ø20 (or nuts and washers), 2 pcs.
Ceiling bracket (standard), 1 pcs.
Suspended ceiling.
M8 threaded rods, 2 pcs.
Locking washers, 2 pcs.
(A HKD anchor can be used as an alternative, which the rods are fixed directly into).
Cut the pendle bracket pipe to a length equalling the distance measured between the concrete ceiling and the
lower face of the suspended ceiling minus 50 mm.
This length is appropriate for a double gypsum layer in the ceiling and an extra allowance of 12 mm.
Cut the threaded rod to a length equalling the distance between the concrete ceiling and the lower face of the
suspended ceiling minus 10 mm.
When installing, first install the top yoke for the centre bracket of the rail, install the yoke as described in the
installation instructions for direct installation in a concrete ceiling. In this case, however, drill both holes for the
expansion bolts at the same time.
When driving in the expansion bolts, leave approx. 15 mm to protruding below the nut, so that you can screw the
coupling nut onto it to its half length. Counter-tighten the coupling nut against the expansion bolt nut.
Attach a nut approx. 20 mm onto the threaded rod and screw the threaded rod into the coupling nut, until it
touches the expansion bolt, and counter-tighten the nut.
Attach the bottom yoke and secure it with nuts.
Note! Avoid paint on the bottom section of the threaded rods until the installation is complete.
Prepare the rest of the installation points after a careful and accurate measuring.
First step of the installation is now complete and the construction of the suspended ceiling can be completed.
In the final installation, position the distance pipe in the suspended ceiling. This pipe will protect the suspended
ceiling. Cut the distance pipe to a length creating a distance of 1-5 mm between the lower face of the suspended
ceiling and the upper face of the installation bracket; instead of pipes, nuts and washers can be used to ensure the
recommended distance.
20
5.2.3 Wooden ceiling
Quick bracket
Note! Rails must not be mounted to a wooden ceiling with tension screws, such as coach screws.
In some cases, mounting to a ceiling timber work may be an alternative to mounting to wall or wall support.
This is provided that the ceiling timber work is accessible from above. When being mounted in the ceiling timber
work, exchange should be placed as reinforcement. When reinforcing, it is important to select exchange wood
that is dimensioned to tolerate the distance between two ceiling beams, so sufficient carrying capacity is achieved.
When having marked up to all ceiling brackets in the ceiling, you should examine whether there is free space above
the ceiling material. When this is done, holes with a diameter of Ø12.5 mm are drilled through the ceiling material.
The holes may now be localized from above, the can be prepared for the exchanges, and you may measure
how long the threaded rods should be. The exchange should cover at least 2 ceiling beams on each side of the
suspension point. When using exchanges, two 45x95 mm should be placed parallel to each other, at a distance of
14 mm, providing a passage for an M12 threaded rod. For determining the length of the threaded rod, determine
the ceiling beam’s height + length of exchange wood + ceiling material + 60 mm for washer and nuts.
Place the adapted threaded rod between the exchange wood and put in a washer and nut before the threaded
rod is guided further down through the ceiling and position it with an aluminium plate, a tightening washer and nut
over the exchange wood. The aluminium plate is screwed into the exchange wood from the top. Let approx. 25
mm threaded rod protrude down under the ceiling material. A Quick ceiling bracket may now be screwed onto
the threaded rod beneath the ceiling material. The ceiling bracket is fastened with an M12 low nut. The threaded
rod is to be screwed entirely through the nut, but must protrude further down that below the fitting.
When mounting the bracket and nut, it is important to use adhesive on bracket as well as nut. When all brackets
are mounted, lift up the rail, adjust the length and secure it. Before the rail is fastened up to the ceiling, which is
done from above the ceiling, it should be checked that the exchange wood is resting on both ceiling beams. If not,
something should be placed between.
The nut over the exchange wood is now secured carefully until the bracket lies evenly with the ceiling material. It
is important not to tighten so much that the ceiling material is pulled up between the ceiling beams. When this is
done, a steel plate is placed in around the threaded rod below the exchange wood, and the nut is secured up into
the steel plate, thus locking the position.
Finally, a lock nut is secured against the nut on the upside of the exchange wood.
Trolleys, end stop and rail end plugs are mounted as described in section 5.2.1.
21
Standard bracket
1.
2.
3.
4.
5.
6.
7.
8.
9.
Threaded rods M10, 2 pcs.
M10 nuts 4 pcs.
Yoke 1 pcs.
Braces 45x90x1500 mm, 2 pcs.
Beam layer.
Under roof/ceiling.
Ceiling bracket, 1 pcs.
Locking nuts M10, 2 pcs.
Washer, 2 pcs. 11x35x2.
NOTE! Never install rails on wooden ceilings with plain wood screws.
In some cases, installation with passing screws may be an alternative to wall or wall support installation.
This requires that the roof beam layer can be accessed from above. This is often the case in one-storied houses.
To reinforce the roof beam layer, exchange of 45x95 mm are placed edgeways.
Instead of the expansion bolts, a M10 threaded rod of appropriate length is used. An installation plate (yoke) rests
on top of the braces.
The exchange must rest on the roof beams on both sides of the suspension if this is not possible, the exchange
must be secured to prevent them from tilting when loaded.
The min. number of (3) mounting points per rail for concrete ceiling does not apply to wooden ceilings.
Here, the max. free span determines the number of mounting points.
The rest of the installation process is similar to the process for concrete ceilings. It is, however, necessary to drill
both holes for the centre bracket (the standard bracket) at the same time.
Cut the threaded rods to appropriate length and attach the washers and M10 nuts locking nuts.
The threaded rods are to be screwed from below and up through the yoke. The yoke is fastened from above to
the exchanges with nails and screws.
Before the rail is fastened to the ceiling, which is done from above, you should double-check that the exchange
wood is resting on two ceiling beams. If not, something should be placed between.
Be careful when tightening the nuts to prevent damage to the suspended ceiling.
22
5.3 Wall installation, end hung rail
The following are recommendations only. Alternatively, expansion bolts with the similar thickness and quality can
be applied. Always follow the recommendations from your supplier.
For freely suspended installation, the end of the rails may be attached to the wall with wall brackets or wall
support. Chose wall support, if you are in doubt of the load bearing capacity of the wall material.
When installing freely suspended rails, the max. rail length must be observed, depending on the selected rail
profile. The distance between the walls must be max. 2 m for rail profile S, 4 m for rail profile M and 8 m for rail
profile L.
If you need to mount or dismount a hoist trolley after installation, the distance from one wall to the rail must be at
least 160 mm.
At secondary installation of Robin Mover, the distance must be minimum 300 mm.
If you need to mount or dismount the traverse trolley after installation, the distance between the one wall and the
rail must be at least 350 mm. (Minimum distance from rail to wall must always be 60 mm).
If you have a wall-mounted rail profile S, you cannot mount or dismount the trolley after installation.
5.3.1 Rail profile M & L
When installing wall brackets or wall support legs, leave a gap of at least 80 mm from the ceiling to the upper edge
of the wall bracket or floor support for rail profile M and 150mm for rail profile L. When using wall support legs,
cut the support leg profile to a appropriate length at the floor end.
NOTE! Remember to make allowance for the floor support foot.
In case of skirting boards, either use the high wall support foot, or cut away the skirting board.
NOTE! Always install wall support legs right at the wall in their full length.
Mark for holes using a level, and drill the holes.
Concrete wall
When mounting a freely hanging rail into a concrete wall, a wall bracket should be used for mounting.
For mounting, we recommend using either Hilti expansion bolt HSA M10x68, drilling depth min. 60mm, Ø10, or
Hilti adhesive mortar HIT-HY 150 and HAS M10, drilling depth min. 95mm, Ø12 (when mounted in wet rooms,
use stainless steel HAS quality A4-70).
NOTE! If the wall is not thick enough to drill up to the threaded rod HAS, you may alternatively use Hilti HIT-TZ.
23
Brick wall:
When mounting into bricks, ordinary wall brackets should be used. However, we recommend using floor supports
if the brick wall is very porous.
For mounting into massive bricks, we recommend using Hilti adhesive mortar HIT-HY 50 and HAS M10, drilling
depth min. 90 mm in ½ brick and 170 mm in 1/1 brick, Ø12., (when mounted in wet rooms, use stainless steel
HAS quality A4-70) For mounting in hollow bricks, we recommend using either Hilti frame sheer connector HRDUGT, drilling depth min. 80 mm, Ø10, or Hilti adhesive mortar HIT-HY 20, hylse and HAS M10, drilling depth min.
95 mm, Ø16.
For mounting into porous brickwork, we recommend using Hilti adhesive mortar HIT-HY 50 and HAS M10,
drilling depth min. 90 mm in ½ brick and 170 mm in 1/1 brick, Ø12. If wall supports are used when mounting, use
HAS M8, drilling depth min. 80 mm, Ø10.
NOTE! If the wall is not thick enough to drill up to the threaded rod HAS, you may alternatively use Hilti HIT-TZ.
Lightweight concrete:
When mounting in light concrete, you may either use wall brackets or wall supports, depending on the condition
of the wall. For mounting, we recommend using Hilti adhesive mortar HIT-HY 50 and HAS M10, drilling depth min.
90 mm, Ø12 (M8 for mounting of wall supports).
You may also use Hilti light concrete sheer connector HGN, HUD-1 10L, drilling depth min. 90 mm, Ø10 / HUD-1
8L, drilling depth min. 80mm, Ø8.
Gypsum wall:
See section 5.6
Complete the installation of the wall bracket or the wall support leg with console, wall support foot and plugs for
covering the screw holes.
Insert the hoist trolley or the traverse trolley in the rail. The hoist trolley can be oriented in both directions,
whereas the orientation of the traverse trolley must correspond to the layout of the traverse system.
Insert end stops at both ends of the rail and finger-tighten them at first.
Insert the insertion tube in the rail. The hole in the tube must face outwards.
Lift the rail while holding on to the insertion tube to prevent it from sliding into the rail.
Mount the insertion tube on the console at the wall bracket or the wall support leg (as shown on page 20).
Adjust the rail lengthwise to achieve the correct distance between the wall and the rail.
There must be an overlap of at least 300 mm between the rail and the insertion tube. Check to verify by looking
through the inspection hole on the side of the rail. The inspection hole is located exactly 300 mm from the end of
the rail.
When the rail is properly positioned, drill a Ø7 mm hole through the rail and the insertion tube, approx. 100 mm
from the end of the rail. Secure the rail in position with passing bolts M6 with locking nuts.
After positioning the rail, adjust the end stop to its proper position. When positioning the end stop, make sure
that the hoist will not hit the wall. With a traverse system, ensure that the two traverse trolleys hit the end stop
simultaneously.
Angular, wall-mounted:
The rail can be mounted diagonally in the room.
The rail must be angled max. 45°.
The mounting is carried out as described for ordinary wall mounting with or without wall supports. However, the
tube is delivered prepared for angled mounting.
24
5.3.2 Wall bracket, side hung
When installing a rail system side hung, the parallel rails can be installed close to the wall.
When installing a rail system side hung, the wall must have such strength, that wall support legs are unnecessary.
When installing S profile, 2000 mm is the maximum distance between each fixation point, but at least 3 points are
necessary.
When installing M profile, 4000 mm is the maximum distance between each fixation point, but at least 3 points are
necessary.
Always measure the distance between both walls accurately, in the correct height and location of the system.
The wall bracket can be adjusted +/- 6mm. If more is required, use a plate of 6 mm between bracket and wall.
Note! Final apperance is influenced by the parallelism between wall and rail. Be accurate!
The traverse system measurements here, is the room size measured, deducted 206 mm (if between-hung
installed), and 62 mm (if under-hung installed).
Again, this requires an accurate measurement as well as some considering of the adjustability due to wall
unevenness.
Wall installation is dependent of the structure of the wall. Always follow recommendations in section 5.3.1
After installing the wall brackets and the two parallel rails, follow instructions in section 5.7.
25
5.4 Curves
Following curves are available:
Angle 30°
Angle 45°
Angle 60°
Angle 90°
0.2 + 0.2 m straight ends
0.2 + 0.2 m straight ends
0.2 + 0.2 m straight ends
0.6 + 0.6 m straight ends
1000 mm
·
·
307 mm
·
366 mm
·
431 mm
·
·
·
·
·
·
The curves are available with right-hand bends and left-hand bends.
It is especially important to distinguish between right and left curves,
when several curves are included in the same rail system.
Right curves are characterized by the mounting pins facing inward
into the curve.
Left curves are characterized by the mounting pins facing out from
the curve.
·
·
Mounting pins
All curves have a radius of 400 mm.
Pipe pins and coupling brackets with lock screws are used to couple curves with straight rails.
Bracket positions on the curves:
Angle 30° 0.2 + 0.2 m straight ends:
A coupling bracket in each end, if the curves is connected to straight rails.
Angle 45° 0.2 + 0.2 m straight ends:
A coupling bracket at both ends, if the curves is connected to straight rails and a narrow bracket at the middle of
the curve.
Angle 60° 0.2 + 0.2 m straight ends:
One coupling bracket, at both ends if the curve is connected to straight rails and a narrow bracket at the middle of
the curve.
Angle 90° 0.6 + 0.6 m straight ends:
One coupling bracket, if the curve is connected to straight rails and a narrow bracket at the middle of the curve.
For installation instructions for curves, see section: 5.2.1.1, section 5.2.1.2.
26
5.5 Rail coupling
5.5.1 Rail coupling for profile M & L
The following items are used for rail coupling:
1.
2.
3.
4.
5.
6.
7.
8.
9.
Rail profile M no. 1.
Rail profile M no. 2.
Insertion tube (for profile M).
Coupling bracket (quick or standard).
Pipe pins.
Stop screws.
Bolt M6.
Washer.
M6 lock nuts.
Push the insertion tube halfway into rail profile no. 1 and secure it with a passing bolt. Furthermore, drill the holes for
the pipe pins in rail profile no. 2 up to Ø3.2mm in a depth corresponding to half the length of the pipe pins.
Drive the pipe pins halfway into rail profile no. 1 and squeeze them together in the end.
Push the coupling bracket halfway onto rail profile no. 1 and secure it with the stop screw.
The coupling bracket is only required when mounting the rail on the ceiling. If you are coupling a traverse rail, the
coupling bracket is not required. Drive together rail profile no.2 and no.1 and secure them with the locking screw
in the coupling bracket and the passing bolt.
Install the coupled rail using the instructions for installation of straight rail profiles, see section 5.2.
When coupling long rails, it can be difficult to lift the coupled rail in one piece. In this case, first install the first rail
on the ceiling. Then lift up the next rail which has been prepared for coupling and push the rails together.
5.5.2 Rail coupling for profile S
The following items are used for rail coupling:
1.
2.
3.
4.
5.
Rail profile S no. 1.
Rail profile S no 2.
Coupling bracket (quick or standard).
Pipe pins.
Stop screws.
Drill the holes for the pipe pins in rail profile no. 2 up to Ø3.2mm in a depth corresponding to half the length of
the pipe pins.
Drive the pipe pins halfway into rail profile no. 1 and squeeze them together in the end.
Push the coupling bracket halfway onto rail profile no. 1 and secure it with the stop screw.
Insert rail profile no. 2 into the coupling bracket and drive the two rails together.
Tighten the stop screw on rail profile no.2.
Install the coupled rails using the instructions for installation of straight rail profiles.
When coupling long rails, it can be difficult to lift up the coupled rail in one piece. In this case, first
install the first rail on the ceiling. Then lift the next rail which has been prepared for coupling and
push the rails together.
27
5.6 Wall support leg
Wall support leg are used for installation on gypsum walls and walls of other
lightweight plate material.
1.
2.
3.
4.
5.
Wall support leg profile (adjust length).
Support console.
Wall support foot.
Plastic cover plugs.
Screws M6.
The wall support leg is cut in the right length, in the end facing against the floor.
When measuring the profile length, include a minimum distance between the top of
the bracket and the ceiling.
This min. distance must be observed for any of the three rail profiles:
•
•
M-profile: min. 80 mm.
L-profile: min. 150 mm.
Mount the wall support leg on the wall with three screws. Use Ø6 mm screws. The wall material determines the
choice of screws.
For mounting into gypsum, we recommend using Hilti HGA sheer connector for cavities.
NOTE! Remember to make allowance for the wall support foot.
In case of skirting boards, either use the high wall support foot or cut the skirting boards.
NOTE! Always install wall support leg directly on the wall in their full length.
See section 5.6 for further details.
28
5.7 Mounting traverse system
The parallel rails are mounted in ceiling or wall as described
in the previous section on the current mounting conditions.
Either if the two parallel rails are mounted using quick or
standard fittings, it is important that any deviation of parallelism
of the two rails does not exceed +/- 2mm.
When mounting parallel rails, it is important to take into account whether it must be possible to insert a traverse
trolley later on or not. If not, the rails may run all the way out to the wall (minimum distance from rail to wall
must always be 60 mm). In this case it is important that the traverse trolley and end stop are pushed into the rail
before the rail is mounted. However, if it should be possible to insert the trolley later on, it is important that there
is a minimum distance between the one end of the rail and the wall of 350 mm.
Remember that the end stop in the parallel rails is to be placed so that the two traverse trolleys hit the end stops
simultaneously.
The distance between two parallel rails is always measured from centre to centre of the two rails.
Generally, the following applies to the traverse rail with reference to the free span between the parallel rails as
well as the max. protrusion a rail can handle.
•
•
•
Rail profile S:
Rail profile M:
Rail profile L:
Max. free span 2000 mm, max. protrusion 200 mm
Max. free span 4000 mm, max. protrusion 400 mm
Max. free span 8000 mm, max. protrusion 500 mm
Note! When a rail is mounted as partially between-hung, it is always the max. protrusion for the
S-profile that is applicable.
When mounting the traverse rail, there are three possible methods:
The traverse rail is between-hung
The measurement for the traverse rail is always the distance between the two parallel rails minus 86 mm.
When the traverse rail is mounted between-hung, the hoist trolley is inserted in the traverse rail and the end stops
are placed loosely in each end of the traverse rail. Remember that the rubber plug on the end stop always should
face inward toward the hoist trolley. Lift the rail on top of the traverse trolley, so that the end stop’s 2 bolts align
with the two holes in the traverse trolley, then secure it with washers and lock nuts. Before the rail is securely
fastened, it is important that the distance between the traverse rail and each of the parallel rails is equal in both
ends. When the rail is secured, install the cover plugs on lock nuts and in the rails.
29
The traverse rail is under-hung
When the parallel rails are mounted and the traverse trolleys and end stop is positioned and secured, install quick
traverse brackets underneath the traverse trolley, as shown on the drawing.
Regardless whether the two traverse trolleys are facing opposite each other or the same way, it is important that
the two quick traverse brackets face the same way, or else there will be problems when mounting the rail.
When the traverse rail is correctly placed lengthwise and secured in the quick traverse bracket with the
Allen-screw, the rail is locked using a lathe centre screw, which is screwed into the quick traverse bracket from
above until it has been screwed all the way down.
The traverse rail is partly between-hung
When the traverse rail is partly between-hung, the same mounting principle is used as with under-hung traverse
rail. Here, the rail will be cut upon delivery, so that the quick traverse bracket may be mounted to the rail’s middle
suspension point.
Remember before mounting the traverse rail to determine whether it should be possible to mount the hoist
trolley later or not.
30
5.8 Installation of rail switches
The rail switch is used where a change in direction is required during movement of the patient. The rail switch is
manually operated.
By coupling of the rail switch with both straight rails as well as curved rails, different combinations can be obtained.
Installation dimensions:
The rail switch can only be used in combination with ceiling installation and S-profile rails. The rail switch is
designed for standard ceiling bracket.
During ordering or installation of the straight or curved single rail system, it is important to bare in mind in which
direction the mounting dowels of the rail switch are facing. Only one standard rail switch is available - refer to the
illustration.
By installation in concrete ceiling, refer to section 5.2.1 (standard brackets), and section 5.5.2 (coupling of S-profile
rails).
As described in section 5.5.2, a rebore in the rails is performed when coupling the rails. This rebore is done in the
rail switch at delivery, and the necessary tube pins are supplied. When installing the rails to the switch, remember
to tighten the pre-installed locking screws on the rail switch - refer to the illustration.
In connection with installation of a rail switch onto different ceiling types or in combinations with pendles, please
contact Invacare® for further information.
After installation, the functions of the rail switch and the fastening of the end stops must be
inspected.
31
5.9 Installation of the Transit coupling
The transit coupling is used in situations where transportation from one room to another is required, using only
one Robin motor. The coupling is operated electrically.
The Transit coupling can be installed in different rail system combinations.
The coupling can be used to connect either two traverse systems or one traverse system and one mono-rail
system.
The coupling is delivered with a standard length of 800 mm, and can be used where the wall is, up to 170 mm thick.
The coupling is delivered with; one control button, one power supply with 2 metres of wire (which must be
adjusted during installation), and a user manual.
NB! If a transit coupling is needed in situations where the wall is thicker than 170 mm, please contact Invacare®.
When ordering the transit coupling, it is important to order lock fixtures for the rails in both room 1 and 2.
When coupling to a mono-rail system, please see section 5.5 about Rail coupling.
Pendles for the installation are not delivered with the coupling, please order pendles seperately in required length
for the coupling.
Recommended installation:
• Transit coupling
• Traverse system/Mono-rail system
• Positioning fixtures
• End test – Function and load test
5.9.1 Adjustment of hole in the wall/door opening
If it is required that only the rail must pass through the wall,
the hole needs to be minimum 73 mm high and minimum 65 mm wide.
The hole must always be placed exactly in the centre of the door opening.
See drawing.
If increased lifting height is required it might be necessary to
cut a bigger hole in the wall. If the hole has to be higher than 80 mm,
then the hole needs to have a width of 600 mm in order for the
ceiling hboist to pass through.
The hole must always be placed exactly in the centre of the door opening.
See drawing.
NB! The best result is obtained, if the transit coupling has been taken into consideration in the very beginning of
the house construction, this way the door opening can be constructed with the optimum lifting height.
32
5.9.2 Installation of transit coupling
The coupling is delivered assembled with motor box, fixtures for pendles
and lock fixtures. The delivered transit coupling is prepared so that the hole
motor box is placed in one of the two rooms after installation.
See drawing.
The motor box and lock fixtures, have to be placed as the transit is delivered,
to ensure functionality and safety.
Fixtures for pendles can be placed freely as long as it complies with the
construction of the system. See measure sketch.
NB! It is very important that the thickness of the wall is controlled in advance.
When installing the transit coupling it is very important that the motor box is placed in the room where it was
intended when it was ordered, because the entire system is constructed under consideration of where the motor
box is placed.
Installation with pendles are described in section 5.2.2.1.
See the measure sketch for further information, if necessary.
NB! Installation of the transit coupling is only possible using pendles, therefore the coupling can only be installed
where ceiling mounting is possible.
The best result is obtained in a concrete ceiling.
When installing in wooden ceilings, it is very important that the traverse system and coupling are installed in a way
that they bend down equally and with minimum bending.
If it is necessary to strengthen the ceiling in a wooden ceiling construction, please make sure to strengthen with a
connected construction between rail system and transit coupling.
Do not install the pendles in different rafters this way the coupling and traverse system will not bend down equally
and the coupling will not work correctly.
33
5.9.3 Installation and connection of control button and power supply
Before connection of the control button and power supply, it is necessary to dismount the covers on the motor
box.
The covers are dismounted by loosening the two screws, which holds each cover and pulling the covers
horizontally to the side.
The control switch is mounted in the room and at the height, the user prefers.
The control switch is opened with tools, and the back side is mounted on the wall using two screws Ø3.5X30mm.
The wire is shortened to a suitable length and connected to the motor box. See drawing pos 1.
The power supply is mounted on the wall, visible or hidden, depending on what is most suitable.
The power supply is mounted on a Ø3.5X30mm screw on the wall, using the “key” hole on the back side of the
power supply.
At the bottom of the power supply there is hole for a Ø3.5X30mm screw which makes it possible to lock
the power supply on the wall.
The wire is shortened to a suitable length and connected to the motor box. See drawing pos 2.
The cover is re-attached, when the wires are connected correctly and the control switch is tested.
Please remember to mount the wires in the end-plate, in order to avoid that the wire conflicts with the cover
when it is re-attached. See drawing pos 3.
1
2
•
•
•
3
NB! It is very important that there are no loose wires hanging from the coupling.
34
5.9.4 Installation of traverse system with lock fixture for transit coupling
In general a traverse system is installed as shown in subject 5.7
We recommend that the parallel rail of the traverse system is mounted in the ceiling in order to make the function
of the transit coupling as stable as possible.
When installing the parallel rail remember always to place a ceiling bracket/pendle in front of the transit coupling,
especially on the rail closest to the transit coupling. See section 5.9.6.
When the parallel rail is mounted, it is important to ensure a correct distance to the coupling. See drawing.
The traverse rail is adjusted to the specific order when it is delivered, if however it is necessary to shorten the rail
further, it must be shortened in the end opposite to where the coupling is situated.
It is possible to use the following traverse rails together with a transit coupling system:
• S, M and L- profiles, under-hung
• M and L- profiles partly between-hung
It is very important to ensure the correct free overhang for the traverse rail spacing between the pendles and free
span from the rails to ensure that the rails can couple correctly. See drawing above.
When the traverse system and the coupling are installed it is very important to control the height between these
and adjust if necessary.
The lower edge of the traverse rail must not differ more than 0,5 mm from the coupling rail, if there is a difference
in height, it has to be the coupling track must be the lowest.
It may be necessary to adjust the height differently according to the users weight or the condition of the ceiling, to
optimize the function of the coupling.
When the lock fixtures are installed, it is very important that they
are in line with the end of the traverse rail and that they are turned
correctly compared to the the fixture on the coupling, before they are locked.
See drawing.
Lock fixtures for M-/ and L-profiles are delivered with a little plate,
which is important to install.
5.9.5 Installation of a mono-rail rail for a coupling system
When the coupling is installed with a mono-rail rail in one of the rooms, it is prepared for this, without the lock
fixture, when delivered.
When the coupling is installed with an S-profile rail, the rail is coupled as shown in section 5.5.
The pendle is mounted in the coupling fixture.
The rest of the mono-rail system is installed as shown in section 5.2 and 5.5.
35
5.9.6 Mounting the positioning fixtures on parallel rail S-profile and M/L profiles
The positioning fixture is mounted to easily position the traverse rail
in proportion to the coupling.
The fixture is mounted on the rail closest to the coupling and is turned
towards the coupling. See drawing.
The positioning fixture for the S-profile rails are partly mounted in the standard fixture, therefore it is important
to place a standard fixture right in front of the coupling rail.
The one part of the positioning fixture is mounted in the M10 bolt
at the standard ceiling bracket in the same direction as the quick
fixture on the traverse trolley.
The traverse part of the positioning fixture is mounted on the
Quick fixture of the traverse trolley. See drawing.
The positioning fixture for M-/L-profile rails are mounted on respectively the parallel and the traverse rail.
The traverse part of the positioning fixture is mounted on the Quick fixture of the traverse trolley.
The traverse rail and transit coupling must be coupled when mounting
the parallel rail part of the positioning fixture.
This way it is possible to tick up for correct position of the fixtures
before they are mounted.
After the right position is ticked up, the rails are separated again before
the Ø4 mm holes for the screws are drilled.
See drawing.
Adjustment of hardness:
The positioning fixtures must be adjusted to a hardness that makes it
easy for the coupling to catch the traverse rail, but at the same time,
makes it possible for the rail to pass the coupling without getting
caught by the coupling.
If the positioning fixture is adjusted too hard- loosen the resilient black screw,
and opposite if the fixture is too soft, tighten the screw See drawing.
Remember to tighten nut (M12) after adjustment.
Black screw
Lock-nut
•
•
Adjustment of positioning fixtures:
The parallel –rail part of the positioning fixture can be adjusted further
by loosening the screws and moving the fixture horizontally until the rail is
right in front of the coupling.
After adjustment the fixture can be fastened . please note that there is
some play, which must be divided between both sides of the rail.
In general it is very important that everything is adjusted correctly and carefully fastened due to
safety and functionality.
The system must be tested thoroughly after installation.
36
5.10 Mounting of Gantry with or without wheels
Please follow the below options for height adjustment for Gantry without wheels.
When the Gantry is finally installed, the holder for both charger and hand control are then mounted.
Please follow the below options for height adjustment for Gantry with wheels.
When the Gantry is finally installed, the holder for both charger and hand control are then mounted.
For both versions the following installation instructions are applicable:
37
1) The feet are mounted onto
the adjustable legs by means
of the Allen key located on
top of the leg.
Remember to re-tighten
both screws.
2) The top rail is installed by
hitching the on the rail
onto the top of the legs.
2)
3) Tighten the pre-installed screw
which is located in the top
of the leg with the Allen key.
Put back the Allen key in the
holder after use.
3)
1)
4) The charger is installed onto the
pre-drilled holes in the legs.
Use the 5 pcs. M3X5 screws that
came with the Gantry.
.
4)
5) Adjustment of the height.
Up: Lift the upper part of the
leg to the desired height.
Down: Lift the upper part of
the leg slightly, pull the handle,
lower leg upper part to the
desired height and release the
handle.
5)
6) Install Robin into the Trolley as
described in the users manual.
6)
38
6. Inspection/check of the rail system
After mounting a rail system, the system shall be inspected. All fastening points shall be inspected. Check that all
end stops are correctly located and secured. Check if the friction brake on all trolleys is correctly set, so that no
trolleys are moving unintentionally.
In accordance with the European standard EN 10535, the system shall be stress tested with 300 kg. This should be
done at each fixing point. This test is carried out as a re-testing of the system structures ability to secure the rail
system in place.
When the inspection has been completed, the system is
-certified.
The inspection of a rail system must only be carried out by authorised Invacare® service technician.
7. Technical description of the rail system EC-TrackTM
7.1 The rail system
All rail profiles are manufactured in extruded aluminium alloy EN AW-6060/AlMgSi F22.
The rails are available with a natural anodization or a white powder coating.
The rails are stocked in a number of standard lengths of up to 8 m and cut to desired length before delivery.
The rails are available in three different heights; S= 68 mm, M=114 mm and L=183 mm, providing a fee span of
2000 mm, 4000 mm and 8000 mm, respectively.
The profile width of all three profiles is 58 mm.
The top of the profiles are shaped to permit the coupling of the rails to the installation brackets.
On delivery, the rail for the hoist will feature a milled groove on its bottom. This groove is used for hoist
installation and are called keyhole.
7.2 Possible installations.
Mono-rail can be installed on the ceiling or onto the wall and floor. The rail position in the room can be either
parallel to a wall or angular in relation to a wall.
The traverse system can be installed on the ceiling or onto the wall and floor. The free span between the two
parallel rails can be up to 8000 mm.
Curves are available in the S-profile and can be installed on the ceiling. They are available in angles of 30°, 45°, 60°
and 90°.
7.3 Special solutions
Installation with pendling brackets is used in the following cases:
When the height of the ceiling varies in the lenghtwise direction of the rail, or when the rail is to be countersunk.
Angular installation is used when the rail has to be installed in other angles than 90°.
39
7.4 Building dimensions and ceiling height requirements
The required ceiling height depends on several parameters. The rail system itself - if single-rail or traverse system
is required. The installation location - ceiling or wall, and the required lifting height from floor to hoist.
A traverse system requires a greater ceiling height than a mono-rail system. Wall-mounted rails require greater
ceiling height, since a higher/stronger rail profile must be used.
For wall installation in large rooms, a higher/stronger rail profile is required. Similarly, the traverse rails in large
rooms must be higher/stronger.
7.5 Building dimensions for different track installations
The building dimensions of an installation is defined as the distance between the ceiling underside
and the hooks of the hoist.
7.5.1 Mono-rail
For the EC-Track system and Robin ceiling hoist, the dimensions for being inbuilt, measured from the ceiling with
the rail mounted as close as possible to the ceiling, are:
K
•
•
•
•
40
Ceiling mounted rail profile S
Wall/floor mounted rail profile M
Wall/floor mounted rail profile L
Measured from beneath the rail to the sling hook
H = 410 mm
H = 450 mm
H = 519 mm
K = 336 mm
7.5.2 Traverse rail system
A
B
C
Parallel rail
Traverse rail
S-profile
M-profile
S-profile
A = 83 mm
C =156 mm
M-profile
A = 129 mm
B = 156 mm
B = 203 mm
C = 203 mm
C = 250 mm
L-profile
C = 272mm
L-profile
A = 198 mm
C = 319 mm B = 272 mm
C =388 mm
41
8. Technical description of the ceiling hoist ROBINTM
The Invacare RobinTM is a two-strap ceiling hoist for max. user weight of 200 kg driven at 24-volts. The motor is
powered by batteries charged through the hand control.
The Invacare RobinTM carries
-marking according to the Medical Directive 93/42/EEC of 27 of May 2003 and
has been tested and approved by TÜV Product Service in compliance with the standard EN10535.
8.1 Mechanical construction
2 straps
The Invacare RobinTM is a ceiling-hoist featuring two straps. The straps run synchronously, which means that they
always have the same length and are rewound/unwound at the same speed. The straps exit the bottom of the
housing at the housing ends, and are secured by two bolts on the rewinding gears.
2x2 gears with rewinding and arresting device
The rewinding mechanism functions by rewinding the two straps onto the two rewinder gear spools, where the
gear wheels engage with the driving shaft of the gear motor output shaft. The rewinder gear is constructed with a
centred spool between two sets of teeth on which the strap rewinding occurs.
The gear motor output shaft engages with all four set of teeth (2x2), thus ensuring that the entire construction
always is balanced and preventing any kind of twisting or build-up of moment in the chassis.
The gears, including the rewinder, are manufactured from synthetic material and assembled with bolts with inner
and outer hexagonal heads. The motor output shaft is manufactured from alloy steel.
The gear wheels have a built-in arresting device. If the straps unwind too quickly, two steel latches engage with
arresting bolts on the housing sides, stopping the unwinding immediately.
Gear motor and parallel plate chassis
The chassis consists of two aluminium plates, between which the rewinder gears are placed centrally. The chassis
plates are held by the rewinder gears and bolts, respectively. The drive motor is a worm gear motor located on
the chassis exterior, where the output shaft goes through the chassis plates. The motor is a standard 24-volt
wiper-motor.
Revolving inlets
At the housing inlets for the two straps, there are two inlet switches which prevent the straps and the hooks
from being pulled too far into the housing and protects against pinching. The inlet switches are manufactured from
synthetic material. Both inlets are revolving to reduce wear on the straps and ensure optimum rewinding.
Control and batteries
The control pcb is located on the chassis frame exterior on the opposite side of the gear motor inside the housing.
The control includes a soft start, starting the straps and motor slowly, thus ensuring a gentle start.
The control is powered by a battery pack with a voltage rating of 24 volts.
The battery type is NiMh. The batteries are type AA in a pack with an output voltage rating of 24 volts. In the
ceiling hoist, the battery pack is connected to the control through a cable and plug.
Manual control
When not in use, the hand control can be placed in a clip to the strap. To charge the batteries in the ceiling hoist,
place the hand control in its charger. The back of the hand control features 3 gold plated contacts for charging
the batteries of the ceiling hoist when the hand control is placed in the charger holder. This charger holder can be
mounted on the wall, and the transformer connected to the mains.
Hooks
The end of each strap features hooks for the lifting sling. The hooks have pivots so that the lower part of the hook
may pivot freely. This prevents the strap from twisting which could result in an irregular operation or inadvertent
halt when using the ceiling hoist.
Each strap hook has been designed to prevent the connection strap of the sling from falling off the hook when it
carries a load.
42
2
Customer Sales and Service
Denmark
INVACARE A/S
Sdr. Ringvej 39
DK-2605 Brøndby
Phone: +45 36 90 00 00
Fax: +45 36 90 00 01
www.invacare.dk
[email protected]
Belgium & Luxemburg
INVACARE N.V.
Autobaan 22
B-8210 Loppem, Brügge
Phone: +32 50 83 10 10
Fax: +32 50 83 10 11
www.invacare.be
[email protected]
France
INVACARE Poirier S.A.S
Route de St Roch
F-37230 Fondettes
Phone: +33 2 47 62 64 66
Fax: +33 2 47 42 12 24
www.invacare.fr
[email protected]
Sweden & Finland
INVACARE AB
Fagerstagatan 9 / Box 66
S-163 91 Spånga
Phone: +46 8 761 70 90
Fax: +46 8 761 81 08
www.invacare.se
[email protected]
Netherlands
INVACARE B.V.
Celsiusstraat 46
NL-6716 BZ Ede
Phone: +31 318 695 757
Fax: +31 318 695 758
www.invacare.nl
[email protected]
Italy
INVACARE MECC SAN S.R.L.
Via dei Pini 62
I-36016 Thiene (VI)
Phone: +39 0445 38 00 59
Fax: +39 0445 38 00 34
www.invacare.it
[email protected]
Norway & Iceland
INVACARE AS
Grensesvingen 9
Postbox 6230 Etterstad
N-0603 Oslo
Phone: +47 22 57 95 00
Fax: +47 22 57 95 01
www.invacare.no
[email protected]
Germany
Aquatec GmbH
Alemannenstrasse 10
88316 Isny
Phone: +49 (0) 75 62 700 0
Fax: +49 (0) 75 62 700 66
www.aquatec.de
[email protected]
United Kingdom & Ireland
INVACARE LTD
South Road
Bridgend Industrial Estate
UK-Bridgend, CF31 3PY
Phone: +44 1 656 664 321
Fax: +44 1 656 667 532
www.invacare.co.uk
[email protected]
Spain
Portugal
INVACARE Lda
Rua Senhora de Campanhã 105
4369-001 Porto
Phone: +351 225 1059 46/47
Fax: +351 225 1057 39
[email protected]
New Zealand
INVACARE NZ
4 Westfield Place,
Mt. Wellington
Auckland
Phone: +64 9 917 3939
Fax: +64 9 917 3957
www.invacare.co.nz
[email protected]
INVACARE S.A.
C/Areny s/n
Poligon Industrial de Celrà
E-17460 Celrà (Girona)
Phone: +34 972 49 32 00
Fax: +34 972 49 32 20
www.invacare.es
[email protected]
Invacare® EC-Høng A/S
Ident. no.: 1441106
Version 05 04. 2006
Australia
INVACARE Australia Pty Ltd
1 Lenton Place
North Rocks
NSW 2151
Phone: +61 2 8839 5333
Fax: +61 2 8839 5353
www.invacare.com.au
[email protected]
Hatfield
2/122 Taradale Road
Napier
Phone: +64 6 843 3119
Fax: +64 6 843 3445
[email protected]
Manufacturer:
INVACARE EC-Høng A/S
Østergade 3
DK-4270 Høng
www.invacarebeds.dk