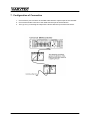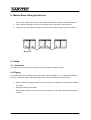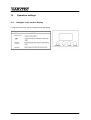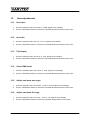
1
User manual
Index
1.
Safety Information ........................................................................................................................... 4
1.1.
2.
Hints for safe and faultless use ............................................................................................... 4
Introduction ...................................................................................................................................... 6
2.1.
Controllable features ............................................................................................................... 6
2.2.
Additional features ................................................................................................................... 6
3.
DMX channels ................................................................................................................................. 7
4.
Product overview ............................................................................................................................ 8
5.
Technical specifications ................................................................................................................... 9
5.1.
Change internal Fuse .............................................................................................................. 9
5.2.
Link devices ............................................................................................................................. 9
6.
DMX Data Cable ............................................................................................................................ 10
6.1.
Cable-connectors .................................................................................................................. 10
6.2.
3-pole to 5-pole adapter ........................................................................................................ 10
7.
Configuration of Connection .......................................................................................................... 11
8.
Master/Slave linking the devices ................................................................................................... 12
9.
Setup ............................................................................................................................................. 12
9.1.
Orientation ............................................................................................................................. 12
9.2.
Rigging................................................................................................................................... 12
10.
Operation settings ..................................................................................................................... 13
10.1.
Navigate in the control display............................................................................................... 13
11.
Menu overview........................................................................................................................... 14
12.
User adjustments ....................................................................................................................... 15
12.1.
Invert pan ............................................................................................................................... 15
12.2.
Invert tilt ................................................................................................................................. 15
12.3.
Flip display ............................................................................................................................. 15
12.4.
Select DMX mode .................................................................................................................. 15
12.5.
Adjust maximum pan range ................................................................................................... 15
12.6.
Adjust maximum tilt range ..................................................................................................... 15
12.7.
Service functions ................................................................................................................... 16
12.7.1.
Device reset ................................................................................................................... 16
12.7.2.
Set to factory default ...................................................................................................... 16
13.
Mode of operation ...................................................................................................................... 16
13.1.
Stand alone mode (Auto Mode)............................................................................................. 16
13.2.
Master/Slave mode ................................................................................................................ 16
13.3.
DMX mode ............................................................................................................................. 16
2 / 21
14.
DMX Values (Spot) 13 channels ............................................................................................... 17
15.
DMX Values (Wash) 12 channels ............................................................................................. 18
16.
Technical data ........................................................................................................................... 20
3 / 21
1. Safety Information
•
The usage of this device is only allowed for indoor use.
•
The warranty expires in case of manual changes at the device by the user.
•
The device may only be repaired by professionals.
•
Only use fuses of the same type as the original and only use original spare
parts.
•
To prevent fire and electric shock, protect the device against rain and
humidity
•
Disconnect main power plug before opening the casing.
1.1. Hints for safe and faultless use
Care of heat and high temperatures!
Place the device where it is not exposed to extreme temperatures, humidity or dust. Only use the
device in ambient temperature between 5°C (41°F) - 35°C (95°F). Protect the device against sunlight
and sources of heat.
Protect the device against humidity, water and dust!
The device should be place where high humidity does not dominate. Do not place liquids on or
next to the system.
Only place the device on solid surfaces!
Place the device on solid surfaces, to avoid vibrations.
Do not use chemical cleaners!
Metal parts can be cleaned with a moist cloth. Before cleaning the device, always pull out the mains
power plug!
If the device does not work correctly!
The user should not try, to maintain the device autonomously. All repairs and service should be
realized by a qualified technician.
Handle the mains cable with care!
Never pull at the mains cable to disconnect the device! If the device is not used for a long time period,
pull the plug of mains cable out of the socket.
4 / 21
Attention!
The warranty claim expires, when damages are caused by disregarding this user manual. The
manufacturer and importer does not assume liability for consequential damages at all. Only qualified
and trained technicians are allowed to work at electric parts of the device. All electrical and
mechanical connections have to be mounted according to the european safety standards.
5 / 21
2. Introduction
2.1. Controllable features
•
Control with 5 or 12 DMX- channels
•
540° Pan/270°Tilt
•
RGB color-mixing
•
Gobo-wheel with 9 gobos and gobo shake-function
•
Adjustable electronic strobe
•
Adjustable electronic dimmer
•
Adjustable speed for Pan/Tilt, color-mixing and color-presets
•
Pre-programmed movements, controlled by DMX or master-slave mode
2.2. Additional features
•
The user can select between basic and advanced mode.
•
Selectable pan and tilt range
Pan 540°, 360°, 180°
Tilt 270°, 180°, 90°
•
Compact and light
•
LED-display with rotatable menu
•
Function to reset the device to factory settings
•
Automatic on/off function for the display
•
Invert pan/tilt
•
Fan-cooled
6 / 21
3. DMX channels
12 channel mode for wash light
13 channel mode for spot
Channel
Function
Channel
Functon
1
Pan
1
Pan
2
Pan fine
2
Pan fine
3
Tilt
3
Tilt
4
Tilt fine
4
Tilt fine
5
Speed pan/tilt
5
Speed pan/tilt
6
Dimmer/strobe
6
Dimmer/strobe
7
Red
7
Red
8
Green
8
Green
9
Blue
9
Blue
10
Colors
10
Colors
11
Color speed
11
Color Speed
12
Movement
12
Movement
13
Gobo
4 channel mode for wash light
5 channel mode for spot
Channel
Function
Channel
Functon
1
Pan
1
Pan
2
Tilt
2
Tilt
3
Dimmer/strobe
3
Dimmer/strobe
4
Color
4
Color
5
Gobo
5
7 / 21
4. Product overview
8 / 21
5. Technical specifications
5.1. Change internal Fuse
Push out the fuse-holder with a screwdriver. Exchange the fuse only by one of the exact same type.
Push the fuse-holder back on its origin position and connect the mains cable to the socket again.
5.2. Link devices
You need 3-pin DMX cables to realize a lightshow with two or more devices. However you can run the
devices also by master/slave control. The maximum quantity of devices, in this mode, is given by the
maximum usable channels of DMX512. The addition of all fixture channels must not be higher than the
maximum channels of DMX512.
Important:
Devices, which are controlled by DMX512, are connected by a serial cable. For a
proper operation, the EIA-485 provides, to run not more than 32 devices in one DMX
line. If you want to use more than 32 devices, you need to use a DMX-splitter.
Maximum recommended link distance: 500m
Maximum recommended devices in on DMX line: 32
9 / 21
6. DMX Data Cable
Only use a cable, which is conforming to the RS-485 standard. Standard microphone cable cannot
transfer DMX signal correct over long distances. The cable should fulfill following requirements:
2 conductors + ground (3-pole)
Maximum capacity between conductors 30pF/ft.
Maximum capacity between conductor and ground 55pF
Maximum electric resistance 20 Ohm/1000ft
nominal impedance 100 – 140 Ohm
6.1. Cable-connectors
The cables must have a male DMX connector on one side, and a female on the other side.
Pin-assignment:
Attention:
Avoid contact between “common” and the ground of the device. This could produce a
ground loop and your device could react irrationally. Test the function of the cables
with a cable-tester before usage.
6.2. 3-pole to 5-pole adapter
If you use a controller with 5-pole output, you need a 3-pole to 5-pole adapter. The list below shows a
possible configuration.
Conductor
3-pole female (output)
5-pole male (Input)
ground
Pin 1
Pin 1
Data (-)
Pin 2
Pin 2
Data (+)
Pin 3
Pin 3
Do not use
Pin 4
Do not use
Pin 5
10 / 21
7. Configuration of Connection
1. Connect the 3-pole connector of the DMX cable with the 3-pole output of the controller.
2. Connect the female connector of the cable with the input of the first device.
3. Then go on by connecting the output of the device with the input of the next device.
11 / 21
8. Master/Slave linking the devices
1. Connect the 3-pole male connector of the DMX cable with the 3-pole output the first device.
2. Then connect the female connector of the cable with the input of the second device.
3. Then go on by connecting the output of the each device with the input of each next device.
9. Setup
9.1. Orientation
The fixture can be used in every position, as long as enough ventilation is given.
9.2. Rigging
It is important that the ventilation doesn´t get limited. Only use fitting “C”- or “O”-clamps for hanging
devices. Loosen the clamps, adjust the angle of the devices and tighten the clamps again.
•
Select the place of rigging, that you are able to change the illuminant, respectively to maintain
the device.
•
Always use safety steel cables.
•
Never place the device at locations, where it is exposed to rain, high temperature changes or
humidity.
12 / 21
10.
Operation settings
10.1.
Navigate in the control display
To adjust the functions, use the 4 buttons below the display.
13 / 21
11.
Menu overview
14 / 21
12.
User adjustments
12.1.
Invert pan
1. Press the “MODE” button until “PAN” or “rPAN” appears in the display.
2. Use the “UP/DOWN” buttons to select the requested adjustment and then press enter.
12.2.
Invert tilt
1. Press the “MODE” button until “t iL” or “rt iL” appears in the display.
2. Use the “UP/DOWN” buttons to select the requested adjustment and then press enter.
12.3.
Flip display
1. Press the “MODE” button until “d iS” or “rd iS” appears in the display.
2. Use the “UP/DOWN” buttons to select the requested adjustment and then press enter.
12.4.
Select DMX mode
1. Press the “MODE” button until “12CH” or “4CH” appears in the display.
2. Use the “UP/DOWN” buttons to select the requested adjustment and then press enter.
12.5.
Adjust maximum pan range
1. Press the “MODE” button until “PA54”, “PA36” or “PA18” appears in the display.
2. Use the “UP/DOWN” buttons to select the requested adjustment and then press enter.
12.6.
Adjust maximum tilt range
1. Press the “MODE” button until “Ti27”, “Ti18” or “Ti9” appears in the display.
2. Use the “UP/DOWN” buttons to select the requested setting and then press enter.
15 / 21
12.7.
Service functions
12.7.1. Reset device
1. Press the “MODE” button until “rESt” appears in the display.
2. Press enter.
12.7.2. Set to factory default
1. Press the “MODE” button until “LoAd” appears in the display.
2. Press enter.
13.
Mode of operation
13.1.
Stand alone mode (Auto Mode)
This mode allows to use the device without DMX-controller by pre-programmed movement, included
two speed options.
1. To configure the device for fast auto-mode, choose “NAFA”. The display shows “FASt”.
2. To configure the device for slow auto-mode, choose “NASL”. The display shows “SLoW”.
13.2.
Master/Slave mode
This mode allows to link up to 32 devices and to use them without DMX-controller.
1. Use standard DMX-cables to connect the devices to each other. It could be useful to use a
DMX-terminator after last device in the DMX-line.
2. Set the first device in the DMX-line as master. Choose “NAFA/NASL” or “NStS”, depending on
which program you want to use.
Master auto “NAFA” or “NASL”
Master sound to light “NStS” (SrUn appears in the display).
3. Set all the other devices to slave mode. Select “SLAv” in the menu with the “UP/DOWN”
buttons. They will react like the master.
Slave “SLAv” will be shown as “Son” in the display.
13.3.
DMX mode
In this mode you can control the device by every usual in trade DMX controller. The default address is
“001” and will be shown in the display as “d001”. Adjust the addresses of the devices according to the
addresses which are adjusted at the controller.
16 / 21
14.
DMX Values (Spot) 13 channels
17 / 21
15.
DMX Values (Wash) 12 channels
18 / 21
19 / 21
16.
Technical data
20 / 21
Importeur:
B & K Braun GmbH
Industriestraße 2
D-76307 Karlsbad
www.bkbraun.com
[email protected]
21 / 21