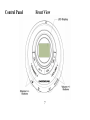
1
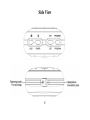
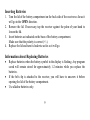
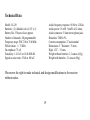
R-120 20-Channel Programmable Digital Receiver User Manual Español: Para descargar este manual en español, ingrese a: www.enersound.com/manuals Portugues: Para baixar este manual em português, acesse: www.enersound.com/manuals INDEX About This Manual...........................3 Safety Warnings................................4 Control Panel....................................7 Inserting Batteries.............................9 Selecting Carrying Option...............10 Care..................................... ............13 Using the Receiver............ ..............14 Switching the Receiver On and Off.14 Selecting Channels..........................15 Setting the volume...........................15 Changing Factory Set Frequencies...15 Locking/Unlocking the Receiver......17 Warranty......................................17-19 Technical Data..................................19 Disposal............................................20 2 NOTE: To switch the receiver on and off, gently press and hold the POWER key for approx. 2 seconds. About this Manual Read this user manual carefully before using your receiver. Use the product only as described to avoid accidental injury or damage. Also, read safety warnings carefully. Keep this manual for future reference. If you give this product to someone else, remember to include this manual. Symbols in this Manual This symbol warns of hazards that may cause injury. The word HAZARD indicates a life-threatening risk or the possibility that a significant personal injury may occur. The word CAUTION represents the risk of slight injury or damage. This is how supplementary information is shown. 3 Safety Warnings Intended Use This receiver is designed for private use. HAZARD to Children Batteries can be highly dangerous if swallowed. Therefore, keep batteries and the receiver out of the reach of children. If a battery has been swallowed, seek medical assistance immediately. Keep the packaging out of children’s reach as it may cause suffocation! HAZARD! Neck Strap Be careful when using the neck strap. Under unfavorable circumstances you could strangle yourself with the neck strap. Never allow children to play with the neck strap. They could strangle themselves. 4 WARNING! Damage to your Health Using headphones at a loud volume or over a prolonged period of time can lead to permanent hearing damage. Batteries should not be recharged or reactivated by other means, taken apart, thrown into fire or short-circuited. There is a risk of explosion. CAUTION! Damages Protect the receiver against moisture, water, dust, extreme temperatures or direct sunlight. Never let the receiver fall, and do not expose it to a strong impact. Do not use the receiver or its accessories if there are any visible signs of damage. Never take the receiver or its accessories apart. Have repairs carried out by the manufacturer only. Remove batteries from the receiver if they are dead or if you do not intend to use the receiver for a prolonged period of time. This will avoid damage that may be caused by leakage. 5 Do not use caustic cleaning products, benzene, solvents, etc. for cleaning. These substances may damage the surface of the case. Always replace all batteries at once and do not use different battery types or brands or batteries with different capacities. HAZARD! Pacemaker Safety Before using this receiver with a pacemaker or another medical device, consult your physician or the manufacturer of your pacemaker or another medical device. If you have a pacemaker or another medical device, make sure that you are using this receiver in accordance with safety guidelines established by your physician or the pacemaker manufacturer. 6 Control Panel Front View 7 Side View 8 Inserting Batteries 1. Turn the lid of the battery compartment on the back side of the receiver as far as it will go in the OPEN direction. 2. Remove the lid. If necessary, tap the receiver against the palm of your hand to loosen the lid. 3. Insert batteries as indicated on the base of the battery compartment. Make sure that the polarity is correct (+/-). 4. Replace the lid and turn it clockwise as far as it will go. Information about Replacing Batteries Replace batteries when the battery symbol in the display is flashing. Any program saved will remain stored for approximately 1-2 minutes while you replace the batteries. If the belt clip is attached to the receiver, you will have to unscrew it before opening the lid of the battery compartment. Use alkaline batteries only. 9 Selecting Carrying Option Carrying Options at a Glance 10 Option 1- Using the Neck Strap HAZARD When worn around the neck, the neck strap presents a risk of strangulation. Keep the receiver, including the neck strap, out of reach of children. Never allow children to play with the neck strap. Particular care must be taken when the receiver is attached to the neck strap. The strap is already threaded, but it can easily be removed. However, if you want to thread it again at a later time, proceed as follows: 1. Thread the thin loop of the neck strap through the eyelet on the upper side of the receiver. If necessary use a bent paperclip for help. 2. Pull the other end of the neck strap completely through the loop. 11 Option 2- Attached to your Belt. 1. Remove the lid of the battery compartment on the back side. 2. Pull or press the small cap out. 3. Replace the lid of the battery compartment. 4. Using the screw, attach the belt clip to the receiver. Keep the cap in a safe place; you might want to remove the belt clip in the future and close the opening. Do not insert your belt through the clip slots. They are designed for the arm band. 12 Option 3- On the Arm 1. Insert the arm band through the slots of the belt clip. 2. Proceed as described above in “Option 2” (Items 1-3). 3. Screw the belt clip to the receiver with the arm band pulled through. Use the Velcro to fit the arm band to your arm width. Care CAUTION! Damage to the Unit Do not use caustic cleaners, alcohol, thinners, etc. to clean the case. Whenever necessary, use a soft, dry cloth to clean the case. 13 Using the Receiver WARNING The use of headphones/earphones at a loud volume or over a prolonged period of time can lead to permanent hearing damage. Set the volume at a low level before putting the headphones on. (On the optional model R-120BL, the display will light up for a few seconds when a key is pressed while the receiver is in operation. When the battery charge is under 1/3 approximately, the receiver will operate in a “save” mode in which the back light is turned off. The standard receiver R-120 does not include a backlight.) The headphone cord also serves as an antenna. Therefore, it should be fully extended. Note: In the United States the FCC rules limit use of this equipment to auditory assistance. Switching the Receiver On and Off To switch the receiver on and off, gently press and hold the POWER key for approx. 2 seconds. 14 Selecting Channels 1. The unit has 20 channel settings. 2. To change channels: Press the CHANNEL+ key or CHANNEL- key. Setting the Volume To increase the volume: Press the VOLUME+ key. To decrease the volume: Press the VOLUME- key. Changing Factory Set Frequencies The receiver is factory set to the following frequencies: CH 1: CH 2: CH 3: CH 4: CH 5: 72.1 MHz 72.5 MHz 72.9 MHz 75.7 MHz 74.7 MHz CH 6: 75.3 MHz CH 7: 72.3 MHz CH 8: 72.7 MHz CH 9: 75.5 MHz CH 10: 75.9 MHz CH 11: CH 12: CH 13: CH 14: CH 15: 15 72.2 MHz 72.6 MHz 75.4 MHz 75.8 MHz 72.8 MHz CH 16: CH 17: CH 18: CH 19: CH 20: 72.4 MHz 75.6 MHz 72.0 MHz 76.0 MHz 73.0 MHz If you wish to modify the frequency assigned to a channel, please follow the steps listed below: 1. Select the desired channel by pressing the CHANNEL+ key or CHANNEL- key. 2. Press and hold the PROGRAM button for approx. 6 seconds to access the program mode and the current assigned frequency will be shown on the display. 3. Press the CHANNEL+/- key to modify the frequency assigned to that channel. 4. Press the SET key to save your selection (Proceed within 10 seconds while setting, otherwise the unit will switch back to normal mode and you will have to repeat this procedure). 5. Press and hold the PROGRAM key for 6 seconds to exit the PROGRAM mode; otherwise, after 10 seconds the receiver will switch back to normal mode automatically. Note: For multi-channel operation in the same location it is recommended to leave a separation of at least 0.4 MHz between channels and place transmitter’s antennas apart from each other. 16 Locking/Unlocking the Receiver The receiver can be locked to prevent changing channels accidentally. The lock function will not affect “Volume” or “Power” buttons. 1. To lock the receiver, press and hold the LOCK key for approx. 2 seconds until the key symbol appears on the bottom right corner of the display. 2. To unlock the receiver, press and hold the LOCK key for approx. 2 seconds until the key symbol disappears from the bottom right corner of the display. Limited Warranty Enersound warrants its receivers R-120 to be free from defects in workmanship and material under normal use and conditions for one year from the date of purchase to an authorized dealer. All other products and accessories, including but not limited to headphones, earphones, belt clips, neck straps, cases, cables, etc. are warranted for 90 days from date of purchase. This warranty is only available to the original end purchaser of the product and cannot be transferred. If this product is determined to be defective, Enersound will repair or replace the receiver, at its option, at no charge. Customer has to pay for shipping. This warranty is void if damage occurred because of misuse or if the product has been repaired or modified by anyone other than a factory authorized service technician. Warranty does not cover normal wear and tear on the product or any other physical damage unless the damage was the result of a manufacturing defect. Enersound has no control over the conditions under which this product is used. Therefore, disclaims 17 all warranties not set forth above, both express and implied, with respect to the R-120 receiver, including but not limited to any implied warranty of merchantability or fitness for a particular purpose. Enersound R-120’s manufacturer, distributors and/or dealers shall not be liable to any person or entity for any medical expenses or any direct, incidental or consequential damages caused by any use, defect, failure or malfunction of the product, whether a claim for such damages is based upon warranty, contract, tort or otherwise. The sole remedy for any defect, failure or malfunction of the product is replacement of the product. No person has any authority to bind Enersound to any representation or warranty with respect to the R-120 receiver. This warranty gives you specific legal rights, and you may also have other rights which vary from state to state. Some states do not allow limitations on how long an implied warranty lasts, the exclusion or limitation of incidental or consequential damages so the above limitation may not apply to you. This warranty applies to products sold only within the United States of America and does not cover products sold AS IS or WITH ALL FAULTS. For products sold outside the US, please consult with your local dealer about the terms and conditions applicable in your county. Proof of purchase in the form of a bill of sale, invoice number or receipted invoice, which is evidence that the unit is within the warranty period must be presented to obtain warranty service. If you experience difficulty with your system, send an email to [email protected] with your name, address, phone number and a complete description of the problem. We will respond to you as soon as possible and if it is necessary to return the system for service, your Customer Service Representative will give you a Return Authorization Number (RAN) and shipping instructions. For more information, visit www.enersound.com. You may also call 1-305-731-2416 or our toll-free number 1-800-644-5090 within the US. 18 Technical Data Model: R-120 Batteries: (2) Alkaline AAA (1.5V x 2) Battery life: 35 hours of use approx. Number of channels: 20 programmable Frequency range: FM 72.0 to 76.0 MHz. FM deviation: +/- 75 KHz De-emphasis: 75 uS. Sensitivity: 1.413 uV at 12 db SINAD. Signal to noise ratio: 55 db at 100 uV. Audio frequency response: 80 Hz to 12 Khz Audio power: 16 mW +16mW at 32 ohms. Audio connector: 3.5mm stereo phone jack. Distortion: THD 0.5% Current consumption: 27 mA nominal Dimensions: 3’’ Diameter / 76 mm. High: 1.22” / 31 mm. Weight without batteries: 2.3 ounces (65g). Weight with batteries: 3.1 ounces (88g). We reserve the right to make technical and design modifications to the receiver without notice. 19 Disposal Dispose the packaging in the proper manner. Containers for the proper disposal of batteries are provided at battery retailers as well as at local authority collection points. Should you wish to dispose the product, do so in accordance with the latest local regulations. Details are available from your local authority. 2012 All rights reserved. www.enersound.com 20