1
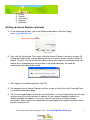
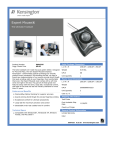
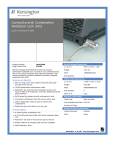
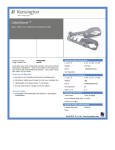
Delivery and Operating Procedures
for New ClassMate PC
Utilizing the E-Learning for
Kids Online Web Portal
For more resources & project info, visit www.RightStart4Kids.org
Delivery of Computers & Receipt of Delivery
This checklist is to provide the hospital with a summary of key external contacts (such as the
donor(s), tech support) and common internal contacts. This process also acts as a receipt of delivery
process, so the hospital (and donor(s)) can keep track of donated computers.
Hospital Name & Address:
________________________________________________________________________________
Number and type of netbooks being donated:
____ ClassmatePC (clamshell) ___ ClassmatePC (convertible tabletPC)
____ Other (______________)
____Battery Pack
____Power Cords
____Stylus Pen
____Operating System Recovery CD
____Users Manual
Date Delivered: _________________________________
Received by (Name/phone/email):
________________________________________________________________________________
Funding Donor’s Contact Info:
Name of Organization:______________________________________________________________
Main Contact (Name/phone/email):____________________________________________________
Technical Support Donor’s Contact Info:
Name of Organization:______________________________________________________________
Main Contact (Name/phone/email):____________________________________________________
For more resources & project info, visit www.RightStart4Kids.org
2
Operating Procedures for setting up NEW ClassMatePC Netbook
The purpose of this checklist/guideline is to help you easily set up the classmate PCs. By initiating a
process that standardizes each computer; maintenance, updates, and overall safety will be insured.
This checklist will also allow users to recall information that may be pertinent when setting up PC’s in
the future.
Please follow each step as accurately as possible. If you have any questions regarding this setup
process, please contact a local System Administrator.
1. Open box containing PC and identify that all required material is included:
PC Shell
Battery Pack
Power Cords
Operating System Recovery CD
User’s Manual
vStylus Pen
NOTE: For TabletPC netbook, please see page 9 of the Users Manual for proper storage of
the stylus pen.
2. Read pages 7-12 of the users manual for an overview and explanation of battery setup and
proper battery charging protocol.
Female End
3. Insert battery according to directions in user manual.
•
Align and insert female end of the battery with the
male portion of the computer.
Male End
4. Attach power cords and insert three pronged end into an
electrical socket while plugging the power adapted into
the back of the computer.
• The User Manual provides further explanation in
regards to powering the computer’s battery.
• Initial charge of the battery takes approximately 2
hours to complete.
• The battery light found on the flip top of the computer will be yellow while charging and
green once the charge is complete.
For more resources & project info, visit www.RightStart4Kids.org
3
(Operating Procedures for setting up NEW ClassMatePC Netbook continued)
5. To power the computer on, find the blue toggle switch located on the left side of the computer.
Slide switch forward and immediately let go. To indicate power is on, a side panel of lights
should become apparent. NOTE: The computer can be powered on while the battery is
charging. The battery will continue to charge as the computer is being used.
6. For the
computers initial setup, a
Microsoft XP prompt will guide the user through the remaining setup procedures.
• The person conducting the initial setup should be considered the System Administrator.
• This Administrator will be designing a naming convention that will be followed by all the
computers used for this program within the hospital environment (ex. CMH6W1,
CMH6W2).
o This computers name is: CMH6W2
• A description will also need to accompany the naming convention. It is ideal to use a
description that parallels what the specific computer will be used for (ex. CMH
Computer).
o This computers description is: CMH Computer
• It is imperative to keep a record of computer names on file.
7. Label Users Manual and Recovery CD with the computers name that they are attributed to.
• Label User Manual in the upper left hand corner.
• Label Recovery CD on the front, left side of the disk.
For more resources & project info, visit www.RightStart4Kids.org
4
(Operating Procedures for setting up NEW ClassMatePC Netbook continued)
8. Set up users as directed
• You will be creating user accounts so decide if you want multiple users on the
computer, and develop a naming system such as CMH6WA, CMH6WB, or some
system like NURSES (for Administrator) and KIDS (for children)
• The first time you log into the computer, you will be logged in as the ADMINISTRATOR.
Under the START menu choose the Control Panel
i. Under the Control Panel, select Add or Remove user accounts
1. Decide on and enable a password for the Administrator. This pass word
should be something that is easily recalled by Hospital Staff only
a. This User name should be: NURSES
2. Set up a second User Account with limited access. This account should
NOT be password
protected and should
be named KIDS
9. Establish a wifi connection with the
hospitals local Internet. Right click the
dual computer icon shown to the right,
and select the wireless connection that is
associated with the hospital. Select your
network and enter password
IMPORTANT: This computer does not come with virus protection. Please verify that a virus
application has been acquired as the Internet can be dangerous to unprotected computers
10. Develop a checkout/check in process that works for your nurses as well as patients
• To help the floor nurses and aids check in and out, we strongly recommend adding a
label with key contact information on the bottom of each netbook
i. Computer Unique Tracking ID (see step 7 above and consider using the
Computer Name)
ii. Location to Return netbook, power supply, cable lock & accessories
iii. Internal Support Name, Phone, & Department
iv. Any other useful information to make it easy to locate (e.g., length allowed to
check out)
v. Create a spreadsheet that lists the computers, when checked out, to whom, kids
room number, parents contact information, when netbook was returned, nurses
name/initial checking in/out computers
11. To help prevent netbooks from being stolen, we strongly recommend purchasing inexpensive
laptop locks.
For more resources & project info, visit www.RightStart4Kids.org
5
•
•
•
Kensington K64560US ComboSaver Portable Notebook Computer Lock by Kensington
Pick a combo number that is easy for nurses to document & remember (e.g., 2468)
When the netbook is not being checked out by a patient, we strongly urge you to keep
each unit locked
Setting up Internet Explorer
The purpose of this checklist/guideline is to help you easily set up the Internet Explorer. One of the
added benefits found within the Microsoft XP Operating System is the ability to set controls on the
Internet. As you will be receiving classmate PCs slowly and at different intervals, standardizing
Internet controls is of the utmost importance. This guideline can assist you in controlling the material
that is accessible on the new Classmate PC Netbooks.
The Microsoft XP Operating System provides some safeguarding of the internet, though you are
welcome to add additional software that provides added protection if needed.
1. The System Administrator has the authority to set the individual parameters for overall access
by additional users.
2. For initial use, log in as the System Administrator and open a new link to the Internet through
Internet Explorer. Enter username: NURSES
3. You will need to set the Home page
as: www.e-learningforkids.org
To do this simply click on the options
button on the far right side of the
page
Scroll down through the options and select
the Internet Options tab
4. A
seven
second pop-up screen will appear with
tabs as options
1. General
2. Security
For more resources & project info, visit www.RightStart4Kids.org
6
3.
4.
5.
6.
7.
Privacy
Content
Connections
Programs
Advanced
(Setting up Internet Explorer continued)
5. In the Home page text box, type in the following web address then click “Apply”:
www.e-learningforkids.org
6. Next, click the Content tab. The current setting for Internet Explorer is the most stringent. By
clicking the Enable button, you are blocking all sites that may be violent, sexual in nature, or
graphic. The only sites that will be accessible are those with a positive kid friendly rating. Any
website that is attempted to be accessed that is not rated adequately, will need the
administrators password to be viewed.
7. Click “Apply” on the bottom right then click “Ok.”
8. Exit completely out of Internet Explorer and then re-sign in to verify that the E-Learning Portal
is the administered Home page
9. The E-Learning portal does not contain any certifications, so as the Administrator you will need
to check many of the links found on its website. As you navigate through the website, an
additional prompt may appear. In this case, you will need to enter the Administrators
password as well as choose the radio button that corresponds to the option that always allows
persons to view this site
For more resources & project info, visit www.RightStart4Kids.org
7
IMPORTANT: You will need to check the majority of links on this website as well as enter your
password multiple times so that new users will always be able to fully access the E-Learning
portal without restriction
Additional References
These are additional tips that may help you in preparing the netbooks.
Click on desktop on left sidebar to get to places like my computer, my docs, etc.
Evernote is included on some computers. It might be useful to have each child create an
account to keep notes, writing, and anything else that might be useful. To create accounts,
click on “create free account.” You will need the name, email, username, and password for
each account/child. Confirmation will come via email.
My script stylus: this is another forum for kids to record writing.
You can close blue dolphin and return to normal desktop mode.
For more resources & project info, visit www.RightStart4Kids.org
8