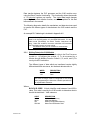
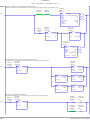
1
Corporate Office 9801 Camino Media Suite 105 Bakersfield, CA 93311 (661) 664-7208 Phone (661) 664-7233 Fax 2100-AGA Revision 1.98 Revision 2.08 March, 2001 AGA Gas Flow Processor and Communications Module AGA 3, 7 and 8 USER MANUAL Please Read This Notice Successful application of the Flow Processor card requires a reasonable working knowledge of the Modbus protocol, the AGA 3, 7 and 8 flow calculations, and the application in which they are being applied. For this reason, it is important that those responsible for configuring the module satisfy themselves that the module's functionality will meet the application's requirements. This manual is provided to assist the user. Every attempt has been made to assure that the information provided is accurate and a true reflection of the product's installation requirements. In order to assure a complete understanding of the operation of the product, the user should familiarize themselves with the Modbus protocol and the AGA 3, 7 and 8 Gas Flow specifications. Under no conditions will ProSoft Technology, Inc. be responsible or liable for indirect or consequential damages resulting form the use or application of the product. Reproduction of the contents of this manual, in whole or in part, without written permission from ProSoft Technology, Inc. is prohibited. Information in this manual is subject to change without notice and does not represent a commitment on the part of ProSoft Technology, Inc. Improvements and/or changes in this manual or the product may be made at any time. These changes will be made periodically to correct technical inaccuracies or typographical errors. WARNING This product will allow remote access to binary and register data which may have Control-related implications in the devices connected to the card. The User is responsible for assuring that any applicable regulations and safety practices concerning the remote operation of equipment are adhered to. ProSoft Technology, Inc. 1994, 1995, 1996, 1997, 1998, 1999, 2000 PLC and SLC are registered trademarks of Allen-Bradley Company Inc. Modbus is a registered trademark of AEG-Modicon Preface Getting Started The key to successfully getting started with this product is to install the example ladder logic, and to experiment with the ladder logic and the module. Through this experimentation, you will learn how the PLC communicates with the module, the layout of the AGA and Modbus memory map and the relationship between the module memory and the PLC memory. As you familiarize yourself with the product, begin to adapt the configuration data to your application. What to Read Section III and IV are the most important chapters of the manual to understand and to familiarize yourself with. If you have experience with any of our other products, you will probably be able to get by with these chapters and the example ladder logic. If you have not used one of products previously, you should add Section II to the list of important reading, while scanning the remaining sections. The key concepts to understand that will help you the most in working with our module is the memory paging between the PLC and the module. This is discussed in an overview fashion in Section II, while the actual data structures are discussed in Section III and IV. The AGA Calculations The Flow and Compressibility calculations used in this product have been implemented as published in the 1992 American Gas Association Report No. 3 and No. 8 publications, including the latest known erratas, and the latest AGA 7 publication. These equations are quite extensive and based on years of work by experts in their fields. We recommend that key decisions involving the configuration data and/or the operation of the product should be made by those familiar with the ramifications, and therefore familiar with the AGA Reports. ( This page intentionally left blank ) Product Revision History Revision Date 1.9 1.92 7/25/95 Description of Changes Added the Modbus Master functionality Added the code necessary to support the Energy rate and totalization. Added several configuration control bits to disable BTU calc and to enable the Fw Calculation.(AGA 8 Configuration Word) AGA 3 and 7 results can be modified by the Fw Factor (English Units Only) 1.93 1/6/95 1.94 8/30/96 1.95 7/12/97 2.01 01/12/98 2.02 04/12/98 1.98/2.03 2.04 12/02/98 2.05 2.06 06/01/99 07/01/99 2.07 04/08/00 2.08 01/19/01 Added a new variable called Totalized Energy - Daily Contract Period to current data. Used up spare register to do this Added ability to disable contract period rollover (End of Day) on a per meter basis. The bit to enable and disable the rollover was added to the Meter Configuration Word (bit 4). Fix MBM driver to support ASCII protocol. Compile MBMDRV.C and PCMAIN.C (rev/date) only -Modified mbm.cfg file to add mode selection Fix AGA7 rollover at 1000000. Had constant entered with commas and compiler did not like it. Changed to 10000000 entry and changed working number (flow_pulses) to unsigned long int. Problem has gone away Worked on protecting against date lockup when PLC is first init with month/day as 0. This was causing an invalid lookup in day calc handling routine. Also put some logic in to account better for year 2000 Fix PCAGA where it calls Pf_calc() no matter if run is cfg for AGA3 or AGA7. Causes a problem if cfg for AGA 7 w/ AGA 8 turned on Fix AGA7.C and the handling of energy calculation. Was only occuring in aga3 mode and not in aga7 09/13/98 Fix Energy calc value as is not getting zeroed out when the AGA3 gas flow rate goes to 0 due to low flow cutoff Added logic in BT routine to count up to 5 times of bad time before flagging to screen. Put in to address problem that seems to be arising with EIP modules with old PLC5 units. Fix Modbus Slave driver problem where rx_sum() was not called in time to prevent response bytes to be sent even w/ bad crc/fc. Add logic to allow the BTU value to be input from the PLC. code detects if value is > 0 and uses PLC value. For questar. Fixed Modbus master so that it would read more than one slaves command list from the MBM.CMD file ( This page intentionally left blank ) TABLE OF CONTENTS I. II. III. IV. V. PRODUCT OVERVIEW.....................................................................................................1 1.1 Product Specifications ...................................................................................1 1.2 Items included as part of 2100 module ...........................................................2 INSTALLING THE MODULE..............................................................................................5 2.1 Locating the Module in I/O Chassis ................................................................5 2.2 Placing the Keying Bands...............................................................................5 2.3 Installing Battery Backup Jumper....................................................................5 2.4 Inserting Module in Chassis............................................................................6 2.5 Connecting a Monitor .....................................................................................7 2.6 Connecting a Keyboard..................................................................................8 2.7 Serial Port Connectors and Jumpers ..............................................................8 2.8 Installing the AGA Software ............................................................................9 2.8.1 Initial Installation................................................................................9 2.8.2 Upgrading an Operating Module .........................................................9 2.9 Using the VGA Data Display Capabilities........................................................10 MODULE FUNCTIONAL OVERVIEW ................................................................................13 3.1 Modbus Slave Communications......................................................................13 3.1.1 Command/Reply Cycle.......................................................................13 3.1.2 Command Types................................................................................13 3.1.3 Command Error Checking.................................................................14 3.1.4 Data Integrity.....................................................................................14 3.2 Module Memory Layout ..................................................................................14 3.2.1 Modbus Data Memory........................................................................15 3.2.2 Communications Configuration Memory.............................................16 3.2.3 AGA Data Memory.............................................................................16 3.3 PLC Data Transfer Interface ..........................................................................16 3.3.1 Writing Data to the 2100 Module .......................................................17 3.3.2 Receiving Master Write Commands from the Module.........................18 DATA MOVEMENT - PLC TO THE 2100 MODULE............................................................19 4.0 Section Overview...........................................................................................19 4.1 Moving Data to Modbus Data Memory - Block ID 0 to 19 ...............................19 4.1.1 Real Time Clock ................................................................................20 4.2 Configuring the 2100 Module - Block ID 255...................................................20 4.2.1 Slave Port Configuration - COM 1......................................................21 4.2.2 Flow Calculation Configuration - System Parameters.........................23 4.3 Configuring the Meter Runs (Block ID 20 - 29)................................................26 4.3.1 Meter Run Configuration Data - AGA 3 Diff. Pressure........................27 4.3.2 Meter Run Configuration Data - AGA 7 Turbine/Linear Analog Meters ................................................................................................30 4.3.3 Real Time Update Data - AGA 3 and AGA 7.......................................32 4.3.4 AGA 8 Configuration Data..................................................................34 DATA MOVEMENT - 2100 MODULE TO PLC ...................................................................37 5.0 Section Overview...........................................................................................37 5.1 Modbus Write Commands ..............................................................................37 5.1.1 Register Writes (Func. Code 6 and 16) .............................................37 5.1.2 Single Bit Write ( Func. Code 5) ........................................................38 5.1.3 Multiple Bit Write (Func. Code 15) (Future)........................................39 5.2 Module Status Data ( Read Block ID 0) ..........................................................40 5.2.1 Reading Module Status Data .............................................................40 5.2.2 Resetting Module Status Data ...........................................................41 5.2.3 Module Status Codes ........................................................................41 5.3 Meter Run Results (Block ID 20 - 29) ............................................................42 5.3.1 Real Time Meter Data........................................................................43 5.3.2 Meter Run Summary Data - Current Period........................................46 5.3.3 Meter Run Summary Data - Last Period ............................................48 VI. MODBUS SLAVE COMMANDS.........................................................................................51 6.1 MODBUS Commands .....................................................................................51 6.1.1 Function Code 1 - Read Output Status ..............................................51 6.1.2 Function Code 2 - Read Input Status .................................................51 6.1.3 Function Code 3 - Read Multiple Registers........................................51 6.2.4 Function Code 4 - Read Input Registers ............................................51 6.2.5 Function Code 5 - Single Bit Write.....................................................51 6.2.6 Function Code 6 - Single Register Write............................................52 6.2.7 Function Code 15 - Multiple Bit Write (Future) ...................................52 6.2.8 Function Code 16 - Write Multiple Registers......................................52 6.2 Reading and Writing Floating Point Data ........................................................52 6.2.1 Reading Floating Point Values ...........................................................52 6.2.2 Writing Floating Point Values.............................................................52 7.0 SUPPORT, SERVICE AND WARRANTY ...........................................................................55 7.1 Technical Support...........................................................................................55 7.2 Service and Repair ........................................................................................55 7.3 Warranty ........................................................................................................56 7.3.1 General Warranty Policy ...................................................................56 7.3.2 Limitation of Liability..........................................................................56 7.3.3 Hardware Product Warranty Details ..................................................57 APPENDICES A B C D E Block Transfer Buffer Register Assignments Modbus Register Map RS-232 and RS-422/485 Cabling Gas Viscosity Chart Use Interlink to Connect A Computer PLC-5 Example Ladder Logic F Modbus Master Port Example - Daniels 2251 Analyzer I. PRODUCT OVERVIEW The ProSoft Technology, Inc. 2100 family of Flow Processor products gives AllenBradley 1771 I/O compatible processors the ability to: 1. Perform the American Gas Association Report No. 3 (1992) and the American Gas Association Report No. 7 (1984) gas flow rate equations 2. Perform the American Gas Association Report No. 8 (1992) compressibility calculations 3. Interface to a Modbus Master device 1.1 Product Specifications The product performs per the following specifications: Modbus Slave Specifications • RTU mode with CRC-16, or ASCII mode with LRC • Function codes: 1 Read Output Status (Future) 2 Read Input Status (Future) 3 Read Multiple Data Registers 4 Read Input Registers 5 Force Single Coil (Future) 6 Preset (Write) Single Data Register 8 Loopback Test (Future) 15 Multiple Bit Write (Future) 16 Preset (Write) Multiple Data Register • Supports broadcast commands from Master • Software configuration (From PLC) Address : 1 to 247 (0 is broadcast) Parity : None, odd, or even, Stop Bit : 1 or 2 Baud Rate : 300 TO 19,200 • Hardware RS-232C handshaking for modem and radio applications • RS-422/RS-485 compatible for multidrop applications • Supports the addressing of up to 1000 registers from the PLC data table, while giving read access directly to the Flow Processor’s memory AGA - 3, 7 & 8 Specifications • Support for ten independently configured and operated meter runs • AGA 3 Flange-Tapped Orifice Metering, Report No.3-1992 User configurable parameters - Orifice and Meter run materials and base conditions - Compressibility calculation type AGA Report No. 8 User entered densities Revised 3/21/01 1 • • • • • • • - Static pressure Up/Down stream - English or Metric units AGA 7 Turbine Meter Gas Flow Measurement, Report No. 7-1984 Pulse data based on Allen-Bradley 1771-CFM module Configurable for analog or pulse signal User configurable parameters : - Meter K Factor AGA 8 Compressibility Factors, Report No. 8-1992 Based on Detailed Characterization Method User configurable parameters : - 21 component gas composition - Z Factor recalculation ranges, Pres and Temp Independent meter run calculation control and status, including Enable and Accumulator Reset Uses PLC Analog Input values or 1771-CFM module and Block Transfer file transfer capabilities to update real time data Modbus Slave port provides read access to all meter run data and calculation results for easy upload to Modbus Master Provides historical status, run time and accumulated flow data to PLC Stores 10 days of historical status, run time and accumulated flow data for retrieval (PCMCIA retrieval to be added in future upgrade) Environmental Requirements • • • • 1.2 Operating Temperature : Storage Temperature : Relative Humidity (Operating) : Vibration (Operating) : 0 to 60 C (32 to 140 F) -40 to 85 C (-40 to 185 F) 5 - 95% non-condensing 10 to 150 Hz 2 g max peak acceleration 0.012 in (peak to peak) displacement Items included as part of 2100 module The 2100 product is shipped as one complete unit from the factory, with hardware, software and several items needed to support the product long term. Included in the 2100 package from ProSoft should be the following items: Item 1 2 2 Description Allen-Bradley 1771-DSX2 Module The hardware used as the platform for the 2100 module PCMCIA Flash Ram Card This card, marked with a ProSoft sticker indicating the serial number and revision level, must be installed in the DSX2 per Section 2.8 of this User Manual Revised 3/21/01 Revised 3/21/01 3 Utility Diskette (3.5”) This diskette contains the files necessary to setup and Interlink connection between the 2100 module and a PC. This utility will be used when it is necessary to upgrade the AGA software 4 Serial Cable - Rev ACT302 This cable is used in combination with the Interlink utility to connect a PC to the 2100 module during the software upgrade process described in Section 2.8. 5 Remote Reset Connector Kit These components are used to interface an I/O module to the 2100 reset circuitry. Please call us at (661) 664-7208 if you desire to install this option. We will fax you a connection diagram 6 9-25 Pin Converter This converter is provided at assist in connecting the Serial Cable to the PC during the software upgrade. 7 Example Ladder Logic diskette This diskette contains example PLC 5 ladder logic to implement up to 10 flow meters on the 2100 module. Also included is an Excel spreadsheet of the register listing in Appendix A-1 8 This User Manual 3 (This page intentionally left blank) 4 Revised 3/21/01 II. INSTALLING THE MODULE Installing the 2100-AGA module into a 1771 I/O platform is straightforward and procedural in nature. The following sections detail the step-by-step procedures that must be followed to take a 2100 module out of the shipping box to the point of being operational. Many aspects of this section are excerpted from the 1771DSX2 User Manual. 2.1 Locating the Module in I/O Chassis Place the 2100 module in a chassis in one of the slots closest to the PLC. Group similar modules to minimize adverse effects from radiated electrical noise and heat. It is recommended that you: • • • 2.2 Group analog and low voltage DC modules away from AC modules or high voltage DC modules to minimize electrical noise Do not place the 2100 module in the same even-odd slot pair with: - A 16-bit I/O module when using 2-slot addressing - A 32-bit I/O module when using 1-slot addressing Consider the environmental requirements outlined in Section 1 Placing the Keying Bands Once you have designated a slot for the module, steps should be taken to assure other modules are not accidentally inserted into this slot. It is recommended that the plastic keying bands shipped with each I/O chassis be used to key the I/O slot for the 2100 module. The module is slotted in two places on the lower rear edge of the card. The position of the keying bands on the backplane connector must correspond to the slots in the board to allow the module to be inserted in the chassis. For the 2100, snap the keying bands onto the lower backplane connector between 2-4 and between 14-16. 2.3 Revised 3/21/01 Installing Battery Backup Jumper 5 The 2100 module has a replaceable 3.6 V lithium battery (A-B part 1770XZ) that provides backup power for the clock and configuration information. When the module is shipped from ProSoft Technology, the battery jumper is located in the Enabled position. This is the result of the testing procedure the module has been placed through at the factory. Use the following information to adjust the battery jumper if ever required or to locate the battery if you need to change it. 2.4 Inserting Module in Chassis To insert the 2100 module into the I/O chassis, use the following procedure: 1. Remove power from the 1771 I/O chassis 2. Place the module in the card guides on the top and bottom of the slot. Slide the module into the slot. 3. Snap the chassis latch over the top of the module to secure it 6 Revised 3/21/01 SAFETY NOTICE Remove power from the 1771 I/O chassis backplane before installing the module. Failure to remove power could cause : • Injury • equipment damage from unexpected operation • degradation of performance 2.5 Connecting a Monitor A VGA compatible monitor is supported by the 2100 module to display meter run calculation results directly out of the module. This section details the hardware connection, while a later section details how the VGA interface functions with a keyboard. Use only VGA compatible monitors with an analog-type interface. Generic analog monitors are listed as either analog-interlaced or analog-noninterlaced with a dot-pitch resolution. The following monitors are listed by Allen-Bradley as having been tested, ‘but are not supported by AllenBradley:’ • • • • • NEC Multisync II - Model NEC JC-1402 IBM PS/2 Monochrome display - IBM 8503-001 Panasonic Panasync C1395 Panasonic Panasync C1381i Samsung CJ4681 Color Monitor Some analog monitors have a 9 pin connector rather than the 15 pin connector. To convert from the 9 pin to the 15 pin head, the G&C #45-590 9-15 pin adapter is recommended. If a TTL type monitor is used, the video will be distorted and equipment could be damaged if connected under power for a prolonged period of time Revised 3/21/01 7 2.6 Connecting a Keyboard Any AT style keyboard can be connected to the 2100. PS/2 keyboards require a special adapter (Radio Shack #90-2441). 2.7 Serial Port Connectors and Jumpers The 2100 module has three 9 pin connectors for serial ports. Each serial port maintains 500 volts of isolation from the backplane, and is isolated from the other serial port by 500 volts. At this time, only COM1 is activated, supporting Modbus Slave functionality. 8 Revised 3/21/01 Each serial port can be configured by setting a jumper located on the top of the module. The jumpers are easily reached without disassembly of the module when the module is removed from the I/O chassis. Appendix B details the cabling necessary to support RS-232, RS-422 and RS-485. The RS-422 transmitter is controlled by the RTS line. In the RS-422 mode, the receiver is always enabled. In the RS-485 mode, the transmitter and receiver are controlled by the RTS line, with the transmitter enabled when RTS is true, and the receiver enabled when RTS is false. 2.8 Installing the AGA Software The 2100 module’s software is supplied with the initial purchase of the module on a PCMCIA Flash Memory Card. 2.8.1 Initial Installation In order to install the software on the module: 1. Insert the PCMCIA card into the slot on the module 2. Power up the I/O rack or press the reset button on the module 3. Leave the card in the PCMCIA slot in case of system power fail. With the card in the slot, the system will automatically power up and re-start the AGA calculation process 2.8.2 Upgrading an Operating Module Provisions in the implementation of the 2100 module have been made to allow Users to easily update the AGA software to the latest release. The update software will be made available through our Bulletin Board (BBS) to all User’s who have completed one of our Product Registration Forms. Special software provided with the 2100 module is used to perform the upgrade. Appendix D in this manual includes a detailed explanation on how this software works. In order to execute an upgrade, please follow the following procedure: Items needed to perform Upgrade: • Serial Cable supplied with 2100 module • PC, laptop or otherwise • Downloaded file from ProSoft BBS loaded on PC • Spare keyboard Revised 3/21/01 9 1. Download the new EXE file from the ProSoft BBS and place file on PC to be used to connect to 2100 module. The procedure and passwords for this will be provided upon receipt of completed Product Registration Form 2. Make sure the ProSoft Flash Ram card is in the PCMCIA socket 3. Plug the Serial Cable supplied with the module into COM 3 on the front of the 2100 module 4. Plug the other end of the cable into COM 1 of a PC containing the upgrade EXE file 5. Plug the spare keyboard into the 2100 module and press the F10 key. The F10 key will take the 2100 out of the AGA run mode, and invoke the Interlink server program, INTERSVR.EXE 6. On the PC, invoke the INTERLNK utility supplied with the 2100 module on the ‘System Utilities’ diskette. Prior to invoking INTERLNK, several changes may have to be made to your system configuration files. Appendix D includes a detailed explanation of the INTERLINK utility to assist you in this effort 7. From the PC, invoke the following command: COPY [pathname]\PCMAIN.EXE [dest drivr]: 8. Once the copy command is complete (may take about one minute), disconnect the Serial Cable from the 2100 module, and press the Reset Push-button located behind the card removal handle. 9. When the 2100 module completes the reset process, it will boot up into the AGA software and begin the calculation process. 2.9 Using the VGA Data Display Capabilities The 2100-AGA package supports the display of data to the VGA port on the front of the 2100 module. In order to see this data and make the most use of it, install a VGA monitor and keyboard as outlined earlier in this Section. Once the monitor warms up, the ‘AGA Module Status Screen’ should be displaying the status of the enabled meter runs. At this point, the following keystrokes may be used to navigate through the available display options: Key a 10 Meaning AGA Module Status Screen Revised 3/21/01 This screen displays four meter calculation results per screen. To view more meters, use the Right Arrow (->) or Left Arrow (<-) keys. h AGA Historical Storage Display Screen This screen displays the historical storage results for four meters per screen. To view more meters, use the Right Arrow (->) or Left Arrow (<-) keys. To scroll through the historical records (up to 10 days worth) use the PG UP and PG DN keys. d Modbus Data Table screen This screen is a ‘Data Table’ Format screen, similar to what you would see with PLC programming software. The registers which are displayed consist of the Modbus data registers. The 0 - 999 registers will be the data that has been written from the PLC, and the 1000+ registers will be the AGA data space. The display context can be changed by selecting one of the following keys: I h b c Integer Mode Hex Mode Binary Mode Communication Status Screen This screen displays the Modbus slave port status information. In addition to receive and transmit counters, error status information is also displayed. The error status/counters can be reset by pressing the ‘r’ key. SCREEN UPDATE TIMING The data display routines for the local VGA screen are called every 5 seconds in order to minimize processor loading. This automatic update timing can be overridden by simply hitting the key for the active screen. Once one of these keys are pressed, the screen update will occur immediately. Revised 3/21/01 11 (This page intentionally left blank) 12 Revised 3/21/01 III. MODULE FUNCTIONAL OVERVIEW 3.1 Modbus Slave Communications The 2100 Flow Processor’s Modbus Slave port runs the RTU and ASCII versions of the Modbus protocol. This capability allows the module to communicate data to a Modbus Master (as available in most SCADA Master packages), and vice-versa. The module supports both point-topoint implementations as well as multi-drop implementations. The following discussion centers on the functional capabilities of the Modbus Slave port. 3.1.1 Command/Reply Cycle Successful communications between a Modbus Slave and a Master will always consist of the following two transactions: Command: Message from master giving instruction to slave. Reply: Response to command. A slave station will respond to a master issued command in several ways. Data Message: If the command was executed by the slave, the response message will include the data requested, or an acknowledgment that the command was executed. Error Message: If the command could not be executed by the slave, for whatever reason, an error response message is transmitted to the master. The error response message consists of the original function code (or'd with 80hex) and an error code. No Reply: If the master does not detect a reply within its timeout period, the master should re-transmit the command, before a time out error is issued. If the Slave could not decode the message or an error occurred preventing the Slave from recognizing the message, no response will be issued. 3.1.2 Command Types The Modbus Slave can respond to three types of commands from the master; read data, write data, and a diagnostic command. These are overviewed below and detailed in Appendix C. Read : The following data read commands are supported: 1 Read Output Status 2 Read Input Status 3 Read Multiple Registers Revised 3/21/01 13 4 Read Input Registers Write Data: The following data write commands are supported: 5 Single Bit Write 6 Single Register Write 16 Multiple Register Write Diagnostics: The following diagnostic supported: 8 Loopback Test - Code 0 command is 3.1.3 Command Error Checking When the Modbus Slave cannot execute a command, an error code is generated and returned to the master. Error codes generated at the slave will usually be indicative of an illegal function, an illegal address, bad data, or the inability to complete a transaction because of a network problem. Error codes are note returned under states of failed or tentative communications, such as bad checksum. 3.1.4 Data Integrity As in all good protocols, there must exist a level of data integrity checking to verify, with some degree of assurance, the quality of the transmitted data. The Modbus protocol supports two types of error checking: • • RTU Mode : 16 bit cyclic redundancy check (CRC-16) ASCII Mode : 8 bit longitudinal redundancy check (LRC) One bit parity check CRC-16: When the master generates a message, a 16 bit CRC value is added to the end of the transmitted packet. The CRC value is generated using a series of bit shifts and manipulations. The receiving station executes the same calculation on the data and verifies the transmitted CRC. Any discrepancy will cause the message to be disregarded. LRC: When the master generates a message in the ASCII mode, an 8 bit LRC value is added to the end of the transmitted packet. The LRC value is generated by two's complementing the result of a binary summation on the characters. The receiving station executes the same calculation on the data and verifies the transmitted LRC. Any discrepancy will cause the message to be disregarded. Parity: Parity checking can be added as an additional level of data security. If parity checking is selected, even or odd parity can be implemented. 3.2 14 Module Memory Layout Revised 3/21/01 This section serves to explain the different segments of the memory which are utilized in the PLC and in the 2100 Module. The 2100 module maintains several segments of memory: - Modbus Data Memory - Communications Configuration Memory - AGA Data Memory Data values are moved over the backplane between the module and the processor using the Block Transfer capabilities of the PLC. 3.2.1 Modbus Data Memory The Modbus register address range of 0 to 999 is considered the Modbus Data Memory. In order to understand how the module handles the data memory, it is easier if the discussion is broken down into Read and Write Memory. Read Memory: This memory contains the data which services read data requests from a Master (i.e., Function Codes 1,2,3, and 4). This memory is maintained in the 2100 module, and services the data read requests directly. Data is transferred from the PLC to the module asynchronously from the Master's data read requests. This allows the application ladder logic to manipulate and position the data as needed before transfer to the module. Since the module stores the data from the ladder logic in local memory, read requests from the Master can be serviced immediately. Write Memory: Write commands are sent directly to the PLC, bypassing the module’s Modbus Data memory. The Write Memory shall accept the data received by the slave as the result of a write data command from a Master (i.e., Function Codes 5,6,15 and 16). This memory is a one (1) command buffer in the 2100 module that holds the data until the PLC performs a BTR file read. Write data from a master does not go directly into the module's Modbus Data Memory. PLC ladder logic must be used to accept the write data and place it in appropriate registers if the master is to be able to read back the data it has written. The 2100 module controls the data which is transferred from the module to the PLC. The only time valid 'data' is transferred to the ladder logic is when a write command is issued from the Master. Revised 3/21/01 15 Section IV and V of this manual provides further information on the data transfer mechanism, while Appendix A contains a PLC program showing an example of the logic to transfer data registers to and from the module. 3.2.2 Communications Configuration Memory The Communication Configuration Memory contains the parameter data necessary for the module to set up the module's communications port (Port 1 on the 2100 module). On power up, the module will not proceed without receiving the configuration block (Block ID 255) and the Meter Run Data Initialization blocks (Block ID 256 to 266) This memory can only be accessed by the PLC, and is Write Only (i.e., the configuration memory contents in the 2100 module are not accessible for reading by the PLC). 3.2.3 AGA Data Memory The 2100 module maintains the AGA Data Memory accessible for the flow calculation logic. The AGA Memory consists of several different types of data. The input and output values are available to the PLC ladder logic through Block ID Numbers 20 through 29. In addition to the data that is transferred to the PLC, historical storage data and all relevant working data is available to the Modbus Slave port. AGA Data Memory is addressed on the Modbus Slave port starting at Register Address 1000. The AGA Data Memory structure is overviewed in the following table (A detailed breakdown of the register/address assignments is provided in the Appendix): Block ID Description Write data from PLC 255 W i_sys_config i_time 20,21,22,23 W i_loop_data structure [10] (70/run ) 24,25,26,27 i_loop_config (31 words) 28,29 i_loop_update (9 words per) aga_8_config (23 words per) Space[7] r_time space Read Data To PLC 20,21,22,23 R f_loop_output[10] (40 words per) 24,25,26,27 space 28,29 R loop_storage[10] (300 words per) space 3.3 16 Cnt Modbus Start Finish 20 10 1000 1020 1019 1029 Run 1-10 1030 1729 10 60 1730 1740 1739 1799 Run 1-10 40 Run 1-10 100 1800 2200 2240 5240 2199 2239 5239 5339 PLC Data Transfer Interface Revised 3/21/01 Data transfer between the PLC processor and the 2100 module occur using the Block Transfer functionality. This functionality allows the transfer of 64 physical registers per transfer. The logical data length changes depending on the data transfer function, as will be explained in this and later sections in the manual. The following discussion details the mechanism and data structures used to transfer the different types of data between the 2100 module and the PLC. An example PLC ladder logic is included in Appendix A-2. In order for the Flow Processor module to function, the PLC must be in the RUN mode, or in the REM RUN mode. If in any other mode (Fault/PGM), the Block Transfer instructions will stop. Under this condition, the meter calculation will increment the Time Away counter once per minute. The Modbus Slave port will continue to communicate. 3.3.1 Writing Data to the 2100 Module This section discusses how to transfer data to the Flow Processor module to: 1)Configure the module, 2) To be accessed by a Master through Modbus Function Codes 1,2,3, and 4, and 3) For use by the AGA calculation. The different types of data which are transferred require slightly different data block structures, but the basic data structure is: WORD 0 1-63 DESCRIPTION Block ID code Data The BTW file length must be configured for 64 words when programming the instruction. Module operation will be unpredictable otherwise. Where: BLOCK ID CODE: A block identifier code between 0 and 255 in value. This code is used by the 2100 module to determine what to do with the data block. Valid codes are: CODE 0-19 20-29 255 256-266 Revised 3/21/01 DESCRIPTION Modbus Data Memory AGA Data Memory Module Configuration Memory Meter Run Initialization Data 17 DATA: The data to be written to the module. The structure of the data is dependent on the Block ID code. Section IV provides details on the structure of the data depending on the data type. 3.3.2 Receiving Master Write Commands from the Module This section discusses how to get data written to the Flow Processor module by a Master into the PLC’s memory. Supported Modbus Function Codes include 5, 6, and 16. The transfer of data from the 2100 Flow Processor module to the PLC is executed through the Block Transfer Read function. Four basic different types of data are read from the module into the processor. The data structure for the block transfer depends on the type of data to be transferred and the Block ID. The following provides an introduction to the data transfer, while Section IV details the data structures. The different types of data which are transferred require slightly different data block structures, but the basic structure is: WORD 0 1-63 DESCRIPTION Block ID code Data The BTR file length must be configured for 64 words when programming the instruction. Module operation will be unpredictable otherwise. Where: BLOCK ID CODE: A block identifier code used by the Flow Processor module to determine what to do with the data block. Valid codes are: CODE 1 2 4 20-29 255 256-266 DESCRIPTION Register Write command from Master (FC 6 or 16) Bit Set or Reset Write command from Master (FC 5) Multiple Bit Write command from Master (FC 15) AGA Data Memory read Module is requesting configuration data Module request for Meter Run initialization data DATA: The data to be written to the PLC. The structure of the data is dependent on the block ID code. Section IV details the different structures. 18 Revised 3/21/01 IV. DATA MOVEMENT - PLC TO THE 2100 MODULE 4.0 Section Overview This section is dedicated to the movement of data from the PLC Ladder Logic to the 2100 module. Several different types of data are required to be transferred to the 2100 module, and this Section is broken down accordingly: 4.1 4.2 4.3 4.1 Moving Data to Modbus Data Memory 4.1.1 Real Time Clock Configuring the 2100 Module 4.2.1 Slave Port Configuration 4.2.2 Flow Calculation Configuration - System Parms. Configuring the Meter Runs 4.3.1 Meter Run Config Data - AGA 3 4.3.2 Meter Run Config Data - AGA 7 4.3.3 Real Time Update Data 4.3.4 AGA 8 Configuration Moving Data to Modbus Data Memory - Block ID 0 to 19 Writing to the Modbus Data Memory in the 2100 module is a simple Block Transfer Write with Block ID Codes from 0 to 19 followed by 50 words of data. The data that is to be made available to the Modbus Master for reading is written into the module in this fashion. The actual data table is built starting at word 0 (Block ID #0, word 0), and is built incrementally after this. The full range of the table is 0 to 999. As an example, the following memory table demonstrates the relationship between the processor data table, the module data table, and the protocol addressing. Assuming we are using N10 as the data file in the PLC, the data will map as follows: Proc Addr N10:0 N10:1 N10:2 -N10:49 N10:50 N10:51 -N10:99 Blk ID /Word 0/0 0/1 0/2 -0/49 1/0 1/1 -1/49 Module Addr 0 1 2 -49 50 51 -99 Modbus Addr 0 1 2 -49 50 51 -99 By paging the different data blocks into the module on a continuous basis, the module will always contain relatively current data. Revised 3/21/01 19 The example ladder logic in Appendix A demonstrates how to execute the data write for Block ID 0 (50 words of data) 4.1.1 Real Time Clock The module uses the PLC’s real time clock as the basis for the module's time. The real time value is updated to the module by the PLC ladder logic as part of every Block Transfer with a Block ID between 0 and 19, with the PLC clock registers being copied to the tail end of every block transfer data block. The real time clock values are copied in the BTW transfer buffer, starting at word 58 of the buffer (Data word 57). Real Time Clock Data Word 57 58 59 60 61 62 63 Description Time - year Time - month Time - day Time - hour Time - minute Time - second Format/Units xxxx xx xx xx xx xx Where: Time Data Values: ( xx ) The Time Set Data values to be used by the module for all decisions based on real time clock values. These functions include End of Day, Hourly data accumulations (future), and Rollover timestamping. The time data is copied straight from the PLC’s Status File. 4.2 Configuring the 2100 Module - Block ID 255 The ProSoft Technology firmware must be configured at least once when the card is first powered up, and any time thereafter when the configuration parameters must be changed. The Module Configuration data block consists of data necessary to configure the Modbus Slave port as well as key Flow Measurement calculation setup values. On power up, the module enters into a logical loop waiting to receive configuration data from the PLC. While waiting, the module sets the first word of the BTR buffer to 255, telling the PLC that the module must be configured before anything else will be done. The module will continuously perform block transfers until the Module Configuration block is received. Upon receipt, the module will execute a Modbus port initialization, reset the Modbus error counters, and then proceed to request the Meter Run Initialization Data. 20 Revised 3/21/01 Transferring the Module Configuration block to the module will force a reset of the communication port. In order to initiate the configuration process from the PLC, the Block Transfer Write must be setup with a value of 255 in the data buffer's first word (the Block ID position). Configuration data will follow the Block ID, as outlined in the following sections. A full listing of the configuration block is contained in Appendix A-1. 4.2.1 Slave Port Configuration - COM 1 The data to configure the Modbus Slave port (COM 1) must be transferred from the PLC to the module. The structure of the data is as follows: Module Configuration Data Data Word Description Format/Units Modbus Slave Configuration 0 Modbus Slave Address 1 Parity 2 Stop Bits 3 Baud Rate 4 RTS to TxD delay 5 RTS Off Delay 6 Input Table Offset 7 Output Table Offset 8 RTU/ASCII Mode Select 9 Spare Modbus Address N/A N/A N/A N/A N/A N/A N/A N/A N/A N/A Where: SLAVE ADDRESS: The module's slave address. The valid Slave addresses are 1 to 247 PARITY: The parity mode to be used by the module is defined by this word as follows: 0 No parity 1 Odd parity 2 Even parity STOP BITS: The number of stop bits to be used is defined as follows: 1 One stop bit 2 Two stop bits BAUD RATE: The baud rate at which the module is to operate. The baud rate is configured as follows: VALUE 0 Revised 3/21/01 BAUD RATE 300 Baud 21 1 2 3 4 5 6 600 Baud 1200 Baud 2400 Baud 4800 Baud 9600 Baud 19200 Baud RTS TO TXD DELAY: This value represents the time in 1 ms increments to be inserted between asserting RTS and the actual transmission of data. The delay, if greater in duration than the hardware time delay associated with CTS, will override the CTS line until the timeout is complete. This configurable parameter is useful when interfacing with modem based devices, or anytime line noise must be allowed to subside before data is transmitted. RTS OFF-DELAY: The value in this word represents the number of 1 ms time delay increments inserted after the last character is transmitted and before RTS is dropped. The delay serves an important function in modem and multidrop line driver applications (RS-422/RS-485 applications). Recommended values to be placed in the configuration register are as follows: CONNECTION TYPE VALUE RS-232C 0 All others (Modem, RS-422/485, etc.) 300 Baud 25-50 600 Baud 14-16 1200 Baud 9-10 2400 Baud 3-4 4800 Baud 2-3 9600 Baud 1-2 19200 Baud 1 If an incorrect value is used in a system which requires a time delay, communications will most likely fail completely, or at least on an intermittent basis. The values presented here have been empirically determined, and should therefore only be used as starting points. The maximum value that can be used is 65535. INPUT MEMORY START ADDRESS: This value defines the offset address into the 1000 word data space that the Modbus slave will use when responding to Function Code 2 and 4 commands. As an example, to start the address space at word 150, enter a 150. A Function Code 2 or 4 command with an address of zero will then start reading at word 150. OUTPUT MEMORY START ADDRESS: This value defines the offset address into the 1000 word data space that the Modbus 22 Revised 3/21/01 slave will use when responding to the Function Code 1 command. As an example, to locate the output image at word 100, enter a 100. A Function Code 1 command with an address of zero will start reading at word 100. RTU/ASCII MODE SELECT: The module will operate as either an RTU or an ASCII mode slave. The following values control the selection: Value 0 1 2 4.2.2 Mode RTU Mode (Default mode) ASCII 8 bit Mode ASCII 7 bit Mode Flow Calculation Configuration - System Parameters The Flow Processor must receives certain Meter Run configuration parameters prior to execution. This information consists of meter run independent calculation setup data. The configuration data received through the 255 Module Configuration is as follows: Flow Calculation Configuration Data Wd/ 10 11 12 13 14 15 16 17 18 19 20 21 Description Format/Units Flow Calc Control Word Delta T3- for AGA 3 recalc resolution xxx.x Deg F( Deg C) Delta T8- for AGA 8 recalc resolution xxx.x Deg F( Deg C) Delta P8 - for AGA 8 recalc resolution xxx.x 1003 Base T - Contract base Temperature xxx.x Deg F( Deg C ) Base P - Contract Base Pressure xxx.x PSIA ( kPa ) Time Zone - Hours behind GMT xx.x hrs End of Day Rollover - Hours (0 to 23) xx hr Number of Active Meter Runs(1-10) xx Number of Modbus Read Data Blocks xx 1-80 Gauge Press to Absolute Press Offset xx.x PSIA(kPa) Modbus Master Read Data Block Cnt xx Modbus Address 1000 1001 1002 PSIA ( kPa ) 1004 1005 1006 1007 1008 1009 1010 1011 Where: Flow Calc Control Word: (Binary pattern) This Control Word is used to perform several overall setup functions. The active bits have the following meanings: Bit 0/1 These bits are not used in 2100 at this time Bit 2 Revised 3/21/01 Force End of Day Rollover : When this bit is set, the module executes an End of Day data rollover. This forced rollover does not begin a new day, but does add the values to the historical data array, and reinitializes the daily accumulators for all meter runs. The normal End of Day rollover will still occur based on the configured Hour value (See Configuration Word 17). The bit must be cleared by the ladder logic or manually. 23 Bit 3 English or Metric Mode Select : The Flow Processor support both modes of operation. When bit 3 is clear, the module will be configured for English units, while a 1 is for metric. Bit 4 Display Mode : A text line display mode can be enabled to assist debugging the module’s operation under conditions when the module’s operation becomes unreliable. The bit is normally reset to 0 to display the data display screens. When set to 1, the text line display mode (debug mode) is enabled. Bit 5 Disk Log Mode (Future) : Event logging to the PCMCIA disk is disabled when the bit is reset to 0. When this bit is set, the module will log events and data to the PCMCIA disk. This data is in a ASCII format and may be extracted for use in other packages. Contact the Factory for further information. Bit 6 Hard Debug Mode : This bit causes the module to shut down in the case of a math error. This bit will be removed in the future, but is currently to be set only when requested by the factory during debug sessions. Bit 7 Modbus Master Enable : The COMM 2 port on the module can be enabled as a Modbus Master port. In this mode, the port will execute a series of commands as configured in the MBM.CMD file on the PCMCIA card. Full documentation on this feature will be provided in later editions of this manual. DeltaT3: ( xxx.x Deg F [Deg C]) The DeltaT3 value is used by the module in a Greater Than test to determine when to recalculate the AGA 3 temperature dependent parameters. This optimization can be performed with minimum loss on accuracy. A value of 0 will cause the recalculation to be performed every time a temperature change is detected. The value is entered as an integer with a 0.1 resolution. An entered value of 50 means 5.0 to the module DeltaT8: ( xxx.x Deg F [Deg C]) The DeltaT8 value is used by the module in a Greater Than test to determine when to recalculate the AGA 8 temperature dependent equations. This optimization can be performed with minimum loss on accuracy. A value of 0 will cause the recalculation to be performed every time a temperature change is detected. The value is entered as an integer with a 0.1 resolution. An entered value of 50 means 5.0 to the module 24 Revised 3/21/01 DeltaP8: ( xxx.x PSI [kPa]) The DeltaP8 value is used by the module in a Greater Than test to determine when to recalculate the AGA 8 pressure dependent equations. This optimization can be performed with minimum loss on accuracy. A value of 0 will cause the recalculation to be performed every time a temperature change is detected. The value is entered as an integer with a 0.1 resolution. An entered value of 50 means 5.0 to the module Base T: Contract Base Temperature ( xxx.x Deg F[Deg C]) This value represents the Contract Base Temperature condition. Normal values for this parameter are 68.0 Deg F, or 20.0 Deg C. An entered value of 680 means 68.0 to the module Base P: Contract Base Pressure ( xxx.x PSIA[kPa]) This value represents the Contract Base Pressure condition. Normal values for this parameter are 14.7 PSIA, or 101.3 kPa. An entered value of 147 means 14.7 to the module Time Zone: ( xx.x Hours) The Time Zone parameter is used to correct the timestamp calculation from GMT to local time. The entered value represents the number of hours behind GMT. An entered value of 80 means 8.0 hours to the module End of Day Rollover: ( xx Hour) The End of Day Rollover parameter is used to configure the Hour of the day when the daily flow accumulation values will be placed into the historical storage buffer and the current values will be reset. The rollover occurs as soon as the module logic detects the beginning of the configured hour. Number of Active Meter Runs: (xx Meter Runs) The Number of Active Meter Runs parameter is used by the module to optimize calculation time and the number of block transfers that are executed at the end of each calculation sequence. Valid values for this parameter are 1-10, with the module defaulting to 10 if a value of zero is entered. Number of Modbus Data Read Blocks: ( xx Blks) The Number of Modbus Data Read Blocks parameter is used by the module, in combination with the Number of Active Meter Runs parameter, to determine the total number of block transfers to be executed at the end of each calculation sequence. Valid values are from 1 to 80, with the module defaulting to 2 if a value of 0 is entered. Revised 3/21/01 25 The sum of the Number of Active Meters and the Number of Modbus Read Data Blocks determines the total number of block transfers executed at the end of each calculation sequence. Gauge Press to Absolute Press Offset (xx.x PSIA[kPa]) The Statis Pressure for each meter run can be entered in either Gauge or Absolute Pressure. If it is desired to provide the Static Pressure in Gauge form, then the local atmospheric pressure can be entered in this register to conver the Gauge pressure to Absolute. Note that if Abosulte pressure is provided to the module then this register should contain a zero. Modbus Master Read Block Count (xx. Blks) This register will be used to determine the number of block transfers required to move the results from the Modbus Master port read commands to the PLC ladder logic. 4.3 Configuring the Meter Runs (Block ID 20 - 29) Configuring the meters runs is accomplished by writing to the AGA Data Memory in the 2100 module using the Block Transfer Write with the Block ID Code between 20 and 29, followed by the necessary data. The relationship between the Block ID number and the meter run is: Meter Run #1 Meter Run #2 Meter Run #3 Meter Run #4 Meter Run #5 Meter Run #6 Meter Run #7 Meter Run #8 Meter Run #9 Meter Run #10 Block ID 20 21 22 23 24 25 26 27 28 29 The data structure for each meter is exactly the same. In order to more easily explain the data structure, we have broken it down into the following types: Data Type Meter Run Configuration Data AGA 3 block type AGA 7 block type Real Time Update Data AGA 8 Composition Data 26 Data Word 0 - 30 31 - 39 40 - 62 Revised 3/21/01 4.3.1 Meter Run Configuration Data - AGA 3 Diff. Pressure The Meter Run Configuration Data block consists of meter run specific configuration data. Data must be entered for each meter run that will be operational. The structure of the data block is different between the AGA 3 and AGA 7 equations after the Flow Calc Select bit. This bit determines which equation set will be used. Values entered in words 0-9 are not used by the module until the Configuration Enable bit (word 10, Section 4.4.2) is set. Meter Run Configuration Data - AGA 3 Meter type (Modbus addresses shown only for Meter #1) Data Wrd Description Format/Units 0 Meter Configuration Control Word 1,2 Dm - Meter tube pipe ID @ TDm Float 3,4 TDm - Meter tube measuring temp Float 5,6 dm - Orifice plate bore @ Tdm Float 7,8 Tdm - Orifice plate measuring temp Float 9,10 Viscosity Float 11,12 Density @ T, P( if ‘User Entered’ selected) Float 13,14 Density @ base(if ‘User Entered’ selected) Float 15,16 Low Flow Cutoff Float 17,18 Diff P Scaling - Min value Float 19,20 Diff P Scaling - Max value Float 21,22 Tf Scaling - Min value Float 23,24 Tf Scaling - Max Value Float 25,26 Pf Scaling - Min value Float 27,28 Pf Scaling - Max Value Float 29,30 Spare Float inches(mm) Deg F (Deg C) inches (mm) Deg F (Deg C) cP (cP) lb/ft3(kg/m3) lb/ft3(kg/m3) in H2O (kPA) in H2O (kPa) in H2O (kPa) Deg F (Deg C) Deg F (Deg C) PSIA (kPa) PSIA (kPa) Modbus Address 1030 1031 1033 1035 1037 1039 1041 1043 1045 1047 1049 1051 1053 1055 1057 1059 Where: Meter Configuration Control Word: (Binary pattern) This Control Word is used to perform/control several meter specific setup functions. The active bits have the following meanings: Revised 3/21/01 Bit 1 Description PLC/User Config Select : This bit determines if the module uses configuration data from the PLC or from the Modbus port. This value should be set to a 1 as User configuration through Modbus Port is not enabled in this release. PLC Configuration Data = 1 * User Modbus Config Data = 0 (Inactive) 2 AGA 3 or AGA 7 Flow Calculation Select : This bit is used to select the flow measurement equations which will be performed for this meter. AGA 3 = 0 ( Differential Pressure) AGA 7 = 1 (Turbine pulses or analog) 4 Disable End of Day Rollover : This bit is used to disable the End of Day Rollover that the module 27 executes automatically based on the Real Time Clock and the configured End of Day Hour. Enable End of Day Rollover = 0 Disable End of Day Rollover = 1 5 Static Pressure Location : Selects the Static Pressure measurement location for the Flange tap. If the downstream location is selected, the module adds the Delta P value to determine the Upstream pressure. Downstream = 1 Upstream = 0 6/7 Orifice Plate Material : These bits allow the user to select the Orifice Plate material. Available selections are: Bit 7 0 0 1 1 8/9 Bit 8 0 1 0 1 Description 304/316 SS Monel Carbon Steel Invalid Compressibility Calculation Type Select : These bits allow the user to select the compressibility factor/density calculation method for the meter run. The available selections are: Bit 11 0 0 1 1 28 Description 304/316 SS Monel Carbon Steel Invalid Meter Run Material Select : These bits allow the user to select the Meter Run material. Available selections are: Bit 9 0 0 1 1 10/11 Bit 6 0 1 0 1 Bit 10 0 1 0 1 Description Use 'USER' entered values AGA 8 Invalid Invalid 13 Output Value Scaling : In AGA 3 calculation, this bit determines the Output Flow rate and accumulation scaling factor. The changes are reflected in the data returned from the module. MCFD and MCF = 0 (Default in AGA 7) MMCFD and MMCF = 1 (Not used in AGA 7) 14 Compressible Fluid Flag : This bit is used select the fluid type in the AGA 3 calculations: Liquid (Incompressible) = 0 Gas (Compressible) = 1 Revised 3/21/01 Dm : Meter Tube Internal Diameter ( inches[mm]) The entered value represents the Meter Tube Internal Diameter measured at TDm. TDm : Meter Tube ID Measurement Temp ( Deg F [Deg C]) The entered value represents the temperature at which the Meter Tube Internal Diameter (Dm) was measured. dm : Orifice Plate Internal Diameter ( inches [mm]) The entered value represents the Orifice Plate Internal Diameter measured at Tdm. Tdm : Orifice Plate ID Measurement Temp ( Deg F [Deg C]) The entered value represents the temperature at which the Orifice Plate Internal Diameter (dm) was measured. Viscosity : Base and Exponent (cP) The viscosity base and exponent values are used together to enter the fluid viscosity in centipoise. Appendix C contains a chart from the GPSA manual for gas viscosities. Density @ T,P - User Entered ( lbm/ft3 [kg/m3]) This value is the User Entered density which will be used to calculate flow at process conditions if the meter run 'Compressibility Calc Type' (word 0, bits 10/11) is set for User Entered Values. Density @ Base - User Entered ( lbm/ft3 [kg/m3]) This value is the User Entered density which will be used to calculate flow at base conditions if the meter run 'Compressibility Calc Type' (word 0, bits 10/11) is set for User Entered Values. Low Flow Cutoff ( inches of water [kPa]) The entered value represents the low flow cutoff differential pressure. Any measured differential pressure less than the Low Flow Cutoff value will force the measured flow to zero(0.0). Diff Pressure Scaling Min/Max ( inches of water [kPa]) The Minimum and Maximum scaling values represent the range of the Differential Pressure Transmitter for the meter run. These values are used to range the unscaled 0-4095 real time value. Tf Scaling Min/Max ( Deg F [Deg C]) The Minimum and Maximum scaling values represent the range of the Temperature Transmitter for the meter run. These values are used to range the unscaled 0-4095 real time value. Revised 3/21/01 29 Pf Scaling Min/Max ( PSIA [kPa]) The Minimum and Maximum scaling values represent the range of the Pressure Transmitter for the meter run. These values are used to range the unscaled 0-4095 real time value. 4.3.2 Meter Run Configuration Data - AGA 7 Turbine/Linear Analog Meters The Meter Run Configuration Data block consists of meter run specific configuration data. Data must be entered for each meter run that will be operational. The structure of the data block is different between the AGA 3 and AGA 7 equations after the Flow Calc Select bit. This bit determines which equation set will be used. Values entered in words 0-9 are not used by the module until the Configuration Enable bit (word 10, Section 4.4.2) is set. Meter Run Configuration Data - AGA 7 Meter type (Modbus addresses shown only for Meter #1) Data Wrd Description Format/Units 0 Meter Configuration Control Word 1,2 Dm - Meter tube pipe ID Float 3,4 K Factor Float 5,6 Spare Float 7,8 Spare Float 9,10 Spare Float 11,12 Density @ T, P( if ‘User Entered’ selected) Float 13,14 Density @ base(if ‘User Entered’ selected) Float 15,16 Low Flow Cutoff Float 17,18 Analog Pulse rate Scaling - Min value Float 19,20 Analog Pulse rate Scaling - Max value Float 21,22 Tf Scaling - Min value Float 23,24 Tf Scaling - Max Value Float 25,26 Pf Scaling - Min value Float 27,28 Pf Scaling - Max Value Float 29,30 Spare Float Modbus Address 1030 inches(mm) 1031 pulses/ft3 1033 pulses/m3 1035 1037 1039 lb/ft3(kg/m3) 1041 lb/ft3(kg/m3) 1043 in H2O (kPA) 1045 ft3/s (m3/hr) 1047 ft3/s (m3/hr) 1049 Deg F (Deg C) 1051 Deg F (Deg C) 1053 PSIA (kPa) 1055 PSIA (kPa) 1057 1059 Where: Meter Configuration Control Word: (Binary pattern) This Control Word is used to perform/control several meter specific setup functions. The active bits have the following meanings: 30 Bit 1 Description PLC/User Config Select : This bit determines if the module uses configuration data from the PLC or from the Modbus port. This value should be set to a 1 as User configuration through Modbus Port is not enabled in this release. PLC Configuration Data = 1 * User Modbus Config Data = 0 (Inactive) 2 AGA 3 or AGA 7 Flow Calculation Select : This bit is used to select the flow measurement equations which will be performed for this meter. Revised 3/21/01 AGA 3 = 0 ( Differential Pressure) AGA 7 = 1 (Turbine pulses or analog) 3 AGA7 Input Type Select : Selects if the meter calculation logic will be looking for pulse values or for analog values. Pulse = 0 (example, 1771-CFM module) Analog = 1 4 Disable End of Day Rollover : This bit is used to disable the End of Day Rollover that the module executes automatically based on the Real Time Clock and the configured End of Day Hour. Enable End of Day Rollover = 0 Disable End of Day Rollover = 1 10/11 Compressibility Calculation Type Select : These bits allow the user to select the compressibility factor/density calculation method for the meter run. The available selections are: Bit 11 0 0 1 1 13 Bit 10 0 1 0 1 Description Use 'USER' entered values AGA 8 Invalid Invalid Output Value Scaling : In AGA 3 calculation, this bit determines the Output Flow rate and accumulation scaling factor. The changes are reflected in the data returned from the module. MCFD and MCF = 0 (Default in AGA 7) MMCFD and MMCF = 1 (Not used in AGA 7) Dm : Meter Tube Internal Diameter ( inches [mm]) The entered value represents the Meter Tube Internal Diameter measured at TDm. This value is included in the data set for historical logging purposes K Factor (pulses / ft3 [pulses / m3]) The value represents the pulses per cubic foot or per cubic meter for the turbine meter. If the analog type is selected, the module defaults the K factor to 1.0. Density @ T,P - User Entered ( lbm/ft3 [kg/m3]) This value is the User Entered density which will be used to calculate flow at process conditions if the meter run 'Compressibility Calc Type' (word 0, bits 10/11) is set for User Entered Values. Revised 3/21/01 31 Density @ Base - User Entered ( lbm/ft3 [kg/m3]) This value is the User Entered density which will be used to calculate flow at base conditions if the meter run 'Compressibility Calc Type' (word 0, bits 10/11) is set for User Entered Values. Low Flow Cutoff ( inches of water [kPa]) The entered value represents the low flow cutoff differential pressure. Any measured differential pressure less than the Low Flow Cutoff value will force the measured flow to zero(0.0). Analog Scaling Min/Max ( ft3/Sec [m3/hr]) The Minimum and Maximum scaling values represent the range of the Analog signal that will be received from the meter’s pulse to analog Transmitter for the meter run. These values are used to range the unscaled 0-4095 real time value. Tf Scaling Min/Max ( Deg F [Deg C]) The Minimum and Maximum scaling values represent the range of the Temperature Transmitter for the meter run. These values are used to range the unscaled 0-4095 real time value. Pf Scaling Min/Max ( PSIA [kPa]) The Minimum and Maximum scaling values represent the range of the Pressure Transmitter for the meter run. These values are used to range the unscaled 0-4095 real time value. 4.3.3 Real Time Update Data - AGA 3 and AGA 7 The Meter Run Real Time Update Data block contains the pressure, temperature and differential pressure data that the module requires to determine the instantaneous flow rates. In addition, the data block contains a control word which can be used to control the operation of the meter. Real Time Update Data- AGA 3 and AGA 7 (Modbus addresses shown only for Meter #1) Data Wrd Description 31 Meter Control Word 32 Delta P(AGA 3) or Analog value (AGA7) 33 Tf - Flowing temp : real time value 34 Pf - Flowing Pressure : real time value 35 Turbine Frequency - High (AGA 7) 36 Turbine Frequency - Low (AGA 7) 37 Turbine pulse total - High (AGA 7) 38 Turbine pulse total - Low (AGA 7) 39 Spare Format/Units 0-4095 0-4095 0-4095 0-120 0-999 0-999 0-9999 Modbus Address 1061 1062 1063 1064 1065 1066 1067 1068 1069 Where: 32 Revised 3/21/01 Meter Control Word: (Binary pattern) This Control Word is used to perform/control several meter specific setup functions. The active bits have the following meanings: Bit 0 Description Configuration Enable : This bit will instruct the module to perform a re-configuration of the meter run flow equations using the new values that have been entered in words 0-9 (See Section 4.2.1 and 4.2.2). The module will return a Configuration Done bit which can be used to unlatch this bit. 1 AGA 8 Configuration Enable : This bit will instruct the module to perform a re-configuration of the meter run AGA 8 Compressibility equations using the new values that have been entered (See Section 4.4.4). The module will return an AGA 8 Configuration Done bit which can be used to unlatch this bit. 2 Meter Freeze : This bit will freeze the meter flow rate to 0, and will disable the compressibility and flow rate calculations while the bit is set. 3 Meter Reset : This bit, when set, will reset the meter accumulators to 0. No historical storage of the values is done. This function is to assist in the metering of batches. The module will return a Meter Reset Done bit which can be used to unlatch this bit. 15 Instrument Fail Detected : This bit, when set by the PLC ladder logic, will be transferred into the Meter Status Word for logging with the historical data. No action is taken by the meter except to store the bit in status. This indication may be used later when analyzing data to determine if any readings may be bad. Delta P (AGA 3) or Pulse/Analog (AGA 7) 0-4095 The entered number is the unscaled value for the Differential Pressure or the Pulse/Analog signal. This value should be updated by the ladder logic from measurements taken by an analog input module. Analog signal coming from instrument may need to be scaled to correct units for module to handle. Tf - Flowing Temperature 0-4095 The entered value represents the process fluid temperature, in engineering units, as measured in the process stream. This value should be updated by the ladder logic from measurements taken by an analog input module. Revised 3/21/01 33 Pf - Flowing Pressure 0-4095 The entered value represents the Gauge or Aboslute pressure as measured in the process stream. The pressure may be measured upstream or downstream of the orifice plate. The location can be configured in the Meter Configuration Word (Word 0, bit 5). This value should be updated by the ladder logic from measurements taken by an analog input module. If the pressure is provided in Gauge form, then see module configuration registers to enter the Gauge to Absolute offset. 4.3.4 AGA 8 Configuration Data The AGA 8 Composition Data block contains the gas composition data necessary for the module to perform the Detailed Characterization Method compressibility calculations. The Detailed Method requires a total gas analysis, with composition in either mole percents or mole fractions. Values entered in words 40-61 are not used by the module until the AGA 8 Configuration Enable bit (word 10, Section 4.4.2) is set, or until the Configuration Enable bit( Word 10, bit 0) is set. AGA 8 Configuration Data (Modbus addresses shown only for Meter #1) Data Wrd Description 40 AGA 8 Update Control Word 41 Concentration - Methane 42 Concentration - Nitrogen 43 Concentration - Carbon Dioxide 44 Concentration - Ethane 45 Concentration - Propane 46 Concentration - Water 47 Concentration - Hydrogen Sulfide 48 Concentration - Hydrogen 49 Concentration - Carbon Monoxide 50 Concentration - Oxygen 51 Concentration - i-Butine 52 Concentration - n-Butane 53 Concentration - i-Pentane 54 Concentration - n-Pentane 55 Concentration - n-Hexane 56 Concentration - n-Heptane 57 Concentration - n-Octane 58 Concentration - n-Nonane 59 Concentration - n-Decane 60 Concentration - Helium 61 Concentration - Argon 62 Spare Format/Units xx.xx Mole % xx.xx Mole % xx.xx Mole % xx.xx Mole % xx.xx Mole % xx.xx Mole % xx.xx Mole % xx.xx Mole % xx.xx Mole % xx.xx Mole % xx.xx Mole % xx.xx Mole % xx.xx Mole % xx.xx Mole % xx.xx Mole % xx.xx Mole % xx.xx Mole % xx.xx Mole % xx.xx Mole % xx.xx Mole % xx.xx Mole % xx.xx Mole % Modbus Address 1070 1071 1072 1073 1074 1075 1076 1077 1078 1079 1080 1081 1082 1083 1084 1085 1086 1087 1088 1089 1090 1091 1092 to 1099 Where: 34 Revised 3/21/01 AGA 8 Update Control Word: (Binary pattern) This Control Word is used to control the use of the AGA 8 configuration parameters. The active bits have the following meanings: Bit 0 Description Not Used 1 PLC/User Config Select : This bit determines if the module uses configuration data from the PLC or from the Modbus port. This value should be set to a 1 as User configuration through Modbus Port is not enabled in this release. PLC Configuration Data = 1 * User Modbus Config Data = 0 (Inactive) 2 BTU Calculation Disable : This bit determines if the module will perform the energy calculations on the gas mixture. This value, when defaulted to 0 will perform the calcuations. In order to disable the calculations, place a value of 1 in this bit position 3 Fw Factor Calculation Enable : When this bit is clear, the Volumetric flow values will be returned to the PLC as they are calculated straight from the AGA 3, 7 and 8 equations. When the bit is set, the Fw equation will be applied to the volumetric flow Concentration - Fluid Component: (xxx.xx %) The values entered are the individual gas component concentrations obtained from a detailed gas analysis. The values are entered as a percentage number. Care should be taken in rounding concentration values to assure the best accuracy possible. A value of 9651 means 96.51%. If no conversation data is found. The data will assume 100% methane for calculation purposes. Revised 3/21/01 35 (This page intentionally left blank) 36 Revised 3/21/01 V. DATA MOVEMENT - 2100 MODULE TO PLC 5.0 Section Overview This section is dedicated to the movement of data from the 2100 module to the PLC Data Table. Several different types of data can be expected from the 2100 module, and this Section is broken down accordingly: 5.1 5.2 5.3 5.1 Modbus Write Commands 5.1.1 Register Writes - FC 6 and 16 5.1.2 Single Bit Writes - FC 5 5.1.3 Multiple Bit Writes - FC 15 Communication Status Data 5.2.1 Reading Module Status Data 5.2.2 Resetting Module Status Data 5.2.3 Module Status Codes Meter Run Results 5.3.1 Real Time Meter Data 5.3.2 Meter Run Summary Data - Current Period 5.3.3 Meter Run Summary Data - Last Period Modbus Write Commands This section discusses how to get data written to the ProSoft module by a Modbus Master into the PLC processor. Supported Modbus Function Codes include 5, 6, 15 and 16. Data transfer from the 2100 module to the PLC is executed through the Block Transfer Read function. Four different types of data are read from the module into the processor. The data structure for the Block Transfer depends on the type of data. The following sections detail the different types of data. 5.1.1 Register Writes (Func. Code 6 and 16) When a register write command is received from a Master, the ProSoft module transfers the command immediately to the BTR buffer for the ladder logic to work with, bypassing the module’s own Modbus and AGA Memory. The ladder logic must be programmed to look at the BTR buffer, decode several words, and then take action. The BTR buffer definition, as it pertains to the Momentary and Continuous Control commands, is: WORD 0 1 2 3-62 Revised 3/21/01 DESCRIPTION Write Type 1 = Register Write Count Destination Address Write Data (60 contiguous registers) 37 WRITE TYPE: Word 0 of the BTR buffer is used to tell the processor the type of data which has been written from the Master. When the value is equal to 1, a register write Function Code (6 or 16) has been received. With simple ladder logic to decode this value, the appropriate action can be taken. COUNT: The number of registers being written by the Master. Valid numbers which will be received will range from 1 to 60. Any numbers outside this range will result in a protocol error response from the Slave to the Master. DESTINATION ADDRESS: This value is used by the ladder logic to determine the address in the processor data in which to start the data write. The processor ladder logic must decode this word to determine where to begin locating the data from the Master. DATA: The data values written from the Master. The values will be 16 bit register values, and should be placed into an integer file. 5.1.2 Single Bit Write ( Func. Code 5) When a Single Bit Control command is received from a Master, the ProSoft module transfers the command immediately to the BTR buffer for the ladder logic to work with. The ladder logic must be programmed to look at the BTR buffer, decode several words, and then take action. The BTR buffer definition, as it pertains to the Single Bit Control command is: WORD 0 1 2 DESCRIPTION Control Type 2 = Single Bit Control Bit Address Control Action Where: CONTROL TYPE: Word 0 of the BTR buffer is used to tell the processor the type of Control action has been commanded from the Master. When the value is equal to 2, a new Single Bit Control command has been received. With simple ladder logic to decode this value, the appropriate action can be taken. BIT ADDRESS: The Bit Address represents the bit which will be acted on within the word addressed in the previous parameter. CONTROL ACTION: The action commanded by the Master is transferred in this word. When the value is a 0, the addressed bit is 38 Revised 3/21/01 to be reset, and when the value is a 1, the addressed bit is to be set. 5.1.3 Multiple Bit Write (Func. Code 15) (Future) When a Multiple Bit Control command is received from a Master, the ProSoft module transfers the command immediately to the BTR buffer for the ladder logic to work with. The ladder logic must be programmed to look at the BTR buffer, decode several words, and then take action. The BTR buffer definition, as it pertains to the Multiple Bit Control command is: WORD 0 1 2 3-32 33-62 DESCRIPTION Control Type 4 = Multiple Bit Control Word Count Word Start Address Data (30 words of bit sets/resets) Mask image for 30 data words Where: CONTROL TYPE: Word 0 of the BTR buffer is used to tell the processor the type of Control action has been commanded from the Master. When the value is equal to 4, a new Multiple Bit Control command has been received. With simple ladder logic to decode this value, the appropriate action can be taken. COUNT: This value represents the number of words in the data block that contain valid bit write data. Valid numbers will range from 1 to 30. Note that because a master can write a bit length that is not equal to a full word, it is possible that only a part of a data word will contain valid data. The ladder logic should mask out the invalid bits should they be used elsewhere. START ADDRESS: This value represents the offset word address into which the bit write data block will start to be written. When the master addresses a bit write, it sends the starting bit address. The starting bit address is used by the module to generate this word start address (Bit address / 16). DATA: These registers contain the bit write data received from the master. Note that partial word length bit writes are acceptable. The mask bits and some PLC logic protects unaddressed bits within a common word. MASK: These words mask off the addressed bits. This allows for starting addresses which are not on a word boundary, and lengths Revised 3/21/01 39 which do not end on a word boundary. The example logic shows how to use the mask bits. 5.2 Module Status Data ( Read Block ID 0) The module maintains communications status for the PLC. This section discusses how to get this module status data from the ProSoft Technology module into the PLC. The module maintains several pieces of status information that can be useful for module debugging purposes, as well as determining communication integrity. 5.2.1 Reading Module Status Data The Status Data block is transferred to the processor with a Block ID of 0. The structure of the data block is as follows: DATA WORD 0 1 2 3 4 5 6 7 8 9 DESCRIPTION Current module status Last transmitted error condition Total Messages to this slave Total Msg responses from this slave Total Msgs seen by this slave Spare Spare MBM Error Code MBM Receive Counter MBM Block ID Where: BLOCK ID: When the Block ID number in the BTR buffer (Word 0 ) is 0, the module is transferring the Status Data block. CURRENT MODULE ERROR STATUS: This value represents the current value of the error code inside the module. The possible values are detailed in the following section. LAST TRANSMITTED ERROR CONDITION: This value is the last error code transmitted to the master by this slave. Error codes which can be expected in this field are 0, 1, 2, 3, and 6. The field will only be cleared by re configuring the module (Block ID 255). TOTAL MESSAGES TO THIS SLAVE: This value represents the total number of messages that have matched this slaves address, whether the slave actually determined them to be good (worthy of response) or not. TOTAL MESSAGE RESPONSES FROM THIS SLAVE: This value represents the number of good (non-error) responses that 40 Revised 3/21/01 the slave has sent to the master. The presumption is that if the slave is responding, the message was good. TOTAL MESSAGES SEEN BY THIS SLAVE: This value represents the total number of commands seen by the slave, regardless of the slave address. Note : All accumulators will rollover to 0 after reaching 65535 ( -1 in PLC Integer File) MBM Error Code : This value represents the current error code status fo the Modbus Master port MBM Receive Counter : This value increments upon each successful reception from a Modbus Slave device. Monitoring the value in this register with a timer can be used to determine if communications on the Modbus Master port are troubled. MBM Block ID : This value is used to page Modbus Master read data blocks from the 2100 module into the ladder logic memory. As with all Block ID values in the 2100 module, each data block is 50 words and the Block ID value can be used to decode which 50 word block is being received from the module 5.2.2 Resetting Module Status Data The module Communications Status accumulators are reset to 0 anytime the module receives a new configuration data block from the processor (Block ID 255). 5.2.3 Module Status Codes The possible communication status codes returned in fields 1 and 2 of the Module Status Data block are detailed below: Code 0 Revised 3/21/01 Description All OK The module is operating as desired. 1 Illegal Function An illegal function code request has been received from the master 2 Illegal Data Address The address, or the range of addresses, covered by a request from the master are not within allowed limits 3 Illegal Data Value The value in the data field of the command is not allowed. 41 6 Module Busy The module busy status code is returned when a write command from the master has not yet been completed when a second write command is received 254 5.3 Checksum Error The slave determined that the message checksum was in error, and therefore discarded the message Meter Run Results (Block ID 20 - 29) The ProSoft module maintains the results of the AGA flow calculation in data blocks for the PLC. This section discusses how to get the Meter Run Flow calculation results from the 2100 module into the PLC, and the meaning of the data. The ProSoft module maintains several pieces of status and output information that are designed to provide detailed instantaneous data, current period summary data, and last period summary data. Reading the Meter Run Results from the AGA Data Memory in the 2100 module is accomplished using the Block Transfer Read command and decoding the Block ID codes between 20 and 29. The PLC ladder logic controls the selection of the Meter Run data block. In a one for one relationship, Meter run data is returned to the PLC every time the corresponding meter run AGA Data Memory is written into (i.e., when the PLC ladder logic executes a BTW write to Block ID 20, meter #1, the next BTR will contain the read data for Block ID 20). The relationship between the Block ID number and the meter run is: Meter Run #1 Meter Run #2 Meter Run #3 Meter Run #4 Meter Run #5 Meter Run #6 Meter Run #7 Meter Run #8 Meter Run #9 Meter Run #10 Block ID 20 21 22 23 24 25 26 27 28 29 The data structure for each meter is exactly the same. In order to more easily explain the data structure, we have broken it down into the following types: 42 Revised 3/21/01 Data Word Data Type Meter Data - Real Time 0 - 13 Meter Summary Data - Current 14 - 37 Meter Summary Data - Last Period 38 - 63 5.3.1 Real Time Meter Data The Real Time Meter Results data block contains current status word and output flow values for the meters. The structure of the data block is as follows: Meter Run Real Time Data (Modbus Addresses shown only for Meter #1) Data Wrd Description Format/Units 0 Meter Status word 1 Spare Control/Status word 2/3 Volumetric Flow Rate @ Contract Conditions float 4/5 Energy Flow Rate float 6/7 Z- AGA 8 Compressibility Factor float 8/9 Gas Density @ Flowing T, P float 10/11 Gas Density @ Base conditions (14.7 psia, 60 F) float 12/13 Spare float (future) Modbus Address 1800 1801 1802 1804 1806 1808 1810 1812 Where: Meter Status Word: (Binary pattern) This Meter Status Word is used to toggle and flag the status of meter specific events occurring in the module. The active bits have the following meanings: Revised 3/21/01 Bit 0 Description Configuration Done : This bit will toggle after the module has completed a re-configuration of the meter run flow equations using the new values that have been entered. The module has performed this configuration as a result of receiving a Configuration Enable bit from the Meter Control Word. 1 AGA 8 Configuration Done : This bit will toggle after the module has completed a re-configuration of the AGA 8 compressibility equations using the new values that have been received from the PLC. The module has performed this configuration as a result of receiving an AGA 8 Configuration Enable bit from the Meter Control Word. 2 Meter Freeze Status : This bit indicates the Run status of the meter. When set (1) the meter is stopped with the meter flow rate at 0, and the compressibility and flow rate calculations not being performed. The module is in this state as a result of 43 receiving the Meter Freeze bit from the Meter Control Word. 3 Meter Reset : This bit will toggle after the module has completed resetting the flow accumulators for the meter. The module has performed this step as a result of receiving a Meter Reset bit from the Meter Control Word. 5 Meter Configuration Status : This bit indicates the Configuration status of the meter. When set (1) the meter has successfully been configured. The following 'Rollover Status' bits are one-shot latch bits that indicate the occurrence of an event sometime since the last End of Day Rollover. These bits can be used to qualify/disqualify flow accumulation values, or to explain otherwise inexplicable events. These bits are also stored in the Historical Data 'Stat' field for historical purposes. 10 Rollover Power Up/Module Config Status : This bit indicates that a 255 Block ID configuration data block was received and processed from the PLC. 11 Rollover Meter Configuration Status : This bit indicates that the Configuration Enable bit in the Meter Control Word has been set. 12 Rollover AGA 8 Configuration Status : This bit indicates that the AGA 8 Configuration Enable bit in the Meter Control Word has been set. 13 Rollover Meter Freeze Status : This bit indicates that the Meter Freeze bit in the Meter Control Word has been set. 14 Rollover Meter Reset Status : This bit indicates that the Meter Reset bit in the Meter Control Word has been set. 15 Rollover Instrument Fail Status : The PLC ladder logic has set the Instrument Fail bit in the Meter Control Word. Spare Control/Status Word: ( Binary pattern) This Spare Control/Status Word is used to toggle and flag the occurrence of an ‘end of period’, a rollover, where data is shifted from the Current Period registers to the Historical registers. The active bits have the following meanings: 44 Revised 3/21/01 Bit 0 Description New Data Status Flag : This bit will toggle after the module has completed a rollover at the End of Day. During this rollover, data is transferred internally in the module, and the Current Period registers are reinitialized. The Status Flag is cleared by the module. 4 Last Calc Time Bad On Power Up : On power up the Last Calc Time is retrieved from battery backed memory. If this time is determined to be bad, the module defaults the Last Calc Time to the current PLC time, and then sets this flag. When this flag is set, there is a good change the Time Away value is in error. 6-15 Instrument Fail Overflow and Underflow : These bits store the occurrence of an Overflow and/or an Underflow condition during the current period. These conditions are detected based on bits 15 and 14 in the real time analog data. The bits are simply or’d into the status word, and maintained until daily rollover. Volumetric Flow Rate @ Contract: ((M)MCFD [(E3)m3/h) The Volumetric Flow Rate @ Contract conditions is the output of the AGA 3 and 7 flow calculation equations, compensated for compressibility and density. as measured at flowing (actual) conditions. This value is defined as Qb in the AGA 3-1992 specifications. The value is presented in MCFD [m3/h] or MMCFD[(E3)m3/h], depending on the scaling selection made in the Meter Configuration Control Word. Energy Flow Rate: ((M)MBTUD) The Energy Flow Rate is the output of the AGA 3 flow calculation equations, compensated for compressibility and density, as measured at flowing (actual) conditions. The value is presented in MBTUD or MMBTUD, depending on the scaling selection made in the Meter Configuration Control Word. Z AGA 8 Compressibility Factor: ( factor) The Z Compressibility Factor represents the output value from the AGA 8 calculations. This value is provided for information purposes only, as its effect is already built into the gas flow rate and total values. Density at Flowing T,P: ( lbm/ft3 [kg/m3]) The Density at Flowing T,P represents the value calculated by the AGA 8 calculations. This value is provided for information purposes only, as its effect is already built into the gas flow rate and total values. Revised 3/21/01 45 Density at Base T,P: ( lbm/ft3 [kg/m3]) The Density at Base T,P represents the value calculated by the AGA 8 calculations. This value is provided for information purposes only, as its effect is already built into the gas flow rate and total values. 5.3.2 Meter Run Summary Data - Current Period The Meter Run Summary Data for the Current Period block contains the accumulated and average results for the current ‘Contract Period’. Unless overridden by meter control bits (whenever the Force End of Day Rollover bit in the Flow Calc Control Word is set), the ‘Contract Period’ is one day in length, starting and ending at the End of Day Rollover Hour as detailed in Section 4.2.2. The structure of the data block is as follows: Meter Run Summary Data (Modbus Addresses shown only for Meter #1) Data Wrd Description Format/Units 14/15 Totalized Flow float 16/17 Totalized Energy float 18/19 Average Diff Press float 20/21 Average Flowing Pressure float 22/23 Average Flowing Temperature float 24/25 Totalized Energy - Daily Contract Period float 26/27 Time Away float 28/29 Meter On Production Time float 30/31 Sequence Counter float 32/33 Meter On ProductionTime - Daily Contract Period float 34/35 Totalized Flow - Daily Contract Period float 36/37 Timestamp-current seq long int Modbus Address 1814 1816 1818 1820 1822 1824 1826 1828 1830 1832 1834 1836 Where: Totalized Flow: ( (M)MCF [(E3)m3]) The Accumulated Flow volume represents the summation over time of the Volumetric Flow Rate. The value is reset during the End of Day Rollover process, or whenever the Reset Meter command is received in the Meter Control Word. Totalized Energy: ((M)MBTU) The Accumulated Energy represents the summation over time of the heating value of the gas. This value is reset during the End of Day Rollover process, or whenever the Reset Meter command is received in the Meter Control Word. Average Diff Press: (PSI [kpa]) The Average Diff Pressure represents the Flow-dependent timeweighted linear average of the measured differential pressure. The differential pressure is sampled once per second. 46 Revised 3/21/01 Average Flowing Temperature: (Deg F [Deg C]) The Average Flowing Temperature represents the Flow-dependent time-weighted linear average of the flowing temperature. The temperature is sampled once per second from the module’s data, independent of the update data rate from the PLC. Average Flowing Pressure: (PSIA [kPa]) The Average Flowing Pressure represents the Flow-dependent time-weighted linear average of the flowing pressure. The pressure is sampled once per second from the module’s data, independent of the update data rate from the PLC. The Flow-dependent time-weighted linear average calculation method used does not increment the averages during the sampling period if there is a no or low flow condition. In all average value cases, the actual values are sampled once per second and accumulated in the module, but the calculated output values returned to the PLC and to the VGA display are only updated once per minute Totalized Energy - Daily Contract Period : ((M)BTU [(E3)J3]) This Totalized Energy value represents the summation of the Energy Flow Rate since the last End Of Day Rollover. This value is reset during the End Of Day Rollover process Time Away Time: (Minutes) The Time Away value represents the amount of time in minutes that the meter/module has detected a failed block transfer or power down/reset condition. The block transfer failure condition may be caused by the PLC being taken out of Run. The power down/reset condition could be an actual power failure, or if the module is taken out of run, such as for a software upgrade. The 2100-AGA module stores the current calculation time in battery backed ram once per minute. When the module is reset or powered up, these registers are read to determined how long the module has been down, and therefore the ‘Time Away’. Meter On Production Time - Sequence Period (Minutes) The Meter On Production Time represents the duration of the ‘sequence period’, in minutes. During which flow has been > = to the low flow cut off. This value may be used to determine actual flow times in cases where contract period interruptions are detected. Revised 3/21/01 47 The 2100-AGA module clears all of its internal registers on power up. To overcome the potential loss of valuable flow data, the ladder logic is used to detect the power up or reset condition of the 2100 module. When this condition is detected, the ladder logic shifts all Current Period data into the Historical data and timestamps it. Sequence Counter : This value is used to monitor the number of re-configurations that have occurred in the middle of ‘Contract’ periods (24 hour). Upon detecting a re-configuration request from the PLC (on command or on power up) the 2100 module increments the Sequence Counter, and cuts a new historical record, shifting all current period Summary Data to the 1st day of historical storage. Meter On Production Time - Daily Contract Period : ( Minutes) This value represents the measured duration of the true ‘contract’ period in minutes as measured from the last End Of Day Rollover. Qualified by the low flow cut off configuration value ( > = ) and no stock transfer error. This value is not reset on a module reconfiguration, and is therefore a true representation of the Meter On Production Time for the Contract Period, independent of the Sequence Counter. This value is reset during the End Of Day Rollover process. Totalized Flow - Daily Contract Period : ((M)MCF [(E3)m3]) This Totalized Flow value represents the summation of the Volumetric Flow Rate since the last End Of Day Rollover. This value is reset during the End Of Day Rollover process. Timestamp-Current Seq: (Seconds since 1/1/70) This is the timestamp value for the beginning of the current accumulation sequence. This value is used in a power down situation to provide the timestamp for the historical record when the module is powered back up. 5.3.3 48 Meter Run Summary Data - Last Period The Meter Run Summary for the Last Period data block contains the accumulated and average results for the last ‘Contract Period’. Unless overridden by meter control bits (whenever the Force End of Day Rollover bit in the Flow Calc Control Word is set), the ‘contract period’ is one day in length, starting and ending at the End of Day Rollover Hour as detailed in Section 4.2.2. The structure of the data block is as follows: Revised 3/21/01 Meter Run Summary Data - Last Period (Modbus Addresses shown only for Meter #1) Data Wrd Description Format/Units 38 Status flags 39 Status flags - word 2 40/41 Timestamp Long int 42/43 Totalized Flow float 44/45 Totalized Energy float (future) 46/47 Average Flow Rate float 48/49 Average Flowing Pressure float 50/51 Average Flowing Temperature float 52/53 Spare float 54/55 Time Away float 56/57 Meter On Production Time float 58/59 Sequence Counter float 60/61 Spare float Modbus Address 2240 2241 2242 2244 2246 2248 2250 2252 2254 2256 2258 2260 2262 Where: Control Status Flags: (Binary pattern) The Control Status Flags word is contains several different values encoded and embedded within the word. The bit fields are defined as follows: Bit 2 Description Meter Freeze Status : This bit indicates the Run status of the meter. When set (1) the meter is stopped with the meter flow rate at 0, and the compressibility and flow rate calculations not being performed. The module is in this state as a result of receiving the Meter Freeze bit from the Meter Control Word. 5 Meter Configuration Status : This bit indicates the Configuration status of the meter. When set (1) the meter has successfully been configured and the compressibility and flow rate calculations not being performed. The module is in this state as a result of receiving the Meter Freeze bit from the Meter Control Word. 10-15 Rollover Status : The bits from the Rollover bits in Section 5.3.1 are stored in these bits. See 5.3.1 for details on the bits. All other values are as detailed in the Current Period discussion above. Revised 3/21/01 49 ( This page intentionally left blank ) 50 Revised 3/21/01 VI. MODBUS SLAVE COMMANDS The 2100 module Modbus Slave functionality supports several data read and write commands. The decision on which commands to use is made depending on the type of data being addressed, and the level of Modbus support in the slave and master equipment. The following sections detail the different commands supported by the module. 6.1 MODBUS Commands The Modbus Slave driver supports the following commands. As stated in earlier sections, the data for responding to read commands is taken directly out of module memory, while write data from the Master is sent directly to the processor ladder logic, bypassing the module memory table. 6.1.1 Function Code 1 - Read Output Status The slave returns bit data from the data space pointed to by the "Output memory start address" configuration word. The module will support up to 125 words per requests, and will support starting bit addresses not on a word boundary. 6.1.2 Function Code 2 - Read Input Status The slave returns bit data from the data space pointed to by the "Input memory start address" configuration word. The module is subjected to the same operating criteria as outlined in Section 6.1.1. 6.1.3 Function Code 3 - Read Multiple Registers The module will return up to 125 words of data from anywhere within the module's data space. This command will also support the reading of Floating Point data from the module. In order to retrieve a Floating Point value (2 words per value), add 7000 to the desired address, and increment the count field to represent the actual number of words to be retrieved. When the module receives a read request addressed above 7000, it will swap the words before returning them to the host. This swapping is essential in order to successfully transfer floating point data to many host packages. Revised 3/21/01 6.2.4 Function Code 4 - Read Input Registers The module returns word data from the data space pointed to by the "Input memory start address" configuration word. The module will return up to 125 words per request. 6.2.5 Function Code 5 - Single Bit Write This message turns individual bits on or off. The Modbus protocol calls for this code to force a bit, overriding all other conditions. The module is capable only of communicating the write data (starting 51 address and bit condition) to the ladder logic. Ladder logic in the processor must act upon the data and actually set or clear the bit. See Section 5.1 for a more thorough discussion of this command. 6.2.6 Function Code 6 - Single Register Write The module supports the single data register write command. The data value and destination address written from the master will be transferred directly to the processor. The ladder logic must actively move the data from the BTR buffer to the correct Data Table location in order for the write command to be completed. 6.2.7 Function Code 15 - Multiple Bit Write (Future) The module supports the multiple bit write command. Section 5.1 discusses implementation of this command in detail. 6.2.8 Function Code 16 - Write Multiple Registers The module supports a data register write request from 1 to 60 words in length (Note that the actual MODBUS protocol limitation is 125 registers per communications transaction). This command will also support the writing of Floating Point data to the PLC. In order to write a Floating Point value (2 words per value), add 7000 to the desired address, and increment the count field ( 2 words per write) to represent the actual number of words. Note the limit of 30 Floating Point values due to the word length. 6.2 Reading and Writing Floating Point Data The movement of Floating Point data to and from the 2100 module requires some special consideration. Floating Point (FP) data is stored in the module in IEEE 784 format, with two words per value. Depending on the host package, the orientation of these two words may need to be swapped in order to successfully use the data value. 6.2.1 Reading Floating Point Values Function Code 3 is used to read FP values from the 2100 module. In order to access FP values, the command must be configured to request 2 words per desired value with a starting address offset by 7000. The base starting address can be determined from Appendix A. With a starting address offset by 7000 the word pairs will be swapped by the module while building the response message. If no swapping is required, the host can read the data in pairs without including the 7000 offset in the address. 6.2.2 52 Writing Floating Point Values Revised 3/21/01 Function Code 16 is used to write FP values to the 2100 module. In order to access FP values, the command must be configured to write 2 words per desired value with a starting address offset by 7000. The base starting address can be determined from Appendix A. As the data is received by the module it is moved into the BTR buffer space. Up to 15 FP values may be written at a time in this fashion. With a starting address offset by 7000 the word pairs will be swapped by the module while moving the data to the BTR buffer. If no swapping is required, the host can write the data in pairs without including the 7000 offset in the address. Once the data is received in the PLC, a COP command must be used to copy the data from the Integer File space to a Floating Point File type. Examples of COP commands to move data from/to Integer files are included in the Appendix A ladder logic. Revised 3/21/01 53 ( This page intentionally left blank ) 54 Revised 3/21/01 7.0 SUPPORT, SERVICE AND WARRANTY 7.1 Technical Support ProSoft Technology survives on its ability to provide meaningful support to its customers. Should any questions or problems arise, please feel free to contact us at: Factory/Sales California ProSoft Technology, Inc. 9801 Camino Media Suite 105 Bakersfield, CA 93311 (661 664-7208 (800) 326-7066 (661) 664-7233 (fax) Email: [email protected] Before calling for support, please prepare yourself for the call. In order to provide the best and quickest support possible, we will most likely ask for the following information (you may wish to fax it to us prior to calling): 1. Product Serial and Version Number 2. Hardware Information - Dip Switches - Jumpers - Communication cabling 3. Application specific information - Configuration - Ladder listing - AGA setup data - etc. An after-hours answering service (on the Bakersfield number) can patch you to one our qualified technical and/or application support engineers at any time to answer the questions that are important to you. 7.2 Service and Repair The 2100 product is a product designed and manufactured to function under somewhat adverse conditions. As with any product, through age, misapplication, or any one of many possible problems, the product may require repair. The 2100 product has a 90 day upgrade warranty and a one year parts and labor warranty according to the limits specified in the warranty. Revised 3/21/01 55 Replacement and/or returns should be directed to the distributor from whom the product was purchased. If you need to return the card for repair, it is first necessary to obtain an RMA number from ProSoft Technology. Please call the factory for this number and display the number prominently on the outside of the shipping carton used to return the card. 7.3 Warranty 7.3.1 General Warranty Policy ProSoft Technology, Inc. (Hereinafter referred to as ProSoft) warrants that the Product shall conform to and perform in accordance with published technical specifications and the accompanying written materials, and shall be free of defects in materials and workmanship, for the period of time herein indicated, such warranty period commencing upon receipt of the Product. This warranty is limited to the repair and/or replacement, at ProSoft's election, of defective or non-conforming Product, and ProSoft shall not be responsible for the failure of the Product to perform specified functions, or any other nonconformance caused by or attributable to: (a) any misapplication of misuse of the Product; (b) failure of Customer to adhere to any of ProSoft's specifications or instructions; (c) neglect of, abuse of, or accident to, the Product; or (d) any associated or complementary equipment or software not furnished by ProSoft. Limited warranty service may be obtained by delivering the Product to ProSoft and providing proof of purchase or receipt date. Customer agrees to insure the Product or assume the risk of loss or damage in transit, to prepay shipping charges to ProSoft, and to use the original shipping container or equivalent. Contact ProSoft Customer Service for further information. 7.3.2 Limitation of Liability EXCEPT AS EXPRESSLY PROVIDED HEREIN, PROSOFT MAKES NO WARRANT OF ANY KIND, EXPRESSED OR IMPLIED, WITH RESPECT TO ANY EQUIPMENT, PARTS OR SERVICES PROVIDED PURSUANT TO THIS AGREEMENT, INCLUDING BUT NOT LIMITED TO THE IMPLIED WARRANTIES OF MERCHANT ABILITY AND FITNESS FOR A PARTICULAR PURPOSE. NEITHER PROSOFT OR ITS DEALER SHALL BE LIABLE FOR ANY OTHER DAMAGES, INCLUDING BUT NOT LIMITED TO DIRECT, INDIRECT, INCIDENTAL, SPECIAL OR CONSEQUENTIAL DAMAGES, WHETHER IN AN ACTION IN CONTRACT OR TORT (INCLUDING NEGLIGENCE AND STRICT LIABILITY), SUCH AS, BUT NOT LIMITED TO, LOSS OF ANTICIPATED PROFITS OR BENEFITS RESULTING FROM, OR ARISING OUT OF, OR IN CONNECTION WITH THE USE OR FURNISHING OF EQUIPMENT, PARTS OR SERVICES HEREUNDER OR THE PERFORMANCE, USE OR INABILITY TO USE THE SAME, EVEN IF PROSOFT OR ITS DEALER'S TOTAL LIABILITY EXCEED THE PRICE PAID FOR THE PRODUCT. Where directed by State Law, some of the above exclusions or limitations may not be applicable in some states. This warranty provides specific legal rights; other rights that vary from state to state may also exist. This warranty shall not be applicable to the extent that any provisions of this warranty is prohibited by any Federal, State or Municipal Law that cannot be preempted. 56 Revised 3/21/01 7.3.3 Hardware Product Warranty Details Warranty Period : ProSoft warranties hardware product for a period of one (1) year. Warranty Procedure : Upon return of the hardware Product ProSoft will, at its option, repair or replace Product at no additional charge, freight prepaid, except as set forth below. Repair parts and replacement Product will be furnished on an exchange basis and will be either reconditioned or new. All replaced Product and parts become the property of ProSoft. If ProSoft determines that the Product is not under warranty, it will, at the Customer's option, repair the Product using current ProSoft standard rates for parts and labor, and return the Product freight collect. Revised 3/21/01 57 (This page intentionally left blank) 58 Revised 3/21/01 APPENDICES APPENDIX A - Block Transfer Buffer Register Mapping - Modbus Register Mapping APPENDIX B RS-232 and RS-422/485 Cabling APPENDIX C Gas Viscosity Chart APPENDIX D Use Interlink to Connect a Computer APPENDIX E PLC-5 Example Ladder Logic APPENDIX F Modbus Master Port Example Daniel 2251 Analyzer APPENDIX A - Block Transfer Buffer Register Mapping - Modbus Register Mapping Note that all Register Map spreadsheet files are available on the ProSoft Technology, Inc BBS. See Section 7 for instructions. 2100-AGA Module Example Ladder Logic Data Table Usage Integer File Setup N[]:0 N[]:10 N[]:20 N[]:30 N[]:40 N[]:50 N[]:60 0 1 2 3 4 5 6 7 8 9 Config Wrd Control Wrd Delta P Tf - Temp Pf - Pressure Pulse Rate - H Pulse Rate- L Pulse Total - H Pulse Total - L Spare AGA8 Control Methane Nitrogen Carbon Dioxide Ethane Propane Water H2S Hydrogen Carbon Monoxide Oxygen i-Butane n-Butane i-Pentane n-Pentane n-Hexane n-Heptane n-Octane n-Nonane n-Decane Helium Argon Mtr Status 1 Mtr Status 2 Mtr Stat 1 Last P Mtr Stat 2 Last P Floating Point File Setup F[]:0 F[]:5 F[]:10 F[]:15 F[]:20 F[]:25 F[]:30 F[]:35 F[]:40 F[]:45 F[]:50 6/10/98 Updated: 7/29/95 Revision 1.92 0 1 2 3 4 Mtr Tube ID Mtr Tube Temp Orifice ID Orifice Temp Viscosity Density @ T,P Density @ Base Low Flow Cutoff Diff P Min Diff P Max Temp Min Temp Max Press Min Press Max Spare Flow Rate Energy Flow Z Factor Density @ T,P Spare Total Flow Total Energy Avg DP Avg Press Avg Temp Tot Energy-Daily Time Away On Prod T-Cur Sequence Cntr On Prod T-Daily Tot Flow-Daily Timestamp-Cur Timestamp Total Flow Total Energy Avg DP Avg Press Avg Temp Spare Time Away On Prod Time Sequence Cntr Spare Spare Plcagamp.xls Configuration Density @ Base Meter Results Historical Last Period Register Mapping 2100-AGA Module Block Transfer Buffer Register Map Block ID Description Wrd cnt Block Transfer Write data 255 W i_sys_config i_time 20,21,22,23,24 W i_loop_data structure [10] (70 words per meter) 25,26,27,28,29 i_loop_config (31 words) i_loop_update (9 words per) aga_8_config (23 words per) Space[7] r_time sys (data not transferred to ladder ) space Block Transfer Read Data 20,21,22,23 R f_loop_output[10] (40 words per) 25,26,27,28,29 space R loop_storage[10] (300 words per) for 10 days space Internal Working Registers loop_config[MAX_LOOP_CNT] (70 words per) i_space4 loop_update[MAX_LOOP_CNT] (15 words per) sys_config loop_calc[MAX_LOOP_CNT] (320 words per) sys Printed:6/10/98 Revision 1.92 20 10 70 Run 1 Run 2 Run 3 Run 4 Run 5 Run 6 Run 7 Run 8 Run 9 Run 10 10 40 20 Modbus Start Modbus Finished 1000 1020 1019 1029 1030 1100 1170 1240 1310 1380 1450 1520 1590 1660 1099 1169 1239 1309 1379 1449 1519 1589 1659 1729 1730 1740 1780 1739 1779 1799 40 400 total 1800 1840 1880 1920 1960 2000 2040 2080 2120 2160 40 2200 300 Run 1 2240 Run 2 2540 Run 3 2840 Run 4 3140 Run 5 3440 Run 6 3740 Run 7 4040 Run 8 4340 Run 9 4640 Run 10 4940 100 5240 Run 1 Run 2 Run 3 Run 4 Run 5 Run 6 Run 7 Run 8 Run 9 Run 10 1839 1879 1919 1959 1999 2039 2079 2119 2159 2199 2239 2539 2839 3139 3439 3739 4039 4339 4639 4939 5239 5339 280 10 60 15 1280 30 Page 1 2100-AGA Module Block Transfer Buffer Register Map BTW BLOCK ID 255 - Modbus and AGA configuration data File Loc BT Word Description N7:0 0 Modbus Slave Address N7:1 1 Parity N7:2 2 Stop Bits N7:3 3 Baud Rate N7:4 4 RTS to TxD delay N7:5 5 RTS Off Delay N7:6 6 Input Table Offset N7:7 7 Output Table Offset N7:8 8 RTU/ASCII Mode Select N7:9 9 N7:10 10 Flow Calc Co-Pro System Setup 0 N/A 1 N/A 2 Force End of Day Rollover 3 English or Metric Units 4 Display Mode 5 Disk Log Mode (PCMCIA) 6 Hard debug - Shuts down on a Math-Error 7 MBM Enable N7:11 11 Delta T3 - for AGA 3 recalc resolution N7:12 12 Delta T8 - for AGA 8 recalc resolution N7:13 13 Delta P8 - for AGA 8 recalc resolution N7:14 14 Base T - Contract base Temperature N7:15 15 Base P - Contract Base Pressure N7:16 16 Time Zone - Hours behind GMT N7:17 17 End of Day Rollover - Hours (0 to 23) N7:18 18 Active Meter Runs (1 - 10) N7:19 19 Modbus Slave Port Read Data Blocks (0 to 80) N7:20 20 Gauge Press to Absolute Pressure Offset N7:21 21 Modbus Master Port Read Data Block Cnt (0-20) N7:22 22 Spare N7:23 23 Spare N7:24 24 Spare N7:25 25 Spare N7:26 26 Spare N7:27 27 Spare N7:28 28 Spare N7:29 29 Spare BTW BLOCK ID 0 to 19 File Loc BT Word 0 to 49 50 51 52 53 54 55 56 57 58 59 60 61 62 Printed:6/10/98 Description Modbus Data ( Registers 0 - 999) Spare Spare Spare Spare Spare Spare Spare PLC date and time PLC date and time PLC date and time PLC date and time PLC date and time PLC date and time - Revision 1.92 Format Units Modbus Address 1000 Set to enable, clear in PLC logic 0 = English, 1 = Metric 0 = Normal, 1 = Debug 0 = no log, 1 = log to PCMCIA 1=Enable xxx.x xxx.x xxx.x xxx.x xxx.x xxx.x xx xx xx xx.x Deg F (Deg C) Deg F (Deg C) psia (kPa) Deg F (Deg C) psia (kPa) hrs psia (kPa) 1001 1002 1003 1004 1005 1006 1007 1008 1009 1010 1011 1012 1013 1014 1015 1016 1017 1018 1019 Units N7:368 in BTW buffer N7:369 N7:370 N7:371 N7:372 N7:373 Page 2 2100-AGA Module Block Transfer Buffer Register Map AGA 3 - Differential Pressure Meters BTW BLOCK ID 20 to 29 File Loc BT Word N[]:0 0 Description Meter Configuration Word 0 1 2 5 6 7 8 9 10 11 12 13 14 15 F[]:0 F[]:1 F[]:2 F[]:3 F[]:4 F[]:5 F[]:6 F[]:7 F[]:8 F[]:9 F[]:10 F[]:11 F[]:12 F[]:13 F[]:14 N[]:1 1,2 3,4 5,6 7,8 9,10 11,12 13,14 15,16 17,18 19,20 21,22 23,24 25,26 27,28 29,30 31 0 1 2 3 15 N[]:2 N[]:3 N[]:4 N[]:5 N[]:6 N[]:7 N[]:8 N[]:9 N[]:10 32 33 34 35 36 37 38 39 40 1 2 3 N[]:11 N[]:12 N[]:13 N[]:14 N[]:15 N[]:16 N[]:17 N[]:18 N[]:19 N[]:20 N[]:21 N[]:22 N[]:23 N[]:24 N[]:25 N[]:26 N[]:27 N[]:28 N[]:29 N[]:30 N[]:31 N[]:32 Printed:6/10/98 41 42 43 44 45 46 47 48 49 50 51 52 53 54 55 56 57 58 59 60 61 62 Units Use PLC Config (1) or User Port Config(0) AGA 3 or 7 Flow Calc Select Static pressure upstream(0) or downstream(1) Orifice Plate Material - bit 0 - bit 1 Meter Run Material - bit 0 - bit 1 Compress. Calc Type - bit 0 - bit 1 Modbus Address 1030 (Future) 0 = AGA3, 1 = AGA7 00 - 304/316 SS 10 - Carbon Steel 01 - Monel 00 - 304/316 SS 10 - Carbon Steel 01 - Monel 00 - Use entered values 01 - AGA 8 Output Value Scaling (0 = MCF, 1 = MMCF) Compressible Fluid Flag (Yes = 1, No = 0) Dm - meter tube pipe ID measured @ TDm Float inches (mm) TDm - meter tube measuring temp Float Deg F (Deg C ) dm - Orifice plate bore measured @Tm Float inches (mm) Tdm - Orifice plate measuring temp Float Deg F( Deg C ) Viscosity Float cP ( cP ) Density @ T,P - Used if 'Entered' selected Float lb/ft3 (kg/m3 ) Density @ base T,P - Used if 'Entered' selected Float lb/ft3 (kg/m3 ) Low Flow Cutoff Float in H2O (kPa) Diff P Scaling - Min Value Float in H2O (kPa) Diff P Scaling - Max Value Float in H2O (kPa) Tf Scaling - Min Value Float Deg F (Deg C ) Tf Scaling - Max Value Float Deg F (Deg C ) Pf Scaling - Min Value Float PSIA (kPa) Pf Scaling - Max Value Float PSIA (kPa) Spare Float Meter Control Word Configuration Enable Set to enable Config (words 0 - 9) AGA8 Configuration Enable Set to enable new AGA 8 values Meter Freeze Set to freeze meter / Clear to run meter Force Meter Reset Set to reset meter to 0 Instrument Fail Detected Set when detect any instrument failure Delta P : real time value 0-4095 Upper 2 bits for alarms Tf - Flowing temp : real time value 0-4095 Upper 2 bits for alarms Pf - Flowing Pressure : real time value 0-4095 Upper 2 bits for alarms Spare Spare Spare Spare Spare AGA 8 Update Control Word Control bit - User (0) or PLC (1) 1 = Must be set Control bit - BTU Calc Disable 0 = enable, 1 = disable Control bit - Fw Factor Calc Enable( English Units Only) 0 = disable, 1 = enable Concentration (Mole %) - Methane Integer xx.xx Mole % Concentration (Mole %) - Nitrogen Integer xx.xx Mole % Concentration (Mole %) - Carbon Dioxide Integer xx.xx Mole % Concentration (Mole %) - Ethane Integer xx.xx Mole % Concentration (Mole %) - Propane Integer xx.xx Mole % Concentration (Mole %) - Water Integer xx.xx Mole % Concentration (Mole %) - Hydrogen Sulfide Integer xx.xx Mole % Concentration (Mole %) - Hydrogen Integer xx.xx Mole % Concentration (Mole %) - Carbon Monoxide Integer xx.xx Mole % Concentration (Mole %) - Oxygen Integer xx.xx Mole % Concentration (Mole %) - i-Butane Integer xx.xx Mole % Concentration (Mole %) - n-Butane Integer xx.xx Mole % Concentration (Mole %) - i-Pentane Integer xx.xx Mole % Concentration (Mole %) - n-Pentane Integer xx.xx Mole % Concentration (Mole %) - n-Hexane Integer xx.xx Mole % Concentration (Mole %) - n-Heptane Integer xx.xx Mole % Concentration (Mole %) - n-Octane Integer xx.xx Mole % Concentration (Mole %) - n-Nonane Integer xx.xx Mole % Concentration (Mole %) - n-Decane Integer xx.xx Mole % Concentration (Mole %) - Helium Integer xx.xx Mole % Concentration (Mole %) - Argon Integer xx.xx Mole % space Revision 1.92 1031 1033 1035 1037 1039 1041 1043 1045 1047 1049 1051 1053 1055 1057 1059 1061 1062 1063 1064 1065 1066 1067 1068 1069 1070 1071 1072 1073 1074 1075 1076 1077 1078 1079 1080 1081 1082 1083 1084 1085 1086 1087 1088 1089 1090 1091 1092 to 1099 Page 3 2100-AGA Module Block Transfer Buffer Register Map AGA 7 - Turbine Meters BTW BLOCK ID 20 to 29 File Loc BT Word N[]:0 0 Description Meter Configuration Word 0 1 2 3 5 10 11 12 13 14 15 F[]:0 F[]:1 F[]:2 F[]:3 F[]:4 F[]:5 F[]:6 F[]:7 F[]:8 F[]:9 F[]:10 F[]:11 F[]:12 F[]:13 F[]:14 N[]:1 1,2 3,4 5,6 7,8 9,10 11,12 13,14 15,16 17,18 19,20 21,22 23,24 25,26 27,28 29,30 31 0 1 2 3 15 N[]:2 N[]:3 N[]:4 N[]:5 N[]:6 N[]:7 N[]:8 N[]:9 N[]:10 32 33 34 35 36 37 38 39 40 1 2 3 N[]:11 N[]:12 N[]:13 N[]:14 N[]:15 N[]:16 N[]:17 N[]:18 N[]:19 N[]:20 N[]:21 N[]:22 N[]:23 N[]:24 N[]:25 N[]:26 N[]:27 N[]:28 N[]:29 N[]:30 N[]:31 N[]:32 Printed:6/10/98 41 42 43 44 45 46 47 48 49 50 51 52 53 54 55 56 57 58 59 60 61 62 Units Use PLC Config (1) or User Port Config(0) AGA 3 or 7 Flow Calc Select AGA7 Input Type Static pressure upstream(0) or downstream(1) Compress. Calc Type - bit 0 - bit 1 Modbus Address 1030 (Future) 0 = AGA3, 1 = AGA7 0 = Turbine, 1 = Analog 00 - Use entered values 01 - AGA 8 Output Value Scaling (0 = MCF, 1 = MMCF) Compressible Fluid Flag (Yes = 1, No = 0) Dm - meter tube pipe ID measured @ TDm Float inches (mm) K Factor Float pulses/ft3 Spare Float Spare Float Spare Float Density @ T,P - Used if 'Entered' selected Float lb/ft3 (kg/m3 ) Density @ base T,P - Used if 'Entered' selected Float lb/ft3 (kg/m3 ) Low Flow Cutoff Float Analog flow rate Scaling - Min Value Float Analog flow rate Scaling - Max Value Float Tf Scaling - Min Value Float Deg F (Deg C ) Tf Scaling - Max Value Float Deg F (Deg C ) Pf Scaling - Min Value Float PSIA (kPa) Pf Scaling - Max Value Float PSIA (kPa) Spare Float Meter Control Word Configuration Enable Set to enable Config (words 0 - 9) AGA8 Configuration Enable Set to enable new AGA 8 values Meter Freeze Set to freeze meter / Clear to run meter Force Meter Reset Set to reset meter to 0 Instrument Fail Detected Set when detect any instrument failure Turbine analog : real time value 0-4095 Upper 2 bits for alarms Tf - Flowing temp : real time value 0-4095 Upper 2 bits for alarms Pf - Flowing Pressure : real time value 0-4095 Upper 2 bits for alarms Turbine frequency - high 0-120 Upper 2 bits for alarms Turbine frequency - low 0-999 Turbine pulse total - high 0-999 Upper 2 bits for alarms Turbine pulse total - low 0-9999 Spare AGA 8 Update Control Word Control bit - User (0) or PLC (1) 1 = Must be set Control bit - BTU Calc Disable 0 = enable, 1 = disable Control bit - Fw Factor Calc Enable( English Units Only) 0 = disable, 1 = enable Concentration (Mole %) - Methane Integer xx.xx Mole % Concentration (Mole %) - Nitrogen Integer xx.xx Mole % Concentration (Mole %) - Carbon Dioxide Integer xx.xx Mole % Concentration (Mole %) - Ethane Integer xx.xx Mole % Concentration (Mole %) - Propane Integer xx.xx Mole % Concentration (Mole %) - Water Integer xx.xx Mole % Concentration (Mole %) - Hydrogen Sulfide Integer xx.xx Mole % Concentration (Mole %) - Hydrogen Integer xx.xx Mole % Concentration (Mole %) - Carbon Monoxide Integer xx.xx Mole % Concentration (Mole %) - Oxygen Integer xx.xx Mole % Concentration (Mole %) - i-Butane Integer xx.xx Mole % Concentration (Mole %) - n-Butane Integer xx.xx Mole % Concentration (Mole %) - i-Pentane Integer xx.xx Mole % Concentration (Mole %) - n-Pentane Integer xx.xx Mole % Concentration (Mole %) - n-Hexane Integer xx.xx Mole % Concentration (Mole %) - n-Heptane Integer xx.xx Mole % Concentration (Mole %) - n-Octane Integer xx.xx Mole % Concentration (Mole %) - n-Nonane Integer xx.xx Mole % Concentration (Mole %) - n-Decane Integer xx.xx Mole % Concentration (Mole %) - Helium Integer xx.xx Mole % Concentration (Mole %) - Argon Integer xx.xx Mole % space Revision 1.92 1031 1033 1035 1037 1039 1041 1043 1045 1047 1049 1051 1053 1055 1057 1059 1061 1062 1063 1064 1065 1066 1067 1068 1069 1070 1071 1072 1073 1074 1075 1076 1077 1078 1079 1080 1081 1082 1083 1084 1085 1086 1087 1088 1089 1090 1091 1092 to 1099 Page 4 2100-AGA Module Block Transfer Buffer Register Map BTR BLOCK ID 20 to 29 File Loc BT Word N[]:60 0 0 1 2 3 5 10 11 12 13 14 15 N[]:61 1 0 4 6 7 8 9 10 11 12 13 14 15 F[]:20 F[]:21 F[]:22 F[]:23 F[]:24 F[]:25 F[]:26 F[]:27 F[]:28 F[]:29 F[]:30 F[]:31 F[]:32 F[]:33 F[]:34 F[]:35 F[]:36 F[]:37 N[]:62 N[]:63 F[]:40 F[]:41 F[]:42 F[]:43 F[]:44 F[]:45 F[]:46 F[]:47 F[]:48 F[]:49 F[]:50 Printed:6/10/98 2,3 4,5 6,7 8,9 10,11 12,13 14,15 16,17 18,19 20,21 22,23 24,25 26,27 28,29 30,31 32,33 34,35 36,37 38 39 40,41 42,43 44,45 46,47 48,49 50,51 52,53 54,55 56,57 58,59 60,61 62,63 Description Status word Configuration Done Toggle AGA8 Configuration Done Toggle Meter Freeze Status Meter Reset Done Toggle Meter Configuration Status Rollover : Power Up Status Rollover : Configuration status Rollover : AGA8 Configuration status Rollover : Meter Freeze Status Rollover : Meter Reset Status Rollover : Instrument Fail status Spare Control/Status word Last Period Data New Data Status Flag (new = 1) Last Calc Time bad on power up Pulse rate instrument fail - underflow Pulse rate instrument fail - overflow Pulse total instrument fail - underflow Pulse total instrument fail - overflow dp/pulse analog instrument fail - underflow dp/pulse analog instrument fail - overflow Tf instrument fail - underflow Tf instrument fail - overflow Pf instrument fail - underflow Pf instrument fail - overflow Volumetric Flow Rate Energy Flow rate Z - AGA 8 Compressibility Factor Gas Density @ flowing T,P Gas Density @ Base Conditions Spare Totalized Flow - Current Totalized Energy - Current Average Diff Press - Current Average Flowing Pressure - Current Average Flowing Temperature - Current Totalized Energy - Daily Contract Period Time away - Current On Production Time - Current Sequence Counter On Production Time - Daily Contract Period Totalized Flow - Daily Contract Period Time Stamp- Current Period Status flags - Last Period Status flags - word 2 Timestamp Totalized Flow - Last Period Totalized Energy - Last Period Average Diff Press - Last Period Average Flowing Pressure - Last Period Average Flowing Temperature - Last Period Spare Time away - Last Period On Production Time - Last Period Sequence Counter Spare Revision 1.92 Units Run 1 Modbus Address 1800 = 1 when meter is frozen = 1 when meter has been configured Power up or 255 Config since rollover Configuration has occured since rollover AGA 8 configuration has occured since rollover Meter has been frozen since rollover Meter reset has occured since rollover Instrument fail has been detected since rollover 1801 cleared after BTW w/ Last Period Data Accepted 1 if bad time detected, defaulted to current time Float (M)MCFD Float (M)MBTUD Float Float lb/ft3 Float lb/ft3 Float Float (M)MCF Float (M)MBTU Float (M)MCFD Float PSIA Float DEG F Float rst only on cont rollover Float Min Float Min Float Float rst only on cont rollover Float rst only on cont rollover long int Seconds since 1/1/70 LoopStorage Data Section Long Int Float Float Float Float Float Float Float Float Float Float Seconds since 1/1/70 (M)MCF (M)MCFD PSIA DEG F Sec. Min Min 1802 1804 1806 1808 1810 1812 1814 1816 1818 1820 1822 1824 1826 1828 1830 1832 1834 1836 2240 2241 2242 2244 2246 2248 2250 2252 2254 2256 2258 2260 2262 Page 5 2100-AGA Module Block Transfer Buffer Register Map BTW BLOCK ID 256 to 266 File Loc BT Word Description F[]:26 14,15 Totalized Flow - Current F[]:27 16,17 Totalized Energy - Current F[]:28 18,19 Average Diff Press - Current F[]:29 20,21 Average Flowing Pressure - Current F[]:30 22,23 Average Flowing Temperature - Current F[]:31 24,25 Time Stamp- Current Period F[]:32 26,27 Time away - Current F[]:33 28,29 On Production Time - Current F[]:34 30,31 Sequence Counter F[]:35 32,33 On Production Time - Daily Contract Period F[]:36 34,35 Totalized Flow - Daily Contract Period F[]:37 36,37 Totalized Energy - Daily Contract Period Printed:6/10/98 Revision 1.92 Float Float Float Float Float long int Float Float Float Float Float Float (M)MCF (M)MBTU (M)MCFD PSIA DEG F Seconds since 1/1/70 Min Min Page 6 2100-AGA Modbus Register Assignments Description i_sys_config i_time i_loop_data structure [10] (70 words per meter) i_loop_config (31 words) i_loop_update (9 words per) aga_8_config (23 words per) Space[7] r_time sys (data not transferred to ladder ) space f_loop_output[10] (40 words per) space loop_storage[10] (300 words per) for 10 days space loop_config[MAX_LOOP_CNT] (70 words per) i_space4 loop_update[MAX_LOOP_CNT] (15 words per) sys_config loop_calc[MAX_LOOP_CNT] (320 words per) sys 6/10/98 Agamoddt.xls Module Configuration 2100-AGA Modbus Register Assignments Module Configuration N7:0 N7:1 N7:2 N7:3 N7:4 N7:5 N7:6 N7:7 N7:8 N7:9 N7:10 N7:11 N7:12 N7:13 N7:14 N7:15 N7:16 N7:17 N7:18 N7:19 N7:20 N7:21 N7:22 N7:23 N7:24 N7:25 N7:26 N7:27 N7:28 N7:29 6/10/98 Modbus Address Modbus Slave Address Parity Stop Bits Baud Rate RTS to TxD delay RTS Off Delay Input Table Offset Output Table Offset RTU/ASCII Mode Select Flow Calc Co-Pro System Setup Delta T3- for AGA 3 recalc resolution Delta T8- for AGA 8 recalc resolution Delta P8 - for AGA 8 recalc resolution Base T - Contract base Temperature Base P - Contract Base Pressure Time Zone - Hours behind GMT End of Day Rollover - Hours (0 to 23) Active Meter Runs (1 - 10) Modbus Read Data Blocks (0 to 80) Gauge Pressure to Absolute Press Offset Modbus Master Read Data Block Count Spare Spare Spare Spare Spare Spare Spare Spare 1000 1001 1002 1003 1004 1005 1006 1007 1008 1009 1010 1011 1012 1013 1014 1015 1016 1017 1018 1019 Agamoddt.xls Module Configuration 2100-AGA Modbus Register Assignments BTW BLOCK ID 0 to 19 Description Modbus Data ( Registers 0 - 999) Spare Spare Spare Spare Spare Spare Spare PLC date and time PLC date and time PLC date and time PLC date and time PLC date and time PLC date and time - 6/10/98 Agamoddt.xls Module Configuration 2100-AGA Modbus Register Assignments AGA 3 - Differential Pressure Meters N[]:0 F[]:0 F[]:1 F[]:2 F[]:3 F[]:4 F[]:5 F[]:6 F[]:7 F[]:8 F[]:9 F[]:10 F[]:11 F[]:12 F[]:13 F[]:14 N[]:1 N[]:2 N[]:3 N[]:4 N[]:5 N[]:6 N[]:7 N[]:8 N[]:9 N[]:10 N[]:11 N[]:12 N[]:13 N[]:14 N[]:15 N[]:16 N[]:17 N[]:18 N[]:19 N[]:20 N[]:21 N[]:22 N[]:23 N[]:24 N[]:25 N[]:26 N[]:27 N[]:28 N[]:29 N[]:30 N[]:31 N[]:32 N/A N/A N/A N/A N/A N/A N/A 6/10/98 Meter Configuration Word Dm - meter tube pipe ID measured @ TDm TDm - meter tube measuring temp dm - Orifice plate bore measured @Tm Tdm - Orifice plate measuring temp Viscosity - Base Density @ T,P - Used if 'Entered' selected Density @ base T,P - Used if 'Entered' selected Low Flow Cutoff Diff P Scaling - Min Value Diff P Scaling - Max Value Tf Scaling - Min Value Tf Scaling - Max Value Pf Scaling - Min Value Pf Scaling - Max Value Spare Meter Control Word Delta P : real time value Tf - Flowing temp : real time value Pf - Flowing Pressure : real time value Spare Spare Spare Spare Spare AGA 8 Update Control Word Concentration (Mole %) - Methane Concentration (Mole %) - Nitrogen Concentration (Mole %) - Carbon Dioxide Concentration (Mole %) - Ethane Concentration (Mole %) - Propane Concentration (Mole %) - Water Concentration (Mole %) - Hydrogen Sulfide Concentration (Mole %) - Hydrogen Concentration (Mole %) - Carbon Monoxide Concentration (Mole %) - Oxygen Concentration (Mole %) - i-Butane Concentration (Mole %) - n-Butane Concentration (Mole %) - i-Pentane Concentration (Mole %) - n-Pentane Concentration (Mole %) - n-Hexane Concentration (Mole %) - n-Heptane Concentration (Mole %) - n-Octane Concentration (Mole %) - n-Nonane Concentration (Mole %) - n-Decane Concentration (Mole %) - Helium Concentration (Mole %) - Argon space Spare in 2100 module Spare in 2100 module Spare in 2100 module Spare in 2100 module Spare in 2100 module Spare in 2100 module Spare in 2100 module Meter 1 Meter 2 Meter 3 Meter 4 Meter 5 Meter 6 Meter 7 Meter 8 Meter 9 Meter 10 1030 1031 1033 1035 1037 1039 1041 1043 1045 1047 1049 1051 1053 1055 1057 1059 1061 1062 1063 1064 1065 1066 1067 1068 1069 1070 1071 1072 1073 1074 1075 1076 1077 1078 1079 1080 1081 1082 1083 1084 1085 1086 1087 1088 1089 1090 1091 1092 1093 1094 1095 1096 1097 1098 1099 1100 1101 1103 1105 1107 1109 1111 1113 1115 1117 1119 1121 1123 1125 1127 1129 1131 1132 1133 1134 1135 1136 1137 1138 1139 1140 1141 1142 1143 1144 1145 1146 1147 1148 1149 1150 1151 1152 1153 1154 1155 1156 1157 1158 1159 1160 1161 1162 1163 1164 1165 1166 1167 1168 1169 1170 1171 1173 1175 1177 1179 1181 1183 1185 1187 1189 1191 1193 1195 1197 1199 1201 1202 1203 1204 1205 1206 1207 1208 1209 1210 1211 1212 1213 1214 1215 1216 1217 1218 1219 1220 1221 1222 1223 1224 1225 1226 1227 1228 1229 1230 1231 1232 1233 1234 1235 1236 1237 1238 1239 1240 1241 1243 1245 1247 1249 1251 1253 1255 1257 1259 1261 1263 1265 1267 1269 1271 1272 1273 1274 1275 1276 1277 1278 1279 1280 1281 1282 1283 1284 1285 1286 1287 1288 1289 1290 1291 1292 1293 1294 1295 1296 1297 1298 1299 1300 1301 1302 1303 1304 1305 1306 1307 1308 1309 1310 1311 1313 1315 1317 1319 1321 1323 1325 1327 1329 1331 1333 1335 1337 1339 1341 1342 1343 1344 1345 1346 1347 1348 1349 1350 1351 1352 1353 1354 1355 1356 1357 1358 1359 1360 1361 1362 1363 1364 1365 1366 1367 1368 1369 1370 1371 1372 1373 1374 1375 1376 1377 1378 1379 1380 1381 1383 1385 1387 1389 1391 1393 1395 1397 1399 1401 1403 1405 1407 1409 1411 1412 1413 1414 1415 1416 1417 1418 1419 1420 1421 1422 1423 1424 1425 1426 1427 1428 1429 1430 1431 1432 1433 1434 1435 1436 1437 1438 1439 1440 1441 1442 1443 1444 1445 1446 1447 1448 1449 1450 1451 1453 1455 1457 1459 1461 1463 1465 1467 1469 1471 1473 1475 1477 1479 1481 1482 1483 1484 1485 1486 1487 1488 1489 1490 1491 1492 1493 1494 1495 1496 1497 1498 1499 1500 1501 1502 1503 1504 1505 1506 1507 1508 1509 1510 1511 1512 1513 1514 1515 1516 1517 1518 1519 1520 1521 1523 1525 1527 1529 1531 1533 1535 1537 1539 1541 1543 1545 1547 1549 1551 1552 1553 1554 1555 1556 1557 1558 1559 1560 1561 1562 1563 1564 1565 1566 1567 1568 1569 1570 1571 1572 1573 1574 1575 1576 1577 1578 1579 1580 1581 1582 1583 1584 1585 1586 1587 1588 1589 1590 1591 1593 1595 1597 1599 1601 1603 1605 1607 1609 1611 1613 1615 1617 1619 1621 1622 1623 1624 1625 1626 1627 1628 1629 1630 1631 1632 1633 1634 1635 1636 1637 1638 1639 1640 1641 1642 1643 1644 1645 1646 1647 1648 1649 1650 1651 1652 1653 1654 1655 1656 1657 1658 1659 1660 1661 1663 1665 1667 1669 1671 1673 1675 1677 1679 1681 1683 1685 1687 1689 1691 1692 1693 1694 1695 1696 1697 1698 1699 1700 1701 1702 1703 1704 1705 1706 1707 1708 1709 1710 1711 1712 1713 1714 1715 1716 1717 1718 1719 1720 1721 1722 1723 1724 1725 1726 1727 1728 1729 Agamoddt.xls Module Configuration 2100-AGA Modbus Register Assignments AGA 7 - Turbine Meters N[]:0 F[]:0 F[]:1 F[]:2 F[]:3 F[]:4 F[]:5 F[]:6 F[]:7 F[]:8 F[]:9 F[]:10 F[]:11 F[]:12 F[]:13 F[]:14 N[]:1 N[]:2 N[]:3 N[]:4 N[]:5 N[]:6 N[]:7 N[]:8 N[]:9 N[]:10 N[]:11 N[]:12 N[]:13 N[]:14 N[]:15 N[]:16 N[]:17 N[]:18 N[]:19 N[]:20 N[]:21 N[]:22 N[]:23 N[]:24 N[]:25 N[]:26 N[]:27 N[]:28 N[]:29 N[]:30 N[]:31 N[]:32 N/A N/A N/A N/A N/A N/A N/A 6/10/98 Meter Configuration Word Dm - meter tube pipe ID measured @ TDm K Factor Spare Spare Spare Density @ T,P - Used if 'Entered' selected Density @ base T,P - Used if 'Entered' selected Low Flow Cutoff Analog flow rate Scaling - Min Value Analog flow rate Scaling - Max Value Tf Scaling - Min Value Tf Scaling - Max Value Pf Scaling - Min Value Pf Scaling - Max Value Spare Meter Control Word Turbine analog : real time value Tf - Flowing temp : real time value Pf - Flowing Pressure : real time value Turbine frequency - high Turbine frequency - low Turbine pulse total - high Turbine pulse total - low Spare AGA 8 Update Control Word Concentration (Mole %) - Methane Concentration (Mole %) - Nitrogen Concentration (Mole %) - Carbon Dioxide Concentration (Mole %) - Ethane Concentration (Mole %) - Propane Concentration (Mole %) - Water Concentration (Mole %) - Hydrogen Sulfide Concentration (Mole %) - Hydrogen Concentration (Mole %) - Carbon Monoxide Concentration (Mole %) - Oxygen Concentration (Mole %) - i-Butane Concentration (Mole %) - n-Butane Concentration (Mole %) - i-Pentane Concentration (Mole %) - n-Pentane Concentration (Mole %) - n-Hexane Concentration (Mole %) - n-Heptane Concentration (Mole %) - n-Octane Concentration (Mole %) - n-Nonane Concentration (Mole %) - n-Decane Concentration (Mole %) - Helium Concentration (Mole %) - Argon space Spare in 2100 module Spare in 2100 module Spare in 2100 module Spare in 2100 module Spare in 2100 module Spare in 2100 module Spare in 2100 module Meter 1 Meter 2 Meter 3 Meter 4 Meter 5 Meter 6 Meter 7 Meter 8 Meter 9 Meter 10 1030 1031 1033 1035 1037 1039 1041 1043 1045 1047 1049 1051 1053 1055 1057 1059 1061 1062 1063 1064 1065 1066 1067 1068 1069 1070 1071 1072 1073 1074 1075 1076 1077 1078 1079 1080 1081 1082 1083 1084 1085 1086 1087 1088 1089 1090 1091 1092 1093 1094 1095 1096 1097 1098 1099 1100 1101 1103 1105 1107 1109 1111 1113 1115 1117 1119 1121 1123 1125 1127 1129 1131 1132 1133 1134 1135 1136 1137 1138 1139 1140 1141 1142 1143 1144 1145 1146 1147 1148 1149 1150 1151 1152 1153 1154 1155 1156 1157 1158 1159 1160 1161 1162 1163 1164 1165 1166 1167 1168 1169 1170 1171 1173 1175 1177 1179 1181 1183 1185 1187 1189 1191 1193 1195 1197 1199 1201 1202 1203 1204 1205 1206 1207 1208 1209 1210 1211 1212 1213 1214 1215 1216 1217 1218 1219 1220 1221 1222 1223 1224 1225 1226 1227 1228 1229 1230 1231 1232 1233 1234 1235 1236 1237 1238 1239 1240 1241 1243 1245 1247 1249 1251 1253 1255 1257 1259 1261 1263 1265 1267 1269 1271 1272 1273 1274 1275 1276 1277 1278 1279 1280 1281 1282 1283 1284 1285 1286 1287 1288 1289 1290 1291 1292 1293 1294 1295 1296 1297 1298 1299 1300 1301 1302 1303 1304 1305 1306 1307 1308 1309 1310 1311 1313 1315 1317 1319 1321 1323 1325 1327 1329 1331 1333 1335 1337 1339 1341 1342 1343 1344 1345 1346 1347 1348 1349 1350 1351 1352 1353 1354 1355 1356 1357 1358 1359 1360 1361 1362 1363 1364 1365 1366 1367 1368 1369 1370 1371 1372 1373 1374 1375 1376 1377 1378 1379 1380 1381 1383 1385 1387 1389 1391 1393 1395 1397 1399 1401 1403 1405 1407 1409 1411 1412 1413 1414 1415 1416 1417 1418 1419 1420 1421 1422 1423 1424 1425 1426 1427 1428 1429 1430 1431 1432 1433 1434 1435 1436 1437 1438 1439 1440 1441 1442 1443 1444 1445 1446 1447 1448 1449 1450 1451 1453 1455 1457 1459 1461 1463 1465 1467 1469 1471 1473 1475 1477 1479 1481 1482 1483 1484 1485 1486 1487 1488 1489 1490 1491 1492 1493 1494 1495 1496 1497 1498 1499 1500 1501 1502 1503 1504 1505 1506 1507 1508 1509 1510 1511 1512 1513 1514 1515 1516 1517 1518 1519 1520 1521 1523 1525 1527 1529 1531 1533 1535 1537 1539 1541 1543 1545 1547 1549 1551 1552 1553 1554 1555 1556 1557 1558 1559 1560 1561 1562 1563 1564 1565 1566 1567 1568 1569 1570 1571 1572 1573 1574 1575 1576 1577 1578 1579 1580 1581 1582 1583 1584 1585 1586 1587 1588 1589 1590 1591 1593 1595 1597 1599 1601 1603 1605 1607 1609 1611 1613 1615 1617 1619 1621 1622 1623 1624 1625 1626 1627 1628 1629 1630 1631 1632 1633 1634 1635 1636 1637 1638 1639 1640 1641 1642 1643 1644 1645 1646 1647 1648 1649 1650 1651 1652 1653 1654 1655 1656 1657 1658 1659 1660 1661 1663 1665 1667 1669 1671 1673 1675 1677 1679 1681 1683 1685 1687 1689 1691 1692 1693 1694 1695 1696 1697 1698 1699 1700 1701 1702 1703 1704 1705 1706 1707 1708 1709 1710 1711 1712 1713 1714 1715 1716 1717 1718 1719 1720 1721 1722 1723 1724 1725 1726 1727 1728 1729 Agamoddt.xls Module Configuration 2100-AGA Modbus Register Assignments Meter Run Real Time Data N[]:60 N[]:61 F[]:20 F[]:21 F[]:22 F[]:23 F[]:24 F[]:25 Status word Spare Control/Status word Volumetric Flow Rate Energy Flow rate (future) Z - AGA 8 Compressibility Factor Gas Density @ flowing T,P Gas Density @ Base Conditions Spare Meter 1 Meter 2 Meter 3 Meter 4 Meter 5 Meter 6 Meter 7 Meter 8 Meter 9 Meter 10 1814 1816 1818 1820 1822 1824 1826 1828 1830 1832 1834 1836 1838 1839 1854 1856 1858 1860 1862 1864 1866 1868 1870 1872 1874 1876 1878 1879 1894 1896 1898 1900 1902 1904 1906 1908 1910 1912 1914 1916 1918 1919 1934 1936 1938 1940 1942 1944 1946 1948 1950 1952 1954 1956 1958 1959 1974 1976 1978 1980 1982 1984 1986 1988 1990 1992 1994 1996 1998 1999 2014 2016 2018 2020 2022 2024 2026 2028 2030 2032 2034 2036 2038 2039 2054 2056 2058 2060 2062 2064 2066 2068 2070 2072 2074 2076 2078 2079 2094 2096 2098 2100 2102 2104 2106 2108 2110 2112 2114 2116 2118 2119 2134 2136 2138 2140 2142 2144 2146 2148 2150 2152 2154 2156 2158 2159 2174 2176 2178 2180 2182 2184 2186 2188 2190 2192 2194 2196 2198 2199 2240 2241 2242 2244 2246 2248 2250 2252 2254 2256 2258 2260 2262 2264 2266 2268 2540 2541 2542 2544 2546 2548 2550 2552 2554 2556 2558 2560 2562 2564 2566 2568 2840 2841 2842 2844 2846 2848 2850 2852 2854 2856 2858 2860 2862 2864 2866 2868 3140 3141 3142 3144 3146 3148 3150 3152 3154 3156 3158 3160 3162 3164 3166 3168 3440 3441 3442 3444 3446 3448 3450 3452 3454 3456 3458 3460 3462 3464 3466 3468 3740 3741 3742 3744 3746 3748 3750 3752 3754 3756 3758 3760 3762 3764 3766 3768 4040 4041 4042 4044 4046 4048 4050 4052 4054 4056 4058 4060 4062 4064 4066 4068 4340 4341 4342 4344 4346 4348 4350 4352 4354 4356 4358 4360 4362 4364 4366 4368 4640 4641 4642 4644 4646 4648 4650 4652 4654 4656 4658 4660 4662 4664 4666 4668 4940 4941 4942 4944 4946 4948 4950 4952 4954 4956 4958 4960 4962 4964 4966 4968 1800 1801 1802 1804 1806 1808 1810 1812 1840 1841 1842 1844 1846 1848 1850 1852 1880 1881 1882 1884 1886 1888 1890 1892 1920 1921 1922 1924 1926 1928 1930 1932 1960 1961 1962 1964 1966 1968 1970 1972 2000 2001 2002 2004 2006 2008 2010 2012 2040 2041 2042 2044 2046 2048 2050 2052 2080 2081 2082 2084 2086 2088 2090 2092 2120 2121 2122 2124 2126 2128 2130 2132 2160 2161 2162 2164 2166 2168 2170 2172 Meter Run Summary Data - Current Period F[]:26 F[]:27 F[]:28 F[]:29 F[]:30 F[]:31 F[]:32 F[]:33 F[]:34 F[]:35 F[]:36 F[]:37 N/A N/A Totalized Flow - Current Totalized Energy - Current Average Flow Rate - Current Average Flowing Pressure - Current Average Flowing Temperature - Current Totalized Energy - Daily Contract Period Time away - Current On Production Time - Current Sequence Counter On Production Time - Daily Contract Period Totalized Flow - Daily Contract Period Timestamp - Current Spare in 2100 module Spare in 2100 module Meter Run Summary Data - Historical Last Period N[]:62 N[]:63 F[]:40 F[]:41 F[]:42 F[]:43 F[]:44 F[]:45 F[]:46 F[]:47 F[]:48 F[]:49 F[]:50 N/A N/A N/A 6/10/98 Status flags - Last Period Status flags - word 2 Timestamp Totalized Flow - Last Period Totalized Energy - Last Period Average Flow Rate - Last Period Average Flowing Pressure - Last Period Average Flowing Temperature - Last Period Spare Time away - Last Period On Production Time - Last Period Sequence Counter Spare Dm - Meter Tube ID dm - Orifice plate ID (AGA 3)/K factor (AGA 7) spare Agamoddt.xls Module Configuration 2100-AGA Modbus Register Assignments Meter Run Summary Data - Day 2 Meter 2 Meter 3 Meter 4 Meter 5 Meter 6 Meter 7 Meter 8 Meter 9 Meter 10 N/A N/A N/A N/A N/A N/A N/A N/A N/A N/A N/A N/A N/A N/A N/A N/A Status flags - Last Period Status flags - word 2 Timestamp Totalized Flow - Last Period Totalized Energy - Last Period Average Flow Rate - Last Period Average Flowing Pressure - Last Period Average Flowing Temperature - Last Period Spare Time away - Last Period On ProductionTime - Last Period Sequence Counter Spare Dm - Meter Tube ID dm - Orifice plate ID (AGA 3)/K factor (AGA 7) spare 2270 2271 2272 2274 2276 2278 2280 2282 2284 2286 2288 2290 2292 2294 2296 2298 2570 2571 2572 2574 2576 2578 2580 2582 2584 2586 2588 2590 2592 2594 2596 2598 2870 2871 2872 2874 2876 2878 2880 2882 2884 2886 2888 2890 2892 2894 2896 2898 3170 3171 3172 3174 3176 3178 3180 3182 3184 3186 3188 3190 3192 3194 3196 3198 3470 3471 3472 3474 3476 3478 3480 3482 3484 3486 3488 3490 3492 3494 3496 3498 3770 3771 3772 3774 3776 3778 3780 3782 3784 3786 3788 3790 3792 3794 3796 3798 4070 4071 4072 4074 4076 4078 4080 4082 4084 4086 4088 4090 4092 4094 4096 4098 4370 4371 4372 4374 4376 4378 4380 4382 4384 4386 4388 4390 4392 4394 4396 4398 4670 4671 4672 4674 4676 4678 4680 4682 4684 4686 4688 4690 4692 4694 4696 4698 4970 4971 4972 4974 4976 4978 4980 4982 4984 4986 4988 4990 4992 4994 4996 4998 N/A N/A N/A N/A N/A N/A N/A N/A N/A N/A N/A N/A N/A N/A N/A N/A Status flags - Last Period Status flags - word 2 Timestamp Totalized Flow - Last Period Totalized Energy - Last Period Average Flow Rate - Last Period Average Flowing Pressure - Last Period Average Flowing Temperature - Last Period Spare Time away - Last Period On Production Time - Last Period Sequence Counter Spare Dm - Meter Tube ID dm - Orifice plate ID (AGA 3)/K factor (AGA 7) spare 2300 2301 2302 2304 2306 2308 2310 2312 2314 2316 2318 2320 2322 2324 2326 2328 2600 2601 2602 2604 2606 2608 2610 2612 2614 2616 2618 2620 2622 2624 2626 2628 2900 2901 2902 2904 2906 2908 2910 2912 2914 2916 2918 2920 2922 2924 2926 2928 3200 3201 3202 3204 3206 3208 3210 3212 3214 3216 3218 3220 3222 3224 3226 3228 3500 3501 3502 3504 3506 3508 3510 3512 3514 3516 3518 3520 3522 3524 3526 3528 3800 3801 3802 3804 3806 3808 3810 3812 3814 3816 3818 3820 3822 3824 3826 3828 4100 4101 4102 4104 4106 4108 4110 4112 4114 4116 4118 4120 4122 4124 4126 4128 4400 4401 4402 4404 4406 4408 4410 4412 4414 4416 4418 4420 4422 4424 4426 4428 4700 4701 4702 4704 4706 4708 4710 4712 4714 4716 4718 4720 4722 4724 4726 4728 5000 5001 5002 5004 5006 5008 5010 5012 5014 5016 5018 5020 5022 5024 5026 5028 N/A N/A N/A N/A N/A N/A N/A N/A N/A N/A N/A N/A N/A N/A N/A N/A Status flags - Last Period Status flags - word 2 Timestamp Totalized Flow - Last Period Totalized Energy - Last Period Average Flow Rate - Last Period Average Flowing Pressure - Last Period Average Flowing Temperature - Last Period Spare Time away - Last Period On Production Time - Last Period Sequence Counter Spare Dm - Meter Tube ID dm - Orifice plate ID (AGA 3)/K factor (AGA 7) spare 2330 2331 2332 2334 2336 2338 2340 2342 2344 2346 2348 2350 2352 2354 2356 2358 2630 2631 2632 2634 2636 2638 2640 2642 2644 2646 2648 2650 2652 2654 2656 2658 2930 2931 2932 2934 2936 2938 2940 2942 2944 2946 2948 2950 2952 2954 2956 2958 3230 3231 3232 3234 3236 3238 3240 3242 3244 3246 3248 3250 3252 3254 3256 3258 3530 3531 3532 3534 3536 3538 3540 3542 3544 3546 3548 3550 3552 3554 3556 3558 3830 3831 3832 3834 3836 3838 3840 3842 3844 3846 3848 3850 3852 3854 3856 3858 4130 4131 4132 4134 4136 4138 4140 4142 4144 4146 4148 4150 4152 4154 4156 4158 4430 4431 4432 4434 4436 4438 4440 4442 4444 4446 4448 4450 4452 4454 4456 4458 4730 4731 4732 4734 4736 4738 4740 4742 4744 4746 4748 4750 4752 4754 4756 4758 5030 5031 5032 5034 5036 5038 5040 5042 5044 5046 5048 5050 5052 5054 5056 5058 Meter Run Summary Data - Day 3 Meter Run Summary Data - Day 4 6/10/98 Meter 1 Agamoddt.xls Module Configuration 2100-AGA Modbus Register Assignments Meter Run Summary Data - Day 5 Meter 2 Meter 3 Meter 4 Meter 5 Meter 6 Meter 7 Meter 8 Meter 9 Meter 10 N/A N/A N/A N/A N/A N/A N/A N/A N/A N/A N/A N/A N/A N/A N/A N/A Status flags - Last Period Status flags - word 2 Timestamp Totalized Flow - Last Period Totalized Energy - Last Period Average Flow Rate - Last Period Average Flowing Pressure - Last Period Average Flowing Temperature - Last Period Spare Time away - Last Period On Production Time - Last Period Sequence Counter Spare Dm - Meter Tube ID dm - Orifice plate ID (AGA 3)/K factor (AGA 7) spare 2360 2361 2362 2364 2366 2368 2370 2372 2374 2376 2378 2380 2382 2384 2386 2388 2660 2661 2662 2664 2666 2668 2670 2672 2674 2676 2678 2680 2682 2684 2686 2688 2960 2961 2962 2964 2966 2968 2970 2972 2974 2976 2978 2980 2982 2984 2986 2988 3260 3261 3262 3264 3266 3268 3270 3272 3274 3276 3278 3280 3282 3284 3286 3288 3560 3561 3562 3564 3566 3568 3570 3572 3574 3576 3578 3580 3582 3584 3586 3588 3860 3861 3862 3864 3866 3868 3870 3872 3874 3876 3878 3880 3882 3884 3886 3888 4160 4161 4162 4164 4166 4168 4170 4172 4174 4176 4178 4180 4182 4184 4186 4188 4460 4461 4462 4464 4466 4468 4470 4472 4474 4476 4478 4480 4482 4484 4486 4488 4760 4761 4762 4764 4766 4768 4770 4772 4774 4776 4778 4780 4782 4784 4786 4788 5060 5061 5062 5064 5066 5068 5070 5072 5074 5076 5078 5080 5082 5084 5086 5088 N/A N/A N/A N/A N/A N/A N/A N/A N/A N/A N/A N/A N/A N/A N/A N/A Status flags - Last Period Status flags - word 2 Timestamp Totalized Flow - Last Period Totalized Energy - Last Period Average Flow Rate - Last Period Average Flowing Pressure - Last Period Average Flowing Temperature - Last Period Spare Time away - Last Period On Production Time - Last Period Sequence Counter Spare Dm - Meter Tube ID dm - Orifice plate ID (AGA 3)/K factor (AGA 7) spare 2390 2391 2392 2394 2396 2398 2400 2402 2404 2406 2408 2410 2412 2414 2416 2418 2690 2691 2692 2694 2696 2698 2700 2702 2704 2706 2708 2710 2712 2714 2716 2718 2990 2991 2992 2994 2996 2998 3000 3002 3004 3006 3008 3010 3012 3014 3016 3018 3290 3291 3292 3294 3296 3298 3300 3302 3304 3306 3308 3310 3312 3314 3316 3318 3590 3591 3592 3594 3596 3598 3600 3602 3604 3606 3608 3610 3612 3614 3616 3618 3890 3891 3892 3894 3896 3898 3900 3902 3904 3906 3908 3910 3912 3914 3916 3918 4190 4191 4192 4194 4196 4198 4200 4202 4204 4206 4208 4210 4212 4214 4216 4218 4490 4491 4492 4494 4496 4498 4500 4502 4504 4506 4508 4510 4512 4514 4516 4518 4790 4791 4792 4794 4796 4798 4800 4802 4804 4806 4808 4810 4812 4814 4816 4818 5090 5091 5092 5094 5096 5098 5100 5102 5104 5106 5108 5110 5112 5114 5116 5118 N/A N/A N/A N/A N/A N/A N/A N/A N/A N/A N/A N/A N/A N/A N/A N/A Status flags - Last Period Status flags - word 2 Timestamp Totalized Flow - Last Period Totalized Energy - Last Period Average Flow Rate - Last Period Average Flowing Pressure - Last Period Average Flowing Temperature - Last Period Spare Time away - Last Period On Production Time - Last Period Sequence Counter Spare Dm - Meter Tube ID dm - Orifice plate ID (AGA 3)/K factor (AGA 7) spare 2420 2421 2422 2424 2426 2428 2430 2432 2434 2436 2438 2440 2442 2444 2446 2448 2720 2721 2722 2724 2726 2728 2730 2732 2734 2736 2738 2740 2742 2744 2746 2748 3020 3021 3022 3024 3026 3028 3030 3032 3034 3036 3038 3040 3042 3044 3046 3048 3320 3321 3322 3324 3326 3328 3330 3332 3334 3336 3338 3340 3342 3344 3346 3348 3620 3621 3622 3624 3626 3628 3630 3632 3634 3636 3638 3640 3642 3644 3646 3648 3920 3921 3922 3924 3926 3928 3930 3932 3934 3936 3938 3940 3942 3944 3946 3948 4220 4221 4222 4224 4226 4228 4230 4232 4234 4236 4238 4240 4242 4244 4246 4248 4520 4521 4522 4524 4526 4528 4530 4532 4534 4536 4538 4540 4542 4544 4546 4548 4820 4821 4822 4824 4826 4828 4830 4832 4834 4836 4838 4840 4842 4844 4846 4848 5120 5121 5122 5124 5126 5128 5130 5132 5134 5136 5138 5140 5142 5144 5146 5148 Meter Run Summary Data - Day 6 Meter Run Summary Data - Day 7 6/10/98 Meter 1 Agamoddt.xls Module Configuration 2100-AGA Modbus Register Assignments Meter Run Summary Data - Day 8 Meter 2 Meter 3 Meter 4 Meter 5 Meter 6 Meter 7 Meter 8 Meter 9 Meter 10 N/A N/A N/A N/A N/A N/A N/A N/A N/A N/A N/A N/A N/A N/A N/A N/A Status flags - Last Period Status flags - word 2 Timestamp Totalized Flow - Last Period Totalized Energy - Last Period Average Flow Rate - Last Period Average Flowing Pressure - Last Period Average Flowing Temperature - Last Period Spare Time away - Last Period On Production Time - Last Period Sequence Counter Spare Dm - Meter Tube ID dm - Orifice plate ID (AGA 3)/K factor (AGA 7) spare 2450 2451 2452 2454 2456 2458 2460 2462 2464 2466 2468 2470 2472 2474 2476 2478 2750 2751 2752 2754 2756 2758 2760 2762 2764 2766 2768 2770 2772 2774 2776 2778 3050 3051 3052 3054 3056 3058 3060 3062 3064 3066 3068 3070 3072 3074 3076 3078 3350 3351 3352 3354 3356 3358 3360 3362 3364 3366 3368 3370 3372 3374 3376 3378 3650 3651 3652 3654 3656 3658 3660 3662 3664 3666 3668 3670 3672 3674 3676 3678 3950 3951 3952 3954 3956 3958 3960 3962 3964 3966 3968 3970 3972 3974 3976 3978 4250 4251 4252 4254 4256 4258 4260 4262 4264 4266 4268 4270 4272 4274 4276 4278 4550 4551 4552 4554 4556 4558 4560 4562 4564 4566 4568 4570 4572 4574 4576 4578 4850 4851 4852 4854 4856 4858 4860 4862 4864 4866 4868 4870 4872 4874 4876 4878 5150 5151 5152 5154 5156 5158 5160 5162 5164 5166 5168 5170 5172 5174 5176 5178 N/A N/A N/A N/A N/A N/A N/A N/A N/A N/A N/A N/A N/A N/A N/A N/A Status flags - Last Period Status flags - word 2 Timestamp Totalized Flow - Last Period Totalized Energy - Last Period Average Flow Rate - Last Period Average Flowing Pressure - Last Period Average Flowing Temperature - Last Period Spare Time away - Last Period On Production Time - Last Period Sequence Counter Spare Dm - Meter Tube ID dm - Orifice plate ID (AGA 3)/K factor (AGA 7) spare 2480 2481 2482 2484 2486 2488 2490 2492 2494 2496 2498 2500 2502 2504 2506 2508 2780 2781 2782 2784 2786 2788 2790 2792 2794 2796 2798 2800 2802 2804 2806 2808 3080 3081 3082 3084 3086 3088 3090 3092 3094 3096 3098 3100 3102 3104 3106 3108 3380 3381 3382 3384 3386 3388 3390 3392 3394 3396 3398 3400 3402 3404 3406 3408 3680 3681 3682 3684 3686 3688 3690 3692 3694 3696 3698 3700 3702 3704 3706 3708 3980 3981 3982 3984 3986 3988 3990 3992 3994 3996 3998 4000 4002 4004 4006 4008 4280 4281 4282 4284 4286 4288 4290 4292 4294 4296 4298 4300 4302 4304 4306 4308 4580 4581 4582 4584 4586 4588 4590 4592 4594 4596 4598 4600 4602 4604 4606 4608 4880 4881 4882 4884 4886 4888 4890 4892 4894 4896 4898 4900 4902 4904 4906 4908 5180 5181 5182 5184 5186 5188 5190 5192 5194 5196 5198 5200 5202 5204 5206 5208 N/A N/A N/A N/A N/A N/A N/A N/A N/A N/A N/A N/A N/A N/A N/A N/A Status flags - Last Period Status flags - word 2 Timestamp Totalized Flow - Last Period Totalized Energy - Last Period Average Flow Rate - Last Period Average Flowing Pressure - Last Period Average Flowing Temperature - Last Period Spare Time away - Last Period On Production Time - Last Period Sequence Counter Spare Dm - Meter Tube ID dm - Orifice plate ID (AGA 3)/K factor (AGA 7) spare 2510 2511 2512 2514 2516 2518 2520 2522 2524 2526 2528 2530 2532 2534 2536 2538 2810 2811 2812 2814 2816 2818 2820 2822 2824 2826 2828 2830 2832 2834 2836 2838 3110 3111 3112 3114 3116 3118 3120 3122 3124 3126 3128 3130 3132 3134 3136 3138 3410 3411 3412 3414 3416 3418 3420 3422 3424 3426 3428 3430 3432 3434 3436 3438 3710 3711 3712 3714 3716 3718 3720 3722 3724 3726 3728 3730 3732 3734 3736 3738 4010 4011 4012 4014 4016 4018 4020 4022 4024 4026 4028 4030 4032 4034 4036 4038 4310 4311 4312 4314 4316 4318 4320 4322 4324 4326 4328 4330 4332 4334 4336 4338 4610 4611 4612 4614 4616 4618 4620 4622 4624 4626 4628 4630 4632 4634 4636 4638 4910 4911 4912 4914 4916 4918 4920 4922 4924 4926 4928 4930 4932 4934 4936 4938 5210 5211 5212 5214 5216 5218 5220 5222 5224 5226 5228 5230 5232 5234 5236 5238 Meter Run Summary Data - Day 9 Meter Run Summary Data - Day 10 6/10/98 Meter 1 Agamoddt.xls Module Configuration APPENDIX B RS-232 and RS-422/485 Cabling Definitions of RS-232C Handshaking Signals (Excerpted form Allen-Bradley Publication 1785.6.5.2) SIGNAL TITLE TXD Transmitted Data RXD Received Data RTS Request To Send CTS Clear to Send DTR Data Terminal Ready DSR Data Set Ready DCD Data Carrier Detect DESCRIPTION Carries serialized data. It is an output from the module. RXD is serialized data input to the module. RXD is isolated from the rest of the circuitry on the modules. RTS is a request from the module to the modem to prepare to transmit. RTS is turned ON when the module has a message to transmit. Otherwise, RTS is OFF. CTS is a signal from the modem to the module that indicates the carrier is stable and the modem is ready to transmit. The module will not transmit until CTS is on. If CTS is turned off during transmission, the module will stop transmitting until CTS is restored. DTR is a signal to the modem to indicate that the module is operational and ready for communication. The module will continually assert DTR. DSR is a signal from the modem to the module to indicate that the modem is operational and ready for communication. The module will not transmit or receive unless DSR is on. This signal is typically continually asserted by the modem. The module will continually assert DSR. If the modem does not properly control DSR, or if no modem is used, DSR must be jumpered to a high signal at the module's RS-232-C connector. Since DTR is held high by the module, DSR can be jumpered to DTR. DCD is a signal from the modem to the module to indicate that the carrier from another modem is being sensed on the link. The module will continually assert DCD. RS-232C CABLE CONFIGURATION (WITH HANDSHAKING) MODEM (25 Pin ) ProSoft Module 2 RxD ------------------- 2 (Verify) 3 TxD ------------------- 3 (Verify) 7 RTS ------------------- 4 8 CTS ------------------- 5 5 GND ------------------- 7 4 DTR ------------------- 20 (WITHOUT HANDSHAKING) RS-232 Device (25 Pin) ProSoft Module 2 RxD ------------------- 2 RxD 3 TxD ------------------- 3 TxD 7 RTS ----| ----- 8 CTS ----- 4 RTS | ----- 5 CTS ---- 6 DSR | ----- 20 DTR 5 GND -------------------- 7 GND RS-422/RS-485 CABLE CONFIGURATION (Two Wire Mode) ProSoft Module 7 RTS Foreign Device 8 CTS ---| ---- 9 TxRxD+ -------------------- TxRxD+ 1 TxRxD- -------------------- TxRxD- 5 GND -------------------- GND RS-422 CABLE CONFIGURATION (Four Wire Mode) Foreign Device ProSoft Module 7 RTS 8 CTS ---| ---- 1 TxD+ -------------------- RxD+ 2 RxD+ -------------------- TxD+ 6 RxD- -------------------- TxD- 9 TxD- -------------------- RxD- 5 GND -------------------- GND NOTES: If communication in RS-422/RS-485 do not work, despite all attempts, try switching termination polarities. Some manufacturers interpret (+) and (-) differently. (This page intentionally left blank) APPENDIX C Gas Viscosity Chart APPENDIX D Use Interlink to Connect a Computer Excerpted from Allen-Bradley Publication 1771-6.5.100 - Dec 1992 APPENDIX E PLC-5 Example Ladder Logic Note that the example PLC 5 ladder program files are available on the ProSoft Technology, Inc BBS. See Section 7 for instructions. AGA5SI.RSP LAD 2 - MAIN --- Total Rungs in File = 2 0000 0001 Page 1 JSR Jump To Subroutine Prog File Number U:3 END Thursday, July 08, 1999 - 09:48:39 AGA5SI.RSP LAD 3 - AGA_MAIN --- Total Rungs in File = 14 CONFIGURATION The card configuration is activated on first scan or when the module identifies it needs to be configured. 1ST SCAN CONFIG ACTIVATE N7:309 L 0 1ST SCAN STATUS S:1 0000 15 DECODE BT READ BLOCK ID EQU Equal Source A Source B 0001 N7:410 0< 255 255< FORCE METER CONFIGURATION On Power Up or when module is reset for some reason, this rung forces a configuration of the individual meter. Until this logic is executed, the meter will be considered unconfigured, and will not operate. To activate more meters, simply add the appropriate branches to this rung 1ST SCAN METER #1 CONFIG CONFIG DETECT ENABLE N7:309 N20:1 L 0 0 METER #2 CONFIG ENABLE N21:1 L 0 METER #3 CONFIG ENABLE N22:1 L 0 METER #4 CONFIG ENABLE N23:1 L 0 0002 BT WRITE DATA AND CONFIGURATION ENCODING The BTW Data Block is incremented prior to each BTW command being executed in rung 2. If the card configuration is activated (first scan or N7:410=255), then 255 is written into the BTW Block ID. INCREMENTS BT READ BT WRITE BT WRITE ENABLE ENABLE DATA BLOCK N7:400 N7:300 ADD Add 15 15 Source A N7:310 20< Source B 1 1< Dest N7:310 20< DECODE BT WRITE BLOCK EQU Equal Source A Source B Page 2 N7:310 20< 1 1< ENCODES BT WRITE BLOCK ID MOV Move Source Dest 20 20< N7:310 20< Thursday, July 08, 1999 - 09:48:40 AGA5SI.RSP LAD 3 - AGA_MAIN --- Total Rungs in File = 14 DECODES BT WRITE DATA BLOCK GEQ Grtr Than or Eql (A>=B) Source A N7:310 20< Source B 22 22< ENCODES BT WRITE BLOCK ID MOV Move Source DECODE BT READ BLOCK ID LIM Limit Test Low Lim ENCODES BT WRITE BLOCK ID MOV Move Source Test High Lim 1ST SCAN CONFIG DETECT N7:309 0 256 256< N7:410 0< 266 266< Dest Dest ENCODES BT WRITE BLOCK ID MOV Move Source Dest 0003 BT READ ENABLE N7:400 BT WRITE ENABLE N7:300 15 15 LIM Limit Test Low Lim Test High Lim Page 3 N7:410 0< N7:310 20< 255 255< N7:310 20< WRITES DATA TO MODBUS SLAVE REGISTERS 0 - 999 Based on the value in the BTW Block ID, either data is moved to the module, or configuration parameters are moved to the module. To move additional data, add a new branch with EQU N7:310,2 and COP #N10:100,#N7:311,50. WRITE TO BT READ BT WRITE BT WRITE ENABLE ENABLE BUFFER N7:400 N7:300 LIM COP Limit Test Copy File 15 15 Low Lim 0 Source #N10:0 0< Dest #N7:311 Test N7:310 Length 50 20< High Lim 19 19< 0004 0005 0 0< N7:310 20< 0 0< N7:310 20< 19 19< COP Copy File Source Dest Length #S:18 #N7:368 6 WRITING METER RUN DATA BLOCKS TO 2100 MODULE This rung moves the integer and floating point data for meter runs 1-10 to the 2100 module. The actual data files which are pointed to are determined by the range allowed on n7:310 in the ADD rung above. BT READ BT WRITE ENABLE ENABLE N7:400 N7:300 LIM CPT Limit Test Compute 15 15 Low Lim 20 Dest N7:307 20< 30< Test N7:310 Expression N7:310 + 10 20< High Lim 29 29< Thursday, July 08, 1999 - 09:48:45 AGA5SI.RSP LAD 3 - AGA_MAIN --- Total Rungs in File = 14 MOV Move Source N[N7:310]:0 17410< Dest N7:311 17410< COP Copy File Source #N[N7:310]:1 Dest #N7:342 Length 32 COP Copy File Source #F[N7:307]:0 Dest #N7:312 Length 30 BT READ ENABLE N7:400 BT WRITE ENABLE N7:300 15 15 0006 DECODE BT WRITE BLOCK EQU Equal Source A Source B N7:310 20< 255 255< WRITE TO BT WRITE BUFFER COP Copy File Source Dest Length #N7:0 #N7:311 30 1ST SCAN CONFIG DEACTIVATE N7:309 U 0 LIM Limit Test Low Lim Test High Lim BLOCK TRANSFER WRITE TO 2100 MODULE BT READ BT WRITE ENABLE ENABLE N7:400 N7:300 0007 15 Page 4 15 256 256< N7:310 20< 266 266< CPT Compute Dest N7:307 30< Expression N7:310 - 226 WRITE TO BT WRITE BUFFER COP Copy File Source #F[N7:307]:26 Dest #N7:311 Length 24 BT WRITE TO MODULE BTW Block Transfer Write Module Type Generic Block Transfer Rack 000 Group 2 Module 0 Control Block N7:300 Data File N7:310 Length 64 Continuous No EN DN ER Thursday, July 08, 1999 - 09:48:47 AGA5SI.RSP LAD 3 - AGA_MAIN --- Total Rungs in File = 14 BT READ AND MODBUS FC 6/16 REGISTER WRITE DECODING BT READ from module. If BT READ Block ID is 1, then decodes length and destination address of write data from master. BT WRITE ENABLE N7:300 BT READ ENABLE N7:400 15 15 BT READ FROM MODULE BTR Block Transfer Read Module Type Generic Block Transfer Rack 000 Group 2 Module 0 Control Block N7:400 Data File N7:410 Length 64 Continuous No 0008 BT READ DONE BIT N7:400 13 DECODE BT READ BLOCK ID EQU Equal Source A Source B N7:410 0< 1 1< Source B EQU Equal Source A Source B 0010 MODBUS FC 5 - BIT SET/RESET COMMAND When the BT READ Block ID is 2, the action (set/reset) and bit address are decoded, and excecuted. DECODE BT READ BT READ DONE BIT BLOCK ID N7:400 EQU Equal 13 Source A N7:410 0< Source B 2 2< N7:419 16899< 0 0< N7:419 16899< 1 1< EN DN ER COPYING MODULE STATUS COP Copy File Source Dest Length #N7:411 #N7:800 5 COP Copy File Source Dest Length #N7:420 #N16:0 50 COP Copy File Source Dest Length #N7:420 #N16:50 50 DECODE SET/RESET BIT CMD N7:412 0 DECODE SET/RESET BIT CMD N7:412 0 Page 5 ER N7:411 0< R11:0.LEN 0< Dest BLOCK 0 - MODULE STATUS READ and MODBUS MASTER DATA When BTR Block ID is 0, the Modbus slave status is available as well as the Modbus Master port data DECODE BT READ BT READ DONE BIT BLOCK ID N7:400 EQU Equal 13 Source A N7:410 0< Source B 0 0< EQU Equal Source A DN FC 6 & 16 COPY WRITE LENGTH MOV Move Source FC 6 & 16 COPY WRITE DATA FAL File Arith/Logical Control R11:0 Length 0< Position 0< Mode ALL Dest #N10:[N7:412] 0< Expression #N7:413 0009 EN EXECUTE SET/RESET BIT B13 L [N7:411] EXECUTE SET/RESET BIT B13 U [N7:411] Thursday, July 08, 1999 - 09:48:49 AGA5SI.RSP LAD 3 - AGA_MAIN --- Total Rungs in File = 14 0011 MODBUS FC 15 - MULTIPLE BIT SET/RESET COMMAND When the BT READ Block ID is 4, the logic necessary to combine the existing data registers with the new masked data is executed. DECODE BT READ BT READ DONE BIT BLOCK ID N7:400 EQU Equal 13 Source A N7:410 0< Source B 4 4< FC 15 CONTROL REG #5 FAL File Arith/Logical Control R11:5 Length 4< Position 0< Mode ALL Dest #R11:1.LEN 1< Expression N7:411 FC 15 CONTROL REG #1 FAL File Arith/Logical Control R11:1 Length 1< Position 0< Mode ALL Dest #N12:0 0< Expression NOT #N7:443 FC 15 CONTROL REG #2 FAL File Arith/Logical Control Length Position Mode Dest FC 15 CONTROL REG #3 FAL File Arith/Logical Control Length Position Mode Dest EN DN ER DN ER DN ER EN R11:4 1< 0< ALL #N10:[N7:412] 0< Expression #N10:[N7:412] OR #N12:30 Page 6 ER EN R11:3 1< 0< ALL #N10:[N7:412] 0< Expression #N7:413 AND #N7:443 0012 DN EN R11:2 1< 0< ALL #N12:30 0< Expression #N10:[N7:412] AND #N12:0 FC 15 CONTROL REG #4 FAL File Arith/Logical Control Length Position Mode Dest EN DN ER 2100 MODULE METER DATA The meter results are returned in BTR blocks with block ID codes 20-29. This rung decodes the data and moves the data into the appropriate integer and floating point registers. DECODE BT READ BT READ DONE BIT BLOCK ID N7:400 LIM CPT Limit Test Compute 13 Low Lim 20 Dest N7:406 20< 31< Test N7:410 Expression N7:410 + 10 0< High Lim 29 29< Thursday, July 08, 1999 - 09:48:52 AGA5SI.RSP LAD 3 - AGA_MAIN --- Total Rungs in File = 14 TIMESTAMP COP Copy File Source #N7:411 Dest #N[N7:410]:60 Length 2 REAL TIME OUTPUT VALUES COP Copy File Source #N7:413 Dest #F[N7:406]:20 Length 18 COP Copy File Source #N7:449 Dest #N[N7:410]:62 Length 2 COP Copy File Source #N7:451 Dest #F[N7:406]:40 Length 11 METER CONFIG DONE N[N7:410]:60 0 METER AGA 8 CONFIG DONE N[N7:410]:60 1 METER RESET DONE N[N7:410]:60 3 0013 Page 7 METER CONFIG ENABLE N[N7:410]:1 U 0 METER AGA 8 CONFIG ENABLE N[N7:410]:1 U 1 METER RESET ENABLE N[N7:410]:1 U 3 END Thursday, July 08, 1999 - 09:48:54 APPENDIX F Modbus Master Port Example 2100-AGA Modbus Master with Daniels 2251 Analyzer The 2100-AGA (revision 1.9 and later) has been configured with a Modbus Master port on COM2 of the module. Configuration of the port communication parameters is accomplished by editing the MBM.CFG file. Also included with the unit is a file called MBM.CMD. This file contains the Modbus Master command configurations, instruction the Master driver on what data to read from the Daniels and where to put it in the modules buffer memory. Configuring Communications The PCMAIN.EXE looks for a file called MBM.CFG in the local directory. If this file is not found or a problem is encountered in loading the file, the EXE file will abort with an error message. The MBM.CFG may be edited with any dos editor which does not add characters (hidden or otherwise) to the file. We normally use the DOS EDIT command, which is provided with DOS 5.0+. The structure of the file as originally provided is as follows (Note that if your file gets corrupted, you may clip out the following text and save to MBM.CFG. This first line of the file should be 'Modbus Master'): Modbus Master bits: 1 par: 0 stop: 0 baud: 5 rtson: 1 rtsoff: 1 timout: 2000 retry: 1 mode: 0 The meaning of these parameters is as follows: bits: 1 par: 0 stop: 0 baud: 7 The number of data bits each character should have. In RTU this should always be a 1, representing 8 data bits. 0 7 bits 1 8 bits The parity which the Modbus Slave should operate with. Valid values are: 0 None 1 Odd 2 Even The number of stop bits. Valid values are: 0 1 Stop bit 1 2 Stop bits The baud rate at which the slave port should operate. Valid values are: rtson: 1 rtsoff: 1 timeout: retry: 1 0 300 baud 1 600 baud 2 1200 baud 3 2400 baud 4 4800 baud 5 9600 baud 6 19200 baud RTS to TXD delay for modem warmup or otherwise are required. Time interval is in ms (5 = 5ms) RTS OFF DELAY for delaying turning off modems or line drivers. Time interval is in ms (5 = 5ms) 2000 Number of ms to wait after issuing a command to a slave before considering the slave non-responsive Number of times that the master should retry the command before considering the slave non-responsive mode: 0 Selects between RTU and ASCII modes 0 RTU 1 ASCII Configuring Commands The PCMAIN.EXE looks for a file called MBM.CMD in the local directory. If this file is not found or a problem is encountered in loading the file, the EXE file will abort with an error message. The MBM.CFG may be edited with any dos editor which does not add characters (hidden or otherwise) to the file. We normally use the DOS EDIT command, which is provided with DOS 5.0+. The structure of the file as originally provided is as follows (Note that if your file gets corrupted, you may clip out the following text and save to MBM.CFG. The CMD files is setup to support up to 10 slaves, with each slave setup to handle 10 commands. Each slave can be named with a 10 character name, followed by the slave address (Note spacing is very important. Do not alter spacing in the file). Following the definition of the slave name and address, the CMD file contains up to 10 commands for the slave. The command structure consists of the following: DANIEL2251 1 1 0 0 0 0 0 0 0 0 | | | | | | Enable 1 ß 10 char slave name, slave address 3 0 27 3032 10 3 30 16 7000 10 0 0 0 0 0 0 0 0 0 0 0 0 0 0 0 0 0 0 0 0 0 0 0 0 0 0 0 0 0 0 0 0 0 0 0 0 0 0 0 0 | | | | | | | | | Frequency | | | Remote Address | | Count | Local Address Function Code Enable: 1 Enables(1) or disables(0) the command Function: 3 The Function Code to be executed by the MBM program Local Addr: 0 The address in the MBM programs data buffer here the read data Will be deposited or where the write data will get its data Count: 10 The number of words that the MBM program will request from the Slave Remote Addr: 0 The register address in the slave where the MBM is requesting the Data to come from Frequency: 2 The number of 1/2 second intervals between executions of the command. A value of two should cause the command to be executed once per second. Receiving Modbus Data from the Slave The 2100 module returns the data received from the slave device embedded in the block ID 0 data block. The structure of Block 0 is as follows: (The Following section has been excerpted from the 2100-AGA manual and modified to include the Modbus Master specific information) 5.2.1 Reading Module Status Data The Status Data block is transferred to the processor with a Block ID of 0. The structure of the data block is as follows: BT Buf Offset N7:410 0 N7:411 1 N7:412 2 N7:413 3 N7:414 4 N7:415 5 N7:416 6 N7:417 7 N7:418 8 N7:419 9 N7:420 10-59 DESCRIPTION Current module status Last transmitted error condition Total Messages to this slave Total Msg responses from this slave Total Msgs seen by this slave Spare Spare MBM Error Code MBM Receive Counter MBM Block ID MBM Data Block[0 to 49] Where: BLOCK ID: When the Block ID number in the BTR buffer (Word 0 ) is 0, the module is transferring the Status Data block. CURRENT MODULE ERROR STATUS: This value represents the current value of the error code inside the module. The possible values are detailed in the following section. LAST TRANSMITTED ERROR CONDITION: This value is the last error code transmitted to the master by this slave. Error codes which can be expected in this field are 0, 1, 2, 3, and 6. The field will only be cleared by re configuring the module (Block ID 255). TOTAL MESSAGES TO THIS SLAVE: This value represents the total number of messages that have matched this slaves address, whether the slave actually determined them to be good (worthy of response) or not. TOTAL MESSAGE RESPONSES FROM THIS SLAVE: This value represents the number of good (non-error) responses that the slave has sent to the master. The presumption is that if the slave is responding, the message was good. TOTAL MESSAGES SEEN BY THIS SLAVE: This value represents the total number of commands seen by the slave, regardless of the slave address. Note : All accumulators will rollover to 0 after reaching 65535 ( -1 in PLC Integer File) MBM Error Code : This value represents the current error code status for the Modbus Master port MBM Receive Counter : This value increments upon each successful reception from a Modbus Slave device. Monitoring the value in this register with a timer can be used to determine if communications on the Modbus Master port are troubled. MBM Block ID : This value is used to page Modbus Master read data blocks from the 2100 module into the ladder logic memory. As with all Block ID values in the 2100 module, each data block is 50 words and the Block ID value can be used to decode which 50 word block is being received from the module Steps to Implement Modbus Master The Steps to implement the Modbus Master port capabilities are as follows: 1. Layout the memory map for the device/instrument that the MBM port is going to read data from. This map will assist in the development of the commands. 2. Edit the MBM.CMD file to configure the commands. Through this configuration, the placement of data from the slave into the MBM memory buffer can be controlled. 3. Edit the MBM.CFG file to configure the communication parameters for the slave device. 4. Add the logic to the PLC ladder to support the decoding of the MBM data block and the movement of data into the PLC data table. 5. Set the MNM enable bit in the module configuration word (Bit 7). 6. Connect the device to COM2 using either RS232,422 or 485. Set the jumper on the module for the appropriate position. Aga5si.rsp LAD 4 - MBM_LADDER --- Total Rungs in File = 2 BLOCK 0 - Module Status Read and Modbus Master Data When BTR Block ID is 0. the Modbus Slave Status is available as well as the Modbus Master port data BT Read Done Bit N7:400 0000 13 Decode BT Read Block ID EQU Equal Source A Source B Copying Module Status N7:410 20< 0 0< MBM Block ID EQU Equal Source A Source B MBM Block ID EQU Equal Source A Source B 0001 Page 1 N7:419 16778< 0 0< N7:419 16778< 1 1< COP Copy File Source Dest Length #N7:411 #N7:800 5 Copy MBM Data Block COP Copy File Source Dest Length #N7:420 #N16:0 50 Copy MBM Data Block COP Copy File Source Dest Length #N7:420 #N16:50 50 END Monday, March 19, 2001 - 16:19:11