1
System Release Bulletin
Models ESTRELLA
Series 200, 300 and 700
___________________________________________
AIX 4.3.2
Bull Enhancement 2.25
___________________________________________
May 25th, 1999
Bull Electronics Angers CEDOC
34 Rue du Nid de Pie BP428
49004 ANGERS CEDEX 01
FRANCE
86 A2 69EE REV 01
http://www–opensup.bull.com
Copyright e Bull S.A. 1999
No part of this document may be translated, reproduced, or copied in any form by any means without the
written permission of Bull S.A.
The information contained in this document is subject to change without notice.
Bull S.A. shall not be liable for errors contained herein, or for incidental or consequential damages in
connection with the use of this material.
TRADEMARKS
We acknowledge the right of proprietors of trademarks mentioned in this book.
DPX/20, Escala and Estrella are trademarks of Groupe Bull.
AIXTM is a trademark of International Business Machines Corporation, and is being used under license.
UNIX is a registered trademark in the USA and other countries licensed exclusively through X/Open.
DAS150, DAS1300, DAS2300, DAS3100, DAS3500, DAS 5700 are registered trademarks of Bull Group.
ATF is a product of CLARiiON.
CLARiiON is a registered trademark of Data General Corporation.
SNiiFFER is a registered trademark of Data General Corporation.
PostScript is a registered trademark of Adobe Systems Incorporated.
Epson is a registered trademark of Epson Corporation.
IBM Proprinter is a registered trademark of IBM Corporation.
HP LaserJet is a registered trademark of Hewlett Packard Inc.
NetWare is a trademark of Novell Inc.
PC–Xware is trademark of NCD Software.
HMX, Xplora, NCDnet, and NCDware are trademarks of Network Computing Devices, Inc.
EMCPower is a software product of the EMC2 company.
Netscape Entreprise Server, Netscape FastTrack Server, Netscape Proxy server, Netscape Navigator, and
Netscape Navigator Gold are trademarks of Netscape Communication Corporation.
Table of Contents
PART 1. General Information . . . . . . . . . . . . . . . . . . . . . . . . . . . . . . . .
1. About This SRB . . . . . . . . . . . . . . . . . . . . . . . . . . . . . . . . . . . . . . . . . . . . . . . . . . . . . .
1-1
2. List of Software Media . . . . . . . . . . . . . . . . . . . . . . . . . . . . . . . . . . . . . . . . . . . . . . . .
1-1
3. Year 2000 . . . . . . . . . . . . . . . . . . . . . . . . . . . . . . . . . . . . . . . . . . . . . . . . . . . . . . . . . . . .
1-1
4. Documentation . . . . . . . . . . . . . . . . . . . . . . . . . . . . . . . . . . . . . . . . . . . . . . . . . . . . . . .
1-1
Ordering Documentation . . . . . . . . . . . . . . . . . . . . . . . . . . . . . . . . . . . . . . . . . . . . . . .
5. List of Packages of the Bull Enhancement 2.25 CD-ROM . . . . . . . . . . . . . . . .
1-2
1-3
6. List of Packages of the Bonus Pack CD-ROMs . . . . . . . . . . . . . . . . . . . . . . . . . .
1-5
7. Requirements and Environment . . . . . . . . . . . . . . . . . . . . . . . . . . . . . . . . . . . . . . .
1-7
7.1 Firmware . . . . . . . . . . . . . . . . . . . . . . . . . . . . . . . . . . . . . . . . . . . . . . . . . . . . . . . . . .
7.2 Disk and Memory Space: Basic System Disk . . . . . . . . . . . . . . . . . . . . . . . . . .
8. Installation of the Software . . . . . . . . . . . . . . . . . . . . . . . . . . . . . . . . . . . . . . . . . . . .
1-7
1-7
1-8
9. Install from Scratch: New and Complete Overwrite . . . . . . . . . . . . . . . . . . . . . .
1-9
9.1 Install 4.3.2 AIX System . . . . . . . . . . . . . . . . . . . . . . . . . . . . . . . . . . . . . . . . . . . . .
9.2 Install Bull Enhancement Packages . . . . . . . . . . . . . . . . . . . . . . . . . . . . . . . . . .
9.3 Install Bonus Pack Packages . . . . . . . . . . . . . . . . . . . . . . . . . . . . . . . . . . . . . . . .
9.4 Install SNA Packages and PTFs . . . . . . . . . . . . . . . . . . . . . . . . . . . . . . . . . . . . .
9.5 Install OSI Packages . . . . . . . . . . . . . . . . . . . . . . . . . . . . . . . . . . . . . . . . . . . . . . .
9.6 Install Additional Products from Other Media . . . . . . . . . . . . . . . . . . . . . . . . . . .
9.7 Continue the AIX Installation . . . . . . . . . . . . . . . . . . . . . . . . . . . . . . . . . . . . . . . . .
9.8 Installing a Graphic Display . . . . . . . . . . . . . . . . . . . . . . . . . . . . . . . . . . . . . . . . . .
10. Install Additional Device Software . . . . . . . . . . . . . . . . . . . . . . . . . . . . . . . . . . . .
1-9
1-11
1-12
1-12
1-13
1-13
1-13
1-14
1-16
11. Migration from AIX 4.1.x or 4.2.x to AIX 4.3.2 . . . . . . . . . . . . . . . . . . . . . . . . . . .
1-16
PART 2. Special Notes Concerning Packages . . . . . . . . . . . . . . . .
Bull S.A.
1-1
2-1
1. ArrayGUIde, DiskArray, DasEmail – (DAS Storage Systems) . . . . . . . . . . . . .
2-2
1.1 Functions . . . . . . . . . . . . . . . . . . . . . . . . . . . . . . . . . . . . . . . . . . . . . . . . . . . . . . . . .
1.2 Requirements and Compatibility . . . . . . . . . . . . . . . . . . . . . . . . . . . . . . . . . . . . .
1.3 Installing DiskArray, ArrayGUIde, and DasEmail Softwares . . . . . . . . . . . . . .
1.4 DiskArray Restrictions and Limitations . . . . . . . . . . . . . . . . . . . . . . . . . . . . . . . .
1.5 ArrayGUIde Restrictions and Limitations . . . . . . . . . . . . . . . . . . . . . . . . . . . . . .
1.6 DiskArray Warning . . . . . . . . . . . . . . . . . . . . . . . . . . . . . . . . . . . . . . . . . . . . . . . . .
1.7 ArrayGUIde Warning . . . . . . . . . . . . . . . . . . . . . . . . . . . . . . . . . . . . . . . . . . . . . . .
2. asrx – (Automatic Site behavior Reporter for uniX) . . . . . . . . . . . . . . . . . . . . . .
2-2
2-2
2-2
2-3
2-3
2-4
2-4
2-5
2.1 Installation . . . . . . . . . . . . . . . . . . . . . . . . . . . . . . . . . . . . . . . . . . . . . . . . . . . . . . . .
2.2 Restrictions and Limitations . . . . . . . . . . . . . . . . . . . . . . . . . . . . . . . . . . . . . . . . .
3. Bulldisk, Bulldisk_diag – (Disks) . . . . . . . . . . . . . . . . . . . . . . . . . . . . . . . . . . . . . . .
2-5
2-5
2-6
Restrictions and Limitations . . . . . . . . . . . . . . . . . . . . . . . . . . . . . . . . . . . . . . . . . . . . .
4. devices.pci.11100200 & devices.pci.0d111200 –
(PCI Ethernet 10/100 Mbps Adapters) . . . . . . . . . . . . . . . . . . . . . . . . . . . . . . . . . . . . .
2-6
Known Problems . . . . . . . . . . . . . . . . . . . . . . . . . . . . . . . . . . . . . . . . . . . . . . . . . . . . . .
5. devices.pci.48110040 – (PCI FDDI Adapters) . . . . . . . . . . . . . . . . . . . . . . . . . . . .
2-7
2-7
May 25th, 1999
2-7
i
5.1 Installation . . . . . . . . . . . . . . . . . . . . . . . . . . . . . . . . . . . . . . . . . . . . . . . . . . . . . . . .
5.2 Restrictions . . . . . . . . . . . . . . . . . . . . . . . . . . . . . . . . . . . . . . . . . . . . . . . . . . . . . . .
6. devices.pci.441000a4 – (SCSI RAID PCI Adapter) . . . . . . . . . . . . . . . . . . . . . . .
2-7
2-7
2-8
6.1 Restrictions and Limitations . . . . . . . . . . . . . . . . . . . . . . . . . . . . . . . . . . . . . . . . .
6.2 Storage Manager on Graphical Motif Mode . . . . . . . . . . . . . . . . . . . . . . . . . . . .
6.3 Device Write Caching Configuration . . . . . . . . . . . . . . . . . . . . . . . . . . . . . . . . . .
6.4 Operations on RAID Arrays . . . . . . . . . . . . . . . . . . . . . . . . . . . . . . . . . . . . . . . . . .
6.5 Errlog from SCSI RAID Adapter . . . . . . . . . . . . . . . . . . . . . . . . . . . . . . . . . . . . . .
7. kermit – (File Transfer) . . . . . . . . . . . . . . . . . . . . . . . . . . . . . . . . . . . . . . . . . . . . . . . .
2-8
2-8
2-8
2-8
2-8
2-9
7.1 kermit with the VIP3X Package . . . . . . . . . . . . . . . . . . . . . . . . . . . . . . . . . . . . . .
7.2 kermit with the VIP5 Package . . . . . . . . . . . . . . . . . . . . . . . . . . . . . . . . . . . . . . . .
7.3 Restrictions and Limitations . . . . . . . . . . . . . . . . . . . . . . . . . . . . . . . . . . . . . . . . .
8. ltcprint – (BQ350 Printing Support) . . . . . . . . . . . . . . . . . . . . . . . . . . . . . . . . . . . .
2-9
2-9
2-9
2-10
Restrictions and Limitations . . . . . . . . . . . . . . . . . . . . . . . . . . . . . . . . . . . . . . . . . . . . .
9. PRTE42, PRTBull_mcode – (Printers Management) . . . . . . . . . . . . . . . . . . . . .
2-10
2-11
9.1 List of the Supported Printers . . . . . . . . . . . . . . . . . . . . . . . . . . . . . . . . . . . . . . . .
9.2 Installing a Compuprint 2043, 2048, 914, 925 or 956 . . . . . . . . . . . . . . . . . . . .
9.3 In Case of Installation problems . . . . . . . . . . . . . . . . . . . . . . . . . . . . . . . . . . . . . .
9.4 Restrictions and Limitations . . . . . . . . . . . . . . . . . . . . . . . . . . . . . . . . . . . . . . . . .
10. psx25 – (Power Stream X.25) . . . . . . . . . . . . . . . . . . . . . . . . . . . . . . . . . . . . . . . . .
2-11
2-12
2-12
2-12
2-13
10.1 Installation . . . . . . . . . . . . . . . . . . . . . . . . . . . . . . . . . . . . . . . . . . . . . . . . . . . . . . .
10.2 License key management (IFOR/LS) . . . . . . . . . . . . . . . . . . . . . . . . . . . . . . . .
10.3 Restrictions and Limitations . . . . . . . . . . . . . . . . . . . . . . . . . . . . . . . . . . . . . . . .
11. rsf – (Remote Services Facilities) . . . . . . . . . . . . . . . . . . . . . . . . . . . . . . . . . . . . .
2-13
2-13
2-13
2-14
11.1 Restrictions and Limitations . . . . . . . . . . . . . . . . . . . . . . . . . . . . . . . . . . . . . . . .
11.2 Installing RSF . . . . . . . . . . . . . . . . . . . . . . . . . . . . . . . . . . . . . . . . . . . . . . . . . . . .
12. smw – (WatchWare) . . . . . . . . . . . . . . . . . . . . . . . . . . . . . . . . . . . . . . . . . . . . . . . . . .
2-14
2-14
2-15
Restrictions and Limitations . . . . . . . . . . . . . . . . . . . . . . . . . . . . . . . . . . . . . . . . . . . . .
13. srb.pack – (SRB Management Tools) . . . . . . . . . . . . . . . . . . . . . . . . . . . . . . . . . .
2-15
2-16
Restrictions and Limitations . . . . . . . . . . . . . . . . . . . . . . . . . . . . . . . . . . . . . . . . . . . . .
14. xr_host – (XRemote Host) . . . . . . . . . . . . . . . . . . . . . . . . . . . . . . . . . . . . . . . . . . . .
2-16
2-17
14.1 Installation . . . . . . . . . . . . . . . . . . . . . . . . . . . . . . . . . . . . . . . . . . . . . . . . . . . . . . .
14.2 Restrictions and Limitations . . . . . . . . . . . . . . . . . . . . . . . . . . . . . . . . . . . . . . . .
2-17
2-17
PART 3. Miscellaneous . . . . . . . . . . . . . . . . . . . . . . . . . . . . . . . . . . . . .
ii
3-1
1. AIX Restrictions and Limitations . . . . . . . . . . . . . . . . . . . . . . . . . . . . . . . . . . . . . . .
3-1
2. Suggestions and Recommendations . . . . . . . . . . . . . . . . . . . . . . . . . . . . . . . . . . .
3-1
3. Localization . . . . . . . . . . . . . . . . . . . . . . . . . . . . . . . . . . . . . . . . . . . . . . . . . . . . . . . . . .
3-3
4. TFTP Method for Downloading Your X Manager File . . . . . . . . . . . . . . . . . . . . .
3-3
5. X Manager File Name on a TX Explora . . . . . . . . . . . . . . . . . . . . . . . . . . . . . . . . . .
3-4
6. Installing the X Terminals. . . . . . . . . . . . . . . . . . . . . . . . . . . . . . . . . . . . . . . . . . . . . .
3-4
7. Paging Space . . . . . . . . . . . . . . . . . . . . . . . . . . . . . . . . . . . . . . . . . . . . . . . . . . . . . . . .
3-5
8. Filesets Management . . . . . . . . . . . . . . . . . . . . . . . . . . . . . . . . . . . . . . . . . . . . . . . . .
3-5
9. Hypertext Library for AIX . . . . . . . . . . . . . . . . . . . . . . . . . . . . . . . . . . . . . . . . . . . . . .
3-6
11. TPAD/HPAD Documentation Erratum . . . . . . . . . . . . . . . . . . . . . . . . . . . . . . . . . .
3-6
May 25th, 1999
Bull S.A.
PART 4. The Euro Character . . . . . . . . . . . . . . . . . . . . . . . . . . . . . . . .
Bull S.A.
4-1
1. Generalities & Standards . . . . . . . . . . . . . . . . . . . . . . . . . . . . . . . . . . . . . . . . . . . . . .
4-1
1.1 What is the Euro character? . . . . . . . . . . . . . . . . . . . . . . . . . . . . . . . . . . . . . . . . .
1.2 Is it the only symbol for Euro currency? . . . . . . . . . . . . . . . . . . . . . . . . . . . . . . .
1.3 What are the codifications of the Euro Character? . . . . . . . . . . . . . . . . . . . . . .
1.4 What is the ISO 4217 codification? . . . . . . . . . . . . . . . . . . . . . . . . . . . . . . . . . . .
1.5 What are the ISO8859–15, ISO8859–1, and IBM–1252 codes? . . . . . . . . . .
1.6 What are the Unicode and UTF–8 codes? . . . . . . . . . . . . . . . . . . . . . . . . . . . . .
1.7 What is the Code Page 858? . . . . . . . . . . . . . . . . . . . . . . . . . . . . . . . . . . . . . . . .
1.8 Conversion Tables . . . . . . . . . . . . . . . . . . . . . . . . . . . . . . . . . . . . . . . . . . . . . . . . .
1.9 Where is the Euro Character on the keyboard? . . . . . . . . . . . . . . . . . . . . . . . .
1.10 What Difficulties Are Encountered With the Euro Character? . . . . . . . . . . . .
2. What are the Consequences for the User? . . . . . . . . . . . . . . . . . . . . . . . . . . . . .
4-1
4-1
4-1
4-1
4-2
4-2
4-2
4-2
4-3
4-3
4-3
3. Recommendations . . . . . . . . . . . . . . . . . . . . . . . . . . . . . . . . . . . . . . . . . . . . . . . . . . .
4-3
4. Compilers and Euro . . . . . . . . . . . . . . . . . . . . . . . . . . . . . . . . . . . . . . . . . . . . . . . . . .
4-4
4.1 Cobol . . . . . . . . . . . . . . . . . . . . . . . . . . . . . . . . . . . . . . . . . . . . . . . . . . . . . . . . . . . . .
4.2 C Compiler . . . . . . . . . . . . . . . . . . . . . . . . . . . . . . . . . . . . . . . . . . . . . . . . . . . . . . . .
4.3 FORTRAN . . . . . . . . . . . . . . . . . . . . . . . . . . . . . . . . . . . . . . . . . . . . . . . . . . . . . . . .
5. Terminals and Euro . . . . . . . . . . . . . . . . . . . . . . . . . . . . . . . . . . . . . . . . . . . . . . . . . . .
4-4
4-4
4-4
4-4
5.1 ASCII Terminals . . . . . . . . . . . . . . . . . . . . . . . . . . . . . . . . . . . . . . . . . . . . . . . . . . . .
5.2 Graphical Terminals (X11 manager) and X Terminals (X11 manager,
or NCD based) . . . . . . . . . . . . . . . . . . . . . . . . . . . . . . . . . . . . . . . . . . . . . . . . . . . . . . . .
6. Printers and Euro . . . . . . . . . . . . . . . . . . . . . . . . . . . . . . . . . . . . . . . . . . . . . . . . . . . . .
4-4
7. My Peripheral Is Not Upgradable. What to Do? . . . . . . . . . . . . . . . . . . . . . . . . . .
4-5
8. Restrictions . . . . . . . . . . . . . . . . . . . . . . . . . . . . . . . . . . . . . . . . . . . . . . . . . . . . . . . . . .
4-5
8.1 Codification . . . . . . . . . . . . . . . . . . . . . . . . . . . . . . . . . . . . . . . . . . . . . . . . . . . . . . .
8.2 Products that do not support Euro character . . . . . . . . . . . . . . . . . . . . . . . . . . .
8.3 C Libraries . . . . . . . . . . . . . . . . . . . . . . . . . . . . . . . . . . . . . . . . . . . . . . . . . . . . . . . .
9. Work-arounds . . . . . . . . . . . . . . . . . . . . . . . . . . . . . . . . . . . . . . . . . . . . . . . . . . . . . . . .
4-5
4-5
4-5
4-5
9.1 ASCII Terminals . . . . . . . . . . . . . . . . . . . . . . . . . . . . . . . . . . . . . . . . . . . . . . . . . . . .
9.2 Graphical or X Terminal . . . . . . . . . . . . . . . . . . . . . . . . . . . . . . . . . . . . . . . . . . . . .
9.3 Usage of ”locale” in C programs . . . . . . . . . . . . . . . . . . . . . . . . . . . . . . . . . . . . . .
9.4 Usage of NLS in Cobol programs . . . . . . . . . . . . . . . . . . . . . . . . . . . . . . . . . . . .
10. Summary . . . . . . . . . . . . . . . . . . . . . . . . . . . . . . . . . . . . . . . . . . . . . . . . . . . . . . . . . . .
4-5
4-7
4-8
4-9
4-11
May 25th, 1999
4-5
4-5
iii
iv
May 25th, 1999
Bull S.A.
PART 1. General Information
1. About This SRB
Before installing a software on your system, we recommend you carefully read the System
Release Bulletin (SRB) that comes with the software media.
The SRB provides release-specific information and instructions related to software
installation. It also contains information it is important to be aware of, such as known
limitations or special operational notes.
The present SRB applies to Estrella 200, 300 and 700 Series, running the AIX 4.3.2 and
Bull Enhancement 2.25 software.
Note: Do not install AIX 4.3.2 and Bull Enhancement 2.25 on an Estrella Power Console.
2. List of Software Media
The following media are delivered with the systems:
Reference
Designation
Release Format
76 723 717–001 AIX 4.3.2 Estrella 200 & 300 Series
4.3.2
3 CD-ROMs
76 723 725–001 AIX 4.3.2 Estrella 700 Series
4.3.2
3 CD-ROMs
76 723 698–001
4.3.2
1 CD-ROM
76 723 712–001 Bull Enhancement 2.25
432_1
1 CD-ROM
76 723 684–001
4.3
2 CD-ROMs
AIX 4.3.2 Updates (for Estrella 700)
Bonus Pack
3. Year 2000
The AIX 4.3.2 software is year 2000 ready.
4. Documentation
You will find, in the booklets enclosed with the CD-ROMs, useful information on:
• Consulting Documents,
• Installing Products from CD-ROM,
• Consulting SRB packages.
The “Hypertext Library for AIX” CD-ROM contains the online documentation for AIX and
other products. You will find in the CD-ROM booklet, the step-by-step procedure to access
this information.
Two paper documents, delivered with every system, are also very useful:
• AIX 4.3 Installation Guide (Reference: 86 A2 43GX)
• AIX 4.3 NIM Guide & Reference (Reference: 86 A2 17 HX)
Some information not included in the standard documentation is available in the file:
/usr/lpp/bos/README
Finally, you will find technical information on the following Bull Web site:
http://www–opensup.bull.com
Bull S.A.
May 25th, 1999
1-1
Ordering Documentation
Paper documentation can be purchased separately:
• Write at “Bull Electronics Angers CEDOC”, by providing the reference number of the
document.
• Or connect to the Bull Web site http://www.logistics.bull.net and select “Order your
documentation software and freeware”.
1-2
May 25th, 1999
Bull S.A.
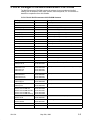
5. List of Packages of the Bull Enhancement 2.25 CD-ROM
The Bull Enhancement CD-ROM contains the software for some products of the Bull
catalog, such as adapters, disks, tapes, printers, disks subsystems, etc. This software is
installed in complement of the AIX software.
76 723 712-001 Bull Enhancement 2.25 CD-ROM Contents
Package
Version
Description
ArrayGUIde
01.06.0007.0000
Disk Array Software
Bullcdrom
01.03.0000.0000
Bull SCSI CD-ROM Support
Bullcdrom_diag
01.06.0001.0000
Bull CD-ROM Diagnostics Support
Bulldisk
02.09.0001.0000
Bull SCSI Disks Support
Bulldisk_diag
02.09.0000.0000
Bull SCSI Disks Diagnostics Support
Bulltape
01.06.0003.0000
Bull SCSI Tapes Support
Bulltape_diag
01.05.0003.0000
Bull SCSI Tapes Diagnostics Support
BX11.Dt
01.03.0000.0000
AIXWindows Desktop Bull interactive console setup
DasEmail
01.00.0000.0002
Disk Array Software
DiskArray
04.12.0000.0000
Disk Array Software for SCSI and FC Adapters
PRTBull_mcode
01.00.0001.0000
Bull Printers Microcodes
PRTE42
02.10.0001.0000
Bull Printers
PRTE42.prts.obj
02.10.0001.0006
Bull Printers
TERM
02.03.0000.0000
Terminal BQ306
asrx.asrx
01.06.0003.0000
ASRX Client Side
bos.rte.odm
04.03.0002.0001
Object Data Manager
bullasync.base
01.08.0001.0000
Bull Common Asynchronous Adapter Software
bullasync.isa
bullasync.isa.rte
01.08.0001.0000
01.08.0001.0004
Bull ISA Asynchronous Adapter Software
bullx25.adm
bullx25.adm.conf
bullx25.adm.cat
bullx25.adm.rte
02.03.0005.0000
02.03.0005.0002
02.03.0005.0001
02.03.0005.0003
High Speed WAN Comm. Adapter SNMP Agent – Config
bullx25.board
bullx25.board.rte
bullx25.board.com
bullx25.board.smit
02.03.0006.0000
02.03.0006.0001
02.03.0006.0001
02.03.0006.0005
High Speed WAN Comm. Board – Smit
bullx25.tcpip
bullx25.tcpip.rte
02.03.0006.0000
02.03.0006.0002
High Speed WAN Comm. TCP
bullx25.xpi
bullx25.xpi.rte
02.03.0006.0000
02.03.0006.0003
High Speed WAN Comm. XPI interface – Smit
devices.common.IBM.ethernet
devices.common.IBM.hdlc
devices.common.IBM.hdlc.sdlc
devices.common.IBM.fddi
devices.common.IBM.tokenring
04.03.0002.0000
04.03.0001.0000
04.03.0001.0001
04.03.0001.0000
04.03.0001.0000
devices.csii
devices.csii.all
02.00.0008.0000
02.00.0008.0001
Common Serial I/O Interface (CSII)
devices.nddutils
devices.nddutils
06.03.0001.0000
06.03.0001.0001
Networking Device Driver Utilities
devices.pci.0a121101
02.00.0008.0000
1–Port PCI Serial I/O Board
devices.pci.0a124101
02.00.0008.0000
4–Port PCI Serial I/O Board
Bull S.A.
May 25th, 1999
1-3
1-4
Package
Version
Description
devices.pci.11100200
devices.pci.11100200.rte
06.03.0001.0000
06.03.0001.0008
DEC 2104X Ethernet Adapter Software
devices.pci.11100900
devices.pci.11100900.rte
06.03.0001.0000
06.03.0001.0001
DEC 2114X Fast Ethernet Adapter Software
devices.pci.11101400
devices.pci.11101400.rte
06.03.0001.0000
06.03.0001.0001
DEC 21041 Ethernet Adapter Software
devices.pci.2b101905.rte
devices.pci.2b101905.x11
04.02.0001.0000
04.02.0001.0000
devices.pci.441000a4
04.03.0002.0000
SCSI RAID PCI Adapter
devices.pci.48110040
devices.pci.48110040.diag
devices.pci.48110040.rte
06.03.0000.0000
06.03.0000.0001
06.03.0000.0003
PCI FDDI Adapter Software for EPC400
devices.pci.b8100120
devices.pci.b8100120.rte
06.03.0001.0000
06.03.0001.0001
SMC DEC 21140 Ethernet Adapter Software
devices.syn_sio.
02.00.0008.0000
1Port and 4Port Common CSII Provider
isdn_access
isdn_access.syngate
isdn_access.synway
01.01.0004.0000
01.01.0004.0005
01.01.0004.0010
Syneris ISDN
kermit
02.04.0000.0000
Kermit File Tranfer Support
ltcprint
02.04.0000.0000
02.04.0000.0001
LTC (BQ350) Printing Support
pswx25.wsm
02.00.0008.0000
psx25.adm
psx25.adm.all
02.00.0008.0000
02.00.0008.0002
Power Stream X25 SNMP Agent
psx25.hdlc
psx25.hdlc.all
02.00.0008.0000
02.00.0008.0005
HDLC on Common Serial I/O Interface
psx25.ipx25
psx25.ipx25.all
02.00.0008.0000
02.00.0008.0006
TCP/IP on x25p Lines.
psx25.x25
psx25.x25.all
02.00.0008.0000
02.00.0008.0012
Power Stream X.25
rsf
rsf.extended
rsf.data
rsf.rsflite
rsf.rsflite.data
03.07.0000.0000
03.07.0000.0000
03.07.0000.0000
03.07.0000.0001
03.07.0000.0001
RSF Remote Services Facilities
Extended Remote Services Facilities
smw.asrx
01.01.0013.0000
WatchWare SM: Tools for ASRX
smw.pages
01.01.0013.0000
WatchWare SM: HTML pages
smw.rsf
01.01.0013.0000
WatchWare SM: Tools for RSF
smw.server
01.01.0013.0000
WatchWare SM:HTTP Server
srb.BULLX25
02.03.0006.0000
SRB for High Speed WAN Comm. Adapter
srb.pack
02.03.0000.0000
Tools for SRB Management
unlock
01.01.0000.000
xr_host
04.02.0118.0000
XRemote Host
May 25th, 1999
Bull S.A.
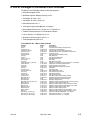
6. List of Packages of the Bonus Pack CD-ROMs
The Bonus Pack CD-ROMs contain the following products:
• Netscape Navigator V4.06
• Web-based System Manager Security V4.3.2
• VisulaAge for Java V2.0
• VisualAge for Java Entry V2.0
• Ultimedia Services V2.2.1
• Techexplorer Hypermedia Browser V2.0 plug-in
• Novell Network Services 4.1 for AIX V2.2.1, Evaluation S.
• TotalNET Advanced Server V5.3 Evaluation Software
• Lotus Domino Go Webserver 4.6.2.5
• WorkGroup conferencing for AIX V1.1.0
• Tivoli Management Agent V3.2
76 723 684-001 Vol. 1 Bonus Pack Contents
Package
ipfx.msg
ipfx.rte
internet_server.*
devices.mca.dfe5.rte
devices.isa_sio.*
dce.xdsxom.rte
dce.pthreads.rte
dce.msg.*
dce.doc.*
dce.dfs_server.rte
dce.compat.*
dce.client.*
collab.help.msg.en_US.client
collab.client.Dt
bos.crypto
bos.adt.lib
bos.som.*
dce.client.core.*
dce.tools.admin.rte
dce.cds.rte
dce.edfs.rte
dce.security.rte
dce.dfsnfs.rte
Netscape.nav.rte
Netscape.msg.*
Netscape.help.*
Netscape.communicator–fr.rte
NetQ.client.rte
NetQ.client.sdk
NetQ.rte.com
NetQ.server.misc
NetQ.server.rte
NetQ.cgi.base
NetQ.cgi.*
UMS.info.en_US.user_gd
UMS.html.en_US.prog_gd
UMS.html.en_US.user_gd
Bull S.A.
Version
02.02
02.02
04.06.02.05
04.03.02.00
04.03.02.00
02.01.00.01
02.01
02.01
02.01
02.01
02.01
02.01
01.01.00.00
01.01.00.00
04.03.02.00
04.03.02.00
04.01.03.00
02.01
02.01.00.08
02.01.00.19
02.01.00.19
02.01.00.24
02.01.00.11
04.00.07.00
04.00
04.00.07.00
04.00.07.00
01.01.00.00
01.01.00.00
01.01.00.00
01.01.00.00
01.01.00.00
01.01.00.00
01.01.00.00
04.02.02.00
04.03.02.00
04.03.02.00
Description
IPF Messages
Information Presentation Facility Runtime
Lotus Domino Go Webserverr
AIX Ultimedia Services RISC Audio Device
AIX Ultimedia Services New RISC PC Audio Device
X.500 API Library
DCE Threads Compatability Library
DCE Messages
DCE Documentation Files
DCE DFS Base Server
DCE SMIT
DCE DFS Client Filess
WorkGroup Conferencing Help HTML Files – U.S. English
WorkGroup Conferencing Desktop Files
40 Bit Encryption for IP Security
Base Application Development Libraries
SOM Files
DCE Client Files
DCE Administration Tools
DCE Cell Directory Services
DCE Enhanced DFS
DCE Security Services
DCE NFS to DFS Authenticating Gateway
Netscape Navigator Runtime Environment
Netscape Navigator Runtime Messages
Netscape Navigator Help
Netscape Communicator Runtime Environment (French)
Webserver Search Engine Client API
Webserver Search Engine Client Development Toolkit
Webserver Search Engine Client/Server common files
Webserver Search Engine Admin Tools
Webserver Search Engine Server
Webserver Search Engine CGI executables + icons
Webserver Search Engine CGI executables + icons
Ultimedia InfoExplorer Database – U.S. English
Ultimedia Programming – U. S. English
Ultimedia User Guides – U. S. English
May 25th, 1999
1-5
76 723 684-001 Vol. 2 Bonus Pack Contents
Package
IBMVJava.*
jmf.html.
jmf.rte.*
ncps.sys.*
ncps.html.en_US.nns
ncps.base.api
ncps.base.cmd
ncps.base.kernel
ncps.base.ldap
ncps.base.nls
ncps.base.smit
ipx.msg.*
ipx.base.lib
ipx.base.api
ipx.base.smit
ipfx.rte
ipfx.msg.*
db2_05_00.repl
db2_05_00.odbc
db2_05_00.msg.*
db2_05_00.jdbc
db2_05_00.html.*
db2_05_00.esrv
db2_05_00.db2.rte
db2_05_00.db2.engn
db2_05_00.db2.samples
db2_05_00.das
db2_05_00.cs.rte
db2_05_00.cs.sna
db2_05_00.cs.drda
db2_05_00.cs.ipx
db2_05_00.conv.*
db2_05_00.conn
db2_05_00.cnvucs
db2_05_00.client
Tivoli_Management_Agent.client.rte
TAS.server
IMNSearch.rte.httpdlite
IMNSearch.rte.SBCS
IMNSearch.rte.DBCS
IMNSearch.bld.SBCS
IMNSearch.bld.DBCS
IBMVJava.html.help
IBMVJava.html.en_US.common
IBMVJava.html.en_US.entry
IBMVJava.html.common
IBMVJava.html.SBCS
IBMVJava.dab.rte
IBMVJava.dab.adt
DB2V5SERV.Bnd
DB2V5CAE.Bnd
Adobe.acrobat
Version
02.00.00.00
01.01.00.00
01.01.00.00
02.02.00.00
04.03.02.00
02.02.00.01
02.02.01.02
02.02.01.00
02.02.00.00
02.02.00.00
02.02.00.02
04.03.00.01
04.03.01.01
04.03.02.00
04.03.02.00
02.02.00.00
02.02.00.00
05.02.00.00
05.02.00.00
05.02.00.00
05.02.00.00
05.02.00.00
05.02.00.00
05.02.00.00
05.02.00.00
05.02.00.00
05.02.00.00
05.02.00.00
05.02.00.00
05.02.00.00
05.02.00.00
05.02.00.00
05.02.00.00
05.02.00.00
05.02.00.00
03.02.00.00
05.03.00.00
01.01.01.01
01.02.01.03
01.02.00.04
01.02.01.03
01.02.00.04
02.00.00.00
02.00.00.00
02.00.00.00
02.00.00.00
02.00.00.00
02.00.00.00
02.00.00.00
05.02.00.00
05.02.00.00
03.00.01.00
Description
VisualAge for Java
Java Media Framework Documentation – U.S. English
Java Media Framework Runtime
Novell Network Services Files
Novell Network Services Guides – U. S. English
Novell Network Services API Support
Novell Network Services Commands
Novell Network Services Kernel Support
Novell Network Services LDAP Support
Novell Network Services Base NLS Support
Novell Network Services SMIT Panels
IPX/SPX Protocol Suite Messages – U.S. English
IPX/SPX Libraries
IPX/SPX API Support Files
IPX/SPX SMIT Panels
Information Presentation Facility Runtime
IPF Messages
DB2 Replication
Open Database Connectivity (ODBC) Support
DB2 Product Messages
Java Support
DB2 Product Document (HTML)
License Support for DB2 UDB Enterprise Edition
DB2 Run–time Environment
DB2 Engine
DB2 Sample Database Source
Administration Server
DB2 Communication Support – TCP/IP
DB2 Communication Support – SNA
DB2 Communication Support – DRDA Application Server
DB2 Communication Support – IPX
Code Page Conversion Tables
DB2 Connect
Code Page Conversion Tables – Uni Code Support
DB2 Client Application Enabler
”Tivoli Management Agent runtime”
TotalNET Advanced Server
NetQuestion Local HTTP Daemon
NetQuestion SBCS Search Engine
NetQuestion DBCS Search Engine
NetQuestion SBCS Buildtime Modules
NetQuestion DBCS Buildtime Modules
VisualAge for Java HTML Help Engine
VA Java Documentation–U.S. English Common Files
VA Java Entry Documentation (HTML)–U.S. English
VisualAge for Java Documentation (HTML)–Common Files
VisualAge for Java Documentation (HTML)––Single Byte Files
VisualAge for Java Data Access Beans Runtime
VisualAge for Java Data Access Beans
DB2 Server(s) Software Bundle
DB2 Client Application Enabler Software Bundle
Adobe acrobat reader
Note: In these lists of contents, items such as ipx.msg.* mean “all packages beginning with
ipx.msg”.
1-6
May 25th, 1999
Bull S.A.
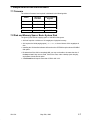
7. Requirements and Environment
7.1 Firmware
The minimum firmware level required is indicated in the following table:
Model
Minimum
Firmware
Latest Firmware
Upgrade
200
PPC 1 BUG 1.9
PPC 1 BUG 1.9
300
OF 1.2 RM 06
OF 1.2 RM 11
350
OF 1.2 RM 08
OF 1.2 RM 11
700
97251 DOR
98153 DOR
7.2 Disk and Memory Space: Basic System Disk
The given figures include a paging space of 160 MB of disk space:
• AIX itself requires a minimum of 32 megabytes of physical memory.
• AIX requires the initial paging space (/dev/hd6) to be a minimum of 64 megabytes in
size.
• Installing the AIX bundled software delivered on the CD-ROM requires about 600 MB of
disk space.
• Be aware that if the disk is completely full, you may not be able to increase the size of
the /tmp or /etc if they are too small. If this is the case, make a backup (smit mksysb),
and restore with the shrink option.
• A Full Install would require more than 3 GB for AIX 4.3.2.
Bull S.A.
May 25th, 1999
1-7
8. Installation of the Software
Choose one of the following installation operations:
• Install from Scratch: New and Complete Overwrite on page 1-9
• Install Additional Device Software on page 1-16
• Migration from AIX 4.1.x or 4.2.x to AIX 4.3.2 on page 1-16
For detailed information refer to the AIX 4.3 Installation Guide (Ref. 86 A2 43GX).
The list of the installed packages is given by: # lslpp –L
Note: It is recommended to make a backup copy of the software when the installation
operations are completed. You can later restore it in case of problem, rather than
re-install a complete system from scratch. The following command will create a
bootable backup:
# smit mksysb
Note: Do not install IBM AIX PTF (Uxxxx) on Estrella 200 and Estrella 300 systems
without the formal agreement of your Bull representative.
1-8
May 25th, 1999
Bull S.A.
9. Install from Scratch: New and Complete Overwrite
Install from scratch is a long operation (2 or 3 hours), which completely overwrites the data
of the system disk.
Synopsis of an Install from Scratch
To install:
Use the CD-ROM:
Use the procedure:
AIX runtime 1
AIX 4.3.2 Vol. 1
Define the CD-ROM as boot
device, and boot the system.
bundle AIX descriptor
Bull Enhancement 2.25
smit install_latest
and select the bundle name
AIX runtime 2
AIX 4.3.2 Vol. 1
smit easy_install_bundle
and select the bundle name
AIX 4.3.2 PTFs
(on Estrella 700 only)
AIX 4.3.2 Updates
smit update_all
Bull Enhancement packages
Bull Enhancement 2.25
Depending on your system:
smit install_all
or smit install_latest
PTFs for OSI
Bull Enhancement 2.25
smit update_all
To optionally install:
Use the CD-ROM:
Use the procedure:
Bonus Pack packages
Bonus Pack 4.3
smit install_all
Other applications
CD-ROM of application
smit install_latest
9.1 Install 4.3.2 AIX System
Note About Multiple Volume CD–ROMs
AIX 4.3 has added the “multiple volume CD–ROMs” function. If you ask to install a fileset or
a bundle of filesets, you may be prompted to insert another CD–ROM volume to complete
the installation. If you do not wish to be prompted, or do not have the other volumes
available, set the Process multiple volumes? field in SMIT to no (it is set to yes by
default). If using the command line to call installp, specify the –S flag to not process multiple
volumes. If the CD volume is already mounted as a filesystem at the time of the installation,
multiple volume processing is disabled.
Note: You will not be asked to switch CD–ROMs during a Base (BOS) Installation of AIX.
Multiple volume CD–ROMs are only enabled after the operating system has
rebooted.
1st Phase: define the CD-ROM as boot device
This operation depends on the model of your system.
1. Insert the AIX Vol. 1 CD–ROM.
2. Turn on the system.
3. For Estrella 200 Systems:
–
–
–
–
Bull S.A.
Type ESC each time it is requested.
A menu is displayed. Select 3 then return.
PPC1–Diag prompt is displayed. Type: ioi
The CLU and DLUN of the CD-ROM are displayed (usually 0 50). To boot from the
CD-ROM type: pboot 0 50
May 25th, 1999
1-9
4. For Estrella 300 Systems:
–
–
–
–
Type ESC each time it is requested.
The Main menu is displayed. Select Administrative Option
Select Invoke the command line prompt
The OK> prompt is displayed. Type: boot cdrom
5. For Estrella 700 Systems:
The System Management Services (SMS) is used to define the boot device. This
operation can be performed on a graphic or an ASCII console:
With a graphic console:
– Initialization icons appear at the bottom of the screen: press the F1 key when the
keyboard icon appears
– Click on the Boot Icon
– Click on the Default Icon
– Exit from SMS
With an ASCII console:
– The keyboard text symbol is displayed, press 1 on the ASCII console.
– In the screen that appears, select: Select Boot Devices
– Select Default Settings
– Exit from SMS
2nd Phase: installation of the basic AIX
From the “Base Operation System Installation and Maintenance” menu, you have to select
some parameters for the installation, in particular:
– the language,
– the installation method: New and Complete Overwrite
– the destination disk.
Select 0 to start the installation. When the operation is completed the “Installation
Assistant” menu is displayed. Fill in the fields that you need and exit the menu with the
option “Tasks Completed – Exit to AIX Login”.
3rd Phase: installation of the AIX bundle packages
1. Go to the AIX prompt and load the AIX bundle:
– Insert the Bull Enhancement 2.25 CD-ROM.
– Log in as root.
– Type: smit install_latest
and select:
INPUT device/directory for software: [/dev/cd0]
SOFTWARE to install:
[bundle_aix432]
2. Once the AIX bundle list is loaded:
– Insert the AIX Vol.1 CD-ROM
– Press F3–Esc3 to exit smit menu
– Enter: smit easy_install_bundle
and select: INPUT device/directory for software: [/dev/cd0]
– Select the bundle to install:
AIX_4.3.2_ESTRELLA
– Follow the instructions given on the screen
– When the procedure is completed exit smit (F10–Esc0)
3. Reboot the System:
# shutdown –Fr
1-10
May 25th, 1999
Bull S.A.
4th Phase for Estrella 700 only: installation of the AIX PTFs
Note: Perform this operation on Estrella 700 only. The “AIX 4.3.2 Updates” CD-ROM does
not apply to Estrella 200 and 300.
Note: To install the fileset X11.loc.ZH_CN.base.rte 4.3.2.1 it is necessary to install the
fileset X11.fnt.ucs.ttf_CN 4.3.2.0 which is on the CD-ROM Volume 3 of AIX 4.3.2.
Follow this procedure:
1. Insert the “AIX 4.3.2 Updates” CD-ROM and enter:
smit update_all
Make sure to select the following options (“no” commitment is mandatory):
INPUT device/directory for software:
COMMIT software updates
[/dev/cd0]
no
2. When this operation is completed de-install the bos.rte.tty fileset; enter:
smit maintain_software
Select:
Reject Applied Software Updates
Select these options:
SOFTWARE name
[bos.rte.tty]
REJECT dependant software
yes
3. Get the following PTFs from the www–opensup.bull.com Bull server (or contact your Bull
representative):
–
–
–
–
–
U461248 bos.atm.atmle
U461454 bos.mp
U461208 bos.rte.tty
U461236 bos.up
U461423 dev.pci.14107c00.com
4. Install these PTFs on your system.
5th Phase: Reboot the System:
# shutdown –Fr
9.2 Install Bull Enhancement Packages
Note: To install isdn_access packages, you must stop synway; enter: smit synway then
select stop in the menu.
Note: To install bullx25 packages make sure that no application is running using
/usr/sbin/dat_x25 or /etc/datx25tcpd.
1. Insert the Bull Enhancement 2.25 CD-ROM.
2. According to your Estrella system (200/300 or 700) apply one of the following
procedures:
On Estrella 200/300:
# smit install_all
Make sure to select the following options:
INPUT device/directory for software:
[/dev/cd0]
SOFTWARE to install
[all]
AUTOMATICALLY install requisite software?
no
OVERWRITE same or newer versions?
yes
# smit update_all
INPUT device/directory for software:
Bull S.A.
May 25th, 1999
[/dev/cd0]
1-11
On Estrella 700:
# smit install_latest
Make sure to select the following options:
INPUT device/directory for software:
SOFTWARE to install
[/dev/cd0]
[all_latest]
3. Reboot the system:
# shutdown –Fr
Note for the PCI FDDI Adapters
The devices.pci.48110040 package present on the Bull Enhancement CD-ROM is
dedicated to the PCI FDDI adapters that are marked with the label B5-3, B5-4, or B5-5. If
your system has a PCI FFDI adapter without one of these labels, you have to load the
devices.pci.48110040 package from a separate media delivered with the adapter.
Consequently, if you have PCI FDDI adapters without the label B5-3, B5-4, or B5-5, the
devices.pci.48110040 package has been wrongly installed during the installation of the
Bull Enhancement CD-ROM. You must:
• De-install the package:
enter smit remove and select:
SOFTWARE Name
PREVIEW only?
[devices.pci.48110040]
no
• Install the package from the FDDI media as described in the special notes on page 2-7.
9.3 Install Bonus Pack Packages
Using SMIT you can install the packages that you need from the Bonus Pack CD-ROM.
Remark:
If the /etc/tftpaccess.ctl file was not used, the installation of the netstation package adds
the following lines in the /etc/tftpaccess.ctl file:
allow:/usr/netstation
allow:/usr/netstation/configs
allow:/usr/netstation/mods
allow:/usr/netstation/fonts/pcf/100dpi
allow:/usr/netstation/fonts/pcf/dw100dpi
allow:/usr/netstation/fonts/pcf/misc
allow:/usr/netstation/fonts/pcf/ns3270
allow:/usr/netstation/fonts/pcf/java
This allows to load the netstation package through tftp without login authorization, but
preventing access to all the other files of the system.
Restrictions:
• The IPX/SPX Backward Compatibility Package ipx.rte contains older level IPX/SPX
protocol suite. This package is included in AIX Version 4.3 to handle the rare case when
an existing IPX/SPX application is not binary compatible with AIX Version 4.3 IPX/SPX
(ipx.base package). The ipx.rte package cannot be installed on a system that has
ipx.base installed.
• It is not possible to install the UMS.info.en_US.user_gd since the bos.info.*
prerequesites are no more delivered with AIX 4.3.2.
9.4 Install SNA Packages and PTFs
Using SMIT you can install the packages that you need from the SNA CD-ROM.
When the packages installation is performed you need to install the PTFs that are present
on the SNA CD-ROM. Leave the SNA CD-ROM in the drive and proceed as follows:
1-12
May 25th, 1999
Bull S.A.
# mount –rv cdrfs /dev/cd0 /mnt
# cd /mnt/PTF
# smit update_all
.
INPUT device/directory for software:
# umount /mnt
9.5 Install OSI Packages
The Bull OSI COM 2.3.6 CD-ROM contains the Bull Communications packages. To install
the OSI packages please refer to the OSI SRBs which are available on the CD-ROM.
Note: A failure message may be displayed during the installation of the OSI CD-ROM, if
the ROSE and XAP products are missing. ROSE and XAP are optionnal products
delivered on 2 separate CD-ROMs. If you don’t use ROSE and XAP, do not take
care of the messages related to the osi_api.rose.adt and xap_api.adt filesets.
In addition, you must install OSI PTFs from the Bull Enhancement 2.25 CD-ROM. Insert
this CD-ROM and run the following commands:
# mount –rv cdrfs /dev/cd0 /mnt
# cd /mnt/PTF
# smit update_all
.
INPUT device/directory for software:
SOFTWARE to update?
_update_all
# cd
# umount /mnt
9.6 Install Additional Products from Other Media
• Hypertext Information Base Library CD-ROM
Refer to the procedure described in the corresponding CD–ROM booklet.
• Netscape SuiteSpot
You cannot install it using SMIT or install_assist. Refer to the associated documentation.
9.7 Continue the AIX Installation
• The install_assist function does not set the time. If you use the install_assist function,
you have to set the time with the time command.
• Install the X11 package, especially if you intend to use NetBackup graphic management.
• Install AIX Server number of licensed users.
Run the following command: # smit chlicense. It specifies the maximum number of
fixed licenses to which you are entitled on the system. This will be taken into account at
next reboot.
• Install the products related iFOR/LS licences when required. Follow the procedure
provided with the licence diskette.
• Set the Time Zone
The Time Zone variable is not set correctly for changes between summer and winter
time in Europe. To correct it, set TZ using smit chtz and set, for example for France:
Time Zone [MET–01:00:00EET–02:00:00,M3.5.0/02:00:00,M10.5.0/03:00:00]
M3.5.0/02:00 means “change time on last Sunday of March at 02h00” (day 0 of 5th
week of 3rd month).
M10.5.0/03:00 means “change time on last Sunday of October at 03h00” (day 0 of 5th
week of 10th month).
Bull S.A.
May 25th, 1999
1-13
9.8 Installing a Graphic Display
Refer to /usr/lpp/X11/README.MGA.Bull file to use your PCI High–Resolution
Graphics adapter with more than 8 bits per pixel.
Estrella 700: Configuration rules
– If one board GXT110P: GXT110P in Slot 1
– If one board GXT110P + one board GXT255P: GXT110P in Slot 1, GXT255P in Slot 2
– If one board GXT255P: GXT255P in Slot 2
– If a second board GXT255P: the second GXT255P in Slot 1
All Estrella Series:
An additional PCI graphics board may be plugged in your system.
– Choose a display type to select a set of possible resolution:
smit devices
–> Graphic Displays
–> Select the Display Type
– Configure the correct resolution and refresh rate:
smit devices
–> Graphic Displays
–> Select the Display Resolution and Refresh Rate
Choose the parameters in the following table:
Serie
Display
Display Type
640 800 1024 1280 1600
x480 x600 x768 x1024 x1280
Board
200
DMUG012 PanaSync_5A
60
60
75
Mother Board
200
DMUG013 PanaSync_5A
60
60
75
60 *
Mother Board
200
DMUG014 PanaSync_5A
60
60
75
60 *
Mother Board
200
DMUG012 IBM_15V
75
75
75
GTFG037
200
DMUG012 IBM_15V
75
75
75
GTFG037
200
DMUG014 POWER display 20
75
75
75
300
DMUG012 LM15FST
60
60
75
300
DMUG013 LM17FST
60
60
75
60
PCI SVGA Graphics Cirrus
300
DMUG014 PanaSync_5A
60
60
75
75
PCI SVGA Graphics Cirrus
300
DMUG012 LM_15FST
60
300
DMUG013 LM_17FST
75
60
300
DMUG014 Panasync_5A
75
75
700
DMUG012 IBM_15V
75
75
75
700
DMUG013 POWER display 17
75
75
75
60
700
DMUG014 POWER display 20
75
75
75
75
60
GTFG041/042
700
DMUG014 Standard
**
**
**
**
**
GTFG041/042
75
60
GTFG037
PCI SVGA Graphics Cirrus
75
GTFG043
GTFG043
60
GTFG043
GTFG041/042
GTFG041/042
Notes:
* 2 MByte DRAM needed.
** Plug & Play: Automatically choosen: VESA DDC1/2B compliant.
1-14
May 25th, 1999
Bull S.A.
Estrella Series 200 only:
• When one or several PCI graphics boards are plugged, you can have difficulties to
continue to use the planar graphics subsystem (the Cirrus controller): refer to
/usr/lpp/X11/README.
• If 3 PCI graphics boards are plugged, the planar graphics subsystem must not be used in
the same time.
Modify the file /usr/lpp/X11/defaults/xserverrc in setting the variable
EXTENSIONS with the standard AIX Server –P gga<n> flags for each graphic adapter.
See the X Server start–up flags for more information about the –P gga<n> flag.
• It is not possible to test the graphics controller on the mother board (cvga0) by
PPC1–Diag (VGA543X) if a PCI graphics adapter is plugged in.
As soon as the PCI adapter has been unplugged, PPC1–Diag runs fine.
• There is no possibility under PPC1.bug to detect the available graphic RAM. When you
configure the resolution display 1280x1024 60Hz, you must use xdpyinfo to know the
exact graphic configuration.
Bull S.A.
May 25th, 1999
1-15
10. Install Additional Device Software
If you want to install an add-on device ordered separately, you need to perform the following
operation:
• Insert the Bull Enhancement 2.25 CD-ROM
Note: You must use a Bull Enhancement CD-ROM release 2.25 or later to install
additional software on AIX 4.3.2. (For example do not use release 2.23 on AIX
4.3.2).
• Run these commands:
# smit update_all
INPUT device/directory for software:
[/dev/cd0]
# smit cfgmgr
• If necessary reboot the System:
# shutdown –Fr
The list of the installed packages is given by: # lslpp –L
11. Migration from AIX 4.1.x or 4.2.x to AIX 4.3.2
The migration of AIX 4.1.x or 4.2.x to AIX 4.3 is a complex operation, subject to frequent
updates. This is the reason why the present SRB does not provide the migration procedure.
In order to have the complete and up-to-date migration procedure, please contact your Bull
representative.
Note: Do not install IBM AIX PTF (Uxxxx) on Estrella 200 and Estrella 300 systems
without the formal agreement of your Bull representative.
1-16
May 25th, 1999
Bull S.A.
PART 2. Special Notes Concerning Packages
This part of the SRB gives special notes related to some software pakages such as:
• Special installation procedures
• Special requirements
• Restrictions and limitations.
Only the packages for which a special note is necessary, are described. The packages are
listed by alphabetical order, and not by function.
Bull S.A.
May 25th, 1999
2-1
1. ArrayGUIde, DiskArray, DasEmail – (DAS Storage Systems)
1.1 Functions
Note: For ATF (Application-Transparent Failover) software operations refer to the ATF
SRB (reference 86 A2 70WF).
The DiskArray package supports the DAS 3500, DAS 3200, DAS 2900. It contains:
–
–
–
–
–
–
basic software to support the subsystem
dassmgr software to monitor the DAS
flare95602_das2900.bin: LIC firmware for the DAS 2900
flare95602_das3200.bin: LIC firmware for the DAS 3200
flare94602_das3500.bin: LIC firmware for the DAS 3500
shell scripts for reconfiguration at system level.
There are two possibilities for monitoring the DAS 3500, DAS 3200, DAS 2900 Models:
1. dassmgr which can run on any system console. You need to connect the RS232
interface of one SP to your system. dassmgr is automatically installed with the
DiskArray lpp, but you do not need to configure it if you choose to monitor the DAS with
ArrayGUIde.
2. ArrayGUIde which can only run on Graphical terminals. The Graphical terminal does not
need to be directly connected to the system. You do not need to install ArrayGUIde if
you choose to monitor the DAS with dassmgr.
1.2 Requirements and Compatibility
• ArrayGUIde requires the minimum flare Firmware versions to be previously installed:
8.55 (DAS 2900 and 3200) or 9.45 (DAS 3500).
• ArrayGUIde requires ATF release 2.1.7 if this software is installed on the system.
• DasEmail requires ArrayGUIde 1.6.3.2 minimum.
• dassmgr and ArrayGUIde can both be installed, but they must not run simultaneously.
– Before using ArrayGUIde, you must close all the dassmgr windows.
– Before using dassmgr, you must stop the CLARiiON agent by the command:
/etc/clariion–server stop
• dassmgr and ArrayGUIde must both be installed before to install Navisphere.
1.3 Installing DiskArray, ArrayGUIde, and DasEmail Softwares
1.3.1 Before you begin your installation
If you want to install both ArrayGUIde and ATF softwares, you have to install ArrayGUIde
first.
If ATF software is already installed, and if you want to change the version of DiskArray, you
should:
• de–install ATF
• update DiskArray
• re–install ATF.
If ATF is already installed, and if you want to change the version of ArrayGUIde:
• de–install ATF
• update ArrayGUIde
• re–install ATF.
2-2
May 25th, 1999
Bull S.A.
1.3.2 Installation
1. Start by installing or updating the lpps DiskArray, ArrayGUIde, DasEmail:
# smit install_latest
Execute the procedure described in the ”Configuring and Managing a DAS” manual.
2. If your DAS subsystem does not yet have the latest LIC Firmware 9.xx release
installed, you must download it. Refer to the DAS documentation.
It is mandatory to disable cache and to verify there are no dirty pages before installing a
new version of flare Firmware.
After downloading a new version of flare Firmware, you should update the PROM code.
1.3.3 Notes After Installation
• If for any reason you need to disconnect the Y SCSI cable from your system, do not
forget to reinstall the terminators on the adapter board, or your system will not reboot.
• In a random I/O application with Raid5, it is recommended to configure 8 MB in Write
Cache for better performance.
• We recommend that you reboot the host after successfully binding the DAS disks.
• LUN Auto-assign parameter — The storage-system Auto-assign value for each LUN
must be disabled. You can use your storage system manager to make sure that each
LUN has its Auto-assign option disabled.
• ArrayGUIde implements a configuration editor to edit and create a configuration file (type
the edit_cfg command).
• Do not leave dassmgr running if you do not need it, because it is CPU consuming.
1.4 DiskArray Restrictions and Limitations
• Do not add any LUN in rootvg.
• Changing the console baud rate menu must not be used: only the default baud rate
(9600 bauds) is valid.
• The file systems that were working during an SP failure, need a complete fsck.
Sometimes disks will be rebuilt; in this case, it is necessary to wait for the end of the
rebuilding process before running fsck.
• ”Read Cache Statistics” are updated only when ”Write Cache” is enabled. They are not
updated when only ”Read Cache” is enabled.
1.5 ArrayGUIde Restrictions and Limitations
• The ArrayGUIde agent is not automatically launched at reboot.
• The mail notification is operational only if arraymgr is working.
• A remote user cannot modify the DAS configuration.
• If a ”busy” error is displayed when you try to de-configure an AIX hdisk or to create a
volume group, you should stop both the arraymgr and the agent before the
de-configuration operation.
• When you use ATF, and if there is a failover, the ArrayGUIde agent stops until the failure
is repaired.
• Changing LUN parameters can only be done for LUNs seen by the system.
Bull S.A.
May 25th, 1999
2-3
1.6 DiskArray Warning
• The capacity of a disk drive bound as a hot spare must not be lower than the disk it
might replace.
• If there are outstanding writes when the SP owner is changed, a background verify
automatically starts.
• If an UNDETERMINED ERROR is reported on a SCSI adapter, check that:
– the SCSI cabling is correct,
– each SCSI bus connector is firmly latched in place,
– each SCSI–bus is terminated with the proper differential terminator.
• Before upgrading a DAS 2900 flare firmware, you should:
–
–
–
–
–
make a backup of your data,
unbind your RAID3 LUN,
upgrade the flare,
bind your RAID3 LUN,
restore your data.
• Documentation Erratum: “Using DASSMGR” (86
A2 56JX)
The designations Physical Disk Unit and Physical Unit that are displayed in the screens
of the ”Using DASSMGR to Configure and Manage a DAS” manual (86 A2 56JX) have
to be replaced respectively by Logical Disk Unit and Logical Unit.
1.7 ArrayGUIde Warning
• At least one Logical Disk Unit must be configured to enable ArrayGUIde to access
DAS. Use dassmgr and an asynchronous port to create the first Logical Disk Unit.
• If you use ATF and ArrayGUIde, you must use sp objects in the ArrayGUIde
configuration file instead of hdisks as devices to access the DAS Subsystem.
• ArrayGUIde and dassmgr differently display the disk capacities:
ArrayGUIde displays available disk capacities, whereas dassmgr displays raw disk
capacities.
2-4
May 25th, 1999
Bull S.A.
2. asrx – (Automatic Site behavior Reporter for uniX)
ASRX (Automatic Site behavior Reporter for uniX) is a software tool that provides metrics
on the dependability of Unix machines.
2.1 Installation
The package BX11.Dt is mandatory for all machines with a Graphic system console.
The package bos.sysmgt.serv_aid (errpt command) is mandatory at installation
(prerequisite).
If ’WatchWare’ is installed, ASRX is automatically installed, configured, and started.
2.2 Restrictions and Limitations
In order to record the cause of a system stop, an ASRX menu appears after a reboot. This
menu waits 15 minutes for an answer.
The processor number given in the reports has no relationship with its logical or physical
number; it is definitely not the slot number in which they are plugged.
Only one “asrx_rpt” command must be used at the same time, otherwise unpredictable
results may be produced.
PSDs may be lost (not sent) if RSF dial–out is disabled.
asrx_rpt must be used with LANG set to “En_US” or “en_US”.
Bull S.A.
May 25th, 1999
2-5
3. Bulldisk, Bulldisk_diag – (Disks)
These packages provide software for Bull disks Differential and Single Ended Fast/Wide,
and Ultra/Wide. This software allows to use the functions of the AIX Diagnostics Subsystem
for Bull disks:
• Disk diagnostics
• From the Tasks and Service Aids diagnostics functions, access to format and certify
commands, and to disk error log report analysis.
Restrictions and Limitations
• For all STxxx disks (in the upper table), the diag command format is aborted after some
time; run again the same command to format disk properly.
• The mkvg command, after formatting STxxx disks, gives an error like: bad pvid....
Use the chdev command to give a new pvid:
# chdev –l hdiskX –a pv=yes
and perform the mkvg command again.
• If you have already connected disks recognized as “Other SCSI Disk Drives”,
reboot the system after installing the Bulldisk package.
• The lsdev command prints a 4.3 GB capacity for disk drives model ST3437X. This
value is a rounded value; the capacity usable under AIX is given by the lspv command.
2-6
May 25th, 1999
Bull S.A.
4. devices.pci.11100200 & devices.pci.0d111200 –
(PCI Ethernet 10/100 Mbps Adapters)
Known Problems
It is not possible to use the adapter 76730263–001 (label B5-M) in a point-to-point
connection (i.e. with a crossover table) to the Ethernet-on-board of a Estrella 300 platform
at 100 Mbps: the adapter reports loss of signals that prevents correct operation. The
behaviour is correct when both equipments (the 76730263–001 adapter and the
ethernet-on-board of the Estrella 300) are connected to a 100 Mbps Ethernet hub (or
switch).
5. devices.pci.48110040 – (PCI FDDI Adapters)
The devices.pci.48110040 package provides software and diagnostic tests to connect
FDDI Adapters Fibre Single Ring, UTP Single Ring and Fibre Dual Ring.
This package is present on the Bull Enhancement CD-ROM for the PCI FDDI adapters that
are marked with the label B5-3, B5-4, or B5-5.
The PCI FFDI adapters without the label B5-3, B5-4, or B5-5 are delivered with a separate
diskette or CD-ROM containing the package. You must install the devices.pci.48110040
from this media and not from the Bull Enhancement CD-ROM.
5.1 Installation
1. Install the board.
2. You must install the devices.common.IBM.fddi.rte package:
– Insert the AIX CD–ROM:
– # smit devinst
INPUT device / directory for software
[/dev/cd0]
SOFTWARE to install
[devices.common.IBM.fddi.rte]
PREVIEW only?
no
Include corresponding LANGUAGE filesets?
yes
3. If your FDDI adapter is marked with the label B5-3, B5-4, or B5-5, insert the
Bull Enhancement CD-ROM.
If your FDDI adapter has not the label B5-3, B5-4, or B5-5, insert the diskette or
CD-ROM containing the devices.pci.48110040 package.
4. Type: # smit devinst
INPUT device / directory for software
[/dev/cd0] (for CD-ROM)
or [/dev/fd0] (for diskette)
SOFTWARE to install
[devices.pci.48110040]
PREVIEW only?
no
Include corresponding LANGUAGE filesets?
yes
5. In the case of a first installation of the package, reboot is not necessary. (The software
has been installed and configured at the same time.)
In the case of a software update, reboot the system.
5.2 Restrictions
Boot from a FDDI adapter is not supported.
Bull S.A.
May 25th, 1999
2-7
6. devices.pci.441000a4 – (SCSI RAID PCI Adapter)
This package provides the software to support the SCSI RAID (Redundant Array of
Inexpensive Disks) PCI adapter. It includes the board driver and the DPT storage manager
for the configuration and the management of RAID volumes.
Refer to the “SCSI RAID Adapter, Installation & Configuration Guide” (Ref: 86 A1 44HX), for
more information.
6.1 Restrictions and Limitations
• If the Storage manager, during a “Set System Configuration” displays the message ODM
could not be updated, please reboot to complete the operation.
• Using the Storage Manager program, the click on the buttons of the mouse function
becomes ineffective if num_lock mode is set.
• After software installation (either the first time, or with a PTF), the firmware of the board
is automatically updated, if necessary, at next reboot time.
• The first boot after first installation may lead to duplicate disk definitions in ODM bases:
you may find a set of disks in defined state. No functional issues. Just delete these
objects with rmdev –dl hdisk<x> command to clean up the bases.
• Do not use direct AIX commands or smit menus to manage disks in RAID Array (rmdev,
mkdev, etc...). These actions are safely performed through the Storage Manager
program.
• To launch the Storage Manager program in curses mode, change to /usr/lpp/dpt
directory, then issue the dptmgrac command for the curses version, and dptmgram
command for the graphical Motif version.
• If newly created RAID volumes are not seen after RAID building, update the ODM
objects with the cfgmgr command.
6.2 Storage Manager on Graphical Motif Mode
When using the Motif program, the Num Lock key must be unlocked. There is
incompatibility between this key and mouse button operations.
6.3 Device Write Caching Configuration
The Write Through mode is the default mode supported on all the drives. It is the only mode
supported on the disk drives with rootvg. The Write Cache mode must be selected on
physical drives before the creation of RAID arrays.
6.4 Operations on RAID Arrays
Before inserting, modifying or deleting a drive in an array, check that the drive is not AIX
active and not used (varyoffvg).
Operations on arrays using the Storage Manager must be considered as low–level
hardware modification of the disk configuration, at the same level as disk formatting
operations.
6.5 Errlog from SCSI RAID Adapter
Sometimes the errors logged by the SCSI RAID adapter are incorrectly time–stamped in
the ASCII formatted message. Prefer the Errlog head date which is accurate.
The Error Recovery Procedure results in the logging of some SRA (SCSI RAID Adapter)
name errors but these have no impact on data operations.
2-8
May 25th, 1999
Bull S.A.
7. kermit – (File Transfer)
The Kermit File Transfer program moves files between machines having different operating
systems and architectures.
7.1 kermit with the VIP3X Package
For file transfer between PC and AIX systems, the following environment is suggested:
• PC emulator configured as VIP7800
• File Transfer Configuration as [7 bit Kermit...]
• Port configured for 7bits
In order to run the “file transfer” functions, the PC must become an AIX system terminal.
Then, the user must run kermit on the AIX system: refer to the Kermit User’s Guide.
7.2 kermit with the VIP5 Package
For file transfers between PC and Escala systems, the following environment is suggested:
• PC emulator configured as VIP7800
• File Transfer Configuration as [UNIX]
• Line configured for 7bits
Note: In order to avoid problems, it is advisable to use the complete pathname instead of
using only the filename. It is advisable to exchange one binary file only, between
Host and PC during a kermit session.
7.3 Restrictions and Limitations
When you use kermit connections – except on 16 port board –, you cannot use “–s” or “–r”
option.
If you want to transfer files, you must use interactive commands send and receive on the
kermit prompt.
If you have problems with set line /dev/tty1 or cu –l /dev/tty1, reconfigure the
STTY attributes:
# smit chgtty
Select STTY attributes for RUN time:
add clocal, and suppress hupcl
Bull S.A.
May 25th, 1999
2-9
8. ltcprint – (BQ350 Printing Support)
ltcprint is the package used by BQ350 remote printers.
BQ350 configuration parameters must be chosen according to your own printer type, and
network environment.
If incorrect values are specified, unpredictable print request processing might occur (such
as undetected spool level printer problems).
Please refer to the Terminals and Printers Configuration Guide (86 A1 22 WE)
Restrictions and Limitations
If there are 2 Ethernet boards on your machine, and if LTC print queues are configured with:
TCP connection queuing supported: yes
then problems might occur with static routes.
In such a case, you simply have to add static routes to explicitly specify the printer address
and the gateway to use.
2-10
May 25th, 1999
Bull S.A.
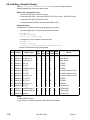
9. PRTE42, PRTBull_mcode – (Printers Management)
These packages are used for Bull printers management. PRTE42 is for AIX 4.2 and higher,
PRTBull_mcode is to upgrade microcode printers.
For more information refer to Terminals and Printers Installation and Configuration Guide
(86 A1 22WE)
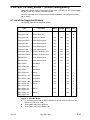
9.1 List of the Supported Printers
The following table lists the supported printers.
Type
Emulation
RS232C RS422A Centro Notes
Compuprint 200
HP–Deskjet+
–
–
Yes
–
Compuprint 300
HPPCL3 Deskjet+
–
–
Yes
b
Compuprint 415
HPPCL5, PostScript
Yes
Yes
Yes
a
Compuprint 914N
Epson, IBM Proprinter
Yes
–
Yes
–
Compuprint 925
Epson, IBM Proprinter
Yes
–
Yes
–
Compuprint 925N
Epson, IBM Proprinter
Yes
–
Yes
–
Compuprint 956
Epson, IBM Proprinter
Yes
Yes
Yes
–
Compuprint 1225
HPPCL5, PostScript Lev2
Yes
Yes
Yes
–
Compuprint 1645e
HPPCL5, PostScript Lev2
Yes
Yes
Yes
–
SIGNUM 2043
Epson, IBM Proprinter
Yes
Yes
Yes
–
SIGNUM 2048
Epson, IBM Proprinter
Yes
Yes
Yes
–
BULL PR800
Serial Matrix
Yes
–
Yes
–
BULL PR800–vfu
P.Series
Yes
–
Yes
–
BULL PR900
Serial Matrix
Yes
–
Yes
–
BULL PR900–vfu
P.Series
Yes
–
Yes
–
BULL PR701 / 702
Serial Matrix
Yes
–
Yes
c
BULL PR801 / 802
Serial Matrix
Yes
–
Yes
c
BULL PR901 / 902
Serial Matrix
Yes
–
Yes
c
BULL PR701–vfu
BULL PR702–vfu
P.Series
Yes
–
Yes
c
BULL PR801–vfu
BULL PR802–vfu
P.Series
Yes
–
Yes
c
BULL PR901–vfu
BULL PR902–vfu
P.Series
Yes
–
Yes
c
Legend for the table (Notes)
a
b
c
Bull S.A.
To use these printers with the RS422 interface, a special cable must be used. Its
reference is CBLG023–1800.
No available cable for the serial link.
No available cable for the RS422 link
May 25th, 1999
2-11
9.2 Installing a Compuprint 2043, 2048, 914, 925 or 956
The Proprinter IBM emulation (asc) requires the prior installation of the package
printers.ibm4207–2.rte.
9.3 In Case of Installation problems
In case of problems with printer management after a system upgrade, or if you did not
follow the procedure previously described, proceed as follows:
• Remove printer queues and devices:
# smit lprint
• Remove Bull printer package PRTE*:
# smit install_remove
or the command:
# installp –u PRTE*
• Remove all AIX printer packages: printers* and bos.rte.printers:
# installp –u printers*
# installp –u bos.rte.printers
• From AIX CD–ROM, re–install AIX printer packages:
# smit printerinst
• Install bos.rte.printers from AIX CD–ROM:
# smit install_latest
• Install Bull printer package PRTE from Bull Enhancement CD-ROM:
# smit install_latest
• Re–configure printer queues and devices:
# smit lprint
9.4 Restrictions and Limitations
Mode limitations:
• PM200 does not work with the 12–pitch (–p12) option.
Other limitations:
• No message is delivered before printing a job if the printer is powered off.
• PostScript emulation: the –w flag cannot be changed.
• Commands used in printer filters scripts do not take into account NLS environment
variables such as LOCPATH, NLSPATH for security reasons. Default values are used.
For example, the iconv command does not use LOCPATH but /usr/lib/nls/loc to
access converter files.
2-12
May 25th, 1999
Bull S.A.
10. psx25 – (Power Stream X.25)
The psx25 packages allow the use of the 1 port synchronous communication adapter and
of the 4 port synchronous communication adapter with the OSI stack & Bull MAX3
proprietary API Application Programming Interface, TCP/IP, XTI & XX25 or SNA/QLLC
psx25.hdlc
HDLC on Common Serial I/O Interface
psx25.ipx25 TCP/IP on x25p lines
psx25.x25
Power Stream X.25
psx25.adm
Power Stream X.25 – SNMP Agent
psx25.wsm
Power Stream X.25 – Web SM
The X.25 Documentation is delivered on the documentation CD–ROM, but it can also be
ordered as a paper book: Power Stream X.25 Installation & Service Guide (86 A2 95AT)
10.1 Installation
1. Insert the Bull Enhancement CD-ROM:
smit install_selectable_all
INPUT device / directory for software: [/dev/cd0]
Select all
AUTOMATICALLY install requisite software?
OVERWRITE same or newer versions?
yes
no
2. If you use XTI/XX25 on Multi–protocol Serial I/O adapters:
if the bullx25 product is already installed on your system, change the default XX25 path:
– for bullx25: #xtiselectx25 bullx25
– for psx25: #xtiselectx25 psx25
3. Reboot the system.
10.2 License key management (IFOR/LS)
psx25 uses the iFOR/LS encrypted license keys. (Key type nodelock only.) The following
iFOR/LS keys are supported by the product:
–
–
–
–
–
–
OSI–MP bundle (unlock a single X.25 line)
1 line
2 to 4 lines (1 line or OSI–MP bundle must also be installed)
5 to 8 lines (2 to 4 lines key must also be installed)
9 to 32 lines (5 to 8 lines key must also be installed)
More than 32 lines.
The key is checked at run time only. The installation can be done without the presence of
the key. If the key becomes wrong during exploitation:
– An error is logged and can be seen using the errpt command.
– The X.25 links are disconnected and connections already established are broken.
To know the status of the key, run the command:
x25pstatus –n
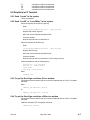
10.3 Restrictions and Limitations
• For an X.25 line, if a PVC is attached to the OSI stack it is possible to configure it in an
IP/x25p Host Entry, but the PVC cannot work with TCP/IP. Only one stack over X25 (or
application using X25) can use a configured PVC of an X.25 line.
• The NLS messages are only printed when environment variable LANG=en_US
Bull S.A.
May 25th, 1999
2-13
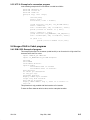
11. rsf – (Remote Services Facilities)
RSF, which stands for Remote Services Facilities, is a software package dedicated to
system monitoring and remote maintenance operations. It provides a link between the
customer’s system and a Bull Customer Service center.
RSF is delivered to customers who have an appropriate maintenance contract.
Note: The customer service will use the uname –m to print out a 12–digit number that will
be used as a machine serial number.
11.1 Restrictions and Limitations
Be careful when you change the Configuration of the Remote Service Line. Do not modify
TTY parameters (Service Line Speed and Remote Terminal Type).
Help on line under SMIT RSF is available only if the “LANG” environment variable is set to
En_US, en_US, it_IT, es_ES, Es-ES, fr_FR, de_DE, or De_DE.
If you have installed all the packages of RSF and the snmpd daemon is not running, some
warning may appear on the console.
Even in a cluster configuration, the “Send Test Message to Station” function is not possible
when “Remote Service Support” flag is disable.
11.2 Installing RSF
If ’WatchWare’ is installed, RSF (without rsf.extended) is automatically installed,
configured, and started.
2-14
May 25th, 1999
Bull S.A.
12. smw – (WatchWare)
WatchWare Server Monitor is a user–friendly supervision application that gives you a
comprehensive insight of your system. Refer to the WatchWare Server Monitor User’s
Guide (reference 86 A2 62GX) for more information.
Restrictions and Limitations
• In WatchWare Management, if you redirect the System Console to get console
messages, you may have problems at boot or shutdown phase, and also in using a LFT
(Low Function Terminal). Read the Help page.
Boot phase: the login prompt may be interlaced with the boot messages that are
displayed late after the boot. Type the <Enter> or <Return> key several times to clear
the display.
Shutdown phase: the Halt Completed message does not appear when the machine
is stopped.
• The Local file System page may be impossible to build if the nobody user is not able to
launch the df command without an error message.
• In the System Load page, the number of processes may not appear if the w –u
command returns an error (because the date was corrupted).
• In the System Status page, the given number of Processors (Nx PowerPC...) is the
number of available processors, not the number of processor physically present on the
machine.
• In the System Status page, the type of the processors is displayed as:
Nx PowerPC XXX.
Sometimes, the XXX info (e.g. 604, 604e, ...) is not present.
• In the System Description page, the Number of Disks information is the number of
disks physically present on the machine, while the Total Disk Capacity is the total
size of all available disks.
This size is computed by dividing the total number of bytes by 1024*1024*1024: it is the
real size.
• The /var file system must have a sufficient size. 10 MB of free space is a minimum.
• If you have a problem with CDE (cde does not start), run it in fail–safe mode.
• If /tmp is full, WatchWare cannot be run.
• If the Server Monitor Status is yellow and the Alarms Service is inoperative, you can use
the WatchWare Management page in order to restart RSF.
• If the following message is displayed when installing WatchWare or when restarting RSF
(in the case of the Server Monitor Status is yellow and the Alarms Service is inoperative):
Fatal: Could not access source’s action: over
rsfd: Fatal: A fatal error was detected
chrsf: Warning: Could not start daemon: rsfd
Type the following commands under root autority:
# addent –n over –t s null
# chrsf –s
• If, when asking for a WatchWare page, you get a message like:
Can’t fork: too many processes
check that the number of max processes for the user nobody is sufficient.
When a Netscape Proxy or Enterprise Server is running, 40 is not enough.
Bull S.A.
May 25th, 1999
2-15
13. srb.pack – (SRB Management Tools)
This package comprises the tools for the SRB management and is a prerequisite for all the
srb.<ProductName> packages. It gives tools to manage the SRBs contained on various
Bull Specific CD–ROMs.
Once this package has been installed, you have access to the following: # smit SRB
The following menu will be proposed:
• Load SRB from media
• Print installed SRB
• List installed SRB
• View installed SRB
Note: It is possible to view an SRB without the use of those tools, since SRB files are in
the/usr/share/man/mann directory once they are installed, by using vi or pg.
Restrictions and Limitations
Load SRB from media runs only on AIX 4.1. On AIX 4.3.2 load it by the smit command:
# smit install_selectable_all
Choose the desired srb package (all srb package names begin with ’srb’).
All other menus of srb pack are then available.
LANG=en_US must be set before calling Read SRB.
2-16
May 25th, 1999
Bull S.A.
14. xr_host – (XRemote Host)
The lpp xr_host contains the Xremote utility from NCD. Xremote allows the X11 protocol to
be used efficiently over a serial link. Thus a PC running PC Xware can be used as a
Graphic Console for an Escala machine without having to purchase a dedicated graphic
adapter and screen.
Xremote is an NCD proprietary protocol supported by NCD. Please refer to your usual NCD
support contact if you have any problem using this product. Updates and more information
are available via the NCD FTP server, at
ftp://ftp.ncd.com/
PC Xware must be ordered separately.
14.1 Installation
xr_host is installed from the Bull Enhancement CD-ROM. X11.apps and X11.motif filesets
are requested.
After installation, type xterm. If not found, enter:
rm –r /usr/bin/X11
ln –s /usr/lpp/X11/bin /usr/bin/X11
The path of the command xinitremote is /usr/lpp/X11/bin/ncd/bin
For installation with an X Terminal manager refer to Installing the X Terminals on page 3-4.
14.2 Restrictions and Limitations
• If you are logged under AIX via the serial line of your PC using PC–Xware, to start a
graphic console, enter:
cd /usr/lpp/X11/bin/ncd/bin
PATH=$PATH:.
xinitremote
• Between 2 xinitremote, you must exit and login again.
Bull S.A.
May 25th, 1999
2-17
2-18
May 25th, 1999
Bull S.A.
PART 3. Miscellaneous
1. AIX Restrictions and Limitations
Estrella all series:
• LFT terminals: ”Low Function Terminal” are not intended to support all of the features of
other ascii terminals, in particular the ”tput bold” function is not supported.
• telnetd: Do not use the –a option (performance) in inetd.conf file.
• smit minarg requires that disks be already included in the Volume group in order to be
used.
• shutdown: after a # shutdown –m (mono–user), execute # shutdown –Fr to
restart all the processes.
• When you run netls_config with the variable LANG=fr_FR: for a message of the form
“question (Y/N)” you must reply “O” for “Y” and “N” for “N”.
• The lex command incorrectly manages LANG=fr_FR. Use LANG=C instead
• The svmon command does not return the right number of free frames.
• aixterm has not been enhanced to support locale thai or vietnamese, or any of the new
UTF-8 locales added in AIX 4.3.2. Please use dtterm for these locales.
Estrella series 200 only:
• The dump on tape with block_size = 0 is not possible.
• With the graphics controller on the mother board (cvga0), do not change the default
values for the monitor type (Display type): PanaSync_5A using the command
smit g_display
2. Suggestions and Recommendations
Estrella all series:
• The default login method is dtlogin. If you log in using xdm to invoke the X Display
Manager, the PATH variable is changed. As a result, some SMIT commands will not
work. To prevent this problem add the following lines to your $HOME/.profile:
PATH=$PATH:/usr/sbin
export PATH
• When a tty line is opened you can update only the Enable LOGIN and TERMINAL
type line attributes with the smit chgtty command
If you try to change other attributes when the line is opened, you get the following error:
Method error (/etc/methods/chgtty):
0514–062 Cannot perform the requested function because
888–409–092 the specified device is busy.
To change the other attributes proceed as follows:
–
–
#
#
#
Bull S.A.
check if the tty<x> is already in use,
if the getty program alone is running enter:
pdisable tty<x>
smit chgtty
penable tty<x>
(where <x> is the number of your line.)
May 25th, 1999
3-1
• make command: All AIX commands must have their options set before the arguments;
so, for the make command use the syntax: make –f <makefile> <target>
The syntax make <target> –f <makefile> accepted by most UNIX systems is not
accepted by AIX 4.x.
• The root user account can be locked (by the root user) using: # smit lockuser but
cannot be unlocked because root cannot log in anymore!
In such a situation, you need to:
–
–
–
–
boot in SERVICE mode from a bootable media (CD–ROM, system backup...),
access rootvg from maintenance shell,
edit /etc/security/user
for root, change: stanza account_locked = true
to: account_locked = false
• setmaps –t (or –i, –o) cannot be run by non–root users to load map files.
As a workaround use:
# chown root /usr/bin/setmaps
# chmod u+s /usr/bin/setmaps
• If you do not have a Graphic Adapter, you will get an error label GRAPHICS recorded
in the error log at each system reboot.
To avoid it, you can remove the fileset devices.graphics.com using:
# chmod –x /usr/lib/methods/startlft
• In order to improve the performance of products using iFOR/LS (Fortran compiler, C
compiler, Bull OSI communications) we strongly advise you to configure iFOR/LS with:
– /usr/lib/netls/conf/auto_config (if only nodelocked keys are used)
or:
– /usr/lib/netls/conf/netls_config (if concurrent keys are used).
• During some update or migration operations, the nodelock file containing the licenses is
renamed nodelock.V2. To recover the licenses already installed, it is necessary to copy
the /usr/lib/netls/conf/nodelock.V2 in /usr/lib/netls/conf/nodelock.
• Before a tcopy command is performed, check that both tapes are configured with the
same block size values.
The default “block size” for tape is different on Escala or DPX/20 (512) and Estrella
(1024). On Estrella, when you use a tape created on Escala or DPX/20, make sure the
block_size for the tape drives are identical.
Estrella series 300 only
• OpenFirmware 1.2
To boot from DAT 4mm or QIC TDC4222, enter the following command at
OpenFirmware command line prompt:
boot tape
• If you get the following error: ERROR ”CANNOT OPEN DEBLOCKER PACKAGE”, you
must use the boot tape command under the OpenFirmware prompt (the operation
takes about 15 minutes).
• Reset button
By default, the Reset Button is used to reboot the System. If you want to start a dump
with the Reset Button, and automatically reboot after, enter:
sysdumpdev –k
chdev –l sys0 –a autorestart=true
3-2
May 25th, 1999
Bull S.A.
Estrella series 200 and 300 only:
• It is recommended to enable the option ”Automatically REBOOT system after a
crash”. Proceed as follows:
# smit system
Select ”Change/Show Characteristics of the Operating System”
Set the ”Automatically REBOOT system after a crash” option to TRUE.
3. Localization
You can choose the language of the messages.
• When installing a software product using smit install_latest the messages
associated to this product are installed according to the MESSAGES environment variable
(in /var/adm/ras/bosinst.data file).
For example, installing AIX Common Desktop Environment (CDE) fileset X11.Dt.rte
will install X11.msg.en_US.Dt.rte if MESSAGES=en_US
• Suppose that the messages corresponding to the products already installed are in
American (en_US), and you want those messages to be in French (fr_FR); proceed as
follows:
# smit mlang
Select: Additional Language Environment, and enter:
CULTURAL convention to install
LANGUAGE translation to install
INPUT device/directory for software
fr_FR
fr_FR
/dev/cd0
This will install message filesets for all already installed products.
Be careful: that means that both messages in American and in French can be displayed
according to the LANG variable of each user: if you do not change the LANG variable,
messages will continue to be displayed in American.
• Suppose you want messages in a particular language for some, not all, products (for
example X11.Dt in French), proceed as follows:
# smit mlang
Select: Change/Show Applications for a Language
Then select: Add Language for Applications already Installed, and enter:
LANGUAGE translation to install
INPUT device/directory for software
Installed Application
fr_FR
/dev/cd0
X11.Dt.rte
4. TFTP Method for Downloading Your X Manager File
TFTP method for downloading your X Manager file (Xncdhmx, Xncdxpl...) is not available
from AIX 4.3.1 with Xterminal Manager 5.0.129.
A workaround is to:
1. Stop inetd: stopsrc –s inetd
2. Kill any tftpd processes which may be running
3. Update tftpd configuration in /etc/inetd.conf:
replace:
tftp dgram udp wait nobody /usr/sbin/tftpd tftpd –n
Bull S.A.
May 25th, 1999
3-3
by:
tftp dgram udp6 SRC nobody /usr/sbin/tftpd tftpd –n
4. Restart inetd: startsrc –s inetd
5. X Manager File Name on a TX Explora
If the name of the X Manager file is erroneous in the local configuration of a TX Explora,
with a PCMCIA board, it is impossible to reboot the terminal.
A workaround is to modify the file name on the PCMCIA board. Proceed as follows:
1. De-install the PCMCIA board and install it on another terminal of the same type.
2. From the console window click on Terminals, then New Terminal.
3. Select File and rename the Xmanager file with the correct name (use the rename
command).
4. Re-install the PCMCIA board and reboot.
6. Installing the X Terminals.
• If the UTSG006 X terminal manager is already installed, and if you want to add a
NCDWare X terminal manager, version 4.1.141 or greater, enter this command at the
end of the installation:
ln –s /usr/bin/X11/ncd_0/Xncd.3.2.1 \
/home/ncd/<X Terminal Version>/hostside/AIX/Xncd.3.2.1
• If the NCDWare X terminal manager, version 4.1.141 or greater, is already installed, and
if you want to add UTSG006 X terminal manager, enter the following commands:
mv /usr/bin/X11/ncd /usr/bin/X11/ncd_0
ln –s ncd_0/Xncd.3.2.1 \
/home/ncd/<X Terminal Version>/hostside/AIX/Xncd.3.2.1
ln –s /home/ncd/<X Terminal Version>/hostside/AIX/Xncd.3.2.1 \
/usr/bin/X11/ncd
• If you have the xr_host package already installed, you have to enter the following
command after the installation of the X terminal manager:
ln –s /usr/lpp/X11/bin/ncd_O/bin /usr/lpp/X11/bin/ncd/bin
• Set the TERM variable correctly:
chdev –l tty0 –a term=vt320
• If you choose the DeskTop session, no more operation is necessary. But if you choose
the XDM session, perform the following:
– edit the /usr/lpp/X11/defaults/xinitrc file,
– put every line as comment, from line:
Set the X server’s keyboard
till line:
Start the X Clients.
• In some cases (for example, loss of font server), you will have to reboot the X terminal
after exiting from the X session.
3-4
May 25th, 1999
Bull S.A.
7. Paging Space
The amount of paging space that a system needs is entirely dependent on the programs
that are running on the system, not on the system’s physical memory. You can start with the
primary page space (hd6) equals to the size of physical memory plus 64MB and increase
this amount until processes are no longer killed for lack of paging space.
To increase the size of a paging space, you must execute the command # smit pgsp.
But if the size of the paging space proposed is greater than 512 Logical partitions, you must
modify the MAXIMUM NUMBER of LOGICAL PARTITIONS parameter:
• # smit chlv1
• Give to LOGICAL VOLUME a name, for example: hd6
• In the menu Change a Logical Volume, change the MAXIMUM NUMBER of
LOGICAL PARTITIONS parameter to [1024]
• Exit SMIT
• Then increase the size of a paging space by: # smit pgsp
To add a new paging space to your system, use the # smit mkps command to create the
paging space in an existing volume group.
You may need to add more physical volumes to the volume group or add new volume
groups to accommodate the new paging space.
8. Filesets Management
AIX 4.3.2 includes a new, optionally installable fileset, bos.content_list, that lists all
installable files and the filesets/packages that contain them. The fileset includes one file,
/usr/lpp/bos/AIX_file_list.
The bos.rte.install fileset now also ships the /usr/sbin/which_fileset command, which
allows you to search the /usr/lpp/bos/AIX_file_list file after bos.content_list is installed.
Bull S.A.
May 25th, 1999
3-5
9. Hypertext Library for AIX
The Hypertext Library for AIX is delivered on a CD-ROM, and comes with a set of tools
called Hypertext Library Utilities. This set of tools contains a Search function allowing to
search for information through the entire Library and a Multi-Print capability allowing to
print several documents with a single click in the Search Results window.
It is not possible to use the AIX docsearch tool to search for information in the Hypertext
Library for AIX.
11. TPAD/HPAD Documentation Erratum
The paper documentation TPAD/HPAD Reference manual 86 A2 65 WE Rev 04,
Appendix B, is wrong concerning the TPAD Profile Parameters:
Instead use the softcopy documentation from the Hypertext Documentation CD-ROM, or
the TPAD Interactive commands:
help parameter
help parameter <param–number>
3-6
May 25th, 1999
Bull S.A.
PART 4. The Euro Character
1. Generalities & Standards
1.1 What is the Euro character?
The Euro character
is a new symbol representing the Euro currency, the new single
currency of the European Community.
The Euro currency is in application since 1/1/1999.
The introduction of a new currency symbol has far-reaching consequences. Software
applications in all areas of finance and accounting are deeply affected.
The underlying operating systems must enable basic functions like typing, displaying,
printing and exchanging, to support the new symbol.
1.2 Is it the only symbol for Euro currency?
No, there is also the acronym cent (.01 of Euro).
The cent will not be used as a symbol for editing.
1.3 What are the codifications of the Euro Character?
Different codifications exist for the Euro character:
• The ”Currency” ISO 4217 codification, which codes Euro in a chain of 3 characters
(EUR).
• The IBM–1252 codification which codes Euro on 8 bits (hex 80). (This is the codification
implemented in Windows/NT systems).
• The ISO 8859–15 codification which codes Euro on 8 bits (hex a4).
• The Unicode codification which codes Euro on 16 bits (hex 20ac).
• The UTF–8 codification which codes Euro on 24 bits (hex e282ac). This codification can
be mixed up amidst other 8–bit codifications. Estrella 200 and 300 do not support the
UTF-8 codification.
• The PC Code Page 858 codification which codes Euro on 8 bits (hex d5).
1.4 What is the ISO 4217 codification?
ISO 4217 Currency Codes:
This is a list of global currencies and their three–character ISO 4217 currency code. The
ISO 4217 currency code is usually composed of the country’s two–character ISO 3166
country code, plus a one–character currency designator. For example, the code for Belgian
Franc is simply Belgian’s two–character ISO 3166 code (BE) plus a one–character currency
designator (F).
BEF
DEM
DKK
ESP
FRF
GBP
ITL
LUF
NLG
Bull S.A.
Belgian Franc
Deutsche Mark
Danish Crone
Spanish Peseta
French Franc
British Pound
Italian Lira
Luxembourg Franc
Dutch Guilder
May 25th, 1999
4-1
NOK
PTE
SEK
USD
EUR
Norwegian Crone
Portuguese Escudo
Swedish Crone
US Dollar
EURO Currency
The Euro currency is given with 3 characters: EUR.
The currency code “EUR” (numeric code 978) is registered in the international standard ISO
4217 for use in international business and the financial world. In addition, the country code
“EU” has been reserved in ISO 3166.
This codification can be used when neither programs nor peripherals can be updated to
support Euro character.
1.5 What are the ISO8859–15, ISO8859–1, and IBM–1252 codes?
The difference between these three 8-bits codifications go further than the simple
replacement of the monetary symbol by Euro. Note that ISO 8859–1 Latin–1 does not
implement the Euro character.
ÁÁÁÁÁ
ÁÁÁÁÁÁÁÁ
ÁÁÁÁÁÁÁÁ
ÁÁÁÁÁÁÁÁ
ÁÁÁÁÁ
ÁÁÁÁÁÁÁÁ
ÁÁÁÁÁÁÁÁ
ÁÁÁÁÁÁÁÁ
ÁÁÁÁÁ
ÁÁÁÁÁÁÁÁ
ÁÁÁÁÁÁÁÁ
ÁÁÁÁÁÁÁÁ
ÁÁÁÁÁ
ÁÁÁÁÁÁÁÁ
ÁÁÁÁÁÁÁÁ
ÁÁÁÁÁÁÁÁ
ÁÁÁÁÁ
ÁÁÁÁÁÁÁÁ
ÁÁÁÁÁÁÁÁ
ÁÁÁÁÁÁÁÁ
ÁÁÁÁÁ
ÁÁÁÁÁÁÁÁ
ÁÁÁÁÁÁÁÁ
ÁÁÁÁÁÁÁÁ
ÁÁÁÁÁ
ÁÁÁÁÁÁÁÁ
ÁÁÁÁÁÁÁÁ
ÁÁÁÁÁÁÁÁ
ÁÁÁÁÁ
ÁÁÁÁÁÁÁÁ
ÁÁÁÁÁÁÁÁ
ÁÁÁÁÁÁÁÁ
ÁÁÁÁÁ
ÁÁÁÁÁÁÁÁ
ÁÁÁÁÁÁÁÁ
ÁÁÁÁÁÁÁÁ
ÁÁÁÁÁ
ÁÁÁÁÁÁÁÁ
ÁÁÁÁÁÁÁÁ
ÁÁÁÁÁÁÁÁ
1.6 What are the Unicode and UTF–8 codes?
ÁÁÁÁÁÁÁ
ÁÁÁÁÁÁ
ÁÁÁÁÁÁ
ÁÁÁÁÁÁÁ
ÁÁÁÁÁÁ
ÁÁÁÁÁÁ
ÁÁÁÁÁÁÁ
ÁÁÁÁÁÁ
ÁÁÁÁÁÁ
Code hex
80
a6
a4
a8
b4
b8
bc
bd
be
ISO 8859–15 Latin–9
No symbol
S caron
Euro
s caron
E caron
e caron
Œ
œ
Y diaresis
Euro coding
Unicode
Code hex
20ac
Code length (bytes) 2
ISO 8859–1 Latin–1
No symbol
|
¤
¨
Sharp accent
Cedilla
1/4
1/2
3/4
IBM–1252
Euro
|
¤
¨
Sharp accent
Cedilla
1/4
1/2
3/4
UTF–8
e282ac
3
The UTF–8 Euro character is the only 3–bytes codification that can be mixed in other 8–bit
codifications. On the contrary, with Unicode, all the characters must be coded on 2-bytes.
1.7 What is the Code Page 858?
Code page 858 has been registered as identical to code page 850 except for the
replacement of LI61 (dotless i) at code point D5 by SC20 (euro symbol). In other words,
applications will have to recognize that ”code page 850” may mean CP 00850, or may mean
CP 00858. If necessary, it will be up to the application to determine which code page, 850 or
858, is really being used. By checking the mapping between the Microsoft code page 1252
and 850, it is possible to determine if the euro changes have been installed:
if (WinCpTranslateChar((HAB)0, 1252, 0x80, 850) == 0xd5) euro supported
1.8 Conversion Tables
New conversion tables are required to support the new code pages:
IBM–850 (= ISO8859–1)
IBM–858
IBM–1252
ISO8859–15
UTF–8
Example:
The following command will translate the file ISO8859–15 fic1 into the file IBM–858 fic2.
4-2
May 25th, 1999
Bull S.A.
iconv –f ISO8859–15 –t IBM–858 fic1 > fic2
1.9 Where is the Euro Character on the keyboard?
ÁÁÁÁ
ÁÁÁÁÁÁÁÁÁÁÁÁÁÁÁ
ÁÁÁÁ
ÁÁÁÁÁÁÁÁÁÁÁÁÁÁÁ
ÁÁÁÁ
ÁÁÁÁÁÁÁÁÁÁÁÁÁÁÁ
ÁÁÁÁ
ÁÁÁÁÁÁÁÁÁÁÁÁÁÁÁ
ÁÁÁÁ
ÁÁÁÁÁÁÁÁÁÁÁÁÁÁÁ
ÁÁÁÁ
ÁÁÁÁÁÁÁÁÁÁÁÁÁÁÁ
ÁÁÁÁ
ÁÁÁÁÁÁÁÁÁÁÁÁÁÁÁ
The CEN standard defines the key where the Euro character is engraved on:
Key
altGr–E
altGr–4
altGr–5
altGr–U
Country
Denmark, Finland, Norway, Portugal, Sweden,
Italy, Spain, Belgium, NetherLands, France,
Switzerland, Germany
United Kingdom, Ireland
United States
Poland
1.10 What Difficulties Are Encountered With the Euro Character?
The Euro character must be seized, displayed, printed, and transmitted. However:
• It is not engraved on all keyboards.
• It is not defined in the ISO8859–1, and IBM–1252 codifications that are today applied on
the customer systems.
• It may be used for applications.
• It is not defined for all locale program definitions.
2. What are the Consequences for the User?
• If the hardware is partially upgraded to support the Euro character, it may not be able to
seize, to display, to print, or to transmit the Euro character.
• If the hardware supports different Euro codifications, the administrator must make sure
that the configuration correctly manages this case.
• In the case of old, non-upgradable systems, a work around is to use the character ”E” for
the Euro symbol (this solution is recommended by the French Ministry of Finances). But
”E” can be confounded with the character ”F”, for example when it is printed on old
printers.
• On non-upgradable terminals the hex code a4 sent to the AIX system is still displayed as
the ancient code of the ISO table ( ¤ ).
• All customer applications that treat the Euro character need to be modified.
• Data transmitted via network (TCP,...) should clearly indicate the norm of codification of
the Euro character since several codifications can be used (except for the UTF–8
codification).
3. Recommendations
• Choose a unique code for the representation of the Euro character in AIX. The
recommended code is the one of ISO8859–15: hex a4.
• Create filters for peripheral devices (setmaps, maps,) to convert this code automatically
from and to.
Example: you use RPC DCE between an AIX system and a GCOS7 system. The
codification of the Euro character is hex a4 on AIX and EBCDIC hex 9F on GCOS7.
The software under GCOS7 makes the conversions:
9F –> a4 to send to AIX
a4 –> 9F to receive from AIX.
Bull S.A.
May 25th, 1999
4-3
Remarks:
• It is not necessary for AIX to manage the Euro character when the firmware of terminals
or printers do it at their level: AIX will simply stock the binary value hex a4 as any binary
value.
• On the contrary, AIX has to provide the fonts of the Euro character for graphic consoles.
• Names of files can include the Euro symbol.
4. Compilers and Euro
Compilers do support the Euro character.
4.1 Cobol
Cobol MicroFocus follows the X/OPEN standard, and thus allows localization and in
particular the management of the monetary symbol in editions.
To compile the Euro character, use one of the following methods:
• Use the internationalization function (locale).
• Or use the binary value of the Euro character: hex 282ac, 80, or a4.
Remarks:
• You can compile with the NLS environment division.
• For examples of conversions of currencies inside a program, refer to the “Work-arounds”
section.
4.2 C Compiler
To compile the Euro character, use one of the following methods:
• Use the internationalization function (locale). The locale can be modified inside a
program, thus allowing conversions of currencies.
• Or use the binary value of the Euro character: hex 282ac, 80, or a4.
4.3 FORTRAN
To compile the Euro character use its binary value: hex 282ac, 80, or a4.
5. Terminals and Euro
Refer to the Terminals and Printers Configuration Guide (ref. 86 A1 22WE).
ÁÁÁÁÁ
ÁÁÁÁÁÁ
ÁÁÁÁÁ
ÁÁÁÁÁÁ
ÁÁÁÁÁ
ÁÁÁÁÁÁ
ÁÁÁÁÁ
ÁÁÁÁÁÁ
ÁÁÁÁÁ
ÁÁÁÁÁÁ
ÁÁÁÁÁ
ÁÁÁÁÁÁ
ÁÁÁÁÁ
ÁÁÁÁÁÁ
5.1 ASCII Terminals
Model
BQ306 (*)
BQ3102
BQ303
BQ315x
BQ210
Euro Support
Yes
No
No
No
No
(*) BQ306 with VR320 and WY55 emulations only.
4-4
May 25th, 1999
Bull S.A.
5.2 Graphical Terminals (X11 manager) and X Terminals (X11 manager,
or NCD based)
• Even when the Euro character is engraved on the keyboard, the “AIX 4.3.2 Updates”
CD-ROM must be installed to support the Euro character.
• A substitution of key (xmodmap) is necessary to key in the Euro character.
6. Printers and Euro
Refer to the Terminals and Printers Configuration Guide (ref. 86 A1 22WE).
7. My Peripheral Is Not Upgradable. What to Do?
Use a work–around, as described in the “Work-arounds” section.
8. Restrictions
8.1 Codification
• Estrella 200 and 300 do not support the UTF-8 codification.
• The ISO8859–15 Euro codification is not supported for X terminals.
• The Alt–Gr E (4, 5, u) combination key is not allowed on Graphical or X terminals. (use
work-arounds)
8.2 Products that do not support Euro character
• Bull printers
• HTML
• SNA20 with X Terminals
• Affinity 16 bits
• FR_FR language does not operate with aixterm
• Cobol does not provide NLS UTF–8 codification.
8.3 C Libraries
• isalpha and isprint give FALSE result with any of the Euro character codification.
9. Work-arounds
9.1 ASCII Terminals
9.1.1 Send “hex a4” to the system
Use function keys F6 to F10 as the Euro character. The character displayed on the screen
will be the ”International Currency ¤”
Example:
To use the F6 key for Euro character proceed as follows:
Create the file /usr/lib/nls/termmap/f.in with the line:
\x1b\x5b\x31\x37\x7e:\xa4
Then enter the command:
Bull S.A.
May 25th, 1999
4-5
# setmaps –v –i f
To use other Function keys, refer to the following table:
F key
F6
F7
F8
F9
F10
/usr/lib/nls/termmap/f.in
\x1b\x5b\x31\x37\x7e:\xa4
\x1b\x5b\x31\x38\x7e:\xa4
\x1b\x5b\x31\x39\x7e:\xa4
\x1b\x5b\x32\x30\x7e:\xa4
\x1b\x5b\x32\x31\x7e:\xa4
9.1.2 Send “hex 80” to the system
Use function keys F6 to F10 as the Euro character. Since the hex 80 cannot be displayed
on the terminal, the ”International Currency ¤” will be chosen to be echoed on the display.
Example:
To use the F6 key for Euro character proceed as follows:
Create the file /usr/lib/nls/termmap/f.in with the line:
\x1b\x5b\x31\x37\x7e:\x80
Then enter the command:
# setmaps –v –i f
Create the file /usr/lib/nls/termmap/f.out with the line:
\x80:\xa4
Then enter the command:
# setmaps –v –o f
To use other Function keys, refer to the following table:
F key
F6
F7
F8
F9
F10
/usr/lib/nls/termmap/f.in
\x1b\x5b\x31\x37\x7e:\x80
\x1b\x5b\x31\x38\x7e:\x80
\x1b\x5b\x31\x39\x7e:\x80
\x1b\x5b\x32\x30\x7e:\x80
\x1b\x5b\x32\x31\x7e:\x80
9.1.3 Send “hex e282ac” to the system
Use function keys F6 to F10 as the Euro character. Since the hex e282ac cannot be
displayed on the terminal, the ”International Currency ¤” will be chosen to be echoed on the
display.
Example:
To use the F6 key for Euro character proceed as follows:
Create the file /usr/lib/nls/termmap/f.in with the line:
\x1b\x5b\x31\x37\x7e:\xe2\x82\xac
Then enter the command:
# setmaps –v –i f
Create the file /usr/lib/nls/termmap/f.out with the line:
\xe2\x82\xac:\xa4
Then enter the command:
# setmaps –v –o f
To use other Function keys, refer to the following table:
F key
F6
4-6
/usr/lib/nls/termmap/f.in
\x1b\x5b\x31\x37\x7e:\xe2\x82\xac
May 25th, 1999
Bull S.A.
F7
F8
F9
F10
\x1b\x5b\x31\x38\x7e:\xe2\x82\xac
\x1b\x5b\x31\x39\x7e:\xe2\x82\xac
\x1b\x5b\x32\x30\x7e:\xe2\x82\xac
\x1b\x5b\x32\x31\x7e:\xe2\x82\xac
9.2 Graphical or X Terminal
9.2.1 Send “hex a4” to the system
This is not possible.
9.2.2 Send “hex 80” or “hex e282ac” to the system
Check the keycode of the Control–right key.
Enter:
/usr/lpp/X11/Xamples/bin/xev | grep keycode
Depress the Control–right key.
Move the mouse inside the opened window.
Close the window.
Note the keycode value: it should be 72.
Check the keycode of the Euro key:
Enter:
/usr/lpp/X11/Xamples/bin/xev | grep keycode
Depress the Euro key.
Move the mouse inside the opened window.
Close the window.
Note the keycode value: it should be 27 for Euro Sign on E key.
Create the euro file, with the following lines:
keycode 27 = e E EuroSign
keycode 72 = Mode_switch
clear Mod2
add Mod2 = Mode_switch
Enter:
xmodmap euro
9.2.3 To get the Euro Sign coded hex 80 in a window
The X terminal server and the font server must be updated with the “AIX 4.3.2 Update”
CD-ROM.
Enter:
LANG=fr_FR.IBM–1252; dtterm
or:
LANG=fr_FR.IBM–1252; aixterm
9.2.4 To get the Euro Sign coded hex e282ac in a window
The X terminal server and the font server must be updated with the “AIX 4.3.2 Update”
CD-ROM.
Install the extension UTF–8 language, and enter:
LANG=FR_FR; dtterm
Bull S.A.
May 25th, 1999
4-7
9.3 Usage of ”locale” in C programs
9.3.1 IBM–1252: Example of a conversion program
This example prints the Euro character (coded hex 80) on an X terminal.
#include <monetary.h>
#include <locale.h>
#include <stdio.h>
main(int argc, char **argv)
{
char bfr[256];
ssize_t size;
float value, cours = 6.55957;
(void) setlocale (LC_ALL, ”fr_FR.IBM–1252”);
value = 10000.00;
size = strfmon(bfr, 256, ”%+15#5.2n”, value);
printf (”valeur en Francs: %s ”, bfr);
value = 10000.00 / cours;
(void) setlocale (LC_MONETARY, ”fr_FR.IBM–1252@euro”);
size = strfmon(bfr, 256, ”%+15#5.2n”, value);
if (size > 0)
printf (”soit en EUROS: %s\n”, bfr);
}
9.3.2 ISO8859–15: Example of a conversion program
This example prints the Euro character (coded hex a4) on an ASCII BQ306 terminal.
#include <monetary.h>
#include <locale.h>
#include <stdio.h>
main(int argc, char **argv)
{
char bfr[256];
ssize_t size;
float value, cours = 6.55957;
char euro = 0xa4;
(void) setlocale (LC_ALL, ”fr_FR.IBM–1252”);
value = 10000.00;
size = strfmon(bfr, 256, ”%+15#5.2n”, value);
printf (”valeur en Francs: %s ”, bfr);
value = 10000.00 / cours;
printf (”%s soit en EUROS: %5.2f %c\n”, bfr, value,
euro);
}
4-8
May 25th, 1999
Bull S.A.
9.3.3 UTF–8: Example of a conversion program
In the following example the Euro character is coded hex e282ac.
#include <monetary.h>
#include <locale.h>
#include <stdio.h>
main(int argc, char **argv)
{
char bfr[256];
ssize_t size;
float value, cours = 6.55957;
(void) setlocale (LC_ALL, ”fr_FR.IBM–1252”);
value = 10000.00;
size = strfmon(bfr, 256, ”%+15#5.2n”, value);
printf (”valeur en Francs: %s ”, bfr);
value = 10000.00 / cours;
(void) setlocale (LC_MONETARY, ”FR_FR@euro”);
size = strfmon(bfr, 256, ”%+15#5.2n”, value);
if (size > 0)
printf (”soit en EUROS: %s\n”, bfr);
}
9.4 Usage of NLS in Cobol programs
9.4.1 IBM–1252: Example of program
This example prints the Euro character (coded hex 80) on an X terminal. It will give the Euro
character before the Euro value:
export LANG=fr_FR.IBM–1252
export LC_MONETARY=fr_FR.IBM–1252@euro
$set NLS
$set XOPEN
environment division.
special–names.
environment–name is envname
environment–value is envvalue.
data division.
01 valeur pic $$$$$$9.99.
01 lang pic x(5).
procedure division.
display ”LANG” upon envname.
accept lang from envvalue.
move 456.23 to valeur.
display ”When LANG=” lang ”, value is =” valeur ”.”.
stop run.
This procedure is only possible with float insertion or fix insertion.
To have the Euro character after its value, see the examples hereafter.
Bull S.A.
May 25th, 1999
4-9
9.4.2 IBM–1252: Example of a conversion program
This example prints the Euro character (coded hex 80) on an X terminal.
export LANG=fr_FR.IBM–1252
keeps the F character for the value to convert.
The Euro character is given by the filler value hex 80.
$set NLS
$set XOPEN
environment division.
special–names.
environment–name is envname
environment–value is envvalue.
data division.
working–storage section.
01 francs–value pic 9(10)v99.
01 euro–value pic 9(10)v99.
01 edited–francs–value pic $(9)9.99.
01 edited–euro–value.
02 edited–euro–value–1 pic z(9)9.99.
02 filler pic x value x”80”.
01 change–rate pic 9V9(5) value 6.55957.
procedure division.
move 10000.00 to francs–value.
divide change–rate into francs–value
giving euro–value rounded.
move francs–value to edited–francs–value.
move euro–value to edited–euro–value–1.
display edited–francs–value ” = ”
edited–euro–value.
stop run.
9.4.3 ISO8859–15: Example of a conversion program
This example prints the Euro character (coded hex a4) on an ASCII BQ306 terminal.
export LANG=fr_FR.IBM–1252
keeps the F character for the value to convert.
The Euro character is given by the filler value hex a4.
$set NLS
$set XOPEN
environment division.
special–names.
environment–name is envname
environment–value is envvalue.
data division.
working–storage section.
01 francs–value pic 9(10)v99.
01 euro–value pic 9(10)v99.
01 edited–francs–value pic $(9)9.99.
01 edited–euro–value.
02 edited–euro–value–1 pic z(9)9.99.
02 filler pic x value x”a4”.
01 change–rate pic 9V9(5) value 6.55957.
procedure division.
move 10000.00 to francs–value.
divide change–rate into francs–value
giving euro–value rounded.
move francs–value to edited–francs–value.
move euro–value to edited–euro–value–1.
display edited–francs–value ” = ”
edited–euro–value.
stop run.
4-10
May 25th, 1999
Bull S.A.
9.4.4 UTF–8: Example of a conversion program
In the following example the Euro character is coded hex e282ac.
export LANG=fr_FR.IBM–1252
keeps the F character for the value to convert.
The Euro character is given by the filler value hex e282ac.
$set NLS
$set XOPEN
environment division.
special–names.
environment–name is envname
environment–value is envvalue.
data division.
working–storage section.
01 francs–value pic 9(10)v99.
01 euro–value pic 9(10)v99.
01 edited–francs–value pic $(9)9.99.
01 edited–euro–value.
02 edited–euro–value–1 pic z(9)9.99.
02 filler pic x(3) value x”e282ac”.
01 change–rate pic 9V9(5) value 6.55957.
procedure division.
move 10000.00 to francs–value.
divide change–rate into francs–value
giving euro–value rounded.
move francs–value to edited–francs–value.
move euro–value to edited–euro–value–1.
display edited–francs–value ” = ”
edited–euro–value.
stop run.
ÁÁÁÁÁÁÁÁÁÁÁÁÁÁÁÁÁÁÁÁÁÁÁÁÁÁÁÁÁ
ÁÁÁÁÁÁ
ÁÁÁÁÁÁ
ÁÁÁÁÁÁÁ
ÁÁÁÁÁÁÁ
ÁÁÁÁÁÁÁ
ÁÁÁÁÁÁÁÁÁÁÁÁÁÁÁÁÁÁÁÁÁÁÁÁÁÁÁÁÁ
ÁÁÁÁÁÁ
ÁÁÁÁÁÁ
ÁÁÁÁÁÁÁ
ÁÁÁÁÁÁÁ
ÁÁÁÁÁÁÁ
ÁÁÁÁÁÁ
ÁÁÁÁÁÁ
ÁÁÁÁÁÁÁ
ÁÁÁÁÁÁÁ
ÁÁÁÁÁÁÁ
ÁÁÁÁÁÁ
ÁÁÁÁÁÁ
ÁÁÁÁÁÁÁ
ÁÁÁÁÁÁÁ
ÁÁÁÁÁÁÁ
ÁÁÁÁÁÁ
ÁÁÁÁÁÁ
ÁÁÁÁÁÁÁ
ÁÁÁÁÁÁÁ
ÁÁÁÁÁÁÁ
ÁÁÁÁÁÁ
ÁÁÁÁÁÁ
ÁÁÁÁÁÁÁ
ÁÁÁÁÁÁÁ
ÁÁÁÁÁÁÁ
ÁÁÁÁÁÁ
ÁÁÁÁÁÁ
ÁÁÁÁÁÁÁ
ÁÁÁÁÁÁÁ
ÁÁÁÁÁÁÁ
ÁÁÁÁÁÁ
ÁÁÁÁÁÁ
ÁÁÁÁÁÁÁ
ÁÁÁÁÁÁÁ
ÁÁÁÁÁÁÁ
ÁÁÁÁÁÁ
ÁÁÁÁÁÁ
ÁÁÁÁÁÁÁ
ÁÁÁÁÁÁÁ
ÁÁÁÁÁÁÁ
ÁÁÁÁÁÁ
ÁÁÁÁÁÁ
ÁÁÁÁÁÁÁ
ÁÁÁÁÁÁÁ
ÁÁÁÁÁÁÁ
ÁÁÁÁÁÁ
ÁÁÁÁÁÁ
ÁÁÁÁÁÁÁ
ÁÁÁÁÁÁÁ
ÁÁÁÁÁÁÁ
ÁÁÁÁÁÁ
ÁÁÁÁÁÁ
ÁÁÁÁÁÁÁ
ÁÁÁÁÁÁÁ
ÁÁÁÁÁÁÁ
ÁÁÁÁÁÁ
ÁÁÁÁÁÁ
ÁÁÁÁÁÁÁ
ÁÁÁÁÁÁÁ
ÁÁÁÁÁÁÁ
ÁÁÁÁÁÁ
ÁÁÁÁÁÁ
ÁÁÁÁÁÁÁ
ÁÁÁÁÁÁÁ
ÁÁÁÁÁÁÁ
ÁÁÁÁÁÁ
ÁÁÁÁÁÁ
ÁÁÁÁÁÁÁ
ÁÁÁÁÁÁÁ
ÁÁÁÁÁÁÁ
ÁÁÁÁÁÁ
ÁÁÁÁÁÁ
ÁÁÁÁÁÁÁ
ÁÁÁÁÁÁÁ
ÁÁÁÁÁÁÁ
10. Summary
Product
BQ306
X terminals
Printers
Applications
locale
Bull S.A.
Hardware or applications products support for Euro codes
ISO 8859–15
IBM–1252
UTF–8
Comment
(hex code a4)
(hex code 80)
(hex code e282ac)
Yes: standard
Yes: use filters
Yes: use filters
use setmaps to set
filters
No: not ready
Yes: standard
Yes: standard
use xmodmap to
configure keyboard
Yes: standard
Yes: standard
No: not ready
No: not ready
Yes.
Yes.
ca_ES.IBM–1252
de_DE.IBM–1252
en_GB.IBM–1252
es_ES.IBM–1252
fi_FI.IBM–1252
fr_BE.IBM–1252
fr_FR.IBM–1252
it_IT.IBM–1252
nl_BE.IBM–1252
nl_NL.IBM–1252
pt_PT.IBM–1252
CA_ES
DE_DE
ES_ES
FI_FI
FR_BE
FR_FR
IT_IT
NL_BE
NL_NL
PT_PT
May 25th, 1999
Catalan
German
English
Spanish
Finish
Belgian French
French
Italian
Belgian Dutch
Netherlands Dutch
Portugese
4-11
4-12
May 25th, 1999
Bull S.A.