1
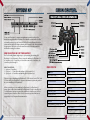
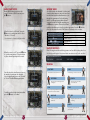
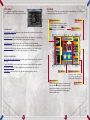
�
��������������������������������������������
��������������������������������������������������������������������
�� ����� ������ ����������� ��� ������������ ���� ����������� ���������� ��������� ��� ���������� �����
��������������������������������������������������������������������������������������������������
��������������������������������������������������������������������������������������������������
������ ������������� ������ ����������� ���� �������� ����������� ����������� ���������� ��������� ���
�������������������������������������������������������������������������������������������������
��������������������������������������������������������������������������������������������������
�����������������������������������������������������������������������������������������
����������������������������������������������������������������������������������
�� ����������
�� ����������������
�� ����������������
�� ����������
�� ������������������������
�� ���������������������������������������
�� �������������������
����������������������������������������������������
�����������������������������������������������������������������������������
����������������������������������������������������������������������
�� ������������������������������������������������������������������������������������
�� ������������������������������������������������������������������������������
�� ��������������������������������������������������
� �������������������������������������������������
�� ������������������������������������������������
�����������������������������������������������������������������������������
����� ������ ���� ������� ������������ ��� ���� ����������� ���� ��� ���� ���������� ����������
����������������� �������� ��� �� ���������� �������� ��� ������� ���������� ����������� ��� ����� ��� ����
�����������������������������������������������������������������������������������������������������
���������������������������������������������
����������������������������������������������������������������������������������������������������
������������������������������������������������������������������������������������������������
����������
�����������������������������������������
�� ����������������������������������������������������������������������������������������������
�� ����������������������������������������������������
�� �������������������������������������������������������������������������������
�� ���������������������������������������������������������������
�� �����������������������������������������������������������������������������������������������
� ���������������������������������������������������������������������������������������������������
� ��������������������������������������������������������������������
SETTING UP
MENU CONTROL
Set up your PlayStation®2 computer entertainment system according to the
instructions supplied with your system. Check that the system is turned on (the
on/standby indicator is green). Insert the Fire Pro Wrestling Returns disc in the
system with the label side facing up. Attach game controllers and other peripherals
as appropriate. Follow the on-screen instructions and refer to this manual for
information on using the software.
How to use mutiltap (for PlayStation®2)
Fire Pro Wrestling Returns supports up to 8 players using the multitap (for
PlayStation®2) (sold separately). Please connect the multitap (for PlayStation®2)
to controller port 1 or controller port 2 and then connect the controllers to the
controller port A through D.
WHAT IS NEEDED:
1 - 2 players: 2 Controllers
3 - 5 players: 3 – 5 Controllers and multitap (for PlayStation®2) x 1
6 – 8 players: 6 – 8 Controllers and multitap (for PlayStation®2) x 2
There are 2 types of multitap (for PlayStation®2): SCPH-10090 U and SCPH-70120
U. Please check your PlayStation®2 computer entertainment system and purchase
the correct multitap (for PlayStation®2).
When connecting one or two multitap (for PlayStation®2) to PlayStation®2
system, please either connect multitap (for PlayStation®2) to the controller port
1 on PlayStation®2 system or connect the controller to controller port A before
connecting more controllers. Please do not connect any products that are not
supported by Sony Computer Entertainment, Inc.
Menu Controls
Ω button
å button
Open /close list
Move cursor to left
≈ button
Directional button
Confirm selection
Move cursor/make selection
√ button
Right analog stick
Open submenu
Shortcut selection
∂ button
ç button
Move cursor to right
Cancel/Return to previous screen
START button
Start game/Confirm all selections
2
3
STARTING A GAME
Press the START button at the Title
Screen.
Match Settings
Match Settings must be decided before a match
can start. Use the up and down directional
buttons to highlight selections and use the Left
and Right directional button to change selections.
You can also use the ≈ button to open a menu
and make changes there.
*Match Setting options vary depending on the game
mode chosen.
*Press the START button to exit the match settings and proceed to the wrestler
select screen.
Settings
Main Menu Screen.
1. GAME MODES: Compete in various
match modes.
2. EDIT: Edit wrestlers, referees,
organizations, teams, belts, etc.
3. OPTIONS: Set gameplay settings.
4. DATA: Save/Load game data or copy data.
Game Modes
1. EXHIBITION: Single match against a
CPU opponent or human players.
2. TOURNAMENT: Single-elimination
matches arranged in a conventional ladderstyle format.
3. LEAGUE: Set up a league and compete.
4. TEAM MATCH: Each team consists of 5
wrestlers competing as a team.
5. BATTLE ROYAL: Free-for-all with each wrestler trying to be the last man
standing.
6. TITLE MATCH: Match competing for a champion belt.
7. MATCH MAKER: Become a promoter and try to produce a profit.
*Game data can be saved on memory card (8MB)(for PlayStation®2). Minimum of
917KB free space is required to save the game data.
4
You can save up to 4 match settings.
Decide the player entry (see page 8 for details). From 1 versus 1 and up
Blue/Red Corner
to 4 versus 4 in a tag match.
Decide the victory condition: 3 count, 2 count, Fall Only, Give Up, and
Rule
Escape in Cage Deathmatch.
Wrestlers can be eliminated by being thrown over
Over-Rope
the top rope.
Time
Decide match duration: 3, 5, 10, 15, 20, 30, 45, 60 minutes, or unlimited.
Matches
Set match numbers to play: 1 match or best of 3.
Ring
Select a ring for the match.
Venue
Select the venue where the match will be held.
COM Skill
Set CPU skill level. (1 Lowest ~ 10 Highest).
Speed
Set match speed from 100% ~ 800%.
COM Skip
Set ON/OFF to skip a match between CPU wrestlers.
Referee
Select a referee for the match.
Rope
Pins and submission holds are broken if a wrestler is touching the rope.
Match continues until all the wrestlers from one team are eliminated in
Elimination
a multi-wrestler match.
Wrestlers automatically return to the ring after being thrown out or
Lumber
exiting the ring.
All participating wrestlers in a tag match are allowed in the ring at the
Tornado
same time.
During a tag match, teammates are allowed to interfere if a wrestler is in
Cut Play
danger of being pinned or under a submission hold.
The referee counts to 5 for an illegal act, and the wrestler is disqualified
DQ Count
if the act is still present at count 5.
Outside
The referee counts to 20 when a wrestler is outside the ring.
BGM
Select the background music for the match.
Critical
Select the frequency rate for Critical Hits.
5
About Player Entry
On the Match Settings screen move the
cursor to the Blue or Red Corner and press
the ≈ button.
When the cursor is on “Wrestler”, press the
≈ button to open the menu window. Select
“Wrestler” or “Second”.
*Second cannot be selected as the first wrestler.
Wrestler Select
Select the wrestlers for the match. Use the up and
down directional buttons to move the cursor, and
use the left and right directional buttons to cycle
through the organizations. Use the left analog
stick to cycle through groups within the same
organization. After selecting the wrestlers, press
the ≈ button to continue. Now use the left and
right directional buttons to select the wrestler’s appearance. Press the ≈ button to
proceed to the match. Press the START button to randomly select a wrestler.
Directional button Up and Down
Directional button Left and Right
≈ button
å and ∂ buttons
Left analog stick
Select wrestler
Cycle organizations/select appearance
Confirm selections
Cycle organizations
Cycle Groups
Starting the Match
When the cursor is on “1P”, press the ≈ button
to open the menu window. Select the number
of players that will participate in the match.
After selecting the wrestlers and their appearance and once all the settings have been
decided, the match begins. Some venues feature an entrance movie for the wrestlers.
Venues with Entrance Movies
SPIKE DOME
NO.1 RING
WEST DOME
USA DOME
Referees
Press the down directional button to increase
the number of participants for the match.
Select the participating players and “Wrestler”
or “Second” for the additional participants.
PANTHER
SAGA
A traditional referee that follows the book.
His officiating is considered conservative.
SEPTIEGO
IMADA
Indie referee whose officiating is lenient
on illegal acts.
SWA referee who often makes
controversial calls.
DAI
To finish, press the left direction button, then
press the ≈ button on “Confirm.”
6
TAKI
Referee representing the Women’s wrestling
with quick moves and rational calls.
A theatrical and dramatic referee.
MR. FAIR
JOE
A well respected referee that officiates
with fairness.
A legendary referee in the world
of wrestling.
REI
CINDY
A female referee who officiates
deathmatches.
Very quick to respond, but weak to
physical contact.
7
MATCH RULES
Basic rules for the matches are as the following:
Normal Match
1. WIN: Take count 3 in pinned position.
2. WIN: Opponent gives up (taps) under a submission hold.
3. LOSE: Staying on top of a corner post when count 5 is called.
4. LOSE: Illegal act is present when count 5 is called.
5. LOSE: Outside the ring when count 20 is called.
6. BREAK: A pin, hold, or submission near the rope.
SWA/S-1 Rule (Rule 1-6 will apply)
7. LOSE: Unable to stand within a 10 count after being knockout.
Change Match Rules
Rules can be changed with the following options.
1. 3 COUNT: Match ends when taking 3 counts in pinned position or give up.
2. 2 COUNT: Match ends when taking 2 counts in pinned position or give up.
3. GIVE UP: Match ends when the participants give up or by a knockout.
4. FALL ONLY: Match ends when taking 3 counts in pinned position.
5. ESCAPE: Match ends when the participant escapes from a cage ring (only
available in Cage Deathmatch).
GAME MODES
Exhibition
You can play a single match with detailed
settings that you decided on.
NORMAL MATCH: Normal rules.
CAGE DEATHMATCH: Ring will be
surrounded by a steel cage. Match Setting rule
Escape can be selected for this match mode.
The first participant successfully escaping from
the cage wins.
CAGE WITH ESCAPE ENABLED: Wrestler can climb the cage from the apron.
The controls are below:
From Apron
Directional button (towards cage) + √
Grab the cage
button (or ≈ button)
Directional button (towards cage) + Ω
Shake the cage
button
While grabbing the cage
Directional button
Directional button + Ω button
Move on cage
Attack while grabbing the cage
Near the top of the cage
Directional button up + √ button (or
≈ button)
Go over to the opposite side of the cage
Near the bottom of the cage
Directional button down + √ button
(or ≈ button)
Go down to the outside ring or apron
Near top of the cage around corner
Directional button left or right + √
button (or ≈ button)
8
Climb on the cage corner
9
BARBED WIRE DEATHMATCH: This deadly deathmatch is enclosed in
electrified barbed wire. When the wrestler is whipped into the wire, an explosion
will occur and the wrestler may start to bleed. Also an explosive can be set around
the ring to be detonated at a decided time. This explosion inflicts heavy damage to
everyone in the ring.
LANDMINE DEATHMATCH: Landmines are set around the ring and
fluorescent tubes or barbed wires can be set in front of the corner posts. When the
wrestler is tossed outside the ring, an explosion occurs, inflicting damage to the
wrestler.
SWA RULES MATCH: This mode is played with mix marital arts rules. Various
match settings can be decided including: Number of rounds and TKO rule.
S-1 RULES MATCH:This mode is played with rules that don’t allow grappling.
Only striking attacks can be used and the match is decided by Knockout. The match
is played as a single match.
Special rules for S-1 rules:
NO GRAPPLING/SUBMISSION.
NO RUNNING INSIDE THE RING.
GRUESOME FIGHTING: The match is played in an octagon ring. It can only be
played as a single match.
Special rules for Gruesome Fighting:
GIVE UP: Match ends by Knockout or give up.
NO ROPE.
Tournament
Elimination-style tournament can be played.
Participating wrestlers are placed in brackets
to face each other and the winner advances to
the next round. Fatigue and damage is carried
over to the next round. The match settings can
be set in detail. Minimum of 3 wrestlers and
maximum of 32 wrestlers can be assigned.
League
Round robin-style league can be played. The
winner earns fixed points for a win or draw.
The one with the most points will be the
champion. A minimum of 4 wrestlers and
a maximum 64 wrestlers can be assigned.
Wrestlers can be placed into groups and the
number for those groups can be decided by
the player.
2 and 4 groups
PARTICIPANTS: A maximum of 64 wrestlers can be
assigned when a league is decided and played in groups.
FINAL KNOCKOUT STAGE: If the League is played
in groups, the final knockout stage will decide the
champion. From 1 to 3 qualifying wrestlers can be
selected. The bracket will automatically be determined
depending on the points earned.
Z
V
C
c
v
X
Z
V
C
c
v
X
10
5 Point System
Win: fall/give up/KO
Win: DQ/ring-out
Draw: time up
Draw: ring-out
Lose: DQ/ring-out
Lose: fall/give up/KO
2 Point System
Win: fall/give up/KO
Win: DQ/ring-out
Draw: time up
Draw: ring-out
Lose: DQ/ring-out
Lose: fall/give up/KO
5
4
2
0
0
0
2
2
1
0
0
0
11
Team Match
Teams consisting of 5 wrestlers face each other in a series of single matches. The
match style can be selected from Elimination, Round-robin, or Tug-of-War. If the
Team Match is played as Elimination, the fatigue and damage will be carried over to
the next match.
ELIMINATION: The winner stays to face the next opponent. A team that defeats
the opposing team’s 5th wrestler is the winner.
ROUND ROBIN: Wrestlers from each team will face each other. The team with
the better record wins. The team order can be decided by the player.
TUG-OF-WAR: The matches are played as Round Robin style, but the team order
is set by the computer.
About Edit Team:
An original team can be used to play this mode. The original team must be created
or edited prior. Select “Edit Team” on the Team Match main menu screen. Existing
team can be edited or a custom team can be created. Enter the team name and
select the wrestlers.
Battle Royal
Up to eight wrestlers can fight against each other. There are 5 different rules for
Battle Royal.
NORMAL: Eliminated wrestlers are forced to leave the ring.
FIRST WIN: First pinfall wins the match.
ENDLESS: Eliminated wrestlers stay in the ring and continue to fight.
OVER-ROPE: Any participant that is tossed over the rope (thrown outside the
ring) is eliminated.
TIME: The match starts with two wrestlers and the other participants enter the
ring at timed intervals. After the participants are determined the entrance order
must be assigned.
Title Match
Match Maker
The player is assigned the duty of a promoter who books matches. This allows
the player to create a complete match card or a series of cards. The player will be
rewarded with FP points depending how well the crowd was entertained.
SEASON: Host 12 events
COMPETITION: Host a single event
RANKING: View FP points from Season and Competition
BASIC MATCH MAKER MODE FLOW
1. ORGANIZATION/VENUE: Select the
organization and a venue to host the event.
2. MATCH MAKER: Book the matches.
Select Match Style: Normal, Cage Deathmatch,
Barbed Wire Deathmatch, Landmine
Deathmatch, SWA Rules Match, and S-1 Rules
Match.
*Some match styles cannot be selected depending
on the venue.
Match Settings: Decide match settings.
Wrestler Select: To book wrestlers cost FP and the more popular a wrestler the
more they cost. Some wrestlers cannot be booked at the beginning of a season.
3. HOST EVENT: Each match will be evaluated.
4. EVENT RESULT: Crowd satisfaction
percentage, overall score and FP earned will be
displayed.
Title Match is a mode to decide which wrestler is worthy to earn a title belt.
12
13
MATCH CONTROLS
Standing (strike):
The key to standing attacks is to use weak strikes at the start of a match. Once the
opponent becomes tired or hurt; start using medium and strong strikes.
Directional button
√ button
≈ button
Ω button + directional button
Ω button
√ button + ≈ button
ç button + directional button
Move wrestler
Weak strike
Medium strike
Strong strike 1
Strong strike 2
Strong strike 3
Run towards the selected direction
Run left or right (when the wrestler is on the
ç button + directional button L/R
diagonal line between the corner posts)
Use breathing to avoid fatigue
å button
Circle around the opponent
∂ button + directional button L/R
Walk toward the opponent or away from the
∂ button + directional button Up/Down
opponent
Left analog stick
Execute Performance
Front Grapple:
When the wrestler makes contact (grapple), press the button once at the right
timing to perform a grapple move.
*Pressing the button rapidly does NOT help.
√ button
≈ button
Ω button
√ button + ≈ button
ç button + directional button
∂ button + ç button
∂ button
Small move (different move with directional button)
Medium move (different move with directional button)
Big move 1 (finisher) (different move with directional
button)
Big move 2 (finisher)
Irish Whip (throw opponent toward the rope)
Throw opponent over the top rope
Front face lock
FRONT FACE LOCK: Use this command to grab the opponent by the head and
drag them away from their partner or closer to your own partner.
CONTEST OF STRENGTH: When the wrestlers perform the same move while
grappling, they go into a “Contest of Strength”. Press the directional button rapidly
to win.
OVER-ROPE: While front grappling press the ∂ and ç button simultaneously
to throw the opponent over the top rope (outside the ring).
14
Back Grapple:
Use this command to grab the opponent from behind. This command can be used
when the opponent is standing dazed or facing other wrestlers in a multi-wrestler
situation.
√ button
≈ button
Ω button
√ button + ≈ button
ç button + directional button
Back small move (different move with directional
button)
Back medium move (different move with directional
button)
Back big move 1 (finisher) (different move with
directional button)
Back big move 2 (finisher)
Irish Whip (throw opponent toward the rope)
BACK GRAPPLE COUNTER: Press the √ button or ≈ button to make counter
move when grabbed from behind by the opponent. The timing is the same as a
normal grapple move.
Opponent down (face up):
When the opponent is on the ground, various moves such as striking or submission
holds can be performed.
√ button near opponent’s head
√ button near opponent’s feet
≈ button near opponent’s head
≈ button near opponent’s feet
Ω button near opponent’s head
Ω button near opponent’s feet
Run toward opponent + Ω button
∂ button
Lift opponent to feet
Roll the opponent to face down
Down move 1 (to opponent’s upper body)
Down move 2 (to opponent’s lower body)
Down move 3 (to opponent’s upper body)
Down move 4 (to opponent’s lower body)
Running strike
Drag opponent
Opponent down (face down):
√ button near opponent’s head
√ button near opponent’s feet
≈ button near opponent’s head
≈ button near opponent’s feet
Ω button near opponent’s head
Ω button near opponent’s feet
Run toward opponent + Ω button
∂ button
Lift opponent to feet
Roll the opponent to face up
Down move 5 (to opponent’s upper body)
Down move 6 (to opponent’s lower body)
Down move 7 (to opponent’s upper body)
Down move 8 (to opponent’s lower body)
Running strike
Drag opponent
15
When your wrestler is down on the ground, there are three ways to possibly avoid
an opponent’s attack.
Time standing
√ button
Play dead
≈ button
≈ button + directional button Up/Down Roll
Running Attack:
Use the following commands to use moves while running.
Press toward the opposite direction while
running to stop
Small move
√ button
Medium move
≈ button
Big move
Ω button
Running strike
Run toward opponent + Ω button
Execute corner move when the opponent is
Run toward corner post + Ω button
dazed in the corner
Run towards the corner and run-up a corner
Run toward corner post + hold √ button
post and attack to the standing opponent
Run towards the corner and run-up a corner
Run toward corner post + hold ≈ button
post and attack to the standing opponent
Directional button
Diving Attack from the Corner Post:
Use the following commands to move from the top of a corner post.
√ button
≈ button
Ω button
√ button + ≈ button
Post move 1
Post move 2
Post move 3
Post move 4
*Some wrestlers cannot climb the corner post.
Press the √ button or ≈ button + directional button (press towards the corner
post) to use Deadly Drive and throw the opponent from the top of a corner post.
Diving Attack to the Outside/Inside the Ring:
Diving attacks can be used when the opponent is outside the ring. If nobody is
outside, these moves cannot be used.
Run toward outside + hold Ω button
Ω button + directional button while
on the apron
Ω button + directional button near
the rope
Diving attack from inside the ring to the opponent
outside the ring
Slingshot attack from the apron to the opponent
inside the ring
Slingshot attack from inside the ring to the
opponent outside the ring
*Some wrestlers cannot use corner post climbing attack.
*Some wrestlers cannot use diving/slingshot attacks.
Running Counter:
THROW THE OPPONENT OUTSIDE THE RING: When grappled near
the rope, press the ç button + directional button (towards outside) to throw the
opponent outside the ring. If the opponent is fatigued, he/she will be dazed when
getting up.
Use these commands to counter attack the opponent when Irish Whipped.
√ button
≈ button
Ω button
√ button + ≈ button
å button
Small move counter
Medium move counter
Big move counter
Standing attack counter
Feint move
*Feint move may not be used depending on the wrestler’s fight style.
THROW THE OPPONENT INSIDE THE RING: When grappled near the ring
while staying outside the ring, press the ç button + directional button (towards
ring) to throw the opponent into the ring. If the opponent is fatigued, he/she will be
dazed while getting up.
Corner Grapple:
When throwing the opponent towards the left or right corners, he/she will be dazed
while leaning on the post. Grapple the opponent while dazed and command the
following moves to use corner grapple attacks.
Ω button + directional button Up/
left or right/down)
∂ button
16
Corner grapple move (three different moves
depending on the direction pressed)
Tree of woe (hang the opponent upside down)
17
Top-rope Move (Avalanche-style move):
There are some corner post moves that set the opponent on top of a turnbuckle
and throw him/her from it. When you set the opponent on top of a turnbuckle, the
wrestlers grapple at which time you can press the Ω button to a use top-rope move.
When the opponent sets you on top of turnbuckle, press the √ button, ≈ button
or the Ω button to counter move.
Irish Whip Counter:
When getting Irish Whipped by the opponent, press the ≈ or √ button when
making contact with the rope to evade the opponent attack (not all the time).
√ BUTTON: Put your arms around the rope to stop. This may not work if the
opponent is running towards you to attack.
≈ BUTTON: Stop at the rope and counter attack.
*Beside the actions above, you may throw the opponent towards the rope when getting
Irish Whipped.
Grapple on the Apron:
When one of the wrestlers is on the apron and the other is inside the ring and they
are involved in a grapple. Press the √, ≈, or Ω button to use the Apron move.
THROW OPPONENT TO THE APRON: When your wrestler grapples the
opponent near the rope, press the ∂ button + directional button (press towards
the outside) to throw the opponent to the Apron.
Face Lock Position:
When the opponent tries to tackle and take you down to the ground, your wrestler
sometimes puts the opponent under a face lock position while standing. Press the
√, ≈, or Ω button to perform an attack move.
Face Lock Position Counter:
Press the √, ≈, or Ω button to perform a counter move when the opponent
performs a face lock position.
Back-Mount Position:
Some moves take the opponent to the ground and assume a back mount position.
Press the √, ≈, or Ω button to perform an attack move when the wrestlers
performs a back-mount position action.
Back-Mount Position Counter:
Press the √, ≈, or Ω button to perform a counter move when the opponent
performs a back-mount position.
Corner-to-Center Move:
When the opponent is down and around the center of the ring, go to the left or
right side corner post and press the Ω button + directional button (press towards
the post) to perform the corner-to-center move. Your wrestler will perform the
attack move when the opponent stands up.
Guard Position (Mount Position):
Some moves take the opponent to the ground and assume guard position (mount
position). Press the √, ≈, or Ω button to use the attack move when the wrestler
makes a guard position action.
Guard Position (Mount Position) Counter:
If the opponent takes the guard position on your wrestler, press the √, ≈, or Ω
button to perform a counter move.
18
ñ
*This move will only be successful if the opponent is standing dazed.
19
EDIT MODE
Other Moves
Press ≈ button rapidly
Press directional button rapidly
Press any button(s) rapidly
Escape from a pin.
Escape from a submission or hold.
Recover from down.
Voluntarily release the pin, submission, or
Voluntarily release the pin or hold ≈ button hold. This can be used to make the match
more exciting.
*The wrestler sometimes can be knocked out (KO). KO is different from a normal
down. When the wrestler is knocked out, the referee will stop the match immediately
(TKO). If the opponent is knocked out but your wrestler gets him/her up on their feet,
the match will continue until he/she is downed again.
Tag Match Control:
å and directional button (near corner)
∂ button after grappling from behind
∂ button + directional button UP after
grappling from behind
Any button while getting pinned or under
submission hold
From the apron
∂ button + directional button
Opponent on the top of corner post
√ button + directional button
Tag out. It can be done while having the
opponent under a face lock position.
Grab the opponent.
Grab the opponent and have your
partner attack from the corner post.
Cut play to help your partner escape
from a pin, submission or hold.
Grab the opponent inside the ring while
standing on the apron.
Grab the opponent who is standing on
top of the corner post while you’re on
the apron.
Double Team Grapple (Front):
Edit Wrestler
This section describes the Edit Wrestler in
detail.
After selecting Edit Wrestler, you will see the
organization/group list on the left side and the
wrestler list on the right side.
All edit commands will be done by using menu
windows which appear by pressing the √ button. Short cut commands are available
by using the right analog stick.
Organization/Group List Window
Directional button Up and Down
ç button
√ button
≈ button
Right analog stick
Move cursor
Open/close the wrestler list (when the specific
organization is selected)
Open/close submenu
Return to the previous screen
Move cursor to the wrestler list (right side of the
screen)
Short cut commands
SUBMENU WINDOW COMMANDS:
1. TOP: Return to the top of the list
Press the √, ≈, or Ω button to perform a double team move when two wrestlers
grab an opponent. The move is dependent on the wrestler and who is making the
move.
2. OPEN/CLOSE ALL: Open and close all subcategories.
Double Team Grapple (Back):
5. EDIT NAME: Edit the name of an organization or group.
Press the √, ≈, or Ω button to perform a double team move when two wrestlers
grab an opponent from behind. The move is dependent on the wrestler and who is
making the move.
Double Team Grapple (Corner):
Press the √, ≈, or Ω button to perform a double team corner move when two
wrestlers grab an opponent near the corner post. The move is dependent on the
wrestler and who is making the move. Your turn comes after your partner attacks
the opponent at the corner, press and hold the Ω button + ∂ button until the
attack hits the opponent.
20
3. CREATE NEW: Create a new organization or group.
4. SORT: Switch wrestler’s positions within an organization or group.
6. CHANGE LOGO: Change organization’s logo.
7. DELETE: Delete a selected organization or group.
(6). CHANGE ATTRIBUTE (WHEN SPECIFIC TEAM IS SELECTED):
Change the attribute of a group or organization.
21
Wrestler List Window
Directional button Up and Down
ç button
√ button
≈ button
Right analog stick
Edit Wrestler Window Commands
Move cursor
Return to Organization/Group list window
Open/close submenu
View wrestler information
Short cup commands
SUBMENU WINDOW COMMANDS:
1. TOP: Go back to the top of the list.
1. EDIT NAME:
Change the name of a wrestler.
2. EDIT SKILL:
Edit the skills of a wrestler.
3. APPEARANCE:
Edit the appearance of a wrestler.
4. MOVESETS:
Edit the moves and decide special/critical and voices.
5. PARAMETER:
Edit the parameters of the wrestler.
6. CPU LOGIC:
Edit the CPU Logic of the wrestler.
7. FINISHER NAME EDIT: Change the name of the finisher move.
2. NEW: Create a new wrestler.
3. SWITCH: Switch current position of the wrestler.
4. TRANSFER: Transfer the wrestler to the different organization or group.
5. EDIT NAME: Edit a wrestler’s name.
6. DELETE: Delete the selected wrestler.
Creating a New Wrestler
1. Select any group in the Organization/
Group List window. When the cursor is on
an organization name, you cannot create a
new wrestler.
2. Open a submenu window in the Wrestler
List window.
3. Select “Model Wrestler” or “Default
Wrestler” and enter the name to create a new wrestler.
Newly created wrestler or edited wrestler will have “ED” mark on the left of the
wrestler’s name.
MODEL WRESTLER: Use a model wrestler from the list to create a new wrestler.
Data that will be carried over to the new wrestler will include: Wrestler Name,
Appearance, Moveset, and CPU Logic. “Skill” and “Parameter” will not be carried
over.
DEFAULT WRESTLER: Create a new wrestler from a default wrestler.
22
8. OTHERS:
Edit a wrestler’s profile.
Edit Name:
Change the wrestler’s name. Alphabet and symbols can be used to enter the
wrestler name. Press the √ button to open the submenu window or use right
analog stick to open the shortcut menu window. “Flip” is used to change the display
order of the first and last name. “Space” is used to put a space or symbol between
first and last name. Use the å and ∂ buttons to cycle through the fist name,
last name, flip, space, and nickname.
First Name: Maximum of 7 characters
Last Name: Maximum of 9 characters
Flip: ON/OFF
Space: Space or a symbol between first
and last name
ç button
≈ button
√ button
å button
∂ button
START button
Right analog stick
Erase character
Insert character
Open/close submenu window
Move cursor to the left
Move cursor to the right
Exit edit name
Shortcut menu
23
Appearance:
Edit the appearance of a created wrestler.
Select the base for each body part and decide
the appearance for each layer. The color for
each layer can be edited in detail. Press the ç
button to edit the color. Color can be edited
by adjusting RGB colors or choosing from the
color samples from the submenu window.
Style
Size
Head
Chest
Waist
Upper Arm
Lower Arm
Wrist
Thigh
Calf
Feet
Fighting style of the wrestler
Body size
Head parts
Chest parts
Waist parts
Upper arm parts
Lower arm parts
Wrist parts
Thigh parts
Calf parts
Feet parts
Control Commands:
Directional button Up and Down Make selection
Open/close list when selecting a main category
ç button
Move to palette window
Open/close submenu window
√ button
Ω button
Confirm selection
≈ button
START button
End editing and exit
Right analog stick
Shortcut menu
Control Commands (Palette Window):
Directional button Up and Down
ç button
√ button
Ω button
≈ button
å/∂ button
Right analog stick
Select color/gradient/RGB color
Go back to Appearance main
Open/close submenu window
Confirm selection
Move cursor on gradient categories
Shortcut menu
24
Edit Skill
CLASS: Select the weight class the wrestler belongs to. There are two classes:
Junior and Heavy. No weight restriction of selecting the weight class.
INFORMATION: Decide the wrestler’s information: Height, weight, gender, date
of birth, and country.
RANK: Decide wrestler’s rank which affects the loudness of the cheer from the
audience. “S” is the highest rank.
CHARISMA: Set the wrestler attractiveness which affects the loudness of the
cheer from the audience.
FIGHT STYLE: Fighting style of the wrestler.
Orthodox
Technician
Wrestling
Ground
Power
American
Junior
Luchador
Heel
Mysterious
Shooter
Fighter
Grappler
Panther
Giant
Vicious
Traditional Orthodox style
Great at technical moves
Amateur wrestling style using tackles and Suplexes
Good at ground attacks and submissions
Main style is to maximize strength
Mixed style of technical moves and rough attacks
Mixed style of various styles
Traditional Lucha Libre
Main style is rough
Technical style heel with oriental elements
No entertainment element for this style
Main style is kick boxing and karate
Main style is Jujutsu
Maximize agility and Lucha Libre style
Maximize size and power
Mixed style excelling at various fighting styles
RETURN: Counter move category
Orthodox
Technician
Power
American
Junior
Luchador
Heel
Mysterious
All Round
Shooter
Fighter
Grappler
Giant
Vicious
Orthodox counter style
Counter-pinfall moves
Power-based counter moves
Tough and technical counter moves
Lucha Libre based counter moves with Japanese arrangement
Orthodox Lucha Libre based counter moves
Rough attack based counter moves
Heel-based elegant counter moves
Mixed styles of counter moves
Kick and submission based counter moves
Standing-based counter moves
Submission hold based counter moves
Orthodox counter moves using its giant size
Counter moves using agility
25
CRITICAL: Some wrestlers have critical moves that can knock out the opponent.
Critical occurs at certain frequency.
Finisher
Striking
Suplex
Submission
Power
Technical
Critical can occur when a move set as “Critical” is executed.
Critical can occur when a punch or kick (striking attack) lands.
Critical can occur when a throwing move is used (holding moves not included).
Critical can occur when a submission hold or locking move is executed.
Critical can occur when throwing an opponent to the ring mat.
Can take 3 counts on pinfall no matter how fatigued the opponent is.
RECOVERY: Decide the recovery speed for two variables: Normal and bleeding.
Faster the recovery, the more resistant against attacks.
BREATHING: Decide the breathing level. Each wrestler has a “Breathing value”
and decreases when executing a move against the opponent. When the value
reaches 0, the wrestler won’t be able to perform moves for a certain period of time.
SPIRIT: Decide the spirit strength. Higher the value, the more a wrestler can
mentally endure.
ENDURANCE: Endurance for each body part can be decided. The endurance
value doesn’t recover during the match.
Compatibility for critical and counter move:
There’s the compatibility between a fighting style and counter move/critical move.
The effect of the move can increase if combination has a good compatibility, and the
effect can decrease if combination has a poor compatibility.
UP AND DOWN SPEED: Decide the ascending and descending speed when
climbing a corner post.
SPECIAL: A special skill dictates the wrestler’s personality can be decided.
ASCENT STYLE: Decide the value when climbing a corner post: Disable, Enable,
or Run.
None
Stardom
Q. Return
Over Turn
Start Dash
Guts
Strikeback
Finish
Blood
Hardcore
Focus
Adapt
Hardbody
Superstar
Warrior
2nd Wind
Rage
Banish
Spirit
Monster
Do or Die
Reborn
No special skill.
Gets involved with the audience and repeats popular moves.
Recover immediately after taking a big move.
Becomes more concentrated under disadvantage circumstances.
Shows great strength at the beginning of the match.
Doesn’t give up easily.
Rejuvenates and strikes back when the opponent show signs of fatigue.
Extremely effective finisher.
Becomes stronger when starting to bleed.
Weapon specialist.
Focused during the match and has a higher rate of evading a striking attack,
submissions, and technical moves.
Flexible body and has a higher rate to avoid suplexes and power moves.
Strong and healthy body.
Stardom and a strong critical finisher.
Quick kill and immediate recovery.
Strong will to stand up and the ability to over turn the match under
disadvantage circumstances.
Strong will to stand up and be rejuvenated when the opponent is fatigued.
Very focused and can over turn the match under disadvantage circumstances.
100% output from the opponent and 120% output from your own strength to win.
Star power, a strong critical finisher, and a flexible body.
Strong guts and can strike back and over turn the match.
Strong guts, concentration, and a strong iron body.
26
MOVE SPEED: Decide the movement speed of a wrestler.
WEAPON: Decide the wrestler’s favorite weapon.
THEME SONG: Decide the theme song for the wrestler.
VOICE: Decide the voice: Voice 1 and Voice 2.
27
Parameter Edit
Movesets Edit
Offense Parameter
MAIN (MAIN ATTACK): Value set in the parameter is displayed. Main Attack
value represents the effectiveness of the move when used against the opponent.
Parameter value for abilities can be decided.
There are two main categories: Offense and
Defense. Each parameter can be set from
1 – 10. Use the directional button Up and
Down to make selections and left and right to
increase/decrease the value. Use the å and
∂ button to switch between offense and
defense category.
Punch
Kick
Throw
Joint
Stretch
Power
Agility
Arm
Tech.
Rough
Overall
Entertain
Offense parameter for attacks using hands.
Offense parameter for attacks using legs.
Offense parameter for suplexes and throws.
Offense parameter for joint attacks, accuracy and strength.
Offense parameter for moves involving stretch.
Offense parameter for power based attacks.
Offense parameter for aerial moves and suplexes.
Offense parameter for attack using arm power.
Offense parameter for technical moves.
Offense parameter for attacks using weapons, head butts, and chokes.
Offense parameter for overall strength.
Offense parameter for entertainment based moves.
Defense Parameter
Punch
Kick
Throw
Joint
Stretch
Flying
Body
Lariat
Tech.
Rough
Overall
Entertain
Defense parameter against attacks using hands.
Defense parameter against attacks using legs.
Defense parameter against suplexes.
Defense parameter against joint attacks resistance.
Defense parameter against moves involving stretch.
Defense parameter against aerial attack moves.
Defense parameter against attacks using opponent’s body weight.
Defense parameter against lariat attacks.
Defense parameter against technical moves.
Defense parameter against weapons, head butts, and chokes.
Defense parameter against overall strength.
Defense parameter against entertainment based moves.
28
Moves can be assigned to a wrestler. The move
list is on the left and the wrestler’s display is
on the right. Use the ç button to display a
preview of a selected move. You can move
the wrestler’s display by using the left analog
stick. Use the å and ß buttons to zoom
in and out.
SUB (SUB ATTACK): Value represents the effectiveness of the move on a section
other than Main Attack value affects. It cumulates overall attack ability.
COMPATIBILITY: The overall compatibility between a wrestler’s fight style and
the move assigned. Grade A is the best compatibility between them.
Critical move, special move, voice 1, and voice 2 can be decided in the assigned
moveset. Open the Movesets list and press the ≈ button to move to the bottom
section. Use the left directional button to move the cursor to the left. Move the
cursor to the left “•” to set the voice and move the
cursor to right “•” to set the critical and special.
CRITICAL AND SPECIAL: Press the ≈ button
once to set “Special” (represented as “S”) and press
the ≈ button twice to set “Critical” (represented
as “C”). Only one critical and four specials can be
assigned to a wrestler.
VOICE 1 AND VOICE 2: Press ≈ button once to
set “Voice 1” (represented as “V1”) and press the ≈
button twice to set “Voice 2” (represented as “V2”).
FINISHER NAME EDIT: Finisher move name can be edited.
29
CPU Logic
Action patterns of an edited wrestler when
controlled by the CPU can be decided in detail.
PERSONALITY
PERSONAL TRAITS: Higher this value, the more the wrestler performs moves to
entertain the crowd.
Edit Logo:
When you select “Edit Logo”, you will be taken to thumbnail load screen. If you are
creating a new logo, please select “No Data”.
Navigation Window
Use the directional buttons to make
selections and the left analog stick to
move the image. Use the ∂ and
ƒ button to rotate windows.
Edit Window
Option Window
DISCRETION: Higher this value, the more the wrestler emphasizes on winning.
Lower the value, the more the wrestler focuses on dealing damage.
FLEXIBILITY: Higher the value the wrestler is more flexible in different
circumstances. Lower the value the wrestler attempts to stay with own match plan.
COOPERATION: Higher this value, the more a wrestler is cooperative in a tag
match. Lower the value, a wrestler has a tenacity to act on his/her own.
OTHER TENDENCIES
OUTSIDE RETURN COUNT: Decide the speed of how fast a wrestler returns to
the ring.
TOUCHWORK: Decide the time when a wrestler is more likely to tag a partner.
WEAPON USAGE: Decide how likely the wrestler will pick up a weapon.
SECOND: Decide how likely a second will interfering during a match.
Tool Window
Information Window
Each layer can be selected
for editing. Logo data can be
loaded to the selected layer.
Palette Window
Use the directional buttons to select the grid
and press the ≈ button. Use the directional
button left and right to select a color to edit.
Use the directional button left and right to
select the RGB color.
30
31
Layer Window
Exit
EDIT WINDOW
Exit Edit Logo.
Undo
Undo action.
Redo
Redo action. Use the directional button
down to display this option.
Deselect
Deselect selected area.
Select inverse
Inverse selected area. Use the directional
button down to display this option.
Copy
Copy selected area.
Cut
Cut selected area.
Paste
Paste copy or cut area.
Select image outline ON/OFF. Use the
directional button right to show outline
options window.
Set grid ON/OFF. Use directional button
right to show grid options.
Outline
OPTION WINDOW
LAYER WINDOW
Grid
Gradient Tool
Fill the area with a selected color. To select
the color to fill, press the √ button and
select “Edit Color”. Select the desired color
and press the √ button. Select “Tool” to
go back.
Gradient tool using the selected 1st and
2nd color to fill with gradient.
Gradient Tool E
Elliptical gradient tool.
Gradient Tool
lozenge
Lozenge-shaped gradient tool.
Tool Type
Tool used to type horizontally.
Tool Type
(vertical)
Tool used to type vertically.
Outline Tool
Draw an outline around the selected area.
Transform Tool
Transform tool.
Fill Tool
*Press the directional button UP to show all options.
Ring Edit:
Layers
Hide/unhide layer. Select the layer and
press the ≈ button to hide/unhide the
selected layer.
Load
Load sample logo data.
Delete
NAME EDIT: Enter the name for your new ring.
Delete selected layer.
TURNBUCKLE: Select the type of turnbuckle:
*Press and hold ƒ button to move the cursor faster.
Marquee Tool R
Rectangular marquee tool.
Marquee Tool E
Elliptical marquee tool.
Magic Wand
Magic wand tool.
Airbrush tool with a rectangular dot using
the foreground color. Use the directional
buttons to select the starting point. Press
and hold the ≈ button to drag the cursor
using the directional buttons.
Airbrush tool with an Elliptical dot using
the foreground color. Use the directional
buttons to select the starting point. Press
and hold the ≈ button and drag the cursor
using the directional buttons.
TOOL WINDOW
Airbrush R
Airbrush E
Line Tool
Tool used to draw lines.
32
A custom ring can be created for your matches. Please select “Edit Ring” in the Edit
main menu.
Type A: Cylinder
Type B: Triangle
Type C: Triangle-shaped mat
TURNBUCKLE COLOR: Select the turnbuckle color.
POST COLOR: Select the corner post color.
ROPE COLOR: Select the rope color.
MAT TYPE: Select the ring mat from Type A, Type B, and Type C.
RING MAT COLOR: Select the ring mat color.
APRON COLOR: Select the ring apron color.
LOGO: Select the logo for the mat.
*Use the left analog stick to rotate the ring and use the ∂ and ß buttons to zoom
in and out.
33
OPTIONS AND DATA
Edit Referee:
A custom referee can be created to officiate.
Select “Referee” in the Edit main menu.
NAME ENTRY: Enter the name for the referee.
APPEARANCE: Referee appearance can be set in details. Please see wrestler
appearance on page 24.
EDIT REFEREE SKILLS:
Recovery time after colliding with a wrestler or involved in
Down Time
explosion.
Fall Count
Fall count speed.
DQ Count
DQ count speed.
Ringout Count
Ringout count speed.
Move SP (move speed) Movement speed.
Run in Check
How fast the referee check cut the play during a tag match.
Involvement
How fast the referee check cut play.
Voice
Select female or male voice.
Options
Various game settings can be decided.
Use the directional button up and down to
make selections and use the directional button
left and right to change the values. You can also
press the Ω button to open the submenu to
make changes.
1. SOUND: Decide between Stereo and Mono.
2. BGM MENU: Set the background music volume for the menu screens.
3. THEME ENTRANCE BGM: Set the background music volume for theme songs.
4. BGM VOLUME: Set the background music volume for the matches.
5. ENTRANCE MOVIE: Set ON/OFF the entrance movies.
6. VIBRATION: Set vibration ON/OFF.
*This title supports the vibration function for up to 2 players and doesn’t support the
vibration function if there’re 3 or more players.
7. SHORTCUT: Set ON/OFF the shortcut submenus.
8. CHECK SAVE OPTIONS: Set ON/OFF the check save function.
9. DEMO BATTLE SETTINGS: Set the demo battle cards for the title movie.
10. CREDITS: View the credits.
Save/Load
The save and load data can be managed.
1. SAVE: Save the game data to a memory card (8MB)(for PlayStation®2).
2. LOAD: Load the game data stored on a memory card (8MB)(for PlayStation®2).
3. WRESTLER DATA COPY: Copy edited wrestler data from a memory card
(8MB)(for PlayStation®2) to the PlayStation®2 system.
4. LOGO DATA COPY: Copy edited logo data from a memory card (8MB)(for
PlayStation®2) to the PlayStation®2 system.
*If you would like to copy the edited wrestler data to a different memory card
(8MB)(for PlayStation®2), please follow the steps below:
1. Insert the memory card (8MB)(for PlayStation®2) with data stored in the
system. Copy wrestler data to the system on “Wrestler Data Copy” screen.
2. Insert a different memory card (8MB)(for PlayStation®2) in the system. Select
“Save” to save the data to the memory card (8MB)(for PlayStation®2).
*Edited wrestler(s) copied to the system will be stored in the “Retired” section.
34
35
FIRE PRO WRESTLING
RETURNS CREIDTS
Spike Co., Ltd.
Executive Producer
Mitsutoshi Sakurai
General Producer
Maki Kimura
Localization Producer
Satoshi Akaishizawa
Producer
Hiroyuki Yamaguchi
Sales
Eiichiro Iizuka
Koji Yukita
Atsushi Narui
Hiroaki Ogawa
Marketing
Satoshi Koike
Tomoko Asakawa
Takuro”Anthony”Inoue
Shunsuke Kousaka
Tomo Nakamura
WEB site Management
Hiroyuki Takahashi
Production Support
Yoshinori Terasawa
Ryota Haino
Kazuhiro Watanabe
Hiroshi Hiratsuka
Hiroyuki Abe
Makoto Sugiura
Daisuke Sugisawa
Atsuko Nito
Takashi Hayasaka
Keigo Nakamura
Y’sK Inc.
Producer
Hiroyuki Yonezawa
Direction & Planning
Toshiaki Tamura
Assistant Direction
Takashi Kobayashi
Program
Akito Yoneda
Animation Design &
Planning Support
Atushi Otani
Kazuhito Kimura
Graphic
Takeshi Kadoma
Localization Assistant
Planning
Tatsushi Okumura
Localization Program
Tatsuya Kageyama
Akihisa Suwa
Localization Graphic
Miki Sakata
S-NEO Co., Ltd.
Main Program
Takeshi Aikoh
Program
Takehiko Ozawa
Tetuya Tanabe
Shinichi Nakamoto
Information Direction &
Graphic
Satoru Minei
Graphic
Kazuhisa Watarigawa
AGETEC Localization
Team:
Executive Producer
Hide Irie
Producer
Mark Johnson
Product Manager
Hiro Fukuoka
DIGIT KINO Co.,Ltd.
Wrestler Face Graphic
Seiichiro Ishiguro
Kensuke Nishi
Atsushi Matsuda
Satoshi Hatsutani
Dimension Cruise:
Music Composition
Takafumi Wada
Yoko Wada
Mituhiro Uehara
Guitar
Satoshi Izumi
Casting Support:
Art Quest Co.,Ltd.
Kenproduction Co., Ltd.
Genki Project
Recording Studio:
Iphigeneia Studio
Voice Actors:
Tomoyuki Shimura
Hikaru Hanada
Kayato Ohashi
Kosuke Takaguchi
Masahito Yabe
Ian Gibb
Jeff Gedert
Ryan Drees
Maki Sawamura
Hikaru Tokita
Saki Umesato
Y’sK Inc.
Special Thanks:
DIGITAL Hearts CO.,LTD
Sony Music
Communications Inc.
S•A•Dorufu
Noriko Cohen
Yuri Haniuda
Keith Miyamoto
David Silviera
Sheri Snow
Sandbox Strategies
SVG Distribution, Inc.
Miki Takashima
Terry Wolfinger
Bill Wood
Critical Special Thanks:
Everyone at Fireproclub.com
for all their support.
Agetec, Inc. Limited Warranty - Software
Agetec, Inc. warrants to the original purchaser of this Agetec, Inc. product that
the medium on which this software program is recorded is free from defects
in materials and workmanship for a period of ninety (90) days from the date of
purchase. Agetec, Inc. agrees for a period of ninety (90) days to either repair or
replace, at its option, the Agetec, Inc. product. You must call (408) 736-8001 to
receive instructions to obtain repair/replacement services.
This warranty shall not be applicable and shall be void if the defect of the Agetec,
Inc. product has arisen through abuse, unreasonable use, mistreatment or
neglect. THIS WARRANTY IS IN LIEU OF ALL OTHER WARRANTIES AND
NO OTHER REPRESENTATIONS OR CLAIMS OF ANY NATURE SHALL BE
BINDING ON OR OBLIGATE AGETEC, INC. ANY IMPLIED WARRANTIES
APPLICABLE TO THE SOFTWARE PRODUCT, INCLUDING WARRANTIES
OF MERCHANTABILITY AND FITNESS FOR A PARTICULAR PURPOSE,
ARE LIMITED TO THE NINETY (90) DAY PERIOD DESCRIBED ABOVE.
IN NO EVENT WILL AGETEC, INC. BE LIABLE FOR INCIDENTAL OR
CONSEQUENTIAL DAMAGES RESULTING FROM POSSESSION, USE, OR
MALFUNCTION OF THE AGETEC, INC. SOFTWARE PRODUCT.
Some states do not allow limitations as to how long an implied warranty lasts
and/or exclusions or limitations of consequential damages, so the above limitations
and/or exclusions of liability may not apply to you. This warranty gives you specific
legal rights, and you may also have other rights which vary from state to state.
Repair/ Service After Expiration of Warranty
If your game disc requires repair after expiration of the 90-day Limited Warranty
Period, you may contact the Consumer Service Department at the number
listed below. You will be advised of the estimated cost of repair and the shipping
instructions.
Agetec, Inc. Customer Service Department/Technical Support Line (408) 736-8001
Call this number for help in installing or operating our products and for general
product questions. Representatives are available Monday-Friday, 8:30am-4:00pm
Pacific Time.
Agetec, Inc. Online at http://www.agetec.com
Our news is always cool! Visit our website and find out what’s happening at Agetec,
Inc. — new titles, new products, and fresh tidbits about the new gaming world!
BEST SCORE Inc.
Sound SE Direction &
Casting
Mitunobu Nishimoto
Sound SE
Atuhiro Motoyama
36
37