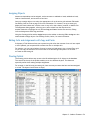
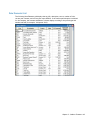
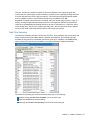
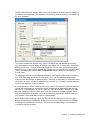
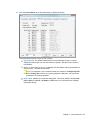
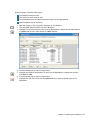
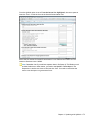
1
ProSystem fx®
Trial Balance
User Guide
December 2013
© 2000-2013, CCH INCORPORATED and/or its affiliates. All rights reserved. Material in this publication may not be
reproduced or transmitted, in any form or by any means, without prior written permission. Requests for that
permission should be directed to:
CCH INCORPORATED
20101 Hamilton Ave., Suite 200
Torrance, CA 90502
The contents of this publication are believed to be accurate. However, responsibility cannot be assumed for the
information contained herein, and the consequences resulting from the use thereof. Material in this publication is
subject to change without notice.
This User Manual and the computer software it describes are designed to provide accurate and authoritative
information in regard to the subject matter covered. They are distributed with the understanding that the publisher
is not engaged in rendering accounting, legal, or other professional service. If legal advice or other expert assistance
is required, the services of a competent professional should be sought.
“ProSystem fx” is a registered trademark of CCH INCORPORATED.
Portions Copyright 1984-1990, FairCom Corporation. All rights reserved.
Portions Copyright, Novell, Inc. All rights reserved.
“Windows” is a registered trademark of Microsoft Corporation.
All other brand, product, or company names are trademarks or registered trademarks of their respective owners.
Introduction
WELCOME TO PROSYSTEM
FX
TRIAL BALANCE
Welcome to ProSystem fx T rial B alance
ProSystem fx Trial Balance is the most complete system available for preparing and updating
workpapers and financial statements. It also provides industry-specific ratios for analytical
review. Unlike other trial balance packages, ProSystem fx Trial Balance offers built-in fund
accounting for tax-exempt organizations. With more than 200 standard workpapers documenting
the audit process, you are assured of a smoother, more reliable audit.
Conventions
To help you locate and interpret information easily, this book uses consistent visual cues and a
few standard text formats:
Specific entries or actions to be made by the user appear in bold lettering. For example,
Enter Install, Click OK, Select Setup, Press F4.
The bold Note contains important additional information about the preceding text.
Terminology
This guide assumes you are familiar with the Windows environment and that you are using a mouse
with Windows. However, the function and cursor movement keys you can use instead of a mouse
are listed in Function Keys on page iv.
The following is a list of terms used consistently throughout the guide:
Choose. To use a mouse or key combinations to pick an item that begins an action in
ProSystem fx Trial Balance.
Select. To highlight an item by clicking it with your mouse. Selecting an item does not start
an action. Once you select an item, choose the action that will affect the item.
Click. To position the cursor on a button or menu command and then press and release the
active mouse button once.
Double-click. To position the cursor on an icon or selectable item and then press the mouse
button two times in rapid succession.
Check. To position the cursor in a check box and click the mouse once. A check mark
enables the option. Click in the check box again to remove the check mark and disable the
option.
Drag. To position the cursor on an object and then, while pressing and holding the active
mouse button, move the mouse pointer to a new position.
Welcome to ProSystem fx Trial Balance • iii
Icon. A graphic symbol representing a program or an option.
Drop-down list. A variation of the list box that displays one item until the user chooses to
display other options within the list.
The following abbreviations are used throughout the guide:
AJE. Adjusting Journal Entry
EJE. Eliminating Journal Entry
PAJE. Passed Adjusting Journal Entry
TJE. Tax Journal Entry
RJE. Reclass Journal Entry
Function Keys
While working in ProSystem fx Trial Balance, use the function keys listed below to initiate actions
and to move within the grids.
Key(s)
Function(s)
In a dialog or menu, executes a command.
In a grid, moves the focus from cell to cell.
Enter
Note: To move the cursor right after pressing Enter, select Options >
Move Right After Edit. To move the cursor down after pressing Enter,
select Options > Move Down After Edit.
Tab
Moves the focus from cell to cell, moving to the right and down (when
it reaches the end of a row).
Shift + Tab
Moves the focus from cell to cell in reverse order.
Alt + letter
Initiates the action or moves to the option whose underlined letter
matches the one you enter.
Up Arrow, Down Arrow,
Left Arrow, Right Arrow
Moves from cell to cell in the direction of the selected key.
Home
Moves to the first cell in the row.
Page Up or Page Down
Scrolls up and down through a grid.
Spacebar
Depending on the type of cell that is in focus, deletes the data in the
cell or opens the picklist.
Shift + Up Arrow, Down
Arrow, Left Arrow, Right
Arrow
Extends the selection of cells in the direction of the selected arrow
key.
Shift + Home
Extends the selection of cells to the first cell in the row.
Welcome to ProSystem fx Trial Balance • iv
Key(s)
Esc or Alt + F4
F2
Function(s)
Closes a dialog box without completing the command (same as the
Cancel button).
Depending on the type of cell that is in focus, opens the picklist or
zooms.
In Financial Statement Formatting mode, opens the Cell Value dialog.
F4
Functions as a toggle to show or hide the information in a picklist.
Ctrl + N
Creates a new company.
Ctrl + O
Opens an existing company.
Ctrl + F
Saves Financial Statements.
Ctrl + P
Opens the Print dialog.
Ctrl + C
Copies the selected data.
Ctrl + V
Pastes the selected data.
Adds a blank row below the row which is in focus.
+ (on keypad)
In a Journal Entries grid, opens the Details grid to add a journal entry.
In the Transactions grid, moves to the last line of the grid.
Adds a blank row below the row which is in focus.
Ctrl + A
In a Journal Entries grid, opens the Details grid to add a journal entry.
In the Transactions grid, moves to the last line of the grid.
Ctrl + I
Restores all grid icons.
Ctrl + U
In Financial Statement Formatting mode, moves row up.
Ctrl + D
In Financial Statement Formatting mode, moves row down.
Ctrl + F6
Activates each grid in sequence (regardless of whether the grid is
maximized).
Shift + Ctrl + F6
Activates each grid in reverse sequence (regardless of whether the
grid is maximized).
Welcome to ProSystem fx Trial Balance • v
Contents
Welcome to ProSystem fx Trial Balance
iii
Conventions
iii
Terminology
iii
Function Keys
iv
Chapter 1 - Getting Started
1
Introduction
1
Installation Overview
1
Directory Structure
1
Software/Hardware Requirements
1
Installing ProSystem fx Trial Balance
2
Local Installation
3
Network Installation
3
Laptop Installation
5
Installing the ProSystem fx Trial Balance User Guide
5
ProSystem fx Trial Balance e-fx Update
5
Download and Install Update Option
6
Download Update Only Option
7
Install Previous Download
8
Using the Help System
8
ProSystem fx Trial Balance Support on the Web
9
How ProSystem fx Trial Balance is Organized
9
Industry Standards
10
Opening, Creating, or Converting a Company
10
Opening an Existing Company
10
Creating a New Company
12
Roundoff Accounts/Retained Earnings
16
Creating and Using Template Companies
16
Creating the Template Company
17
Modifying a Template Company
17
Converting Databases from Other Trial Balance Packages
17
Converting Company Data
18
Data Converted from Other Trial Balance Packages
19
Importing Account Balances
20
Importing from Pre-Defined Packages
20
Importing ASCII Account Balances
21
Renumbering Multiple Accounts
24
Tips for Converting/Importing Data
25
General Tips on Importing
25
Contents • vi
Contents
CSA - Write-Up Solution for Windows
25
GoSystem Audit
26
Intacct
26
ACE for DOS
26
ATB for Windows
26
QuickBooks™
26
PeachTree™
27
ATB Writeup™
27
Entering Company Data Manually
28
Diagnostics
28
Multi-User Operations
29
Database Modes
30
Working with Multi-User Companies
30
Opening a Master Database
31
Opening a Review or Edit Copy of the Database
31
Refreshing Data from the Master
32
Saving Changes Made in Edit Mode
32
Check-in/Check-out Processing
33
Checking Out a Company
33
Checking In a Company
35
Reviewing Pending Changes
38
Activity Logs
40
Master Copy Activity Logs
40
Multi-User and Restricted Copy Activity Logs
41
Viewing and Purging Activity Logs
41
Copy Company
Chapter 2 - Guide to Features
42
44
Introduction
44
User Interface Overview
44
ProSystem fx Trial Balance Desktop
44
Toolbar
45
ProSystem fx Trial Balance Help System
46
Accessing and Using Grids
46
Grid View
48
Grid Filter
50
Grid Zoom
52
Adding New Objects
53
Contents • vii
Contents
Editing Cells on Grids
53
Assigning Objects
54
Editing Cells and Assignments with Copy and Paste
54
Floating Picklist
54
Current Year Selection
Current Year and Period Selection
Journal Entries
55
57
57
Adding Journal Entries
58
Passed Adjusting Journal Entries
59
Changing Journal Entry Types
60
Creating Recurring Journal Entries
61
Deleting Journal Entries
61
Renumbering Journal Entries
61
Ratios/Data Elements
61
Data Elements Grid
62
Add/Delete/Modify Data Elements
63
Ratios Grid
64
Ratio Groups Grid
66
Workpapers and Reports
66
Batch Print
69
Printing Grids, Workpapers and Reports
69
Embedding Workpapers and Reports
70
Cash Flow Analysis
72
Cash Flow - Setup
72
Cash Flow - Balance Sheet Reconciliation
73
Cash Flow Summary
77
Financial Statements
78
Financial Statement Manager
79
Financial Statement Wizard - Creating a New Statement
80
Financial Statements - Moving Between Editing Modes
84
Financial Statements - Formula Mode
84
Financial Statements - Formatting Mode
86
Financial Statements - Formatting Rows
86
Financial Statements - Resizing Columns
88
Financial Statements - Formatting Cells
88
Financial Statements - Formatting the Overall Statement
90
Financial Statements - Column Sets
90
Contents • viii
Contents
Financial Statements Copy and Modify Wizards
Printing Financial Statements
Creating Links to Other Windows Applications
99
102
102
Clipboard/Link Format Preferences
103
Establishing Multiple Links
104
Copying Single Links
105
DDE Linking with Interim Period Data
106
Tax Capabilities
107
Tax Information Setup
107
Tax Lines Grid
108
Tax Journal Entries
109
Tax Workpapers
109
Linking to ProSystem fx Tax
110
Dynalink to ProSystem fx Tax
110
Quiklink Updates
110
Quiklink to ProSystem fx Tax
110
Consolidated Databases
111
Combined Databases
112
Funds Databases
113
Budget Balances
114
Chapter 3 - Transactions
Introduction
115
115
Flow of Information
115
Enabling Transactions
116
New Companies
116
Existing Companies
116
Beginning Balances
117
Enabling Transactions for a Specific Prior Period
118
Enabling Transactions for a New Year during Roll Forward
118
Years Grid for Transactions
118
Disabling Transactions
118
Working with Transaction Journals
119
Adding or Modifying Custom Transaction Journals
120
Transaction Journal Entry Defaults
121
Accessing the Transactions Grid
122
Adding Transactions to the Transactions Grid
122
Deleting Transactions
124
Contents • ix
Contents
Posting Transactions
124
Unposting a Transaction
125
Move to Journal
125
Transactions and Roll Forward
125
Current Year Beginning Balances Settings
126
Transaction Workpapers and Reports
127
Chapter 4 - Interim Periods
128
Introduction
128
How Interim Period Data is Calculated
128
Fiscal Years
129
Enabling Interim Periods
129
Interim Period Features of ProSystem fx Trial Balance
136
Interim Period Abbreviations and Numbers
136
ProSystem fx Trial Balance Title Bar for Interim Period Display
136
Grid Display of Interim Period Data
137
Years Grid - Interim Periods
139
Accounts Grid - Interim Periods
140
Transactions - Interim Periods
142
Data Elements - Interim Periods
142
Ratio Formulas - Interim Periods
143
Balance Sheet Reconciliation/Cash Flow Summary
144
Converting Interim Period Data
145
Importing/Appending Interim Period Data
145
Workpapers and Reports - Interim Periods
146
Financial Statements for Interim Period Data
147
Roll Forward Interim Period Data
147
DDE Linking
148
Merge ProSystem fx Trial Balance Companies
Chapter 5 - Administration & Maintenance
Roll Forward
148
150
150
Completing the Roll Forward/General Dialog
151
Completing the Roll Forward/Interim Periods Dialog
152
Completing the Roll Forward/Interim Dates Dialog
154
Completing the Roll Forward/Interim Options Dialog
155
Completing the Roll Forward/Transactions Dialog
155
Backup and Restore
Backing Up Company Data
156
157
Contents • x
Contents
Restoring Company Data
158
Deleting Company Databases
160
Maintenance Options
160
Rebuild Bitmaps/Caches
161
Rebuild Key Files
161
Rebuild Diagnostics
161
Rebuild - All
161
Chapter 6 - Updating with Quiklink
162
Introduction
162
Setting Up Dynalink
162
Configure Accounting Bridges
163
Using Dynalink
164
Requirements for Quiklink Processing and Updates
166
Examples of Processing with Quiklink
167
Quiklink Updates - Tax Preparation to ProSystem fx Trial Balance
167
Quiklink Updates - ProSystem fx Trial Balance to Tax Preparation
171
Contents • xi
Chapter 1
GETTING STARTED
C hapter 1 - Getting Started
Introduction
ProSystem fx Trial Balance is a state-of-the-art Windows-based trial balance software solution
designed to help practitioners streamline their reviews, compilations, and audits. It automates
recurring clerical and mathematical functions allowing you to focus on serving your clients.
Installation Overview
This section explains how to install ProSystem fx Trial Balance as an independent product on
standalone computers, networks, and laptops.
When you run ProSystem fx Trial Balance on a network, multiple users can run the program
concurrently and can work with a specific set of client data. You must license the number of
concurrent users in advance. ProSystem fx Trial Balance does not allow a greater number of
concurrent users than licensed.
Directory Structure
The default directory for ProSystem fx Trial Balance installation is: X:\avision\, where X is the
drive where ProSystem fx Trial Balance will be installed.
Software/Hardware Requirements
The minimum software and hardware specifications your computer system needs to run
ProSystem fx Trial Balance are listed below.
Microcomputer
100% IBM-compatible Pentium PC
Memory
Minimum of 256MB recommended for all operating systems
Hard Drive
50MB of hard disk free for Program files
4MB for Tutorial files (optional)
Chapter 1 - Getting Started • 1
Operating
System
Operating
System
Components
Windows XP - Service Pack 3 or higher, Windows 2003, Windows 2008, Windows
Vista, Windows 7, Windows 8, 8.1 and Windows Server 2008 R2 and 2012 R2.
MDAC 2.8 or higher is required on each workstation.
Internet Explorer 5.5 or greater
Adobe® Reader® 5.0 or greater
Supported Network Platforms
Novell NetWare, version 5.1 or higher
Windows 2003 Server, Service Pack 1
Peer-to-Peer environments running Windows XP Professional - Service Pack 3 or higher, or
Linux (kernal 2.4.2 or higher, Samba 2.2.3a or higher)
Linux RedHat version 6.2 or 7.0
Citrix Metaframe
Note: When running in Peer-to-Peer environments, a dedicated server is required.
WAN Processing
Windows Server 2008 and 2008 R2 with Terminal Server or Terminal Server with Citrix XP or
higher, or Windows 2003 Server, Service Pack 1 with Terminal Server or Terminal Server with
Citrix XP are required to process ProSystem fx Trial Balance across a WAN line.
Supported Network Clients
The latest version of Microsoft Client for NetWare or Novell Client for Windows 2008. We
recommend that Novell Client users disable the cache-write feature.
Supported Network Topologies
Ethernet. 10Mbps or greater
Virus Scan
If running Real Time virus scanning options, exclusion of ProSystem fx Trial Balance directory
structures and .NTR files is required on workstations and servers.
Display Settings
We recommend a minimum resolution setting of 1024 x 768 using small fonts.
Installing ProSystem fx Trial Balance
ProSystem fx Trial Balance can be installed locally, on a network, or to a laptop computer (after a
network installation). Select the following instructions that fit your needs.
Chapter 1 - Getting Started • 2
Local Installation
ProSystem fx Trial Balance can be installed on a PC, independent of a network. This is useful for
users who are not connected to a network or who do not need to make the software available to
others on the network. This installation automatically creates directories, copies files from the
installation disks to the local hard disk, and sets up the Start Menu group and icon for ProSystem fx
Trial Balance.
Before you begin the installation, exit all Windows programs.
To perform a local installation, do the following:
1. Start Windows and insert the ProSystem fx Trial Balance CD into the appropriate drive.
2. Select Start > Run.
3. Enter the CD drive letter, a colon (:), and a backslash (\), followed by setup (for example,
e:\setup). The Welcome screen displays.
4. Read the information on the screen and click Next. The Select Type of Installation dialog
displays.
5. Select Install ProSystem fx Trial Balance and click Next.
Note: You can also check Install Tutorial and/or Install User Guide, and they are
installed after the program installation is complete. Or, you can install these items
separately later.
6. Continue through the installation dialogs. You can accept the default drive or change it to
the drive of your choice.
7. On the Type of Installation dialog, choose Standalone Install and click Next.
Note: If this is your first installation of ProSystem fx Trial Balance, or if the system
cannot locate your permission data, you are requested to download the permission files
from the Internet or insert the permission diskette provided to you. Insert the disk and
click Next.
8. Select the Program Folder and click Next.
9. Continue through the installation process until the Setup Complete dialog displays. Click
Finish.
Network Installation
Network installation is for PCs that are connected to a network at all times. The network
installation loads an installation program (Workstation Setup) on the network from which you can
set up ProSystem fx Trial Balance on each workstation. A subdirectory named NET is created
under the network subdirectory that you specify. The Workstation Setup is run from the NET
subdirectory which automatically creates the Start Menu group and icon for ProSystem fx Trial
Balance. For example, if you install ProSystem fx Trial Balance in the X:\avision\av32 directory,
you would run the Workstation Setup from X:\avision\av32\net\setup.
Before Network Installation
Log in to your network as a Supervisor (or equivalent). If you do not, you may not be able to
create subdirectories and install/overwrite files on the network server.
Chapter 1 - Getting Started • 3
If each workstation uses the Windows files from the server (as opposed to having Windows
installed locally), do the following:
Ask all users to exit Windows and then temporarily remove user rights to the Windows
subdirectory.
Set the DLL files in the Windows > System subdirectory to Read/Write. This allows any
new Dynamic Link Libraries to be installed on the program subdirectory.
If a previous version of ProSystem fx Trial Balance is installed on the server, set all the files
in the ProSystem fx Trial Balance program subdirectories to Read/Write. This ensures that
the Installation program can overwrite any existing ProSystem fx Trial Balance files.
A permission disk is provided if you are licensed for ProSystem fx Trial Balance.
Network Installation Instructions
1. Start Windows.
2. Insert the ProSystem fx Trial Balance CD into the appropriate drive.
3. Select Start > Run.
4. Enter the CD drive letter, a colon (:), and a backslash (\), followed by setup (for example,
e:\setup). The Welcome screen displays.
5. Read the information on the screen and click Next. The Select Type of Installation dialog
displays.
6. Select Install ProSystem fx Trial Balance Program and click Next.
Note: You can also check Install Tutorial and/or Install User Guide, and they are
installed after the program installation is complete. Or, you can install these items
separately later.
7. Continue through the installation dialogs. You can accept the default drive or change it to
the drive of your choice.
8. On the Type of Installation dialog, select Network Install and click Next.
Note: If this is your first installation of ProSystem fx Trial Balance, or if the system
cannot locate your permission data, you are requested to download the permission files
from the Internet or insert the permission diskette provided to you. Insert the disk and
click Next.
9. Select the Program Folder and click Next.
10. Continue through the installation process until the Setup Complete dialog displays. Click
Finish.
Once ProSystem fx Trial Balance is installed on your network, set it up on each individual
workstation by running Workstation Setup. Click the Workstation Setup icon and select
Workstation Setup on the Type of Installation dialog. Follow the standard installation steps as
outlined above for each workstation you want to set up.
After Network Installation
Once ProSystem fx Trial Balance has been installed on your network, you may want to assign
Shareable and Read Only attributes to all the program files in the Trial Balance subdirectories.
This prevents any users from inadvertently overwriting these files. Reset any files you changed to
Read/Write in the Windows directory to their previous settings.
Chapter 1 - Getting Started • 4
Laptop Installation
Laptop installation is available only to users who have licensed the Network version of
ProSystem fx Trial Balance and can be installed only after Network installation has taken place (as
outlined in the preceding section).
1. From the laptop to which you are installing the program, click the Workstation Setup icon.
2. Read the information and click Next.
3. Select Laptop Install on the Type of Installation dialog.
4. Click Next.
5. Continue through the installation dialogs. You can accept the default drive or change it to
the drive of your choice.
6. On the Setup Complete dialog, click Finish.
Note: A pop-up window notifies you when an update is available on the network.
Installing the ProSystem fx Trial Balance User Guide
The ProSystem fx Trial Balance User Guide is located on the program CD. The installation process
installs the current version of Adobe Acrobat, which enables you to read the PDF file format in
which the Guide displays. The Guide remains on the CD; it is not installed to a standalone or
network directory. When you want to view the Guide, you must insert the CD in your CD drive.
To install Adobe Acrobat and the Guide, follow the standard installation steps and select Install
User Guide on the Select Type of Installation dialog. You will be walked through Acrobat's
installation procedure. Following the installation, an Instruction Guides on CD icon is created on
your desktop.
ProSystem fx Trial Balance e-fx Update
The e-fx Update allows you to update currently installed versions of ProSystem fx Trial Balance
via the Internet. You can use e-fx Update to download and install any available e-fx update files.
The e-fx Update downloads files from the ProSystem fx Office Web site; therefore, the
workstation from which you choose to run the e-fx Update must have an active connection to the
Internet.
Note: The e-fx Update cannot be run from a laptop.
The e-fx Update provides two different methods to download the e-fx downloads. You can choose
the method that best matches your needs.
Download and install update. Downloads and installs the appropriate update files for
ProSystem fx Trial Balance.
Download update only. Downloads the appropriate files to be installed at a later time using
the Install previous download.
Note: If the download process is interrupted, you are notified of a failed download process
after restarting e-fx Update. Select Yes on the notification dialog and the download begins
with the file that was interrupted. Files downloaded prior to the failure will not be affected or
overwritten. If you select No, you are prompted to delete or maintain the files. If you select to
delete the files, the download process restarts from the beginning.
Chapter 1 - Getting Started • 5
Download and Install Update Option
To perform the Download and install update option, complete the following steps:
1. Select Help > e-fx Updates. A message displays indicating the Trial Balance application will
be closed in order to install the e-fx update.
2. Select Yes to continue and the e-fx Update dialog displays.
3. Select Download and install update.
Tip: We recommend that you leave the Check system for available disk space box
checked. If this option is selected, you are notified before a download begins when
there is not enough disk space on your computer for the files being downloaded.
If the box is not checked, the system does not check the disk space and a download could be
halted before completing when there is not enough disk space.
Leave the Check for presence of Internet connection option if you want to have the PC
performing the e-fx download checked for an active connection to the Internet. If you have
any problems with your browser or Internet service provider while using e-fx update, you
may want to clear the check from this option.
Note: Any previously downloaded release is deleted.
4. Click Next. The e-fx Update program establishes a connection to the Internet and checks for
an available update file for the currently installed version of ProSystem fx Trial Balance.
5. The Download e-fx Update dialog displays the progress as the e-fx update files are
downloaded.
6. When the download completes, the e-fx update immediately begins the installation. The e-fx
Updates message shows the progress.
7. A message displays when the installation is complete and you are prompted to delete the
downloaded files.
8. Click Yes to retain the downloaded files, or click No to delete the file.
Chapter 1 - Getting Started • 6
Download Update Only Option
To perform the Download update only option, use the following steps:
1. Select Help > e-fx Updates. A message displays indicating the Trial Balance application will
be closed in order to install the e-fx update.
2. Select Yes to continue and display the following e-fx Update dialog.
3. Select Download update only.
We recommend that you leave the Check system for available disk space box checked. If
this option is selected, you are notified before a download begins when there is not enough
disk space on your computer for the files being downloaded.
If the box is not checked, the system does not check disk space and a download could be
halted before completing when there is not enough disk space.
Leave the Check for presence of Internet connection option selected if you want to have
the PC performing the e-fx download checked for an active connection to the Internet. If
you have any problems with your browser or Internet service provider while using e-fx
update, you may want to clear the check for this option.
Note: Any previously downloaded release is deleted.
4. Click Next. The e-fx Update program establishes a connection to the Internet and checks for
an available update file for the currently installed version of ProSystem fx Trial Balance.
A message displays the file progress as the e-fx updates are downloaded.
The Download Complete dialog lists items that have been downloaded but not installed.
5. You can install the update items listed by selecting the Install Now button or use the Install
previous download option to install later. If you choose to Install Now, the install begins
immediately and once the installation completes, you are prompted to delete the
downloaded files.
6. If you select Exit, the e-fx Update program closes.
Chapter 1 - Getting Started • 7
Install Previous Download
To perform the Install previous download option, do the following:
1. Select Help > e-fx Updates. A message displays indicating the Trial Balance will be closed
in order to install the e-fx update.
2. Select Yes to continue.
The following dialog displays to allow you to choose the applicable e-fx Update option.
3. Select Install previous download, then select the Next button. The e-fx update
immediately begins the installation. The e-fx Updates message shows the progress.
4. Upon completion of the installation, you are prompted to delete the downloaded files. Click
Yes.
Using the Help System
ProSystem fx Trial Balance has a detailed and comprehensive online Help system that can be
accessed in a number of ways:
Click Help on the toolbar to access context-sensitive Help for the currently active grid.
Select the appropriate item from the Help menu (Contents, Overview, Commands, Glossary)
to access the specified part of the Help system.
Click Help on a dialog to get specific Help information for that dialog.
Select Help > Active Window to get specific Help information for the active grid.
Chapter 1 - Getting Started • 8
ProSystem fx Trial Balance Support on the Web
You can visit the Customer Support Web site for the latest product information on ProSystem fx
Trial Balance. You can also access a number of useful customer services such as release
information, program updates, product support tips, and answers to frequently asked questions.
The primary goal of the Web site is to enhance the quality of our support and service by providing
you the convenience of accessing information on the Web. The ProSystem fx Trial Balance support
on the Web menu options open your Internet Web browser and take you to the selected area of the
Customer Support Web site:
Product Home Page. View information (e.g., FAQs, System Requirements, Hot Topics)
related to the product.
Browse our Knowledge Base. Browse articles by topic to find solutions that our tax and
support team have compiled.
Contact Support. Contact us with your general comments and questions, check the status of
support and enhancement requests, view firm information change requests, find Web site
administration information, and more.
Start A Remote Support Session. Start a support session with a support representative.
My Account. Log in or register to manage your account, receive copies of your invoices,
check the status of your order, and more.
You can access the Customer Support Web site directly from within the ProSystem fx Trial Balance
Help menu if you are using one of these browsers:
Microsoft Internet Explorer version 5.5 (or greater)
Netscape Communicator version 4.0 (or greater)
Netscape Navigator version 4.0 (or greater)
If you are using a provider such as America Online, you need to set up one of the above listed
browsers as your default browser in order to launch directly from ProSystem fx Trial Balance to
our Web site.
You can also access our Web site at http://support.cch.com.
How ProSystem fx Trial Balance is Organized
ProSystem fx Trial Balance uses a basic hierarchical relationship to accomplish data grouping and
presentation. That hierarchy consists of the following:
Account Types. Identify an object as an Asset, Liability, Equity, Revenue, or Expense.
Classifications. Assist in sorting financial data for workpaper presentations. They further
identify Asset and Liability objects as Current, Long-term, or Other and Expense objects as
Cost of sales, Operating, or Other. Classifications must have an Account Type assigned.
Leads/Subleads. Provide a means of grouping accounts. Leads must be assigned to a
Classification and they inherit its Account Type. Subleads must be assigned to a Lead and
they inherit the Classification and Account Type of the Lead. Subleads are used to create
sub-groupings of related accounts, such as sub-groupings for inventories, fixed assets,
revenues, and expenses. Leads can have both Accounts and Subleads assigned to them.
Chapter 1 - Getting Started • 9
Accounts. The lowest level in the hierarchy. All accounts must be assigned to Leads or
Subleads (not both). Accounts assigned to a Lead or Sublead inherit the Account Type and
Classification of the Lead or Sublead.
The diagram in the topic Opening, Creating, or Converting a Company on page 10 illustrates
ProSystem fx Trial Balance's hierarchy.
This hierarchy must be set up correctly before creating workpapers or financial statements;
otherwise, accounts or leads may not be included in the workpapers or financial statements. At
any time after importing or entering data, you can verify that your hierarchy is set up properly by
examining the Diagnostics grid in ProSystem fx Trial Balance. Any unassigned accounts or leads
are listed in the Diagnostics window.
Industry Standards
ProSystem fx Trial Balance contains industry standards for funds, fund types, classifications, leads,
subleads, data elements, and ratios. A complete listing of the industry standards is located in the
Help file. To access this listing, select Help > Glossary, click ProSystem fx Trial Balance
Control File Industry Standards, and select the industry you want to view.
When a new company is created, you are required to select an industry, but you are given the
option of whether or not to include the industry standards for each applicable object.
The industry can be changed for existing databases using the Company Information dialog
accessed from the Setup menu.
These standards can also be added to existing databases if you did not select them when a
database was first created or if a database was created through conversion from another package.
Opening, Creating, or Converting a Company
These sections explain how to open an existing company, create a new company, create and use
template companies, or convert existing company data from another package to ProSystem fx
Trial Balance. You will also find instructions for importing ASCII account balances to new or
existing companies.
Opening an Existing Company
When ProSystem fx Trial Balance starts, the Open Company dialog is displayed. The company list
identifies ProSystem fx Trial Balance databases. The ID and name of the companies are displayed
in the list.
Chapter 1 - Getting Started • 10
If installed, the sample companies appear on the company list.
When you select a company from the list, its data directory is displayed at the bottom of the
dialog.
There are two ways to add existing ProSystem fx Trial Balance databases to the client list: Browse
and Find.
The Browse button allows you to navigate the disks and directories to locate a database.
Select the directory in which the company data is stored from the list displayed by
double-clicking the relevant folder.
When you double-click a directory containing company data, the company name is displayed
at the top of the dialog box. Click OK to open the company. After ProSystem fx Trial Balance
loads the files, you are ready to begin working with the company data.
The Find button allows you to specify an entire drive or a specific directory to be searched
for ProSystem fx Trial Balance databases. All databases found on that drive are added to the
list. If a database already appears on the list, the company information in the list is
refreshed from the drive.
The Show only companies accessible by this workstation box, which is checked by default,
performs a validation of the company list upon opening. As a result of the validation, a
workstation displays only a list of companies it can actually open.
Note: To display template and backup files in the list of companies, check the Show
templates and Show backups boxes. Backup files are identified with an asterisk (*).
Chapter 1 - Getting Started • 11
Creating a New Company
1. Open ProSystem fx Trial Balance. The Open Company dialog displays.
2. Click Close on the Open Company dialog.
3. Select File > New Company. The New Company dialog displays.
4. Choose Regular, Regular - create from template, Consolidation, or Combination to
indicate the type of company you are creating.
Note: Once the company has been created, the company type cannot be changed.
5. Click the Directory button. The New Company Path dialog displays.
When a new company is created, ProSystem fx Trial Balance creates a number of new files
for that company. These files are unique to that company and must be stored in a unique
directory. Two different companies cannot share the same directory.
6. Select the directory where ProSystem fx Trial Balance will create the company data.
If the directory you choose already contains information pertaining to another company,
ProSystem fx Trial Balance informs you of this and gives you the option to overwrite it.
To create a new directory, enter the file path including the new directory name. For
example: c:\avision\av32\client\new, where "new" is the directory you want to create.
ProSystem fx Trial Balance recognizes this as a new directory and asks if you want to create
it. Click OK to create the new directory.
Note: If you are creating a consolidated company, you can also select the directory
containing the parent company information. There is a section at the bottom of the New
Company dialog where you make this selection.
7. Click OK. The new company's database is created and the company type cannot be changed.
The New Company Information dialog displays.
Enter the information specific to the new company:
Client number. Enter a unique company identifier.
Note: If you are linking the data to a tax return in ProSystem fx, the client
number must be unique and must be 12 characters or less.
Company name. Enter the company's legal name.
Chapter 1 - Getting Started • 12
Industry. Select an industry from the drop-down list in order for the system to
determine the industry classification, leads/subleads, and/or data element/ratio
standards to be assigned. The industry can be changed after the company is created
through Setup > Company Information.
Client options. Instructs ProSystem fx Trial Balance to add Funds, Budget,
Transactions, and/or Interim period capability to the company database. See Chapter
3 - Transactions on page 115 and Chapter 4 - Interim Periods on page 128 for
additional information.
Industry standards. Designate for which grids you want industry standards applied.
ProSystem fx Trial Balance contains industry-specific standards for funds/fund types,
classifications, leads/subleads, and data elements/ratios. If it is necessary to change
the Industry at a later time, select Setup > Update with Industry Standards to
recreate the built-in standards.
Tax return type. If you are exporting this company's ProSystem fx Trial Balance data
to a tax program, check the type of tax return required for this company.
Tax year and dates. If you are exporting this company's ProSystem fx Trial Balance
data to a tax program, select the Tax year from the drop-down box and indicate the
beginning and ending dates of the tax year.
8. When finished, click OK to display the Company Information dialog.
9. Enter the company's information in the appropriate fields:
Identification information. The Client number and Company name fields are
populated from data you entered on the New Company Information dialog. If
required, that information can be changed here. Enter other identification
information for this company, including Short name (an optional field used for display
purposes in the ProSystem fx Trial Balance title bar) and the company's full address.
General information. The Industry field is populated from the selection you made on
the New Company information dialog. If required, you can change the industry by
making another selection from the drop-down list.
Chapter 1 - Getting Started • 13
Check Override report dates on workpapers, reports, and f/s if you want to use the
date in the Engagement date field to override all Report date fields. In the
Engagement date field, enter the date that will be used as a company-level override
of any Report date fields (for all defined years) entered on the Years dialog.
Rounding. Allows you to specify at which level ProSystem fx Trial Balance performs
rounding: None, Whole units, Thousands, or Millions.
Client options. The appropriate boxes are checked based on the choices made on the
New Company Information dialog. If necessary, you can change your choices on this
dialog.
10. If you are linking the data to a tax return, click the Tax Information button and complete
the fields on the Tax Information dialog.
Tax Return. The type of tax return is populated from the information entered on the
Company Information dialog. Enter the company's federal tax ID.
Dates. The Tax Year, Beginning, and Ending dates are populated from the information
entered on the Company Information dialog. Select the ProSystem fx Trial Balance
year that corresponds to the tax year. Enter the company's legal date of incorporation
in the Date of Incorporation field.
Tax Service. Select the tax service that is used from the Service drop-down list and
enter a client ID for the tax service in the Client ID field.
Basis. Select the accounting basis, Accrual or Cash, used by the client.
Chapter 1 - Getting Started • 14
11. Click OK to return to the Company Information dialog.
12. Click the Account Structure button to open the Account Number Structure dialog.
ProSystem fx Trial Balance supports up to 40 alphanumeric characters for an account
number.
Short Account Number. ProSystem fx Trial Balance allows you to define a Short
Account Number that is a segment of the Account Number, but contains fewer digits
and can be used in grid views and workpapers. To use a Short Account Number, check
the Different From Account Number box. At this point you can indicate the position
of the first digit and the length (# of Characters) of the Short Account Number.
To use short account numbers in grid views and workpapers, select the Grid View
button for the Account grid, clear the check box for Account, and check the box for
Account (Short).
Account Segments. Account Segments are parts of the account number that identify
specific elements (for example, the first three digits of an account number may
represent a profit center, and the next five digits may represent a company division).
Segments can be used as filtering elements on the Accounts grid. Click Add to identify
an account segment, indicate where it starts in the account number (5th digit, 13th
digit), and how many characters are included in the segment.
13. After completing the Account Number Structure dialog, click OK to return to the Company
Information dialog.
14. If the company uses transactions, click Transaction Setup to add, modify, or delete
transaction journals. For detailed information about this process, refer to Working with
Transaction Journals on page 119. If the company uses interim periods, click Interim
Periods Setup to select specific interim period options for the company. For detailed
information about this process, refer to Enabling Interim Periods on page 129.
15. When you have finished setting up the company data as necessary, click OK to complete the
creation of the new company.
Note: If you have to make data changes to a company after you have created it, access
the Company Information dialog by selecting Setup > Company Information from the
menu bar.
Chapter 1 - Getting Started • 15
Roundoff Accounts/Retained Earnings
The Roundoff Accounts and Retained Earnings buttons are not available on the Company
Information dialog during the new company setup process. These buttons are available only after
you establish the data hierarchy structure for the company (accounts, leads/subleads,
classifications, and types).
If you are not importing beginning data for the company, or if you are importing some unassigned
data, follow the procedure in Chapter 2 for assigning objects (accounts to leads, leads to
classifications, classifications to types). A floating picklist feature is available to facilitate the
process when you are assigning multiple accounts to the same lead or multiple leads to the same
class.
Once you have at least one account of each type (asset, revenue/expense, liability/equity, and
retained earnings) assigned correctly with the lead, classification, and type, the hierarchy is
established and the roundoff accounts and the retained earnings account can be assigned.
At any point after the data hierarchy is established, select Setup/Company Information to access
the Company Information dialog. The Roundoff Accounts and Retained Earnings buttons are
available, allowing you to do the following:
Click the Roundoff Accounts button to designate the four roundoff accounts: Asset,
Revenue/Expense, Liability/Equity, and Retained Earnings.
Click the Retained Earnings button to define a retained earnings account for Cash Flow,
Transactions, Interim Periods, Financial Statements, and to roll the company forward to the
next year.
These accounts can also be assigned during Cash Flow setup.
Creating and Using Template Companies
To minimize setup time for companies that use similar data structures, ProSystem fx Trial Balance
allows you to establish and use template company files. If you are setting up companies that
utilize the same chart of accounts, leads, subleads, classifications, ratios, and financial
statements, you can create one template company and use it as a basis for creating all the others.
Chapter 1 - Getting Started • 16
Creating the Template Company
1. Select File > Create Template Company and the Select Template Source Company dialog
displays.
Note: Variable data, such as account balances and Journal Entries, is not copied when
the template company is created.
2. Select the source company to create the template and click OK. The Create Template
Company dialog displays. The template source company name and path are shown.
3. Select the Directory path for the new template, complete the Template name field and click
OK.
4. After the template company is created, the company is opened and the Company
Information dialog displays. You can now edit the client number, company name, and other
applicable settings.
Modifying a Template Company
1. Select File > Open Company to display template databases. The Show templates box must
be checked to display the template companies.
2. Highlight the preferred template company, click Open and a prompt displays reminding you
that the database being opened is a template.
3. Make the applicable changes and select File > Close Company.
Converting Databases from Other Trial Balance Packages
ProSystem fx Trial Balance makes it simple for you to convert your current client files from the
FAST™!, FAST!Advantage™, GoSystem Audit™, ACE™, and ATB ™ trial balance packages.
Note: Before beginning a conversion you can refer to Tips for Converting/Importing Data on
page 25. If you are converting a database that contains interim period data, please read
Converting Interim Period Data on page 145.
Chapter 1 - Getting Started • 17
Converting Company Data
1. Select File > Convert Company. The Convert Company dialog displays. Select the source
trial balance package from the drop-down list.
2. Click the Directory button in the Convert From section to select the directory holding the
company to be converted. Click OK.
3. Click Directory in the New Company section and select the directory in which the converted
data will be stored. This must be a directory that does not contain any other ProSystem fx
Trial Balance company data. If the directory specified does not exist, the system prompts
you to create it.
4. If you want to renumber the accounts during the conversion process, check Renumber
during Conversion, then click List File to locate the file that contains the renumbered
accounts.
Note: Be sure you have read Renumbering Multiple Accounts on page 24 before using
this feature.
5. Click OK. The Company Information dialog displays any company information contained in
the database. You can add or edit any of the company information.
Note: A client number must be entered and an industry selected before continuing.
6. Click OK to begin the conversion process. ProSystem fx Trial Balance creates a new company
using the converted data.
7. Once the conversion is complete, you can update the company information and use the
company as you would any other company created in ProSystem fx Trial Balance.
Note: After conversion, changes made to the company database in ProSystem fx Trial
Balance are reflected only in ProSystem fx Trial Balance and not the previous
accounting package.
Chapter 1 - Getting Started • 18
Data Converted from Other Trial Balance Packages
FAST! and FAST!Advantage
Basic Company Information
Accounts
Leads
Classifications
Journal Entries, including TJEs
Data Elements
Ratios
Tax Lines
ATB for Windows (Version 2.x) and ATB for DOS (Versions 3.x and 4.x)
Basic Company Information
Accounts
Leads (Grouping schedules do not convert)
Journal Entries, excluding TJEs
ACE Audit (Versions Preceding ACE Audit Plus 2.x)
Basic Company Information
Accounts
Leads
Journal Entries, excluding TJEs
Tax Lines
ACE Audit Plus 2.x
Basic Company Information
Accounts
Leads
Journal Entries, including TJEs
Tax Lines
GoSystem Audit
Basic Company Information
Accounts
Leads
Journal Entries, including TJEs
Tax Lines
Chapter 1 - Getting Started • 19
Importing Account Balances
As an alternative to converting the entire company database, accounts and account balances for
existing ProSystem fx Trial Balance companies can be imported (or appended) from another trial
balance, accounting, write-up, or general ledger package (DOS or Windows based). This can be
accomplished in one of several ways:
Accounts and balances from specific pre-defined packages can be automatically imported to
ProSystem fx Trial Balance. These packages are:
ACE Audit, older versions
ATB 3.x and 4.x for DOS
ATB for Windows
CBEAM for DOS or Windows
CSA - Write-Up Solution for Windows
FAST!
FAST!Advantage
GoSystem Audit
Intacct
QuickBooks
In addition, balances from one ProSystem fx Trial Balance database can be imported into another
ProSystem fx Trial Balance database.
Accounts and balances from programs not pre-defined by ProSystem fx Trial Balance can be
imported as standard ASCII text files (fixed width or delimited) using the ASCII Import
Wizard. An ASCII text file can generally be created by the source program's export utility or
by printing a report (such as a trial balance or chart of accounts) to a file.
Scanning software can be used to scan the company's hardcopy reports. After scanning, open
the scanned file in Excel, run it through an OCR program, delete blank lines or lines that do
not contain importable data, and save as an ASCII text file and import to ProSystem fx Trial
Balance.
Note: If you have previously used separate ProSystem fx Trial Balance companies or separate
years within the same company to perform interim period processing and now want to combine
all databases or years, refer to Merge ProSystem fx Trial Balance Companies on page 148.
Importing from Pre-Defined Packages
ACE Audit (older versions), 3.x and 4.x for DOS, ATB for Windows, CBEAM for DOS or Windows,
CSA - Write-Up Solution for Windows, FAST!, FAST!Advantage, GoSystem Audit, Intacct, and
QuickBooks are accounting packages that are pre-defined by ProSystem fx Trial Balance in order
to quickly import accounts and account balances. Use the following procedure to import from
these packages and to import balances from one ProSystem fx Trial Balance company to another.
Before beginning the process, remember the following:
If you plan to renumber the accounts being imported, be sure to read Renumbering Multiple
Accounts on page 24 before continuing the procedure.
Chapter 1 - Getting Started • 20
If you are importing interim period balances, interim periods must be enabled for the
company and the period type matching the data being imported must be activated.
To import balances from pre-defined packages, do the following:
1. Select Setup > Import Account Balances or Setup > Append. (Use Append if the company
has existing accounts that you do not want replaced by the incoming data.)
2. Select the package from which you are importing balances using the Import From drop-down
box.
3. Click the Directory button to select the file that contains the data you want to import.
4. To renumber the accounts, check the Renumber during Import box, then click the List File
button to locate the file that contains the renumbered accounts.
5. Click OK. The import process begins.
Importing ASCII Account Balances
ProSystem fx Trial Balance can import balances from packages that are not pre-defined by using
the ASCII Import Wizard. The wizard is designed to guide you through the process of importing an
ASCII file. It can work with either delimited or fixed-width ASCII files, and usually can detect
which type of file is present.
For fixed-width files, ProSystem fx Trial Balance allows you to set the column breaks, then
review the results by scrolling through all the lines of the file.
For delimited files, ProSystem fx Trial Balance automatically detects the delimiters. You are
allowed to alter those delimiters and review the results by scrolling through all the lines of
the file.
Preparing an ASCII File for Import
Before you can import an ASCII file into ProSystem fx Trial Balance, you must first edit it and
remove the header information (excluding the first page), blank rows, and page breaks.
ProSystem fx Trial Balance requires that each row of data in the file represents a single account;
therefore, data for an account cannot flow to multiple lines. You can use Windows programs such
as Excel, Word, or Notepad to prepare the file, but it must be saved in the ASCII text format. Once
you have prepared the ASCII file, you are ready to begin the import process.
Note: If you are preparing an ASCII file from General Ledger Connection, be sure to follow the
steps in the next section before starting the import process.
Preparing a General Ledger Connection ASCII File
The ASCII file is created from the Chart of Accounts Report in General Ledger Connection. This
report contains the account number, description, tax line, and prior/current year balances.
To create the print file in GLC from the Chart of Accounts, do the following:
1. If the trial balance is not already open, select File > Open and choose the trial balance.
2. Select File > Print. The Reports dialog displays.
3. Select the Chart of Accounts report and check the File box. Click OK.
4. Enter a file name and click OK. The file will have an extension of .rep and is created in the
directory designated as the T/B path (for example, \glcwin32\client).
Chapter 1 - Getting Started • 21
5. Open the report file with any editor with which you are familiar (for example, Notepad or
WordPad).
6. Once the file is opened, delete all headers, total lines, and blank lines so that only lines
starting with account numbers are left.
Once the file is saved, you can begin the import process.
Using the ASCII Import Wizard
When you have prepared the ASCII file containing the account balances you want to import, use
the following procedure to import the data:
Note: If you plan to renumber the accounts being imported, be sure to read Renumbering
Multiple Accounts on page 24 before continuing the procedure.
1. Open the company in ProSystem fx Trial Balance. Select Setup > Import Account
Balances.
2. Be sure ASCII File appears in the Import from drop-down box.
3. Click the File button and locate the ASCII file which contains the data you want to import.
4. To renumber the accounts, check the Renumber during Import box, then click the List File
button to locate the file that contains the renumbered accounts.
5. Click OK. The ASCII Import Wizard begins a three-step process. Step 1 displays the data
contained in the selected file.
ProSystem fx Trial Balance determines the text type - Delimited or Fixed Width.
Delimited. Text has columns of varying lengths such that you may not be able to
determine the location of each column. Each field of data is separated by a delimiter
such as a comma.
Fixed Width. Text is entered in columns of specific length. Data in a fixed-width text
file is clearly displayed in columns.
If ProSystem fx Trial Balance selects the wrong type, select the correct one.
Chapter 1 - Getting Started • 22
If the file contains column headings, set the Start Import at Row counter to the first row of
Account data to prevent these headings from being imported. Click Next to continue to step
2 of the Wizard.
6. The display box shows the suggested placement for the information. Adjust the placement as
needed.
Delimited text involves selecting the type of delimiter used (tab, comma, or semicolon). If
the correct choice has been made, the View of Data in File box displays the data in columns.
If an incorrect delimiter is selected, select the correct delimiter. If you select Treat
consecutive delimiters as one, ProSystem fx Trial Balance ignores the second of two
consecutive delimiters.
With fixed-width text, you must insert column breaks at the point where the longest entry in
each column ends. Follow the instructions on the dialog for inserting, deleting, and moving
column breaks.
Click Next to continue to step 3 of the wizard.
7. In the final step, identify the contents of each column of data and, if applicable, designate
the year (and period) for which data is being imported. Initially, each column contains the
<Ignore> label. Click within a column to select it, and then select the column data type from
the Import column as drop-down list (for example, Account, Account Description, Unadj.
Balance).
If you select balance type from the Import column as drop-down list, a Year drop-down box
appears. If Interim Periods is enabled for the company, Period type and Period no. dropdown boxes display. Also, if the Budget option is enabled, selections for Budget 1 and Budget
2 are available. The selections available in each of the drop-down lists are based on the
options enabled for the company (Budgets, Transactions, Interim Periods).
The first balance column is automatically selected as the Current year (period). If additional
columns are labeled as balances, the lists automatically reflect prior years/periods.
8. When all columns have been identified, click Finish to complete the import process.
9. If ProSystem fx Trial Balance is unable to import the data, a message displays indicating
which lines are causing the problem. You may need to re-edit the ASCII file to resolve the
Chapter 1 - Getting Started • 23
problem (remove a blank line or add an account number). After you have corrected the
error, you can begin the import process again.
10. When the import process is complete, review the Diagnostics grid to ensure there are no
problems with the data. See Diagnostics on page 28 for more information.
Note: If you want to be notified of any future problems, check Warn When Diagnostics
Present on the Options menu. When this option is selected, a message displays when you
close the company notifying you that there are unresolved problems in the database.
Renumbering Multiple Accounts
This feature enables you to renumber accounts in existing ProSystem fx Trial Balance databases. It
uses a simple two-column ASCII file as the input, which you can create using any spreadsheet
program or text editor. Old numbers must be in one column, new numbers in the other.
To renumber multiple accounts, do the following:
1. Select Setup > Renumber Multiple Accounts. The Renumber Accounts - List File dialog
displays.
Chapter 1 - Getting Started • 24
Notes:
The Renumbering Multiple Accounts option is also offered in conjunction with the
Conversion, Import, and Append features by checking the Renumber during box on
the Convert, Import, or Append dialog.
This feature is not available for Consolidation or Combination companies.
2. Select the drive that your list file is located on from the Drives drop-down list, and browse to
the directory folder in the Directories window, if necessary.
3. Enter the name of your list file in the File Name box, or select it from the window below.
4. Select a button in the Column Alignment section to indicate which column in your list file
contains the old account numbers and which column indicates the new account numbers.
5. Click OK to renumber your accounts, or Cancel to exit the dialog.
Tips for Converting/Importing Data
Here are some tips and hints for converting or importing data from other accounting packages.
This information is provided for quick reference and is not intended to replace any instructional
material provided by the makers of the software.
General Tips on Importing
Text files must not include special characters (such as * or /) or blank lines.
If an account is imported twice, the second occurrence of the account number includes the
letters DUP at the end (for example, 123456DUP).
CSA - Write-Up Solution for Windows
The CSA - Write-Up Solution import files must have a file extension of .wsz or .wsw.
The Import Account Balances option allows importing flexibility regarding Years of data,
Interim Periods and Fiscal Year specifications. Click for additional information on Import
options for CSA - Write-Up Solution.
Retained earnings accounts must be specified to properly calculate the retained earning
balance for the Interim Periods Import.
Weekly and 13 Periods data can be imported in to Trial Balance:
Weekly. For example, data entered in Write-Up Solution that is imported to another
period in Trial Balance (such as from 01/31/YYYY to 02/YYYY).
13 Periods. For example, data entered in Write-Up Solution that is imported to
another period in Trial Balance (from 01/31/YYYY to 02/YYYY). This example shows
the closing date for the 01/31/YYYY data in Write-Up Solution is a February date such
as 02/05/YYYY.
Note: This requires every account in Trial Balance to be adjusted for the interim period if the
data is to balance according to the entry dates or transaction dates from Write-Up Solution.
The balances are imported accurately according to the closing dates from Write-Up Solution.
Chapter 1 - Getting Started • 25
GoSystem Audit
GoSystem Audit companies have only one file (*.mdb).
Subleads are not converted.
Intacct
The Intacct import includes account numbers, account descriptions, and current year
balances only.
ACE for DOS
Only one grouping schedule can be converted.
ATB for Windows
In ATB for Windows, leads and subleads are found under the Analytical Ratios tab.
Classifications are not converted. After converting, select Setup > Update with Industry
Standards to create them, then assign them manually.
If the company is set up in ATB with grouping schedules rather than leads, the grouping
schedules are not converted to leads. When this happens, create an ASCII file containing
columns for Account number, Lead, and Lead description. Use the grouping schedule names
as Lead descriptions. In the column for Leads, enter a unique identifier for each grouping.
Import the file using the ASCII file import instructions in Importing ASCII Account Balances on
page 21.
Tax lines are not converted.
QuickBooks™
The database file required for import is *.qbw. This file is created by QuickBooks versions 4,
5, 6, 99, 2000-2013.
QuickBooks databases to be imported require unique account numbers.
Note: To enable account numbers in QuickBooks, select Edit > Preferences >
Accounting > Company Preferences > Use Account Numbers.
The import process does not require the QuickBooks program for versions 2005 and before.
However, for QuickBooks 2006 and later, it is mandatory that the company being imported is
open in QuickBooks for the first import. The user can then select an option to allow access to
the company without QuickBooks being open.
Password protection activated in QuickBooks is not transferred to ProSystem fx Trial
Balance.
The Setup > Import Account Balances option allows flexibility when used to import Years
of data, Interim Periods, and Fiscal Year specifications. See Importing Account Balances on
page 20 for more details.
First month of fiscal year is enabled for importing QuickBooks annual databases only.
Import as current year is available for Annual and Interim Period Trial Balance
databases. Use this option to import prior year QuickBooks databases.
Chapter 1 - Getting Started • 26
Note: If the Trial Balance database is an Interim Period database, this option
must match the fiscal year set up in the Trial Balance Years grid.
Number of Years is an option used to choose the import of Current Year only, Current
Year and prior year, or Current Year through Year XX.
Select period to begin import is available only for importing in to Trial Balance
Interim Period databases. This option allows you to begin importing from a specific
period, preventing the overwriting of existing periods.
The Setup > Append and File > Convert Company features are not available for
QuickBooks.
PeachTree™
To create an import file in PeachTree, do the following:
1. Open the company from which you are going to export data to ProSystem fx Trial Balance.
2. Select Reports > General Ledger.
3. From the Report List, select General Ledger Trial Balance.
4. Click Print. The Filter, Layout, and Options tabs are available, with the Filter tab displayed
on top. Click each tab to display its associated page.
5. Be sure these dialogs correctly reflect the way you want data to be exported.
6. On the Options dialog, click Default Printer. The Printer Setup dialog displays.
7. Select Specific printer and then select Generic > Text Only on FILE from the drop-down
list, and click OK. The Print dialog displays.
8. Click OK. The Print To File dialog displays.
9. Select a path and file name on the Print To File dialog. Click OK.
10. Edit the file to remove headers, total lines, and other data that cannot be imported. After
saving the file, begin the ProSystem fx Trial Balance import process.
ATB Writeup™
To create an import file in ATB Writeup, do the following:
1. Select a company.
2. Select 6. Prepare analytical procedures, then select 1. Categorize accounts for ratio
computation.
3. At this point, you need to categorize the accounts. However, for the purpose of this report,
it does not matter which category you choose. Select a category and press F5 to duplicate
the entry entirely. Once all the accounts are categorized, press F10 to accept.
4. Go to option 5, Print analytical procedures workpapers.
5. Select Five Year Comparison - Without Totals.
6. Press F2 to set options.
7. Select basis of accounting. For prior years, select Y (YTD).
8. Press F10 to accept.
9. Select 3, Direct Output to Disk, and confirm your destination.
10. Open the file in Excel and perform a standard clean up (remove special characters or blank
lines) prior to importing in to ProSystem fx Trial Balance.
Chapter 1 - Getting Started • 27
Entering Company Data Manually
In an open company in ProSystem fx Trial Balance, the Add Accounts button allows you to add new
objects and establish their data groupings all on one dialog. You can create new accounts and
make their lead, sublead, classification, and tax line assignments.
1. Open the Accounts grid. If this is a new company, the grid is empty.
2. Click the Grid View button to open the Grid View dialog and make sure there are
checkmarks in the Lead, Sublead, and Tax Line boxes and click OK. This displays the Lead,
Sublead, and Tax Line columns in the grid.
3. Select the Add Account button. The Create New Account dialog displays.
You can also select Work > New, Edit > Add Account, press the + key on the keypad or
press Ctrl + A to add new objects.
4. The Create New Account dialog allows you to add new accounts and enter the appropriate
description for the account, as well as assign or create Leads, Subleads, or Tax Lines, if
applicable.
5. Click the CY Unadj. fields (or Beginning Balances if transactions are being used) and enter
the current year unadjusted balance.
6. If you did not use the ProSystem fx Trial Balance default leads, subleads, and classifications
when you created the company, you must update with Industry Standards (Setup > Update
with Industry Standards) to make these objects available.
Diagnostics
Each object containing incomplete data appears on the Diagnostics grid. A large variety of
conditions are checked in the database and reported on the grid. Only in rare circumstances is it
appropriate to ignore a diagnostic.
Chapter 1 - Getting Started • 28
You can activate the Diagnostics grid by selecting Work > Diagnostics, or by clicking the
Diagnostics button on the toolbar.
If there are multiple errors related to one of the objects, ProSystem fx Trial Balance reports the
total number of errors in the # of Problems column and lists the description of the first error. To
view a listing of all problems, double-click the cell in the # of Problems column, or select the
cell and press F2.
If you want to be warned when diagnostics are present, check Options > Warn When Diagnostics
Present. If diagnostics are present when closing a company, ProSystem fx Trial Balance displays a
warning and asks if you want to review them. Click Yes to view them (on the Diagnostics grid) or
No to simply close the company database. This feature can be disabled by clearing the Show
warning upon exiting company box on the Diagnostic warning or clearing the Options >
Preferences > Warn When Diagnostics Present box.
Multi-User Operations
ProSystem fx Trial Balance permits more than one user to access a database simultaneously. With
the multi-user feature, the following operations can be performed:
Open Multi-user Copies. In a network environment, you can open a multi-user copy when a
Master copy is currently in-use. Multi-user copies are available in the following two modes:
Review Mode. No changes can be made to a Review mode copy. The copy can be
used for review purposes only.
Edit Mode. With an Edit mode copy you can add Journal Entries, Data Elements,
Ratios, and Groups. You can also edit WP references and comments. You cannot edit
other pre-existing items.
When you close an Edit copy that you have changed, you have the option of saving
those changes. If you save them, the changes are placed in a Changes Pending Action
queue, where they await review and approval or rejection by the Master copy. If you
do not save the changes, they are deleted; the multi-user Edit copy is a temporary file
and is not saved when it is closed.
Other users will not see your changes until they are processed by the Master.
As you are working in a multi-user copy, you can keep track of any changes being
made to the Master copy through a Refresh feature which becomes available
whenever the system detects that changes have been made to the Master.
There is no limit to the number of multi-user copies that can be open at the same
time.
Check-in/Check-out. You can check-in and check-out both Master and Restricted copies.
Restricted Copies. Restricted copies can be checked out in either Edit or Review
mode, similar to the multi-user copies. However, a checked-out restricted copy can
be opened and closed as often as necessary while it is checked out, allowing you to
Chapter 1 - Getting Started • 29
work on the copy at another workstation or location.
You cannot Refresh data from the Master copy and changes are not saved
automatically to the Master. However, when you check in the Restricted copy, any
changes you made are placed in a Changes Pending Action queue awaiting acceptance
or rejection by the Master. Once checked in to the Master, a Restricted copy cannot
be opened again.
There is no limit to the number of restricted copies that can be checked out.
Master Copy. When you check out a master copy, a restricted copy, in either Edit or
Review mode, is left behind. Only one person at a time can access this restricted
copy.
A checked-out Master copy has the same functionality as a regular Master copy: multiuser copies can be opened from it and restricted copies can be checked-out from it.
Process Pending Activity Queue. From a Master copy, you can access a Changes Pending
Action dialog which allows you to either approve or delete all changes incorporated from
multi-user or restricted copies. A record of all processed changes is recorded in an Activity
Log.
Activity Logs. Activity Logs record activity for Master, Restricted Edit, and Multi-User Edit
copies.
Database Modes
A company database is in one of the following modes:
Master. The full-access database to which all types of changes can be made and into which
all changes made on other copies of the database are merged.
Multi-User Review. A temporary copy of the database that can only be viewed. No changes
can be made to it.
Multi-User Edit. A temporary copy of the database to which you can add journal entries,
ratios, groups, and data elements only. Changes made in the Edit mode are placed in a queue
for review before they are merged with the Master.
Note: For a complete list of available functionality in Review and Edit modes, refer to
the online Help file.
Restricted. A copy of the database in either Review or Edit mode. A restricted copy can
either be a copy checked-out from the Master, or the copy left behind when the Master is
checked out. The restricted copy is designated as Edit or Review at the time it is created.
Working with Multi-User Companies
If you are working in a network environment, multiple copies of a company can be open
simultaneously. The following section covers the steps you must follow to open a Master, Edit, or
Review copy of the database.
Note: The multi-user feature is available only when ProSystem fx Trial Balance is running in a
network environment. However, the check-in/check-out feature is available for either
standalone or network installations.
Chapter 1 - Getting Started • 30
When you first open ProSystem fx Trial Balance or when you select File > Open Company, the
Open Company dialog displays.
"Master" designates a Master copy. "Restricted Copy" can refer to either the copy left behind when
the master was checked out, or a copy checked out from the Master.
If you check the Show backups or Show templates box, backups are preceded by an asterisk (*)
and templates by a (t).
Opening a Master Database
To open a Master database, select the company you want to open and click Open. The system
performs a series of validations. Based on the validations, one or more of the following happens:
If the Master is not currently in use and if there are no changes in the Pending queue, the
Master opens.
If there are changes that have been made to a copy of the database which are waiting in the
Pending queue to be approved for merging with the Master, a message displays asking if you
want to review the pending changes.
If you click Yes, the Changes Pending Action dialog displays (see Reviewing Pending Changes
section in this chapter for further details). If you click No, the Master opens without the
pending changes being reviewed.
If the Master is in use, you have the opportunity to open a multi-user Edit or Review copy of
the database as indicated in the following section.
Opening a Review or Edit Copy of the Database
When you try to open a Master database that is in use, the Company In Use dialog displays. The
dialog displays the name and path of the company, the name of the user who currently has the
Master open, and the date and time that user opened the company.
Chapter 1 - Getting Started • 31
If you want to open an Edit or Review copy of the database, enter your name and purpose in the
corresponding fields of the dialog. Then select to open either a Review copy (no changes
permitted) or an Edit copy (limited changes permitted) of the database and click OK.
Note: If a critical process is underway in the Master, such as Roll Forward, a message displays
informing you that the database cannot currently be accessed. You cannot open a copy of the
database while these functions are being performed in the Master.
If there are changes waiting in the Pending queue to be approved for merging with the Master, a
message displays asking if you want to open the copy of the database anyway. If you click Yes,
the database opens in the selected mode (Review or Edit), but keep in mind that the pending
changes are not included in the copy of the database that you open. If you click No, the copy does
not open.
Refreshing Data from the Master
When you have open a multi-user Review or Edit copy and the system determines that changes
have been made to the Master copy, the File > Refresh Data from Master command becomes
available and the Refresh button on the toolbar changes color.
Select File > Refresh Data from Master or click Refresh to have the multi-user copy updated
with any changes made to the Master. Workpaper references and Comments do not refresh from
the Master. Open grids are closed and the words Refreshing From Master display in the Status bar
until the database has been refreshed.
If you have made changes to the copy in Edit mode, these changes are not incorporated in the
Master during the refresh. They are saved only when the Edit copy is closed and you request that
they be saved. At that time, they are placed in the Changes Pending Action queue for review,
approval or rejection by the Master.
If the Master is available when you initiate a Refresh, a message displays asking if you would like
to use it. Click Yes to open the Master. Click No to keep the copy open and continue with the
refresh.
If you choose to open the Master and have been making changes to an Edit copy, you are asked if
you want to save your changes. Click Yes to place the changes in the Pending queue for review
and approval to merge with the Master (see Reviewing Pending Changes section in this chapter).
Click No to discard the changes.
Saving Changes Made in Edit Mode
When you open a database in Edit mode, you can make only specified changes: Adding journal
entries, ratios, groups, and data elements and editing WP references and Comments. When you
close a company in multi-user Edit mode after these types of changes have been made, a message
displays asking if you want the changes saved to the Master database.
You can do one of the following:
Click Yes to place the changes in the Changes Pending Action queue for review and approval
to merge with the Master. The changes do not display in another multi-user copy until they
have been merged with the Master.
Click No to close the company without saving any of the changes.
Click Cancel to return to the company without closing it.
Chapter 1 - Getting Started • 32
All saved changes are placed in a Pending queue where they must be reviewed before they can be
merged with the Master. Refer to Reviewing Pending Changes in this chapter for more information
on this process.
Note: Once a multi-user copy has been closed, it cannot be opened again.
Check-in/Check-out Processing
The Check-in/Check-out feature allows you to check out either the Master or a Restricted copy of
the database, but keep the following in mind:
If you check out the Master, a Restricted copy of the database remains behind. At the time
you check out the Master, you must designate whether the Restricted copy is in Review or
Edit mode. The mode cannot be changed while the Master is checked out.
Multi-user functionality is not available for Restricted copies when the Master is checked out.
Only one user at a time can open the Restricted copy that is left behind while the Master is
checked out.
If you check out a Restricted copy of the database, the Master remains behind with full
functionality.
Changes made to a Restricted checked-out database are placed in the Changes Pending
Action queue upon check-in and then reviewed and approved to merge with the Master.
Changes made to a Restricted database while the Master is checked out are placed in the
Pending queue for review and approval when the Master is checked in.
Restricted copies can be checked out from a checked-out Master. For example, if you have
the checked-out Master at a client location, Restricted copies can be checked out from it at
the client location.
The following sections cover the check-out and check-in processes.
Checking Out a Company
1. Select File > Check out Company. The Check-out Selection dialog displays.
2. Highlight the company you want to check out, or use the Browse button to locate the
company, and click Check-out.
Note: A Master database can be checked out only when the Master is available. If a
company is listed as "Checked-out" on the Check-out Selection dialog, it means the
Master is already checked out and you can open only the Restricted copy that was left
behind.
However, if you have access to the checked-out Master, you can check out Restricted copies
from it.
Chapter 1 - Getting Started • 33
3. The Check-out Company dialog displays.
Complete the dialog according to the following instructions:
Enter your name and the purpose for checking out the database in the corresponding
fields.
In the Type of check-out section, select the type of database you are checking out:
Restricted copy or Master.
In the Restricted copy access mode section, if you are checking out a Restricted copy,
select Review or Edit as the mode for the checked-out copy. If you are checking out
the Master, select Review or Edit for the mode of the Restricted copy that remains
behind.
4. To check out a compressed (ZIP) file, check Compressed file mode. This is recommended,
particularly if you are checking out the database to a floppy disk. Many databases are so
large that they easily exceed the capacity of a floppy disk if they are not zipped.
5. Click either File or Directory (the button name changes depending on whether or not you
are checking out a compressed file) to open the Check-out Destination dialog where you
identify the drive, directory, and (if checking out a compressed file) name of the ZIP file to
which the database is being checked out.
6. Click OK. The system performs a series of validations. Depending on the type of database you
are checking out, you may receive one or more of the following messages:
If you are checking out the Master and another user currently has the Master open, a
message displays indicating that you cannot check out the database at this time. Click
Retry to attempt the check out again or Cancel to cancel the check out.
Chapter 1 - Getting Started • 34
If you are checking out the Master and another user currently has a multi-user copy of
the database open, a message displays iterating that you cannot check out the
database at this time. Click Retry to attempt the check out again or Cancel to cancel
the check out.
If you are checking out a Restricted copy and there are pending changes waiting to be
reviewed and merged with the Master, you are asked if you want to proceed.
If you are checking out a Restricted copy and another user has either the Master or a
copy of the database open in Edit mode, a message displays informing you that if you
continue with the check out, the copy you are checking out does not contain changes
made by the user.
Click Yes to continue or No to cancel the check out. If you click Yes, the database
you check out does not contain any changes being made to a multi-user edit copy.
The database contains any changes made to a Master copy up to the time of check
out.
Once a database has been successfully checked out, it can be opened on another installation of
ProSystem fx Trial Balance (on a laptop, for example). If the Restricted copy has been checked
out in Edit mode, specified changes can be made to the database. If the Master has been checked
out, you have full access to make any changes to it.
The Master has all multi-user functionality. Multi-user copies can be opened and Restricted copies
can be checked out from the checked-out Master.
Checking In a Company
There are three different situations for checking in a company, and each requires a slightly
different check-in procedure. These situations and the page on which each is discussed are:
A Restricted copy was checked out; the Master was left behind. You have the Master open
and are checking in the Restricted copy from the Master. See the next section for more
information.
The Master was checked out; a Restricted copy was left behind. You have the checked-out
Master open and are checking in the Master from the Master. See Check-in/Check-out
Processing on page 33 section for more information.
The Master was checked out; a Restricted copy was left behind. You have the left behind
Restricted copy open and are checking in the Master from the Restricted copy. See Checkin/Check-out Processing on page 33 section for more information.
Chapter 1 - Getting Started • 35
Checking in a Restricted Copy from the Master
To check in a Restricted copy from the Master, do the following:
1. Select File > Check-in Company. The Check-in Selection dialog displays a list of all
outstanding Restricted copies.
2. Highlight the Restricted copy that you are checking in and click Check-in. To add or remove
Restricted copies from the list, do the following:
Click Add to locate and add the preferred copy. The Check-in Company dialog
displays.
To remove a Restricted copy that you no longer want to be tracked, highlight it and
click Remove.
3. Check File is compressed if the copy you are checking in is in a compressed format.
4. Click File or Directory (the name changes depending on whether or not the company you
are checking in is compressed) to open the Restricted Copy Location dialog where you
identify the drive, directory, and (if applicable) the ZIP file where the Restricted copy you
are checking in is located.
5. Once you have provided the Restricted copy's location, click OK. The system begins the
check-in process and performs a series of validations. Depending on the outcome of these
validations, one of the following happens:
If the check-in was not successful, a message displays informing you of this. Click OK
to return to the Check-in Company dialog and try the check-in again.
If the check-in was successful and there were no changes made on the Restricted
copy, a message displays that the check-in was successful and that the copy has now
been deleted.
Click OK to return to the Check-in Company dialog where you can check in another
Restricted copy or click Close.
If the check-in was successful and there were changes made on the Restricted copy, a
message displays that the check-in was successful, that the copy has now been
deleted, and that there are pending changes ready for review.
Click Yes to review these changes (see Reviewing Pending Changes section in this chapter)
or No to return to the Check-in Selection dialog.
Chapter 1 - Getting Started • 36
Checking in the Master from the Master
To check in a Master when you have that Master open, do the following:
1. Select File > Check-in Company. The Check-in Selection dialog displays.
2. Highlight the Restricted copy that was left behind when the Master was checked out and
click Check-in. The Check-in Company and Replace dialog displays.
3. Check File is compressed if the Restricted copy is in a compressed format.
4. Click File (or Directory, if the Restricted copy is compressed) to open the Restricted Copy
Location dialog where you identify the drive, directory, and (if applicable) the ZIP file
where the Restricted copy is located.
5. Once you have provided the Restricted copy's location, click OK. The checked-out Master
you currently have open closes and the system begins the check-in process. The Master is
checked in by replacing the Restricted copy that was left behind when it (the Master) was
checked out.
6. During the check-in, the system performs a series of validations. Depending on the outcome
of these validations, one of the following happens:
If the check-in was not successful, a message displays informing you of this. Click OK
to reopen the checked-out Master and try the check-in process again.
If the Master has existing multi-user copies outstanding, it cannot be checked in. A
message displays informing you of this. Click OK to return to the Check-in Company
and Replace dialog.
If the check-in was successful and there were no changes made on the Restricted copy
while the Master was checked out, a message displays that the check-in was
successful and that the checked-out Master and the Restricted copy have now been
deleted. Click OK to open the checked-in Master.
If the check-in was successful and there were changes made on the Restricted copy
while the Master was checked out, a message displays that the check-in was
successful, that the checked-out Master and the Restricted copy have now been
deleted, and that there are pending changes ready for review. Click Yes to review
these changes (see Reviewing Pending Changes section in this chapter) or No to open
the checked-in Master.
Chapter 1 - Getting Started • 37
Checking in the Master from the Restricted Copy
To check in the Master when you have the Restricted copy that was left behind open, do the
following:
1. Select File > Check-in Company. The Check-in Company and Replace dialog displays.
2. Check File is compressed if the Master is in a compressed format.
3. Click the File (or Directory, if the Master is compressed) to open the Master Location dialog
where you identify the drive, directory, and (if applicable) the ZIP file where the Master is
located.
4. Click OK. The Restricted copy closes and the check-in process begins. One of the following
happens:
If the check-in is successful, the Master opens at its new location (where the
Restricted copy was located). The Restricted copy is deleted.
If the check-in is not successful, a warning message displays. Click OK to reopen the
Restricted copy. The checked-out Master remains where it was before the check-in
process was initiated.
If the Master is in use by another user when you try to check it in, a warning message
displays. Click Retry to try the check-in again. Click Cancel to return to the Check-in
Company and Replace dialog.
Reviewing Pending Changes
While in Edit mode, you can make limited changes to the database. When you close a Multi-user
Edit copy, you are asked if you want to save these changes. If you respond Yes, the changes are
placed in a Pending queue to await review and approval to be merged with the Master database,
and the Edit copy is deleted.
When a Restricted checked-out copy is closed, changes are automatically saved. The Restricted
copy can be opened and closed as many times as necessary while the copy is still checked out.
When you check in a Restricted Edit copy, any changes made to it while it was checked out are
automatically added to the Pending queue awaiting review and approval to be merged with the
Master.
When there are items in the Pending queue of a Master database, the Changes Pending Action
command is available from the File menu and the Changes Pending Action button displays in
color. In addition, there are certain steps during the multi-user and check-in/check-out processes
where you are asked if you would like to review the Pending changes.
Note: The Changes Pending Action dialog is accessible only from the Master copy since it is the
Master copy that approves or rejects changes made to an Edit copy.
When you select File > Changes Pending Action, or click the associated button, or you respond
Yes to a message asking if you would like to review pending changes, the Changes Pending Action
dialog displays.
Chapter 1 - Getting Started • 38
Each item displays a system-assigned Entry number, which is unique within each company, the
type and description of the change, the status, the date and time it was created, and the user who
created it. The View Details button allows you to review the detail of a selected Change Pending
Action item prior to assigning a status. The details of pending Journal Entries (JEs), Data Elements,
Ratios, Groups, Lead comments, Sublead comments, and W/P references can be displayed before
approval. If the status is Suspended, you can use the scroll bars to see the Reason for Suspension
column at the far right of the dialog. If you do not need to review the details of the pending
changes, you can highlight a single item or use the Select All button to assign the applicable
status: Approve, Pending, or Delete.
To review details of pending changes, do the following:
1. Highlight an item on the list and click the View Details button. The Details of Changes
Pending Action dialog displays.
Chapter 1 - Getting Started • 39
2. Click the appropriate button to assign the correct status: Approve, Pending, or Delete (to
mark an entry for deletion).
3. You can use the Previous and Next buttons to navigate the items on the Change Pending
Action list.
4. When the applicable assignments have been made, click OK. The User Name dialog displays.
5. The dialog defaults to the name of the user who has the Master open. If this is not your
name, enter yours in the Name field. Click OK.
Note: During processing, if the system encounters a change that cannot be merged with
the Master, it assigns a status of Suspended and provides the reason in the Reason for
Suspension column.
An example of the above would be if an Adjusting Journal Entry (AJE) was added for an
account in the Edit copy and meanwhile the account has been deleted from the Master.
You can either delete the suspended item or update the Master so that the change can be
applied. Each time you open the Changes Pending Action dialog, the system checks each
suspended item to determine if it can now be applied. If it can, the status is changed to
Pending, which you can then change to Approved and run the merge process again.
When the merge process is complete, a message displays listing the number of changes
incorporated in to the Master, the number deleted, and the number suspended.
Activity Logs
Master Copy Activity Logs
Master copy Activity Logs display the multi-user and check-in/ check-out activity that has taken
place in a company database. Activity can be viewed in one of two modes: Current (copies that
are still open or checked out, changes that are still pending) or Historic (copies that have been
closed or checked in, changes that have been processed). In addition to viewing data, you can
also purge the data on a log in Historic view.
Note: If a log has been previously purged, the data displayed on the log reflects only activity
since the purge.
Chapter 1 - Getting Started • 40
The following three activity logs are available in the Master:
Multi-users. Displays the names of users who have opened a multi-user copy, the mode (Edit
or Review) of the copy, the date and time the copy was opened, and the purpose. If the log
is in Historic view, it also displays the date and time the copy was closed and if the copy
contained any changes.
Restricted copies. Displays the names of users who have checked out Restricted copies, the
mode (Edit or Review), the date and time the copy was checked out, and the purpose of the
check-out. If the log is in Historic view, it also displays the date and time of check-in and if
the copy contained any changes.
Changes added. Displays the entry number, type, description, status, date created, user
name, reference number, date processed and if the status is Suspended, the reason for the
suspension. If the log is in Historic view, it also displays the date and time the change was
processed and the name of the user who processed the change. In addition, for journal
entries, the Historic view also displays the journal entry reference number (a cross-reference
to the number on the appropriate journal entry grid) and the period type and number (for
example, Q3 for third quarter).
Multi-User and Restricted Copy Activity Logs
Users working with Multi-user Edit or Restricted Edit copies can see a Changes Added log in both
Current and Historic view.
Current View. The Current View Changes Added Log keeps a record of all changes that have
been added to the copy.
Historic View. The Historic View Changes Added Log lists any items that are rejected by the
Master copy when the Master copy refreshes. If items are rejected during a Refresh, a
message displays and asks if you want to view the rejected items. If you answer Yes, the
Current Changes Added dialog displays listing the rejected items. Once you close that
dialog, all rejected items are added to the log in the Historic View.
Note: This view is applicable to Multi-user Edit and Restricted Edit copies only.
Viewing and Purging Activity Logs
To view an Activity Log, select Work > Activity Logs. The Activity Logs dialog for a Master copy
displays.
Make the appropriate selections in the Logs and Views sections of the dialog to view the selected
log in the appropriate view.
Chapter 1 - Getting Started • 41
The following is an example of the Activity Log for a multi-user copy.
To purge an Activity Log, choose Historic as the view and click Purge. You cannot purge an
activity log in the Current view.
A message displays warning you that once you have deleted the data on a log, the operation
cannot be undone. Click Yes to proceed or No to return to the Activity Logs dialog. After a log is
purged, it does not display additional data until further multi-user or Restricted activity takes
place. The next time you view the log, it displays only the activity that has taken place since the
last purge.
Copy Company
The Copy Company command allows you to make a copy of a company. This is useful when you
want to use a company as a source or template for setting up another company. You can copy the
company to a new directory and give the copy a new name.
Note: The Copy Company command does not track changes made to the copy. Any changes
you make on the copied company cannot be checked-in or applied to the source database. Also,
you cannot make a copy of a multi-user database. You must use the Master database as the
source.
Chapter 1 - Getting Started • 42
To copy a company, use the following method:
1. Select File > Copy Company. The Copy Selection dialog displays.
2. Highlight the company you want to copy. Click Copy. The Copy Company dialog displays.
3. Check one of the following:
Uncompressed file mode. Copies an existing database in an unzipped format.
Compressed file mode. Copies an existing database as a ZIP file. (This is
recommended when copying a company to a floppy disk.)
Copy company (CY) with variable data deleted. Copies the database with
information such as account balances and AJEs removed.
4. Click the File or Directory button (the name changes depending on whether you are using
compressed-file mode). The Copy Destination dialog displays.
5. Select the drive, directory, and (if applicable) the name of the ZIP file to which you are
copying the company.
6. Click OK. The Copy Company dialog displays again with the path to which you are copying
next to the File or Directory button.
7. Click OK. The copy process begins.
Chapter 1 - Getting Started • 43
Chapter 2
GUIDE TO FEATURES
C hapter 2 - Guide to Features
Introduction
This chapter is a guide to the features of ProSystem fx Trial Balance. The guide, the online Help
system, and the online tutorial provide you with sources of information to help get you started,
guide your explorations, and answer your detailed questions about ProSystem fx Trial Balance.
To provide an overview of ProSystem fx Trial Balance, this chapter includes sample screens that
illustrate the main features of the program. Browsing through this chapter will quickly provide you
with a sense of the power and breadth of ProSystem fx Trial Balance. Explanations are also
included, so even experienced users will find it worthwhile to review this material from time to
time. However, you can also refer to the online Help system for detailed information about these
features.
User Interface Overview
ProSystem fx Trial Balance uses a standard Windows interface and the ProSystem fx Trial Balance
grids have the familiar look and feel of a standard Windows spreadsheet, thereby allowing you to
learn the application quickly.
This version of ProSystem fx Trial Balance is a 32-bit Windows application that requires either
Windows XP - Service Pack 3 or higher, 2003, 2008, Vista, or Windows 7. It does not work with the
Windows 3.x series.
ProSystem fx Trial Balance Desktop
When a company is first opened, the ProSystem fx Trial Balance desktop includes the menu bar,
the toolbar, the edit field, a large workspace, rows of icons which represent the data grids
associated with the company, and a status bar.
Chapter 2 - Guide to Features • 44
When grids are maximized, they display in the workspace.
Toolbar
The toolbar resides at the top of the main window, providing quick access to most of ProSystem fx
Trial Balance's features.
Grid View. Customizes how the data is displayed in the active grid. Grid View is available
only on open grids.
Grid Filter. Filters data in the active grid. Grid Filter is available only on open grids.
Add. Opens a pop-up menu used to add new objects, such as accounts, leads, subleads,
classifications, and tax lines on grids. Add is available only on open grids.
Assign. Used with the floating picklist, assigns object relationships on grid columns such as:
accounts to subleads or leads, leads to classifications, and accounts to tax lines. Assign is
available only on open grids.
Grid Zoom. Links to data in related grids. Grid Zoom is available only on open grids.
Changes Pending Action. Opens the queue for review of changes waiting to be merged
with the Master database. This button is enabled (displayed in color) only when there are
changes pending.
Refresh. Updates a multi-user Review or Edit copy of the database with any changes that
have been made to the Master database.
Show/Hide Picklists. Opens the picklist window for performing assignments.
Chapter 2 - Guide to Features • 45
Grids. Displays a list of all available grids.
Diagnostics. Opens the Diagnostics grid.
Transactions. Opens the Transactions grid (when Transactions are enabled for the
company).
Journal Entries. Opens any of the active Journal Entries grids.
Workpapers and Reports. Opens the Workpapers and Reports dialog.
Financial Statements. Opens the Financial Statement Manager.
Quiklink to ProSystem fx Tax. Links to the corresponding tax return in ProSystem fx.
Copy to Clipboard. Copies selected data to the Windows Clipboard.
Paste. Pastes data from the Windows Clipboard.
Print. Prints the active grid, financial statement, or previewed workpaper.
Print Preview. Displays a print preview of active Grids, Workpapers, Reports, and Financial
Statements in Adobe® Acrobat®.
Help. Accesses context-sensitive Help for the currently active grid.
ProSystem fx Trial Balance Help System
ProSystem fx Trial Balance includes an extensive online Help system with a detailed table of
contents and index available through the Contents, Index, or Search tabs. Select Help >
Contents to access this system.
The Help system is also context sensitive. Click Help on the toolbar, click Help on a dialog, or
select Help > Active Window to open the detailed Help for the currently active grid.
Accessing and Using Grids
In ProSystem fx Trial Balance, company data is displayed in grids. A grid is a spreadsheet-style
window in which you edit and view company data. While all grids share a similar layout and
appearance, each performs a different function and displays different types of data. What follows
is an example of a company's Accounts grid.
Chapter 2 - Guide to Features • 46
The Hide unused accounts feature allows you to suppress the display and print of unused Accounts,
Leads, Subleads, Groups, Tax Lines, and Classifications by checking the box at the top of the
corresponding grid. Also at the top of applicable grids, the Totals at top option allows you to
display totals on the first line of the grid. If you select Grid Credit Balances in Red in Options >
Preferences, credit amounts (amounts with a minus sign (-) or amounts in the credit column)
display in red. Because the display of data can be customized for each grid, your company's
Accounts grids may appear somewhat differently than the example. See Grid View on page 48 for
more information.
When a company is first opened, all of the grids associated with that company are opened and
minimized, appearing as icons at the bottom of the screen. Each grid uses the standard Windows
interface and can be maximized, minimized, or closed by clicking the appropriate button in the
upper right corner of the grid. When maximized, the grid appears in the ProSystem fx Trial
Balance desktop. You do not need to keep all grids open at all times; they are simply opened
automatically when you open a company.
Use the Window menu functions to arrange, open, and close the grids. Select Window > Cascade
or Tile to arrange the grids horizontally or vertically. Select Window > Restore Original Icons,
or press Ctrl + I to open and re-minimize all icons. Select Window > Minimize All to minimize all
grids. Select Window > Close All if you prefer all grids to be closed.
Chapter 2 - Guide to Features • 47
Grids can be maximized easily by double-clicking any icon that appears in the main work area.
When those icons are covered by other windows, or when you want to open a grid that is not
already open, you may find it easier to use the Grids dialog. You can access this dialog by
selecting Work > Grids or by clicking the Grids button on the toolbar.
To open a grid, click its icon. However, if you check the Filtered Grid box at the top of the
dialog, the Filter dialog displays first, allowing you to define the criteria that the grid displays.
Grid View
A grid view consists of the columns that display on a grid, how the columns are arranged, and the
orientation of the grid. Each grid has a default view; however, the grid view can be customized on
the Grid View dialog. Each column can be either displayed or hidden, and you can control the
number and order of years shown. A line showing totals can be displayed on any applicable grid.
You are also able to rotate the grid to a vertical orientation so each object fills a column instead
of a row. In addition, if Interim Periods is activated for the company, you can select the interim
period types and options to display.
To access the Grid View dialog for the grid which is currently active, do any of the following:
Select Edit > Grid View.
Click the Grid View button on the toolbar.
Chapter 2 - Guide to Features • 48
Right-click on the title bar of the active grid. (This does not work if the grid is fully
maximized - filling the entire screen.)
The Grid View dialog is tabbed. The Settings tab, as shown above, is always present. The Interim
Periods tab is present only if Interim Periods is activated for the company.
All of the possible display items are listed in the Display group box. Check each item that you
want displayed in the grid. Indicate which years to display in the Years group box and whether the
display should be from the present to the past or from the past to the present. Indicate if totals
should be shown and the orientation of the grid in the Miscellaneous group box. If you check
Transactions in the Display group box, a Transaction column displays in the account grid. By
double-clicking the number in the Transactions column, you can drill down to the transactions
that comprise the balance. (The Transactions check box displays only if the company has
transactions enabled.)
Check Save view settings to save the settings made to this grid. Check Use global settings to
have global settings apply to this grid.
Click Global Settings to open the Global View dialog and select the global presentation of years,
totals, orientation, and interim period types that apply to all grids in the company. (Display
columns are too specific to make global.) Each grid with Use global settings checked displays
according to the global settings.
Click Restore Settings to open the Restore Settings dialog.
Select the appropriate option to return the grid settings to one of the following:
The Last saved settings, if Save view settings is checked.
Global settings as established on the Global Grid View dialog.
Display default settings for the columns displayed on the grid.
System defaults for all aspects of the view columns and other settings.
Chapter 2 - Guide to Features • 49
The other tab on the Grid View dialog is available only if Interim Periods is activated for the
company. The Grid View/Interim Periods tab allows you to select the periods (current, current
and preceding, and all periods in year) to display based on the period types (monthly, quarterly)
that are active for the company. As with the Grid View/Settings tab, you can also access the
Global Grid View and Restore Settings dialogs from here.
Grid Filter
When a company is first opened, the grid filters are preset to All, so that any grid you view
displays all objects in the grid (e.g., the Accounts grid displays all the company's accounts, the
Leads grid displays all the company's leads). However, most grids can be filtered using the Grid
Filter dialog, allowing you to view items that meet a specific criteria.
To use the Grid Filter dialog for the active grid, select Edit > Grid Filter, click the Grid Filter
button on the toolbar, or check Filtered Grid on the Grids dialog before selecting the type of
grid. Using any of these methods, the Grid Filter dialog displays for the active/selected grid.
Chapter 2 - Guide to Features • 50
The criteria by which a grid can be filtered differs from grid to grid depending on the type of data
the grid presents. In the example, the Filter dialog for the Accounts grid is shown.
The Accounts Filter has been chosen as an example because of the amount of information it
contains and the level of filtering available. However, regardless of what grid you are filtering,
you must select the filtering criteria and click OK.
On the Accounts Filter dialog, by using the Filter group box and the Account Segment Filter
boxes, up to three levels of Account filtering are possible:
One Filter item with no Account Segment selections
One Filter item and one Account Segment item
One Filter item and two Account Segments items
Account Segment Filters
Each Account Segment Filter line consists of two elements:
A drop-down list box from which you select the account segment, as defined in the Account
Number Structure dialog in Creating a New Company on page 12, on which you want to
filter the grid.
An edit box in which you enter the specific account segment numbers on which you want to
filter the grid.
The default entry in the list box is None and the associated edit box is blank. When you select a
valid account segment from the drop-down list, the edit box is filled with zeroes. You can then
enter the appropriate numbers over the zeroes in the edit box.
The second Account Segment Filter line becomes available when an entry has been completed in
the first line. If you want to filter on a second Account Segment, it is completed in the same
manner as the first.
Chapter 2 - Guide to Features • 51
When selecting filtering criteria, keep the following in mind:
If you are filtering only by account segments, leave the default of All in the Filter group
box.
If you are filtering only by an item in the Filter group box and do not want to use account
segment filters, the account segment filters must be set to None. If necessary, click the
Reset button to return both account segment filters to None.
When you click OK, the grid displays only those objects which meet all of the criteria indicated on
the Grid Filter dialog.
Title Bar of a Filtered Grid
The title bar of a filtered grid displays all the filtering criteria, with each item separated by a
comma, for example:
Accounts (Lead 2000-Cash, Account number='200001-00', Branch='003')
If the resulting information is too long for the title bar, it is truncated and followed by an ellipsis (...).
Grid Zoom
The Grid Zoom button on the toolbar allows you to automatically create a filtered grid from
another grid. For instance, if you highlight one Lead schedule on a Leads grid, you can click the
Grid Zoom button to create an Accounts grid filtered on that Lead.
The zoom capabilities apply to many grids. For instance, you can zoom from a Classifications grid
to a Leads grid filtered on a Classification or from a Tax Line grid to an Accounts grid filtered on a
Tax Line.
If you zoom to an Accounts grid, you can filter the resulting grid using Grid Filter on page 50. For
grids other than Accounts, no additional filters are available at the zoom level.
Chapter 2 - Guide to Features • 52
The Grid Zoom button works regardless of which columns are visible. However, if the appropriate
detail column is currently visible, such as the Accounts column on the Leads grid, you can simply
double-click a cell in that column in order to zoom to the appropriate grid. If the Accounts column
is not visible on the Leads grid, you can customize the grid view to display it. See the Grid View
on page 48 section in this chapter.
Adding New Objects
To add a new object (such as an account or a lead) to an active grid, do one of the following:
Press Add on the toolbar.
Select Edit > Add.
Press Ctrl + A.
Press the plus sign (+) key on the numeric keypad.
You are prompted for the ID of the new object, such as the account number or the lead ID. The
object is created as soon as the ID is entered. You can then enter the rest of the information for
that object in the appropriate cells.
Editing Cells on Grids
To enter or update information contained in a cell on a grid, you must be in Edit mode. Click
inside the cell to select it. When a cell is available for editing, the Edit bar in the upper left
corner of the workspace becomes available.
After selecting the cell, do one of the following to enter data:
Start typing the new value.
Press F2.
Press Enter.
Double-click the cell.
To exit a cell and save the new value, do one of the following:
Press Enter.
Press Tab or Shift + Tab.
Click the check mark button on the Edit bar.
To discard the changes, do one of the following:
Press Esc.
Click another cell without pressing Enter in the current cell.
Click Close on the Edit bar.
Chapter 2 - Guide to Features • 53
Assigning Objects
Numerous relationships can be assigned, such as accounts to subleads or leads, subleads to leads,
leads to classifications, and accounts to tax lines.
One way to assign objects is to select the appropriate cell on the active grid and enter Edit mode.
See Editing Cells on Grids on page 53 for more information. For instance, on an Accounts grid,
display the Lead column and, with the cursor in any cell in that column, press F2 or double-click.
The assignment dialog appears, allowing you to select a lead from the drop-down list.
Another method is to highlight the cell and use Copy and Paste. See the next section, Editing
Cells and Assignments with Copy and Paste.
Using the floating picklist and the Assign button on the toolbar or selecting Edit > Assign are also
methods used to assign objects. See Floating Picklist, below, for more information.
Editing Cells and Assignments with Copy and Paste
ProSystem fx Trial Balance allows you to paste into grids. After the contents of one cell are copied
to the Clipboard, you can paste those contents into one or multiple cells.
For instance, you can copy a balance from an Accounts grid and paste it into a Journal Entry grid.
Or you can copy the tax line ID for one account on an Accounts grid and paste it to 20 other
accounts on that same grid.
Floating Picklist
The floating picklist allows easy access to the ID and description of all objects in the database.
The controls at the top of the picklist enable you to view different objects. This feature is
especially useful when making multiple assignments.
For example, in the following Accounts grid, there are many accounts that have not been assigned
to a lead. The object's Lead column is empty.
Chapter 2 - Guide to Features • 54
To make multiple assignments, highlight the accounts that should be assigned to the same lead.
Then click the Picklist button, or select Work > Picklists, to open the Picklist. Select Leads from
the Picklist drop-down box. All available leads display with the Accounts grid open behind the
Picklists window.
Select the lead to which the highlighted accounts should be assigned. Double-click on the selected
lead. The highlighted accounts are assigned to the selected lead.
The Picklist remains open and you can continue to highlight accounts and assign leads. This
process also works in reverse: you can open the Leads grid, open the Picklist, select accounts, and
assign accounts to a highlighted Lead. (You can assign more than one account to a lead. The
number of assigned accounts displays in the Accounts column of the Leads grid.)
Tip: You can also assign multiple groups to accounts using the floating picklist.
Current Year Selection
The Current Year Selection feature allows you to focus on any year for which a company has data.
By changing the year designated as the "Current Year," you can work with the current and all
previous and future years with ease. (If Interim Periods is active for a company, a current period
type and period number can also be selected.)
Note: ProSystem fx Trial Balance can retain up to 11 years of data for a company.
The description of a year is based on its relationship to the designated Current Year. For example,
if ProSystem fx Trial Balance holds data for the years 2009 through 2014 for a company and 2013
is designated as the Current Year, then the following descriptions apply:
2013 is the Current Year
2014 is the Next Year
2015 is the Next Year 2
Chapter 2 - Guide to Features • 55
2012 is the Prior Year
2011 is Year 3
2010 is Year 4
2009 is Year 5
Years designations appear in the Description column of the Years grid.
You can change the current year selection on the Current Year Selection dialog. Either select
Options > Current Year Selection from the menu bar or click the Select Current Year button on
the Years grid. If Interim Periods is not activated for the company, the Current Year Selection
dialog displays.
You can change the Current Year settings by doing one of the following:
Current Year - Temporary. Double-click the year for this session. This changes the current
year for this session of ProSystem fx Trial Balance only. Once the company is closed, the
current year reverts to the default selection when the company is opened again.
Current Year - Default. Select the year you want from the Current Year - Default
drop-down list. This sets the selected year as the default current year for this and all
subsequent sessions. This selection can be overridden for the current session only by changing
the Current Year - Temporary setting as explained in the paragraph above.
Chapter 2 - Guide to Features • 56
Current Year and Period Selection
If Interim Periods is activated for a company, when you select Options > Current Year and
Period Selection from the menu bar or click the Select Current Year button on the Years grid,
the Current Year and Period Selection dialog displays.
In the Current year and period selection (temporary) group box, select the year and period type
from their respective drop-down lists. The period type can be Annual; however, if the type is
anything other than Annual (i.e., Monthly, Quarterly, or Semiannually), a period number must also
be selected from the Period no. drop-down list. The year and period selection made here is
temporary. If you want this selection to replace the existing default (which appears in the Current
default settings group box), click the Save As Default button.
For detailed information about the Years grid and the associated Years dialog, refer to Chapter 4,
Interim Periods.
Journal Entries
ProSystem fx Trial Balance supports five types of journal entries (Adjusting [AJE], Passed Adjusting
[PAJE], Reclass [RJE], Tax [TJE], and Eliminating [EJE]), each with its own grid. A variety of
workpapers are also available to summarize journal entries (see the Trial Balance Help).
Regardless of the type of journal, the procedures to add, edit, or delete journal entries are the
same. All journal entries can be processed for annual and interim periods except Tax Journal
Entries, which are applicable to the annual period only. The Journal Entries dialog is accessed by
selecting Work > Journal Entries or by clicking the Journal Entries button.
Chapter 2 - Guide to Features • 57
Click the appropriate button to access the desired Journal Entries grid. What follows is an example
of the Adjusting JEs grid with the Expand Summary Grid box selected.
The default display for each Journal Entry grid includes the journal entry number (No.),
description, workpaper reference (WP Ref), and the status. The Expand Summary Grid option, if
checked, displays the additional details for each of the journal entries listed. The Year drop-down
allows you to view journal entries entered in prior years. If Interim Periods is activated for this
company in the year selected, the Period type and Period no. drop-down lists are also available to
view journal entries from specific interim periods in the selected year.
Adding Journal Entries
To add a journal entry, open the appropriate Journal Entries grid and press the Add JE button,
select Edit > Add AJE, EJE, PAJE, TJE, or RJE, press the plus sign (+) key on the numeric
keypad, or press Ctrl + A. You can also use the Edit > Insert Journal Entry Line option to place a
new line directly above the selected line within an existing journal entry. The Details grid opens
for Tax Journal Entries.
1. Add a description of the journal entry and a workpaper reference in the appropriate boxes.
2. Where applicable, click the Recurring button to open a dialog where you can specify the
journal entry detail to recur in subsequent periods in the year and/or roll forward to the
following year.
Select either Without Amounts or With Amounts (from the Use of Amounts drop-down list)
to indicate if the amounts will also be carried forward with the detail. (When you are ready
to create the recurring journal entries, refer to Creating Recurring Journal Entries on page
61.)
3. Place the cursor in the Account/Tax Line or Description column and press F2 to access the
associated picklist. The available accounts/tax lines vary depending on the type of journal
entry you are adding.
4. Select the appropriate account from the picklist.
5. Enter the debit and credit amounts in their respective columns. Unless this is a Tax or
Eliminating journal entry, debit and credit amounts must balance.
6. If you are adding a Tax journal entry and the debits and credits are not balanced for M1 tax
lines only, you can double-click in the Difference column to indicate if this is a temporary
or permanent imbalance.
7. To delete a line in the journal entry detail, select Edit > Delete Journal Entry Line and
confirm that you want to delete the line.
Chapter 2 - Guide to Features • 58
8. To add additional journal entries use the Add AJE, EJE, PAJE, TJE, or RJE button at the
bottom of the screen. The Previous and Next buttons are available to navigate the list of
existing journal entries.
9. When you exit from the Details grid, the journal entry you have added appears on the Journal
Entries grid.
Passed Adjusting Journal Entries
The following Passed Adjusting Journal Entries Details grid contains additional functions to allow
the recording of a PAJE as an AJE and to gather information for preparing the Summary of Audit
Differences workpaper.
The grid contains the Journal Entry Description and W/P Ref fields, and the Recurring button,
similar to the other Journal Entry Detail grids; however, it also includes an Effect and an Error
section which are completed as indicated below:
Effect. This section is used to document whether a PAJE affects Income Statement accounts
only, Balance Sheet accounts only, or both. In addition, you must indicate if the PAJE has a
reversing impact (such as, the entry represents an adjustment which would be reflected in
normal operations in the next period). If this is a reversing entry, enter the amount that
impacts the next year and future years in the appropriate fields.
Error. This section is used to document the nature and source of the PAJE. Select Actual if
this entry is the result of a detected error, Judgmental if this entry is the result of an
adjustment to an estimate, or Projected if this entry is the result of a sampling application.
If this is a Projected error, enter the Known error and Unexamined amounts in the
appropriate fields.
The PAJE account and amount information is entered in the same way as it is on any other Journal
Entry Details grid.
Chapter 2 - Guide to Features • 59
Changing Journal Entry Types
Other than Tax Journal Entries, which have Tax Lines assigned to them, ProSystem fx Trial
Balance allows you to change the type of existing journal entries. (Tax Journal Entries that
contain only account assignments can also be changed.) To change a Journal Entry type, highlight
the entry and select Edit > Change JE Type.
Note: The Journal Entry type cannot be changed if you are using the expanded summary grid.
The Change JE Type dialog displays.
The journal entry types you can change to depend on the type of journal entry you are changing
and the type of company involved (Eliminating JE applies only to consolidated companies). Check
the type of journal entry you are changing to and indicate whether this is a complete or partial
change.
Complete Change. Select this option to post the entire journal entry as a different type.
After the transfer, the Details grid for the new journal entry opens, allowing you to confirm
that the correct detail lines have been recorded. Once transferred, this entry is no longer
displayed on the original Journal Entry grid.
Partial Change. Select this option to change only part of an entry. If you select this option,
the lower portion of the dialog becomes available, allowing you to change all or part of an
amount by entering it in the New column. After you have made your changes, use the
Revised column to verify the amounts entered.
Chapter 2 - Guide to Features • 60
Creating Recurring Journal Entries
When you are ready to start processing work for the next period, create any recurring entries for
the period by selecting Work > Interim Items > Create Interim Recurring J/Es. This opens a
dialog where you select the period types for which you want to create the recurring journal
entries. If recurring entries are created without amounts, after they have been created, access
the Journal Entry Details grid for the journal entry and enter the correct amounts.
Deleting Journal Entries
To delete a Journal Entry, highlight the entry or entries you want to delete and select Edit >
Delete JE.
Note: When you delete entries, you can leave openings in the number sequence. Journal
entries are not renumbered automatically. For example, if you have five journal entries and
you delete number 3, journal entries 4 and 5 are not automatically renumbered. To renumber
journal entries, select Edit > Renumber JEs. If you have established Journal Entry DDE links to
other programs, you must re-establish those links after renumbering.
Renumbering Journal Entries
In cases where you have deleted a journal entry and want to renumber all or some of your entries,
you can use the ProSystem fx Trial Balance renumber feature. Highlight the entry or entries you
want to renumber and select Edit > Renumber JEs. A warning message displays reminding you
that if you have established Journal Entry DDE links to other programs, you must re-establish those
links after renumbering.
Note: The Renumbering Journal Entries option is not available if you are using the expanded
summary grid.
Ratios/Data Elements
ProSystem fx Trial Balance automatically creates and calculates a series of analytical ratios for
each company based upon the industry assigned to the company. The industry is selected at the
time the company is created; the industry can later be changed on the Company Information
dialog by selecting Setup > Company Information. A listing of industry-specific ratios is located
in the Glossary of the ProSystem fx Trial Balance Help file, which can be found under Help >
Glossary, and clicking ProSystem fx Trial Balance Control File Industry Standards, and then
selecting the industry you want to view.
Data elements are the components used in ratio formulas. ProSystem fx Trial Balance
automatically establishes a default set of data elements based on the assigned industry.
Chapter 2 - Guide to Features • 61
Data Elements Grid
The following Data Elements grid displays the tag (ID), description, source, number of links,
current year constant, and current year report balance. If the interim periods option is selected
for the company, the constant and balance columns display according to the period type and
number selected (for example, 3rd Quarter 2013).
Chapter 2 - Guide to Features • 62
Add/Delete/Modify Data Elements
You can add new data elements through the Edit > Add Data Element command, and delete
existing data elements through Edit > Delete Data Element. Modify existing data elements by
double-clicking on the cell in the Source column to open the Data Element dialog.
Here you can select the source for the data element. If you select one of the constants (a constant
can be either a rounded currency amount or a numeric or percentage with a specified decimal
place), the Source of values for constants portion of the dialog becomes available.
If Interim Periods is not active for the company, Annual is the only selection available, and Manual
entry is the only entry method. If Interim Periods is active, you can select each box that is
appropriate for the period types active for the company. Once you have checked a period type or
period type YTD (year-to-date), the associated drop-down box becomes available. Select from the
drop-down list the method by which the value in the Constant column should be calculated. These
methods are:
Manual entry. Allows you to make manual entries in the Constant column for the selected
period.
Prorated from annual (by days). Calculates the period value based on the annual value by
days. The cell is not editable.
Prorated from annual (by periods). Calculates the period value based on the annual value
by periods. The cell is not editable.
Same as annual. Sets the same value for the period as that entered for annual. The cell is
not editable.
Sum of periods-to-date. Calculates the period value as a sum of all the periods-to-date.
This option is available only for the year-to-date period types. The cell is not editable.
Links
To add or delete source accounts, classifications, leads, or subleads in the data element,
double-click the cell in the Links column of the Data Elements grid. This opens the appropriate
grid where you can add or delete the sources using the Edit > Add and Edit > Delete commands.
Chapter 2 - Guide to Features • 63
To modify a source, double-click the item you want to edit and enter the updated information in
the Edit field box in the upper left of the workspace.
Update with Industry Standards
Select Setup > Update with Industry Standards to reset all the ratios/data elements for the
company with industry standards. The update process replaces the ratio formula for all ratios that
have tags that have the same name as those found in the industry standards control file.
Therefore, if you have modified a standard formula and want to retain it, change the name of the
tag to one not used in the control file. Prior to updating, you receive a message alerting you to
the possible loss of added or modified tags.
Ratios Grid
The Ratios grid displays the tag, description, formula, current year value, and the formula status
of the ratios defined for the company. Although it is not part of the default display, you can
update the grid view to include a Format column (as in the following example) which defines the
format of the ratio values (for example, N2 means a numeric value with two decimal places, %2,
a percentage with two decimal places, $2, currency with two decimal places).
Ratio Formulas
A ratio formula consists of tags, numerals, and operators (+, -, *, /). Formulas assume that current
year report balances are being used, unless otherwise specified. If Interim Periods is active for the
company, you can select to display a period type. If an interim period type is selected, the
formula assumes that current year and current period report balances are being used unless
otherwise specified. For formulas using the prior year, when an interim period is selected, the
formula uses the immediately preceding interim period.
Chapter 2 - Guide to Features • 64
Other than the default balance of current year report balance, you can use the following balances
in a ratio formula:
PY. Prior year balance
UB. Unadjusted balance
AB. Adjusted balance
RB. Report balance
FRB. Final report balance (Consolidated databases only)
TXB. Tax balance
BB. Budget balance
Add/Delete/Modify Ratios
Use the Edit > Add and Edit > Delete commands to add and delete ratios. To modify a ratio,
double-click the cell and make the change in the Edit field in the upper left of the workspace.
To update a formula or format, double-click the cell in the Formula or Format column to open
the Ratio dialog.
Check Exclude ratio from analytical workpapers if the ratio should not be included. If Interim
Periods is not activated for the company, the Ratio calculation options section is not available and
all calculations are annual. If Interim Periods is activated, select the annualization option (by
periods, by days, or none) and the interim period types to be used in the calculation.
Chapter 2 - Guide to Features • 65
Whether or not Interim Periods is activated, select the format for the ratio: Currency, Numeric, or
Percentage, and enter the number of places for the decimal. Decimal places can be specified for
any of the three format choices. Numbers are rounded based on the number of decimal places
specified.
Ratio Groups Grid
Ratio groups are used to place ratios in specific categories, such as Operating or Asset utilization
for organizing ratios in workpapers. All ratios must be assigned to a ratio group to appear in a
workpaper.
The following Ratio Groups grid includes the ratio group ID (tag), description, and the number of
ratios assigned to the group.
To add a ratio to a ratio group, highlight the group on the grid, and click the Picklist button.
Select Ratios from the drop-down list, and double-click the ratio you want to assign to the group.
The ratio is added and the number in the # of Ratios column increases.
To display the grid of ratios that comprise a ratio group, double-click on the cell in the # of Ratios
column, and a Ratio grid for the group displays. To delete a ratio from a group, highlight the ratio
you would like to remove from the group, then use the Edit > Unassign Ratio from this Ratio
Group command.
Workpapers and Reports
ProSystem fx Trial Balance can produce 200 standard workpapers using preferences to customize
its presentation. These custom selections are saved automatically for subsequent sessions. Multiple
workpapers and reports can be created in each of the following areas:
Lead and sublead schedules
Trial balance
Material variance
Balance comparison
Vertical fluctuation
Ratios
Budgets
Tax schedules
Chapter 2 - Guide to Features • 66
Tax line supporting schedules
General Ledger
Workpapers are grouped into the following categories: All, Basic, Tax, Analytical, Budgets,
Financial Statements, Transactions and Favorites. Some categories may not be available
depending on the company. For instance, Tax reports are not available if the company's tax return
type is None, and Transaction reports are not available if the company does not have the
transactions option enabled. The Favorites group is a user-defined group that is created when a
workpaper or report is added to the Favorites group on the Produce Workpapers or Reports dialog.
Access the workpaper dialog by selecting Work > Workpapers and Reports or by clicking the
Workpapers and Reports button on the toolbar. The Workpapers and Reports dialog displays.
You can select to view workpapers and reports in a specific category or select All to view a list of
all available workpapers and reports. (Refer to the Trial Balance Help for descriptions and samples
of all workpapers and reports.)
Select a workpaper or report by highlighting it and clicking the Produce button or double-clicking
the workpaper title.
Note: If the interim periods option is activated for the company, before clicking Produce,
select from the bottom of the dialog, as applicable, the period type, period number, and
comparison period, and indicate whether the year-to-date figures should be used for the current
period.
Chapter 2 - Guide to Features • 67
After clicking Produce, the Produce Workpaper or Report dialog opens. This dialog allows you to
specify parameters regarding what and how data prints on the report. The appearance of the
dialog differs depending on the type of workpaper/report selected. In the example, the Produce
Workpaper or Report dialog for the Sublead Schedules (Complete) Report displays.
Where applicable, you can filter the accounts or leads that appear on the report. You can also
select the Print-to-fit option to prevent printing in strips, print page numbers, include a sign-off
box, print with double-spacing, print the data path as a footer, specify the number of copies to
print, use a short account number, and determine the width of description columns (the minimum
setting is 15). Clear the Descr. columns box if you do not want descriptions to print. To save
selections without viewing or printing, select Save and Close.
Note: Workpaper selections are saved and used for subsequent sessions on most workpapers and
reports.
Before printing, click View to preview the workpaper/report. You can resize the View window (by
moving the sides or by clicking the maximize button) to see more of the preview.
Note: The Preview window always presents the report as single-spaced.
Chapter 2 - Guide to Features • 68
Batch Print
Highlight two or more workpapers or reports in a workpaper group to activate the Batch Print
option. This option allows you to print the selected workpapers or reports in a single print session,
using settings retained from the last time the workpaper was produced and saved, viewed, or
printed. Use the Print setup to specify the number of copies to print, Print quality, default printer,
and fonts.
To select multiple workpapers, highlight the first selection and hold down the Ctrl key, then
select subsequent workpapers.
Printing Grids, Workpapers and Reports
Print options are available when the active window is either a grid or a previewed workpaper. The
following print options are applicable to a grid, workpaper or report. Print to fit is applicable to
workpapers and reports only.
Each of the following methods displays the Print dialog.
With the desired workpaper or grid open, select File > Print.
Click the Print button on the toolbar.
Click Print on the Produce Workpaper or Report dialog.
Click File > Print Preview to display a print preview of active Grids, Workpapers, Reports,
and Financial Statements in Adobe Acrobat.
Note: When printing in Adobe Acrobat, we recommend you select only the Auto-rotate
and center page option in the Copies and Adjustments group box.
The Print dialog displays.
The Print to Fit option makes automatic adjustments to prevent Workpapers and reports from
printing in strips. Print to fit automatically adjusts the point size of fonts and, if necessary, you
are prompted to accept a change to the page orientation.
Note: A message box displays to inform you if the Orientation Change option is necessary. To
suppress this message, select Options/Preferences/Warn Before Printing in Strips or select the
designated box within the message box.
Chapter 2 - Guide to Features • 69
You can also indicate if page numbers and/or a sign-off box should print on the report or grid, if it
should print doubled-spaced, how many copies should print, or if you want the data path to print
as a footer.
The following print destinations are available for selection:
To printer. Spools to the printer configured in the Printer Setup.
To PDF file. Creates a file in PDF file format. Batch print for workpapers and reports can
also use this option.
To RTF file. Creates a file in RTF format.
If you have decided not to use Print to fit, you can clear the Print to fit box. You are notified if a
workpaper is too wide for a single page. To make a report fit on one page width, there are a few
options:
Use Print to fit for Workpapers and Reports.
Use a smaller font.
Print in landscape orientation (select Print and then Setup).
Use the short account number and reduce the description column widths (the minimum is 15
characters). The account and description columns can be suppressed.
Use a larger paper size, such as 8.5 x 14 (legal).
Click the Font button to access the Printer Font dialog, where you can select another font.
Click the Setup button to access the Print Setup dialog, where you can select a printer, paper
size, and page orientation (portrait or landscape).
Embedding Workpapers and Reports
ProSystem fx Trial Balance enables you to embed workpapers into one of two applications: Excel
or Word. Once embedded, these documents can be used in a paperless audit, included in a
checklist, stored for later comparison, or used to save print defaults.
From the Microsoft application, you can insert, refresh, or replace a workpaper. The embedded
workpapers cannot be edited in the Microsoft application. To edit a workpaper, you can copy the
original from ProSystem fx Trial Balance (or copy the embedded document from the Microsoft
application) and make changes to the copy. Any links in the embedded document are not copied.
Only one copy of ProSystem fx Trial Balance needs to be open to insert, refresh, or replace
documents. ProSystem fx Trial Balance must be installed, but not necessarily open, to view a
workpaper embedded in any of the container applications.
Inserting a Workpaper
1. Open Word or Excel.
2. In Word or Excel, select Insert > Object.
3. Select ProSystem fx Trial Balance Workpaper. In Word and Excel, we recommend that
Embed as icon be selected.
4. Click OK. If ProSystem fx Trial Balance is not running, you are prompted to run it. Click the
Run ProSystem fx Trial Balance button.
5. If the company is not already open, open it.
Chapter 2 - Guide to Features • 70
6. Click the Produce New button on the Insert ProSystem fx Trial Balance Workpaper Object
dialog.
7. Select Work > Workpapers and Reports.
8. Highlight the workpaper you want to insert and click Produce.
9. Click View.
10. Return to the Microsoft application. All open workpapers are displayed in the Currently Open
Workpapers section of the Insert ProSystem fx Trial Balance Workpaper Object dialog.
11. Highlight the workpaper you want to insert and click Insert. The workpaper is now
embedded in the Microsoft application.
Refreshing a Workpaper
Refresh provides the ability to update the workpaper with any changes that have been made since
the workpaper was inserted or last refreshed. This feature is accessible from within an embedded
workpaper. Double-click within the embedded workpaper in the Microsoft application and select
Workpapers > Refresh Existing Workpaper or click the Refresh button. The applicable
ProSystem fx Trial Balance company must be open in order to refresh, and only one workpaper can
be refreshed at a time.
Replacing a Workpaper
1. In the Microsoft application, open the file containing the embedded workpaper.
2. Double-click the workpaper.
3. Select Workpaper > Replace with New Workpaper.
4. If ProSystem fx Trial Balance is not running, you are prompted to run it. (Click the Run
ProSystem fx Trial Balance button.)
5. If the company is not already open in ProSystem fx Trial Balance, open it.
6. Click the Produce New button on the Insert ProSystem fx Trial Balance Workpaper Object
dialog.
7. Select Work > Workpapers and Reports.
8. Highlight the workpaper you want to insert and click Produce.
9. Click View.
10. Return to the Microsoft application in which you are working. All open workpapers are
displayed in the Currently Open Workpapers section of the Replace ProSystem fx Trial
Balance Workpaper Object dialog.
11. Highlight the workpaper you want and click Replace. The original workpaper is now
replaced with the one selected.
Printing Embedded Workpapers
In Word and Excel, workpapers are printed one at a time. Double-click within the embedded
workpaper, then click the Print button on the Workpapers toolbar to print the workpaper.
Selecting File > Print prints the Word document or Excel spreadsheet, not the embedded
workpaper.
Chapter 2 - Guide to Features • 71
Cash Flow Analysis
The purpose of the Cash Flow module is to produce an accurate Cash Flow financial statement
which compares the current-year balances for the leads with the balances for previous years (you
select the years to compare). Any differences between the balances for each lead must be
explained to reconcile the statement.
Once the cash flow statement is complete, you can then remove extraneous information and
prepare it for printing. The finished statement is generated and printed via the Financial
Statement wizard. See the Financial Statement Wizard - Creating a New Statement on page 80.
Before beginning this process, the following conditions must be met:
Diagnostics must be clear: All objects must have their correct assignments (accounts
assigned to leads/subleads, leads to classifications, classifications to account types) and all
four roundoff accounts must be specified. Check the Diagnostics grid to be sure it is empty;
if it is not, correct any reported problems.
The Trial Balance must be in balance.
Most of your Journal Entries should already be posted to ensure that the information on the
Cash Flow statement is current.
Cash Flow - Setup
Information related to Cash Flow must be set up before you can access the Cash Flow and Balance
Sheet Reconciliation grids. To begin setting up a cash flow statement, select Setup > Cash Flow
to open the Cash Flow - Setup dialog.
Chapter 2 - Guide to Features • 72
When Cash Flow is set up for the first time, industry standard cash flow lines are added to the
database automatically. Once the Cash Flow has been set up, you can change this information as
needed. Complete the fields on the dialog as indicated in the instructions below:
Cash Flow Method. Indicate whether the statement should be Direct or Indirect.
Update w/Industry Standard Lines. Check this option to choose from a list of common cash
flow lines used in the industry. If you do not select this option, you must create your own
lines. If at some future point you add the industry standard lines, lines you have created are
not deleted.
Reset Years to 0.00. Check this option to reset a year column that is incorrect. Click the
Years button to select the years to be reset.
Cash Leads. Click this button to specify which leads represent Cash Leads.
Roundoff Accounts. Click this button to designate the accounts to be used for rounding.
Four accounts must be selected: Asset, Revenue/Expense, Liability/Equity, and Retained
Earnings. If this information has already been set up, the message All selected displays in
the Roundoff Accounts section. If you have not designated all of the Roundoff Accounts, the
message Must be selected! displays.
Note: If the company you are setting up uses Fund Accounting, the Roundoff Accounts are
designated on the Funds grid. The Roundoff Acct. button is disabled and the message Select on
Funds Grid! displays.
When you have completed the dialog, click OK. The Cash Flow Summary and Balance Sheet
Reconciliation grids are opened and minimized on the desktop. These grids include a Setup button
that can be used to access the Cash Flow - Setup dialog whenever necessary.
Note: If Interim Periods is active for the company, the ending periods on both grids are
determined by the current year and period selection.
Once the Cash Flow setup is complete, you are ready to continue with the Cash Flow Summary
process. The year-to-year differences in the balance sheet must be explained. Because the Cash
Flow Summary and Balance Sheet Reconciliation grids perform interrelated functions in the
reconciliation process, you can begin the process through either grid. In this Guide, we cover
Balance Sheet Reconciliation first (see next section) and then Cash Flow Summary on page 77;
however, if you want, you can start with the Cash Flow Summary first. Either way, the Cash Flow
must be balanced before you print the final statement.
Cash Flow - Balance Sheet Reconciliation
The Balance Sheet (B/S) Reconciliation grid shows the current and prior year report balances, the
difference between them, and the remaining unexplained difference. Use the grid and its
associated Reconcile Lead dialogs to reconcile the components of the year to year changes in
asset, liability, and equity lead schedules.
The Balance Sheet Reconciliation grid can be activated by doing the following:
Double-clicking the B/S Reconciliation icon in the work area.
Selecting B/S Reconciliation on the Grid dialog.
Clicking the Go to B/S Reconciliation button on the Cash Flow Summary grid.
Chapter 2 - Guide to Features • 73
The B/S Reconciliation grid displays.
The columns and years available in this grid can be customized just like any other grid by using
Grid View.
You cannot add or delete leads on the B/S Reconciliation grid, but you can change lead numbers
and descriptions. Because changes in cash are considered part of the Cash Flow Summary, cash
leads are not reconciled.
Reconcile Lead - Cash Flow Lines
When a cell in the Unexplained Difference column is something other than zero, double-click that
cell to open the Reconcile Lead (Step 1) - Cash Flow Lines dialog.
Use this dialog to identify Cash Flow Lines that are associated with the selected Lead and which
are used to explain the difference.
The upper third of the dialog displays the currently selected lead, year (and, if applicable, period
selections), and the current report balance. Use the Prev Lead and Next Lead buttons and
years/periods drop-down lists to navigate through the leads without moving back and forth
between the grid and this dialog.
The list of Cash Flow Lines at the bottom of the dialog matches the lines on the Cash Flow
Summary grid. You can modify the list by adding, editing, or deleting lines. Use the up and down
arrow buttons to change the order of the lines. Click the Filter button to select another filtering
criteria. Click Select Line to move the highlighted line into the Cash flow lines used in
reconciliation section of the dialog.
Chapter 2 - Guide to Features • 74
For each Cash Flow line that appears in the Cash flow lines used in reconciliation section, click
the Reconcile button to access the Reconcile Lead (Step 2) - Value for Cash Flow Line dialog.
This step must be performed for each cash flow line selected on the Step 1 dialog. The differences
can be explained using a manual entry or by making assignments from one or more database
objects, listed in the Objects section at the bottom of the dialog. Click the Assign Change button
to assign the year-to-year change in value of the object selected. Click the Assign Value button
to assign the value of the object selected. Use the Reverse Sign button as a toggle (Change/Rev
Change or Value/Rev Value) to reverse the current sign.
Whenever the unexplained difference for a lead schedule has reached zero, a large red check
appears next to the zero on both the Step 1 and Step 2 dialogs; however, any changes made on the
Step 2 dialog are not saved until the Step 1 dialog is either closed or Next Lead or Prev Lead is
selected.
Chapter 2 - Guide to Features • 75
Copy to Years
When a lead schedule has been reconciled in a particular year, the assignments can be copied to
other years by clicking the Copy to button in the Year and period selection section of the Step 1
dialog. This opens the Copy to Years dialog. If Interim Periods is not activated for the company,
the following dialog appears.
Check the year(s) to which the lead schedule should be copied and click OK.
If Interim Periods is activated for the company, the Copy To dialog displays.
Chapter 2 - Guide to Features • 76
The year, period type, and period number of the source displays in the Copy from group box.
Indicate the year, period type, and period number to which you are copying by making selections
from the drop-down lists in the Copy to group box. (The interim period type and period number
are not available in years in which interim periods were not enabled.) Click OK.
Regardless of whether Interim Periods is activated, when you use the Copy to Years or Copy To
dialogs, existing assignments and manual entries for each target year/period are removed and
replaced by the assignments and manual entries in the source year/period. If a cash flow source
was a manual entry, the source is copied to the other years, but the value is set at zero. Manual
entries of the actual value must then be made for each target year/period.
Cash Flow Summary
The Cash Flow Summary grid shows all the cash flow lines, along with their source and value, and
allows cash flow lines to be added, deleted, renamed, and reordered. The columns and years
available in this grid can be customized just like any other grid. In addition, the Totals at Top
option allows you to see at a glance whether your cash flow summary totals are balanced.
The Cash Flow Summary grid can be activated by doing any of the following:
Double-clicking the Cash Flow Summary icon in the work area.
Selecting Cash Flow on the Grid dialog.
Selecting Go To Cash Flow Summary on the B/S Reconciliation grid.
Chapter 2 - Guide to Features • 77
Double-click a cell in the Source or Value column to access a reconciliation dialog.
The dialog displays the source and the value for the line in the year specified, and the period
specified, if applicable. If the line draws its value from the Balance Sheet reconciliation, you can
manually adjust it or override it entirely. You can also click the Details button to display the
assigned objects. For cash flow lines that do not draw their values from the balance sheet
reconciliation, a manual entry is the only available option. The Prev Line and Next Line buttons
and the Year, Period type, and Period number combo boxes allow easy navigation through the
lines without moving back to the grid.
Once all leads are reconciled, all lines are adjusted, and the totals at the top of the Cash Flow
Summary are equal, with a difference of zero, you are ready to generate the actual statement of
cash flows through the Financial Statement Manager.
Financial Statements
ProSystem fx Trial Balance includes an integrated financial statements module with the following
features:
Financial Statement wizards to guide you through creating, copying, or modifying
statements.
Ability to print financial statements as is, with custom formatting, or used as the starting
point for your own customized financial statements.
WYSIWYG on-screen formatting, including TrueType proportional fonts.
Predefined and user-defined column sets, including interim periods, yearly balances,
variances, budgets, and totals.
The ability to produce both relational and fixed report data (for companies with the interim
periods feature activated).
Multiple columns for consolidations, combinations, and funds.
Chapter 2 - Guide to Features • 78
Customizable financial statement rows assigned to leads, subleads, or accounts with
customizable subtotals and totals.
Customizable page headers, page footers, column headers, and text lines.
The ability to link financial statements to a Windows word processing or spreadsheet
program.
The ability to produce supplemental schedules on the account level.
Financial Statement Manager
Through the Financial Statement Manager, you can create a new financial statement, copy an
existing statement (in order to make changes on the copy and retain the original), modify an
existing statement, open an existing statement to customize its appearance, print a statement, or
delete a statement.
The Financial Statement Manager can be accessed by selecting Work > Financial Statements or
by clicking the F/S button on the toolbar. The Financial Statement Manager dialog displays.
Financial statements that have already been created display in the Financial Statements list box.
Highlight the statement you want to create to select it. If no financial statements have been
created, the list box will be empty.
The buttons on the dialog initiate the following functions:
The New button opens the Financial Statement Wizard (see the following Financial
Statement Wizard - Creating a New Statement section), allowing you to create a new
statement.
The Copy button opens the Financial Statement Copy Wizard (see Financial Statements Copy
and Modify Wizards on page 99), allowing you to copy the selected statement. You can then
make changes to the copy and retain the original statement in its unchanged form.
The Modify button opens the Financial Statement Modify Wizard (see Financial Statements
Copy and Modify Wizards on page 99), allowing you to make changes to the selected
statement. Unlike when using the Copy Wizard, when you use the Modify Wizard, the
modified statement overrides the original. The statement is changed, no copy is made, and
after you have modified the statement, there is no way to view the statement as it was
before the modification.
The Open button displays the selected financial statement in the workspace, ready for
printing or custom formatting (see The Formatting Mode Edit Toolbar on page 86).
Chapter 2 - Guide to Features • 79
The Print button opens the Print dialog (see the Printing Financial Statements on page 102
section) and allows you to print the selected statement.
The Delete button deletes the selected statement.
Financial Statement Wizard - Creating a New Statement
To create a new financial statement, click the New button on the Financial Statement Manager
dialog. This invokes step 1 of the Financial Statement Wizard. In step 1, you designate the type,
ID, and name of the financial statement you are going to create.
Note: The Back button is always available on the wizard, allowing you to go back to a previous
step and make additional changes before creating the statement.
Select the type of financial statement you are creating: Balance Sheet, Income Statement, Cash
Flow, or Other (custom). ProSystem fx Trial Balance assigns a default statement ID and name, but
you can overwrite them with ones of your own. (IDs must be eight alphanumeric characters or
less.) Click Next to access step 2 of the wizard.
In step 2, you specify the level of detail required on the statement: Data source (Lead Schedule or
Chart of Accounts), and balance sheet type (classified or unclassified). You can also use the option
Close net income to retained earnings on the balance sheet.
Chapter 2 - Guide to Features • 80
If you check Produce Supplemental Schedules, the lower section of the dialog becomes
available and you can select account or sublead level and the appropriate lead schedules for the
supplemental statement.
Click Next to access step 3 of the wizard.
Chapter 2 - Guide to Features • 81
In step 3, you control the appearance and format of the different types of lines that are generated
(major title, section title, detail line, subtotal line, and total line). You can link or copy line
descriptions into the statement.
Linking descriptions causes the descriptions to maintain the formatting details from their
source. If you select this option, no capitalization options are available.
Copying descriptions causes text, not formatting, to be copied (fonts are preserved when
copied/linked to Word), and allows you to make capitalization changes to the descriptions.
Regardless of whether you select to link or copy, the indenting option is always available. Enter
the distance (number of characters) from the left edge of the statement that each line type should
appear. (The major title cannot be indented.)
Click Next to access step 4 of the wizard.
In step 4, you can choose the Hide zero balances box to suppress the display or print of zero
balances or select Column sets for the new financial statement. Pre-configured column sets (and
any customized column sets previously created) applicable to the type of financial statement you
are designing (Balance Sheet, Income Statement, Cash Flow, or Other) are listed in the Name
drop-down list. When you select a column set from the list, information displays in the Specifics
field:
If the selected column set is customized, the Specifics field displays the words
"USER-DEFINED."
If the selected column set is a pre-configured set, the Specifics field displays the parameters
of the set. For example, it displays CY, PY, % Variance for a report that displays a current
year balance, a prior year balance, and the percentage of variation between the two. These
parameters are preceded by SYS:, indicating it is a system-defined column set.
Select the year and, when Interim Periods is activated for the company, the period type and
number (for example, 2008 Quarterly Q3), which the report should reflect. The Column
descriptions list box displays descriptions of the columns in the selected set. If you select a
different year/period, the descriptions will change accordingly, where appropriate.
Chapter 2 - Guide to Features • 82
If you want to design your own column set, click the Design button to open the Design Column Set
dialog. See Financial Statements - Column Sets on page 90 for detailed information on creating
your own column sets.
After the column set has been selected or designed, click Finish to create the financial
statement. It displays in the workspace, along with any supporting schedules. The statement is
ready to be printed, customized, or to serve as a source for links to other Windows programs. An
example of a completed financial statement follows.
When a financial statement is open in the workspace, you will notice some differences from the
standard grid interface:
Each row is defined by a letter to the far left of the row. These are called row definitions.
The row definitions are:
D - Direct Entry. The row allows entry of text or numbers.
A - Assignment. The row allows assignment of different types of data to a row.
F - Formula. The row represents a formula to which figures in other rows can be
added, subtracted, or used in percentage calculations.
L - Lines. Lines (single or double) display in designated columns in the row.
B - Blank. A blank row displays.
P - Page Break. When printing, the page ends at this row.
The commands on the Edit menu and the buttons on the Edit toolbar are different, and you
are able to toggle between two editing modes: Formula or Formatting.
Each of these features provides the means to format the statement prior to printing. The following
sections detail how to format the statement.
Chapter 2 - Guide to Features • 83
Financial Statements - Moving Between Editing Modes
When a financial statement is open in the workspace, you will always be in either the Formula or
Formatting edit modes:
Formula. Allows you to display and edit the formulas that calculate data in the financial
statement.
Formatting. Allows you to change the appearance of the entire statement or selected cells
on the statement.
To move between modes, click the Formula button on the toolbar. This button functions as a
toggle between the formula and formatting modes. You can also check or uncheck Formula Mode
on the Edit menu to switch between the two modes.
Financial Statements - Formula Mode
Formula mode allows you to display and edit the formula rows in the financial statements. A
formula can be one of two types:
Sum formula. Gives a total for all the rows in a section, or just a selection of rows in a
section, depending on how the formula is defined.
Percentage formula. Calculates a percentage based on the rows selected as numerator and
denominator.
While you are in Formula mode, an additional column displays on the far left of the statement (as
shown in this example) indicating how the row is used in the formula selected.
Chapter 2 - Guide to Features • 84
The Formula Mode Edit Toolbar
When you are in Formula mode, the Edit toolbar (at the upper left side of the desktop) appears.
The buttons allow you to perform the following functions:
Toggle between Formatting and Formula modes.
Add highlighted rows to a sum formula.
Subtract highlighted rows from a sum formula.
Exclude highlighted rows from a formula.
Make highlighted rows the numerator in a percentage formula.
Make highlighted rows the denominator in a percentage formula.
Display the previous formula on the financial statement.
Display the next formula on the financial statement.
Display the rows that are components of the selected formula row. (You must have a formula
row selected for this option to be available.)
Convert a non-formula row into a sum or percentage formula row.
These functions are also available through the Edit menu when in formula mode.
To create a formula, do the following:
1. Prior to creating the formula, have in mind the rows that will be part of the formula, how
the formula will be calculated, and the row that will display the result.
2. In formatting mode, highlight the row that will display the result of the formula. Select
Edit > Row Definition.
3. Select Formula as the type of row. In the Formula group box that displays in the upper right
of the dialog, select whether this is a sum or percentage formula. Click OK.
4. If you want a cell (or cells) in the formula row to display descriptive text (such as the word
"TOTAL"), highlight the cell(s), select Edit > Cell Value, and override the existing definition
of the cell by selecting Text and entering the desired data. Click OK.
5. Switch to formula mode by clicking the Formula Mode button.
6. Designate the rows for inclusion in the formula by highlighting each row and selecting the
appropriate Edit option: Add to Formula, Subtract from Formula, Make Numerator, or Make
Denominator.
7. When you are finished, the formula row now contains data that reflects the results of the
formula.
You can also use this procedure to edit existing formulas.
To leave formula mode, clear the Formula Mode box on the Edit menu, or click the Formula
Mode button. You then return to Formatting Mode.
Chapter 2 - Guide to Features • 85
Financial Statements - Formatting Mode
Formatting mode allows you to make any of the following changes to the appearance of a
financial statement:
Change the placement or definition of rows.
Resize the width of columns.
Change the formatting of an individual cell (or selected group of cells), including cell value,
font, font color, and formatting (alignment, style, wrapping features, and whether a cell
should extend over multiple columns).
Change the overall appearance of the financial statement, including margin sizes,
header/footer information, and standard font.
These features are covered in the following sections.
The Formatting Mode Edit Toolbar
While you are in Formatting mode, the Edit toolbar appears at the upper left side of the desktop.
Attributes you can select from this toolbar include font selection, font size, bolding, italicizing,
underlining, and justification. The buttons and drop-down lists on the toolbar are identical in look
and function to standard Windows formatting buttons/lists.
Financial Statements - Formatting Rows
To make a change to a row, select a cell within the row you want to change, then select the
appropriate option from the Edit menu:
Row Definition. Opens a dialog where you can review the current settings of the selected
row and make changes to the display of the row and the row definition. (See the following
section, Row Definitions.)
Insert Row. Inserts a blank row above the row currently highlighted.
Add Row. Adds a new blank row below the row currently highlighted.
Delete Row. Deletes the selected row.
Move Row Up. Switches the places of the selected row and the row directly above it.
Move Row Down. Switches the places of the selected row and the row directly below it.
Row Definitions
Several types of rows are available in a financial statement. The type of each row is identified by
a letter that appears in the button at the left of each row (see the Financial Statements on page
78 section).
To view or modify the definition for a row, double-click the letter at the left of the row, or
highlight one or more cells in a row and select Edit > Row Definition.
Chapter 2 - Guide to Features • 86
The Row Definition dialog displays. What follows is an example of the Row Definition dialog for a
row defined as A (Assignment). The appearance of the dialog differs depending on the type of row
for which it displays.
The current row definition displays in the Type of row display box and, depending on the row
type, associated information displays in the upper-right display box. For Direct Entry, Blank Row,
and Page Break lines, no further information is displayed. For Line rows, you select the type of
line and in which columns the line displays. For Formula rows, you can select the type of formula
(sum or percentage) and click the Enter Formula Mode button to switch from formatting to
formula mode.
For Assignment rows, the current assignment displays in the Assigned to Row list box. Use Sort to
filter these items using the Default list, Description, or ID. You can update the assignment by
selecting a new one from the Available items box. The Assign to individual F/S rows button allows
you to insert an item in a financial statement as an individual row. The Assign Item Details button
lists accounts assigned to a Lead or Sublead.
A row designated as a Column Header prints on every page of the statement. Keep with Next Row
ensures that the selected row and the next one are not separated by page breaks when printing.
100% Row in % Cols designates the row as a 100% row. The row values are considered to be 100%
and other values are compared to this figure, with their relative percentages displayed. Never
Hide allows designated Assignment rows to be excluded when the Hide Zero Balances feature is
used; however, Never Hide does not apply to column headers.
While the Row Definition dialog is open, the Next and Previous buttons allow you to navigate
through the statement by highlighting the next (or previous) row on the statement and updating
the dialog with the definition for that row. This allows you to make changes to any number of
rows without leaving the dialog.
Chapter 2 - Guide to Features • 87
Financial Statements - Resizing Columns
The Edit menu includes two formatting options for column size. To make changes to column sizes,
select a cell within the column you want to change, then select the appropriate option:
Select Edit > Column Width to open a dialog where you can designate the width (in
characters) of the column.
Select Edit > Column Auto Fit to resize the column according to its widest entry.
Columns can also be resized by dragging the column boundaries at the top of the financial
statement while holding down the left-mouse button.
Financial Statements - Formatting Cells
Cell formats can be modified for any cell or range of cells that you highlight. Various formatting
attributes can be changed, including alignment, numeric style, numeric value, wrapping,
indenting, negative style, zero style, and to extend the information of one cell to display over
multiple columns (which is generally a requirement for many standard financial statements).
To format a cell or range of cells, highlight the desired cells on the financial statement, select
Edit > Cell Format or click the right-mouse button and select Cell Format from the pop-up menu.
The Format dialog displays.
Note: If the range of cells selected includes formats which are not shared by all the cells in the
range, those formats are not initialized (do not appear on the Format dialog) and are affected
only if you actually make a change to that formatting attribute.
Make your formatting selections from the options on the dialog. Click OK. The selected cells are
then reformatted in accordance with your choices.
Cell fonts can be formatted in the same way. After you have highlighted a cell or range of cells,
select Edit > Cell Font or right-click the selection and select Cell Font from the pop-up menu.
The Font dialog displays.
Chapter 2 - Guide to Features • 88
As with the Format dialog, the Font dialog is initialized only with font attributes that are shared
by all highlighted cells. This allows you to change the point size, for example, of a range of cells
that have different fonts or styles.
Note: The Font color feature does not apply to page headers or footers. Financial statements
copied or modified using the Copy and Modify Wizard in Trial Balance retain the colors of the
copied or modified statements; however, financial statements that are copied and pasted do
not retain the colors of the financial statements.
Cell Values
Cell values can be edited in a manner similar to cells on a spreadsheet. There are several ways to
edit a cell value. First, you must highlight a cell. You can then do one of the following:
Start entering the new value.
Press F2.
Press Enter.
Double-click the cell.
Select Edit > Cell Value.
Right click to select Cell Value from the pop-up menu.
The Cell Value dialog displays differently depending on the type of row in which the cell resides
(Assignment, Formula or Direct Entry) and if the cell already has a value assigned.
In Direct Entry rows, all cell values are entered directly. They can be entered as either numbers or
text (the text can include numbers), regardless of the column type.
In Assignment and Formula rows, where values are already assigned, you can also override
numbers in the Cell Value dialog.
Chapter 2 - Guide to Features • 89
You can override with a number or text (the text can include numbers). Check the Override with
box, make the appropriate selection, and enter the data in the associated field. The Row
Definition Assignment details box displays the hierarchy of the selected cell value. The Financial
Statement Details workpaper provides a record of cells that have been overridden in the Financial
Statement. The Financial Statement Details workpaper can be accessed by selecting Edit >
Workpaper Details or by right-clicking the title bar of the financial statement.
Financial Statements - Formatting the Overall Statement
While in Formatting mode, you can make changes to the overall appearance of a financial
statement by selecting some of the additional options in the Edit menu. These options include:
F/S Options. Allows you to change the name and ID of the statement. (The ID is used in links
to other applications.) You can also change the margin sizes (within established ranges) and
the starting page number of the statement (this is useful if you want a series of statements to
have continuous page numbering). The Hide Zero Balances option allows you to suppress the
display and print of zero balances. You can also designate the number of decimal places used
in the %Variance and % of Elements columns.
Header/Footer. Allows you to assign headers and footers to your statement, including preset
field codes which the system updates automatically (for example, the current date in a
particular format, such as MM/DD/YY).
Standard Font. Allows you to change the font, font style, and font size in which the
statement prints.
Financial Statements - Column Sets
Each financial statement is associated with a column set. ProSystem fx Trial Balance includes a
large number of predefined system column sets. You can apply one of these predefined sets on the
4th step of the Financial Statement wizard (see Financial Statements Copy and Modify Wizards on
page 99). To design your own customized column sets, click the Design button on the 4th step.
To change the column set for an existing statement, click the Design button on the 2nd step of
the Financial Statement Copy or Modify Wizard (see Financial Statements Copy and Modify
Wizards on page 99).
Chapter 2 - Guide to Features • 90
Regardless of whether you are creating a new financial statement or modifying the column set of
an existing one, when you click the Design button, the Design Column Set dialog displays.
Note: Customized column sets can be applied to more than one financial statement, which
provides you with great flexibility when designing and generating your statements. However,
use caution when editing a column set that is used by more than one financial statement. Any
changes made to a customized column set affect every financial statement which uses that
particular column set. To avoid inadvertent changes to financial statements resulting from
changes to customized column sets, copy and rename the column set, make changes only to the
copy, and apply the updated set only to those statements that should use it. The original
column set (and the statements using it) are unaffected by changes made to the copied set.
Copying a column set and copying a financial statement are not the same thing. When you copy a
financial statement, it uses the same column set as the original statement unless you copy and
rename the column set that applies to the copied statement.
When multiple statements share a single customized column set, we recommend a thorough
review of all financial statements using that column set if the column set is changed. Do this
before generating any client reports.
The name and filter criteria (All Types, Balance sheet, Cash flows, Income statement, or Other)
reflect what was selected on the previous dialog. You can select another filter and/or name from
the drop-down lists.
Descriptions of the columns for the selected year/period display in the Column descriptions, using
the selected year/period list box.
Click the appropriate button (Add, Edit, Copy, or Delete) to initiate the desired action.
Remember, only user-defined column sets can be edited or deleted. If you want to change a
pre-configured system-defined column set, you must highlight it, copy it, and make changes to
the copied set.
Chapter 2 - Guide to Features • 91
Clicking Add, Edit, or Copy opens the Add/Edit/Copy Column Set dialog. (The example shown is
for the Add New Column Set dialog; the Edit and Copy dialogs are the same, except they display
the name of the existing set in the Name field.)
Information about the column set previously selected displays on the dialog. Enter a new unique
name for the column set in the Name field. Check the boxes in the Applicable financial statement
types group box indicating to which financial statement types the column set applies.
After you have completed the dialog, click the Columns button to access the Columns dialog,
where you define the column types you want to include in the column set. The type and amount of
information that displays on the Columns dialog differs depending on the column type.
If you are adding a new column set with no existing columns, when you first open the Columns
dialog it displays with a single Description column.
If you are editing/copying an existing column set, any existing columns display in the Columns list
box in the order they appear in the financial statement.
Chapter 2 - Guide to Features • 92
When you highlight a column, information about that column displays in the Column information
group box in the bottom section of the dialog.
To delete a column, highlight it and click Delete. To change the order of the columns, highlight a
column and use the up and down arrow buttons to move it elsewhere in the list. To add a new
column, highlight the column above where you want the new column to appear and click Add,
you can then select the new column and edit it as desired.
To edit a new or existing column, highlight it and then complete the Column information group
box as appropriate for the Column type selected. There are eight column types to select from:
Description
Text
Balance
% of Element
Formula
Average
% Variance
ID
Other than Text, Description, and ID columns, each column type requires additional
specifications, and the display in Column information changes and must be updated accordingly.
If you select Text or Description for the column type, no further information is necessary. The
other column types and the information they require are covered on the following pages.
Chapter 2 - Guide to Features • 93
Balance Columns
The dialog for Balance columns displays when you select Balance from the Column type
drop-down list. Balance columns can be either relative or fixed:
Relative. Uses relative values for the period selected in the Columns dialog. Values can
change to reflect current data that corresponds to whichever period is selected (for
example, Current or Preceding).
Fixed. Uses fixed values for the period; for example, Q1 is always the first quarter.
Select the year, period type, and period from their drop-down lists. Regardless of whether you are
adding a relative or a fixed-balance column, Year always lists relative terms: CY for the current
year, PY for the prior year, and Y3 for the year before the prior year. However, Period type and
Period list different values depending on whether Relative (the default) or Fixed is selected in the
Period options group box:
When Relative is selected in Period options, the types available in the Period type drop-down list
are Annual, Semiannual, Quarterly, Monthly, or Any Interim. (Annual is not available for any YTD
balance type.) The associated periods available in the Period drop-down list are Current and all
preceding periods. For example, if Quarterly is selected as the period type, the associated periods
are Current, Preceding, Preceding 3, and Preceding 4.
Note: Any Interim columns allow you to create financial statements that apply to any interim
period. If you select Any Interim as the period type, the only periods available are Current and
Preceding.
Chapter 2 - Guide to Features • 94
When Fixed is selected in Period options, the types available in the Period type drop-down list are
the same as those for Relative, except for Any Interim which is not available. The associated
periods available in the Period drop-down list are the system-defined period labels. For example,
for the Quarterly period type, the associated periods are Q1, Q2, Q3, and Q4.
Columns can also be focused on a particular included company (in consolidated databases), on a
fund (in fund databases), or on a group. When one of these choices is made from the Type
drop-down list in the Focus group box, click Choose to make the appropriate company, fund, or
group selection.
% of Element Columns
The dialog for % of Element columns displays when you select % of Element from the Column type
drop-down list.
% of Element columns calculate the percentage of values in another column relative to the
particular row of the financial statement (the 100% row) or relative to a data element, such as
sales. Select the column whose percentages are to be calculated from the drop-down list.
Indicate what shall be used as the 100% value in the calculation: the 100% row in the financial
statement or a data element. If you select to use a data element, click Choose to select the
appropriate element.
Chapter 2 - Guide to Features • 95
Formula Columns
The dialog for Formula columns displays when you select Formula from the Column Type
drop-down list.
Formula columns add and subtract the values of other columns. Select the appropriate option for
each available column: Add (+), Subtract (-), or Don't include.
Chapter 2 - Guide to Features • 96
Average Columns
The dialog for Average columns displays when you select Average from the Column Type
drop-down list.
Average columns calculate the average of two or more columns. For each column to be included
in the average, check the associated Include in Average box.
Chapter 2 - Guide to Features • 97
% Variance Columns
The dialog for % Variance columns displays when you select % Variance from the Column type
drop-down list.
% Variance columns calculate the percentage of variance between two columns. Choose the base
and comparative columns from the drop-down lists.
After Creating/Modifying the Column Set
When you have finished creating/updating the column set, click OK to return to the
Add/Copy/Edit Column Set dialog. Click Yes to save the changes. Click Finish to display the
statement in the workspace.
Warning! If you edit a column set that applies to more than one financial statement, we
strongly recommend a thorough review of all financial statements using that column set. Do
this before generating client reports to ensure that inadvertent changes have not been made as
a result of the column set modification.
Chapter 2 - Guide to Features • 98
Financial Statements Copy and Modify Wizards
The Financial Statements module includes wizards for copying and modifying existing financial
statements. These wizards function in essentially the same manner, except the Copy wizard
creates a copy of an existing statement. You can then make changes to the copy, leaving the
original statement unchanged. The Modify wizard changes an existing statement. No copy is made
and, after you have modified the statement, there is no way to view the statement as it was
before modification. The modified statement overrides the original.
You can copy and change the original statement any number of times, creating multiple copies of
the same statement. This is useful when you want to produce copies of the same statement, each
using a different column set or some other formatting difference. Because financial statements do
not roll forward, the copy feature is also helpful for copying financial statements from year to
year and from interim period to interim period.
Copying a financial statement and copying a column set are not the same thing. When you copy a
financial statement, the copied statement uses the same column set as the original statement
unless you copy and rename the column set that applied to the copied statement. If you do not
want the copied financial statement to use the same column set as the original statement, you
must copy and rename the column set, make editing changes to the copy, and apply the updated
set to the copied statement. This ensures that the original column set (and the financial
statements using it) remains unaffected by the changes made to the copied set.
To start the Copy or Modify Wizard, select Work > Financial Statements to open the Financial
Statements Manager dialog. Highlight the statement you want to copy or modify. Click the Copy
or the Modify button as appropriate.
Note: You do not have to open the Financial Statement Manager if the financial statement is
already open in the workspace. Instead, select Edit > Copy Wizard or Edit > Modify Wizard to
start the appropriate wizard.
Chapter 2 - Guide to Features • 99
Either method opens step 1 of the wizard.
If you are using the Copy wizard, the ID field displays a system default. If you are using the Modify
wizard, the ID field displays the existing ID of the statement. In both cases the Name field displays
the name of the statement being copied/modified. Enter new ID and Name information, if
necessary.
The Column set used for financial statement group box displays the name and specifics of the
column set associated with the financial statement. These cannot be edited. Select if you are
going to use the existing column set of the financial statement or change it. The Column set
options and the Column header options work together:
If you select the Use existing column set option, all the controls in the Column header
options group box are available; however, you cannot copy or edit the column set used by
the financial statement.
If you select the Allow column set to be changed option, the Use default page and column
headers option is automatically selected. You can copy or edit the column set used by the
financial statement.
Chapter 2 - Guide to Features • 100
After selecting the column options, click Next to open step 2 of the wizard.
The options available in step 2 of the wizard differ depending on the selections made in step 1:
If you selected Use existing column set in step 1, the Name and Specifics fields of the
Column set group box in step 2 are disabled. In this mode, you keep the existing column set
and simply change the year and/or period selection to which the column set points.
If you selected Allow column set to be changed in step 1, the Name field of the Column set
group box in step 2 is active. In this mode, you can change the column set of the financial
statement and, if required, change the year and/or period selection to which the column set
points.
The Hide Zero Balances option, when checked, suppresses the display and print of zero balances of
Assignment rows on Financial Statements.
If you have selected Allow column set to be changed, you can click the Design button to
create/update the column set (see Financial Statements - Column Sets on page 90 for detailed
procedures on designing a column set).
When you have selected the desired column set or have designed your own, click Finish and the
copied/modified financial statement appears in the workspace, available for further editing, like
any other financial statement.
Chapter 2 - Guide to Features • 101
Printing Financial Statements
Financial statements can be printed in much the same way as grids and workpapers. However,
while the font and certain formatting attributes are designated at print time for grids and
workpapers, the font and format are set within the financial statements themselves.
Note: Like grids and workpapers, financial statements can also print in strips. To have
ProSystem fx Trial Balance warn you if a financial statement is going to print in strips, be sure
to select Options > Warn Before Printing in Strips.
If the financial statement you want to print is not open, select Work > Financial Statements to
open the Financial Statement Manager dialog, select the statement you want to print, and click
the Print button. The Print dialog displays.
To print a financial statement while the financial statement is open on the ProSystem fx Trial
Balance desktop, select File > Print or click the Print button on the toolbar. The Print dialog
displays.
Select a Print destination option to send the statement to a printer, PDF file, or RTF file and click
OK.
If you receive the warning that the statement will print in strips and you do not want this type of
output, click Cancel. You can reduce the column widths, use a smaller font, and/or print in
landscape (click Setup on the Print dialog and choose the landscape orientation) to reduce the
size of the statement.
Creating Links to Other Windows Applications
One of ProSystem fx Trial Balance's powerful features is its ability to create Windows DDE
(Dynamic Data Exchange) links to other Windows applications using the Copy, Copy Multiple Links,
and Paste functions of the Edit Menu. This allows you to establish links to most objects on grids, as
well as to entire financial statements. You can establish individual cell links or, by copying
multiple links, establish a link between an entire statement and the target program.
Chapter 2 - Guide to Features • 102
For example, you can link a financial statement to a spreadsheet program (such as Microsoft
Excel) and format the statement in the spreadsheet program. ProSystem fx Trial Balance does not
override the formatting in the other program, so if you continue to update the data in the
statement, which in turn updates the spreadsheet through the DDE link, established formatting in
the spreadsheet does not change.
Note: Fonts copied/linked from ProSystem fx Trial Balance to Microsoft Word are preserved;
however, font colors specified in the Edit > Font cell option are not retained.
This section covers how to set up your Clipboard in preparation for linking, how to establish a DDE
link between a statement and another Windows program, and how to establish single links.
Clipboard/Link Format Preferences
Before copying data from ProSystem fx Trial Balance to the Clipboard, to be pasted into another
Windows application, you can specify the format that the data should take when copied to the
Clipboard. This flexibility gives you control over the appearance of ProSystem fx Trial Balance
data when pasted in another application.
Note: Any changes made to these preferences do not affect data currently in the Clipboard or
established links. The new changes are in effect for all links established after the preferences
are updated. You have to recopy and paste existing links if you want them to include the new
formatting.
To establish the formats for new links, select Options > Clipboard > Link Format Preferences.
The Clipboard/Link Format Preferences dialog displays.
The dialog consists of three separate sections, each independent of the other. The sections contain
check boxes or radio buttons which allow you to select specific formatting options. These are:
Grids and Clipboard. Select the formatting preferences for the appearance of numbers in
grids. You can select one or more of the options under Numeric Style, but for Numeric
Value, Negative Style, and Zero Style, you can make only one selection.
Workpapers and Clipboard. Select Unformatted Values to ensure that formatting (such as
using $ signs) does not affect how the target application interprets numeric values. Select
Formatted as in Preview if you want all numeric styles set in your previewed workpaper to
be copied to the Clipboard and pasted to the target application.
Fin. Statements and Clipboard. Select Unformatted Values to ensure that formatting (such
as using $ signs) does not affect how the target application interprets numeric values. Select
Formatted as in Statement if you want all numeric styles set in your financial statement to
be copied to the Clipboard and pasted to the target application.
Chapter 2 - Guide to Features • 103
The following is an example of the Clipboard/Link Format Preferences dialog.
Once you have established your link format preferences, all new links contain the specified
formatting.
Establishing Multiple Links
All links to data in ProSystem fx Trial Balance, whether those links were created using grids or
financial statements, are made to single pieces of data. Maximum flexibility is possible when each
piece of data is independently linked, regardless of the application to which it is being linked. To
facilitate the creation of multiple, individual links, ProSystem fx Trial Balance includes the ability
to create multiple links through a single process. This process allows multiple linking to Microsoft
Word, Microsoft Excel, Lotus 123, or Quattro Pro.
To establish multiple links, do the following:
1. Open (or create) the Financial Statement you want to link to another Windows application.
Highlight the portion of the statement you want to copy (or select the entire statement by
clicking the blank cell in the upper left of the grid).
2. Select Edit > Copy Multiple Links and choose the target program: Microsoft Word, Microsoft
Excel, Lotus 123, or Quattro Pro.
Chapter 2 - Guide to Features • 104
3. Open the target program and select Edit > Paste. Each cell in the target application is linked
to the respective cell in the Financial Statement in ProSystem fx Trial Balance.
4. Format the statement as you want and save it in the target program. The next time you open
the file, the DDE links are refreshed.
Note: In the target programs, there is an option to have links auto refresh when the file
is opened. If this option is not on, you are prompted to refresh the links when you open
the file.
Copying Single Links
In cases where you want to establish a link between a single piece of data (the contents of one
cell) in ProSystem fx Trial Balance and a target application, first copy the cell to the Clipboard
from ProSystem fx Trial Balance. This is done through Edit > Copy or by clicking the Copy button
on the toolbar. Then select Paste > Link in the target Windows application. The second step varies
depending on the application. In an application, including those in Microsoft Office, select Edit >
Paste Special, and then choose Paste Link on the Paste Special dialog. The result is a link to a
ProSystem fx Trial Balance database.
Most other applications that allow links to their data use full path names to identify the data
source. While this has some minor advantages, it creates problems when those paths change. To
prevent those kinds of problems, ProSystem fx Trial Balance takes a unique approach. When you
are updating links from the ProSystem fx Trial Balance database, the source of the data is always
the ProSystem fx Trial Balance database that is currently open, regardless of whether it is in the
same directory it was in when the link was first established. This is a tremendous advantage,
particularly when large numbers of links are involved.
For instance, a single spreadsheet template that links to data at the lead level can be reused with
any database that follows the same lead schedule convention - no new links need to be created.
When a link is created to a cell on a grid, the link is to the underlying data (for example, the lead
balance or the account description), not to the grid itself. The grid window can be closed and the
link is not affected. However, the link is based on the object's ID, so if a lead ID changes from
2012 to 2013, any links to an attribute of lead 2012 become invalid.
Chapter 2 - Guide to Features • 105
When a link is created to a cell on a financial statement, the link is to the underlying cell, not to
the window. The financial statement window can be closed and the link is not affected, although
if the underlying financial statement itself is deleted through the Financial Statement Manager,
the link becomes invalid.
In addition to Paste Link, it is also possible simply to Paste to a Windows application without a
DDE link. That merely copies the information to the target application; no link is established.
Note: Microsoft Word 6.0 has a limitation of updating 126 DDE links per document. The error
message "Word Cannot Obtain Data" displays if you attempt to update more than 126 links at
one time. To overcome this limitation, open a new Word document and continue linking from
ProSystem fx Trial Balance.
Available system resources can also affect the number of available DDE links. To increase
available system resources, close all applications other than ProSystem fx Trial Balance and Word
when linking.
Note: When creating DDE links from ProSystem fx Trial Balance to Lotus 123, an earlier release
of Lotus 123 is required.
DDE Linking with Interim Period Data
When DDE links are established for interim period grid data, the Year link is always relative (most
recently defined year), whereas the period links are specific to a particular period. For example,
a 2012 3rd Quarter spreadsheet becomes a 2013 3rd Quarter spreadsheet. ProSystem fx Trial
Balance includes Change Interim Period macros for Word and Excel that allow you to create a new
document or spreadsheet for the next interim period while retaining the formatting of the
original.
Please refer to Macros in the Help file for step-by-step procedures on using the Change Interim
Period macro. However, be sure the following conditions are valid before using the macro:
Word is running under Microsoft Office 97 Service Pack 2 (or later).
The template (called ChgPrd.dot for Word documents and ChgPrd.xlt for Excel spreadsheets)
is in your program files directory, which is usually Program Files > Microsoft Office >
Templates. (If the macro is not there, be sure to copy it from the AV32 subdirectory of the
ProSystem fx Trial Balance Install directory.)
You are linking to the document from a ProSystem fx Trial Balance grid (such as the Leads
grid or the Accounts grid) and not from a financial statement created through the Financial
Statement Wizard.
You have already linked the grid's first period data to the document and have formatted the
document with the required bolding, underlining, font sizes, and italicizing.
Financial Statement links are always specific for both year and period and cannot be changed
using this macro.
Chapter 2 - Guide to Features • 106
Creating an XML Export File
The Create XML Export File option allows the export of ProSystem fx Trial Balance data to an XML
file. This option assigns XML tags to exported data as it creates the export file.
To create an XML Export File, do the following:
1. Open the applicable ProSystem fx Trial Balance database.
2. Select Work > Create XML Export file.
The XML File Created box displays to confirm the creation of the XML export file. The box also
displays the path where the file is stored. The XML export file is stored in the ProSystem fx Trial
Balance database directory for the selected company.
Notes:
ProSystem fx Trial Balance does not create an XML file if there are invalid characters
present. XML recognizes only printable ASCII characters and all others are considered invalid.
See the ProSystem fx Trial Balance Help file for a list of printable ASCII characters.
Trial Balance does not create an XML file if Beginning/Ending dates are not defined for all
years.
Creating a GIFI File
Canadian corporations are required to include a General Index of Financial Information (GIFI)
when they file a T2 Corporation Income Tax Return with Revenue Canada. The GIFI is a list of
financial statement items where each item has a unique four-digit code pre-defined by Revenue
Canada.
In ProSystem fx Trial Balance, GIFI codes are assigned on the Leads and Subleads grids. After
codes are assigned, a GIFI file can be created and then be imported to a tax software package for
preparation of the tax return. The tax software must be certified by Revenue Canada. See detailed
instructions for creating a GIFI file in the ProSystem fx Trial Balance online Help.
Tax Capabilities
ProSystem fx Trial Balance includes Corporation, S Corporation, Partnership, and Exempt
Organization tax lines, tax journal entries, and a large variety of tax workpapers. You can also
create interface files to link data to several of the leading tax software packages including
ProSystem fx Tax, CLR/Fast-Tax, GoSystem Tax, and Lacerte.
Tax Information Setup
If you are linking the data to a tax return, complete the Tax Information dialog.
1. Select Setup > Tax Information to display the Tax Information dialog.
2. Enter the following information:
Federal Tax ID
Tax year dates, ProSystem fx Trial Balance year, date of incorporation
The accounting basis used by the company: Cash or Accrual
The tax service used (for example, ProSystem fx Tax)
Chapter 2 - Guide to Features • 107
The company's Client ID with the tax service
Tax Lines Grid
The Tax Lines grid is created when you specify a tax return type in the Tax Information dialog
and displays all Tax Lines included in the current client database. The default grid view setting of
the Tax Lines grid includes Tax Line, Tax Line Description, Tax Input (override), Form, Form Line,
Send to, Accounts, Report Balance, Net US TJEs, and US Tax Balance for the current year.
Tax Lines can be master lines (for example, 357.00), or subscript tax lines (for example, 357.05).
The master lines are determined by the system; therefore, you cannot create, modify, or delete
master lines. You can create, modify, and delete subscript tax lines.
Add or delete subscripted lines through the Edit menu. When you add a tax line, ProSystem fx Trial
Balance defaults to the next available subscript for the tax line currently selected. Modify an
existing line by double-clicking the item to be updated and making the change.
Chapter 2 - Guide to Features • 108
Tax Journal Entries
Tax Journal Entries display on the Journal Entry Details grid. The Journal Entry Details grid allows
you to edit, add, and navigate the JE list. Open the Tax Journal Entry grid and then double-click
the journal entry for which you want detail. The Details grid displays.
The grid view includes columns for the Account or Tax Line, Account or Tax Line Description,
Debit, Credit and Difference. The difference column allows you to identify amounts recorded to
Schedule M1 tax lines as they relate to Temporary or Permanent differences.
Journal entries must be in balance; if not, the Journal Entries grid Status column shows the entry
as Incomplete and the Diagnostic grid also reports the problem. Tax journal entries can be marked
as Unbalanced intentionally to accommodate the cases where unbalanced entries may be
required. If the Unbalanced intentionally box is checked, the Journal Entries grid and Diagnostic
grid do not reflect a problem with the entry. Until you check the box, the tax journal entries are
treated the same as all other entries.
Tax Workpapers
Several Tax Workpapers are available in ProSystem fx Trial Balance. See the Trial Balance online
Help for information on the specific workpapers available.
Chapter 2 - Guide to Features • 109
Linking to ProSystem fx Tax
Dynalink and Quiklink offer links from ProSystem fx Trial Balance to the ProSystem fx Tax system.
Dynalink to ProSystem fx Tax
Dynalink is the recommended method for importing tax data into ProSystem fx Tax from
ProSystem fx Trial Balance. When Dynalink is used, there is no need to create a tax interface file
through ProSystem fx Trial Balance. Instead, Dynalink processing is invoked by selecting File >
Import in ProSystem fx Tax software. For details on Dynalink, see Chapter 6 - Updating with
Quiklink on page 162. The chapter includes the process for setting up and using Dynalink.
Note: For tax years 1995 and earlier, ProSystem fx Trial Balance is not supported by Dynalink.
Quiklink Updates
After Dynalink has been used to bridge ProSystem fx Trial Balance data to a return in ProSystem fx
Tax, the Quiklink Update feature can be used to streamline the update process as trial balance
data changes.
When a ProSystem fx Trial Balance database and the corresponding return in ProSystem fx Tax are
both open on the same workstation, changes to the ProSystem fx Trial Balance database can be
made to flow automatically to the return, without the need to Dynalink again.
For this feature to be enabled, two conditions must be met:
1. Dynalink must already have been run at least once between that ProSystem fx Trial Balance
database and the return.
2. Activate Quiklink Updates must have been selected on the Work menu in ProSystem fx Trial
Balance.
If client data is changed while Quiklink Updates is inactive, Dynalink must be rerun before
Quiklink Updates are again available for that data.
For details on using Quiklink, see Chapter 6 - Updating with Quiklink on page 162.
Quiklink to ProSystem fx Tax
Similarly, after Dynalink has been used to bridge ProSystem fx Trial Balance data to ProSystem fx
Tax, Quiklink can also be used to make contextual jumps from a tax line grid in ProSystem fx Trial
Balance to the corresponding interview form field in ProSystem fx Tax.
When a ProSystem fx Trial Balance database and the corresponding return in ProSystem fx Tax are
both open on the same workstation, highlight a tax line on the Tax Lines grid in ProSystem fx Trial
Balance. Select Quiklink to ProSystem fx Tax on the Work menu or click the Quiklink to
ProSystem fx Tax button.
You can jump contextually in the other direction as well. A corresponding feature in ProSystem fx
Tax allows contextual jumps from interview form fields to the corresponding tax line in
ProSystem fx Trial Balance. See Chapter 6 - Updating with Quiklink on page 162, for details.
Chapter 2 - Guide to Features • 110
Consolidated Databases
The first step to performing a consolidation is to create a new consolidated database (see Creating
a New Company on page 12). Since the parent company's database exists independently of the
consolidated database, it can be chosen at this time, provided it was already created. Some
company-level information is copied from the parent, which is also established as the first
included company. Other than that, creating a new consolidated database is no different than
creating any other new company. Select File > New Company to create a new consolidated
database.
Complete the New Company and Company Information dialogs to create the new company.
Information about the parent company and any subsidiaries appears on the Included Companies
grid.
Companies can be added to or deleted from the grid. Once the ID is specified on the grid, you can
set the rest of the information in the Included Company dialog. You can access this dialog by
double-clicking the Name, Short Name, or Path on the grid.
Once all the included companies are set up, you can then select Setup > Consolidate.
Select the consolidation method, by account or by lead/sublead. ProSystem fx Trial Balance
supports consolidation at either the account level or the lead/sublead level. If you consolidate by
lead/sublead, one account is created for each populated lead or sublead in each included
company. This helps to control the size of the Chart of Accounts for large consolidations.
In subsequent years, you can either start over by creating a new consolidated database, or you can
roll forward each database, including the consolidated database, and consolidate just the current
year information.
Chapter 2 - Guide to Features • 111
Once the first consolidation has been completed, you can focus a grid on a particular included
company. For instance, to focus a leads grid, you would make that grid the active grid, then
select Edit > Grid Filter or click the Grid Filter button on the toolbar. While the focus is in
effect, the balances shown include only balances for that company.
You can also set a focus for all grids by selecting Options > Global Focus on Included Company.
Additional options are available to workpapers in consolidated databases. The same Lead
Schedules workpaper shown in the Workpapers section has an additional option to focus on one or
more included companies.
There are also some additional workpapers available in consolidated databases, such as the
Consolidating Trial Balance by Leads.
Columns in financial statements can also be focused on specific included companies.
Combined Databases
Combined databases are similar to consolidated databases.
A consolidation is intended primarily for entities with included companies (parent and subsidiaries)
that file their own tax returns or that are bridged individually to tax software packages and
consolidated for tax purposes within those packages.
A combination is intended for entities with included units (divisions and branches) that do not file
their own tax returns and are not bridged individually to tax software packages.
In other words, you consolidate ProSystem fx Trial Balance databases for financial statement
purposes only, whereas you combine ProSystem fx Trial Balance databases for both financial
statement purposes and tax purposes.
Chapter 2 - Guide to Features • 112
Aside from the naming conventions, consolidation and combination companies differ:
No parent company is requested when creating a new combined database.
Tax line assignments are combined but not consolidated.
Eliminating journal entries are available only in consolidated databases.
Funds Databases
Fund capabilities are built into ProSystem fx Trial Balance. These capabilities include the
following features:
40-character account numbers
Account segment filtering
Funds and fund types
Focusing grids on specific funds
Special features in workpapers
Special features in financial statements
A database is designated as a funds database when it is created. When the following New Company
Information dialog displays during new company creation, check the Funds box in Client options.
Note that industry standard funds are available.
If you request industry standards, the Funds grid is populated with Industry Specific funds, each
assigned to a fund type.
Chapter 2 - Guide to Features • 113
In a funds database, every account must be assigned to a fund. The assignment process can be
automated by assigning an account to a fund during the append process. It can also be simplified
through the use of account segments. You can first define an account segment for funds, and then
filter the accounts grid on that account segment for funds. You would then assign the resulting
accounts to the relevant fund.
The focus capabilities for funds are essentially the same as the focus capabilities for
consolidations and combinations on grids, workpapers, and Financial Statements.
There are also some additional workpapers available in funds databases, such as the Combining
Funds Trial Balance by Leads.
Columns in financial statements can be focused on specific funds. See Financial Statements Column Sets on page 90.
You can also remove funds at a later time by using the Company Information dialog. Fund data
that is already present is not deleted. If funds are enabled again at a later time, the data is
available again.
Budget Balances
Any company can include budget balances for as many years as there are available.
The option to include budget balances is present when the company is first created, although it
can also be enabled through the Company Information dialog from the Setup menu at any time.
When budget balances are enabled, the Budget 1 and Budget 2 columns are available for display
in all applicable grids.
Additional workpapers are also available for databases which use budget balances.
If budget balances are disabled from the Company Information dialog at a later time, budget data
that is already present is not deleted. If budget balances are re-enabled at a later time, the data is
available again.
Chapter 2 - Guide to Features • 114
Chapter 3
TRANSACTIONS
C hapter 3 - T ransactions
Introduction
Transactions are detailed journal entries which finalize the beginning balances of an unadjusted
balance. ProSystem fx Trial Balance's Transactions feature allows the importing of preliminary
unadjusted balances from a general ledger or other package and uses transactions to finalize the
beginning balances. You can also use this feature to perform client write-up and accounting
service engagements for your small business clients. Use of this feature is optional, and it can be
enabled on a company and/or yearly basis.
The Transactions feature is available on the individual-company level only, and is not available
for the following:
Combination companies
Consolidation companies
Companies that use Funds
In each of these cases, the Transactions option is disabled.
Flow of Information
When the Transactions option is selected for a company, the flow of information in ProSystem fx
Trial Balance is:
Chapter 3 - Transactions • 115
Enabling Transactions
New Companies
1. As transactions are optional, you must specifically choose to enable them. When creating a
new company, this can be done by checking Transactions in the Client options section of
the New Company Information dialog.
2. When you complete the Company Information dialog, click the Transaction Setup button.
When you are setting up transactions for a new company, the Transaction Setup dialog
displays (see Working with Transaction Journals on page 119).
Existing Companies
1. For existing companies, enable the transactions option by selecting Setup > Company
Information and selecting the Transactions option in the Client options section. This
enables transactions for the latest defined year.
2. Click the Transaction Setup button. When you are enabling transactions for an existing
company, the Source for Beginning Balance dialog displays as detailed in the following
section.
Chapter 3 - Transactions • 116
Beginning Balances
When you enable transactions for an existing company, ProSystem fx Trial Balance requests the
source of the beginning balance:
1. Select the beginning balance source from the following options:
PY Report Balance. Select this option to use the report balances from the prior year.
Selecting this option means that the existing unadjusted balances for the current year
are deleted and are recalculated using the prior year information. All journal entries
remain unaffected by this.
PY Adjusted Balance. Select this option to use the adjusted balances from the prior
year. Selecting this option means that the existing unadjusted balances for the current
year are deleted and are recalculated using the prior year information. All journal
entries remain unaffected by this.
Note: PY options are not available when no prior year has been established for
the company.
CY Unadjusted Balance. Select this option to use the unadjusted balances from the
current year.
0.00. Select this option to delete the existing unadjusted balances and replace them
with a zero value.
Once you have selected the source of the beginning balance, current year beginning balance
settings can be refreshed, imported, or reset to zero. See Current Year Beginning Balances
Settings on page 126.
Note: ProSystem fx Trial Balance can import beginning balances for a company, but it
does not support the import of transaction detail or totals. See Importing Account
Balances on page 20 for additional information on importing beginning balance data.
2. Once you have enabled transactions, you can continue with the setup process by clicking the
Transaction Setup button again on the Company Information dialog. This opens the
Transaction Setup dialog (see Working with Transaction Journals on page 119).
Chapter 3 - Transactions • 117
Enabling Transactions for a Specific Prior Period
To enable the Transactions feature for a prior year, double-click in the Transactions column of
the Years grid for the year you want to enable (or select Setup > Years and click the Transactions
tab). Be sure the year in the Year drop-down box is the one you want to enable, then check Use
transactions in selected year.
Enabling Transactions for a New Year during Roll Forward
You can enable Transactions for a new year for companies that have Transactions enabled when
rolling forward by checking the box on the Roll Forward dialog. See Transactions and Roll
Forward on page 125 for additional information.
Years Grid for Transactions
When Transactions have been enabled for a company, the Years grid displays.
This version of the grid differs from the Years grid for a company without transactions:
Transactions column is added. This column is available only if transactions are enabled for
the company. The latest defined year defaults to Yes and any years prior default to No.
Click the column to change the current selection. You are prompted for the new setting.
Allow Refresh column is added. If this option is set to Yes, any changes in a prior year can
be carried forward to the current year.
Current Year Effect, Next Year Effect, and Future Years Effect columns can be displayed by
selecting them on the Grid View dialog.
In addition to these changes, columns for Beginning Balance and Net Transactions appear on the
Accounts grid when transactions are enabled.
Note: If a retained earnings account is not specified when Transactions are enabled for an
existing company, a message displays prompting you to do so.
Disabling Transactions
To disable the Transactions feature for all years within a company, clear the Transactions box on
the Company Information dialog. If you deselect the feature for the entire company, a warning
message displays.
Chapter 3 - Transactions • 118
To disable the Transactions feature for a specific year, double-click in the Transactions column of
the Years grid for the year you want to disable, or select Setup > Years and click the
Transactions tab. Be sure the year in the Year drop-down box is the one you want to disable, then
clear the Use transactions in selected year box.
Transactions data for disabled years is used to calculate the actual unadjusted trial balances and is
then deleted.
Working with Transaction Journals
ProSystem fx Trial Balance creates the following transaction journals automatically:
Cash Disbursements
Cash Receipts
General Journal
Using the Transaction Setup dialog, you can add, modify and delete transaction journals. You can
access this dialog by doing the following:
Selecting Transaction from the Setup menu.
Clicking the Setup button on the Transaction Journals grid.
Clicking the Transaction Setup button on the Company Information dialog.
The Transaction Setup dialog displays. Select from the following options when working with the
Transaction Setup dialog:
Add. Click this button to add a new custom transaction journal. See Adding or Modifying
Custom Transaction Journals in the next section for additional information.
Delete. Click this button to delete the selected transaction journal. (Journals that have
transaction entries cannot be deleted.)
Chapter 3 - Transactions • 119
Modify. Click this button to modify the selected transaction journal. See Adding or
Modifying Custom Transaction Journals, below for additional information on using the
Transaction Journal Setup dialog.
Entry Defaults. Click this button to open the Transaction Journal Entry Defaults dialog to
set up data entry defaults for new transactions and to determine how features are
implemented. See Transaction Journal Entry Defaults on page 121 for additional
information.
Adding or Modifying Custom Transaction Journals
In addition to the default transaction journals provided by ProSystem fx Trial Balance, you can
define your own custom journals or update existing ones using the Transaction Journal Setup
dialog (select Setup > Transaction).
To add or modify a custom transaction journal, click the Add or Modify button on the Transaction
Setup dialog. The Transaction Journal Setup dialog displays.
Enter or update the fields on the dialog as follows:
Journal ID. Enter an ID for the transaction journal. This is a unique ID that has a limit of five
alphanumeric characters. The ID is used on each line of the general ledger report to identify
from which journal an entry or total is carried.
Journal Description. Enter a description for the transaction journal. This is a unique
description that has a limit of twenty-five alphanumeric characters.
Separate Transactions with a Blank Line. Check this box to print the transaction journals
with a blank line separating each transaction.
Suppress Reference No. Check this box to disable the Reference No. column on the grid
view and make it not a required field. If entries have been made in a journal when you
select this option, all existing reference numbers are saved, and can be retrieved at a later
time by deselecting this option.
Chapter 3 - Transactions • 120
Transaction Journal Entry Defaults
ProSystem fx Trial Balance allows you to set up defaults for new transactions entered into the
journals. These defaults apply only to new transactions and do not affect existing ones. Also, any
selections you make do not change the way data is displayed on the Transactions grid.
To setup transaction journal defaults, click the Entry Defaults button on the Transaction Journals
grid or the Transaction Setup dialog. The Transaction Journal Entry Defaults dialog displays.
Select from the following options: Date
Repeat Previous. Select this option to automatically use the previously keyed date
when creating a new entry.
Last Day of Period. Select this option to automatically use the last day of the period
when creating a new entry. (For companies that do not have interim periods
activated, this date corresponds to the last day of the year.)
Reference Number
Increment Numeric. Select this option to automatically use the next incremental
number from the previous entry reference number.
Repeat Previous. Select this option to automatically use the previously keyed
number when creating a new entry.
Blank. Select this option to leave the reference number initially blank when creating
a new entry. You can then enter your own number.
Chapter 3 - Transactions • 121
Miscellaneous
Repeat Account. Select this option to automatically repeat the account number from
the previous entry.
Repeat Description. Select this option to automatically repeat the previously keyed
description.
Accessing the Transactions Grid
The Transactions grid can be accessed using one of four methods:
Select Transaction Journals from the Work menu.
Click the Transactions button on the toolbar.
Click the Transactions icon on the Grids dialog.
Open the minimized Transaction grid.
The following grid displays. (If Interim Periods is not enabled for the company, the Period type
and Period no. drop-down boxes do not display.)
Adding Transactions to the Transactions Grid
Transaction data is entered directly on the Transactions grid. You can enter new data on the grid
by clicking Ctrl + A or pressing the plus sign (+) key on the numeric keypad to access the last row
on the grid and begin entering data. Prior to making transaction entries, use the Entry Defaults
button to establish repetitive information as the default (see Transaction Journal Entry Defaults
on page 121 for more information).
Data is displayed/entered on the grid. As with most grids, you can change and/or filter the data
displayed.
Chapter 3 - Transactions • 122
The drop-down boxes at the top of the grid display the following:
Year. Select the year to display. All years within a company are listed, even if the
transactions have not been enabled for a specific year. Selecting a year which does not
contain transaction data results in the grid fields being disabled.
Period type. If the interim periods option is active for the company, select the period type
from the drop-down list. If Interim Periods is not active, this list is not available.
Period no. If the interim periods option is active for the company, select the period number
from the drop-down list. (For example, if Period type is Quarterly, select period number Q1,
Q2, Q3, or Q4 for the first, second, third, or fourth quarter.) If Interim Periods is not active,
this list is not available.
Journal. Select the individual transaction journal type to display on the grid.
Sort by. Select the field on which the grid is sorted. You can select from Order Entered,
Date, Ref No., Account, or Description.
Begin/End. Displays the beginning and ending dates of the selected year or period.
Post transactions when entered. Check this box to post entries immediately after you
enter them. If you do not check this box, you have two other methods of posting
transactions. Refer to Posting Transactions on page 124 for more information.
The columns on the grid display the following:
Date. Enter the date for the entry.
Ref No. Enter a reference number for the entry. This field is limited to ten alphanumeric
characters and is required, unless suppressed on the Transaction Journals Setup dialog.
Account. Enter the account number against which the entered transaction amount is
recorded. You can also press F2 to access the accounts picklist and select the account from
the list.
Account Description. Displays the description associated with the selected account number.
This does not display as a default column; it must be selected on the Grid View dialog.
Description. Enter a description of the entry.
Recur. To make this a recurring entry, do the following:
a. Double-click the cell to open the Recurring Transactions dialog. Recur is not a default
column; you must select to display it on the Grid View dialog.
Chapter 3 - Transactions • 123
b. In the Recurring Transaction dialog, select the period type of the recurring entry.
c. Check the All following periods in selected year box if the transaction should recur
in every remaining period of the year.
d. Indicate if the entry should recur with or without amounts and if it should recur on the
last day of the periods or the comparable date in the following periods.
e. Check if the entry should roll forward to the next year, when it should occur (if
Interim Periods is not enabled, Create entry is the only option), if it should be with or
without amounts, and on what dates it should recur during the next year. To create
recurring transactions see Creating Recurring Transactions in the next section.
Posted. Indicates if the entry has been posted.
Dr Amount. Enter the debit value.
Cr Amount. Enter the credit value.
Note: You can enter 0.00 in any amount field.
Post. Click this button to post entries for the active journal or all journals.
W/P and Reports. Click this button to generate workpapers and reports for the selected
company. See Workpapers and Reports on page 66 for additional information.
Entry Defaults. Click this option to change the entry default settings. See Transaction
Journal Entry Defaults on page 121 for additional information.
Setup. Click this button to create, modify, and delete transaction journals. See Working
with Transaction Journals on page 119 for additional information.
Move to Journal. Click this button to move a transaction line to another transaction
journal.
Creating Recurring Transactions
To start processing work for the next period, select Work > Interim Items > Create Interim
Recurring Transactions. Enter the date up through which the recurring transactions should be
created and click OK. If the recurring transactions are created without amounts, access the
Transactions grid and enter the correct amounts.
Deleting Transactions
Deleted transactions are backed out of all balances. To delete a transaction, highlight the lines in
the Transactions grid and select Edit > Delete Transaction Line. You are prompted to confirm
the deletion.
Posting Transactions
Transactions can be posted in one of three methods:
Check the Post transactions when entered box on the Transactions grid.
Select Work > Post All CY Transactions. A message displays listing how many transactions
are posted.
Chapter 3 - Transactions • 124
Click the Post button on the Transactions Journal grid. The Post Transactions dialog opens,
allowing you to select from two options:
Post [Active Journal]. Select this option to post all transaction entries to the
currently selected journal. It does not post entries in other transaction journals.
Post All Journals. Select this option to post all transaction entries from all journals
established for the company.
Unposting a Transaction
To unpost a transaction (reverse it without leaving a paper trail), do the following:
1. Open the Transactions grid and select the appropriate journal from the Journal drop-down
list.
2. Verify that the Post transactions when entered box is not checked.
3. On the transaction line that you want to unpost, double-click in the Dr Amount or
Cr Amount column. The edit field at the top of the workspace now becomes available.
4. Click the green check mark button beside the edit field. The Posted column displays No.
5. Continue the process to unpost all the necessary transactions. If you want, you can now
delete the unposted transactions by highlighting them and selecting Edit > Delete
Transaction Line.
Move to Journal
Use the Move to Journal option on the Transaction grid to move transaction journal line(s) to
other transaction journal types.
1. Open the Transactions grid, select the journal line(s) to be moved and click the Move to
Journal button. To select more than one transaction journal line to move, hold down the
Ctrl key, and then click the lines you want.
2. Click OK and the Move to Journal dialog displays a list of available Transaction Journal
types.
3. Select the applicable journal type and click OK to change the journal type.
Transactions and Roll Forward
Before the roll forward process can take place, the Roll Forward dialog must be completed. This
dialog consists of five tabs, each of them accessing an individual dialog which contains
information about a specific part of the process. Not all of these dialogs concern the Transaction
option. This chapter covers just the fields that are specific to Transactions; the entire Roll
Forward dialog is covered in detail in Chapter 5 - Administration & Maintenance on page 150.
Note: You must define a Retained Earnings account before attempting to use the Roll Forward
feature for a company that uses Transactions.
To access the Roll Forward dialog, select Setup > Roll Forward. The dialog with the General tab
displays. Click the Transactions tab to access this dialog.
Chapter 3 - Transactions • 125
Complete the fields on the dialog as follows:
Transactions Processing for new CY
Use transactions in selected year. If the Transactions option has been selected for
the company, this box is checked and the other controls on the dialog are enabled.
Allow refresh of beginning balances. Check this box to have the system allow a
refresh of beginning balances for the new year.
The Previous year for transaction processing is by default the year prior to the new CY.
Other fields (not specific to the Transactions option) on other tabs within this dialog require
completion before roll forward can take place. Refer to Chapter 5 for detailed information on
rolling forward.
Current Year Beginning Balances Settings
Current Year Beginning Balances can be refreshed, imported, or reset to zero using the CY
Beginning Balances dialog. Select Setup > CY Beginning Balances to open this dialog.
Select from the following options:
Refresh From Prior Year Balances.
Allow Refresh From PY. Select this option to allow the new CY beginning balances to
be refreshed. Deselecting this option prevents changes made in previous years from
affecting the current year. The CY amounts can be changed manually or by importing
data in to them.
Refresh Now. Click this button to refresh all balances and close this dialog.
Balances. Select which prior year balances will be used to refresh the CY beginning
balances.
Chapter 3 - Transactions • 126
Import.
Import Account Balances. Click this button to import beginning balances for the
latest defined year within the company from an external file. Clicking this button
begins the import process. See Importing Account Balances on page 20 for more
information on the import process.
Reset to 0.00.
Reset. Click this button to reset the selected accounts to 0.
Account. Select which accounts will be reset.
Transaction Workpapers and Reports
Several workpapers and reports are available with the Transactions feature:
Transaction Setup Report.
Transaction Journals. (This report can be sorted by date, reference number, account, or
description.)
General Ledger - Detail Transactions.
General Ledger - Summary by Journals.
Trial Balance by Accounts Classified (Beginning Balance to Unadjusted Balance, List
Transactions).
Trial Balance by Accounts Unclassified (Beginning Balance to Unadjusted Balance, List
Transactions).
Trial Balance by Accounts Unclassified (Beginning Balance to Report Balance, List Details).
Trial Balance by Leads Classified (Beginning Balance to Unadjusted Balance).
Trial Balance by Leads Unclassified (Beginning Balance to Unadjusted Balance).
Transaction workpapers are produced and printed in the same manner as any other workpaper. See
Workpapers and Reports on page 66 for additional information.
Chapter 3 - Transactions • 127
Chapter 4
INTERIM PERIODS
C hapter 4 - Interim Periods
Introduction
Interim periods are accounting periods of less than one year which divide the year into a specific
number of equal parts. ProSystem fx Trial Balance allows you to assign one or more of the
following interim period types to a company:
Monthly
Quarterly
Semiannual
Once you have activated interim periods for a company, you are then able to select the types of
interim periods the company uses and determines, on a year-by-year basis, whether the interim
periods feature is enabled and, if so, how the system processes and displays data for the selected
types.
By using the interim periods feature, you can import, calculate, and display interim data for a
company and prepare workpapers and reports which reflect interim, as well as annual, figures.
How Interim Period Data is Calculated
ProSystem fx Trial Balance calculates interim period data based on three factors:
The source of original, stored data: either detail transactions or unadjusted trial balance.
The interim periods processing option selected, which can be one of the following:
Transactions. Beginning balances of an unadjusted balance are finalized by detailed
journal entries.
Unadjusted Trial Balance. The information for the discrete period is imported or the
data is entered.
Unadjusted Trial Balance YTD. The original imported/entered data for the period is
year-to-date (YTD) data. ProSystem fx Trial Balance calculates the nominal accounts
and retained earnings by performing a comparison between consecutive periods.
For any of the three methods, larger periods can be built from smaller periods (for
example, quarterly balances can be calculated from monthly balances).
Chapter 4 - Interim Periods • 128
The calculation method selected for each period type: original data or calculated based on
original data in another period.
Each of these options can be selected during the enabling of interim periods, as covered in the
next section. They can also be added later by updating information on the Years dialog.
Fiscal Years
In addition to the calculation options previously listed, ProSystem fx Trial Balance uses fiscal year
information to process interim period data. This information, which includes the beginning and
ending dates of the fiscal year, must be established in ProSystem fx Trial Balance before interim
period processing can begin. ProSystem fx Trial Balance recognizes three types of fiscal years:
Regular. A fiscal year of twelve months, regardless of the beginning and ending dates. A
fiscal year beginning January 1 and ending December 31 is a regular fiscal year, as is a fiscal
year beginning April 1 and ending March 31.
Short. Any fiscal year of less than 12 months. Generally, this occurs when a company is
changing the dates of its fiscal year. A short fiscal year refers to the time between the
ending date of the old regular fiscal year and the beginning date of the new regular fiscal
year.
Prior Comparison. A previous fiscal year used to compare with the same period in the
current fiscal year.
Fiscal year information is entered using the Years/Annual Dates dialog, which is covered in the
next section.
Note: All companies in a Consolidation or Combination company must select the same type of
fiscal year.
Enabling Interim Periods
Before you can enable the desired interim period types, you must indicate that the company in
question uses interim periods. If you are setting up a new company, start with step 1 in the
following procedure. If you are assigning interim periods to an existing company, start with
step 3.
1. When entering data on the New Company Information dialog, check the Interim periods
box in the Client options section.
Chapter 4 - Interim Periods • 129
When you have completed all of the necessary fields, click OK and the Company Information
dialog displays.
2. If you are setting up a new company, the Company Information dialog displays with the
Interim periods check box already checked. Continue with step 4.
3. If you are setting up interim periods for an existing company, access the Company
Information dialog (Setup > Company Information) and check the Interim periods box.
From this point, the procedure is the same for both new and existing companies.
4. Click the Interim Periods Setup button to access the Interim Periods Setup dialog.
5. Complete the fields on the dialog as follows:
Interim period types. Check one or more of the interim period types listed: Monthly,
Quarterly (default), and/or Semiannual. For each box checked, ProSystem fx Trial
Balance processes data for that period type.
Interim periods supplementary data. If desired, check one or both of the boxes:
Chapter 4 - Interim Periods • 130
Budgets. Check this box to store and process budgets data (if applicable) for
interim periods.
Workpaper references (WP Refs). Check this box to enter workpaper
references data for interim periods.
6. Click the appropriate button to access the desired tab of the Years dialog to set up how
interim period data is calculated.
Fiscal Years
Interim Periods
Interim Dates
Interim Options
7. Click the Fiscal Years button to open the Years dialog. The Annual Dates tab displays.
You can change the year on which you are working by making a selection from the Year
drop-down box at the bottom of the dialog. This box is available from all of the tabs.
As you go through the process of entering or updating interim period data, complete the
tabbed dialogs that are necessary for the type of interim period processing the company
requires.
As you complete the necessary fields on each tab, you can do any of the following:
Click OK to save the changes and exit the dialog.
Click Apply to apply the changes you have made without exiting the dialog (this
button is available only when changes have been made).
Select another year from the Year drop-down box and update the settings for that
year.
Click the next tab you want to access.
Steps 8 through 11 cover each of the interim period tabs on the Years dialog.
Chapter 4 - Interim Periods • 131
8. Complete the information on the Annual Dates tab of the Years dialog as follows:
Year label. This field reflects its corresponding field in the Label column of the Years
grid.
Report date. Enter specific report dates for each applicable year. This field is
available only if the Override report dates on reports, workpapers, and f/s box is
not checked on the Company Information dialog.
Fiscal year. You must complete this section of the dialog if Interim Periods is enabled
for the selected year.
Assign fiscal year to selected year. Check this box to assign a fiscal year to the
ProSystem fx Trial Balance year selected in the Year drop-down box at the bottom of
the dialog. In years where Interim Periods is active, this option is mandatory, so the
box is checked and disabled. For years where Interim Periods is not active, you have
the option of selecting it.
Fiscal year. Select a fiscal year. This field displays in the corresponding field in the
Fiscal Year column on the Years grid. The system default is the same year as the tax
year default.
Ending month. Select a month from the drop-down list. This field reflects its
corresponding field in the Ending Month column on the Years grid. The system
default is December.
Year type. Select from Regular (default), Short, or Prior Comparison. The same
fiscal year can be assigned with each one of these year types.
Annual dates. The Beginning and Ending dates respectively reflect their
corresponding fields in the Beginning Date and Ending Date columns on the Years grid.
If the Assign fiscal year to selected year box is checked, these fields default to the
beginning and ending dates of the fiscal year and can only be overridden by checking
the appropriate boxes in the Fiscal year dates edit options.
If the Assign fiscal year to selected year box is not checked, you can edit the
Beginning and Ending fields directly.
Fiscal year dates edit options. Check the appropriate box to edit the Beginning or
Ending dates in the Annual dates group box when the Assign fiscal year to selected
year option is checked.
Chapter 4 - Interim Periods • 132
9. Click the Interim Periods tab of the Years dialog to display the following dialog:
Complete the information on the fields:
Check Use interim periods in selected year to activate interim periods for the year
selected in the Year drop-down box at the bottom of the dialog.
Note: This option is not available until a fiscal year is assigned to the selected
ProSystem fx Trial Balance year.
Indicate how data for each selected period type (monthly, quarterly, semiannual,
and/or annual) is processed:
Allow import/data entry of data. Select this option to have the system store
original data for this period type.
Calculate automatically from data. Select this option to have the system
automatically calculate balances for this period type from the balances of
another period type. (For example, quarterly balances can be calculated from
monthly data; semiannual balances can be calculated from monthly or
quarterly data.)
Not applicable to this year. This box defaults to being checked if Use interim
periods in selected year is checked, but the period type is not active for the
company.
Chapter 4 - Interim Periods • 133
10. Click the Interim Dates tab of the Years dialog to display this dialog.
The Interim Dates list box consists of four columns:
Interim Period. The standard abbreviation for the interim period type. It always
displays the period type with the most amount of periods. The data in this column is
non-editable.
Beginning Date and Ending Date. Populated with the default interim period dates for
the fiscal year. This data can be edited.
Note: If inconsistent or non-consecutive dates are entered in the Beginning Date
and/or Ending Date columns, the system generates a diagnostic, but you are not
prevented from entering the dates.
Report Date. Defaults to the period's ending date. This can be edited if the Override
report dates on reports, workpapers, and f/s box is not checked on the Company
Information dialog.
Chapter 4 - Interim Periods • 134
11. Click the Interim Options tab of the Years dialog to display the following dialog:
Complete the dialog as follows:
Interim financial statements option. Check the Print the word "Unaudited" in
interim financial statement default headers box to have the system automatically
include the word "Unaudited" in default headers for interim financial statements. The
default is for this box to be unchecked.
Note: If you select this option, and produce one or more financial statements
using the default, and then subsequently clear the option, the financial
statements created with "Unaudited" in the headers will retain it.
Interim period processing option. The following option is not applicable to
Consolidation or Combination companies, or to any fiscal years for which the
Transactions option is active:
Use year-to-date comparisons to calculate nominal accounts. Check this
box to be able to import book year-to-date unadjusted trial balance data for
each period. You also have the option to calculate the nominal account
(revenues and expenses) unadjusted trial balances for each period by
comparing the year-to-date balances of consecutive periods.
12. The two remaining tabs on the dialog (Transactions and Special Items) are not specific to
interim periods. However, you can click the Transactions tab to enable transactions in the
selected year (if the company is set up to use transactions). You can also click the Special
Items tab to designate the effects of PAJEs.
13. When you have completed all of the information required, click OK to save the changes and
exit the dialog.
If you are creating a new company, you can continue with the creation process (as covered in
Creating a New Company on page 12), enabling other options, such as Transactions.
Chapter 4 - Interim Periods • 135
Once the company has been created/updated, you are ready to import balances, calculate and
display data, and produce and print interim period data on workpapers, reports, and statements.
Differences between the standard ProSystem fx Trial Balance interface and the interface when
Interim Periods is activated are covered in the next section.
Interim Period Features of ProSystem fx Trial Balance
In general, the ProSystem fx Trial Balance user interface is the same regardless of whether or not
Interim Periods is enabled for a company. However, some features change in the way they display
and/or process data to accommodate interim periods. This section focuses on the changes that
occur when Interim Periods is active.
Note: This section presents only the changes that result in a dialog, grid, or process when the
interim periods option is activated for a company. Many of the functions mentioned here are
also covered in more detail in Chapter 2 - Guide to Features on page 44.
Interim Period Abbreviations and Numbers
To designate interim period type and period numbers, ProSystem fx Trial Balance uses the
following conventions:
Monthly periods are designated as 1st Mo., 2nd Mo.,...12th Mo. (In column headings, Mo 1,
Mo 2,...Mo 12.)
Quarterly periods are designated as 1st Qr., 2nd Qr., 3rd Qr., and 4th Qr. (In column
headings, Qr 1, Qr 2, Qr 3, Qr 4.)
Semiannual periods are designated as 1st Half, 2nd Half. (In column headings, Half 1,
Half 2.)
In drop-down lists, monthly abbreviations are M1, M2, M3,... M12; quarterly abbreviations
are Q1, Q2, Q3, and Q4; and semiannual abbreviations are H1 and H2.
ProSystem fx Trial Balance Title Bar for Interim Period Display
When Interim Periods is active for a company, the title bar of the ProSystem fx Trial Balance
desktop displays the current year and period selection.
Chapter 4 - Interim Periods • 136
Current Year and Period Selection
If Interim Periods is activated for a company, when you select Options > Current Year and
Period Selection from the menu bar or click the Select Current Year button on the Years grid,
the Current Year and Period Selection dialog displays.
In the Current year and period selection (temporary) group box, select the year and period type
from their respective drop-down lists. The period type can be Annual; however, if the type is
anything other than Annual (such as Monthly, Quarterly, or Semiannual), you must also select a
period no. The year and period selection made here is temporary. If you want this selection to
replace the existing default (which appears in the Current default settings group box), click Save
As Default.
Grid Display of Interim Period Data
When Interim Periods is active, the Grid View dialog (Edit > Grid View) displays two tabs:
Settings and Interim Periods. The dialog opens on the Settings tab, which lists all possible display
items in a scrolling list of check boxes.
Chapter 4 - Interim Periods • 137
Check each item you want displayed in the grid. For example, if you select Unadjusted
Balance-Period, the grid displays columns containing the corresponding data for the period type
active for the company. The period numbers displayed (current, current and preceding, and all
periods in the year) are selected on the Interim Periods tab of the Grid View dialog.
Select one or more options in the Period type selection group box. Then for each selection made,
select that type in the drop-down box of the Interim period type options group box, and indicate
which periods should display (current, current and preceding). If you select Specific [period], a
listing displays in the lower box from which at least one period must be selected.
Note: The Interim Periods tab is not available on grids that do not contain period-specific
columns (for example, Tax Lines, Tax Journal Entry Details).
For more information about the Grid View, including setting global defaults, see Grid View on
page 48.
Chapter 4 - Interim Periods • 138
Years Grid - Interim Periods
When the interim periods option is selected for a company, the Years grid displays. The grid's
default is for the current year to have interim periods active.
Note: In this example, the company does not have the transactions option enabled.
Current Year Effect, Next Year Effect, and Future Years Effect columns are also available and
can be displayed by checking the appropriate boxes on the Grid View dialog. When the
transactions option is selected, the grid also includes Transactions and Allow Refresh columns.
To edit data in the various columns of the Years grid, press Enter, F2, or double-click within a
cell. This opens the Years dialog to the appropriate tab. Data is edited on the following tabs of the
Years dialog:
Column
Edited On
Year Label
Annual Dates
Beginning Date
Annual Dates
Ending Date
Annual Dates
Interim Periods
Interim Periods
Fiscal Year
Annual Dates
Ending Month
Annual Dates
Transactions
Transactions
Allow Refresh
Transactions
Current Year Effect
Special Items
Next Year Effect
Special Items
Future Years Effect
Special Items
Chapter 4 - Interim Periods • 139
Accounts Grid - Interim Periods
When Interim Periods is activated, the Accounts grid changes to include the following information.
Workpaper References
When Workpaper references (W/P Refs) is checked on the Interim Period Setup dialog, the WP
Ref column on the Accounts grid can be included for both annual and interim periods. Workpaper
references cannot be imported. They must be entered onto the grid.
Budgets
When Budgets is checked on the Interim Period Setup dialog, a Budget column on the Accounts
grid can be included for both annual and interim periods. Budget data can be imported or entered
directly onto the grid.
Retained Earnings Unadjusted Trial Balance
To view how the Retained Earnings Unadjusted Trial Balance is calculated, double-click in the
Unadjusted Balance cell of the Retained Earnings account to open the following dialog:
Note: This dialog can also be accessed by selecting Work > Interim Items > Retained
Earnings Unadj. T/B Calculation if you have the current period selection set to an applicable
period.
The fields on the dialog display the following information. None of the fields can be edited on this
dialog.
Unadjusted T/B YTD for period.
Plus: Unadjusted net income of previous periods. This figure is added to the Unadjusted
T/B YTD amount.
Unadjusted T/B for period calculation. Displays the sum of the two fields above. This
figure displays on the Accounts grid.
Note: You can also double-click in the Retained Earnings Unadjusted Balance YTD column to
display a similar dialog for the unadjusted trial balance year-to-date calculation.
Chapter 4 - Interim Periods • 140
Journal Entries - Interim Periods
When Interim Periods is active, you have the option of entering separate sets of journal entries for
each period for which the Allow import/data entry option has been selected on the
Years/Interim Periods dialog. Each period's set of journal entries is numbered sequentially,
starting with 1. Workpapers that display specific numbers and amounts for AJEs and/or RJEs (for
example, Lead Schedules - Complete) are focused upon a single period's data and, therefore,
distinctions do not need to be made between the journal entries of different periods.
The Journal Entries grid can be expanded to display the detail of journal entries listed by checking
the Expand Summary Grid box. This grid also includes drop-down lists for Year, Period Type, and
Period No. (such as 2013, Quarterly, Q3).The Journal Entry Details grid that follows displays the
year and period of the journal entry in the title bar. You can edit existing journal entries and use
the Previous and Next buttons to navigate the list of journal entries. The Add AJE allows you to
add a new journal entry.
To designate a journal entry as recurring in the remaining periods of the year, click the Recurring
button, which opens a dialog where you can indicate when the journal entry should recur and if it
should recur with or without amounts.
For complete details on entering journal entries, refer to Adding Journal Entries on page 58.
Chapter 4 - Interim Periods • 141
Transactions - Interim Periods
Like the Journal Entries grid, the Transactions grid includes drop-down lists for selection of year,
period type, and period number. For complete details, refer to Chapter 3 - Transactions on page
115.
Data Elements - Interim Periods
When Interim Periods is active, the Data Element Source dialog includes options for period types.
Double-click the Source column of the Data Elements grid to open the following dialog:
If you select a constant (rounded currency amount, numeric, or percentage) as the source, the
Source of values for constants portion of the dialog becomes available. You can check the
appropriate boxes for the period types active for the company.
Once you have checked a period type or period type YTD (year-to-date), the associated drop-down
box becomes available. Select from the drop-down list the method by which the value in the
Constant column should be calculated: Manual entry. Allows you to make manual entries in the Constant column for the selected
period. (This is the default selection.)
Prorated from annual (by days). Calculates the period value based on the annual value by
days. The cell is not editable.
Chapter 4 - Interim Periods • 142
Prorated from annual (by periods). Calculates the period value based on the annual value
by periods. The cell is not editable.
Same as annual. Sets the same value for the period as that entered for annual. The cell is
not editable.
Sum of periods-to-date. Calculates the period value as a sum of all the periods-to-date.
This option is available only for the year-to-date period types. The cell is not editable.
Ratio Formulas - Interim Periods
When Interim Periods is activated for a company, the associated ratio formulas can include
annualized options and interim period types. Open the Ratio dialog by double-clicking the Formula
or Format column on the Ratios grid.
Select the annualization option (by periods, by days, or none) and the interim period types to be
used in the calculation. For complete details on data elements and ratios, refer to Ratios/Data Elements on page 61.
Chapter 4 - Interim Periods • 143
Balance Sheet Reconciliation/Cash Flow Summary
When Interim Periods is active, step 1 of the Reconcile Lead dialog reflects the year and period of
the report balance.
Select the year and period from the drop-down lists in the Year and period selection group box.
Interim periods balances are reconciled in the same manner as annual balances. Refer to Cash
Flow Summary on page 77 for complete details.
When a lead schedule has been reconciled in a particular year/period, the assignments can be
copied to other years/periods by clicking the Copy to button on the Step 1 dialog. The Copy to
dialog displays.
The year, period, and period number of the source display in the Copy from group box. Indicate
the years, period types, and period numbers to which you are copying by making selections from
the drop-down lists in the Copy to group box. The period type and period number are not enabled
for years in which Interim Periods is not active. Click OK.
Existing assignments and manual entries in the target years/periods are removed and replaced by
the assignments and manual entries in the source year/period. If a cash flow source was a manual
entry, the source is copied to the other years, but the value is set at zero. Manual entries of the
actual value must then be made in the target years/periods.
Chapter 4 - Interim Periods • 144
Converting Interim Period Data
Company databases which contain interim period data can be converted from two accounting
packages: GoSystem Audit (32-bit) and ACE (16-bit). The process of converting interim periods
databases follows the same steps as converting annual databases (refer to Converting Databases
from Other Trial Balance Packages on page 17) with the following differences:
The interim periods database being converted must be using an interim period type that is
supported by ProSystem fx Trial Balance (monthly, quarterly, or semiannual).
During the conversion process, when the new company is created, the Interim Periods option
will be selected.
When the Company Information dialog displays during the conversion process, you can select
not to convert the interim period data by clearing the Interim Periods option.
The Fiscal Year check box defaults to being checked for any year that contains a supported
interim period type. ProSystem fx Trial Balance derives the fiscal year by subtracting 12
months from the fiscal year end. For example, if the fiscal year in GoSystem is June 1, 2013
to May 31, 2014, the fiscal year in ProSystem fx Trial Balance is 2013 and the ending month
is May.
The fiscal year type is Regular.
ProSystem fx Trial Balance designates a balance as unadjusted as the starting point.
Interim dates are converted.
Calculation options default to allowing import for the period type being imported and
calculating annual data automatically from the period type being imported.
If you attempt to convert an interim period type that is not supported by ProSystem fx Trial
Balance (for example, thirdly, bi-monthly, 4 weeks), ProSystem fx Trial Balance displays a
warning message during the conversion process. If you elect to continue the conversion,
ProSystem fx Trial Balance sets up the new company as annual with no interim periods.
Importing/Appending Interim Period Data
Interim period balances can be imported, using an ASCII file, from any accounting package that
contains interim period data. The procedure for importing (or appending) interim period data from
an ASCII file follows essentially the same procedure as importing annual balances (refer to
Importing ASCII Account Balances in Chapter 1), until you reach step 3 of the ASCII Import wizard.
Chapter 4 - Interim Periods • 145
Step 3 of the ASCII Import wizard displays.
In this step of the wizard, you identify the contents of each column of data and, if applicable,
designate the year (and period) for which data is being imported. Initially, each column contains
the <Ignore> label. Click within a column to select it, and then select the column data type from
the Import Column As drop-down list (for example, Account, Account Description, Unadj.
Balance).
If you select a balance type from the Import column as drop-down list, a Year drop-down box also
displays. When Interim Periods is active for the company in the selected year, Period type and
Period no. drop-down boxes also display.
The selections available in each of the drop-down lists are based on the options enabled for the
company (Budget, Transactions, Interim Periods) and the years/periods for which they are active.
The first balance column is automatically selected as the Current year (period). If additional
columns are labeled as balances, the items available in the drop-down lists automatically reflect
prior years/periods.
After step 3 of the wizard has been completed, the import (append) process continues in the same
manner as importing for annual balances.
Workpapers and Reports - Interim Periods
Where applicable, workpapers and reports can be produced to contain interim period data. The
Trial Balance help file includes samples of all workpapers and reports and indicates whether the
report can be produced using interim period data and, if so, what interim period comparison data
can be used.
Chapter 4 - Interim Periods • 146
Select Work > Workpapers and Reports to open the Workpapers and Reports dialog.
The dialog includes a section called Select period and comparison where the period type, period
number, comparison period, and whether the year-to-date figures should be used for the current
period can be selected.
If an interim period type is selected in Period selection, the Use YTD figures as current data box
becomes available. The Comparison period display group box is available only if the selected
workpaper or report includes a comparison column and the appropriate types of data are available
for it.
Producing, viewing, and printing the workpaper or report is otherwise the same for annual or
interim period data. Refer to Workpapers and Reports in Chapter 2 for detailed information.
Financial Statements for Interim Period Data
When Interim Periods is active, the ProSystem fx Trial Balance financial statements module can
produce both relational and specific report data. Financial statements are covered in detail
starting in Chapter 2 including where interim periods data can be selected.
Roll Forward Interim Period Data
The roll forward process for interim period data includes completion of a tabbed dialog very
similar to the Years dialog covered earlier in this chapter. Roll forward always uses the latest
defined ProSystem fx Trial Balance year as the Current Year and it rolls forward to a new Current
Year. When Interim Periods is active, a fiscal year always is applied to the new Current Year and
the fiscal year type defaults to Regular. Refer to Roll Forward on page 150 for a full explanation
of the roll forward process and dialog.
Chapter 4 - Interim Periods • 147
DDE Linking
When DDE links are established for interim period grid data, the Year link is always relative (most
recently defined year), whereas the period links are specific to a particular period. For example,
a 2012 3rd Quarter spreadsheet becomes a 2013 3rd Quarter spreadsheet. The period type and
number is specific and does not change.
ProSystem fx Trial Balance includes "Change Interim Period" macros for Word and Excel, which
allows you to create a new document or spreadsheet for the next interim period while retaining
the formatting of the original.
Refer to Macros in the Help file for step-by-step procedures on using the "Change Interim Period"
macro. However, please be sure the following conditions are valid before using the macro:
Word is running under Microsoft Office 97 Service Pack 2 (or later).
The template (called ChgPrd.dot for Word documents and ChgPrd.xlt for Excel spreadsheets)
is in your program files directory, which is usually Program Files > Microsoft Office >
Templates.
You are linking to the document from a ProSystem fx Trial Balance grid (such as the Leads
grid and the Accounts grid) and not from a financial statement created through the Financial
Statement Wizard.
You have already linked the grid's first period data to the document and have formatted the
document with the required bolding, underlining, font sizes, and italicizing.
Financial Statement links are always specific for both year and period and cannot be changed
using this macro.
Merge ProSystem fx Trial Balance Companies
If you have used separate ProSystem fx Trial Balance companies and/or separate years within a
single company to perform interim period processing, the Merge ProSystem fx Trial Balance
Companies feature allows you to combine all databases into one or all years of a database into one
year.
To merge ProSystem fx Trial Balance companies, do the following:
1. Create and set up the target company (the company that receives the merged information)
with the correct interim period information including fiscal years, and interim period types.
2. With the target company open, select Setup > Interim Periods > Merge ProSystem fx Trial
Balance Companies.
Chapter 4 - Interim Periods • 148
The Merge ProSystem fx Trial Balance Companies dialog displays.
3. Click the Add button. The Source period group box becomes available.
4. Click Directory. Select the directory in which the company to be merged resides.
5. After the directory has been selected, the Year to be merged drop-down list is populated
with all the years present in the company specified. Select the desired year from the list.
6. Select the target year, period type, and period number for the associated drop-down lists in
the Target period group box.
7. Click Apply. The source and target information appear in the appropriate columns of the
Periods to be merged list box.
8. Continue this process until all of the companies (or years) have been selected for merging.
To cancel adding a particular company/year, click Cancel Add. The Source period
and Target period group boxes are disabled until you click Add again.
To remove an item from the Periods to be merged list box, highlight the item and
click Delete.
If a source year is already in the merge list and you try to add it again, a message
requests confirmation that the source year should be added again.
9. When the merge listing is complete, click Merge. ProSystem fx Trial Balance merges the
source years into the target company.
Note: Transactions are not merged. If a source balance contains transactions, the
transactions are not merged. You have to enter the transactions in the target company
after the merge process has taken place.
Chapter 4 - Interim Periods • 149
Chapter 5
ADMINISTRATION & MAINTENANCE
C hapter 5 - A dministration & Maintenance
Roll Forward
With ProSystem fx Trial Balance, the process of rolling data forward in preparation for subsequent
year engagements is easy. ProSystem fx Trial Balance can store up to eleven years of data,
including the details of all journal entries.
Note: Back up company data before beginning the roll-forward process. See Backup and
Restore on page 156.
To initiate a roll forward, select Setup > Roll Forward to display the Roll Forward dialog.
Chapter 5 - Administration & Maintenance • 150
Note: If there are any unprocessed changes for this company, a message displays asking if you
want to review the changes prior to initiating the roll forward. Click Yes to open the Changes
Pending Action dialog (see Reviewing Pending Changes on page 38) or No to continue with the
roll forward without reviewing the changes. If you click No, the roll-forward process
continues without the pending changes being applied.
The Roll Forward dialog consists of five tabs: General, Interim Periods, Interim Dates, Interim
Options, and Transactions. Each tab accesses an individual dialog. The Interim Periods, Interim
Dates, and Interim Options tabs are not enabled if the Interim Periods option has not been selected
for the company. The Transactions tab is always active.
When you first access the Roll Forward dialog, the General dialog displays. You can access the
other dialogs by clicking the appropriate tab. Each dialog is covered in this chapter.
Completing the Roll Forward/General Dialog
This dialog displays when Setup > Roll Forward is accessed. (Refer to the sample shown in
section above.) Complete the fields on the dialog as follows:
Current/Will be. Select from the appropriate Will be drop-down list the Tax year and
ProSystem fx Trial Balance year for the new year created by the roll-forward process, and
enter a new Report (engagement) date.
PY/CY. Enter the Year label and Beginning and Ending dates for the new year. If the Assign
fiscal to new CY box is not checked, the system defaults to using dates that are one year
later than those used in the current year. If it is checked, these dates default to the
beginning and ending dates of the fiscal year and its ending month. Select one or both of the
Fiscal year dates edit options to override the system default dates.
Fiscal year. You must complete this section of the dialog if Interim Periods is active for the
selected year.
Assign fiscal year to new CY. Check this box to assign a fiscal year to the new
Current Year. This option is mandatory in years where Interim Periods is active, so the
box is checked and disabled.
Fiscal year. Select a fiscal year. This field reflects its corresponding field in the
Fiscal Year column on the Years grid. The system default is the same year as the tax
year default.
Ending month. Select a month from the Ending month drop-down list. This field
reflects its corresponding field in the Ending Month column on the Years grid. The
system default is December (that is, using a calendar year).
Year type. This defaults to Regular. If you want to change it to Short or Prior
Comparison, you must do so on the Years dialog after the roll forward is complete.
Fiscal year dates edit options. Check the appropriate box to edit the Beginning or Ending
dates in the PY/CY group box when the Assign fiscal year to new CY option is checked.
Chapter 5 - Administration & Maintenance • 151
Initialize with
Close prior period's net income to retained earnings. Check this box to calculate
the net income and roll it forward to the new year's retained earnings account using
one of the selected Roll Forward types to the new current year unadjusted balance
column.
Note: This option is not applicable to consolidated, combined databases, or
databases with funds. Also, if transactions are selected, this option is checked
and enabled.
New CY...balance. Select the value to be used to initialize the new year balance
(either unadjusted balance, if the Transactions option is not active, or beginning
balance, if the Transactions option is active).
New CY budget 1. If budgets have been enabled for the company, select the value
that is used to initialize the new year Budget 1 balance.
The Year drop-down box at the bottom of the dialog reflects the New CY year. You cannot change
this setting.
When you have completed the necessary fields on this dialog, click the tab for the next dialog you
want to access. If you have completed updating Roll Forward information, click OK to save your
changes and initiate the roll forward process.
Completing the Roll Forward/Interim Periods Dialog
The dialog shown above is available only if interim periods has been selected for the company. If
you want interim periods to be used in the roll forward, check Use interim periods in selected
year. If this box is not checked, no other options on the dialog are enabled.
Chapter 5 - Administration & Maintenance • 152
Complete the fields on the dialog as follows:
Monthly
Allow import/data entry of monthly data. This option is chosen if the Monthly period
type is active for the company. When this option is selected, the system stores
original data for monthly interim periods.
Not applicable to this year. This option is the default if the Monthly period type is
not active for the company.
You can check this option if the Monthly period type has been selected for the
company but you do not want it to be active for the selected year.
Quarterly
Allow import/data entry of quarterly data. This option is the default if the
Quarterly period type is active for the company. When this option is selected, the
system stores original data for quarterly interim periods. No automatic calculations
are made.
Calculate automatically from monthly data. Choose this option to have the system
automatically calculate quarterly balances from monthly data.
Not applicable to this year. This option is the default if the Quarterly period type is
not active for the company.
You can check this option if the Quarterly period type has been selected for the
company but you do not want it to be active for the selected year.
Semiannual
Allow import/data entry of semiannual data. This option is the default if the
Semiannual period type is active for the company. When this option is selected, the
system stores original data for semiannual interim periods. No automatic calculations
are made.
Calculate automatically from monthly data. Choose this option to have the system
automatically calculate semiannual balances from monthly data.
Calculate automatically from quarterly data. Choose this option to have the system
automatically calculate semiannual balances from quarterly data.
Not applicable to this year. This option is the default if the semiannual period type
is not active for the company.
You can check this option if the Semiannual period type has been selected for the
company but you do not want it to be active for the selected year.
Annual
Allow import/data entry of annual data. This option is the default if Use interim
periods in the new CY is checked. When this option is selected, the system stores
original data for annual periods. No automatic calculations are made.
Calculate automatically from monthly data. Choose this option to have the system
automatically calculate annual balances from monthly data.
Calculate automatically from quarterly data. Choose this option to have the system
automatically calculate annual balances from quarterly data.
Calculate automatically from semiannual data. Choose this option to have the
system automatically calculate annual balances from semiannual data.
Chapter 5 - Administration & Maintenance • 153
When you have completed the necessary fields on this dialog, click the tab for the next dialog you
want to access. If you have completed updating Roll Forward information, click OK to save your
changes and initiate the roll-forward process.
Completing the Roll Forward/Interim Dates Dialog
The dialog shown above displays the dates applicable to an interim period type for the new year.
If only one interim period type is active for the year, then that type automatically displays. If
more than one type is active, then the system displays the type with the larger number of periods.
The Interim Dates list box consists of four columns:
Interim Period. The standard abbreviation for the interim period type. The data in this
column is non-editable.
Beginning Date and Ending Date. Populated with the default interim period dates for the
fiscal year. This data can be edited.
Note: If inconsistent or non-consecutive dates are entered in the Beginning Date
and/or Ending Date columns, the system generates a diagnostic, but you are not
prevented from entering the dates.
Report Date. Enter the report date for each period.
When you have completed the necessary fields on this dialog, click the tab for the next dialog you
want to access. If you have completed updating Roll Forward information, click the OK button to
save your changes and initiate the roll forward process.
Chapter 5 - Administration & Maintenance • 154
Completing the Roll Forward/Interim Options Dialog
The Roll Forward dialog, Interim Options tab, presents the interim period processing options for
the new year. Complete the fields on the dialog as follows:
Interim financial statements option. Check the Print the word "Unaudited" in interim
financial statement default headers box to have the system automatically include the
word Unaudited in default headers for interim financial statements.
Note: If you select this option, and produce one or more financial statements using the
default, and then subsequently deselect the option, the financial statements created
with Unaudited in the headers will retain it.
Interim periods processing options. The following option is not applicable to Consolidation
or Combination companies, or to any fiscal years for which the Transactions option is active.
Each of the options defaults to not being checked.
Use year-to-date comparisons to calculate nominal accounts. Check this box to be
able to import book year-to-date unadjusted trial balance data for each period. This
also calculates the nominal account (revenues and expenses) unadjusted trial balances
for each period by comparing the year-to-date balances of consecutive periods.
When you have completed the necessary fields on this dialog, click the tab for the next dialog you
want to access. If you have completed updating Roll Forward information, click OK to save your
changes and initiate the roll forward process.
Completing the Roll Forward/Transactions Dialog
Chapter 5 - Administration & Maintenance • 155
The tab to access this dialog is enabled only if the Transactions processing option has been
selected for the company. Complete the fields on the dialog as follows:
Transactions processing for new CY
Use transactions in new CY. If the Transactions option has been selected for the
company, this box is checked and the other controls on the dialog are enabled.
Allow refresh of beginning balances. Check this box to have the system allow a
refresh of beginning balances for the new year.
Previous year. Displays the year to be used as the previous year for transaction
processing. The default is the year prior to the new CY.
When you have completed the necessary fields on this dialog, click the tab for the next dialog you
want to access. If you have completed updating Roll Forward information, click OK to save your
changes and initiate the roll forward process.
Backup and Restore
It is important to periodically back up company data for storage and safeguarding purposes and to
transfer data from or to a network server or other computer. There are also several processes
performed within ProSystem fx Trial Balance which warn you to be sure you have a current
backup before you continue (such as rolling forward or converting a database from an earlier
version of the program). In addition, unplanned events such as hard disk crashes or network
failures can leave you with no recourse if you do not have a recent backup of company data.
ProSystem fx Trial Balance provides an integrated method for backing up data, featuring
compression in the standard ZIP format. Zipped company data can be restored using the
ProSystem fx Trial Balance Restore feature. Both the Backup and Restore functions can be
accessed from the File menu. Backup is also available from the Open Company dialog. You can
create the backup on the hard disk and then copy it to a floppy disk or create the backup directly
on the floppy.
We strongly recommend using the File > Backup Company Data command to create backups.
Because ProSystem fx Trial Balance databases can easily exceed the capacity of high-density
diskettes (1.2 or 1.44 MB), using the DOS copy command or the Windows copy feature can result in
an incomplete database. When you back up to a ZIP file, that file almost always fits onto a single
diskette.
Note: If you do make backups using the DOS backup or copy commands (not recommended),
watch carefully for error messages. If a diskette runs out of space during a DOS copy, an
Insufficient disk space message displays and the copy process ends, resulting in an incomplete
database. If this goes unnoticed and the incomplete data is subsequently accessed in
ProSystem fx Trial Balance, errors occur due to missing data files.
Chapter 5 - Administration & Maintenance • 156
Backing Up Company Data
1. Select File > Backup Company Data. The Backup Company Data dialog displays. (You can
also access this dialog by selecting File > Open Company, highlighting the company you
want to backup, and clicking the Backup button.)
Note: The name and location of the currently open company (or the company you
highlighted on the Open Company dialog) displays in the Company Directory section of
the dialog.
2. If the company you want to back up is not already displayed on the dialog, click Directory
to open the Company Directory dialog where you identify the drive, directory, and the file
name of the company you want to back up, and then click OK.
3. Select one of the two following options for the type of files you are backing up:
Include ProSystem fx Trial Balance data files only backs up only ProSystem fx Trial
Balance files and no other files in the company directory (such as worksheets).
Include all files in directory backs up all the files in the company directory.
4. Check the Delete existing company after creating backup box if you want the company to
be deleted after the backup is complete. 5. Click File in the Zip file section of the dialog.
Chapter 5 - Administration & Maintenance • 157
The Backup File dialog displays.
6. Navigate to the drive and directory where the backup file will be created. All of the existing
ZIP files in the selected directory display in the list box on the left side of the dialog.
Note: You cannot create a new directory using this dialog. If you want to place the
backup file in a new directory, you must create it before you begin the backup process.
7. Identify the name of the backup file in one of the following ways:
If you want to copy over an existing ZIP file, highlight the file from the list box and
that file name appears in the File name field of the dialog.
If you want to create a new backup file, place the cursor in the File name field and
enter a complete file name with the ZIP extension (for example, abcco.zip).
8. Click OK to return to the Backup Company Data dialog.
9. Click OK to back up the company data. If the company is currently open, it will be closed as
the backup process begins.
10. When the backup is complete, a confirmation message displays. Click OK.
Restoring Company Data
Use the following procedure to restore company data that has previously been backed up.
1. Select File > Restore Company Data. The Restore Company Data dialog displays.
Chapter 5 - Administration & Maintenance • 158
2. Click the File button in the Zip file section of the dialog. The Restore File dialog displays.
3. Navigate to the drive and directory containing the ZIP file that you want to restore.
4. Highlight the pertinent ZIP file in the list. The name displays in the File name field.
5. Click OK to return to the Restore Company Data dialog. The name and path of the file you
selected in step 4 displays next to the File button.
6. Click the Directory button in the Company Directory section of the dialog. The Restore
Company Path dialog displays.
7. Navigate to the drive and directory where you want to restore the company data.
If you want to create a new directory, enter the complete path in the Directory field
(for example, c:\avision\samp\abcco).
If you want to restore the company to an existing directory, double-click the
directory in the Directories list box so that the full path displays in the Directory
field.
8. Click OK.
Note: If you have selected to restore the company over an existing database, a
confirmation message displays. Click Cancel to return to the Restore Company Path
dialog to identify another directory (repeating steps 7 and 8), or click OK to overwrite
the existing company.
Chapter 5 - Administration & Maintenance • 159
9. On the Restore Company Data dialog, check one, both, or none of the following options:
Check Delete all files from directory before restoring if you are restoring the
company over an existing company and you want to delete the existing files in the
directory.
Check Open company after restoring to open the company after the restore process
is complete.
10. Click OK to restore the company data. If you have selected to open the company after
restoring, the company opens in the workspace when the process is complete.
Note: You can also restore a company database using the File > Open Company
command. Click Browse on the Open Company dialog, select Company backups as the
browse criteria, and use the subsequent dialogs to identify the ZIP file you are restoring
and the directory where the company is to be restored. After the restore process, the
company opens in the workspace.
Deleting Company Databases
To delete a company's database, do the following:
1. Select File > Open Company.
2. Select the company you want to delete from the list of existing companies and click
Remove. The Remove Company dialog displays.
3. Choose from the following options:
Remove Company from Client List Only. This option removes the company from the
list displayed in the Open Company dialog, but does not delete the database files
associated with the company. The company can be added to your client list again at a
later time.
Remove Company from Client List and Delete Company Files. This option removes
the company from the client list and permanently deletes the company database files.
4. Click OK.
Maintenance Options
Selecting Options > Maintenance allows you to perform four maintenance processes: Rebuild
bitmaps/caches, Rebuild key files, Rebuild diagnostics, or Rebuild-All.
These processes are transparent to the user and generally increase the time required to open a
database. However, the additional time is required only the first time the database is opened.
Generally, running these processes resolves any ProSystem fx Trial Balance database problems.
Chapter 5 - Administration & Maintenance • 160
Rebuild Bitmaps/Caches
Sometimes information stored in the bitmap or cache files for a database is not synchronized,
(such as the total value of accounts assigned to a lead is not in agreement with the total for the
lead displayed on the lead grid). This maintenance option rebuilds the balances of most objects in
the database and should resolve the problem.
Rebuild Key Files
Sometimes object links are not synchronized. For example, you can see each object having the
same number of accounts assigned and all the balances for each object can be the same. This
maintenance option rebuilds the key files and should resolve the problem.
Rebuild Diagnostics
Occasionally, problems reported on the Diagnostics grid may not be correct. This maintenance
option revalidates every data object to verify the contents of the Diagnostics grid.
Rebuild - All
Use this option to select all of the above-mentioned rebuild options for a company database. If the
database is open, select the Rebuild - All option and the process will begin. If the database is
closed, selecting Rebuild - All, displays the Rebuild - All dialog for you to select the applicable
database.
Chapter 5 - Administration & Maintenance • 161
Chapter 6
UPDATING WITH QUIKLINK
C hapter 6 - U pdating with Quiklink
Introduction
The Quiklink feature provides you with enhanced linkages between the trial balance data in
ProSystem fx Trial Balance and the corresponding tax return data in ProSystem fx Tax Preparation.
Once ProSystem fx Trial Balance client data has been imported into a Tax Preparation return using
Dynalink, Quiklink becomes available. It enables you to jump between ProSystem fx Trial Balance
and the tax return and also to update the tax return when you update an item in ProSystem fx
Trial Balance.
The Quiklink feature allows you to transfer automatically from an interview form box in the tax
return to the corresponding tax code line on the Tax Lines grid in ProSystem fx Trial Balance.
Also, you can transfer automatically from a tax code line on the Tax Lines grid in ProSystem fx
Trial Balance to the corresponding interview form box in the tax return. You do either of these by
selecting the item to be reviewed or changed (such as an interview form box in the tax return),
and then clicking the Quiklink toolbar button, or using the matching menu selection File >
Import > Quiklink in Tax, or Work > Quiklink to ProSystem fx Tax in Trial Balance.
If you Quiklink from Tax Preparation to ProSystem fx Trial Balance, once a tax code line is
highlighted, you can use the Trial Balance Zoom feature to edit account balances. You can also
use the TJEs window to modify Tax Journal Entries. When your changes are completed, you can
reopen the Tax Lines grid to see the changes reflected there automatically. Click the Quiklink
button to return to the tax return and automatically see the changes made on the interview form.
This chapter covers the preliminary Dynalink procedures that must be performed before Quiklink
can be activated, as well as information on using the Quiklink feature in ProSystem fx Trial
Balance.
Setting Up Dynalink
Dynalink is the ProSystem fx Tax Preparation module that allows you to easily import ProSystem fx
Trial Balance tax data into a tax return. Once the data has been imported, you can use Quiklink to
update your return quickly and to toggle between Trial Balance and Tax Preparation.
Note: ProSystem fx Trial Balance only reports those clients that have a client number of 12
characters or less to Dynalink. Verify that the client number is an appropriate size (Setup >
Company Information) before beginning the Dynalink process.
Chapter 6 - Updating with Quiklink • 162
Configure Accounting Bridges
The first step to set up Dynalink is to configure Accounting Bridges in ProSystem fx Tax. This can
be done through Configure Applications in Office Manager or through Options > Interface
Options in Tax. Regardless of which method you choose, the Accounting Bridges dialog displays.
Accounting Bridges tells ProSystem fx Tax which package you are using and where it is installed.
Highlight ProSystem fx Trial Balance (this may appear as ProSystem fx Trial Balance/CBEAM)
and click Configure. The Configure Accounting System dialog displays.
In the Accounting system path section, designate the drive and directory location for ProSystem fx
Trial Balance (or use the Browse button to locate it). In the Quiklink option section, select the
appropriate option:
From the first tax line highlighted. This setting causes you to be returned to the same
place in the tax return where you started when you clicked the Quiklink button.
From the last tax line highlighted. This option allows you to move to the location in Tax
Preparation represented by the last tax line highlighted in ProSystem fx Trial Balance.
After making your selections, click OK. You return to the Accounting Bridges dialog. Click the
Create Client List button to create a list of ProSystem fx Trial Balance clients from which you
can choose when you use Dynalink.
Chapter 6 - Updating with Quiklink • 163
Once the list has been created, the Create Client List button changes to Refresh Client List.
Remember that prior to going through the Dynalink process with new clients from ProSystem fx
Trial Balance, you need to return to this dialog and refresh the client list. The dialog displays the
date the list was last updated in the List created column.
Using Dynalink
When you have configured Accounting Bridges and updated/refreshed the client list, you can
proceed to import your data. In Tax, select File > Import > Dynalink. The Dynalink dialog
displays.
1. Click the Select Client button to select ProSystem fx Trial Balance as the accounting
system.
2. Select the tax product and then click OK to access the Select Client dialog.
3. Select the appropriate client from the list and click OK. The Dynalink dialog displays again
with the client information fields populated.
4. Once the client information has been populated, click the Select Return button to
determine how to import the data.
5. You can choose to import the data into a new, existing, or Pro Forma return. The data
required on this dialog changes depending on the type of return selected. When you have
entered the necessary return information, click OK. The Dynalink dialog displays again, this
time with both client and return information populated.
Note: If you have created a Pro Forma for your prior year return, we recommend using
the Pro Forma option. Importing to a Pro Forma avoids duplicate lines in the return.
6. If you are importing into an existing return or a Pro Forma return, be sure the client name
and Employer Identification Number match in both the client and return information sections
of the dialog.
7. Before initiating the Dynalink process, verify that the correct options have been set by
clicking the Options button.
Chapter 6 - Updating with Quiklink • 164
The G/L Bridge and Dynalink - Options dialog displays.
8. Under the General tab in the Schedule M-3 options (C Corporation, S Corporation,
Partnership) section, make one of the following selections:
If you are importing M-3 balances, check the Import Schedule M-3 book amounts
box.
If you are not importing M-3 balances, check DO NOT import Schedule M-3
differences box.
9. On the same tab in the Schedule M-3 data removal options section, choose one of the
following:
If you need to remove specific M-3 amounts, choose the Remove existing M-3 values
based on the M-3 import options selected radio box.
If you want to remove all M-3 amounts, choose the Remove existing M-3 values from
all M-3 fields radio box.
Note: The data options on the Existing Returns tab are not applicable when importing
into a new tax return or importing in to Pro Forma.
Chapter 6 - Updating with Quiklink • 165
10. Verify that all of the options checked or selected are correct and this is how you want to
import the data. Change anything that needs to be changed. Click Save As Default if you
want to save these options as the default each time you use Dynalink.
11. Click OK to return to the Dynalink dialog.
12. Click Import to begin the Dynalink process. The data displays on the interview forms of the
selected return. To view the imported data on government forms, you first need to calculate
the return.
Requirements for Quiklink Processing and Updates
Once you have established the initial Dynalink connection between a ProSystem fx Trial Balance
company and a Tax Preparation tax return, you can use the Quiklink feature. Prior to using
Quiklink, be sure the following conditions have been met:
The tax year is 1996 or later.
The client data has already been imported into the tax return using Dynalink.
The ProSystem fx Trial Balance Tax Service ID (Setup > Tax Information) matches the tax
return ID, including the version suffix (V1 and V2).
The Quiklink Processing Option is activated in ProSystem fx Trial Balance. The menu
selection Work > Activate Quiklink Updates should be checked. (If the Quiklink Updates
option is not activated, the first time a change is made to the trial balance data,
ProSystem fx Trial Balance prompts you to have it automatically activated.)
The linking option is appropriate. In Tax Preparation, select Options > Interface Options >
Accounting Bridges, highlight ProSystem fx Trial Balance and click Configure. As you
move between ProSystem fx Trial Balance and Tax Preparation, the location of the cursor in
Tax Preparation is based on the option selected.
The company is open in ProSystem fx Trial Balance and the associated tax return is open in
Tax Preparation.
Notes:
If a Dynalinked return is open in Tax Preparation, choosing Quiklink automatically
opens ProSystem fx Trial Balance to the appropriate company.
If the Quiklink Updates option is activated in ProSystem fx Trial Balance, but the tax
return is not open, the first time a change is made to the trial balance data,
ProSystem fx Trial Balance prompts you to open the return and click Retry. If you
click Cancel, the Quiklink Updates option is disabled.
We also recommend the following:
Open only one session of ProSystem fx Trial Balance and one session of Tax Preparation and
keep them both open while using the Quiklink option.
Note: ProSystem fx Trial Balance displays a warning message alerting you if changes are
about to be made when the corresponding tax return is not open. If the changes are
made and saved anyway, the next time that the trial balance is opened, ProSystem fx
Trial Balance displays a message telling you that Dynalink needs to be reprocessed.
Dynalink will need to be reprocessed in order to reestablish the integrity of the linkages.
Chapter 6 - Updating with Quiklink • 166
Add the Quiklink button to the toolbar in Tax Preparation. Select Options > Customize
Toolbar to do so. Having this button available on the toolbar makes your Quiklink processing
far more convenient because it is not necessary for you to use the File > Import > Quiklink
command each time you want to make a Quiklink jump to ProSystem fx Trial Balance. (In
ProSystem fx Trial Balance, the Quiklink button automatically displays on the toolbar.)
If you make a large number of changes to the client's data in ProSystem fx Trial Balance
after Dynalink processing, leave the Work > Activate Quiklink Updates option unchecked
and Dynalink the data to the return again.
Examples of Processing with Quiklink
The rest of this chapter presents some examples of Quiklink processing methods.
The first example demonstrates the Quiklink process when you start from Tax Preparation,
Quiklink to ProSystem fx Trial Balance, enter the required trial balance data changes, and
then Quiklink back to Tax Preparation.
The second example demonstrates the process when you start in ProSystem fx Trial Balance,
enter the required trial balance data changes and Quiklink to Tax Preparation.
In each example, you must modify some tax journal entries in a trial balance that have already
been processed through Dynalink.
The following conditions apply:
The Quiklink Updates option is activated in ProSystem fx Trial Balance.
ProSystem fx Trial Balance is configured in Tax Preparation for Dynalink and Quiklink
processing.
The Quiklink Option is set to From the last tax line highlighted.
The Quiklink button is available on the Tax Preparation toolbar.
Note: When closing Quiklink after use, the changes you made are saved automatically; no
warning message displays.
Quiklink Updates - Tax Preparation to ProSystem fx Trial Balance
In this first example, which uses the Newco sample company, you start by reviewing the tax
return. During the review, you determine that the Goodwill Amortization and Life Insurance
Premium entries require some changes. ProSystem fx Trial Balance is not currently open.
1. Open the tax return in Tax Preparation.
2. Navigate to Federal Interview Form L-3 (Schedule M-1).
3. Place the cursor in the Goodwill amortization field as shown in the example.
Chapter 6 - Updating with Quiklink • 167
Notice the amount of the amortization is 5000.00 and the amount for Life Insurance
Premiums is 100000.00.
4. Click the Quiklink button.
5. The ProSystem fx Trial Balance program, the company, and the company's Tax Lines grid
open automatically. Tax line 720.10 is selected on the following grid.
From the Tax Lines grid, you can zoom to edit account data. You can open either the AJEs or
the TJEs windows to edit your journal entries. Any changes you make are automatically
transferred to the tax return. (To review Grid Zoom, see Grid Zoom on page 52 and read
more about Journal Entries, see Journal Entries on page 57.)
Chapter 6 - Updating with Quiklink • 168
6. Click the Grids button and click the TJEs button.
7. Highlight the TJE for amortization of goodwill and click the Zoom button. Change both
amounts from 5000 to 6000. Press Enter after entering each updated amount.
8. After changing both amounts, close the Details grid for this tax journal entry.
9. Highlight the TJE for Life Insurance Premiums and click Zoom. Change the first debit amount
to 100500 and the first credit amount to 10500.
Note: When you are using a Schedule M-3 tax code, the Sch M3 Difference column needs
to specify if the Schedule M-3 difference is temporary or permanent. An expanded M-3
tax line displays as Temporary. You can change it to Permanent. Tax lines that are not
M-3 expanded will have an N/A.
10. Close the Details grid for this tax journal entry.
Chapter 6 - Updating with Quiklink • 169
11. Highlight the tax line 720.90 and click the Quiklink button on the toolbar to return to Tax
Preparation, Interview Form L-3. The focus is on Life Insurance Premiums because the
Quiklink option was set to From the last tax line highlighted. Note that the amount for Life
Insurance Premiums is now 100500, and the amount for Goodwill Amortization is now 6000.
Note: If you add new repeater data such as Other Deductions or Other Assets, use
Options > Reset Input in Tax Preparation to see the new items on the interview form.
You need to recalculate the return to see the impact on government forms.
If the Quiklink option had been set to First tax line highlighted, you would have returned to
Interview Form L-3 with the focus on Goodwill Amortization, because that box was the focus when
you initiated the Quiklink jump from Tax Preparation.
Chapter 6 - Updating with Quiklink • 170
This example demonstrates the ease with which you can make last minute changes using the
enhanced linkages provided by Quiklink.
Note: If ProSystem fx Trial Balance Accounting Bridges are configured on both the firm level
in Office Manager and the user level in Tax Preparation, the following dialog displays when you
Quiklink from Tax Preparation to Trial Balance. Your selection is active while the return
session is active. Choose which configuration you want to use and click OK.
Quiklink Updates - ProSystem fx Trial Balance to Tax Preparation
In this second example that follows, you review the trial balance data in ProSystem fx Trial
Balance. During the review you determine that the amount of Goodwill Amortization and Life
Insurance Premium entries require some changes.
Chapter 6 - Updating with Quiklink • 171
Before we begin, remember these points:
Tax Preparation must be open
The client's tax return must be open
The trial balance must have been processed at least once through Dynalink
Quiklink updates must be activated
1. Open the company's Tax Lines grid in ProSystem fx Trial Balance.
2. Click the Grids button and then click the TJEs button.
3. Highlight Life Insurance Premiums and click the Zoom button. Change the first debit amount
to 100000 and the first credit amount to 10000 as shown.
4. Close the Details grid for this tax journal entry.
5. Highlight the Goodwill Amortization TJE and click the Zoom button. Change both amounts
from 6000 to 5000.
6. Close the Details grid for this tax journal entry.
7. Highlight tax code 720.10 and click the Quiklink button to make a Quiklink jump to Tax
Preparation.
Chapter 6 - Updating with Quiklink • 172
Since the Quiklink option is set to From the last tax line highlighted, the return opens at
Interview Form L-3 with the focus in the Goodwill Amortization line.
Notice that the amount for Goodwill Amortization is now 5000 and the amount for Life
Insurance Premiums is now 100000.
Note: Remember that if you add new repeater data in ProSystem fx Trial Balance such
as Other Deductions or Other Assets, you need to use Options > Reset Input in Tax
Preparation to see the new items on the interview form. You need to recalculate the
return to see the impact on government forms.
Chapter 6 - Updating with Quiklink • 173