1
®
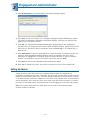
ProSystem fx Engagement
User Guide
October 2009
Copyright 2001-2009 CCH INCORPORATED. A Wolters Kluwer business. All Rights Reserved.
Material in this publication may not be reproduced or transmitted, in any form or by any means,
without prior written permission. Requests for that permission should be directed to:
CCH INCORPORATED
20201 Hamilton Ave.
Suite 200
Torrance, CA 90502
The contents of this publication are believed to be accurate. However, responsibility cannot be
assumed for the information contained herein, and the consequences resulting from the use
thereof. Material in this publication is subject to change without notice.
This User Guide and the computer software it describes are designed to provide accurate and
authoritative information in regard to the subject matter covered. They are distributed with the
understanding that the publisher is not engaged in rendering legal, accounting or other
professional service. If legal advice or other expert assistance is required, the services of a
competent professional should be sought.
“ProSystem fx Engagement” is a trademark of CCH INCORPORATED.
“Windows” is a registered trademark of Microsoft Corporation.
All other brand, product, or company names are trademarks or registered trademarks of their
respective owners.
Printed in U.S.A.
C O N T E N T S
Chapter 1 - Introduction
1-1
Overview....................................................................................................... 1-1
What's New for ProSystem fx Engagement Version 6.0 .......................................1-1
Trial Balance Overview .................................................................................... 1-2
Trial Balance Setup Features .....................................................................1-2
Organizational Tools........................................................................................ 1-4
Levels of Organization .............................................................................. 1-4
Tools in the Workpaper Management Module .....................................................1-6
File Room Window................................................................................... 1-6
Engagement Today View .......................................................................... 1-7
Binder Index Window ............................................................................... 1-7
Binder Templates..................................................................................... 1-9
Staff Member Assignments.......................................................................1-9
Roll Forward Capability............................................................................. 1-9
Reviewing Workpapers and Workpaper Tabs ......................................................1-9
Sharing and Distribution Tools .......................................................................... 1-10
Sharing Workpapers................................................................................. 1-10
Publishing Workpapers ............................................................................. 1-10
Protecting Document Integrity ...................................................................1-11
Documentation............................................................................................... 1-11
Prerequisite Knowledge ............................................................................ 1-11
ProSystem fx Engagement Documentation ..................................................1-12
Help ...................................................................................................... 1-12
Tip of the Day......................................................................................... 1-12
Notations Used in the Documentation ........................................................1-13
Related Documentation ............................................................................ 1-13
Web Site ................................................................................................ 1-13
Using the Engagement Toolbars........................................................................1-13
Administrator Toolbar Commands ..............................................................1-14
Engagement File Room Toolbar Commands .................................................1-16
Engagement Binder Index Toolbar Commands .............................................1-18
Customizing the Engagement Interface ..............................................................1-20
Customizing Toolbars............................................................................... 1-21
i
Chapter 2 - Installation
2-1
Overview....................................................................................................... 2-1
Engagement 6.0 Requirements .........................................................................2-2
Administrator Module............................................................................... 2-2
Workpaper Management Module ...............................................................2-5
Installation Considerations ............................................................................... 2-7
Compressed Folders................................................................................. 2-8
Networking Best Practices ........................................................................2-8
ProSystem fx Engagement Administrator Considerations...............................2-9
Pre-Installation Checklist........................................................................... 2-10
General Installation Instructions ........................................................................2-11
Post-Installation Checklist .........................................................................2-14
Altering a Current Install of Engagement ............................................................2-14
Modifying a Current Install ........................................................................2-14
Repair a Current Install ............................................................................. 2-15
Removing ProSystem fx Engagement .........................................................2-16
CCH Workpaper Downloads ............................................................................. 2-16
Knowledge Tools Content ................................................................................ 2-16
Knowledge Coach Content............................................................................... 2-16
Terminal Services Installation ........................................................................... 2-16
Installation Considerations for Terminal Services Database ............................2-17
Terminal Services Installations...................................................................2-17
Chapter 3 - Engagement Administrator
3-1
Overview....................................................................................................... 3-1
Using the ProSystem fx Engagement Administrator .............................................3-2
Initial Login to the Engagement Administrator..............................................3-2
Entering Information about Your Firm .........................................................3-3
Using Your Active Directory in ProSystem fx Engagement ....................................3-4
Mapping Your Active Directory to Engagement Staff ....................................3-4
Manually Updating Staff ........................................................................... 3-5
Viewing the Active Directory Import Log ....................................................3-6
Scheduling an Import from Active Directory ................................................3-6
Setting Up Staff Groups and Staff ....................................................................3-7
Staff Groups ........................................................................................... 3-8
Default Staff Groups ................................................................................ 3-8
ii
Adding a New Staff Group........................................................................3-8
Assigning Staff Group Rights ....................................................................3-9
Deleting a Staff Group ............................................................................. 3-11
Adding Staff Members .................................................................................... 3-11
Adding New Staff Members ......................................................................3-11
Modifying Staff Properties ........................................................................3-13
Using the Global Profile Manager ...............................................................3-14
Setting Up Teams ........................................................................................... 3-16
Managing Teams ..................................................................................... 3-17
Assigning Staff to a Team ........................................................................3-17
Licensing ....................................................................................................... 3-19
Adding Licenses ...................................................................................... 3-19
Assigning Licenses .................................................................................. 3-20
Setting up the Administrator Environment ..........................................................3-24
Creating a Secondary Office Server............................................................3-24
Disabling/Enabling Admin Synchronization for an Office Server ......................3-26
Changing the Main Office Server ...............................................................3-26
Creating an Admin Package ......................................................................3-27
Saving the Admin Package to a Hard Drive .................................................3-27
Attaching the Admin Package to an E-mail ..................................................3-28
Receiving an Admin Package.....................................................................3-28
Scheduling Admin Synchronization ............................................................3-29
Manually Running an Admin Synchronization...............................................3-30
Viewing Admin Synchronization History......................................................3-31
Viewing the Admin Activity Log ................................................................3-31
Setting Firm Options ................................................................................ 3-32
Setting Admin Synch Options ...................................................................3-33
Using the Document Completion Date Report ..............................................3-34
Scheduling the Document Completion Date Report.......................................3-35
Creating a Central File Room ............................................................................ 3-36
Disabling/Enabling Synchronization on a Central File Room ............................3-37
Setting Up Client Folders .......................................................................... 3-38
Deleting a Client...................................................................................... 3-39
Deleting a Central File Room .....................................................................3-39
Deleting a Secondary Office Server ............................................................3-39
Deleting the Secondary Office Server Program.............................................3-40
Managing Binder Types ................................................................................... 3-40
Creating a New Binder Type......................................................................3-40
Editing an Active Binder Type....................................................................3-41
iii
Deleting a Binder Type ............................................................................. 3-42
Editing a Deleted Binder Type....................................................................3-43
Managing Binder Statuses................................................................................ 3-43
Creating a new Binder Status ....................................................................3-43
Editing an Active Binder Status .................................................................3-44
Deleting a Binder Status ........................................................................... 3-44
Editing an Inactive Binder Status................................................................3-45
Managing Client Binders .................................................................................. 3-45
Creating a New Client Group.....................................................................3-45
Editing a Client Group .............................................................................. 3-46
Deleting a Client Group ............................................................................ 3-46
Assigning Clients to Client Groups .............................................................3-46
Assigning Staff Members to Binders...........................................................3-48
Archiving a Binder ................................................................................... 3-49
Unarchiving a Binder ................................................................................ 3-50
Unfinalizing a Binder ................................................................................ 3-50
Moving Binders ....................................................................................... 3-51
Receiving Transition Binder Packages .........................................................3-53
Deleting a Binder ..................................................................................... 3-53
Using the ProSystem fx Practice Interface..........................................................3-54
Linking and Editing Projects ......................................................................3-54
Linking and Editing Clients ........................................................................3-55
Accessing the ProSystem fx Practice Inquiry Module ....................................3-55
Managing Bins................................................................................................ 3-56
Launching the Bin Manager Utility..............................................................3-56
Bin Manager Utility Main Window ..............................................................3-57
Creating a Bin ......................................................................................... 3-58
Deleting a Bin ......................................................................................... 3-59
Scheduling Daily Tasks............................................................................. 3-59
Updating Bin Statistics Manually................................................................3-59
Moving Binders ....................................................................................... 3-60
Viewing Binder Properties .........................................................................3-60
Viewing and Interpreting the Bin Diagnostic Report ......................................3-61
Managing the Tip of the Day ............................................................................ 3-62
Chapter 4 - Workpaper Management
4-1
Overview....................................................................................................... 4-1
Starting ProSystem fx Engagement ...................................................................4-1
iv
Logging In To Engagement........................................................................4-1
Configuring ProSystem fx Engagement ..............................................................4-4
Individual Engagement Profiles ..................................................................4-4
Changing and Viewing User Profile Information............................................4-5
Setting ProSystem fx Engagement Options .................................................4-6
Backing Up ProSystem fx Engagement Binders ............................................4-12
Chapter 5 - Using the File Room
5-1
Overview....................................................................................................... 5-1
Using the File Room ........................................................................................ 5-1
Using the Client Index View ............................................................................. 5-1
Binder Icons............................................................................................ 5-2
Client Index View Panes ........................................................................... 5-2
Managing the Buddy List .......................................................................... 5-4
Using the Engagement Today View ...................................................................5-5
Adding and Editing Client Folders......................................................................5-6
Creating New Client Folders ......................................................................5-7
Creating a New Client Folder by Copying ....................................................5-9
Changing and Viewing Client Properties......................................................5-10
Deleting Clients ....................................................................................... 5-10
Chapter 6 - Creating and Using Binders
6-1
Overview....................................................................................................... 6-1
Sources for Creating Binders ............................................................................ 6-1
Using the New Binder Wizard ........................................................................... 6-2
Creating a New Binder ............................................................................. 6-3
Defining Binder Properties.........................................................................6-5
Setting Knowledge Coach Options (If Applicable).........................................6-8
Assigning Staff to Binders ........................................................................6-9
Saving Binders as Templates ............................................................................ 6-12
Copying a Binder ............................................................................................ 6-13
Viewing and Editing Binder Properties................................................................6-15
General Tab ............................................................................................ 6-15
Periods Tab ............................................................................................ 6-16
Dates Tab .............................................................................................. 6-17
Information Tab....................................................................................... 6-18
Binder Staff Tab ...................................................................................... 6-18
History Tab............................................................................................. 6-18
v
Using the Document Completion Date Report (Workpaper Management) ................6-19
Deleting Binders ............................................................................................. 6-20
Using Client Folders and Binders .......................................................................6-20
Viewing Binders for a Client ......................................................................6-20
Viewing the Contents of a Binder ..............................................................6-21
Diagnostics Pane (Knowledge Coach only) ..................................................6-30
Notes Pane ............................................................................................. 6-31
Shortcut Bar ........................................................................................... 6-32
Using the Binder Snapshot ........................................................................6-33
Opening Workpapers Inside/Outside ...........................................................6-34
Refreshing the Window ............................................................................ 6-34
Opening Multiple Binders .......................................................................... 6-34
Accessing Trial Balance Functions .............................................................6-34
Creating and Modifying Workpaper Tabs............................................................6-35
Adding Workpaper Tabs ........................................................................... 6-35
Changing and Viewing Workpaper Tab Properties ........................................6-36
Creating Workpaper Tab Notes..................................................................6-36
Copying Tabs between Binders..................................................................6-36
Deleting and Recovering Workpaper Tabs ...................................................6-37
Sharing and Distributing Binders .......................................................................6-38
Using Shared Local File Rooms ..................................................................6-38
Office Network Environment - Central File Room..........................................6-40
Peer-to-Peer Network Environment - Direct Synchronization ..........................6-44
View Synchronization History....................................................................6-47
Non-Network Environment - Binder Packages ..............................................6-47
Backing Up and Restoring a Binder ....................................................................6-50
Binder Sign Off............................................................................................... 6-51
Signing Off on a Binder ............................................................................ 6-51
Removing a Sign Off on a Binder ...............................................................6-52
Finalizing Binders ............................................................................................ 6-52
Rolling Forward Binders ................................................................................... 6-54
Effects of Rolling Forward on a Binder ........................................................6-54
Rolling Forward a Binder........................................................................... 6-57
Using the ProSystem fx Practice Interface..........................................................6-60
Linking and Editing Projects ......................................................................6-60
Linking and Editing Clients ........................................................................6-61
Accessing the ProSystem fx Practice Inquiry Module ....................................6-62
Operating the ProSystem fx Practice Time Clock..........................................6-62
Entering Time Transactions .......................................................................6-63
vi
Entering Dates................................................................................................ 6-64
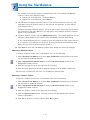
Chapter 7 - Using the Trial Balance
7-1
Overview....................................................................................................... 7-1
Accessing Trial Balance Functions.....................................................................7-1
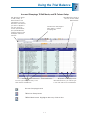
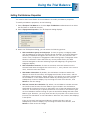
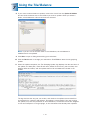
Using the Trial Balance Window........................................................................7-2
Views .................................................................................................... 7-2
Account Groupings .................................................................................. 7-2
Showing Debits and Credits ......................................................................7-3
Showing Journal Entries ........................................................................... 7-3
Workpaper Reference ............................................................................... 7-3
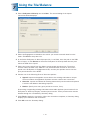
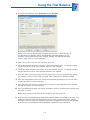
Using the Trial Balance Snapshot ......................................................................7-4
Panes in the Trial Balance Snapshot View ...................................................7-4
Grouping Diagnostics in the Trial Balance Snapshot......................................7-4
Trial Balance Diagnostics in the Trial Balance Snapshot ................................7-5
Tip of the Day in the Trial Balance Snapshot ...............................................7-6
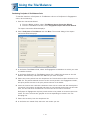
Editing the Trial Balance .................................................................................. 7-6
Using the Trial Balance in Excel 2007................................................................7-6
Account Groupings, TB Edit Mode, and TB Column Setup .............................7-7
Creating Trial Balances .................................................................................... 7-8
Sources for Trial Balances ........................................................................7-8
Creating a Trial Balance............................................................................ 7-8
Basic Trial Balance Commands .........................................................................7-10
Opening the Trial Balance .........................................................................7-10
Closing the Trial Balance .......................................................................... 7-11
Refreshing the Trial Balance ......................................................................7-11
Functions Unavailable in Trial Balances .......................................................7-11
Saving a Trial Balance as a Template..........................................................7-12
Deleting a Trial Balance ............................................................................ 7-13
Trial Balance Properties ............................................................................ 7-13
Setting Up Trial Balance Columns and Views ......................................................7-14
Trial Balance Column Setup ......................................................................7-14
Selecting Columns to Display in the Trial Balance.........................................7-15
Setting Trial Balance Properties ........................................................................7-19
Converting and Importing Trial Balance Data ......................................................7-20
Importing Data from ProSystem fx Write-Up................................................7-21
Converting ProSystem fx Trial Balance Data................................................7-23
Account and Ratio Classifications ..............................................................7-26
vii
Converting Trial Balance Data from GoSystem Audit ....................................7-28
Converting Data from CaseWare Working Papers 2005 or Higher...................7-33
Converting Trial Balance Data from ATB for Windows ..................................7-36
Importing Trial Balance Data from an Excel or ASCII File ...............................7-39
Importing Data from an Engagement Trial Balance........................................7-44
Adding, Modifying, or Deleting Trial Balance Accounts ........................................7-45
Adding Accounts..................................................................................... 7-46
Modifying Accounts................................................................................. 7-47
Deleting Accounts ................................................................................... 7-48
Account Groupings ......................................................................................... 7-48
Opening the Account Groupings Window....................................................7-50
Creating, Editing, and Deleting Grouping Lists .............................................7-50
Creating and Editing Groups and Subgroups ................................................7-52
Using the Add or Remove Tax Group Utility ................................................7-57
Assigning Accounts to Account Groups and Subgroups ................................7-58
Total Balance Amount for Selected Accounts ..............................................7-59
Creating Journal Entries................................................................................... 7-60
Journal Entries Types............................................................................... 7-60
Creating Journal Entries ........................................................................... 7-60
Editing and Deleting Journal Entries ...........................................................7-63
Using the Journal Entry Summary Window .................................................7-64
Journal Entry Reports............................................................................... 7-65
Creating Trial Balance Reports .......................................................................... 7-66
Types of Reports ..................................................................................... 7-67
Creating New Trial Balance Reports ...........................................................7-67
Sample Settings for Trial Balance Reports ...................................................7-70
Formatting Trial Balance Reports ...............................................................7-71
Changing a Trial Balance Report ................................................................7-72
Moving Reports ....................................................................................... 7-73
Creating a Classified Trial Balance Report ...................................................7-73
Creating an Unclassified Trial Balance Report ..............................................7-74
Creating Consolidated Trial Balance Reports ................................................7-75
Modifying a Consolidated Trial Balance Report.............................................7-77
Using ProSystem fx Engagement Reports ...................................................7-78
Consolidating Trial Balances ............................................................................. 7-78
Creating a Consolidated Trial Balance .........................................................7-80
Setting Up Consolidated Trial Balance Columns ...........................................7-81
Consolidating Subsidiary Trial Balances ......................................................7-82
Reconsolidating Subsidiary Trial Balances ...................................................7-84
viii
Creating Consolidated Reports ..................................................................7-84
Adding Journal Entries to a Consolidated Trial Balance .................................7-84
Write Up Trial Balance ..................................................................................... 7-84
Creating a Write Up Trial Balance ..............................................................7-85
Setting Up Write Up Trial Balance Columns .................................................7-86
Using Write Up Journals .......................................................................... 7-87
Creating Write Up Reports ........................................................................7-89
Creating Client Journal Entries...................................................................7-90
Using the Tax Software Interface......................................................................7-91
Exporting a Trial Balance to ProSystem fx Tax or Global fx Tax .....................7-91
Configuring a Trial Balance for Export.........................................................7-95
Linking to ProSystem fx Tax or Global fx Tax .....................................................7-103
Launching ProSystem fx Tax from Engagement ...........................................7-103
Configuring an Accounting Bridge ..............................................................7-103
Using the ProSystem fx Profit Driver Interface ....................................................7-110
Importing a Profit Driver Account Grouping List ...........................................7-110
Modifying a Profit Driver Account Grouping List ..........................................7-112
Importing ProSystem fx Engagement Trial Balances......................................7-113
Using the ProSystem fx TBRepair Utility ............................................................7-114
Chapter 8 - Managing Workpapers
8-1
Overview....................................................................................................... 8-1
Adding and Modifying Workpapers....................................................................8-1
Adding a New Workpaper from a Template .................................................8-1
Adding ProSystem fx Knowledge Tools Workpapers .....................................8-4
Adding ProSystem fx Knowledge Coach Workpapers....................................8-6
Adding a New Workpaper from an Existing File............................................8-7
Adding a Manual Workpaper .....................................................................8-10
Working With Placeholders .......................................................................8-11
Adding a ProSystem fx Tax PDF File ..........................................................8-12
Creating a PDF Workpaper from a Windows Application ...............................8-12
Adding a Scanned Document as a Workpaper .............................................8-14
Configuring the Interface Option ................................................................8-15
Adding and Exporting a ProSystem fx Fixed Assets FAC File .........................8-15
Adding ProSystem fx Fixed Assets Report Data ...........................................8-16
Using ProSystem fx Tax Workpaper Templates............................................8-18
Inserting a ProSystem fx Tax PDF File ........................................................8-19
Adding a Microsoft Excel Document...........................................................8-21
ix
Adding Microsoft Outlook Files..................................................................8-22
Adding a Profit Driver or Key Performance Indicator File ...............................8-23
Adding a ProSystem fx Profit Driver Report .................................................8-25
Changing Workpaper Properties .................................................................8-26
Using Workpapers .......................................................................................... 8-29
Opening Workpapers Inside or Outside .......................................................8-30
Closing Workpapers ................................................................................. 8-31
Saving Changes to Workpapers .................................................................8-31
Copying and Moving Workpapers...............................................................8-32
Saving a Workpaper as a Template ............................................................8-34
Publishing Workpapers ............................................................................. 8-35
Sending a Workpaper to a Third Party ........................................................8-35
Printing Workpapers................................................................................. 8-37
Printing Views in the Binder ......................................................................8-40
Deleting Workpapers ................................................................................ 8-41
Restoring Items from the Trash .................................................................8-41
Emptying the Trash.................................................................................. 8-41
Searching for Workpapers.........................................................................8-42
Linking Workpapers ................................................................................. 8-42
Copy/Paste TB Link ................................................................................. 8-43
Freezing Engagement Links .......................................................................8-49
Unfreezing Engagement Links....................................................................8-50
Drilling Down to Trial Balance Accounts .....................................................8-50
Workpaper Reference Links.......................................................................8-51
Sharing Workpapers................................................................................. 8-53
Reviewing Workpapers .................................................................................... 8-55
Workpaper and Workpaper Tab Notes ........................................................8-55
Managing the Notes Pane .........................................................................8-57
Managing Notes ...................................................................................... 8-57
Workpaper Sign Off ................................................................................. 8-58
Locking and Unlocking Workpapers ............................................................8-61
Current Editor ......................................................................................... 8-62
Live Editor .............................................................................................. 8-62
Assigning and Unassigning Workpapers ......................................................8-62
Taking Over a Workpaper .........................................................................8-64
Using Tickmarks in Workpapers ........................................................................8-64
Tickmark Definition.................................................................................. 8-64
Using the Tickmark Definition List..............................................................8-65
x
Chapter 9 - Using Excel
9-1
Overview....................................................................................................... 9-1
Engagement-Specific Features in Excel ..............................................................9-1
ProSystem fx Engagement Menus and Commands ..............................................9-1
Using Engagement with Excel 2007 ..................................................................9-6
Using Tickmarks in Excel Workpapers................................................................9-6
Linking ProSystem fx Engagement Information ...................................................9-6
Replacing TB Link Names.......................................................................... 9-7
Refreshing Links ...................................................................................... 9-7
Freezing and Unfreezing Engagement Links .................................................9-8
Name Functions ............................................................................................. 9-9
List of Name Functions............................................................................. 9-10
Date Functions ............................................................................................... 9-12
Calculating Dates .................................................................................... 9-12
Date Formats .......................................................................................... 9-13
List of Date Functions .............................................................................. 9-13
Calculation Functions ............................................................................... 9-14
Chapter 10 - Using Word
10-1
Overview....................................................................................................... 10-1
Engagement-Specific Features in Microsoft Word ................................................10-1
ProSystem fx Engagement Menus and Commands ..............................................10-1
Using Engagement with Word 2007 ..................................................................10-4
Header and Footer .......................................................................................... 10-5
CCH Footnotes............................................................................................... 10-5
Viewing Field Codes........................................................................................ 10-6
Using Tickmarks in Word Workpapers ...............................................................10-6
Linking ProSystem fx Engagement Information ...................................................10-6
Replacing TB Link Names.......................................................................... 10-7
Refreshing Links ...................................................................................... 10-7
Freezing Engagement Links .......................................................................10-7
Unfreezing Engagement Links....................................................................10-8
Name Functions ...................................................................................... 10-9
Date Functions........................................................................................ 10-11
Calculating Dates .................................................................................... 10-12
Date Formats .......................................................................................... 10-12
xi
List of Date Functions .............................................................................. 10-12
xii
1
C H A P T E R
Introduction
Overview
ProSystem fx® Engagement provides powerful tools to help you prepare audit and tax
workpapers and reports in the programs that you use most: Microsoft Word and Excel. It
extends the capabilities of these Microsoft Office applications and provides powerful tools
for organizing and managing your engagement files electronically.
The core of the Engagement system is the trial balance. You can use the Engagement
extensions in Word and Excel to integrate trial balance data into your workpapers. Changes
that you make to the trial balance are updated in your workpapers.
The Engagement Administrator and Workpaper Management modules also provide powerful
tools for organizing, reviewing, and sharing workpapers.
This chapter describes the main elements in the ProSystem fx Engagement system and
shows you how they work. Instructions on setting up and using these functions are found
in subsequent chapters.
What's New for ProSystem fx Engagement Version 6.0
The following features are new for Engagement 6.0:
§
§
§
Full Integration with Knowledge Coach, CCH’s new audit planning and workflow tool.
ProSystem fx Knowledge Coach streamlines audit processes through the use of
intelligent engagement tailoring, dynamic linking of risks to audit programs, extensive
diagnostics, and automated flow of information across workpapers. Knowledge
Coach leverages many of Engagement’s paperless workflow features such as central
and local file room management, document sharing, sign-offs and others.
Conversion of Knowledge Tools Workpapers to Knowledge Coach is provided in
Engagement so that Knowledge Tools customers can take advantage of the dynamic
Knowledge Coach content. See the Knowledge Coach help for more information.
Trial Balances are now organized using a Microsoft SQL Database, rather than the
Microsoft Access database method used prior to 6.0.
Note: Trial balances created with a version of Engagement prior to 6.0 must be
converted to Microsoft SQL Server database files. Select Start/Programs/Engagement
/Utilities, click Trial Balance Conversion Wizard, and follow the instructions.
§
Engagement now uses separate databases to store your binders, trial balances, and
Knowledge Coach workpapers (if Knowledge Coach is licensed).
1-1
Chapter
1
Introduction
Trial Balance Overview
The trial balance stores and manages all account balances and journal entries for an
engagement. You can have several trial balances in an engagement.
The trial balance provides a centralized data source for all the workpapers in the
engagement. Although the trial balance displays as an Excel spreadsheet, data is stored in a
database. Because the system has a centralized database, changes made to the trial
balance are also applied throughout the workpapers.
For more information about trial balances, see Chapter 7, Using the Trial Balance.
Trial Balance Setup Features
Trial balance meets your needs for any type of engagement. When setting up a trial
balance, you can use one of the trial balance templates provided, or you can use a trial
balance template as a starting point and customize it to serve your needs.
Use the features described in this section to customize the trial balance.
Flexible Column Setup
You can select columns for calculating the variances between columns, add different types
of journal entries, and store actual and budgeted balances from current and prior periods.
Trial balance columns are divided among current and comparative headings. Workpaper
reference columns can be displayed to the left, to the right, or on both sides of any amount
column.
The available custom views contain current columns, comparative columns, or whatever
combination best serves your firm. All views can be configured to display variance
information based on any balance column within the view.
Account Groupings
You can assign trial balance accounts to groups and subgroups for various purposes, such
as leadsheets, financial statement classifications, or tax return lines. ProSystem fx
Engagement can use these groupings to generate reports and financial statements or to
export to tax preparation software.
The default ProSystem fx Engagement grouping lists provide for most situations, and you
may add your own grouping lists if necessary. You can assign two types of classifications
to groups and subgroups: account classifications and ratio classifications.
Account classifications indicate the type of account used as an asset, liability, equity, etc.
Ratio classifications further define the account classification by providing a level of detail
that is useful for ratio calculations or other formulas.
1-2
Introduction
Chapter
1
Journal Entries
You can create journal entries from the Binder window, in the trial balance, and in Excel and
Word workpapers. The journal entry windows in ProSystem fx Engagement make it easy to
assign accounts to a journal entry and verify the debit and credit balances before you post
them to the trial balance. The journal entry windows also allow you to select the type of
journal entry, which trial balance you want the journal entry posted to, and if the journal
entry recurs or reverses in the next period. You can also enter proposed journal entries that
do not affect balances in the trial balance.
With ProSystem fx Engagement, you can make temporary or permanent journal entries to
accounts grouped to ProSystem fx C Corporation, S Corporation, or Partnership Grouping
Lists that have been selected for M-3 enhancement. These journal entries are transferred to
the tax return as either temporary (T) or permanent (P) differences in the appropriate column
in the tax return.
Note: A Federal balance must be transferred for an M-3 enhanced grouping.
Trial Balance Snapshot
Important diagnostic information for all of the trial balances in a binder is available in the
Trial Balance Snapshot view. QuickView displays balance information broken down by
assets, liabilities and equity, revenue, expenses, and net (income) loss. Trial Balance
Diagnostics displays detailed information regarding out-of-balance columns in the trial
balance. You can also open any of the trial balances directly from the Trial Balance
Snapshot.
Reports
Reports can be generated from the trial balance or from Excel workpapers. This feature
gives you flexibility in formatting reports and performing analysis.
Trial balance reports are based on account numbers or account groups and subgroups you
set up. For example, if you want to create leadsheets, you set up account groupings for
leadsheets categories. You can include any trial balance columns in a report and create
additional columns for showing percentage or dollar amount variances. You can choose to
report the information in summary or with detail.
Classified reports can be generated when groups and subgroups have been assigned to an
account classification. These reports define and organize assets, liabilities, equity, revenue
expenses, and net income for the trial balance.
Sharing Trial Balance Data with Other Programs
ProSystem fx Engagement can easily import trial balance data files that are generated in
electronic format from most accounting systems, as well as convert trial balance data from
other trial balance software packages.
In addition, you can export a trial balance to several tax preparation programs. See Chapter
7, Using the Trial Balance, for further information.
1-3
Chapter
Introduction
1
Excel and Word Workpapers
In ProSystem fx Engagement, you create workpapers using the tools you already know,
Microsoft Excel and Word. Workpapers can be linked to data in the trial balance and used
with other Engagement features. You can create workpapers from your existing Excel and
Word files or use the templates that come with Engagement. You can also create new
templates by saving Engagement workpapers as templates to use in future engagements.
Note: You can create workpapers from any type of file (e.g. JPG, GIF, PDF).
For more information about workpapers, see the following chapters:
§
§
§
Chapter 8, Managing Workpapers, for information on creating and using workpapers.
Chapter 9, Using Excel, for features specific to Excel.
Chapter 10, Using Word, for features specific to Word.
Evaluation Workpaper and Binder Templates
ProSystem fx Engagement provides an evaluation version of the integrated CCH workpaper
and binder templates. This evaluation contains many useful Word audit programs, reports,
checklists, and correspondence, as well as Excel workpaper templates.
For a description of the workpaper and work program content, see the topic titled CCH
Evaluation Integrated Engagement Workpaper Content in the Engagement Help file.
Organizational Tools
With ProSystem fx Engagement, managing and organizing client information is easy. You
can use binder templates and the Roll Forward feature to save time in preparing new
engagement files.
Levels of Organization
Information is organized into the following levels:
§
§
§
§
§
§
Office Servers
Local and Central File Rooms
Client Folders
Binders
Workpaper Tabs
Workpapers
Office Servers
Every office must create a main office server. This main server is the Administration
module, which stores staff, licensing, team, client groups, etc. Secondary office servers are
optional and may be created as needed. If needed, a secondary office server can be
promoted to be the main office server.
An office server that does not have a connection to other office servers can be designated
as disabled for Admin synchronization. You can synchronize with this server by creating and
receiving an Admin package. See Chapter 3, Engagement Administrator, for more
information.
1-4
Introduction
Chapter
1
Local and Central File Rooms
Local file rooms allow multiple users working on the same or different engagements to work
in the office or out in the field independently of one another. You can store local copies of
work done by other users without conflicting with their work. Local file rooms can also be
shared, allowing multiple users to access and work with the same binder simultaneously.
While in the field, you can update engagement information among local file rooms so all
users are kept up to date. In the office, all local file rooms can synchronize their information
to the central file rooms. Office servers manage and organize all your client and engagement
information. You can create as many central file rooms as you like to organize your client
data.
Client Folders
You can set up an unlimited number of clients to store your binders. You can enter and
keep track of client data in the Contact form. Within each client folder, you enter
information about the client, including name and entity type. Additionally, you can create
Client Groups to organize and filter client folders.
Binders
The New Binder Wizard guides you through the creation and setup of binders for each client
engagement. These binders go inside the client folders. For each binder you create, you can
specify the engagement type, period beginning and ending dates, and fiscal year end. This
information is then used in the trial balances and workpapers of that particular binder.
Workpaper Tabs
You can use workpaper tabs to organize workpapers inside the binder. You can also nest
tabs within tabs. These dividers typically mirror the dividers used in physical engagement
files.
Workpapers
You can insert any electronic file into an engagement binder. These documents are referred
to as workpapers. They can be created from a template or from an existing file.
You can create workpapers from any type of file (e.g. JPG, GIF, PDF). You can also insert
scanned images. This is helpful for electronically storing information obtained from the client
or third-party vendors.
1-5
Chapter
Introduction
1
Tools in the Workpaper Management Module
The main ProSystem fx Engagement program contains the following windows that enable
you to access and use these different levels of workpaper organization.
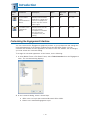
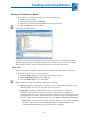
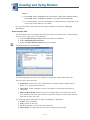
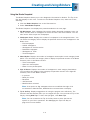
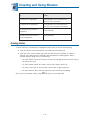
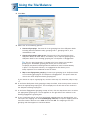
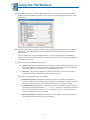
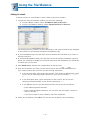
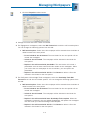
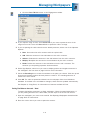
File Room Window
The File Room is the first window that displays when you start ProSystem fx Engagement.
It contains the local file room, central file rooms, remote file rooms, client folders, and
binders that you have set up.
The File Room window is organized similarly to the Windows Explorer folder tree. The
upper-left pane of the Client Index displays your local file room and client folders while the
pane on the right displays the contents of the local file room or client binder. The lower-left
pane is the Remote File Room that contains up to three tabs, depending on whether you
logged in to an Office or Field location.
The three tabs are as follows:
§
§
§
CFR. Displays central file room connections if your user login location is Office.
Staff. Displays a list of all staff members if your user login location is Office or Field.
Buddy list. Displays a custom list of staff members you select to use to expedite field
synchronization when your login location is Office or Field.
You can also switch to the Engagement Today view, which displays diagnostic information
about binders in the local file room.
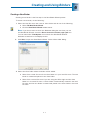
An example of the File Room window is shown below. For more information, see Chapter 5,
Using the File Room.
1-6
Introduction
Chapter
1
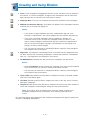
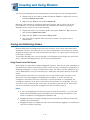
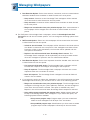
Engagement Today View
The Engagement Today view displays as an alternate view of the File Room window.
Engagement Today displays diagnostic information regarding binders in your local file room.
For more information, see Chapter 5, Using the File Room.
Note: The Engagement Today view is not available if you are viewing a shared file room.
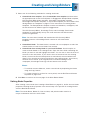
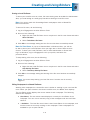
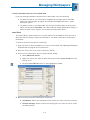
Binder Index Window
When you open a binder from the File Room window, the Binder Index window displays.
The Binder window contains the workpaper tabs and workpapers for a single binder. This
window allows you to open workpapers and contains a Shortcut bar that allows you to
quickly access many Engagement functions, ProSystem fx Tax (if installed), and guidance
options.
1-7
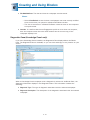
Chapter
1
Introduction
You can open multiple binders within ProSystem fx Engagement. These binders can be
minimized, restored, or maximized using the normal Windows commands. You can even
copy a workpaper from one binder to another by dragging it from one binder to another
binder or by using the Copy and Paste functions.
For more information about using this window, see Chapter 6, Creating and Using Binders.
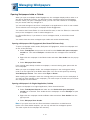
Binder Snapshot
The Binder Snapshot view allows you to review key diagnostic information for binders in the
Binder view. The Binder Snapshot summary page provides important status information
regarding workpapers, workpaper counts, Notes, and Sign Off Status. For more information,
see Chapter 6, Creating and Using Binders.
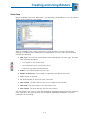
Trial Balance Snapshot
The Trial Balance Snapshot window displays a snapshot of the trial balances in the binder.
The Trial Balance Snapshot window includes a list of trial balances and the selected trial
balance’s QuickView and diagnostics. TB Diagnostics displays detailed information
regarding out-of-balance columns in the trial balance.
1-8
Introduction
Chapter
1
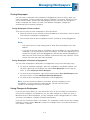
Binder Templates
ProSystem fx Engagement provides binder templates that automate the setup process for
first-year engagements. Binder templates contain the tab structure, trial balance(s), and
workpapers typically used in your engagements.
You can also create an unlimited number of custom binder templates. You may want certain
templates for various engagement types for different industries. For example, each of your
engagements may have the same, or similar, tab structure, account groups and subgroups,
leadsheets and trial balance reports, journal entry summaries, and financial statements. You
would create a binder template with all of these items included and use that to automate
each of your subsequent first-year engagements.
Staff Member Assignments
You assign staff members or teams access to each Engagement binder. Access rights are
assigned to staff groups in Engagement Administrator. Then each staff member is assigned
to a staff group so you can manage and control the tasks they can perform. (See Chapter 3,
Engagement Administrator, for additional information.)
Roll Forward Capability
At the end of a period, you can roll forward a binder and use it as a template for the
following period. ProSystem fx Engagement automates your workpapers so the content of
the workpapers and financial statements reflect the date and balance information of the
following periods.
When you choose to roll forward a binder, the Roll Forward Binder Wizard walks you
through the process. During the roll forward, you can select which workpapers you want to
roll forward, unlock workpapers, and select which workpapers to replace with workpaper
templates. You also have the option of saving journal entries and team assignments.
Assuming you have automated your workpapers with the tools ProSystem fx Engagement
provides, the content of the workpapers and financial statements are rolled forward as well.
For more information about the Roll Forward capability, see Chapter 6, Creating and Using
Binders.
Reviewing Workpapers and Workpaper Tabs
ProSystem fx Engagement provides all the tools you need to review an engagement
electronically. You can write, respond to, and clear notes for an individual workpaper or
workpaper tab. You can also view existing notes sorted by the note type, open/cleared
status, dates, and other criteria. Diagnostic tools (e.g., Engagement Today, Binder
Snapshot, and Trial Balance Snapshot) provide detailed Engagement summary information.
To show that you agree with the contents and conclusions, you can sign off as preparer,
reviewer, or second-level reviewer. Multiple preparer and reviewer signatures are possible.
You can view a summary list, which is sorted by workpapers in process, ready for review,
reviewed, and 2nd reviewed.
1-9
Chapter
1
Introduction
Sharing and Distribution Tools
Your workpapers can be electronically distributed to—and simultaneously shared by—all
engagement staff members. Data integrity is ensured by maintaining a single definitive
version of each document for editing.
Additional information about these features can be found in Chapter 8, Managing
Workpapers.
Sharing Workpapers
You can share workpapers in several ways. If you are on a network, a central file room is
used to automatically point you to the engagement binder with which you need to
synchronize. If you are on a network, you can also use the Buddy List to expedite the
synchronization process. If you are connected in a peer-to-peer network, you can
synchronize directly to another team member’s local file room. In a peer-to-peer network
you can also synchronize using the Shared File Room feature, which allows multiple users
to work directly on the same binder at the same time.
If you are not on a network, you share workpapers by packaging the entire binder, or
specific workpapers within the binder, into a single file. You can then send the binder
package by saving it to a floppy disk or another removable media device, or by attaching
the file to an email message.
When you attach the file to an email, Engagement opens a new email message and adds the
package as an attachment. This feature requires a MAPI-compliant email system.
If Microsoft Outlook is installed and running on your local machine, you can use the
Engagement interface in Outlook to receive email binder package attachments directly into a
binder or to send messages and workpapers from a binder.
You can also hand off workpapers to another team member by using the Assign To feature.
The Current Editor of the workpaper can assign the workpaper to another team member.
The next time both staff members synchronize to the central file room, the workpaper
shows the other team member as the Current Editor. This eliminates the need to check a
workpaper in or out.
Publishing Workpapers
Many of your ProSystem fx Engagement Word and Excel workpapers will have links to a
trial balance. To share these workpapers with someone who does not have access to the
trial balance, you must publish the workpaper to convert the links to values. After a copy of
the original workpaper is created in the Published Workpapers tab, you can distribute the
copy as needed.
1 - 10
Introduction
Chapter
1
Protecting Document Integrity
To protect data integrity, a single copy of a workpaper is maintained as the definitive
version for editing. The staff member assigned as Current Editor of the workpaper can edit
the workpaper. If the workpaper is unassigned or assigned to another staff member, you
have read-only rights to the workpaper.
If the workpaper is in a shared local file room, and the file room Host is the Current Editor,
then anyone who logs in to the shared file room can open the workpaper and become the
"Live Editor." In a shared file room, only the Live Editor can edit a workpaper.
Documentation
Before using ProSystem fx Engagement, you should review this section to familiarize
yourself with the documentation provided. This documentation contains a number of
features to help you learn to use the product more efficiently. You can access additional
information at the ProSystem fx Web site at http://Tax.CCHGroup.com.
Prerequisite Knowledge
This manual was written for accountants in public practice who have experience with
Microsoft Windows, Microsoft Word, and Microsoft Excel.
To use ProSystem fx Engagement, you should be familiar with at least the following basic
features of Word and Excel as displayed in the table on the following page. If you plan to
customize templates, you may need experience in additional areas.
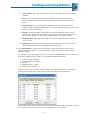
Program
Microsoft
Word
Basic Operations
Customization
Basic editing and
formatting.
Creating and managing styles and
templates.
Recording and using macros.
Visual Basic for Applications and
advanced customization.
Microsoft
Excel
Basic data entry and
formatting.
Creating sophisticated formulas.
Inserting simple formulas.
Visual Basic for Applications and
advanced customization.
Arranging worksheets
and cells within
worksheets.
Recording and using macros.
1 - 11
Chapter
Introduction
1
ProSystem fx Engagement Documentation
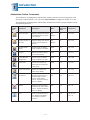
The table below lists the ProSystem fx Engagement documentation, with an explanation of
what each document contains and when to use it.
Document
User Guide
What It Includes
Installation instructions.
Concepts and detailed
procedures for product
functions.
Help
Descriptions of concepts
and usage.
Summaries of
procedures.
When to Use It
When installing and setting up the
product.
When learning to use the product.
When becoming acquainted with
broad concepts concerning various
areas of the program.
When reminding yourself how to
perform common commands.
Tip of the
Day
Suggestions for using
the program most
efficiently.
When using Engagement Today,
TB Snapshot, or Binder Snapshot.
Release
Bulletin
Latest changes to the
product.
After you have installed the
product.
Help
The Help file includes descriptions of dialogs and commands, and explanations of frequently
used procedures. You can use this information as a reminder when performing tasks or as a
reference when the user guide is unavailable. It also contains references to ProSystem fx
Engagement fields and formulas used in Excel and Word.
You can view Help by doing any of the following:
§
§
§
Press
1 at a dialog or menu command.
Select the Help icon on dialogs where it displays.
Select Help Topics from the Help menu. You can then select the Contents, Index, or
Search tabs. A Favorites tab is also included so you can build a list of help items you
review on a regular basis.
Tip of the Day
The Tip of the Day feature is viewable in Engagement Today, Binder Snapshot, and TB
Snapshot views. If you do not want to display the Tip of the Day in these views, you have
the option to hide them for each view.
Note: You can customize the Tip of the Day items to show tips that are specific to
your firm’s operations. Select Tools/Tip of the Day in the Main Office Server
Administrator module to add, edit, and delete the Tip of the Day. Updated Tip of
the Day items synchronize to Secondary Office Servers and users’ local machines.
See Chapter 3, Engagement Administrator, for more details.
1 - 12
Introduction
Chapter
1
Notations Used in the Documentation
This section describes special notations and formatting used in the documentation. There
are also additional formats used in describing fields and formulas. You can see the following
special formats and notations:
Notation
Description
Tip
A suggestion that can help you use the product more
efficiently.
Note
Additional information to help you understand a procedure or
step.
Important
Important information that can help prevent unintended or
invalid results or loss of data.
Related Documentation
You may find the following additional manuals helpful in using ProSystem fx Engagement:
§
§
Microsoft Word, Excel, and Outlook manuals and Help.
Microsoft Windows 2000, Windows 2000 Server, Windows 2003 Server, Windows
XP, or Windows Vista User Guides.
Web Site
Visit the CCH Web site at http://Tax.CCHGroup.com for additional information. You can link
to information about product announcements, support, and frequently asked questions
(FAQs). You can also go to the Web site directly from ProSystem fx Engagement. Select
Help/ProSystem fx on the Web.
Using the Engagement Toolbars
The ProSystem fx Engagement toolbar buttons provide quick access to the most frequently
used functions in the Engagement program. You can turn the toolbar on and off from
View/Toolbar. You can also read a description of a toolbar button by positioning the mouse
pointer over it.
1 - 13
Chapter
1
Introduction
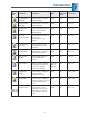
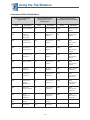
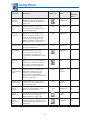
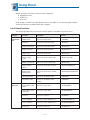
Administrator Toolbar Commands
The ProSystem fx Engagement Administrator toolbar contains the most frequently used
functions in Administrator. You can select View/Toolbars to toggle the toolbar on or off.
The ProSystem fx Engagement Administrator Standard and Client Groups toolbars include
the following buttons:
Toolbar
Icon
Command
Description
Menu
Right-Click
Menu
Access Key
Client Groups
Opens a dialog that allows
an administrator to create
client groups.
File
Rooms
No
Alt+R/G
Assign Clients to
Groups
Opens a dialog that allows
clients to be assigned to
groups.
File
Rooms
No
Alt+R/A
Assign Binder
Staff
Allows a user to assign
staff members to a binder.
Staff
Yes
Alt+S/B
Teams
Opens the Teams dialog
for a selected team.
Staff
No
Alt+S/T
Team Member
Assignment
Allows a user to assign
staff members to a team.
Staff
No
Alt+S/M
New Staff
Allows the creation of
New Staff for a selected
staff group.
Staff
Yes
Alt+S/S
New Staff Group
Opens the Create New
Staff Group dialog.
Staff
Yes
Alt+S/G
Properties
Displays properties for a
selected object (Staff
Group, Staff, Office
server, Central File Room,
Client or Binder).
File
Yes
Alt+F/P
Delete
Deletes a selected object
(Staff Group, Staff, Office
server, Central File Room,
Client or Binder).
Edit
Yes
Ctrl+D
Cut
Cuts the selected item to
the Windows Clipboard
for pasting to another
location.
Edit
Yes
Alt+E/T or
Ctrl+X
1 - 14
Introduction
Toolbar
Icon
Chapter
1
Command
Description
Menu
Right-Click
Menu
Access Key
Paste
Pastes the selected item
that was copied to the
Clipboard to the selected
locations.
Edit
Yes
Alt+E/P or
Ctrl+V
Refresh
Refreshes the Admin
Frame.
View
No
F5 or
Alt+V/F
Create Central
File Room
Opens the Central File
Room Properties dialog.
File
Rooms
Yes
Alt+R/F
New Client
Opens the Create New
Client dialog.
File
Rooms
Yes
Alt+R/C
Archive Finalized
Binder
Opens the Archive
Finalized Binder dialog.
File
Rooms
Yes
Alt+R/R
Unarchive Binder
Allows you to open an
archived binder.
File
Rooms
No
Alt+R/N
Unfinalize Binder
Allows you to unfinalize a
binder.
File
Rooms
Yes
Alt+R/U
Manual
Synchronization
Launches the manual
Admin synchronization
function.
Tools
No
Alt+T/M
Client Inquiry
Opens the Inquiry Module
of ProSystem fx Practice,
if you have installed
version 7.0 or higher.
File
Rooms/
Pfx
Practice
Interface
Yes
Alt+R/I/I
Expand All
Expands the entire tree.
View
No
Alt+V/A
Collapse All
Collapses the entire tree.
View
No
Alt+V/L
Help Topics
Opens the Engagement
Help topics.
Help
No
Alt+H/H
1 - 15
Chapter
1
Introduction
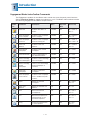
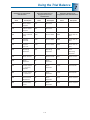
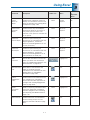
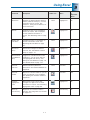
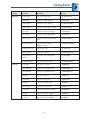
Engagement File Room Toolbar Commands
The Engagement File Room toolbars contain the most frequently used functions in
Workpaper Management. You can select View/Toolbar to toggle the toolbars on or off.
The File Room toolbar includes the following Engagement and Client Groups buttons:
Toolbar
Icon
Command
Description
Menu
Right-Click
Menu
Access Key
New Client
Allows users to create
new clients.
File
Yes
Alt+F/C
New Binder
Wizard
Opens the New Binder
Wizard.
File
Yes
Alt+F/Z
Assign Binder
Staff
Allows users to assign
staff members to a binder.
Tools
No
Alt+T/A
Open
Opens or expands the
selected item.
File
Yes
Alt+F/O or
Ctrl+O
Open Trial
Balance
Opens the trial balance in
the binder or displays the
Open Trial Balance dialog.
File
Yes
Alt+F/T
Cut
Cuts the selected binder
to the Windows Clipboard
for pasting to another
location.
Edit
Yes
Alt+E/T or
Ctrl+X
Copy
Copies the selected item
to the Windows Clipboard
for pasting later.
Edit
Yes
Alt+E/C or
Ctrl+C
Paste
Pastes the last item
copied to the Clipboard to
the selected location.
Edit
Yes
Alt+E/P or
Ctrl+V
Expand All
Expands the entire tree.
View
No
Alt+V/A
Collapse All
Collapses the entire tree.
View
No
Alt+V/L
Properties
Displays the properties of
the selected item.
File
Yes
Alt+F/P
Refresh
Refreshes the contents of
the list.
View
Yes
Alt+V/H or
F5
1 - 16
Introduction
Toolbar
Icon
Chapter
1
Command
Description
Menu
Right-Click
Menu
Access Key
Create Binder
Package
Allows a user to create a
binder package.
Tools
Yes
Alt+T/P
Receive Binder
Package
Allows a user to receive a
binder package.
Tools
Yes
Alt+T/V
Synchronize
Binder
Allows authorized users to
open the Synchronize
Binder Wizard.
Tools
Yes
Alt+T/S
Express
Synchronization
Allows authorized users to
launch the
Synchronization Job
Queue.
Tools
Yes
Alt+T/E
Tax Software
Interface
Allows a user to export
trial balance data to tax
software.
Tools
No
Alt+T/X
Finalize Binder
Allows a user to open the
Finalize Binder Wizard.
Tools
Yes
Alt+T/Z
Roll Forward
Binder
Allows users to use the
Roll Forward Binder
Wizard.
Tools
Yes
Alt+T/F
Client Inquiry
Opens the Inquiry Module
of ProSystem fx Practice,
if you have installed
version 7.0 or higher.
Tools/Pfx
Practice
Interface
Yes
Alt+T/I/I
Engagement
Today
Allows users to toggle the
view to display
Engagement Today.
View
No
Alt+V/G/E
Client Index
Allows users to toggle the
screen to display the Local
File Room Client Index
view.
View
No
Alt+V/G/I
Client Groups
Allows users to use a
drop-down list to pick a
client group to filter the
client folders in the file
room.
View
No
Alt+V/P
1 - 17
Chapter
1
Introduction
Engagement Binder Index Toolbar Commands
The Engagement toolbars for the Binder Index contain the most frequently used functions.
Select View/View Toolbar to toggle the toolbars on or off. The Binder Index toolbar includes
the following Engagement and Client Groups buttons:
Toolbar
Icon
Command
Description
Menu
Right-Click
Menu
Access Key
New Tab
Creates new tabs in a
binder.
File/New
Yes
Alt+F/N/T or
Ctrl+T
New Workpaper
from Template
Creates a new workpaper
from a template.
File/New
Yes
Alt+F/N/W or
Ctrl+W
New Workpaper
from File
Creates a new workpaper
from an existing file.
File/New
Yes
Alt+F/N/F or
Ctrl+Shift+W
New Trial
Balance
Creates a new trial
balance.
File/New
Yes
Alt+F/N/B or
Ctrl+B
New Manual
Workpaper
Creates a new manual
workpaper.
File/New
Yes
Alt+F/N/N
New Placeholder
Inserts a placeholder at
the selected location.
File/New
Yes
Alt+F/N/L
New Knowledge
Tools Workpaper
Creates a new Knowledge
Tools workpaper.
File/New
Yes
Alt+F/N/K
New Knowledge
Coach
Workpaper
Inserts a new Knowledge
Coach Workpaper (if
installed)
File/New
Yes
Alt+F/N/O
New CCH
Workpaper
Creates a new CCH
workpaper.
File/New
Yes
Alt+F/N/M
New Workpaper
from Scanner
Creates a new workpaper
from a TWAIN compliant
scanner.
File/New
Yes
Alt+F/N/S
Open
Opens the selected
workpaper.
File
No
Alt+F/O or
Ctrl+O
Open Trial
Balance
Opens the selected trial
balance.
File
No
Alt+F/T
Print
Prints the selected
workpaper(s).
File
Yes
Alt+F/P or
Ctrl+P
Cut
Removes and places the
selected binder to the
Windows Clipboard.
Edit
Yes
Alt+E/T or
Ctrl+X
Copy
Copies the selected item
to the Clipboard.
Edit
Yes
Alt+E or
Ctrl+C
1 - 18
Introduction
Toolbar
Icon
Chapter
1
Command
Description
Menu
Right-Click
Menu
Access Key
Paste
Pastes the last item that
was copied to the
Clipboard.
Edit
Yes
Alt+E/P or
Ctrl+V
Properties
Displays the properties of
the selected item.
File
Yes
Alt+F/I
Expand All
Expands the entire tree.
View
No
Alt+V/A
Collapse All
Collapses the entire tree.
View
No
Alt+V/L
Refresh
Refreshes the content of
the list.
View
No
Alt+V/F
Publish
Workpaper
Publishes the selected
workpaper(s).
Workpaper
Yes
Alt+K/P
Lock Workpaper
Locks the selected Excel
and Word workpaper(s).
Workpaper
Yes
Alt+K/K
Unlock
Workpaper
Unlocks the selected
Excel and Word
workpaper(s).
Workpaper
Yes
Alt+K/N
Freeze Links
Freezes Engagement links
in the selected
workpaper(s).
Workpaper
Yes
Alt+K/F
Unfreeze Links
Unfreezes Engagement
links in the selected
workpaper(s).
Workpaper
Yes
Alt+K/U
Create
Workpaper Note
Creates a workpaper note
for the selected
workpaper.
Workpaper
Yes
Alt+K/C
Sign Off
Workpaper
Signs off the selected
workpaper(s).
Workpaper
Yes
Alt+K/G
Tax Software
Interface
Opens the Tax Software
Interface dialog.
Tools
Yes
Alt+T/X
Binder View
Displays the contents of
binders.
View
No
Alt+V/B
Notes Summary
View
Displays all notes in a
selected binder by note
type.
View
No
Alt+V/U
Sign Off
Summary View
Displays all workpapers for
a selected binder by the
sign off status.
View
No
Alt+V/O
1 - 19
Chapter
Introduction
Toolbar
Icon
Command
Description
Menu
Right-Click
Menu
Access Key
Current Editor
View
(Non-Shared File
Room)
Displays staff members
assigned to a binder and
lists the workpapers for
which they have current
editor rights.
View
No
Alt+V/E
Live Editor View
(Shared File
Room)
Displays users who are
currently editing
workpapers in a shared
file room and the
workpapers they are
editing.
View
No
Alt+V/E
1
Customizing the Engagement Interface
You can customize the Engagement graphical interface to your preferences and change the
universal appearance of the frames. In Binder Frame and File Room Frame, you can
customize the toolbars and the appearance of buttons within the toolbars. For all changes,
you must access the Customize dialog.
To change the universal appearance of the frames, do the following:
1. In either Binder Frame or File Room Frame, select Tools/Customize from the Engagement
menu. The Customize dialog displays.
2. In the Customize dialog, select a Visual Style.
§
§
2003 is the new style that matches Microsoft Office 2003.
Classic is the standard Engagement style.
1 - 20
Introduction
Chapter
1
Customizing Toolbars
In Binder Frame and File Room Frame, you can customize the toolbars by adding, deleting,
or modifying buttons in the following ways:
§
§
Delete. Removes the selected button from the toolbar.
Button Appearance. Opens the Button Appearance dialog, where you can customize
the images and/or text for the button. Alternately, you may also remove a button by
dragging it off the toolbar.
— Image Only. Displays the graphical button only.
— Image and Text. Displays the graphical button plus text to the right of it.
§
§
Put Separator Before. Puts a line on the left side of the button, separating it from the
button on the left.
Put Separator After. Puts a line on the right side of the button, separating it from the
button on the right.
To customize a toolbar, do the following:
1. Select Tools/Customize from the Engagement menu. In the Customize dialog, the
directory tree displays the current toolbar settings.
2. Leaving the Customize dialog open, right-click the button in the Engagement toolbar.
Note: With the exception of button appearance, changes are applied
immediately.
Customizing Button Appearance
In order to customize a button’s appearance, you must first open the Customize dialog.
1. From either the Binder Frame or the File Room Frame, select Tools/Customize from the
Engagement menu. After the dialog opens, you may move and resize it to make
customizing the toolbar easier.
2. Right-click the button you want to customize. Select one of the following options:
§
§
§
§
§
§
Delete. Removes the selected button from the toolbar.
Button Appearance. Opens the Button Appearance dialog, where you can
customize the images and text for the button. You may also remove a button by
dragging it off the toolbar.
Image Only. Displays the graphical button only.
Image and Text. Displays the graphical button plus text to the right of it.
Put Separator Before. Puts a line on the left side of the button, separating it from
the button on the left.
Put Separator After. Puts a line on the right side of the button, separating it from
the button on the right.
1 - 21
Chapter
1
Introduction
3. Select Button Appearance from the pull-down menu to open the Button Appearance
dialog.
4. In the Button Appearance dialog, choose whether to display Image Only or Image and
Text.
5. If you chose text, type the text into the Text field.
6. Select a button image from the Images box.
7. Click OK to finalize your changes.
1 - 22
2
C H A P T E R
Installation
Overview
This chapter provides step-by-step instructions for installing the ProSystem fx Engagement
Administrator and Workpaper Management modules. The minimum and recommended
system requirements are also provided.
Before you begin, refer to the following documents:
§
§
§
The License Agreement for information and restrictions on installation.
The ProSystem fx Engagement Release Bulletin for new product features.
The Administrator/Office Server Tips document for assistance in determining how you
should configure office servers for your firm.
Two ProSystem fx Engagement modules must be installed in order for the application to
function. These modules are the Administrator module and the Workpaper Management
module.
The Administrator module is an organizational tool designed to provide security and control
rights for different staff levels, as well as organize and maintain your office servers and
central file rooms. The Administrator module should be installed on a Windows server or a
dedicated computer, and it should be on a location that can be accessed by all computers in
your firm. If you have multiple offices, you may want to establish secondary office servers,
and thus install the Administrator module on the Windows server or dedicated computer for
each office. The Administrator module installation must be performed while sitting at the
console of the Windows server or the dedicated computer.
The Workpaper Management module relies on the Administrator module to provide login
information, central storage, and secured access to all your client data. The Workpaper
Management module should be installed on each user’s computer.
Note: If you are installing to a multi-server Citrix farm or to a Windows Terminal
Services environment, install ProSystem fx Engagement Administrator in the
standard manner, and then see Terminal Services Installation on page 2-12.
2-1
Chapter
2
Installation
Engagement 6.0 Requirements
The following two tables detail the requirements for the Engagement Administrator and
Workpaper Management modules.
Administrator Module
System
Requirements
Recommended
Minimum
Microprocessor
32-Bit
32-Bit
Pentium 4 processor, 2.8 GHz or faster
Pentium 4 processor, 2 GHz
64-Bit
64-Bit
Pentium 4 single-core processor, 3.2
GHz, or any multi-core processor
§ Pentium 4 processor, 3.2 GHz, or
any multi-core processor
§ AMD Athlon 64, Intel Pentium 4
with Intel EM 64T support
Supported
Operating
Systems
For SQL 2005
§ Windows Vista (Business, Enterprise, and Ultimate: 32 bit and 64 bit)
§ Windows XP Professional with Service Pack 2 (32 bit)
§ Windows XP Professional with Service Pack 1 (64 bit)
§ Windows Server 2003 Service Pack 1 (Standard and Enterprise: 32 bit and 64
bit)
§ Windows Server 2008 (Standard and Enterprise: 32 bit and 64 bit)
For SQL 2008
§ Windows Vista (Business, Enterprise, and Ultimate: 32 bit and 64 bit)
§ Windows XP Professional with Service Pack 2 (32 bit and 64 bit))
§ Windows Server 2003 Service Pack 2 (Standard and Enterprise: 32 bit and 64
bit)
§ Windows Server 2008 (Standard and Enterprise: 32 bit and 64 bit)
Note: Novell Netware 5.1 or higher and Linux are supported for workpaper storage
only.
Terminal Server
and Citrix
§ Windows Server 2003 with Service Pack 1 (32 bit and 64 bit) with Terminal
Services
§ Windows 2008 Server (32 bit and 64 bit) with Terminal Services
§ Citrix Presentation Server 4.5 or higher
2-2
Installation
System
Requirements
Recommended
Minimum
System Memory
2 GB RAM
32 Bit
Chapter
2
§ 1 GB RAM for Windows XP
Professional
§ 2 GB RAM for Vista and server-class
operating systems
64 Bit
4 GB RAM
Additional memory improves performance and may be required to run additional
applications simultaneously.
Drive Space
Administrator requires 500 MB of drive space when installed with the CD image files,
200 MB of drive space in the Temp folder, and additional space required for data.
Video
Super VGA at 32 bit color quality with a
resolution of 1024 x 768.
Super VGA at 16 bit color quality with a
resolution of 800 x 600.
ProSystem fx Engagement does not support large fonts.
Network Environment
Microsoft
Client for Microsoft Networks and Microsoft TCP/IP.
Other Software
SQL
SQL 2005 Supported Editions:
§ SQL Server 2005 Service Pack 2 Standard Edition (32 bit and 64 bit)
§ SQL Server 2005 Service Pack 2 Enterprise Edition (32 bit and 64 bit)
§ SQL Express Service Pack 2 (32 bit)
SQL 2008 Supported Editions
§ SQL Server 2008 Standard Edition (32 bit)
§ SQL Server 2008 Enterprise Edition (32 bit)
§ SQL Server 2008 Express (32 bit)
Note: SQL Server 2008 64 bit is not supported
Data Access
Components
The following items are installed automatically with ProSystem fx Engagement:
§ Microsoft Jet Database Engine 4.0 with Service Pack 6
§ Soap Toolkit 3.0
§ MSXML 4.0 Service Pack 2 parser
§ SQLXML 3.0 Service Pack 3
§ Microsoft Visual C++ 2008 Redistributable vcredistsp1_x86.exe - 9.0.30729.17
§ Microsoft Visual C++ 2008 Redistributable vcredist_x86.exe - 9.030729.4148
2-3
Chapter
2
Installation
System
Requirements
Recommended
Data Access
Components
The following items are installed automatically with ProSystem fx Engagement if an
SQL 2005 instance is found:
(cont)
Minimum
§ Microsoft SQL Server 2008 Management Object (32 bit)
§ Microsoft SQL Server 2008 Native Client (32 bit or 64 bit, according to operating
system)
§ SQL Server System CLR Types (32 bit)
The following items are installed automatically with ProSystem fx Engagement if SQL
2008 32bit is found on a 64 bit operating system:
§ Microsoft SQL Server 2008 Management Object (32 bit)
§ SQL Server System CLR Types (32 bit)
MDAC 2.8 Service Pack 1 is required by SQL Server 2005 Express.
Windows Installer 3.1 is required by SQL Server 2005 Express.
Windows Installer 4.5 is required by SQL Server 2008 Express.
Microsoft .NET Framework 2.0 is required by SQL 2005 and Admin Workstation.
Microsoft .NET Framework 3.5 SP1 is required by SQL 2008.
Adobe Reader 7.0 or higher is optional.
Web Browser
Internet Explorer 6.0 with Service Pack 1 or higher
Email
Microsoft Mail, Microsoft Exchange,
GroupWise, Internet SMTP/POP3, or
other MAPI compliant messaging
software to use network or Internet email
None
Other Hardware
Internal or
External DVD
drive
Any internal or external DVD compatible drive for reading the installation media. The
installation media is distributed on DVD, and can be copied to other machines or
locations as needed.
2-4
Installation
Chapter
2
Workpaper Management Module
System
Requirements
Recommended
Minimum
Microprocessor
32-Bit
32-Bit
Pentium 4 processor, 2.8 GHz or faster
Pentium 4 processor, 2 GHz
64-Bit
64-Bit
Pentium 4 single-core processor, 3.2 GHz
(or any multi-core processor)
§ Pentium 4 processor, 3.2 GHz (or
any multi-core processor)
§ AMD Athlon 64, Intel Pentium 4
with Intel EM 64T support
Supported
Operating
Systems
For SQL 2005
§ Windows Vista with Service Pack 1 (Business, Enterprise, and Ultimate: 32 bit
and 64 bit)
§ Windows XP Professional with Service Pack 2 (32 bit)
§ Windows XP Professional with Service Pack 1 (64 bit)
For SQL 2008
§ Windows Vista (Business, Enterprise, and Ultimate: 32 bit and 64 bit)
§ Windows XP Professional with Service Pack 2 (32 bit and 64 bit)
Terminal Server
and Citrix
§ Windows Server 2003 with SP 1 (32 bit and 64 bit) with Terminal Services
§ Windows Server 2008 (32 bit and 64 bit) with Terminal Services
§ Citrix Presentation Server 4.5 or higher
System Memory
32-Bit
32-Bit
§ 1 GB RAM for Windows XP
2 GB RAM
Professional
64-bit
§ 2 GB RAM for Vista and Server
4 GB RAM
class operating systems
64-Bit
4 GB RAM
Additional memory improves performance and may be required to run additional
applications simultaneously.
Drive Space
Workpaper Management requires 250 MB of drive space, 200 MB of free space for
the Temp folder during installation, and additional space required for data.
Video
Super VGA at 32 bit color quality with a
resolution of 1024 x 768.
Super VGA at 16 bit color quality with a
resolution of 800 x 600.
ProSystem fx Engagement does not support large fonts.
2-5
Chapter
2
Installation
System
Requirements
Recommended
Minimum
Knowledge Coach
Knowledge
Coach
Requirements
§
§
§
§
Microsoft Vista with Service Pack 2
Office 2007
Visual Studio Tools for Office (VSTO)
Microsoft .NET Framework 3.5 Service Pack 1
Other Software
Microsoft Office
Office 2003 with Service Pack 2 or
higher
§ Office 2007, Office 2003 with
Service Pack 1, or Office XP with
Service Pack 2 is required for
ProSystem fx Engagement
§ Office 2007 is required for
ProSystem fx Knowledge Coach
§ Office 2007 or Office 2003
Professional with Service Pack 2 is
required for ProSystem fx
Knowledge Tools
SQL
SQL 2005 Supported Editions
§ SQL Server 2005 Service Pack 2 Standard Edition (32 bit)
§ SQL Server 2005 Service Pack 2 Enterprise Edition (32 bit)
§ SQL Express Service Pack 2 (32 bit)
SQL 2008 Supported Editions
§ SQL Server 2008 Standard Edition (32 bit)
§ SQL Server 2008 Enterprise Edition (32 bit)
§ SQL Server 2008 Express (32 bit)
Note: SQL Server 2008 64 bit is not supported.
Data Access
Components
The following items are installed automatically with ProSystem fx Engagement:
§ Microsoft Jet Database Engine 4.0 with Service Pack 6
§ Soap Toolkit 3.0
§ MSXML 4.0 Service Pack 2 parser
§ SQLXML 3.0 Service Pack 3
§ Microsoft Visual C++ 2008 Redistributable vcredistsp1_x86.exe - 9.0.30729.17
§ Microsoft Visual C++ 2008 Redistributable
The following items are installed automatically with ProSystem fx Engagement if an
SQL 2005 instance is found:
§ Microsoft SQL Server 2008 Management Object (32 bit)
§ Microsoft SQL Server 2008 Native Client (32 bit or 64 bit, according to operating
system)
§ SQL Server System CLR Types (32 bit)
2-6
Installation
Chapter
2
System
Requirements
Recommended
Minimum
Data Access
Components
The following items are installed automatically with ProSystem fx Engagement if SQL
2008 32bit is found on a 64 bit operating system:
§ Microsoft SQL Server 2008 Management Object (32 bit)
§ SQL Server System CLR Types (32 bit)
MDAC 2.8 Service Pack 1 is required by SQL Server 2005 Express.
Windows Installer 3.1 is required by SQL Server 2005 Express.
Windows Installer 4.5 is required by SQL Server 2008 Express.
Microsoft .NET Framework 2.0 is required by SQL 2005.
Microsoft .NET Framework 3.5 SP1 is required by SQL 2008, Workpaper
Management, and Knowledge Coach.
If Office 2007 is installed, Office 2007 Primary Interop Assemblies (PIA) and Visual
Studio Tools for the Office Runtime version 3.0 will be installed automatically.
If Office 2003 Professional SP2 is installed and Knowledge Tools is selected for
installation, Office 2003 Primary Interop Assemblies (PIA) and Visual Studio 2005
Tools for Office Runtime 2.0 (VSTOR) will be installed automatically.
Visual Studio Tools for Office (VSTO) is required for Knowledge Coach.
Adobe Reader 7.0 or higher is optional.
Web Browser
Internet Explorer 6.0 with Service Pack 1 or higher.
Email
Microsoft Mail, Microsoft Exchange,
GroupWise, Internet SMTP/POP3, or
other MAPI compliant messaging
software to use network or Internet
email.
None.
Other Hardware
Internal or
External DVD
drive
Any internal or external DVD compatible drive for reading the installation media. The
installation media is distributed on DVD, and can be copied to other machines or
locations as needed.
Installation Considerations
Important:
§
§
If you are using MSI Push, please see MSI Push Installation Guide located in the
document folder for more information.
You must first install SQL manually if you are installing Engagement Administrator
and/or Engagement Workpaper Management for the first time to a server or
workstation that does not have a C: drive.
We recommend that you update your video card driver to the latest driver available and
install Microsoft Direct X 9.x or higher.
2-7
Chapter
Installation
2
Compressed Folders
The requirement of uncompressed drives is outlined in SQL Server 2005 Books Online (see
http://msdn2.microsoft.com/en-us/library/ms143719.aspx). If you are upgrading a current
installation of Engagement, this should not be an issue. Otherwise, it is important to identify
and uncompress any compressed folders and files that may exist in locations where
Engagement or Microsoft SQL Server/Express databases exist. The new SQL Instance
installation detects any compressed files and exits with an error message if they are found.
If compressed files are found, it is recommended that you uncompress the drive containing
SQL and Engagement.
To uncompress the drive, do the following:
1. In My Computer, right-click the drive that will contain Engagement and select Properties.
2. Uncheck the option Compress this drive to save disk space.
3. Click Apply and then OK to uncompress the drive.
If the SQL Instance installation still detects compressed files, then please call Technical
Support for assistance. If you are upgrading Engagement, then you should not have to do
anything regarding compressed drives.
Networking Best Practices
For in-depth networking instructions on ProSystem fx Engagement, please see the
ProSystem fx Engagement Networking Best Practices document located in the Documents
folder of the installation CD. This document covers the following network issues:
§
§
§
§
§
§
Windows, Novell, and Linux servers
LAN, WAN, and VPN topologies
Port configuration
SQL configuration
Communication across networks and subnets
Static versus dynamic IP addresses on office servers
The ProSystem fx Engagement Networking Best Practices document also addresses the
following topics in detail:
§
§
Long file names must be enabled on the server(s) where the ProSystem fx
Engagement Administrator is located.
ProSystem fx Engagement utilizes Microsoft SQL server 2005 Express and Microsoft
SQL server 2008 Express.
The server must be a Windows computer with any of the following operating systems
installed: Windows XP Professional with Service Pack 2, Windows 2003 Server with
Service Pack 1 (Service Pack 2 required for SQL Server 2008), Windows XP
Professional with Service Pack 1 (64 Bit, Service Pack 2 for SQL Server 2008),
Windows 2003 Server with Service Pack 1 (64 bit, Service Pack 2 for SQL Server
2008), Windows 2008 Server (32 bit or 64 bit), or Windows Vista (Enterprise,
Ultimate, or Business). The databases cannot reside on a Novell or Linux server.
§
SQL Server 2005 is a memory intensive program. Steps can be taken to optimize
these programs for improved program and server performance.
2-8
Installation
§
§
§
Chapter
2
ProSystem fx Engagement allows users to use their workpapers on a different server
than where the binder database is located (Office Server). In these cases, the
ProSystem fx Engagement Synchronization service needs to be configured to run
under an account with rights to the location where the workpapers are being stored.
The workpapers can reside on a non-Windows server.
Time synchronization plays an important part in ProSystem fx Engagement. All
servers and workstations running Engagement (in the office and out in the field)
should maintain time clock synchronization to ensure that you do not lose data and to
ensure that the latest changes to data and server are properly synchronized.
Changing the names for any workstation or server is not recommended after
ProSystem fx Engagement has been installed. This is due to the installation of SQL.
For additional information or for the latest update on any of these items, please contact
ProSystem fx Technical Support at 1-800-739-9998.
ProSystem fx Engagement Administrator Considerations
Engagement Administrator is an organizational tool designed to provide security and control
rights for different staff levels and to organize and maintain your office servers and central
file rooms. Workpaper Management relies on Administrator to provide login information,
central storage, and secured access to all your client data.
Administrator should be installed and configured on a Windows server or a dedicated
computer with Windows 2003 Server with Service Pack 1 or higher. If you plan to maintain
multiple office servers, the Administrator module should be installed and configured on a
Windows server or a dedicated computer for each office. (For more information on office
servers, please refer to Setting up the Administrator Environment on page 3-24.)
Engagement Administrator must be installed to a location accessible by all computers
running ProSystem fx Engagement Workpaper Management. Administrator installation must
be performed at the console of the Windows server or the dedicated computer. It cannot be
installed by pushing the install from another computer to the Windows server or dedicated
computer.
The Administrator Workstation setup allows you to remotely access the Administrator
module. The Administrator Workstation can be installed to any workstation that needs to
remotely access the Administrator module.
Important: Engagement Administrator should not be installed on every computer
in your firm.
2-9
Chapter
2
Installation
Pre-Installation Checklist
For detailed installation and configuration instructions, please see the ProSystem fx
Engagement Networking Best Practices document.
Before beginning the installation, verify that all of the following tasks are completed:
¨
If you are upgrading to ProSystem fx Engagement 6.0 from a prior version, do the
following:
Important: All machines running Engagement in a network environment must be
upgraded to version 6.0 in order for users to access the software. It is not
possible to run different versions of Engagement within the same office.
§
§
§
§
Upgrade the main office server first. We recommend that you upgrade the main
office server first, then upgrade the workstations in order of priority to begin using
the software.
Back up the central databases. Back up all central admin and bin databases prior
to upgrading. For detailed instructions on using the backup restore utility, refer to
the Database and Restore Instructions v6.0.pdf file in the Documents folder of the
installation DVD.
Back up the workpapers. Back up all workpapers before upgrading. To ensure that
this backup contains the latest versions of all files, users should synchronize all
binders to the Central File Room prior to the backup.
Back up templates. Back up all centrally located templates prior to upgrading to
allow for a full rollback if necessary.
¨
¨
¨
¨
Close Microsoft Word, Excel, and Outlook.
¨
If you install ProSystem fx Engagement to a server that is running Microsoft SQL
Server 2005 or 2008 Enterprise or Standard Edition, we recommend that you use the
SQL Server 2005 or 2008 Enterprise or Standard Edition instead of SQLExpress 2005
or 2008. This allows ProSystem fx Engagement to run optimally.
We strongly recommend that you close any additional programs.
Disable virus-checking programs.
If you are installing on a computer that currently has another application using SQL,
stop that instance. For instructions on how to stop and start services, see the
ProSystem fx Engagement Networking Best Practices document.
If you use the Standard or Enterprise Editions, you must do the following:
§
§
§
¨
Configure a named instance of SQL Server for ProSystem fx Engagement prior to
installation. Detailed instructions for how to setup and configure SQL Server are
included on the CD in the ProSystem fx Engagement Networking Best Practices
document.
Install Service Pack 2 for SQL Server 2005.
Have appropriate licensing on the SQL server.
Ensure that the operating system, Microsoft Internet Explorer, and Microsoft Office are
all installed with the required service packs (see page 2-2, Engagement 6.0
Requirements, for details).
2 - 10
Installation
Chapter
2
General Installation Instructions
This section provides standard installation procedures for the ProSystem fx Engagement
Administrator module and Workpaper Management module.
Notes to Citrix Users:
§
§
Follow these instructions if you are installing to a single-server Citrix or Windows
Terminal Services environment.
Do not follow these instructions if you are installing to a multi-server Citrix or
Windows Terminal Services (Load Balanced) farm. Instead, refer to Terminal Services
Installation on page 2-16.
Caution: Publishing installation Group Policy Objects through Active Directory is not
recommended due to possible conflicts among versions (e.g., Canadian Engagement
Administrator and United States Engagement Workpaper Management on the same
workstation).
To install ProSystem fx Engagement, do the following:
1. Complete all tasks in the Pre-Installation Checklist on page 2-10.
2. Insert the Engagement CD.
Notes:
§
§
If you do not have Adobe Reader version 7.0 or later, you are given the
opportunity to install it. You need Adobe Reader to view the Installation Guide or
Release Bulletin in step 11 of this procedure. You also need Adobe Reader to view
the ProSystem fx Engagement User Guide via Help/User Guide. Click Yes to
continue installing ProSystem fx Engagement without Adobe Reader. Click No to
cancel the installation and install Adobe Reader 7.0 or later. Adobe Reader 8.0 is
included on the Engagement Installation Disk.
The splash screen can be customized. Please contact Technical Support for
additional information.
3. If an Engagement SQL Instance is already installed, skip to step 8.
If an Engagement SQL Instance is not already installed, do one of the following:
§
§
Install Microsoft SQL Server 2005 Standard or Enterprise edition (32 bit or 64 bit)
or SQL Server 2008 (32 bit) as explained in the ProSystem fx Engagement
Networking Best Practices document, and then skip to step 8.
Install Microsoft SQL Express 2005 or 2008 that are included on the Engagement
disc. To install SQL Express 2005 or SQL Express 2008, continue to step 4.
4. If autorun is enabled, click Install SQL Express 2005 or Install SQL Express 2008.
If Autorun is not enabled, select Start/Run. In the Open field, enter X:\ProSystem fx SQL
2005 Instance Installer.msi or X:\ProSystem fx SQL 2008 Instance Installer.msi (Vista or
Server 2008 users enter ProSystem fx SQL 2005 Instance Installer.exe or ProSystem fx
SQL 2008 Instance Installer.exe), where X represents your CD-ROM drive letter, and
click OK. The SQL 2005 Instance Installer wizard displays.
2 - 11
Chapter
2
Installation
5. Click Next. The Ready to Install the Program page displays.
6. Click Install. Several status screens display as the SQL Instance is installed.
7. Click Finish.
8. If Autorun is enabled, the Engagement splash screen displays. Click Install ProSystem fx
Engagement.
If Autorun is not enabled, the Run dialog displays. In the Open field, enter X:\ProSystem
fx Engagement.msi (Vista or Server 2008 users enter X:\PfxEngSetup.exe), where X
represents your CD-ROM drive letter, and click OK. The Welcome dialog displays.
9. Click Next. The License Agreement dialog displays.
10. Read the license agreement. If you agree to the terms, select I accept the terms in the
license agreement and click Next. The Install Guide and Release Bulletin dialog displays.
11. Click Install Guide to view a PDF of the Installation Guide. Click Release Bulletin to view
the Release Bulletin for ProSystem fx Engagement.
12. Click Next. The Custom Setup page displays.
13. Select the module or modules to install. Click the appropriate icon and select This feature
will be installed on local hard drive to install the module or This feature, and all
subfeatures, will be installed on local hard drive to install the module and all subfeatures
(e.g., Engagement CD Image for Administrator, or Templates and Sample Binder for
Workpaper Management).
§
Workpaper Management. Workpaper Management should be installed on
computers that will be accessed by Engagement staff members.
Note: Microsoft Office 2003 Professional with Service Pack 2 or a later
version of Microsoft Office is required in order to install ProSystem fx
Knowledge Tools. For new installations of Engagement, the Professional
edition is required. If you are upgrading from a prior Engagement version,
then another edition of Office 2003 (such as Standard) is allowed if it is
already installed. If a prior version of Office is detected, the Knowledge
Tools subfeature of Workpaper Management is not available for
installation.
2 - 12
Installation
§
Chapter
2
Administrator. The Administrator module should be installed on a dedicated
computer that is designated as the main office server. Computers with the
Workpaper Management module installed need access to this main office server
computer.
Notes:
— If you plan to create a secondary office server or servers, install the ProSystem
fx Engagement Administrator module on a separate dedicated computer. When
more than one office server exists, workstations with Workpaper Management
installed do not necessarily need a network connection to both office servers.
Some can connect to the main office server while others connect to a
secondary office server.
— It is not mandatory to have a network connection between the main and
secondary office servers. Data can be passed between the two using Create
and Receive Admin Packages. (For more information, see Creating an Admin
Package on page 3-27 and Receiving an Admin Package on page 3-28.)
§
Administrator Workstation. The Administrator Workstation setup allows you to
access the Administrator module remotely.
14. If you selected Administrator in step 13 (with or without Workpaper Management) the
Administrator Bin Database Path dialog displays. The system creates the database in the
default folder on your local computer unless you click Browse and specify a different
location.
15. Click Next. The Ready to Install dialog displays.
Notes:
§
§
If you attempt to install conflicting applications, such as Administrator and
Administrator Workstation, InstallShield displays a conflict message specifying the
conflicting applications. Click Back to make the necessary changes.
If your system does not meet the requirements for the application you are
installing, InstallShield displays a message listing the missing components. Click
Cancel to install the necessary components. Click Back to install a different
application. For detailed information about the new bin structure of the
Engagement database, see Managing Bins, page 3-56.
16. Click Install. InstallShield displays several progress screens as the necessary programs
and features are installed.
Note: If ProSystem fx Knowledge Tools is selected for installation and
Microsoft Office 2003 or Office 2007 Primary Interop Assemblies (PIA) and
Visual Studio 2005 Tools for Office Runtime (VSTOR) are not installed on your
computer, the respective progress for these components display.
17. If you are installing Administrator, read the information on the Backup Information dialog
and select I have read the above warning, then click Next. The InstallShield Wizard
Completed dialog displays.
18. Click Finish, then complete any applicable tasks in the Post-Installation Checklist on page
2-14.
2 - 13
Chapter
2
Installation
Post-Installation Checklist
After completing the installation, you should perform the following tasks, as applicable:
¨
If you are upgrading from a prior version of Engagement, convert all trial balances to
the Microsoft SQL database format. To do this, select Start/Programs/ProSystem fx
Engagement/Utilities/ProSystem fx Engagement Trial Balance Conversion Wizard, and
then follow the instructions in the wizard.
¨
Verify that all administrative users have full access to the Admin Share folder on the
office server. This folder, which is created during the installation, is shared by default,
but the network administrator needs to ensure that all Engagement administrative users
have full rights to that location. For additional information, see the ProSystem fx
Engagement Networking Best Practices document.
¨
Windows XP and Windows Server 2003 have built-in security that, by default, does
not enable full rights to newly created folders. If installing ProSystem fx Engagement to
a Windows XP workstation, the network administrator or person installing the program
needs to ensure that full rights are given to the installation location of any installed
Engagement module. This is especially important if the program is being installed to the
Program Files folder. For additional information, see the ProSystem fx Engagement
Networking Best Practices document.
Altering a Current Install of Engagement
ProSystem fx Engagement Program Maintenance allows you to modify, repair, or remove
the current installation.
Modifying a Current Install
To add new program features or remove currently installed features, do the following:
1. Close all programs on your computer.
2. Select Add or Remove Programs (or Programs and Features in Windows Vista and
Windows Server 2008) from your computer's Control Panel.
3. Select ProSystem fx Engagement from the list and click Change to open the Welcome
dialog.
2 - 14
Installation
Chapter
2
4. Click Next to display the Program Maintenance dialog.
5. Select Modify and then click Next. The Custom Setup dialog displays.
6. Select applications to install and deselect applications to remove. Click the plus sign (+),
where available, to select individual options to install or remove. The Custom Setup
dialog displays the amount of space required for installation.
7. Click Next to display the Ready to Modify dialog.
8. Click Install to begin the update process. The InstallShield Wizard Completed dialog
displays when the process is finished.
9. Click Finish to exit the installation.
Repair a Current Install
To repair program features from a previous installation, do the following:
1. Close all programs on your computer.
2. Select Add or Remove Programs (or Programs and Features in Windows Vista and
Windows Server 2008) from your computer's Control Panel.
3. Select ProSystem fx Engagement from the list and click Change to open the Welcome
dialog.
4. Click Next. The Program Maintenance dialog displays.
5. Select Repair and then click Next. The Ready to Repair dialog displays.
6. Click Install. The Installing ProSystem fx Engagement status bar displays while
InstallShield repairs the installation(s). Once the repair process is finished, the
InstallShield Wizard Completed dialog displays.
7. Click Finish.
2 - 15
Chapter
2
Installation
Removing ProSystem fx Engagement
To remove all installed features, do the following:
1. Close all programs on your computer.
2. Select Add or Remove Programs (or Programs and Features in Windows Vista and
Windows Server 2008) from your computer's Control Panel.
3. Select ProSystem fx Engagement from the list and click Remove to display the Welcome
dialog.
4. Click Yes on the confirmation dialog. Windows removes all ProSystem fx Engagement
applications.
CCH Workpaper Downloads
For detailed instructions on downloading and installing a CCH (formerly Miller) Integrated
Engagement Guide, please refer to the release bulletin for each integrated title.
You can download the release bulletin from the CCH Web site at http://tax.cchgroup.com.
A release bulletin will also be mailed to you when you purchase an integrated CCH Title.
Knowledge Tools Content
For instructions on downloading and installing Knowledge Tools content, please refer to the
Knowledge Tools User Guide, available on the Engagement Installation CD.
For more information about Knowledge Tools, or to download Knowledge Tools titles, go to
http://tax.cchgroup.com/knowledgetools.
Knowledge Coach Content
For instructions on downloading and installing Knowledge Coach content, please refer to the
Getting Started with Knowledge Coach section of the Knowledge Coach Help file.
Terminal Services Installation
Follow these instructions if you are installing to a multi-server Citrix or Windows Terminal
Services (Load Balanced) farm.
Important: If you are installing Engagement to a single (or stand-alone) Citrix or
Windows Terminal server, do not follow these instructions. Instead, install
Workpaper Management using the general installation instructions starting on page
2-9.
The installation of ProSystem fx Engagement Workpaper Management can vary based on
the Terminal Services and Citrix MetaFrame software setup. For this reason, we strongly
suggest that you consult with your network administrator prior to installing Engagement.
We also advise contacting Technical Support prior to installation to address any questions
you may encounter with the installation.
2 - 16
Installation
Chapter
2
Important: The following instructions outline the preferred steps for installing
ProSystem fx Engagement Terminal Services Client; however, your configuration
may require additional or alternate steps. For additional assistance, please contact
Technical Support at 1-800-739-9998.
Before beginning, install ProSystem fx Engagement Administrator. Refer to the general
installation instructions starting on page 2-11 for detailed instructions.
The following section contains instructions for installing the ProSystem fx Engagement
Terminal Services Client (Workpaper Management for Terminal Services), ProSystem fx
Engagement Terminal Services Database, and ProSystem fx Engagement Administrator
Workstation.
Installation Considerations for Terminal Services Database
Keep the following in mind when installing Terminal Services Database:
§
§
The Terminal Services Database should be installed to a static location that is
accessible for all of the load balanced servers. This location should be a dedicated
Windows 2003 or 2008 server with enough space to store data being created in the
Terminal Services Client module.
The recommended location is the main office server where the ProSystem fx
Engagement Administrator is installed. The Terminal Services Database installation
must be performed at the server console of the computer it is to reside on.
Terminal Services Installations
This section provides installation instructions for ProSystem fx Engagement Terminal
Services Database, Terminal Services Client, or Administrator Workstation on a Windows
Terminal Services enabled server.
1. Complete all tasks in the Pre-Installation Checklist on page 2-10.
2. Determine that no one is accessing the Terminal Services server.
3. Insert the ProSystem fx Engagement CD.
4. Open Control Panel and select Add/Remove Programs\Add New Programs on Server
2003.
5. Click CD or Floppy, and then click Next. The Install Program from Floppy Disk or
CD-ROM dialog displays.
6. Click Next. The Run Installation Program dialog displays.
7. If an Engagement SQL Instance is already installed, skip to step 15.
If an Engagement SQL Instance is not already installed, do one of the following:
§
§
Install Microsoft SQL Server 2005 or 2008 Standard or Enterprise edition as
explained in the ProSystem fx Engagement Networking Best Practices document,
and then skip to step 15.
Install Microsoft SQL Express 2005 or Microsoft SQL Express 2008, which are
included on the Engagement disc. To install SQL Express 2005 or 2008, continue
to step 8.
2 - 17
Chapter
2
Installation
8. Click Browse and locate the ProSystem fx SQL 2005 Instance Installer.msi (Vista or
Server 2008 users locate ProSystem fx SQL 2005 Instance Installer.exe or ProSystem fx
SQL 2008 Instance Installer.exe).
9. Click Finish. The SQL 2005 or SQL 2008 Instance Installer wizard displays.
10. Click Next. The Ready to Install the Program page displays.
11. Click Install. Several status screens display as the SQL Instance is installed.
12. Click Finish.
13. Click CD or Floppy, and then click Next. The Install Program from Floppy Disk or
CD-ROM dialog displays.
14. Click Next. The Run Installation Program dialog displays.
15. Click Browse and locate the PfxEngSetup.exe file.
16. Click Finish. The Welcome dialog displays.
Note: If you do not have Adobe Reader version 7.0 or later, you are given the
opportunity to install it. You need Adobe Reader to view the Installation Guide
or Release Bulletin in step 19 of this procedure. You also need Adobe Reader to
view the ProSystem fx Engagement User Guide via Help/User Guide. Click Yes
to continue installing ProSystem fx Engagement without Adobe Reader. Click
No to cancel the installation and install Adobe Reader 7.0 or later. Adobe
Reader 8.0 is included on the Engagement Installation Disk.
17. Click Next. The License Agreement dialog displays.
18. Read the license agreement. If you agree to the terms, select I accept the terms in the
license agreement and click Next. The Install Guide and Release Bulletin dialog displays.
19. Click Install Guide to view a PDF of the Installation Guide. Click Release Bulletin to view
the Release Bulletin for ProSystem fx Engagement.
20. Click Next. The Custom Setup dialog displays.
21. Select the program feature to install: Terminal Services Database, Terminal Services
Client, or Administrator Workstation. Click the plus sign (+) to select or deselect
subfeatures to install, or choose This feature, and all subfeatures, will be installed on
local hard drive. Deselect Workpaper Management, which is selected by default.
Note: Microsoft Office 2003 Professional with Service Pack 2 or a later version
of Microsoft Office is required in order to install ProSystem fx Knowledge
Tools. For new installations of Engagement, the Professional edition is required.
If you are upgrading from a prior Engagement version, then another edition of
Office 2003 (such as Standard) is allowed if it is already installed. If a prior
version of Office is detected, the Knowledge Tools subfeature of Terminal
Services Client is not available for installation.
22. If you are installing Terminal Services Client, click Next to display the Terminal Services
Database Location dialog. Enter the name of the server where the database is installed.
2 - 18
Installation
Chapter
2
23. Click Next. The Ready to Install screen displays.
Notes:
§
§
If you attempt to install conflicting applications, InstallShield displays a message
specifying the conflicting applications. Click Back to make the necessary changes.
If your system does not meet the requirements for the application you are
installing, InstallShield displays the Requirements dialog, listing the necessary
components. Click Cancel to install the necessary components, or click Back to
change the application to install.
24. Click Install. The Installing ProSystem fx Engagement status bar displays as InstallShield
completes the installation. The InstallShield Wizard Completed dialog displays.
Note: If you are installing Terminal Services Client with ProSystem fx
Knowledge Tools selected, and Microsoft Office 2003 or Office 2007 Primary
Interop Assemblies (PIA) and Visual Studio 2005 Tools for Office Runtime
(VSTOR) are not installed on your computer, the respective progress bars for
these components display.
25. Click Finish, then complete any applicable tasks in the Post-Installation Checklist on page
2-14.
2 - 19
3
C H A P T E R
Engagement Administrator
Overview
This chapter shows you how to set up the ProSystem fx Engagement Administrator module.
When accessing the Administrator module for the first time, the administrator must
designate a main office server. The main office server manages firm, licensing, staff, and
central file room information. An optional secondary office server can be created and
promoted to main office server in the event an administrator at the secondary office server
needs to perform functions limited to the main office server.
Secondary office servers can be configured and connected to the main office server or
maintained as disabled for synchronization. The secondary office server shares pertinent
staff, firm, and central file room information with the main office server. Firm, team, client
group, and staff information can be viewed, but not changed, from a secondary office
server.
You must use the Administrator module to set up staff members in your firm before they
can begin to use the ProSystem fx Engagement program.
Each staff member is assigned to a staff group. Each group is given specific group rights to
various functions within ProSystem fx Engagement. You can also create staff teams to
streamline the binder assignment process. This allows you to control and manage the
electronic engagement process.
In the Administrator module, you can do the following:
§
§
§
§
§
§
§
§
§
§
§
Add ProSystem fx Engagement, CCH Title, and Knowledge Tools licenses
Add staff groups and assign the appropriate rights to those groups
Add staff members and assign them to staff groups
Manage staff profiles
Assign staff members to a home office server
Assign licenses to staff members
Add teams and assign staff members to teams
Add clients to be used in the ProSystem fx Engagement program
Add client groups and assign clients to the groups
Assign staff members and teams to client engagement binders
Archive binders that have been finalized
3-1
Chapter
Engagement Administrator
3
§
§
§
§
§
§
§
§
§
§
§
§
§
Unarchive and unfinalize binders
Create a main office server to store firm, staff, licensing, team, client group, and
central file room information
Create secondary office servers to store additional central file rooms with client and
binder information, if applicable
Create central file rooms to store and organize binders
Synchronize main and secondary office server information
Move binders from one central file room to another
Edit Binder properties in a central file room
Create, edit, and delete custom binder types and binder statuses
Import staff and staff groups
Import staff via Active Directory
Manage Binder database information by storing binders in bins
Edit ProSystem fx Practice projects and clients, and launch the ProSystem fx Practice
Client Inquiry module
Manage Tip of the Day
Using the ProSystem fx Engagement Administrator
From the Windows Start menu, select the program group where you installed the
ProSystem fx Engagement Administrator. Select ProSystem fx Engagement Administrator,
or double-click the Administrator icon on your desktop. The ProSystem fx Engagement
Admin Login dialog displays.
Initial Login to the Engagement Administrator
Only staff assigned to the Administrator Staff Group can log in to the Administrator. The
program provides one default staff member in the Administrator Staff Group. You can
modify the password and staff information for the default user, but you cannot change the
Login Name or delete this staff member. There is no limit to the number of licensed staff
you can assign as administrators.
Note: If you want other workstations to access the Administrator module, install
Administrator Workstation to those workstations. See Chapter 2, Installation, for
details.
The first time you log in, do the following:
1. In the Login Name field, enter ADMIN. Leave the Password field blank.
2. Click OK. The ProSystem fx Engagement Administrator program detects that a main
office server has not been set up and displays a message that the computer must be
configured as an office server before you can log in.
3. Click Yes. The Provide Office Server Information dialog displays.
3-2
Engagement Administrator
Chapter
3
4. Enter a label of up to 32 characters for the main office server in the Label field. The label
is required and is used as the office server's name.
5. The Server name field defaults to the name of the computer to which you are logged in.
6. Enter a description for the server of up to 60 characters in the Description field. The
description is optional.
7. Click Next. The Determine the office server designation dialog displays.
8. Select Main office server to establish this as the main office server.
9. If the Firm has more than one office server and this office server does not have a
physical connection with the other office server(s), check the Disable Admin
Synchronization check box.
10. Click OK. The Firm Properties dialog displays.
11. Enter the firm information and click Next. The Configure Office Server Summary Report
displays.
12. Do any of the following:
§
§
§
§
§
Click
Click
Click
Click
Click
Print to print the summary report.
Save As to save the report as an HTML file.
Back to make changes to your settings.
Cancel to discard your work and exit the Configure Office Server Wizard.
Finish to save your settings and open Engagement Administrator.
Once you are in the program, you can change the administrator’s password and add more
staff to the Admin group, if needed. See Adding New Staff Members on page 3-11.
Note: For instructions on creating a secondary server, see page 3-24.
Entering Information about Your Firm
The upper-most icon in the left pane represents your firm. Using this feature, you can
change the properties of the firm and enter your firm name and information.
To change firm information, click the icon and perform one of the following actions:
§
§
§
Select File/Properties.
Right-click and select Properties from the pop-up menu.
Click the Properties button on the toolbar.
3-3
Chapter
3
Engagement Administrator
The Firm Properties dialog displays.
Complete the information in the dialog. When you are finished, click OK. The caption for the
File Room icon changes to the name entered in the mandatory Firm Name field. You can use
the Properties command to change firm information. The information entered in this dialog is
available for linking to your Word and Excel workpapers. See Chapter 9, Using Excel, and
Chapter 10, Using Word, for further information.
Using Your Active Directory in ProSystem fx Engagement
Administrators can leverage the time and effort spent building up the Active Directory on
the firm’s network.
ProSystem fx Engagement allows administrators to import and map existing users in the
ProSystem fx Engagement staff table. This can be done manually or scheduled via
Scheduled Tasks to be done during off hours.
Mapping Your Active Directory to Engagement Staff
Use this procedure to map existing users in your Active Directory to existing users in the
ProSystem fx Engagement staff.
1. From the ProSystem fx Engagement Administrator main menu, select Staff/Import from
Active Directory/Configure Mapping. The Domain Login dialog displays.
3-4
Engagement Administrator
Chapter
3
2. Log in to the domain. The Configure Mapping dialog displays.
3. Select the Users tab.
4. Select the appropriate directory from the Active Directory from which to import field.
The default is Engagement. Once you make this selection, the Users section is populated
with Active Directory users and Engagement staff. (If the Active Directory prompt from
which to import field is not editable, configure the Active Directory group first, then
return to this task.)
5. Click Auto-map Users to automatically map Active Directory users to Engagement staff
via name-matching. The mapping displays in the Engagement staff section, showing the
Active Directory user nested under the Engagement staff.
6. Check the Show only unmapped staff box to display unmapped Engagement staff
members.
7. Manually map unmapped staff, if necessary, by first highlighting the correlating names in
the Active Directory and the Engagement staff. Then either click the right arrow to map
the person from the Active Directory to the Engagement staff or click the left arrow to
unmap the person from the Engagement staff to the Active Directory.
8. Click OK to finalize the mapping and exit the Configure Mapping dialog.
Manually Updating Staff
You can run a manual import from Active Directory to the main office server but not the
secondary office server. This is because you can modify staff properties on the main office
server only.
To manually update staff, do the following:
1. Select Active Directory/Manual Import/Update/Staff/Import. If you have not logged in to
a domain yet, the Domain Login dialog displays. Once you are logged in, the
Import/Update Staff Progress dialog displays throughout the import process. If any errors
occur, the Errors tab displays when import is complete.
2. Click the Tasks tab to see a list of all the attempted tasks and whether their status is
Completed or Failed.
3-5
Chapter
Engagement Administrator
3
3. Click View Import Log to see the cumulative diagnostic report for all imports. The most
recent import inserts at the top of the report.
§
§
You can print the import log from your Internet browser.
An electronic copy is stored at X:\Pfx Engagement\Admin\Admin Share directory
(where X represents the drive where Engagement Administrator is installed).
We Recommend: Schedule nightly updates, even if you routinely do manual
updates after every staff change. (See Scheduling an Import from the Active
Directory on page 3-6.)
Viewing the Active Directory Import Log
The Active Directory Import Log keeps a history of all imports from Active Directory for the
firm, with the most recent import inserted at the top of the document. The log opens in
your Internet browser as a printable HTM file. The log is stored in the X:\Pfx
Engagement\Admin\Admin Share directory (where X represents the drive where
Engagement Administrator is installed).
Use one of the following methods to view the Active Directory import log:
§
§
Select Staff/Import from Active Directory/View Import Log from the main menu.
Initiate a manual update by selecting Staff/Import from Active Directory/Manual
Import/Update. When the update is completed, click View Import Log in the
Import/Update Staff Progress dialog.
Scheduling an Import from Active Directory
You can schedule the import from Active Directory to take place automatically on the date
and time you select. You can review the schedule, retry if an import fails, and view the
import log of the office servers involved in the import.
You can schedule an import from Active Directory to the main office server but not to a
secondary office server. This is because you can modify staff properties on the main office
server only.
To schedule an import of staff information from Active Directory, do the following:
1. Select Tools/Scheduled Tasks from the ProSystem fx Engagement Administrator main
menu. The Scheduled Tasks dialog displays.
2. Select Import staff information from Active Directory and click Edit. The Scheduled
Tasks opens, displaying Admin Active Directory Import in its title bar.
3-6
Engagement Administrator
Chapter
3
3. Select the Task tab.
4. In the Run field on the Task tab, the path to the import defaults to X:\Pfx
Engagement\ADImport.exe (where X represents the drive where the ProSystem fx
Engagement Administrator program was installed). You can also browse to another
location.
5. The Run as field should display the Windows user name of the person logged on to the
computer. Click Set Password to enter and confirm the user’s Windows password. The
scheduled task will not run without this information. Click OK to exit the Set Password
dialog.
6. Check the Enabled (scheduled task runs at specified time) box.
7. Click the Schedule tab and select how often the task is to be run from the Schedule
Task drop-down list.
8. Use the arrows to specify the time that the synchronization is to start. You may also
click Advanced to specify start and end dates and details on when to repeat the task.
Click OK to exit the Advanced Schedule Options dialog.
9. Use the Every field in the Schedule Task Daily section to specify if you want to repeat
the import every day, every two days, etc.
10. Check the Show multiple schedules box to change or delete schedules. Click the New
button to create a new schedule for the task, which will run after the last schedule is
completed. Click Delete to delete a highlighted schedule.
11. Click the Settings tab to specify the following:
§
§
§
§
Whether to delete the task if it is not scheduled to run again.
Whether to stop the task if it runs beyond a time you specify.
To start the task only if the computer has been idle for a specified time or to stop
the task if the computer becomes active.
Whether to start the task if the computer is running on batteries, stop the task if
battery mode starts, and wake the computer to run the task.
12. Click OK to save your schedule and exit Scheduled Tasks.
13. Click Close to exit the Scheduled Tasks dialog.
Note: The first time the scheduler is run, you must input the password for the
current Windows user.
Setting Up Staff Groups and Staff
In the ProSystem fx Engagement Administrator module, you add the staff members that you
want to access ProSystem fx Engagement. You assign each staff member to a staff group.
Staff groups are assigned rights to various functions within the program, and these rights
transfer to the staff members that you assign to the group. This allows you to control and
manage the electronic engagement process.
3-7
Chapter
Engagement Administrator
3
Staff Groups
You can customize staff groups to represent the different levels and roles of your firm’s
staff. At each staff group level, you select which rights in the ProSystem fx Engagement
program you want to enable. Once staff members are assigned to the appropriate staff
group, they receive the rights of that staff group when they log in to the program.
Default Staff Groups
The Administrator module provides five default staff groups:
§
§
§
§
§
Admin
Manager
Partner
Senior
Staff
You may customize staff groups by adding, deleting, or modifying groups.
One staff member, Default Admin, has already been added to the Admin staff group. This
staff person cannot be deleted, but you can modify the staff information with the Staff
Properties dialog. For example, you may want to change the password to prevent others
from accessing the ProSystem fx Engagement Administrator module. You can also add
additional staff members to the Admin group.
Adding a New Staff Group
To add a new staff group, do the following:
1. Click the Staff Groups icon in the left pane of the Administrator screen and do one of the
following:
§
§
§
Select Staff/New Staff Group.
Right-click the Staff Groups icon and select New Staff Group.
Click the New Staff Group button on the toolbar.
The Create New Staff Group dialog displays.
3-8
Engagement Administrator
Chapter
3
2. Complete the Name and Description fields. The Name field is required.
The rights available to a staff group are found on the following tabs:
§
§
§
§
§
§
LFR
Client
Binder
Workpaper
Notes
Sign Off
These rights are discussed in more detail in the Assigning Staff Group Rights section
below.
3. Click OK to close the dialog.
Assigning Staff Group Rights
To assign or modify staff group rights, do the following:
1. Select from the tabs listed below on the Create New Staff Group dialog:
§
§
§
LFR. This tab allows you to select whether sharing of local file rooms is allowed.
Client. These rights are associated with the tasks involved with creating,
modifying, and deleting clients.
Binder. These rights allow staff members to create binders, modify binder
properties and staff assignments, override document completion dates, override
binder retention periods, and roll forward, finalize, synchronize, back up, and
restore binders.
You can also allow staff members to create, modify, and delete binder tabs,
empty all workpapers from the trash, empty Current Editor workpapers from the
trash, interface with tax software, create and receive binder packages, and save
binders as templates.
Note: Override document completion date and Override binder retention
period are inactive until Modify binder properties/staff assignment is
selected.
§
Workpaper. The Workpaper tab contains rights associated with workpapers within
the engagement binders. These rights include creating, deleting/restoring, moving,
taking over, and assigning/unassigning workpapers, as well as deleting
workpapers after the document completion date. This tab also establishes rights
for saving workpapers as templates, locking workpapers, unlocking workpapers,
freezing and unfreezing engagement links, publishing workpapers, and printing
workpapers.
In the Trial Balance section of the Workpaper tab, you can also grant rights to
create new trial balances, and save trial balances as templates on this tab.
3-9
Chapter
3
Engagement Administrator
§
Roll forward. These rights allow staff members to select how workpapers are
handled when the binder is rolled over.
In the All Workpaper section, you can grant group members the right to determine
whether a workpaper should or should not be included when the binder is rolled
forward.
In the Knowledge Tools section of the Roll forward tab, you can grant group
members the right to choose to accept/reject changes in Knowledge Tools
workpapers that are rolled forward, and/or to keep answers and comments when
a Knowledge Tools workpaper is rolled over. This section displays only if
Knowledge Tools is installed.
In the Knowledge Coach section of the Roll forward tab, you can grant group
members the right to override the roll forward settings that have been applied to
individual responses, and to accept/reject changes to the Knowledge Coach
content. This section displays only if Knowledge Coach is licensed.
§
Notes/Diagnostics. Notes rights include creating/clearing notes, deleting the staff
member's own notes, deleting cleared notes belonging to other members, deleting
uncleared notes belonging to other members, clearing other staff members' notes,
and printing a notes report.
Diagnostics rights allow users to delete Knowledge Coach diagnostics.
§
Sign Off. The rights on the Sign Off tab include signing off as preparer, signing off
as a first or second reviewer, adjusting sign off dates, and changing the
password.
Note: Sign Off as Reviewer and is dependent on Sign Off as Preparer. In
order to be able to sign off as reviewer, you must first be able to sign off
as preparer.
If Knowledge Coach is licensed, this tab also allows you to grant users the right to
maintain the program step sign off when creating new workpapers from existing
workpapers.
§
Content. Displays if Knowledge Coach is licensed. These rights include adding and
removing Knowledge Coach titles, releasing titles to staff, and inserting
Knowledge Coach workpapers from unreleased titles.
2. For existing staff groups, select the applicable group and perform one of the following
options:
§
§
§
Select File/Properties.
Right-click and select Properties from the pop-up menu.
Select the Properties button.
Note: The Admin group defaults to all rights selected. This cannot be modified.
3. When you are finished, click OK. The staff group caption is taken from the Name field.
You can use the Properties command to change staff group information, if required.
Note: Modifications to the rights of a user do not take effect until the user logs in
to or synchronizes to the office server.
3 - 10
Engagement Administrator
Chapter
3
Deleting a Staff Group
To delete a staff group, click the staff group in the left pane and perform one of the
following actions:
§
§
§
Select Edit/Delete.
Right-click the staff group icon and select Delete Staff Group.
Click the Delete button on the toolbar.
You cannot delete the Admin staff group. This group is required for access to the
ProSystem fx Engagement Administrator module. Also, you cannot delete staff groups with
staff members assigned. You must delete or move the staff before deleting the staff group.
Adding Staff Members
After the trial period for using ProSystem fx Engagement expires, you are required to have a
license for each staff member set up in the Administrator module. See Licensing on page
3-19 for information on adding licenses.
Important: Verify that you have the required number of licenses before creating users.
Adding New Staff Members
1. Click the staff group to which you want to assign the staff member in the left pane and
perform one of the following actions:
§
§
§
Select Staff/New Staff.
Right-click the staff group icon and select New Staff.
Click the New Staff button on the toolbar.
The Staff Properties dialog displays with the Staff Profile tab selected.
3 - 11
Chapter
3
Engagement Administrator
2. In the Account information section, enter a Login name of up to 16 characters. This field
is required.
3. Enter a Password of up to 16 characters in the Password field, and then enter it a
second time in the Confirm password field.
Check the Inactive box to mark the staff member as inactive.
Note: An inactive staff member cannot log in to the Workpaper Management
or Administrator modules. In addition, binder synchronization cannot be
performed with the inactive staff member. Marking a staff member as inactive
removes any license assignment you have made for the staff member.
4. In the Staff information section, enter the First name, Initials, and Last name. These
fields are required.
5. In the Default location field, enter the name of the computer the staff member uses
when accessing Engagement, or click Browse to choose the computer. This is the
default computer associated with this staff member for peer-to-peer synchronization.
6. From the Home Office Server drop-down list, select the default office server that
contains the central file rooms and client folders the staff member would normally use.
You can change the home office server and default computer location when logging in to
Workpaper Management.
7. Select the Other Info tab.
You can use the drop-down list to assign a staff member to an alternate staff group.
When assigning a staff member to a binder, you are able to choose between the default
or alternate staff group assignment. The staff member acquires the rights of either the
default or alternate staff group for that binder assignment.
3 - 12
Engagement Administrator
Chapter
3
8. If the staff member has access to the CCH Tax Research NetWork (TRN) or to
Accounting Research Manager (ARM), enter the login information on this tab.
Enter the staff member’s login name and password in the appropriate fields. This allows
the staff to access the TRN or ARM without having to enter their login name and
password.
Access the TRN by selecting Help/ProSystem fx on the Web, and access the ARM by
selecting Help/Accounting Research Manager on the Web in ProSystem fx Engagement.
TRN and ARM can also be accessed from the Guidance items in the Binder window.
9. When you have finished entering information for a staff member, you can do one of the
following:
§
§
§
Click Save and then New to save the new staff and create another staff member.
Click Save and Close to create the new staff member and exit the dialog.
Click Close to exit the dialog. If you have entered any information, you are asked
if you want to save it. Select Yes to create the new staff member or No to close
the dialog without creating the new staff.
Notes:
— If you want to reassign a staff member’s role in your firm, drag the staff
member from one staff group to another.
— The All Firm Staff team automatically updates to include the new staff created.
Binders with the All Firm Staff team assigned are also updated. If the All Firm
Staff team is assigned to several binders, the processing time to update may
be lengthy. To avoid delays, import the staff prior to adding the All Firm Staff
team to existing binders.
Modifying Staff Properties
Use the Properties command in the Admin module to change staff information. Highlight the
staff member and select File/Properties or right-click and select Properties. Staff members
can change their passwords by selecting Tools/User Profile in the Engagement File Room.
If you must delete a staff member instead of making them inactive, follow these steps:
1. In the Firm and Staff pane, click the staff group to which the staff member belongs.
2. Do one of the following in the Staff Members pane:
§
§
§
Highlight the staff member and select Edit/Delete.
Highlight the staff member and click the Delete icon on the toolbar.
Right-click the staff member and select Delete Staff from the pop-up menu.
3. Click Yes to confirm deletion.
Notes:
§
§
You cannot delete the Admin Default or the user that is logged in to Administrator.
The All Firm Staff team automatically updates when staff are deleted. Binders with
the All Firm Staff team assigned are also updated. If the All Firm Staff team is
assigned to several binders, the processing time to update may be lengthy.
3 - 13
Chapter
3
Engagement Administrator
Using the Global Profile Manager
The Global Profile Manager in Engagement Administrator allows you to manage all staff
profiles across all of your office servers. You can view summary information about staff
members, disable staff profiles, and scan selected staff to view checked out and assigned
workpapers.
Viewing Profile Information
To view summarized profile information, do the following:
1. In Engagement Administrator, select Staff/Profiles. The Global Profile Manager window
displays.
2. The Active Profiles tab is selected by default. The following information is provided:
§
§
§
§
§
§
§
§
Staff Name
Staff Initials
Login Name
Staff Status
Machine Name
Home Office Server
Profile ID
Staff ID
3. Select the Disabled Profiles tab to view profiles that have been disabled. The following
information is provided:
§
§
§
§
§
§
§
§
Staff Name
Staff Initials
Login Name
Staff Status
Machine Name
Home Office Server
Profile ID
Staff ID
4. Click Save Report to save a report of the active tab. The Save Report as a CSV file
dialog opens. Enter a file name and click Save.
3 - 14
Engagement Administrator
Chapter
3
Scanning Active Profiles for Workpapers
To scan selected Active Profiles for checked out and assigned workpapers, do the
following:
1. In Engagement Administrator, select Staff/Profiles. The Global Profile Manager window
displays.
2. Select the staff member(s) to scan by checking the check box(es) on the left.
3. Click Scan. The Scan for Workpapers Disclaimer notification displays, informing you that
the scan applies only to the current server.
4. Click OK. The Checked Out/Assigned Workpapers dialog displays. Any workpapers
checked out by or assigned to the selected staff member(s) display, organized by Profile,
Office Server, File Room, Client, and Binder. Click the minus sign (-) to collapse any of
these levels.
5. Click Save Report to open the Save Report as a CSV file dialog. The default location for
reports is X:Pfx Engagement/Admin/Archive (where X represents the drive where
ProSystem fx Engagement is installed). Keep the default location or select a different
location. The extension must be CSV. Enter a file name and click Save.
6. Click Close to close the Checked Out/Assigned Workpapers dialog.
Disabling a Profile
If a computer or server becomes unavailable, the Global Profile Manager can be used to
disable profiles on that machine. Any workpapers or other information associated with that
profile remain on the machine.
Note: Once a profile has been disabled, it cannot be reactivated from the Global
Profile Manager. If the computer or server becomes available once again, the user can
log in to Workpaper Management on that machine and establish the profile again.
To disable a profile, do the following:
1. In Engagement Administrator, select Staff/Profiles. The Global Profile Manager window
displays.
2. Select the staff member(s) to disable by checking the box(es) on the left.
3 - 15
Chapter
3
Engagement Administrator
3. Click Disable Profile. The Disable Profile Confirmation dialog displays.
4. Click Scan to scan for checked out or assigned workpapers before disabling the profile.
The Scan for Workpapers Disclaimer notification displays, informing you that the scan
applies only to the current server.
5. Click OK. The Checked Out/Assigned Workpapers dialog displays. Any workpapers
checked out by or assigned to the selected staff member(s) display, organized by Profile,
Office Server, File Room, Client, and Binder. Click the minus sign (-) to collapse any of
these levels.
6. Click Save Report to open the Save Report as a CSV file dialog. The default location for
reports is X:Pfx Engagement/Admin/Archive (where X represents the drive where
ProSystem fx Engagement is installed). Keep the default location or select a different
location. The extension must be CSV. Enter a file name and click Save.
7. Click Close to return to the Disable Profile Confirmation dialog.
8. Click Yes to disable the profile. The profile is removed from the Active Profiles tab.
Setting Up Teams
Teams provide a quick and easy way to organize staff members for assignment to
ProSystem fx Engagement binders. Teams are set up so that multiple staff members can be
added to a binder at the same time. The staff members added to or removed from the team
in the Administrator module are added to or removed from the binder team. A staff member
can be assigned to more than one team, and a team may have many members. To create a
new team or edit staff teams, the administrator must be logged in to the main office server.
Note: The system defined All Firm Staff team can be used to automatically assign
all staff members to binders.
3 - 16
Engagement Administrator
Chapter
3
Managing Teams
The Teams dialog displays the names and descriptions of existing teams on the main office
server and allows you to assign the teams to new binders. It allows you to create new
teams or edit and delete existing teams. This option is a view-only feature on a secondary
office server.
To set up a team, do the following:
1. Perform one of the following actions to open the Teams dialog:
§
§
Select Staff/Teams.
Select the Teams icon on the Toolbar.
2. The following options are available on the main office server only.
§
§
New. Creates a new team. Enter a unique name of up to 50 characters in the
Name field on the New Team dialog. This is a required entry. Enter a description
for the team. There is an option to automatically assign the team to binders
created in the New Binder and Roll Forward wizards.
Edit. Allows you to edit the highlighted team’s name and/or description on the Edit
Team dialog. The option to automatically assign the team to binders created in the
New Binder and Roll Forward wizard can also be edited.
Note: The team name for the system-defined All Firm Staff team cannot
be edited.
§
Delete. Deletes the highlighted team.
Note: The system-defined All Firm Staff team cannot be deleted.
3. Click OK.
Note: Changes made to existing teams do not affect team assignments. Deleted
staff members are automatically unassigned. See the following section, Assigning
Staff to a Team, for additional instructions.
Assigning Staff to a Team
The Team Member Assignment dialog allows you to assign staff members to teams. To
assign staff members to a team, follow the steps below:
1. Perform one of the following actions:
§
§
Select Staff/Team Member Assignment.
Select the Team Member Assignment icon on the toolbar.
3 - 17
Chapter
3
Engagement Administrator
The Team Member Assignment dialog displays.
2. Select a team from the drop-down list. The description provided for the selected team
displays in the Description field. If this team is automatically assigned in the New Binder
and Roll Forward wizards, this option is checked. To change this option, go to
Staff/Teams, select the team, and click Edit.
Note: The staff assigned to the All Firm Staff team cannot be modified. This
team always includes all active and inactive staff of the firm.
3. All existing staff members not already assigned to the selected team display in the
Available Staff list.
To filter the list of staff, you can enter a name or partial name, the asterisk wild card (*),
or the placeholder (?) in the field above Staff Name. To change the way the staff is
sorted, click the Staff Name column header.
4. To assign staff members to a team, do either of the following:
§
§
Click the Assign All button to move all staff members to the Assigned team
members box.
Highlight specific staff members and click the Assign button to move the selected
staff to the Assigned team members box.
5. The Assigned team members box displays staff members assigned to the team. To
change the way the team members are sorted, click the Staff Name column header.
6. To filter the list of staff, enter a name or partial name, the asterisk wild card (*), or the
placeholder (?) in the field above Staff Name.
To remove team members from a team, do either of the following:
§
§
Click the Unassign All button to move all team members to the Available staff
box.
Highlight specific team members and click the Unassign button to move the
selected team members to the Available staff box.
3 - 18
Engagement Administrator
Chapter
3
7. Click one of the following when you have finished assigning staff members to teams:
§
§
§
Click OK to save staff selections and close the dialog.
Click Cancel to close the dialog without saving your changes.
Click Apply to save staff selections for the selected team and select another team.
Notes:
§
§
If your firm has more than one office server, an Admin Synchronization should be
performed on all office servers to update the servers with the changes made to the
teams. See Manually Running an Admin Synchronization on page 3-30 for
instructions.
When you exit the Team Member Assignment dialog, binders where teams were
modified are updated. If the teams that were modified are assigned to numerous
binders, there may be a lengthy processing time.
Licensing
You can purchase licenses for the following:
§
§
§
§
ProSystem fx Engagement — Workpaper Management
ProSystem fx Engagement — Trial Balance
ProSystem fx Knowledge Tools
CCH Integrated Engagement Guides
Once you have set up your staff members, assign the license information for each specific
staff member so they can access the programs. See Setting Up Staff Groups and Staff on
page 3-7.
Adding Licenses
Your license key information unlocks the number of licenses purchased for each program.
Once you have purchased your licenses, you can either download the permission key files or
receive a diskette with the files.
Notes:
§
§
A license for ProSystem fx Engagement Workpaper Management is required for every
active staff member. If there are more active staff members than available licenses, a
dialog displays prompting the administrator to make applicable staff members
inactive. Staff members can be set to inactive status on the Staff Properties dialog.
If the number of licenses for any other module added is less than the number of
licenses currently assigned, a message displays in Workpaper Management indicating
that the administrator must unassign licenses.
Internet Download
To download your Engagement permission key files, do the following:
1. Select Staff/Add/Update License. The Add/Update License dialog displays. Internet
Download is selected by default.
2. Click OK. The Global fx Login screen displays.
3 - 19
Chapter
Engagement Administrator
3
3. Enter your User ID and Password to log in to Configure Staff. Based on your account
information, the application automatically downloads the appropriate permission key and
installs the licenses. A message displays when the licenses have been added
successfully.
4. Click OK.
Diskette
To add or update your licenses using a permission key on a diskette, do the following:
1. Insert your permission diskette and select Staff/Add/Update License. The Add/Update
License dialog displays.
2. Select the Permission key disk drive path radio button.
3. Click Browse to select the drive and folder where the perm key files reside. Click OK. A
message displays stating that the licenses have been added to the application.
4. Click OK.
Note: If you are upgrading your version of Engagement, a dialog asks if you are
upgrading from a previous version of Engagement. You may choose from these
three options:
§
§
§
Yes. I would like to convert 2.x staff and staff groups now. Choose this option to
begin converting your 2.x staff and staff groups immediately.
Yes. Remind me to convert 2.x staff and staff groups next time I log in. Choose
this option and the next time you log in to Engagement you will be reminded to
convert your 2.x staff and staff groups to the upgraded version of Engagement.
No. Do not ask me again. Choose this option if you are adding licenses for the
first time.
Assigning Licenses
After the license information has been added, you must assign licenses to staff members
who access the programs. You can assign, unassign, and review staff license assignments
using one of the following views:
§
§
View by Staff, which is the default, displays available product licenses and the
number of licenses available for assignment. The Available staff box on the right
displays staff groups and staff members and their license assignments.
View by Product displays the Available staff box on the left, which displays the staff
members and their group assignments. The Available licenses box displays a list of
products, the number of available licenses, and current staff assigned to the product.
Note: Be sure you have enough licenses for the staff using the program. If you
purchase fewer licenses than the number of staff you create during your trial
period, the unlicensed staff members must be inactive. Also, the default staff
members provided with the trial program are deleted.
3 - 20
Engagement Administrator
Chapter
3
Assigning Licenses Using View by Staff
To assign license information using the Staff view, do the following:
1. Select Staff/Assign License. The License Assignment dialog displays.
On the left side of the dialog, the Available licenses box displays the following
information:
§
§
§
Products. A description of the application, the CCH Integrated Engagement Guide
(formerly Miller Integrated Engagement Guides) purchased, or the McGladrey &
Pullen Integrated Work Program purchased.
Total. The total number of licenses purchased for the product.
Available. The number of licenses available for staff assignment.
On the right side of the dialog, the Available staff box displays the following information:
§
§
Staff Groups. Lists the established staff groups.
Staff Members. The staff to whom you are assigning licenses. Click the plus sign
beside a staff group to display the staff members belonging to the group.
Note: Admin Default does not display beneath the Admin group because
you cannot assign licenses to the Admin Default.
§
Licensed Products. Assigned products are listed under the user’s name. Once a
license is assigned, the staff member can access the product.
Note: Miller titles purchased previously display with the original titles.
3 - 21
Chapter
3
Engagement Administrator
2. You can assign the licenses available on the left side of the dialog to the appropriate
staff member listed on the right side of the dialog by doing one of the following:
§
§
§
§
Click the product on the left, click the staff member on the right, and then click
the Assign button pointing to the right.
Click the product on the left and drag it to the target staff on the right.
Right-click a staff member and click the Transfer Licenses option. Highlight an
unlicensed staff member to which you want to transfer the licenses and click
Paste Licenses. All licenses except the Workpaper Management license are
removed from the first staff member and assigned to the second staff member.
Right-click the staff member that has the licenses you want to copy and click the
Copy Licenses option. Click the unlicensed staff member to which you want the
licenses copied and click Paste Licenses. The second staff member now has the
same licenses as the first staff member.
Note: You must have licenses available in order to copy and paste from one
staff member to another.
As you match licenses to staff members, the number of available licenses decreases.
You do not have to assign all the available products at one time. You can return to this
dialog and assign licenses at a later time.
Note: When licenses are added and a new staff member is added to a staff
group, the ProSystem fx Engagement Workpaper Management license is
automatically assigned to the staff member. You must have a Workpaper
Management license to log in to ProSystem fx Engagement.
3. Click OK to save settings and close the dialog.
Assigning Licenses Using View by Product
To assign licenses using the product view, do the following:
1. Select Staff/Assign License. The License Assignment dialog displays.
2. Select the View by Product tab.
3 - 22
Engagement Administrator
Chapter
3
On the left side of the dialog, the Available staff information displays the following
information:
§
§
Staff. Lists all staff members available for license assignments.
Group. Lists the group to which the staff members are assigned.
On the right side of the dialog, the Available licenses information displays the following
information:
§
§
Available Licenses. Lists all available products. The total number of licenses
available for assignment displays in brackets next to each product.
Staff Members Assigned. Clicking the plus sign beside a product displays staff
members who have been assigned a license for this product. Once a license is
assigned, the staff member can access the product.
3. You can modify or assign the licenses available on the right side of the dialog to the
appropriate staff members listed on the left side of the dialog by doing one of the
following:
§
§
§
§
Click the staff member on the left, click the product on the right, and then click
the Assign arrow pointing to the right.
Drag the staff member's name from the left column to the appropriate product on
the right.
Right-click a staff member and click the Transfer Licenses button. Highlight an
unlicensed staff member to which you want to transfer the licenses and click
Paste Licenses. All licenses except the Workpaper Management license are
removed from the first staff member and assigned to the second staff member.
Right-click the staff member that has the licenses you want to copy, and click the
Copy Licenses button. Click the unlicensed staff member to which you want the
licenses copied to and click Paste Licenses. The second staff member now has the
same licenses as the first staff member.
As you match up staff members to licenses, the number of licenses in the Available
licenses column on the right decreases.
Note: When licenses are added and a new staff member is added to a staff
group, the ProSystem fx Engagement Workpaper Management license is
automatically assigned to the staff member because you must have the
Workpaper Management license to log in to ProSystem fx Engagement.
You do not have to assign all the available products at one time. You can return to this
dialog and assign licenses at a later time.
4. Click OK to save and close the dialog.
3 - 23
Chapter
3
Engagement Administrator
Setting up the Administrator Environment
This section provides instructions on setting up office servers that can manage one or more
central file rooms and your client engagement work. You can create multiple office servers.
One office server must be designated as the main office server upon the initial log in to
Administrator. For more details on configuring the main office server, see Initial Log In to
the Engagement Administrator on page 3-2.
The main office server contains firm, licensing, staff, staff group, team, client, client group,
and central file room information.
You may want to create one or more secondary office servers if you have more than one
office or more than one network server.
In the event you have to take the main office server down or you want the administrator at
the secondary office server to perform functions limited to the main office server, you can
designate a secondary office server as the main office server.
You can create secondary office servers that are disabled for Admin synchronization and
send Admin Packages created on the main office server to synchronize the admin
information.
Secondary office servers and the main office server should be synchronized either manually
or automatically on a regular basis to ensure that information on all servers remains current.
Client folders may be set up in the central file rooms in the Engagement Administrator or in
Workpaper Management. When staff members log in to the servers in the office, they can
synchronize client engagement binders with central file rooms.
This facilitates the collaboration of multiple staff members working on the same electronic
engagement binder simultaneously and from remote sites. The client engagement binders
must be created in the local file room and then synchronized to the central file room. You
cannot create a client engagement binder in the central file room.
You may want only your firm’s administrator to set up client folders so you can control the
process. Or you may permit some or all of the staff to set up client folders in the
Engagement program by utilizing the Staff Group rights in Administrator.
Note: If the administrator sets up the client folder in the Administrator module, the
New Binder Wizard must be used to create a binder for the client in ProSystem fx
Engagement. See Chapter 6, Creating and Using Binders, for information on the
New Binder Wizard.
Creating a Secondary Office Server
You can create secondary office servers, which are optional, to organize your central file
rooms and client information. During the creation process, the main office server
information (i.e. server properties, staff properties, central file room properties, client
properties, and client group data) is passed to the secondary office server.
Secondary office servers can also be configured and then connected to the main office
server. Firm, team, client group, and staff information can be viewed, but not changed,
from a secondary office server. Data on main and secondary office servers should be
synchronized frequently. You can set up an automatic synchronization schedule or manually
synchronize the servers.
3 - 24
Engagement Administrator
Chapter
3
We recommend that you close all dialogs on the main office server when creating a
secondary office server. If a dialog is open, it is possible that the main office server will not
recognize the secondary office server after it has been created.
An office server can be disabled for Admin Synchronization. This office server does not
have a connection with other office servers. In this case, an Admin Package needs to be
created on the main office server and received on the secondary server to transfer Admin
data.
If it becomes necessary to disable the main office server or the administrator of a secondary
office server needs to perform functions limited to the main office server, you can promote
a secondary office server to be the main office server by passing the main office server
token to the secondary server. (See Changing the Main Office Server on page 3-26 for
instructions.)
If you are setting up a secondary server with synchronization disabled, create an Admin
Package on the main office server before beginning this process, because you need to
receive the Admin Package as part of setup. (See Creating an Admin Package on page 3-27
for detailed instructions.)
Note: In a multi-office server environment, all office servers need to be installed
on computers that have static IP addresses.
To set up a secondary server, do the following:
1. Log in to ProSystem fx Engagement Administrator on a computer that has Administrator
installed but does not have an office server associated with it. The Configure Office
Server dialog displays.
2. Click Next. The Provide office server information dialog displays.
3. Enter a label of up to 64 characters for the secondary office server in the Label field.
4. The Server name field defaults to the name of the computer you are logged in to. This
field cannot be edited.
5. Enter a description of up to 64 characters in the Description field. The description is
optional.
6. Click Next. The Determine the office server designation dialog displays.
7. Select Secondary office server to establish this as the secondary office server. The
Connect to main office server field becomes active.
8. Enter the name of the computer where the main office server is located, or click Browse
to select the computer name from a list.
9. Check the Disable Admin synchronization box, if applicable.
10. On the Browse for Admin Package dialog, click the Browse button and choose the
location of the Admin Package (file extension AZA).
11. Click OK. The Admin Package is received on the secondary office server.
3 - 25
Chapter
3
Engagement Administrator
Disabling/Enabling Admin Synchronization for an Office Server
To disable/enable Admin Synchronization for an office server, do the following:
1. In the Central File Rooms pane, click the Office Servers icon.
2. Right-click the office server in the List pane.
3. Select Properties from the pop-up menu and the Office Server Properties dialog displays.
4. Check the Disable Admin synchronization box. If the office server is disabled, it becomes
enabled. If the office server is enabled, it becomes disabled. If an office server is
disabled and later enabled, synchronize it with the main office server.
Note: If an office server is disabled because maintenance work is needed,
disable the local file room to central file room synchronization in the central file
room properties of the central file rooms on the office server. Once
maintenance is complete, modify both the office server and CFR properties to
allow for synchronization.
Changing the Main Office Server
Designating a secondary office server as the main office server can be accomplished by
passing the main office server token to a secondary office server. If synchronization is
disabled on the secondary office server, the system creates an Admin Package as part of
the process of changing servers.
To change the main office server, do the following:
1. Log in to the main office server.
2. Select Tools/Pass Main Office Server Token to open the Select New Main Office Server
dialog.
3. Use the drop-down list to select the secondary office server you want to make the new
main office server and click OK.
4. A message confirming the change of the main office server appears. Click Yes to
continue.
5. If the secondary office server has disabled synchronization, continue with step 6. If the
secondary office server is enabled for synchronization, the Manual Admin Sync dialog
displays as the system activates the secondary office server as the main office server.
The office server’s icon changes to that of the main office server.
Note: Be sure to perform an Admin synchronization between the new main
office server and all other secondary office servers to notify them of the
change in main office server.
3 - 26
Engagement Administrator
Chapter
3
6. If the secondary office server is disabled for synchronization, the Create Admin Package
dialog displays when you select Yes to continue. Choose Save package to a file or Send
package via email. See the following section on Creating an Admin Package.
7. Follow the directions under Receiving an Admin Package on page 3-28. After the Admin
Package is received, the system activates the secondary office server as the main office
server. The office server's icon changes to that of the main office server.
Note: Be sure to exchange an Admin Package from the new main office server
to any secondary office servers to notify them of the new main office server.
Creating an Admin Package
The Create Admin Package function creates a package containing office server information
that can be used to synchronize data between any two office servers.
Create Admin Package can be used to pass information to and from office servers that are
disabled for synchronization. It is also used to pass main office server information to a
secondary office server that is going to be disabled for synchronization. The following
information is included in an Admin Package: staff, licensing, teams, staff groups, client
groups, office server properties, central file room properties, and client and binder
properties.
When you create an Admin Package file, you can do one of two things:
§
§
Save the file to the hard disk
Attach the file to an email
After you create the file, it can be applied to the other office server using the Receive
Admin Package function.
Saving the Admin Package to a Hard Drive
1. Select Tools/Create Admin Package.
2. Choose Save package to a file.
3. Either enter a drive, directory, and file name, or click the Browse button and select a
drive, directory, and file name in the Save As dialog and then click Save. The file
extension is AZA. The drive and directory default to X:\Pfx Engagement\ADMIN\Admin
Packages\<office server name> (where X represents the drive where the Administrator
module is installed).
4. Click OK to create the file and store it in the location specified.
Notes:
§
§
You can use only alphanumeric characters (letters and numbers) in the Admin
Package file name.
If you have already saved an Admin Package file with the same name to the
specified location, you are given the option of overwriting the existing file or
changing the file name.
3 - 27
Chapter
3
Engagement Administrator
Attaching the Admin Package to an E-mail
1. Select Tools/Create Admin Package.
2. Enter a file name for the package in the file name field. The file extension must be AZA.
3. Choose Send package via e-mail.
4. Click OK to create the file.
5. Your email application opens with the file attached so you can send the package to the
appropriate person.
Note: You cannot use the following characters in the Admin Package file name:
/:*?“<>|\
Receiving an Admin Package
Admin Packages are created on the main office server or any secondary office server and
are used to download and synchronize data between office servers when at least one of the
office servers is disabled for synchronization.
To receive an Admin Package, do the following:
1. Log in to the office server that is going to receive the Admin Package.
2. Select Tools/Receive Admin Package.
3. Select the appropriate folder on the Receive Admin Package dialog.
4. Select the AZA Admin Package file.
5. Click OK.
3 - 28
Engagement Administrator
Chapter
3
Scheduling Admin Synchronization
Admin Synchronization can be scheduled and run only from the main office server.
Synchronization needs to be maintained between the main office server and secondary
office servers so that updated information on the main office server regarding staff,
licensing, teams, staff groups, and client groups is passed to the secondary office servers.
Also, synchronization ensures that changes to office server properties, central file room
properties, client folder properties, and binder properties are updated on every server.
A secondary office server must be set up and visible on the main office server before the
Scheduled Task option becomes available. If the secondary office server is not recognized
by the main office server, you need to run a manual admin synchronization on the
secondary office server. See Manually Running an Admin Synchronization on page 3-30.
Both servers must be enabled for synchronization for an automatic Admin Synchronization
to take place. If a secondary office server is disabled, an Admin Package must be created
on the main office server and received on the secondary office server. See Creating an
Admin Package, page 3-27, and Receiving an Admin Package, page 3-28, for instructions.
You can schedule synchronization to take place automatically on the date and time you
select. During synchronization a progress marker displays. You can view the schedule, retry
if a synchronization fails, and view the synchronization history of the office servers involved
in the synchronization.
Note: The first time the scheduler is run, you need to input the user name and
password for the user who will be logged in to Windows at the time the
synchronization takes place.
To schedule Admin Synchronization, do the following:
1. Log in to the main office server.
2. Select Tools/Scheduled Tasks.
3. Select Main office server synchronization with secondary office servers and click Edit.
4. In the Run field on the Task tab, the path to the synchronization EXE file defaults to
X:\Pfx Engagement\ADMIN\CFRSynch.exe (where X represents the drive where the
Administrator program was installed).
5. The Run as field should show the Windows user name of the user logged on to the
computer. Click Set Password to enter and confirm that user's Windows password. The
scheduled task does not run without this information.
Note: The user name should be the user who will be logged in to the computer
when the task is run.
6. Click the Enabled (Scheduled task runs at specified time) box. The synchronization does
not run if Enabled is not checked.
Note: Only a Windows administrator can successfully launch the scheduled task.
7. Click the Schedule tab and select how often the task is to be run from the Schedule
Task drop-down list.
3 - 29
Chapter
3
Engagement Administrator
8. Use the arrows to specify the time the synchronization is to start. You can click
Advanced to specify start and end dates and details on when to repeat the task. Click
OK to exit the Advanced Schedule Options dialog.
9. Use the Every field in the Schedule Task Daily section to specify if you want to repeat
the synchronization every day, every two days, etc.
10. Check the Show multiple schedules box to change or delete schedules. Click New to
create a new schedule for the task that will run after the last schedule is completed.
Click Delete to delete a highlighted schedule.
11. Click the Settings tab to specify the following:
§
§
§
§
To delete the task if it is not scheduled to run again. This option is not
recommended, as you would have to recreate the task.
To stop the task if it runs beyond a time you specify.
To start the task only if the computer has been idle for a specified time or to stop
the task if the computer stops being idle.
To start the task if the computer is running on batteries, stop the task if battery
mode starts, or wake the computer to run the task.
12. Click Apply to save your schedule and then OK to exit the scheduler.
13. Click Close to exit the Scheduled Task dialog.
Manually Running an Admin Synchronization
The time required for the manual Admin Synchronization depends on the office servers
involved. You can run a manual Admin Synchronization from either a main or a secondary
office server.
Note: Run a manual Admin Synchronization if the main office server does not
recognize a secondary office server. In this case, run the synchronization from the
secondary office server.
To run a manual Admin Synchronization, do the following:
1. Log in to the appropriate office server.
2. Select Tools/Manual Admin Synchronization.
3. The system starts the synchronization either from the main office server or the
secondary office server, depending on the server you are logged in to.
4. The Admin Synchronization Status dialog displays during the synchronization process.
You can perform the following procedures on this dialog:
§
§
§
Click Retry to have the system attempt the synchronization again if an office
server has a status of failed.
Click View Synchronization History to view the synchronization record for the
server you are logged in to.
Click View Schedule to view the schedule for the synchronization.
3 - 30
Engagement Administrator
Chapter
3
Viewing Admin Synchronization History
Admin Synchronization needs to be maintained between the main office server and
secondary office servers. You can view an office server's synchronization history to resolve
synchronization issues and provide detailed data to Technical Support personnel, if required.
A synchronization history displays the following information:
§
§
§
§
§
§
Person currently logged in to the computer
Computer name
Operating system
ProSystem fx Engagement version number
Office server name and if it is a main or secondary server
Office server ID
The synchronization history also displays a list of all synchronization for the server.
To view synchronization history, do the following:
1. Log in to the office server.
2. Highlight the office server in the Central File Room pane.
3. Select File/Properties.
4. Click View Synchronization History. You can save or print the log.
Viewing the Admin Activity Log
The Admin Activity Log records actions taken within the ProSystem fx Engagement
Administrator module. This log file lists the date, action taken, result, user, computer, office
server, and, if necessary, the reason an activity fails.
To view the log file, follow these steps:
1. Select Tools/View Admin Activity Log. The View Admin Activity Log dialog displays.
2. Click one of the following options:
§
§
§
§
Details. Displays detail of a log entry.
Print. Prints the Admin Activity log.
Save as. Saves the Admin Activity log to a file.
Clear. Deletes the contents of the log.
3. Click Close when you are finished viewing the file.
3 - 31
Chapter
3
Engagement Administrator
Setting Firm Options
The Firm Options feature in Administrator allows you to set firm-wide administrative
options.
To set firm options, do the following:
1. Select Tools/Firm Options to open the Firm Options dialog.
2. Select the applicable options as described below. Firm options can be set only on the
main office server and are firm-wide. They are synchronized to local file rooms.
General tab
§
§
§
Shared Local File Room. Select this option to allow users to collaborate on binders
through directly accessing shared local file rooms.
Trash. When a binder is closed, Engagement will keep the items in the trash,
prompt the user to empty the trash, or automatically empty the trash, depending
on your selection here.
Prompt when/for. By default, a warning message displays when a binder that is
set to monitor the Document Completion Date is opened during the assembly
period. If you clear this check box, the warning message does not display.
Sign off tab
§
Sign off options
— Skip Binder Staff Sign Off Analysis page in Finalize Binder Wizard. In the
Finalize Binder Wizard, a page with analysis of staff sign off for the binder
displays by default. Checking this box prevents this page from displaying
during the finalizing process.
— Skip Clear Workpaper Sign Off Dates and Times page in Finalize Binder Wizard.
In the Finalize Binder Wizard, a page can display that gives you the opportunity
to clear the workpaper sign off dates and times. By default, ProSystem fx
Engagement skips this step. If you want to be able to clear the workpaper sign
off dates and times, then uncheck this item.
— Retain workpaper sign off history upon binder finalization. Select this option to
retain all workpaper sign off information after binder finalization. When this
option is selected, the option Skip Clear Workpaper Sign Off Dates and Times
page in Finalize Binder Wizard is automatically checked and cannot be
deselected. If this option is not selected, only the final sign off for preparer and
the final sign off for reviewer are retained.
— Display indicator when workpapers are modified after reviewed. Select this
option if you want the Modified After Review icon to display for workpapers
that have been modified after review. If you clear this box, the icon does not
display.
3 - 32
Engagement Administrator
§
Chapter
3
Knowledge Tools Program step sign off options
— Show current date when program step is signed off with initials. When signing
off a Knowledge Tools workpaper with initials, shows the current date.
— When program step is marked as N/A show. Select either Initials or Current
Date to display when the program step is marked as N/A.
Note: Knowledge Tools Program step sign off options apply only if you
have purchased Knowledge Tools licenses and are using Knowledge Tools
workpapers.
Engagement Today tab
Engagement today will display binders in the diagnostics area based on your selections:
§
§
Document completion date is past due or within <X> days of current date.
Binders will display in Engagement Today diagnostics if the document completion
date is past due or within the specified number of days from the current date.
Enter a number or use the spin boxes to select a number of days. The default is
15.
Due date is within <X> days of current date. Binders will display in Engagement
Today diagnostics if the due date is within the specified number of days from the
current date. Enter a number or use the spin boxes to select a number of days.
The default is 15.
3. Click OK to exit the dialog.
Setting Admin Synch Options
1. Select Tools/Admin Synch Options to display the Admin Synch Options dialog.
2. If a secondary office server has been created, then when Engagement Administrator is
closed, a message asks if you want immediate synchronization. This message does not
appear if you select either of the two following options:
§
§
Automatically synchronize when closing. Any changes to the main office server
information are automatically synchronized to existing secondary office servers,
when the Administrator is closed. Any changes made to a secondary office server
automatically synchronize to the main office server when the secondary
Administrator is closed.
Don’t prompt me regarding synchronize when closing. Changes are not
automatically synchronized and the message regarding synchronization does not
display.
3. Click OK to exit the dialog.
3 - 33
Chapter
Engagement Administrator
3
Using the Document Completion Date Report
The Document Completion Date Report displays all binders with document completion
dates that fall within the date range you specify. This report provides the following
information about each binder:
§
§
§
§
§
§
§
§
§
§
§
§
§
§
§
§
Office Server
CFR (Central File Room)
Binder Name
Binder ID
Client Name
Client ID
Binder Type
Binder Status
Lead Partner
Client Group
Period End Date
Report Date
Report Release Date
Doc Completion Date
Finalized Date
Retention Period End
To use the Document Completion Date Report, do the following:
1. Select Tools/Doc Completion Date Report. The Document Completion Date Report dialog
displays.
2. Select Run central file room report to update the central file room report. Select View
report from last scheduled task to view the most recent report.
3. If you selected Run central file room report, do the following:
a. Select Include only binder types set to monitor document completion date to
include only binder types that have been set to be monitored for the document
completion date.
b. Select Include finalized binders to include finalized binders in the report.
c. You can filter your results to binders that have a Document Completion Date, Year
End, Period End, or Retention Period within a certain date range. Select the
criterion from the Date range drop-down list, or select No Date Range.
d. Select the appropriate beginning date in the Start field. Either enter the date or
click the down arrow to use the calendar. The default setting is the current date.
e. Select the final date for the report range in the End field. Either enter the date or
click the down arrow to use the calendar. The default setting is two months from
the current date.
4. Click Update Report. The report displays the binders that fall within the range you
selected. Click a column heading to sort by that heading. Drag column headings to
reorder the columns.
5. Click Export to Excel to open an Excel spreadsheet of the report data.
6. Click Close to exit the report.
3 - 34
Engagement Administrator
Chapter
3
Scheduling the Document Completion Date Report
You can schedule a Document Completion Date report to be generated automatically on a
specified date and time. You can schedule the Generate Document Completion Date Report
task on either the main office server or a secondary office server.
To schedule the Document Completion Date Report to run as a scheduled task, do the
following:
1. From the ProSystem fx Engagement Administrator main menu, select Tools/Scheduled
Tasks. The Scheduled Tasks dialog displays.
2. Select Document Completion Date Report and click Task Properties. The Windows
scheduler opens, displaying the name of the task in the title bar.
3. Select the Task tab if it is not already selected.
4. In the Run field on the Task tab, the path to the import defaults to X:\Pfx
Engagement\Admin\DCDScheduledReport.exe (where X is the drive where Administrator
was installed). You can also browse to another location if that is necessary.
5. The Run as field should show the Windows user name of the person logged on to the
computer. Click Set Password to enter and confirm that user’s Windows password. The
scheduled task will not run without this information. Click OK to exit the Set Password
dialog.
6. Check the Enabled (scheduled task runs at specified time) box.
7. Click the Schedule tab and select how often the task is to be run from the Schedule
Task drop-down list.
8. Use the arrows to specify the time the report should run.
Tip: We recommend that you schedule the Generate Document Completion
Date Report task to run after the Admin Synch task. This will help to ensure
that the Document Completion Date report is as accurate as possible.
9. Click Advanced to specify start and end dates and when to repeat the task.
Note: The Document Completion Date report can be generated only once every
24 hours.
10. Click OK to exit the Advanced Schedule Options dialog.
11. Use the Every field in the Schedule Task Daily section to specify if you want to repeat
the task every day, every two days, etc.
12. Check the Show multiple schedules box to change or delete schedules. Click the New
button to create a new schedule for the task, which will run after the last schedule is
completed. Click Delete to delete a highlighted schedule.
3 - 35
Chapter
3
Engagement Administrator
13. Click the Settings tab to specify the following:
§
§
§
§
Whether to delete the task if it is not scheduled to run again
Whether to stop the task if it runs beyond a time you specify
To only start the task if the computer has been idle for a specified time or to stop
the task if the computer becomes active
Whether to start the task if the computer is running on batteries, stop the task if
battery mode starts, and wake the computer to run the task
14. Click OK to save your schedule and exit the Windows scheduler.
15. Click Settings to display the Document Completion Date Report dialog and select the
appropriate settings.
16. Click Close to exit the Scheduled Tasks dialog.
Creating a Central File Room
You can create central file rooms on the main office server or a secondary office server,
depending on the server you are logged in to. A central file room is used to store client
folders, which can be created in the Administrator module or in Workpaper Management. A
client's binders can only be created in the client folder in a local file room in Workpaper
Management and must be synchronized with the central file room to copy the binder
information to the central file room.
Note: If a secondary office server has been disabled for synchronization, an Admin Package
needs to be created on the main office server and then received by the secondary office
server for the central file room to display in the secondary office server.
You can create as many central file rooms as you need.
To create a central file room, do the following:
1. In the Central File Rooms pane, select the office server where you want to create the
central file room. If you are logged in to the main office server, you can select it or any
secondary office server. If you are logged in to a secondary office server, you can create
only central file rooms on that server.
2. In the lower left pane, do one of the following to open the Central File Room Properties
dialog:
§
§
Select File Rooms/Create Central File Room.
Right-click an office server and then select Create Central File Room.
3 - 36
Engagement Administrator
§
Chapter
3
Click the Create Central File Room button on the toolbar.
3. The Name field is mandatory. Enter a name of up to 64 characters for the central file
room. This name displays with its own icon under the respective office server icon. You
may also enter a description.
4. Enter the path where the central file room workpapers are to be located or use the
Browse button to select a drive and directory. Choose any drive or directory on the
computer or available network connection except directories already used by other
central file rooms. The default is X:\Pfx Engagement\ADMIN\Workpapers, where X is the
drive where the Administrator module is installed.
You can click New Folder to create a new folder for the workpapers.
5. To disable synchronization, check the Disable LFR to CFR synchronization box. Binders
cannot be synchronized with the central file room when synchronization is disabled.
6. Click OK to save the information and close the dialog.
Disabling/Enabling Synchronization on a Central File Room
Notes:
§
§
§
You may disable synchronization of binders from local file rooms to the central file
room when maintenance is performed on the server with the central file room.
If a central file room is disabled for synchronization, binders are locked and cannot be
synchronized with the central file room.
If a central file room is enabled for synchronization, local file rooms can synchronize
binders with the central file room.
To disable or enable the synchronization of a central file room, do the following:
1. In the Central File Room pane, right-click the file room you want to disable or enable.
2. Select Properties from the pop-up menu.
3. Check the Disable LFR to CFR synchronization box to disable synchronization of binders
to the central file room. Remove the check mark to enable the central file room for binder
synchronization.
3 - 37
Chapter
3
Engagement Administrator
Setting Up Client Folders
New clients can be added in the Administrator module, but you must use the Workpaper
Management program to add client binders for new clients.
To add a new client in a central file room, do the following:
1. To display the Create New Client dialog, click the central file room in which you want to
add a client and perform one of the following actions:
§
§
§
Select File Rooms/New Client.
Right-click the Central File Room icon and select New Client.
Click the New Client button on the toolbar.
2. Enter the client information on the Profile tab. An entry in the Client name 1 field (Last
name field if you select Individual as the Entity type) is required and can contain up to
64 characters. The name you enter becomes the client folder name.
3. If you want to add the client to one or more client groups, select the Group tab and
check the box next to the group or groups you want to add the client to. You can also
do this at a later time using the File Rooms/Assign Clients to Groups option. See
Creating a New Client Group on page 3-45 for setting up the client groups.
4. Select the Contacts tab.
5. Click New and enter the information as desired. An entry in the Last Name field is
required. To continue entering contacts for the client, click Save and New. You can use
the left and right arrow buttons to move to the previous or next contact entered.
6. When you have finished entering contact information and have saved all the data, click
OK to exit the dialog.
You can use the Properties command to change client information entered earlier. The
profile information entered in this dialog is available for linking into Excel and Word
workpapers. See Chapter 9, Using Excel, and Chapter 10, Using Word, for information on
linking these fields.
3 - 38
Engagement Administrator
Chapter
3
Deleting a Client
To delete a client, click the client folder in the left pane and then do one of the following:
§
§
§
Select Edit/Delete.
Right-click the Client Folder and select Delete Client.
Click the Delete button on the toolbar.
When the confirmation dialog displays, click Yes to delete or No to cancel the deletion.
Notes:
§
§
You must remove all binders from the client folder before it can be deleted.
To delete a client on a secondary office server when logged in to the main office
server, there must be a connection between the servers , and they must be enabled
for Admin Synchronization.
Deleting a Central File Room
To delete a central file room, click the icon of the file room to delete and do one of the
following:
§
§
§
Select Edit/Delete.
Right-click and select Delete CFR from the pop-up menu.
Click the Delete button on the toolbar.
When the confirmation prompt displays, click Yes to permanently delete the central file
room. This deletes the central file room from Engagement Administrator.
Notes:
§
§
The CFR to be deleted must not contain any client folders or binders.
When logged in to the main office server to delete a central file room on a secondary
office server, there must be a connection between the servers and they must be
enabled for synchronization.
Deleting a Secondary Office Server
You cannot delete a secondary office server if it contains any central file rooms. You must
first move the client binders in the central file rooms to a different central file room(s) on a
different server. After removing the binders, you must delete the central file rooms. (See the
sections on moving binders to a different central file room beginning on page 3-51.)
To delete the secondary office server, do the following:
1. In the Central File Room pane, highlight the secondary office server to delete and do one
of the following:
§
§
§
Select Edit/Delete.
Right-click and select Delete Server.
Click the Delete button on the toolbar.
2. Click Yes to delete the office server.
If more than one secondary office server has been configured, run a manual Admin
Synchronization to update the other secondary office servers. See Manually Running an
Admin Synchronization on page 3-30.
3 - 39
Chapter
3
Engagement Administrator
Deleting the Secondary Office Server Program
To completely delete a secondary office server, you also need to manually remove the
program from the computer where the secondary office server was located. Once you have
removed the three programs listed below, you can use Microsoft Explorer to delete the Pfx
Engagement directory on the local drive of the computer.
To manually remove the secondary office server program, do the following:
1. Right-click My Computer on your Windows desktop and select Manage. The Computer
Management window displays.
2. Select Services under Services and Applications.
3. In the list of services in the right-hand pane, right-click SQL Server
(PROFXENGAGEMENT) and select Stop.
4. Select File/Exit to close the Computer Management window.
5. Select Start/Control Panel, and then double-click Add or Remove Programs. The Add or
Remove Programs window displays.
6. Remove the following programs:
§
§
ProSystem fx Engagement
Microsoft SQL Server 2005
Note: When removing Microsoft SQL Server 2005, select only the
PROFXENGAGEMENT: Database Engine instance in the Component Selection section.
Managing Binder Types
Like paper-based engagement binders, ProSystem fx Engagement binders store and organize
client workpapers for any type of engagement, such as a tax return or an audit. Binder
types allow you to specify completion date calculations and retention period calculations for
binders used for different purposes. You can view, create, edit, and delete types of binders
from the Engagement Administrator module.
Creating a New Binder Type
To create a new binder type, do the following:
1. Select File Rooms/Binder Types. The Binder Types dialog displays.
3 - 40
Engagement Administrator
Chapter
3
2. Click New. The New Binder Type dialog displays.
3. Enter a name for the new binder type in the Name field. This field is required. Once the
Name field is filled, the OK and New buttons become active.
Note: Duplicate binder type names are not allowed.
4. Select Date of Report or Report Release Date in the Beginning of assembly period
drop-down list to set the date from which Engagement calculates the document
completion date. Select N/A if you do not want Engagement to calculate the document
completion date.
5. Enter the appropriate information in the Length of assembly period field. The entry may
be between 1 and 365 days.
6. Select Date of Report, Report Release Date, or Document Completion Date in the Start
of retention period drop-down list to set the date from which Engagement calculates the
End of Retention Period. Select N/A if you do not want Engagement to calculate the
retention period.
7. Use the spin box or type the appropriate information in the Duration of retention period
field. The entry may be between 1 and 10 years.
8. Click New to save the binder type and begin creating another. Click OK to save the
binder type and close the New Binder Type dialog.
Editing an Active Binder Type
To edit an active binder type, do the following:
1. Select File Rooms/Binder Types. The Binder Types dialog displays.
2. Select the binder type to edit and click Edit. The Edit Binder Type dialog displays.
3. If this is a binder type you have created, you can edit the Name field. Edit the
information in the Document Completion Date Calculation and Retention Period
Calculation sections as necessary.
Note: You cannot edit the name of a standard binder type.
4. Click OK to close the Edit Binder Type dialog.
3 - 41
Chapter
Engagement Administrator
3
5. Click Save on the Binder Types dialog to save your changes and exit the dialog. Click
Cancel to discard your changes and exit the Binder Types dialog.
Deleting a Binder Type
Note: You cannot delete standard binder types.
If a Central File Room or Manual Admin Synchronization has not occurred since you created
the binder type, you can perform a "hard delete." The binder type is permanently deleted.
If a Central File Room or Manual Admin Synchronization has occurred since you created the
binder type, you can perform a "soft delete." The deleted binder type no longer appear as
an option in the Type drop-down list, but any binders of that type already created remains.
Deleting a Binder Type before Synchronization
To hard delete a binder type you have created, do the following:
Notes:
§
§
This process applies if a Central File Room or Manual Admin Synchronization has not
occurred.
You can delete only binder types that you have created. You cannot delete standard
binder types. When a standard binder type is selected, the Delete button becomes
inactive.
1. Select File Rooms/Binder Types. The Binder Types dialog displays.
2. Select the binder type to delete and click Delete. A confirmation box asks you to confirm
the deletion.
3. Click Yes to delete the binder type. Click No to cancel the deletion.
4. Click Save on the Binder Types dialog to save your changes and exit the dialog. Click
Cancel to discard your changes and exit the Binder Types dialog.
Caution: If you delete a binder type, you can view and edit it by checking the
Show deleted binder types box on the Binder Types dialog. However, once you
click Save, the binder type is permanently deleted.
Deleting a Binder Type after Synchronization
To soft delete a binder type you have created, do the following:
Notes:
§
§
This process applies if a Central File Room or Manual Admin Synchronization has
occurred.
You can delete only binder types that you have created. You cannot delete standard
binder types. When a standard binder type is selected, the Delete button becomes
inactive.
1. Select File Rooms/Binder Types. The Binder Types dialog displays.
2. Select the binder type to delete and click Delete. A confirmation box asks you to confirm
the deletion.
3 - 42
Engagement Administrator
Chapter
3
3. Click OK to delete the binder type.
4. Click Save on the Binder Types dialog to save your changes and exit the dialog. Click
Cancel to discard your changes and exit the Binder Types dialog.
Caution: If you delete a binder type, you can view and edit it by checking the
Show deleted binder types box on the Binder Types dialog. However, once you
click Save, the binder type is permanently deleted.
Editing a Deleted Binder Type
To edit a binder that has been deleted, do the following:
1. Select File Rooms/Binder Types. The Binder Types dialog displays.
2. Check the Show deleted binder types box. Binder types you have deleted since the last
save display in red print.
Note: If you have saved changes to the Binder Types dialog since deleting the
binder type, it does not appear. You must create the binder type again.
3. Select the deleted binder type to edit and click Edit. The Edit Binder Type dialog displays
with all fields inactive.
4. Check the Activate Binder Type box. All fields become active.
5. Edit the information in the Document Completion Date Calculation and Retention Period
Calculation sections as necessary.
6. Click OK to save your changes.
7. Click Save on the Binder Types dialog to save your changes and exit the dialog. Click
Cancel to discard your changes and exit the Binder Types dialog.
Managing Binder Statuses
In Administrator you can view binder statuses and create, edit, and delete custom binder
statuses.
Creating a new Binder Status
To create a new binder status, do the following:
1. Select File Rooms/Binder Statuses. The Binder Statuses dialog displays.
2. Click New. The New Binder Status dialog displays.
3. Enter the name of the new binder status.
4. Click New to save the new binder status and create another binder status. Click OK
when you are finished creating new binder statuses.
3 - 43
Chapter
Engagement Administrator
3
Editing an Active Binder Status
To edit the name of a binder status, do the following:
1. Select File Rooms/Binder Statuses. The Binder Statuses dialog displays.
2. Select the binder status to edit.
3. Click Edit. The Edit Binder Status dialog displays.
4. Change the name of the binder status.
5. Click OK.
Note: Only custom binder statuses can be edited. The system-defined statuses (In
Process, Finalized, and Archived) cannot be edited.
Deleting a Binder Status
If you create a binder status and choose to delete it before the binder statuses have
synchronized to Engagement Workpaper Management, you can perform a "hard delete."
The binder status is permanently deleted.
If the binder statuses have synchronized after you created the binder status, you can
perform a "soft delete." The deleted binder status no longer appears as an option in the
Status drop-down list of the Binder Properties dialog. However, any binders with this status
already assigned will remain. A soft delete occurs in any of the following situations:
§
§
§
§
The custom binder status has been saved in the Binder Statuses dialog and a user
has opened Engagement Workpaper Manager, which causes the binder statuses to
synchronize.
The custom binder status has been saved in the Binder Statuses dialog and an Admin
Synch has been performed.
The custom binder status has been saved in the Binder Statuses dialog and the
custom binder status was previously saved as the status of a binder in the
Administrator binder properties.
The custom binder status has been saved in the Binder Statuses dialog and any
binder has been archived or unarchived in Administrator.
Note: Only custom binder statuses can be deleted. The system-defined statuses
(In Process, Finalized, and Archived) cannot be deleted.
To delete a binder status, do the following:
1. Select File Rooms/Binder Statuses. The Binder Statuses dialog displays.
2. Select the binder status to delete.
3. Click Delete.
4. Click Save.
3 - 44
Engagement Administrator
Chapter
3
Editing an Inactive Binder Status
To activate and edit a binder status that has been soft-deleted, do the following:
1. Select File Rooms/Binder Statuses. The Binder Statuses dialog displays.
2. Check the Show deleted binder statuses box. Binder statuses you have deleted since the
last save display in red.
Note: If you have saved changes to the Binder Statuses dialog since deleting
the binder status, it does not appear. You must create the binder status again.
3. Select a deleted binder status and click Edit. The Edit Binder Status dialog displays.
4. Check the Activate Binder Status box. The Binder status name field becomes active.
5. Edit the binder status name if necessary.
6. Click OK to save your changes.
7. Click Save on the Binder Statuses dialog to save your changes and exit the dialog.
Managing Client Binders
Individual client binders are created in the ProSystem fx Engagement Workpaper
Management program. Once they are created and synchronized to the main or secondary
office server, you can perform certain actions with the binders from the Administrator
module, including the following:
§
§
§
§
§
§
Creating, editing, and deleting client groups
Assigning clients to client groups
Assigning staff and teams to binders
Archiving binders that are finalized
Unarchiving binders, if necessary
Unfinalizing binders, if necessary
Creating a New Client Group
Client Groups allow you to organize processing for your firm by grouping clients with
common requirements. Clients can be assigned to multiple client groups. Client Groups are
created within the Admin module on the main office server.
1. Select one of the following to add a new Client Group.
§
§
File Rooms/Client Groups.
Click the Client Groups button on the toolbar.
3 - 45
Chapter
3
Engagement Administrator
The Client Groups (Main Office Server) dialog displays.
2. Click New. The New Client Group dialog displays.
3. Complete the information in the following fields:
§
§
Name. Enter the name of the new client group. This field is required.
Description. Enter a description of the new client group.
4. Click OK to save.
Editing a Client Group
1. Select File Room/Client Groups or click the Client Groups button on the toolbar.
2. Highlight a Client Group, click Edit, and the Edit Client Group dialog displays.
3. Edit the applicable information in the Name and Description fields and click OK to save.
Deleting a Client Group
1. Select File Room/Client Groups or click the Client Groups button on the toolbar.
2. Highlight the client group you want to delete and click Delete.
3. When the confirmation message box displays, click Yes to delete or No to cancel the
deletion.
Note: Clients that are assigned to deleted client groups will be unassigned. The
client properties for clients in that group no longer reflect that the client is
assigned to that group.
Assigning Clients to Client Groups
To assign clients to Client Groups on the Office Server, follow these steps:
1. Do one of the following:
§
§
Select File Rooms/Assign Clients to Groups.
Click the Assign Clients to Groups button.
3 - 46
Engagement Administrator
Chapter
3
The Assign Clients to Groups dialog displays.
2. Select a client group from the drop-down list. The client group’s description displays in
the Description field.
§
Available clients. Lists clients not previously assigned to the selected client group.
You can enter text, wildcards (*), and placeholders (?) in any of the filter fields to
filter the various columns listed below.
— Client Name. Lists the client name.
— ID. Lists the client ID.
— Entity Type. Use the drop-down list to change the filter to one of the following:
None, Entity Type, or Industry Type.
§
Assigned clients. Lists clients previously assigned to the selected client group.
You can enter text, wildcards (*), and placeholders (?) in any of the filter fields to
filter the various columns.
— Client Name. Lists the client name.
— ID. Lists the client ID.
— Entity Type. Use the drop-down list to change the filter to one of the following:
None, Entity Type, or Industry Type.
3. You can select one or more clients from the Available client box and click the Assign
button. The selected client(s) now display on the right side of the dialog. You can
unassign clients by highlighting the client(s) and clicking the Unassign button. The
selected client(s) now display on the left side of the dialog.
4. Click Apply to save the changes and continue to assign clients, if necessary.
5. Click OK to save the changes and close the dialog.
3 - 47
Chapter
3
Engagement Administrator
Assigning Staff Members to Binders
The staff that works on an engagement binder are called staff members. Staff members can
be assigned to binders in either Administrator or Workpaper Management. You must be a
binder staff member in order to open and use the binder.
To assign staff members to binders in the Admin module, do the following:
1. Click the binder where you want to assign the Staff members and do one of the
following:
§
§
§
§
§
Select Staff/Assign Binder Staff.
Select File/Properties. Select the Binder Staff tab and click Assign.
Right-click the binder in the right pane and select Assign Binder Staff.
Right-click the binder and select Properties. Select the Binder Staff tab and click
Assign.
Click the Properties toolbar button. Select the Binder Staff tab and then click
Assign.
The Assign Binder Staff dialog displays.
2. In the Available teams or staff list, select one of the following options:
§
§
§
View: All. Lists all teams and staff members that are not assigned to this binder.
View: By team. Lists the teams, if any, that were set up in the Admin module that
are not assigned to this binder.
View: By staff. Lists all staff members that are not assigned to this binder.
3. Click the staff member’s name or team's name, then click the Assign button. The
selected staff members now display on the right side of the dialog as Assigned binder
teams and staff.
You can select multiple staff or teams by holding down the
b or k keys.
Note: When staff members are added to or removed from the team in the
Admin module, the staff members are automatically added to or removed from
the team assigned to the binder.
3 - 48
Engagement Administrator
Chapter
3
4. Click OK to accept the assignments.
The next time the binder is synchronized from the central file room to the local file room,
the binder staff assignments will be active.
Archiving a Binder
Binders that have been finalized in ProSystem fx Engagement can be archived in
Administrator. The Archive feature compresses the binder into one file, making it easy for
you to store on your network or on a backup system. If you need to restore an archived
binder, see the section Unarchiving a Binder on page 3-50.
To archive a binder, follow these instructions:
1. Click the binder you want to archive and do one of the following:
§
§
§
Select File Rooms/Archive Finalized Binder.
Right-click the binder and select Archive Finalized Binder.
Click the Archive Finalized Binder button on the toolbar.
The Archive Finalized Binder dialog displays.
The Archive Finalized Binder dialog displays a default file name consisting of the client
folder ID and name, binder ID and name, and binder current period end date.
2. Click Browse to open a dialog where you can select the drive and directory where you
want to store the archived file. The path defaults to X:\Pfx Engagement\ADMIN\Archive,
where X is the drive where ProSystem fx Engagement Administrator is installed.
3. You can change the default file name or the default path by entering the pathway or the
file name for the archived binder in the Destination Path field. The file extension defaults
to EAB.
4. Click OK to archive the binder. The binder is compressed into one file and stored in the
chosen destination path. Archived binders listed in the central file room are identified by
the icon to the left.
5. Click OK on The selected binder was successfully archived dialog or click View Log to
see a log of archived/unarchived binders. To view the log at a later time, navigate to
X:\Pfx Engagement\Admin\Admin Share\archive log, where X is the drive where the
Administrator module is installed.
3 - 49
Chapter
3
Engagement Administrator
Unarchiving a Binder
If you need to retrieve an archived binder, you can use the Unarchive Binder feature.
1. Click the binder you want to unarchive and do one of the following:
§
§
§
Select File Rooms/Unarchive Binder.
Right-click the binder and select Unarchive Binder.
Click the Unarchive Binder button on the toolbar.
2. The binder is unarchived automatically.
3. On the confirmation message, click OK to close the dialog or click View Log to view a
log of the unarchived binders.
If the archived binder to unarchive is not in the central file room, follow these directions:
1. Do one of the following:
§
§
Select File Rooms/Unarchive Binder.
Click the Unarchive Binder button on the toolbar.
2. Use the Look in field to locate the archived file. The default path is X:\Pfx Engagement\
ADMIN\Archive, where X represents the drive where ProSystem fx Engagement is
installed. The file type is Binder Archive File (EAB).
3. Highlight the archived file and click Open.
4. On The selected binder was successfully unarchived dialog, click OK to close the dialog
or click View Log to view a log of the archived/unarchived binders.
5. The archived file is uncompressed and restored in the central file room.
Unfinalizing a Binder
Binders that have been finalized in ProSystem fx Engagement can be unfinalized in the
Administrator module, allowing binder staff members to access the binder and make any
necessary changes. The read-only restriction is removed; however, any team or open item
notes, workpaper history, or sign-off dates and times are not restored.
For detailed instructions, see Finalizing Binders on page 6-52.
To unfinalize a binder, do the following:
1. Highlight the finalized binder and perform one of the following actions:
§
§
§
Select File Rooms/Unfinalize Binder.
Right-click the finalized binder and select Unfinalize Binder.
Click the Unfinalize Binder button on the toolbar.
2. Click Yes to confirm the action to unfinalize the selected binder.
The binder is unfinalized, and the next time the binder is synchronized from the central file
room to the local file room, binder staff members can modify the binder as required.
3 - 50
Engagement Administrator
Chapter
3
Moving Binders
You can move binders from one central file room to another central file room. In addition,
you can move binders from one client to another client within the same central file room.
Moving Binder(s) to Another Client Folder in the Same CFR
In the Admin module, you can move binder(s) from one client folder to another in the same
central file room. Binders that are finalized, archived, or in use by another binder staff
member cannot be moved to a different client folder.
You can move a binder using either of the following methods:
Moving a Binder Using Drag and Drop
1. Click the binder you want to move.
2. Drag the binder from the List pane to the new client folder on the same central file
room in the Central File Rooms pane. The binder is moved to the new client folder
and deleted from the original client folder.
Moving a Binder Using Cut and Paste
1. Click the binder you want to move and select Edit/Cut.
2. Click the client folder on the same central file room where you want to move the
binder.
3. Select Edit/Paste. The binder is moved to the new client folder and deleted from the
original client folder.
Note: You can move multiple binders using the
b or k keys.
Moving Binders to a Different CFR on the Same Office Server
Binders must have been synchronized to the central file room. Archived binders and binders
that are in use by another binder staff member cannot be moved.
To move binders, do the following:
1. To move all binders assigned to a client folder, click the folder. To move a single binder,
click the binder. To move multiple binders assigned to a client folder, use the b or
k key to select the binders.
2. Drag the client folder or binder(s) from the List pane to the new central file room in the
Central File Room pane.
3. Select Yes on the confirmation message to move the folder or binder. Select No to
cancel the process.
The binder(s) are associated with the new central file room. If the client folder associated
with the binder(s) does not already exist in the new central file room, the client folder is
copied there. The client folder in the original central file room is not deleted.
3 - 51
Chapter
3
Engagement Administrator
Moving Binders to a CFR on a Different Office Server
Binders can be moved from a central file room on the main office server to a central file
room on a secondary office server. You cannot move binders from a secondary office server
to another office server.
To move a binder, do the following:
1. To move all the binders assigned to a client folder, click the client folder. To move a
single binder, click the binder. To move multiple binders assigned to a client folder, use
the b or k key to select the binders.
2. Drag the client folder or binder(s) from the List pane to the new central file room in the
Central File Room pane.
3. If both office servers are enabled for synchronization, a confirmation message displays.
Select Yes to move the binder(s) or select No to cancel the process.
The binder(s) in the original central file room display with an "in-transition binder" icon.
While a binder is in transition, the following cannot be done:
§
§
§
§
Binder staff members cannot synchronize the binder(s) from the local file room to
the original central file room.
An administrator cannot change the binder properties of the binder(s) in the
original central file room.
An administrator cannot delete the binder(s) in the original central file room.
An administrator cannot modify the client properties for the client associated with
the binder(s).
If both office servers are enabled for synchronization, the binder(s) are copied to the new
central file room. The client folder in the original central file room is not deleted.
Moving Binders to a CFR on a Disabled Office Server
Binders can be moved from a central file room on the main office server to a central file
room on a disabled secondary office server. See step 4 of the procedure above, Moving
Binders to a CFR on a Different Office Server, for more information.
To move binders, do the following:
1. To move all the binders assigned to a client folder, click the client folder. To move a
single binder, click the binder. To move multiple binders, use b and k.
2. Drag the client folder or binder(s) from the Contents pane to the new central file room in
the Central File Room pane.
3. If only one binder is being moved, the Create Transition Binder Package dialog displays.
Choose one of these options:
§
§
Save package to a file. The File name field displays the default path and file name
for the transition binder package. You can enter a different path and/or file name
or click Browse to open the Save As dialog and select a different path.
Send package via email. Your email application opens with the binder package
attached.
3 - 52
Engagement Administrator
Chapter
3
If multiple binder packages are being moved, the Location to Save Transition Binder
Packages dialog displays. Select the drive and directory where you want to save the
packages. You can click New Folder to create a new directory. Click OK.
4. A confirmation dialog displays when the transition binder package(s) have been
successfully created. You can do one of the following:
§
§
Select Print to print a report listing the transition binder packages and location of
the transition binder package file.
Select Save As to save the report to a file.
5. After the transition binder package(s) is created on the main office server, an
administrator at the secondary office server must receive the transition binder package.
The binder displays in the central file room on the secondary office server.
6. To delete the in-transition binder on the main office server, an Admin Package must be
created by an administrator on the secondary office server and received by an
administrator on the main office server. See Creating an Admin Package on page 3-27
and Receiving an Admin Package on page 3-28 for instructions.
Receiving Transition Binder Packages
Transition binder packages are created when binders are being moved from a central file
room on one office server to another office server that is not connected to the network.
To receive a transition binder package, do the following:
1. Log in to the office server that is going to receive the Transition Binder Packages.
2. Select Tools/Receive Transition Binder Package.
3. On the Receive Transition Binder Package dialog, select the folder containing the
package(s).
4. Select the AZB transition binder package file and click OK. The binders display in the
central file room of the secondary office server.
To remove the in-transition binder from the Central file Room on the main office server,
an administrator on the secondary office server must create an Admin Package to be
received by an administrator on the main office server.
Deleting a Binder
Important: If you delete a binder, you permanently remove the binder and all its
contents.
To delete a binder, do the following:
1. Click the binder you want to delete.
2. Select Edit/Delete, click the Delete button, or right-click the binder and select Delete
Binder from the pop-up menu.
3. A message box prompts you to confirm the delete. To delete the binder, click Yes. To
cancel the deletion, click No.
3 - 53
Chapter
Engagement Administrator
3
Using the ProSystem fx Practice Interface
ProSystem fx Engagement Administrator now interfaces with ProSystem fx Practice version
7.0 or higher, allowing access to valuable features in Practice. These include the following:
§
§
Inquiry Module, which allows you to quickly look up or edit client information.
The ability to link projects and clients so that edits made in ProSystem fx
Engagement are automatically updated in ProSystem fx Practice.
Linking and Editing Projects
A binder in ProSystem fx Engagement correlates to a project in ProSystem fx Practice. You
cannot tell by looking at binders whether they are already linked or not. However, the
system automatically produces the correct dialog. If you need to link, the Select Project to
Link dialog displays. If the project is already linked, the Edit Project dialog displays.
To link a project, do the following:
1. Highlight the binder.
2. Select File Rooms/Pfx Practice Interface/Edit Linked Project, or right-click the highlighted
binder and select Edit Linked Project from the pop-up menu. If the project is not yet
linked, the Select Project to Link dialog displays so that you can link the project. (If
ProSystem fx Practice is not already running, you must log in first, then the Select
Project to Link dialog displays.)
3. Specify the ProSystem fx Practice Client and Engagement ID. The display area displays
the ProSystem fx Practice projects that are associated with that client.
4. If you do not see the project you want, check the Include projects already linked box.
5. Highlight the project to which you want to link.
6. Click Link.
To edit linked projects, do the following:
1. Highlight the binder and right-click to open the pop-up menu.
2. Select Edit Linked Project. If the project is already linked, the ProSystem fx Practice Edit
Project dialog displays. (If ProSystem fx Practice is not already running, you must log in
first, then the Edit Project dialog displays.)
3. Edit as directed by ProSystem fx Practice Help.
3 - 54
Engagement Administrator
Chapter
3
Linking and Editing Clients
You can link a ProSystem fx Engagement client to the same client in ProSystem fx Practice.
You cannot tell by looking at ProSystem fx Engagement clients whether they are already
linked or not. However, the system automatically produces the correct dialog. If you need
to link, the Select Client to Link dialog displays. If the client is already linked, the Client
Properties dialog displays.
To link a client, do the following:
1. Highlight the client.
2. Select File Rooms/Pfx Practice Interface/Edit Linked Client or right-click the highlighted
client and select Edit Linked Client from the pop-up menu. If the client is not yet linked,
the Select Client to Link dialog displays so that you can link the client. (If ProSystem fx
Practice is not already running, you must log in first, then the Select Client to Link dialog
displays.)
3. Specify the ProSystem fx Practice Client and Engagement ID. (Only unlinked ProSystem
fx Practice clients are available for selection.)
4. Click Link.
To edit linked clients, do the following:
1. Highlight the client.
2. Select File Rooms/Pfx Practice Interface/Edit Linked Client or right-click the highlighted
client and select Edit Linked Client from the pop-up menu. If the client is already linked,
the ProSystem fx Practice Client Properties dialog box displays. (If ProSystem fx Practice
is not already running, you must log in first, then the Client Properties dialog displays.)
3. Edit as directed by ProSystem fx Practice Help.
Accessing the ProSystem fx Practice Inquiry Module
You can use the Inquiry Module from ProSystem fx Practice to look up information about
your clients that are linked to ProSystem fx Practice, just as you have been doing in
ProSystem fx Practice.
To access the Inquiry Module, do the following:
1. From the Engagement Administrator main menu, select File Rooms/Pfx Practice
Interface/Client Inquiry. The Inquiry Module displays. If the Inquiry Module is not already
running, you must log in first, then the Inquiry Module displays.
§
§
If a linked client is selected, the Inquiry Module defaults to the linked client in
ProSystem fx Practice.
If an unlinked client is selected, or if a non-client object is selected, the Inquiry
Module displays without a pre-selected client.
2. For further instructions, open the ProSystem fx Practice Help and locate the Inquiry book
in the table of contents.
3 - 55
Chapter
Engagement Administrator
3
Managing Bins
Engagement has an efficient database structure, in which each database is divided into bins
and a binder's database information can be stored in any bin. Once the space in a bin is
maximized, a new bin is created, and the database information for new binders is placed in
the new bin. Administrators can also create additional bins and set them up to be used in
other ways, such as organizing the binders' database information.
The Bin Manager Utility allows administrators to view and manage bins. Bins can be viewed
in a list or in a graphical view, which provides color coded bar charts that notify the
administrator when a binder is approaching capacity. Using the Bin Manager Utility,
administrators manage bins in the following ways:
§
§
§
§
§
§
§
Create bins
Name bins
Delete bins
Designate one bin as the primary bin (where new binders are assigned)
Move binders from bin to bin
Specify the default path for creating new bins
Specify the start time for database maintenance tasks
Launching the Bin Manager Utility
To launch the Bin Manager Utility, you must know which computer you want to log in to.
1. From the Engagement Administrator main menu, select Tools/Manage Bins. The Bin
Manager Login dialog displays.
2. Select whether you want to manage bins containing trial balances, binders, or
Knowledge Coach content.
Note: Trial Balance and Knowledge Coach appear only if your firm has licenses for
these products.
3. Choose the location to log in to.
§
§
Currently logged in office server is pre-selected unless you are logged in to the
main office server and a secondary office server is selected in the Administrator
frame.
Another office server is pre-selected when you are logged in to the main office
server and a secondary office server is selected in the Administrator frame.
3 - 56
Engagement Administrator
§
Chapter
3
Terminal services database should be chosen if you need to manage bins for an
office server located in a terminal services environment.
Note: If you are logged in to a secondary office server, you cannot manage the
bins on another office server.
3. Specify the path where the login computer can be found, in the Select the computer to
log in to field.
§
§
§
If you choose Currently logged in office server, the path defaults to that of the
current office server and is not editable.
If you choose Another office server, with a secondary office server selected in the
Administrator frame, the path defaults to that of the secondary office server and
is editable. If no secondary office server was selected in the Administrator frame,
the field remains blank.
If you choose Terminal services database, the field remains blank.
4. If the field is editable and you want to change the path, type in the field, or click Browse
to open the Browse for computer dialog and to navigate to a remote computer.
5. Click OK to exit the dialog and log in to the specified computer.
Bin Manager Utility Main Window
The main window of the Bin Manager Utility is divided into a left frame and a right frame.
The left frame displays the office server and the bins within that office server. The right
frame can display either a list view or a graphical view.
List View
The list view is the default view. The list view is a table listing all the current bins attached
to this office server. You can double-click a bin to show the binders within the bin in the
frame on the right.
The right pane of the list view provides the following information when an office server is
selected:
§
§
§
§
§
§
§
Name. The name of the bin.
Primary. Whether each bin is the primary bin (Yes or No). Only one bin can be
designated as the primary bin.
Capacity. Whether the bin capacity is at the Full level (more than 2.5 GB for a
primary bin or more than 3.75 GB for a non-primary bin) or Within Limit (less than
2.5 GB for a primary bin or less than 3.75 GB for a non-primary bin).
Space Used (MB). The exact space used for the bin, in megabytes.
Binders. The total number of binders contained within this bin.
Database Name. The name of the database that contains the bins.
Location. The path to the location of each bin.
3 - 57
Chapter
Engagement Administrator
3
The right pane displays the following information when a bin is selected:
§
§
§
§
§
§
§
§
§
§
§
Trial Balance Name. The name of the trial balance. Displays only for Trial Balance
bins.
Trial Balance Index. The trial balance index number. Displays only for Trial Balance
bins.
Binder Name. The name of the binder.
Binder ID. The binder's index number.
Profile. The staff profile the binder belongs to. Displays only for binders in terminal
services databases.
Status. Whether the binder is in process, in transition, or finalized.
Type. The type of binder.
Year End. The year end as designated in the binder properties.
Period End. The period end as designated in the binder properties.
Client ID. The ID of the client the binder is assigned to.
Client Name. The name of the client the binder is assigned to.
Graphical View
To open the graphical view from the Bin Manager Utility, select View/Graphical View from
the main menu. To return to list view from graphical view, select View/List View. The
graphical view is a color-coded bar chart that notifies you when bins are reaching capacity.
§
§
For a primary bin, capacity is 2.5 GB. During daily scheduled tasks, the system
automatically creates a new primary bin if the existing one has reached the 2.5 GB
capacity.
For a non-primary bin, the warning level capacity is 3.75 GB. However, the bin is not
maximized until it reaches 4.0 GB. A red warning zone indicates when the
non-primary bin is in this zone. Binders cannot be synchronized to this bin.
Creating a Bin
In most cases, it is not necessary to create a new primary bin in the Bin Manager Utility.
The daily scheduled task that calculates the space used by each bin automatically creates a
new primary bin when the existing primary bin reaches 2.5 GB of space used. However,
you can create a new bin manually whenever you want a new primary bin or when you
want to organize binders by bin.
When new bins are created, the default bin size is 4 MB for binders, 6 MB for trial balances,
and 2 MB for Knowledge Coach content.
1. In Administrator, select Tools/Manage Bins. The Bin Manager Login dialog displays.
2. Select the type of bin you want to create.
3. Select the location to log in to.
4. Click OK. The Bin Manager Utility displays.
5. Highlight the name of the bin in the left pane of the Bin Manager Utility.
3 - 58
Engagement Administrator
Chapter
3
6. Select Bins/Create Bin from the Bin Manager main menu. The Create Bin dialog displays.
7. In the Bin name field, type a unique name for the new bin.
8. In the Bin database path field, type the path to the location where the bin should be
created or click Browse to open the Browse dialog and navigate to the location.
9. If the new bin is to be a primary bin for assigning new binders, check the Primary bin
box.
10. Click OK to exit the dialog and create the new bin.
Deleting a Bin
A bin can be deleted only under the following conditions:
§
§
§
The bin is not designated as the primary bin.
The bin is empty.
A connection can be made with the office server/terminal services database.
To delete a bin, do the following:
1. In the Bin Manager Utility, highlight the office server and the bin that you want to delete.
2. From the Bin Manager Utility main menu, select Bins/Delete Bin. A warning message
asks you if you are sure you want to delete the bin.
3. Click Yes. The bin is deleted.
Scheduling Daily Tasks
The daily tasks consist of both calculating the disk space used for each bin and updating
the bin statistics. You must tell the system when you want these tasks to be performed. It
is recommended that you run these tasks during the night when normal ProSystem fx
Engagement processing is not occurring.
1. From the Bin Manager Utility main menu, select Bins/Global Settings. The Global Bin
Settings dialog displays.
2. Specify the Start time by clicking the spinner arrows to move to the time you want or
type the time in the field.
3. Click OK to finalize the schedule and exit the Global Bin Settings dialog.
Updating Bin Statistics Manually
You do not have to wait for the daily scheduled tasks to be executed to update bin
statistics. If ProSystem fx Engagement users are experiencing performance issues, you may
want to manually initiate a bin statistics update. However, the process may take longer
during the daytime when other processes are also functioning.
1. In the Bin Manager Utility, highlight the office server whose bin statistics you want to
update.
2. From the Bin Manager Utility main menu, select Bins/Update All Bin Statistics. As the bin
statistics are updated, an hourglass displays. This may take a few minutes.
3. When the bin statistics are updated, a message displays. Click OK.
3 - 59
Chapter
Engagement Administrator
3
Moving Binders
You can move binder database information from one bin to another. You can move binders
singly or in multiples by selecting one or more binders at a time. One purpose for moving
binders is to keep the capacity of bins less than the warning level of 3.0 GB.
A binder can be moved only under the following conditions:
§
§
§
The target bin must be different than the source bin.
Capacity of the target bin must be less than the warning level of 3.0 GB.
A connection can be made with the office server/terminal services database.
To move binders, do the following:
1. In the Bin Manager Utility, highlight the office server and the bin that contain the
binder(s) you want to move.
2. Select the binder(s) to be moved by using the
b or k keys.
3. Either drag the binders to the target bin or use the Cut and Paste functions to move the
binders. A warning message asks you if you are sure you want to move the binder(s).
4. Click Yes. The Move Binder Job Queue dialog opens, displaying the status of each binder
as it is moved.
Viewing Binder Properties
Administrators occasionally need to view the statistical properties of binders assigned to a
bin. Archived binders are not included in the bins.
To view binder properties, do the following:
1. In the Bin Manager Utility, highlight the office server and the bin that contain the binder
whose statistical properties you want to view.
2. Highlight the binder whose statistical properties you want to view.
3. From the Bin Manager Utility main menu, select File/Properties. The read-only Binder
Properties window displays the following information about the binder:
§
§
§
Name. Displays the name of the binder.
ID. Displays the ID of the binder.
Status. Displays the status of binder:
— Finalized. Binder’s engagement is complete and the binder successfully
finalized.
— In Transition. Binder is being moved to another office server or central file
room.
— In Process. Binder’s engagement is in process.
— <Custom>. A custom binder status that has been created in Administrator.
§
§
§
§
Type. Displays the type of engagement.
Workpapers. Tallies the total number of workpapers within this binder.
Notes. Tallies the total number of notes within this binder.
History Records. Tallies the total number of history records within this binder.
3 - 60
Engagement Administrator
Chapter
3
4. When you are finished viewing the statistical properties of the binder, click Close to exit
the Binder Properties window.
Viewing and Interpreting the Bin Diagnostic Report
If there is a diagnostic result to report, the Bin Diagnostic Report automatically displays
when you log in to the Engagement Administrator. A result means one of the following
conditions exists:
§
§
§
A new primary bin was automatically created when the former primary bin reached
2.5 GB.
A non-primary bin has reached the warning level of 3.0 GB, meaning that new
binders can no longer be synchronized to this bin.
It has been over 24 hours since performance of the daily scheduled tasks (i.e., either
calculating the disk space used for each bin or updating the bin statistics).
The Bin Diagnostic Report is especially helpful because, in addition to reporting diagnostic
facts, it also explains exactly what action should be taken for each scenario.
Note: The Bin Diagnostic Report does not display upon log in to a terminal
services database (a Citrix local file room).
The following items display on the Bin Diagnostic Report:
§
§
§
§
§
§
§
Bin Diagnostic Report. Displays the office server, office server name, and computer
name being reported.
Bin Created for New Binders. Displays the name and path of the new primary bin, if
one was created.
At Warning Capacity Level. Displays the bin name and path of bins that have
exceeded the warning capacity of 3.0 GB.
Failed Disk Space Usage Check. In the event that the scheduled task to calculate disk
space failed, displays the date and time of the attempt. If a failure occurred, a
message advises what corrective action you should take.
Status of Scheduled Bin Disk Space Usage Check. In the event that the scheduled
task to calculate disk space failed, displays the status of the schedule for calculating
disk space. For example, the scheduled task to calculate bin disk space may have
been disabled or deleted or, even though the daily task was properly scheduled, the
calculation of disk space did not run as scheduled. A message advises what
corrective action you should take for each scenario.
Failed Updated Bin Statistics Report. In the event that the scheduled task to update
the bin statistics failed, displays the date and time of the attempt. If a failure
occurred, a message advises what corrective action you should take.
Status of Scheduled Update Bin Statistics Check. In the event that the scheduled
task to update the bin statistics failed, displays the status of the schedule for
updating bin statistics. For example, the scheduled task to update the bin statistics
may have been disabled or deleted, or even though the daily task was properly
scheduled, the updating of bin statistics did not run as scheduled. A message advises
what corrective action you should take for each scenario.
3 - 61
Chapter
3
Engagement Administrator
Managing the Tip of the Day
The Tip of the Day feature displays the Tip of the Day in Engagement Today, Binder
Snapshot, and Trial Balance Snapshot in Workpaper Management. You can customize the
Tip of the Day items to show tips that are specific to your firm’s operations in each of the
categories listed above. Using your administrator login, you can add, edit, or delete tips for
Tip of the Day in the main office server. The updated Tip of the Day items synchronize to
secondary office servers and users' local machines.
To create, edit, or delete a Tip of the Day, do the following:
1. Select Tools/Tip of the Day in the Administrator module on the main office server. The
Tip of the Day dialog displays.
2. Select one of the following Tip of the Day categories to edit. The default selection is
Engagement Today.
§
§
§
Engagement Today
Binder Snapshot
Trial Balance Snapshot
3. Select one of the following:
§
§
§
New. Click New to open the New Tip of the Day dialog. Enter the title in the Title
field and then enter the body of the tip in the Description field.
Edit. Highlight a Tip of the Day item and click Edit. On the Edit Tip of the Day
dialog you can edit the tip title and or description.
Delete. Highlight a Tip of the Day and click Delete. Engagement prompts you for
confirmation and then deletes the tip.
The updated Tip of the Day items carry to secondary office servers and users’ local
machines after the next synchronization.
3 - 62
C H A P T E R
Workpaper Management
4
Overview
This chapter shows you how to configure ProSystem fx Engagement Workpaper
Management and describes tasks that you should perform on a periodic basis.
Before you begin, refer to Chapter 2, Installation, for system requirements and other related
information you need to set up ProSystem fx Engagement.
When you start ProSystem fx Engagement, select a login option that indicates whether or
not you are connected to your server(s). Depending on your selection of Field, Office, or
Shared File Room, different items display in your local file room to allow you to collaborate
with other team members.
Starting ProSystem fx Engagement
The initial login screen prompts you to define your home office server, which provides
Engagement license and staff rights information. You are also prompted to create a Location
Profile for your computer.
Logging In To Engagement
Only staff who are set up in the Administrator module can log in to ProSystem fx
Engagement.
1. Double-click the ProSystem fx Engagement icon on your desktop, or go to Start/All
Programs/ProSystem fx Engagement/ProSystem fx Engagement.
The ProSystem fx Engagement Login dialog displays.
2. Enter a valid user name. This is the user name that was set up in the ProSystem fx
Engagement Administrator module.
3. Enter the corresponding password that was set up in Administrator.
4-1
Chapter
4
Workpaper Management
4. In the Select location field, select one of the following options:
§
§
§
Field. If you are in the field and connected to other computers with a peer-to-peer
network, this connection allows you to synchronize directly with other team
members. You can also use this option when you do not want to connect with a
network or another staff member.
Office. If you are connected to the network in the office, this option allows you to
synchronize with the central file rooms set up in Administrator.
Shared File Room. If shared file rooms are enabled in Administrator, this
connection allows you to connect directly to another user's local file room. See
Using a Shared Local File Room on page 6-38 for more information.
5. Click OK.
6. If you are logging in for the first time, you are prompted by the Choose Office Server
dialog to define an office server. Do the following:
a. To select an office server to obtain licensing and staff rights information, enter a
computer name in the Computer Name field or click Browse to select a server.
Note: You cannot use an IP address for the computer name.
If you select Browse, the Browse for Computer dialog displays.
4-2
Workpaper Management
Chapter
4
Enter a valid office server computer name in the Computer Name field, or select
an office server from the list of available servers.
If a recently installed server is not available for selection, you may need to select
Refresh to update the list of servers. Click OK to close the Browse for Computer
dialog.
b. If you leave the Home office server box checked, the computer name is saved as
the home office server in the staff properties in the Admin module.
If you clear the check box, you must select a home office server again the next
time you log in.
c. A message box displays asking if you would like to create a profile.
§
§
If you click Yes, the system prompts you to make this computer your default
profile. Click Yes to save the setting as the default location in the staff
properties in the Admin module.
If you click No, the message closes without creating a profile.
Note: Staff members who share a computer are prompted to create
individual Engagement profiles on the computer.
d. You are asked if you would like to create a sample binder at this time. Select Yes
to receive a binder package with the sample client binder and to have the binder
set up for you. Select No to cancel the sample binder installation.
7. If you are logging in to a shared local file room, the Select Shared Profile dialog displays.
Do the following:
a. The Computer name field displays the computer that was previously selected, if
any. If no computer has been selected during a previous login, or if you need to
connect to a different computer, click Browse and select the appropriate
computer.
b. Select the appropriate staff name from the Staff name drop-down list.
c. Click OK.
8. If you are assigned to a binder with a document completion date that has passed or is
approaching, the Binders with Doc Completion Dates Approaching or Past Due warning
displays. This window provides information about each binder that is approaching or
past its completion date. One of the following icons appears beside the binder name:
§
§
Document Completion Date Approaching. This icon displays if the completion date
is within the time period specified in Firm Options.
Document Completion Date Past Due. This icon displays if the completion date
has already passed.
Click Export to Excel to open an Excel spreadsheet with the report data. Click Close to
exit the window and continue to ProSystem fx Engagement.
For more information about document completion dates, see Viewing and Editing Binder
Properties starting on page 6-15.
4-3
Chapter
4
Workpaper Management
9. The Engagement module launches to display the File Room. The items that display
depend on the location you selected during login.
§
§
§
Office. If you selected Office, your local file room and all the central file rooms set
up in ProSystem fx Engagement Administrator display. In Office, you can
synchronize to the central file rooms.
Field. If you selected Field, your local file room and all staff members created in
Administrator display. You can synchronize directly with other team members to
whom you are connected in a peer-to-peer network.
Shared File Room. If you selected Shared File Room, the Host's local file room
displays. You can open any binder and work directly with any workpaper the Host
has Current Editor rights for.
See Chapter 6, Creating and Using Binders, for procedures on synchronizing Engagement
binders to central file rooms or directly to other staff members in a peer-to-peer
environment.
Configuring ProSystem fx Engagement
Once you have logged in to ProSystem fx Engagement, you can customize several options
in the program before you begin to work.
Individual Engagement Profiles
Engagement creates a profile for each user who logs in to a computer. This allows more
than one user to use a single computer and maintain separate local file rooms (LFRs).
Each profile has its own binder record for each binder in the LFR. Only binder staff and
binder prior period records are shared across profiles. For example, User A and User B each
has a profile on the same computer, and both users have synchronized the same binder to
their LFRs. If user A changes a binder staff assignment or prior period information, user B
sees the changes without having to synchronize the binder. This automatic update of binder
staff assignments and prior period information only occurs when both users have the binder
in their LFRs and are using the same computer. It does not automatically update on other
computers that have a copy of the binder in a LFR.
4-4
Workpaper Management
Chapter
4
Changing and Viewing User Profile Information
Staff members are added in ProSystem fx Engagement Administrator. When logged in to the
Office in ProSystem fx Engagement, you can change a user’s password, default location,
home office server, Tax Research NetWork user ID and password, and Accounting Research
Manager user ID and password. The other user profile information can be viewed, but not
edited.
To create a new password, do the following:
1. Select Tools/User Profile. The Staff Properties dialog displays.
2. Enter the new password in the Password field. You may use up to 16 characters.
3. Confirm the new password by entering it again.
4. Click OK to save the new password.
Removing a User Profile
To delete profiles from a computer, you must exit Engagement and go to the Utilities
located within the Pfx Engagement Start menu folder.
To remove a profile on a computer with ProSystem fx Engagement installed, do the
following:
1. Exit ProSystem fx Engagement.
2. From the Windows Start menu, select All Programs\ProSystem fx Engagement\Utilities\
ProSystem fx Engagement Profile Manager. The Profile Manager dialog displays.
3. Highlight the profile you want to remove and click Remove. A message informs you that
deleting the profile deletes the user's local file room data on this computer.
4. Click Yes to continue. Click No to cancel the process.
5. Either enter the password associated with the login name of the profile to be removed,
or, if you are an administrator, enter the login name and password.
6. Click OK to remove the profile and its local file room data from the computer.
4-5
Chapter
4
Workpaper Management
Setting ProSystem fx Engagement Options
The tabs on the ProSystem fx Engagement Options dialog customize certain program
features, establish default paths for templates, data, and CCH and McGladrey & Pullen data
locations, and set or change firm properties.
Changing General Options
To change the ProSystem fx Engagement options, do the following:
1. Select Tools/Options to open the Engagement Options dialog.
2. Make any necessary changes to the following options on the General tab:
§
General. Check the applicable boxes to enable the options listed below. Clear the
check mark to disable the option.
— Auto express synchronize binder on open. After you have initially run the
Synchronize Binder Wizard for a binder, this option automatically synchronizes
changes from the local file room and central file room when you open a binder
without having to run the Synchronize Binder Wizard again.
— Auto express synchronize binder on close. After you have initially run the
Synchronize Binder Wizard for a binder, this option automatically synchronizes
changes from the local file room and central file room when you close a binder
without having to run the Synchronize Binder Wizard again.
— Auto refresh workpapers and trial balances. Automatically refreshes open Excel
workpapers when changes are made to the trial balance. This also refreshes
the open trial balance if a change is made to a trial balance function from
within an open Excel workpaper (e.g., a journal entry is created when viewing
the Accounts Payable TB report). Open Word workpapers must be manually
refreshed when any changes are made to the trial balance.
4-6
Workpaper Management
Chapter
4
— Auto refresh workpapers and trial balances before printing. Automatically
refreshes workpapers and trial balances before they are printed so all changes
are incorporated.
— Auto open last used binder. Automatically opens the last binder used in
Engagement before Engagement was exited.
— Double-click opens workpaper outside. When a workpaper is double-clicked, it
opens in the file type's default application. If this option is disabled,
double-clicking a workpaper opens it in a Workpaper Management window.
Note that this does not apply to trial balances, which always open outside.
— Restore window positions. Opens windows to the size they were when
ProSystem fx Engagement was exited.
— Launch separate instances of Excel (Dual monitors). Allows you to open
multiple Excel workpapers for viewing in two monitors.
— Launch separate instances of Adobe Acrobat (Dual monitors). Allows you to
open multiple PDF workpapers for viewing in two monitors.
§
Display. Select the items you want to display by default.
— Engagement Today as default view in File Room. Displays the Engagement
Today window rather than the File Room window when you open Workpaper
Management. The Engagement Today window lets you see your binders in
three different panes: most recently worked on, lead partner assignment, and
engagement type. A fourth pane lists binders by other criteria, such as past
due status and binders with new notes addressed to the current user or the
entire team, etc.
— Binder Snapshot on binder open. Displays a snapshot of the last binder you
worked on when you open a binder. The binder snapshot is divided into four
panes that show workpapers assigned to you, workpaper counts, workpaper
notes, and sign off status.
— TB Snapshot on binder open. Displays a snapshot of the trial balances in the
binder most recently used when you open a binder. The Trial Balance Snapshot
window includes a list of trial balances and the selected trial balance's
QuickView and diagnostics. You can open a trial balance from the snapshot.
§
Check the following options to open the Welcome dialog when starting the
wizards specified below:
—
—
—
—
§
New Binder Wizard
Roll Forward Wizard
Synchronize Binder Wizard
Finalize Binder Wizard
Prompt when/for. If you check the following options, the system prompts you for
confirmation before completing the specified action:
—
—
—
—
—
—
Notification of data changes from related workpaper
Insert Knowledge Tools workpaper
Document completion date warning
Moving items to the Trash
Deleting items from the Trash
Restoring items from the Trash
4-7
Chapter
4
Workpaper Management
—
—
—
—
—
—
—
—
—
—
Posting out-of-balance journal entry
Locking workpapers upon Reviewer sign off
Freezing Engagement links upon Reviewer sign off
Workpaper will be saved when links are frozen or unfrozen
Dynalink configuration confirmation
Workpaper is read only
Workpaper cannot be refreshed
Auto refresh before printing is not selected
TB Link formula contains over 540 characters
Link binder to Pfx Practice project after creation
Notes:
§
§
Insert Knowledge Tools workpaper displays only if you have ProSystem fx
Knowledge Tools installed.
Notification of data changes from related workpaper displays only if you have
ProSystem fx Knowledge Coach installed.
3. When you are finished, click OK. You can edit options at any time.
Changing Default Paths for Templates
Within the ProSystem fx Engagement Options dialog, use the Templates tab to set default
paths for Engagement templates.
To set the default paths for ProSystem fx Engagement templates, do the following:
1. Select Tools/Options.
2. Select the Templates tab.
4-8
Workpaper Management
Chapter
4
3. The following options are available in the Templates tab:
§
§
§
§
Binder Templates. Indicates where your binder templates are located. The default
path is C:\Pfx Engagement\WM\Binder Templates, where C is the installation
drive.
Trial Balance Templates. Indicates where your trial balance templates are located.
The default path is C:\Pfx Engagement\WM\Trial Balance Templates, where C is
the installation drive.
Workpaper Templates. Indicates where your workpaper templates are stored. The
default path is C:\Pfx Engagement\WM\Workpaper Templates, where C is the
installation drive.
Account Grouping Templates. Indicates where your account grouping templates
are stored. The default path is C:\Pfx Engagement\WM\Account Grouping
Templates, where C is the installation drive.
Tip: If you are in a network environment, you can share templates by
configuring all team members’ paths to point to the same network directory.
4. To change a default, click Browse next to its directory and select the appropriate folder
on the Select Folder dialog. When you are finished, click OK to apply the new settings.
5. You are returned to the ProSystem fx Engagement Options dialog. When you have
finished changing the directories, click OK.
Changing Default Paths for Data
1. Select Tools/Options.
2. Select the Data tab.
4-9
Chapter
4
Workpaper Management
3. The following options are available on the Data tab:
§
§
Profile name. Displays current user’s profile name and the computer where the
profile exists.
Local file room location. Displays the location of the local data on your computer
(client folders, binders, and workpapers). This directory cannot be changed, as
you need the data on your local system. The default path is
C:\Pfx Engagement\WM\Workpapers\Staff Guid.
Note: Please contact technical support for assistance if you want to
change the local file room location.
§
§
§
§
§
§
Home office server. Displays the name of the office server where administrative
data for the current user (licensing, rights, staff groups, etc.) are stored.
Print groups location. Displays the location of the pre-defined system print groups
and any print groups you create. You may share these print groups with other
staff members. The default path is C:\Pfx Engagement\WM\Print Groups, where C
is the installation drive.
Tickmarks location. Displays the location where tickmark definitions are stored.
The default path is C:\Pfx Engagement\WM\Tickmark, where C is the installation
drive.
Create binder package location. Displays the drive and directory where binder
packages created for disabled central file rooms and remote local file rooms are
stored. The default path is C:\Pfx Engagement\WM\Binder Packages, where C is
the installation drive.
Backup binder and restore binder location. Displays the location where binder
backups are stored. The default path is C:\Pfx Engagement\WM\Binder Backups,
where C is the installation drive.
Scheduled task document completion date report location. This is the location
where document completion date reports are stored when run as a scheduled
task. The default is \\<servername>\Admin Share, where <servername> is the
server where ProSystem fx Engagement Administrator is installed.
4. To change a default, click Browse next to the path you are changing and select the new
folder. When you are finished, click OK to apply the new settings.
5. When you are finished making changes, click OK. You can edit options at any time.
4 - 10
Workpaper Management
Chapter
4
Changing Default Paths for Practice Aids
To set the default paths for CCH Workpaper Templates, CCH Footnotes, McGladrey &
Pullen Work Programs, and Knowledge Tools Workpaper Templates, follow these steps:
1. Select Tools/Options.
2. Click the Practice Aids tab.
3. The following options are available on the Practice Aids tab:
§
§
§
§
CCH Workpaper Templates Path. When you purchase any CCH (formerly Miller)
Integrated Engagement Guides that are part of the Engagement workpaper
management system, the templates are stored here. The default path is
C:\Pfx Engagement\WM\CCH Workpaper Templates, where C is the installation
drive.
CCH Footnotes Path. When you purchase the CCH GAAP Financial Statement
Disclosures Manual that includes footnotes, the workpaper templates are stored
here. The default path is C:\Pfx Engagement\WM\CCH Footnotes, where C is the
installation drive.
McGladrey & Pullen Work Programs Path. When you purchase any of the
McGladrey & Pullen Integrated Work Programs, the workpaper templates are
stored here. The default path is C:\Pfx Engagement\WM\McGladrey and Pullen
Work Programs, where C is the installation drive.
Knowledge Tools Workpaper Template Path. When you purchase Knowledge Tools
Workpaper Templates, those templates are stored here. The default path is C:\Pfx
Engagement\WM\Knowledge Tools Templates, where C is the installation drive.
4. To change the default, click Browse next to the directory you are changing.
5. On the Select Folder dialog, select the appropriate folder. When you are finished, click
OK to apply the new settings. You are then returned to the ProSystem fx Engagement
Options dialog.
6. When you are finished making changes, click OK. You can edit options at any time.
4 - 11
Chapter
Workpaper Management
4
Entering and Changing Firm Properties
To enter or change Firm Properties, do the following:
1. Select Tools/Options.
2. Select the Firm Properties tab.
If firm information was entered in the Administrator module, it displays in this dialog.
You can make changes to information in this dialog, and the edits will not affect the
information in the Engagement Administrator module.
If, after editing Firm Properties, you want to restore the original information from the
Administrator module, click Reset.
3. When you are finished entering information, click OK.
The information entered here is available for linking to your Word and Excel workpapers.
See Chapter 9, Using Excel, and Chapter 10, Using Word, for further information on
linking these fields.
Note: Any changes made on this dialog are not transferred to the Administrator
module or to other staff profiles. The changes remain local.
Backing Up ProSystem fx Engagement Binders
We recommend that you back up your ProSystem fx Engagement binders frequently.
Backing up binders allows you to do the following:
§
§
Preserve previous versions of binders so that you can restore them in case of a
problem or an error.
Copy an entire set of ProSystem fx Engagement databases so that you can restore
them on another system.
You can use your backup software to back up the binders in your data folder. The default
location is C:\Pfx Engagement\WM\Binder Backup, where C is the installation drive. You
may also manually copy this folder to another location for a backup.
Note: See Chapter 6, Creating and Using Binders, for procedures on backing up
individual engagement binders.
4 - 12
C H A P T E R
Using the File Room
5
Overview
The ProSystem fx Engagement File Room is similar to your paper-based file room. It
provides a means to organize client folders and their engagement binders. It allows you to
switch between the Local File Room Client Index and Engagement Today views.
This chapter shows you how to set up and use the File Room and how to set up clients.
Using the File Room
The Client Index view allows you to organize client folders and their engagement binders in
your local file room and remote rooms. See Using the Client Index View on page 5-2 for
more details.
An alternate view to the Client Index view is the Engagement Today view, which is a
powerful diagnostic tool you can use to sort and summarize key local file room binder
information. The Engagement Today view may be accessed using one of the following
options:
§
§
Select View/Go To/Engagement Today.
Click the Engagement Today toolbar icon.
See Using the Engagement Today View on page 5-5 for more details.
Note: If staff members must share a computer, each staff member must have a
separate Engagement profile on the computer. Computer profiles are created when
you use the Office login location, or when you use the Field login location if a
Local Administrator has been established. If you log in to a computer on which you
have not set up a profile, a message box informs you that you do not have an
Engagement Profile on the computer and asks if you would like to create one.
Select Yes to create the Engagement profile.
Using the Client Index View
The Client Index view is organized like Windows Explorer, with expanding and collapsing
client folders in the left pane of the window and the contents of the selected file room or
client folder in the right pane. The Client Index view comprises the local file room, central
file rooms, remote staff file rooms, client folders, and binders.
5-1
Chapter
Using the File Room
5
Binder Icons
The following icons are used to represent binders. Each icon represents a binder that meets
certain criteria.
Icon
Name/Description
Standard Binder. The user is not the Current Editor of any workpapers in the binder, and the
document completion date is not approaching or past due.
Current Editor. The user is the Current Editor of at least one workpaper in the binder, and
the document completion date is not approaching or past due.
Document Completion Date Approaching. The user is not the Current Editor of any
workpapers in the binder, and the document completion date is within the specified number
of days (i.e., 45 or 60 days) from the current date.
Document Completion Date Approaching and Current Editor. The user is the Current Editor
of at least one workpaper in the binder, and the document completion date is within the
specified number of days (i.e., 45 or 60 days) from the current date.
Document Completion Date Past Due. The user is not the Current Editor of any workpapers
in the binder, and the document completion date set for the binder is past due, so all
changes made to the binder must be documented.
Document Completion Date Past Due and Current Editor. The user is the Current Editor of at
least one workpaper in the binder, and the document completion date set for the binder is
past due, so all changes made to the binder must be documented.
Client Index View Panes
There are three panes in the Client Index view.
§
§
Client Index pane. The upper left side of the window displays the file room and client
folders in your local file room.
Remote File Room pane. The bottom left pane has up to three tabs, depending on the
type of login connection. The pane displays the following tabs:
— CFR. This tab displays a list of central file room (CFR) connections and can display
a list of binders for each CFR that can be selected for synchronization to your
local file room when you log in from the office.
— Staff. This tab displays a list of all active staff members. When you connect to a
remote staff member's file room, you can view all clients and binders in that file
room.
— Buddy List. This tab displays a custom list of staff members you select to expedite
field synchronization.
§
Content pane. Depending on what is selected on the left side, the right side of the
window displays either the client folders in the local file room, the client folders in the
Central or Remote File Room, or the binders in the client folders to which you have
access.
5-2
Using the File Room
Chapter
5
Switching Between Panes
Press 6 to move between the panes in the Client Index window. If you selected an item in
a previous pane, it is highlighted when you switch back to that pane.
Refreshing the Window
Changes you make should be reflected in the Client Index window as you make them. If you
do not see changes that you have made, you can refresh the current/active window by
selecting View/Refresh or clicking the Refresh toolbar button.
Sorting with Client Groups
The Client Groups drop-down list on the toolbar allows you to organize processing for your
firm by sorting clients using client groups. Clients can be assigned to client groups that are
created within the Administrator module on the main office server. See Creating a New
Client Group on page 3-45 and Assigning Clients to Client Groups on page 3-46 for detailed
information.
Sorting Client Index Contents
You can sort the information in the Contents pane by any of the columns in ascending or
descending order.
If you are viewing client folders, you can sort them by the following criteria:
§
§
§
§
Name
ID
Entity Type
Industry type
If you are viewing binders, you can sort them by the following criteria:
§
§
§
§
§
§
§
§
§
§
§
§
Name
ID
Type
Status
Lead Partner
Year End
Period End
Due Date
Document Completion Date
Finalized by
Finalized Date
Retention Period End Date
To use the sort option, do the following:
1. Click the local file room or client folder. For Central or Remote File Rooms, double-click
the CFR or staff name.
2. Select View/Sort By. A menu displays listing the columns you can sort by. The list
changes depending on the items you are viewing. A check displays next to the current
sort.
3. In the Contents pane, click the gray column bar to sort by that column. Click the gray
column bar again to toggle between ascending and descending order.
5-3
Chapter
5
Using the File Room
Finding Clients and Binders
You can use the Find command to search for client folders and binders in the File Room
window. You can then open the client or binder from the Find dialog.
Note: The Find command works differently in a Binder window than it does in the
File Room window. When a Binder window is active, the Find command searches
for workpapers in the binder. See Chapter 8, Managing Workpapers, for an
explanation. If the Find command does not work as demonstrated in the following
section, make sure you are in the File Room window and not the Binder window.
To perform a search in the local file room, do the following:
1. Open the Find dialog by doing one of the following:
§
§
§
Select Edit/Find.
Right-click the local file room and select Find from the pop-up menu.
Press b+F.
2. In the Name field, type the name of the client or binder. You can type a complete or
partial name. The program matches all the items with names that contain the text you
type. For example, if you type "eng" in the Name field, the program could find all of the
following:
§
§
§
Engagement.
Pacific Engineering.
Avenger Products
Note: The search is not case sensitive.
3. In the Type section, select the type of items you are searching for. If you select Find
Binders for Client, select the client folder where you want to search.
4. Click Find Now. The search results are displayed in the lower half of the dialog.
5. To select the client folder you were looking for in the local file room window, or to open
the binder you were looking for, double-click the client folder or binder.
Managing the Buddy List
The Buddy List tab in the Remote pane allows you to maintain a custom list of staff
members to quickly initiate field synchronization in the local file room.
1. To open the Manage Buddy List dialog, use one of the following options:
§
§
Select Tools/Manage Buddy List.
Use the right-click menu and select Manage Buddy List.
The Manage Buddy List dialog displays the following information:
§
§
Available staff. Lists all firm staff members not previously assigned to the Buddy
List.
Buddy list. Lists all firm staff members assigned to the Buddy List.
5-4
Using the File Room
Chapter
5
2. To assign/unassign staff to the Buddy List, you can do one of the following:
§
§
§
§
Select staff member(s) from the Available staff list, then click the Assign button
to add the staff to the Buddy List.
Select the staff member(s) from the Buddy List, then click the Unassign button to
remove staff from the Buddy List.
Click the Assign All button to add all staff members to the Buddy List.
Click the Unassign All button to remove all staff members from the Buddy List.
3. Click OK to save settings and close.
Using the Engagement Today View
The Engagement Today view displays user-level diagnostic information that summarizes key
statistics regarding the binders in your local file room. The Engagement Today view also
displays the Tip of the Day.
To switch to the Engagement Today view, select View/Go To/Engagement Today or click
the Engagement Today icon.
Note: Engagement Today View is not available when working in a shared local file room.
The Engagement Today Panes
The following panes display in Engagement Today:
§
§
§
My Recent Binders. Displays links to the last four binders used.
By Lead Partner. Displays a list of binder links sorted by lead partner from the binder
properties.
Other Highlights. Displays a list of binder links sorted by the categories listed below.
— Binders with checked out workpapers
— Binders with open notes to me
— Binders not synchronized in a week
— Past due binders
— Binders within X days of due date (where X represents the number of days
specified in Firm Options
— Binders within X days of document completion date (where X represents the
number of days specified in Firm Options)
— Binders past completion date
Note: Finalized binders are not listed in these categories.
§
By Engagement Type. Displays a list of binder links sorted by one of the following
Engagement types:
— Audit
— Bankruptcy
— Business Valuation
5-5
Chapter
Using the File Room
5
—
—
—
—
—
—
—
—
—
Collateral Review
Compilation
Correspondence
Litigation
Other
Permanent
Review
Tax Accrual
Tax Return
Note: Clicking the triangle next to a topic in the Lead Partner, Other Highlights,
or Engagement Type pane causes a list of binders that have the selected topic
incorporated to display. Clicking a binder link opens the binder in Binder view.
§
Tip of the Day. Displays suggestions for using the program more efficiently. You can
hide the Tip of the Day by clicking Hide Tips. The Previous and Next buttons allow
you to navigate the tips. To restart Tip of the Day, select Show Tips.
Note: You can customize the Tip of the Day items to show tips that are
specific to your firm’s operations. See Managing the Tip of the Day on page
3-62 for more details.
Refreshing the Engagement Today Window
Refresh the Engagement Today options by selecting the Refresh button on the top-right
corner of the Engagement Today window.
Displaying Engagement Today as the Default Window
To display Engagement Today as the default window, select one of the following options:
§
§
Select the Display as the default view in the File Room box on the Engagement Today
window.
Select Tools/Options and Engagement Today as default view in File Room.
Adding and Editing Client Folders
You can create an unlimited number of client folders. The folders are located in the local file
room.
For each client folder, you enter information about the client, including the client’s name
and company entity type. You then create engagement binders inside each client folder.
You can create new client folders in the following ways:
§
§
By entering and saving the client’s company information in a new folder.
By copying an existing folder.
When you name client folders, you must use a unique client ID and name combination.
This section describes how to set up client folders using methods listed above. Once you
have set up folders, see Chapter 6, Creating and Using Binders, to create the binders that
go into the client folders.
5-6
Using the File Room
Chapter
5
Creating New Client Folders
To create new client folders, do the following:
Entering Client Profile Information
1. In the Client Index view, click the local file room to place the new folder at its root.
2. Do one of the following:
§
§
§
Select File/New Client.
Right-click the Local File Room icon and select New Client.
Click the New Client toolbar button.
The Create New Client dialog displays.
3. Select the Profile tab.
4. Enter the name of the client in the Client name 1 field (Last name field if you select
Individual as the Entity type). This is a required field.
5. The remaining fields on this tab are optional. However, all of the information entered is
available for linking to your Word and Excel workpapers. See Chapter 9, Using Excel,
and Chapter 10, Using Word, for information on linking these fields.
Note: The Entity Type you choose in this dialog does not impact how you
export to your tax software. Also, it does not impact the conversion of tax
grouping codes from other software. See Chapter 7, Using the Trial Balance,
for more information on interfacing with tax software and converting from
other software packages.
5-7
Chapter
5
Using the File Room
Adding New Clients to Client Groups
1. In the Client Index view, click the Local File Room to place the new folder at its root.
2. Perform one of the following actions to display the Create New Client dialog:
§
§
§
Select File/New Client.
Right-click the Local File Room icon and select New Client.
Click the New Client toolbar button.
3. Enter information on the Profile tab, if necessary.
4. Select the Group tab. The Group tab displays existing client groups so that you can add
the client to one or more groups. Clients in the File Room can be filtered by client group.
There is no limit to the number of groups to which a client can belong.
5. To add a client to a client group, check the box next to the client group. To remove a
client from a group, remove the check from the group box.
See Managing Client Binders, starting on 3-45, for more details regarding Client Groups.
Entering Contacts for the Client
1. In the Client Index view, click the Local File Room to place the new folder at its root.
2. Perform one of the following actions to display the Create New Client dialog:
§
§
§
Select File/New Client.
Right-click the Local File Room icon and select New Client.
Click the New Client toolbar button.
3. Enter information on the Profile tab. The Last Name field is required before entering
contacts.
4. Select the Contacts tab.
5. Click New. The fields on the Contacts tab become available for data entry.
5-8
Using the File Room
Chapter
5
6. Type the information for the contact. The Last Name field is required. Once the Last
Name field is completed, the Save button becomes enabled. The other fields are
optional.
7. Click Save. Once you have saved a contact, you can do any of the following:
§
§
§
§
§
Click New to enter information for another contact.
Review the contacts you have created for the client by clicking the left arrow (<)
and right arrow (>) buttons next to the Last Name field. You can scroll through
the contact list in last-name order.
Select a contact by last name by clicking the drop-down arrow next to the Last
Name field.
Change a contact’s information by selecting the contact and then positioning your
cursor in the field to be changed. The Save button becomes enabled once you
make a change.
Delete a contact by selecting the contact and clicking Delete. You are prompted to
confirm the delete.
Saving Client Information
When you have entered all the client information, click OK to create a new client folder in
the local file room.
Creating a New Client Folder by Copying
You can also create a new client folder by making a copy of another client folder. Use this
method if a new client folder has information similar to that in an existing client folder or if
you are creating a number of similar companies with similar information, such as
subsidiaries of a parent company. Copying a client folder copies only the client folder.
Workpapers and binders are not copied.
To create a new client folder by copying, do the following:
1. Right-click the folder you want to copy and select Copy from the pop-up menu.
2. Right-click the Local File Room icon and select Paste from the pop-up menu. A new
client folder is created with the same ID and name as the original with the words Copy
of appended at the beginning. Follow the instructions in the next section to change the
name and related properties of the new folder.
Note: Avoid using duplicate IDs and client names, as this creates problems
when binders are archived.
5-9
Chapter
Using the File Room
5
Changing and Viewing Client Properties
You can view and change client information on the Client Properties dialog. To open the
Client Properties dialog, click the client folder and do one of the following:
§
§
§
Select File/Properties.
Right-click the client name from the Client Index pane and select Properties from the
pop-up menu.
Click the Properties toolbar button.
You can edit or view client information on the Profile tab, client group assignments on the
Group tab, and contact information on the Contacts tab.
Deleting Clients
Important: Deleting a client is irreversible if the client is removed from the central
file room and all local file rooms. Once you delete a client from all file rooms, you
cannot retrieve that information, including any ProSystem fx Engagement binders
associated with the deleted client. We recommend that you verify that all binders
associated with the client have been synchronized to the central file room prior to
deleting the client from your local file room.
To delete a client, do the following:
1. Select the client from the Client Index view.
2. Do one of the following:
§
§
§
Select Edit/Delete.
Press i.
Right-click and select Delete from the pop-up menu.
3. On the confirmation prompt, click Yes to complete the delete or No to cancel the
deletion.
5 - 10
6
C H A P T E R
Creating and Using Binders
Overview
You can create as many binders for a client as you need. Like paper-based engagement
binders, ProSystem fx Engagement binders store and organize client workpapers for any
type of engagement, such as a tax return or an audit. Because binders are electronic, each
staff member assigned to an engagement can have his or her own copy.
Binders are created using the New Binder Wizard. Items within your binders can have the
same name if the index numbers of the items are different.
The Binder Snapshot view allows you to review key diagnostic information in binders. The
Binder Snapshot Summary page provides important status information regarding
workpapers, workpaper counts, notes, and sign-off status. The Binder Snapshot also
displays the Tip of the Day. See Using the Binder Snapshot on page 6-33 for detailed
information.
This chapter shows you how to create and use binders, including how to share and
distribute binders, view the workpapers inside a binder, and change information about a
binder.
Sources for Creating Binders
You can use one the following options when creating binders in the New Binder Wizard:
§
§
§
Create binders from templates
Create blank binders
Create binders from an existing binder in your local file room
These options are described in the following sections.
Notes:
§
§
When you roll forward a binder to the next period, a new binder is created during the
process. See Rolling Forward Binders on page 6-54 for more information.
Binders can only be created in the local file room. You can synchronize the binder to a
central file room, as needed. See Office Network Environment - Central File Room on
page 6-40 for more information.
6-1
Chapter
Creating and Using Binders
6
Creating a Binder from a Template
You can use the ProSystem fx Engagement Sample Binder template to create binders for
your clients. The Sample Binder template contains a trial balance, workpapers, and the tab
structure for different types of engagements.
You can create binders using the CCH (formerly Miller), McGladrey & Pullen binder
templates, if licensed and installed. All CCH and McGladrey & Pullen binder templates are
automatically set up with a tab structure following the CCH or McGladrey & Pullen
organization.
You can also create binders using the ProSystem fx Knowledge Tools or Knowledge Coach
templates, if licensed and installed. In addition, you have the ability to create your own
binder templates from the binders you already have. You can create as many templates as
you need.
Creating a Binder from a Blank Binder
This option creates an empty binder without workpapers and tabs. Use this option to create
a new binder from scratch or if you need a custom binder that does not conform to any of
the templates or existing binders.
You may want to start with a blank binder when creating templates for the various
engagements you perform. See Saving Binders as Templates on page 6-12 for instructions.
Creating a Binder from an Existing Binder
You can create a new binder based on an existing binder. This option is useful when the
contents and organization of an existing binder closely match that of the one to be created.
If you use the chart of accounts or journal entries options, the account IDs and descriptions
are maintained, but balances are cleared.
Notes:
§
§
If you need to maintain account balances, use the Copy option.
Do not use this feature to create a binder for a new fiscal year for the same client.
Instead, use the roll forward feature that automatically rolls the dates forward and
moves the balances to the prior periods. See Rolling Forward Binders on page 6-54.
Using the New Binder Wizard
Using the New Binder Wizard to create a new binder is a three-step process, or a four-step
process for Knowledge Tools and Knowledge Coach binders. The steps include the
following:
§
§
§
§
Creating a new binder
Setting Knowledge Coach options (if applicable)
Defining binder properties
Assigning staff to binders
These steps are described in more detail in the sections that follow.
6-2
Creating and Using Binders
Chapter
6
Creating a New Binder
Creating a new binder is the first step in the New Binder Wizard process.
To create a new binder, do the following:
1. Select the local file room user name or client folder and do one of the following:
§
§
Select File/New Binder Wizard.
Click the New Binder Wizard toolbar button.
Note: If you do not want to show the Welcome dialog the next time you use
the New Binder Wizard, check the Do not show this welcome page again box.
You can also select Tools/Options and uncheck the New Binder Wizard Welcome screen box in the Display section.
2. Click Next to open the New Binder Wizard - Select Client folder dialog.
3. Select the client folder where the binder will be added.
§
§
Select from a local file room if the client folder is in your local file room. The new
binder is created and placed in the client folder.
Select from a central file room if you are using the Office login and the client
folder is in a central file room. A client folder is automatically created in the local
file room and the new binder is created and placed in the client folder in the local
file room.
6-3
Chapter
6
Creating and Using Binders
4. Click Next. The New Binder Wizard - Designate a Central File Room dialog displays.
Note: The new binder is created in the local file room, not in the central file
room. You can synchronize the binder from the local file room to a central file
room afterwards. See Office Network Environment - Central File Room on page
6-40.
5. Use the drop-down list to select the central file room you want to synchronize the binder
to when performing the initial binder synchronization.
6. Click Next. The New Binder Wizard - Select Source for the Binder dialog displays.
6-4
Creating and Using Binders
Chapter
6
7. Select one of the following methods for creating the binder:
§
Create binder from template. Select Create binder from template and then select
the appropriate tab to use the ProSystem fx Engagement Sample Binder template,
CCH (formerly Miller) binder template, Knowledge Tools binder template,
Knowledge Coach binder template, or any binder templates you have created. See
Saving Binders as Templates on page 6-12 for instructions on creating binder
templates. The Sample Binder template contains a trial balance, workpapers, and
the tab structure for different types of engagements.
The CCH (formerly Miller), Knowledge Tools, and Knowledge Coach binder
templates are automatically set up with a tab structure that follows each
product's organization.
Note: You must have licensed and installed the CCH (formerly Miller)
Integrated content or Knowledge Coach content to use these binder
templates.
§
§
Create blank binder. The blank binder is created with no workpapers or tabs. Use
a blank binder to create a new binder from scratch.
Create binder from existing binder in your Local File Room. Use this option to
create a binder based on an existing binder. Open the client folder containing the
binder you want to use and highlight the binder. You can use or clear the chart of
accounts in the new binder. If you use the chart of accounts from the existing
binder, the account IDs and descriptions are maintained; account balances are
cleared. You can also save journal entries from the existing binder. Journal entry
amounts are not saved. If the original binder includes Knowledge Tools
workpapers, Knowledge Tools sign offs and answers are cleared.
Notes:
— To maintain account balances, create a new binder by duplicating the binder
using the Copy feature.
— To create a binder for a client for a new period, use the Roll Forward feature
explained on page 6-54.
8. Click Next to continue to the next page of the New Binder Wizard.
Defining Binder Properties
After creating a new binder (see Creating a New Binder on page 6-3), define the new binder
properties. Defining binder properties is the second step in the process of creating binders
with the New Binder Wizard.
Note: The binder Name, Binder ID, Year-end date, and period number must be a
unique combination within the client folder.
6-5
Chapter
6
Creating and Using Binders
To define binder properties, do the following:
1. In the New Binder Wizard - General Properties dialog, complete the information as
follows:
§
§
The Name field is required. Type the name of the binder. The name can be up to
64 characters. The ID can be up to ten characters.
The Due Date field is required. The default date is either 12/31/YYYY of the
current year or the due date of the binder that the new binder is being created
from.
The remaining fields are optional.
Note: The Name, ID, Type, and Lead Partner fields can be used to sort binders
in the File Room Window.
2. Click Next. The New Binder Wizard - Enter Period Information dialog displays. You can
define beginning and ending dates for the current and prior periods.
6-6
Creating and Using Binders
§
Chapter
6
Year-end date. Enter the year-end date or select the date from the drop-down
calendar.
Note: If you enter a year-end date other than a calendar month-end date,
you may need to select the prior periods button to modify the prior periods
dates.
§
§
§
§
Period sequence. The length of the engagement. If you change the period
sequence after changing a default date on the Prior Periods dialog, you may need
to edit the prior period dates.
Period. The period number as defined by the period sequence of the current
period. If you change the period after changing any of the default dates on the
Prior Periods dialog, you may need to make changes to the prior periods.
Beginning date. Beginning date of the current period. Must be on or before the
year-end date.
Ending date. Ending date of the current period. Must be on or after the current
period beginning date and on or before the year-end date.
3. Click Prior Periods to modify prior period dates if the year-end date is other than a
calendar month-end date or if you need to define prior periods other than calendar
month-end dates.
For example, if you are doing a review for the quarter ending September 30, 2005, for a
fiscal year ending June 30, 2006, you complete the fields as follows:
§
§
§
§
§
Year-end date: 6/30/06
Period sequence: Quarterly
Period: 1
Beginning date: 7/1/05
Ending date: 9/30/05
To enter a date, you can either type the date in the date format shown in the field or
click the arrow at the end of the field and select the date from the calendar.
The example shown above displays the prior period information (36 periods for 36 years)
for an annual client with a current period ending date of 12/31/2006.
6-7
Chapter
6
Creating and Using Binders
The Beginning Date and Ending Date fields, which initially display dates calculated by the
system based on the current period dates, can be changed. To change the dates, either
type the date in the date format shown in the fields or click the date field and use the
arrow at the end of a field to open a calendar. Then select the date from the calendar.
The Beginning Date and Ending Date cannot overlap in one or more periods. In addition,
the Beginning Date cannot occur after the Ending Date in the same period.
4. Click OK to save the new period information and exit the Prior Periods dialog.
Note: If you change the year-end date, period sequence, or period after saving
the information, you may need to change the prior period dates.
5. Do one of the following:
§
§
Click Finish to accept the current settings and create the binder.
Click Next to assign staff members to the binder.
Setting Knowledge Coach Options (If Applicable)
If you are creating a Knowledge Coach binder, the Knowledge Coach Options page of the
New Binder Wizard displays.
To set options for Knowledge Coach content, do the following:
1. Select how the
§
§
Keep the same version of Knowledge Coach Workpapers as in the source binder.
The workpaper will be included in the new binder. If the workpaper uses links to
Date functions or links to the trial balance, the formulas will be updated with the
next period's information.
Replace Knowledge Coach workpapers with the latest content version. The
Knowledge Coach workpaper will be replaced by the most up-to-date template
when the workpaper is opened in the new rolled-forward binder.
2. Select the data retention options for the Knowledge Coach content:
§
§
Keep program step sign-off. The program step sign-off information for the
workpaper will be maintained in the new binder.
Responses. Select one of the following:
— Use response roll forward setting. The Knowledge Coach workpaper will roll
forward each response according to the setting for that response.
— Keep all responses. The Knowledge Coach workpaper will retain the current
responses when the new binder is created.
— Reset all responses. The Knowledge Coach workpaper will reset all field cell
values in the new binder.
6-8
Creating and Using Binders
Chapter
6
3. If you select to replace the workpaper in the roll forward with the latest Knowledge
Coach content in step 1, you can select any of the following customizations to be
included when the content is updated:
§
§
Merge row customizations. The Knowledge Coach workpaper will merge the prior
year's additions, deletions, and text changes to rows when the new binder is
created. This option is available only when Replace in the roll forward with latest
Knowledge Coach template is selected.
Audit programs populated with program steps. Added program steps will be kept
in Knowledge Coach audit workpapers. If you select this option, the following
options become available:
— Custom program steps. Program steps you have created and added to audit
workpapers will be kept in the new binder.
— Modified program steps. Modifications you have made to added program steps
in audit workpapers will be kept in the new binder.
Assigning Staff to Binders
After defining the binder properties and setting Knowledge Coach options (if applicable),
assign staff to the new binder.
To assign staff to the new binder, do the following:
1. Click Next and the New Binder Wizard - Verify Binder Staff Assignment dialog displays.
To open an engagement binder, you must be assigned to that binder.
2. The Available teams or staff box displays a list of staff members or teams available for
assignment to the new binder. The user who creates the binder is automatically assigned
to the binder. Use the following View radio buttons to modify how teams and staff
display.
§
§
§
All. Displays a list of all teams and staff members set up in the Admin module.
By team. Displays a list of staff teams set up in the Admin module.
By staff. Displays a list of available staff members set up in the Admin module.
6-9
Chapter
6
Creating and Using Binders
3. To assign staff members in the New Binder Wizard, select the applicable staff members
or team and click the Assign arrow that points to the right. You can select multiple
teams or staff members by holding down the k or b keys.
To assign all teams or staff members to the binder, click the Assign All double arrows
that point to the right.
Note: If the Firm option in the Admin module is set to automatically assign the
team to new binders, the team is assigned to the binder.
4. The Assigned binder teams and staff box displays staff members assigned to the binder.
§
§
To unassign a team or staff member, select the staff member and then click the
left arrow.
To unassign all teams and staff members, click the left-pointing double arrows.
Note: When you unassign all teams and staff members, you receive the
following message: "At least one staff member must be assigned to the binder.
Therefore, you will not be unassigned from the binder staff."
5. If a staff member is assigned to an alternate staff group in the Administrator module, the
staff group assignment can be changed for this binder. Click the staff member in the
Assigned binder teams and staff box, then click Change Group. The Change Group
dialog displays.
6. Select a group in the Group for this binder drop-down list and click OK.
Note: The staff member inherits the security rights of the new group, except
for those related to clients, binder packages, and binder backup/restore. The
staff member retains the defaults for those rights.
7. To review the properties of staff members and teams, use one of the following options:
§
Select the staff member and click Properties. The Staff Properties dialog displays
the following information:
—
—
—
—
—
Account Information
Staff information
Staff groups
Tax Research NetWork (TRN) login information
Accounting Research Manager (ARM) login information
To change staff properties, see Chapter 3, Engagement Administrator.
6 - 10
Creating and Using Binders
§
Chapter
6
Select the team name and click Properties. The Team Properties dialog displays
the following information:
—
—
—
—
Team name
Team description
Team members
Whether to assign the team to new binders.
To change Team information, see Chapter 3, Engagement Administrator.
8. Click Finish. The Completing the New Binder Wizard dialog displays.
The dialog summarizes the properties of the new binder. It contains the New Binder
Summary Report, which displays the following information:
§
General Properties. Displays the following items:
—
—
—
—
—
—
—
—
—
§
Client folder name and File Room location
Source type and template or existing binder, if any
Binder name
Binder ID
Description
Type
Due date
Charge code
Lead partner
Period Properties. Displays the following items:
—
—
—
—
—
Year-end date
Period sequence
Period
Beginning date
Ending date
6 - 11
Chapter
6
Creating and Using Binders
§
§
Binder Staff. Displays staff assigned to the binder.
Additional Settings. Displays selections for Include Journal Entries and Clear
Account Details, for a binder created from an existing binder only.
9. The following options can be selected on the Completing the New Binder Wizard dialog:
§
§
§
Print. Prints the New Binder Summary report.
Save As. Allows you to save the report to a file in a user-specified location. The
file extension is HTM.
Open the binder automatically when this wizard closes. When this item is
checked, the new binder automatically opens when the wizard closes.
10. Click Create to save the settings and create the new binder.
Note: Once the required information has been entered on the General
Properties dialog of the Wizard, the Finish button becomes available. You can
select Finish on any page to accept the default information without displaying
subsequent dialogs of the Wizard.
Saving Binders as Templates
Binder templates are generic starting points for subsequent engagements. You can save a
binder as a template if you want to use the information and format of a binder again for a
similar engagement. The binder template does not include workpaper sign offs, notes,
published workpapers, trash items, and workpaper history information.
Note: To organize your binder templates (e.g., by industry or entity type) use
Windows Explorer to create folders within the Pfx Engagement\WM\Binder
Templates path. Save your binders within the appropriate folders. When new
binder templates are stored in this manner, the folder names display as tabs on the
Save Binder as Template dialog.
To save a binder as a template, do the following:
1. Verify that the binder is closed.
2. In the local file room’s right pane, click the binder that you want to save as a template
and do one of the following:
§
§
Select File/Save Binder as Template.
Right-click and select Save Binder as Template from the pop-up menu.
The Save Binder As Template dialog displays.
The file name defaults to the name of the binder from which the template was created.
To change the default name, type a new name. Do not include the extension. It is added
automatically.
6 - 12
Creating and Using Binders
Chapter
6
The default path of the binder template depends on the type of binder, as follows:
§
§
§
§
CCH (Formerly Miller) binder templates default to Pfx Engagement\WM\Binder
Templates\CCH (Formerly Miller).
Knowledge Tools binder templates are saved to Pfx Engagement\WM\Binder
Templates\Knowledge Tools
Knowledge Coach binder templates are saved to Pfx Engagement\WM\Binder
Templates\Knowledge Coach.
All other binder templates default to Pfx Engagement\WM\Binder Templates.
3. To clear the chart of accounts in the binder, check the Clear chart of accounts box.
Note: If you choose to use the chart of accounts, only the account IDs and
descriptions are maintained. The account balances are cleared.
4. To unlock any workpapers that may be locked, check the Unlock all locked workpapers
in the binder template.
Note: If any workpapers contain frozen links, the links remain frozen in the
binder template and in any resulting new binder created from the template. You
can select Workpaper/Unfreeze Engagement links to unfreeze the links in
workpapers created in the new binders.
5. Click Save to create the binder template.
Copying a Binder
You can copy a binder if you are assigned to the binder and belong to a staff group with
rights to create a new binder. You can copy binders only to client folders within your local
file room. When you copy a binder to a new client folder, all workpapers and tabs are
copied, but the synchronization history is not. Workpapers in the new binder keep a record
of the last modification made to workpapers in the copied binder.
To copy a binder to a different folder, do the following:
1. Click a binder in the List pane of the local file room to select it. To copy multiple binders,
use b or k.
2. Click the Copy button on the toolbar.
3. Select the client folder to which you want to copy the binder.
4. Click the Paste button. The Paste Binder Options dialog displays for each binder you are
copying to another folder.
6 - 13
Chapter
6
Creating and Using Binders
5. On the General tab, choose from the following:
§
§
§
Trash content. The contents of the trash folder are copied to the new binder.
Binder History. The report date, report release date, calculation and/or override for
the document completion date, and end of retention period are copied.
Staff assignment. Select to copy any of all of the following settings: workpaper
notes, sign off information, and Current Editor status information. You have
Current Editor rights; however, any workpapers owned by another staff member
are assigned to that person.
6. On the Trial balance tab, choose from the following:
§
§
Chart of accounts. The chart of accounts is copied to the new binder.
Journal entries. Journal entries are copied to the new binder.
7. The Knowledge Coach tab displays if ProSystem fx Knowledge Coach content is
included in the binder. Choose from the following:
§
§
Select whether to keep the Knowledge Coach workpapers as they exist in the
original binder, or to replace the Knowledge Coach workpapers with the latest
content.
Data retention options for entered data. Select Keep program step sign-off to
retain all program step sign-off information in Knowledge Coach workpapers.
Select one of the following options for dealing with responses in Knowledge
Coach workpapers:
— Use response roll forward settings. The Knowledge Coach workpaper will roll
forward each response according to the setting for that response.
— Keep all responses. The Knowledge Coach workpaper will retain the current
responses when the new binder is created.
— Reset all responses. All Knowledge Coach workpaper responses will be reset
when the new binder is created.
— Keep the following customizations for template updates. Select whether to
merge the prior year's additions, deletions, and text changes to rows when the
new binder is created.
8. The Knowledge Tools tab displays if ProSystem fx Knowledge Tools workpapers are
included in the binder. Choose from the following options:
— Select whether to keep the Knowledge Tools workpapers as they exist in the
original binder, or to replace the Knowledge Tools workpapers with the latest
template version.
— Data retention options for entered data. Select whether to keep the program
step sign-off information, all responses, and/or all comments and workpaper
references in the pasted binder.
— Keep the following customizations for template updates. Select whether to
merge the prior year's additions, deletions, and text changes to rows when the
new binder is created.
6 - 14
Creating and Using Binders
Chapter
6
Notes:
§
§
§
You cannot copy a binder to another staff member’s local file room.
If the binder is currently being used by another staff member or if it is locked in the
Administrator module, you cannot copy it.
The system records when the binder was copied and who copied it.
Viewing and Editing Binder Properties
To view and edit the properties of a binder, click the binder you want to change, then do
one of the following:
§
§
§
Select File/Properties.
Right-click the binder and select Properties from the pop-up menu.
Click the Properties toolbar button.
The Binder Properties dialog displays with the following tabs:
§
§
§
§
§
§
General
Periods
Dates
Information
Binder Staff
History
These tabs are described in more detail in the following sections.
General Tab
The General tab displays general information about the binder. If the binder is selected from
a central file room on a secondary office server, finalized, archived, or in transition, the
information is read-only.
Fields on this tab include the following:
§
§
§
§
Name. Displays the name assigned to the binder. You can change the name which
can be up to 64 characters in length. This field is required.
Binder ID. Displays the ID assigned to the binder. You can change or enter an
identification for the binder. This can be any character combination of up to 10
characters based on your ID scheme.
Description. Displays the binder description. If a description has not been entered,
enter an identifying description for the binder of up to 32 characters.
Type. Displays the type selected for the binder. Either keep the default (based on the
template or existing binder) or use the drop-down list to select a type. The following
types are available by default:
—
—
—
—
—
—
Audit
Bankruptcy
Business Valuation
Collateral Review
Compilation
Correspondence
6 - 15
Chapter
Creating and Using Binders
6
—
—
—
—
—
—
§
§
§
Litigation
Other
Permanent
Review
Tax Accrual
Tax Return
Due date. Displays the due date assigned to the binder. This field is required. The
default is 12/31/yyyy or the due date of the binder template that this binder is being
created from. Enter a due date or use the drop-down arrow to select a date from the
calendar.
Charge code. Displays the charge code assigned to the binder. Change the charge
code, or if no code was assigned, enter a code of up to 50 characters. You can also
leave the code blank.
Lead partner. Displays the name of the lead partner assigned to the binder, if
applicable. Leave the field blank, or select a lead partner from the drop-down list. To
find the lead partner you want, type the first few letters of the name, and the system
takes you directly to that spot in the list. You must type rapidly for the string of
letters to be seen as one unit. For example, if you type “ATL” within half a second,
the system advances to the first “ATL” in the list. If you take more than half a
second to type “ATL,” the system advances to the first “A,” then to the first “T,”
and then to the first “L” in the list. This field can be used to sort binders in the File
Room window.
Periods Tab
The Periods tab allows you to customize the settings for the binder's periods. If the binder
is selected from a central file room on a secondary office server or is finalized, archived, or
in transition, the information is read-only. Otherwise, you can change the information in the
following fields.
Year-end date. Displays the year-end date. You can enter another date, or use the
drop-down arrow to select a date from the calendar.
Period sequence. The length of the engagement period, including the following:
§
§
§
§
Annually
Semi-Annually
Quarterly
Monthly
Period. You can choose the period from the drop-down list.
Beginning date. You can change the beginning date of the engagement period. The
beginning date must be before the year-end date and the current period ending date.
Ending date. You can change the ending date of the engagement period. The year-end date
must be on or after the current period ending date.
Prior Periods. Click to modify the prior period dates.
6 - 16
Creating and Using Binders
Chapter
6
Dates Tab
The Dates tab allows you to edit the settings for the document completion period and the
binder retention period. If the binder is selected from a central file room on a secondary
office server or is finalized, archived, or in transition, the information is read-only. The
following fields appear on the Dates tab:
§
§
§
Date of report. Click the down arrow to choose the report date.
Report release date. Click the down arrow to choose the report release date.
Document completion period section
— Start date. This field is filled automatically according to the settings of the binder
type selected on the General tab. If you change the binder type on the General
tab, click Refresh at the top of the Dates tab. The Start Date field then reflects
the new binder type settings.
— Duration. This field is filled automatically according to the settings of the binder
type selected on the General tab. If you change the binder type on the General
tab, click Refresh at the top of the Dates tab. The Duration field then reflects the
new binder type settings.
— Document completion date. This field is calculated automatically when the Date of
report or Report release date field is completed, according to the binder type
settings.
Click Override to choose a document completion date independent of the binder type
settings. Click Reset to return the field to the automatically calculated document
completion date.
§
Binder retention period section
— Start date. This field is filled automatically according to the settings of the binder
type selected on the General tab. If you change the binder type on the General
tab, click Refresh at the top of the Dates tab. The Start Date field then reflects
the new binder type settings.
— Duration. This field is filled automatically according to the settings of the binder
type selected on the General tab. If you change the binder type on the General
tab, click Refresh at the top of the Dates tab. The Duration field then reflects the
new binder type settings.
— End of retention period. This field is calculated automatically when the Date of
report, Report release date, or Document Completion Date field is completed,
according to the binder type settings.
— Click Override to choose a retention period independent of the binder type
settings. Click Reset to return the field to the automatically calculated retention
period.
Note: In Admin a clear button is available to clear the Date of report and
Report release date, the dates previously entered will be deleted and the
respective calculations will be cleared. If the calculation has been
overridden it will not be cleared. The user will have to reset the
calculation.
6 - 17
Chapter
Creating and Using Binders
6
Information Tab
The Information tab displays information about the creation and location of the binder,
including information from the following fields:
§
§
§
§
§
§
§
§
§
Status
Primary Title (if ProSystem fx Knowledge Coach workpapers exist in the binder)
Created by
Date created
Finalized by (if applicable)
Date finalized (if applicable)
Workpaper path
File size
Central file room
If custom statuses have been added in Administrator and the binder status is not Finalized
or Archived, the Status field is enabled. Click the arrow and select a new status from the
drop-down list, if necessary.
Click the View Synchronization History button on the Information tab to display the
Synchronization History dialog, which records each time the binder is synchronized with the
central file room or with another team member and whether the synchronization was
successful. Click View Details to open a more detailed synchronization log. Click Save As to
save the synchronization history as a text document. Click Print to print the synchronization
history.
Binder Staff Tab
The Binder Staff tab lists the staff members assigned to the binder in the Current binder
staff box and the binder sign off date for each staff member, when applicable. The
following buttons are available:
§
§
Assign. Select to view personnel by staff or by team and to assign/unassign staff
members to the binder.
Sign Off Binder. Select your user name from the Current binder staff box and click
Sign Off Binder to sign off the binder. Once you sign off the binder, the current date
displays in the Sign Off Date column. If you have already signed off on the binder,
the Remove Sign Off button replaces the Sign Off Binder button.
History Tab
The History tab displays a log of critical activities that have occurred within the binder. The
activity, a date/time stamp, and the user's name are recorded when any of the following
actions occur:
§
§
§
§
§
§
§
§
Finalize binder
Unfinalize binder
Override Document Completion Date
Reset Document Completion Date
Override Binder Retention Period
Reset Binder Retention Period
Change Binder Type
Change Binder Status
6 - 18
Creating and Using Binders
Chapter
6
Using the Document Completion Date Report (Workpaper
Management)
The Document Completion Date Report displays all binders with document completion dates
that fall within the date range you specify. This section explains how to use the Document
Completion Date Report from Engagement Workpaper Management. For instructions on
using the Document Completion Date Report from Engagement Administrator, see Using the
Document Completion Date Report (Administrator) on page 3-34.
The Document Completion Date Report displays the following items:
§
§
§
§
§
§
§
§
§
§
§
§
§
§
§
§
Office Server
CFR (Central File Room)
Binder Name
Binder ID
Client Name
Client ID
Binder Type
Binder Status
Lead Partner
Client Group
Period End Date
Report Date
Report Release Date
Doc Completion Date
Finalized Date
Retention Period End
In addition, one of the following icons may appear if applicable:
§
§
Document Completion Date Approaching. This icon displays if the completion date is
within the time period specified in Firm Options.
Document Completion Date Past Due. This icon displays if the completion date has
already passed.
To use the Document Completion Date Report, do the following:
1. From the File Room in Workpaper Management, select Tools/Reports/Document
Completion Date Report. The Document Completion Date Report window displays.
2. Select Run local file room report to run a new report on your local file room, or select
View central file room report to view the most recent central file room report run by an
administrator.
3. If you selected Run local file room report, do the following:
a. Select Include only binder types set to monitor document completion date to include
only binder types that have been set to be monitored for the document completion
date.
b. Select Include finalized binders to include finalized binders in the report.
6 - 19
Chapter
6
Creating and Using Binders
c. You can filter your results to binders that have a Document Completion Date, Year
End, Period End, Retention Period, or No Date Range within a certain date range.
Select the criterion from the Date range drop-down list.
d. Select the appropriate beginning date in the Start field. Either enter the date or click
the down arrow to use the calendar. The default setting is the current date.
e. Select the final date for the report range in the End field. Either enter the date or click
the down arrow to use the calendar. The default setting is two months from the
current date.
4. Click Update Report. The report displays the binders with document completion dates
that fall within the range you selected. Click on a column heading to sort by that
heading. Drag column headings to reorder the columns.
5. Click Export to Excel to open an Excel spreadsheet of the report data.
6. Click Close to exit the report.
Deleting Binders
Important: If you delete a binder for which you have workpapers checked out,
there is the potential for data loss. Be sure to check in all workpapers and
synchronize the binder with the central file room prior to deleting the binder from
your local file room.
To delete a binder from the local file room, do one of the following:
1. Click the binder you want to delete.
2. Do one of the following:
§
§
§
Select Edit/Delete.
Right-click the binder and select Delete from the pop-up menu.
Press i.
3. A message box prompts you to confirm the binder deletion. To delete the binder, click
Yes. To cancel the deletion, click No.
Using Client Folders and Binders
Once you have set up a binder, you can view and access its contents. This section
describes how to use the features of the Binder window, which is a separate window that
enables you to view and edit a binder’s tabs, workpapers, notes, sign offs, diagnostic
information, etc.
Viewing Binders for a Client
In the Workpaper Management File Room window, the local file room pane contains the
binders you created or currently have checked out from the central file room. In the left
pane, click the client folder you want to open. The binders for that client appear in the right
pane of the local file room window.
6 - 20
Creating and Using Binders
Chapter
6
Viewing the Contents of a Binder
To open a binder in a separate window, do one of the following:
§
§
§
§
Double-click the binder.
Click the binder and select File/Open.
Right-click the binder and select Open from the pop-up menu.
Click the Open icon on the toolbar.
The Binder window displays.
The Binder window can be displayed in four views: Binder View, Notes Summary View,
Sign Off Summary View, and Current Editor View (Live Editor View if you are viewing a
shared local file room). These views are described in the sections that follow.
Binder View
Binder View shows the binder contents and the status of the workpapers in the binder.
To select Binder View, do one of the following:
§
§
§
Click the Binder View tab at the bottom of the Binder window.
Select View/Binder View from the Menu bar.
Click the Binder View icon on the toolbar.
Binder content and status information includes the following:
§
§
Tabs that organize workpapers in the binder. You can name tabs according to your
individual needs, and you can nest tabs within other tabs.
Workpapers are Microsoft Word and Excel files created within or outside of
ProSystem fx Engagement, other file formats created outside of Engagement,
scanned images, etc. The workpaper information displays in columns across the top
of the Binder View window. A brief description of these settings is described below.
For more information on using these features, see Chapter 8, Managing Workpapers.
— Binder Index. The alphanumeric index number is optional. It is a unique workpaper
identifier used to reference the workpaper and the related workpapers. The
workpaper name describes the content inside the workpaper.
6 - 21
Chapter
6
Creating and Using Binders
— Locked. If the workpaper is locked, a padlock icon displays in this column. A
locked workpaper is read-only.
Note: If the Engagement links are not frozen in a locked workpaper, the
links are updated when changes are made to the trial balance and/or the
name and date properties. This allows you to prevent formatting changes
to the workpaper while maintaining current trial balance, name, and date
link information.
— Frozen. If the workpaper’s Engagement links are frozen, a broken link icon displays
in this column. In a frozen workpaper, changes to the trial balance and/or name
and date properties are not carried to documents or reports.
Note: Knowledge Coach workpapers cannot be frozen.
— Note. If a note has been created for a workpaper, a note icon displays. Select the
workpaper with a note attached and view the note information in the Notes Pane
at the bottom of the Binder window.
— Modified after Reviewer Sign Off. If a workpaper has been modified after a
reviewer has signed off the workpaper, then a Modified icon displays in this
column. If the workpaper is subsequently reviewed again, then the Modified icon
is removed.
Notes:
§
§
§
If the option to flag workpapers that were modified after sign off is not
selected in Administrator, the icon will not appear.
If you view a reviewed workpaper without making any changes, we
recommend that you do not save the workpaper when you close it. If the
option to flag workpapers modified after sign off is selected in Administrator
and you save an unchanged workpaper, the modified icon will display even
though you did not make changes.
The time may be inaccurate in a Shared File Room unless the time settings on
the computers are synchronized.
— Diagnostics. If ProSystem fx Knowledge Coach is licensed and any diagnostics
have not been cleared, such as missing workpapers, unanswered questions,
unaddressed risks, etc., the Diagnostics icon displays in this column.
— Prepared By. When a preparer signs off a workpaper, the preparer's initials
display. If more than one preparer signs off on the workpaper, the most recent
preparer's initials are displayed. To view all sign offs, use the Sign Off Summary
View.
— Reviewed By. When a workpaper is signed off by a reviewer, the reviewer's
initials display. If more than one reviewer signs off on the workpaper, the most
recent reviewer's initials display. To view all of the sign offs, use the Sign Off
Summary view.
— 2nd Reviewed By. When a workpaper is signed off by a second reviewer, the
reviewer's initials display. If more than one second reviewer signs off on the
workpaper, the most recent second reviewer's initials display. To view all of the
sign offs, use the Sign Off Summary view.
6 - 22
Creating and Using Binders
Chapter
6
— File Modified Date. The date and time the workpaper was last saved.
Notes:
§
§
§
Do not save a workpaper if you have not modified it.
Select View/Refresh to see the date the workpaper was last modified since the
last time you opened or refreshed the Binder window.
The time may be inaccurate in a Shared File Room unless the time settings on
the computers are synchronized.
— Current Editor (Non-Shared Local File Room). The name of the binder staff who
currently has the workpaper checked out displays in this column. The Current
Editor can make changes to the workpaper. All other binder staff can only view
the workpaper.
— Live Editor (Shared Local File Room). The name of the user who is currently
editing the workpaper displays in this column. The Live Editor can make changes
to the workpaper. All other users can only view the workpaper.
— Assigned To (Non-Shared Local File Room). When the Current Editor assigns a
workpaper to another staff member, that person’s name displays in this column.
The next time both staff members synchronize, the workpaper shows the other
staff member as the Current Editor. This eliminates the step of checking in or
checking out the workpaper.
Note: This column does not display when viewing a shared local file room.
Workpaper assignments are unnecessary when working with shared file
rooms.
§
§
§
Unfiled Workpapers. This folder stores workpapers that have not been filed.
ProSystem fx Engagement reports display here when they are generated. You can
then move each report to the desired workpaper tab section.
Conflicts. This folder stores workpapers in conflict after synchronization or from
binder packages that have been received. This allows you to view the workpaper
before filing it. You can compare this workpaper to the local copy of the workpaper in
your binder. You can then decide which copy of the workpaper to retain in the binder.
Incompatible Workpapers. This folder stores workpapers that are determined to be
incompatible after a content update.
Note: The Incompatible Workpapers folder displays only if Knowledge
Coach is licensed.
§
§
Published Workpapers. This folder stores workpapers that have been published. A
published workpaper is a copy of a workpaper in which the Engagement links have
been automatically converted from formulas (e.g., trial balance links) to values. This
allows you to share the workpaper with people who do not have access to
ProSystem fx Engagement or the trial balance database.
Trash. This folder contains deleted workpapers and tabs. If you delete a workpaper
by mistake, you can restore it to the appropriate tab.
6 - 23
Chapter
Creating and Using Binders
6
Notes:
§
§
Knowledge Coach workpapers are not moved to Trash when deleted. When a
Knowledge Coach workpaper is deleted, it is removed from the binder.
You cannot delete or move a workpaper or a tab containing a workpaper if you
are not the Current Editor or Live Editor.
For more information about Current Editor rights, please see Chapter 8, Managing
Workpapers.
Notes Summary View
The Notes Summary View displays all notes that exist in the open binder. To select Notes
Summary View, select one of the following:
§
§
§
Click the Notes Summary View tab at the bottom of the Binder.
Select View/Notes Summary View.
Select the Notes Summary View icon on the toolbar.
The Notes Summary View displays.
This view segregates the notes and displays the responses nested under each note.
There are three types of notes:
§
§
§
Team Note. A team note can be addressed to all staff members assigned to the
binder or to a specific staff member.
Open Items. These workpaper notes are intended to communicate questions or
comments.
Notes for Next Period. These notes are not cleared and are carried forward to the
next period's binder during the roll forward process. After the roll forward, the note
becomes an open item note.
The following status information for each note displays, if applicable:
§
§
§
§
Status. Open or Cleared.
From. Author of the note.
To. Staff member to whom the note is directed.
Date created. The date and time the note or response was created.
6 - 24
Creating and Using Binders
§
§
§
§
Chapter
6
Cleared By. The staff member who cleared the note.
Date Cleared. The date and time the note was cleared.
# of Responses. The number of responses recorded for each note.
Workpaper. The workpaper that this note was created for.
The notes can be sorted by status to show open, cleared, or all notes. This is done by
right-clicking the Status column header and selecting the status to display.
For more information about adding and responding to notes, please see Chapter 8,
Managing Workpapers.
Sign Off Summary View
The Sign Off Summary View displays a list of all the workpapers in the open binder and
their sign-off status. To select the Sign Off Summary View, select one of the following.
§
§
§
Click the Sign Off Summary View tab at the bottom of the Binder window.
Select the View/Sign Off Summary View from the menu.
Click the Sign Off Summary View icon on the toolbar.
The Binder Window - Sign Off Summary View window displays.
Each workpaper can be assigned one of four statuses:
§
§
§
§
In Process. All workpapers that have not yet been signed off.
Ready for Review. All workpapers that have been signed off by a preparer only.
Reviewed. All workpapers that have been signed off by both a preparer and a
reviewer.
2nd Reviewed. All workpapers that have been signed off by the 2nd Reviewer.
Under each workpaper, the staff member that signed off is listed with the sign off date. If
multiple staff members signed off on the same workpaper, all names are shown in
chronological order. The following status information displays for each workpaper, if
applicable:
§
Locked. The locked icon indicates the workpaper is locked. A locked workpaper is
read-only.
6 - 25
Chapter
Creating and Using Binders
6
§
§
§
Frozen. If the workpaper’s Engagement links are frozen, a broken link icon displays in
this column. In a frozen workpaper, changes to the trial balance and the name and
date properties are not carried to the documents or reports.
Workpaper Note. The note icon indicates that notes are attached to this workpaper.
Modified after Reviewer Sign Off. A modified icon displays if the workpaper has been
modified after a reviewer has signed off.
Notes:
— If the option to flag workpapers that were modified after sign off is not
selected in Administrator, this column displays but the indicator flag does not.
— If you view a reviewed workpaper without making any changes, we
recommend that you do not save the workpaper when you close it. If the
option to flag workpapers modified after sign off is selected in Administrator
and you save an unchanged workpaper, the modified icon will display even
though you did not make changes.
— The time may be inaccurate in a Shared File Room unless the time settings on
the computers are synchronized.
§
§
Diagnostics. If ProSystem fx Knowledge Coach is licensed and any diagnostics have
not been cleared, such as missing workpapers, unanswered questions, unaddressed
risks, etc., the Diagnostics icon displays in this column.
File Modified Date. Displays the date and time the workpaper was last saved.
Notes:
— Select View/Refresh to see the date the workpaper was most recently modified
since the last time you opened or refreshed the Binder window.
— The time may be inaccurate in a Shared File Room unless the time settings on
the computers are synchronized.
§
§
§
Current Editor (Non-Shared Local File Room). Displays the name of the staff member
who has Current Editor rights.
Live Editor (Shared Local File Room). Displays the name of the user who is currently
editing the workpaper.
Assigned To (Non-shared Local File Room). Displays the name of the staff member to
whom the workpaper will be assigned during the next synchronization.
Note: This column does not display when viewing a shared local file room.
Workpaper assignments are unnecessary when working with shared file
rooms.
For more information about signing off and modifying workpapers after sign off, please see
Chapter 8, Managing Workpapers.
6 - 26
Creating and Using Binders
Chapter
6
Current Editor View (Non-Shared Local File Rooms Only)
The Current Editor View shows all staff members assigned to the binder. Under each staff
member's name, the workpapers they have Current Editor rights to are listed. To select the
Current Editor View, do one of the following:
§
§
§
Click the Current Editor View tab at the bottom of the Binder window.
Select View/Current Editor View from the menu.
Click the Current Editor View icon on the toolbar.
The Binder Window - Current Editor View window displays.
Any workpaper not assigned to a staff member appears in the Unassigned section. The
following status information for each workpaper displays, if applicable.
§
§
§
§
Locked. The locked icon indicates a workpaper is locked. A locked workpaper cannot
be edited.
Frozen. If the workpaper’s Engagement links are frozen, a broken link icon displays in
this column. In a frozen workpaper, changes to the trial balance and the name and
date properties are not carried to the documents or reports.
Workpaper Note. The note icon indicates if any notes are attached to this workpaper.
Modified after Reviewer Sign Off. A modified icon displays if the workpaper has been
modified after a reviewer has signed off.
Notes:
— If the option to flag workpapers that were modified after sign off is not
selected in Administrator, this column displays but the indicator flag does not.
— If you view a reviewed workpaper without making any changes, we
recommend that you do not save the workpaper when you close it. If the
option to flag workpapers modified after sign off is selected in Administrator
and you save an unchanged workpaper, the modified icon will display even
though you did not make changes.
— The time is inaccurate in a Shared File Room unless the time on the computers
are synchronized.
6 - 27
Chapter
Creating and Using Binders
6
§
§
§
§
§
Diagnostics. If ProSystem fx Knowledge Coach is licensed and any diagnostics have
not been cleared, such as missing workpapers, unanswered questions, unaddressed
risks, etc., the Diagnostics icon displays in this column.
Prepared By. When a workpaper is signed off by a preparer, the preparer's initials
display. If more than one preparer signs off on the workpaper, the most recent
preparer's initials display.
Reviewed By. When a workpaper is signed off by a reviewer, the reviewer's initials
display. If more than one reviewer signs off on the workpaper, then the most recent
reviewer's initials display.
2nd Reviewed By. When a workpaper is signed off by a second reviewer, the
reviewer's initials display. If more than one second reviewer signs off on the
workpaper, then the most recent second reviewer's initials display.
File Modified Date. The date and time the workpaper was last saved.
Notes:
— Select View/Refresh to see the date a workpapers was most recently modified
since the last time you opened or refreshed the Binder window.
— The time is inaccurate in a Shared File Room unless the time on the computers
are synchronized.
§
§
Location. If a staff member has an Engagement profile on more than one computer,
then the computer name where the staff member has the Current Editor copy of the
workpaper displays here.
Assigned To. The name of the staff member to whom the workpaper will be assigned
during the next synchronization.
For more information about signing off and modifying workpapers after sign off, please see
Chapter 8, Managing Workpapers.
Live Editor View (Shared File Rooms Only)
The Live Editor View shows all users who are currently editing a workpaper in a shared
binder, and the workpapers they are editing. To select the Live Editor View, do one of the
following:
§
§
§
Click the Live Editor View tab at the bottom of the Binder window.
Select View/Live Editor View from the menu.
Click the Live Editor View icon on the toolbar.
6 - 28
Creating and Using Binders
Chapter
6
The Binder Window - Live Editor View window displays.
Any workpaper not being edited by a staff member appears in the Available section if the
Host is the Current Editor, or in the Unavailable section if the Host is not the Current Editor.
The following status information for each workpaper displays, if applicable.
§
§
§
§
Locked. The locked icon indicates a workpaper is locked. A locked workpaper cannot
be edited.
Frozen. If the workpaper’s Engagement links are frozen, a broken link icon displays in
this column. In a frozen workpaper, changes to the trial balance and the name and
date properties are not carried to the documents or reports.
Workpaper Note. The note icon indicates if any notes are attached to this workpaper.
Modified after Reviewer Sign Off. A modified icon displays if the workpaper has been
modified after a reviewer has signed off.
Notes:
— If the option to flag workpapers that were modified after sign off is not
selected in Administrator, this column displays but the indicator flag does not.
— If you view a reviewed workpaper without making any changes, we
recommend that you do not save the workpaper when you close it. If the
option to flag workpapers modified after sign off is selected in Administrator
and you save an unchanged workpaper, the modified icon will display even
though you did not make changes.
§
§
§
Prepared By. When a workpaper is signed off by a preparer, the preparer's initials
display. If more than one preparer signs off on the workpaper, the most recent
preparer's initials display.
Reviewed By. When a workpaper is signed off by a reviewer, the reviewer's initials
display. If more than one reviewer signs off on the workpaper, then the most recent
reviewer's initials display.
2nd Reviewed By. When a workpaper is signed off by a second reviewer, the
reviewer's initials display. If more than one second reviewer signs off on the
workpaper, then the most recent second reviewer's initials display.
6 - 29
Chapter
Creating and Using Binders
6
§
File Modified Date. The date and time the workpaper was last saved.
Notes:
— Select View/Refresh to see the date a workpapers was most recently modified
since the last time you opened or refreshed the Binder window.
— The time is inaccurate in a Shared File Room unless the time on the computers
are synchronized.
§
Location. If a staff member has an Engagement profile on more than one computer,
then the computer name where the staff member has the current copy of the
workpaper displays here.
Diagnostics Pane (Knowledge Coach only)
If you have Knowledge Coach installed, the Diagnostics Pane displays below the Binder
Pane. The Diagnostics Pane is dockable, so you can click and drag it to any location on your
screen.
When a Knowledge Coach workpaper with a diagnostic is selected in the Binder Pane, the
diagnostic information displays in the Diagnostics Pane. This information includes the
following:
§
§
Diagnostic Type. The type of diagnostic associated with the selected workpaper.
Diagnostic Description. The description of the diagnostic associated with the selected
workpaper.
6 - 30
Creating and Using Binders
Chapter
6
Notes Pane
Below the Binder Pane is the Notes Pane. The Notes Pane is dockable, so you can click and
drag it to any location on your screen.
When a workpaper with a note is selected in the Binder Pane, the note’s information
displays in the Notes Pane. Responses are nested below the note. This note information
includes the following:
§
Note Type. The note icon that displays varies depending on the note type. The three
note types are as follows:
— Two people on top (Team Note)
— An exclamation point on top (Open Item)
— A clock on top (Note for Next Period)
§
§
§
§
§
§
§
Subject. The short description of the note.
Number of Responses. The number of responses recorded for each note.
From. Author of the note.
To. Staff member to whom the note is directed.
Date Created. The date and time the note or response was created.
Cleared By. The staff member who cleared the note.
Date Cleared. The date and time the note was cleared.
You can double-click a note to open the Workpaper Note Detail dialog. From this dialog you
read, respond to, and clear the note. See Chapter 8, Managing Workpapers, for more
information on this dialog.
6 - 31
Chapter
Creating and Using Binders
6
Shortcut Bar
The Shortcut bar provides quick access to many Engagement
functions. The Shortcut Bar displays to the left of the selected view
in the Binder pane.
The Shortcut bar displays by default. It can be re-sized, minimized, or
closed. If the Shortcut bar is closed, you can open it by selecting
View/Shortcut Bar.
Shortcuts pane
The Shortcuts pane displays shortcuts to commonly used
Engagement features and the Knowledge Tools Web site.
§
§
§
§
§
Workpapers. Displays the Binder window where you can select
the Binder View, Notes Summary View, Sign Off Summary
View, or Current Editor View.
Binder Snapshot. Displays diagnostic information for the
binder. The Tip of the Day also displays in this view. (See the
next section, Using the Binder Snapshot, for additional
information).
Trial Balance Snapshot. Displays a diagnostic summary of all
the trial balances in a binder. The Tip of the Day also displays
in this view. (See Trial Balance Snapshot on page 7-4 for
additional information).
Knowledge Tools Website. Links to the Knowledge Tools Web
site, where you can download Knowledge Tools content and
information.
Capital Confirmation. Links to the Capital Confirmation electronic audit confirmation
service.
Tax Pane
If ProSystem fx Tax is installed, the Tax pane allows you to launch up to five installed
versions of Tax directly from the Shortcut bar.
Note: If ProSystem fx Tax is not installed, the Tax pane does not display.
Guidance pane
The Guidance pane displays links to useful resources on the Internet.
§
§
§
§
IntelliConnect. Links to the IntelliConnect tax research platform, which gives you
unprecedented access to the industry's best content.
CCH Tax Research NetWork. Links to the CCH Internet Tax Research NetWork,
where you can research tax information.
Accounting Research Manager. Links to online analytical accounting, auditing, and
SEC information databases.
FAQs. Links to the Frequently Asked Questions about using Engagement.
6 - 32
Creating and Using Binders
Chapter
6
Using the Binder Snapshot
The Binder Snapshot allows you to view diagnostic information for binders. The Tip of the
Day also displays in this view. To switch to the Binder Snapshot view, select one of the
following:
§
§
Click the Binder Snapshot icon on the Shortcuts bar.
Select View/Binder Snapshot.
The Binder Snapshot view displays the panes described on the next page.
§
§
My Workpapers. Lists workpaper links which display alongside workpaper icons, the
index, and the name of workpapers of which the user is the Current Editor. You can
also use the links to open the workpapers.
Workpapers Count. Displays the number of workpapers in the categories below. You
can select the category links to display the particular section of the workpapers in the
Binder view.
—
—
—
—
—
—
§
Filed workpapers
Unfiled workpapers
Workpapers in Conflict section
Published workpapers
Workpapers in Trash
Total Workpapers
Notes/Replies. Displays the number of workpaper notes/replies in each category listed
below. You can select the category links to display the particular section of the Notes
Summary View in the Binder window.
— Team notes/replies
— Open item notes/replies
— Notes for next period/replies
§
Sign off Status. Displays the number of workpapers in each category listed below.
You can select the category links to display the particular section of the Sign Off
Summary View of the Binder window.
—
—
—
—
—
In process
Ready for review
Reviewed
2nd Reviewed
Modified after reviewed
Note: If the option to flag workpapers that were modified after sign off is
not selected in Administrator, Modified after reviewed does not display.
§
Tip of the Day. Displays suggestions for using the program more efficiently. The
Previous and Next buttons allow you to navigate the tips. You can hide the Tip of the
Day by clicking Hide Tips. To show the tips again, click Show Tips.
Note: You can customize the Tip of the Day items to show tips that are
specific to your firm’s operations. See Managing the Tip of the Day on
page 3-62 for more details.
6 - 33
Chapter
Creating and Using Binders
6
Refreshing the Binder Snapshot Window
You can refresh the Binder Snapshot panes by clicking the Refresh button on the upper-right
corner of the Binder Snapshot window.
Displaying Binder Snapshot as the Default Window
To display the Binder Snapshot as the default window when a binder is opened, select
Tools/Options and then, on the General tab, check the Binder Snapshot on binder open box.
Opening Workpapers Inside/Outside
When you open a workpaper inside ProSystem fx Engagement, the workpaper displays
either under or to the right of the Binder window. To set the location, select
View/Workpaper Preview. You cannot make changes to a workpaper you are viewing
inside. This feature is for online review only.
You can view and edit a workpaper in the application used to create it. This is referred to as
viewing the workpaper outside ProSystem fx Engagement. For information about opening
workpapers inside and outside, see Chapter 8, Managing Workpapers.
Refreshing the Window
Changes you make to the contents of the binder should be reflected in the Binder window
as you make them. If you do not see your changes, refresh by doing the following:
§
§
§
Select View/Refresh.
Press 5.
Click the Refresh button on the toolbar.
Opening Multiple Binders
You can open multiple binders. After you have opened one binder, select ProSystem fx
Engagement - File Room from the Workpaper menu. Find and open the other binder. You
can switch between binders or back to the File Room from the Workpaper menu. The
menus and toolbars may change depending on the active binder.
Tip: Clicking the Restore Down button on the active window sizes the window so
it does not fill the entire screen. You can now easily drag a workpaper from one
binder to another.
Important: Do not drag Trial Balance (TB) Reports or Journal Entry (JE) Reports to
other binders, as these types of files are specific to the trial balance.
Note: When you have multiple binders open and you open more than one Excel
workpaper created from a rolled forward binder or the same binder template, you
can only edit the first workpaper opened. The other copies are read-only.
Accessing Trial Balance Functions
From the Binder window, you can access the following trial balance functions:
§
§
§
§
TB Column Setup
Import Conversion Wizard
Consolidate TB
Classifications
6 - 34
Creating and Using Binders
§
§
§
§
§
§
§
Chapter
6
Account Groupings
Chart of Accounts
QuickView
Quiklink/Desktop Updates Status
Journal Entry Summary
Add Journal Entry
Write Up Journal Entry
For more information on these functions, see Chapter 7, Using the Trial Balance.
Creating and Modifying Workpaper Tabs
Workpaper tabs allow you to group related workpapers in a binder. An index system allows
you to assign page numbers to workpapers and tabs. These two tools are designed to
reflect the way you organize workpapers in the physical engagement binders you currently
use. The following sections describe the procedures associated with workpaper tabs.
Adding Workpaper Tabs
To add a new tab to a binder, do the following:
1. In the Binder Index, click where you want to add the new tab.
2. Do one of the following:
§
§
§
Select File/New/Tab.
Right-click the item and select New Tab from the pop-up menu.
Click the New Tab button on the toolbar.
The New Tab dialog displays.
3. Complete the New Tab dialog as follows:
§
§
In the Index # field, enter the index number to assign to the tab. This field is
optional.
In the Name field, type the name for the tab. This field is required.
Note: The index number and name combination must be unique within the binder.
4. Click OK. The new tab displays in the Binder Index.
6 - 35
Chapter
6
Creating and Using Binders
Changing and Viewing Workpaper Tab Properties
To change the name or index number of a tab or to view information, do the following:
1. In the Binder Index, click the pertinent tab.
2. To display the Tab Properties dialog, do one of the following:
§
§
§
Select File/Properties.
Right-click the tab you selected and select Properties from the pop-up menu.
Click the Properties button on the toolbar.
3. Change the name or index number, if needed. You can also view these tab statistics:
§
§
§
§
The
The
The
The
number of tabs and workpapers stored in the selected tab.
name of the person who created the tab.
date and time the tab was created.
name of the person who last modified the properties and when.
4. Once finished, click OK.
Creating Workpaper Tab Notes
ProSystem fx Engagement provides a platform to create, respond to, and manage your
notes. You can create three types of notes for workpapers and binder tabs: Team Notes,
Open Items, and Notes for Next Period. For more information, see Workpaper and
Workpaper Tab Notes on page 8-55.
Copying Tabs between Binders
You can copy tabs to another binder by dragging them or by using the Copy and Paste
commands. When you copy tabs, the workpapers and tabs within that tab are also copied.
To copy individual workpapers, see Chapter 8, Managing Workpapers.
Note: You cannot move items from one binder to another.
To copy workpaper tabs, do the following:
1. Open the binder with the tab you want to copy.
2. Open the binder where you want to place the tab. For instructions on opening multiple
binder windows, see Opening Multiple Binders on page 6-34.
3. Select the tab you want to copy, then do one of the following:
§
§
§
Select Edit/Copy.
Drag the tab to the destination.
Right-click the tab and select Copy from the pop-up menu.
4. In the binder window where you want to place the tab, do the following:
§
§
To place the tab in the first level, drag or paste the tab to the binder icon at the
top of the Binder Index.
To place the tab within another tab, drag or paste the tab to the icon of the tab
where you want to put it.
6 - 36
Creating and Using Binders
Chapter
6
Notes:
— If you copy a tab into a binder, the name of the new tab and workpaper begin
with the words Copy of if that same tab or workpaper exists in the binder. You
can rename the tab or workpaper using the Properties dialog.
— Copying a tab between binders may cause the links within the workpapers and
reports to fail because the links are pointing to a specific trial balance. Trial
balance and journal entry reports should not be copied to another binder, as they
will not refresh properly.
5. Repeat this procedure for each tab you want to copy.
Deleting and Recovering Workpaper Tabs
You can delete any tab, except the Unfiled Workpapers, Conflicts, Published Workpapers,
and Trash tabs. Deleted items remain in the Trash until you empty it. You can recover items
from the Trash as needed. When the Trash is emptied, any workpapers and tabs in it are
permanently deleted.
Notes:
§
§
When you roll forward a binder, items in Trash are not carried forward to the new
binder. For information on roll forward, see Rolling Forward Binders on page 6-54.
When you delete a tab that contains Knowledge Coach workpapers, the Knowledge
Coach workpapers are permanently deleted. The tab is moved to the Trash.
The rules for items in the Trash are as follows:
§
§
§
§
You must have rights to move, delete, or restore a workpaper if you are not the
Current Editor.
You must have rights to move or delete a tab that contains a workpaper for which
you are not the Current Editor.
Only the workpapers for which you are the Current Editor are restored when a tab is
restored. The workpapers you are not the Current Editor of remain in the trash. In a
shared file room binder, workpapers where the Host is the current editor will be
restored.
Your staff group must also have been granted the right to delete and restore
workpapers and tabs in order to delete/restore workpapers or tabs.
To delete a workpaper tab, do the following:
1. In the Binder Index, click the tab you want to delete.
2. Do one of the following:
§
§
§
§
Select Edit/Delete.
Right-click the tab and select Delete from the pop-up menu.
Press i.
Drag the tab to the Trash icon.
6 - 37
Chapter
Creating and Using Binders
6
You can restore deleted tabs and workpapers by performing one of the following actions:
§
§
Display items in the Trash by double-clicking the Trash icon. Right-click the item
and select Restore from Trash.
Right-click the Trash icon and select Restore All.
Restoring a tab restores all workpapers associated with the tab for which you are the
Current Editor. You can permanently delete the workpapers and tabs by emptying or
deleting from the Trash. Do one of the following:
§
§
§
Display the items in the Trash by double-clicking the Trash icon. Right-click the
item and select Delete from Trash.
Right-click the Trash icon and select Empty Trash.
The Trash will be emptied when the binder is closed if the option is set in
Administrator.
Sharing and Distributing Binders
Because ProSystem fx Engagement binders are electronic, they can be easily shared and
distributed. There are four methods you can use to share binders. The method you choose
depends on whether you are using a network (in the office), on a peer-to-peer network (out
in the field), or neither.
This section describes how you can manage your workpaper flow through your main office
server, using the Packaging feature, and by synchronizing binders.
Using Shared Local File Rooms
Shared local file rooms allow multiple Engagement users to work directly with workpapers in
the same binder without synchronizing with a central file room, checking out workpapers, or
assigning workpapers. To work with shared file rooms, the option must be enabled for your
firm in Administrator, and you must belong to a staff group that allows sharing of local file
rooms.
A Host selects to share his or her local file room, and then other users can log in to the
shared file room (see Logging In To Engagement on page 4-1). Users can open any
workpaper in the Host's file room. If the Host is not Current Editor of a workpaper, the
workpaper is read-only to all users. If the Host is Current Editor of a workpaper, then the
first user to open it becomes the "Live Editor" and is able to edit and save it. Other users
can view a read-only copy of the workpaper until the Live Editor closes it.
Notes:
§
§
§
If you are using Microsoft Vista and you do not have Service Pack 1, you will need
hotfix number 935366 to prevent possible errors while sharing trial balances. This
hotfix is included on the Engagement installation CD.
Engagement does not support sharing local file rooms between different locales (for
example, US and Australia).
Engagement does not support the same user simultaneously logging in to a shared file
room from multiple computers.
6 - 38
Creating and Using Binders
Chapter
6
Sharing a Local File Room
To share your local file room as a host, file room sharing must be enabled in Administrator.
Also, you must belong to a staff group that allows sharing of local file rooms.
Note: You cannot work with Knowledge Coach workpapers within a Shared File
Room environment.
To share a file room, do the following:
1. Log in to Engagement as either Office or Field.
2. Do one of the following:
§
§
Right-click the Local File Room icon or anywhere in the file room frame and select
Share File Room.
Select Tools/Share File Room.
3. Click OK on the message stating that the file room has been successfully shared.
Note for Vista Users: If you are a Standard User in Windows Vista, you will not
be able to share your Local File Room from your login due to Vista's User Account
Control. To share your Local File Room, have a Vista Administrator or Power User
log in to Windows, log in to Engagement with your profile, and follow the
procedure above.
To stop sharing a file room, do the following:
1. Log in to Engagement as either Office or Field.
2. Do one of the following:
§
§
Right-click the Local File Room icon or anywhere in the file room frame and select
Stop Sharing File Room.
Select Tools/Stop Sharing File Room.
3. Click OK on the message stating that sharing of the file room has been successfully
stopped.
Note: You cannot stop sharing your local file room if another user is currently
logged in.
Editing Workpapers in a Shared File Room
Working with workpapers in a shared file room is similar to working in your own local file
room. When you open a binder in the Host's local file room, the Binder View displays.
The Live Editor column displays the current status of each workpaper. The following
statuses are displayed:
§
§
(User Name). The user whose name displays is currently the Live Editor of the
workpaper. You can view a read-only copy of the workpaper until the Live Editor
closes it.
<Available>. The local file room's Host is the Current Editor of the workpaper, and
no other users are currently working on the workpaper. These workpapers are
available for you to open and edit.
6 - 39
Chapter
Creating and Using Binders
6
§
<Unavailable>. The Host is not Current Editor of the workpaper.
Click on any workpaper with <Available> displayed in the Live Editor column to edit the
workpaper. Close the workpaper when you finish editing it. There is no synchronization or
check-in required.
Note: In a Shared File Room, workpapers that have not been opened by any user
will appear in bold font. Once any user opens a workpaper, that workpaper will not
appear bold the next time users access the Shared File Room.
Office Network Environment - Central File Room
When an Engagement staff member is attached to a network, the central file rooms can be
used to share and distribute binders with anyone on the network. The central file rooms are
set up in the Administrator module by the person responsible for the implementation of
ProSystem fx Engagement.
For information on setting up the central file room, see Chapter 3, Engagement
Administrator.
When you log in to ProSystem fx Engagement connected to the Office, the program
displays the central file rooms that have been set up. When you double-click the central file
room or right-click and select Connect, ProSystem fx Engagement checks to see if you are
connected to the server. If you are not connected, that central file room displays with a red
X mark. If you are connected, the following procedures explain how to share binders.
Initial Synchronizing to the Central File Room
The synchronization feature copies a binder from the local file room to the central file room
or from the central file room to the local file room.
Note: You must close the binder before you attempt to synchronize the binder.
Also be sure Word and Excel are closed before you synchronize.
When synchronizing a binder to the central file room for the first time, do the following:
1. Select the binder in the local file room and do one of the following to open the
Synchronize Binder Wizard:
§
§
§
Select Tools/Synchronize Binder.
Right-click the binder and select Synchronize Binder from the pop-up menu.
Click the Synchronize Binder toolbar button.
6 - 40
Creating and Using Binders
Chapter
6
2. Click Next on the Welcome dialog to open the Select a Synchronization Target dialog.
Note: If you do not want to display the Welcome dialog again, check the Do
not show this Welcome page again box on the Welcome dialog.
3. Select the central file room with which to synchronize.
4. Click Next. The Synchronize Entire Binder or Selected Workpapers screen displays.
5. Select one of the following:
§
§
Synchronize entire binder. Synchronizes the entire binder, including all
workpapers.
Synchronize only selected workpapers. Synchronizes only the workpapers you
select for synchronization.
Note: Individual Knowledge Coach workpapers cannot be selected for
synchronization. If you are synchronizing a Knowledge Coach workpaper,
you must select all Knowledge Coach workpapers in the binder.
6. Click Next. The Check In Workpapers dialog displays.
7. Select the workpapers you would like to check in to the central file room. When you
check the workpaper in, you no longer have Current Editor rights to this workpaper in
the local file room. To select workpapers, click the Plus sign (+) to expand the view,
and then do one of the following:
§
§
§
Select all the workpapers by checking the box next to the binder.
Select all the workpapers in a section by checking the box next to the workpaper
tab.
Select specific workpapers by checking the box next to the workpapers.
8. If you are synchronizing the entire binder, continue to step 10. If you are synchronizing
only selected workpapers, click Next. The Synchronize Workpapers from your LOCAL file
room dialog displays.
6 - 41
Chapter
6
Creating and Using Binders
9. Click the plus sign to expand the view, and then select workpapers to synchronize with
the central file room by doing one of the following:
§
§
§
Select all the workpapers by checking the box next to the binder.
Select all the workpapers in a section by checking the box next to the workpaper
tab.
Select specific workpapers by checking the box next to the workpapers.
10. Click Next. The Completing the Synchronization Wizard dialog displays. This dialog
displays a summary of your selections. If you check the box at the bottom of the
window, the copy of the binder in your local file room automatically opens after the
synchronization is finished.
11. Click Synchronize. The Synchronization Job Queue dialog displays.
The Synchronization Job Queue shows the progress of the synchronization. You may
click Hide to close the dialog. The synchronization process continues.
The synchronization steps copy the binder from the local file room to the selected central
file room. The same steps can be taken to copy the binder from the central file room to the
local file room.
6 - 42
Creating and Using Binders
Chapter
6
Subsequent Synchronizing to the Central File Room
After a binder has been synchronized to the central file room, there are five methods for
subsequent synchronization.
§
§
Synchronize Binder Wizard. When using the Synchronize Binder Wizard as described
above for subsequent synchronization, you can also check out workpapers.
Synchronize selected workpapers. You can select specific workpapers to synchronize
without synchronizing the entire binder. Within an open binder, select the workpapers
to synchronize and then select Workpapers/Synchronize, or right-click the workpapers
and select Synchronize Workpaper. You can also select Check In or Check Out to
transfer the Current Editor rights to or from the central file room while in the open
binder.
Note: Individual Knowledge Coach workpapers cannot be selected for
synchronization. If you are synchronizing a Knowledge Coach workpaper,
you must select all Knowledge Coach workpapers in the binder.
§
Express Synchronization. Automatically synchronizes the binder in the local file room
and the central file room, without opening the wizard. You do not have the option to
check workpapers in or out.
Select the binder in the local file room and do one of the following:
— Select Tools/Express Synchronization.
— Right-click the binder and select Express Synchronization.
— Click the Express Synchronization toolbar button.
§
§
Auto express synchronize binder on open. Select Tools/Options. On the General tab,
you can select to automatically synchronize a binder upon opening it.
Auto express synchronize binder on close. Select Tools/Options. On the General tab,
you can select to automatically synchronize a binder upon closing it.
All five methods synchronize changes from both locations (local file room and central file
room) simultaneously. Changes made in the local file room are synchronized to the central
file room and changes made in the central file room are synchronized to the local file room.
Synchronizing a Binder from the Central File Room
The Synchronization feature also allows staff members assigned to a binder to copy or
check out from the central file room a binder that is not currently in their local file room.
To check out a binder from the central file room, do the following
1. Select the binder in the central file room and do one of the following:
§
§
§
Select Tools/Synchronize Binder.
Right-click the binder and select Synchronize Binder from the pop-up menu.
Click the Synchronize Binder button on the toolbar.
The Synchronize Binder Wizard dialog displays.
2. Click Next on the Welcome to the Synchronization Binder dialog. The Synchronize Entire
Binder or Selected Workpapers dialog displays.
6 - 43
Chapter
6
Creating and Using Binders
3. Select one of the following:
§
§
Synchronize entire binder. Synchronizes the entire binder, including all
workpapers.
Synchronize only selected workpapers. Synchronizes only the workpapers you
select for synchronization.
Note: Individual Knowledge Coach workpapers cannot be selected for
synchronization. If you are synchronizing a Knowledge Coach workpaper,
you must select all Knowledge Coach workpapers in the binder.
4. Click Next. The Check OUT Workpapers (Receive Current Editor Rights) screen displays.
5. Click the plus sign (+) to expand the view, and then select workpapers to check out to
your local file room by doing one of the following:
§
§
§
Select all workpapers by checking the box next to the binder.
Select all workpapers in a section by checking the box next to the workpaper tab.
Select specific workpapers by checking the box next to the workpaper.
6. If you are synchronizing the entire binder, go to step 8. If you are synchronizing only
selected workpapers, click Next. The Synchronize Workpapers (REMOTE File Room)
dialog displays.
7. Click the plus sign (+) to expand the view and then select workpapers to synchronize by
doing one of the following:
§
§
§
Select all workpapers by checking the box next to the binder.
Select all workpapers in a section by checking the box next to the workpaper tab.
Select specific workpapers by checking the box next to the workpaper.
8. Click Next. The Completing the Synchronization Wizard dialog displays a summary of
your selections. If you check the box at the bottom of the dialog, the binder
automatically opens after the synchronization is finished.
9. Click Synchronize to copy the binder from the central file room to your local file room. If
the client folder does not already exist in your local file room, it is also copied. The
Synchronization Job Queue dialog displays, showing the status of the synchronization.
10. You can click Hide to close the dialog. The synchronization process continues even if the
dialog is hidden.
Peer-to-Peer Network Environment - Direct Synchronization
Engagement staff members who are assigned to the same binders can share and distribute
binders directly with one another when they are connected on a peer-to-peer network.
When a binder staff member logs in using the Office or Field location, the program displays
the name of each staff member who is set up and active in the Administrator module in the
Staff tab of the File Room.
In addition, you can synchronize binders with staff members displayed on the Buddy List
tab. When you double-click a staff member’s name, Engagement tries to connect to the
staff member. If it cannot connect, you receive a message stating that the program was
unable to connect to the computer.
6 - 44
Creating and Using Binders
Chapter
6
Synchronization to Another User’s Local File Room
When you are logged in to ProSystem fx Engagement in the Field location, the
synchronization feature copies a binder from one user’s local file room to another user’s
local file room.
Important: You must close the binder before you attempt to synchronize it.
To synchronize a binder with another user, do the following:
1. Select the binder in the local file room, and do one of the following:
§
§
§
Select Tools/Synchronize Binder.
Right-click the binder and select Synchronize Binder from the pop-up menu.
Click the Synchronize Binder toolbar button.
The Synchronize Binder Wizard displays.
2. Click Next on the Welcome dialog. The Select a Synchronization Target screen displays.
3. Select the staff member to synchronize with from either the Staff or Buddy List tab. If
the Existing Location field is grayed out, browse to the user’s alternate location. A staff
member can have an Engagement profile on multiple computers, and you can select from
any existing location or an alternate location when synchronizing the binder with the
staff member.
4. Click Next. If the staff member is not assigned to the binder and you have the staff
group right to modify binder properties, you are given the option of assigning the staff
member to the binder. Click Yes to assign the staff member.
5. Select one of the following from the Synchronize Entire Binder or Selected Workpapers
screen:
§
§
Synchronize entire binder. Synchronizes the entire binder, including all
workpapers.
Synchronize only selected workpapers. Synchronizes only the workpapers you
select for synchronization.
Note: Individual Knowledge Coach workpapers cannot be selected for
synchronization. If you are synchronizing a Knowledge Coach workpaper,
you must select all Knowledge Coach workpapers in the binder.
6. Click Next. If you are the Current Editor of the binder, the Assign Workpapers screen
displays. Select the workpapers to assign to the staff member by clicking the plus sign
(+) to expand the view and do one of the following:
§
§
§
Select all the workpapers by checking the box next to the binder.
Select all the workpapers in a tab by checking the box next to the tab.
Select specific workpapers by checking the box next to the workpapers.
7. Click Next. If you are synchronizing the entire binder, continue to step 8. If you are
synchronizing only selected workpapers, the Synchronize Workpapers (LOCAL File
Room) dialog displays. Select the workpapers to synchronize. Click the plus sign (+) to
expand the view and then select workpapers by doing one of the following:
§
§
§
Select all workpapers by checking the box next to the binder.
Select all workpapers in a section by checking the box next to the workpaper tab.
Select specific workpapers by checking the box next to the workpaper.
6 - 45
Chapter
Creating and Using Binders
6
8. Click Next. A summary of your selections displays. If you check the box at the bottom
of the dialog, the copy of the binder in your local file room opens automatically after the
synchronization is finished.
9. Click Synchronize. The synchronization steps copy the binder from one local file room to
another local file room.
Notes:
§
§
After synchronization is completed, you no longer have Current Editor rights to the
workpapers you assigned to another staff member.
You can alternatively assign workpapers to another staff member before
synchronization. Current editor rights are transferred automatically upon a
subsequent synchronization.
The Synchronization Job Queue dialog displays, showing the synchronization status.
10. You can click Hide to close the dialog. Synchronization continues.
Resolving Synchronization Conflicts
The Synchronization Conflicts dialog allows you to resolve workpaper conflicts you may
encounter when synchronizing or receiving a binder that has had a workpaper or trial
balance restored or had its Current Editor changed.
Choose from the following options:
§
§
§
Local wins. Choosing this option retains the local file room copy and replaces the
remote location's copy with a copy from the local file room.
<Computer Name> wins. Choosing this option causes the local workpaper to be
replaced by the copy from the selected computer. The local copy of the workpaper is
permanently removed.
Undecided. Choosing this option causes the copy from the other computer to be filed
on the Conflict tab and the local copy to remain filed in its current tab.
The Conflicts dialog has an option allowing you to decide on an individual basis the action
to be taken on a workpaper. You can also decide globally on an action for all workpapers.
You have an option to view details for both workpapers in conflict, but the workpapers
cannot be edited.
If ProSystem fx Knowledge Coach is licensed, the Duplicate workpapers not allowed section
shows when there are multiple instances of single instance limited Knowledge Coach
workpapers between the binders being synchronized.
Choose from the following options:
§
§
§
Local wins. This option retains the local file room Knowledge Coach workpaper
instance and replaces the remote location’s Knowledge Coach workpaper instance
from the local file room.
<Computer Name> wins. This option causes the local Knowledge Coach workpaper
instance to be replaced by the Knowledge Coach workpaper instance on the selected
computer. The local Knowledge Coach workpaper instance is overwritten.
The Duplicate workpapers not allowed section allows you to decide which instance of
a single instance limited Knowledge Coach workpaper to retain.
6 - 46
Creating and Using Binders
Chapter
6
Opening Workpapers in the Conflicts Tab
After synchronization finishes, you can open workpapers on the Conflicts tab for resolution.
The titles of Workpapers with conflicts are preceded by (C), and these workpapers are
read-only.
Notes:
§
§
Workpapers that have a matching conflict workpaper in the Conflicts tab cannot be
assigned until the conflict is resolved.
Knowledge Coach workpapers shown in the Duplicate workpapers not allowed
section of the Synchronization Conflicts dialog do not appear under the Conflicts tab.
You can right-click the item in the Conflicts tab and select one of the following actions from
the pop-up menu.
§
§
§
§
Open the workpaper in a read-only state (view outside).
Delete the conflicting workpaper.
File the selected workpaper, which opens the Conflicts dialog for resolution of the
workpaper’s conflict.
View workpaper properties.
View Synchronization History
The Synchronization History option allows you to easily access detailed information about
the Synchronization History from within Engagement. You can review, print, or save the
Synchronization History using the following options:
§
§
For a local file room binder, you can access the history from the Information tab in
Binder Properties in the Workpaper Management module.
For a central file room binder, you can access the history from the Information tab in
Binder Properties in the Workpaper Management module or the Administrator module.
An entry is made to the history table every time a binder synchronizes with a central file
room or with another staff member, every time a binder package is created or received, and
every time a packaged binder is backed up or restored. The entry includes whether or not a
synchronization was successful or not.
Non-Network Environment - Binder Packages
If you are not on a network or need to email a binder to a binder staff member, create a
binder package. Do not synchronize to a central file room or to another staff member's local
file room.
6 - 47
Chapter
6
Creating and Using Binders
Creating a Binder Package
The following procedure creates a binder package that you can save as a file or send as an
attachment to an email message. Close the binder before you create the binder package.
To create a binder package, do the following:
1. In the local file room window, select the binder you want to distribute.
2. Do one of the following:
§
§
§
§
Select Tools/Create Binder Package.
Right-click the binder and select Create Binder Package.
Click the Create Binder Package toolbar button.
Select Send To on the File menu.
The Create Binder Package dialog displays.
3. The Create Binder Package dialog displays the following options:
§
§
Include all workpapers. Preselects all of the workpapers, including those that are
in the Trash. This option also includes all newly created workpapers when local
file rooms receive the binder package. This is the default selection.
Include selected workpapers. Allows you to select specific workpapers, except
items in the Trash folder. This option does not include newly created workpapers.
Note: Individual Knowledge Coach workpapers cannot be selected for creating
a binder package. If you are creating a binder package with at least one
Knowledge Coach workpaper selected, all Knowledge Coach workpapers in the
binder must be selected.
4. If you select the Include selected workpapers option, select the workpapers to include in
the binder package. Click the Plus sign (+) to expand the view and select workpapers
using one of these methods:
§
§
§
Select all the workpapers by checking the box next to the binder.
Select all the workpapers in a tab by checking the box next to the tab.
Select specific workpapers by checking the box next to the workpapers.
6 - 48
Creating and Using Binders
Chapter
6
5. Select how you want to distribute the binder package.
§
§
If you want to save the binder package as a file, select the Save package to a file
option. Verify the path, file name, and file size of the binder file. You can change
the path by clicking Browse.
If you want to send the binder package as an email attachment, select the Send
package via email option. The system uses a default file name for the attachment.
Note: To use email features, you need a MAPI-compliant email system. These
systems include Microsoft Exchange, Microsoft Mail, and Internet SMTP/POP3.
6. Click OK. If you are saving the binder package, the file is created according to the path
you specified. If you are sending the binder package through email, a new email message
displays with the binder package file as an attachment.
Receiving a Binder Package
After a binder package has been created, other binder staff members can receive the file.
When you are not in a network environment or synchronization is not enabled for the
central file room, this is how you share binders with other binder staff members.
Note: When you receive a binder, a signature change may occur, which causes
the binder's Dynalink to be broken. To reconfigure the Dynalink, see Chapter 7,
Using the Trial Balance.
1. Do one of the following to open the Receive Binder Package dialog:
§
§
§
Select Tools/Receive Binder Package.
Right-click a binder and select Receive Binder Package from the pop-up menu.
Click the Receive Binder Package toolbar button.
2. Use the Look in field to select the binder package file to receive. The binder package file
extension is AZP.
3. Click OK to receive the package.
4. A message displays when the binder is successfully received. Click View Log to open
the Synchronization History Log which you can print or save to a file. Click OK to exit
the message dialog.
6 - 49
Chapter
Creating and Using Binders
6
When you receive a binder, the following occurs:
§
§
If the binder does not exist in the local file room, ProSystem fx Engagement finds the
client folder and attempts to insert the binder into the client folder. If you do not have
this client folder, the program automatically creates it.
If the binder exists in the local file room, Engagement checks the binder you are
receiving and the binder you already have to determine if there are any conflicts.
Important: When you receive a binder package, your local file room is updated
with changes in the binder package and the package is updated with changes
in your local file room. Do not use binder packages for backup purposes; use
Backup/Restore instead. (For details, see Backing Up and Restoring a Binder on
page 6-50.)
Using Outlook to Receive Binder Packages
Engagement users who have Microsoft Outlook on their local computers can use the
Engagement interface option, Engagement/Receive Binder Package, in Outlook to receive a
binder package directly into an Engagement binder.
Note: If you are not using Outlook and you receive a binder package file as an
email attachment, save the file to your computer's hard drive first. Then follow the
instructions on page 6-49 for receiving the binder package.
Backing Up and Restoring a Binder
We recommend that a regular backup policy be implemented, preferably daily. You can use
the backup and restore options on the Tools menu in your local file room both to back up
and to restore the binder to its original state.
Backing Up a Binder in a Local File Room
1. Highlight the binder and select Tools/Backup Binder. The Backup Binder dialog displays.
2. Select the location to which you want to save the binder in the Save in field. The default
path is C:\Pfx Engagement\WM\Binder Backups.
3. Type a name for the binder in the File name field. The default name of the backup
package is the client ID and name, binder name, binder ID, binder current period end
date, and system date with a BZP file extension.
4. The Save as field defaults to BZP and cannot be changed. File names cannot contain
these characters: / : * ? \ " < > |.
5. Click Backup to create the backup file.
6. Click OK on the message telling you the backup was successful.
Note: If you assigned workpapers to other staff members, the Current Editor
change takes place when the backup is created. Workpaper assignments made by
other users are not affected.
6 - 50
Creating and Using Binders
Chapter
6
Restoring a Binder
1. Select Tools/Restore Binder. The Restore Binder dialog displays.
2. If necessary, select the directory where the binder is stored in the Look In field.
3. Highlight the binder to be restored and click Restore.
Notes:
§
§
§
When you restore a binder, a signature change may occur, which causes the binder's
Dynalink to be broken. To reconfigure the Dynalink, see Chapter 7, Using the Trial
Balance.
If the binder already exists in the local file room, a warning message prompts you
that the binder will be overwritten. Select OK to continue or Cancel to stop the
process.
You will no longer be the Current Editor of workpapers you assigned to other staff
members at the time of backup. Workpaper assignments made by other users are not
affected.
Binder Sign Off
Binder sign off allows staff members to sign off on a binder when they have completed their
work. This provides a quick way to see which staff members have completed their work on
the selected binder.
Signing Off on a Binder
Once staff members have signed off on all assigned workpapers, they can sign off the
binder, indicating that their work is complete.
1. From the File Room window, do one of the following to open the Binder Properties
dialog.
§
§
§
Right-click the binder and select Properties.
Select File\Properties.
Highlight the binder and click the Properties toolbar button.
2. Click the Binder Staff tab in the Binder Properties dialog.
3. Highlight your name as the staff member signing off on the binder.
4. Click the Sign Off Binder button. A dialog displays, asking you to confirm the sign off.
5. Click Yes.
6. If you have notes that have not been cleared, you are asked if you want to continue with
the binder sign off. Click Yes to continue, or click No to cancel.
7. If you have workpapers assigned that you have not signed off, a message states that
there are workpapers that have not been signed off and asks if you want to continue.
Click Yes to sign off the binder, or click No to cancel.
8. The date and time display next to the name of the user who signed off in the Binder
Properties dialog.
6 - 51
Chapter
6
Creating and Using Binders
Removing a Sign Off on a Binder
If staff members need to do more work on a binder after they have signed off, they should
remove their sign off on the binder until they complete their work.
To remove a binder sign off, do the following:
1. From the File Room, do one of the following to open the Binder Properties dialog.
§
§
§
Right-click the binder and select Properties.
Select File\Properties.
Highlight the binder and select Properties from the Toolbar.
2. Click the Binder Staff tab in the Binder Properties dialog.
3. Highlight your name as the staff member who is removing sign off.
4. Click the Remove Sign Off button. A dialog displays, asking you to confirm the sign off
removal.
5. Click Yes. The sign-off date and time are removed from the Properties dialog.
Finalizing Binders
When the work in the current engagement binder is complete, you can choose to finalize
the binder. The Finalize Binder feature guides you through a wizard that analyzes the status
of the workpapers, notes, and sign offs. The wizard ensures that all open binder items are
completed. Using the Finalize Binder feature is optional.
1. To finalize a binder, click the binder and do one of the following:
§
§
§
Select Tools/Finalize Binder.
Right-click the binder and select Finalize Binder from the pop-up menu.
Click the Finalize Binder toolbar button.
2. A prompt reminds you to synchronize the binder with its central file room to ensure that
the binder's contents reflect the latest changes. Click OK to continue with the
synchronization, or click Cancel to exit the wizard.
3. The Finalize Binder Welcome dialog displays. You can click the View Diagnostic Report
link to view the results of the finalization analysis. You can also click the Do not show
this Welcome page again to stop the Welcome dialog from appearing when you start the
Finalize Binder Wizard.
4. If an item conflicts between the binder in the local file room and the binder in the central
file room, the Synchronization Conflicts dialog appears.
You may check the Resolve all conflicts with the local copy of the workpaper box to
continue or, to resolve the conflict with the remote copy of the workpaper, click Cancel
and resolve the conflict within the binder.
6 - 52
Creating and Using Binders
Chapter
6
5. The Finalize Binder Wizard displays. The wizard guides you through the binder finalization
process. The wizard analyzes the binder and prompts you in the following situations:
§
§
§
§
§
§
Workpapers exist in the Trash. To continue, check the Delete all workpapers in
the Trash box and click Next. The workpapers are permanently deleted when the
Finalize Binder process completes.
Workpapers exist in the Conflicts section. To continue, you must resolve all
workpaper conflicts. Click the Local Wins button for each workpaper and click
Next, or select Cancel to exit the wizard.
Current Editor Analysis. You must be the Current Editor of all the workpapers to
continue. To continue, check the Take over all workpapers box and click Next.
Workpapers do not have a preparer sign off. To continue, check the Continue
without assigning Preparer sign off box and click Next.
Workpapers do not have at least one reviewer sign off. To continue, check the
Continue without assigning a Reviewer sign off box and click Next.
Workpapers have been modified after being signed off by a reviewer. To continue,
check the Continue with workpapers modified after reviewed box and click Next.
Note: This page displays only if the option to display the file modified flag
is selected in Administrator.
§
§
§
§
§
Uncleared Notes Analysis. To continue, check the Clear all team and open item
notes for the listed workpapers box and click Next.
Placeholder Analysis. To continue, check the Continue without clearing
placeholders box and click Next.
Uncleared Diagnostics Analysis (Knowledge Coach only). To continue, check the
Clear all diagnostics for the listed workpapers box and click Next.
Binder Staff Sign Off Analysis. To continue, check the Continue without requiring
all binder staff to sign off on the binder box and click Next.
Incomplete row customization analysis (Knowledge Tools only). To continue,
check the Continue without clearing incomplete row customizations box and click
Next.
If you do not want to continue with any of these open items, select Cancel and resolve
the open items.
Note: In the Administrator module, there is an option in Tools/Options to skip
the Binder Staff Sign Off Analysis page.
6. The last page of the wizard displays a summary report, which you can print or save to a
file. Click Back to modify your selections, or click Finalize to complete the finalization.
When you finalize a binder, the following occurs:
§
§
The binder in the local file room automatically synchronizes with the binder in the
central file room.
The icon for the binder changes from an open position to a closed position to indicate
the binder is finalized.
6 - 53
Chapter
Creating and Using Binders
6
§
§
§
If you open the finalized binder, the binder window displays (Finalized) at the top, and
the workpapers are read-only.
The workpaper history is deleted on all workpapers.
All Team and Open Item notes are deleted.
If you need to unfinalize a binder, use the ProSystem fx Engagement Administrator module.
See Unfinalizing a Binder on page 3-50.
Rolling Forward Binders
When you roll forward a binder, you prepare it to be used as the next period's engagement
binder. The roll forward process enables you to create a new binder for each new period.
This process also enables you to retain the prior period's information for analysis. This
section explains what information is rolled forward and how to perform the roll forward
function.
Effects of Rolling Forward on a Binder
When you roll forward a binder, the index and structure of the binder are preserved.
Workpaper Roll Forward Options
For most Engagement workpapers, you have the following roll forward options:
§
§
§
§
§
Include the workpaper in the roll forward. The workpaper will be included in the
binder when a new binder is created for the next period. If the workpaper uses links
to Date functions or links to the trial balance, the formulas will be updated with the
next period's information.
Do not include the workpaper in the roll forward. The workpaper will not be included
in the binder when a new binder is created for the next period. You would choose
this option if the workpaper is specific to this period and does not apply to the next.
This option is not available for Trial Balance workpapers, which are automatically
rolled forward to maintain trial balance links and reports.
Replace in the roll forward with placeholder. A placeholder appears in the new binder
for the new period. You can replace the placeholder with a file or scanned document
later. You might use this option for workpapers that you receive from clients later in
the period. The placeholder maintains the name and index for the workpaper until you
can add it.
Replace the workpaper in the roll forward with a designated file. You can use this
option for audit programs and checklists that are updated periodically.
Save or delete existing journal entries in the binder.
Notes:
— If you choose to replace the workpaper with another workpaper, the roll forward
option for the new workpaper is set to replace the workpaper.
— Items in the Trash file are not carried over to the new binder.
6 - 54
Creating and Using Binders
Chapter
6
Knowledge Tools Roll Forward Options
With ProSystem fx Knowledge Tools workpapers, you have the following options:
Roll Forward Options
Choose from the following roll forward options:
§
§
§
§
Do not include in the roll forward. The workpaper will not be included in the binder
when a new binder is created for the next period. You would choose this option if the
workpaper is specific to this period and does not apply to the next. This option is not
available for Trial Balance workpapers, which are automatically rolled forward to
maintain trial balance links and reports.
Include in the roll forward. The workpaper will be included in the binder when a new
binder is created for the next period. If the workpaper uses links to Date functions or
links to the trial balance, the formulas will be updated with the next period's
information.
Replace in the roll forward with latest Knowledge Tools template. The Knowledge
Tools workpaper will be replaced by the most up-to-date template when the
workpaper is opened in the new rolled-forward binder.
Replace in the roll forward with this file. Allows you to browse to choose a
workpaper to replace this workpaper in the binder. You may want to use this option
with standard workpapers you fill out for the client every year. For example, with a
bank reconciliation workpaper, you may want to use the same workpaper, but
without the specific information.
Data Retention Options
Select one of the following roll forward settings for data retention:
§
§
§
Keep all responses. The Knowledge Tools workpaper will retain the current responses
when the new binder is created. This option is available only when Include in the roll
forward or Replace in the roll forward with latest Knowledge Tools template is
selected.
Keep all comments and workpaper references. The Knowledge Tools workpaper will
retain the current comments and workpaper references when the new binder is
created. This option is available only when Include in the roll forward or Replace in
the roll forward with latest Knowledge Tools template is selected.
Merge row customizations from prior period workpaper. The Knowledge Tools
workpaper will merge the prior year's additions, deletions, and text changes to rows
when the new binder is created. This option is available only when Replace in the roll
forward with latest Knowledge Tools template is selected.
6 - 55
Chapter
Creating and Using Binders
6
Knowledge Coach Roll Forward Options
With ProSystem fx Knowledge Coach workpapers, you have the following options:
Roll Forward Options
Choose from the following roll forward options:
§
§
Include in the roll forward. The workpaper will be included in the binder when a new
binder is created for the next period. If the workpaper uses links to Date functions or
links to the trial balance, the formulas will be updated with the next period's
information.
Replace in the roll forward with latest Knowledge Coach content. The Knowledge
Coach workpaper will be replaced by the most up-to-date content when the
workpaper is opened in the new rolled-forward binder.
Data Retention Options
Select one of the following roll forward settings for data retention:
§
§
§
Use response roll forward setting. The Knowledge Coach workpaper will roll forward
each response according to the setting for that response.
Keep all responses. The Knowledge Coach workpaper will retain the current
responses when the new binder is created.
Reset all responses. The Knowledge Coach workpaper will reset all field cell values in
the new binder.
If you select the option to replace the workpaper in the roll forward with the latest
Knowledge Coach content, you can select one or more of the following options:
§
§
Merge row customizations from prior period workpaper. The Knowledge Coach
workpaper will merge the prior year's additions, deletions, and text changes to rows
when the new binder is created. This option is available only when Replace in the roll
forward with latest Knowledge Coach template is selected.
Keep audit programs populated with program steps. Added program steps will be
kept in Knowledge Coach audit workpapers. If you select this option, the following
options become available:
§
§
Keep custom program steps. Program steps you have created and added to
audit workpapers will be kept in the new binder.
Keep modified program steps. Modifications you have made to added program
steps in audit workpapers will be kept in the new binder.
During the roll forward process, the following occurs:
§
§
§
A new binder is created for the new period. If changes are made to workpaper roll
forward settings or to journal entry roll forward or recurring settings, these changes
are reflected in the original binder.
The new binder does not contain sign off information.
The new binder does not contain the workpaper notes from the original binder,
except for Notes for Next Period. These notes are brought forward into the new
binder as Open Item notes.
6 - 56
Creating and Using Binders
§
§
Chapter
6
All trial balance data is moved to the prior period and your current period data is
initially blank.
All date and account balance fields linked in your workpapers reflect the next period's
date and account balance. For example, with comparative financial statements, the
dollar amount columns automatically roll forward or last year's current period
becomes the prior period and current period balances are zero. In addition, all dates in
the financials roll forward.
Notes:
— In order to ensure the integrity of prior and current periods, the period sequence
cannot be changed. If you need to change the period sequence, you should create
a new binder and import data into the new binder with the new dates.
— If an M-3 Federal journal entry is selected as recurring, the temporary (T) or
permanent (P) designation is retained in the new binder.
Rolling Forward a Binder
During the roll forward process, the Binder window must be closed. If it is open, you
receive a message prompting you to close the window.
To roll forward a binder, do the following:
1. Click the binder you want to roll forward.
2. Do one of the following:
§
§
§
Select Tools/Roll Forward Binder.
Right-click the binder and select Roll Forward Binder from the pop-up menu.
Click the Roll Forward Binder toolbar button.
The Roll Forward Binder Wizard Welcome dialog displays. You can click the Do not show
this Welcome page again if you do not want to view the Roll Forward Binder Wizard
Welcome dialog again.
3. Click Next. The Roll Forward Binder Wizard - Verify General Properties dialog displays.
4. The binder properties from the original binder are displayed by default for the new
binder. All fields are editable, with the exception of Client Name.
6 - 57
Chapter
6
Creating and Using Binders
5. Click Next. The Roll Forward Binder Wizard - Verify Period Properties dialog displays.
6. The period dates and sequence information are updated to reflect the next period. The
current period dates become the first prior period dates for the new binder.
Verify that the dates are correct for the new binder. If they are incorrect, enter the date
in the date format shown or click the arrow button to select the date from a calendar.
Note: The period sequence cannot be changed because doing so would distort
prior period information. If you need to change the period sequence, you should
create a new binder and import data into the binder with new dates.
7. Click Next. The Roll Forward Binder Wizard - Verify Binder Staff Assignment dialog
displays.
8. The staff member rolling forward the binder is automatically assigned to the new binder.
You can assign new teams or staff members and unassign existing teams or staff
members. You cannot unassign yourself until after the new binder is created. You can
also view by teams and staff, teams only, or staff only.
Note: If the Firm option to automatically assign a team to new binders is
selected in the Administrator module, the team is assigned to the new binder.
You may also unassign any staff members at this time.
6 - 58
Creating and Using Binders
Chapter
6
9. Click Next. The Roll Forward Binder Wizard - Workpaper Roll Forward Settings dialog
displays.
All workpapers in the binder are listed with the roll forward option displayed. Select a
workpaper and click Modify to change the roll forward option. Trial balances are not
listed.
Note: Changes made to the roll forward settings are saved to the original
binder.
10. Click Next. If there are journal entries in the binder, the Verify Journal Entry Roll Forward
Settings dialog displays. All journal entries for each trial balance are listed with the roll
forward option displayed. You can click a journal entry to modify the roll forward option.
11. Click Next. If the trial balance is a write up trial balance, a dialog displays allowing you
to specify the write up trial balance roll forward settings.
Note: Make sure to select the correct balance to Roll to the Beginning.
12. Click Finish. The Roll Forward Binder Wizard - Completing the Roll Forward Binder Wizard
dialog displays.
13. Click Roll Forward. The new binder is created.
6 - 59
Chapter
Creating and Using Binders
6
Using the ProSystem fx Practice Interface
ProSystem fx Engagement now interfaces with ProSystem fx Practice versions 7.0 or later.
You can use the following features:
§
§
§
Time Entry Module, which allows you to track billable hours.
Inquiry Module, which allows you to quickly look up or edit client information.
The ability to link binders and clients in ProSystem fx Engagement to projects and
clients in ProSystem fx Practice.
Linking and Editing Projects
A binder in ProSystem fx Engagement correlates to a project in ProSystem fx Practice. You
cannot tell by looking at binders whether they are already linked to projects or not.
However, the system automatically produces the correct dialog. If you need to link a binder
to a project, the Select Project to Link dialog displays. If a project is already linked, the Edit
Project dialog displays. You can also configure the system to remind you to link new binders
when they are created.
You can link to a ProSystem fx Practice project from anywhere within ProSystem fx
Engagement.
Linking to a Project
Note: If ProSystem fx Practice is not already running, you must log in before you
can complete the following procedure.
To link an Engagement binder to a Practice project, do the following:
1. Highlight the binder.
2. Select Tools/Pfx Practice Interface/Edit Linked Project, or right-click the highlighted
binder and select Edit Linked Project from the pop-up menu. If the project is not yet
linked, the Select Project to Link dialog opens so that you can link the project.
3. Specify the ProSystem fx Practice Client and Engagement ID, which consists of the
four-digit Practice Client ID, then a dash, followed by the three-digit Engagement ID. The
ProSystem fx Practice projects that are associated with the selected client display.
4. If you do not see the project you want, check the Include projects already linked box.
5. Highlight the project to which you want to link.
6. Click Link.
6 - 60
Creating and Using Binders
Chapter
6
Editing a Project that is Already Linked
Note: If ProSystem fx Practice is not already running, you must log in before you
can complete the following procedure.
To edit a Practice project that is already linked to an Engagement binder, do the following:
1. Select the binder.
2. Select Tools/Pfx Practice Interface/Edit Linked Project, or right-click the highlighted
binder and select Edit Linked Project from the pop-up menu. If the project is already
linked, the Edit Projects dialog displays in ProSystem fx Practice.
3. Edit as directed by ProSystem fx Practice Help.
Creating a Reminder to Link Projects
Note: If ProSystem fx Practice is not already running, you must log in before you
can complete the following procedure.
To receive a reminder to link projects whenever you create a new project, do the following:
1. Select Tools/Options. The ProSystem fx Engagement Options dialog displays.
2. On the General tab, select the Prompt when/for box.
3. Check the Link binder to Pfx Practice project after binder creation box. When you create
a new binder, the system prompts you to link it to a ProSystem fx Practice project.
Linking and Editing Clients
You can link a ProSystem fx Engagement client to the same client in ProSystem fx Practice.
You cannot tell by looking at ProSystem fx Engagement clients whether they are already
linked or not. However, the system automatically produces the correct dialog. If you need
to link a client, the Select Client to Link dialog displays. If the client is already linked, the
Client Properties dialog displays.
You can link to a ProSystem fx Practice client from within the File Room Frame of
ProSystem fx Engagement.
Linking a Client
Note: If ProSystem fx Practice is not already running, you must log in before you
can complete the following procedure.
To link an Engagement client to a Practice client, do the following:
1. Highlight the client.
2. In Engagement, select Tools/Pfx Practice Interface/Edit Linked Client, or right-click on the
highlighted client and select Edit Linked Client from the pop-up menu. If the client is not
yet linked, the Select Client to Link dialog displays so that you can link the client.
3. Specify the ProSystem fx Practice Client ID and the Engagement ID, which consists of
the four-digit Practice Client ID, then a dash, followed by the three-digit Engagement ID.
4. Click Link.
6 - 61
Chapter
6
Creating and Using Binders
Editing a Linked Client
Note: If ProSystem fx Practice is not already running, you must log in before you
can complete the following procedure.
To edit a linked client, do the following:
1. Select the client.
2. Select Tools/Pfx Practice Interface/Edit Linked Client, or right-click on the highlighted
client and select Edit Linked Client from the pop-up menu. The Edit Client dialog displays
in ProSystem fx Practice.
3. Edit as directed by ProSystem fx Practice Help.
Accessing the ProSystem fx Practice Inquiry Module
While logged in to Engagement, you can use the ProSystem fx Practice Inquiry module to
look up information about linked clients.
To access the Inquiry Module, do the following:
1. From the File Room menu, select Tools/Pfx Practice Interface/Client Inquiry. The Inquiry
Module displays. If the Inquiry Module is not already running, you must log in.
§
§
If a linked client is selected, the Inquiry Module defaults to the linked client in
ProSystem fx Practice.
If an unlinked client is selected or if a non-client object is selected, the Inquiry
Module displays without a pre-selected client.
2. For further instructions regarding the Inquiry Module, open the ProSystem fx Practice
Help and locate the Inquiry book in the table of contents.
Operating the ProSystem fx Practice Time Clock
You can use ProSystem fx Practice clocks to track your billable hours within ProSystem fx
Engagement, just as you have been doing in ProSystem fx Practice.
To open the time clock, do the following:
1. Access the ProSystem fx Practice Time Entry Module from within ProSystem fx
Engagement using one of the following methods:
§
§
§
§
From the main menu, select Tools/Pfx Practice Interface/Time Clock.
In Binder Frame, Binder Index View, select a binder name and right-click. From the
pop-up menu, select Time Clock.
In File Room Frame, highlight a binder or client name and right-click. From the
pop-up menu, select Time Clock.
In Binder Frame or File Room Frame, click the clock toolbar in the lower right
corner of the any Engagement window.
2. If the Time Entry Module is not already running, it opens and you must log in. If the Time
Entry Module is already running, then the clock is started in the background and the
remaining clock functions (Pause, Stop, and Delete) become active.
6 - 62
Creating and Using Binders
Chapter
6
3. The following options display:
Start
Starts the clock. This button becomes disabled after the clock is
started.
Pause
Pauses the clock. This button is only active when a clock is
running.
Resume
Restarts a paused clock. All other clocks are paused when you
restart a paused clock, unless you have checked Allow clocks to
run simultaneously in the User Preferences/Clocks tab of the Time
Entry Module. This button is only active when a clock is paused.
Stop
Stops the clock. When you stop a clock, you are automatically
taken to the Enter Transaction dialog. This button becomes active
when a clock is running or paused.
Delete
Deletes the current clock, along with all related information,
elapsed time, Client ID, and Engagement ID. This button becomes
active when a clock is running or paused.
4. For further instructions regarding clocks, open the ProSystem fx Practice Help and locate
the Time Entry book in the table of contents.
Entering Time Transactions
Access the Time Entry Module of ProSystem fx Practice to enter time transactions. If
ProSystem fx Practice is not already running, you must log in before you can complete the
procedure.
To enter time transactions, do the following:
1. Select the client or binder for which you want to enter a transaction.
2. Do one of the following:
§
§
§
From the main menu, select Tools/Pfx Practice Interface/Enter Transaction.
In the Binder Frame, Binder View, right-click a binder’s index to open the pop-up
menu, then select Enter Transaction.
In the local file room or central file room, right-click on a highlighted client or
binder to open the pop-up menu, then select Enter Transaction.
3. When the Enter Transaction dialog opens, follow the directions provided by ProSystem
fx Practice Help. The state of the dialog upon opening depends on the following
preconditions:
6 - 63
Chapter
Creating and Using Binders
6
If…
Then…
a linked client is highlighted,
fields populate with the ProSystem fx
Practice client information.
a linked binder is highlighted,
fields populate with the ProSystem fx
Practice client and project information.
an unlinked client or binder is
highlighted,
fields are blank.
an object other than a client or
binder is highlighted,
fields are blank.
Entering Dates
To enter a date in a ProSystem fx Engagement date field, do one of the following:
§
§
Type the date in the format shown in the date field (mm/dd/yyyy).
Click the arrow near the field and select the date from the calendar. If a date is
already in the date field, the calendar uses that date as a starting point. Select
another date by doing one of the following:
— To move ahead or back one month, use the left and right arrows on either side of
the month and year.
— To move ahead or back one week, use the up or down arrow key.
— To move to the next or previous day, use the left or right arrow key.
— To insert today's date, click the red circle at the bottom of the dialog.
Once you have selected a date, press
a to insert it in the date field.
6 - 64
C H A P T E R
Using the Trial Balance
7
Overview
The trial balance stores and manages the chart of accounts, account balances, and journal
entries for an engagement. Within the trial balance, you can do the following:
§
§
§
§
§
§
§
§
Import account data from a spreadsheet or another supported trial balance package
Store account balances for the current period and up to 36 prior periods
Enter transactions in write up journals
Group accounts for reporting purposes
Perform calculations, including comparisons and summaries
Post journal entries for the current period
Consolidate entities
Create reports
The trial balance also provides a centralized data source for all the workpapers in an
engagement. You can link trial balance information dynamically to your Word and Excel
documents. When the trial balance information changes, such as when you add a journal
entry, all related workpapers and reports are automatically updated.
When you roll forward the engagement binder in the subsequent period, ProSystem fx
Engagement uses these links to automatically update your engagement workpapers and
reports based on the trial balance data you import in that subsequent period. The trial
balance is flexible and can be customized to meet the needs of any engagement.
Note: Trial balances created with a version of Engagement prior to 6.0 must be
converted to Microsoft SQL Server database files. Select
Start/Programs/Engagement/Utilities, click Trial Balance Conversion Wizard, and
follow the instructions in the wizard.
Accessing Trial Balance Functions
In the Binder Index window, use the trial balance command on the menu bar to access any
of the following trial balance functions:
§
§
§
§
§
§
TB Column Setup
Import Conversion Wizard
Consolidate TB
Classifications
Account Groupings
Chart of Accounts
7-1
Chapter
Using the Trial Balance
7
§
§
§
§
§
QuickView
Quiklink/Desktop Updates Status
Journal Entry Summary
Add Journal Entry
Write Up Journal Entry
Using the Trial Balance Window
The trial balance is a customized Excel workbook that organizes the chart of accounts,
account balances, and journal entry data into columnar views with different tabs to reflect
the levels of grouping detail.
Views
Views display a series of user-defined columns in the trial balance. Each view is based on
the type of data. The Engagement trial balance contains the following standard views:
§
§
Default view. The default columns are balances and journal entries for the current
period, plus one prior period column. You can add more columns for the current or
prior periods. Also, you can add columns to show variances between any of the
balance columns.
Financial Statement view. The default columns are the final balances for the current
period and the prior period, plus the dollar and percent variances for these balances.
You can add or remove columns from this view.
Account Groupings
Account groupings enable you to summarize account balances. For example, in an audit,
you may want to summarize account balances by leadsheet and financial statement
categories. In a tax engagement, you may want to summarize account balances by tax
return line. You are provided an account grouping list template to use when linking to
ProSystem fx Profit Driver.
With ProSystem fx Engagement, you can create account groupings easily using an interface
similar to Windows Explorer.
You can create two levels of groupings:
§
§
Account Groups, such as Receivables.
Account Subgroups, such as Gross Accounts Receivable and Allowance for Doubtful
Accounts. Account Subgroups are nested in Account Groups.
You assign accounts either at the account group or subgroup level, except when using the
Profit Driver grouping lists. With Profit Driver grouping lists, you should map to the
subgroup level only. (See page 7-112 for Profit Driver account grouping details.)
Account groupings can be selected by the following controls in the trial balance window:
§
§
The Group drop-down list enables you to select the account grouping you want.
The workbook tabs list the groups and subgroups in the selected account grouping.
7-2
Using the Trial Balance
Chapter
7
Showing Debits and Credits
In ProSystem fx Engagement, debits and credits are shown in the same column. Debits are
shown as positive amounts in black, and credits are shown as negative amounts in red. In
workpapers, you may want to refer to credits as positive amounts. You can paste amounts
from the trial balance as absolute amounts. You also have the option of reversing the sign
of an amount. For example, you may want to show a decrease in retained earnings (a debit)
as a negative amount and an increase (a credit) as a positive amount. For details, see
Copy/Paste TB Link on page 8-43.
Showing Journal Entries
Journal entries are only shown in the Account Detail tab. Every journal entry type has a
journal entry number reference column. When your trial balance contains journal entries and
you are on the Account Detail tab, the journal entry detail/summary indicator is on the far
left side of the spreadsheet. This is similar to the subtotal feature in Excel.
Click the minus sign (-) to collapse the detail for a specific account or the 1 button on the
top of that column to collapse all detail. Click the plus sign (+) to expand the detail for a
specific account or the 2 button on the top of the column to expand all detail.
To set the Account Detail tab to default in detail or summary mode, see Trial Balance
Properties on page 7-13.
Workpaper Reference
The workpaper reference column enables you to add an alphanumeric reference for the
selected trial balance line item. You can select up to two workpaper reference columns for
each balance column.
You can copy multiple workpaper references and paste them into multiple cells, or you can
copy one workpaper reference paste it into multiple cells, by holding k or b. You can
also insert one workpaper reference into multiple cells by holding k or b, selecting
multiple cells, and then selecting Engagement\Workpaper Reference\Insert WP Reference.
For more information on selecting the workpaper reference columns, see Selecting Columns
to Display in the Trial Balance on page 7-15. You have the option to print the workpaper
reference columns in the trial balance reports. You must have the TB Edit Mode feature
turned on in order to enter references in this column. For more information on the TB Edit
Mode function, see Editing the Trial Balance on page 7-6.
7-3
Chapter
Using the Trial Balance
7
Using the Trial Balance Snapshot
The Trial Balance Snapshot provides a summary of all the trial balances in a binder, except
those that are in the Conflicts tab or the Trash tab. You can also view Diagnostic and
QuickView information for each trial balance.
To switch to the Trial Balance Snapshot, do one of the following:
§
§
Click the Trial Balance Snapshot icon on the Shortcuts bar.
Select View/Trial Balance Snapshot from Binder View.
If you would like to use the Trial Balance Snapshot view as your default binder view, select
Tools/Options and check the TB Snapshot on binder open box.
To update the information shown based on current binder activity, click Refresh.
Panes in the Trial Balance Snapshot View
The following panes are available from the Trial Balance Snapshot view:
§
§
§
§
Shortcuts. The Shortcuts bar provides shortcut access to workpapers, the Binder
Snapshot, the Trial Balance Snapshot, and the ProSystem fx Knowledge Tools Web
site.
Guidance. The Guidance bar provides shortcut access to CCH Tax Research
NetWork, Accounting Research Manager, and FAQs.
Trial Balance Snapshot. The Trial Balance Snapshot displays existing trial balances in
the top pane. The consolidation structure of the trial balances included in the binder
are represented in a tree structure. If a trial balance belongs to multiple consolidated
trial balances, the trial balance is shown under multiple trees. In addition, the Trial
Balance Snapshot displays the grouping diagnostics and trial balance diagnostics for
the selected trial balance.
Tip of the Day. Displays suggestions for using the program more efficiently. You can
hide the Tip of the Day by clicking Hide Tips. The Previous and Next buttons allow
you to navigate the tips. To start the tips again, click Show Tips.
Note: You can customize the Tip of the Day items to show tips that are
specific to your firm’s operations. See Managing the Tip of the Day on
page 3-62 for more details.
Grouping Diagnostics in the Trial Balance Snapshot
Grouping Diagnostics in the Trial Balance Snapshot provides the following details about a
selected trial balance:
§
§
§
Grouping. Allows you to view the account grouping lists as they are set up for the
selected trial balance.
Balance. Contains all valid current period balance columns for the specific type of trial
balance, as previously set up in the TB Column Setup dialog.
Ungrouped Accounts. Indicates the number of accounts that have not been grouped
to the selected account grouping list for the selected trial balance. The link opens the
Account Groupings dialog so that the accounts can be grouped.
7-4
Using the Trial Balance
§
Chapter
7
Unclassified Groups/Subgroups. Breaks down the groups in the selected grouping list
into groups and subgroups without account classifications or ratio classifications.
— Account classification. The numbers tally the groups and subgroups that have not
been assigned an account classification for the selected account grouping list. The
link opens the Account Groupings dialog, where account classes can be selected
for the unclassed groups.
— Ratio classification. The numbers tally the groups and subgroups that have not
been assigned a ratio classification for the selected account grouping list. Click the
hyperlink to open the Account Grouping dialog.
Note: To view the existing account classes selected for the groups and
subgroups, click Advanced in the Account Groupings window.
§
§
§
§
§
Assets. Displays the total value of the current assets plus non-current assets, for the
selected account grouping list and balance type.
Liabilities and Equity. Displays the total value of the current liabilities, plus
non-current liabilities, plus equity.
Revenue. Displays the total value of the revenue for the selected account grouping
list and balance type.
Expenses. Displays the total value of the expenses for the selected account grouping
list and balance type.
Net (Income)/Loss. Displays the total value of the revenue less expenses for the
selected account grouping list and balance type.
Trial Balance Diagnostics in the Trial Balance Snapshot
Trial Balance Diagnostics in the Trial Balance Snapshot provides the following details about
a selected trial balance:
§
§
Any current period column out of balance? Indicates whether any of the balance
columns are not equal to zero in the Account Detail tab of the selected trial balance.
The link opens the trial balance.
Configured for Roll Forward? Appears only when there is a write up trial balance. This
indicates whether the following items are configured in the selected write up trial
balance:
— An account has been identified as the Retained Earnings account.
— A classified grouping list has been identified as the account grouping list to use for
roll forward. This account grouping list must have at least one account that is
associated with groups that are included in the Revenue and Expenses account
classes.
§
§
§
CJE. Displays the number of Client Journal Entries. Clicking this link opens the
Journal Entry Summary dialog.
AJE. Displays the number of Adjusting Journal Entries. Clicking this link opens the
Journal Entry Summary dialog.
RJE. Displays the number of Reclassifying Journal Entries. Clicking this link opens the
Journal Entry Summary dialog.
7-5
Chapter
Using the Trial Balance
7
§
§
FTJE. Displays the number of Federal Tax Journal Entries. Clicking this link opens the
Journal Entry Summary dialog.
PJE. Displays the number of Proposed Journal Entries. Clicking this link opens the
Journal Entry Summary dialog.
Tip of the Day in the Trial Balance Snapshot
Displays suggestions for using the program effectively. Click Hide Tips to hide the Tip of the
Day. Click Show Tips to display the tips again. The Previous and Next buttons allow you to
navigate the tips.
Note: You can customize the Tip of the Day items to show tips that are specific to
your firm’s operation. For details, see Managing the Tip of the Day on page 3-62.
Editing the Trial Balance
To be able to edit certain columns of the trial balance or enter information in the Workpaper
Reference (WP Ref) column, do the following:
1. Open the trial balance.
Note: Trial balances created with a version of Engagement prior to 6.0 must be
converted to Microsoft SQL Server database files. Select
Start/Programs/Engagement/Utilities, click Trial Balance Conversion Wizard, and
follow the instructions in the wizard.
2. Click the TB Edit Mode toolbar button to enable editing. The illustration on the following
page describes the fields in the trial balance window.
3. Enter the information into the highlighted fields as needed.
4. Click the TB Edit Mode button again to toggle the edit mode off.
Notes:
§
§
If you are working with a trial balance in a shared local file room, you must be the
Live Editor of the Trial Balance to access TB Edit Mode.
In a consolidated trial balance, TB Edit Mode is available only for the Prior Period
columns. This is to ensure the integrity of the data from the subsidiaries. If you want
to edit the current period information, make the change in the subsidiary trial balance
and then re-consolidate.
Using the Trial Balance in Excel 2007
When you open a trial balance in Excel 2007, a ribbon displays with all trial balance-specific
functions available.
7-6
Using the Trial Balance
Chapter
7
Account Groupings, TB Edit Mode, and TB Column Setup
Use TB Column Setup to
edit the column header
abbreviations.
Use TB Column Setup
to add, modify, or
delete Views of the
trial balance. You can
also select the columns
you want to appear in
the view, such as:
current year balances,
prior period balances,
variance columns, and
workpaper reference
columns.
Use Account Groupings to
add, modify, or delete
Grouping lists.
To protect the integrity of the
calculated amounts, you cannot type
in the cells that are not marked blue.
You can type changes directly in the
cells that are marked blue.
Account Groupings button
TB Column Setup button
TB Edit Mode button. Highlights data entry fields in blue.
7-7
Chapter
Using the Trial Balance
7
Creating Trial Balances
This section explains how to create a trial balance and open it once you have created it.
Sources for Trial Balances
You can create the trial balance from either of the following:
§
§
From a pre-defined trial balance template. Trial balance templates can include pre-set
columns, account groups, and a standard chart of accounts.
From a blank trial balance template. A blank template only has columns for the
account number and description.
Creating a Trial Balance
To create a trial balance, do the following:
1. In the Binder window, click the workpaper tab where you want to put the trial balance.
2. To display the New Trial Balance dialog, do one of the following:
§
§
§
Select File/New/Trial Balance.
Right-click the tab and select New Trial Balance from the pop-up menu.
Click the New Trial Balance toolbar button.
Note: You can change the path of the trial balance templates from the
Tools/Options dialog and share these templates if you are in a network
environment. For more information about sharing a path, see Changing Default
Paths for Templates on page 4-8.
3. Select the tab with the type of trial balance you want to create.
4. Select the trial balance template you want to use and click OK. The Workpaper
Properties dialog displays.
7-8
Using the Trial Balance
Chapter
7
5. In the Index # field, enter an index number (may be alphanumeric) for the trial balance
workpaper. This is an optional field. Its purpose is to help you organize your workpapers
and to provide a means to reference the workpapers. To insert workpaper reference links
into other workpapers, the workpapers must have an index number. See Workpaper
Reference on page 7-3 for more information.
6. In the Name field, enter the name for the trial balance. This is a required field. The
default name is the trial balance template name. You can use the default name or enter a
new name. Do not use the following characters: ‘ | : “ , ( ).
Important: The trial balance name displays in the formulas that link trial
balance data to workpapers. The trial balance name in formulas does not
change if you rename the trial balance. Therefore, choose a name in this field
that you will recognize when reviewing your formulas. For example, if you are
working on a consolidated entity, use the entity name for each trial balance
name. That way, you will know which entity a specific amount came from
when reviewing your TB Link formulas.
If you rename your trial balance and then your links no longer work, rename it to its
original name or use the Replace TB Link Name feature available in Excel and Word
workpapers. See Replacing TB Link Names on page 9-7 and on page 10-7.
7. Click OK. The trial balance is added to the workpaper tab you selected in step 1.
7-9
Chapter
7
Using the Trial Balance
Basic Trial Balance Commands
This section explains how to open, close, and refresh the trial balance.
Opening the Trial Balance
You can open the trial balance in either the File Room or the Binder window without having
to find it among your workpaper tabs.
Note: Trial balances created with a version of Engagement prior to 6.0 must be
converted to Microsoft SQL Server database files. Select
Start/Programs/Engagement/Utilities, click Trial Balance Conversion Wizard, and
follow the instructions in the wizard.
To automatically open a trial balance, do the following:
1. From the File Room window, select the binder containing the trial balance to open using
one of the following options:
§
§
§
Select File/Open Trial Balance.
Right-click and select Open Trial Balance from the pop-up menu.
Click the Open Trial Balance toolbar button.
In the Binder window, do one of the following:
§
§
Select File/Open Trial Balance.
Click the Open Trial Balance toolbar button.
If there is only one trial balance within a binder, the trial balance opens.
If there is more than one trial balance within a binder, the Open Trial Balance dialog
displays.
2. Select the trial balance to open and click OK.
7 - 10
Using the Trial Balance
Chapter
7
Closing the Trial Balance
Close the trial balance in Excel by selecting File/Close or clicking the Close Window icon at
the top right of the window. Any changes you made to a trial balance are saved
automatically as you close it.
Closing the Trial Balance in Engagement
You can close the trial balance from the Binder window in Engagement. Any changes you
made to a trial balance are saved automatically as you close it. To close the trial balance, do
one of the following:
§
§
Click the trial balance and select Workpaper/Close Workpaper.
Right-click the trial balance and select Close Workpaper from the pop-up menu.
To close all open trial balances and workpapers in a binder, do either of the following:
§
§
Select Workpaper/Close All Workpapers.
Right-click any binder or tab and select Close All Workpapers from the pop-up menu.
To close all open trial balances and workpapers of all binders, close ProSystem fx
Engagement.
Refreshing the Trial Balance
ProSystem fx Engagement updates the trial balance automatically whenever you make
changes. However, if you do not see the changes, you can refresh the trial balance
manually in any view. This ensures that you are viewing the latest information. To refresh
the trial balance, do either of the following:
§
§
Select Engagement/Refresh.
Click the Refresh button on the Engagement toolbar.
Functions Unavailable in Trial Balances
If you are not the Current Editor or Live Editor of the trial balance, you can view it, print it,
and perform the Copy TB Link function. The following are some functions that you cannot
perform:
§
§
§
§
§
Save changes.
Add, delete, and
Add, delete, and
Add, delete, and
Add, delete, and
modify
modify
modify
modify
journal entries.
columns.
account numbers, descriptions, and balances.
account groupings.
For additional information about Current Editor rights with workpapers and trial balances,
see Chapter 8, Managing Workpapers.
7 - 11
Chapter
7
Using the Trial Balance
Saving a Trial Balance as a Template
If there is a trial balance that has a format you use frequently, you can save it as a
template. Follow these steps to save a trial balance as a template:
1. Select File/Open Trial Balance or click the Open Trial Balance toolbar button from either
the File Room or the Binder window.
2. Select Engagement/Properties. Uncheck Hide zero balance groups and subgroups and
Hide zero balance accounts. The numbers and groups now display on the trial balance
when it is created from this template. Click OK and close the trial balance.
3. Select the trial balance in the Binder window.
4. Select File/Save As Template or right-click the trial balance and select Save as Template
from the pop-up menu. The Save As dialog displays.
5. Open the template folder where you want to save the template.
Note: If you save the trial balance in the Trial Balance Templates folder, the
template appears on the General tab in the New Trial Balance dialog when you
create a new trial balance. If you save the trial balance in a sub-folder within
the Trial Balance Templates folder, it appears in the corresponding tab in the
New Trial Balance dialog.
6. Enter the file name for the template.
7. Uncheck the Clear Chart of Accounts box if you want to save the account numbers and
descriptions in the template. If you do not want to save the account numbers and
descriptions in the template, leave the check mark.
8. Check the Save Journal Entries box (which becomes active when the Clear Chart of
Accounts box is unchecked) if you want to save the journal entries (accounts and
descriptions) in the template.
9. Click Save. A new icon appears in the New Trial Balance dialog under the selected
template tab. You can access this template when creating a new trial balance. An XLT
file and an SQL database file are created with the same name as the trial balance
template and are located in the trial balance template folder.
7 - 12
Using the Trial Balance
Chapter
7
Deleting a Trial Balance
You can delete a trial balance by selecting it and doing one of the following:
§
§
§
§
Select Edit/Delete.
Right-click and select Delete from the pop-up menu.
Press i.
Drag it to the Trash icon in the binder.
You are prompted to confirm that you want to send the trial balance to the Trash folder.
Click Yes to confirm the deletion. Click No to prevent the trial balance from going to the
Trash folder.
Note: To delete a trial balance, you must be the Current Editor or have the
appropriate rights.
Restoring Deleted Trial Balances
When you delete a trial balance or any workpaper, it goes into the Trash folder. Once it is in
the Trash folder, it can be recovered by performing one of the following actions:
§
§
Click the trial balance and select Workpaper/Restore from Trash.
Right-click the trial balance and select Restore from Trash from the pop-up menu.
To recover all workpapers and trial balances in the Trash, do one of the following:
§
§
Click the Trash icon and select File/Restore All.
Right-click the Trash icon and select Restore All.
This returns all deleted workpapers to their original locations.
Note: You must have the appropriate rights to restore a deleted trial balance if you
are not the Current Editor.
Trial Balance Properties
To view trial balance properties, you must have the trial balance open. To modify trial
balance properties, you must be the Current Editor of the trial balance.
Perform the following steps to open the TB Properties dialog:
1. Open the trial balance by selecting File/Open Trial Balance or clicking the Open Trial
Balance toolbar button from either the File Room or the Binder window.
2. Select Engagement/Properties. The TB Properties dialog displays.
7 - 13
Chapter
Using the Trial Balance
7
3. You can select from the following options:
§
§
§
§
§
§
Hide zero balance groups and subgroups. If this option is checked, and there are
group or subgroup totals with zero balances on either the Account Group
Summary or Account Subgroup Summary sheets throughout the entire row (i.e.,
for every column in the current view), Engagement hides those groups and
subgroups.
Hide zero balance accounts. If this option is checked and there are accounts with
zero balances on the Account Detail sheet throughout the entire row (i.e., every
column in the view), those accounts are hidden.
Hide header information. Check this option to suppress header information.
Hide net (income) loss calculation. Check this option to suppress Net (income) loss
calculation.
Show JE Details. Check this option to show all journal entry details (i.e., every
debit and credit with the journal entry number). See page 7-3, Showing Journal
Entries, for details.
Print as black and white. Check this option to print related worksheets with no cell
background colors, which saves toner or ink in your printer.
4. Click OK to close the TB Properties dialog.
Setting Up Trial Balance Columns and Views
This section explains how to set up columns and views in the trial balance. If you created
the trial balance from a template, then certain columns and views are already set up;
however, you should still refer to this section to add or change columns and views.
Trial Balance Column Setup
Use the Trial Balance Column Setup dialog to customize, add or remove columns and views.
Note: You must be the Current Editor of the trial balance in order to modify the
trial balance column setup.
Perform one of the actions described below to open the Trial Balance Column Setup dialog,
then proceed to the next section.
§
§
From the Binder window, select Trial Balance/TB Column Setup.
In an open trial balance, do one of the following:
— Select Engagement/TB Column Setup.
7 - 14
Using the Trial Balance
Chapter
7
— Click the TB Column Setup button on the Engagement toolbar in Excel.
Note: The account number and description columns do not display in the Trial
Balance Column Setup dialog because they are required columns in all views.
These columns cannot be changed or removed from a view.
Selecting Columns to Display in the Trial Balance
In the Trial Balance Column Setup dialog, select which columns to display and their order of
display in the trial balance.
You can add prior period columns and current year columns in the same view by selecting
the available column from the period desired. This is useful, for example, if you want to
view the prior period’s final balance along with all of the current period’s balance data.
If you create the trial balance from a template, a number of columns are pre-selected. If you
create the trial balance from a blank template, no columns are pre-selected. You must select
the columns to appear in each view of the trial balance.
Use the L and R check boxes in the Selected columns section to designate whether you
want the selected workpaper reference column to display to the left (L) or right (R) of the
dollar amount column, or check both boxes to have the column display to both the left and
the right of the dollar amount column.
Important: You can change the order that these columns are viewed in the trial
balance. Journal entries are added to column balances based on column properties,
not on the order of the columns.
Types of Columns
A trial balance can have the following types of columns:
§
§
Beginning balance column. This column is available only with the write up trial
balance template where it shows the balance from the prior period. If this is the first
period for the year, the income statement accounts have a zero balance.
Unadjusted balance column. In trial balances other than the write up trial balance, this
column shows a zero balance. You can convert or import balances (see Converting
and Importing Trial Balance Data on page 7-20) or manually enter balances (see
Adding, Modifying, or Deleting Trial Balance Accounts on page 7-45).
7 - 15
Chapter
Using the Trial Balance
7
§
§
§
§
§
Journal entry columns. This column shows amounts from journal entries. A trial
balance can have up to seven journal entry columns (eight with write up trial
balances). You can rename the columns to indicate different types of journal entries.
See Creating Journal Entries on page 7-60.
Total balance columns. This column shows the total of a journal entry column and the
previous balance column. For example, Final Balance column is the total of the
Reclassifying Journal Entry column and the Adjusted Balance column. There is a total
balance column for each journal entry column.
Variance columns. This column shows the difference between any two columns you
select. You can show the difference as a dollar amount and/or percentage. You also
have the option of showing the amount as an absolute value.
Imported balance columns. This column is for importing a column from trial balance
software, an Excel spreadsheet, or an ASCII file. The trial balance has three “Other
Imported Balance” columns, so you can import up to four columns (beginning
balance/unadjusted balance column plus three other imported balance columns).
Prior period balance columns. This column is used to store the history of balances in
the prior periods. You can also import balances to the prior period columns.
Selecting Columns to Display
To select columns to display in the trial balance, do the following:
1. Open the Trial Balance Column Setup dialog.
§
§
From the Binder window, select Trial Balance/TB Column Setup.
In an open trial balance, do one of the following:
— Select Engagement/TB Column Setup.
— Click the TB Column Setup button on the Engagement toolbar in Excel.
2. Select the trial balance columns to modify.
3. In the View field, select the view for the column setup that you want to modify. The
columns change to show the columns available in that view.
To add a view, rename a view, create a copy of a view, or delete a view, click the
Options button to open the Trial Balance View Options dialog.
Note: To create views based on the types of reports you want to create from
the trial balance, see Creating Trial Balance Reports on page 7-67.
7 - 16
Using the Trial Balance
Chapter
7
4. In the Available columns field of the Trial Balance Column Setup dialog, select the
balance type and the period that has the columns that you want in this view. The
periods include the current period and the prior 36 periods.
5. Select an available column with the pertinent characteristics and move it to the Selected
columns pane. (See Types of Columns on page 7-15.)
To select the columns, do either of the following:
§
§
Click the available column on the left side of the dialog and then click the arrow
pointing to the right.
Click the available column on the left and drag it to the right side of the window.
Select more than one column at a time by holding down b or k while clicking on
the column. The selected columns appear on the right side of the window.
6. To rename the TB column header in the Selected columns list, do one of the following:
§
§
Double-click the name to change in the Abbrev column.
Click the name to change in the Abbrev column and click the Rename button
below the Selected columns list.
a or click outside the box to accept the change.
To cancel the change, press c.
Type the new name and press
The Abbrev column, as it appears in the Selected columns list, displays as the TB
column header.
Note: You can also change the Name column in the Selected columns list by
following the steps listed above for the Abbrev column. The Name column is
for your information only and has no effect on your TB column header.
7. To change the order of the selected columns in the view, select the column and click the
up or down arrow on the right side of the Selected columns list.
Note: Although you can change the order of these columns in the trial balance,
the journal entry amounts are added to column balances based on column
properties.
Five columns available in the current period can define the column properties (i.e., how
the column amount is calculated). The column properties allow you to select which
balance type to add the corresponding journal entry to. The following five columns are
available:
§
§
§
§
§
Federal Tax Balance (FTAX)
State Tax Balance (STAX)
Other Balance1 (OBAL1)
Other Balance2 (OBAL2)
Other Balance3 (OBAL3)
When you click any of these columns, the Column Properties appear at the bottom-left
corner of the Trial Balance Column Setup dialog.
The Balance Type for the highlighted column equals the sum of the journal entry type
and the selected balance type.
7 - 17
Chapter
7
Using the Trial Balance
For example, you have the option of calculating the sum of the Federal Tax Balance
column in either of the following ways:
§
§
Federal Tax Journal Entries + Adjusted Balance
Federal Tax Journal Entries + Final Balance
8. You can add a workpaper reference column to the selected columns in the view. The
workpaper reference columns can be on the left side, the right side, or both sides of
each balance column.
To add a workpaper reference column, check the box in the L column for the left side or
the R column for the right. Based on your selections, the workpaper reference columns
appear in the trial balance.
9. To add a variance column, click the Add Variance button. The Column Properties for the
Variance Column display at the bottom of the Trial Balance Column Setup dialog.
In the Column Properties section, choose to show the variance as either a dollar amount
or as a percent. You also have the option of showing the amount as an absolute value.
Select the two columns to calculate the variance.
10. Click Close to close the Trial Balance Column Setup dialog and accept the changes.
Removing a Balance Column
To remove a balance column from a trial balance view, do the following:
1. Select File/Open Trial Balance or click the Open Trial Balance toolbar button from either
the File Room or the Binder window.
2. Select Engagement/TB Column Setup or click the TB Column Setup button on the
Engagement toolbar in Excel.
3. Click the selected column on the right side of the dialog.
4. Click the arrow pointing to the left or drag the column to the Available Columns list.
The column is removed from the view. It is available for selecting later.
Removing a Variance Column
To remove a variance column from a trial balance view, do the following:
1. Select File/Open Trial Balance or click the Open Trial Balance toolbar button from either
the File Room or the Binder window.
2. Select Engagement/TB Column Setup or click the TB Column Setup button on the
Engagement toolbar in Excel.
3. Click the variance column on the right side of the dialog.
4. Click the Delete Variance button. A prompt informs you that deleting this variance
column is permanent.
5. Click Yes to delete the variance column. Click No to cancel.
7 - 18
Using the Trial Balance
Chapter
7
Setting Trial Balance Properties
You must be the Current Editor of the trial balance to modify trial balance properties.
To modify trial balance properties, do the following:
1. Select File/Open Trial Balance or click the Open Trial Balance toolbar button from either
the File Room or the Binder window.
2. Select Engagement/Properties. The TB Properties dialog displays.
3. Within the TB Properties dialog, you can select the following options:
§
§
§
§
Hide zero balance groups and subgroups. If there are group or subgroup totals
with zero balances on either the Account Group Summary or Account Subgroup
Summary worksheets throughout the entire row (i.e., for every column in the
current view), ProSystem fx Engagement hides these groups or subgroups when
this box is checked. If there has been any current period activity for detail
accounts assigned to this zero balance groups and subgroups, the groups and
subgroups display.
Hide zero balance accounts. If there are accounts with zero balances on the
Account Detail sheet throughout the entire row (i.e., every column in the current
view), these accounts are hidden.
Hide header Information. By default, the trial balance includes a header that
displays the client ID and name, the Engagement (binder) ID and name, and the
trial balance index and name. Check this box if you prefer not to have a header on
the trial balance. If the header has been hidden by checking this box, and you
subsequently choose to display it by removing the check from this box, click
Refresh to see the change.
Hide net (income) loss calculation. By default, the trial balance includes accurate
net (income) loss amounts for each balance type included in the trial balance,
presented as a bold text line item on the bottom row of the trial balance after the
Total row. This allows you to quickly determine net income for the balance types
on the trial balance without having to open the QuickView dialog and select each
balance type. However, you may check this box if you prefer not to show the net
(income) loss calculation on the trial balance. When the net (income) loss displays,
it also prints.
If the net (income) loss has been hidden by checking this box, and you
subsequently choose to display it by removing the check from this box, click
Refresh in order to see the change.
7 - 19
Chapter
Using the Trial Balance
7
§
§
Show JE Details. Check this option to show all journal entry details (i.e., every
debit and credit with the journal entry number). See Showing Journal Entries on
page 7-3 for more information.
Print as black and white. Check this option to print related worksheets with no cell
background colors, which saves color ink or toner in your printer.
4. Click OK to close the TB Properties dialog.
Converting and Importing Trial Balance Data
You can transfer trial balance data from other supported trial balance software packages to
a ProSystem fx Engagement trial balance. Supported trial balance software includes the
following:
§
§
§
§
§
§
ProSystem fx Write-Up
ProSystem fx Trial Balance (formerly ProSystem fx Audit), version 2001.a00 or
higher
GoSystem Audit, version 3.0 or higher
CaseWare Working Papers 2005 or Higher
ATB for Windows, version 3.04 or higher
ASCII text file
Data you can convert includes account numbers, account descriptions, account balances
(current period and prior periods), and grouping codes. You can transfer trial balance data
into a ProSystem fx Engagement trial balance from any accounting system (i.e.,
QuickBooks, Peachtree, Great Plains, etc.) that can export the data to either an
Excel-readable format or an ASCII file format.
Data you can import includes account numbers, account descriptions, and account balances
(current period and prior periods).
Notes:
§
§
§
To import data to trial balance from Excel, copy the data to the Clipboard and use the
Paste TB Import option as described in the Importing Trial Balance Data from an Excel
or ASCII file on page 7-39.
Before you begin this task, you need to create the trial balance in ProSystem fx
Engagement and set up the necessary columns (i.e., current year columns and prior
year columns).
You must be the Current Editor of the trial balance to convert or import trial balance
data.
7 - 20
Using the Trial Balance
Chapter
7
Importing Data from ProSystem fx Write-Up
Converting ProSystem fx Write-Up client data transfers account numbers, account
descriptions, account balances (current and all prior periods), journal entries, lead codes,
and sublead codes. You have the option to specify the number of prior periods to import.
The option to specify the number of prior periods allows you to modify prior period Write-Up
balances in Engagement and not have those modifications overwritten when balances for
other, more current periods, are imported.
If you are importing data a second time, you are given the option of overwriting or
appending data to the trial balance. Overwriting or appending existing trial balance data
adds duplicate journal entries if the imported data contains journal entries. These journal
entries must be deleted through the Journal Entry Summary dialog.
To transfer data from ProSystem fx Write-Up, do the following:
1. Using one of the following methods, launch the Import Conversion Wizard.
§
§
From the Binder Index View, highlight a trial balance, then select Trial
Balance/Import Conversion Wizard from the main menu.
Open a trial balance in Excel or Word, then select Engagement/Import Conversion
Wizard from the menu.
7 - 21
Chapter
7
Using the Trial Balance
2. Select ProSystem fx Write-Up and click Next. The second dialog of the Import
Conversion Wizard displays.
3. Select the Engagement trial balance into which you intend to transfer data from the
Select Trial Balance drop-down list.
4. In the Select ProSystem fx Write-Up export file (*.xml) field, enter the path to the XML
file to import, or click Browse to locate the ProSystem fx Write-Up data directory and
select the XML file to import.
5. Select the current period from the Select current period drop-down list. The period
choices reflect the data in the XML file. The period selected converts to the current
period in the ProSystem fx Engagement binder, and the prior periods convert into the
prior period columns of the binder.
6. Choose one of the following Chart of Accounts options:
§
§
§
Append. Imports and appends current data to the existing trial balance. Unique
account numbers are appended. Duplicate account numbers are overwritten.
Overwrite. Imports and deletes all existing data and all journal entries and replaces
it with the trial balance data being imported.
Number. Specify how many prior periods to convert, if any.
Overwriting or appending existing trial balance data adds duplicate journal entries if the
ProSystem fx Write-Up company contains journal entries. These journal entries must be
deleted through the Journal Entry Summary dialog.
7. Click Finish to begin the conversion. When the conversion completes, a Summary dialog
displays your selections and information.
8. Click OK to exit the Summary dialog.
7 - 22
Using the Trial Balance
Chapter
7
Notes:
§
§
If accounts do not have descriptions, Engagement creates descriptions during the
import. The description consists of the word Description plus the account number.
Tax journal entries are converted for the current year. However, if the Engagement
binder is set up with interim periods, then prior year tax journal entries are not
converted.
Converting ProSystem fx Trial Balance Data
You can convert ProSystem fx Trial Balance client data from version 2001.a00 or higher.
The conversion transfers account numbers, account descriptions, account balances (current
period and prior periods), journal entries, lead codes, sublead codes, default lead
classifications, and tax codes. Engagement converts the standard ProSystem fx Trial
Balance lead classifications to the equivalent Engagement Account and Ratio
Classifications. See the Engagement Help topic ProSystem fx Trial Balance Conversion
Table for a list of trial balance classifications and their Engagement equivalents.
Reviewing the ProSystem fx Trial Balance Client
Open the client in ProSystem fx Trial Balance. Make note of the following information, so
you choose the correct selections during conversion:
§
§
§
Entity type: C Corporation, S Corporation, Partnership, or Non-Profit Organization.
Fiscal year end and current period end.
Number of periods in the year.
Create the XML file using Work/Create XML Export File. The file is saved in the Avision
directory where your ProSystem fx Trial Balance client data is stored.
Preparing the Client, Binder, and Trial Balance
To prepare for the conversion in ProSystem fx Engagement, you need to do the following:
§
§
Create a client for the client you want to convert. See Creating New Client Folders on
page 5-7 for more information.
Create a binder for the client. See Using the New Binder Wizard on page 6-2 for
details. Set the Period sequence type for the binder to agree with the period type in
the ProSystem fx Trial Balance data.
For example, if you add journal entries and balances on a monthly basis, set up the
Engagement Period Sequence as "monthly." If the ProSystem fx Trial Balance data
has more than one period type, then the prior period balances may have to be
adjusted manually to reflect the correct balances.
Note: Tax Journal Entries that use tax code lines are converted if you
select to Convert Tax Codes during the conversion setup process. The
conversion process adds the lines that are used in the Tax Journal Entries
to the chart of accounts.
§
Create a Trial Balance for the client. See Creating Trial Balances on page 7-8 for more
information. Set up the necessary columns (i.e., current year columns and prior year
columns).
7 - 23
Chapter
7
Using the Trial Balance
Transferring ProSystem fx Trial Balance Data
To transfer data from a ProSystem fx Trial Balance client to a ProSystem fx Engagement
client, do the following:
1. Start the Conversion Wizard.
§
§
From the Binder window, select Trial Balance/Import Conversion Wizard.
From the Trial Balance window, select Engagement/Import Conversion Wizard.
The Import Conversion Wizard displays.
2. Select ProSystem fx Trial Balance and click Next. The second dialog of the Import
Conversion Wizard displays.
3. In the Select Trial Balance field, select the Engagement trial balance to which you want
to transfer the data.
4. In the Select ProSystem fx Trial Balance export file (*.XML) field, browse to the trial
balance data directory and select the XML file you want to import.
5. Select the current period from the drop-down list. Period choices reflect the data in the
XML file. The period selected converts to the current period in the Engagement binder,
and prior periods convert to the prior period columns of the binder.
6. Leave the Convert tax codes box checked to have the tax codes and their descriptions
converted. If this option is selected and there are tax journals entries that use tax code
lines, the tax code lines are added as new accounts in the chart of accounts.
ProSystem fx Engagement requires journal entries to be posted to accounts versus tax
codes. The new accounts are grouped to the corresponding tax codes in the Tax
Grouping List.
7. Select the tax entity from the drop-down list.
8. In the Select tax vendor field, select the tax vendor you use.
7 - 24
Using the Trial Balance
Chapter
7
9. If this is not the first import for this trial balance, select the appropriate radio button:
§
§
Append. Imports and appends the current data to the existing trial balance. This is
the default selection. Unique account numbers are appended, but any duplicate
account numbers are overwritten, and original data is lost.
Overwrite. Imports and deletes all existing data groupings and all journal entries,
and replaces them with the trial balance data you are importing.
10. Check the Convert Default lead classifications box to convert the ProSystem fx Trial
Balance classifications to the equivalent Engagement classes. The program converts the
standard ProSystem fx Trial Balance classifications.
If you have defined your own classes or changed the ProSystem fx Trial Balance
standard classifications, you may not want to convert the lead classifications. To review
classification conversion data, see ProSystem fx Trial Balance Conversion Table in the
Engagement Help file.
11. Click Finish to begin the conversion. When the conversion completes, a Summary dialog
displays, listing your selections and information.
12. Click OK to exit the Summary dialog.
Notes:
§
§
If accounts or codes do not have descriptions, ProSystem fx Engagement creates
descriptions during the import. The description consists of the word Description
plus the account number or code.
Tax journal entries are converted for the current year. However, if the Engagement
binder is set up with interim periods, prior year tax journal entries are not
converted.
7 - 25
Chapter
7
Using the Trial Balance
Account and Ratio Classifications
ProSystem fx Trial Balance
Classifications
Class
Equivalent ProSystem fx
Engagement Account
Classifications
Description
Class
Equivalent ProSystem fx
Engagement Ratio Classifications
Description
Class
Description
001
Current Assets
CA
Current Assets
OCA
Other Current
Assets
025
Property,
Plant, and
Equipment
NA
Non-Current
Assets
FA
Gross Fixed
Assets
050
Long Term
Investments
NA
Non-Current
Assets
ONA
Other
Non-Current
Assets
060
Endowment
Investments
NA
Non-Current
Assets
ONA
Other
Non-Current
Assets
075
Investments in
Affiliates
NA
Non-Current
Assets
ONA
Other
Non-Current
Assets
100
Other Assets
NA
Non-Current
Assets
ONA
Other
Non-Current
Assets
200
Current
Liabilities
CL
Current
Liabilities
OCL
Other Current
Liabilities
220
Long-Term
Liabilities
NL
Non-Current
Liabilities
ONL
Other
Non-Current
Liabilities
240
Capitalized
Lease
Obligations
NL
Non-Current
Liabilities
ONL
Other
Non-Current
Liabilities
260
Deferred
Income Taxes
NL
Non-Current
Liabilities
ONL
Other
Non-Current
Liabilities
280
Other
Long-Term
Liabilities
NL
Non-Current
Liabilities
ONL
Other
Non-Current
Liabilities
300
Equity
EQ
Equity
400
Revenues
REV
Revenues
7 - 26
Using the Trial Balance
ProSystem fx Trial Balance
Classifications
Class
Equivalent ProSystem fx
Engagement Account
Classifications
Description
Class
Chapter
7
Equivalent ProSystem fx
Engagement Ratio Classifications
Description
Class
Description
450
Direct Public
Support
REV
Revenues
475
Indirect Public
Support
REV
Revenues
500
Cost of Goods
Sold
COS
Cost of Sales
OCS
Other Cost of
Sale
550
Program
Services
COS
Cost of Sales
OCS
Other Cost of
Sale
575
Support
Services
COS
Cost of Sales
OCS
Other Cost of
Sale
600
Operating
Expenses
OPX
Operating
Expenses
OOE
Other
Operating
Expenses
700
Other Income
OI
Other Income
OTI
Other Income
750
Other
Expenses
OE
Other
Expenses
800
Income Taxes
— Currently
Payable
OE
Other
Expenses
TAX
Tax Expense
850
Income Taxes
— Deferred
OE
Other
Expenses
TAX
Tax Expense
900
Discontinued
Operations
OE
Other
Expenses
OTE
Other Expense
950
Extraordinary
Items
OE
Other
Expenses
OTE
Other Expense
7 - 27
Chapter
Using the Trial Balance
7
Converting Trial Balance Data from GoSystem Audit
You can convert GoSystem Audit client data from version 3.0 or higher. The conversion
transfers account numbers, account descriptions, account balances (current period and all
prior periods), leadsheet codes, leadsheet subcodes, grouping code 1, grouping code 2,
consolidation codes, and tax codes.
You can also map your existing GoSystem Audit codes to a standard list of grouping codes
set up in ProSystem fx Engagement.
Reviewing the GoSystem Audit Client
Open the client in GoSystem Audit. Make note of the following information, so you choose
the correct selections during conversion:
§
§
§
Entity type: C Corporation, S Corporation, Partnership, or Non-Profit.
Fiscal year end and current period end.
Number of periods in the year.
Preparing the Client, Binder and Trial Balance
To prepare for the conversion in ProSystem fx Engagement, do the following:
1. Create a client for the client you want to convert. See Creating New Client Folders on
page 5-7 for more information.
2. Create a binder for the client. See Using the New Binder Wizard on page 6-2 for
information. Set the current period dates to agree with the current period dates set up in
GoSystem Audit.
Note: If the current period in GoSystem Audit has journal entries, be sure
to select the balance type during conversion that reflects the journal
entries. The conversion does not bring over the detail of the journal
entries. It does bring over the net balance after journal entries.
3. Create a trial balance for the client. See Creating Trial Balances on page 7-8 for more
information.
Set up the necessary columns (i.e., current year columns and prior year columns). Also,
if you choose to map your existing GoSystem Audit grouping codes to a new list of
ProSystem fx Engagement grouping codes, make sure the new list exists in the trial
balance.
Transferring Data from GoSystem Audit
To transfer data from a GoSystem Audit client, do the following:
1. Start the Import Conversion Wizard by doing one of the following:
§
§
From the Binder window, select Trial Balance/Import Conversion Wizard.
From the Trial Balance window, select Engagement/Import Conversion Wizard.
2. Select GoSystem Audit 3.0 or higher and click Next.
7 - 28
Using the Trial Balance
Chapter
7
3. On the Import Conversion Wizard dialog, use the Select Trial Balance field to select the
trial balance to which you want to transfer the data.
4. In the Select GoSystem Audit file (aud32sys.mdb) field, enter the path to the
aud32sys.mdb file, or click Browse to locate the GoSystem Audit directory and select
the aud32sys.mdb file.
Note: You must browse to the program file aud32sys.mdb, not the client MDB
file. The default path to the program file is C:\clr\audit\aud32sys.mdb, or
C:\wincsi\audtsys\aud32sys.mdb.
5. A list of GoSystem Audit clients available for conversion displays. Highlight the
GoSystem Audit client you want to convert.
6. Select the number of prior periods to transfer.
7. In the Select balance type to convert field, select the appropriate balance type to
transfer from the drop-down list. This balance type applies to both current and prior
period amounts.
7 - 29
Chapter
7
Using the Trial Balance
8. Click Next.
9. Select one of the following options:
§
§
Convert all groupings. Converts all of the grouping lists from GoSystem Audit
including lead and sublead codes, grouping code 1, grouping code 2, and
consolidation code.
Convert all groupings and map one. Converts all of the grouping lists from
GoSystem Audit, as listed above, and allows you to map one grouping list in
GoSystem Audit to one existing grouping list in ProSystem fx Engagement.
Tip: This is a good opportunity to update all of your clients to a standard
grouping list. A standard grouping list allows you to create more
workpaper templates (including financial statements) with formulas already
in place. This improves efficiency on engagements and allows you to
easily implement firm standards across all clients.
§
Map to one Engagement grouping. Converts one grouping list in GoSystem Audit
to one existing grouping list in ProSystem fx Engagement. This option does not
convert the other GoSystem Audit grouping lists.
If you choose to map to a grouping list, continue with step 10; otherwise, skip to step
17.
10. In the Select GoSystem Audit grouping to map from field, click the drop-down arrow to
select the appropriate grouping list. The list displays on the left side of the window in
the GoSystem Audit grouping box.
11. In the Select Engagement grouping to map to field, click the drop-down arrow to select
the appropriate grouping list. The list appears on the right side of the window in the
Existing Engagement grouping box.
12. If you or someone else in your firm has already mapped these two grouping lists, you
can import the mapping file. Click Load Mapping From File to import a mapping file that
was saved earlier. Browse to the MDB file and click OK. The mapping of the two
grouping code lists appears in the boxes below.
7 - 30
Using the Trial Balance
Chapter
7
13. If you do not have a mapping file, you need to match the grouping codes on the left side
of the window to the equivalent grouping codes on the right side of the window. You
can do one of the following:
§
§
Select the grouping code on the right, then select the equivalent grouping code on
the left side, then click the arrow pointing to the right.
Select the grouping code on the left and drag it to the equivalent grouping code on
the right.
As you match grouping codes, the codes you map are disabled in the left column.
Notes:
§
§
You do not have to map all of the grouping codes from the left side of the
window. Any accounts assigned to the grouping codes you do not map are
available to map later in the Engagement trial balance. See Account Groupings on
page 7-48 for more information.
You can map more than one grouping code on the left to the same grouping code
on the right.
14. Click the expand (+) button below the Existing Engagement grouping box to expand all
groups so that the subgroups and grouping assignments display. To collapse all entries in
the grouping box to show only subgroups, click the collapse (-) button.
15. To remove a grouping code you have mapped, click the GoSystem Audit grouping code
on the right side of the window and click the arrow pointing to the left. The column is
removed from the list on the right and available for selecting later.
16. Click the Save Mapping to File button to save this mapping of grouping codes. The Save
Mapping dialog displays the default path: C:\Pfx Engagement\WM\Import Mapping. You
can change the path to a network drive, so others in your firm can access it. Accept the
default file name or enter a new one. Click OK. The mapping is saved to an MDB file.
17. Check the Convert tax codes box if you want to convert the GoSystem Audit tax codes
to the equivalent ProSystem fx Engagement tax codes.
18. In the Select tax vendor field, click the drop-down arrow to select the appropriate tax
vendor.
ProSystem fx Engagement provides different tax code lists for each tax vendor. These
lists are customized to the available codes in the tax program. If your tax vendor does
not display on this list, select Other. A tax code list is created. However, we do not
provide support for these other tax lists.
If your tax vendor does appear, select the vendor to receive the customized list.
Note: Any user-defined tax codes you added in your GoSystem Audit client are
converted as a Subgroup in the tax grouping list. The tax code, the tax code
description, and the accounts assigned to the tax code are converted.
The Tax entity field is automatically completed. If Engagement cannot determine the tax
entity, you are prompted to select the entity type yourself.
Note: If the wrong tax entity type appears, verify the entity type selection in
the GoSystem Audit program. Make any necessary corrections there and
continue with the wizard.
7 - 31
Chapter
7
Using the Trial Balance
19. Click Next to open the Chart of Accounts dialog. The chart of accounts information
displays in the spreadsheet window. The first two columns default as Account # and
Description.
20. Click the gray bar at the top of each column to select the appropriate column header
information. The dollar amount columns display in order from most recent period to
oldest period.
You can select any of the available columns. You can only assign one trial balance
column to a column of imported data. Once a trial balance column has been assigned, it
is disabled in the menu.
21. Select one of the following radio buttons:
§
§
Append. Imports and appends the current data to the existing trial balance. This is
the default selection. Unique account numbers are appended, but any duplicate
account numbers are overwritten, and original data is lost.
Overwrite. This function deletes all existing data and any journal entries and
replaces it with the trial balance data you are importing.
Clear the following diagnostics as indicated:
§
§
§
Duplicate account(s). Displayed in blue text. You must replace the duplicate
account number with a unique account number. In the display window, click the
account number you want to change and type the new account number.
Invalid account(s). Displayed in red text. An account number has one or more of
the following invalid characters: ‘ |: “ , ( )*?, or an account description has one of
the following invalid characters: *?. In the display window, click the field you
want to change and enter the change.
Blank description(s). Highlighted in yellow. In the display window, click the cell
that is blank and enter the account description.
7 - 32
Using the Trial Balance
Chapter
7
22. Select the place to round the account balances to in the Round balance to nearest field.
The choices are None, $1, $10, $100, or $1,000.
Note: The account balances are only rounded during the import or conversion.
If you select to round the balances, then you must complete the Select rounding account
field. Click the drop-down arrow to select the appropriate account to post the net
difference to. You can either select an existing account or create a new account. To
create a new account, select Round to New Account from the list.
23. Click Next. A message displays verifying your selection to either append or overwrite
any existing chart of accounts. Click Yes to continue. A message displays stating that
this may take a while to convert. Click OK to begin the conversion or Cancel to return to
the wizard.
24. A Summary dialog opens a listing of the selections and information to be converted to
ProSystem fx Engagement. Click Finish to exit the Summary dialog. The converted trial
balance information displays in the ProSystem fx Engagement trial balance.
Note: Memo accounts are converted. If the memo account has a balance, you
may want to delete the account balance in the current year and prior periods,
so it is not included in the trial balance totals.
You can create an account grouping for the memo accounts and select the Memo
account classification. This allows you to segregate the accounts for reporting purposes.
Converting Data from CaseWare Working Papers 2005 or Higher
You can convert client data from CaseWare Working Papers 2005 or higher. The conversion
transfers account numbers and descriptions, current and prior year balances, account
grouping lists and assignments, and tax grouping lists and assignments.
To import client data from CaseWare Working Papers 2005 or higher into an Engagement
trial balance, do the following:
1. Do one of the following to display the Import Conversion Wizard:
§
§
From the Binder window, select Trial Balance/Import Conversion Wizard.
From the Trial Balance window, select Engagement/Import Conversion Wizard.
7 - 33
Chapter
7
Using the Trial Balance
2. Select CaseWare Working Papers 2005 or higher and click Next. The next screen of the
Import Conversion Wizard displays, as shown below.
3. Use the Engagement trial balance drop-down list to select the Engagement trial balance
into which you are importing data.
4. In the CaseWare client file field, enter the CaseWare client file (extension .ac) that
contains the entity you are importing, or click Browse to select the client file.
Important: Compressed CaseWare client files (extension .ac_) are not
accepted.
5. Select the entity to import from the CaseWare entity drop-down list.
6. Select the period sequence in the CaseWare entity from the Period sequence drop-down
list. Only period sequences supported by ProSystem fx Engagement display in the list.
These include the following:
§
§
§
§
Monthly
Quarterly
Semi-annual
Annual
Note: Annual is listed for both Independent and Calculated period sequence
settings in CaseWare.
Tip: If the selected entity does not contain a period sequence type that is
supported in ProSystem fx Engagement, then either select another entity or add
a Yearly period sequence in CaseWare and compute the balance from the
unsupported sequence.
7. Select the period in the CaseWare entity to import into the current period of Engagement
from the Current period drop-down list. All period dates available in the current year of
the selected CaseWare entity display in the list.
7 - 34
Using the Trial Balance
Chapter
7
8. From the Current period balance type drop-down list, select the CaseWare balance type
to import. The balance types include Unadjusted, Adjusted, Final, or Tax.
Note: This selection applies to the current period balances. All balance types
are imported for the prior periods.
9. Choose whether to append or overwrite the chart of accounts and balances.
Note: If you select Overwrite, existing journal entries in the Engagement trial
balance are removed.
10. In the Round balance to nearest drop-down list, accept the default of None or select a
value to round the balances to.
11. If you selected an option other than None in step 10, you must select an account to post
the rounding difference to. In the Select rounding account drop-down list, select an
existing account, or select Round to new account to create a new account.
12. If you selected Round to new account, the Add Rounding Account dialog displays. Enter
the account number and description in the appropriate fields, and then click OK.
13. To create a tax grouping list and convert the CaseWare tax code assignments, select the
Convert tax groupings check box and do the following:
a. Select the tax vendor you may send the tax balances to from the Tax vendor
drop-down list.
b. Select the tax entity type of the client from the Tax entity drop-down list.
c. Select the tax year for the current year of the client from the Tax year drop-down
list.
14. Click Next. The next screen of the Import Conversion Wizard displays.
15. Select one of the following options:
§
§
§
Convert all CaseWare groupings. This will convert all of the grouping lists from the
CaseWare file.
Convert all CaseWare groupings and map to one Engagement grouping. This will
convert all of the grouping lists from CaseWare, as listed above, plus allow you to
map one grouping list in CaseWare to an existing grouping list in the Engagement
trial balance.
Map to one Engagement grouping. This will convert one grouping list in CaseWare
to one existing grouping list in the Engagement trial balance. This option will not
convert the other CaseWare grouping lists.
Note: These conversion options are for non-tax grouping lists.
16. If you accept the default selection, Convert all CaseWare groupings, click Finish to begin
the import process. When the import is complete, the Summary screen displays. Click
OK to close the wizard.
If you select Convert all CaseWare groupings and map to one Engagement grouping or
Map to one Engagement grouping, continue to step 17.
17. In the Select CaseWare grouping drop-down list, select the CaseWare grouping list to
map from.
7 - 35
Chapter
Using the Trial Balance
7
18. In the Select Engagement grouping drop-down list, select the Engagement grouping list
to map to.
19. If you or someone else in your firm has already mapped these two grouping lists, then
you can import the mapping file. Click Load Mapping From File to import a mapping file
that was saved earlier. Browse to the MDB file and click OK. At the bottom of the
dialog, you will see the mapping of the two grouping code lists.
20. If you do not have a mapping file, you need to match the grouping codes on the left side
of the dialog to the equivalent grouping codes on the right. Drag the grouping code on
the left to the equivalent grouping on the right, or select both groupings and click the
right-pointing arrow.
Note: You do not have to map all of the grouping codes from the left side of
the window. Any accounts assigned to the grouping codes that you do not
map will be available to map later in the ProSystem fx Engagement trial
balance. Also, you can map more than one grouping code on the left to the
same grouping code on the right.
21. To remove a grouping code that you have mapped, click the CaseWare grouping code on
the right and click the left pointing arrow. The column will be removed from the list on
the right and available for selecting later.
22. Click Save Mapping to File to save this mapping of grouping codes. The Save Mapping
dialog displays with the default path of C:\Pfx Engagement\WM\Import Mapping. You
can change the path to a network drive, if desired. Click OK to save the mapping to a
file with the extension .mdb.
23. Click Finish. The Summary screen displays.
24. Click OK to close the Summary screen.
Converting Trial Balance Data from ATB for Windows
You can convert ATB client data from the Windows version 3.04. The conversion transfers
account numbers, account descriptions, and account balances (current period and prior
periods).
Reviewing the ATB For Windows Client
Open the client in ATB for Windows. Verify the following information, so you make the
correct selections during conversion:
§
§
Entity type
Fiscal year end
7 - 36
Using the Trial Balance
Chapter
7
Preparing the Client, Binder, and Trial Balance
To prepare for the conversion in ProSystem fx Engagement, you need to do the following:
§
§
Create a client for the client you want to convert. See Creating New Client Folders on
page 5-7 for more information.
Create a binder for the client. See Using the New Binder Wizard on page 6-2 for more
information. Set the current period dates to agree with the current period dates set
up in ATB.
Note: If the current period in ATB has journal entries, the conversion
process does not carry over the detail of the journal entries. It does bring
over the net balance from ATB, and you can select to have that shown as
the Unadjusted or Other Imported Balances in Engagement.
§
Create a trial balance for the client. See Creating Trial Balances on page 7-8. Set up
the necessary columns (i.e., current year columns and prior year columns).
Transferring Data from ATB For Windows
To transfer data from an ATB for Windows client into a ProSystem fx Engagement trial
balance, follow these steps:
1. To start the Conversion Wizard, do one of the following:
§
§
§
From the Binder window, select Trial Balance/Import Conversion Wizard.
From the Trial Balance window, select Engagement/Import Conversion Wizard.
From within an Excel or Word workpaper, select Engagement/Import Conversion
Wizard.
The Import Conversion Wizard displays.
2. Select ATB for Windows and click Next to open the Import Conversion Wizard - Client
dialog.
3. In the Select Trial Balance field, click the down arrow and select the trial balance you
want to transfer to.
7 - 37
Chapter
7
Using the Trial Balance
4. In the Select ATB for Windows file (*.atb) field, select the company data to import. The
company information displays in the box.
5. Select the number of prior periods you want to transfer from ATB to Engagement from
the Number of prior periods drop-down list and click Next to open the Import Conversion
Wizard - Grouping dialog.
6. The Select Account Grouping(s) box displays a list of account groupings. Select
individual groups to convert or use the Select All button to select them all. Use the
Unselect All button to unselect all groups selected for conversion.
7. Click Next and the chart of accounts information displays in the spreadsheet window.
The first two columns default as Account # and Description. Click the gray bar at the
top of each column and select the appropriate column header information.
You can select any of the available columns. You can only assign one trial balance
column to a column of imported data. Once a trial balance column has been assigned, it
is disabled in the menu.
7 - 38
Using the Trial Balance
Chapter
7
8. Select one of the following radio buttons, if applicable:
§
§
Append. Imports and appends the current data to the existing trial balance. This is
the default selection. Unique account numbers are appended, but any duplicate
account numbers are overwritten, and original data is lost.
Overwrite. This function deletes all existing data and any journal entries and
replaces it with the trial balance data you are importing.
9. Clear the following diagnostics as indicated:
§
§
§
Duplicate account(s). Displayed in blue text. You must replace the duplicate
account number with a unique account number. In the display window, click the
account number you want to change and type the new account number.
Invalid account(s). Displayed in red text. An account number has one or more of
the following invalid characters: ‘ |: “ , ( )*?, or an account description has one of
the following invalid characters: *?. In the display window, click the field you
want to change and type the change.
Blank descriptions. Highlighted in yellow. In the display window, click the cell that
is blank and type the account description.
10. Select the place to round the account balances to in the Round balance to nearest field.
The choices are: None, $1, $10, $100, or $1,000. This option rounds each account
balance up or down to the level of rounding selected.
Note: The account balances are only rounded during the import or conversion.
11. If you choose to round the balances in the step above, then you must complete the
Select rounding account field. Click the drop-down arrow to select the appropriate
account to post the net difference to. You can either select an existing account or create
a new account. To create a new account, select Round to New Account from the list.
12. Click Next. A message displays that verifies your selection of appending or overwriting
any existing chart of accounts. Click Yes to continue. A message displays stating that
this may take awhile to convert. Click OK to begin the conversion or Cancel to return to
the wizard.
13. A Summary dialog opens a listing of the selections and information to be converted to
ProSystem fx Engagement. Click Finish to exit the Summary dialog. The converted trial
balance information displays in the ProSystem fx Engagement trial balance.
Importing Trial Balance Data from an Excel or ASCII File
You can transfer trial balance data from any accounting system (e.g., QuickBooks,
Peachtree, Great Plains, etc.) that can export the data to an Excel-readable format or an
ASCII file into a ProSystem fx Engagement trial balance. Data you can import includes
account numbers, account descriptions, and account balances (current period and prior
periods).
7 - 39
Chapter
Using the Trial Balance
7
Preparing Accounting System Information
ProSystem fx Engagement requires the following columns from the accounting system:
§
§
Account number
Account description
In the accounting system that you are working with, generate a trial balance with the setup
you want to export. If there is an option to export the data into a spreadsheet, Lotus 1-2-3,
or Excel file, use that. Otherwise, save it as an ASCII file using an export, save as, or print
to file command. See the documentation from that accounting system for instructions.
Preparing the Exported Trial Balance
Before you import the trial balance data into ProSystem fx Engagement, you must format it
so that it can be read by Engagement. Open the file in Excel or a text editor and follow
these instructions:
§
§
§
§
§
§
Put account numbers in contiguous rows. The easiest method is to highlight the
entire trial balance and sort it by account number in ascending order. See the Excel
user’s manual and help for information.
Remove any page breaks and rows used as separators, headings, and subtotals.
Verify that all account numbers are unique.
Note which columns contain which type of information. For example, the third
column is the current year unadjusted and the fourth column is the prior period
balance, etc.
Check for errors in the data.
Verify that the debits and credits are in one column. The credits should be
differentiated with a minus sign (-) or in brackets.
Preparing the Client, Binder, and Trial Balance
To prepare for the conversion in ProSystem fx Engagement, do the following:
§
§
§
Create a client for the client you want to convert. See Creating New Client Folders on
page 5-7 for more information.
Create a binder for the client. See Using the New Binder Wizard on page 6-2 for more
information.
Create a trial balance for the client. See Creating Trial Balances on page 7-8. Set up
the necessary columns (i.e., current year columns and prior year columns).
Using the Conversion Wizard to Import an ASCII File
To transfer data from an ASCII file into a ProSystem fx Engagement client, do the following:
1. To start the Conversion Wizard, do one of the following:
§
§
From the Binder window, select Trial Balance/Import Conversion Wizard.
From the Trial Balance window, select Engagement/Import Conversion Wizard.
The Import Conversion Wizard - Import Source dialog displays.
7 - 40
Using the Trial Balance
Chapter
7
2. Select ASCII Text file and click Next to open the Import Conversion Wizard - Import File
dialog.
3. In the Select Trial Balance field, click the down arrow and select the trial balance you
want to transfer the data to.
4. In the Select ASCII Text file (*.txt) field, browse to the text file for the client data.
5. Select either Comma delimited or Tab delimited.
6. Select the Number of prior periods the text file contains. The selection here determines
how many columns are read in the text file. Click Next.
7. The chart of accounts information displays in the spreadsheet window.
Click the gray bar at the top of each column and select the appropriate column header
based on the following information:
§
§
§
Define the account numbers, account descriptions, and current period balances
from the current list.
Define the prior period balances from the appropriate comparative lists.
If you do not want to transfer a column to the trial balance, do not select the
column header.
7 - 41
Chapter
7
Using the Trial Balance
You can select any of the available columns. You can assign only one trial balance
column to a column of imported data. Once a trial balance column has been assigned, it
is disabled in the menu.
8. Select one of the following radio buttons, if applicable:
§
§
Append. Imports and appends the current data to the existing trial balance. This is
the default selection. Unique account numbers are appended, but any duplicate
account numbers are overwritten, and original data is lost.
Overwrite. This function deletes all existing data and any journal entries and
replaces them with the trial balance data you are importing.
9. Clear the following diagnostics as indicated:
§
§
§
Duplicate account(s). Displayed in blue text. You must replace the duplicated
account number with a unique account number. In the display window, click the
account number you want to change and type the new account number.
Invalid account(s). Displayed in red text. An account number has one of the
following invalid characters: ‘ |: “ , ( )*?, or an account description has one of the
following invalid characters: *?. In the display window, click the field you want to
change and type the change.
Blank descriptions. Highlighted in yellow. In the display window, click in the cell
that is blank and type the account description.
10. Select the place to round the account balances to in the Round balance to nearest field.
The choices are: None, $1, $10, $100, or $1,000. This option rounds each account
balance up or down to the level of rounding selected.
Note: The account balances are only rounded during the import or conversion.
11. If you choose to round the balances in step 10, you must complete the Select rounding
account field. Click the drop-down arrow to select the appropriate account to post the
net difference to. You can either select an existing account or create a new account. To
create a new account, select Round to New Account from the list.
12. Click Next. A message displays verifying your selection to either append or overwrite the
existing chart of accounts. Click Yes to continue. A message displays stating that this
may take awhile to convert. Click OK to begin the conversion or Cancel to return to the
wizard.
13. A Summary dialog opens, listing the selections and information to be converted to
ProSystem fx Engagement. Click Finish to exit the Summary dialog. The converted trial
balance information displays in the ProSystem fx Engagement trial balance.
Using the Paste TB Import Option to Import an Excel File
To transfer data from an Excel file into a ProSystem fx Engagement client without using the
wizard, do the following:
1. Open the ProSystem fx Engagement trial balance or any Excel workpaper in the binder.
2. In Excel, select Tools/Options/Windows in Taskbar.
3. Open the prepared export trial balance in Excel.
7 - 42
Using the Trial Balance
Chapter
7
4. Highlight the cells as follows:
§
§
Start at the first row with account information, and highlight down to the last row
with account information. Do not highlight heading and total rows.
Highlight across to the last column of data to import. You can include blank
columns or other columns you do not want added to the trial balance. When you
map the columns to the trial balance, do not map the columns you do not want to
import.
Note: You should not have any blank rows.
5. Select Edit/Copy or right-click the information and select Copy from the pop-up menu.
6. Switch to the trial balance or Excel workpaper and perform one of the following:
§
§
§
Select Edit/Paste TB Import.
Right-click in the trial balance and select Paste TB Import from the pop-up menu.
Click the Paste TB Import toolbar button.
7. The chart of accounts information displays in the spreadsheet window.
Click the gray bar at the top of each column and select the appropriate column header
based on the following information:
§
§
§
Define the account numbers, account descriptions and current period balances
from the "current" list.
Define the prior period balances from the appropriate "comparative" lists.
If you do not want to transfer the column in the trial balance, do not select a
column header.
You can select any of the available columns. You can only assign one trial balance
column to a column of imported data. Once a trial balance column has been assigned, it
is disabled in the menu.
7 - 43
Chapter
7
Using the Trial Balance
8. Select one of the following radio buttons:
§
§
Append. Imports and appends the current data to the existing trial balance. This is
the default selection. Unique account numbers are appended, but any duplicate
account numbers are overwritten, and the original information is lost.
Overwrite. This function deletes all existing data and any journal entries, and
replaces it with the trial balance data you are importing.
9. Clear the following diagnostics as indicated:
§
§
§
Duplicate account(s). Displayed in blue text. You must replace the duplicate
account number with a unique account number. In the display window, click the
number you want to change and type the new account number.
Invalid account(s). Displayed in red text. An account number has one or more of
the following invalid characters: ‘ |: “ , ( )*?, or an account description has one of
the following invalid characters: *?. In the display window, click the field you
want to change and type the change.
Blank descriptions. Highlighted in yellow. In the display window, click the cell that
is blank and enter the account description.
10. Select the place to round the account balances to in the Round balance to nearest field.
Note: The account balances are only rounded during the import or conversion.
11. If you choose to round the balances, you must complete the Select rounding account
field. Click the drop-down arrow to select the appropriate account to post the net
difference to. You can select an existing account or create a new account. To create a
new account, select Round to New Account from the list.
12. Click Next. A message displays verifying your selection to append or overwrite any
existing chart of accounts. Click Yes to continue. A message displays stating that this
may take awhile to convert. Click OK to begin, or click Cancel to return to the wizard.
13. A Summary dialog opens, listing the selections and information to be converted to
ProSystem fx Engagement. Click the Finish to exit the Summary dialog. The converted
trial balance information displays in the ProSystem fx Engagement trial balance.
Importing Data from an Engagement Trial Balance
To import trial balance data from an existing ProSystem fx Engagement trial balance, do the
following:
1. Open the trial balance to import data to.
2. Select Engagement/Import from Engagement TB.
3. Select the client name, binder, and trial balance from which to import. These fields are
required.
4. If necessary, check the Import current period balance box and select the current period
balance type to import.
5. If necessary, check the Import prior period balance box and select the prior period
balance type to import.
7 - 44
Using the Trial Balance
Chapter
7
6. If you checked Import current period balance, Import prior period balance, or both,
choose whether to append or overwrite the data.
7. If you have previously imported trial balance data from the source trial balance, the
Import status based on last binder synchronization section displays the date and time of
the last import, the date and time that the source binder was last synchronized, and the
status of the source binder. Click Check for Source TB Changes to determine whether
any changes exist between the source trial balance and the target trial balance.
8. Click OK.
Checking for Changes to the Source Trial Balance
You can check for differences between a source Engagement trial balance and a target
Engagement trial balance after you have imported data from one to the other. To check for
changes, do the following:
1. From the Binder window, select Trial Balance/Check for Source TB Changes, or click the
Check for Source TB Changes icon.
2. If more than one trial balance exists in the binder, the Select Target Trial Balance dialog
displays. Select the target trial balance and click OK.
3. The Import from Engagement TB Log File displays. Only accounts with balance
differences are shown in the log file.
Note: If no differences between the source trial balance and the target trial
balance are detected, a message displays. The log file does not display if there
are no differences.
Adding, Modifying, or Deleting Trial Balance Accounts
You can add new accounts to a trial balance. You can also modify or delete accounts that
you have imported or manually entered into the trial balance. Within the trial balance, you
can modify the description and balance information for the current and prior periods. When
you delete an account, you remove it from the trial balance along with the balances and
journal entries applied to that account.
Notes:
§
§
Deleting an account in the trial balance causes any TB links from that account
number to a workpaper to fail. This may result in invalid data in the workpaper.
You must be the Current Editor of the trial balance in order to add, modify, or delete
trial balance accounts.
7 - 45
Chapter
7
Using the Trial Balance
Adding Accounts
To add an account to a trial balance, use the Chart of Accounts window.
1. To open the Chart of Accounts window, do one of the following:
§
§
From the Binder window, select Trial Balance/Chart of Accounts.
From the trial balance window, select Engagement/Chart of Accounts.
The existing account numbers, account descriptions, and account balances are displayed
in the window for the selected trial balance and balance type.
2. In the Trial balance field, click the down arrow and select the trial balance you want to
add the account to.
3. In the Period and balance fields, click the down arrows and select the balance type and
period you would like to display for the existing accounts and the balance you would like
to add for the new account.
4. Click Add Account. A blank row is added after the last account.
5. Enter the information you want for each new account. Use the d and
your mouse to select the cell where you are entering information.
§
§
§
a keys or
In the Account field, type the account number. This can be an alphanumeric value.
Do not use the following invalid characters in your account number: ’ | : “ , ( ) *
?.
In the Description field, type a description for the account. Do not use the
following invalid characters in your account description: * ?.
In the Balance column, type the balance amount for the account as follows:
— Enter debits as positive amounts.
— Enter credits as negative amounts. You can enter the minus sign (-) before or
after the number.
— If you do not want to enter a balance, leave the field blank.
6. When you are finished, click Close. The new account is added to the trial balance.
7 - 46
Using the Trial Balance
Chapter
7
Modifying Accounts
You can modify trial balance accounts in two ways: TB Edit Mode and Chart of Accounts
window. The first method, TB Edit Mode, is the quickest and easiest method.
The TB Edit Mode
Follow these steps to modify account information:
1. Open the trial balance.
Note: Trial balances created with a version of Engagement prior to 6.0 must be
converted to Microsoft SQL Server database files. Select
Start/Programs/Engagement/Utilities, click Trial Balance Conversion Wizard, and
follow the instructions in the wizard.
2. Perform one of the following actions. These actions enable and disable the edit mode.
The editable fields become highlighted when the mode is on.
§
§
Select Engagement/TB Edit Mode.
Click the TB Edit Mode toolbar button.
3. Change the highlighted fields as needed. You can change:
§
§
§
§
§
Account number. The following are invalid characters and cannot be used in the
account number: ‘| : “ , ( ) * ?.
Account description. The following are invalid characters and cannot be used in
the account description: * ?.
Account balance – current period: unadjusted amount; beginning balance amount
with write up trial balances.
Account balance – prior periods: any balance type.
Workpaper references.
The trial balance should equal zero (0) after you have made your dollar amount changes.
4. Click the TB Edit Mode button again to disable the edit mode. To protect data integrity,
the edit mode automatically disables if you click any of the trial balance functions in
Excel.
Chart of Accounts Window
The second method of modifying account information is to use the Chart of Accounts
window.
1. Open the Chart of Accounts window as follows:
§
§
From the Binder window, select Trial Balance/Chart of Accounts.
From the trial balance window, select Engagement/Chart of Accounts.
The window displays the existing account numbers, account descriptions, and account
balances for the trial balance, and the balance type selected.
2. In the Trial balance field, click the down arrow and select the trial balance you want to
modify.
7 - 47
Chapter
7
Using the Trial Balance
3. In the Period and balance type fields, click the down arrows and select the balance type
and period to display for the existing accounts.
4. Click the cell you want to modify and type the change. You can change the following:
§
§
§
Account number. This can be an alphanumeric value. All other entries, including
the special characters ' | : " , ( ) * ? are invalid.
Account description. The following are invalid characters and cannot be used in
the account description: * ?.
Account balance. Enter negative numbers with a minus ( - ) sign before or after
the number. The field may be left blank. Zero (0) is a valid entry.
5. When finished, click Close. The account modifications are made to the trial balance.
Deleting Accounts
To delete a trial balance account, follow these steps:
1. Open the Chart of Accounts window as follows:
§
§
From the Binder window, select Trial Balance/Chart of Accounts.
From the Trial Balance window, select Engagement/Chart of Accounts.
Existing account numbers, descriptions, and balances for the trial balance and balance
type selected are displayed.
2. In the Trial balance field, click the down arrow and select the trial balance you want to
delete the account from.
3. Click the account row you want to delete and click the Delete Account button. A
confirmation message displays.
Important: This process is irreversible. Deleting an account in the trial balance
causes workpapers that contain TB links to the account to fail.
4. Click Yes to confirm the deletion and then click Close. The trial balance is updated to
remove the account and any balances and journal entry amounts applied to it.
Account Groupings
This section shows how to create account groups and subgroups and assign accounts to
them. You can also assign classifications to the groups and subgroups. The classifications
help further define the accounts to calculate net income or loss and to calculate ratios.
Account groupings enable you to summarize account balances. For example, in an audit,
you may want to summarize account balances by leadsheet and financial statement
categories. In a tax engagement, you may want to summarize account balances by tax
return line.
If you create a trial balance from a template or another trial balance, it may already have
account groupings. You may have also converted your groupings from another trial balance
package in ProSystem fx Engagement. You can add, change, or remove account groupings
as needed if you are the Current Editor of the trial balance.
7 - 48
Using the Trial Balance
Chapter
7
You can create as many grouping lists or groups and subgroups within a grouping list, as
you need. You can also assign classifications to the groups and subgroups. The
classifications help to define the accounts to calculate net income or loss and to calculate
ratios.
There are two levels to account groupings:
§
§
Account groups such as Receivables.
Account subgroups such as Gross Accounts Receivable and Allowances for Doubtful
Accounts. Subgroups are nested in groups.
You can link the totals of either of these two levels to your workpapers or financial
statements. For example, you may have a group for Inventory and subgroups for Raw
Materials, Finished Goods, and Work-in-Process.
The most common type of grouping is a financial statement grouping, where you have a
group for each financial statement line item and subgroups for amounts disclosed in
supplemental schedules or the footnotes. You can use this same grouping list to generate
your leadsheet reports. (See Creating Trial Balance Reports on page 7-66.) You may have
additional grouping lists for supplemental schedules or other reports or workpapers you
want to automate.
Standard tax grouping lists are available for ProSystem fx Tax C-Corporations (1120),
S-Corporations (1120S), Partnerships (1065), and Exempt Organizations (990) for the years
2006 through 2007, and for Individual (1040) for the years 2005 through 2007. You can
also import your pre-existing grouping lists which you created in previous versions of
Engagement. Depending on the type of entity, you group your accounts into the
corresponding grouping list. You then export the grouped account balances to your tax
software. When you create or import tax grouping lists, you have the opportunity to specify
whether to send data from accounts grouped to this group to ProSystem fx Tax. See Using
the Tax Software Interface on page 7-91 for information.
If you plan to import trial balance data into ProSystem fx Profit Driver, you must use a
special account grouping list that is available for import into the trial balance. This grouping
list matches Profit Driver line items. See Using the ProSystem fx Profit Driver Interface on
page 7-110 for more information.
Important:
§
§
§
§
To remove groups from tax grouping lists, use the Add or Remove Tax Group Utility.
Once a group has been removed, it can be added back to the grouping list using the
same utility. See Using the Add or Remove Tax Group Utility on page 7-57 for more
information.
In order to ensure that trial balance data is imported correctly into ProSystem fx Profit
Driver, you should not add, modify, or delete groups in the Profit Driver grouping
lists.
You should not add or delete subgroups or change a subgroup index number,
although you can change a subgroup description. See Modifying a Profit Driver
Account Grouping List on page 7-112 for details.
Tax Group index numbers and descriptions cannot be modified.
7 - 49
Chapter
Using the Trial Balance
7
Opening the Account Groupings Window
To create grouping lists, account groups, and account subgroups, and assign accounts to
the groups, use the Account Groupings dialog. To open the Account Groupings dialog, do
one of the following:
§
§
From the Binder window, select Trial Balance/Account Groupings.
From the trial balance window, select Engagement/Account Groupings, or click the
Account Grouping button on the Engagement toolbar.
Creating, Editing, and Deleting Grouping Lists
Grouping Lists contain groups and subgroups, which are used to organize accounts. You
can have as many grouping lists as you want and as many groups and subgroups within a
grouping list. If you are the Current Editor of the trial balance, you can create, delete,
change, rename, create a copy, import, export account groupings, and select eligible tax
grouping lists for Schedule M-3 expanded processing. The following section highlights these
functions.
1. Open the trial balance whose grouping lists you want to create, edit, or modify.
2. Open the Account Groupings dialog by selecting Trial Balance/Account Groupings in the
Binder window, or Engagement/Account Groupings in the Trial Balance window.
3. Click the Options button to the right of the Grouping List drop-down menu. All available
grouping lists associated with the trial balance display in the Grouping List Options
dialog.
7 - 50
Using the Trial Balance
Chapter
7
The following list provides a brief description of the functions in this dialog:
§
§
§
§
§
§
New. Creates a new grouping list. Type the new grouping list name in the
corresponding blank field. You can build a grouping list from scratch with this
option.
Rename. Double-click a group in the list or click Rename to enter Edit mode. Make
changes to the name as needed, and then press a to save your changes. Press
c to cancel your changes.
Create Copy. Highlight a grouping and select the Create Copy button to save a
copy. This creates a duplicate grouping list. Click the Rename button to make
changes as needed, and then press a to save the changes.
Delete. Highlight a grouping and click Delete to remove the grouping list. A
confirmation message displays. Click OK to confirm the deletion. Any links you
have made from the trial balance to this grouping list become invalid upon
deletion. However, deleting a grouping list removes it only from the trial balance,
not from other saved locations.
Export. Highlight a grouping and select the Export button. This function enables
you to export a grouping list so it can be used by another staff member or in
another trial balance. Select the path and file name from the Save As group box.
An AZG extension is automatically appended to the file. Other staff members
must save it in the directory noted in the Templates tab of the Tools/Options
dialog.
Import. Displays the Open dialog with the default directory path used for Account
Grouping Templates set up in the Tools/Options/Templates dialog. To import a
template, select the appropriate path and file and click Open. Four default folders
are set up in the Account Groupings Templates folder:
— Account Class. Three default templates are available for ratios and balances.
— Financial Statements. Twelve default templates are available by industry.
— Profit Driver. Two default templates are available: General (Sample Binder) and
General. If you choose the sample binder template and are using a trial balance
based on the sample binder, accounts are automatically grouped within the
groups and subgroups in the grouping list. The groups and subgroups link to
main and detail line items in Profit Driver.
— Tax. There are subfolders for ProSystem fx Tax, GoSystem Tax, and Lacerte.
The ProSystem fx Tax folder is further subdivided into folders for 2002 through
2007. Within each of the first four years are four standard tax lists: YYYY
C-Corp Form 1120-ProSystem.AZG, YYYY Exempt Org Form
990-ProSystem.AZG, YYYY Partnership Form 1065-ProSystem.AZG, and
YYYY S-Corp Form 11205-ProSystem.AZG. In the subfolder for 2005, YYYY
Individual Form 1040-ProSystem.AZG is also included. For 2006 and 2007, the
tax groupings are named YYYY C-Corp-ProSystem fx Tax.azg, 2006 Exempt
Org-ProSystem fx Tax.azg, 2006 Individual-ProSystem fx Tax.azg, 2006
Partnership-ProSystem fx Tax.azg, and 2006 S-Corp-ProSystem fx Tax.azg.
When you import 2004 or later ProSystem fx Tax grouping lists, you have the
option to send this tax grouping information to ProSystem fx Tax when you
edit the group or subgroup. There are also customized tax lists for each
supported tax vendor. The customized lists provide specific codes that link to
the tax software.
7 - 51
Chapter
7
Using the Trial Balance
4. To organize the grouping list, you can use the Up and Down arrows to move a grouping
list to the order desired.
5. Select the Sch. M-3 box for any eligible tax grouping list for expanded processing.
Notes:
§
§
§
§
You must be the Current Editor to select tax groups for expanded M-3 processing.
If you are not the Current Editor, the Sch. M-3 and Year fields are not created.
Only one tax grouping list can be selected for expanded processing. If a second
record is selected, a message notifies you that the previously selected M-3
grouping list will be replaced by the current selection.
Changing the Sch. M-3 selection for a trial balance configured for Dynalink
disables Quiklink until the Dynalink process is run in ProSystem fx Tax.
Changing the Sch. M-3 selection for a trial balance configured for Dynalink
disables the ability to transfer desktop updates to the tax return until the Dynalink
process is run in ProSystem fx Tax.
6. Click Close to save your changes to the trail balance's grouping lists.
Notes:
§
§
The detail codes provided with the tax vendor-specific grouping lists are numbered
with two-digit numeric extensions. The detail codes are not consecutive because
some vendors do not support all the detail codes we provide. The list you see for
your tax vendor is customized to meet the detail codes allowed by that vendor. If
you want to add your own detail codes to flow to the appropriate tax lines (i.e.,
Other deductions), you can add a subgroup code under the main tax code.
The groups provided in the ProSystem fx Profit Driver template grouping list map
to the main line items in Profit Driver. The subgroups correspond to the detail line
items in Profit Driver. Groups and subgroups should not be added or deleted in
ProSystem fx Engagement. Index numbers should not be changed.
Creating and Editing Groups and Subgroups
This section explains how to create, rename, and delete account groups and subgroups.
Creating New Groups and Subgroups
To create new groups and subgroups, do the following:
1. In the Account Groupings window, select the trial balance where you want to add the
new groups and subgroups.
2. Select the grouping list in which you want to add the groups and subgroups.
7 - 52
Using the Trial Balance
Chapter
7
3. Click Advanced. The Group and Subgroup Classifications dialog displays.
The account groups are listed on the left side of the window. The plus sign (+) to the
left of the account group index number indicates there are account subgroups for this
account group. Click the account group and the corresponding account subgroups are
listed on the right side of the window.
Important:
§
§
To remove groups from tax grouping lists, use the Add or Remove Tax Group
Utility. Once a group has been removed, it can be added back to the grouping list
using the same utility. See Using the Add or Remove Tax Group Utility on page
7-57 for more information.
You should not add, modify, or delete groups in Profit Driver grouping lists. In
addition, you should not add or delete subgroups or modify a subgroup index
number. However, you can change a subgroup name. (See page 7-112 for
details.)
4. To create a new group or subgroup, do one of the following:
§
§
With the cursor positioned on the left side of the window for a group or the right
side of the window for a subgroup, click the New button.
Double-click <new> in the last row of the list.
5. Type the index number for the group or subgroup and press d or a to advance to
the next cell. Do not use the following invalid characters: ‘ | : “ , ( ).
6. Enter the Description for the group or subgroup and press
next cell.
d or a to advance to the
7. The Account Classifications (AccClass) and Ratio Classifications (RatioClass) are
optional. Click the down arrow in the AccClass cell. The available classifications are
listed. You cannot add, delete, or modify this list directly from this field. However, you
can view or modify the account classifications by clicking Classifications to open the
Classifications dialog (see step 9 of this procedure.)
7 - 53
Chapter
7
Using the Trial Balance
These classifications are used to breakdown balances and calculate net income or loss
for the period. The default descriptions are shown below. Any new account
classifications you created are also listed.
CA - Current Assets
NA - Non-Current Assets
CL - Current Liabilities
NL - Non-Current Liabilities
EQ - Shareholder's Equity
REV - Revenues
COS - Cost of Sales
OPX - Operating Expenses
OI - Other Income
OE - Other Expenses
MEM - Memo Accounts
After the Account Groupings dialog is closed, the QuickView option displays the
balances broken down by assets, liabilities and equity, revenue, expenses, and net
(income) loss.
To open the QuickView dialog, do one of the following:
§
§
From the Binder window, select Trial Balance/QuickView.
From the Trial Balance window, select Engagement/QuickView.
Select the applicable trial balance, grouping list, and balance type and the balances for
the assets, liabilities and equity, revenue, expenses, and net income display.
Note: In a write up trial balance, the net income or loss is posted to the
retained earnings account during the roll forward process at year end.
The account classifications can be used in formulas for TB links to Word and Excel
workpapers when using the Insert TB Link feature.
8. Click the down arrow in the RatioClass cell. The available classifications are listed. You
cannot add, delete, or modify this list directly from this field.
§
§
If you selected an AccClass in the previous cell, the list of ratio classifications is
filtered to those that are applicable to that choice.
If you did not select an AccClass in the previous cell, the whole list of available
ratio classifications displays.
7 - 54
Using the Trial Balance
Chapter
7
The ratio classifications are dependent upon the account classifications. You can make
your selections from left to right to filter the ratio classifications. You can also make
your selections from right to left to display the account classification automatically, or
select the account classification and leave the ratio classification blank.
If there are any subgroups, the classifications default based on the selections made at
the group level. You can change the default classifications at the subgroup level.
The ratio classifications can be used in formulas for TB links to Word and Excel
workpapers. The ratio classifications include the following:
AD - Accumulated Depreciation
AP - Accounts Payable
AR - Trade Receivables
CS - Credit Sales
DEE - Depreciation Expense
DES - COS-Depreciation
FA - Gross Fixed Assets
INE - Interest Expense
INI - Interest Income
INV - Inventory
LTD - Long-Term Debt
MA - Memo Accounts
OCL - Other Current Liabilities
OCS - Other Cost of Sales
OE - Other Shareholder's Equity
ONA - Other Non-Current Assets
ONL - Other Non-Current Liabilities
OOE - Other Operating Expenses
OS - Other Sales
OTE - Other Expense
OTI - Other Income
RE - Retained Earnings
RET - Returns and Allowances
TAX - Tax Expense
OCA - Other Current Assets
9. If it is necessary to view or modify either account classifications or ratio classifications
for the trial balance, click Classifications to open the Classifications dialog.
When you are satisfied with the ratio classifications and account classifications, click
Close to exit the Classifications dialog and return to the Group and Subgroup
Classifications dialog.
7 - 55
Chapter
7
Using the Trial Balance
10. The Send to Tax column displays only if the grouping list you selected is a 2004 or later
ProSystem fx Tax grouping list. When this column displays, “Yes” indicates that data
from accounts grouped to this group will be forwarded to ProSystem fx Tax. “No”
indicates that the data will not be sent. You can change the status by clicking inside the
cell to activate the drop-down list.
11. Select from the M-3 Option drop-down list to add the M-3 option field to a subgroup to a
2006 or later ProSystem fx Tax grouping that is eligible for M-3 processing.
12. You can create a new group from an existing subgroup. Highlight the subgroup you want
to change and click the Create Group from Subgroup icon in the middle of the window.
Click Yes to confirm.
13. You can use the up and down arrows to order the group and subgroup lists. The order
you select appears in the following areas:
§
§
The trial balance reports you create later.
The list of groups and subgroups in the Account Group Summary and Account
Subgroup Summary tabs of the Trial Balance window.
This allows you to present the data in the reports as you want; it also makes it easier to
manage the list and the accounts placed in the groups and subgroups.
14. Click Close to save your changes.
Renaming Groups and Subgroups
Note: To ensure that trial balance data imports correctly in ProSystem fx Profit
Driver, you should not change the ID of a group in a Profit Driver grouping list.
However, you can change the name of a Profit Driver group or subgroup. See page
7-112 for more details.
To rename a group or subgroup, do the following:
1. In the Account Groupings dialog, select the trial balance where you want to rename the
groups or subgroups.
2. Select the grouping list that contains the group or subgroup you want to rename.
3. Click the Advanced button. The Group and Subgroup Classifications dialog displays.
4. Highlight the group or subgroup you want to rename and click Rename. A warning
message displays, stating that you will break any TB Links that rely on this group or
subgroup. Click Yes to continue.
Note: You cannot change the description for the group in tax grouping lists.
Important: If you rename a group or subgroup index and there is an associated
trial balance link, the link does not function properly. This is true for the Index
field only. You can change the description without affecting the link.
5. Enter the new index number or description for the group or subgroup. Press
to accept the changes.
6. Click Close to save your changes.
7 - 56
a or d
Using the Trial Balance
Chapter
7
Deleting Groups and Subgroups
Note: To ensure that trial balance data imports correctly in ProSystem fx Profit
Driver, you should not delete Profit Driver account groups or subgroups.
To delete groups and subgroups, do the following:
1. In the Account Groupings window, select the trial balance with the groups or subgroups
to delete.
2. Select the grouping list that contains the group or subgroup you want to delete.
3. Click Advanced. The Group and Subgroup Classifications dialog displays.
4. Highlight the group or subgroup you want to delete and click the Delete button. A
warning message displays stating that this deletion will be permanent. Click Yes to
continue.
Note: If you delete a group or subgroup and there is a trial balance link or a
trial balance report associated with it, the link does not function properly.
Important: Deleting a group or subgroup is an irreversible process. You cannot
restore a group or subgroup once it is deleted. You have to create the group or
subgroup again.
5. Click Close to save your changes. The accounts that were in that group or subgroup
become ungrouped.
Using the Add or Remove Tax Group Utility
The Add or Remove Tax Group Utility provides the flexibility to remove unused tax groups
and add tax groups that were previously removed from the tax grouping list. The Add or
Remove Tax Group Utility is located in the ProSystem fx Engagement program group on
your Start menu, or under C:\Pfx Engagement\WM\Utilities.
Note: If an active Dynalink exists with the selected tax grouping list, the Dynalink
is broken.
To add or remove tax groups, do the following:
1. Open the trial balance that contains the tax grouping list that you would like to modify.
Only one trial balance can be open at a time.
2. Select Start/All Programs/ProSystem fx Engagement/Utilities/ProSystem fx Engagement
Add or Remove Tax Group Utility or browse to X:\Pfx Engagement\WM\Utilities, where X
is the drive where ProSystem fx Engagement is installed.
3. Follow the instructions in the Add or Remove Tax Group Utility.
7 - 57
Chapter
7
Using the Trial Balance
Assigning Accounts to Account Groups and Subgroups
To assign accounts to a grouping, do the following:
1. If you are in the Binder Index, select Trial Balance/Account Groupings. If you are in the
trial balance, select Engagement/Account Groupings.
2. Select the trial balance and grouping list that contain the group or subgroup you want to
assign the accounts to. The groups and subgroups that have been defined for this
grouping list appear on the right side of the dialog.
3. On the left side of the dialog is a listing of the accounts that have not been grouped.
Select the accounts you want to assign to the group or subgroup. You can select several
accounts using k to select a range of accounts or b to select non-sequential
accounts.
Tips:
§
§
Use the Account Filter field to show only the accounts you want. For example, to
only show accounts with a second character of 2, type ?2* in the filter field.
Delete this information to show all accounts again.
Use the Description Filter field to show only the account descriptions you want.
For example, to only show Accumulated Depreciation accounts, type: accum* in
the filter field. Delete this information to show all accounts again.
4. On the right side of the dialog, select the group or subgroup where you want to place
the accounts. Click the plus sign (+) below the Groups and Subgroups box to expand all
groups and display the subgroups and accounts assigned to each. Click the minus sign
(-) to collapse all entries in the grouping box to show only subgroups. You can also click
individual groups and subgroups to expand and collapse their listings.
5. Click the Group Accounts right arrow button to move the selected accounts to the group
or subgroup you selected.
Tip: You can also move selected accounts by dragging them to the appropriate
grouping on the right.
To remove accounts from a group or subgroup, select them and click the Ungroup
Accounts left arrow button. In the lower left corner of the Account Groupings dialog, the
number of ungrouped accounts displays. In most cases, group all of the accounts to the
grouping list.
6. To add an account not listed in the Chart of Accounts, click Add Account and enter the
new account information. Click OK to create the account. Remember to group the
account after you create it.
7. To move accounts from one group or subgroup to another, highlight the accounts,
right-click, and select Cut. Then highlight a new group or subgroup, right-click and select
Paste.
8. To copy subgroups from one group to another, highlight the subgroup, right-click, and
select Copy from the pop-up menu. Then right-click the new group and select Paste.
7 - 58
Using the Trial Balance
Chapter
7
9. If you are satisfied with the changes you made to the account group, perform one of the
following actions. ProSystem fx Engagement refreshes the corresponding trial balance.
§
§
Select another account grouping list. The changes you made to the account
grouping you just defined are saved.
If you are finished assigning accounts and categories, click Close.
Notes:
§
§
§
Accounts can only be cut, not copied, because each account can only be grouped to
one group or subgroup in each account grouping list.
Click Options to add, rename, copy, delete, export, or import a new grouping list for
the selected trial balance.
When working with a Profit Driver grouping list, you should group accounts to the
subgroup level only, not to the group level. The value of any accounts that you do
assign to the group level will be added to the first detail line item (subgroup of
xxx-01) in that group when data is imported to Profit Driver.
Total Balance Amount for Selected Accounts
In the Account Groupings dialog, you can select specific accounts, groups, or subgroups,
and the total balance for the selected items displays. This is helpful when you are grouping
accounts and when you create formulas with the grouping codes. You can determine if the
total result is reasonable for the account groups.
To display the total of the account balance(s), do the following:
1. In the Binder window, select Trial Balance/Account Groupings.
2. Select the trial balance that you want to use.
3. Select the grouping list that contains the groups and subgroups you want to view. The
groups and subgroups that have been defined for this grouping list appear on the right
side of the window.
4. In the upper right corner of the Account Groupings dialog, there are two fields for the
Period and balance type. In the first field, select the period (i.e., current or comparative)
and in the second field, select the available balance type column for that period. This
determines the period and balance type for the accounts selected.
5. In the Groups and Subgroups section, click an account, a group, or a subgroup. If
checked, the Calculate Sum field at the bottom displays the balance of the selected
account, group, or subgroup.
You can select several accounts, groups, or subgroups by using
of accounts or b to select non-sequential accounts.
7 - 59
k to select a range
Chapter
Using the Trial Balance
7
Creating Journal Entries
Journal entries enable you to adjust trial balance amounts for the current period on an
account-by-account basis. You can post journal entries to any journal entry column you
have selected to include in any of your trial balance views. See Setting Up Trial Balance
Columns and Views on page 7-14 for instructions on setting up journal entry columns.
Note: You must be the Current Editor of the trial balance in order to add, modify,
or delete journal entries.
Journal Entries Types
The journal entries you can make depend on the columns you have added to the trial
balance. You set up different columns for different types of engagements. You can create
journal entries as follows:
§
§
You can select a journal entry type that corresponds to one of the journal entry
columns in the trial balance. The journal entry is posted to that column.
You can create a Proposed Journal Entry (PJE) if you want to create an entry that
does not get posted to any of the journal entry columns. You can use PJEs to review
and evaluate journal entries before you post them.
Creating Journal Entries
You can create journal entries from the Binder window, trial balance window, TB or JE
Reports, or any Word or Excel workpaper.
To create a journal entry, do the following:
1. Open the Journal Entry Detail window as follows:
§
§
§
§
§
From the Binder window, select Trial Balance/Add Journal Entry.
From the Binder window, select Trial Balance/Journal Entry Summary, select the
trial balance from the drop-down list, and click the New button.
From the trial balance, Excel, or Word window, select Engagement/Journal
Entry/Add Journal Entry.
From the trial balance, Excel, or Word window, select Engagement/Journal Entry
/Journal Entry Summary. Select the trial balance from the drop-down list and then
click the New button.
From the trial balance, Excel, or Word window, click the JE Summary button on
the Engagement toolbar, select the trial balance from the drop-down list, and then
click the New button.
7 - 60
Using the Trial Balance
Chapter
7
The Journal Entry Detail dialog displays.
2. If you selected the Add Journal Entry option in step 1, select the trial balance to which
you want to post the journal entry from the Trial Balance drop-down menu.
3. Complete the Journal entry info section by doing the following:
§
§
In the Type field, select the type of journal entry you are creating. The options in
this field depend on which journal entry columns are in the trial balance. The
Proposed Journal Entries type is always available.
In the JE # field, type a number to indicate the number of the journal entry in
ProSystem fx Engagement, if one is not already in that field.
Note: This journal entry number must be a unique number within the range
of 1 to 32,767.
§
§
In the Description field, type a brief description of the journal entry of up to 255
characters.
In the W/P Reference field, you can type an index number as a reference to the
workpaper that supports the journal entry. This field is in the Journal Entry Report,
but it is optional.
4. Select an account for the journal entry by doing any one of the following:
§
§
§
Double-click the account in the Accounts list on the left. It is added to the next
available row in the journal entry grid.
From the Accounts box, drag the account to the journal entry grid. To select more
than one account, use the b and k keys. In the # (Account) column, press
4 to display the drop-down list of accounts. Type the account number in the #
column. The first account that matches the numbers you type is highlighted.
When the account number you want is highlighted, press a.
If you do not want a line in the journal entry grid, select it and click Remove JE
Line.
7 - 61
Chapter
7
Using the Trial Balance
Tips: Use the Account Filter field to show only the accounts you want. For
example, to only show accounts with a second character of 2, type: ?2* in the
field. Delete this information to show all accounts again.
Use the Description Filter field to show only the account descriptions you want. For
example, to show only Accumulated Depreciation accounts, type: accum* in the filter
field. Delete this information to show all accounts again.
Note: To add a new account, select the Add Account button to open the Chart
of Accounts window. See Adding, Modifying, or Deleting Trial Balance
Accounts on page 7-45 for instructions on adding a new account.
5. Type the debit and credit amounts for the journal entry. Type just the amount. Do not
include currency symbols, separator characters such as commas, or minus symbols.
Press a or d as you type each amount so the totals at the bottom of the journal
entry box are updated. If the journal entry is out of balance, the Difference field shows
the difference between the debits and credits.
Important: Make sure the journal entry is in balance before you save it. If
journal entries are out of balance, a message displays. Click Yes to post the
journal entry; click No to modify the entry. If you do not want to be prompted
for out-of-balance messages, check the Do not display this message again box.
To turn the prompt back on, select Tools/Options in the File Room or Binder
window.
6. If Federal Tax Journal Entries is selected and the trial balance has a grouping list that is
selected for M-3 processing, an M-3 column is available in the Journal Entry dialog. If
the account that is selected for a journal entry is grouped to a group that is eligible for
M-3 enhancement, you have the option to designate the journal entry as a temporary (T)
or permanent (P) journal entry. These journal entries flow to the Temporary Difference
and Permanent Difference columns in the tax return when the trial balance is exported to
ProSystem fx Tax.
Note: If the account that is selected for a journal entry is grouped to a tax
group that is not eligible for M-3 enhancement, the M-3 column defaults to N/A
(Not Applicable), and the selection cannot be modified.
7. You can select how each journal entry is to be treated when the binder is rolled forward
to the next period:
§
§
§
Do not include in roll forward. The journal entry is cleared in the next period’s
binder. This is the default selection.
Recurring journal entry. If selected, the journal entry is automatically created in the
next period’s binder. The same accounts and amounts appear. If you do not want
the dollar amounts to appear, check the Clear amounts box. This journal entry
continues to recur each period, until you select one of the other options.
Reversing journal entry. If selected, the journal entry is automatically created in
the next period’s binder. In the new binder, the same accounts are listed in the
journal entry, but the dollar amounts are reversed. Debits are moved to the credit
column and vice versa. In the new period’s binder, this journal entry is not
checked to reverse.
7 - 62
Using the Trial Balance
Chapter
7
Note: If Federal Tax Journal Entries is selected and a grouping list is selected
for Schedule M-3 processing in the trial balance, the Current Editor may choose
to modify the M-3 temporary (T) or permanent (P) default. The Not Applicable
(N/A) default cannot be modified.
8. When you are finished with the journal entry, click Save and Close to close the Journal
Entry Detail window or click Save and New to create another journal entry.
Editing and Deleting Journal Entries
The Journal Entry Summary dialog enables you to add, open, and delete journal entries and
change the journal entry type.
If you want to post a Proposed Journal Entry to the trial balance, you can easily change the
journal entry type to one of the journal entry columns in the trial balance. Drag the journal
entry in the Journal Entry Summary dialog from the Proposed Journal Entries list to the
appropriate journal entry book on the left side of the window. There is no limit to how many
times you can change a journal entry’s type.
Notes:
§
§
You can only make journal entry changes if you are the Current Editor of the trial
balance.
When a tax grouping list in the trial balance is eligible and selected for Schedule M-3,
the appropriate M-3 defaults are reflected in the detail lines of the journal entry if the
journal entry is moved to a Federal tax journal entry and the M-3 selections do not
already exist. Also, if the journal entry type is moved from a Federal tax journal entry
to another journal entry type, the M-3 selections remain in the detail lines of the
journal entry but are hidden. This allows the user to move the journal entry back to
Federal tax journal entry without losing the user's original selections.
To display the Journal Entry Summary window, do the following:
§
§
From the Binder window, select Trial Balance/Journal Entry Summary.
From the trial balance, Excel, or Word window, select Engagement/Journal
Entry/Journal Entry Summary.
7 - 63
Chapter
Using the Trial Balance
7
§
From the trial balance, Excel, or Word window, click the JE Summary button on the
Engagement toolbar.
Using the Journal Entry Summary Window
You can do the following from the Journal Entry Summary Window:
§
§
Select a trial balance from the list to view the journal entry options for that trial
balance. A list of the journal entries you can create displays on the left. These are
based on the journal entry columns selected in the trial balance.
Click a journal entry type folder, and the Folder icon displays. The right side of the
window shows the journal entries of that type that have been created.
Note: The Proposed Journal Entries (PJE) folder shows the journal entries that
have been created but not posted to a journal entry column in the trial balance.
This folder is automatically available with all trial balances.
Editing and Viewing Journal Entries
You can view and change journal entries from the Journal Entry Summary window by
double-clicking the journal entry or by clicking it once and then clicking Open. The Journal
Entry Detail window displays and you can make changes. See Creating Journal Entries on
page 7-60 for instructions.
Creating New Journal Entries
You can create new journal entries from the Journal Entry Summary window. Click New to
open the Journal Entry Detail window and follow the instructions in Creating Journal Entries
on page 7-60.
Deleting Journal Entries
To delete a journal entry, do the following:
1. Select the journal entry.
2. Click the Delete button or press
i. A warning message appears.
3. Choose Yes to accept. Choose No to abort the delete.
7 - 64
Using the Trial Balance
Chapter
7
Changing Journal Entry Types
You can change journal entry types by dragging them from one folder type to another folder
type. For example, you can use this method to move a proposed journal entry to one of the
journal entry types that have a column in the trial balance.
To change journal entry types, do the following:
1. On the left side of the Journal Entry Summary window, select the trial balance from the
drop-down list.
2. Click the folder for the type of journal entry you want to change. The journal entries that
were created for that journal entry type display on the right side of the window.
3. Click the journal entry to change and drag it to another journal entry type folder. Now
the journal entry exists in the new folder. You can repeat this process as many times as
you need.
Note: When a tax grouping list in the trial balance is eligible and selected for
Schedule M-3, the appropriate M-3 defaults are reflected in the detail lines of the
journal entry if the journal entry is moved to a Federal tax journal entry and the
M-3 selections do not already exist. Also, if the journal entry type is moved from a
Federal tax journal entry to another journal entry type, the M-3 selections remain in
the detail lines of the journal entry but are hidden. This allows the user to move
the journal entry back to Federal tax journal entry without losing the user's original
selections.
Journal Entry Reports
Create Journal Entry Reports to review the journal entries you have made for the trial
balance.
1. Do the following to display the Create Journal Entry Report dialog:
§
§
From the trial balance window, select Engagement/Create Reports/Journal Entry
Reports.
From any Excel workpaper, select Engagement/Create Reports/Journal Entry
Reports.
2. If you are creating the report from an Excel workpaper, select the trial balance containing
the journal entries you want to print from the Trial Balance drop-down list.
7 - 65
Chapter
Using the Trial Balance
7
3. Check the box for each type of journal entry report you want to create. To select all
types of journal entries, click Select All. Click Unselect All to clear all check boxes.
4. If you select just one type of journal entry to print, the report name defaults to that
name with the word Report added to the end of the name once the report is created.
You can replace the default name with a name of your choosing. When the report is
created, the report’s title displays in the Report Name field. Do not use the following
invalid characters in the report name: \ / : * ? [ ].
If you select more than one journal entry type, the Report Name field is grayed out, and
the program automatically names the reports.
5. Check the Print as Black and White box if you do not want to print cell background
colors.
6. Click OK. The report is generated as an Excel workpaper and saved in the Unfiled
Workpapers tab of the binder. You can view the report from that tab or move the
workpaper to another tab.
For other types of reports, see the next section, Creating Trial Balance Reports.
Creating Trial Balance Reports
ProSystem fx Engagement creates Excel-based reports that summarize trial balance
information by account numbers, groups, or subgroups. For example, if you want to know
which accounts were assigned to the Cash group, you can create a Cash report that shows
details of the individual accounts that make up that group.
You create reports from the account groups you set up. You can put as many account
groups in a report as you need. You also have the choice of showing summary or detail
information.
Examples of summary reports are preliminary and final analytic workpapers. Detail reports
can be leadsheets, working trial balances, book-to-tax comparisons, or budget-to-actual
comparisons.
When you generate reports, they are saved as Excel workpapers in the Unfiled Workpapers
tab of the binder. You can then move the workpaper to any tab. Since these reports are in
Excel, you can add documentation, tickmarks, and referencing as you would to a normal
Excel workpaper.
Once these reports are created, you do not need to create them again. If trial balance
amounts change due to journal entries, the amounts are automatically updated, leaving any
documentation you added intact.
Notes:
§
§
If the Excel workpaper is open while you make a change to the trial balance amounts,
you may need to refresh the open workpaper before the changes display. Click the
Refresh button on the Engagement toolbar.
You can add customized information to trial balance reports. However, if you delete
groups or subgroups or re-sequence the order of any groups or subgroups, the
customizations no longer exist in the report.
7 - 66
Using the Trial Balance
Chapter
7
Types of Reports
You can create the following types of reports:
§
§
§
Summary by groups includes just the totals of each account group.
Summary by subgroups includes the subtotals by subgroup and then the totals for
each group.
Detail reports list the accounts in each group and subgroup and show the subtotals.
You can have each account group in a separate report or combine all groups in a
single report.
Creating New Trial Balance Reports
When you generate trial balance reports, they are saved as Excel workpapers in the Unfiled
Workpapers tab. You can move the workpaper to any tab and add documentation,
tickmarks, and referencing. If trial balance amounts change due to journal entries, the
amounts are automatically updated in the report.
Trial balance reports summarize trial balance information by account numbers, groups, or
subgroups. For example, if you wanted to know which accounts were assigned to the Cash
group, you can create a Cash report that shows details of the individual accounts that make
up that group. Reports can be summary or detailed. You can put as many account groups in
a report as you need.
When you create the report, you add the columns from the trial balance you want to see. If
you remove a column from the trial balance, the report still contains that column.
Note: Once you create a report, open the report before freezing any Engagement
links.
To create a report from a trial balance, do the following:
1. Open the binder containing the trial balance for which you want to create the report.
2. Open the Create Trial Balance Report dialog by one of the following methods:
§
§
From the Trial Balance window or an Excel workpaper from the binder containing the
trial balance for which you want to create the report, select Engagement/Create
Reports/TB Reports.
From the Trial Balance window or an Excel workpaper from the binder containing the
trial balance for which you want to create the report, click the Create TB Report
button on the Engagement toolbar.
7 - 67
Chapter
7
Using the Trial Balance
The Create Trial Balance Report dialog displays.
3. From the Trial Balance drop-down list, select the trial balance from which you want to
create the report.
4. In the Grouping List field, select the account grouping with the groups you want to use.
The account groups in that grouping appear in the Account Groups box. Notice that the
list does not show subgroups.
5. In the Account Groups box, choose one of the following radio buttons:
Include selected. Includes only those account groups that are selected from the
Account Groups list.
§
§
Include current and future. Includes all current account groups listed in the
Account Groups list as well as any additional groups you add in the future. When
this option is selected, all of the account groups are automatically selected and
the Select All button become inactive.
Classified report. This check box is enabled if you chose Include current and
future. Checking this box includes account class and account type totals in the
trial balance report. This check box is disabled if you chose Include selected.
6. Check the boxes next to the group or groups for which you want to create a report. To
include all groups, click Select All. To clear all selections, click Unselect All.
7. A default report name appears in the Report Name Guide field. You can accept the
default report name or type a different name.
7 - 68
Using the Trial Balance
Chapter
7
8. Under Report Type, choose the type of report you want to create:
§
§
§
Summary - Groups. Includes just the totals of each account group.
Summary - Subgroups. Includes the subtotals by subgroup and the totals for each
group.
Detail. Detail reports list the accounts in each account group and account
subgroup and show the subtotals. You can have each account group in a separate
report or combine all account groupings in a single report. Check the Combine
Groups box if you want all detail information in a single report.
9. Based upon the selections made, check or uncheck the following boxes under Settings.
§
§
Hide empty groups and subgroups. Causes groups and subgroups without
accounts grouped to them not to be included on the report.
Hide accounts with zero balances. This option is available only when you select
Detail as the report type. Hides any accounts that have zero balances from within
your report.
Caution: Only accounts with zero balances in the columns selected to be
included on the report are hidden. Other balance columns or journal entry
columns may have non-zero balances or activity, but the account is not
included on the report.
§
§
§
§
Print as Black and White. Sets the printer to print black and white.
Show WP Ref Columns. Shows any workpaper references. This check box is only
enabled if the report type is Detail.
Include sum of account groups. Prints a Sum of Account Groups row at the
bottom of the trial balance report, which provides the total for each balance and
journal entry type of all the groups selected to be included in the report. This box
is enabled for all Summary - Groups, Summary - Subgroups, and Detail report
types, both classified and unclassified, except an unclassified Summary - Group
TB Report.
Include net income. Prints a Net (Income) Loss row at the bottom of the trial
balance report, which provides the net (income) loss amount for each balance and
journal entry type included in the report. This is the true net (income) loss amount
for all groups, not just the groups selected to be included in the report.
10. Click Format to define what columns are reflected in the report(s). For details, see
Formatting Trial Balance Reports, page 7-71.
11. When you finish defining the report, click OK. The reports are created and stored in the
Unfiled Workpapers tab within the Binder window. If you are creating multiple reports,
you can see what report is being created in the status bar of Excel in the bottom-left
corner of the Excel window.
Note: If the workpaper is open when you make changes to the trial balance, you
may need to click the Refresh button to have the changes display on the report.
7 - 69
Chapter
7
Using the Trial Balance
Sample Settings for Trial Balance Reports
The following table represents sample settings for certain types of reports. Remember that
any combination can be used to create the report of your choice.
For these examples, you should assume that the adjusted balance is the report balance, that
you have added a Tax balance column, and that Hide empty groups and subgroups, Hide
accounts with zero balances and Print as Black and White are checked. See Creating New
Trial Balance Reports on page 7-67 for more information on these options.
Report Name
Account Group
Radio Button
Report Type
Format - Columns
Included
Leadsheets
Include selected…
(Check boxes as
needed)
Detail
PY-Adjusted
CY-Unadjusted
CY-AJE
CY-Adjusted
Working Trial
Balance*
Include all…
Detail,
Combine
Groups
PY-Adjusted
CY-Unadjusted
CY-AJE
CY-Adjusted
Preliminary
Analytical
Review
Include all…
Summary by
Group or
Subgroup
PY-Adjusted
CY-Unadjusted
$-Variance
%-Variance
Final Analytical
Review
Include all…
Summary by
Group or
Subgroup
PY-Adjusted
CY-Adjusted
$-Variance
%-Variance
Book-to-Tax
Include selected…
(Check boxes are
needed)
Detail
Combine
Groups
CY-Adjusted
CY-FTJE
CY-Tax
* Another option for a report of this type is to print the Account Group Detail sheet in the
trial balance. Although this report looks very similar to the above report, the Account Group
detail sheet is not customizable in Excel.
7 - 70
Using the Trial Balance
Chapter
7
Formatting Trial Balance Reports
1. From an open trial balance or Excel workpaper, select Engagement/Create Reports/TB
Reports. The Create Trial Balance Report dialog displays.
2. Click Format. The Trial Balance Report Format dialog displays.
3. In the field below Available columns in this period, select the view from the drop-down
menu that contains the columns you want in the report. The display area below the
Available columns in this period field contains columns in the trial balance for that view.
Note: The account number and account description columns do not appear in
the list of columns selected for the report. These columns are required and
must always appear as the first two columns of all reports.
4. Select the column you want to show in the report in the Available columns in this period
list on the left and then click the right-arrow button to add a column to the list, or drag
the column to the list. Press k and b to add more than one column at a time.
5. To remove a column from the report, select the column and click the left-arrow button to
remove a column from report button or drag the column to the Available columns in this
period list.
6. To add columns to show variances between columns in the report, do the following:
§
§
Click New % Var to show the difference as a percentage; click New $ Var to
show the difference as a dollar amount. You can add both percentage and dollar
difference columns in the reports. The new column appears above. When you
select the new column, the Variance Properties options at the bottom of the
window become available. Select the columns you want to compare from the
drop-down menus.
If you want the differences to be shown as positive amounts, check the Absolute
Difference box.
7. To change the placement of a column in the report, select it in the right box and click
the up or down arrow button to change its order in the report. Moving a column up
moves it towards the left in the report. Moving a column down moves it to the right.
8. Click OK to save the report format. You can then complete the steps for creating
reports. See Creating New Trial Balance Reports on page 7-67.
7 - 71
Chapter
7
Using the Trial Balance
Changing a Trial Balance Report
You must be the Current Editor of the trial balance report in order to modify trial balance
report properties.
1. Double-click the trial balance report in the Unfiled Workpapers tab or in another tab or
folder if you have moved the report.
2. Select Engagement/Properties. The Trial Balance Report Properties dialog displays. The
trial balance, grouping list, report name guide, and report type information cannot be
changed.
3. Under Account Groupings, specify which account groups you want on the report.
§
§
§
Include selected. Includes only the account groups that you check. Future account
groups you create are not automatically included. Use the Select All and Unselect
All buttons to speed up the selection process. For example, if you want most
account groups, click Select All, then uncheck the account groups you do not
want, or if you only want a few account groups, click Unselect All, then check the
account groups you want.
Include current and future. All current and future account groups are automatically
included in the report when the report is refreshed. Therefore, the Select All
button is disabled because all account groups are already selected.
Classified report. This option is disabled.
4. Check or uncheck the following boxes under Settings.
§
§
§
Hide empty groups and subgroups. Causes groups and/or subgroups without
accounts grouped to them not to print on the report.
Print as Black and White. Sets the printer settings not to print the cell background
colors.
Include net income. Prints Net (Income) Loss row at the bottom of the trial
balance report, which provides the net (income) loss amount for each balance and
journal entry type included in the report. This is the true net (income) loss amount
for all groups, not just the groups selected to be included in the report.
Note: The other options are disabled.
5. Click Format to add or remove columns from the report.
6. Click OK to close the TB Report Properties dialog and save the changes.
7 - 72
Using the Trial Balance
Chapter
7
Moving Reports
By default, all reports appear in the Unfiled Workpapers tab in the binder and are given a
default name or an assigned name. There are no index numbers on the reports. You may
want to move the reports to another tab in the binder and rename them. For more
information about tabs in binders, see Chapter 6, Creating and Using Binders.
To move reports between tabs, do the following:
1. From the Binder window, select the Unfiled Workpapers tab. The new reports appear
there. These reports are in Excel.
If you want to change a report name or any of its other properties, right-click the report
and select Properties from the pop-up menu. See Chapter 8, Managing Workpapers, for
more information.
2. Select View/Expand All to show all tabs in your binder. This enables you to easily drag
the reports to the desired tab. Or, click the plus sign (+) to expand a particular tab’s
branch until you can see the tabs in which you want to store the reports.
3. Select the report, right-click, and select Cut from the pop-up menu. Then, right-click the
workpaper tab where you want to file the report and select Paste. You can also drag the
reports to the appropriate workpaper tab in the binder.
Creating a Classified Trial Balance Report
A classified trial balance report includes account classification and account type totals. One
advantage of classified reports is that they refresh faster than standard reports.
You can include the sum of account groups in the reports. This is a sum of all the group
balances for the groups included in the report. If all groups are selected to be included, you
know the trial balance is in balance.
You can include net income on trial balance reports. For classified reports, the net (income)
loss amounts are included in the Equity account classification total and as the sum of
Revenues and Expenses. This net (income) loss amount always reflects the "true" net
(income) loss for all classified groups even if all of the groups have not been selected to be
included in the report.
The date and time print in the header, and the page number prints in the footer.
7 - 73
Chapter
7
Using the Trial Balance
To create a classified trial balance report, do the following:
1. Once the trial balance is created (see Creating Trial Balances on page 7-8), you must
open the trial balance and select Engagement/TB Reports. The Create Trial Balance
Report dialog displays.
2. Under Account Groups, select Include current and future and check the Classified report
box.
3. The Report Name Guide field displays the name of the trial balance from which the
report was created. You can change this name if necessary.
4. After the proper pre-selections have been made in step 2 of this procedure, the Create
Trial Balance Report dialog enables only those fields that support the creation of a
classified report. For details, click Help or press 1 while in the Create Trial Balance
Report dialog. Make your choices and click OK.
Note: In the classified report, total liability and equity is the sum of all accounts
grouped as liabilities and all accounts grouped as equity plus the net (income) loss
from the trial balance. By contrast, liability and equity is calculated in QuickView
and the Trial Balance Snapshot by adding all accounts grouped as liabilities and all
accounts grouped as equity.
Creating an Unclassified Trial Balance Report
You can create a unclassified report from a trial balance. The unclassified report can include
the sum of account groups in the Summary - Subgroup and the Detail reports. This is a sum
of all the group balances for the groups included in the report. If all groups are selected to
be included, you know the trial balance is in balance.
You can include net income on trial balance reports. For unclassified reports, the net
(income) loss amounts are printed at the bottom of the report. This net (income) loss
amount always reflects the true net (income) loss for all classified groups even if all of the
groups have not been selected to be included in the report.
7 - 74
Using the Trial Balance
Chapter
7
The date and time print in the header, and the page number prints in the footer.
To create an unclassified trial balance report, do the following:
1. Once the trial balance is created (see Creating Trial Balances on page 7-8), you must
open the trial balance and select Engagement/TB Reports. The Create Trial Balance
Report dialog displays.
2. Under Account Groups, uncheck the Classified report box.
3. The Report Name Guide field displays the name of the trial balance the report was
created from. You can change this name.
4. After the proper pre-selections have been made in step 2 of this procedure, the Create
Trial Balance Report dialog enables only those fields that support the creation of an
unclassified report. For details, click Help or press 1 while in the Create Trial Balance
Report dialog. Make your choices and click OK.
Creating Consolidated Trial Balance Reports
You can generate a consolidated trial balance report based on the subsidiary data that is
gathered. You must begin with a consolidated trial balance in order to create a consolidated
trial balance report.
To create a consolidated trial balance report, do the following:
1. Once the consolidated trial balance is created (see Creating a Consolidated Trial Balance
on page 7-80), open the consolidated trial balance and select Engagement/Create
Reports/Consolidated Reports. The Create Consolidated Report dialog displays.
2. Select the consolidated trial balance from the Trial Balance drop-down list.
3. From the Grouping List drop-down list, select the grouping list.
4. In the Account Groups box, choose from the following:
§
§
§
Include selected. Includes only those account groups that are selected from the
Account Groups list. If you want separate reports, select this option.
Include current and future. Includes all current account groups listed in the
Account Groups list as well as any additional groups you add in the future. When
this option is selected, all of the account groups are automatically selected and
the Select All button become inactive.
Classified report. This check box is enabled if you chose Include current and
future. Checking this box includes account class and account type totals in the
trial balance report. This check box is disabled if you chose Include selected.
5. A default name displays in the Report Name Guide field. You can accept this default
name or enter one of your own.
6. Under Report Type, select the type of report you want to create: Summary - Groups,
Summary - Subgroups, or Detail. By default, the Combine Groupings box is checked so
that all detail group information is reported in a single report.
7 - 75
Chapter
7
Using the Trial Balance
7. Based upon the selections made, check and uncheck the following boxes under Settings.
§
§
Hide empty groups and subgroups. Causes groups and/or subgroups without
accounts grouped to them not to print on the report.
Hide accounts with zero balances. This option is available only when you select
Detail as the report type. It hides any accounts that have zero balances from
within your report.
Caution: Only accounts with zero (0) balances in the columns selected to
be included on the report are hidden. Other balance columns or journal
entry columns may have non-zero balances or activity, but the account is
not included on the report.
§
§
§
§
Print as Black and White. Sets the printer settings not to print the cell background
colors.
Show WP Ref Columns. Shows any Workpaper references. This check box is only
enabled if the report type is Detail.
Include sum of account groups. Prints a Sum of Account Groups row at the
bottom of the trial balance report, which provides the total for each balance and
journal entry type of all the groups selected to be included in the report.
Include net income. Prints a Net (Income) Loss row at the bottom of the trial
balance report, which provides the net (income) loss amount for each balance and
journal entry type included in the report. This is the true net (income) loss amount
for all groups, not just the groups selected to be included in the report.
8. Click the Format button to format the report.
9. In the field below Available columns in this period, select the view from the drop-down
menu that contains the columns you want in the report. The account number and
account description columns do not appear in the list of columns selected for the report.
These columns are required and always appear as the first two columns of all reports.
10. Select the column you want to show in the report by clicking the column in the Available
columns in this period list on the left and then clicking the Show Column in Report
button or by dragging the column. You can add one or more columns at a time by using
the k and b keys. If a column is in a different view, you also need to repeat step 8.
11. If you want to remove one or more columns from the report, select the one you want to
remove and click Remove Column from Report.
12. If you want to add columns to show variances between columns in the report, do the
following:
§
§
Click the New % Var button to show the difference as a percentage or the New $
Var button to show the difference as a dollar amount. You can add both
percentage and dollar difference columns in the reports. When you select the new
column, the Variance Properties options at the bottom of the window become
available. Select the columns you want to compare from the drop-down menus.
If you want the differences to be shown as positive amounts, check the Absolute
Difference box.
7 - 76
Using the Trial Balance
Chapter
7
13. To change the placement of a column in the report, select it in the right box and click
the up or down arrow button to change its order in the report. Moving a column up
moves it towards the left in the report. Moving a column down moves it to the right.
14. Click OK to save the report format and OK again to create the report.
Modifying a Consolidated Trial Balance Report
In order to modify a consolidated trial balance report, you must be the Current Editor of the
report.
To modify a consolidated trial balance report's properties, do the following:
1. Open the consolidated trial balance report.
2. Select Engagement/Properties. The Consolidated TB Report Properties dialog displays.
3. Under Account Groups, include or remove the following options from your consolidated
trial balance report:
§
§
§
Include selected. Includes only those account groups that are selected from the
Account Groups list. If you want separate reports, select this option.
Include current and future. Includes all current account groups listed in the
Account Groups list as well as any additional groups you add in the future. When
this option is selected, all of the account groups are automatically selected and
the Select All button becomes inactive.
Classified report. This option is disabled.
4. The report type cannot be modified after creation. If the report type displayed is not
acceptable to you, create another consolidated trial balance report with the correct
report type.
5. Check or uncheck the following boxes under Settings:
§
§
Hide empty groups and subgroups. Causes groups and/or subgroups without
accounts grouped to them not to print on the report.
Hide accounts with zero balances. This option is available only when you select
Detail as the report type. Hides any accounts that have zero balances from within
your report.
Caution: Only accounts with zero balances in the columns selected to be
included on the report are hidden. Other balance columns or journal entry
columns may have non-zero balances or activity, but the account is not
included on the report.
§
§
Print as Black and White. Sets the printer settings to not print the cell background
colors.
Show WP Ref Columns. Shows any Workpaper references. This check box is only
enabled if the report type is Detail.
7 - 77
Chapter
Using the Trial Balance
7
§
§
Include sum of account groups. Prints, at the bottom of the trial balance report, a
Sum of Account Groups row, which provides the total for each balance and
journal entry type of all the groups selected to be included in the report.
Include net income. Prints, at the bottom of the trial balance report, a Net
(Income) Loss row, which provides the net (income) loss amount for each balance
and journal entry type included in the report. This is the true net (income) loss
amount for all groups, not just the groups selected to be included in the report.
6. Click OK to close the Consolidated TB Report Properties dialog.
Using ProSystem fx Engagement Reports
In addition to showing the columns for the account groups selected, reports also provide
details from any journal entry columns that you have and enable you to add documentation,
tickmarks, or referencing.
See Chapter 8, Managing Workpapers, for information on workpaper references. See
Chapter 9, Using Excel, for information on tickmarks.
Consolidating Trial Balances
You can consolidate data from single company trial balances into a consolidated trial
balance. This consolidated data can then be included in another consolidated trial balance.
When consolidating trial balances, you need to be aware of the following information:
§
§
§
§
§
§
You must be the Current Editor of the consolidated trial balance in order to
consolidate trial balances.
Data can be consolidated by account detail, groups, or subgroups. Changes made to
the subsidiary can be reconsolidated to the consolidated level without losing any
work done in the consolidated trial balance.
For reporting purposes, you can create a consolidated trial balance report and
formulas that use either the subsidiary balances or the consolidated balances.
During reconsolidation, the Number of prior periods field is automatically reset to zero
to avoid data loss. If you subsequently choose to reconsolidate prior period balances,
the existing prior period data is overwritten with the data you are currently
consolidating (see Reconsolidating Subsidiary Trial Balances on page 7-84).
If you consolidate by account groups or account subgroups, make sure you assign all
accounts to a group or subgroup, or the consolidated trial balance may not include all
balances.
To bring consolidated prior period comparative data into a trial balance (e.g., if
consolidation had not been required in the past), you can use one of the three
methods explained below.
— Create a binder with trial balances and the consolidated trial balance in the earliest
year of restatement. Enter the trial balance information, consolidate the trial
balances, make eliminating journal entries, and roll the binder forward, repeating
for each successive year.
7 - 78
Using the Trial Balance
Chapter
7
— Use TB Edit Mode to directly key prior period information into the consolidated
trial balance. This edit mode is only available for prior period information as
current year information can only be posted to the consolidated trial balance
during the consolidation process.
— Make sure subsidiary prior period information is available on any subsidiary trial
balances and then select the desired number of prior periods when creating the
consolidated trial balance. This imports and sums subsidiary prior period final
balances and posts the sum to the prior period comparative pre-consolidated and
consolidated balance columns. You can then use TB edit mode to adjust the prior
period consolidated balance and reflect any prior period eliminating journal entries.
§
§
§
§
You can view consolidated account group and subgroup balances by opening the
consolidated trial balance, clicking the Group drop-down list (located below the Excel
toolbar), and selecting Consolidation. After the consolidated trial balance refreshes,
view your consolidated balances using the same account groupings used in the
subsidiary trial balances.
To do a nested consolidation (where a consolidated company becomes a subsidiary of
another) and use the same grouping list as the component subsidiaries, select
Consolidation as the Grouping list when creating the consolidation in the Consolidate
TB dialog.
Two types of journal entries are possible in a consolidated trial balance: Proposed Journal
Entries and Eliminating Journal Entries. Journal entries are added to a consolidated trial
balance using the same procedures as journal entries in the trial balance.
When a consolidated trial balance and the selected grouping list is eligible and
selected for Schedule M-3, expanded balances transfer to the return via G/L Bridge. If
you are using a consolidated trial balance with an M-3 enhanced grouping, only G/L
Bridge can be used to transfer balances to a return.
If Schedule M-3 is selected, up to four balances are transferred to the return.
Because Federal tax journal entries cannot be entered for a consolidated trial balance,
the system calculates the balances transferred from each of the individual trial
balances that were consolidated.
You must be certain that the consolidated trial balance is in balance with the individual trial
balances. If you have made a change to an individual trial balance, you must reconsolidate
prior to transferring the balances to the return. Otherwise, the balances sent to the return
are not the same as the consolidated trial balance.
If you are using an M-3 enhanced consolidated trial balance, you must also transfer the
pre-consolidated balance from the consolidated trial balance as the tax balance. You should
not transfer the consolidated balance because it might include eliminating journal entries. In
that case, the total book balance plus temporary/permanent balances from the individual
trial balances would not equal the tax balance. A consolidated trial balance that is not M-3
enhanced can be exported to Taxprep using either Dynalink or G/L Bridge. The consolidated
balance must be used for data to transfer accurately.
7 - 79
Chapter
7
Using the Trial Balance
Creating a Consolidated Trial Balance
Consolidations occur at the trial balance level within one engagement binder. First, set up a
trial balance for each subsidiary. Then, create a separate consolidated trial balance for the
consolidated balances.
To create a consolidated trial balance, do the following:
1. In the Binder window, click the workpaper tab where you want to put the trial balance.
2. Do one of the following:
§
§
§
Select File/New and then Trial Balance.
Right-click the tab and select New Trial Balance.
Click the New Trial Balance toolbar button.
The New Trial Balance dialog displays.
3. Click the Consolidated tab.
4. Click the Consolidated Trial Balance - 2 Year template.
5. Click OK to open the Workpaper Properties dialog.
7 - 80
Using the Trial Balance
Chapter
7
6. Complete the top of the Workpaper Properties dialog as follows:
§
In the Index # field, type an index number for the trial balance workpaper. This is
an optional field.
Its purpose is to help you organize your workpapers and provide a means to
reference the workpapers. It also is necessary if you want to insert a workpaper
reference link to this workpaper.
§
In the Name field, type the name for the trial balance. The default name is the
name of the trial balance template. You can use this name or enter a new name.
This is a required field. Do not use the following characters: ‘ | : “ , ( ).
Important: The trial balance name that you enter here displays in the
formulas that link your trial balance data to workpapers. See Chapter 9,
Using Excel, and Chapter 10, Using Word, for more information. The
formulas do not change if you rename your trial balance. Therefore,
choose a suitable name that you will recognize when reviewing your
formulas.
For example, with a consolidated entity, use the entity name for each trial balance
so that you know which entity a specific amount came from when reviewing your
TB Link formulas. If you do rename your trial balance and realize your links no
longer work, simply rename it back to its original name.
7. Click OK to create the trial balance.
Setting Up Consolidated Trial Balance Columns
The consolidated trial balance starts with six columns in the current view:
§
§
§
§
§
§
Account. Represents the grouping basis for the consolidation. It is the account
number, the group code, or the group+subgroup code from the subsidiaries.
Description. Represents the description of the grouping basis for the consolidation. It
is the account description, the group name, or the subgroup name from the
subsidiaries.
PRE-CONSOL. The Pre-Consolidated column is the sum of the balances from all of the
subsidiaries.
JE Ref #. The Journal Entry Reference Number relates to the eliminating journal
entries posted in the consolidated trial balance.
EJE. The Eliminating Journal Entries posted in the consolidated trial balance display in
this column. This is the only journal entry allowed in a consolidated trial balance. If
you want to make an adjusting entry or a reclassifying entry, you need to post that at
the subsidiary level.
CONSOL. The Consolidated column is the sum of the PRE-CONSOL column plus the
EJE column.
After the consolidation, new columns display with the subsidiary information. Each
subsidiary is represented in a column before the PRE-CONSOL column. You can control the
order of the subsidiaries and the balance type that is used.
7 - 81
Chapter
7
Using the Trial Balance
You can add more columns, such as percent variance, dollar variance, and prior year
columns. You may also choose to show prior period columns for each of the subsidiary trial
balances in the consolidated trial balance. For more information on how to add columns in
the trial balance, see Setting Up Trial Balance Columns and Views on page 7-14.
Consolidating Subsidiary Trial Balances
You consolidate subsidiary trial balances into a blank consolidated trial balance. If changes
are made to the subsidiary balances subsequent to the consolidation, then you can
reconsolidate the trial balance to reflect the changes. All the work done in the consolidated
trial balance is preserved.
To consolidate the subsidiary trial balances, do the following:
1. Select Trial Balance/Consolidate TB in the Binder window or open any Excel or Word
workpaper and do one of the following:
§
§
Select Engagement/Consolidate TB.
Click the Consolidate button on the Engagement toolbar.
The Consolidate TB dialog displays.
2. From the Consolidated Trial Balance drop-down list, select the trial balance you want to
use to hold the consolidated information.
3. Click Add to add a subsidiary trial balance.
4. Open the Trial Balance list to view the trial balances available in this binder and click the
trial balance you want. The order in which you list the subsidiaries in this window is the
order in which they appear in the consolidated trial balance window and in reports. Once
you have selected all of the trial balances to consolidate, you can use the up and down
arrows on the right side of the window to re-order the subsidiaries.
Tip: You can press
a or d to advance to the next cell.
5. In the Abbreviation field, type the abbreviation you want for the column heading in the
trial balance window and in reports.
Note: To rename an abbreviation, select the abbreviation, click Rename, and
type the new abbreviation.
7 - 82
Using the Trial Balance
Chapter
7
6. Open the Grouping List to view the grouping lists available for this subsidiary. Click the
grouping list by which you want the data consolidated.
Notes:
§
§
If you select a Tax Grouping list, all subsidiary trial balances must be grouped to
the same grouping list.
If you consolidate based on subgroups, select the grouping list with the
subgroups.
7. Check the Overriding List box if you want this trial balance to take precedence over the
other trial balance(s) when there are conflicts with the account descriptions, account
groupings, and grouping code assignments. Only one trial balance can be selected as the
overriding list.
8. In the Balance field, select the balance type to consolidate by. All current balance types
appear.
9. To add more subsidiary trial balances, click Add and repeat steps 4 through 8.
10. To remove a subsidiary trial balance that you do not want to consolidate, highlight the
trial balance row and click the Remove button.
11. Select the basis to consolidate the subsidiaries by:
§
§
§
Consolidate based on Groups. The groups from the subsidiaries become the
account numbers in the consolidated trial balance.
Consolidate based on Subgroups. The group + subgroup from the subsidiaries
become the account numbers in the consolidated trial balance.
Consolidate based on Account Detail. The account numbers from the subsidiaries
become the account numbers in the consolidated trial balance.
Note: Once the consolidation has been performed, the consolidation basis
cannot be changed during subsequent consolidations.
Important: If the consolidation was performed by account groups or
subgroups, verify that all subsidiary accounts have been grouped.
12. Select the place to round the account balances to in the Round balance to the nearest
field. The choices are $1, $10, $100, or $1,000. This option rounds each account
balance up or down to the level selected. If you select to round the balances, an account
with the index number of Round and the description of Rounding Account is
automatically created in the consolidated trial balance to post the net difference to.
13. Select the number of prior periods you want to gather during the consolidation. This
information displays in the comparative columns of the consolidated trial balance.
14. Click OK to consolidate the subsidiary trial balances. The consolidated trial balance now
has a column for each subsidiary that was selected for consolidation. These columns
appear before the PRE-CONSOL column, and the sum of the columns appears in the
PRE-CONSOL column.
7 - 83
Chapter
7
Using the Trial Balance
Reconsolidating Subsidiary Trial Balances
If you need to make changes to subsidiary data, open the subsidiary trial balance and make
your changes. Then reconsolidate the consolidated trial balance, so the changes flow to it.
Upon reconsolidation, subsidiary information is overwritten instead of appended to.
Therefore, any accounts at the detail level that have been added, modified, or deleted at the
subsidiary level are added, modified, or deleted in the consolidated trial balance. Any work
done prior to the reconsolidation is saved, such as eliminating journal entries, reports, TB
links, etc.
Note: During reconsolidation, Engagement automatically resets the Number of
prior periods field to zero to avoid data loss. When you choose to reconsolidate
prior period balances, Engagement overwrites the existing prior period data
with the data you are currently consolidating.
Creating Consolidated Reports
ProSystem fx Engagement generates a consolidated report, based on the subsidiary data
that is gathered.
To create a consolidated report, do the following:
1. From the trial balance window, select Engagement/Create Reports/Consolidated Reports.
2. Select the report options, as desired. These options are the same as those for regular
trial balance reports. Refer to Creating Consolidated Trial Balance Reports on page 7-75
for information.
3. Click OK to create the report. Like other ProSystem fx Engagement trial balance reports
you can customize this report in Excel.
Adding Journal Entries to a Consolidated Trial Balance
Two types of journal entries are available in a consolidated trial balance: Proposed Journal
Entries and Eliminating Journal Entries. These journal entries are added using the same
procedures as journal entries in the trial balance. For more information on adding these
journal entries, see Creating Journal Entries on page 7-60.
Write Up Trial Balance
ProSystem fx Engagement uses the write up trial balance as a means to enter client
transactions. There are two methods to enter transactions for the current period: write up
journals and client journal entries (CJE).
Engagement provides 11 default write up journals to help you organize the transactions.
You can rename or delete the default journals. You can also add as many new journals as
you want. The amounts from the write up journals appear in the trial balance in the CJE
column.
Another way to record the transactions for the current period is to use the journal entry
area of the program. In a write up trial balance, there is a journal entry type CJE. You can
use CJEs to enter the transactions for the current period. The amounts appear in the CJE
column of the trial balance.
7 - 84
Using the Trial Balance
Chapter
7
You can only use one of the these methods at a time in a trial balance. Once you enter data
in a write up journal or in a client journal entry, you are prevented from entering data using
the other method.
Note: You must be the Current Editor of the write up trial balance in order to enter
current period transactions.
Creating a Write Up Trial Balance
To access the features in ProSystem fx Engagement that allow you to enter transactions in
write up journals or in client journal entries, you must start with a write up trial balance
template.
To create a write up trial balance, follow these steps:
1. In the Binder window, click the workpaper tab where you want to put the trial balance.
2. Do one of the following:
§
§
§
Right-click the tab and select New Trial Balance.
From the File menu, select New, then Trial Balance.
Click the New Trial Balance toolbar button.
The New Trial Balance dialog displays.
3. Use the arrows to scroll to the right and click the Write Up tab.
4. Click the Write Up Trial Balance template and then OK to open the Workpaper Properties
dialog.
5. Complete the top of the dialog as follows:
§
§
In the Index # field, type an index number for the trial balance workpaper. This is
an optional field provided to help you organize workpapers and provide a means to
reference the workpapers. It also is necessary if you want to insert a workpaper
reference link to this workpaper.
In the Name field, type a name for the trial balance. This is a required field. You
can use the default name, which is the name of the template, or you can type a
new name. Do not use the following characters: ‘ | : “ , ( ).
7 - 85
Chapter
7
Using the Trial Balance
Important: The trial balance name that you enter in this field displays in
the formulas that link your trial balance data to workpapers. See Chapter
9, Using Excel, and Chapter 10, Using Word, for this analysis. The
formulas do not change if you rename your trial balance. Therefore,
choose a suitable name in this field that you will recognize when reviewing
your formulas.
6. Click OK.
Setting Up Write Up Trial Balance Columns
The write up trial balance starts with the following columns in the current view:
§
§
§
§
§
§
§
§
§
§
§
§
Account. This column displays the account number.
Description. This column displays the account description.
BEGIN. The beginning balance column. When you roll forward a binder to the next
period, the ending balances from the prior period appear in this column. When you
roll a binder forward to a new year, the balance sheet accounts start with the
prior period’s ending balances and the income statement accounts start with zero.
Net income or loss for the year is posted to the retained earnings account during
the roll forward.
JE Ref #. Displays the journal entry reference number, which relates to either the
write up journal or client journal entries used to post the detail transaction. If you
use the write up journals, the abbreviation for the journal and the reference
number displays. If you use the client journal entries, CJE and the journal entry
number display.
CJE. Displays the current period transactions that were entered in either the write
up journals or the client journal entries. You can select to show the summary or
the detail of the entries.
UNADJ. Displays the unadjusted balance, which is the sum of the beginning
balance column plus the CJE column
JE Ref #. Displays the Journal Entry Reference Number, which relates to the
reclassifying journal entries posted.
AJE. Displays the posted adjusting journal entries.
ADJ. Displays the adjusted balance column, which is the sum of the unadjusted
balance plus the AJE column.
RJE. Displays the posted reclassifying journal entries.
Final. Displays the sum of the adjusted balance plus the RJE column.
WP Ref. A column for inserting workpaper references.
You can add more columns, such as percent variance, dollar variance, and tax balance
columns. For more information, see Setting Up Trial Balance Columns and Views on
page 7-14.
To set up the accounts and beginning balances for the write up trial balance, see
Converting and Importing Trial Balance Data on page 7-20 or Adding, Modifying, and
Deleting Trial Balance Accounts on page 7-45.
7 - 86
Using the Trial Balance
Chapter
7
Using Write Up Journals
ProSystem fx Engagement provides 11 default write up journals to help you organize the
different types of transactions. You can rename or delete the default journals.
The amounts from the write up Journals appear in the trial balance in the CJE (Client
Journal Entry) column. All default journals behave the same—only the name of the journal is
different.
To use the write up journals, do the following:
1. Open the write up trial balance (see Opening the Trial Balance on page 7-10).
2. Do one of the following:
§
§
Select Engagement/Journal Entry/Write Up Journal Entry.
Click the Write Up Journal Entry button on the Engagement toolbar.
The Write Up Journal Entry dialog displays.
3. From the Trial Balance drop-down list, select the write up trial balance you want to post
the transactions to.
4. From the Journal drop-down list, select the type of write up journal you want to use to
enter the transactions.
5. If you want to modify the abbreviation and/or journal name, delete an existing write up
journal, or add a new write up journal, click the Add/Edit Journals button. Make the
desired change and click Close.
7 - 87
Chapter
7
Using the Trial Balance
6. Click Options to set the options for the active journal. The Options dialog displays.
7. Select the options and click OK.
8. Click the New button to start entering in the journal. A new row appears in the journal.
The following fields display:
§
§
§
§
§
§
§
Date. The default date is based on the setting in Options. You can accept the
default or change it.
Ref. The reference number is also based on the setting in Options. You can accept
the default or type over it.
Transaction. Type the description of the detail transaction.
Account #. Enter the account number. You can type the account number or open
the drop-down list by pressing 4. You can set the account number and
description to repeat from the row above in the Options.
Account Description. The account description defaults to that entered for the
account number selected.
Debit. Enter the debit amount for this transaction, if applicable.
Credit. Enter the credit amount for this transaction, if applicable.
A running total of Debits and Credits displays at the bottom of the window. Also,
each new row added in the journal automatically defaults an amount to balance
the journal. You can accept this amount or type a different amount.
Tip: You can press
the journal.
a or d to advance to the next cell in the row of
9. If you want to delete an existing row in the journal entry, highlight the row and click the
Delete button.
10. Click Close to finish entering transactions.
7 - 88
Using the Trial Balance
Chapter
7
Creating Write Up Reports
ProSystem fx Engagement provides three transaction reports to display the information
entered in the write up journals: Write Up Detail Report, G/L Current Period Report, and G/L
YTD Report.
Write Up Detail Report
This report shows the detail of the entries in the selected journal. The columns in the report
are the same as in the journal.
To create a write up detail report, do the following:
1. Open the write up trial balance (see Opening the Trial Balance on page 7-10).
2. Select Engagement/Create Reports/Write Up Reports/Write Up Detail Report.
The Create Write Up Journal Report dialog displays.
3. Select the trial balance from the drop-down list.
4. Check the boxes for the specific write up journals you want to create reports for. To
select all journal types, click Select All. Click Unselect All to clear all check boxes.
5. Click OK to create the report(s). The report is created and filed in the Unfiled Workpapers
tab in the binder.
G/L Current Period Report
This report shows the accounts in the trial balance and their beginning balances, transaction
amounts, and ending balances for the current period only. The G/L Current Period Report
generates detail information for both annual and non-annual binders.
To create the G/L Current Report, do the following:
1. Open the write up trial balance (see Opening the Trial Balance on page 7-10).
2. Select Engagement/Create Reports/Write Up Report/G/L Current Report. The Select
Journal Entry dialog displays.
3. Select the journal entry types to display in the report. When you select a journal entry
type, all preceding journal entry types are automatically selected.
4. Click OK. The report is created and filed in the Unfiled Workpapers tab in the binder.
7 - 89
Chapter
7
Using the Trial Balance
G/L YTD Report
This report shows the accounts in the trial balance and their beginning balances, transaction
amounts, and ending balances for all periods in the fiscal year. The G/L YTD Report
generates detail information for annual binders only.
To create the G/L YTD Report, do the following:
1. Open the write up trial balance (see Opening the Trial Balance on page 7-10).
2. Select Engagement/Create Reports/Write Up Report/G/L YTD Report. If the write up trial
balance is in an annual binder, the Select Journal Entry dialog displays.
Important: If the write up trial balance is in a non-annual binder, a message
displays warning that the report will contain write up journal entries only. Click
OK to generate the report with write up journal entries only.
3. Select the journal entry types to display in the report. When you select a journal entry
type, all preceding journal entry types are automatically selected.
4. Click OK. The report is created and filed in the Unfiled Workpapers tab in the binder.
Creating Client Journal Entries
You can also record transactions for the current period with the Journal Entry. In a write up
trial balance, there is a journal entry type CJE (Client Journal Entry). You can use client
journal entries to enter the transactions for the current period. The amounts appear in the
CJE column of the trial balance.
To create a client journal entry, do the following:
1. Open the Journal Entry Detail window as follows:
§
§
§
From the Binder window, select Trial Balance/Add Journal Entry.
From the trial balance, Excel, or Word window, select Engagement/Journal
Entry/Add Journal Entry.
From the trial balance, Excel, or Word window, click the JE Summary button on
the Engagement toolbar, select the trial balance from the drop-down list, and then
click the New button.
2. If you selected the Add Journal Entry option in step 1, select the write up trial balance
that you want to post the journal entry to from the Trial Balance drop-down list.
3. In the Type field, select the Client Journal Entries option.
4. Complete the Journal Entry as normal. For more information on how to create journal
entries, see Creating Journal Entries on page 7-60.
The amounts posted in the client journal entries appear in the write up trial balance in the
CJE column. You can choose to show the detail of the journal entry in the trial balance.
The regular trial balance reports print the client journal entries. For more information on how
to create trial balance reports, see Creating Trial Balance Reports on page 7-66.
7 - 90
Using the Trial Balance
Chapter
7
Using the Tax Software Interface
You can export trial balance data to ProSystem fx Tax, Global fx Tax, RIA GoSystem Tax,
and Lacerte. When you export trial balance data, the data is formatted so that it can be
imported directly to the tax software or bridge the trial balance with the tax software.
Notes:
§
§
§
§
You must be the Current Editor of the trial balance to export to ProSystem fx Tax or
Global fx Tax.
Trial balance export configurations are transferred to other binder staff members
when the binder is synchronized.
When a grouping has been selected for expanded M-3 processing in the Account
Groupings dialog, Engagement automatically transfers the M-3 balances. The system
also defaults to the Federal tax balance and disables the Balance field. The exception
for this is the consolidated trial balance. With the consolidated trial balance, you need
to transfer the pre-consolidated balance that is based on the Federal tax balance.
Before exporting the trial balance data, verify that you have assigned accounts to
their proper tax groupings. See page 7-58 for instructions on how to group accounts
into grouping lists.
Tip: We recommend you import only trial balance data that is from the Current
Editor copy of the trial balance.
Exporting a Trial Balance to ProSystem fx Tax or Global fx Tax
You can export a trial balance to ProSystem fx Tax using G/L Bridge or Dynalink. If you are
going to export a trial balance using Dynalink, you must update your trial balance-specific
account groupings to the 2002 or later ProSystem fx Tax groupings. Use the Tax Grouping
Update Wizard to update the groupings (see page 7-93).
G/L Bridge Overview
When you export using G/L Bridge, a COMPFILE.TXT export file is created. You import the
COMPFILE.TXT file into a tax return using File/Import/G/L Bridge in Tax Preparation. When
importing, you can select which ProSystem fx Engagement trial balance COMPFILE.TXT file
you want to import to the tax software. If you make last minute changes to the trial balance
after exporting to G/L Bridge, recreate the export file and import it to the tax return again.
Notes:
§
§
If you are using a consolidated trial balance with an M-3 enhanced grouping, only G/L
Bridge can be used to transfer balances to a return.
If you are using the generic tax groupings provided with ePaceENGAGEMENT Version
2.5 or earlier or if you have not updated your ProSystem fx Tax-specific tax
groupings to the 2002 or later groupings, you must use the G/L Bridge option to
export trial balance data to ProSystem fx Tax. In addition, you need to select Other
(Generic Processing) as the accounting system when importing the file in Tax
Preparation.
7 - 91
Chapter
Using the Trial Balance
7
With ProSystem fx Engagement, the tax interface mapping capabilities with ProSystem fx
Tax are expanded to include the new M-3 data items for "Book if Different," "Temporary
Difference," and "Permanent Difference" amounts for tax year 2006 and later processing of
C Corporation (Form 1120), Partnership (Form 1065), and S-Corporation (Form 1120S).
The expanded data items on the Income and Expense Interview Forms A-1 through A-4 and
E-1 are also included in the new tax interface mapping. These new boxes represent
additional amounts for each tax line item. In addition to "Amount" (or tax balance), there
are now new data items for "Book if Different," "Temporary Difference," and "Permanent
Difference" amounts.
For instructions on importing G/L Bridge files into a tax return, see the ProSystem fx Tax
User Guide, Chapter 5, Import/Export Functions.
Dynalink Overview
When you configure an export for Dynalink, an XML file is created. The Dynalink is
established when you import the file using the File/Import/Dynalink option in Tax
Preparation.
Note: If you are using a consolidated trial balance with an M-3 enhanced grouping,
only G/L Bridge can be used to transfer balances to a return.
Before you can import using Dynalink, do the following:
§
§
Update your ProSystem fx Tax-specific tax groupings to the 2002 or later ProSystem
fx Tax groupings and create a list of the clients whose trial balances you have
configured for Dynalink.
Configure ProSystem fx Engagement as an Accounting Bridge in ProSystem fx Tax
and create a list of the clients whose trial balances you have configured for Dynalink.
When importing using Dynalink, select the Engagement client and the tax return to import
to. If multiple versions of a return exist, select the version to which you want to import.
For ProSystem fx Tax, once you have performed the initial import using Dynalink, you can
use the Quiklink update feature to update your return. When Quiklink is activated, changes
made to the trial balance flow directly to the tax return and you can jump between an
interview form or worksheet box in the tax return and its corresponding tax group in the
trial balance.
Note: Global fx Tax waits for you to manually install updates from your desktop.
Global fx Tax does not push the updates dynamically.
With ProSystem fx Engagement, the tax interface mapping capabilities with ProSystem fx
Tax are expanded to include the new M-3 data items for "Book if Different," "Temporary
Difference," and "Permanent Difference" amounts for tax year 2006 and later processing of
C Corporation (Form 1120), Partnership (Form 1065), and S-Corporation (Form 1120S).
The expanded data items on the Income and Expense Interview Forms A-1 through A-4 and
E-1 are also included in the new tax interface mapping. These new boxes represent
additional amounts for each tax line item. In addition to Amount (or tax balance), there are
now new data items for Book if Different, Temporary Difference, and Permanent Difference
amounts.
7 - 92
Using the Trial Balance
Chapter
7
For complete instructions on importing to a tax return using Dynalink, see the ProSystem fx
Tax User Guide, Chapter 5, Import/Export Functions. For instructions on configuring an
accounting bridge and updating Quiklink, see pages 7-103 and 7-105 of this User Guide.
Using the Tax Grouping Update Wizard Utility
The Tax Grouping Update Wizard updates the account groupings in ProSystem fx
Engagement to 2002 or later groupings. The update includes only those local file room
binders to which the staff member running the update is assigned, and it updates only the
trial balances for which the staff member is the Current Editor.
With the ProSystem fx Engagement Tax Grouping Update Wizard, administrators can update
trial balances that are checked in to the central file room. Administrators can do this only if
the binder's current period beginning date matches the year selected in the wizard for the
trial balance.
Note: In order for a trial balance to be updated from the Central File Room using
the Tax Grouping Update Wizard, the trial balance must be checked in.
Use the ProSystem fx Engagement Tax Grouping Update Wizard to update a ProSystem fx
Tax grouping to the current Tax year.
§
§
§
§
Up to 99 rental income and expenses to C Corporation (Form 1120), S Corporation
(Form 1120S), Partnership (Form 1065) and Individual (Form 1040) returns.
Up to 99 farm property income and expenses to C Corporation (Form 1120), S
Corporation (Form 1120S), Partnership (Form 1065) and Individual (Form 1040)
returns.
Up to 99 business income and expenses to Individual (Form 1040), Schedule C.
Book balance, temporary difference, permanent difference and tax balance to C
Corporation (Form 1120), Partnership (Form 1065), and S-Corporation (Form 1120S),
Schedule M-3.
To update your ProSystem fx Tax-specific tax groupings, do the following:
1. Close all ProSystem fx Engagement windows.
2. Select Start/Programs.
3. From the ProSystem fx Engagement menu, select Tax Grouping Update Wizard Utility.
4. After verifying the information on the Welcome to the Tax Grouping Update Wizard
dialog, click Next to continue.
5. On the Tax Vendor and Tax Year of Binders to Update dialog, select ProSystem fx from
the Tax vendor drop-down list.
6. Select the tax year from the Tax year drop-down list.
7. Click Next to open the Binders to Update dialog. All binders in the local file room with
binder properties' Period 1 Beginning Date showing the same as the tax year are listed
and selected for update.
7 - 93
Chapter
7
Using the Trial Balance
8. If you want to select binders to update, remove the check from the Update all binders
box and click the boxes next to the binders you want to update. When you select a
binder, all trial balances within that binder are selected.
Note: If you are not the Current Editor of a trial balance, the trial balance is
disabled and is not updated.
9. Click Next to open a dialog summarizing your selections.
10. Click the Back button to change your selections. Click Finish to start the tax grouping
update.
11. When the update completes, the Tax Grouping Update Log displays the date and time of
the update, the data path, client ID and name, binder ID and name, year-end date, trial
balance Name and Index, and the update status of all trial balances included in the
update.
The log also lists the tax year, tax vendor, and whether the update was successful or
unsuccessful for a specific trial balance. An update is unsuccessful if the user running
the update is not the Current Editor of the trial balance, the detail accounts are assigned
to the non-ProSystem fx Tax groupings, or the trial balance has already been updated.
7 - 94
Using the Trial Balance
Chapter
7
The log displays in Microsoft Notepad, and you can use the available Notepad menu
commands to print the log, change the font or word wrap, and find text. The log is
stored in the Pfx Engagement\WM\Workpapers\Staff GUID directory. If additional
updates are run, the information is appended to the log.
Using the Tax Grouping Update Wizard from the Local File Room
To convert your ProSystem fx Tax specific groupings within the local file room, do the
following:
Important: Tax grouping lists in binders that are open will not be updated. Please
close all binders that require updating prior to running the Tax Grouping Update
Wizard.
1. From the local file room, select Tools/Tax Grouping Update Wizard.
2. Click Next. The Tax Vendor and Tax Year of Binders to Update dialog displays.
3. Select ProSystem fx Tax as the tax vendor.
4. Select the tax year from the Tax Year drop-down list.
5. Select whether to assign account classifications to groups/subgroups. You can select
not to assign any account classifications, to assign classifications that already exist in
the trial balance, or to assign all account classifications.
6. On the Binders to Update dialog, annual binders in the local file room whose binder
properties Current Period Beginning Date are the same as the tax year are included and
are selected to be updated. If you want to select a specific binder or binders, remove the
check from the Update all binders box and click the box next to the binders to update.
7. Click Next to display a dialog summarizing your selections.
8. Click Finish to start the tax grouping updates.
When the update is completed, the Tax Grouping Update Log displays the time and date
of the conversion, the data path, binder ID, trial balance name and index, and the status
of all trial balances included in the update.
The log is displayed in Microsoft Notepad and can be edited using any of the available
Notepad menu commands. It is stored in the X:\Pfx Engagement\WM\Workpapers\Staff
GUID directory, where X is the drive where ProSystem fx Engagement is installed.
Information for subsequent updates is appended to the existing log.
Configuring a Trial Balance for Export
You must configure a trial balance correctly so that information is retained during the export.
If the selected trial balance grouping list is eligible and selected for Schedule M-3, up to four
expanded balances are transferred to the return via Dynalink or G/L Bridge.
If the selected trial balance is a consolidated trial balance and the selected grouping list is
eligible and selected for Schedule M-3, expanded balances can only be transferred to the
return via G/L Bridge for ProSystem fx Tax C Corporation, S Corporation, or Partnership
grouping lists.
7 - 95
Chapter
Using the Trial Balance
7
Notes:
§
§
If you are using a consolidated trial balance with an M-3 enhanced grouping, only G/L
Bridge can be used to transfer balances to a return.
Schedule M-3 expanded balances for consolidated trial balances must be in balance
with the individual trial balance. If you have made a change to an individual trial
balance, you must re-consolidate prior to transferring the balance to the return;
otherwise, the balances sent to the return will not be the same as the consolidated
trial balance.
Important: If you are using an M-3 enhanced consolidated trial balance, you must
also transfer the pre-consolidated balance from the consolidated trial balance as
the tax balance. You should not transfer the consolidated balance because it might
include eliminating journal entries. In that case, the total book balance plus
temporary/permanent balances from the individual trial balances would not equal
the tax balance. A consolidated trial balance that is not M-3 enhanced can be
exported to Taxprep using either Dynalink or G/L Bridge. The consolidated balance
must be used for data to transfer accurately.
Configuring a Trial Balance for Export Using Dynalink
Configuring a trial balance for ProSystem fx Tax (Dynalink) export makes the trial balance
available for both Wfx and Gfx import.
Note: If you are using a consolidated trial balance with an M-3 enhanced grouping,
only G/L Bridge can be used to transfer balances to a return.
To export a trial balance using Dynalink, do the following:
1. To export from the Binder window, do one of the following:
§
§
§
Select Tools/Tax Software Interface.
Right-click the trial balance and select Tax Software Interface from the pop-up menu.
Click the Tax Software Interface toolbar button.
To export from the File Room window, highlight the client's binder and do one of the following:
§
§
Select Tools/Tax Software Interface.
Click the Tax Software Interface toolbar button.
The Tax Software Interface dialog displays.
2. If there is more than one trial balance in the binder, select the trial balance from the Trial
balance drop-down list.
7 - 96
Using the Trial Balance
Chapter
7
3. In the Tax software field, select ProSystem fx Tax (Dynalink).
Note: If the selected grouping list is eligible and selected for Schedule M-3 in
the Groupings List Options dialog, Schedule M-3 applicable displays on the
Software Tax Interface dialog. See Creating, Editing, and Deleting Grouping
Lists on page 7-50 for more information.
4. Select the tax year from the Tax year drop-down list.
5. The beginning date defaults to January 1 of the selected tax year. To change the date,
use the drop-down list to select another date from the calendar.
6. The ending date defaults to December 31 of the selected tax year. To change the date,
use the drop-down list to select another date from the calendar.
7. Prior year data is always exported, and the Export prior year box is selected by default.
For example, if the tax year chosen is 2009, data is exported for 2008 and 2009.
8. From the Grouping drop-down list, select the ProSystem grouping list for the tax entity
of the trial balance you are exporting.
9. From the View drop-down list, select the view setup for the trial balance that contains
the balance column you are exporting.
10. From the Balance drop-down list, select the balance column containing the amounts that
you want to export.
Note: Only current period columns are included in the drop-down list.
11. Enter the client's Federal Employer Identification Number (FEIN) in the Employer ID # box. This
number is used as the Employer ID Number in the tax return as well as the Client code for
building the client list when you configure ProSystem fx Engagement as an accounting bridge.
Be sure to use a unique FEIN for each trial balance transferred to Tax Preparation.
7 - 97
Chapter
7
Using the Trial Balance
12. The Save as default for this trial balance box is pre-selected.
Note: You can change the default configuration for this trial balance on a
subsequent export. However, if you change the configuration after you have
imported the trial balance to a tax return, Quiklink/Desktop Updates are
disabled until the trial balance is imported to the tax return again and
Quiklink/Desktop Updates is reactivated.
13. Click OK. The Tax Software Interface Report opens, listing any ungrouped accounts or tax
groups not supported by ProSystem fx Tax. For 2005 and later grouping lists, the Tax
Software Interface Report also lists any group or subgroup balances for which you have not
selected Send to Tax.
14. You can do any of the following with the Tax Software Interface Report:
§
§
§
Select Print to use this report as a reference.
Select Save As to save the tax report as an HTML file that you can print at a later time.
Click Close to exit the report.
Note: For instructions on updating with Quiklink, see page 7-105.
Configuring a Trial Balance for Export using G/L Bridge.
If you are using the generic tax groupings provided with ProSystem fx Engagement Version
2.5 or later, or if you have not updated your ProSystem fx Tax-specific tax groupings to the
2002 or later groupings, you must use the G/L Bridge option to export trial balance data to
ProSystem fx Tax. In this case, select Other (Generic Processing) as the accounting system
when you import the file in Tax Preparation.
If you have updated your tax groupings to 2002 or later and want to use G/L Bridge rather
than Dynalink, select ProSystem fx Engagement as the accounting system when you import
the file in Tax Preparation.
Note: If you are using a consolidated trial balance with an M-3 enhanced grouping,
only G/L Bridge can be used to transfer balances to a return.
To export a trial balance using G/L Bridge, do the following:
1. To export from the Binder Window or File Room Window, do one of the following to
open the Export Trial Balance to Tax Software dialog:
§
§
Select Tools/Tax Software Interface.
Click the Tax Software Interface toolbar button.
If you are in the Binder Window, you can also right-click the trial balance and select Tax
Software Interface from the pop-up menu.
2. If more than one trial balance exists in the binder, select the trial balance from the Trial balance
drop-down list. (Trial balances in the Trash or Conflict section are not included in the list.)
7 - 98
Using the Trial Balance
Chapter
7
3. In the Tax software field, select ProSystem fx Tax (G/L Bridge).
Note: If the selected grouping list is eligible and selected for Schedule M-3 in
the Groupings List Options dialog, Schedule M-3 applicable displays on the
Software Tax Interface dialog. See Creating, Editing, and Deleting Grouping
Lists on page 7-50 for more information.
4. Select the tax year from the Tax year drop-down list. Prior year data is always exported,
and the Export prior year box is checked by default. For example, if the tax year chosen
is 2009, data is exported for 2008 and 2009.
5. From the Grouping drop-down list, select the ProSystem fx grouping list for the tax
entity of the trial balance you are exporting.
6. The Balance field defaults to the Federal Tax Balance column. You can select another
column to be exported, if applicable.
Note: Only current period columns are included in the drop-down list.
7. Enter the client's Federal Employer Identification Number (FEIN) in the Employer ID #
box. If no FEIN is entered, the number is taken from client properties.
8. In the File name box in the Export information section, enter the drive and directory
where you want to save the COMPFILE.TXT file. The path defaults to C:\Documents and
Settings\Name\My Documents\COMPFILE.TXT.
9. If you are the Current Editor of the trial balance, you can check the Save as default for
this trial balance box to save the configuration as the default.
Note: If you change the configuration, recreate the export file and then import
the file to Tax Preparation again.
10. Click OK. The Tax Report dialog opens, listing any ungrouped accounts or tax groups not
supported by ProSystem fx Tax. For 2004 and later grouping lists, also listed in the Tax
Software Interface Report are any group or subgroup balances that you have selected
not to "Send to Tax."
7 - 99
Chapter
7
Using the Trial Balance
11. You can do any of the following with the Tax Software Interface Report:
§
§
§
Select Print to use this report as a reference.
Select Save As to save the tax report as an HTML file that you can print at a later time.
Click Close to exit the report.
Configuring a Trial Balance for Export to GoSystem Tax
Prior year data is automatically included in the GoSystem export file. When you import the
data to GoSystem Tax, you are given the option of merging the prior year data.
You must be a team member assigned to the binder to export a trial balance to GoSystem
Tax. To save an export configuration as the default for a trial balance, you must be the
Current Editor of the trial balance.
To export the trial balance to GoSystem Tax, do the following:
1. To export from the Binder Window or File Room Window, do one of the following to
open the Export Trial Balance to Tax Software dialog:
§
§
Select Tools/Tax Software Interface.
Click the Tax Software Interface toolbar button.
If you are in the Binder Window, you can also right-click the trial balance and select Tax
Software Interface from the pop-up menu.
2. If more than one trial balance exists in the binder, select the trial balance from the Trial
balance drop-down list.
Note: Trial balances in the Trash or Conflict sections are not included in the
list.
3. In the Tax software field, select GoSystem Tax from the Tax software drop-down list.
4. Select the tax year from the Tax year drop-down list.
5. Select the appropriate GoSystem Grouping list.
7 - 100
Using the Trial Balance
Chapter
7
6. The Balance field defaults to the Federal Tax Balance column. You can select another
balance column to be exported.
7. In the Export information section, you can change the default path for the RIA file. The
default path is C:\Documents and Settings\Name\My Documents\Client Name Tax Year
Tax Export.RIA (e.g., CorpABC2003TaxExport.RIA.).
8. If you are the Current Editor of the trial balance, you can check the Save as default for
this trial balance box to save the configuration to be used as the default.
9. Click OK. The Tax Report dialog displays any ungrouped accounts, tax groups not
supported by GoSystem Tax, and grouped accounts with account numbers containing
more than 30 characters. You can do one of the following:
§
§
§
Select Print to use this report as a reference.
Select Save As to save the tax report as an HTML file that you can print at a later time.
Click Close to exit the report.
Configuring a Trial Balance for Export to Lacerte
Note: Lacerte does not allow long file names. Your export file name must be no
more than eight characters for the file name and three characters for the
extension.
You must be a team member assigned to the binder to export a trial balance.
1. To export from the Binder Window or File Room Window, do one of the following to
open the Export Trial Balance to Tax Software dialog:
§
§
Select Tools/Tax Software Interface.
Click the Tax Software Interface toolbar button.
If you are in the Binder Window, you can also right-click the trial balance and select Tax
Software Interface from the pop-up menu.
2. If more than one trial balance exists in the binder, select the trial balance from the Trial
balance drop-down list.
Note: Trial balances in the Trash and Conflict sections are not included in the list.
7 - 101
Chapter
7
Using the Trial Balance
3. In the Tax software field, select Lacerte from the Tax software drop-down list.
4. Select the tax year from the Tax year drop-down list.
5. To export data for both the current and prior tax years, check the Export prior year box.
6. From the Grouping drop-down list, select the appropriate Lacerte Grouping list for the
trial balance.
7. The Balance field defaults to the Federal Tax Balance column. You can select another
column to be exported, if applicable.
8. In the Export information section, the Client ID field defaults to the Engagement Client
ID. You can change the ID, if appropriate.
9. You can also change the default path for the export file. The path defaults to
X:\Lacerte\YYTax\Cdata\Client ID.CBY, where X equals the drive where Lacerte is
installed and YY equals the tax year. In the file extension, C represents the tax entity ©
for Corporation, P for Partnership, etc.) and Y equals the tax year.
10. If you are the Current Editor of the trial balance, you can check the Save as default for
this trial balance box to save the configuration to be used as the default when exporting
this trial balance to Lacerte.
11. Click OK. The Tax Report dialog displays any ungrouped accounts or tax groups not
supported by Lacerte. You can do one of the following:
§
§
§
Select Print to use this report as a reference.
Select Save As to save the tax report as an HTML file that you can print at a later time.
Click Close to exit the report.
7 - 102
Using the Trial Balance
Chapter
7
Linking to ProSystem fx Tax or Global fx Tax
Launching ProSystem fx Tax from Engagement
You can launch up to five installed versions of ProSystem fx Tax (if installed) from the
Binder window in Engagement. Open a binder and select Tax from the Shortcuts bar. See
Shortcut Bar on page 6-32 for more information.
Configuring an Accounting Bridge
If you are going to use the ProSystem fx Tax Dynalink function to export trial balance data,
you need to configure Engagement as an accounting bridge and create a client list of trial
balances configured for export before importing the data to ProSystem fx Tax.
Configuring Accounting Bridges tells ProSystem fx Tax which accounting software you are
using and where it is located.
You can configure Engagement as an accounting bridge by opening Office Manager and
selecting Configure Applications/Accounting Bridges or by opening Tax Preparation and
selecting Options/Interface Options/Accounting Bridges.
Notes:
§
§
§
At this time, ProSystem fx Engagement does not support using Global fx Tax in a
Shared File Room environment.
If you use Global fx Tax, it is not necessary to configure an accounting bridge.
If you are using a consolidated trial balance with an M-3 enhanced grouping, only G/L
Bridge can be used to transfer balances to a return.
To configure the accounting bridge in Tax Preparation, do the following:
1. Open Tax Preparation and select Options/Interface Options.
2. Select Accounting Bridges to open the Accounting Bridges dialog.
7 - 103
Chapter
7
Using the Trial Balance
3. Highlight ProSystem fx Engagement and click Configure to open the Configure Account
System dialog.
4. In the Accounting system path, enter the drive and directory where the Dynalink
processor (Dynalink.exe) is located, typically, C:\Pfx Engagement\WM, or click Browse
to locate the drive and directory.
5. In the Quiklink option section, select the appropriate option to determine your action
when using Quiklink:
§
§
From the first tax line highlighted. Causes you to be returned to the same place in
the tax return where you started when you jumped to the trial balance.
From the last tax line highlighted. Causes you to return to the place in the tax
return that corresponds to the last group highlighted in the trial balance.
6. Click OK to return to the Accounting Bridges dialog and then click Create Client List to
create a list of the clients whose trial balances are configured for export to Dynalink.
Once the client list has been created, return to this dialog to refresh the list when you
configure additional trial balances for export using Dynalink.
Note: The Employer Identification Number entered for the trial balance when
configuring for Dynalink on the Tax Software Interface dialog is the client code
in the client list.
7. Click Close.
7 - 104
Using the Trial Balance
Chapter
7
Updating with Quiklink
When you use Dynalink to import trial balance data to a ProSystem fx Tax or Global fx Tax
return, you can use the Quiklink feature to update the return automatically when you make
changes to the trial balance data.
In ProSystem fx, you can jump from an interview form box in the return to its corresponding
tax grouping balance in the trial balance, or you can jump from the tax grouping balance in
the trial balance to the corresponding box on the interview form. If you are using Global fx
Tax, however, you cannot jump from an interview form box in the return to its
corresponding tax grouping balance in the trial balance.
Notes:
§
§
Global fx Tax waits for you to manually install updates from your desktop. Global fx
Tax does not push the updates dynamically.
For instructions on importing data to a tax return using Dynalink, see the ProSystem
fx Tax User Guide.
To use Quiklink Updates, the following conditions must be met:
§
§
§
§
§
§
The tax year of the return and trial balance must be 2002 or later.
Dynalink processing has been performed at least once.
The binder containing the trial balance is open and unfinalized.
Quiklink Updates must be activated. Running the Dynalink process from Tax
Preparation automatically activates Quiklink Updates. To verify that it is active, or to
deactivate the option, select Trial Balance/Quiklink/Desktop Updates Status in the
Binder Window, or Engagement/Quiklink/Desktop Updates Status in the trial balance
in Word or Excel.
The person using Quiklink/Desktop Updates is the Current Editor of the trial balance.
The tax return must be open on the computer where the changes are being made to
the trial balance.
Note: If Quiklink is active and the tax return is closed when you make a
change to the trial balance that should update the return, a message states that
the return needs to be open for Quiklink to process the change.
You can open the return and click Retry in this dialog to process the changes. If you do
not open the return, your return is not updated and you need to reprocess Dynalink to
reestablish the link between the return and the trial balance.
Quiklink Updates - Engagement to ProSystem fx Tax
Note: If you plan to make a large number of changes to the trial balance, you
should not use Quiklink Updates to update the return. You should reprocess the
trial balance by importing it again using Dynalink.
To update using Quiklink Updates, do the following:
1. Open the tax return in Tax Preparation.
2. Select a binder in the local file room.
7 - 105
Chapter
7
Using the Trial Balance
3. Verify that Quiklink is activated by selecting Trial Balance/Quiklink/Desktop Updates
Status if the Binder window is active, or Engagement/Quiklink/Desktop Updates Status
in the trial balance, Excel, or Word window.
4. The Quiklink Updates Status dialog displays the trial balances available in the binder for
updating with Quiklink Updates.
To deactivate Quiklink Updates for a trial balance, uncheck the box next to it. You must
Dynalink again to turn the option back on.
5. Make the appropriate changes to the trial balance data. To use Quiklink Updates, the
change must affect the balance column configured for Dynalink and an account assigned
to the configured grouping list.
Some of the changes that initiate Quiklink Updates include the following:
§
§
§
Account Changes. Assigning or unassigning an account to the grouping list,
moving an account from one group to another, adding or deleting an account, or
changing an account balance.
Account Balance Change. Changing an account balance in TB Edit mode.
Journal Entry Changes. Entering, editing, or deleting journal entries or write up
journal entries that change the balance configured for Dynalink.
Moving a journal entry to or from a journal entry type that updates the balance
configured for Dynalink.
6. The changed data is transferred to the tax return.
Desktop Updates - Engagement to Global fx Tax
Note: If you plan to make a large number of changes to the trial balance, do not
use Desktop Updates to update the return. Instead, reprocess the trial balance by
importing it again using Dynalink.
To update using Desktop Updates, do the following:
1. Open the tax return in Tax Preparation.
2. Select a binder in the local file room.
7 - 106
Using the Trial Balance
Chapter
7
3. Verify that Quiklink Desktop Updates is activated by selecting Trial Balance/Quiklink
Desktop Updates Status if the Binder window is active, or Engagement/Quiklink Desktop
Updates Status in the trial balance, Excel, or Word window.
4. The Quiklink Desktop Updates Status dialog displays the trial balances available in the
binder for updating with Quiklink Updates.
To deactivate Quiklink Desktop Updates for a trial balance, uncheck the box next to it.
You must Dynalink again to turn the option back on.
5. Make the appropriate changes to the trial balance data. To use Quiklink Updates, the
change must affect the balance column configured for Dynalink and an account assigned
to the configured grouping list.
Some of the changes that initiate Quiklink Updates include the following:
§
§
§
Account Changes. Assigning or unassigning an account to the grouping list,
moving an account from one group to another, adding or deleting an account, or
changing an account balance.
Account Balance Change. Changing an account balance in TB Edit mode.
Journal Entry Changes. Entering, editing, or deleting journal entries or write up
journal entries that change the balance configured for Dynalink.
Moving a journal entry to or from a journal entry type that updates the balance
configured for Dynalink.
Note: Cutting or pasting a subgroup breaks the Dynalink. You must
reestablish the Dynalink by importing again to Global fx Tax. For more
information, see Configuring an Accounting Bridge, page 7-103.
The changed data is transferred to the tax return.
6. Go to File/Import/Desktop Updates to transfer the changed data to the tax return.
7 - 107
Chapter
7
Using the Trial Balance
Jumping from the Trial Balance to the Tax Return in ProSystem fx
To use Quiklink to jump from the trial balance to an open tax return, do the following:
1. Open the tax return in Tax Preparation.
Note: If the tax return is not open and you attempt to use Quiklink, you are
instructed to open the tax return and retry the Quiklink.
2. In the local file room, select the binder containing the trial balance that has been
imported to the return using Dynalink.
3. Open the trial balance.
4. Highlight any tax code cell, or any cells adjacent to the tax code, from the Group
Summary worksheet of the trial balance.
5. Do one of the following:
§
§
Click the Quiklink toolbar button.
Select Engagement/Quiklink to ProSystem fx Tax.
You are taken to one of two places in the tax return:
§
If you selected From the first tax line highlighted when configuring ProSystem fx
Engagement as an accounting bridge, you return to the interview form and box the
cursor was on when you initiated Quiklink.
If you did not initiate Quiklink from an interview form box, the return opens and
the selected view displays when the process completes.
§
If you selected From the last tax line highlighted when configuring ProSystem fx
Engagement as an accounting bridge, you return to the place in the tax return
corresponding to the last tax group highlighted in the trial balance.
If a tax group is not highlighted in the trial balance, the return opens and the
selected view displays when the process completes.
Jumping from the Tax Return to the Trial Balance in ProSystem fx
To use Quiklink to jump from an open tax return to the trial balance, do the following:
1. Open Engagement.
Note: If Engagement is not open, the Engagement Login dialog displays. After
you log in, the local file room window opens and you can open the appropriate
trial balance and Quiklink again.
2. In the local file room, open the trial balance that has been imported to the tax return
using Dynalink.
Note: If the trial balance is not open and you attempt to use Quiklink, you are
instructed to open the appropriate trial balance and Quiklink again.
7 - 108
Using the Trial Balance
Chapter
7
3. In Tax Preparation, do one of the following:
§
§
Click the Quiklink toolbar button.
Select File/Import/Quiklink.
If the cursor was on a specific interview form box, you jump to the corresponding row
(group) in the Account Group Summary of the trial balance.
If the cursor was not on a specific interview form box, you jump to the View, Group, and
Column configured for export to Dynalink.
Note: The Quiklink button is not part of the default Tax Preparation toolbar. To
facilitate the Quiklink jump, we recommend that you add the button to the
toolbar using the Tax Preparation Options/Customize Toolbar option.
Reprocessing with Dynalink
The following circumstances cause the link between the tax return and the trial balance to
become disconnected. You must reprocess the trial balance using Dynalink should the
following occur.
§
§
§
Trial balance data is imported with the Import Conversion Wizard or Paste TB Import.
The trial balance or binder is deleted.
The trial balance is taken over by another staff member.
Note: There is no need to reprocess if another staff member becomes the
Current Editor through check in and check out of the trial balance during
synchronization. In this case, the trial balance and tax return remain linked.
§
§
§
§
§
§
§
§
§
§
§
The binder is rolled forward or you create a new binder by copying from an existing
binder. The Dynalink/Quiklink links are disconnected in the new binder. You must
configure for Dynalink on the Export Trial Balance to Tax Software dialog for the new
binder. The linkage in the original binder remains intact.
When you make any changes to the Tax Software Interface dialog.
The Binder Properties period information is modified.
The Federal Tax balance is the balance selected for Dynalink and the formula for
calculating the balance is changed in TB Column Setup.
The grouping list ID used in the export to Dynalink is renamed or deleted.
The View chosen for the Dynalink export configuration is deleted or the balance
column is removed from the View chosen for configuration.
For a consolidated trial balance, the consolidation is processed again.
The Quiklink Updates Status option is deactivated.
If Quiklink Updates is on and you make a change to the trial balance that affects the
tax return (and the tax return in Tax Preparation is not open), the Dynalink breaks if
you click Cancel on the warning message.
You attempt to update an excessive number of tax lines in the tax return.
A grouping list is imported in the Account Grouping window, and it replaces the
grouping list that was configured for Dynalink.
7 - 109
Chapter
Using the Trial Balance
7
§
If you delete a binder in your local file room (and you are the Current Editor of a trial
balance that is Dynalinked), then the binder is brought back into your local file room
through one of the following:
—
—
—
—
§
a sync with another user
a sync with the Central File Room
through Receive Binder Package
through Restore Binder
If a central file room is deleted, (where there is a binder with a checked-out,
Dynalinked trial balance) and the staff member with the trial balance checked out
syncs his or her local file room binder with another local file room or a central file
room, or receives a binder package of the binder.
Using the ProSystem fx Profit Driver Interface
You can import ProSystem fx Engagement trial balance data into ProSystem fx Profit Driver.
ProSystem fx Profit Driver is a financial analysis tool that lets you stress test data, plot
future directions, create projections, and design "what if" scenarios for your clients. You
can then compare the different Profit Driver financial data files you create in Key
Performance Indicator, which is the companion software to Profit Driver.
You can store the files created in Profit Driver and Key Performance Indicator, as well as
any of the reports produced in Profit Driver, in a client's binder in ProSystem fx
Engagement.
All Profit Driver and Key Performance Indicator files and reports can be opened within their
Engagement binder as ordinary Engagement workpapers.
In order to import a ProSystem fx Engagement trial balance into Profit Driver, you must use
a Profit Driver account grouping list to group accounts so that the data can be read and
interpreted correctly by Profit Driver.
This section explains how to import Profit Driver account grouping lists into an Engagement
trial balance, modify a Profit Driver account grouping, and import Engagement trial balance
data into Profit Driver.
Importing a Profit Driver Account Grouping List
Profit Driver imports current and prior period subgroup balances and descriptions from a trial
balance. To ensure that the data imports correctly, you must use a Profit Driver grouping
list template.
The groups in the grouping list correspond to the main line items in Profit Driver and the
subgroups correspond to the detail line items. Ten subgroups are available for each group.
To import a Profit Driver Account Grouping, do the following:
1. From the File Room window, select the binder containing the trial balance you want to
open. Then do one of the following:
§
§
§
Select File/Open Trial Balance.
Right-click and select File/Open Trial Balance from the pop-up menu.
Click the Open Trial Balance toolbar button.
7 - 110
Using the Trial Balance
Chapter
7
In the Binder window, do one of the following:
§
§
Select File/Open Trial Balance.
Click the Open Trial Balance toolbar button.
If there is only one trial balance within a binder, the trial balance opens. If there is more
than one trial balance within a binder, the Open Trial Balance dialog displays so you can
select the trial balance to open.
2. Select Engagement/Account Groupings.
3. Click Options to open the Grouping List Options dialog. Any templates you have already
imported display in the list.
4. Click Import to display the Open dialog.
The Look in field defaults to the directory location specified in the
Tools/Options/Templates dialog and displays the account grouping template folders.
5. Double-click the Profit Driver folder, select the template to use in the trial balance, and
click Open.
6. The template is listed on the Grouping List Options dialog.
7 - 111
Chapter
Using the Trial Balance
7
Click Close to return to the Account Grouping dialog. The new grouping list's account
groups and subgroups display in the right pane after it is selected from the drop-down
list.
Modifying a Profit Driver Account Grouping List
The groups in a Profit Driver grouping list correspond to the main line items in Profit Driver.
The subgroups correspond to the detail line items Profit Driver uses.
Each group has ten subgroups. All groups and some subgroups have pre-defined items that
match the line items in Profit Driver. Additional detail line items available for further
customization are reflected as subgroups with the name <description>.
Groups and subgroups can be renamed to fit the needs of an Individual or industry, with the
exception of the first subgroup within each group (ID of xxx-01). This subgroup
corresponds to a balancing detail line item in Profit Driver, the name of which cannot be
changed. Therefore, any customization of the name made in the grouping list is not
reflected when the data is imported into Profit Driver.
Note: Any accounts that are inadvertently mapped to the group level are added to
the first detail line item line.
Remember the following when modifying a Profit Driver grouping list to ensure that
accounts map correctly for use with Profit Driver:
§
Do not add or delete groups or subgroups within the Profit Driver grouping list.
Note: The value of any accounts mapped to extra subgroups that are
inadvertently added are included in the first detail line item (the subgroup
with the ID of xxx-01) for the group when the data is imported to Profit
Driver.
§
§
Do not cut, copy, or paste a group or subgroup.
Do not change a subgroup's index number. You can change the description of a
group or subgroup.
Note: Use care when changing a subgroup description that has been
pre-defined by Profit Driver as it could affect Profit Driver calculations.
For complete details on how to group accounts to groups and subgroups, see page 7-58.
7 - 112
Using the Trial Balance
Chapter
7
Importing ProSystem fx Engagement Trial Balances
You can link to ProSystem fx Profit Driver by importing a ProSystem fx Engagement trial
balance to Profit Driver. You can use Profit Driver to analyze the trial balance data.
Notes:
§
§
§
You must be assigned to the binder containing the trial balance you are importing.
You must group the trial balance chart of accounts to a Profit Driver grouping list
template.
If ProSystem fx Engagement is not open when you try to import a trial balance, you
are prompted to open it.
To import a trial balance in Profit Driver, do the following:
1. Open Profit Driver and ProSystem fx Engagement.
2. In Profit Driver, select File/New.
3. Select Import Engagement Trial Balance to open the Import Trial Balance dialog.
4. Select the client from those in your local file room.
5. Select the binder containing the trial balance you want to import.
6. Select the trial balance from the drop-down list.
7. Select the Profit Driver account grouping list you have used in the trial balance.
8. Select the current and previous period balances.
9. Click Import.
Note: The Import button does not become available until all fields on the dialog
are completed.
7 - 113
Chapter
Using the Trial Balance
7
Using the ProSystem fx TBRepair Utility
The ProSystem fx TBRepair Utility allows you to rebuild individual trial balances. You must
be the Current Editor of a trial balance to run this utility.
This utility can be used to correct the following database issues:
§
§
§
§
Erroneous formulas are found in the journal entry columns.
Subgroups are out of order in the Subgroup Summary Report.
The following message displays when you access the Account Groupings: "A
problem with the TB database has been detected and the tree for groups, subgroups,
and accounts may not be displayed properly."
You receive any sort of error message when performing trial balance functions.
To run the TBRepair Utility, do the following:
1. Close ProSystem fx Engagement.
2. Select Start/All Programs/ProSystem fx Engagement/Utilities/ProSystem fx Engagement
TB Repair Utility. The TBRepair Utility displays.
3. Click Next on the Welcome dialog.
4. Enter your login name and password and click Next.
5. Click the plus sign (+) to open the local file room.
6. Open the binder containing the trial balance you want to repair.
7. Highlight the trial balance and click Next.
8. If everything shown on the Summary dialog is correct, click Finish to run the utility. To
change an item, click Back.
9. When the utility has finished, a message informs you that the trial balance repair
completed successfully. Click OK.
10. The TBRepair.txt - Notepad details the actions the utility performed on the trial balance.
Select File/Exit to close the dialog.
Note: You may need to refresh the trial balance after running this utility.
7 - 114
C H A P T E R
Managing Workpapers
8
Overview
ProSystem fx Engagement enables you to insert any file (e.g., Word, Excel, Adobe Acrobat)
into an engagement binder. These documents are referred to as workpapers. You can enter
your information into a blank workpaper, or you can create one from a template or from an
existing file.
You can share workpapers with other Engagement staff members. Every staff member can
have a complete set of engagement workpapers in their binder. However, only one copy of
each workpaper can have edit rights. All other copies read-only, which allows the
distribution of workpapers while maintaining the integrity of your work.
This chapter shows you how to create, distribute, and receive workpapers, and how to add
workpapers to a binder.
Adding and Modifying Workpapers
The process of adding and modifying workpapers differs depending on whether you are
creating a new workpaper or inserting an existing one. Once you have added the workpaper
to an engagement binder, you can change its properties at any time.
Adding a New Workpaper from a Template
You can create a new workpaper from the Word and Excel templates ProSystem fx
Engagement provides, from templates your firm has created internally, and from CCH
templates. Engagement also provides blank Word and Excel templates for use in creating a
workpaper. You can add workpapers from the Binder window.
To add a new workpaper from the Binder window:
1. Open the window for the binder where you want to add the workpaper. For instructions
on opening a binder, see Chapter 6, Creating and Using Binders.
2. In the Binder Index pane of the Binder window, click the tab where you want to put the
workpaper. If there are no tabs, you must either create one or add the workpaper to the
Unfiled Workpapers tab. For instructions on creating a workpaper tab, see Chapter 6,
Creating and Using Binders.
8-1
Chapter
8
Managing Workpapers
3. To open the New Workpaper dialog, do one of the following:
§
§
§
Select File/New/Workpaper From Template.
Right-click a workpaper tab icon and select New Workpaper From Template from
the pop-up menu.
Click the New Workpaper from Template button on the toolbar.
The New Workpaper dialog displays.
4. Select the tab containing the type of template that you would like to use.
Note: Use the left and right arrow buttons on the right of the dialog to scroll
through the template tabs. Use the icons at the top right to toggle the template
display between list view and icon view.
Workpaper template tabs include the following:
§
General. This tab includes blank templates for use when creating workpapers from
Microsoft PowerPoint, Microsoft Word, and Microsoft Excel.
The Manual Workpaper template allows you to create an electronic placeholder for
a workpaper that was done manually. You can give the workpaper a name and
reference number so it can be referenced with the electronic workpapers.
Note: If your scanning application is also an OLE Server such as Microsoft
Photo Editor, it displays on the General tab. If you select that template, the
application opens and you can scan the document. To open the scanned
image, double-click the workpaper. The application associated with the file
launches with the scanned image.
§
§
§
§
Engagement Workpapers. This tab includes Word and Excel templates that are
provided with ProSystem fx Engagement. There are 76 Word and Excel templates.
CCH Trial Version. This tab includes CCH evaluation templates. There are 44
evaluation templates available.
ProSystem fx Tax Workpapers. This tab includes templates for exporting
apportionment data to a Corporation or Partnership ProSystem fx Tax return.
Other Tabs. You can create other tabs in this dialog to store your firm’s
templates.
Note: For more information on saving workpapers as templates and adding
folders to store them in, see page 8-34, Saving a Workpaper as a
Template.
5. Select the specific workpaper or workpapers to insert. Press
multiple workpapers for insertion.
8-2
k or b to select
Managing Workpapers
Chapter
8
6. Click OK. The Selected Workpaper Properties dialog displays.
7. In the Index field, enter an index number for the workpaper. This field is optional unless
you link to this workpaper from another workpaper.
Note: If the template was created from a workpaper in an Engagement binder,
the Index field may already be populated with the properties of the original
workpaper.
8. In the Workpaper Name field, enter a name for the workpaper. This field is required.
9. In the Tab Location field, select the location where you want the new workpaper
inserted.
Note: If the template was created from a workpaper in an Engagement binder
that contained the same tab name as the current binder, the Tab Location field
may be populated with the properties of the original workpaper.
10. In the Roll Forward field, select how you want each workpaper handled when the binder
is rolled forward to the next period.
§
§
§
Include in roll forward. The workpaper appears in the new binder created for the
new period. If the workpaper uses date functions or links to the trial balance, the
formulas are updated with the next period’s information. This is the default
selection.
Do not include in the roll forward. The workpaper does not appear in the new
binder created for the next period. You may select this option if the workpaper is
specific to this period and does not apply to the next period. For example,
confirmation workpapers would not be applicable in the next period. This option is
not available for trial balances. In order to maintain links and reports, trial balances
are automatically included in a roll forward.
Replace in the roll forward with placeholder. A placeholder appears in the new
binder for the new period. You can replace the placeholder with a template or
scanned workpaper at a later time.
8-3
Chapter
8
Managing Workpapers
§
Replace in the roll forward with this file. This workpaper does not appear in the
new binder for the next period, but is replaced by another workpaper. You may
select this option with standard workpapers you fill out for the client each year
(e.g., a bank reconciliation workpaper format you want to use again, not including
the data entry).
If you select Replace in the roll forward with this file, the Replace File With... field
becomes active. Browse to the standard workpaper that will replace the current
workpaper.
Note: If you choose to replace the workpaper with another file, the
workpaper's properties retain this option. If you do not want to replace it
in subsequent roll forwards, you must modify the roll forward properties
for the workpaper.
11. Select the check box in the Overwrite column if the new workpaper should overwrite
any current workpaper that has the same workpaper name/index combination.
Overwritten workpapers are moved to the Trash folder with _deleted appended to the file
name.
Tip: Click Edit Multiple Options if several workpapers require the same tab
location, roll forward option, and overwrite selection. The Edit Multiple Options
dialog displays, allowing you to set these options for the selected workpapers.
12. Click OK to create the workpapers from the templates.
Adding ProSystem fx Knowledge Tools Workpapers
To add ProSystem fx Knowledge Tools workpapers, do the following:
1. Open the binder and select the tab into which you want to insert the Knowledge Tools
workpaper.
2. On the binder window toolbar click the New Knowledge Tools Workpaper button, or
select File/New/Knowledge Tools workpaper. The New Knowledge Tools Workpaper
dialog displays.
3. Use the Knowledge Tools Title drop-down list to select the Knowledge Tools title
containing the workpaper(s) you are adding.
8-4
Managing Workpapers
Chapter
8
4. Select the workpaper(s) you want to add. When you highlight a workpaper, its name
displays in the Name section at the top of the dialog, and a description displays in the
Description section to the right.
Note: If you select a workpaper or workpapers and then select a different title
in the Knowledge Tools Title drop-down list, the workpapers are no longer
selected.
5. Click OK. The Selected Workpapers Properties dialog displays, listing all of the
workpapers you have selected.
6. Complete the following fields as applicable:
§
§
§
§
§
§
§
§
§
Index. Enter an index number for each workpaper, if necessary.
Workpaper Name. Required. You can edit the default workpaper name if
necessary.
Tab Location. Select the tab where you want to insert each workpaper. The
default is the tab you selected in step 1.
Roll Forward. Use the drop-down list to select a roll forward option: Do not roll
forward, Include in roll forward, Replace in roll forward with placeholder, Replace
in roll forward with latest Knowledge Tools template, or Replace in roll forward
with this file.
Replace File With. If you select Replace in roll forward with this file as the roll
forward option, select the file that will replace the selected workpaper. You can
enter the file path or click the Browse button to select the file.
Overwrite Existing Workpapers. Select the check box in the Overwrite Existing
Workpapers column if the new workpaper should overwrite any current workpaper
of the same type that has the same workpaper name/index combination.
Keep answers. The Knowledge Tools workpaper will retain the current answers
when the new binder is created. This option is available only when Include in the
roll forward or Replace in the roll forward with latest Knowledge Tools template is
selected.
Keep comments. The Knowledge Tools workpaper will retain the current
comments when the new binder is created. This option is available only when
Include in the roll forward or Replace in the roll forward with latest Knowledge
Tools template is selected.
Merge prior period row customizations. The Knowledge Tools workpaper will
merge the current additions, deletions and text changes to rows when the new
binder is created. This option is available only when Replace in the roll forward
with latest Knowledge Tools template is selected.
Tip: Click Edit Multiple Options if several workpapers require the same tab
location, roll forward option, and overwrite selection. The Edit Multiple Options
dialog displays, allowing you to set these options for the selected workpapers.
7. Click OK.
8-5
Chapter
8
Managing Workpapers
Adding ProSystem fx Knowledge Coach Workpapers
To add ProSystem fx Knowledge Coach workpapers to a binder, do the following:
1. Open the binder and select the tab into which you want to insert the Knowledge Coach
workpaper.
2. From the binder menu, select File/New/Knowledge Coach Workpaper. The New
Knowledge Coach Workpaper dialog displays.
3. Use the Industry list to select the Knowledge Coach title containing the workpaper(s)
you are adding.
4. Select the workpaper(s) you want to add. When you highlight a workpaper, its
description displays to the right.
Notes:
§
§
If you select a workpaper or workpapers and then select a different title in the
Knowledge Coach Title drop-down list, the workpapers are no longer selected.
The first time you insert Knowledge Coach workpapers, the foundation
workpapers (workpapers that are always needed in the binder in order for the flow
of information to work properly between workpapers, and for the binder to comply
with auditing standards) are selected automatically and cannot be deselected.
5. Click OK. The Selected Workpapers Properties dialog displays, listing all of the
workpapers you have selected.
6. Complete the following fields as applicable:
§
§
§
Index. Enter an index number for each workpaper, if necessary.
Workpaper Name. Required. You can edit the default workpaper name if
necessary. Associated values such as audit areas, specialists, service
organizations, etc. will be appended to the workpaper name when applicable.
Tab Location. Select the tab where you want to insert each workpaper. The
default is the tab you selected in step 1.
7. Select from the following Roll Forward options:
§
§
Include in roll forward. The workpaper appears in the new binder created for the
new period. If the workpaper uses date functions or links to the trial balance, the
formulas are updated with the next period’s information. This is the default
selection.
Replace in the roll forward with latest Knowledge Coach content. The Knowledge
Coach content will be replaced by the most up-to-date version when the
workpaper is opened in the new rolled-forward binder.
8-6
Managing Workpapers
Chapter
8
8. Select one of the following roll forward options for Responses:
Note: The following options are not applicable to Excel Knowledge Coach workpapers.
§
§
§
Use response roll forward setting. The Knowledge Coach workpaper will roll
forward each response according to the roll forward setting for that response.
Keep all responses. The Knowledge Coach workpaper will retain the current
responses when the new binder is created.
Reset all responses. The Knowledge Coach workpaper will reset all field cell values
in the new binder.
9. Select the following row customization and program step options, as applicable:
Note: The following options are not applicable to Excel Knowledge Coach workpapers.
§
§
§
§
Merge row customizations. The Knowledge Coach workpaper will merge the
current additions, deletions and text changes to rows when the new workpaper is
created.
Keep Program Steps. The Knowledge Coach workpaper will retain the program
steps. Available only for audit programs.
Keep Custom Program Steps. Program steps you have created and added to audit
workpapers will be kept in the new workpaper.
Keep Modified Program Steps. Modifications you have made to added program
steps in audit workpapers will be kept in the new workpaper.
Tip: Click Edit Multiple Options if several workpapers require the same tab
location, roll forward option, and overwrite selection. The Edit Multiple Options
dialog displays, allowing you to set these options for the selected workpapers.
10. Click OK.
Adding a New Workpaper from an Existing File
To add an existing file as a workpaper, do the following:
1. In the Binder Index pane of the Binder window, click the workpaper tab where you want
to place the workpaper. If there are no tabs, you must either create one or add the
workpaper to the Unfiled Workpapers tab.
2. Do one of the following to open the New Workpaper dialog:
§
§
Select File/New/Workpaper From File.
Right-click a workpaper tab and select New Workpaper From File from the pop-up
menu.
8-7
Chapter
8
Managing Workpapers
§
Click the New Workpaper From File toolbar button.
3. Select the files you want to add. Press k or b to select multiple files. The New
Workpaper dialog contains a standard Windows selection box to choose the drive and
directory containing the file. By default, the dialog displays Microsoft Word (DOC) and
Excel (XLS) files. You can show all files by changing the Files of type field to All Files.
All file formats are supported.
Note: If your scanning application is not an OLE Server application, you can
create the scanned image with your scanning software and save the image as a
file. Then use New Workpaper From File to insert the scanned image. To open
the scanned image, double-click the workpaper file. The application associated
with that file launches with the scanned image.
4. Check the Delete source file after inserting box to delete the original files after the
workpapers are inserted.
5. Click OK. The Selected Workpaper Properties dialog displays.
6. In the Index field, enter an index number for the workpaper. This field is optional unless
you link to this workpaper from another workpaper.
7. In the Workpaper Name field, enter a name for the workpaper. This field is required.
8. In the Tab Location field, select the location where you want the new workpaper
inserted.
8-8
Managing Workpapers
Chapter
8
9. In the Roll Forward field, select how you want each workpaper handled when the binder
is rolled forward to the next period.
§
§
§
§
Include in roll forward. The workpaper appears in the new binder created for the
new period. If the workpaper uses date functions or links to the trial balance, the
formulas are updated with the next period’s information. This is the default
selection.
Do not include in the roll forward. The workpaper does not appear in the new
binder created for the next period. You may select this option if the workpaper is
specific to this period and does not apply to the next period. For example,
confirmation workpapers would not be applicable in the next period. This option is
not available for trial balances. In order to maintain links and reports, trial balances
are automatically included in a roll forward.
Replace in the roll forward with placeholder. A placeholder appears in the new
binder for the new period. You can replace the placeholder with a template or
scanned workpaper at a later time. This option is not available for ProSystem fx
Knowledge Tools workpapers.
Replace in the roll forward with this file. This workpaper does not appear in the
new binder for the next period, but is replaced by another workpaper. You may
select this option with standard workpapers you fill out for the client each year
(e.g., a bank reconciliation workpaper format you want to use again, not including
the data entry).
If you select Replace in the roll forward with this file, the Replace File With... field
becomes active. Browse to the standard workpaper that will replace the current
workpaper.
Note: If you choose to replace the workpaper with another file, the workpaper's
properties retain this option. If you do not want to replace it in subsequent roll
forwards, you must modify the roll forward properties for the workpaper.
10. Select the check box in the Overwrite column if the new workpaper should overwrite
any current workpaper that has the same workpaper name/index combination.
Overwritten workpapers are moved to the Trash folder with _deleted appended to the file
name.
Tip: Click Edit Multiple Options if several workpapers require the same tab
location, roll forward option, and overwrite selection. The Edit Multiple Options
dialog displays, allowing you to set these options for the selected workpapers.
11. Click OK to create the workpapers.
8-9
Chapter
Managing Workpapers
8
Adding a Manual Workpaper
You can create a manual workpaper in a workpaper tab. The manual workpaper points to a
physical workpaper that cannot be inserted into a particular binder.
The manual workpaper allows you to do the following:
§
§
§
§
§
Assign an index number and name.
Sign off as preparer or reviewer.
Add workpaper notes.
Assign a roll forward option.
Assign the workpaper to other staff members.
To add a manual workpaper, do the following:
1. Click a workpaper tab and then do one of the following:
§
§
§
Select File/New/Manual Workpaper.
Right-click and then select New Manual Workpaper from the pop-up menu.
Click the New Manual Workpaper button on the toolbar.
The New Manual Workpaper dialog displays.
2. In the Index # field, type an index number for the workpaper. This field is optional unless
you link a reference to this workpaper from another workpaper.
3. In the Name field, type a name for the workpaper. This field is required.
Note: The workpaper index number and name must be a unique combination
within the binder.
4. On the Roll Forward tab, select the roll forward options.
5. Click OK to insert the manual workpaper in the binder.
8 - 10
Managing Workpapers
Chapter
8
Working With Placeholders
Placeholders represent workpapers that will be added at a later time, either from a file
received from a client or from scanning a physical workpaper.
Inserting a Placeholder
To insert a placeholder, do the following:
1. Click a workpaper tab and then do one of the following:
§
§
§
Select File/New/Placeholder.
Right-click and then select New Placeholder from the pop-up menu.
Click the New Placeholder button on the toolbar.
The New Placeholder dialog displays.
2. In the Index # field, enter an index number for the placeholder. This field is optional
unless you link a reference from another workpaper to the workpaper that will replace
this placeholder.
3. In the Name field, enter a name for the workpaper. This field is required.
Note: The workpaper index number and name must be a unique combination
within the binder.
4. On the Roll Forward tab, select the roll forward options.
5. Click OK to insert the placeholder in the binder.
Replacing a Placeholder
When you have access to the workpaper to be inserted, you can replace the placeholder
with either a saved file or a scanned file.
To replace a placeholder, do the following:
1. Right-click the placeholder to be replaced.
2. Select Replace Placeholder. The Placeholder Properties dialog displays.
8 - 11
Chapter
Managing Workpapers
8
3. Do one of the following:
§
§
If the workpaper is a saved file, click Browse and select the file.
If you are scanning the workpaper, select Replace the placeholder with file from
scanner.
4. Click OK. Depending on your selection, one of the following occurs:
If you selected a saved file to replace the placeholder, the New Workpaper from File
dialog displays. See Inserting a Workpaper from an Existing File on page 8-7.
If you selected a file from a scanner to replace the placeholder, the New Workpaper from
Scanner dialog displays. See Adding a Scanned Document as a Workpaper on page
8-14.
Adding a ProSystem fx Tax PDF File
You can add a ProSystem fx Tax return file in PDF format to an Engagement binder. To
save tax return PDF files, do the following:
§
§
Open ProSystem fx Tax Preparation and configure the Tax Preparation Interface
Options to save PDF files to ProSystem fx Engagement using Options/Interface
Options/PFX Engagement/CPADocument Manager. See page 8-15, Configuring the
Interface Option for more information.
Print the return in Tax Preparation and select To PDF file or To PDF file and to printer
as the print destination. Each time you save a return to PDF, the Engagement Insert
Workpaper Wizard walks you through selecting the binder and workpaper tab where
you want to store the file.
If you print multiple PDF versions of the same return to a binder, the information is checked.
If it is still valid, you are given the choice of overwriting the existing file or creating a file
with a new name.
Creating a PDF Workpaper from a Windows Application
You can use any Windows application to create a PDF file that is inserted as a workpaper
into the binder of your choice.
Before you create the PDF, verify the following:
§
§
You are logged in to Engagement.
You have the right to create new workpapers.
Note: If you do not have the right to create new workpapers, you must use the
append option.
1. Select the Print command from any Windows application.
2. Select Engagement PDF Converter from the printer options list and click OK.
3. Click Next on the Insert Workpaper Wizard Welcome dialog.
If Engagement is not already open, a dialog prompts you to enter your login name and
password.
8 - 12
Managing Workpapers
Chapter
8
4. Click Next to open the Select Documents to Insert dialog.
5. Select the document(s) to insert into a binder by doing one of the following:
§
§
§
Check the box next to the document name.
Click Select All to select all the documents listed.
Click Unselect All to deselect all the documents listed.
6. Click Next.
7. On the Select Client and Binder dialog, open the File Room icon and then select the
appropriate client folder. Click Next to continue, or click Finish to display the Summary
dialog. If you click Finish, the workpaper is placed in the Unfiled Workpapers tab.
8. Enter a name for the workpaper on the Create Workpaper Index and Name dialog.
The workpaper name defaults to the name of the file. Enter an index number if you are
linking a reference to this workpaper from another workpaper or for identification
purposes.
8 - 13
Chapter
8
Managing Workpapers
Notes:
§
§
The index number and name must be a unique combination within the binder.
The Overwrite and Existing Index\Workpaper columns are disabled when inserting
from Pfx Engagement PDF Converter, Outlook, or Fixed Assets.
9. Click Next to continue to the Select Tab in Binder dialog, or click Finish to skip to the
Summary dialog. If you click Finish, the PDF is placed in the Unfiled Workpapers tab.
10. In the Select Tab in Binder dialog, click Modify Tab to change the tab location.
Otherwise, the workpaper is in the Unfiled Workpapers tab.
11. Click Finish to open the Summary dialog. Do one of the following:
§
§
§
§
§
Click
Click
Click
Click
Click
Back to change any information you have entered.
Insert to save the PDF to the selected binder.
Print to print the summary report.
Save As to save the summary report to a file.
Cancel to stop the workpaper insertion process.
Adding a Scanned Document as a Workpaper
This feature allows for consolidated workpaper management by integrating your hard-copy
documents into Engagement. You must have a TWAIN-compliant scanner installed and
connected to your computer to insert a workpaper from a scanner.
1. Perform one of the following actions to display the New Workpaper from Scanner dialog:
§
§
§
Go to File/New/Workpaper from Scanner.
Right-click a tab and select New Workpaper from Scanner from the pop-up menu.
Click the New Workpaper from Scanner icon from the toolbar.
2. Select your scanner from the Scanner drop-down list and click Scan. Your scanner user
interface opens.
3. Adjust settings as necessary and begin the scan process according to your scanner user
guide.
4. Review a thumbnail image of each scanned page.
8 - 14
Managing Workpapers
Chapter
8
5. Do one of the following:
§
§
§
Click Scan More and repeat steps 3 and 4 of to add other documents to the file.
Click Finish and enter the new workpaper properties.
Click Cancel to delete the scanned document and close the dialog without creating
a PDF.
Configuring the Interface Option
To configure the ProSystem fx Tax interface option:
1. In ProSystem fx Tax, open Tax Preparation and select Options.
2. Select Interface Options/Document Manager.
3. Check the Save PDF to box.
4. Select ProSystem fx Engagement from the drop-down list.
5. You can choose to be prompted to save to Document Manager when creating a PDF or
to always save a PDF to Document Manager.
6. Entering the ProSystem fx Engagement user name and password is optional. If you enter
the information, it is passed to Engagement. Otherwise, you are prompted to log in when
the file is inserted into the binder.
Adding and Exporting a ProSystem fx Fixed Assets FAC File
You can add a ProSystem fx Fixed Assets data file to a binder.
§
§
§
§
ProSystem fx Fixed Assets version 2002.03 or higher must be installed on the local
computer.
The binder must be closed.
You must be assigned to the binder.
You must have the rights to create new workpapers.
You can enter your Engagement login name and password by selecting
File\Export\ProSystem fx Engagement\Provide ProSystem fx Engagement User Info.
Otherwise, you are prompted during the export process.
To export a client file from ProSystem fx Fixed Assets, do the following:
1. Open the Fixed Assets client file.
2. Select File/Save to Engagement binder.
3. Click Next on the Insert Workpaper Wizard Welcome dialog. If Engagement is not already
open, a dialog prompts you to enter your login name and password.
4. Click Next to open the Select Documents to Insert dialog.
5. Select the document(s) to insert into a binder by performing one of the following actions:
§
§
§
Check the box next to the document name.
Click Select All to select all the documents listed.
Click Unselect All to deselect all the documents listed.
8 - 15
Chapter
Managing Workpapers
8
6. Click Next to open the Select Client and Binder dialog.
7. Select the client folder and the binder where you want to place the client file.
8. Click Next to continue to the Create Workpaper Index and Name dialog, or click Finish to
continue to the Summary dialog. If you click Finish, the FAC file is placed in the Unfiled
Workpaper tab and given a name based on the Fixed Assets client ID.
9. On the Create Workpaper Index and Name dialog, enter an index number if needed. The
workpaper name defaults to the name of the FAC file.
Note: The index number and name must be a unique combination within the
binder.
10. If you clicked Next, the Select Tab in Binder dialog displays. Select a workpaper and
click Modify Tab if you would like to change the tab location. Otherwise, the workpaper
is placed in the Unfiled Workpapers tab.
11. Click Finish to open the Summary dialog.
Do one of the following:
§
§
§
§
§
Click
Click
Click
Click
Click
Back to change any information.
Insert to save the PDF to the selected binder.
Print to print the summary report.
Save As to save the summary report to a file.
Cancel to stop the workpaper insertion process.
Adding ProSystem fx Fixed Assets Report Data
You can add PDF files created from ProSystem Fixed Assets reports to a binder. The
following must be established before you can add the report data:
§
§
§
ProSystem fx Fixed Assets version 2002.03 or higher must be installed on the local
computer.
You must be assigned to the binder.
You must have the rights to create new workpapers.
8 - 16
Managing Workpapers
Chapter
8
You can enter your Engagement login name and password by selecting
File/Export/ProSystem fx Engagement User Info. If you enter your login information on this
dialog, you are not prompted for it during the export process.
To create a Fixed Assets report PDF and import it to ProSystem fx Engagement, do the
following:
1. Open a client file in Fixed Assets.
2. Select File/ExportProSystem fx Engagement/Export Reports. The Select Reports for
Export dialog displays.
3. Double-click a folder to open a list of available reports.
4. Double-click a report to add it to the Reports selected list. You can select multiple
reports.
5. Select the month, if appropriate, from the Select month drop-down list.
6. Check the formatting options in the Report format section.
7. Click Properties to edit a selected report’s print settings as needed.
8. Click Export. The Insert Workpaper Wizard Welcome dialog displays.
9. Click Next. If you did not enter your login information, you are prompted to do so.
10. Click Next. The Select Documents to Insert dialog displays.
11. Select the document(s) you want to insert into a binder by doing one of the following:
§
§
§
Check the box next to the document name.
Click Select All to select all the documents listed.
Click Unselect All to deselect all the documents listed.
12. Click Next to open the Select Client and Binder dialog.
13. On the Select Client and Binder dialog, select the client folder and binder where you
want to insert the report data.
14. Click Next to specify the workpaper name and index number, or click Finish to skip to
the Summary dialog. If you select Finish, the report is placed in the Unfiled Workpapers
tab and given a name based on the name of the report.
8 - 17
Chapter
8
Managing Workpapers
15. If you select Next, the Create Workpaper Index and Name dialog displays.
16. Enter an index number and name of up to 64 characters for each workpaper, and select
any documents that should be overwritten. Click Next to continue, or click Finish to skip
to the Summary dialog.
Note: The index number and name must be a unique combination within the binder.
17. If you select Next, the Select Tab in Binder dialog displays. Click Modify Tab to change
the tab location. Otherwise, the workpaper is placed in the Unfiled Workpapers tab. Click
Finish to open the Summary dialog.
18. On the Summary dialog, you can do one of the following:
§
§
§
§
§
Click
Click
Click
Click
Click
Back to change any of the information.
Insert to save the PDF to the selected binder.
Print to print the summary report.
Save As to save the summary report to a file for later use.
Cancel to stop the workpaper insertion process.
Using ProSystem fx Tax Workpaper Templates
ProSystem fx Engagement provides two Excel workpaper templates that you can use to
create a workpaper for importing apportionment data into a ProSystem fx tax return. You
can manually input the workpaper template or use TB link formulas to input data.
To use ProSystem fx Tax workpaper templates, do the following:
1. Click the workpaper tab where you want to insert the template.
2. Select File/New.
3. Select Workpaper From Template.
4. Select the ProSystem fx Tax Workpapers tab.
5. Highlight the appropriate template:
§
§
1MSTCorp for Corporation data
1MSTPtr for Partnership data
8 - 18
Managing Workpapers
Chapter
8
6. Click OK to open the Workpaper Properties dialog.
7. Enter the index and name information. Click OK to insert the workpaper in the tab.
8. Open the workpaper in Excel.
9. Enter the apportionment data manually or by using TB link formulas (Copy and Paste TB
Link functions or Insert TB Link).
10. Select File/Save.
11. Select File/Save As and save the file in a directory where it can be easily identified when
importing into ProSystem fx Tax.
Inserting a ProSystem fx Tax PDF File
You can insert multiple ProSystem fx Tax returns into Engagement binders as PDF files.
Each time you save a PDF for a client, the Insert Workpaper Wizard walks you through
selecting the client, binder, and workpaper tab. The steps below describe this process.
Verify the following before printing a PDF:
§
§
You must be assigned to the binder.
You must have rights to create new workpapers for the binder.
To save a PDF to an Engagement binder, do the following:
1. Open the client’s tax return in Tax Preparation.
2. Select File/Print.
3. Select the return copies or sections you want to print, then select either To PDF file or
To PDF file and to printer as the print destination.
4. Click OK. If you select To PDF file and to printer, the return copies requested are printed
to the printer as the Insert Workpaper Wizard displays.
§
§
If you selected to always print PDF to Engagement, the Welcome dialog of the
Insert Workpaper Wizard displays.
If you selected to be prompted, click Yes on the prompt to save the PDF to the
Engagement binder and display the Welcome dialog of the wizard.
8 - 19
Chapter
8
Managing Workpapers
5. Click Next. If you entered your user name and password when configuring the interface
option, the Select Client and Binder dialog displays.
If you did not enter your user name and password, a dialog prompts you to do so. Enter
your user name and password and click Next to open the Select Client and Binder dialog.
6. Select the client folder and binder where you want to insert the report data.
7. Click Next to specify the workpaper name and index number, or click Finish to skip to
the Summary dialog. If you select Finish, the report is placed in the Unfiled Workpapers
tab and given a name based on the name of the report.
8. If you select Next, the Create Workpaper Index and Name dialog displays.
8 - 20
Managing Workpapers
Chapter
8
9. Enter an index number and name of up to 64 characters for each workpaper, and select
any documents that should be overwritten. Click Next to continue, or click Finish to skip
to the Summary dialog.
Notes:
§
§
The index number and name must be a unique combination within the binder.
If a workpaper with the same name and index number combination already exists
in the binder, the Overwrite check box is selected by default for any reinserted tax
returns. Unselect Overwrite to create a new workpaper with a (1) appended to the
name.
10. If you select Next, the Select Tab in Binder dialog displays. Click Modify Tab to change
the tab location. Otherwise, the workpaper is placed in the Unfiled Workpapers tab. Click
Finish to open the Summary dialog.
11. On the Summary dialog, you can do one of the following:
§
§
§
§
§
Click
Click
Click
Click
Click
Back to change any of the information.
Insert to save the PDF to the selected binder.
Print to print the summary report.
Save As to save the summary report to a file for later use.
Cancel to stop the workpaper insertion process.
Note: You can also select Print/Preview and click the Report Being Viewed or All
Reports toolbar button to launch the ProSystem fx Engagement Insert Workpaper
Wizard.
Adding a Microsoft Excel Document
Engagement allows you to insert an Excel document into an Engagement binder.
Verify the following before inserting an Excel document into an Engagement binder:
§
§
You must be assigned to the binder.
You must have the right to create new workpapers.
To insert an Excel document into an Engagement binder, do the following:
1. Open the Excel document you want to insert.
2. Select File/Save to Engagement Binder. The Insert Workpaper Wizard displays.
3. Click Next. If you are logged in to Engagement, the Select Documents to Insert dialog
displays. If you are not logged in to Engagement, the Verifying User Login and Rights
dialog displays. Enter your login information. The current Excel document is selected by
default.
4. Click Next. The Select Client and Binder dialog displays.
5. Select the binder where you want to insert the Excel document and click Next. The
Create Workpaper Index and Name dialog displays.
6. A name must be entered for the workpaper. You can also enter an index number to link a
reference to this workpaper from another workpaper, or for identification purposes.
Note: The index number and name must be a unique combination within the binder.
8 - 21
Chapter
Managing Workpapers
8
7. Click Next to open the Select Tab in Binder dialog or click Finish to open the Summary
dialog and place the workpaper in the Unfiled Workpapers tab.
8. Select a workpaper and click Modify Tab if you would like to select the tab location.
Otherwise, the workpaper is placed in the Unfiled Workpapers tab.
9. Click Finish to open the Summary dialog. You can do one of the following:
§
§
§
§
§
Click
Click
Click
Click
Click
Back to change any of the information.
Insert to insert the Excel document into the selected binder.
Print to print the summary report.
Save As to save the summary report to a file.
Cancel to stop the workpaper insertion process.
Adding Microsoft Outlook Files
Engagement allows you to interface with Microsoft Outlook, inserting an Outlook email, the
body of a message, or an attachment of a message directly into an Engagement binder.
Verify the following before attempting to insert an Outlook file to an Engagement binder:
§
§
§
ProSystem fx Engagement must be installed on the computer where Outlook is
installed.
You must be assigned to the binder.
You must have the right to create new workpapers.
To insert Outlook files as an Engagement workpaper, do the following:
1. In Microsoft Outlook, select the email or email attachment.
2. To launch the Insert Workpaper Wizard, select one of the following options from the
Engagement Functions toolbar in Outlook:
§
§
§
Insert Entire Outlook Email
Insert Message as Text File
Insert Attachment Only
Note: If there are multiple attachments to insert from the same email, select
Insert Attachment Only. You will be given the option to insert multiple files on
the Select Documents to Insert dialog.
3. Click Next on the Welcome dialog. If Engagement is not already open, a dialog prompts
you to enter your login name and password.
4. Click Next to open the Select Documents to Insert dialog.
5. Select the document(s) you want to insert into a binder by doing one of the following:
§
§
§
Check the box next to the document name.
Click Select All to select all the documents listed.
Click Unselect All to deselect all the documents listed.
8 - 22
Managing Workpapers
Chapter
8
6. Click Next to open the Select Client and Binder dialog.
7. Open the file room icon and then open the appropriate client folder.
8. Highlight the binder and click Next to open the Create Workpaper Index and Name
dialog, or click Finish to open the Summary dialog. If you click Finish, the workpaper is
placed in the Unfiled Workpapers tab and given a name based on the subject of the email
or the attachment file name.
9. A name must be entered for the workpaper. You can also enter an index number to link a
reference to this workpaper from another workpaper, or for identification purposes.
Note: The index number and name must be a unique combination within the
binder.
10. Click Next to open the Select Tab in Binder dialog or click Finish to open the Summary
dialog. If you click Finish, the workpaper is placed in the Unfiled Workpapers tab.
11. Select a workpaper and click Modify Tab if you would like to select the tab location.
Otherwise, the workpaper is placed in the Unfiled Workpapers tab.
12. Click Finish to open the Summary dialog. You can do one of the following:
§
§
§
§
§
Click
Click
Click
Click
Click
Back to change any of the information.
Insert to insert the Outlook file into the selected binder.
Print to print the summary report.
Save As to save the summary report to a file.
Cancel to stop the workpaper insertion process.
Adding a Profit Driver or Key Performance Indicator File
You can insert a ProSystem fx Profit Driver strategy file (extension OPT) or a Key
Performance Indicator analytical file (extension KPV, KPM, or KPY) in an Engagement binder
using the Insert Workpaper Wizard from Profit Driver or Key Performance Indicator. The
staff member inserting the file becomes the workpaper's Current Editor.
When you open a Profit Driver workpaper in ProSystem fx Engagement, Profit Driver is
launched so you can edit the file. If Profit Driver is open when you open the workpaper, you
must close the open Profit Driver session before opening and editing a new Profit Driver
OPT file. You cannot print a Profit Driver OPT file.
8 - 23
Chapter
Managing Workpapers
8
When you open a Key Performance Indicator workpaper in Engagement, Key Performance
Indicator launches so you can edit the file.
Before inserting the file, verify the following:
§
§
§
§
Profit Driver is installed on the computer where ProSystem fx Engagement is
installed.
You have established a profile on the computer where Profit Driver and Engagement
are installed. If you have not, log in to Engagement using the Office location and
create a profile.
You are assigned to the binder where you are inserting the file.
You have the rights to create new workpapers.
To insert a Profit Driver or Key Performance Indicator file in an Engagement binder, follow
these directions:
1. In Profit Driver or Key Performance Indicator, open the file you want to save to a binder.
2. Select File/Save to Engagement Binder.
3. Click Next on the Insert Workpaper Wizard Welcome dialog. If Engagement is not already
open, a dialog prompts you for your login name and password. Enter the information.
4. Click Next to open the Select Documents to Insert dialog.
5. Select the document(s) you want to insert into a binder by doing one of the following:
§
§
§
Check the box next to the document name.
Click Select All to select all the documents listed.
Click Unselect All to deselect all the documents listed.
6. Click Next to open the Select Client and Binder dialog.
7. Open the file room and the appropriate client folder.
8. Highlight the binder and click Next to open the Create Workpaper Index and Name dialog
or click Finish to skip to the Summary dialog. If you click Finish, the workpaper is placed
in the Unfiled Workpapers tab and given a name.
9. Enter a name for the workpaper. You can also enter an index number to link a reference
to this workpaper from another workpaper, or for identification purposes.
Note: The index number and name must be a unique combination within the binder.
10. Click Next to open the Select Tab in Binder dialog, or click Finish to open the Summary
dialog. If you click Finish, the workpaper is placed in the Unfiled Workpapers tab.
11. Select a workpaper and click Modify Tab to select the tab location. Otherwise, the
workpaper is placed in the Unfiled Workpapers tab.
12. Click Finish to open the Summary dialog. Do one of the following:
§
§
§
§
§
Click
Click
Click
Click
Click
Insert to insert the file in the binder.
Back to change any information.
Print to print the summary report.
Save As to save the summary report to a file.
Cancel to stop the workpaper insertion process.
8 - 24
Managing Workpapers
Chapter
8
Adding a ProSystem fx Profit Driver Report
You can insert a ProSystem fx Profit Driver report into a ProSystem fx Engagement binder
using the Insert Workpaper Wizard from Profit Driver. The staff member inserting the report
becomes the workpaper's Current Editor.
Before inserting the file, verify the following:
§
§
§
§
Profit Driver is installed on the computer where ProSystem fx Engagement is
installed.
You have established a profile on the computer where Profit Driver and Engagement
are installed. If you have not, log in to Engagement using the Office location and
create a profile.
You are assigned to the binder where you are inserting the file.
You have the rights to create new workpapers.
To insert a Profit Driver report into an Engagement binder, do the following:
1. Open Profit Driver and select File/Export.
2. Select Report to Word or Report to PDF Acrobat and double-click the report to insert.
3. Choose Engagement Binder and click OK.
4. Click Next on the Insert Workpaper Wizard dialog to open the Select Client and Binder
dialog. If Engagement is not already open, a dialog prompts you to enter your login name
and password.
5. Click Next to open the Select Client and Binder dialog.
6. Select the document(s) you want to insert into a binder by doing one of the following:
§
§
§
Check the box next to the document name.
Click Select All to select all the documents listed.
Click Unselect All to deselect all the documents listed.
7. Click Next to open the Select Client and Binder dialog.
8. Double-click to open the file room and then double-click to open the appropriate client
folder.
9. Highlight the binder and click Next to open the Create Workpaper Index and Name
dialog, or click Finish to open the Summary dialog. If you click Finish, the workpaper is
placed in the Unfiled Workpapers tab and given a name.
10. A name must be entered for the workpaper. You can also enter an index number to link a
reference to this workpaper from another workpaper, or for identification purposes.
Note: The index number and name must be a unique combination within the
binder.
11. Click Next to open the Select Tab in Binder dialog, or click Finish to open the Summary
dialog. If you click Finish, the workpaper is placed in the Unfiled Workpapers tab.
12. Select a workpaper and click Modify Tab to select the tab location. Otherwise, the
workpaper is placed in the Unfiled Workpapers tab.
8 - 25
Chapter
Managing Workpapers
8
13. Click Finish to open the Summary dialog. Perform one of the following actions:
§
§
§
§
§
Click
Click
Click
Click
Click
Insert to insert the report in the binder.
Back to change any information.
Print to print the summary report.
Save As to save the summary report to a file.
Cancel to stop the workpaper insertion process.
Changing Workpaper Properties
You can use the Workpaper Properties dialog to do any of the following:
§
Change the index number and name.
Note: If you change the index number on a workpaper, any workpaper
references associated with the original index do not automatically update to
the new index. You must insert a workpaper reference to the new index.
§
§
§
§
View the following information about the workpaper:
— Created by
— Last modified by
— Checked out by
— Assigned to
— Deleted by
— Version
Change the roll forward options.
Sign off as Preparer or Reviewer.
View a workpaper’s history, including the following:
— Workpaper Name
— Transaction
— Time Stamp
— Performed By
To change properties and sign off the workpaper, do the following:
1. Select the workpaper in the Binder window.
2. Perform one of the following actions to open the Workpaper Properties dialog.
§
§
Select File/Properties.
Right-click the workpaper and select Properties from the pop-up menu.
8 - 26
Managing Workpapers
§
Chapter
8
Click the Properties toolbar button.
3. Change the name and index number as needed.
4. For Engagement workpapers, select the Roll Forward tab to edit the roll forward options.
You can change the following options from this tab:
§
Roll forward options. Select how this workpaper will be treated when the binder is
rolled forward to the next period.
— Do not include in the roll forward. The new binder for the next period will not
include the workpaper.
— Include in the roll forward. The workpaper will be included in the binder for
next period.
— Replace in the roll forward with placeholder. The new binder will include a
placeholder with the same name and index number as the workpaper. When
you receive the new workpaper for the next binder, you can replace the
placeholder.
— Replace in the roll forward with this file. Click Browse to select a file to be
inserted in the binder for the next period.
5. For ProSystem fx Knowledge Tools workpapers, select the Knowledge Tools Roll
Forward tab to edit the roll forward options. You can change the following options from
this tab:
§
Roll forward options. Select how this workpaper will be treated when the binder is
rolled forward to the next period.
— Do not include in the roll forward. The new binder for the next period will not
include the workpaper.
— Include in the roll forward. The workpaper will be included in the binder for
next period.
— Replace in the roll forward with latest Knowledge Tools template. When the
workpaper is opened in the new binder Engagement will replace the workpaper
with the most up-to-date Knowledge Tools template.
— Replace in the roll forward with this file. Click Browse to select a file to be
inserted in the binder for the next period.
8 - 27
Chapter
8
Managing Workpapers
§
Data Retention Options. Select how answers, comments, and row customizations
should be handled when the binder is rolled forward to the next period.
— Keep answers. Answers on the Knowledge Tools workpaper will be retained
when the binder is rolled forward to the next period.
— Keep comments. Comments will be retained when the binder is rolled forward
to the next period.
— Merge row customizations from prior period workpaper. Row customizations in
the workpaper will be merged when the binder is rolled forward to the next
period.
6. For ProSystem fx Knowledge Coach workpapers, select the Knowledge Coach Roll
Forward tab to edit the roll forward options. You can change the following options from
this tab:
§
Roll Forward Options. Select how this workpaper will be treated when the binder
is rolled forward to the next period.
— Include in the roll forward. The workpaper will be included in the binder when a
new binder is created for the next period. If the workpaper uses links to Date
functions or links to the trial balance, the formulas will be updated with the
next period's information.
— Replace in the roll forward with latest Knowledge Coach content. The
Knowledge Coach workpaper will be replaced by the most up-to-date content
when the workpaper is opened in the new rolled-forward binder.
§
Data Retention Options. Select how responses should be handled when the binder
is rolled forward to the next period.
— Use response roll forward setting. The Knowledge Coach workpaper will roll
forward each response according to the setting for that response.
— Keep all responses. The Knowledge Coach workpaper will retain the current
responses when the new binder is created.
— Reset all responses. The Knowledge Coach workpaper will reset all field cell
values in the new binder.
§
If you select the option to replace the workpaper in the roll forward with the latest
Knowledge Coach content, you can select one or more of the following options:
— Merge row customizations from prior period workpaper. The Knowledge Coach
workpaper will merge the prior year's additions, deletions, and text changes to
rows when the new binder is created. This option is available only when
Replace in the roll forward with latest Knowledge Coach template is selected.
— Keep audit programs populated with program steps. Added program steps will
be kept in Knowledge Coach audit workpapers. If you select this option, the
following options become available:
§ Keep custom program steps. Program steps you have created and
added to audit workpapers will be kept in the new binder.
§ Keep modified program steps. Modifications you have made to added
program steps in audit workpapers will be kept in the new binder.
8 - 28
Managing Workpapers
Chapter
8
7. Select the Sign Off tab to view sign off information or to sign off the workpaper as
either the Preparer or Reviewer. You can have multiple preparers and reviewers for a
workpaper. For more information on signing off workpapers, see Workpaper Sign Off on
page 8-58.
8. Select the History tab to view the transactions performed by staff members. The
following transactions display on the History tab once performed.
§
§
§
§
§
§
§
§
§
§
§
§
§
§
§
§
§
§
§
§
§
§
New
Modified in 2.x
Moved to Trash
Restored from Trash
Published
Signed Off
Locked
Unlocked
Checked In
Checked Out
Links Frozen
Links Unfrozen
Modified RF Settings
Preparer Signed Off
Reviewer Signed Off
Removed Preparer Sign Off
Removed Reviewer Sign Off
Taken Over
Modified Name or Index
2nd Reviewer Signed Off
Removed 2nd Reviewer Sign Off
Saved After Sign-Off
9. Click OK to save your changes.
Using Workpapers
This section shows you how to open and use workpapers within the Binder window. For
information about modifying workpapers, see the following chapters:
§
§
To add ProSystem fx Engagement functions to Excel workpapers, see Chapter 9,
Using Excel.
To add ProSystem fx Engagement functions to Word workpapers, see Chapter 10,
Using Word.
Important: If you open a workpaper with custom macros, Microsoft Word or
Excel prompts you to run the macros according to your security settings. You
do not see this message with standard Engagement macros.
Note: Only the Current Editor (in a non-shared file room) or the Live Editor (in a
shared file room) of a workpaper can make changes to it.
8 - 29
Chapter
Managing Workpapers
8
Opening Workpapers Inside or Outside
When you open a workpaper inside Engagement, the workpaper displays either under or to
the right of the Binder window. You determine where it displays using View/Workpaper
Preview. When you open a workpaper inside, you can view the contents of a workpaper,
but you cannot make any changes to it.
You can make changes to and view a workpaper in the application in which it was created.
This is referred to as viewing the workpaper outside Engagement.
You must be the Current Editor (in a non-shared file room) or the Live Editor (in a shared file
room) of the workpaper in order to make changes to it.
In a Shared File Room, if you select to view a workpaper inside, it will still be viewed
outside.
You cannot have the same workpaper open inside and outside simultaneously.
Opening a Workpaper within Engagement (Non-Shared File Rooms Only)
To open a workpaper within (inside) ProSystem fx Engagement, select the workpaper and
do one of the following:
§
§
§
Select Tools/Options and remove the check from the Double-click opens workpaper
outside box. Then select File/Open or double-click the workpaper from the Binder
Index.
Right-click the workpaper in the Binder Index and select View Inside from the pop-up
menu.
Select Workpaper/View Inside.
If the viewing pane already contains a workpaper, a second viewing pane opens with the
new workpaper.
When you open a workpaper inside, the workpaper displays in the viewing pane either
under or on the right side of the Binder Index pane. You can set this option by selecting
View/Workpaper Preview. Then select either Right or Bottom.
When opening the workpaper within the viewing pane you can only view the workpaper. If
you want to make changes to the workpaper, you need to open it outside and you must be
the workpaper's Current Editor.
Opening a Workpaper in Its Original Application (Outside)
To open a workpaper in its original application, follow these directions:
§
§
§
Select Tools/Options/General and make sure the Double-click opens workpaper
outside box is checked. Then double-click the workpaper or select File/Open to open
it outside.
Right-click the workpaper inside the Binder Index and select View Outside from the
pop-up menu.
Select Workpaper/View Outside.
Note: If you open more than one Excel worksheet created from a rolled-forward
binder or the same binder template, you can only edit the first workpaper opened.
The other copies of the workpaper are read-only.
8 - 30
Managing Workpapers
Chapter
8
Closing Workpapers
You can close a workpaper from ProSystem fx Engagement, Word, or Excel. When you
close a workpaper, you are prompted to save any changes. If you select Yes and you are
not the Current Editor, the Save As dialog displays and you can save your changes to
another workpaper file. When you close a trial balance workpaper, changes are
automatically saved without prompting.
Closing Workpapers in Excel and Word
There are two ways to close workpapers in Excel and Word:
§
§
Close the window as you normally close a spreadsheet or document in Excel or Word.
This closes the workpaper in Engagement.
You can also close all open workpapers in Excel or Word by closing Engagement.
Notes:
— You need to be out of cell-editing mode to close Excel workpapers or the trial
balance.
— If you are the Current Editor or Live Editor and the workpaper is not a trial balance
workpaper, you are prompted to save the changes. The file name appearing in the
prompt is a long file name that Engagement uses internally because Engagement
does not have control when the window is closed this way and, therefore, cannot
provide the name and index from the binder.
Closing Workpapers in ProSystem fx Engagement
You can close workpapers in ProSystem fx Engagement in any of the following ways:
§
§
§
To close an individual workpaper, select the workpaper in the Binder window. You
can either right-click the workpaper and select Close Workpaper from the pop-up
menu, or select Workpaper/Close Workpaper.
To close all open workpapers, right-click a tab and select Close All Workpapers from
the pop-up menu, or select Workpaper/Close All Workpapers.
To close all open workpapers in all binders, close Engagement.
Note: If you are the Current Editor or Live Editor and the workpaper is not a
trial balance, you are prompted to save changes. The file name and index
number in the message are used in the binder.
Saving Changes to Workpapers
If you are the Current Editor (in a non-shared file room) or the Live Editor (in a shared file
room) of the workpaper or trial balance, you can make changes to it. When you close a
Microsoft Excel or Word workpaper, you are prompted to save changes made to it. When
you close a trial balance, changes are saved automatically.
If you are not the Current Editor or Live Editor, the workpaper is read-only and any changes
made are not saved. Select Save As to save the workpaper with a new name and insert it
into a binder, if desired.
8 - 31
Chapter
Managing Workpapers
8
Refreshing Workpapers and Reports
Each time you open a workpaper or report, it displays the most current trial balance data.
Use Refresh from the Engagement menu or the Engagement toolbar to manually force an
update so an open workpaper refreshes with the latest data from the trial balance.
Important: For the trial balance reports to refresh properly, it is best not to delete
cells, rows, or columns because they might contain data necessary for the refresh
function to work. Instead of deleting columns, hide them by selecting the
row/column header, right-clicking, and then selecting Hide.
Copying and Moving Workpapers
You can copy or move workpapers within a binder. However, you can only copy
workpapers between binders. If you copy a workpaper to a tab in the same binder where
the workpaper index and name combination already exists, the words Copy of are added to
the beginning of the name.
Important: Do not copy TB Reports or JE Reports across binders, as they will not
work properly. Normal workpapers that contain TB links might not work because
these workpapers are linked to particular trial balance accounts or items in an
account grouping list. These accounts or grouping list items may not exist in the
new trial balance. Keep these factors in mind when copying across binders.
Notes for Knowledge Coach Users:
§
§
§
A single instance limited Knowledge Coach workpaper cannot be pasted into a binder
if an instance of the Knowledge Coach workpaper already exists within the target
binder.
When a foundation Knowledge Coach workpaper is selected to be copied, all other
Knowledge Coach workpapers in the binder will also be copied.
When copying Knowledge Coach workpapers, only Knowledge Coach workpapers
can be selected.
Copying Workpapers Within a Binder
To copy workpapers within a binder, do the following:
1. Select the workpaper or workpapers you want to copy.
2. Right-click the workpaper or workpapers and select Copy.
3. Right-click the tab where you want the workpaper or workpapers inserted and select
Paste. The Selected Workpaper Properties dialog displays.
4. Change the workpaper properties as necessary for each workpaper.
5. Click OK.
Moving Workpapers Within a Binder
To move workpapers within the same binder, do the following:
1. Select the workpaper or workpapers to move.
2. Drag the workpapers to the new tab.
8 - 32
Managing Workpapers
Chapter
8
Copying Workpapers Between Binders
To copy a workpaper or workpapers between binders, do the following:
1. Open both binder windows. See Chapter 6, Creating and Using Binders.
2. Select the workpaper or workpapers you want to copy.
3. Drag the workpaper or workpapers to the new binder. The Selected Workpaper
Properties dialog displays.
4. Change the workpaper properties as necessary for each workpaper.
5. Click OK.
Tip: You can also move or copy a workpaper or entire workpaper tab by using
the Cut, Copy, and Paste toolbar buttons.
Copying Knowledge Coach Workpapers
If you copy a Knowledge Coach workpaper (or a tab containing Knowledge Coach
workpapers), the Paste Workpaper Options dialog displays. Select how information will be
copied to the Knowledge Coach workpapers in the selected binder tab.
Note: Knowledge Coach workpapers can be copied between binders via the Copy
function. Knowledge Coach workpapers can be cut and pasted via the Cut
function only within the same binder.
Select from the following options:
§
§
Keep program step sign-off. Select this to retain all program step sign-off information
in Knowledge Coach workpapers.
Responses. Select one of the following options for dealing with responses in
Knowledge Coach workpapers:
— Use response roll forward settings. The new copy of the Knowledge Coach
workpaper will roll forward each response according to the setting for that
response.
— Keep all responses. The new copy of the Knowledge Coach workpaper will retain
the current responses.
— Reset all responses. The new copy of the Knowledge Coach workpaper will reset
all field cell values in the new binder.
8 - 33
Chapter
8
Managing Workpapers
Saving a Workpaper as a Template
If there is a workpaper with a format you use frequently, you can save it as a template.
Whenever you insert the template, the Tab field will auto-populate in the Selected
Workpapers Properties dialog.
To save a workpaper as a template, do the following:
1. Select the workpaper and perform one of the following actions to open the Save As
dialog.
§
§
Right-click the workpaper and select Save as Template from the menu.
Select File/Save As Template.
2. The Save in field defaults to the Pfx Engagement\WM\Workpaper Templates folder. You
can use this folder, select another folder, or create a new folder by clicking the Create
New Folder icon.
Notes:
§
§
If the workpaper you are saving is a ProSystem fx Knowledge Tools workpaper,
the Save in field defaults to X:\Pfx Engagement\WM\Knowledge Tools Workpaper
Templates, where X is the drive where ProSystem fx Engagement is installed.
The Save as Template function cannot be used with Knowledge Coach
workpapers.
3. You can accept the default file name for the template or type a new name and click Save. An
XLT file is created for an Excel workpaper and a DOT file is created for a Word workpaper.
You can access the template when creating new workpapers. See Adding a New
Workpaper from a Template on page 8-1.
8 - 34
Managing Workpapers
Chapter
8
Publishing Workpapers
If you want to send someone an electronic copy of a Microsoft Word or Excel workpaper,
you should publish the workpaper. In a published workpaper, formulas (e.g., trial balance
and name/date links) are converted to values automatically. This allows you to share the
workpaper with people who do not have access to ProSystem fx Engagement or the trial
balance database. A copy of the original workpaper is created in the Published Workpapers
tab.
Note: If you are working in a shared local file room and publish a workpaper, the
file room's Host becomes the Current Editor of the new workpaper.
To publish a workpaper, do the following:
1. In the Binder window, select the workpaper to publish.
2. Perform one of the following actions:
§
§
§
Select Workpaper/Publish Workpaper.
Right-click the workpaper and select Publish Workpaper from the pop-up menu.
Click the Publish Workpaper toolbar button.
The name of the workpaper is its original name with the word Published appended to the
end. All of the formulas, such as dates, names, and amounts, are converted to values.
This published workpaper cannot be updated, because the formulas no longer exist.
Note: You cannot publish ProSystem fx Engagement-generated Excel reports
such as TB, JE, Consolidated, and Write Up reports. However, they may be
sent in PDF format.
Sending a Workpaper to a Third Party
There are three ways to send a workpaper or workpapers: by converting them to a file,
sending them via email, or sending them to ProSystem fx Document.
Sending a Workpaper to File
You can create a file of selected workpapers or all workpapers in a workpaper tab.
Note: When you send workpapers to a file, the next time you insert that file, the
Tab field will auto-populate in the Selected Workpaper Properties dialog.
To send workpapers to file, do the following:
1. Open the binder containing the workpapers to be sent.
2. Select the workpaper or workpaper tab. You can select multiple workpapers holding
down the k or b keys.
8 - 35
Chapter
8
Managing Workpapers
3. Right-click and select Send To/File from the pop-up menu. The File Format dialog
displays.
4. Select one of the following:
§
§
§
Original file format. Select this option to create a file of the original workpaper(s).
Published file. Select this option to create a file of the workpaper with all formulas
(e.g., trial balance links) converted to static text.
PDF file. If you have selected more than one workpaper, you can select this option
to combine the multiple workpapers into a single PDF file. If you select PDF file,
you must complete the File name field.
5. You can choose to include the workpaper index number in the file name automatically.
6. Click OK.
Sending a Workpaper via Email
You can send selected workpapers or all workpapers in a workpaper tab via email. Outlook
must be installed on the computer you are using to send the email.
To send workpapers via email, do the following:
1. Open the binder containing the workpapers to be sent.
2. Select the workpaper or workpaper tab. You can select multiple workpapers holding
down the k or b keys.
3. Right-click and select Send To/Mail Recipient from the pop-up menu. The File Format
dialog displays.
4. Select one of the following:
§
§
§
Original file format. Select this option to create a file of the original workpaper(s).
Published file. Select this option to create a file of the workpaper with all formulas
(e.g., trial balance links) converted to static text.
PDF file. If you have selected more than one workpaper, you can select this option
to combine the multiple workpapers into a single PDF file. If you select PDF file,
you must complete the File name field.
5. You can choose to include the workpaper index number in the file name automatically.
6. Click OK.
If Outlook has not been configured to send email, follow the steps in the Internet
Connection Wizard, or contact your system administrator for assistance.
Note: You cannot send Knowledge Coach workpapers via email.
8 - 36
Managing Workpapers
Chapter
8
Sending a Workpaper to ProSystem fx Document
If your firm uses ProSystem fx Document, you can send selected workpapers or all
workpapers in a workpaper tab to Document.
To send workpapers to ProSystem fx Document, do the following:
1. Open the binder containing the workpapers to be sent.
2. Select the workpaper or workpaper tab. You can select multiple workpapers holding
down the k or b key.
3. Right-click and select Send To/ProSystem fx Document from the pop-up menu. The File
Format dialog displays.
4. Select one of the following:
§
§
§
Original file format. Select this option to create a file of the original workpaper(s).
Published file. Select this option to create a file of the workpaper with all formulas
(e.g., trial balance links) converted to static text.
PDF file. If you have selected more than one workpaper, you can select this option
to combine the multiple workpapers into a single PDF file. If you select PDF file,
you must complete the File name field.
5. You can choose to include the workpaper index number in the file name automatically.
6. Click OK.
Printing Workpapers
When you print workpapers from ProSystem fx Engagement, the workpapers are printed
using the print features of the application in which they were created without your having
to manually open the workpaper. You can also print the workpaper from the original
application. You can print workpapers individually or as part of a group.
Printing a Single Workpaper
1. In the Binder window, select the workpaper you want to print.
2. Perform one of the following to open the Print dialog.
§
§
Select File/Print.
Right-click the workpaper and select Print from the pop-up menu.
8 - 37
Chapter
8
Managing Workpapers
§
Click the Print toolbar button.
3. Choose Current workpaper.
4. Choose To printer and click OK.
Note: When you print a report, the print area is automatically set so that all the
columns fit on one page. You can change the print setting through the normal
Excel print setup. See your Excel documentation or help for instructions on setting
print areas.
Printing a Single Workpaper to PDF
You can print a workpaper to a PDF so that you can share the file with other users who do
not have access to either ProSystem fx Engagement or the trial balance database.
1. In the Binder window, select the workpaper you want to print.
2. Perform one of the following actions to open the Print dialog:
§
§
§
Select File/Print.
Right-click the workpaper and select Print from the pop-up menu.
Click the Print toolbar button.
3. Choose Current workpaper.
4. Choose To PDF file and click OK. You receive a confirmation message stating where the
PDF was stored.
Notes:
§
§
If there is an existing PDF in the binder, you may choose to Append the workpaper
to an existing PDF. If so, after clicking OK, you must select the PDF to append to
and click OK.
Appending to an existing PDF cannot be undone.
8 - 38
Managing Workpapers
Chapter
8
Printing a Group of Workpapers
To print a group of workpapers, follow these steps:
1. From the Binder view, select File/Print Group to open the Print Group dialog.
2. Click the drop-down list in the Available Print Groups section. The list includes the
ProSystem fx Engagement default print groups (designated with an asterisk at the end)
and any print groups you have created and saved. Select the print group to use.
3. In the left pane, select the workpapers to print:
§
§
§
To print selected workpapers, open the workpaper tab(s) containing the
workpapers and check the box next to each workpaper.
To print the entire binder, check the box next to the binder.
To print all the workpapers in a workpaper tab, check the box next to the tab.
4. If you want to save the workpapers as a print group, click the Save Print Group button.
The Save As dialog displays. Enter a name for the group in the File Name field and click
Save.
5. Choose To printer.
6. Click Print to print the group.
Note: When you print a group of workpapers, the paper size settings on each
individual workpaper are not always used. For example, if you print some files
on legal and some on letter size, only one size is used. To avoid this, print
workpapers with customized print settings separately.
Printing a Print Group of Workpapers to PDF
You can either create the print group workpapers as separate PDF files, or you can combine
them into the same PDF. If you combine the print group workpapers, you can choose to
append the newly created PDF to an existing PDF workpaper in the binder.
1. From the Binder view, select File/Print Group to open the Print Group dialog.
8 - 39
Chapter
Managing Workpapers
8
2. Click the drop-down list in the Available Print Groups section. The list includes the
ProSystem fx Engagement default print groups (designated with an asterisk at the end)
and any print groups you have created and saved. Select the print group to use.
3. In the left pane, select the workpapers to print:
§
§
§
To print selected workpapers, open the workpaper tab(s) containing the
workpapers and check the box next to each workpaper.
To print the entire binder, check the box next to the binder.
To print all the workpapers in a workpaper tab, check the box next to the tab.
4. Under Print Destination, choose To PDF file.
5. If you would like to combine the print group into a single PDF, check Combine
Workpapers.
6. If you chose to combine the print group, then you can check Append to append the print
group to an existing PDF.
7. Click Print.
8. If you did not select Append, you must enter a name for the PDF created. You may also
enter an index number for the file. Click OK.
9. If you did select Append, you must select the PDF to append to and click OK.
Note: Once you append workpapers to an existing PDF, the appended
workpapers cannot be removed from the file.
Printing Views in the Binder
You can print the following Binder views:
§
§
§
Binder index report. Prints the Binder Index tree and includes workpaper tabs and
workpapers. The index number and workpaper name print.
Sign off summary report. Prints the binder's Sign Off Summary View and displays the
three levels of sign off: In Process, Ready for Review, and Reviewed. The workpapers
display under their corresponding sign off level.
Notes summary report. Prints the binder's Notes Summary View and displays the
three note types: Team Notes, Open Items, and Notes for Next Period. The notes
print under the corresponding note type.
To print one of the Binder reports, do the following:
1. Select File/Print from the Binder window or click the Print button on the toolbar. The
Print dialog displays.
2. Choose the appropriate radio button for the report you want to print and click OK.
3. A preview of the report displays. You can do the following:
§
§
§
Click Print to print the report.
Click Print Setup to check the print settings.
Click Close to return to the Binder Index.
8 - 40
Managing Workpapers
Chapter
8
Deleting Workpapers
You can send a workpaper to the trash folder by selecting it and then doing one of following:
§
§
§
§
Press the Delete key.
Select Edit/Delete.
Right-click and select Delete from the pop-up menu.
Drag it to the Trash icon.
Important:
§
§
When you delete a Knowledge Coach workpaper, it is permanently deleted. It is
not send to the Trash.
When you select a foundation Knowledge Coach workpaper to be deleted, all
Knowledge Coach workpapers within the binder are selected to be deleted.
Notes:
§
§
§
You cannot delete or restore a workpaper if you are not the Current Editor.
You cannot delete a tab that contains a workpaper for which you are not Current
Editor.
If you delete a workpaper and other staff members have a copy of it, the next
time you synchronize binders with the staff members, their copies of the
workpaper are moved to the Trash folder.
Restoring Items from the Trash
When you delete a workpaper, it goes into the Trash section of the binder. You can recover
a deleted workpaper by performing one of the following actions:
§
§
Highlight the workpaper and select Workpaper/Restore from Trash.
Right-click the workpaper and select Restore from Trash from the pop-up menu.
You can restore all workpapers to their original locations by right-clicking the Trash icon and
selecting Restore All, or by selecting File/Restore All.
Notes:
§
§
Knowledge Coach workpapers cannot be restored from the Trash.
You can restore workpapers only if you are the Current Editor or have been granted
rights to restore other staff members' workpapers.
Emptying the Trash
To permanently delete workpapers from the Trash folder, one of the following:
§
§
Click the workpaper and select Workpaper/Delete from Trash.
Right-click the workpaper and select Delete from Trash.
You can delete all workpapers from the Trash folder by right-clicking the Trash icon and
selecting Empty Trash or by selecting File/Empty Trash.
The trash will be emptied every time the binder is closed if this option is selected in
Administrator.
8 - 41
Chapter
Managing Workpapers
8
Notes:
§
§
You can delete a workpaper only if you are the Current Editor or have been granted
rights to delete other staff members' workpapers.
When you send a workpaper to file, the next time you insert that file, the Tab field
will auto-populate in the Selected Workpaper Properties dialog.
Searching for Workpapers
You can use the Find command to search for workpapers in a binder. This command shows
the index number, name, and location of the workpaper.
Note: The Find command used in a Binder window works differently than the Find
command used in a File Room window, where it searches for client folders and
binders. Verify that you are in a Binder window when searching for workpapers.
1. Perform one of the following actions to open the Find Workpaper dialog:
§
§
§
Select Edit/Find.
Right-click any of the tabs or workpapers in the Binder window and select Find
from the pop-up menu.
Press
b + F.
2. In the Name field, type a complete or partial name. The program matches all items
containing the text you type. For example, if you type bal, the program finds Trial
Balance, Balance Forward, etc. The search is not case sensitive.
You can also search for the index number by entering the number in the Index field and
leaving the Name field blank.
3. Click Find Now to display the results of the search in the lower section of the dialog.
Double-click the workpaper to open it.
Linking Workpapers
Word and Excel workpapers can contain links to the trial balance. These links are used to
automate certain workpapers or to draft your financial statements. TB links are updated as
you change data in the trial balance. You can also use the Freeze/Unfreeze options to
control the update of TB links.
You can create these links using either of the following methods:
§
§
Copy/Paste TB Link command.
Insert TB Link command.
Note: A trial balance link formula can contain a maximum of 850 characters. You
receive a warning message if a link exceeds 540 characters.
8 - 42
Managing Workpapers
Chapter
8
Copy/Paste TB Link
Copying Amounts from the Trial Balance
The first step in copying and pasting linked cells from the trial balance to your workpapers
is to copy the cells with the Copy TB Link function.
Note: Keep the trial balance open throughout the entire Copy and Paste
procedure.
To copy amounts from a trial balance, do the following:
1. Open the trial balance and the workpaper you will be pasting links to outside.
2. In the trial balance, select the cells to copy.
When selecting cells in a single column of the trial balance, you can select non-adjacent
cells by holding down b and highlighting the cells.
Note: You cannot copy the Workpaper Reference columns or column headers
and footers.
You are now ready to paste the cells into your workpaper. For information on the various
pasting options, see the listings below:
§
§
§
Pasting Trial Balance Amounts - General below.
Pasting Trial Balance Amounts - Excel on page 8-44.
Pasting Trial Balance Amounts - Word on page 8-45.
Pasting Trial Balance Amounts - General
This option pastes the trial balance cells from the clipboard at the cursor position. Two
pasting options that are the same for Excel and Word are the Sign and Paste Sum options.
These concepts are discussed below. All other pasting options are specific to either Excel or
Word and are discussed in their respective sections.
Note: You do not need to format the item prior to copying it. Formatting is
performed through the pasting options and through each application's normal
formatting commands.
After you have pasted a link, you can move it to the location you want in Word or Excel.
Note: You cannot use the Undo feature in Word or Excel when you use the Paste
TB Link feature. This could be especially harmful if you forget to Paste Sum where
necessary and overwrite several cells of existing data. Therefore, take extra care
when performing these steps.
Sign Options
In the trial balance, debits are shown as positive amounts and credits are shown as negative
amounts. When you paste these amounts into your workpapers, you can retain the signs
used in the trial balance or change them. When you paste numbers from the trial balance
using Paste TB Link, you have the options in the following table.
8 - 43
Chapter
8
Managing Workpapers
Examples
Paste
Option
Description
When Used
Amounts
Copied As
Amounts Pasted As
Actual
Amounts are
pasted as they
appear in the trial
balance.
To show the amounts
as debits and credits as
they appear in the trial
balance.
275.00
-1,350.25
62,340.00
-7,250.00
275.00
-1,350.25
62,340.00
-7,250.00
Reverse
Sign
Amounts are
pasted with the
sign opposite
from the trial
balance.
To show income and
gains as positive
amounts and expenses
and losses as negative
amounts.
275.00
-1,350.25
62,340.00
-7,250.00
-275.00
1350.25
-62,340.00
7,250.00
Absolute
Value
All amounts are
pasted as
positive.
To describe amounts
without indicating
debits and credits, such
as narrative description
in a Word workpaper.
275.00
-1,350.25
62,340.00
-7,250.00
275.00
1,350.00
62,340.00
7,250.00
Sum Options
If you copy a range of cells in the trial balance using Copy TB Link, you have the option to
paste the individual amounts or paste the sum of the copied amounts.
Pasting Trial Balance Amounts - Excel
To paste trial balance amounts in an Excel workpaper after you have copied the links you
want to paste, follow these steps:
1. Switch to the workpaper you want to paste the links into. You should already have
opened this workpaper outside before copying the TB links. If you have not, open the
workpaper outside now and repeat the process in Copying Amounts from the Trial
Balance on page 8-43.
2. Select the top, left-most cell where you want to paste the trial balance data. You can
select cells that already contain amounts. You have the option either to overwrite the
amounts with the trial balance data or to add, subtract, multiply, or divide the amounts
from the trial balance to the amounts that are already in the destination cells.
3. Do one of the following to open the Paste TB Link dialog:
§
§
Select Edit/Paste TB Link.
Right-click the selected cells and select Paste TB Link.
8 - 44
Managing Workpapers
§
Chapter
8
Click the Paste TB Link button on the Engagement toolbar.
4. If you copied a range of cells, select Paste Sum if you want to paste the sum of the
range into one cell. Leave the Paste default to paste the cells in a range.
5. If you are pasting the cells where there are already amounts, select one of the Operator
Options:
§
§
§
§
§
None. Overwrites the cell's contents with the copied cells.
Add. Adds the amounts in the trial balance to the cell's contents.
Subtract. Subtracts the amounts in the trial balance from the cell's contents.
Multiply. Multiplies the amounts in the trial balance by the cell's contents.
Divide. Divides the amounts in the trial balance into the cell's contents. The
amounts you are pasting represent the denominator.
6. Under Sign Options, select how you want to display positive and negative amounts in
the workpaper. See the chart on page 8-44 for more information.
7. Check the Rounding box to round the numbers to the place you choose. Click the up and
down arrow buttons to select decimal places to round to. The rounding selection is
saved to the next TB link.
8. Click OK. The cells are pasted and linked into the workpaper from the trial balance
database. If the data in the trial balance changes, these links are updated automatically.
See Chapter 9, Using Excel, for information on features available in Excel.
Pasting Trial Balance Amounts - Word
To paste trial balance amounts in a Word workpaper, follow the steps listed below. If
you are pasting amounts into a Word table, see the topic at the end of this section.
1. Open the workpaper you want to use outside. See Opening Workpapers Inside/Outside
on page 8-30 for instructions.
2. Place the cursor where you want to paste the amount.
8 - 45
Chapter
8
Managing Workpapers
3. Do one of the following to open the Paste TB Link Format Preferences dialog.
§
§
§
Select Edit/Paste TB Link.
Right-click where you want to paste the amount and select Paste TB Link from the
pop-up menu.
Click the Paste TB Link button on the Engagement toolbar.
4. In the Numeric Style, Negative Style, Sign Options, and Zero Style boxes, select how to
format the numbers.
5. In the Decimal places field, select the number of decimal places to use.
6. In the Truncate field, specify whether you want numbers to be truncated over a certain
number of digits. Select the number that matches the number of digits you want as the
cutoff, or select None if you do not want to truncate numbers.
7. If you are pasting a range of cells, do one of the following:
§
§
§
If you want to paste the total of the selected amounts, check the Paste Sum box.
If you want to paste the individual amounts from each cell you copied, do not
check Paste Sum. The cells are pasted just as you copied them from the trial
balance. You may need to separate the fields by inserting a space to easily
distinguish the separate items if you copied them in a row from left to right.
If you are pasting cells into a table in Word, see Pasting Trial Balance Amounts
into a Word Table below.
8. Click OK. The amounts are pasted and linked into the workpaper. If the data in the trial
balance changes, these links are updated automatically.
For information about other features available in Word, see Chapter 10, Using Word.
8 - 46
Managing Workpapers
Chapter
8
Pasting Trial Balance Amounts into a Word Table
If you are pasting trial balance amounts into a Word table, note the following:
§
§
To paste the cells as you copied them, highlight all the target cells in the table.
Follow the pasting steps on page 8-45, Pasting Trial Balance Amounts - Word,
starting at step 3.
To paste the cells in one Word table cell, perform the same steps as those listed
above, except select Paste Sum in the Paste TB Link Format Preferences dialog. To
paste the cells in their original, do not select the Paste Sum option.
Insert TB Link
The Insert TB Link option allows you to create links to the trial balance from an Excel or
Word file without having to open the trial balance. You build a formula by selecting six
parameters.
To insert a TB Link into an Excel or Word file:
1. Open the Excel or Word workpaper you want to use outside. See Opening Workpapers
Inside/Outside on page 8-30 for instructions.
2. Place the cursor where you want to insert the TB link.
3. Do one of the following to open the Insert TB Link dialog:
§
§
§
Select Edit/Insert TB Link.
Right-click where you want to paste the amount. Select Insert TB Link from the
pop-up menu.
Click the Insert TB Link button on the Engagement toolbar.
4. Build a formula using the following six parameters:
§
§
Trial Balance. Select the trial balance from which you want to pull the amounts.
Account Grouping. Select the Account Grouping List you want to use to create
the dollar amount.
8 - 47
Chapter
8
Managing Workpapers
§
Type. Select the type of grouping you want to use to reach the dollar amount. This
selection determines your choices in the Account/Index # field. The selections
include the following:
— Account Grouping. Sums the accounts in the account grouping and
subgrouping codes.
— Account Type. Sums the accounts that have the same type: Asset, Liability,
Equity, Revenue, or Expenses.
— Account Class. Sums the accounts that have the same class.
— Ratio Class. Sums the accounts assigned to the same ratio class.
— Account Detail. Allows you to select specific account numbers for the formula.
§
§
§
Period. Select the current period or comparative period that contains the
appropriate balances.
Balance Type. Select the balance type to use in the formula.
Account/Index #. Based on the Type selected above, this field lists the choices for
the type, including account groups, account subgroups, and account numbers.
5. If you want to round the amounts used in the formula, check the Rounding box and
select the number of places after the decimal you want to round to.
6. You can select from the following Sign options: Actual, Reverse sign, or Absolute value.
For Word workpapers, you can select the Negative style, Numeric style, and Zero style.
7. Click Insert once you have selected the parameters for the formula. The formula displays
in the TB Link formula box.
8. A plus sign (+) appears at the end of the formula. You can add to the existing formula
by selecting the appropriate parameters again and clicking Insert. If you use Insert TB
Link in Excel, you can change the plus sign (+) to a minus sign (-), a division sign (/), or
a multiplication sign (*). Excel calculates the operation. For example, you may want to
change the plus sign (+) to /2. This divides the formula by 2.
Note: In Word, the only operator is the plus sign (+). Therefore, you cannot make
changes to the formula that is created. If you want to subtract two values, you
can either use Word formulas in a Word table, or create the formulas in Excel and
use the Microsoft OLE function to link the Excel object into the Word document.
9. The Result field displays the total amount the formula calculates. The Result amount
only yields the values from the TB Links. Other operators you enter manually are not
calculated in the Result field, but are calculated in the Excel cell.
10. Click Save to name this formula for later use. The formula is saved in this binder only.
11. Click Open to load an existing formula you have previously saved. Select a saved
formula and click OK to add it to the TB Link formula in the Insert TB Link dialog.
12. Click Paste to insert the TB link into the workpaper.
13. If you want to paste the same TB link to another cell in the workpaper, click the cell on
the workpaper and select Paste on the Insert TB Link dialog.
14. To paste a different TB link to another cell in the workpaper, click the cell on the
workpaper, click Clear on the Insert TB Link dialog, and repeat steps 4 through 10.
8 - 48
Managing Workpapers
Chapter
8
Freezing Engagement Links
If you freeze Engagement links within an Excel or Word document and an Engagement
report, changes to the trial balance and/or name and date properties are not carried to the
documents or reports. Links are not automatically refreshed before they are frozen, so use
the Refresh function prior to freezing the links.
Note: Be sure to open the report at least once before you freeze links. This
ensures that the links are updated.
When you freeze Engagement links within a workpaper or report, you cannot insert new
links or use the following functions:
§
§
§
§
§
Name and Date
Refresh
Replace TB Link Name
Paste TB Link
Insert TB Link
You cannot freeze engagement links in an open locked workpaper. The locked workpaper
must be closed in the Binder window before links can be frozen.
When a workpaper is rolled forward, frozen engagement links remain frozen. If you copy a
workpaper with frozen links, the links remain frozen. If you save a binder as a template,
Engagement links remain frozen in the template.
You must be the Current Editor of a workpaper to freeze links and you must belong to a
staff group that has rights to freeze links.
To freeze Engagement links from the Binder window, do the following:
1. Select the workpaper whose links you want to freeze.
2. Click the Freeze Engagement Links toolbar button.
To freeze Engagement links from within the workpaper, do the following:
1. Open the workpaper whose links you want to freeze.
2. Make sure the links have been updated to reflect the current trial balance and name/date
information.
3. Select Engagement/Freeze Engagement Links or click the Freeze Engagement Links
toolbar icon.
Notes:
§
§
§
You cannot freeze links in a Knowledge Coach workpaper.
Freezing Engagement links does not freeze OLE or DDE links. It applies only to the
trial balance and name or date properties.
The Freeze Engagement Links option removes non-password protection from a
workpaper. If you want to secure a workpaper, you should apply password protection
in Word or Excel. Links cannot be frozen in a password-protected workpaper.
8 - 49
Chapter
Managing Workpapers
8
§
§
If you publish a workpaper with frozen links, the published workpaper contains the
values of the links when frozen.
Link formulas inserted manually after a workpaper’s links are frozen are not frozen
unless you first unfreeze the workpaper and then refreeze it.
Unfreezing Engagement Links
You can unfreeze Engagement links that were previously frozen so they can be updated or
changed. When you unfreeze links within an open workpaper or report, the links are
automatically updated with any changes to the trial balance or the name and date functions.
You must be the Current Editor of a workpaper to unfreeze links and you must belong to a
staff group that has the right to unfreeze Engagement links.
To unfreeze Engagement links from the Binder Window, do the following:
1. Select a workpaper that has had Engagement links frozen.
2. Select Workpaper/Unfreeze Engagement Links.
Note: You cannot unfreeze Engagement links if the workpaper has been password
protected.
To unfreeze Engagement links from within the workpaper, do the following:
1. Open the workpaper whose links you want to unfreeze.
2. Select Engagement/Unfreeze Engagement Links or click the Unfreeze Engagement Links
toolbar button.
Drilling Down to Trial Balance Accounts
Once links are created in the Excel or Word workpapers, you can drill down to the accounts
that make up the dollar amounts calculated in the linked formula. This helps you review the
formula to ensure the correct accounts were summed together.
To drill down to the accounts from a linked formula, do the following:
1. Open the Excel or Word workpaper you want to use outside Engagement. See Opening
Workpapers Inside/Outside on page 8-30 for instructions.
2. In Excel, click the cell containing the linked formula. In Word, highlight the linked
formula.
3. Do one of the following to open the TB Link Drill Down dialog.
§
§
§
Select Edit/Drill Down TB Link.
Right-click and select Drill Down TB Link from the pop-up menu.
Click the Drill Down TB Link button on the Engagement toolbar.
8 - 50
Managing Workpapers
Chapter
8
4. The top section of the dialog displays the TB Link formula parameters. The bottom
section of the dialog displays the accounts used in the formula. If the formula is made up
of more than one TB Link, this section shows a subtotal for each TB Link and a total of
the amounts.
Notes:
§
§
The Total amount only yields the values from the TB Link formulas. Other operators
you may have entered manually when creating the formula are not calculated.
If the Engagement links in the workpaper are frozen, the total shown may vary from
the linked value in the workpaper.
Workpaper Reference Links
Inserting Workpaper Reference Links
You may insert workpaper reference links into a Word document, Excel spreadsheet, and an
Adobe PDF, as well as a trial balance. In the trial balance, you can insert an alphanumeric
reference for the selected trial balance line item and may select up to two workpaper
reference columns for each balance column. You must have the TB Edit Mode feature
turned on in order to insert workpaper references in this column. You also have the option
to print the workpaper reference columns in trial balance reports.
When you insert the link, you see a list of all workpapers in the binder except workpapers in
the Conflicts folder. Once a workpaper reference link is created, you can open the
referenced workpaper. See Opening a Workpaper Reference Link on page 8-53 for
instructions.
8 - 51
Chapter
Managing Workpapers
8
To create a workpaper reference link, do the following:
1. Open the trial balance, Excel, or Word workpaper outside Engagement. See Opening
Workpapers Inside/Outside on page 8-30 for instructions.
2. To insert the link, do the following:
§
§
§
In Excel, click the cell where you want to insert the workpaper reference link.
In Word or an Adobe PDF, place the cursor where you want to insert the
workpaper reference link.
In the trial balance, select Engagement/TB Edit Mode and then select the cell in
the WP Ref column where you want to insert the workpaper reference link.
3. Right-click and select Insert WP Reference from the drop-down menu. The Insert
Workpaper Reference dialog displays.
4. Highlight the workpaper you want to reference and click Insert or double-click the
workpaper to insert the reference.
5. Click Close. The workpaper reference index number displays in blue text.
Notes:
§
§
§
Workpapers without index numbers do not display in the Insert Workpaper Reference
dialog. To add or change a workpaper's index number, use the Workpaper Properties
dialog. For more information, see Changing Workpaper Properties on page 8-26.
If you change a workpaper index number, the change does not carry over to the
workpaper reference. You must manually change the workpaper reference.
Workpaper reference links cannot be inserted into finalized binders.
8 - 52
Managing Workpapers
Chapter
8
Opening a Workpaper Reference Link
Once a workpaper reference is created in Excel or Word workpapers, an Adobe PDF, or the
trial balance, you can open the referenced workpaper.
To open a workpaper reference link, do the following:
1. Highlight the Excel or Word workpaper and select File/Open, or double-click the trial
balance to open it.
2. To open the referenced workpaper, do the following:
§
§
§
In Excel or the trial balance, click the cell with the workpaper reference.
In Word or an Adobe PDF, highlight the workpaper reference.
Click the Open WP Reference icon on the Engagement toolbar.
3. Select Engagement/Workpaper Reference/Open WP Reference.
The referenced workpaper opens, and the first workpaper stays open. You can view the
information in the referenced workpaper and, if you are the Current Editor of the
workpaper, you can make changes to the referenced workpaper. In Word, you can press
l + d or use the Windows menu to switch between workpapers. In Excel and the
trial balance, you can use the Windows menu to switch between workpapers. You can
open only one referenced workpaper in Word.
Notes:
§
§
If you select more than one workpaper reference to open in Excel or the trial balance,
the first referenced workpaper opens. If you select more than one referenced
workpaper to open and there are duplicate index numbers, a dialog displays and you
must select which workpaper to open.
If you change the index number on a workpaper, workpaper references associated
with the original index number do not automatically update to the new index. You
must edit the old workpaper reference or insert a new workpaper reference to the
new index.
Linking from One Workpaper to Another
Objects can be linked between Word and Excel files. You can link or embed objects in
workpapers from Word to Word, Word to Excel, Excel to Word, or Excel to Excel. For more
information on using Object Linking and Embedding with Paste Special between Microsoft
Office files, refer to your Microsoft Office documentation.
Sharing Workpapers
Because ProSystem fx Engagement workpapers are electronic, they can be easily shared
and distributed. You can share entire binders (see Chapter 6, Creating and Using Binders),
or you can share individual workpapers. This section describes the procedures for checking
in, checking out, and synchronizing individual workpapers.
Note: Checking in, checking out, and synchronizing workpapers is not necessary
when working with shared file rooms.
8 - 53
Chapter
8
Managing Workpapers
Checking In Workpapers
You can check a workpaper or workpapers in to the central file room without checking in
the entire binder. When you check in a workpaper, your Current Editor rights are removed
from that workpaper.
1. Open the binder containing the workpapers to check in.
2. Select the workpapers to check in. If you are checking in multiple workpapers, press
k to select contiguous workpapers, or press b to select non-contiguous
workpapers.
3. Right-click the selected workpapers and select Check-In Workpaper, or select
Workpaper/Check-In Workpaper. The Check-In Workpaper dialog displays a list of
selected workpapers that are available for check-in.
4. Click Check In to check the workpapers in to the central file room.
Checking Out Workpapers
You can check a workpaper or workpapers out from the central file room without checking
out the entire binder. When you check out a workpaper, you gain Current Editor rights for
the workpaper.
1. Open the binder containing the workpapers to check out.
2. Select the workpapers to check out. If you are checking out multiple workpapers, press
k to select contiguous workpapers, or press b to select non-contiguous
workpapers.
3. Right-click the selected workpapers and select Check-Out Workpaper, or select
Workpaper/Check-Out Workpaper. The Check-Out Workpaper dialog displays a list of
selected workpapers that are available for check-out.
4. Click Check Out to check the workpapers out from the central file room.
Synchronizing Workpapers from an Open Binder
You can synchronize selected workpapers with other staff members, a staff member in your
Buddy List, or the central file room without closing the binder.
Note: You cannot select individual Knowledge Coach workpapers for synchronization.
1. Open the binder containing the workpapers to synchronize.
2. Select the workpapers to synchronize. If you are synchronizing multiple workpapers,
press k to select contiguous workpapers, or press b to select non-contiguous
workpapers.
3. Right-click the selected workpapers and select Synchronize Workpaper, or select
Workpaper/Synchronize Workpaper. The Synchronization Target dialog displays. The
central file room defaults to the one selected when the binder was set up. In an initial
synchronization, you can select another central file room.
4. Select the target to synchronize with and click OK. The Synchronize Workpaper dialog
displays a list of selected workpapers that are available for synchronization.
5. Click Synchronize. The Synchronization Job Queue dialog displays the progress of the
synchronization. You can click Hide to close the dialog.
8 - 54
Managing Workpapers
Chapter
8
Reviewing Workpapers
This section explains how to use the workpaper review features in ProSystem fx
Engagement. You can review workpapers and sign off on them when you agree with the
work performed and the conclusions drawn. You can create several types of notes and can
sign off as a preparer and/or reviewer. Multiple preparers and reviewers can sign off on a
workpaper.
Examine the Binder window in the following illustration, which shows the various review
features available for reviewing workpapers, including workpaper notes. You can use this
image as a reference through the following sections.
Workpaper and Workpaper Tab Notes
ProSystem fx Engagement provides a platform to create, respond to, and manage your
notes. You can create three types of notes for workpapers and binder tabs: Team Notes,
Open Items, and Notes for Next Period.
Creating a Workpaper or Workpaper Tab Note
You can create notes about a specific workpaper or a workpaper tab.
1. Select the workpaper or workpaper tab for which you are creating the note. You can do
this in any view that shows the workpapers and tabs.
2. To display the Workpaper Note Detail dialog, do one of the following:
§
§
§
Select Workpaper/Create Workpaper Note.
Right-click the workpaper and select Create Workpaper Note from the pop-up
menu.
Click the Create Workpaper Note icon on the toolbar.
3. Select the type of note you want to create from the Type drop-down list.
§
§
Open Item. This may be a note to yourself, a question to or from a preparer, or a
question to or from a reviewer.
Team Note. You can check the All Binder Staff box to send the note to all staff
members assigned to the binder, or use the drop-down list to select a specific
binder staff member.
8 - 55
Chapter
8
Managing Workpapers
Note: Even though a team note might be addressed to a specific binder
staff member, all binder staff members can read the note.
§
Note for Next Period. The notes in the Note for Next Period section are carried
forward to next year’s binder during the roll forward process. After the roll
forward, the note becomes an open item note. See Rolling Forward Binders in
Chapter 6 for additional information on roll forward.
4. In the Created by field, if another binder staff member needs to create a note from your
login, select the staff member from the list. The staff member is prompted for a
password.
5. In the Subject field, type a description of your workpaper note. This field is required.
6. In the Note field, enter the note’s text. The name of the staff member creating the note
and the date/time stamp appear above the Note field.
7. Check the Cleared By box when the note is resolved. The name of the staff member
clearing the note displays. The text of a note that has been cleared displays with a
strikethrough in the Binder window. You can still double-click the note to read it and any
responses to it.
8. Click the Open Workpaper icon if you want to launch the workpaper from this dialog.
Note: This button is inactive if you are creating a note for a workpaper tab.
9. Click OK to save the note.
Note: Workpaper notes can also be created inside an open Excel or Word
workpaper. Select Engagement/Create Workpaper Note or click the Create
Workpaper Note icon on the toolbar.
Responding to a Note
To respond to a note that has been created for a workpaper or workpaper tab, do the
following:
1. Select the workpaper or tab containing the note you want to respond to in the Binder
Index.
2. Do one of the following to open a specific note:
§
§
From the Notes Pane, right-click the note in the list and select Respond to Note
from the pop-up menu.
Click the Notes Summary View tab, right-click the note in the list, and select
Respond to Note from the pop-up menu.
3. Type your response to the note in the Note field. If the field is gray, another staff
member has already responded to this note. To add your own response, click the New
Response icon and the Note field becomes active.
4. Click OK to save your text.
8 - 56
Managing Workpapers
Chapter
8
Managing the Notes Pane
The Notes Pane is a dockable window pane. You can move it anywhere on the Binder
window by dragging it to a different location. If you drag the pane to the edge of the
window, it docks along the side, top, or bottom of the window.
If you right-click the horizontal scroll bar, a pop-up menu displays with two options:
§
§
Allow Docking. If you remove the check mark from the Allow Docking box, you are
no longer able to dock the pane. You can check the option again if you want to be
able to dock the pane.
Hide the Notes Pane. If this option is selected, the Notes Pane is hidden. To restore
the Notes Pane, select View/Workpaper Notes.
If the Notes Pane is not docked, you can right-click the title bar to display options to Move,
Size, and Hide the Notes Pane.
§
§
§
Move. Select this option with the mouse and then use the arrow keys to move the
Notes Pane. Click the pane to disable the Move function. You can also click and hold
the Title bar and drag it to a new location.
Size. Select this option with the mouse and then use the arrow keys to adjust the
size of the Notes Pane. When finished, click the pane with the mouse to disable the
Size function. You can also click the edge of the Notes Pane with the mouse and drag
the pane edges to the size desired.
Hide the Notes Pane. If this option is selected, the Notes Pane is hidden. To restore
the Notes Pane, select View/Workpaper Notes.
Managing Notes
You can use either the Notes Pane or the Notes Summary View to keep track of which
notes need to be responded to, cleared, or deleted.
You can open the Notes Summary View in the following ways:
§
§
§
Select View/Notes Summary View.
Click the Notes Summary View tab at the bottom on the Binder Index.
Click the Notes Summary View icon on the toolbar.
An example of the Notes Summary View window is shown below.
8 - 57
Chapter
Managing Workpapers
8
The Notes Summary View window displays all of the notes that exist in the open binder.
The notes are broken down into three categories:
§
§
§
Team Notes
Open Items
Notes for Next Period
The Notes Summary View segregates the notes and shows the responses nested under the
note. The notes in the Notes for Next Period section are carried forward to next period’s
binder during the roll forward process where the type is changed to Open Item.
The following status information displays for each note, if applicable:
§
§
§
§
§
§
§
§
Status. Open or Cleared.
From. The author of the note.
To. The staff member to whom the note is directed.
Date Created. The date and time the note or response was created.
Cleared By. The staff member who cleared the note.
Date Cleared. The date and time the note was cleared.
# of Responses. The number of responses to the note.
Workpaper. The workpaper to which the note is attached.
You can click a column header to sort by that column. You can also right-click the status
column header to filter the notes by All, Cleared, and Open. When you click the note in the
upper half of the window, note details display in the lower pane. You can right-click a note
and select Delete Note. This permanently deletes the note. The note does not go into the
Trash bin.
In the Administrator module (see Assigning Staff Group Rights on page 3-9), you can assign
staff group rights to determine who can do the following:
§
§
§
§
Create and Clear Notes
Delete Notes
Print the Notes Report
Clear Other Staff Member’s Notes
In the bottom right side of the window, the following icons allow you to open notes, clear
notes, respond to notes, and open the workpaper, respectively.
Workpaper Sign Off
When you have completed your work on a workpaper, you can sign off on the workpaper as
the Preparer, Reviewer, and/or 2nd Reviewer. You can have multiple preparers, reviewers,
and second-level reviewers on workpapers.
To check the Prepared/Reviewed status of engagement workpapers, use the Workpaper
Sign Off Summary View. You can filter the information to show what you want to see.
Note: In order to sign off a workpaper, you must belong to a staff group that has
been given sign off rights in the Administrator module.
8 - 58
Managing Workpapers
Chapter
8
Signing Off Workpapers
1. Select the workpaper you want to sign off in the Binder window Contents pane.
2. Do one of the following to open the Workpaper Properties - Sign Off tab dialog.
§
§
§
§
§
Select Workpaper/Sign Off Workpaper.
Right-click the workpaper and select Sign Off Workpaper from the menu.
Click the Sign Off Workpaper icon on the toolbar.
Select File/Properties and select the Sign Off tab.
Right-click the workpaper, select Properties, and then select the Sign Off tab.
The Workpaper Properties - Sign Off tab dialog displays.
3. In the Current User field, if another binder staff member needs to sign off a workpaper
from your login, select the staff member from the drop-down list. The staff member is
prompted to enter the password. Click OK.
4. The Date field defaults to the current date. You can enter a different date from the
calendar by clicking the down arrow in the Date field, or by entering a date in the format
shown.
5. Click the Plus sign (+) to add your user name to the appropriate sign off field. You
cannot sign off as a 1st or 2nd Reviewer if no one has signed off as Preparer. Click the
Negative sign (-) to remove your sign off. Only you can remove your sign off.
6. Click the Open Workpaper icon to open the related workpaper, if necessary. Click OK to
save your changes.
Note: If you open a workpaper that has been signed off as reviewed,
Engagement asks you if you want to save the workpaper. This is important
because if you save the workpaper, the Modified flag displays notifying users
that the workpaper was modified after it had been reviewed. This is true even
if you did not make changes to the workpaper. Do not save a workpaper if you
did not make changes to it. If you make changes to it, the reviewer flag
appears, notifying users that the workpaper has been modified after review.
8 - 59
Chapter
Managing Workpapers
8
Managing Workpaper Sign Offs
When you want to view the sign off status of workpapers in a summary format, you can
use the Sign Off Summary View window. You can easily see which workpapers have not
been signed off by a preparer, reviewer, or second-level reviewer, as well as workpapers
that have been modified subsequent to sign off. All workpapers can be signed off from this
window as well.
To open the Sign Off Summary View window, do one of the following:
§
§
§
Select View/Sign Off Summary View.
Click the Sign Off Summary View tab at the bottom of the Binder Index.
Click the Sign Off Summary View icon on the toolbar.
This window displays all of the workpapers in the open binder and the status of sign off: In
Process, Ready for Review, Reviewed, or 2nd Reviewed.
Under each workpaper, the name of the staff member who signed off is listed along with
the sign off date. If multiple staff members signed off, their names are listed in
chronological order.
You can sort each column in ascending or descending order by clicking the column header.
Click the header again to reverse the sort order.
The following status information displays for each workpaper, if applicable:
§
§
§
§
Locked. The Locked icon indicates the workpaper is locked. A locked workpaper is
read-only.
Frozen Links. The Frozen Links icon indicates the Engagement links within the
workpaper are not updated with any changes made to the trial balance or Name/Date
Functions.
Workpaper Note. The Note icon indicates notes are attached to the workpaper.
Modified after Reviewer Sign Off. A Modified icon displays if the workpaper has been
modified after a reviewer has signed off.
Note: If the option to flag workpapers that were modified after sign off is not
selected in Administrator, this column displays but the indicator flag does not.
8 - 60
Managing Workpapers
§
§
§
§
Chapter
8
File Modified Date. The date and time of the last time the workpaper was saved.
Current Editor (Non-Shared Local File Room). The name of the staff member who has
Current Editor rights.
Live Editor (Shared Local File Room). The name of the staff member who is currently
editing the workpaper.
Assigned To (Non-Shared Local File Room only). The name of the staff member to
whom the workpaper will be handed off during the next synchronization.
Workpapers can be signed off from this window using the same methods explained in
Signing Off Workpapers on page 8-59.
Workpaper Sign Off History Report
You can view a report of the sign off history of any binder in the local file room. The report
displays as an Excel document, which can be sorted and printed.
To view the Workpaper Sign Off History Report, do the following:
1. In Binder View, select a binder in your local file room.
2. Select Tools/Reports/Workpaper Sign Off History Report. Microsoft Excel opens and
displays the report. The report lists the workpaper index and name, type of transaction,
sign off date, and who performed the sign off.
Locking and Unlocking Workpapers
After a workpaper has been reviewed and signed off, you may want to lock it. A locked
workpaper is read-only. If the Engagement links are not frozen in the locked workpaper, the
links continue to update as changes are made to the trial balance or the Name and Date
function links.
To lock or unlock a workpaper, do the following:
1. Select the workpaper you want to lock or unlock.
2. Do one of the following:
§
§
§
Select Workpaper/Lock/Unlock Workpaper.
Right-click the workpaper and select Lock/Unlock Workpaper from the pop-up menu.
Click the Lock/Unlock Workpaper toolbar button.
The Lock symbol displays in Binder View, Sign Off Summary View, and Current Editor
View.
Notes:
§
§
§
Knowledge Coach workpaper cannot be locked.
Trial balances cannot be locked.
The Lock Workpaper option removes non-password protection from a workpaper. If
you want to secure a workpaper, you should apply password protection in Word or
Excel.
8 - 61
Chapter
8
Managing Workpapers
Current Editor
The Current Editor of a workpaper can edit and save the workpaper. Other staff members
can view a read-only copy. When you check unassigned workpapers out of the central file
room, you become the Current Editor. You remain the Current Editor until you check the
workpaper in to the central file room or assign the workpaper to another binder staff
member.
Live Editor
The Live Editor of a workpaper can edit and save the workpaper. Other staff members can
view a read-only copy. When you log in to a Host's shared local file room and open a
workpaper that is listed as <Available>, you become the Live Editor. You remain the Live
Editor until you close the workpaper.
Assigning and Unassigning Workpapers
The Current Editor of a workpaper can assign the workpaper to another binder staff
member. During synchronization, this workpaper is automatically checked out to the
assigned person. The Assign To feature communicates to staff members the flow of the
workpaper and streamlines the process.
Note: Staff members must be assigned to the applicable binders to be available on
the Assign/Unassign Workpapers To/From drop-down list.
To assign or unassign a workpaper, do the following:
1. Select the workpaper(s) you want to assign to another binder staff member.
2. Do one of the following to open the Assign/Unassign Workpapers dialog.
§
§
Select Workpaper/Assign/Unassign Workpaper and select a staff member from the
sub-menu.
Right-click the workpaper and select Assign/Unassign Workpaper from the pop-up
menu. Select a staff member from the sub-menu.
Tip: You can select multiple workpapers using the b and k keys. You can
also assign all the workpapers within a tab by selecting the tab.
3. You can change the staff member by using the drop-down list in the Staff member field.
8 - 62
Managing Workpapers
Chapter
8
4. In the Location information section, perform the appropriate action:
§
§
If the selected staff member has a user profile on the computer where the
workpaper assignment is being made, the Existing location field becomes enabled
and displays the computer's name.
If the selected staff member does not have a user profile on the computer where
the workpaper assignment is being made, Alternate location is selected.
Either enter a computer name in the Computer name field, or click Browse to open
the Browse for Computer dialog and select an alternate location.
Note: If you select an alternate location, you must be able to connect to that
location to verify a profile exists for the staff member on that computer.
5. Select Synchronize with selected staff member when dialog is closed to automatically
synchronize when you click OK.
6. Click OK to assign or unassign the workpapers.
All of the views, except the Notes Summary View, display the name of the staff member to
whom the workpaper will be handed off during the next synchronization in the Assigned To
column.
In a Field environment, when the staff member who is the Current Editor of the workpaper
synchronizes with the staff member the workpaper is assigned to, the workpaper will
automatically be checked out to the assigned staff member.
In an Office environment, when the Current Editor synchronizes to the central file room, the
assigned workpaper is automatically checked in. Then, when the staff member to whom the
workpaper is assigned synchronizes with the central file room, the workpaper is
automatically checked out to them.
Note: When sharing workpapers via Binder Packages, the Assign/Unassign
Workpaper function can be used to change the Current Editor status. When the
assigned member receives the binder package, they become Current Editor.
After synchronization, the new Current Editor sees the workpaper in bold, showing there
has been a change. The Current Editor View is a good place to view workpapers. See
Current Editor View on page 6-27 for more information.
You can unassign a workpaper at any time prior to synchronization by doing the following:
1. Select the workpaper to unassign.
2. Select Workpaper/Assign/Unassign Workpaper, and select None from the sub-menu, or
right-click the workpaper, select Assign/Unassign Workpaper, and select None from the
sub-menu.
8 - 63
Chapter
8
Managing Workpapers
Taking Over a Workpaper
If you are not a workpaper’s Current Editor, you can use the Take Over option to become
the Current Editor. Use this option carefully. When taking over a workpaper, make sure that
the Current Editor does not make changes, because those changes will be lost during the
next synchronization.
To take over a workpaper as Current Editor, do the following:
1. Select the workpaper in the Binder window.
2. Do one of the following to open the Workpaper Properties dialog:
§
§
§
Select File/Properties.
Right-click the workpaper and select Properties.
Click the Properties toolbar button.
3. Select the Workpaper tab and check the Take over this workpaper as Current Editor box
at the bottom of the Workpaper Properties dialog.
Note: If you are the Current Editor, the Take over this workpaper as Current
Editor box does not display.
4. Click OK. A warning message states “Manually taking over this workpaper will cause
conflicts during synchronization which can result in loss of data.”
5. Click Yes to continue or No to stop the take over.
6. Click OK to exit the dialog.
The Take Over All Workpapers option on the Tools menu should not be used in everyday
practice, but might be needed in emergency situations.
During the next synchronization by the Current Editor and the staff member who took over
as the Current Editor, a conflict message displays.
Using Tickmarks in Workpapers
Tickmark Definition
Tickmarks enable you to annotate reports by adding symbols and footnotes. You can insert
tickmarks into Excel reports generated by ProSystem fx Engagement, Excel, Word, or
Adobe workpapers you create. The tickmarks can be characters available on the keyboard
as well as images. Engagement provides a list of default tickmark symbols (pictures) and
descriptions. You can use these tickmarks or modify the list to fit your standards.
8 - 64
Managing Workpapers
Chapter
8
Using the Tickmark Definition List
The tickmark definition list contains the tickmark symbols (pictures) and the tickmark
descriptions. ProSystem fx Engagement provides a default list, which you can modify as
necessary.
To use the tickmark definition list, do the following:
1. Open the workpaper. You can define tickmarks in Excel, Word, and Adobe workpapers.
2. Select Engagement/Tickmark/Tickmark Definition. The Tickmark Definition dialog
displays, including the tickmark symbol, name, description, and filename (BMP file).
3. To add your own tickmark to this list, click Add.
4. Type the tickmark name and description.
5. Click the File Name box and then the Browse button.
6. Browse to a bitmap file (BMP), and click Open.
Notes:
§
§
A standard tickmark bitmap is a 16 Color bitmap file. The width and height are 16
pixels by 16 pixels. A tickmark that is not 16 color or is larger than 16 pixels by
16 pixels can be inserted, but it will not appear that way on the toolbar because
the toolbar automatically adjusts the bitmap to fit the toolbar and use 16 Colors.
When you insert the tickmark on an Excel or Word workpaper, your original
tickmark specifications are used. This is because when you add a tickmark to the
toolbar, Engagement copies the bitmap to the Pfx Engagement folder and uses
that bitmap when you later select the tickmark from the toolbar.
7. A copy of the tickmark bitmap file is placed in your default Tickmarks Location path. The
Tickmarks Location path can be changed in ProSystem fx Engagement by selecting
Tools/Options. The Data tab has a field to browse to the desired tickmarks location.
8 - 65
Chapter
8
Managing Workpapers
8. You can delete a tickmark from this list by highlighting the tickmark and clicking the
Delete button. A warning states that this will delete the tickmark permanently; however,
the file in the Tickmarks Location path is not deleted. Click Yes to continue.
9. You can export the list of tickmark definitions and files to a compressed file. This is
helpful if you want to supply this list to another copy of the ProSystem fx Engagement
program. Click Export and save the file with an AZG extension.
10. You can import a list of tickmarks and pictures that were previously exported. Click
Import and browse to the AZG file. The tickmark files are copied to your Tickmarks
Location path.
Opening the Tickmark Toolbar
To use the tickmarks in the Tickmark Definition list, you need to open the tickmark toolbar.
The tickmark toolbar is used to select and insert the tickmark into an Excel workpaper, a
Word workpaper, or an Adobe PDF.
To open the tickmark toolbar, do the following:
1. Open the Excel report or workpaper.
2. Select Engagement/Tickmark then select Tickmark Toolbar from the submenu, or click
the Tickmark Toolbar button. The Engagement Tickmark toolbar displays.
Inserting Tickmarks
Tickmarks can be inserted into Excel workpapers, Word workpapers, and Adobe PDFs.
To insert a tickmark symbol, do the following:
1. Open the workpaper (Excel, Word, or Adobe PDF) inside Engagement. When the
workpaper opens, it displays Engagement menu commands in addition to the usual
commands.
2. Select Engagement/Tickmark/Tickmark Toolbar to open the Tickmark Toolbar.
3. Do one of the following:
§
§
If you are using Microsoft Word or Excel, click where you want to insert the
tickmark, and then click the tickmark symbol in the Tickmark Toolbar.
If you are using Adobe, click the tickmark symbol in the Tickmark Toolbar, and
then click where you want the tickmark to be displayed.
4. The tickmark symbol displays in the designated spot. (In Excel, the tickmark appears on
top of the cell.)
Note: To move the tickmark, click the tickmark until hashmarks appear.
Holding the left mouse button down, drag the tickmark to the desired location.
Click the tickmark symbol in the tickmark toolbar. The tickmark symbol
displays.
If you are using the Tickmark worksheet in Engagement generated reports, you can insert
the tickmark symbol in the tickmarks worksheet and link the tickmark to another tab in the
report.
8 - 66
Managing Workpapers
Chapter
8
To use the tickmarks worksheet in ProSystem fx Engagement-generated reports:
1. Click the Tickmarks worksheet. You can expand and contract the display of text. If the
text box is expanded, click the minus sign (–) on the far left of the window to contract
the box to a single line. To expand the text box, click the plus sign (+).
2. Type the text you want in the text box for the tickmark. Do not type anywhere else in
the worksheet.
3. Click the worksheet that you want to annotate.
4. Click in a blank cell where you want the tickmark to display.
5. If you are using Office 2000, click the equal sign (=) on the Excel formula bar. If you are
using XP, click the fx button on the Excel formula bar.
6. Click the Tickmark worksheet again and then click the tickmark symbol and press Enter.
You can enter a new tickmark letter or symbol for the tickmark on the worksheet. This
change is seen on the worksheet you selected in step three. You can use the normal
Excel formatting commands, such as color and bold, to change the cells to your tickmark
formatting.
Note: In Office XP, click the box below Name and Date to jump to the
tickmark.
Important: Do not change the layout of the Tickmark worksheet. Modifying
the Tickmark worksheet, besides adding text in the box for the tickmark, may
prevent tickmarks from working properly.
Printing a Tickmarks Sheet or Custom Sheets
You must belong to a staff group that has rights to printing workpapers before you can print
a tickmark sheets or custom sheets.
1. In the Binder Index window, highlight the Engagement report (Trial Balance, Journal
Entry, Write Up, or Consolidated) for which you want to print the tickmarks sheet or
custom sheets.
2. Use one of the following methods to open the Print Group dialog.
§
§
Select File/Print Group from the Binder Index main menu.
Select File/Print from the Binder Index main menu, then click Print Groups.
8 - 67
Chapter
8
Managing Workpapers
§
Right-click and select Print from the pop-up menu, then click Print Groups.
3. In the Engagement Reports section, check the Print Tickmarks sheet and/or Print Custom
sheets.
4. Select To printer, then click OK.
Note: Empty custom sheets do not print.
8 - 68
9
C H A P T E R
Using Excel
Overview
When you create a ProSystem fx Engagement workpaper in Microsoft Excel, you have
access to special Engagement menus, commands, toolbar, functions, and formulas.
Included in these features is the ability to link your Excel workpaper to the trial balance.
These functions are only available in ProSystem fx Engagement workpapers. They cannot
be used in Excel workbooks created outside of Engagement. However, you can insert your
Excel workbooks into an Engagement binder by selecting File/New/Workpaper From File.
See Chapter 6, Creating and Using Binders, for instructions.
This chapter shows you how to use Engagement-specific features in Excel. For general
information about using Excel, see the Microsoft Office documentation and Excel help.
Engagement-Specific Features in Excel
When you open an Excel workpaper created in Engagement, Excel opens with the
Engagement-specific features added to the program’s standard interface. This happens
when you view the workpaper outside Engagement in its native application.
When you view the workpaper inside, it is read-only and you do not have access to Excel or
the Engagement-specific features in Excel. When you open an Excel workpaper that was not
created in ProSystem fx Engagement, the Engagement-specific features are not available.
This section provides an overview of the menus, commands, toolbar, functions, and fields
that are Engagement-specific.
ProSystem fx Engagement Menus and Commands
When you open an Engagement Excel workpaper, an Engagement menu is added to the
existing Excel menus along with several new commands. A number of these commands are
also available when you right-click the workpaper in Excel.
These commands are listed in the following table.
9-1
Chapter
9
Using Excel
Command
Description
Toolbar Icon
Menu
In
Right-Click
Menu?
Account
Groupings
Organizes accounts into groups. For
details, see Account Groupings on
page 7-48.
Engagement
No
Add Journal
Entry
Adds a journal entry. For more
information, see Creating Journal
Entries on page 7-60.
None
Journal Entry
No
Chart of
Accounts
Allows you to add, modify, and
delete trial balance accounts. You
can also add balances to different
columns in the trial balance. See
Adding, Modifying, or Deleting Trial
Balance Accounts on page 7-45.
None
Engagement
No
Classifications
Allows you to view and edit account
and ratio classifications.
None
Engagement
No
Consolidate
TB
Consolidates data from single
company trial balances into a
consolidated trial balance. See
Consolidating Trial Balances on page
7-78.
Engagement
No
Copy TB
Link
Copies cells from the trial balance to
paste into the workpaper. The cells
are copied to the Clipboard. See
Copy/Paste TB Link on page 8-43.
Edit
Yes
Create
Consolidated
Report
Creates a report that shows the
subsidiaries' balances, the total
balance, the eliminating journal
entries, and the Consolidated
balance. See Creating a Consolidated
Report on page 7-84.
None
Create
Reports
No
Create Journal
Entry Reports
Creates reports for each type of
journal entry. See Creating Journal
Entries on page 7-60.
None
Create
Reports
No
Create
Reports
Create TB, Consolidated, Journal
Entry, or Write Up reports.
None
Engagement
No
Create
TB Reports
Creates reports based on trial balance
information. See Creating Trial
Balance Reports on page 7-66.
Create
Reports
No
Create
Workpaper
Note
Creates a note for a workpaper. See
Creating and Responding to Notes on
page 8-55.
Engagement
No
9-2
Chapter
Using Excel
Command
Description
Toolbar Icon
Create
Write Up
Report
Creates three transaction reports to
display the information entered in the
Write Up journals. See Creating Write
Up Reports on page 7-89.
Create Write
Up Detail
Report
9
Menu
In
Right-Click
Menu?
None
Create
Reports
No
Creates a Write Up Journal Report
showing the detail of the entries of
the journal type you select. The
columns in the report are the same as
in the journal.
None
Write Up
Reports
No
Create G/L
Current Report
Creates a report showing the
accounts in the trial balance and their
beginning balance, transaction
amounts, and ending balance for the
current period only.
None
Write Up
Reports
No
Create G/L
YTD Report
Creates a report showing the
accounts in the trial balance and their
beginning balance, transaction
amounts, and ending balance for all
YTD periods in the fiscal year.
None
Write Up
Reports
No
Date
Functions
Inserts date information into the cell.
When you select this command, a
menu of available dates displays. See
Date Functions on page 9-12.
Engagement
Yes
Drill Down TB
Link
Drills down to the accounts that
make up the dollar amounts
calculated in the linked formula. See
Drilling Down to Trial Balance
Accounts on page 8-50.
Edit
Yes
Freeze
Engagement
Links
Freezes links so that linked items are
not changed if the trial balance
and/or name and date properties are
changed. See Freezing Engagement
Links on page 8-49.
Engagement
No
Import
Conversion
Wizard
Assist in importing trial balance data
from other supported trial balance
software programs. See Converting
and Importing Trial Balance Data on
page 7-20.
Engagement
No
Insert TB Link
Creates links from the trial balance
without having to open the trial
balance. See Insert TB Link on page
8-47.
Edit
Yes
9-3
None
Chapter
9
Using Excel
Command
Description
Insert WP
Reference
Toolbar Icon
Menu
In
Right-Click
Menu?
Inserts a link to a workpaper in the
binder. See Workpaper Reference
Links on page 8-51.
Workpaper
Reference
Yes
Journal Entry
Summary
Enables you to add, modify, or delete
journal entries. See Using the Journal
Entry Summary Window on page
7-64.
Journal Entry
No
Name
Functions
Inserts text information at the cursor
position. When you select this
command, a menu of available text
items displays. See Name Functions
on page 9-9.
Engagement
Yes
Open WP
Reference
Opens the referenced workpaper. See
Opening a Workpaper Reference Link
on page 8-53.
Workpaper
Reference
Yes
Paste TB
Import
Imports data into the trial balance.
See Converting and Importing Trial
Balance Data on page 7-20.
Edit
Yes
Paste TB Link
Pastes trial balance cells from the
Clipboard to the cursor position. You
have the option of pasting the
amount of each cell or the sum of all
cells. See Pasting Trial Balance
Amounts - General on page 8-43.
Edit
Yes
Properties
(Trial Balance
and TB
Reports Only)
Enables you to view and modify trial
balance and trial balance report
properties. See Trial Balance
Properties on page 7-13.
Engagement
No
Quiklink to
ProSystem fx
Tax
Links between a trial balance and the
ProSystem fx tax return. See
Jumping from the Trial Balance to the
Tax Return in ProSystem fx on page
7-108 and Jumping from the Tax
Return to the Trial Balance in
ProSystem fx on page 7-108.
Engagement
Yes
Quiklink/
Desktop
Updates
Status
Displays trial balances that have been
imported into ProSystem fx Tax using
Dynalink where the automatic
Quiklink Update option is active. See
Updating with Quiklink on page
7-105.
Engagement
No
9-4
None
None
Chapter
Using Excel
Command
Description
Toolbar Icon
QuickView
Displays the balance broken down by
assets, liabilities and equity, revenue,
expenses, and net income. See
Chapter 7, Using the trial balance, for
more information.
Refresh
Updates all links to the trial balance,
TB and JE reports, and workpapers
so that updated information is
shown. See Refreshing Links on page
9-7.
Replace TB
Link Name
Changes the links in a workpaper to
another trial balance name. See
Replacing TB Link Names on page
9-7.
TB Column
Setup
9
Menu
In
Right-Click
Menu?
Engagement
No
Engagement
No
Engagement
No
Defines and changes trial balance
columns. See Trial Balance Column
Setup on page 7-14.
Engagement
No
TB Edit Mode
(Trial Balance
Only)
Toggles the trial balance Edit mode.
Toggled on, you can enter data into
the highlighted cells directly. See
Editing the Trial Balance on page 7-6
and TB Edit Mode on page 7-47.
Engagement
No
Tickmark
Definition
Defines tickmark symbols and
descriptions. See Tickmark Definition on
page 8-64.
Tickmark
No
Tickmark
Toolbar
Opens the tickmark toolbar so you can
insert the tickmark in the workpaper.
See Opening the Tickmark Toolbar on
page 8-66.
Tickmark
Yes
Unfreeze
Engagement
Links
Reactivates frozen links so that
changes once again flow to linked
documents or reports. See Unfreezing
Engagement Links on page 9-9.
Engagement
No
Write Up
Journal Entry
Organizes the transaction data in
journals. See Using Write Up Journals
on page 7-87.
Journal Entry
No
9-5
None
None
None
Chapter
9
Using Excel
Using Engagement with Excel 2007
Engagement takes advantage of the new Ribbon interface in Excel 2007. The Engagement
tab displays all of the functions you need to complete workpaper tasks.
Click a button or drop-down list to use the appropriate function.
The Workflow group of the Engagement tab includes the six most recently used tickmarks.
If no tickmarks have been used, the following tickmarks display by default:
§
§
§
§
§
§
Agrees to
Agrees to GL
Agrees to Prior
Footed
Unreconciled Difference
Immaterial
Notes:
§
§
Excel 2007 uses two new file extensions: .xlsx for Excel files and .xlsm for
macro-enabled Excel files.
Workpapers created with Excel 2007 may not be easily viewed by users who do
not have Excel 2007 installed.
Using Tickmarks in Excel Workpapers
Tickmarks in an Excel workpaper function the same as in any workpaper. For details, see
Using Tickmarks in Workpapers on page 8-64.
Linking ProSystem fx Engagement Information
You can link the following types of information to Excel ProSystem fx Engagement
workpapers:
§
§
§
Name functions. These are used to insert the information of a client, firm,
engagement binder, and workpaper.
Date functions. These are used to insert dates for current or prior periods.
Calculation functions. These are the mathematical functions you can apply to cells
in a worksheet. They provide accounting functions not available in Excel alone.
9-6
Using Excel
§
Chapter
9
Trial Balance Links.
— Copy/Paste TB Links. These links are created by copying and pasting cells from
the trial balance into your Excel worksheet. For more information, see
Copy/Paste TB Link on page 8-43.
— Insert TB Links. This option allows you to create links from the trial balance to an
Excel file, without having to open the trial balance. You can build a formula by
selecting specific parameters. For more information, see Insert TB Link on page
8-47.
§
Workpaper References. These are links to other workpapers in the binder. Once
the link is created, you can open the referenced workpaper. For more information,
see Workpaper Reference Links on page 8-51.
For general instructions on using Excel, see the Microsoft Office documentation and the
Excel help.
Replacing TB Link Names
Within your Excel workpapers and reports, you can replace trial balance links. This feature
is especially useful if you have changed the name of a trial balance used in a link and you
need to update that link. You may also need to use this option if you are using any of the
Engagement workpaper templates. Instead of updating the link manually, you can specify
the new trial balance name with which to replace the old.
To replace the trial balance name in a TB link, do the following:
1. From the Excel workpaper, select the cell in which to replace the trial balance name.
2. Select Engagement/Replace TB Link Name. The Replace TB Links dialog displays.
3. From the Replace TB Link Name With drop-down list, select the new trial balance name.
4. Select one of the following radio buttons:
§
§
Selected links only. Replaces the TB name in the selected cells with the specified
TB name.
All links in the workpaper. Replaces the TB name in all links of the workpaper with
the specified TB name. If the workpaper has multiple worksheets, only the active
worksheet is changed.
5. Click OK. Engagement automatically replaces the TB link(s) names according to the
selections made and refreshes all TB links in the workpaper.
Refreshing Links
When you open Excel workpapers and reports, the links automatically refresh. To refresh
links when the Excel file is open and a change has been made, select Engagement/Refresh,
or click the Refresh toolbar button. The latest information displays with all links in the open
workpaper.
Note: If you do not want to refresh the links in the workpaper every time you
open the workpaper, select Tools/Options in the File Room or Binder window. Then
uncheck the Auto refresh workpapers option on the General tab of the Options
dialog.
9-7
Chapter
Using Excel
9
Freezing and Unfreezing Engagement Links
If you freeze Engagement links within an Excel document, Word document, or Engagement
reports, changes to the trial balance and to the name and date properties are not carried to
the documents or reports. Links are not automatically refreshed before they are frozen, so
use the Refresh function prior to freezing the links.
Note: Open the report at least once before you freeze links. This ensures that the
links are correct.
When you freeze Engagement links within a workpaper or report, you cannot insert new
links or use the following functions:
§
§
§
§
§
Name and Date
Refresh
Replace TB Link Name
Paste TB Link
Insert TB Link
You cannot freeze or unfreeze Engagement links if a workpaper is both open and locked.
The locked workpaper must be closed in the Binder window before links can be frozen or
unfrozen. You cannot lock Knowledge Coach workpapers.
When a workpaper is rolled forward, frozen Engagement links remain frozen. If you copy a
workpaper with frozen links, the links remain frozen. If you save a binder as a template, the
links remain frozen in the binder template and are frozen in any binder created from the
template.
To freeze Engagement links, you must be the Current Editor or Live Editor of the workpaper
and you must belong to a staff group that has rights to freeze Engagement links.
Freezing Engagement Links
To freeze Engagement links, do the following:
1. Select the workpaper whose links you want to freeze.
2. Select the Engagement/Freeze Engagement Links menu option, or click the Freeze
Engagement Links toolbar button.
Notes:
§
§
§
§
§
You cannot freeze links in Knowledge Coach workpapers.
Freezing Engagement links does not freeze OLE or DDE links. It applies only to the
trial balance, and name or date properties as stated above.
The Freeze Engagement Links option removes non-password protection from a
workpaper. If you want to secure a workpaper, you should apply password protection
in Word or Excel. Links cannot be frozen in a password-protected document.
If you publish a workpaper that has had the links frozen, the published workpaper
contains the values of the links when frozen.
Link formulas inserted manually after a workpaper’s links are frozen are not frozen
unless you first unfreeze the workpaper and then refreeze it.
9-8
Using Excel
Chapter
9
Unfreezing Engagement Links
You can unfreeze Engagement links that were previously frozen so they can be updated or
changed. When you unfreeze links within an open workpaper or report, the links are
automatically updated with any changes to the trial balance or name and date functions.
To unfreeze links, you must be the Current Editor of the workpaper and you must belong to
a staff group that has the rights to unfreeze Engagement links.
To unfreeze Engagement links, do the following:
1. Select a workpaper that has had Engagement links frozen.
2. Select Engagement/Unfreeze Engagement Links or click the Unfreeze Engagement Links
icon on the toolbar.
Note: You cannot unfreeze Engagement links if the workpaper has been
password-protected.
Name Functions
Name functions enable you to insert information about the client, firm, engagement binder,
and workpaper into a cell. The information comes from the client, firm, binder, or workpaper
Properties dialog. You can select a cursor position and insert name functions in one of the
following ways:
§
§
§
Insert it from a menu. From the Engagement menu or the right-click menu, select
Name Functions and then select the function from the menu.
Type the name function directly into a cell. See the formula column in the table on
page 9-10 for the formula to use.
Click the Name Functions button on the Engagement toolbar to display a menu of
name functions.
There are several reasons for linking Name Functions to a workpaper. The simplest is so
that you do not have to retype the same name information for every workpaper in your
engagement binder or manually change it if anything changes from period to period.
Another advantage that ProSystem fx Engagement provides is the ability to save binders
and workpapers as templates. If you link any Name Functions into the binder template
workpapers or the individual workpaper templates, you can create files from those
templates. All the name links reflect the correct information based on that client, firm,
binder, and workpaper.
For example, you saved a workpaper in a binder called ABC Annual Audit in your ABC
Corporation client folder as a template with those name fields linked.
If you add the workpaper from the template you saved into a binder called XYZ Quarterly
Compilation in your XYZ Corporation client folder, the Binder Name and Client Name fields
reflect the XYZ information. You do not have to re-link these fields into a new Engagement
binder.
9-9
Chapter
Using Excel
9
Within the Name Functions, there are three categories:
§
§
§
Engagement Info
Client Info
Firm Info
Each category contains corresponding functions. The table on the following page explains
which functions are available under each category.
List of Name Functions
The following table lists the functions as they appear in the Name Functions menu.
Category
Function
Description
Formula
Engagement
Info
Binder Name
Inserts the binder name.
=PJNAME()
Binder ID
Inserts the binder ID number.
=BinderID()
Binder Description
Inserts the binder description.
=BinderDesc()
Binder Due Date
Inserts the binder due date.
=BinderDelivDT()
Binder Type
Inserts the binder type.
=BinderType()
Binder Charge
Code
Inserts the binder charge code.
=BinderChrgCode()
Binder Lead Partner
Inserts the binder lead partner.
=BinderLead()
Binder Date of
Report
Inserts the binder date of report.
=BinderDateOfReport()
Binder Report
Release Date
Inserts the binder report release
date.
=BinderReportReleaseDate(
)
Workpaper Name
Inserts the workpaper name.
=WPNAME()
Workpaper Index
Inserts the workpaper index
number.
=WPINDEX()
Client Name 1/Last
Name
Inserts the client name.
=CLIENTNAME()
Client Name 2/First
Name, M.I.
Inserts the client name.
=CLIENTNAME2()
Client ID
Inserts the client ID.
=CLIENTID()
Client Address1
Inserts the client address line 1.
=CLIENTADDRESS1()
Client Address2
Inserts the client address line 2.
=CLIENTADDRESS2()
Client City
Inserts the client city.
=CLIENTCITY()
Client Info
9 - 10
Using Excel
Chapter
9
Category
Function
Description
Formula
Client Info
Client State
Inserts the client state.
=CLIENTSTATE()
Client ZIP
Inserts the client ZIP code.
=CLIENTZIP()
Client Country
Inserts the client country.
=CLIENTCOUNTRY()
Client Phone
Inserts the client phone number.
=CLIENTPHONE()
Client Fax
Inserts the client fax number.
=CLIENTFAX()
Client URL
Inserts the client URL address.
=CLIENTURL()
Primary Email
Inserts primary email address of
client.
=PRIMARYEMAIL()
Secondary Email
Inserts secondary email
address of client.
=SECONDARYEMAIL()
Client Entity Type
Inserts client type.
=CLIENTTYPE()
Client Industry
Inserts client industry.
=CLIENTINDUSTRY()
Client Federal
ID/SSN
Inserts the client Federal ID or
SSN.
=CLIENTFEIN()
Client State ID
Inserts the client state ID.
=CLIENTSTATEID()
Firm Name
Inserts the firm name.
=FIRMNAME()
Firm Address1
Inserts the firm address line 1.
=FIRMADDRESS1()
Firm Address2
Inserts the firm address line 2.
=FIRMADDRESS2()
Firm City
Inserts the firm city.
=FIRMCITY()
Firm State
Inserts the firm state.
=FIRMSTATE()
Firm ZIP
Inserts the firm ZIP code.
=FIRMZIP()
Firm Country
Inserts the firm country.
=FIRMCountry()
Firm Phone
Inserts the firm phone number.
=FIRMPHONE()
Firm Fax
Inserts the firm fax number.
=FIRMFAX()
Firm URL
Inserts the firm URL address.
=FIRMURL()
Firm Info
9 - 11
Chapter
Using Excel
9
Date Functions
Date functions enable you to insert a date into a cell in a workpaper. You can insert date
functions in the following ways:
§
§
§
You can insert it from the Engagement menu or the right-click menu by selecting Date
Functions and then selecting the function from the menu. If you are selecting a
function for a prior period, select the period from the submenu that displays.
Type the date function directly into a cell. Refer to the formula column of the List of
Date Functions section for the formula to use.
Click the Date Functions button on the Engagement toolbar to display a menu of date
functions.
There are several reasons for linking date functions to a workpaper. The simplest is so that
you do not have to retype the same date information in every workpaper in your
engagement binder. This feature also helps save time when the date information for a
binder changes each year.
Another advantage that ProSystem fx Engagement gives you is the ability to save binders
and workpapers as templates. If you link any date functions into the binder template
workpapers or the individual workpaper templates, you can create files from those
templates and all of the date links reflect the correct information based on that binder’s
Period information.
For example, you might save a workpaper in a binder where you have linked the prior period
and current year-end dates as column headers. If you save that workpaper as a template
and add it to a different binder, the dates automatically change to that binder’s period
information. You do not have to re-link these fields after inserting the workpapers into a
new engagement binder.
Calculating Dates
The dates inserted by these functions are calculated from dates in the Period tab of the
Binder Properties dialog. See Chapter 6, Creating and Using Binders, for details. If you
change the period dates in the Period tab, use the workpaper as a template, or move the
workpaper into another binder, the dates are updated.
Note: The prior period dates are calculated from the current period dates.
Therefore, if you did not enter prior period dates on the Binder Properties dialog
and you change the current period dates in the Period tab on the Binder Properties
dialog, you are essentially changing the prior period dates as well. If you have
modified any of the prior period dates, make sure you review them if you change
the current period dates.
9 - 12
Using Excel
Chapter
9
Date Formats
When you select certain dates, a Date Format dialog displays.
Select the format for the date. If later you want to change the format, delete the link and
add it again with the new format.
List of Date Functions
The following table lists the functions as they appear in the Date Functions menu. For
prior-year commands, a menu displays that enables you to select the prior period.
Category
Function
Description
Formula
Inserts the current year.
=CY()
PY-1
Inserts the 1st prior year.
=PY(1)
PY-2
Inserts the 2nd prior year.
=PY(2)
PY-36
Inserts the 36th prior year.
=PY(36)
Current Year
Begin
Inserts the beginning date for the
current fiscal year.
=CYBDATE()
Current Year
End
Inserts the ending date for the
current fiscal year.
=CYEDATE()
Current Period
Begin
Inserts the beginning date for the
current reporting period.
=CPBDATE()
Current Period
End
Inserts the ending date for the
current reporting period.
=CPEDATE()
PYE-1
Inserts the fiscal year-end date of the
1st prior fiscal year.
=PYEDATE(1)
PYE-2
Inserts the fiscal year-end date of the
2nd prior fiscal year.
=PYEDATE(2)
PYE-36
Inserts the fiscal year-end date for
the 36th prior fiscal year.
=PYEDATE(36)
Current Year
Prior Year
through
Prior Year End
through
9 - 13
Chapter
Using Excel
9
Category
Function
Description
Formula
Prior Period
Begin
PPB-1
Inserts the beginning date for the 1st
prior reporting period.
=PPBDATE(1)
PPB-2
Inserts the beginning date for the
2nd prior reporting period.
=PPBDATE(2)
PPB-36
Inserts the beginning date for the
36th prior reporting period.
=PPBDATE(36)
PPE-1
Inserts the period end date for the
1st prior period.
=PPEDATE(1)
PPE-2
Inserts the period end date for the
2nd prior period.
=PPEDATE(2)
PPE-36
Inserts the period end date for the
36th prior period.
=PPEDATE(36)
Inserts the period sequence
selection.
=PERIODSQ()
through
Prior Period End
through
Period
Sequence
Calculation Functions
ProSystem fx Engagement provides several custom functions to perform financial analysis
with Engagement data.
To insert a ProSystem fx Engagement function, do one of the following:
§
§
Select Insert/Function.
Click the Insert Function icon on the Excel toolbar.
The Insert Function dialog displays.
Note: If you are using an earlier version of Microsoft Office (e.g. Office 2000), the
title on the toolbar is Paste Function.
9 - 14
Using Excel
Chapter
9
In the Or select a category field, you can select one of the following:
§
§
All to show all available functions.
ProSystem fx Engagement to show just the custom functions for Engagement.
The following table lists the calculation functions in alphabetical order.
Function
Description
Page
ADDIFF
Absolute dollar difference. Compares two cells and shows the difference
between them if it is above a certain dollar amount.
9-15
AORAND
Randomly opens a number within the range specified.
9-16
APDIFF
Absolute percentage difference. Compares two cells and shows the
difference between them as a percentage it is above a certain percent.
9-17
DDIFF
Dollar difference. Same as ADDIFF except that negative differences are
shown as negative amounts.
9-18
PDIFF
Percent difference. Same as APDIFF except that Negative differences
are shown as negative amounts.
9-19
XFOOT
Compares the sum of a range of numbers with another range. Use this
function to ensure that amounts cross-foot.
9-20
ADDIFF
This function shows the absolute dollar difference between two cells if it is above a certain
dollar amount. If the difference is below the specified amount, it displays a blank cell,
depending on cell formatting.
ADDIFF shows the difference as a positive number only.
Syntax and Parameters
=ADDIFF(Cell1,Cell2,Target $Diff)
Where:
Parameter
Description
Cell1
The first cell to compare.
Cell2
The second cell to compare.
Target $Diff
The amount, or a cell containing the amount
that the difference must exceed in order to be
shown. If the difference is less than the
amount, the system returns 0.
9 - 15
Chapter
Using Excel
9
Examples
Set up the balance sheet workpaper for difference functions. This workpaper will be
referred to in other examples in this section.
In column D, you want to show dollar differences between the two fiscal years if they are
over $1,000. This amount was entered in cell D3, so for the first item, Cash & Equivalents,
you would enter the following formula:
=ADDIFF(B5,C5,D3)
The system returns 11,010 as the difference between the two cells. You then duplicate the
formula for each row using the Excel Fill Down feature. To ensure that the system always
refers to D3 for the difference limit, enter it as an absolute reference: $D$3.
The system generates the following results:
§
§
For rows where the amount in column B is less than column C, such as Property &
Equipment, the system returns the difference of $10,897.00 as a positive amount
even though it decreased from the prior year.
For items such as inventory, the system returns a blank cell because the difference is
less than $1,000.
You can use ranges of cells with ADDIFF and other functions. For example, if you want to
show the difference between all assets, you can enter the following formula:
=ADDIFF(SUM(B5:B11), SUM(C5:C11),D3)
AORAND
Returns a random number within the range you specified.
Syntax and Parameters
=AORAND(Lower Bound, Upper Bound)
Parameter
Description
Lower Bound
The amount, or the cell containing the
amount, that is the beginning of the range.
Upper Bound
The amount, or the cell containing the
amount, that is the end of the range.
9 - 16
Using Excel
Chapter
9
Example:
Suppose you want to randomly select 20 checks between 10000 and 20000 for
substantive testing. You also want to be able to change the beginning and ending numbers
of the range for future tests.
In cell A1, you provide the beginning of the range (in this case, 10000). In cell A2, you
provide the end of the range (in this case, 20000).
In each cell you want to use for showing the check numbers, enter the following formula:
=AORAND($A$1,$A$2)
The absolute cell references enable you to copy or use fill commands to duplicate the
formula while still referring to the cells that identify the beginning and ending of the range.
Troubleshooting
There are two things you need to avoid when using this function:
§
The value in the beginning of the range must be less than the value at the end. If not,
the system starts generating numbers at the beginning of the range and ignores the
ending value. For example, if you set the range to be between 5000 and 1500, the
system starts generating random numbers at 5000 with no limit.
§
Both the beginning and ending values must be numbers. Using other characters in the
cell generates a #VALUE! Error.
APDIFF
This function shows the absolute percentage difference between two cells if it is above a
certain dollar amount. If the difference is above the specified percentage, it displays the
difference. If the difference is less, it shows a blank cell.
APDIFF shows the difference as a positive number only.
Syntax and Parameters
=APDIFF(Cell1,Cell2,Target %Diff)
Parameter
Description
Cell1
The first cell to compare.
Cell2
The second cell to compare.
Target %Diff
The amount, or a cell containing the amount, that
the difference must exceed in order to be shown. If
you enter an amount, use the same format as the
cell where you are placing the formula. If the cell is
in percent format, enter the amount as a percent.
9 - 17
Chapter
Using Excel
9
Example
Using the spreadsheet on page 9-16, you want to show the difference between the two
cells if the difference is more than the amount in cell E3 (five percent). You enter the
formula in the first row, Cash & Equivalents, as follows:
=APDIFF(B5,C5,E3)
The system returns 0.223780488, which is the difference between the two cells. You can
use the Excel Cell Format feature to convert it to a percent.
Duplicate the formula for each row using the Excel Fill Down feature. To ensure the system
always refers to E3 for the difference limit, enter it as an absolute reference: $E$3.
The system generates the following results:
§
§
For rows where the amount in column B is less than column C, such as Payables, the
system returns the percent difference of 32.74% as a positive amount.
For inventory, the system returns a blank cell because the difference is less than five
percent.
Troubleshooting
Enter the percent in the format of the cell where you are placing the formula. For example,
if the cell is formatted as a percent, enter 5. If the cell is in another format, enter a decimal,
e.g. .05.
DDIFF
This function shows the dollar difference between two cells if it is plus or minus a certain
dollar amount. If the difference is above the specified amount, it shows the difference. If
the difference is smaller than the amount, it displays a zero or a minus sign, depending on
the cell formatting. DDIFF is different from ADDIFF because it shows the difference as a
positive or negative amount.
Syntax and Parameters
=DDIFF(Cell1,Cell2,Target $Diff)
Parameter
Description
Cell1
The first cell to compare.
Cell2
The second cell to compare.
Target $ Diff
The amount, or a cell containing the amount, that the
difference must exceed in order to be shown. If the
difference is less than the amount, the system returns
0.
Example
Using the same spreadsheet as on page 9-16 for the first item, Cash & Equivalents, enter
the following formula:
=DDIFF(B5,C5,D3)
9 - 18
Using Excel
Chapter
9
The system returns -$11,010.00, which is the difference between the two cells.
Duplicate the formula for each row by using the Excel Fill Down feature. To ensure that the
system always refers to D3 for the difference limit, enter it as an absolute reference: $D$3.
The system generates the following results:
§
For rows where the amount in column B is more than column C, such as Cash &
Equivalents, the difference shows as a negative number.
§
For rows where the amount in column B is less than column C, such as Property &
Equipment, the difference shows as a positive amount.
§
For items such as inventory, the system returns a blank cell because the difference is
less than $1,000, regardless of whether it is a positive or negative difference.
PDIFF
This function shows the percentage difference between two cells if it is above or below a
certain percentage. If the difference is above the specified amount, it shows the percent
difference. If the difference is smaller than the amount, it shows a blank cell. PDIFF is
different from APDIFF because it shows the difference as a positive or negative amount.
Syntax and Parameters
=PDIFF(Cell1,Cell2,Target %Diff)
Parameter
Description
Cell1
The first cell to compare.
Cell2
The second cell to compare.
Target %Diff
The amount, or a cell containing the amount, that
the difference must exceed in order to be shown. If
you enter an amount, use the same format as the
cell where you are placing the formula. If the cell is
in percent format, enter the amount as a percent. If
the cell is in another format, enter the amount as a
decimal. If the difference is less than the amount,
the system returns 0.
Example
Using the same spreadsheet as on page 9-16, you want to show the difference between
two cells if it is more than five percent. Enter the formula for the first row as follows:
=PDIFF(B5,C5,E3)
The system returns -0.223780488, which is the decimal difference between the two cells.
You can use the Excel Cell Format feature to convert it to a percent.
Duplicate the formula for each row by using the Excel Fill Down feature. To ensure that the
system always refers to E3 for the difference limit, enter it as an absolute reference: $E$3.
9 - 19
Chapter
Using Excel
9
The system generates the following results:
§
§
§
For rows where the amount in column B is more than column C, such as Cash &
Equivalents, the difference shows as a negative number.
For rows where the amount in column B is less than column C, such as Property and
Equipment, the difference shows as a positive amount.
For items such as inventory, the system returns a blank cell because the difference is
less than plus or minus five percent.
Troubleshooting
Enter the percent according to the format of the cell where you are placing the formula. For
example, if the cell is formatted as a percent, enter 5. If the cell is in another format, enter
a decimal, e.g. .05.
XFOOT
Compares the sum of a range of numbers with another range. Use this function to ensure
that amounts cross-foot. If the sums of the two ranges are equal, the function returns the
sum. If the sums are different, the functions returns the text XFOOT.
Syntax and Parameters
=XFOOT(Range1,Range2)
Parameter
Description
Range1
The first range to compare.
Range2
The second range to compare.
Example
Suppose you have set up the following workpaper:
You want to use the XFOOT function to verify that the column totals are in balance with
the row totals. In cell E7, type the following formula:
=XFOOT(B7:D7,E3:E5)
The XFOOT function returns the total because the row and column totals match.
9 - 20
Using Excel
Chapter
9
However, if the totals are out of balance, the system returns XFOOT, as in the example
below.
Adding a total in cell E3 brings the workpaper back in balance, and the XFOOT is replaced
with an amount.
9 - 21
C H A P T E R
Using Word
10
Overview
When you create a ProSystem fx Engagement workpaper in Word, you have access to
special Engagement menu commands, toolbar, functions, and formulas.
These functions are only available in ProSystem fx Engagement workpapers. They cannot
be used in Word documents created outside of Engagement; however, you can insert your
Word documents into an Engagement binder by selecting File/New/Workpaper From File.
See Chapter 8, Managing Workpapers, for instructions.
This chapter shows you how to use Engagement-specific features in Word. For general
information about using Word, see the Microsoft Office documentation and Word help.
Engagement-Specific Features in Microsoft Word
When you open a Word document created in ProSystem fx Engagement, Word opens with
the Engagement-specific features added to the program’s standard interface. This happens
when you view the workpaper outside Engagement, in its native application. When you
view the workpaper inside, it is read-only and you do not have access to Word or
Engagement-specific features in Word. When you open a Word document that has not been
created in ProSystem fx Engagement, the Engagement-specific features are unavailable.
This chapter provides an overview of the Engagement-specific features, including menus
and commands, toolbar, functions, and fields.
ProSystem fx Engagement Menus and Commands
When you open a ProSystem fx Engagement Word document, an Engagement menu with
several new commands is added to the Word menus. A number of these commands are also
available when you right-click the document in Word.
These commands are in alphabetical order in the table on the following page.
10 - 1
Chapter
10
Using Word
Command
Description
Toolbar Icon
Account
Groupings
Organizes accounts into groups. See
Account Groupings on page 7-48.
Add Journal
Entry
Adds a journal entry. See Creating
Journal Entries on page 7-60.
Classifications
Menu
In Right
Click Menu?
Engagement
No
None
Journal Entry
No
Allows you to view and edit account and
ratio classifications.
None
Engagement
No
Chart of
Accounts
Allows you to add, modify, and delete
trial balance accounts. You can also add
balances to difference columns in the
trial balance. See Adding, Modifying, or
Deleting Trial Balance Accounts on page
7-45.
None
Engagement
No
Consolidate TB
Consolidates data from single company
trial balances into a consolidated trial
balance. See Consolidating Trial
Balances on page 7-78.
Engagement
No
Create
Workpaper
Note
Creates a note for a workpaper. See
Creating and Responding to Notes on
page 8-55.
Engagement
No
Date Functions
Inserts date information at the cursor
location. When you select this
command, a menu of available dates
displays. See Date Functions on page
10-11.
Engagement
Yes
Drill Down TB
Link
Drills down to the accounts that make
up the dollar amounts calculated in the
linked formula. See Drilling Down to Trial
Balance Accounts on page 8-50.
Edit
Yes
Freeze
Engagement
Links
Freezes links so that linked items are not
changed if the trial balance and/or name
and date properties are changed. See
Freezing Engagement Links on page
10-7.
Engagement
No
Import
Conversion
Wizard
Assists in importing trial balance data
from other supported trial balance
software programs. See Converting and
Importing Trial Balance Data on page
7-20.
Engagement
No
Insert CCH
Footnote
Inserts a CCH Footnote where the cursor
is positioned in the Word workpaper. See
CCH Footnotes on page 10-5.
Engagement
No
10 - 2
None
Chapter
Using Word
Command
Description
Toolbar Icon
Menu
10
In Right
Click Menu?
Insert TB Link
Creates links from the trial balance
without having to open the trial balance.
See Insert TB Link on page 8-47.
Edit
Yes
Insert WP
Reference
Inserts a link to a workpaper in a binder.
See Workpaper Reference Links on page
8-51.
Workpaper
Reference
Yes
Journal Entry
Summary
Enables you to add, modify, or delete
journal entries. See Using the Journal
Entry Summary Window on page 7-64 .
Journal Entry
No
Name
Functions
Inserts text information at the cursor
location. When you select this
command, a menu of available text
items displays. See Name Functions on
page 10-9.
Engagement
Yes
Open WP
Reference
Opens the referenced workpaper. See
Opening a Workpaper Reference Link on
page 8-53.
Workpaper
Reference
Yes
Paste TB Link
Pastes the trial balance cells from the
Clipboard to the cursor location. You
have the option of pasting the amount of
each cell or the sum of all cells. See
Pasting Trial Balance Amounts - General
on page 8-43.
Edit
Yes
QuickView
Displays the balance broken down by
assets, liabilities and equity, revenue,
expenses, and net income. See Chapter
7, Using the Trial Balance, for more
information.
Engagement
No
Refresh
Updates all links in the document to the
most current trial balance information.
See Refreshing Links on page 10-7.
Engagement
No
Replace TB
Link Name
Changes the links in a workpaper to
another trial balance name. See
Replacing TB Link Names on page 10-7.
None
Engagement
No
Tickmark
Definition
Defines tickmark symbols and
descriptions. See Tickmark Definition on
page 8-64.
None
Tickmark
No
Tickmark
Toolbar
Opens the tickmark toolbar so you can
insert a tickmark in the workpaper. See
Opening the Tickmark Toolbar on page
8-66.
Tickmark
No
10 - 3
None
Chapter
Using Word
10
Command
Description
Toolbar Icon
Menu
In Right
Click Menu?
TB Column
Setup
Defines and changes trial balance
columns. See Trial Balance Column
Setup on page 7-14.
Engagement
No
Unfreeze
Engagement
Links
Reactivates frozen links so that changes
once again flow to linked documents or
reports. See Unfreeze Engagement Links
on page 10-8.
Engagement
No
View Field
Codes
Toggles the value and the formula used
with links. See Viewing Field Codes on
page 10-6.
None
No
Write Up
Journal Entry
Organizes the transaction data in
journals. See Using Write Up Journals on
page 7-87.
Journal Entry
No
Using Engagement with Word 2007
Engagement takes advantage of the new Ribbon interface in Word 2007. The Engagement
tab displays all of the functions you need to complete workpaper tasks.
Click a button or drop-down list to use the appropriate function.
The Workflow group of the Engagement tab includes the six most recently used tickmarks.
If no tickmarks have been used, the following tickmarks display by default:
§
§
§
§
§
§
Agrees to
Agrees to GL
Agrees to Prior
Footed
Unreconciled Difference
Immaterial
Ribbons are also available when working with trial balance-specific tasks and, if installed,
Knowledge Tools-specific tasks.
Notes:
§
§
Word 2007 uses two new file extensions: .docx for Word XML files and .docm for
macro-enabled Word XML files.
Workpapers created with Word 2007 may not be easily viewed by users who do not
have Word 2007 installed.
10 - 4
Using Word
Chapter
10
Header and Footer
In a Word document, you can insert ProSystem fx Engagement information into the header
and footer sections. The information that can be inserted into these sections includes the
following:
§
§
§
§
Firm Information. You can insert Name, Address1, Address2, City, State, ZIP,
Country, Phone, Fax, and URL.
Client Information. You can insert the client's Name 1/Last Name, Name 2/First
Name, M.I., ID, Address1, Address2, City, State, ZIP, Country, Phone, Fax, URL,
Primary Email, Secondary Email, Entity Type, Industry, Federal ID, and State ID.
Engagement Information. You can insert the binder Name, ID, Description, Due Date,
Type, Charge Code, Lead Partner, Date of report, Report release date, Workpaper
Name, and Workpaper Index.
Date Information. You can insert the Current Year, Prior Year, Current Year
Beginning, Current Year Ending, Current Period Beginning, Current Period Ending,
Prior Year Ending, Prior Period Beginning, Prior Period Ending, and Period Sequence.
To enter header and footer information, do the following:
1. Select View/Header and Footer.
2. Click in the header or footer edit box and then click the Name Functions or Date
Functions button on the Engagement toolbar.
3. Select the desired Engagement name or date information.
4. Click Close.
When you print the Word workpaper, the header and footer sections contain the
Engagement information. Any changes to the linked name and date information are
automatically updated.
CCH Footnotes
In order to insert a CCH Footnote into a workpaper, you must be the Current Editor of the
workpaper. You cannot insert a CCH Footnote into a workpaper if the binder has been
finalized.
To insert a CCH Footnote into a Word document, do the following:
1. Open the Word document into which you want to insert the footnote and position the
cursor where you want to insert the footnote.
2. Click Engagement/Insert CCH Footnote, or click the Insert CCH Footnote button on the
Engagement toolbar.
3. Browse to the CCH Footnotes directory. The Look in path defaults to the drive and
directory entered on the Practice Aids tab in the Tools/Options dialog in ProSystem fx
Engagement.
4. Highlight the footnote needed and click Open to insert the footnote.
10 - 5
Chapter
Using Word
10
Note: To use the CCH Footnotes, you must have a CCH GAAP Financial
Statements Disclosures license. If you subscribe to the Aspen Publishers series,
you can use the CCH Tax Research NetWork.
To launch the Web site, select Help/ProSystem fx on the Web/CCH Tax Research NetWork
from the Binder window. You can also select Guidance on the Shortcuts bar and select the
CCH Tax Research NetWork shortcut. You are prompted to enter your user ID and
password, unless this information has been entered in your staff profile in the Administrator
module.
Viewing Field Codes
Fields Codes are placeholders for data that might change in the document. They are
inserted automatically when you create links or use the Name and Date functions. Field
codes are usually hidden and display the results, such as values linked to the trial balance.
Field codes appear between curly brackets or braces ( { } ).
To view field codes, click the View Field Codes toolbar button, or press
on the display of the field codes in Word.
l+9 to toggle
All of the field codes in the document display. This may be helpful when reviewing the
formulas and links inserted in a Word workpaper.
Using Tickmarks in Word Workpapers
Tickmarks in a Word workpaper function the same as in any workpaper. For details, see
Using Tickmarks in Workpapers on page 8-64.
Linking ProSystem fx Engagement Information
You can link the following types of information into Word Engagement workpapers.
§
§
§
Name functions. These are used to insert the information of a client, firm,
engagement binder, and workpaper.
Date functions. These are used to insert dates for the current or prior periods.
Trial Balance Links.
— Copy/Paste TB Links. These links are created by copying and pasting cells from
the Excel trial balance into your Word workpaper. For more information, see
Chapter 8, Managing Workpapers.
— Insert TB Links. This option allows you to create links from the trial balance to a
Word workpaper without opening the trial balance. You build a formula by selecting
specific parameters. For more information, see Chapter 8, Managing Workpapers.
§
Workpaper References. These are links to other workpapers in the binder. Once the
link is created, you can open the referenced workpaper. For more information, see
Chapter 8, Managing Workpapers.
For general instructions on using Word, refer to the Microsoft Office documentation and the
Word help file.
10 - 6
Using Word
Chapter
10
Replacing TB Link Names
Within your Word workpapers, you can replace the name of the trial balance in the trial
balance links. This feature is especially useful if you have changed the name of a trial
balance used in a link and you need to update that link. Instead of updating the link
manually, you can specify the new trial balance name with which to replace the old.
To replace the trial balance name in a TB link, do the following:
1. From the Word workpaper, select the corresponding links in which to replace the trial
balance name.
2. Select Engagement/Replace TB Link Name. The Replace TB Links dialog displays.
3. From the Replace TB Link Name With drop-down list, select the new trial balance name.
4. Select one of the following radio buttons.
§
§
Selected links only. Replaces the TB name in the selected links with the specified
TB name.
All links in workpaper. Replaces the TB name of all links in the workpaper with the
specified TB name.
5. Click OK. Engagement automatically replaces the TB link(s) names according to the
selections made and refreshes all TB links in the workpaper.
Refreshing Links
When you open Word workpapers and reports, the links automatically refresh. To refresh links
when the Word file is open and a change has been made, select Engagement/Refresh, or click
the Refresh toolbar button. The latest information displays with all links in the open workpaper.
Note: If you do not want to refresh the links in the workpaper every time you
open it, select Tools/Options in the File Room window or Binder window, then
uncheck the Auto refresh workpapers option on the General tab of the Options
dialog.
Freezing Engagement Links
If you freeze Engagement links within an Excel or Word document and Engagement reports,
changes to the trial balance and/or name and date properties are not carried to the
documents or reports. Links are not automatically refreshed before they are frozen, so use
the Refresh function prior to freezing the links.
Note: Be sure to open the report at least once before you freeze links. This
ensures that the links are correct.
10 - 7
Chapter
Using Word
10
When you freeze Engagement links within a workpaper or report, you cannot insert new
links or use the following functions:
§
§
§
§
§
Name and Date
Refresh
Replace TB Link Name
Paste TB Link
Insert TB Link
You cannot freeze engagement links in an open, locked workpaper. The workpaper must be
closed in the Binder window before Engagement links can be frozen. You cannot lock
Knowledge Coach workpapers.
When a workpaper is rolled forward, frozen Engagement links remain frozen. If you copy a
workpaper with frozen links, the links remain frozen. If you save a binder as a template, the
Engagement Links remain frozen in the binder template and are frozen in any binders
created from the template.
You must be the Current Editor of a workpaper to freeze Engagement links and you must
belong to a staff group that has rights to Freeze Engagement links.
To freeze Engagement links, do the following:
1. Select the workpaper whose links you want to freeze.
2. Select the Engagement/Freeze Engagement Links menu option or click the Freeze
Engagement Links toolbar button.
Notes:
§
§
§
§
§
You cannot freeze links in a Knowledge Coach workpaper.
Freezing Engagement links does not freeze OLE or DDE links. It applies only to the
trial balance, and name or date properties as stated above.
The Freeze Engagement Links option removes non-password protection from a
workpaper. If you want to secure a workpaper, you should apply password protection
in Word or Excel. Links cannot be frozen in a password-protected document.
If you publish a workpaper that has had the links frozen, the published workpaper
contains the values of the links when frozen.
Link formulas inserted manually after a workpaper’s links are frozen are not frozen
unless you first unfreeze the workpaper and then refreeze it.
Unfreezing Engagement Links
You can unfreeze Engagement links that were previously frozen so they can be updated or
changed. When you unfreeze links within an open workpaper or report, the links are
automatically updated with any changes to the trial balance or name and date functions.
You must be the Current Editor of a workpaper to unfreeze links and you must belong to a
staff group that has the rights to unfreeze Engagement links.
10 - 8
Using Word
Chapter
10
To unfreeze Engagement links, do the following:
1. Select a workpaper that has had Engagement links frozen.
2. Select Engagement/Unfreeze Engagement Links or click the Unfreeze Engagement Links
icon on the toolbar.
Note: You cannot unfreeze Engagement links if the workpaper has been
password-protected.
Name Functions
Name functions enable you to insert information about the client, firm, engagement binder,
and workpaper. The information comes from the client, firm, binder, or workpaper
Properties dialog. You can insert name functions in one of the following ways:
§
§
You can insert it from a menu. From the Engagement menu or the right-click menu,
select Name Functions and then select the function from the menu.
Click the Name Functions button on the Engagement toolbar to display a menu of
name functions.
There are several reasons for linking Name Functions to a workpaper. The simplest is so
that you do not have to retype the same name information in every workpaper in your
engagement binder or manually change it if anything changes from period to period.
Another advantage that ProSystem fx Engagement gives you is the ability to save binders
and workpapers as templates. If you link any Name Functions into the binder template
workpapers or the individual workpaper templates, you can create files from those
templates and all of the name links reflect the correct information based on that client, firm,
binder, and workpaper.
For example, you saved a workpaper in a binder called ABC Annual Audit in your ABC
Corporation client folder as a template with those name fields linked. If you added that
workpaper from the template you saved into a binder called XYZ Quarterly Compilation in
your XYZ Corporation client folder, the Binder Name and Client Name fields reflect the XYZ
information. You do not have to re-link these fields to a new Engagement binder.
Within the Name Functions, there are three categories: Engagement Info, Client Info, and
Firm Info. Each category contains corresponding functions.
The following table lists the functions as they appear in the Name Functions menu.
10 - 9
Chapter
10
Using Word
Category
Function
Description
Engagement Info
Binder Name
Inserts the binder name.
Binder ID
Inserts the binder ID number.
Binder Description
Inserts the binder description.
Binder Type
Inserts the binder type.
Binder Due Date
Inserts the binder due date.
Binder Charge Code
Inserts the binder charge code.
Binder Lead Partner
Inserts the binder lead partner.
Binder Date of Report
Inserts the binder date of report.
Binder Report
Release Date
Inserts the binder report release date.
Workpaper Name
Inserts the workpaper name.
Workpaper Index
Inserts the workpaper index number.
Client Name 1/Last
Name
Inserts the client name, line 1.
Client Name 2/First
Name, M.I.
Inserts the client name, line 2.
Client ID
Inserts the client ID.
Client Address1
Inserts the client address, line 1.
Client Address2
Inserts the client address, line 2.
Client City
Inserts the client city.
Client State
Inserts the client state.
Client ZIP
Inserts the client ZIP.
Client Country
Inserts the client country.
Client Phone
Inserts the client phone number.
Client Fax
Inserts the client fax number.
Client URL
Inserts the client URL address.
Primary Email
Inserts the client primary email address.
Client Info
10 - 10
Using Word
Chapter
10
Category
Function
Description
Client Info
Secondary Email
Inserts the client secondary email address.
Client Entity Type
Inserts the client entity type.
Client Industry
Inserts the client industry.
Client Federal ID/SSN
Inserts the client Federal ID or SSN.
Client State ID
Inserts the client state ID.
Firm Name
Inserts the firm name.
Firm Address1
Inserts the firm address, line 1.
Firm Address2
Inserts the firm address, line 2.
Firm City
Inserts the firm city.
Firm State
Inserts the firm state.
Firm ZIP
Inserts the firm ZIP
Firm Country
Inserts the firm country.
Firm Phone
Inserts the firm phone number.
Firm Fax
Inserts the firm fax number.
Firm URL
Inserts the firm URL address.
Firm Info
Date Functions
Date functions enable you to insert into workpapers dates related to the engagement. You
can insert date functions in the following ways:
§
§
You can insert it from a menu. From the Engagement menu or the right-click menu,
select Date Functions and the select the function from the menu. If you are selecting
a function for a prior period, select the period from the second menu that displays.
Click the Date Functions button on the Engagement toolbar to display a menu of date
functions.
There are several reasons for linking date functions to a workpaper. The simplest is so that
you do not have to retype the same date information in every workpaper in your
engagement binder or manually change it after you have rolled forward the binder to a
different period.
Another advantage that ProSystem fx Engagement gives you is the ability to save binders
and workpapers as templates. If you link any date functions into the binder template
workpapers or the individual workpaper templates, you can create files from those
templates and all of the date links reflect the correct information based on that binder’s
period information.
10 - 11
Chapter
10
Using Word
For example, you saved a workpaper in a binder where you had linked the prior period and
current year-end dates as column headers. If you saved that workpaper as a template and
added it to a different binder, the dates would automatically change to that binder’s period
information. You do not have to re-link these fields after inserting the workpapers into a
new Engagement binder.
Calculating Dates
The dates inserted by these functions are calculated from dates in the Periods tab in the
Binder Properties dialog. See Chapter 6, Creating and Using Binders, for details. If you
change the period dates in the Periods tab, use the workpaper as a template, or move the
workpaper to another binder, the dates are updated.
Note: The prior period dates are calculated from the current period dates.
Therefore, if you change the current period dates in the Periods tab in the Binder
Properties dialog, you are essentially changing the prior period dates as well.
Date Formats
When you select certain dates, a Date Format dialog displays.
You can then select which format you would like the date to be. If later you want to change
the format, delete the link and add it again with the new format.
List of Date Functions
The following table lists the functions on the Date Functions menu. For prior-year
commands, a menu displays that enables you to select the prior period.
Category
Function
Current Year
Description
Inserts the current year.
Prior Year
through
PY-1
Inserts the 1st prior year.
PY-2
Inserts the 2nd prior year.
PY-36
Inserts the 36th prior year.
Current Year Begin
Inserts the beginning date for the current fiscal year.
Current Year End
Inserts the ending date for the current fiscal year.
10 - 12
Using Word
Category
Function
Chapter
10
Description
Current Period Begin
Inserts the beginning date for the current reporting period.
Current Period End
Inserts the ending date for the current reporting period.
Prior Year End
through
Prior Period Begin
through
Current Period End
through
Period Sequence
PYE-1
Inserts the fiscal year-end date of the 1st prior fiscal year.
PYE-2
Inserts the fiscal year-end date of the 2nd prior fiscal year.
PYE-36
Inserts the fiscal year-end date of the 36th prior fiscal year.
PPB-1
Inserts the beginning date for the 1st prior reporting period.
PPB-2
Inserts the beginning date for the 2nd prior reporting period.
PPB-36
Inserts the beginning date for the 36th prior reporting
period.
PPE-1
Inserts the period end date for the 1st prior period.
PPE-2
Inserts the period end date for the 2nd prior period.
PPE-36
Inserts the period end date for the 36th prior period.
Inserts the period sequence selection.
Note: In the formulas showing prior year dates, you can change them to future
dates by editing the formula. For example, if the formula shows =PYEDATE(1),
then the prior fiscal year end displays. If you change the formula to
=PYEDATE(-1), then next year’s fiscal year-end date displays. This can be
used to automate the listing of future years in a payout schedule.
10 - 13
I N D E X
A
Mapping to Engagement Staff, 3-4
Scheduling an Import from, 3-6
Absolute Values
Viewing Import Log, 3-6
Dollar Differences in Excel, 9-15
ADDIFF Function, 9-15
Pasting Trial Balance Cells, 8-44
Adding
Percentage Differences in Excel, 9-17
Accounts, 7-46
Account Classifications, 1-2, 7-53
CCH Footnotes, 10-5
Account Descriptions, 7-46
Key Performance Indicator File to Binder,
8-23
Account Groupings
Calculate Sum, 7-59
License Information, 3-19
Creating Groups and Subgroups, 7-52
Manual Workpaper, 8-10
Deleting Groups and Subgroups, 7-57
New Staff Group, 3-8
Description of, 1-2, 7-2
New Staff Member, 3-11
Export/Import, 7-51
Profit Driver Files to Binder, 8-23
Levels of, 7-2
Profit Driver Grouping List, 7-110
Modifying Profit Driver Grouping Lists, 7-112
Profit Driver Report, 8-25
Selecting, 7-2
ProSystem fx Tax PDF File, 8-12
Selecting for Reports, 7-68
Teams, 3-16
Account Numbers, 7-46
Tickmarks, 8-65
Accounting Systems, Importing from, 7-20, 7-40
Workpaper from Existing File, 8-7
Accounts
Workpaper from Template, 8-1
Adding, 7-46
Workpaper Tabs, 6-35
Deleting, 7-48
Admin Activity Log, 3-31
Drilling Down, 8-50
ADMIN Login, 3-2
Groupings, 7-48
Admin Package
Importing, 7-20
Attaching to an Email, 3-28
Modifying, 7-47
Creating, 3-27
Placing in Groupings, 7-58
Receiving, 3-28
Active Directory
Manually Updating, 3-5
Saving to Hard Drive, 3-27
Admin Synch Options, 3-33
Index - 1
Index
Admin Synchronization
Bin
Manual, 3-30
Creating, 3-58
Scheduling, 3-29
Deleting, 3-59
Admin Synchronization History, 3-30
Bin Diagnostic Report
Administrator Data
Location, 4-10
Viewing and Interpreting, 3-61
Bin Manager Utility
Administrator Module
Graphical View, 3-58
Installing, 2-11
Launching, 3-56
Administrator Module Requirements, 2-2
List View, 3-57
Altering a Current Install, 2-14
Main Window, 3-57
Answering a Note, 8-56
Bin Statistics
AORAND Function, 9-16
Updating, 3-59
APDIFF Function, 9-17
Binder Index Report, 8-40
Archiving a Binder, 3-49
Binder Packages
ASCII File
Creating, 6-48
Importing, 7-40
Filename, 6-49
Preparing Data to Import, 7-40
Purpose, 1-10
Assigning
Receiving, 6-49
Clients to Client Groups, 3-46
Saving as File, 6-49
Staff Members to Binders, 3-48
Sending through Email, 6-49
Team Members to Binders, 3-48, 6-9
Binder Rights
Workpapers, 8-62
Assigning Licenses
Using Product View, 3-22
Staff Groups, 3-9
Binder Sign Off, 6-51
Binder Status
Using View by Staff, 3-21
ATB for Windows
Managing, 3-43
Binder Types
Converting from, 7-36
Creating, 3-40
Preparing Engagement Client, 7-37
Deleting, 3-42
Reviewing ATB Client, 7-36
Editing, 3-41
AZP Files, 6-49
B
Managing, 3-40
Restoring, 3-43
Binder View
Backing Up Binders, 6-50
Conflict Folder, 6-23
Beginning Balance Column, 7-15
Contents, 6-21
Index - 2
Index
Current Editor, 6-23
Deleting, 6-20
Locked, 6-22
Description of, 1-5
Note, 6-22
Evaluation Templates, 1-4
Preparer Sign Off, 6-22
Finalizing, 6-52
Published Workpapers, 6-23
Moving, 3-60
Tabs, 6-21
Moving to a Different CFR, 3-51, 3-52
Trash, 6-23
Moving to a Disabled Server, 3-52
Unfiled Workpapers, 6-23
Moving to Another Client Folder, 3-51
Workpaper Index Number, 6-21, 8-3, 8-8
Opening Multiple, 6-34
Printing Views, 8-40
Binder Window
Binder View, 6-21
Roll Forward Capabilities, 1-9
Closing Trial Balances in, 7-11
Rolling Forward, 6-54, 6-57
Contents, 6-21
Saving as Templates, 6-12
Current Editor View, 6-27
Sharing and Distributing, 6-38
Live Editor View, 6-29
Synchronizing, 6-40, 6-44
Note Summary View, 6-24
Template Default Paths, 4-8
Opening, 6-21
Templates, 1-9
Refreshing, 6-34
Unarchiving, 3-50
Unfiled Section, 6-23
Unfinalizing, 3-50
Viewing Properties, 3-60
Binder Wizard, 6-2
Binders
Bins
Managing, 3-56
Accessing Trial Balance Functions, 6-34
Archiving Finalized, 3-49
Bitmap Files, Tickmarks, 8-65
Assigning Staff to, 3-48
Building a Formula, 8-47
Assigning Team Members to, 3-48
Backing Up/Restoring, 6-50
C
Binder Window, 1-7
Calculate Sum, 7-59
Changing Properties, 6-15
Calculating
Checking Out of Central File Room, 6-43
Disk Space, 3-59
Conflict Folder, 6-23
Calculating Dates of Prior, 9-12
Copying or Moving Workpapers, 8-32
Calculation Functions
Copying Tabs Between, 6-36
ADDIFF, 9-15
Creating from Blank Binder, 6-5
AORAND, 9-16
Creating from Existing Binder, 6-5
APDIFF, 9-17
Index - 3
Index
Client Contacts
DDIFF, 9-18
Viewing Multiple, 5-9
PDIFF, 9-19
Client Folders
XFOOT, 9-20
Adding, 5-6
CaseWare
Contact Information, 5-8
Converting From, 7-33
Creating, 5-7
CCH (Formerly Miller) Templates and Footnotes
Changing Default Path, 4-11
Description, 1-5
Evaluation Templates, 1-4
Moving Binders to, 3-51
Workpaper Downloads, 2-16
Client Groups
Assigning Clients to, 3-46
Central File Rooms
Creating, 3-36
Creating, 3-45
Deleting, 3-39
Deleting, 3-46
Disabling Synchronization, 3-37
Editing, 3-46
Enabling Synchronization, 3-37
Client Journal Entries, 7-90
Adding, 7-90
Moving Binders, 3-51, 3-52
Synchronizing, 6-40
Clients
Deleting, 3-39
Changing
ProSystem fx Practice, 6-61
Binder Properties, 6-15
Client Properties, 5-10
Clock
Operating the ProSystem fx Practice Time,
6-62
Data Default Paths, 4-9
Firm Properties, 4-12
Journal Entry Type, 7-63, 7-65
Columns
Beginning Balance, 7-15
Main Office Server, 3-26
Consolidated Trial Balance, 7-81
TB Link Names, 9-7, 10-7
Description of, 1-2
Template Default Paths, 4-8
Journal Entry, 7-16
User Profile Information, 4-5
Removing, 7-18
Workpaper Properties, 8-26
Selecting to Display, 7-15
Chart of Accounts Window
Setting Up, 7-14
Adding Accounts, 7-46
Showing Debits and Credits, 7-3
Deleting Accounts, 7-48
Types of, 7-15
Modifying Accounts, 7-47
Unadjusted balance column, 7-15
Classifications
Variance, 7-16
Accounts, 7-53
Write Up Trial Balance, 7-86
Ratio, 7-55
Index - 4
Index
Comparative Views and Current View, 7-2
New Reports, 7-67
Conflict Folder, 6-23
Secondary Office Server, 3-24
Consolidations
Trial Balance, 7-8
Adding Journal Entries, 7-84
Trial Balance Reports, 7-66
Consolidating Subsidiaries, 7-82
Workpaper Notes, 8-55
Description of, 7-78
Write Up Reports, 7-89
Making Changes to Subsidiaries, 7-84
Creating a PDF, 8-12
Reports, 7-84
Cross-footing, 9-20
Trial Balance Columns, 7-81
Current Editor
Deleting Workpapers, 8-41
Using Trial Balance, 7-80
Restoring Deleted Workpapers, 8-41
Conversion Wizard
ASCII file, 7-39, 7-40
Current Editor View, 6-27
ATB, 7-37
Current View
GoSystem Audit, 7-28
Showing Journal Entries, 7-3
ProSystem fx Trial Balance, 7-23
Workpaper Reference Column, 7-3
Copying
Client Folders, 5-9
Custom Macros, 8-29
Custom Sheets
Printing, 8-67
Tabs between Binders, 6-36
TB Links, 8-43
Customizing
Engagement Interface, 1-20
Workpapers, 8-32
Toolbars, 1-21
Creating
Admin Package, 3-27
Binder Package, 6-48
Bins, 3-58
D
Data Conversion
Blank Binder, 6-5
ATB for Windows, 7-36
Central File Room, 3-36
CaseWare, 7-33
Client Folders, 3-38, 5-7
Excel or ASCII File, 7-39
Client Folders by Copying, 5-9
GoSystem Audit, 7-28
Client Groups, 3-45
ProSystem fx Trial Balance, 7-23
Client Journal Entries, 7-90
Date Functions
Consolidated Trial Balance, 7-80
Available in Excel, 9-13
Groups and Subgroups, 7-52
Available in Word, 10-12
Journal Entries, 7-60
Explanation of Use in Excel, 9-12
New Client, 3-38
Explanation of Use in Word, 10-11
Index - 5
Index
Dates
Diagnostics
Formats, 9-13, 10-12
Grouping, 7-4
Inserting in Excel Workpapers, 9-12
Trail Balance, 7-5
Inserting in Word Workpapers, 10-11
Disabling Synchronization
Central File Room, 3-37
List of Word Date Functions, 10-12
Office Servers, 3-26
DDIFF Function, 9-18
Default Paths
CCH (Formerly Miller) Templates and
Footnotes, 4-11
Disk Space
Calculating, 3-59
Document Completion Date Report
Data, 4-9
For Templates, 4-8
Default Staff Groups, 3-8
Workpaper Management Module, 6-19
Documentation, 1-11
Dollar Differences in Excel, 9-15, 9-18
Definition
Tickmark, 8-64
E
Definition List
Using Tickmark, 8-65
Editing
ProSystem fx Practice, 6-61
Deleting
ProSystem fx Projects, 6-60
Accounts in Trial Balance, 7-48
Binders, 6-20
Email
Sending Binder Packages Via, 6-49
Bins, 3-59
Central File Rooms, 3-39
Enabling Synchronization
Central File Room, 3-37
Client Folders, 5-10
Office Servers, 3-26
Client Groups, 3-46
Clients, 3-39
Entering
Time Transactions, 6-63
Groups and Subgroups, 7-57
Journal Entries, 7-64
Secondary Office Server, 3-39
Evaluation Templates, 1-4
Excel
Engagement-Specific Features, 9-1
Secondary Office Server Program, 3-40
Preparing Data to Import, 7-40
Staff Group, 3-11
Preparing Engagement Client, 7-40
Trial Balance, 7-13
Replacing TB Link Names, 9-7
Workpaper Tabs, 6-37
Transferring Data with Paste TB Import
Option, 7-42
Workpapers, 8-41
Diagnostic Report
Viewing Bin, 3-61
Using Tickmark Definition List, 8-64
Excel 2007, 9-6
Index - 6
Index
Calculations, 9-14
Excel Workpapers
ADDIFF Function, 9-15
DDIFF, 9-18
AORAND Function, 9-16
Name, 9-9, 10-9
APDIFF Function, 9-17
PDIFF, 9-19
Calculation Functions, 9-14
XFOOT, 9-20
Date Functions, 9-12
DDIFF Function, 9-18
G
Name Functions, 9-9
General Options, 4-6
PDIFF Function, 9-19
GoSystem Audit
XFOOT Function, 9-20
Converting from, 7-28
Exporting to Tax Software, 7-91
Preparing Engagement Client, 7-28
GoSystem Tax, 7-100
Lacerte, 7-101
Reviewing the Client for Conversion, 7-28
Graphical View
ProSystem fx Tax, 7-91
Express Synchronization, 6-43
Bin Manager Utility, 3-58
Grouping Diagnostics
In Trial Balance Snapshot, 7-4
F
Grouping Lists
Field Codes, 10-6
Deleting, 7-51
File Room
Importing Profit Driver Lists, 7-110
Renaming, 7-51
Description of, 1-6
File Types for Workpapers, 1-4, 1-5
Groups
Finalizing Binders, 6-52
Creating, 7-52
Find Command
Deleting, 7-57
Invalid Characters, 7-53
Binder Window, 8-42
Renaming, 7-56
Firm Properties
Administrator Module, 3-3
Changing in Engagement Module, 4-12
Firm-wide Admin Options, 3-32
H
Headers, 10-5
Footers, 10-5
Footnotes, CCH, 10-5
Formula Parameters, 8-47
I
Import
Functions
AORAND, 9-16
Scheduling from Active Directory, 3-6
Import Log
APDIFF, 9-17
Index - 7
Index
Terminal Services Database, 2-17
Viewing Active Directory, 3-6
Workpaper Management, 2-11
Imported Balance Columns, 7-16
Interface
Importing
Data from ASCII File, 7-40
Customizing, 1-20
Data From ATB, 7-36
Using ProSystem fx Practice, 6-60
Invalid Characters
Data From CaseWare, 7-33
Data from Excel File, 7-42
Account Description, 7-46
Data from GoSystem Audit, 7-28
Account Number, 7-46
Data from ProSystem fx Trial Balance, 7-23
Groups and Subgroups, 7-53
Data to a Trial Balance from an Existing Trial
Balance, 7-44
J
Profit Driver Grouping Lists, 7-110
Journal Entries
Required Columns, 7-40
Balancing, 7-62
Trial Balance in Profit Driver, 7-113
Changing Types, 7-65
Index Number
Client, 7-84, 7-90
Workpapers, 8-3, 8-8, 8-10, 8-11
Columns, 7-16
Inquiry Module
Consolidated Trial Balances, 7-84
Accessing the ProSystem fx Practice, 6-62
Creating, 7-60
Inserting
Debit and Credit Amounts, 7-62
CCH Footnotes, 10-5
Deleting, 7-64
PDF File from ProSystem fx Tax, 8-12
Description of, 1-3
ProSystem fx Key Performance Indicator file,
8-23
Editing, 7-64
ProSystem fx Profit Driver File, 8-23
Posting, 7-60
ProSystem fx Profit Driver Report, 8-25
Reclassifying, 7-65
TB Link, 8-47
Recurring, 7-62
Tickmarks, 8-66
Reports, 7-65
Reversing, 7-62
Installation, 2-11
Post-Installation Checklist, 2-14
Types of, 7-60
Pre-Installation Checklist, 2-10
Validation of, 7-62
Viewing, 7-64
Installing
Administrator Module, 2-11
Journal Entry Columns, 7-16
Altering a Current Install, 2-14
Journal Entry Report, 7-65
Reinstalling a Current Install, 2-15
Journal Entry Summary Window
Creating Journal Entries from, 7-64
Terminal Services, 2-16
Index - 8
Index
K
Field, 4-2
Office, 4-2
Key Performance Indicator, 8-23
Locking Workpapers, 8-61
Login
L
Passwords, 3-2, 4-1
Leadsheets, 7-70
Selecting Location, 4-1
Licenses
To Administrator, 3-2
Adding, 3-19
To ProSystem fx Engagement, 4-1
Assigning by Product View, 3-22
Assigning by Staff View, 3-21
Number Needed, 3-20
Link Formulas, 8-42
M
Macros, Opening Workpapers With, 8-29
Main Office Server
Linking
Changing, 3-26
ProSystem fx Projects, 6-60
Moving Binders, 3-52
To ProSystem fx Practice, 6-61
Moving Binders to Disabled Secondary Office
Server, 3-52
Links
Setting Up, 3-2
Between Workpapers, 8-53
Copy/Paste TB Link, 8-43
Main Office Servers
Moving Binders, 3-51
Drilling Down to TB Accounts, 8-50
General Description, 9-6, 10-6
Main Window
Bin Manager Utility, 3-57
Inserting TB Links, 8-47
Inserting Workpaper Reference Link, 8-51
Managing
Opening Workpaper Reference Link, 8-53
Bins, 3-56
Refreshing in Excel, 9-7
Notes, 8-57
Refreshing in Word, 10-7
Notes Pane, 8-57
List View
Bin Manager Utility, 3-57
Managing Binder Types, 3-40
Manual Admin Synchronization, 3-30
Live Editor View, 6-28
Manual Workpaper, 8-10
Local File Rooms, 1-6
Microsoft Office 2007
Location, 4-10
Using Excel 2007 With Engagement, 9-6
Refreshing the Window, 5-3
Using Word 2007 With Engagement, 10-4
Sorting Contents, 5-3
Modifying
Profit Driver Grouping Lists, 7-112
Switching Between Panes, 5-3
Location
Modifying a Current Install, 2-14
Index - 9
Index
Moving
Binders, 3-51, 3-60
Binders to a Different CFR, 3-51
Notes Summary View, 8-57
O
Binders to a Disabled Server, 3-52
Office Environment, 4-2
Workpapers, 8-32
Office Server Token, 3-26
Online Help, 1-12
N
Opening
Bin Manager Utility, 3-56
Name Functions
Tickmark Toolbar, 8-66
Excel Workpapers, 9-9
Word Workpapers, 10-9
Naming Requirements, 5-7, 6-35, 8-3, 8-8,
8-10, 8-11
Network Environments, 4-2
Operating
ProSystem fx Practice Time Clock, 6-62
Options in Administrator, 3-32
Organizational Tools, 1-4
New
Binder Types, 3-40
P
Central File Room, 3-36
Client Folders, 3-38
Client Groups, 3-45
Paste TB Import Command, 7-42
Paste TB Link
Copying Amounts, 8-43
Staff Group, 3-8
General Options, 8-43
Staff Members, 3-11
In Excel, 8-44
Tab, 6-35
In Word, 8-45
Teams, 3-16
Sign Options, 8-43
Trial Balance Window, 7-8
Sum Option, 8-44
Workpaper from Template, 8-1
Notes
Pasting Trial Balance Amounts
General Options, 8-43
Answering, 8-56
In a Word Table, 8-47
Creating, 8-55
In Excel, 8-44
Managing, 8-57
In Word, 8-45
Pane, 8-57
Rights, 3-10
Summary View, 6-24
Summary View Window, 8-57
Types Available, 8-55
PDF, 8-38, 8-39
PDF Files from ProSystem fx Tax, 8-12
PDIFF Function, 9-19
Percentage Differences
Excel Workpapers, 9-17, 9-19
Window, 6-31
Periods
Index - 10
Index
Calculating Prior Period Dates, 9-12
ProSystem fx Document
Sending Workpapers to, 8-37
Placeholders
Inserting, 8-11
ProSystem fx Practice
Accessing the Inquiry Module, 6-62
Working WIth, 8-11
Using the Interface, 6-60
Posting Journal Entries, 7-60
Post-Installation Checklist, 2-14
ProSystem fx Profit Driver
Adding a Report to Binder, 8-25
Practice
Accessing the Inquiry Module, 6-62
Adding Files to Engagement, 8-23
Operating the Time Clock, 6-62
Importing Grouping Lists, 7-110
Using the Interface, 6-60
Importing Trial Balances, 7-113
Pre-Installation Checklist, 2-10
Modifying Grouping Lists, 7-112
Print Groups
ProSystem fx Tax
Creating, 8-39
Configuring Interface Option, 8-15
Printing, 8-39, 8-40
Inserting PDF File from, 8-19
Printing
ProSystem fx Trial Balance
Group of Workpapers, 8-39
Preparing Engagement Client, 7-23
Print Group to PDF, 8-39
Reviewing Conversion Client, 7-23
Single Workpaper, 8-37
Using Conversion Wizard, 7-24
Tickmarks Sheet or Custom Sheets, 8-67
To PDF, 8-38
Views in Binder, 8-40
Workpapers, 8-37
Prior Period Balance Columns, 7-16
Publishing Workpapers, 1-10, 8-35
Q
QuickView, 7-54
Quiklink, 7-105
Prior Period Dates, 9-12
Profiles
Disabling, 3-15
R
Ratio Classifications
Scanning for Workpapers, 3-15
Description of, 7-53
Viewing Information, 3-14
Projects
Editing ProSystem fx, 6-60
Linking to ProSystem fx, 6-60
Properties
Viewing Binder, 3-60
List of, 7-55
Reassigning Staff to New Staff Group, 3-13
Rebuilding a Trial Balance, 7-114
Receiving an Admin Package, 3-28
Reclassifying Journal Entries, 7-65
Recovering
Proposed Journal Entries, 7-64
Deleted Trial Balance, 7-13
Index - 11
Index
Deleted Workpapers, 8-41
Settings, 7-70
Workpaper Tabs, 6-37
Sign Off Summary, 8-40
Recurring Journal Entries, 7-62
Summary by Groups, 7-67
Reference Links
Trial Balance, 7-66
Types of, 7-67
Inserting Workpaper Links, 8-51
Opening, 8-53
Requirements
Administrator Module, 2-2
Refreshing
Workpaper Management Module, 2-5
Binder Window, 6-34
Excel Links, 9-7
Responding to a Note, 8-56
File Room Window, 5-3
Restoring Binders, 6-51
Trial Balance, 7-11
Reversing Journal Entries, 7-62
Word Links, 10-7
Reviewer Sign Off, 6-22
Workpapers and Reports, 8-32
Reviewing Workpapers, 8-55
Reinstalling a Current Install, 2-15
Rights
Binder, 3-9
Removing
Balance Column, 7-18
Client, 3-9
Variance Column, 7-18
Workpapers, 3-9
Removing a Sign Off, 6-52
Roll Forward
Removing Engagement, 2-16
Binders, 6-54
Renaming Groups and Subgroups, 7-56
Description of, 1-9
Repairing a Trial Balance, 7-114
Wizard, 1-9, 6-57
Replacing TB Links
In Excel, 9-7
In Word, 10-7
S
Saving
Reports
Changes to Workpaper, 8-31
Adding Profit Driver Reports, 8-25
Trial Balances, 7-11
Binder Index, 8-40
Scanned Images, 1-5
Consolidations, 7-84
Scanning Workpapers, 8-8, 8-14
Description of, 1-3
Scheduling
Detail, 7-67
Daily Tasks, 3-59
Journal Entries, 7-65
Import from Active Directory, 3-6
Location, 7-66, 7-73
Scheduling Admin Synchronization, 3-29
Notes Summary, 8-40
Searching
Refreshing, 8-32
For Workpapers, 8-42
Index - 12
Index
Groups and Subgroups, 7-53
Secondary Office Server
Creating, 3-24
Staff
Assigning to Binders, 3-48, 6-9
Deleting, 3-39
Deleting Program, 3-40
Staff Groups
Disable/Enable Synchronization, 3-26
Adding New, 3-8
Moving Binders, 3-51, 3-52
Default Groups, 3-8
Moving Binders to Disabled Server, 3-52
Deleting, 3-11
Passing Token to, 3-26
Rights, 3-9
Sending Workpapers
Staff Members
Assigning Licenses, 3-20
To File, 8-35
To ProSystem fx Document, 8-37
Starting ProSystem fx Engagement, 4-1
Via Email, 8-36
Starting the Administrator Module, 3-2
Setting Up
Subgroups
Administrator Module, 3-2
Creating, 7-52
Column Display, 7-15
Deleting, 7-57
Firm Information, 3-3
Invalid Characters, 7-53
Firm Options, 3-32
Placing Accounts in, 7-58
Teams, 3-16
Renaming, 7-56
Views, 7-14
Sum Options, 8-44
Shared File Rooms, 6-38
Summary
Note View, 6-24
Sign Off
Managing Workpaper, 8-60
Synchronizing
Initial to Central File Room, 6-40
Sign Off Rights
Peer-to-Peer Network, 6-44
Staff Groups, 3-10
Sign Off Summary View, 6-25
Subsequent to Central File Room, 6-43
Sign Options, 8-43
Viewing History, 3-31
Signing Off on a Binder, 6-51
With Team Member, 6-45
Signing Off Workpapers, 8-59
Snapshot
Trial Balance, 7-4
Sorting File Room Contents, 5-3
T
Taking Over a Workpaper, 8-64
Tax Grouping Update Wizard
Special Characters
Using From Local File Room, 7-95
Account Descriptions, 7-46
Account Numbers, 7-46
Using Outside Engagement, 7-93
Tax Software Interface, 7-91
Index - 13
Index
Worksheet, 8-66
TB Edit Mode, 7-6, 7-47
TB Links
Tickmarks Sheet
Printing, 8-67
Copy/Paste, 8-43
Insert, 8-47
Time Clock
Operating the ProSystem fx Practice, 6-62
Replacing, 10-7
TBRepair Utility, 7-114
Time Transactions
Entering, 6-63
Teams
Assigning Staff to, 3-17
Tip of the Day
Setting Up, 3-16
Editing, 1-12, 3-62, 5-6, 6-33, 7-4
Using Admin Synchronization, 3-19
Trial Balance Snapshot, 7-6
Using, 1-12
Templates
Binder, 1-9
Toolbar
Opening Tickmark, 8-66
Consolidated Trial Balance, 7-80
Evaluation, 1-4
Toolbars
Customizing, 1-21
Saving Binders as, 6-12
Saving Trial Balance as, 7-12
Total Balance Amounts, 7-59
Trial Balance, 7-8
Total Balance Columns, 7-16
Write Up Trial Balance, 7-85
Transactions
Entering Time, 6-63
Terminal Services Database
Installing, 2-17
Terminal Services Installation, 2-16
Transactions, Entering, 7-84
Trash
Third Party Vendors, 1-5
Deleting Trial Balance with, 7-13
Tickmark Definition List
Deleting Workpapers, 8-41
Emptied in Roll Forward Binders, 6-54
Using, 8-65
Recovering Deleted Trial Balances, 7-13
Tickmark Toolbar, 8-66
Recovering Deleted Workpapers, 8-41
Opening, 8-66
Rules for Deleting Workpapers, 8-41
Tickmarks
Adding, 8-65
Trial Balance
Bitmap Specifications, 8-65
Adding Accounts, 7-46
Default Location, 4-10
Checking for Changes in Source TB, 7-45
Definition, 8-64
Closing, 7-11
Inserting, 8-66
Column Setup, 7-14
Symbols, 8-66
Column Setup Description, 1-2
Using in Workpapers, 8-64
Column Types, 7-15
Index - 14
Index
Tip of the Day, 7-6
Consolidated Columns, 7-81
Trial Balances
Consolidated Template, 7-80
Creating, 7-8
Consolidating, 7-82
Deleting, 7-13
Functions Unavailable if Not Editor, 7-11
Description of, 1-2
Link Formula Maximum Characters, 8-42
Troubleshooting
Editing, 7-6
AORAND Function, 9-17
Importing Data from Existing Trial Balance,
7-44
APDIFF Function, 9-18
Index Number for, 7-9, 7-81, 7-85
PDIFF Function, 9-20
Journal Entries, 7-60
U
Modifying Accounts, 7-47
Opening, 7-10
Unassigning a Workpaper, 8-62
Properties, 7-13
Unfiled Workpapers, 7-66, 7-73
Recovering Deleted, 7-13
Unfinalizing a Binder, 3-50
Refreshing, 7-11
Uninstalling Engagement, 2-16
Repair Utility, 7-114
Unlocking Workpapers, 8-61
Reports, 7-66
Updating
Saving, 7-11
Active Directory Manually, 3-5
Saving as Template, 7-12
Bin Statistics, 3-59
Selecting Account Groupings, 7-2
User Profile, 4-4, 4-5
Selecting Columns to Display, 7-15
Using
Setup, 1-2
Tickmark Definition List, 8-65
Template Default Path, 4-8
Tickmarks in Workpapers, 8-64
Templates, 7-8
Using the TB Repair Utility, 7-114
Views, 7-2
V
Window, 7-2
Write Up Template, 7-85
Variance Column Description, 7-16
Trial Balance Data
Viewing
Converting from ATB for Windows, 7-36
Converting from ProSystem fx Trial Balance,
7-23
Importing from Excel or ASCII Files, 7-39
Admin Activity Log, 3-31
Binder Content, 6-21
Binder Properties, 3-60
Trial Balance Diagnostics, 7-5
Client Binders, 6-20
Trial Balance Overview, 1-2
Field Codes, 10-6
Trial Balance Snapshot, 7-4
Synchronization History, 3-31
Index - 15
Index
Adding CCH Footnotes, 10-5
Views
Current Editor, 6-27
Adding from Templates, 8-1
Description, 7-2
Adding New from Existing, 8-7
Live Editor, 6-28
Assigning to Team Member, 8-62
Note Summary, 6-24
Changing Properties, 8-26
Selecting Columns for, 7-16
Checking Sign Off Status, 8-60
Sign Off Summary, 6-25
Copying and Moving, 8-32
Deleting, 8-41
W
Description of, 1-5
Web Site, 1-13
File Types, 1-4, 1-5
Word
Finding, 8-42
Engagement-Specific Features, 10-1
Inserting Reference Links, 8-51
Replacing TB Link Names, 10-7
Linking to Trial Balance, 8-42
Word 2007, 10-4
Locking, 8-61
Word Workpapers
Manual, 8-10
Date Functions, 10-11
Opening, 6-34
Headers and Footers, 10-5
Opening Reference Link, 8-53
Name Functions, 10-9
Place Holder Workpapers, 8-10
Printing a Group, 8-39
Workpaper Management
Printing Single, 8-37, 8-38
Installing, 2-11
Publishing, 1-10, 8-35
Workpaper Management Module
Requirements, 2-5
Refreshing, 8-32
Tools, 1-6
Reviewing, 8-55
Workpaper Reference Column, 7-3
Rights, 3-9
Workpaper Rights, Staff Groups, 3-9
Saving Changes, 8-31
Workpaper Tabs
Sharing, 1-10, 8-53
Adding, 6-35
Sign Off, 8-29, 8-58
Copying between Binders, 6-36
Sign Off History Report, 8-61
Deleting, 6-37, 8-41
Taking Over, 8-64
Description of, 1-5
Unlocking, 8-61
Finding Workpapers, 8-42
Using Tickmarks in, 8-64
Recovering, 6-37
Write Up Journals
Description, 7-84
Recovering Deleted, 8-41
Detail Report, 7-89
Workpapers
Index - 16
Index
G/L Current Report, 7-89
G/L YTD Report, 7-90
Options, 7-88
Using Trial Balance Template, 7-85
Write Up Trial Balance
Creating, 7-85
Creating Journal Entries, 7-90
X
XFOOT Function, 9-20
XML Export File, 7-23
Index - 17