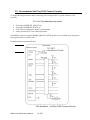
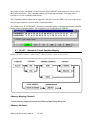
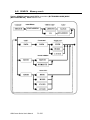
1
EJ-SCT
ARM-Cortex Series
Universal JTAG Emulator
User’s Manual
E090836-02
ARM Cortex Series User's Manual
1 of 81
User’s Manual....................................................................................................................................... 1
1 Technical Information and Cautions.................................................................................................. 5
1.1 Important Warnings and Precautions....................................................................................... 5
1.2 Unpacking and Receipt ............................................................................................................ 5
1.3 Operator Cautions .................................................................................................................... 6
1.4 Class A FCC Notice................................................................................................................. 7
2 Setup for Use With a PC.................................................................................................................... 8
2.1 WATCHPOINT Software Installation........................................................................................ 8
3 Hardware overview......................................................................................................................... 9
3.0.1 Illustration JTAG Hardware Indicators, Connectors & Display....................................... 9
3.1 ARM Series JTAG Cable....................................................................................................... 10
3.1.1 Illustration – EJ-SCT 20-20 Pin Female JTAG Cable.................................................... 10
3.2 Proper JTAG to Unit Under Test Connection Sequence ....................................................... 10
3.3 JTAG Connector Pin Assignment.......................................................................................... 11
3.3.1 Illustration - Standard EJ-SCT 20-20 pin female JTAG cable ....................................... 11
3.5 Test Terminals & Reset Button Under Rubber Cover ........................................................... 12
3.5.1 Illustration – JTAG Reset Button and User Test Terminals ........................................... 12
3.5.2 Table Emulator specification .......................................................................................... 13
3.6 Power On and Off Sequence and Cautions............................................................................ 14
3.7 Other Technical Cautions ...................................................................................................... 14
3.8 EJ-SCT Side JTAG Hardware Interface ................................................................................ 15
3.8.1 - Illustration JTAG Side Hardware Interface..................................................................... 15
3.9 Recommended Hot Plug JTAG Connect Circuitry................................................................ 16
3.9.1 Hot Plug Operating Instructions ........................................................................................ 16
3.9.2 Illustration Hot-Plug JTAG Connect Circuitry............................................................... 16
3.10 JTAG Signal Specification .................................................................................................. 17
3.11 TMS signal, TDI signal........................................................................................................ 17
3.12 TRSTn signal, SRSTn signal ............................................................................................... 17
3.13 RTCK Signal........................................................................................................................ 17
3.14 TDO Signal .......................................................................................................................... 18
3.15 DBGRQ Signal .................................................................................................................... 18
3.16 DBGACK Signal ................................................................................................................. 18
3.17 VCC Signal .......................................................................................................................... 18
3.18 VTREF Signal...................................................................................................................... 18
4 Operation Modes - Development & Programming.......................................................................... 19
4.1 Full JTAG Emulator Development Mode.............................................................................. 19
4.1.1 Illustration JTAG Emulator Development Mode ........................................................... 19
4.2 Stand-Alone JTAG FLASH Writer Mode ............................................................................. 19
5. WATCHPOINT Tutorial ................................................................................................................ 20
5.1 Tutorial Location ................................................................................................................... 20
5.2 WATCHPOINT CD Command Definitions and Location.................................................... 20
6 Commands ....................................................................................................................................... 21
6.1 ALLOC Allocate In-Circuit Emulator Memory ................................................................. 22
6.2 ASSIGN or (.) Evaluate expression and assign value......................................................... 24
6.3 BATCH Execute MACRO batch file ................................................................................. 25
6.4 BP Add - Enable - Disable breakpoints .............................................................................. 26
6.5 BPOFF Delete Breakpoint(s).............................................................................................. 27
ARM Cortex Series User's Manual
2 of 81
6.6 BREAK Forced Break ........................................................................................................ 27
6.7 BPOPT Breakpoint Options................................................................................................ 28
6.8 BPSWITCH Change breakpoint type - Enable/disable Breakpoints.................................. 29
6.9 CHECK Check a memory range......................................................................................... 30
6.10 CD Change Directory ....................................................................................................... 32
6.11 CLOSE Close Project file ................................................................................................. 32
6.12 CLS Clear Command Window ......................................................................................... 32
6.13 COPY Copy a memory range ........................................................................................... 33
6.14 CPRREAD/CPRWRITE...................................................................................................... 35
6.15 DIR List directory contents............................................................................................... 36
6.16 DUMP Display memory range data content..................................................................... 37
6.17 ENV Emulator environment options ................................................................................ 39
6.18 ERROR ECHO Error message display settings................................................................ 41
6.19 EXTCMD Execute WATCHPOINT commands from an external application................ 42
6.20 FILL Fill a memory range................................................................................................. 43
6.21 FMCLEAR Clear Flash Memory...................................................................................... 44
6.22 FMLOAD Change enable/disable flash memory download............................................. 45
6.23 GO Start real-time program execution.............................................................................. 45
6.24 HIST Display Trace History ............................................................................................. 46
6.25 INIT Initialize the emulator environment ......................................................................... 48
6.26 LOAD Load object and symbol files for debugging ........................................................ 49
6.27 LOG Start/stop logging Command Window output ......................................................... 50
6.28 MESSAGEBOX Enable target power On/Off a user message box.................................. 51
6.29 MKDIR Create a Directory............................................................................................... 51
6.30 NEWBATCH Start/stop recording user commands to a macro batch file ....................... 52
6.31 OPTION Command window options................................................................................ 53
6.32 PASS Step Over................................................................................................................ 54
6.33 PLDLOAD Load PLD initialization files ......................................................................... 55
6.34 QUERY Display current environment setting .................................................................. 55
6.36 RASM Reverse assembly ................................................................................................. 56
6.37 REG Viewing CPU register value .................................................................................... 57
6.38 RESET Reset the CPU...................................................................................................... 57
6.39 SAVEWIN Save command window contents to file........................................................ 58
6.40 SEARCH Memory search................................................................................................. 59
6.41 SHELLEXE Execute a shell script ................................................................................... 61
6.42 STEP Step in ..................................................................................................................... 61
6.43 UPDATEALLWIN Update All WATCHPOINT Display Windows ............................... 62
6.44 UPLOAD Save object data to a file.................................................................................. 63
7 Batch Macro Command Processing................................................................................................. 65
7.1 Work Variable........................................................................................................................ 66
7.2 System Variable ..................................................................................................................... 66
7.3 Label ...................................................................................................................................... 67
7.4 Comment................................................................................................................................ 67
7.5 View Memory, I/O Data ........................................................................................................ 68
7.6 Modify Memory, I/O Data..................................................................................................... 68
7.7 View Register Value .............................................................................................................. 69
7.8 Modify Register Value........................................................................................................... 69
7.9 FOR, FBREAK, NEXT Repeat processing ........................................................................ 69
ARM Cortex Series User's Manual
3 of 81
7.10 WHILE, WBREAK, WEND Repeats batch processing................................................... 70
7.11 GOTO Unconditional branch............................................................................................ 71
7.12 IF, ELSEIF, ELSE, ENDIF Conditional Process Control ................................................ 71
7.13 END Terminate Batch processing .................................................................................... 72
7.14 QUIT End the current macro ............................................................................................ 72
7.15 ECHO Batch commands display on/off............................................................................ 73
7.16 KEYIN (Keyboard input) .................................................................................................... 73
7.17 PRINT (Screen display)....................................................................................................... 74
7.18 BEEP (PC Audible alert) ..................................................................................................... 75
7.19 WAIT Delay batch macro process.................................................................................... 75
7.20 Work variable....................................................................................................................... 75
8 Data Expression Formats ................................................................................................................. 76
8.1 Memory I/O Port Reference................................................................................................... 76
8.2 WATCHPOINT Data Expressions ........................................................................................ 77
8.3 Address Expressions .............................................................................................................. 77
8.4 CPU Register Expressions ..................................................................................................... 77
8.5 Address Input Format ............................................................................................................ 78
8.6 Data Input Format .................................................................................................................. 78
8.7 Memory I/O Port References ................................................................................................. 78
9 Data Expression ............................................................................................................................... 79
9.1 Numeric Value ....................................................................................................................... 79
9.2 Address Expression................................................................................................................ 79
9.3 CPU Register Expression....................................................................................................... 79
9.4 Address Format...................................................................................................................... 80
9.5 Data Format ........................................................................................................................... 80
9.6 Memory I/O Port Reference................................................................................................... 80
ARM Cortex Series User's Manual
4 of 81
1 Technical Information and Cautions
No part of this publication may be reproduced without the publisher’s prior permission. Information
in this publication is subject to change without notice. NO LIABILITY FOR DAMAGES. In no
event shall Sophia Systems Ltd or its suppliers be liable for any damages whatsoever (including,
without limitation, damages for loss of business profits, business interruption, loss of business
information, or any other pecuniary loss) arising out of the use of or inability to use this product.
Trademarks and product names within this publication are the property of the respective companies.
Please email questions and comments to [email protected]
1.1 Important Warnings and Precautions
This publication includes important product use warnings and safety precautions. It is important for
you to read and follow directions for proper operation to avoid possible harm to yourself or others,
and prevent damage to your EJ-SCT JTAG emulator.
• Read and study all precautions prior to operating this product.
• Keep these precautions in a safe place with easy operator access.
1.2
Unpacking and Receipt
Check each item itemized on the packing list are present and undamaged by shipment. If damage is
noted save all shipping documents, packing and boxes. Immediately contact your freight forwarder
and local Sophia Systems office or representative.
This product contains delicate components and should be handled with care.
ARM Cortex Series User's Manual
5 of 81
1.3
Operator Cautions
Warning
Always observe the following cautions and instructions. Failure to do so may result in
electrical shock, fire, serious injury, loss life, and/or damage to the product hardware.
Use factory supplied connections, cables
and test points only. Any other
attempts to make connections or
connection modifications may result in
injury, electrical shock or fire.
Prohibited
There are NO user serviceable
components inside the case.
Never attempt to disassemble,
modify or repair this product.
Failure to do so may result in
electrical shock and risk of fire. Contact Sophia
Systems for authorized repairs.
If you smell smoke or detect any
sound of electric arcing while using
this product - Immediately turn off
electrical power and remove all
connections capable of supplying
electricity to the unit. Failure to do so may result in
injury or fire. Contact Sophia Systems for authorized
repairs.
If you suspect that the product is
damaged due to impact or having
fallen, do not attempt to apply power.
If in use at the time of the damage
remove power immediately. Failure
to do so may result in injury or fire. Contact Sophia
Systems for authorized repairs.
Cable and connector cautions. Treat
connection cables gently. Never expose
them to heat, kink, twist or pull on
connection cables. Avoid straining or
placing any objects on cables.
AC mains power caution. Only plug the accessory
power supply in to standard 110 VAC mains power.
Failure to do so may result in injury or
fire. Contact Sophia Systems for
authorized repairs.
Prohibited
Prohibited
Do not attempt to touch the power
connection during electrical storms
to avoid electrical shock. If you
suspect that this product may have
been exposed to a lightening strike
do not attempt to use it. Contact
Sophia Systems for authorized technical inspection
and repair.
Keep the chassis ground on this product
away from any gas line or pipe. Failure
to do so may result in a gas explosion or
fire.
Prohibited
ARM Cortex Series User's Manual
6 of 81
Always ensure that this product chassis ground is at
the same electromotive potential as ground on any
unit under test. Connecting a ground
strap from the ground connection on
this device to all peripheral devices is
highly recommended to eliminate the risk Prohibited
of damage and electrical shock.
Do not pull on the electric cable. Grasp
the plug or cable connector to insert or
extract cable connections. Failure to do
so may damage the cable and risk injury
or fire.
Prohibited
Warnings continued
Always observe the following cautions and instructions. Failure to do so
may result in electrical shock, fire, serious injury, loss life, and/or damage
to the product hardware.
Turn off power and remove power
plug from AC outlet when
connecting or disconnecting an
option. Failure to do so may result
in electrical shock.
Required
Don’t transfer the product with the
option connected because the option
may
drop and lead to injury.
Prohibited
Avoid pulling the electric cable with extreme
force. Remove connections by taking
the plug on hand only. Failure to do
so may result in electrical shock,
cable damage or the risk of fire.
Prohibited
Make sure your hands are dry. Avoid
handing power plug with wet hands.
Failure to do so may result in
Prohibited
electrical shock.
Avoid use and storage in humid
areas such as found in a bathroom.
High humidity may result in
electrical failure and shock due to
liquid condensation forming on this product.
Keep all liquids away from the
product. If a liquid does spill on to the
product, turn off power and pull out
plug from power outlet immediately. Prohibited
Contact Sophia Systems sales office
or distributor for technical inspection and repair.
Avoid covering the adapter and
product. Failure to do so may result
in fire or deform the case due to the
extreme high temperature.
Prohibited
Do not allow any metal items such
as copper wire clippings or staples
to get into this product. Failure to
do so may result in electrical shock
or fire.
Don’t touch AC adapter or product
while their power ON duration.
Failure to do so may result in the
risk of injury.
Prohibited
Prohibited
Do not cover the air flow ventilation
holes in this product. Failure to
do so may result in case deformation
or fire.
Prohibited
1.4 Class A FCC Notice
This product has been tested and demonstrated to comply with the limits for class A digital device
pursuant to part 15 of the FCC Rules. These limits are designed to provide proper protection against
harmful interference when the product is operated in a commercial environment. There is a
possibility of this product causing interference to radio communications if not used in accordance
with procedures in the instruction manual. This product my generate and radiate radio frequency
energy.
There is a possibility that this product may cause radio frequency interference when used in
residential areas. It is the responsibility of the user to prevent or remedy interference complaints and
problems at their own cost if this is the case. This unit will not comply with FCC Rules if modified
in any way without Sophia Systems’ authorization.
ARM Cortex Series User's Manual
7 of 81
2 Setup for Use With a PC
2.1 WATCHPOINT Software Installation
a) Do not connect the EJ-SCT to the PC USB port until after the WATCHPOINT software has
been installed so that the PC will have access to the USB driver.
b) WATCHPOINT versions are determined by the processor that they support. Check to be sure
that the version of WATCHPOINT being installed matches the processor on the unit under
test.
c) Install Sophia Systems WATCHPOINT debug software using the supplied CD ROM.
d) Do not attempt to start a WATCHPOINT session until the JTAG hardware is installed. For a
WATCHPOINT session to start normally the PC must recognize the EJ-SCT on a USB port,
and the EJ-SCT must find a compatible processor on an active JTAG port.
e) The EJ-SCT receives power via the USB cable when connected to a personal computer.
f) Make sure that the supplied WATCHPOINTt CD is in the PC ROM drive and connect the
USB cable to the PC and EJ-SCT. The PC will detect the new USB hardware and find the
needed USB driver on the WATCHPOINT CD.
g) Be sure that the unit under test power is off. When WATCHPOINT is installed and the
EJ-SCT has been recognized by the PC you can plug the EJ-SCT into the unit under test.
Make sure that Pin 1 on the JTAG cable is connected to Pin 1 on the unit under test.
Failure to do so may damage the EJ-SCT and your test unit.
h) Turn on the unit under test. The EJ-SCT target power on LED, (labeled P-ON) should light.
Now you are ready to start the first WATCHPOINT session. Refer to the WATCHPOINT
manual and WATCHPOINT Help button for additional necessary start-up steps and
instructions.
ARM Cortex Series User's Manual
8 of 81
3
Hardware overview
The EJ-SCT is a universal JTAG emulator and FLASH writer that is configured by the
WATCHPOINT software. Additional CPU support including multi-processor capabilities are
added by simply installing another edition of the WATCHPOINT software. Contact Sophia Systems
or your authorized representative for specific details.
The EJ-SCT connects to the host computer via USB interface cable.
The EJ-SCT connects to the unit under test via the supplied JTAG cable.
1. USB Mini B Connector
6. PLAY Batch Macro Button
2. JTAG Cable Connector
7. Micro SD Memory Slot
3. EJ-SCT Power On LED
8. Stand-Alone Mode DC Power In Jack
4. Target unit power on LED (P-ON)
9. OLED EJ-SCT Message Display
5. Unit Under Test Running LED
10. Strap Mounting Hole
3.0.1 Illustration JTAG Hardware Indicators, Connectors & Display
ARM Cortex Series User's Manual
9 of 81
3.1
ARM Series JTAG Cable
The EJ-SCT uses a standard 20 to 20 pin female connector JTAG cable from the emulator to the unit
under test as recommended by ARM.
3.1.1 Illustration – EJ-SCT 20-20 Pin Female JTAG Cable
3.2
Proper JTAG to Unit Under Test Connection Sequence
The following procedure must be adhered to for proper connection to the system under test.
Make sure that the EJ-SCT and target system to be tested power is off or not connected in any way
to a power source.
1. Connect target system to the EJ-SCT using the provided JTAG cable.
2. Connect the power supply and apply power to the EJ-SCT. The Power LED on the EJ-SCT
should be on at this time.
3. Apply power to the target system to be tested.
4. For the WATCHPOINT debugging session to start the EJ-SCT JTAG must detect a valid,
working JTAG port on the target system.
ARM Cortex Series User's Manual
10 of 81
3.3
JTAG Connector Pin Assignment
The following pin assignment is recommended by ARM for the target system to be tested.
3.3.1
Illustration - Standard EJ-SCT 20-20 pin female JTAG cable
ARM Cortex Series User's Manual
11 of 81
3.5
Test Terminals & Reset Button Under Rubber Cover
On the underside of the EJ-SCT there is a rubber dust cover protecting a reset button for the unit and several
user test point connections.
Reset button
3.5.1 Illustration – JTAG Reset Button and User Test Terminals
Pin #
Signal
1
GND
RUNOUT
2
3
4
RESETOUT#
XVCC
LEVEL
Type
Signal Level
---
Output Low = 0.55v
High = 2.33v
Output Low = 0.55v
High = 2.33v
Output
Input
---
0~5.0vDC
5
6
7
*1
*2
*3
---
Not Used
EXTBRK#
Function
External Tester Ground Point
LOW = Unit under test CPU is not running
HIGH = Unit under test CPU IS running
LOW = Unit under test is In Reset
HIGH = Unit under test is NOT in Reset
External Vtref Test Point
DC Monitor point. Voltage if >0.8vDC
appears on JTAG OLE display. 0~5vDC
Resolution 0.25vDC *1
Input
0~5.0vDC
Assert LOW to stop Unit under test CPU*2
The voltage level is displayed on OLED when voltage connected to the LEVEL terminal over 0.8V.
The input signal threshold-level is equal to half the target system power supply voltage. (Vtref)
Signals referenced to test point GND Pin-1 under the EJ-SCT rubber dust cap.
ARM Cortex Series User's Manual
12 of 81
3.5.2 Table Emulator specification
Supported Cores
Target interface
JTAG clock
User power
Memory space
Interrupt
Break
ARM 7 9 11 Cortex core series
JTAG port connection 2.54mm pitch 2 line 20 pin connect
Supports approximate frequencies 66, 33, 16 ,8 ,4, 2, 1 MHz and low speed clock
1.2V~5.0V output signal voltage follows target voltage
All memory space is available to the User.
All interrupts are available to the User.
Hardware break point
ARM7/9 Maximum is 2 hardware break points
May be set on command execution address, status, data
ARM11 Maximum is 7 hardware break points
Reserve command execution address (5p), reserve memory access etc. (2p)
Cortex core series
(A8) :Reserve command execution address (5p), reserve memory access etc. (2p)
(R4) :Reserve command execution address(7p), reserve memory access etc. (8p)
(M3): Reserve command execution address(5p)
Unlimited software break points
Emulator forced break point
*ARM7 & ARM9 JTAG emulation uses 1 of the available hardware break points.
Software break point
Step over
Step out
Run to cursor
Specifications may be changed without notice.
ARM Cortex Series User's Manual
13 of 81
3.6
1.
2.
3.
4.
5.
6.
Power On and Off Sequence and Cautions
When turning on your test system you must apply power to the JTAG emulator first.
When turning off your test system always turn off the unit under test first.
Be careful that only compatible voltage is ever applied to this product.
This emulator will not function if the target unit under test is off.
This emulator will not function correctly if the unit under test CPU is not operating normally.
The WATCHPOINT debug session will not start normally if it does not detect a working JTAG port
on the unit under test.
3.7
Other Technical Cautions
1. Software break points cannot be set in target system ROM address space.
2. A hardware break point must be set to break execution in a ROM space address.
3. The User program will stop executing if the User changes or alters memory while the User program is
running. This includes changing or altering assembler code.
4. The ARM ICEBreaker Module debugging scheme is being used internally as one of the debugging
algorithms. When this Module is accessed is may cause WP Break command to be ignored for an
instant. Contact Sophia Systems for more details if this is causing trouble with your debugging
process.
ARM Cortex Series User's Manual
14 of 81
3.8
EJ-SCT Side JTAG Hardware Interface
The target VTREF signal is detected by the EJ-SCT and is used to set signal levels. Valid VTREF levels are
from 1.2V~5.0Vdc
When VTREF signal detect voltage is over 0.7, input/output circuit on the JTAG emulator side it will be ON.
JTAG Interface parts are as follows:
Designation Description
Part Number
A
Analog Devices
ADG719BTZ
B
TI
SN65LVDS33PW
C
PERICOM
PI5C125QE
D
Ferrite bead
E
EMI filter
3.8.1 - Illustration JTAG Side Hardware Interface
ARM Cortex Series User's Manual
15 of 81
3.9
Recommended Hot Plug JTAG Connect Circuitry
To support Hot Plug connection add the following circuit to target board. A special connector is not
necessary .
3.9.1 Hot Plug Operating Instructions
•
•
•
•
Turn target POWER, SW_SIGNAL off.
Turn target POWER SW_SIGNAL on
EJ-SCT detects target power supply to start normally
At this point the EJ-SCT can control signal lines.
If the SRSTn (target reset signal), DBGRQ, DBGACK, RTCK signals are not available on the target, then
these signals can be no connects, (NC).
Normal connections are detailed below.
3.9.2 Illustration
ARM Cortex Series User's Manual
16 of 81
Hot-Plug JTAG Connect Circuitry
3.10
JTAG Signal Specification
1. TCK signal – Required, and must be connected
2. Possible Clock Frequencies –
2.1. 66.66MHz, 33.33MHz, 16.66MHz ,8.33MHz,.4.16MHz, 2.08 MHz, and 1.04MHz
2.2. Possible low speed clock is supported from 1~500KHz
3. If RTCK and low speed modes are not being used, that the JTAG clock has a 50% duty cycle.
4. TCK can be left low or high, since it is just used for communication to the CPU for JTAG.
5. When the RTCK signal changes there is some initial delay since the JTAG emulator also needs some time
to process the change in RTCK.
6. When the low speed mode is used, then special consideration of the TCK signal should be understood in
terms of duty cycle.
7. When automatic setting is selected in the WATCHPOINT set-up menu, the appropriate JTAG frequency
will usually be selected. However, if the TDO signal is delayed too long, the JTAG will be set to low
frequency.
8. RTCK mode setup is dependent on the RTCK signal information from the target unit under test.
9. The TCK signal specification above may change when WATCHPOINT updates are released.
10. 1.2V~5V output voltage follows the VIREF signal from the target unit under test.
3.11
TMS signal, TDI signal
1. TMS and TDI signals set up timing set at TCK falling edge.
2. When ”RTCK=2 0mode” is used, the RTCK synchronizes with the JTAG emulator for debugging. TCK
signal specification above may change when WATCHPOINT updates are released.
3. 1.2V~5V output voltage follows the VIREF signal from the target unit under test.
3.12
1.
2.
3.
4.
TRSTn signal, SRSTn signal
TRSTn and SRSTn signal must be connected.
Timing is done by an asynchronous assertion.
When the JTAG emulator is initialized, the output is at the low state.
Output voltage is an open drain output. This signal is a pull-up voltage that follows the unit under test
VccIO level. (A 1K Ω ohm pull-up should be added to the controlling device.)
3.13
RTCK Signal
1. The TCK clocking frequency can be set to non-adaptive or adaptive modes. If using adaptive clocking
mode, the JTAG emulator uses the RTCK signal to generate the TCK signal. When the emulator detects
the falling edge of RTCK, it generates the rising edge of TCK. The TCK signal is delayed due to the time
needed to sample the RTCK signal using the emulator internal clock. This might be a problem when
using very low clock speeds.
2. There is a 100K pull-down within the JTAG emulator.
ARM Cortex Series User's Manual
17 of 81
3.14
TDO Signal
1. TRSTn signal must be connected.
2. There is a 100K pull-down within the JTAG emulator.
3. In non-adaptive clocking mode the TDO signal is sampled by the JTAG emulator at the rising edge of the
TCK signal.
4. In adaptive clocking mode the TDO signal is sampled by the JTAG emulator at the rising edge of the
RTCK signal. Sampling requires approximately 9ns setup time, and 5ns hold time form the rising edge of
the RTCK when using adaptive clocking mode.
5. The TDO signal timing specifications may be changed in revised versions of the WATCHPOINT
debugger.
3.15
DBGRQ Signal
1. This pin allows to quickly enter debug mode and should be connected if the unit under test supports
DEGRQ debugging.
2. Output voltage follows target VIREF signal voltage
3. Output timing is asynchronous.
3.16
DBGACK Signal
1. This pin allows the JTAG emulator to quickly determine whether the target is in debug mode or
not. It should be connected if the unit under test supports it.
2. There is a 10K pull-down within the JTAG emulator
3.17
VCC Signal
1. Connects to the target power supply.
2. The JTAG emulator monitors the voltage at terminal VccIO.
3.18
VTREF Signal
1. Must be connected and goes to the target power supply directly.
2. This pin is usually tied to the target's power supply and used by the JTAG emulator as a logic
level reference.
ARM Cortex Series User's Manual
18 of 81
4 Operation Modes - Development & Programming
4.1
Full JTAG Emulator Development Mode
In full development mode the EJ-SCT is connected to a personal computer via a USB connection,
and is controlled by a Sophia Systems WATCHPOINT software session. Power to the EJ-SCT is
supplied by the USB cable connection. Connection to the unit under test is via the supplied
JTAG cable.
4.1.1
4.2
Illustration JTAG Emulator Development Mode
Stand-Alone JTAG FLASH Writer Mode
In stand-alone JTAG FLASH writer mode the EJ-SCT operates under the control of a macro
script, “Batch” program created with WATCHPOINT software and saved to SD memory. The
SD memory is then installed in the EJ-SCT SD memory slot.
In stand-alone mode the EJ-SCT receives power from the supplied accessory AC mains power
supply. Connection to the unit to have FLASH memory written is via the supplied JTAG cable.
The Batch program executes when the operator presses the Start button on the EJ-SCT.
ARM Cortex Series User's Manual
19 of 81
5. WATCHPOINT Tutorial
5.1
Tutorial Location
Tutorial text and illustrations are part of the WATCHPOINT Help file. This file is available apart
from a WATCHPOINT session. Go to the \WATCHPOINT\WPS_ARM_M/help directory, and
double click on ARM.chm. When the file opens, select the Tutorial folder.
5.2
WATCHPOINT CD Command Definitions and Location
WATCHPOINT command definition text and illustrations are part of the WATCHPOINT Help file.
This file is available apart from a WATCHPOINT session. Go to the
\WATCHPOINT\WPS_ARM_M/help directory, and double click on ARM.chm. When the file
opens, select the Command Line folder.
ARM Cortex Series User's Manual
20 of 81
6 Commands
WATCHPOINT has a command line interface for entering commands directly from the keyboard.
Commands are entered in the Command window. Quick command buttons open on the lower edge
of the command window as you type a command on the command line. As you type the first few
letters of the command new buttons are presented. You can use the Left ← and Right → arrow keys
to scroll through the quick command buttons and highlight your desired command. When the
command is highlighted, pressing the <Space> bar will enter the command text on the command
line. You may also use the ↑and ↓ up and down keys to scroll and view command history.
You can also enter the command by using the mouse to click on the > and < buttons under the
command line to select desired command button.
Once a quick command is entered additional context sensitive buttons become available for that
command's options. Depending on the command, you either select an option as described above, or
you are prompted to enter additional information such as address, data value, filename, etc. When all
options have been selected or typed in, press <Enter> to initiate the command. If any command
parameters are omitted when entering a command, the parameter values from the previous command
entry are used
Once an address or data value has been used in a command, it is recalled the next time that you use
the command. You can press <Space> bar to fill in the previous value when you are prompted for a
value, or you can type in a new value. If any command parameters are omitted when entering a
command, the parameter values from the previous command entry are used.
ARM Cortex Series User's Manual
21 of 81
The output of some commands executed from the WATCHPOINT main menu may also be sent to
the Command window. The Command window can be split into two panes. Each pane can be
scrolled to view the command output history.
The Command window output can be logged to a disk file. Press the <Tab> key to move the cursor
between upper and lower portions of the Command window.
The current active WATCHPOINT command or command option are displayed as buttons along the
bottom of the Command window. The command in use is highlighted in GREEN.
6.1 ALLOC Allocate In-Circuit Emulator Memory
(Full In-Circuit Emulator memory mapping function. Not a JTAG emulator feature)
Syntax: ALLOC <Channel><Address range> <Memory attribute> <Write-Protect attribute>
<Memory Mapping Channel>:
Select memory mapping channel from Memory Map Setup dialog box.
<Memory Attribute>:
ARM Cortex Series User's Manual
22 of 81
USER
Allocate address range to User memory
RAM
Allocate address range to emulation memory
<Write Protect attribute>:
DISABLE
Disable Write Protect
ENABLE
Enable Write Protect
<Start Address> <Address Range>:
<start address> [LENGTH <length> /TO <end address>]
start address
Specify starting address for memory allocate range
length
Specify number of Bytes from the starting address
end address
Specify ending address of memory range
Description:
Allocates emulation memory and assigns attributes. There are 8 Mbytes emulation memory,
map-able in two channels.
This command is same as :
Menu >> Resource >> Memory Map Setup
Related Commands: QUERY
ARM Cortex Series User's Manual
23 of 81
6.2
ASSIGN or (.)
Evaluate expression and assign value
Syntax:
Assign <expression1> [=<expression2>]
or
. <expression1> [=<expression2>]
<Expression>:
Specify an expression for evaluation
Description:
If expression2 is included, it assigns the value of expression2 to expression1. Expression1
can be a memory/port address, CPU register, or a work variable. If expression2 is omitted,
then expression1 can be any mathematical expression, including symbol names, and the
resulting value is displayed. You can type the command "ASSIGN", or use the dot "."
notation for viewing and modifying memory/port data, symbol data, I/O data, and register
values.
Refer to Address and Data Input Methods for specifying memory/port addresses and CPU
register values in expressions. For help using WATCHPOINT system variables,
memory/port contents, and CPU registers in expressions, refer to Math Expressions and
Batch Processing.
Example:
.[0x4000].B=0x10
Write 0x10 byte data to address 0x4000.
.R0=0x20
Write 0x20 to R0 register
If you use the dot syntax in place of the ASSIGN statement. However if the dot
syntax is used there will be no command window history.
ARM Cortex Series User's Manual
24 of 81
6.3 BATCH Execute MACRO batch file
Syntax: BATCH <file name> [<argument>] [<argument>] [<argument>]
<file name>:
Specify the name of the batch file.
<argument>:
Argument used in the batch file
Specify each argument in the batch file with $1 ~ $9.
$0 refers to the entire command from the command line.
Description:
Executes commands stored in a batch macro file. You can create a batch file by using the
NEWBATCH command that records commands entered on the command line. The batch file is a
text file that can be edited with any text editor. Refer to the Batch Processing section.
ARM Cortex Series User's Manual
25 of 81
6.4 BP Add - Enable - Disable breakpoints
Syntax: BP <address> <bus status> [ENABLE | DISABLE]
<Address>:
Specify breakpoint address:
R;0x00000000 R;0x000000ff
If address is not specified, press Enter key to display BP list.
<Bus status>:
[SOFT l CODE l MREAD l MWRITE l MACCESS]
SOFT
Set a Software Breakpoint
CODE
Set a hardware Breakpoint for Code fetch
MREAD
Set a Breakpoint for Memory Read
MWRITE
Set a Breakpoint for Memory Write
MACCESS
Set a Breakpoint for Memory Access
<Status>:
Specify disable/enable Breakpoint
ENABLE
Enable Breakpoint
DISABLE
Disable Breakpoint
Description:
Add or Enable/Disable Breakpoints.
After the command is executed, WATCHPOINT will display the current breakpoint status.
This command is the same as [Breakpoints] in the [Go] menu
ARM Cortex Series User's Manual
26 of 81
6.5
BPOFF
Delete Breakpoint(s)
<Mode>:
NO <breakpoint
number(s)>:
Specify the breakpoint number(s) that you want to delete. Ex: 2,4,57.(see QUERY BP command)
ALL
Delete all breakpoints
Description:
Specify breakpoint number(s) to delete or delete all breakpoints. A list of current breakpoints can be
displayed with the QUERY BP command.
After the command is executed, it will display the current breakpoint status.
This command is the same as [Breakpoints] in the [Go] menu.
6.6
BREAK
Forced Break
Description: Forces break during real time CPU execution
This command is same as :
Menu >> Go >> Break
ARM Cortex Series User's Manual
27 of 81
6.7
BPOPT
Breakpoint Options
Syntax: BPOPT TRIGGER <Trigger Break> TRCEND <Trace End Break>
<Mode>:
TRIGGER (Trigger
Break)
Break on Trace Trigger. Specify Trace trigger condition in the
Trigger Setup to enable break when trigger condition is met
TRCEND (Trace End
Break)
Break on Trace End. Specify Trace trigger condition in the
Trigger Setup to enable break on Trace-End (after delay cycles
are captured).
<Status>:
DISABLE CPU will not break on condition
ENABLE
CPU will break execution on condition
Description:
Enable/disable optional break conditions.
This command is same as :
Resource >> ICE Environment..... >> Break....
and :
Resource >> Trace >> Setup >> Trace Break Option
ARM Cortex Series User's Manual
28 of 81
6.8
BPSWITCH
Change breakpoint type - Enable/disable Breakpoints
Syntax: BPSWITCH <bp status> [ENABLE | DISABLE]
<Breakpoint status>:
Select Breakpoint Type
HARD
Select all Hardware Breakpoints
SOFT
Select all Software Breakpoints
<Status>:
Specify disable/enable Breakpoint
DISABLE
Disable Breakpoint
ENABLE
Enable Breakpoint
Description:
Change breakpoint type Enable/Disable Breakpoints.
This command is the same as [Breakpoints…] in the [Enable/Disable All S/W BP],[Enable/Disable
All H/W BP] menu.
ARM Cortex Series User's Manual
29 of 81
6.9
CHECK
Check a memory range
Syntax: CHECK <address range>, SIZE <data size>, MASK [ENABLE/DISABLE], ASIZE <access
size>
<address range>:
<start address> [LENGTH <length> | TO <end address>]
<start address> Specify starting address for memory allocate range
<length> Specify number of Bytes from the starting address
<end address> Specify ending address of memory range
ARM Cortex Series User's Manual
30 of 81
<SIZE>: Specify data size for memory check
BYTE Memory check in byte size
WORD Memory check in word size
LWORD Memory check in long-word size
QWORD Memory check in quad-word size
<data mask>: Specify data mask for memory check
DISABLE Do not specify Mask data
ENABLE Specify Mask data
<ASIZE>: Specify data access size for memory check
BYTE Memory check in byte size access
WORD Memory check in word size access
LWORD Memory check in long-word size access
QWORD Memory check in quad-word size access
Description:
Checks a memory range. If errors are found, the address, write value and read value are
listed in a table.
This command is the same as :
Resource >> Memory Port >> Check.
ARM Cortex Series User's Manual
31 of 81
6.10 CD Change Directory
Syntax: CD <directory path name>
<directory path
Names the directory path to make current
name>:
Description:
Change the directory path.
6.11
CLOSE
Close Project file
Syntax: CLOSE
Description:
Closes the currently opened Project file and all windows in WATCHPOINT.
6.12
CLS
Clear Command Window
Description:
Clear the currently opened Command window in WATCHPOINT.
ARM Cortex Series User's Manual
32 of 81
6.13
COPY
Copy a memory range
ARM Cortex Series User's Manual
33 of 81
<address range>: <start address> [LENGTH <length> | TO <end address>]
Specify start address for memory allocate range
<start address>
<length>
Specify number of Bytes from the starting address
<end address>
Specify end address of memory range
<MEM>:
USR
Specify memory area to copy to
Copy from emulation memory to user memory
RAM
Copy from user memory to emulation memory
ADDR<address>
Specify another address to copy to, within same memory type
<ASIZE>:
BYTE
Specify data access size for memory copy
Byte size memory copy
WORD
Word size memory copy
LWORD
Long Word Memory copy
QWORD
Quad-word memory copy
Description: Copy from one memory area to another memory area. The destination
range, User or Emulation memory, must be allocated in the memory map.
This command is the same as :
Resource >> Memory Port >> Copy
ARM Cortex Series User's Manual
34 of 81
6.14
CPRREAD/CPRWRITE
<CPNUM>:
CPRREAD
In CPRREAD, specify the p<cp#> (cp_num)of MRC{<cond>}, p<cp#>,
<opcode_1>, Rd, CRn, CRm and <opcode_2> with 0 ~ 15.
CPRWRITE
In CPRWRITE, specify the p<cp#> (cp_num)of MCR{<cond>}, p<cp#>,
<opcode_1>, Rd, CRn, CRm and <opcode_2> with 0 ~ 15.
<OPCODE1>:
In CPRREAD, specify the <opcode_1> of MRC{<cond>}, p<cp#>, <opcode_1>,
CPRREAD
Rd, CRn, CRm and <opcode_2> with 0 ~ 15.
CPRWRITE
In CPRWRITE, specify the p<opcode_1> of MCR{<cond>}, p<cp#>,
<opcode_1>, Rd, CRn, CRm and <opcode_2> with 0 ~ 15.
<CRN>:
CPRREAD
In CPRREAD, specify the <CRn> of MRC{<cond>}, p<cp#>, <opcode_1>, Rd,
CRn, CRm and <opcode_2> with 0 ~ 7.
CPRWRITE
In CPRWRITE, specify the <CRn> of MCR{<cond>}, p<cp#>, <opcode_1>,
Rd, CRn, CRm and <opcode_2> with 0 ~ 7.
ARM Cortex Series User's Manual
35 of 81
<CRM>:
CPRREAD
In CPRREAD, specify the <CRm> of MRC{<cond>}, p<cp#>, <opcode_1>, Rd,
CRn, CRm and <opcode_2> with 0 ~ 7.
CPRWRITE
In CPRWRITE, specify the <CRm> of MCR{<cond>}, p<cp#>, <opcode_1>,
Rd, CRn, CRm and <opcode_2> with 0 ~ 7.
<OPCODE2>:
In CPRREAD, specify the <opcode_2> of MRC{<cond>}, p<cp#>, <opcode_1>,
CPRREAD
Rd, CRn, CRm and <opcode_2> with 0 ~ 15.
CPRWRITE
In CPRWRITE, specify the p<opcode_2> of MCR{<cond>}, p<cp#>,
<opcode_1>, Rd, CRn, CRm and <opcode_2> with 0 ~ 15.
<DATA>:
CPRREAD
In CPRREAD, display the Rd value of MRC{<cond>}, p<cp#>, <opcode_1>, Rd,
CRn, CRm and <opcode_2>.
CPRWRITE
In CPRWRITE, specify 4 byte Rd value for MCR{<cond>}, p<cp#>,
<opcode_1>, Rd, CRn, CRm and <opcode_2>.
Description:
These commands configure the CPR. Display the Rd values for MRC{<cond>}, p<cp#>,
<opcode_1>, Rd, CRn, CRm and <opcode_2>
Set the Rd values for MCR{<cond>}, p<cp#>, <opcode_1>, Rd, CRn, CRm and
<opcode_2>.
6.15
DIR
List directory contents
Syntax: DIR <directory path name>
<directory path name>:
The name of the directory to display
Description:
Lists the contents of the specified directory. If no directory name is specified, WATCHPOINT lists
the contents of the current working directory.
ARM Cortex Series User's Manual
36 of 81
6.16
DUMP
Display memory range data content
ARM Cortex Series User's Manual
37 of 81
<Display Format><Data size>:
Select display format and data size as follows
Specify Byte
BYTE
WORD
Specify Word
LWORD
Specify Long-word
4BYTE
Specify 4 Byte real number
8BYTE
Specify 8 Byte real number
10BYTE
Specify 10 Byte real number
12BYTE
Specify 12 Byte real number
<Access size>: Specify data access size for memory dump
Memory dump in bytes
BYTE
WORD
Memory dump in word size
LWORD
Memory dump in long-word size
QWORD
Memory dump in quad word size
Description: Display data in a specified memory range with a specific format.
This command is same as:
Memory dump window >> View memory
ARM Cortex Series User's Manual
38 of 81
6.17
ENV
Emulator environment options
ARM Cortex Series User's Manual
39 of 81
<VERIFY>: Enable/disable verification of emulator memory writes:
Verify emulator memory writes by reading back data
ENABLE
DISABLE
Do not read back data to verify emulator memory writes
<STEPIN>: Enable/disable interrupt during single stepping
Enable interrupt during single Stepping
ENABLE
DISABLE
Disable interrupt during single Stepping
<STEPWAIT>: Enter WAIT duration for single Step. Enter the value x 10ms for duration.
<ENDIAN>: Specify endian.
Specify big endian
BIG
LITTLE
Specify little endian
<Memory access size>:
Specify the default access size for ICE system memory access
BYTE
Byte size memory access
WORD
Word size memory access
LWORD
Long word memory access
<BP type>: Specify Breakpoint type
Select hardware breakpoints
HARD
SOFT
<THUMB mode>:
ARM
THUMB
AUTO
Select software breakpoints
Specify the trace history analysis mode in the Disassembly window.
ARM mode
THUMB mode
Select ARM or THUMB mode automatically according to the CPSR
register.
<ABORT check>: Enable/disable ABORT check function.
Disable ABORT check during memory access
OFF
ON
Enable ABORT check during memory access
<THUMB mode break>: Enable/disable THUMB mode to break
Disable break at 4n + 2 address during THUMB mode
OFF
ON
Enable break at 4n + 2 address during THUMB mode
ARM Cortex Series User's Manual
40 of 81
<JTAGCLOCK>: Specify the JTAG clock frequency for emulation CPU
1.375MHz
JTAGC0
JTAGC1
2.5MHz
JTAGC2
3.75MHz
JTAGC3
5MHz
JTAGC4
7.5MHz
JTAGC5
10MHz
JTAGC6
15MHz
JTAGC7
20MHz
Description:
These commands configure the ICE environment.
This command is same as:
Resource >> ICE Environment
6.18
ERROR ECHO
Error message display settings
Syntax: ERROR ECHO [ON/OFF]
<ERROR ECHO>:
ON
Display error message in [Command window].
Display error message in [Message box].
OFF
Description:
Specify the error message display method.
ARM Cortex Series User's Manual
41 of 81
6.19 EXTCMD
application
Execute WATCHPOINT commands from an external
EXTCMD>:
Enable/disable display of command window:
Display command window
ON
OFF
Do not display command window
<MEMSIZE> (Memory size):
Specify common memory storage size for result data from an external command.
Default memory size is 0x4100.
Description
Executes WATCHPOINT commands from external application. During the command
execution period, operation from WATCHPOINT is unavailable. EXTCMD works with the
optional WPWXPCommand.dll..
ARM Cortex Series User's Manual
42 of 81
6.20
FILL
Fill a memory range
Syntax: FILL [address range]
DATA <fill data> [BYTE/WORD/LWORD ASIZE <access size [BYTE/WORD/LWORD]
ARM Cortex Series User's Manual
43 of 81
<address range>:
start address
Specify starting address for memory fill range
length
Specify number of Bytes from the starting address
end address
Specify ending address of memory range
<fill data>:
Specify data value for memory fill
BYTE
Memory fill byte data operand
WORD
Memory fill word data operand
LWORD
Memory fill long-word data operand
<access size>:Specify data access size for memory fill
BYTE
Memory fill byte data access
WORD
Memory fill word data access
LWORD
Memory fill long-word data access
Description:
Specify the memory fill address range and data
This command is same as:
Resource >> Memory/Port >> Fill
6.21
FMCLEAR
Clear Flash Memory
Syntax: FMCLEAR [ALL/BLOCK] <address>
<mode>:
ALL
Specify clear range.
Clear all device sectors including address.
BLOCK
Clear block including address.
<start address>:
Description:
Specifies start clear address.
Clears the Flash Memory contents.
ARM Cortex Series User's Manual
44 of 81
6.22
FMLOAD
Change enable/disable flash memory download
Syntax: FMLOAD [ENABLE | DISABLE]
<Status>: Specify disable/enable Flash memory Download
DISABLE
Disable Flash memory Download
ENABLE
Enable Flash memory Download
Description: Change Enable/Disable Flash memory Download.
This command is the same as [Disable flash memory, & Not download to flash memory.] in the
[Resource] -> [Flash Memory] -> [Setup…] menu.
6.23
GO
Start real-time program execution
Syntax: GO [PC/FROM < address >]
PC
Starts real time execution from the current program counter
Starts real time execution from the specified address
FROM <address>
Description: Starts real time execution from the PC or from a specific address.
Note: Not all emulator functions are available while the GO command is active.
ARM Cortex Series User's Manual
45 of 81
6.24
HIST
Display Trace History
Syntax: HIST <start cycle> [LENGTH <length> /TO <end cycle>
FORMAT [MNEMON/BINARY] SIGNAL [ENABLE/DISABLE]
<cycle range>:
start cycle
Specify the starting Trace cycle number to display
length
Specify number of Trace cycles to display
end cycle
Specify the last Trace cycle number to display
<format>: Specify data format in the Trace memory dump
MNEMONIC
Display command fetch cycles in disassemble code
BINARY
Display all bus cycles in binary
DATA
Display all bus cycles in dump form
Description:
Display real-time trace history data. You can use the logging command to store the HIST
command results to a file for printing or for future reference.
This command is same as:
View >> Binary History window or View >> Mnemonic History window
ARM Cortex Series User's Manual
46 of 81
Inf1, Inf2, Inf3:
Depending on a data format specified in the Trace memory dump, the CPU pin status can
be displayed in the Inf1, Inf2 and Inf3 tables as follows:
[Inf1]
BIT0
CS0#
BIT14
WE6#/CAS6#/DQM6
BIT1
CS1#
BIT15
WE7#/CAS7#/DQM7/REG#
BIT2
CS2#
BIT16
RD/WR#
BIT3
CS3#
BIT17
BS#
BIT4
CS4#
BIT18
RD#/CASS#/FRAME#
BIT5
CS5#
BIT19
RAS#
BIT6
CS6#
BIT20
RDY#
BIT7
Not used
BIT21
CKE
BIT8
WE0#/CAS0#/DQM0
BIT22
DACK0
BIT9
WE1#/CAS1#/DQM1
BIT23
DACK1
BIT10
WE2#/CAS2#/DQM2/ICI0RD#
BIT24
Not used
BIT11
WE3#/CAS3#/DQM3/ICI0WR#
BIT12
WE4#/CAS4#/DQM4
BIT13
WE5#/CAS5#/DQM5
:
Not used
BIT31
[Inf1] [Inf2]:
BIT0
Not used
Not used
BIT19
IRL2
:
Not used
BIT20
IRL3
BIT7
Not used
BIT21
RESET#
BIT8
P0DEXI0
BIT22
BREW#/BSACK#
BIT9
P0DEXI1
BIT23
BACK#/BSREQ#
BIT10
P0DEXI2
BIT24
DREQ0#
BIT11
P0DEXI3
BIT25
DREQ1#
BIT12
Not used
BIT26
DRAK0
BIT13
Not used
BIT27
STATUS0
BIT14
Not used
BIT28
STATUS1
BIT15
Not used
BIT29
Not used
BIT16
NMI
BIT30
SCK2/MRESET#
BIT17
IRL0
BIT31
TRST#
BIT18
IRL1
ARM Cortex Series User's Manual
47 of 81
[Inf3]
BIT0
RX0#
BIT14
Not used
BIT1
CTS2#
BIT15
Not used
BIT2
Not used
BIT16
Not used
BIT3
MD0/SCK#
BIT17
WPERR#
BIT4
MD2/RXD#
BIT18
Not used
BIT5
MD1/TXD#
BIT19
Not used
BIT6
MD3/CE2A#
BIT20
Not used
BIT7
MD4/CE2B#
BIT21
EXI1CMP
BIT8
MD5/RAS2#
BIT22
EXI2
BIT9
MD6/I0IS16#
BIT23
Not used
BIT10
MD7/TXD
BIT24
Not used
BIT11
MD8/RTS2
6.25
INIT
:
Not used
Initialize the emulator environment
Syntax: INIT
Description: Initialize the emulator hardware.
This command initializes the emulator environment, breakpoint setup, and emulation
memory map.
ARM Cortex Series User's Manual
48 of 81
6.26
LOAD
Load object and symbol files for debugging
Syntax: LOAD [OBJSYM <file name> [ENABLE | DISABLE] <source file path>|
OBJECT <file name> <format> [ENABLE | DISABLE] <source file path>|
SYMBOL <file name> <format> [ENABLE | DISABLE] <source file path>|
SYMBOL RELOAD < load #> | DELETE <load #>]
<LOAD>:
OBJSYM
OBJECT
Specify object symbol file for downloading.
<Supported format>
[AUTO|SYSROF|COFF|ELF|IEEE695|SAUF|CODEVIEW]
Specify object file for downloading.
<Supported format>
[AUTO|SYSROF|COFF|ELF|IEEE695|SAUF|CODEVIEW|IHEX|MHEX|SHF|BINARY]
SYMBOL
Specify SYMBOL file for downloading.>
<Supported format>
[AUTO|SYSROF|COFF|ELF|IEEE695|SYMTEXT|SYMTEXT2]
RELOAD
Specify the load number of the file to be reloaded.
DELETE
Specify the load number of the file to be deleted.
ARM Cortex Series User's Manual
49 of 81
<Format>:
AUTO
Automatically recognize file format
ELF
Specify ELF format (for Green Hills toolset)
IHEX
Specify Intel Hex format
MHEX
Specify Motorola Hex format
SHF
Specify original high speed download format
BINARY <Start address>
Download Binary data from the specific address
SYMTEXT
Specify Text Symbol file format 1
SYMTEXT2
Specify Text Symbol file format 2
<<Source file path>:
ENABLE
Enable alternate search path for source file
DISABLE
Do not use alternate path for source files
Description: Downloads object and symbol files or deletes them. WATCHPOINT can
Auto-detect most common file formats, so AUTO is the normal setting. A key exception is
that AUTO will not detect BINARY file types, and the user must specify them.
6.27
LOG
Start/stop logging Command Window output
Syntax: LOG [ON <file name>| ADD <file name>| OFF]
<Mode>:
ON
Specify the Record
ADD
Mode
OFF
Start a new log file over-write an existing log file.
Add commands to an existing log file.
Stop recording commands to a log file.
<file name>:Specify log filename to store command output
Description:
Saves the output from the Command window to a file. This command can be used to store reverseassembled program from target memory, trace history, memory dump, etc.
ARM Cortex Series User's Manual
50 of 81
6.28
MESSAGEBOX
Enable target power On/Off a user message box
<MESSAGEBOX>:
<mode>: Target power On/Off message
<setting>:
ON
Display the message in [Command window].
OFF
Display the message in [Message box].
Description: Specify the target power On/Off message display.
6.29
MKDIR
<Directory name>:
Create a Directory
The name of the directory to create
Description:
Creates a new directory. You can also use the CD command to change working directories to a new
directory.
ARM Cortex Series User's Manual
51 of 81
6.30
file
NEWBATCH
Start/stop recording user commands to a macro batch
Syntax: NEWBATCH [ON <file name>| ADD <file name>| OFF]
<Mode>:
ON
Start a new batch file over-write an existing batch file.
Specify the Record Mode ADD
Add commands to an existing batch file.
OFF
Stop recording commands to a batch file.
<file name>:Specify the name of the batch file
Description:
Saves commands entered on the command line to a file. The commands are not executed as they are
being recorded. Use the BATCH command to play back the recorded commands.
Use ON when creating a new batch file. If using an existing file name, the new data will over-write
the old file.
Use ADD to append new commands to the end of an existing batch file.
Use OFF to stop recording commands and return to normal command mode.
ARM Cortex Series User's Manual
52 of 81
6.31
OPTION
Command window options
Syntax: OPTION MORE <More Mode
<MORE MODE>:
ENABLE
Specifies More mode for Command execution
Displays one window full of command data at a time if
there is more data than can be shown within the window.
DISABLE Scroll when there is more than one screen display
Description:
Currently, MORE is the only option supported. If MORE is enabled, it will temporarily stop
scrolling if there is more than one screen of data from a single command. When active you can view
the data one screen at a time.
(MORE), view the remainder all at once
(CONTINUE), or cancel without viewing the rest of the data
(CANCEL). If MORE is DISABLED, it will scroll continuously until the command output is
completed. You can also CANCEL the screen output before it is completed.
ARM Cortex Series User's Manual
53 of 81
6.32
PASS
Step Over
Syntax: PASS [PC | FROM < address >] [ASM | SRC] COUNT <number of steps>
<Address>:
PC
Start Step execution from the current Program counter
FROM<Start address> Start Step execution from the specified address
<Mode>:
ASM
Step execution at the assembly level
SRC
Step execution at the source level
<Number of steps>:
Specify number steps to execute. If * is input single steps will execute until a breakpoint is met, or
user keyboard ESC command is input
Description:
Single Step from the Program Counter or from a specific address, stepping over all subroutines and
function calls. A called function or subroutine is executed in real-time. If a breakpoint is set in the
called function or subroutine, the program will stop at that breakpoint.
This command is the same as the [GO] - [Step Over] menu item
ARM Cortex Series User's Manual
54 of 81
6.33
PLDLOAD
<FILENAME>:
Description:
Load PLD initialization files
Specify PLD initialization data file.
Write initialization data file into PLD.
This command is same as:
Resource >> PLDLOAD
6.34
QUERY
Display current environment setting
Syntax: QUERY [ALLOC | BP | BPOPT | ENV | LOAD | OPTION | SWITCH]
ARM Cortex Series User's Manual
55 of 81
<Mode>:
BP
Display list of current breakpoints
LOAD
Display currently loaded modules
OPTION
Display current Command window options
Description: The QUERY command displays current settings for the following commands:
o ALLOC or [Resource] - [Memory Mapping]
o BP or [Go] [Breakpoint]
o BPOPT or [Resource] - [ICE Environment] - [Break]
o ENV or [Resource] - [ICE Environment]
o LOAD or [Resource] - [Download]
o SWITCH or [Resource] - [ICE Environment]
o OPTION command.
6.36
RASM
Reverse assembly
Syntax: RASM < address range > [ENABLE | DISABLE]
<address range><start address>: [LENGTH <length> | TO <end address>]
<start address>:
Specify start address for memory range
<length>:
Specify number of Bytes from the start address
<end address>:
Specify end address of memory range
ARM Cortex Series User's Manual
56 of 81
<Op-Code>:
ENABLE
Display Op-Code hex data with mnemonics
DISABLE
Do not display Op-Code
Description:
Displays disassembled code from the specified memory range. This command output is similar to
the Disassembly window. It can be used with logging turned on to reverse-assemble a program from
memory and save it to disk.
6.37
REG
Viewing CPU register value
Syntax: REG
Description: View current CPU register contents. To modify a register value, use the ASSIGN, or
(.), command.
6.38
RESET
Description:
Reset the CPU
Reset the CPU.
This command is same as:
Go >> Reset
ARM Cortex Series User's Manual
57 of 81
6.39
SAVEWIN
Save command window contents to file
Syntax: SAVEWIN [NEW/ADD]
mode>:
NEW
Create a new file.
ADD
Save the currently exiting file.
<file name>: Saved file name
Description: Save the currently opened Command window history to a file. Differs from
the LOG command, The SAVEWIN command saves all of the executed expression
contents in command window.
ARM Cortex Series User's Manual
58 of 81
6.40
SEARCH
Memory search
Syntax: SEARCH [address range] DATA <searchdata> [BYTE/WORD/LWORD] MODE
[MATCH/NOTMATCH] ASIZE <access size>
ARM Cortex Series User's Manual
59 of 81
<address range>:
start address
Specify start address of the memory search
length
Specify number of bytes from the start address
end address
Specify end address of the memory search
<search data>:
Specify data being searched for. Use quotation marks (" ") or (' ')to search for a specific
string. You cannot use a space or tab characters in search strings.
Use ASCII HEX code \x20 for space and HEX \x9 for TAB.
<display size>: Specify the memory search data size
BYTE
Byte data memory search
WORD
Word data memory search
LWORD data memory search
LWORD
When data search of a character string is specified you should match the memory search
to the size of the character string.
<search condition (MODE)>: Specify data operand for memory search
Search for a match between the search data and memory
MATCH
NOMATCH
Search for a mismatch between the search data and memory content.
Only a single character can be specified. A character string cannot be
specified for NOMATCH. If you use a character string, only the first
character of the string will be used.
<access size (ASIZE)>: Specify data access size for memory search
BYTE
Byte length memory search in byte data access
WORD
Word length memory search
LWORD
Long word memory search
QWORD
Quad word memory search
Description:
Specify a memory range for specific data match or mismatch.
This command is same as:
Resource >> Memory/Port >> Search
ARM Cortex Series User's Manual
60 of 81
6.41
SHELLEXE
Execute a shell script
Syntax: SHELLEXE <FILE name> Execute a shell program
<SHELLEXE>: Specify the PC path and file name.
Description: Execute the specified shell program.
6.42
STEP
Step in
Syntax: STEP [PC | FROM < address >] [ASM | SRC] COUNT <Number of steps
<Mode>:Specify start address for single step execution
PC
Start Step from the current Program counter
FROM<Start address>
Start Step from the specified address
<Setting>:
ASM
Assembly code step
SRC
Source code step
<Number of steps>: Specify number of steps to execute. If 0(ZERO) is input then STEP command
will execute until it reaches a breakpoint, or the user inputs a keyboard ESC command.
Description: Single Step from the program counter or from a specific address, stepping into all
subroutines and function calls.
This command is the same as [GO] - [Step In]
ARM Cortex Series User's Manual
61 of 81
6.43
UPDATEALLWIN
Update All WATCHPOINT Display Windows
<UPDATEALLWIN>:
ON
Update all of WATCHPOINT windows.
OFF
Don't update all WATCHPOINT windows.
Description: Enable/disable WATCHPOINT window update at the program counter
location indicated by yellow highlighted text.
This command is same as :
Resource >> UPDATEALLWIN
ARM Cortex Series User's Manual
62 of 81
6.44
UPLOAD
Save object data to a file
Syntax: UPLOAD <file name> [address range] <output format> PC [ENABLE/DISABLE <address value>
<fill name>: Specify the upload file name
<address range>:
start address
Specify the memory range start address
length
Specify the number of bytes from the start address
end address
Specify the memory range end address
<output format>:
Specify the saved file data format
IHEX64K
Output Intel Hexadecimal 64K file format
IHEX1M
Output Intel Hexadecimal 1M file format
IHEX4G
Output Intel Hexadecimal 4G file format
MHEX64K
Output Motorola Hexadecimal 64K file format
MHEX1M
Output Motorola Hexadecimal 1M file format
MHEX4G
Output Motorola Hexadecimal 4G file format
BINARY
Output binary file format
ARM Cortex Series User's Manual
63 of 81
<PC> <start address>:
Specify if the PC (program counter) address should be included in the saved file
ENABLE
Specify PC (program counter) address is in the output file
DISABLE
Specify PC (program counter) address is NOT in the output file
<PC> <address value>:
Specify PC (program counter) starting address included in the HEX file.
start address
Invalid if the output is a binary file format
value
Description:
Specify PC (program counter) address value included in the binary file
format. Invalid if the output is a HEX file format
Specify address range and data value of the memory to be uploaded.
This command is same as:
Resource >> Upload
Example 1:
UPLOAD c:/wp/updata1.hex 0x1200 LENGTH 0x100 MHEX64K ENABLE_PC 0x5678
File name: updata1
Starting address: 0x1200
Length: 0x100 (bytes) (end address 0x12FF)
Output format: MHEX64K (Motorola HEX 64 Kbyte length)
PC address: Enable, value 0x5678
Example 2:
UPLOAD c:/wp/updata2.hex 0x40000200 TO 0x400045FF IHEX4G DISABLE_PC
File name: updata2
Starting address: 0x40000200
End address: 0x400045FF
Output format: IHEX4G (Intel HEX 4 Gbyte length)
PC address: Disable, no address value
Refer to the [CD (Change Directory)] command for details for setting the location to save
the upload file.
ARM Cortex Series User's Manual
64 of 81
7 Batch Macro Command Processing
Batch macro processing is used to automatically perform repetitive tasks. WATCHPOINT batch
processing supports program loops and conditional branches. Expressions can contain
WATCHPOINT work variables, system variables, and references to memory, register contents and
symbols values. Each batch line requires a carriage return at the end of line. Command execution
does not wait for the result of the current command and will continue to execute the next command.
(If "pass" stepping over a module at full peed is used, there is the possibility that it will be
interrupted by as subroutine.)
Following is an example that shows how to cause the current command to finish prior to the
next command.
Example Finish command prior to the next command
If the CPU has topped, then batch execution drops out of the loop and executes the print
BREAKNUM line.
If the CPU is running, the batch execution will execute the next command after 10 attempts. You
can replace the print BREAKNUM command with any other command that you want to execute.
FOR $A=0 TO $A<10 TEP 1
IF CPUSTATUS==0
print BREAKNUM
FBREAK
ENDIF
wait 1
NEXT $A
You can create a batch macro program and execute it from within the Command Window using the
BATCH command. The easiest way to create a new macro is by using the NEWBATCH command
within the Command window to record the commands as they are used by the operator.
They are entered on the command line and can refined later with a text editor. You can save the
batch macro program to a file and reload it again from the Command window. Unlimited nesting of
is allowed within Windows .
ARM Cortex Series User's Manual
65 of 81
7.1
Work Variable
Batch macro work variables are used for temporary storage and for passing parameters when the
batch file is executed. You can create a global work variable that is available to all batch macro
programs from an expression that contains local work variables. Memory data, I/O data, a CPU
register value, or a string character to a Work variable may be assigned. You can use a Work
variable in a math expression to perform conditional processing, as shown in the example below.
Number expressions are evaluated first, and then string characters.
Work Variable Type
Batch
Global variable
Designator
$0 All string characters from the command line
$1 ~ $9 Batch variables range from 1 ~ 9
$A ~ $Z
Example
.$a=0x10
.$B=[0x4000].W
Assign value 0x10 to Local variable $a
Assign Word data at address 0x4000 to Global
variable $B
True, when Local variable $a equals 0x1234
If ($a==0x1234)
7.2 System Variable
WATCHPOINT system variables can be used in to perform an action based on system status. For
example: do nothing while the user program is running and perform some action when it stops at a
breakpoint. WATCHPOINT system variables are defined in the following table. The system variable
names must be entered in UPPER CASE characters.
System Variable
Description
CPUSTATUS
0
1
CPUCODE
Not public
SYSTEMBOARD
ICE Unit installed status. In bit field; 0 = not installed, 1 =
installed.
bit 0 : Emulation Memory Unit
bit 1 : Trace Unit
bit 2 : CPA Unit
SRAMMEM
SRAM memory size (byte)
DRAMMEM
DRAM memory size (byte)
CPUMEMSIZE
CPU memory range (Kbytes)
CPUIOSIZE
CPU I/O range (Kbytes)
TRACESTATUS
0 : Trace off
1 : Trace executing
2 : Trace end
ARM Cortex Series User's Manual
during Break
during user program execution
66 of 81
Example:
if (CPUSTATUS==1)//True during CPU execution
7.3
Label
The batch macro program can use label to branch to a different part of the program. Label starts with
a colon (:). You cannot write a command on a Label line.
Example:
: CSOME_HERE
7.4
Comment
Comment lines must start with double forward slash (//) followed by the comment statement.
Comment Lines do not affect program execution.
Example:
// This is Comment Line if ($a==0x1234) //if $a equal to 0x1234
You can not write a comment on the same line when using the following commands.
batch
bp
bpl
check
copy
dump
exit
fill
mkdir
newbatch
option
overlay
print
search
upload
Example: The following example causes an error to occur.
batch test.bat // comment
ARM Cortex Series User's Manual
67 of 81
7.5
View Memory, I/O Data
You can print memory data and I/O data or assign memory and I/O data to work variables. Enclose
the memory address in brackets, [ address ].
To specify the memory data, use ASSIGN command or dot (.) to specify the data and length as
follows:
Expression
Description
[Address].B
Get Byte data at the specified address
[Address].W
Get Word data at the specified address
[Address].L
Get Longword data at the specified address
Example:
.$A=[0x4000].L
Assign 4 bytes at address 0x4000 to Work variable $A
If ([0x4000].W==0x1234)
True when data at address 0x4000 equals 0x1234.
.[0x4000].W
Word data value at address 0x4000.
7.6
Modify Memory, I/O Data
Use the ASSIGN, or dot (.), command to modify memory and I/O data, as follows:
Expression
Description
[Address].B=<byte data>
Write Byte data to the specified address
[Address].W=<word data>
Write Word data to the specified address
[Address].L=<longword data>
Write Longword data to the specified address
Example:
.$A=[0x4000].B=0x10.
.[0x4000].W=0x1234
ARM Cortex Series User's Manual
Write 0x10 byte data to address 0x4000 and to Global Work
variable $A
Write 0x1234 word data to address 0x4000
68 of 81
7.7
View Register Value
You can display register values and assign register values to work variables by using the name of the
register in an expression as follows:
Expression
Description
.RegisterName
The specified register's current value
Example:
.[0x4000].B=RegX
Write byte data in Reg X to address 0x4000
.[0x4000].W=RegY
Write word data in Reg Y to address 0x4000
$A=RegZ
Assign the value in the Reg Z register to Work variable $A
If (RegX==0x1234)
True when Reg X value equals 0x1234
7.8
Modify Register Value
Use the ASSIGN, or dot (.), command to modify register, as follows:
Expression
Description
.RegisterName=<value>
Write a value to the specified register
Example:
.RegX=0x10
Assign 0x10 byte value to Reg X
.RegY=0x1234
Assign 0x1234 value to Reg Y
7.9
FOR, FBREAK, NEXT
Repeat processing
Syntax: FOR <Work variable>=<Initial value> TO <Condition> [STEP <Step value>]
<Command>....
[FBREAK]
<Command>....
NEXT <Work variable>
The <work variables> is used as a counter and is initialized by <initial
value>. It is incremented by the value specified by <step value>. You can
<Work variable>:
specify the work variable from $ A ~ $ Z, and $ a ~ $ z. The <work variable>
of the NEXT command must be as the same as the one specified in the FOR
command.
<Initial value>:
The <Initial value> is a signed number specified for the work variable.
<Condition>:
The <Condition> is used to control the flow of the repeat processing with a
terminating value.
<Step value>:
The <Step value> is a signed number added to the work variable after each
completed loop is processed. The default number is 1. The step value can be
a negative number.
Description:
ARM Cortex Series User's Manual
69 of 81
The FOR command repeats a series of commands between FOR and NEXT until the value of a
counter (work variable ) is satisfied
The FBREAK within the FOR - NEXT loop is used for exiting the FOR - NEXT loop.
Example:
FOR $A=0 TO $A<100 TEP 10
IF $A==50
FBREAK
ENDIF
DUMP 0 LENGTH $A
NEXT $A
7.10 WHILE, WBREAK, WEND
Syntax:
WHILE<Condition>
<Command>....
[WBREAK]
<Command>....
WEND
Repeats batch processing
Description:
The WHILE command repeats the series of commands between WHILE and WEND while the
specified <Condition> is true (not 0). The loop ends when the <Condition> is false (equals 0). The
<Condition> is used to control the processing flow.
The WBREAK within the WHILE - WEND loop is used for exiting the WHILE - WEND loop.
WHILE - WEND loops may be nested, but each WHILE - WEND loop must be contained
completely within another WHILE - WEND loop
Example:
. $A=0
WHILE $A<100
IF $A==50
WBREAK
ENDIF
DUMP 0 LENGTH $A
. $A+=10
WEND
Notes:
WHILE, WEND, WBREAK must be on separate lines.
WHILE and WEND must be paired.
ARM Cortex Series User's Manual
70 of 81
7.11 GOTO Unconditional branch
Syntax: GOTO<Label>
<Label>:
Specify <Label> for branch in the Batch
Description:
The GOTO command changes the batch processing flow where the <Label> is specified. It transfers
control to the line defined by <label>. Batch processing terminates if <label> is not defined. <label>
Lines must start with colon (:).
Example:
:LOOP
:
:
GOTO LOOP
7.12 IF, ELSEIF, ELSE, ENDIF Conditional Process Control
Syntax:
IF <Condition>
<Command>....
[ELSEIF <Condition>]
<Command>....
[ELSE]
<Command>....
ENDIF
<Condition>:
Used to control the macro batch process flow.
Description:
If the result of evaluating <Condition1>,<Condition2>, etc is true (not 0), the batch program is
executed up to the next ELSEIF or the next ELSE, whichever comes first. If ELSE (and ELSEIF) are
omitted, the lines up to ENDIF are executed.
If the result of the evaluating <Condition> is false (0), the lines after ELSE and up to END IF are
executed. If ELSE is omitted, control is transferred to the line following ENDIF
ARM Cortex Series User's Manual
71 of 81
Example:
IF $A>$B
DUMP 0 LENGTH $A
ELSEIF $A==$B
DUMP 0x10 LENGTH $A
ELSEIF $A<$B
DUMP 0x20 LENGTH $B
ELSE
DUMP 0x30 LENGTH $B
ENDIF
Notes:
IF, ELSE ELSEIF and ENDIF must be specified on separate lines.
IF and ENDIF must be paired.
IF and ENDIF may be nested, but each IF and ENDIF must be contained completely within another
IF and ENDIF.
7.13 END Terminate Batch processing
Syntax: END
Description:
The END command terminates the entire batch operation of the current nested
and any calling .
The batch operation is ended unconditionally when this command line is encountered. If the
was
called from another , control does not return to the calling .
Example:
IF $A>$B
END
ENDIF
7.14 QUIT End the current macro
Syntax:
QUIT
Description:
When QUIT is executed, one nested is canceled and control returns to the calling .
If the batch file was not called from another , QUIT terminates batch processing like the END
command.
Example:
IF $A>$B
QUIT
ENDIF
ARM Cortex Series User's Manual
72 of 81
7.15
Syntax:
ECHO
Batch commands display on/off
ECHO (ON/OFF)
Description:
By default, the command lines in the batch file are not displayed as they are executed. ECHO ON
command is used to display the command lines as they executed. Batch commands are not displayed
when ECHO OFF is elected.
Example:
IF $A>$B
ECHO ON
ELSE
ECHO OFF
ENDIF
7.16
KEYIN (Keyboard input)
Syntax:
KEYIN [<comment> [<Work variable>]]
A character string enclosed in double-quotes is displayed on the status bar
<comment>:
of the Command window.
<work variable>:
Specify the <work variable> to store the keyboard input value.
Description:
This command displays the specified <comment> and waits for keyboard input. The entered string
must be a numeric expression. The expression is analyzed and the result is stored in <Work
variable>. If an assignment is entered, the assignment is performed and the value is stored in the
<Work variable>.
If <comment> and <Work variable> are not specified, WATCHPOINT imply analyzes the input
value and displays the results.
The Enter key is used to specify the end of the input character string.
Example:
KEYIN "$A="
ARM Cortex Series User's Manual
73 of 81
7.17
PRINT (Screen display)
Syntax:
PRINT{[<comment>][<number expression>][<format>]}+
<comment>:
The specified <comment> is displayed in the Command window
<numeric expression>:
Specify the <work variables> to the keyboard input value
<format>:
Specify the format for <numeric expression>
<Format>:
Format
Description
None
Default format. Displays hexadecimal and (assigned decimal) number
.#B
Displays 2Bytes binary number
.#LB
Displays 4Bytes binary number
.#D
Displays 2Bytes signed decimal number
.#LD
Displays 4Bytes signed decimal number
.#U
Displays 2Bytes unassigned decimal number
.#LU
Displays 4Bytes unassigned decimal number
.#H
Displays 2Bytes hexadecimal number
.#LH
Displays 4Bytes hexadecimal number
Description:
This command evaluates the <numeric expression>, and displays the result in the specified <format>
in the Command window. separates <comment> and <numeric expression> by a pace.
Example:
PRINT"abcdefg"
abcdefg
PRINT"$A=" 1+2+3 "$B=" 1*2*3
$A=0x00000006 (6) $B=0x00000006 (6)
.$A=0xffffffff
PRINT"$A=" $A
$A=0xffffffff (-1)
PRINT"$A=" $A.#B
$A=1111 1111 1111 1111
PRINT"$A=" $A.#LB
$A=1111 1111 1111 1111 1111 1111 1111 1111
ARM Cortex Series User's Manual
74 of 81
7.18
BEEP (PC Audible alert)
Syntax: BEEP
Description:
When the BEEP command is executed, a beep sound is output to the PC speaker.
Example:
IF $A>$B
BEEP
ENDIF
7.19
WAIT
Delay batch macro process
Syntax: WAIT <second>
<Second> Specify number of seconds for delay before batch processing is topped
Description:
When the WAIT command is encountered in a , batch processing will top for the specified number
of seconds before continuing with the next command line.
Example:
IF $A>$B
WAIT 10 //wait for 10 seconds
ENDIF
7.20
Work variable
Work Variable Type
Designator
Batch
$0 All string characters from the command line
$1 ~ $9 Batch variables range from 1 ~ 9
Global variable
$A ~ $Z
Local variable
$a ~ $z
Example:
.$a=0x10
.$B=[0x4000].W
If ($a==0x1234)
ARM Cortex Series User's Manual
Assign value 0x10 to Local variable $a
Assign Word data at address 0x4000 to Global
variable $B
True, when Local variable $a equals 0x1234
75 of 81
8 Data Expression Formats
8.1
Memory I/O Port Reference
Use the [address] notation to refer to the data stored at the specific memory address. This notation
can be used in batch macro files as a test for conditional branching or with the ASSIGN or dot "."
command in the command line interface to view or modify memory or I/O ports.
Expression
Meaning
[address expression]. B
Refers to byte data at specified address
[address expression]. W
Refers to word data at specified address
[address expression]. L
Refers to long-word data at specified address
Example:
.[0x4000].B=0x10
Write 0x10 byte data to address 0x4000
.[0x4000].W
View a word data at address 0x4000
Input to internal I/O register area. - Prefix with INR
.[INR:0x0x4000].B=0x10
Write 0x10 byte data to address 0x4000
.[INR:0x4000].W
View a word data at address 0x4000
ARM Cortex Series User's Manual
76 of 81
8.2
WATCHPOINT Data Expressions
Numerical values can be entered in hexadecimal, decimal, or binary using the following prefixes to
indicate the radix:
Expression
Meaning
0x<number>
Hexadecimal number
H'<number>
Hexadecimal number (Only used for in-line assembler in Disassembly window)
@<number>
Binary number
<number>
Decimal number
8.3
Address Expressions
Memory addresses and Internal Peripheral Register addresses are entered as follows:
Address Expression
Meaning
Comment
<Address value>
Logic address
N/A
mmu:<Address value>
Logic address
Not available for memory map
r:<Address value>
Physical address
N/A
INR:<Address value>
Internal I/O register area
N/A
<Global symbol>
Global symbol address
N/A
Some expressions may not be available depending on the device under test configuration
8.4
CPU Register Expressions
Use the following notation when using CPU register values in expressions. Expressions are not case
sensitive:
R0
R1
R2
R3
R4
R5
R6
R7
R8
R9
R10
R11
R12
R13
R14
R15
CPSR
SPSR
-
-
ARM Cortex Series User's Manual
77 of 81
8.5
Address Input Format
WATCHPOINT address input to a dialog box or command line argument may be entered as a
combination of numeric values, address expressions, and register expressions.
8.6
Data Input Format
WATCHPOINT data value input into a dialog box or command line argument may be entered as a
combination of numerical values, register expressions, and math expressions.
8.7
Memory I/O Port References
Use the [address] notation to refer to the data stored at the specific memory address. This notation
can be used in batch files as a test for conditional branching or with the ASSIGN or dot "." command
in the command line interface to view or modify memory, I/O port.
Expression
Meaning
[address expression]. B
Refers to byte data at specified address
[address expression]. W
Refers to word data at specified address
[address expression]. L
Refers to long-word data at specified address
Example:
.[0x4000].B=0x10
Write 0x10 byte data to address 0x4000
.[0x4000].W
View a word data at address 0x4000
Input to internal I/O register area using the INR prefix.
.[INR:0x0x4000].B=0x10
Write 0x10 byte data to address 0x4000
.[INR:0x4000].W
View a word data at address 0x4000
ARM Cortex Series User's Manual
78 of 81
9 Data Expression
9.1
Numeric Value
Numerical values are entered in hexadecimal, decimal, or binary using the following prefixes to
indicate the radix:
Expression
Meaning
0x<number>
Hexadecimal number
H'<number>
Hexadecimal number (only used for in-line assembler in Disassembly window)
@<number>
Binary number
<number>
Decimal number
9.2
Address Expression
Memory addresses and Internal Peripheral Register addresses are entered as follows:
Address Expression
Meaning
Comment
<Address value>
Logic address
N/A
mmu:<Address value>
Logic address
Not available for memory map
r:<Address value>
Physical address
N/A
INR:<Address value>
Internal I/O register area
N/A
<Global symbol>
Global symbol address
N/A
Some expressions may not apply to all Sophia Systems emulator configurations.
9.3 CPU Register Expression
Use the following notation when using CPU register values in expressions. Input notation is not case
sensitive.
R0
R1
R2
R3
R4
R5
R6
R7
R8
R9
R10
R11
R12
R13
R14
R15
CPSR
SPSR
-
ARM Cortex Series User's Manual
79 of 81
9.4
Address Format
When WATCHPOINT requires an address input in a dialog box or command line argument, the
address may be entered as a combination of numerical values, address expressions, and register
expressions.
9.5
Data Format
When WATCHPOINT requires a data value in a dialog box or command line argument, the data can
be entered as a combination of numerical values, register expressions, and math expressions
9.6
Memory I/O Port Reference
Use [address] notation to refer to the data stored at the specific memory address. This notation may
be used in batch files as a test for conditional branching or with the ASSIGN or dot "." command in
the command line interface to view or modify memory and I/O ports.
Expression
Meaning
[address expression]
[address expression]. B
Refers to byte data at specified address
[address expression]. W
Refers to word (2 bytes) data at specified address
[address expression]. L
Refers to long-word (4 bytes) data at specified
address
Examples:
.[0x4000].B=0x10
Write 0x10 byte data to address 0x4000
.[0x4000].W
View a word data at address 0x4000
Input data to internal I/O register area.
.[INR:0x0x4000].B=0x10
Write 0x10 byte data to address 0x4000
.[INR:0x4000].W
View a word data at address 0x4000
ARM Cortex Series User's Manual
80 of 81
Sophia Systems Co., Ltd
World Headquarters
6-2 Minami Kurokawa, Asao-ku, Kawasaki-shi,
Kanagawa, 215-8588 JAPAN
Tel. +81-44-989-7110
FAX +81-44-989-7014
URL http://www.sophia-systems.com
Email [email protected]
ARM Cortex Series User's Manual
81 of 81