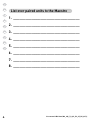
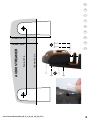
1
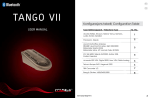
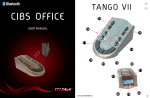
®
CIBS HOME
User manual
MAESTRO
5
4
11
6
7
3
2
8
1
12
9
10
1
AUDIOSTREAMER
14
13
15
17
16
18 19
2
20
21
22
23 24
25
CIBS HOME
3
All units
in this set are
ready-paired for
your convenience!
NO
EN
F
D
NL
ES
SE
DK
SU
English
Congratulations
About CIBS Home
Maestro (neck loop)
Audiostreamer (TV/radio device)
The functions of CIBS Home
Charging the Maestro
Install the Audiostreamer
Connection of audio units to Audiostreamer
Turn On/Off Maestro
Pairing the device
How to...
……adjust the volume (Maestro)
……switch between programmes on the Maestro
……check which programme the Maestro is set to.
……listen to audio equipment (TV/Radio etc.)
……answer a telephone call (Maestro)
……end a telephone call (Maestro)
……make a call (Maestro)
……use voice dialling (Maestro)
……use speed dialling (Maestro)
……using the conversation amplifier on the Maestro
……programme the Maestro
Switch audio sources (Audiostreamer)
Description of light diodes and colours
Factory default settings
Maestro
Audiostreamer
Trouble shooting and FAQ
Storage and maintenance
Certification and safety approvals
Declaration of conformity
4
5
5
6
7
8
8
9
9
10
10
12
12
12
12
12
13
13
13
13
14
14
14
15
15
16
16
17
17
18
C
D
User manual CIBS Home (NO_GB_F_D_NL_ES_SE_DK_SU) 1j
NO
Congratulations
Congratulations with your new CIBS Home. We hope you get a lot of
pleasure from this solution which will give you very good sound from
TV/Radio. Using the Liberto/Allegro (accessory) will also give you better
sound in conversations and at meetings with several participants.
This user manual will ensure you get started, so that you get the most
pleasure from your new solution. Your local dealer offers a range of
accessories which will further enhance the functionality of this product.
Before use, the unit must be fully charged (see page 8 for instructions).
Charge time is approximately 2 hours.
Be aware!
Together with the connected headset/earbuds, the neck loop (Maestro)
can emit sound at a high volume. Exposure to this may cause permanent
hearing damage. Be careful when increasing the volume to avoid such
injuries.
EN
F
D
NL
ES
SE
DK
SU
Be careful when using the device while engaged in activities which
demand your full attention.
Never attempt to dismantle the product yourself. Only approved
distributors or service centres may open the products. Contact your
distributor if any parts of the unit need replacing.
Keep out of reach of children:
The plastic packaging of the product and accessories are not children’s
toys. The packaging or the small parts it contains may cause choking if
swallowed.
Ignition of flammable atmospheres
Do not use the Maestro in environments where there is a danger of
igniting flammable gasses.
About CIBS Home
CIBS Home consists of 2 devices: Maestro (neck loop),
and the Audiostreamer (wireless sound from TV/Radio, etc.).
The Maestro is the primary device in the system. It receives sound from
your Audiostreamer, Liberto/Allegro (accessory) and from your mobile
phone.
User manual CIBS Home (NO_GB_F_D_NL_ES_SE_DK_SU) 1j
5
NO
EN
Maestro (neck loop)
See the illustrations on page 1 for an explanation of the points below
F
•
D
Answer button 1 :
Used to answer incoming calls.
•
Socket for charging and accessories 2 :
The power supply cable (accessory) is connected here, as well as
other accessories with 2.5mm jacks.
•
Programme indicator (lamps) 3 :
Shows which programme the Maestro is on.
See the table on page 15 for an explanation of the light signals.
•
USB socket 4 :
For charging the unit via USB cable connection to a computer.
•
Headset socket 5 :
For connecting the accompanying earbuds with microphone,
standard headsets (accessories) and headsets with microphone
(accessories). Used when you are not using a hearing aid.
•
Microphone
•
Battery indicator lamp 7 :
Shows the battery level of the Maestro.
See the table on page 16 for an explanation of the light signals.
•
Programme selector 8 :
Switches between the different programmes.
•
On/Off button 9 :
Switches device on and off.
•
Volume button 10 :
Push upwards for higher volume and downward for lower volume.
•
Pairing button 11 :
Sets the Maestro to pairing mode. This has to be done the first time
you establish a connection between the devices.
•
Speed-dial button 12 :
Calls a pre-programmed number from a paired mobile phone.
The numbers is easily programmed via a computer with
internet access and standard Bluetooth connection.
NL
ES
SE
DK
SU
6
6
User manual CIBS Home (NO_GB_F_D_NL_ES_SE_DK_SU) 1j
NO
Audiostreamer (TV/radio device)
EN
See the illustrations on page 2 for an explanation of the points below
•
Audio source lamps 13 :
Indicates which audio source that is selected (TV, Radio, etc.).
•
Charge cradle 14 :
For charging the Maestro and wireless microphones (accessories).
•
Alerting lamp 15 :
Indicates that there is an alerting signal from the connected alerting
system (see page 16 for an explanation of the light signals).
•
16 :
F
D
NL
ES
Communication light
Indicates that the unit is transmitting sound signals to the Maestro.
Also indicates if the unit is set to pairing mode
(see page 16 for an explanation of the light signals).
DK
•
Audio source buttons 17 :
Used to select sound source (TV, Radio, etc.).
SU
•
Pairing button 18 :
Sets the Audiostreamer to pairing mode.
•
Factory settings button 19 :
Resets the Audiostreamer to factory settings.
•
Alerting system socket 20 :
Connection for the alerting system.
•
Radio socket 21 :
For the connection of stereo, radio or other sound equipment.
•
TV socket 22 :
For the connection of TV, tuner or other sound equipment.
•
Aux 2 socket 23 :
For the connection of sound equipment with phono jacks.
•
Aux 1 socket 24 :
For the connection of iPod/MP3 players or sound equipment with
3.5mm jacks.
•
Power socket 25 :
For the connection of accompanying power supply.
User manual CIBS Home (NO_GB_F_D_NL_ES_SE_DK_SU) 1j
SE
7
NO
EN
F
D
NL
ES
SE
DK
SU
The functions of CIBS Home
The CIBS Home has three primary functions:
1. Amplifier for TV/Radio, etc. (TV/RADIO):
Sends wireless sound from TV/Radio, etc via the Audiostreamer to
the Maestro. You can choose between 4 different audio sources on the
Audiostreamer. You can also receive an alert from your alerting system
if it has an audio outlet and is connected to the Audiostreamer. The alert
is given highest priority and will overrule all other audio sources and
telephone conversations. To connect audio devices without Bluetooth,
you must use COMMidt’s audio cable (accessory, article no: 908-001) to
receive sound on the Maestro.
NOTE:
You will not receive an alert as long as your Maestro has an active audio
connection to a Liberto or Allegro (wireless microphones).
2. Conversation amplifier
In situations where you feel the sound from the hearing aids/CI is too
low or there is too much noise, you can use the Liberto/Allegro wireless
microphone or cabled microphone (accessory, cabled microphones is
connected to the socket 2 ). The microphone must be placed close to the
sound source to achieve the best sound quality. The Liberto (accessory)
can also be used as a directional microphone. Just point it at what you
want to hear.
3. Telephone amplifier
Communicates with mobile/wireless/telephones with Bluetooth.
For telephones without Bluetooth, use the Tango VII (accessory) for
wireless communication between telephones and Maestro.
Charging the Maestro
Make sure the Maestro is fully charged before using it.
You can charge the Maestro in the following ways:
• Through the Audiostreamer
• Directly from a computer by USB cable
• Through the Twin Charger Cradle (accessory)
• Through the cable from the power supply (accessory).
• With the Car Charger (accessory)
During charging, the Battery indicator lamp 7 will flash red.
When the Maestro is fully charged the Battery indicator lamp 7
will illuminate solid blue.
When the battery is low the Battery indicator lamp 7 will flash red and
you will hear a signal from the Maestro.
8
User manual CIBS Home (NO_GB_F_D_NL_ES_SE_DK_SU) 1j
NO
To recharge Maestro (without clip) in the Audiostreamer you have to
push Maestro down and to the right side in the charging cradle.
Push the Maestro down and in toward the centre of the charging cradle
to remove the device.
EN
To recharge Maestro with the clip you have to you twist the
clip upwards (with the opening towards the T- Loop.
Push the Maestro down in the charging cradle until you hear a click.
Push the Maestro down and then push the clip towards the Maestro to
remove the unit from the Audiostreamer.
D
NOTE: The lifetime of the battery will be significantly reduced if
the device is left uncharged for long periods. We advise you to charge the
device at least once a month.
When the operation time of the battery begins to decrease and you wish
to replace it, please send it to your local dealer.
The article number of the battery is: 956-001
F
NL
ES
SE
DK
SU
Install the Audiostreamer
Connect the accompanying power supply to the power socket 25 .
The Audiostreamer will switch itself on automatically. You can see this by
the audio source lamp 13 illuminate solid green. The Audiostreamer has
no on/off button. It will automatically go into standby mode when it is not
in use.
A removable device is included that allows you to charge Maestro
both with and without clips in the charging cradle. If you wish to charge
Maestro without clips this must be placed down in the charging station,
as shown in the picture together with the assembly instructions on page
B.
If you would like to place the Audiostreamer on the wall, you can use the
accompanying brackets. Assembly instructions on page B.
Connection of audio units to Audiostreamer
The Audiostreamer has 4 sound sockets:
• AUX 1 socket 24 has a 3.5mm jack. Is best suited to iPod/ MP3
players but you can connect other sound equipment to this socket.
•
AUX 2 socket 23 has 2 phono plugs. You can connect your desired
sound equipment here.
User manual CIBS Home (NO_GB_F_D_NL_ES_SE_DK_SU) 1j
9
NO
EN
•
The TV socket 22 has 2 phono plugs. Is best suited to TV and tuners
but you can connect other equipment to this socket
F
•
The radio socket 21 has 2 phono plugs. Is best suited to radio/
stereos but you can connect other sound equipment to this socket.
D
NL
ES
SE
DK
SU
The Audiostreamer has a socket for the alerting system:
• The alert socket 20 has a 3.5mm jack. To this you can connect all
alerting systems which emit sound. This can be done with a cable
(accessory, art. no.: 935-001, 935-002 or 935-003).
Turn On/Off Maestro
How to switch on the Maestro:
• Press and hold in the On/Off button 9 until you see a blue light on
the Battery indicator lamp 7 . At the same time, you should hear a
sound signal via the neck loop or via the headset connected to the
Maestro.
How to switch off the Maestro:
• Press and hold in the On/Off button 9 until you see a red light on
the Battery indicator lamp 7 . At the same time, you should hear a
sound signal via the neck loop or via the headset connected to the
Maestro.
Pairing the device
The units in CIBS Home must be programmed to be able to communicate
with each other and with other Bluetooth devices, e.g. a mobile phone.
This is done by connecting them wirelessly. (pairing).
NOTE: It is important that the Maestro, Audiostreamer and/or the device
it is to be paired with are within one meter of one another during pairing
and that the Maestro and the unit it is to be paired with are fully charged.
Both the units in CIBS Home (Maestro and Audiostreamer) are
ready-paired. If any difficulties arise, such as the if the pairing
disappears, you can use the instructions in section 2.
10
1. Pairing the Maestro with a mobile phone
1.1 How to set the the Maestro to pairing mode:
• Switch on the Maestro
• Press and hold the pairing button 11 until you see the Battery
indicator lamp 7 flash alternately red and blue. You should
also hear a double tone. The Maestro is now ready to pair for
approximately 3 minutes.
User manual CIBS Home (NO_GB_F_D_NL_ES_SE_DK_SU) 1j
NO
1.2 How to configure the mobile phone so it detects the Maestro:
• Follow the mobile phone’s user manual. Usually this involves
finding the setup, connection or the Bluetooth menu on the
mobile phone and choosing DISCOVER or ADD a Bluetooth
device. See an example of a typical mobile phone below.
Fig.
Fig.
Fig.
Fig.
66666
Fig.
Fig. 6
Connectivity
Push to talk
Infrared
Bluetooth
Modem
Synchronization
Data cable
Select
Back
Fig. 6
Devices found
Maestro
Fig. 6
0000
0000
0000 Fig. 6
0000
0000
0000
Maestro
Passcode:
Cancel
Ok
Devices found
Maestro
Maestro
Paired.
The handsfree
is now ready
for use
****
Select
0000
Cancel
EN
F
D
NL
ES
SE
Ok
DK
1.3 The mobile phone finds Maestro!
• The mobile phone asks if you wish to connect to it. Accept by
pressing Yes or OK on the mobile phone and confirm with the
pin code, which is 0000 (4 zeros).
• The mobile phone will confirm if the pairing has been
successful.
• If the pairing was unsuccessful, repeat steps 1.1 to 1.3.
SU
If you wish to pair the the Maestro with a Bluetooth product without a
display, the product must be set to pairing mode and use password 0000
so that the pairing can be performed.
2. Pair the Maestro with the Audiostreamer
• Switch on the Maestro
• Set the Maestro to pairing mode (see section 1.1)
• Press and hold the pairing button 18 on the Audiostreamer
until the communication lamp 16 flashes alternately
red and blue.
• The Audiostreamer is now ready for pairing.
• When the Maestro and Audiostreamer are paired, they will
establish sound communication with each other.
The communication lamp 16 will light solid on the
Audiostreamer. It will do this every time it has a sound
connection with the Maestro.
• If the pairing is unsuccessful, repeat section 2
The Maestro can be paired to a maximum of 8 devices. If you try to pair
a ninth device, the device that is the longest un-used will be deleted from
the Maestro. Use the list on page A to keep an overview of what is paired
with the Maestro.
User manual CIBS Home (NO_GB_F_D_NL_ES_SE_DK_SU) 1j
11
NO
EN
F
D
NL
ES
SE
DK
SU
How to...
…… adjust the volume (Maestro)
• The volume can be gradually increased (press once for each
volume level) or by pressing the volume button 10 in the desired
direction until the desired volume level has been reached.
• You will hear a signal when the volume has reached the lowest or
highest level.
• The Maestro remembers its last volume position, so that when
switched off and on it will start at the same volume position.
…… switch between programmes on the Maestro
• Press the programme button 8 to switch between programmes.
• Wait a few seconds between programme changes.
• The programmes are changed in this order:
-- TV/Radio
-- Conversation (Conversation amplifier)
-- Telephone
…… check which programme the Maestro is set to.
• Press the volume button 10 on the Maestro upwards once.
• The Maestro will indicate which programme it is on by lighting the
programme indicator 3 for approximately 3 seconds.
…… listen to audio equipment (TV/Radio etc.)
• Audio equipment connected to the Audiostreamer
-- Make sure there is power to the Audiostreamer.
-- Switch on the Maestro
-- Set it to the programme: TV/Radio (see page 12 for instructions).
-- After a few seconds the Maestro will establish contact with the
Audiostreamer. This is indicated by the communication lamp
16 lighting solid blue. It will light like this as long as there is an
audio connection with the Maestro.
-- If the Maestro does not establish contact with the
Audiostreamer, you can establish contact by quickly pressing
the pairing button 18 on the Audiostreamer.
• Audio devices with built in Bluetooth
-- The Maestro must be paired with a mobile phone with
intergrated A2DP profile before you continue
(see page 10 for instructions).
-- Set the Maestro to the TV/Radio programme
(see page 12 for instructions).
• Audio devices without Bluetooth (wireless via Liberto)
-- You must use the Liberto (accessory) together with an audio
cable (article no: 908-001, accessory)
12
User manual CIBS Home (NO_GB_F_D_NL_ES_SE_DK_SU) 1j
NO
-- Connect the smallest plug (2.5mm jack) to
the inlet 27 on Liberto.
-- Connect the largest plug (3.5mm jack) to
the audio device’s headset socket.
-- Switch the Liberto on
-- Set the Maestro to the Conversation programme
(see page 12 for instructions).
• Audio devices without Bluetooth (with cable)
-- Use audio cable (accessory, article no: 908-001).
-- Connect the smallest plug (2.5mm jack) to the socket 2 .
-- Connect the largest plug (3.5mm jack) to the audio device.
-- All Bluetooth microphones (Allegro/Liberto) must be
switched off.
-- Set the Maestro to the Conversation programme
(see page 12 for instructions).
• Close the audio connection between the Audiostreamer and the
Maestro
-- Change programme on the Maestro
(see page 12 for instructions), or switch off the Maestro
(see page 10 for instructions).
EN
F
D
NL
ES
SE
DK
SU
…… answer a telephone call (Maestro)
• Press the answer button 1 to answer a telephone call
…… end a telephone call (Maestro)
• Press the answer button 1 to end a telephone call.
…… make a call (Maestro)
• When you call from your mobile phone, the telephone call
(depending on the setup of the phone) is automatically transferred
to the Maestro. If this function is not available on your telephone,
press the answer button 1 quickly to transfer the telephone call to
the Maestro.
…… use voice dialling (Maestro)
• This function is dependant on the mobile phone supporting this
function. See the mobile phone’s user manual for more
information.
• Press the answer button 1 once.
Speak the pre-recorded voice tag into the microphone 6 .
• You will achieve best results if you record the voice tag signal
via the Maestro.
• See the operating instructions of the phone if you need more
information on this function.
User manual CIBS Home (NO_GB_F_D_NL_ES_SE_DK_SU) 1j
13
NO
EN
F
D
NL
ES
SE
DK
SU
…… use speed dialling (Maestro)
• NOTE: For this function to work, the phone must be within range of
the Maestro.
• The Maestro must be programmed before using this function.
See the section: Programming the Maestro on page 14.
• Press and hold the speed-dial button 12 until you hear a tone.
The phone will then call the pre-programmed number.
• When the phone call is ended, the Maestro will return to the
programme it was on before the phone call was made.
…… using the conversation amplifier on the Maestro
• Listening via wireless microphone (Liberto/Allegro, accessory)
-- The Liberto/Allegro must be switched on.
-- Set the Maestro to the Conversation programme (see page 12
for instructions) or press the talk button on the Liberto/Allegro.
The devices will establish a connection with each other.
-- If the Maestro has an active audio connection with the
Audiostreamer, you will be unable to establish
communication by pressing the talk button on
the Liberto/Allegro. This can be solved by switching
the Maestro to the Conversation programme.
• Listening via the integrated microphone 6
-- All Bluetooth microphones (Allegro/Liberto) must be
switched off.
-- Set the Maestro to the Conversation programme
(see page 12 for instructions).
• Listening via an external cabled microphone
-- Connect the external microphone (accessory) to the socket for
charging and accessories 2
-- All Bluetooth microphones (Allegro/Liberto) must be
switched off.
-- Set the Maestro to the Conversation programme
(see page 12 for instructions).
• Terminate the sound connection between the Maestro and the
Liberto/Allegro The connection can be terminated in the following
ways:
-- Change programme on the Maestro
(see page 12 for instructions).
-- Press the push-to-talk button on the Liberto/Allegro
-- Switch off the Maestro or the Liberto/Allegro
14
…… programme the Maestro
• Go to www.commidt.com to download both the operating
instructions and the programme: CIBS Interface.
User manual CIBS Home (NO_GB_F_D_NL_ES_SE_DK_SU) 1j
NO
• The CIBS Interface programme offers the following options:
-- Set up speed-dial number
-- Turn on and off monitoring voice
(enables you to hear your own voice)
-- Locate the serial number
Useful tips:
Using the accompanying rotating shirt/blouse clip can reduce noise
caused by the device rubbing off clothing. The clip is fastened to the back
of the Maestro.
Switch audio sources (Audiostreamer)
Choose the desired sound source (TV, Radio, etc.) by pressing
the socket buttons 17 on the Audiostreamer. The selected socket will
illuminate soldid green.
EN
F
D
NL
ES
SE
DK
SU
Description of light diodes and colours
Programme indicator (lamps) 3 (Maestro)
What you see
What this implies for the Maestro
Solid green light
Connected device with a Bluetooth A2DP
profile, e.g. Audiostreamer, TV with
Bluetooth, etc.
Flashing green light
Searching for a paired device with a
Bluetooth A2DP profile, e.g. Audiostreamer.
Solid blue light
A connected wireless microphone (Allegro /
Liberto, accessory) or an integrated conversation amplifier is activated
Flashing blue light
Searching for Allegro/Liberto (accessory)
Solid yellow light
Connected device with a Bluetooth
handsfree profile, e.g. mobile phone, Tango
Bluetooth, etc.
Flashing yellow light
Searching for a paired device with a
Bluetooth handsfree profile, e.g. mobile
phone.
User manual CIBS Home (NO_GB_F_D_NL_ES_SE_DK_SU) 1j
15
NO
EN
F
D
NL
ES
SE
DK
Battery indicator lamp
7
(Maestro)
What you see
What this implies for the Maestro
Solid blue light
The battery level is between 100% - 20%
Flashing red light
The battery level is below 20%
Solid blue light
(while charging)
Charging complete
Flashing red light
(while charging)
The Maestro is charging
Alternating blue and
red light
The Maestro is ready for pairing
Communication light
SU
16
(Audiostreamer)
What you see
What this implies for the Audiostreamer
Solid blue light
The Audiostreamer has a sound connection
with the Maestro
Flashing blue light
The Audiostreamer is trying to establish a
connection with the Maestro
Alternating blue and
red light
The Audiostreamer is set to pairing mode
Alert light
15
(Audiostreamer)
What you see
What this implies for the Audiostreamer
Flashing white light
The alerting system has given a signal on
the alert socket
Factory default settings
Maestro
•
•
•
16
This function deletes all pairings with the Maestro.
Any settings made after you received the device will also be deleted.
Press and hold the pairing button. First you will hear a double tone
which indicates the device is set to pairing mode. You must keep the
button pressed until you hear the second double tone.
User manual CIBS Home (NO_GB_F_D_NL_ES_SE_DK_SU) 1j
NO
•
•
The flashing red and blue ligth will still flash
Switch off the Maestro. When you switch the device on again, it will
automatically go into pairing mode (the battery indicator lamp 7
will flash alternately red and blue). This indicates that the device
has been reset to the factory default settings.
Audiostreamer
•
•
•
This function deletes all pairings with the Audiostreamer. Any
settings made after you received the device will also be deleted.
Use a pointed object (pen/paper clip) to push in the factory default
settings button 19 . Hold it in until the communication lamp 16
flashes alternately red and blue.
The Audiostreamer is now reset to the factory default settings and is
ready to receive new pairings
EN
F
D
NL
ES
SE
DK
Trouble shooting and FAQ
The Maestro will not switch on!
• Charge the battery
SU
The Maestro will not charge!
• Ensure the Maestro is placed correctly in the Audiostreamer during
charging.
• Make sure the power supply is correctly connected to the
Audiostreamer and that the plug is working.
The Audiostreamer will not switch on!
• Make sure the plug to the power supply is correctly seated in
• the Audiostreamer and that the plug works.
I hear crackling from the Maestro!
• For best sound quality, the Maestro must be within range of the
mobile phone or Audiostreamer.
• If you are using the headset, make sure the plug to the headset is
correctly connected.
I cannot hear anything from the Maestro!
• Increase the volume of the Maestro.
• Check that the Maestro is paired to the mobile phone
• Audiostreamer or another Bluetooth device.
• If you are using the headset, make sure the plug to the headset is
correctly connected.
• If you are using the hearing aid, make sure the loop is placed correctly around the neck and that the hearing aid is set to T or MT.
User manual CIBS Home (NO_GB_F_D_NL_ES_SE_DK_SU) 1j
17
NO
EN
F
D
NL
ES
SE
DK
SU
18
I have connection problems with my mobile phone!
• You may have deleted the pairing with the mobile phone.
Follow the instructions for pairing on page 10.
Will the Maestro/Audiostreamer work with other Bluetooth equipment?
• The devices are made to work with all Bluetooth devices.
This depends on the Bluetooth devices being compatible with
Bluetooth version 1.1, 1.2 or 2.0, that support a headset and have a
handsfree and/or A2DP profile.
• The Bluetooth devices must have “0000” as password.
I cannot use voice-dialling!
• These functions are accessible if the telephone supports them.
See the telephone’s user manual for more information.
Storage and maintenance
• Always store the device with the power switched off.
• Do not store the device in extreme temperatures (over 45°C/113°F,
in direct sunlight, or below -10°C/14°F). This can reduce the lifetime
of the battery and affect use.
• High temperatures can also reduce performance.
• Do not expose the device to liquids or moisture.
• Clean the devices with a dry cloth.
User manual CIBS Home (NO_GB_F_D_NL_ES_SE_DK_SU) 1j
NO
EN
F
D
List over paired units to the Maestro
1. ________________________________
NL
2. ________________________________
ES
3. ________________________________
SE
DK
SU
4. ________________________________
5. ________________________________
6. ________________________________
7. ________________________________
8. ________________________________
A
User manual CIBS Home (NO_GB_F_D_NL_ES_SE_DK_SU) 1j
NO
EN
F
D
NL
ES
SE
57 mm/2,24 in.
120 mm/4,72 in.
SU
94 mm/3,7 in.
AUDIOSTREAMER
DK
1
38 mm/1,50 in.
User manual CIBS Home (NO_GB_F_D_NL_ES_SE_DK_SU) 1j
2
B
NO
EN
F
D
NL
ES
SE
DK
SU
C
Certification and safety approvals
CE
This product is CE marked accordingly to the provisions of the
R & TTE Directive (99/55/EC), COMMidt AS, declares that this product is in
compliance with the essential requirements and other relevant
provisions of Directive 1995/5/EC.
For further information, please consult: http://www.commidt.com
Bluetooth
The Bluetooth word® and logos are owned by the Bluetooth SIG, Inc. and any
use of such marks by COMMidt AS is under licence. Other trademarks and trade
names are those of their respective owners.
Electrical and electronic equipment (EEE) contains materials,
components and substances which can be dangerous and
detrimental to human health and the environment if waste
electrical and electronic equipment (WEEE) is not disposed of
correctly. Products marked with the “crossed-out waste bin”
symbol shown below are electrical and electronic equipment.
This symbol indicates that waste electrical and electronic
equipment must not be discarded along with unsorted household waste, but must
be collected separately. In the development and manufacture of your COMMidt
product, high-quality materials and components have been used which can
be recycled.When disposing of electrical and electronic equipment you should
therefore make use of a collection arrangement intended for this purpose, which
may involve either delivery at your local collection point or recycling station or
collection at your home. Further information should be obtained from your local
dealer.
Batteries contain substances that may be harmful to human health
and the environment if not handled properly.
Batteries are labelled with a crossed dustbin as shown.
It symbolizes that waste batteries must not be disposed of as
unsorted municipal waste, but must be collected separately.
Some batteries are also labelled with the chemical symbol Hg (mercury), Cd
(cadmium) or Pb(lead). This is particularly harmful substances, and therefore it is
important that these batteries will be collected.
It is important that you hand your waste batteries to the collection systems which
are established. On this way you help to ensure that batteries are recycled in
accordance with the law and will not unduly impact the environment.
When disposing of waste batteries you must use a collection system established
for that purpose whether it be handed in at your local collection point or recycling
or collected directly from the household. Detailed information must be obtained
from the local authorities.
User manual CIBS Home (NO_GB_F_D_NL_ES_SE_DK_SU) 1j
NO
Removal of the battery:
1. Unscrew the screw on the rear of the unit
2. Remove the front cover
3. Unscrew the screw on the circuit board.
4. Remove the circuit board
5. Unplug the battery
Declaration of conformity
We COMMidt, Kirkegata 57-59, 7600 Levanger, Norway declare
under our own responsibility that the Bluetooth products to which this declaration
refers conforms withthe relevant standards or other standardised documents.
•93/42/EØF
•NS-EN12182
•ETSIEN301489-1V1.4.1(2002-08)
•ETSIEN301489-17V1.2.1(2002.08)
•EN300328V1.6.1(2004-11)
•EN61000-4-3,5.1
•EN61000-4-2,5.2
According the regulations in Radio Equipment and Telecommunications Terminal
Equipment (R&TTE) Directive 1999/5/EC
EN
F
D
NL
ES
SE
DK
SU
This device complies with Part 15 of the FCC Rules.
Operation is subject to the following two conditions:
(1) this device may not cause harmful interference, and
(2) this device must accept any interference received, including
interference that may cause undesired operation.
This device is a class 2 Bluetooth device (max 2 mW EIRP). Due to the low level
of transmit output power the device is not subject to the routine RF exposure
valuation as per Section 2.1093 of the FCC rules.
Levanger 2009-04-24
Roar Austvik
Managing Director, COMMidt
User manual CIBS Home (NO_GB_F_D_NL_ES_SE_DK_SU) 1j
D