1
References
References
[1] http://maven.apache.org/maven-1.x/maven.pdf
[2] http://jakarta.apache.org/jmeter/
[3] http://www.adventnet.com/products/qengine/index.html
[4] http://java.sun.com
[5] http://java.sun.com/products/archive/j2se/5.0_06/index.html
[6] http://www.badboy.com.au
41
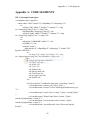
Appendix A – Code Segments
Appendix A: CODE SEGMENTS
XSL Code sample from report
<xsl:template name="pagelist">
<table width="100%" border="0" cellpadding="0" cellspacing="0">
<tr>
<td align="left" width="7" height="7" colspan="2"><img
src="images/top_left.gif" alt=""></img></td>
<td background="images/top_line.gif"></td>
<td align="right" width="7" height="7" colspan="2"><img
src="images/top_right.gif" alt=""></img></td>
</tr>
<tr>
<td bgcolor="#ABABAB" width="1"></td>
<td width="6"></td>
<td align="center">
<table border="0" cellpadding="0" cellspacing="1" width="95%"
bgcolor="#FFFFFF">
<tr>
<th align="left" valign="top" height="25"><img
src="images/testcases.png" alt="Test Scenarios"></img></th>
</tr>
<tr valign="top" bgcolor="#999999">
<th>TEST Case</th>
<th>Status</th>
<th>Tests</th>
<th>Failures</th>
<th>Success Rate</th>
<th>Total Time</th>
<th>Average Time</th>
<th>Details</th>
</tr>
<xsl:for-each select="/testResults/*[not(@tn = preceding::*/@tn)]">
<xsl:variable name="testcase_pre" select="@tn" />
<xsl:variable name="testcase" select="substring-before($testcase_pre, '
')" />
<xsl:variable name="count" select="count(../*[@tn = current()/@tn])"
/>
<xsl:variable name="failureCount" select="count(../*[@tn =
current()/@tn][attribute::s='false'])" />
<xsl:variable name="successCount" select="count(../*[@tn =
current()/@tn][attribute::s='true'])" />
<xsl:variable name="successPercent" select="$successCount div
$count" />
42
Appendix A – Code Segments
<xsl:variable name="totalTime" select="sum(../*[@tn =
current()/@tn]/@t)" />
<xsl:variable name="averageTime" select="$totalTime div $count" />
<tr bgcolor="#E8E8E8">
<xsl:attribute name="class">
<xsl:choose>
<xsl:when test="$failureCount > 0">Failure</xsl:when>
</xsl:choose>
</xsl:attribute>
<th>
<xsl:value-of select="$testcase" />
</th>
<th>
<xsl:if test="$failureCount > 0">Failed</xsl:if>
<xsl:if test="0 >= $failureCount">Passed</xsl:if>
</th>
<th><xsl:value-of select="$count" /></th>
<th><xsl:value-of select="$failureCount" /></th>
<th>
<xsl:call-template name="display-percent">
<xsl:with-param name="value" select="$successPercent" />
</xsl:call-template>
</th>
<th>
<xsl:call-template name="display-time">
<xsl:with-param name="value" select="$totalTime" />
</xsl:call-template>
</th>
<th>
<xsl:call-template name="display-time">
<xsl:with-param name="value" select="$averageTime" />
</xsl:call-template>
</th>
<th>
<xsl:if test="$failureCount > 0">
<a href="">
<xsl:attribute
name="href"><xsl:text/>javascript:change('page_details_<xsl:value-of select="position()"
/>')</xsl:attribute>
<img src="images/expand_f.png"
alt="expand/collapse"><xsl:attribute name="id"><xsl:text/>page_details_<xsl:value-of
select="position()" />_image</xsl:attribute></img>
</a>
43
Appendix A – Code Segments
</xsl:if>
<xsl:if test="0 >= $failureCount">
<a href="">
<xsl:attribute
name="href"><xsl:text/>javascript:change('page_details_<xsl:value-of select="position()"
/>')</xsl:attribute>
<img src="images/expand_p.png"
alt="expand/collapse"><xsl:attribute name="id"><xsl:text/>page_details_<xsl:value-of
select="position()" />_image</xsl:attribute></img>
</a>
</xsl:if>
</th>
</tr>
<!-- Test Case Details goes here -->
<tr class="page_details" bgcolor="#FFFFFF">
<xsl:attribute name="id"><xsl:text/>page_details_<xsl:value-of
select="position()" /></xsl:attribute>
<td colspan="8" bgcolor="#FFFFFF">
<div align="center">
<br/>
<!--b>Details for Page "<xsl:value-of select="$testcase" />"</b->
<table border="0" cellpadding="0" cellspacing="1"
width="95%" bgcolor="#FFFFFF">
<tr bgcolor="#63BB8A">
<th>Request URL</th>
<th>Time (milliseconds)</th>
<th>Bytes</th>
<th>Success</th>
</tr>
<xsl:for-each select="../*[@tn = $testcase_pre]">
<tr bgcolor="#E0EFE7">
<td><xsl:value-of select="@lb" /></td>
<td align="right"><xsl:value-of select="@t" /></td>
<td align="right"><xsl:value-of select="@by" /></td>
<td align="center"><xsl:value-of select="@s" /></td>
</tr>
</xsl:for-each>
</table>
<br/>
</div>
44
Appendix A – Code Segments
</td>
</tr>
</xsl:for-each>
</table>
<br/>
</td>
<td width="6"></td>
<td bgcolor="#ABABAB" width="1"></td>
</tr>
<tr>
<td align="left" width="7" height="7" colspan="2"><img
src="images/bot_left.gif" alt=""></img></td>
<td background="images/bot_line.gif"></td>
<td align="right" width="7" height="7" colspan="2"><img
src="images/bot_right.gif" alt=""></img></td>
</tr>
</table>
</xsl:template>
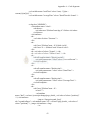
Java Code Segment of the “executesTests” method
public void executeTests(String mappingFilePath,String testMainDir,String
testModules,String testMode,String users,String iterations,String rampUp,String
testCases) {
try {
System.out.println("-----------------------------------------------------------");
System.out.println("| Generating {test.plan} and {userdefined.variables} files");
System.out.println("-----------------------------------------------------------");
String[]
module=commonUtils.commaSeparatedStringToStringArray(testModules);
String[] testcase=commonUtils.commaSeparatedStringToStringArray(testCases);
PropertyEditor.writePropertyToFile(Constants.TESTPLAN_FILENAME,
Constants.TEST_MODE, testMode);
PropertyEditor.writePropertyToFile(Constants.TESTPLAN_FILENAME,
Constants.NUMBER_USERS, users);
PropertyEditor.writePropertyToFile(Constants.TESTPLAN_FILENAME,
Constants.NUMBER_ITERATIONS, iterations);
PropertyEditor.writePropertyToFile(Constants.TESTPLAN_FILENAME,
Constants.RAMPUP_TIME, rampUp);
XMLParser xmlParser=new XMLParser(mappingFilePath);
System.out.println("-----------------------------------------------------------");
System.out.println("| TEST PLAN");
45
Appendix A – Code Segments
System.out.println("-----------------------------------------------------------");
if(testMode.equals(Constants.MODE_LOAD)||testMode.equals(Constants.MODE_REGR
ESSION)){
for(int i=0; i<module.length; i++){
Iterator
moduleIterator=(xmlParser.getNodeList(Constants.XPATH_MODULE)).iterator();
while (moduleIterator.hasNext()){
Element moduleElement=(Element)moduleIterator.next();
String
moduleId=xmlParser.getChildNodeValue(moduleElement,Constants.ELEMENT_MODU
LE_MODULEID);
String
moduleStatus=xmlParser.getChildNodeValue(moduleElement,Constants.ELEMENT_MO
DULE_ACTIVE);
if(moduleStatus.equals(Constants.STR_TRUE) &&
moduleId.equals(module[i].trim())){
System.out.println("| + "+moduleId);
PropertyEditor.writePropertyToFile(Constants.TESTPLAN_FILENAME,
Constants.MODULE_CODE, moduleId);
Element
testcasesElement=moduleElement.getChild(Constants.ELEMENT_MODULE_TESTCAS
ES);
Iterator
testcaseIterator=(testcasesElement.getChildren(Constants.ELEMENT_TESTCASES_TES
TCASE)).iterator();
while(testcaseIterator.hasNext()){
Element testcaseElement=(Element)testcaseIterator.next();
String
testcaseId=xmlParser.getChildNodeValue(testcaseElement,Constants.ELEMENT_TESTC
ASE_ID);
String
testcaseStatus=xmlParser.getChildNodeValue(testcaseElement,Constants.ELEMENT_TE
STCASE_ACTIVE);
String
testcaseType=xmlParser.getChildNodeValue(testcaseElement,Constants.ELEMENT_TES
TCASE_TYPE);
46
Appendix A – Code Segments
if(testcaseStatus.equals(Constants.STR_TRUE) &&
testcaseType.equals(testMode)){
System.out.println("| |_+ "+testcaseId);
PropertyEditor.writePropertyToFile(Constants.TESTPLAN_FILENAME,
Constants.TESTCASE_CODE,testcaseId);
String
propertyFileName=testMainDir+System.getProperty("file.separator")+moduleId+System.
getProperty("file.separator")+Constants.FOLDER_JMETER+System.getProperty("file.se
parator")+Constants.FOLDER_PROPERTIES+System.getProperty("file.separator")+testc
aseId+Constants.PROPERTIES_FILE_EXT;
PropertyEditor.writeToPropertyFile(propertyFileName,Constants.PROPERTY_FILENA
ME);
Element
inputsElement=testcaseElement.getChild(Constants.ELEMENT_TESTCASE_INPUTS);
Iterator
inputIterator=(inputsElement.getChildren(Constants.ELEMENT_INPUTS_INPUT)).iterat
or();
while(inputIterator.hasNext()){
Element inputElement=(Element)inputIterator.next();
String input=inputElement.getText();
System.out.println("| |_ "+input);
PropertyEditor.writePropertyToFile(Constants.TESTPLAN_FILENAME,
Constants.INPUT_CODE,input);
}
}
}
}
}
moduleIterator.remove();
}
}
else if(testMode.equals(Constants.MODE_CUSTOM)){
for(int j=0; j<testcase.length; j++){
Iterator
moduleIterator=(xmlParser.getNodeList(Constants.XPATH_MODULE)).iterator();
while (moduleIterator.hasNext()){
Element moduleElement=(Element)moduleIterator.next();
47
Appendix A – Code Segments
String
moduleId=xmlParser.getChildNodeValue(moduleElement,Constants.ELEMENT_MODU
LE_MODULEID);
String
moduleStatus=xmlParser.getChildNodeValue(moduleElement,Constants.ELEMENT_MO
DULE_ACTIVE);
if(moduleStatus.equals(Constants.STR_TRUE)){
Element
testcasesElement=moduleElement.getChild(Constants.ELEMENT_MODULE_TESTCAS
ES);
Iterator
testcaseIterator=(testcasesElement.getChildren(Constants.ELEMENT_TESTCASES_TES
TCASE)).iterator();
while(testcaseIterator.hasNext()){
Element testcaseElement=(Element)testcaseIterator.next();
String
testcaseId=xmlParser.getChildNodeValue(testcaseElement,Constants.ELEMENT_TESTC
ASE_ID);
String
testcaseStatus=xmlParser.getChildNodeValue(testcaseElement,Constants.ELEMENT_TE
STCASE_ACTIVE);
if(testcaseStatus.equals(Constants.STR_TRUE) &&
testcase[j].equals(testcaseId.trim())){
PropertyEditor.writePropertyToFile(Constants.TESTPLAN_FILENAME,
Constants.MODULE_CODE, moduleId);
PropertyEditor.writePropertyToFile(Constants.TESTPLAN_FILENAME,
Constants.TESTCASE_CODE,testcaseId);
System.out.println("| + "+testcaseId);
String
propertyFileName=testMainDir+System.getProperty("file.separator")+moduleId+System.
getProperty("file.separator")+Constants.FOLDER_JMETER+System.getProperty("file.se
parator")+Constants.FOLDER_PROPERTIES+System.getProperty("file.separator")+testc
aseId+Constants.PROPERTIES_FILE_EXT;
PropertyEditor.writeToPropertyFile(propertyFileName,Constants.PROPERTY_FILENA
ME);
Element
inputsElement=testcaseElement.getChild(Constants.ELEMENT_TESTCASE_INPUTS);
Iterator
inputIterator=(inputsElement.getChildren(Constants.ELEMENT_INPUTS_INPUT)).iterat
or();
48
Appendix A – Code Segments
while(inputIterator.hasNext()){
Element inputElement=(Element)inputIterator.next();
String input=inputElement.getText();
System.out.println("| |_ "+input);
PropertyEditor.writePropertyToFile(Constants.TESTPLAN_FILENAME,
Constants.INPUT_CODE,input);
}
}
}
}
}
moduleIterator.remove();
}
}
System.out.println("-----------------------------------------------------------");
} catch (Exception e) {
System.out.println("****** Exception executeTests ****** "+ e);
}
}
49
Appendix B – Environment Configuration
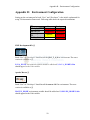
Appendix B: Environment Configuration
Setting-up the environment for both “User” and “Developer” is the initial workaround for
using Test Automation Framework. Following table shows the required installations.
jdk-1_5_0_06
maven-1.0.2
jakarta-jmeter2.2
Badboy-2.0.1
User
Developer
Compulsory Compulsory
Compulsory Compulsory
Optional
Compulsory
N/A
Compulsory
J2SE Development Kit [4]
Both “User” & “Developer” should install the jdk-1_5_0_06 in environment. The exact
version is available at [5]
JAVA_HOME environment variable should be added and %JAVA_HOME%\bin
should append to the Path variable.
Apache Maven [1]
Both “User” & “Developer” should install the maven-1.0.2 in environment. The exact
version is available at [1]
MAVEN_HOME environment variable should be added and %MAVEN_HOME%\bin
should append to the Path variable.
50
Appendix B – Environment Configuration
Apache JMeter [2]
“Developer” needs to install jakarta-jmeter-2.2 in the environment in order to create and
edit automated test scripts.
When “User” executes a test run, there might be some failed test cases in the final analysis.
In that case, user can perform a separate test run for particular test cases with JMeter GUI.
Test Automation Framework itself has an archive of “ready –to-run” test cases. So
installing jakarta-jmeter-2.2 in “User’s” machine is optional (no dependency in
executing test run) but it can be very useful.
jakarta-jmeter-2.2 binary is available at [2]
JMETER_HOME environment variable should be added
and %JMETER_HOME%\bin should append to the Path variable.
Badboy [6]
“Developer” needs to install Badboy-2.0.1 in order to record test cases. So “User” don’t
need this to be installed in the environment. The exact version is available @ [6]
51
Appendix C – User Manual
Appendix C: User Manual
Installation & Configuration
In order to use the Test Automation Framework, “User” has to download “maven-mecptest-plugin” into the environment.
Download “maven-mecp-test-plugin”
Run the following command in the command line & it will automatically download and
install “maven-mecp-test-plugin” in the environment.
> maven plugin:download
-DgroupId=mecp
-DartifactId=maven-mecp-test-plugin
-Dversion=2.0.4
Configuration of “build.properties” file
This property file contains the properties which are specific to the user. Therefore this file
should be placed in the “user’s home directory” (e.g. C:\Documents and Settings\{user
name} in windows and /home/{user name} in Linux)
Test Automation Framework specific properties are listed as follows (with sample
property values);
jmeter.config.protocol=http
jmeter.config.targetserver=192.168.1.206
jmeter.config.portnumber=8680
jmeter.config.testmode=regression
jmeter.config.testmodules=mtravel
jmeter.config.testcases=mtravel_025,mtravel_049
jmeter.config.users=1
jmeter.config.iterations=1
jmeter.config.rampup=1
jmeter.testmodules.mapping=mapping.xml
mecp.test.outputdir=c:/temp
mecp.test.usesnapshot=false
mecp.test.version=1.0.4
52
Appendix C – User Manual
Apart from these Test Automation Framework specific properties, “build.properties” file
should contain following general properties.
maven.repo.remote=http://jupiter:9090/MavenCache/repository/
maven.jboss.home=D:/INSTALLATIONS/jboss-4.0.3SP1
maven.jboss.deploy.dir=${maven.jboss.home}/server/default/deploy
Test Automation Framework Features
1
2
3
4
Feature Configurations
1
jmeter.config.protocol can define the Protocol which user is going to test. In most of our
scenarios, it will be HTTP.
53
Appendix C – User Manual
jmeter.config.targetserver can define the Server which is going to test. If user is going to
test an application running on a local machine, the property value should be localhost and
otherwise Server-IP should be used.
jmeter.config.portnumber can simply define the Port which, Application is running on.
2
This part of the configuration handles all test cases in the mecp-test module. System
designed to handle test cases in very flexible manner.
jmeter.config.testmode property can be used to define the test mode. There are 3 test
modes called regression, load and custom. One of the test modes can be set to this
property.
jmeter.config.testmodules property can be used to define the product(s) or project(s), the
user is going to test. Each project or product should be separated by a comma (,).
jmeter.config.testcases property can be used to define specific test case(s). Each test case
should be separated by a comma (,).
jmeter.config.users property can be used to define the number of threads(users) for the test
case(s). Each thread will execute the test case in its entirety and completely independently
of other test threads. Multiple threads are used to simulate concurrent connections to
server application.
54
Appendix C – User Manual
jmeter.config.iterations property can be used to define the number of iterations(loops) for
the test case(s). Each thread will execute this number of iterations.
jmeter.config.rampup property can be used to define the ramp-up period. The ramp-up
period tells the system how long to take to "ramp-up" to the full number of threads chosen.
If 10 threads are used, and the ramp-up period is 100 seconds, then the system will take
100 seconds to get all 10 threads up and running. Each thread will start 10 (100/10)
seconds after the previous thread was begun.
Regression, Load and Custom mode configurations and their capabilities as follows;
Regression
This configuration run all the regression test cases under the given projects or products in
one by one manner. All the highlighted properties are used in this configuration.
jmeter.config.testmode must set to “regression”.
jmeter.config.testmodules should set with project(s) or product(s) list.
jmeter.config.users should be set to “1”.
jmeter.config.iterations should be set to “1”.
jmeter.config.rampup should be set to “1”.
55
Appendix C – User Manual
Load
This configuration run all the load test cases under the given project(s) or product(s) in
one by one manner. All the highlighted properties are used in this configuration.
jmeter.config.testmode must set to “load”.
jmeter.config.testmodules should set with project(s) or product(s) list.
jmeter.config.users can be set to any number.
jmeter.config.iterations can be set to any number.
jmeter.config.rampup can be set to any number.
Custom
This configuration gives more flexibility of running test cases. One or few specific test
cases can run with this configuration. In most of the load testing scenarios this will be
very much useful. All the highlighted properties are used in this configuration.
jmeter.config.testmode must set to “custom”.
jmeter.config.testcases can be used to define specific test case(s).
jmeter.config.users can be set to any number.
56
Appendix C – User Manual
jmeter.config.iterations can be set to any number.
jmeter.config.rampup can be set to any number.
3
jmeter.testmodules.mapping property contains the mapping file name which is using to
configure and maintain all Test Cases included in the “mecp-test” module. (There is
nothing to change in this property right now)
mecp.test.outputdir property is there to configure Output Directory of the Test Automation
Framework. Test Automation Framework is designed to use this directory for extract
“mecp-test” module, save test results & archive test scripts.
4
mecp.test.usesnapshot with this configuration user can switch between the locally build
“mecp-test” module version and downloaded “mecp-test” version. If the user change
configuration to “true”, the system will build “mecp-test” module locally and use that jar
file to test run. If the user changes it to “false” the system will take the “mecp-test” jar file
version from the mecp.test.version property, then automatically download it from the
maven repository and use it with the test run.
57
Appendix C – User Manual
Test Automation Framework Commands
Test Automation Framework has two main functionalities.
1. Execute Test Run
2. View Test Map
Execute Test Run
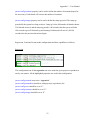
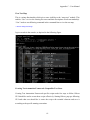
In order to execute a test run, “User” needs to run following command in the commandline.
> maven mecp:test-work
Using command-line console log, “User” can get the clear idea of the ongoing process of
the test run.
As depicted in the figure, Test Automation Framework cleans all the temporary files and
makes necessary new files in the environment.
Then it downloads exact version of the “mecp-test” module from the maven repository
and extract it to the given location.
58
Appendix C – User Manual
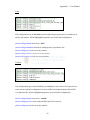
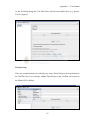
It shows the “User” configuration which is going to follow.
According to the “User” configuration, test plan generates and it shows the “tree-view” of
test plan in the console.
According to the test plan, all the test case files, property files and input files are loading
into the environment. When Test Automation Framework loads each test case, it will
automatically populate the user defined variables.
59
Appendix C – User Manual
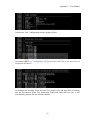
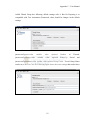
Then Test Automation Framework executes all the loaded scripts one by one and collects
the results.
Once it finished with executing all the test cases, the finalized test results transformed into
two separate HTML reports.
Finally it creates a web-component based on test results and deploys it into the application
server.
60
Appendix C – User Manual
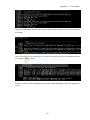
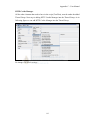
View Test Map
This is a minor functionality which gives some visibility to the “mecp-test” module. This
enables “User” to view the existing test cases and their descriptions in relevant module(s).
“User” needs to run following command in the command-line to view the test map.
> maven mecp:test-map
It gives results in the console, as depicted in the following figure.
Creating Test Automation Framework Compatible Test Cases
Creating Test Automation Framework specific scripts needs few steps to follow. JMeter
GUI should be used to create these scripts effectively. Starting JMeter, pop-ups following
GUI and what user should do is create the script with essential elements and save it
according to the specific naming convention.
61
Appendix C – User Manual
As the first thing change the Test Plan Name with relevant module name (e.g. Invoice,
Travel, Logistics).
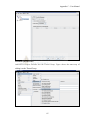
Thread Group
There are essential elements in each and every script. Thread Group is the main element in
the Test Plan (Test Case or Script). Adding Thread Group to the Test Plan can be done by
the JMeter GUI as follows.
62
Appendix C – User Manual
Added Thread Group has following default settings with it. But for Preparing it to
compatible with Test Automation Framework, there should be changes in the default
settings.
jmeter.config.users.value
jmeter.config.rampup.value
variable
variable
value
value
replaced
replaced
Number
Ramp-Up
of
Threads,
Period
and
jmeter.config.iterations.value variable value replaced Loop Count . Thread Group Name
can be set to the Test Case ID. Following figure shows the exact settings that need to have.
63
Appendix C – User Manual
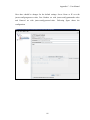
HTTP Cookie Manager
All the other elements that need to have in the script (Test Plan), must be under the added
Thread Group. Next step is adding HTTP Cookie Manager into the Thread Group. As in
following figure we can add HTTP Cookie Manager into the Thread Group.
No changes for default settings.
64
Appendix C – User Manual
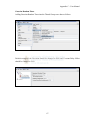
HTTP Request Defaults
Add HTTP Request Defaults into the Thread Group. Figure shows the exact way of
adding it to the Thread Group.
65
Appendix C – User Manual
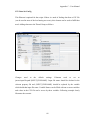
Here there should be changes for the default settings. Server Name or IP set with
jmeter.config.targetserver.value, Port Number set with jmeter.config.portnumber.value
and Protocol set with jmeter.config.protocol.value. Following figure shows the
configuration.
66
Appendix C – User Manual
Gaussian Random Timer
Adding Gaussian Random Timer into the Thread Group can e done as follows.
Default settings of the Deviation should be changed to 2000 and Constant Delay Offset
should be changed to 3000.
67
Appendix C – User Manual
CSV Data Set Config
This Element is optional for the scripts. If there is a need of feeding data from a CSV file
(can be used in most of the load testing test cases), this element can be used to fulfill that
need. Adding element to the Thread Group as follows.
Changes
need
to
the
default
settings.
Filename
need
to
set
as
jmeter.input.file.path/{INPUT_FILENAME}. Input file name should be declared in the
relevant property file and {INPUT_FILENAME} should be replaced by the variable
which holds that input file name. Variable Names can be filled with one or more variables
and values in the CSV file can be access by these variables. Following example clearly
illustrates the scenario.
68
Appendix C – User Manual
Simple Controller
Adding a Simple Controller into the Thread Group is as follows.
69
Appendix C – User Manual
Test Automation Framework specific scripts using two Simple Controllers for both Login
and Logout.
Loop Controller
Adding a Loop Controller into the Thread Group is as follows.
Test Automation Framework specific scripts using a loop controller to handle the core of
the test case.
70
Appendix C – User Manual
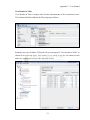
HTTP Request
Adding a HTTP Request into a Simple Controller or Loop Controller is as follows.
HTTP Request has lots of configurations and list of parameters. “Follow Redirects” and
“Use KeepAlive” checkboxes should be checked. Important parameters can be replaced
by variables which are defined in the relevant properties file.
71
Appendix C – User Manual
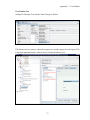
Response Assertion
As a practice add Response Assertions to each and every HTTP Requests. Adding a
Response Assertion is as follows.
72
Appendix C – User Manual
It is possible to add one or more patterns to a Response Assertion. Different
configurations can be used to perform checks on the response.
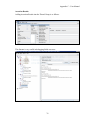
The most important assertion is adding to the Thread group as follows. It is always checks
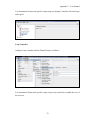
for the common system errors which can be arise in any of the HTTP request. Add all
patterns According to the figure below.
73
Appendix C – User Manual
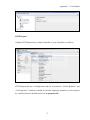
View Results in Table
View Results in Table is using to take all time measurements of the executed test cases.
This element should be added to the Thread group as follows.
Running a test case in JMeter GUI mode will give an output of “View Results in Table” as
shown in the following figure. This listener is very useful to get the time taken for each
and every request and so many other important counts.
74
Appendix C – User Manual
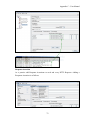
View Results Tree
Adding View Results Tree into the Thread Group as follows.
This listener has two panes to show the requests tree and the output of each request. This
is the most important listener, when it comes to debug failed test cases.
75
Appendix C – User Manual
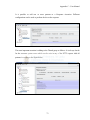
Assertion Results
Adding Assertion Results into the Thread Group is as follows.
This listener is very useful in debugging failed test cases.
76