1
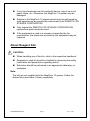
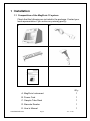
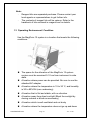
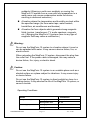
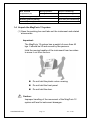
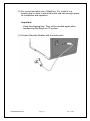
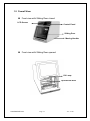
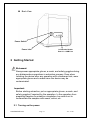
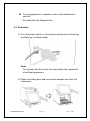
MagPurix 12s -Automated Nucleic Acid Purification System- Instruction Manual UM01001 www.ZINEXTS.com Page 1 Ver: V1.00 TABLE OF CONTENTS Page # INTRODUCTION......................................................................................... 3 SAFETY INFORMATION ............................................................................ 4 1.0 INSTALLATION ................................................................................... 8 1.1 Composition of the MagPurix 12 System ....................................... 8 1.2 Contents of Reagent Kits ............................................................... 9 1.3 Operating Environment / Condition ................................................ 9 1.4 Unpack the MagPurix 12 System ................................................ 11 1.5 Overall View ................................................................................. 14 2.0 GETTING STARTED ......................................................................... 15 2.1 2.2 2.3 2.4 Turning on the power................................................................... 15 Preparation .................................................................................. 16 Extraction .................................................................................... 16 After Extraction Operation ........................................................... 23 3.0 Cleaning & Maintaining the MagPurix 12 Instrument .................... 24 4.0 Troubleshooting ............................................................................... 25 5.0 Specifications .................................................................................... 27 APPENDIX................................................................................................ 28 www.ZINEXTS.com Page 2 Ver: V1.00 INTRODUCTION Thank you for purchase of the MagPurix 12 system which is a fully automated, standalone robot that can purify nucleic acids within 30-45 minutes. With advanced magnetic bead separation technology, it enables you to have high quality extraction results. Moreover, the most user-friendly interface makes users free from troublesome parameter settings and maintenance. This guide contains important information regarding the safe use of the MagPurix 12 system. Please read this manual carefully before you start to run the system at the first time, especially for Safety Information. If there is any question about how to install or operate it, please contact our certified distributors / agents or email to our technical support center ( [email protected] ). MagPurix Magnetic Bead Purification Process www.ZINEXTS.com Page 3 Ver: V1.00 SAFFETY INFORMATION The meanings of safety precaution marks are as follows: WARNING: "WARNING" indicates a dangerous condition that may lead to death or serious injury. BIOHAZARD: "BIOHAZARD" indicates exposure to a biological agent or condition that may be infectious or harmful. CAUTION: "CAUTION" indicates the possibility of danger that may lead to minor or moderate personal injury. "CAUTION" may also indicate an accident of property damage. Important: "Important" shows the important notes for usage, as well as prohibited actions. Note: "Note" indicates the notes, procedures that should be obeyed and supplementary information for use. For your safety and that of others, follow the guidelines provided in the following pages concerning the use of the MagPurix 12 system. www.ZINEXTS.com Page 4 Ver: V1.00 About Instrument WARNING: Ignoring the following notations may lead to fire or electric shock. - In countries other than Taiwan, US and Canada, use a power cable that meets your country’s standard, or contact your local distributor. - Use the AC adapter provided. - Do not use the MagPurix 12 system with voltage other than the voltage specified on the device. - Do not overload the power outlet with too many devices. - Do not use the MagPurix 12 system with a damaged power plug or a loose socket. - If there is dust on the prongs of the power plug or on the plug socket, remove it with a dry cloth. - When you disconnect the plug from the outlet, be sure to hold the power plug itself. Do not pull the power cable. - For maintenance, disconnect the power plug from the outlet. - Do not touch the power plug when you hear the crash of thunder. Do not pour any liquid on the MagPurix 12 system. Do not place any objects containing liquid on the MagPurix 12 system. Doing so may cause a device failure, fire, or electric shock. In the event the device overheats, starts to smoke or smells strange, immediately unplug the power cable. CAUTION: Never attempt to remodel the MagPurix 12 system without the manufacturer’s permission. Doing so may cause fire or electric shock. Do not place or drop objects on the MagPurix 12 system. Also refrain from bumping or knocking it, as doing so may cause a failure or malfunction of the MagPurix 12 system. www.ZINEXTS.com Page 5 Ver: V1.00 If any liquid materials are left inside the device, wipe it up a soft paper tissue, etc. Otherwise, the MagPurix 12 system may be damaged. Repairs to the MagPurix 12 system should only be performed by such agencies as are specifically authorized by the ZINEXTS LIFE SCIENCE CORPORATION. Only original the ZINEXTS LIFE SCIENCE CORPORATION replacement parts should be used. If the equipment is used in a manner not specified by the manufacturer, the protection provided by the equipment may be impaired. About Reagent Kits CAUTION: When handling any of the kits, refer to the respective handbook. Reagents in each kit should be handled by observing the safety information and precautions regarding the kit. Extraction should be performed in an appropriate laboratory or workplace. Note: The kits are not supplied with the MagPurix 12 system. Select the desired kit(s) and order it (them) separately. www.ZINEXTS.com Page 6 Ver: V1.00 About Samples BIOHAZARD: Always wear appropriate gloves, a mask, and safety goggles etc. when handling any infectious samples. About Infectious Wastes When handling or disposing of infectious materials, follow the laboratory guideline or the law regarding infectious waste to perform proper incineration, fusion, sterilization, and/or disinfection. When you use a third party to dispose of it, outsource this work an operator licensed to handle medical waste subject to special control, and give them the manifest of the medical waste at the same time. www.ZINEXTS.com Page 7 Ver: V1.00 1 Installation 1.1 Composition of the MagPurix 12 system Check that the following are included in the package. Contact your local representative if you notice any missing part(s). A B C D E Q’ty A. MagPurix Instrument 1 B. Power Cord 1 C. Sample Tube Rack 1 D. Barcode Reader 1 E. User’s Manual 1 www.ZINEXTS.com Page 8 Ver: V1.00 Please make all the components are free from damages as soon as you get the system. If any damage found, please contact your local representative for the instant support. Note: Zinexts’s global warranty does not cover the damages from the transportation or improper operation. 1.2 Contents of Reagent Kits A B C www.ZINEXTS.com D E F A. Reagent Cartridge(s) B. Reaction Chamber(s) C. Tip Holder D. Pestle (essential for some Kit types) E. Filtered tip F. Sample tube G. Elute tube Page 9 G Ver: V1.00 Note: - Reagent kits are separated purchase. Please contact your local agents or representatives to get further info. - The contents of reagent kits will be various. Refer to the handbook of kits enclosed in reagent box for details. 1.3 Operating Environment / Condition Use the MagPurix 12 system in a location that meets the following conditions: The space for the allocation of the MagPurix 12 system system must be remained 5-10 cm from instrument to side walls. A location where power can be provided. Be sure to use the attached AC adapter. A location where the temperature is 15 to 30°C, and humidity is 30 to 80%RH (non condensing) A location that is flat and stable, with no vibration A location away from direct sunlight (Block the sunlight by closing curtains or blinds as necessary.) A location which is well-ventilated and not dusty A location where the temperature does not go up and down www.ZINEXTS.com Page 10 Ver: V1.00 suddenly (Warming a cold room suddenly or moving the MagPurix 12 system from a room with low temperature to a warm room may cause condensation inside the device, resulting in abnormal extraction.) A location where the temperature and humidity are kept within the specified range (far from water taps, water heaters, humidifiers, air-conditioners and heaters) A location far from objects which generate strong magnetic fields (motors, transformers, TV, audio speakers, magnets, etc.) (Bringing the MagPurix 12 system close to any type of magnetic field may cause a malfunction.) Warning: Do not use the MagPurix 12 system to a location where it is wet or can be splashed with water. It may cause a device failure, fire, or electric shock. When relocating the MagPurix 12 system, disconnect the plug from the outlet first. If the power cable is damaged, this may cause a device failure, fire, injury, or electric shock. Caution: Do not use the MagPurix 12 system in an unstable place such as a slanted surface or a place subject to vibrations. It may cause injury or device failure. Do not use the MagPurix 12 system in direct sunlight or close to a heating device. It may shorten the life of the MagPurix 12 system, or cause a trouble. Operating Conditions Items Temperature (°C) Humidity (RH) www.ZINEXTS.com Conditions During operation 15 - 30 During down time 0 - 55 During operation 30 - 80 During down time 10 - 80 Page 11 Ver: V1.00 Max. wet bulb During operation 29 (non condensing) temperature (°C) During down time 29 (non condensing) Temperature gradient (°C/hr) 12 or less (non condensing) Humidity gradient (RH/day) 30 or less (non condensing) Altitude, operating (m) 1600 or less 1.4 Unpack the MagPurix 12 system (1) Open the packing box and take out the instrument and related accessories. Important: The MagPurix 12 system has a weight of more than 45 kgs. It should be lift and moved by two persons. Hold the moving handler of the instrument from two sides to move it out from the box. Do not hold the plastic outer covering. Do not hold the front panel. Do not hold the door. Caution: Improper handling of the movement of the MagPurix 12 system will lead to instrument damages. www.ZINEXTS.com Page 12 Ver: V1.00 (2) For correct and safe use of MagPurix 12s, install it in a location that is close to electrical outlet and has enough space for installation and operation. Important: Keep the shipping box. They will be needed again when transporting the MagPurix 12 system. (3) Connect Barcode Reader with the Instrument. www.ZINEXTS.com Page 13 Ver: V1.00 1.5 Overall View Front view with Sliding Door closed LCD Screen Control Panel Sliding Door Moving Handler Front view with Sliding Door opened UV Lamp Operational Area www.ZINEXTS.com Page 14 Ver: V1.00 Back View Power Switch Power Inlet 1 x Barcode Reader Port & 1 x USB Port 2 Getting Started Biohazard: Always wear appropriate gloves, a mask, and safety goggles during any biohazardous operations in extraction process. Even when touching the device after any operation with a biohazard risk, wear appropriate gloves and a mask since the device may be contaminated. Important: Before starting extraction, put on appropriate gloves, a mask, and safety goggles if required by the operation. In the operation from preparing samples to extraction completion, be careful not to contaminate the samples with sweat, saliva, etc. 2.1 Turning on the power www.ZINEXTS.com Page 15 Ver: V1.00 (1) Make sure that the power cable are connected securely to the the MagPurix 12 system. (2) Connect the plug of the power cable to the outlet. 2.2 Preparation The following preparations are required for extraction operation. Items to be prepared - Gloves - Mask - Safety Goggles - Reagent Cartridge* - Reaction Chamber* - Tip Holder* - Pestle (Option)* - Filtered tip* - Sample tube* - Elute tube* www.ZINEXTS.com Page 16 Ver: V1.00 For the preparation of samples, refer to the handbook of each kit. *: Provided with the Reagent Kits. 2.3 Extraction (1) Turn the power switch on (the system will process self-testing, and then go to steady mode) Note: The system will block main functions before the completion of self-testing process. (2) Open the sliding door and remove the sample rack from the instrument. www.ZINEXTS.com Page 17 Ver: V1.00 (3) Take out Reaction Cartridges, and all plastics disposables (Reaction Chamber, Tip Holder, Filtered Tip, Pestle, Sample Tube, Elute Tube) from the Reagent Kit box. You need one Reaction Cartridge and one set of plastic plastic disposables per sample. www.ZINEXTS.com Page 18 Ver: V1.00 (4) Place reagent cartridges. Important: - Cartridge should be placed in a flat and stable table when setting up the Reagent Cartridge. - Set Cartridges in the order of the number from left to right. - Make sure that Cartridges are inserted in to the Cartridge Tray tightly. You will hear a click if the cartridge is placed correctly on the tray. - You can load 1-12 cartridges on the tray depending on the number of samples that you wish to process. (5) Place Reaction Chamber(s) (6) Place Tip Holder(s) www.ZINEXTS.com Page 19 Ver: V1.00 (7) Place the pestle(s) [required for some kit types] (8) Place the filtered tip(s) (9) Place Sample Tube and Elute Tube to Sample Rack on the bench www.ZINEXTS.com Page 20 Ver: V1.00 (10) Load the sample(s) to Sample Tube Note: Pretreatments are essential for some sample types before loading to Sample Tube. Please refer to the handbook of reagent kits for details. Make sure the caps of Elute Tube are open as the figure shown above. www.ZINEXTS.com Page 21 Ver: V1.00 (11) Place Sample Rack on the instrument platform Note: - Use two hands to handle the Sample Tray. - Make sure the Sample Tray be placed correctly in the instrument (12) Close the Sliding Door (13) Scan the protocol barcodes to select purification protocol, sample volume and elute volume Note: - There is one protocol barcode paper enclosed in the reagent kit box. - Protocol’s name, sample volume and elution volume will be shown on LCD screen after protocol barcode is scanned. (14) Follow the instructions displayed on LCD screen to double check the operating steps being completed before program running. (15) Push “Enter” to confirm. Instrument will start to run the protocol program automatically until whole processes are completed. Note: www.ZINEXTS.com Page 22 Ver: V1.00 - It takes from 30 to 45 minutes to complete the extraction according to reagent types. Find the detailed time consumption by checking the handbook of your reagent kits. 2.4 After Extraction Operation (1) Take out the Elute Tubes (The extraction yields in them) Note: - You can apply quality checking or do downstream study or storage them as what you expect. (2) Remove the Cartridges and plastic disposables from the instrument and then dispose of them. www.ZINEXTS.com Page 23 Ver: V1.00 3 Cleaning & Maintaining the MagPurix 12 system Two types of maintenance are performed on the the MagPurix 12 system Instrument as listed in the table. For details on each type of maintenance, see below: Maintenance Type Performed by Schedule Routine Cleaning of Sample Tray User After each use Cleaning of instrument User Bi-weekly User Bi-weekly body (outside) Cleaning of instrument body (inside) Service Preventive Engineer Annually Clean the Sample Tray with mild detergent and rinse with deionized water. Allow the parts to dry before use. Clean and disinfect the platform surface by wiping with deionized water followed by 70% ethanol. Clean the instrument body by removing dust gently with a dry, soft cloth. If the outside of the MagPurix 12 system is heavily soiled, or if any samples that may cause infection are adhered to the outside of the the MagPurix 12 system, wipe with a soft paper tissue, soaked with 0.5% sodium hypochlorite solution or ethanol. www.ZINEXTS.com Page 24 Ver: V1.00 4 Troubleshooting Problem Cause Solution Instrument Problems No power (the LCD Screen remains blank AC power cord is not Check AC power cord connections at both ends. or when the power is connected Use the correct cords. turned on) LCD Screen turns on Forget to remove the when the power is on packing stuff from but the self-testing instrument program does not run Technical problem Protocol stops after an Cartridge(s), initial start Plasticwares (Reaction Turn off the power and then turn it on again to stop the Chamber, Tip Holder, program. The system will move back to initial state. Filtered Tip Pestle, Re-load them according to the instructions shown in Sample Tube, Elute this manual. Turn off the instrument and remove the packing stuff. Contact your local representative or agent Tube) incorrectly Note: you could not resume the protocol after stop loaded on the the and you may lose your samples. MagPurix 12 system Problem with motion Turn off the power and remove all samples and sensors plasticwares. Contact your local representatives Bubbles formed during extraction Be sure to add the sample to tubes prior to starting the Missed adding sample protocol. To ensure proper mixing of reagents in the or sample volume is tip and prevent bubble formation during mixing, make lower than the sure the sample volume is at least the recommended recommended volume volume listed in the handbook supplied with the MagPurix Reagent Kits. Presence of buffer in Motor movements may Perform preventive maintenance annually to ensure the Cartridge Tray not be smooth, proper motor movements. incorrect placement of plasticware, or leakage from tips Leakage from Filtered Tips or uneven liquid Air leakage on the handling between Filtered Tip Swap the air-leaked Tip with new one Filtered Tips Blockage of tips www.ZINEXTS.com Too much starting Page 25 Decrease the amount of starting material. Use the Ver: V1.00 material causing recommended amount of starting material as listed in clumps or aggregates the Reagent Kit manual (Handbook). DNA Quality Problems Problem Cause Solution Decrease the amount of starting material used. Be sure to add Proteinase K during lysis, if included in the Incomplete lysis protocol. Make sure that the sample is completely immersed in the Lysis Buffer. Be sure to process sample immediately after collection or Poor quality of starting Low DNA yield store the sample at appropriate temperature. The yield and material the quality of DNA isolated depend on the starting material. During shipping, some magnetic bead solution may adhere Insufficient amount of to the sealing foil of the cartridge. To collect any bead magnetic beads added solution from the foil, tap the cartridge to deposit the bead solution at the bottom of the well. Ensure that the lysate does not contain any particulate Clogged Tips resulting material that can clog the tip sprout. If needed, centrifuge in DNA loss the sample prior to the MagPurix purification. Store cartridge containing the beads at room temperature. Do not freeze the cartridge as the beads may be irreparably No DNA Magnetic beads stored recovered or handled improperly damaged. Make sure that the beads are in solution at all times and do not dry. Dried beads are non-functional. Magnetic beads present Eluate in the eluate containing DNA is discolored Remove any magnetic beads using a magnetic separator or centrifuge the sample in a microcentrifuge for 1 minute at maximum speed. DNA contaminated with Minimize the amount of blood or blood-stained sample used heme (≤ 20 μl blood spot for forensics sample). Bubbles formed during mixing steps DNA is sheared Purified DNA or degraded repeatedly frozen and thawed To prevent bubble formation during mixing, make sure the sample volume is at least the recommended volume listed in the manual supplied with Reagent Kits. Aliquot purified DNA and store at 4°C (short-term) or -20°C (long-term). Avoid repeated freezing and thawing. DNA contaminated with Maintain a sterile environment while working (i.e. wear DNases gloves and use DNase-free reagents). www.ZINEXTS.com Page 26 Ver: V1.00 5 Specifications The MagPurix 12 system Model MagPurix 12 Instrument Type: Benchtop nucleic acid extractor Sample Processing: 1 to 12 samples per batch Sample Volume Handling: 100 - 1200 uL Processing Time: See purification kit manual for details Heat Block Temperature: 60°C to 70°C (assuming the room temperature of ~25°C) Protocol Input: Barcode Reader Built-in Features: LCD Display Screen Instrument Dimensions: 48 cm W x 70 cm D x 52 cm H Weight: 45 kg Input Power: AC 100-240 V, 240 VA, 50/60 Hz Operating Temperature: 10-40°C Operating Humidity: 30-80% CE LV directive (73/23/EEC) EMC directive (89/336/EEC) EMC EN61326-1 Safety EN60101-1 www.ZINEXTS.com Page 27 Ver: V1.00 APPENDIX Replacement/Optional Parts Item Q’ty Parts No. Barcode Reader 1 A01001 Power Cord 1 A01002 Sample Rack 1 A01003 Filttered Tip 38 A02001 Sample Tube 38 A02002 Elute Tube 38 A02003 Product Guarantees - The guaranty period shall be one year from the delivery of the product. - Any part which fails to function properly under normal use, provided that all warnings and cautions in this manual are observed, during the guarantee period will be repaired by the ZINEXTS LIFE SCIENCE CORPORATION free of charge. - If the problem is due to the causes listed below, some charge may be applied for the repair even within the guarantee period. Any failures due to improper use or that are affected by other devices except for those approved by the ZINEXTS LIFE SCIENCE CORPORATION Any malfunctions or damages during transportation or due to dropping of the product by a user. www.ZINEXTS.com Page 28 Ver: V1.00 About Services Before you ask for device repairs, refer to “4 Troubleshooting” to check the problems. If the problems cannot be solved, contact your local representative, or the relative customer support. Notes for Transporting / Shipping the MagPurix 12 system When transporting/shipping the MagPurix 12 system to a new location, perform the following tasks: Warning: - Before carrying the MagPurix 12 system, disconnect the plug from the outlet. If the power cable is damaged, this may cause a device failure, fire, injury, or electric shock. - When transporting/shipping the MagPurix 12 system, be sure to perform the following tasks: Remove all attached parts (Sample Rack, Barcode Reader) from the MagPurix 12 system. - www.ZINEXTS.com After completing the above tasks, pack the MagPurix 12 system in its original shipping box or some other equivalent box. Page 29 Ver: V1.00