1
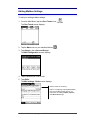
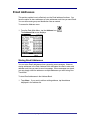
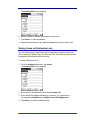
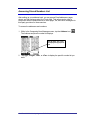
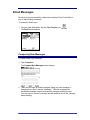
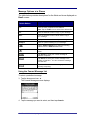
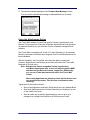
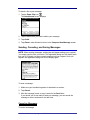
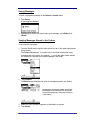
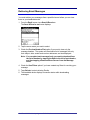
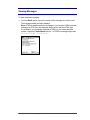
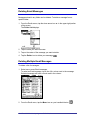
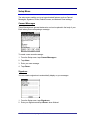
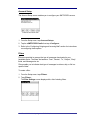
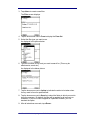
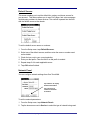
ONE-T OUCH MAIL™
MANUAL
V 2.3
The Email Solution for a Mobile World
One-Touch Mail combines a number of state-of-the-art technologies in one small
package to give you access to vital information and keep you in touch with your
office and your clients. With One-Touch Mail, users can send and receive
Contacts, Calendars, and text attachments as well as regular Email wirelessly.
Additionally, One-Touch Mail supports sending pager, fax, and voice messages
via third-party providers. One-Touch Mail also includes advanced organization
features that allow for intuitive filing and filtering.
Copyright Notice
One-Touch Mail™ is a registered trademark of JP Mobile, Inc. 3Com and the
3Com logo are registered trademarks, and Palm Computing® Platform and the
Palm Computing® Device are trademarks of 3Com Corporation or its
subsidiaries. JP Mobile, Inc. is not responsible for any liability, loss, or damage
caused or alleged to have been caused directly or indirectly by this product.
All other brands and product names are trademarks or registered trademarks of
their respective owners.
©2001 JP Mobile, Inc. All rights reserved. No part of this document may be
reproduced or transmitted in any form by any means, electronic or mechanical,
including photocopying or recording on any information storage and retrieval
system, without prior written permission from JP Mobile, Inc.
Note: JP Mobile was formerly JP Systems. This program’s version was created
before the company name change. Any reference to JP Systems may now be
considered the same as JP Mobile.
DNC Handspring/OTM/UM/v2.3/r01-1022
For more information visit JP Mobile on the
World Wide Web at http://www.jpmobile.com.
Mobile Solutions … for a Mobile World
Licensing Agreement
The use of One-Touch Mail™ v2.3 is governed by the terms of the following
license agreement. Please read and accept to the terms of this agreement
before using the software.
This copy is licensed exclusively to Handspring, Inc.’s Wireless Internet Access
Suite.
As per this agreement, you may make a single copy of One-Touch Mail™ v2.3
for backup purposes. You may also copy the program onto one hard disk for use
in lieu of the original program or backup disk. It is a violation of this agreement to
make program copies of beyond those outlined above. It is a violation of this
license agreement to decompile, reverse engineer, or otherwise generate source
code from the code supplied pursuant to this license.
Site licenses are available from JP Mobile for users who wish to use multiple
copies of the program at one location. For further information please call
1.972.484.5263. The program is provided "AS IS" without warranty of any kind,
either expressed or implied. Some states do not allow exclusion of implied
warranties, so the above exclusion may not apply to you. JP Mobile does not
warrant that the functions contained in the program will meet your requirements.
You assume responsibility for the installation, use, and the results obtained from
the program. If for any reason the limited warranty provided by this agreement
should be determined to be invalid or inapplicable to any claim which is based
upon the quality or performance of the licensed software, the aggregate liability
of JP Mobile and anyone else who has been involved in the creation, production
or delivery of the licensed software nevertheless, shall be limited to the amount
paid by you for the original version of the software. In no event shall JP Mobile be
liable for any damages, including any lost profits, lost savings, patent
infringement, or other consequential damages arising out of the use or inability to
use such program even if any other party has advised JP Mobile or an authorized
dealer of the possibility of such damages or for any claim. In some states, the
above limitation may not apply to you.
One-Touch Mail for Handspring
JP Mobile, Inc.
iii
CONTENTS
INTRODUCTION ........................................................................................................ 6
CONFIGURATION AND SETUP ................................................................................. 7
Configuring Outgoing Mail (SMTP) and Incoming Mail (POP3) Servers .................... 8
Configuring Mail settings - Options ....................................................................... 10
Configuring Mail settings - Advanced ................................................................... 11
Editing Mailbox Settings ...................................................................................... 12
EMAIL ADDRESSES ................................................................................................ 13
Storing Email Addresses ..................................................................................... 13
Storing Group or Distribution Lists........................................................................ 14
Accessing Stored Numbers List ........................................................................... 15
EMAIL MESSAGES ................................................................................................. 16
Composing New Messages ................................................................................. 16
Message Options at a Glance........................................................................ 17
Using the Canned Message List .................................................................... 17
Using the Attachments Option ....................................................................... 18
Sending, Canceling, and Saving Messages .......................................................... 19
Canceling Messages ..................................................................................... 19
Saving Messages ......................................................................................... 21
Sending Messages Stored in the Outbox ........................................................ 21
Retrieving Email Messages ................................................................................. 22
Viewing Messages .............................................................................................. 23
Message Options at a Glance........................................................................ 24
Deleting Email Messages .................................................................................... 25
Deleting Multiple Email Messages........................................................................ 25
OTHER FEATURES ................................................................................................. 27
Edit Menu........................................................................................................... 27
Message Menu ................................................................................................... 27
New ............................................................................................................. 28
Select All Msgs............................................................................................. 28
Deselect All Msgs ......................................................................................... 28
Mark Unread ................................................................................................ 28
Mark Read ................................................................................................... 28
Move to........................................................................................................ 28
Del from Handheld ........................................................................................ 29
Del from Handheld and Server....................................................................... 29
Download from Server .................................................................................. 29
Purge Deleted Items ..................................................................................... 29
Folders............................................................................................................... 30
Setup Menu........................................................................................................ 31
Canned Messages ........................................................................................ 31
Signature ..................................................................................................... 31
Account Setup .............................................................................................. 32
Filters........................................................................................................... 32
One-Touch Mail for Handspring
JP Mobile, Inc.
iv
Default Servers ............................................................................................. 34
Network Panel .............................................................................................. 34
Other Menu ........................................................................................................ 36
SOLVING PROBLEMS ............................................................................................. 37
Common Problems ............................................................................................. 37
Unable to resolve: ......................................................................................... 37
Connection closed by foreign host, while trying to download a message. .......... 37
Invalid Password/Mailbox is locked. ............................................................... 37
Serial port error / PPP timeout. ...................................................................... 37
Memory is too low......................................................................................... 37
No new messages on server. ........................................................................ 37
Other Troubleshooting items:............................................................................... 38
One-Touch Mail for Handspring
JP Mobile, Inc.
v
Introduction
One-Touch Mail is a messaging application for the handheld platform enabling
you to use your handheld device in conjunction with your wireless modem to
send and receive Email messages over the Internet.
This manual explains how to configure, setup, and use One-Touch Mail for your
handheld device and assumes that you are familiar with handheld applications.
For more information about your device, please refer to your Palm OS manual.
Your package includes:
•
•
One-Touch Mail User Manual for handheld devices
One-Touch Mail Software
One-Touch Mail for Handspring
JP Mobile, Inc.
6
Configuration and Setup
This section explains how to configure and setup One-Touch Mail software on
your device. Because you are viewing this manual it is assumed that you have
already installed One-Touch Mail v 2.3 on your device. If you have not, or if you
need to uninstall the program please see the Readme One-Touch Mail file that
was included with you One-Touch Mail v 2.3 program files.
One-Touch Mail for Handspring
JP Mobile, Inc.
7
Configuring Outgoing Mail (SMTP) and Incoming Mail
(POP3) Servers
This section explains how to configure the servers used for outgoing and
incoming mail. Before using One-Touch Mail software you need:
• A handheld device with modem
• An Email account with an Internet Service Provider
To configure outgoing and incoming mail:
1. From the Palm Main Menu, tap the <One-Touch> icon.
The Confirm screen displays.
2. Tap <Yes> to begin configuring the SMTP/POP3 servers.
The Mail Configuration screen displays.
3. Tap <New> to add a new server.
The Mail settings - Basic screen displays.
4. Enter the POP3 server address in the Incoming POP3 mail server field.
5. Enter your user name/mail box name in the Account field.
One-Touch Mail for Handspring
JP Mobile, Inc.
8
6. Tap <Passwd> next to the Account field.
The Password box displays.
7. Enter your password. Tap <Set password> to accept and return to the Mail
settings – Basic screen.
(You can access the Password screen later to change your password.)
8. Enter your SMTP mail server address in the SMTP Server Address field.
The address can be a name or a numeric IP address.
Note: For example, mail.abcd.com is considered a name and
207.184.70.129 is considered as a numeric IP address.
Specifying a numeric IP address reduces the connection set up
time. You can find the numeric IP address from your Internet
Service Provider or network administrator. If you enter server
name, make sure you have configured the DNS entry in the
network configuration.
9. Enter your name in the Name field. The name entered is displayed on
outgoing messages.
10. Enter your Email address in the Email field. The Email address entered is
used when others respond to your mail.
Some services require a valid Email address to be entered in the field before
allowing you to send mail.
11. You can set additional settings using the Options and Advanced screens.
Refer to the “Configuring Mail settings – Options” and “Configuring Mail
settings – Advanced ” procedures for information on completing these
screens.
12. If you want to configure another mailbox, tap <New> again and repeat this
configuration procedure.
13. Tap <Done> again to exit the Configuration menu.
One-Touch Mail for Handspring
JP Mobile, Inc.
9
Configuring Mail settings - Options
The Options screen enables you to customize additional settings for your
mailbox.
1. Tap <Options>.
The Mail settings – Options screen displays.
2. Select the checkbox next to each option you want to activate. A description
of each option is listed below.
Mail setting Option
Description
o Leave a copy of emails on
Select this option if you want to leave
messages on your server after
downloading to your Palm.
server.
o BCC a copy of all outgoing msgs
to _____________.
o Hang up connections when
Select this option if you want to
designate an address to receive blind
carbon copies of all your outgoing
messages.
Select this option if you want the system
to automatically disconnect after sending
or receiving emails.
finished sending or receiving
messages.
o Store complete header.
Select this option if you want keep a
copy of previously downloaded Email
headers.
If incoming message is larger than
______ bytes:
Select whether you want to download or
skip any files sent to your mailbox that
are larger than the specified size. (You
can change the default number of bytes
displayed.)
o Truncate & download.
o Skip it.
One-Touch Mail for Handspring
JP Mobile, Inc.
10
Configuring Mail settings - Advanced
The Advanced screen enables you to define default settings for your mailbox.
1. Tap <Advanced>.
The Mail settings – Advanced screen displays.
You can enter different
port numbers and
time-out values in
these fields.
2. Enter port numbers and time-out values if different from the default values
displayed.
The buttons displayed in the table below provides a description of each
advanced option:
Mail setting Option
Description
Port numbers and Time out
Values
The values displayed above are the default
values. You can edit the values as needed.
Tap <Reset> to restore all mailbox values to
their default values.
Tap <Clear> to deletes the message
download history.
Tap <Cancel> to stop any messages
downloads in pending status.
3. Tap <Done> when finished.
One-Touch Mail for Handspring
JP Mobile, Inc.
11
Editing Mailbox Settings
To edit your existing mailbox settings:
1. From the Main Menu, tap the <One-Touch> icon.
The One-Touch screen displays
2. Tap the Menu icon on your handheld device.
3. Tap <Setup>, then <Account Setup>.
The Mail Configuration screen displays.
4. Tap the address you want to edit.
5. Tap <Edit>.
The Mail settings - Basic screen displays.
Edit the values as necessary.
Refer to “Configuring Outgoing Mail (SMTP)
and Incoming Mail (POP3) Servers” for
instructions on editing the Basic, Options,
and Advanced settings.
One-Touch Mail for Handspring
JP Mobile, Inc.
12
Email Addresses
This section explains how to effectively use the Email address functions. You
have the option to store addresses or enter addresses each time you send Email.
You can also create group and distribution lists as needed.
To access the Address menu:
1. From the Palm Main Menu, tap the Address icon.
The Address List screen displays.
Storing Email Addresses
You can enter Email addresses when composing new messages. However,
storing addresses in the Palm Address Book eliminates the need to enter and
address each time you want to send a message. When messages are stored,
you can simply select the address or multiple addresses you want using OneTouch Mail.
To store Email addresses in the Address Book:
1. Tap <New>. If you want to edit an existing address, tap the address
displayed in the address list.
One-Touch Mail for Handspring
JP Mobile, Inc.
13
The Address Edit screen displays.
2. Enter the person’s address information on this screen.
3. Tap <Done> to save the address.
4. Repeat this procedure for any additional address you want to add or edit.
Storing Group or Distribution Lists
You can create group or distribution lists for coworkers, contacts, friends, etc.
After creating your desired lists, use them with One-Touch Mail to send the same
messages to all recipients within the group.
To create a Distribution List:
1. From the Address List screen, tap <New>.
The Address Edit screen displays.
2. Enter name of the distribution list in the Last name field.
3. Enter each Email address followed by a comma (,) or a semicolon (;).
For example: [email protected], [email protected], [email protected]
4. Tap <Done> to save the distribution list.
One-Touch Mail for Handspring
JP Mobile, Inc.
14
Accessing Stored Numbers List
After setting up your address book, you can access Email addresses, pager,
phone, and fax numbers using One-Touch Mail. This option can be used in
conjunction with the default servers to send pager, fax, and voice messages via
third-party providers for these services.
To access the addresses and numbers:
1. While in the Composing New Message screen, tap the Address icon.
The Address and phone number list displays.
Tap @, Pager, Ph, or Fax
to display the appropriate
list.
2. Tap <@>, <Pager>, <Ph>, or <Fax> to display the specific number list you
want.
One-Touch Mail for Handspring
JP Mobile, Inc.
15
Email Messages
Now that you have successfully installed and configured One-Touch Mail, it’s
time to start sending messages!
To access the Email menu:
1. From the Palm Main Menu, tap the <One-Touch> icon.
The Email screen displays
Composing New Messages
To create a new Email message:
1. Tap <Compose>.
The Compose New Message screen displays.
2. There are two ways to create messages: typing your own message or
selecting from a list of “canned” messages. “Canned” messages are
predefined messages used to automate the message sending process.
You can select a “canned” message and add additional text to the message
before sending.
One-Touch Mail for Handspring
JP Mobile, Inc.
16
Message Options at a Glance
The table below provides descriptions for the fields and icons displayed on
Email screen:
Field, Icon, and
Button Names
Description
To:
Enter the main recipient’s Email address.
Note: Tap the Folder icon to select from address list.
Cc:
Enter the address to send a copy of your message.
Bcc:
Enter the address to send a blind carbon copy of
your message.
Via:
Display the server used to send your message.
Subject:
Enter an optional heading for your message.
Tap the Address Book icon to select an existing
address from the Address List screen.
Tap the Attachments icon to add other files to your
Email.
Tap <Send> to send your current message to
indicated recipients.
Tap <Save> to save your current message in the
Outbox or Draft box. You can access the message
at a later time.
Tap <Cancel> to delete the message you are
currently composing.
Using the Canned Message List
To select a predefined message:
3. Tap the down arrow icon. €
The Canned Messages screen displays.
4. Tap the message you want to select, and then tap <Insert>.
One-Touch Mail for Handspring
JP Mobile, Inc.
17
5. The canned message displays on the Compose New Message screen.
You can send the predefined message or add additional text if needed.
Using the Attachments Option
One-Touch Mail enables you send and receive Contacts, Appointments, and
Memos. These are sent as vCard and vCalendar attachments and can therefore
be read and stored by any user that has vCard or vCalendar compliant Email
software.
One-Touch Mail is compliant with vCard (v2.1) and vCalendar (v1.0) standards.
Similarly, Netscape and Outlook also recognize One-Touch Mail attachments for
these standards.
With this capability, One-Touch Mail users have the ability to share their
Contacts, Appointments, and Memos (as text files) with other One-Touch Mail,
Netscape or Outlook users.
Note: 'Attachments' feature recognizes Contact, Appointment,
and Memo attachments only. It does not support generic MIME
attachments (like Word documents, images etc). Additionally,
you can use vTodo attachments with other One -Touch Mail
clients.
When using Appointme nts, please be aware that the device does
not recognize time zones. Take this into consideration when
traveling.
Typical uses for this feature include:
• Store vCard signatures received in Email directly into your Address Book.
• Send new Appointments from Outlook-Calendar (your desktop) to a user
on the road or vice versa.
• Send an entire day or month's appointments to some or all of your
colleagues in a single Email (limited by 60,000 bytes per Email).
One-Touch Mail for Handspring
JP Mobile, Inc.
18
To attach a file to your message:
1. Tap the Paper Clip icon.
The Attachments screen displays.
2. Tap the attachment you want to add to your message.
3. Tap <Add>.
4. Tap <Done> when finished to return to the Compose New Message screen.
Sending, Canceling, and Saving Messages
NOTE: When sending messages, a dialog box will appear asking you to register.
You simply need to enter your name. The registration dialog box will display each
time (up to 20 times) you issue a send command until you register. Once you
register, the registration dialog box will not display again.
To send a message:
1. Make sure your handheld organizer is attached to a modem.
2. Tap <Send>.
3. After the message is sent, a copy is saved in the Sent folder.
If you decide you do not want to send your message, you can cancel the
message or save it and send it at a later time.
Canceling Messages
To cancel a message:
One-Touch Mail for Handspring
JP Mobile, Inc.
19
1. Tap <Cancel> to delete the current message.
A confirmation message displays.
2. Tap <Yes> to delete the message.
One-Touch Mail for Handspring
JP Mobile, Inc.
20
Saving Messages
To save a composed message to the Outbox or Drafts folder:
1. Tap <Save>.
A message box displays.
2. Depending on where you want to save your message, tap <Outbox> or
<Draft>.
Sending Messages Stored in the Outbox
To send saved messages:
1. From the Email screen, tap the down arrow icon € in the upper right portion
of the screen.
The Folder List displays. A number next to the folder shows how many
messages are in the folder. An asterisk ( * ) next to the folder name informs
you that there is at least one unread message in the folder.
2. Tap <Outbox>.
The Email screen displays with a list of messages stored in the Outbox.
All messages stored in the Outbox will be sent.
If messages are successfully sent, they will be
saved in the Sent folder. If not, they will remain
in the Outbox.
3. Make sure your handheld organizer is attached to a modem.
4. Tap <Send>.
One-Touch Mail for Handspring
JP Mobile, Inc.
21
Retrieving Email Messages
You must retrieve your messages from a specified server before you can view
them on your handheld device.
1. From the Email screen, tap <Send & Receive>.
The Send & Receive on screen displays.
2. Tap the server name you want to select.
3. Check the Preview Headers First option if you want to view only the
message headers. The system will download a list of messages with only
their subject, date, sender and receiver addresses, and size displayed.
Note: You can select each message body you want to download from
the list of headers by tapping the dash to the left of each heade r,
and then tapping <Download from Server> from the Message
menu.
4. Check the Use Filters option if you have created any filters for receiving your
message.
5. Tap <Select> to start retrieving Emails.
6. The handheld device displays connection status while downloading
messages.
One-Touch Mail for Handspring
JP Mobile, Inc.
22
Viewing Messages
To view retrieved messages:
1. From the Email screen, tap on the center of the message you want to view.
The message header and body displays.
Note: OTM only handles plain-text messages. If you receive HTML formatted
messages in OTM, they are displayed simply as text with the HTML tags.
For example if you received a message in HTML on your corporate email
system it might say “Hello World from me.” In OTM the message might read
“<p><b>Hello World </b>from me</p>.”
One-Touch Mail for Handspring
JP Mobile, Inc.
23
Message Options at a Glance
The table below provides descriptions for the fields and icons displayed on the
message screen:
Field, Icon, and
Button Names
Description
Tap the Message Option icon to display your message
with no header, brief header, or the entire header.
Tap the Address Book icon to add an address from your
message to your Address List.
Tap the arrows to scroll to previous and next messages.
Tap the Delete icon to delete your current message
Tap the Delete from Server icon to delete a message from
your Palm and your server.
1
Tap the Folder icon to file messages in different folders.
Reply
Tap to reply to sender.
Reply All
Tap to reply to sender and all recipients.
Forward
Tap to forward the message to another Email address.
Done
Tap done when finished viewing the message.
One-Touch Mail for Handspring
JP Mobile, Inc.
24
Deleting Email Messages
Messages stored in any folder can be deleted. To delete a message from a
specific folder:
1. From the Email screen, tap the down arrow icon € in the upper right portion
of the screen.
The Folder List displays.
2. Tap the folder you want to access.
3. Tap on the center of the message you want to delete.
4. Tap the Delete icon to delete your message.
Deleting Multiple Email Messages
To delete a list of messages:
1. Select one or more Email messages.
To select an Email message, tap in the <All> column next to the message.
Selected message will have a check mark in the column.
2. From the Email menu, tap the Menu icon on your handheld device.
One-Touch Mail for Handspring
JP Mobile, Inc.
25
3. Tap <Message>.
Tapping <Select All Msgs> will select all the messages.
4. Tap <Del from Handheld>.
This removes the selected message(s) from your device only. Select <Del
from Handheld and Server> to remove the selected message(s) from both
the Palm OS device and the server.
Note: Tapping <Purge deleted items> deletes all messages from the
Deleted folder permanently.
5. Tap <Yes> to confirm.
One-Touch Mail for Handspring
JP Mobile, Inc.
26
Other Features
This section provides instructions on the various menus available on the Email
Screen.
To access the above menus:
1. From the Email screen, tap the Menu icon on your handheld device.
.
2. Tap the Menu Name you want to access. (Message, Setup, Other, etc.)
Edit Menu
The Edit menu allows you to perform basic Palm features like Undo, Cut, Copy,
Paste, and Select All. These features only work with editable text. The Edit menu
also provides you access to the Palm OS online Keyboard and the GraffitiHelp
screen.
Message Menu
The Message menu enables you to make changes to the entire message list
displayed on your Email screen. For example, if the Inbox folder list is displayed,
any changes, deletions, selections, etc., made using the Message menu will
apply to all messages listed in the Inbox folder.
One-Touch Mail for Handspring
JP Mobile, Inc.
27
New
Tap <New> to compose a new message.
Select All Msgs
The Select All Msgs feature places a check mark by every email in your
displayed message list. This allows changes to be made to all selected
messages.
Places check
marks next
to each
message.
Deselect All Msgs
The Deselect All Msgs feature removes the check mark by every email in your
displayed message list. This prevents changes from being made to all selected
messages.
Mark Unread
This feature places an * icon next to each selected message, indicating the
message has not been read.
If you do not select all before using this feature, it will only move the first
message in your list.
Mark Read
This feature places an
icon next to each selected message, indicating the
message has been read.
If you do not select all before using this feature, it will only move the first
message in your list.
Move to
This feature moves all selected text to the selected folder.
One-Touch Mail for Handspring
JP Mobile, Inc.
28
If you do not select all before using this feature, it will only move the first
message in your list.
Del from Handheld
This feature deletes all selected messages and sends them to the delete folder.
If you do not select all before using this feature, it will only move the first
message in your list.
Del from Handheld and Server
This feature deletes all selected messages from both the Palm device and the
server. The selected message(s) is completely deleted. No messages are moved
to the Deleted folder.
Download from Server
This feature selects the message headers within your list to be fully downloaded
from the server. You can select immediate download or download during the
next download session.
Purge Deleted Items
This feature marks all selected messages to purge when you exit your OneTouch Mail account.
One-Touch Mail for Handspring
JP Mobile, Inc.
29
Folders
You can organize your email into different message categories. This helps you
keep track of where you store messages.
Folder Name
Description
All
For all messages.
Business
For company-related messages.
Deleted
Stores deleted messages until you permanently
delete the messages.
Draft
Stores emails that you saved as draft.
Inbox
Stores emails sent to your Inbox.
Misc
For emails that are not appropriate for the other
message categories.
Outbox
Stores messages that have not been sent, or that
you manually saved to Outbox.
Personal
For messages that are not business-related.
Sent
Stores a copy of the messages sent from your
mailbox.
Unfiled
For messages have not been categorized.
Edit Categories
Enables you to customize the folder categories.
One-Touch Mail for Handspring
JP Mobile, Inc.
30
Setup Menu
The setup menu enables you to set up automated features such as Canned
Messages, Signature, Filters, Default Servers, and Network Panel settings.
Canned Messages
These Messages are general statements, and can be placed in the body of your
Email when you are composing a message.
To create a new canned message:
1. From the Setup menu, tap <Canned Messages>.
2. Tap <New>.
3. Enter your new message.
4. Tap <Done>.
Signature
You can create a signature to automatically display on you messages.
1. From the Setup menu, tap <Signature>.
2. Enter your Signature and tap <Done> when finished.
One-Touch Mail for Handspring
JP Mobile, Inc.
31
Account Setup
The Account Setup screen enables you to configure your SMTP/POP3 servers.
1. From the Setup menu, tap <Account Setup>.
2. Tap the <SMTP/POP3 Email> then tap <Configure>.
3. Refer to the “Configuring Outgoing and Incoming Mail” section for instructions
on configuring these options.
Filters
Filters are provided to manage the type of messages downloaded to your
handheld device. The filters are based on ‘From’, ‘Sender’, ‘To’, ‘Subject’, ‘Body’
fields, and Message size etc.
Filters enable you to indicate what type of messages to retrieve, skip, or file in a
specific folder.
To create a filter:
1. From the Setup menu, tap <Filters>.
2. Tap <Filters>.
The Filter Settings screen displays with a list of existing filters.
One-Touch Mail for Handspring
JP Mobile, Inc.
32
3. Tap <New> to create a new filter.
The Filter screen displays.
4. Tap the down arrow next to From to display the From list.
5. Select the filter type you want to use.
As displayed in the picture below:
6. Type the condition or key word you want to search for. (This may be
attachments, words etc.)
As displayed in the below picture:
7. Tap the down arrow next to Action to indicate the action to be taken when
the key word is found in specified field.
8. Tap the down arrow next to Save in to select the folder in which you want to
store the message. By default, the filter will be applied for all accounts or
mailboxes. If you do no want it applied to a particular mailbox, you can
deselect the option.
9. After all selections are made, tap <Done>.
One-Touch Mail for Handspring
JP Mobile, Inc.
33
Default Servers
This screen enables you to set the default fax, paging, and phone servers for
your account. This feature allows you to send, fax, pager, and voice messages
via third-party providers for these services. The number is parsed into the field
with the default server as the domain.
To set the default server names or numbers:
1. From the Setup menu, tap <Default Servers> .
2. Select one of the default servers, and then enter the name or number used
as the default.
3. Check the box next to your current selection.
4. Enter your dial prefix. Clear the field if no dial prefix is needed.
5. Repeat steps 2-4 for each applicable server.
6. Tap <OK> when finished.
Network Panel
You can configure network settings from One-Touch Mail.
Tap <Details> to display
itemized information.
Tap <Connect> to
commence Network
connection.
To set the network parameters:
1. From the Setup menu, tap <Network Panel>.
2. Tap the down arrow next to Service to select the type of network being used.
One-Touch Mail for Handspring
JP Mobile, Inc.
34
3. Enter your user name in the User Name field.
4. Tap <Password> to enter your network password information.
5. Tap <Phone> to enter the phone line information.
6. Tap <Done> when finished.
One-Touch Mail for Handspring
JP Mobile, Inc.
35
Other Menu
This menu enables you to view how much memory is being used, and also send
messages to customer support.
To access the Memory Usage menu:
1. From the Email screen, tap the Menu icon on your handheld device.
.
2. Tap <Other>.
3. Tap <Memory Usage>.
To access the Mail to support menu:
1. From the Email screen, tap the Menu icon on your handheld device.
.
2. Tap <Other>.
3. Tap <Mail to support>.
One-Touch Mail for Handspring
JP Mobile, Inc.
36
Solving Problems
This section provides some general guidelines for problems you may encounter
while using One-Touch Mail with your modem.
If, after following these guidelines, you are still having problems with One-Touch
Mail, contact One-Touch Mail Customer Support by sending Email to
[email protected] .
Common Problems
The following list provides some common problems experienced when working
with Email messages and some possible solutions.
Unable to resolve:
Check the address that cannot be resolved.
Check the DNS entry in the network configuration.
Check modem and network configuration settings.
Connection closed by foreign host, while trying to download a
message.
Verify the mail server user name in POP3 settings.
Verify the Email address for the POP3 settings.
Invalid Password/Mailbox is locked.
Password might be wrong. Enter the password again in POP3 settings.
If the password is correct then mailbox might have been locked. Wait for
a while and retry.
Serial port error / PPP timeout.
Check the network settings of the handheld.
Check the modem settings of the handheld.
Memory is too low
Palm mem ory low, delete old messages and purge deleted folder.
No new messages on server.
There are no new messages on the server.
If this frequently occurs and you can see the new messages on your
One-Touch Mail for Handspring
JP Mobile, Inc.
37
Desktop, then your desktop software is pulling all the messages from the
server and deletes the messages on the server. If you
want to access new mail using your Palm, you have to set “Leave
messages on server” option in your desktop software. (Contact your
system administrator.)
Other Troubleshooting items:
Ø Check the operational state of the modem. Verify that the modem is on and
that the transmitter is on. For more information about your modem please
refer to your modem User Guide.
Ø Verify that your wireless modem is in transmitter range.
Ø Make sure that your battery is adequately charged. If you're still experiencing
problems, try resetting the modem by turning it off and on.
Ø Verify there is sufficient memory in the Palm. Tap the <Applications> icon
then tap the <Menu> icon on your handheld device. Next, tap <Info> from
the <App> menu. This displays memory available on the handheld. If
memory is not available, free up space by deleting any outdated messages,
and applications that are no longer needed.
Ø If One-Touch Mail stops responding, try using the Reset button on your
device.
Ø You can also contact [email protected]
One-Touch Mail for Handspring
JP Mobile, Inc.
38