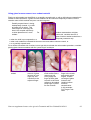
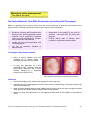
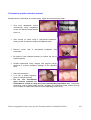
1
Child Friendly Dentistry A family-centred, risk-based approach to the prevention and management of adult dental disease in childhood Notes to supplement lecture series given in Tasmania and New Zealand 2010/ 2011 Not currently for circulation outside of the Dental Therapy Services of New Zealand and Tasmania Dafydd Evans & Nicola Innes Unit of Oral Health, University of Dundee With; Jean Suvan and Christoph Ramseier on Motivational Interviewing Barbara Chadwick on Behavioural Management & Thomas Lamont Illustrations by Amy McKay (www.amymckay.com) Acknowledgement The authors are grateful to the Scottish Dental Clinical Effectiveness Programme for permission to include some material previously published in the SDCEP Guidance Document “The Prevention and Management of Dental Caries In Children” www.scottishdental.org/cep Also to Christoph Ramseier and Jean Suvan, Editors of “Changing Health Behaviour in the Dental Practice; Wiley 2010”, for permission to include material from their book ©University of Dundee 2011 Notes to supplement lecture series given in Tasmania and New Zealand 2010/2011 Child friendly dentistry – a family-centred, risk-based approach to the prevention of adult dental disease in childhood. Introduction, and acknowledgements Adult dental disease begins in childhood (Richard Elderton). Members of the Oral Health Care Team who work with children have the opportunity to help people avoid a lifetime of oral health problems. This is both a privilege, and a responsibility. This guidance has been written to help in discharging that responsibility effectively. Many colleagues, too many to mention all of them, have given generously of their time, and ideas. To David Marshall, and David Butler we owe special thanks for their encouragement and advice in developing the approach and writing this manual to support a series of lectures we gave to their Oral Health Care Teams in New Zealand and Tasmania. Thanks also to Professor Jan Clarkson, Director of the Scottish Dental Clinical Effectiveness Programme, for permission to include material previously published in the SDCEP Guidance Document “The Prevention and Management of Dental Caries In Children”, and to Dr Doug Stirling, Programme Manager, and his team at SDCEP, and all the members of the guidance development group, which DE had the privilege to chair and NI served on. However, the opinions and guidance contained within this document are those of the authors, and not of SDCEP. Thanks also to Nigel Pitts for his foresight in getting SIGN 47 and SIGN 83 guidelines off the ground (www.sign.ac.uk), which formed the basis for the SDCEP guidance, and so this manual, Tom Beckman for encouragement, Ferranti Wong for discussions, David Bearn for advice on the orthodontic component, and Eleanor MacKay for developing the educational side of the brushing advice section. All the photographs in this manual were taken by Simon Scott, of the Department of Medical Photography, University of Dundee, and the authors are grateful to him for his patience and skill. Effective oral health care for children is not easy, and there is still a long way to go before we will have the answers to many of the clinical problems we face on a daily basis. As we all face the same problems, we can learn much from each other if we share information and ideas, and keep an open mind about our own clinical practice. We very much hope that members of the Oral Health Care Team who read this manual will contact us with their comments, ideas and suggestions for improvements. Dafydd Evans ([email protected]) Nicola Innes ([email protected]) For the reader in a hurry It is recommended that the manual is read as a whole. However, the sections regarded as essential in order to have an understanding of the Child Friendly approach are: • The summaries on the following two pages • The summaries in the yellow boxes at the beginning of each section • The Assessment form and post-treatment checklist • The toothbrushing charts • The 24 hour diet analysis chart Notes to supplement lecture series given in Tasmania and New Zealand 2010/2011 2 The Child Friendly approach for the Oral Health Care Team (OHC Team); the one page summary Guiding principles • • • Begin early! See children regularly from 1 year of age Identify all principal carers; find ways to include each of them in the child’s preventive programme Ensure responsibility for the child’s oral health is transferred from the OHC Team to the parent/principal carers, and that they acknowledge that this transfer has taken place Engage with the parent/ carers; be supportive, empathic and encouraging, avoiding at all costs being perceived as judgemental; however, persistent failure by parents/principal carers to meet their child’s oral health needs should be managed as a child protection issue • The check-up (Oral Health Assessment) appointment • • • • Make both the child and the parent/carer feel really welcome; find out the most convenient appointment times for them, and try to fit in with them Work through the process of; keeping in mind the three key goals: 1. Maximise the probability of the permanent dentition remaining caries-free 2. Minimise the risk of any carious primary teeth causing the child pain/sepsis 3. Minimise the risk of treatment-induced anxiety Prioritise the treatment plan around the sequence of the 3 Ps: - Pain relief; if needed - Prevention - Planned management “Nothing about me, without me!” Prevention • • • • Use a caries risk assessment tool to determine the caries preventive programme content Apply the components of this programme to the highest standard The “big four” normally included are: For both of these, use Motivational Interviewing o Brushing advice & Instruction techniques and Action Planning o Dietary advice Fissure sealing Apply & monitor with the same rigour as for restorations o Fluoride varnish For permanent molars – identify and manage early occlusal/ proximal lesions as a priority Caries management • • Caries in the primary dentition should be actively managed to minimise the risk of pain/abscess before exfoliation, using a biological approach, with the choice of treatment option based on a risk assessment for pain/sepsis If caries extending into dentine occurs in the permanent dentition, then infected dentine should be removed, minimising iatrogenic damage, and a restoration placed. If involving a fissure system, then remaining unaffected fissures should be sealed Treatment provision, and follow up • • Make checklists an integral part of your practice Audit your prevention and treatment strategies as a regular part of your practice Notes to supplement lecture series given in Tasmania and New Zealand 2010/2011 3 Child Friendly dentistry; a family-centred, risk-based approach to the prevention and management of adult dental disease in childhood A brief summary of the approach. The premise underlying the approach The permanent dentition is for life, while the primary dentition is transient, and runs its course in patients who are limited in their ability to; - tolerate dental interventions and - truly consent to those interventions, and who have almost no capacity to accept responsibility for their own oral health. Overview • • A B Assessment of Best practice Caries Defining goals attitudes and needs prevention management and agreeing care plans Assessment of attitudes of parents/ principal carers; - who are they? Apply the “Fantastic Four” to the highest possible standard • Toothbrushing • Meticulous caries diagnosis is essential if early lesions are to be managed non-operatively - have they accepted responsibility? Assessment of attitudes of Oral Health Care Team - can you prioritise prevention? - accept the child’s outcome measures may differ from your own? - accept the need for assessment forms & checklists in clinical care? - avoid being judgemental? • Assessment of child’s oral health needs - see from age 1 year - apply a risk based approach for pain/ sepsis when assessing need for caries management in primary teeth - use Motivational Interviewing techniques, and Action Planning - allow at least as much surgery time as for a large restoration • Fissure sealants - place, monitor and maintain with just the same care as for a restoration - new fissure caries is not an option! • Diet advice - use the 24 hour recall diary • Fluoride varnish - apply when indicated by a caries risk assessment C – use radiographs where appropriate • In permanent teeth, infected dentine should be managed operatively. - take exceptional care to avoid iatrogenic damage to the pulp, other teeth, and the child’s trust • In primary teeth, consider a biological approach (usually sealing in), to reduce risk of pain/ sepsis before exfoliation D • “Nothing about me without me” • - Involve the child in all decision making While the child is important, the parents/ carers are key in implementing oral health advice, and bringing their child for care - try to meet their goals for treatment, as well as your own - be prepared to stage treatment - avoid at all costs being perceived as judgemental - sepsis from primary teeth must not be left unmanaged 4 Notes to supplement lecture series given in Tasmania and New Zealand 2010/2011 An overview Child friendly dentistry is an approach which aims to provide high quality, effective child dental care, while minimising stress to children, their parent/ carers and the Oral Health Care Team (OHC Team), with the aim of leading children towards adulthood with the skills and understanding to look after their own oral health. The premise underlying the approach is that: The permanent dentition is for life, while the primary dentition is transient, and runs its course in patients who are limited in their ability to; - tolerate dental interventions and - truly consent to those interventions, and who have almost no capacity to accept responsibility for their own oral health. • • • • • • It must be emphasised that the approach is not presented as a revolutionary new method of child dental care; it simply brings together techniques from a variety of areas of clinical practice, many of which have been used in different parts of the world for many years. It does not involve learning a complete new set of skills, and at most requires nothing more than the refinement of a few skills that experienced members of the OHC Team will already have. Much of what is contained in the manual will be familiar to anyone involved in providing oral health care for children, although the emphasis may be different. The approach to managing the carious primary dentition is not a simplified, dumbed-down, version of specialist paediatric dental treatment for those who don’t have access to such care; a kind of “second class dentistry for second class citizens”! Indeed, it is every bit as intellectually and clinically challenging (and satisfying) as the classical “surgical” approach; just less stressful for all the parties involved. It is not exclusionist, and is not proposed as the only model of child dental care; the approaches may not suit every clinician, every parent/carer, every child or every carious tooth in that child. Clinicians may find some parts of the approach easier to integrate into their clinical practice than other parts, and that is perfectly acceptable. Clinicians share the same goal when providing care for their child patients, even if they choose different routes to getting there. The approach does not involve “writing off”, ignoring, or always using only prevention to managing the carious primary dentition The approach does not claim to provide all the answers, and most areas of it will benefit from further research and development. What the approach does offer, is a method of providing high quality dental care for children, managed in the context of their family and carers, using techniques and interventions that both they, and their OHC Team, are likely to find acceptable, whilst reducing the risk of the child developing treatmentinduced dental anxiety. Reduced to a minimum, the three defining characteristics of the approach are: • A transfer of the principal responsibility for a younger child’s oral health to the parent/ carers of the child. This will be achieved using the latest behavioural management techniques to ensure the parent/ carers accept this role willingly, with the knowledge and motivation to take it on, and feeling they are working in partnership with the OHC Team, without being judged by them. • Intensive preventive dental care, again employing evidence-based educational and behaviour change techniques, and provided by the OHC Team with the same attention to detail as for any complex dental restorative procedure. Notes to supplement lecture series given in Tasmania and New Zealand 2010/2011 • A pragmatic approach to managing caries in the primary dentition, where the disease is actively managed (and not just left). It follows biological rather than surgical principals, to achieve the goal of reducing the risk of affected teeth causing the child pain or sepsis before they shed naturally, while minimising stress to the child, and the OHC provider; all set against a background of using checklists to help ensure the optimum treatment is provided, and audit to monitor effectiveness. Whilst caries in the primary dentition is never left unmanaged, it is the health of the permanent dentition that is prioritised. Final thought The aim of the manual is to assist members of the OHC Team, working with parent’s carers, in helping young people achieve and maintain oral health through childhood and adolescence, into adulthood, with a healthy dentition, and the skills and motivation to maintain it. Notes to supplement lecture series given in Tasmania and New Zealand 2010/2011 6 Introduction Providing dental care for children is not the same as providing dental care for adults! There are some important differences: • Unlike adult dental care, the most important person in determining the child’s future oral health is not the person sitting in the chair. It is the parent/ carers who hold the principal responsibility for their child’s oral health, and it will require great skill and expertise from the OHC Team to ensure that the parent/ carers appreciate this, without inadvertently alienating them in the process. However, without the active, willing participation of the parent/ carers, the effectiveness of any caries preventive programme will be compromised. • Younger children have a different perception of oral health compared to adults, being very much less concerned (if at all) by poor aesthetics or loss of function. It is pain and sepsis (chronic infection) that bothers them. In addition, most children have little sense of the benefit of investment now (e.g. having a filling) for future gain (freedom from pain in a year or two). The combination of these two factors, coupled with children being at an early stage in their emotional development, results in them having a limited capacity to tolerate dental treatment. Dental interventions, therefore, have to be tailored to the child’s capacity to cope, with the imperative of always practising within the envelope of the child’s ability to tolerate treatment. To do otherwise when providing an intervention risks winning the battle, but losing the war. • Unlike the permanent dentition, the primary dentition is temporary, and is shed. This offers a significant opportunity for the OHC Team when managing dental caries in the primary dentition, particularly if trying to meet the child’s treatment objectives (freedom from pain and sepsis), rather than most adults’ treatment objectives (freedom from pain and sepsis, and good aesthetics, and good function). There are evidence-based methods available for slowing, or even arresting, dental caries for long enough to allow the affected teeth to shed naturally, without pain or sepsis, and without the child having to tolerate complete surgical excision of carious tissue, followed by restoration of the tooth. This manual is a practical guide to an effective caries preventive and management programme, which works within the parameters outlined above, and can be provided for children attending for dental care. It is not aimed at undergraduates (as it assumes a basic level of knowledge and skill), but at members of the OHC Team who have some experience of clinical practice. How the approach will be presented in this manual Providing child dental care is as complex, multifactorial and non-linear as playing a musical instrument or driving a car, and using the written word alone to convey information about it has limitations. With that proviso: • those areas which define the child friendly approach as being different from an adult model for dental care will be highlighted on the next page, in the sequence they are likely to occur when a child is brought for dental care; • these areas will then be explored in more depth, with sufficient practical information to allow them to be applied. The evidence supporting them, where available, and information on further reading and resources will be itemised for each area in the Appendices; and finally • cases will be presented, showing how some children were managed with this child friendly approach Notes to supplement lecture series given in Tasmania and New Zealand 2010/2011 7 The child friendly approach, highlighting areas differing from the provision of adult dental care Guiding principles The clinician A need to reorder priorities Parent/ carers The route (or barrier) to success The child Cannot be managed as a small adult The Oral Health Assessment (OHA) Communication Engagement is the key, not just talking at them Caries diagnosis Presence or absence is only half the story Diagnosing dental sepsis Cannot be left unmanaged Agreed Problem List What needs to be managed? Discuss options The child’s, parent/ carer & your priorities may differ Agreed Treatment Plan Defining goals and agreeing care plans Providing care Changing behaviours “Info dumps” don’t work Prevention New fissure caries is not an option Biological caries management “The seal’s the deal” Helping children cope Simple, effective techniques - may involve staging care Surgical caries management Sometimes needed Follow up support When, and how, to review Maintaining momentum Notes to supplement lecture series given in Tasmania and New Zealand 2010/2011 8 Guiding principles The clinician Parent/ carers The child The clinician Review priorities The clinician; key points • Give the parent/ carers at least as much attention as you give their child, ensuring you engage with them, rather than just talk at them • the origin of most adult dental disease can be traced back to childhood, so make prevention a priority • Keep in mind that providing dental care for children is not the same as providing dental care for adults • The goal when managing the carious primary dentition is to prevent pain and infection until the tooth is shed, and does not necessarily include the additional goals for adults; restoration of function and aesthetics • Keep interventions within the child’s ability to cope; helping them to develop their ability to cope with treatment, and their continued co-operation is probably more important than the intervention in the long term • Be aware of the child’s growth and development and constantly appraise their changing abilities to cope with experiences • As they become older, start to hand responsibility over to them • Be open to using checklists at the start and end of treatment; they help prevent Type 1 errors (the mistakes other clinicians make, but never us!!) Clinicians must appreciate that dental care for children is not the same as dental care for adults. The aims for child dental care are broadly similar to those when providing adult dental care: • to keep the primary and permanent dentition free from disease; • to reduce the risk of the child experiencing pain or abscess, or acquiring treatment-induced dental anxiety if dental caries does occur; • for the child to grow up and reach adulthood feeling positive about their oral health, and with the skills and motivation to maintain it. However, choosing the best possible route to achieving those aims may involve a change in mindset from that when providing adult oral health care. The imperative of engaging with the parent/ carers The oral health team needs to make a particular effort to engage with the parent/ carers, when the natural tendency will be to focus on the child. Of course the child is important, but for the pre-schooler and primary school child, it will be the parent/ carers who will determine the success or failure of dental care, and not the child. The permanent dentition is the priority While the primary dentition is transient, the permanent dentition is for life, but like the primary dentition, appears in the oral cavity well before the child is of an age to take responsibility for looking Notes to supplement lecture series given in Tasmania and New Zealand 2010/2011 9 after it. It is relatively easy for the clinician to become focussed on obvious dental disease in the primary dentition, and to take their eye off the ball regarding the permanent dentition. For example, have a look at the radiograph below, and identify which pathology catches your attention first. Was it the leaking restorations on the upper primary molars? Or the distal caries on the upper second primary molar? Or the cavity on the lower first primary molar (which seems arrested), or even the space loss already obvious following loss of the lower second primary molar? Is it the buccal pit masquerading as occlusal caries on the lower first permanent molar? (its linearity gives it away, but it will need to be sealed!). Arguably, the most significant lesion of long term importance to the child’s future oral health is the early, enamel-only lesion on the mesial of the upper first permanent molar. Appropriate management of this lesion might avoid the necessity for a Class II restoration, which when placed in a child has a poor prognosis. The primary teeth, with all their problems, will be gone in three or four years; the permanent dentition is for life. Similarly, with the maxillary dentition of this 6 year old child, it is the poor state of the primary molars which catches the eye, but the maxillary right first permanent molar is erupting into an environment where the caries is still uncontrolled. A note should be made to fissure seal the mesial fossa in a couple of months, with glass ionomer if necessary, once the operculum has retracted, and not to wait until the disto-palatine fissure is also accessible. Accepting the child’s priorities when managing the carious primary dentition With a few exceptions, children seem unconcerned about any aesthetic or functional problems with a failing primary dentition. What they are undoubtedly concerned about is pain or infection. Avoidance of this should be the management priority for carious primary teeth, and not restoring function and aesthetics as would be the case for a permanent tooth. Accepting this opens a whole range of alternative, less invasive management options for the clinician, other than the classical “drill n’ fill” approach. As clinicians, though, we often feel more comfortable with the surgical approach. Intuitively, it may seem “right”, and it was usually what we were trained to do. We feel satisfied with a nice looking restoration, and assume that it is always someone else who upsets children, and not us. Yet the evidence is clear that children really do not like operative interventions (see Appendix for further details). Stay within the child’s ability to cope Children’s different perceptions of, and ability to cope with, dental interventions was covered in the introduction. Well intended attempts to impose dental interventions on the child when they are clearly struggling to cope risks alienating the child, their parent/ carers, and storing up attitudinal and behavioural problems in the future. A classic example is a young child presenting for the first time at your surgery with a painful, unrestorable tooth. If they were an adult, then making time in your schedule to extract the tooth at that visit would be the most appropriate management of the situation, and if gaining adequate anaesthesia took a little time, the adult would still be appreciative, and feel positive about the experience. This is not necessarily the case with a small child! Notes to supplement lecture series given in Tasmania and New Zealand 2010/2011 10 It should also be remembered that as children grow, their cognitive abilities change and develop with them and this should be capitalised on in helping children to take on responsibility for their own oral health care as young adults. Notes to supplement lecture series given in Tasmania and New Zealand 2010/2011 11 Guiding principles The clinician Parent/ carers The child Parent/ carers The route (or barrier) to success The Parent/ carers; key points • Accept that parent/ carers have, within limits, autonomy over the care of their child. Avoid coming across as judgemental at all costs. • Key carers (those who look after the child for significant periods of time) can be many; they need to be identified, and ways found of including them within an individualised preventive programme. • Bringing children for dental care is inconvenient for parent/ carers. Be sure to show your appreciation for their visit, and make efforts to find out which days and times suit them best; it’ll be the children who benefit from this. • Children are entirely dependant on their parent/ carers for their oral health. Parent/ carers may need to be guided to recognise their responsibility in this area. If, despite guidance, they do not accept and discharge this responsibility, then the oral health team in turn has a responsibility to follow this up as a possible child neglect issue, following local protocols. Parent/ carers hold the key to improving and maintaining oral health in children under their care. A child’s oral health is their responsibility, and children are totally reliant on them discharging that responsibility. The oral health team can assist with this process, but cannot take on the primary responsibility for it; that lies with the parent carers. One of the key differences between providing dental care for the adult and the child is that with children (especially young ones) there is always a triangle of communication. The clinician needs to take note of this when formulating a management plan. Accepting, and then working with, the autonomy of the parent/ carers The quality of the oral health care provided for children by their parent/ carers is dependant on many factors, most of which are outside the control of the OHC Team, and some of which are even outside the control of the parent/ carers. Taking an autocratic, paternalistic approach with parent/ carers (even at a non-verbal, or a sub-conscious level) will not produce positive results. Taking even a mildly critical approach with parent/ carers will alienate them. They themselves might be struggling with very significant life problems about which we have no knowledge or experience, and oral health (theirs, and their child’s) might be a long way down their list of priorities. Generally, it is necessary when working with people to change their behaviours, to start where they are, and not where you’d like them to be. More information on this is in the sections on Communication, and Changing behaviours. Notes to supplement lecture series given in Tasmania and New Zealand 2010/2011 12 Identifying the key carers Childcare arrangements can be complex. Young children may spend significant amounts of time with grandparents, or with a childminder. It is important to identify the key adults involved in child care, particularly those responsible for overnight care (because of the importance of good toothbrushing practice), and to find ways of involving them in your preventive programme. This may involve sending out several copies of a preventive management plan, with the carers agreed part clearly written out for each person. The older child/teenager may well be developing the ability to take responsibility for their own oral health care, but most will still need some support and encouragement from parents/principal carers until they leave home. Try to make appointments more convenient for them Bringing a child in for dental care frequently involves a greater commitment from parent/ carers than attending an appointment themselves. The OHC Team should recognise this, and show appreciation for their visit, even if it is their first visit and only because the child is in pain! This will also aid Communication (see next section). Ask which days and times are more convenient for them, and attempt to meet their requests; the child will be the one who benefits. Managing suspected dental neglect Local protocols must be followed. Notes to supplement lecture series given in Tasmania and New Zealand 2010/2011 13 Guiding principles The clinician Parent/ carers The child The child Cannot be managed as a small adult The Child; key points • Children should be seen regularly in the dental surgery from 1 year of age, to allow the preventive messages to be discussed before dental disease becomes established. • Children’s autonomy should always be respected; they should be fully involved in treatment decisions about their care, and permission sought from them to begin, and continue, with dental treatment. Treatment must never be forced on an unwilling child. • Care for the carious primary dentition should be provided to fit with the child’s treatment priorities for the primary dentition (freedom from pain and infection), and within the child’s ability to cope with treatment. • Like all of us, children respond well to attention, praise, and rewards, and stickers seem a useful currency. Children are different from adults in how they perceive the value of dental care, and this has largely been covered in previous sections When to start? Children should be seen in the dental surgery, with their parent/ carers, from 1 year of age. This is an ideal age to get the preventive message across, and much easier for all than trying to manage a 3 year old presenting for the first time with established disease. It is also an opportunity to begin the process of ensuring the parent/ carer appreciates that their child’s oral health is their responsibility, and not that of the Oral Health Care Team. When parents bring older children for care, enquiries should be made as to whether there are other children in the family group, and if so, they should also be invited to attend. Avoiding things the child doesn’t like Working within the child’s priorities, and ability to cope, has been covered in the section The Clinician. Dental care often involves experiences that are totally outside a young child’s familiar world (cotton wool rolls in the mouth, compressed air, suction, the sounds and sensations of handpieces, local anaesthesia etc), and it is a testament to a child’s trust and fortitude that any of these can be used at all. However, with proper preparation (see Managing behaviour), the child can often be helped to cope with them. Preparation is everything, but if cooperation falters, then the procedure must be stopped. It is difficult to think of a scenario where continuing to work on a child who is crying can ever be acceptable. Notes to supplement lecture series given in Tasmania and New Zealand 2010/2011 14 Children, however young, need to be managed with the same respect for their autonomy as would be given to an adult. Using age-appropriate language, everything should be explained to them, and their permission sought before beginning any procedure. Children do not like being talked over; they should be fully involved in any decisions about their care. Things occasionally do not go well; perhaps an injection was painful, or some unpleasant taste was experienced. In these situations, a full explanation to the child, and an apology, will prove more effective at settling things down than trying to brush over what happened. Trust has been mentioned above, and it is accepted that when an individual loses trust in a clinician, the resultant mistrust phobia can be one of the most difficult forms of phobia to resolve. While for an adult, treatment is usually continued until the patient is “dentally fit”, for children (and their parent/ carers) there may be value in trying to limit visits to around four per course of treatment, with non-urgent items (for example, an early dentinal proximal lesion in a primary molar) being postponed till the next course of treatment. This is more fully covered in Planning treatment. Working with the things the child does like Fortunately, there is much children do like. They like being taken notice of, and listened to. They also like making adults laugh, and they like receiving praise and rewards. For some reason, the sticker holds a special place in most children’s hearts, and should be used at the conclusion of a successful appointment, and also an unsuccessful appointment if the child did their best. The appreciation of stickers can also be used with toothbrushing charts (see Prevention), to help children motivate their parents. Notes to supplement lecture series given in Tasmania and New Zealand 2010/2011 15 The Oral Health Assessment Building communication, and the first visit Engagement is the key, not just talking at them Communication & history taking; key points • • • • • Communication is a two-way, interactive process, and is critical in moving the relationship between oral health worker and patient/ parent/ carer from the traditional “Expert giver/ Passive receiver” to a more empathic relationship, which is an essential component of effective behaviour change This begins by warmly welcoming the parent/ carers as well as the child, and beginning the engaging process through the two stages of: a) getting eye contact, and b) gaining a positive response to a verbal exchange (making them smile!) Then building on the engagement through open questions, matching the parent/ carers communication style, being non-judgemental, and showing an appreciation of the efforts the parent/ carers have made to attend, and a willingness to reduce the inconvenience by altering appointment times Include the child at every opportunity; they intensely dislike being talked over, and can be a valuable source of reliable information on brushing and diet Using the above techniques, take a; Social history, to gain information about; - the care arrangements for the child, particularly regular overnight stays, to help develop an effective prevention programme - the most convenient appointment times for the parent/ carers Dental history, to help with; - diagnosis of any pain - current brushing practice - attitude and experience of child (and parent/carer) to treatment - assess whether anxious, and if so, level and causes of anxiety • Medical history, to; - Identify any medical conditions which may influence oral health, and the provision of oral health care The use of a structured form for recording the oral health assessment, or at least a checklist, is essential (see Section Problem List) Overview First establish communication, then take a history; Social history Dental history Medical history Notes to supplement lecture series given in Tasmania and New Zealand 2010/2011 16 Communication Communicate verb /kə’mju :.n.ket/ ”to share information with others by speaking, writing, moving your body or using other signals” There is more to communicating effectively with patients than simply speaking very clearly, and avoiding jargon. This is, of course, a part of communication, but only a relatively small part. Good communication is a two-way process, which involves actually engaging with the person, both at a verbal and a non-verbal level; listening to them; hearing what they are telling you, and responding to it. Most members of the OHC Team are “good with people”; otherwise they wouldn’t be able to achieve the miracles of people management that are a part of every day dental practice. The skills used to achieve this can be difficult to clearly describe with words. Much of clinical practice is very physical and tangible, with readily-identifiable parameters. For example; soft, active dentine caries is identified in a permanent tooth, and removed until it’s all gone; calculus is detected on a root surface, and instrumented until the root surface is clean and smooth; problem identified, problem managed. The sections on Building Communication and Changing behaviour cover areas very different from these. These sections use language and concepts that may be less familiar to the OHC Team. Many of us may feel relatively comfortable with the “rules of engagement” of our routine, day-to-day interactions with other people, and see no need to break them down into their component parts. However, it is becoming increasingly accepted that there are real advantages for us, and our patients, in doing so. A: The welcome, (or laying the foundations) With the practice-based model of oral health care the standard in most countries, most interactions between parent/ carers and children will take place in a dental surgery. This is a unique environment for most people, and they will enter it with all sorts of feelings. Parent/ carers may well carry their own anxieties about dental care, and children are bound to have chatted in the playground about dental treatment. Much can be achieved in those all important first few seconds by a really warm, straight forward welcome. Avoid irony; children don’t understand it, and it irritates the parents. Parent/ carers will have gone to considerable personal inconvenience to bring their children for care, and that must be recognised by a simple “Thanks for coming to see us today”, and an introduction of yourself and any other members of the oral health team who are in the surgery. There is a natural tendency to fuss over the child, and it is important to acknowledge them as an individual, and to welcome them. However, it’s the level of engagement with the parent/ carers which is achieved that will ultimately determine the oral health of the child. Engaging with the parent/ carers, and the child The key first step to achieving positive health behaviour change is to engage with the patient, and parent/ carers; that state of connecting with another person such that you both have each others attention, and in addition see each other as people, rather than “service provider” and “customer”. This is usually fairly easy to achieve, by following the two key steps: • Get eye contact, and • Say something that makes them smile, or at least respond to in a positive way. The parent/ carer and/or child may also initially say something to which you can respond positively, and that is just as good. Once you have engaged with them (remember, there will be a very few people will never engage with you), you can then begin the process of building on your communication. Good communication between the OHC Team, parent/ carers and child will make any dental treatment much easier to Notes to supplement lecture series given in Tasmania and New Zealand 2010/2011 17 provide (see Helping children cope), and provides the basis for changing behaviour in a positive way. It must be remembered, though, that the level of engagement (and its very close relative, empathy (see Changing behaviour)), are not fixed, and can go down as well as up during a single treatment session, or between appointments. This must be identified, if it occurs, by the OHC Team, and managed appropriately. B: Building communication This section draws from an excellent short book, edited by Ramseier and Suvan “Health Behaviour Change in the Dental Practice”, which is highly recommended (see section on Further Reading for details). Stimulating engagement (sometimes referred to as rapport), is the first step to building up good communication with the parent/ carer and child. Having achieved it, you will then settle the family group down in the surgery, and will begin the process of history taking. This is a good opportunity to begin to lay out what you expect the relationship between you and the parent/ carer to be, which may well be different to that which they are used to, or expecting. Changing the balance The old model of clinical care is as follows: Dentist Expert Active Authoritative Judgemental Patient Cooperative Passive Unable to think for themselves In need of guidance to differentiate between good and bad behaviour This model, which many clinicians and their patients still feel comfortable with is, arguably, appropriate for a very few clinical situations. However, it is not conducive to behaviour change, where the drivers, and barriers, to change exist in the context of patient’s life outside, not inside, the dental surgery. Instead, a different model of care, more conducive to behaviour change is: Dentist A person, with some additional skills and knowledge Patient A person who might benefit from those skills, but who also has a whole lot of other things to think about By its very nature, history taking, with its reliance on question and answer, will have a tendency to reinforce the old model (Expert; subject). This will be unavoidable for the medical history, but for the dental and social history, the use of open, rather than closed questions is a significant step to introducing the parent/ carer to the new relationship. Open, and closed, questions A closed question, such as; “How often do you brush his teeth?” “Does he get fizzy juice?” anticipates a simple, short response. The problem with closed questions is that they inevitably carry an inference that there is a wrong answer as well as a right answer, especially with the answers being scribbled in the notes as the patient speaks! This, in turn, indicates the old model of clinical care is Notes to supplement lecture series given in Tasmania and New Zealand 2010/2011 18 being followed. While the oral health team may obtain some information about home care, it is very likely to make the parent/ carer feel uncomfortable about the process. Instead, change a closed question into an open question, by altering the beginning: Closed question “How often do you brush his teeth?” “How often does he get fizzy juice?” “Who looks after him when you work?” Open question “How are you managing with his brushing?” “Tell me about what he likes to drink? “Can you go through with me how you manage with working part-time?” Communicating styles When the patient responds to you, they will generally follow one of three main communicating styles. Most oral health care workers will naturally follow the patients lead on style, which is important for increasing rapport and empathy, but the nuances are subtle, and we may well rationalise with ourselves that that is what we do, when actually we don’t! If there is a positive, supportive relationship between two members of the OHC Team, such a nurse and therapist, carefully worded feedback after a consultation can be invaluable. Styles of Example communication Directing “What can I give him that’s good for his teeth?” Following “I feel awful that he’s going to need all those teeth out” Guiding “I know I should brush his teeth twice a day, but it’s so difficult” Comments Can be useful, but only where there is really good rapport Patient takes the lead, and you just respond to them; classically used in breaking bad news Best for behaviour change Communicating styles may change during an appointment, or a patient may indicate in a response that they want to change style; if so, change to accommodate them. This is worth doing if you feel your hard won rapport starting to slip away. As the patient responds to you, avoid at all costs being perceived as judgemental. This can take a real effort of will when the parent states something which is not correct or best practice, but note what the parent/carer says, and deal with it later using Motivational Interviewing techniques (see section Changing behaviour). As will be explained in that section, if you try to correct something at this stage by saying, for example: “Actually, he’s too young to brush his own teeth, you need to do it for him” you will unwittingly be perceived as challenging the parent/ carers autonomy regarding their own child, and they will immediately be on the defensive; a state in which behaviour change will probably not occur. Communication; Pulling it all together In summary, with your warm welcome and introductions of yourself and team (unless you’re single handed!), with eye contact, and saying something they can engage with and respond to, you will begin gaining rapport with the parent/ carer and child. Then, using open questions, listening to the responses, and the style in which they’re given, you respond in turn, following the parent/ carers or older child’s lead, as far as you are able to, and resisting at all costs being perceived as judgemental. This means completely avoiding correcting at this early stage. Notes to supplement lecture series given in Tasmania and New Zealand 2010/2011 19 The parent/ carers will then begin to see you and themselves as a team, working together to improve their child’s oral health, and this will allow genuine empathy to grow. This will be enhanced by subsequently asking if it’s ok to talk about things they might regard as; a) not particularly relevant, such as homecare arrangements, b) potentially embarrassing, as usually considered part of good parenting and something they should know about. This would include brushing instruction and dietary advice Empathy is the single most important component of successful behaviour change, and it will be discussed fully in the section on Changing behaviour. Having begun the process of establishing communication, proceed to history taking. History taking 1/3 History taking; Social history A child’s oral health status will largely be determined by the degree of compliance of the child’s principal carers with evidence-based guidance on best toothbrushing practice, and diet. Several adults may have regular, significant involvement in a child’s care, particularly if the mother is working, and for some children, their “care network” can be extensive, and include: • Parents and step parents • A single parent’s partner • Siblings • Extended family members; grandparents, aunts & uncles • Childminders, nurseries, family friends It is important that all of these are identified, and their level of involvement recorded in the child’s assessment sheet (Appendix). The OHC Team will then need to work with the adult or adults who are attending with the child to ensure transfer of knowledge and understanding regarding the preventive programme. In addition (and a significantly more difficult task), the OHC Team must try to ensure that the individual adults in the child’s care-network also accept their personal responsibility for the child’s oral health. It is particularly important to identify and target any adults who provide regular over night care for a child, due to the major contribution to caries prevention provided by effective toothbrushing with a fluoridated paste. 2/3 History taking; Dental history Using open questions, explore the range of issues which will help you to build up a picture of how best to manage the child’s oral health; the issues which need to be addressed and the possible barriers to doing so. These will include: • History of pain; if so, time, frequency, severity etc. to aid diagnosis • Brushing practice; how often? When? By who? F Concentration of paste? Amount? Spits out, or rinses? • Attitude, and previous experience of dental care • Anxiety levels, and causes of anxiety 3/3 History taking; Medical history A comprehensive medical history should be taken to identify any conditions which might either affect the child’s oral health (long term oral medication in syrups, for example), or the provision of oral health care. Information on these is readily available in most standard textbooks. It is, however, worth exploring here the issue of a child with congenital or acquired heart problems which places them at increased risk of infective endocarditis. Notes to supplement lecture series given in Tasmania and New Zealand 2010/2011 20 Children at increased risk of bacterial endocarditis Guidance on the provision of oral health care in the UK to people who are at increased risk of infective endocarditis has recently changed. Dental procedures which are known to cause a bacteremia need no longer be covered with antibiotic prophylaxis, nor is it necessary to provide a pre-treatment rinse with chlorhexidene. It is important to note, however, that this is due to the evidence indicating that any benefit to the patient of antibiotic prophylaxis is outweighed by the disadvantages of the prophylaxis itself; it does not mean that bacteremias of oral origin are no longer thought to increase the risk of bacterial endocarditis. For child oral health care provision, this means that primary teeth associated with a dental abscess, or which are assessed as at increased risk of causing a dental abscess, should be extracted promptly, although there is no need to cover the extraction with antibiotic prophylaxis. This means, for example, that while in some situations retained roots of primary teeth, or primary teeth with pulp polyps, might be managed very conservatively, and simply monitored for signs of abscess, if occurring in children at increased risk of infective endocarditis, they should be extracted. Notes to supplement lecture series given in Tasmania and New Zealand 2010/2011 21 Summary flowchart for taking a History at a first appointment The first appointment Comments Parent/ carers and child enter surgery Try to have your notes written up, so that you are turned to face them Give: • A warm welcome - Smile, gain eye contact, make them both smile (or at least acknowledge you as another person), and thank the parent/ carers for bringing their child • Introduce everyone in the room First impressions count Establishing a basic level of engagement to build on, as an entreé to building empathy Using open questions; matching the parent/ carers communicating style, and avoiding judgement, ask permission to, then take, a social history; “Would it be alright to ask you for a bit of background information about who looks after Sophie?” • Who are the principal carers for the child during the daytime • Does the child stay overnight on a regular basis with another parent/ carer • Is this appointment time convenient? Or would another suit better? • Would it help if appointments were shared with another family member? Parent/ carers generally have a lot going on in their lives. Acknowledging that you appreciate the effort they have made, and will do what you can to reduce the inconvenience to them of further appointments, will help build rapport. Knowledge of regular overnight stays are important when planning brushing advice Following the same principles, take a dental history, • Ask about previous dental experience • Current pain/ swelling • Brushing habits (see toothbrushing section in Prevention) The answers here will give valuable information for Planning Treatment Now take your standard medical history Medical histories usually involve closed questions, so should be left till the final part of the History taking, when rapport should be well established Notes to supplement lecture series given in Tasmania and New Zealand 2010/2011 22 The Oral Health Assessment Examination; an overview; key points • • • • A thorough, comprehensive and meticulous examination and diagnosis are the foundation of successful oral health care, and must include both of the following factors: - An assessment of the oral health status of the child with respect to the presence or absence of dental disease, and - An assessment of the attitudes, opinions and expectations of both the parent/ carers and the child regarding the child’s oral health . Use of a standardised data recording form is essential to ensure all relevant information is collected in a usable form, and to prevent reversion to a habit-based approach to diagnostic decision making (see Section Problem List) The examination should include: - An extra-oral examination - An intra-oral examination of the soft tissues - An assessment for dental caries and sepsis - Plaque levels - A caries risk assessment A review of the developing dentition, with a particular emphasis on: - Identification, and appropriate management of first permanent molars with a poor prognosis before the child reaches 10 years of age - Identification, and appropriate management of: - Maxillary permanent canines which are impacting palatally - Missing/ unerupted permanent teeth Soft tissue examination An intra-oral examination should always begin with the oral soft tissues. This is to exclude pathology, which for children will most commonly include signs of infection of dental origin, such as dental abscess. This will be fully covered in the section following caries diagnosis. After this, Recording plaque levels, caries risk assessment, assessing the occlusion, and Managing first permanent molars of poor prognosis will complete the section on examination and diagnosis. Notes to supplement lecture series given in Tasmania and New Zealand 2010/2011 23 The Oral Health Assessment Caries diagnosis Presence or absence is only half the story Caries diagnosis; key points • Primary teeth shed. Therefore, the principle aim of managing dental caries is to prevent the disease causing the child pain or abscess before the affected tooth is shed, and this requires a different assessment of the disease from that for permanent teeth. Assess caries in primary teeth using the following 3 criteria: 1. Is caries present? 2. If present; is it active or inactive? 3. If present and active, what’s the risk of it causing pain/ sepsis before the affected tooth exfoliates; and is that risk imminent? or delayed? 1. Is caries present? • • Teeth must be clean and dry. Bitewing radiographs will usually be an essential part of any examination, repeated at subsequent intervals as determined by a risk assessment (every 12 to 24 months if at increased caries risk) Dentine will be carious and infected if: - Shadowing/opaque whiteness visible under enamel adjacent to pit or fissure - Microcavitation present - Dentinal caries visible on a radiograph 2. If present; is it active or inactive? • • • Enamel caries which is active feels rough to a probe gently stroked across the surface; arrested caries feels smooth Dentinal caries which is active is soft to probing; arrested caries feels hard. Assume dentinal caries which is not accessible to probing is active, unless proved otherwise (by non progression using a diagnostic system sensitive enough to detect progression (sequential radiographs, photography, ICDAS in early lesions)) 3. If present and active, what’s the risk of it causing pain/ sepsis before the affected tooth exfoliates; • Assess this using the following criteria: - proximity of the lesion to the dental pulp - activity of the lesion and time to exfoliation - whether the lesion is sufficiently cavitated to allow cleaning with brushing - anticipated cooperation of child and parent/carers with preventive interventions • Asymptomatic dental infection (sepsis) must be identified, from: - History - Inflammation/ sinus/ tenderness in peri-alveolar tissues - Pathological mobility - Radiographs - Clinical judgement based on extent of cavity Information must be recorded using a method that allows caries progression to be monitored, and for different clinicians to be able to interpret the information about the same assessment in the same way Notes to supplement lecture series given in Tasmania and New Zealand 2010/2011 24 Caries diagnosis Presence or absence is only half the story The management of dental caries in primary teeth is different from permanent teeth. Introduction Primary teeth shed naturally, and so a carious tooth might, if the rate of progression of the disease can be slowed, exfoliate before the child experiences pain or infection. In addition, children are generally little bothered by either the aesthetics or loss of function of carious primary teeth. For these reasons, the management of caries in the primary dentition differs from that of the permanent dentition, and a different diagnostic approach is required, based on three parameters: 1. Is caries present? 2. If present; is it active or inactive? 3. If present and active, what’s the risk of it causing pain/ sepsis before the affected tooth exfoliates; and is that risk imminent? Or delayed? How each of these three parameters can affect the treatment provided is shown in the summary table below. The three stages of caries assessment in the primary dentition (assumes all patients are receiving standard prevention) 1/3 Is caries present? Yes No Continue to monitor for disease 2/3 Is it active? Yes No Monitor for change in activity 3/3 Risk of pain/ sepsis before the affected tooth exfoliates? Yes Operative intervention required, & enhanced prevention No Provide enhanced prevention, and monitor The OHC Team will need a thorough understanding of the pathology of dental caries in order to prevent it, and manage it effectively if it occurs. The pathology of the disease is covered later. This section will cover caries diagnosis and assessment, as follows: Is caries present? Is caries active? Risk of pain/abscess before exfoliation? and will finish with how this information might be recorded. How this information is used will be covered in a later Section. Notes to supplement lecture series given in Tasmania and New Zealand 2010/2011 25 Is caries present? Is caries active? Risk of pain/abscess before exfoliation? 1/3: Is caries present? An overview of diagnosing dental caries There are several diagnostic criteria for dental caries, based on detecting changes in the physical characteristics of affected tissues, including: • Visual - colour - translucency - microcavitation • Tactile • Radiographic -radiodensity • Electrical - smoothness/roughness -surface continuity/discontinuity -hardness/softness - impedance Applying the criteria will be aided by an understanding of the normal visual characteristics of healthy dental hard tissues. Normal visual characteristics of healthy enamel and dentine For most people, healthy enamel is: • colourless, and • translucent. This can be readily observed at the incisal edge, where the enamel wraps over the underlying dentine. It can appear quite dark, but it is the shadow at the back of the mouth which is being observed, rather than the enamel itself. Healthy dentine is: • light yellow/ creamy • opaque Teeth gain their characteristic appearance due to the translucent enamel modifying the light reflected of its surface, and the surface of the underlying dentine. How this normal appearance is affected by dental caries Dental caries initially causes acid dissolution of the surface layer of enamel, but differentially, favouring the prism sheaths, rather than dissolving the surface evenly. This creates pores in the enamel surface. If these pored are filled with a material of around the same refractive index as enamel (water), the optical characteristics will be largely unaffected. However, if the pores are filled with air, then much of the light will be refracted many times before being reflected off the surface, making the enamel appear a) white, and b) opaque. Notes to supplement lecture series given in Tasmania and New Zealand 2010/2011 26 How this affects the visual appearance of caries can be seen in the following demonstration. Enamel is hard, brittle, colourless and translucent Dentine is soft, flexible, and opaque Together, they give teeth their characteristic appearance of colour and translucency If the surface is roughened by caries, or acid etch, light is reflected back off the surface layer, so it appears white and opaque If the under surface of the enamel is roughened by dentinal caries, the enamel appears white and opalescent However, if the pores are filled by a liquid of the same refractive index as enamel (i.e.water), the optical characteristics of healthy enamel are restored Clinical examples a) Note how cleaning and drying the cervical margins of these teeth highlights the enamel caries b) here, the enamel has been undermined by caries spreading through the dentine. Although the outer, surface half of enamel is not affected, the inner half is demineralised. This can often be seen through the surface enamel as a characteristic bloom, or opalescence, as in the figure below. Sound enamel Demineralised enamel Notes to supplement lecture series given in Tasmania and New Zealand 2010/2011 27 c) the transition from translucent to opaque caused by demineralisation of the inner surface of enamel, due to undermining dentinal caries The clinical diagnosis of dental caries The meticulous diagnosis of dental caries requires optimal conditions with regards to line of vision, and access to potentially affected sites, therefore: • Teeth must be clean and dry, and viewed under a bright light. • The optimum tools for caries diagnosis are a mirror in one hand, and a triple syringe in the other. • It is no longer considered acceptable to probe suspicious fissures. However, a probe may be used to: - gently debride a fissure as an aid to diagnosis - draw gently over the surface of enamel to determine if a white spot lesion is active or arrested (see next section) - probe exposed carious dentine to determine caries activity (see next section) Additional aids to diagnosis include: • Use of separators Orthodontic separating elastics can be placed for 3-5 days to allow visualisation of proximal tooth surfaces. This could be a particular indication for managing suspicious proximal lesions on permanent teeth; if found to be cavitated, then the lesion should be restored. • Transillumination With practice, many clinicians find transillumination an effective method of caries diagnosis. It can be particularly useful for diagnosing proximal lesions on anterior permanent teeth, using the overhead dental lamp as the light source, and placing the dental mirror in the shadow towards the back of the mouth, and observing the light passing through the anterior teeth. Notes to supplement lecture series given in Tasmania and New Zealand 2010/2011 28 Radiography Radiography is an essential aid to diagnosing caries for most children. Due to the broad, flat contacts of primary molars, proximal caries may not be visible until at an advanced stage. Note that while the mesial lesion on the lower second primary molar can be diagnosed from the opalescence of the marginal ridge, the distal lesion affecting the first primary molar might have passed unnoticed. The bitewing film demonstrates no intra radicular pathology affecting either of the lower primary molars; however, the intra radicular area of both upper primary molars is not visible on the film. A useful film if the child can manage, is the vertical bitewing film. A disadvantage, though is that great accuracy is required to include first and second primary molars, and the first permanent molar, on one film. There is good evidence that the great majority of children are happy to tolerate bitewing radiography. • • Unless the dentition is spaced, or the child is assessed as at very low risk of dental caries , bitewing radiography should be part of the clinical examination for children aged 4 years and above. If radiographs have been taken previously, take subsequent bitewing radiographs at the following intervals (as recommended by the Faculty of General Dental Practitioners) based on the child’s risk of developing caries. - For children at increased risk of developing caries: 6-–12 months. - For all other children: 12-–18 months for primary teeth and ~2 yearly for permanent teeth. Notes to supplement lecture series given in Tasmania and New Zealand 2010/2011 29 Is caries present? Is caries active? Risk of pain/abscess before exfoliation? 2/3: Is the caries active? “Any carious lesion, at any stage of advancement, can be arrested, and in some cases, reversed” Kidd For the primary dentition, where loss of function and aesthetics are not major issues for the child, caries which has arrested can often be managed with a prevention-alone management strategy. It is therefore essential for the clinician to be able to differentiate between active and arrested dental caries. Enamel Enamel caries appears as a white, opaque lesion, due to the roughened surface reflecting the majority of the light that falls on it. If caries is active, the surface will feel slightly rough to the side of a probe drawn gently across the surface. If the caries is arrested, the surface will feel smooth to the side of the probe. • Active enamel caries feels rough • Arrested enamel caries feels smooth Dentine The mineral content of dentine is around 75%, much less than that of enamel. As it has a well organised collagen matrix, loss of some of the mineral does not always result in a complete collapse of the affected area. Instead, it can become softened, while maintaining its shape. Eventually, a combination of proteolytic bacteria degrading the collagen, and abrasion and attrition of the softened dentine will result in its loss. Enamel overlying carious dentine loses its support, and also has its dentinal surface demineralised. As a result of its brittleness, the enamel fractures under stress, causing a cavity to form. Cavitation can open up the plaque biofilm sufficiently to the oral environment to cause the caries to arrest. Lower primary molars with arrested dentinal caries, which is hard to probing • • Bitewing radiograph of the same teeth Arrested caries on an upper first showing absence of radiographic primary molar, which is light signs of infection coloured, and hard to probing Active dentinal caries feels soft to the probe. Arrested dentinal caries feels hard, and is often, but not always, dark in colour Notes to supplement lecture series given in Tasmania and New Zealand 2010/2011 30 Note • • An arrested lesion can become active again, if there is a change in the micro-environment The only certain criteria of an arrested lesion is that it does not progress over time. Ideally, therefore, these lesions need to be recorded using a system that allows change over time to be identified. Is caries present? Is caries active? Risk of pain/abscess before exfoliation? 3/3 Is there a risk of pain or abscess before the tooth exfoliates? When examining the carious primary dentition, the clinician needs to assess the risk of each lesion progressing to pain or abscess in order to decide on the most appropriate management option. Not all carious lesions require operative management. To make this decision, consider: • proximity of the lesion to the dental pulp • activity of the lesion • time to exfoliation • whether the lesion is sufficiently cavitated to allow cleaning with brushing • anticipated cooperation of the child and parent/carers with preventive interventions In short: Assess carious primary tooth clinically and radiographically Risk of abscess before exfoliation High Imminent Manage now, if possible Low Prevention and monitor Delayed manage later, if necessary The clinician needs to use their skill and judgement when carrying out this risk assessment. It should also be noted that caries activity can change. With so many variables, it is not possible to clearly define specific criteria that will accurately predict which carious lesions will, or will not, result in pain or abscess for the child. The following is intended as a guide only. Notes to supplement lecture series given in Tasmania and New Zealand 2010/2011 31 Clinical scenario Description Distal carious lesion, outer 1/3 of dentine, lower first primary molar, 5 year old child Occlusal carious lesion, soft to probing, lower second primary molar, 5 year old child Risk of abscess before exfoliation? High Imminent risk? Or delayed? Delayed intervention can be planned for a follow up course of treatment; manage within 12 months High Imminent risk? Or delayed? Slightly delayed Try to manage within 4 months Low Distal carious lesion, hard to probing, upper first primary molar, 5 year old child May be managed with a prevention alone approach, but monitor for change Notes to supplement lecture series given in Tasmania and New Zealand 2010/2011 32 Clinical scenario Description Distal carious lesion, soft to probing, upper first primary molar, 6 year old child Pulp chambers cariously exposed, and open to the oral environment Risk of abscess before exfoliation? High Imminent risk? Or delayed? Imminent Try to manage within this course of treatment High Imminent risk? Or delayed? Imminent Try to manage within this course of treatment Notes to supplement lecture series given in Tasmania and New Zealand 2010/2011 33 Clinical scenario Description Risk of abscess before exfoliation? Low Distal carious lesion lower primary canine, hard to probing, and retained root first primary molar, 7 year old child May be managed with a prevention alone approach, but monitor for change Low Several carious lesions in lower primary teeth, hard to probing, 7 year old child Mesial carious lesion, upper second primary molar, with pulp polyp, and no signs or symptoms of abscess May be managed with a prevention alone approach, but monitor for change Low May be managed with a prevention alone approach, NB in primary molars, pulp polyps (by definition, vital pulp) might only be associated with some of the root canals; other root canals might be necrotic; if signs or symptoms of abscess, extract Notes to supplement lecture series given in Tasmania and New Zealand 2010/2011 34 Recording the caries assessment Recording the results of a caries assessment in a way that allows disease progression to be monitored is problematic. For example, below are three examples of occlusal caries (becoming progressively more extensive, and each with different management options), on a lower second primary molar, and how they would be recorded on a standard dental chart: Similarly, two distal lesions on an upper first primary molar; one active and at high risk of causing pain/ abscess, and one hard and arrested, and needing a prevention alone approach, and how both would be recorded on most charts. In addition, most charts are relatively crude schematics of tooth morphology, with the following for a maxillary second primary molars, and first and second maxillary permanent molars,: Instead of this schematic, which allows for there being two distinct and separate sites for caries development on the occlusal surface; the mesial fossa, and the distopalatine fissure. Notes to supplement lecture series given in Tasmania and New Zealand 2010/2011 35 Alternatives to standard dental charting 1) The most widely reported system is ICDAS (International Caries Diagnostic and Assessment System; (www.ICDAS.org). Here, two numerical codes are ascribed to each tooth surface; the first represents any sealants or restorations present, the second the extent of any carious lesion. The codes are listed below, along with some examples of charting: Restoration and Sealant Codes 0 = Not sealed or restored 1 = Sealant, partial 2 = Sealant, full 3 = Tooth coloured restoration 4 = Amalgam restoration 5 = Stainless steel crown 6 = Porcelain, gold, PFM crown or veneer 7 = Lost or broken restoration 8 = Temporary restoration Caries Codes 0 = Sound tooth surface 1 = Visual change in enamel, only when dry 2 = Visual change in enamel visible when wet 3 = Enamel breakdown, no dentine visible 4 = Dentinal shadow (not cavitated into dentine) 5 = Distinct cavity with visible dentine 6 = Extensive distinct cavity with visible dentine . 04 04 . . . . . 35 . 40 46 . . . . Note how use of red indicates an active lesion (this is the authors own approach). A full chart for using with the ICDAS system is in the Appendix. A training session for the ICDAS system is available for free download from the Web. After a little practice, a full chart can be completed in around 5 minutes, and will contain much more information of clinical relevance than a standard dental chart. 2) Another system is the NYVAD system, named after Bente Nyvad, who developed it. Here a single number is ascribed, as follows, and with examples, as above: 0 = Sound surface 1 = active lesion, intact surface 2 = active lesion, surface discontinuity 3 = active lesion, cavity 4 = inactive lesion, intact surface 5 = inactive lesion, surface discontinuity 6 = inactive lesion, cavity . 1 1 . . . . 8 . 7 = filling, sound 8 = filling active lesion 9 = filling inactive lesion . . 7 8 . . Notes to supplement lecture series given in Tasmania and New Zealand 2010/2011 36 Although simpler than the ICDAS system, the Nyvad system records less information to assess change in lesion size over time, and there is no capacity to record fissure sealants; whether present, or partially lost. 3) Photography. With practice, a good digital camera with a ring flash, and an assistant to hold the mirror, full arch views can be taken within around 2 minutes. The information they provide can be invaluable in determining whether carious lesions really have arrested, and they can be very useful as a child, and parent/ carer motivation tool. The example below shows progression of mesial lesions in both of the maxillary second primary molars over 3 years, based on which the management strategy was changed from prevention alone, to Hall crowns. Recording radiographic findings Currently, no system of recording radiographic findings is in common use, although UK regulations require a radiographic report to be entered in the patient’s notes. A significant difference, however, with assessing caries is that radiographs are available at subsequent visits, unless they are mislaid. If mounted sequentially, they can be invaluable in monitoring caries progression, and assessing for change in caries risk. They are also an extremely important adjunct to treatment planning for the child with dental caries. Notes to supplement lecture series given in Tasmania and New Zealand 2010/2011 37 The Oral Health Assessment Diagnosing dental abscess/ sepsis Sepsis cannot be left unmanaged The diagnosis of dental sepsis Dental sepsis (chronic suppurating dental infection, usually asympotmatic) can be difficult to diagnose, as the presentation can vary. Sinuses are not always obvious, but if present are usually located on the non-attached mucosa adjacent to the attached mucosa. A slight cleft, or notch, may also be noted in the adjacent gingival margin. The following are indicators of established dental sepsis: • patient reported symptoms of dental infection (swelling, tenderness etc) • alveolar tenderness, sinus or swelling • inter-radicular radiolucency • tenderness to percussion in a non-exfoliating tooth • Pathological mobility (compared with the healthy contralateral tooth) when the tooth is gently rocked bucco-lingually with the points of a pair of tweezers placed on the occlusal surface Sinus with associated inter-radicular radiolucency of lower first primary molar Alveolar inflammation that, on gentle palpation, releases infected material from a lower primary molar • • Assessing for the increased, non-physiological mobility often associated with sepsis It is now regarded as unacceptable to leave dental sepsis in the mouth. There are two treatment options: extraction of the tooth, or pulp therapy if feasible. In exceptional circumstances, it may be possible to monitor asymptomatic dental sepsis for up to three months while the child is acclimatised to the dental treatment necessary to manage the dental sepsis. If within this time the child does not respond to anxiety management, consider referral to a specialist centre. Notes to supplement lecture series given in Tasmania and New Zealand 2010/2011 38 The Oral Health Assessment Recording plaque levels Recording plaque levels at each visit, and sharing this information with the child and their parent/carer, will help reinforce the importance of effective tooth brushing. An example of a quick method of recording plaque levels, and presenting the information in terms the child will understand, is to give marks out of 10 as follows: perfectly clean tooth 10/10 line of plaque around the cervical margin 8/10 cervical third of the crown covered 6/10 middle third covered 4/10 Record the worst score in each sextant, for example: 8/10 6/10 8/10 8/10 6/10 8/10 It is also important to assess the surface of open carious lesions for plaque that is visible or evident when an instrument is gently drawn across the surface of the lesion, particularly if considering managing the lesion with a prevention-alone approach. Caries risk assessment A caries risk assessment is an essential part of a comprehensive oral health assessment. All children are at risk of developing caries in the future, but for some the risk will be high, while for others it will be moderate, or low. Assessing an individual child’s caries risk will: • Allow caries preventive interventions to be targeted at those who need them most • Aid selection of the optimum caries management technique for existing carious lesions Three easy-to-use, evidence based factors which clearly predict future caries development, and which all clinicians should use in their caries risk assessment are: • Existing dental caries • Social deprivation ?? • Health workers intuition Notes to supplement lecture series given in Tasmania and New Zealand 2010/2011 39 Other factors related to increased caries risk which some clinicians might like to include in addition to those above are: • Strep Mutans levels • Lactobacilli levels • Salivary buffering capacity • Parental & sibling caries rates • Salivary flow rates A computer aided caries risk assessment tool (Google “Cariogram”) is available for free download. It could be particularly useful as a patient and parent education tool. Following this, the clinician should assign a caries risk status to the child as either lower, medium or higher risk of developing new caries, and of existing disease progressing. The level of risk will determine the intensity of the preventive programme. Assessing the occlusion Details of a full orthodontic assessment are outside the scope of this manual. It is incumbent on the clinician to monitor the developing occlusion for problems and, if in doubt, to seek specialist advice. The following list is not exhaustive, but includes some of the more common problems to be on the look out for, and how they might be managed: Impacting maxillary first permanent molars It may be possible to disimpact using orthodontic elastic separators, but if still impacted after around 9 months, then extract the second primary molar, otherwise there is an increased risk of caries affecting the first permanent molar. Premature loss of the second primary molar will inevitably lead to crowding in that quadrant, so ensure the parent is advised, and this is documented. Anterior crossbite These are usually best corrected as soon as is possible, using a removable appliance. However, if part of a developing Class III skeletal relationship, then simple management with a URA is unlikely to be effective, and the child should be referred for specialist advice. Notes to supplement lecture series given in Tasmania and New Zealand 2010/2011 40 Impacting maxillary permanent canines It is very important that maxillary permanent canines which are moving palatally are identified early, as prompt management may avoid protracted and difficult orthodontic treatment later. Around the ages of 9 and 10, the maxillary canines should be palpable high in the labial sulcus. If they cannot be palpated by 10 years of age, consider taking parallax radiographic views, to determine if they are palatally placed. If they are, seek an urgent orthodontic opinion. Early loss of maxillary primary canines can in some cases allow the permanent canines to realign to a normal eruption path. R L R L These parallax views show the maxillary left permanent canine is palatally placed (the AOMax beam angle is 45 degrees, the DPT is horizontal; the tooth has moved with the tube, therefore its deep) Increased overjet Current UK guidance, based on recent research, is that early treatment of increased overjets only offers the patient advantages if they are unhappy, due to being teased at school. Otherwise, arrange for treatment, if the patient wishes it, when the permanent dentition has erupted. Submerging primary molars The majority of these are eventually shed, with little problems. However, if submerging to the extent that adjacent teeth are crowding over them, consider extraction. Submerging second primary molars may be associated with missing second premolars; if so, refer for specialist opinion. Premature loss of maxillary primary canine, with centre line shift If unilateral loss of a maxillary primary incisor is associated with a centre line shift to that side, then current UK guidance is that the remaining maxillary primary incisor should be extracted. Missing or impacted permanent teeth If a child is assessed as missing permanent teeth such as maxillary lateral incisors, or second premolars, or eruption of a permanent tooth is delayed more than 9 months after its antimere has erupted, consider early referral for an orthodontic opinion. Notes to supplement lecture series given in Tasmania and New Zealand 2010/2011 41 Management of first permanent molars of poor prognosis First permanent molars (FPMs) are the permanent teeth most vulnerable to caries in the school aged child. In addition, around 1 in 20 children are affected, to varying degrees, by Molar Incisor Hypomineralisation (MIH). This condition, of unknown aetiology primarily affects FPMs, but can also affect permanent incisors, though usually much less severely. The affected teeth have yellowish areas of hypomineralisation, which often rapidly breaks down. Extraction of FPMs of poor prognosis at around 9 years of age can allow the second permanent molars to erupt into an acceptable occlusion with the second premolars. Molars of poor prognosis include those that have: • an advanced occlusal lesion, or an approximal Class II lesion • hypomineralisation that has caused breakdown and cavitation of enamel • lingual decalcification, with cavitation. Delaying loss of FPMs of poor prognosis can result in the child having to tolerate several restorative interventions, before the tooth is finally extracted, resulting in a poor relationship between the second premolar and the second permanent molar, as for this patient. When carrying out extractions of FPMs, the optimal occlusal result will be obtained when: • bifurcation of the lower second permanent molar is seen to be forming on an orthopantomogram (OPG) full mouth panoramic radiograph, usually around the age of 8½–10 years • 5s and 8s are all present on an OPG • mild buccal segment crowding is present • Class I incisor relationship is present. When deciding on extractions, each FPM should be considered on its own merit. It is not necessary to balance extractions (extraction of the contralateral tooth), and evidence supporting the benefit of compensating extractions (extraction of the same tooth in the opposing arch) is weak. The Royal College of Surgeons of England guidance provides more detailed advice on planned extraction of first permanent molars. If FPMs are assessed as being of poor prognosis • Obtain a good quality OPG full mouth panoramic radiograph to ensure that all teeth are present, in good condition and are well placed for eruption before extracting any first permanent molars. • With the possible exception of the third permanent molars, if any of the remaining permanent teeth are missing (hypodontia), or poorly placed, have hypomineralisation and are not well placed for eruption or there is significant skeletal discrepancy, refer for specialist paediatric or orthodontic opinion before undertaking extractions. Notes to supplement lecture series given in Tasmania and New Zealand 2010/2011 42 • • • If there is pain or sepsis and the child accepts local anaesthesia, consider extraction of the affected tooth only, before referring for specialist paediatric or orthodontic opinion. If necessary, consider temporising first permanent molars of poor prognosis in young children, possibly using preformed metal crowns, to keep them free from symptoms until the optimal age for extractions is reached. If in doubt at any stage, temporise the teeth, continue prevention and refer the child for specialist paediatric or orthodontic opinion. Extraction of FPMs under local anaesthesia, especially if more than one tooth needs to be extracted, is a significant undertaking for the child (and clinician!). Clinicians should use their judgement, on a case by case basis, as to whether the use of sedation or general anaesthesia might be indicated, and refer as appropriate. Good buccal segment alignment as a result of loss of FPMs of poor prognosis at the optimum time Notes to supplement lecture series given in Tasmania and New Zealand 2010/2011 43 The Oral Health Assessment Discuss options The child’s, parent/ carer & your priorities may differ Discussing treatment options; key points • • • • Child and parent preferences and other factors, as well as the clinician’s all play a part in deciding upon the components of a treatment plan For each problem, explain what the treatment options are and the pros and cons of each Aim to come to an agreed treatment plan which fits everyone’s priorities using the same two-way process of communication described in the section History and Examination, engaging the child and parent and getting some “buy in” from them Involving them and helping them to have ownership for a treatment plan will help adherence to it and improve the chances of success. Although we all discuss treatment plans with our patients, it is worth taking a few minutes to look at just how important it is to involve them in this step, which is often taken for granted. Because we are so familiar with what we do, it is easy to gloss over the treatment plan and not involve the child and parent/ carer in the discussion. This section details what most clinicians do anyway, but presents it in a very clear way. The aim is for the child and their carer to be kept at the centre of the planned care, by involving them in the formulation of the treatment plan. It would be rare indeed that one single treatment plan would be derived and agreed upon by all clinicians who looked at a given child with a carious dentition. This variation in treatment planning is the result of a complex process of decision making where many (not always obvious), factors are taken into account. These include things such as health expectations, payment systems, previous experiences (on all parts), the ability of carers to bring the child for appointments, perceived ability of the child to cope with invasive treatment, whether the family believe they can influence their own health by changing their behaviours etc etc etc. In order to reach a consensus treatment plan, it is necessary that information is shared both ways: • the parent/ carer and child share their expectations of treatment for example - is the goal to remain pain free in as few appointments as possible or do aesthetics play an important part in the parent’s perceptions; is there a preference for avoiding a certain kind of treatment for example preformed metal crowns, if alternatives are available? • the clinician shares different options for overall treatment goals as well as for each of the treatment components Notes to supplement lecture series given in Tasmania and New Zealand 2010/2011 44 for example – for a lower right first primary molar with micro-cavitated occlusal caries extending radiographically into dentine, a resin or glass ionomer fissure sealant, composite, amalgam, or glass ionomer filling and even a Hall crown might all reasonable treatment options in certain circumstances. However, some might appeal more to a particular clinician as being easier for them to deliver. Also, there might be a balance to be struck between a simple non-invasive intervention that is suitable for the less cooperative child, but is likely to need replaced regularly, compared with a different intervention which might have a better longevity but be more invasive, for a child in a family where there is difficulty getting to appointments. It is usually the case that the clinician draws up the list of problems and issues based on the parent and child’s histories and the clinical/ radiographic examinations. However, as can be seen from the above examples, it may not be the case that the clinician, parent and child’s problem list and priorities completely coincide and so it is important to build in the step of discussing with the child and the parent all of the findings from the oral health assessment before discussing treatment options. The list of problems/issues need to be agreed upon and then how these are prioritised (does the aesthetics of an anterior tooth with Molar Incisor Hypomineralisation take precedence in an older child over restoring active caries in posterior primary molars?) Following this step, for each problem/ issue, a range of options can be discussed and by working together, the child/ parent and clinician must come to some agreement on how each of these can be addressed. • • • discuss findings identify and discuss problems/ issues prioritise these (see section on assessing risk of pain/ sepsis from carious primary teeth to help with this but include the child’s and parent/ carers priorities) • discuss options for each problem/ issue and their pros and cons • work towards establishing a consensus treatment plan bearing in mind that a treatment plan should be: - A guide for a course of interventions for the problems/ issues that have been identified - DYNAMIC – it should be reviewed and updated regularly to meet any changing needs - It should include an evaluation of progress for the child/ parent in meeting any specified goals and objectives for each problem/ issue Notes to supplement lecture series given in Tasmania and New Zealand 2010/2011 45 Steps involved in agreeing a treatment plan. Notes to supplement lecture series given in Tasmania and New Zealand 2010/2011 46 The Oral Health Assessment Agreed Problem List What needs to be managed? Problem list; key points The problem list • Write out all the problems which need to be addressed to improve the child’s oral health. This might include Parent related issues • Current attitude to oral health care • Extended care arrangements for the child • Financial, social or personal barriers to bringing their child for care Child related issues • Fears and expectations regarding oral health care • Relevant medical problems • Ability to cope with dental interventions Dental related issues • Current presence of pain or infection • Caries risk • Vulnerable permanent dentition • Primary teeth at risk of causing pain or infection before exfoliation • Dental development problems The rationale for a problem list In the context of providing oral health care for children; A diagnosis is the detection or exclusion of oral health related disease. It leads on to: A problem list, which is a collection of the oral health related issues arising from history, examination and diagnosis, which the clinician feels need to be addressed to improve the child’s oral health. From this is derived; The treatment plan, which is a sequence of interventions selected by the clinician to manage those issues most effectively for that particular child and family group. Notes to supplement lecture series given in Tasmania and New Zealand 2010/2011 47 These should be kept separate. For example, the diagnosis for this lower second primary molar is active, moderately advanced occlusal and proximal caries, with no signs or symptoms of sepsis. However, the problem list and treatment plan for this tooth could vary with different scenarios, as the following examples show; Scenario 5 year old child, lower first primary molar free from caries Lower second primary molar as above (active, moderately advanced occlusal and proximal caries), 5 year old child, lower first primary molar moderately advanced proximal caries Lower second primary molar as above (active, moderately advanced occlusal and proximal caries), 10 year old child, lower first primary molar already shed Lower second primary molar as above (active, moderately advanced occlusal and proximal caries), Problem list Active proximal caries second primary molar; High risk of sepsis; but delayed Treatment plan Hall crown this course of treatment Active proximal caries first primary molar; High risk of sepsis; imminent Active proximal caries second primary molar; High risk of sepsis; but delayed Hall crown first molar this course of treatment (prioritise the more vulnerable tooth); Hall crown second molar in 4 months time. Active proximal caries second primary molar; Low risk of sepsis Prevention alone, and monitor The treatment plan defines what the OHC Team will do to improve a child’s oral health, and it is clear that for it to be effective, it must be based on the highest quality of history taking, examination & diagnosis, and problem list formulation. A good treatment plan can, of course, be spoilt by poor quality treatment delivery, but that will be covered in the sections on treatment provision. The following section will cover the difficulties in consistently achieving excellence in an oral health assessment, and how these difficulties might be addressed. Notes to supplement lecture series given in Tasmania and New Zealand 2010/2011 48 How clinical problems are usually diagnosed, and solutions decided upon, and problems with this approach Are you a Type 1 decision maker? Or a Type 2 decision maker? Type 1 decision making Type 2 decision making Intuitive Experiential Non-sequential Habitual Non-verbal thinking Sequential Structured Logical Analytical Verbal (thinking in words) Right brain “Left brain” Characteristics Quick Effortless Characteristics Relatively slow Requires mental effort Dental (and medical) students are trained to approach diagnosis and treatment planning in a logical, structured, sequential, and analytical way. This has been described as a “Type 2” approach (Crosskerry), or a “Left brain” approach. The problem is that once qualified, they soon stop doing so. It seems that once in practice, most clinicians formulate their problem list and treatment plan intuitively, as they progress through the history, examination and diagnosis stage, and then use the dental chart as their restorative treatment plan. This is “Type 1” (intuitive, non-sequential) decision making (or a “Right brain” approach), which can be reliable for the experienced clinician who regularly audits and critiques their own clinical practice. Clinicians tend to revert to Type 1 thinking because: • It’s quick • It takes less mental effort than Type 1 thinking, so it’s easier. It is the natural default position of the human mind when engaged in a familiar task, even if it’s complex, such as driving a car or flying an airplane. Unfortunately, it is largely based on pattern recognition from previous experience, and with the natural tendency of the human mind to look for “best fit”, and rationalise away factors which interfere with that fit, Type 1 decision making is prone to both repeating the same mistakes, and making new errors. This is why the great majority of car accidents and air accidents are caused by human error (see book “The Naked Pilot” for further information, and if not intending flying again). On a smaller scale, consider how some clinicians are repeatedly amazed at the extent of a new carious lesion when they open into a suspicious fissure, without stepping back for a minute, and re-evaluating their index of suspicion with regard to caries diagnosis. There is evidence that significantly less clinical errors occur with Type 2 decision making (Leitch), but clinicians will only tend to adopt Type 2 thinking when presented with something significantly different from their experience. To consciously change to the non-default, Type 2 decision making when carrying out an oral health assessment would require an almost superhuman effort of will by the clinician to maintain it for a treatment session. Instead, the mind must be “tricked” into Type 2 thinking and decision making, and it’s easy to do; use a form or a checklist! Notes to supplement lecture series given in Tasmania and New Zealand 2010/2011 49 The need for forms or checklists in oral health assessments Using a form or checklist forces a Type 2 approach to the information gathering part of the oral health assessment, with two advantages: • It reduces the risk of relevant information not being obtained, due to the clinician forgetting to seek it, and; • by requiring the writing out of the problem list, which is a verbal, sequential Type 2, left brain activity, it encourages the use of Type 2 thinking and decision making for formulating the treatment plan. Two methods can be used; • A standardised pro-forma, to be completed and retained as part of the patient’s clinical records • A simple checklist, to be retained at the chairside, and used to check that all the steps of an oral health assessment have been completed. Traditionally (and there is now evidence to support this), many clinicians have baulked at using proforma’s or checklists; seeing them as beurocratic and time consuming. Interestingly, after a large study in the USA showed significant benefits in terms of patient mortality and morbidity from using a simple pre- and post-op checklist, around 60% of surgeons who were involved in the study said they would continue to use the checklists after the end of the study, while 95% of the same sample stated they would wish their surgeon to use the checklist if ever they needed an operation! Most of us clinicians believe it is other people who are occasionally slipshod or haphazard; never us. If we use pro forma’s and checklists as part of our regular clinical practice, we can prove to ourselves that this is true! Assessment sheets and post-treatment checklists for downloading The Appendix contains an Oral Health Assessment sheet (two pages of A4), a dental chart with radiographic report (1 sheet A4) and a post-treatment checklist (1 sheet A4). These are designed to be photocopied onto both sides of an A3 sheet of paper, which is then folded to give a booklet, with the assessment sheets on pages 1 and 3, while the chart is inside, on page 2, and the post-treatment checklist at the back on page 4. These sheets are also available for downloading as Word documents, to allow them to be modified as required for the local situation. The five Oral Health Assessment sheets and post-treatment checklist challenge! Members of the OHC Team who are dubious about the value of using the sheets, or something similar, are urged to try using the sheets on at least 5 patients. At the end of this, they should evaluate whether using the sheets allowed them to collect clinically useful information which they might otherwise have missed, and so offer a better quality of care for their patients. Notes to supplement lecture series given in Tasmania and New Zealand 2010/2011 50 The Oral Health Assessment Agreed Treatment plan Achieving success by following the right route Treatment planning; key points The treatment plan • • • • • Be guided by discussion with child and parent Follow the sequence: - Pain relief (if necessary) - Prevention - Planned treatment (caries management) Plan treatment to meet the following three goals: - Maximise the probability of the permanent dentition remaining caries-free - Minimise the risk of any carious primary teeth causing the child pain/sepsis - Minimise the risk of causing treatment-induced anxiety All interventions need to be provided within the child’s ability to accept them, and with their full consent. Following a risk-assessment for pain/ sepsis, consider which active lesions in primary teeth need to be managed now, and can be managed later “Nothing about me without me” The Treatment Plan is the selection and sequencing of interventions chosen by the clinician to manage the problems identified in the Problem List. Effective treatment planning is a skill which takes many years to develop, and is probably never completely mastered. There are a great many variables which feed into a treatment plan, some of which are shown below; Notes to supplement lecture series given in Tasmania and New Zealand 2010/2011 51 There is, however, an accepted framework on which to base an effective treatment plan, sometimes referred to as the “3 Ps” : Pain relief (If necessary) Prevention Planned treatment (caries management). It is essential that the treatment plan is fully discussed, negotiated and agreed with the parent/ carers and the child before it is started. Full involvement in decision making about their oral health is both their right, and is likely to help with compliance with oral health care advice. The following is a guide only. Pain relief If a child is in pain, then this needs to be managed. However, the following points should be noted: • Children can find invasive dental treatment (injections, extractions) challenging at the best of times, but especially if experienced in their first few appointments. Try to avoid extractions on a child’s first visit if at all possible, even if under pressure from the parent to provide this treatment • For reversible pulpitis, restore the tooth if possible, or if the child would find this too challenging at this stage, place a temporary dressing in the cavity • For an irreversible pulpitis in a primary molar, try hand excavation, then a Ledermix lining under a temporary dressing, with a view to pulp therapy or extraction at a later date. • If a dental abscess, then antibiotics may have to be prescribed. • Ensure the parents provide adequate oral analgesia for their child (an oral suspension of paracetamol is usually very effective for most paediatric dental pain) • Arrange a follow up appointment, and pursue this if not kept Prevention “Look after the living, let the dead take care of themselves” John • It is important that Prevention comes before Caries management. If it is anticipated the prevention will take some time, then a part of that programme can be placing dressings in the more vulnerable carious teeth, a process known as stabilisation. However, a really effective preventive programme will significantly slow down, or even arrest, carious lesions, without dressings being placed. • The permanent teeth most vulnerable to dental caries are the first and second molars. It must be an oral health care priority to prevent caries affecting either the pits & fissures, or the proximal surfaces of these teeth, and if it does occur, to identify it early, and manage appropriately. Further information on this, and other aspects of managing permanent molar teeth, is in the section on Prevention. Notes to supplement lecture series given in Tasmania and New Zealand 2010/2011 52 Planned treatment (Caries management) The following are just general guidelines, for no one approach will suit every clinician, every parent/ carer, every child, or every carious tooth in that child. • Plan treatment to meet the following three goals: - Maximise the probability of the permanent dentition remaining caries-free - Minimise the risk of any carious primary teeth causing the child pain/sepsis - Minimise the risk of causing treatment-induced anxiety • All interventions need to be provided within the child’s ability to accept them, and with their full consent. • Following a risk-assessment for pain/ sepsis, consider which active lesions in primary teeth need to be managed soon, and which might be left for a further course of treatment in a few months • Avoid the use of local anaesthesia, dental handpieces and extractions until the child is able to manage them. Taking a long view of oral health care, and attitudes to it, it may be better, on occasion, for a child to receive slightly compromised treatment in the early stages of attending for care; for example, managing fissure caries in a lower first permanent molar in a 7 year old with Fuji Triage, postponing the IDB necessary to place a permanent restoration until the child is acclimatised to dental treatment. Notes to supplement lecture series given in Tasmania and New Zealand 2010/2011 53 Providing care Changing behaviours Prevention Biological caries management Helping children cope Surgical caries management Changing behaviours “Info dumps” don’t work This section is draws extensively from an excellent short book Edited by Christoph Ramseier & Jean Suvan, “Changing Health Behaviour in the Dental Practice; Wiley, 2010”,and highly recommended for further reading. Changing a parent/ carers behaviour regarding their child’s oral health care is a key step, arguably the single most important step, in managing the oral health of children with active dental caries, particularly in encouraging compliance with toothbrushing advice and diet advice. It could also be used to encourage: • completion of a course of treatment, and reducing failed appointments • attendance for regular recall appointments Changing behaviour; our own, or another persons, is hard, in fact very hard, but with an understanding of ourselves as people, and our limitations, it is possible. What is known is that simply giving patients information, however intensely and earnestly, is unlikely to change behaviour, possibly because as adults we are generally happy with our behaviour (or at least have rationalised it entirely to our own satisfaction!), and to respond to a request to change implies criticism of us, and loss of our autonomy. In a nutshell, none of us like being told what to do! Behaviour change is more likely to occur when the patient acknowledges to themselves that changing their current behaviour will be beneficial to them (or their children), rather than being told it will be beneficial for them by a health care worker. “as I hear myself speak, I learn what I believe, and it is persuasive to me because I said it” Bringing about that subtle twist is achieved using a communication method known as Motivational Interviewing, and the oral health team are ideally placed to use it, as we are skilled at verbal and nonverbal communication, and we see fit, healthy people who return on a regular basis. The diagram shows how Motivational interviewing fits in when helping parent/ carers achieve a behaviour change in toothbrushing. Nothing will be achieved unless you have already engaged with them before starting. The stages in helping parent/ carers achieve a behaviour change in toothbrushing 1. Assessing the need Having engaged with them, and • using open questions, and • being nonjudgemental you have identified a need for a behavioural change, and asked permission to address it, 2. Educating and Motivating 3. Action planning before using best practice educational methods to ensure they have knowledge of best brushing practice, and the ability to apply it, and by integrating your teaching with Motivational Interviewing, you ensure they have the will to apply the knowledge. Finally, you help them turn the will into action, using Action Planning, 4. Habituating and set up, strategies to keep the change going for long enough to become a habit. Notes to supplement lecture series given in Tasmania and New Zealand 2010/2011 54 1. Assessing the need This is the process by which you determine whether there is an educational need, and this will normally have been completed during the first appointment. By using the communication techniques of open questions, avoiding judgement, and matching the parent/ carers communication style when obtaining this information, you should have managed to maintain rapport, and will not have alienated them. It is fully described in the previous section; Communication, and in the Toothbrushing part of the following section; Prevention. 2. Educating and motivating Educating and motivating are considered together as they need to be delivered together for maximum effect. Some degree of education will be required with most brushing and dietary interventions. How this can be provided effectively, following current accepted teaching strategies, and without patronising or alienating the parent/ carers, is fully described in the relevant sections in Prevention. It is essential, however, that any educational intervention is delivered using the Motivational interviewing method of communication. There may well be a need for advice, but try to get the patient to request it. If this doesn’t happen, try prefacing the advice with something like: “Some mothers tell me….” “Research indicates….” Motivational Interviewing The following quotation, from a paper by the two authors who first described the method, gives a concise, but comprehensive description of the method. “Motivational interviewing is a method of communication, rather than a set of techniques. It is not a bag of tricks for getting people to do what they don’t want to do. It is not something that one does to people; rather, it is a fundamental way of being with, and for, people – a facilitative approach to communication that evokes natural change” (Miller & Rollnick 2002). In essence, the technique involves subtly guiding the patient to discover and strengthen their own motivation to change, remembering: • it’s a collaborative process • the need to understand the patient’s viewpoint (if you want people to change, you usually have to start from where they are, not where you’d like them to be) • to resist the righting reflex (correcting them early in the process) • to listen with empathy, and roll with resistance • to encourage the patient to believe they can do it The method will be described as a sequence of stages, with the proviso that this is only for ease of description on the written page, and in reality there may well be blurring of the boundaries between the stages. In addition, when written down, it may appear long winded, slow to use, and overly complex. In reality, it is none of these things (imagine how long it would take to describe on paper how to dance a Foxtrot, or a Samba!); the concepts described will be very familiar to anyone who has been working with people for a year or two, even if the descriptive terms applied to the concepts seem unfamiliar. The experienced oral health worker should view the following as a guide, rather than a script, as flexibility is essential. Members of the oral health team will not find success by applying the same approach all the time; there will be a need to modify the approach for different patients, and sometimes also for the same patient within an appointment. Notes to supplement lecture series given in Tasmania and New Zealand 2010/2011 55 Overview of Motivational interviewing You use 4 specific communication skills O- Open questions A - Affirmations R - Reflective listening S - Summarising to gain….. empathy then you ….. develop discrepancy, rolling with resistance, until the parent/ carer verbalise the changes they need to make, when you ….. support them in making their choice (self efficacy) The four specific communication skills Before describing these four skills, remembered using the acronym OARS; O A R S - Open questions - Affirmations - Reflective listening - Summarising it will be helpful to review what their aim is; to gain, and enhance, empathy. Empathy is the fuel on which motivational interviewing, and thus behaviour change, runs; no empathy, no behaviour change. Rapport is the process of simply engaging with someone; empathy is the process of being at one with them; of really seeing and feeling things from their perspective. But take note; a Universal truth is that when relating to another person, it is not how you think you are coming across that matters; it is how you are perceived! And so with empathy; feeling it is of little use; the parent/ carer must be given enough cues to recognise it within you for themselves. Open questions This form of asking questions was discussed in the section Communication. It’s worth repeating that whatever the answer, it is essential to avoid coming across as judgemental. To do so will lose rapport, and without rapport, gaining empathy will be impossible. Affirmations Most parent/ carers will have feelings of insecurity regarding the quality of oral health care they provide for their children. Self confidence; the belief that they are fully able to take on the challenge of improving things, lies at the heart of behaviour change, and a positive affirmation from a member of the oral health team is a good way of boosting self confidence. Just reflect on the last time you said something nice to a parent/ carer; not about their child, or the child’s outfit, but about their oral health care for their child. Affirmations: • build rapport, • increase the parent/ carer’s confidence, but not too many, and look for signs that the parent/ carer is uncomfortable; “It’s clear it’s important to you…” “You’ve really tried to work with this…” “That’s a good idea…” “Thanks for chatting this over with me…” “I can see you’re a very determined person…” “It’s been good getting to know how you manage things…” Notes to supplement lecture series given in Tasmania and New Zealand 2010/2011 56 Reflective listening Reflective listening; listening, and hearing what they say, and letting them know you’ve heard what they say by your response. The following is an example of how NOT to do it!! “Do you manage to brush their teeth twice a day?” “I try to, but I find it difficult to find time in the morning” “It’s important, you know?!” “Yes, I know, but there is so much else to do” “Have you tried getting up a little earlier?” “But I’ve so many children to sort out before I go to work” “Will you try to find the time; otherwise they’ll continue to get cavities?” “OK, I’ll do my best” Here, the GDP is assuming the “expert” role, but the patient is “expert” as to what fits in with their life. In essence, reflective listening involves making a statement which indicates you understand (not just hear, but understand) what the parent/ carer has said. It also: • increases rapport (which can go up as well as down!), and so empathy • gives you extra time and information to discern what’s going on, and what the barriers might be. It does take time to become skilled at reflective listening. When starting out, try putting “It sounds as though you….” In front of what they have said, but be sure to make the intonation go down, not up, at the end of the statement, confirming that you are understanding what they’ve just said, and are not simply asking another question! Parent/ carers will normally respond with elaboration. As you listen to the information the parent/ carer is telling you, you are almost certain to identify Ambivelance i.e. “I know I ought to brush his teeth, but he just wont let me!”. A good response might be: “I appreciate that; you know you want to brush his teeth for him because it’ll help stop him developing cavities, and you want to know how best to manage that” It is crucial to recognise that ambivalence is normal! and must not be confused with resistance to change. Here you must resist the righting reflex, and roll with any resistance. Try using evocative questioning to develop discrepancy, where the parent/ carer identifies for themselves what they know ought to happen, and what actually happens; Oral health team “What do you think might happen if you don’t manage to brush his teeth twice a day?” Parent/ carers thoughts sequence “I know it’s a problem” “What might happen if you did manage it?” “I think I could manage it” “It’d be better if I managed it” “I will manage it!” Notes to supplement lecture series given in Tasmania and New Zealand 2010/2011 57 Summarising By this stage, you will have used your communication skills to; • Identify the need for behavioural change in some area of oral health care • Addressed any knowledge issues using educational interventions • Helped develop the parent/ carers intrinsic motivation to change and all without losing rapport. You will have achieved this by collaborating with the parent/ carer, respecting their autonomy, avoiding any sense of being judgemental, and being perceived as empathic. Once ready for change, stop the Motivational interviewing! Strengthen commitment by effectively summarising where you and the parent/ carer have reached; “It sounds like you want to change things….” “What would you see as the next step?”. “So you find it difficult to brush his teeth twice daily but you appreciate that it will benefit him if you do this. You think you may be able to find extra time by asking his older brother to take responsibility for the morning brushings during the week” You now need to “close the deal” by turning the will for change into action, and this is achieved through Action Planning. Action planning Action planning is where the intended action is actually planned! For example, the typical New Year’s resolution “I will improve my fitness this year” is changed to “I will improve my fitness this year. I finish work an hour early on Tuesdays and Thursdays, so I’ll call in to the Gym on my way home tonight, join up, then go swimming on Tuesdays, and work out on Thursdays, and cycle to work every Monday and Friday”. There is evidence that forming an action plan increases the likelihood that a patient will perform a behaviour, and a recent study in young adults showed action planning to have a significant effect on compliance with oral care. Consider developing an individual action plan for the child as follows: • identify a convenient time and place for the preventive behaviour to occur (e.g. toothbrushing after breakfast in the morning and last thing at night), and a date for when the task is to be started (ideally from the day of the appointment) and who is to carry it out; • identify a trigger as a reminder for the child or parent/carer to carry out the preventive behaviour (e.g. when the child gets ready for bed); • agree a date to review progress (e.g. assess oral hygiene at the next visit); • agree the action plan with the child and parent/carer and write this down for them if necessary, possibly on a copy of their toothbrushing chart; • record the action plan in the child's notes so that reference can be made to it at a subsequent visit. • At the next visit, provide encouragement, further advice and revise the action plan if necessary. Even with Action planning and the best of intentions, behavioural change can falter over time, unless it is continued for long enough to become a Habit. Habituation As you sit and read this page; fed, watered, clean, clothed, over 95% of the stages you went through to arrive at this point will have been completed without any conscious thought, but instead as a habit. We are our habits; they define us. Living is too complex for us to waste time consciously thinking through every action. Instead, we save thinking time for new things; the routine we complete on Notes to supplement lecture series given in Tasmania and New Zealand 2010/2011 58 automatic pilot. The Holy Grail of behaviour change is habituation; to continue with a behaviour change until it no longer requires conscious thought to initiate or complete it. The key to habituation is repetition. This begs the question; how often is often enough? Popular science has suggested the 21 day rule; complete an action daily for 21 days, and it will become a habit. Recent research indicates that, of course, it is much more complicated than this, and depends on a multitude of factors, needing anything from 18 days to 80 days repetition to become habitual (Pat Lally). More research is needed on toothbrushing practice before there will be good evidence on how long is long enough, but the research to date indicates that it is unlikely to be less than for around three weeks, and it is likely that there will always be external factors which will influence this; how entrenched are the involved parties in current bahaviours, and how well does a habit change to the desired behaviour fit in with their existing day to day lifestyle. This therefore suggests the need: • for toothbrushing charts to aid compliance over time • to anticipate that lapses do not indicate complete apathy or resistance on behalf of the parent/ carer, but will just be a normal part of behaviour change interventions, which will best be managed by support and encouragement over successive recall appointments. More on the use of toothbrushing charts will be found in the toothbrushing section of Prevention. Notes to supplement lecture series given in Tasmania and New Zealand 2010/2011 59 Providing care Changing behaviours Biological caries management Prevention Helping children cope Surgical caries management Prevention The need to raise our game Adult dental disease can be, and needs to be, prevented in childhood, and there are a range of effective, evidence-based strategies for doing this. As much effort and attention to detail should be put into applying them as with any other aspect of dental treatment, such as advanced restorative procedures. Not all children and parent/ carers will need a full caries preventive programme, so a caries risk assessment should be carried out, and the result recorded in the patient’s notes. The level of risk will determine the intensity of the preventive programme. The four main caries preventive strategies to include in a programme Four main strategies are available to the oral health team; • Toothbrushing with a fluoridated toothpaste • Additional fluoride therapy • Dietary advice • Fissure sealants The effect of caries risk assessment on a preventive programme Children assessed at higher risk of caries should receive: • Hands-on brushing instruction every year, with appropriate F concentration paste (1,450ppmF if >3 years, 2,800ppmF if>10 years), and flossing advice • Fluoride varnish application at least three times a year, and ToothMousse • Dietary assessment and advice every year • Sealing of all susceptible pits and fissures in permanent teeth, with GI sealants being considered for partially erupted permanent teeth • 4 month recall intervals until caries risk decreases Children assessed as at medium risk of caries should receive: • Hands-on brushing advice yearly, with appropriate F concentration paste (1000ppmF, and 1,450ppmF if >6 years), and flossing advice if proximal enamel lesions visible on X ray • Fluoride varnish application at least twice a year, and ToothMousse • Dietary assessment and advice every year • Sealing of all susceptible pits and fissures in permanent teeth • 6 month recall intervals, and monitor for change in caries risk Children assessed as at lower risk of caries should receive: • Brushing advice yearly, with appropriate F concentration paste (1000ppmF, and 1,450ppmF if >6 years) • Dietary advice every year • 6 month recall intervals, and monitor for change in caries risk The four caries prevention strategies will be described in turn. The section on Changing behaviour should be read before beginning this section. Notes to supplement lecture series given in Tasmania and New Zealand 2010/2011 60 1 of 4; Toothbrushing with a fluoridated toothpaste Toothbrushing; key points • The four key components of effective brushing are; - Twice daily brushing - Correct concentration (minimum 1000ppmF), and amount, of paste - Spit, not rinsing - Supervised • Hands-on, practical advice at the chairside, using: 1. Motivational interviewing techniques to increase empathy, and so help parent/ carers discover their own motivation to change behaviour 2. Turning motivation into action through Action Planning 3. Turning action into habit, through brushing charts • Including flossing for mixed dentition children at higher risk of caries • Ensure all adults with a responsibility for the child’s oral health are identified, and agreement gained from the attending parent/ carer as to how the information is to be shared with them An important word about fluoride Fluoride significantly reduces the risk of dental caries, 99% of which begins at just two sites, both of which are inaccessible to direct contact with fluoride containing vehicles, such as toothpaste, varnish, mouthwash, tablets or fluoridated water. The sites are the base of fissures and just below the contact points. So how does fluoride reach these two sites? By diffusion. It is important to fully appreciate this, because the rate of diffusion of fluoride through plaque to reach these two sites is significantly affected by a number of factors, several of which are in the oral health team’s control. The rate and quantity of diffusion is directly related to: Concentration gradient • assists diffusion • Time • assists diffusion • • Therefore use 1000 ppmF paste rather than 500-750 ppmF paste, and 1,450 ppmF paste for children aged 7 years and over if at increased caries risk. This is why F concentration is important, and why giving a child a larger quantity of a lower F concentration paste is not as effective as using a small quantity (smear < 2 years; pea sized < 6 years) of an adult paste Consider 2,800 ppmF paste for children over 10 years of age if at increased caries risk “Spit, not rinsing” after brushing allows a film of paste to coat the teeth for a few hours, particularly after the last brush at night, when the salivary flow rates drop to about a tenth of daytime flow. “Nuthin’ after brushin’” also helps retain the film, allowing more time for diffusion. “nothing to eat for 30 minutes after varnish application” allows more time for diffusion Notes to supplement lecture series given in Tasmania and New Zealand 2010/2011 61 Distance • works against diffusion • Teeth at the back of the mouth must be brushed as thoroughly as the front teeth, so that they are thoroughly covered by full concentration paste. Varnish also needs to be applied as close as possible to the sites it is designed to protect; that is, it needs to be applied to the approximal embrasure The toothbrushing advice session Toothbrushing with fluoride toothpaste (along with fissure sealants) are the closest things in oral health care to a magic bullet, achieving astonishing reductions in disease if properly applied. The four key components of an effective brushing programme that parent/ carers and children must put into practice are: • Brush twice daily, for at least two minutes, being sure to reach all areas of the mouth, in the morning and last thing at night before bed, with nothing to eat or drink after brushing at night. (Night time brushing is particularly important, due to the reduction in salivary flow at night allowing longer retention of fluoride in the mouth, which in turn allows more time for the fluoride ions to diffuse to where they’re needed). • o o o Use the correct amount of a toothpaste with the correct fluoride concentration Under 3 years old: use a small smear of paste containing not less than 1000 ppm F. 3–6 years inclusive: use a pea-sized amount of paste containing not less than 1000 ppm F. 7 years old or over: use paste containing 1350–1500 ppm F. • ‘Spit, don’t rinse’ (Children who spit out and don’t rinse after brushing show an extra 10% reduction in caries experience compared with those who rinse their mouth out with water after brushing). • Supervised! Children under the age of 7 do not have the manual dexterity to clean their own teeth, and must be helped by the parent & principal carers. Children older than 7 years will still need to be kept an eye on! Notes to supplement lecture series given in Tasmania and New Zealand 2010/2011 62 Making it happen As was covered in the section Changing behaviour, simply telling the parent/ carer and child the above four points, however enthusiastically, is probably wasting your time and theirs. There is good evidence that “Information dumps” (simply giving patients a list of do’s and dont’s) is ineffective. Instead, think of the process: The four (by four) stages! 1. Assessing 2. Educating & motivating the need Having engaged, by - Eye contact - Make them smile You use - Open questions - Avoid judgement - Follow their communication style to assess the need, and to determine adults responsible for care, then Stage 1. Use; O- Open questions A - Affirmations R - Reflective listening S - Summarising Stage 2 to be perceived as empathic, then you Stage 3 develop discrepancy rolling with resistance, Stage4 until the parent/ carer verbalise the changes they need to make, when you support them in their choice! 3. Action planning 4.Habituation Close the session by identifying specific times and specific people who will be involved with brushing It takes time and repetition; Use brushing charts, and reinforce at recall visits Although these four “stages” are shown in an itemised, discreet sequence, there will, in reality, be much crossover and merging between the stages. In addition, the dynamics between a health care worker and a patient can rarely be predicted or categorised, and one of the satisfying parts of the job of health care is reacting to, and adapting to, changing dynamics when interfacing with patients. The following is offered as general guidance for the oral health team, as a source of ideas to be adapted, rather than adopted verbatim, as best suits their local situation. With that proviso, the key components of the four stages are: 1. Assessing the need It is very likely that the parent/ carer knows that regular brushing helps prevent decay, and that good brushing practice is part of good parenting. However, it is much less likely that the parent/ carers: • Have knowledge of, and awareness of the importance of, the four key components of good brushing listed above • Are aware that children under 7 years of age require parental/ carer assistance with all brushing • Have the skills to thoroughly brush a child’s dentition, covering all surfaces so as to aid diffusion of the fluoride ion to reach where it’s needed • Are currently fully discharging their responsibilities with encouraging and supervising good brushing practice for all children in their care Notes to supplement lecture series given in Tasmania and New Zealand 2010/2011 63 This discrepancy between what the parent/ carer think they know, and what they actually know, poses some challenges for the oral health team. There is a great risk in managing this discrepancy of coming across as one, or all three, of the human traits almost guaranteed to alienate and “switch off” the recipient of any educational intervention: • Judgemental • Authoritative • Patronising. However, if any group of health professionals have the necessary skills, it must include members of the oral health team who have been working with the public for a couple of years! Finding out what happens now If the parent/ carers and the child are all fully on message, and already following best brushing practice, then there is no need to run through the entire process, although positive reinforcement should still be used. Step 1 try broaching the matter with the child first, at the first appointment; Child sitting up, no protective glasses, with eye contact with you, and eyes at same level as yours. Dialogue “Tell me about your toothbrushing?” “I brush my teeth every day” “Every day?! That’s really good, well done! Does mum help you?” “I do it myself” “Oh, you do it yourself? What a big boy you are for 5!” “When you’ve finished brushing, do you rinse the paste away? Or do you spit it out?” “I rinse with water from the tap…” “That’s fine, I’m very pleased that you can brush your teeth” Comments Maintaining empathy Seeking factual information, but in as indirect way as possible; remember, the parent/ carer will be listening intently Resist the righting reflex (temptation to correct). Affirmation, and Praise Resist the righting reflex. Praise Resist the righting reflex Be positive about what you can. You will have obtained much useful information, with a veracity you might not have had from the parent/ carer Notes to supplement lecture series given in Tasmania and New Zealand 2010/2011 64 Step 2 now turn to parent/ carer, and open a discussion with them Get eye contact with them, smile; remember that they might not be feeling entirely comfortable discussing something which is considered by most to be part of normal parenting Dialogue “Can you tell me a little more about his brushing?” “Well, I try to make sure he brushes his teeth every day, but he won’t let me help him, and I do find it a bit of a struggle” “Oh, I know, he’s a lovely boy, and they can be so independent at this age; well done for trying, though” “D’you think, though, that he can brush his back teeth as well as he brushes his front ones?” “Well, there’s paste everywhere when he does it, but I’m not sure how much gets to his back teeth!” “I can imagine the mess!” “Do you think that is maybe why he has some holes in his back teeth?” “It might be, yes, but he just won’t let me” “I know, it can be such a struggle at this age” “I know you are on your own at the moment, and you’ve a lot to do” Comments Open question Ambivalence; she’s indicating she’s like to, but can’t. This is completely normal, and should not be misinterpreted as resistance to change Reflective listening Absolutely crucial to increase empathy at this stage, and avoiding voicing judgement, substituting it with affirmations where possible. Using a Motivational Interviewing approach to guide the parent/ carer to voice the changes they need to make Emotive questioning Empathy Getting the parent/ carer to acknowledge a link between current practice, and outcome (developing discrepancy) This will have been ascertained earlier in the first appointment; see Communication Listen to what the mother is telling you, and respond to it, above all resisting the righting reflex, rolling with resistance, and so increasing empathy. “What other mother’s have said helps is to share the brushing; allowing the child to brush the front teeth, then letting you brush the back ones; do you think that might work for you?” Getting the information across without being authoritative, and de-personalising it (“… other mothers”, rather than “I suggest…”) “and Peter; would that be OK with you?” Include the child, for they will have been listening intently! “Yes, I think we could try that, eh, Peter?” “That would be great, and it will really help you both to stop Peter getting so many holes.” “Change talk” This is key! Praise, and explanation of importance Notes to supplement lecture series given in Tasmania and New Zealand 2010/2011 65 “Would it be OK if I just spent a few minutes now going over brushing with you? There’s been some recent research which has shown how to make brushing even more effective at preventing holes developing” “Would that be OK to do that, Peter?" “Yes, that’ll be fine” Asking permission (of both parties) is courtesy, but also helps to further reduce the risk of seeming authoritarian (avoiding the perception of “I’m going to show you something now that you should already know, and should have been doing for years…”) Autonomy of the parent/ carer is not being challenged With perhaps 1-2 minutes of dialogue, you have: • Sympathetically probed a personal area of home care • Avoided judgement • Increased empathy • Highlighted the benefit of the intervention you are now providing • Ascertained compliance with three of the four key parts of effective brushing (frequency, spit, not rinsing; supervised) and identified a strategy for addressing one of them (shared brushing) • Prepared the ground to increase the chances of success for your intervention You can now progress onto the next stage, Educating, although the single word “educating” is used here in its broadest sense, in that you will not just be transferring knowledge, but also the skills and motivation to operationalise that knowledge (?put that knowledge into practice?). 2. Educating and motivating; transferring knowledge, and the skills and motivation to apply it Modern educational practice recognises a range of techniques that can be used in order to help the learner to achieve an educational goal, and these can be applied to a toothbrushing instruction session: Teaching strategies • Interaction • Transfer • Enactment • • • • Repetition of core ideas Practice Feedback Clarification In addition, it is recognised that people have different learning styles, which are listed as follows: Learning styles • Visual Demonstration using visual prompts. Learns by remembering images • Verbal Learns by talking through ideas and explaining things themselves. Dialogue, with the learner • Reading/ writing Use of the written word, and names • Kinesthetic learns ideas by applying them practically Notes to supplement lecture series given in Tasmania and New Zealand 2010/2011 66 speaking Although different people will favour different learning styles, everyone will use a combination of all four. It is easier to remember and recall information that was presented using a variety of modalities so all four learning styles should be included in your brushing instruction. Learning outcomes What you want the learner to be able to achieve at the end of the session. For brushing advice, it will be for parent and patient to be able to brush the entire dentition thoroughly. Patient and parent to know core ideas of brushing twice daily, with the correct amount of the correct strength fluoride paste, spitting, not rinsing on completion and if brushing is to be supervised, Task analysis Breaking down the task into smaller stages. Avoids trying to cover too much at once and allows you to check that each stage has been understood before moving on. Baseline knowledge will have been covered already, in Preparing the ground. Have ready: • Disclosing solution • Micro brush • Toothbrush • • Mirror Floss/ floss wand (if child in mixed dentition, & high caries risk) The child should have a bib on, to protect clothing from the disclosing solution. Toothpaste can be used, but any advantage of using it is probably outweighed by subsequent mess and clean-up impacting negatively on its implementability! Dialogue “I’d like to put some special stuff on your teeth, Peter, so that you can see where you need to brush, would that be OK?” “OK” “Good boy! You watch in the mirror, while I paint this stuff on….. that’s excellent! And now I want you to rinse it away until the water stops coming out blue” Teaching strategy Comments There is no evidence that disclosing, or not disclosing, affects the uptake of advice, but it does seem to help with engagement, and children seem to like it! Asking permission aids empathy, as discussed above Praise (children really appreciate it). Invariably, the parent/ carer (the primary target of this educational intervention) will now be leaning forward to see the result, indicating their engagment Notes to supplement lecture series given in Tasmania and New Zealand 2010/2011 67 Dialogue “Wow! What do you think of that, Peter?” “Do you think that blue stuff has anything to do with you having the holes in your teeth we talked about earlier?” “What do you think would get that blue stuff off?” “Brushing? Yes, good boy, that would certainly get it off if you brushed your teeth really well” “Now, I’d like to show you, Peter, how to brush your teeth clean, would that be OK?” “Yes!” “Mrs McGregor, do you prefer to brush Peter’s teeth from in front of him? Or from behind him? Either is fine” “Oh, from behind him, usually” And do you brush the outside, top, and inside of each corner of his mouth at a time, before moving onto the next corner, or do you do all the outsides all the way round, then the tops, then the insides?” “A corner at a time, usually” “OK, I’d like to show you a way of getting these teeth really clean; can you see how I’m keeping the brush in line with the teeth I’m cleaning?” “Can you see how I’m using short little strokes to scrub the tops of the back bottom teeth on this side; keeping scrubbing, and only after quite a few scrubs do I now move to the outside of the same teeth, and clean them?” “and Peter, what can you hear? Yes! You can hear the schhh…schhh of the teeth being really cleaned!” “Now, well done, Peter! You’ve let me brush your bottom teeth on both sides at the back, and then at the front. “How long did it take me to brush your bottom teeth? Yes!!, it took about a minute, didn’t it? So how long will it take you to bruch all of your teeth? Yes, a couple of minutes, good boy!” Teaching strategy Interaction Comments Seeking permission, as above This also lets the mother know she’s not going to be put on the spot by being required to demonstrate what she does at this stage, and her autonomy is not being challenged Baseline knowledge A matter of personal preference, and no right or wrong, but allows you to fit in with the mother’s preference, so increasing engagement and empathy Interaction A method of getting the knowledge across (that there are three surfaces to be cleaned, and back teeth as well as the front ones) without challenging either the mother’s knowledge, or her autonomy. Which is best is, again, a matter of personal preference Baseline knowledge Demonstrate a modified Bass technique, engaging with the child, but also including the mother in your dialogue This is the opportunity to help the mother learn the need to include the back teeth (see diffusion of fluoride in previous section), and all three surfaces Aural feedback aids correct technique You’ve now transferred the information that it’ll take about 2 minutes to clean his teeth Notes to supplement lecture series given in Tasmania and New Zealand 2010/2011 68 It took me about a minute to do that, didn’t it? Now I want you to spit out into the sink, and that’s what you need to do when you’ve finished brushing with toothpaste; spit, not rinse!” properly, and the need to spit out, not rinse, after brushing” “Now, do you want to brush your top teeth, then let Mum help you get to the back ones?” This is flagging up to the Mother that you will be shortly asking her to become actively involved. This may not be your usual practice, but it is probably important. It needs, however, to be handled with great sensitivity, to avoid the mother feeling this is a test, or empathy will evaporate, and with it your chances of changing behaviour. Addressing the child, and using the term “Mum will help you” should assist with avoiding problems. Enactment Transfer Practice “OK, Peter, that was really good, now can Mum help you? Good boy! There, Mrs McGregor, can you now get to those back ones on that side? Excellent! That’s good, perhaps just a little firmer? Excellent, that’s perfect….. This’ll be really good for his teeth, you could see he was struggling a Feedback little with the front ones… Good, you’ve done both the insides and the outsides now on that side, and you would go on to do the same on the other side; are you quite happy with all of that?” You are now empowering the Mother by showing her that she can manage brushing, and also the necessity for it by contrasting the child’s attempts on his front teeth with your own. Plenty of praise helps with adults as well as children! “That was fine, but whether he’ll let me do that at home is another thing!” “Oh, I think you’ll let Mum help you, won’t you Peter? Because I’m going to give you a lovely brushing chart, and some stickers, and if you finish it all, then I think Mum might have a present for you!” Roll with resistance! “That was good, Mrs McGregor, I thought you both did really well. Just to pull everything together, there is very good research now that brushing teeth twice a day, rather than just once, gives a significant extra benefit, with “Nuthin’ after brushin’!” at night, to let the paste really strengthen his teeth. And spitting out, not rinsing out after brushing has the same effect. Repetition of core ideas Clarification Mentioning research will reduce the risk of seeming authoritarian, so that the mother perceives you as a conduit for information, rather than you yourself telling her what to do, which would reduce empathy. The Summary part of OARS Notes to supplement lecture series given in Tasmania and New Zealand 2010/2011 69 “Here is the brushing chart I’d like to give you, and Peter, I’d like you to sign it, if you will, then Mum can sign it, so that you agree to Mum helping you. And you’ll see there is a space for a present if you fill in all the boxes with stickers!” “Here, Mrs McGregor, I’ve filled in the correct fluoride concentration toothpaste Peter should be using, and here’s a toothpaste packet to show you where you can find the concentration listed. I’ve also written in the amount you should put on Peter’s brush” “You told me that Peter spends weekends with his Granny; can you go through all of this with her, and make sure she has the chart this weekend? D’you think Granny will be OK with all of this?” Repetition of core ideas (see Changing behaviour) The brushing chart, properly used, allows a number of bases to be covered. It • gives written confirmation of the information covered • it may form a contract between the child, the parent/ carer • it gives the child reward for completion • it may encourage the child to, in turn, encourage the parent/ carer to comply • it may help to keep good brushing practice going for long enough to become a habit; which is the aim of all behaviour change interventions • it aids dissemination of information to other parent/ carers who did not attend the appointment Additional points on brushing advice • some clinicians ask parent/ carers to attend with the child’s brush and paste. The advantage is that both can be checked for suitability; the disadvantage is the hygiene issues with the brushes being caries in pockets etc! • remember to demonstrate brushing from the side if there are erupting lower first and second permanent molars • Flossing advice. Although the evidence linking flossing with a significant reduction in approximal caries in children is weak, this may be a reflection of the study designs, and further research is needed. However, with the Ecological Plaque Hypothesis now answering many previously unexplained questions about dental caries, there would seem to be merit in asking parents to floss their children’s teeth, especially the DE6 contacts, on alternate evenings, immediately after brushing so that the paste is carried through the contact. This is likely to be especially beneficial in higher caries risk children, and those where radiographic examination reveals proximal enamel lesions. Either floss or floss wands may be used, as suits the parent/ carers preferences. Notes to supplement lecture series given in Tasmania and New Zealand 2010/2011 70 • • For higher caries risk children, consider recommending the use of 1350–1500 ppm fluoride toothpaste for children over 3 years old For higher caries risk children, consider prescribing 2800 ppm fluoride toothpaste for children over 10 years old Step 3. & 4. Action Planning, and Habituation These have been covered in Changing behaviour, but here is how they fit into the toothbrushing instruction Dialogue Teaching Comments strategy “Now you told me that you brushed Peter’s teeth Action planning is a key part of every night before he goes to bed? Now he’ll also turning motivation into action! be brushing in the morning, when is going to be See Changing behaviour. the best time to do it? When he uses the bathroom having just got up? Or after his If there are older siblings in the breakfast? Oh, so he uses the bathroom, then family, they can sometimes be dresses himself while you make breakfast? Yes, pressed into service with then, straight after breakfast sounds a good time brushing if the Mother is to brush; that OK with you, Peter?” struggling to get several children ready for school. “Is there anything you’re unsure about? I thought that was a good session, and if you can both manage to stick at it, it really will help reduce your visits in the future, and you getting sore teeth again, Peter!” “Would it be OK for me to see you again in three weeks? We’ll have a look at helping you manage the amount of sweets Peter has then. And Peter, see if you can remember to bring your chart with you!” Praise again, and highlighting benefits of compliance to both Parent/ carers do us, the Oral Health Care Team, the favour by coming to see us, so recognise this by requesting, rather than requiring, further visits; it aids empathy Mixing dietary advice and brushing advice in the same session risks overloading the parent/ carer. It should be brushing first, then diet later. Closing the toothbrushing session Be up beat and positive. Give a brushing chart (example in Appendix) , and stickers to complete it!, plus toothpaste and a brush if possible, and agree, and confirm on the brushing chart: o an Action Plan o a reward for completing the chart successfully o that the child signs to confirm the “contract” o as does the parent/ carer Notes to supplement lecture series given in Tasmania and New Zealand 2010/2011 71 Remember that if there is an older sibling, they might be able to take on the role of supervising the evening brushing session. Also, some people have suggested that asking children to brush their teeth immediately before bedtime might make them associate it with punishment, while it might be more constructive to have them brush half an hour before bedtime, with then half an hour to do what they like (reading, play, TV) as a reward. No snacks though!! Reinforcement At every visit, ask about brushing, and be supportive and encouraging. Notes to supplement lecture series given in Tasmania and New Zealand 2010/2011 72 Summary of a practical toothbrushing session 1. Assessing the need 2. Education & motivation 3. Action planning 4.Habituation Having Engaged, by gaining - Eye contact, & - Making them smile, or respond positively to you, You use - Open questions - Avoid judgement - Follow their communication style to assess the need, and to determine adults responsible for care, then Stage 1. Use; O- Open questions A - Affirmations R - Reflective listening S - Summarising Stage 2 to ensure you are, & are perceived, as empathic, then you Stage 3 develop discrepancy rolling with resistance, Stage4 until the parent/ carer verbalise the changes they need to make, when you support them in their choice! Close the session by identifying specific times and specific people who will be involved with brushing It takes time and repetition; Use brushing charts, and reinforce at recall visits 2 Education & Motivation: The information • Adult paste - < 3 years, smear of 1000ppmF - 3-6 years, pea size 1000ppmF - 7 years and over 1,450ppmF • • • Twice daily Spit, not rinse supervised 2 Education & Motivation: Delivering the information: to avoid losing empathy, avoid giving advice directly; preface with: • Research shows…. • Some parents tell me…. 2 Education & Motivation: The materials • Disclosing solution • Mirror • Micro brush • Toothbrush • Floss/ floss wand (if child in mixed dentition, & high caries risk) 2 Education & Motivation : The technique (with communication between you and parent/ carer following the guidance above) 1 disclose 4 ask parent to brush other arch 2 ask parent about preference for; 5 ask child to brush as well a) brushing from in front or behind? 6 demonstrate flossing of posterior contacts, if appropriate b) brushing the same surface in a complete 7 close with affirmations and encouragement arch, or all 3 surfaces in each quadrant? 3 demonstrate brushing in one arch 3 Action planning • Agree timings of home brushing sessions 4 Habituation • Give, and complete, brushing chart • Agree rewards with parent/ carer • If available, give paste, brush and stickers • Agree who will supervise each session • Reinforce at recall appointments Notes to supplement lecture series given in Tasmania and New Zealand 2010/2011 73 2 of 4; Additional fluoride supplementation Fluoride varnish; key points • • • Apply twice yearly for children at medium risk of caries, and three time a year for children at higher risk of caries Varnishes contain high levels of fluoride, so follow manufacturers recommendations on dosage, and exclusions Apply to the buccal and lingual surface of embrasures, and the fissures of unsealed teeth, so aiding diffusion of F- through to the “at risk” sites for caries by applying the varnish as close to the sites as possible, rather than just painting over surfaces which are at very low risk of caries (labial surface of incisors, for example). In addition to fluoride toothpaste, other topical fluoride therapies are available, including tablets, mouthwashes and varnishes. Daily fluoride tablets have been recommended, but evidence indicates poor compliance rates, so they are not part of current UK guidance. Fluoride varnish has the advantage of not relying on parental compliance, although the child does have to attend for it to be applied! Note Fluoride varnishes often use the adhesive colophony (also found in Elastoplast), which is derived from Pine resins. The oral health team should follow the manufacturers instructions, but a child who has been hospitalised due to severe asthma or allergy or who is allergic to sticking plaster may be at risk of an allergic reaction to the varnish, so it should not be used. For such a child, if they are older than 7 years of age and at higher risk of caries, then an alcohol-free mouthrinse might be considered, to be used at a different time of day to toothbrushing. Fluoride Varnish Application Technique Fluoride varnishes contain high concentrations of fluoride, and it is important not to apply more than the manufacturer’s recommendations. For example, for Duraphat varnish which contains 22,600 ppm fluoride, the manufacturer’s recommended dose for children aged 2-5 years is 0.25 ml (shown on the left of the picture) and for 6 years and older is 0.4 ml (shown on the right of the picture). Approximal surfaces of primary teeth are particularly prone to caries. Therefore, it is particularly important to include these areas when applying varnish to tooth surfaces. 0.25 ml 0.4 ml Isolate and thoroughly dry the teeth a quadrant at a time to optimise adhesion of the varnish to the tooth. Apply a small amount of fluoride varnish to the buccal, and then the lingual, embrasure area, using a small brush. Advise that the child should eat soft food and should not brush their teeth for the rest of the day. Notes to supplement lecture series given in Tasmania and New Zealand 2010/2011 74 3 of 4; Dietary advice Dietary advice; key points • • • Sugar no more than 4 times a day Between meals, drink milk or water; snack on fresh fruit, or occasionally, a small piece of cheese “Nuthin’ after brushin’!” Successfully changing behaviour regarding a child’s diet poses the same challenges to the oral health team as promoting good brushing practice. The food parent/ carers provide for their children is at the core of parenting, but there may be many factors impacting on their choices which are not always in the parent/ carers control. The fact is that high carbohydrate/ high fat foods are generally tasty, immediately satisfying, inexpensive and quick to prepare, compared with high protein foods. A packet of sweets, or a sugary night time drink, will often settle a distracting child. Dietary modification should be approached with caution, and a sense of realism. Just as with brushing, avoiding judgement, and gaining empathy, are everything if progress is to be made (see section on Changing behaviour). Couple those two, and combine them with realistic expectations, and some dietary modification might be achieved. There is clear evidence that the key component of a cariogenic diet is sugars more than four times daily, so the aim should be to reduce the frequency of sugar consumption to four times or less, per day. Being realistic, and in view of all the barriers to dietary change, it would seem sensible to concentrate on two areas: • Between meals • The last hour before bedtime, especially anything just before going to sleep. Why concentrate on between meals eating? Because of the amount of “hidden sugars” in many pre-prepared meals and foodstuffs. It may well be unrealistic to expect many families to prepare a full meal, identifying and excluding foods and drinks with sugars. And why is eating last thing at night so damaging? Because the salivary flow rate drops to about one tenth of the daytime flow rate. This results in a longer clearance time for sugars in the mouth, and so encourages the development of dental caries. Changing behaviour The basic model for behaviour change stays the same as for toothbrushing: 1. Assessing the need 2. Educating and Motivating 3. Action planning 4. Habituating 1. Assessing the need A high caries rate, or erosion, would indicate the need for a dietary intervention. As part of this process, a 3 day diet diary has been recommended. The parent/ carer and child are given a booklet, and asked to write down everything their child has to eat and drink over three days. The days need Notes to supplement lecture series given in Tasmania and New Zealand 2010/2011 75 not be consecutive, but one should be a weekend. The diary then forms the basis for discussion between the parent/ carer, child, and the member of the oral health team. There is as yet no evidence supporting the efficacy of diet diaries, but they are useful as a basis for discussion. Anecdotally, however, the diaries are often either left at home, or can be seen to have been completed by the one hand, and at a single sitting! The food parent/ carers give to their children is potentially an emotive issue for the parent/ carers, and it perhaps a lot to expect that they will complete a 3 day diary reliably, and without feeling that their autonomy was being challenged. This would lead to loss of empathy and rapport, and without those, behaviour change is unlikely to occur. A slightly less threatening method is to ask the parent/ carer and child together, to complete a “24 hour recall diary”. An example is shown in the Appendix. Here, the family group write down everything the child had to eat and drink from the time of the appointment on the day before, up until they attended the clinic. 2. Educating and motivating The key dietary change messages are: • Restrict sugar containing foods and drinks to mealtimes, and certainly not more than four times a day • Drink only water or cows milk between meals Drinks such as sweetened milk, soy formula milk and fruit juices increase the risk of caries. Cows milk is non-cariogenic. Children aged 1 to 2 years should drink full fat cows milk, in order to increase their intake of Vitamins A and D. From 2 years of age, semi-skimmed milk may be slowly introduced into the diet, if wished, but skimmed milk should only be drunk by children over 5 years of age, as it is so low in calories and Vitamin A. • Snack between meals on fresh fruit, or occasionally a small piece of cheese. Oatcakes, sugar-free crackers or raw carrots can make an alternative snack. • “Nuthin’ after brushin’!” The increased caries risk posed by the reduction in night-time salivary flow to a tenth of daytime values has already been discussed. • Children should not be put to bed with a bottle containing anything other than warm water. 3. Action planning and habituation This involves broadly the same processes as for brushing advice; defining and agreeing with the parent/ carers achievable objectives, then applying them for long enough for them to become habitual. Additional points to note are: • Sweets, biscuits and fizzy drinks which aren’t bought, cannot be eaten and drunk, no matter how persistently the child ask for them at home! • Childcare arrangements during the day need to be explored sensitively with regard to snacking Notes to supplement lecture series given in Tasmania and New Zealand 2010/2011 76 4 of 4; Fissure sealing Fissure sealing; key points • Children who are at medium and higher risk of caries should have all susceptible pits and fissures in permanent teeth sealed • Children who are at higher risk of caries should, in addition, have susceptible pits and fissure on partially erupted permanent teeth sealed with glass ionomer to protect them until they are sufficiently erupted to seal with a resin material • Sealants must be checked visually and physically for wear and leakage at review appointments • The most common reason for sealant failure is moisture contamination; resin should only be applied when the dried, etched tooth surface is completely frosty in appearance • Current advice is that sealants must not be applied in permanent teeth where caries extends into dentine; the tooth should be restored (see section Surgical management) Fissure sealants have been shown to be very effective in preventing caries in pits and fissures, and to be more effective at this than fluoride varnishes. However, placing high quality sealants is demanding for the clinician, and sometimes for the child as well. An uncomfortable truth Fissure sealants are very effective at caries prevention. If caries does develop in a tooth which has been sealed, then it is likely for one of the following reasons: • The sealant was poorly applied, so that it was either lost entirely, or the bond failed around part of the margin, but the material retained on the tooth as a cantilever (this is why sealants must be checked physically, as well as visually) • The sealant has worn (the material is an unfilled resin; it wears!), exposing fissures in a child at higher risk of caries; this has not been managed by topping-up, and caries has developed. • There was pre-existing caries in the tooth before sealing, which was not diagnosed. Worn sealant, with exposed fissures now carious. If the child has attended regularly, this is a failure of clinical care rather than failure of the fissure sealant. It is difficult to see a situation where a child who has been regularly attending for dental care goes on to develop new pit and fissure caries, as anything other than a failure of clinical care. Fissure sealants, where indicated, need to be placed and maintained with the same attention to detail as any restoration. Notes to supplement lecture series given in Tasmania and New Zealand 2010/2011 77 A technique for placing fissure sealants Cleaning the fissures Clean the tooth using one of the following methods to ensure it is free from obvious debris (use of a 3in-1 syringe alone is usually insufficient to clean fissures if debris is present). Wipe the tooth with cotton wool pledget. Use a bristle brush without prophy paste. Clean with a toothbrush with no paste. Clean Gently dredge the fissures with a probe taking extreme care to avoid damaging the enamel. Checking the airline for moisture Check the air line is free from water by blowing air onto the mirror surface to reveal any water contamination. Achieving isolation Isolate the tooth using cotton wool rolls, mouth mirror and saliva ejector and consider the use of dry guard. Some clinicians use rubber dam, and provided the clamp can be applied without upsetting the child, this would be ideal.. Notes to supplement lecture series given in Tasmania and New Zealand 2010/2011 78 Etch the tooth. Dry the tooth to avoid diluting the etch. Apply the etch (30% phosphoric acid, not selfetch products) for 30 seconds. Wash the etch, positioning the high volume aspirator so that the water will flow off the tooth into the aspirator. Apply the sealant. Avoid moisture contamination of the tooth when changing cotton wool rolls. Dry the tooth surface, until the entire surface is frosty. Apply resin to etched enamel, ensuring the resin flows without air inclusions to cover approximately a third of the incline of the cusp. Do not allow resin to overflow into gingival sulcus as this will compromise the seal. Light cure the sealant. Check the sealant. Wipe the air-inhibited layer from the surface of the sealant as children find the taste distressing. Check for flash and the integrity of the sealant with a probe. If the sealant can be picked off with a probe, then it is almost certainly leaking and needs to be removed. Notes to supplement lecture series given in Tasmania and New Zealand 2010/2011 79 Reasons for failure • The most common reason for failure is inadequate moisture control. Generally, the mouth mirror should never leave the patient’s mouth during the procedure; in the maxilla, it separates the tooth from the patient’s tongue, while in the mandible it does the same, by stabilising the lingually placed cotton wool roll. • The tooth surface must look frosty before applying the resin; if not, then there has been moisture contamination • The resin must not be allowed to flow distally into the gingival sulcus; when the flash is removed, it will invariably also take part of the sealant, indicating an absence of bond in that area. Children will be better served having no sealants placed, than a leaky one. Monitoring fissure sealants over time A fissure sealant is only effective when all the fissures are fully covered by a well bonded resin. Fissures should be monitored at each recall visit and fissure sealants maintained until the child is no longer at increased risk of caries. Visually check fissure sealants With clear sealants, opalescence visible at the sealant/tooth interface usually indicates leakage and demineralisation. This sealant should be removed. Physically check fissure sealants with a probe. An apparently sound fissure sealant at recall visit. Probe inserted under palatal extension, which lifts away. A stained fissure is revealed. Notes to supplement lecture series given in Tasmania and New Zealand 2010/2011 80 With a sound, well retained but worn sealant, the edge of the sealant should merge without a step with the enamel surface. This example clearly needs topping up, but close examination shows lumpy margins, and a fractured mesial edge. This suggests a lack of bond between some parts of the sealant and the tooth, and in fact the whole sealant was easily flicked off with a probe. • Top up any fissure sealants as required if the child is still at increased caries risk. Notes to supplement lecture series given in Tasmania and New Zealand 2010/2011 81 Using glass ionomer cement as a sealant material Placing a resin sealant can be difficult on a partially erupted tooth, or with a child whose cooperation is limited. In these situations, a glass ionomer material can be used as a temporary measure, but the retention rates of this material are poor over the long term. Partially erupted lower 6, being inadequately cleaned, in a child at higher risk of caries. This tooth might be carious by the time it has erupted sufficiently to allow placement of a resin sealant For children assessed as at higher caries risk, consider the use of glass ionomer sealant material as a temporary measure only: • when the child is pre-cooperative, or • when resin sealant is indicated but there are concerns about moisture control, or • on a partially erupted tooth. For a child at increased risk of caries, but not yet able to tolerate the resin sealant procedure, consider placing glass ionomer sealants with the “press finger” technique. Lower 6 to be sealed. Place a small amount of glass ionomer on one finger tip, and Vaseline on the adjacent finger. If possible, wipe the tooth surface with a cotton wool roll. Firmly apply the finger tip with glass ionomer to the tooth surface to be sealed. Keep finger in place for two minutes. Place the second finger in the mouth, and rapidly switch fingers, to allow coverage of glass ionomer with Vaseline before moisture contamination. In this example, Fuji Triage was used. Notes to supplement lecture series given in Tasmania and New Zealand 2010/2011 82 Providing care Changing behaviours Prevention Biological caries management Helping children cope Surgical caries management Helping children cope Simple, effective techniques Helping children cope; key points • • • Begin every session with: - Gaining rapport - Giving control - Teaching relaxation through diaphragmatic breathing, if it hasn’t already been done Additional behavioural management techniques useful enough to be included at every intervention, even if the child appears not to be anxious include: - Praise and reward - Tell show do - Structured time - Systematic desensitisation If local anaesthetic injections are necessary, reduce discomfort by: - Using topical anaesthetic - Injecting very slowly (a minimum of 60 seconds for half a cartridge) - Use of intra-papillary injections to achieve palatal or lingual anaesthesia Receiving any sort of dental intervention is likely to be challenging for the child, until they have built up a good level of trust with their clinician. There are a range of behavioural management techniques which can be used both for the anxious child, and also for the child who is not anxious, but is new to receiving dental care. Use of these techniques can make a dental visit much less stressful both for the child and their clinician! Getting off to a good start Before beginning: • Engage with parent/ carer and chaild, gaining rapport • Give control • Teach relaxation Engaging with the parent/ carer and child This has been covered in a previous Section. Giving control For a child to have control over their treatment is an absolute basic right. It is difficult to conceive of a clinical situation where it is in the child’s best interest to continue with an intervention if they are distressed and vocalising. There will invariably be a way of managing the situation in a different way. Notes to supplement lecture series given in Tasmania and New Zealand 2010/2011 83 The child must be clear, then, that they have the final say as to whether an intervention can continue. • Saying to a child “Let me know if you want me to stop” is not adequate to give them control. Giving control means making sure the child understands that they decide whether treatment continues or not, and rehearsing a signal to stop, such as raising their hand. If the child gives the signal, then stop treatment immediately. Failing to do so may well result in the child developing mistrust phobia, which can be very difficult to resolve. • Be aware that young children may not yet be familiar with, or able to readily grasp, the concept of control; look for other signs (eyes are good, so use clear safety specs), of distress Teach relaxation It is not physiologically possible to be both anxious and physically relaxed at the same time, so physical relaxation is an extremely powerful method of reducing anxiety. However, just telling a child to relax will not help them to relax, but showing them how to breathe deeply using their diaphragm can. 1. Ask the child to place a hand on their tummy. 2. Ask them to breath in slowly and deeply, making the air “fill their tummy”. 3. Watch to see if their tummy rises; if so, praise them, and ask them to release their breath slowly, telling them that as they breathe slowly out, so they will become more relaxed. 4. Ask them to do this three times, any time they feel tense and worried. Other Behavioural Management Techniques Tell, Show, Do Explain to the child what you are going to do, and then show them, before continuing with the treatment. The following example demonstrates how to encourage an apprehensive 5-year-old child to accept treatment that involves use of a high-speed handpiece for the first time. 1. Gain rapport, give control, teach relaxation 2. Tell the child what you would like to do, and show them the handpiece (tell-show-do). 3. Show them the high-volume aspirator and ask them if it would be alright to try it. If they agree, ask the nurse to put the aspirator tip into the child’s mouth, switch it on, then off and then remove it. 4. Ask the child if that was OK. 5. Tell the child you would like to put the handpiece in their mouth (calling it whatever your favoured term is), switch it on, count to 4 (structured time, see below) then remove it. You will not touch their tooth. Ask the child if this would be OK. 6. If the child agrees, then proceed as above. If the child is happy, tell them you would now like to touch the tooth and ask if that is OK. Continue using this technique for each new action. Although this approach can appear laboured, after a child has accepted the procedure, it is usually not necessary to work through all the stages at subsequent visits. A child who has a profound needle phobia will need an enhanced version as described below. Structured time Children can tolerate some potentially upsetting procedures (such as use of a slow handpiece) if they know it will only continue for a finite period of time. “Just a little bit more” for a child could mean anything from a second or two, to eternity. Instead: Notes to supplement lecture series given in Tasmania and New Zealand 2010/2011 84 • • Break down time into units the child can understand. For example; “I’ll buzz your tooth while I count to three, then stop; is that OK? Good, 1…..2…..3; Well done! And again, 1….2….3 etc”. Note that young children (up to 5 years old) may not understand the concept of numbers above 4, despite being able to recite them. Notes to supplement lecture series given in Tasmania and New Zealand 2010/2011 85 Systematic desensitisation Systematic desensitisation is a very powerful technique to for helping people cope with something they find fearful, and is an enhanced version of the sequence above. Only an outline is given here. For further details refer to ‘Child Taming: How to Manage Children in Dental Practice’ by Barbara Chadwick (see Further Reading section). • Discuss with the child how to recognise the signs of stress and anxiety that they may be experiencing (e.g. hyperventilation, tension). • Teach the child how to manage their anxiety, principally with breathing but also using progressive muscle relaxation and other techniques such as guided imagery. • Teach the child how to describe their level of anxiety, using a scale from 1 to 10 (where 1 is completely relaxed, and 10 is the most anxious they have ever been). • Break the procedure down into stages, and describe all the stages to the child. • Give control, then try the first stage, asking the child at the end of it to describe their anxiety level. If rated above 5, ask them to spend a minute going through their relaxation regime, and try again, only proceeding to the next stage when: (1) the child has reduced their anxiety to a manageable level; and (2) the child has given their permission to proceed. • Giving local anaesthesia could, for example, be broken down into holding the syringe by the side of the chair, placing it in the child’s mouth but with the cap on, then holding the syringe in the child’s mouth with the cap off, and so on. For children who continue to demonstrate significant anxiety, consider the use of inhalation sedation (if available) or referral to a specialist. Local Anaesthesia Local anaesthesia (LA) is recommended for any cavity preparation that involves cutting sound dentine in both primary and permanent teeth. Dentine in primary teeth is as sensitive as that of permanent teeth. LA can be used successfully in children as young as 4 years old. Infiltrations are effective for most treatments on primary teeth, including extractions. However when carrying out pulpotomies on lower Es, an inferior dental block (IDB) has been found to be more effective. Most children will be apprehensive about receiving local anaesthesia. However, the use of “sleight of hand” techniques when giving LA may lead to “mistrust” phobias, which may be difficult to resolve at a later time. Ask the child if they want to see what you would like to use to make their tooth (and not them!) go to sleep. If they say yes, then show them the syringe, emphasising how fine the needle is (like a cat’s whisker), and that only a tiny part of it will go into their gum. To reduce the discomfort of local anaesthesia use: − use topical anaesthesia; − use a very slow injection technique, taking at least 60 seconds for an infiltration; − use intra-papillary injections rather than palatal injections (see below).. Intra-papillary Injection Technique Intra-papillary injections are useful for achieving palatal or lingual anaesthesia without any discomfort. However, it does take several minutes to complete. 1. Apply topical anaesthesia. 2. Give a buccal infiltration injection adjacent to the tooth you want to anaesthetise. 3. Draw an imaginary line across the base of one of the interdental papilla, and drop a perpendicular down Notes to supplement lecture series given in Tasmania and New Zealand 2010/2011 86 onto the line. Where the lines intersect, insert the needle horizontally, so as to pass between the teeth on either side. 4. Advance the needle 1-2 mm and gently inject a drop or two of LA solution. Ensure the needle remains in the correct plane, so as to neither obstruct on the interseptal bone, nor emerge into the interdental col. 5. Advance another 1-2 mm, and inject another drop of LA solution. 6. Continue to do this, while observing the palatal aspect of the mucosa in your mirror. After blanching is seen, withdraw the needle and insert it into the blanched area on the palatal side. The child will not feel this, and the needle may then be advanced further apically, if necessary, until complete anaesthesia is achieved. Notes to supplement lecture series given in Tasmania and New Zealand 2010/2011 87 Providing care Changing behaviours Prevention Biological caries management Helping children cope Surgical caries management Biological caries management “The seal’s the deal” Biological caries management of primary teeth; key points • • • The success of the biological approach depends on altering the micro-environment of the plaque biofilm: - if relying on prevention-alone, then brushing and diet must improve significantly - if relying on sealing in, then the seal must be of high quality, and must be monitored and maintained over time all lesions managed by the biological approach must be monitored for progression, and if progressing at a rate which increases the risk of pain or abscess before exfoliation, then a different strategy should be selected the biological approach should only be used on primary teeth with no clinical or radiographic signs of sepsis Overview of dental caries It has been taught for many years that plaque + sugar + susceptible tooth surface = caries. If it was a simple as this, then there would be far more dental caries to manage than there in reality is. Plaque is ubiquitous in the mouth, sugars are ubiquitous in the diet, and there are not many tooth surfaces that are completely immune from dental caries, as can be noted in extreme cases of dental caries. So where is all the caries? The explanation is that not all plaque is cariogenic. All plaque is potentially cariogenic, but it requires an extremely protected, sheltered environment for it to mature to the complex biofilm that is capable of dropping the pH to the level at which mineral dissolution occurs. This is why the great majority of dental caries begins on two sites which together make up less than 1% of the tooth surface: • Base of pits and fissures • Just below the contact points on proximal surfaces High caries susceptibility Plaque is far from the bland, homogenous material it appears to the naked eye. Given time, and a stable environment, plaque will mature into a complex, organised structure, with channels and pores. Notes to supplement lecture series given in Tasmania and New Zealand 2010/2011 88 Its bacterial population will shift and change in composition, with symbiotic relationships developing between some species, while other species will be gradually squeezed out by their neighbours. In the deeper layers, organic acids formed as a by-product of bacterial metabolism will favour a shift in the bacterial composition from non-cariogenic species such as Streptococcus oralis and Streptococcus salivarius to more cariogenic species such as the mutans streptococci and lactobacilli. Plaque has been described by Marsh as a “city of slime”. This is a useful analogy because just as a city is a complex structure, whose smooth functioning can be interrupted by a change in the supply of any number of factors (food, water, oxygen, power, light), so can the cariogenic potential of plaque be altered by changing the supply of carbohydrates, oxygen, or pH. Plaque biofilm, after Marsh, with apologies to “The Fantastic Voyage” DE Sealing-in caries techniques, such as the Hall Technique, manipulate the plaque’s environment by sealing it into the tooth, separating it from the substrates (essentially, nutrition) it would normally receive from the oral environment. There is a possibility that the plaque may continue to receive some nutrition from perfusion through the dentinal tubules. However, there is good evidence that if caries is effectively sealed from the oral environment, the bacterial profile in the caries changes significantly to a less cariogenic community, and the lesion does not progress. What about the soft dentinal lesion? It is easy to see how an enamel lesion can be reversed but it can be difficult to imagine how we can influence a change in the soft dentinal lesion. However, most clinicians will be familiar with this clinical picture. Perhaps because the cavity has become self cleansing, or the child’s diet has changed, the caries has arrested, with the colour changing to dark brown or black. This lesion was once soft and active and is now hard and arrested. The evidence that caries can arrest is visible to us on a daily basis, yet we continue to provide management therapies (conventional restorative treatment) based on its complete excision. Arrested caries on primary molars – the caries is dark and feels hard. The key point for clinicians is that this all points to the actively cariogenic plaque biofilm being extremely vulnerable to changes in its micro-environment; alter the micro-environment, and the carious process can stop. These approaches are termed “Biological”, to differentiate them from the classic “surgical” approach, where all active caries is completely excised from a tooth, and the resultant cavity restored. Notes to supplement lecture series given in Tasmania and New Zealand 2010/2011 89 Biological approaches to managing active dental caries in primary teeth All of these approaches are aimed at disrupting the micro-environment of the plaque biofilm, so that it is no longer actively cariogenic, and include; • Improving plaque control by the child and parent/ carer over the surface of an active lesion, through brushing and flossing for proximal lesions • Occasionally opening a lesion to facilitate the above • Sealing in the lesion with a dental material/ restoration, to isolate the lesion from the oral environment, and dietary-based nutrients Advantages of biological management of caries • Usually less demanding for the patient to accept, and less demanding for the clinician to provide • Reduced risk of iatrogenic harm to the dental pulp • • • Disadvantages of biological management of caries If based on plaque control alone, very reliant on child/ parent/ carer compliance with advice If based on sealing in, “the seal’s the deal!” A leaky seal will allow caries to progress. Clinicians are generally trained to diagnose whether caries is present or absent, and the evidence is that even in this, clinicians show poor reliability. The biological approach requires clinicians to do something even more difficult; diagnose whether caries is progressing over time and, if so, to identify it soon enough to apply a new management strategy before the patient is disadvantaged There is an increasing body of research supporting the use of a biological approach to managing caries in primary teeth in primary care, with treatment provided by primary care clinicians. Excluding irreversible pulpal involvement in primary teeth Before managing primary teeth with a restorative-based biological caries management approach, irreversible pulpal involvement of the tooth must be excluded. A full history and clinical examination, including bitewing radiography, should be carried out. Vitality testing of primary molars with Ethyl Chloride is unreliable. Instead, dentists should rely on their clinical acumen to assess the viability of a dental pulp, based on a thorough assessment, including: • Clinical signs or symptoms of irreversible pulpitis, or dental abscess • Radiographic signs or symptoms of dental abscess • Non-physiological mobility, assessed by placing the points of a pair of tweezers in an occlusal fossa, and gently rocking the tooth bucco-lingually, and comparing with a healthy antimere • Obvious carious, or clinical, exposure of pulp chamber Notes to supplement lecture series given in Tasmania and New Zealand 2010/2011 90 Biological approaches to managing active dental caries in permanent teeth A significant advantage of using a biological approach to managing caries in primary teeth is that primary teeth shed; therefore, it may well be sufficient to simply slow down the carious process, even if it is not fully arrested. The same does not apply to permanent teeth. The caries must be arrested, and if the management strategy was unsuccessful, then there must be diagnostic systems in place which are sensitive enough to reliably detect caries advancement at an early enough stage for the patient not to be disadvantaged. Clinicians need to be trained, and patients need to be aware, of the responsibilities and pitfalls of this different approach to managing the carious permanent dentition, and there needs to be further research based in primary care showing this approach is effective when provided by primary care clinicians before it can be generally recommended. There are, however, two forms of biological management for caries in permanent teeth which have a strong evidence base supporting them: • Indirect pulp cap • Stepwise caries removal Indirect pulp cap When preparing a cavity in a vital permanent tooth, from which there have been no signs or symptoms of irreversible pulpal disease, any remaining active caries for which removal would risk pulpal exposure, should be left, and a lining placed over it, before placing a permanent restoration; ideally, a sealed restoration. The tooth should be monitored for vitality at follow up appointments. It is worth reflecting that most clinicians are completely happy providing this well evidenced biological approach, and use it regularly as part of their clinical practice, yet it involves leaving active caries closest to the most vulnerable part of the tooth, the dental pulp. However, the small amount of active caries left will be sealed in by a restoration which will generally be abutting sound dental hard tissue for the majority of its periphery, reducing the risk of significant micro-leakage. Stepwise caries removal If a vital permanent tooth, with no signs or symptoms of irreversible pulpal disease, is found to have an extensive carious lesion present which threatens pulpal health, then superficial caries only should be removed, to an adequate depth to allow placement of a durable temporary restorative material for a period of 4 to 6 months. This allows time for secondary dentine to be laid down, and the pulp to recover from the caries insult. After this period, the cavity is re-entered, and the remaining caries removed, unless felt likely to risk pulpal exposure, in which case an indirect pulp cap is placed before sealing with a permanent restoration. Notes to supplement lecture series given in Tasmania and New Zealand 2010/2011 91 Management Options for Carious Lesions in Primary Teeth with no Clinical or Radiographic Signs of Pulpal Involvement. For each type of lesions shown, the possible treatment options are indicated. Further details on each caries treatment technique are provided in the following sections. Complete caries removal and restoration Partial caries removal and restoration No caries removal, seal seal caries caries with with Hall fissure crown sealant No caries removal, provide make prevention lesion alone selfcleansing and provide prevention Extraction, or review with extraction if pain or sepsis develops * Occlusal, non-cavitated lesions * * Occlusal, cavitated lesions * Approximal, early dentinal lesions * * Approximal, advanced lesions Anterior cavitated lesions Grossly carious unrestorable tooth, without signs or symptoms of pain or sepsis * due to a lack of supporting evidence, these approaches are only appropriate for these lesions when no other approach is feasible. Document the use of these approaches in the patient’s record. Notes to supplement lecture series given in Tasmania and New Zealand 2010/2011 92 Biological caries management “The seal’s the deal” Partial caries removal and restoration Aim: to remove sufficient carious tooth tissue to enable an effective marginal seal to be obtained with a bonded adhesive restorative material, and thus inhibit further progression of residual caries. Advantages • Evidence, largely from secondary care and private practice, that this approach can be effective. Reduced risk of pulpal exposure. Reduced time for cavity preparation, and less need for local anaesthesia. Particularly suited to ART approach. • • • Disadvantages • • As caries is left in the cavity, the marginal seal must be effective to prevent caries progression. No evidence, as yet, that this approach is effective in Primary Care. As it is imperative to obtain a complete marginal seal in order to slow or arrest caries progression, the use of plastic adhesive materials is likely to be most successful on Class I lesions, with preformed metal crowns being the preferred option for Class II lesions. Technique for primary molars • • • • • If necessary, gain access to caries using a high-speed handpiece. As this approach rarely requires the cutting of sound dentine, local anaesthetic is usually unnecessary. Remove superficial caries with a slow-speed handpiece or excavators, until there is no obvious caries visible at the enameldentine junction and the cavity allows an adequate thickness of restorative material to be placed. Take extra care not to cause iatrogenic damage to adjacent teeth if cutting a Class II cavity (see Section 9.3). Placing a matrix band around the adjacent tooth may help. Be aware of the pulp chamber anatomy to reduce the risk of pulpal exposure. Notes to supplement lecture series given in Tasmania and New Zealand 2010/2011 93 • Place the restoration, using adhesive material and a bonding system. Do not use glass ionomer materials for restoration of a Class II cavity. • Fissure seal the tooth surface and as many of the restoration margins as possible. • Monitor for any caries progression using radiographs where appropriate. • Inform the child and parent/carer of the approach taken and record details in the patient’s notes. Partial caries removal with preformed metal crowns Preformed metal crowns are the best restoration for all but the smallest of Class II cavities. One option for a proximal lesion in a primary molar is the Hall Technique (see below); however, preformed metal crowns can also be used with a partial caries removal technique, where the tooth is prepared as for a conventional preformed metal crown, but with no additional caries removal. This will, however, still involve the use of local anaesthesia and the high speed handpiece, but reduces the risk of pulpal damage compared with conventional cavity preparation, and avoids the bite propping associated with the Hall Technique. Notes to supplement lecture series given in Tasmania and New Zealand 2010/2011 94 Technique for carious primary incisors • • • • • Thoroughly clean the teeth with prophylaxis paste. Caries removal will be minimal so local anaesthesia is not required. Acid etch the entire crown; wash, dry and apply a bonding system. Place the composite restoration, either by handbuilding or using strip crowns. Inform the child and parent/carer of the approach taken and record details in the patient’s notes. Primary incisors managed by partial caries removal and restoration Notes to supplement lecture series given in Tasmania and New Zealand 2010/2011 95 Biological caries management “The seal’s the deal” No Caries Removal, Seal With Restoration (including Hall Technique) Aim: to completely seal a carious lesion from the oral environment so that the environment of the plaque biofilm is altered sufficiently to slow or even arrest caries progression. Advantages • Evidence, including some research from Primary Care, that this approach can be effective, and is preferred to complete caries removal techniques by children, their parent/carer and dentists. Avoids need for local anaesthesia, and tooth preparation. No risk of iatrogenic damage to adjacent teeth. • • Disadvantages • • Dependent on the quality of the seal for success. If the seal fails, the caries will progress. Further clinical trials in Primary Care needed to consolidate evidence base. Technique using fissure sealant • Place a fissure sealant over noncavitated pit or fissure caries, to completely seal the fissure system. • If using this approach on a precooperative child, consider using the press finger technique with a glass ionomer material as a temporary measure (see Section 6.5). Non-cavitated caries before and after fissure sealing Aftercare • • • • Check the integrity of the sealant with a probe at each recall visit. Consider the use of radiography to monitor if the lesion is progressing, at intervals informed by caries risk assessment. When a fissure sealant that has been applied over a carious lesion has worn enough to expose some parts of the fissure system, apply a fresh fissure sealant. Inform the child and parent/carer of the approach taken and record details in the patient’s notes. Notes to supplement lecture series given in Tasmania and New Zealand 2010/2011 96 Hall Technique using preformed metal crowns This technique involves sealing caries into primary molars with a preformed metal crown (PMC). No local anaesthesia, tooth preparation or caries removal is used. The Hall Technique: caries in a lower E sealed in with a PMC Only an outline of the technique is outlined given below. Before using it, refer to the Hall Technique User’s Manual available at www.scottishdental.org/index.aspx?o=1404. Early detection of proximal lesions with radiographs before there is marginal ridge breakdown will facilitate management with the Hall Technique, as PMCs can be more difficult to satisfactorily fit if the mesio-distal width of the carious tooth has been reduced by mesial migration of the tooth behind. Outline of Technique • • • • • • • • • • • Ensure the child is sitting upright. Assess whether separators are required. Placing separators requires a second visit 3-5 days later to remove them and to fit the crown, but some clinicians find they ease the fitting of a Hall crown. If there is any possibility of the crown endangering the airway during fitting, make a ‘handle’ for it with a strip of sticking plaster, or ensure the airway is protected with gauze. Select the correct size of PMC. Do not seat the crown through contacts prior to cementation, as it might be difficult to remove. Ensure the PMC is well filled with a glass ionomer luting cement. Seat the PMC over tooth. Seating can be assisted by the child biting on the crown, or on a cotton wool roll placed on the crown. Remove excess cement and clear the contacts using floss. Ensure excess cement does not flood over the tongue because it has a very bitter taste that children dislike. Notes to supplement lecture series given in Tasmania and New Zealand 2010/2011 97 Indications and Contra-indications for using the Hall Technique It is very important that selection of teeth for the Hall Technique is carried out carefully. The following table lays out guidelines. Indications include teeth with: • Proximal (Class II) lesions, cavitated or non-cavitated • Occlusal (Class I) lesions, non-cavitated o If the patient unable to accept fissure sealant, partial caries removal technique or conventional restoration • Occlusal (Class I) lesions, cavitated o If the patient unable to accept partial caries removal technique, or conventional restoration Contraindications include: • Signs or symptoms of irreversible pulpitis, or dental sepsis • Clinical or radiographic signs of pulpal exposure, or peri-radicular pathology • Crowns so broken down that they would normally be considered as unrestorable with conventional techniques • Teeth with arrested caries • Teeth close to exfoliation • Child at risk of endocarditis or immunocompromised Notes to supplement lecture series given in Tasmania and New Zealand 2010/2011 98 Biological caries management “The seal’s the deal” No Caries Removal, Prevention With or Without Self-cleansing Aim: to reduce the cariogenic potential of the lesion by altering the environment of the plaque biofilm overlying the carious lesion through brushing and dietary advice. Making the lesion self-cleansing by slice preparation may aid plaque control. Advantages • The absence of operative intervention (unless the lesion must be shaped to make it self-cleansing) makes this approach acceptable to children. Disadvantages • • As yet, there is no evidence base that this approach is effective. Very reliant on parent/carer and child changing their oral health behaviours with regard to oral health. Technique for prevention alone • • • • • • • • Show the parent/carer and the child the carious lesion. Provide enhanced Prevention, with particular emphasis on effective brushing of the lesion (e.g. to brush a Class II lesion may require the brush to be moved laterally). Keep a record of the size, colour and consistency of the lesion to enable monitoring and an alteration of the treatment plan if the lesion does not arrest. Consider recording caries progression via radiographs, photography or ICDAS Assess for the presence or absence of plaque biofilm on the surface of the lesion at each visit (consider recording plaque scores). If the child, or parent/carer cannot keep the lesion free from plaque, consider an alternative management strategy. Ensure the parent/carer is made fully aware of their responsibility. If caries progresses, choose another option. Consider whether making the lesion self-cleansing would aid plaque control. Inform the child and parent/carer of the approach taken and record details in the patient’s notes. This carious lower E has been managed with a prevention alone strategy. This has not been successful as plaque is visible four months later and the caries appears active rather than dark, hard and inactive (arrested). Therefore, a more restorative-based approach is now required. Notes to supplement lecture series given in Tasmania and New Zealand 2010/2011 99 Technique for making a lesion self-cleansing As only enamel and carious dentine are removed, the use of a local anaesthetic should not be necessary unless subgingival tooth preparation is required. • • • • Using a high-speed handpiece, or hand instruments, remove undermined enamel adjacent to the carious lesion making the surface of the lesion accessible to toothbrushing. The resulting cavity form will vary in shape depending on the lesion. It might be opening out of an occlusal lesion or result in a ‘slice preparation’, as shown in these photographs. Apply fluoride varnish. Inform the child and parent/carer of the approach taken and record details in the patient’s notes. Notes to supplement lecture series given in Tasmania and New Zealand 2010/2011 100 Providing care Changing behaviours Prevention Biological caries management Helping children cope Surgical caries management Surgical caries management Sometimes needed Surgical caries management of primary teeth; key points • • • Surgical caries management (complete caries removal and restoration) has a good evidence base when provided by secondary care dentists, often on selected patients, but there is evidence that it is relatively ineffective when provided by primary care dentists. If following this model, be very careful to avoid iatrogenic damage in three domains: - Damaging adjacent teeth when preparing proximal cavities - Damaging the dental pulp through exposure - Causing the child anxiety through the invasiveness of the procedure Glass ionomer material must not be used for restoring Class II cavities; there is very strong evidence that it has an excessive failure rate in this situation The preformed metal crown is the optimum restoration for a primary molar with anything but the smallest of Class II cavities to restore, and the only restoration which should be placed following a pulp therapy Complete Caries Removal and Restoration Aim: to remove all infected carious tooth tissue, and restore the tooth to function. Advantages • Evidence, largely from secondary care and private practice, that this approach can be effective7. • Currently accepted as best practice by British Society for Paediatric Dentistry. Traditionally taught in most UK dental schools. Disadvantages • • Some evidence that this approach is not effective in general dental practice in Primary Care in the UK. Can be demanding of both the child and the dentist, as this involves use of local anaesthesia and high speed handpieces and required requires good moisture control. Notes to supplement lecture series given in Tasmania and New Zealand 2010/2011 101 Technique for plastic restorative material Example shown: restoration of a mesial cavity, upper left second primary molar • Give local anaesthetic before commencing cavity preparation as this will require sound dentine to be cut. • Gain access to caries using a high-speed handpiece, leaving a wall of enamel to protect the adjacent tooth. • Remove caries excavators. • Be aware of pulp chamber anatomy to reduce the risk of pulpal exposure. • Prepare approximal cavity margins with gingival margin trimmers to prevent iatrogenic damage to the adjacent tooth. • • Place the restoration. If at risk of pulpal exposure, place an indirect pulp cap. Do not use conventional glass ionomer materials for restoration of a Class II cavity due to the unacceptably high failure rate. Composite, compomer, resin modified glass ionomer, amalgam and preformed metal crowns are may all be suitable, the particular material choice depending on the cavity. • with a slow-speed handpiece and Notes to supplement lecture series given in Tasmania and New Zealand 2010/2011 102 Traditional technique for preformed metal crowns • Give local anaesthetic. • Remove caries. • If at risk of pulpal exposure, place an indirect pulp cap (molar shown has had a pulp therapy). • Cut a mesial slice and a distal slice. The bur should pass through the crown cervically so as to avoid creation of a cervical ledge, as this will impede the seating of the crown. Note how a wall of enamel is left while cutting the slice to ensure there is no iatrogenic damage to the adjacent tooth. The wall will then fall away as the cut is completed cervically. • • Reduce the occlusal surface of the tooth enough to allow a straight probe to be passed across the tooth surface when the teeth are in occlusion. • Select the correct size of preformed metal crown (PMC), cement the PMC in place with glass ionomer cement, remove excess cement and clear contacts using floss. Notes to supplement lecture series given in Tasmania and New Zealand 2010/2011 103 Pulp Therapy for Primary Molars For the child with caries-related dental pain or sepsis (sinus or abscess), the clinician has to decide whether a pulp therapy is required and if so, whether this should be a vital, or a non-vital pulp therapy. Aim: to enable a primary molar with irreversible pulpal disease to be retained free from pain and sepsis until exfoliation. Advantages • • Evidence, largely from secondary care and private practice, that these approaches can be effective. Can avoid dental extractions. Disadvantages • Indications • • • • Irreversible pulpitis. (vital pulp therapy) Dental abscess/non-vital pulp (non-vital pulp therapy) Abscess. Radiographic signs of pulpal involvement. Techniques can be demanding both for the child and the clinician as they require local anaesthesia and immediate placement of a preformed metal crown (PMC) to maximise effectiveness. Contra-Indications • • • • Tooth close to exfoliation. Tooth unrestorable. Pre-cooperative child. Multiple pulp therapies needed. There is currently debate about the indications for pulp therapy when a primary molar is asymptomatic. A fractured marginal ridge alone is not necessarily an indication. When a narrow band of ‘normal’ dentine can be seen on radiographs between a carious lesion and the dental pulp and when the tooth is otherwise free from clinical and radiographic signs of pulpal disease, a pragmatic approach is to manage the tooth without a pulp therapy and to monitor vitality at subsequent visits. As roots of primary teeth resorb, conventional endodontics is contra-indicated. Instead, removal of irreversibly diseased pulp tissue from the pulp chamber alone, followed by placement of a preformed metal crown (PMC) to achieve a good coronal seal, can resolve symptoms. Clinical view Radiographic view Symptomatic upper left first primary molar in a 5-year-old which requires pulp therapy Pulp morphology of upper first primary Perforated pulp chamber floor Note from the radiograph and model: • • how much higher the pulp horns are relative to the central part of the pulp chamber roof in primary molars; how divergent the root canals are when leaving the pulp chamber. Notes to supplement lecture series given in Tasmania and New Zealand 2010/2011 104 Care is needed to avoid perforating the floor of the pulp chamber, which is very thin in primary molars (photo on right). The choice of pulp therapy technique will depend on whether the pulp is found to be vital or non-vital once accessed. Vital Pulp Therapy • Example shown: pulp therapy of a symptomatic upper left first primary molar in a 5 -year -old • • • Give local anaesthetic. Cut a large access cavity using a high speed handpiece, ensuring the entire roof of the chamber is cleared. • Remove the contents of the pulp chamber using a slow-speed handpiece, or sharp excavator. • Thoroughly irrigate the pulp chamber with water from the 3-in-1 syringe. Avoid the use of compressed air, which could cause surgical emphysema. • • Identify entrances to root canals, which will be in the corners of the pulp chamber. - Maxillary primary molars have three canals (two buccal and one palatal). - Mandibular primary molars have just two canals (mesial and distal). • If still bleeding, arrest haemorrhage by placing a pledget of cotton wool dampened in ferric sulphate into the pulp chamber, place another pledget on top, and then have the child bite on a cotton wool roll placed over the tooth for ~ 2 minutes. Use of formocresol is not recommended due to concerns about its safety. • • If haemorrhage cannot be arrested, consider sealing in ferric sulphate in cotton wool until the next visit. • Remove the cotton wool and place zinc oxide-eugenol cement in the pulp chamber. Alternatively, setting calcium hydroxide cement Notes to supplement lecture series given in Tasmania and New Zealand 2010/2011 105 or MTA may first be placed on pulp stumps and the floor of the pulp chamber. • • Fill the cavity with zinc oxide-eugenol cement, then place a PMC following a conventional preparation at the same appointment. There is evidence that placing a PMC at the same appointment as the pulpotomy improves the prognosis of the tooth. Aftercare • • Advise the parent/carer that the tooth might be a little uncomfortable for the child when the anaesthetic wears off, and that the child may need analgesia. Conduct a radiographic review of pulpotomised primary molars annually. Non-vital Pulp Therapy It should be noted that there is currently no evidence base supporting the following approach (or indeed any other approach) to managing the non-vital primary molar, and some opinion is that these teeth should always be extracted. However, if it is specifically wished to avoid extractions, then the following technique might prove useful. Example shown: pulp therapy of a lower second primary molar in a 6 -year -old. • Give local anaesthetic. • Cut a large access cavity using a high speed handpiece, ensuring the entire roof of the chamber is cleared. • Remove the contents of the pulp chamber using a slowspeed handpiece, or sharp excavator, and remove as much necrotic tissue as is possible from the entrance to the root canals, using a straight probe. • Thoroughly irrigate the pulp chamber with water from the 3in-1 syringe. Avoid the use of compressed air, which could cause surgical emphysema. Consider gentle irrigation of root canals using local anaesthetic solution. To facilitate access, use a needle that has been bent with tweezers. • • Notes to supplement lecture series given in Tasmania and New Zealand 2010/2011 106 • Dry pulp chamber with cotton wool. Place calcium hydroxide paste in coronal section of canals, using either an applicator, or a probe. Alternatively, use a mix of plain zinc oxideeugenol. • Back fill with zinc oxide-eugenol paste, applied with firm pressure, then at the same appointment, place a conventional preformed metal crown PMC. • If the tooth remains symptomatic, or a sinus is still present after three months, extract the tooth. • If the child will accept the placement of rubber dam, clinicians could consider a pulpectomy procedure, where endodontic files and irrigation are used to clean the canals before filling them with a mix of plain zinc oxide-eugenol cement. Further information on this specialist technique is available. Notes to supplement lecture series given in Tasmania and New Zealand 2010/2011 107 Providing care The carious permanent molar Management of the Suspicious Fissure in a Permanent Molar Aim: to ensure the optimum management of possible fissure caries in permanent molars. Advantages • Disadvantages Appropriate management of early carious lesions may prevent the child entering the restorative cycle unnecessarily. If early occlusal dentinal caries is inadvertently sealed in, then there is evidence that provided the sealant is maintained, the caries will not progress. • • If a sealing-in approach is adopted when managing a suspicious fissure, then careful long-term monitoring and repair of fissure sealants is essential. If there is uncertainty whether caries is present in an occlusal fissure, the appropriate procedure is as follows. • • Thoroughly clean the fissures of all debris, dry the tooth and view it with bright, direct light. Drying allows any demineralisation in the enamel to be visualised, in the same way that etched enamel only appears frosty when completely dry. • View a good-quality bitewing radiograph of the tooth. If there is either: micro-cavitation or shadowing visible under enamel adjacent to fissure or dentinal caries clearly visible radiographically then place a conventional composite restoration limited to the site of the carious lesion as described below, and fissure seal the remaining fissure system. • It is important to note that the two clinical examples shown above do not represent a failure of the fissure sealants; they represent a failure to monitor and repair existing sealants (possibly due to patient non-attendance or on the part of the dental team). Notes to supplement lecture series given in Tasmania and New Zealand 2010/2011 108 • • • • If the fissure is discoloured or stained but none of the above applies and caries is not clearly undermining the enamel, either visually or radiographically, then place a fissure sealant and review at every recall visit. Top up the sealant if it wears enough to expose fissures. If early occlusal dentinal caries is inadvertently sealed in, provided the sealant is maintained, the caries is unlikely to progress. If the tooth is only partially erupted, or the child’s cooperation is insufficient for placement of a resin fissure sealant or a restoration, consider the use of a glass ionomer material as a temporary sealant or restoration. Monitor for any caries progression using radiographs. Self audit of diagnostic decision making Reliable diagnosis of active dentinal caries is a fissure system is not easy. Before cutting into a permanent tooth’s fissure system with a handpiece (and so starting the child off on the restorative cycle), at least one of the three diagnostic criteria listed above should have been met. However, clinicians should constantly appraise what they expect to see when the dentine has been accessed with what they actually see. If there is regularly no soft carious dentine visible, then it is likely the clinician’s index of suspicion is set too high, and needs to be decreased. If the carious dentine is always more extensive than anticipated, then it is likely the clinician’s index of suspicion is set too low, and the clinician needs to be a little more pessimistic about the suspicious looking fissure. The sealed restoration for managing a permanent tooth with active dentinal caries in a pit or fissure. If one or more of the three diagnostic criteria listed above as indicating the presence of infected carious dentine in a permanent tooth are met, then the tooth should be managed as follows; • Give LA and isolate with rubber dam • Thoroughly clean all the fissure system • Use a high speed handpiece to access the carious dentine, but do not “extend for prevention”. • Remove all soft, infected dentine, unless pulpal exposure would result, in which case place an indirect pulp cap. • Place a lining if appropriate, avoiding any Zinc Oxide/ Eugenol product. • Etch the entire fissure system and cavity walls • • • • • • Wash and dry Once the enamel is frosty in appearance, apply an appropriate bonding agent, then blow thin with dry air from the triple syringe Light cure Restore the cavity with composite, in increments if necessary, light curing after each stage Flow an unfilled resin sealant over remaining fissure systems, and light cure Remove rubber dam, check the occlusion, and discharge the patient Notes to supplement lecture series given in Tasmania and New Zealand 2010/2011 109 Management of the Enamel-only Approximal Lesion in a Permanent Molar Aim: to reduce the risk of permanent molars requiring a Class II restoration. Advantages • Identification and appropriate management of an early proximal lesion may prevent the child entering the restorative cycle unnecessarily. Avoids Class II restorations which are destructive of tooth tissue, and are challenging to place, both for the clinician and the child. • Disadvantages • As yet, few clinical studies in primary care have assessed the effectiveness of interventions in arresting or reversing enamel-only lesions on approximal surfaces, although there is growing evidence supporting infiltration techniques. Identification and appropriate management of an early proximal lesion may prevent the child entering the restorative cycle unnecessarily. Approximal caries is particularly difficult to diagnose visually, and radiographic examination is recommended when this is suspected. Alternatively, orthodontic separators may be used, but this requires the child to reattend after five days. Early diagnosis of lesions, before they cavitate, may allow them to be managed without operative intervention. However, cavitated approximal lesions should be managed with a restoration, as it will generally not be possible to alter the micro-environment of the lesion sufficiently to prevent it progressing. • Make it a priority to identify, and arrest, early enamel-only lesions on the mesial surface of 6s. If uncertain whether cavitated, a separator can be applied. Separator removed 5 days later, allowing visualisation of the proximal surface. Techniques for managing non-cavitated proximal lesions • • Apply fluoride varnish, and monitor with bitewing radiographs. Ensure the parent/carers are fully aware of the potential impact on their child’s oral health, and encourage them to floss, or use floss wands, on the 6/E contact 2-–3 times a week. • In addition, if the distal of the E has a Class II lesion, consider: • a Hall crown on the E or a restoration. If restoring, take extreme care not to cause iatrogenic damage to the mesial of the 6 when, if rotary instruments are used • Extraction of the E (this will necessitate loss of the 5 for crowding relief in due course) Early approximal enamel lesion on upper left 6 Notes to supplement lecture series given in Tasmania and New Zealand 2010/2011 110 Atraumatic Restorative Technique (ART) Aim: To prepare cavities in a manner that is less stressful for the child than conventional techniques. Advantages • Disadvantages Evidence that children find cavity preparation with ART less stressful than conventional preparation. Cavity preparation using ART may be advantageous where child behavioural management is an issue. • • Requires the use of very sharp hand instruments and is a very exacting technique for the clinician. ART was developed for cavity preparation using hand instruments only, without local anaesthesia, in developing countries where there was no access to power. Children perceive cavity preparation with ART to be less stressful than conventional techniques, so dentists might consider using ART to prepare cavities. Unfortunately, ART has become synonymous with use of glass ionomer cement as the restorative material (as it is the only material which can safely be hand mixed, and is also self curing). However, while glass ionomer is satisfactory for use in Class I cavities, it has significant limitations in Class II cavities. Therefore, conventional glass ionomer should not be used when restoring Class II cavities. Instead, composite, compomer, amalgam or resin-modified glass ionomer cement can be used7. Technique The technique relies on the use of very sharp hand instruments: enamel chisels to cleave off unsupported enamel, and then excavators to remove carious dentine. Excavator and enamel margin trimmer • • • • • • Using a sharpening stone to sharpen Excavator sharp enough to cut paper Ensure excavators and enamel chisels/gingival margin trimmers are kept sharp. Use sharp enamel chisels to cleave off unsupported enamel, enabling access to carious dentine. Advise the children that this part will sound “scratchy”, or “picky”. Use a firm finger rest. Pare off carious dentine by cutting across the line of the dentinal tubules. This will minimise pain during instrumentation of carious dentine, which occurs when pressure is applied in a pulpal direction causing an increase in fluid pressure in patent tubules beneath the lesion which is then transmitted to the pulp. Restore the cavity with an adhesive material. Notes to supplement lecture series given in Tasmania and New Zealand 2010/2011 111 • • Do not use conventional glass ionomer materials for restoration of a Class II cavity due to the unacceptably high failure rate. If glass ionomer is used, limit this to Class I cavities. Inform the child and parent/carer of the approach taken and record details in the patient’s notes. Avoiding Iatrogenic Damage when Preparing Class II Restorations When preparing Class II cavities, iatrogenic damage to the approximal surface of the adjacent tooth is common. This damage has been shown to occur in up to 60% of Class II preparations and is associated with a significantly increased risk of subsequent caries development. To reduce the risk, a matrix band can be placed around the adjacent tooth prior to cavity preparation or the enamel margins of the box can be prepared with hand instruments alone, as shown below. Technique • Example shown: Class II cavity preparation for a mesial cavity on an upper left 5, with gingival margin trimmers alone being used to prepare the box. • Access cavity prepared with a high-speed handpiece, leaving the approximal wall of enamel intact. • Remove caries using a slow-speed handpiece. • Prepare approximal cavity margins using gingival margin trimmers only. • Complete the restoration. Notes to supplement lecture series given in Tasmania and New Zealand 2010/2011 112 Follow up support When to review Maintaining momentum Planning recall intervals Recall intervals will vary between patients, and should be determined by: • their caries risk. • If operative treatment has been staged Maintaining momentum An approach to oral health care for children which places a major emphasis on prevention will present challenges to the OHC Team in terms of maintaining their motivation. There is a natural tendency for those whose training has majored on operative care to find a dental arch containing multiple well maintained, polished restorations inherently more satisfying than a caries-free arch. There are no straightforward answers for this. Undoubtedly, though, one route is through greater involvement with the children and their parent/ carers in the child’s oral health care, with freedom from caries becoming something to celebrate with stickers and rewards. How often are children copiously rewarded for tolerating some difficult intervention, compared with the amount of praise and excitement when a regular check up reveals a healthy mouth? The origin of most oral health problems in adults can be traced back to their childhood. What greater privilege is there than to be in a position to help prevent another person from having to cope with a lifetime of oral health problems. Notes to supplement lecture series given in Tasmania and New Zealand 2010/2011 113 Further reading “Child Taming: How to Manage Children in Dental Practice” Barbara L Chadwick & Marie Therese Hosey. Quintessence Pub Co Ltd ISBN 1-85097-062-9 “Health Behaviour Change in the Dental Dental Practice” Christoph A Ramsier and Jean E Suvan Wiley-Blackwell 2010 ISBN 978-0-8138-2106-1 Notes to supplement lecture series given in Tasmania and New Zealand 2010/2011 114 Appendix All the following documents are available for download; please contact your Principal Dental Officer: • Assessment form • Dental chart • Post treatment checklist The four A4 sheets that make up the assessment form, dental chart and post treatment checklist are designed to be photocopied onto both sides of a sheet of A3 paper, which is then folded to make a booklet. . They can be downloaded as Word documents to allow them to be amended to suit local requirements, and also as pdfs, allowing them to be printed off as a double sided A3 document • • • Toothbrushing chart, without flossing Toothbrushing chart with flossing 24 hour recall Diet Diary Notes to supplement lecture series given in Tasmania and New Zealand 2010/2011 115 First page of Oral Health Assessment sheet Notes to supplement lecture series given in Tasmania and New Zealand 2010/2011 116 Second page of Oral Health Assessment sheet Notes to supplement lecture series given in Tasmania and New Zealand 2010/2011 117 Dental chart Notes to supplement lecture series given in Tasmania and New Zealand 2010/2011 118 Post treatment checklist Notes to supplement lecture series given in Tasmania and New Zealand 2010/2011 119 Toothbrushing chart, without the option of flossing three times a week Available to download as a pdf Notes to supplement lecture series given in Tasmania and New Zealand 2010/2011 120 Toothbrushing chart, with the option of flossing three times a week Available to download as a pdf Notes to supplement lecture series given in Tasmania and New Zealand 2010/2011 121 24 hour recall Diet Diary Available to download as a pdf Notes to supplement lecture series given in Tasmania and New Zealand 2010/2011 122