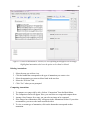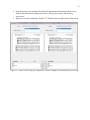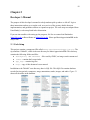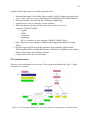
1
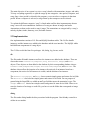
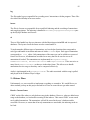
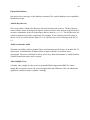
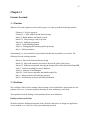
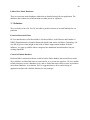
1
IDRgeneralization: Music Appreciation
Karen Hanes and Iain Shorland
Semester project for CS 4624: Multimedia, Hyptertext, and Information Access
Mentors
Ivica Ico Bukvic
Edward Fox
May 8, 2013
Virginia Tech
Blacksburg, Virginia
2
Table of Contents
Title
1
Table of Contents
2
List of Figures
3
Executive Summary
4
Chapter 1: User’s Manual
1.1 Search Features ….........................................................................................................5
1.2 Song Details Form …....................................................................................................7
1.3 Annotations ….............................................................................................................. 8
Chapter 2: Developer’s Manual
2.1 Code Setup …............................................................................................................. 12
2.2 System Overview …................................................................................................... 13
2.3 Implementation …...................................................................................................... 14
2.4 Future Plans …........................................................................................................... 15
Chapter 3: Lessons Learned
3.1 Timeline …................................................................................................................. 17
3.2 Problems …................................................................................................................ 17
3.3 Solutions …................................................................................................................ 18
Acknowledgements
19
References
19
3
List of Figures
Figure 1.1: Shows the taxonomy browser …................................................................................. 5
Figure 1.2: Illustrates the Song Details Form................................................................................ 8
Figure 1.3: Depicts the Add Annotation Form …......................................................................... 9
Figure 1.4: Shows that highlighted annotations can be edited or deleted................................... 10
Figure 1.5: Demonstrates the comparison of two songs ……………..…................................... 11
Figure 2.1: Illustrates the tables in the database …………………......………………………... 12
Figure 2.2: Depicts the system overview as a concept map........................................................ 13
4
Executive Summary
When instructors teach courses, they break up the material into components. The students need
to fully understand these components in order to understand the entire course. This concept led
Uma Murthy to create the SuperIDR. The SuperIDR is a tool that was formatted for Wildlife
Sciences. It allows users to search for a species of fish, annotate selected parts of the fish, and
compare annotations of two different species of fish. This tool improved students’ in Wildlife
Sciences ability to learn. We sought to generalize the SuperIDR for other disciplines in order to
improve more students’ learning experiences.
The discipline we focused on was Music Appreciation. There are so many components to Music
Appreciation: scores, audio, and historical context. To ensure that students have a grasp on all of
Music Appreciation’s components, we enhanced the annotations feature and added a feature to
handle audio files. The annotations feature now handles different types of annotations, and the
“Song Details Form” has the ability to play an audio file. The rest of SuperIDR’s features remain
the same, but have been augmented to handle time periods, composers, and songs as opposed to
families of fish, geneses of fish, and species of fish.
In this document, we have included User’s Manual, Developer’s Manual, and Lessons Learned
sections. The User’s Manual gives detailed steps on how to use each of the features in the
MusicAppreciationIDR. The User’s Manual goes over the search features, Song Details Form,
and annotations respectively. The Developer’s Manual steps through how to set up the code,
describes the components of our system, and discusses how we implement each component. The
Lessons Learned section discusses our timeline, issues we ran into, and solutions we used.
Our project works off Uma Murthy’s SuperIDR. We changed her program to handle music-based
components such as time periods, composers, and songs. To improve students’ understanding of
music, we included audio files and enhanced the annotation capabilities to handle different types
of annotations. We hope that people will pick up this project and fill out the databases so that the
MusicApprectionIDR can be used in the classroom.
5
Chapter 1
User’s Manual
This user manual is meant to show users how the search features, Song Details Form, and
annotations capabilities work in the MusicAppreciationIDR. This user manual was adapted from
Uma Murthy’s user manual that shows the user how to use her SuperIDR [1].
1.1 Search Features
There are various ways to search songs in the SuperIDR. These features include a browser,
image, text, and combined search.
Taxonomy Browser
1 Select a time period from the Time Period column.
2 Select a composer from the Composer column.
Figure 1.1: Selecting a song in the Taxonomy Browser
3 Select a song from the Song column.
4 Click on the link that appears below the Song column to view the selected song’s details.
6
Image Search
1
2
3
4
5
6
7
8
9
Select the “Search” menu and then “Image Search” in the submenu.
This will open a file browser that will allow you to choose an image to search.
A file dialog will allow you to select and display the search image.
You can use the entire image as your search request, or you check “Mark” and mark the
image and use that mark as your search request.
Once you have decided on an image to search, click the “Search” button.
A new window will show results. The results can be complete images or parts of
annotated images if you check “Mark” and mark the image.
Each of these results open in a separate tab. The top of each tab should display the
number of search results.
Each result will show an image, song and composer label, and the associated annotation
and mark.
Select one of the search results to view the results Song Details Form.
Text Search
Select the “Search” menu and then “Text Search” in the submenu.
This will open a new window with a text box.
Write key terms in the text box that you wish to search.
Use “Text Search Help” to try different search combinations.
Click the “Clear” button if you wish to clear the box and start over.
Select one of the three radio buttons to choose a type of search. Annotations will search
only annotations, song will search only song descriptions, and both will search
annotations and song descriptions.
7 A result window will appear with Song Results and Annotation Results in separate tabs.
Each search result will display a similarity score.
8 Select one of the search results to view its Song Details Form.
1
2
3
4
5
6
Combined Search
1 Select “Search” in the menu and then “Combined Search” in the submenu.
2 A new window will appear with an image box and a text box.
3 Click “Select Image” to pick an image. The images can be complete images or parts of
annotated images if you check “Mark” and mark the image.
4 Click on the text box to enter text.
5 The weight of image search and text search can be adjusted by moving the slider. The
default value gives the image search and text search the same weight.
6 Click on the “Search” button.
7
7 The results will be shown in a new window. The results are similar to the Image Search
and Text Search sections.
8 Select one of the search results to view its Song Details Form.
9 Click on the “X” button in the top-right corner to close the window.
1. 2 Song Details Form
The Song Details Form shows the user images, annotations, and description of the selected song.
Features
1
2
3
4
5
6
7
8
9
The Song Details Form can be reached through the browser, text and image searches.
The screen can be enlarged for a better view.
The primary image will be shown in the display.
If the song has multiple images, the images’ thumbnails will be shown in the image list
box below the selected image.
Selecting a thumbnail will make it the primary image.
If any annotations were made before, a list of annotations associated with the image will
appear to the right of the image. A certain type of annotation can be viewed by clicking
on the button that corresponds to that type.
Selecting an annotation will display the mark associated with it on the image.
Clicking the play button on the media player will play an audio file associated with the
song.
Clicking the pause button will pause the song.
Adding Images to the Song Details Form
1 Select the “Add” link and a file dialog will display. This will allow the user to add an
image.
2 A thumbnail of the newly added image will appear in the image list box.
3 If the image list box is not updated, click refresh.
Deleting Images from the Song Details Form
1 Select the image you want to delete from the image list box.
2 A box will appear and request your confirmation. Note: An image marked as a primary
image cannot be deleted.
3 If the image list box is not updated, click refresh.
8
Figure 1.2: Song Details Form
1. 3 Annotations
Annotations are the key part of the SuperIDR. They allow the user to capture a region of an
image and write text that corresponds to that marked region. Annotations can be added, edited,
deleted, or compared.
Adding Annotations
1 To create an annotation, find the song you wish to annotate. This can be done by
browsing.
2 Once in the Song Details Screen, make sure that the image you want to annotate is
selected. Other images can be selected in the box below the image currently being
viewed.
3 Select the link “+Add.”
4 The Add Annotation Form window will appear on the screen. To annotate, you may type
it or use a tablet-based pen.
9
Figure 1.3: Add Annotation Form
5
6
7
8
Select the type of annotation you want to write in the drop-down box.
Select a region of the image to annotate.
Write an annotation onto the text area.
Click on the “Save Annotation” button. The annotation will be saved, and the image and
text box will be cleared. You can type another annotation or click the “Close” button to
return to Song Details Form.
9 Note: An error dialog box will appear. Click “Continue.” The annotation will be saved to
your database, but it will not be searchable.
Editing Annotations
1
2
3
4
5
Select the song you wish to view.
Click the button that corresponds to the type of annotation you want to view.
Select the annotation you want to edit listed in the text box.
Select the “Edit” link.
The Edit Annotation Form will appear. It’s similar to the Add Annotation Form. The type
of annotation being edited will be shown in the drop-down box.
6 Change the annotation text.
7 Click on the “Save Annotation” button. Click the “Close” button to return to the Song
Details Form.
10
Figure 1.4: When an annotation is selected, its corresponding mark appears on the image.
Highlighted annotations also have the option to be edited or deleted.
Deleting Annotations
1
2
3
4
5
Select the song you wish to view.
Click the button that corresponds to the type of annotation you want to view.
Select the annotation you want to delete listed in the text box.
Select the “X Delete” link.
Click “Yes” when you are prompted.
Comparing Annotations
To compare two songs side by side, click on “Comparison” from the Main Menu.
The Comparison Form will appear. Here, you can select two songs and compare them.
Among a list of images for a song, you can select an image to be compared.
If the images have annotations, they will appear in the Annotations list box. If you select
an annotation, you can see the mark associated with it.
5 To view a certain type of annotation, click on the button that corresponds to that
annotation.
1
2
3
4
11
6 From this screen, you can add, edit, and delete annotations at the bottom of the screen.
Refer to the sub-sections Adding Annotations, Editing Annotations, and Deleting
Annotations.
7 When you are done comparing, click the “X” button in the top-right corner of the screen.
Figure 1.5: Shows a user using the Comparison Form to compare the annotations for two songs.
12
Chapter 2
Developer’s Manual
The purpose of this developer’s manual is to help students pick up where we left off. It gives
them instructions on how to set up the code, an overview of the system, details about our
implementation, and guidelines on how to expand our project. The code setup was adapted from
Uma Murthy’s code setup listed in her dissertation.
If you run into troubles with setting up the program, feel free to contact Iain Shorland at
[email protected] or Karen Hanes at [email protected]. Please put MusicAppreciationIDR in the
subject line.
2. 1 Code Setup
This project contains a compressed file called hanes-shorland-musicappr-idr.zip. The
zip contains a TabletPC, which is the root directory for MusicAppreciationIDR. This directory
contains the following folders and files:
● Descriptors, XML Database - files used by CBISC, an image search content tool
● index - contains the Lucene index
● app_logs - contains log files
● help - copy of this document’s user manual
In addition to the TabletPC root directory, there is SQL file. This SQL file contains database
records for time periods, composers, songs, annotations, marks, images, and audio. Figure 2.1
shows all the tables in the database.
Figure 2.1: Tables in the database
13
Perform the following steps to successfully upload the code:
1 Download and install Visual Studio 2008 (or higher), MySQL (change App.config in the
source code to reflect the set user ID and password), and MySQL GUI tool/Workbench.
2 Restore the database from the SQL file “multihyper(withdata).sql.”
3 Unzip the source code to a directory on your computer.
4 Make sure that the following .dll files are located in <directory on your
computer>/TabletPC/TabletPC:
○ Log4net
○ CBISC
○ Lucene.Net
○ MySqlData
○ BIC (in <directory on your computer>/TabletPC/TabletPC/DLLs)
5 Open <directory on your computer>/TabletPC/MusicAppreciationIDR.sln in Visual
Studio
6 Open the App.config file and edit the parameters for mysqlString, appRootFolder,
familyImageRootFoler, and figureRootFolder to reflect the correct path on your machine.
Make similar changes in the log4net.config file.
7 Compile and run the code in Visual Studio.
2.2 System Overview
There are a lot of working parts in our system. The concept map illustrated in Figure 2.2 helps
keep track of everything.
Key:
Figure 2.2: Concept map showing how the songs relate to the annotations and media aspects
14
The main objective of our system is to view a song’s details with annotations, images, and audio.
To keep everything organized, we split the songs up into categories: time period, composer, and
song. Once a time period is selected in the program, a user can select a composer in that time
period. When a composer is selected, a song written by that composer can be selected.
To explain the different categories “song” is listed under and list other important notes about a
song, a user will create annotations. Instances of a song are shown in images and audio.
Annotations are then used to mark a song’s image. The annotations are categorized by a song’s
melody, rhythm, timbre, harmony, text, and other features.
2.3 Implementation
Our implementation consists of C# files and MySQL database tables. The C# files handle
instances, and the instances are added to the database and the user interface. The MySQL tables
hold different components of a song object.
The C# files are divided into five packages: db, dialog, log, lucene, and ui.
db
The files under db handle instances and how the instances are added to the database. There are
classes that create TimePeriod, Composer, Song, Annotation, ImageO, and Audio
objects. These objects are then added to the database by their corresponding database classes:
TimePeriodDB, ComposerDB, SongDB, AnnotationDB, ImageODB, and AudioDB. The
database classes allow the insertion of an instance, the retrieval of an instance based on a
component, the retrieval of all instances in a table, and the deletion of an instance.
The TimePeriod, Composer, and Song classes contain simple getters and setters for its fields.
The Annotation class also has simple getters and setters for its fields. For our purpose of
generalizing the SuperIDR, we added an annType field that stores the annotation’s type. The
ImageO and Audio classes have simple setters and getters for most for its fields. However to
store the location of an image or audio file, you have to set the folder that corresponds to image
or audio.
dialog
The files under dialog handle the diary associated with the program. Uma Murthy created it to
aid her in user studies.
15
log
The files under log are responsible for recording users’ interactions with the program. These files
also aided Uma Murthy in her user studies.
lucene
The files in Lucene are responsible for text and field indexing and the searching of annotations
and song descriptions. The indexing is handled in FieldKeys. MySQLToLuceneSyncer syncs
up the MySQL database and Lucene.
ui
These ui files handle how the user interacts with the MusicAppreciationIDR and its respected
databases. The layouts for all the forms are also created under ui.
To implement the different types of annotations, we have helper functions that correspond to
each type and handle its insertion and removal with a ListBox object. Each type of annotation
corresponds to a List object. Only annotations of the same type can be added to or removed
from a list. However, all annotations are added to an array that can be used to access all
annotations if needed. The annotations are implemented in SongDetailsForm,
AddAnnotationForm, EditAnnotationForm and ComparisonForm. There are twice as
many lists in ComparisonForm as there are in the other forms. This allows us to handle
annotations for two songs so that they can be compared effectively.
Audio is implemented in the SongDetailsForm. The audio associated with the song is pulled
and played in the Windows Player widget.
2. 4 Future Plans
Unfortunately, we were not able to implement everything we wanted to. We would like to see
other students pick up on this project and add to it. Here are some ideas to get other started:
Resolve Current Issues
CBISC worked fine when we only had one song in the database. However, when we added more
songs to the database, we had trouble resetting all the indexes. This causes CBISC to not search
newly added annotations. The annotations will still be stored in the user’s database and be
accessible. However, to ensure that all newly annotations are searchable, the indexing needs to
be fixed.
16
Expand the Database
Our project was a prototype, so the database is minimal. We want the database to be expanded to
include more songs.
Add the Key Browser
We were not able to add the Key Browser due to limited time and resources. The Key Browser
works with the classes focusing on the figures. Someone needs to take apart the song and classify
its music components, such as key and tempo, and save them in Figures. The Key Browser can
search for songs based on their components. For example, if you wanted to search for songs in
the key of C#, you will search the figure of C#. It will show you a list of all songs in the key of
C#.
Ability to Annotate Audio
We think it would be useful to students if they could annotate specific frames of an audio file. To
achieve this, we think that the Windows Player widget would have to transform into a
spectrogram. The users would then be able to select a key frame and annotate it. SoundCloud has
a similar feature that can be used as a guide.
Allow Multiple Users
Currently, only a single user has access to an installed MusicAppreciationIDR. We want to
change that so a group of users can access the application and collaborate. This can enhance the
application’s ability to improve student’s learning.
17
Chapter 3
Lessons Learned
3. 1 Timeline
When we first came together to work on this project, we came up with the following timeline:
February 6: Project Approval
February 13: Meet with client and discuss design
March 1: Build database and finish research
March 22: First prototype ready to present
March 25: Midterm presentation
April 5: Finish building database
April 19: Debugging and finishing up final prototype
May 6: Final presentation
Unfortunately, we were not able to keep with this timeline due to problems we ran into. The
following lists our working timeline.
March 4: Meet with client and discuss design
March 22: Meet with instructor and client to discuss the goals of the project
March 25: Midterm presentation, showing the design layout of the generalized SuperIDR
April 7: Finish researching free music databases
April 14: Integrate UI and database
April 28: Create classes and tables that handle audio files
May 6: Debug software and finish the prototype
May 8: Present demo of project and final presentation
3. 2 Problems
We would have liked to have students who are taking or have taken Music Appreciation use our
program. However, we ran into problems that kept us from conducting a user study.
These problems include finding a client and limited free music databases.
Finding an Interested Client
We had a hard time finding an interested client. We didn’t know how to design our application
for two months, so we lost a lot of time just conducting research.
18
Limited Free Music Databases
There are not many music databases online that are detailed enough for our application. The
databases that contain a lot of information are either private or expensive.
3. 3 Solutions
We were lucky to have Dr. Fox. He was able to put his resources to use and find help for our
problems.
Found an Interested Client
Dr. Fox introduced us to Professor Bukvic. Professor Bukvic is the Director and Founder of
DISIS (Digital Interactive Sound & Intermedia Studio) and works with Music Technology. He
was able to give us some insight on the needs of Music Appreciation students. With his
influence, we came up with the idea to categorize the annotations and add audio to the preexisting SuperIDR.
Created a Limited Database
Professor Bukvic informed us that it would be hard to find a database that would fit our needs.
We would have to either find some to create one for us, or create one ourselves. We were unable
to find someone to create a database for us, and we lacked the music skills to create an extensive
music-based database. As a solution, Dr. Fox suggested that we focus on the design of
application and provide a shallow database for our prototype.
19
Acknowledgements
We would like to thank Dr. Fox for helping us get our project up and running. If it wasn’t for
him, we wouldn’t be able to find a client or know where to begin our project. He always worked
with us and helped us find the resources we needed.
Professor Ivica Ico Bukvic was an awesome client. He helped us establish goals for our project
and point us in the direction we needed to carry out those goals. We want to thank him for being
interested in our project and helping us make such an incredible tool.
We are also thankful that Uma Murthy made her SuperIDR public so that we could generalize it
for Music Appreciation. Without her and all her hard work, we would not have worked on such a
remarkable learning tool.
We would also like to thank Ricardo da Silva Torres for his work on CBISC. His work allowed
us to adapt the image search from the original SuperIDR to our application.
References
[1] Murthy, Uma. Digital Libraries with Superimposed Information: Supporting Scholarly Tasks
That Involve Fine Grain Information. Diss. Virginia Tech, 2011.
[2] Murthy, Uma. "Title Page for ETD Etd-04142011-175752." Title Page for ETD Etd04142011-175752. 2011. Web. 07 May 2013. <http://scholar.lib.vt.edu/theses/available/etd04142011-175752/>.