1
Alpha Communications® and Alpha Media, Inc.
AlphaEntry™ Editor V.1.5
Installation & Configuration Manual
Alpha Communications®
42 Central Drive
Farmingdale, NY 11735-1202
Phone: 631-777-5500 Fax: 631-777-5599
Copyright© 2005-2007 Alpha Communications® All Rights Reserved.
AEEManual (06/07)
Rev. 1.1
i
.
LICENSE AGREEMENT
ALPHA MEDIA, INC. ALPHAENTRY™, ALL VERSIONS, AND SOFTWARE RELATED COMPONENTS. END-USER LICENSE AGREEMENT FOR ALPHA
MEDIA, INC. SOFTWARE
IMPORTANT-READ CAREFULLY: This Alpha Media, Inc. End-User License Agreement ("EULA") is a legal agreement between you (either an individual or a
single entity) and Alpha Media, Inc. Corporation for the Alpha Media, Inc. software product(s) identified above which may include associated software
components, media, printed materials, and "online" or electronic documentation ("SOFTWARE PRODUCT"). By installing, copying, or otherwise using the
SOFTWARE PRODUCT, you agree to be bound by the terms of this EULA. If you do not agree to the terms of this EULA, do not install or use the SOFTWARE
PRODUCT.
The SOFTWARE PRODUCT is protected by copyright laws and international copyright treaties, as well as other intellectual property laws and treaties. The
SOFTWARE PRODUCT is licensed, not sold.
1. GRANT OF LICENSE. The SOFTWARE PRODUCT is licensed as follows:"
* Installation and Use. Alpha Media, Inc. grants you the right to install and use copies of the SOFTWARE PRODUCT on your computers running validly licensed
copies of the operating system for which the SOFTWARE PRODUCT was designed [e.g., Windows® 95; Windows® 98; Windows NT®; Windows2000®;
Windows Me®; Windows XP®]."
* Backup Copies. You may also make copies of the SOFTWARE PRODUCT as may be necessary for backup and archival purposes.
* Components. Certain software components of the SOFTWARE PRODUCT are subject to the following additional provisions:
2. DESCRIPTION OF OTHER RIGHTS AND LIMITATIONS.
* Maintenance of Copyright Notices. You must not remove or alter any copyright notices on all copies of the SOFTWARE PRODUCT.
* Distribution. You may not distribute copies of the SOFTWARE PRODUCT to third parties.
* Prohibition on Reverse Engineering, Decompilation, and Disassembly. You may not reverse engineer, decompile, or disassemble the SOFTWARE
PRODUCT, except and only to the extent that such activity is expressly permitted by applicable law notwithstanding this limitation.
* Rental. You may not rent, lease, or lend the SOFTWARE PRODUCT.
* Transfer. You may permanently transfer all of your rights under this EULA, provided the recipient agrees to the terms of this EULA.
* Support Services. Alpha Media, Inc. may provide you with support services related to the SOFTWARE PRODUCT ("Support Services"). Use of Support
Services is governed by the Alpha Media, Inc. polices and programs described in the user manual, in "on line" documentation and/or other Alpha Media, Inc.provided materials. Any supplemental software code provided to you as part of the Support Services shall be considered part of the SOFTWARE PRODUCT
and subject to the terms and conditions of this EULA. With respect to technical information you provide to Alpha Media, Inc. as part of the Support Services,
Alpha Media, Inc. may use such information for its business purposes, including for product support and development. Alpha Media, Inc. will not utilize such
technical information in a form that personally identifies you, without your
permission.
* Compliance with Applicable Laws. You must comply with all applicable laws regarding use of the SOFTWARE PRODUCT.
3. TERMINATION. Without prejudice to any other rights, Alpha Media, Inc. may terminate this EULA if you fail to comply with the terms and conditions of this
EULA. In such event, you must destroy all copies of the SOFTWARE PRODUCT.
4. COPYRIGHT. All title, including but not limited to copyrights, in and to the SOFTWARE PRODUCT and any copies thereof are owned by Alpha Media, Inc.
or its suppliers. All title and intellectual property rights in and to the content which may be accessed through use of the SOFTWARE PRODUCT is the property
of the respective content owner and may be protected by applicable copyright or other intellectual property laws and treaties. This EULA grants you no rights to
use such content. All rights not expressly granted are reserved by Alpha Media, Inc.
5. U.S. GOVERNMENT RESTRICTED RIGHTS. The SOFTWARE PRODUCT is provided with RESTRICTED RIGHTS. Use, duplication, or disclosure by the
Government is subject to restrictions as set forth in subparagraph (c)(1)(ii) of the Rights in Technical Data and Computer Software clause at DFARS 252.2277013 or subparagraphs (c)(1) and (2) of the Commercial Computer Software Restricted Rights at 48 CFR 52.227-19, as applicable. Manufacturer is Alpha
Media, Inc. 42 Central Drive, Farmingdale, NY 11735-1202.
6. EXPORT RESTRICTIONS. You agree that you will not export or re-export the SOFTWARE PRODUCT to any country, person, entity or end user subject to
U.S.A. export restrictions. Restricted countries currently include, but are not necessarily limited to Cuba, Iran, Iraq, Libya, North Korea, Sudan, and Syria. You
warrant and represent that neither the U.S.A. Bureau of Export Administration nor any other federal agency has suspended, revoked or denied your export
privileges.
7. NO WARRANTIES. Alpha Media, Inc. expressly disclaims any warranty for the SOFTWARE PRODUCT. THE SOFTWARE PRODUCT AND ANY
RELATED DOCUMENTATION IS PROVIDED "AS IS "WITHOUT WARRANTY OF ANY KIND, EITHER EXPRESS OR IMPLIED, INCLUDING, WITHOUT
LIMITATION, THE IMPLIED WARRANTIES OR MERCHANTABILITY, FITNESS FOR A PARTICULAR PURPOSE, OR NONINFRINGEMENT. THE ENTIRE
RISK ARISING OUT OF USE OR PERFORMANCE OF THE SOFTWARE PRODUCT REMAINS WITH YOU. THIS SOFTWARE IS DISTRIBUTED ON A FREE
90-DAY TRIAL BASIS. IT IS THE CUSTOMER'S RESPONSIBILITY TO FULLY USE AND TEST THIS SOFTWARE, BEFORE PURCHASING, TO
DETERMINE IF THE SOFTWARE MEETS THE CUSTOMER'S NEEDS, AND PERFORMS TO THE CUSTOMERS 100% SATISFACTION. IF IN ANY WAY
THE SOFTWARE IS UNSATISFACTORY OR IS NON-FUNCTIONING, THE CUSTOMER SHALL NOT REGISTER OR PAY FOR THE SOFTWARE. ONCE
THE CUSTOMER REGISTERS OR PAYS FOR THE SOFTWARE, THE CUSTOMER HAS ACCEPTED THE SOFTWARE 'AS-IS' AND WILL NOT BE
ENTITLED TO ANY REFUND OR COMPENSATION OF ANY KIND.
8. LIMITATION OF LIABILITY. To the maximum extent permitted by applicable law, in no event shall Alpha Media, Inc. or its suppliers be liable for any special,
incidental, indirect, or consequential damages whatsoever (including, without limitation, damages for loss of business profits, business interruption, loss of
business information, or any other pecuniary loss) arising out of the use of or inability to use the SOFTWARE PRODUCT or the provision of or failure to provide
Support Services, even if Alpha Media, Inc. has been advised of the possibility of such damages. In any case, Alpha Media, Inc.'s entire liability under any
provision of this EULA shall be limited to the replacement of any registered software that has been determined by Alpha Media Inc. to be defective. Because
some states and jurisdictions do not allow the exclusion or limitation of liability, the above limitation may not apply to you.
9. MISCELLANEOUS.
This EULA is governed by the laws of the State of New York, U.S.A.
Should you have any questions concerning this EULA, or if you desire to contact Alpha Media, Inc. for any reason, please contact the Alpha Media, Inc.
subsidiary serving your country, or write: Alpha Media, Inc., 42 Central Drive, Farmingdale, NY 11735-1202. You may contact us by
phone at 631-777-5500 or fax at 631-777-5599 or by email at [email protected]
ii
Table of Contents
CHAPTER 1
Introduction
System Requirements
Installing AlphaEntry™ Software
What is A Dongle?
Starting AlphaEntry™
Exiting AlphaEntry™
1
2
3
3
3
3
CHAPTER 2
The AlphaEntry™ Editor
System Setup Settings
(1st Tab)
Option Settings
(2nd Tab)
Welcome Screen Settings
(3rd Tab)
Phone Code Settings
(4th Tab)
Database Settings
(5th Tab)
Main Screen Color Settings
(6th Tab)
Tenant Access Settings
(7th Tab)
Switch Console Configuration (8th Tab)
4
5
7
8
10
12
12
13
14
CHAPTER 3
Entering Contact Information
Adding, Editing, Deleting Contact Data
Assigning Call Buttons
Entering Emergency Contact Information
Entering Off Premises Information
15
15
17
18
18
Appendices
Designing Your Own Custom Graphics
The Event Log
Lobby Panel Handset installation
Lobby Open Voice installation
A
B
C
D
iii
iv
Chapter
1
Introduction
A
lphaEntry™ is a computerized directory display system that provides detailed
information and communication ability literally at your fingertips.
There are different ways to configure AlphaEntry™ depending on your applications
specific needs.
The Lobby version (AlphaEntry™ “L”) provides features for visitors to call a resident or
company through a touchscreen lobby panel with either a handset or open voice, hands-free
communication, depending on your specific equipment and needs. AlphaEntry™ “L” will also
allow tenant access with personal entry codes.
The Concierge version (AlphaEntry™ “C”) adds additional features to allow a
Concierge or Doorman to easily obtain contact information and place a call to the desired
party using either a touchscreen or a conventional flat screen monitor and mouse. In this
version, information regarding emergency and frequently called numbers at off premises
locations can also be stored for immediate access.
Another feature available with AlphaEntry™ “C” is the ability to control lobby lights,
taxi lights, gates, elevator calls, cameras, or any other device that uses a momentary or
latching dry contact closure to operate (for safety considerations this feature is not
recommended for unsupervised garage door opening or closing).
All these available features can be enabled or disabled in the AlphaEntry™ Editor to
customize the application to suit your buildings unique needs and security issues.
AlphaEntry™ software holds a virtually unlimited amount of names, locations, and
phone numbers, and can interface to almost any new or existing intercom system, or can be
used as a standard dialer or “No Phone Bill” type telephone entry system.
1
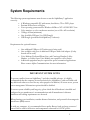
System Requirements
The following system requirements must be met to run the AlphaEntry™ application
correctly.
• A Windows compatible PC with mouse, hard drive, CD or DVD player
• Pentium III Processor or Higher
• Your operating system must be Windows 98/Me or NT 4.0/2000/XP/ Vista
• Color monitor or color touchscreen monitor (set to 800 x 600 resolution)
• 32 Megs of Ram (minimum)
• One Available USB port ( for USB Dongle)
• USB Dongle (provided with AlphaEntry™ software)
Requirements for optional features:
•
•
•
•
One additional USB port (if Touchscreen is being used)
One available serial port or additional USB port with serial adapter (if relay
boards will be used).
Voice Modem, Dedicated Phone Line, and Concierge Handset, Lobby
Handset, or Lobby Open Voice Module are required to call to Suites.
Additional equipment may be required for special customized applications.
Please contact Alpha Communications for more information.
IMPORTANT SYSTEM NOTES
To prevent conflicts between AlphaEntry™ and other installed software, it is highly
recommended that the computer be used exclusively for AlphaEntry™ and not loaded with
any additional software or used for any other purposes. In addition, all screen savers, system
power management/ hibernation options should be disabled.
To ensure system reliability and longevity, please check that all hardware is installed and
configured as per manufacturer’s recommendations and all manufacturer’s distance
limitations and cabling requirements are observed.
When planning your installation, consider distance limitations, and potential electromagnetic
interference (EMI) sources.
As with any computer, it is recommended that a quality Battery back up/surge protector/
power filter be used for all devices and components connected to 110VAC power.
2
3
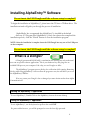
Installing AlphaEntry™ Software
Do not insert the USB Dongle until the software setup is complete!!
To begin the installation of AlphaEntry™, please insert the CD into a CD-Rom drive. The
installation wizard will guide you through the process of installation.
Alpha Media, Inc. recommends that AlphaEntry™ is installed in the default
directory (C:\Program Files\AlphaEntry\). Once the software has completed the
installation process, click the “Finish” button to close the installation program.
NOTE: After the installation is complete insert the USB Dongle into any one of the USB ports
on that computer.
Do not insert the USB Dongle until the software setup is complete!!
What is a Dongle?
A Dongle (pronounced DONG-uhl) is a mechanism for ensuring that only authorized
users can use specific software applications. This is your hardware key that plugs into an
available USB port on your computer. Like a key, no two Dongles are alike.
The AlphaEntry™ program accesses this key for verification while running. Removing
this key while using AlphaEntry™ will not allow the program to run, but will allow you to use
the AlphaEntry™ Editor.
If for any reason your Dongle is lost or damaged you must obtain another from Alpha
Communications®.
Starting the AlphaEntry™ Application
To start AlphaEntry™, Double Click on the AlphaEntry icon on the screen desktop.
Exiting the AlphaEntry™ Application
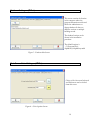
To exit AlphaEntry™ , use the keyboard to spell out the word EXIT .
If a password has been set, you will be prompted to enter the four digit password.
4
Enter the password and click “submit”. This will bring you to the Windows desktop.
To restart AlphaEntry™, double click the desktop icon.
5
Chapter
2
AlphaEntry™ Editor
T
Programming and System Configuration
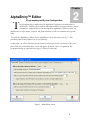
he information that is displayed in the AlphaEntry™ application is maintained in a
database file. This file stores residence and business names, locations, and other contact
information. Alpha Media, Inc. has developed the AlphaEntry™ Editor to allow the
administrator to input names, locations, and phone numbers as well as set administrative options
easily.
To access the AlphaEntry™ Editor exit the AlphaEntry™ screen if necessary (see Pg. 3 – Exit
procedure) then click the Editor Icon on your desktop.
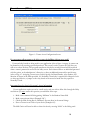
At this point you will be asked for your password if you have previously entered one. Once your
password is entered the Main editor screen will appear. By default, there is no password. We
recommend setting up a password (see Page 6 – Security Code Setup).
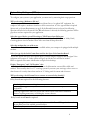
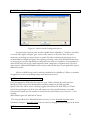
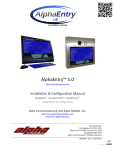
Figure 1 – Main Editor Screen
6
The Main Editor is comprised of 8 tabbed screens. Depending on initial configuration some of these
tabs may not be active. The following is a description of each screen, and information on all the
questions related to them.
7
System Setup Settings - (1st Tab)
To configure your system to your application you must start by answering basic setup questions.
Will you be using a Modem to dial out?
If your system will be connected to a dedicated phone line or “no phone bill” equipment, the
computer will require a modem to interface to those connections. A Voice type modem is required
(please refer to System Requirements on pg.2). If the Yes radio button is selected, the following
questions will need to be answered. If the No radio button is selected, the following questions will be
grayed out and not required for your application.
Select the type of device you will be using to Talk/Listen when dialing out.
The three choices of configuration are Open-Voice on Lobby Panel, Handset on Lobby Panel,
Concierge phone wired to modem. Please select one from the drop down box.
Select the modem that you wish to use.
You will most likely have only one choice available unless your computer is equipped with multiple
modems.
Select (or type in) the Serial Comm Port used for the Open Voice Interface Board.
If you have chosen the Open Voice option above you must assign a serial port that the Open Voice
equipment will connect to. Other options will gray out this box as it will not be needed.
Refer to Appendix D for more information on Open Voice hookup.
Display “Emergency” and “Off Premises” tabs
If this checkbox is checked, the additional tabs on the Information screen will be visible and
enabled. This is usually done in a “C” concierge system if you want your concierge to have access to
these features. It is rarely done when used as an “L” lobby panel for tenant and visitor use.
Will you be using a Serial Comm Port to connect to external relay board(s)?
Relay boards are required for the following features:
Interfacing with a new or existing intercom system.
All lobby panel applications (for control of the door strike, handset or open voice
equipment).
Concierge applications where the system will control a door strike and/or additional
features requiring momentary or latching dry contact closures.
Relay boards would not be required:
Concierge applications that use standard telephone or “No Phone Bill” type interface and
do not make use of the available control features.
AlphaEntry™ systems used as a Directory only.
8
If the radio button “Yes” is selected then you must assign which serial port will be used to send
information to the relay boards. You can choose from the available communication ports by clicking
on the input box and a list of available ports will drop down. It is recommended to try Port #1 first
and if there is no result when the relays are tested to try others until you are successfully connected.
More information on Ports can be found on your PC by Right clicking on My Computer and
selecting Properties, Hardware, Device Manager, Ports.
9
System Setup Settings - (1st Tab) continued
Display Switch Console
The Switch Console is used for Concierge control of lights, gates, cameras, elevator calls, etc. If this
feature is used by your application, it will control relays providing either momentary or latching dry
contact closures. Checking this box enables the Switch Console configuration tab in the Editor and
the Switch Console tab on the AlphaEntry™ directory screen. This feature is usually used for
Concierge type installations however, it can be enabled for Lobby use if special needs require it.
The Edit Contact Data button at the lower left corner of the Editor screen will access
the AlphaEntry™ database to allow additions, deletions, and editing of tenant,
emergency, and off premises information that will be displayed. This button is visible
from all Editor tabs.
This button will activate the on-screen keyboard. This is to be used when you are at a
touchscreen without a keyboard to allow small changes in the Editor or Resident
Database.
To close the on-screen keyboard, use the close button at the top right of the keyboard.
The Close Button will exit the Editor program and prompt you to launch
AlphaEntry™. This button is visible from all Editor tabs.
10
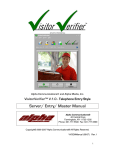
Options Settings - (2nd Tab)
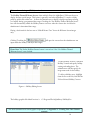
Figure 2 – Option Configuration Screen
Default number of seconds a relay is activated for: This is a global default setting for relay
activation times (if relays are used in your application). This time can be set from .1 to 999.9 seconds.
Individual relay times and functions can be set in the contact database.
Security Code: To password protect the editing capabilities and prevent unauthorized changes to the
names and settings within the AlphaEntry™ Database, enter your 4 digit code. (make note of your
security code). When starting the Editor or exiting AlphaEntry™ you will be prompted to enter your
code.
Idle Settings before re-displaying Welcome Screen:
Allows the administrator to set an idle time from 5 to 999 seconds before the Welcome Screen will reappear covering the AlphaEntry™ application. Once the screen is touched or mouse is moved
(depending on equipment used) the Directory Screen will activate again.
Idle Seconds before clearing call box:
Determines how long a call box will display. When a name is selected, a call box will pop up. If a call
is not initialized within this specified time (between 5 to 999 seconds) the call box will automatically
close and control will revert to the main directory. A recommended setting for this time is between 515 seconds. If a duration is specified that exceeds the “Idle Settings before re-displaying Welcome
Screen” value, a warning box will appear.
Maximum number of seconds a call can last ( Open Voice Only): This setting allows you to
determine a limit on conversations at the lobby panel to the resident. This number can range from 1 –
999 seconds. Usual time should be between 30 and 60 seconds. Default is 45 seconds.
11
On screen Keyboard Type: Keyboard can be set to an alphabetical order or “QWERTY” keyboard
style depending on preference. Default is Alphabetical.
12
Welcome Screen Settings - (3rd Tab)
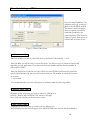
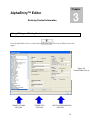
Figure 3 – Welcome Screen Settings
The Welcome Screen settings allow the administrator full customization of pictures and text.
By checking the “Welcome Screen is a slide show” box, the screen background will automatically
change pictures at the interval chosen in the “Change Slide every” field. (5 –999 seconds)
When you put a check mark in the box next to “Hide Welcome Text” it will take out the text
overlay leaving the Welcome Screen just with the background image. This allows the administrator to
make any custom graphics with their own Welcome Screen text.
The graphics file default location is
C:\Program Files\AlphaEntry\SlideShowPics
For more information on custom graphic requirements, see Making Your Own Graphics on Page 19
13
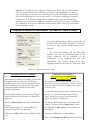
Welcome Screen Settings - (3rd Tab) continued
The Holiday-Themed Welcome Screen, when enabled, allows the AlphaEntry™ Welcome Screen to
display alternate special images. This feature is generally used when AlphaEntry™ is used as a lobby
panel for public and resident use. It allows the administrator to display a background image relating
to a holiday during a programmed date range. Checking the “Use Holiday-Themed Welcome Screen”
box will automatically enable the Holiday themes to activate when the current date is within the
administrator’s determined date range.
Placing a check mark in the box next to “Hide Welcome Text” leaves the Welcome Screen images
only.
Clicking/Touching the
input and delete holidays and adjust date ranges.
will open the screen where the administrator can
Please Note: The Define Holidays/Images button is grayed out if the “Use Holiday-Themed
Welcome Screen” is not checked.
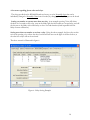
To add a holiday click the “Add New
Holiday” button and specify holiday
starting and ending dates. The
administrator will also specify the
image name used for the holiday.
To delete a holiday entry, highlight
from the list on the left, and click the
“Delete Selected Holiday” button.
Figure 4 – Holiday Editing Screen
The holiday graphics file default location is
C:\Program Files\AlphaEntry\HolidayPics
For more information on custom graphic requirements, see Appendix A - Creating Your Own Custom
Graphics
14
15
Phone Code Settings - (4th Tab)
If you are using AlphaEntry™ as a
telephone entry type system, the
phone codes tab will be enabled.
This screen is used to configure
relays to respond to touchtone
commands produced by the
tenant telephones. This allows the
tenants to operate door releases or
control other necessary devices.
Figure 5 – Phone Codes Screen
To Add a phone code :
Enter the number you wish to control the device in the Phone Code field (0-9, *, or #).
Enter the Relay you will be using to control the device. You can have up to 16 boards of 8 relays each
depending on your application so you must enter the board number and then the relay number in
their respective fields.
Enter the duration in seconds that the relay will be activated. The Editor will insert the previously
specified global default relay time, but this can be overwritten. The number of seconds of activation
can be from
1 – 999 seconds.
It is recommended that you enter a description to document what the relay usage will be.
To Delete a phone code :
Highlight the line of the relay you wish to remove by clicking on it.
Press the “Remove Selected Phone Code” button to the right.
Note: Only one relay line can be removed at a time.
To Edit a phone code :
Highlight the line of the relay you wish to edit by clicking on it.
The information for that line will appear in the Add/Edit fields below and can then be modified as
16
needed.
When editing is finished for that relay press the “Add Phone Code” button and the information will
be updated.
17
A few notes regarding phone codes and relays:
The relays provided on the RY008AE boards are factory set to be Normally Open but can be
individually changed to Normally Closed state if needed, by changing the relay’s jumper on the board.
Setting one number to operate more than one relay. As an example: pressing 7 that will release
the door for 5 seconds on one relay, turn on the lobby light for 180 seconds on a second relay, and call
the elevator to the lobby with a third relay set for a 2 second duration (wired in parallel with the
lobby elevator call button).
Setting more than one number to activate a relay. Using the above example, the first relay can also
activate by pressing a 9 to release the door, but this will not turn on the light or call the elevator, as
the other two relays will not be activated.
The above scenario is illustrated in figure 6.
Figure 6 – Relay Setting Example
18
Database Settings - (5th Tab)
This screen contains the location
in the computer where the
program information resides and
allows the administrator to
change databases if there are
different versions or multiple
buildings stored.
The database location can be
chosen in the installation
procedure.
The default location is
C:\Program Files\
AlphaEntry\AlphaEntry.mdb
Figure 7 – Database Info Screen
Main Screen Color Settings - (6th Tab)
Colors of the On-screen keyboard
and Exit button can be selected
from this screen
Figure 8 – Color Options Screen
19
Tenant Access - (7th Tab)
Figure 9 – Tenant Access Configuration Screen
Do you want to allow tenants to be able to enter the building with an access code?
If external relay boards are being used in your application (refer to figure 1 on page 4), tenants can
let themselves in by entering a personal password. This screen is used to connect the relay that you
will use to release the door. The program must know which relay on which board will be activated
when a tenant’s password is entered on the lobby screen. Each tenant will have an individual password
with the option, at the administrator’s discretion, to have an additional password for special usage
(refer to Page 15 – Assigning Tenant Access Codes). Specify the Board number, relay number, and
duration of closure in the fields provided. If a Normally Closed relay is required for a Magnetic Lock
or other special device, a jumper on the relay board can be moved to make the relay operate as
Normally Closed.
Important Postal or Service Personnel Access information
If your application requires access for a mail carrier, and you wish to allow this through the lobby
touchscreen you must answer this question yes and follow these steps.
1.
2.
3.
4.
Make a new commercial listing putting “Mailman” in the Business Name field
Make a non-existent Suite # (Example: “M” )
Check the Hide Listing Box so “Mailman” does not show in the tenant listings.
Enter a Tenant Access Code of your choice (Example: 123)
The Mail Carrier will now be able to release the door by entering “M123” at the lobby panel.
20
This procedure can be used for other service personnel that require building entry on a regular
basis. By listing each service person separately the event log will display time and date of each
access for each person.
21
Switch Console Configuration (8th Tab)
Figure 10 – Switch Console Configuration Screen
If external relay boards are used, another available feature AlphaEntry ™ includes is the ability
to control lobby lights, taxi lights, gates, elevator calls, cameras, or any other device that uses a
momentary or latching dry contact closure to operate (for safety considerations this feature is not
recommended for unsupervised garage door opening or closing). Some of the RY008AE board relays
are reserved for system use depending on configuration, but others are available to be programmed to
either DTMF tones sent by the tenant telephones (when configured as a telephone entry system) or
these switches. Additional RY008AE boards can be provided to add relays if your application requires
additional switches.
All these available features can be enabled or disabled in the AlphaEntry™ Editor to customize
the application to suit your buildings unique needs and security issues.
To Add a switch console activated relay :
Using the appropriate fields below the main box, enter a label to identify the switch function.
Identify the relay to be used by Board number and Relay number in the fields provided.
Specify if this relay will be used as a latching/toggled switch (Push ON, Push OFF), or a Timed
switch (after pressing the switch the relay will remain active for a specified amount of seconds).
If the switch is timed, enter the number of seconds the relay will remain active ( between 0.1 – 999
seconds).
When finished, press the “Add Switch” button.
The relays provided on the RY008AE boards are factory set to be Normally Open but can be
individually changed to Normally Closed state if needed, by changing the relay’s jumper on the board.
To Delete a console activated relay :
22
Highlight the switch to be deleted. Press the “ Remove Selected Switch” button
To Edit a console activated relay :
Highlight the switch to be edited. Edit the switch information in the fields provided then press the
“Add Switch” button.
23
Chapter
AlphaEntry™ Editor
3
Entering Contact Information
Adding, Editing, and Deleting Contacts
From the Main Editor Screen, touch/click on
appear.
The Contact Editor Screen will
Figure 10
Contact Editor Screen
TENANT LISTINGS
SECTION
TENANT INFO
SECTION
BUTTON CONFIGURATION
SECTION
24
Adding Contacts
The Main Information Screen is divided into three sections.
With the Residents tab selected:
The leftmost section is a scrolling list of all tenants in the database. From here you can highlight any
tenant to modify or delete their related information.
The middle section displays the highlighted tenants suite, name, and access code information.
The rightmost section is information used by the program to associate the phone numbers to call, or
relays that will activate when the call buttons are pressed. AlphaEntry™ allows up to three call buttons
to be listed for each tenant
Residents
(Residents and Businesses in the building)
Select the Residents tab.
Adding a Resident
Using the Radio Buttons, select whether the entry is a Residential or Commercial Listing.
At the top of the window you may enter the “Suite/ Apartment” number or location within the
building if you wish it to be listed on the Directory Screen, or leave the suite number empty so that
the number will not show for privacy and security reasons.
RESIDENTIAL
Enter the first name of the resident.
Enter the last name of the resident.
Residents are alphabetized automatically by Last
Name, then First Name or Initial.
COMMERCIAL
Enter the Business name as you want it displayed
Enter the Start sort position ( for Alphabetizing)
The “Start Sort Position” allows the
administrator to determine the sort position of
the business name. In the example “Dr. William
Gold DDS”. If the administrator wishes to sort
the name under “G” that would be the 13th
character, so 13 would be entered in the “Start
Sort Position:” text box.
Please Note: Spaces and punctuation are included in the number of characters.
Assigning Tenant Access Codes
Tenant Access codes are used to allow tenants to “buzz” themselves in when
AlphaEntry™ controls locked entry door(s). Access codes can be assigned by the
administrator, or tenants can choose their own and have the administrator enter them into the
database.
25
AlphaEntry™ can hold two access codes per resident record. The second code can be used for a
visitor or service personnel that would need access to the tenants apartment on a temporary
basis. By allowing two codes, the tenant could have the second code changed if necessary and
still retain their personal code. Access codes can be 3 to 15 characters consisting of numbers 09 and letters A-Z. By allowing combinations of 36 alpha-numeric characters and requiring
matching of the suite number, AlphaEntry™ provides a very high level of security. A monthly
log is updated for each event for additional security/tracking ability. These logs can be found
in your AlphaEntry folder.
Assigning Call Buttons to Phone Numbers, “No Phone Bill” Codes, or Relays
Up to three different phone numbers or relay codes can
be entered for each resident or business. A suite does
not have to have a phone number entered, this is
optional.
On systems that interface with “No Phone Bill”
hardware, the necessary information passed to the
N.P.B. equipment will be dependant on the
manufacturer of the equipment and their code
requirements. The necessary string for the relay
equipment should be entered in the “Dial Num.” field
Figure 11 – Button Information Detail
ENTERING PHONE NUMBERS
For each phone number entered, add the location
and comments as needed. For example, you can enter
the phone number for that suite, the cell phone
number for that person and a work number as well.
In the comments, you can specify the times when
each phone number should be used or other
pertinent information.
ENTERING RELAY INFO
Your system must be equipped with
optional Relay Boards
The optional relays are used to interface with an in
house intercom system. AlphaEntry™ can be used with
most any intercom system that requires a dry contact
to initiate a call.
To add a phone number, choose button 1 through 3,
click the radio button “Dial Num.” (see Button 2 in
Figure 11)
To enter information tying a relay to a button, choose
button 1 – 3, and click the radio button “Activate
Relay”. After this is selected, the relay fields will
appear. (see Button 1 in Figure 11)
Enter the Phone Number (999-9999 or 999-999-9999
format).
If the number requires a “1” before dialing, the
program will provide it automatically
The first two fields identify the relay location to the
software. You must enter the Board number in the
first field and the Relay number on that board in the
second field.
Then enter a Label (such as: Suite, Cellphone, Work,
etc.)
Then enter a Label (such as a Suite number.)
26
Next, enter Comments for Button (such as: No Calls
Entering Emergency Contacts
This section is used for what is considered Emergency contacts only. Police numbers, Fire
Department, and Medical numbers.
You may have some emergency numbers for building issues (ie. Elevator Emergency Repair)
that you would prefer to enter in here as well.
Select the Emergency tab.
Press the New button near the bottom of the screen.
Enter the name of the contact, phone number, button label, and related comments in the appropriate
fields as shown in the previous section.
When all the information is entered and verified, Press the Add button to save the contact to the
database.
Entering Off Premises Contacts
(Frequently called Phone numbers in other locations)
This section is used for Phone numbers at other locations that the concierge would call on a
regular basis such as, Parking Garage, Restaurants, Drug Stores, off site Building Manager, etc.
By entering these types of numbers here, the concierge will have quick access to important
phone numbers.
Press the New button near the bottom of the screen.
Enter the name of the contact, phone number, button label, and related comments in the appropriate
fields as shown in the previous section.
When all the information is entered and verified, Press the Add button to save the contact to the
database.
Editing contacts
To edit a contact of any type, highlight the selected entry from the appropriate list on the left of the
Contacts Editor Screen, and make your changes to the fields as needed.
The changes will be saved to the database automatically, as typed.
27
Deleting contacts
To remove a contact of any type, highlight the selected entry from the appropriate list, and press the
“Remove” button.
Enter the Security code to complete the deletion.
28
Save Settings
When exiting the Editor program, AlphaEntry™ will ask if you would like to launch the application.
Choosing “Yes” will automatically launch the AlphaEntry™ application.
Choosing “No” will bring you back to Windows.
NOTES:
29
30
Appendices
Appendix A
Creating Your Own Custom Graphics
AlphaEntry™ allows you to add your own graphics as a background for your Welcome
Screen.
Whether you want pictures of your building, a neighborhood map, a text message
announcing an event, rental information telephone numbers, or other ideas you may have,
this can be done quite easily following these guidelines.
A picture size of 800 wide by 600 high pixels will fill the screen nicely and is the best size for
the display. If the size you have chosen is smaller, the picture will be placed in the upper left
corner of the screen but not fill the entire screen, this may or may not give you the effect you
want.
If a picture is larger the display will crop it to fit by putting the image in the top left corner
and cropping the right side and bottom of the image as needed. Again, this may not give you
the desired effect.
When your pictures have been properly formatted, save them to the SlideShowPics Folder.
The graphics file default location is C:\Program Files\AlphaEntry\SlideShowPics.
If your “ Welcome Screen is a slide show” box is checked, all the images in that folder will
rotate in order. If it is not checked only the picture that is first in the folder alphabetically
will be displayed.
If you have several pictures that you want to use as a slide show, alphabetize them in the
order you wish them to display.
You may wish to move images that you do not want to show into a new folder such as:
C:\Program Files\AlphaEntry\SavedPics
Image files with .bmp, .jpg, or .gif extensions can be used.
A
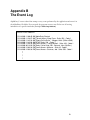
Appendix B
The Event Log
AlphaEntry™ creates a date/time stamp at every event performed by the application and stores it in
the AlphaEntry file folder. Every month, the program creates a new file for ease of locating
information in a specific timeframe (Example: Event Log 12-06.txt)
EVENT LOG SAMPLE
[12/18/2006 11:00:45 AM] AlphaEntry Started
[12/18/2006 11:29:57 AM] Tenant Access: Berg, Dave - Suite: 501 - Code 1
[12/18/2006 11:42:33 AM] Phone Call to Suite: - Morgan, Keith (Office x5302)
[12/18/2006 11:42:58 AM] DTMF Relay Call - Code: 7
[12/18/2006 11:46:10 AM]Tenant Access: Tseng, Mitchell - Suite: 323 - Code 1
[12/18/2006 02:13:59 PM] Relay Call to Suite: 201 - Bertucci, John (30 Sec.)
[12/18/2006 12:03:39 PM]Tenant Access: Mailman - Suite: M - Code 1
[12/18/2006 12:03:39 PM]Tenant Access: Clarkson, Jed - Suite: 553 - Code 1
:
:
:
B
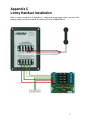
Appendix C
Lobby Handset Installation
When installing a handset on an AlphaEntry™ lobby panel or concierge system, use this wiring
guide to properly attach the handset and control unit to the RY008AE Board.
C
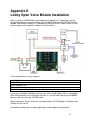
Appendix D
Lobby Open Voice Module Installation
When installing an AEMDFB open voice module on an AlphaEntry™ lobby panel, use this
wiring guide to properly attach the module to the RY008AE Board and the VVDTMF/VV100D
decoder. Note that the incoming C.O. telephone line connects to the VV100D Isolator first and
from there goes to the computer’s modem Line IN connection.
To find available ports on your computer:
Go to My Computer and right click.
Click on Properties.
Select Hardware Tab.
Click on Device Manager button.
Click on the + sign in front of Ports to expand the list
If you have no available COM ports you can use a serial to USB adapter. When it is plugged in
to the USB connection it will show up on the Ports list. You will need a port for your RY008AE
board as well as one for your VVDTMF board.
Specify which ports will be used by the relay board and the VVDTMF board in the Editor (refer
to Page 5 of this manual.
For additional configuration or special applications, contact Alpha Communications.
D
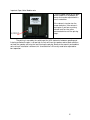
Important Open Voice Module note:
There is a gain control on the back
of the AEMDFB in the bottom left
corner that can be adjusted with a
small screwdriver.
If the volume is too low turn the
screw clockwise, if the volume is
too high or if you hear a pulsing
volume level turn the screw
counterclockwise until the pulsing
stops.
The pulsing is caused by the switching of the VOX electronics between speaking and
listening and when the gain is set too high, the mic will hear the speaker and cut back and then
not hear the speaker and raise the level causing the pulsing. Because the acoustic and ambient
noise of each installation is different this “threshold level” will usually need to be adjusted for
best operation.
E