1
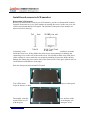
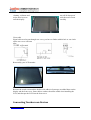
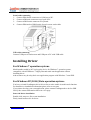
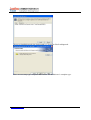
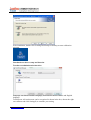
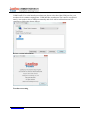
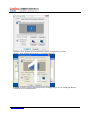
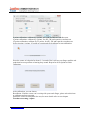
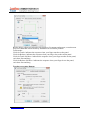
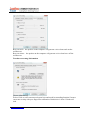
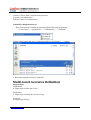
Multi-touch Infrared Touch Screen User Manual Version 1.01 Copyright ©2009-2010 by Leadingtouch Technology Co., Ltd HuiLongGuan LongXiang industrial center,ChangPing,Beijing,China www.leadingtouch.com Tel:+86-51090978 http://www.leadingtouch.com Fax:+86-51090979 E-mail:[email protected] 1/18 PREFACE Thank you for choosing our Infrared touch screen products! This guide is the hardware installation manual of Leadingtouch Infrared touch screens. We hope it will help you to make better use of our touch screens. CONTENTS CONTENTS............................................................................................................................................ 2 Components of touch screen ................................................................................................................... 3 Components ................................................................................................................................... 3 Accessories: ................................................................................................................................... 3 Tools: ............................................................................................................................................. 3 Hardware Installation.............................................................................................................................. 3 Before Inastallation........................................................................................................................ 3 Install touch screen in LCD monitor.............................................................................................. 4 Connecting Touchscreen Devices .................................................................................................. 5 Installing Driver ...................................................................................................................................... 6 For Windows 7 operation system: ................................................................................................. 6 For Windows XP/2000/Vista operation system:............................................................................ 6 Start 6.06 driver installation........................................................................................................... 6 Introduction to driver setup and function....................................................................................... 8 Uninstall Leadingtouch drivers.................................................................................................... 15 Multi-touch Gestures Definition ........................................................................................................... 15 Multi-touch Gesture Application........................................................................................................... 16 FAQ....................................................................................................................................................... 17 www.leadingtouch.com 2/18 Components of touch screen According to the installation, there are the components and the accessories of Leadingtouch touchscreen. Components: 9 Touch screen 9 Cables Accessories: 9 Double-side adhesive foam tapes 9 Dust-proof strips Tools: 9 Cross screwdriver, Flat screwdriver 9 Diagonal cutting pliers, Sharp-nose pliers 9 Knife, Scissors, etc. Hardware Installation Before Inastallation Before your installation, please set the touch screen horizontally and test to confirm it’s in good function. Cautions: ¾ For touch screen assembly inside monitor: 9 Make sure the front frame of monitor not overlay the surface of filter aside active area. 9 Front frame of monitor should not press on touch screen too tighty to cause deformation and defection. 9 If fix the touch screen by screws aside touch screen, make sure the distance between screws equal and suitable not to cause deformation and defection. ¾ For touch screen assembly outside monitor: 9 Make sure the touch screen overlay surface is flat. 9 For size under 22” touch screen can be fixed by adhesives, size above 22” should add extra fix components. Install touch screen in CRT monitor www.leadingtouch.com 3/18 Install touch screen in LCD monitor Disassemble LCD monitor Before you install touch screen in your LCD monitor, you have to disassemble monitor. Open the front and rear cover of the monitor by turning the screws on the rear cover, the switch circuit board and the LCD panel. The positions of the parts of the monitor are showed as below drawing. Commonly, some reinforces are made inside the front cover, If they hinder the touch screen from putting in or damage the connecting wires on the side of the touch screen. You should cut them away with pliers. (After cutting, be sure to make the cut smooth by abrading, because the sharp cut may damage the connecting wires on the side of the touch screen. If the space permits, the cut can be bonded with adhesive foam tape.) Stick the dust-proof strips around LCD panel Tear off the outer strips for about 3 or 4mm Thoroughly clean the touch screen as well with the glass www.leadingtouch.com layers of dust-proof two surfaces of the as the display area detergent. After 4/18 cleaning, collimate and strips outer layers to onto the display tear off all dust-proof stick the touch screen carefully Clear cable Signal cable need to put through rear cover, you have to find a suitable hole or cut a hole on the rear cover with cant plier. Reassembly your LCD monitor Remarks: Because the touch screen and the double-side adhesive foam tape are added between the display and the front cover, Some rubber washers should be added when installing the LCD, and then put the LCD into the front cover. Connecting Touchscreen Devices www.leadingtouch.com 5/18 Serial cable connecting 1. Connect DB9 female connector to COM port of PC. 2. Connect ADB male connector to ps2 port of PC. 3. Connect ADB female connector to keyboard. 4. Connect DB9 male to DB9 female of touch screen outlet cable. USB cable connecting Connect USB port of touchscreen and USB port of PC with USB cable. Installing Driver For Windows 7 operation system: Model number ended by M7 is plug-play device for Windows 7 operation system, compatible with all Windows 7 single-point and multi-touch application without installing driver. And customer may develop their own application program with Windows 7 own SDK. For Windows XP/2000/Vista operation system: You have to install Leadingtouch 6.06 driver first to make enable its multi-touch function. For detail driver installation information please refer to next part. If you plan to develop your own application, please contact Leadingtouch to ask for SDK files by the contact information shown in cover page. Start 6.06 driver installation Double click setup.exe file to start installation. Firstly install resource kit for driver www.leadingtouch.com 6/18 Choose an installation path, the default path is C:\Program files\Leadingtouch. There are two setup type: complete and Custom. The default one is complete type. www.leadingtouch.com 7/18 After installation, double click LeadingTouchSetup on desktop to enter calibration program. Introduction to driver setup and function Touchscreen administration interface Language: can choose interface language, now has two choice Chinese and English language. Touchscreen: All touchscreen can be recognized is shown in the box, choose the right one calibrate and click Setting(S) to continue your setting. www.leadingtouch.com 8/18 COM Port(P): For serial interface touchscreen, please select the right COM port for your touchscreen to continue setting(Note: COM interface touchscreen can’t not be recognized autoly, user need to select COM port manually and click Add to add touchscreen into computer as following picture shows). Driver version information Touchscreen setting www.leadingtouch.com 9/18 Calibrate: show monitor and resolution information recognized by system Identify: show monitor information to current touchscreen. Custom: to define custom calibration area by changing drag Left-Top and Right-Bottom coordinate to set calibration area. www.leadingtouch.com 10/18 4 points calibration: calibrate by 4 points, for SAW and Infrared touchscreens. 9 points calibration: calibrate by 9 points, for 4W, 5W and capacitive touchscreen. 25 points calibration: calibrate by 25 points, for 4W, 5W and capacitive touchscreen. Select 4 points, 9 points, 25 points or custom and click calibrate to start calibration. Press the center of red point for about 2-3 seconds. Don’t release your finger until the red point shaft to next position or hearing beep sound. Repeat for all red point to finish calibration. After calibration, you can choose: Recalibrate: If mouse cursor can’t overlap with your touch finger, please select this item to calibrate touchscreen again. DrawLine: Select to enter draw-line test, for more details refer to next chapter Touchscreen setting- Adjust www.leadingtouch.com 11/18 Border adjust: adjust screen border scale border to fit current touchscreen, as touchscreen may have abnormal action caused by installation or non-linear problem. Touch mode: Click On Touch: indicates the response when your finger touches on the panel Click On Release: indicates the response when your finger leaves the touchs panel Click On Touch No Move: indicates the response when your finger touches on the panel, can’t draw line and drag Click On Release No Move: indicates the response when your finger leaves the panel, can’t draw line and drag Touchscreen setting-Buttom www.leadingtouch.com 12/18 [Button Switch]: Enable Auto Right Button Switch Auto range: Click effectual in 10mm area Auto time: Click effectual in 1000mMsec Auto right button effects only when above two items effectual. [Double Click Setting]: Range: Clicks in range of 10 mm are determined to be a touch point Time: Clicks in 500 msec are determined to be a touch point If any icon or program can’t open normally, please drag the two rules above to right side a little. Touchscreen setting-Advanced [Enable Touch]: Enable or disable touch function of touch panel [Advanced Function]: Enable Const Touch Function: The range of 10 mm are determined to be a touch point Enable Line Continue Function: Settings for handwriting input or drawing. Range: Disconnected line in range of 20mm will be amended by algorithm Time: Disconnected line in range of 100msec will be amended by algorithm Enable Line Smooth Function: Line can be smoothed by algorithm to insert 5points in 15mm range Touchscreen setting-Sound www.leadingtouch.com 13/18 Beep on touch the speaker on the computer will generate voice when touch on the touchscreen Beep on release the speaker on the computer will generate voice when leave off the touchscreen Touchscreen setting-Information [Screen information] Select: Click to select current touch panel size and model to amending function if mouse cursor not overlap with your finger after calibration. Default size is from 3.5inch to 42 inch www.leadingtouch.com 14/18 Custom: Click to input a custom touch panel size [Control Card information] Indicate Control Card information Uninstall Leadingtouch drivers Enter Touchscreen Uninstall program through the following programmer 1 Click “Start”----“programmer”----“Leadingtouch” ----“Uninstall” 2 Open control panel and select “Leadingtouch Driver for Window” ----“delete” 3. Run setup program and select “uninstall”. Multitouch Gestures Definition Single-Fingers SingleDown A single finger touches the screen. SingleMove A single finger touching the screen moving SingleUp A single finger lifts up. www.leadingtouch.com 15/18 Two-Fingers TwoFingersDown Two fingers touching the screen at the same time. TwoFingersMove Two fingers moving together on the screen. TwoFingersUp Any of the two fingers lifting up, you get a TwoFingersUp gesture. Rotate One finger anchored and the other moving around. Split Two fingers moving away or close. NOTE: You may keep a certain distance between two fingers to initial this gesture SecondFingerDown One finger touches first and the other touches after a short while. SecondFingerUp Any of the two fingers lifts up after SecondFingerDown. Multi-Fingers MultiFingersDown Three or more fingers touch on the screen. MultiFingersMove Any finger moves.after MultiFingersDown MultiFingersUp Some fingers lifting up and less than 3 fingers left after MultiFingersDown. Multitouch Gesture Application Magic Photo Single-finger gesture works as the left mouse button and two-finger gesture works as a scale. Virtual Earth Single-finger gesture works as moving the map. TwoFingersDown -> TwoFingersMove -> TwoFingersUp works as zoom in, zoom out. Multi-fingers gesture tilts the viewpoint. Rotate gesture rotates the earth and Split zooms in or zooms out. www.leadingtouch.com 16/18 Google Earth Gestures are mapped almost the same as Virtual Earth. Warcraft SecondFingerDown / SecondFingerUp are mapped as mouse right button. BigFist results in an attack. The destination is the center of the fist. Rotate / Split is mapped to operations of the rotation and zooming of the map. Multi-fingers gestures are used to drag and move the scene. Smoke No generic gesture. Touch the screen to generate smoke under the finger. FAQ Q: Touch no response. Please follow below steps to find out the cause: 1. If driver is installed 2. If touch screen is broken during transportation 3. If computer serial port is applicable 4. If touch screen and computer is in good connection 5. If the power supply for touch screen and host is normal 6. If touched the right side of touch screen 7. If driver is installed correctly 8. If protection film is tear off Solution: 1. Install driver 2. Change a good touch screen 3. Check if serial port connection and driver serial port setting is right 4. Plug all cables in right way. 5. Change a good power supply or host for testing. 6. Set the touch screen right positioned. 7. Download the latest driver program from our website or contact us by phone or email. 8. Tear off the protection film. Q: Touch screen is not sensitive and most area has no response This abnormal always caused by outside interference. Follow below steps to find out the cause 1. Check if there is strong light on touch screen 2. Check if there is protection film overlay on touch screen 3. Check if power supply is normal 4. Check if LED on touch screen in broken www.leadingtouch.com 17/18 Solution: 1. Take touch screen to where light is weaker 2. Tear off protection film 3. Change another host for testing 4. Change LED or touch screen Q: About 1 or 2cm area near the border has no response This abnormal always caused by abnormal calibration. Follow below steps to find out the cause: 1. If driver is the latest version 2. If touched the right point shown by flicker cursor to during calibration Solution: 1. Install right driver 2. Redo calibration test www.leadingtouch.com 18/18