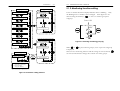
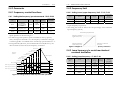
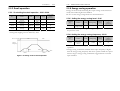
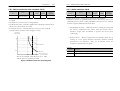
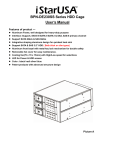
1
PREFACE Thank for purchasing small general-purpose multi-functional inverter MOSCON-E7. MOSCON-E7 is a small and easy to use inverter. This user’s manual describes installation, maintenance and inspection, troubleshooting and specifications of the MOSCON-E7. Read this user’s manual thoroughly for safe operation of the system and retain for future reference. Samsung Electronics Co., Ltd. General precautions • This manual may contain some drawings with the cover or protective shields removed for more detail and clear explanation of the device. Make sure to reassemble the device before operation. • The information in this manual may be subject to change without a previous notice in case of modification or improvement, or changes in specifications. Such modifications are denoted by a revised manual number. • Contact your Samsung representative or the nearest Samsung sales office to order a copy of this manual if it has been damaged or lost. • Samsung is not responsible for any modification of the product made by the user, since that will void your guarantee. Copyrightⓒ2001 Samsung Electronics Co., Ltd. MOSCON-E7 is trademarks of Samsung Electronics Co., Ltd. The software and hardware described in this manual is protected by the copyright. No part of this manual may be photocopied or reproduced in part or in whole without the written consent of Samsung Electronics Co., Ltd. We will try our best to meet your demands with this manual. Contact our office stated below in case of being a printing error, mistakes and improvement in this manual. Contact Office : Samsung Electronics Co., Ltd. 416, Maetan-3 Dong, Paldal-Gu, Suwon City, Kyungki-Do, Korea TEL : 82-31-200-2489 FAX : 82-31-200-2295 Safety precautions This user’s manual uses (Danger), (Caution) or (Note) for the safety precautions depending on the degree of precautions. ! DANGER: Wrong handling may cause a dangerous ! CAUTION: Wrong handling may cause a dangerous situation, which can lead to death or a severe injury. situation, which can lead to a severe injury, slight injury, or damage to the production, or faulty operation. Safety precautions MOSCON E-7 User’s Manual ! CAUTION • Do not carry the inverter by holding the plastic parts, but hold the heatsink. The heat sink may fall and cause injury. • Use nonflammable materials such as metal for the part where the inverter is installed. • When installing several inverters in a single enclosed space, install a cooling fan to keep the ambient temperature below 45℃ • Cover the inverter during installation to protect it from metal chip coming from drilling. Installation ! DANGER • Before starting wiring or inspection, switch power off, wait for more than 1 minutes, and check for residual voltage between terminal P/B and N with a meter etc, to avoid a hazard of electrical shock.. • Do not remove the operator from the main body. It may cause an electric shock. Wiring ! DANGER • Always turn OFF the input power supply before wiring. Otherwise, an electric shock or fire may occur. • Wiring must be performed by qualified personnel. • Always check if the bolts on the main circuit and control circuit terminals are properly tightened. • When using the digital operator away from the main body, use the separated operator(E7OPTR-S). • Turn ON the inverter only after completely assembling the covers. Do not detach the cover when the power is ON. Otherwise, an electric shock or fire may occur. • Suitable for use in a circuit capable of delivering not more than 5kA rms symmetrical amperes. • Ground the ground terminal (200V & 400V class: ground to 100Ω or less). Otherwise, an electric shock or fire may occur. Safety precautions MOSCON E-7 User’s Manual Parameter setting ! CAUTION • Tighten all terminal screws of the main circuit and the control circuit. • Check if the voltage of the inverter rated voltage satisfies with the AC power supply voltage. Otherwise, it may cause fire or injury • Do not perform withstand voltage test on the inverter. It may damage the semi-conductor element. • When wiring other devices read their manuals carefully. Samsung is not responsible for any accident resulting from user’s carelessness. If not, it may cause injury or fire. • Do not connect electromagnetic switches or contactors to the output circuits. • Never connect an AC power supply to output terminals U/T1, V/T2, and W/T3. Otherwise, it may damage the internal circuits of the inverter. • Never short or ground output terminals: the output terminals should not be touched with bare hands and also, the output wires should not have contact with the inverter case Otherwise, an electric shock or grounding may occur • Do not connect a phase advancing capacitor or LC/RC noise filter to an output circuit. Otherwise, it may damage the inverter or cause a fire. • Do not connect an electromagnetic switch or MC to an output circuit. Otherwise, it will actuate the over current protective circuit in the inverter. • Do not disassemble the digital operator. Otherwise, it may cause a personal injury. ! CAUTION • Set the appropriate parameter. If not, it will not operate or trigger the protection operation. • Record the previous parameters (even though Moscon-E7 records the information of the last parameter), the records can be useful in case of malfunction or errors. • When changing the parameters, make small change at a time especially when controlling the motor parameter, changing the V/f or max. output frequency. If not, it may damage the inverter and motor. Safety precautions Maintenance and inspection MOSCON E-7 User’s Manual ! CAUTION DANGER • Do not touch the COMOS IC in the control board directly. Otherwise it can be damaged by static electricity. • Do not remove the digital operator from the unit since it carries high voltages. Using the cable between operator and unit is also prohibited, since it is very dangerous. • Do not change the wiring, or remove the digital operator or connectors, during operation. Otherwise, it may cause a personal injury. ! • Do not touch the terminals since some of them carry high voltages and are extremely dangerous. Otherwise, it may cause an electric shock. • Do not remove the cover when power is being supplied to the inverter. Always turn off the power to the inverter through the MCCB when detaching the cover. Otherwise, the charge remained in the capacitor may cause an electric shock. • After turning off the main circuit power supply, wait for a while before maintenance or inspection since it may remain charged. Otherwise, it may cause an electric shock. • Maintenance, inspection, and replacement of parts must be done only by authorized personnel. Otherwise, it may result an injury or an accident. • Remove all metal objects, such as watches and rings, before the maintenance, inspection, and replacement of parts. Also, always use grounded tools. Otherwise, it may cause an electric shock. • Always turn off the power supply before the inspection Otherwise, it may cause an electric shock. Contents - 1 Contents 2 - MOSCON-E7 User’s Manual 3.6.3 Dealing with inductive noises ------------------------------------------------------------------- 3-16 3.6.4 Dealing with radio interference (RFI) -------------------------------------------------------- 3-16 1.Overview ---------------------------------------------------------------------------------------- 1-1 1.1 1.2 1.3 1.4 Main features ------------------------------------------------------------------------------------ 1-3 System diagram ------------------------------------------------------------------------------ 1-5 Dimensions ---------------------------------------------------------------------------------------- 1-6 Specifications ------------------------------------------------------------------------------------- 1-8 2. Installation ----------------------------------------------------------------------------------- 2-1 2.1 Receiving ------------------------------------------------------------------------------------------2.2 Nameplate information --------------------------------------------------------------2.3 Installation ---------------------------------------------------------------------------------------- 2-3 3.7 Precautions when wiring -------------------------------------------------------------- 3-18 3.7.1 Control circuit wiring precautions -------------------------------------------------------------- 3-18 3.7.2 Main circuit input/output wiring --------------------------------------------------------------- 3-18 3.8 Grounding ---------------------------------------------------------------------------------------- 3-20 3.9 Cable specification ---------------------------------------------------------------------------------- 3-21 3.10 Wiring check ------------------------------------------------------------------------------------ 3-22 2-4 4 Digital operator ------------------------------------------------------------------------- 4-1 2-5 4-4 2.3.1 Precautions for delivery and installation ------------------------------------------------------- 2-5 2.3.2 Installation site --------------------------------------------------------------------------------------- 2-6 2.3.3 Controlling the ambient temperature -------------------------------------------------------- 2-7 2.3.4 Installation space ------------------------------------------------------------------------------------ 2-8 3. Wiring ---------------------------------------------------------------------------------------------- 3-1 3.1 3.2 3.3 3.4 3.5 3.6 3.6.5 Cable length between inverter and motor ---------------------------------------------------- 3-17 Connection diagram --------------------------------------------------------------------- 3-4 Terminal block configuration ---------------------------------------------------- 3-6 Main circuit terminal functions ------------------------------------------------ 3-7 Control circuit terminal functions ------------------------------------------- 3-8 Connections to peripheral devices ------------------------------------------- 3-9 Wiring the main circuits -------------------------------------------------------------- 3-10 4.1 Usage of digital operator -------------------------------------------------------------4.2 Monitoring functions of digital operator -------------------------------4.3 Test run ---------------------------------------------------------------------------------------------- 4-5 4-6 5 Parameters ------------------------------------------------------------------------------ 5-1 5.1 Main feature ------------------------------------------------------------------------------------- 5-3 5.1.1 U-parameter : monitoring function ------------------------------------------------------------- 5-4 5.1.2 Monitoring function setting ---------------------------------------------------------------------- 5-8 5.2 Terminal status LED --------------------------------------------------------------------- 5-9 5.3 B-Parameter -------------------------------------------------------------------------------- 5-10 5.3.1 Basic setup ---------------------------------------------------------------------------------------------- 5-10 5.3.1.1 Selecting the source of frequency command : B0.01 -------------------------------------------------- 5-10 5.3.1.2 Selecting the source of RUN command : B0.02 ---------------------------------------------------- 5-10 3.6.1 Wiring on the input side of main circuit ----------------------------------------------------- 3-10 5.3.1.3 Selecting stopping method : B0.03 ----------------------------------------------------------------- 5-11 3.6.1.1 Installing a molded-case circuit breaker --------------------------------------------------------- 3-10 5.3.1.4 Prohibiting the reverse rotation : B0.04 --------------------------------------------------------------- 5-11 3.6.1.2 Installing a magnetic contactor(MC) ------------------------------------------------------------------- 3-10 5.3.1.5 Setting the motor direction : B0.05 ---------------------------------------------------------------- 5-12 3.6.1.3 Installing an AC reactor/DC reactor ------------------------------------------------------------ 3-11 5.3.1.6 Setting the monitor default : B0.06 ----------------------------------------------------------------- 5-12 3.6.1.4 Connecting input power supply --------------------------------------------------------------------- 3-12 5.3.1.7 Setting the automatic start operation : B0.07 ------------------------------------------------------- 5-12 3.6.1.5 Installing a surge absorber ------------------------------------------------------------------------- 3-12 5.3.2 System initialization --------------------------------------------------------------------------------- 5-13 3.6.1.6 Installing a noise filter on power supply side --------------------------------------------------- 3-13 5.3.2.1 Controlling the inverter initialization : B1.01 ---------------------------------------------------------- 5-13 3.6.2 Wiring on the output side of main circuit --------------------------------------------------- 3-15 5.3.2.2 Setting and verifying the password : B1.02, B1.03 ---------------------------------------------- 5-14 3.6.2.1 Precautions when wiring on the output side of main circuit ------------------------------- 3-15 5.3.3 Setting power capacity ------------------------------------------------------------------------5-14 3.6.2.2 Connecting the inverter and motor -------------------------------------------------------------- 3-15 5.3.3.1 Setting the inverter and motor capacity : B2.01, B2.02 ---------------------------------------- 5-14 3.6.2.3 Installing a noise filter on the output side ------------------------------------------------------- 3-15 5.4 F-Parameter -------------------------------------------------------------------------------------- 5-15 Contents - 3 5.4.1 Frequency control functions --------------------------------------------------------------- 5-15 4 - MOSCON-E7 User’s Manual 5.6 C-Parameter : H/W functionality setup ----------------------------- 5-31 5.4.1.1 Setting the frequency/speed command: F0.01~F0.09 -------------------------------- 5-15 5.6.1 V/f setting ----------------------------------------------------------------------------------------- 5-31 5.4.2 Frequency limit --------------------------------------------------------------------------------- 5-16 5.6.1.1 Setting V/f : C0.01 ---------------------------------------------------------------------------------------- 5-31 5.4.2.1 Setting lower/upper frequency limit : F1.01,F1.02 ------------------------------------- 5-16 5.6.1.2 Setting user-programmable V/f pattern ------------------------------------------------------------ 5-37 5.4.3 Jump frequency to avoid mechanical resonant oscillation ---------------------- 5-16 5.6.2 Carrier frequency setting ------------------------------------------------------------------ 5-38 5.4.3.1 Setting jump frequency : F1.03~F1.06 ---------------------------------------------------- 5-16 5.6.2.1 Setting the carrier frequency : C1.01 ------------------------------------------------------------------ 5-38 5.4.3.2 Selecting the jump mode : F1.07 ----------------------------------------------------------- 5-17 5.6.3 Main motor constants ------------------------------------------------------------------------------------ 5-38 5.4.4 Frequency match detection ---------------------------------------------------------- 5-19 5.6.3.1 Setting the motor line-to-line resistance : C2.01 ---------------------------------------------------- 5-38 5.4.4.1 Controlling the frequency detection : F1.08. F1.09 --------------------------------------- 5-19 5.6.3.2 Setting the iron loss : C2.02 ------------------------------------------------------------------------------ 5-38 5.4.4.2 Automatic activation of 2nd accel/decel time : F1.10 ---------------------------------- 5-19 5.6.3.3 Setting the motor rated current : C2.03 -------------------------------------------------------------- 5-39 5.4.5 accel/decel time ----------------------------------------------------------------------------- 5-20 5.6.3.4 Motor no-load current : C2.04 ------------------------------------------------------------------------- 5-39 5.4.5.1 Setting the accel/decel time : F2.01~F2.04 ---------------------------------------------- 5-20 5.6.3.5 Setting the motor rated slip : C2.05 -------------------------------------------------------------------- 5-39 5.4.5.2 Setting the time unit of accel/decel time : F2.05 --------------------------------------- 5-20 5.6.4 H/W Adjusting data : C3.01~C3.06 ------------------------------------------------------------ 5-40 5.4.6 Configuring S-curve time : F3.01 --------------------------------------------------- 5-21 5.7 H-Parameter : I/O control functions ---------------------------------------------- 5-41 5.5 S-Parameter ------------------------------------------------------------------------------ 5-22 5.7.1 Multi-function contact input --------------------------------------------------------------------------- 5-41 5.5.1 DC braking ---------------------------------------------------------------------------- 5-22 5.7.1.1 Set input type of multi-function contact input : H0.01 ----------------------------------------- 5-41 5.5.1.1 Controlling DC breaking : S0.01~S0.04 ------------------------------------------------------ 5-22 5.7.1.2 Setting the function of contact input : H0.02~H0.05 ------------------------------------------- 5-41 5.5.2 Speed search ----------------------------------------------------------------------------------- 5-23 5.7.2 Multi-function contact output --------------------------------------------------------------- 5-50 5.5.2.1 Controlling the speed search operation : S1.01 ------------------------------------------------ 5-23 5.7.2.1 Set output type of multi-function output : H1.01 ---------------------------------------------- 5-50 5.5.2.2 Speed search level, current and deceleration time --------------------------------------- 5-23 5.7.2.2 Setting the function of multi-function output : H1.02 -------------------------------------- 5-50 5.5.3 Dwell operation -------------------------------------------------------------------------------- 5-25 5.7.3 Multi-function analog input --------------------------------------------------------------------------- 5-52 5.5.3.1 Controlling the dwell operation : S2.01~S2.04 ----------------------------------------------- 5-25 5.7.3.1 Analog input form : H2.01 --------------------------------------------------------------------------- 5-52 5.5.4 Energy saving function ---------------------------------------------------------------------- 5-26 5.7.3.2 Analog input filter time constant : H2.02 ---------------------------------------------------------- 5-52 5.5.4.1 Setting the energy saving level : S3.01 ------------------------------------------------------ 5-26 5.7.3.3 Adjusting analog inputs : H2.03, H2.04, H2.06, H2.07 ------------------------------------------ 5-53 5.5.4.2 Setting the energy-saving frequency : S3.02 ----------------------------------------------- 5-26 5.7.3.4 Setting the multi-function analog input terminal function : H2.05 ---------------------------- 5-54 5.5.5 Slip compensation ----------------------------------------------------------------------------- 5-27 5.7.4 Multi-function analog output : H3.01~H3.03 ------------------------------------------------------- 5-55 5.5.5.1 Setting the slip compensation gain : S4.01 ------------------------------------------------ 5-27 5.7.4.1 Setting multi-function analog output : H3.01 ---------------------------------------------------- 5-55 5.5.5.2 Setting the slip compensation delay : S4.02 ----------------------------------------------- 5-27 5.7.4.2 Adjusting the monitor output : H3.02, H3.03 --------------------------------------------------------5-56 5.5.5.3 Slip compensation limit : S4.03 -------------------------------------------------------------- 5-27 5.7.5 Digital operator setting -------------------------------------------------------------------------------------5-57 5.5.6 Automatic torque boost --------------------------------------------------------------------- 5-29 5.7.5.1 Setting the display format in U0.07 : H4.01 ------------------------------------------------ 5-57 5.5.6.1 Torque compensation gain : S5.01 ----------------------------------------------------------- 5-29 5.7.5.2 Setting the STOP key enable/disable : H4.02 -------------------------------------------------- 5-57 5.5.6.2 Torque compensation delay : S5.02 --------------------------------------------------------- 5-29 5.7.5.3 Setting the operation when switching REMOTE→LOCAL : H4.03 ----------------------------5-57 5.5.7 System function compensation ------------------------------------------------------------ 5-30 5.7.5.4 Setting the device ID : H4.04 -------------------------------------------------------------------- 5-58 5.5.7.1 Hunting prevention gain : S6.01 ------------------------------------------------------------- 5-30 5.7.5.5 Select frequency unit : H4.05 ------------------------------------------------------------------ 5-58 5.5.7.2 Boosting brake performance : S6.02 --------------------------------------------------------- 5-30 5.7.5.6 Setting the parameter setting mode : H4.06 ------------------------------------------------- 5-59 Contents - 5 5.7.5.7 Setting the fan operating method : H4.07 --------------------------------------------------- 5-59 5.8 P-Parameter : Protective functions -------------------------------------------------- 5-60 5.8.1 Motor overload protection --------------------------------------------------------------- 5-60 5.8.1.1 Select motor protection : P0.01 -------------------------------------------------------------------- 5-60 5.8.1.2 Motor protection time constants : P0.02 ----------------------------------------------------------------- 5-61 5.8.1.3 Motor selection: P0.03 ------------------------------------------------------------------------------------- 5-62 5.8.2 Momentary power failure -------------------------------------------------------------------------- 5-63 5.8.2.1 Operation at power loss : P1.01 --------------------------------------------------------------------- 5-63 5.8.2.2 Compensation time of power loss : P1.02 ------------------------------------------------------ 5-63 5.8.2.3 V/f recovery time : P1.03 -------------------------------------------------------------------------- 5-64 5.8.2.4 : Undervoltage level : P1.04 ------------------------------------------------------------------------ 5-64 5.8.3 Stall prevention ----------------------------------------------------------------------------------------- 5-65 5.8.3.1 Stall prevention at start : P2.01 ---------------------------------------------------------------------- 5-65 5.8.3.2 Stall prevention level at start : P2.02 --------------------------------------------------------------- 5-65 5.8.3.3 Stall prevention limit during acceleration : P2.03 ----------------------------------------------- 5-66 5.8.3.4 Stall prevention at stop : P2.04 --------------------------------------------------------------------- 5-67 5.8.3.5 Stall prevention when the motor is running : P2.05 ------------------------------------------- 5-68 5.8.3.6 Stall prevention when the motor is running at the desired frequency : P2.06 ------------- 5-68 5.8.4 Overtorque detection : P3.01~P3.03 ----------------------------------------------------------- 5-70 5.8.4.1 Overtorque detection : P3.01 ------------------------------------------------------------------------ 5-70 5.8.4.2 Overtorque detection level & overtorque delay time : P3.02,P3.03 -------------------------- 5-71 5.8.5 Fault retry -------------------------------------------------------------------------------------------------- 5-72 5.8.5.1 Number of fault retry : P4.01 ------------------------------------------------------------------- 5-72 5.8.5.2 Output terminal function during retry : P4.02 ---------------------------------------------- 5-73 5.8.5.3 Fan error : P5.01 ------------------------------------------------------------------------------------ 5-73 5.9 Error monitoring ---------------------------------------------------------------------------- 5-74 6. Troubleshooting ----------------------------------------------------------------------- 6-1 6.1 Protective function/error description ---------------------------------------- 6-3 7. Maintenance and inspection -------------------------------------------- 7-1 7.1 Daily inspection ----------------------------------------------------------------------------------- 7-4 7.2 Periodic inspection --------------------------------------------------------------------------- 7-4 7.3 Part replacement ------------------------------------------------------------------------------ 7-6 6 - MOSCON-E7 User’s Manual -------------------------------------MEMO------------------------------------- List of figures - 1 List of figures 2 - MOSCON-E7 User’s Manual Figure 5.5 Setting jumping frequencies -------------------------------------------------- 5-18 Figure 5.6 Acceleration/deceleration time switching frequency --------------------- 5-19 1.Overview Figure 5.7 Setting S-curve characteristics ---------------------------------------------- 5-21 Figure 1.1 System diagram -------------------------------------------------------------------- 1-5 Figure 5.8 DC braking timing chart -------------------------------------------------------- 5-22 Figure 1.2 Dimensions of 1 phase 20P4 and 3 phase 20P4, 20P7 ------------------------ 1-6 Figure 5.9 Speed search timing chart -------------------------------------------------------- 5-24 Figure 1.3 Dimensions of 1 phase 20P7, 21P5 and 3 phase 21P5~22P2, 40P4~41P5 -- 1-6 Figure 5.10 Timing chart for dwell function -------------------------------------------- 5-25 Figure 1.4 Dimensions of 1 phase 22P2 and 3 phase 23P7, 42P2~43P7 --------------------1-7 Figure 5.11 Slip compensation limit -------------------------------------------------------- 5-28 Figure 5.12.1 V/f pattern : settings 0~14 & setting15 -------------------------------- 5-33 2. Installation Figure 5.12.2 V/f pattern : settings 0~14 & setting15 ---------------------------------- 5-34 Figure 2.1 Example of nameplate ---------------------------------------------------------- 2-3 Figure 5.13.1 V/f pattern : settings 0~14 & setting15 ---------------------------------- 5-35 Figure 2.2 Installation space ------------------------------------------------------------------- 2-8 Figure 5.13.2 V/f pattern : settings 0~14 & setting15 ----------------------------------- 5-36 Figure 5.14 User-defined V/f pattern ------------------------------------------------------- 5-37 3. Wiring Figure 5.15 3-wire sequence wiring example ------------------------------------------------ 5-43 Figure 3.1 Connection diagram (200V class) ----------------------------------------- 3-4 Figure 5.16 Time chart for 3-wire sequence ----------------------------------------------- 5-43 Figure 3.2 Connection diagram (400V class) ------------------------------------------- 3-5 Figure 5.17 Using two accel/decel time ------------------------------------------------------ 5-45 Figure 3.3 Terminal configuration ------------------------------------------------------- 3-6 Figure 5.18 Acceleration/deceleration jamp hold -------------------------------------------- 5-46 Figure 3.4 Peripheral devices ------------------------------------------------------------- 3-9 Figure 5.19 Timing chart for up and down commands ------------------------------------- 5-47 Figure 3.5 Reactor installation ---------------------------------------------------------- 3-11 Figure 5.20 Timing chart for DC injection braking command ------------------------------- 5-48 Figure 3.6 Power supply noise filter installation ------------------------------------- 3-14 Figure 5.21 Timing chart for the external search command ------------------------------- 5-49 Figure 3.7 Noise filter on the output side --------------------------------------------- 3-15 Figure 5.22 Gain and bias ------------------------------------------------------------------------- 5-53 Figure 3.8 Dealing with inductive noise ------------------------------------------------- 3-16 Figure 5.23 Monitor output adjustments ----------------------------------------------------- 5-56 Figure 3.9 Dealing with radio interference ----------------------------------------------- 3-16 Figure 5.24 Motor protection operating time ------------------------------------------------- 5-61 Figure 3.10 Ends of twisted-pair cables ------------------------------------------------- 3-18 Figure 5.25 Acceleration stall prevention function : P2.01=1 ----------------------------- 5-66 Figure 3.11 Direction of motor’s rotation ------------------------------------------- 3-18 Figure 5.26 Stall prevention limit during acceleration ---------------------------------------- 5-66 Figure 3.12 Multiple grounding ---------------------------------------------------------- 3-20 Figure 5.27 Deceleration stall prevention function : P2.04=1 ------------------------------ 5-67 Figure 5.28 Run stall prevention function : P3.05=1 or 2 ------------------------------------- 5-69 4. Digital operator Figure 4.1 Monitoring functions of digital operator ---------------------------------- 4-5 Figure 4.2 Test run using digital operator ---------------------------------------------- 4-7 5. Parameters Figure 5.1 Parameter setting method --------------------------------------------------------- 5-7 Figure 5.2 Selecting monitoring group (U) --------------------------------------------------- 5-8 Figure 5.3 Timing chart for multi-step and JOG operation --------------------------- 5-15 Figure 5.4 Upper and lower limits of the frequency reference ------------------------ 5-16 Figure 5.29 Timing chart for overtorque detection ------------------------------------------- 5-71 List of tables - 1 List of tables 1.Overview Table 1.1 Dimensions of FARA MOSCON-E7 -------------------------------------------- 1-7 Table 1.2 Specifications for 200V class --------------------------------------------------------- 1-8 Table 1.3 Specifications for 400V class -------------------------------------------------------- 1-10 3. Wiring Table 3.1 200V class main circuit terminal functions ---------------------------------------- 3-7 Table 3.2 400V class main circuit terminal functions ------------------------------------------ 3-7 Table 3.3 Cable circuit terminal block ------------------------------------------------------------- 3-8 Table 3.4 MCCB and Magnetic Contactor ------------------------------------------------------ 3-11 Table 3.5 DC Reactor ------------------------------------------------------------------------------- 3-12 Table 3.6 AC Reactor ------------------------------------------------------------------------------- 3-12 Table 3.7 Application of the surge absorber ---------------------------------------------------- 3-13 Table 3.8 Cable length.vs.carrier frequency ---------------------------------------------------- 3-17 Table 3.9 Cable size -------------------------------------------------------------------------------- 3-21 5. Parameters Table 5.1 Functions of each group -------------------------------------------------------------- 5-3 Table 5.2 Operation status ------------------------------------------------------------------------- 5-4 Table 5.3 Inverter operation status on last fault ----------------------------------------------- 5-5 Table 5.4 Fault list ---------------------------------------------------------------------------------- 5-5 Table 5.5 Parameter check list --------------------------------------------------------------------- 5-5 6. Troubleshooting Table 6.1 Fault display and contents (Faults in inverter) ------------------------------------- 6-3 Table 6.2 Fault display and contents (Warning on inverter) : Blinking display ----------- 6-6 Table 6.3 Fault display and contents (Communication fault) ----------------------------------- 6-7 7. Maintenance and Inspection Table 7.1 Periodic inspection --------------------------------------------------------------------- 7-5 Table 7.2 Part replacement ------------------------------------------------------------------------- 7-6 2 - MOSCON-E7 User’s Manual -------------------------------------MEMO------------------------------------- 1. Overview 1-1 1. Overview An overview of the MOSCON-E7 and its functions are described in this chapter. 1.1 Main features ............................................................................ 1-3 1.2 System diagram......................................................................... 1-5 1.3 Dimensions............................................................................... 1-6 1.4 Specifications ............................................................................ 1-8 1-2 MOSCON-E7 User’s Manual 1. Overview 1-3 1.1 Main features Easy to use • Digital operator with digital volume allows simplified and easy operation. • Built-in automatic speed controller and many automatic functions provide a smooth and powerful operation. • More than 150 parameters for configuring the functions of MosconE7 are segmented into 7 groups according to its function for convenience. Small size & uniform height • Small size & weight allows convenient installation and easy maintenance. • The height of Moscon-E7 is 128mm regardless of its rating. This allows optimal utilization of installation area. High performance • Built-in digital speed controller adopting 32bit RISC micro-processor allows high precision & high performance frequency and voltage control. (Frequency resolution : 0.01Hz, Voltage resolution : 0.1V) • Built-in automatic torque boost & speed control algorithm provides smooth and improved speed control characteristics. Various operational functions • Various built-in functions that are compatible to various operation method : Dwell, DC-Brake, Up/Down operation, etc. • 4 multi-functional, and 2 fixed contact input terminals (19 input types) • 2 multi-functional analog input terminals • 1 multi-functional analog contact • Multi-functional contact output (11 output functions) • Application-specific function can be supported if needed. 1-4 MOSCON-E7 User’s Manual Various built-in input devices for command • Keypad in digital operator • Digital volume in digital operator • Analog voltage (0~10V) & current (4~20mA) input through terminal block (Resolution : 1/1024 of maximum frequency) • Communication supports (RS-485) Practical and versatile protection function • Prevents malfunctioning by detecting 17 types of errors. • Recent 4 errors are reported. • The last operational status of the inverter is provided. 1. Overview 1-5 1.2 System diagram 1-6 MOSCON-E7 User’s Manual 1.3 Dimensions Digital operator Sticker marked capacity Front cover Wiring holes for control circuit Wiring holes for main circuit 76 123 Cooling fan 128 Heatsink Mounting hole Opening the covers Main circuit terminal block Ground terminal Figure 1.2 Dimensions of 1 phase 20P4 and 3 phase 20P4, 20P7 Status indicating lamp Digital volume 120 142 Control circuit terminal block Charge lamp Ground terminal [1 phase 20P4S and 3 phase 20P4, 20P7] Status indicating lamp Digital volume Charge lamp (200V class) Charge lamp (400V class) Control circuit terminal block Main circuit terminal block Ground terminal [1 phase 20P7S, 21P5S, 22P2S and 3 phase 21P5, 22P2, 23P7, 40P4~43P7] Figure 1.1 System diagram 128 Figure 1.3 Dimensions of 1 phase 20P7, 21P5 and 3 phase 21P5, 22P2, 40P4~41P5 1. Overview 1-7 1-8 MOSCON-E7 User’s Manual 1.4 Specifications 142 150 Table 1.2 Specifications for 200V class Figure 1.4 Dimension of 1 phase 22P2 and 3 phase 23P7, 42P2~43P7 Output 128 Table 1.1 Dimensions of FARA MOSCON E-7 200V 3phase 400V 3phase 20P4S 20P7S 21P5S 22P2S 20P4 20P7 21P5 22P2 23P7 40P4 40P7 41P5 42P2 43P7 Installation Dimension W1×H1, Φ Volume (㎣) Weight (㎏) 76×128×123 66×118, M4 1,186,816 0.95 120×128×142 103×118, M4 2,150,400 1.6 150×128×142 134×118, M4 2,150,400 2.0 76×128×123 66×118, M4 1,186,816 0.95 120×128×142 103×118, M4 2,150,400 1.6 150×128×142 134×118, M4 2,150,400 2.0 120×128×142 103×118, M4 2,150,400 1.6 150×128×142 134×118, M4 2,688,000 2.0 20P4 20P7 21P5 22P2 23P7 SI-E7S 1 phase 20P4S 20P7S 21P5S 22P2S - Max. Applicable Motor Capacity[kW]*1 0.4 0.7 1.5 2.2 3.7 Inverter Capacity[kVA] (1 phase) 1.1 (1.1) 1.9 (1.7) 3.0 (2.7) 4.2 (3.7) 6.7 (-) Rated Output Current[A] (1 phase) 3.2 (3.2) 5.0 (4.6) 8.0 (7.2) 11.0 (9.6) 17.5 (-) Rated Output Voltage[V] 3 phase, 200~230Vac (Proportional to input voltage) Max. Output Frequency 600Hz [Hz] 3Phase, 200~230Vac, 50/60Hz Input Voltage and Frequency Single phase, 200~230Vac, 50/60Hz Rated Input Current[A] 3.9 6.4 11.0 15.1 (1 phase) (6.4) (11.0) (15.1) (24.0) Voltage: -15% ~ +10%, Allowable Fluctuation Frequency: ±5% Control Method Frequency Control Range Control Characteristic 200V 1phase External Dimension (W×H ×D) Input MOSCON-E7 Type SI-E7 3 phase Frequency Control Accuracy Frequency Setting Resolution Output Frequency Resolution Overload Capacity Frequency Setting Signal Accel/Decel Time 24.0 (-) Space vector PWM, VVVF method 0.01 ~ 600Hz*2 Digital :±0.01% (-10 ~ 50℃)*2 Analog :±0.5% (25℃±10℃) Digital (operator) : 0.01Hz Analog:0.06/60Hz(1/1,024:10-bit) 0.01Hz 150% of rated current for 1min DC0~10V (Input impedence:20 ㏀) DC4~20mA (Input impedence:250Ω) 0.1~3000.0sec (unit of 0.1sec setting) 2 sets available Continuous Regenerative 20% of rated torque Torque V/f Pattern 15 of fixed pattern and 1 of optional pattern Protective Functions Inverter Overload Overvoltage Undervoltage Cooling Fin Overheat Momentary Power Loss Stall Prevention Power Charge Indication Environmental condition Location Ambient Temperature Humidity Storage Temperature Vibration Motor stops at 190V or lower. Motor stops if the temperature of the cooling fin is higher than approximately 90℃. Motor stops if power loss is 15ms or longer, by selecting the momentary power loss mode, operation can be continued if power is restored within 500ms. Automatic setting during acceleration, deceleration, and constant speed operation (Individual setting is possible). SI- E7 3 phase 40P4 40P7 41P5 42P2 43P7 Max. Applicable Motor Capacity[kW]*1 0.4 0.7 1.5 2.2 3.7 Inverter Capacity[kVA] 1.4 2.6 3.7 4.2 6.5 Output Instantaneous Overcurrent Rated Output Current[A] 1.8 3.4 4.8 5.5 8.6 Rated Input Current[A] Control Method Indoor (Free from corrosive gas, dust, or oil) Normally 0.2G or less, less than 20Hz, 1G max. *1. The maximum applicable motor capacity is for a standard 4-pole motor. When selecting the motor and inverter, make sure that the Inverter’s rated current is applicable for the motor’s rated current. *2. Tuning may be required. *3. The storage temperature refers to the temperature during the transportation for a short period of time. 2.4 4.7 7.0 8.1 12.0 Voltage: -15% ~ +10%, Frequency: ±5% Space vector PWM, VVVF method Frequency Control Range 0.01 ~ 600Hz*2 Frequency Accuracy -10 ~ 40℃ -20 ~ 60℃*3 380~460Vac Rated Output Voltage[V] 3phase, (Proportional to input voltage) Max. Output Frequency 600Hz [Hz] Input Voltage 3 Phase, 380~460Vac, 50/60Hz and Frequency Allowable Fluctuation LED is ON until the DC bus voltage becomes 50V or less. 90% RH or less MOSCON-E7 User’s Manual Table 1.3 Specifications for 400V class Control Characteristics Motor Overload 150%/3Hz Motor stops in 1 minute at approx. 150% of motor rated current. Motor stops immediately at 200% of inverter rated current. Motor coasts to stop in 1 minute at approx. 150% of inverter rated current. Motor stops at 410V or higher. 1-10 Protective Function Starting Torque 1-9 Input 1. Overview Frequency Setting Resolution Output Frequency Resolution Overload Capacity Frequency Setting Signal Accel/Decel Time Continuous Regenerative Torque V/f Pattern Starting Torque Motor Overload Protection Instantaneous Overcurrent Digital : ±0.01% (-10 ~ 50℃)*2 Analog : ±0.5% (25℃±10℃) Digital (operator): 0.01Hz Analog: 0.06/60Hz (1/1,024:10-bit) 0.01Hz 150% of rated current for 1min DC0~10V(Input impedence:20 ㏀) DC4~20mA(Input impedence:250Ω) 0.1~3000.0sec (unit of 0.1sec setting) Includes 2-set each. 20% of rated torque 15 of fixed pattern and 1 of optional pattern 150%/3Hz Motor stops in 1 minute at approx. 150% of motor rated current. Motor stops immediately at 200% of inverter rated current. 1. Overview Inverter Overload Overvoltage Undervoltage Cooling Fin Overheat Momentary Power Loss Environmental condition Stall Prevention Motor coasts to stop in 1 minute at approx. 150% of inverter rated current. Motor stops at 820V or higher. Motor stops at 380V or lower. Motor stops if the temperature of the cooling fin is higher than 90℃. Motor stops if power loss is 15ms or longer, by selecting the momentary power loss mode, operation can be continued if power is restored within 500ms. Automatic setting during acceleration, deceleration, and constant speed operation (individual setting is possible). Power Charge Indication LED is ON until the DC bus voltage becomes 50V or less. Location Indoor (Free from corrosive gas, dust, or oil) Ambient Temperature Humidity Storage Temperature Vibration 1-11 -10 ~ 40℃ 90% RH or less -20 ~ 60℃*3 Normally 0.2G or less, less than 20Hz, 1G max. *1. The maximum applicable motor capacity is for a standard 4-pole motor. When selecting the motor and inverter, make sure that the inverter’s rated current is applicable fro the motor’s rated current. *2. Tuning may be required. *3. The storage temperature refers to the temperature during the transportation for a short period of time. 1-12 MOSCON-E7 User’s Manual 1.5 Short circuit rations Suitable for use in a circuit capable of delivering not more than 5kA rms symmetrical amperes. 1.6 Fuse The fuse used on the input side should be any of the UL Class K5 fuses having The ratings as listed below. Rated Rated Model Rated Rated Model Voltage(V) Current(A) Voltage(V) Current(A) 20P4 10 40P4 16 20P7 21P5 22P2 23P7 20P4S 20P7S 21P5S 22P2S 250 10 20 20 40P7 41P5 42P2 30 20 20 20 30 43P7 500 600 16 16 20 20 2. Installation 2-1 2. Installation Nameplate information and installation site are described in this chapter. 2.1 Receiving ................................................................................... 2-3 2.2 Nameplate Information .......................................................... 2-4 2.3 Installation................................................................................. 2-5 2-2 MOSCON-E7 User’s Manual 2. Installation 2-3 2.1 Receiving 2-4 MOSCON-E7 User’s Manual 2.2 Nameplate information Confirm the following upon delivery of the Moscon-E7: • Verify the model number to check if the correct item has been delivered. • Check if any physical damage has occurred during shipping. If there is any damage or missing part, call the place where you purchased the product or sales office for service immediately. ! CAUTION • Don’t install the inverter that there is any damage or missing part. It may be cause injury. Program version MODEL : SI43P7E7/EXP PRG:V019 Input Voltage : AC3PH 380-460V 50/60Hz 12.0A Output Power: AC3PH 0-460V 6.5kVA 8.6A 0.01-600Hz IP20 INSTALLATION CATEGORY Ⅱ MASS : 2.0kg SER. NO : 2Q15A20002 Model number Input specifications Output specifications Serial number SAMSUNG ELECTRONICS CO., LTD. MADE IN KOREA Figure 2.1 Example of nameplate Inverter model number SI 4 3P7 E7/EXP Samsung inverter E7 series E7/EXP : 3 phase E7/EXS : 1 phase Voltage class 2 : 200V class 4 : 400V class Max. motor capacity 0P4:0.4kW 0P7:0.7kW 1P5:1.5kW 2P2:2.2kW 3P7:3.7kW Name plate location Name plate (Attachment an the right side) 2. Installation 2-5 2.3 Installation 2-6 MOSCON-E7 User’s Manual 2.3.2 Installation site 2.3.1 Precautions for delivery and installation ! DANGER • Do not inspect components unless inside “Charge” lamp is off. It may cause an electric shock. • Do not remove the operator from the main body. It may cause an electric shock. Free from direct sunlight Free from harmful gases and liquids Free from oil mist and dust Free from chlorides Free from rain and wind, water Free from dust (In case of enclosed wall mount type) Without excessive vibration Low ambient temperature Ambient temperature of – 10℃~40℃ Without any magnetic noises Free from radioactive material Free from combustible material • When using the digital operator away from the main body, use the separated operator (E7OPTR-S). ! CAUTION (In case of enclosed wall mount type) • Be careful not to be damaged the inverter in delivering. • Do not carry the inverter by holding the plastic parts, but hold the heat sink. Otherwise, the heat sink may fall and cause injury. • Use nonflammable materials such as metal for the part where the inverter is installed. • When installing several inverters in a single enclosed space, install a cooling fan to keep the ambient temperature below 45℃. • Cover the inverter during installation to protect it from metal chip coming from drilling. (e.g. Free from a welding machine or power supply) 2. Installation 2-7 2-8 MOSCON-E7 User’s Manual 2.3.3 Controlling the ambient temperature 2.3.4 Installation space To maintain the optimum condition, the inverter should be installed at the ambient temperature of –10℃~40℃. If installed in a closed environment (e.g. enclosed panel), install a cooling fan or air conditioner to avoid any extreme temperature increases and to maintain the internal air temperature within the range. Install the inverter on a vertical surface to enhance the cooling effect. When installing the inverter, always leave enough space around it to provide normal heat dissipation. ! Airflow 30mm or more 30mm or more 100mm or more CAUTION • If installed in a closed environment (e.g. enclosed panel), we strongly recommend the inverter to be installed on a vertical space. If it is installed on a horizontal space, its internal temperature may increase excessively and thus, reducing its durability. 80mm or more 100mm or more Vertical mounting Herizontal mounting Inverter 23P7 Figure 2.2 Installation space Table 2.1 Cabinet Size Cabinet (enclosure) Vent Hole Area Size(Unit:mm) ・ 55% of both the side 270x328x222 of the cabinet ・ width of each slit : 3.2mm ・ To be provided on each of the upper side areas Inlet Temp. -10~+40℃ Cooling Fan Installed at the enclosure top to suck air from inside the enclosure to the outside. (Fan air flow : 2x0.59 m3/min or more 3.Wiring 3-1 3. Wiring Wiring specifications, terminals, main circuit terminal connection, peripheral device connection and precautions in wiring are described in this chapter. 3.1 Connection diagram ................................................................ 3-4 3.2 Terminal block configuration ................................................. 3-6 3.3 Main circuit terminal functions .............................................. 3-7 3.4 Control circuit terminal functions ......................................... 3-8 3.5 Connections to peripheral devices......................................... 3-9 3.6 Wiring the main circuits ........................................................ 3-10 3.7 Precautions when wiring ....................................................... 3-18 3.8 Grounding............................................................................... 3-20 3.9 Cable specification ................................................................. 3-21 3.10 Wiring check ......................................................................... 3-22 3-2 MOSCON-E7 User’s Manual 3.Wiring ! 3-3 DANGER • Always turn OFF the input power supply before wiring. Otherwise, an electric shock or fire may occur. 3-4 MOSCON-E7 User’s Manual 3.1 Connection diagram The connection diagram of the Moscon-E7 is shown below. When using the digital operator, the motor can be operated by wiring only the main circuits. External Braking Unit (optional) • Wiring must be performed by a qualified personnel. • Always check if the volts on the main circuit and control circuit terminals are properly tightened. • Be sure to ground the ground terminal. Otherwise, an electric shock or fire may occur. • Turn ON the inverter only after completely assembling the covers. Do not detach the cover when the power is ON. Otherwise, an electric shock or fire may occur. • Ground the ground terminal (200V & 400V class: ground to 100Ω or less). Otherwise, an electric shock or fire may occur. ! CAUTION External DC reactor to improve power factor. (optional) MCCB Input power • Do not perform withstand voltage test on the inverter. It may damage the semi-conductor element. • When wiring other devices, read their manuals carefully. Samsung is not responsible for any accident resulting from user’s carelessness. If not, it may cause injury or fire. • Do not connect AC power to output terminal U, V and W. Otherwise, it may damage the inverter. • Do not connect electromagnetic switches or contactors to the output circuits. +2 N P/B ◠ R/L1 U/T1 Motor ◠ S/L2 V/T2 M ◠ T/L3 W/T3 Multi-function contact input Forward run/stop Reverse run/stop External fault Fault reset Multi-step command1 Jogging 1 A1 2 B1 3 C1 4 5 6 7 E • Tighten all terminal screws of the main circuit and the control circuit. • Check if the voltage of the inverter rated voltage satisfies with the AC power supply voltage. Otherwise, it may cause fire or injury. +1 There is no built-in internal braking unit for the 200V class. Thus, external braking unit should be used. Multi-function contact output DC 30V 1A max AC 250V 1A max (basic setting : fault) Sequence Command Ground 1kΩ ㏀ 2kΩ 8 Power for speed command (+12V 20mA) Speed command (0~10V 20kΩ) 12Analog command 9 10 Speed command (4~20mA 250Ω) 11 Analog monitor output (0~10V) Figure 3.1 Connection diagram (200V class) p : Twisted pair shield wire. Note 1) : Shield wire, 2) : Main circuit terminal, : Control circuit terminal. 3) Max. current value for +12V voltage of the control circuit terminal No.8 is 20㎃. 3.Wiring 3-5 3-6 MOSCON-E7 User’s Manual 3.2 Terminal block configuration Braking Unit or Auxiliary Capacitor (optional) Ground terminal Braking resistor Unit (optional) External DC reactor to improve power factor. (optional) +1 MCCB Input power +2 N P/B ◠ R/L1 U/T1 ◠ S/L2 V/T2 ◠ T/L3 W/T3 Multi-function contact input Forward run/stop Reverse run/stop External fault Fault reset Multi-step command1 Jogging Main circuit terminal block Built-in braking unit is available for the 400V class. Thus, the external braking resistor can be installed as an option. External braking unit is an option Control circuit terminal block Motor M Ground terminal [20P4, 20P7] 1 A1 2 B1 3 C1 4 5 Multi-function contact output DC 30V 1A max AC 250V 1A max (basic setting : fault) 1 2 3 4 5 6 7 8 9 10 11 12 A1 B1 C1 Control circuit terminal 6 7 Sequence Command E Ground Main circuit terminal 1kΩ ㏀ 2kΩ Ground terminal 8 Power for speed command (+12V 20mA) 9 Speed command (0~10V 20kΩ) 12 Analog command 10 Speed command (4~20mA 250Ω) 11 Analog monitor output (0~10V) Figure 3.2 Connection diagram (400V class) p : Twisted pair shield wire. Note 1) : Shield wire, 2) : Main circuit terminal, : Control circuit terminal. 3) Max. current value for +12V voltage of the control circuit terminal No.8 is 20㎃. [21P5 – 23P7, 40P4 – 43P7] Figure 3.3 Terminal configuration 3.Wiring 3-7 3-8 MOSCON-E7 User’s Manual 3.3 Main circuit terminal functions 3.4 Control circuit terminal functions Table 3.1 200V class main circuit terminal functions Table 3.3 Control circuit terminal block Purpose Symbol Terminal Function Signal level Default setting Main circuit power input R/L1, S/L2, T/L3 1 Forward run/stop command - Inverter outputs U/T1, V/T2, W/T3 2 Reverse run/stop command - DC power input +1, N 3 Multi-function input 1 DC reactor connection +1, +2 (Remove short-bar)* 4 Multi-function input 2 Braking unit connection P/B, N (No internal braking unit) 5 Multi-function input 3 Multi-step speed1 command Auxiliary capacitor (+): P/B (-):N 6 Multi-function input 4 Jogging command 7 Sequence control input common +24V Ground 8 Power for freq. command +12V(Max 20mA) - 9 Voltage command for output frequency DC 0~+10V(25Ω) - 10 Current command for output frequency 4~20mA(250Ω) - Ground *Short-bar must be removed when connecting the DC reactor. Table 3.2 400V class main circuit terminal functions Purpose Terminal Symbol Photo-Coupler input +24V, 10mA External fault Fault reset Sequence 0V Main circuit power input R/L1, S/L2, T/L3 Inverter output U/T1, V/T2, W/T3 11 Analog monitor output 0V +2, N (Additional circuit is needed to prevent the damage caused by inrush current.) +1, +2(Remove short-bar)* 12 Common for control DC 0 ~ +10V (Output frequency) Multi-function output Contact : AC 250V, 1A or below DC 30V, 1A or below Fault occurred DC power input DC reactor connection Braking resistor unit +2, P/B (used for the internal braking unit) Braking unit +2, N Auxiliary capacitor (+) : +2 (-) : N Ground *Short-bar must be removed when connecting the DC reactor. A1 B1 C1 Note) Be attentive to below mention when changing output frequency in using the external frequency command terminal. - Voltage command input terminal is set only in factory setting. - Change setting value of parameter H2.01 from 0 to 1 in using the current command input terminal. - In setting the function of contact input, H0.02~H0.05, parameter H2.01 is regardless if voltage current command transfer(14) is set. 3.Wiring 3-9 3-10 MOSCON-E7 User’s Manual 3.5 Connections to peripheral devices 3.6 Wiring the main circuits Examples of connections between the Moscon-E7 and peripheral devices are shown in the figure below. 3.6.1 Wiring on the input side of main circuit Power supply Molded-case circuit breaker or leakage current circuit breaker Magnetic contactor AC/DC reactor for power factor improvement Input noise filter MOSCON-E7 Ground Output noise filter Motor 접지 Ground ~ Power supply Follow the specification on power supply. Molded-case circuit breaker or leakage current circuit breaker Large inrush current flows when power is supplied thus, use appropriate breaker, which is tolerant to high frequency. Magnetic contactor Installed to remote control the supply/block of the power. Frequent start/stop of the inverter through this device reduces durability of the inverter. Install the surge absorber on the coil. AC/DC reactor for power factor improvement AC/DC reactor is required when improving the power factor or when the inverter is connected to a largecapacity power transformer whose capacity is 600kVA or more. If not, invert may be damaged. Input noise filter Install it close to the inverter to reduce the noise from the wire. Input wiring Inappropriate wiring damages the inverter. Do not connect input power R, S, and T to output U/T1, V/T2, and W/T3. Keep enough distance between the control signal line and main circuit to prevent the effect of noise. Installation area Install in a place free from gas and dust. Maintain the ambient temperature within the specified range. Output noise filter Install the output noise filter close to the inverter to reduce the noise from output wire of the inverter. Motor Follow the specification when running the motor. Grounding Ground the inverter and motor to prevent any electric shock. Wiring between the inverter and motor Keep the wire between the inverter and motor short. If not, it may decrease the carrier frequency. Leakage current from the cable affects the inverter and other peripheral devices. Figure 3.4 Peripheral devices 3.6.1.1 Installing a molded-case circuit breaker • Always connect the input power terminals (R/L1, S/L2 and T/L3) via an appropriate MCCB. • Large inrush current flows when power-up, thus, use appropriate breaker. Use the one that is tolerant to high frequency. • MCCB with a capacity of 1.5 to 2 times greater than the rated current of the inverter should be used. • When one MCCB is used for more than one device (e.g. inverter), the sequence must be set up so that the power supply is turned off by a fault output. 3.6.1.2 Installing a magnetic contactor (MC) • The inverter is able to use without the magnetic contactor of power supply side. • In case of installing the magnetic contactor to input power supply in order to prevent an accident occurred by the automatic restart operation after the recovery from a power interruption, frequent start/stop of the inverter through this device reduces durability of the inverter. • When the digital operator is used, unless the inverter operation mode is set to the automatic start operation, it cannot be automatically started after the recovery rom a power interruption. • Install the surge absorber on the coil. 3.Wiring 3-11 Table 3.4 MCCB and magnetic contactor Model Capacity (kVA) Rated Output Current(A) AF AT Magnetic Contactor Rated Current(A) MCCB 1.1 3.2 30A 5A 10A 20P7 21P5 1.9 3.0 5.0 8.0 30A 30A 10A 20A 10A 10A 22P2 4.2 11.0 30A 20A 20A 23P7 6.7 17.5 30A 30A 20A 40P4 1.4 1.8 30A 5A 10A 40P7 2.6 3.4 30A 5A 10A 41P5 3.7 4.8 30A 10A 10A 42P2 4.2 5.5 30A 10A 10A 43P7 6.5 8.6 30A 20A 10A 3.6.1.3 Installing an AC reactor/DC reactor • Two options are available when the inverter is connected to a largecapacity power transformer whose capacity is 600kVA or higher: AC Reactor Transformeter Inverter MOSCON-E7 User’s Manual Table 3.5 DC Reactor 20P4 Transformeter 3-12 Inverter M Inverter capacity(kW) 200V Class 400V Class 0.4 0.7 1.5 2.2 3.7 5.4 5.4 18 18 18 8 8 3 3 3 Current[A] 3.2 3.2 5.7 5.7 12 Inductance[mH] 28 28 11 11 6.3 0.4 0.7 1.5 2.2 3.7 Current[A] 2.5 5 10 15 20 Inductance[mH] 4.1 2.1 1.1 0.71 0.53 Current[A] 1.3 2.5 5 7.5 10 Inductance[mH] 28 8.4 4.2 3.6 2.2 Current[A] Inductance[mH] Table 3.6 AC Reactor Inverter capacity(kW) 200V Class 400V Class 3.6.1.4 Connecting input power supply • Input power supply can be connected to any terminal R/L1, S/L2, or T/L3 on the terminal block; the phase sequences of input power supply are irrelevant. M DC Reactor Figure 3.5 Reactor installation • If not, inverter may be damaged due to an excessive peak current flow through the input power circuit. • AC reactor/DC reactor also can be used to improve the power factor on input power supply side. 3.6.1.5 Installing a surge absorber • A surge absorber must be used for inductive loads near the FARA MOSCON-E7. Otherwise, it may damage the devices or cause malfunctioning. • These inductive loads includes: - MC, - Electromagnetic relay, - Solenoid valves and solenoids, - MCCB 3.Wiring 3-13 3-14 MOSCON-E7 User’s Manual Table 3.7 Application of the surge absorber Description 200 ~230V Model Specification Large Capacity Coil except Relay DCR2-50A 22E AC250V 0.5u ㎌ 200Ω Control Relay DCR2-10A 25C AC250V 0.1 ㎌ 100Ω 380~460V Devices MCCB ◠ ◠ ◠ Power ~ E7 MCCB DCR2-50D 100B DC 1000V 0.5 ㎌ 220Ω ◠ ◠ Note) The above surge absorbers are the product of MARCON. Use the recommend product or equivalents. Control circuit IM ※Connecting the insulating transformer to power supply of the control circuit is same effective of the noise filter. (c) Wiring example 3 3.6.1.6 Installing a noise filter on power supply side • Install the noise filter in order to eliminate noise transmitted from the power line to the inverter. MCCB Power ~ MCCB Power ~ ◠ ◠ ◠ Noise filter MCCB ◠ ◠ Control circuit E7 ~ ◠ ◠ ◠ ◠ ◠ ※Use the noise filter designed specifically for the inverter IM General noise filter Control circuit MCCB Power ~ ◠ ◠ ◠ General noise filter E7 IM MCCB MCCB Power E7 MCCB IM (a) Wiring example 1 (Correct) ◠ ◠ ◠ Noise filter E7 IM ※Noise filter is not necessary if the inverter and power is used 1:1 (b) Wiring example 2 ◠ ◠ Control circuit ※Using the general noise filter is not effective. (d) Incorrect wiring example Figure 3.6 Power supply noise filter installation 3.Wiring 3-15 MOSCON-E7 User’s Manual 3-16 3.6.2 Wiring on the output side of main circuit 3.6.3 Dealing with inductive noises 3.6.2.1 Precautions when wiring on the output side of main circuit • As mentioned previously, noise filter can be used to prevent the inductive noise generated on the output side. • As an option, cables can be routed through a grounded metal pipe to prevent inductive noise. • If the metal pipe and the signal line are at least 30cm apart, the inductive noise can be considerably reduced. ! DANGER • Never connect a power supply to output terminals U/T1, V/T2, and W/T3. Otherwise, it may damage the internal circuits of the inverter. • Never short or ground output terminals. • The output wires should not have contact with the inverter heatsink. • Do not connect a phase advancing capacitor or LC/RC noise filter to an output circuit. Otherwise, it may damage the inverter or cause a fire. • Do not connect an electromagnetic switch or MC to an output circuit. Otherwise, it will actuate the overcurrent protection circuit of the inverter. 3.6.2.2 Connecting the inverter and motor • Connect output terminals U/T1, V/T2, and W/T3 to motor wires U, V, and W respectively. • Check if the motor rotates in correct direction according to the command. If not (motor rotating in reverse with the forward run command), switch any of two output terminals to each other and reconnected them. 3.6.2.3 Installing a noise filter on the output side Install a noise filter to reduce radio noise and inductive noise. MCCB Metal pipe ◠ ◠ ◠ Power ~ IM E7 30cm Min. Controller Signal line Figure 3.8 Dealing with inductive noise 3.6.4 Dealing with radio interference (RFI) • Radio noise is generated from the inverter as well as the input/output lines. • The radio noise can be reduced by installing the noise filters on both input and output sides, and also installing the inverter in an enclosed and grounded steel box. • Make the cable between the inverter and motor as short as possible. MCCB Power ~ ◠ ◠ ◠ E7 Noise filter MCCB IM Power ~ Radio noise Signal line Controller Inductive noise ◠ ◠ ◠ Metal pipe Noise filter E7 Noise filter AM radio Inductive noise: Noise generated on the signal line by electromagnetic induction. It causes the controller to malfunction. Radio noise: High-frequency noise generated from the inverter and cables. Figure 3.7 Noise filter on the output side Figure 3.9 Dealing with radio interference IM 3.Wiring 3-17 3.6.5 Cable length between inverter and motor • If the cable between the inverter and motor is long and the carrier frequency is high, high-frequency current is leaked from the cable and peripheral devices. This may damage the inverter and peripheral devices. • Adjust the carrier frequency as shown in table below. • To change the setting related to the carrier frequency, refer to the parameter setting of C1-01. Table 3.8 Cable length.vs. carrier frequency Cable length 30m max. 50m max. 100m max. Carrier frequency Less than 10kHz 10 Less than 8kHz 8 Less than 4kHz 4 C1.01 More than 100m Less than 1kHz 1 3-18 MOSCON-E7 User’s Manual 3.7 Precautions when wiring 3.7.1 Control circuit wiring precautions • Separate the control circuit wiring (terminals 1 to 11) from main circuit wiring (terminals P/B, N, R/L1, S/L2, T/L3, U/T1, V/T2, W/T3, +1, and +2) and other high-power lines. • Separate the control circuit terminals A1, B1 and C1 (contact outputs) from wiring for control circuit terminals (terminals 1 to 11). • Use twist-pair or shielded twisted-pair to prevent operating faults due to noise. The maximum cable length is 50cm. Shield Armor 실드sheath 피부 외피 Connect to ground terminal Insulate with tape 여기는 연결하지 않는다 Do not connect here Figure 3.10 Ends of twisted-pair cables 3.7.2 Main circuit input/output wiring • Do not connect the main circuit power to output terminal U/T1, V/T2, and W/T3. • When the output terminals U/T1, V/T2, and W/T3 and motor terminals U, V, and W are connected, the forward rotation command causes the motor to rotate counter-clockwise from the view of load side. To change the direction, switch any of two wires of U, V and W. Figure 3.11 Direction of motor’s rotation 3.Wiring 3-19 • Output wiring should not touch with case. Otherwise, it may cause an GND-fault or a short-circuit. • Do not connect the phase advanced capacitor, LC, or RC noise filter to the output side of Moscon-E7. 3-20 MOSCON-E7 User’s Manual 3.8 Grounding • Ground the ground terminal. • Never ground the MOSCON-E7 in common with welding machines, motors, or other electrical equipment. Separate the ground cable from the high voltage equipment wiring. • Use the GND cable specified in the technical standards for electrical facilities. Wire the cable as short as possible. • When several MOSCON-E7 are used, ground each unit as shown below. Do not loop the ground as example ⓒ. Good ⓐ 양호 ⓑ 양호 Good Poor ⓒ 나쁨 Figure 3.12 Multiple grounding 3.Wiring 3-21 3.9 Cable specification Table 3.9 Cable size Main Power (R/L1, S/L2, T/L3, +1,+2, P/B,N U/T1, V/T2, W/T3) Control MOSCON-E7 User’s Manual 3.10 Wiring check Determine the cable size for the main circuit. The line voltage drop should be within 2% of the rated voltage. The line voltage drop is calculated as below: Line voltage drop(V) = 3 × cable resistance(Ω/km) × wiring length (m) × current (A) × 10-3 Circuit 3-22 Model Terminal Tightening Crimping Screw Torque Nm Terminal Cable Size mm2 AWG 20P4 M3.5 0.8-1.0 2-3.5 2 14 20P7 M3.5 0.8-1.0 2-3.5 2 14 21P5 M4 1.2-1.5 2-4 3.5 12 22P2 M4 1.2-1.5 2-4 3.5 12 23P7 M4 1.2-1.5 5.5-4 5.5 10 20P4S M3.5 0.8-1.0 2-3.5 2 14 20P7S M4 1.2-1.5 2-4 3.5 12 21P5S M4 1.2-1.5 2-4 3.5 12 22P2S M4 1.2-1.5 5.5-4 5.5 10 40P4 M4 1.2-1.5 2-4 2 14 40P7 M4 1.2-1.5 2-4 2 14 41P5 M4 1.2-1.5 2-4 2 14 42P2 M4 1.2-1.5 2-4 2 14 43P7 M4 1.2-1.5 2-4 2 14 All M2 0.22-0.25 - 0.5 ~ 1.25 20-16 Note : The wire size is set for copper wires at 75℃ Kind of Cable Power cable (600V Vinylsheathed wire or equivalent) Shielded twisted-pair ! CAUTION • After wiring has been complete, check the following. perform a buzzer check on control circuit. Do not • Check if all wiring is correct. Especially check if the power supply is connected the U/T1, V/T2, W/T3 terminal. • Check if any wire clippings, screws or other foreign material are left. • Check if all screws are tight. • Check if the load status is good. • Check if any wire ends are contacting other terminals. 4.Digital operator 4-1 4 Digital operator All functions of the MOSCON-E7 are controlled by the digital operator. Descriptions of the display and the modes are described in this chapter. 4.1 Usage of digital operator ........................................................ 4-4 4.2 Monitoring functions of digital operator.............................. 4-5 4.3 Test run ..................................................................................... 4-6 4-2 MOSCON-E7 User’s Manual 4.Digital operator 4-3 4-4 MOSCON-E7 User’s Manual 4.1 Usage of digital operator 7-Segment Display: Displays data for monitoring and parameters with 4 characters. FWD LED: Lit when the motor is running forward.(CW) Increment/Up key: - Increases parameter number and value. - Shifts between the parameter groups. REV LED: Lit when the motor is running backward .(CCW) Run key: Runs the motor from the operator command mode. Stop key: Stops the motor. Reset key: Resets the fault. Decrement /Down key: - Decreases parameter number and value. - Shifts between the parameter groups. Shift keys: Selects the digits which need modification. Digital volume*: - Frequency setting mode (changes frequency command) - Parameter setting mode CW : increment CCW : decrement - Shifts between the parameter groups. • Digital operator can be used for: - basic command (RUN, STOP, Error reset, etc.), - monitoring the operational status and errors of the inverter, - programming the parameters. • In Figure 4.1, the monitoring functions of digital operator in its default status are presented. As described, the UP/DOWN key can be used to navigate between monitor parameters. Note that, unless you monitor U0.01, digital volume has the same function with UP/DOWN key. • In Figure 4.2, the example of test run using digital operator is shown. In this example, at first, the motor is run and stopped with the frequency command 60Hz. And then, the acceleration time (F2.01) is changed from 10sec to 3sec. Finally, the output voltage in U0.04 is monitored. Data key: Displays the description of parameter. Set key: - Set the parameter to the displayed value. - After changing the parameter, displays the parameter number. ! * Using the digital volume, a displayed data or parameter number can be changed in different rate. DANGER • Do not disassemble the digital operator. Otherwise, it may cause a personal injury. • When using the digital operator away from the main body, use the separated operator (E7IOTR-S). 4.Digital operator 4-5 4.2 Monitoring functions of digital operator 4-6 MOSCON-E7 User’s Manual 4.3 Test run Command Frequency > > U0.01 < < Power On U0.02 U0.12 FWD S/W version < < REV In order to increase the value, rotate the digital volume in CW direction. Set Command Frequency > > Output Frequency FWD U0.03 U0.11 REV Run Time [min.sec] Run RUN Press RUN key. STOP RST Press STOP key. DATA SET Press DATA/SET key. FWD < < > > Output Current REV U0.04 U0.10 Accumulated Run Time [Hr] Output Voltage Stop FWD > > < < REV U0.05 Go to upper level U0.09 FWD I/O Status DC-link Voltage < < > > REV U0.06 Output Torque [%] > < Output Power REV Go to digit to be changed < U0.07 Rotate the digital volume clockwise for 2 click. FWD U0.08 > Go to different parameter group > Press Right Shift Key FWD REV Motor Speed Estimated Motor[RPM] Speed [RPM] Increase parameter subgroup number Rotate the digital volume clockwise for 2 click. FWD Figure 4.1 Monitoring functions of digital operator REV Parameter modification DATA SET FWD REV Press DATA/SET key. (Switched to DATA mode) 4.Digital operator > Change digit Press Right Shift Key FWD REV In order to decrease the value, rotate the digital volume in CCW direction. Decrease the number FWD REV Store displayed parameter DATA SET Press DATA/SET key. (Now F2.01 = 3.00) DATA SET Press DATA/SET key. (Escape from Data mode.) FWD REV Go to upper level FWD REV > Change digit Press Right Shift Key 2 times FWD REV Go to different parameter group Rotate the digital volume in CCW direction for 2 clicks. FWD REV Parameter modification DATA SET Press DATA/SET Key to see the contents of U0.01. FWD REV Run RUN FWD REV > Go to U0.02 Press Up Key (Now display Output Frequency) FWD REV Rotate the digital volume clockwise for 2 click. Go to U0.04 FWD REV Figure 4.2 Test run using digital operator (when the inverter is in its default status) 4-7 4-8 MOSCON-E7 User’s Manual ---------------------------------------MEMO----------------------------------------- 5. Parameters 5-1 5 Parameters In this chapter, parameters of MOSCON-E7 and drive functions associated with them are presented. 5.1 Main Feature..................................................................5-3 5.2 Terminal status LED ......................................................5-9 5.3 B-Parameter.................................................................5-10 5.4 F-Parameter .................................................................5-15 5.5 S-Parameter .................................................................5-22 5.6 C-Parameter : H/W Functionality setup .......................5-31 5.7 H-parameter : I/O Control functions ............................5-41 5.8 P-Parameter : Protective functions...............................5-60 5.9 Error Monitoring .........................................................5-74 5-2 MOSCON-E7 User’s Manual 5. Parameters 5-3 Refer to the following tables and figures to program the inverter for a specific application. 5.1 Main Feature MOSCON-E7’s parameters are divided into seven groups and each group is divided into several subgroups for easier manipulation as described in Table 5.1. Table 5.1 Functions of each group Function (Group) Monitoring (U) Basic Setup (B) Frequency Control (F) System Adjustment (S) H/W Functionality (C) Parameter No. Function U0 U1 U2 U3 B0 B2 Monitors inverter operational status. Monitors the inverter status on the last fault. Monitors the previous faults histories. Monitors parameter check lists.. Controls basic settings of the inverter. Controls the system initialization and password protection. Sets the capacity of inverter & motor. F0 Sets the frequency /speed command. F1 Sets the limit of output frequency. Controls jump frequency and frequency detection. Sets the acceleration/deceleration time. Sets the S-curve accel/decel time. Controls the DC braking function. Controls the speed search function. Controls the Dwell function. Controls the energy saving operation. Controls the slip compensation. Controls the torque compensation. Controls the system performance. Selects the V/f pattern. Controls carrier frequency. Sets the parameters of the motor in use. B1 F2 F3 S0 S1 S2 S3 S4 S5 S6 C0 C1 C2 5-4 MOSCON-E7 User’s Manual I/O Control (H) Protective Function (P) H0 Controls the multi-function contact inputs. H1 Controls the multi-function contact outputs. H2 Controls the multi-function analog inputs. H3 Controls the multi-function analog outputs. H4 Controls the settings of digital operator. P0 Controls the motor protective functions. P1 P2 Controls the protective functions related to momentary power failure. Controls the stall prevention function. P3 P4 P5 Controls the over-torque etection/protection. Controls the fault retry. Controls the other protective options. 5.1.1 U-Parameter : Monitoring Function Table 5.2 Operation status Name U0.01 U0.02 U0.03 U0.04 U0.05 U0.06 U0.07 U0.08 U0.09 U0.10 U0.11 U0.12 Effective Command Frequency Current Output Frequency Output Current in RMS Output Voltage in RMS DC Link Voltage Output Power in 0.1kW Motor Speed in RPM Percentage Output Torque I/O Status Cumulative Power On Time Elapsed Time since Power On S/W Version Unit 0.01Hz 0.01Hz 0.01A 1V 1V 0.1kW 1rpm 1% bit 10Hr Min.Sec Display xx.xx~xxx.x xx.xx~xxx.x xx.xA xxxu dxxx Pxx.x xxxx oxxx xxxx mm.ss r.xxx 5. Parameters 5-5 Table 5.3 Inverter operation status on last fault Name Unit Display 0.01Hz 0.01Hz 0.01A 1V 1V 0.1kW 1rpm 1% bit 10Hr xx.xx~xxx.x xx.xx~xxx.x xx.xA xxxu dxxx Pxx.x xxxx oxxx Name Unit Display Fault 1 (recent one) Fault 2 Fault 3 Fault 4 - * * * * Name Unit Display U3.01 Modified Parameter List - “----” (None) U3.02 Fault Parameter List - “----” (None) U1.01 U1.02 U1.03 U1.04 U1.05 U1.06 U1.07 U1.08 U1.09 U1.10 Command Frequency Output Frequency Output Current Output Voltage DC Voltage Output Power Motor rpm Output Torque I/O Status Cumulative Power On Time xxxx Table 5.4 Fault list U2.01 U2.02 U2.03 U2.04 Table 5.5 Parameter Check list • The commonly used drive operating conditions are monitored from U0-group. All parameters except U0.01 in this group are read-only. • Note that unless the source of frequency command is changed, the data in U0.01 (frequency command) is not changed even though the power is off. 5-6 MOSCON-E7 User’s Manual • U3.01 and U3.02 have the function of list reference. Here, Up/Down ( , ) keys are used in shifting between the items internally. Also, the number of next item is displayed. Shift( ) key is used in shifting between the content and number of the item. 5. Parameters Changing the Group 5-7 Changing the Subgroup U(Monitor)-Parameter group X 0-Subgroup B(Basic)-Parameter group X 1-Subgroup 5-8 MOSCON-E7 User’s Manual 5.1.2 Monitoring function setting Letter or number in bold on display indicates that it is blinking. Only the blinking letter or number can be changed. Next digit has to be selected using the shift key ( ) to move to another group and subgroup. Power ON F(Frequency)-Parameter group X n-Subgroup S(System)-Parameter group DATA DATA SET SET X : U, B,, F, S, C, H, P C(Control)-Parameter group H(I/O)-Parameter group Changing the Parameter Number XY-01 Parameter 0.00 (U0.01) SET U0.01 DATA DATA SET SET U0.01 U0.01 Figure 5.2 Selecting monitoring group (U) P(Protection)-Parameter group XY-02 Parameter Data Changing Mode xxx.x (Parameter-Setting value) DATA SET XY-n Parameter Y : 0, 1, 2 ~ Value *Change the number using the up/down key *Change the digit using the shift key Figure 5.1 Parameter setting method When or is pressed from group U, next or previous subgroup is displayed. Since U has a monitoring function and the setting can not be altered, can not be functioned to change the constant as in other groups. 5. Parameters 5-9 MOSCON-E7 User’s Manual 5-10 5.2 Terminal status LED 5.3 B-Parameter When command is input to a terminal, corresponding LED is turned on. The B-parameters are used in order to change the basic settings related to the operation modes of the inverter, capacity of the inverter & the motor, and to control the initialization. #6 #1 Contact input status Contact output status Control relay output status Power relay output status Brake action status None (Not used) DC-braking on start DC-braking on stop 5.3.1 Basic setup 5.3.1.1 Selecting the source of frequency command : B0.01 Parameter No. B0.01 B0.01 Name Unit Setting range Factory Setting Changeable during operation - 00~23 00 X Active source of frequency command Digit1 Digit0 Active source of frequency command in local mode (0~2) Active source of frequency command in remote mode (0~3) • B0.01 is used to select the source of the frequency command. • Active source of frequency command in local and remote mode can be selected independently. Normally, unless the local mode is selected, the source of frequency command in remote mode is the active one. • Setting Setting constant Source of command frequency 0 Operator (Digital volume) 1 Operator (Keypad) 2 Analog frequency command (Voltage or current: terminal 9 or 10) 3 Communion (RS-485) 5.3.1.2 Selecting the source of RUN command : B0.02 Parameter No. Name Unit Setting range Factory Setting Changeable during operation B0.02 Active source of RUN command - 00~12 00 X • B0.02 is used to select the source of the run command. 5. Parameters 5-11 • Active source of RUN command in local and remote mode can be selected independently as follows. B0.02 Digit1 Digit0 Active source of RUN command in local mode (0~1) Active source of RUN command in remote mode (0~2) Reference source 0 Operator 1 Contact input 2 Communication (RS-485) Name B0.03 Stopping method (contact 1 or 2 on terminal block) Unit Setting range Factory Setting Changeable during operation - 0~1 0 X Function Ramp to stop Free run stop Unit Setting range Factory Setting B0.05 Default Motor Direction Changeable during operation - 0~1 0 O Function Forward (CCW from the axis view) Reverse (CW from the axis view) 5.3.1.6 Setting the monitor default : B0.06 Parameter No. Name Unit Setting range Factory Setting Changeable during operation B0.06 Default Monitor Item - 1~10 0 O 5.3.1.7 Setting the automatic start operation : B0.07 Parameter No. Parameter No. Name Unit Setting range Factory Setting B0.04 Prohibiting Reverse Rotation Changeable during operation - 0~1 0 X • B0.04 is used to prohibit the reverse run • Setting 1 Name • B0.06 is used to sets the monitor item to be displayed when the power is turned on. • If B0.06=5, U0.05 is displayed at power-up. 5.3.1.4 Prohibiting the reverse rotation : B0.04 Setting constant 0 Parameter No. • If B0.04=1, it is automatically changed to 0(forward). • B0.03 is used to select the stopping. • Setting Setting constant 0 1 5.3.1.5 Setting the motor direction : B0.05 Setting 0 1 (RUN/STOP key on keypad) 5.3.1.3 Selecting stopping method : B0.03 Parameter No. MOSCON-E7 User’s Manual • B0.05 is used to select the direction of the motor’s rotation • It is only applicable when B0.02 = 0 (operator) • Setting • Setting Setting constant 5-12 Function Reverse rotation enabled Reverse rotation disabled B0.07 Name Unit Automatic start after power on Setting range Factory Setting Changeable during operation - 0~1 0 O • B0.07 is set to 1, if the motor is to be started automatically at power-up. • The automatic start option (B0.07=1) is valid only when the active source of run command is the digital operator. (B0.02=0) • Setting Setting constant 0 1 Function Does not use the automatic start operation. Motor runs automatically without RUN command. 5. Parameters 5-13 5-14 MOSCON-E7 User’s Manual 5.3.2.2 Setting and verifying the password : B1.02, B1.03 DANGER ! • If B0.07 is set as 1 the motor starts automatically at power-up. It may cause a serious accident. Thus, pay extra caution when using automatic start operation. 5.3.2 System initialization 5.3.2.1 Controlling the inverter initialization : B1.01 Parameter No. Name Unit Setting range Factory Setting B1.01 Inverter initialization Changeable during operation - 0~9999 0000 X • B1.01 is used to initialize the parameters of the inverter . When the inverter is initialized, all the changed parameters are deleted and initialized to factory-setting values. • Setting Setting constant 1010 1111 Parameter No. Name Unit Setting range Factory Setting B1.02 Check password - 0~9999 0000 Changeable during operation X B1.03 Set password - 0~9999 0000 X • B1.02 is used to check and verify the password when a password has been set in B1.03(i.e. B1.03 ≠ 0000). • B1.03 is used to set the new password. • When the new password is entered and saved in B1.03, not blinking 0000 is displayed immediately regardless of the input password. 5.3.3 Setting power capacity 5.3.3.1 Setting the inverter and motor capacity : B2.01, B2.02 Parameter No. Name Unit Setting range Factory Setting B2.01 Power capacity of the inverter Power capacity of the motor - 20P4 ~43P7 20P4 ~43P7 Changeable during operation - X - X B2.02 Function Complete initialization Partial initialization (exclude multi-functional I/O terminal setting) - • Parameter B2.01 is used to set the power capacity of the inverter. • Parameter B2.02 is used to set the power capacity of the motor. Capacity (Motor & Inverter) 200V 400V 0.4kW 0.75 kW 1.5 kW 2.2 kW 3.7 kW 20P4 20P7 21P5 22P2 23P7 40P4 40P7 41P5 42P2 43P7 NOTE • The power capacity of the motor can not be set bigger than the power capacity of the inverter. • B2.01 and B2.02 can not be set to different voltage class. 5. Parameters 5-15 5-16 MOSCON-E7 User’s Manual 5.4 F-Parameter 5.4.2 Frequency limit 5.4.1 Frequency control functions 5.4.2.1 Setting lower/upper frequency limit : F1.01,F1.02 5.4.1.1 Setting the frequency/speed command : F0.01~F0.09 Parameter No. Name Unit Setting range Factory Setting F0.01 Main frequency command of operator mode & communication mode Changeable during operation 0.01Hz 0.00 ~600.00 0.00 O F0.02 ~F0.08 Frequency 2~8 0.01Hz 0.00 O F0.09 Jog Frequency 0.01Hz 0.00 ~600.00 0.00 ~ 600.00 6.00 O • Parameters F0.01~F0.09 are frequency commands used for multi-step speed operation as shown in Fig 5.3. • In multi-step speed operation, JOG command has the top priority. Thus, when JOG command is on, the frequency command is changed to F0.09 regardless of terminal status of multi-step speed reference 1~3. • In keypad mode (B0.01=1) and communication mode (B0.01=3), the value in F0.01 becomes the active frequency command. Reference 8 Reference 5 Reference 4 Reference 3 Reference 2 Auxiliary speed F0.02 Reference 1 F0.01 RUN/STOP Multi-step speed reference 2 Multi-step speed reference 3 JOG reference OFF OFF OFF Unit Setting range Factory Setting F1.01 F1.02 High Speed Limit Low Speed Limit 0.1% 0.1% 0.1~100.0 0~99.9 100.0 0.0 Changeable during operation O O • Parameter F1.01 and F2.02 are used to set the upper and lower limit of output frequency respectively. • The setting unit of F1.01 and F1.02 is the percentage of the maximum utput frequency (C0.02). Internal Frequency Reference Frequency Reference Upper Limit (F1.01) Frequency Reference Lower Limit (F1.02) Frequency Command from User Figure 5.4 Upper and lower limits of the frequency reference F0.05 JOG frequency F0.04 F0.03 F0.09 OFF ON OFF Name 5.4.3 Jump frequency to avoid mechanical resonant oscillation Reference 7 F0.07 Reference 6 F0.06 Frequency reference Multi-step speed reference 1 F0.08 Parameter No. ON ON ON ON Figure 5.3 Timing chart for multi-step and JOG operation 5.4.3.1 Setting jump frequency : F1.03~F1.06 Parameter No. Name Unit Setting range Factory Setting F1.03 Jump Frequency1 0.01Hz 0.00 O F1.04 Jump Frequency2 0.01Hz 0.00 O F1.05 Jump Frequency3 0.01Hz 0.00 O F1.06 Jump Frequency Width 0.01Hz 0.00 ~600.00 0.00 ~600.00 0.00 ~600.00 0.00 ~20.00 Changeable during operation 0.50 O 5. Parameters 5-17 • F1.03~F1.05 are used to prohibit the inverter from producing output voltages of certain frequency ranges, in order to prevent the mechanical vibration caused by mechanical structure as shown in Figure 5.5. • Set F1.03~F1.05 as 0.00Hz to disable the jump frequencies. • F1.03~F1.05 set the center values of the frequency to be jumped. • Jump frequencies should be set so that F1.05 ≤ F1.04 ≤ F1.03 • F1.06 is used to control the jump frequency bandwidth. • Jump frequency range = jump frequency ±jump frequency bandwidth 5-18 MOSCON-E7 User’s Manual Internal Frequency Reference F1.06 Dotted Lines show operation during Acceleration/Deceleration 5.4.3.2 Selecting the jump mode : F1.07 Parameter No. Name Unit Setting range Factory Setting F1.07 Jump Mode - 0~1 0 Changeable during operation X • F1.07 is used to fix the output frequency inside the jump frequency region • Setting Setting constant 0 Output frequency is fixed to lower limit of jump frequency region 1 Output frequency is fixed to upper limit of jump frequency region F1.05 F1.04 F1.03 Frequency Command Internal Frequency Reference F1.06 Function • During accel/decel operation, output frequency changes smoothly without jump even though jump frequencies are activated. Dotted Lines show operation during Acceleration/Deceleration F1.05 F1.04 F1.03 Frequency Command Figure 5.5 Starting jumping frequencies 5. Parameters 5-19 5.4.4 Frequency match detection 5.4.5 accel/decel time 5.4.4.1 Controlling the frequency detection : F1.08. F1.09 Parameter No. Name Unit Setting range Factory Setting Changeable during operation F1.08 Frequency of Match Detection Frequency Match Detection Width 0.01Hz 0.00 ~600.00 0.00 ~20.00 0.00 O 0.50 O F1.09 0.01Hz • F1.08 and F1.09 are used to generate the frequency matching signal, which is used for the operation of multi-function output in section 5.7.2.2. For more details, see section 5.7.2.2. 5.4.4.2 Automatic activation of 2nd accel/decel time : F1.10 Parameter No. F1.10 Name Unit Frequency of Accel/Decel Time 0.01Hz Switching . Setting range Factory Setting Changeable during operation 0.00 ~600.00 0.00 O • F1.10 is used to automatically activate 2nd set of accel/decel times. By setting F1.10 other than 0, 2nd set of accel/decel times (F2.03 and F2.04) are automatically applied if the output frequency is higher than the value specified in F1.10. Output-Frequency 5.4.5.1 Setting the accel/decel time : F2.01~F2.04 Parameter No. Name Unit Setting range Factory Setting F2.01 AccelTime1 0.01Sec 10.00 O F2.02 DecelTime1 0.01Sec 10.00 O F2.03 AccelTime2 0.01Sec 10.00 O F2.04 DecelTime2 0.01Sec 0.00 ~600.00 0.00 ~600.00 0.00 ~600.00 0.00 ~600.00 Changeable during operation 10.00 O • Acceleration time: Time required to go up to 100% of the maximum output frequency from 0%. • Deceleration time: Time required to go down to 0% of the maximum output frequency from 100%. • F2.01~F2.02 can be used to set the acceleration and deceleration time in normal status. • F2.03 and F2.04 are activate when : i) F1.10 > 0 and ii) Output frequency > F1.10. • The possible setting ranges for the acce/decel times depends on the setting in F2.05. 5.4.5.2 Setting the time unit of accel/aecel time : F2.05 Acc./Dec. Time Switching Frequency (F1.10) F2-01 MOSCON-E7 User’s Manual 5-20 F2-03 F2-04 F2-02 Figure 5.6 Acceleration/Deceleration time switching frequency Parameter No. Name Unit Setting range Factory Setting F2.05 Accel/Decel Time Base Changeable during operation - 0~1 0 X • F2.05 can be used to set the time base of accel/decel time. • If F2.05 is set to “1” the setting range will be 0.0 to 6000.0s. • Setting Setting constant 0 Sets the accel/decel time unit to 0.01sec 1 Sets the accel/decel time unit to 0.1sec Function 5. Parameters 5-21 5.4.6 Configuring S-curve time : F3.01 5-22 MOSCON-E7 User’s Manual 5.5 S-Parameter Parameter No. Name Unit Setting range Factory Setting Changeable during operation F3.01 S-Curve time 0.01sec 0.00~2.50 0.20 O • F3.01 can be used to set the S-curve pattern time of the accel/decel changing points to reduce shock caused by abrupt stopping and starting. 5.5.1 DC Braking 5.5.1.1 Controlling DC breaking : S0.01~S0.04 Parameter No. S0.01 ON Run Command OFF S0.02 S0.03 Output Frequency S0.04 F 3.01 F 3.01 F 3.01 F 3.01 Figure 5.7 Setting S-curve characteristics Time Name DC Brake Starting Frequency DC Brake Current DC Braking Time at Start DC Braking Time at Stop Unit Setting range Factory Setting Changeable during operation 0.01Hz 0.00 ~10.00 1.50 X 1% 0~ 100 50 X 0.1sec 0.0~ 25.0 0.0 X 0.1sec 0.0~ 25.0 0.5 X • S0.01 : The frequency where the DC braking starts. It is valid only for deceleration. • S0.02 : The level of output DC current during DC braking. ( in the percentage of rated inverter output current ) • S0.03 : Set the DC braking operation time before the motor is started. • S0.04 : Set the DC braking operation time before the motor is stopped. • In order to decrease the stopping time, increase DC braking current in S0.02. • To disable the DC braking, set DC braking time (S0.03 and S0.04) to 0. ON Run Command OFF Output Frequency C0.07 S0.03 S0.01 S0.04 Figure 5.8 DC braking timing chart Time 5. Parameters 5-23 5.5.2 Speed search 5-24 MOSCON-E7 User’s Manual • S1.04 sets the output frequency deceleration time during the speed search operation. 5.5.2.1 Controlling the speed search operation: S1.01 Parameter No. Name S1.01 Speed Search at Start Unit Deceleration time set in S1.04 Setting range Factory Setting Changeable during operation 0~1 0 X - Output frequency • S1.01 finds the speed of a rotating motor and runs up smoothly from the searched speed. • This function is useful when the smooth operation is required in case of momentary power loss. • Setting Setting constant Function 0 Disables speed search operation: Motor starts from minimum output frequency. 1 Enables speed search operation: Speed search is performed from command frequency. Speed search is done every time the run command is input. 5.5.2.2 Speed search level, current, and deceleration time Parameter No. Name Unit Setting range Factory Setting Changeable during operation S1.02 Speed Search Start Frequency Speed Search Current Speed Search Deceleration Time 0.01Hz 0.00 ~600.00 0.00 X 1% 0~200 100 X 0.1sec 0~10.0 2.0 X S1.03 S1.04 Run command OFF S1.02 • S1.02 is used to set the frequency where the speed search is started • S1.03 sets the operating current for the speed search. Lower the setting if restarting is not possible. Setting unit is the percentage of inverter’s rated output current. ON Frequency command that is set S1.03 Output current Figure 5.9 Speed search timing chart 5. Parameters 5-25 5-26 MOSCON-E7 User’s Manual 5.5.3 Dwell operation 5.5.4 Energy saving operation 5.5.3.1 Controlling the dwell operation : S2.01~S2.04 Energy can be saved by decreasing the output voltage of the inverter in steady-state under a light load condition. Do not use the energy-saving function in normal situation. Parameter No. Name Unit Setting range Factory Setting S2.01 Dwell Frequency at Start Dwell Time at Start Dwell Frequency at Stop Dwell Time at Stop 0.01Hz 0.00 ~600.0 0.00 ~25.00 0.00 ~600.0 0.00 ~25.00 Changeable during operation 0.00 X 0.00 X Parameter No. Name Unit Setting range Factory Setting Changeable during operation 0.00 X S3.01 Energy Saving Voltage Level 1% 0~100 80 X 0.00 X S2.02 S2.03 S2.04 0.01Sec 0.01Hz 0.01Sec • Dwell function is used to temporarily hold the output frequency when starting and stopping a motor with heavy load. 5.5.4.1 Setting the energy saving level : S3.01 • If S3.01=80, the output voltage in energy saving mode will be 80% of the previous value. 5.5.4.2 Setting the energy-saving frequency : S3.02 Run Command ON Parameter No. OFF S3.02 Output Frequency S2.01 S2.02 S2.03 Time S2.04 Figure 5.10 Timing chart for dwell operation Name Unit Energy Saving 0.01Hz Frequency Level Setting range Factory Setting Changeable during operation 0.00 ~600.0 0.00 X • S3.02 sets the minimum frequency for the effective energy saving operation • Energy-saving command is enabled when output frequency is higher than the energy-saving frequency and motor speed is within the “speed match” range or energy saving command is triggered from a external input terminal. 5. Parameters 5-27 5.5.5 Slip compensation • Slip compensation function improves speed control accuracy when the motor is operating with a load by calculating the motor torque according to the output current. 5-28 MOSCON-E7 User’s Manual Slip Compensation Limit C 0.02 X S 4.03 C 0.04 Actual limit 5.5.5.1 Setting the slip compensation gain : S4.01 Parameter No. Name Unit Setting range Factory Setting Changeable during operation S4.01 Slip Compensation Gain 1% 0 ~S4.03 0 O C 0.04 C 0.02 Output Frequency C 0.04 : Base Frequency C 0.02 : Max. Output Frequency Figure 5.11 Slip compensation limit 5.5.5.2 Setting the slip compensation delay : S4.02 Parameter No. Name Unit Setting range Factory Setting S4.02 Slip Compensation Delay Time Changeable during operation 1msec 0~9999 200 X • Normally S4.02 does not need to be adjusted. • Lower the value in S4.02 if the response time of slip compensation is too slow. 5.5.5.3 Slip compensation limit : S4.03 Parameter No. Name Unit Setting range Factory Setting S4.03 Slip Compensation Limit Changeable during operation 1% 0 ~250 200 X • The setting unit of S4.03 is the percentage of motor rated slip(C2.05). • Raise the slip compensation limit in S4.03 if the speed is lower than the target value and no changes takes place even after the adjustment of slip compensation gain. NOTE • Sum of the reference frequency and the slip compensation limit does not exceed the speed capacity of the system. • Raise the value in S4.02 if speed control characteristics are unstable. 5. Parameters 5-29 5-30 MOSCON-E7 User’s Manual 5.5.6 Automatic torque boost 5.5.7 System function compensation MOSCON-E7 automatically adjust the output torque by detecting the variation in a load, to provide better speed control performance. 5.5.7.1 Hunting prevention gain : S6.01/S6.03 5.5.6.1 Torque compensation gain : S5.01 Parameter No. Name Unit Setting range Factory Setting Changeable during operation Hunting Prevention Gain Current ripple restraint (1 phase only) % 0~100 20 O - 0~1 1 X Parameter No. Name Unit Setting range Factory Setting Changeable during operation S6.01 S5.01 Torque Compensation Gain 1% 0~250 100 X S6.03 • Normally adjustment of S5.01 is not required. • Raise the value in S5.01 if the output wiring between inverter and motor is long, or when the capacity of installed motor is quite smaller than the maximum motor capacity of the inverter. • Decrease the value in S5.01, if the excessive mechanical vibration occurs. • Normally adjustment of S6.01 is not required. • Raise the value in S6.01 if mechanical vibration occurs under a light load condition. • Decrease the value in S6.01 if stall occurs. • S6.03 is used in restraining from the unique current ripple in 1 phase only(Invalidness in 3 phase). 5.5.6.2 Torque compensation delay : S5.02 5.5.7.2 Boosting brake performance : S6.02 Parameter No. Name S5.02 Torque Compensation Delay Time Unit Setting range 1msec 0 ~9999 Factory Setting Changeable during operation Parameter No. Name Unit Setting range Factory Setting Changeable during operation 20 X S6.02 Enable Brake Boosting - 0~1 0 X • Normally adjustment of S5.02 is not required. • Raise the value in S5.02 if the mechanical vibration occurs. • Decrease the value in S5.02 if the performance of speed regulation is poor. • If S6.02=1, the performance of braking is increased. However, since frequent braking under this condition may damage the inverter, use this function carefully. 5. Parameters 5-31 5.6 C-Parameter : H/W Functionality setup 5.6.1 V/f Setting MOSCON-E7 User’s Manual 5-32 • Setting Setting constant 0 1 5.6.1.1 Setting V/f : C0.01 Parameter No. Name Unit Setting range Factory Setting C0.01 V/f pattern - 0~15 15 Changeable during operation X • C0.01 can be set to one of the following: - One of 15 preset patterns (settings 0~14) - A user-programmable pattern (setting 15) • C0.01 is not changed by initialization (set B1.01= ‘1010’ or ‘1111’). However, if C0.01=15, C0.02~C0.08 are changed to the values associated with the case “C0.01=1” by initialization. • If C0.01=15, the arbitrary V/f pattern can be generated by properly setting the values in C0.02~C0.08 as shown in Fig 5.14. • Normally high starting torque is not necessary except the following cases: - Long wiring - Large voltage drop when started - AC reactor is connected to the input/output of the inverter - Running with a motor smaller than the maximum applicable motor. - Needs large starting torque (like as in elevator) • When using preset V/F patterns, consider the rated voltage & frequency of the motor and load characteristics as shown in the following table. 2 Max. Frequency 5 6 7 8 9 10 11 Application 50Hz 60Hz 3 4 Specification 60Hz saturation 50Hz saturation General-purpose 72Hz 50Hz 60Hz 50Hz 60Hz Square decreased Cubic decreased Square decreased Fans/Pumps Decreased torque Cubic decreased Smaller starting torque Large starting torque Smaller starting torque High start-up torque Larger starting torque 12 90Hz 13 120Hz 14 180Hz Rated output operation 5. Parameters V/f pattern: 0.4~1.5kW Setting0 50Hz (V) 200 Setting1 60Hz (V) 200 5-33 5-34 MOSCON-E7 User’s Manual Setting8 50Hz (V) 200 0 1.3 2.5 50 (Hz) 0 1.3 2.5 60Hz 50 (Hz) 50 (Hz) Setting3 72Hz 60Hz (V) 200 Setting11 60Hz (V) 200 (V) 200 (V) 200 24 19 15 11 15 9 15 9 50 60 (Hz) 0 1.5 3 60 72 (Hz) 0 1.5 3 0 1.5 3 60 (Hz) Setting12 90Hz Setting4 50Hz (V) 200 Setting5 120Hz 50Hz 50 8 Setting13 60 (Hz) (V) 200 15 9 15 9 35 0 1.5 3 (V) 200 (V) 200 0 1.5 3 60 90 (Hz) Setting14 180Hz 0 1.5 3 60 120 (Hz) 9 0 1.3 25 Setting6 50 (Hz) 60Hz (V) 200 0 1.3 25 Setting7 50 (Hz) (V) 200 Setting15 60Hz (V) 200 60Hz (V) 200 15 9 0 1.5 3 50 35 8 0 1.5 0 1.3 2.5 60 (Hz) 0 1.5 3 Setting10 Setting2 13 11 15 9 9 50Hz (V) 200 24 19 15 Setting9 15 9 60 180 (Hz) 0 1.5 3 60 (Hz) 9 30 60 (Hz) 0 1.5 30 60 (Hz) Figure 5.12.1 V/f pattern : settings 0~14 & setting15 (For 400V class, doubles the voltage in Figure) Figure 5.12.2 V/f pattern : settings 0~14 & setting15 (For 400V class, doubles the voltage in Figure) 5. Parameters V/f pattern: 2.2~3.7kW Setting0 5-35 5-36 MOSCON-E7 User’s Manual Setting8 50Hz (V) 200 Setting1 Setting9 50Hz 60Hz (V) 200 23 18 14 8 0 1.3 2.5 Setting2 50 (Hz) 60Hz (V) 200 9 0 1.3 2.5 14 8 0 1.5 3 60 (Hz) Setting3 72Hz Setting10 11 60Hz (V) 200 Setting11 50 (Hz) 60Hz (V) 200 (V) 200 14 8 0 1.5 3 50 60 (Hz) Setting4 50Hz 9 0 1.5 3 14 8 0 1.5 3 60 23 Setting5 50Hz 25 Setting6 50 (Hz) 60Hz (V) 200 7 0 1.3 Setting12 90Hz (V) 200 25 Setting7 0 1.5 3 60 (Hz) Setting13 120Hz 50 (Hz) 60Hz (V) 200 7 0 1.5 3 Setting14 (V) 200 14 14 50 35 13 60 (Hz) 72 (V) 200 (V) 200 60 90 (Hz) 7 0 1.5 3 60 120 (Hz) 180Hz (V) 200 50 35 6 0 1.5 0 1.3 2.5 50 (Hz) 18 6 0 1.3 50Hz (V) 200 (V) 200 14 7 30 60 (Hz) 0 1.5 30 60 (Hz) Figure 5.13.1 V/f pattern: settings 0~14 & setting15 (For 400V class, doubles the voltage in Figure) 7 0 1.5 3 60 180 (Hz) Figure 5.13.2 V/f pattern : settings 0~14 & setting15 (For 400V class, doubles the voltage in Figure) 5. Parameters 5-37 5-38 MOSCON-E7 User’s Manual 5.6.2 Carrier frequency setting 5.6.1.2 Setting user-programmable V/f pattern • Default setting depends on the inverter capacity.(Refer to Appendix 2) Parameter No. Name Unit Setting range Factory Setting C0.02 Max Output Frequency Max Output Voltage Base Frequency Mid Output Frequency Mid Output Voltage Min Output Frequency Min Output Voltage 0.01Hz 30 ~600.00 0.0 ~250.0 30.00 ~600.00 0.00 ~600.00 0.0 ~250.0 0.00 ~600.00 0.0 ~250.0 Changeable during operation 60.00 X 200.0 X Parameter No. Name Unit Setting range Factory Setting 60.00 X C1.01 Carrier Frequency 0.01kHz 1.50 ~10.00 Changeable during operation 10.00 X 3.00 X 14.0 X 1.50 X 8.0 X C0.03 C0.04 C0.05 C0.06 C0.07 C0.08 0.1V 0.01Hz 0.01Hz 0.1V 0.01Hz 0.1V NOTE • The following four frequency setting must be as follows: C0.02 ≥ C0.04 >C0.05 ≥ C0.07 Output Voltage Max.Voltage C 0.03 5.6.2.1 Setting the carrier frequency : C1.01 5.6.3 Main motor constants 5.6.3.1 Setting the Motor line-to-line resistance : C2.01 Parameter No. Name Unit Setting range Factory Setting Changeable during operation C2.01 Stator Resistance 0.01Ω 0.00 ~99.99 * X • C2.01 is used as a reference value for the torque compensation. • Default value depends on the inverter capacity. • If motor’s terminal resistance is not printed on the motor nameplate, contact the motor manufacturer for the terminal resistance at the insulation class temperature. 5.6.3.2 Setting the iron loss : C2.02 Mid.Voltage C 0.06 Min.Voltage C 0.08 Frequency (Hz) Min. Frequency C 0.07 Mid. Base Max. Frequency Frequency Frequency C 0.05 C 0.04 C 0.02 Figure 5.14 User-defined V/f Pattern Parameter No. Name Unit Setting range Factory Setting C2.02 Iron Loss 1W 0~9999 * • Default value depends on the inverter capacity. Changeable during operation X 5. Parameters 5-39 Name C2.03 Rated Output Current MOSCON-E7 User’s Manual 5.6.4 H/W Adjusting data : C3.01~C3.06 5.6.3.3 Setting the motor rated current : C2.03 Parameter No. 5-40 Unit Setting range Factory Setting Parameter No. Name Unit Setting range Factory Setting Changeable during operation 0.1A 0.0 ~999.9 Changeable during operation * X C3.01 DC Voltage Compensation Analog Output Compensation Coefficient Current Detector Compensation Coefficient 1 Current Detector Compensation Coefficient 2 Analog Command Compensation Coefficient Current Terminal Gain Compensation Coefficient Current Detector Compensation Coefficient - - * X - - * X - - * X - - * X - - * X - - * X - - * X • C2.03 is used to set the rated current (A) shown on the motor nameplate. • Default value depends on the inverter capacity. C3.02 C3.03 5.6.3.4 Motor no-load current : C2.04 Parameter No. Name Unit Setting range Factory Setting C2.04 No Load Current 0.1A 0.0 ~999.9 Changeable during operation * X • C2.04 is used as a reference value for the torque compensation. • Default value depends on the inverter capacity. • If rated voltage and rated frequency are not printed on the motor nameplate, contact the motor manufacturer. C3.04 C3.05 C3.06 C3.07 5.6.3.5 Setting the motor rated slip : C2.05 Parameter No. Name Unit Setting range Factory Setting C2.05 Rated Slip 0.01Hz 0.00 ~600.0 Changeable during operation * X • C2.05 is used as a reference value for the torque compensation. • Default value depends on the inverter capacity. • Calculate C2.05 from the value printed on the motor nameplate: Rated slip=rated frequency(Hz) - rated speed(r/min) × number of poles/120 ! CAUTION • C3.01~C.07 are set from the factory and the user is not allowed to change the setting. (Modification may influence to system performance) 5. Parameters 5-41 5.7 H-parameter : I/O Control functions •Setting Setting constant 5.7.1 Multi-function contact input 5.7.1.1 Set input type of multi-function contact input: H0.01 Parameter No. Name H0.01 Select Terminal Input Type Unit Setting range - 00~3F (Hexadecimal) Factory Setting MOSCON-E7 User’s Manual 5-42 Changeable during operation Function 0 3-Wire Sequence 1 External Fault 2 Fault Reset 3 Multi-step Speed 1 4 Multi-step Speed 2 5 6 Multi-step Speed 3 Jog Frequency Command Selection 7 Reverse Jogging 8 Forward Jogging 9 Accel/Decel Time Switching Command 10 Holding Accel/Decel 11 External Base block Command 5.7.1.2 Setting the function of contact input : H0.02~H0.05 12 Frequency Up Command 00 X • H0.01 is used to set the input type of each terminal. •The definition of each bit in H0.01 H0.01 bit7 bit6 0 0 bit5 bit4 bit3 bit2 bit1 bit0 Terminal Terminal Terminal Terminal Terminal Terminal no. 6 no. 5 no. 4 no. 3 no. 2 no. 1 •Setting Setting constant 0 1 Function Each bit is set as ‘a’ contact (NO) Each bit is set as ‘b’ contact (NC) Parameter No. Name Unit Setting range Factory Setting 13 Frequency Down Command H0.02 Function of Terminal3 Function of Terminal4 Function of Terminal5 Function of Terminal6 Changeable during operation - 0~19 1 X 14 Current Analog Command Selection - 0~19 2 X 15 DC Braking - 0~19 3 X 16 - 0~19 6 X 17 18 Speed Search Command 1 Speed Search Command 2 Energy-Saving Operation 19 Remote → Local Selection H0.03 H0.04 H0.05 • Refer to the table on the next page for the function settings of the multi-function input terminal. • Note that H0.02~H0.05 should be different from each other. Description Uses 3-wire operation when operating with the external terminal External fault signal input. Resets the fault when turned on Runs in selecting the set speed(Using the binary code) Reference 5-43 5-43 5-44 5-44 5-44 Higher priority than multistep speed commands ON: Clockwise run at jog frequency F0.09. OFF: Counterclockwise run at jog frequency F0.09. Change the accel/decel rate from F2.01/F2.02 to F2.03/F2.04 ON: accel/decel stopped, frequency on hold Blocks the output voltage of the inverter(Frequency on hold) Always set with the frequency down command. Always set with the frequency up command. Uses the external current analog command to the command frequency Valid in stopping only : outputs DC current Searches the speed to the output frequency Searches the speed to the input frequency ON: energy-saving control set for S3.01, S3.02 Switches to the set speed/Run command in local mode 5-44 5-44 5-44 5-45 5-45 5-46 5-46 5-46 5-48 5-48 5-48 5-49 5. Parameters 5-43 3-wire sequence (Setting : 0) • When 0 is set for multi-function inputs H0.02~H0.05, 3-wire sequence control is used and terminal 1 becomes run command, terminal 2 becomes stop command. And if terminal 5 has setting 0, it becomes terminal for forward/reverse run command as shown in Figure 5.15. Stop switch (NC) Run switch (NO) 1 Run command (Operates when the run switch is closed) 2 Stop command (Stop when the stop switch is open) 5 Forward/reverse command (Multi-function input) 11 Sequence input common Figure 5.15 3-wire sequence wiring example 50 ms min ON/OFF (Enter is possible) Run command OFF(Stop) Stop command OFF(Forward) Forward/Reverse Run command ON(Reverse) 5-44 MOSCON-E7 User’s Manual • Method to resume the operation after a fault: 1.Turn OFF the run command. 2.Turn the fault reset input from ON to OFF since a fault can not be reset with the run command ON. 3. Turn the run command ON again. Multi-step speed 1~3 and JOG frequency command (Setting : 3~6) • 8 frequency commands and 1 JOG frequency command can be used. • 8-step speed operation: (Refer to the Figure 5.3) B0.02=1(Select the active source of RUN command) B0.01=1(Select the active source of frequency command) F0.01=(Frequency1, Main frequency) F0.02=(Frequency2) F0.03=(Frequency3) F0.04=(Frequency4) F0.05=(Frequency5) F0.06=(Frequency6) F0.07=(Frequency7) F0.08=(Frequency8) Forward and reverse jogging (Setting : 7~8) The jogging can be run clockwise or counterclockwise. Motor speed Stop Forward Reverse Stop Forward Figure 5.16 Time chart for 3-wire sequence Fault reset (Setting : 2) OFF Normal operation ON Resets the faults when input goes from OFF to ON. • With the fault reset function, the faults can be reset by the contact input. • When a fault occurs, find out the cause of the fault and correct it before restarting the inverter. The inverter may be damaged if a fault is reset repeatedly without correcting the cause of fault. Setting 7 8 Function Reverse jog command: Runs clockwise at the jog frequency. Forward jog command: Runs counterclockwise at the jog frequency. • Forward and reverse jog commands have priority over other frequency commands (e.g. F0.01~F0.08). • Do not turn on both the forward and reverse jog command. If the setting 7 and 8 are both ON for more than 500ms, then the inverter will stop with the stopping method set in B0.03. • It is not necessary to input the forward/reverse run command since these jog command alone can operate the inverter. • These functions run/stop immediately when set on ON/OFF. At this time, the accel/decel is not applied. 5. Parameters 5-45 5-46 MOSCON-E7 User’s Manual Accel/Decel time switching command (Setting : 9) Run/Stop command OFF ON Accel Time1 F2.01 Decel Time1 F2.02 Accel Time2 F2.03 Decel Time2* F2.04 Decel Time1* F2.02 Output Frequency Acceleration/deceleration OFF jump hold ON OFF OFF ON ON Frequency reference F1.07=1 Forward/Reverse Run command ON Multi-Step Speed Reference ON Accel/Decel Time selection Terminal S2 TO S5 Output frequency ON Figure 5.17 Using two accel/decel time • Set of accel/decel times can be switched by turning ON/OFF the accel/decel command terminals if input terminal function selection (H0.02~H0.05) is set to “accel/decel command”. When OFF: F2.01 (accel time 1), F2.02 (decel time 1) When ON : F2.03 (accel time 2), F2.04 (decel time 2) Acceleration time: Time required for output frequency to reach from 0% to 100%. Deceleration time: Time required for output frequency to reach from 100% to 0%. Holding accel/decel (Setting : 10) OFF ON Normal operation or restart accel/decel. Holds accel/decel and maintain the present frequency. • The output frequency can be hold when the accel/decel holding terminal is ON. • The output frequency can be kept when the accel/decel holding terminal is OFF. F1.07=0 Figure 5.18 Acceleration/deceleration Jump hold Frequency up and down command (Setting : 12~13) Operation Up command Down command Acceleration ON OFF Deceleration OFF ON Hold ON ON Hold OFF OFF • With these settings, the inverter’s output frequency can be controlled by the multi-function inputs. • Both setting 12 and 13 must be set when using this function. • This function will operate only when B0.02(Operation mode) is set to 1(Contact input: contact 1 or 2 on terminal block). • The upper and lower limits for the output frequency with the up/down commands are as follows: - Upper limit=Max. output frequency(C0.02)×High speed limit(F1.01)/100 - Lower limit=Max. output frequency(C0.02)×Low speed limit(F1.02)/100 • If a run command is input, the output frequency will be accelerated to the lower limit when this function is used. • If the up/down function is set, the multi-step commands 1 to 8 are disabled. 5. Parameters 5-47 MOSCON-E7 User’s Manual 5-48 DC braking (Setting : 15) Output frequency Upper limit Accelerates to lower limit Same frequency F1.07=1 F1.07=0 Lower limit Forward/Stop ON Up command ON OFF Normal operation ON Applies DC injection braking if the inverter is stopped. • This function is used to prevent the motor from rotating due to inertia or external forces at stop. • Inputting a run command or jog command (jog, clockwise jog, or counterclockwise jog) clears the DC injection braking causing the motor to start. Reference frequency reset ON Down command Speed agree signal Power Supply Run command ON ON DC injection Braking command ON ON OFF ON DC braking DC braking Output frequency The speed Agree signal remains ON while the run command is ON and the motor is not accelerating or decelerating Figure 5.19 Timing chart for up and down commands OFF C0.07 Min. output frequency S0.01 Zero speed level Figure 5.20 Timing chart for DC injection braking command Speed search command 1 (Setting :16) OFF Normal operation. ON Starts a speed search from the output frequency command. Speed search command 2 (Setting :17) OFF Normal operation. ON Starts a speed search from the pre-defined frequency. • Only one of the search functions can be selected. • When switching the operation from a commercial power supply and the inverter or starting a coasting motor, this function can be used to run the motor without tripping. 5. Parameters 5-49 5-50 MOSCON-E7 User’s Manual 5.7.2 Multi-function contact output Run command OFF ON External search command OFF ON Pre-defined frequency 5.7.2.1 Set output type of multi-function output: H1.01 5 ms min Deceleration time set in S1.04 Frequency command Output frequency Minimum baseblock time Figure 5.21 Timing chart for the external speed search command Remote → local selection (Setting : 19) Operates with the frequency command and run command OFF specified in remote mode. For more detail, see B0.01 (reference source) and B0.02 (operation mode). Operates with the frequency command and run command ON specified in local mode. • With this setting, the multi-function input selects the input method for the frequency command and run command. Parameter No. Name Unit Setting range Factory Setting H1.01 Select Terminal Output Type Changeable during operation - 0~ 1 0 X • H1.01 is used to set the output type of each terminal. • Setting Setting constant 0 1 Function Contact output is set as ‘a’ contact (NO) Contact output is set as ‘b’ contact (NC) 5.7.2.2 Setting the function of multi-function output: H1.02 Parameter No. Name Unit Setting range Factory Setting H1.02 Function of Output Terminal Changeable during operation - 0~11 0 X • Refer to the table below for the setting of the multi-function input terminal. 5. Parameters 5-51 5.7.3 Multi-function analog input • Setting Setting constant Function (The contact output is activated by the definition specified in H1.02 when the following situation occurs.) 0 Fault occurred 1 Running 2 Matching command frequency 3 Matching temporary frequency 4 MOSCON-E7 User’s Manual 5-52 Defeated matching frequency or higher 5 Defeated matching frequency or lower 6 Base blocking 7 Over torque detection H2.01~H2.07 are used to configure the function of analog inputs. Description 5.7.3.1 Analog input form : H2.01 Output frequency matches with command frequency. U0.01 – F1.09 ≤U0.02 ≤ U0.01 + F1.09 Output frequency matches with command frequency of match detection. F1.08 – F1.09 ≤U0.02, U0.02 ≤F1.08 + F1.09 Output frequency is higher than the frequency detection level. U0.02 ≥F1.08 Output frequency is lower than the frequency detection level. U0.02 ≤F1.08 Blocking the output(during the contact in putting). Occurring the over torque (OL3). 8 Reverse RUN 9 Current limiting Occurring the current(torque) limiting. 10 Speed searching Searching the speed. 11 Zero speed Parameter No. Name Unit Setting range Factory Setting H2.01 Analog Input Type Changeable during operation - 0~3 0 X • H2.01 is used to configure the function of the analog input when H2.05=0(frequency command). • Setting Setting constant 0 Function Frequency Command Vin(Voltage input) (terminal 9) 1 Frequency Command Ain(Current input) (terminal 10) 2 Frequency Command Vin + Ain (9+10) ≤ Fmax 3 Frequency Command Vin – Ain (9-10) ≥ 0 5.7.3.2 Analog input filter time constant : H2.02 Parameter No. Name Unit Setting range Factory Setting H2.02 Analog Input Time Constant Changeable during operation 1ms 0~100 20 X • H2.02 is useful when there are noises in the analog input signal. • As the value in H2.02 is increased, the noise immunity and the response time to analog input are increased. 5. Parameters 5-53 5.7.3.3 Adjusting analog inputs : H2.03, H2.04, H2.06, H2.07 Parameter No. H2.03 H2.04 H2.06 H2.07 Name Voltage Input Gain (Terminal 9) Voltage Input Bias (Terminal 9) Current Input Gain (Terminal 10) Current Input Bias (Terminal 10) Unit Setting range Factory Setting Changeable during operation 0.1% 0.0 ~200.0 100.0 O 0.1% -100.0 ~100.0 0.0 O 0.1% 0.0 ~200.0 100.0 O 0.1% -100.0 ~100.0 0.0 O • Adjust gain and bias of analog inputs, as shown in Figure 5.22 if there are undesirable offset and gain changes in the analog inputs. • The setting unit of gain and bias changes according to the values in H2.05. For more details, see the paragraph 5.7.3.4. MOSCON-E7 User’s Manual 5-54 5.7.3.4 Setting the multi-function analog input terminal function : H2.05 Parameter No. Name Unit Setting range Factory Setting H2.05 Function of Current Input Terminal Changeable during operation - 0~ 7 0 X • H2.05 is used to set the function of Ain(no. 10) terminal. • Constants and function for multi-function analog input • Setting Setting constant 0 1 Gain 100 Bias Max. Output Frequency x 100 When H2.05=0 Frequency Command Analog input 0V 10V (4mA) (20mA) Use the current value in parenthesis when current input has been selected Figure 5.22 Gain and Bias Setting unit is the percentage of Frequency command Frequency gain Max. output frequency Max. output frequency 2 Voltage bias Max. output voltage 3 DC breaking current Max. output current 4 Over torque detection level Stall prevention level during operation Minimum frequency command level Jump frequency Max. output current 5 Max. Output Frequency x Function 6 7 Max. output current Max. output frequency Max. output frequency 5. Parameters 5-55 5.7.4 Multi-function analog output : H3.01~H3.03 5.7.4.1 Setting multi-function analog output : H3.01 Parameter No. Name Unit Setting range Factory Setting H3.01 Analog Monitor Function Setting Changeable during operation - 0~7 1 X • H3.01 is used to select the function of the analog monitor output terminal. • Setting Setting constant Function Reference 0 Frequency command U0.01 1 Output frequency U0.02 2 Output current U0.03 3 Output voltage U0.04 4 DC voltage U0.05 5 Output power U0.06 6 Motor speed U0.07 7 Estimated torque U0.08 5-56 MOSCON-E7 User’s Manual 5.7.4.2 Adjusting the monitor output : H3.02, H3.03 Parameter No. Name Unit Setting range Factory Setting H3.02 Analog Monitor Gain setting Analog Monitor Bias setting 0.1% 0.0 ~200.0 -100.0 ~100.0 Changeable during operation 100.0 O 0.0 O H3.03 0.1% • H3.02 and H3.03 are used to set the gain and bias of monitor output. • H3.02 : set what multiple of 10V will correspond to a 100% output of the monitored item. • H3.03: set the amount that the output characteristic will be shifted vertically. Set this amount as a percentage, with 10V corresponding to 100%. When H3.01=0 Frequency Command Gain 100 Bias Max. Output Frequency x 100 Max. Output Frequency x Analog output 0V 10V Use the current value in parenthesis when current input has been selected Figure 5.23 Monitor output adjustments 5. Parameters 5-57 5.7.5 Digital operator setting • Setting 5.7.5.1 Setting the display format in U0.07 : H4.01 Parameter No. Name Unit Setting range Factory Setting H4.01 Display Format of U0.07 Changeable during operation - 0~3999 30 O • H4.01 is used to set the display format of U0.07. H4.01 Digit 3 Position of Decimal Point (0~3) Digit 2 Digit 1 Number to be multiplied to the frequency Operate according to the RUN signal after switching to local. No operation even if the Run signal is on after switching to local 5.7.5.4 Setting the device ID : H4.04 Name Unit Setting range Factory Setting 0000~3999 H4.04 Device ID - 1~253 1 Changeable during operation O • H4.04 is used to set the number to identify the node address of the inverter during communication. Name Unit Setting range Factory Setting H4.02 Digital Operator Stop Changeable during operation - 0~1 1 X • H4.02 is used to enable or disable the stop key during operation using input terminals. • Setting 1 Function Parameter No. Parameter No. 0 Setting constant 0 1 Range Digit 0 5.7.5.2 Setting the STOP key enable/disable : H4.02 Setting constant MOSCON-E7 User’s Manual 5-58 Function The stop key is disabled when the run command is input from the external terminal. The stop key is enabled at all times during operation. 5.7.5.3 Setting the operation when switching REMOTEÆLOCAL : H4.03 Parameter No. Name Unit Setting range Factory Setting H4.03 Operation when Change Local Remote Changeable during operation - 0~1 0 X • H4.03 is used to set the interlock operation to be used after switching REMOTEÆLOCAL. • Setting Setting constant 1 2~253 254 255 Function Representative receiver: perform and response to command to #1 and #255 Normal receiver: perform command to itself and #255, but response only to command to itself. Not selectable: entire inverters on network respond (remote operation) Not selectable: only representative inverter on network responds (broadcast) 5.7.5.5 Select frequency unit : H4.05 Parameter No. Name Unit Setting range Factory Setting H4.05 Select Frequency Unit of Digital Volume Changeable during operation - 0~1 1 O • H4.05 is used to set the frequency unit when using the digital volume. 5. Parameters 5-59 1 Function 5.8.1 Motor overload protection Frequency is decreased/increased by 0.01Hz. Motor overload protection function monitors temperature of the motor based on the output current of the inverter in order to protect the motor from overheating. Frequency is decreased/increased by 0.05Hz 5.7.5.6 Setting the parameter setting mode : H4.06 Parameter No. H4.06 Name Parameter setting mode Unit - Setting range Factory Setting 0~1 1 Changeable during operation X • H4.06 can be used to set the parameter setting method. • Setting Setting constant 0 1 Parameter No. Name Unit Setting range Factory Setting P0.01 Select Motor Protection Changeable during operation - 0~1 1 X Setting constant 0 1 Changes group/subgroup at the same time (ex: Divides into ‘U0’ or ‘01’) Changes group/subgroup individually (ex: Divides into ‘U’, ‘0’ or ‘01’) Parameter No. Name Unit Setting range Factory Setting H4.07 Fan Operation Mode Changeable during operation - 0~1 1 X • H4.07 can be used to set the fan operation method. • Setting 1 5.8.1.1 Select motor protection : P0.01 • Setting Function 5.7.5.7 Setting the fan operating method : H4.07 Setting constant 0 MOSCON-E7 User’s Manual 5.8 P-Parameter : Protective functions • Setting Setting constant 0 5-60 Function Rotates continuously Stops when the motor is stopped Function Disabled Enabled • P0.01 can be used to enable or disable the motor overload protection function. • The rated current setting (C2.03) is used as a basis for overload detection. ! CAUTION A motor may not be protected when the power supply is turned on and off frequently, because the thermal value is reset each time the power is turned off. • When two or more motors are connected to a single inverter: - Disable the motor protection function (setting 0) - Use another method for overload protection to each motor (e.g. connect to a thermal overload relay to the power line of each motor) 5. Parameters 5-61 5.8.1.2 Motor protection time constants: P0.02 MOSCON-E7 User’s Manual 5-62 5.8.1.3 Motor selection: P0.03 Parameter No. Name Unit Setting range Factory Setting Parameter No. Name Unit Setting range Factory Setting P0.02 Motor Protection Time Constants Changeable during operation min 0.0~60.0 8.0 X P0.03 Motor Selection - 0~1 0 • P0.02 can be used to set the time when the motor protection function is started. • Normally it is not necessary to change P0.02. • Set P0.02 if a 150% overload is applied after operating continuously at the motor’s rated current (hot start). • For known motor’s overload capacity, set the hot-start overload resistance level, but allow some margin for safety. Operating Time (min) 10 7 3 Cold Start • P0.03 can be used to set the motor protection characteristic. • Induction motors (i.e. general-purpose motor and inverter motor) are classified based on their cooling capabilities thus, the motor overload function operates differently between them. * General-purpose motor : When the motor is rotating at a low speed, the motor’s temperature rises faster than the inverter motor, therefore torque must be limited to protect the motor from overheating. * Inverter motor : Motor’s temperature rise relatively slower if it is rotating at a low speed, therefore electronic thermal overload protection is not activated. Thus, use an inverter motor for continuous operation at low speed. • Setting 1 0.4 Hot Start 100 150 200 Motor current (%) (C 2.03 is 100%) This is the example when P0.02 is set to 1min and the motor is operating at 60Hz. Figure 5.24 Motor protection operating time Changeable during operation X Setting constant 0 1 Function Applied to general-purpose motor Applied to inverter motor 5. Parameters 5-63 5.8.2 Momentary power failure Parameter No. Name Unit Setting range Factory Setting P1.01 Operation at Power Loss Changeable during operation - 0~2 1 X • P1.01 can be used to set the operation when the power is supplied after the momentary power failure. • Setting 1 2 MOSCON-E7 User’s Manual 5.8.2.3 V/f recovery time : P1.03 5.8.2.1 Operation at power loss : P1.01 Setting constant 0 5-64 Function Stops with the error display. Restarts if power is restored within the compensation time of power loss (P1.02). Restarts if power is restored as long as the bus voltage is high enough to maintain logic. • When setting 2 is chosen, speed search will be performed automatically if the power is restored within the allowed time interval. • When setting 0 is chosen, an under voltage fault will be detected if power is interrupted for more than 15ms. 5.8.2.2 Compensation time of power loss : P1.02 Parameter No. Name Unit Setting range Factory Setting P1.02 Compensation Time of Power Loss Changeable during operation 0.1sec 0.0~2.0 0.5 X • P1.02 can be used to set the time of recovery after the power loss • The factory setting depends on the inverter capacity. • P1.02 is valid only when P1.01 is set to 1. Parameter No. Name Unit Setting range Factory Setting P1.03 V/f Recovery Time 0.1sec 0.0 ~2.0 Changeable during operation 0.5 X • P1.03 can be used to set the V/f recovery time until reaching the maximum output voltage after the blocking of output. i.e. -For 200V class inverter: Time for voltage to be restored from 0 VAC to 200VAC. - For 400V class inverter: Time for voltage to be restored form 0 VAC to 400VAC. • P1.03 is valid for speed searched after: - momentary power loss - regular speed searches - voltage changes with energy-saving control - voltage changes with baseblock clearing. 5.8.2.4 : Undervoltage level : P1.04 Parameter No. Name Unit Setting range Factory Setting P1.04 Undervoltage Level Changeable during operation 1V 0~250 190 X • P1.04 can be used to when adding an AC reactor and lower the main circuit undervoltage detection level. • Set a main circuit DC voltage value that will detect a main circuit undervoltage. • Normally it isn’t necessary to change P1.04. 5. Parameters 5-65 5.8.3 Stall prevention • Stall occurs when the rotor cannot keep up with the rotating magnetic field on the motor start side. e.g. a large load is applied to the motor and sudden acceleration or deceleration is performed, etc. 5-66 MOSCON-E7 User’s Manual • Decrease this setting when: - The motor capacity is small compared to the inverter capacity - Stall occurs when the motor is operated with the factory setting Output current P2.02 (Acceleration stall prevention level) 5.8.3.1 Stall prevention at start : P2.01 Parameter No. Name P2.01 Stall Prevention at Start Unit - Setting range Factory Setting Changeable during operation 0~1 1 X • P2.01 can be used to set the stall prevention function at start. 0 1 Disabled (The motor with excessive load is possibly stalled. acceleration time and reduced load is required.) Enabled Then a longer • When setting 1 is selected, acceleration is stopped if the motor current exceeds the acceleration stall prevention level(P2.02). Acceleration is started again when the current falls below this level. The actual acceleration time can be longer than the set value (at F2.01) depending on the load. 5.8.3.2 Stall prevention level at start : P2.02 Name P2.02 Stall Prevention Level at Start The output frequency is controlled to prevent stall Time 5.8.3.3 Stall prevention limit during acceleration : P2.03 Function Parameter No. Output frequency Figure 5.25 Acceleration Stall Prevention function : P2.01=1 • Setting Setting constant Time Unit 1% Setting range 0~200 Factory Setting 170 Changeable during operation O • P2.02 can be used to set the output current limit level as a percentage of rated current of the inverter at start. (i.e. 100% corresponds to the rated current of the inverter) • This setting is valid when P2.01 is let to 1. • Normally it isn’t necessary to change this setting. Parameter No. Name Unit Setting range Factory Setting P2.03 Stall Prevention at Acc. Limit Changeable during operation 1% 0~100 50 O • P2.03 can be used to set the stall prevention limit when high-speed motor is being used in the high-speed range (the high frequency range above the base frequency) • Normally it isn’t necessary to change this setting. • The standard target setting is the motor’s rated current. • Set P2.03 as a percentage of the inverter’s rated current. (i.e. 100% corresponds to the inverter’s rated current) Acceleration stall prevention level P2.02 (Acceleration stall prevention level) P2.03 (Acceleration stall prevention limit) C0.01 Base frequency (FA) Output frequency Figure 5.26 Stall prevention limit during acceleration 5. Parameters 5-67 • When the motor is used in the high-speed range, the acceleration stall prevention level is automatically lowered to provide smoother acceleration. • P2.03 limits how much the acceleration stall prevention level is lowered so that it isn’t lowered any more than necessary. MOSCON-E7 User’s Manual 5-68 5.8.3.5 Stall prevention when the motor is running : P2.05 Parameter No. Name Unit Setting range Factory Setting P2.05 Stall Prevention in Running Changeable during operation - 0~2 1 X • P2.05 can be used to set the stall prevention function during running. 5.8.3.4 Stall prevention at stop : P2.04 Parameter No. Name Unit Setting range Factory Setting P2.04 Stall Prevention at Stop Changeable during operation - 0~1 1 X • P2.04 can be used to set the stall prevention selection during stop. • Setting Setting constant 0 1 2 • Setting Setting constant 0 1 Function Disabled (when braking device is used) Enabled (when braking device is not used) • When setting1 is selected, the deceleration time is extended automatically so that a main circuit over voltage fault doesn’t occur. • Braking device used : - braking resistor unit (for 400V class only) - braking unit • When braking device is NOT used, deceleration time should be long enough to prevent the over voltage. Output Frequency The deceleration time is controlled to prevent over voltage Time Deceleration Time Setting Figure 5.27 Deceleration stall prevention function : P2.04=1 Function Disabled (run according to the setting. Stalls may occur with excessive loads) Enabled (use deceleration time in F2.02 for stall prevention function) Enabled (use deceleration time in F2.04 for stall prevention function) • When setting 1 is selected, deceleration is started if the phase current continues to be higher than the stall prevention level for more than 100ms. The motor is accelerated back to the reference frequency again when the current falls below this level. 5.8.3.6 Stall prevention when the motor is running at the desired frequency : P2.06 Parameter No. Name Unit Setting range Factory Setting P2.06 Stall Prevention Level in Running 1% 0~200 170 Changeable during operation O • P2.06 can be used to set the stall prevention level during running • This setting is valid when P2.05 =1 or 2 • Normally it isn’t necessary to change this setting. • Decrease this setting when: - The motor capacity is small compared to the inverter capacity - Stall occurs when the motor is operated with the factory setting • Set this value as a percentage of the inverter’ s rated current (i.e. 100% corresponds to the inverter’s rated current) 5. Parameters 5-69 MOSCON-E7 User’s Manual 5-70 5.8.4 Overtorque detection : P3.01~P3.03 5.8.4.1 Overtorque detection : P3.01 Output current P2.06 (Run stall prevention level) Time Output frequency The output frequency is controlled to prevent stall. Deceleration rate:F2.02 or F2.04 Time Parameter No. Name Unit Setting range Factory Setting P3.01 Overtorque Detection Changeable during operation - 0~4 0 X • P3.01 can be used to detect an excessive mechanical load from an increase in the output current (or output torque) • The setting in P3.01 determine: - whether overtorque conditions will be detected - what kind of processing will be performed if a overtorque condition is detected. Figure 5.28 Run stall prevention function : P3.05=1 or 2 • Setting Setting constant 0 1 2 3 4 Function Disabled Enabled only during speed matching. Continues operation even after detection. Detect overtorque at any time. Continues operation even after detection Detect only during speed matching. Stops output after detection Detect overtorque at any time. Stops output after detection. • When overtorque detection is enabled, set the overtorque detection level P3.02 • Overtorque is detected when the current exceeds the overtorque detection level for longer than the overtorque detection time. 5. Parameters 5-71 MOSCON-E7 User’s Manual 5.8.5 Fault retry P3.02 Motor current (Output torque) * 5% of the rated current Overtorque detection1 (NO) or overtorque detection2 (NO) P3.03 ON P3.03 ON 5.8.5.1 Number of fault retry : P4.01 Parameter No. Name Unit Setting range Factory Setting P4.01 Number of Fault Retry Changeable during operation - 0~10 0 X • P4.01 can be used to restart the inverter automatically even when an internal fault occurs during inverter operation. • Use P4.01 only when continuing operation is more important than possibly damaging the inverter. *The overtorque detection is cleared when the current drops about 5% of the inverter’s rated current (or the motor’s rated torque) Figure 5.29 Timing chart for overtorque detection 5.8.4.2 Overtorque detection level & overtorque delay time : P3.02,P3.03 Parameter No. Name Unit Setting range Factory Setting P3.02 Overtorque Detection Level Overtorque Delay Time Changeable during operation 1% 0~300 180 O 1sec 0.0~10.0 0.1 X P3.03 5-72 • P3.02 and P3.03 can be used to detect an excessive mechanical load from an increase in the output current (or output torque) NOTE • The inverter may be damaged when using the fault retry function too frequently. • Since the inverter might be damaged, be sure to take the following precautions: - Always set up a molded-case circuit breaker - Set up a sequence that will stop peripheral equipment when an inverter fault occurs • The fault retry function is effective with the following faults. With others, the protective operation will engage immediately without attempting to restart operation: - overcurrent - motor overload - inverter overload - main circuit overvoltage - main circuit undervoltage •The counter which counts the number of the past fault is cleared when: -normal operation is maintained for 10 minutes. -the fault reset input from digital operator or input terminal is received after the protection operation. -the input power supply is off. 5. Parameters 5-73 5.8.5.2 Output terminal function during fault retry : P4.02 Parameter No. Name Unit Setting range Factory Setting P4.02 Output Terminal Function at Retry Changeab le during operation - 0~1 0 X P4.02 can be used when the multi-function output terminal setting function is ‘default output’ (H1.01) • Setting Setting constant 0 1 Function Do not output fault restart (fault contact does not operate) Output fault restart (fault contact operates) 5.8.5.3 Fan error : P5.01 Parameter No. Name Unit Setting range Factory Setting P5.01 Fan Error - 0~1 0 Changeable during operation X P5.02 can be used to enable or disable the fan error detecting function. • Setting Setting constant 0 1 Function Enabled (fan error is detected) Disabled (fan error is not detected) 5-74 MOSCON-E7 User’s Manual 5.9 Error Monitoring Information on the previous error can be monitored from U1 and U2 • U1-displays the information on the last error. • U2-displays up to last four errors. (refer to parameter description for more details) 6. Troubleshooting 6-1 6. Troubleshooting Trouble shootings as well as protective and diagnostic functions of the MOSCON-E7 are described in this chapter. 6.1 Protective function/error description ------------------- 6-3 6-2 MOSCON-E7 User’s Manual 6. Troubleshooting 6-3 6-4 MOSCON-E7 User’s Manual 6.1 Protective function/error description In case of the wrong parameter setting or faulty writing, the inverter and/or the motor may not function as commanded. The MOSCON-E7 has many protective functions, which is displayed on the digital operator when the fault occurs. When the fault is detected, the fault contact output operates and the inverter output to be shut off causing the motor to stop. The stopping method can be selected for some faults. • Refer to the table below for the fault display, cause and corrective actions. • To reset the fault, use one of the followings: - Press the reset key on the digital operator. - Turn the power supply off and on again. - Turn on the fault reset terminal. Table 6.1 Fault display and contents (Faults in inverter) Code OC2 Short circuit Error OC1 Over current Meaning Cause Corrective action • A short-circuit or ground fault (caused The inverter by motor damage, worn Reset the fault after output or load was short-circuited. insulation, or a damaged correcting. cable) at the inverter output. The inverter output current exceeded 200% of the rated current instantly. • A short-circuit or ground fault (caused by motor damage, worn insulation, or a damaged cable) at the inverter output. • Too large load or too Reset the fault after short accel/decel time. correcting. • A magnetic switch was switched at the inverter output. • A special-purpose motor with too large capacity for the inverter is used. Code FAN Fan stopped. OH2 Inverter Over-Heated. OV Main Over-Voltage. Meaning Fan at the bottom of the inverter is not operating. Cause Corrective action • Defective cooling fan or fan cable. Check the wiring and replace the fan if necessary. • Too high ambient temperature. Install a cooling unit. The temperature of the inverter’s • Heat source nearby cooling fin the inverter. exceeded approximately95℃. • Inverter cooling fan is malfunctioning. Replace the cooling fan.(Contact Samsung) • Too short deceleration time. • Too large regenerative energy from the motor. Increase the deceleration time or connect a braking resistor (or unit). • Too high power supply voltage. Decrease the voltage within specification. The main circuit DC voltage exceeded the over voltage detection level. 200V class:410V. 400V class:820V. Remove the heat source. UV1 Main Under-Voltage. The main circuit DC voltage is below the under voltage detection level. 200Vclass:190V. 400Vclass:380V. • A open-phase occurred with the input power supply. • A momentary Reset the fault after power loss. Correction. • Too large voltage fluctuation in the input power supply. OL3 Over-torque Det. There was output of 180% of the rated current instantly. • Set P3.02 and P3.03 appropriately. • Too heavy load or too • Check the mechanical system rapid acceleration. and correct the cause of the over torque. 6. Troubleshooting 6-5 6-6 MOSCON-E7 User’s Manual Table 6.2 Fault display and contents (Warning on inverter) : Blinking display Code OL2 Inverter Over-load. OL1 Motor Over-load. CB3 Analog Speed command failure. CB2Parameter range over. CB1 EEPROM failure. EF4 External Fault. (Terminal 4) EF3 External Fault. (Terminal 3) EF2 External Fault. (Terminal 2) EF1External Fault. (Terminal 1) CB0 Parameter Fault. Meaning Cause Corrective action Check the size of the • Too heavy load. Too load, length of the short accel/decel time 150% output accel/decel and cycle current of inverter and cycle time times. rating lasted more than 1 minute, or • Too high V/f pattern Check the V/f Pattern. equivalent situation. • Too low inverter Replace the inverter capacity with larger capacity. Check the size of the • Too heavy load. Too load, length of the short accel/decel time accel/decel and cycle Output of 150% and cycle time of the motor’s times. rating lasted more the V/f • Too high V/f pattern Check than 1 minute or pattern. equivalent situation. • Incorrect C2.03 Check C2.03 (motor’s rated current) (motor’s rated current). Wire of the external analog Replace the wire. speed control is (Contact Samsung) disconnected. Input parameter Input the value is out of max/min within the value. max/min value. Error during recalling of the Contact Samsung preset parameter Fault in external Input (Terminal 4) • Check if the multiFault in external function input is Input (Terminal 3) • An “external fault” was input from a multi- properly selected. Fault in external function input. •Remove the cause Input (Terminal 2) of the external fault. Fault in external input (Terminal 1) The check of the parameters stored in Error in leading EEPROM is failed. the parameter (The detected Contact Samsung. when power is parameters can be applied. confirmed in U3.02, max. 32) Code Meaning Cause Corrective action • A open-phase occurred with the input power supply. • A momentary power loss. Reset the fault after • Too large voltage correction. fluctuation in the input power supply. UV Main underVoltage. The main circuit DC voltage was below: 200Vclass: 190V 400Vclass: 380V OL3 Over torque detection. There was output of180% • Too large load. of the rated • Too low inverter’s capacity. current instantly. • Set P3.02 and P3.03 appropriately. • Check the mechanical system and correct the cause of the over torque. SE Warning. Forward/reverse The forward and reverse run commands •run command input at the input at the same same time. time. Check the sequence of the forward and reverse run commands. BB Base block. Output block command was input from external. • The base block command input. Motor stopped STP In the remote mode, the Local Stopped in by the stop key •local stop command input. Remote Mode. in remote mode. 6. Troubleshooting 6-7 6-8 MOSCON-E7 User’s Manual Table 6.3 Fault display and contents (Communication fault) Code FMT Abnormal Format. SUM Check Sum Error. MEM Memory Fault. WRE Rejection in Running. Meaning Cause Corrective action • The communications Input command is command arrangement different from the is different from the normal format. reguration protocol. Part of the information • The error caused by noise, etc occurred to has been changed the data on during transmission. communication. Error in the EEPROM • An error occurred in parameter the EEPROM. Modification of the unchangeable parameter • This command can during running was not be used in running.. rejected. Operation is being input EEP on EEPROM. (Other • EEPROM is operating EEPROM Busy. input command is at present. ignored) MOD Remote mode is not Invalid Frequency /Run selected. command mode. Set the • Invalid command in appropriate this mode. mode. Refer to B0.02. ---------------------------------------MEMO----------------------------------------- 7. Maintenance and Inspection 7-1 7. Maintenance and Inspection Basic maintenance and inspection for the MOSCON-E7 are describes in this chapter. 7.1 Daily inspection........................................................................ 7-4 7.2 Periodic inspection................................................................... 7-4 7.3 Part replacement....................................................................... 7-6 7-2 MOSCON-E7 User’s Manual 7. Maintenance and Inspection ! 7-3 DANGER • Do not remove the digital operator from the unit since it carries high voltages and are extremely dangerous. Using the cable between operator and unit is also prohibited. • Do not touch the terminals since some of them carry high voltages and are extremely dangerous. Otherwise, it may cause an electric shock. • Do not remove the cover when power is being supplied to the inverter. Always turn off the power to the inverter through the MCCB when detaching the cover. Otherwise, the capacitor remained charged may be very dangerous. • After turning off the main circuit power supply, wait for a while before maintenance or inspection since it may remain charged. Otherwise, it may cause an electric shock. • Maintenance, inspection, and replacement of parts must be done only by authorized personnel. Otherwise, it may result an injury or an accident. • Remove all metal objects, such as watches and rings, before the maintenance, inspection, and replacement of parts. Also, always use grounded tools. Otherwise, it may cause an electric shock. ! CAUTION • Do not touch the CMOS IC in the control board directly. Otherwise it can be damaged by static electricity. • Do not change the wiring, or remove the digital operator or connectors, during operation. Otherwise, it may cause a personal injury. 7-4 MOSCON-E7 User’s Manual NOTE Periodically inspect the MOSCON-E7 within 18 months of shipping from the factory or within a year of being delivered to the user, whichever comes first. Regular inspection will prevent accident and ensure high-performance with higher-reliability. 7.1 Daily inspection Check the system in operation if: • the motor vibrates or makes unusual noises. • there are any abnormal heat generation • the ambient temperature is too high • the output current value shown on the monitor display is higher than normal • the cooling fan is operating normally. 7.2 Periodic inspection Refer to the table below for the periodic inspection. ! DANGER • Always turn off the power supply before the inspection. Otherwise, it may cause an electric shock. • After turning off the main circuit power supply, wait for a while before maintenance or inspection since it may remain charged. Otherwise, it may cause an electric shock. 7. Maintenance and Inspection 7-5 7-6 MOSCON-E7 User’s Manual 7.3 Part replacement Table7.1 Periodic inspection Item Inspection Solution Terminals, mounting bolts, connectors, etc. Are all connection hardware properly seated and bolts tightened? Reconnect the loose connectors and tighten the bolts. Cooling fins Are the fins dirty or dusty? Clean with dry compressed air: 39.2×10⁴ to 58.8 ×10⁴ Pa (4 to 6 kg ㆍ㎠ ) PCB Is there any accumulation of conductive material or oil mist? Clean with dry compressed air: 39.2×10⁴ to 58.8 ×10⁴ Pa (4 to 6kg ㆍ㎠ ) Replace the inverter if the board can not be cleaned, Cooling fan Is there any abnormal noise or vibration? Replace the cooling fan Power element Is there any accumulation of conductive material or oil mist? Clean with dry compressed air: 39.2×10⁴ to 58.8 ×10⁴ Pa (4 to 6 kg ㆍ㎠ ) Smoothing capacitor Is there any abnormal odor or discoloration? Replace the capacitor. Inverter is composed of many parts and these parts must function properly for normal operation of the inverter. To maintain normal operation of the inverter for a long period of time, it is recommended to perform a regular inspection and replace parts. Inspection period may vary depending on the installation environment and usage conditions. CAUTION ! Usage condition • Ambient temperature(yearly average of 30℃) • Load factor: 80% max. • Operating rate: 12hrs max/day Refer to the table below for the periodic inspection of the MOSCONE7. Table 7.2 Part replacement Part Standard Replacement Period Cooling fan 2~5 yrs Breaker relays - Aluminum capacitors on PCBs 5yrs Replace with new board. Inspect to determine if inspection is required. Fuses 10yrs Replace with new part. Method Replace with new part. Inspect to determine if the replacement is required. Appendix Appendix A 26.00 18.00 9.70 4.60 3.00 A-2 MOSCON-E7 User’s Manual Appendix B Factory setting that change with the motor capacity C2.01 C2.02 C2.03 C2.04 Motor Motor Motor Motor terminal iron rated no load resistance loss current current (Ω ) (Watt) (A) (A) 20P4 10.50 25 2.40 1.40 20P7 7.50 30 3.80 2.20 21P5 2.60 75 6.60 4.30 22P2 1.80 90 9.00 4.40 23P7 0.90 200 14.30 7.00 40P4 40P7 41P5 42P2 43P7 A-1 30 45 83 150 230 1.40 2.20 3.80 5.20 8.30 0.90 1.30 2.20 2.50 4.00 C2.05 Motor rated slip (Hz) 3.83 3.66 3.00 2.67 2.33 3.83 3.66 3.00 2.67 2.33 Monitors U0.01 U0.02 U0.03 U0.04 U0.05 U0.06 U0.07 U0.08 U0.09 U0.10 U0.11 U0.12 Name Unit Display Page Effective Frequency Command Current Output Frequency Output Current in RMS Output Voltage in RMS DC link Voltage Output Power in 0.1kW Motor speed in RPM Percentage Output Torque I/O Status Cumulative Power On Time Elapsed Time since Power On S/W Version 0.01Hz 0.01Hz 0.01A 1V 1V 0.1kW 1rpm 1% bit 10Hr min.sec xx.xx~xxx.x xx.xx~xxx.x xx.xA xxxu dxxx Pxx.x xxxx oxxx xxxx mm.ss r.xxx 5-4 5-4 5-4 5-4 5-4 5-4 5-4 5-4 5-4 5-4 5-4 5-4 Name Unit Display Page Last Fault U1.01 Command Frequency 0.01Hz xx.xx~xxx.x 5-5 U1.02 Output Frequency 0.01Hz xx.xx~xxx.x 5-5 U1.03 Output Current 0.01A xx.xA 5-5 U1.04 Output Voltage 1V xxxu 5-5 U1.05 DC Voltage 1V dxxx 5-5 U1.06 Output Power 0.1kW Pxx.x 5-5 U1.07 Motor rpm 1rpm xxxx 5-5 U1.08 Output Torque 1% oxxx 5-5 U1.09 I/O Status bit U1.10 Cumulative Power On Time 10Hr xxxx 5-5 Unit Display Page 5-5 Fault List Name U2.01 Fault 1 (recent) - * 5-5 U2.02 Fault 2 - * 5-5 U2.03 Fault 3 - * 5-5 U2.04 Fault 4 - * 5-5 Appendix A-3 Parameter Check List Unit Display Page U3.01 Modified Parameter List - “----” (None) 5-5 U3.02 Fault Parameter List - “----” (None) 5-5 Basic Setup Active Source of Frequency Command Unit Setting Range Factory Setting Changeable During Operation Page - 00~23 00 X 5-10 B0.02 Active Source of RUN Command - 00~12 00 X 5-10 B0.03 Stopping Method - 0~1 0 X 5-11 - 0~1 0 X 5-11 B0.04 B0.05 Prohibiting Reverse Rotation Automatic Start after Power On - 0~1 0 O 5-12 - 1~10 0 O 5-12 - 0~1 0 O 5-12 B1.01 B1.02 B1.03 Inverter Initialization Check Password Set Password F0.02 F0.03 F0.04 F0.05 F0.06 F0.07 F0.08 F0.09 B2.01 B2.02 Power Capacity of the Inverter Power Capacity of the Motor Setting Range Factory Setting Unit Setting Range Factory Setting Changeable During Operation Page - 0~9999 0000 X 5-13 - 0~9999 0~9999 0000 0000 X X 5-14 5-14 F1.01 High Speed Limit F1.02 Low Speed Limit 0.01Hz 0.00~600.00 0.00 ○ 5-15 0.01Hz 0.01Hz 0.01Hz 0.01Hz 0.01Hz 0.01Hz 0.01Hz 0.01Hz 0.00~600.00 0.00~600.00 0.00~600.00 0.00~600.00 0.00~600.00 0.00~600.00 0.00~600.00 0.00~600.00 0.00 0.00 0.00 0.00 0.00 0.00 0.00 6.00 ○ ○ ○ ○ ○ ○ ○ ○ 5-15 5-15 5-15 5-15 5-15 5-15 5-15 5-15 Setting Range 0.1~100.0 0.0~99.9 Factory Setting 100.0 0.0 Changeable During Operation ○ ○ 0.01Hz 0.01Hz 0.01Hz Setting Range 0.00~600.00 0.00~600.00 0.00~600.00 Factory Setting 0.00 0.00 0.00 Changeable During Operation ○ ○ ○ 0.01Hz 0.00~20.00 0.50 ○ 5-16 - 0~1 0 X 5-17 Factory Setting Changeable During Operation Unit Factory Setting Changeable During Operation Page - 20P4~43P7 - X 5-14 - 20P4~43P7 - X 5-14 Page Unit 0.1% 0.1% Page 5-16 5-16 Jump Frequency Limit F1.03 Jump Frequency1 F1.04 Jump Frequency2 F1.05 Jump Frequency3 Jump Frequency F1.06 Width F1.07 Jump Mode Unit Page 5-16 5-16 5-16 Frequency Detection Name Setting Range Changeable During operation Frequency Limit System Capacity Setup Name Main Frequency Command of Operator Mode & Communication Mode Frequency2 Frequency3 Frequency4 Frequency5 Frequency6 Frequency7 Frequency8 Jog Frequency Name System Initialization Name Unit Name Name Default Motor Direction B0.06 Default Monitor Item B0.07 Frequency/Speed Command F0.01 B-parameter B0.01 MOSCON-E7 User’s Manual F-parameter Name Name A-4 Frequency of Match Detection Frequency Match F1.09 Detection Width Frequency of Accel/Decel F1.10 Time Switching F1.08 Unit Setting Range Page 0.01Hz 0.00~600.00 0.00 ○ 5-19 0.01Hz 0.00~20.00 0.50 ○ 5-19 0.01Hz 0.00~600.00 0.00 ○ 5-19 Appendix A-5 F2.05 Name Unit Accel Time 1 Decel Time 1 Accel Time 2 Decel Time 2 Accel/Decel Time Base 0.01sec 0.01sec 0.01sec 0.01sec Setting Range 0.00~600.00 0.00~600.00 0.00~600.00 0.00~600.00 - 0~1 Name Factory Setting 10.00 10.00 10.00 10.00 Changeable During Operation ○ ○ ○ ○ 5-20 5-20 5-20 5-20 0 X 5-20 Page S2.01 S2.02 S2.03 S2.04 Name Unit S-Curve Time 0.01sec Name Setting Range 0.00~2.50 Factory Setting 0.20 Changeable During Operation ○ Page 5-21 S0.01 S0.02 S0.03 S0.04 Speed Search at Start Speed Search S1.02 Start Frequency Speed Search S1.03 Current Speed Search S1.04 Deceleration Time S1.01 S3.02 Energy Saving Voltage Level Energy Saving Frequency Level Slip Compensation Gain Slip Compensation S4.02 Delay Time Slip Compensation S4.03 Limit S4.01 Unit Setting Range Factory Setting Changeable During Operation Page 0.01Hz 0.00~10.00 1.50 X 5-22 1% 0~100 50 X 5-22 Factory Setting Changeable During Operation Page 0.01Hz 0.00~600.0 0.00 X 5-25 0.01sec 0.00~25.00 0.00 X 5-25 0.01Hz 0.00~600.0 0.00 X 5-25 0.01sec 0.00~25.00 0.00 X 5-25 Unit Setting Range Factory Setting Changeable During Operation Page 1% 0~100 80 X 5-26 0.01Hz 0.00~600.00 0.00 X 5-26 Unit Setting Range Factory Setting Changeable During Operation Page 1% 0~S4.03 0 ○ 5-27 1msec 0~9999 200 X 5-27 1% 0~250 200 X 5-27 Unit Setting Range Factory Setting Changeable During Operation Page 1% 0~250 100 X 5-29 1msec 0~9999 20 X 5-29 Unit Setting Range Factory Setting Changeable During Operation Page % 0~100 20 ○ 5-30 - 0~1 0 X 5-30 - 0~1 1 X 5-30 Torque Compensation Name 0.1sec 0.0~25.0 0.0 X 5-22 S5.01 0.1sec 0.0~25.0 0.5 X 5-22 S5.02 Speed Search Name S3.01 Name DC Braking DC Brake Starting Frequency DC Brake Current DC Braking Time at Start DC Braking Time at Stop Setting Range Slip Compensation S-parameter Name Dwell Frequency at Start Dwell Time at Start Dwell Frequency at Stop Dwell Time at Stop Unit Energy Save Function S-Curve Accel/Decel Time F3.01 MOSCON-E7 User’s Manual Dwell Operation Accel/Decel Time F2.01 F2.02 F2.03 F2.04 A-6 Torque Compensation Gain Torque Compensation Delay time System function Compensation Unit Setting Range Factory Setting Changeable During Operation Page - 0~1 0 X 5-23 S6.01 0.01Hz 0.00~600.00 0.00 X 5-23 S6.02 1% 0~200 100 X 5-23 S6.03 0. 1sec 0~10.0 2.0 X 5-23 Name Hunting Prevention Gain Enable Brake Boosting Current ripple restraint (1 phase only) Appendix A-7 A-8 MOSCON-E7 User’s Manual H/W Adjusting Data C-parameter Name V/f Setting C0.01 C0.02 C0.03 C0.04 C0.05 C0.06 C0.07 C0.08 C3.01 Name Unit V/f Pattern Max Output Frequency Max Output Voltage Base Frequency Mid Output Frequency Mid Output Voltage Min Output Frequency Min Output Voltage - Setting Range 0~15 Factory Setting 15 Changeable During Operation X 5-31 0.01Hz 30.00~600.00 60.00 X 5-37 0.1V 0.0~250.0 200.0 X 5-37 0.01Hz 30.00~600.00 60.00 X 5-37 0.01Hz 0.00~600.00 3.00 X 5-37 0.1V 0.0~250.0 14.0 X 5-37 0.01Hz 0.00~600.00 1.50 X 5-37 0.1V 0.00~250.0 8.0 X 5-37 Page C1.01 Carrier Frequency Unit 0.01Hz Setting Range 1.50~10.00 Factory Setting 10.00 Changeable During Operation X Page 5-38 Motor Data Name C2.01 C2.02 C2.03 C2.04 C2.05 Stator Resistance Iron Loss Rated Output Current No Load Current Rated Slip C3.03 C3.04 C3.05 C3.06 C3.07 Carrier Frequency/ Modulation Related Setting Name C3.02 Factory Setting Changeable During Operation Page - - * X 5-40 - - * X 5-40 - - * X 5-40 - - * X 5-40 - - * X 5-40 - - * X 5-40 - - * X 5-40 Setting Range 00~3F (Hexa -Decimal) Factory Setting Changeable During Operation Page 00 X 5-41 - 0~19 1 X 5-41 - 0~19 2 X 5-41 - 0~19 3 X 5-41 - 0~19 4 X 5-41 Multi-Function Inputs H0.01 0.01Ω 1W Factory Setting * * Changeable During Operation X X 5-38 5-38 H0.02 0.1A 0.0~999.9 * X 5-39 H0.03 0.1A 0.0~999.9 * X 5-39 H0.04 0.01Hz 0.00~600.0 * X 5-39 H0.05 Page Setting Range H-parameter Setting Range 0.00~99.99 0~9999 Unit DC Voltage Compensation Analog Output Compensation Coefficient Current Detector Compensation 1 Current Detector Compensation 2 Analog Command Compensation Coefficient Current Terminal Gain Compensation Coefficient Current Detector Compensation Coefficient Unit Name Unit Select Terminal Input Type - Function of Terminal 3 Function of Terminal 4 Function of Terminal 5 Function of Terminal 6 Appendix A-9 Multi-Function Output Name H1.01 H1.02 Select Terminal Output Type Function of Output Terminal H2.01 Analog Input Type Analog Input H2.02 Time Constant Voltage Input Gain H2.03 (Terminal 9) Voltage Input Bias H2.04 (Terminal 9) Function of H2.05 Current Input Terminal Current H2.06 Input Gain (Terminal 10) Current H2.07 Input Bias (Terminal 10) Unit Factory Setting Changeable During Operation Page - 0~1 0 X 5-50 - 1~11 0 X 5-50 - Setting Range 0~3 Factory Setting 0 Changeable During Operation X 5-52 1ms 0~100 20 X 5-52 0.1% 0.0~200.0 100.0 ○ 5-53 0.1% -100~100 0.0 ○ 5-53 - 0~7 0 X 5-54 Unit Page H3.01 H3.02 H3.03 Analog Monitor Function Setting Analog Monitor Gain Setting Analog Monitor Bias Setting Name H4.01 Motor Speed Form Digital H4.02 Operator Stop Operation when H4.03 Change Local Remote H4.04 Device ID Select H4.05 Frequency Unit of Digital Volume Parameter Setting H4.06 Method Fan Operation H4.07 Mode - Setting Range 0~3999 Factory Setting 30 Changeable During Operation ○ 5-57 - 0~1 1 X 5-57 - 0~1 0 X 5-57 - 1~253 1 ○ 5-58 - 0~1 1 ○ 5-58 - 0~1 1 X 5-59 - 0~1 1 X 5-59 Unit Setting Range Factory Setting Changeable During Operation Page - 0~1 1 X 5-60 min 0.0~60.0 8.0 X 5-61 - 0~1 0 X 5-62 Unit Setting Range Factory Setting Changeable During Operation Page - 0~2 1 X 5-63 0.1sec 0.0~2.0 0.5 X 5-63 0.1sec 0.0~2.0 0.5 X 5-64 1V 0~250 190 X 5-64 Unit Page P-parameter Motor Protection 0.1% 0.0~200.0 100.0 ○ Name 5-53 P0.01 0.1% -100~100 0.0 ○ 5-53 Setting Range Factory Setting Changeable During Operation Page - 0~7 1 X 5-55 0.1% 0.0~200.0 100 ○ 5-56 0.1% -100~100 0.0 ○ 5-56 Unit P0.02 P0.03 Multi-Function Analog Monitor Output Terminal Name MOSCON-E7 User’s Manual Digital Operator Setting Setting Range Multi-Function Analog Input Name A-10 Select Motor Protection Motor Protection Time Constants Motor Selection Momentary Power Failure Name P1.01 P1.02 P1.03 P1.04 Operation at Power Loss Compensation Time of Power Loss V/f Recovery Time Undervoltage Level Appendix A-11 P2.01 P2.02 P2.03 P2.04 P2.05 P2.06 Stall Prevention at Start Stall Prevention Level at Start Stall Prevention at Acc Limit Stall Prevention at Stop Stall Prevention in Running Stall Prevention Level in Running MOSCON-E7 User’s Manual Appendix C Stall Prevention Name A-12 Unit Setting Range Factory Setting Changeable During Operation Page E7 Dynamic Brake User’s Manual - 0~1 1 X 5-65 1. Mounting 1% 0~200 170 ○ 5-65 1% 0~100 50 ○ 5-66 - 0~1 1 X 5-67 - 0~2 1 X 5-68 1% 0~200 170 ○ 5-68 Unit Setting Range Factory Setting Changeable During Operation Page - 0~4 0 X 5-70 1% 0~300 180 ○ 5-71 1sec 0.0~10.0 0.1 X 5-71 For the optimal performance of the dynamic brake, mount it in a place, which satisfies the conditions listed below. - Refer to the figure 1 for the dimensions and installation space. - A dynamic brake and braking resistor generate heat, thus install the peripheral devices, which are not tolerant to heat, far away from them. - Refer to the figure 1 for the mounting method. Over Torque Detection Name P3.01 P3.02 P3.03 Overtorque Detection Overtorque Detection Level Overtorque Delay Time Dynamic Brake 25 Retry Fault Unit Setting Range Factory Setting Changeable During Operation Page - 0~10 0 X 5-72 - 0~1 0 X 5-73 Name Unit Setting Range Factory Setting Changeable During Operation Page Fan Error - 0~1 0 X 5-73 Name P4.01 P4.02 96 86 Number of Fault Retry Output Terminal Function at Retry 35.5 64 M4 SCREW (2 places) Fan Error P5.01 MOSCON-E7 Figure 1. Mounting method Appendix A-13 2. Identifying each part A-14 MOSCON-E7 User’s Manual 4. Braking voltage 1) Controlling the braking start voltage The dynamic brake is related to the braking start voltage. Refer to the Table 1. When setting the braking start voltage. BRAKE : Braking indicating LED FAULT : Fault indicating LED B2 : Connect to braking resistor B1 : Connect to braking resistor P : Connect to P/B of inverter N : Connect to N of inverter Table 1. Braking start voltage for each source voltage Source Voltage Braking Start Voltage (DC LINK voltage) 230V 380V 220V 365V 208V 345V 200V 330V Note: The variance of source voltage is ±10V. Figure 2 Part names of dynamic brake 3. Wiring 1) Precaution when wiring the signal line The dynamic brake and braking resistor may generate strong noise, thus wire separately the signal lines, which are not tolerant to noise. The voltage-selection switch, 4P DIP SW., is located on the front of the dynamic brake. Turn on only one of the switch corresponding to desired braking start voltage, and turn off the rest of them. 2) Wiring method and distance Follow the wiring methods and distances of the dynamic brake, Braking resistor and inverter as shown on the figure 3. 230V 220V 208V 200V Example of selecting 200V ON 3) Wiring specification OFF Type Terminal name Wire size ㎟ (AWG) Wire type Terminal volt size DYNAMIC BRAKE ( SIBR-23P7 ) P, N, B1, B2 3.5~5.5 (12~10) 600V vinyl wire M3.5 Inverter SIBR-23P7 200V Class P/B N P N Braking resistor B1 B2 Less than 10m Figure 3. Wiring 1 2 3 4 5. Operation 1) Check if the required braking characteristic can be obtained. 2) Dynamic brake is operated when the inverter is starting to decelerate and the BRAKE LED (yellow) is ON at this time. 3) If the FAULT LED is ON, 1) braking resistance is higher than the rated value, or 2) output wire short occurred, or 3) the error has occurred in the braking unit. Check the problem before restarting. Note: High voltages in the dynamic brake may cause electric shock. Be sure to keep the cover closed when operating. Appendix A-15 6. Specification Braking resistor (unit) Specification (1 SET) Quantity (SET) Braking torque (10%ED) 0.5(0.4) 70W, 200Ω 1 220% 1(0.75) 70W, 200Ω 1 125% 2(1.5) 260W, 100Ω 1 125% 3(2.2) 260W, 70Ω 1 120% 5(3.7) 390W, 40Ω 1 125% 2) Specifications of dynamic brake Model name / Specification Motor capacity kW (HP) Max. discharge peak current (A) Output Rated discharge current (A) characteristic Braking starting voltage Max. hysteresis voltage error Power VDC Protection Overcurrent protection BRAKE LED FAULT Installation site Installation condition MOSCON-E7 User’s Manual ---------------------------------------MEMO----------------------------------------- 1) Dynamic brake and braking resistor Inverter (CLASS 200V) Capacity HP (kW) A-16 Ambient temperature Storage temperature Humidity Vibration Protective structure SIBR-23P7 / 0.4~3.7kW 200V 3.7 (5) 10 4 330/345/365/380V± 3V Approximately 8V 243~400V Protects overcurrent fuse Turns on when braking (Yellow LED). Turns on when there is a fault (Red LED) Indoor installation to protect form corrosive gases and dust. +14 ~ +104℉ or –10 ~ +40℃ (no dew formation) +4 ~ +140℉ or –20 ~ +60℃ 90% RH 1G (10 ~ 20Hz), 0.2G (20 ~ 50Hz) Closed-type panel Index Index 3-wire sequence ---------------------------------------------------------- 5-43 AC/DC reactor --------------------------------------------------------- 3-20 Accel/decel time -------------------------------------------------------- 5-20 Cable length ------------------------------------------------------------- 3-16 Carrier frequency ------------------------------------------------------- 5-38 Circuit breaker ---------------------------------------------------------- 3-10 Connection diagram ---------------------------------------------------- 3-4 Control circuit terminal ------------------------------------------------ 3-6 Daily inspection --------------------------------------------------------- 7-4 DC breaking ------------------------------------------------------------ 5-22 Digital operator ----------------------------------------------------------- 4-3 Dimensions --------------------------------------------------------------- 1-6 Dwell operation ---------------------------------------------------------- 5-25 Energy saving ---------------------------------------------------------- 5-26 Error description display ------------------------------------------------- 6-3 Error monitoring ------------------------------------------------------- 5-74 External dimension ----------------------------------------------------- 1-7 External search -------------------------------------------------------- 5-49 Fault retry -------------------------------------------------------------- 5-72 Frequency control ---------------------------------------------------- 5-15 Frequency limit -------------------------------------------------------- 5-17 Grounding -------------------------------------------------------------- 3-20 Hunting prevention ---------------------------------------------------- 5-29 Inductive noise ------------------------------------------------------- 3-15,16 Installation dimension ----------------------------------------------- 1-7 Installation site -------------------------------------------------------- 2-7 Installation space ----------------------------------------------------- 2-8 Inver capacity ---------------------------------------------------------- 5-14 Inverter model number ----------------------------------------------- 2-4 Iron Loss -------------------------------------------------------------- 5-38 Jogging frequency ----------------------------------------------------- 5-16 Jump frequency ----------------------------------------------------------- 5-18 MOSCON-E7 User’s Manual Main circuit terminal ------------------------------------------------------ 3-7 Magnetic contactor ------------------------------------------------------- 3-10 Monitoring function ------------------------------------------------------ 5-4 Motor capacity ------------------------------------------------------------ 5-14 Motor direction ----------------------------------------------------------- 5-11 Motor protection -------------------------------------------------------- 5-60 Multi-function analog input --------------------------------------------- 5-52 Multi-function analog output ------------------------------------------ 5-55 Multi-function input contact ------------------------------------------- 5-41 Multi-function output contact ----------------------------------------- 5-50 Multi-step operation ----------------------------------------------------- 5-16 Nameplate ------------------------------------------------------------------ 2-4 Noise filter ---------------------------------------------------------- 3-11,12,15 Operation method -------------------------------------------------------- 5-10 Overtorque ---------------------------------------------------------------- 5-70 Parameter setting method ------------------------------------------------ 5-7 Part replacement ----------------------------------------------------------- 7-7 Password ------------------------------------------------------------------ 5-13 Periodic inspection -------------------------------------------------------- 7-5 Peripheral devices --------------------------------------------------------- 3-8 Power failure --------------------------------------------------------------- 5-63 Reference source ----------------------------------------------------------- 5-9 RFI -------------------------------------------------------------------------- 3-16 S-curve ---------------------------------------------------------------------- 5-21 Slip compensation -------------------------------------------------------- 5-27 Speed search --------------------------------------------------------------- 5-23 Stall prevention ------------------------------------------------------------ 5-65 Standard specification ----------------------------------------------------- 1-8 Stopping method --------------------------------------------------------- 5-17 Surge absorber --------------------------------------------------------- 3-11,12 System diagram ------------------------------------------------------------ 1-5 System initialization ----------------------------------------------------- 5-13 Terminal block -------------------------------------------------------- 3-7 Terminal status LED ------------------------------------------------ 5-9 Index Test run ----------------------------------------------------------------- 4-6 Time switching frequency ------------------------------------------ 5-20 Torque compensation ----------------------------------------------- 5-29 Undervoltage --------------------------------------------------------- 5-64 Up/down frequency command ----------------------------------- 5-46 Upper and lower frequency limit ---------------------------------- 5-17 V/f pattern ----------------------------------------------------------- 5-31 V/f recovery time ---------------------------------------------------- 5-64 Cable specification -------------------------------------------------------- 3-21 Wiring check ---------------------------------------------------------- 3-22