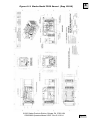
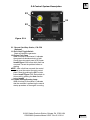
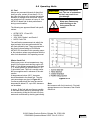
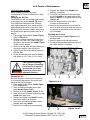
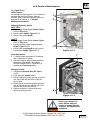
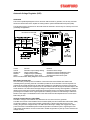
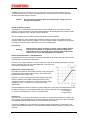
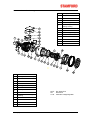
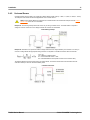
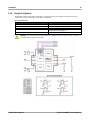
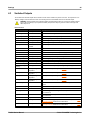
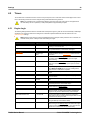
1
OPERATION AND MAINTENANCE MANUAL 20.0kW - 40.0kW GENERATORS MODELS CD20, CD30, CD40T4 For Service or Repairs to your generator contact Stadco Generator Support at 1-800-377-2120 or (717) 738-2500. When seeking information please provide Genset Serial No. and Engine Serial No. as shown on Rating Plate. Products Division © 2013 Stadco Products Division, Ephrata, PA 17522 USA CD20/30/40 Operators Manual 13067 Rev 02 121514 Page 1 Foreword Important This Operators Manual describes the appropriate measures for operation and maintenance for the models of Stadco generators set forth herein. It is presumed that operations described in this manual will be carried out by qualified personnel with prior experience in handling this type of machinery and electronics; consequently this manual shall not be considered a teaching manual for the inexperienced. If you do not clearly understand the references in this manual, please contact Stadco Products Division immediately. Contact information is posted in Section 2.0. The accident prevention regulations and all other generally recognized regulations on safety and occupational medicine shall be observed. Contents of this manual are copyrighted and are the property of Stauffer Diesel Inc/ Stadco. Unauthorized reproductions of this manual are prohibited. © 2013 Stadco Products Division, Ephrata, PA 17522 USA CD20/30/40 Operators Manual 13067 Rev 02 121514 Page 2 TABLE OF CONTENTS SECTION 1. Safety Precautions 2. Contacts & Registration 3. General Information 3.1 3.2 3.3 3.4 Introduction Factory Settings Initial Inspection How to Identify Genset 4. Genset Drawings 5. Control System Description 5.1 5.2 1779 Digital Control System 1780 Remote Station 6. Starting & Operating Instructions 6.1 6.2 6.3 6.4 Starting Procedure from 1790 Main Control Panel Resetting the control system Starting Procedure from 1780 Remote Station (Optional) Shutdown Procedure 7. 12VDC Electrical System 7.1 7.2 7.3 7.4 7.5 Wiring General 12V Battery Connections Control System Wiring Digital Controller Start Inhibit Feature 8. AC Electrical System 8.1 8.2 8.3 Electrical Connections Generator Grounding AC Wiring Diagram 9. Operating Media 9.1 9.2 Lube Oil Specification Fuel Specification 10. Installation Instructions 10.1 10.2 10.3 10.4 10.5 10.6 General Mounting Instructions Exhaust Gas System Fuel System Cooling System Design Features and Specifications Installation Checks © 2013 Stadco Products Division, Ephrata, PA 17522 USA CD20/30/40 Operators Manual 13067 Rev 02 121514 Page 3 TABLE OF CONTENTS SECTION 11. Points of Maintenance 11.1 11.2 11.3 11.4 11.5 11.6 11.7 11.8 11.9 Maintenance Precautions Break-in Instructions Routine Maintenance Schedule Lubrication System Fuel System Dry Type Air Filter V-belt Drive Valve Clearance Cooling System 12. Service Items List 13. Limited Warranty A.C. Alternator Operation & Maintenance Stamford Electronic Regulated Generator (P0-1-MAN) AS480 Automatic Voltage Regulator (AS480) TG410 Digital Engine Controller © 2013 Stadco Products Division, Ephrata, PA 17522 USA CD20/30/40 Operators Manual 13067 Rev 02 121514 Page 4 1 1.0 Safety Precautions Safety Precautions General Before operating the generator set, read the operation manual/s and become familiar with it and the equipment. In order to avoid personal injury and to prevent damage to equipment, it is imperative that all the safety precautions listed are followed when operating this equipment. Observe all IMPORTANT, CAUTION, WARNING and DANGER notices, defined as: Important! Important refers to hazard or unsafe method or practice which can result in product damage or related equipment damage Warning! CAUTION! Warning refers to a hazard or unsafe method or practice which CAN result in severe personal injury or possible death. This symbol refers to a hazard or unsafe practice which can result in personal injury or product or property damage. Danger refers to immediate hazards which WILL result in severe personal injury or death. Danger! Low Voltage Control circuits utilized by the generator set are low voltage (12 volts D.C.). This voltage is not considered dangerous, but the large amount of current available (over 300 amps) can cause severe burns if shorted to ground. • Disconnect the negative terminal of the battery if possible when working on the generator set. • Disconnect the cable end that is away from the battery. • Do not wear jewelry, watches or rings. These items can short out and cause severe burns to the wearer. High Voltage (AC Current) Never attempt any kind of service or repair while the engine is running. When servicing or repairing a generator set with the engine running, the possibility of serious or even fatal injury from electrical shock exits. Lethal voltage potentials may exist. Treat all wires and connections as high voltage until meter and wiring diagram show otherwise. Do not attempt to work on high voltage equipment. Have a qualified electrician perform these tasks IMMEDIATE action must be initiated after a person has received an electric shock. Quickly obtain expert medical assistance. The source of shock must be immediately removed by either turning the generator off or turning the circuit breaker off. Guard Against Electric Shock Do not operate the generator with protective covers, access covers or safety shields removed. Never operate the generator, or handle any electrical equipment while standing on wet surfaces or while in touch with wet surfaces. Maintain all electrical cords in good condition. Worn, frayed or bare wires will cause severe electrical shock. Use extreme caution when working on electrical components. High voltages cause injury or death. Follow all state and local safety codes. Do not wear jewelry while working on electrical equipment. Keep the Unit Area Clean Keep engine and equipment clean and in good working condition. Remove all oil deposits. Remove all unnecessary grease and oil from the unit. Accumulated grease and oil can cause overheating and subsequent generator damage and may present a potential fire hazard. DO NOT store anything in or around the generator, such as oil or gas cans, oily rags, chains, wooden blocks, portable propane cylinders, etc. A fire could result or the generator system operation (cooling, noise, and vibration) may be adversely affected. © 2013 Stadco Products Division, Ephrata, PA 17522 USA CD20/30/40 Operators Manual 13067 Rev 02 121514 Page 5 1 1.0 Safety Precautions Protect Against Moving Parts Avoid moving parts on the unit. Loose clothing or jewelry should not be permitted because of the danger of becoming caught in moving parts. Keep safety shields and guards in position. Be sure to stop the engine whenever checking and correcting the engine fluids. If adjustments must be made while the unit is running, use extreme caution around rotating, hot or electrical components. General Precautions • Have all installations performed by qualified licensed personnel. • Always stop engine and disable engine starting circuit before attempting to perform any type of service. • Make sure that all fasteners are secure and are the correct length. • Keep the genset and surrounding area clean. • Always provide adequate ventilation. Engines consume oxygen and give off deadly monoxide gases. • Use extreme caution if holes are drilled into the generator set. Holes drilled into an electrical wire can cause fire, explosion or shock hazard. • Use correct tools. Use tools with insulated handles. • Check that the fuel, water and lubricating oil levels are correct. • Never start the generator with an electrical load applied. • Do not start any operation until you have taken all the necessary steps to ensure that you are in complete safety. Battery Hazzards The electrolyte in a lead acid battery is dilute sulfuric acid (H2SO.). During charge or discharge functions of a battery, a chemical change takes place within the cells that causes the formation of hydrogen and oxygen gases, and it is EXPLOSIVE. If, during this gassing action, a means of ignition is present, an explosion could occur. A battery explosion could hurl corrosive sulfuric acid into your face and eyes and could cause blindness. Precautions Always wear eye protection when servicing batteries. If electrolyte is splashed on the skin or in the eyes, flush immediately under running water or use a neutralizing fluid. Obtain medical help as soon as possible. When charging batteries, do not remove the vent caps. When disconnecting or reconnecting the generator set battery, make sure the “POWER” switch is in the OFF position to prevent an arc which could cause the battery to explode. Disconnect the ground (NEGATIVE) cable first, preferably at a point away from the battery. Reconnect the ground cable last, again away from the battery if possible. Do not check a battery by “sparking” across the posts. Eye injury from the arc or an explosion may occur. Exhaust System Carbon monoxide is a deadly gas. Never operate the engine in closed areas unless properly ventilated. Internal combustion engine exhaust Warning! gases have a high content of carbon monoxide which is very dangerous when ventilation is poor. Breathing carbon monoxide polluted air causes disturbances depending upon the exposure time; these disturbances may range from a simple headache, to fainting fits, paralysis, coma, death. Precautions for Filters and Elements • The materials used in the manufacture and treatment of some filters may cause irritation or discomfort if they come into contact with the eyes or mouth and they may give off toxic gasses if they are burned. • Used liquid filters and elements contain some of the filtered liquid and should be handled and disposed of with care. • After handling new or used elements the users hands should be thoroughly washed, particularly before eating. CAUTION! Fuel and lubricating oils may cause skin irritation. © 2013 Stadco Products Division, Ephrata, PA 17522 USA CD20/30/40 Operators Manual 13067 Rev 02 121514 Page 6 2 2.0 Contacts & Registration 2.1 Contacts STADCO PRODUCT SUPPORT To expedite your inquiries and fill your needs most efficiently we recommend channeling your Stadco related inquiries to the appropriate department as follows: Sales: Parts: Service & Electrical: Application & Installation: Tony Stauffer [email protected] Sandy Schaeffer s [email protected] Tim Stauffer [email protected] Travis Stauffer [email protected] Main Office: Phone: 717-738-2500 FAX: 717-738-2550 Toll free: 800-377-2120 E-mail: [email protected] Website: www.stadcogen.com For emergency service after office hours call the following number: (717) 738-2500 When requesting service or parts please provide the following information: -Genset model no. -Genset serial no. -Engine serial no. This information is located on page #1 of this manual and can also be found on the unit as shown in section 3.4 of this manual. Deutz Engine Service Nationwide: To find your nearest Deutz engine distributor contact Deutz headquarters in Atlanta as follows: a. Telefax 770-564-7132 (Service Dept.) b. Nationwide toll free 1-800-241-9886 (Emergency Only) c. Deutz Service Desk d. Website: www.deutzusa.com © 2013 Stadco Products Division, Ephrata, PA 17522 USA CD20/30/40 Operators Manual 13067 Rev 02 121514 Page 7 2 2.0 Contacts & Registration 2.2 Registration It is very important to register your generator so that we may keep you informed of product updates and improvements. Also registration will help to verify in service date for warranty purposes. Fill in the following information and send, fax or email to: Stauffer Diesel Inc. PO Box 586 34 Stauffer Lane Ephrata, PA 17522 Fax: (717)-738-2550 Email: [email protected] Generator Registration Info Generator Model: Generator Serial No: Generator Model & Serial No. can be found on first page of this manual & on Stadco tag riveted to generator. Date Purchased: Name: Company: Address 1: Address 2: City: State/Prov: Country: Zip/Postal Code: Phone: Fax: Email: Comments: © 2013 Stadco Products Division, Ephrata, PA 17522 USA CD20/30/40 Operators Manual 13067 Rev 02 121514 Page 8 3 3.0 General Information 3.1 Introduction Thank you for choosing a STADCO Generator. STADCO is the full service supplier for the STADCO generator products line: We design it - We build it - We support it. Most parts, including major repair parts, are usually available same day from our own stock. Deutz, diesel engines are additionally supported by independent engine distributors located throughout the U.S. and Canada. We are constantly improving on our products; taking advantage of the latest technical advancements, to assure you the most reliable, efficient generator available anywhere. Please read the installation and service sections of this manual carefully. A clean environment and proper installation are as critical to generator performance as is the engineering of the internal components. If you have any difficulty in installing or servicing your STADCO genset our service and technical staff will be happy to assist you. We are confident that if these guidelines are observed, you will get many years of reliable service from your STADCO generator set. 3.2 Factory Settings The generator set consists of a Deutz diesel engine which is directly coupled to a revolving field, brushless alternator. The STADCO AC and DC electronic control systems are completely pre-wired at the factory. The generator A.C. alternator is totally brushless with a revolving field and is electronically regulated. Configuration is single bearing at one end, having the opposite end supported and driven by a disc coupling. 3.4 How to Identify Genset For genset identification locate tag similar to Figure 3.4.1. This tag is located on the generator connection cabinet. Figure 3.4.1 Engine Identification It is necessary and important to identify the Model No. and Serial No. of the engine when ordering parts or needing service. 1 Figure 3.4.2 The engine Rating Plate/Model/SN tag is attached to the top of the engine valve cover Item #1, Figure 3.4.2. The engine serial number is also stamped on the engine crankcase, Figure 3.4.3. 3.3 Initial Inspection Your STADCO generator has been carefully inspected and tested before leaving the factory. However, it is wise to examine the generator before installation. Upon delivery, carefully unpack the generator and examine for any shipment damage. If there is any damage, file a damage claim with the carrier. Save all packing materials for inspection by the carriers agent. Figure 3.4.3 © 2013 Stadco Products Division, Ephrata, PA 17522 USA CD20/30/40 Operators Manual 13067 Rev 02 121514 Page 9 3 3.0 General Information 6 5 1 11 7 1. 2. 3. 4. 5. 6. 7. 8. 2 3 4 10 8 Lube Oil Filter Fuel Filter Lube Oil Dipstick Lube Oil Fill Cap Load Circuit Breaker AC Connection Cabinet 12VDC Alternator 12VDC Starter 9 9. Automatic Voltage Regulator 10. Engine Air Cleaner 11. Exhaust Connection © 2013 Stadco Products Division, Ephrata, PA 17522 USA CD20/30/40 Operators Manual 13067 Rev 02 121514 Page 10 Figure 4.1.1 Stadco Model CD20 Genset (Dwg 12916) © 2013 Stadco Products Division, Ephrata, PA 17522 USA CD20/30/40 Operators Manual 13067 Rev 02 121514 4 Page 11 Figure 4.1.2 Stadco Model CD30 Genset (Dwg 12917) © 2013 Stadco Products Division, Ephrata, PA 17522 USA CD20/30/40 Operators Manual 13067 Rev 02 121514 4 Page 12 Figure 4.1.3 Stadco Model CD40T4 Genset (Dwg 13012) © 2013 Stadco Products Division, Ephrata, PA 17522 USA CD20/30/40 Operators Manual 13067 Rev 02 121514 4 Page 13 5 5.0 Control System Description 4 8 Figure 5.1.1 3 2 1 Figure 5.1.2 9 10 7 6 5 See Section 6.0 Starting & Operating Instructions for details on Control System Operation. 5.1 Digital Control System 1790 Standard Features 1. Power Switch Turns on/off 12VDC power to control system. Unit cannot be started with this switch in the OFF position. This applies to remote stations as well. 2. 12 Volt Circuit Breaker Protects D.C. circuits against shorted/ overloaded circuits. Reset button, in center of circuit breaker, permits resetting after fault conditions are corrected. 3. Alternator Lamp Monitors the battery charging current. 4. Digital Controller Controls genset startup and monitors engine & generator functions. 5. RUN Button Starts the engine manually and will continue to run until OFF button is pressed, Emergency Stop input is activated or a failure occurs. 6. AUTO Button Places the controller in Auto mode which allows it to start or stop based upon certain conditions. Must be in Auto mode to start from Remote locations. 7. OFF Button Used for turning off engine controller or exiting out of Auto mode. 8. LCD Screen Displays the engine/generator parameters that are being monitored. Also displays warning and failure notifications. 9. Navigation Buttons Used to move throughout the menu system, view parameters and change settings. 10. LED Indicator Displays the current status of the system: Solid Green - Engine Running Solid Amber - Warning Solid Red - Failure © 2013 Stadco Products Division, Ephrata, PA 17522 USA CD20/30/40 Operators Manual 13067 Rev 02 121514 Page 14 5 5.0 Control System Description 13 11 12 Figure 5.2.1 5.2 Remote Start/Stop Station, PN:1780 (Optional) 11. Start- Stop Toggle Switch Starts and stops the generator. 12. Engine Fault Lamp When this lamp is illuminated, it indicates the system has shutdown due to a fault. Check the main control panel LCD Screen Item#8 Figure 5.1.2 to see which fault has occurred. Correct the problem before restarting. NOTE: After a fault has occurred, the control system must be reset at the main control panel. Reset by pushing the Off Function button Item#7 Figure 5.1.2. Return back to Auto mode by pushing the Auto function button Item#6. 13. Engine Starting/Running Lamp When this lamp is illuminated, it indicates that the controller is performing the normal startup procedure or the engine is running. © 2013 Stadco Products Division, Ephrata, PA 17522 USA CD20/30/40 Operators Manual 13067 Rev 02 121514 Page 15 6 6.0 Starting and Operating 6.0 Starting And Operating Instructions Prestart Checks 1. Check lube oil level at dipstick. Add oil if required, (Section 11.2). 2. Check fuel level in fuel tank. 3. Set main load circuit breaker to OFF position before starting generator. 4. Make sure all personnel are clear of moving parts and all enclosure panels and guards are in place. 6.1 Starting Procedure for Digital Control System PN:1790 1. Move toggle Power switch Item#1 Figure 5.1.1 to ON position, this activates the control system. 2. Push RUN function button Item#5 Figure 5.1.2 to start engine. The engine controller will activate and perform the following startup procedure: a. First, the engine will preheat for a preset preheat time. b. Next, the engine controller will crank the engine until it begins to start. The LCD Screen Item#8 will display “Running” and LED Indicator Item#10 will light Solid Green. The engine should continue to run normally unless a fault condition exists. If the engine fails to start after cranking for the preset crank cycle, the unit will stop and Overcrank failure will appear in the LCD Screen and LED Indicator will light Solid Red. If a fault occurs, the control system will need to be reset. See Section 6.2. 6.2 Resetting the Control System The control system needs to be reset after the generator has shutdown from any fault condition. Check the fault indication on the LCD Screen Item#8 Figure 5.1.2 to determine what caused the generator to shutdown. Correct this fault before restarting. To reset, push the Off Function button Item#7 Figure 5.1.2. Return back to Auto mode by pushing the Auto function button Item#6. Warning! CAUTION! Do not use starting fluid while the electrical manifold heater is in use; otherwise a dangerous explosion will occur in the intake system which may seriously injure operator. Never move the START switch to START position while engine is running or in motion in any way. 6.3 Starting Procedure for optional Remote Station PN:1780 1. Power switch Item#1 Figure 5.1.1 in the main control panel must be in the ON position and Digital Controller Item#4 Figure 5.1.1 must be in Auto Mode before starting from remote station. 2. Push Start/Stop Toggle switch Item #11 Figure 5.2.1 to GENERATOR START position. When the Engine Starting/Running lamp Item#13 lights up, release the switch. The engine controller will begin the following start-up procedure: a. First, the engine will preheat for a preset preheat time. b. Next, the engine controller will crank the engine until it begins to start. The engine Starting/Running LED will remain lit. The engine should continue to run normally unless a fault condition exists. If the engine fails to start after the default cranking procedure, the unit will stop and the Engine Fault lamp Item#12 will become lit. If a fault occurs, the control system will need to be reset at the main control panel before being restarted. See Section 6.2. Note: See Section 7.5 for Digital controller default setup. Warning! The main generator will automatically activate and build up current immediately upon engine start up . © 2013 Stadco Products Division, Ephrata, PA 17522 USA CD20/30/40 Operators Manual 13067 Rev 02 121514 Page 16 6 6.0 Starting and Operating 6.4 Shutdown Procedure Prior to shutdown of the engine: 1. Switch the main circuit breaker to OFF position to disengage load. 2. Permit engine to run without load or with light load for 3-5 minutes (cool down cycle). Shutdown can be accomplished several ways: a. By pressing the OFF button Item#7 Figure 5.1.2. b. By moving the toggle Power Switch Item#1 Figure 5.1.1 to the OFF position. c. By pushing the Start/Stop Toggle Switch Item#11 Figure 5.2.1 to the GENERATOR STOP position. Warning! Manual shutdown should be exercised whenever any abnormal events occur; precluding the possibility of engine damage which may occur if the automatic engine protection devices fail to function properly. Check the AC electrical load systems and driven machinery to make sure all unsafe conditions are corrected prior to activation of Generator current and/or engagement of main circuit breaker. Also check all electrical connections and conductors to make certain that no shorted circuits, open conductors or open ground circuits exist. In the event portable equipment, hand tools, portable heaters, or portable lighting are operated from this unit: use Ground Fault Interrupting (GFI) type secondary circuit breaker(s) in the output circuits for the personal safety of the operators. OBSERVE ALL THESE PRECAUTIONS BEFORE ATTEMPTING TO ENGAGE AC LOAD. CAUTION! NOTE: To reduce the chances of catastrophic engine failure, we recommend to inspect and test the function of the automatic safety engine protection system at regular intervals. Check the system at each oil change interval, or once per year, whichever occurs first. Warning! Warning! Automatic safety engine protection system does not provide absolute protection against major engine damage in the event of abnormal operating conditions. Failure of this system may occur if not properly maintained. When working on or around a running engine use extreme caution! Be aware of moving or rotating parts which can catch onto loose clothing or jewelry. © 2013 Stadco Products Division, Ephrata, PA 17522 USA CD20/30/40 Operators Manual 13067 Rev 02 121514 Page 17 7 7.0 12VDC Wiring 7.1 Wiring General All wiring must meet applicable local electrical codes. Have a qualified electrician install and inspect the wiring. Mount switches and controls securely to prevent damage from vibration and road shocks. All switches must be vibration proof to prevent accidental opening or closing while the vehicle is in motion. The conductors to the generator system output must have an ampere rating of not less that 115% of the nameplate current rating of the generator system. The factory supplied conductor insulation must be rated at 105°C. Wires connected to the generator must meet or exceed this insulation rating. (See National Electrical Code, NFPA 70) State and local codes specify different grounding requirements for mobile vehicles with electric generator systems. These specific codes must be followed in order to insure personal protection. CAUTION! Read topic "BATTERY HAZARD" in the Safety Guidelines section of this manual before servicing or maintaining battery system. CAUTION! Do not reverse the battery polarity. Reversed battery polarity will damage or destroy the generator electrical components. 7.2 12 Volt Battery Connections A 12VDC battery is not supplied with the genset but must be provided. Connect the positive cable to the starter post as shown in Figure 7.2.1. The negative cable should be attached to a convenient location on the engine block. Be sure to remove the paint before attaching the cable to ensure a good electrical connection. When making the connection from the battery to the engine use minimum #1 gauge wire, this is calculated on a 25 foot system, total loop. When systems exceed the 25 feet in length, consult STADCO for recommendation on the size of wire to use. Use all copper stranded cables only. Make sure the battery is properly connected. Unit control system is a negative ground (-) system. For recommended battery size see “Design Features and Specification” Table, Section 10.5. Before connecting the battery cables, make sure power switch Item#1, Figure 5.1.1, is in the OFF position. 7.3 Control System Wiring A 10ft. control cord is provided for interconnection between Terminal Strip #1 located inside main control panel and plug in connectors on engine wiring harness. Also a plug in connection is required for speed monitoring from the AC generator to the Digital Controller. A wiring diagram should be provided along with the generator. If not available, a copy can be requested from Stadco. Remote Start/Stop Station PN:1780 (Optional) Installers are responsible to supply the wiring from the main control panel (terminals 10-14 on Terminal Strip #1 to the terminals on remote station. Use a minimum of 16 gauge wiring, 105ºC rated, to make these connections. NOTE: Make sure all electrical cables are adequately protected against chafing or any other failure of insulating material. Protect all loose wiring with appropriate wire protection material. Battery Positive Figure 7.2.1 © 2013 Stadco Products Division, Ephrata, PA 17522 USA CD20/30/40 Operators Manual 13067 Rev 02 121514 Page 18 7.0 12VDC Wiring 7 7.4 Digital Controller Default Settings The Digital Engine Controller is programmed by Stadco with the following default settings. These settings are programmed according to the engine manufacturers specifications and should not be changed without consulting with Stadco. Crank cycles: 2 attempts, 15 sec. crank Crank rest: 15 seconds Preheat timer: 0 seconds Crank Disconnect: 450 RPM / 15 HZ. Overspeed: 2,100 RPM / 70 HZ. Start-up Routine 1. First, the controller will preheat the engine for a preset period of time. 2. Next, the controller will crank the engine for 15 seconds or until engine starts. If engine fails to start after 15 seconds the controller will rest for 15 seconds then it will repeat the preheat & crank cycle. If after 2 consecutive tries the engine fails to start the controller will shutdown on overcrank & Overcrank failure will be displayed in the LCD display screen. Note: Engine preheat is optional, preheat cycle may be turned off. 7.5 Start Inhibit Feature The digital Controller is equipped with a start inhibit feature which when activated will prevent the genset from being started and also will shutdown the genset if it is already running. This feature is designed to work in conjunction with a transfer switch to prevent shore power and Auxiliary genset power simultaneously. To utilize this feature, remove jumper wire in control panel 1790 between terminals #12 & #15. The start inhibit feature triggers (or is active) on Open circuit. Connect a Closed contact from the transfer switch to terminal #15 for genset running, an Open contact to prevent starting/running. © 2013 Stadco Products Division, Ephrata, PA 17522 USA CD20/30/40 Operators Manual 13067 Rev 02 121514 Page 19 8 8.0 AC Wiring 8.1 Electrical Connections All wiring must meet applicable local & national electrical codes. Have a qualified electrician install and inspect the wiring. Mount switches and controls securely to prevent damage from vibration and shocks. All switches must be vibration proof to prevent accidental opening or closing. The conductors to the generator system output must have an ampere rating of not less that 115% of the nameplate current rating of the generator system. The factory supplied conductor insulation must be rated at a minimum of 105ºC. Wires connected to the generator must meet or exceed this insulation rating. 1 Figure 8.1.1 Connections for load cables are to be made directly to the load circuit breaker Item#1 Figure 8.1.1. The neutral conductor should be connected to the neutral post on the generator main terminal strip Item#2. Due to the many different AC connection options (voltage, phase, etc.) not all AC connection diagrams are included in this manual. Contact Stadco if you have any questions regarding connection diagrams. Danger! 2 AC wiring should only be carried out by a qualified technician familiar with state a local electrical codes. Failure to follow proper grounding techniques can result in serious personal injury or death. See Section 8.3 for AC wiring diagrams. Note: Some items shown may be optional. Make sure all electrical cables are adequately protected against chafing or any other failure of insulating material. Protect all loose wiring with appropriate wire protection material. NOTE: The Automatic Logic Controller in the Remote Control Panel also requires a high voltage connection for speed monitoring. This connection is pre-wired and is part of the standard connection cord from genset to remote panel. See AC & DC Wiring Diagrams. 8.2 Generator Grounding State and local codes specify various grounding requirements for electric generator systems. These specific codes must be followed in order to insure personal safety. © 2013 Stadco Products Division, Ephrata, PA 17522 USA CD20/30/40 Operators Manual 13067 Rev 02 121514 Page 20 8.3.1 AC Wiring Diagram 1-phase Dwg. 13066 © 2013 Stadco Products Division, Ephrata, PA 17522 USA CD20/30/40 Operators Manual 13067 Rev 02 121514 8 Page 21 9.0 Operating Media 9 9.1 Lube Oil Lube oils are distinguished according to their performance and quality class. Oil quality has a considerable effect on the life and performance of the engine. In common use are the API & ACEA Specifications. Approved API oil classes: CG-4/CH-4/CI-4/CJ-4 Approved ACEA oil classes: E7-04/E3-96/E5-02/E4-07/E6-04 For a complete description of the oil qualifications see the latest revision of Deutz technical circular 0199-99-3002. The engine is filled by Stadco with 15W40 Deutz brand oil. DO NOT mix oils of different brands & types. Oil Viscosity: The viscosity of lube oil is dependent on the ambient temperature, therefore the choice of the SAE-grade should be governed by the ambient temperature prevailing at the engine operating site. Optimum operating performance can be attained by using the oil viscosity diagram (Figure 9.1.1). Conversion to ºF ºF = (ºC x 1.8)+32º The temperatures given in the “Oil Viscosity” table are the ambient temperatures at the time when the engine is started. However, if the running ambient temperatures are much higher than the starting temperatures, a higher viscosity oil must be used. Oil changes dictated by changing temperatures can be avoided by using multigrade lube oils. Multigrade oils overcome the problem, provided they have a suitable specification. Should the temperatures temporarily fall below the limits of the SAE-grade selected, this will merely affect the starting performance, but will not cause any damage to the engine. The temperature limits should not be exceeded over lengthy periods of time in order to conserve engine service life. Figure 9.1.1 © 2013 Stadco Products Division, Ephrata, PA 17522 USA CD20/30/40 Operators Manual 13067 Rev 02 121514 Page 22 9 9.0 Operating Media 9.2 Fuel Always use commercial brands of diesel fuel having a sulfur content of less than 0.5 %. In the case of a higher sulfur content the periods between oil changes must be shorter. Never use substitute fuel, kerosene or heavy oil. Use ASTM 2-D diesel fuel for best performance during normal weather. The following are approved diesel fuel specifications: CAUTION! Always use clean diesel fuel. The use of contaminated fuel, may result in engine damage. Keep open flames away when working on the fuel system! Do not smoke! Danger! ASTM D 975; 1-D and 2-D DIN EN 590 JIS K 2204, Grade 1 and Grade 2 NATO Code F-54 The certification measurements to satisfy the legal emission limits are performed with the test fuels defined by law. These correspond to the diesel fuels according to EN 590 and ASTM D 975 described in this operating manual. No emission values are guaranteed with the other fuels described in this operating manual. Winter Grade Fuel Waxing may occur at low temperatures, clogging the fuel system and reducing engine efficiency. If the ambient temperature is less than 0 °C, winter-grade fuel (suitable down to -20 ° C) should be used. This fuel is usually available from suppliers well in advance of the cold months. At temperatures below -20°C/, kerosene should be added to the diesel fuel. The relevant percentages are given in Figure 9.2.1. If summer-grade diesel fuel must be used at temperatures below 0°C, up to 60% kerosene can be added. In winter, fill the fuel tank as often as possible to eliminate the air space for preventing moisture condensing. Keep the fuel tank free from water and contaminant by draining periodically. Figure 9.2.1 Note: Mix kerosene with fuel in tank only. First add appropriate amount of kerosene, then fill with diesel fuel. © 2013 Stadco Products Division, Ephrata, PA 17522 USA CD20/30/40 Operators Manual 13067 Rev 02 121514 Page 23 10.0 Installation Instructions 10 10.1 General Mounting Instructions The framework must be constructed in accordance with good mechanical design so that the weight of the generator system will not stress the compartment construction. Plan the location to be large enough to permit set removal. Allow additional clearance for easy access to the oil fill, oil filter, oil drain, fuel filter, air filter, as well as the voltage regulator and main load circuit breaker. Allow enough clearance so that the exhaust system may be disconnected for future service work. Design the compartment large enough for the generator system. Install the generator system in its own compartment. Separate the compartment area from the storage areas, fuel supply areas and personnel. See Section 4.0 for genset drawing. Construct the compartment floor in a manner so as to prevent oil, fuel, or water accumulation. Secure the modular generator system to the compartment frame using 1/2-13 UNC, grade 5 bolts. Danger! Exhaust gases are poisonous, and should be directed away from any occupied area. Be certain that exhaust gases cannot be drawn into any enclosed spaces where gases could accumulate. © 2013 Stadco Products Division, Ephrata, PA 17522 USA CD20/30/40 Operators Manual 13067 Rev 02 121514 Page 24 10 10.0 Installation Instructions Danger! Exhaust gases are poisonous, and should be directed away from any occupied area. Be certain that exhaust gases cannot be drawn into any enclosed spaces where gases could accumulate. 10.2 Exhaust Gas System Typically the exhaust gas system consists of exhaust gas manifold, muffler and tailpipe. All of this will necessarily restrict the flow of the exhaust gas; such restriction must not exceed the limits specified for the particular engine, Additionally: The exhaust system must prevent the entrance of rain, road sprays or other water sources into the engine. To prevent recirculation of exhaust gases into the engine combustion or cooling air system locate the exhaust outlet as far as possible from these systems. Use flexible tubing to connect the engine exhaust to any rigid pipe extensions. This is used to prevent transmission of vibration. Exhaust Backpressure The exhaust system will produce a certain resistance to the exhaust gas flow (“exhaust backpressure”) consisting of the total resistance of the system, including the pipes, pipe bends, muffler, tailpipe and/or exhaust accessories. The exhaust system design must ensure that the total system flow resistance does not exceed the maximum permissible backpressure, Refer to Section 10.5 for Specifications. If you are going to supply your own muffler for the genset, the following are factors that govern the selection of the muffler: 1. Exhaust volume flow at rated output and speed. 2. maximum permissible engine exhaust backpressure. 3. degree of noise reduction required in dB(A). 4. configuration required. Whenever the muffler is not mounted on the engine, suitable engine-muffler connections must be provided. These connections must be kept as short as possible. Elbows Provide sweeping bends to minimize exhaust backpressure. 90º elbows should have a radius not smaller than the pipe I.D. NOTE: Use of short radius water-pipe elbows and/or miter cut elbows is strictly forbidden and may void engine warranty. Exhaust Connections CD Connect the exhaust piping to the connector provided on the exhaust manifold Item#1 Figure 10.2.1. The exhaust outlet should be installed so the exhaust is directed away from any operator station and shall be properly guarded to protect the operator. 1 The engine exhaust manifold I.D. constitutes the reference value for designing the exhaust piping. It is not permissible to reduce the I.D. beyond this size. Mufflers CD20/CD30 Generators are supplied with an engine mounted exhaust muffler. An optional exhaust kit with muffler is available from Stadco, See Figure 10.2.2. CD40T4 Generators are supplied with an exhaust muffler kit loose. Figure 10.2.2. Figure 10.2.1 Danger! Inhalation of exhaust gases can result in severe personal injury or death Be sure that exhaust system does not leak. © 2013 Stadco Products Division, Ephrata, PA 17522 USA CD20/30/40 Operators Manual 13067 Rev 02 121514 Page 25 10.0 Installation Instructions 10 Figure 10.2.2 © 2013 Stadco Products Division, Ephrata, PA 17522 USA CD20/30/40 Operators Manual 13067 Rev 02 121514 Page 26 10 10.0 Installation Instructions 10.3 Fuel System The fuel system on Deutz 2011 series engines require a fuel suction & return line. The engine is equipped with a mechanical fuel transfer pump which feeds the fuel supply from the fuel tank to the fuel filter system and subsequently to the fuel injection pumps. Connect the fuel supply line to engine fuel pump Item #1, Figure 10.3.1. The pump connection is 5/16” dia. and is the minimum pipe I.D. for the fuel suction line up to 6 ft. long. Connect the fuel return line to Item #2, Figure 10.3.1. The fuel return connection is 1/4” dia. Place a hose clamp on all fuel line connections. Be sure that all connections are air tight. Figure 10.3.1 Pipe Length < 6 ft. < 19 ft. < 32 ft. 2 1 Pipe I.D. (minimum) 5/16” 3/8” 1/2” The fuel piping system may consist of both rigid and flexible material. Rigid lines can be made of seamless copper or stainless steel. Metal lines must be thoroughly cleaned prior to installation. When using rigid lines use an approved flexible line to make the connection from rigid lines to fuel connections on engine. The flexible hoses should be able to withstand the environment they will be operating in and be compatible with the diesel fuel being used. All fuel pipes must be located in protected areas, away from intensive heat sources (engine exhaust system) and securely fastened. The fuel piping routing must also be carefully designed. Avoid sharp bends and keep the number of connections to a minimum. Any air which has found its way into the fuel system can cause irregular running of the engine and decrease its performance, even leading to stopping of the genset and preventing its restarting. Fuel suction dip tube and/or fuel connection at the fuel tank should be located below fuel level at all times to prevent air cavitation of the fuel system. Fuel suction point in fuel supply tank should be located a minimum of 1 to 1-1/2 inches above the floor of the tank to minimize the pick up of fuel sediment and tank condensate material into the fuel system. To prevent fuel drain back, install a fuel check valve in the suction line, at the fuel tank. NOTE: Due to the design of the fuel injection pumps the fuel return line should enter the tank above the maximum fuel level and should not be immersed in the fuel. Also, the fuel return line should be kept >12” away from the fuel suction point inside the tank. This will help prevent the aerated fuel from being picked up by the suction line. If the tank is equipped with a dip tube for the return line, drill a 1/8” dia. hole in the tube, inside the tank, but above the fuel full level. Note: If the fuel for the generator is being supplied by the vehicle tank, the supply line must be configured so that it can only utilize 75% of the total tank volume. IMPORTANT Air cavitation causes engine starting problems. Make sure that all joints and connections in the fuel system are 100% air tight. Do not install fuel shut-off valves in the return line of the engine fuel system. Warning! © 2013 Stadco Products Division, Ephrata, PA 17522 USA CD20/30/40 Operators Manual 13067 Rev 02 121514 Page 27 10 10.0 Installation Instructions 10.4 Cooling System The CD Series gensets are powered by oilcooled diesel engines so no other coolant is required. It is critical however, to supply adequately sized openings for cooling air flow to both the engine and the AC generator. See Figure 10.4.1 for diagram of air intake and discharge locations. It must be assured that these areas are not covered or blocked. Engine Cooling Air Engine Hot Air Discharge Combustion Air Inlet Generator Cooling Air Inlet Figure 10.4.1 Generator Hot Air Discharge © 2013 Stadco Products Division, Ephrata, PA 17522 USA CD20/30/40 Operators Manual 13067 Rev 02 121514 Page 28 10 10.0 Installation Instructions 10.5 Design Features and Specifications Item Engine Speed Engine Model Recommended Battery Capacity * Engine Lube oil Capacity including Cooler & Filter Combustion Air Flow Maximum Intake Restriction Exhaust Gas Flow Max. Exhaust Backpressure Engine cooling Air Flow Unit RPM CCA CD20 1800 D2011L03o 600 - 750 CD30 1800 D2011L04o 600 - 750 CD40T4 1800 TD2011L04o 600 - 750 Quarts * 9.5 * 14.3 *15.9 CFM In. H2O CFM In. H2O CFM 62 22 165 26 1260 77 26 209 30 1260 130 26 353 30 4800 340 340 30,000 27,000 38,000 35,000 29,000 25,000 38,000 35,000 29,000 25,000 38,000 35,000 AC Alternator cooling Air Flow CFM 251 Generator Rating 3-phase, 480/240V, 60HZ Standby Rating Watts 20,000 Continuous Rating Watts 17,000 Generator Rating 3-phase, 208V, 60HZ Standby Rating Watts 20,000 Continuous Rating Watts 17,000 Generator Rating 1-phase, 240V, 60HZ Standby Rating Watts 20,000 Continuous Rating Watts 17,000 13067 specifications Rev01.xls Figure 10.5.1 * Capacity is approx. always fill to upper marking on dipstick. Refer to Section 11.2 for oil fill procedures. © 2013 Stadco Products Division, Ephrata, PA 17522 USA CD20/30/40 Operators Manual 13067 Rev 02 121514 Page 29 10.0 Installation Instructions 10 10.6 Installation Checks Prestart Checks Before starting the generator set, perform these steps: • Check oil level in oil pan (Section 11.2) Check for leaks. See Section 9.1 for the recommended oil and quantity Section 10.5. • Check Battery connections for tightness. • Check to make sure that the Load circuit breaker is in the “OFF” position. • Check all electrical connections and be sure that all bolts have been securely tightened. • Refer to Installation Review, this section. • Follow the Start-Up Section in Section 6. Do not attempt to start generator system until all Installation Review questions have been answered satisfactorily. Once this has been done, proceed to the Operator’s Section for the Start-Up sequences. Installation Review Prior to initial start-up of the generator system, address each of the following installation review items; correct as necessary. Is the generator mounted securely to the floor of compartment? (Section 10.1) Is there adequate airflow openings both for inlet airflow and discharge airflow? Are all the generator power output cables routed in such a way as to prevent chaffing? Are the power output cables of the generator connected properly & tightened? (See Wiring Diagrams Section 8.3) Are the battery cables connected properly & tightened? (Section 7.2) Are the 12VDC control system plugs wired & connected properly? (Section 7.3 & 7.4) Can the following routine maintenance be performed? • Change oil filter, fuel filter and air filter. • Check the valve clearance. • Check oil level in engine. • Operate main load circuit breaker. NOTE Are electrical junction boxes adequately sealed, and of adequate size for the power circuit? © 2013 Stadco Products Division, Ephrata, PA 17522 USA CD20/30/40 Operators Manual 13067 Rev 02 121514 Page 30 10 11.0 Points of Maintenance 11.1 Maintenance Precautions The recommendations and instructions in this section may be of a general nature, if more detailed information is required The Workshop Manual should be consulted. 11.2 Break-in Instructions • Check the alternator belt tension. Section 11.7 Check lube oil level 2x daily, adjust if necessary. Section 11.4 Check nuts, bolts and connections paying particular attention to the fuel system connections. Check for leaks and tighten if necessary. Observe the exhaust at full load. A black exhaust means that the engine is overloaded or the injection system is out of order. Do not allow the engine to run with a dirty exhaust without determining the cause as this may result in an expensive breakdown. • • • • • • • The engine should receive regular attention during the first 500 hours of its life from new and after a major overhaul. Long periods of light or “no load” running early in the engines life may lead to cylinder bore glazing and high oil consumption. The instructions given in Section 11.3 “Routine Maintenance Schedule” are based on average operating conditions and cover the minimum requirements to keep an engine running at peak performance with trouble free operation. Under very dusty conditions, air cleaners, lubricating oil and fuel filters will require more frequent attention. Before carrying out any maintenance work on engine or generator make sure Power Switch Item#1, Figure 5.1.1 is in the OFF position and the negative battery cable is removed. It is essential to ensure that nuts and bolts are tightened to the torques as specified in the Workshop Manual. Renew nuts and bolts that have been taken from high stress locations. The fuel injector can only be checked and set, off the engine, using suitable nozzle testing equipment. Have fuel injectors tested by an authorized service agent only. It is recommended that the following receive regular attention until the engine has run 50 hours. © 2013 Stadco Products Division, Ephrata, PA 17522 USA CD20/30/40 Operators Manual 13067 Rev 02 121514 Page 31 11 11.0 Points of Maintenance Check = l Service Item Walk around inspection Valve clearance Oil level Lube Oil Lube oil Oil filter Fuel level Fuel filter(s) Fuel pump Fuel screen System Fuel tank Fuel Injector Nozzles Cooling System Adjust = Clean = p Every Year Minimum Notes Section 1 11.8 2 2 11.4 l l n n l n p 11.5 l n 1 p Heat exchanger V-belt tension Restriction indicator Hose clamps & Air connectors Cleaner Filter element Dust Discharge Valve Heater Plugs Wiring & AC load AC & DC cables Electrical Battery & cable System connectors Engine protection & monitoring devices Timing Belt Misc. Mounting hardware & engine mounts Engine Overhaul Replace = n ROUTINE MAINTENANCE & SERVICE INTERVALS Running Hours Every 10 Hrs. Every Every Every Every or Daily 500 Hrs. 1000 Hrs. 3000 Hrs. 6000 Hrs. p 11.9 11.7 l l Replace as indicated by restriction indicator or Maximum 1,000 Hrs. 2 Clean when performing Air Filter maintenance 2 l 11.6 6 l l l n l 3, 4 8 3, 4 7 5 7.0, 8.0 1, 7 3 Recommended every 12,000 operating hours. 1 Figure 11.3.1 Notes: 1. Have this service performed by an authorized Deutz service dealer. 2. If engine runs fewer hours during the year than what is stated in this table perform this maintenance at least once a year. 3. Check hardware & connections for tightness. 4. Check for cracked or broken wires. 5. Check for proper operation. 6. Replace every 2 years. 7. If engine does not reach hour limit replace maximum 5 years. Scheduled maintenance intervals apply only for normal engine utilization and at normal environmental conditions. Warning! When utilization or environmental conditions become particularly severe, scheduled maintenance intervals must be reduced accordingly. Stop engine before attempting any kind of service! Be sure the Power Switch Item#2 Figure 5.1.1 is in the OFF posiWarning! tion. This will prevent the genset from being started. © 2013 Stadco Products Division, Ephrata, PA 17522 USA CD20/30/40 Operators Manual 13067 Rev 02 121514 Page 32 11 11.0 Points of Maintenance 11.4 Lubrication System Before changing oil and filters read “Precautions for Filters and Elements” in Section 1.0. Changing the Oil Filter The oil filter is a spin-on cartridge type located on the side of the engine Item#1 Fig. 11.4.1. Only OEM filters should be used, as these have high temperature joints, adequate filter paper characteristics and a rigid case. Other filters may have the same external dimensions and thread as the genuine one but may fail in service. 1. Place toggle Power Switch Item#1 Figure 5.1.1 to Off position. 2. Provide a suitable container to collect any oil which may spill. Use a band type gripping tool to remove the filter item#1 Figure 11.4.1 from the engine. 2. With a clean rag, wipe the filter seating surface on the engine, clean off any dirt. 3. Lightly oil the face of the rubber gasket on the new filter. 4. Screw the new filter onto the filter adapter and tighten to 15-17 Nm (11-12.5 ft-lbs). Warning! 8. Replace and tighten plug item#6 when draining is complete. 9. Fill the oil sump with new lube oil through the oil fill item#2 to the upper mark on the dipstick item#3. For oil grade/viscosity See Section 9.1. 10. Start the engine and run it for a few minutes to circulate the oil. 11. Stop the engine and allow two minutes for the oil to drain down and check the level on the dipstick as described below. Add more oil if necessary. Checking the Oil Level 1. Remove oil dipstick Item#3 Figure 11.4.1 and wipe clean. 2. Insert oil dipstick fully and then remove. 3. Oil should be maintained between high and low marks. Add oil if necessary. Take care when draining hot oil. Danger of scalding! Catch used oil in appropriate container for proper disposal to prevent environmental pollution. Draining the Oil Since the engine is cooled by the lubricating oil, oil must be drained from the oil pan and also from the heat exchanger. 1. Place toggle Power Switch Item#1 Figure 5.1.1 to Off position. 2. Place a container beneath the oil drain hose item#4, Figure 11.4.2. 3. Remove oil fill cap item#2, Figure 11.4.1 4. Drain oil into the container by removing cap item#5 from drain hose. 5. Replace and tighten cap item#5 on drain hose when draining is complete. 6. Next, place a container beneath heat exchanger drain plug item#6. 7. Drain oil into container by removing plug. 1 3 2 6 Figure 11.4.1 5 4 © 2013 Stadco Products Division, Ephrata, PA 17522 USA CD20/30/40 Operators Manual 13067 Rev 02 121514 Figure 11.4.2 Page 33 11 11.0 Points of Maintenance Keep open flames away when working on the fuel system! Do not smoke! Danger! 2 3 11.5 Fuel System The fuel filter is an essential part of the engine and it must never be run without a filter. The element should be renewed every 1000 hours, or more frequently, if for any reason the fuel is known to be dirty. Sediment and/or water accumulation in the fuel filter will cause trouble with the operation of the engine. Changing the Fuel Filter Element Before changing the filter refer to the warnings in "Precautions For Filters and Elements". 1. Place toggle Power Switch Item#1 Figure 5.1.1 to Off position. 2. Place a container beneath the fuel filter to collect any fuel which may spill. 3. Use a band type gripping tool to remove the fuel filter Item#1, Figure 11.5.1 from the engine. 4. With a clean rag, wipe the filter seating surface on the engine, clean off any dirt. 5. Lightly oil the face of the rubber gasket on the new filter. 6. Screw the new filter onto the filter adapter and tighten to 10-12 Nm (7.4-8.9 ft-lbs). 4 5 Figure 11.5.2 Cleaning the Fuel Pump Screen 1. Place a container beneath the fuel pump to collect any fuel which may spill. 2. Close supply line shutoff valve. 3. Disconnect fuel hose Item#4 to fuel filter. 4. Remove the fuel screen/cover Item#2 Figure 11.5.2 by removing the screw Item#3. 5. Clean the fuel screen & o-ring seal with diesel fuel. Replace if damage is found. 6. Replace fuel screen/cover Item#2 making sure o-ring is in the proper position. 7. Tighten mounting screw Item#3. 8. Reconnect fuel hose Item#4. 9. Open fuel shutoff valve. 10. After restarting, check for leaks. Venting the Fuel System Make sure the supply hose fuel valve is open. 1. Operate the hand pump Item#5 Figure 11.5.2 until a strong resistance is felt. 2. Start the engine and run without load to allow the air to return to the fuel tank via the return line. CAUTION! 1 Figure 11.5.1 Warning! After restarting engine check to make certain there are no leaks. All waste fuel which has been collected must be disposed of in a manner which will prevent environmental pollution! © 2013 Stadco Products Division, Ephrata, PA 17522 USA CD20/30/40 Operators Manual 13067 Rev 02 121514 Page 34 11.0 Points of Maintenance 11 11.5 Fuel System cont’d. Optional Fuel/Water Separator Before changing the filter refer to the warnings in "Precautions For Filters and Elements". 1. Place toggle Power Switch Item#1 Figure 5.1.1 to Off position. 2. Place a container beneath the fuel filter to collect any fuel which may spill. 3. Use a band type gripping tool to remove the fuel filter element Item#6, Figure 11.5.3 from the filter base. 4. With a clean rag, wipe the filter seating surface on the filter base, clean off any dirt. 5. Lightly oil the face of the rubber gasket on the new filter. 6. Screw the new filter onto the filter adapter and tighten according to the instructions on the filter. 6 7 Figure 11.5.3 Draining Water from the Fuel/Water Separator 1. Place toggle Power Switch Item#1 Figure 5.1.1 to Off position. 2. Place a container beneath the fuel filter to collect the fuel & water. 3. Open drain valve Item#7 Figure 11.5.3 and observe the liquid flowing out. If water, drain until only fuel begins to flow. 4. Close valve completely. 5. Dispose of fuel/water properly. © 2013 Stadco Products Division, Ephrata, PA 17522 USA CD20/30/40 Operators Manual 13067 Rev 02 121514 Page 35 11 11.0 Points of Maintenance 11.6 Dry-type Air Filter Read "Precautions for Filters and Elements" Section 1.0 before servicing. An air filter for the engine combustion air is mounted as shown Item#2, Figure 11.6.2. The degree of soiling of the air cleaner depends on the amount of dust contained in the air. Consequently, the cleaning intervals cannot be fixed generally, but have to be determined from case to case. Servicing the Air Cleaner The air cleaner is due for servicing when the entire red section Item#1, Figure 11.6.1, is visible, in the service indicator with the engine shut off. After servicing the air cleaner, reset the signal by pressing the reset button of the service indicator. The service indicator is ready Figure 11.6.1 to resume its function. 1. Place toggle Power Switch Item#1, Figure 5.1.1 to Off position. 2. Remove the service cover of the air cleaner, Item#2, Figure 11.6.2 by unlatching clips Item#3. 3. The primary-filter is fitted over the outlet tube, creating a critical seal on the inside diameter of the filter end-cap. Gently remove the primary-filter by moving the filter back and forth to break the seal. 4. Remove the element from the filter housing. NOTE: If the air cleaner is equipped with a safety element, it only needs to be replaced every three air cleaner services or every two years whichever occurs first. 4. The safety-filter is fitted inside the outlet tube, creating a critical seal on the outside diameter of the filter end-cap. Gently remove the safety-filter by moving the filter back and forth to break the seal. 5. Remove the element from the filter housing. 6. Wipe the sealing surfaces of the outlet tube with a clean cloth. Be careful not to leave any dirt which could prevent a good seal or be ingested into the engine. 7. Inspect the old filters for any signs of damage. A streak of dust on the inside surface of the filter is a indication of damage. Remove any cause of leaks before installing new filters. 8. Inspect the new filters before installing and make sure they are not damaged. 9. Carefully insert the safety filter into the filter housing making certain it is completely seated into the housing. 10. Carefully insert the primary filter into the filter housing, over the safety filter. Seat the filter by hand making certain it is completely seated into the housing before latching the cover in place. If the cover hits the primary filter before it is fully in place, remove the cover and push the filter further into the housing. The cover should go on with no extra force. 11. Secure lid with snap clips Item#3. 3 2 Figure 11.6.2 Cleaning the Dust Discharge Valve Empty the dust discharge valve by pressing together the discharge slot, applying pressure as indicated by the arrows (Figure 11.6.3). Clean the discharge slot. Figure 11.6.3 © 2013 Stadco Products Division, Ephrata, PA 17522 USA CD20/30/40 Operators Manual 13067 Rev 02 121514 Page 36 11 11.0 Points of Maintenance 11.7 V-belt Drives V-Belt Tension It is important that the tension of the v-belts are checked after the first 50 hours, after an overhaul, after a new belt has been fitted and as specified in Section 11.3 "Routine Maintenance Schedule". 1 2 Changing/Adjusting V-belts CD20, CD30 1. Place toggle Power Switch Item#1, Figure 5.1.1 to Off position. 2. Remove bolts Item#1, Figure 11.7.1. 3. Remove fan guard Item#2. CD40T4 1. Place toggle Power Switch Item#1, Figure 5.1.1 to Off position. 2. Remove cooling system support bracket Item#7, Figure 11.7.2. 3. Remove fan guard Item#8 to gain access to alternator Item#6, Figure 11.7.3. 1 Figure 11.7.1 V-belt Adjustment 4. To check proper adjustment of V-belts obtain a v-belt tension gauge. 5. Place the tension gauge midway between the pulleys. The proper v-belt tension should be 300N (68 lbf.). If tensioning is required see Tensioning below. Changing V-belts 1. Loosen bolts Items#3, #4 & #5, Figure 11.7.3. 2. Push alternator Item#6 inward. 3. Remove belt from pulley grooves and place one side of belt into the notch of the fan shroud hole. 4. Rotate the fan by hand and allow the other side of the belt to rotate with the fan until it lines up with notch, remove belt. 5. Replace new belt in reverse order and align into pulley grooves. 7 8 Figure 11.7.2 Warning! Never try to retension or renew V-Belts while the engine is running! Replace all guards and panels when completed. © 2013 Stadco Products Division, Ephrata, PA 17522 USA CD20/30/40 Operators Manual 13067 Rev 02 121514 Page 37 11.0 Points of Maintenance 11 11.7 V-belt Drives V-Belt Tension Tensioning 1. To tension, pull alternator Item#6 outward until correct tension is achieved. 2. Tighten bolts 3,4 & 5, Figure 11.7.3. CD20, CD30 3. Replace v-belt guard Item#2, Figure 11.7.1. 4. Tighten bolts Item#1, Figure 10.7.1. CD40T4 3. Replace v-belt guard Item#2 & support bracket Item#1. Note: When a new belt is installed it needs to be pretensioned and then retensioned 15 minutes after the engine is run under load. 1. Tension to 450N (101lbf.) 2. Run engine for 15 minutes under full load. 3. Stop engine and tension v-belt to 300N (68 lbf.) 4 5 Figure 11.7.3 Warning! 3 6 Never try to retension or renew V-Belts while the engine is running! Replace all guards and panels when completed. © 2013 Stadco Products Division, Ephrata, PA 17522 USA CD20/30/40 Operators Manual 13067 Rev 02 121514 Page 38 11 11.0 Points of Maintenance 11.8 Valve Clearance Checking Valve Clearance Before adjusting any valve clearances: Allow the engine to cool down, oil temperature below 80°C [176°F]. Place toggle Power Switch Item#1 Figure 5.1.1 to Off position. Remove the cylinder head cover. Position the crank- shaft to Position 1 as per the setting schematic Figure 11.8.1. Check the valve clearance between pad of rocker arm 2 and valve 3 with feeler blade 6. Clearance is correct if the feeler blade can just be inserted in the gap with a slight drag. Permissible valve clearances: Intake: 0.3mm, Exhaust: 0.5mm Adjust valve clearance if necessary. Adjusting Valves Release locknut 4 Use allen key 7 to turn setscrew 5 until the correct clearance is obtained after tightening locknut 4. Check and adjust valve clearance on all remaining cylinders. Replace cylinder head cover with new gasket if necessary. Figure 11.8.1 Crankshaft Position 1: Turn the crankshaft until both valves at cylinder 1 overlap, exhaust valve about to close, inlet valve about to open. Adjust clearances of the valves marked all-black in Position 1, Figure 11.8.1. Mark the respective rocker arm with chalk to show that the adjustment has been made. Crankshaft Position 2: Turn the crankshaft further by one revolution (360°). The clearances of the other valves (marked all-black in Position 2, Figure 11.8.1) can now be adjusted. © 2013 Stadco Products Division, Ephrata, PA 17522 USA CD20/30/40 Operators Manual 13067 Rev 02 121514 Page 39 11.0 Points of Maintenance 11 11.9 Cooling System Cleaning the Heat Exchanger The cooling system is a very essential part of the generator set, therefore proper maintenance is critical in extending the life of the engine. 1. Place toggle Power Switch Item#1 Figure 5.1.1 to Off position. 2. Cleaning the heat exchanger Item#1 Figure 11.9.1 can be accomplished by blowing compressed air through the core in the direction of the arrows as shown. Take care not to damage the fins of the heat exchanger core. 3. When finished, clean up loose dirt and debris. CAUTION! Do not spray water through radiator core due to sensitive electronic equipment in the generator compartment! 1 Figure 11.9.1 © 2013 Stadco Products Division, Ephrata, PA 17522 USA CD20/30/40 Operators Manual 13067 Rev 02 121514 Page 40 12.0 Routine Service Parts List Genset Model Engine Model CD20 D2011L03o CD30 D2011L04o CD40T4 TD2011L04o Engines are filled from 12 Routine Maintenance Parts List Fuel Filter Air Filter Oil Filter V-belt Pre-filter Final Primary Safety (Optional) 1174416 1174696 56795 C14200 CF200 1174612 1174416 1174696 56795 C14200 CF200 1174612 1174416 1174482 56795 P827653 P829332 1180195 the factory with Deutz lube oil PN: 305656 SAE 15W40 13067 filter list.xls © 2013 Stadco Products Division, Ephrata, PA 17522 USA CD20/30/40 Operators Manual 13067 Rev 02 121514 Page 41 13.0 Warranty 13 13.1 GENERAL WARRANTY NOTICES Installation inconsistent with the instructions contained in this document and accepted industry practices will render null and void all Stadco Warranty coverage for the affected equipment and consequential equipment damage; including but not limited to the following acts: • Installation not performed in strict accordance with these instructions. • Mounting genset in any manner inconsistent with instructions in Section 10.1 "Mounting", and elsewhere in this document. • Installation of equipment not strictly approved by Stadco in writing. (Installation of equipment not approved by Stadco may destroy the integrity, performance or service life of critical internal systems and/or equipment of the generator unit). • Unapproved modifications to unit; any and all modifications must have prior written approval from Stadco to preserve the intent of Stadco warranty. • Overloading of the generator. (Max. ratings available from Stadco). • Installation of equipment which constitutes or creates an operational or environmental hazard. • Tampering with Stadco factory settings, including but not limited to: fuel delivery rate, voltage regulator adjustments, overcurrent system adjustments and logic controller adjustments. • Damage resulting from improper operation of this unit, ie; running with contaminated fuel, improper maintenance, overheating, overloading, overspeeding, low oil or low coolant. NOTICE: The use of threaded iron pipe elbows in the exhaust system will void Stadco manufacturers warranty coverage. © 2013 Stadco Products Division, Ephrata, PA 17522 USA CD20/30/40 Operators Manual 13067 Rev 02 121514 Page 42 13 13.2 Stadco Warranty STADCO LIMITED WARRANTY POLICY D25.2 FOR CELLPAC™ & TOP DOG™ MOBILE GENERATOR SYSTEMS 1. 2. 3. COVERAGE & TERM This Warranty statement applies exclusively to Stadco Mobile Generator Sets, (hereinafter referred to as the “Products”), sold by STADCO PRODUCTS DIVISION of Stauffer Diesel, Inc. (“Stadco”) subject to conditions stated herein. Stadco warranty coverage area limited to continental USA and Canada. Stadco guarantees such Products against defects, which occur under normal (non-marine) use and service in mobile, compartment and enclosed applications for Cellpac type Products and Non-Enclosed applications for Top Dog type Products, which can be proved to the reasonable satisfaction of Stadco to be a result of defect in workmanship or materials (“Warrantable Failure”). Stadco does not guarantee defects arising out of installation of the Product unless the recommended installation procedures are followed pursuant to the provisions in this Policy and defects can be proved to the reasonable satisfaction of Stadco to be a result of defect in workmanship or materials. Term of this Stadco warranty is limited to the earlier of a period of (24) consecutive months of service or (2000) hours of operation to the first User (“User”), but not to exceed (30) months from the date of invoice by Stadco to its original Customer (“Customer”). STADCO RESPONSIBILITIES In case of Warrantable Failure, Stadco’s responsibility is limited solely to, at its option, repairing or replacing the defective Product or parts of the Product, or refunding Stadco’s reasonable estimate of the costs of repairs. Stadco may, at its option, replace faulty components with new or factory rebuilt components of their choice. Stadco, at its option may elect to have units returned to Stadco for repair of Warrantable Failure; in which case Stadco will provide return freight to customer via Stadco choice of carrier. BUYER/INSTALLER/RESELLER/OWNER RESPONSIBILITIES 4. Reseller is responsible for proper Product model selection from Stadco Product Information publications. Installer is responsible for proper application and installation of the Product. Installation, operation and maintenance procedures are specified in regular publications and operators manual available from Stadco and are made a part of this warranty by reference. Resellers, users and maintenance personnel are expected to have Stadco publications available and be familiar with contents before proceeding with sales, installation and operation of the Product. 5. Before the expiration of the warranty, first User or original Customer must immediately notify Stadco of any Warrantable Failures and deliver the defective Product, at his own expense, to a facility designated by Stadco for repair. User/Customer is solely responsible for all travel expenses required to perform Warrantable Repair on job site. List of authorized repair stations available from Stadco upon request. 6. User/Customer is solely responsible for contingent expenses and repairs and for “downtime” expenses, and all contingent business costs and losses resulting from Warrantable Failures. LIMITATIONS & CONDITIONS 7. User/Customer’s option for repair of Warrantable Failures is strictly limited to repair at a Stadco facility, or in lieu thereof, a qualified Stadco designated repair facility, which has expressly obtained prior approval to perform such repair. 8. Labor allowance for Warrantable Failure repairs is strictly limited to labor required for repair of the Product. This warranty does not cover any other labor which may be required to complete Warrantable Failure repairs, including but not limited to, recovery of the Product, cleaning, reinstallation or any other contingent labor costs. 9. Without limiting the generality of the foregoing or other limitations herein, warranty for engines is limited to the prevailing terms and policies of manufacturer of the engines furnished with the Product. Engine manufacturers warranty statement is available from Stadco or from the manufacturer of the engine. 10. This warranty does not cover the following: (i) wear and tear or contaminants; (ii) exposure, corrosion or prolonged or improper storage; (iii) normal maintenance service or the replacement or repair of parts required to be replaced or repaired in the course of normal maintenance service; (iv) improper installation, use, fuels, lubricants operation, maintenance, transportation or packing; (v) misuse, alteration, negligence and accidents; (vi) chemical or electrical action; or, (vii) unauthorized repairs or modifications. 11. Components used in warranty repairs will carry the same warranty coverage as the components they replace, but the expiration dates will be the same as those of the original Product. Any Product or component that is replaced by or for Stadco shall become the property of Stadco. 12. 13. 14. 15. 16. 17. 18. 19. Warranty claims must be submitted on STADCO WARRANTY CLAIM FORM within (30) days after completion of the warranty repair. Stadco reserves the right to request return of Warrantable Failure parts for evaluation prior to making a determination; such parts must be shipped transportation prepaid. STADCO IS NOT RESPONSIBLE FOR INCIDENTAL OR CONSEQUENTIAL LOSS OR DAMAGE. . THIS WARRANTY IS THE SOLE WARRANTY MADE BY STADCO IN REGARD TO THE PRODUCT, STADCO MAKES NO OTHER WARRANTIES, EXPRESSED OR IMPLIED, OR OF MERCHANTABILITY, OR FITNESS FOR A PARTICULAR PURPOSE. Installer/Reseller/User/Customer agrees to indemnify and hold Stadco harmless from and against any loss, liability, damages or expenses resulting from injury to persons or property, without limitation, due to acts or omissions of the Installer/Reseller/User/Customer, its agents and employees in the sale, installation, use and operation of Products purchased from Stadco and shall assert no claim against Stadco for consequential damages. The warranties, obligations, liabilities and remedies of the parties, as provided herein, are exclusive and in lieu of any other available at law or in equity. Stadco’s total aggregate liability with respect to any defective Products shall not exceed the amount paid by the Customer for such Products. To the fullest extent allowed by law, Customer releases Stadco from all contingent liabilities, and limitations of liability shall apply notwithstanding breach of contract, tort (including negligence), strict liability or other theory of legal liability asserted. LIMITED MONEY BACK WARRANTY Stadco CELLPAC or TOP DOG Product may be returned by original Buyer for money back if Product fails to perform reliably or fails to perform to specifications as advertised by Stadco. Buyer reimbursement is limited to refund of purchase price of such Product less cost of restoration for resale. Money back guarantee is limited to either ninety (90) days from original shipment date or 300 hours of operation, whichever occurs first. In no case will return for reimbursement be allowed for any Product that is not physically received at Stadco plant within one hundred and twenty (120) days from original shipment date. Evidence of tampering with the Product will completely void this provision of warranty. Offer limited to first model unit purchased by each Customer. SAFETY NOTICE To prevent possible accidents that may result from the use of any generator set system it is important that correct installation, maintenance and operation procedures are followed. Installation, maintenance and operation procedures specified by Stadco, and the engine manufacturer must be followed in conjunction with engineering and safety information specified. Grounding equipment, guards and other suitable safety equipment or procedures that may either be desirable or specified in safety codes must be provided to assure safe operation in the prevailing conditions. THESE DEVICES MAY NOT BE INCLUDED WITH THE PRODUCT, AND ARE NOT THE RESPONSIBILITY OF STADCO. INSTALLER IS RESPONSIBLE FOR PROVIDING SAFETY ITEMS TO SATISFY PREVAILING SAFETY CODES. SUMMARY Provisions of this warranty are limited to these terms; no other claims will be valid unless authorized in writing by an Executive officer of Stadco. This warranty shall be construed in accordance with the laws of the Commonwealth of Pennsylvania. Exclusive venue and jurisdiction for resolution of any disputes arising out of or related to this Agreement shall be in the Court of Common Pleas of Lancaster County, Pennsylvania, USA. Effective date: October 1, 2009. Supersedes all previous warranty statements for this Product. © 2013 Stadco Products Division, Ephrata, PA 17522 USA CD20/30/40 Operators Manual 13067 Rev 02 121514 Page 43 13.3 Deutz Engine Warranty © 2013 Stadco Products Division, Ephrata, PA 17522 USA CD20/30/40 Operators Manual 13067 Rev 02 121514 13 Page 44 Installation, Service and Maintenance Manual For STAMFORD P0 / P1 Generators Original Instructions SAFETY PRECAUTIONS First Steps to Safe Operation Read this manual, obey all Warnings and Cautions, and become familiar with the product. Warnings & Notices used in this manual The various warnings are out lined below and appear in the text in this format. Warnings and Cautions appear at the appropriate position in the, to which they refer. Warning! Information that draws attention to the risk of injury or death. Caution! Information that draws attention to the risk of damage to the product, process or surroundings. Note. Used to convey, or draw attention to, additional information or explanations. Notes appear after the text to which they refer. Skill requirements of personnel Service and maintenance procedures should only be carried out by experienced and qualified engineers, who are familiar with the procedures and the equipment. Before any intrusive procedures are carried out, ensure that the engine is inhibited and the generator is electrically isolated. Electrical Equipment All electrical equipment can be dangerous if not operated correctly. Always service and maintain the generator in accordance with this manual. Always use genuine ‘STAMFORD’ replacement parts. Warning: Electrical shock can cause injury or death. Ensure that all personnel operating, servicing, maintaining or working near this equipment are fully aware of the emergency procedures in case of accidents. Before removing the protective covers to carry out service maintenance or repair, ensure that the engine is inhibited and the generator is electrically isolated. The AVR access covers are designed to be removed while the generator is on load. Lifting Lift the generator using the points provided with the aid of a spreader and chains. The angle on the chains must be vertical during the lift. Do not lift single bearing generators without the, transit bar, securely fitted. When removing the transit bar just prior to offering the generator up to the engine, be aware that the rotor is not securely held in the generator. Keep the generator in the horizontal plane to when the transit bar is not fitted. If large terminal boxes are fitted extensions to the lifting points may be necessary. Warning! The lifting points provided are designed for lifting the generator only. Do not lift the Generating Set by the generator’s lifting points. Note: Due to our policy of continuous improvement, details in this manual which were correct at time of going to print and may now be due for amendment. Information included must therefore not be regarded as binding. P0-1-MAN-EN-4 2 Copyright Cummins 2009 Foreword The Manual Before operating, the generating set read this manual and all additional documentation supplied with it. Great care has been taken with the design of this product to ensure that it is safe to operate. Misuse and the failure to follow the safety precautions contained in the manual are potential causes of accidents. Read the manual and make sure that all personnel who work on the equipment have access to the manual. The manual should be considered as part of the product and should remain with the product. Make sure that the manual is available to all users throughout the life of the product. Scope This manual contains guidance and instructions for the Installation, Servicing and Maintenance of the generator. It is not possible, within the scope of the manual, to teach the basic electrical and mechanical skills required to safely carry out the procedures enclosed. The manual is written for skilled electrical and mechanical technicians and engineers, who have prior knowledge and experience of generating equipment of this type. We offer a range of training courses that cover all aspects of STAMFORD generators. Generator Designation P I P I - 1 4 4 E 1 - 1 4 4 E 1 (example) Generator type Applications, I = Industrial, M = Marine. Frame size, 0 or 1 AS480 AVR Number of poles, 2 or 4 Core Size Number of bearings, 1 or 2 Excitation Boost System (EBS) – is optional The Product The product is an AVR controlled, self excited synchronous ‘ac generator’. Designed for incorporation into a generatingset. (A generating-set is defined as ‘machinery’ in European directives). Serial Number Location Each generator has a unique serial number stamped into the upper section of the drive end of the frame. The serial number is also shown on the nameplate. Two other labels are located inside the terminal box, one on the sheet metal work and the other on the main frame of the generator. Neither of these two labels is considered to be permanently fixed. Rating Plate The generator has been supplied with a self-adhesive rating plate label to enable fitting after final assembly and painting. Stick the plate on the side of the barrel (either side, we suggest the opposite side to the output cables). The surface in the area where a label is to be stuck must be clean, dry and any paint finish must be cured before attempting to attach label. Recommended method for attaching label is peel and fold back sufficient of the backing paper to expose some 20 mm of label adhesive along the edge which is to be located against the sheet metal protrusions. Once this first section of label has been carefully located and stuck into position progressively peel off the backing paper and smooth down with a clean cloth. The adhesive will achieve a permanent bond in 24 hours. A factory fitted metal nameplate is available for some applications. Caution! Do not exceed the parameters as marked on the rating plate. Copyright Cummins 2009 3 P0-1-MAN-EN-4 Contents SAFETY PRECAUTIONS ............................................................................................................................ 2 FIRST STEPS TO SAFE OPERATION ............................................................................................................ 2 WARNINGS & NOTICES USED IN THIS MANUAL ............................................................................................. 2 SKILL REQUIREMENTS OF PERSONNEL ........................................................................................................ 2 ELECTRICAL EQUIPMENT ........................................................................................................................... 2 LIFTING .................................................................................................................................................... 2 FOREWORD ................................................................................................................................................ 3 THE MANUAL ............................................................................................................................................ 3 SCOPE ..................................................................................................................................................... 3 GENERATOR DESIGNATION........................................................................................................................ 3 THE PRODUCT .......................................................................................................................................... 3 SERIAL NUMBER LOCATION ....................................................................................................................... 3 RATING PLATE .......................................................................................................................................... 3 CONTENTS .................................................................................................................................................. 4 INTRODUCTION .......................................................................................................................................... 7 GENERAL DESCRIPTION ............................................................................................................................ 7 SELF-EXCITED AVR CONTROLLED GENERATORS ....................................................................................... 7 Main Stator Powered AVR ............................................................................................................... 7 SEPARATELY EXCITED AVR CONTROLLED GENERATORS ........................................................................... 7 Optional Excitation Boost System(EBS) .......................................................................................... 7 FOR PARALLEL OPERATION ....................................................................................................................... 7 Function and Adjustment of the Fitted Accessories. ........................................................................ 7 STANDARDS. ............................................................................................................................................ 8 EUROPEAN DIRECTIVES. ........................................................................................................................... 8 Applications the Generator is designed for. ..................................................................................... 8 UNSUITABLE APPLICATIONS ....................................................................................................................... 9 ADDITIONAL INFORMATION FOR EMC COMPLIANCE ..................................................................................... 9 APPLICATION OF THE GENERATOR ..................................................................................................... 10 ENVIRONMENTAL PROTECTION ................................................................................................................ 10 Air Flow ........................................................................................................................................... 10 AIRBORNE CONTAMINATES ...................................................................................................................... 10 Air Filters ........................................................................................................................................ 10 HIGH HUMIDITY ENVIRONMENTS............................................................................................................... 10 Anti-condensation heaters .............................................................................................................. 10 Enclosures ...................................................................................................................................... 10 VIBRATION .............................................................................................................................................. 11 Definition of BS5000 – 3 ................................................................................................................. 11 Definition of ISO 8528 - 9 ............................................................................................................... 11 Vibration Monitoring ....................................................................................................................... 11 Excessive Vibration levels .............................................................................................................. 11 BEARINGS .............................................................................................................................................. 11 Factors that effect bearing life: ....................................................................................................... 11 Health Monitoring of the Bearings .................................................................................................. 12 Bearing 'Service Life' Expectancy .................................................................................................. 12 INSTALLATION INTO THE GENERATING SET ...................................................................................... 13 DELIVERY ............................................................................................................................................... 13 HANDLING THE GENERATOR..................................................................................................................... 13 STORAGE ............................................................................................................................................... 13 AFTER STORAGE .................................................................................................................................... 13 ROTOR BALANCING ................................................................................................................................. 13 GENERATOR VIBRATION, FREQUENCY...................................................................................................... 13 SIDE LOADS............................................................................................................................................ 14 COUPLING ARRANGEMENTS ..................................................................................................................... 14 Coupling Two Bearing Generators ................................................................................................. 14 P0-1-MAN-EN-4 4 Copyright Cummins 2009 Coupling Single Bearing Generators.............................................................................................. 15 4-pole Single Bearing Coupling Alignment .................................................................................... 15 EARTH ARRANGEMENT ............................................................................................................................ 15 PAINT FINISH .......................................................................................................................................... 16 WARNING LABELS ................................................................................... ERROR! BOOKMARK NOT DEFINED. DIRECTION OF ROTATION ........................................................................................................................ 16 PHASE ROTATION ................................................................................................................................... 16 VOLTAGE AND FREQUENCY ..................................................................................................................... 16 AVR ADJUSTMENT .................................................................................................................................. 16 AUTOMATIC VOLTAGE REGULATOR (AVR) ......................................................................................... 17 AS480 AVR........................................................................................................................................... 17 MAIN STATOR POWERED AVR ................................................................................................................ 17 OPTIONAL EXCITATION BOOST SYSTEM (EBS).......................................................................................... 17 VOLTAGE ADGUSTMENT .......................................................................................................................... 18 TO ADJUST THE GENERATOR OUTPUT VOLTAGE, PROCEED AS FOLLOWS: ................................................... 18 STABILITY ADJUSTMENT .................................................................................................................. 18 UNDER-FREQUENCY-ROLL-OFF ADJUSTMENT: (UFRO) .............................................................. 18 ACCESSORIES ........................................................................................................................................ 18 GENERATOR SET TESTING ...................................................................................................................... 18 Test Metering/Cabling .................................................................................................................... 19 INITIAL START-UP .............................................................................................................................. 19 Pre-Running Checks ...................................................................................................................... 19 Insulation resistance test ................................................................................................................ 19 SETTING THE VOLTAGE ........................................................................................................................... 19 SETTING THE STABILITY CONTROL. .......................................................................................................... 20 LOAD TESTING........................................................................................................................................ 20 AVR Controlled Generators - AVR Adjustment .............................................................................. 20 UFRO (Under Frequency Roll Off) ................................................................................................. 20 ACCESSORIES ........................................................................................................................................ 20 Remote Voltage Adjust. ................................................................................................................. 21 Parallel Operation........................................................................................................................... 21 Droop .............................................................................................................................................. 21 Setting Procedure........................................................................................................................... 22 INSTALLATION ON SITE .......................................................................................................................... 23 General ........................................................................................................................................... 23 Glanding ......................................................................................................................................... 23 Earthing .......................................................................................................................................... 23 Protection ....................................................................................................................................... 24 Commissioning ............................................................................................................................... 24 SERVICE AND MAINTENANCE ............................................................................................................... 25 SERVICE ................................................................................................................................................ 25 WINDING CONDITION .............................................................................................................................. 25 New Machines ................................................................................................................................ 25 At Generating Set Assembler’s Works ........................................................................................... 25 Generators in Service .................................................................................................................... 25 Winding Condition Assessment ..................................................................................................... 25 PROCEDURE FOR INSULATION TESTING ................................................................................................... 26 METHODS OF DRYING OUT GENERATORS ................................................................................................ 26 Cold Run ........................................................................................................................................ 26 Blown Air Drying ............................................................................................................................. 26 Short Circuit Method ...................................................................................................................... 26 TYPICAL DRYING OUT CURVE.................................................................................................................. 27 AIR FILTERS ........................................................................................................................................... 28 Air Filter Cleaning Procedure ......................................................................................................... 28 MAINTENANCE ........................................................................................................................................ 28 Fault Finding ................................................................................................................................... 28 AVR - FAULT FINDING............................................................................................................................. 28 Field Flashing procedure ................................................................................................................ 29 Separate Excitation Test Procedure .............................................................................................. 29 GENERATOR W INDINGS AND ROTATING DIODES, AND EXCITATION CONTROL TEST. ................................... 29 1 GENERATOR W INDINGS AND ROTATING DIODES .................................................................................... 29 Copyright Cummins 2009 5 P0-1-MAN-EN-4 Balanced Main Terminal Voltages.................................................................................................. 30 Rectifier Diodes .............................................................................................................................. 30 Replacement of Faulty Diodes ....................................................................................................... 30 Surge Suppressor .......................................................................................................................... 30 2 EXCITATION CONTROL TEST ................................................................................................................. 30 AVR Function Test ......................................................................................................................... 30 MAIN EXCITATION W INDINGS ................................................................................................................... 31 Incorrect resistances indicate faulty windings and component replacement is necessary. ........... 31 MAIN STATOR RESISTANCE ..................................................................................................................... 31 REMOVAL AND REPLACEMENT OF COMPONENT ASSEMBLIES..................................................................... 33 Removal of EBS unit ...................................................................................................................... 33 REMOVAL OF THE ROTOR (TWO BEARING GENERATOR) ............................................................................. 33 REMOVAL OF THE ROTOR (SINGLE BEARING GENERATOR) ......................................................................... 33 BEARING REMOVAL ................................................................................................................................. 34 FITTING NEW BEARINGS ........................................................................................................................... 34 REPLACING ANTI-CONDENSATION HEATERS .............................................................................................. 34 REPLACING RECTIFIER DIODES AND SURGE SUPPESSOR .......................................................................... 34 REMOVING THE TERMINAL BOX ................................................................................................................ 34 Lifting the generator with a large box ............................................................................................. 34 SPARES AND AFTER SALES SERVICE ................................................................................................. 35 Recommended Spares ................................................................................................................... 35 After Sales Service ......................................................................................................................... 35 PARTS IDENTIFICATION SINGLE BEARING ................................................................................................. 36 PARTS IDENTIFICATION TWO BEARING ..................................................................................................... 37 PARTS IDENTIFICATION RECTIFIER ASSEMBLY .......................................................................................... 38 A.C. GENERATOR WARRANTY ......................................................................................................... 39 P0-1-MAN-EN-4 6 Copyright Cummins 2009 INTRODUCTION General Description The P0&P1 generators are brushless with rotating field, available up to 660V/50Hz (1500 rpm, 4 pole and 3000 rpm, 2 pole) or 60Hz (1800 rpm, 4 pole and 3600 rpm, 2 pole), and built to meet B.S. 5000 Part 3 and other international standards. The P0 & P1 are self-excited generators with excitation power derived from the main output windings, using the AS480. Self-Excited AVR Controlled Generators Main Stator Powered AVR The main stator provides power for excitation of the exciter field via the SX480 AVR which is the controlling device governing the level of excitation provided to the exciter field. The AVR responds to a voltage-sensing signal derived from the main stator winding. By controlling the low power of the exciter field, control of the high power requirement of the main field is achieved through the rectified output of the exciter armature. The AVR senses average voltage on two phases ensuring 1 Main rotor 5 AVR close regulation. In addition it detects engine speed and 2 Rotating diodes 6 Main stator provides voltage fall off with speed, below a pre-selected 3 Exciter rotor 7 Output speed (Hz) setting, preventing over-excitation at low 4 Exciter stator 8 Shaft engine speeds and softening the effect of load switching to relieve the burden on the engine. The detailed function of the AVR circuits and their adjustment are covered in the load testing section. Separately Excited AVR Controlled Generators Optional Excitation Boost System(EBS) 1 2 3 4 9 Main rotor Rotating diodes Exciter rotor EBG rotor Output 5 6 7 8 10 EBG stator Exciter stator AVR Main stator Shaft The EBS is a single, self-contained unit, attached to the non-drive end of the generator. The EBS unit consists of the Excitation Boost Controller (EBC) and an Excitation Boost Generator (EBG). Under fault conditions, or when the generator is subjected to a large impact load such as a motor starting, the generator voltage will drop. The EBC senses the drop in voltage and engages the output power of the EBG. This additional power feeds the generator’s excitation system, supporting the load until breaker discrimination can remove the fault or enable the generator to pick up a motor and drive the voltage recovery. For Parallel operation The AS480 AVR also incorporates circuits which, when used in conjunction with accessories, can provide for parallel operation with the addition of a CT, 'Voltage droop' control. Function and Adjustment of the Fitted Accessories. Inside the generator terminal box are covered in the accessories section of this book. Separate instructions are provided with other accessories available for control panel mounting. Copyright Cummins 2009 7 P0-1-MAN-EN-4 Standards. STAMFORD ac generators meet the relevant parts of national and international standards pertaining to generators. The generator must be operated within the limits laid down in the relevant standards and within the parameters on the generator rating plate. Marine generators meet the requirements of all the major marine classification societies. European Directives. Each generator is supplied with an ‘EC Declaration of Conformity’ in accordance with the relevant EU directives designed for incorporation into an electricity generating set and is CE marked. Our authorized representative in the Community is Mr Jeffrey Matthews, Director, Engineering, Cummins Generator Technologies Ltd. All STAMFORD generators meet the following Standards and Directives: Directives: 2004/108/EC EMC Directive 2006/95/EC Low Volts Directive 2006/42/EC Machinery Directive Standards: EN 61000-6-1 EN 61000-6-2 EN 61000-6-4 EN ISO 12100-1 EN ISO 12100-1 EN ISO 14121-1 EN 60034-1 BS ISO 8528-3 BS5000-3 Note: Once the generator is built into a generating set, it is the responsibility of the generating set manufacture to ensure that the generating set complies with the relevant EC Directives. P0-1-MAN-EN-4 8 Copyright Cummins 2009 Applications the Generator is designed for. STAMFORD ac generators are supplied on the basis that: They are used for power generation or related functions. They are to be applied in one of the following environments: Portable (open construction – temporary site supply) Portable (enclosed – temporary site supply) Containerised (temporary or permanent site supply) Ship – borne, below decks (marine auxiliary power) Commercial vehicle (road transport / refrigeration etc.) Road transport (auxiliary power) Industrial vehicle (earthmoving, cranes etc.) Fixed installation (Industrial – factory / process plant) Fixed installation (residential, commercial and light industrial – home / office / health.) Energy management (combined heat & power and/or peak lopping.) Alternative energy schemes. The standard generators are designed to meet the ‘industrial’ emissions and immunity standards. Where the generator is required to meet the residential, commercial and light industrial emissions and immunity standards reference must be made to document reference N4/X/011. This publication outlines the additional equipment that may be required. The installation ‘earth/ground’ arrangements require the connection of the generator frame to the site protective earth conductor using a minimum lead length. Maintenance and servicing with unauthorised parts, not of STAMFORD brand, will invalidate us from any liability for EMC compliance. Installation, maintenance and servicing are carried out by adequately trained personnel fully aware of the requirements of the relevant EC directives. Unsuitable Applications Synchronous generators require a constant speed for power generation. Applications where the generator is not run at a constant speed are not suitable for the standard generator. Such applications may be possible within certain parameters. Contact the factory for advice, there is every possibility that we can provide you with a satisfactory technical solution to meet your requirement. Additional information for EMC compliance Standard generators are designed to meet the ‘industrial’ emissions and immunity standards. Where the generator is required to meet the residential, commercial and light industrial emissions and immunity standards, reference must be made to document reference N4/X/011. This publication outlines the additional equipment that may be required. Copyright Cummins 2009 9 P0-1-MAN-EN-4 Application of the Generator Environmental Protection STAMFORD generators are protected to IP23. IP23 is not adequate protection for use outdoors without additional measures. o This table represents the normal operating conditions that the generator is designed for. Operation outside of these parameters is possible after due consideration and will be reflected on the generator nameplate. If the operating environment for the generator has changed after purchase, the rating of the generator needs to be revised, refer to the factory for details. Ambient Temperature <40 C Humidity <60% Altitude <1000m Air Flow The airflow requirements for the generator can be found in the Data section at the back of this manual. Ensure that the air inlets and outlets are not obstructed when the generator is running. Airborne Contaminates Contaminates such as salt, oil, exhaust fumes, chemicals, dust, sand, etc., will reduce the effectiveness of the insulation and lead to premature failure of the windings. Consider using air filters or an enclosure with greater protection to protect the generator. Air Filters Air filters are available on request. Filters present a restriction to the airflow so the rating of the generator must be reduced by 5%. If the filters are supplied, factory fitted, the rating on the nameplate will include the reduced rating. The filters can be up-fitted after delivery in which case the customer must apply the power reduction. Air filters remove airborne particulates above 3 microns. The frequency of changing and cleaning the filters depend on the site conditions. We recommend that the filters are monitored frequently until a suitable cycle of change is established. Air filters do not remove water. Additional protection must be employed to prevent the filters from getting wet. If the filters are allowed to get wet the airflow will be restricted and the generator will overheat. This will reduce the life expectancy of the insulation leading to premature failure of the generator. High Humidity environments The humidity of the air will allow condensation to form on the windings if the temperature of the windings falls below the dew point. The dew point is a relationship between the ambient temperature and humidity. In areas of high humidity additional protection may be required even if the generator is fitted inside an enclosure. Anti-condensation heaters Anti-condensation heaters are designed to raise the temperature of the windings above the temperature of the surrounding material so that the condensation will not form on the windings. We recommend that anti-condensation heaters are fitted to all generators that are left switched off for any period of time. The best practice is to wire the heaters such that the heaters come on when the generator is switched off. This is particularly important in applications where high humidity is a significant problem. Always check the condition of the generators windings before switching the generator on. If moisture is observed carry out one or more of the drying-out methods outlined in the Service section of this manual. Enclosures An enclosure should be employed to protect the generator from adverse environmental conditions. If the generator is to be fitted inside an enclosure, ensure that there is adequate airflow to support both the engine and the generator. Ensure that the generator air supply is clean (free from moisture and contaminates) and at or below the ambient temperature stated on the rating plate. The P0 and the P1 generators have round end brackets that will create an air flow pattern that is different to previous generators of this size. The air flow should be modelled to identify and prevent hot air from recirculating within the enclosure. P0-1-MAN-EN-4 10 Copyright Cummins 2009 Vibration STAMFORD generators are designed to withstand the vibration levels encountered on generating sets built to meet the requirements of ISO 8528-9 and BS 5000-3. (Where ISO 8528 is taken to be broad band measurements and BS5000 refers to the predominant frequency of any vibrations on the generating set). Definition of BS5000 – 3 Generators shall be capable of continuously withstanding linear vibration levels with amplitudes of 0.25mm between 5Hz and 8Hz and velocities of 9.0mm/s rms between 8 Hz and 200 Hz, when measured at any point directly on the carcass or mainframe of the machine. These limits refer only to the predominant frequency of vibration of any complex waveform. Definition of ISO 8528 - 9 ISO 8528-9 refers to a broad band of frequencies; the broad band is taken to be between 2 Hertz and 300 Hertz. The table below is an example from ISO 8528 - 9 (value 1). This simplified table lists the vibration limits by kVA and speed for acceptable genset operation. Vibration Levels As Measured On The Generator Engine Speed Min -1 Set Output Kva Vibration Displacement (S rms) > 1300 (rpm) <50 kVA 0.64 mm <2000 The ‘Broad band’ is taken as 2 Hz - 300 Hz Caution: Vibration Velocity (V rms) 40 mm/sec Vibration Acceleration (a rms) 25 m/sec Exceeding either of the above specifications will have a detrimental effect on the life of the bearings and other components. This will invalidate the generator warranty. Vibration Monitoring We recommend that the set builder checks the vibration levels using vibration analysing equipment. Ensure that the vibration levels of the generating set are within the levels stated in BS 5000-3 and ISO 8528-9. If the vibration levels are not within tolerance the genset builder should investigate the root cause of the vibrations and eliminate them. The ‘best practice’ is for the genset builder to take initial readings as a base line and the user to periodically monitor the genset and bearings to detect any deteriorating trend. It will then be possible to plan ahead for bearing changes and eliminate vibration problems before excessive damage to the generating set occurs. Vibration checks should be made every 3 months. Excessive Vibration levels If the vibration levels of the generating set are not within the parameters quoted above: Consult the genset builder; the genset builder should address the genset design to reduce the vibration levels as much as possible. Discuss, with us, the impact of not meeting the above levels on both bearing and generator life expectancy. When requested, or it is deemed necessary, we will work with the genset builder in an attempt to find a satisfactory solution. Bearings This product is fitted with sealed for life fitted within machined housings, in the end brackets. All of the bearings have pressed steel cages and have type C3 fit. The grease used is a high specification synthetic compound that must not be mixed with grease with a different specification. Factors that effect bearing life: The life of a bearing in service is subject to the working conditions and the environment: Copyright Cummins 2009 11 P0-1-MAN-EN-4 High levels of vibration from the engine or misalignment of the set will stress the bearing and reduce its service life. If the vibration limits set out in BS 5000-3 and ISO 8528-9 are exceeded bearing life will be reduced. Long stationary periods in an environment where the generator is subject to vibration can cause false brinnelling. Long stationary periods in an environment where the rotor is stationary will leave flats on the balls and grooves on the races, leading to premature failure when run. Very humid atmospheric or wet conditions can emulsify the grease causing corrosion and deterioration of the grease, leading to premature failure of the bearings. Health Monitoring of the Bearings We recommend that the user check the bearing condition, using monitoring equipment, to determine the state of the bearings. The ‘best practice’ is to take initial readings as a base line and periodically monitor the bearings to detect a deteriorating trend. It will then be possible to plan a bearing change at an appropriate generating set or engine service interval. Bearing 'Service Life' Expectancy Bearing manufacturers recognise that the “service life” of their bearings is dependent upon many factors that are not in their control; they cannot therefore quote a “service life”. Although “service life” cannot be guaranteed, it can be maximised by attention to the generating set design. An understanding of the generating set’s application will also help the user to maximise the service life expectancy of the bearings. Particular attention should be paid to the alignment, reduction of vibration levels, environmental protection, maintenance and monitoring procedures. We do not quote life expectancy figures for bearings, but suggests practicable replacement intervals based on the L10 life of the bearing, the type of grease and the recommendations of the bearing and grease manufacturers. For general-purpose applications: providing the advice above is considered, the correct maintenance is carried out, vibration levels do not exceed the levels stated in ISO 8528-9 and BS5000-3, and the ambient temperature does not exceed 50°C. Plan to replace bearings within 30,000 hours of operation. It is important to note that bearings in service, under good operating conditions, can continue to run beyond the recommended replacement period. It should also be remembered that the risk of bearing failure increases with time. If in doubt about any aspect of the ‘bearing life’ on STAMFORD generators, contact your nearest supplier of STAMFORD generators or contact the Stamford factory direct. P0-1-MAN-EN-4 12 Copyright Cummins 2009 Installation into the Generating Set The generator is supplied as a component part for installation into a ‘generating set’. Delivery Upon receipt of the generator, check the generator for damage that may have occurred during transport. Also check that the rating-plate details are correct and as ordered for the application. Handling the generator When lifting the generator always use a spreader bar as shown. Ensure that the lifting chains are vertical to the lifting position on the generator at all times. When generators are fitted with an optional large box, bolt on extensions to the lifting lugs are required to extend the lifting position clear of the terminal box. When fitted these extensions form an integral part of the terminal box support. Do not remove them. Warning: The generator lifting points are designed to lift the generator only. Do not lift the complete generating set by the generator lifting lugs. Single bearing generators have a transit bar fitted at the drive end. This bar holds the rotor in position during transit. The transit bar should be left in position until it is necessary to remove it to allow the generator to be coupled to the engine. Warning! If the generator is moved without the transit bar be aware that the rotor could fall out of the frame. When moving the generator always keep it in the horizontal plane, this will reduce the risk of the rotor falling out. Storage If the generator is not to be used immediately, it must be stored in a clean, dry, vibration free environment. If anti-condensation heaters are fitted, switch them on. If heaters are not fitted use other means to ensure that condensation cannot form on the windings. Spin the shaft by hand every month to prevent flat spots in the bearings and to free up the grease. After Storage After a period of storage, carry out ‘pre running checks’ to determine the condition of the windings. If the winding are damp or the insulation is low, follow one of the ‘drying out procedures’, in the Service section of this manual. Replace the bearing after 12 months in storage. Rotor balancing Dynamic balancing of the generator rotor assembly has been carried out during manufacture in accordance with BS 6861 Part 1 Grade 2.5 to ensure vibration limits of the generator are in accordance with BS 4999 Part 142. Generator Vibration, Frequency The main vibration frequencies produced by the component generator are as follows: 4-pole 1500 r.p.m. 25 Hz 4-pole 1800 r.p.m. 30 Hz 2-pole 3000 r.p.m. 50 Hz 2-pole 3600 r.p.m. 60 Hz However, vibrations induced by the engine are complex and contain frequencies of 1.5, 3, 5 or more times the fundamental frequency of vibration. These induced vibrations can result in generator vibration levels higher than those derived from the generator itself. It is the responsibility of the generating set Copyright Cummins 2009 13 P0-1-MAN-EN-4 designer to ensure that the alignment and stiffness of the bedplate and mountings are such that the vibration limits of BS5000 part 3 and ISO 8528 part 9 are not exceeded. In standby applications where the running time is limited and reduced life expectancy is accepted, higher levels than specified in BS5000 part 3 can be tolerated, up to a maximum of 18mm/sec. Side Loads In the case of belt driven generators, ensure alignment of drive end and driven pulleys to avoid axial load on the bearings. Screw type tensioning devices are recommended to allow accurate adjustment of belt tension whilst maintaining pulley alignment. Belt and pulley guards are not provided by the company. Note: 2/4-Pole P0 P1 Incorrect belt tensioning will result in excessive bearing wear. kgf 92 173 Side Load N 900 1700 Shaft extension mm 82 82 Coupling arrangements Warning! Do not use the fan to rotate the shaft this is particularly important when the engine and the alternator are connected. Single and two bearing arrangements are available both arrangements can be close coupled. Both arrangements also need a firm level foundation. Two bearing generators require a substantial bedplate with engine/generator mounting pads to ensure a good base for accurate alignment. Close coupling of the engine to the generator can increase the overall rigidity of the set. A flexible coupling, designed to suit the specific engine/generator combination, is recommended to minimise the torsional effects. Accurate alignment of single bearing generators is essential, vibration can occur due to the flexing of the flanges between the engine and generator. A substantial bedplate with engine/generator mounting pads is required. For the purposes of establishing set design the bending moment at the engine flywheel housing to generator adaptor interface should not exceed 125ft.lb. (17 kgm). The maximum bending moment of the engine flange must be checked with the engine manufacturer. Torsional vibrations occur in all engine-driven shaft systems and may be of a magnitude to cause damage at certain critical speeds. It is therefore necessary to consider the torsional vibration effect on the generator shaft and couplings. It is the responsibility of the generator set manufacturer to ensure compatibility, and for this purpose drawings showing the shaft dimensions and rotor inertias are available for customers to forward to the engine supplier. In the case of single bearing generators coupling details are included. Caution! Torsional incompatibility and/or excessive vibration levels can cause damage or failure of the generator and/or engine components. Coupling Two Bearing Generators P0-1-MAN-EN-4 14 Copyright Cummins 2009 Warning! Do not use the fan to rotate the shaft this is particularly important when the engine and the alternator are connected. A flexible coupling should be fitted and aligned in accordance with the coupling manufacturer's instruction. If a close coupling adaptor is used the alignment of machined faces must be checked by offering the generator up to the engine. Shim the generator feet if necessary. Ensure adaptor guards are fitted after generator/engine assembly is complete. Open coupled sets require a suitable guard, to be provided by the set builder. Axial loading of the generator bearings should be avoided. Should it be unavoidable contact the factory for advice. Warning! Incorrect guarding and/or generator alignment can result in injury and/or equipment damage. Coupling Single Bearing Generators Warning! Do not use the fan to rotate the shaft this is particularly important when the engine and the alternator are connected. Alignment of single bearing generators is critical. If necessary, shim the generator feet to ensure alignment of the machined surfaces. For transit and storage purposes the generator frame spigot and rotor coupling plates have been coated with a rust preventative. This MUST BE removed before assembly to engine. A practical method for removal of this coating is to clean the mating surface areas with a de-greasing agent based on a petroleum solvent. Warning! Care should be taken not to allow any cleaning agent to come into prolonged contact with skin. 4-pole Single Bearing Coupling Alignment 1. On the engine check the distance from the coupling mating face on the flywheel to the flywheel housing mating face. This should be within 0.5mm of nominal dimension. This is necessary to ensure that a thrust is not applied to the ac generator bearing or engine bearing. 2. Check that the bolts securing the flexible plates to the coupling hub are tight and locked into position. torque. (75Nm : 55 lb/ft) 3. Remove air outlet cover from the drive end of the generator to gain access to coupling and adaptor bolts. Check that coupling joint interfaces are clean and lubricant free. 4. Check that coupling discs are concentric with adaptor spigot. This can be adjusted by the use of tapered wooden wedges between the fan and adaptor. Alternatively, the rotor can be suspended by means of a rope sling through the adaptor opening. 5. Consider using alignment studs to ensure that the disc and the flywheel are in alignment. 6. Offer the generator to engine and engage both coupling discs and housing spigots at the same time, pushing generator towards engine until coupling discs are against flywheel face, and the housing spigots are located. Caution! Do not pull the generator to the engine using bolts through the flexible discs. 7. Fit housing and coupling bolts, taking care to use heavy gauge washers between coupling bolt head and coupling disc. Tighten bolts evenly around assembly sufficiently to ensure correct alignment. 8. Tighten housing bolts. 9. Tighten coupling disc to flywheel bolts. Refer to engine manufacturer’s manual for correct tightening torque. 10. Remove rotor aligning aids, the sling, or wooden wedges and replace all covers. Caution! Incorrect generator alignment can result in damage to the generator. Warning! Failure to replace protective covers can result in injury. Earth arrangement Copyright Cummins 2009 15 P0-1-MAN-EN-4 The generator frame should be earth bonded to the generating set bedplate. If anti-vibration mounts are fitted between the generator frame and its bedplate a suitably rated earth conductor (normally one half of the cross sectional area of the main line cables) should bridge across the anti-vibration mounts. Warning! Refer to local regulations to ensure that the correct earth requirements are incorporated into the installation. Inadequate earth installations put lives at risk. Paint Finish Unless previous arrangements have been agreed, the generator will be supplied in a water based primer coat. It is expected that the generating set assembler will want to paint the generating set with a final coat in their company livery. The primer coat will not provide adequate protection for used out-doors. Note The primer coat is not adequate protection for many applications without additional protection. Warning Labels Warning labels are affixed to the generator. These must be visible at all times. As we expect the set builder to paint the generator in his own livery, a second set of labels can be found in a wallet attached to the generator. Use the labels as per the instructions printed on the reverse of the labels. NOTE: If removed or painted over, it is the genset manufacturer's responsibility to reaffix warning symbols onto the generator Direction of Rotation The direction of rotation of the generator is designed to be clockwise as viewed from the drive end of the generator. It will run in the reverse direction with some loss of performance. Refer to the factory for guidance. Phase Rotation The output from the generator will have a phase sequence of U V W with the generator running clockwise as viewed from the drive end. If the phase rotation of the generator has to be reversed, the customer must rearrange the output cables to a UVW configuration. Ask for a circuit diagram of ‘reverse phase connections’. Voltage and Frequency Check the generator nameplate to ensure that the generator parameters are as required for the generating-set application. AVR adjustment To make AVR selections and adjustments remove the AVR cover. Use the tool provided to make adjustments to the AVR settings. The AVR is factory set and will give satisfactory performance during initial running tests. Subsequent voltage adjustment both on and off load may be required. Guidance can be found in the AVR section. P0-1-MAN-EN-4 16 Copyright Cummins 2009 Automatic Voltage Regulator (AVR) AS480 AVR This AVR is specifically designed to fit into and work with the P0 & P1 generator, it is the only AVR that fits into the terminal box and is capable of working with the optional Excitation Boost System (EBS). The following 'jumper' connections on the AVR should be checked to ensure they are correctly set for the generating set application. connections for the EBS Control Function Direction VOLTS Generator output voltage setting Clockwise raises voltage STABILITY Output voltage stability Clockwise increases stabilisation effect DROOP Voltage droop for paralleling Clockwise increases drooping effect UFRO Under-frequency 'Knee' point Clockwise decreases 'Knee' point Refer to the Generator Wiring Diagrams for all Connection detail Main Stator Powered AVR The main stator provides power for excitation of the exciter field via the SX480 AVR which is the controlling device governing the level of excitation provided to the exciter field. The AVR responds to a voltage-sensing signal derived from the main stator winding. By controlling the low power of the exciter field, control of the high power requirement of the main field is achieved through the rectified output of the exciter armature. The AVR senses average voltage on two phases ensuring close regulation. In addition it detects engine speed and provides voltage fall off with speed, below a pre-selected speed (Hz) setting, preventing over-excitation at low engine speeds and softening the effect of load switching to relieve the burden on the engine. The detailed function of the AVR circuits and their adjustment are covered in the load testing section. Optional excitation Boost system (EBS) The EBS is a single, self-contained unit, attached to the non-drive end of the generator. The EBS unit consists of the Excitation Boost Controller (EBC) and an Excitation Boost Generator (EBG). Under fault conditions, or when the generator is subjected to a large impact load such as a motor starting, the generator voltage will drop. The EBC senses the drop in voltage and engages the output power of the EBG. This additional power feeds the generator’s excitation system, supporting the load until breaker discrimination can remove the fault or enable the generator to pick up a motor and drive the voltage recovery. Copyright Cummins 2009 17 P0-1-MAN-EN-4 Voltage Adgustment The generator output voltage is set at the factory but can be altered by adjustment of the VOLTS control on the AVR board or by the external hand trimmer if fitted. Before adjusting the generator output voltage , note the following warnings. WARNING! Do not increase the voltage above the rated generator voltage shown on the rating plate mounted on the generator case. WARNING! Do not ground any of the external hand trimmer terminals. Failure to observe this could cause equipment damage. To adjust the generator output voltage, proceed as follows: Before running the generator set, turn the [VOLTS] control fully anti-clockwise. Turn the [STABILITY] control to its midway position and the external hand trimmer (if fitted) to its midway position. 1. Connect a suitable voltmeter (0-300Vac) across Line and Neutral of the generator. 2. Start the generator set, on no load at nominal frequency e.g. 50Hz (or 60Hz). 3. If the red Light Emitting Diode (LED) is illuminated, refer to the section on Under-Frequency-Roll-Off adjustment. 4. Carefully turn the [VOLTS] control clockwise until the required voltage is reached. 5. If instability is present at rated voltage, refer to the section on Stability adjustment. 6. Voltage adjustment is now completed. STABILITY ADJUSTMENT The AVR includes an optimised stability circuit to provide good steady state and transient performance of the generator. Links are provided to change the response of the stability circuit to suit different frame size generators and applications. On generators of this size a slow response setting is more appropriate and will prove helpful in reducing lamp flicker. The correct setting of the Stability adjustment can be found by running the generator at no load and slowly turning the stability control anti-clockwise until the generator voltage starts to become unstable. The optimum position for the control is slightly clockwise from this point (i.e. where the machine volts are stable but close to the unstable region). UNDER-FREQUENCY-ROLL-OFF ADJUSTMENT: (UFRO) The AVR incorporates an under-speed protection circuit which produces a volts/Hz characteristic when the generator frequency falls below a preset threshold - known as the "knee" point. The red Light Emitting Diode (LED) gives indication that the UFRO circuit is operating in the low frequency region. The UFRO adjustment is preset and sealed and only requires the selection of 50Hz or 60Hz operation using the jumper link. Accessories Droop CT (P1only) RFI suppression, thermistors and anti-condensation heaters are available. Generator Set Testing Warning! P0-1-MAN-EN-4 During testing it may be necessary to remove covers to adjust controls exposing 'live' terminals or components. Only personnel qualified to perform electrical service should carry out testing and/or adjustments. 18 Copyright Cummins 2009 Test Metering/Cabling Connect any instrument wiring and cabling required for initial test purposes with permanent or spring-clip type connectors. Minimum instrumentation for testing should be line - line or line to neutral voltmeter, Hz meter, load current metering and kW meter. If reactive load is used a power factor meter is desirable. Caution! When fitting power cables for load testing purposes, ensure cable voltage rating is at least equal to the generator rated voltage. The load cable termination should be placed on top of the winding lead termination and clamped with the nut provided. Check that all wiring terminations for internal or external wiring are secure, and fit all terminal box covers and guards. Failure to secure wiring and/or covers may result in personal injury and/or equipment failure. INITIAL START-UP Pre-Running Checks Before starting the generating set. Test the insulation resistance of windings. Check all connections are in the correct location and tight Check the generator air path is clear of obstructions Replace all covers. Insulation resistance test 1. Disconnected all leads connected to the AVR. 2. Use a 500V Megger or similar instrument. 3. Disconnect any conductor connected between neutral and earth. 4. Megger an output lead terminal U, V or W to earth. The insulation resistance reading should be in excess of 5 Megohm to earth. Should the insulation resistance be less than 5 Megohm the winding must be dried out. For drying out procedures see the Service section of this Manual. Caution! The windings have been High Voltage H.V. tested during manufacture and further H.V. testing may degrade the insulation with consequent reduction in operating life. Should it be necessary to demonstrate H.V. testing, for customer acceptance, the tests must be carried out at reduced voltage levels i.e. Test Voltage= 0.8 (2 X Rated Voltage + 1000) Warning! Caution! Warning! During testing it may be necessary to remove covers to adjust controls exposing 'live' terminals or components. Only personnel qualified to perform electrical service should carry out testing and/or adjustments. Refit all access covers after adjustments are completed. On completion of generating set assembly and before starting the generating set ensure that all engine manufacturer's pre-running procedures have been completed, and that adjustment of the engine governor is such that the generator will not be subjected to speeds in excess of 125% of the rated speed. Over speeding of the generator during initial setting of the speed governor can result in damage to the generator rotating components. Setting the Voltage Copyright Cummins 2009 19 P0-1-MAN-EN-4 In addition remove the AVR access cover and turn VOLTS control fully anti-clockwise. Start the generating set and run on no-load at nominal frequency. Slowly turn VOLTS control potentiometer clockwise until rated voltage is reached. Caution! Do not increase the voltage above the rated generator voltage shown on the generator nameplate. Setting the Stability Control. The STABILITY control potentiometer should be set to the midway position and with the stability selection correctly set should not normally require adjustment. Should adjustment be required, usually identified by oscillation of the voltmeter, proceed as follows: Run the generating set on no-load and check that speed is correct and stable. Turn the STABILITY control potentiometer clockwise, and then turn slowly anti-clockwise until the generator voltage starts to become unstable. The correct setting is slightly clockwise from this position (i.e. where the machine volts are stable but close to the unstable region). Load Testing Warning! During testing it may be necessary to remove covers to adjust controls exposing 'live' terminals or components. Only personnel qualified to perform electrical service should carry out testing and/or adjustments. Refit all access covers after adjustments are completed. AVR Controlled Generators - AVR Adjustment Having adjusted VOLTS and STABILITY during the initial start-up procedure, the AVR control function UFRO should not normally need adjustment. If however, poor voltage regulation on-load is experienced, refer to the following paragraph to a) check that the symptoms observed do indicate adjustment is necessary, and b) to make the adjustment correctly. UFRO (Under Frequency Roll Off) The AVR incorporates an under speed protection circuit, which gives a voltage/speed (Hz) characteristic as shown: The UFRO control potentiometer sets the "knee point". Symptoms of incorrect setting are a) the light emitting diode (LED) indicator, adjacent to the UFRO Control potentiometer, being permanently lit when the generator is on load, and b) poor voltage regulation on load, i.e. operation on the sloping part of the characteristic. Clockwise adjustment lowers the frequency (speed) setting of the "knee point" and extinguishes the LED. For Optimum setting the LED should illuminate as the frequency falls just below nominal frequency, 1) Knee point i.e. 47Hz on a 50Hz generator or 57Hz on a 60Hz generator. 2) Typical slope Accessories Generator control accessories may be fitted, as an option, in the generator terminal box. If fitted at the time of supply, the wiring diagram(s) in the back of this book shows the connections. When the options are supplied separately, fitting instructions are provided with the accessory. Accessories available are droop transformer for parallel operation applicable to P1 generators. and remote voltage adjust (hand trimmer). The latter being available for all AVR types but not fitted on the generator. P0-1-MAN-EN-4 20 Copyright Cummins 2009 Remote Voltage Adjust. A remote voltage adjust can be fitted to the control panel. Remove link 1-2 on the AVR and connect adjuster to terminals 1 and 2. Parallel Operation Understanding of the following notes on parallel operation is useful before attempting the fitting or setting of the droop kit accessory. When operating in parallel with other generators or the mains, it is essential that the phase sequence of the incoming generator matches that of the bulbar and also that all of the following conditions are met before the circuit breaker of the incoming generator is closed on to the bus bar (or operational generator) Frequency must match within close limits. Voltages must match within close limits. Phase angle of voltages must match within close limits. A variety of techniques, varying from simple synchronising lamps to fully automatic synchronisers, can be used to ensure these conditions are met. Caution! Failure to meet conditions 1, 2, and 3 when closing the circuit breaker, will generate excessive mechanical and electrical stresses, resulting in equipment damage. Once connected in parallel a minimum instrumentation level per generator of voltmeter, ammeter, watt meter (measuring total power per generator), and frequency meter is required in order to adjust the engine and generator controls to share kW in relation to engine ratings and kVAr in relation to generator ratings. It is important to recognise that: kW derived from the engine, and speed governor characteristics determine the kW sharing between sets. kVAr derived from the generator, and excitation control characteristics determine the kVAr sharing. Reference should be made to the generating set manufacturer's instructions for setting the governor controls. Droop The most commonly used method of kVAr sharing is to create a generator voltage characteristic, which falls with decreasing power factor (increasing kVAr). This is achieved with a current transformer (C.T.), which provides a signal dependent on current phase angle (i.e. power factor) to the AVR. The current transformer has a burden resistor on the AVR board, and a percentage of the burden resistor voltage is summed into the AVR circuit. Increasing droop is obtained by turning the DROOP control potentiometer clockwise. The diagrams below indicate the effect of droop in a simple two-generator system: Copyright Cummins 2009 21 P0-1-MAN-EN-4 Generally 5% droop at full load current zero p.f. is sufficient to ensure kVAr sharing. If the droop accessory has been supplied with the generator it will have been tested to ensure correct polarity and set to a nominal level of droop. The final level of droop will be set during generating set commissioning. The following setting procedure will be found to be helpful. Setting Procedure Depending upon available load the following settings should be used - all are based on rated current level. 0.8 P.F. LOAD (at full load current) SET DROOP TO 3% 0 P.F. LOAD (at full load current) SET DROOP TO 5% Setting the droop with low power factor load is the most accurate. Run each generator as a single unit at rated frequency or rated frequency + 4% depending upon type of governor and nominal voltage. Apply available load to rated current of the generator. Adjust 'DROOP' control potentiometer to give droop in line with above table. Clockwise rotation increases amount of droop. Refer to AVR section, for potentiometer location. After adjustment check NO LOAD voltage level and adjust if necessary. Note 1: Reverse polarity of the C.T. will raise the generator voltage with load. The polarities S1-S2 shown on the wiring diagrams are correct for clockwise rotation of the generator looking at the drive end. Reversed rotation requires S1-S2 to be reversed. Note 2: The most important aspect is to set all generators equal. The precise level of droop is less critical. Note 3: A generator operated as a single unit with a droop circuit set at rated load 0.8-power factor is unable to maintain the usual level (%) of regulation. A shorting switch can be connected across S1-S2 to restore regulation for single running. Caution! LOSS OF FUEL to an engine can cause its generator to motor with consequent damage to the generator windings. Reverse power relays should be fitted to trip main circuit breaker. LOSS OF EXCITATION to the generator can result in large current oscillations with consequent damage to generator windings. Excitation loss detection equipment should be fitted to trip main circuit breaker. P0-1-MAN-EN-4 22 Copyright Cummins 2009 Installation on site General The extent of site installation will depend upon the generating set build, e.g. if the generator is installed in a canopied set with integral switchboards and circuit breaker, on site installation will be limited to connecting up the site load to the generating set output terminals. In this case reference should be made to the generating set manufacturer's instruction book and any pertinent local regulations. If the generator has been installed on a set without switchboard or circuit breaker the following points relating to connecting up the generator should be noted. Glanding This generator can be fitted with one of several terminal box arrangements. Each box comes in two parts, a four sided body and a lid. The body of the terminal box has knock-out punch holes for customer to fit their gland arrangement. If these are not adequate the box can be removed and additional holes can be punched through. Incoming cables should be supported from either below or above the box level and at a sufficient distance from the centre line of the generating set so as to avoid a tight radius at the point of entry into the terminal box panel, and allow movement of the generator set on its anti-vibration mountings without excessive stress on the cable. Before making final connections, test the insulation resistance of the windings. The AVR should be disconnected during this test. A 500V Megger or similar instrument should be used. Should the insulation resistance be less than 5MW the windings must be dried out as detailed in the Service and Maintenance section of this manual. When making connections to the terminals the incoming cable termination should be placed on top of the winding lead termination(s) and clamped with the nut provided. eg current carrying component next to current carrying component. Caution! To avoid the possibility of swarf entering any electrical components in the terminal box, panels must be removed for drilling. The AVR can be fitted on either side of the NDE bracket in its own compartment. There is sufficient length of wiring to allow the customer to swap sides without rewiring. Earthing The neutral of the generator is not bonded to the generator frame as supplied from the factory. An earth terminal is provided inside the terminal box adjacent to the main terminals. Should it be required to operate with the neutral earthed a substantial earth conductor (normally equivalent to one half of the section of the line conductors) must be connected between the neutral and the earth terminal inside the terminal box. A hole is provided on the generator foot, which may be tapped to give an additional earthing point. The feet should be already bonded to the generating set bedplate by the generating set builder, but will normally be required to be connected to the site earth system. Warning! Reference to local electricity regulations or safety rules should be made to ensure correct earthing procedures have been followed. Copyright Cummins 2009 23 P0-1-MAN-EN-4 Protection It is the responsibility of the end user and his contractors/subcontractors to ensure that the overall system protection meets the needs of any inspectorate, local electricity authority or safety rules, pertaining to the site location. To enable the system designer to achieve the necessary protection and/or discrimination, fault current curves are available on request from the factory, together with generator reactance values to enable fault current calculations to be made. Warning! Incorrect installation and/or protective systems can result in personal injury and/or equipment damage. Installers must be qualified to perform electrical installation work. Commissioning Ensure that all external cabling is correct and that all the generating set manufacturer's pre-running checks have been carried out before starting the set. The generator AVR controls will have been adjusted during the generating set manufacturer's tests and should normally not require further adjustment. Should adjustment on site be necessary and for paralleling adjustments see section on Automatic Voltage Regulators. Should malfunction occur during commissioning refer to Service and Maintenance section 'Fault Finding' procedure. P0-1-MAN-EN-4 24 Copyright Cummins 2009 Service and Maintenance Service Warning! Service and fault finding procedures present hazards, which can result in severe personal injury or death. Only personnel qualified to perform electrical and mechanical service should carry out these procedures. Ensure engine-starting circuits are disabled before commencing service or maintenance procedures. Isolate any anti-condensation heater supply. Winding Condition Guidance of Typical Insulation Resistance [IR] Values The following is offered as general information about IR values and is aimed at providing guidance about the typical IR values for generators from new, through to the point of refurbishment. New Machines The generator’s Insulation Resistance, along with many other critical factors, will have been measured during the generator manufacturing process. The generator will have been transported with an appropriate packaging suitable for the method of delivery to the Generating Set assembler’s works. The assembler is expected to store the generator in a suitable location, protected from adverse environmental (and other) conditions. However, absolute assurance that the generator will arrive at the Genset production line with IR values still at the factory test levels of above 100 Megohm to be guaranteed. At Generating Set Assembler’s Works The generator should have been transported and stored such that it will be delivered to the assembly area in a clean dry condition. If held in appropriate storage conditions the generator IR value should typically be 25 Megohm If the unused/new generator’s IR values fall below 5 Megohm then a drying out procedure should be implemented by one of the processes outlined below, before being despatched to the end customer’s site. Some investigation should be undertaken into the storage conditions of the generator while on site. Generators in Service It is known that a generator will give reliable service with an IR value of just 1.0 Megohm. For a relatively new generator to be so low it must have been subjected to inappropriate operating or storage conditions. Any temporary reduction in IR values can be restored to expected values by following one of the drying out procedures. Winding Condition Assessment Caution! The AVR should be disconnected and the Resistance Temperature Detector (R.T.D.) leads grounded during this test. Caution! The windings have been H.V. tested during manufacture and further H.V. testing may degrade the insulation with consequent reduction in operating life. Should it be necessary to demonstrate H.V. testing, for customer acceptance, the tests must be carried out at reduced voltage levels i.e. Test Voltage= 0.8 (2 X Rated Voltage + 1000) The condition of the windings can be assessed by measurement of insulation resistance [IR] between phase to phase, and phase to earth. Measurement of winding insulation should be carried out: • • • As part of a periodic maintenance plan. After prolonged periods of shutdown. When low insulation is suspected, e.g. damp or wet windings. Copyright Cummins 2009 25 P0-1-MAN-EN-4 Care should be taken when dealing with windings that are suspected of being excessively damp or dirty. The initial measurement of the [IR] Insulation Resistance should be established using a low voltage (500V) megger type instrument. If manually powered, the handle should initially be turned slowly so that the full test voltage will not be applied. If low values are suspected or immediately indicated the test should only continue for long enough to very quickly assess the situation. Full megger tests (or any other form of high voltage test) should not be applied until the windings have been dried out, and if necessary cleaned. Procedure for Insulation Testing 1. Disconnect all electronic components, AVR, electronic protection equipment etc. Ground the RTD's (Resistance Temperature Detection devices) if fitted. 2. Short out the diodes on the rotating diode assembly. Be aware of all components connected to the system under test that could cause false readings, or be damaged by the test voltage. 3. Carry out the insulation test in accordance with the ‘operating instructions’ for the test equipment. 4. he measured value of insulation resistance for all windings to earth and phase to phase should be compared with the guidance given above for the various 'life stages' of a generator. The minimum acceptable value is 1.0 Megohm on a 500V megger. If low winding insulation is confirmed, one or more of the methods, given below, for drying the winding should be carried out. Methods of Drying Out Generators Cold Run In the case of a generator in otherwise good condition that has not been run for some time, and has been standing in damp, humid conditions a simple procedure may suffice. It is possible that simply running the generator set unexcited – AVR terminals “K1” “K2” open circuit - for a period of say 10 minutes will sufficiently dry the surface of the windings and raise the IR to greater than 1.0 Megohm, and so allow the unit to be put into service. Blown Air Drying Remove the covers from all apertures to allow the escape of the water-laden air. During drying, air must be able to flow freely through the generator in order to carry off the moisture. Direct hot air from two electrical fan heaters of around 1 – 3 kW into the generator air inlet apertures. Ensure the heat source is at least 300mm away from the windings to avoid over heating and damage to the insulation. Apply the heat and plot the insulation value at half hourly intervals. The process is complete when the parameters covered in the section entitled, ‘Typical Drying Out Curve’, are met. Remove the heaters, replace all covers and re-commission as appropriate. If the set is not to be run immediately ensure that the anti-condensation heaters are energised, and retest prior to running. Short Circuit Method • • Warning! This process should only be performed by a competent engineer familiar with safe operating practices within and around generator sets of the type in question. Ensure the generator is safe to work on, initiate all mechanical and electrical safety procedures pertaining to the genset and the site. Caution! The short circuit must not be applied with the AVR connected in circuit. Current in excess of the rated generator current will cause damage to the windings. Bolt a short circuit of adequate current carrying capacity, across the main terminals of the generator. The shorting link should be capable of taking full load current. Disconnect the cables from terminals F1 and F2 of the AVR. P0-1-MAN-EN-4 26 Copyright Cummins 2009 • • • • • • • Connect a variable dc supply to the F1 (positive) and F2 (negative) field cables. The dc supply must be able to provide a current up to 2.0 Amp at 0 - 24 Volts. Position a suitable ac ammeter to measure the shorting link current. Set the dc supply voltage to zero and start the generating set. Slowly increase the dc voltage to pass current through the exciter field winding. As the excitation current increases, so the stator current in the shorting link will increase. This stator output current level must be monitored, and not allowed to exceed 80% of the generator’s rated output current. After every 30 minutes of this exercise: Stop the generator and switch off the separate excitation supply, measure and record the stator winding IR values, and plot the results. The resulting graph should be compared with the classic shaped graph. This drying out procedure is complete when the parameters covered in the section entitled 'Typical Drying Out Curve' are met. Once the Insulation Resistance is raised to an acceptable level - minimum value 1.0 Megohm the dc supply may be removed and the exciter field leads F1 and F2 re-connected to their terminals on the AVR. Rebuild the genset, replace all covers and re-commission as appropriate. If the set is not to be run immediately ensure that the anti-condensation heaters are energised, and retest the generator prior to running. Typical Drying Out Curve Whichever method is used to dry out the generator the resistance should be measured every half-hour and a curve plotted as shown 1) Y axis = Resistance 2) X axis = Time 3) One Megohm limit The illustration shows a typical curve for a machine that has absorbed a considerable amount of moisture. The curve indicates a temporary increase in resistance, a fall and then a gradual rise to a steady state. Point ‘A’, the steady state, must be greater than 1.0 Megohm (If the windings are only slightly damp the dotted portion of the curve may not appear). For general guidance, expect that the typical time to reach point ‘A’ will be around 3 hours. Drying should be continued after point “A” has been reached for at least one hour. It should be noted that as winding temperature increases, values of insulation resistance may significantly reduce. Therefore, the reference values for insulation resistance can only be established with windings at a temperature of approximately 20°C. If the IR value remains below 1.0 Megohm, even after the above drying methods have been carried out correctly, then a Polarisation Index test [PI] should be carried out. If the minimum value of 1.0 Megohm for all components cannot be achieved, rewinding or refurbishment of the generator will be necessary. Caution! The generator must not be put into service until the minimum values are achieved. After drying out, the insulation resistances should be rechecked to verify the minimum resistances quoted above are achieved. On re-testing it is recommended that the main stator insulation resistance is checked as follows: Copyright Cummins 2009 27 P0-1-MAN-EN-4 Separate the neutral leads Ground V and W phase and megger U-phase to ground Ground U and W phase and megger V-phase to ground Ground U and V phase and megger W-phase to ground Caution! The generator must not be run if the minimum insulation value of 1.0 Megohm is not obtained. Air Filters Air filters for the removal of airborne particulate matter (dust) are offered as an addition to the standard build option. The filter elements do not remove WATER and must not be allowed to get wet. The frequency of filter maintenance will depend upon the severity of the site conditions. Regular inspection of the elements will be required to establish when cleaning is necessary. Caution! Do not charge filters with oil. Warning! Removal of filter elements enables access to LIVE parts. Only remove elements with the generator out of service. Air Filter Cleaning Procedure 1. Remove the filter elements from the filter frames, taking care not to damage them. 2. Invert the filters dirty side down and agitate to remove particles of dirt. To remove stubborn particles low-pressure air can be used, in the reverse direction of flow, to force out stubborn particles. If necessary use a soft brush to gently brush off any remaining dirt particles. 3. Clean the sealing gaskets and surrounding area. 4. Visually check the condition of the filter elements and sealing gaskets, replace as necessary. 5. Ensure that the filter elements are dry before putting them back into service. 6. Carefully replace the filter elements Maintenance Fault Finding Caution! Before commencing any fault finding procedures examine all wiring for broken or loose connections. Three excitation control systems can be fitted to the range of generators covered by this manual, identified by the last digit of the generator frame size designation. Refer to the nameplate and then proceed to the appropriate subsection as indicated below: AVR - Fault Finding No voltage build-up when starting set Unstable voltage either on no-load or with load High voltage either on no-load or with load Low voltage no-load P0-1-MAN-EN-4 1. Check speed 2. Check residual voltage. 3. Follow separate excitation test procedure to check generator 1. Check speed stability. 2. Check stability setting. 1. Check speed. 2. Check that generator load is not capacitive (leading power factor). 1. Check speed. 2. Check link 1-2 or external hand trimmer leads for continuity. 28 Copyright Cummins 2009 Low voltage on-load 1. Check speed. 2. Check UFRO setting. 3. Follow separate excitation procedure to check generator and AVR. Residual Voltage Check (Field Flashing) This procedure applies to all generators fitted with AVR control. With the generator set stationary remove AVR access cover and leads F1 and F2 from the AVR. Start the set and measure voltage across AVR terminals 7-8. A minimum level of 5 volts is required at these terminals. Replace leads F1 and F2 on the AVR terminals. If the voltage is less than 5 volts stop the set, and carry out field flashing procedure. Field Flashing procedure. Using a 12-volt D.C. battery as a supply, clip leads from battery negative to AVR terminal F2, and from battery positive through a diode to AVR terminal F1. Caution! A diode must be used as shown below to ensure the AVR is not damaged. Caution! If the generating set battery is used for field flashing, the generator main stator neutral must be disconnected from earth. Restart the set and note output voltage from the main stator, which should be approximately nominal voltage, or voltage at AVR terminals 7 and 8, which should be between 170 and 250 volts. Stop the set and unclip battery supply from terminals F1 and F2. Restart the set. The generator should now operate normally. If no voltage build-up is obtained it can be assumed a fault exists in either the generator or the AVR circuits. Follow the SEPARATE EXCITATION PROCEDURE to check generator windings, rotating diodes and AVR. Separate Excitation Test Procedure The generator windings, diode assembly and AVR can be checked using this procedure. With the generating set stationary remove AVR access cover and leads F1 and F2 from the AVR. Connect a 60W 240-volt household lamp (or two 120V lamps in series) to AVR terminals F1 and F2. Connect a 0-12 volt, 1.0 Amp supply to leads F1 and F2. The positive of the D.C. supply is connected to the lead marked F1 and the negative to the lead marked F2. The procedure is simplified by dividing into two sections: Generator Windings and Rotating Diodes, and Excitation Control Test. 1 Generator Windings and Rotating Diodes Caution! The resistances quoted apply to a standard winding. For generators having windings or voltages other than those specified refer to factory for details. Ensure all disconnected leads are isolated and free from earth. This procedure is carried out with leads F1 and F2 disconnected at the AVR and with a 12 volt d.c. supply to leads F1 and F2. Copyright Cummins 2009 29 P0-1-MAN-EN-4 • Start the set and run at rated speed, on no-load. • Measure the voltages at the main output terminals U, V and W. These should be balanced and within 10% of the generator nominal voltage. Balanced Main Terminal Voltages If all voltages are balanced within 1% at the main terminals, it can be assumed that all exciter windings, main windings and main rotating diodes are in good order, and the fault is in the AVR. Refer to AVR section for test procedure. If voltages are balanced but low, there is a fault in the main excitation windings or rotating diode assembly. Proceed as follows to identify: Rectifier Diodes The diodes on the main rectifier assembly can be checked with a multimeter. The flexible leads connected to each diode should be disconnected at the terminal end, and the forward and reverse resistance checked. A healthy diode will indicate a very high resistance (infinity) in the reverse direction, and a low resistance in the forward direction. A faulty diode will give a full deflection reading in both directions with the test meter on the 10,000 ohms scale, or an infinity reading in both directions. Replacement of Faulty Diodes The rectifier assembly is split into two plates, the positive and negative, and the main rotor is connected across these plates. Each plate carries 3 diodes, the negative plate carrying negative biased diodes and the positive plate carrying positive biased diodes. Care must be taken to ensure that the correct polarity diodes are fitted to each respective plate. When fitting the diodes to the plates they must be tight enough to ensure a good mechanical and electrical contact, but should not be over tightened. The recommended torque tightening is 4.06 - 4.74Nm (36-42lb in). Surge Suppressor The surge suppressor is a metal-oxide varistor connected across the two rectifier plates to prevent high transient reverse voltages in the field winding from damaging the diodes. This device is not polarised and will show a virtually infinite reading in both directions with an ordinary resistance meter. If defective this will be visible by inspection, since it will normally fail to short circuit and show signs of disintegration. Replace if faulty. 2 Excitation Control Test AVR Function Test 1. Remove exciter field leads F1 & F2 from the AVR terminals F1 & F2. 2. Connect a 60W 240V household lamp to AVR terminals F1 & F2. 3. Set the AVR VOLTS control potentiometer fully clockwise. 4. Connect a 12V, 1.0A DC supply to the exciter field leads F1 & F2 with F1 to the positive. 5. Start the generating set and run at rated speed. 6. Check that the generator output voltage is within +/- 10% of rated voltage. 7. Voltages at AVR terminals 7-8 should be between 170 and 250 volts. If the generator output voltage is correct but the voltage on 7-8 is low, check auxiliary leads and connections to main terminals. 8. The lamp connected across F1 & F2 should glow. Turning the "VOLTS" control potentiometer fully anti-clockwise should turn off the lamp. Failure to turn off indicates faulty protection circuit and the AVR should be replaced. 9. Should the lamp fail to light the AVR is faulty and must be replaced. Caution! P0-1-MAN-EN-4 After this test turn the VOLTS control potentiometer fully anticlockwise. 30 Copyright Cummins 2009 Main Excitation Windings If after establishing and correcting any fault on the rectifier assembly the output is still low when separately excited, then the main rotor, exciter stator and exciter rotor winding resistances should be checked (see Resistance Charts), as the fault must be in one of these windings. The exciter stator resistance is measured across leads F1 and F2. The exciter rotor is connected to six studs, which also carry the diode lead terminals. The main rotor winding is connected across the two rectifier plates. The respective leads must be disconnected before taking the readings. Resistance values should be within 10% of the values given in the table below: 4 - Pole Main Rotor Exciter stator Exciter Rotor EBS P044D P044E P044F P044G P044H P144D P144E P144F P144G P144H P144J P144K 0.437 0.415 0.465 0.551 0.545 0.657 0.67 0.708 0.857 0.89 0.983 0.99 17.5 17.7 18.5 18.5 18.5 18.5 19.36 20.25 22.25 22.9 22.9 22.9 0.211 0.211 0.228 0.228 0.228 0.228 0.215 0.201 0.201 0.21 0.21 0.21 12.9 12.9 12.9 12.9 12.9 12.9 12.9 12.9 12.9 12.9 12.9 12.9 2 - Pole P042D P042E P042F P042G P142D P142E P142F P142G P142H P142J Main Rotor 0.798 0.895 0.931 0.993 1.125 1.214 1.28 1.479 1.59 1.709 Exciter stator 13.5 13.5 13.5 13.5 18 19 20 20 20 20 Exciter Rotor 0.0479 0.0479 0.0479 0.0479 0.128 0.134 0.105 0.105 0.105 0.105 EBS 12.9 12.9 12.9 12.9 12.9 12.9 12.9 12.9 12.9 12.9 Incorrect resistances indicate faulty windings and component replacement is necessary. Main Stator Resistance If voltages are unbalanced, this indicates a fault on the main stator winding or main cables to the circuit breaker. NOTE Faults on the stator winding or cables may also cause noticeable load increase on the engine when excitation is applied. Disconnect the main cables and separate the winding leads U1-U2, U5-U6, V1-V2, V5-V6, W1-W2, W5W6 to isolate each winding section. Measure insulation resistance between sections and each section to earth. Unbalanced or incorrect winding resistances and/or low insulation resistances to earth indicate rewinding of the stator will be necessary. Copyright Cummins 2009 31 P0-1-MAN-EN-4 4 - Pole windings P044D P044E P044F P044G P044H P144D P144E P144F P144G P144H P144J P144K 2 - Pole Windings P042D P042E P042F P042G P142D P142E P142F P142G P142H P142J P0-1-MAN-EN-4 Main stator winding resistances 311 1.908 1.33 0.95 0.625 0.51 0.353 0.3 0.26 0.213 0.171 0.15 0.155 Main stator winding resistances 311 1.149 0.726 0.640 0.494 0.336 0.283 0.231 0.165 0.144 0.118 32 Copyright Cummins 2009 Removal and Replacement of Component Assemblies Caution! removed The following procedures assume that the generator has been from the generating set. On single bearing generators before removal from the engine, position the rotor such that a full pole face is at bottom dead centre. Use engine pulley to turn rotor. Metric threads are used throughout. Warning! When lifting single bearing generators, care is needed to ensure the generator frame is kept in the horizontal plane. The rotor is free to move in the frame and can slide out if not correctly lifted. Incorrect lifting can cause serious personal injury. Removal of EBS unit This unit is designed to be be fitted and removed as a single unit. 1. Remove the AVR cover and disconnect the flag connectors from terminals DR EB F2 F1 on the AVR, ensure the cable is free to move. 2. Remove the terminal box lit and free the cable ties holding the cable in place, ensure the cable is free to move. 3. Remove the cover from the rear of the EBS unit. 4. Look into the unit and identify the bolt holding the rotor to the shaft remove and put aside. 5. Remove four bolts holding the unit in position. The whole unit together with the connecting cable can be lifted clear as one unit. Assemble in reverse order, torqued to 10Nm. Removal of the Rotor (two bearing generator) 1. Remove the EBS unit if fitted. 2. Ensure that a full pole face of the rotor is at the bottom dead centre of the stator. 3. Remove the eight bolts from the DE bracket and use fox wedges to remove the bracket. 4. Remove the outer section of the fan. This is necessary on large cores but good practice on all cores. 5. Disconnect stator leads at the terminal block. 6. Remove the plastic cover from the NDE bracket 7. Access is now available for the removal of the bolts holding the NDE bracket in place. 8. Because of the angle on the rotor caused by the removal of the DE bracket it will help with the removal if the rotor is pulled out by a few cm. Use a rope or web sling to support the rotor when moving it. 9. Lift the NDE bracket clear when free to do so. 10. The rotor is now free at both ends and can be inched out with the careful use of slings. Note bearings can now be changed, without moving the rotor. Assemble in reverse order, torque to 26Nm Removal of the Rotor (single bearing generator) 1. Remove the EBS unit if fitted. 2. Ensure that a full pole face of the rotor is at the bottom dead centre of the stator. 3. Remove the coupling disc and the outer section of the fan to prevent damage to them 4. Disconnect stator leads at the terminal block. 5. Remove the plastic cover from the NDE bracket 6. Access is now available for the removal of the bolts holding the NDE bracket in place. 7. Because of the angle on the rotor it will help with the removal of the NDE bracket if the rotor is pulled Copyright Cummins 2009 33 P0-1-MAN-EN-4 out by a few cm. Use a rope or web sling to support the rotor from when moving it. 8. Lift the NDE bracket clear when free to do so. 9. The rotor is now free at both ends and can be inched out with the careful use of slings. Note bearings can now be changed, without moving the rotor. Assemble in reverse order, torque to 26Nm Bearing Removal • Use the appropriate method described above to remove the end bracket(s)or remove the rotor. • Use three legged bearing pullers to remove the bearings from the shaft. Fitting new bearings Only use genuine STAMFORD replacement parts. The bearings are pre-packed with grease and sealed for life. note do not reuse the old bearing , 'o' rings or wave washers, always use the new ones supplied with the bearing kit. Caution! set up a clean area around the job to eliminate the possibility of contamination. Unpack the bearing and clean off the preservative oil using a lint free cloth. Heat the bearing to 20oC above ambient (do not exceed 100oC) fit the 'o' ring in the bearing housing(s) using using (MP14002 – Kluber Altenp Q NB 50) anti-fretting grease. Position the wave washer. fit the bearing(s) onto the shaft, ensure that it is hard up against the shoulder. Allow to cool. Refit the NDE bracket; gently tap the bracket onto the bearing using a hide mallet. Use slings work the rotor back into the frame. Position and bolt up NDE bracket. On two bearing generators, align and fit the bracket onto the bearing. Align the DE bracket, position the bolts and take up the slack. Tighten and torque from both ends ensuring that the shaft is free to rotate at all times. Replacing anti-condensation heaters Warning! ensure that the power is removed from the heaters. Remove the plastic end cover from the non drive end to gain access to the heater. Identify the heater at the bottom of the NDE bracket. Cut the leads, unbolt the fixin arrangement Replacing Rectifier diodes and Surge Suppessor Remove the plastic end cover from the non drive end to gain access. The rectifier plates are positioned on the NDE of the exciter rotor. Rotate the rotor until each diode, in turn, is accessible from the bottom quadrant. Remove and replace each diode and the suppressor in turn. Smear Midlands Silicons Heat sink compound, type MS2623, on the underside of each diode when assembling the diodes. Caution This compound must not be applied to the thread of the diodes. Diodes to be tightened to a torque of 2.03-2.37 Nm. Removing the Terminal box The terminal box has knockouts for customer cables there should be no need to remove the box. To remove the box take off the lid and remove 4 bolt securing the box. The box is in two parts the lid and a four sided frame. There are optional, larger boxes for customers that require additional room. Lifting the generator with a large box The standard fitted lifting eyes will be obstructed if the large box is fitted. A set of extension pieces can be bolted onto the standard lifting eyes to facilitate the lift. P0-1-MAN-EN-4 34 Copyright Cummins 2009 Spares and After Sales Service Recommended Spares Service parts are conveniently packaged for easy identification. Genuine parts may be recognised by the STAMFORD name. We recommend the following for Service and Maintenance. In critical applications a set of these service spares should be held with the generator. * AVR P0 / P1 AVR control E000-14800* Bearings Bearing 6306 C3 O' Ring 051-01058* 051-21792* Diodes Rectifier service kit Comprises:Metal Oxide Varistor BC Diode Stud (fwd) Diode Stud (rev) RSK-1101* Complete Rectifer Assembly Rectifier assembly Rectifier assembly BC-fwd Rectifier assembly BC-rev 45-0427 130-1413 130-1414 EBS EBS 190-EBS0001 073-08063 073-50032 073-50033 When ordering parts the machine serial number or machine identity number and type should be quoted, together with the part description. Orders and enquiries for parts should be addressed to: STAMFORD PARTS Dept. STAMFORD Lincolnshire PE9 2NB UK Telephone: 44 (0) 1780 484000 Fax: 44 0)1780766074Stamford Or any of our subsidiary companies listed on the back cover. After Sales Service A full technical advice and on-site service facility is available from our Service Department at Stamford or through our Subsidiary Companies. A repair facility is also available at our Stamford Works. Copyright Cummins 2009 35 P0-1-MAN-EN-4 Parts Identification Single Bearing item Description 1 cover, EBS 2 EBS unit 3 EBS rotor 4 6 rear screen, plastic NDE casting with bearing housing AVR cover 7 AS480 AVR 8 NDE bearing, 'o' ring 9 terminal block 10 exciter stator 11 frame 12 main stator 5 13 air flow baffle 14 exciter rotor 15 rotating rectifier assembly 16 main rotor assembly 17 fan, removable 18 fan hub, fixed 19 20 shaft shaft spacer 21 coupling disc 22 DE adapter 23 DE screen 24 standard terminal box 25 standard terminal box lid 26 large terminal box 27 large terminal box lid P0-1-MAN-EN-4 N.D.E. D.E. A.V.R. 36 Non Driven End Driven End Automatic Voltage Regulator Copyright Cummins 2009 Parts Identification Two Bearing item Description 1 cover, EBS 2 EBS unit 3 EBS rotor 4 6 rear screen, plastic NDE casting with bearing housing AVR cover 7 AS480 AVR 8 NDE bearing, 'o' ring 9 terminal block 10 exciter stator 11 frame 12 main stator 13 air flow baffle 5 14 exciter rotor 15 rotating rectifier assembly 16 main rotor 17 fan, removable 18 fan hub, fixed 19 bearing, 20 wave washer DE adapter 21 22 24 DE screen DE adapter with bearing housing standard terminal box 25 standard terminal box lid 26 large terminal box 27 large terminal box lid 23 Copyright Cummins 2009 N.D.E. D.E. A.V.R. 37 Non Driven End Driven End Automatic Voltage Regulator P0-1-MAN-EN-4 Parts Identification Rectifier Assembly 1 2 3 4 5 Description exciter field forward diodes varistor reverse diodes exciter hub Quantity 1 3 1 3 1 The rectifier assembly is on the NDE of the exciter rotor. NOTE Coat the underside of diodes with Midlands Silicons Heat sink compound type MS2623, Code 030-02318. This compound must not be applied to diode thread. Diodes to be tightened to a torque of 2.03-2.37 Nm. P0-1-MAN-EN-4 38 Copyright Cummins 2009 A.C. GENERATOR WARRANTY WARRANTY PERIOD A.C. Generators In respect of A.C. generators the Warranty Period is eighteen months from the date when the goods have been notified as ready for despatch or twelve months from the date of first commissioning (whichever is the shorter period). DEFECTS AFTER DELIVERY We will make good by repair or, at our option, by the supply of a replacement, any fault which under proper use appears in the goods within the period specified on Clause 12, and is found on examination by us to be solely due to defective material and workmanship; provided that the defective part is promptly returned, carriage paid, with all identification numbers and marks intact, or our works or, if appropriate to the Dealer who supplied the goods. Any part repaired or replaced, under warranty, will be returned free of charge (via sea freight if outside the UK). We shall not be liable for any expenses, which may be incurred in removing or replacing any part sent to us for inspection or in fitting any replacement supplied by us. We shall be under no liability for defects in any goods which have not been properly installed in accordance with recommended installation practices as detailed in the publication ‘Installation, Service and Maintenance Manual', or which have been improperly stored or which have been repaired, adjusted or altered by any person except ourselves or our authorised agents, or in any second-hand goods, proprietary articles or goods not of our own manufacture although supplied by us, such articles and goods being covered by the warranty (if any) given by the separate manufacturers. Any claim under this clause must contain fully particulars of the alleged defect, the description of the goods, the date of purchase, and the name and address of the Vendor, the Serial Number (as shown on the manufacturers identification plate) or for Spares the order reference under which the goods were supplied. Our judgement in all cases of claims shall be final and conclusive and the claimant shall accept our decision on all questions as to defects and the exchange of a part or parts. Our liability shall be fully discharged by either repair or replacement as above, and in any event shall not exceed the current list price of the defective goods. Our liability under this clause shall be in lieu of any warranty or condition implied by law as to the quality or fitness for any particular purpose of the goods, and save as expressly provided in this clause we shall not be under any liability, whether in contract, tort or otherwise, in respect of defects in goods delivered or for any injury, damages or loss resulting from such defects or from any work undone in connection therewith. Copyright Cummins 2009 39 P0-1-MAN-EN-4 Head Office Address: Barnack Road Stamford Lincolnshire, PE9 2NB United Kingdom Tel: +44 (0) 1780 484000 Fax: +44 (0) 1780 484100 www.cumminsgeneratortechnologies.com P0-1-MAN-EN-4 Copyright 2009, Cummins Generator Technologies Ltd, All Rights Reserved Stamford and AvK are registered trade marks of Cummins Generator Technologies Ltd 40Cummins and the Cummins logo are registered Copyright 2009 tradeCummins marks of Cummins Inc. Part Number: P0-1_MAN_EN_4 TG410 User Manual Manual Revision: 1.4.0 Min. FW Revision: 1.42.01 Date Released: 09/01/2014 © 2014 DYNAGEN Technologies Inc TOUGH Series Manual Table of Contents 1 Introduction 1.1 Specifications ................................................................................................................................... 4 2 Installation 2.1 Terminal Descriptions ................................................................................................................................... 6 2.2 Typical Wiring Diagram ................................................................................................................................... 8 ................................................................................................................................... 9 2.3 Typical Wiring Diagram with Relay Pak 2.4 Wiring Considerations ................................................................................................................................... 10 2.4.1 2.4.2 2.4.3 2.4.4 2.4.5 2.4.6 Emergency Stop Wiring .......................................................................................................................................................... 10 Universal Sensor .......................................................................................................................................................... 11 CAN Bus Wiring .......................................................................................................................................................... 12 Modbus Wiring.......................................................................................................................................................... 13 Current Transformers .......................................................................................................................................................... 14 RelayPak (Optional) .......................................................................................................................................................... 15 3 Using the Controller 3.1 Modes, Starting ................................................................................................................................... and Stopping 17 3.2 Using Cooldown ................................................................................................................................... Mode 18 4 Settings 4.1 Operator Setup ................................................................................................................................... 19 4.2 Switched Inputs ................................................................................................................................... 20 4.2.1 4.2.2 4.2.3 4.2.4 Voltage Select.......................................................................................................................................................... 22 RPM / Frequency Select .......................................................................................................................................................... 22 Configurable Inputs .......................................................................................................................................................... 23 Start / Stop (Momentary Function) .......................................................................................................................................................... 23 4.3 Switched Outputs ................................................................................................................................... 24 4.3.1 Group Outputs.......................................................................................................................................................... 26 4.3.2 Pull and Hold Coil .......................................................................................................................................................... 26 4.4 Sensors ................................................................................................................................... 27 4.4.1 4.4.2 4.4.3 4.4.4 Engine Temperature .......................................................................................................................................................... 27 Oil Pressure .......................................................................................................................................................... 27 Fuel Level .......................................................................................................................................................... 28 Engine Speed.......................................................................................................................................................... 28 Front Panel ......................................................................................................................................................... Speed Control 29 4.4.5 Battery Level .......................................................................................................................................................... 30 4.4.6 Auxiliary .......................................................................................................................................................... 31 ......................................................................................................................................................... 32 Fault Monitor Example Start on Low ......................................................................................................................................................... / High Example 33 Output on......................................................................................................................................................... Low / High Example 34 Tables 4.4.7 Custom Sender .......................................................................................................................................................... 35 4.5 Timers ................................................................................................................................... 36 © 2014 DYNAGEN Technologies Inc TOUGH Series Manual 4.5.1 Engine Logic .......................................................................................................................................................... 36 Preheat Mode ......................................................................................................................................................... 37 OFF Button ......................................................................................................................................................... Function 37 .......................................................................................................................................................... 38 4.5.2 Exerciser 4.5.3 Maintenance .......................................................................................................................................................... 39 4.6 AC Monitor ................................................................................................................................... 40 4.6.1 Generator Voltage .......................................................................................................................................................... 40 4.6.2 Generator Frequency .......................................................................................................................................................... 41 4.6.3 Generator Current .......................................................................................................................................................... 41 4.7 Communications ................................................................................................................................... 42 .......................................................................................................................................................... 42 4.7.1 CAN Bus (J1939) 4.7.2 MOD Bus (RS485) .......................................................................................................................................................... 43 5 Troubleshooting © 2014 DYNAGEN Technologies Inc 3 Introduction 1 Introduction The TOUGH series controllers are designed to provide complete control, protection, AC metering, and engine instrumentation for both standard and electronic engines. The module is easily configured using either the front panel buttons or our DYNAGEN Configurator software. TOUGH series controllers are ideally suited for severe duty applications where reliability is critical such as mobile and stationary generators. Features and Functions: 5 Year Warranty SAE J1939 CAN Bus Protocol RPM via J1939, Magnetic Pickup, or Generator Speed control offset for electronic engines Autostart on low battery and other sensors Trim feature for AC monitoring and sensors Maintenance counter Exerciser Clock 150 Event Log Conformally coated for protection against moisture Gasket for water ingress protection IP65 Free DYNAGEN Configurator Software Fast and rugged installation clips Passcode protected Automatic shutdowns and warnings Manual and Remote start Momentary Start / Stop inputs Pre-heat and many other configurable timers Accepts common senders (VDO, Datcon) Custom senders configurable with DYNAGEN Configurator Displays: Engine Temperature Oil Pressure Fuel Level Engine Speed AC Metering Battery Voltage Feature Real Time Clock Engine Hours Time to Maintenance J1939 DTCs + Custom Text Custom Senders Warnings and Failures Included DPF / DEF Ready J1939 CAN Bus Isolated RS485 Modbus Magnetic Pickup Input 150 Event Log Clock / Exerciser Generator Voltage Metering Single, 3-Phase Generator Current Metering Single, 3-Phase Configurable Switched Inputs 5 Resistive Sensors (1 High Ω, 1 Low Ω) 2 Universal Sensor (Resistive, 0-5V, 4-20mA) 2 5V Sensor Output for Electronic Sensors Configurable Switched Outputs TOUGH Series Manual 6 © 2014 DYNAGEN Technologies Inc 4 Introduction 1.1 Specifications The TOUGH Series controllers were rigorously tested to ensure durability, reliability and functionality. The following specifications are a brief summary of the standards to which the controller has been tested. For complete details on the testing performed please contact DYNAGEN. Testing Specifications Specification Rating Electrical Transients SAE1113-11 Thermal Shock and Cycling SAE1455 Vibration Profiles SAE1455 Electric Static Discharge SAE1113-13 Physical Specifications Specification Rating Operating Temperature -40 to +158°F (-40 to +70°C) LCD Viewing Temperature -4 to +158°F (-20 to +70°C ) (Optional heater available, call factory) Weight Weight w/ RelayPak 0,83lb (0.38kg) 1.32lb (0.60kg) Dimensions Dimensions w/ RelayPak 4.17" x 6.50" x 1.38" (10.59cm x 16.51cm x 3.51cm) 4.41" x 6.79" x 3.33" (11.20cm x 17.25cm x 8.46cm) Electrical Specifications Specification Rating Operating Voltage 5.5 ~ 36VDC Standby Current 60mA @ 12V 38mA @ 24V Switched Inputs +Battery, Ground, Open Switched Outputs +Battery @ 1A Max Low Resistance Sensors 0 ~ 750Ω High Resistance Sensors 0 ~ 7,500Ω Universal Sensors 0 ~ 750Ω, 0 ~ 7,500Ω, 0 ~ 5VDC, 4 ~ 20mA Magnetic Pickup 10 ~ 10,000Hz at 1 ~ 50VAC AC Voltage (Line-To-Line) 50 ~ 575VAC True RMS, Accuracy: 1% Full Scale AC Current (TG410 only) 0 ~ 5A (Current Transformer), Accuracy: 1% Full Scale Communications SAE J1939 (Tier II, III, IV) Isolated RS485 (Slave Modbus RTU) TOUGH Series Manual © 2014 DYNAGEN Technologies Inc 5 Installation 2 Installation Generator systems contain high voltage circuitry and precautions to protect against it should be taken. Failing to power down and lock out equipment can cause damage, injury or death. WARNING: Wiring of this controller should be performed by qualified electricians only. The following general electrical safety precaution should be followed: Do a thorough inspection of the area before performing any maintenance. Keep fluids away from electrical equipment. Unplug connectors by pulling on the plug and not the cord. Use fuses where appropriate. Ensure all equipment is properly grounded. Provide support to wires to prevent stress on terminals. To ensure proper and safe operation, caution must be taken at the installation site to make sure it is free from excessive moisture, fluctuating temperature, dust and corrosive materials. Choose a mounting surface with the least amount of vibration and not more than 0.125" thick. 1) Choose a suitable mounting location based on the criteria above. 2) Create a rectangular cutout in the panel that is minimum 3.9" high and 6.2" wide. 3) Place the controller into the panel cutout so that the LCD screen and buttons are facing out. 4) Place the mounting clips into the designated slots on the top and bottom of the controller. 5) Tighten the screws on the clips until controller is snug against the panel. Do not over tighten, the bottom of the screws should angle very slightly away from the controller. 6) If applicable, snap the RelayPak (RP100) to the back of the controller. Place one side of the RP100s tabs into the slot on the back of the controller and without pushing on the relays, snap the other tab into place. TOUGH Series Manual © 2014 DYNAGEN Technologies Inc 6 Installation 2.1 Terminal Descriptions Main Connector (J4) Terminal Name Description J4-1 +Battery Provides power to the controller from the battery J4-2 +Battery Provides power to the controller from the battery J4-3 Ground Provides ground return for the controller J4-4 Ground Provides ground return for the controller J4-5 Switched Input A Configurable to detect +Battery, Ground, or Open J4-6 Switched Input B Configurable to detect +Battery, Ground, or Open J4-7 Switched Input C Configurable to detect +Battery, Ground, or Open J4-8 Switched Output A Outputs +Battery voltage when active (Max Current: 1A) J4-9 Switched Output C Outputs +Battery voltage when active (Max Current: 1A) J4-10 Switched Output B Outputs +Battery voltage when active (Max Current: 1A) J4-11 Sensor Ground Provides ground return for 2-wire sensors. J4-12 Sensor Input A High impedance sensor input (0 - 7,500Ω) J4-13 Sensor Input B Low impedance sensor input (0 - 750Ω) J4-14 Sensor Input C Universal sensor input (0 - 750Ω, 0 - 7,500Ω, 0 - 5VDC, 4 - 20mA) See Universal Sensor section for more information. Expansion Connector (J3) Terminal Name Description J3-1 Switched Input D Configurable to detect +Battery, Ground, or Open J3-2 Switched Input E Configurable to detect +Battery, Ground, or Open J3-3 Switched Output D Outputs +Battery voltage when active (Max Current: 1A) J3-4 Switched Output E Outputs +Battery voltage when active (Max Current: 1A) J3-5 Switched Output F Outputs +Battery voltage when active (Max Current: 1A) J3-6 Sensor 5V Provides 5V for electronics sensors. J3-7 Sensor Ground Provides ground return for 2-wire sensors. J3-8 Sensor Input D Universal sensor input (0 - 750Ω, 0 - 7,500Ω, 0 - 5VDC, 4 - 20mA) See Universal Sensor section for more information. TOUGH Series Manual © 2014 DYNAGEN Technologies Inc 7 Installation Communications Connector (J6) Terminal Name Description J6-1 RS485-A Communications line for Modbus (RS485) J6-2 RS485-B Communications line for Modbus (RS485) J6-3 No Connection No Connection J6-4 CAN-L Communications line for CAN Bus (J1939) J6-5 CAN-H Communications line for CAN Bus (J1939) J6-6 CAN-Shield Connect the shield of the twisted pair cable to this terminal. J6-7 Speed Sensing A Connect to a magnetic pickup, tachometer, or a flywheel alternator. Not polarity sensitive and not required if using AC voltage terminals for speed sensing. J6-8 Speed Sensing B Connect to a magnetic pickup, tachometer, or a flywheel alternator. Not polarity sensitive and not required if using AC voltage terminals for speed sensing. J6-9 No Connection No Connection J6-10 RS485-Common Common line for Modbus (RS485) Generator AC Voltage (J7) Terminal Name Description J7-1 Phase A Connect to Phase A of the generator. J7-2 Phase B Connect to Phase B of the generator. J7-3 Phase C Connect to Phase C of the generator. J7-4 Neutral Connect to neutral. Generator AC Current (J5) Terminal Name Description J5-1 Phase A Connect to current transformer for Phase A of the generator. J5-2 Phase B Connect to current transformer for Phase B of the generator. J5-3 Phase C Connect to current transformer for Phase C of the generator. J5-4 CT Common Connect to the commons of the current transformers. TOUGH Series Manual © 2014 DYNAGEN Technologies Inc Installation 2.2 8 Typical Wiring Diagram TOUGH Series Manual © 2014 DYNAGEN Technologies Inc Installation 2.3 9 Typical Wiring Diagram with Relay Pak TOUGH Series Manual © 2014 DYNAGEN Technologies Inc Installation 2.4 10 Wiring Considerations The following sections are meant to describe certain wiring configurations for illustrative purposes. Not all applications are the same and make sure to modify these examples to better fit your system. 2.4.1 Emergency Stop Wiring If Emergency Stop functionality is required, it is mandatory to install an external mushroom style switched wired in series with the fuel or ignition supply to ensure reliable and immediate shutdown upon activation. Shown below is an example wiring diagram of a double pull single throw switch being use to activate the e-stop input and cut power to the fuel solenoid. In this configuration, the e-stop is activated when there is an open circuit to the switched input and inactive when the input detects +Battery voltage. TOUGH Series Manual © 2014 DYNAGEN Technologies Inc 11 Installation 2.4.2 Universal Sensor Universal Sensors have the ability to be configured to detect different sender types (0 - 750Ω, 0 - 7,500Ω, 0 - 5VDC, 4 - 20mA). The examples shown below are advanced applications of the universal sensor. NOTE: Custom Sender tables are required for the universal sender to work with these examples. See the Custom Sender Table section for more information. Example #1: The following example shows the correct way for wiring a 4-20mA sensor. The 240Ω resistor is required to change the 4-20mA current into a 0-5V voltage level that the controller can understand. 4-20mA Wiring Example Example #2: Sometimes it is required to measure voltages outside the 0-5V range allowed by the controller. To do this you must use a voltage divider with appropriate scaling resistors. The equation to calculate the resistor values is as follows: Vout = 5V Vin = Maximum Voltage to Read R1 = Common Resistor Value > 10kΩ R2 = Calculated Resistor Value (Select closest common resistor value) The following diagram shows the typical wiring of a voltage divider. The resistors values have been selected to allow the controller to read up to 36V from an external battery bank. 0-36V Wiring Example TOUGH Series Manual © 2014 DYNAGEN Technologies Inc 12 Installation 2.4.3 CAN Bus Wiring The following table outlines some items that must be taken into consideration when connecting to a CAN bus engine. Consideration Description Bus Termination Each end of the bus must be terminated from H to L with 120? resistors. If the controller is a device that is not at the end of the bus, it does not require a terminating resistor. A J1939 twisted pair 120? cable is required for communications. Possible options are: Cable Selection Shielding 1. Belden 9841 - One twisted pair, 24AWG 2. Belden 7895A - Two twisted pair, 20AWG, second pair can be used for power When using a Belden style cable, the shield must be grounded on one end of the bus. This prevents loss of data from electromagnetic interference. Communications Wiring For the ECM to function, it must first receive power for a short time before cranking to allow it to boot up. It is common practice to use the fuel relay output connected to a relay to trigger the key input of the ECM. There are two ways to configure this: The fuel relay is on during Preheat therefore increasing the Preheat time in the Engine Logic menu will allow longer time for the ECM to boot up before cranking. Turning on the Auto Power ECM setting in the Communications -> CAN Bus (J1939) menu enables the fuel relay to be on when controller is in Auto mode. This way the ECM will be always be on except when in OFF mode. ECM Wiring TOUGH Series Manual © 2014 DYNAGEN Technologies Inc 13 Installation 2.4.4 Modbus Wiring The following table outlines some items that must be taken into consideration when connecting up a Modbus system. Consideration Description Bus Termination Each end of the bus must be terminated from A to B with 120? resistors. If the controller is a device that is not at the end of the bus, it does not require a terminating resistor. RS485 twisted pair 120? cables are required for communications: Cable Selection 1. Belden 9841 - One twisted pair, 24AWG, the shield of this cable must be used for Modbus common. 2. Belden 7895A - Two twisted pair, 20AWG, second pair can be used for power If running power and ground from the battery of your system to another device, use the following guidelines for the gauge of the power and ground wires: Distance (Power and Ground) 1. Up to 450ft - 22AWG 2. Up to 700ft - 20AWG 3. Up to 1125ft - 18AWG 4. Up to 1800ft - 16AWG 5. Up to 2800ft - 14AWG Communications Wiring TOUGH Series Manual © 2014 DYNAGEN Technologies Inc 14 Installation 2.4.5 Current Transformers When wiring current transformers into the system you must follow these considerations: 1. The current transformer of each phase must be facing the same direction. See below. 2. The CT Common connection must be connected the black wire on each current transformer. 3. The wires from the current transformers to the controller should be as short as possible. NOTE: If readings are unstable with the configuration shown below, attempt connecting the CT Common's to the negative terminal of the battery. Ensure the connecting wire is as short as possible. TOUGH Series Manual © 2014 DYNAGEN Technologies Inc 15 Installation 2.4.6 RelayPak (Optional) The RelayPak is used to provide built-in slave relays in a compact and easy to wire package. This allows the low current outputs of the controller to switch high current relays on the RelayPak. Electrical Specifications Specification Rating Operating Voltage 12V / 24V Output Pilot Duty Rating 5.83A Per Relay @ 12V Output Resistive Rating 10A Continuous Per Relay @ 12V 40A Momentary Per Relay @ 12V Relay Style Automotive Cube WARNING: You must use relays in the RelayPak that are suitable for the system voltage. Example: 12V relays in a 12V system and 24V relays in a 24V system. TOUGH Series Manual © 2014 DYNAGEN Technologies Inc 16 Using the Controller 3 Using the Controller The LCD display is the primary source of information of the controller. The LCD allows you to view/change settings and monitor the status of sensors and other engine peripherals. LCD Display Using the Menu System Task Description Entering Menu When in the OFF mode, press the enter button to bring up the menu. Navigating Menu Once in the menu, use the up and down arrows to navigate. Pressing enter will move you into that menu. Change a Setting Scroll to the desired value and press enter to select. A check mark should now be beside that item. Press enter again to save the setting and return to the previous screen. Scroll Parameters When in Auto or Running mode, pressing the up and down arrows will scroll through the parameters pages. Lock Screen When in Auto or Running mode, you can lock the screen onto a certain parameter page by pressing enter. You can unlock the screen by pressing enter again. Events History Once in the menu, select Events History to view the most recent controller event. Use the up and down arrows to navigate to other events. The controller can store up to 150 events. If more than 150 events occur, the oldest event is deleted to make room for the next event. Front Panel Items Item TOUGH Series Manual Name Description Off Button Used for turning off the engine or exiting out of Auto mode. This is not intended to function as an Emergency Stop as there are conditions in which it will not shutdown the engine. See the OFF Button Function section for more information Auto Button Used for placing the controller into Auto mode. Once in Auto the controller waits for a start command to be received. Run Button Used to start the engine manually. Must use the Off button to shutdown the engine if started from front panel. Up Button Used for moving around in the menu, changing a settings value, or changing the currently displayed parameter page. Enter Button Used for entering the menu system, accepting settings, or locking the LCD screen when viewing parameters. Down Button Used for moving around in the menu, changing a settings value, or changing the currently displayed parameter page. Generator LED Green = Engine running with no issues Amber = Engine running with warnings Red = Engine shutdown on failure © 2014 DYNAGEN Technologies Inc 17 Using the Controller 3.1 Modes, Starting and Stopping The following table describes the different operating modes of the controller: Modes Mode / State Description OFF When in the OFF mode, the engine cannot be remotely started. Auto When in the Auto mode, the engine waits to receive a start command. Running When engine is Running, the controller monitors engine parameters and waits to receive a stop command. Failure When a failure occurs, the controller shuts down the engine and displays reason for failure. The unit must be reset using the front panel OFF button with the exception of Modbus. Menu When in the menu you can change settings and view the events history. The following table describes the different methods in which a controller can start. The controller must be in the AUTO mode in order to start for all methods with the exception of Manual Run. Starting Methods Methods Description Manual Run Pressing the Run button will start the engine. You must press the OFF button to shutdown the engine. Start / Stop Switched Input When this input is active the engine will start. When the input becomes inactive the engine will shutdown. Momentary Switched Inputs Switched inputs Momentary Start and Momentary Stop can be used for starting and stopping of the engine. Unlike other inputs, they only have to be activated for a short period of time. Battery Recharge When the battery voltage drops below a certain level the engine will start and run for a predetermined amount of time. Exerciser When the scheduled exerciser interval occurs the engine will start and run for a predetermined amount of time. Auxiliary Sensors When a properly configured Auxiliary sensor falls below / rises above a certain point the engine will start as determined by the Auxilairy Sensors -> Mode Select settings. Loss of Mains (TG350AMF only) When loss of mains power is detected the engine will start to provide power to the load. All the appropriate settings in regards to Auto Mains Failure must be set properly. Modbus Start (TG410 only) When a certain command is sent to the controller over Modbus the engine will start. See the Modbus Reference Manual for more information. WARNING: See the Using Cooldown Mode section for more information on how it affects starting and stopping. TOUGH Series Manual © 2014 DYNAGEN Technologies Inc 18 Using the Controller 3.2 Using Cooldown Mode When the controller is configured to have a cooldown period (See Engine Logic section) for the engine, there is some special functionality that must be considered. The cooldown period is special in that during this time, it will accept a Start Command. This means that if the engine is cooling down and a start command is received, the controller will be placed back into a running mode and will not shutdown. Example: The following is an example of how the cooldown functionality works. 1. Remote Start contacts close 2. Engine starts and is in the running mode 3. Remote Start contacts open 4. Engine starts cooldown period 5. User presses RUN button on the front panel 6. Engine moves back into running mode and does not shutdown 7. Engine can now only be shutdown by the OFF button or Emergency Stop input TOUGH Series Manual © 2014 DYNAGEN Technologies Inc 19 Settings 4 Settings The following section relates to settings that can be changed to alter the way the controller performs its functions. Read and review these sections carefully to ensure your settings are set correctly for your engine. 4.1 Operator Setup The following settings are used to change the way the user interacts with the controller. They are not password protected and can be changed by anyone from the front panel. Name Range Description Lamp Test Function Performs a lamp test on the LED's when selected. Display -> LCD Reverse Function Reverses the white and black pixels when selected. Display -> LCD Contrast 5 ~ 95% Changes the contrast of the LCD. Display -> Page Scroll 1 ~ 10 seconds Amount of time between each auto scroll of the parameter pages. Display -> Message Pop-Up 1 ~ 10 seconds Amount of time each message is displayed on the screen before displaying next message in buffer. Display -> DPF/DEF Display Time 0 ~ 10 seconds See the J1939 Reference Manual for more information. Display -> LCD Backlight Timeout 10 ~ 600 seconds Amount of time the LCD Backlight stays on after button activity stops. Date / Time -> Date Change 1 ~ 31 days 1 ~ 12 months 2000 ~ 2099 years Sets the date. Date / Time -> Time Change 0 ~ 23 hours 0 ~ 59 minutes 0 ~ 59 seconds Sets the time. Date / Time -> Daylight Savings Enable ~ Disable Turns Daylight Savings Time on or off. Units -> Temperature Unit °F or °C Selects the units in which temperature is displayed. Units -> Pressure Unit PSI or kPa Selects the units in which oil pressure is displayed. Run from OFF Enable ~ Disable When enabled, allows user to start engine using the run button while in the OFF mode. When disabled the controller must be placed in AUTO mode before the run button can start the engine. TOUGH Series Manual © 2014 DYNAGEN Technologies Inc 20 Settings 4.2 Switched Inputs The controller has switched inputs which when activated, cause the controller to perform a function. Settings Name Range Description Functions List - See Below The function that the switched input performs when active. Active Modes List - See Below Determines under which operating conditions the switched input can be active. Multiple selections are allowed. Trigger List - See Below The state of the input that determines if it is active or inactive. Name Active Mode Description Disabled N/A Input is disabled and has no function. Start / Stop Auto, Running Starts the engine when active, stops the engine when deactivated. WARNING: The Triggers are different from the regular triggers for this function. See the Start / Stop (Momentary Function) section for more information. Emergency Stop Global Shutsdown the engine when active and displays 'Emergency Stop.' Idle Mode Running Controller ignores under speed, voltage and frequency warnings and failures when active. If using J1939, the controller will broadcast TSC1 as the Idle Speed parameter found in the Engine Speed section. Voltage Select 1 Auto Used for changing the systems voltage configuration. See Voltage Select for more information. Voltage Select 2 Auto Used for changing the systems voltage configuration. See Voltage Select for more information. Battery Charger Fault Global Controller displays 'Charger Fault' warning when active. Momentary Start Auto Starts the engine when momentarily active (Approximately 2 seconds). Momentary Stop Running Stops the engine when momentarily active (Approximately 2 seconds). Functions Configurable Warning 1 Configurable Controller displays a warning with configurable text when active. The DYNAGEN Configurator must be used to change the text. Configurable Warning 2 Configurable Controller displays a warning with configurable text when active. The DYNAGEN Configurator must be used to change the text. Configurable Failure 1 Configurable Controller displays a warning with configurable text and shutsdown engine when active. Configurable Failure 2 Configurable Controller displays a warning with configurable text and shutsdown engine when active. Configurable Failure 3 Configurable Controller displays a warning with configurable text and shutsdown engine when active. Air Pressure Failure Cranking Controller displays 'Air Pressure Failure' and shutsdown engine when active. Hydraulic Pressure Failure Cranking Controller displays 'Hydraulic Pressure Failure' and shutsdown engine when active. Low Oil Pressure Warning Running Controller displays 'Oil Pressure Warning' when active. Low Coolant Level Failure Global Controller displays 'Coolant Level Failure' and shutsdown engine when active. High Fuel Warning Global Controller displays 'High Fuel Level' warning when active. Lamp Test Global Controller performs lamp test when active. Fuel In Basin Global Controller displays 'Fuel In Basin' warning when active. Battle Mode Running Controller ignores all warnings and failures when active. If a failure occurs during Battle Mode it is 'latched' and the engine will shutdown on failure TOUGH Series Manual © 2014 DYNAGEN Technologies Inc 21 Settings when the controller leaves Battle Mode. Start Inhibit Auto Controller ignores all start commands and engine cannot start when active. Once Start Inhibit becomes inactive starting is enabled again. If the engine is running, activating this input will shutdown the engine. Primary RPM / 60Hz Auto Secondary RPM / 50Hz Select Used for changing between Primary and Secondary RPM for an engine or 50Hz / 60Hz for a generator. See RPM / Frequency Select for more information. Preheat Signal When the Preheat Mode setting in the Engine Logic menu is set to Switched Input. It uses this input to determine to control the preheat time. Cranking Active Modes Name Description Disable Input cannot be triggered. Global Input can be triggered at any time. OFF Mode Input can be triggered while in the OFF mode. AUTO Mode Input can be triggered while in the AUTO mode. Running Input can be triggered after a start command is received until shutdown. Cranking Input can be triggered during cranking. After Cranking Input can be triggered after engine has started until shutdown. Cooldown Input can be triggered while cooldown timer is active. NOTE: More than one Active Mode can be selected. Triggers Name Description Close +BAT Input is active when +Battery is present at the terminal. Close GND Input is active when Ground is present at the terminal Close +BAT/GND Input is active when either +Battery or Ground is present at the terminal. Open Input is active when neither +Battery or Ground is present at the terminal. NOTE: When running wires over long distances (100+), it is recommended to use +BATTERY as the trigger method. TOUGH Series Manual © 2014 DYNAGEN Technologies Inc 22 Settings 4.2.1 Voltage Select The controller has the ability to automatically change its AC voltage display mode and it's associated warnings and failures through use of switched inputs. The AC Metering -> Generator Voltage -> Voltage Configuration setting must be set to Auto Selection. When using voltage select, the controller will continue to monitor the inputs for 10 seconds after crank success, once that time expires the controller will then display the selected voltage configuration. Use the table below to see how the switched inputs status correspond to the voltage configuration: Volt Select 1 Input Volt Select 2 Input Voltage Configuration Inactive Inactive 3-Wire Single Phase Active Inactive 3-Phase (1) Inactive Active 3-Phase (2) Active Active 3-Phase (3) NOTE: Both Voltage Select 1 and Voltage Select 2 must be assigned to switched inputs for the feature to function properly. The following settings are affected by the Voltage Select Inputs: 1. AC Monitor -> Generator Voltage -> Auto Nominal 2. AC Monitor -> Generator Voltage -> Auto Scaling Factor 3. AC Monitor -> Generator Current -> Auto Rated Amps 4. AC Monitor -> Generator Current -> Auto Scaling Factor 4.2.2 RPM / Frequency Select The controller has the ability to change between Primary RPM / 60Hz and Secondary RPM / 50Hz through use of a switched input. The AC Metering -> Generator Frequency -> Frequency Source setting must be set to RPM Switch for this feature to work. This setting can only be changed when the controller is not in running mode. The following settings must be set in order for this feature to function: Switched Input X -> Primary RPM / 60Hz - Secondary RPM / 50Hz Select AC Metering -> Generator Frequency -> Frequency Source -> RPM Switch Sensors -> Engine Speed -> Auto RPM Nominal -> Primary RPM / 60Hz Sensors -> Engine Speed -> Auto RPM Nominal -> Secondary RPM / 50Hz Use the table below to see how the switched input status corresponds to the RPM / Frequency: Switched Input Frequency Inactive Primary RPM / 60Hz Active Secondary RPM / 50Hz NOTE: If enabled, the TSC1 PGN will be broadcasted according to the selected speed. Otherwise only the warning and failure set points are affected by this function. TOUGH Series Manual © 2014 DYNAGEN Technologies Inc 23 Settings 4.2.3 Configurable Inputs These inputs are used to create custom warnings and failures. Using the DYNAGEN Configurator you can change the text that is displayed when the warning or failure occurs. If you select one of these inputs without changing the text it will default to 'Config Warn X' and 'Config Fail X.' There are also timers associated with which can be found in the menu under Timers -> Trigger Delays. These timers change the amount of time the input has to be active before the controller registers the warning or failure. NOTE: If the switched input becomes inactive before the trigger delay time expires, the warning or failure will not occur. Example: The user wants a pump to turn on 30 seconds after a high water level switch is tripped and remain on until the level switch turns off. The level switch is connected to Switched Input C and closes to ground when the water level is too high. The words 'Water Pumping' are also required to be displayed on the controllers LCD screen. The pump is connected to a slave relay which is controlled by Switched Output D on the controller. Relevant Settings 4.2.4 Setting Value Switched Input C -> Function Configurable Warning 1 Switched Input C -> Active Mode Global Switched Input C -> Trigger Close GND Configurable Warning 1 Custom Text Water Pumping Switched Output D -> Warnings Configurable Warning 1 Start / Stop (Momentary Function) When a switched input is configured to Start / Stop, the trigger modes have different meanings than other inputs. The following table describes the trigger mode functionality. Trigger Description Close to +Battery Input active when +Battery is applied. Close to Ground Input active when ground is applied. Close to +Battery / Ground Input active when +Battery or ground is applied for approximately 2 seconds then deactivated. Open Input active when neither +Battery or ground is applied for approximately 2 seconds then deactivated. The reason for changing these trigger mode is to allow the user to wire a single push button to be used for both starting and stopping the engine. Holding the button for too long will cause the engine to shutdown immediately after starting and vice versa. TOUGH Series Manual © 2014 DYNAGEN Technologies Inc 24 Settings 4.3 Switched Outputs The controller has switched outputs that are turned on under certain conditions to perform a function. The outputs turn on to +Battery voltage to drive the load when active. The following items are the available functions for switched outputs. WARNING: Switched outputs have a floating voltage of approximately 8V when off. If using the outputs for digital logic, it will be necessary to put a pull down resistor (1kΩ) from the output to ground to ensure a low logic level when output is off. Event Functions Name Active Mode Description Pull Coil Cranking See Pull and Hold Coil section for more information. LCD Backlight Global Active when LCD Backlight is active. Voltage Regulator Running Active when engine is starting/running and is not in Idle Mode. Energize to Stop ETS Timer Active during Energize to Stop timer. Fuel Cranking, Running Active during cranking and running to supply fuel to engine. Crank Cranking Active during cranking to start the engine. Glowplug Preheat, Midheat, Postheat Active during the Preheat, Midheat and Postheat timers. Not In Auto Off Active when the controller is in the OFF mode. Idle Mode Idle Mode Active when Idle Mode switched input is active. Warmup Warmup Timer Active after Warmup timer has expired to apply load to engine. Cooldown Cooldown Timer Active when Cooldown timer is active. Engine Running Cranking, Running Active when engine is cranking or running. Exercising Exercise Timer Active during the engine exercising cycle. Battery Recharge Battery Recharge Timer Active during the battery recharge cycle. Maintenance Required Global Active when Maintenance timer has expired. Low Battery During Cranking Cranking Active when Low Battery During Cranking warning is displayed. Auxiliary Sensor 1 Auxiliary Settings Dependent Active dependent upon settings in the Auxiliary sensor section. Auxiliary Sensor 2 Auxiliary Settings Dependent Active dependent upon settings in the Auxiliary sensor section. Auxiliary Sensor 3 Auxiliary Settings Dependent Active dependent upon settings in the Auxiliary sensor section. Auxiliary Sensor 4 Auxiliary Settings Dependent Active dependent upon settings in the Auxiliary sensor section. System Ready Auto Active when controller is in Auto mode and no warnings or failures are present. Delay to Start Delay to Start Timer Active when the Delay to Start timer is active. Battle Mode Battle Mode Active when Battle Mode switched input is active. Force Regeneration User Controlled When user triggers a Force Regeneration, output is active for 20 seconds then switches off. Regeneration Inhibit User Controlled When user triggers a Regeneration Inhibit, output is active for 20 seconds then switches off. Common Failure Any Failure Active when any failure occurs. RPM Increment Running Output is used to to trigger inputs on an ECM to control speed. See Front Panel Speed Control section for more information. RPM Decrement Running Output is used to to trigger inputs on an ECM to control speed. See Front Panel Speed Control section for more information. TOUGH Series Manual © 2014 DYNAGEN Technologies Inc 25 Settings DEF Fluid Level Running Active when DEF Fluid Level falls below the DEF Low Level and stays active until the level rises above the DEF High Level. See CAN Bus (J1939) section for more information. Generator Coil (TG350AMF only) Global Active when transfer switch is to be switched to the generator position. Mains Coil (TG350AMF only) Global Active when transfer switch is to be switched to the mains position. Warning Functions Functions Low Engine Temperature High Engine Temperature Low Oil Pressure Under Speed Over Speed Low Fuel Level High Fuel Level Low Battery Voltage High Battery Voltage Under Frequency Over Frequency AC Under Voltage AC Over Voltage Over Current Fuel In Basin Battery Charger Fault Configurable Warning 1 Configurable Warning 2 Auxiliary Sensor 1 Auxiliary Sensor 2 Auxiliary Sensor 3 Auxiliary Sensor 4 --- --- Overcrank Engine Failed to Stop DM1 Stop Lamp High Engine Temperature Low Oil Pressure Low Fuel Level Under Speed Over Speed Low Battery Voltage High Battery Voltage Low Coolant Level Low Air Pressure Low Hydraulic Pressure Under Frequency Over Frequency AC Under Voltage AC Over Voltage Over Current ECM Communication Failure Configurable Failure 1 Configurable Failure 2 Auxiliary Sensor 1 Auxiliary Sensor 2 Auxiliary Sensor 3 Auxiliary Sensor 4 --- --- --- Failure Functions Functions TOUGH Series Manual © 2014 DYNAGEN Technologies Inc 26 Settings 4.3.1 Group Outputs Group functions are designed so that multiple output functions can be bundled together and assigned to a single switched output pin. The definition of a group output is as follows: -When any of the functions in a group is active (OR logic), the assigned switched output will be active. Group Functions Name Active Mode Description Group #1 Group Dependent Must be set from DYNAGEN Configurator software. Group #2 Group Dependent Must be set from DYNAGEN Configurator software. Group #3 Group Dependent Must be set from DYNAGEN Configurator software. Group #4 Group Dependent Must be set from DYNAGEN Configurator software. Example: Low AC Frequency, High AC Frequency are bundled in 'Group #1' and assigned to Switched Output D. This output is connected to an external indicator lamp labeled 'AC Frequency Warnings.' This allows one output to indicate there is a warning with the AC frequency. The following table shows the output state based on the warnings status. 4.3.2 Low AC Frequency Warning High AC Frequency Warning Switched Output State Inactive Inactive OFF Inactive Active ON Active Inactive ON Active Active ON Pull and Hold Coil On some engine systems the fuel pump has two coils. The reason for this is that the initial power on of the fuel solenoid requires substantial current (Pull Coil), but only needs a small amount of current to hold it in place (Hold Coil). 1. Hold Coil (Fuel) is energized. 2. Pull Coil is energized for 2 seconds before cranking. 3. Repeat if engine cranking failed. Configuring a switched output to Pull Coil automatically configures the engine logic necessary for a Pull Coil system. Pull Coil Wiring Example TOUGH Series Manual © 2014 DYNAGEN Technologies Inc 27 Settings 4.4 Sensors The controller has sensor ports which can be connected to a variety of different sensor types (Temperature, Pressure, Level, etc). See the Terminal Descriptions section for more information on which terminals your sensor is compatible with (Low Ω, High Ω, 0-5V or 4-20mA). Most sensors are used to monitor for warnings and failures but the Auxiliary sensors can be used to perform special functions (Example: Starting engine on low temperature). 4.4.1 Engine Temperature The following settings are used to configure how the controller reads and interprets data from the engine temperature sender. 4.4.2 Name Range Description Signal Source Sensor Port X J1939 Bus The source from which the sensor data is attained. Sensor Type Sender Table X Close = Warning Open = Warning Close = Failure Open = Failure Select one of the pre-configured sender tables or one of the switch functions. A custom table can also be created using the DYNAGEN Configurator. Trim Offset -50.0 ~ 50.0°F Calibrate a sensor by using the offset to correct errors. Setpoints -> Bypass Time 0 ~ 90 seconds Amount of time to bypass warnings and failures after engine has started. Setpoints -> Low Warning 32 ~ 200°F Reading at which a warning occurs. Setpoints -> High Warning 50 ~ 300°F Reading at which a warning occurs. Setpoints -> High Failure 50 ~ 300°F Reading at which a failure occurs. Close = Ground Open = Open Circuit Oil Pressure The following settings are used to configure how the controller reads and interprets data from the oil pressure sender. Name Range Description Signal Source Sensor Port X J1939 Bus The source from which the sensor data is attained. Sensor Type Sender Table X Close = Warning Open = Warning Close = Failure Open = Failure Select one of the pre-configured sender tables or one of the switch functions. A custom table can also be created using the DYNAGEN Configurator. Trim Offset -50.0 ~ 50.0 PSI Calibrate a sensor by using the offset to correct errors. Setpoints -> Bypass Time 0 ~ 90 seconds Amount of time to bypass warnings and failures after engine has started. Setpoints -> Low Warning 0.1 ~ 99.0 PSI Reading at which a warning occurs. Setpoints -> Low Failure 0.1 ~ 99.0 PSI Reading at which a failure occurs. TOUGH Series Manual Close = Ground Open = Open Circuit © 2014 DYNAGEN Technologies Inc 28 Settings 4.4.3 Fuel Level The following settings are used to configure how the controller reads and interprets data from the fuel level sender. 4.4.4 Name Range Description Signal Source Sensor Port X The source from which the sensor data is attained. Sensor Type Sender Table X Close = Warning Open = Warning Close = Failure Open = Failure Select one of the pre-configured sender tables or one of the switch functions. A custom table can also be created using the DYNAGEN Configurator. Trim Offset -50.0 ~ 50.0% Calibrate a sensor by using the offset to correct errors. Setpoints -> Bypass Time 0 ~ 90 seconds Amount of time to bypass warnings and failures after engine has started. Setpoints -> Low Warning 1 ~ 90% Reading at which a warning occurs. Setpoints -> Low Failure 1 ~ 90% Reading at which a failure occurs. Setpoints -> High Warning 1 ~ 125% Reading at which a warning occurs. Close = Ground Open = Open Circuit Engine Speed The following settings are used to configure how the controller reads and interprets speed sensing data. Name Range Description Signal Source J1939 Bus Mag Pickup Genset Voltage The source from which the sensor data is attained. Speed Settings -> Rated RPM 500 ~ 4000 Speed at which the engine runs under normal operating conditions. Warning and failure setpoints are calculated from this setting. Speed Settings -> Idle RPM 300 ~ 2000 Speed at which the engine runs when it is idling. Speed Settings -> Tooth Count 1 ~ 600 Number of teeth on the flywheel (Mag Pickup only). Setpoints -> Low Warning 50 ~ 99% Reading at which a warning occurs. Setpoints -> Low Failure 50 ~ 99% Reading at which a failure occurs. Setpoints -> High Warning 101 ~ 150% Reading at which a warning occurs. Setpoints -> High Failure 101 ~ 150% Reading at which a failure occurs. Front Panel Speed Control Settings N/A See Front Panel Speed Control section for more information on these settings. RPM Switch -> Secondary RPM / 50Hz 500 ~ 4000 The Rated RPM when the Secondary RPM / 50Hz is selected. See RPM / Frequency Select section for more information. RPM Switch -> Primary RPM / 60Hz 500 ~ 4000 The Rated RPM when the Primary RPM / 60Hz is selected. See RPM / Frequency Select section for more information. NOTE: When using J1939 or Genset Signal as a signal source, connections to the speed sensing terminals are not required. TOUGH Series Manual © 2014 DYNAGEN Technologies Inc 29 Settings 4.4.4.1 Front Panel Speed Control The controller is able to adjust the speed of the engine through use of the front panel. This section will describe the 2 methods in which speed control is implemented, the settings, the parameters, as well as the steps the operator must take in order to control the speed. Speed Control Methods Setting Description J1939 (TSC1 Speed Command) The controller can instruct the ECM of an electronic engine to adjust its speed by broadcasting the the TSC1 command. Switched Outputs The controller can instruct the ECM of an electronic engine to adjust its speed by using switched outputs on the controller set to RPM Increment and RPM Decrement to interface with digital inputs on the ECM. When the speed is changed, the corresponding switched output will be on for 1 second each time increment or decrement is pressed. WARNING: Switched outputs have a floating voltage of approximately 8V when off. If using the outputs for digital logic, it will be necessary to put a pull down resistor (1kΩ) from the output to ground to ensure a low logic level when output is off. Speed Control Settings Name Range Description Speed Control Enable Enable ~ Disable Enables or disables front panel speed control. RPM Display Nothing / Blank AC Frequency Auxiliary Sensor 1 Auxiliary Sensor 2 Parameter to display when adjusting speed from front panel. This is used to provide operator feedback in the case that the engine RPM affects another parameter such as AC Frequency or an Auxiliary Sensor (Example: Flow rate of pump). RPM Control -> Limit Method Speed Bias Min RPM / Max RPM The method in which the minimum and maximum speeds the operator is allowed to adjust is determined. RPM Control -> Speed Bias 0 ~ 600 The minimum or maximum RPM that the engine speed can be adjusted around the Rated RPM. Example: Rated RPM is 1800 and Speed Bias is 150. The minimum RPM will be 1650 and maximum RPM will be 1950. Only valid when the correct limit method is chosen. RPM Control -> Minimum RPM 500 ~ 4000 The minimum RPM that can be set using speed control. Only valid when the correct Limit Method is chosen. RPM Control -> Maximum RPM 500 ~ 4000 The maximum RPM that can be set using speed control. Only valid when the correct Limit Method is chosen. Speed Control Instructions When the controller is running and there is other functions occurring the controller will scroll through its display parameters as usual. When the speed control page is displayed, it will show the Engine Speed as well as the following instructions Hold AUTO + Up/Down to Adjust RPM. Speed Control Parameter Page Speed Control Adjust Page Pressing and holding the AUTO button will display the screen to the right. If a 'Display Adjust Parameter' is set, it too will be displayed underneath the Engine Speed. While still holding the AUTO key, press the up or down arrows to adjust the RPM. The Engine Speed display should update as the engine physically changes it speed to accommodate the speed request. NOTE: When using switched outputs for speed control, the Set RPM will display '---' instead of the set speed. TOUGH Series Manual © 2014 DYNAGEN Technologies Inc 30 Settings 4.4.5 Battery Level The following settings are used to configure how the controller reads and interprets the battery voltage level. Name Range Description Battery Recharge Enable ~ Disable Enables or disables the ability to have the engine start on low battery voltage in order to charge it. Recharge Setup -> Level 6.0 - 30.0V Voltage level at which the controller starts the engine to recharge the battery. Recharge Setup -> Pre-Alarm 1 ~ 20 minutes Amount of time to display a warning before starting the engine. Recharge Setup -> Duration 10 ~ 900 minutes Amount of time to run the engine. Setpoints -> Low Warning 6.0 ~ 24.0V Reading at which a warning occurs. Setpoints -> Low Failure 6.0 ~ 24.0V Reading at which a failure occurs. Setpoints -> High Warning 12.0 ~ 32.0V Reading at which a warning occurs. Setpoints -> High Failure 12.0 ~ 32.0V Reading at which a failure occurs. Crank Low Batt 6.0 ~ 24.0V Screen displays a 'Low Voltage During Cranking' warning if voltage dips below this level during cranking. NOTE: When the engine is running, the battery voltage will equal the alternator charging voltage. The actual opencircuit battery voltage may be lower than displayed. Battery Recharge Sequence TOUGH Series Manual © 2014 DYNAGEN Technologies Inc 31 Settings 4.4.6 Auxiliary The Auxiliary sensors on the controller are used for performing functions based on sensor readings. There are 2 different ways in which the auxiliary sensors can be utilized: Scenario #1 - Custom Sensors Use the auxiliary sensors to create custom sensors (Current, Voltage, etc.) that are not supported by the controller by default (Engine Temperature, Oil Pressure, Fuel Level). Scenario #2 - Add-On Functionality Double up the auxiliary sensor onto the same Sensor Port that is currently being used by one of the other sensors (Engine temperature, Oil pressure, Fuel level). This allows you to use the special functions (Start on Low, Output on High, etc.) in conjunction with those sensors. NOTE: You must set the auxiliary sensor port and sender table to the same values as the other sensor. 1 Name Range Description Signal Source Sensor Port X The source from which the sensor data is attained. Display Enable ~ Disable Determines if the sensors value is displayed on the screen when the engine is running. Active Modes Disable Global Not In Auto Auto State Running Cranking After Cranking Cooldown Determines under which operating conditions the Auxiliary Sensor is monitored. Multiple selections are allowed. Refer to the Switched Inputs section for more information on the Active Modes. Mode Select Fault Monitor Output on Low Output on High Start on Low Start on High Determines how the controller responds to the readings of the auxiliary sensor. Refer to the examples in the following pages for more information on how each mode functions. Trim Offset -50.0 ~ 50.0 units Calibrate a sensor by using the offset to correct errors. Mode Settings -> Bypass Time 0 ~ 90 seconds Amount of time to bypass warnings and failures after engine has started. Mode Settings -> Active Time1 1 ~ 600 minutes The amount of time to turn on the auxiliary switched output or engine before turning off. Mode Settings -> Start Level1 Sender Table Dependent The level at which the auxiliary switched output or engine turns on. Mode Settings -> Stop Level1 Sender Table Dependent The level at which the auxiliary switched output or engine turns off. Setpoints -> Low Warning Sender Table Dependent Reading at which a warning occurs. Setpoints -> Low Failure Sender Table Dependent Reading at which a failure occurs. Setpoints -> High Warning Sender Table Dependent Reading at which a warning occurs. Setpoints -> High Failure Sender Table Dependent Reading at which a failure occurs. Refer to the sections below for more information on how these settings affect the auxiliary sensors. TOUGH Series Manual © 2014 DYNAGEN Technologies Inc 32 Settings 4.4.6.1 Fault Monitor Example In this example, a sensor is monitoring the temperature of an engine block. If the temperature rises above 275°F a warning message is displayed. If the temperature rises above 350°F the engine shuts down and a failure message is displayed. Relevant Settings Setting Value Signal Source Same as Engine Temperature Display Disable (If enabled, controller will display Engine Temperature twice) Sensor Type Same as Engine Temperature Sender Table Name Engine Temp. Active Range Running Mode Select Fault Monitor Setpoints -> Low Warning Disabled Setpoints -> Low Failure Disabled Setpoints -> High Warning 275°F Setpoints -> High Failure 350°F The chart above shows the connection between engine temperature and time. At approximately 13 minutes run time the temperature rises above the 275°F warning threshold so a warning is displayed. The engine continues to run because it does not reach the 350°F failure threshold. At 20 minutes run time the temperatures falls below the warning threshold and the warning disappears. TOUGH Series Manual © 2014 DYNAGEN Technologies Inc 33 Settings 4.4.6.2 Start on Low / High Example In this example, a sensor is monitoring the voltage of an external battery bank. If the voltage falls below 10.5V, the engine will start and run for 40 minutes to charge the battery. Relevant Settings Setting Value Signal Source Sensor Port X Display Enable Sensor Type Custom Sender Table Name Battery Bank Active Range N/A (These ranges are fixed for Start on Low / High) Mode Select Start on Low Mode Settings -> Active Time 40 minutes Mode Settings -> Start Level 10.5V Mode Settings -> Stop Level1 Disabled 1 Stop Level is disabled because when the engine is running, the battery voltage will equal the alternator charging voltage. Having this disabled will force the engine to run for the entire duration of the active time. The chart above shows the connection between a battery bank and time. At approximately 80 minutes time the voltage falls below the 10.5V start threshold causing the engine to start. The engine runs for the 40 minutes active time regardless of the voltage reading and the shuts down. TOUGH Series Manual © 2014 DYNAGEN Technologies Inc 34 Settings 4.4.6.3 Output on Low / High Example In this example, a sensor is monitoring the temperature of an engine. If the temperature rises above 325°F a fan will turn on to cool the engine. Once the temperature drops to below 200°F the fan will turn off. Relevant Settings (Auxiliary Sensor) Setting Value Signal Source Same as Engine Temperature Display Disable (If enabled, controller will display Engine Temperature twice) Sensor Type Same as Engine Temperature Sender Table Name Engine Temp. Active Range Global Mode Select Output on High Mode Settings -> Active Time1 Disabled Mode Settings -> Start Level 325°F Mode Settings -> Stop Level 200°F 1 Active time is disabled because the fan needs to stay on indefinitely or until 200°F is reached. Relevant Settings (Switched Outputs) Setting Value Switched Output X Auxiliary Sensor X (Choose based on which Auxiliary Sensor is being used) The chart above shows the connection between engine temperature and time. At approximately 10 minutes run time the temperature rises above the 325°F start threshold and the fan turns on. The fan continues to run as the temperature declines. When the temperature falls below the 200°F stop threshold the fan turns off. TOUGH Series Manual © 2014 DYNAGEN Technologies Inc 35 Settings 4.4.7 Custom Sender Tables Custom Sensor Tables are created using the DYNAGEN Configurator when using a sensor that is not supported by DYNAGEN. The configurator has the ability to create these custom tables so that the controller can properly read the sensor data. NOTE: Custom sender tables can only be created when using the configurator. Parameter Description Name The label that will be displayed in the controller (Engine Temp, Oil Pressure, etc.) Input Type Choose resistance, voltage or current based on the sensor type. Use the Terminal Descriptions section to determine if your sender is compatible with a sensor port. Unit Type Choose temperature, pressure, voltage, current or percentage based on the sensor. This defines what unit of measurement will be displayed on the front panel (F, PSI, V, A, %). The following steps are an example of how to create a custom sensor table: 1. Navigate to the sensor input that will be using your custom sensor table. 2. Select a Name, Input Type and Unit Type for the controller (Definitions in table above). 3. Click the check box next to 'Build Table' (Image Step 1). 4. From the 'Sender' drop down menu, select 'Custom' (Image Step 2). 5. Click the 'Edit' button next to the drop down menu (Image Step 3). 6. Enter the sensor values. Once entered, click Apply then OK. TOUGH Series Manual © 2014 DYNAGEN Technologies Inc 36 Settings 4.5 Timers The controller has an internal clock which is used not only to keep time, but to make sure certain events happen at the correct times. The following sections are used to configure settings associated with timing functions. NOTE: The controller has an on-board backup battery to keep time even when main power is not supplied to the unit. This battery has an un-powered (no main power) lifetime of approximately five years. 4.5.1 Engine Logic The following settings determine how the controller starts and stops the engine. It gives the user the functionality to add delays and timers to the sequences. Most of the settings have a switched output associated with them that must be set in the Switched Outputs settings. NOTE: Setting a timers value to 0 seconds will disable the timer. Example: If Delay to Start is set to 0 seconds, the controller will not perform a Delay to Start when starting the engine. Name Range Description Delay to Start 0 ~ 90 seconds Amount of time to delay the starting of the engine after receiving a command to start. Delay to Start on Manual Run Enable ~ Disable Determines if the the Delay to Start timer is used when the front panel RUN button is used to start the engine. Preheat Mode Preheat Timer Switched Input J1939 Determines which method controls when the glowplug output should be enabled. See the Preheat Mode section for more information. Preheat Time 0 ~ 90 seconds Amount of time the Glowplug output is active before cranking the engine. Used on diesel engines to warm the engine before cranking. Crank Time 3 ~ 30 seconds Amount of time the Crank output is active before going to crank rest. This timer immediately expires upon successful cranking. Midheat Time 0 ~ 90 seconds Keeps Glowplug output turned on while cranking but not during crank rest. Output will turn off upon cranking failure, crank success or midheat time expiration. Crank Rest Time 1 ~ 90 seconds Amount of time to delay between each attempt to start the engine. Crank Attempts 1 ~ 20 Number of attempts to start the engine before going to a overcrank failure. Fuel Crank Rest Fuel ON Fuel OFF Determines if the fuel output stays on during the crank rest time. RPM Disconnect 100 ~ 2000 RPM Speed at which controller determines the engine has started successfully and turns off the Crank output. Postheat Time 0 ~ 90 seconds Amount of time the Glowplug output remains on after crank success and the engine is running. Restart on False Start Enable ~ Disable Determines if the controller will monitor for false starts and attempt a restart. Controller will only attempt restarting the engine as many times as determined by Crank Attempts. False Restart Detect Time 5 ~ 30 seconds Amount of time after successful cranking to monitor for a false restart. If this time expires and the engines stalls out the controller will not attempt a restart. Auto Idle Enable ~ Disable Determines if the controller will automatically enter Idle Mode during the Warmup and Cooldown delays. Warmup Time 0 ~ 600 seconds After successful cranking, engine delays this amount of time before turning on the Warmup output. This allows the engine to warmup before applying any load to it. The output will turn off when the controller enters the Cooldown Delay. TOUGH Series Manual © 2014 DYNAGEN Technologies Inc 37 Settings 4.5.1.1 OFF Button Function Cooldown Shutdown Force Cooldown The function the OFF button on the front panel performs while engine is running. See the OFF Button Function section for more information. Cooldown Delay 0 ~ 600 seconds Amount of time to cooldown the engine after a stop command has been received. During this time the Warmup output turns off and the Cooldown output turns on. If another start command is received during cooldown, the controller will return to running mode. Energize to Stop Duration 0 ~ 30 seconds Amount of time the Energize to Stop output is on after the engine has shutdown. If controller still detects speed (RPM) after this time expires, it goes to a 'Failed to Stop' failure. Time must be greater than 0 seconds for the Energize to Stop function to work. Preheat Mode The controller has the ability to control the length of the preheat time through 3 different methods. The table below describes each method: Mode Description Preheat Timer This mode uses the Preheat Timer setting in the Engine Logic menu. Switched Input This mode uses a switched input set to Preheat Signal. J1939 This mode uses commands sent from the ECM over J1939. NOTE: During preheat the Glowplug switched output is on. 4.5.1.2 OFF Button Function The OFF button on the front panel of the controller can be configured to function in 3 different ways while the engine is running. The table below describes each of these functions: Function Description Cooldown This function causes the controller to go into cooldown. Pressing the OFF button again will cause the engine to shutdown. Shutdown This function bypasses Cooldown and causes the engine to shutdown. Force Cooldown This function causes the controller to go into cooldown. Pressing the OFF button will have no affect as the controller is forcing the engine to perform a full cooldown. WARNING: If the controller receives a command to start while in Cooldown, it will leave the Cooldown mode and go back to Running mode. TOUGH Series Manual © 2014 DYNAGEN Technologies Inc 38 Settings 4.5.2 Exerciser The Exerciser function is used start and run the engine periodically. This is commonly used to make sure problems with the engine do not arise from sitting idle for too long. The following settings configure the Exerciser function: Name Range Description Enable Enable ~ Disable Determines if the engine is automatically exercised periodically. Delays -> Pre-Alarm 1 ~ 20 minutes Amount of time to display a warning before starting the engine. Delays -> Run Time 10 ~ 1500 minutes Amount of time to run the engine. Schedule -> Start Date 1 ~ 31 The initial day of the month to run the exerciser. Schedule -> Start Hour 0 ~ 23 The initial hour of the day to run the exerciser. Schedule -> Repeat Days 1 ~ 28 days Number of days between each exerciser cycle. When configuring the Start Date and Hour, you must select a time in the future in which to run the initial exerciser sequence. After the initial sequence, the exerciser runs at an interval determined by 'Repeat Days.' Exerciser Sequence TOUGH Series Manual © 2014 DYNAGEN Technologies Inc 39 Settings 4.5.3 Maintenance The controller has the ability to count down the time between scheduled maintenance by a technician. Once maintenance is required, the controller will alert the operator via the LCD screen and a switched output (if enabled) wired to a lamp / horn / buzzer. The following settings are used to configure the maintenance timer. Name Range Description Reset Counter Enable ~ Disable Once the maintenance count interval expires, use this setting to reset the time and turn off the switched output (if enabled). Enable Counter Enable ~ Disable Determines the number of hours between required maintenance. A switched output can be configured to turn on once the count interval expires. Counter Interval 10 ~ 9990 hours Enables or disables the maintenance function. To find out the amount of time until next maintenance, follow these menu steps: Main Menu -> Device Info. -> Maintenance Maintenance counter is disabled if '----' is displayed. A negative number indicates the amount of time since maintenance timer expired. TOUGH Series Manual © 2014 DYNAGEN Technologies Inc 40 Settings 4.6 AC Monitor The controller has the ability to monitor AC voltage and current from a generator. The following sections are use to configure settings associated with AC monitoring. 4.6.1 Generator Voltage The following settings are used to configure how the controller responds to voltage measurements. Name Range Description Voltage Source Disable 2-Wire Single 3-Wire Single 3-Wire 3-Phase 4-Wire 3-Phase 4-Wire Delta Auto Selection The wiring configuration of the generator. Selecting Auto Selection will use the Voltage Select inputs to determine which wiring configuration is implemented and displayed. Scaling Factor 0.500 ~ 2.500 Scaling factor at which the voltage is read into the controller. See below for more information. Nominal Volts 50 ~ 800Vac Voltage at which the generators runs at when operating under normal running conditions. Auto Nominal -> 1-Phase 3-Wire 50 ~ 800Vac Nominal Volts when using the Voltage Select inputs. Auto Nominal -> 3-Phase (1) 50 ~ 800Vac Nominal Volts when using the Voltage Select inputs. Auto Nominal -> 3-Phase (2) 50 ~ 800Vac Nominal Volts when using the Voltage Select inputs. Auto Nominal -> 3-Phase (3) 50 ~ 800Vac Nominal Volts when using the Voltage Select inputs. Auto Ratios -> 1-Phase 3-Wire 0.500 ~ 2.500 Scaling Factor when using the Voltage Select inputs. Auto Ratios -> 3-Phase (1) 0.500 ~ 2.500 Scaling Factor when using the Voltage Select inputs. Auto Ratios -> 3-Phase (2) 0.500 ~ 2.500 Scaling Factor when using the Voltage Select inputs. Auto Ratios -> 3-Phase (3) 0.500 ~ 2.500 Scaling Factor when using the Voltage Select inputs. Auto Single A-C Phase A-B Phase For 1-Phase 3-Wire when using the Voltage Select inputs, this determines which phases the voltage is read from. V Setpoints -> Low Warning 50 ~ 99% Reading at which a warning occurs. V Setpoints -> Low Failure 50 ~ 99% Reading at which a failure occurs. V Setpoints -> High Warning 101 ~ 150% Reading at which a warning occurs. V Setpoints -> High Failure 101 ~ 150% Reading at which a failure occurs. Application Note: Scaling Factor The scaling factor setting can be used to calibrate the AC voltage if there is discrepancies between the reading and the actual value. It can also be used if transformers are used to step up / down the voltage.The scaling factor applies to all phases in a system. Example: The voltage source is a 3-Wire 3-Phase system with a nominal voltage of 208V. The controller is reading 206.3V but a calibrated multimeter gives 208.3V. Use the formula below to determine the scaling factor. 1. Scaling Factor = Multimeter Reading / Controller Reading 2. Scaling Factor = 208.4V / 206.3V 3. Scaling Factor = 1.010 TOUGH Series Manual © 2014 DYNAGEN Technologies Inc 41 Settings 4.6.2 Generator Frequency The following settings are used to configure how the controller responds to frequency measurements. 4.6.3 Name Range Description Frequency Source Nominal 50Hz Nominal 60Hz Auto Selection The wiring configuration of the generator. Selecting Auto Selection will use the Frequency Select input to determine which frequency is used. Hz Setpoints -> Low Warning 50 ~ 99% Reading at which a warning occurs. Hz Setpoints -> Low Failure 50 ~ 99% Reading at which a failure occurs. Hz Setpoints -> High Warning 101 ~ 150% Reading at which a warning occurs. Hz Setpoints -> High Failure 101 ~ 150% Reading at which a failure occurs. Generator Current The following settings are used to configure how the controller responds to current measurements. Name Range Description Current Source Enable ~ Disable Enables or disables current metering. Turns Ratio 5 ~ 5000A : 5A The turns ratio of the current transformers. Scaling Factor 0.500 ~ 1.250 Scaling factor at which the voltage is read into the controller. See below for more information. Volt Sel Inputs -> 1-Phase 3-Wire 5 ~ 5000A : 5A Rated Amps when using the Voltage Select inputs. Volt Sel Inputs -> 3-Phase (1) 5 ~ 5000A : 5A Rated Amps when using the Voltage Select inputs. Volt Sel Inputs -> 3-Phase (2) 5 ~ 5000A : 5A Rated Amps when using the Voltage Select inputs. Volt Sel Inputs -> 3-Phase (3) 5 ~ 5000A : 5A Rated Amps when using the Voltage Select inputs. Volt Sel Ratios -> 1-Phase 3-Wire 0.500 ~ 2.250 Scaling Factor when using the Voltage Select inputs. Volt Sel Ratios -> 3-Phase (1) 0.500 ~ 2.250 Scaling Factor when using the Voltage Select inputs. Volt Sel Ratios -> 3-Phase (2) 0.500 ~ 2.250 Scaling Factor when using the Voltage Select inputs. Volt Sel Ratios -> 3-Phase (3) 0.500 ~ 2.250 Scaling Factor when using the Voltage Select inputs. Setpoints -> Rated Amps 5 ~ 5000A Maximum current draw the generator can provide when operating under normal running conditions. Setpoints -> High Warning 1 ~ 125% Reading at which a warning occurs. Percentages based off the Rated Amps value. Setpoints -> High Failure 1 ~ 125% Reading at which a failure occurs. Percentages based off the Rated Amps value. TOUGH Series Manual © 2014 DYNAGEN Technologies Inc 42 Settings 4.7 Communications The controller has the ability to communicate with other systems over communication buses. The following sections relate to settings associated with communications. 4.7.1 CAN Bus (J1939) For detailed information about J1939 settings and functions please use the J1939 Reference Manual. The manual can be found at www.dynagen.com/support. Name Range Description ECM Model Generic J1939 John Deere JDEC Volvo EMS Cummins CM850 Yanmar ECO Detroit Diesel Volvo EMS2B Isuzu 4H GM PSI econtrol Choose the one of the available ECM modules from the list. ECM Communication Failure Enable ~ Disable If no CAN messages are received for more than 6 seconds, the controller shuts down the engine. DTC Display Enable ~ Disable Enables or disables active fault messages (DM1) monitoring. Active DTC Log Enable ~ Disable Enables or disables the storing of active faults (DM1). Read Stored DTC Enable ~ Disable Enables or disables the ability to request stored fault codes from the ECM (DM2). Auto Power ECM Enable ~ Disable When enabled, the fuel relay is enabled in Auto mode so that the ECM is already booted up and initialized before the user decides to start the engine. ECM Power Delay 5 ~ 30 seconds Used in conjunction with Auto Power ECM. When the engine shutdowns the controller waits the ECM Power Delay before turning on the fuel relay again. This is to prevent unwanted start ups due to the engine not being completely shut down. Cummins PGNs Enable ~ Disable Enables or disables the broadcasting of PGNs required by Cummins engines. SPN Conversion Version 1 Version 2 Version 3 Select the SPN conversion method. EMS2B Frequency Select Primary Secondary For Volvo EMS2B Engine Control Modules only. EMS2B Accelerator Pedal 40.0 ~ 60.0% For Volvo EMS2B Engine Control Modules only. TOUGH Series Manual © 2014 DYNAGEN Technologies Inc 43 Settings 4.7.2 MOD Bus (RS485) The Modbus functionality on the controller provides the ability to interface to PLCs, SCADA and building management systems. For detailed information about the Modbus registers and their interpretations please use the Modbus Reference Manual. The manual can be found at www.dynagen.com/support. Name Description Range / Values Device Address The device address of the controller. 1 ~ 247 Baud Rate (BPS) The speed at which the controller (slave) communicates with the master. 9600, 19200, 38400, 57400 Communication Protocol The controller always communicates in Modbus RTU. Modbus RTU (Fixed) Slave / Master Configuration The controller is always the slave and must be queried by the master. Slave (Fixed) TOUGH Series Manual © 2014 DYNAGEN Technologies Inc 44 Troubleshooting 5 Troubleshooting If you are having issues with your controller, please refer to the table below for a solution before contacting technical support. Issue Solution Engine starts but the crank output does not turn off The controller is not receiving a speed signal. 1. Verify the Sensors -> Engine Speed -> Signal Source setting is set correctly. 2. Verify the Timers -> Engine Logic -> RPM Disconnect setting is set correctly. 3. Ensure the correct wiring to the controller. For magnetic pickup, Speed Sensing A and B terminals are used. For generator voltage, the AC voltage connections are used. Sender always displayed its lowest or highest value The sender could either be open (not connected) or shorted to ground. Verify your connections and ensure the correct sender table is loaded. Reserved Reserved for future troubleshooting. Reserved Reserved for future troubleshooting. Reserved Reserved for future troubleshooting. Contacting DYNAGEN can be done by any of the methods below. Technical support is offered Monday - Friday, 8:00am 4:00pm (EST). If you are unable to get a hold of one of our engineers, please leave a message and they will return your call as soon as possible. Type Information Website www.dynagen.ca/support Email [email protected] Phone Number (902) 406-0133 Twitter @DynaGenTech Facebook www.facebook.com/DYNAGEN Address 3 Spectacle Lake Drive, Unit B105 Dartmouth, NS B3B1W8, Canada TOUGH Series Manual © 2014 DYNAGEN Technologies Inc