1
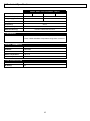
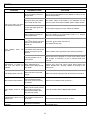
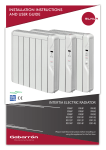
INSTALLATION AND USER'S GUIDE CLIMASTAR ® Smart EASY TECH version Smart TOUCH version SMART INTERTIA RADIATORS INDEX 1. INTRODUCTION ..........................................................................................................................2 2. INSTALLATION INSTRUCTIONS ...............................................................................................3 3. USING THE INERTIA RADIATOR, SMART TOUCH RANGES ..................................................4 3.1 Starting the Smart Touch Radiator ......................................................................................4 3.2 Setting the Date and Time ....................................................................................................4 3.3 Manual Mode .........................................................................................................................5 3.4 Automatic Mode ....................................................................................................................5 3.5 Pilot Wiring Mode ..................................................................................................................6 3.6 Copy Function .......................................................................................................................6 3.7 Key Block Function...............................................................................................................7 3.8 Sound Function.....................................................................................................................7 3.9 Other Information ..................................................................................................................7 4. USING THE INERTIA RADIATOR, SMART EASY TECH RANGES ..........................................8 4.1 Starting the Smart Easy Tech Radiator ...............................................................................8 4.2 Set Up Temperature . ............................................................................................................8 4.3 Selecting the Operating Mode .............................................................................................8 5. CLEANING AND MAINTENANCE ..............................................................................................9 6. TECHNICAL SPECIFICATIONS................................................................................................10 7. FAQ.s .........................................................................................................................................11 8. WARRANTY TERMS AND CONDITIONS .................................................................................12 1 1. Introduction • • • • • • • • • • • • • • • • • • • • The warranty of the heater will not cover any damage caused by non observance of any of these instructions. This guide must be kept and given to any new owner. IMPORTANT SAFETY ADVISE: When using electrical appliances, basic precautions should always be followed to reduce the risk of fire, electrical shock, and injury to persons, including the following: • IMPORTANT - If this heater is installed in a room containing a bath or shower, it should be so installed that switches and other controls cannot be touched by a person using a bath or shower. • The installation of this product should be carried out by an electrician or competent person and be in strict accordance with the current IEE Wiring Regulations and relevant Building Regulations. • The heater must be installed in accordance with these instructions. • The heater must be mounted using the wall bracket supplied. • The heater should be positioned in accordance to the clearances stated in these instructions. WARNING THE SURFACE OF THIS HEATER CAN BE HOT: Momentary contact with any part of the heater should not cause injury. However aged or infirm persons or young children should not be left unsupervised in the vicinity of the heater unless a suitable guard is fitted. Not intended for use by children or persons with reduced, physical, sensory or mental capabilities. Cleaning and maintenance must not be carried out by children without supervision. The heater must be installed, moved or installed by an electrician or competent person and be in strict accordance with the current IEE Wiring Regulations and relevant Building Regulations. The use of these heaters is forbidden in any area where there is a presence of gases, explosives or inflammable objects. Neither the connecting cable nor any other object must come into contact with the hot unit. Before connecting the heater check that the supply voltage is the same as that stated on the heater. WARNING: To avoid overheating NEVER cover or obstruct in any way the heat outlet slots at the top of the heater or the air inlet slots at the base of the heater. DO NOT cover the heater - Do not place material or garments on the heater or obstruct the air circulation around the heater. This heater should be switched off at the isolating switch before any repair work is carried out. This action should also be taken during the times of the year when heat is not required. The radiator should not be installed just below an electrical socket or in front of a socket outlet. The appliance must be installed in such a way that switches and other control devices cannot be touched by a person using a bath or shower. The installation must be carried out in accordance with the current electrical regulations. The heater is fitted with a flexible cable size 3 x 1.00 mm2 for electrical connection. It may be used to connect the heater to the fixed wiring of the premised through a suitable connection box positioned adjacent to the heater. The supply circuit to the heater must incorporate a double pole isolating switch having a contact separation of at least 3 mm. If the supply cable is damaged, it must be replaced by the manufacturer, its after sales service agents or any other competent qualified person. All models are supplied with an electrical interrupt cut-out. This will switch off the heater if, for any reason, it overheats. Should the cut-out operate, turn the heater off and remove the cause for the overheating. The cut-out will be reset automatically. The presence in air of particles of smoke, dust and other pollutants could, in time, discolour the walls and surfaces around the heater. 2 2. Installation Instructions Open the package and check that it is the correct model and it is in good condition. To obtain optimum performance it is necessary to maintain a minimum clearance of 15 cm between the radiator and any inflammable material as furniture, curtains etc. Recommended clearances required to maintain optimum performance are indicated on the following picture: 500mm 100mm 150mm Once you have decided the location to install the device, remove the packaging and extract the device and its mounting kit: This kit has to be assembled for safety: Fix the support to the wall using it as a pattern. A correct stabilization of the support clamp is required. The image below shows where to drill to fix the support (recommended distance). Note: first fix the screws of the upper part to the wall with appropriate rawl plugs, once the support is properly levelled, then fix the screw of lower bar too. Horizontal and square radiator. Vertical radiator. 1320mm 850mm 3 Once the heater is on the wall support, proceed to screw the support to the lower part of the heater. 3. Using the Smart TOUCH Inertia Radiators 1. “POWER /esc” button: Turn on and off the device / allows moving back from any menu. 2. “OK/mode” button: to access main menu and select or confirm the desired option. 3. “UP/DOWN” arrows : allows you to set the values and navigate through the different options of the menus. 4. DISPLAY: shows the different options and desired values. 5. RED DOT: if flashing, the device is working in PILOT WIRING mode, if not, then it is working in automatic as per the set programming. 3.1 STARTING THE DEVICE After connecting the power cable to a mains power outlet, click the switch on the right. The display starts, shows a welcome message, and shows . To start the device, press (Power button) and the set temperature appears on the screen. 3.2 SETTING DATE AND TIME a) Press the 'OK/mode' button for a few seconds. b) The display shows (Configure Time). If not, press until you see it and press the 'OK/mode' button. c) The display shows H (Hours), using the and buttons adjust the hours to the current time and press the 'OK/mode' button. d) The display now shows N (Minutes), using the and buttons adjust the minutes to the current time and press the 'OK/mode' button. e) The display now shows DAY.1, use the and buttons to select the current day of the week (i.e. DAY.1 is Monday, DAY.2 is Tuesday, Etc.) and then press the 'OK/mode' button. f) The display now shows (Configure Time) again. Press the ' /esc' button. The date and time are now set. Your device is now working! 4 3.3 MANUAL MODE In this mode, the device works using factory settings. All you have to do is press to select the desired temperature. The set temperature can be modified from 15º C to 28º C in intervals of 0.5º C. How to select the manual mode. a) Press the 'OK/mode' button. b) Select the mode by pressing or buttons until (Manual Mode) is displayed and press the 'OK/mode' button to confirm. c) Now select the desired temperature by pressing and buttons. The heater will now operate and cycle on and off up to the desired temperature. Note:- The FROST setting automatically activates to prevent temperatures going below 7ºC. To activate this setting simply press the ' /esc' (Power button) to turn the heater off, the display should show OFF. 3.4 AUTOMATIC MODE In this mode the device works on the programmed time schedule. It can work as per factory set (see table below) or according to the user’s configuration. TIME 00 H 01 H 02 H 03 H 04 H 05 H 06 H 07 H 08 H 09 H 10 H 11 H 12 H 13 H 14 H 15 H 16 H 17 H 18 H 19 H 20 H 21 H 22 H 23 H MONDAY ECO ECO ECO ECO ECO ECO ON ON ECO ECO ECO ON ON ECO ECO ECO ECO ON ON ON ON ON ECO ECO TUESDAY ECO ECO ECO ECO ECO ECO ON ON ECO ECO ECO ON ON ECO ECO ECO ECO ON ON ON ON ON ECO ECO WEDNESDAY ECO ECO ECO ECO ECO ECO ON ON ECO ECO ECO ON ON ECO ECO ECO ECO ON ON ON ON ON ECO ECO THURSDAY ECO ECO ECO ECO ECO ECO ON ON ECO ECO ECO ON ON ECO ECO ECO ECO ON ON ON ON ON ECO ECO FRIDAY ECO ECO ECO ECO ECO ECO ON ON ECO ECO ECO ON ON ECO ECO ECO ECO ON ON ON ON ON ECO ECO SATURDAY ECO ECO ECO ECO ECO ECO ECO ON ON ON ON ON ON ON ON ON ON ON ON ON ON ON ECO ECO SUNDAY ECO ECO ECO ECO ECO ECO ECO ON ON ON ON ON ON ON ON ON ON ON ON ON ON ON ECO ECO Before setting the device, take into account the following: OFF, the device is programmed to switch off. (Frost protection if heater goes below 7°C.) ECO, economy temperature, 3ºC below set temperature. i.e. Comfort temperature set by user is 21°C then the ECO temperature would automatically set to 18°C. ON, comfort temperature. As set by the user this temperature can be modified in the manual or automatic mode when the temperature is shown on the display. 5 3.4 AUTOMATIC MODE (continued) How to select and carry out custom programming. a) Press the 'OK/mode' button. b) Select the auto mode by pressing the button until (Automatic Mode) is displayed and press the 'OK/mode' button to confirm. c) The display will now show the set temperature together with a red dot that indicates the unit is working in automatic mode. If the unit has been programmed previously then it may show d) Press the 'OK/mode' button for a few seconds until (Configure Time) is displayed. e) Press the button and then press the 'OK/mode' button on (Select Day). f) Press and buttons to select the day you wish to change the on/off times and then press the 'OK/mode' button. g) The display now shows or or depending on how it was previously programmed. The indicates the time in hours, i.e. =12:00am, =01:00am and so on. h) By using the and buttons you can select (OFF), (ECO) or (ON) for that time period. Once selected Press the 'OK/mode' button to move onto the next time period. i) Repeat step h) until you go through all the 24 hours. The display will now show allowing you to select the next day to program. Press the 'OK/mode' button and continue from step f) if you wish to program each day individually. Alternatively you can copy one day to the next by following steps in section 3.5 COPY FUNCTION step b). 3.5 COPY FUNCTION This function enables you to copy a previously programmed day to any other day. i.e. day1 to day2 or day1 to day5, etc. To copy the setting of one day into another, do as follows: a) Press the 'OK/mode' button for a few seconds until (Configure Time) is displayed. b) Press button until is displayed and press the 'OK/mode' button. c) Press button to select the day you wish to copy and press the 'OK/mode' button. d) The display will now show , , etc depending on which day you selected. The first number is the day you are copying from, the second number is the day you are copying too. e) By Pressing button you can now change the day you want to copy too, once happy Press the 'OK/mode' button to copy. f) You are now taken back to menu where you can Press the 'OK/mode' button to copy another day (repeat from step c) ) or exit by Pressing the ' /esc' button. Note:- If (Automatic Mode) is selected the heater cannot be turned off. To turn off the device, Press the 'OK/mode' button and use and buttons to select (Manual Mode) then Press the 'OK/mode' button. You can now turn off the device using the ' /esc' button. 3.6 PILOT WIRING MODE In this mode the device works following instructions from an external controller. How to select FP mode? a) Press the 'OK/mode' button. b) Press the button until is displayed and press the 'OK/mode' button. c) The display will show the set temperature together with a red flashing dot that indicates the unit is working in FP mode. Note:- If F.P. mode is selected the heater cannot be turned off. To turn off the device, press 'OK' and using the and buttons select (Manual Mode) then Press the 'OK/mode' button. You can now turn off the device using the ' /esc' button. 6 3.7 KEY BLOCK FUCTION This function enables to block the controls. To set this function, do as follows: a) Press the 'OK/mode' button for a few seconds until (Configure Time) is displayed. b) Repeatedly press the button until is displayed and then press the 'OK/mode' button. c) Press the button until is displayed and then press the 'OK/mode' button. The display now shows to indicate the controls are now locked. To unlock the device, wait until the dashes disappear and the display shows the temperature then press and hold down the ' /esc' button for 5 seconds until the dashes are shown again, now press the button to confirm. 3.8 SOUND FUNCTION The SOUND function enables you to activate and deactivate the beep emitted on touching the buttons. To activate or deactivate the sound do as follows: a) Press the 'OK/mode' button for a few seconds b) Repeatedly press the button until is displayed and then press the 'OK/mode' button. c) Press the button to select (to activate) or (to deactivate) the beep and press the 'OK/mode' button to confirm. 3.9 OTHER INFORMATION • • • • If you enter a submenu, and stop using the device for a few seconds, it will automatically return to the main menu. If you are in the main menu, and the device is not being manipulated; it will turn to stand-by mode and the display will only show a dot. To turn on the screen again, press any key on the button panel. Even if the device is in an OFF cycle, the radiator can still start working. This is because it has a minimum frost protection set temperature as per factory set to 7ºC. This mode is called FROST PROTECTION and it prevents the room temperature going below 7ºC temperature. The device also has a built in sensor that detects any sudden temperature changes that may occur, i.e. when a window is opened, air conditioners activated, or any other circumstance that may prevent the radiator from raising the room temperature. This mode activates when the temperature decreases by 3ºC in 5 minutes. At this stage, the radiator turns off and shows on the display; this mode stays until this decreasing tendency disappears. 7 4. Using the Smart EASY TECH Inertia Radiators 4.1 STARTING THE DEVICE After connecting the power cable to a mains power outlet, click the switch on the right. Press the ' turn on the radiator, ECO light turns on. ' button to 4.2 SET UP TEMPERATURE Once the unit is ON, press the ' ' button to select the desired temperature. (see images below) 18°C 19°C 22°C 24°C 21°C 4.3 SELECT THE OPERATING MODE There are 4 operating modes: • Manual: The user determines the set point temperature. • Timer: The user selects both the set point temperature and the operating time or downtime. • Replay: The user selects desired temperature and time duration. The unit automatically will start and stop. • Pilot Wiring. Manual Mode To select temperature, press the ' (see figures 2.2). ' button repeatedly until the light activates on the desired temperature Timer Mode Setting the heater to stay ON for a set amount of time(1h,4h,5h,8h,9h,12h,13h): The device will work at the preset temperature as per user’s configuration. a) Press the ' ' button to select the desired temperature. b) Now press the '' button to select the operating time. By pressing the '' button repeatedly, operating hours or a combination of operating hours will be selected. e.g. The above example shows the device programmed to be ON at 21ºC for 5 hours. To deactivate the timer function press the '' button repeatedly until the time LEDs are all deactivated. 8 Timer Mode(continued) Setting the heater to stay OFF for a set amount of time(1h,4h,5h,8h,9h,12h,13h): The device will stay off as per the user’s configuration and then turn on to the set temperature. a) On starting the device again, press the ' ' button to select the temperature to reach. b) Press the ' ' button for 2 seconds to switch to OFF mode. c) Press the '' button to select the switch-off time of the device. d) Now press the '' button to select the operating time. By pressing the '' button repeatedly, operating hours or a combination of operating hours will be selected. e.g. The above example shows the device is programmed to be OFF for 5 hours. To deactivate the timer function press the '' button repeatedly until the time LEDs are all deactivated. 5. Cleaning and Maintenance • • • • • • The radiators do not require any special maintenance providing thermal comfort during large periods. Dust clean with a dry, soft cloth only when the unit is disconnected and cold. At the beginning of the year’s heating season, vacuum any dust that has accumulated in the inner heating element while the radiator has been off for long periods during warmer weather. Do not use solvents or abrasive products for cleaning. After the heating season turn off the radiator with the switch located on the right side of the radiator. This inertia radiator has been manufactured under an assured quality system using environment friendly processes. Disposal: Please take the radiator to a recognised disposal point so any useful material is recycled in the right way. 9 6. Technical Specifications SMART EASY TECH and SMART TOUCH Power: (W) 500 Dimensions: (mm) H.500 x W.500 x D.70 H.500 x W.1000 x D.70 11 22 Weight: (Kg) Voltage: 1000 1500 2000 230v ~AC Frequency: 50 Hz Ceramic component: DUAL KHERR External Housing: Powder coated steel structure THERMOSTAT Features: TOUCH VERSION Temperature range from 15 to 28°C EASY TECH VERSION Temperature range from 18 to 24°C SAFETY THERMOSTAT Number of Thermostats: 1 Features: Bimetallic Reset: Automatic Rated Temperature: 90 ±5°C Reset Temperature: 65 ±10°C TYPE OF PROTECTION Class: II IP Rating: 24 10 7. FAQs PROBLEM PROBABLE CAUSE SOLUTION Incorrect setting of the set temperature. Check the set temperature on the display to verify it is the desired temperature. Improper sizing, the heater is too small for the room. The power rating of the heater is not adequate for the place in which it has been installed. Select a larger heater. Lower and Upper grids are obstructed. Do not place anything on top or below the radiator. Set temperature below the room temperature. Rise the radiator’s set temperature until it is 1 degree above the room temperature. The /esc button has been pressed and the heater is turned off. Press the /esc button and turn on. (the display shows ON) The switch at the side of the heater is turned to the off position. Set the switch at the right side of the heater to position 'I'. The set program is in an OFF period. Check that the set program is correct for the time period and change if necessary or put in manual mode and override. Appearance of stains on the wall just above the radiator. Dust, Carpet fibers or smoke fumes going through the heater. Vacuum any dust and loose carpet fibers below the heater. Refrain from burning candles or smoking in the same room. The display does not work Disconnection from power supply. Make sure power is going to the device and it is turned on. No response from buttons Control panel has been locked to prevent pressing of buttons. Refer to key locking function section 3.7 The display shows a red dot. After a short amount of time if no buttons have been pressed the display goes into stand-by mode. Press any button and the display will activate Temperature does not go below 15ºC. The heaters temperature is at its limit. The heaters temperature range is 15-28ºC. The display “dashes” The device is blocked Press button POWER/ESC during 4 seconds and press the DOWN arrow. The room does not reach the desired temperature The radiator operate. does not shows 11 8. Warranty Terms and Conditions Your CLIMASTAR product has been designed and tested to give you many years of trouble-free service. For your additional peace of mind, Climastar UK gives the following Warranty. Your statutory rights are not affected by this Warranty. Subject as provided below. Climastar UK warrants to the original purchaser at the original installation site that its products will be free from defects in materials, electronic components and workmanship for the period of 5 (Five) years. The original purchaser’s remedy for breach of this Warranty is expressly limited to repair or replacement of any part or parts found to be defective under conditions of normal service and use during the above Warranty period and does not extend to Climastar UK being liable for any incidental, special or consequential damages or losses whatsoever. Such as loss of use of the product, inconvenience or lost profits. This Warranty does not cover any defect, damage or malfunction in the product which is due to; failure to comply in any respect with Climastar's installation, maintenance or operating instructions; faulty storage, handling, installation or repair; mis-use; neglect; accident; abuse; or general wear and tear. To ensure that our products provide you with the service that we expect, it is important that they are installed in accordance with the British Electrical Standards and Approved codes of Practice. Before free service under this Warranty can be provided, the original purchaser will be required to prove the date of purchase and may be required to provide Climastar UK with supporting information, as Climastar UK may need to conduct its investigation into the alleged defect. Climastar UK reserves the right to make reasonable charges for the inspection and testing of any product which is subject to a Warranty claim and the rights conferred by the Warranty are conditional upon the payment of such charge. The charge may be made at Climastar UK´s discretion, either before or after the inspection and testing of the product. In the event that it is established to Climastar UK's reasonable satisfaction that a valid Warranty claim has been made in respect of the product, then any charges which has been paid will be refunded in full by Climastar UK. 12 CLIMASTAR ® Climastar UK Unit 3, East Bond Street Leigh, Lancashire WN7 1BP Tel. 01942 670158 Fax. 01942 262221 www.climastar.co.uk