1
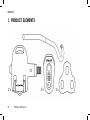
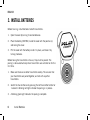
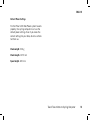
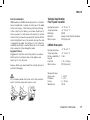
ENGLISH
Contents
1. PRODUCT ELEMENTS........................
2
2. INTRODUCTION ..............................
3
3. INSTALL BATTERIES.........................
6
4. SET CRANK LENGTH.........................
8
5. INSTALL PEDALS ............................
9
6. INSTALL TRANSMITTERS.................... 11
7. TEACH TRANSMITTERS TO CYCLING
COMPUTER .................................. 12
8. TRAINING .................................... 14
9. IMPORTANT INFORMATION .................
Changing Batteries.......................
Changing Transmitter Sealing
Rings ......................................
Maintenance..............................
Technical Specifications ................
Limited International Polar
Guarantee.................................
LOOK Limited Warranty .................
Disclaimer ................................
16
16
16
16
17
18
19
20
ENGLISH
1. PRODUCT ELEMENTS
2
Product Elements
ENGLISH
2. INTRODUCTION
Together with a Polar cycling computer (CS600X,
CS600 and CS500), Polar LOOK Kéo Power
system provides the following training information:
For video tutorials of the Polar LOOK Kéo Power,
go to www.polar.fi/en/support/video_tutorials or
www.lookcycle.com.
•
Actual, average and maximum power values
•
Left/Right Balance (CS600X and CS600 only)
•
Cycling cadence
•
Cycling efficiency (CS600X and CS600 only)
The power output measurement of the Polar LOOK
Kéo Power system is based on strain gauges.
There are eight strain gauges attached to each
pedal axle. Each pedal axle has two measuring
circuits, and each circuit has four strain gauges.
The force applied to the pedals bends the axle
slightly, and causes the strain gauges to lengthen
or shorten. This leads to a change in the
resistance of the gauges. By measuring the change
in resistance, the force applied to each pedal can
be determined, and the power output generated
while cycling can be measured. Cycling cadence is
measured with a magnet located in the pedal.
For information on the power features of your
cycling computer, refer to the user manual of the
cycling computer in question.
The latest versions of the user manuals can be
downloaded at www.polar.fi/support and
www.lookcycle.com/en/int/infos/support-technique/
index.html.
Introduction
3
ENGLISH
The power output measurement is performed
simultaneously from both pedals with identical
measurement systems. This enables accurate
comparison of left and right leg power output. The
total power output of the cyclist is the sum of the
power outputs of both legs. The right transmitter
sends the power output and cadence data from the
right pedal to the left transmitter. The left
transmitter then sends the power output and
cadence data from both pedals to the cycling
computer.
Kéo Power pedals are not intended for beginning
cyclists, and they are not designed to release
automatically in a fall or crash. Proper use by
skilled riders will increase riding efficiency and
performance, but pedals may be an aggravating
factor in the event of a fall or collision. Do not use
your Kéo Power pedals with ‘street’ shoes or with
cleats other than LOOK Kéo cleats, as your feet
may slip off and cause a crash.
•
This Kéo Power pedal is construction and
optimized to be used by cyclists less than 100
kgs (220.5 lbs).
•
Before going on the road, make sure you are
used to the function of your new pedals.
•
Practice engaging and disengaging your new
pedals while stationary, and train yourself
mentally to disengage your pedals at every stop
or in other situations where you may need to
steady yourself with a foot on the ground.
READ THIS FIRST!
Bicycle riding is an inherently dangerous activity.
To reduce the risk of serious injury, be sure your
bicycle is adequately maintained and that all
components are correctly installed and adjusted.
Always wear a helmet and follow the rules of the
road when cycling. Do not rely on reflectors.
Always use a proper headlight and tail lights when
riding at any time of reduced visibility.
4
Introduction
ENGLISH
•
The material of the Kéo cleats is especially
designed to be compatible with the body of your
Kéo. Using other than LOOK Kéo cleats can
seriously damage your pedals, and creates a real
risk of malfunction.
•
Please read these instructions carefully and
completely before installing or using these
pedals, and keep these instructions in a safe
place for future reference. If you have any
questions during the installation or adjustment
of your Kéo Power pedals, please contact your
authorized dealer.
•
LOOK reserves the right to change product
specifications without prior notice.
LIFESPAN - WEAR - INSPECTION REQUIREMENT
The Iifespan of LOOK components depends on
many factors, such as rider size and riding
conditions. Impacts, falls, improper use or harsh
use in general may compromise the structural
integrity of the components and significantly
reduce their Iifespan. Some components are also
subject to wear over time. Please have your bicycle
regularly inspected by a qualified mechanic for
any cracks, deformation, signs of fatigue or wear.
If the inspection reveals any deformation, cracks,
impact marks or stress marks, no matter how
slight, immediately replace the component;
components that have experienced excessive wear
also need immediate replacement. The frequency
of inspection depends on many factors; check with
your authorized LOOK representative to select a
schedule that is best for you. If you weigh 85
kg/185 Ibs or more, you must be especially
vigilant and have your bicycle inspected more
frequently (than someone weighting less than 85
kg/185 Ibs) for any evidence of cracks,
deformation, or other signs of fatigue or stress.
Introduction
5
ENGLISH
3. INSTALL BATTERIES
Before training, install batteries to both transmitters.
1.
Open the cover by turning it counterclockwise.
2.
Place the battery (CR2354) inside the cover with the positive (+)
side facing the cover.
3.
Put the cover with the battery inside it in place, and close it by
turning clockwise.
Before taking the transmitters into use, they must be paired. The
pairing is done automatically when transmitters are switched on for the
first time.
1.
Make sure there are no other transmitters nearby. This ensures that
your transmitters are paired together, and not with any other
transmitters.
2.
Switch the transmitters on by pressing the left transmitter button for
1 second. A blinking red light indicates the pairing is in process.
3.
A blinking green light indicates the pairing is complete.
6
Install Batteries
ENGLISH
Pair Transmitters Manually
The transmitters can also be paired manually.
1.
Press and hold the left transmitter button for
10 seconds (green light blinks 10 times).
2.
A blinking red light indicates the pairing is in
process.
3.
A blinking green light indicates the pairing is
complete.
Install Batteries
7
ENGLISH
4. SET CRANK LENGTH
Before starting training for the first time, set your crank
length on the left transmitter. Press and hold the button
on the left transmitter for 5 seconds to access the crank
length selection mode (green battery light blinks 5
times). Press the button for 1 second to change the
crank length. When the correct crank length light is
static, wait for 10 seconds to have the crank length
stored.
There are four possible crank lengths. These are 170
mm, 172.5 mm, 175 mm and 177.5 mm. The default
value is 172.5 mm.
To change the selected crank length at any time, press
and hold the left transmitter button for 5 seconds to
access the crank length selection mode.
When switching the transmitters and pedals from one
bike to another, make sure the correct crank length is
chosen.
8
Set Crank Length
ENGLISH
5. INSTALL PEDALS
Carefully read all these instructions before use to
get the best out of the product. The specifications
may be changed without notice when
improvements are made in this product.
1.
Screw the pedal onto the crank. Make sure to
screw it as far as it goes but do not tighten it.
2.
Unscrew the pedal so that the mark on the
pedal axle points forward when the crank is
facing up (picture 1 on page 10). If the pedal
axle sticks out of the inside of the crank, put an
additional ring (included in package) between
the crank and the pedal bolt.
3.
Place the pedal installation tool into the pedal
axle so that its shaft is in line with the crank
(picture 2 on page 10).
4.
Hold the pedal installation tool in place, and
tighten the pedal bolt with a thin 18 mm
wrench. The recommended tightening torque is
30 Nm.
To install the pedals, you will need a thin 18 mm
wrench, an 8 mm Allen key and the pedal
installation tool (provided in product package).
Kéo Power pedals are standard 9/16 x 20 BSA
threading. Check that your cranks have the same
threading before installing the pedals.
The right pedal screws onto the crank clockwise.
The left pedal, marked with a groove on the pedal
bolt, screws onto the crank counterclockwise.
Make sure the crank thread and face in contact
with the pedal axle and bolt are clean before
installing the pedals. If they are not clean, the
pedal axle may be damaged during installation.
Also, check that the ring in front of the pedal bolt
is in place.
Kéo power pedals are designed to be compatible
with cranks less than 16 mm thick. If your cranks
are thicker, you may not be able to attach the
transmitters to the pedals.
Install Pedals
9
ENGLISH
Check the pedal positioning to allow correct
transmitter attachment to pedal.
The use of any device joining the cycling shoes to
the pedals such as toe clips or clipless pedals may
increase or decrease the risk of injury resulting
from a fall or a collision. If you are unsure about
the installation and adjustment of your Kéo Power
pedal, you should have the work completed by a
LOOK cycling product dealer.
10
Install Pedals
ENGLISH
6. INSTALL TRANSMITTERS
After installing the pedals, install the transmitters
to the bike. The transmitters are marked R (right),
and L (left). With correct pedal installation, the
transmitters point forward when the cranks face
up. See picture for correct transmitter positioning.
Perform the steps below to both transmitters:
1. Remove the protective cap from the
transmitter.
2.
Insert the transmitter into the pedal axle. Check
that the shape of the transmitter corresponds
with the shape inside the pedal axle. Push
firmly but do not use too much strength. Using
too much strength can damage the transmitter.
3.
Check that the transmitter is positioned
correctly (see picture). If the transmitter is in
an incorrect position, remove it and adjust the
pedals so that the transmitter attaches
correctly.
4.
Pass the cable tie through the hole in the
transmitter. Press and hold the transmitter in
place, and tighten the cable tie around the
crank. Cut off any excess ends.
5.
Before cycling, rotate the cranks with the chain
on the outer chainring and smallest sprocket,
and check that the transmitters do not hit any
part of the bike or the chain. The system is not
compatible with all bike setups.
Install Transmitters
11
ENGLISH
7. TEACH TRANSMITTERS TO CYCLING COMPUTER
The Polar LOOK Kéo Power system is compatible
with Polar CS600X, CS600 and CS500 cycling
computers. Before training for the first time, the
transmitters must be taught to the cycling
computer.
CS500
Select Settings > Bike SET > Bike 1/ 2 / 3 >
Power SET > ON.
C. length: Set chain length as 1473 mm. Accept
the set value with OK.
To teach the transmitters, switch them on by
pressing the button on the left transmitter for 1
second.
CS600 and CS600X
Select Settings > Bike > Bike 1/2/3 > Power >
On/Off. Teach new sensor? is displayed.
Select Yes to confirm teaching. Start test drive
is displayed.
Completed is displayed when the teaching is
complete.
12
Teach Transmitters to Cycling Computer
C. weight: Set chain weight as 304 g. Accept the
set value with OK.
S. length: Set span length as 420 mm. Accept the
set value with OK.
Power TEACH? is displayed. To confirm teaching,
press OK. Test drive is displayed.
Completed is displayed when the teaching is
complete.
ENGLISH
Default Power Settings
For the Polar LOOK Kéo Power system to work
properly, the cycling computer must use the
default power settings. Even if you know the
correct settings for your bike, do not use them.
Set them as:
Chain weight: 304 g
Chain length: 1473 mm
Span length: 420 mm
Teach Transmitters to Cycling Computer
13
ENGLISH
8. TRAINING
Calibration
Important Calibration Information
The Polar LOOK Kéo Power system is
automatically calibrated each time the
transmitters are switched on. During calibration
the transmitters are measuring zero power values.
•
Switch the transmitters on outside, to ensure
calibration is done in training conditions.
•
If the temperature changes 10°C or more during
training, calibrate again.
•
If you are unsure if the calibration succeeded,
switch the transmitters off, and then back on.
•
If the calibration fails, a static red light is on for
5 seconds, and the transmitters switch off.
Switch power on by pressing the button on the left
transmitter for 1 second. A blinking red light
indicates the transmitter is on, and calibration is
in process. Do not move the cranks or pedals for 2
seconds. A blinking green light indicates the
calibration is complete. After the calibration, the
crank length light will blink for 30 seconds
showing your crank length.
14
Training
If the calibration is interrupted, the measured
power values will be incorrect.
ENGLISH
Start Training
Transmitter LED Light Color Information
Activate your cycling computer. The cycling
computer detects the transmitters automatically.
•
Blinking red light: automatic pairing and
calibration. Do not touch the pedals.
Press START to start the recording.
•
Blinking green light: ready to start training.
A blinking green transmitter light indicates
training can be started. When pedaling is started,
and cadence data is received, the green light will
blink for 30 seconds, and then switch off. When
pedaling is stopped, the green light will start
blinking again.
•
Static red light: Error.
Transmitter Button Functions
•
Press button for 1 second: switch transmitters
on/off.
•
Press and hold button for 5 seconds: access
crank length selection mode.
•
Press button for 1 second in crank length
selection mode: change crank length.
Stop Training
To pause your training session, press STOP on
your cycling computer. To stop recording, press
STOP again.
To switch the transmitters off, press the left
transmitter button for 1 second.
The transmitters will automatically switch off if
the pedals measure 0 power values for 30
minutes.
Training
15
ENGLISH
9. IMPORTANT INFORMATION
Changing Batteries
It is recommended that you change both transmitter
batteries at the same time. When the battery is low, a red
light will blink once every two seconds when the
automatic calibration has been completed.
When changing the sealing rings, use caution to avoid damaging
them or the transmitters.
Maintenance
The selected crank length is retained when changing the
batteries.
Do not throw the old batteries away with normal waste;
batteries should be disposed of properly according to local
regulations.
Keep batteries away from children. If swallowed, contact a doctor
immediately.
Changing Transmitter Sealing Rings
Additional sealing rings for the transmitters are included
in the product package.
Remove the existing sealing rings carefully with tweezers.
Using tweezers, place the new sealing rings carefully into
the grooves.
16
Important Information
Before every ride, check your pedals and cleats to be sure
they are free of dirt and that they are operating properly.
Check your cleats daily for excessive wear, and replace as
indicated. Worn cleats may release inadvertently and
cause you to crash. Replace only with genuine LOOK Kéo
cleats. Do not drill, paint or refinish. Keep pedals and
cleats away from any heat source. Spindle: LOOK spindles
are subjected to a rotation test of one million cycles at
100 revs / minute, with a load of 80 kg on the pedal and
off centered rotation (which creates an impact at each
rev). This test exceeds the toughest known standard EN
14781. High pressure cleaners are not recommended.
ENGLISH
Pedal Tension Adjustment
LOOK pedals are ALWAYS delivered pre-set to a minimum
tension. Adjustment is carried out at the rear of the pedal,
on the lever, using a 3 mm Allen key. By turning the key
in the + direction (clockwise), you increase the amount of
stress necessary for cleat release. Allow tension to remain
minimal until you have become perfectly familiar with the
system. Adjustment can not be carried out when the cleat
is engaged in the pedal. You will hear a ‘’click’’ when the
maximum adjustment is reached. Once this click is heard,
stop screwing as it may damage the pedal.
Engagement / Release
Engagement: Insert the cleat in the pedal in accordance
with trajectory 1 and press down on the pedal as per
trajectory 2 to lock the cleat.
Release: Rotate your heel towards the outside (picture 3)
and it will disengage.
Do not release towards the inside, as this may cause the
heel to touch the spokes and cause a crash.
Technical Specifications
Polar P5 power transmitter
Operating temperature:
Storage temperature:
Battery type:
Battery life:
Water resistance:
-10 °C to +50 °C
-20 °C to +60 °C
CR2354
Average 5 months (2h/day, 7days/week)
IPX7 (Splash proof)
LOOK Kéo Power pedals
-10 °C to +50 °C
-20 °C to +60 °C
55 mm
Operating temperature:
Storage temperature:
Distance crank/middle of
the pedal
Pedal float:
Water resistance:
0, 4.5, or 9 degrees
IPX7 (Splash proof)
Measurement ranges
Average power:
L/R balance:
Cadence:
Maximum load:
0 - 2000 W
0 - 100 %
30 - 199 rpm
1800 N
Important Information
17
ENGLISH
Limited International Polar Guarantee
•
This guarantee does not affect the consumer’s statutory
rights under applicable national or state laws in force, or
the consumer’s rights against the dealer arising from
their sales/purchase contract.
• This limited Polar international guarantee is issued by
Polar Electro Inc. for consumers who have purchased
this product in the USA or Canada. This limited Polar
international guarantee is issued by Polar Electro Oy for
consumers who have purchased this product in other
countries.
• Polar Electro Oy/Polar Electro Inc. guarantees the
original consumer/purchaser of this device that the
product will be free from defects in material or
workmanship for two (2) years from the date of purchase.
• The receipt of the original purchase is your proof
of purchase!
•
18
The guarantee does not cover the battery, normal wear
and tear, damage due to misuse, abuse, accidents or
non-compliance with the precautions; improper
maintenance, commercial use, cracked, broken or
scratched cases/displays, armband, elastic strap and
Polar apparel.
Important Information
•
The guarantee does not cover any damage/s, losses,
costs or expenses, direct, indirect or incidental,
consequential or special, arising out of, or related to the
product.
• Items purchased second hand are not covered by the two
(2) year warranty, unless otherwise stipulated by local
law.
• During the guarantee period, the product will be either
repaired or replaced at any of the authorized Polar
Service Centers regardless of the country of purchase.
Guarantee with respect to any product will be limited to
countries where the product has been initially marketed.
This product is compliant with Directive 93/42/EEC. The
relevant Declaration of Conformity is available at
www.support.polar.fi/declaration_of_conformity.
Regulatory information is available at
www.polar.fi/support.
ENGLISH
This crossed out wheeled bin marking shows that Polar
products are electronic devices and are in the scope of
Directive 2002/96/EC of the European Parliament and of
the Council on waste electrical and electronic equipment
(WEEE) and batteries and accumulators used in products
are in the scope of Directive 2006/66/EC of the European
Parliament and of the Council of 6 September 2006 on
batteries and accumulators and waste batteries and
accumulators. These products and batteries/accumulators
inside Polar products should thus be disposed of
separately in EU countries. Polar encourages you to
minimize possible effects of waste on the environment
and human health also outside the European Union by
following local waste disposal regulations and, where
possible, utilize separate collection of electronic devices
for products, and battery and accumulator collection for
batteries and accumulators.
Copyright © 2011 Polar Electro Oy, FIN-90440
KEMPELE, Finland.
Polar Electro Oy is a ISO 9001:2008 certified company.
All rights reserved. No part of this manual may be used or
reproduced in any form or by any means without prior
written permission of Polar Electro Oy. The names and
logos marked with a ™ symbol in this user manual or in
the package of this product are trademarks of Polar
Electro Oy. The names and logos marked with a ® symbol
in this user manual or in the package of this product are
registered trademarks of Polar Electro Oy.
LOOK Limited Warranty
Please keep your proof of purchase and register
your warranty on line at www.lookcycle.com
If you register on line, you need not return the coupon
“carte de garantie”but you must keep your proof of
purchase. LOOK pedals provide the latest and best
technology in the field of automatic pedals. They can not,
however, guarantee safety in the event of accident. LOOK,
through its authorized distributor in the country in which
this product was first sold at retail, warrants to the first
retail purchaser or user that this product shall be free
from defects in materials and workmanship. This Limited
Warranty, as well as any implied warranty, shall expire 2
years from date of the initial retail purchase. This limited
warranty does not apply to ordinary wear and tear
(including worn out cleats), parts which have been
refinished or subjected to improper repairs or
modifications, or to damage caused by accident, abuse,
Important Information
19
ENGLISH
lack of reasonable care or improper use. Improper use
which will void this warranty includes spinning, jumping,
acrobatics, extreme cycling and similar activities. The sole
remedy under the LOOK limited warranty or any implied
warranty shall be limited to the repair or replacement, at
LOOK’s sole option, of the subject product or parts
thereof. In no event shall LOOK or its agents or
distributors be liable for incidental or consequential
damages or for any cost of transporting or shipping the
product, whether the claim is based upon contract,
warranty, negligence or product liability, including,
without limitation, loss or damage to property other than
the warranted product itself, loss of use of any property, or
other economic losses. Neither LOOK nor any agent or
distributor shall be liable for contribution or
indemnification, whatever the cause. Warranty rights and
remedies may not be assigned or transferred. LOOK’s
obligations under any warranty shall be limited, to the
greatest extent allowed by law, as provided in this LOOK
Limited Warranty. Some states do not allow limitations on
how long an implied warranty lasts and/or the exclusion or
limitation of incidental or consequential damages, so the
above limitation and exclusion may not apply to you. This
Limited Warranty gives you specific legal rights, and you
may also have other rights which vary from state to state.
20
Important Information
Disclaimer
•
The material in this manual is for informational purposes
only. The products it describes are subject to change
without prior notice, due to the manufacturer’s
continuous development program.
• Polar Electro Inc. / Polar Electro Oy makes no
representations or warranties with respect to this manual
or with respect to the products described herein.
• Polar Electro Inc. / Polar Electro Oy shall not be liable
for any damages, losses, costs or expenses, direct,
indirect or incidental, consequential or special, arising
out of, or related to the use of this material or the
products described herein.