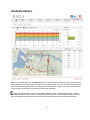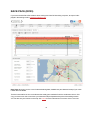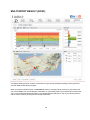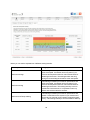
1
POLARPERSONALTRAINER.COM HELP
CONTENTS
Contents
2
Introduction
9
Registration and Login
10
Data Transfer
11
Training Data / Activity data
11
Training Programs
11
Strength Training Exercises
11
Data Transfer Software
12
Polar WebSync
12
Polar WebLink
12
Transferring Data with Polar WebLink
12
Transferring results to Polar Flow web service
13
Home
14
Product in Use
14
Add to Your Diary
14
Activity Feed
14
Training Programs
14
Events
15
Challenge Status
15
Partners
15
Diary View
16
Diary Symbols
16
2
Week, Month and List Overviews
17
Summary
19
Favorite Training Sessions
19
STAR Training Program Status
19
Training Load
19
Adding a Training Target
21
Adding a Strength Training Target
23
Adding a Phased Target
25
Adding a Zone Target
28
Adding a Race Pace Target
30
Adding a Favorite Training Session to Your Diary
32
Adding an Event
33
Adding a Note
34
Adding a Training Result to Your Diary
35
Add training results with data transfer software
35
Add a training result manually
35
Merging a Target and a Result
37
Viewing a Training Result / Daily Activity Result
38
General Functions in Training Result View
39
Training Result
41
Curve
42
Map
42
Sport Zones / Optimized Sport Zones / Zones
43
3
Sport Zones / Optimized Sport Zones / Zones Detailed
43
Laps and Automatic Laps
43
Laps and Automatic Laps Detailed
44
Data
45
BENEFIT
45
Altitude
45
Lap notes
46
Race Pace (RCX5)
47
Phases (RC3 GPS, RCX3, RCX5)
48
Multisport result (RCX5)
50
Curve
51
Map
51
Sport Zones / Optimized Sport Zones
51
Sports
52
Sports detailed
52
Data
52
Altitude
53
Strenght Training Result
53
Curve
54
Workout
54
Zones
55
Data
55
Daily Activity Result
55
4
Editing a Training Result
56
Sharing your training result in social media
57
Shared training result view
57
Adding Fitness Data to Your Diary
59
Adding Polar BodyAge Test Results to Your Diary
60
Benefit
61
Exporting Data
65
Training sessions, fitness data, notes and events
65
The structure of the exported xml-file
65
XML schema information
65
Route data
65
Strength Training Exercises
67
Viewing and editing exercises
67
Adding Your own strength training exercise
67
Adding a Strength Training Target
68
Easier and more effective strength training with Polar FT80
68
Favorites
69
Training Equipment
70
Editing Equipment Settings
70
Training Load
71
Why should I monitor my cumulative training load?
71
Training Load Analyzing View
71
Selection and navigation
72
5
Training load curves
72
Training Load Bars
73
Future days
73
Training Programs
74
Running, Cycling, Outdoor and Fitness Programs
74
STAR Training Program
75
Endurance Program (RC3 GPS, RCX3 and RCX5)
75
Creating Endurance Program
75
Following up Endurance Program
77
Updating Endurance Program
78
Endurance Program Levels and Exercise Descriptions
79
Running program levels
79
Cycling program levels
80
Running Exercise Descriptions
80
Cycling Exercise Descriptions
81
Progress
83
Progress Summary
83
Progress Reports
83
Comparison Report
83
Other reports
85
Challenges
88
Creating a Challenge
89
Sharing Challenges in Social Media
91
6
Editing a Challenge
92
Starting a Challenge
93
Finishing a Challenge
94
Joining Public Challenges
95
Applications
96
Downloads
96
Calculators
96
Messages
97
Inbox
97
Sending a Message
97
Friends
99
Finding and Adding a Friend
99
Viewing and editing friends
99
Pending Friend Requests
100
Profile
101
Private profile
101
Contact Information
101
Physical Information
101
General Settings
102
Training Settings
102
Public Profile
102
Notifications
103
Sports
104
7
Sports List in polarpersonaltrainer.com
104
Sports List for RC3 GPS, RCX3 and RCX5 Users
104
Sports list for Polar Beat users
105
Product Registration
106
Partners
107
Adding a Partner
107
Accepting a Partner's Request
107
If the Partner Agreement Changes
108
Viewing, Editing and Removing a Partner
108
Articles
109
Deleting Your Polar Account
110
Disclaimer
112
8
INTRODUCTION
Welcome to the polarpersonaltrainer.com web service. This is for you who want to train right, follow your progress and have fun with friends.
Training: You can either transfer training data from your compatible Polar product into your Diary, or manually
enter and edit your training data in diary.
Progress enables you to analyze and follow your development to the finest detail.
Optimize the way you train by putting the Polar Training Programs into good use. If you like working out at
the gym, use the Strength Training Exercises to create workouts.
Training programs for RC3 GPS, RCX5 and RCX3 users: polarpersonaltrainer.com web service offers
complete endurance training programs for running and cycling, including warm-up, work and cool-down
phases for every session. You can transfer these training programs to your Polar RC3 GPS, RCX3 or RCX5
training computer.
Training load tells the user conveniently at a glance on polarpersonaltrainer.com the cumulative training load
for every day with color codes in the weekday headers. In addition, the cumulative training load can be viewed
as a graph in Training Load, illustrating the time needed to recover to a certain level.
The bikes from your Polar RC3 GPS training computer, Polar RCX3 training computer, Polar RCX5 training
computer, and Polar CS500 cycling computer are listed in Training / Training Equipment after you have synchronized your product with polarpersonaltrainer.com. It is easy for you to keep track how you use different
bikes as the accumulated training information for each bike is shown in Training Equipment.
Find new or keep in touch with your existing Friends. Exchanging a favorite training session or finding a free
slot in your diary is no longer a headache as you can grant your contacts an access to your diary. You can also
create or take part in Challenges.
Check also Polar product support pages at www.polar.com/support to find useful information on the web service.
9
REGISTRATION AND LOGIN
Registering in the web service is free of charge. Just click Register on the login page. Fill in the required
information and read through the Polar Privacy Policy.
After registration update your physical information to get more accurate training analysis. Click the link on the
Activity Feed on the Home page or go to your profile by placing your mouse over your name next to the main
menu and clicking Profile. Fill in the missing or incorrect data. Remember to save changes.
Your email address is your user name and you define your password yourself when registering in this service.
If you have forgotten your password, click the link Have you forgotten your password? on the registration page
then enter your e-mail address, and we’ll e-mail you a new password right away. Before requesting new password, check that your e-mail spam filter is not blocking e-mails from Polar. You can change your e-mail
address and password in your Profile.
The same username and password are valid for polarpersonaltrainer.com, Polar product registration,
Polar discussion forum and Newsletter registration.
10
DATA TRANSFER
You can transfer data between certain Polar products (listed below) and polarpersonaltrainer.com web service. To transfer training information to polarpersonaltrainer.com, you need to be registered at the web service.
TRAINING DATA / ACTIVITY DATA
Transfer training/activity data from your training/activity computer to your diary in polarpersonaltrainer.com.
You can easily see which data is new and transferred after your last login, since it has been highlighted in your
diary.
The Polar Beat mobile app transfers your training data automatically to polarpersonaltrainer.com when you are
logged in to your account in Polar Beat. Just stay logged in, and your training data is always transferred automatically.
TRAINING PROGRAMS
Endurance programs for running and cycling, available for Polar RC3 GPS, RCX3 and RCX5 training
computer users, help you improve your endurance by guiding with the amount and intensity of training that is
suitable for your individual fitness level. Create a program in polarpersonaltrainer.com and transfer it into your
RC3 GPS, RCX3 or RCX5.
Polar Running training programs are available on five levels and can help improve your fitness or train for a
specific event. Polar Cycling training programs are developed for you to improve your fitness or to train for
an event. Create a program in polarpersonaltrainer.com and transfer it into your RC3 GPS, RCX3 or RCX5.
Activate the STAR training program on your Polar FT60 or FT80 training computer, and transfer it into
polarpersonaltrainer.com. For more information on the STAR training program, see your training computer's
user manual.
Create Keeps U Fit - Own Workout program in polarpersonaltrainer.com and transfer it to your Polar F55 training computer.
See more information in Training Programs.
STRENGTH TRAINING EXERCISES
Create strength training workout in polarpersonaltrainer.com and save it to your diary. Transfer the workout to
your Polar FT80 training computer. See more information in Strength Training Exercises.
11
DATA TRANSFER SOFTWARE
Go to Applications / Downloads to download data transfer software. Depending on your product, select
either WebLink or WebSync software.
The Polar Beat mobile app transfers your training data automatically to polarpersonaltrainer.com when
you are logged in to your account in Polar Beat. Just stay logged in, and your training data is always transferred automatically.
POLAR WEBSYNC
Use Polar WebSync™ and USB cable or Polar DataLink or FlowLink data communication device with Polar
RC3 GPS training computer, Polar RCX3 training computer, Polar RCX5 training computer, Polar CS500 cycling computer, Polar FA20 activity computer, Polar FT7, FT40, FT60, FT80 and RS300X training computers.
Instructions on how to use Polar WebSync 2.x can be found from Polar WebSync 2.x Help.
POLAR WEBLINK
You can transfer data via SonicLink or IR communication. Polar WebLink is compatible with the following
Polar products: AXN500, AXN700, CS200, CS300, CS400, CS600, F6, F7, F11, F55, RS200, RS400,
RS800, RS800CX, S410, S510, S520, S610, S610i, S625X, S710, S710i, S720i, S725, S725X, S810 and
S810i.
TRANSFERRING DATA WITH POLAR WEBLINK
1. Double click the WebLink icon on your PC screen to open the software.
2. Enter your polarpersonaltrainer.com web service username and password in the Settings page.
3. Select the Polar product model that you use in Settings. Check your model from the back plate of your
training computer.
4. Select the communication port for your training computer.
5. Save settings by clicking OK from the Settings page.
6. Click Continue and set your unit to start the transmission. The files will be automatically transferred to
the web service.
7. After the transfer, the software informs you how many new training sessions were sent to your diary in
the web service. The same training sessions will not be saved in your diary twice.
8. After training data transfer, you can click Go to Web to log into www.polarpersonaltrainer.com.
9. Click Close on the right-top corner of the window to close the software. You will find comprehensive
instructions in the Help function of the Polar WebLink software once you have installed it to your PC.
12
TRANSFERRING RESULTS TO POLAR FLOW
WEB SERVICE
You can transfer training results and Fitness test results to the new Polar Flow web service.
Please note that some values, such as heart rate zone limits, may change in the transfer. This is because
polarpersonaltrainer.com and Polar Flow web service employ slightly different ways of calculating certain values.
The results are transferred from your Diary. Open the result you want to transfer, click the Transfer to Flow
button, and follow the instructions. To transfer several results at a time, go to the List view in your Diary.
Select up to 25 results and then click the Transfer to Flow button, and follow the instructions. When the transfer is completed, you get a summary of all the results you transferred.
13
HOME
On the Home page you can easily and quickly see your latest activities, check the dates of your events and
statuses of your challenges and training program.
The news concerning polarpersonaltrainer.com web service are shown at the Home page.
PRODUCT IN USE
You can see your product in the Product in Use section after you have registered it in polarpersonaltrainer.com. Click Add a new product, if you want to register. Register your product to ensure we can
keep improving our products and services to better meet your needs. See more information in Product Registration.
If you have registered more than one product, you can browse the products in the Product in Use section
with the arrows and select one product for use.
ADD TO YOUR DIARY
Create new entries to your Diary by clicking the links under Add to your Diary.
ACTIVITY FEED
Your latest activities are listed in the Activity Feed showing your training results, fitness data, received messages and challenge invitations after your last login. Activity Feed also shows you some tips for using polarpersonaltrainer.com more efficiently.
There is lots of different kind of information in your Activity Feed. To find the most important information easily, you can filter the Activity Feed to see only certain items. Click Feed items, select the items you want to
see in the Activity Feed and click Refresh. This setting is saved in your browser's cookies.
TRAINING PROGRAMS
Click Create a training program to create yourself a Polar training program.
If you have already created yourself a Polar training program, you can see the status of your current training
program on the Home page. View detailed information on your training program by clicking the View program
link.
For other than STAR training program (FT60, FT80), Endurance Programs (RC3 GPS, RCX3, RCX5),
and Running and Cycling programs (RC3 GPS, RCX3 or RCX5), transferring the training result to polarpersonaltrainer.com alone will not update the program status. To have the program status updated on your
14
polarpersonaltrainer.com Home page you need to merge your training result with the training program target.
See more information in Merging a Target and Result.
Endurance Program update link appears on the Home page when there are fewer than one week's training targets left in your Diary.
EVENTS
Check out the dates of your events, which you have created to your Diary. Click the link on the Events box to
view detailed information on the event.
Create a new event by clicking Set new event.
CHALLENGE STATUS
Check out the Challenge Status at the Home page. View detailed information on your challenges by clicking
the challenge link.
Only training data transferred with WebSync or WebLink software will affect challenge status.
Click Create a challenge and start creating a new challenge or click View challenges to see all the latest
news about the challenges you are taking part in.
PARTNERS
Partners' requests are shown on the Home page. Click the link to proceed with accepting the request.
See Partners for more information.
15
DIARY VIEW
Diary is a personal training log that displays e.g. your training sessions, daily activity (FA20), events and fitness data.
DIARY SYMBOLS
Training target
Training result
Merged training data
Strength training target
16
Strength training result
Merged strength training data
Multisport training results and targets have been marked with a small M character.
The training sessions related to a training program (excluding STAR training
program) have been marked with a small P icon.
Underlined icon means that the training session is new i.e. you have transferred the exercise via WebSync software but not yet opened in polarpersonaltrainer.com.
Event
Note
Fitness data
Activity bar shows your daily active time.
Cumulative training load indicator on the weekday or date header
Green: You are recovered and ready to train more.
Yellow: Cumulative training load is on a high level. You can still train but
should avoid high intensity training and/or races.
Red: Cumulative training load is on a very high level. Training is not recommended.
WEEK, MONTH AND LIST OVERVIEWS
You can select week, month or list view - whichever you find most useful for you.
On the week or month view you can browse the diary with the arrow buttons on the week/month header.
17
In the list view you can easily manage your diary, for instance, delete training sessions by ticking the box next
to the training session name and clicking Delete Selected. You can also add new data by clicking Add,
export data by clicking Export Selected or export the route information by clicking Export GPX. See more
information in Exporting Data.
18
SUMMARY
In the Summary section, you can easily compare results with targets. The number of sessions, duration, distance, and calories are all displayed.
Sport Zones Summary / Fitness Zones Summary shows the time spent in each zone during the selected
week / month
FAVORITE TRAINING SESSIONS
The list of your favorite training sessions (targets and results) is displayed on the left side of the diary view.
There you can easily drag and drop them to your Diary. See more information in Favorites.
STAR TRAINING PROGRAM STATUS
Status of your STAR training program is displayed on the left side of the diary view. The status of your STAR
training program is displayed only if you have transferred it from your FT60 or FT80 training computer to polarpersonaltrainer.com.
TRAINING LOAD
Your cumulative training load is indicated as green, red, or yellow colors in date or weekday header in your
diary.
19
Green:
l
You are recovered from previous training sessions and ready to train more.
l
If you're continuously in green you can increase your cumulative training load by adding more training
sessions to your weekly plan or making the training sessions more intensive.
l
Intensive training sessions and races should preferably be done when you are "in green"
Yellow:
l
Cumulative training load is on a high level.
l
You can still train but should avoid high intensity training and/or races.
Red:
l
Cumulative training load is on a very high level
l
If you continue training when "in red", it may lead to a state of overreaching.
Training intensity and duration as well as physical parameters (for instance, age, weight) affect cumulative
training load.
Improving your performance level requires also strenuous periods in your training program. If you are continuously in green, you should include also more intensive training sessions in your plan.
See more information on training load analyzing in Training Load.
Visit also www.polar.com/support for more information.
20
ADDING A TRAINING TARGET
Planning your training is easy. You can create a personal training program and all the training targets are automatically transferred into your Diary. See more information in Training Programs.
You can also add your own training targets and transfer them to your RC3 GPS, RCX3 or RCX5 training computer with WebSync.
Use basic Latin letters to create a target that can be transferred to the training computer.
Before adding a training target, please note the following:
l
If you want to use a specific sport for your target, make sure you have created the sport in WebSync
(RCX5 only) or in polarpersonaltrainer.com. See more information in WebSync help and in Sports.
If you are using Polar RCX5 training computer, we recommend that you add sports / sport profiles
in WebSync.
l
If you want to add the target to your Favorite Training Sessions list, save the target, open it from your
Diary and click Add to Favorites. See Favorites for more information on using favorite training sessions.
To add a training target:
1. Click Add to your Diary - Training Target on the Home page
or
Go to Training / Diary. Click Add New Training Target
or
Go to Training / Diary. Click a future date and select Training Target.
2. Name your training session, select the sport and set the date and time. If a sport is missing from the
sports list, click Add a new sport to create a new sport. You can write additional notes in the Note
field.
If you want to use one of your favorite training targets as a base when creating a new target, click
Favorite targets and select a target from the list. The list shows the training targets you have added to
your Favorite Training Sessions list.
3. On the Training Target tab fill in the target duration, calories, distance and average heart rate. If you
set a target duration and distance, your race pace target time is shown. Select Use Race Pace to add
21
a race pace target to your Diary, which you can transfer to your Polar RCX5 training computer. See
more information in Adding a Race Pace Target.
To get your target training load value, add average heart rate or distance.
You can create different kinds of targets on the Strength Training Target, Phased Target and Zone
Target tabs.
Repeat target: If you do the same training for example every Monday and Friday, you can set the training target to repeat automatically. Click Repeat target. Select the weekdays when you want to repeat
the training and the end date for repeating. Click Ok. The number of trainings to repeat is shown on the
Repeat training target view as well as on the Add new training target view.
4. Click Save to add the training target/targets to your diary.
Note that active steps cannot be set as a target with FA20.
For more detailed information on adding different kinds of targets see:
Adding a Strength Training Target
Adding a Phased Target
Adding a Race Pace Target
Adding a Zone Target
See also:
Training Programs
Sports
Favorites
22
ADDING A STRENGTH TRAINING TARGET
Strength training targets can be transferred to Polar FT80 training computer with WebSync software.
See WebSync help for more information on data transfer. See FT80 user manual for more information on
strength training with FT80.
Before adding a strength training target, please note the following:
l
If you want to use a specific sport for your target, make sure you have created the sport in WebSync
(RCX5 only) or in polarpersonaltrainer.com. See more information in WebSync help and in Sports.
If you are using Polar RCX5 training computer, we recommend that you add sports / sport profiles
in WebSync.
l
If you want to add the target to your Favorite Training Sessions list, save the target, open it from your
Diary and click Add to Favorites. See Favorites for more information on using favorite training sessions.
l
Make sure that you have created all the needed strength training exercises in polarpersonatrainer.com.
See more information in Strength Training Exercises.
To add a strength training target:
1. Go to Home page. Click Add to your Diary - Training Target.
OR
Go to Training / Diary. Click Add New Training Target.
OR
Go to Training / Diary. Click a future date. Select Training Target.
OR
Go to Training / Strength Training Exercises. Click Add Target.
2. Name your training session, select the sport and set the date and time. If a sport is missing from the
sports list, click Add a new sport to create a new sport. You can write your own notes in the Note
field.
If you want to use one of your favorite training targets as a base when creating a new target, click
Favorite targets and select a target from the list. The list shows the training targets you have added to
your Favorite Training Sessions list.
23
3. Go to Strength Training Target tab.
4. Fill in the target duration, calories, distance and average heart rate. The distance can be for example
the distance you run on the treadmill when warming up or cooling down.
To get your target training load value, add average heart rate or distance.
5. Select the exercises for your training.
Click a muscle group to view the exercises in that group. Click an exercise to add it into your training
target. The list of added exercises is shown on the bottom. Remove an exercise from the list by ticking
the box beside the exercise number and selecting Delete Selected.
Alternatively you can use the ready-made exercise list by clicking Create basic strength training
exercise list. The list includes basic strength training exercises covering all muscle groups.
6. Fill in sets and repetitions (required information) and if you wish also weights.
If you have added default sets, repetitions and weight for an exercise in Training / Strength
Training Exercises, they are shown in your workout as default.
Repeat target: If you do the same training for example every Monday and Friday, you can set the training target to repeat automatically. Click Repeat target. Select the weekdays when you want to repeat
the training and the end date for repeating. Click Ok. The number of trainings to repeat is shown on the
Repeat training target view as well as on the Add new training target view.
7. Click Save to add the training target/targets to your Diary.
See also:
Adding a Training Target
Adding a Phased Target
Adding a Race Pace Target
Adding a Zone Target
Sports
Favorites
Strength Training Exercises
24
ADDING A PHASED TARGET
You can add phased targets to your Diary and transfer them to your Polar RC3 GPS, RCX3 or RCX5 training
computer.
Use basic Latin letters to create a target that can be transferred to the training computer.
You can also create a target with only one phase.
Before adding a phased target, please note the following:
l
If you want to use a specific sport for your target, make sure you have created the sport in WebSync
(RCX5 only) or in polarpersonaltrainer.com. See more information in WebSync help and in Sports.
If you are using Polar RCX5 training computer, we recommend that you add sports / sport profiles
in WebSync.
To add a phased target:
1. Go to Home page. Click Add to your Diary - Training Target.
OR
Go to Training / Diary. Click Add New Training Target.
OR
Go to Training / Diary. Click a future date. Select Training Target.
2. Name your training session, select the sport and set the date and time. If a sport is missing from the
sports list, click Add a new sport to create a new sport. You can write additional notes in the Note
field.
If you want to use one of your favorite training targets as a base when creating a new target, click
Favorite targets and select a target from the list. The list shows the training targets you have added to
your Favorite Training Sessions list.
3. Go to Phased Target tab.
4. Add phase name or select a name from the list that opens when you click the name field: Warm-up,
Work, Recovery or Cool-Down.
Select phase type: Time, Distance or Manual.
Add phase duration: if the phase type is Time, the duration is given in hours, minutes and seconds. If
25
the phase type is Distance, the duration is given in kilometers/miles. If phase type is Manual, duration
cannot be added in polarpersonatrainer.com but phase has to be changed manually in the Polar RC3
GPS, RCX3 or RCX5 training computer during training.
Select limits: No limits, Sport Zones, Heart Rate, Speed or Pace.
Add the Lower limit and Upper limit.
Click Add Phase to add more phases in your training target. You can add a maximum of four
phases.
Repeat phases: If you are using Polar RC3 GPS, RCX3 or RCX5 training computer, you can select
some phases to be repeated up to twelve times. Example: If you want to repeat phases 2 and 3 five
times, select as follows:
You can remove a phase by ticking the box beside the phase name and selecting Delete Selected.
A summary of the total distance and duration of the phases is calculated automatically.
To get your target training load value, add average heart rate or distance.
5. Set target calories.
Repeat target: If you do the same training for example every Monday and Friday, you can set a training
target to repeat automatically. Click Repeat target. Select the weekdays when you want to repeat the
training and the end date for repeating. Click Ok. The number of trainings to repeat is shown on the
Repeat training target view as well as on the Add new training target view.
6. Click Save to add the phased target/targets to your diary.
7. Click Add to Favorites to add the training target to your Favorite Training Sessions list where you
can easily drag and drop it on future days.
8. Use WebSync to synchronize your Polar RC3 GPS, RCX3 or RCX5 training computer with polarpersonaltrainer.com and the phased target is transferred to your RC3 GPS, RCX3 or RCX5.
Synchronization status message, Synchronize target to training computer with WebSync
or Synchronization OK
, on the upper right corner of the training target view shows whether or
not you have transferred the target to your RC3 GPS, RCX3 or RCX5. If you modify the target after
transferring it, the status message changes back to Synchronize target to training computer with
WebSync
. See WebSync help for more information on data transfer.
See also:
Adding a Training Target
26
Adding a Strength TrainingTarget
Adding a Race Pace Target
Adding a Zone Target
Sports
Favorites
27
ADDING A ZONE TARGET
Before adding a zone target, please note the following:
l
If you want to use a specific sport for your target, make sure you have created the sport in WebSync
(RCX5 only) or in polarpersonaltrainer.com. See more information in WebSync help and in Sports.
If you are using Polar RCX5 training computer, we recommend that you add sports / sport profiles
in WebSync.
To add a zone target:
1. Go to Home page. Click Add to your Diary - Training Target.
or
Go to Training / Diary. Click Add New Training Target.
or
Go to Training / Diary. Click a future date in the diary and select Training Target.
2. Name your training session, select the sport and set the date and time. If a sport is missing from the
sports list, click Add a new sport to create a new sport. You can write additional notes in the Note
field.
If you want to use one of your favorite training targets as a base when creating a new target, click
Favorite targets and select a target from the list. The list shows the training targets you have added to
your Favorite Training Sessions list.
3. Go to Zone Target tab.
4. Set target time for each zone. The Duration is calculated automatically according to the target time for
each zone. You can change the duration if needed.
You can have either three zones (Zone 3, Zone 2 and Zone 1) or two zones (Fit and Fat) visible. The
zones depend on the product you have in use in polarpersonaltrainer.com. See more information in
Product Registration.
The default limits for the zones are:
Zone 3: 80-90% of maximum heart rate
Zone 2: 70-80% of maximum heart rate
Zone 1: 60-70% of maximum heart rate
Fat: 0-50% of maximum heart rate
Fit: 50-100% of maximum heart rate
The Lower limit and Upper limit for each zone are calculated automatically according to your
28
maximum heart rate. The limits are always shown in beats per minute regardless of the heart rate unit
setting in polarpersonaltrainer.com or on your training computer. You can change the limits if necessary.
5. Fill in the target calories, distance and average heart rate.
The distance is calculated automatically based on sport if the duration is given. You can change the distance if needed.
To get your target training load value, add average heart rate or distance.
Repeat target: If you do the same training for example every Monday and Friday, you can set a training
target to repeat automatically. Click Repeat target. Select the weekdays when you want to repeat the
training and the end date for repeating. Click Ok. The number of trainings to repeat is shown on the
Repeat training target view as well as on the Add new training target view.
6. Click Save to add the training target/targets to your diary.
7. Click Add to Favorites to add the training target to your Favorite Training Sessions list where you
can easily drag and drop it on future days.
See also:
Adding a Training Target
Adding a Strength TrainingTarget
Adding a Phased Target
Adding a Race PaceTarget
Sports
Favorites
Exercise Zones
29
ADDING A RACE PACE TARGET
Race pace allows you to set a target speed/pace for a certain distance.
If you are using a Polar RCX5 training computer, you can add race pace targets to your Diary and transfer
them to your training computer with WebSync. Race pace helps pacing the run or ride by showing the current
speed/pace and by telling in time, how much you are behind or ahead of the set target.
Use basic Latin letters to create a target that can be transferred to the training computer.
Before adding a race pace target, please note the following:
l
If you want to use a specific sport for your target, make sure you have created the sport in WebSync
(RCX5 only) or in polarpersonaltrainer.com. See more information in WebSync help and in Sports.
If you are using Polar RCX5 training computer, we recommend that you add sports / sport profiles
in WebSync.
To add a race pace target:
1. Go go Home page. Click Add to your Diary - Training Target.
or
Go to Training / Diary. Click Add New Training Target
or
Go to Training / Diary. Click a future date and select Training Target.
2. Name your training session, select the sport and set the date and time. If a sport is missing from the
sports list, click Add a new sport to create a new sport. You can write additional notes in the Note
field.
If you want to use one of your favorite training targets as a base when creating a new target, click
Favorite targets and select a target from the list. The list shows the training targets you have added to
your Favorite Training Sessions list.
3. On the Training Target tab fill in the target duration, calories, distance and average heart rate. Your
race pace target is shown.
To get your target training load value, add average heart rate or distance.
4. Select Use Race Pace.
30
Repeat target: If you do the same training for example every Monday and Friday, you can set a training
target to repeat automatically. Click Repeat target. Select the weekdays when you want to repeat the
training and the end date for repeating. Click Ok. The number of trainings to repeat is shown on the
Repeat training target view as well as on the Add new training target view.
5. Click Save to add the race pace target/targets to your Diary.
6. Click Add to Favorites to add the training target to your Favorite Training Sessions list where you
can easily drag and drop it on future days.
7. Use WebSync to synchronize your Polar RCX5 training computer with polarpersonaltrainer.com and
the race pace target is transferred to your RCX5.
Synchronization status message, Synchronize target to training computer with WebSync
or Synchronization OK
, on the upper right corner of the training target view shows whether or
not you have transferred the target to your RCX5. If you modify the target after transferring it, the
status message changes back to Synchronize target to training computer with WebSync
WebSync help for more information on data transfer.
See also:
Adding a Training Target
Adding a Strength TrainingTarget
Adding a Phased Target
Adding a Zone Target
Sports
Favorites
31
. See
ADDING A FAVORITE TRAINING SESSION TO
YOUR DIARY
If you have saved some of your training results or training targets as favorites, you can drag and drop them in
your Diary easily.
1. Go to Training / Diary.
2. Drag and drop a training result or training target from the Favorite Training Sessions list to a desired
date on your Diary.
Use Favorites to help you in planning your training. Create one or more training targets, add them to your
Favorite Training Sessions list and drag and drop them on future days in your Diary.
32
ADDING AN EVENT
You can set an important event date for yourself.
1. Click Add to your Diary - Event on the Home page
or
Go to Training / Diary. Click Add New Event
or
Go to Training / Diary. Click a future date and select Event.
2. Set the date, time and name of the event.
3. Click Save to add the event to your Diary.
Your event is transferred to your, Polar RC3 GPS, Polar RCX3, Polar RCX5 or Polar RS300X training
computer the next time you synchronize your training computer with WebSync. The event is shown on your
training computer watch face.
Use basic Latin letters to create an event that can be transferred to the training computer.
33
ADDING A NOTE
1. Click Add to your Diary - Note on the Home page
or
Go to Training / Diary. Click Add New Note
or
Go to Training / Diary. Click a past or future date and select Note.
2. Make a note for yourself.
3. Click Save to add the note in your Diary.
34
ADDING A TRAINING RESULT TO YOUR DIARY
ADD TRAINING RESULTS WITH DATA TRANSFER
SOFTWARE
Use Polar WebSync or WebLink software for transferring training results and daily activity results to your
diary. This way data transfer is easier and quicker, and you get more detailed information on your training session. You can for example see your heart rate curve.
The Polar Beat mobile app transfers your training data automatically to polarpersonaltrainer.com when you are
logged in to your account in Polar Beat.
See more information in Data Transfer. ADD A TRAINING RESULT MANUALLY
Daily activity results from FA20 activity computer can only be transferred with the Polar WebSync software. They cannot be added manually.
Before adding a training result manually, please note the following:
l
Add New Training Result view contains only the basic training information. You can add some extra
training information after saving your manually added training result. The available extra information
depends on the product you have in use in polarpersonaltrainer.com.
l
If you want to define a sport for your training result, make sure you have created the sport in WebSync
or in polarpersonaltrainer.com. See more information in WebSync help and in Sports.
If you are using Polar RCX5 training computer, we recommend that you add sports / sport profiles
in WebSync software.
l
You can select training equipment for the training result, if you are using Polar RC3 GPS training computer, Polar RCX3 training computer, Polar RCX5 training computer or Polar CS500 cycling computer
and you have synchronized your product with polarpersonaltrainer.com. See more information in Training Equipment.
To add a training result manually:
1. Click Add New Training Result on the Home page.
Or
Go to Training / Diary. Click Add New Training Result on the left side of the Diary view.
35
Or
Go to Training / Diary. Click a past date and select Training Result.
2. Give your training session a Name. Add Date and Time and Training notes if necessary.
The name can contain a maximum of 64 characters.
The date must be past or today.
3. Select Training Result, Multisport Result or Strength Training Result.
l
Training Result
Select Sport and Equipment. If a sport is missing from the sports list, click Add a new sport
to create a new sport. Fill in the training data.
Speed unit in the training data is the same as the speed unit for the selected sport.
l
Multisport Result
Select Sport and Equipment. If a sport is missing from the sports list, click Add a new sport
to create a new sport. Fill in the training data. Click OK. The first sport has now been added.
Add other sports in the same way. The sports are listed on the bottom of the result view and the
training information is summarized. You can edit a sport by clicking the pen icon. Click OK to
save the changes. Remove a sport from the list by clicking the delete icon.
Speed unit in the training data is the same as the speed unit for the selected sport.
l
Strength Training Result
Select Sport. If a sport is missing from the sports list, click Add a new sport to create a new
sport. Fill in the training data. Make a list of the exercises you performed in your strength training
session. Click a muscle group to view the exercises in that group. Click an exercise to add it
into your training result. The list of added exercises is shown on the bottom. Fill in the Sets,
Repetitions and Weight. Remove an exercise from the list by clicking the delete icon on the
exercise row.
If an exercise is missing from the predefined exercise list, you can add your own exercises by
clicking the link add your own exercise. See more information in Strength Training Exercises.
Calories and Training load are calculated automatically when Duration and HR Avg are
given. Pace/Speed Avg is calculated automatically when Duration and Distance are given.
Distance is calculated automatically when Duration and Pace/Speed Avg are given.
5. Click Save.
36
MERGING A TARGET AND A RESULT
1. Transfer your training result to polarpersonaltrainer.com with the Polar WebSync or WebLink software.
2. Go to Training / Diary.
3. Drag and drop the transferred training session onto the target training session.
4. Do you want to merge these training sessions? dialog box opens.
5. To merge, click Yes. To cancel, click No.
Note that merging cannot be undone once performed.
Alternatively, you can manually insert the data into the planned training session (Training Target, Strength
Training Target, Phased Target or Zone Target) by clicking it open. This way comparing the target with the
actual result is easy.
You can merge one training result with one training target. Note that strength training target merges only with
strength training result.
Strength training results can only be transferred from Polar FT80 training computer.
For other than STAR training program (FT60, FT80), Endurance Programs (RC3 GPS, RCX3, RCX5), and
Running and Cycling programs (RC3 GPS, RCX3 or RCX5), transferring the training result to polarpersonaltrainer.com alone will not update the program status. To have the program status updated on your
polarpersonaltrainer.com Home page you need to merge your training result with the training program target.
If you are using an endurance program in your Polar RC3 GPS, RCX3 or RCX5 training computer, the results are merged with the targets automatically when the training results are transferred to polarpersonaltrainer.com.
37
VIEWING A TRAINING RESULT / DAILY ACTIVITY
RESULT
Go to Training / Diary and click a training result to view and analyze your training after you have transferred it
to polarpersonaltrainer.com with the Polar WebSync or WebLink software.
Depending on your Polar product, there may be different kinds of result entries on your diary:
Training results
Multisport results (for RCX5 users)
Strength training results (for FT80 users)
Daily Activity results (for FA20 users)
Note that the data shown on the training result depends on your Polar product.
38
GENERAL FUNCTIONS IN TRAINING RESULT VIEW
After you have opened a training result from your Diary, you can browse your training results and targets by
clicking the arrows above the training session header.
In training result view you can
l
delete a training session by clicking Delete.
39
l
add the training result to your favorite training sessions list by clicking Add to Favorites. From Favorites you can drag and drop them easily to your diary as training results. See Favorites for more information.
l
copy your training session. Click Copy. Click a date on your diary and select Paste Training
Session.
l
export the route data of your training session in GPX format. Click Export GPX and open or save the
.gpx file. Route data is available for Polar Beat mobile app users, Polar RC3 GPS training computer
users and Polar RCX3, RCX5, RS800CX training computer and Polar CS600X cycling computer users
training with Polar G5 or G3 GPS sensor.
Note that tabs, menus and data shown depend on your Polar product and sport type.
(Back to top)
40
TRAINING RESULT
When you open a training result, an Overview tab shows you an upper level summary of your training session.
On the header you can see the basic information on your training result. The overview tab can also show you a
curve of selected training information, for example heart rate and pace, a map of your training route as well as
a short summary of the sport zone or training zone and lap information.
Map of the training route is shown for Polar Beat mobile app users, Polar RC3 GPS training computer
users and Polar RCX3 training computer, Polar RCX5 training computer, Polar RS800CX training computer
and Polar CS600X cycling computer users training with Polar G5 GPS sensor or Polar G3 GPS sensor.
41
CURVE
Curves are shown if you have transferred your training results from Polar Beat mobile app, RC3 GPS,
RCX3, RCX5, CS500, CS400, CS600, CS600X, RS400, RS800, RS800CX or FT80 to polarpersonaltrainer.com with WebSync software. Curves are not shown for training results transferred from FT60,
FT40 or FT7 or for manually added training results.
Training information curves are shown on the Overview, Curve and Lap Notes tab.
Heart rate curve is shown as a default - speed/pace curve is shown as a default as well if speed/pace data
has been recorded. In addition to heart rate and speed/pace, the curve may also display cadence (running/cycling), power, altitude, air pressure and temperature. Click Settings to define which curves are shown.
The curves are available, if the recorded training session contains this information. The Y-axis on the left
shows heart rate values. The Y-axis on the right shows the last selected value which can be speed/pace/altitude/cadence/power/air pressure/temperature. The X-axis shows time.
If you are using the Polar Beat mobile app, you can see the heart rate data and curve only if you have
used a Polar Bluetooth® smart heart rate sensor in your training.
Placing your mouse over a curve shows you the X-axis and Y-axis values at certain phase of your training session. Also if GPS data is available, your location on the map is shown as an orange marking. See chapter Map
for more information.
The colors on the background of the curves indicate Sport Zones/Zones. Go to Articles section in polarpersonaltrainer.com to learn more about training zones.
The black vertical lines indicate the end points of laps. See chapter Laps and Automatic Laps for more information.
Click Full Screen to view the curve in full screen and Exit Full Screen to return to the default view.
You can zoom a certain area of the curve either in full screen view or in default view by selecting an area with
your mouse (click, hold down, drag, release). You can browse the zoomed curve with the arrows on the upper
right corner of the curve view. Click Reset Zoom to return to the default zoom level.
MAP
Map of the training route is shown for Polar Beat mobile app users, Polar RC3 GPS training computer
users and Polar RCX3 training computer, Polar RCX5 training computer, Polar RS800CX training computer
and Polar CS600X cycling computer users training with Polar G5 GPS sensor or Polar G3 GPS sensor.
Map is shown on the Overview and Map tabs.
The beginning and the end of the route are marked with flags. Laps are marked with yellow numbered markers
showing the end point of each lap. Clicking a lap marker on the map shows distance and duration so far, average and maximum speed and pace of the lap.
42
Placing your mouse over a curve (see chapter Curve) shows your position on the map as an orange marker.
Clicking a lap on the Laps or Automatic Laps list on the right side of the Overview tab highlights the lap on
the map.
With navigation controls (arrows, zoom, zoom slider), you can zoom and move the map. You can move in the
map by dragging with your mouse. Click Reset Map to return to the default view. Click Full Screen view the
map in full screen and Exit Full Screen to return to the default view.
SPORT ZONES / OPTIMIZED SPORT ZONES / ZONES
Sport Zones, Optimized Sport Zones or Zones menu is shown on the right side of the Overview tab.
The menu shows time spent on each Sport Zone/heart rate zone as a bar diagram. The lower limit of each
zone is displayed on the left side of the bar diagram. The heart rate value on the top is your maximum heart
rate.
If you have used optimized Sport Zones in your training with RC3 GPS, RCX3 or RCX5, Sport Zones menu
shows your default age-based sport zone and your optimized sport zone.
SPORT ZONES / OPTIMIZED SPORT ZONES / ZONES DETAILED
If GPS or lap data is not available, a more detailed Sport Zones / Optimized Sport Zones / Zones information is shown on the Overview tab.
Time spent in each zone as well as lower and upper limits of the zones are shown.
Click the pen icon (Edit) to change the limits of a zone. Confirm the change by clicking OK. Remember to
save the changes by clicking Save on the lower right corner of the training result view.
If you change the limits of one zone, remember to change the limits of the other zones accordingly to preserve consistency.
LAPS AND AUTOMATIC LAPS
Lap menu is shown if you are using CS500, CS400, CS600, CS600X, RS300X, RS400, RS800 or
RS800CX, and you have taken laps or automatic laps during your training, and you have transferred your training result from your training computer to polarpersonaltrainer.com with WebSync software. If you have Polar
RCX5 training computer in use, and you have registered it in Products, the lap menu is always shown in the
training result view.
Laps or Automatic Laps menu is shown on the right side of the Overview tab.
43
The menu shows the duration, distance and maximum heart rate of each lap. The end points of the laps are
shown on the map as yellow markers and on the curve as black vertical lines, when Laps or Automatic Laps
menu is open.
Click a lap on the menu and the lap is highlighted on the curve view showing the duration, average heart rate
and average speed/pace of the lap. Lap route is highlighted on the map.
LAPS AND AUTOMATIC LAPS DETAILED
Lap menu is shown if you are using CS500, CS400, CS600, CS600X, RS300X, RS400, RS800 or
RS800CX, and you have taken laps or automatic laps during your training, and you have transferred your training result from your training computer to polarpersonaltrainer.com with WebSync software. If you have Polar
RC3 GPS training computer, Polar RCX3 training computer or Polar RCX5 training computer in use, and you
have registered it in Products, the lap menu is always shown in the training result view. A detailed list of laps is shown on the Overview, Curve and/or Map tabs.
Here you can edit, delete and add laps.
Click a lap on the menu and the lap is highlighted on the curve view showing the duration, average heart rate
and average speed/pace of the lap. Lap route is highlighted on the map.
Editing a lap
1. Click Edit on the lap row.
2. Edit the duration or distance of the lap.
3. Click OK on the lap row. The values of the following laps are calculated and changed automatically on
the lap list if your Polar product records sample data (RC3 GPS, RCX3, CS500, RCX5, CS400,
CS600, CS600X, RS400, RS800 and RS800CX).
4. Remember to click Save on the bottom right corner of the tab to save the training result on your Diary.
Adding a lap
1. Click Add Lap on the lap list.
2. Add Elapsed time or Distance or adjust them with the slider.
3. Click OK. If you are using a Polar product which records sample data (RC3 GPS, RCX3, CS500,
RCX5, CS400, CS600, CS600X, RS400, RS800 and RS800CX), the values shown in Laps/Automatic
Laps tab are calculated automatically after adding a new lap.
4. Remember to click Save on the bottom right corner of the tab to save the training result on your Diary.
Deleting a lap
44
1. Select a lap by ticking the box beside the lap number.
2. Click Delete selected.
3. Remember to Save the training session.
DATA
Data tab shows detailed information on your training session. You can edit the information if needed. Remember to Save changes.
Defining sport type (Sport) and naming the training session (Training name) enables you to view a summary
of your training sessions by certain sport/training in Progress. See more information in Progress.
Selecting equipment enables you to view the usage of your training equipment in Training / Training Equipment. See more information in Training Equipment.
You can add Training notes of for example the weather or your feelings on the training day.
How did your training session feel? Select a suitable alternative with the slider. The alternatives are SUPER!,
GREAT, OKAY, TOUGH and INJURED. The feeling you have set for your training session in the Polar Beat
mobile app is transferred to polarpersonaltrainer.com. Note that the changes made in polarpersonaltrainer.com are not transferred back to Polar Beat.
BENEFIT
The Training Benefit feature is available with the following Polar training computers: RC3 GPS, RCX3,
RCX5, RS800CX, RS400, CS400 and CS600X.
Polarpersonaltrainer.com gives you both textual and visual feedback of the benefits of each training session
done with a Polar product with the Polar sport zones feature. These are shown on the Benefit tab in the training result view. See more information in Training Benefit.
ALTITUDE
Altitude is available for the following training computers: CS600(X), RS800(CX), CS500+, RCX5 with
GPS, RCX3 with GPS, RC3 GPS. RC3 GPS, CS600X, RS800CX and CS500+ record altitude data and this
data is visible on the Altitude tab. For other above mentioned training computers, you need to turn the setting
Add altitude data in my training results when I use GPS on to get data in the Altitude tab. See more
information in Profile - Training Settings.
The altitude curve for the training session is shown on the Altitude tab. In addition to the altitude curve, the
heart rate curve is also shown if heart rate data has been recorded. The curve may also display speed/pace,
cadence (running/cycling), power, air pressure and temperature. In Settings you can select a maximum of
three curves to be shown. The curves are available, if the recorded training session contains this information.
The Y-axis on the left shows heart rate values. The Y-axis on the right shows the other selected value(s). The
X-axis shows time.
45
Hovering your mouse over a curve shows the X-axis and Y-axis values at certain phase of your training session.
The colors on the background of the curves indicate Sport Zones. Go to Articles section in polarpersonaltrainer.com to learn more about training zones.
The black vertical lines indicate the end points of laps. See chapter Laps and Automatic Laps for more information.
Click Full Screen to view the curve in full screen and Exit Full Screen to return to the default view. In the full
screen view, click Curve settings to select which curves are shown.
You can zoom a certain area of the curve by selecting an area with your mouse (click, hold down, drag,
release). You can browse the zoomed curve with the arrows on the upper right corner of the curve view. Click
Reset Zoom to return to the default zoom level.
If you are using Polar RC3 GPS training computer and have taken laps or automatic laps during training, the
ascent and descent values for each lap are shown in the bar graph and in the table. The table also shows the
total ascent and descent values for the laps.
A maximum of ten laps can be illustrated in the bar graph. If the training session includes more than ten laps,
the laps are grouped automatically in the bar graph. Then the bars illustrate the ascent and descent values for
each lap group. Hover your mouse over a column on the bar chart to see the ascent and descent values for the
specific lap or lap group.
When you click a lap on the table or on the bar graph, it is highlighted on the table and in the curve view and
zoomed in the bar graph. Click Reset zoom above the bar graph to return to the default graph view.
LAP NOTES
If you have taken laps or automatic laps during training or you have added laps in polarpersonaltrainer.com,
the laps are listed on the Lap notes tab on the training result view. There you can add a note for each lap as
well as a recap of lap notes. Also training information curves are shown on the Lap notes tab. See more
information in chapter Curve.
If the training session includes more than ten laps, the laps are grouped on the lap list. To see a lap group's
laps, click the group's title (for example Laps 1-10). If you click a lap on the list, the lap is highlighted on the
curve.
Click the pen icon (Edit) on the lap row to add a comment for a lap and confirm by clicking the green checkmark icon (OK). Click the cancel icon to cancel editing.
You can delete a lap by clicking the delete icon on the lap row. Remember to save your changes.
46
RACE PACE (RCX5)
If you have used the Race Pace feature when training with Polar RCX5 training computer, race pace is displayed in the training result in polarpersonaltrainer.com.
Race Pace tab shows you the curve of selected training data, detailed race pace data and a map of your route
if GPS data is available.
The blue horizontal line in the curve indicates the steady pace needed to finish the set distance in time. Placing your mouse over the curve shows your heart rate and pace/speed at that point of the training session.
You can also see your location on the map. See Curve for more information on functions of the curve view.
47
Race Pace Details section shows the needed pace/speed for achieving the target. It shows how much you
are ahead or behind your target, current and target distance, target duration, as well as race pace.
PHASES (RC3 GPS, RCX3, RCX5)
If you have created a phased training target in polarpersonaltrainer.com, transferred it to your Polar RC3 GPS,
RCX3 or RCX5 training computer and performed it with your RC3 GPS, RCX3 or RCX5, Phases tab is
shown in your training result. See more information in Creating Phased Target.
48
A short summary of phases is shown on the right side of the Overview tab. The menu shows the distance as
well as average and maximum heart rate of each phase. If you click a phase on the list, the phase is highlighted on the curve and on the map.
You can see more detailed information about phases on the Curve tab.
The phases are shown on the curve as colored areas.
The detailed phase list shows
l
the duration of each phase (either time or kilometers/miles)
l
phase limits (either heart rate or pace)
l
time in, above and below the limits
l
phase duration
l
cumulative distance of the training session
l
average and maximum heart rate of the phase
l
average and maximum speed/pace of the phase.
(Back to top)
49
MULTISPORT RESULT (RCX5)
A multisport training session consists of more than one type of sport. Multisport trainings can be performed
only with Polar RCX5 training computer.
When you open a multisport result, an Overview tab shows you an upper level summary of your training session. On the header you can see the basic information on your training result. The overview tab can also show
you a curve of selected training information, for example heart rate and pace, a map of your training route as
well as a short summary of the sport zone and lap information.
50
CURVE
Training information curves are shown on the Overview, Curve and Lap Notes tab.
Heart rate curve is shown as a default - speed/pace curve is shown as a default as well if speed/pace data
has been recorded. In addition to heart rate and speed/pace, the curve may also display cadence (running/cycling), power, altitude, air pressure and temperature. Click Curve Settings to define which curves are
shown. The curves are available, if the recorded training session contains this information. The Y-axis on the
left shows heart rate values. The Y-axis on the right shows the last selected value which can be
speed/pace/altitude/cadence/power/air pressure/temperature. The X-axis shows time.
Placing your mouse over a curve shows you the X-axis and Y-axis values at certain point of your training session. Also if GPS data is available, your location on the map is shown as an orange marking. See chapter Map
for more information.
The colors on the background of the curves indicate Sport Zones. Go to Articles section in polarpersonaltrainer.com to learn more about training zones.
Different sports are described with sport icons. The black vertical lines indicate the sport change points.
Click Full Screen to zoom the curve and Exit Full Screen to return to the default view.
You can zoom a certain area of the curve either in full screen view or in default view by selecting an area with
your mouse (click, hold down, drag, release). You can browse the zoomed curve with the arrows on the upper
right corner of the curve view. Click Reset Zoom to return to the default zoom level.
MAP
If you are using Polar RCX5 training computer and Polar G5 GPS sensor in your training, your training route is
shown on the map.
Map is shown on the Overview and Map tabs.
The beginning and the end of the route are marked with flags.
Placing your mouse over a curve (see chapter Curve) shows your position on the map as an orange marker.
Clicking a lap on the Laps or Automatic Laps list on the right side of the Overview tab highlights the lap on
the map.
With navigation controls (arrows, zoom, zoom slider), you can zoom and move the map. You can move in the
map by dragging with your mouse. Click Reset Map to return to the default view. Click Full Screen to zoom
the map and Exit Full Screen to return to the default view.
SPORT ZONES / OPTIMIZED SPORT ZONES
Sport Zones / Optimized Sport Zones menu is shown on the right side of the Overview tab.
51
The menu shows time spent on each Sport Zone / Optimized Sport Zone as a bar diagram. The lower limit of
each zone is displayed on the left side of the bar diagram. The heart rate value on the top is your maximum
heart rate.
If you have used optimized Sport Zones in your training with RCX5, Sport Zones menu shows your default
age-based sport zone and your optimized sport zone.
SPORTS
Sports menu is shown on the right side of the Overview tab.
The menu shows time spent on each sport. Click a sport row and it is highlighted on the curve as well as on
the map on the Overview tab.
Click Open on the Sports row to view the training result of that sport.
See Training_Result for more information on the training information shown.
You can browse the single sports of the multi sport training result with the arrows on the header.
Click Back to Multisport Session to return to the Multisport training result.
SPORTS DETAILED
Detailed Sports information is shown on Overview, Curve and/or Map tabs of a multisport training result.
The duration, distance, average heart rate, average speed and calories of each sport are shown.
Click Open to view the training result of one sport. See Training_Result for more information on the training
information shown.
You can add a new sport manually by clicking New Sport. Select the sport, add duration, distance, average
heart rate and calories. Click OK. The given data is added to the total values of the multisport training session.
Remember to save the training session by clicking Save on the lower right corner of the training result.
You can delete a sport by opening a sport and clicking Remove Sport.
DATA
Data tab shows you general Training Session info as well as detailed information on your training session
by sports. Four sports are displayed at a time. If you have more than four sports on your training result, scroll
the sports with the arrow buttons. To edit the training information, open the sport you want to edit by clicking
the sport name (underlined).
Defining sport type (Sport) and naming the training session (Training name) enables you to view the summary of your training sessions by certain sport/training in Progress. See more information in Progress.
52
Selecting equipment enables you to view the usage of your training equipment in Training / Training Equipment. See more information in Training Equipment.
You can add training notes of for example the weather or your feelings on the training day.
How did your training session feel? Select a suitable alternative with the slider. The alternatives are SUPER!,
GREAT, OKAY, TOUGH and INJURED.
ALTITUDE
If you have used GPS in a multisport training session with your RCX5 and you have turned the altitude setting
on in Profile - Training settings, the altitude curve for the multisport training session is shown on the Altitude tab.
Sport-specific ascent and descent are not available in RCX5 multisport training results.
In addition to the altitude curve, the heart rate curve is also shown if heart rate data has been recorded. The
curve may also display speed/pace, cadence (running/cycling), power, air pressure and temperature. In Settings you can select a maximum of three curves to be shown. The curves are available, if the recorded training session contains this information. The Y-axis on the left shows heart rate values. The Y-axis on the right
shows the other selected value(s). The X-axis shows time.
Hovering your mouse over a curve shows the X-axis and Y-axis values at certain phase of your training session.
The colors on the background of the curves indicate Sport Zones. Go to Articles section in polarpersonaltrainer.com to learn more about training zones.
The black vertical lines indicate the end points of laps. See chapter Laps and Automatic Laps for more information.
Click Full Screen to view the curve in full screen and Exit Full Screen to return to the default view. In the full
screen view, click Curve settings to select which curves are shown.
You can zoom a certain area of the curve by selecting an area with your mouse (click, hold down, drag,
release). You can browse the zoomed curve with the arrows on the upper right corner of the curve view. Click
Reset Zoom to return to the default zoom level.
(Back to top)
STRENGHT TRAINING RESULT
If you are training with Polar FT80 training computer, you can create a strength training workout target in
polarpersonaltrainer.com, transfer it to your Polar FT80 training computer with WebSync software and have
the workout guiding you when working out in the gym. See more information in Strength Training Exercises.
53
When you open a strength training result, an overview tab opens. On the header you can see the basic information on your training result. The overview tab also shows you a heart rate curve, strength training exercise
moves and training zones.
When you open your first strength training result with exercise weight information, polarpersonaltrainer.com asks Your training result includes exercise weight information. Do you want your
one repetition maximum to be automatically updated now and in the future? (You can later change
the option in Profile > Training settings. Select Yes or No. You can change the option later in Profile.
CURVE
Heart rate curve is shown as a default.
Placing your mouse over a curve shows you the X-axis and Y-axis values at a certain phase of your training
session.
The colors on the background indicate training zones. Go to Articles section in polarpersonaltrainer.com to
learn more about training zones.
The numbered green areas indicate the exercises (moves).
Click Full Screen to zoom the curve and Exit Full Screen to return to the default view.
You can zoom a certain area of the curve either in full screen view or in default view by selecting an area with
your mouse (click, hold down, drag, release). You can browse the zoomed curve with the arrows on the upper
right corner of the curve view. Click Reset Zoom to return to the default zoom level.
WORKOUT
Workout list with set, repetition and weight information is shown on the Overview tab of the strength training
result. If you have selected your one repetition maximum to be automatically updated, weight (% of 1RM) and
1RM (kg) values are shown as well.
You can edit the sets, repetitions and weight if needed.
It is possible to add moves to the list:
1. Click New Exercise.
2. Choose the exercises from the Select Exercises list.
3. Click Select and the exercises appear in the Workout list.
54
ZONES
You can check the training zone information on the Zones tab of the Overview. Time spent in each training
zone as well as lower and upper limits of the zones are shown.
Click Edit to change the limits of a zone. Accept the change by clicking Ok. Remember to save the training
result by clicking Save on the lower right corner of the training result view.
If you change the limits of one zone, remember to change the limits of the other zones accordingly to preserve consistency.
DATA
Data tab shows the detailed information on your training session. You can edit the information if needed.
Defining sport type (Sport) and naming the training session (Training name) enables you to view the summary of your training sessions by certain sport/training in Progress. See more information in Progress.
You can add training notes of for example your feelings on the training day.
How did your training session feel? Select a suitable alternative with the slider. The alternatives are SUPER!,
GREAT, OKAY, TOUGH and INJURED.
Remember to Save any changes you make.
(Back to top)
DAILY ACTIVITY RESULT
If you are training with Polar FA20 activity computer, your activity data can be transferred to polarpersonaltrainer.com.
When you open a daily activity result you can see your activity data as well as general training session info.
You can edit the information if needed. Remember to Save changes.
Defining sport type (Sport) and naming the training session (Training name) enables you to view the summary of your training sessions by certain sport/training in Progress. See more information in Progress.
You can add training notes of for example the weather or your feelings on the training day.
How did your training session feel? Select a suitable alternative with the slider. The alternatives are SUPER!,
GREAT, OKAY, TOUGH and INJURED.
(Back to top)
55
EDITING A TRAINING RESULT
1. Go to Training / Diary.
2. Open a training session by clicking it.
3. Edit the training data.
4. Click Save.
56
SHARING YOUR TRAINING RESULT IN SOCIAL
MEDIA
Share your training result as your status update in a social network and get feedback from your friends or
people following you.
1. Transfer your training result from your training computer or add the result manually to polarpersonaltrainer.com. 2. Open the training result in polarpersonaltrainer.com diary.
3. Click a social media button on the training result view.
4. Log in to the social media unless you already are logged in.
5. Add comments to your status message or edit your message in the social media and publish your
status update.
When editing the status message, be careful not to delete the link to your training session.
You can check how your training results are shown in the social media by clicking Publish and view shared
training / View shared training.
You can remove the shared training result by clicking Remove shared training. Note that this does not
remove the training result from the social media. The link to your shared training result in the social media
does not work after you have removed the shared training result.
You do not need to be registered in any social media in order to be able to share your training results. Just click
the envelope icon in your training result view in polarpersonaltrainer.com and you can send a link to your training result to your friends by e-mail!
SHARED TRAINING RESULT VIEW
Shared training result looks much like your training result in polarpersonaltrainer.com. Your friends can see a
versatile summary of your training session.
The curve and map view and their functionality is the same as in your training result view in polarpersonaltrainer.com.
Training zones, laps, automatic laps, strength training workout, phases, limits, and sports information is
shown on separate tabs. Note that tabs and data shown depend on your Polar product. Training information
cannot be edited or removed in shared training result view.
Note that the data shown on the shared training result depends on your Polar product. For example,
curves are shown if you have transferred your training results from Polar Beat mobile app, RC3 GPS,
57
RCX3,RCX5, CS500, CS400, CS600, CS600X, RS400, RS800, RS800CX or FT80 to polarpersonaltrainer.com with WebSync software. Map of the training route is shown if you have used Polar RC3
GPS training computer or Polar RCX3 training computer, Polar RCX5 training computer, Polar RS800CX training computer or Polar CS600X training computer and Polar G5 GPS sensor or Polar G3 GPS sensor in your
training. See more information in Viewing a Training Result / Daily Activity Result.
58
ADDING FITNESS DATA TO YOUR DIARY
You can add new fitness data and also some additional data of your choice in the Diary.
1. Click Add to your Diary - Fitness data on the Home page
or
Go to Training / Diary. Click Add New Fitness data
or
Go to Training / Diary. Click a date in the past and select Fitness data.
2. Fill in the data. Click Add other personal data to insert data of your own choice, for instance, your
BMI or waist circumference.
3. Click Save to add the data to your diary.
Follow the added values in Progress.
If you change your weight or OwnIndex/VO2max value either by synchronizing your training computer
with polarpersonaltrainer.com or in Profile, a new fitness data item with the changed value is automatically
created to your Diary.
See Adding Polar BodyAge Test Results to Your Diary for more information on Detailed Fitness and Health
Data.
59
ADDING POLAR BODYAGE TEST RESULTS TO
YOUR DIARY
Polar BodyAge test results can be added to your diary. You can add data also without taking the BodyAge test
if you want to follow, for instance, your blood pressure or cholesterol. Some gyms and other service providers
perform Polar BodyAge tests.
1. Click Add to your Diary - Fitness data on the Home page
or
Go to Training / Diary. Click Add New Fitness data
or
Go to Training / Diary. Click a date in the past and select Fitness data.
2. Click Detailed Fitness and Health Data and you find a list of values.
3. Fill in the data and click Save to add it to your diary.
60
BENEFIT
The Training Benefit feature is available with the following Polar training computers: RC3 GPS, RCX3,
RCX5, RS800CX, RS400, CS400 and CS600X.
The Training Benefit feature helps you understand the effect of your training better. You learn how your training affects your body and fitness, and you can make sure that you get the training effect you are looking for.
The Training Benefit feature helps you in achieving your training goals!
Polarpersonaltrainer.com gives you both textual and visual feedback of the benefits of each training session
done with a Polar product with the Polar sport zones feature. These are shown on the Benefit tab in the training result view. The short explanation of the training benefit is shown on the list view of the Diary as well.
To get the Benefit tab you need to train over 10 minutes within the sport zones, record heart rate data, and
transfer the training result from a Polar product with the sport zones feature.
The explanations of the benefits are based on Polar sport zones and defined according to the time spent and
calories consumed in each sport zone.
The Benefit tab shows the Benefit text, Polar sport zone limits, heart rate curve and time spent in each sport
zone.
61
Below you can see the explanations of different training benefits.
Short explanation
Long explanation
Maximum training+
This training increased your maximum performance and
sprint race speed. It toned the nervous system of your
muscles and required maximal or near maximal effort for
breathing and muscles. The training duration was long
enough to increase fatigue resistance at the used speed.
Maximum training
This training increased your maximum performance and
sprint race speed. It toned the nervous system of your
muscles and required maximal or near maximal effort for
breathing and muscles. This training intensity is recommended for short exercises. It is important to warm up
before and cool down after the workout.
Maximum and Tempo training
This training increased your maximum performance and
speed. It toned the nervous system of your muscles and
improved your maximal oxygen uptake (VO2max) and efficiency. This training intensity is recommended for relatively
62
short exercises. It is important to warm up before and cool
down after the workout.
Tempo and Maximum training
This training increased your anaerobic tolerance. It
improved your maximal oxygen uptake (VO2max), speed,
efficiency, and performance. This training intensity is recommended for relatively short exercises. It is important to
warm up before and cool down after the workout.
Tempo training+
This training increased your anaerobic tolerance, and
improved your maximal oxygen uptake (VO2max) and efficiency. It also raised the speed you can maintain without
building up lactic acid. The training duration was long
enough to increase fatigue resistance at the used speed.
Carbohydrates are the main energy source that your body
uses at this training intensity.
Tempo training
This training increased your anaerobic tolerance, and
improved your maximal oxygen uptake (VO2max) and efficiency. It also raised the speed you can maintain without
building up lactic acid. Carbohydrates are the main energy
source that your body uses at this training intensity.
Tempo and Steady state training
This training began to increase your anaerobic tolerance and
develop the speed you can maintain without building up
lactic acid. It also improved your aerobic fitness, and the
endurance of the working muscles by enhancing blood circulation to them. Carbohydrates are the main energy source
that your body uses at this training intensity.
Steady state and Tempo training
This training improved your aerobic fitness. It also improved
the endurance of the working muscles by enhancing blood
circulation to them. It began to increase your anaerobic tolerance and develop the speed you can maintain without
building up lactic acid. Carbohydrates are the main energy
source that your body uses at this training intensity.
Steady state training+
This training improved your aerobic fitness. It also improved
the endurance of the working muscles by enhancing blood
circulation to them. The training duration was long enough to
increase fatigue resistance at the used speed. Carbohydrates are the main energy source that your body uses
at this training intensity.
Steady state training
This training improved your aerobic fitness. It also improved
the endurance of the working muscles by enhancing blood
circulation to them. Carbohydrates are the main energy
source that your body uses at this training intensity.
Steady state and Basic training, long
This training improved the endurance of your muscles and
63
your aerobic fitness. It also boosted your metabolism. Your
body’s ability to store oxygen within the cardio system and
muscles improved. Because the training session was long,
effects are expected to be stronger. Fat and carbohydrates
are the energy sources that your body uses at this training
intensity.
Steady state and Basic training
This training improved the endurance of your muscles and
your aerobic fitness. It also boosted your metabolism. Your
body’s ability to store oxygen within the cardio system and
muscles improved. Fat and carbohydrates are the energy
sources that your body uses at this training intensity.
Basic and Steady state training, long
This training improved your basic aerobic endurance and aerobic fitness, and boosted your metabolism. Your body’s ability to store oxygen within the cardio system and muscles
improved. This training also developed the endurance of the
working muscles. Because the training session was long,
effects are expected to be stronger. Fat and carbohydrates
are the energy sources that your body uses at this training
intensity.
Basic and Steady state training
This training improved your basic aerobic endurance and aerobic fitness, and boosted your metabolism. Your body’s ability to store oxygen within the cardio system and muscles
improved. This training also developed the endurance of the
working muscles. Fat and carbohydrates are the energy
sources that your body uses at this training intensity.
Basic training, long
This training improved your general base fitness and basic
aerobic endurance, and boosted your metabolism. Your
body’s ability to store oxygen within the cardio system and
muscles improved. Because the training session was long,
effects are expected to be stronger. Fat is the main energy
source that your body uses at this training intensity, thus preserving your glucose storages.
Basic training
This training improved your general base fitness and basic
aerobic endurance, and boosted your metabolism. Your
body’s ability to store oxygen within the cardio system and
muscles improved. Fat is the main energy source that your
body uses at this training intensity, thus preserving your
glucose storages.
Recovery training
This training helped and speeded up your recovery from
intense activity. This training intensity is recommended for
recovery exercises throughout the training season, and it is
suitable also for warm-up and cool-down. It can promote
overall health and wellbeing.
64
EXPORTING DATA
TRAINING SESSIONS, FITNESS DATA, NOTES AND EVENTS
You can export your training sessions, fitness data, notes and events from polarpersonaltrainer.com diary to
your computer. The exported data will be in xml-format.
1. Go to Training - Diary.
2. Select List view from the upper right corner of the Diary.
3. Select the data you want to export by ticking the box.
4. Click Export Selected.
5. Select if you want to open the file or save it to your computer. If you select Save, the filename is composed of your user account nickname, current date and the word 'export'.
THE STRUCTURE OF THE EXPORTED XML-FILE
Below you can see a shortened example of an exported xml-file.
XML SCHEMA INFORMATION
XML schema for an exported XML is available at www.polarpersonaltrainer.com/schemas/ped-1.0.xsd. The
version number for an exported XML structure can be seen in XML root tag's (<polarexercise-data>) version
attribute (1.0 in the example above). The corresponding XML schema file for that structure is ped-1.0.xsd.
ROUTE DATA
Export the route data of your training sessions to use it in other applications. The exported data is in GPXformat.
65
Route data is available as follows:
l
Polar Beat mobile app
l
Polar RC3 GPS
l
Polar RCX3, RCX5, RS800CX and CS600 CX when paired with Polar G5 or G3 GPS sensor
1. Go to Training - Diary
2. Open a training result which includes GPS data.
OR
Select List view from the upper right corner of the Diary and select the training sessions you want to
export. You can export up to 10 training sessions at a time.
3. Click Export GPX.
4. A .gpx file or a .zip file of all the exported training sessions is created. Open the file or save it to your
computer.
66
STRENGTH TRAINING EXERCISES
In Training / Strength Training Exercises a list of ready-made strength training exercises provide you guidance covering all major muscle groups. Complete the variety with your own favorite exercises and create a
strength training target to your Diary.
VIEWING AND EDITING EXERCISES
The exercises are shown as thumbnail images or in a list. Change the view by clicking Thumbs or List.
l
In the Thumbs view, click a muscle group name to view the exercises in that group and re-click to hide
them. Click Expand all to view the contents of all muscle groups and Collapse all to hide the contents. Bring your mouse over an exercise image to see a larger version.
l
In the List view you can sort the exercises. For example if you want to see all leg exercises, write "leg"
in the Sort by name field and all exercises that belong to muscle group Legs or have word leg in their
name are listed.
Click an exercise name to learn more about it, to edit the default exercise settings, and to add notes.
The name and muscle group for the ready-made exercises cannot be edited.
Browse the images of the ready-made exercises to learn how to perform the exercises correctly.
ADDING YOUR OWN STRENGTH TRAINING EXERCISE
Complete the ready-made list with your own exercises.
1. Go to Training / Strength Training Exercises.
2. Click Add Exercise on the bottom left corner.
3. Add Exercise name and select Muscle group from the drop-down menu. These are required fields.
The name can contain a maximum of 32 characters.
Displayed in FT80 as shows the exercise name in Polar FT80 training computer. See more information in Easier and more effective strength training with Polar FT80.
One Repetition Maximum (1RM), Default Weight, Default Repetitions and Default Sets are
optional information. If you add the exercise to your strength training target, this exercise information
will be there as default. You can change the information if needed. The maximum values for the fields
are: One Repetition maximum: 999, Default Weight: 453, Default Repetitions and Default Sets: 99.
One repetition maximum (1RM) is the maximum weight one can lift in a single repetition for a given
exercise. One repetition maximum can be used for determining an individual's maximum strength. It
67
can also be used as an upper limit in order to determine the desired load for an exercise. For example,
10- RM is the maximum weight that can be lifted 10 times. To calculate your 1 RM go to Applications
/ Calculators / One Repetition Maximum.
In the Notes field you can for example write instructions on how to perform the exercise. The Notes
field can contain a maximum on 512 characters.
You can also add an image of your exercise. The size of the image should be no larger than 356x410
pixels and the format should be either .jpg, .png or .gif.
4. Click Save.
5. Click Close to return to the strength training exercises list.
ADDING A STRENGTH TRAINING TARGET
Plan your strength training by adding strength training targets to your polarpersonaltrainer.com Diary. Planning
helps you to train more efficiently.
See more information in Adding a strength training target.
EASIER AND MORE EFFECTIVE STRENGTH TRAINING WITH
POLAR FT80
If you create a strength training target in your Diary, you can transfer it to your Polar FT80 training computer
with WebSync application and have your FT80 guiding you when working out in the gym. The next three
strength training targets in the future are transferred automatically from polarpersonaltrainer.com Diary to your
FT80. If there are no future strength training targets in your Diary, no data will be transferred.
See WebSync help for more information on data transfer. See FT80 user manual for more information on
strength training with FT80.
68
FAVORITES
Name and save some of your training targets or results as favorites. You can do it when creating a training target, when viewing a training target, when adding a training result manually or when viewing a training result.
This enables you to drag and drop them in your diary easily.
You can see the list of your favorite training sessions both in Training / Favorites and in Training / Diary.
In Training / Favorites you can delete favorite training sessions as well as view and edit them by clicking the
training session name.
Use Favorites to help you in planning your training. Create one or more training targets, add them to your
Favorite Training Sessions list and drag and drop them to the future days in your Diary.
69
TRAINING EQUIPMENT
The bikes of your Polar RC3 GPS training computer, Polar RCX3 training computer, Polar RCX5 training computer and Polar CS500 cycling computer are listed in Training / Training Equipment after you have synchronized your product with polarpersonaltrainer.com. The bike you have used in the training session is linked
to your training results in Diary in synchronization. Accumulated training information for each bike is shown in
Training Equipment. Therefore, it is easy for you to keep track how you use different bikes.
EDITING EQUIPMENT SETTINGS
1. Teach the sensors to your training computer. See more information in the training computer's user
manual.
2. Synchronize your training computer with polarpersonaltrainer.com. See more information in Data Transfer and in Polar WebSync 2.x help.
3. Go to Training / Training Equipment.
4. Click the equipment name in the training equipment list.
5. Edit the equipment settings:
l
Name: The name of your equipment in polarpersonaltrainer.com. give a more detailed description on
the equipment, for instance, Look.
l
Short name: The equipment name in your training computer. Cannot be edited.
l
Products: Products that your equipment is linked to. Cannot be edited.
l
Distance: The distance is calculated automatically from the training sessions where the bike has been
selected as equipment. You can reset the distance shown in polarpersonaltrainer.com.
l
Odometer: The odometer distance is calculated automatically from the training sessions where the
bike has been selected as equipment. You can reset the distance shown in polarpersonaltrainer.com.
l
Click Save.
70
TRAINING LOAD
WHY SHOULD I MONITOR MY CUMULATIVE TRAINING
LOAD?
Monitoring your cumulative training load enables you to
l
control the total training load
l
optimize training by adjusting the intensity and duration of training
l
monitor performance development
l
recognize your personal limits.
Visit www.polar.com/support for more information on training load.
TRAINING LOAD ANALYZING VIEW
Go to Training Load to view and analyze your training load of the selected time period.
71
SELECTION AND NAVIGATION
Select Sport: As a default, training load curve of all your sports is shown. You can view training load curve by
sport types (written in capital letters) and/or sport names to for example quantify the physical strain of different
sports.
1. Click Select Sport.
2. Tick the sports you want to include to the training load view.
3. Click Refresh.
See Sports for more information on naming your sports.
Period selection: Select the observation Period Start day and Period End day and click Refresh. Note that
the period can be maximum 183 days.
Browse the training load observation period by clicking Previous and Next buttons.
TRAINING LOAD CURVES
The red curve indicates your actual training load status and is based on your training results. The grey curve
indicates the planned training load status and is based on the training targets on your diary. The grey curve
continues to the future days if you have created training targets on your Diary. By comparing the planned training load status and the actual training load status you can analyze the strenuousness of your training session
and use the training load information when planning your future training sessions.
See Creating Training Target to find out how to create training targets.
The training load curves are on red, yellow and green background.
If your training load status curve is on
Green:
l
You are recovered from previous training sessions and ready to train more.
l
If you're continuously in green you can increase your cumulative training load by adding more training
sessions to your weekly plan or making the training sessions more intensive.
l
Intensive training sessions and races should preferably be done when you are "in green"
Yellow:
l
Cumulative training load is on a high level.
l
You can still train but should avoid high intensity training and/or races.
Red:
72
l
Cumulative training load is on a very high level.
l
If you continue training when "in red", it may lead to a state of overreaching.
Improving your performance level requires also strenuous periods in your training program. If you are continuously in green, you should include also more intensive training sessions in your plan.
TRAINING LOAD BARS
The training load bars indicate your daily training load value. The red bar describes your actual daily training
load value that is based on your training results of that day. The grey bar describes your planned training load
value and is based on your training targets of the day. By comparing the planned training load and the actual
training load you can analyze the strenuousness of your training session and use the training load information
when planning your future training sessions.
Training intensity and duration as well as physical parameters (for instance, age, weight) affect cumulative
training load.
Place your mouse over the training load bar and the date of the training session, the sport and training load
value are shown. If you have had several training sessions on one day, all the training sessions are shown.
FUTURE DAYS
The lighter area indicates the future days. Only blue target curve and target bar are shown on that area.
73
TRAINING PROGRAMS
polarpersonaltrainer.com offers a variety of training programs for fitness, running, cycling, and outdoor sports.
Just go to Training Programs and click on the Create program link to get a training program customized to
suit your needs.
Available programs depend on the Polar product you have registered in Products.
In Training Programs you can easily see the status of your current program.
You can have only one active training program in polarpersonaltrainer.com.
RUNNING, CYCLING, OUTDOOR AND FITNESS PROGRAMS
1. Go to Training Programs.
2. Click on the Create program link.
3. Before creating the program, read and answer the questions in the Physical Activity Readiness
Questionnaire. Then, tick the box I have read and understood the Physical Activity Readiness
Questionnaire. Click Next.
4. Fill in the required information about your fitness level and goals - it only takes a couple of minutes.
Click Next to proceed.
5. A summary of the program is shown. Click Create and then Finish to confirm your choices and the
training program will automatically appear in your diary. Click Back to return to the previous step and
Cancel to cancel program creation.
The starting date of the training program depends on the program. Most programs will start the next full week.
If you create an event-based program, for example, the starting date is determined by how much time there is
to the event (as calculated from the day you create the program) and how long is the program you are creating.
The training targets will be added in the diary and each of them will give you more precise training instructions.
These training targets are shown in your diary as long as the program lasts.
The training sessions related to a training program have been marked with a small P-icon on the upper right
corner of a training session.
Running and Cycling Programs can be transferred to Polar RCX5, RCX3 and RC3 GPS training computers. Outdoor Program cannot be transferred to any training computer. The Fitness Program - Polar Keeps
You Fit - Own Workout Program - can be transferred only into your Polar F55 training computer.
For other than Running and Cycling programs (RC3 GPS, RCX3 or RCX5), transferring the training result to
polarpersonaltrainer.com alone will not update the program status. To have the program status updated on
your polarpersonaltrainer.com Home page you need to merge your training result with the training program target. See more information in Merging a Target and Result.
74
If you want to delete your training program, go to Training Programs and click Delete. The program related
training targets are removed from your diary.
STAR TRAINING PROGRAM
The STAR Training Program is a personalized fitness program included in the Polar FT60 and FT80 training
computers. You can activate the program in your training computer and then transfer it into polarpersonaltrainer.com. The program cannot be created in polarpersonaltrainer.com. Transfer your training results
from your FT60 or FT80 to polarpersonaltrainer.com and the program status is updated to your Diary and
polarpersonaltrainer.com Home page.
ENDURANCE PROGRAM (RC3 GPS, RCX3 AND RCX5)
Create a training program that will help you improve your endurance by guiding with the amount and intensity
of training that is suitable for your individual fitness level. Create a program in the web and transfer the program schedule into your Polar RC3 GPS, RCX3 or RCX5 training computer.
The program can be transferred only to Polar RC3 GPS, RCX3 and RCX5 training computers.
It is not possible to transfer training programs when you use polarpersonaltrainer.com in Japanese or
Chinese.
Endurance Program is based on different program levels. Your program level can be defined by answering the
questions regarding your physical activity or by analyzing automatically your training history in polarpersonaltrainer.com. Training history based definition can be done if user has enough training history from the
last three months in polarpersonaltrainer.com.
CREATING ENDURANCE PROGRAM
1. Go to Training Programs.
2. Click Create program link under Endurance Program for Running or Endurance Program for
Cycling.
3. Before creating the program, read and answer the questions in the Physical Activity Readiness
Questionnaire. Then, tick the box I have read and understood the Physical Activity Readiness
Questionnaire.
4. Define the program level:
If you have at least three month's training history in polarpersonaltrainer.com, the program level can be
calculated based on your training history. The calculation is done automatically after you have read and
agreed the Physical Activity Readiness Questionnaire. Program Summary is displayed.
If you don't have training history in polarpersonaltrainer.com or you don't want polarpersonaltrainer.com to calculate the program based on your training history, define the program level by
75
answering the questions regarding the level of your physical activity. Click Define the level of your
Endurance Program by answering a series of questions. After you have answered the third question, the Program Summary is displayed.
See more information on program levels in Endurance Program Levels and Exercise Descriptions.
5. Click the calendar icon to select the week when you want to start your Endurance program. The program starts automatically on the first day of the week. You can change the first day of the week in Profile > Diary Settings.
6. The Program Summary shows you the description, details and schedule of the program. You can see
the details of each exercise by clicking the exercise name on the Schedule.
See more information on exercise descriptions in Endurance Program Levels and Exercise Descriptions.
7. Click Create to add the program to your Diary. The detailed program information is shown.
76
8. Transfer the program to your Polar RC3 GPS, RCX3 or RCX5 training computer. See more information
in Data Transfer and in WebSync help.
9. Train according to the program.
10. Transfer the training results from your RC3 GPS, RCX3 or RCX5 to polarpersonaltrainer.com with
WebSync.
FOLLOWING UP ENDURANCE PROGRAM
Follow up your endurance program progress in Training Programs.
Program summary on the upper right corner shows you the status of the four weeks' endurance program
period. Planned number of training sessions, duration, calories and distance is described with grey bar and
realized with red bar.
In addition you can see weekly summary of your endurance program training sessions. Both planned and realized number of training sessions, duration, distance and calories are shown. Time spent in each sport zone is
shown with colored bars. Planned and actual training load values for each training session are shown with
grey and red bars. Training session name works as a link to the target/result in Diary.
Only Endurance Program training sessions are included in the endurance program summary. Summaries
of all your training sessions in polarpersonaltrainer.com can be generated in Progress.
You can browse completed/becoming weeks of endurance program using the previous and next buttons. The
buttons are disabled if there is no information to show.
77
UPDATING ENDURANCE PROGRAM
When there is two weeks left of your Endurance Program, Update Program button appears in program summary in Training Programs. If you choose to update your program, polarpersonaltrainer.com creates new
four weeks program period with new training targets. The new period starts after the current period ends.
1. Click Update Program.
2. Select whether you want to increase or decrease your program level or continue with the same level.
polarpersonaltrainer.com gives you a recommendation about new program level, but regardless of the
recommendation you can select any of the options. Program level can be increased or decreased by
one.
3. Click the calendar icon to select the week when you want to start the new program period. The period
starts automatically on the first day of the week. You can change the first day of the week in Profile >
Diary Settings.
4. Your program is calculated and Program Summary is displayed.
5. Click Create to add the program to your Diary. The detailed program information is shown.
6. You can see the training targets on your Diary.
7. Transfer the program to your Polar RC3 GPS, RCX3 or RCX5 training computer.
78
ENDURANCE PROGRAM LEVELS AND
EXERCISE DESCRIPTIONS
Endurance Program is based on different program levels. User's program level is defined by answering some
questions regarding user's physical activity or by analyzing automatically user's training history in polarpersonaltrainer.com. Training history based definition can be done if user has enough training history from the
last three months in polarpersonaltrainer.com.
General programs are compiled of 4 weeks long training modules. Training module in level 1 is the least
demanding and the module in level 20 is the most demanding. Steps between 1-20 are linear, which means
that user can improve his/her fitness step by step (for example from level 7 to level 8 etc.) Training modules
and user's training activity are linked together so that training modules gets more challenging as user's training
activity increases (also less challenging when user's training activity decreases), see figure below:
RUNNING PROGRAM LEVELS
Beginner (levels 1-6):
The objective of the Beginner –level programs is to accustom your body to endurance training to enable you to
run longer runs in the suitable intensity. The training volume is relatively low and the training sessions are
basic and long runs. If you want to prepare for a marathon or half-marathon, you need to proceed to higher
levels by following this program carefully.
Moderate (levels 7-12):
The objective of the Moderate –level programs is to accustom your body to higher levels of endurance training
to enable you to run even longer runs. By training according to guidelines, you will get fit enough to keep your
heart rate under control and stable when running. The program consists of 3-5 training sessions per week
including basic, long and interval runs. Compared to advanced levels, moderate levels do not include tempo
runs that are aimed to develop resistance to fatigue at higher speeds.
Advanced (levels 13-20):
79
The objective of the Advanced –level program is to develop endurance running performance close to your own
maximum level. The program consists of 5-6 training sessions per week including basic, long, interval, and
tempo runs. This program requires personal care and awareness to ensure optimal recovery, sleep and nutrition. Also, a personal coach could point out your individual strengths and weaknesses, which could be helpful
in fine-tuning the program.
CYCLING PROGRAM LEVELS
Beginner (levels 1-6):
The objective of the Beginner –level programs is to accustom your body to endurance training to enable you to
do longer rides in the suitable intensity. The training volume is relatively low and the training sessions are
basic and long rides. If you want to prepare for a cycling race in the future, you need to proceed to higher levels
by following this program carefully.
Moderate (levels 7-12):
The objective of the Moderate –level programs is to accustom your body to higher levels of endurance training
to enable you to do even longer rides. The aim is also to improve your cycling technique. By training according
to guidelines, you will get fit enough to keep your heart rate under control and stable when cycling. Your legs
will start to tolerate higher speeds and longer distances. The program consists of 3-5 training sessions per
week including basic, long and interval rides. Compared to advanced levels, moderate levels do not include
tempo rides that are aimed to develop resistance to fatigue at higher speeds.
Advanced (levels 13-20):
The objective of the Advanced –level program is to develop endurance and cycling performance close to your
own maximum level. Training tips also include special sessions with high cadence (to optimize efficiency and
technique) and low cadence (cycling -specific strength training with high charge and fairly low heart rate).The
program consists of 5-6 training sessions per week including basic, long, interval, and tempo runs. This program requires personal care and awareness to ensure optimal recovery, sleep and nutrition. Also, a personal
coach or an experienced cyclist could point out your individual strengths and weaknesses, which could be
helpful in fine-tuning the program.
RUNNING EXERCISE DESCRIPTIONS
Long Run
The target of a long run is to build basic endurance by running a long distance. In the beginning of the long run,
the intensity target is zone 2. In the beginner and moderate levels, zone 3 is included towards the end of the
session. Running in zone 2 builds endurance by developing fat oxidation capability. Running in zone 3 in the
end of the session (included in the beginner and moderate levels) also builds up resistance to fatigue in marathon speed.
Basic Run
Basic run is the most typical endurance running session. The duration of the basic run is normally around one
80
hour (distance 7 – 15 km). One phase of the basic run is always run in zone 3. Before the phase in zone 3
starts, the higher program levels also include running in zone 2.
Easy Run
Easy run sessions are similar in duration as the basic run sessions, but easy runs are run in zone 2 only.
There are several reasons to keep the sessions easy: good runners can run relatively fast even having low
heart rates – they can effectively build up total training load / weekly mileage and develop fat oxidation during
training, while they can still ensure recovery and readiness for the upcoming high intensity sessions. Good
recovery is achieved because muscle glycogen is spared and hitting forces/impulses to legs are kept at a low
level.
Interval Run
Interval runs develop speed, aerobic and anaerobic capacity, and resistance to fatigue at 3-10 km race
speeds. Keeping short recovery periods between the sprints allows more training at high speeds. The sprint
periods are recommended to be done in zones 4 and 5, and the recovery periods in zone 3. Zone 3 is usually
low enough to remove lactate, but note that you should also use the low end of zone 3 during the recovery periods. In particular, if your target is to develop maximal speed for short endurance distances, it can be beneficial
to lower your heart rate even to zone 2.
Tempo Run
Tempo runs develop aerobic capacity and resistance to fatigue at 10 km marathon race speeds. The tempo
parts are recommended to be run in zone 4 in order to build resistance to fatigue at marathon and half-marathon speeds and to improve speed in the lactate threshold.
CYCLING EXERCISE DESCRIPTIONS
Long Ride
All our cycling programs include one weekly long ride. The target of a long ride is to build basic endurance by
cycling a long distance. The intensity target is always zone 2. Running in zone 2 builds endurance by developing fat oxidation capability.
Basic Ride
A basic ride is the most typical endurance training session. The duration of the basic ride is normally around
one hour. One phase of the basic ride is always done in zone 3. Before the phase in zone 3 starts, the higher
program levels also include cycling in zone 2.
Easy Ride
In levels 4-20, some of the short and normal duration sessions are done in zone 2 only; these sessions are
called easy ride sessions. There are several reasons to keep the sessions easy: good cyclists can ride relatively fast even having low heart rates – they can effectively build up total training load, keep weekly mileage
at a high level and develop fat oxidation during training, while they can still ensure recovery and readiness for
the upcoming high intensity sessions. Sparing muscle glycogen and keeping pedalling forces at a low level
ensures recovery.
Interval Ride
Interval rides develop speed, aerobic and anaerobic capacity, and resistance to fatigue at very high speeds.
Keeping short recovery periods between the sprints allows more training at high speeds. The sprint periods
81
are recommended to be done in zones 4 and 5, and the recovery periods in zone 3. Zone 3 is usually low
enough to remove lactate, but note that you should also use the low end of zone 3 during the recovery periods.
In particular, if your target is to develop maximal speed for short endurance distances, it can be beneficial to
lower your heart rate even to zone 2.
Tempo Ride
Tempo rides develop aerobic capacity and resistance to fatigue. The tempo parts are recommended to be ridden in zone 4 in order to build resistance to fatigue at typical racing speed and to improve performance in the
lactate threshold.
82
PROGRESS
PROGRESS SUMMARY
Progress Summary sums up the total number of your training sessions, duration, calories and distance. All
the training results in your Diary have been taken into account.
PROGRESS REPORTS
COMPARISON REPORT
You can compare your training sessions: heart rate curves, speed curves, altitude curves, lap durations, and
more.
Search for the training sessions you want to include in the comparison report. First select the time period for
the search. Then you can limit the search to certain sport/sports or search sessions by name. The name
search works for sessions you have named yourself in polarpersonaltrainer.com. Click Search and the list of
training sessions appear.
Select 1-4 training sessions for the comparison report. Note that for multisport sessions the selection is done
by sport. Each selected session is marked with a color that is used in the comparison table and curves.
The comparison table shows the basic information about your training sessions.
The comparison curve can show heart rate, speed, pace or altitude, one value at a time. You can add lap markers or autolap markers in the curve. You can also compare lap or autolap durations in a bar graph.
Placing your mouse over a curve shows you the X-axis and Y-axis values at a certain phase of your training
session.
Click Full Screen to view the curve in full screen and Exit Full Screen to return to the default view.
You can zoom a certain area of the curve either in full screen view or in default view by selecting an area with
your mouse (click, hold down, drag, release). You can browse the zoomed curve with the arrows on the upper
right corner of the curve view. Click Reset Zoom to return to the default zoom level.
In addition to basic information and curves, other information and SportZones of your training session are also
included in the comparison report.
83
84
OTHER REPORTS
You can follow up your training progress from different points of view with the pre-defined progress reports.
Each report illustrates certain pre-selected information about your training. The default time period in the
reports is three months, and the months are split into weeks. You can change the default period and modify
the pre-selections in the reports according to your needs.
Open the report by clicking report name or View report.
85
1. The header shows the total value of the selected period (e.g. 38 trainings) and depending on the grouping selection, the average of each day/week/month of the period (e.g. 4,2 trainings per week). From the
header you can select the diagram to show Trainings, Duration, Distance, Calories or Sport Zones.
2. You can select either all or only a certain sport to be included in the report. Open Select Sport menu
and select the sport types or training sessions.
3. You can change the time period by clicking the Period Start or Period End field and selecting the
dates from the calendar.
4. You can group the information by Day, Week or Month.
If you change the sport selection, time period or grouping, click Refresh View.
Time period and grouping selections are saved in your browser's cookies.
5. Hover your mouse over a bar of the diagram to see the detailed information of the training sessions. A
bar indicates a day, a week or a month depending on the grouping selection. The mouseover shows the
basic information (number of training sessions, duration, distance and calories) as a sum value of the
day/week/month. It also shows the average values of selected curves, detailed fitness and health data
and personal values.
86
6. Browse the time period by one day/week/month with the arrow buttons.
7. Monitor the progress of your fitness values i.e. weight, OwnIndex or resting heart rate with the previous
ones. Select some Curves or Detailed Fitness and Health Data to be shown on the diagram. Tick
the box and the curve appears on the diagram view .Note that Detailed Fitness and Health Data
curves are shown only if you have manually added the data to your diary. See more information in
Adding Fitness Data to Your Diary.
8. Personal values curves are shown if you have added data of your own choice, for instance, your BMI
or waist circumference, to your diary. See more information in Adding Fitness Data to Your Diary.
9. If you are using heart rate zones in your training computer, compare the heart rates of training sessions
by ticking the Heart rate comparison box.. Green line indicates your average heart rate, red line the
upper limit of the highest sport zone/training zone and the blue line the lower limit of the lowest sport
zone/training zone.
87
CHALLENGES
Go to Challenges to find out the status of the challenge you have either created or taken part in. You may also
receive invitations from other polarpersonaltrainer.com users to take part in the challenges they have created.
By accepting their invitations, the challenge is added to your challenges list. In Challenges you can easily
send and receive messages related to a certain challenge.
If you want to leave an ongoing challenge, go to Challenges, click on the name of the challenge and click
Leave challenge.
88
CREATING A CHALLENGE
1. Go to Challenges.
2. Click Create Challenge.
3. Select the challenge
Type
Individual - All the members compete individually on reaching the target or
Team - members try to reach the target as a team.
Goal
Measure - Distance - quickest accumulation of the certain distance.
Measure - Calories - quickest accumulation of the certain amount of calories.
Time - Distance - most accumulated distance in certain time frame.
Time - Calories - most accumulated calories in certain time frame.
Starting
Define the starting date of the challenge. If you are not sure of the starting date, you can define it later
on the Challenge page.
Finishing
Depending on the goal you set, define the amount of kilometres, calories or days to the challenge completion.
4. Then click Next and define the challenge
Name
Description
Publicity, whether it is private (visible only for the members invited in the challenge) or public. If you
select the challenge to be public, you have to define how many members can join in.
Invitations: Enter the nickname or e-mail address of the people you want to invite to the challenge.
Alternatively you can select them from your Friends list by clicking the link Select from Friends list.
You can also set the Autostart on, which means you have to define the number of members needed for
the challenge to start automatically.
89
5. Click Next to view the summary of the challenge.
6. Click Create to create the challenge. The invitees will receive a challenge invitation in their message
box in Home page and in their e-mail, if they have allowed polarpersonaltrainer.com to send e-mails to
them (can be done in Profile) and their e-mail spam filter is not preventing emails from Polar.
90
SHARING CHALLENGES IN SOCIAL MEDIA
Share a public challenge you have created in a social network and get feedback from your friends or people following you.
1. Open the challenge in polarpersonaltrainer.com.
2. Click a social media button.
3. Log in to the social media unless you already are logged in.
4. Add comments to your status message or edit your message in the social media and publish your
status update.
When editing the status message, be careful not to delete the link to your challenge.
You can check how your challenge is shown in the social media by clicking Publish and view shared challenge / View shared challenge.
You can remove the shared challenge by clicking Remove challenge sharing. Note that this does not
remove the challenge from the social media. The link to your shared challenge in the social media does not
work after you have removed the shared challenge.
You do not need to be registered in any social media in order to be able to share your challenges. Just click the
envelope icon in your challenge view in polarpersonaltrainer.com and you can send a link to your challenge to
your friends by e-mail!
91
EDITING A CHALLENGE
Only the challenge host can edit or delete challenges.
1. Go to Challenges.
2. Click the challenge name and the challenge information page opens up.
3. Click Edit Challenge on the bottom left hand corner.
4. Edit the challenge: invite more members or remove invitees, add more info text or edit challenge name.
5. Click Save.
The challenge can also be started here manually, if you have not set the starting date yet.
You can delete a challenge by clicking Delete Challenge.
92
STARTING A CHALLENGE
The challenge will start at 00:00 on the day you have set it to start. You can also start the challenge later manually on the Challenge page.
1. Go to Challenges.
2. Click on the name of the challenge you want to start.
3. Click Edit Challenge.
4. Click Start challenge now.
93
FINISHING A CHALLENGE
Challenges will end at 24:00 on the day set as the finishing day. Challenges that have a certain value (kilometers or calories) as a target to be reached will end when the desired amount of kilometers or calories has
been reached. After a challenge is finished it stays active for two weeks before archiving. Discussion will be
denied after a challenge is archived.
94
JOINING PUBLIC CHALLENGES
If you are looking for a challenge to join:
1. Go to Challenges
2. Search for a suitable challenge. Browse the Public Challenges list or enter the challenge name in the
search field and click Search. The list shows all the upcoming and ongoing challenges.
3. Click Join.
After joining a challenge you can see more detailed information about it and a list of all participants.
95
APPLICATIONS
DOWNLOADS
Go to Applications / Downloads to get the latest downloads, Polar WebSync™ or Polar WebLink™ for transferring your training data in to and from polarpersonaltrainer.com. For complete instructions, see Data Transfer
and Polar WebSync help.
CALCULATORS
Polar has developed a range of interactive tools to help you monitor your progress and achieve your goals.
Go to Applications / Calculators. Select the calculator to get useful information on your health and fitness
based on the facts and figures in your registration profile, or those you enter manually.
96
MESSAGES
You can check out all the messages you have received and sent.
You can send messages to registered polarpersonaltrainer.com users who you have added as your friends.
See more information in Friends. The messages are sent and received within polarpersonaltrainer.com.
However, you will receive a notification email about received messages to your email, if you have activated
"Messages" in Profile / Notifications. See more information in Profile.
Messages related to challenges can only be seen in the Challenges view.
INBOX
Click the Messages icon on top of the page. The Inbox opens showing the messages you have received.
Click the Subject of a message to open a message. Click Close to return to Inbox. Click Reply to respond to
the message. Click Delete to delete the message. Confirm the deletion by clicking OK.
In the Inboxor in an open message, click the sender's name to view his/her public profile.
You can delete messages in the Inbox view by ticking the box beside a message and clicking Delete Selected.
If a message includes attachment(s), an attachment icon is shown in the Inbox. The attachment can be a
training result or a training target. When you receive for example a training target from your friend or coach,
you can easily add it to your Diary. Go to Inbox, open the message, click the attachment link on the bottom of
the message and the training target opens. You can edit the training target if necessary. You can save the
training target to your Diary as it is, copy it to a different date in your Diary or add it to your favorite training sessions list from where you can drag and drop it to your Diary.
SENDING A MESSAGE
Send a message to your friends or coach. The required information is marked with an asterisk (*).
1. Click the Messages icon on top of the page.
2. Click Compose message on the right.
3. Enter the receiver's nickname or e-mail address. Alternatively click Select from Friends, select the
person you want to send the message to and click OK. Note that the receiver has to be a registered
polarpersonaltrainer.com user.
4. Write the subject on the Subject field and the message on the message contents box. The subject can
contain a maximum of 64 characters and the message 2048 characters.
97
5. You can attach a maximum of five training sessions to your message. The training sessions are selected from your favorite training sessions list. To attach a training session, click Attach, select the training session(s) you wish to attach and click Attach to Message. See Favorites for more information on
favorite training sessions.
6. Click Send to send the message.
The messages you have sent are saved in the Sent messages. The functions in the Sent messages are the
same as in the Inbox, except that you cannot reply to a sent message.
98
FRIENDS
Click the Friends icon on top of the page to add new and manage your friends. Listing your friends makes it
easier to send messages and training sessions and create challenges.
You can give, for example, to your personal trainer access to your diary and this way make it easier to view
your training targets.
FINDING AND ADDING A FRIEND
To be able to find your friend, he/she needs to be a registered polarpersonaltrainer.com user.
1. Click the Friends icon on top of the page.
2. Click Find friends.
3. Enter, for example, the person's name, email address or nickname and click Find friends to find the
person. If the search does not return any results, enter the person's nickname only.
4. The search results are listed in Result.
5. In Result, click Add friend to add the person to your friends list.
In Result you can view the person's public profile by clicking the name. Click Send Message in the
public profile view to send your friend a message. Click Add to Friends to add the person to your
friends list. Return to the search results by clicking Back.
Your friend needs to accept your friend request in polarpersonaltrainer.com before you can have access to
your friend's diary.
VIEWING AND EDITING FRIENDS
Click the Friends icon on top of the page to see the list of your friends.
Click a friend's name to view his/her public profile.
The friends list shows the training computer your friend is using and the Status of your friend. You can find the
explanations for the symbols on the status field from the table below. Click the symbol to change the status.
User you have granted an access to your diary. The access is granted as default when you add a friend to your friend list. Click the symbol to block the access to your diary.
User that has granted you access to his/her diary. Click the symbol to
view your friend's diary.
99
A user you have blocked. The user cannot see your public profile, or
send messages of challenge invitations to you. Click the symbol to
block/allow the user.
Click the symbol to send a message to your friend.
If a symbol is grey, it means that you have not granted/received access to someone's diary.
You can remove a friend by ticking the box beside a friend's name and clicking Delete Selected.
In addition to granting an access to your diary, you can share your training data by sending training data
attachments to other polarpersonaltrainer.com users. See Messages for more information on sending training
data.
PENDING FRIEND REQUESTS
If someone adds you as a friend in polarpersonaltrainer.com, the person is shown in PENDING FRIEND
REQUESTS list in Friends.Click the Friends icon on top of the page to view the request. Click Add friend to
add the person to your friends list. The person is shown in the PENDING FRIEND REQUESTS list until you
add him/her as your friend or he/she removes you from his/her friends list. The person who has added you as a
friend can see only the information you have defined in Profile / Public Profile.
The number of pending friend requests is shown next to the Friends icon on top of the page.
100
PROFILE
To manage and update your user information:
1. Log into polarpersonaltrainer.com.
2. Place your mouse over your name next to the main menu and select Profile.
PRIVATE PROFILE
CONTACT INFORMATION
Add and edit your contact information and change your polarpersonaltrainer.com password. Required information is marked with an asterisk (*).
You can also upload your photo. The size of the photo should be no larger than 450x600 pixels and the format
should be either .jpg, .png or .gif.
PHYSICAL INFORMATION
Add and edit your physical information such as date of birth, gender, height, weight and activity level.
The more physical information you add to your profile, the more benefits you get from polarpersonaltrainer.com features and the more accurate training analysis you get! Physical information
affects for example training load calculation.
If you change your weight or OwnIndex/VO2max value either by synchronizing your training computer
with polarpersonaltrainer.com or in Profile, a new fitness data item with the changed value is automatically
created to your Diary.
Activity level is calculated automatically according to your training data from the past three months. If three
month's training data is not available, the activity level has to be selected manually. If you change your activity level manually, the calculation will start from the date the change was made and the activity level is
updated automatically after three months.
To change your Activity level: Select the alternative that best describes the overall amount and intensity of
your physical activity during the past three months
1. TOP (5+ hours per week): You participate in heavy physical exercise at least 5 times a week, or you
exercise to improve performance for competitive purposes.
2. HIGH (3-5 hours per week): You participate at least 3 times a week in heavy physical exercise, e.g.
you run 20-50 km or 12-31 miles per week or spend 3-5 hours per week in comparable physical activity.
101
3. MODERATE (1-3 hours per week): You participate regularly in recreational sports, e.g. you run 5-10
km or 3-6 miles per week or spend 1-3 hours per week in comparable physical activity, or your work
requires modest physical activity.
4. LOW (0-1 hours per week): You do not participate regularly in programmed recreational sport or heavy
physical activity, e.g. you walk only for pleasure, or exercise hard enough to cause heavy breathing or
perspiration only occasionally.
You can set the user settings of your Polar RC3 GPS, RCX3, RCX5 or FT7 training computer by using
Polar WebSync application. WebSync transfers your personal information and some general settings from
your polarpersonaltrainer.com user account to your training computer or from your training computer to polarpersonaltrainer.com user account. See more information in Polar WebSync Help.
GENERAL SETTINGS
You can add and edit general settings, such as units, diary settings and time settings.
TRAINING SETTINGS
If you are training with Polar FT80 training computer, you can choose polarpersonaltrainer.com to update your
one repetition maximum (1RM) automatically by ticking the box Automatically update my exercise one
repetition maximum (1RM) value if I make a new record. The 1RM value is updated to strength training
exercise information in Training / Strength Training Exercises.
One repetition maximum (1RM) is the maximum weight one can lift in a single repetition for a given exercise.
One repetition maximum can be used for determining an individual's maximum strength. It can also be used
as an upper limit in order to determine the desired load for an exercise. For example, 10- RM is the maximum
weight that can be lifted 10 times.
You can choose to add altitude data in your training result when you have trained with Polar Beat mobile app or
used GPS in your training with Polar RC3 GPS, RCX3, RCX5, RS800CX or CS600X training computer. If
your training computer records altitude data, the accuracy may differ in your training computer and Google
Maps.
PUBLIC PROFILE
Public, partly public or hidden: you can choose in Public Profile what you want to show others about yourself
and what you prefer to hide. Note, however, that your nickname is always public.
Select the information that will be shown to your friends in polarpersonaltrainer.com and in the challenges you
have created and are taking part in. Write something more about yourself on the About me field, for example
about your favorite sports and sports-related ambitions and goals. The maximum length of the text is 512 characters.
Add links to for example your home page address or blog.
Click Save and select View My Public Profile to see how your information is shown.
102
NOTIFICATIONS
Choose the email notifications that you want to receive from polarpersonaltrainer.com. The notifications are
sent to your email address. In case you do not receive the email notifications make sure your email spam filter
is not blocking emails from Polar.
103
SPORTS
Place your mouse over your name next to the main menu and select Sports to find your sports. In Sports you
can track time spent and calories burned on different sports. The number of training sessions, total duration
and calories for different sports is calculated automatically according to the sport defined in your training result. You can also locate your sports in Diary, in Progress and in Training Load.
SPORTS LIST IN POLARPERSONALTRAINER.COM
If you are using Polar RC3 GPS training computer, Polar RCX3 training computer or Polar RCX5 training
computer, see chapter Sports List for RC3 GPS, RCX3 and RCX5 Users.
First you need to add your frequent sports in Sports:
1. Place your mouse over your name next to the main menu and select Sports.
2. Click Add Sport.
3. Give the sport a name.
4. Select Speed Unit.
5. Select a logo for your sport. The logo is shown in your training result in Diary.
6. Click Save.
7. To exit, click Close.
To get data for your sports in your sports list, you need to define sports for your training results in Diary. You
can add the sport by editing the training results or you can select the sport when creating a training target.
You can edit your sports later by clicking the sport name on the list. Remember to Save the changes.
Delete a sport by ticking the box beside the sport name and clicking Delete Selected.
SPORTS LIST FOR RC3 GPS, RCX3 AND RCX5 USERS
SPORTS list is empty if you have not created any sports in polarpersonaltrainer.com or synchronized your
Polar RC3 GPS training computer, Polar RCX3 training computer or Polar RCX5 training computer with polarpersonaltrainer.com. After the first synchronization you will have five RC3 GPS sports (Running, Cycling, Cycling 2, Other sport 1 and Other sport 2 ), four RCX3 sports (Running, Cycling, Cycling 2 and Other sport) or
RCX5 default sports (Running, Cycling, Cycling 2, Swimming and Other sport) on your sports list.
Note for RCX5 users: We recommend that you add and edit your sports / sport profiles in WebSync software. You can then transfer them to your RCX5 and use them in your training. If you create sports in polarpersonaltrainer.com, they cannot be transferred to your RCX5. See Polar WebSync help for more information
104
on adding and editing your sports / sport profiles in WebSync. See also RCX5 user manual for more information on sport profiles.
The RCX5 default sports and sports created in WebSync can only be managed in WebSync.
Sports created in polarpersonaltrainer.com can only be managed in polarpersonaltrainer.com. See more
information in chapter Sports Management in polarpersonaltrainer.com.
The location of the sports / sport profiles is indicated in the sports list with the training computer image or
polarpersonaltrainer.com logo.
SPORTS LIST FOR POLAR BEAT USERS
SPORTS list is empty if you have not created any sports or transferred training results from a Polar product
with the Sport Profiles feature. After the first transfer from Polar Beat, your list will include the same sports as
in Polar Beat. If you have sports in your list before the first transfer, the sports with the same name will be
merged.
105
PRODUCT REGISTRATION
Register your Polar product as follows:
1. Select Add a new product on the Home page.
Or
Place your mouse over your name next to the main menu and select Products.
2. Click Register New Product.
3. Select the model from the drop-down list.
4. Enter the serial number. The number can be found on the back cover of the product.
5. Click Save.
6. Click Close to return to the PRODUCT REGISTRATION page.
Note that you can register more than one product, but need to select the product you are currently using by
clicking Select product for training.
Find more information on your Polar product by clicking the Product Support link.
Registration does not affect the use of the product.
Place your mouse over your name next to the main menu, select Products and click the product name to edit
your product Model and Serial number.
106
PARTNERS
The Partners section availability depends on which country you have selected in Profile.
A partner can be for example an insurance company. By registering a partner you as a customer agree to have
your training data sent to the partner to collect activity points. For the activity points you get some benefits,
such as a discount on your insurance with the partner company, for example.
Data can be sent to the partner only when it is transferred from a training computer to polarpersonaltrainer.com
via WebLink or WebSync software.
You can add a partner yourself or a partner can send you a partner request.
Check that you have entered your user information in polarpersonaltrainer.com exactly in the same
format as you have informed the partner. Your personal information for example your first name, last name and
date of birth will be checked during the partnership registration.
ADDING A PARTNER
To add a partner yourself:
1. Place your mouse over your name next to the main menu and select Partners
2. Click Add a new partner.
3. Select the partner from the drop-down list.
4. Fill in the necessary information.
5. Confirm your acceptance for sending your data to your partner by ticking the box.
6. Click Send request.
7. Read the agreement carefully. Click Check the data provided for the service provider through
AccessLink to find out what data will be shared with the partner.
8. Click Accept.
9. Your partner request is sent and is waiting for partner's approval. You can check the approval status in
Partners.
ACCEPTING A PARTNER'S REQUEST
A partner can send you a partner request. The request is shown in three places:
l
in your Activity Feed on the Home page
l
under Partner requests on the Home page
107
l
in Partners section.
To accept the request:
1. Click the partner request link.
2. Fill in the necessary information.
3. Confirm your acceptance for sending your data to your partner by ticking the box.
4. Click Accept request.
5. Read the agreement carefully. Click Check the data provided for the service provider through
AccessLink to find out what data will be shared with the Partner.
6. Click Accept.
IF THE PARTNER AGREEMENT CHANGES
If your partner changes the partner agreement, a notification appears in your Activity Feed. To accept the
new agreement:
1. Click the link in your Activity Feed.
2. Fill in the necessary information.
3. Confirm your acceptance for sending your data to your partner by ticking the box.
4. Click Accept request.
5. Read the agreement carefully. Click Check the data provided for the service provider through
AccessLink to find out what data will be shared with the Partner.
6. Click Accept.
VIEWING, EDITING AND REMOVING A PARTNER
The list of partners is shown in Partners. The list shows the partner name, status (for example accepted, waiting for partner's approval), the date and time when the status has been changed and the latest data transfer
time. The latest data transfer time is the time when the partner has taken your data from polarpersonaltrainer.com. Note that the time may be different from the time you have transferred the data to polarpersonaltrainer.com.
1. Place your mouse over your name next to the main menu and select Partners. The list of partners
appears.
2. Click a partner to view the partner information.
3. You can edit the information. Before saving the changes, confirm your acceptance for sending your
data to your partner by ticking the box.
4. Click Remove to remove the partner. Confirm the removal by clicking OK.
108
ARTICLES
Take a look through our training articles section and you'll find all the information you need to improve your
health and fitness. From training tips to setting goals, you'll discover how heart rate and activity monitoring
can combine with Polar training computers to help you achieve your goals.
Place your mouse over your name next to the main menu and select Articles.
109
DELETING YOUR POLAR ACCOUNT
You can delete all your data, including your training data at polarpersonaltrainer.com, by deleting your Polar
account.
1. Go to global Polar website at www.polar.com.
2. Click Account on the bottom of the page.
3. Sign into your Polar account by entering your username and password. Click Sign in.
110
4. Select Unregister.
5. Enter your user name and password.
6. Click Send.
7. Click OK to confirm.
111
DISCLAIMER
The material in this manual is for informational purposes only. The products it describes are subject to change
without prior notice, due to the manufacturer’s continuous development program.
Polar Electro Inc. / Polar Electro Oy makes no representations or warranties with respect to this manual or
with respect to the products described herein.
Polar Electro Inc. / Polar Electro Oy shall not be liable for any damages, losses, costs or expenses, direct,
indirect or incidental, consequential or special, arising out of, or related to the use of this material or the
products described herein.
© 2014 Polar Electro Oy, FI-90440 KEMPELE, Finland.
Polar Electro Oy is a ISO 9001:2008 certified company. All rights reserved. No part of this manual may be
used or reproduced in any form or by any means without prior written permission of Polar Electro Oy. The
names and logos marked with a ™ symbol in this user manual are trademarks of Polar Electro Oy. The names
and logos marked with a ® symbol in this user manual are registered trademarks of Polar Electro Oy, except
that Windows is a trademark of Microsoft Corporation.
112