1
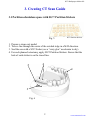
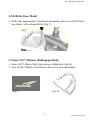
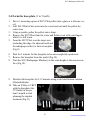
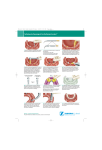
User Manual
SG™ Radiopaque Marker Kit
1. Warnings, cautions and notices
User must comply with all warnings, cautions and notices indicated in
this manual. Failure to comply with any of the warnings, cautions or notices
can result in personal injuries and/or equipment damages. If you do not fully
understand the information contained in this manual, please contact Stomatotech
Inc. Refer to the back cover of this manual for contact information.
Drilling safety warning
WARNING: Always read and follow the operating and safety instructions in the
power tool owner's manual and the instructions for use of the accessory. Always
wear safety goggles to protect your eyes, and wear other appropriate safety
items for protection. Do not use excessive force while drilling. Do not use a
side-to-side movement when drilling. Adjust the drilling speed to the job; generally the harder the material being drilled the slower the RPMs.
2. What’s in the box
Quantity
1 SG™ Markers (Radiopaque Rods)
60
2 SG™ Plast 1.5Oz (43gr)
3 SG™ Partition Stickers (5 sets)
1
140
4 Drill bit ø2mm
5 Measuring spoon
1
1
1
www.stomatotech.com
SG™ Radiopaque Marker Kit
3. Creating CT Scan Guide
3.1 Partition edentulous space with SG™ Partition Stickers
Fig. 5
1.
2.
3.
4.
SG™ Partition Stickers
Prepare a stone cast model.
Trace a line through the center of the residual ridge in a M-D direction.
Seal the area with a SG™ Sealer (use a “crazy glue” accelerator to dry).
For each planned osteotomy, apply SG™ Partition Stickers. Ensure that the
hole of each sticker is on the traced line.
4
2
1
3
Fig. 6
2
www.stomatotech.com
SG™ Radiopaque Marker Kit
3.2 Drill the Stone Model
1. Drill a hole approximately 10mm deep through the center of each SG™ Partition Sticker, with a ø2mm drill bit (Fig. 7).
Fig. 7
3.3 Insert SG™ Markers (Radiopaque Rods)
1. Insert a SG™ Marker (Fig.8) into each pre-drilled hole ((Fig.8a).
2. Trim the SG™ Markers 2-3mm above the level of an occlusal plane.
Fig. 8
Fig. 8a
3
www.stomatotech.com
SG™ Radiopaque Marker Kit
3.4 Form the base-plate (3 to 5 teeth)
1.
2.
3.
4.
5.
6.
7.
8.
Put in 1 measuring spoon of SG™ Plast pellets into a glass or a silicone vessel.
Add 100-150ml of hot water into the vessel and wait until the pellets become clear.
Using a spatula, gather the pellets into a lump.
Remove the SG™ Plast from the water and flatten it out with your fingers
while it is still warm.
Form the SG™ Plast over the target area
(including the ridge, the adjacent teeth and
the radiopaque rod(s)) to form a baseplate
(Fig.9).
Fig. 9
Wait for 3 minutes for the baseplate to become completely opalescent.
Remove the baseplate from the model (Fig 10).
Trim the SG™ Radiopaque Marker(s) to the same height as the mucosa surface (Fig.10).
Fig. 10
9. Disinfect the baseplate for 5-12 minutes using a cold sterilization solution
(Glutaraldehyde).
10. Take an X-Ray or CBCT Fig. 11
with the baseplate (the
CT Guide) in the patient’s mouth to start
planning the implant
treatment (Fig.11).
4
www.stomatotech.com
Mail:
Stomatotech Inc.
1 Holiday Ave.,
East Tower #501,
Pointe-Claire (Montreal)
Quebec H9R 5N3
Canada
Phone: 1-888-559-7795
Email: [email protected]
visit
www.stomatotech.com
or
Scan a QR Code