1
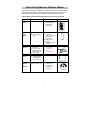
WIRELESS WEATHER CENTRE
WS2306
Quick Set Up Manual
0
Quick Set Up Manual - Weather Station
Using cable connection or 433MHz for wireless transmission of weather data,
this unique weather station can be powered using batteries or AC power (or
both at the same time) for all your weather needs in the home or office.
Open carefully and check that the following contents are complete:
Item:
Consisting of:
Fittings:
Base
Station
1) Main unit
1) AC/DC 240V
power Adaptor optional use
(included)
ThermoHygro
Sensor
1) Main unit
2) Rain protection
cover
1) 10 metre cable optional
connection to the
base station
(included)
2) Wall mounting
screws
3) Plastic anchors for
screws
Wind
Sensor
1) Main unit with
wind vane
2) 10 metre cable
(already attached
to the main unit)
3) Mast holder
1) 1 x U-bolts for
mast holder
2) 2 x Washers
3) 2 x Nuts
4) 2 x cable ties
Rain
Sensor
1) Base and funnel
2) 10 metre cable
(already attached
to the main unit)
‘Heavy
Weather”
PC
software
CD-ROM
(English version only)
1) 2 metre computer
cable for PC
function only optional use
(included)
1
Illustration:
Setting Up:
Important: Operating power is supplied to both the wind and rain sensors by
the thermo-hygro sensor
Thermo-Hygro Sensor
Battery Cover
Sensor sockets
Battery Compartment
Base Station
Battery
compartment
Sockets
and PC
COM port
Setting up using batteries:
1) Sensors: Pull and remove the protective rain cover to reveal three socket
ports and the battery cover. Insert the cables of the wind and rain
sensors in the correctly marked sockets. Slide open the battery
compartment and checking the correct polarity insert 2 x AA/LR6, 1.5V
batteries and replace the cover and rain cover
2) Base Station: Now open the battery cover at the back of the unit and
checking the correct polarity insert 3 x AA/LR6, 1.5V batteries and replace
the battery cover
Setting up using the AC/DC power adaptor:
2
1)
2)
Sensors: Set up the sensors as described above in Setting up using
batteries.
Base Station: Using the AC power adaptor (included in this set) plug it
into mains supply and connect it to the 6.0V DC adaptor socket located at
the side of the base station.
Performing a function test:
After powering up the units, the base station has to synchronize to the sensors
before the weather data can be received. The synchronization mode lasts for
15 minutes. During the synchronization mode, perform the following function
test to check operation:
1)
2)
3)
4)
Check that the wind-vane and fan of the wind sensor can freely rotate by
moving the vane gently and also blowing into the fan to emulate wind
speed and direction
Holding the rain sensor in both hands with the longest side facing you, tilt
the unit from side to side and hear the rain counter flip which emulates
rainfall
The base station will start to receive the 433MHz data transmitted from
the sensors. Data such as rainfall will not be updated as regularly as lets
say the outdoor temperature since it does not rain constantly all the time
and therefore these readings may take up to two minutes before being
shown on the LCD.
Now using the DISPLAY key on the base station, toggle between different
weather modes on the LCD to check that the weather readings can be
received for the relevant sections, for example outdoor temperature and
humidity etc.
Note: Should any outdoor data not be received from the sensors (when “- - -“
is displayed), then check all cables are correctly inserted and press and hold
the PLUS(+) key for 2 seconds to hear a beep and the base station will
synchronize to the sensors transmitting signal. Wind speeds that read zero,
does not mean reception failure, it simply means that there was no wind at the
time of reading the data.
Mounting the units:
Users must take their living surroundings into consideration before deciding
which method is best suited for them. Connection by cable is advantageous in
that data from the sensors to the base station is interference free. Using
433MHz wireless transmission gives users little restriction so that all units can
be positioned virtually anywhere to within a 100m radius of the base station so
decide which method is best suited to you. For cable connecting, please
ensure that the 10 metre cable included in this set meets with your distance
requirements (see accessories in the main user manual for adding extension
cables).
3
To change from 433MHz to cable connection (or vice versa) simply connect
(or disconnect) the 10 metre cable from the base station to the sensor. The
base station will automatically detect the connection and read the weather
data. If the data cannot be received then press and hold the PLUS(+) key for
2 seconds to synchronize the base station with the sensor.
Important: Ensure all signals can be received and/or all cable distances meet
with your requirements at the point of fixing particularly before you start drilling
any mounting holes.
Wind sensor
Secure the main unit to the shaft of the mast holder using the single screw
provided with the front of the sensor (marked E) facing in the East-West
direction otherwise wind direction will not be accurate. Now fix the entire unit
to a suitable mast using the U-bolt, 2 washers and nuts, or the 2 cable ties
found in this set.
Note: For best results mount the wind sensor onto a mast to allow the wind to
freely travel from all directions to enable an accurate reading (ideal mast size
should be from Ø1.9 – Ø0.4 m). Ensure that the 10 metre cable of the wind
sensor meets your distance requirements.
Rain sensor
The rain sensor should be mounted horizontally about 0.6-0.9m off from the
ground in an open area away from trees or other coverings to allow rain to fall
naturally for an accurate reading.
Note: For best results ensure the base is horizontal to allow maximum
drainage of any collected rain
Thermo-hygro Sensor
To wall mount the thermo-hygro sensor, fix the wall holder onto the desired
wall (2 screws are supplied), plug the sensor firmly into the wall holder and
then carefully replace the rain cover back over the thermo-hygro sensor.
Note: After mounting the units, should the weather data not be received then
press and hold the PLUS(+) key for 2 seconds to synchronize the base station
with the sensor.
Weather station for use with your PC
Use your PC to read the latest weather data collected by the weather station.
Just simply install the software from the enclosed CD-ROM onto your PC. For
full details, see the “Heavy Weather “ PC software instructions in the CD-ROM
(English version only)
4
System Requirements:
The minimum system requirement for use of “Heavy Weather” PC software
is:
Operating system: Windows 98 or above
Processor: Pentium 166 MHz or above processor
RAM: 32MB or above
Hard-disc: 20MB free space
CD-ROM drive
Distributed by:
Sontax Australia
Phone: 1800 653 238
Email: [email protected]
Website: www.sontax.com.au
Printed in China
5