1
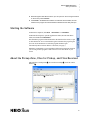
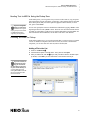
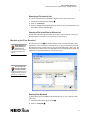
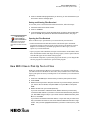
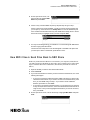
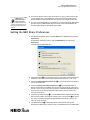
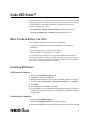
U SING NEO S HARE ™ Using NEO™ Share, you can easily send text or files to NEO 2™ users and receive files back from them as you work with your group or classroom. NEO Share works on your computer desktop or with standard and interactive whiteboards or projectors. If you have any questions, email us: • US, Asia/Pacific, Canada, and Latin America: [email protected] • UK, Europe, Middle East, and Africa: [email protected]. What You Need Before You Start To use NEO Share with NEO 2, you need to have the following: • A computer to run the software, either on the desktop or on an interactive whiteboard • A Renaissance Receiver™ connected to that computer • One or more NEO 2s running System 3.8 or higher It’s a good idea to give your Receiver a unique name in the Renaissance Wireless Server Utility if you have more than one within range of the NEO 2 laptops. To find out how to connect your Renaissance Receiver and give it a unique name, see the NEO 2 Quick Guide or the NEO 1 and NEO 2 User Manual. Installing NEO Share On Windows Comput er s 1. Double-click the NEO Share setup.exe file. 2. Click Next > in the Wizard that appears. 3. Read the license agreement. (You can print it if necessary.) When you’re ready to continue, click I accept the terms in the license agreement. Then, click Next >. 4. Click Install. 5. Click Finish when the installation is complete. 6. You must restart your computer before you start using the program. If you want to restart now, close all other programs; then, click Yes. If not, click No and restart the computer later. On Macintosh Computers 1. Double-click the NEO Share.dmg file. 2. Double-click NEO Share Installer in the volume that opens. 3. Enter the administrator user name and password for the computer; then, click OK. 1 Starting the Software ..... USING NEO SHARE™ 4. Read through the NEO Share license. (You can print it or save it using the buttons on the screen.) Click Continue. 5. Click Install in the NEO Share Installer. The software will be installed, and the folders for this program and the Renaissance Wireless Server Utility will open. S t a r t i ng t h e S o f t w a r e On Windows computers, click Start NEO Share NEO Share. On Macintosh computers, open the Applications folder, then the NEO Share folder, and double-click NEO Share. The NEO Share program will be minimized on the left side of the screen; to open it, click the blue bar. You can click the bar again to minimize the program again. (You can use the Preferences to make the program minimize again automatically after it has been idle for a short time; see page 7.) Whether it is minimized or open, NEO Share will become transparent whenever you are using another program so that it does not cover other items on your screen. About the Pickup Zone, Files for Pickup, and Files Received NEO Share has a Pickup Zone A, a list of Files for Pickup B, and a list of Files Received C. A C B 2 ..... USING NEO SHARE™ About the Pickup Zone, Files for Pickup, and Files Received Sending Text to NEO 2s Using the Pi ckup Zone If you are using NEO Share in a classroom, linked files are a great way to give your class rubrics or additional information supporting an assignment. In the Pickup Zone, you can type the text you want to send to NEO 2s, copy and paste text from another program, document, or Web page, or drag selected text into the NEO Share Pickup Zone. (Only text will be pasted in; graphics will be omitted.) To erase text, press or click Clear. You can even specify that some text should be in a linked file by typing <form> at the beginning of that text and </form> after it. This text won’t be in the main file when it is picked up on the NEO 2, but the user can open the linked file by pressing ctrl-L. For more information about linked files, see the NEO 1 and NEO 2 User Manual. Choosing the Files for Pickup In the Files for Pickup area, you can select text files that you want to send to your NEO 2 users. On Windows computers, files must be in text (.txt) format. On Macintosh computers, you can also select .doc and .rtf (rich text format) files. Adding a File to the List 1. Press or click Browse A. 2. Find the file and press or click its name. Then, press or click Open. 3. After you add the file, click On B if you want your NEO 2 users to be able to pick up the file, or click Off if you don’t want them to see the file in the list yet. If you are a teacher, at the beginning of the day you can add all the files that you will need for your classes that day. As you work with each class, clicking On or Off for each file lets you choose which files that class will see. B C A 3 ..... USING NEO SHARE™ About the Pickup Zone, Files for Pickup, and Files Received Removing a File from the List To remove a file from this list (but not its original location), follow these steps: 1. Check the box next to the file name(s) C. 2. Press or click Remove. 3. Press or click Yes if the program asks if you are sure; you can check the box if you don’t want to see the message again. Opening a File in the Files for Pickup List Double-click a file in the Files for Pickup list to open it. The file will open using your default program for text files (or the type of file you have chosen). Monit oring the Files Received When NEO Share is minimized and you receive files, the NEO Share bar turns orange to show you that files have come in. The Files Received Area A lists the files that have been sent back from NEO 2 users. Depending on what you choose in the preferences (see page 7), this list may show the file names chosen by your NEO users or anonymous file names (File 1, File 2, etc). The files in this list are also saved in your default directory in the Files Received folder; the preferences set the default directory’s location (see page 7). You can drag a file from Files Received to Files for Pickup if it contains something (such as a writing idea) that you want to send to all your NEO users. B A C Deleting Files Received To delete files from the list and from the default directory on your computer, follow these steps: 1. Check the boxes next to the file names B. 2. Press or click Delete C. 4 ..... USING NEO SHARE™ How NEO 2 Users Pick Up Text or Files 3. Press or click Yes if the program asks if you are sure; you can check the box if you don’t want to see the message again. Saving and Clearing Files Received To save files you have received and clear them from the list, follow these steps: 1. Check the boxes next to the file names. 2. Press or click Save. 3. In the window that opens, choose the folder where you want to save the files; then, press or click OK. The preferences determine the default location; see page 7. If the file that you received had any text in a linked file on NEO 2, that text will appear within <form> and </form> tags at the end of the received file. Opening the Files Received There are three ways to open the files you’ve received from your NEO users: • Double-click the file in the Files Received list. The file will open in the default program for text files (or the type of file you have chosen). On Windows, it may be helpful to set WordPad as your default program for text files to give you more options as you work with the file. • Open a program, such as WordPad, and open a new document. In NEO Share, click a file in the Files Received list and drag it into the program you have opened. The text of the file will appear in a document in that program. • On Macintosh computers, if you have the program in the dock, you can drag the file onto the program icon in the dock to open it in that program. How NEO 2 Users Pick Up Text or Files Make sure your Renaissance Receiver is connected to your computer, and make sure your NEO 2 users know the Receiver name. Then, ask your NEO 2 users to follow these steps to pick up the text from your Pickup Zone or one of the files you’ve selected to be picked up: 1. Press one of the file keys to choose where you want to pick up the text or file. 2. Press cmd-O. 3. NEO 2 will ask if you want to keep the current file. If you want to keep it, press Y for yes, enter a name for the file, and press enter. If not, press N for no and press enter. 4. NEO 2 will search for your network (Receiver). If you have connected to a Receiver before, NEO 2 will ask if you want to stay connected to that network. If you want to connect to the same Receiver, press Y for yes, then enter and go to step 5. If you need to choose a different Receiver, press N for no, then enter. If you haven’t connected to a Receiver before, or if you have and you chose not to stay connected to the same one, the screen will list the Receivers that are in range. Press until you have highlighted the Receiver you want to connect to; then, press enter. 5 ..... USING NEO SHARE™ How NEO 2 Users Send Files Back to NEO Share 5. On the Open From screen, use the arrow keys to highlight NEO Share and press enter. 6. If there is only one file available for pickup, skip this step and go to step 7. If there is more than one file available, you will see a list of the text and files that you can pick up. Text is shown as << Pickup Zone >>. Files are identified by file name. All files include a date when they were added to the Pickup Zone or saved. Use the arrow keys to highlight the file you want and press enter. 7. You may see messages telling you that NEO 2 is communicating with NEO Share and then copying from NEO Share. The text from the Pickup Zone or the file will appear in the NEO 2 file space that you had open. If there is a linked file, press ctrl-L to see it. How NEO 2 Users Send Files Back to NEO Share Make sure your Renaissance Receiver is connected to your computer, and make sure your NEO 2 users know the Receiver name. Then, ask your NEO 2 users to follow these steps to send their files back to NEO Share. (The files they send will also remain on NEO 2.) 1. Open the file that you want to send back to NEO Share. 2. Press cmd-send. 3. If you have shut the NEO 2 off since you last connected to the Receiver, one of the following will happen: • If you have connected to a Receiver before, NEO 2 will ask if you want to stay connected to that network. If you want to connect to the same Receiver, press Y for yes, then enter and go to step 4. If you need to choose a different Receiver, press N for no, then enter. • If you haven’t connected to a Receiver before, or if you have and you chose not to stay connected to the same one, the screen will list the Receivers that are in range. Press until you have highlighted the Receiver you want to connect to; then, press enter. 4. On the Open From screen, use the arrow keys to highlight NEO Share and press enter. 6 If NEO Share is minimized, when it receives your file, the NEO Share bar may turn orange to show the person at the computer that files have come in. ..... USING NEO SHARE™ Setting the NEO Share Preferences 5. You may be asked to enter a name for the file. If so, type a name for the file that you are sending; then, press enter. The person who receives it in NEO Share decides whether to show the file name you choose or an anonymous file name. 6. You may see messages telling you that NEO 2 is communicating with NEO Share and then copying to NEO Share. When the screen shows you that NEO 2 has finished copying the file to NEO Share, press enter. Setting the NEO Share Preferences 1. On Windows computers, press or click the Edit menu in NEO Share and choose Preferences. On Macintosh computers, press or click the NEO Share menu and choose Preferences. The Preferences window will open. A B C D E F 2. Check the first box A if you want NEO 2 users to enter a file name for the files they send back. If the box is not checked, the files will be named File 1, File 2, etc. 3. Check the Append date to filenames box B if you want the date to be added to the end of the file name. 4. Check the Display anonymous filenames box C if you want NEO Share to display the file names your NEO 2 users entered or anonymous file names (such as File 1, File 2, etc.) If you are using a projector or interactive whiteboard and your users can see the list of Files Received in NEO Share, you may want to use anonymous file names. 5. Check the box under General D if you want NEO Share to minimize automatically after a certain number of seconds of inactivity. Then, use the arrows E to choose how many seconds the program should wait before minimizing, or enter a new value (up to 100 seconds). 6. The default directory F is where NEO Share saves Files for Pickup, Files Received, and files that you choose to save. The default directory is a NEO Share 7 Closing the Program ..... USING NEO SHARE™ folder within your personal My Documents folder (Windows) or Documents folder (Macintosh). This directory includes the following subfolders: • When you add Files for Pickup, they are saved in a Files for Pickup subfolder within the NEO Share directory. • Files Received are saved in a Files Received subfolder in the NEO Share folder. • Saved files are placed in a subfolder inside a Saved Files folder. The subfolder name includes the date you saved the files. To change the default location for the NEO Share files, press or click Browse and either open a different folder or create a new folder. With the folder highlighted, press or click OK (Windows) or Open (Macintosh). 7. To save your changes to the preferences, press or click OK. Closing the Program To close the program, press or click the X in the red square (Windows) or circle (Macintosh) in the window or on the minimized NEO Share bar. On Windows computers, you can also press or click the File menu and choose Exit. On Macintosh computers, you can press or click the NEO Share menu and choose Quit NEO Share. 8