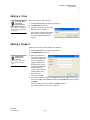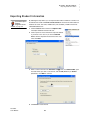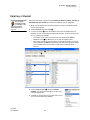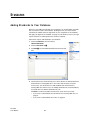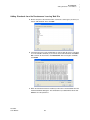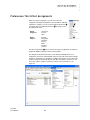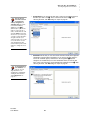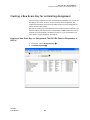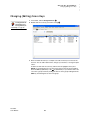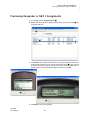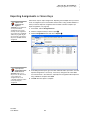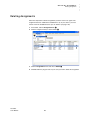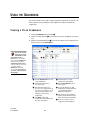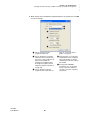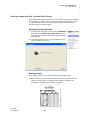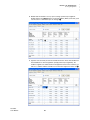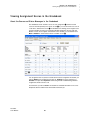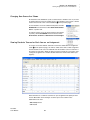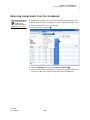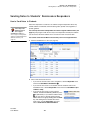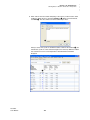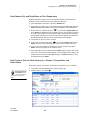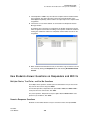
1
User Manual United States United Kingdom, Europe, the Middle East, and Africa Renaissance Learning PO Box 8036 Wisconsin Rapids, WI 54495-8036 Technical questions or problems: UK Tel: 0870 120 0718 Europe, Middle East, and Africa Tel: +44 870 120 0718 Email: [email protected] Telephone: (800) 338-4204 (715) 424-3636 Outside the US: 1.715.424.3636 Fax: (715) 424-4242 Latest support information: Website: www.renlearn.co.uk/renaissance-zone For product information and how to purchase: www.renlearn.co.uk Email (general questions): [email protected] Email (technical questions): [email protected] Website: www.renlearn.com Copyright Notice Copyright © 2011 by Renaissance Learning, Inc. All Rights Reserved. This publication is protected by US and international copyright laws. It is unlawful to duplicate or reproduce any copyrighted material without authorization from the copyright holder. This document may be reproduced only by staff members in schools that have a license for AccelTest software. For more information, contact Renaissance Learning at the address above. 2Know!, Accelerated Math, AccelScan, AccelTest, Advanced Technology for Data-Driven Schools, NEO, NEO 2, NEO Manager, Renaissance, Renaissance Learning, the Renaissance Learning logo, Renaissance Place, Renaissance Receiver, and Renaissance Responder are trademarks of Renaissance Learning, Inc. registered or pending registration in the United States and in other countries. PowerPoint and Windows are registered trademarks of Microsoft Corporation in the United States and/or other countries. Novell® is a trademark of Novell, Inc. UNIX is a registered trademark of The Open Group. Linux® is the registered trademark of Linus Torvalds in the U.S. and other countries. Macintosh and QuickTime are registered trademarks of Apple Inc., registered in the US and other countries. Any standards referenced in this manual, software, or reports are the property of their respective copyright holders. Note: This equipment has been tested and found to comply with the limits for a Class B digital device, pursuant to part 15 of the FCC Rules. These limits are designed to provide reasonable protection against harmful interference in a residential installation. This equipment generates, uses and can radiate radio frequency energy and, if not installed and used in accordance with the instructions, may cause harmful interference to radio communications. However, there is no guarantee that interference will not occur in a particular installation. If this equipment does cause harmful interference to radio or television reception, which can be determined by turning the equipment off and on, the user is encouraged to try to correct the interference by one or more of the following measures: Reorient or relocate the receiving antenna. Increase the separation between the equipment and receiver. Connect the equipment into an outlet on a circuit different from that to which the receiver is connected. Consult the dealer or an experienced radio/TV technician for help. FCC Caution: Any changes or modifications not expressly approved by Renaissance Learning could void the user’s authority to operate the equipment. This device complies with part 15 of the FCC Rules. Operation is subject to the following two conditions: (1) This device may not cause harmful interference, and (2) this device must accept any interference received, including interference that may cause undesired operation. 8/2011 AT v.3.5 C ONTENTS Welcome to AccelTest and the 2Know! Classroom Response System . . . . . . . . . . . . . . . . . . . . . . . . . . . 1 How the 2Know! Classroom Response System Works . . . . . . . . . . . . . . . . . . . . 1 How AccelTest Works. . . . . . . . . . . . . . . . . . . . . . . . . . . . . . . . . . . . . . . . . . . . . . 2 Using AccelTest to Create, Assign, and Score Assignments. . . . . . . . . . . . . . . . . . . . 2 Using AccelTest to Score Assignments You Already Have . . . . . . . . . . . . . . . . . . . . . 2 Using AccelTest with Teacher-Paced Sessions (for In-Class Assignments) . . . . . . . . 2 Programs You Will Use. . . . . . . . . . . . . . . . . . . . . . . . . . . . . . . . . . . . . . . . . . . . . 3 AccelTest Software . . . . . . . . . . . . . . . . . . . . . . . . . . . . . . . . . . . . . . . . . . . . . . . . . . . 3 Renaissance Wireless Server Utility . . . . . . . . . . . . . . . . . . . . . . . . . . . . . . . . . . . . . . 3 Other Programs that You May Use with the 2Know! Classroom Response System . . 3 Tools to Help You with AccelTest . . . . . . . . . . . . . . . . . . . . . . . . . . . . . . . . . . . . . 4 Manual . . . . . . . . . . . . . . . . . . . . . . . . . . . . . . . . . . . . . . . . . . . . . . . . . . . . . . . . . . . . . 4 Help in the Software. . . . . . . . . . . . . . . . . . . . . . . . . . . . . . . . . . . . . . . . . . . . . . . . . . . 4 Free Online Training. . . . . . . . . . . . . . . . . . . . . . . . . . . . . . . . . . . . . . . . . . . . . . . . . . . 4 Need More Help? . . . . . . . . . . . . . . . . . . . . . . . . . . . . . . . . . . . . . . . . . . . . . . . . . 4 Getting Started . . . . . . . . . . . . . . . . . . . . . . . . . . . . . 5 Before You Start . . . . . . . . . . . . . . . . . . . . . . . . . . . . . . . . . . . . . . . . . . . . . . . . . . 5 Getting Started with the AccelTest Software . . . . . . . . . . . . . . . . . . . . . . . . . . . . 5 Starting the AccelTest Software. . . . . . . . . . . . . . . . . . . . . . . . . . . . . . . . . . . . . . . . . . Checking for Updates to the Software . . . . . . . . . . . . . . . . . . . . . . . . . . . . . . . . . . . . . Getting the AccelTest Version and Serial Number . . . . . . . . . . . . . . . . . . . . . . . . . . . . Navigating the AccelTest Software . . . . . . . . . . . . . . . . . . . . . . . . . . . . . . . . . . . . . . . Tasks to Be Completed for AccelTest . . . . . . . . . . . . . . . . . . . . . . . . . . . . . . . . . . . . . Closing the AccelTest Software . . . . . . . . . . . . . . . . . . . . . . . . . . . . . . . . . . . . . . . . . . 5 6 7 7 8 8 Getting Started with the 2Know! Classroom Response System . . . . . . . . . . . . . 9 Setting Up the 2Know! Classroom Response System. . . . . . . . . . . . . . . . . . . . . . . . . 9 Assigning a Unique Name to Each Receiver If You Have More than One. . . . . . . . . 10 Changing the Administrator PIN . . . . . . . . . . . . . . . . . . . . . . . . . . . . . . . . . . . . . . . . 11 Assigning a Student Owner to Each Responder . . . . . . . . . . . . . . . . . . . . . . . . . . . . 12 Changing a Student’s Personal Identification Number (PIN) for a Responder. . . . . . 13 Displaying a Forgotten Student PIN. . . . . . . . . . . . . . . . . . . . . . . . . . . . . . . . . . . . . . 14 Resetting the Student Owner of a Responder . . . . . . . . . . . . . . . . . . . . . . . . . . . . . . 14 Responder Models, Firmware Versions, and Updates. . . . . . . . . . . . . . . . . . . . . . . . 14 Firmware Versions for RESP Responder Models. . . . . . . . . . . . . . . . . . . . . . . . 14 Firmware Versions for RES-1001 Responder Models . . . . . . . . . . . . . . . . . . . . 15 Updating Firmware or Changing the Firmware Version Being Used . . . . . . . . . 16 AccelTest User Manual i C l a s s e s a n d S t u d e n t s . . . . . . . . . . . . . . . . . . . . . . . 17 Using the Classes Tab . . . . . . . . . . . . . . . . . . . . . . . . . . . . . . . . . . . . . . . . . . . . 17 Adding a Class . . . . . . . . . . . . . . . . . . . . . . . . . . . . . . . . . . . . . . . . . . . . . . . . . . 18 Adding a Student . . . . . . . . . . . . . . . . . . . . . . . . . . . . . . . . . . . . . . . . . . . . . . . . 18 Enrolling Students in a Class . . . . . . . . . . . . . . . . . . . . . . . . . . . . . . . . . . . . . . . 19 Unenrolling Students from a Class. . . . . . . . . . . . . . . . . . . . . . . . . . . . . . . . . . . 20 Importing Classes from Renaissance Place . . . . . . . . . . . . . . . . . . . . . . . . . . . 21 Importing Student Names from a File . . . . . . . . . . . . . . . . . . . . . . . . . . . . . . . . 23 About Comma Separated Value (CSV) Files . . . . . . . . . . . . . . . . . . . . . . . . . . . . . . . 23 About Importing Data from Other Desktop Renaissance Learning Programs . . . . . . 24 How to Import Students from a CSV File or Another Desktop Program . . . . . . . . . . 24 Editing a Class Name. . . . . . . . . . . . . . . . . . . . . . . . . . . . . . . . . . . . . . . . . . . . . 27 Editing Student Names or IDs . . . . . . . . . . . . . . . . . . . . . . . . . . . . . . . . . . . . . . 28 Deleting a Class . . . . . . . . . . . . . . . . . . . . . . . . . . . . . . . . . . . . . . . . . . . . . . . . . 29 Exporting Student Information . . . . . . . . . . . . . . . . . . . . . . . . . . . . . . . . . . . . . . 30 Deleting a Student . . . . . . . . . . . . . . . . . . . . . . . . . . . . . . . . . . . . . . . . . . . . . . . 31 Standards . . . . . . . . . . . . . . . . . . . . . . . . . . . . . . . . 32 Adding Standards to Your Database . . . . . . . . . . . . . . . . . . . . . . . . . . . . . . . . . 32 Adding Standards from the Renaissance Learning Web Site . . . . . . . . . . . . . . . . . . 33 Adding Standards from a File . . . . . . . . . . . . . . . . . . . . . . . . . . . . . . . . . . . . . . . . . . 34 Deleting Standards. . . . . . . . . . . . . . . . . . . . . . . . . . . . . . . . . . . . . . . . . . . . . . . 36 Setting Up Assignments . . . . . . . . . . . . . . . . . . . . . . 37 Viewing the List of Assignments . . . . . . . . . . . . . . . . . . . . . . . . . . . . . . . . . . . . 37 Preferences That Affect Assignments . . . . . . . . . . . . . . . . . . . . . . . . . . . . . . . . 38 Item (Question) Types . . . . . . . . . . . . . . . . . . . . . . . . . . . . . . . . . . . . . . . . . . . . 39 Creating Assignments in AccelTest . . . . . . . . . . . . . . . . . . . . . . . . . . . . . . . . . . 39 Adding Graphics, Equations, and Plots to Assignments . . . . . . . . . . . . . . . . . . 45 Adding Graphics to Assignments. . . . . . . . . . . . . . . . . . . . . . . . . . . . . . . . . . . . . . . . 45 Adding Equations to Assignments . . . . . . . . . . . . . . . . . . . . . . . . . . . . . . . . . . . . . . . 46 Adding Plots to Assignments . . . . . . . . . . . . . . . . . . . . . . . . . . . . . . . . . . . . . . . . . . . 48 Creating a New Score Key for an Existing Assignment . . . . . . . . . . . . . . . . . . . 50 Creating a New Score Key for Assignments That Will Be Done on Responders or NEO 2s . . . . . . . . . . . . . . . . . . . . . . . . . . . . . . . . . . . . . . . . . . . . . . . . . . . . . . . . . 50 Creating a New Score Key for an Assignment That Will Be Scored with Scanners. . 53 Scanning a Card with the Correct Answers . . . . . . . . . . . . . . . . . . . . . . . . . . . . . . . . 56 Aligning Items to Standards on an Assignment or Score Key . . . . . . . . . . . . . . 57 Importing Assignments . . . . . . . . . . . . . . . . . . . . . . . . . . . . . . . . . . . . . . . . . . . 59 Changing (Editing) Assignments . . . . . . . . . . . . . . . . . . . . . . . . . . . . . . . . . . . . 60 Adding Items to the Assignment . . . . . . . . . . . . . . . . . . . . . . . . . . . . . . . . . . . . . . . . 62 AccelTest User Manual ii ..... CONTENTS Adding One Item to the End of the Assignment . . . . . . . . . . . . . . . . . . . . . . . . . Adding Multiple Items, or Adding Items from the Libraries or Other Assignments . . . . . . . . . . . . . . . . . . . . . . . . . . . . . . . . . . . . . . . . . . . . . . . . . . . . Changing (Editing) an Item on an Assignment . . . . . . . . . . . . . . . . . . . . . . . . . . . . . Moving Items on an Assignment . . . . . . . . . . . . . . . . . . . . . . . . . . . . . . . . . . . . . . . . Changing Assignment Properties . . . . . . . . . . . . . . . . . . . . . . . . . . . . . . . . . . . . . . . Changing the Assignment Mode . . . . . . . . . . . . . . . . . . . . . . . . . . . . . . . . . . . . . . . . 62 62 64 66 66 67 Changing (Editing) Score Keys . . . . . . . . . . . . . . . . . . . . . . . . . . . . . . . . . . . . . 69 Copying Assignments . . . . . . . . . . . . . . . . . . . . . . . . . . . . . . . . . . . . . . . . . . . . 71 Printing a Single Copy of an Assignment. . . . . . . . . . . . . . . . . . . . . . . . . . . . . . 72 Previewing Responder or NEO 2 Assignments . . . . . . . . . . . . . . . . . . . . . . . . . 73 Exporting Assignments or Score Keys . . . . . . . . . . . . . . . . . . . . . . . . . . . . . . . . 74 Deleting Assignments . . . . . . . . . . . . . . . . . . . . . . . . . . . . . . . . . . . . . . . . . . . . 75 Using the Grad ebook . . . . . . . . . . . . . . . . . . . . . . . . 76 Viewing a Class Gradebook . . . . . . . . . . . . . . . . . . . . . . . . . . . . . . . . . . . . . . . . 76 Adding Assignments to the Gradebook . . . . . . . . . . . . . . . . . . . . . . . . . . . . . . . 77 Adding an AccelTest Assignment or Score Key . . . . . . . . . . . . . . . . . . . . . . . . . . . . . 78 Adding a Points-Only Assignment . . . . . . . . . . . . . . . . . . . . . . . . . . . . . . . . . . . . . . . 80 Assigning Assignments to Students. . . . . . . . . . . . . . . . . . . . . . . . . . . . . . . . . . 83 Printing Assignments for Students . . . . . . . . . . . . . . . . . . . . . . . . . . . . . . . . . . . 84 Changing the Dates, Category, and Other Properties for Gradebook Assignments. . . . . . . . . . . . . . . . . . . . . . . . . . . . . . . . . . . . . . . . . . . . . . . . . . . . 85 How Students Complete Assignments. . . . . . . . . . . . . . . . . . . . . . . . . . . . . . . . 87 Using the Responder or NEO 2 . . . . . . . . . . . . . . . . . . . . . . . . . . . . . . . . . . . . . . . . . Completing In-Class Assignments, Including Quizzes, Tests, and Exams, Using a Responder or NEO 2 . . . . . . . . . . . . . . . . . . . . . . . . . . . . . . . . . . . . . . . Completing Homework Using the Responder Only . . . . . . . . . . . . . . . . . . . . . . Using the AccelScan Scan Cards . . . . . . . . . . . . . . . . . . . . . . . . . . . . . . . . . . . . . . . For Manual Scoring . . . . . . . . . . . . . . . . . . . . . . . . . . . . . . . . . . . . . . . . . . . . . . . . . . 87 87 87 88 89 Scoring Assignments . . . . . . . . . . . . . . . . . . . . . . . . . . . . . . . . . . . . . . . . . . . . . 89 Scoring Assignments with the Responder . . . . . . . . . . . . . . . . . . . . . . . . . . . . . . . . . Scoring Assignments with the NEO 2 . . . . . . . . . . . . . . . . . . . . . . . . . . . . . . . . . . . . Scoring Assignments with the AccelScan Scanner . . . . . . . . . . . . . . . . . . . . . . . . . . Starting the Scanning Session . . . . . . . . . . . . . . . . . . . . . . . . . . . . . . . . . . . . . . Scanning Cards . . . . . . . . . . . . . . . . . . . . . . . . . . . . . . . . . . . . . . . . . . . . . . . . . Ending the Scanning Session. . . . . . . . . . . . . . . . . . . . . . . . . . . . . . . . . . . . . . . Scoring Assignments Manually . . . . . . . . . . . . . . . . . . . . . . . . . . . . . . . . . . . . . . . . . Scoring Points-Only Assignments . . . . . . . . . . . . . . . . . . . . . . . . . . . . . . . . . . . . . . . Overriding Scores in the Gradebook . . . . . . . . . . . . . . . . . . . . . . . . . . . . . . . . . . . . . 89 89 90 90 90 91 91 94 94 Viewing Assignment Scores in the Gradebook . . . . . . . . . . . . . . . . . . . . . . . . . 96 About the Scores and Status Messages in the Gradebook . . . . . . . . . . . . . . . . . . . . 96 Changing How Scores Are Shown. . . . . . . . . . . . . . . . . . . . . . . . . . . . . . . . . . . . . . . 97 Viewing Students’ Scores for Each Item on an Assignment . . . . . . . . . . . . . . . . . . . 97 AccelTest User Manual iii ..... CONTENTS How Grades Are Calculated. . . . . . . . . . . . . . . . . . . . . . . . . . . . . . . . . . . . . . . . 98 Term, Semester, and Final Grades . . . . . . . . . . . . . . . . . . . . . . . . . . . . . . . . . . . . . . 98 How AccelTest Preferences Affect Grades . . . . . . . . . . . . . . . . . . . . . . . . . . . . . . . . 99 Categories (Category Weights) . . . . . . . . . . . . . . . . . . . . . . . . . . . . . . . . . . . . . 99 Exams. . . . . . . . . . . . . . . . . . . . . . . . . . . . . . . . . . . . . . . . . . . . . . . . . . . . . . . . . 99 Grading Scale . . . . . . . . . . . . . . . . . . . . . . . . . . . . . . . . . . . . . . . . . . . . . . . . . . . 99 Extra Credit . . . . . . . . . . . . . . . . . . . . . . . . . . . . . . . . . . . . . . . . . . . . . . . . . . . . . . . 100 Two Ways to Choose Extra Credit Assignments. . . . . . . . . . . . . . . . . . . . . . . . 100 How AccelTest Uses Points Possible with Extra Credit . . . . . . . . . . . . . . . . . . 100 How Category Weights Work with Extra Credit . . . . . . . . . . . . . . . . . . . . . . . . 100 Exporting Scores from AccelTest . . . . . . . . . . . . . . . . . . . . . . . . . . . . . . . . . . . 102 Exporting Results from One Class’s Assignments in the Gradebook . . . . . . . . . . . Exporting Detailed Scoring Data for One Assignment and Multiple Classes. . . . . . Standard Export . . . . . . . . . . . . . . . . . . . . . . . . . . . . . . . . . . . . . . . . . . . . . . . . Custom Export . . . . . . . . . . . . . . . . . . . . . . . . . . . . . . . . . . . . . . . . . . . . . . . . . 102 104 105 106 Unassigning Assignments . . . . . . . . . . . . . . . . . . . . . . . . . . . . . . . . . . . . . . . . 108 Removing Assignments from the Gradebook . . . . . . . . . . . . . . . . . . . . . . . . . 110 Sending Notes to Students’ Renaissance Responders . . . . . . . . . . . . . . . . . . 111 How to Send Notes to Students. . . . . . . . . . . . . . . . . . . . . . . . . . . . . . . . . . . . . . . . 111 How Students Get and Read Notes on Their Responders . . . . . . . . . . . . . . . . . . . 113 How Teachers View the Note History for a Student, Change Notes, and Delete Notes . . . . . . . . . . . . . . . . . . . . . . . . . . . . . . . . . . . . . . . . . . . . . . . . . . . . . . 113 U s i n g S e s s i o n s . . . . . . . . . . . . . . . . . . . . . . . . . . . . 115 What Are Sessions?. . . . . . . . . . . . . . . . . . . . . . . . . . . . . . . . . . . . . . . . . . . . . 115 Using the Teacher-Paced Session . . . . . . . . . . . . . . . . . . . . . . . . . . . . . . . . . . 116 Starting a Session for Projected Assignments. . . . . . . . . . . . . . . . . . . . . . . . . . . . . Starting a Session for Existing Assignments . . . . . . . . . . . . . . . . . . . . . . . . . . . . . . Starting a Session for Verbal Questions . . . . . . . . . . . . . . . . . . . . . . . . . . . . . . . . . Starting a Session for PowerPoint Slides (Windows Only) . . . . . . . . . . . . . . . . . . . PowerPoint Sessions with an Existing Assignment . . . . . . . . . . . . . . . . . . . . . PowerPoint Sessions with Verbal Questions . . . . . . . . . . . . . . . . . . . . . . . . . . 117 121 124 128 129 132 Using the Student-Paced Sessions . . . . . . . . . . . . . . . . . . . . . . . . . . . . . . . . . 136 How Students Answer Questions on Responders and NEO 2s. . . . . . . . . . . . 138 Multiple-Choice, True/False, and Yes/No Questions . . . . . . . . . . . . . . . . . . . . . . . . 138 Numeric-Response Questions. . . . . . . . . . . . . . . . . . . . . . . . . . . . . . . . . . . . . . . . . 138 Short-Answer Questions . . . . . . . . . . . . . . . . . . . . . . . . . . . . . . . . . . . . . . . . . . . . . 139 Viewing Information on Past Sessions . . . . . . . . . . . . . . . . . . . . . . . . . . . . . . . 140 Reports . . . . . . . . . . . . . . . . . . . . . . . . . . . . . . . . . . 142 Printing or Previewing AccelTest Reports . . . . . . . . . . . . . . . . . . . . . . . . . . . . 142 Report Descriptions . . . . . . . . . . . . . . . . . . . . . . . . . . . . . . . . . . . . . . . . . . . . . 143 Answer Key . . . . . . . . . . . . . . . . . . . . . . . . . . . . . . . . . . . . . . . . . . . . . . . . . . . . . . . 143 Assignment Analysis . . . . . . . . . . . . . . . . . . . . . . . . . . . . . . . . . . . . . . . . . . . . . . . . 143 AccelTest User Manual iv ..... CONTENTS Assignment Results . . . . . . . . . . . . . . . . . . . . . . . . . . . . . . . . . . . . . . . . . . . . . . . . . Assignment Standards. . . . . . . . . . . . . . . . . . . . . . . . . . . . . . . . . . . . . . . . . . . . . . . Assignments . . . . . . . . . . . . . . . . . . . . . . . . . . . . . . . . . . . . . . . . . . . . . . . . . . . . . . Class Standards . . . . . . . . . . . . . . . . . . . . . . . . . . . . . . . . . . . . . . . . . . . . . . . . . . . Form Numbers . . . . . . . . . . . . . . . . . . . . . . . . . . . . . . . . . . . . . . . . . . . . . . . . . . . . . Free Response Grading Worksheet . . . . . . . . . . . . . . . . . . . . . . . . . . . . . . . . . . . . Gradebook Summary by Term . . . . . . . . . . . . . . . . . . . . . . . . . . . . . . . . . . . . . . . . Group Assignment . . . . . . . . . . . . . . . . . . . . . . . . . . . . . . . . . . . . . . . . . . . . . . . . . . Overdue Assignments . . . . . . . . . . . . . . . . . . . . . . . . . . . . . . . . . . . . . . . . . . . . . . . Program Information . . . . . . . . . . . . . . . . . . . . . . . . . . . . . . . . . . . . . . . . . . . . . . . . Student Grade . . . . . . . . . . . . . . . . . . . . . . . . . . . . . . . . . . . . . . . . . . . . . . . . . . . . Student ID . . . . . . . . . . . . . . . . . . . . . . . . . . . . . . . . . . . . . . . . . . . . . . . . . . . . . . . . Student Record . . . . . . . . . . . . . . . . . . . . . . . . . . . . . . . . . . . . . . . . . . . . . . . . . . . . Student Standards . . . . . . . . . . . . . . . . . . . . . . . . . . . . . . . . . . . . . . . . . . . . . . . . . . 144 144 144 145 145 145 146 146 146 147 147 147 148 148 Preferences . . . . . . . . . . . . . . . . . . . . . . . . . . . . . . . 149 AccelTest Preferences . . . . . . . . . . . . . . . . . . . . . . . . . . . . . . . . . . . . . . . . . . . 149 Auto Update . . . . . . . . . . . . . . . . . . . . . . . . . . . . . . . . . . . . . . . . . . . . . . . . . . . . . . . Assignment Creation . . . . . . . . . . . . . . . . . . . . . . . . . . . . . . . . . . . . . . . . . . . . . . . . Categories . . . . . . . . . . . . . . . . . . . . . . . . . . . . . . . . . . . . . . . . . . . . . . . . . . . . . . . . Data Location. . . . . . . . . . . . . . . . . . . . . . . . . . . . . . . . . . . . . . . . . . . . . . . . . . . . . . Devices . . . . . . . . . . . . . . . . . . . . . . . . . . . . . . . . . . . . . . . . . . . . . . . . . . . . . . . . . . Exams . . . . . . . . . . . . . . . . . . . . . . . . . . . . . . . . . . . . . . . . . . . . . . . . . . . . . . . . . . . Grading Scale . . . . . . . . . . . . . . . . . . . . . . . . . . . . . . . . . . . . . . . . . . . . . . . . . . . . . Libraries/ Standards . . . . . . . . . . . . . . . . . . . . . . . . . . . . . . . . . . . . . . . . . . . . . . . . . . . . . . . . Password . . . . . . . . . . . . . . . . . . . . . . . . . . . . . . . . . . . . . . . . . . . . . . . . . . . . . . . . . Registration Information. . . . . . . . . . . . . . . . . . . . . . . . . . . . . . . . . . . . . . . . . . . . . . Reports . . . . . . . . . . . . . . . . . . . . . . . . . . . . . . . . . . . . . . . . . . . . . . . . . . . . . . . . . . Responder . . . . . . . . . . . . . . . . . . . . . . . . . . . . . . . . . . . . . . . . . . . . . . . . . . . . . . . . Scanner Settings . . . . . . . . . . . . . . . . . . . . . . . . . . . . . . . . . . . . . . . . . . . . . . . . . . School Year . . . . . . . . . . . . . . . . . . . . . . . . . . . . . . . . . . . . . . . . . . . . . . . . . . . . . . . 150 150 150 150 150 151 151 151 152 152 152 152 153 153 Setting the Data Location Preference . . . . . . . . . . . . . . . . . . . . . . . . . . . . . . . 154 Check Rights Before Choosing or Creating a Different Data Folder . . . . . . . . . . . . Rights Required for Network Data Folders . . . . . . . . . . . . . . . . . . . . . . . . . . . . Subjects . . . . . . . . . . . . . . . . . . . . . . . . . . . . . . . . . . . . . . . . . . . . . . . . . . . . . . . . . . Rights Required for Data Folders on Windows and Macintosh OS X Computers . . . . . . . . . . . . . . . . . . . . . . . . . . . . . . . . . . . . . . . . . . . . . . . How to Choose a Different Data Location . . . . . . . . . . . . . . . . . . . . . . . . . . . . . . . . 154 154 154 155 156 Setting Reports Preferences . . . . . . . . . . . . . . . . . . . . . . . . . . . . . . . . . . . . . . 157 Setting Assignment Creation Preferences . . . . . . . . . . . . . . . . . . . . . . . . . . . . 159 About Lib raries . . . . . . . . . . . . . . . . . . . . . . . . . . . . 164 Installing Accelerated Math Libraries . . . . . . . . . . . . . . . . . . . . . . . . . . . . . . . . . . . . 164 AccelTest User Manual v ..... CONTENTS Other Respond er Features an d Settings . . . . . . . . . . 165 Changing the Responder Font Size . . . . . . . . . . . . . . . . . . . . . . . . . . . . . . . . . 165 Changing the Font Size on Responder Model RESP . . . . . . . . . . . . . . . . . . . . 165 Changing the Font Size on Responder Model RES-1001 . . . . . . . . . . . . . . . . 165 Using the Calculator in the Responder . . . . . . . . . . . . . . . . . . . . . . . . . . . . . . 166 Using the Calculator . . . . . . . . . . . . . . . . . . . . . . . . . . . . . . . . . . . . . . . . . . . . . . . . 166 Disabling the Calculator Function . . . . . . . . . . . . . . . . . . . . . . . . . . . . . . . . . . . . . . 166 Index . . . . . . . . . . . . . . . . . . . . . . . . . . . . . . . . . . . 167 AccelTest User Manual vi ..... CONTENTS W ELCOME TO A CCEL T EST AND THE 2K NOW ! C LASSROOM R ESPONSE S YSTEM The 2Know! classroom response system allows students to enter their answers to assignments on hand-held Responders or NEO 2s for quick, automatic scoring. The system also allows teachers to send homework and notes to students. AccelTest software allows you to create your own quizzes, tests, and assignments for any subject, score assignments quickly, and have the scores entered in its electronic Gradebook. AccelTest can help you manage all your existing assignments, quizzes, and tests. How the 2Know! Classroom Response System Works The optional 2Know! classroom response system includes a Renaissance Receiver and Renaissance Responders. The Renaissance Receiver is connected to the teacher’s computer. Working with the AccelTest software, it sends assignments, homework, and notes from the teacher to students’ Responders. When students use the Responders to complete assignments, the Receiver sends their responses to the AccelTest software for quick, automatic scoring. Your Responder model number and firmware version determine which features the Responder supports. For more information, see page 14. AccelTest User Manual When you purchase the 2Know! classroom response system, students use hand-held Renaissance Responders to answer questions to assignments. They can also use them to get their assignments and notes from the teacher. If you received this software with a NEO 2 SmartOption Mobile Lab, students can also use NEO 2s to answer questions to assignments, though NEO 2 does not support homework and notes. 1 How AccelTest Works ..... W E L C O M E T O A C CE L TE S T A N D T H E 2 K N OW ! C L A S S RO O M R E S P O N S E S Y S T EM How Acce lTe st Works You can use AccelTest to create, assign, and score the assignments that you want to give your students, or you can use it to score assignments that exist outside of AccelTest. You can also use AccelTest for in-class assignments. AccelTest also calculates overall student grades, which are based on the dates teachers set for the school year and terms and on the grading scale teachers have chosen. Using AccelTest to Create, Assign, and Score Assignments 1. You create assignments. Assignment questions can be in a variety of formats, including multiple-choice, matching, ranking, true/false, yes/no, essay, short answer, or numeric response. 2. You add the assignments to your class Gradebook. 3. If you didn’t assign the assignments as you added them to the class Gradebook, you assign the assignments later. If students need printed copies of the assignments, they will be printed when you assign them. 4. The assignments are scored in one of three ways: • Students enter their answers on Renaissance Responders or NEO 2s during a student-paced session, and the assignments are then scored automatically by the software. • Students enter their answers on AccelScan cards, and you use the AccelScan scanner to scan the cards for automatic scoring. • You score the assignments manually. Using AccelTest to Score Assignments You Already Have 1. You create a score key for the existing assignments. (The assignments aren’t in the AccelTest software—only the score key is.) 2. You add the score key to your class Gradebook. 3. You assign the score key to your students. 4. The assignments are scored in one of three ways: • Students enter their answers on Renaissance Responders or NEO 2s during student-paced sessions, and the assignments are then scored automatically by the software. • Students enter their answers on AccelScan cards, and you use the AccelScan scanner to scan the cards for automatic scoring. • You score the assignments manually. Using AccelTest wit h Teacher-Paced Sessi ons (for I n- Class Assignments) 1. You create the assignment. 2. You start a teacher-paced session and select the assignment. You can project the assignment, use PowerPoint slides, ask students questions verbally, or use printed copies for students. AccelTest User Manual 2 Programs You Will Use ..... W E L C O M E T O A C CE L TE S T A N D T H E 2 K N OW ! C L A S S RO O M R E S P O N S E S Y S T EM 3. Using Renaissance Responders or NEO 2s, students complete the assignment in class at the pace you set in the session. These assignments may or may not be scored, depending on the choice you made as you started the session. If you chose to score the assignments, the software will score them automatically, and the scores will appear in your Gradebook after the session is complete. Programs You Will Use Before you install and use the programs listed below, make sure that your computers meet the minimum system requirements for the AccelTest software, the 2Know! classroom response system, and AccelScan. To see the requirements, visit www.renlearn.com/requirements. AccelTest Software The AccelTest software is included with the 2Know! classroom response system and with NEO 2 SmartOption Mobile Labs, classroom bundles, or class sets. You can use this software to create, assign, print, and score assignments for students, view student scores, and print reports. To install this software, refer to the AccelTest Software Installation Guide. Renai ssance Wi reless Server Util ity The Renaissance Wireless Server Utility is installed with the AccelTest software. It helps you manage and monitor communication between your computer and the Renaissance Receiver. You can also use it to set the administrator Personal Identification Number (PIN) for Responders and to change the Receiver name if you need to distinguish your Receiver from others in your school. Other Programs that You May Use wit h the 2Know! Classroom Response System You can also download the 2Know! Toolbar at www.renlearn.com/neo/ downloads (US) or http://renlearn.co.uk/ renaissance-zone/rzinform/software-downloads (UK). AccelTest isn’t the only software from Renaissance Learning that can use the 2Know! classroom response system. You can also use the 2Know! Toolbar, which you can install using the 2Know! Toolbar CD that is in the back of the 2Know! Setup and Resource Guide (US). The 2Know! Toolbar allows you to quickly quiz or get feedback from your class or group. For more information, see the instructions installed with the program. You can also use the classroom response system with Accelerated Math RP so students can enter their answers to assignments using Responders or NEO 2s. If you use the classroom response system with Accelerated Math RP, you must download and install the Renaissance Responder program from Renaissance Place. For more information, see the Accelerated Math Software Manual. You don’t need to install AccelTest to use Renaissance Responders or NEO 2s with the 2Know! Toolbar or Accelerated Math RP. You can only use Responders or NEO 2s with one program at a time. AccelTest User Manual 3 Tools to Help You with AccelTest ..... W E L C O M E T O A C CE L TE S T A N D T H E 2 K N OW ! C L A S S RO O M R E S P O N S E S Y S T EM Tools to Help You with AccelTest Manual If you’re reading this manual at your computer, you’ve already discovered that the AccelTest User Manual is in your Start menu under AccelTest (Windows) or in your program folder (Macintosh). When you are reading this manual on your computer, all references to other pages or sections are links that you can click to go directly to that page, section, or procedure. When you move the cursor over the link, it will change to a hand pointing to the link. The sections listed in the Contents and the page numbers in the Index are also links. If you are using Adobe Reader, you can also use the buttons in the Reader to go forward or back one page or to go to a specific page number. This manual will help you use AccelTest software on both Windows and Macintosh computers. In most cases, the steps are the same for both operating systems. When the Windows and Macintosh software is different, this manual will provide the information for both. Help i n the Software While using AccelTest, you can get help by clicking the Help menu and clicking AccelTest Help. This menu is available no matter where you are in the program. Use the contents and index in the help to find the information you need. Fr ee Onl ine Trai ni ng Renaissance Learning provides free online training and additional resources for its products through the Renaissance Training Center. Visit www.renlearn.com/training/ and choose from a variety of learning opportunities, including: • Webinars: Using the Internet and a telephone, attend guided software training with a Renaissance Coach. • On-Demand Sessions: These short tutorials cover essential step-by-step guidance on specific software tasks. Need More Help? • Knowledge Base: Search the Renaissance Learning Knowledge Base on the Web at support.renlearn.com/techkb/ for technical support information. • Email: In the US, send general questions to [email protected]; send technical questions to [email protected]. In the UK, send general questions to [email protected]; send technical questions to [email protected]. • Phone: See the front of this manual for the telephone number for your area. AccelTest User Manual 4 G ETTING S TARTED This section gives you the procedures you’ll need to start using the 2Know! classroom response system and AccelTest. Before You Start Before you start using AccelTest and the 2Know! classroom response system, check the following: • Make sure you’ve installed the AccelTest software. See the AccelTest Software Installation Guide. • Make sure you’ve connected the Renaissance Receiver to your computer. For instructions in the US, see the 2Know! Setup and Resource Guide or the NEO 2 Quick Guide if you have a NEO SmartOption Mobile Lab. In the UK, go to http://renlearn.co.uk/renaissance-zone/rz-inform/user-guides and download the 2Know! CRS Installation and Set-Up Guide or the NEO 2 wireless setup instructions. • If you have AccelScan scanners, make sure they’re connected. See the AccelTest Software Installation Guide or the AccelScan User’s Guide. G e t t i n g S t a r t e d w it h t he A c c e lT e s t S o f t w a r e St art ing the Accel Test Software Important: When you start the computer, log in with your own user name and password so that you see the correct classes in AccelTest. Users who log in to this computer with a different user name and password will be asked to select their own database. For more information, see the AccelTest Software Installation Guide. Follow these steps to start the AccelTest software: 1. Follow the instructions for your operating system: If you have upgraded from version 2.x to version 3.x, the first time you start AccelTest after the upgrade, the Data Migration Tool will convert your database to the newest format. This may take some time. Windows: Click StartAll ProgramsAccelTestAccelTest. Macintosh: Open the Applications folder. Then, open the AccelTest folder. Double-click AccelTest A in that folder. A 2. If this is the first time you have started AccelTest, the program may ask you to choose a data location and enter your serial number. See the AccelTest Software Installation Guide for details. AccelTest User Manual 5 ..... GETTING STARTED Getting Started with the AccelTest Software 3. Enter your password. (If you haven’t changed it, the default password is admin.) Then, click OK. 4. If this is the first time you have started AccelTest, the program will ask if you want to set up your school year and terms. It’s a good idea to do this right away so your grading periods are available. To do this, click Setup School Year Now and follow the instructions for the School Year preference on page 153. Checking for Updates to the Software AccelTest automatically checks for updates periodically. This helps ensure that you have the latest version of the software. The Auto Update preference sets how often the software checks for updates; see page 150. If you update from version 2.x to version 3.x, the first time you start AccelTest after the upgrade, the Data Migration Tool will convert your database to the newest format. This may take some time. If you want to check for updates manually, click the Help menu and choose Check for Updates. The software will notify you if no updates are available. If updates are available, they’ll be listed. Click Download to get the updates. Click Done when the download is complete. The update file will be downloaded to your computer’s desktop; double-click it to begin the update. You may be told to restart your computer after the update is installed. A B A If you decide not to download some updates, check the boxes next to them before clicking Download. AccelTest will only download updates that are not checked. AccelTest User Manual 6 B If you don’t want to download any updates now, click Cancel. ..... GETTING STARTED Getting Started with the AccelTest Software Getti ng the AccelTest Ver si on and Seri al Number Follow the instructions for your type of computer to see your AccelTest software version or serial number: Windows computers: Click the Help menu and choose About AccelTest. Macintosh computers: Click the AccelTest menu and choose About AccelTest. Navigat ing the Accel Test Software Click the tabs in the software to switch between AccelTest screens: A B C D A Assignments: Click this tab to create, change, or delete assignments. C Gradebook: Click this tab to assign or print assignments and monitor student scores. B Sessions: Click this tab to start or monitor teacher-paced or student-paced sessions. D Classes: Click this tab to add, edit, or delete students and classes and to manage class enrollment. You’ll find other tasks in the menus at the top of the screen. For example, to set preferences, click the Preferences menu and choose a preference. To generate reports, click the Reports menu and choose a report. AccelTest User Manual 7 ..... GETTING STARTED Getting Started with the AccelTest Software Tasks to Be Compl et ed for Accel Test After AccelTest is installed on your computer, complete these tasks to set up your data and start using the software for your assignments. Don’t forget your 2Know! classroom response system setup. See page 9 for a list of the tasks you should complete to start using the 2Know! classroom response system. Task Where to Find Instructions Create or select a data location (database). You will be asked to do this the first time you start AccelTest after installing the software. AccelTest Software Installation Guide Set up your school year information so that AccelTest can include it in your assignments automatically. As you enter your school year information, you will be asked to set up your terms (and possibly semesters). Page 153 Add your classes. Page 18 Add or import your students. Page 18 Add the standards that you would like to align items to on your assignments. Page 32 Review the Subjects preference, and if necessary, add to or edit the subject list. Page 154 Use the Device preference to choose which types of assignments you will use (Responder, NEO 2, projected, scanner, and/or printed). Page 150 Look at the Categories preference, and add or edit categories to fit the subjects you teach. You can set grade weights for categories, decide whether a category’s worst score should be dropped, and choose how to calculate grades. Page 150 Review the Grading Scale preference. You may want to change the Grading Scale to fit your grading system. Page 151 Look at the Exams preference. You may want to adjust the percent and marking period the exam grade applies to. Page 151 If you want to change your data location, see page 154. Cl osing the AccelTest Software Windows: To close the software, click the choose Exit. button, or click the File menu and Macintosh: To close the software, click the AccelTest menu and choose Quit AccelTest. AccelTest User Manual 8 ..... GETTING STARTED Getting Started with the 2Know! Classroom Response System Getting Started with the 2Know! Classroom Response System First, do the following: • Connect the Renaissance Receiver to your computer. • Install, check the charge of, or replace batteries in your Renaissance Responders or NEO 2s. To find instructions, in the US refer to the 2Know! Setup and Resource Guide or the NEO 2 Quick Guide. In the UK, go to http://renlearn.co.uk/renaissance-zone/rzinform/user-guides and download the 2Know! CRS Installation and Set-Up Guide or the NEO 2 wireless setup instructions. The following instructions describe other tasks that will help you use Renaissance Responders or NEO 2s with AccelTest software. Setti ng Up the 2Know! Cl assroom Response Syst em Perform these tasks to set up the 2Know! classroom response system: Task About NEO 2 setup: Although NEO 2s cannot be assigned owners, students can use them to complete assignments, either in student-paced sessions or teacher-paced sessions. For homework and notes, Renaissance Responders are required. NEO 2s do not require firmware updates because they receive updates through the NEO Manager software. AccelTest User Manual Where to Find Instructions Give a unique name to each Receiver so students and teachers can tell them apart when they choose a Receiver on their Responders. Page 10 Change the Administrator Personal Identification Number (PIN) used for logging in to the Renaissance Wireless Server Utility and for changing settings or owners for Responders. Page 11 Assign a student owner to each Responder if you want to be able to send students homework and notes. Page 12 Perform firmware updates as needed. Page 14 9 ..... GETTING STARTED Getting Started with the 2Know! Classroom Response System Assigni ng a Uni que Name t o Each Recei ver If You Have More than One When students complete AccelTest assignments using either a Renaissance Responder or a NEO 2, they need to select the correct Renaissance Receiver. You should give each Receiver a unique name so students can be sure to choose the right one. (Each Receiver is named “Renaissance Receiver” unless you rename it.) Assigning a unique name is especially important if you have more than one Receiver in your school. You can choose a name that makes it easy for students to choose the correct Receiver, such as Mrs. Smith’s Class or Room 245. 1. Open the Renaissance Wireless Server Utility program: Tell students the Receiver name. When you change the name of your Receiver, be sure to give students the new name so they connect to the right Receiver. • Windows computers: Right-click the icon in the task bar in the lower-right corner of your screen and choose Manage from the menu. You can also click StartAll ProgramsRenaissance Wireless ServerRenaissance Wireless Server Utility. • Macintosh computers: If you see the icon in the dock, click it to start the utility. You can also open the Applications folder on your hard drive, open the Renaissance Wireless Server folder, and double-click Renaissance Wireless Server Utility. 2. Enter the Administrator Personal Identification Number (PIN) in the Server Login dialog box and click OK. If you haven’t changed the PIN, it is 1234. 3. Click the Server Settings tab A. 4. Click in the Network Name field B, delete the name, and type the new name you want to use. 5. Click Update Network Settings C. 6. Click OK when the program tells you the settings have been updated. You can then close the utility. If you are using NEO 2s, click the Renaissance Place Settings button if you are using the Accelerated Reader SmartApplet or the two MathFacts in a Flash SmartApplets on NEO 2. Click the button to set the server name or address for your Renaissance Place server so the SmartApplets can communicate with your server. AccelTest User Manual A B C 10 ..... GETTING STARTED Getting Started with the 2Know! Classroom Response System Changing the Admi ni strator PIN The Administrator Personal Identification Number (PIN) is used when you reset the student owner for a Responder, when you view a student’s forgotten PIN on the Responder, when you update Responder firmware, or when you log in to the Renaissance Wireless Server Utility at the teacher’s computer. Follow these steps if you need to change the Administrator PIN: 1. Open the Renaissance Wireless Server Utility program: • Windows computers: Right-click the icon in the task bar in the lower-right corner of your screen and choose Manage from the menu. You can also click Start All Programs Renaissance Wireless Server Renaissance Wireless Server Utility. • Macintosh computers: If you see the icon in the dock, click it to start the utility. You can also open the Applications folder on your hard drive, open the Renaissance Wireless Server folder, and double-click Renaissance Wireless Server Utility. 2. Enter the Administrator Personal Identification Number (PIN) in the Server Login dialog box and click OK. If you haven’t changed the PIN before now, it is 1234. 3. Click the Server Settings tab A. 4. Click Set Administrator PIN B. A B AccelTest User Manual 11 ..... GETTING STARTED Getting Started with the 2Know! Classroom Response System 5. In the dialog box that appears, your current PIN has already been entered. Enter the new PIN you want to use in the last two blank fields. Then, click OK. 6. Click OK when the program notifies you that the PIN was changed successfully. Assigni ng a Student Owner to Each Responder Make sure the Responder preference is set to support owned Responders. This is the default setting, but it can be changed. To check the preference setting, click the Preferences menu and choose Responder. Then, make sure the Support Owned Responders box is checked and click OK. Although students can use Responders without owning them, you do need to assign student owners to send homework or notes to students. (NEO 2s do not have assigned owners. Some Responders also cannot have assigned owners; see page 14.) When you assign an owner to a Responder, only that student can use that Responder. When you start the Responder, the student will be asked to enter his or her Personal Identification Number (PIN). This helps ensure that only that student uses the Responder; the student or teacher can change the student PIN (see page 13). Follow these steps to assign owners to Responders: 1. Before you start assigning owners, make sure you have added your students (page 18) and your classes (page 18) and assigned students to their classes (page 19). The AccelTest software must be running, and the class for which you want to assign Responders should be selected. 2. Press the On/Off button A on the Responder that needs an owner assigned to start the Responder. 3. Press B to scroll down to Settings; then, press Select. 4. Press to scroll down to Assign Owner; then, press Select. The Responder will search for a Receiver. B 5. If the Responder asks you to stay connected to the previously chosen Receiver, press yes (True), then Select to continue. If not, highlight the correct Receiver and press Select. A AccelTest User Manual 12 Student IDs are also available in the Student ID Report. ..... GETTING STARTED Getting Started with the 2Know! Classroom Response System 6. You will be asked to enter your AccelTest student ID. AccelTest automatically assigns an ID number to each student you add. To see student ID numbers, click the Classes tab in the AccelTest software C. Then, refer to the ID numbers in the master student list on the left side of the tab D. C D 7. On the Responder, enter the ID number of the student that should own this Responder. Then, press Select or ENTER. 8. The Responder will identify the student owner by name and show a default PIN. Each student’s PIN is 1212 when you first assign the Responder owner. If you want to change a student’s PIN, see the steps below. Changing a St udent’s Personal Identification Number (PIN) for a Responder 1. On the Responder the student owns, press the On/Off button to start the Responder. 2. Enter the student’s current PIN and press Enter. (The default PIN is 1212; you may have changed it or set a different one.) 3. Press to scroll down to Settings and press Select. 4. Press to scroll down to Change PIN and press Select. 5. The student’s name will appear, and you’ll be asked to enter a new PIN. Enter the letters and/or numbers for the new PIN (1–11 characters) and press ENTER. The Responder will identify the student owner by name and show the new PIN. AccelTest User Manual 13 ..... GETTING STARTED Getting Started with the 2Know! Classroom Response System Di splaying a Forgotten Student PIN Entering the Administrator PIN: If you make a mistake while entering the Administrator PIN, you can press CLEAR to start over. To change the PIN, see page 11. If a student owner of a Responder forgets his or her PIN, follow these steps to see the number: 1. Press the On/Off button to start the Responder. 2. Press ?. 3. If your Receiver name appears, click yes True and press Select. If more than one Receiver name appears, scroll to select the correct Receiver; then, press Select. 4. Enter your administrator PIN and press ENTER. 5. The Responder will tell you the device is unlocked, and it will show you the student’s PIN. Make a note of the forgotten PIN; then, press any key. The student can use this PIN the next time he or she uses the Responder. Resetting the St udent Owner of a Responder When you need to reset the owner of a Responder, follow these steps: 1. Press the On/Off button to start the Responder. 2. Press ?. 3. If your Receiver name appears, click yes True and press Select. If more than one Receiver name appears, scroll to select the correct Receiver; then, press Select. 4. Enter your administrator PIN and press ENTER. 5. The Responder will tell you the device is unlocked, and it will show you the student’s PIN. Press any key. 6. Press to scroll down to Settings; then, press Select. 7. Press to scroll down to Reset Owner; then, press Select. 8. Enter the administrator PIN again and press ENTER. The owner will be reset, so no student will own the Responder. To assign a new owner, see page 12. Responder Models, Firmware Versions, and Updates Firmware is the software that runs inside your Responders and Receiver. The firmware version that can be run on your Responder depends on your Responder model, which is shown on the label on the back of each Responder. Firmware Versions for RESP Responder Models Responders with the model number RESP on the back use version 4.x firmware. Occasionally, you may get firmware updates through your AccelTest software. You can update the firmware on your Responders when you get new versions through AccelTest software updates. RESP model Responders have all features available, including math facts practice, assigned owners, notes, and homework. For these Responders, font size can be changed in the settings, not by changing the firmware version. For more information, see page 165. AccelTest User Manual 14 ..... GETTING STARTED Getting Started with the 2Know! Classroom Response System Firmware Versions for RES-1001 Responder Models Responders with the model number RES-1001 on the back may use version 1.x firmware, version 2.x firmware, or version 3.x firmware. For these models, the firmware on your Renaissance Responders serves three purposes: • The firmware version that you select tells the RES-1001 Responders what functions and features you want on the Responder. • Occasionally, you may get firmware updates through your AccelTest software. You can update the firmware on your Responders when you get new versions through AccelTest software updates. • If you are using a 1.xx version of the Responder firmware, you can switch between the even and odd versions of the firmware to switch between a small and large font. There are three sets of firmware versions on your RES-1001 Responders: Firmware Versions AccelTest User Manual What Is Included What Is Not Included 1.xx • Ability to join sessions for AccelTest or the 2Know! Toolbar • Support for owned Responders • Homework • Notes • Settings • Synchronizing with AccelTest • Calculator • Small or large font based on firmware selected • MathFacts in a Flash practice and history features • Ability to answer short answer questions in AccelTest or the 2Know! Toolbar 2.xx • Ability to join sessions for AccelTest or the 2Know! Toolbar • MathFacts in a Flash practice • MathFacts in a Flash practice/test history • Ability to send MathFacts in a Flash practice data to Renaissance Place • Settings • Support for owned Responders • Homework • Notes • Synchronizing with AccelTest • Ability to answer short answer questions in AccelTest or the 2Know! Toolbar • Calculator • Small or large font based on firmware selected 3.xx • Ability to join sessions for AccelTest or the 2Know! Toolbar • Support for owned Responders • Homework • Notes • Settings • Synchronizing with AccelTest • Ability to answer short answer questions in AccelTest or the 2Know! Toolbar • Calculator • Small or large font based on firmware selected • MathFacts in a Flash practice and history features 15 ..... GETTING STARTED Getting Started with the 2Know! Classroom Response System Updating Firmware or Changing the Firmware Version Being Used If you would like to update your firmware or just switch to a different version, make sure your data is synchronized on your Responder before installing the update (scroll down on the menu and select Synchronize). Usually, any changes you’ve made to the Responder settings will still be in place after the firmware update; if they are not, you may need to change the settings or assign an owner again. Follow these steps to change or update firmware on each Responder: You can update more than one Responder at the same time. If you follow these steps at more than one Responder at a time, you can update a set of 24 Responders in as little as 20 minutes. 1. Press the On/Off button to start the Responder. 2. If the Responder has been assigned a student owner and asks for the Student PIN, press ?. Then, press yes (True) and then Enter to stay connected to the current Receiver (server). Enter the Administrator PIN (1234 is the default) and press Enter. Then, press any key. 3. Press to scroll down to Settings and press Select. 4. Press to scroll down to Firmware Update and press Select. 5. If the Responder asks if you want to stay connected to the Receiver, press yes and then Enter. 6. The Responder will find and display the available updates. NEO 2s are not updated in this way. They receive their updates to the NEO 2 and its SmartApplets through the NEO Manager software. RESP Responders: For Responders with the model number RESP on the back, choose the most recent firmware version (the highest number). RES-1001 Responders: For Responders with the model number RES-1001 on the back, do one of the following: • If you are using a 1.xx firmware version (see the table on page 15) and you want to switch between the small and large fonts, scroll to the even-numbered version to choose the large font, or scroll to the odd-numbered version to choose the small font. • If you want to switch the Responder to a MathFacts in a Flash Responder, scroll to the 2.xx firmware version. • If you want the ability to answer short-answer questions with Responders, scroll to the 3.xx firmware version. Choose the highest version number of the type you want to get the latest version. 7. Press Select. 8. Enter the Administrator PIN when the Responder asks you to do this (the default is 1234), and press Enter. 9. The Responder will start updating the firmware. The program shows you its progress as it does the update. When the update is complete, the Responder will show you the new version number. Press any key to go to the Responder menu or the student PIN entry screen. AccelTest User Manual 16 C LASSES AND S TUDENTS Using the Classes Tab To set up or view your classes or students, click the Classes tab A. Different teachers may see different classes and students. AccelTest requires every person who logs in to the computer with a unique user name and password to select or create a database. You will see only the classes and students that are in your database. F A B C D E A The Classes tab shows your classes and students. B Use these buttons to add students or classes or to enroll students in the selected class. C Use the Class drop-down list to choose the class you want to view and work with. D This list shows you all students you’ve added in your AccelTest database. AccelTest User Manual 17 E This list shows you which students are in the selected class. F In the Classes menu, you can choose other tasks, such as importing, editing, exporting, or deleting classes and students or unenrolling students from a class. If you don’t have the Classes tab selected when you click the Classes menu, some options won’t be available in this menu. Adding a Class ..... C LASSES AND STUDENTS Adding a Class You may be able to save time by importing classes and student information. To import classes, see page 21. To import student information, see page 23. Follow these steps to add a new class. 1. Click the Classes tab in AccelTest. (See page 17). 2. Click Add Class on this tab. 3. Type the name of the new class in the dialog box. Then, click OK. Next, add your students as described below; then, you can enroll them in the class by following the steps on page 19. Adding a Student Follow the steps below to add students to the database. 1. Click the Classes tab in AccelTest. (See page 17). 2. Click Add Student on this tab. Student IDs are shown in three places: the Gradebook, on the Classes tab, and in the Student ID report. 3. Enter the student’s first name and last name. (You can enter a middle name, but it’s not required.) A suggested ID has been entered for you; you can change this number to the student’s ID for your school or district. IDs can include numbers only. After entering the information, click OK. 4. If you want to add more students, click Yes in the alert that appears. Then, enter the name and ID for each additional student and click Add. When you’ve finished, click Done. If you don’t want to add more students, click No in the alert. To enroll the student(s) in classes, see page 19. AccelTest User Manual 18 Enrolling Students in a Class ..... C LASSES AND STUDENTS Enrolling Students in a Class 1. Click the Classes tab in AccelTest A. 2. Choose the class that needs students enrolled from the Class drop-down list B. 3. Click Enroll Students C. A C B 4. Check the boxes next to the students that you want to D enroll in the selected class D. Notice that the list shows which classes the students are already enrolled in. You can also click E F Select All E or Deselect All F to select or deselect all students in the list. After choosing the students to enroll in the class, click OK. AccelTest User Manual 19 ..... C LASSES AND STUDENTS Unenrolling Students from a Class Unenrolling Students from a Class If you want to unenroll one or more students from a class, follow these steps: 1. Click the Classes tab in AccelTest A. 2. Using the Class drop-down list B, choose the class that needs students unenrolled. D A B C 3. Select the students that you want to remove from the class in the list on the right C. To select one student, click the student’s name. To select more than one, use one of these two methods: • If the names aren’t next to each other in the list, hold down the Ctrl key (Windows) or the key (Macintosh) as you click the student names. • If the names are next to each other in the list, click the first name you want to select, hold down the Shift key, and click the last name in the group you want to select. The first name, the last name, and all names in between will be selected. 4. Click the Classes menu D and choose Unenroll Students. (This option isn’t available if you don’t start from the Classes tab.) 5. Click Yes to continue when the program asks if you’re sure you want to unenroll the students. AccelTest User Manual 20 ..... C LASSES AND STUDENTS Importing Classes from Renaissance Place Importing Classes from Renaissance Place By following the steps below, you can import classes from your Renaissance Place programs. When you do this, the students and their class enrollments are also imported. To import students from a comma separated value (CSV) file or from a Renaissance Learning desktop program, see page 23. 1. Click the Classes menu in AccelTest and choose Import from Renaissance Place. (It doesn’t matter which tab you’re viewing before you click this menu.) 2. Enter the server or IP address of your Renaissance Place server. (If you don’t know the address, contact your server administrator.) Then, click Next. 3. Enter the user name and password that you normally use to log in to Renaissance Place. Then, click Next. AccelTest User Manual 21 ..... C LASSES AND STUDENTS Importing Classes from Renaissance Place 4. Click the name of the school that has the class that you want to import. Then, click Next. Student IDs are not imported. AccelTest will give the student a new ID. You can edit the ID by editing the student’s information; see page 28. 5. Check the boxes next to the classes that you want to import. Then, click Next. A B C D A To choose classes one by one, check the box next to each class that you want to import. B To select all the classes listed, click Select All. This checks the box next to each class. C To remove the check mark from all classes listed, click Deselect All. D Check this box if you don’t want to enroll the students that are being imported into the class. If the box is checked, the class name is not imported, and the students aren’t enrolled in a class when they are imported, but you can enroll them into a class after importing them. 6. Read the Summary to make sure you’ve chosen the correct classes. Then, click Next. 7. Click Done when the program tells you it has finished importing students. AccelTest User Manual 22 ..... C LASSES AND STUDENTS Importing Student Names from a File Importing Student Names from a File Do you want to import information from Renaissance Place instead? See page 21 to import entire classes, including student names and class enrollments. Instead of adding students, you may be able to import their names from another program you’re using. You can import text files with information separated by commas (CSV files), or you can import students from the database for a desktop Renaissance Learning program. About Comma Separated Val ue (CSV) Fi les A comma separated value (CSV) file is a text file that separates information within each line of data with commas. The file must have the information in a specific order so the student names and IDs are imported correctly. Follow these guidelines: • Your file must have only one student record per line. Use a comma to separate each piece of information. The maximum line length is 255 characters (including spaces). • Each record must contain at least the student’s first and last names. The middle name and ID are optional. • Add a header line to the file that identifies the information. This line must start with either the @ symbol or no symbol. (If you are creating the file in Microsoft Excel and saving it in .csv format, it is easiest to use no symbol.) Then, the header must list the names of the fields in the order they are in for each student record. In the header, use LNAME to show where the last name occurs, FNAME for the first name, MNAME for the middle name, and ID for the student ID. If the record includes information that AccelTest would not import, use an X in the header to show where this information occurs. For example, suppose that you have a file in which each record shows the student’s first name, then the student’s last name, the student’s ID, and then the student’s grade. Since the program will not import the grade, your file should look like one of these examples: @FNAME,LNAME,ID,X Ryan,Emerson,3253,6 Luis,Camacho,3192,3 Lyle,Johnson,3325,4 FNAME,LNAME,ID,X Ryan,Emerson,3253,6 Luis,Camacho,3192,3 Lyle,Johnson,3325,4 Note the X in the header to show where the grade is in each record. The X tells AccelTest to ignore this information. If some students are missing some of the information, include a comma to represent that field even though the information is not there. In the following example, Katrina Peters does not have a middle name in her record. @FNAME,MNAME,LNAME Ryan,John,Emerson Katrina,,Peters AccelTest User Manual 23 ..... C LASSES AND STUDENTS Importing Student Names from a File About Importing Dat a from Ot her Desktop Renaissance Learning Programs AccelTest can also import data directly from the database for any Renaissance Learning desktop product, such as Accelerated Reader 5.x–6.x, Accelerated Vocabulary 1.x, Accelerated Math 1.x–2.x, MathFacts in a Flash 1.x, STAR Early Literacy 1.x, STAR Math 1.x–2.x, and STAR Reading 2.x. Note: The steps below explain how to import students from desktop products. If you want to import classes and students from the Renaissance Place version of these products, see page 21. How t o Import St udents f rom a CSV Fi le or Another Desktop Program 1. Click the Classes menu in AccelTest and choose Import from File. (It doesn’t matter which tab you’re viewing before you click this menu.) The Import Students Wizard or Assistant will start. 2. On the first panel, choose whether to import students from a text file or a database from another Renaissance Learning desktop program. Then, click Next. AccelTest User Manual 24 ..... C LASSES AND STUDENTS Importing Student Names from a File 3. On the next panel, click Select File or Select Folder. Find and select (highlight) the file or folder that you want to import students from. Then click Select, OK, or Choose. (The button name varies depending on your operating system and the type of item that you are choosing.) 4. After you’ve chosen the file or folder, notice that the panel in the wizard will show you how many students were found in that location. To continue, click Next. 5. Check the boxes next to the students that you want to import. Then, click Next. A B A To choose students one by one, check the box next to each student that you want to import. If you want to enroll students in classes as you import them, make sure you only select only students who are in the same class! C B To select all the students listed, click Select All. This checks the box next to each student. C To remove the check mark from all students listed, click Deselect All. 6. If any student names that you are importing are the same as student names that are already in your database, AccelTest will show you the duplicate student names one by one. For each student, you will have some or all of these options: AccelTest User Manual • Update ID and Update All IDs: These options are available when the student name is the same but the ID is different. Clicking Update ID updates the student’s ID in the database to the one that is in the file or folder you are importing. Clicking Update All IDs does this for all student names that match names in the file or folder you’re importing. • Update Name and Update All Names: These options are available when the ID for a student in the import source matches the ID of a student in your AccelTest database. Clicking Update Name changes the name of the student in the database to match the student with the same ID in the import source. Update All Names does this for all students with matching IDs. Make sure the student in your AccelTest database is the same as the one in the import source before doing this to avoid attributing a student’s grades to another name. • Skip and Skip All: If the student information that’s already in your database is correct, and you don’t want to replace it or update it with information from the file, click Skip to skip just this student (without importing the student) or Skip All to skip all duplicate students in the file. 25 ..... C LASSES AND STUDENTS Importing Student Names from a File 7. Next, choose whether to enroll the students you’re importing in a class. After choosing an option (and a class if necessary), click Next. D E F D Click this option if you want to import the students, but you don’t want to enroll them in a class now. This is a good choice if you are importing students that are actually in different classes. To enroll the students in classes later, see page 19. E Click this option if you want to enroll the students you’re importing in a class that already exists. Then, use the drop-down list to choose the class. F Click this option if you want to enroll the students in a new class. Then, click in the blank field and type a name for your new class. 8. Read the information in the summary to make sure it is correct. Then, click Done to continue. (If you need to make changes, click Back to go back and make your corrections.) AccelTest User Manual 26 Editing a Class Name ..... C LASSES AND STUDENTS Editing a Class Name 1. Click the Classes tab in AccelTest A. 2. Choose the class that you want to edit from the Class drop-down list on this tab B. C A B 3. Click the Classes menu C and choose Edit Class. (This option isn’t available if you don’t start from the Classes tab.) 4. Make your changes to the class name. Then, click OK. AccelTest User Manual 27 Editing Student Names or IDs ..... C LASSES AND STUDENTS Editing Student Names or IDs 1. Click the Classes tab in AccelTest A. 2. In the list on the left, click the name of one student whose information you want to edit B. C A B 3. Click the Classes menu C and choose Edit Student. Student IDs are shown in three places: in the Gradebook, on the Classes tab, and in the Student ID Report. AccelTest User Manual 4. Edit the student’s first name, middle name, last name, and/or ID as needed. (The middle name is not required.) When you have finished, click OK. 28 Deleting a Class De le ting a Clas s 1. Click the Classes tab in AccelTest A. 2. Choose the class that you want to delete from the Class drop-down list B. C A B 3. Click the Classes menu C and choose Delete Class. (This option isn’t available if you don’t start from the Classes tab.) 4. Click Yes when the program asks if you’re sure you want to delete the class. AccelTest User Manual 29 ..... C LASSES AND STUDENTS Exporting Student Information ..... C LASSES AND STUDENTS Exporting Student Information If you want to export students’ assignment scores instead, see page 102. By following the steps below, you can export student names and IDs to a text file. The file will have the header “@LNAME,FNAME,MNAME,ID,” and each line will include one student’s last name, first name, middle name (if it’s available), and ID in this format: “Smith,Olivia,Marie,135”. 1. Click the Classes menu and choose Export to File. The Export Students Assistant will start. 2. Click an option to choose whether to export all students or just those in one class. If you choose Selected Class, click the drop-down list and choose the class. Then, click Next. 3. Enter a name for the file in the File Name field A. Then, click Select Folder, open the folder where you want to save the file, and click OK (Windows) or Choose (Macintosh). Click Next to continue. A 4. Click Finish to create the file. AccelTest User Manual 30 Deleting a Student ..... C LASSES AND STUDENTS Deleting a Student You can export assignment results for a student so you have a record of the student’s grades. See page 102. Follow the steps below to delete a student. When you delete a student, you lose all information for that student. This includes the student’s classes and grades. 1. Make sure the students that you want to delete have been unenrolled from their classes (see page 20). 2. Click the Classes tab in AccelTest A. 3. In the list on the left B, select the students who need to be deleted from your database. To select one student, click the student’s name. To select more than one, use one of these two methods: • If the names aren’t next to each other in the list, hold down the Ctrl key (Windows) or the key (Macintosh) as you click the student names. • If the names are next to each other in the list, click the first name you want to select, hold down the Shift key, and click the last name in the group you want to select. The first name, the last name, and all names in between will be selected. C A B 4. Click the Classes menu C and choose Delete Student. (This option isn’t available if you don’t start from the Classes tab.) 5. Click Yes to continue when the program asks if you’re sure you want to delete the students. AccelTest User Manual 31 S TANDARDS Adding Standards to Your Database Before you start adding or importing your assignments, you should add the standards that are relevant for your school or district. By doing this first, you ensure that the standards are available when you align items on your assignments to the standards that apply. (To align items to standards, see page 57.) This makes it easy for you to get reports that focus on student performance for those standards. Follow these steps to add standards to your database: 1. Click the Preferences menu and choose Libraries/Standards. 2. Click the Standards tab A. 3. Click Add B. The Install Standards Wizard or Assistant will start. A B 4. The first panel of the wizard will ask you to choose whether to add standards from the Renaissance Learning Web site or from a file. Click the option you prefer. In most cases, you should choose to add standards from the Renaissance Learning Web site. However, if you are adding standards from a TestCheck library, you would choose to add the standards from a file. Click Next to continue and follow the instructions for the choice you made: AccelTest User Manual • If you chose to add standards from the Renaissance Learning Web site, see page 33. • If you chose to add standards from a file, see page 34. 32 ..... S TANDARDS Adding Standards to Your Database Addi ng Standards from the Renaissance Learning Web Site 5. On the next panel, check the box next to each state or other agency for which you want to add standards. Then, click Next. 6. Check the box next to each standard that you want to add. (Be sure to scroll down to see all available standards.) If you want to check all the standards, click Select All; to remove all check marks, click Deselect All. After choosing the standards, click Install. 7. When the standards have been installed, you will return to the Standards tab in the Libraries/Standards dialog box. The standards that you added will be listed. Click Close to close the preference. AccelTest User Manual 33 ..... S TANDARDS Adding Standards to Your Database Addi ng Standards from a Fil e 5. On the Install Standards panel, click Browse A. A 6. In the dialog box that opens, open the folder that contains the content with the standards you want to add. Then, click OK (Windows) or Choose (Macintosh). 7. Click Next. 8. On the next panel, check the box next to each state or other agency for which you want to add standards. Then, click Next. AccelTest User Manual 34 ..... S TANDARDS Adding Standards to Your Database 9. Check the box next to each standard that you want to add. (Be sure to scroll down to see all available standards.) If you want to check all the standards, click Select All; to remove all check marks, click Deselect All. After choosing the standards, click Install. 10. When the standards have been installed, you will return to the Standards tab in the Libraries/Standards dialog box. The standards that you added will be listed. Click Close to close the preference. AccelTest User Manual 35 ..... S TANDARDS Deleting Standards Deleting Standards Follow these steps if you want to delete some standards that you have added. This can be helpful if you find that you don’t need some of the standards you have added; removing them can help you focus on the standards you do use. Important: If you delete standards that you’ve selected when aligning assignment items to standards, those alignments will be lost. Make sure you know which standards you have used for alignments before deleting standards. 1. Click the Preferences menu and choose Libraries/Standards. 2. Click the Standards tab. 3. Select the standards you want to delete: • To choose one, click on it. • To choose more than one, hold down the Ctrl key (Windows) or the key (Macintosh) as you click the standards. • To choose a group of adjacent standards, click the first standard in the group, hold down the Shift key, and click the last one in the group to highlight the whole group. 4. Click Delete. 5. When the program asks if you’re sure you want to delete the standards, click Yes. 6. Click Close to close the preference. AccelTest User Manual 36 S ETTING U P A SSIGNMENTS This section explains how to create, print, change, or delete assignments or score keys that you will use for your class. Viewing the List of Assignments To view the list of assignments you’ve created so far, or to create new ones, start by clicking the Assignments tab. When you create assignments, you choose the types of items (questions) to include, the number of items, and the point value for each item. If you want to use assignments that you already have outside of AccelTest, you can create a score key to score them quickly within the program. A B D C A Click this drop-down list to choose which assignments you want to see. You can list assignments from all subjects or just specific subjects. Choosing one subject helps shorten the list you’re viewing if you have many assignments. B Click New Assignment to start creating a new assignment or score key. (Score keys are for an assignment that you already have outside AccelTest. Although the assignment isn’t in the program, the score key will let you score it using AccelTest.) AccelTest User Manual 37 C The list shows how you plan to present and score each assignment. It also shows you the total points students can earn on the assignment and the date when you last saved changes. D The symbols in this column show whether items in the assignment have been aligned to standards. means all items on the assignment are aligned. means some items are aligned. No symbol means no items are aligned. ..... SETTING UP ASSIGNMENTS Preferences That Affect Assignments Preferences That Affect Assignments When you create assignments, you can choose from the categories and subjects listed below. If you would like to add other categories or subjects, you can use the Categories preference A (see page 150) or the Subjects preference B (see page 154) in the Preferences menu. Default Categories: • Homework • In Class • Quiz Default Subjects: • English • Geography • Grammar • History • Math • Reading • Science A C B The Devices preference C lets you choose the types of assignments you will have: Responder, NEO 2, projected, scanner, and/or printed. The Assignment Creation preferences set the default (standard) font for your assignments, the layout, and the default values for each type of item that you might include on assignments. For example, for multiple-choice items, you can choose the number of points you’d normally give for each item, the number of choices you use most often, and the number of columns. For more on these preferences, see page 159. AccelTest User Manual 38 Item (Question) Types ..... SETTING UP ASSIGNMENTS Item (Question) Types When you create assignments in AccelTest, you can choose from the item types listed below. You choose the number of items to include from each type and the point values. The item types that are available for a specific assignment depend on how you’ve chosen to present the assignment to students and score the assignment. Assisted Response Item Types • Multiple choice (MC) • Matching (M) • Ranking (R) • True/False (TF) • Yes/No (YN) Free-Response Item Types • Essay (E) • Short Answer (SA) • Numeric Response (NR) Creating Assignments in AccelTest Score keys and points-only assignments. On the Assignments tab, you can also create score keys for scoring assignments that exist outside AccelTest; see page 50. In the Gradebook, you can create points-only assignments when you add assignments to the Gradebook; see page 77. In AccelTest, you can create assignments with different types of items. For example, an assignment may include both multiple-choice items and true/false items, and it may include both assisted-response and free-response item types. When you create your assignment, you specify the item types, decide how many items to add, and enter the number of points students can earn for each item. The available item types depend on the method you choose for presenting and scoring the items. If you choose to present items with the Responder or NEO 2, the available item types are limited to multiple-choice, true/false, yes/no, numeric response, or short answer. If you choose a printed assignment with any scoring method, all item types are available; however, if you use the Responder or NEO 2 as the scoring method, students may need to answer some items on paper for manual scoring (such as essay items). If you are planning to align items on your assignments to standards, it’s helpful to add the standards first so you can align items to standards as you create assignments. See page 32. Follow these steps to create a new assignment: 1. In AccelTest, click the Assignments tab A. AccelTest User Manual 39 Creating Assignments in AccelTest ..... SETTING UP ASSIGNMENTS 2. Click New Assignment B. A B 3. Enter information about the assignment. Then, click OK. a. Enter the title C. Assignment and scoring options: The Devices preference (see page 150) determines which options are available in the New Assignment window. To see the Scanner option, you may need to change the preference. The scoring methods available in the second list depend on the type of assignment you chose in the first list. Extended ASCII characters, such as Spanish characters or other international characters, are supported in NEO 2 assignments if your NEO 2s have been updated to system 3.9 or higher using the NEO Manager software. AccelTest User Manual b. Choose the subject from the Subject drop-down list D. c. Click the option that shows how students will see the questions E: on the Responder or NEO 2, projected on a screen, or on a printed copy. (If you want to choose a Score Key, see the steps on page 50.) C D E F If you choose Responder or NEO 2 Only in the left column, you can include multiple-choice, true/false, yes/no, numeric-response, and short-answer items on the assignment. Printed assignments can include all item types. d. Click the option that shows how the assignment will be scored =F. If students enter answers using the Responder or NEO 2, or if they scan cards with their answers using an AccelScan scanner, their responses will be scored automatically. If you choose manual scoring, you must enter the points earned or the students’ answers in the software. If you choose Responder as the scoring method, students can use either a Responder or NEO 2 to complete the assignment, but if you choose NEO 2 Only as the scoring method, only NEO 2s may be used. 40 Creating Assignments in AccelTest You can only use one tab in this window. When you click OK, AccelTest will only apply your selections from the tab you have selected. Any selections you’ve made on other tabs will not be used. ..... SETTING UP ASSIGNMENTS 4. In the Add Items dialog box, click one of the tabs at the top G to decide whether to specify the number of items and point values (Template), use sample items that are in the AccelTest libraries (Library), use items from an assignment you’ve already created (Assignment), or use items that you’ve aligned to standards (Standards): • Template: If you choose this tab, enter the number of items of each type that you want to include on the assignment H, and enter the points per item for each item type I. Some item types may not be available depending on the type of assignment you chose. If you want to add instructions before the items (for printed assignments only), check the box J. To finish, click Add. G H I Points for matching and ranking items: On the Template tab, when you add matching or ranking items, note that the total points for those items is calculated by multiplying the number of items you add by the default number of answers to match or rank. J • Library: If you choose this tab, click + next to a library K. Then, open the subject and category L and select the item(s) to add to this assignment M. After choosing the items, click Add and go to step 6 on page 44. K L M AccelTest User Manual 41 Creating Assignments in AccelTest • You can choose more than one item to add from the Library, Assignment, or Standards tabs. To do this, hold down the Ctrl key (Windows) or the key (Macintosh) as you click the items. To select a group of items, click the first one, hold down the Shift key, and click the last one. If you select just one item, you’ll see the item to the right of the list. If you select more than one, you will not see the items. You can click and drag the border between the two panes in this window to change the size of each. Assignments: If you choose this tab, click + next to the assignment that has the items you want to use N. Then, select the items in the list O. After choosing the items, click Add and go to step 6 on page 44. N O • To add standards to your database, see page 32. You can align each item on an assignment to standards by clicking the item and then clicking Align Item; see page 57. Standards: On this tab, you can select items that have already been aligned to standards in other AccelTest assignments. If you choose this tab, click the + next to the standards agency that relates to the assignment P. Expand categories as needed until you see the standard for which you want to add items. Then, select the items associated with that standard in the list Q. After choosing the items, click Add and go to step 6 on page 44. P Q AccelTest User Manual ..... SETTING UP ASSIGNMENTS 42 Creating Assignments in AccelTest ..... SETTING UP ASSIGNMENTS 5. If you entered the number of items and point values on the Templates tab, a wizard will open to help you create the questions in the assignment. Enter the information for each question or item; then, click Next >. (If you chose to add instructions, you’ll also be asked to enter or edit those instructions.) When you finish the last item, click OK Z. X W R S T U Responder and NEO 2 assignments don’t have all options available. If students will view questions on the Responder or NEO 2, you cannot change the number of columns or the font, and you cannot add a graphic, equation, or plot. Be sure to limit the questions for Responder assignments to 150 characters if possible (including spaces and punctuation) so students don’t need to scroll to read the question. V Y R The options depend on the item type. For multiple-choice items, you can choose the number of answer choices you want to give the student, the number of columns for answer choices, and which answer choices to shuffle (or rearrange) for students. (The default shuffle option is “All.”) S If you chose to add instructions before items, you can edit the instructions here. T Enter the question here. U Enter the correct answer. For multiple-choice questions, you must also enter the incorrect answers; then, specify the letter of the correct answer. For matching and ranking items, you must enter all choices. For short answer items, choose whether answers must be case-sensitive; enter each possible Z answer and press Enter or return after each one. V Enter the number of points students can earn by choosing the correct answer. W If you want to change the format of the text (for printed or projected assignments only), use the dropdown lists to choose the font and/or size, and use the buttons to make the text bold, italic, or underlined. X Use the buttons on the right if you want to add a graphic, equation, or plot to the assignment. For more information, see page 45. Y Click Next > to go to the next question, or click < Previous to go back. In some cases, < Previous will take you back to the assignment instructions. Z Click OK after entering the last question. AccelTest User Manual 43 Creating Assignments in AccelTest ..... SETTING UP ASSIGNMENTS 6. After you enter the questions, the assignment will open in the assignment editor. How the assignment looks in the editor depends on whether students will see a printed page or view the assignment on the Responder or NEO 2. If necessary, use the buttons to change or preview the assignment as described below. When you’re ready to finish the assignment, click Done. Printed or projected assignments F A B C Responder assignments D F A B A^ Click Add Items if you need to add You can also move items. Click an item that you want to move, click the Assignments menu, and choose Move Up or Move Down. You can only move one item at a time; the menu options aren’t available if you choose more than one item. more questions/items to the assignment. Then, enter the information for the new item(s). In the dialog box that appears, enter the number of each item type that you want to add and the points for each item. Then, click OK. (You can also click the Assignments menu, click Add Item, and click the type of item.) To enter the text for each item, click it and click Edit Item. B^ To change an item, click it first to highlight it; then, click Edit Item. C^ To change the assignment’s title, subject, fonts, page layout, or options, click Properties. The layout includes the page margins and where answer spaces (if any) will be located. The options determine whether the point values are shown on the assignment. AccelTest User Manual 44 C D E For assignments that will be viewed on the Responder or NEO 2, you can only change the title and subject. D^ Click Align Item to associate a standard with a specific item. See page 57. E^ For assignments that will be viewed on the Responder or NEO 2, click Preview to see how the questions will look on the device. In the preview window, use the arrow buttons to go to the next and previous questions. When you’ve finished, click OK. F^ Use the and buttons to go to the next or previous page or question. Click or to go to the first or last page or question. To go to a specific page or question, enter the page or question number and press the Enter or return key on your keyboard. After you create an assignment, you can print it (see page 72) to check it carefully before assigning it to students. To add the assignment to a Gradebook so it is assigned to your class, see page 77. ..... SETTING UP ASSIGNMENTS Adding Graphics, Equations, and Plots to Assignments 7. Click Save when the program asks if you want to save the assignment. The assignment will be added to your list on the Assignments tab. Adding Graphics, Equations, and Plots to Assignments As you add questions for a new assignment or edit them for an assignment you’ve already created, you can add a graphic, equation, or plot; the following sections explain how. You cannot add graphics, equations, or plots to Responder or NEO 2 assignments. Addi ng Graphics to Assignments 1. As you edit the question, position your cursor where you want to place the graphic A. Then, click Graphic B. B A AccelTest User Manual 45 To limit the size of your assignment files, choose graphics with a small file size. ..... SETTING UP ASSIGNMENTS Adding Graphics, Equations, and Plots to Assignments 2. Find the graphic file in the folder where you have stored it. Click the graphic file to select it; then, click Open. 3. The graphic will now appear in your question. If you decide to delete the graphic at any time, simply click the graphic and press the Delete key on your keyboard. Addi ng Equations to Assignments 1. As you edit the question, position your cursor where you want to place the equation A. Then, click Equation. A AccelTest User Manual 46 ..... SETTING UP ASSIGNMENTS Adding Graphics, Equations, and Plots to Assignments 2. In the equation editor, type text and use the buttons to select the components of the equation that you would like to use. For more detailed information, refer to the help in the equation editor’s Help menu. 3. When you exit the equation editor, the equation will be inserted. If you decide to delete the equation at any time, simply click the equation and press the Delete key on your keyboard. AccelTest User Manual 47 ..... SETTING UP ASSIGNMENTS Adding Graphics, Equations, and Plots to Assignments Addi ng Plots to Assi gnments 1. As you edit the question, position your cursor where you want to place the plot A. Then, click Plot. A 2. The function plotter will appear. Start by choosing the axes type. This will determine what other options will be available. Cartesian Plot Number Line Plot Polar Plot Cartesian Plots: These plots have X and Y axes. When you add these plots, you can choose whether to view the axes or up to 3 plots. If you choose one of the plots, you can then choose what to show, such as a line, segment, point, sine, etc. The remaining options depend on what you choose. AccelTest User Manual 48 ..... SETTING UP ASSIGNMENTS Adding Graphics, Equations, and Plots to Assignments Number Line Plots: These plots show positions on a standard number line. When you add a number line, you can choose whether to view the axes, a point, or a segment. For the axes, you can enter the limits—that is, the range of numbers shown on the line. You can also choose the value of each tick mark on the line and the intervals for labeling tick marks (for example, 2 would mean every second tick mark would be labeled). For a point, you can enter the value of the point on the number line, the size (diameter) of the point, and whether to make it black, white, or transparent. For a segment, you can enter the value of each end of the segment, the symbol you’d like to use on each end, the weight (thickness) of the line, and the type of line. Polar Plots: When you add a polar plot, you can choose whether to view the axes or one of three plots. If you choose one of the plots, you can then choose what to show: a point, text, circle, or cardoid. For the axes, you can enter the limits in terms of the radius, the ring interval (that is, how far apart the rings are), and the ring interval label. (For example, 2 would mean every second ring is labeled.) For a point, you can choose the location, size (diameter), and color. For text, you can choose the location, enter the text, and choose the justification (left, center, or right). For a circle, you can choose the radius, line weight, range/location, line style, and units (radians, degrees, or revolutions). 3. Click Update after changing your plot settings. 4. Click Close to go back to your assignment item, where the plot will be inserted. If you decide to delete the plot at any time, simply click the plot and press the Delete key on your keyboard. AccelTest User Manual 49 ..... SETTING UP ASSIGNMENTS Creating a New Score Key for an Existing Assignment Creating a New Score Key for an Existing Assignment If you are using assignments that were created outside of AccelTest, you can still use AccelTest to score them. To do this, create score keys for the assignments. The assignments themselves will not be in AccelTest, but the score keys will provide the correct answers to the software. The steps for creating a score key depend on how you will score the assignment. If you will have students enter their answers on Responders or NEO 2s, follow the steps on page 50. If you want students to mark their answers on a scan card and then scan each card to score the assignment, see page 53. Creating a New Score Key for Assignments That Wi ll Be Done on Responders or NEO 2s 1. In AccelTest, click the Assignments tab A. 2. Click New Assignment B. A B AccelTest User Manual 50 Responder versus NEO 2 Only assignments: Responder assignments can be viewed and completed on either a Responder or a NEO 2. They can include multiplechoice, true/false, yes/no, numeric-response, and shortanswer items. (Short-answer items can only be answered on Responders with firmware version 3.0 or higher; see page 14.) NEO 2 Only assignments can include the same item types, and they can only be viewed and completed on NEO 2s. 3. Enter the title of the assignment C and choose the subject from the drop-down list D. Then, click Score Key E and click Responder or NEO 2 Only for the scoring method F. (You cannot choose manual scoring.) Click OK. ..... SETTING UP ASSIGNMENTS Creating a New Score Key for an Existing Assignment C D E F 4. Enter the number of items of each type you want to include G and the number of points students can earn for each of these items H. You can choose multiplechoice, true/false, yes/no, numeric response, and/or short-answer items. When you’ve finished, click Add. G H 5. Next, AccelTest will show you a sample scan card on which you can choose or enter the answers and set the points for each question. To delete an item from the score key, click the item to highlight it; then, press Delete on your keyboard. You can select more than one item at once by holding down the Ctrl key (Windows) or the key (Macintosh) as you click the items. You can select a group of items by clicking the first one in the group, holding down the Shift key, and clicking the last one in the group. AccelTest User Manual 51 M N O ..... SETTING UP ASSIGNMENTS Creating a New Score Key for an Existing Assignment P =I L J K I For multiple-choice, true/false, and yes/no questions, click the correct answer to fill in the circle. J When you click in the answer area for a numeric response question, you can enter or change the answer. K When you click a short answer question, the item wizard opens so you can enter correct answers and choose whether answers must be case-sensitive. L To change a point value, click it to see a text field; then, type the new point value. M To add more items or questions to the score key, click Add Items. Enter the number of items of each type you’d like to 6. Click Done when you’ve finished. 7. Click Save to save the score key. AccelTest User Manual 52 add and the point values for those item types; then, click Add to return to the score key. N The Edit Item button is not available for most score key items; however, it is available when you have a short answer item highlighted so that you can edit the possible answers. O To change the assignment title or subject, click Properties, enter your changes, and click OK. P To choose or change the standards aligned with the items, click the item and click Align Item. See page 57. ..... SETTING UP ASSIGNMENTS Creating a New Score Key for an Existing Assignment Creating a New Score Key for an Assignment That Wi ll Be Scor ed with Scanners 1. In AccelTest, click the Assignments tab A. 2. Click New Assignment B. A B 3. Enter the title of the assignment C and choose the subject from the drop-down list D. Then, click Score Key E and click the Scanner scoring method F. C D E F AccelTest User Manual 53 Short answer items can’t be scored with the scanner. When the cards are scanned to score the assignment, AccelTest assumes students earned all points on the short answer items until the teacher scores them manually (see page 91). ..... SETTING UP ASSIGNMENTS Creating a New Score Key for an Existing Assignment 4. Enter the number of multiple-choice and short-answer items you want to include G and the number of points students can earn for each of these items H. When you’ve finished, click OK. G H 5. Next, AccelTest will show you a sample scan card on which you can choose the answers. You can either select the answers or scan a card that has the correct answers to the assignment. If you plan to scan a card, see the next step for more detailed instructions. To delete an item from the score key, click the item to highlight it; then, press the Delete key on your keyboard. You can select more than one item at once by holding down the Ctrl key (Windows) or the key (Macintosh) as you click the items. You can select a group of items by clicking the first one in the group, holding down the Shift key, and clicking the last one in the group. AccelTest User Manual 54 L M N O ..... SETTING UP ASSIGNMENTS Creating a New Score Key for an Existing Assignment J =I K I Multiple-choice items are labeled AR (assisted-response). Click the correct answer to each of these items. Correct answers will be darker; to remove one so you can select another answer, click it again. You can’t enter answers for freeresponse (FR) items. J Click Scan Form to scan a card that has the correct answers. (See page 56.) K To change a point value, click it and enter a new value in the text field. Choose the type of items you want to add, the number, and the points for each item; then, click OK to return to the score key. M Since score keys don’t include the actual assignment items, the Edit Item button is disabled for scanner score keys. N To change the assignment title or subject, click Properties, enter your changes, and click OK. O To choose or change the standard L To add more items or questions to the score key, click Add Items. To continue, go on to the steps on page 56. AccelTest User Manual 55 aligned with an item, click the item and click Align Item. See page 57. ..... SETTING UP ASSIGNMENTS Creating a New Score Key for an Existing Assignment Scanning a Car d with t he Correct Answer s You can only mark answers to assistedresponse items. Free-response items must be scored manually in the Gradebook; see page 91. 6. If you want to enter the answers on a scan card and then scan it to mark the correct answers in the score key, first fill in the answers on a card like the one below. Be sure to fill in the assignment title for your records. When the card is ready, click Scan Form in the score key window in AccelTest. 7. When this window appears, insert the card in your AccelScan scanner. Scanner settings: If the Scan Answer Key window shows you that the scanner hasn’t been found, click Scanner Settings and make sure you’ve selected the correct port (the one that the AccelScan scanner is connected to on this computer). For AccelScan model 2110 or 2210 (shown): Insert the card face up, with the AccelTest name going into the scanner first as shown to the right. For AccelScan model 1100 USB: Insert the card face down, with the AccelTest name going into the scanner first. For AccelScan model 1100 Serial: Insert the card face up, with the AccelTest name going into the scanner first. 8. When you’ve finished, the message will close, and you’ll return to the score key. If necessary, change the points, add items, delete items, or change the assignment properties as described above. Then, click Done. 9. Click Save to save your score key. AccelTest User Manual 56 ..... SETTING UP ASSIGNMENTS Aligning Items to Standards on an Assignment or Score Key Aligning Items to Standards on an Assignment or Score Key By following the steps below, you can align items on your assignments to any standards you have added. (To add standards to your database, see page 32.) Once you’ve done this, you can use the Assignment Standards Report to see the alignments you’ve set up, and when students have completed the assignment, you can use the Class Standards and Student Standards reports to see how students performed on the aligned standards. (For more about reports, see page 142.) 1. If the assignment is already open, go to step 2. If not, click the Assignments tab and double-click the assignment for which you want to set alignments. 2. Click the item that you want to align to highlight that item A. (You can only align one item at a time.) B A 3. Click Align Item B. (This button is not available if you select more than one item.) 4. In the list at the top of the window, click the + C next to the standards group you’re interested in to see the standards in that group. Continue to expand the standards or categories until you see one standard that you want to align this item to. Then, click that standard D and click Add E. The standard will appear in the list at the bottom of the window F. Repeat this step for each standard you want to add. AccelTest User Manual 57 If you change your mind and want to remove a standard you’ve chosen to align the item to, simply click the standard in the bottom list to highlight it and click Remove. C D E F 5. When you’ve finished choosing standards, click OK. When you return to the assignment, the symbol will appear next to the item G. G AccelTest User Manual 58 ..... SETTING UP ASSIGNMENTS Aligning Items to Standards on an Assignment or Score Key Importing Assignments ..... SETTING UP ASSIGNMENTS Importing Assignments AccelTest can import two types of assignments: • Assignments that another user exported from AccelTest. Since everyone who logs into the computer has a unique database, this is a way to share assignments with teachers who have a different database. Note: If the assignment that you are importing has items aligned to standards, those alignments will be imported with the assignment; if you haven’t already added those standards to the database, the program will ask if you want to import them with the assignment. • XML assignment files. To import a file, follow these steps: 1. Click the Assignments menu in AccelTest and choose Import. 2. Find and open the file that you want to import. Note: For Windows computers, you may need to click the drop-down list at the bottom of the window and choose the file types you want to import, such as AccelTest 2.x or 3.x assignments or XML assignment files. Click the file name to highlight it; then, click Open. 3. If you chose an XML assignment file, click the scoring method you want to use. Then, click OK. 4. If the assignment’s items are aligned to standards that you have not added, the program will ask if you want to import the standards too. Click Yes if you want to keep the alignments or No if you don’t want to keep them or import the standards. If you already have an assignment with the name you’ve chosen, the program will notify you. Click OK and change the name for the newly imported assignment. AccelTest User Manual 5. The assignment will open. You can use the options on the screen to make changes, just as you would when you create an assignment (see page 39) or change one (see page 60). When you’ve finished, click Done. 6. Click Save when the program asks if you want to save the assignment. 7. Enter a name for the assignment and choose a subject; then, click OK. 59 Changing (Editing) Assignments ..... SETTING UP ASSIGNMENTS Changing (Editing) Assignments Important: You cannot change assignments once you have added them to a class Gradebook. If you want to create another version of the assignment, you can make a copy; see page 71. 1. In AccelTest, click the Assignments tab A. 2. Double-click the assignment you want to change B. A B 3. When the assignment opens, you can add, edit, move, or delete items, change the assignment properties (title, subject, fonts, layout, and whether points are shown), change the mode (how the assignment is presented or scored), or change the standards alignments that you’ve set for the items in the assignment. See the instructions on the following pages. AccelTest User Manual 60 Changing (Editing) Assignments ..... SETTING UP ASSIGNMENTS Printed or projected assignments H C D E F Responder assignments H C C To add items, see page 62. D To change an item, see page 64. (To move one, E F G the questions will look on the screen. In the preview window, use the arrow buttons to go to the next and previous questions. When you’ve finished, click OK. see page 66.) E To change the assignment properties, see H Use the and buttons to go to the next or previous page or question. Use the and buttons to go to the first or last page or question. To go to a specific page or question, enter the question or page number and press the Enter or return key on your keyboard. page 66. F To set the standards for an item, click it and click Align Item. See page 57. G For assignments that will be viewed on the Responder or NEO 2, click Preview to see how AccelTest User Manual D 61 Changing (Editing) Assignments ..... SETTING UP ASSIGNMENTS Addi ng I tems to the Assignment There are two ways to add items to an assignment: Adding One Item to the End of the Assignment To add one new item, click the Assignments menu, select Add Item, and then choose the item type. (The item types available depend on how you chose to present and score the assignment.) The new item will be added to the end. To edit it, see page 64. Adding Multiple Items, or Adding Items from the Libraries or Other Assignments You can only use one tab in this window. When you click OK, AccelTest will only apply your selections from the tab you have selected. Any selections you’ve made on other tabs will not be used. Points for matching and ranking items: On the Template tab, when you add matching or ranking items, note that the total points for those items are calculated by multiplying the number of items you add by the default number of answers to match or rank. AccelTest User Manual Click Add Items while A viewing the B C assignment. Then, use one of the tabs at the top A to decide whether to specify the number of D items to add and the point values (Template), add sample items from the AccelTest libraries (Library), add items from an assignment you’ve already created (Assignment), or add items you’ve already aligned to standards (Standards): • Template: If you choose this tab, enter the number of items of each type that you want to add to the assignment B, and enter the points per item for each item type C. If you want to add instructions before the items, check the box D. (Note: The item types available depend on how you chose to present and score the assignment. Only printed assignments allow you to add instructions.) To finish, click Add. A wizard will appear to help you create the questions in the assignment. Enter the information for each question or item; then, click Next. (If you chose to add instructions, you’ll also be asked to enter or edit those instructions.) When you finish the last item, click OK. 62 Changing (Editing) Assignments • ..... SETTING UP ASSIGNMENTS Library: If you choose this tab, click + next to the library E. Then, open the subject and category F and select the item(s) that you want to add to this assignment G. After choosing the items, click Add. E You can choose more than one item from a library or another assignment. To do this, hold down the Ctrl key (Windows) or the key (Macintosh) as you click the items. To select a group of items, click the first one, hold down the Shift key, and click the last one. If you select just one item, you’ll see the item to the right of the list. If you select more than one, you will not see the items. You can click and drag the border between the two panes in this window to change the size of each. F G • Assignments: If you choose this tab, click + next to the assignment that has the items you want to add H. Then, select the items in the list I. After choosing the items, click Add. H I AccelTest User Manual 63 Changing (Editing) Assignments • To add standards to your database, see page 32. You can align each item on an assignment to standards by clicking the item and clicking Align Item; see page 57. ..... SETTING UP ASSIGNMENTS Standards: On this tab, you can select items that have already been aligned to standards in other AccelTest assignments. If you choose this tab, click the + next to the standards agency that relates to the assignment J. Expand categories as needed until you see the standard for which you want to add items. Then, select the items associated with that standard that you want to add to the assignment K and click Add. J K Changing (Edit ing) an Item on an Assi gnment There are two ways to begin editing an item: • Click the item to highlight it; then, click Edit Item. • Double-click the item. When you do this, a wizard will open to help you edit the questions in the assignment. The item you chose will be the one shown. Make your changes to the question, the answers, or the options for the question. If you want to change another item, click Next or Previous to go to that item. When you’ve finished your changes to all items, click OK. AccelTest User Manual 64 Changing (Editing) Assignments I H Some items can’t be edited right away. If you can’t edit an item, it may be a dynamic library item. If so, you can substitute another, similar, library item by clicking New Instance. You can change the item by clicking Edit. These buttons are only available for dynamic library items. B A C D E F G K J A For multiple-choice, matching, and Responder and NEO 2 assignments don’t have all options available. If students will view questions on the Responder or NEO 2, you cannot change the number of columns or the font, and you cannot add a graphic, equation, or plot. Be sure to limit the questions for Responder assignments to 150 characters if possible so students don’t need to scroll to read the question. ranking items, choose the number of answer choices you want to give the student. For matching items, you must also choose the number of items to match. B For multiple-choice items, choose the number of columns for answer choices (printed assignments only). C For multiple-choice items, choose which answer choices to shuffle (or rearrange) for students. D If the assignment includes instructions, you can change the instructions shown in this field. E You can edit the question here. F You can edit, enter, or select the answers to the question. For short answer, enter each possible correct answer and press Enter or return after each answer. Then, use the check box to choose whether answers must be case-sensitive. AccelTest User Manual 65 For multiple-choice questions like the one shown above, you can edit the correct answer and each incorrect answer. Enter the letter of the correct answer. G Enter the number of points students can earn by choosing or entering the correct answer. H If you want to change the format of the text for printed or projected assignments, use the drop-down lists to choose the font and/or size, and use the buttons to make the text bold, italic, or underlined. I Use the buttons on the right if you want to add a graphic, equation, or plot to the assignment. For more information, see page 45. J Click Next > to go to the next question, or click < Previous to go back. In some cases, < Previous will take you back to the assignment instructions. K Click OK after editing the last question. ..... SETTING UP ASSIGNMENTS Changing (Editing) Assignments ..... SETTING UP ASSIGNMENTS Movi ng I tems on an Assignment Click an item that you want to move to highlight the item. Then, click the Assignments menu, and choose Move Up or Move Down. You can only move one item at a time; the menu options aren’t available if you choose more than one item. Changing Assignment Properties Click Properties while viewing the assignment. Then, click the tab that shows what you want to change. Title/Subject: On this tab, you can change the title or click the Subject drop-down list to choose a different subject. Fonts: On this tab, choose the font name and font size for the title and the body (the questions and instructions). You cannot change fonts for Responder or NEO 2 assignments. AccelTest User Manual 66 Changing (Editing) Assignments ..... SETTING UP ASSIGNMENTS Layout: On this tab, enter the top, bottom, left, and right page margins in inches. Then, click an option for answer spaces: you can leave them out (no answer spaces), put them on a separate sheet, or leave space beside the questions. These options are not available for Responder or NEO 2 assignments since they are not printed. Options: Check the Show item points on assignment box if you want students to see how many points they can earn for each question. Leave the box empty if you don’t want students to see the point values. This option isn’t available for Responder or NEO 2 assignments. After changing the assignment properties, click OK to save your changes. Changing the Assignment Mode You can change how an assignment or score key should be presented to students and how it should be scored. Before you do this, please note: • You can only change the mode for assignments that haven’t been added to a class Gradebook. • When you change the assignment mode, some items that are not appropriate for the new mode may be removed from the assignment. For example, if you change the scoring option to Responder, items with more than five answer choices, matching items, ranking items, items with graphics or plots, or instructions may be removed. To change the mode while viewing the assignment, follow these steps: 1. Click the File menu and choose Change Mode. AccelTest User Manual 67 Changing (Editing) Assignments The Devices preference determines which options are available for presenting and scoring the assignment. ..... SETTING UP ASSIGNMENTS 2. If you want to change how the assignment will be presented to students, click a different option A in the left side of the window that opens. A B 3. If you want to change how the assignment is scored (and also how students record their answers), click a different option in the right side of the window B. (The presentation method that you choose may limit the scoring methods available.) 4. Click Next. 5. If your new method of presenting or scoring the assignment does not support some items that are already on the assignment, the next screen in the wizard will list the unsupported items. Those items (including instructions) will be removed from the assignment. (For example, if you changed from a printed assignment to a Responder assignment, matching items will be removed.) Read through the list to make sure you’d like to continue changing the mode and allow the program to remove these items. If you’d like to continue, click Next. (If not, click Cancel.) 6. Click Done to finish changing the mode. AccelTest User Manual 68 Changing (Editing) Score Keys ..... SETTING UP ASSIGNMENTS Changing (Editing) Score Keys 1. In AccelTest, click the Assignments tab A. To change the mode (presentation and scoring method) for a score key, see page 67. 2. Double-click the score key you want to change B. A B 3. Next, AccelTest will show you a sample scan card on which you can choose the answers. You can add or delete items, changes your answers, or change the point values. To delete an item from the score key, click the item to highlight it; then, press Delete on your keyboard. You can select more than one item at once by holding down the Ctrl key (Windows) or the key (Macintosh) as you click the items. You can select a group of items by clicking the first one in the group, holding down the Shift key, and clicking the last one in the group. AccelTest User Manual 69 Changing (Editing) Score Keys ..... SETTING UP ASSIGNMENTS Responder or NEO 2 score key Scanner score key G H I J G H I J K C C D F F E C To change the correct answer for an assistedresponse question (multiple-choice, true/false, or yes/no), first, click the answer that is filled in so it is empty again. Then, click the new correct answer. G To add more items or questions to the score key, click Add Items. Choose the type of items you want to add, the number of items, and the points for each item; then, click OK to come back to the score key. D To change the correct answer for a numeric- H The Edit Item button is not available for most response item (Responder and NEO 2 assignments only), click the answer and type the new answer in the text field that opens. score key items; however, it is available when you have a short-answer item highlighted so that you can edit the possible answers. E To change the correct answer for a shortanswer item (Responder and NEO 2 assignments only), double-click the item, enter the correct answers, and choose whether answers should be case-sensitive (in other words, they must match the case of the correct answers you’ve entered). F To change a point value, click it to open a text field where you can type a new value. I To change the assignment title or subject, click Properties, enter your changes, and click OK. J To choose or change the standard aligned with an item, click it and click Align Item. See page 57. K To scan a form with the correct answers so that these are changed in the score key, click Scan Form. For detailed instructions, see page 56. 4. Click Done. 5. Click Save when the program asks if you want to save the score key changes. AccelTest User Manual 70 Copying Assignments ..... SETTING UP ASSIGNMENTS Copying Assignments By following the steps below, you can copy an assignment or score key that you’ve created. This can be helpful if you want to create a variant of an assignment that is already in a class Gradebook. You cannot change the original assignment once you’ve added it to the Gradebook, but you can edit the new copy that you have not used yet. 1. In AccelTest, click the Assignments tab A. 2. Double-click the assignment that you want to copy B. The assignment will open. A B 3. Click the File menu and choose Save As. 4. Enter a new name for the assignment. (You can also change the subject if necessary.) Then, click OK. 5. You are now working in the copy of the assignment. If necessary, make changes to the items or properties. When you have finished your changes, click Done. 6. If you’ve made any changes, click Save when the program asks if you want to save the assignment. AccelTest User Manual 71 ..... SETTING UP ASSIGNMENTS Printing a Single Copy of an Assignment Printing a Single Copy of an Assignment 1. In AccelTest, click the Assignments tab A. Opening the assignment ensures that you can select the printer. If you simply select the assignment in the list before choosing File and Print, some operating systems use the default printer without allowing you to select the printer. 2. Double-click the assignment that you want to print B. The assignment will open. A B 3. Click the File menu and choose Print. 4. Choose a printer in your computer’s print dialog box. Then, click OK or Print. 5. Click OK when the program notifies you that the assignment has been printed. 6. Click Done to close the assignment. AccelTest User Manual 72 ..... SETTING UP ASSIGNMENTS Previewing Responder or NEO 2 Assignments Previewing Responder or NEO 2 Assignments 1. In AccelTest, click the Assignments tab A. 2. Double-click the Responder or NEO 2 assignment that you want to preview B. The assignment will open. A B 3. Click Preview. The Preview window will show you how the first question will look on the Responder or NEO 2 screen. Click the left and right arrows C to go to the next or previous question. Click the up and down arrows to scroll up and down within a question. When you’ve finished previewing the assignment, click OK. C C 4. Click Done to close the assignment. AccelTest User Manual 73 ..... SETTING UP ASSIGNMENTS Exporting Assignments or Score Keys Exporting Assignments or Score Keys If items on the assignment are aligned to standards, those alignments are exported with the assignment. If the teacher who imports the assignment doesn’t have those standards added, the program will give the teacher the opportunity to import the standards with the assignment. Follow these steps to export assignments. Exporting can be helpful when you want to share an assignment you’ve created with someone who is using another database or when you want to import the assignment into AccelTest at another computer. (To import assignments, see page 59). 1. In AccelTest, click the Assignments tab. 2. Click the assignment that you want to export A. 3. Click the Assignments menu and choose Export B. B A If you export an assignment from the latest version of AccelTest, and you try to import it into an older version of the software, the assignment may not be compatible. Update AccelTest before importing the assignment. AccelTest User Manual 4. In the dialog box that opens, go to the drive and folder where you want to save the exported assignments or score keys. If necessary, change the file name. Make sure it ends with an “.at3” extension, especially if the assignment will be imported using a Windows computer. Click Save. 5. Click OK when the export is complete. 74 Deleting Assignments ..... SETTING UP ASSIGNMENTS Deleting Assignments Follow the steps below to delete assignments you don’t want to use again. If the assignment has been added to the Gradebook for any of your classes, you must remove it from the Gradebook before you can delete it (see page 110). 1. In AccelTest, click the Assignments tab A. 2. Click the assignment that you want to delete B. A C B 3. Click the Assignments menu and choose Delete C. 4. Click Yes when the program asks if you’re sure you want to delete the assignment. AccelTest User Manual 75 U SING THE G RADEBOOK This section explains how to add or assign assignments, print them, score them, and monitor grades in your Gradebook. It also explains how students complete the assignments. Viewing a Class Gradebook 1. Click the Gradebook tab in AccelTest A. 2. Click the left drop-down list B to choose the class whose Gradebook you want to view. 3. Click the second drop-down list C to choose the subject for the assignments you want to view, or choose All Subjects. F A C B You can choose the time period to show and whether to show percentage scores or points. To choose the time period, click the Gradebook menu and choose either Show Entire School Year or a specific term. To choose the score type, click the Gradebook menu and choose either Show Scores as Points or Show Scores as Percentages. G H a class Gradebook. B Click this drop-down list to choose the class. C This drop-down list lets you choose to see assignments from one subject or all subjects. It can help you shorten the list you’re viewing if you have many assignments. D Click Add to add a new assignment to the Gradebook for this class. See page 77. 76 E I A Click the Gradebook tab to view AccelTest User Manual D E Click this button to assign assignments. See page 83. F Click the Gradebook menu for more options. G You set the ID when you add students. IDs are important when you assign Responders to students. See page 12. H The status tells you if students need to retrieve Homework (H) or Notes (N) with their Responders. I You’ll see a column for each assignment in the Gradebook. ..... USING THE GRADEBOOK Adding Assignments to the Gradebook Adding Assignments to the Gradebook Follow the steps below to add assignments to a class Gradebook. Before you do this, you must do the following: • Create your classes (see page 18) or import them from Renaissance Place (see page 21) • Add your students (see page 18) or import them (see page 23) You don’t need to create points-only assignments before adding them. You can simply follow these steps to add them to the Gradebook. • Create assignments (see page 39) or import them (see page 59) • Set up your school year (see page 153) You can add assignments or score keys. (For more about score keys, see page 50.) Be sure to check your assignments before you add them to a Gradebook because you cannot change assignments once they’ve been assigned to students. Important note for teacher-paced sessions: Do not add assignments that you will use with teacher-paced sessions on the Responder or NEO 2 or assignments that are projected. When sessions are complete, AccelTest adds the assignments (with scores) to the Gradebook, so you should not add the assignments separately. Projected assignments are always teacher-paced and are only used with in-class sessions, so you can’t add them as described below. 1. View the Gradebook for a class (see page 76). 2. Click Add. 3. Click the type of assignment you want to add: AccelTest User Manual • AccelTest assignments are assignments you’ve created on the Assignments tab in this software (see page 39). They include the questions and answers. • Score keys allow you to use AccelTest to score assignments that exist outside of the program. They include only answers, not the assignment questions. Score keys are also added on the Assignments tab (see page 50). • Points-only assignments are not on the Assignments tab in this software. They are simply a record of points you award students for an assignment. You do not need to create these assignments before adding them. 77 ..... USING THE GRADEBOOK Adding Assignments to the Gradebook 4. Click Next. Then, follow the instructions for the type of assignment you chose to add: • If you are adding an AccelTest assignment or a score key, see the next section. • If you are adding a points-only assignment, see page 80. Addi ng an AccelTest Assignment or Scor e Key 5. Click the drop-down list A and choose the assignment’s subject, or choose All Subjects. Then, click the assignment that you want to add B and click Next. A B 6. Now, choose options for the assignment: You can add assignment categories using the Categories preference; see page 150. • Click the Term drop-down list (C on the next page) and choose the term when students will take the assignment. The program chooses the current term by default. • Click the Category drop-down list D and choose whether the assignment will be Homework, In-Class work, a test, a quiz, or extra credit. • Use the check boxes E to choose other options for the assignment: Assignment is extra credit: You can check this box if the assignment is extra credit; however, you don’t need to check it if you chose the Extra Credit category from the Category drop-down list D; for more information, see “Two Ways to Choose Extra Credit Assignments” on page 100. Assignment is an exam: Check this box if the assignment is an exam. This helps determine the weight of the assignment’s score. (See the Exams preference on page 151.) Each student gets his/her own variation: Check this box if you want the questions to be in a different order for each student. (This box isn’t available for score keys.) Turn on student feedback: For assignments that require students to use the Responder or NEO 2, make sure this box is checked if you want students to see their score at the end of the assignment. (The box is checked by default.) After choosing the options, click Next. AccelTest User Manual 78 ..... USING THE GRADEBOOK Adding Assignments to the Gradebook C D E 7. Next, click Yes if your assignment needs a start date, or No if it does not. Then, click Yes if your assignment needs a due date, or click No if there is no due date. If you choose Yes for either date, enter the date F, or click the calendar button G and click a date on the calendar that appears. You can use the arrows in the calendar to move to a different month. If you want to make today the start or due date, click Today under the calendar. If you choose No for the due date, you won’t be able to assign the assignment now; if you assign it later, the program will ask you to set a due date. When you’re ready to continue, click Next. F G 8. If you chose a due date for the assignment, choose whether to assign the assignment to all students or just some. Then, click Next. (This choice won’t appear if you didn’t choose a due date for the assignment.) AccelTest User Manual 79 ..... USING THE GRADEBOOK Adding Assignments to the Gradebook If you chose to select the students, on the next panel, check the box next to each student who needs the assignment, or click Select All to choose all the students. Then, click Next. 9. Read the Summary. If the information is correct, click Done. (If not, click Back to make changes.) If the assignment is a printed assignment, a copy will be printed for each student after you click Done. If the assignment is a score key, and the score key is meant to be scored with the AccelScan scanner, the Form Numbers Report will be generated so that you have each student’s number for scoring. Depending on the setting of the Form Numbers Report preference, you may be asked whether you want to preview or print; click one of the options. To print the report on your own, see page 142. Your assignment will appear in the Gradebook to the right of previously added assignments. The students that you assigned it to will have “Waiting” in the column under your new assignment (or “Pending” if the assignment has not yet started). Addi ng a Points-Only Assignment 5. Enter the information for the points only assignment: • You can add assignment categories using the Categories preference; see page 150. Enter a title (A on the next page). • Choose a subject from the Subject drop-down list B. • Enter the total points that can be awarded for the assignment C. • Choose the term when students will complete the assignment D. • Click the Category drop-down list E and choose whether the assignment will be Homework, In-Class work, a test, a quiz, or extra credit. • Click the check boxes F to set whether the assignment is extra credit or an exam. If you chose the Extra Credit category, you don’t need to check the extra credit box; for more information, see “Two Ways to Choose Extra Credit Assignments” on page 100. Click Next after entering the information. AccelTest User Manual 80 ..... USING THE GRADEBOOK Adding Assignments to the Gradebook A B C D E F 6. Next, click Yes if your assignment needs a start date, or click No if there is no start date. Then, click Yes if your assignment needs a due date, or click No if there is no due date. If you choose Yes for either date, enter the date G, or click the calendar button H and click a date on the calendar that appears. You can use the arrows in the calendar to move to a different month. If you want to make today the date, click Today under the calendar. If you choose No for the due date, you won’t be able to assign the assignment now; if you assign it later, the program will ask you to set a due date. When you’re ready to continue, click Next. G AccelTest User Manual 81 H ..... USING THE GRADEBOOK Adding Assignments to the Gradebook 7. If you chose a due date for the assignment, choose whether to assign the assignment to all students or just some. Then, click Next. (This choice won’t appear if you didn’t choose a due date for the assignment.) If you chose to select the students, on the next panel, check the box next to each student who needs the assignment, or click Select All to choose all the students. Then, click Next. 8. Read the Summary. If the information is correct, click Done. (If not, click Back to make changes.) Your assignment will appear in the Gradebook to the right of previously added assignments. The students that you assigned it to will have “Waiting” in the column under your new assignment (or “Pending” for future assignments). AccelTest User Manual 82 ..... USING THE GRADEBOOK Assigning Assignments to Students Assigning Assignments to Students Before you assign assignments, you must create the assignments, add your students, and enroll students in classes. When you add an assignment to a class Gradebook, you can choose the students that you’d like to assign it to. By following the steps below, you can assign the assignments to more students in the class. 1. View the Gradebook for a class (see page 76). 2. Select the student(s) who need the assignment: • To select one student and assignment, click where the column for the assignment and the row for the student meet A. To select more than one student and assignment, select the square(s) where the assignment column and student row meet. Hold down the Ctrl key (Windows) or the key (Macintosh) as you click the students’ squares in the column for that assignment. A • AccelTest User Manual To assign all available assignments to students, select one or more student names instead. 83 ..... USING THE GRADEBOOK Printing Assignments for Students To assign a specific assignment to the whole class, click the assignment name at the top of the column. If you didn’t set a due date for the assignment when you added it to the Gradebook, the program will ask you to set a due date when you assign it. Choose or enter a date and click OK. 3. Click Assign. If students require printed copies of the assignment (based on the choices you made when you created the assignment), student copies of the assignment will automatically be printed at your default printer. Printing Assignments for Students When you create an assignment (see page 39), you choose whether printed assignments will be used. When you add the assignment to the Gradebook (see page 77), or when you assign it to individual students (see page 83), AccelTest prints the assignment automatically for each student. You don’t need to print assignments separately. If you need to reprint an assignment for a student, go to the Gradebook and click the square at the intersection of the student’s name and the assignment; then, click Assign again. Since the assignment is already assigned, the program will simply reprint the assignment. (The program will only print the assignment if you chose to present it to students using a printed copy; Responder assignments, NEO 2 assignments, and projected assignments won’t be printed for students.) AccelTest User Manual 84 ..... USING THE GRADEBOOK Changing the Dates, Category, and Other Properties for Gradebook Assignments Changing the Dates, Category, a n d O t h e r P r o p e r t i e s f o r Gradebook Assignments After you add an assignment to the Gradebook, you can still change the assignment’s term, category, whether it is extra credit and/or an exam, start date, due date, and whether student feedback is on. Follow these steps: 1. View the Gradebook for a class (see page 76). 2. Click the name of the assignment for which you want to change the dates A. A 3. Click the Gradebook menu and choose Assignment Properties. AccelTest User Manual 85 ..... USING THE GRADEBOOK Changing the Dates, Category, and Other Properties for Gradebook Assignments 4. Make changes to the Gradebook assignment properties as needed. Then, click OK to save the changes. B C D E F B Choose the term when the assignment will be done. C Choose whether the assignment will be Homework, In-Class work, a test, a quiz, or extra credit. This can affect how the student can complete the assignment and/or the weight of the grade. (See the Categories preference information on page 150. D Choose whether to make the assignment extra credit and/or an AccelTest User Manual 86 exam. To see how this affects grades, see page 99. E Check the boxes if you want start and due dates for the assignment. Then, enter the date or click the calendar button and click a date in the calendar. F For Responder and NEO 2 assignments, you can check this box if you want your students to see their scores after completing assignments. ..... USING THE GRADEBOOK How Students Complete Assignments How Students Complete Assignments When you create assignments (see page 39), you choose how each assignment will be presented to students and how it will be scored. This information determines whether students will use the Responder, a NEO 2, an AccelScan scan card, or simply an answer sheet to complete the assignment. Using the Responder or NEO 2 If you chose Responder for scoring the assignment, students can use either Responders or NEO 2s to complete the assignment. If you chose NEO 2 Only, students must use NEO 2s. When you add the assignment to the Gradebook (see page 77), you choose the category of the assignment (In Class, Homework, Test, Quiz, or Extra Credit). Completing In-Class Assignments, Including Quizzes, Tests, and Exams, Using a Responder or NEO 2 For these assignments, you must start a session so students can take the assignment in class. For more information, see page 115. Some Responder firmware versions don’t support homework or notes. For more on types of Responders (based on model number and firmware versions), see page 14. Completing Homework Using the Responder Only When a teacher adds assignments to a class Gradebook, the teacher chooses the assignment category. One of these categories is Homework. Any homework in your Gradebook that is set up to use the Responder as the scoring method is available to students on their Responders (but not NEO 2s, which don’t support Homework). If you’re not sure what scoring method is selected for a specific assignment, click the Assignments tab, find the assignment, and check the Score With column. Students can follow these steps to retrieve and complete homework on their Responders. Students must own their Responders to follow these steps; see page 12. 1. If the Responder isn’t already on, press the On/Off button. The Responder remembers the last Receiver it was connected to in order to save you time. If the Responder asks whether it should stay connected, you can press yes to stay connected or press no to see a list of Receivers that you can connect to. 2. The student enters his/her Personal Identification Number (PIN) and presses Enter or Select. The default PIN is 1212; you may have changed it or set a different one. 3. On the menu, the student must press to scroll down to Synchronize; then, press Select or Enter. When synchronization is finished, the Responder will show how many new homework assignments and notes were downloaded and how many files were submitted from the Responder. 4. The student presses any key. 5. In the menu, the student presses to scroll up to Homework; then, the student presses Select or Enter. 6. The Responder lists the homework assignments. The student uses the arrows to scroll to one assignment; then, the student presses Select. AccelTest User Manual 87 ..... USING THE GRADEBOOK How Students Complete Assignments 7. The student answers each item and presses Enter: More information about short-answer items and Responders: For more about the model number or firmware version required, see page 14. For more information about answering short-answer questions on Responders, see page 138. • For multiple-choice items, the student presses a letter key to choose an answer and then presses Enter. • For true/false items, the student presses yes True or no False and then presses Enter. • For numeric response items, the student enters the number and presses Enter. • For short-answer items, students with version 3.x or 4.x firmware use texting techniques to enter the answer and press Enter. The student’s answer can have up to 25 characters. • For other free-response items (essay), the Responder tells the student to enter an answer on paper. 8. After the student answers the last question, the Responder asks the student if the homework is complete. If it is, the student presses yes True, then Select, and the Responder shows the main menu. If not, the student presses no False, then Select, and the Responder goes back to the first question so the student can enter additional answers or check the answers he or she has already entered. The student can repeat steps 6–8 above to complete other Homework assignments. (In the list of Homework, checked assignments are complete.) When the student has finished all homework, the student must return to the menu, highlight Synchronize again, and press Select to send the completed homework back to the teacher’s computer for automatic scoring. Any homework that wasn’t completed won’t be turned in during the synchronization. Using the AccelScan Scan Cards When you create assignments (see page 39) and choose Scanner scoring, you must also choose to use printed assignments. When you assign the assignment to students in your Gradebook, the program prints a copy of the assignment for each student. Each student has a unique form number at the top of that assignment. Make sure each student has a blank AccelTest scan card for this assignment. Students follow the steps below to complete the assignment. 1. The student fills in his or her unique form number at the top of the card and fills in the circles for the form number as shown below. AccelTest User Manual 88 Scoring Assignments ..... USING THE GRADEBOOK 2. Next, the student fills in an answer for each multiple-choice question. If the assignment has some free-response questions, the student must answer them on a separate piece of paper. 3. The student or teacher scans the card for scoring as described on page 90. For Manual Scoring When you created an assignment (see page 39), you may have chosen the Manual scoring method. For this method, you can have students fill in their answers on the assignment itself or a separate sheet of paper, or even an AccelTest scan card. Then, the teacher must score the answers as described on page 91. Scoring Assignments There are four ways to score AccelTest assignments: • Responder scoring: If students used the Responders to enter their answers, either for Homework or an In-Class assignment session, the software will score assistedresponse, numeric-response, and short-answer answers automatically. (For homework, this will happen when the student synchronizes the Responder again.) • NEO 2 scoring: If students used NEO 2s to enter their answers for in-class assignments only, the software will score assisted-response and numeric-response answers automatically. Short answer questions are also scored automatically. • Scanner scoring: Students can fill in their answers on scan cards, and teachers or students can scan the cards for scoring. See the instructions on page 90. • Manual scoring: Students can fill in their answers on the assignment or a separate sheet of paper, and teachers can score them manually; see page 91. Scoring Assignments wi th the Responder When students use Responders to complete assignments, the software automatically scores assisted-response, numeric-response, and short-answer answers in those assignments. However, if the assignments also include other free-response items such as essay questions, you must score those items manually; see page 91. Scoring Assignments wi th the NEO 2 When students use NEO 2 to complete assignments, the software automatically scores assisted-response and numeric-response answers in those assignments, and it can score short-answer responses if you entered correct answers when you created the assignment. However, if the assignments also include essay questions, you must score those items manually; see page 91. AccelTest User Manual 89 Scoring Assignments ..... USING THE GRADEBOOK Scoring Assignments wi th the AccelScan Scanner When students have filled in their answers on scan cards (see page 88), the students or the teacher can scan the cards for scoring. Before you follow these steps, make sure the AccelScan scanner is connected to the computer as described in the AccelTest Software Installation Guide. Starting the Scanning Session 1. In the AccelTest, the teacher must first click the Gradebook menu and choose Start Scanning Score Cards. (You can select this menu and item no matter which tab you’re viewing in the software.) 2. The program will search for the scanner and will notify you when it’s ready to start scoring. Scanning Cards Now, students or teachers can scan their cards by following these steps: 3. Make sure the correct form number is filled in at the top of the card, both in the squares and in the circles. Each student’s form number is unique for each assignment; it is printed on that student’s assignment. AccelTest User Manual 90 Scoring Assignments ..... USING THE GRADEBOOK 4. Make sure answers are filled in properly: • Make sure that all answers have been filled in and marked next to the correct problem numbers. • Erase any stray marks. • If any answers were changed, be sure the old answers are completely erased. 5. For AccelScan model 2110 (shown) or 2210: Insert the card face up, with the AccelTest name going into the scanner first as shown to the right. For AccelScan model 1100 USB: Insert the card face down, with the AccelTest name going into the scanner first. For AccelScan model 1100 Serial: Insert the card face up, with the AccelTest name going into the scanner first. 6. The program will tell you that the results have been sent; click OK. The card will come out behind the scanner. Save it so you can use the other side. If the assignment also has free-response items, you must score those items manually; see the instructions below. 7. Now, the teacher or the next student can scan the next card. If you need to change the AccelTest password, use the Password preference; see page 152. Ending the Scanning Session When you or your students have finished scanning cards, click Done. The program will ask you to enter a password to unlock AccelTest. (This is so students can’t access the Gradebook or other parts of the program.) Enter the same password that you use to log in to the software (the default is admin); then, click OK. Scoring Assignments Manuall y Manual scoring is required when: • You chose “Manual” as the scoring method when you created the assignment (see page 39). The teacher must score both assisted-response and free-response questions manually. Free response items are numeric-response questions, shortanswer questions, and essay questions. Assisted-response items are multiple-choice, true/false, yes/no, matching, and ranking questions. • The assignment has free-response items that were not scored by the scoring method you chose. AccelTest will score the items that can be scored automatically using the method you chose (Scanner, Responder, or NEO 2); for the other items, such as essay questions, the software will assume the student earned all points unless you score those items manually. If you used the Scanner for scoring, and the assignment has numeric-response items, the program will mark them incorrect unless you use manual scoring to enter the student’s answers to those items. Follow the steps below to score an assignment manually. You can also follow the steps to change scoring that was already done. 1. Click the Gradebook tab and choose your class (see page 76). AccelTest User Manual 91 Scoring Assignments ..... USING THE GRADEBOOK 2. Double-click the name of the assignment you want to score (the top of the column) A. A 3. A window will open that shows each item number and each student’s name. For one student, double-click the square for the first item in the assignment B. B AccelTest User Manual 92 Scoring Assignments ..... USING THE GRADEBOOK 4. The Score Items Wizard lets you score each item in the assignment: Some answers will already be entered in this wizard if you scored the assisted-response items using the Responder, NEO 2, or the AccelScan Scanner. • For multiple-choice, matching, and ranking items, check the box next to the student’s answer(s) C. • For true/false and yes/no items, click the student’s answer D. • For numeric-response items, enter the student’s answer if necessary E. • For short-answer items on NEO 2 or Responder assignments only, you can view the student’s answer and change how it is scored if necessary F. • For free-response items that can’t be automatically scored using the method you chose, enter the number of points the student earned G. After entering the information for each item, click Next. To go to a previous item, click Back. When you have finished, click Done. C D Free Response Grading Worksheet. Teachers can use the Free Response Grading Worksheet in the AccelTest Reports to keep track of the points they are awarding for free-response items until they enter the points in the Gradebook. See page 145. E F G AccelTest User Manual 93 Scoring Assignments ..... USING THE GRADEBOOK 5. Notice the student’s scores have been entered H. Repeat steps 3–4 for each student. I H 6. When you have finished editing scores for students, click Done I. The students’ scores for the assignment will be shown in the Gradebook. If you didn’t score the assignment for some students, you’ll see “Waiting” in the Gradebook instead of a score. Scoring Points-Only Assi gnment s When you add a points-only assignment (see page 80), the assignment itself is not in AccelTest, and you don’t have a score key. Points-only assignments are assignments that only require you to award a certain number of points to a student without scoring specific items. To score these assignments, follow the steps for overriding a score in the next section. Overriding Scores in the Gradebook By following these steps, you can override the overall score for a student’s assignment in the Gradebook. You can also follow these steps to score points-only assignments. 1. Click the Gradebook tab and choose your class (see page 76). AccelTest User Manual 94 Scoring Assignments ..... USING THE GRADEBOOK 2. Double-click the student’s score. (If you’re scoring a points-only assignment, double-click the word Waiting in the row for that student.) When you do this, you’ll see the score in a text field so you can change it A. A 3. Type the new score that you want to override the old one. Then, click elsewhere in the Gradebook. For most assignments (except points-only assignments), the student’s original score will be shown in the upper-left corner of the cell; then, you will see a / and the student’s override score in the lower-right corner of the cell B. B AccelTest User Manual 95 ..... USING THE GRADEBOOK Viewing Assignment Scores in the Gradebook Viewing Assignment Scores in the Gradebook About t he Scores and St at us Messages i n the Gradebook The Gradebook shows students’ scores for each assignment A and their overall scores for the time period you’ve chosen to view B. If you see more than one score in a cell with a / between the scores C, the Gradebook is showing you the original score and the overriding score that you entered by double-clicking the cell (see page 94). Median or mean scores appear at the bottom of the window; you can click the word Mean or Median to switch between mean or median scores D. E B A C D If an assignment has not yet been scored, but it has been assigned to the student, you will see Waiting if the assignment isn’t due yet, Pending if it hasn’t started yet, or Overdue if it is past due. Important: Unlike assignments marked Waiting, Overdue assignments will be scored as a 0. For homework, you will see Sent if the student has retrieved homework on his or her Responder, but the student hasn’t finished the homework yet. AccelTest User Manual 96 ..... USING THE GRADEBOOK Viewing Assignment Scores in the Gradebook Changing How Scores Are Shown At the bottom of the Gradebook, you’ll see either mean or median scores. If you want to switch from mean scores to median scores or from median scores to mean, click the word in the lower-left corner of the Gradebook (D on the previous page). To view students’ scores for a different time period, click the Gradebook menu and choose either Show Entire School Year or a specific term. To change how the scores are shown (either in percentages or points), click the Gradebook menu and choose either Show Scores as Points or Show Scores as Percentages. Vi ewing Students’ Scores for Each I tem on an Assi gnment To see the scores that students achieved on each item, double-click the assignment name (E on the previous page). You will see a table of the items on that assignment and the students in the class. The table will show the student’s score for each item. If the square for each item is blank, the item hasn’t been scored yet; if you want to start scoring the assignment for a student, double-click the first item for that student (see page 91). Notice that there is a column for each item on your assignment. The points per item and an abbreviation for the item type are at the top of each column. These abbreviations are used: • MC: Multiple-choice • YN: Yes/No AccelTest User Manual 97 How Grades Are Calculated ..... USING THE GRADEBOOK • TF: True/False • M: Matching • R: Ranking • NR: Numeric-response • SA: Short answer • E: Essay When you’ve finished viewing the scores for each item, click Done. How Grades Are Calculated In the last column of the Gradebook, you’ll see the overall grade for the time period you’re viewing (the entire school year or a specific term). By default, AccelTest calculates grades by dividing points earned by the points possible on each assignment. The software then chooses the appropriate letter grade based on the scale you’ve chosen in the Grading Scale preference. Term, Semester, and Final Grades Term grades are derived from the assignment scores. Semester grades are computed by averaging term grades. Final grades for the year are computed using semester or trimester grades if there is no final exam. (If there are no semesters in the school year, only term grades are used.) For example: 1st Term Grade 81% 2nd Term Grade 75% 3rd Term Grade 82% 4th Term Grade 86% 1st Semester Grade (81% + 75%) 2nd Semester Grade (82% + 86%) Final Grade The Exam preference is ignored if there are no exams in the grading period. AccelTest User Manual (78% + 84%) ÷ 2 = 78% ÷ 2 = 84% ÷ 2 = 81% The Exam preference settings determine how final exam grades are included in the grade calculation. (See page 151). For example, if final exams are 30% of the term grade, and a student earned 75% on the exam: Term Grade 81% × 70 = 56.7% Final Exam 75% × 30 = 22.5% Grade (including exam) 56.7% + 22.5% = 79.2% 98 How Grades Are Calculated ..... USING THE GRADEBOOK If final exams are 20% of the semester grade, and a student earned 72% on the exam: Semester Grade 78% × 80 = 62.4% Final Exam 72% × 20 = 14.4% Grade (including Exam) 62.4% + 14.4% = 76.8% You may choose different categories, weights, and grading options for each term in the school year. This gives you the flexibility to change how you compute grades during the course of the school year. How AccelTest Preferences Aff ect Grades Three AccelTest preferences affect how grades are shown or calculated: • Categories (Category Weights) • Exams • Grading Scale Categories (Category Weights) Using the Categories preference (see page 150), you can assign a weight to each assignment category so that some types of assignments have more of an effect on the student’s grade than others. If you do this, the software will first calculate the percent correct within each category. Then, to determine grades, it will calculate a weighted average of the percent correct within each category. Exams Using the Exams preference (see page 151), you can choose to count exams as a specific percentage of the term, semester, or final grade. Grading Scale Using the Grading Scale preference (see page 151), you can choose which grading scale to use, and you can set the minimum percentage correct required for each grade in the scale. The available scales are: • Standard (A+ to F) • Pass/Fail • Outstanding/Satisfactory/Unsatisfactory • 1 to 10 AccelTest User Manual 99 How Grades Are Calculated ..... USING THE GRADEBOOK Extra Credi t Two Ways to Choose Extra Credit Assignments You can use extra credit assignments to allow your students to improve their grades. There are two ways to do this, and you can choose either method when you add an assignment to your Gradebook and assign it to students (see page 77): • You can select the Extra Credit category, and use this category for all of your extra credit work. This is the preferred way to handle extra credit if you are using category weights to compute grades. (See the Categories preference on page 151.) • You can check a box to designate an assignment in any category (homework, test, or quiz) as an extra credit assignment. You may prefer to do this if you are using points possible to compute grades. How AccelTest Uses Points Possible with Extra Credit Assignments designated as Extra Credit contribute to each student’s points earned, but not to the total points possible so that students can improve their score. See the example below, where the student earned 5 points out of 0 possible on the extra credit assignment A. When you give assignments for Extra Credit, it is possible for students to earn enough points so they achieve a term or semester grade above 100%. However, AccelTest limits the grade to 100%. Homework Chapter 9/10 Quiz Chapter 8/10 Homework Questions 7/10 Homework Chapter 2 10/10 Homework Chapter 3 9/10 A Extra Credit Homework 5/0 Test Chapters 1–4 9/10 Total 57/60 = 95% How Category Weights Work with Extra Credit Category weights work differently depending on how you designate an assignment extra credit: • When you add an assignment in another category to the Gradebook (Homework, Test, Quiz, etc.) and check the box to make it extra credit, extra credit assignments improve the percent correct within that category. For example, if you make a Homework assignment extra credit, this increases the percent correct in the Homework assignment category for students earning points on that assignment. • When you choose the Extra Credit category as you add the assignment to the Gradebook, the assignments in the Extra Credit category are treated like assignments in any other category. The percent correct on these extra credit AccelTest User Manual 100 How Grades Are Calculated ..... USING THE GRADEBOOK assignments is multiplied by the category weight. However, the Extra Credit category weight is not included when category weights are totaled, so you can assign points possible on extra credit assignments if you use category weights to calculate grades. For best results, make the non-extracredit category weights add up to 100%. The weights that you select for the Extra Credit category in the Categories preference determine how much the extra credit assignments will contribute to term grades. If you choose a weight of 10 for Extra Credit, and the total of the weights of your other categories is 100, any student with a perfect score on every assignment would earn a grade of 110% for the term. However, AccelTest sets a top limit of 100% for the grade. The following detailed example shows calculations for grades when using Category Weights with Extra Credit assignments: Tests Chapter 1 Test Chapter 2 Test Chapter 3 Test 82/100 80/100 78/100 240/300 = 80% Chapter 1 Homework Chapter 2 Homework Chapter 3 Homework 30/40 20/30 40/50 90/120 = 75% Library Museum 8/10 7/10 15/20 = 75% Report #1 Report #2 7/10 3/10 10/20 = 50% Total Homework Total Field Trip Total Extra Credit Total Tests Homework Field Trips Extra Credit Total 80% correct × 50 weight = 40.0% 75% correct × 30 weight = 22.5% 75% correct × 20 weight = 15.0% 50% correct × 10 weight = 5.0% = 82.5% Without Extra Credit assignments, this student would have a grade of 77.5% for the term. Note that the Extra Credit category is not included when the category weights are totaled, making the assignments truly extra credit. Note: If you check Drop Worst Score in the Categories preference, an Extra Credit assignment that happens to be the lowest score will not contribute to the grade. AccelTest User Manual 101 ..... USING THE GRADEBOOK Exporting Scores from AccelTest Exporting Scores from AccelTest There are two ways that you can export information about student grades in AccelTest: Both types of export files are tabdelimited files. In tabdelimited files, the program puts a tab after each piece of information. This format can be imported by many spreadsheet programs. • You can export one class’s results for one or more assignments using the Export Results feature. The file includes the assignment name, category (such as In Class), and total points as well as each student’s name, ID, and score. The file is saved in text format; here is an example: Names ID Arnold, Jacob 101 Grade 3 Math, Word Problems In Class 17 16 • You can export detailed scoring data for one assignment using the Export Scoring Data feature. For each student who has completed this assignment in any class, the file includes a line for each question on the assignment. Each line includes the student’s name and ID, the assignment name, the question number, the student’s answer (or “Answered” for some free-response items), the correct answer, the points the student earned for the question, and the number of points possible. The file is in CSV (comma-separated value) format, which allows you to easily open the file in a spreadsheet program. Follow the steps for the type of export you’d like to do. Export ing Result s from One Class’ s Assignments i n the Gradebook By following the steps below, you can export students’ scores from assignments in the Gradebook. Each student’s overall score for the assignment is exported. (If you want detailed scoring data on each question, see page 104.) The text file that is exported is tab-delimited so you can use it in a spreadsheet program. 1. Click the Gradebook tab and choose your class (see page 76). 2. Choose the assignment(s) for which you want to export results A: AccelTest User Manual • To select one, click the assignment name at the top of the column. • To choose more than one, hold down the Ctrl key (Windows) or the key (Macintosh) as you click the assignment names. • To choose a group of assignments, click the first name in the group, hold down the Shift key, and click the last name in the group. 102 A 3. Click the Gradebook menu and choose Export Results. 4. Choose the file location and enter a name for the file. Then, click Save. 5. Click OK when the program notifies you that student results have been exported. AccelTest User Manual 103 ..... USING THE GRADEBOOK Exporting Scores from AccelTest ..... USING THE GRADEBOOK Exporting Scores from AccelTest Export ing Detailed Scori ng Dat a for One Assignment and Multi pl e Classes By following these steps, you can export detailed scoring data from one assignment. The file includes results from all classes. For each student, the file includes scoring data for each question on the assignment. The file is in CSV (comma-separated value) format so that you can easily open it in a spreadsheet program. 1. Click the Assignments tab in AccelTest. 2. Click the assignment for which you want to export scoring data A. B A 3. Click the Assignments menu and choose Export Scoring Data B. 4. Choose whether to create a standard or custom export file: • Use the Custom export to create a .csv file that you can import into your gradebook software.The ability to customize the file can help you make it compatible with your software. AccelTest User Manual Standard: All fields of information are included in this order: Name, ID, Assignment Name, Question Number, Student Response, Correct Response, Points Earned, and Points Possible. For each student, there is a row in the file for every question. For example, a standard export file may look like this: NAME,ID,ASSIGNMENT NAME,QUESTION NUM,STUDENT RESPONSE,CORRECT RESPONSE,POINTS EARNED,POINTS POSSIBLE "Brown, Deiondre","100","American Revolution",1,"B","B",1,1 "Brown, Deiondre","100","American Revolution",2,"D","D",1,1 "Brown, Deiondre","100","American Revolution",3,"D","D",1,1 "Brown, Deiondre","100","American Revolution",4,"D","D",1,1 "Brown, Deiondre","100","American Revolution",5,"D","D",1,1 "Del Castillo, Miranda","101","American Revolution",1,"C","B",0,1 "Del Castillo, Miranda","101","American Revolution",2,"D","D",1,1 "Del Castillo, Miranda","101","American Revolution",3,"C","D",0,1 "Del Castillo, Miranda","101","American Revolution",4,"D","D",1,1 "Del Castillo, Miranda","101","American Revolution",5,"D","D",1,1 • Custom: You choose the fields of information to include, the order, and whether to put each student’s information in a single row. Click the type of export you prefer; then, click Next. If you chose a Standard export, continue with the instructions on page 105; if you chose Custom, see page 106. 104 ..... USING THE GRADEBOOK Exporting Scores from AccelTest Standard Export a. On the Export Summary, if necessary, change the file name A. b. To choose where to save the export, click Choose Folder B, select the location where you want to save the file, and then click Save. (If you do not choose a location, the default location is the last location where you saved an export or to the My Documents/Documents folder if you have not done an export before.) A B C c. If you want the folder where you are exporting the file to open after the export is finished, leave the box checked C. (This box is checked by default.) d. Click Export. If you chose to open the folder, it will open after the export is ready. AccelTest User Manual 105 ..... USING THE GRADEBOOK Exporting Scores from AccelTest Custom Export a. All fields of information are checked. Remove the check mark from any field that you do not want to include in your export file A. (You can’t remove the check mark next to ID; IDs must be included.) Click Next to continue. To select or unselect all fields (except ID, which is always selected), check Select All. A b. To change the order of the fields, click a field B and click Move Up or Move Down C until the field is where you want it to be. When you have finished moving fields, click Next. When you see “(repeated)” next to a field in the list, it means that the field will be repeated for each question on the assignment in the students’ records. In the next step, you’ll decide whether to keep all of this information in one row or in separate rows for each question. AccelTest User Manual B C 106 ..... USING THE GRADEBOOK Exporting Scores from AccelTest c. By default, each student’s assignment record will be in a single row as shown in the sample. If you want to have a row for each question as in the standard format, remove the check mark next to Keep each student's assignment results in a single record (row) D. Click Next when you are ready to continue. D d. On the Export Summary, if necessary, change the file name E. e. Click Choose Folder F, select the location where you want to save the file, and then click Save. (If you do not choose a location, the default location is the last location where you saved an export or to the My Documents/Documents folder if you have not done an export before.) E G AccelTest User Manual 107 F Unassigning Assignments f. ..... USING THE GRADEBOOK If you want the folder where you are exporting the file to open after the export is finished, leave the box G checked. (This box is checked by default.) g. Click Export. If you chose to open the folder, it will open after the export is ready. Unassigning Assignments When you unassign an assignment, it stays in your Gradebook unless you remove it; see page 110. By following these steps, you can unassign assignments for students. If the students have already completed the assignments, their scores will be lost. 1. View the Gradebook for a class (see page 76). 2. Select the assignment to unassign: • If you want to clear an assignment for all students in the Gradebook, click the name of the assignment A. A AccelTest User Manual 108 Unassigning Assignments • If you want to clear an assignment for one student, click where the column for the assignment and the student’s row meet B. If you want to clear an assignment for a few students, hold down the Ctrl key (Windows) or the key (Macintosh) as you click this location for each student. B 3. Click the Edit menu and choose Clear. 4. The program will ask if you are sure that you want to remove the students’ scores, even if the assignment has not yet been scored. To continue, click Yes. The assignment will no longer be assigned for those students, but it will remain in the Gradebook so you can assign it again later. AccelTest User Manual ..... USING THE GRADEBOOK 109 ..... USING THE GRADEBOOK Removing Assignments from the Gradebook Removing Assignments from the Gradebook If you want to export student scores before removing an assignment, see page 102. By following the steps below, you can remove an AccelTest assignment from a class Gradebook. When you do this, all student scores and assignment information are lost. 1. View the Gradebook for a class (see page 76). 2. Click the title of the assignment A. B A 3. Click the Gradebook menu and choose Remove Assignment B. 4. The program will remind you that student records for this assignment will be lost. To continue, click Yes. The assignment will be removed from the Gradebook. AccelTest User Manual 110 ..... USING THE GRADEBOOK Sending Notes to Students’ Renaissance Responders S e n d i n g N o t e s t o S t u d e n t s ’ Renaissance Responders How t o Send Not es to Students Some Responder firmware versions don’t support homework or notes. For more on types of Responders (based on model number and firmware versions), see page 14. Follow the steps below to send notes to students using the Responder. Notes may remind students of Homework, tell them about grades, provide encouragement, or provide guidance. You can only send notes to Responders that have assigned student owners (see page 12). The program sends the note only to the Responder owned by the students you selected so that other students won’t see notes that aren’t meant for them. You cannot send notes to NEO 2s because they can’t have assigned owners. 1. View the Gradebook for a class (see page 76). A B 2. Choose who will receive the note: AccelTest User Manual • If you want to send the same note to all students, click the Responder menu and choose Send Note to All Students A. • If you want to send a note to one student, click the student’s name in the Gradebook. Then, click the Responder menu and choose Send Note to (the student’s name). • If you want to send a note to a few selected students, hold down the Ctrl key (Windows) or the key (Macintosh) as you click the student names B. You can select a group by clicking the first student name in the group, holding down the Shift key, and clicking the last student name in the group. Then, click the Responder menu and choose Send Note to Selected Students. 111 ..... USING THE GRADEBOOK Sending Notes to Students’ Renaissance Responders 3. Enter a title for the note and the text (body) of the note. If you don’t want to allow students to delete the note, check the Locked box C. When you have finished, click Send D. The notes will be sent to the students you chose. C D After you send a note, you’ll see an N in the Status column for the students E. (For locked notes, you’ll see a lock at the lower-right corner of the N.) When the student has read the note on his or her Responder as described below, the N will disappear. E AccelTest User Manual 112 ..... USING THE GRADEBOOK Sending Notes to Students’ Renaissance Responders How Students Get and Read Notes on Their Responders Students follow these steps to view notes from their teachers on the Responder. Students can only view their notes on the Responders they own. 1. If the Responder isn’t already on, press the On/Off button. 2. The student must enter his or her Personal Identification Number (PIN) and press Enter. The default PIN is 1212; you may have changed it or set a different one. 3. On the menu, the student must press to scroll down to Synchronize and press Select. The Responder may ask whether to stay connected to the Receiver, or it may ask the student to select a Receiver. When synchronization is finished, the Responder will show how many new homework assignments and notes were downloaded and how many files were submitted from the Responder. 4. The student can press any key to continue. 5. In the menu, the student must press to scroll up to Notes and then press Select. The Notes screen will list the titles of the notes the student has so far. 6. To view a note, the student can use the arrow keys to scroll to it; then, press Select. The note will appear on the student’s screen. 7. After reading the note, the student must press Menu to go back to the main screen. If the note is not locked, the Responder will ask if the student wants to keep it. The student must then press either yes True to keep it or no False to delete it. Then, the student must press Select. How Teachers View t he Note History for a St udent, Change Notes, and Delete Not es Follow these steps to view a history of the notes that have been sent to a student: 1. In AccelTest, view the Gradebook for a class (see page 76). You can only choose one student because you can only view one student’s note history at a time. 2. Click the name of one student A. B A AccelTest User Manual 113 ..... USING THE GRADEBOOK Sending Notes to Students’ Renaissance Responders 3. Click the Responder menu and choose Note History for (the student’s name) (B on the previous page). The Note History will show you the notes you’ve sent to this student so far. C Students don’t see new notes or changed notes right away; they have to synchronize first. See page 113. D E F G H I C You can re-sort the list by clicking one of the column headings. The dark column heading shows you how the list is sorted. In this example, the list is sorted by the date when the status changed. You could click the Title heading to sort the list by note title. D Locked notes can’t be deleted by students. E In the Status column, “Sent” means you’ve sent the note, but you don’t have confirmation that the student read it. “Confirmed” means the student has seen the note on the Responder. “Deleted” means you have deleted the note in the Note History; it does not mean the student has deleted the note. You may have deleted the note before or after the student saw it. F Click New if you want to send a new note to the student. G If you want to change a note, click the note first in the list; then, click Edit. Make your changes and click Send. When you change a note, the note will be sent again, and it will appear more than once in the note history. The original note will have the status “Deleted.” H To resend a note without changing it, click the note in the list and click Resend. Since you are re-sending the same note, it won’t appear more than once in the note history. I To delete a note, click the note in the list and click Delete. If the student has not received the note yet, it will not be sent; if the student has received it, the note will still be visible to the student. 4. When you have finished viewing the note history, click Close. AccelTest User Manual 114 U SING S ESSIONS W h a t A re S e s s i o ns ? In the AccelTest software, the Sessions tab A lets you view and start sessions. Sessions help teachers monitor in-class student work that is done with the Responder or the NEO 2. The Sessions tab does not show AccelScan Scanning sessions. For more about AccelScan scoring, see page 90. A There are two types of sessions: • Student-paced sessions: When you start a student-paced session, students can work on any of the Responder or NEO 2 assignments that are assigned to them in the Gradebook except Homework, which is done separately on Responders only. In a student-paced session, students don’t need to wait for the teacher to ask a question; they can answer the questions that are sent to them on the Responder or NEO 2 or that they see on a printed copy of the assignment. The AccelTest software automatically scores the student’s submitted responses. During a session, teachers can see which students are working on assignments and how many questions they have answered so far. • Teacher-paced sessions: Use teacher-paced sessions for work that you want your students to do together in class. Students must wait until teachers ask and send each question. The assignments used in teacher-paced sessions shouldn’t be added to the Gradebook beforehand; AccelTest will add them after you finish the session, and it will automatically score the students’ responses. During a session, teachers may see which students have responded to each question and how many have answered the questions correctly. AccelTest User Manual 115 ..... USING SESSIONS Using the Teacher-Paced Session Using the Teacher-Paced Session Use teacher-paced sessions when you want students to use their Responders to complete the same assignment at the same time in class. Do not add this assignment to the Gradebook first. Assignments that you use in teacher-paced sessions will be added to the Gradebook as you complete each session. (If you do more than one session for different students, the assignment will be added to the Gradebook once for each session.) Follow these steps to use a teacher-paced session for in-class work: 1. In AccelTest, click the Sessions tab A. A B 2. Choose your class from the drop-down list B. 3. Click the Responder menu and choose Start Teacher Paced Session. The Responder Session Wizard will start. 4. Click one of the options to choose the type of assignment; then, click Next. Then, follow the instructions for the type of assignment you chose. AccelTest User Manual • Projection assignments are those that you chose to present with a projector when you created the assignments. See page 117 to continue if you chose a projection assignment. • Existing assignments are other assignments you’ve created in AccelTest. If you chose an existing assignment, see page 121 to continue. • Verbal questions are for in-class work that you want to do without creating an AccelTest assignment. If you chose verbal questions, go to page 124. • PowerPoint slides are an option on Windows computers only. If you chose PowerPoint slides, see page 128 to continue. 116 ..... USING SESSIONS Using the Teacher-Paced Session St art ing a Session for Proj ected Assi gnments 5. Click the assignment that you want to use in this session C. (If necessary, you can choose a subject from the drop-down list D to make an assignment easier to find.) Then, click Next. This list is limited to the assignments that you chose to make “Projected” when you created assignments. The scoring method you chose when creating the selected assignment determines whether students can use Responders and NEO 2s (for Responder assignments) or just NEO 2s (NEO 2 Only assignments) to respond to questions. D C 6. Next, click Yes or No to choose whether you want the assignment to be scored. If you choose No, you can check the first box E if you want to allow an anonymous login, which means students don’t need to identify themselves to participate. You can check the second box F if you want to use this session for a survey, voting, or polling instead of an assignment; if you check this box, the questions have no correct answer. When you’re ready to continue, click Next. E F AccelTest User Manual 117 You can add assignment categories using the Categories preference; see page 150. ..... USING SESSIONS Using the Teacher-Paced Session 7. If you chose to score the assignment, the next screen will ask you to enter the assignment details. Click the Category drop-down list G to choose whether the G session is for inH class work, a test, a quiz, or extra credit. You can also check the boxes provided H to designate an assignment as an exam or extra credit. (For more on this, see page 100.) When you’re ready to continue, click Next. 8. Read the Summary to make sure it lists the options you want; then, click Done. The session window will open. 9. Next, students follow these steps to connect to the session: a. Students turn on their Responders or NEO 2s. b. For Responders that have assigned owners, students must enter their Personal Identification Numbers (PINs). (NEO 2s never have assigned owners.) c. On Responders, once students see the menu, they should press Select to choose Join Session. Make sure your students know the Receiver name. See page 10 to change the name. Students using Responders will get special notifications in these circumstances: • If the assignment is for NEO 2s only, students who try to use Responders will be notified that the session doesn’t support their device. • If the assignment includes short-answer items, but your Responder version is 1.x or 2.x, students will be asked to see their teachers. For more about Responder firmware versions, see page 14. AccelTest User Manual On NEO 2s, students press applets. When students see the list of SmartApplets, they use the arrow keys to move the cursor next to Responder; then, they press enter. d. If the Responder or NEO 2 asks the student whether to stay connected to a specific Receiver, the student must press yes or no (Responder) or Y or N (NEO 2) and press Enter. If the Responder or NEO 2 does not ask this question, or if the student answers no, a list of Receivers will be shown. The student must use the arrow keys to highlight the correct Receiver and press enter. e. Students who are using Responders with no owner or NEO 2s will be asked to enter their IDs. Student IDs are shown in the AccelTest Gradebook; they’re also available in the Student ID report. 10. The Responders or NEO 2s will tell students to wait until you (the teacher) tell them to press Enter. Click Send Question in the Teacher-Paced Session window to show the first question. 11. Tell your students to press Enter on their Responders or NEO 2s to start the assignment. When they have read the question, they can press or enter a response and then press Enter. (For more about how students answer questions, see page 138.) 118 ..... USING SESSIONS Using the Teacher-Paced Session 12. Wait for your students to answer the question. The boxes in the lower-left corner of the window I will show you how many of the connected students have answered. Blue (filled in) boxes indicate a student who has answered, while empty boxes indicate students who have not answered. When you want to end this question, click Stop Accepting Responses J in the session window. I AccelTest User Manual K 119 J ..... USING SESSIONS Using the Teacher-Paced Session 13. After you stop accepting responses for a question, and before you send the next question, you can press the graph button (K on the previous page) to see a graph like the one below. The bars on the graph show you more information about the answers the students chose: • The green bar shows the number of correct answers. • The red bars show the number of students who chose each incorrect answer. • The yellow bar shows the number of students who did not answer. Click Done when you have finished viewing the graph. 14. Repeat steps 10–13 for each question on the assignment. 15. Click Done after you’ve accepted the responses for the last question. Then, click Yes to confirm that you want to end the session. You’ll see the session that you’ve just completed in the list on the Sessions tab. In your Gradebook, you will see that the assignment has been added if you chose to score the assignment, and the students’ scores are shown. 16. Tell your students to press Enter one more time to finish the assignment. They will be told there is no session. With N (no) selected, students can press Enter to leave the session on their Responders or NEO 2s. AccelTest User Manual 120 ..... USING SESSIONS Using the Teacher-Paced Session St art ing a Session for Exi sting Assignments This list is limited to assignments that you chose to present and score with Responders or NEO 2. The scoring method you chose when creating the selected assignment determines whether students can use Responders and NEO 2s (for Responder assignments) or just NEO 2s (for NEO 2 Only assignments) to respond to questions. 5. Click the assignment that you want to use in this session C. (If necessary, you can choose a subject from the drop-down list D to make an assignment easier to find.) Then, click Next. D C 6. Next, choose whether you want the assignment to be scored. Click Yes or No to choose whether the assignment will be scored. If you choose No, you can check the first box E if you want to allow an anonymous login, which means students don’t need to identify themselves to participate. You can check the second box F if you want to use this session for a survey, voting, or polling instead of an assignment; if you check this box, the questions have no correct answer. When you’re ready to continue, click Next. E F AccelTest User Manual 121 You can add assignment categories using the Categories preference; see page 150. ..... USING SESSIONS Using the Teacher-Paced Session 7. If you chose to score the assignment, the next screen will ask you to enter the assignment details. Click the Category drop-down list G to choose whether the G session is for inH class work, a test, a quiz, or extra credit. You can also check the boxes provided H to designate an assignment as an exam or extra credit. (For more on this, see page 100.) When you’re ready to continue, click Next. 8. Read the Summary to make sure it lists the options you want; then, click Done. The session window will open. 9. Next, students follow these steps to connect to the session: a. Students turn on their Responders or NEO 2s. b. For Responders that have assigned owners, students must enter their Personal Identification Numbers (PINs). (NEO 2s never have assigned owners.) c. On Responders, once students see the menu, they should press Select to choose Join Session. On NEO 2s, students press applets. When students see the list of SmartApplets, they use the arrow keys to move the cursor next to Responder; then, they press enter. Make sure your students know the Receiver name. See page 10 to change the name. Students using Responders will get special notifications in these circumstances: • If the assignment is for NEO 2s only, students who try to use Responders will be notified that the session doesn’t support their device. • If the assignment includes short-answer items, but your Responder version is 1.x or 2.x, students will be asked to see their teachers. For more about Responder firmware versions, see page 14. AccelTest User Manual d. If the Responder or NEO 2 asks the student whether to stay connected to a specific Receiver, the student must press yes or no (Responder) or Y or N (NEO 2) and press Enter. If the Responder or NEO 2 does not ask this question, or if the student answers no, a list of Receivers will be shown. The student must use the arrow keys to highlight the correct Receiver and press enter. e. Students who are using Responders with no owner or NEO 2s will be asked to enter their IDs. Student IDs are shown in the AccelTest Gradebook; they’re also available in the Student ID report. 10. As students join the session (and enter their IDs if necessary), you will see them listed on the left side of the session window (see M on the next page). If you have chosen to allow anonymous access, you will see numbers instead of the student names. 11. The Responders or NEO 2s will tell students to wait until you (the teacher) tell them to press Enter. Click Send Question in the Teacher-Paced Session window to show the first question. 122 ..... USING SESSIONS Using the Teacher-Paced Session 12. Tell your students to press Enter on their Responders or NEO 2s to start the assignment. When they have read the question, they can press or enter a response and then press Enter. (For more about how students answer questions, see page 138.) 13. Wait for your students to answer the question. When you’re ready to go on, click Stop Accepting Responses I in the session window. (Notice the viewing options you have during the session; they are described below.) I K M J L I Click Send Question to send a new question to the students. Click Stop Accepting Responses when the time is up for this question and you want to go on to the next question. J Click + next to any question that has been completed to see the percentage of students who chose each answer. If you chose to score the assignment, the correct answer is green. K If the assignment is being scored, use the bar next to each question to see how many students chose the correct answer (green), how many chose incorrect answers (red), and how many didn’t answer the question (yellow). AccelTest User Manual 123 L For the current question, use the graph to see how many students have chosen each answer and how many haven’t chosen an answer. Unless you’ve chosen to run the session as survey/polling, the bar for the correct answer is green, and the bars for incorrect answers are red. The yellow bar shows how many of the students haven’t chosen an answer. M Use the list on the left to see which students have answered the current question. If you chose to allow anonymous access, you will see numbers instead of names. If you chose to score the assignment, you will see a check mark for correct answers and an X for incorrect ones. ..... USING SESSIONS Using the Teacher-Paced Session 14. Repeat steps 11–13 for each question on the assignment. 15. Click Done after you’ve accepted the responses for the last question. Then, click Yes to confirm that you want to end the session. You’ll see the session that you’ve just completed in the list on the Sessions tab. In your Gradebook, you’ll see that the assignment has been added if you chose to score the assignment, and the students’ scores are shown. 16. Tell your students to press Enter one more time to finish the assignment. They will be told there is no session. With N (no) selected, students can press Enter to leave the session on their Responders or NEO 2s. St art ing a Session for Verbal Questi ons 5. On the next panel, leave Include Short Answer Questions checked if you want to use short-answer questions in the assignment. Then, click Next. (Some Responders may not be compatible with short-answer questions; see page 14.) 6. Choose whether you want the assignment to be scored and choose the responder type. The Responder types available depend on the Devices preference. For example, NEO 2 will not be an option for sessions unless you open the Devices preference and check NEO 2. For more information, see page 150. Click Yes or No to choose whether the assignment will be scored. If you choose No, you can check the first box C if you want to allow an anonymous login, which means students don’t need to identify themselves to participate. You can check the second box D if you want to use this session for a survey, voting, or polling instead of an assignment; if you check this box, the questions have no correct answer. Click one of the responder type options E to choose how students will enter their responses: using either a Responder or a NEO 2 (if you choose Responder), or using a NEO 2 only. Both Responder and NEO 2 sessions allow you to ask multiple-choice, true/false, yes/no, numeric-response, and short-answer questions. (Responders need firmware version 3.x or higher if students will be answering short-answer questions; see page 14.) When you’re ready to continue, click Next. C D E AccelTest User Manual 124 You can add assignment categories using the Categories preference; see page 150. ..... USING SESSIONS Using the Teacher-Paced Session 7. If you chose to score the assignment, the next screen will ask you to enter the assignment details. Enter the title, choose a subject, and enter the number of points to award for each item. Click the Category drop-down list to choose whether the session is for in-class work, a test, a quiz, or extra credit. You can also check the boxes provided to designate an assignment as an exam or extra credit. (For more on this, see page 100.) When you’re ready to continue, click Next. 8. Read the Summary to make sure it lists the options you want; then, click Done. The session window will open. 9. Next, students follow these steps to connect to the session: a. Students turn on their Responders or NEO 2s. b. For Responders that have assigned owners, students must enter their Personal Identification Numbers (PINs). (NEO 2s never have assigned owners.) c. On Responders, once students see the menu, they should press Select to choose Join Session. Make sure your students know the Receiver name. See page 10 to change the name. On NEO 2s, students press applets. When students see the list of SmartApplets, they use the arrow keys to move the cursor next to Responder; then, they press enter. d. If the Responder or NEO 2 asks the student whether to stay connected to a specific Receiver, the student must press yes or no (Responder) or Y or N (NEO 2) and press Enter. If the Responder or NEO 2 does not ask this question, or if the student answers no, a list of Receivers will be shown. The student must use the arrow keys to highlight the correct Receiver and press enter. e. Students who are using Responders with no owner or NEO 2s will be asked to enter their IDs. Student IDs are shown in the AccelTest Gradebook; they’re also available in the Student ID report. Students using Responders will get a special notification if the session includes shortanswer items, but their Responder version is 1.x or 2.x. Students will be asked to see their teachers. For more about Responder firmware versions, see page 14. AccelTest User Manual 10. As students join the session (and enter their IDs if necessary), you’ll see them listed on the left side of the session window. (You will see numbers instead of names if you chose to allow anonymous access.) The Responders or NEO 2s will tell students to wait until you (the teacher) tell them to press Enter. 11. Click the type of question that you want in the top-right portion of the session window. 125 ..... USING SESSIONS Using the Teacher-Paced Session 12. Tell your students to press Enter on their Responders or NEO 2s to start the assignment. When they have read the question, they can press or enter a response and then press Enter. (For more about how students answer questions, see page 138.) 13. Wait for your students to answer the question. The list on the left will show you which students have responded. When you’re ready to go on, click Stop Accepting Responses in the session window. 14. Now, you can select or enter the correct answers: AccelTest User Manual • For multiple-choice questions, check the box for the correct answer at the top of the window F. • For true/false or yes/no questions, click the circle next to the correct answer. • For numeric-response questions, enter the correct answer in the blank field provided. • For short answer questions, look at the list of student responses below the question number. Check the box next to the correct answer. 126 ..... USING SESSIONS Using the Teacher-Paced Session 15. Click Set Answer G. (Notice the viewing options you have during the session; they are described below.) F G K I H J F Click Stop Accepting Responses when the time is up for this question and you want to go on to the next question. Then, select the correct answer and click Set Answer. G Select or enter the correct answer as I If the assignment is being scored, use the bar next to each question to see how many students chose the correct answer (green), how many chose incorrect answers (red), and how many didn’t answer the question (yellow). J For the current question, use the graph to see described in step 14. H Click + next to a question to see the percentage of students who chose each answer. If you chose to score the assignment, the correct answer is green. how many students have chosen each answer and how many haven’t chosen an answer. K Use the list on the left to see which students have responded. 16. Repeat steps 11–15 for each question on the assignment. 17. Click Done after you’ve accepted the responses for the last question. Then, click Yes to confirm that you want to end the session. You’ll see the session that you’ve just completed in the list on the Sessions tab. In your Gradebook, you will see that the assignment has been added if you chose to score the assignment, and the students’ scores are shown. 18. Tell your students to press Enter one more time to finish the assignment. They will be told there is no session. With N (no) selected, students can press Enter to leave the session on their Responders or NEO 2s. AccelTest User Manual 127 ..... USING SESSIONS Using the Teacher-Paced Session St art ing a Session for PowerPoi nt Slides (Windows Onl y) 5. Click Select C, and use the drop-down list at the top of the window D to choose the drive where you can find the file. When you’ve found the file, click it once; then, click Open. Click Next to continue. C D 6. When the program asks you whether to use an existing assignment or verbal questions, click a choice and click Next. If you chose to use an existing assignment, see page 129. If you chose to use verbal questions, see page 132. AccelTest User Manual 128 ..... USING SESSIONS Using the Teacher-Paced Session PowerPoint Sessions with an Existing Assignment This list is limited to assignments that you chose to present and score with Responders or NEO 2. The scoring method you chose when creating the selected assignment determines whether students can use Responders and NEO 2s (for Responder assignments) or just NEO 2s (for NEO 2 Only assignments) to respond to questions. 7. Click the assignment that you want to use in this session E. (If necessary, you can choose a subject from the drop-down list F to make an assignment easier to find.) Then, click Next. F E 8. Next, click Yes or No to choose whether you want the assignment to be scored. If you choose No, you can check the first box G if you want to allow an anonymous login, which means students don’t need to identify themselves to participate. You can check the second box H if you want to use this session for a survey, voting, or polling instead of an assignment; if you check this box, the questions have no correct answer. When you’re ready to continue, click Next. G H AccelTest User Manual 129 You can add assignment categories using the Categories preference; see page 150. ..... USING SESSIONS Using the Teacher-Paced Session 9. If you chose to score the assignment, the next screen will ask you to enter the assignment details. Click the Category drop-down list I to choose whether the I session is for inJ class work, a test, a quiz, or extra credit. You can also check the boxes provided J to designate an assignment as an exam or extra credit. (For more on this, see page 100.) When you’re ready to continue, click Next. 10. Read the Summary to make sure it lists the options you want; then, click Done. The session window will open; the window will show the first slide in your PowerPoint presentation. 11. Next, students follow these steps to connect to the session: a. Students turn on their Responders or NEO 2s. b. For Responders that have assigned owners, students must enter their Personal Identification Numbers (PINs). (NEO 2s never have assigned owners.) c. On Responders, once students see the menu, they should press Select to choose Join Session. Make sure your students know the Receiver name. See page 10 to change the name. Students using Responders will get special notifications in these circumstances: • If the assignment is for NEO 2s only, students who try to use Responders will be notified that the session doesn’t support their device. • If the assignment includes short-answer items, but your Responder version is 1.x or 2.x, students will be asked to see their teachers. For more about Responder firmware versions, see page 14. AccelTest User Manual On NEO 2s, students press applets. When students see the list of SmartApplets, they use the arrow keys to move the cursor next to Responder; then, they press enter. d. If the Responder or NEO 2 asks the student whether to stay connected to a specific Receiver, the student must press yes or no (Responder) or Y or N (NEO 2) and press Enter. If the Responder or NEO 2 does not ask this question, or if the student answers no, a list of Receivers will be shown. The student must use the arrow keys to highlight the correct Receiver and press enter. e. Students who are using Responders with no owner or NEO 2s will be asked to enter their IDs. Student IDs are shown in the AccelTest Gradebook; they’re also available in the Student ID report. 12. The Responders or NEO 2s will tell students to wait until you (the teacher) tell them to press Enter. Click Send Question in the Teacher-Paced Session window to show the first question. 13. Tell your students to press Enter on their Responders or NEO 2s to start the assignment. When they have read the question, they can press or enter a response and then press Enter. (For more about how students answer questions, see page 138.) 130 ..... USING SESSIONS Using the Teacher-Paced Session 14. Wait for your students to answer the question. The boxes in the lower-left corner of the window K will show you how many of the connected students have answered this question. When you’re ready to go on, click Stop Accepting Responses M in the session window. (Notice the viewing options you have during the session; they are described below.) K L K You will see a box for each student who has connected to the session. Empty boxes show you how many students have not responded to the current question. Filled in boxes show you how many have responded. N M are projecting the PowerPoint presentation for all students to see, wait to show the graph until after you stop accepting responses so that students don’t see the correct answer before they’ve responded. L Click the graph button if you want to see how many M Click Send Question to send a new question to the students have chosen each answer. If you have chosen to score the assignment, the number of correct answers will be shown by a green bar, the number of incorrect answers will be shown by red bars, and the number of students who haven’t responded yet will be shown by a yellow bar. If you students. Click Stop Accepting Responses when the time is up for this question and you want to go on to the next question. AccelTest User Manual 131 N Click Next Slide or Previous Slide to go to another slide. ..... USING SESSIONS Using the Teacher-Paced Session 15. Repeat steps 12–14 for each question on the assignment. Be sure to click Next Slide or Previous Slide as needed to show the slides that should accompany each question. 16. Click Done after you’ve accepted the responses for the last question. Then, click Yes to confirm that you want to end the session. You’ll see the session that you’ve just completed in the list on the Sessions tab. In your Gradebook, you’ll see that the assignment has been added if you chose to score the assignment, and the students’ scores are shown. 17. Tell your students to press Enter one more time to finish the assignment. They will be told there is no session. With N (no) selected, students can press Enter to leave the session on their Responders or NEO 2s. PowerPoint Sessions with Verbal Questions 7. Next, click Yes or No to choose whether you want the assignment to be scored. Since the short answer item type isn’t available for verbal PowerPoint sessions, the program doesn’t ask you to choose the responder type. Either Responders or NEO 2s can always be used for this type of session. If you choose No, you can check the first box E if you want to allow an anonymous login, which means students don’t need to identify themselves to participate. You can check the second box F if you want to use this session for a survey, voting, or polling instead of an assignment; if you check this box, the questions have no correct answer. When you’re ready to continue, click Next. E F AccelTest User Manual 132 You can add assignment categories using the Categories preference; see page 150. ..... USING SESSIONS Using the Teacher-Paced Session 8. If you chose to score the assignment, the next screen will ask you to enter the assignment details. Enter the title, choose a subject, and enter the number of points to award for each item. Click the Category drop-down list to choose whether the session is for in-class work, a test, a quiz, or extra credit. You can also check the boxes provided to designate an assignment as an exam or extra credit. (For more on this, see page 100.) When you’re ready to continue, click Next. 9. Read the Summary to make sure it lists the options you want; then, click Done. The session window will open. 10. Next, students follow these steps to connect to the session: a. Students turn on their Responders or NEO 2s. b. For Responders that have assigned owners, students must enter their Personal Identification Numbers (PINs). (NEO 2s never have assigned owners.) c. On Responders, once students see the menu, they should press Select to choose Join Session. Make sure your students know the Receiver name. See page 10 to change the name. On NEO 2s, students press applets. When students see the list of SmartApplets, they use the arrow keys to move the cursor next to Responder; then, they press enter. d. If the Responder or NEO 2 asks the student whether to stay connected to a specific Receiver, the student must press yes or no (Responder) or Y or N (NEO 2) and press Enter. If the Responder or NEO 2 does not ask this question, or if the student answers no, a list of Receivers will be shown. The student must use the arrow keys to highlight the correct Receiver and press enter. e. Students who are using Responders with no owner or NEO 2s will be asked to enter their IDs. Student IDs are shown in the AccelTest Gradebook; they’re also available in the Student ID report. 11. The Responders or NEO 2s will tell students to wait until you (the teacher) tell them to press Enter. 12. Click the type of question you want in the bottom-right portion of the session window. If necessary, click Next Slide or Previous Slide to go to the correct slide. AccelTest User Manual 133 Students using Responders will get a special notification if the session includes shortanswer items, but their Responder version is 1.x or 2.x. Students will be asked to see their teachers. For more about Responder firmware versions, see page 14. AccelTest User Manual ..... USING SESSIONS Using the Teacher-Paced Session 13. Tell your students to press Enter on their Responders or NEO 2s to start the assignment. When they have read the question, they can press or enter a response and then press Enter. (For more about how students answer questions, see page 138.) 14. Wait for your students to answer the question. The boxes in the lower-left corner of the window (G on the next page) will show you how many of the connected students have answered the question. When you’re ready to go on, click Stop Accepting Responses in the session window. 15. Now, you can select or enter the correct answers: • For multiple-choice questions, check the box for the correct answer I. • For true/false or yes/no questions, click the circle next to the correct answer. • For numeric-response questions, enter the correct answer in the blank. 134 ..... USING SESSIONS Using the Teacher-Paced Session 16. Click Set Answer G. (Notice the viewing options you have during the session; they are described below.) H I G G You will see a box for each student who has K J students to see, wait to show the graph until after you stop accepting responses so that students don’t connected to the session. Empty boxes show you see the correct answer before they’ve responded. how many students have not responded to the current question. Filled in boxes show you how many I After you stop accepting responses, you can choose have responded. the correct answer. For multiple-choice questions, check the correct answer(s). For true/false or yes/no H Click the graph button if you want to see how many questions, click the correct answer. For numericstudents have chosen each answer. If you have response questions, type the correct number. chosen to score the assignment, the number of correct answers will be shown by a green bar, the J Click Set Answer after choosing or entering the number of incorrect answers will be shown by red correct answer. bars, and the number of students who haven’t responded yet will be shown by a yellow bar. If you K Click Next Slide or Previous Slide to go to another slide. are projecting the PowerPoint presentation for all AccelTest User Manual 135 ..... USING SESSIONS Using the Student-Paced Sessions 17. Repeat steps 12–16 for each question on the assignment. 18. Click Done after you’ve accepted the responses for the last question. Then, click Yes to confirm that you want to end the session. You’ll see the session that you’ve just completed in the list on the Sessions tab. In your Gradebook, you’ll see that the assignment has been added if you chose to score the assignment, and the students’ scores are shown. 19. Tell your students to press Enter one more time to finish the assignment. They will be told there is no session. With N (no) selected, students can press Enter to leave the session on their Responders or NEO 2s. Using the Student-Paced Sessions You can work in the AccelTest software during a studentpaced session, but you cannot change to a different class on the AccelTest tabs until the session is over. Student-paced sessions allow students to work on anything that has been assigned to them in the class Gradebook except for Homework. Students can complete these assignments without needing the teacher to lead the session or send the questions one by one. Follow these steps to start a student-paced session so students can use a Responder or a NEO 2 to complete assignments: 1. In AccelTest, click the Responder menu and choose Start Student Paced Session. The Responder Session Manager window will open. 2. Next, students follow these steps to connect to the session: a. Students turn on their Responders or NEO 2s. b. For Responders that have assigned owners, students must enter their Personal Identification Numbers (PINs). The default PIN is 1212 if you have not changed it. (NEO 2s never have assigned owners and don’t require PINs.) c. On Responders, once students see the menu, they should press Select to choose Join Session. Make sure your students know the Receiver name. See page 10 to change the name. On NEO 2s, students press applets. When students see the list of SmartApplets, they use the arrow keys to move the cursor next to Responder; then, they press enter. d. If the Responder or NEO 2 asks the student whether to stay connected to a specific Receiver, the student must press yes or no (Responder) or Y or N (NEO 2) and press Enter. If the Responder or NEO 2 does not ask this question, or if the student answers no, a list of Receivers will be shown. The student must use the arrow keys to highlight the correct Receiver and press enter. e. Students who are using Responders with no owner or NEO 2s will be asked to enter their IDs. Student IDs are shown in the AccelTest Gradebook; they’re also available in the Student ID report. AccelTest User Manual 136 Notes about students using Responders: • NEO 2 Only assignments are not available when students are using Responders. Students who use Responders during a studentpaced session will only be given the opportunity to complete Responder assignments. They will not see NEO 2 Only assignments. • If an assignment includes short-answer items, but the Responder version is 1.x or 2.x, students will be asked to see their teachers. For more about Responder firmware versions, see page 14. ..... USING SESSIONS Using the Student-Paced Sessions 3. If the student only has one non-Homework assignment available in the Gradebook, the Responder or NEO 2 will ask if the student is ready to work on the assignment. The student should press yes (Responder) or Y (NEO 2) and then press Enter. If the student has more than one non-Homework assignment in the Gradebook, the Responder or NEO 2 will ask the student to choose the assignment to work on. The student must press the letter for an assignment and press Enter. 4. The Responder or NEO 2 will show the student the questions in the assignment, one by one. The student must choose or enter the answer to each question and then press Enter. (For more about how students answer questions, see page 138.) If the assignment has questions that can’t be completed on the Responder or NEO 2 (such as essay questions), the student must answer those questions on paper. Students can answer the questions in order or use these commands to go back or to go to a specific question: To do this... ...press these keys: Scroll through a question. Press the up and down arrow keys. Go forward or back one question. On Responders, press ?; then, press to go back one question or to go forward one question. You can press ? again when you want to use the arrow buttons to scroll within a question. On NEO 2s, press z-?; then, press to go back one question or to go forward one question. Press z-? again when you want to use the arrow keys to scroll within a question. Go to a specific question number. Press Select on the Responder or find on NEO 2; then, enter the question number. Go to the beginning or end of the question on NEO 2. For NEO 2 only, to go to the beginning of the question, press z-. To go to the end of the question, press z-. Switch scrolling between the question and answers in multiple-choice questions on NEO 2. On NEO 2 only, if both the question and the answer choices require scrolling, you can press the tab key or the or keys to switch between the question and answer. Then, use the and keys to scroll up or down. 5. After the student answers the last question, the Responder or NEO 2 will ask if the student is ready to submit the work. If so, the student must press yes (Responder) or Y (NEO 2) and then press Enter. If not, the student must press no (Responder) or N (NEO 2) and press Enter, and each question will be shown again so the student can change his or her answers. 6. If you’ve chosen to turn on student feedback, after the student completes the assignment the Responder or NEO 2 will show the student’s score in points and percentage. The student can press any key to leave this screen. AccelTest User Manual 137 ..... USING SESSIONS How Students Answer Questions on Responders and NEO 2s 7. The Responder or NEO 2 may show Session Complete after the student finishes the assignment. The device will return to the main menu (Responder) or the SmartApplets list (NEO 2), and the student can repeat steps 2–6 to complete other assignments. 8. The teacher can see which students are connected in the Responder Session Manager window. As students choose and work on assignments, the window will show the teacher which assignment each student is working on, the question number the student is viewing, the number the student has completed, and the number of items on the assignment. 9. When students have finished their work (or when time is up), the teacher can end the session by clicking the Responder menu and choosing End Student Paced Session. H o w S t u d e n t s A n s w e r Q u e s t i on s o n R e s p o n d e r s a n d N E O 2 s Mul tiple-Choice, True/False, and Yes/No Questi ons For multiple-choice questions, students press the letter button or key for the answer they want to choose; then, they press Enter. For true/false questions, Responder users press True or False, then Enter. NEO 2 users press T for true or F for false, then enter. For yes/no questions, Responder users press yes or no, then Enter. NEO 2 users press Y for yes or N for no, then enter. Numer ic-Response Questi ons Students use the number buttons or keys to enter their answer, then press Enter. AccelTest User Manual 138 ..... USING SESSIONS How Students Answer Questions on Responders and NEO 2s Shor t-Answer Questions On NEO 2s, students type their answer and press enter. Short answer responses can have up to 40 characters on NEOs or 25 characters on Responders. On Responders, students use common phone texting techniques to enter their responses. For Responders with the model number RES-1001, you may have received overlay templates with your Responders like the one shown to the right; students can place them over their Responders to help them see which buttons to push for each character. For Responder model RESP, the letters are printed on the Responder. As on cell phones, the very first letter that a student enters (or the first letter after “.” or “?” or “!”) is capitalized by default, with the lowercase letters following (i.e. 2ABCabc). After that, letters default to the lowercase letters, followed by uppercase letters (i.e. 2abcABC). For example, to enter the word “The,” students would press the 8 button twice for “T,” the 4 button three times to get “h,” and the 3 button three times to get “e.” Students press Select to enter a space or go to the next character, and they press Clear to delete the previous character. After entering their answer, students press Enter. The table below shows what buttons students press to get each character. To enter a fraction in an answer, enter a “/” between the numerator and denominator. AccelTest User Manual Responder Key Characters (in Order) or Function 1 1 ,%<> ()?!"':; $£?&@# 2 2ABCabc 3 3DEFdef 4 4GHIghi 5 5JKLjkl 6 6MNOmno 7 7PQRSpqrs 8 8TUVtuv 9 9WXYZwxyz 0 0 +/- +/-*= . . Select space or next character Clear back or delete Enter takes you to next question 139 ..... USING SESSIONS Viewing Information on Past Sessions Viewing Information on Past Sessions The Sessions tab in AccelTest lists the teacher-paced and student-paced sessions that you have completed. You can see more information about a session by doubleclicking it in the list. For teacher-paced sessions, you will see information about the students who completed a specific assignment. A C E B D A Click Next > or < Previous to go to another question, or you will see the percentage of students who entered the correct answer and the percentage who entered an incorrect answer. click the question. B If the assignment was scored, use the bar next to each D For the current question, use the graph to see how question to see how many students chose the correct answer (green), how many chose incorrect answers (red), and how many didn’t answer the question (yellow). many students have chosen each answer and how many didn’t choose an answer. E On the left, you can see which students answered the C Click + next to the color bar below a question to see the question. If you allowed anonymous access, you will see numbers instead of names. If you chose to score the assignment, you will see a check mark for correct answers and an X for incorrect answers. You also will see the points earned and the student’s answer. percentage of students who chose each answer. If you chose to score the assignment, the correct answer is green. For numeric-response and short answer questions, you won’t see all the answers entered, but AccelTest User Manual 140 ..... USING SESSIONS Viewing Information on Past Sessions For student sessions, the window shows students’ points and which students have worked on the assignment. F =J =G =H ==I F Click Next > or < Previous to go to another question, or click the question. G If the assignment was scored, use the bar next to each question to see how many students chose the correct answer (green), how many chose incorrect answers (red), and how many didn’t answer the question (yellow). H Click + next to the color bar below a question to see the percentage of students who chose each answer. If you chose to score the assignment, the correct answer is green. For numeric-response and short answer questions, you won’t see all the answers entered, but you will see the AccelTest User Manual 141 percentage of students who entered the correct answer and the percentage who entered an incorrect answer. I For the current question, use the graph to see how many students have chosen each answer and how many didn’t choose an answer. J Use the list on the left to see which students answered the question. If you allowed anonymous access, you will see numbers instead of names. If you chose to score the assignment, you will see a check mark for correct answers and an X for incorrect answers. You also will see the points earned and the student’s answer. R EPORTS Printing or Previewing AccelTest Reports AccelTest has several reports that give you information about your assignments and your students’ work. To generate a report, click the Reports menu and choose the report name. Many reports are not available unless you have the Gradebook tab selected. Some require you to select something in the Gradebook (such as a student name, assignment name, or student results for an assignment) before you choose the report. For more information, see the table that starts on the next page. When you choose a report, the program may ask if you want to preview it in the program or print it. You can click Preview to see what the report looks like and check its contents in the program before printing. When you preview a report, you can scroll down to see other pages in the report. If you’d like to print it, click Print in the preview window; if not, click Close when you’re ready to close the window. For each report, AccelTest has a preference so you can customize report options. Each preference lets you decide if you’ll be asked whether to preview or print the report before printing. Some preferences also let you choose other options for the report. For more information, see page 157. AccelTest User Manual 142 ..... R EPORTS Report Descriptions Report Descriptions The table below lists the AccelTest reports. The table tells you what to select before you choose the report, and it includes a brief description of each report. Report Name For some reports that require you to select items in the Gradebook, you can choose more than one assignment, student, or score. To choose one, click it. To choose more than one, hold down the Ctrl key (Windows) or key (Macintosh) as you click it. To choose a group, click the first item, hold down the Shift key, and click the last item. Answer Key Go to the Gradebook tab and select assignment name(s) (at the top of the column), student name(s), or the students’ scores. You can choose more than one assignment, student, or score. When You Would Use the Report Use this report when you need answer keys for assignments. For each student, this report shows you the correct answer to every question on the assignment (except for questions that can’t be automatically graded for that assignment, such as essay questions). It also shows you the number of points possible per item. Each student’s answer key may be different if you chose to shuffle multiple-choice questions when you created the assignment. Preferences (page 157): Print/preview setting Assignment Analysis Questions and answers will not be shown on the Assignment Analysis Report if they are not in AccelTest or if they are in the form of a graphic or chart. For questions that are longer than 3 lines or 150 characters, only the beginning of the question is shown. What to Select Before Choosing the Report Go to the Gradebook tab and select one or more assignment names at the top of the column. Use this report to get detailed information about class performance on an assignment. The report includes assignment information, the number of students for whom the assignment was assigned and scored, the average, median, high, and low scores, and the standard deviation. In the Question Analysis - Summary, for each item, the report shows the total number of student responses and the average points earned. In the detailed question analysis, for each item, the report shows: • the question and possible answers if possible (with the correct answer in bold) • the number and percentage of students who chose each answer for assistedresponse questions (or the number and percentage who responded for freeresponse questions) • a list of the students who answered the question incorrectly and the answer each of them chose (or, for free-response questions, a list of those who did not respond to the question) The report can be used with assignments that were not created in AccelTest; however the report will show less information for each item. Preferences (page 157): Print/preview setting, Include item details AccelTest User Manual 143 Report Name Assignment Results What to Select Before Choosing the Report Go to the Gradebook tab and select assignment name(s) (at the top of the column), student name(s), or the students’ scores. You can choose more than one assignment, student, or score. ..... R EPORTS Report Descriptions When You Would Use the Report Use this report to give your students their assignment results. The report tells students their score on an assignment. It identifies the student by name and ID and the assignment by name, and it has a blank for the teacher’s signature and comments. The report also lists either the missed questions or all questions (depending on the preference settings; see page 157). For each question, the list includes the points possible, points earned, and the student’s answer. If the list shows only missed questions, the question text is included. Depending on the preference settings for this report, it may print automatically after the assignment is scored. You can also choose to print the student assignments with the report. Preferences (page 157): Print/preview setting, Questions to display, Show correct answers, Auto print after student score, Print student assignment with report, Batch print Assignment Standards Assignments Go to the Assignments tab and select assignment name(s). You can choose more than one assignment. (If no assignments are selected, the report will include all assignments that have items aligned to standards.) Use this report when you’ve aligned assignment questions to standards (see page 57) and you want to see the alignments you’ve set. The report includes the agency and standard set name used for the alignments, each standard code and description, the number of questions aligned to each standard, and the total points possible for those questions. Nothing—you can choose this report from any AccelTest tab, and you don’t need to select anything before choosing the report. Use this report to get a list of all assignments found in the Assignments tab. It can give you a quick overview of the available assignments that you may want to use in your Gradebook. The report includes the date the assignment last changed, how it should be presented and scored, the total number of points available, and whether the assignment has already been assigned in a Gradebook. Preferences (page 157): Print/preview setting Preferences (page 157): Print/preview setting, Sort order for assignments AccelTest User Manual 144 Report Name Class Standards What to Select Before Choosing the Report Go to the Gradebook tab and select the class. The report will include all class assignments that have items aligned to standards. ..... R EPORTS Report Descriptions When You Would Use the Report Use this report when you’re aligned assignment questions to standards (see page 57) and you want to see how well the class as a whole is performing on those standards. The report includes the agency and standard set. For each standard, it includes the description and a list of the assignments that have items aligned to that standard. The list includes the number of students who completed each assignment, the number of questions aligned to the standard, the total number of points possible, the total number of points earned, and the percentage of possible points earned. (The point totals include the number of points possible and points earned for all students, so they are larger than the points available on the assignment.) Preferences (page 157): Print/preview setting Cells in the Gradebook. A “cell” in the Gradebook is the square in the table where an assignment column and a student row meet. After the student’s assignment is scored, the cell shows the score. Before the assignment is scored, it shows the status of the assignment, such as “Waiting” for incomplete assignments that are not yet due, or “Overdue” for assignments that are past due. Form Numbers Free Response Grading Worksheet Go to the Gradebook and choose the name of one assignment or the cells (squares) for each student in the column for that assignment. The report is only available for assignments meant to be scored with the AccelScan scanner. Use this report to get the form numbers that students must fill in on their AccelTest scan cards. The form number tells the software which student and assignment the card is for. Each student has a unique form number for each assignment. The form number is also printed on each student’s copy of the assignment. Go to the Gradebook and choose the name of one or more assignments. Some assignments have free-response items that can’t be scored automatically. Use this report to fill in students’ points for these questions before you score the questions manually (see page 91). This can help you score the items more quickly. If you do not score these free-response items manually, and other items on the assignment have been automatically scored with the Responder, NEO 2, or the scanner, the program assumes that each student earned all points for the free-response items. In the report, the AR column shows the points the student earned so far on the assistedresponse items (if they have been scored). Preferences (page 157): Print/preview setting Preferences (page 157): Print/preview setting AccelTest User Manual 145 Report Name Gradebook Summary by Term Group Assignment What to Select Before Choosing the Report ..... R EPORTS Report Descriptions When You Would Use the Report Nothing—you can choose this report from any AccelTest tab, and you don’t need to select anything before choosing the report. However, please note that the report will include only the class you’ve selected on the Gradebook tab. Use this report to get your students’ grades by subject for each term or semester and the school year as a whole. The report gives you a separate set of grades for each subject. (It lists the grades for each subject on a separate page.) The report shows grades the way you’ve chosen to display them in the Gradebook—either by points or percentage. Go to the Gradebook and choose your class. Use this report to get an overview of student progress for each assignment in your Gradebook. The report shows information about each assignment, including the due date, the number of students for which it has been assigned and scored, and the number that still need the assignment scored. Preferences (page 157): Print/preview setting For scored assignments, the report shows the points and percentage earned and the date scored for each student. For unscored assignments, the report shows the status (Waiting, Pending, Overdue, Not Assigned, or Sent for homework). The report also includes the class average score, median score, standard deviation of points earned, and the high and low scores. Preferences (page 157): Print/preview setting, Sort order for students Overdue Assignments AccelTest User Manual Nothing—you can choose this report from any AccelTest tab, and you don’t need to select anything before choosing the report. However, please note that the report will include only the class you’ve selected on the Gradebook tab. 146 Use this report to see which students have overdue assignments. The lists includes all assignments (in-class, quizzes, tests, and homework). In the Gradebook, overdue assignments have a score of 0 until they are scored. Preferences (page 157): Print/preview setting Report Name Program Information What to Select Before Choosing the Report Nothing—you can choose this report from any AccelTest tab, and you don’t need to select anything before choosing the report. ..... R EPORTS Report Descriptions When You Would Use the Report Use this report to get information about the following: • School, teacher, and AccelTest serial number • Renaissance Receiver connected (if any) • AccelScan scanner connected (if any) • Some preference settings (School Year, Categories, Subjects, Grading Scale, and some Reports settings) • Gradebook display • The computer setup • The AccelTest program Preferences (page 157): Print/preview setting Student Grade Nothing—you can choose this report from any AccelTest tab, and you don’t need to select anything before choosing the report. However, please note that the report will include only the class you’ve selected on the Gradebook tab. Use this report to get each student’s final grades for each subject for each term or semester and the school year. The report includes blanks where you can fill in the student’s tardies and excused or unexcused absences. It also includes the dates for each term. You can use this as a report card if you don’t have standard report cards, or you can use it as a reference when you create student report cards. Preferences (page 157): Print/preview setting Student ID AccelTest User Manual Nothing—you can choose this report from any AccelTest tab, and you don’t need to select anything before choosing the report. However, please note that the report will include only the class you’ve selected on the Gradebook tab. 147 Use this report to get each student’s AccelTest ID. Students who don’t own their Responders need to enter their IDs when they participate in a teacher-paced or student-paced session; students who use NEO 2s also need to enter their IDs during sessions. You set each student’s ID when you add the student (see page 18) or edit the student’s information (see page 28). Preferences (page 157): Print/preview setting Report Name Student Record What to Select Before Choosing the Report Nothing—you can choose this report from any AccelTest tab, and you don’t need to select anything before choosing the report. However, please note that the report will include only the class you’ve selected on the Gradebook tab. ..... R EPORTS Report Descriptions When You Would Use the Report Use this report to get a record of all assignments that each student has completed. The report lists the assignments by subject and shows you the assignment category, the score (in points and percentage), and the date it was scored. Assignments from teacher-paced sessions with verbal questions are listed separately. This report may be useful in parent-teacher conferences or in a student’s portfolio. Preferences (page 157): Print/preview setting, Page break after student Student Standards Go to the Gradebook tab and select the student name(s). You can choose more than one student. (If no students are selected, the report will include all students in the class.) Use this report when you have aligned items on your assignments to standards (see page 57) and you want to see how each student is performing on those standards. A report will be generated for each student. The report includes the standards agency and standard set. For each standard, the report lists the assignments with questions aligned to the standard. The list includes the number of questions aligned to the standard on that assignment, the number of points possible for those questions, the number of points the student earned, and the percentage of possible points earned. Preferences (page 157): Print/preview setting AccelTest User Manual 148 P REFERENCES AccelTest Preferences Using the AccelTest preferences, you can adjust how AccelTest works for your school. The preferences are listed in the Preferences menu. The table that starts on the next page lists the preferences in AccelTest and tells you how to change them. AccelTest User Manual 149 ..... P REFERENCES AccelTest Preferences Preference What It Does How to Change It Auto Update AccelTest software automatically checks for updates that you can install so that you have the latest version of the software. This preference shows you when the program was last updated and lets you choose how often the program checks for updates. If you have chosen to ignore some updates, you can also reset the ignored updates so that you’ll have the chance to select them again. 1. Click the Preferences menu and choose Auto Update. The Auto Update Settings dialog box will open. The last date Auto Update was run is shown at the top. 2. Auto Update is checked by default. To disable it, remove the check mark in the Auto Update Enabled box. 3. Click the Frequency drop-down menu and select how often you want updates—daily, weekly, or monthly. 4. Click Reset Ignored to if you want the chance to install updates that you previously chose to ignore. You will then be able to see these updates once again so you can install them. 5. Click OK to save your changes. Assignment Creation The assignment creation preferences allow you to choose the default options for the appearance of your assignments and for the item types. See page 159. Categories Use this preference to create or change categories for assignments. You choose an assignment category when you add an assignment to your Gradebook. In this preference, you can also do the following: • Assign a weight to each category to set how the assignments affect students’ final grades • Decide whether to drop a student’s worst score for assignments in each category • Decide whether to calculate students’ term and school year grades using the category weights or the overall total points earned • Decide how much extra credit should be worth (if you’ve chosen to use category weights) 1. Click the Preferences menu and select Categories. The Categories dialog box will open. Data Location Use this preference to choose a different data location. You may also copy a data location. See the instructions on page 154. Devices Use this preference to choose which devices you want to use to present assignments to students or to score the assignments. Choices include Responder, NEO 2, Projected, Scanner (AccelScan), and Printed. Checked items will be available when you create assignments, run sessions, or change assignment modes. Items that are not checked will not be available. 1. Click the Preferences menu and select Devices. AccelTest User Manual 150 2. Make your changes to the categories: • To add a category, click in a field and type the category name. • To change a category name, click in the field and make your changes. • At the bottom of the dialog box, click Category Weights or Total Points Earned to choose how grades will be calculated. If you choose Category Weights, make sure you enter a weight for each category above. For best results, make certain the category weights add up to 100%. • If you want to drop each student’s worst score for a category, check the box after the category weight. 3. Click OK to save your changes. 2. Check each device or method that you want to use to present assignments to students or to score the assignments. Remove the check mark from items you don’t intend to use. 3. Click OK to save your changes. Preference Exams ..... P REFERENCES AccelTest Preferences What It Does How to Change It Use this preference to set exam weight in student grades for terms, semesters, and the entire school year. Note: The Exams preferences is ignored if there are no exams in the grading period. 1. Click the Preferences menu and select Exams. The Exams dialog box will open. 2. Exams will be a certain percentage of the grade you choose (term, semester, or final grade). Enter the percentage that you want. Then, click the grade that you want this percentage to apply to. (Semesters aren’t available if you haven’t specified semesters.) For more information about how grades are calculated, see page 98. 3. Click OK to save your changes. Grading Scale Use this preference to select the grading scale used to calculate term, semester, and school year grades in the Gradebook and reports. Your choices are: • Standard (A+ to F) • Pass/Fail • Outstanding/Satisfactory/ Unsatisfactory • 1 to 10 1. Click the Preferences menu and select Grading Scale. The Grading Scale dialog box will open. 2. Click the drop-down list and choose a grading scale. 3. For each grade in the scale, enter the lowest score that allows students to achieve that grade. (You don’t need to do this for the lowest grade since 0 is the lowest score for that grade. You cannot enter criteria for the grades if you choose the 1 to 10 scale.) 4. Click OK to save your changes. Libraries/ Standards Use this preference to install or delete AccelTest libraries or to add or remove standards. Libraries contain book files with items that you can add to assignments. For more about finding these libraries, see page 164. If you own a desktop version of Accelerated Math (such as version 2.x), you can install your Accelerated Math libraries in AccelTest; see page 164. You can also add standards that you can align your assignment items to. This allows you to get information about how students are performing on standards. (See the Class Standards, Assignments Standards, and Student Standards Reports.) Follow the steps below to install libraries. To add standards, see page 32; to align assignment items to standards, see page 57. 1. Click the Preferences menu and select Libraries/Standards. The Libraries dialog box will open. 2. If you want to install libraries, click Add. Then, open the folder where your libraries currently exist and click OK (Windows) or Choose (Macintosh). When the program finishes the installation, it will notify you; click OK. 3. If you want to delete libraries, select the libraries that you want to delete first. To select one, click its name. To select more than one, hold down the Ctrl key (Windows) or the key (Macintosh) as you click the library names, or, to select a group, click the first library in the group, hold down the Shift key, and click the last library in the group. Click Delete. Then, click Yes when the program asks if you’re sure you want to delete the libraries. 4. Click Close to close the dialog box. AccelTest User Manual 151 Preference Password ..... P REFERENCES AccelTest Preferences What It Does How to Change It Use this preference to change the AccelTest password. It’s a good idea to change the password after you install the program to keep it secure. The default password is admin. 1. Click the Preferences menu and select Password. The Change Password dialog box will open. 2. Type your current password in the Current Password field. 3. Press the Tab key and type your new password in the New Password field. 4. Press Tab again and type your new password in the Confirm Password field. 5. Click OK to save your new password. Anyone who logs into the program must use the new password the next time AccelTest is started. Registration Information Use this preference to see your AccelTest serial number and to change your school or teacher name. 1. Click the Preferences menu and select Registration Information. The serial number is at the top of the dialog box that will open. 2. If necessary, change the school name and/or teacher name. 3. Click OK to save any changes you have made. Reports The Reports preferences allow you to choose the options you prefer to use for the AccelTest reports. See page 157. Responder Use this preference to decide whether you want the program to support owned Responders (see page 12 to assign student owners to Responders). If you don’t support owned Responders, students cannot complete Homework with the Responders (see page 87) or receive notes, and they will need to enter their student IDs from the Gradebook to participate in sessions. Note: This preference affects Responders only because NEO 2s are not owned, and they cannot be used for homework or notes. Responders using version 2.x firmware also cannot have assigned owners; see page 14. 1. Click the Preferences menu and select Responder. You can also use this preference to decide if you want to allow students to have the Responders synchronize during a session. If you allow students to synchronize, they can retrieve Homework or Notes during a session, which may increase Responder and Receiver activity. You may want to deselect this option if you have a large number of students using the Responders at the same time. If you do not support owned Responders, you can decide whether you want the AccelTest software to connect to your Renaissance Receiver when the program starts. AccelTest User Manual 152 2. Check the box next to Support Owned Responders if you are assigning Responders to individual students. (See the notes to the left.) See the note in this dialog box for more about the possible effects of changing this setting. 3. If you chose to support owned Responders, decide whether to allow Responders to synchronize during a session. If the box is checked, synchronizing is allowed. 4. If you chose not to support owned responders, decide whether to allow AccelTest to connect to the Receiver when the AccelTest software starts. If the Connect to Receiver at Startup box is checked, AccelTest will do this. 5. Click OK to save your changes. Preference Scanner Settings What It Does ..... P REFERENCES AccelTest Preferences How to Change It Use this preference to set the scanner port setting and the scanner sensitivity. 1. Click the Preferences menu and select Scanner Settings. The Scanner Settings dialog box will open. The port setting tells the computer where to find the AccelScan scanner that you’ve already connected. To connect the scanner, see the instructions in the AccelTest Software Installation Guide. Then, start your computer and AccelTest and open this preference. 2. The scanner status at the bottom of the dialog box will show you if AccelTest is detecting the scanner. If it isn’t, click the Port drop-down list and choose the computer port that the scanner is connected to. Wait while the Scanner Status shows that the program is searching for the scanner. If AccelTest still does not detect the scanner, make sure the AccelScan is on (if it has a switch) and plugged in. You should also check the AccelScan system requirements for AccelTest at www.renlearn.com/requirements. You may need to adjust the scanner sensitivity to allow for differences in the way students mark scan cards. If the AccelScan is too sensitive to stray marks, decrease the sensitivity. If the AccelScan does not recognize some marked answers, increase the sensitivity. 3. If you need to change the scanner sensitivity, click the pointer and drag it to the left to decrease sensitivity or drag it to the right to increase sensitivity. 4. Click OK to save your changes. School Year Use this preference to enter your school year information, including the start and end dates for the school year, the number of terms, and the start and end dates for the terms. If you have 4 or 6 terms, you’ll also be asked to set the number of terms per semester. Changing the school year affects the calculation of student grades. Your school year and terms should be set up before you start scoring student assignments. 1. Click the Preferences menu and select School Year. 2. Read the text in the Welcome panel of the Wizard or Assistant. Then, click Next. 3. Enter the Start and End dates for your school year. You can type the dates or click the calendar button and click the dates; you can also click Today in the calendar. Click Next to continue. 4. Select the number of terms in your school year and click Next. 5. Enter the start and end date for each term and click Next. 6. If you entered 4 or 6 terms, the program will ask you to choose the number of terms per semester from a drop-down list. If your terms aren’t grouped into semesters, click Not Applicable. If they are, choose the number of semesters. Click Next to continue. 7. Check the information in the Summary. If it is correct, click Done; if not, click Back to go back and make changes. AccelTest User Manual 153 Preference Subjects What It Does ..... P REFERENCES Setting the Data Location Preference How to Change It Use this preference to add subjects, edit their names, or delete subjects. When you create assignments (see page 39), you must choose a subject. In the Gradebook, you can choose to view assignments from one subject or all subjects. Some reports also provide grades by subject. 1. Click the Preferences menu and select Subjects. 2. The Subjects dialog box will open. • If you are adding a subject, click Add and type the name of the subject you want to add. Then, click OK. • To edit a subject, scroll down the list until you find the subject, and click it. Then click Edit, change the name, and click OK. • To delete a subject that is not being used, scroll down the list to find the subject, and click it. Then click Delete. You can’t delete subjects that have been used for assignments. 3. Click OK. Setting the Data Location Preference The Data Location preference lets you do any of the following: • Choose a different data folder that already has data. When you do this, you are no longer using the data you’ve been using up to now. Your original data folder is still there, and you can select it again later, but you are now using the student and assignment data in the new data folder. Important: You can select a data folder that someone else will also be using; however, only one person can use AccelTest with that data folder at a time. • Create a new data folder to “start over.” There will be no students or assignments in this data folder until you add them or import them. You can switch back to your previous data folder at any time. • Copy a data location somewhere else. The new data folder will have the same data as the previous folder. The previous copy of the data folder will not be removed, but it will also not be updated. Check Right s Before Choosing or Creati ng a Different Dat a Folder You must have certain rights to the data folder that you will be using with AccelTest. If you are not using the default location, check your rights to the folder you plan to select before changing your data location. You will need the rights described below. Rights Required for Network Data Folders • Windows 2000 Server and Windows Server 2003 Networks: Grant the Modify Permission to the data folder on your network server, including all files. If you want to assign specific rights to the folder, make sure you include the Read, Write, and Delete permissions. AccelTest User Manual 154 ..... P REFERENCES Setting the Data Location Preference • Novell Networks: Grant the following rights to the data folder on your network server, including all files: [RWCEMF] (read, write, create, erase, modify, and file scan). Other rights required: On Windows XP, Vista, and Windows 7 computers, AccelTest users need full access to the Renaissance Learning and Renaissance Wireless Server folders in Documents and Settings\All Users\Application Data (Windows XP) or Users\user name\AppData\Roaming\ AccelTest (Windows Vista and 7). On OS X computers, the Owner, Group, and Everyone must have Read and Write permissions to the Renaissance Learning and Renaissance Wireless Server folders in Library : Application Support. On all computers, users must have at least read access to the AccelTest program location. AccelTest User Manual • Unix/Linux Networks: Grant the following permissions to the data folder on your network server, including all files: Read, Write and Execute (drwxrwxrwx) for the owner, group, and others. If you have a group created for students and teachers, you can grant the Read, Write and Execute permissions to the owner and to that particular group only (drwxrwx---). • OS X Networks: Grant the following permissions to the data folder on your network server, including all files: Read & Write for the Owner, Group, and Everyone. If you have a group created for students and teachers, you can grant the Read & Write permissions to the owner and to that particular group only. Rights Required for Data Folders on Windows and Macintosh OS X Computers • Windows XP, Windows Vista, and Windows 7 Computers: If you put your data folder on your computer (but not in the default location), make sure you have full access to the data folder. • Macintosh OS X Computers: If you put your data folder on your computer (but not in the default location), grant the Read and Write permissions for the Owner, Group, and Everyone. If you have a group created for students and teachers, you can grant the Read & Write permissions to the owner and to that particular group only. 155 ..... P REFERENCES Setting the Data Location Preference How t o Choose a Di fferent Data Locati on Follow these steps to change the data location using the Data Location preference: Where is the default data location? The default location is on your computer’s hard drive. On Windows XP computers, it is in the Documents and Settings folder, under your personal folder, in Application Data\AccelTest\. On Windows Vista and Windows 7 computers, the default location is Users\your user name\AppData\Roaming\ AccelTest\. On Macintosh computers, it is in Users : your user name : Library : Application Support : AccelTest. The default location is in your personal folder so that other teachers can log in to this computer and use their own data folder. 1. Click the Preferences menu and choose Data Location. 2. The Data Location Preference Wizard will open. The first panel shows where your current data folder is A. First, click an option B to choose whether to use the default data location or a data location somewhere else. The first option isn’t available if you are currently using the default data location. A B 3. If you chose the default data location, go to step 4. If you are using a Macintosh computer and you are selecting a folder on your network, be sure to use an afp connection to the network. AccelTest User Manual If you chose a data folder somewhere else, a dialog box will open to allow you to select a different location. Find and open the folder where you want to store your AccelTest data. Then, click OK (Windows) or Choose (Macintosh). 4. If the folder that you chose already has AccelTest data in it, the program will ask whether you want to overwrite the existing data or just use the data that is already there. Important: If you overwrite the existing data, it cannot be recovered. Make sure you know what is in the existing data, and make sure no one needs the data before you choose to overwrite it. Click one of the options; then, click Next. 156 ..... P REFERENCES Setting Reports Preferences If the folder you chose does not have data in it, you will be asked whether you want to copy your current data there or create a new empty data location (with no students, classes, or assignments). Click one of the options; then, click Next. 5. If you chose to copy data or to overwrite existing data, the program will show you its progress copying the data. 6. The Summary panel will show you the data location you have chosen. Click Done. Setting Reports Preferences AccelTest has several Reports preferences that allow you to choose options for AccelTest reports. To select these preferences, click Preferences, choose Reports, and then choose the report that you’d like to set the preferences for. AccelTest User Manual 157 ..... P REFERENCES Setting Reports Preferences Once you choose one of the Reports preferences, you can click the drop-down list A and switch to the preference for another report. When you do this, any changes you chose for the first preference will still be saved when you click OK. A Follow these steps to change the report preferences: 1. Click the Preferences menu, choose Reports, and choose the report for which you want to change preferences. The Report Options window will open. 2. Click the Print/Preview drop-down list to choose what will happen when you choose the report: • Ask means the program will ask if you want to preview the report or print it every time you choose the report. • Always Preview means the program will always open the preview window when you choose the report. (You can print the report from this window.) • Always Print means the program will always print the report without showing you the preview window first. 3. Some reports have additional preferences in the Report Options window: • • Assignment Analysis Report: Check the Display item details box if you want the report to include the number of students who chose each possible answer to each assisted-response question. Assignment Results Report: Use the following options: Questions to display: Click this drop-down list and choose whether to list all questions or just missed questions. The list shows the possible points, the points the student earned, and the student’s answer (if possible). For missed questions, the list also includes the text of the question. Show correct answers: Check this box if you want the list of missed questions to include the correct answers as well as the student’s answer. Auto print after student score: Check this box if you want the report to print automatically every time a student’s assignment is scored; this applies only when the assignment is scored using an AccelScan scanner. Print student assignment with report: Check this box if you want to print students’ assignments with the report. Batch print report: Check this box if, during scoring, you want the program to wait until all scoring is complete and print the reports for all students together instead of printing them one by one as each assignment is scored. AccelTest User Manual 158 • Assignments Report: Click the Sort Order drop-down list and choose how you want to sort assignments on the report: by title, date changed, the total points the assignment is worth, or by whether the report has been assigned in a Gradebook. • Group Assignment: Click the Sort Order drop-down list and choose how you want to sort assignments on the report: by student name, the number of points earned, or the percentage of possible points earned. • Student Record: Check the Page break after student box if you want each student’s information to start on a new page. 4. Click OK to save your changes. Setting Assignment Creation Preferences AccelTest has several Assignment Creation preferences that allow you to choose options for AccelTest assignments, including default fonts, layout used, options for various question types, instructions, number of points, and the amount of answer space provided for free-response questions. To select these preferences, click Preferences, choose Assignment Creation, and then choose a preference. AccelTest User Manual ..... P REFERENCES Setting Assignment Creation Preferences 159 ..... P REFERENCES Setting Assignment Creation Preferences Once you choose one of the assignment creation preferences, you can click the dropdown list A and switch to another assignment creation preference. When you do this, any changes you chose for the first preference will still be saved when you click OK. A The following table tells you how to change each of the assignment creation preferences. Assignment Creation Preference Default Fonts Print Layout AccelTest User Manual What It Does Sets the fonts that will be used by default when you create a new assignment. The fonts apply only to printed or projected assignments, and you can change the font used in a specific assignment by changing the assignment properties when you create or edit the assignment. See “Changing Assignment Properties” on page 66. Sets the default page margins and how or whether answer spaces should be printed. The settings apply only to printed and projected assignments, and you can change the options for a specific assignment by changing the assignment properties when you edit the assignment. See “Changing Assignment Properties” on page 66. How to Change It 1. Click the Preferences menu, choose Assignment Creation, and choose Default Fonts. The Assignment Creation Options dialog box will open. 2. Use the drop-down lists to choose the font faces and point sizes for the fonts that will be used in the assignment title and in the body of the assignment (the instructions and questions). 3. Click OK to save your changes. 1. Click the Preferences menu, choose Assignment Creation, and choose Print Layout. The Assignment Creation Options dialog box will open. 2. Enter the top, bottom, left, and right margins in inches. 3. Click one of the options for answer spaces. You can include space beside each question or on a separate sheet, or you can choose not to include answer spaces. 4. Click OK to save your changes. 160 Assignment Creation Preference Projector Layout Multiple Choice What It Does ..... P REFERENCES Setting Assignment Creation Preferences How to Change It Sets the projector screen size for projected assignments so that they will display properly in the assignment editor when you create or edit the assignments. Note that this does not affect how the assignment will look when it is actually projected; the software will use your projector’s native screen size. 1. Click the Preferences menu, choose Assignment Creation, and choose Projector Layout. The Assignment Creation Options dialog box will open. Sets the default options for multiple-choice items on assignments, including the instructions, the default point values, the default number of answer choices, and the default number of columns for answer choices. Please note that you can choose different options for each item as you create or change assignments. 1. Click the Preferences menu, choose Assignment Creation, and choose Multiple Choice. The Assignment Creation Options dialog box will open. 2. Click the drop-down list and choose the screen size that you are using at your computer. 3. Click OK to save your changes. 2. If you’d like to change the instructions that are used by default on printed assignments, edit the text in the Instruction field. 3. If necessary, change the default number of points that students can earn for each item. 4. Use the Choices drop-down list to choose how many possible answers you want to include for each item by default. This can be changed for each item. 5. Use the Columns drop-down list to choose the default number of columns you want to use for answer the choices below the question. This applies to printed assignments; it can be changed for assignments. 6. Click OK to save your changes. True/False Sets the default options for true/false items on assignments, including the instructions and point values. However, please note that you can change the options for each item as you create or change assignments. 1. Click the Preferences menu, choose Assignment Creation, and choose True/False. The Assignment Creation Options dialog box will open. 2. If you’d like to change the instructions that are used by default on printed assignments, edit the text in the Instruction field. 3. If necessary, change the default number of points that students can earn for each item. 4. Click OK to save your changes. Yes/No Sets the default options for yes/no items on assignments, including the instructions and point values. However, please note that you can change the options for each item as you create or change assignments. 1. Click the Preferences menu, choose Assignment Creation, and choose Yes/No. The Assignment Creation Options dialog box will open. 2. If you’d like to change the instructions that are used by default on printed assignments, edit the text in the Instruction field. 3. If necessary, change the default number of points that students can earn for each item. 4. Click OK to save your changes. AccelTest User Manual 161 Assignment Creation Preference Matching What It Does Sets the default options for matching items on assignments, including the instructions, point values, the number of questions to be matched, and the number of possible matches. Please note that you can change the options for each item as you create or change assignments. ..... P REFERENCES Setting Assignment Creation Preferences How to Change It 1. Click the Preferences menu, choose Assignment Creation, and choose Matching. The Assignment Creation Options dialog box will open. 2. If you’d like to change the instructions that are used by default on printed assignments, edit the text in the Instruction field. 3. If necessary, change the default number of points that students can earn for each numbered matching item. 4. Use the Choices drop-down list to choose how many matching choices you want to list on the right. 5. Use the Questions drop-down list to choose the number of items you want to match to the possible choices. 6. Click OK to save your changes. Ranking Sets the default options for ranking items on assignments, including the instructions, point values, and the number of items to be ranked. However, please note that you can change the options for each item as you create or change assignments. 1. Click the Preferences menu, choose Assignment Creation, and choose Ranking. The Assignment Creation Options dialog box will open. 2. If you’d like to change the instructions that are used by default on printed assignments, edit the text in the Instruction field. 3. If necessary, change the default number of points that students can earn for each item. 4. Use the Choices drop-down list to choose how many items you want students to rank in the questions. This is a default value; you can choose a different number as you create assignments. 5. Click OK to save your changes. Numeric Response Sets the default options for numeric response items on assignments, including the instructions, point values, and the amount of space for the answer. However, please note that you can change the options for each item as you create or change assignments. 1. Click the Preferences menu, choose Assignment Creation, and choose Numeric Response. The Assignment Creation Options dialog box will open. 2. If you’d like to change the instructions that are used by default on printed assignments, edit the text in the Instruction field. 3. If necessary, change the default number of points that students can earn for each item. 4. Enter the amount of space (in inches) that you want to leave below the question for the student’s answer on printed assignments. 5. Click OK to save your changes. AccelTest User Manual 162 Assignment Creation Preference Short Answer What It Does Sets the default options for short answer items on assignments, including the instructions, point values, and the amount of space for the answer on printed assignments. However, please note that you can change the options for each item as you create or change assignments. ..... P REFERENCES Setting Assignment Creation Preferences How to Change It 1. Click the Preferences menu, choose Assignment Creation, and choose Short Answer. The Assignment Creation Options dialog box will open. 2. If you’d like to change the instructions that are used by default on printed assignments, edit the text in the Instruction field. 3. If necessary, change the default number of points that students can earn for each item. 4. Enter the amount of space (in inches) that you want to leave below the question for the student’s answer on printed assignments. 5. Click OK to save your changes. Essay Sets the default options for essay items on assignments, including the instructions, point values, and the amount of space for the answer. However, please note that you can change the options for each item as you create or change assignments. 1. Click the Preferences menu, choose Assignment Creation, and choose Essay. The Assignment Creation Options dialog box will open. 2. If you’d like to change the instructions that are used by default on printed assignments, edit the text in the Instruction field. 3. If necessary, change the default number of points that students can earn for each item. 4. Enter the amount of space (in inches) that you want to leave below the question for the student’s answer on printed assignments. 5. Click OK to save your changes. AccelTest User Manual 163 A BOUT L IBRARIES Your 2Know! classroom response system package includes libraries of items to help you easily create quizzes, tests, and other exercises. You can add items from these libraries to your assignments instead of writing the items yourself. All library content will work with printed assignments, but some may not be suitable for projected questions or questions sent to the Responder. Matching, ranking and multiple choice with more than five distractors will not work for projected assignments. Some content items may be too large to fit on the screen, and some may contain graphics that are only legible when printed. Installi ng Accelerated Math Libraries If you own a desktop version of Accelerated Math (version 2.x), you can install your Accelerated Math libraries in AccelTest. As you follow the steps for installing libraries using the Libraries preference (see page 151), you will be asked to choose the location of the libraries that you want to install. If you have downloaded the libraries from download.renlearn.com, open the folder where you saved the downloaded libraries. If you want to select the libraries that are already installed for your desktop version of Accelerated Math, open your Accelerated Math data folder, then the AccMath folder, and then the Library folder. When you click OK (Windows) or Choose (Macintosh), AccelTest will find and install the Accelerated Math libraries. AccelTest User Manual 164 O THER R ESPONDER F EATURES AND S ETTINGS Changing the Responder Font Size How you change the font size depends on your Responder model. Look at the model number on the back of your Responder; then, follow the instructions for your model below. Changing the Font Size on Responder Model RESP 1. Press the On/Off button. 2. If the Responder has been assigned a student owner and asks for the Student PIN, press ?. Select your server (Receiver) or press yes (True) and then Enter to stay connected to the current server. Enter the Administrator PIN (1234 is the default) and press Enter. Press any key to continue. 3. Press to scroll down to Settings; then, press Select. 4. Press to scroll down to Change Font Size; then, press Select. 5. Use the arrows to choose Small Font or Large Font; then, press Select. Changing the Font Size on Responder Model RES-1001 NEO 2 font changes are done in the Control Panel or via the NEO Manager software, but they do not affect the Responder SmartApplet. Font changes on NEO 2 affect AlphaWord Plus and some other SmartApplets. If you are using a 1.x firmware version (see page 14), you can change the font size by choosing either the odd-numbered or even-numbered version of the firmware. Firmware versions that end in odd numbers display a small font; firmware versions that end in even numbers display a large font. You cannot change the font size on Responders that are using a 2.x or 3.x firmware version. Follow these steps to change your firmware version to select a different font size: 1. Press the On/Off button. 2. If the Responder has been assigned a student owner and asks for the Student PIN, press ?. Select your server (Receiver) or press yes (True) and then Enter to stay connected to the current server. Enter the Administrator PIN (1234 is the default) and press Enter. Press any key to continue. 3. Press to scroll down to Settings; then, press Select. 4. Press to scroll down to Firmware Update; then, press Select. 5. When the Responder displays the available update, scroll to choose the oddnumbered 1.x version if you want a small font or the even-numbered version if you want a large font; then, press Select. 6. Enter the Administrator PIN when the Responder asks you to do this (the default is 1234); then, press Enter. 7. The Responder will start updating the firmware. The program shows you its progress as it does the update. When the update is complete, the Responder will show you the new version number. Press any key to go to the Responder menu or the student PIN entry screen. AccelTest User Manual 165 Using the Calculator in the Responder ..... OTHER RESPONDER FEATURES AND S ETTINGS Using the Calculator in the Responder NEO 2 also has a calculator SmartApplet. To find out how to use it, see the NEO 2 Quick Guide. If you are using a 4.x or 1.x firmware version (see page 14), the Responder has a calculator that students can use for simple math operations. If you don’t want students to use this calculator, the teacher can disable the calculator for all students using the Renaissance Wireless Server Utility program; see page 166 for instructions. The calculator is not included on Responders using version 2.x or 3.x firmware. Using the Calculator Follow these steps to use the calculator in the Responder: 1. Press the On/Off button. 2. Press to scroll down to Calculator; then, press Select. 3. If the program asks if you want to stay connected to the Receiver, press yes True and press Select. 4. Follow these instructions to enter calculations: • To enter numbers, use the number keys. • To add, press A (+). • To subtract, press B (–). • To multiply, press C (×). • To divide, press D (/). • To calculate percent, press E (%). • To clear an entry, press Clear. • To get an answer, press Enter (=). 5. To exit the calculator, press Menu. Di sabling the Calculator Function The calculator is enabled by default in this release of AccelTest. Follow these steps to disable (or re-enable) the calculator: 1. Open the Renaissance Wireless Server Utility: • Windows computers: Right-click the icon in the lower right corner of your computer screen and choose Manage from the menu. You can also click StartAll Programs Renaissance Wireless Server Renaissance Wireless Server Utility. (Click Start in the program to start the server if necessary.) • Macintosh computers: If you see the icon in the dock, click it to start the utility. You can also open the Applications folder on your hard drive, open the Renaissance Wireless Server folder, and double-click Renaissance Wireless Server Utility. 2. Type 1234 and click OK to log in. (This is the default password. If you have changed the password, enter your new password.) 3. Click the Device Settings tab. 4. Check or uncheck the box next to Calculator. When the box is checked, students are allowed to use the calculator on their Responders. 5. Click Update Device Settings. Click OK when the settings have been updated. AccelTest User Manual 166 I NDEX Numerics Short Answer, 163 True/False, 161 Yes/No, 161 Assignment editor, 44, 61 Assignment properties, 66 answer spaces, 67 fonts, 66 layout, 67 margins, 67 options (show points), 67 subject, 66 title, 66 Assignment Results Report, 144 Assignment Standards Report, 144 Assignment subject, 66 Assignments, 37 adding equations, 46 adding graphics, 45 adding items, 62 adding items aligned to standards, 42, 64 adding items from other assignments, 63 adding plots, 48 adding to the Gradebook, 77 aligning items to standards, 57 answer spaces, 67 assigning to students, 83 categories, 38 changing, 60 changing mode, 67 completing, 87 completing for AccelScan, 88 completing for manual scoring, 89 completing with the Responder or NEO 2, 87 copying, 71 creating, 39 creating score keys, 50 default fonts, 160 deleting, 75 editing, 60 editor, 44, 61 Essay item preferences, 163 existing and AccelTest, 2 exporting, 74 exporting results, 102, 104 1 to 10 grading scale, 99 2Know! classroom response system how it works, 1 programs, 3 setup tasks, 9 using with Renaissance Place programs, 3 2Know! Toolbar, 3 A About AccelTest, 3, 7 Accelerated Math libraries, 164 AccelScan connecting, 5 scoring assignments, 90 Adding assignments to the Gradebook, 77 Adding classes, 18 Adding items to assignments, 62 from libraries, 62 from other assignments, 63 Adding score keys, 50 Adding standards to the database, 32, 33, 34, 35, 151 Adding students, 18 Administrator PIN, 11 changing, 11 Aligning items on an assignment to standards, 57 Answer Key Report, 143 Answer space, 160 Answering questions on Responders or NEO 2s, 138 Assigning a name to a Receiver, 10 Assigning an owner to a Responder, 12 Assigning assignments to students, 83 Assignment Analysis Report, 143 Assignment creation preferences, 159 Default fonts, 160 Essay, 163 Matching, 162 Multiple Choice, 161 Numeric Response, 162 Print layout, 160 Projector layout, 161 Ranking, 162 AccelTest User Manual 167 C exporting scoring data, 102, 104 fonts, 66 importing, 59 in-class, 2 layout, 67 library items, 41 margins, 67 Matching item preferences, 162 mode, 67 moving items, 66 Multiple Choice item preferences, 161 Numeric Response item preferences, 162 preferences, 38, 159 previewing Responder and NEO 2 assignments, 73 Print layout preference, 160 printing for students, 84 printing one copy, 72 properties, 66 Ranking item preferences, 162 removing from the Gradebook, 110 Report, 144 reprinting, 84 scoring, 89 scoring manually, 91 scoring options, 40 scoring with AccelScan scanner, 90 scoring with NEO 2, 89 scoring with Responder, 89 Short Answer item preferences, 163 showing points, 67 subjects, 38, 66 template, 41 title, 66 True/False item preferences, 161 unassigning, 108 viewing, 37 Yes/No item preferences, 161 Assignments Report, 144 Auto Update preference, 150 Automatic updates, 6 Calculations for grades, 98 Calculator in Responder, 166 disabling, 166 Cartesian plots, 48 Categories preference, 150 effect on grades, 99 Category weights, 99, 150 Cells in the Gradebook, 145 Changing a class name, 27 Changing a student’s PIN, 13 Changing assignment dates in the Gradebook, 85 Changing assignment mode, 67 Changing assignments, 60 Changing items on assignments, 64 Changing notes, 113 Changing score keys, 69 Changing student IDs, 28 Changing student names, 28 Changing the password for AccelTest, 152 Changing the Receiver name, 10 Checking for updates to the software, 6 Class Standards Report, 145 Classes, 17 adding, 18 changing the name, 27 deleting, 29 enrolling students, 19 importing from Renaissance Place, 21 removing students, 20 tab, 17 unenrolling students, 20 viewing, 17 Closing AccelTest software, 8 Comma separated value (CSV) files, 23 Completing AccelScan assignments, 88 Completing assignments, 87 Computer requirements, 3 Connecting the AccelScan scanner, 5 Connecting the Renaissance Receiver, 5 Copying assignments, 71 Creating assignments, 39 CSV files, 23 B Book files, 151 AccelTest User Manual 168 ..... I NDEX D F Data Location preference, 150, 154 Database, 150 Default Fonts preference, 160 Default password, 6 Default Student PIN, 13 Deleting a class, 29 Deleting assignments, 75 Deleting libraries, 151 Deleting notes, 113 Deleting standards from the database, 36 Deleting students, 31 Desktop programs, 24 Determining grades, 165 Devices preference, 150 Displaying a student’s PIN, 14 Downloading standards, 151 Duplicate students (when importing), 25 Final grades, 98 Firmware versions for Responders, 14 Fonts on assignments, 43, 66, 160 Forgotten student PIN, 14 Form Numbers Report, 145 Free Response Grading Worksheet, 145 Free-response items scoring, 91 G Grade calculations, 98 Gradebook, 76 adding assignments, 77 assigning assignments, 83 assignment properties, 85 cells, 145 changing assignment dates, 85 exporting assignment results, 102 mean, 97 median, 97 note history, 113 overriding scores, 94 removing assignments, 110 scoring assignments, 89 scoring assignments manually, 91 sending notes to students, 111 show entire school year, 97 showing scores as percentages, 97 showing scores as points, 97 showing term, 97 unassigning assignments, 108 viewing, 76 viewing scores, 96 Gradebook Summary by Term, 146 Grades, 98 and Categories preference, 99 and Exams preference, 99 and preferences, 99 category weights, 99 exam, 99 exam grade percentage, 98 extra credit calculations, 100 final, 98 semester, 98 term, 98 E E (Essay), 39, 98 Editing a class name, 27 Editing assignments, 60 Editing items on assignments, 64 Editing notes, 113 Editing score keys, 69 Editing student IDs, 28 Editing student names, 28 Ending a scanning session, 91 Enrolling students in a class, 19 Equations in assignments, 46 Essay, 39 Essay preference, 163 Exam grades and overall grades, 98, 99 Exams preference, 151 effect on grades, 99 Exiting AccelTest software, 8 Exporting assignment results, 102, 104 Exporting assignments, 74 Exporting score keys, 74 Exporting scores, 102, 104 Exporting student information, 30 Extra credit, 100 AccelTest User Manual 169 ..... I NDEX Libraries/Standards preference, 151 Library items in new assignments, 41 Grading scale, 99, 151 1 to 10, 99, 151 outstanding/satisfactory/unsatisfactory, 99, 151 pass/fail, 99, 151 preference, 151 standard, 99, 151 Graphics in assignments, 45 Group Assignment Report, 146 M M (Matching), 39, 98 Manuals, 4 Margins, 160 Matching, 39 preference, 162 MC (Multiple choice), 39, 97 Mean, 97 Median, 97 Models for Responders, 14 Moving items on assignments, 66 Multiple choice, 39 preference, 161 H Help, 4 History of a student’s notes, 113 Homework, completing with Responder, 87 I IDs (student) exporting, 30 in report, 147 Importing assignments, 59 Importing classes from Renaissance Place, 21 Importing students from a file, 23, 24 from desktop programs, 24 In-class assignments, 2 Installing AccelTest software, 5 Installing libraries, 151 Installing standards, 151 Item scores, viewing, 97 Item types, 39 Items changing, 64 moving on assignments, 66 N NEO 2 completing assignments, 87 previewing assignments, 73 scoring assignments, 89 student feedback, 78 Network name, 10 New class, 18 New student, 18 Notes changing, 113 deleting, 113 history, 113 reading on Responders, 113 resending, 114 sending to students, 111 NR (Numeric Response), 39, 98 Number line plots, 49 Numeric Response, 39 preference, 162 L Layout of assignment, 67 Learning AccelTest, 4 Libraries, 151, 164 Accelerated Math, 164 adding items to assignments, 62 deleting, 151 downloading, 164 installing, 151 searching for, 164 AccelTest User Manual ..... I NDEX O On-demand sessions, 4 Outstanding/Satisfactory/Unsatisfactory grading scale, 99 Overdue, 96 170 Preferences that affect grades, 99 Previewing Responder and NEO 2 assignments, 73 Print layout preference, 160 Printing assignments before assigning them, 72 Printing assignments for students, 84 Printing reports, 142 Program Information Report, 147 Programs, 3 Projector layout preference, 161 Projector screen size, 161 Properties for assignments, 66 fonts, 66 layout, 67 options (show points), 67 title, 66 Publisher libraries, 151 Overdue Assignments Report, 146 Overlay for Responders, 139 Overriding scores in the Gradebook, 94 Overview of AccelTest, 2 Owners for Responders, 12 resetting, 14 P Pass/Fail grading scale, 99 Password, 6 changing, 152 preference, 152 Past sessions, 140 Pending, 96 Percentages, showing in Gradebook, 97 Permissions, 154 Personal Identification Number (PIN) administrator, 11 student, 13, 14 PIN administrator, 11 student, 13, 14 Plots in assignments, 48 Points on assignments, 67 Points only assignments, 80 scoring, 94 Points, showing in Gradebook, 97 Polar plots, 49 Port for scanner, 153 Preferences, 149 Assignment creation, 159 Auto Update, 150 Categories, 150 Data Location, 150, 154 Devices, 150 Exams, 151 Grading Scale, 151 Libraries/Standards, 151 Password, 152 Registration Information, 152 Reports, 157 Responder, 152 Scanner Settings, 153 School Year, 153 Subjects, 154 using, 149 Preferences that affect assignments, 38 AccelTest User Manual ..... I NDEX Q Question types, 39 Questions answering using Responders or NEO 2s, 138 changing on assignments, 64 moving on assignments, 66 Quitting AccelTest software, 8 R R (Ranking), 39, 98 Ranking, 39 preference, 162 Reading notes on Responders, 113 Receiver, 1 changing the name, 10 connecting, 5 Registration Information preference, 152 Removing assignments from the Gradebook, 110 Removing students from a class, 20 Renaissance Place classes, importing, 21 Renaissance Place programs and the 2Know! classroom response system, 3 Renaissance Receiver, 1 changing the name, 10 connecting, 5 Renaissance Responder, 1 Renaissance Wireless Server Utility, 3, 152 Report descriptions, 143 171 S Reports, 142 Answer Key, 143 Assignment Analysis, 143 Assignment Results, 144 Assignment Standards, 144 Assignments, 144 Class Standards, 145 descriptions, 143 Form Numbers, 145 Free Response Grading Worksheet, 145 Gradebook Summary by Term, 146 Group Assignment, 146 Overdue Assignments, 146 preferences, 157 previewing, 142 printing, 142 Program Information, 147 Student Grade, 147 Student ID, 147 Student Record, 148 Student Standards, 148 Reprinting assignments, 84 Resending notes, 114 Resetting the owner of a Responder, 14 Responder, 1, 165 and homework, 87 assigning a student owner, 12 calculator, 166 changing a student’s PIN, 13 completing assignments, 87 disabling the calculator, 166 displaying a student’s PIN, 14 firmware versions, 14 font size, 165 models, 14 preference, 152 previewing assignments, 73 reading notes, 113 resetting the student owner, 14 scoring assignments, 89 short answer questions on, 139 student feedback, 78 support for owned Responders, 152 updating the firmware, 14 Rights, 154 AccelTest User Manual SA (Short Answer), 39, 98 Saving assignments with a new name, 71 Scanner connecting, 5 port, 153 preferences, 153 scoring assignments, 90 sensitivity, 153 Scanner settings, 56, 153 Scanning cards for scoring, 90 Scanning correct answers for a score key, 56 Scanning session ending, 91 starting, 90 School name, 152 School year, 153 preference, 153 showing in Gradebook, 97 Score keys aligning items to standards, 57 creating, 50 editing, 69 exporting, 74 for Responder or NEO 2 assignments, 50 for scanner assignments, 53 scanning correct answers, 56 Scores as percentages in Gradebook, 97 as points in Gradebook, 97 in the Gradebook, 96 overriding in Gradebook, 94 Scoring assignments, 89 AccelScan, 90 free-response items, 91 manually, 91 NEO 2, 89 points only assignments, 94 Responder, 89 scanner, 90 Semester grades, 98 Semesters, 153 Sending notes to students, 111 Sensitivity of scanner, 153 Sent, 96 Serial number, 152 Serial number for AccelTest, 7 Server settings, 166 172 ..... I NDEX note history, 113 reading notes, 113 removing from a class, 20 sending notes to students, 111 unassigning assignments, 108 unenrolling from a class, 20 Subjects, 66, 154 Subjects preference, 154 System requirements, 3 Sessions, 115 definition, 115 student-paced, 136 teacher-paced, 116, 117, 121, 124, 128 viewing results for past sessions, 140 Setting a student’s PIN, 13 Setting the Administrator PIN, 11 Setting up assignments, 37 Setting up the 2Know! classroom response system, 9 Setting up your data, 8 Short answer, 39 on Responders, 139 preference, 163 Show entire school year, 97 Show term in Gradebook, 97 Slash between scores, 94 Software updates, 6 Standard grading scale (A+ to F), 99 Standards, 32 adding, 32, 33, 34, 35, 151 aligning assignment items to, 57 deleting, 36 Starting a scanning session, 90 Starting AccelTest software, 5 Student feedback on Responder or NEO 2 assignments, 78 Student Grade Report, 147 Student ID Report, 147 Student names, exporting, 30 Student PIN, 13, 14 changing, 13 displaying, 14 Student Record Report, 148 Student Standards Report, 148 Student-paced sessions, 136 Students, 17 adding, 18 changing a name, 28 changing IDs, 28 completing AccelScan assignments, 88 completing assignments, 87 completing assignments for manual scoring, 89 completing Responder or NEO 2 assignments, 87 deleting, 31 enrolling in a class, 19 exporting assignment results, 102 exporting names and IDs, 30 importing from a file, 23, 24 importing with classes from Renaissance Place, 21 AccelTest User Manual T Tab-delimited export files, 102 Tabs in AccelTest, 7 Teacher name, 152 Teacher-paced sessions, 116 existing assignments, 121 PowerPoint slides, 128 projected assignments, 117 verbal questions, 124 Template for Responders, 139 Term grades, 98 Terms, 153 showing in Gradebook, 97 Text files for import, 23 TF (True/False), 39, 98 Title of assignment, 66 Training, 4 True/False, 39 preference, 161 U Unassigning assignments, 108 Unenrolling students from a class, 20 Updates, 6 Updates for AccelTest software, 6 Updating Responder firmware, 14 Using AccelTest for assignments you already have, 2 Using AccelTest for in-class assignments, 2 Using AccelTest to create, assign, and score assignments, 2 173 ..... I NDEX V Verbal questions and teacher-paced sessions, 124 Version of AccelTest, 7 Viewing a class Gradebook, 76 Viewing assignments, 37 Viewing classes, 17 Viewing past session results, 140 Viewing scores by item, 97 Viewing scores in the Gradebook, 96 W Waiting, 96 Webinars, 4 Y Yes/No, 39 preference, 161 YN (Yes/No), 39, 97 AccelTest User Manual 174 ..... I NDEX About Renaissance Learning Renaissance Learning, Inc. is a leading provider of technology-based school improvement and student assessment programs for K12 schools. Adopted by more than 70,000 schools, Renaissance Learning’s tools provide daily formative assessment and periodic progressmonitoring technology to enhance core curriculum, support differentiated instruction, and personalize practice in reading, writing, and math. Renaissance Learning products help educators make the practice component of their existing curriculum more effective by providing tools to personalize practice and easily manage the daily activities for students of all levels. As a result, teachers using Renaissance Learning products accelerate learning, get more satisfaction from teaching, and help students achieve higher test scores on state and national tests. P.O. Box 8036 Wisconsin Rapids, WI 54495-8036 (800) 338-4204 www.renlearn.com © 2011 Renaissance Learning, Inc. R54064.0811