1
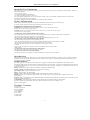
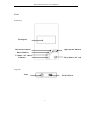
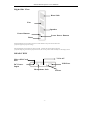
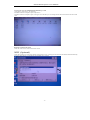
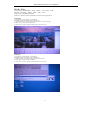
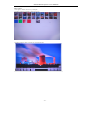
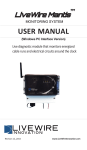
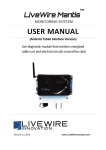
Smart Mini Projector User Manual
30 Lumens LED mini Projector with
Windows CE Support WIFI WORD
EXCEL PPT PDF File View
User Manual
-1-
Smart Mini Projector User Manual
Contents
Intended Use Statement.......................................................................................... …........3
Safety Information...................................................................................................3
Introduction............................................................................................................3
Package Contents...................................................................................................3
Parts....................................................................................................................4
Getting Start........................................................................................................6
Making Connections..............................................................................................6
Basic Operating Instructions..................................................................................6
Basic File Operations.............................................................................................7
Home Screen................................................................................................................7
WIFI....................................................................................................................8
Media Files.................................................................................................9
Document and PDF Files.................................................................................................11
Cleaning the Projector...................................................................................................12
Troubleshooting........................................................................................12
Specifications...................................................................................................12
-2-
Smart Mini Projector User Manual
Intended Use Statement
This smart projector is designed for operating with the specified battery and power adapter in normal office, outdoor or
home environments.
• 10˚–30˚C (50˚–86˚F)
• 10–80% RH (without condensation)
• 0–1829 m (0–6000 feet) above sea level
The environment should be far away from airborne smoke, grease, oil and other contaminants that can affect the
operation or performance of the projector.
Use of this product in adverse conditions will void the product warranty.
Safety Information
Please read, understand, and follow all safety information contained in these instructions prior
to the use of this projector. Retain these instructions for future reference.
Explanation of Signal Word Consequences
Warning: Indicates a potentially hazardous situation, which, if not avoided, could result in
death or serious injury and/or property damage.
Caution: Indicates a potentially hazardous situation, which, if not avoided, may result in minor
or moderate injury and/or property
To reduce the risk associated with hazardous voltage:
• Do not modify this product in any way. Use only the manufacturer -approved replacement components.
• Do not use the wall power supply in a wet environment.
• Do not use with a damaged wall power supply. Replace damaged part prior to use.
To reduce the risk associated with fire and explosion:
• Do not immerse the projector in any liquid or get wet.
• Use only the manufacturer-approved power supply and lithium ion polymer battery provided.
• Do not operate this projector in any environment above 30°C (86°F).
• Do not expose the projector to direct sunlight in a closed space such as
a vehicle.
• Do not carry the projector in pockets, purses or handbags where it may contact
metal objects.
To reduce the risks associated with driver distraction:
• Do not use this projector in a moving motor vehicle.
To reduce the risks associated with choking:
• Keep micro-SD card, AV adapters and other small parts away from young children.
Introduction
Thank you for choosing our smart projector. This product has been produced in accordance with our quality and safety
standards to provide smooth and trouble-free use in the years to come. For optimum performance, please follow the
operating instructions carefully.
Product Features
The smart projector is an all-in-one mini projector. It supports common business application file formats such as
PowerPoint, PDF, Word, Excel and either standard movie files or music files. Using the interchangeable micro-SD card
or the build in flash memory, you can load your presentation from a computer, cell phone, or smart-phone and view it on
the smart projector.
Design: Touch pad operation same as notebooks with elegant buttons design
Lenses sourcing: 3M MM200 RGB color with LCOS technology
Operating system:Microsoft Windows CE 5.0
WIFI:support 802.11a/b/g(Optional)
Storage: built-in flash memory 256MB~16GB optional and micro-SD card extension
Media: Connects to your favorite digital media sources: MP3 players, PCs, DVD players, digital cameras and
smart-phones.
Features: Fully equipped with sound, 1800mAh Polymer lithium battery 90 minutes of battery life, screen size up to 80
inches,30 lumens of brightness.
Compatibility: View files created in Microsoft® Word, Microsoft® PowerPoint®, Microsoft®
Excel® or Adobe® Acrobat PDF. Share files, photos and movies from your computer, cell
phone, or smart-phone.
Package Contents
1 Projector
2 Table-Top Tripod
3 Power Adapter
4 AV Adapters
5 User Manual
6 AV Cable
7 VGA Cable
8 USB Cable
-3-
Smart Mini Projector User Manual
Parts
Front View
Touchpad
right mouse button
left mouse button
Enter Button
Volume-/AV chose
Play/Pause/AV exit
Volume+
Top View
Lens
Focus Wheel
-4-
Smart Mini Projector User Manual
Right Side View
Heat Sink
Fan
Speaker
Power Button
Lense Power Button
Reset
Push and hold the power button for three seconds. Release the power button when the
projector begins to project an image
Pull and hold the power button for three seconds, Release the power button when the
projected image is gone but the projector still on, this is save power mode normally use while play music
REAR VIEW
VGA-AV
Micro-SD Card
Slot
USB Port
DC Power
Input
Headphone Jack
-5-
Ir Port
Smart Mini Projector User Manual
Getting Start
Charge the Battery
In normal brightness mode, the projector rechargeable battery gives you up to one hour
of battery life. When the battery needs to be charged, the status indicator will flash red or
the low battery message will display. The battery should be fully charged before using.
Charge the battery by connecting the power adapter to the projector.
1 Turn the projector power off.
2 Connect the power adapter to the projector’s DC input.
3 Connect the other end of the power adapter into the electrical outlet.
4 The status indicator will change while the battery is charging.
5 Allow four hours to fully charge the battery. When charging is complete, the status indicator will turn off.
Making Connections
The projector will display informational icons depending on the input device
and signal being detected. If no devices or input cables are connected to the projector, the
home screen will display.
Connecting to a Composite Video Device
Use the AV cable to input video from camcorders, digital cameras, DVD players and digital
media players into the VGA-AV input on the projector.
1 Connect the AV cable to the projector’s VGA-AV input.
2 Connect the other end of the AV cable to the video device’s video outputs
3 Click” video mode switching” icon on the home menu, choose “AV” “win ce” “VGA” depend on different device
Basic Operating Instructions
Powering On
Push and hold the power button for three seconds. Release the power button when the
projector begins to project an imag
Powering Off
Push and hold the power button for three seconds. Release the power button when the
projected image is gone.
Adjusting the Focus
Turn the focus wheel to sharpen the image.
Adjusting the Volume
The volume can be adjusted during video or song playback,
or during a photo slideshow. Press the Vol+ or Vol- button on the directional pad to adjust the sound one level. You can
also adjust the volume by touchpad
Checking the Battery Level
The amount of charge currently in the battery displays in the status bar battery icon at the top
of the home screen.
Attaching the Tripod
The projector includes a table-top tripod that mounts to the bottom of the projector.
Transfer Files to Projector
The projector has optional 256MB to 16GB internal memory. To access the projector’s internal memory or the micro-SD
Card memory:
1 Connect the USB cable to the projector.
2 Connect the USB cable to the computer.
3 Turn on the projector
4 The projector will be detected as a removable drive labeled “NAND” by the computer.
The computer will detect a second removable drive when a micro-SD Card is installed into
the projector.
5 Now the projector is ready to receive a file from your computer.
Using the micro-SD Card Slot
The projector has a micro-SD card slot that can read up to a 16 GB card. You
can either place files on the card before you insert it into the projector’s card slot or while the
projector is connected to a USB port on a computer.
Insert micro-SD Card
Insert the micro-SD card into the micro-SD slot until it “clicks” into place.
Eject micro-SD Card
Push the micro-SD card into the micro-SD slot until it “clicks”.
Release the micro-SD card and the card will eject.
-6-
Smart Mini Projector User Manual
Basic File Operations
Home Screen
At power on, the home screen will display if there are no input cables or video devices connected to the projector.
Home Screen
The projector provides an easy way to view all files of a specific type with a single icon.
Selecting a File and Opening It
1 Navigate to “My device” by touchpad
2 Double click the touchpad to open ”My device”
3 Double click the touchpad to open “NAND”, and then you can manage all the files that stored on the internal flash
memory
-7-
Smart Mini Projector User Manual
View File List on MICRO SD Memory Card
1 Navigate to “My device” by touchpad
2 Double click the touchpad to open “My device”
3 Double click the touchpad to open “Storage Card” and then you can manage all the files that stored on the micro-SD
card
Return to Home Screen
Click the close Icon to return to the home screen.
WIFI (Optional)
Click the internet icon on the right bottom of the home screen. It will appear the internet information and automatically
search for the internet. you can choose the suitable net to connect
-8-
Smart Mini Projector User Manual
Media Files
Video Format: RM/RMVB、MPG、WMV、AVI、MP4、VOB
Music Format: MP3、WMA、OGG、APE、FLAC
Image Type: GIF,BMP,JPG,PNG
There are shortcut Icons on the home screen for easy operation
Video play
1 Navigate to “Video player” by touchpad
2 Double click the touchpad to open the player
3.click the video you want to play from the video list on the top right
4.Click “play” button to play the video
5.Click “Exit” or press “Menu” button return to home screen
Audio play
1 Navigate to “Audio player” by touchpad
2 Double click the touchpad to open the player
3.click the music you want to play from the music list on
4.Click “play” button to play the Music
5.Click “Exit” or press “Menu” button return to home screen
-9-
Smart Mini Projector User Manual
Photo Viewer
1 Navigate to “Photo Viewer” by touchpad
2 Double click the touchpad to open the viewer
3.Double click the photo you want to view from the list
- 10 -
Smart Mini Projector User Manual
Document and PDF Files
This projector support following office software:Wordpad,Word ,Excel,PDF,PPT ect,you can edite by wordpad,while
other files can only be browsed
Viewing a Document
1 Double Click the shortcut icons on the home screen
2 Click “File” and then “Open”
3 Click “NAND” or “Storage Card”, appear all the files stored on the internet memory or micro SD card,click the file you
want to view
English
Cleaning the Projector
1 Turn off the projector and disconnect power and other cables.
2 Use a soft cloth to wipe off dust.If the dust is difficult to remove, dampen the cloth with clean water and then wipe the
projector clean. Then use a clean cloth to dry the projector.
Troubleshooting
The image is not visible or is very dim.
• The projector is a battery-operated device and requires controlled lighting
conditions. The image may appear very dim in brightly lit rooms.
• Make sure the status indicator is yellow. This indicates that the projector is powered on
and projecting an image.
• Project the image onto a flat, white surface.
• Decrease the light on the surface where the image is being projected.
• Decrease the size of the image.
• When there is nothing connected to the projector, it will project the home screen.
The projector is making a noise.
• The projector has a small fan for cooling the LED light source. The fan turns on and off
automatically based on the projector’s internal temperature. The fan will turn on more
often in warm environments or at high altitudes.
• The speakers make noise when the volume is set to high and nothing is connected to the
projector audio inputs. This is typical. Reduce the projector’s volume setting to zero.
• The speakers may make noise when the component AV cable is not correctly connected
to the video device.
- 11 -
Smart Mini Projector User Manual
Specifications
System
Type
Processor
Memory Storage
SDRAM
Operating system
Engine Specification
Panel Type
Resolution
Mobile Projector
Teleships TCC7901 498MHZ*2 Dual CPU
2GB(1-16GB Optional)
64MB/128MB
Windows CE 5.0
Luminous Flux
Contrast Ratio
LCOS
640*480
97:1(ratio)
4:3
0.84(ratio)
17.8cm
200cm
7 inch
80 inch
≤20S
RGB three-color LED
More than 20,000 hours
30 LUM/@2.5W
200:1(ratio)
Function
WIFI
support 802.11a/b/g(Optional)
USB type
Wireless mouse and keyboard
DEVICE USB2.0, HOST USB1.1
Support
VGA input
Support , resolution up to 1080i
AV(CVBS+L/R) input
Speaker
support
Built-in 1.5W
Headphones
32mW+32mW, 3.5mm headset jack
File view
WORD,EXCEL,PPT,PDF
Multimedia Player
Video Format: RM/RMVB、MPG、WMV、AVI、MP4、VOB,
Maximum resolution up to:800*480
Music Format: MP3、WMA、OGG、APE、FLAC
Lyrics Format: LRC
MP3 bit stream :32Kbps–320Kbps
WMA bit stream:48Kbps–320Kbps
E-book: TXT
Image Type: GIF,BMP,JPG,PNG
Contrast Ratio(ANSI)
Aspect Ratio
Throw Ratio
Minimum Projection Distance
Maximum Projection Distance
Minimum Image Diagonal
Maximum Image Diagonal
To Restart time
Lamp house
LED lamp live
T-FLASH card support maximum :16GB
External Storage
Host USB support for USB storage devices, including the U disk,
mobile hard disk, etc.
Power Specifications
Power Adapter
1800mAh Polymer lithium battery
Charging Mode: DC interface
INPUT:AC 200-240V,OUTPUT:DC 5V /2A
Sustainable Time
1 hour
Power consumption
Appearance Description
Antenna
Weight
size
<10W
Battery
Built-in WIFI antenna
115g
128.1×70×20mm
- 12 -
Smart Mini Projector User Manual
Other features
System Language
Chinese/English
Networking for sharing files
Other features
Temperature Range
Required matching WIFI
SNR≥85dB
Operating temperature: 0 ℃ to 45 ℃
Storage temperature: room temperature
Please note: Design and characters may change without prior notice.
- 13 -