1
RF 900 MHz
STEREO WIRELESS
SPEAKER SYSTEM
(WSP150)
TABLE OF CONTENTS
Introduction ....................................................................................2
Features ............................................................................................2
Care and Maintaince ......................................................................2
Parts ..................................................................................................3
Instillation ................................................................................4, 5, 6
Operation Notes ..............................................................................6
Trouble Shooting ............................................................................6
Specifications ..................................................................................7
Warranty ..........................................................................................7
Owner’s Manual
Please read before using this equipment.
INTRODUCTION
This WSP150 Wireless Speaker system uses the latest 900 MHz RF technology that enables you to enjoy stereo
sound anywhere around your home - even outside on your deck or patio! Just follow the simple instructions to
connect the transmitter to any audio source (CD, DSS, VCR, Stereo, Radio or TV) for full stereo sound without the
need to run wires to your speakers. You may place the speakers anywhere within range (approx. 150 feet) of the
transmitter to receive the stereo signal.
FEATURES
■ 900 MHz RF technology.
■ RF technology lets you roam freely throughout your house.
■ Operating distance up to 150 feet.
■ No line-of-sight limitation.
■ ALC and auto ON/OFF control.
CARE AND MAINTAINCE
With proper care, your speaker system will provide you with years of enjoyment. Here are a few guidelines to
follow in caring for your system:
■ Always use a soft cloth to clean the speakers and transmitter. If required, you may use a mild detergent and
warm water to clean any dirt or dust from the component surfaces. Never use any product containing
alcohol or other solvents as they may damage the surface.
■ Use caution when plugging the power transformers in an AC outlet to avoid the risk of electric shock.
■ Never expose the speakers or transmitter to rain or moisture as this may cause damage . If the speakers are
used outside on a deck or patio, make sure you take them indoors in the event of a rainstorm to prevent
possible damage.
■ Do not operate or store the system in extreme temperatures below 32oF (0oC) and above 122oF (50oC).
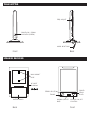
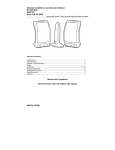
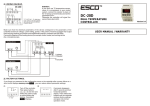
TRANSMITTER
FREQ. ADJUST
POWER ON / SIGNAL
INDICATOR (GREEN)
AUDIO INPUT PLUG
Front
Back
SPEAKER RECEIVER
WALL MOUNT
HOLE
DC INPUT
6V 800mA
POWER
STAND
BY LED
STEREO LED (ST.)
TUNING
BATTERY DOOR
Back
NORMAL/BOOST
BASS
VOLUME ON/OFF
CONTROL
Front
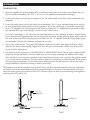
INSTALLATION
TRANSMITTER
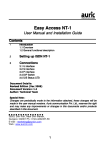
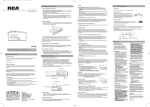
1. Plug the supplied AC power adapter into an electrical outlet near your audio source. Make sure it is
the one for the transmitter ("DC 19V") - the two for the speakers are marked accordingly.
2. Connect the plug end of the power adapter to the DC jack located on the back of the transmitter (see
diagram).
3. Locate the audio input cord on the back of the transmitter. The 3.5 mm standard plug can be used to
fit most headphone output jacks in audio equipment. If you are connecting to the audio output jacks
from a TV, amplifier, etc. then plug the audio input cord into the "Y" adapter that is provided to have
the standard RCA type audio plugs to connect to the audio source.
If you are connecting to a TV there may be some interference to the speakers (a hum or squeal sound).
If you experience this problem then use the noise filter provided. Simply plug the audio input cord into
the jack of the noise filter, then plug the noise filter into the "Y" adapter for the RCA type audio plugs
(see diagram). This should eliminate the interference noise.
4. Turn on the audio source. The green LED indicator light on the lower front panel will glow which
indicates the unit is transmitting a signal. If it does not glow, increase the volume level of the audio
source until the light glows.
5. On the back of the transmitter is the FREQUENCY ADJUSTMENT knob. This is used to adjust the RF
frequency for the transmitter. For now, make sure it is set in approximately the middle of the range.
This will allow you to tune the speakers to the transmitter frequency once you have the speakers ready
to go. Under certain conditions, you may need to adjust this frequency to a different level in the event
you encounter interference in your home from cordless phones or baby monitors. But for the initial
setup installation, a mid-level setting is ideal to start with.
This speaker system has automatic level control (ALC) circuitry that automatically turns the transmitter
on if there is an audio signal detected and the green LED light on the front of the transmitter will glow.
Once the audio source is switched off, the ALC will turn off power and stop transmitting to the speakers
and the green LED will be off.
AC/DC
ADAPTER
GREEN LED
AUDIO INPUT PLUG
Back
Front
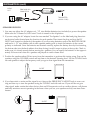
INSTALLATION (cont.)
AUDIO
OUT
STANDARD RCA
CONNECTOR
TRANSMITTER
(AUDIO CORD)
NOISE FILTER
SPEAKER RECEIVER
1. You may use either the AC adapter or 4 - "D" size alkaline batteries (not included) to power the speaker.
Make sure the "Volume On/Off Control" knob is turned to the off position.
2. If you are using the AC adapter, locate the ones marked "For Speaker" on the label and plug them into
an electrical outlet located near the location for each speaker. Then insert the plug end into the DC
INPUT jack located on the back of the speaker. If you are using batteries, remove the BATTERY DOOR
and insert 4 - "D" size alkaline cells in each speaker making sure to insert the batteries in the correct
polarity as indicated. Once the batteries are inserted correctly, replace the battery door by first inserting
the bottom tabs into the back cabinet slots then closing it until it snaps in place at the top tab. Check to
make sure it is closed securely before moving the speakers. You can expect the batteries to last approximately 24 hours total when the speakers are played at a mid-volume level.
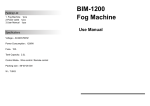
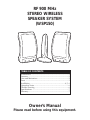
3. Position the speakers about 20 feet away from the transmitter to perform this tuning setup. Turn on the
speakers using the VOLUME control and set them to the desired listening level. Use the TUNING knob
on each speaker to adjust the frequency until you get a clear signal from the transmitter.
20 FEET
4. If you hear static or noise and the signal is not clear, set the FREQUENCY ADJUST knob to a new setting and then try to tune the speakers using the TUNING knob on each one. If you still do not get a
clear signal, make certain that other devices that use RF frequencies such as cordless phones, cell phones
and baby monitors are not operating in the home when you use your speakers as they can cause interference.
TUNE
20 FEET
INSTALLATION (cont.)
5 The BASS BOOST switch can be used to enhance the sound depending on your own music preferences.
To improve the bass response of the speaker, simply slide the switch to the right position. Once you
have properly followed the setup procedure, you may position the speakers in any location within
approximately 150 feet of the transmitter to enjoy quality stereo sound.
OPERATION NOTES
If you notice a disruption of the sound or the signal breaks up, adjust the speakers tuning control to maximize stereo reception.
If you hear interference from other sources, readjust the frequency on the transmitter then re-tune the
speakers the same way as described in the setup procedure. You may have to try several settings to find
the one that works best in your home
When transmitting or receiving over long distances, the signal from the system will become weak and the
stereo indicator light will go dim. If this occurs, move the speakers to a new location closer to the transmitter to receive a stronger signal.
For protection of the transmitter and to save power, the transmitter will cut off automatically in approximately one minute if there is no audio signal, or if the signal is weak. The green LED indicator light will
then turn off. Once the signal is restored, the transmitter will turn on and the green LED will glow.
TROUBLE SHOOTING
NO SOUND
Check that power adapters and/or batteries are connected properly and that
power is on.
Make sure the control knob on the speaker is ON.
If using batteries, they may be too weak to power the speakers. Replace the batteries.
Ensure the TV or audio component is on and that the unit is receiving an adequate
audio signal.
The volume control knob on the speaker is set too low. Adjust the volume if required.
DISTORTED SOUND
Ensure the stereo indicator light on each speaker is on. If not, adjust the tuning controls
for each until the light is on.
Change the position of the frequency adjust knob on the transmitter. Then readjust the
tuning controls on each speaker until the indicator light is on.
Speaker batteries may be too weak. Replace with fresh batteries.
The speakers are too far from the transmitter to receive a strong signal. Move them
closer to the transmitter.
The input level of the audio signal is too low. Turn up the volume on the audio
source to increase the signal level so that the green LED indicator light on the
transmitter glows.
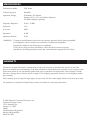
SPECIFICATIONS
Transmission Mode
UHF stereo
Carrier Frequency
900 MHz
Operation Voltage
Transmitter, 19V 200mA
Speaker, 6V (8 x “D” size Alkaline batteries)
6V 800mA adapter (optional)
Frequency Response
20 Hz - 15 KHz
Distortion
1.5%
S/N ratio
60dB
Separation
30 dB
Operation distance
50 M
WARNING:
Changes or modifications to this unit not expressly approved by the party responsible
for compliance could void the user’s authority to operate the equipment.
Operation is subject to the following two conditions:
1) This device may not cause interference, and 2) this device must accept any
interference, including interference that may cause undesired operation of the device.
WARRANTY
Thomson Consumer Electronics warrants that for one year from date of purchase this product is free from
defects in material and workmanship. If the item is defective within that period, return it at your expense to the
dealer from whom it was purchased together with proof of purchase for replacement. This warranty excludes
defects or damage due to misuse, abuse, or neglect. The foregoing represents Thomson’s sole obligation under
this warranty.
This warranty gives you specific legal rights, and you may also have other rights which vary from state to state.
For purchases in outside the United States contact your dealer for warranty information.
© 1998 Thomson Consumer Electronics, Inc.
Product Exchange Center
11721 Alameda Ave.
Socorro, Tx. 79927
1J1882
Trademark(s) ® Registered
Marca(s) Registrada(s)
Made in China