1
Copyright © 2015 SolarWinds Worldwide, LLC. All rights reserved worldwide. No
part of this document may be reproduced by any means nor modified,
decompiled, disassembled, published or distributed, in whole or in part, or
translated to any electronic medium or other means without the written consent of
SolarWinds. All right, title, and interest in and to the software and documentation
are and shall remain the exclusive property of SolarWinds and its respective
licensors.
SOLARWINDS DISCLAIMS ALL WARRANTIES, CONDITIONS OR OTHER
TERMS, EXPRESS OR IMPLIED, STATUTORY OR OTHERWISE, ON
SOFTWARE AND DOCUMENTATION FURNISHED HEREUNDER
INCLUDING WITHOUT LIMITATION THE WARRANTIES OF DESIGN,
MERCHANTABILITY OR FITNESS FOR A PARTICULAR PURPOSE, AND
NONINFRINGEMENT. IN NO EVENT SHALL SOLARWINDS, ITS SUPPLIERS,
NOR ITS LICENSORS BE LIABLE FOR ANY DAMAGES, WHETHER ARISING
IN TORT, CONTRACT OR ANY OTHER LEGAL THEORY EVEN IF
SOLARWINDS HAS BEEN ADVISED OF THE POSSIBILITY OF SUCH
DAMAGES.
The SOLARWINDS and SOLARWINDS & Design marks are the exclusive
property of SolarWinds Worldwide, LLC and its affiliates, are registered with the
U.S. Patent and Trademark Office, and may be registered or pending registration
in other countries. All other SolarWinds trademarks, service marks, and logos
may be common law marks, registered or pending registration in the United
States or in other countries. All other trademarks mentioned herein are used for
identification purposes only and may be or are trademarks or registered
trademarks of their respective companies.
Last revised: 8/6/2015
About SolarWinds
SolarWinds, Inc develops and markets an array of IT management, monitoring, and
discovery tools to meet the diverse requirements of today’s IT management and
consulting professionals. SolarWinds products continue to set benchmarks for quality
and performance and have positioned the company as the leader in IT management and
discovery technology. The SolarWinds customer base includes over 85 percent of the
Fortune 500 and customers from over 170 countries. Our global business partner
distributor network exceeds 100 distributors and resellers.
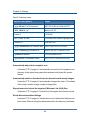
Contacting SolarWinds
You can contact SolarWinds in a number of ways, including the following:
Team
Contact Information
Sales
1.866.530.8100
http://www.solarwinds.com/
Technical
Support
http://www.solarwinds.com/support (you need a customer account to
access the Customer Support area of the website.)
User
Forums
http://www.thwack.com/
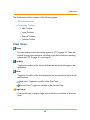
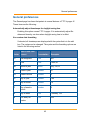
Conventions
The documentation uses consistent conventions to help you identify items throughout
the printed and online library.
Convention
Specifying
Bold
Window items, including buttons and fields
Italics
Book and CD titles, variable names, new terms
Fixed font
File and directory names, commands and code examples,
text typed by you
Straight brackets, as in
[value]
Optional command parameters
Curly braces, as in
{value}
Required command parameters
Logical OR, as in
value1|value2
Exclusive command parameters where only one of the
options can be specified
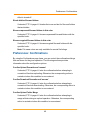
FTP Voyager JV documentation library
The following documents are included in the FTP Voyager JV documentation library:
Document Purpose
User
Guide
Provides detailed setup, configuration, and conceptual information.
Release
Notes
Provides late-breaking information, known issues, and updates. The
latest Release Notes can be found at http://www.solarwinds.com.
Table of Contents
FTP Voyager JV overview
9
Chapter 1: Layout
10
Application overview
10
Initial layout
11
Local pane and remote pane overview
12
Initial layout
13
Tree pane overview
13
Preview pane overview
14
List pane overview
15
Transfer pane overview
16
Status bar overview
18
Chapter 2: Main menu
20
Main menu overview
20
File menu
21
Edit menu
23
View menu
24
Windows menu
26
Help menu
27
Chapter 3: Toolbars
28
5
FTP Voyager JV User Guide
Main toolbar overview
28
Main toolbar actions
29
Local and remote navigation bar overview
30
Local and remote navigation bar actions
30
Local and remote toolbars overview
32
Local and remote toolbar actions
33
Local and remote search bar overview
35
Local and remote search bar actions
36
Transfer toolbar overview
37
Transfer toolbar actions
37
Chapter 4: Dialogs
40
About: Program information
41
About: Computer information
41
General preferences
42
Examples
44
Preferences: Confirmations
46
Preferences: Transfer pane
48
Preferences: Sounds
49
Preferences: Toolbars
49
Synchronize folders: Overview
49
Synchronize folders: Results panes
50
Results Pane - Toolbar
51
Results pane: List
52
Synchronize folders: Options pane
53
Save login dialog
54
Change password dialog
55
6
FTP Voyager JV User Guide
Activate window dialog
56
Chapter 5: Additional information
57
Active pane overview
57
Docking framework overview
58
Navigating directories
59
Mouse and keyboard navigation
59
Navigation bar
60
Navigation history
60
Up Directory
61
Managing directories and files
61
Creating directories
61
Deleting directories or files
62
Renaming directories or files
62
Refreshing a directory listing
62
Viewing detailed information about directories or files
62
Copying or moving directories and files
62
Transferring files
63
Downloading files and directories
63
Uploading files and directories
63
Drag and drop variations
64
Managing transfers
65
Searching for files or folders
66
Type-ahead
66
Search bar
66
Frequently Asked Questions
67
7
FTP Voyager JV overview
FTP Voyager JV is a full-featured, Java-based transfer client based on the awardwinning FTP Voyager product from SolarWinds. It is distributed by a licensed Serv-U
File Server to provide a familiar, powerful way to transfer files for all users of the file
server.
Some important features of FTP Voyager JV include the following:
l
FTP Voyager JV only requires the Java Runtime Environment. No installation is
required.
l
Operates using the HTTP protocol for easy firewall configuration.
l
Supports SSL encrypted communication using HTTPS.
l
Provides thumbnail view of remote images that minimizes bandwidth usage.
l
Maintains timestamps of transferred files.
l
Provides easy drag and drop file transfers between local and remote panes.
l
Supports multiple concurrent transfers for fast delivery of files.
l
Supports a customizable appearance, providing a sense of familiarity between
applications.
l
Provides easy management of transfers through a Transfer Queue.
l
Provides the ability to resume transfers.
l
Provides a view of different parts of the same file system simultaneously by using
the docking framework.
l
Supports user customizable workspaces.
l
Provides preview image files (JPG, PNG, GIF, and many more).
l
Supports storing login files to disk for easier launching.
l
Supports searching for files and directories.
Chapter 1: Layout
This topic provides information about the user interface of FTP Voyager JV, and
about the panes available in the user interface. The information is organized into
the following sections:
l
Application overview
l
Local pane and remote pane overview
l
Tree pane overview
l
Preview pane overview
l
List pane overview
l
Transfer pane overview
l
Status bar overview
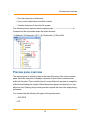
Application overview
The user interface of FTP Voyager JV makes it easy to navigate a file system. By
using a familiar and simple layout you can quickly begin to navigate through the
file system. A significant addition to the layout is the docking framework. Through
the docking framework, you can look at two different parts of the same file system.
You can also change the location of the frames and toolbars that can be docked,
and this way you can create a customized workspace. This creates an intuitive
file transfer client tailored to each user of Serv-U.
10
Chapter 1: Layout
Initial layout
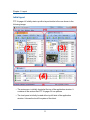
FTP Voyager JV initially starts up with a layout similar to the one shown in the
following image:
l
l
The main menu is initially located at the top of the application window. It
contains all the actions that FTP Voyager JV can perform.
The local pane is initially located at the top left side of the application
window. It shows the local file system of the client.
11
Local pane and remote pane overview
l
l
l
The remote pane is initially located at the top right side of the application
window. It shows the remote file system of the server.
The transfer pane is initially located at the bottom of the application window.
It shows the transfers between the client and server.
The status bar is located at the bottom of the application window. It shows
dynamic descriptions of buttons and actions of FTP Voyager JV, and it also
shows local and remote listing information, such as the number of files or
folders, and the number of selected files or folders.
Local pane and remote pane overview
You can navigate through a file system by using the local and remote panes.
Each pane has a similar layout which provides for a comfortable transition
between the two file systems. The panes also inherit the functionality of the
docking framework, so that you can customize the layout of each pane. Each
local pane shows the contents of the local file system of the client, and each
remote pane shows the contents of the remote file system of the server.
Note: The file name extensions in the local panes are displayed according to the
operating system settings. To change the way the file name extensions are
displayed, configure your operating system settings.
From the local and remote panes, you can perform the following actions:
l
Navigate through directories, viewing their contents
l
Create new directories
l
Delete directories and files
l
Rename directories and files
l
View detailed properties of directories and files
l
Copy or move files from one directory to another
l
Transfer files between the local and remote file systems
l
Display thumbnail images of supported file types
12
Chapter 1: Layout
l
Preview the contents of supported file types
l
Search for files, folders, or both
Initial layout
The panes initially consist of the following components:
l
l
l
The navigation bar shows the current working directory using a crumb to
represent each directory in the path. You can also type in an absolute path
to navigate within this toolbar.
The local or remote toolbar shows the actions that can be performed on
directories and files. You can customize the toolbar by right-clicking and
toggling the visible state of each button.
The tree pane shows the folders of the corresponding file system as a tree
structure.
l
The preview pane shows a preview of the file selected from the listing.
l
The list pane shows the file listing of the current working directory.
l
The search bar shows the controls that can be used to perform a search
through the current working directory.
Tree pane overview
The tree pane is initially displayed in the upper-left corner of the local or remote
pane, above the preview pane. It displays the folders of the corresponding file
system as a hierarchy. This makes it easy to understand how the file system is
laid out.
You can perform the following file system management activities in the tree pane:
l
Create directories
l
Delete directories
l
Rename directories
l
Open directories to view their contents
13
Preview pane overview
l
View the properties of directories
l
Copy or move directories to another location
l
Transfer directories to the other file system
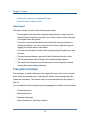
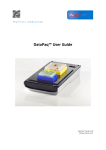
The following screen capture uses the sample path C:\Downloads\RhinoSoft to
illustrate how the tree breaks down the folder structure:
(1) Desktop | (2) Computer | (3) C: | (4) Downloads | (5) RhinoSoft
Preview pane overview
The preview pane is initially located in the lower left corner of the local or remote
pane, below the tree pane. It displays a preview of the file that is selected from
within the list pane. This is useful when it is more efficient to preview an image file
without downloading the original. When the preview pane is not docked, you can
adjust its size. Resizing the preview pane also adjusts the size of the image being
previewed.
You can preview the following file types in the preview pane:
l
JPG/JPEG
l
GIF
14
Chapter 1: Layout
l
PNG
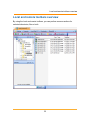
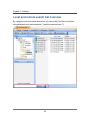
List pane overview
The list pane is initially displayed to the right of the local or remote pane. It
displays all the files and directories of the current working directory.
You can perform the following file system management activities in the list pane:
l
Create directories
l
Delete directories and files
l
Rename directories and files
l
Open directories to view their contents
l
Open files
l
View the properties of directories and files
l
Copy or move directories and files to another location
l
Transfer directories and files to another file system
The directory contents in the list pane are displayed in one of the following views:
l
l
l
l
l
Large Icons: Displays the file names along with an appropriate large icon
determined by the file type.
Small Icons: Displays the same information as large icons, except using a
smaller icon.
List: Displays the same information as small icons, but scrolling horizontally
to display additional files.
Details: The traditional view used by Windows Explorer to display
additional information about each file.
Thumbnails: Displays the file names along with a preview of supported
image types.
15
Transfer pane overview
The Details view contains the following columns that display information about
each file:
l
Name: Shows the display name of the file or directory.
l
Size: Shows the size of the file or directory.
l
l
Type: Identifies the file type as registered with the operating system of the
client.
Modified: Shows the last date when the file was modified.
The Thumbnail view can display each file as a thumbnail representation of itself.
If the file does not produce an image of itself, then the Large Icon is used instead.
For more information about the different sizes available for thumbnails, see View
menu.
Transfer pane overview
The transfer pane is initially displayed at the bottom of the application window.
The transfer pane shows status information for all file transfers. By default,
transfers are removed from this pane if they are completed, canceled, or
interrupted. However, you can configure FTP Voyager JV to leave entries in the
transfer pane until they are removed manually. You can use the following file
transfer management features in the transfer pane:
l
Stop the selected transfer after the current file is complete
l
Move on to the next file for the selected transfer
l
Pause the selected transfer
l
Resume the selected transfer
l
Cancel the transfer
l
Remove the transfer from the list
l
Cancel all transfers that are in the list
l
Remove all transfers from the list
The transfer pane contains columns showing information about the transfer.
16
Chapter 1: Layout
These columns are the following:
l
Operation: Displays the current state of the transfer. At any time, the state of
the transfer can change. The transfer can be in the following states:
l
l
l
l
l
l
l
l
Paused: The transfer item has been paused. This can be the result
of selecting the Pause option.
Skipped: The transfer item has been skipped. This can be the
result of selecting the Skip option.
Pending: The transfer item is pending; a worker thread will
eventually carry out the operation for this item.
Waiting: The transfer item is waiting for the user to start the
operation. When it is started, the item will be put into the pending
state.
Listing: The transfer item is performing a listing for a directory item.
Downloading: The transfer item is being downloaded from its
source path to its destination path.
Uploading: The transfer item is being uploaded from its source
path to its destination path.
l
Deleting: The source path of the transfer item is being deleted.
l
Cancelled: The transfer item has been canceled.
l
l
l
l
l
Stopped: The transfer item has been stopped. This can be the
result of selecting the Stop After File Completes option.
Confirming: The transfer item has encountered a condition which
requires user input.
Error: The transfer item has encountered an error which requires
user input.
Complete (Green Icon): The transfer item and all its nested
operations are complete.
Complete (Yellow Icon): The transfer item has performed all
operations, but some items within may not have been completed.
Name: Displays the name for each transfer item.
Note: Each transfer item is located within a transfer group. The transfer
17
Status bar overview
group and nested directories can be expanded by pressing the expansion
graphic (for example, a "+" sign on a Windows operating system) located in
front of the name. Each transfer group has an icon to easily identify its
operation. These icons are the following:
l
Upload
l
Download
l
l
Delete
Transferred: Displays the progress for the current file being transferred. It
displays the total size of the file as well as how much of the file has already
been transferred in actual bytes as well as a percentage with a visual
progress indicator.
l
l
l
Completion: Shows the transfer rate and the estimated amount of time until
transfer completion. The estimated time is displayed in the format of
HH:MM:SS where "HH" represents hours, "MM" represents minutes, and
"SS" represents seconds. The transfer also displays one of two icons to
indicate whether the transfer is an upload or download:
l
Uploading
l
Downloading
Source Path: Displays the complete path for the source file that is currently
being transferred.
Destination Path: Displays the complete path for the destination file that is
currently being transferred.
Status bar overview
The status bar is located at the bottom of the main application window. It can
show descriptions for various actions of FTP Voyager JV, the name of the
currently connected user account, secure connection identifier, and the elapsed
time for this session.
18
Chapter 1: Layout
l
l
l
l
Status Area: Dynamically updates to show extended information about
buttons and actions. It also shows the number of files and number of
selected files in the active local or remote pane.
User: Shows which user account is active in FTP Voyager JV.
Secure Connection: Shows an icon and text if FTP Voyager JV is using a
secure connection to Serv-U.
Duration: Displays the elapsed time for this session of FTP Voyager JV.
19
Chapter 2: Main menu
This topic contains information about the main menu of FTP Voyager JV, and
provides information about each menu item. The information is organized into the
following sections:
l
Main menu overview
l
File menu
l
Edit menu
l
View menu
l
Windows menu
l
Help menu
Main menu overview
The main menu is located at the top of the application window. It provides access
to all of the operations and features of FTP Voyager JV. Some operations can
also be performed using keyboard shortcuts. If an operation supports a keyboard
shortcut, it is displayed at the end of the corresponding menu entry.
The main menu is divided into the following categories:
l
File menu
l
Edit menu
l
View menu
l
Windows menu
l
Help menu
20
Chapter 2: Main menu
File menu
New Local Browser
Creates a new dockable frame that is associated with the local file system.
New Remote Browser
Creates a new dockable frame that is associated with the remote file
system.
New Folder
Creates a new directory under the current working directory of the active
pane.
Open
Opens the directory in the active pane or attempts to open the file with the
default program of the system for the file extension.
Delete
Permanently deletes the selected items in the active pane.
Note: Depending on your settings, FTP Voyager JV may request a
confirmation of the action before the deletion occurs.
Rename
Allows file and folder names to be edited in the active pane.
Properties
Launches a window that shows the properties of the selected items of the
active pane.
Upload Files
Initiates a file transfer that copies the selected items in the active local pane
to the file server. If more than one remote browser window is currently open,
a window is displayed where you can choose the appropriate destination.
21
File menu
Note: The server retains the directory tree structure of any client files that
may be directories.
Download Files
Initiates a file transfer that copies the selected items in the active remote
pane to the local file system. If more than one local browser window is
currently open, a window is displayed where you can choose the
appropriate destination.
Note: The client retains the directory tree structure of any server files that
may be directories.
Stop Remote Directory Listing
If a directory listing is pending on the server, this option terminates the
listing without waiting for it to finish.
Note: This action is only available while a remote directory listing is in
progress. Remote directory listings may take a long time to complete,
especially if the file server is accessing resources across a network. Certain
commands cannot be executed until FTP Voyager JV receives a remote
directory listing or the directory listing has been canceled.
Synchronize Folders
Opens the Synchronize Folders window, where you can view
inconsistencies between two directories whose files should match.
Lock Navigation
Locks the navigation of a source listing to a target listing. When navigation
is locked, navigating through the directory of one of the listings
automatically updates the other.
Unlock Navigation
Removes the lock navigation information from the source and target listings.
Save Login
Opens the Save Login window, where you can save a file with your login
credentials to the client machine. When the credentials are saved, you can
22
Chapter 2: Main menu
log in to this server by opening the saved file.
Note: Saving passwords to files could pose a security risk.
Change Password
Opens the Change Password window, where you can change the password
for your user account.
Note: This option is only available if the administrator allows users to
change their password.
Exit
Closes FTP Voyager JV and optionally logs out the current user account
from Serv-U.
Note: If you are logged in to FTP Voyager JV using an administrator
account, logging out of Serv-U may not be recommended. Logging out will
also log out the instance of the Management Console, requiring another
login before returning to the Management Console from within the browser.
Edit menu
Select All
Selects all rows of the active list pane.
Invert Selection
Reverses the selection state of each row of the active list pane. Therefore,
any rows not selected become selected and any rows selected become
deselected.
Preferences
Opens the Preferences window, where you can configure various options in
FTP Voyager JV. The Preferences window has several options that you can
change to suit individual needs.
23
View menu
The Preferences window consists of the following pages:
l
General preferences
l
Preferences: Toolbars
l
Main Toolbar
l
Local Toolbars
l
Remote Toolbars
l
Transfer Toolbar
View menu
Theme
Provides alternate skins that can be applied to FTP Voyager JV. There are
several custom styles available, including a style that reflects the operating
system that FTP Voyager JV is running on.
Toolbars
Toggles the visibility of the various toolbars that are located throughout the
application.
Panes
Toggles the visibility of the dockable panes that are located on the local and
remote panes.
l
Tree Pane: Toggles the visibility of the Tree Pane.
l
Preview Pane: Toggles the visibility of the Preview Pane.
Large Icons
Changes the view to display large icons of the files and folders in the active
pane.
24
Chapter 2: Main menu
Small Icons
Changes the view to display small icons of the files and folders in the active
pane.
Details
Changes the view to display detailed information of all the files and folders
in the active pane. In addition to showing the file name, detailed listings also
show the file size, the file type, and the modification date and time.
Thumbnails
Thumbnails are displayed in the list pane. You can change the size of the
thumbnails by selecting a predefined size that is listed here. Thumbnails are
only retrieved and displayed for recognized image types. Otherwise, a large
icon is displayed for the item. The predefined sizes are the following:
l
75 x 75
l
100 x 100 (Default)
l
150 x 150
l
200 x 200
l
250 x 250
Back
Navigates back one entry in the navigation history of the active pane.
Forward
Navigates forward one entry in the navigation history of the active pane.
Up One Level
Navigates to the parent directory of the current directory in the active pane.
Refresh
Retrieves an updated directory listing for the active pane.
25
Windows menu
Windows menu
Close
Closes the active pane. Note: Closing the active pane updates the frame
list.
Auto Hide
Changes the state of the active pane to become a hidden pane attached to
the application window. The hidden pane can be shown by hovering the
mouse over the tab assigned to the pane.
Dockable
Changes the state of the active pane to a dockable frame that is attached to
the application window. This is the default state of window panes in FTP
Voyager JV.
Floating
Changes the state of the active pane to a floating frame that is detached
from the application window.
Auto Hide All
Changes all frames to an Auto Hide state.
Close All Frames
Closes all frames for the application.
Frame List
Contains all the frames that are active for this session. The menus are
dynamically updated in accordance with the frames that have been created
and destroyed. Selecting a frame from this list makes it active in the
application.
26
Chapter 2: Main menu
Windows
Displays the Activate Window dialog where you can activate frames within
the application.
Help menu
Help Context
Launches the online help documentation within the default web browser.
User Manual
Launches the online user guide within the default web browser.
About FTP Voyager JV
Launches the About window of FTP Voyager JV. The About window
contains important product information.
It has the following two pages:
l
l
Program Information: Contains information about the FTP Voyager JV
version, build date, and contact information.
Computer Information: Contains information about the operating system
and Java installation of the computer. Click Copy to clipboard to copy this
information to the clipboard for submission to technical support.
27
Chapter 3: Toolbars
This topic contains information about the toolbars of FTP Voyager JV, and
provides information about each item. The information is organized into the
following sections:
l
Main toolbar overview
l
Main toolbar actions
l
Local and remote navigation bar overview
l
Local and remote navigation bar actions
l
Local and remote toolbars overview
l
Local and remote toolbar actions
l
Local and remote search bar overview
l
Local and remote search bar actions
l
Transfer toolbar overview
l
Transfer toolbar actions
Main toolbar overview
The main toolbar provides a quick way to perform common actions for the
application. The main toolbar is initially located directly below the main menu. It is
hidden by default.
To show the toolbar:
1. Go to View > Toolbars.
2. From the Main Menu, select Main.
28
Chapter 3: Toolbars
Main toolbar actions
This topic provides information about the actions that you can perform on the
main toolbar.
Preferences
Opens the Preferences window where you can configure various options in FTP
Voyager JV. The Preferences window has several options that you can change to
suit individual needs.
The Preferences dialog consists of the following pages:
l
General
l
Toolbars
l
Main Toolbar
l
Local Toolbars
l
Remote Toolbars
l
Transfer Toolbar
Context
Launches the online help documentation within the default web browser.
User Manual
Launches the online user guide within the default web browser.
About
Launches the About dialog of FTP Voyager JV. The About dialog contains
important product information.
It has the following two pages:
l
Program Information: This page contains information about the FTP
Voyager JV version, build date, and contact information.
29
Local and remote navigation bar overview
l
Computer Information: This page contains information about the operating
system and Java installation of the computer, which you can copy to the
clipboard for submission to technical support by clicking Copy to
clipboard.
Exit
Closes FTP Voyager JV and optionally logs out the current user account from
Serv-U.
Note: If you are logged in to FTP Voyager JV using an administrator account,
logging out of Serv-U may not be recommended. Logging out will also log out the
instance of the Management Console, requiring another login before returning to
the Management Console from within the browser.
Local and remote navigation bar overview
The local and remote navigation bars are initially located at the top of each local
and remote pane. In the navigation bar, you can change the current working
directory in various ways. To change the current working directory, perform one of
the following actions:
l
Use a crumb button or the drop-down of a crumb button.
l
Specify an absolute path for the file system.
l
Select a previous path from the drop-down history list.
Local and remote navigation bar actions
In the navigation bar, you can perform various actions to navigate to a directory on
the corresponding file system. The functionality of the navigation bar is detailed in
the following section.
30
Chapter 3: Toolbars
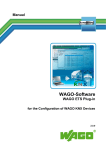
Crumb buttons (1 - 5)
Each crumb represents a directory. To change the working directory to the
corresponding crumb, click the crumb. Clicking on the drop-down arrow of a
crumb brings up a list of the sub-directories of that crumb location. Click one
of these sub-directories to change the working directory.
The previous screen capture uses the sample path
C:\Downloads\RhinoSoft to show how the tree breaks down the folder
structure:
Desktop (1)| Computer (2) | C: (3) | Downloads (4) | RhinoSoft (5)
Absolute Path Mode (6)
Provides an option to change the navigation bar to an edit field. The edit
field initially displays the current working directory as an absolute path. You
can replace this string with a different absolute path that points to a valid
directory on the file system. Press enter to set the working directory to the
specified path.
History (7)
Displays a list of previous working directories. Select a path from this list to
change the current working directory.
Refresh (8)
Retrieves an updated directory listing for the active pane.
31
Local and remote toolbars overview
Local and remote toolbars overview
By using the local and remote toolbars, you can perform common actions for
selected directories, files or both.
32
Chapter 3: Toolbars
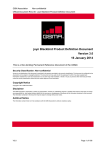
Local and remote toolbar actions
This topic lists all the actions that you can perform in the local and remote
toolbars.
Back (1)
Navigates back one entry in the navigation history of the active pane.
Forward (2)
Navigates forward one entry in the navigation history of the active pane.
Note: The drop-down button shows a history of the directories browsed to
by using the back and forward mechanism.
Up Directory (3)
Navigates to the parent directory of the current directory in the active pane.
Upload (4a)
Initiates a file transfer that copies the selected items to the file server. If more
than one remote browser window is currently open, a window is displayed
where you can choose the appropriate destination.
Note: Only a local pane toolbar can show the Upload button.
Download (4b)
Initiates a file transfer that copies the selected items to the local file system.
If more than one local browser window is currently open, a window is
displayed where you can choose the appropriate destination.
Note: Only a remote pane toolbar can show the Download button.
New Folder (5)
Creates a new directory under the current working directory.
Delete (6)
Permanently deletes the selected items in the active pane.
33
Local and remote toolbar actions
Views (7)
Provides a method to cycle through the various views available to the list
pane.
Note: From here, you can quickly select the appropriate view for the list
pane from the drop-down button. The available views for the list pane are
the following:
l
l
l
l
l
Large Icons: Displays the file names along with an appropriate large
icon determined by the file type.
Small Icons: Displays the same information as large icons, except
using a smaller icon.
List: Displays the same information as small icons, but scrolling
horizontally to display additional files.
Details: The traditional view used by Windows Explorer to display
additional information about each file.
Thumbnails: Displays the file names along with a preview of
supported image types.
Synchronize Folders (8)
Opens the Synchronize Folders window, where you can view
inconsistencies between two directories whose files should match.
Rename (9)
Allows file and folder names to be edited in the active pane.
Properties (10)
Opens a window that shows the properties of the selected items of the
active pane.
Lock Navigation (11)
Locks the navigation of a source listing to a target listing. When navigation
is locked, navigating through the directory of one of the listings
automatically updates the other.
34
Chapter 3: Toolbars
Local and remote search bar overview
By using the local and remote search bar, you can quickly find files and folders
using wildcards such as the asterisk (*) and the question mark (?).
35
Local and remote search bar actions
Local and remote search bar actions
This topic contains information about the options you can access in the search
bar.
Search field
Use the search field to enter search criteria, including file and folder names. You
can also use standard wildcards to search for files, populating the listing with all
file names that match the search criteria. You can use the following wildcards:
*
Any characters produce a match. For example, "*" or "*.*" results in all files
and folders being returned in the listing.
?
The question mark is a character mask, and it matches any individual
character at the specified position. For example, Betty.??? returns all files
that start with "Betty." and end with a three character extension. As an
additional example, LogFile??2009.txt returns all files that start with
LogFile, contain two characters in the middle, and end in 2009.txt, as
might be the case with monthly log files.
Search button
The search button starts the search process. While the search query is
processed, interaction with the GUI is still possible.
Search drop-down button
The search drop-down button provides more options to configure the search
criteria. You can include specific date ranges and file sizes in the search
algorithm.
36
Chapter 3: Toolbars
Transfer toolbar overview
In the transfer toolbar, you can perform common actions for transfers that are
occurring between the client and server. The transfer toolbar is initially located at
the top of the transfer pane.
Transfer toolbar actions
This section contains information about the actions that you can perform in the
transfer toolbar.
Show in Folder (1)
Launches the default file explorer of the operating system, and navigates to
the download's target directory of the selected row.
Open File (2)
Launches the default program of the operating system for the download's
target file of the selected row.
Stop After File Completes (3)
Instructs FTP Voyager JV to stop transferring additional files in the item's
transfer queue when the file currently being transferred is complete.
Note: This option is only available when the transfer has more than one
item to process.
37
Transfer toolbar actions
Skip File (4)
Instructs FTP Voyager JV to cancel the transfer of the current file but to
continue transferring any remaining files in the transfer queue of the item.
Note: This option is only available when the transfer has more than one
item to process.
Pause (5)
Allows the user to pause a transfer. This stops FTP Voyager JV from
sending or receiving any data for the particular transfer until it is resumed.
Resume (6)
Allows the user to resume a transfer. Resuming a transfer has many
advantages. If you pause the transfer, or the connection is lost momentarily,
you can resume the transfer. This allows FTP Voyager JV and Serv-U to
pick up where they left off during the transfer. This saves time and resources
because you are not forced to transfer the entire contents of the file again.
Start (7)
Starts an operation queue that has been stopped completely.
Restart/Relist (8)
Restarts a failed operation or re-lists a directory listing operation that has
failed.
Cancel (9)
Immediately cancels the transfer. This action is only available when a
transfer is in progress.
Remove (10)
Removes an entry from the transfer pane. This action is only available when
the transfer is complete or has been canceled.
Note: By default, completed or canceled transfers are automatically
removed from the transfer pane. To make this option available for manual
38
Chapter 3: Toolbars
removal of transfer items, see the Help documentation about General
preferences.
Remove All (11)
Selecting this option removes all entries from the transfer pane.
Note: By using the drop-down portion of this button, you can remove
specific entries from the queue.
Workers (12)
By default, FTP Voyager JV transfers four files at a time. You can decrease
this number for faster performance on slower systems, or increase this
number on higher-performance systems.
39
Chapter 4: Dialogs
This topic contains information about the dialog boxes of FTP Voyager JV, and
provides information about each menu item. The information is organized into the
following sections:
l
About: Program information
l
About: Computer information
l
General preferences
l
Preferences: Confirmations
l
Preferences: Transfer pane
l
Preferences: Sounds
l
Preferences: Toolbars
l
Synchronize folders: Overview
l
Synchronize folders: Results panes
l
Results Pane - Toolbar
l
Results pane: List
l
Synchronize folders: Options pane
l
Save login dialog
l
Change password dialog
l
Activate window dialog
40
Chapter 4: Dialogs
About: Program information
The Program Information page contains useful information about FTP Voyager
JV. The page is divided into the following sections:
l
l
l
l
Product Information: Contains the version number and build date of FTP
Voyager JV.
Contact Information: Lists all parties involved in the distribution of the
product.
Development Information: Lists all parties involved in the development of
the product.
Legal Information: Contains information about the copyright law applicable
to the product.
About: Computer information
The Computer Information page contains useful information about the
configuration of the client machine. The page is divided into the following
sections:
l
l
Operating System Information: Displays information about the operating
system of the client machine.
Java Runtime Information: Displays information about the Java Runtime
Environment that is installed on the client machine.
The Computer Information page also has a Copy to clipboard button that copies
more in-depth details about the client operating system and Java Runtime
Environment. This information is useful for technical support issues related to
FTP Voyager JV.
41
General preferences
General preferences
The General page has items that pertain to several features of FTP Voyager JV.
These items are the following:
Automatically adjust timestamps for daylight saving time
Enabling this option causes FTP Voyager JV to automatically adjust file
dates and times by one hour when daylight saving time is in effect.
Use custom date formatting
If selected, all timestamps are displayed with the syntax that is in the edit
box. The syntax can be changed. The syntax and the formatting options are
listed in the following section.
Date or time comLetter ponent
Presentation
Examples
G
Era designator
Text
AD
y
Year
Year
1996; 96
M
Month in year
Month
July; Jul; 07
w
Week in year
Number
27
W
Week in month
Number
2
D
Day in year
Number
189
d
Day in month
Number
10
F
Day of week in
month
Number
2
E
Day in week
Text
Tuesday; Tue
a
a.m. and p.m.
marker
Text
PM
42
Chapter 4: Dialogs
Date or time comLetter ponent
Presentation
Examples
H
Hour in day (0-23)
Number
0
k
Hour in day (1-24)
Number
24
K
Hour in a.m. or p.m.
(0-11)
Number
0
h
Hour in a.m. or p.m.
Number
12
(1-12)
m
Minute in hour
Number
30
s
Second in minute
Number
55
S
Millisecond
Number
978
z
Time zone
General time
zone
Pacific Standard Time; PST;
GMT-08:00
Z
Time zone
RFC 822 time
zone
-0800
Pattern letters are usually repeated, because their number determines the exact
presentation.
l
Text: For formatting, if the number of pattern letters is four or more, the full
form is used. Otherwise, a short or abbreviated form is used if available. For
parsing, both forms are accepted, independent of the number of pattern
letters.
l
Number: For formatting, the number of pattern letters is the minimum
number of digits, and shorter numbers are zero-padded to this amount. For
parsing, the number of pattern letters is ignored unless it is needed to
separate two adjacent fields.
43
Examples
l
Year: For formatting, if the number of pattern letters is two, the year is
truncated to two digits. Otherwise, it is interpreted as a number.
For parsing, if the number of pattern letters is more than two, the year is
interpreted literally, regardless of the number of digits. So using the pattern
"MM/dd/yyyy", "01/11/12" is parsed as Jan 11, 12 A.D.
l
l
Month: If the number of pattern letters is three or more, the month is
interpreted as text. Otherwise, it is interpreted as a number.
General time zone: Time zones are interpreted as text if they have names.
For time zones representing a GMT offset value, the following syntax is
used:
GMTOffsetTimeZone:
GMT SignHours : Minutes Sign: one of
+ Hours: Digit DigitDigit Minutes: DigitDigit Digit: one of
0 1 2 3 4 5 6 7 8 9
must be between 0 and 23, and Minutes must be between 00 and 59.
The format is locale independent and digits must be taken from the Basic
Latin block of the Unicode standard.
Hours
For parsing, RFC 822 time zones are also accepted.
l
RFC 822 time zone: For formatting, the RFC 822 4-digit time zone format is
used:
RFC822TimeZone: SignTwoDigitHoursMinutes TwoDigitHours: Digit Digit
must be between 00 and 23. Other definitions are as for
general time zones.
TwoDigitHours
For parsing, general time zones are also accepted.
Examples
The following examples show how date and time patterns are interpreted in the
US locale. The given date and time are 2001-07-04 12:08:56 local time in the US
44
Chapter 4: Dialogs
Pacific Time time zone.
Date and time pattern
Result
"yyyy.MM.dd G 'at' HH:mm:ss z"
2001.07.04 AD at 12:08:56 PDT
"EEE, MMM d, ''yy"
Wed, Jul 4, '01
"h:mm a"
12:08 PM
"hh 'o''clock' a, zzzz"
12 o'clock PM, Pacific Daylight Time
"K:mm a, z"
0:08 PM, PDT
"yyyyy.MMMMM.dd GGG hh:mm aaa" 02001.July.04 AD 12:08 PM
"EEE, d MMM yyyy HH:mm:ss Z"
Wed, 4 Jul 2001 12:08:56 -0700
"yyMMddHHmmssZ"
010704120856-0700
"yyyy-MM-dd'T'HH:mm:ss.SSSZ"
2001-07-04T12:08:56.235-0700
Automatically adjust lock navigation root
If selected, FTP Voyager JV automatically moves the lock navigation root
directory to the upper-most parent that matches both locked file system
frames.
Automatically switch to thumbnail view for directories with mostly images
If selected, FTP Voyager JV automatically changes the view to Thumbnail,
if the listing contains a large number of image files.
Expand search to include the targets of Windows Link (LNK) files
If selected, FTP Voyager JV includes link file targets in the search results.
Shade directories without listings
If selected, FTP Voyager JV shades the icons for directories that have not
been listed. When a listing has been retrieved for the directory, the shade
45
Preferences: Confirmations
effect is turned off.
Shade hidden files and folders
If selected, FTP Voyager JV shades the icons and text for files and folders
that are hidden.
Show compressed files and folders in this color
If selected, FTP Voyager JV shows compressed files and folders with the
specified color.
Show encrypted files and folders in this color
If selected, FTP Voyager JV shows encrypted files and folders with the
specified color.
Note: File name colors are only available for remote file listings.
Preferences: Confirmations
By using the Confirmations page items, you can control the confirmation dialogs
that are shown for the given operation. The following sections provides
information about the configuration options.
Confirm Upload Overwrite and 'resume'
If selected, FTP Voyager JV asks for confirmation before attempting to
overwrite a file when uploading. Otherwise, the corresponding action is
carried out when this condition is encountered.
Confirm Download Overwrite and 'resume'
If selected, FTP Voyager JV asks for confirmation before attempting to
overwrite a file when downloading. Otherwise, the corresponding action is
carried out when this condition is encountered.
Confirm Upload Folder Merge
If selected, FTP Voyager JV asks for confirmation before attempting to
merge a folder during an upload operation. Otherwise, the corresponding
action is carried out when this condition is encountered.
46
Chapter 4: Dialogs
Confirm Download Folder Merge
If selected, FTP Voyager JV asks for confirmation before attempting to
merge a folder during a download operation. Otherwise, the corresponding
action is carried out when this condition is encountered.
Confirm File Delete
If selected, FTP Voyager JV asks for confirmation before attempting to
delete a file.
Confirm Folder Delete
If selected, FTP Voyager JV asks for confirmation before attempting to
delete a folder.
Confirm Multiple Deletes
If selected, FTP Voyager JV asks for a single confirmation before attempting
to delete a set of files and folders. When the confirmation is received, all
files and folders of that particular batch are deleted without further notice.
Confirm Logout when Exiting Application
If selected, FTP Voyager JV asks whether or not it should log out of Serv-U
when it is closed. If a logout is requested when closing FTP Voyager JV, it
is not be possible to return to the Management Console or restart FTP
Voyager JV without first logging in to Serv-U again. If this option is disabled,
FTP Voyager JV automatically performs the last action given in response to
the confirmation dialog. If this confirmation has never been asked, FTP
Voyager JV does not log out of Serv-U when it is closed.
Confirm Folder Relists when Restarting Transfers
If selected, a notification appears when a folder is 'relisted' within the
transfer queue. A 'relist' causes all nested files and folders of that directory
to be refreshed within the transfer queue.
47
Preferences: Transfer pane
Preferences: Transfer pane
The transfer pane contains items where you can modify how the transfer queue
looks and behaves.
Workers (1-10, 4)
By default, FTP Voyager JV will transfer four files at a time. However, you
can decrease this number for faster performance on slower systems, or
increase it on higher-performance systems.
Enable Row Colors
Enabling row colors will alternate coloring of rows in the transfer pane if you
want even and odd rows to be identified. The colors can be selected as
well.
Automatically resume transfers if the connection is lost
When enabled, the transfer pane attempts to resume the current transfers
when the connection is momentarily lost.
Automatically expand new transfer groups
When enabled, transfer groups or operation groups expand by default to
show a list of all files or folders being operated upon. This option can be
disabled.
Automatically start new transfer items
By default, new transfers are started immediately. This can be disabled so
that operations can be queued, then started on demand.
Automatically remove completed transfers
The transfer pane does not automatically clear completed items, so you can
review transferred items before clearing the list. This can be set to
automatically clear items that are successfully transferred. Failed transfers,
or operations that encountered an error, are left in the list for review.
48
Chapter 4: Dialogs
Preferences: Sounds
The Sounds page contains items where you can specify sounds to play when the
corresponding event is triggered. The events for which you can specify sounds
are the following:
Transfer Operation Succeeded
This field specifies the audio file to play when a transfer group has
successfully transferred all items.
Note: If the field is empty, no sound file will be played.
Transfer Operation Failed
This field specifies the audio file to play when a transfer operation has
encountered an error.
Note: If the field is empty, no sound file will be played.
Preferences: Toolbars
The Toolbar pages of the Preferences dialog show the available buttons that can
be displayed on the corresponding toolbar. You can change the layout of the
toolbar by reordering the list. Use the following buttons to reorder the list:
l
Move to Top: Moves the button to the top of the list.
l
Move Up: Moves the button up one position in the list.
l
Move Down: Moves the button down one position in the list.
l
Move to Bottom: Moves the button to the bottom of the list.
Select the Enabled check box to toggle the visibility of each button.
Synchronize folders: Overview
By using the Synchronize Folders feature, you can fully synchronize or "mirror"
directories and files between the client and server, and the other way around.
This is a powerful utility that helps maintain a master set of files and directories.
49
Synchronize folders: Results panes
This feature is especially useful for updating web sites. By using this feature, you
can add, remove, and update files with the push of one button.
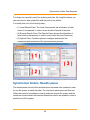
It is initially laid out in the following order:
l
l
l
(1) Local-Results Pane: The Local Frame shows the information of what
needs to be replaced, in order to mirror what the Remote Frame has.
(2) Remote-Results Pane: The Remote Frame shows the information of
what needs to be replaced, in order to mirror what the Local Frame has.
(3) Options Pane: Contains options to configure and execute the
comparison and operations of the synchronization process.
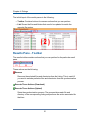
Synchronize folders: Results panes
The results panes show the files and directories that need to be updated in order
for one file system to match the other. The local-result pane shows the files and
folders that need to be updated in order to match the remote file system, and the
remote-result pane shows the files and folders that need to be updated in order to
match the local file system.
50
Chapter 4: Dialogs
The initial layout of the results panes is the following:
l
l
Toolbar: Contains buttons for common actions that you can perform.
List: Shows the files and folders that need to be updated to match the
opposite file system.
Results Pane - Toolbar
The results toolbar contains actions that you can perform for the particular result
pane.
These actions are the following:
Remove
Removes the selected files and directories from the listing. This is useful if
you want to exclude particular files and directories from the synchronization
process.
Execute These Actions (Download)
Execute These Actions (Upload)
Starts the synchronization process. The process takes each file and
directory of the corresponding listing and performs the action associated for
that item.
51
Results pane: List
Results pane: List
The results list shows the files and directories that have to be updated in order to
match the master copy of the root directories that are being compared.
The results pane contains the following columns:
l
File or Folder: Shows the relative file name of the file or folder that will be
updated. The relative file name is based on the root comparison directory
that was specified.
Note: The following conditions may arise when comparing directories:
l
l
l
$IMG_BTN_TRANSFER_DONE$: The comparison root directories
are already synchronized. This means that the comparison routines
could not find any files or folders that differ from the comparison
options you specified.
: An error occurred during the comparison routines. There are
numerous reasons why this operation could fail; contact your system
administrator for more information about the failure code.
Results: Displays the results of the comparison. The results are based on
the following criteria:
l
l
Not on Local
l
Not on Remote
l
Older
l
Newer
Action: Displays what action will be taken on the file, once the
synchronization process is executed. The possible actions are the
52
Chapter 4: Dialogs
following:
l
Delete
l
Upload
l
Download
l
Local Size: Displays the local files or folders size.
l
Remote Size: Displays the remote files or folders size.
l
l
Local Date Modified: Shows the time stamp of when the local file or folder
was modified.
Remote Date Modified: Shows the time stamp of when the remote file or
folder was modified.
Note: Columns (4), (5), (6), and (7) can be initially swapped depending on which
result pane you are viewing. For example, for the remote-result pane, initially
column (4) is remote size, column (5) is local size, column (6) is remote date
modified, and column (7) is local date modified.
Synchronize folders: Options pane
The options pane has different settings that you can adjust to produce different
comparison results and adjust certain synchronization operations.
The available options are the following:
l
l
l
l
Compare Size: Adds any files or folders to the comparison list that differ in
size .
Compare Time: Adds any files or folders to the comparison list where the
Date Modified timestamps differ.
Include Subfolders: Adds any nested folders or any files of nested folders
to the comparison list that match the above criteria .
Delete: Adds any files or folders that require a deletion in order to match the
opposite root directory.
53
Save login dialog
l
l
l
Prompt for Overwrite Confirmations: Shows a prompt for any overwrites
that may occur during the synchronization process.
Prompt for Delete Confirmations: Shows a prompt for any deletions that
may occur during the synchronization process.
Compare: Manually refreshes the comparison listing.
Note: Changing an option activates an automatic refresh of the comparison
listing.
Save login dialog
By using the save login feature, you can save a file on the client machine that
directly connects to the server when it is opened. This eliminates the need to log
in to the server through a web browser in order to launch FTP Voyager JV.
Provide the following information:
l
l
l
l
l
l
l
Server: The server that you want to connect to.
Port: The "public" port that the server is listening on.
Note: The "public" port can be different from the port that the server is
listening on. For example, a router can map the public port of 8080 to the
private port of 80 that the server is listening on.
Language: The language to use when logging in to the server.
Secure: Specifies if the connection used is secure; HTTP or HTTPS
protocols.
Note: When toggling this flag, verify that the port is correct. Otherwise, you
may encounter a connection error when attempting to log in.
User: The user ID to use when attempting to log in to the server.
Password (Optional): The password to use for the user ID that is specified
above.
Note: If this field is empty, you will be prompted for a password before
entering FTP Voyager JV.
Verify Password: This field verifies whether your password is correct.
54
Chapter 4: Dialogs
l
l
l
l
Destination Path: The absolute file name for the launch file.
Note: The file name extension must "jnlp". This is a requirement for the
Java Runtime Environment to properly open the file.
Browse: Clicking this button opens a window where you can specify a local
folder where the launch file will be created.
Create: When clicked, a "JNLP" file is created at the destination path with
the file name that you specified.
Note: The file name extension must be "jnlp". This is a requirement for the
Java Runtime Environment to properly open the file.
Cancel: Cancels and closes the window.
Change password dialog
The file server administrator can configure whether or not users are allowed to
change their own passwords. If your administrator allows it, the password can be
changed from within FTP Voyager JV. Change passwords frequently to maintain
security for the server. The administrator can also place certain requirements on
the content of passwords. In case of trouble changing your password, contact the
Serv-U administrator.
To change your password:
1. In the File menu, click Change password. If this entry is unavailable,
then your administrator does not allow password changes by users.
2. Enter your old password.
3. Enter your new password.
4. Enter your new password again to ensure accuracy.
5. Click OK to complete the password change.
If the password change is not successful, a detailed error message is shown to
explain why the new password does not meet the administrator's security
requirements.
55
Activate window dialog
Activate window dialog
The Activate window dialog has a list of all the panes that are available to FTP
Voyager JV. It includes all local and remote panes and the transfer pane. Select
the frame to activate, and then click OK. This frame is moved to the front of the
main window of FTP Voyager JV and becomes the active pane.
56
Chapter 5: Additional information
This topic provides additional information about the options and functions
available in FTP Voyager JV. The information is organized into the following
sections:
l
Active pane overview
l
Docking framework overview
l
Navigating directories
l
Managing directories and files
l
Transferring files
l
Managing transfers
l
Searching for files or folders
l
Frequently Asked Questions
Active pane overview
The active pane is identified by having a different color surrounding it. It receives
all menu and keyboard input.
57
Chapter 5: Additional information
In the following screen capture, the local-list pane is the active pane.
Docking framework overview
The docking framework provides the flexibility to change the entire look and feel
of the application. With all this customization, the application can be tailored to
meet your needs. This helps create a familiar layout that is easy to understand
and intuitive to each user. The docking framework also grants access to view
other parts of the same file system by using multiple frames. The frames can be
laid out in a tabbed interface, floated, docked, or auto-hidden. The skin of the
application can also be changed. This can be done by selecting a different style
under the main menu.
58
Navigating directories
The following screen capture displays the areas that can be dragged to change
the layout of the frame.
Navigating directories
In FTP Voyager JV, you can navigate the local and remote file systems in multiple
different ways to find the files and directories to transfer. The following is the list of
the most common directory navigation methods.
Mouse and keyboard navigation
The current directory can be changed using the mouse or keyboard. Use one of
the following methods:
From the list pane:
l
Use the keyboard to select the folder you want, and then press enter.
l
Click to select the folder, and then press enter.
59
Chapter 5: Additional information
l
Double-click the folder you want.
l
Right-click the folder you want, and then click Open.
From the tree pane:
l
Use the keyboard to select the folder you want.
l
Click to select the folder you want.
l
Right-click the folder you want. Note: This automatically opens the selected
folder.
Navigation bar
The navigation bar has many methods of opening a directory. Use one of the
following methods:
l
l
l
l
Click on a crumb button.
Click on the drop-down next to each crumb button to display the contents of
that particular directory. Then select a folder from the drop-down.
Click between the crumb buttons and the history button to enter into
absolute path mode. Then type a full path into the edit field, and then press
enter.
Click on the history button to show a drop-down of previous working
directories, and then select one of them from the list.
Navigation history
Both the local and remote panes have an independent navigation history that
makes moving back and forth between multiple locations quick and easy. There
are two toolbar buttons available for the navigation history that provide sequential
access to previously browsed locations:
l
Click
Back to change the current directory of the active pane to the
previous location in the navigation history.
60
Up Directory
l
Click
Forward to change the current directory of the active pane to the
next location in the navigation history.
Both buttons contain an arrow on the right side that displays a list of all previously
visited directories when clicked to allow direct navigation to a specific directory. If
there are no previous or next locations in the navigation history, the appropriate
button is disabled.
Up Directory
Click Up Dir on the toolbar to change the current directory of the active pane to
the immediate parent directory. If the parent directory is not accessible, this option
is disabled.
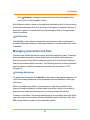
Managing directories and files
Directories are folders that can be used to store files and other folders. Creating a
directory makes it possible to store similar files in one place, while deleting a
directory removes it from the file system along with all of its contents. Directories
can also be renamed when necessary. The following sections contain information
about the directory and file management activities you can perform in FTP
Voyager JV.
Creating directories
To create new directories, click New Dir in the toolbar of the appropriate pane. An
option for creating directories is also accessible from the File menu or the rightclick menu.
When you create a new folder in the local pane, a new entry is added to the
directory listing immediately. A default name is provided, which you can edit by
typing the new name and pressing enter, or clicking outside the edit box.
Creating a new folder in the remote pane brings up a new dialog where the folder
name you want can be entered. After providing the name for the new folder, click
OK or press enter to create it on the remote file system.
61
Chapter 5: Additional information
Deleting directories or files
You can delete multiple files and directories at once by first selecting the items to
delete using the keyboard or mouse. After selecting the items you want to delete,
click Delete in the appropriate toolbar, File menu, or right-click menu. You can
also use the Delete key on the keyboard.
Depending on your general preferences, a confirmation prompt may be displayed.
Use caution when deleting items as this action cannot be undone.
Renaming directories or files
To rename a file or directory, first select the item you want to rename using the
keyboard or mouse. Then click Rename from the right-click menu, File menu, or
by pressing F2 on your keyboard. The name of the selected item then becomes an
edit box. Once the new name is entered, press enter, or click outside the edit field
to complete the rename operation. Press Escape to cancel a rename operation.
Refreshing a directory listing
If the contents of the current local or remote working directory are changed from
outside FTP Voyager JV, it is necessary to manually refresh the directory listing to
see the changes. Refresh the directory listing by clicking Refresh on the
appropriate toolbar, from the View or right-click menus, or by pressing F5.
Viewing detailed information about directories or files
Detailed information about directories and files can be accessed through FTP
Voyager JV. For detailed information about the selected items, click Properties
from the File or right-click menus, or press Alt+Enter on your keyboard.
Copying or moving directories and files
Files and directories can be copied to other locations on the same file system.
Select the directories and files to copy or move. Then click and drag the selected
files into the list pane or tree pane of the same file system. Release the mouse
button over the target directory to complete the operation. Note: Left-click drag
62
Transferring files
initiates a copy operation. Right-click drag displays pop-up menu options after
releasing the mouse button.
Transferring files
FTP Voyager JV can simultaneously download and upload files to and from a
Serv-U File Server. Transfers are performed in the background, so you can
continue interacting with the interface while transfers are in progress.
There are numerous ways to initiate a transfer between the client and server.
Some of the methods are the following:
Downloading files and directories
To download files from the server:
l
l
(1) Select the files or directories to transfer from the server to the client. You
can do this by performing one of the following steps:
l
Highlighting the files or directories from a remote list pane.
l
Highlighting a directory from a remote tree pane.
(2) Initiate the transfer:
l
l
Click and drag the files or directories to a local list pane or a local tree
pane, and then drop them into a destination directory. The destination
directory is identified by a highlight when the mouse hovers over it.
Click Download to transfer the files to a local list pane working
directory.
Uploading files and directories
To upload files from the client to the server:
l
(1) Select the files or directories to transfer from the client to server. You can
do this by performing one of the following steps:
63
Chapter 5: Additional information
l
l
Highlighting the files or directories from a local list pane.
l
Highlighting a directory from a local tree pane.
(2) Initiate the transfer:
l
l
Click and drag the files or directories to a remote list pane or a remote
tree pane, and then drop them into a destination directory. The
destination directory is identified by a highlight when the mouse
hovers over it.
Click Upload to transfer the files to a remote list pane working
directory.
Drag and drop variations
The following are different variations of drag and drop:
l
l
Left-clicking and dragging: Copies the source files and directories to the
target directory.
Right-clicking and dragging: When the source files are dropped into a
destination directory, a pop-up menu appears with the following two options:
l
l
Move Files: Moves the source files and directories to the target
directory. This is done by copying the source files to the destination,
then deleting them from the source location.
Copy Files: Copies the source files and directories to the target
directory.
64
Managing transfers
Managing transfers
After a transfer has been initiated, it is placed in the transfer pane where you can
view detailed information about the status of the transfer. You can perform the
following actions while the transfer is in progress:
Stop After File Completes
Selecting this option instructs FTP Voyager JV to stop transferring
additional files in the item's transfer queue once the file currently being
transferred is complete.
Note: This option is only available if the transfer has more than one item to
process.
Skip File
The skip file command instructs FTP Voyager JV to abort the transfer of the
current file but to continue transferring any remaining files in the item's
transfer queue.
Note: This option is only available if the transfer has more than one item to
process.
Pause
Allows the user to pause a transfer. This stops FTP Voyager JV from
sending or receiving any data for this particular transfer until it is resumed.
Resume
Allows the user to resume a transfer. Resuming a transfer has many
advantages. If the transfer was paused, or the connection was lost
momentarily, the user can resume the transfer. This allows FTP Voyager JV
and Serv-U to pick up where they left off during the transfer. This saves time
and resources because the user is not forced to transfer the entire contents
of the file again.
65
Chapter 5: Additional information
Cancel
The cancel action immediately stops the transfer. This action is only
available when a transfer is in progress.
Remove
Selecting this option removes the entry from the transfer pane. This action is
only available when the transfer is complete or when it has been canceled.
Note: By default, completed or canceled transfers are automatically
removed from the transfer pane. For more information about making this
option available for manual removal of transfer items, see General
preferences.
Searching for files or folders
You can search for files and folders in the current working directory by using
either of the following methods:
Type-ahead
You can use the type-ahead feature within trees and listings. By having focus in a
tree and listing, and then typing the name of the file or folder you are looking for,
the row selection changes to each file that matches the character sequence you
entered. This is useful so you can quickly locate the file you are looking for
without having to scroll through the listing.
Search bar
By using the search bar, you can search for a particular file or folder within the
entire file system. It provides a powerful mechanism for searching for files based
on name, size, and the modification time stamp of a file.
For more information about searching, see Local and remote search bar
overview.
66
Frequently Asked Questions
Frequently Asked Questions
Why does a welcome message appear after I log in with my web browser?
User accounts in Serv-U can be configured to receive welcome messages. If your
user account is set up with one, it is received after successfully logging on to the
file server.
Why do I need the Java Runtime installed to use FTP Voyager JV?
FTP Voyager JV was written in the Java programming language. Because Java
is an interpreted language, the Java Runtime is necessary for it to run. The latest
version of the JRE is available on the Java website.
Why do I have to accept a certificate in order to run FTP Voyager JV?
FTP Voyager JV needs full access to the local file system in order to upload and
download files to Serv-U. Java applications that request these permissions must
be digitally signed with a certificate. FTP Voyager JV is signed using Rhino
Software, Inc.'s developer certificate provided by a certification authority. This
guarantees that FTP Voyager JV is a genuine product of Rhino Software, Inc. and
it is safe to allow it to access your system for the purpose of transferring data with
Serv-U.
Is there a way to automatically launch FTP Voyager JV after I log in?
Yes. Please contact the Serv-U administrator and ask them to set up your account
with FTP Voyager JV as the default web client.
Is there a way I can go back to selecting which web client I would like to use
after I login?
Yes. Contact the Serv-U administrator and ask them to set up your account to
prompt for a web client instead of using a default web client.
Why does the remote directory listing fail?
There could be various reasons why FTP Voyager JV cannot perform a remote
directory listing. Some possible reasons are the following:
67
Chapter 5: Additional information
l
The Serv-U File Server is not running.
l
The Serv-U File Server is not online.
l
l
The session between FTP Voyager JV and the Serv-U File Server may
have been disconnected.
The user account may not have permission to view the remote directory.
Try closing FTP Voyager JV and logging in to Serv-U again. If remote directory
listings still fail, contact your Serv-U administrator to confirm your permissions to
the directory in question.
Why can't I create a directory, rename a directory, delete a directory, upload
files, or download files?
The Serv-U administrator can assign specific privileges to each user. The scope
of operations for any particular user account is limited by these privileges. If errors
are displayed when you try to perform one of the operations listed previously, the
dialog should indicate that the user account logged in does not have the corresponding privilege to perform that action. If this is in error, please contact your
Serv-U administrator.
Why does the browser fail to communicate with Serv-U when I log out of
FTP Voyager JV?
FTP Voyager JV and the browser it was launched from share the same session
ID that Serv-U uses to communicate to the corresponding client. Therefore, after
logging out of FTP Voyager JV, the browser it was launched from no longer has a
valid connection to Serv-U. It is necessary to log in again through the browser to
establish a new connection to Serv-U.
Why can't I log out of Serv-U?
FTP Voyager JV can log out of Serv-U. There is an option in the Preferences
dialog under the General tab that allows automatic logout from Serv-U when FTP
Voyager JV closes.
68
Frequently Asked Questions
If I have multiple browsers on my computer, can I use both to launch FTP
Voyager JV?
Yes. Both browsers can be used to simultaneously launch FTP Voyager JV.
However, use caution: because the Java Runtime only uses the proxy settings of
the default browser, FTP Voyager JV may use the wrong proxy settings. For
example, if your default browser is Internet Explorer, which is set up to use a
proxy server, then FTP Voyager JV also uses these proxy settings even if it was
launched by Mozilla Firefox.
69