1
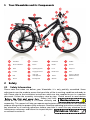
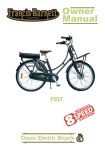
bicycle owner‘s manual
Contents
1 Your Woombike and its Components ....................................................................................... 2 2 Safety ................................................................................................................................................ 2 3 Intended Use ................................................................................................................................... 3 4 Before the First and Every Ride................................................................................................... 4 5 Components – Functions and Handling ................................................................................... 4 6 Accessories ...................................................................................................................................... 6 2.1 Safety Information ..................................................................................................................................... 2 2.2 Information for Parents and Guardians .............................................................................................. 3 2.3 Road Safety .................................................................................................................................................. 3 5.1 Frame .............................................................................................................................................................. 4 5.2 Control –Handlebar .................................................................................................................................. 4 5.3 Fork ................................................................................................................................................................. 4 5.4 Saddle and Seating Position ................................................................................................................... 5 5.5 Use of Quick Release ................................................................................................................................ 5 5.6 Cranks and Bearings ................................................................................................................................. 5 5.7 Derailleur ....................................................................................................................................................... 5 5.8 Brakes............................................................................................................................................................. 6 5.9 Wheels ........................................................................................................................................................... 6 6.1 Bell ................................................................................................................................................................... 6 6.2 Kickstand....................................................................................................................................................... 7 6.3 Lighting System .......................................................................................................................................... 7 6.4 Luggage Carrier .......................................................................................................................................... 7 6.5 Bottle Holder ............................................................................................................................................... 7 7 Maintenance .................................................................................................................................... 7 8 Inspection Plan ............................................................................................................................... 7 9 Technical Data ................................................................................................................................ 8 10 Environment and Disposal ......................................................................................................... 8 11 Liability, Warranty, and guarantee ........................................................................................... 8 9.1 Weight and Geometry .............................................................................................................................. 8 9.2 Tightening Torques ................................................................................................................................... 8 Woombikes user’s manual USA 12.2014
WOOMBIKES USA, LLC
Austin, TX
United States
Phone: 512-695-9780
Email: [email protected]
1
1
Your Woombike and its Components
1
5
3
19
16
7
10
9
21
9
23
17
14
24
14
15
24
12
2
22
18
11
4
13
20
6
18
8
2
2.1
22
1
Handlbar
7
Headset
13
Derailleur
19
Saddle
2
Bottom Bracket
8
Chain
14
Brakes
20
Spokes
3
Stem
9
Lighting System
15
Fork
21
Seatpost
4
Pedals
10
Luggage Carrier
16
Brake lever
22
Tires
5
Bell
11
Hub and
Hub Dynamo
17
Frame
23
Seatpost Clamp
(Quick Release)
6
Crank
12
Chainguard
18
Wheels
24
Fender
Safety
Safety Information
Please note that when we deliver your Woombike it is only partially assembled. Some
adjustments must be made to ensure that your bike will be in working condition and ready to
ride. Please refer to the installation instructions which are also supplied to you in a separate
document. Follow the assembly instructions step by step. Please ensure to read section
"Before the first and every ride." Riding your bike
W ar ning re fer en ce
should be fun and is healthy if it is done correctly and
responsibly. This manual will help you operate and maintain your Woombike for the intended
purpose along with the proper safety measures. Read the operating instructions carefully and
pay attention to all warning references before your bike is used. Also pay attention to all
maintenance references and follow the inspection plan
M ain tena nce r efe re nce
as outlined in section 8.
2
2.2
Information for Parents and Guardians
As a parent or supervising legal guardian of a child you are responsible for the activities and
safety of the child. We want you there to support and to teach the correct aspects of riding a
bike. Please pay attention to the following aspects:
Helmet and Clothing
Ensure that your child is wearing a certified helmet at all times. Never let your child ride
without a helmet. The helmet must fit properly and must be tightened according to the
instructions of the helmet manufacturer. Your child should also wear bright and preferably
reflective clothing to ensure that all traffic participants can immediately see and spot your
child. Ensure that your child is wearing appropriate footwear and proper clothing at all times.
Coach and instruct your child the proper cycling technique
Make sure you teach your child the function of the brakes. Ensure that your child familiarizes
him/herself with the brakes before the first ride. Instruct and teach safe and responsible use
of the bicycle.
Watch your child
Always watch your child when riding him/her bike. Always be present. Always ensure that
the situation and surroundings provide for a safe and secure riding experience. Ensure that
the surroundings are safe and that there are no distractions. Do not let your child ride near
other children. Always ensure that your child is in a safe situation and avoid riding close to
others. Be aware that a bike can have hard and edgy components that can cause injuries.
If/when your child has an accident, always check and inspect the bike and all components
for damage. Never use a bike that has damaged parts or components. Avoid cycling in slick
and wet conditions. If unavoidable, brake more slowly and more carefully. Ensure that lights
are installed and running during times of limited visibility or darkness.
2.3
Road Safety
Teach your child the laws and regulations of cycling. Never break any traffic laws and always
adhere to the regulations set forth.
Never listen to music while your child rides his/her bike. Never use a cell or smart
phone. Always ensure that your child has both hands on the handle bars. Always be
the best role model for your child.
3
Intended Use
The Woombike is designed for ordinary cycling in a safe traffic environment. The Woombike
is a bike specifically designed for children. The design takes the weight of the child into
account and the design is based on weight and height of the rider. In case you would like to
add a luggage carrier, please review section 6.4.
Please note that there will be wear and tear of the bike after use and time. Take care
of your bike and maintain it periodically. Refer to section 7 to review the
recommended maintenance of your bike. Please refer to the inspection plan in
section 8.
Do not perform the following
Jumps, stunts, downhill and other extreme riding types are not compatible with your
Woombike. Frames and components are designed for children and they will not handle
adults. Frames and components might not handle the weight of adults.
3
4
Before the First and Every Ride
Prior to your first bike ride, ensure that the bike is in operational condition. Please follow the
attached assembly instructions. Always assemble the bike according to the instructions and
follow the torque recommendations for all components as shown in section 9.2.
Prior to your first and every ride ensure that
✔ Saddle, handlebar and pedals are properly installed according to the assembly
instructions and torque recommendations
✔ Saddle and handlebar position complement the size of your child. Ensure that
your child can safely start and stop.
✔ Brakes are operational and have the necessary stopping power. Ensure that the
brake levers can be easily reached.
✔ Wheels are properly attached to the fork. Ensure that the wheels turn
easily.
✔ Wheels and rims are free of any damages.
Ensure that they do not contain any external
particles.
✔ Tires have enough profile. Ensure that the
tires have the recommended air pressure.
5
5.1
Questions ?
512-695-9780
[email protected]
Components – Functions and Handling
Frame
The WOOM frame is made out of AL-6061-Aluminum, which is optimized for easy handling
and maintaining balance. This frame is designed to allow for an upright riding position and
provide the placement of the steering safety delimiter for Woom models 1, 2, 3. The exact
geometry data of each bike is available on our website www.us.woombikes.com.
Please always store the serial number of your frame separately in case your bike is stolen.
This number is available at the bottom end of the seat tube.
5.2
Control –Handlebar
The steering system consists of handlebar, stem and headset
The Headset holds the fork in the frame and allows for easy turning of the handlebar. The
headset is under heavy loads during the ride and must always sit properly. It cannot have
any space and must always turn easily.
The Ahead-stem is the connection piece between headset and handlebar. Use the two
Allen screws at the end stem to adjust the handlebar. Four Allen screws on the front part of
the stem of the handlebars allow for the handlebar to turn around its own axis.
Please make sure to first carefully turn the screws one by one and after that tighten
them with the right torque level.
5.3
Fork
The bicycle fork holds the front wheel and thus has an important function. It is very
important for the safety of your child. The elaborately crafted unicrown fork made of
chrome-molybdenum steel provides for necessary degree of damping.
4
Never let your child ride a bike if you encounter any damages or bends or cracks on
frame of fork, immediately. Never attempt to repair bike components, frame or fork.
Always seek a professional bike mechanic.
5.4
Saddle and Seating Position
Your child should always be able to touch the ground with both feet at the same time and
have a stable position when in the seated position. The saddle can be adjusted in three ways:
Height: To adjust the height of the seat, use quick release. Please adhere to minimum and
maximum saddle height recommendations.
Horizontal: You can adjust the seat and move it more to the front or the back. This can be
done by loosening the screws underneath the saddle along the rails.
Saddle Pivot: A single screw is available to adjust the pivoting angle of the saddle.
5.5
Use of Quick Release
The quick release has two parts: the adjustment nut (1) and the clamping lever (2).
Open: Open the clamping lever. You should see the inside
of the lever. To open the quick release further, adjust the
nut counter clockwise.
Close: While the clamping lever is open, adjust the nut
clockwise while holding the lever with the other hand.
Once the adjustment nut is tightened, lock the clamping
lever so that you can only see the outside of the clamping
lever.
5.6
2
Cranks and Bearings
Cranks connect the pedals to the bottom bracket and allow for the forward motion of the
bike. Cranks can loosen over time and after use. Please ensure to check the cranks and
pedals on a periodic basis to ensure that they are tight. To check the cranks, hold both crank
arms with both hands and move the crank arms back and forth. Movement of the
cranks can be signs of damage. Immediately seek a professional mechanic to inspect
and correct the cranks. Please also check possible that the bottom bracket on a periodic
basis. If you hear a sound from the bottom bracket or cranks, please immediately seek a
professional mechanic for inspection or repair.
5.7
Derailleur
Woom 4, 5 has an SRAM eight speed shifter. The City Bike and the Woom 26 have Shimano
shifters. Shifting accuracy will naturally diminish with use and time for a number of reasons.
For quick adjustments and improvement of the shifting accuracy, visit
www.us.woombikes.com and refer to the YouTube how-to video.
Bicycle Chain
The chain has to manage a substantial amount of force during the ride and it has to have the
appropriate tension. If the tension is too loose then you will hear a noise in the bottom
bracket. You can adjust the chain tension though the horizontal movement of the rear wheel.
This will help optimize the tension of chain.
Please clean and lubricate the chain frequently. First clean the chain with a
biodegradable chain cleaner and wipe it down. Next, lubricate the clean chain with bike
chain lubricant.
5
5.8
Brakes
The front break is operated through the left brake lever while the rear brake is operated
through the right lever. It is common that your brake cable will stretch after use. Make small
adjustment through the adjustment screw.
Regularly inspect the brake pads and ensure that they are in operating condition.
Inspect them regularly and check the wear marker on the pads to evaluate condition.
Prior to reaching the final wear marker on the pad, replace the break pad with new pad.
It is important that both pads are replaced at the same time.
It is important to note that pads cannot come in contact with any type of oils or fats.
Properly adjusted brake pads touch the rim and not the tire.
Brake lever reach adjustment
The brake contains an adjustment crew which adjusts the brake lever reach for perfect reach.
The distance between lever and grip can be adjusted with a cross wrench for Woom 1, 2, 3
or an Allen wrench of size 2 mm ( Woom 4, 5, 26).
We deliver your Woombike with a standard bike brake set up for your bike. Please continue
to inspect and review the brake and steering components regularly. Ensure that the
brakes work flawlessly. The lever should never touch the grips. The brakes should be
adjusted to allow for safe and fatigue free handling and stopping of the bike.
The fastening bolts will help you to adjust the right angle of the handle bar itself. Make sure,
that the hand is aligned with the forearm in one line while keeping a comfortable position.
5.9
Wheels
A wheel must be tight and centered in the frame respectively fork. It needs to turn easily. Use
the quick release or a suitable 15 wrench to adjust the wheel accordingly.
Rims are subject to wear and tear. Deformed, cracked or broken rims must be
replaced immediately. Rims include embossed rim wear marks. These wear mark
become visible after a certain period of use. Once the markings show wear, replace it
immediately.
Spokes connect the hub with the rim. They need to have tension and they affect the
ability of the bike to ride in a straightforward manner. Regularly inspect and evaluate
the tension of the spokes.
On the wall of the tire, you will find the minimum and maximum air pressure for your
tire. In addition, you can also see the dimensions of the tire. 50-403 implies 50 mm
wheel width and 403 mm is the rim diameter. This is helpful for tire and tube
replacement.
Check the profile of the times frequently and check air pressure and evaluate the
condition of the tires. Replace old or worn out tires immediately.
6
6.1
Accessories
Bell
The bell is installed on the hand brake. First, release the 4mm (2mm for woom 1, 2, 3)
screw with an Allen wrench enough so that you can move it onto to the hand break. Once
the bell is on the hand break, take the Allen wrench and tighten the 4mm screw. The bell
should now be sitting nicely on the break.
6
6.2
Kickstand
The kickstand will come with an 8 mm screw as well as a washer. To install the kickstand,
simply insert the top of the kick stand into the bottom hole of the frame. Next, simply add the
screw and washer and tighten the screw with the 8mm Allen key.
6.3
Lighting System
The City Bike is equipped with a high-quality hub dynamo. The Illumination with integrated
reflectors front and rear has a parking light for full visibility at traffic light stops. The light
continues to run for four minutes – even at times of no motion. The front halogen light is
corrosion resistant, impact resistant and offers illumination of 17 Lux. There is also an on/off
switch on the rear end of the front lamp. The LED rear light has a special light technology
which offers improved rear and side visibility and has a burning time of 100,000 hours.
6.4
Luggage Carrier
The luggage carrier is compatible with most common saddlebags. It also contains an
integrated clamping device and loops to allow for the installation of straps.
Make sure that saddle bags are correctly mounted. Check and ensure that straps or
other parts do not interfere with the wheel. The maximum load of the carrier is 25 kg
or 45lbs.
6.5
Bottle Holder
The bottle holder is specifically designed for the smaller bike frames. The "side clip" design
allows for easy handling (removing bottle and inserting it) of the bike bottle. The bottle
holder is installed with two Allen screws and it can be mounted easily on all Woom models
(except the balance bike Woom 1 model). Installation: Remove the Allen screws from the
bike. Install the bottle holder on the frame with the same Allen screws.
7
Maintenance
Please pay special attention to section 5. In addition please review section 8 and follow our
recommended inspection plan.
To clean your bike, we recommend using warm water and a sponge. If special cleaning
products are used, pay attention to the instructions.
Never clean your bike with acids, fats, hot oil, brake cleaner or solvent-containing
liquids.
8
Inspection Plan
Regular and thorough inspections of your Woombike is very important for the safety of your
child. We recommend the following inspection plan for every Woombike:
After the first 100 miles und at least once every year, please inspect tires and wheels for
integrity and proper condition. Adjust the tension of the brake cable since it can expand after
initial use. Adjust the shifters and derailleur. Check all connection and torque points on the
bike such as Handlebar, headset, cranks, pedals, saddle, seat post, and all mounting screws.
200 miles to 400 miles, check brake pads, bicycle chain, gear, sprocket, rims for wear and
check the tightness of all fittings and connections
Every 700 miles a professional and experienced mechanic should disassemble, inspect,
clean, lubricate and possibly replace the following components: Hubs, pedals, headset,
brakes, gears.
7
9
9.1
Technical Data
Weight and Geometry
Technical details and data such weight and geometry of all bikes are available on our website
www.us.woombikes.com. Select the bike on the website and scroll down to view the
technical information.
9.2
Tightening Torques
When adjusting and maintaining your bike, we recommend the following torque for the
respective connections:
Connection
Torque
Connection
Torque
Pedals
30 Nm
Stem at handle bars
5 Nm
Wheel nuts, front
25 Nm
Seat post at frame
10 Nm
Wheel nuts, rear
40 Nm
Brake cable clamp
10 Nm
Stem at fork
10 Nm
Brake cable clamp
10 Nm
Crank
40 Nm
10 Environment and Disposal
When you clean and maintain your bike, please take care of the environment. Please use bio
degradable and environmentally friendly cleaning supplies. Please dispose any old lubricants
at the appropriate recycling or collection points. Old tires and tubes should also be disposed
in the most environmental way.
11 Liability, Warranty, and guarantee
Satisfaction Guaranteed
If you buy a product from us and it does not meet your expectations (too large, too small
etc.), you can return the product within 30 days - no questions asked. In the event that you
would need a different size, we will ship it to you at no additional cost. All shipping cost
after the initial shipment to you will be covered by Woombikes. All you have to do is send us
the bike.
If you need a different size, just contact us and we will get another size to you.
We offer a 24 months Warranty period for frame and all components. We cover any obvious
defects - not covered are damages caused by crashes or mis-usage of the products. All you
need to do is send us a picture of the damage and we will help you quickly. In case you break
something or get a part stolen from your bike, you can buy all components from us at cost.
Please contact us through email.
8