1
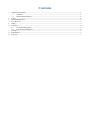
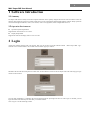
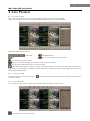
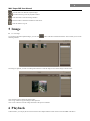
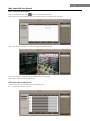
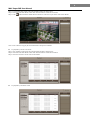
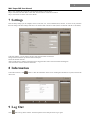
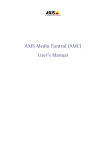
MAC Super CMS User Manual Contents 1 2 3 4 5 6 7 8 9 Software Introduction ........................................................................................................................................ 1 1.1 Summary ................................................................................................................................................ 1 1.2 Operation Environment ......................................................................................................................... 1 Login .................................................................................................................................................................. 1 Device Management .......................................................................................................................................... 2 Live Preview ...................................................................................................................................................... 3 Image ................................................................................................................................................................. 4 Playback............................................................................................................................................................. 4 6.1 Local Record Playback .......................................................................................................................... 5 6.2 Remote Record Playback ....................................................................................................................... 5 Settings .............................................................................................................................................................. 7 Information ........................................................................................................................................................ 7 Log Out .............................................................................................................................................................. 7 1 MAC-SuperCMS User Manual 1 Software Introduction 1.1 Summary The Super CMS which is mainly used in the computer with MAC OS is specially designed for network video surveillance. After the network video monitoring system is well built, multi devices can be connected and monitored through this software. Many operations can be done through this software, such as, live monitor, video record, playback, remote configuration and so on. 1.2 Operation Environment Operation System Requirement Supports MAC OS Version 10.7.0 or above Display Requirement Supports the wide-screen display with 16:10 or 16:9 ratio 2 Login Acquire the software package from your supplier. Then you will see the icon of this software named “MAC Super CMS…app”. Click this icon to run this software. An account creation window pops up as follows: Self-define the account name and password. Then click “Create” button to create account for Super CMS. This will bring up a login window as shown below: You can check “Remember” to remember the account and password for quick login next time. If “Auto login” is checked, you will login the software automatically next time after you run this software. Click “Login” to see the following window. 2 MAC-SuperCMS User Manual 3 Device Management To add device In the live interface, click “Add” button on the server list column as shown in the picture on the left hand. Title: Self-define. Address: The IP address or domain name of the device you want to add. Port: The HTTP port of the device you want to add. Account: The login account of the device. The default account is admin. Password: The login password of the device. The default password is 123456. If your computer and the devices are in the same local area network segment, you can directly input the LAN IP address of the device here. If your computer and the devices are not in the same local area network segment, you should forward the IP address and http port of your device in the router or virtual server. Then input the WAN IP address here. After you fill the device information, please click “Save” button to save the settings. Then you will see the device listed in the server list as shown in the above picture on the right hand. icon means the device has been connected. icon means the device fails to connect. To delete device Choose the device name and click “Delete” button to delete this device. To modify device Choose the device name and click “Modify” button to modify the information of the device. 3 MAC-SuperCMS User Manual 4 Live Preview To view the live image Step 1: Make sure the devices are well connected and then click the device name to unfold its channels. Step 2: Choose the screen mode, click one screen and drag the channel to the screen or click this channel. Buttons description of the live preview: : Screen mode. : Talk. : Enable/disable audio. : PTZ. Click it to display the PTZ control panel. : Color. Adjust the color of live image. : Record. Click it to start recording. The record files will be saved in the computer. : Snap. Choose the channel and click this icon to take snapshot. : Dwell button. Dwell means to display live images from different cameras in a sequence. The images may be displayed as a single channel or in a grid fashion from different cameras. Dwell mode is enabled only when the chosen display mode is not able to display all the available cameras. To close the live image Choose the live image you want to close. Then a close the live image. icon will display at the bottom right corner of the image. Click this button to To see the main menu Click “Operation” button on the live interface. This will bring up the main menu bar as shown below: : Click this button to see the live interface. 4 MAC-SuperCMS User Manual : Click this button to check the captured images. : Click this button to go into the playback interface. : Click this button to enter the settings interface. : Click this button to check the information of the device. : Click this button to log out. 5 Image To view image If you want to check the captured images, you can click following interface. button in the above-mentioned window. This will take you to see the If no image is captured, you will see nothing in this interface. Click the image to zoom in this image as shown below: Click “Delete” button to delete the chosen image. Click “Copy” button to copy this image to other positions. Click “Close” button to close this image and return to the previous interface. 6 Playback In this interface, you can play the local record saved in the computer and the remote record saved in the HDD of the device. 5 MAC-SuperCMS User Manual 6.1 Local Record Playback Step 1: In the main menu bar, click button to see the following interface. Step 2: Choose date, time and channel. Then click “Search” button to see the files listed in the table. Step 3: Click the file you want to play. This will bring up the following interface. Click “Close” button to end the playback and return to the previous interface. Click “Delete” button o delete the playback file. 6.2 Remote Record Playback There are three ways to play back the remote record of the device. To playback by remote time search 6 MAC-SuperCMS User Manual Step 1: Click “Remote time search” tab in the playback interface as shown above. Step 2: Chose date, time and channel. Then click “Search” button to search the record files. Step 3: Click button beside the channel name in the file list. This will let you see the video of the channel. Click “Close” button to stop play the record and return to the previous interface. To playback by remote event search Step 1: Click “Remote event search” tab in the playback interface as shown below. Step 2: Chose date, time and channel. Then click “Search” button to search the record files. Step 3: Click the event file to see the video of the channel. To playback by remote file search 7 MAC-SuperCMS User Manual Step 1: Click “Remote file search” tab in the playback interface as shown above. Step 2: Chose date, time and channel. Then click “Search” button to search the record files. Step 3: Click the file to see the video of the channel. 7 Settings There are many settings you can configure, such as, local, basic, live, record, schedule, alarm, network , etc. Here we only introduce the local settings. The other settings of the device are similar to that of the device itself (see the user manual of the device for details). In the local settings, you can configure storage, dwell, alarm and auto reconnection. Storage: Set the record file clip size and reserved disk space. Dwell: Set the dwell intervals. Alarm: If audio alarm is enabled, sound alarm will be triggered when video loss/sensor/motion alarm happens. Auto reconnection: Set the connection check time. 8 Information In the main menu bar, click online users. button to check the information of the device including the information of system, network and 9 Log Out Click button to log out the software. You shall input the account and password to log in again.