1
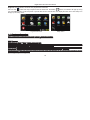
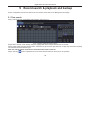
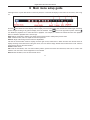
Digital Video Recorder User Manual
4 Main menu setup guide
Click right mouse or press ESC button on the front panel, the control bar will display on the bottom of the screen, refer to Fig
4-1:
Click the
Fig 4-1 menu toolbar
icon beside the screen display mode to display a channel select dialog. 6/8 channels can realize single channel big
screen. Images can drag to any place to display in the live interface. Click
icon to set up picture-in-picture. Click the
icon beside the playback icon to select the time to playback. For example, if 2 minutes is selected and then click playback
button, it will start to playback from 2 minutes ago.
Dwell: Range of selecting to dwell is from single picture preview mode to 4/6/8 picture preview mode.
Color: Click this button; user can adjust the color of live pictures.
E-Zoom: Single channel large screen electronic amplification
Left click the channel which needs to amplify; Click the right mouse, select Zoom in button and then click the left mouse to
amplify the image. Press left mouse to drug the cursor, user can view the image. Double-click the left mouse to exit. Click the
right mouse to return to the main interface.
Volume: Enable sound.
PTZ: Click the PTZ button, user can control rotation position, speed of the dome and start track, auto scan or cruise in this
interface. User can refer to PTZ configuration for more details.
Record: Click this button, user can start manual record.
17
Digital Video Recorder User Manual
Playback: Click this button, the device can playback the record files.
User can click
button and drag it anywhere with the left mouse. Click Menu
button, the interface will pop-up as Fig
4-2; press MENU button on the front panel or operate with remote controller also can display the main menu. Click Setup icon
will pop-up the Setup menu:
Fig 4-2 main menu
Setup menu
4.1 Basic configuration
Basic configuration includes three sub menus: system澝date&
澝
time and DST.
4.1.1 System
Step1: enter into SetupàBasicàsystem;
Setupà
àBasicà
àsystem; refer to Fig 4-3:
Step2: in this interface user can setup the device name, device ID, video format, max online users, Video Output and language,
Screensaver and so on. The definitions for every parameters display as below:
Device name: the name of the device. It may display on the client end or CMS that help user to recognize the device remotely.
Video format: two modes: PAL and NTSC. User can select the video format according to that of camera.
Password check: Enable this option. user needs to input user name and password can do corresponding operations with the
relevant right in system configuration.
18
Digital Video Recorder User Manual
5 Record search & playback and backup
Search configuration includes four submenus: Time Search, Event Search, File Management and Image.
5.1 Time search
Step1: enter into Search configurationàTime Search; refer to Fig 5-1:
Fig 5-1 Search configuration-time search
Step2: select channel, screen display mode, the highlight date in the calendar means have record data
Step3: select a date and press Search button. Click the time grid to set the play start time or input play record time manually.
The selected time match the blue grid.
Note: the vertical column means hours, horizontal column means channels.
Step4: click Play
button to playback record; click the relevant buttons on the screen to do operation:
48
Digital Video Recorder User Manual
Playback buttons
Note: when the monitor resolution is VGA800*600, the time search interface will appear a hide button. Click this
button to expand the whole interface.
The method of record backup during a certain period in the playback interface:
Select the start time by dragging the slider and click
icon. Then select the end time and click this icon again to confirm the
record period. Next, click
icon to backup the record during this period.
5.2 Event search
Step1: enter into Search configurationàevent search; refer to Fig 5-2:
Step2: After clicking Search button, the searched event information will displayed in the event list box. User can select date,
channel. Tick off Motion, Sensor or All accordingly.
Step3: double check a certain record file to playback.
Note: when the monitor resolution is VGA800*600, the event search interface will appear a hide button. Click this
button to expand the whole interface.
49
Digital Video Recorder User Manual
Fig 5-4 backup configuration
Step2: set the start & end time, select channels and click Search button to display the searched data in the data backup list box
Step3: checked a data file or tick off “All” to select all data files, click Backup button, Backup information dialog box will pop-up.
Step4: in the backup information interface, user can check the relevant information of backup files, storage type, save file type,
etc. click Start button to starting backup.
52