1
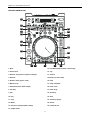
User Manual
Cross 2.0
KURO / K2. User Manual Cross 2.0
BEFORE USING KURO OR K2 WITH MIXVIBES SOFTWARE CROSS 2.0, BE SURE YOU HAVE AVAILABLE THE
LATEST FIRMWARE VERSION
FOR VIEWING YOUR CURRENT FIRMWARE
FOLLOW THE INSTRUCTIONS BELOW:
1- TURN ON THE DEVICE.
2- PRESS THE BUTTON “ENTER” FOR 2 SECONDS
UNTIL YOU ENTER TO THE INTERNAL MENU.
3- TURN FOLDER KNOB UNTIL YOU READ
“ F. VERSIÓN”
4- TURN TRACK KNOB TO VIEW THE FIRMWARE
PARAMETERS: CON / DSP
FOR VIEWING YOUR CURRENT FIRMWARE
FOLLOW THE INSTRUCTIONS BELOW:
1- TURN ON THE DEVICE.
2- PRESS THE BUTTON “ENTER” FOR 2 SECONDS
UNTIL YOU ENTER TO THE INTERNAL MENU.
3- TURN FOLDER KNOB UNTIL YOU READ
“ F. VERSIÓN”
4- TURN TRACK KNOB TO VIEW THE FIRMWARE
PARAMETERS: CON / SER / BUF / DSP
FIRMWARE PARAMETERS RELATE TO:
- CON: VER XX (MIDI CONTROL VERSION) > THIS IS
THE MIDI MAP ADRESSES
- DSP: VER XX (DSP VERSION)
FIRMWARE PARAMETERS RELATE TO:
- CON: VER XX (MIDI CONTROL VERSION) > THIS IS
THE MIDI MAP ADRESSES
- SER: VER XX (SERVO VERSION)
- BUF: VER XX (BUFFER VERSION)
- DSP: VER XX (DSP VERSION)
K2 FIRMWARE: CON: 3 / DSP:6
KURO FIRMWARE: CON: 8 / DSP:11
PLEASE BE SURE YOU HAVE INSTALLED THE LAST
FIRMWARE UPDATE BEFORE START WITH CROSS
DJ LE
PLEASE BE SURE YOU HAVE INSTALLED THE LAST
FIRMWARE UPDATE BEFORE START WITH CROSS
DJ LE
1 KURO / K2. User Manual Cross 2.0
MIDI IMPLEMENTATION
1
23
24
2
3
25
26
22
4
21
6
5
20
19
7
8
18
9
17
16
10
11
12
13
14
15
1. Eject
15. Fine Bend (Shift=Confirm / Discard tap)
2. Active Deck
16. Tap
3. Browse / Tree (press= Expand / Collapse)
17. Scratch
4. Reverse
Pitch bend (+ shift= seek)
5. Browse/ Track (press= Load)
18. Pitch
6. Manual Loop
19. Vinyl / Cdj Mode
7. Seek Move (shift= Seek Length)
20. Pitch mode
8. Cue Play
21. Pitch range
9. Cue
22. Autoloop
10. Play
23. Shift
11. Sync
24. Autoloop Length
12. Match
25. Effects
13. Hot Cues / Samples (Shift= Delete)
26. Volume A & B
14. Sample mode
2 KURO / K2. User Manual Cross 2.0
1. EJECT
Delete the track loaded on the Player.
Another way to move inside the songs/tracks is by SHIFT
control and JOG WHEEL. It has been explained in point 17.
2. ACTIVE DECK
There are some functions that only work on Deck A and others
on Deck B. To control Deck A we must press “A” and to control
Deck B we must press “B”.
Seek Length with active loop: We can move the complete
created loop to the position we need into the track. With “Seek
Length” (5) we fix the length and with “Seek Move” (7) button
we move the loop. (See point 6. How to create a loop).
8. CUE PLAY
Press the button to return to the last CUE point and resume
playback immediately. You can also tap the button to create a
BOP effect.
9. CUE
A Cue Point is a self-defined starting point, usually at the
beginning of a beat.
To set a CUE point: using the Jog Wheel while in Pause mode.
You will access the Frame Search mode (fragmented repeats
=1/75 minute) and can precisely set your Cue Points.
While in Play mode, press CUE button the player will then
return to the Cue Point and go into Pause mode
3. BROWSE TREE
The Browse function is global, i.e., in the parameterization
MIDI Player not depends on Deck A or B.
Select forder
NOTE: When pressing the Cue Button while in Play mode
when no Cue Point has been set, the player returns to the start
of the track and goes into Pause mode (Auto-Cue).
Expand / Collapse folder
Shift= Expand / Collapse folders.
10. PLAY
Play or pause the playback of the track.
4. REVERSE
Activate reverse function to play the track or sampler in
reverse. Press the button again to deactivate this effect.
11. SYNC
This is used to synchronize the BPM and beat of one player to
the other. Click on the right hand sync button to sync player 2
with player 1. Alternately click on the left hand match button
and this will sync Player 1 with player 2.
12. MATCH
This is used to MATCH the BPM of one player to the other. .
Click on the right hand match button to match player 2 with
player 1.Alternately click on the left hand match button and this
will match Player 1 with player 2.
5. BROWSE TRACK
The Browse function is global, i.e., in the parameterization
MIDI Player not depends on Deck A or B. However, load
function will be applied to the deck corresponding to the player
where you press the encoder.
13. HOT CUES / SAMPLES
These buttons allow the user to create and use up to 4 location
points in the track. To store a location point, simply move to
the position on the track that you want to mark and press the
desired locator. To jump to a location point, simply click on the
relevant location point number.
BROWSE TRACK
Select Track
Load Track
To load samples we must activate the sample mode (14).
6. LOOP MANUAL
IN: Sets the starting point of seamless loop.
OUT: Set the ending point of a loop.
RELOOP: Deactivate the Loop. Cross have not Reloop mode.
When sample mode is active (red led). We can choose
between 4 samples. Buttons 1 to 4 act as PLAY/STOP.
-If sample it is empty, sample is loaded form deck.
7. SEEK MOVE
With this buttons you can jump by the value set (SEEK
LENGHT).
To delete this locators hold SHIFT button (23) and press the
“LOCATOR (1, 2, 3 or 4) you want to delete.
Shift= (SEEK LENGTH). Select the length of the step used to
Note: To delete samples, they must be stopped.
jump into the track (you select the length pressing Shift +
button).
14. SAMPLE MODE
Activate or deactivate SAMPLES mode.
15. FINE BEND
Range +0,01% and -0.01%
3 KURO / K2. User Manual Cross 2.0
Shift= (Confirm / Discard Tap). When you analyse a track,
Cross will detect the BPM. If you are not happy with this BPM
you can change it by using the TAP tempo.
1. Tap on the tap tempo button (16)
2. When you think that the BPM showed by Cross is OK, stop
tapping.
3. After a few seconds, Cross proposes to confirm the new
BPM (a 'OK' button under the new BPM appears).
4. If you think that this BPM is OK, you need to confirm it by
pushing on the Confirm button (shift + left button).
5. If you think that this BPM is wrong, you need to discard it by
pushing on the Discard button (shift + right nutton).
21. PITCH RANGE
The available pitch range is 4%, 6%, 8%, 16%, 32%, 100%. As
you press this button, the pitch range will change from low to
high.
16. TAP
Within Manual TAP Mode, you have to press at least three
times this button to fix the Beat you want.
Once selected AUTOLOOP function, we can manipulate the
length of the Loop with the AUTO LOOP LENGTH (24),
explained further on.
17. SCRATCH / PITCH BEND /SEEK MOVE
A- SCRATCH: To make SCRATCH, please make sure you
that VINYL MODE (19) is activated. To obtain a good
SCRATCH response we recommend you a 896 samples
latency (20,3ms). CROSS: File/Preferences/audio
B- PITCH BEND: The Jog Wheel is the default CD mode,
which means that if the move forward or backward the wheel, it
changes the playback speed. It is called Pitch Bend because
by failing to manipulate the wheel, pitch is returned
automatically to the normal play or pitch 0%.
C- SEEK MOVE: We have already explained it in (5) and (7).
You can move the playback point across the song pressing
SHIFT (23) and moving the Jog Wheel (wheel).
23. SHIFT
This button is what we call a "wildcard". It allows us to select
second functions on the player. All functions that depend on
this button (SHIFT) are explained in their respective points.
22. AUTO LOOP
Pressing this button will activate the Auto Loop. The LED on
the player KURO & K2 will light.
24. AUTO LOOP LENGHT
This button determines the length of Automatic Loop. We can
determine the length of the Loop by pressing the buttons
KURO /K2 loop green leds will light. When you select the
AUTO LOOP button (22) the loop length determined will be
formed. Also you can modify the loop length in AUTO LOOP
mode. KURO /K2 loop red leds will light.
25. EFECTOS
You can select and activate ECHO, FLANGER and FILTER
pressing the corresponding button.
Hold buttons X or Y and move the Jog Wheel to change
parameters AMOUNT and DEPTH.
Hold FILTER and move the Jog Wheel to apply the filter effect.
HOLD button activates or deactivates the effect.
Shift= you can select any of the available effects.
18. PITCH SLIDER
It is used to determine the percentage of pitch of the song in a
defined range. The software display shows the percentage of
Pitch applied. The pitch ranges available are 4%, 6%, 8%,
16%, 32%, 100% and you can select them pressing the button
PITCH RANGE (21).
Note: If you are in Vinyl mode (19) you have to touch the
rubber part. If you are in Cdj mode you can change the
parameter touching anywhere on the Jog wheel.
19. VINYL MODE
Pressing this button the Vinyl LED will light and this will
indicate us we are in Vinyl mode (SCRATCH). The software
SCREEN also illuminate VINYL icon.
26. VOLUME A & B
With these small rotary buttons adjust the volume of Deck A
and Deck B Deck regardless of where we are.
VOLUM EN DECK A
To exit Vinyl mode and access to CD mode, we must press the
button again. We will see that on the player the Led Software
CDJ is enabled and CD mode is active in the software.
You can manipulate the Volume of Deck A and B but not in the
cargo volume you want to change, namely, if the load is on
Player A can move the volume of Player B and vice versa.
20. PITCH MODE
With this button we select the type of mode we want to pitch.
We can choose between HYBRID, SPEED and TEMPO. On
the software Screen will reflect the way we are.
4 VOLUM EN DECK B
C/ Praga, nº 11. Pol. Cova Solera
08191. Rubí - Barcelona (Spain)
www.akiyamadj.com
[email protected]