1
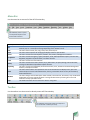
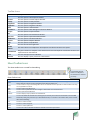
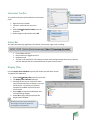
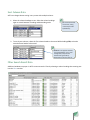
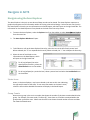
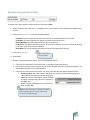
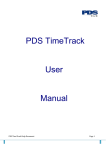
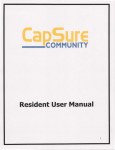
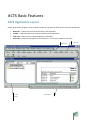
ACTS Basic Features ACTS Application Layout Similar to Microsoft® programs, such as Word® and Excel®, the layout of ACTS consists of several workspaces: Menu Bar – Used to access all the functionality in the application Toolbar – Used to directly access select functionality in the application Task Area – Used to view or edit the application information Status Bar – Shows the key application information (i.e. current user, database, and tasks) Menu bar Task Area Toolbar Status Bar 3 Menu Bar Use the menu bar to access all of the ACTS functionality. The availability of menu options and dropdowns depend on the windowBar that isOptions selected. Menu Menu Options File Edit View Assets Compliance Land Safety Reporting Tools Window Help Description This menu contains basic options, such as New, Open, Copy, Delete, Close, Save, Save As, Print, Print Preview, Exit, etc. These options change depending on the window in view. This menu contains Undo, Cut, Copy, Paste, Clear, Select All, etc. This menu contains options for changing the display within an open window. This menu accesses the Asset Explorer, Portfolio, Area, Facility and Equipment windows. This menu accesses the Agency, Agency Exception, Audit, Audit Spreadsheet Import, Emission Data, Regulation, Regulation Synchronization, and Tasks windows This menu accesses the Lease Window. This menu accesses the Incident, Hazard, Injury, Observation, Property Damage, Vehicle Accident, Training and Attendance Spreadsheet Import windows. This menu accesses the Dashboard, Document Generator, Form, Procedures and Best Management Practices, and Report windows. This menu contains basic user implements such as File Attachment and Display Filters, plus more advanced options such as Code Maintenance, Security, and Utilities which can only be accessed by ACTS Administrators. This menu changes the window layout. Select Cascade, Tile Horizontal, Tile Vertical, Layer or Minimize All Windows to arrange multiple windows or change window views by selecting from a list of all windows currently open within ACTS. This window accesses various resources to assist in using ACTS. Toolbar Use the toolbar as a shortcut tool to directly access ACTS functionality. The availability of the sheet toolbar icons depend on the window that is selected (or active). 4 Toolbar Icons Icon Description Explorer Contact Facility Equipment Regulation Tasks Procedures Project File Ops Data Dashboard Reports Help Exit Global Refresh This icon opens the Asset Explorer Window. This icon opens the Contact Explorer Window. This icon opens the Facility Window. This icon opens the Equipment Window. This icon opens the Regulation Window. This icon opens the Tasks Window. This icon opens the Best Management Practices Window. This icon opens the Project Window. This icon opens the File Attachment Window. This icon opens the Operational Data Window. This icon opens the Dashboard Window. This icon opens the Reports Window. This icon opens the Help Window. This icon exits the ACTS application. Local Refresh Print Preview The white refresh icon collapses the Asset Explorer and refreshes all data in the reports. The green refresh icon collapses to the selected level in the Asset Explorer and refreshes all data in the reports below the selected level. This icon that opens the Print Window. This icon displays a report preview of a selected item. Sheet Toolbar Icons The sheet toolbar icons are used for data editing. Sheet Toolbar Icons Icon Open Copy New Save Print Preview Delete Cut Copy Paste Undo The availability of sheet toolbar icons depend on the window that is selected (or active). Description This icon opens a list of all data records in ACTS, which can then be filtered. (EXAMPLE: If a Regulation Window is active, Open will provide a list of all regulations within ACTS to select from.) This icon creates a copy of the existing data record. The new data record is opened in another window and “Copy of” is appended to the name. This icon creates new data record. This icon saves any data that has been changed or edited within the selected window. This icon opens the Print Window. This icon displays a report preview of a selected item. This icon will delete the selected item. Selecting this permanently terminates the selected data and should not be utilized (unless given permission by an ACTS Administrator). To maintain a record within ACTS, add an inactive date instead of deleting. This icon is used to cut text. This icon is used to copy text. This icon is used to paste text. This icon will undo the last data modification and does not work for past actions. 5 Customize Toolbar Select the Show Text To customize the layout of the toolbar use the context menu. option This to make all of the menu, context toolbar icons larger and add text under them. 1. Right-click on the toolbar. 2. Choose a command from the menu. or 1. Select Tools Customize Toolbar from the menu bar. 2. Make changes as desired and select OK. Status Bar The status bar shows key application information in the bottom right corner including: Current date and time Name of the user logged into ACTS Database name The user’s task notification: This shows how many tasks are upcoming and how many tasks are overdue. Double-click on the task notification to open the task screen. Display Filter Use this Display Filters Window to specify the various lists and search results throughout the application. 1. Select Tools Display Filters from the menu bar. 2. The Display Filters Window will open. 3. Checking the box next to a status will cause any item with that status to display in lists and search results. Conversely, any statuses unchecked are hidden from the lists and search results. 4. Select Apply to keep the window open and continue making changes. 5. Select OK to apply changes and close the Display Filters Window. Verify that the statuses update at the bottom when changes are made. This shows how many displays are shown/hidden. 6 Sort Column Data ACTS can change column sorting in any screen with multiple columns. 1. Select the column headings to sort. Select the column headings again to switch between ascending and descending order. Sort order follows ACTS conventions, sorting numerically and then alphabetically. . 2. To sort by two columns, select the first column header to be sorted. While holding CTRL, select the second column header to be sorted. Filter Search Result Data EXAMPLE: Limit Type was selected, sorting alphabetically. Then, while holding CTRL, Compound was selected sorting secondarily. Administrators have the option of using the Show report deliveries for everyone checkbox on the Report Delivery screen. Additional windows may open in ACTS to narrow results. Filter by selecting a column heading then entering text into the Filter text box. 7 Navigate in ACTS Navigate using the Asset Explorer The Asset Explorer is the main screen where all data records can be viewed. The Asset Explorer represents a graphical arrangement of all information within ACTS using a hierarchical design. Select the text at any level in the Asset Explorer hierarchy to view information on a Detail Report, which will open on the right-hand side. The information on the Detail Reports will vary based on the level of the hierarchy chosen. 1. To access the Asset Explorer, select the Explorer icon from the toolbar or select AssetsAsset Explorer from the menu bar. 2. The Asset Explorer Window will open. 3. To drill down or roll up the Asset Explorer hierarchy, select the icon to the left of each parent level. When selected, the “+” icon expands the hierarchy. When selected, the “–“ icon collapses the hierarchy. 4. Select the text of each level to view information on the Detail Report, which will open on the right-hand side. To roll-up (collapse) the entire Asset Explorer hierarchy, select the Global Refresh icon on the toolbar. To roll-up (collapse) to a particular level, select a parent level and select the Local Refresh icon on the toolbar. Status Icons Assets, in the Asset Explorer, may have a colored circle next to their icon indicating the type and/or status of that item. To see more information on the item's status, select the item and the detailed information will display in the Detail Report. Group Counts Next to every group in the tree is a number that shows the number of sub-items contained within that group. For example, if the text reads, “Facilities (5)”, then there are 5 facilities contained within that group under a particular asset. Please note that this count shows the total number of items and does not show the filtered count. 8 Navigate using the Search Bar To search within Asset Explorer, select the search filter next to Find: 1. Select the type of item from the Find dropdown. This list will expand as new attributes are added to the system. 2. Select the Search Operator from the second dropdown. Contains: This search operator will search for text that is contained anywhere in the item. Ends With: This search operator will search for text at the end of the item. Exactly Matches: This search operator will search for exact text. Is Similar To: This search operator will search for text that is similar to the item; if spacing or spelling is not exact, it will show any near-matches. Starts With: This search operator will search for text at the beginning of the item. 3. Enter the Search Text. 4. Select Find. This is a text field. It is not case sensitive. 5. Based on the entered search criteria, one of the following will occur: If the search criteria doesn’t match any items, a message will pop-up stating so. If the search criteria matches only one item, ACTS will navigate to the item in the Asset Explorer. The Detail Report will open on the right-hand side. If the search criteria matches more than one result, a window will open with all possible results. Sort by columns: Select the column headings to sort. Select the column headings again to switch between ascending and descending order. Filter: Filter by first selecting the column heading to search in and entering a phrase or fragment in the Filter: box. Double-click on the desired entry from the list to open or select OK. EXAMPLE: When searching for a regulation, the default filter is Regulation Name. To change, select another column, such as Regulation Type. 9