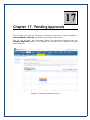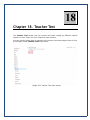
1
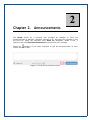
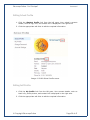
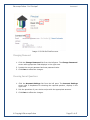
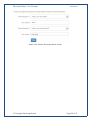
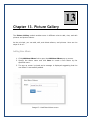
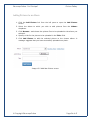
User Manual - For ‘Principal’ Table of Contents Chapter 1. EducompOnline – Overview.......................................................3 Introduction to EducompOnline ....................................................................... 3 Best Configuration ........................................................................................ 3 Getting Started ............................................................................................ 4 Logging In .................................................................................................4 Major Features ...........................................................................................7 Chapter Chapter Chapter Chapter Chapter Chapter Chapter 2. 3. 4. 5. 6. 7. 8. Announcements .....................................................................9 School Website .................................................................... 11 Calendar ............................................................................ 13 Marks ................................................................................ 15 Attendance ......................................................................... 17 Reports.............................................................................. 19 Messages ............................................................................ 21 Composing a Message ................................................................................... 21 Chapter 9. Videos ............................................................................... 23 Chapter 10. Settings ............................................................................. 25 Adding a New Category ................................................................................. 25 Changing Access Level .................................................................................. 26 Chapter 11. Tests ................................................................................. 27 Chapter 12. Account ............................................................................. 29 Editing School Profile ................................................................................... Editing Self Profile ....................................................................................... Changing Password ...................................................................................... Choosing Secret Questions ............................................................................. 30 30 31 31 Chapter 13. Picture Gallery .................................................................... 33 Adding New Album....................................................................................... Adding Pictures to an Album .......................................................................... Editing Pictures .......................................................................................... Edit Pictures ............................................................................................ Delete Pictures......................................................................................... Deleting an Album ....................................................................................... 33 34 35 35 36 36 Chapter 14. Polls.................................................................................. 39 Chapter 15. Eduwiki ............................................................................. 41 Chapter 16. Eduxpress .......................................................................... 43 Chapter 17. Pending Approvals ................................................................ 45 Chapter 18. Teacher Test....................................................................... 47 1 Chapter 1. EducompOnline – Overview Introduction to EducompOnline EducompOnline is a virtual school for Educomp Smartclass schools. As part of Educomp Smartclass schools, EducompOnline gives schools an institutional online presence to schools where they can perform a dynamic range of activities that empower them to deliver more value to students, parents, teachers, and principals. With activities like send a message and, send an important announcement, the schools can inform the teachers, parents, and students about the upcoming events or updates. They can customize their website to match the identity of the school with a logo and use several services offered by EducompOnline. From a single access point, the schools can manage the accounts of teachers and students accounts by adding them into the system, tracking their activities, and viewing content and tests. They can share photos and videos of all the school events by uploading them on the website. For each school, these activities are performed by a school administrator. As the principal, you can perform certain useful activities specific to your needs, for example, reviewing / approving / rejecting website content and calender events, sending out messages and announcements, previewing tests, uploading pictures, and viewing reports. Best Configuration The EducompOnline Web application is best used on Internet Explorer versions higher than 7.0 or Firefox versions 4.x or above, with a resolution of 1024 X 768 and colour depth of 16 bit or higher. The browser settings should be set to default for best performance. These settings ensure optimum user-friendliness of the user interface as well as easy maintenance of the application. EducompOnline - For ‘Principal’ EducompOnline – Overview Getting Started The following information will help you quickly get started with the EducompOnline application. Logging In The EducompOnline web application Login screen authenticates your identity and lets you in to use the provided functionality. Fill up the User ID and Password provided to you to log into the application. Image 1.1 Member Login screen © Copyright EducompOnline Page 4 of 47 EducompOnline - For ‘Principal’ EducompOnline – Overview The Remember me on this computer option preserves your login credentials into computer cache to make them available to you at your next login. If you come across any login related problems, such as forgot password or User ID, or you are facing another error, click the Are you experiencing login problem? link to open the following screen. Select the problem you are facing and click Continue to find some suggestion / resolution. Image 1.2 Login problems screen © Copyright EducompOnline Page 5 of 47 EducompOnline - For ‘Principal’ EducompOnline – Overview On successfully logging into the Web application, you see the main screen. From here, you can perform all operations specific to the EducompOnline Web Application. Image 1.3 EducompOnline main screen The messages received are listed here, you can click any of these to open the message details. © Copyright EducompOnline Page 6 of 47 EducompOnline - For ‘Principal’ EducompOnline – Overview Major Features A principal can use the following major features offered by the EducompOnline website: • Send out announcements • Update school profile • View Videos • Preview Tests • Upload / Edit / Delete Pictures • Create / Edit Message Categories • Manage Messages • View Reports • View / Create Calendar Events • Manage School Website CMS • Approve school website and calendar change submissions © Copyright EducompOnline Page 7 of 47 2 Chapter 2. Announcements The Home screen for a principal user provides an interface to send out announcements to teachers, students, parents or all. Just write the message in the big text box, select the recipients from Send To: dropdown, attach a link, if required, and click Send Announcement to send across your message. Select the checkbox if you want recipients to get the announcement on their mobile phones as well. Image 2.1 Send Announcements screen EducompOnline - For ‘Principal’ © Copyright EducompOnline Announcements Page 10 of 47 3 Chapter 3. School Website The School Website section is an advanced functionality for the privileged schools who wish to subscribe to it. It basically lets the school administrator and principal users update and maintain the school website on its own. The section provides controls to enable updating the design templates, upload various images, and edit content on the website. Broadly, you can choose what template should be used for your website, what sections (also referred to as features) that should the website should contain, choose the appropriate font styles, theme, change images, and create/ edit the website content. EducompOnline - For ‘Principal’ School Website Image 3.1 School Website screen To effect the desired changes, use the controls provided and click Save. You can also preview the changes before and after submission on the live server, using the available buttons. © Copyright EducompOnline Page 12 of 47 4 Chapter 4. Calendar The Calendar section lets you create calendar events and view calendar in weekly, monthly, and agenda views. As the principal user, you can create calendar events meant for Teachers, Students, Parents, or all. The View Calendar and Create Event links display and create calendar events respectively. Image 4.1 View Calendar screen EducompOnline - For ‘Principal’ Calendar Image 4.2 Create Event screen © Copyright EducompOnline Page 14 of 47 5 Chapter 5. Marks Principal Marks Module As the Principal, you can use the Marks module to do the following activities: 1. Principal receives a message when School Admin submits the exam structure on registered mobile number. 2. View, approve or reject the exam structure set by the admin. 3. View, approve or reject exam marks sent by teachers. 4. Principal also receives a message as Teacher submits any exam data for any class or exam type for approval or rejection. 5. Generate and view different types of reports. 6. Generate Report Cards for students. Viewing Exam Structure Details To view the exam structure set by the admin: 1. Click the View Exam Structure link on the left pane. 2. Click the View button. This opens the Exam Structure screen sent by Admin. Figure 1: View Exam Structure screen Figure 2: Exam Structure screen 3. Principal can view the exam structure sent by Administration for verification. Approving or Rejecting the Exam Structure To approve or reject the exam structure set by the admin after verification: 1. Click the View Exam Structure link on the left pane. 2. Click the Approve or Reject button. A confirmation pop-up message box will be displayed. 3. A message will also send to School Admin as Principal approves or rejects the exam structure. Note: When you reject the exam structure using the Reject button, a pop-up box will be displayed on the screen to ask ‘Are you sure, You want to continue?’, after clicking on Ok button, a new popup box will open on the screen then enter your rejection comments in the pop-up box and click Save. Figure 3: View Exam Structure screen Figure 4: Comments pop-up screen Viewing Submission Summary To view the submission summary of teachers: 1. Click the View Submission Summary link on the left pane. 2. By default All classes, sections and Subjects are selected for current academic year. Data on this page will display after approval of exam structure from principal. 3. You can select the class, section and subject and then click on Go button for which you want to view the Submission Summary details. Figure 5: View Submission Summary screen 4. Here you can see how much submissions are assigned to a teacher and how much submissions are pending yet. View, Approve or Reject Submissions of marks To view, approve or reject submissions sent by teachers: 1. Click the View Records link on the left pane. 2. By default All classes, sections, subjects and Overdue status is displayed. 3. Principal receives a message as Teacher submits any exam data for any class or exam type. 4. You can select from Submitted, Approved, Rejected, Not Started and Overdue status from the drop down and then click on Go button to view various types of submissions by teacher. Figure 6: View Records screen 5. To view the details of an assessment submission, click the View button against the record. Figure 7: Exam Score details screen 6. In case of FA/SA, ‘?’ button is also visible on the header control. By clicking on this button you can view the details of FA/SA (a pop-up message box will open on the screen). 7. To approve an assessment submission, click the Approve button against the record. 8. To reject an assessment submission, click the Reject button against the record. A confirmation comment pop-up message box will be displayed. 9. For Approval and Rejection a message will be sent to Teacher. Note: For a given submission, the color of the light next to the Status column indicates the approval status of the submission. Green light: This color shows that when submissions are Approved, In Progress and Submitted. Red light: The submissions have been Rejected or Overdue. Viewing Class-Wise Report 1. Click the Class-wise link under Reports on the left pane. 2. Select class and section for which you want to view report. 3. Select one of the following tabs: Overall, Marks Wise, Grade Wise. 4. To specify whether you want the report to be generated based on subject or exam type, select an option from the Plot Graph on drop-down box. 5. Select appropriate options from the drop-down boxes next to the Plot Graph on drop-down box. 6. Select a view for the report from the Mode drop-down box. Data view – Report shows only data. Graph view – Report shows only graph. Mixed view – Report shows the graph at the top followed by data at the bottom. Figure 8: Class-Wise Report screen 7. Exam Type filter works only on the basis of Graph View. 8. Click on the Student Name, a new window will open which display the report of that student. 9. Only CCE classes report can be viewed in this tab. Viewing Student-Wise Report 1. Click the Student-wise link under Reports on the left pane. 2. Select class and section that has the student for whom you want to generate report and click on Go button. 3. Click the View button against the student for whom you want to view the report. Figure 9: Select Student screen Figure 10: Student-Wise Report screen 4. Click on Co-Scholastic tab to view the report of soft skills. 5. You can view the report as per requirement on the data or graph or mixed view from mode drop down. 6. Only CCE classes report can be viewed in this tab. Generate Report Card 1. Click the Generate Report Card tab on the left pane. 2. Select the academic year, class, section and then click on Go button. 3. Select the student by clicking on view button to whom, you want to generate report card. Figure 11: Generate Report Card screen 4. Click the Generate Report Card button. 5. After clicking on Generate Report Card, a PDF will open with the report card of that student. 6. Now, you can save this report card on your desired location. 6 Chapter 6. Attendance The Attendance section lets you view attendance records for all the students from any class section. Image 6.1 Attendance screen 7 Chapter 7. Reports The Reports section hosts links to different kind of useful reports. There are several other useful reports, such as the Announcements report detailing the number of announcements made by various roles on various topics, at different times. There are reports for bringing out the statistics for test attempts, assignments, and messages as well. Image 7.1 Reports screen 8 Chapter 8. Messages The Messages section enables you to compose messages. It also stores the sent and received messages and announcements. Here, you can compose messages, view sent announcements and messages, and check received messages and announcements. Image 8.1 Messages screen For checking the received / sent messages and announcements, click the relevant links from the left pane. And, to compose messages and announcements, perform the following steps: Composing a Message 1. Click Compose – Message link to open the Compose Message screen on the right. 2. Use the available fields to choose one from the available Message Categories. Specify the subject, message, and attachments (if any). Choose Recipients. 3. Click Send Message to send out the drafted message. EducompOnline - For ‘Principal’ Messages Image 8.2 Compose Message screen © Copyright EducompOnline Page 22 of 47 9 Chapter 9. Videos The Videos section provides links to the various interesting videos uploaded by EducompOnline for different classes. These self- paced informative videos are meant to act as an aid to students’ day-to-day education. You can view these uploaded videos by selecting the relevant class and subject under it from the left pane under Videos main screen. This displays the videos for that subject of that class in the right centre area. Image 9.1 Videos selection screen Click the video you wish to play. While the selected video plays in the right centre area, the links to other videos and tests under the same chapter are displayed alongside. EducompOnline - For ‘Principal’ Videos Image 9.2 Videos play screen © Copyright EducompOnline Page 24 of 47 10 Chapter 10. Settings As a Principal user, you can manage the message categories and also control their access levels. The Settings tab lets you do so. Here are the required steps: Adding a New Category 1. Click the Add New Category link to open the Add New Category screen. 2. Here, specify the Category Access and Category Name values. 3. Click Save to add category. Image 10.1 Add New Category screen EducompOnline - For ‘Principal’ Settings Changing Access Level 1. Click the Change Access link next to the message category. This opens the Change Access pop up screen. 2. Change the Category Access settings as desired. 3. Click Save to submit the changes. A message suggests that the category access level has been successfully changed. Image 10.2 Change Access screen © Copyright EducompOnline Page 26 of 47 11 Chapter 11. Tests The Tests section provides links to the various interactive practice tests for different subjects under various classes. These tests are preloaded by Educomp for the sake of giving students the practice for their preparations on different chapters/ topics. You can preview these uploaded tests by selecting the relevant class and subject under it from the left pane under Tests main screen. This displays the tests for that subject of that class in the right centre area. Image 11.1 Tests selection screen EducompOnline - For ‘Principal’ Tests Click the test you wish to preview. The test is previewed and links to other related tests are also displayed on the right side. Image 11.2 Tests preview screen © Copyright EducompOnline Page 28 of 47 12 Chapter 12. Account The Account section enables you to update profile settings for the school as well as your own profile. In this section, you as the principal user can edit school profile, your profile, change password, and choose your secret questions in case you forget your password. Image 12.1 School Profile screen EducompOnline - For ‘Principal’ Account Editing School Profile 1. Click the Student Profile link from the left pane. Your school’s account details, such as logo, title, and contact info is displayed in the right area. 2. Click the appropriate edit links to edit the required information. Image 12.2 Edit School Profile screen Editing Self Profile 1. Click the My Profile link from the left pane. Your account details, such as basic info, profile picture, and contact info is displayed in the right area. 2. Click the appropriate edit links to edit the required information. © Copyright EducompOnline Page 30 of 47 EducompOnline - For ‘Principal’ Account Image 12.3 Edit Self Profile screen Changing Password 1. Click the Change Password link from the left pane. The Change Password screen with appropriate fields displays in the right area. 2. Provide the current password and new password twice. 3. Click Save to effect the changes. Choosing Secret Questions 1. Click the Account Settings link from the left pane. The Account Settings screen with 2 dropdowns for choosing the required question, displays in the right area. 2. Pick the questions of your choice and provide the appropriate answers. 3. Click Save to effect the changes. © Copyright EducompOnline Page 31 of 47 EducompOnline - For ‘Principal’ Account Image 12.4 Choose Secret Questions screen © Copyright EducompOnline Page 32 of 47 13 Chapter 13. Picture Gallery The Picture Gallery module enables users in different roles to add, view, and edit pictures and picture albums. As the principal, you can add, edit, and delete albums, and pictures. Here are the steps to do so: Adding New Album 1. Click Add New Album link to open the Add New Album pop up screen. 2. Specify the album name and click Save to create a new album by the specified name. 3. The pop up screen is closed and a message is displayed suggesting that the new album is successfully added. Image 13.1 Add New Album screen EducompOnline - For ‘Principal’ Picture Gallery Adding Pictures to an Album 1. Click the Add Picture link from the left pane to open the Add Picture screen. 2. Select the album to which you wish to add pictures from the Album: dropdown. 3. Click Browse… and choose the picture files to be uploaded to the album you selected. 4. Specify a title for the picture to be uploaded in the Title: field. 5. Click Add Picture to add the selected picture to the chosen album. A message suggests that you have successfully uploaded one photo. Image 13.2 Add New Picture screen © Copyright EducompOnline Page 34 of 47 EducompOnline - For ‘Principal’ Picture Gallery Editing Pictures You can change the caption or the picture files for individual picture files added to an album or you can delete one or more pictures from an album in this section. Edit Pictures 1. Click the Edit Picture link from the left pane to open the Edit Picture screen. 2. Select the album under which you wish to edit pictures from the Select by Album dropdown. 3. Click the Edit link next to the picture you wish to edit. This opens the Edit Picture pop up screen. 4. Here, you can change the picture file or the picture title. 5. Click Save when done making the changes. A message suggests that your changes have been successfully updated. Image 13.3 Edit Picture screen © Copyright EducompOnline Page 35 of 47 EducompOnline - For ‘Principal’ Picture Gallery Delete Pictures 1. Click the Edit Picture link from the left pane to open the Edit Picture screen. 2. Select the album under which you wish to delete pictures from the Select by Album dropdown. 3. Select the picture(s) you wish to delete. You can click the Select All link to select all pictures under the selected album. 4. Click Delete. A message box confirms if you are sure about the deletion. 5. Click OK and the picture is deleted from the selected album. Image 13.4 Delete Picture screen Deleting an Album 1. Under the Picture Gallery main screen, click the Delete Album link to open the Delete Album pop up screen. 2. Click Delete next to the album record you wish to delete. A message box confirms if you are sure about the deletion. 3. Click OK to confirm deletion. If the album had no pictures, it gets deleted. Otherwise, a message suggests that the album could not be deleted as it had pictures in it. Delete the contained pictures in the second case and then repeat the above steps to delete an album. © Copyright EducompOnline Page 36 of 47 EducompOnline - For ‘Principal’ Picture Gallery Image 13.5 Delete Album screen © Copyright EducompOnline Page 37 of 47 14 Chapter 14. Polls The Polls section enables you to create poll of the day questions for the other users of your school to answer. You also get a view of people’s response (%age wise) in this window. Image 14.1 Poll creation screen EducompOnline - For ‘Principal’ Polls Image 14.2 Poll results pane © Copyright EducompOnline Page 40 of 47 15 Chapter 15. Eduwiki EduWiki is a knowledge warehouse populated and maintained by the EducompOnline teachers’ fraternity. From this screen, you can search for information on any topic, which your school teachers and / or other Educomp teachers might have added information on. It acts just like a search engine and you need to be smart while keying in the search criteria to get most precise results. You can search better by specifying a teacher’s name, subject title, or the school or class name. Image 15.1 EduWiki screen When you click the document name or View link, the document is opened in a document viewer pop-up window. EducompOnline - For ‘Principal’ Eduwiki Image 15.2 Document Viewer screen © Copyright EducompOnline Page 42 of 47 16 Chapter 16. Eduxpress Eduxpress is a place to view and post articles on specific topics created by Educomp. As the Principal, you can view all the published articles here. You can share your liking or disliking for an article, and can also report an article as inappropriate using the available controls. Image 16.1 17 Chapter 17. Pending Approvals The principal user has the privilege to preview and accept or reject changes to School Website, Calendar submitted by the School Admin user. You, as the principal, get information about the submitted changes under the Pending Approvals section. The changes are notified on the respective module screens as well. Image 17.1 Pending Approvals screen 18 Chapter 18. Teacher Test The Teacher Test section lets you preview the tests created by different subject teachers of your school for their respective class sections. You can preview these tests by selecting the relevant class and subject under it from the left pane under Teacher Test main screen. Image 18.1 Teacher Test main screen