1
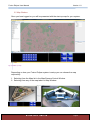
Fusion Eclipse User Manual Version 1.0 User Manual MEYERTECH LIMITED Page 1 Fusion Eclipse User Manual 3. Version 1.0 1. What’s New? ....................................................................................................... 4 2. System Overview................................................................................................. 5 Getting Started – Basic Operation............................................................................. 7 3.1 Starting Fusion .................................................................................................... 7 3.2 System Model ...................................................................................................... 7 3.3 Logging On .......................................................................................................... 8 3.4 Logging Off .......................................................................................................... 8 3.5 Map Window ........................................................................................................ 9 2.5.1 Atlas ............................................................................................................... 10 2.5.2 Maps/Cameras Window ................................................................................. 10 2.5.3 Search ............................................................................................................ 10 4. 3.6 Selecting a Camera ........................................................................................... 11 3.7 Camera Icons .................................................................................................... 11 3.8 Controlling a PTZ Camera ................................................................................. 12 3.9 Fusion Control Window ..................................................................................... 13 3.10 Fusion Patrols ................................................................................................ 14 3.11 Fusion Alarm Window .................................................................................... 15 3.12 Fusion Alarm Icons ........................................................................................ 16 3.13 Zonal Switches ............................................................................................... 17 3.14 Zonal Switch Icons ......................................................................................... 18 3.15 Zonal Switch Sequences ................................................................................ 19 3.16 Camera Sequences ....................................................................................... 19 3.17 Covert Cameras ............................................................................................. 20 Advanced User Operations ..................................................................................... 21 4.1 Fusion Gadget Window ..................................................................................... 21 4.1.1 Overview ..................................................................................................... 21 4.1.2 Accessing the Gadget Window ................................................................... 21 4.1.3 Choosing Gadgets ...................................................................................... 22 4.1.4 Fusion Layout complete with Gadgets ........................................................ 23 4.2 DVR Playback ................................................................................................... 24 4.2.1 Overview ..................................................................................................... 24 4.2.2 The Playback Control Panel ....................................................................... 24 4.2.3 Clip Download ............................................................................................. 25 4.2.4 Burn to Disc ................................................................................................ 26 4.3 Monitor Walls ..................................................................................................... 27 4.3.1 Overview ..................................................................................................... 27 4.3.2 Switching Cameras ..................................................................................... 27 4.3.3 Changing Layouts ....................................................................................... 28 MEYERTECH LIMITED Page 2 Fusion Eclipse User Manual 4.4 Overview ..................................................................................................... 29 4.4.2 Creating and Editing Zonal Switches .......................................................... 29 4.4.3 Local/Global Zonal switches ....................................................................... 30 User Layouts ..................................................................................................... 31 4.5.1 Overview ..................................................................................................... 31 4.5.2 Docking Windows ....................................................................................... 31 4.5.3 Saving/Editing Layouts ............................................................................... 31 4.6 User Groups and Users ..................................................................................... 32 4.6.1 Overview ..................................................................................................... 32 4.6.2 Users .......................................................................................................... 32 4.6.3 Groups ........................................................................................................ 34 4.7 Programming Presets ........................................................................................ 35 4.7.1 Overview ..................................................................................................... 35 4.7.2 Preset Icons ................................................................................................ 35 4.8 Patrols ............................................................................................................... 37 4.8.1 Overview ..................................................................................................... 37 4.8.2 Patrol Editor ................................................................................................ 38 4.8.3 Using Patrols .............................................................................................. 39 4.9 6. Zonal Switches .................................................................................................. 29 4.4.1 4.5 5. Version 1.0 Hyperlinks .......................................................................................................... 40 4.9.1 Overview ..................................................................................................... 40 4.9.2 Hyperlink Editor........................................................................................... 40 4.9.3 Hyperlink Icons ........................................................................................... 42 System Model Editing ............................................................................................. 43 5.1 Overview ........................................................................................................... 43 5.2 Saving and Distributing System Models ............................................................ 43 Fusion Troubleshooting ........................................................................................... 44 6.1 Fusion Eclipse Software Restart Procedure ...................................................... 44 6.2 Fusion Hardware Restart Procedure ................................................................. 44 Workstation restart procedure ................................................................................. 44 6.3 Fault Finding and Diagnostics ........................................................................... 44 7. Support…………………………………………………………………………………….46 8. Appendices ............................................................................................................. 47 8.1 Network and Firewall Information ...................................................................... 47 MEYERTECH LIMITED Page 3 Fusion Eclipse User Manual Version 1.0 1. What’s New? FUSION-Eclipse delivers the complete-package. ONVIF conformant Profile-S, innovative functionality; HD images, PSIM capable; resilient servers with fail-over, hybrid interoperability; a totally open platform and with cost-neutral licensing. The most complex VMS Meyertech has ever developed (Powerful, Versatile and Innovative) it is still the easiest VMS to use on the market and with the new levels of cost versus performance that FUSION-Eclipse achieves it really is the only VMS you will ever need. It simply evolves with you. Summary of Features Onvif Profile S conformant with future support for Profile Q. Discover, add and integrate all of your Onvif devices with a click of the mouse. 3D mapping support. Meyertech H.264 Decoder support – No SDK’s required. New Scalable Licensing Model providing a cost effective, scalable Video Management System. Resilient Server fail over support Powerful GUI User friendly Enhanced Alarm handling features Monitor Copy and Track Enhanced Fusion Patrol Editor Enhanced Zonal switch functionality Android IOS support Fusion Capture support Meyertech NVS Compatible – A powerful new ONVIF recording solution coming soon. Enhanced administrator debugging tools Auto Log Off features Fusion Security Server support – Prevent Users logging on to multiple workstations. String Tags – If bandwidth is limited Fusion Eclipse allows you to choose between encoder source and or NVR for your live video feeds. Improved Video monitoring - Generate alarms automatically when bandwidth deteriorates. “No more frozen images on video walls”. MEYERTECH LIMITED Page 4 Fusion Eclipse User Manual Version 1.0 2. System Overview Next Generation Technology The Meyertech® brand has always been recognised for its quality and technologically advanced CCTV products. Now with the launch of Fusion Eclipse, it’s all new ONVIF conformant Security Management Software, Meyertech has produced a scalable, coherent product to manage CCTV based security systems in the 21st Century, setting new benchmarks for integration. Intelligent Mapping Fusion Eclipse allows users to drag the map around the screen for navigation and use the mouse scroll wheel to zoom in and out through the map layers. Any number of map layers can be constructed and map transition zoom levels specified during configuration. Multiple maps can be easily opened and displayed in Fusion Eclipse using simple drag & drop operations. Maps can also be ‘tagged’ for quick reference and the Atlas-browser feature gives users the ability to select and navigate maps and hyperlinks directly on a named basis. A unique feature is map-flow which is activated using CTRL-TAB on the keyboard. With each press of TAB a new map is pushed to the front. All new 3D maps are supported in Fusion Eclipse as well as retaining the market leading GIS deepzoom and Xaml maps. Intuitive GUI The flexibility of Fusion Eclipse provides supervisors with powerful features to configure individual users Security Management Console (SMC) and working environment. A users personal SMC is then saved and recalled whenever they log in, enabling multiple users to operate from the same workstation without having to continually reconfigure it. The GUI is navigated using a standard PC mouse supporting all the normal mouse functions (left & right click, scroll wheel) you would expect in a Windows program, e.g. Drag and Drop camera selection. Fully user definable in every way, Fusion Eclipse is simplicity itself to operate. Dual-Monitor Operation The Fusion Eclipse operating environment provides the user with true dual-monitor operability. Typically, monitor 1 would be dedicated to the maps and monitor 2 used as a local spot monitor. Floating Virtual Monitors (VM) Virtual Monitors are windows which the user can open to display live 4 video images directly off the network. These floating video windows can be re-sized and dragged to any part of Fusion Eclipse and can be opened on any or both of the dual-monitors. Virtual Monitor Wall The Virtual Monitor Wall (VMW) director console provides operators the power to select and modify different layouts for each screen in the Virtual Monitor Wall. MEYERTECH LIMITED Page 5 Fusion Eclipse User Manual Version 1.0 Layouts typically change and are updated during major incidents or crisis when the VMW is used as a shared resource to manage the incident. Layouts are completely customisable and can also be programmed to change automatically under the control of Fusion Eclipse events e.g. Scheduled events, user logon and alarm events. Instant review facilities Users can instantly review events and incidents from any camera recorded on the system using Fusion Eclipse technology, which integrates 3rd Party NVR and DVR systems. If a camera has review capability a Review icon is displayed when the operator moves their mouse over the bottom left corner of a Virtual Monitor. Selecting the Review icon allows instant review of the camera through controls which appear in the Virtual Monitor. Revolutionary Virtual-Monitor PTZ Fusion Eclipse incorporates revolutionary PTZ control functionality. If a camera has PTZ capability a PTZ icon is displayed when the operator moves their mouse over the bottom left corner of the Virtual Monitor. MEYERTECH LIMITED Page 6 Fusion Eclipse User Manual Version 1.0 3. Getting Started – Basic Operation 3.1 Starting Fusion 1. Double click the Fusion Eclipse icon on the desktop 2. Wait for Logon window 3.2 System Model 1. The Fusion System Model will load automatically, or can be configured to allow you to select a particular system model. 2. New – Creates a new System Model 3. Open – Launches a Windows explorer window and allows you to manually search for a system model. 4. Import – Allows you to Import a system model from .CSV file. (Importing and exporting Fusion System Models should only be carried out by Engineers). 5. Download System Model – Allows you to download a particular system model from another machine on the network. 6. Select Default – This will automatically load the default system model. Please see appendices for for further information. MEYERTECH LIMITED Page 7 Fusion Eclipse User Manual Version 1.0 3.3 Logging On 1. Select your username 2. Enter your password 3. Click Logon button 3.4 Logging Off Click the ‘Log Off’ button. MEYERTECH LIMITED 1. Page 8 Fusion Eclipse User Manual Version 1.0 3.5 Map Window Once you have logged on you will be presented with the start-up map for your system. Fig 2.5 Start-up map Depending on how your Fusion Eclipse system is setup you can choose the map required by: 1. Selecting from the Atlas list in the Map/Camera Control Window. 2. Selecting from any of the map tabs in a Map Window. MEYERTECH LIMITED Page 9 Fusion Eclipse User Manual Version 1.0 2.5.1 Atlas 2.5.2 Maps/Cameras Window 2.5.3 Search Atlas – Choose a map Maps/Cameras - only Search – Search for cameras contains list of cameras from and areas of interest. the currently selected map. Search results will show from all maps configured in the system. Navigation to other maps can be achieved by: 1. Selecting from the Atlas list. 2. Selecting from any of the map tabs in a Map Window. 3. Select a Hyperlink from the map. These will be highlighted in the map graphics and when the mouse is over one the pointer changes to a finger. 4. Zoom into a known area or building and Fusion Eclipse will automatically switch to a map of that area or building 5. Zoom out of a known area or building and Fusion Eclipse will automatically switch to the map “above”. MEYERTECH LIMITED Page 10 Fusion Eclipse User Manual Version 1.0 3.6 Selecting a Camera The user will have a “current” monitor, that is the currently selected monitor and it will be shown highlighted in green. Select a camera icon from the map and the current monitor will show that camera Select a camera icon from a map and drag it onto one of your spot monitors or one of the monitors in the video wall to make the camera switch to that monitor. Qwerty Keyboard – Using the PC keyboard allows you to switch cameras and monitors by using a combination of mouse clicking and entering the numerical values. E.g. M1 followed by the ‘Enter’ key selects Monitor 1 as your current monitor. You can then type ‘C123’ to select camera no 123 to Monitor 1. You can also use the + and – keys to skip through the cameras in the list for that particular map. + - C1 M1 3.7 Camera Icons Static Camera Icon - Normal Static Camera Icon - Current PTZ Camera Icon - Normal PTZ Camera Icon - Current PTZ Camera Icon - Controlled PTZ Dome Camera Icon - Normal PTZ Dome Camera Icon - Current PTZ Dome Camera Icon – Controlled Note: All types of static camera are represented by same type of icon. MEYERTECH LIMITED Page 11 Fusion Eclipse User Manual Version 1.0 3.8 Controlling a PTZ Camera If your workstation includes a CCTV keyboard that is integrated with Fusion Eclipse, you can use this with its control joystick and buttons (often referred to as using the keyboard in PCI mode). Fusion Eclipse provides advanced software controls for operators who don’t have a keyboard or who wish to use the PC. When the operator selects a camera that has controllable functions, Fusion will display a PTZ icon on the monitor. When the operator clicks on this icon the auxiliary control buttons will appear for the camera. These buttons can then be used as required. If the operator then clicks the middle mouse wheel button, the camera Pan & Tilt can then be controlled using the mouse position relative to the centre of the monitor. To switch off the Pan & Tilt control, simply click the middle mouse wheel button again. MEYERTECH LIMITED Page 12 Fusion Eclipse User Manual Version 1.0 3.9 Fusion Control Window With No Camera Selected By entering the camera number manually and a monitor, then hitting ‘Enter’ the operator can mimic the controls normally available on a matrix controlling keyboard. This example will switch camera 1 (site 1) to monitor 101. With A Camera Selected When selecting this window with a camera selected, the user is provided with additional selections for: 1. Presets 2. Patrols 3. Lamps, Auxiliary functions 4. Iris and Focus MEYERTECH LIMITED Page 13 Fusion Eclipse User Manual 3.10 Version 1.0 Fusion Patrols The patrols can be triggered the same way as normal patrols. A patrol can be selected by typing in its number in the ‘patrol’ text box and hitting return just like a standard patrol. Alternatively, patrols can be toggled on or off using the Start / Stop button situated underneath should you prefer to use the mouse. Selecting patrol ‘0’ will stop the camera from patrolling. A status light will change colour to indicate the patrol state of the currently selected camera. Orange indicates the status is not currently known. Green indicates the camera is currently patrolling. Red indicates the camera is not patrolling. Status Indicator Start / Stop button Figure 1 - Control window with patrol interface In addition to these new items in the control window, there is a small addition to the camera icons on the map. When a camera is currently patrolling a small cog will appear in the lower right of the icon. MEYERTECH LIMITED Page 14 Fusion Eclipse User Manual 3.11 Version 1.0 Fusion Alarm Window When an alarm(s) is raised this is highlighted next to the Scale slider. Dependant on how Fusion Eclipse is setup to display alarms they may be shown in a floating or docked window or in a tab. Here, the alarms are shown in a floating window in one of 5 tabs: 1. Reported: new alarms 2. Accepted: 3. Parked: 4. Postponed: 5. Custom: If there are multiple Fusion workstations they will all show the same synchronised alarm status. Accept an alarm. Park an alarm. The alarm will remain in the parked tab until moved. Postpone an alarm. The alarm will automatically be raised again. Cancel/clear an alarm. MEYERTECH LIMITED Page 15 Fusion Eclipse User Manual 3.12 Version 1.0 Fusion Alarm Icons MEYERTECH LIMITED Page 16 Fusion Eclipse User Manual 3.13 Version 1.0 Zonal Switches Choose a Zonal Switch … The Zonal switch window is displayed with a list of the available Zonal switches. Select the required one and click ‘OK’. This will then switch any number of predetermined cameras to any monitor or monitor wall server. Recent Zonal Switches Step back Zonal Switch Clicking this menu item will show a list of the most recent Zonal switches used, which provides a fast way to repeat a Zonal switch. Clicking this menu item will revert the group of monitors, last set by a Zonal switch, to their previous displays. This can be useful following an alarm, where the operator wishes to see the displays, that have been changed due to the alarm, as they were pre-alarm. Further to running Zonal switches from the window it is also possible to assign a number of Zonal switches to Zonal switch icons. This makes it particularly useful if for example you wanted to open a door or turn a light on by clicking a button on the map. MEYERTECH LIMITED Page 17 Fusion Eclipse User Manual 3.14 Version 1.0 Zonal Switch Icons MEYERTECH LIMITED Page 18 Fusion Eclipse User Manual 3.15 Version 1.0 Zonal Switch Sequences Zonal switch sequences can be particularly useful if you want to sequence between various zonal switches. E.g. Monitor Wall Layouts and camera to monitor selections. 1. Highlight the pre-configured zonal switch sequence. 2. Set the Dwell Time. 3. Select ‘Run’. 3.16 Camera Sequences Sequences, are ran and controlled from the ‘Camera Sequences’ window. A Fusion Eclipse Camera Sequence can contain a list of up to 64 cameras with or without pre-sets. Examples: Sequence: a selection of cameras with no pre-sets Patrol: one camera with several pre-set views Tour : a selection of cameras with several pre-set views To run a ‘Camera Sequence’ , drag from the available list to a monitor. To stop a ‘Camera Sequence’ , select it and click the ‘Stop’ button. MEYERTECH LIMITED Page 19 Fusion Eclipse User Manual 3.17 Version 1.0 Covert Cameras There are two types of Covert mode: Manual and Automatic. Covert camera operation allows a user to take control of a camera and prevent other users from being able to view the camera in live or replay mode. The ability to place a camera in Manual Covert Mode is controlled by operator permissions, and conversely, the operator permissions also set who will get blocked when a camera is in Covert mode. When a camera is put into Covert Mode it is removed from any monitors belonging to operators who do not have permission to view it in this mode. A camera may also be placed into AutoCovert Mode, which will put the camera into Covert Mode whenever the camera is away from its home position. The effect on operators is the same as Manual Covert Mode. To place a camera into or remove from Covert Mode or Auto - Covert Mode right click the camera on a map then select the appropriate context menu item to toggle the state. If a camera is shown with a red circle with a line through it then another user has placed the camera into covert mode. If a user attempts to log off with cameras still in covert mode they will be given option to take the cameras out of covert mode before logging off. MEYERTECH LIMITED Page 20 Fusion Eclipse User Manual Version 1.0 4. Advanced User Operations 4.1 Fusion Gadget Window 4.1.1 Overview The Fusion ‘Gadget Window’ allows you to select built in features that can be used and saved in to the Fusion Layout. The Gadgets offer added functionality to a range of Fusion Eclipse features. 4.1.2 Accessing the Gadget Window To access the gadget window from the Fusion menu Select ‘Edit’ > ‘Gadget Window’. Fig 3.1.2 Edit > Gadget Window Once selected the ‘Gadget Window’ will appear on screen. Fig 3.1.3 MEYERTECH LIMITED Page 21 Fusion Eclipse User Manual Version 1.0 The user can then select which gadgets they want to use in Fusion. 4.1.3 Choosing Gadgets Alarm Gadget – Enabling this gadget will add an alarm status icon to the bottom of the Fusion Window. When an alarm is received it will store the alarm and flash red to alert the user of a new alarm and number of active alarms. This feature works alongside the Fusion Alarm Window and ‘alarm sound’ gadget. Alarm Sound Gadget – This gadget No visible gadget on the display bar at the bottom will enable Fusion to play a particular of the screen. sound file when an alarm is received. This works in line with the Alarm Action plans and can be particularly useful in busy control rooms to alert operators. See ‘Alarm Action Plans’ section for further information. Incident Gadget – This works alongside Fusion Incident Workstation and is used as an Incident recording trigger for Fusion. It also displays the current/previous Incident number. Keystroke Preview gadget – This allows Fusion to display any keyboard commands that allow camera switching and monitor selection. Stop All Patrols – This allows the user to stop all patrols currently running on the system. Save Clip Gadget – This allows the user to track the download status of a recorded video clip. The progress of the download is displayed as a % and numerical value. E.G. 30%. Airlock Gadget – This can be used when there is a requirement to Open/Close doors when used alongside a ZoneVU IOM8 controller. MEYERTECH LIMITED Page 22 Fusion Eclipse User Manual Version 1.0 4.1.4 Fusion Layout complete with Gadgets Fig 3.1.4 Fusion Gadgets MEYERTECH LIMITED Page 23 Fusion Eclipse User Manual Version 1.0 4.2 DVR Playback 4.2.1 Overview Fusion Eclipse now supports an ever increasing range of Digital recording systems through its powerful GUI. Instant review from each workstation with the ability to Time and date search, download clips and burn DVD’s straight from Fusion. (Please see Appendices for Supported peripherals). 4.2.2 The Playback Control Panel When viewing a live camera on a Fusion Eclipse monitor a recording icon will be shown if that camera is setup as being local digitally recorded. If this icon is clicked Fusion Eclipse will automatically present the operator with historic video from the camera 30 seconds old (this feature is dependent on the Codec), plus a video replay controller superimposed on the picture. Stops the playback and exits back to Live. Rewind. The recorded video will be reversed at x4 normal speed. Consecutive presses will increase the rewind speed. NB: Some SDK’s do not support Rewind functionality. Reverse play. The recorded video will be played in reverse at x1 normal rate. Frame Reverse. The recorded video will be reversed a frame at a time. Pause playback. Frame Forward. The recorded video will be advanced a frame at a time. Play. The recorded video will be played in forward at x1 normal rate. MEYERTECH LIMITED Page 24 Fusion Eclipse User Manual Version 1.0 Fast Forward. The recorded video will be played at x4 normal speed. Consecutive presses will increase the forward speed. Date/Time. Use this button to display a calendar and clock where the required date & time can be selected. Clip Download. Use this button to display the clip download window. 4.2.3 Clip Download The ability to save video clips is achievable through Fusion by clicking on the ‘Clip download’ button. Enter a Start and End time and select Continue to save the video clip to the default location. The default location of the ‘Video evidence vault’ can be set in the Fusion configuration file. It’s also possible to assign the clip to a particular ‘Incident’. This allows the user to associate the saved footage with Meyertech’s Fusion Incident Logging packages. MEYERTECH LIMITED Page 25 Fusion Eclipse User Manual Version 1.0 4.2.4 Burn to Disc With the addition of a DVD-RW drive it is possible to save the video clip and burn them straight to DVD from a one place. To Access the ‘Burn to disc’ feature Select ‘Tools -> ‘Burn to Disc’ from the Fusion menu. Users will require full ‘Configuration’ rights in order to do this. See the ‘Help’ section for step by instructions of how to burn to disc. MEYERTECH LIMITED Page 26 Fusion Eclipse User Manual Version 1.0 4.3 Monitor Walls 4.3.1 Overview Fusion Eclipse supports traditional Analogue monitor switching and Virtual (Digital) Monitor walls, providing a hybrid video switching platform. The application works seamlessly with ZoneVU VMW servers to allow the user to select cameras to any Virtual monitor throughout the system. The Monitor Wall window shows either a live virtual monitor wall (‘local’ mode) or a representation of a live virtual monitor wall that is being displayed on a physical wall monitor (‘remote’ mode). In either mode, dragging and dropping a camera icon onto one of its virtual monitors switches the video stream from that camera to that virtual monitor. The right mouse-click context menu can be used to change the sizes and arrangements of the virtual monitors by selecting a different local or global layout. Select this from the main Fusion Eclipse Menu: Window > Monitor Wall By selecting this menu item the operator can create a new Virtual Monitor window, which can be left floating or can be docked. 4.3.2 Switching Cameras To switch a camera to a monitor wall simply left mouse click over a camera and drag the camera to the chosen monitor. MEYERTECH LIMITED Page 27 Fusion Eclipse User Manual Version 1.0 4.3.3 Changing Layouts By Right clicking over the Fusion monitor wall it’s possible to select a number of options. 1. Monitor Wall – Change the current monitor wall to any of the other monitor walls configured in your system. 2. Wall Mode – Put the current monitor wall in to ‘Local’ or ‘Remote’ mode. 3. Local Configurations – Select any of the local configurations (Layouts) assigned to that particular monitor wall. 4. Global Configurations – Select any of the global configurations (Layouts) and assign it to any monitor wall. 5. On-screen display – Tick this to enable OSD on the monitor wall. 6. Full Screen – Puts the monitor wall in to full screen mode. NB: The Fusion Monitor Wall Editor will allow you to configure all monitor walls, layouts and OSD. Please see separate Fusion Administration manual. MEYERTECH LIMITED Page 28 Fusion Eclipse User Manual Version 1.0 4.4 Zonal Switches 4.4.1 Overview Zonal switches can be used to make multiple camera to monitor selections and pre-sets with a single action. They are particularly useful when configured as alarm events or populating whole or partial monitor wall servers. 4.4.2 Creating and Editing Zonal Switches Select the Zonal Switches Editor from the Zonal Switches menu. 1. Workstation – Choose the workstation you want to create the Zonal switch for. 2. Select ‘New’ to create a new Zonal Switch. 3. Give the Zonal Switch a name. 4. Select the individual monitors you want to switch or monitor wall screen. 5. Choose a camera to switch to each monitor. 6. To quickly create a zonal switch for the current Monitor Wall configuration you can highlight a particular monitor/Monitor Wall screen and select the ‘Online system settings’ button. This will automatically populate the cameras to monitors assignement. MEYERTECH LIMITED Page 29 Fusion Eclipse User Manual Version 1.0 4.4.3 Local/Global Zonal switches Zonal switches can be saved as ‘Local’ or ‘Global’ zonal switches. Local Zonal switches are saved local to the workstation and can only be ran from there. Global Zonal switches are saved ‘Globally’ and will be available from all other workstations. MEYERTECH LIMITED Page 30 Fusion Eclipse User Manual Version 1.0 4.5 User Layouts 4.5.1 Overview Fusion Eclipse allows all windows to be moved and left floating or docked. Depending on where your mouse is at the time Fusion will indicate the options for docking. 4.5.2 Docking Windows To move a window , use the mouse to click and drag on the window Title Bar. Depending on the options available, as set by Fusion Eclipse, the user will see several icons as per the table below, these are called docking areas. These are the options for docking within the current window. 1. Dock to the top of the current window 2. Dock to the right of the current window 3. Dock to the bottom of the current window 4. Dock to the left of the current window 5. Add as a new tab to the current window Dock to the top of the current window Dock to the right of the current window Dock to the bottom of the current window Dock to the left of the current window 4.5.3 Saving/Editing Layouts Choose a Layout MEYERTECH LIMITED Page 31 Fusion Eclipse User Manual Version 1.0 From Main Menu > Layout the operator can choose several commands, dependant on permissions, to edit, load and save layouts. As the layouts will be preset the main basic function will be: Layout > Choose Layout... Displays list of layouts available. Select a layout and click OK to change layout, or click Cancel. 4.6 User Groups and Users 4.6.1 Overview Each user will have a password and will belong to one or more groups. User Groups are used by Fusion Eclipse to logically group the users so that permissions and access rights can be readily granted/denied by a single setting – for instance if there are 24 persons capable of logging onto Fusion2 it would be a tedious task to reset the permissions of all 24 without the use of a group. It is also possible to add cameras to a user group, thereby being able to control which users have access to which cameras. i It is likely that the system integrator will setup the necessary groups and their relationships, plus the initial setup of which user belongs to which group. It is then a task of keeping the users grouping up-to-date as staff changes occur – this is seen as a task that a system supervisor can perform. 4.6.2 Users Each user will have a password. Each user will belong to one or more groups MEYERTECH LIMITED Page 32 Fusion Eclipse User Manual Version 1.0 Select this from the main Fusion Eclipse Menu: Edit > Users Highlight the user required and click Properties to change the users password or groups. Use Add to add a new User and Remove to delete an existing one. The user Fred Smith is shown here with a password not entered yet and he belongs to the default user group “Operators”. With a group selected, click Remove to remove the user from that group(s). Click the Add to add the user to a group … Select all the groups to be added and click OK MEYERTECH LIMITED Page 33 Fusion Eclipse User Manual Version 1.0 4.6.3 Groups Each user will have a password. Each user will belong to one or more groups. Groups can belong to groups, eg if group A belongs to group B then group A inherits all the permissions of group B. Select Edit > User Groups There are two default systems groups that should not be removed: Installers and Operators. Add new group: Click on New Group. You can choose from : a) System Group b) Cameras Group For all but cameras choose (a). Enter the name of the group. Define which groups, if any, this group belongs to.(this would normally be setup by the systems integrator, and is potentially a complex area). Add the Users to the group as required. Set the permissions as required. Change a group: Select a group Click on Properties. Edit as per descriptions for Add new. Delete a group Select a group Click on Remove. Check your groups Select a group Click on Effective Member Of… i As previously mentioned, the task of setting up groups and inter-relationships is potentially a complex one. The main risk is in-advertantly giving a user higher privileges than required by virtue of the user belonging to the wrong group. Use this feature to check effective membership, showing the hierarchical list of groups. Add a new group of cameras Click on New Group. Choose Cameras Group. Give the group a name. MEYERTECH LIMITED Page 34 Fusion Eclipse User Manual Version 1.0 Click Cameras and add those selected. You do not need to set : Member of Users Permissions 4.7 Programming Pre-set’s 4.7.1 Overview Camera Pre-sets can be configured and programmed through Fusion Eclipse via the intuitive GUI interface. By putting Fusion into Map editing mode and selecting a camera pre-set icon from the 4.7.2 Preset Icons Before setting a static preset ensure the camera of interest is selected and you have control of it. Then, before dragging a new preset icon onto a map, ensure the camera is set correctly for pan, tilt, zoom and focus. Firstly, you need to put the map in to editing mode by right mouse clicking on the Fusion map and choosing ‘Startediting’. MEYERTECH LIMITED Page 35 Fusion Eclipse User Manual Version 1.0 Drag from the Camera’s yellow dot to the location on the map where the preset is located. Repeat as required, remembering to manually control the camera before dragging the new preset icon onto a map to ensure the camera is set correctly for pan, tilt, zoom and focus. Give the preset icons meaningful names, then they can be accessed by the Fusion Eclipse search facility. Select the camera you want to assign to the icon from the properties Window. Enter a pre-set number MEYERTECH LIMITED Page 36 Fusion Eclipse User Manual Version 1.0 4.8 Patrols 4.8.1 Overview For most devices patrols will be managed and executed on the device itself. Typically this means programming the patrol on the device and then simply selecting the patrol in a ‘fire and forget’ style through fusion. This has the benefit of being very efficient as no processing is done on the VMM and the site controller only has to translate a single patrol selection message. PTZ Device DEVICE: Select Patrol Data Layer: Select Patrol Workstation Workstation ZONEVU: Select Patrol Site Site Controller Controller Primary Primary VMM VMM Figure 2 - A typical device patrol For scenarios where the device does not support patrols natively, patrols can now be managed and processed on the VMM using a plugin. This will run through a sequence of presets on the camera in order to carry out a patrol. Unlike native patrols, these emulated patrols are not fire & forget and the patrol state of a camera is synchronised between workstations. One downside to this emulation is that more processing is carried out on the VMM, thus the site controller will have to handle a larger number of preset selection messages instead of a single patrol selection. MEYERTECH LIMITED Page 37 Fusion Eclipse User Manual Version 1.0 DEVICE: Select Preset DEVICE: Select Preset DEVICE: Select Preset Running Emulated Patrols PTZ Device DEVICE: Select Preset DEVICE: Select Preset Data Layer: Select Patrol Workstation Workstation Device with no native patrol support ZONEVU: Select Preset ZONEVU: SelectZONEVU: Preset Select Preset ZONEVU: Select Preset ZONEVU: Select Preset Primary Primary VMM VMM Site Site Controller Controller 4.8.2 Patrol Editor For standard patrols you need to configure the individual patrols for a camera on the device through propriety protocol or application. This is not an option for devices without hardware patrol support, so each patrol for a camera is saved in the system model. There is no limit on the number of patrols that can be stored for a camera. To add a patrol to a camera, or edit an existing one, simply select a camera and open the Patrol Editor window. Each patrol is numbered, and occupies a tab along the top of the window. Modify the patrol as required by configuring the sequence of presets in the datagrid below. Figure 3 - The patrol editor MEYERTECH LIMITED Page 38 Fusion Eclipse User Manual Version 1.0 4.8.3 Using Patrols The patrols can be triggered the same way as normal patrols. A patrol can be selected by typing in its number in the ‘patrol’ text box and hitting return just like a standard patrol. Alternatively, patrols can be toggled on or off using the Start / Stop button situated underneath should you prefer to use the mouse. Selecting patrol ‘0’ will stop the camera from patrolling. A status light will change colour to indicate the patrol state of the currently selected camera. Orange indicates the status is not currently known. Green indicates the camera is currently patrolling. Red indicates the camera is not patrolling. Status Indicator Start / Stop button Figure 4 - Control window with patrol interface In addition to these new items in the control window, there is a small addition to the camera icons on the map. When a camera is currently patrolling a small cog will appear in the lower right of the icon. Figure 5 - Icon for patrolling camera MEYERTECH LIMITED Page 39 Fusion Eclipse User Manual Version 1.0 4.9 Hyperlinks 4.9.1 Overview Fusion Hyperlinks allow you to create ‘shortcut’s’ to areas of interest within the Fusion Mapping area. An infinite number of Hyperlinks can be set up and assigned to icons or pinned to the Hyperlinks menu in the Atlas window. Meyertech System Models that also incorporate GIS deepzoom maps contain hyperlinks which are generated from the text description fields of the map database. This allows the user to search for any road/street name in the mapping area. 4.9.2 Hyperlink Editor To Create a New Hyperlink the user is required to right mouse click on the Hyperlinks folder located in the Atlas window and select ‘Add new Hyperlink’. You can also create new folder structures within the Hyperlinks folder to organise them into particular areas of key interest. For example if you had multiple maps in the system for a block of flats you might want to name hyperlinks for each floor level. E.g. Level 1, Level 2. The ‘Import Hyperlinks’ feature is used when configuring Hyperlinks for a Fusion system containing deepzoom maps. The Hyperlinks for the GIS database are generated by Meyertech into an Excel spreadsheet and then Imported. MEYERTECH LIMITED Page 40 Fusion Eclipse User Manual Version 1.0 Once the new Hyperlink is created the Hyperlink Properties window will appear. You will need to position the cross hairs over the exact location you require making sure you are zoomed in to the correct level. Once confirmed you will need to set the options in the properties window to ‘True’. Set ‘Use Location’ to True. Set ‘Use Map’ to True. Set ‘Use Zoom’ to True. MEYERTECH LIMITED Page 41 Fusion Eclipse User Manual Version 1.0 4.9.3 Hyperlink Icons Hyperlink Icons are a particularly useful way of using an icon image to trigger/run a hyperlink shortcut. An ideal scenario to use this feature would be if you wanted to access different maps from your main Deepzoom map.E.g. You have a multi-storey car park with individual Bitmaps and a deepzoom map in your system model. You have ‘Parking’ image on the main Fusion deepzoom map which once clicked with the mouse will take you into the multi-storey car park bitmaps. From here you can navigate to each car park map and get back out to the main Fusion map by zooming out with the mouse wheel. Hyperlink icons can be added to the Fusion maps and hyperlinks assigned to the particular icon. The icons are then used to navigate to key areas of interest. The Polygon hyperlink can be sized and shaped to cover any area of interest. Once Selected with the mouse it can be edited in the hyperlink properties window. The Hyperlink properties window allows you to configure the hyperlink icon. Background colour – Assign a colour from the Windows palette or set to Transparent to make the hyperlink invisible. Hyperlink – Browse the list of configured hyperlinks and select the one you want to assign to the icon. Zoom to Map – Set to True or False if you want the hyperlink to zoom in or out. Zoom Trigger – A maximum and minimum zoom scale can be applied to the zonal switch. These values can be altered to trigger the hyperlink when the zoom level on the particular icon exceeds the two parameters. MEYERTECH LIMITED Page 42 Fusion Eclipse User Manual Version 1.0 5. System Model Editing 5.1 Overview A System model is a single file that stores all the Fusion Eclipse configuration settings and supporting files, including maps, Users and User Groups. Files are named with a .sm extension. 5.2 Saving and Distributing System Models When a control room manager or engineer has made any changes to the system it is likely that these will be needed by the other workstations on the network. To do this the manager will use the Distribute System Model function available from the main Fusion Eclipse Menu: File > Distribute System Model... A list of workstations and servers will be given and the administrator can select all or some of these to distribute the new system model to. Progress of this is shown by each workstation going orange then green. When editing the system on the local PC the administrator can use the Save command or the Save As command as and when required. When Fusion starts it may bring up a select System Model window, in which case the user can select the required one. More likely, is that Fusion has been configured to use a default System Model. This default System Model can be set using the main Fusion Menu: File > Open On Start. Then simply browse to the .sm file required. Use main menu File Updates the currently used system model. > Save Use main menu File Creates a new system model file and saves the currently used >Save As system model + updates to the new file. Use Distribute System Model…. To update the other Fusion Eclipse VMS workstations and servers . This will prevent the dialog box from opening, asking the Use main menu File operator to choose a system model. This function will request > Open On Start which system model to open by default. Clicking this menu item will present the operator with a list of Use main menu File recently used system models. Selecting one of these will cause > Recent Models the Fusion VMS to initialise with this system model. MEYERTECH LIMITED Page 43 Fusion Eclipse User Manual Version 1.0 6. Fusion Troubleshooting 6.1 Fusion Eclipse Software Restart Procedure 6.1.1 Use menu File > Exit to close the Fusion Eclipse VMS workstation. 6.1.2 Start the Fusion Eclipse VMS workstation. 6.1.3 Logon to the Fusion Eclipse VMS workstation. 6.2 Fusion Hardware Restart Procedure Workstation Restarts A Workstation restart maybe performed by an operator as part of the initial fault fix/resolution to a problem. All such fault fix/resolution restarts should be logged and reported as per the current maintenance and support contract guidelines. Should a particular workstation be restarted, there is no requirement to restart any other servers or workstations on the Fusion network. Workstation restart procedure 1. Use menu File > Exit to close the Fusion Eclipse VMS workstation. 2. Perform a Windows Shutdown & Restart. 3. When the PC has restarted, logon to windows using the standard user account provided. 4. Start the Fusion Eclipse VMS workstation. 5. Logon to the Fusion Eclipse VMS workstation. 6.3 Fault Finding and Diagnostics Fault Scenario Possible Reason Fix No camera switch to a particular monitor Is the particular monitor selected ? Select the monitor. No PTZ camera control Camera control maybe denied by a higher priority operator. The higher priority operator needs to relinquish control by selecting another camera or by using the context menu of the camera and select ‘Relinquish Control’. Check the status of the camera icon. A camera that is being controlled by another operator will MEYERTECH LIMITED Page 44 Fusion Eclipse User Manual Version 1.0 display ‘Red’ arrows when the particular operator tries to move it. The monitor on which the camera is displayed is not the current monitor. Select the correct monitor. The CCTV joystick controls a different camera from that expected. The monitor on which the camera is displayed is not the current monitor. Select the correct monitor. Unresponsive or slow system. Software problem. Log off then back on to Fusion Eclipse. If problem persists restart the Fusion Eclipse software 1. If problem persists perform a Windows restart2 followed by restarting the Fusion Eclipse software1. MEYERTECH LIMITED Page 45 Fusion Eclipse User Manual Version 1.0 7. Support Meyertech support can be accessed a number of different ways depending on whether you are a Meyertech Certified Partner (MCP), a Non-MCP with a current Support Menu or a customer who has just purchased a new product. Meyertech Certified Partner (MCP) / Non-MCP with a Support Menu Request a Support Ticket http://www.meyertech.co.uk/support.html Email the Meyertech Service Centre [email protected] Phone the Meyertech Service Centre +44 (0) 161 643 7956 All Other Customers Request a Support Ticket http://www.meyertech.co.uk/support.html Only one issue maybe reported per Support Case. If multiple unrelated issues are reported Meyertech support engineers will create a separate support case for each unrelated issue. Customers access Meyertech support by purchasing a Support Menu which meets their Requirements in relation to the support they require access to. The concept of the Support Menu is based on a food theme. There are six menus to facilitate the provision of support to Meyertech partners, non-partners and SLA driven contracts. If you are a customer who does not have a current Support Menu or currently not a Meyertech Certified Partner our Support Menus can be purchased or ‘topped-up’ with additional credits at any time. If you fall into this category you will receive GRATIS Support Credits every time you purchase a product. If you are a customer who has a Support Menu the GRATIS Support Credits are simply added to your current menu with every purchase you make. MEYERTECH LIMITED Page 46 Fusion Eclipse User Manual Version 1.0 8. Appendices 8.1 Network and Firewall Information IP Port Number Protocol Description 4000 TCP Axis Telemetry 12897 9090 28190 28920 28921 1000 5900 9090 28190 28920 28921 1000 80 3514 60006 1433 1024-5000 TCP TCP TCP TCP TCP TCP TCP TCP TCP TCP TCP TCP TCP TCP TCP TCP TCP/UDP Data Layer Custom System Model Distribution Custom Security Service protocol Custom Monitor Wall Protocol Custom Covert Monitor Protocol Custom shared Serial Port Ultra VNC Custom System Model Distribution Custom Security Service protocol Custom Monitor Wall Protocol Custom Covert Monitor Protocol Custom shared Serial Port Instek SDK Command Live Streaming Instek SDK Playback Veracity SDK SQL Server Fusion Incident Workstation + Console MEYERTECH LIMITED Page 47