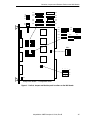
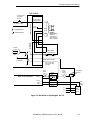
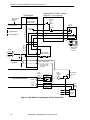
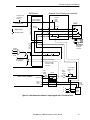
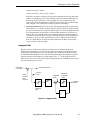
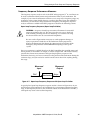
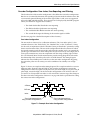
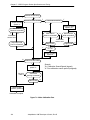
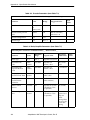
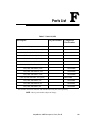
1
C
VME
D
R
S
2
3
2
/
T
E
R
M
#2
#1
1
0
0
m
A
2
4
V
I
/
O
R
S
2
3
2
E
T
H
E
R
N
E
T
R
S
2
3
2
R
S
2
3
2
A
D
R
I
V
RESET E
SCSI
ACC V
ESTOP
OK
SIO
OK
RESET
F
P
/
M
C
P
4
3
2
1
1 2 3 4 5 6 7 8
R
S
4
2
2
SCR
B
ON
ABORT
STP
A
040
SF
DE4
DE5
S
E
R
V
O
M
A
C
H
I
N
E
E
N
C
O
D
E
R
DE6
DE3
F4
F5
F6
DE2
F3
DE1
HPE
MI6
F2
F1
ES
O
U
T
P
U
T
S
O
U
T
P
U
T
S
I
N
P
U
T
S
PASS
DIO
FAIL
I
N
P
U
T
S
AdeptMotion VME
Developer’s Guide
®
WARNING:
FOR CONTINUED PROTECTION AGAINST RISK OF FIRE,
REPLACE ONLY WITH SAME TYPE AND RATING OF FUSE.
USE ONLY WITH
250V FUSES
5AT
~100-240V
50/60HZ
AdeptMotion VME
Developer’s Guide
E
T
H
E
R
N
E
T
1
0
0
m
A
2
4
V
I
/
O
R
S
2
3
2
~100-240V
50/60HZ
#2
#1
R
S
2
3
2
/
T
E
R
M
R
S
4
2
2
VME
D
5AT
RESET
C
F
P
/
M
C
P
SCR
B
R
S
2
3
2
WARNING:
FOR CONTINUED PROTECTION AGAINST RISK OF FIRE,
REPLACE ONLY WITH SAME TYPE AND RATING OF FUSE.
ABORT
STP
A
S
E
R
V
O
M
A
C
H
I
N
E
R
S
2
3
2
E
N
C
O
D
E
R
A
D
R
I
V
RESET E
OK
1 2 3 4 5 6 7 8
SF
040
O
U
T
P
U
T
S
I
N
P
U
T
S
DE6
DE5
F5
F6
DE4
O
U
T
P
U
T
S
PASS
FAIL
DE3
I
N
P
U
T
S
DE2
DE1
HPE
F4
MI6
F3
F1
ES
F2
ACC V
ESTOP
OK
SIO
SCSI
4
3
1
ON
2
DIO
®
USE ONLY WITH
250V FUSES
00961-00830, Rev B
December, 1996
®
150 Rose Orchard Way • San Jose, CA 95134 • USA • Phone (408) 432-0888 • Fax (408) 432-8707
Otto-Hahn-Strasse 23 • 44227 Dortmund • Germany • Phone 0231/75 89 40 • Fax 0231/75 89 450
adept
technology, inc.
41, rue du Saule Trapu • 91882 • Massy cedex • France • Phone (33) 01.69.19.16.16 • Fax (33) 01.69.32.04.62
Via don Luigi Sturzo 39/41 • 52100 Arezzo • Italy • Phone 575.3986 11 • Fax 575.3986 20
1-2, Aza Nakahara Mitsuya-Cho • Toyohashi, Aichi-Ken • 441-31 • Japan • (0532) 65-2391 • Fax (0532) 65-2390
The information contained herein is the property of Adept Technology, Inc., and shall not be
reproduced in whole or in part without prior written approval of Adept Technology, Inc. The
information herein is subject to change without notice and should not be construed as a
commitment by Adept Technology, Inc. This manual is periodically reviewed and revised.
Adept Technology, Inc., assumes no responsibility for any errors or omissions in this document.
Critical evaluation of this manual by the user is welcomed. Your comments assist us in
preparation of future documentation. A form is provided at the back of the book for submitting
your comments.
Copyright © 1993, 1994, 1995, 1996 by Adept Technology, Inc. All rights reserved.
The Adept logo is a registered trademark of Adept Technology, Inc.
Adept, AdeptOne, AdeptOne-MV, AdeptThree, AdeptThree-MV, PackOne, PackOne-MV,
HyperDrive, Adept 550, Adept 550 CleanRoom, Adept 1850, Adept 1850XP,
A-Series, S-Series, Adept MC, Adept CC, Adept IC, Adept OC, Adept MV,
AdeptVision, AIM, VisionWare, AdeptMotion, MotionWare, PalletWare,
AdeptNet, AdeptFTP, AdeptNFS, AdeptTCP/IP, AdeptForce, AdeptModules,
and V+ are trademarks of Adept Technology, Inc.
Any trademarks from other companies used in this publication
are the property of those respective companies.
Printed in the United States of America
Table of Contents
PART 1
Overview and Installation
1
Introduction and Safety . . . . . . . . . . . . . . . . . . . . . . . . . . . . . . . . . . . . . . . 3
1.1 How to Use This Manual . . . . . . . . . . . . . . . . . . . . . . . . . . . . . . . . . . . . . . . . . . . . . . .3
Follow These Steps to Install and Configure AdeptMotion VME. . . . . . . . . . .3
Related Manuals . . . . . . . . . . . . . . . . . . . . . . . . . . . . . . . . . . . . . . . . . . . . . . . . .3
Standard Manuals . . . . . . . . . . . . . . . . . . . . . . . . . . . . . . . . . . . . . . . . . . . . .3
Other Adept Product Manuals . . . . . . . . . . . . . . . . . . . . . . . . . . . . . . . . . .4
Optional V+ Developer’s Manuals . . . . . . . . . . . . . . . . . . . . . . . . . . . . . . . .4
1.2 Warnings, Cautions, and Notes . . . . . . . . . . . . . . . . . . . . . . . . . . . . . . . . . . . . . . . .5
1.3 Safety. . . . . . . . . . . . . . . . . . . . . . . . . . . . . . . . . . . . . . . . . . . . . . . . . . . . . . . . . . . . . .5
Reading and Training for Users and Operators . . . . . . . . . . . . . . . . . . . . . . . .5
System Safeguards. . . . . . . . . . . . . . . . . . . . . . . . . . . . . . . . . . . . . . . . . . . . . . . .6
Safety Features on External VME Front Panel (VFP). . . . . . . . . . . . . . . . . .6
Computer Controlled Robots and Motion Devices . . . . . . . . . . . . . . . . .7
Manually Controlled Robots and Motion Devices . . . . . . . . . . . . . . . . . .7
Other Computer Controlled Devices . . . . . . . . . . . . . . . . . . . . . . . . . . . . .7
Program Security . . . . . . . . . . . . . . . . . . . . . . . . . . . . . . . . . . . . . . . . . . . . . . . . .7
Overspeed Protection . . . . . . . . . . . . . . . . . . . . . . . . . . . . . . . . . . . . . . . . . . . . .7
Voltage Interruptions . . . . . . . . . . . . . . . . . . . . . . . . . . . . . . . . . . . . . . . . . . . . . .7
Inappropriate Uses of the Adept MV Controller . . . . . . . . . . . . . . . . . . . . . . .8
1.4 Standards Compliance . . . . . . . . . . . . . . . . . . . . . . . . . . . . . . . . . . . . . . . . . . . . . . .8
1.5 How Can I Get Help?. . . . . . . . . . . . . . . . . . . . . . . . . . . . . . . . . . . . . . . . . . . . . . . . .9
Within the Continental United States. . . . . . . . . . . . . . . . . . . . . . . . . . . . . . . . .9
Service Calls . . . . . . . . . . . . . . . . . . . . . . . . . . . . . . . . . . . . . . . . . . . . . . . . . .9
Application Questions. . . . . . . . . . . . . . . . . . . . . . . . . . . . . . . . . . . . . . . . . .9
Training Information. . . . . . . . . . . . . . . . . . . . . . . . . . . . . . . . . . . . . . . . . . . .9
Within Europe . . . . . . . . . . . . . . . . . . . . . . . . . . . . . . . . . . . . . . . . . . . . . . . . . . .10
Outside Continental United States or Europe. . . . . . . . . . . . . . . . . . . . . . . . .10
Adept World Wide Web Site. . . . . . . . . . . . . . . . . . . . . . . . . . . . . . . . . . . . . . .10
Adept Bulletin Board Service . . . . . . . . . . . . . . . . . . . . . . . . . . . . . . . . . . . . . .10
2
Product Description . . . . . . . . . . . . . . . . . . . . . . . . . . . . . . . . . . . . . . . . . 11
2.1 Introduction . . . . . . . . . . . . . . . . . . . . . . . . . . . . . . . . . . . . . . . . . . . . . . . . . . . . . . .11
2.2 Features and Capabilities . . . . . . . . . . . . . . . . . . . . . . . . . . . . . . . . . . . . . . . . . . . .11
2.3 System Overview . . . . . . . . . . . . . . . . . . . . . . . . . . . . . . . . . . . . . . . . . . . . . . . . . . .12
AdeptMotion VME Developer’s Guide, Rev B
iii
Table of Contents
2.4 AdeptMotion VME Hardware Overview . . . . . . . . . . . . . . . . . . . . . . . . . . . . . . . 12
MI6/MI3 AdeptMotion Hardware Components . . . . . . . . . . . . . . . . . . . . . . 13
MI6 AdeptMotion VME Interface Module . . . . . . . . . . . . . . . . . . . . . . . . 13
MI3 AdeptMotion VME Interface Module . . . . . . . . . . . . . . . . . . . . . . . . 13
AdeptMotion VME Interface Panels (MP6) . . . . . . . . . . . . . . . . . . . . . . . 13
2.5 Encoder, Drive and I/O Requirements . . . . . . . . . . . . . . . . . . . . . . . . . . . . . . . . . 15
Encoder Input Specifications. . . . . . . . . . . . . . . . . . . . . . . . . . . . . . . . . . . . . . 15
Analog Servo Amplifier Output . . . . . . . . . . . . . . . . . . . . . . . . . . . . . . . . . . . . 15
Dedicated Digital Inputs . . . . . . . . . . . . . . . . . . . . . . . . . . . . . . . . . . . . . . . . . 16
Dedicated Digital Outputs. . . . . . . . . . . . . . . . . . . . . . . . . . . . . . . . . . . . . . . . 16
2.6 AdeptMotion VME Performance Specifications . . . . . . . . . . . . . . . . . . . . . . . . . 17
Hardware Specifications . . . . . . . . . . . . . . . . . . . . . . . . . . . . . . . . . . . . . . . . . 17
Software Specifications . . . . . . . . . . . . . . . . . . . . . . . . . . . . . . . . . . . . . . . . . . 17
2.7 Environmental Specifications. . . . . . . . . . . . . . . . . . . . . . . . . . . . . . . . . . . . . . . . . 18
Internally Mounted AdeptMotion VME Components. . . . . . . . . . . . . . . . . . 18
Externally Mounted AdeptMotion VME Components . . . . . . . . . . . . . . . . . 18
3
MI6 and MI3 Module Technical Reference . . . . . . . . . . . . . . . . . . . . . . 19
3.1 Introduction . . . . . . . . . . . . . . . . . . . . . . . . . . . . . . . . . . . . . . . . . . . . . . . . . . . . . . . 19
Overview of Installation Process . . . . . . . . . . . . . . . . . . . . . . . . . . . . . . . . . . . 19
3.2 Configuration of the Adept MV Controller . . . . . . . . . . . . . . . . . . . . . . . . . . . . . 20
3.3 Switches, Jumpers and Resistor-Packs on the MI6 Module . . . . . . . . . . . . . . . . 20
VMEbus Address Settings . . . . . . . . . . . . . . . . . . . . . . . . . . . . . . . . . . . . . . . . . 20
Drive Fault Block Delay Time . . . . . . . . . . . . . . . . . . . . . . . . . . . . . . . . . . . . . . 21
Encoder Input Configuration (Differential vs. Single-Ended) . . . . . . . . . . . . 21
Encoder Terminating Resistors . . . . . . . . . . . . . . . . . . . . . . . . . . . . . . . . . . . . . 22
Encoder Configuration (Software Parameters). . . . . . . . . . . . . . . . . . . . . . . 22
Encoder Filtering . . . . . . . . . . . . . . . . . . . . . . . . . . . . . . . . . . . . . . . . . . . . . . . . 22
MI6 Logic Voltage Configuration for Digital Input Signals . . . . . . . . . . . . . . 23
Analog Power Source Selection . . . . . . . . . . . . . . . . . . . . . . . . . . . . . . . . . . . 23
Other Required Jumper Settings . . . . . . . . . . . . . . . . . . . . . . . . . . . . . . . . . . . 24
3.4 Proper Wiring and Electrical Design Practices. . . . . . . . . . . . . . . . . . . . . . . . . . . 26
3.5 Emergency Stop Circuit Wiring . . . . . . . . . . . . . . . . . . . . . . . . . . . . . . . . . . . . . . . 27
VFP Options . . . . . . . . . . . . . . . . . . . . . . . . . . . . . . . . . . . . . . . . . . . . . . . . . . . . 27
Circuit Configuration Options . . . . . . . . . . . . . . . . . . . . . . . . . . . . . . . . . . . . . 27
External E-Stop Input (On SIO Module). . . . . . . . . . . . . . . . . . . . . . . . . . . . . . 28
Passive E-Stop Output (On SIO Module) . . . . . . . . . . . . . . . . . . . . . . . . . . . . 28
3.6 Enclosure for the Adept MV Controller. . . . . . . . . . . . . . . . . . . . . . . . . . . . . . . . . 32
3.7 MP6 Panel Technical Reference . . . . . . . . . . . . . . . . . . . . . . . . . . . . . . . . . . . . . . 32
Rail-Mounting the MP6 Panels . . . . . . . . . . . . . . . . . . . . . . . . . . . . . . . . . . . . . 32
Panel-Mounting the MP6 Panels . . . . . . . . . . . . . . . . . . . . . . . . . . . . . . . . . . . 33
Plug-In Opto Modules on the MP6-M . . . . . . . . . . . . . . . . . . . . . . . . . . . . . . . 33
3.8 Installing Cables from the Controller to the MP6 Panels. . . . . . . . . . . . . . . . . . . 37
3.9 MP6 Machine (MP6-M) Panel Wiring. . . . . . . . . . . . . . . . . . . . . . . . . . . . . . . . . . . 38
Optical Isolation . . . . . . . . . . . . . . . . . . . . . . . . . . . . . . . . . . . . . . . . . . . . . . . . 38
Input Current Requirements (OT, HM) . . . . . . . . . . . . . . . . . . . . . . . . . . . 38
iv
AdeptMotion VME Developer’s Guide, Rev B
Table of Contents
Input Voltage Configuration . . . . . . . . . . . . . . . . . . . . . . . . . . . . . . . . . . .39
Output Current Requirements (MP6-M, HPE and BR, External) . . . . . . .39
User-Supplied Logic Power (Internal) . . . . . . . . . . . . . . . . . . . . . . . . . . . .39
Overtravel Limit Switches (Input) . . . . . . . . . . . . . . . . . . . . . . . . . . . . . . . . . . .40
Home Switch (Input) . . . . . . . . . . . . . . . . . . . . . . . . . . . . . . . . . . . . . . . . . . . . .40
Brake Release (Output). . . . . . . . . . . . . . . . . . . . . . . . . . . . . . . . . . . . . . . . . . .40
High Power Enable (Output) . . . . . . . . . . . . . . . . . . . . . . . . . . . . . . . . . . . . . .40
3.10 MP6 Servo (MP6-S) Panel Wiring . . . . . . . . . . . . . . . . . . . . . . . . . . . . . . . . . . . . . .42
Drive Compatibility . . . . . . . . . . . . . . . . . . . . . . . . . . . . . . . . . . . . . . . . . . . . . .42
Optical Isolation . . . . . . . . . . . . . . . . . . . . . . . . . . . . . . . . . . . . . . . . . . . . . . . . .42
MP6-S Input Current Requirements (Drive Fault) . . . . . . . . . . . . . . . . . . .42
MP6-S Output Current Requirements (Drive Enable) . . . . . . . . . . . . . . .42
Analog Power. . . . . . . . . . . . . . . . . . . . . . . . . . . . . . . . . . . . . . . . . . . . . . . . . . .43
Connecting the Drives. . . . . . . . . . . . . . . . . . . . . . . . . . . . . . . . . . . . . . . . . . . .43
Drive Enable (Output) . . . . . . . . . . . . . . . . . . . . . . . . . . . . . . . . . . . . . . . . . . . .44
Delay Time . . . . . . . . . . . . . . . . . . . . . . . . . . . . . . . . . . . . . . . . . . . . . . . . . .44
Drive Fault (Input). . . . . . . . . . . . . . . . . . . . . . . . . . . . . . . . . . . . . . . . . . . . . . . .44
Command Drive (Output) . . . . . . . . . . . . . . . . . . . . . . . . . . . . . . . . . . . . . . . .44
3.11 MP6 Encoder (MP6-E) Panel Wiring . . . . . . . . . . . . . . . . . . . . . . . . . . . . . . . . . . .46
Encoder Compatibility . . . . . . . . . . . . . . . . . . . . . . . . . . . . . . . . . . . . . . . . . . .46
Connecting Power to the Encoders . . . . . . . . . . . . . . . . . . . . . . . . . . . . . . . .46
Encoder Cable Length (User Supplied). . . . . . . . . . . . . . . . . . . . . . . . . . . . . .47
Connecting the Encoders. . . . . . . . . . . . . . . . . . . . . . . . . . . . . . . . . . . . . . . . .47
Encoder Input Circuitry . . . . . . . . . . . . . . . . . . . . . . . . . . . . . . . . . . . . . . . . . . .48
Encoder Power-Failure Detection . . . . . . . . . . . . . . . . . . . . . . . . . . . . . . . . . .48
Encoder Signal-Failure (“Broken-wire”) Detection . . . . . . . . . . . . . . . . . . . . .49
Encoder Fault Output/Lamp Status Output . . . . . . . . . . . . . . . . . . . . . . . . . .49
Resolver to Digital Encoder (R/D) Converters. . . . . . . . . . . . . . . . . . . . . . . . .49
Encoder Input Configuration . . . . . . . . . . . . . . . . . . . . . . . . . . . . . . . . . . . . . .49
Conveyor Belt Tracking . . . . . . . . . . . . . . . . . . . . . . . . . . . . . . . . . . . . . . . . . . .50
AdeptMotion VME Developer’s Guide, Rev B
v
Table of Contents
PART 2
Software: Description and Configuration
4
Theory and Overview . . . . . . . . . . . . . . . . . . . . . . . . . . . . . . . . . . . . . . . . 53
4.1
4.2
4.3
4.4
Introduction . . . . . . . . . . . . . . . . . . . . . . . . . . . . . . . . . . . . . . . . . . . . . . . . . . . . . . . 53
Control System Overview . . . . . . . . . . . . . . . . . . . . . . . . . . . . . . . . . . . . . . . . . . . . 53
Basic Operation of the Control System . . . . . . . . . . . . . . . . . . . . . . . . . . . . . . . . 56
Description of Servo Parameters . . . . . . . . . . . . . . . . . . . . . . . . . . . . . . . . . . . . . . 58
Amplifier Control Section . . . . . . . . . . . . . . . . . . . . . . . . . . . . . . . . . . . . . . . . . 58
Encoder Path. . . . . . . . . . . . . . . . . . . . . . . . . . . . . . . . . . . . . . . . . . . . . . . . . . . 60
Proportional Path . . . . . . . . . . . . . . . . . . . . . . . . . . . . . . . . . . . . . . . . . . . . . . . 61
Integrator Path . . . . . . . . . . . . . . . . . . . . . . . . . . . . . . . . . . . . . . . . . . . . . . . . . 63
Feedforward Path . . . . . . . . . . . . . . . . . . . . . . . . . . . . . . . . . . . . . . . . . . . . . . . 65
4.5 Tuning Analysis Tools: Step and Frequency Response . . . . . . . . . . . . . . . . . . . . 67
Step Response Performance Measures . . . . . . . . . . . . . . . . . . . . . . . . . . . . . 67
Frequency Response Performance Measures. . . . . . . . . . . . . . . . . . . . . . . . 69
Open-loop Frequency Response (Open-loop Excitation) . . . . . . . . . . 69
Open-loop Frequency Response (Closed-loop Excitation) . . . . . . . . . 70
Closed-loop Frequency Response (Closed-loop Excitation) . . . . . . . . 70
5
Software Configuration Using CONFIG_C . . . . . . . . . . . . . . . . . . . . . . . . 73
5.1 Introduction . . . . . . . . . . . . . . . . . . . . . . . . . . . . . . . . . . . . . . . . . . . . . . . . . . . . . . . 73
Terminology . . . . . . . . . . . . . . . . . . . . . . . . . . . . . . . . . . . . . . . . . . . . . . . . . . . . 73
Adept Utility Disk . . . . . . . . . . . . . . . . . . . . . . . . . . . . . . . . . . . . . . . . . . . . . . . . 74
Device Module Documentation . . . . . . . . . . . . . . . . . . . . . . . . . . . . . . . . . . . 74
Software Installation Procedure for a New System . . . . . . . . . . . . . . . . . . . . 75
Upgrade Procedure for an Existing System . . . . . . . . . . . . . . . . . . . . . . . . . . 75
5.2 Robots and Device Modules . . . . . . . . . . . . . . . . . . . . . . . . . . . . . . . . . . . . . . . . . 76
Procedure to Load CONFIG_C . . . . . . . . . . . . . . . . . . . . . . . . . . . . . . . . . . . . 76
Program Prompts . . . . . . . . . . . . . . . . . . . . . . . . . . . . . . . . . . . . . . . . . . . . . . . 77
5.3 Servo Loop Rate . . . . . . . . . . . . . . . . . . . . . . . . . . . . . . . . . . . . . . . . . . . . . . . . . . . 81
6
SPEC Program: Overview and Main Menu . . . . . . . . . . . . . . . . . . . . . . . 83
6.1 Introduction . . . . . . . . . . . . . . . . . . . . . . . . . . . . . . . . . . . . . . . . . . . . . . . . . . . . . . . 83
6.2 Using the SPEC Program . . . . . . . . . . . . . . . . . . . . . . . . . . . . . . . . . . . . . . . . . . . . . 83
Specification Worksheets. . . . . . . . . . . . . . . . . . . . . . . . . . . . . . . . . . . . . . 84
System Parameter Categories . . . . . . . . . . . . . . . . . . . . . . . . . . . . . . . . . 84
Notes on SPEC Program Usage . . . . . . . . . . . . . . . . . . . . . . . . . . . . . . . . . . . . 84
Self-configuring Menus. . . . . . . . . . . . . . . . . . . . . . . . . . . . . . . . . . . . . . . . 84
Online Help . . . . . . . . . . . . . . . . . . . . . . . . . . . . . . . . . . . . . . . . . . . . . . . . . 84
Viewing and Changing Parameter Values . . . . . . . . . . . . . . . . . . . . . . . 85
Procedure to Load the SPEC Program . . . . . . . . . . . . . . . . . . . . . . . . . . . . . . 85
vi
AdeptMotion VME Developer’s Guide, Rev B
Table of Contents
6.3 Overview of SPEC program . . . . . . . . . . . . . . . . . . . . . . . . . . . . . . . . . . . . . . . . . .86
6.4 SPEC Program Main Menu . . . . . . . . . . . . . . . . . . . . . . . . . . . . . . . . . . . . . . . . . . .87
Variations to Main Menu . . . . . . . . . . . . . . . . . . . . . . . . . . . . . . . . . . . . . . . . . .87
6.5 Enter Password to Increase Access Level . . . . . . . . . . . . . . . . . . . . . . . . . . . . . . .88
Password-Protected Robots . . . . . . . . . . . . . . . . . . . . . . . . . . . . . . . . . . . . . . .88
6.6 Robot Options and Motor Configuration . . . . . . . . . . . . . . . . . . . . . . . . . . . . . . .88
6.7 Motion Hardware Diagnostics . . . . . . . . . . . . . . . . . . . . . . . . . . . . . . . . . . . . . . . .91
Testing Encoders . . . . . . . . . . . . . . . . . . . . . . . . . . . . . . . . . . . . . . . . . . . . . . . .91
Testing Overtravel and Home Sensor . . . . . . . . . . . . . . . . . . . . . . . . . . . . . . .92
Testing Amp Fault Signal . . . . . . . . . . . . . . . . . . . . . . . . . . . . . . . . . . . . . . . . . .92
6.8 Edit Robot Specifications . . . . . . . . . . . . . . . . . . . . . . . . . . . . . . . . . . . . . . . . . . . .93
6.9 Saving and Loading Specifications . . . . . . . . . . . . . . . . . . . . . . . . . . . . . . . . . . . .93
Save Robot Specifications to a Disk File . . . . . . . . . . . . . . . . . . . . . . . . . . . . .93
Load Robot Specifications from a Disk File . . . . . . . . . . . . . . . . . . . . . . . . . . .94
Save ALL Specifications to System Disk . . . . . . . . . . . . . . . . . . . . . . . . . . . . . .94
6.10 Change Robot Number . . . . . . . . . . . . . . . . . . . . . . . . . . . . . . . . . . . . . . . . . . . .95
6.11 Switch to External Encoder Specifications . . . . . . . . . . . . . . . . . . . . . . . . . . . . .95
7
SPEC Program: Robot Specifications and Tuning . . . . . . . . . . . . . . . . . 97
7.1 Introduction . . . . . . . . . . . . . . . . . . . . . . . . . . . . . . . . . . . . . . . . . . . . . . . . . . . . . . .97
7.2 Robot Specifications . . . . . . . . . . . . . . . . . . . . . . . . . . . . . . . . . . . . . . . . . . . . . . . .97
7.3 Robot Initialization Specifications. . . . . . . . . . . . . . . . . . . . . . . . . . . . . . . . . . . . . .98
Robot Start-up Message . . . . . . . . . . . . . . . . . . . . . . . . . . . . . . . . . . . . . . . . . .98
Module Password. . . . . . . . . . . . . . . . . . . . . . . . . . . . . . . . . . . . . . . . . . . . . . . .98
Calibration File Name . . . . . . . . . . . . . . . . . . . . . . . . . . . . . . . . . . . . . . . . . . . .98
Robot Model Number and Serial Number . . . . . . . . . . . . . . . . . . . . . . . . . . .99
Hand Signals . . . . . . . . . . . . . . . . . . . . . . . . . . . . . . . . . . . . . . . . . . . . . . . . . . . .99
*Time-out nulling error* Limit . . . . . . . . . . . . . . . . . . . . . . . . . . . . . . . . . . . . . . .99
Power Sequencing Parameters . . . . . . . . . . . . . . . . . . . . . . . . . . . . . . . . . . . .99
7.4 Motor/Amp and Encoder Specifications . . . . . . . . . . . . . . . . . . . . . . . . . . . . . .103
Encoder Scale Factor . . . . . . . . . . . . . . . . . . . . . . . . . . . . . . . . . . . . . . . . . . .103
Encoder Counts Per Zero Index . . . . . . . . . . . . . . . . . . . . . . . . . . . . . . . . . . .104
Encoder Configuration: Zero-Index, Error Reporting, and Filtering . . . . . .105
Zero-Index Configuration . . . . . . . . . . . . . . . . . . . . . . . . . . . . . . . . . . . . .105
Zero-Index Errors. . . . . . . . . . . . . . . . . . . . . . . . . . . . . . . . . . . . . . . . . . . . .106
Quadrature Errors . . . . . . . . . . . . . . . . . . . . . . . . . . . . . . . . . . . . . . . . . . .106
Encoder Broken-Wire Detection . . . . . . . . . . . . . . . . . . . . . . . . . . . . . . .106
Encoder Filtering, Digital, 1 MHz/4 MHz . . . . . . . . . . . . . . . . . . . . . . . . . .107
Encoder Sign. . . . . . . . . . . . . . . . . . . . . . . . . . . . . . . . . . . . . . . . . . . . . . . . . . .107
Motor Sign . . . . . . . . . . . . . . . . . . . . . . . . . . . . . . . . . . . . . . . . . . . . . . . . . . . . .108
Maximum DAC Output . . . . . . . . . . . . . . . . . . . . . . . . . . . . . . . . . . . . . . . . . .108
Maximum DAC Output in Manual Mode . . . . . . . . . . . . . . . . . . . . . . . . . . .109
*Duty-cycle Exceeded* DAC Limit . . . . . . . . . . . . . . . . . . . . . . . . . . . . . . . .109
*Duty-cycle Exceeded* Filter Parameter . . . . . . . . . . . . . . . . . . . . . . . . . . .109
*Motor Stalled* Timeout. . . . . . . . . . . . . . . . . . . . . . . . . . . . . . . . . . . . . . . . . .109
*Soft Envelope Error* Limit . . . . . . . . . . . . . . . . . . . . . . . . . . . . . . . . . . . . . . . .109
AdeptMotion VME Developer’s Guide, Rev B
vii
Table of Contents
*Hard Envelope Error* Limit . . . . . . . . . . . . . . . . . . . . . . . . . . . . . . . . . . . . . . 110
Machine Input Polarity . . . . . . . . . . . . . . . . . . . . . . . . . . . . . . . . . . . . . . . . . . 110
7.5 Motor Servo Tuning Parameters . . . . . . . . . . . . . . . . . . . . . . . . . . . . . . . . . . . . . 112
Tools and Techniques . . . . . . . . . . . . . . . . . . . . . . . . . . . . . . . . . . . . . . . . . . . 112
Select Test . . . . . . . . . . . . . . . . . . . . . . . . . . . . . . . . . . . . . . . . . . . . . . . . . . . . 113
Test and Plot . . . . . . . . . . . . . . . . . . . . . . . . . . . . . . . . . . . . . . . . . . . . . . . . . . 114
Test and Display . . . . . . . . . . . . . . . . . . . . . . . . . . . . . . . . . . . . . . . . . . . . . . . 115
Export Results . . . . . . . . . . . . . . . . . . . . . . . . . . . . . . . . . . . . . . . . . . . . . . . . . . 115
Output Data to Text File. . . . . . . . . . . . . . . . . . . . . . . . . . . . . . . . . . . . . . 115
Output Data to Screen . . . . . . . . . . . . . . . . . . . . . . . . . . . . . . . . . . . . . . 115
Save Plot to TIFF Graphics File . . . . . . . . . . . . . . . . . . . . . . . . . . . . . . . . . 115
Step-by-Step Tuning Procedure . . . . . . . . . . . . . . . . . . . . . . . . . . . . . . . . . . 116
Tuning Overview . . . . . . . . . . . . . . . . . . . . . . . . . . . . . . . . . . . . . . . . . . . . . . . 117
Detailed Tuning Procedure . . . . . . . . . . . . . . . . . . . . . . . . . . . . . . . . . . . . . . 117
Auto-Tuning of Feedforward Parameters. . . . . . . . . . . . . . . . . . . . . . . . . . . 119
Summary of Active Parameters . . . . . . . . . . . . . . . . . . . . . . . . . . . . . . . . . . 120
7.6 Motor Calibration Parameters . . . . . . . . . . . . . . . . . . . . . . . . . . . . . . . . . . . . . . . 121
Homing Configuration . . . . . . . . . . . . . . . . . . . . . . . . . . . . . . . . . . . . . . . . . . 123
Speed and Direction . . . . . . . . . . . . . . . . . . . . . . . . . . . . . . . . . . . . . . . . . . . 124
Speed for Fine Search . . . . . . . . . . . . . . . . . . . . . . . . . . . . . . . . . . . . . . . . . . 124
Motor Stalled Timeout During Cal . . . . . . . . . . . . . . . . . . . . . . . . . . . . . . . . . 124
Maximum Search Distance . . . . . . . . . . . . . . . . . . . . . . . . . . . . . . . . . . . . . . 124
Maximum Home Switch Width/ ‘Hard-stop Found’ Position Error . . . . . . . 124
Distance From Edge of Home Switch to First Zero Index . . . . . . . . . . . . . . 125
Motor Position at Zero Index/Hard Stop/Home Switch/Current Position . 125
Motor Calibration Groups . . . . . . . . . . . . . . . . . . . . . . . . . . . . . . . . . . . . . . . 125
Park Position After Calibration . . . . . . . . . . . . . . . . . . . . . . . . . . . . . . . . . . . . 125
Teach Calibration Specs . . . . . . . . . . . . . . . . . . . . . . . . . . . . . . . . . . . . . . . . 126
Calibrate Motor. . . . . . . . . . . . . . . . . . . . . . . . . . . . . . . . . . . . . . . . . . . . . . . . 126
Calibrate Robot . . . . . . . . . . . . . . . . . . . . . . . . . . . . . . . . . . . . . . . . . . . . . . . 126
7.7 Joint Motion Parameters . . . . . . . . . . . . . . . . . . . . . . . . . . . . . . . . . . . . . . . . . . . 128
Nulling Tolerances (FINE, COARSE, TIME REQUIRED) . . . . . . . . . . . . . . . . . . 128
READY Position. . . . . . . . . . . . . . . . . . . . . . . . . . . . . . . . . . . . . . . . . . . . . . . . . 128
Joint Speed and Acceleration . . . . . . . . . . . . . . . . . . . . . . . . . . . . . . . . . . . 128
JOINT Pendant Increment and Speed . . . . . . . . . . . . . . . . . . . . . . . . . . . . . 128
FREE Mode Configuration Parameters . . . . . . . . . . . . . . . . . . . . . . . . . . . . . 129
Velocity Servo . . . . . . . . . . . . . . . . . . . . . . . . . . . . . . . . . . . . . . . . . . . . . . . . . 129
Joint Limits . . . . . . . . . . . . . . . . . . . . . . . . . . . . . . . . . . . . . . . . . . . . . . . . . . . . 129
7.8 Link Dimensions . . . . . . . . . . . . . . . . . . . . . . . . . . . . . . . . . . . . . . . . . . . . . . . . . . . 131
Tool Z-Offset Distance. . . . . . . . . . . . . . . . . . . . . . . . . . . . . . . . . . . . . . . . . . . 131
Link Dimension Value #n. . . . . . . . . . . . . . . . . . . . . . . . . . . . . . . . . . . . . . . . . 131
7.9 Cartesian Motion Parameters . . . . . . . . . . . . . . . . . . . . . . . . . . . . . . . . . . . . . . . 133
Cartesian 100% Speed and Acceleration . . . . . . . . . . . . . . . . . . . . . . . . . . 133
WORLD/TOOL Manual Control Parameters . . . . . . . . . . . . . . . . . . . . . . . . . 133
7.10 General Motion Specifications . . . . . . . . . . . . . . . . . . . . . . . . . . . . . . . . . . . . . 135
Upper Speed Limit for SCALE.ACCEL . . . . . . . . . . . . . . . . . . . . . . . . . . . . . . 135
viii
AdeptMotion VME Developer’s Guide, Rev B
Table of Contents
7.11 S-Curve Trajectory Generation . . . . . . . . . . . . . . . . . . . . . . . . . . . . . . . . . . . . . .136
7.12 Stop-on-Force Parameters (for AdeptForce) . . . . . . . . . . . . . . . . . . . . . . . . . .138
Stop-on-Force Nulling Tolerance . . . . . . . . . . . . . . . . . . . . . . . . . . . . . . . . . .138
Stop-on-Force *Envelope error* Limit. . . . . . . . . . . . . . . . . . . . . . . . . . . . . . .138
Stop-on-Force Integral Gain . . . . . . . . . . . . . . . . . . . . . . . . . . . . . . . . . . . . . .138
7.13 Saving and Testing Parameters . . . . . . . . . . . . . . . . . . . . . . . . . . . . . . . . . . . . .139
8
Test and Troubleshooting. . . . . . . . . . . . . . . . . . . . . . . . . . . . . . . . . . . . 141
8.1 Diagnostic Tests . . . . . . . . . . . . . . . . . . . . . . . . . . . . . . . . . . . . . . . . . . . . . . . . . . .141
Discrete Inputs . . . . . . . . . . . . . . . . . . . . . . . . . . . . . . . . . . . . . . . . . . . . . . . . .141
Discrete Outputs . . . . . . . . . . . . . . . . . . . . . . . . . . . . . . . . . . . . . . . . . . . . . . .142
High Power Enable, Drive Enable, and Brake Outputs . . . . . . . . . . . . .142
Analog (DAC) Outputs . . . . . . . . . . . . . . . . . . . . . . . . . . . . . . . . . . . . . . . . . .143
Encoder Channels . . . . . . . . . . . . . . . . . . . . . . . . . . . . . . . . . . . . . . . . . . . . . .144
Encoder and Motor Sign . . . . . . . . . . . . . . . . . . . . . . . . . . . . . . . . . . . . . . . . .145
8.2 Additional Parameter Tests . . . . . . . . . . . . . . . . . . . . . . . . . . . . . . . . . . . . . . . . . .146
Calibration Sequence . . . . . . . . . . . . . . . . . . . . . . . . . . . . . . . . . . . . . . . . . . .146
Software Joint Limits. . . . . . . . . . . . . . . . . . . . . . . . . . . . . . . . . . . . . . . . . . . . .146
READY Position . . . . . . . . . . . . . . . . . . . . . . . . . . . . . . . . . . . . . . . . . . . . . . . . .146
Manual Control Motion Parameters . . . . . . . . . . . . . . . . . . . . . . . . . . . . . . .146
Program Control Motion Parameters . . . . . . . . . . . . . . . . . . . . . . . . . . . . . .147
8.3 Customizing “Move Between Taught Points” Test . . . . . . . . . . . . . . . . . . . . . . .148
Procedure to Use Custom Program . . . . . . . . . . . . . . . . . . . . . . . . . . . . . . . .148
Program Development Description . . . . . . . . . . . . . . . . . . . . . . . . . . . . . . . .148
Example Program . . . . . . . . . . . . . . . . . . . . . . . . . . . . . . . . . . . . . . . . . . . . . .149
Custom Data Collection and Plotting . . . . . . . . . . . . . . . . . . . . . . . . . . . . . .150
9
V+ Programming for Multiple Robots and Latch/Trigger Functions . . 151
9.1
9.2
9.3
9.4
Introduction . . . . . . . . . . . . . . . . . . . . . . . . . . . . . . . . . . . . . . . . . . . . . . . . . . . . . .151
ATTACHing and SELECTing a Robot . . . . . . . . . . . . . . . . . . . . . . . . . . . . . . . . . . .151
Calibrating . . . . . . . . . . . . . . . . . . . . . . . . . . . . . . . . . . . . . . . . . . . . . . . . . . . . . . .153
High-Speed Position Latch and Vision Trigger . . . . . . . . . . . . . . . . . . . . . . . . . .154
Position Latch . . . . . . . . . . . . . . . . . . . . . . . . . . . . . . . . . . . . . . . . . . . . . . . . . .154
Vision Position Latch. . . . . . . . . . . . . . . . . . . . . . . . . . . . . . . . . . . . . . . . . . . . .155
9.5 Using the Manual Control Pendant . . . . . . . . . . . . . . . . . . . . . . . . . . . . . . . . . . .156
Controlling More Than One Robot. . . . . . . . . . . . . . . . . . . . . . . . . . . . . . . . .156
Robots With Less Than Six Joints . . . . . . . . . . . . . . . . . . . . . . . . . . . . . . . . . . .156
Robots With More Than Six Joints . . . . . . . . . . . . . . . . . . . . . . . . . . . . . . . . . .157
A
B
Specification Worksheets . . . . . . . . . . . . . . . . . . . . . . . . . . . . . . . . . . . 159
X/Y/Z/Theta Device Module . . . . . . . . . . . . . . . . . . . . . . . . . . . . . . . . . 171
B.1 Copying the Device Module File to a Boot Disk. . . . . . . . . . . . . . . . . . . . . . . . .171
B.2 X/Y/Z/Theta Device Module Description. . . . . . . . . . . . . . . . . . . . . . . . . . . . . . .171
Module Specifications. . . . . . . . . . . . . . . . . . . . . . . . . . . . . . . . . . . . . . . . . . .171
AdeptMotion VME Developer’s Guide, Rev B
ix
Table of Contents
Device Module Identification Number: 8 . . . . . . . . . . . . . . . . . . . . . . . 171
Default Start-up Message: “X/Y/Z/Theta Robot Control Module” . . . 171
Default Joint Configuration: . . . . . . . . . . . . . . . . . . . . . . . . . . . . . . . . . . . . . 172
Robot Option Word . . . . . . . . . . . . . . . . . . . . . . . . . . . . . . . . . . . . . . . . . . . . 172
Axis Configuration . . . . . . . . . . . . . . . . . . . . . . . . . . . . . . . . . . . . . . . . . . . . . . 172
Variations in Axis Configuration. . . . . . . . . . . . . . . . . . . . . . . . . . . . . . . . . . . 173
Geometric Dimensional Constants . . . . . . . . . . . . . . . . . . . . . . . . . . . . . . . . 173
Cartesian Motion . . . . . . . . . . . . . . . . . . . . . . . . . . . . . . . . . . . . . . . . . . . . . . 173
Coupling Between Robot Joints and Motors. . . . . . . . . . . . . . . . . . . . . . . . 174
Robot Configuration Control Instructions. . . . . . . . . . . . . . . . . . . . . . . . . . . 174
Additional Restrictions . . . . . . . . . . . . . . . . . . . . . . . . . . . . . . . . . . . . . . . . . . 174
C
External Encoder Device Module . . . . . . . . . . . . . . . . . . . . . . . . . . . . . 175
C.1 Copying the External Encoder Device Module to a Boot Disk . . . . . . . . . . . . 175
C.2 External Encoder Device Module . . . . . . . . . . . . . . . . . . . . . . . . . . . . . . . . . . . 175
Module specifications . . . . . . . . . . . . . . . . . . . . . . . . . . . . . . . . . . . . . . . . . . 176
Start-up Message: “Adept External Encoder Module” or “External Encoder Module” . . . . . . . . . . . . . . . . . . . . . . . . . . . . . . . . . . . . . . . . . . . . . 176
Default Encoder Configuration: . . . . . . . . . . . . . . . . . . . . . . . . . . . . . . . . . . 176
Number of Encoder Channels. . . . . . . . . . . . . . . . . . . . . . . . . . . . . . . . . . . . 176
Hardware Connections . . . . . . . . . . . . . . . . . . . . . . . . . . . . . . . . . . . . . . . . . 176
V+Instructions and Functions for External Encoders . . . . . . . . . . . . . . . 177
D
Coordinated Joints Robot Device Module . . . . . . . . . . . . . . . . . . . . . 179
D.1 Copying the Device Module File to a Boot Disk . . . . . . . . . . . . . . . . . . . . . . . . 179
D.2 Coordinated Joints Robot Module Description . . . . . . . . . . . . . . . . . . . . . . . . 179
Module Specifications . . . . . . . . . . . . . . . . . . . . . . . . . . . . . . . . . . . . . . . . . . 180
Device Module Identification Number: 15 . . . . . . . . . . . . . . . . . . . . . . 180
Default Start-up Message: “Coordinated Joint Control Robot” . . . . . 180
Default Joint Configuration: . . . . . . . . . . . . . . . . . . . . . . . . . . . . . . . . . . 180
Robot Option Word . . . . . . . . . . . . . . . . . . . . . . . . . . . . . . . . . . . . . . . . . . . . 180
Variations in Axis Configuration. . . . . . . . . . . . . . . . . . . . . . . . . . . . . . . . . . . 180
Geometric Dimensional Constants . . . . . . . . . . . . . . . . . . . . . . . . . . . . . . . . 180
Interpretation of Cartesian Rotations . . . . . . . . . . . . . . . . . . . . . . . . . . . . . . 180
Coupling Between Robot Joints and Motors. . . . . . . . . . . . . . . . . . . . . . . . 180
Robot Configuration Control Program Instructions. . . . . . . . . . . . . . . . . . . 181
Additional Restrictions . . . . . . . . . . . . . . . . . . . . . . . . . . . . . . . . . . . . . . . . . . 181
E
F
x
Sample Specification File. . . . . . . . . . . . . . . . . . . . . . . . . . . . . . . . . . . . 183
Parts List . . . . . . . . . . . . . . . . . . . . . . . . . . . . . . . . . . . . . . . . . . . . . . . . . . 189
AdeptMotion VME Developer’s Guide, Rev B
Table of Contents
G
Encoder Wiring Diagrams . . . . . . . . . . . . . . . . . . . . . . . . . . . . . . . . . . . 191
G.1 Introduction . . . . . . . . . . . . . . . . . . . . . . . . . . . . . . . . . . . . . . . . . . . . . . . . . . . . . .191
G.2 MI6/MP6-E Systems . . . . . . . . . . . . . . . . . . . . . . . . . . . . . . . . . . . . . . . . . . . . . . . .192
G.3 Encoder Interface Technical Reference . . . . . . . . . . . . . . . . . . . . . . . . . . . . . .194
Encoder Timing Requirements . . . . . . . . . . . . . . . . . . . . . . . . . . . . . . . . . . . .194
H
Third-Party Suppliers . . . . . . . . . . . . . . . . . . . . . . . . . . . . . . . . . . . . . . . 197
H.1
H.2
H.3
H.4
I
Encoders – North America . . . . . . . . . . . . . . . . . . . . . . . . . . . . . . . . . . . . . . . . . .197
Motors/Drives – North America . . . . . . . . . . . . . . . . . . . . . . . . . . . . . . . . . . . . . .198
Encoders – International . . . . . . . . . . . . . . . . . . . . . . . . . . . . . . . . . . . . . . . . . . . .199
Motors/Drives – International . . . . . . . . . . . . . . . . . . . . . . . . . . . . . . . . . . . . . . . .200
Cable Pinouts . . . . . . . . . . . . . . . . . . . . . . . . . . . . . . . . . . . . . . . . . . . . . . 203
I.1 MI6 to MP6 Cables . . . . . . . . . . . . . . . . . . . . . . . . . . . . . . . . . . . . . . . . . . . . . . . . .204
J
Customizing Calibration . . . . . . . . . . . . . . . . . . . . . . . . . . . . . . . . . . . . 207
J.1 Introduction. . . . . . . . . . . . . . . . . . . . . . . . . . . . . . . . . . . . . . . . . . . . . . . . . . . . . . .207
J.2 When Customization May Be Required . . . . . . . . . . . . . . . . . . . . . . . . . . . . . . . .207
J.3 Standard Calibration Process . . . . . . . . . . . . . . . . . . . . . . . . . . . . . . . . . . . . . . . .208
Calibration Process Flow . . . . . . . . . . . . . . . . . . . . . . . . . . . . . . . . . . . . . . . . .208
How STANDARD.CAL Works . . . . . . . . . . . . . . . . . . . . . . . . . . . . . . . . . . . . . .208
Standard Homing Sequence . . . . . . . . . . . . . . . . . . . . . . . . . . . . . . . . . . . . .209
J.4 Creating a Custom Calibration Process . . . . . . . . . . . . . . . . . . . . . . . . . . . . . . .209
Features of a Custom Calibration Program . . . . . . . . . . . . . . . . . . . . . . . . .209
Procedure for Setting Up a Custom Calibration Program . . . . . . . . . . . . .210
Calibration Primitives . . . . . . . . . . . . . . . . . . . . . . . . . . . . . . . . . . . . . . . . . . . .211
Advanced Customization. . . . . . . . . . . . . . . . . . . . . . . . . . . . . . . . . . . . . . . .213
J.5 Examples of Custom Calibration . . . . . . . . . . . . . . . . . . . . . . . . . . . . . . . . . . . . .214
Single-Axis Mechanism . . . . . . . . . . . . . . . . . . . . . . . . . . . . . . . . . . . . . . . . . .214
Absolute Encoders . . . . . . . . . . . . . . . . . . . . . . . . . . . . . . . . . . . . . . . . . . . . . .215
J.6 Program Listings For Calibration Utilities . . . . . . . . . . . . . . . . . . . . . . . . . . . . . . . .217
STANDARD.CAL Listing . . . . . . . . . . . . . . . . . . . . . . . . . . . . . . . . . . . . . . . . . . .217
Program Headers for Calibration Primitives . . . . . . . . . . . . . . . . . . . . . . . . .219
J.7 Error Codes . . . . . . . . . . . . . . . . . . . . . . . . . . . . . . . . . . . . . . . . . . . . . . . . . . . . . . .225
AdeptMotion VME Developer’s Guide, Rev B
xi
Table of Contents
List of Figures
Figure 2-1
AdeptMotion VME System Block Diagram . . . . . . . . . . . . . . . . . . . . . . . . . . . . 14
Figure 3-1
Switch, Jumper and Resistor-pack Locations on the MI6 Boards . . . . . . . . . . 25
Figure 3-2
MI6 Motion E-Stop Diagram, No VFP . . . . . . . . . . . . . . . . . . . . . . . . . . . . . . . . . 29
Figure 3-3
MI6 Motion E-Stop Diagram with VFP and/or MCP . . . . . . . . . . . . . . . . . . . . . 30
Figure 3-4
MI6 Alternative Motion E-Stop Diagram with VFP and/or MCP . . . . . . . . . . . 31
Figure 3-5
MP6-S Panel – Layout and Dimensions . . . . . . . . . . . . . . . . . . . . . . . . . . . . . . . 34
Figure 3-6
MP6-E Panel – Layout and Dimensions . . . . . . . . . . . . . . . . . . . . . . . . . . . . . . . 34
Figure 3-7
MP6-M Panel – Layout and Dimensions. . . . . . . . . . . . . . . . . . . . . . . . . . . . . . . 35
Figure 3-8
Typical System Wiring for One Axis of Motion . . . . . . . . . . . . . . . . . . . . . . . . . . 36
Figure 3-9
Cable Connections from MI6 to each MP6 panel. . . . . . . . . . . . . . . . . . . . . . 37
Figure 3-10
MI6 Encoder Input Circuitry. . . . . . . . . . . . . . . . . . . . . . . . . . . . . . . . . . . . . . . . . 48
Figure 4-1
AdeptMotion VME Command Flow. . . . . . . . . . . . . . . . . . . . . . . . . . . . . . . . . . 53
Figure 4-2
Spring-Mass-Damper System Compared to a Closed Loop Motor . . . . . . . . 54
Figure 4-3
Block Diagram of the AdeptMotion VME Control System. . . . . . . . . . . . . . . . 56
Figure 4-4
Amplifier Control Section. . . . . . . . . . . . . . . . . . . . . . . . . . . . . . . . . . . . . . . . . . . 58
Figure 4-5
Frequency Response of DAC Output Filter . . . . . . . . . . . . . . . . . . . . . . . . . . . . 60
Figure 4-6
Proportional Path . . . . . . . . . . . . . . . . . . . . . . . . . . . . . . . . . . . . . . . . . . . . . . . . . 61
Figure 4-7
Integrator Path . . . . . . . . . . . . . . . . . . . . . . . . . . . . . . . . . . . . . . . . . . . . . . . . . . . 63
Figure 4-8
Feedforward Path . . . . . . . . . . . . . . . . . . . . . . . . . . . . . . . . . . . . . . . . . . . . . . . . 65
Figure 4-9
Friction Explanation . . . . . . . . . . . . . . . . . . . . . . . . . . . . . . . . . . . . . . . . . . . . . . . 66
Figure 4-10
Time Responses to a Step Command . . . . . . . . . . . . . . . . . . . . . . . . . . . . . . . . 68
Figure 4-11
Open-loop Frequency Response with Open-loop Excitation. . . . . . . . . . . . . 69
Figure 4-12
Typical Open-loop Frequency Response . . . . . . . . . . . . . . . . . . . . . . . . . . . . . 70
Figure 4-13
Open-loop Frequency Response with Closed-loop Excitation. . . . . . . . . . . . 70
Figure 4-14
Closed-loop Frequency Response with Closed-loop Excitation. . . . . . . . . . . 71
Figure 4-15
Typical Closed-loop Frequency Response . . . . . . . . . . . . . . . . . . . . . . . . . . . . 71
Figure 5-1
Procedure for Copying Device Modules to a System File. . . . . . . . . . . . . . . . 76
Figure 5-2
Robots and Device Modules Menu . . . . . . . . . . . . . . . . . . . . . . . . . . . . . . . . . . 77
Figure 5-3
Example System Disk Configuration in CONFIG_C. . . . . . . . . . . . . . . . . . . . . . 78
Figure 5-4
Typical Multi-robot System Initialization Messages . . . . . . . . . . . . . . . . . . . . . . 78
Figure 5-5
Example Device Module REPLACE Procedure . . . . . . . . . . . . . . . . . . . . . . . . . 80
Figure 6-1
SPEC Program Main Menu (Non-protected Robot). . . . . . . . . . . . . . . . . . . . . 87
Figure 6-2
Motor/Joint Configuration Menu . . . . . . . . . . . . . . . . . . . . . . . . . . . . . . . . . . . . 88
Figure 6-3
Motor/Axis Mapping Menu . . . . . . . . . . . . . . . . . . . . . . . . . . . . . . . . . . . . . . . . . 90
Figure 6-4
Joint-to-Axis Screen Example . . . . . . . . . . . . . . . . . . . . . . . . . . . . . . . . . . . . . . . 90
Figure 6-5
Diagnostic Display with POWER Switch Off . . . . . . . . . . . . . . . . . . . . . . . . . . . . 92
Figure 7-1
Robot Specification Submenu . . . . . . . . . . . . . . . . . . . . . . . . . . . . . . . . . . . . . . 97
Figure 7-2
Power Sequencing. . . . . . . . . . . . . . . . . . . . . . . . . . . . . . . . . . . . . . . . . . . . . . . 100
xii
AdeptMotion VME Developer’s Guide, Rev B
Table of Contents
Figure 7-3
Example Zero-Index Configuration . . . . . . . . . . . . . . . . . . . . . . . . . . . . . . . . . .105
Figure 7-4
Servo Tuning Menu . . . . . . . . . . . . . . . . . . . . . . . . . . . . . . . . . . . . . . . . . . . . . . .112
Figure 7-5
Servo Tuning Data Collection Menu . . . . . . . . . . . . . . . . . . . . . . . . . . . . . . . . .114
Figure 7-6
Tuning Plot for Square-Wave Response Test . . . . . . . . . . . . . . . . . . . . . . . . . .114
Figure 7-7
Plant+Controller Frequency Response Test . . . . . . . . . . . . . . . . . . . . . . . . . . .115
Figure 7-8
Motor Calibration Flow . . . . . . . . . . . . . . . . . . . . . . . . . . . . . . . . . . . . . . . . . . . .122
Figure 7-9
S-Curve (Trapezoidal Acceleration) Profile . . . . . . . . . . . . . . . . . . . . . . . . . . .136
Figure 8-1
Diagnostic Display with POWER Switch On . . . . . . . . . . . . . . . . . . . . . . . . . . .142
Figure B-1
Link Definitions and Dimensions for an X/Y/Z/Theta Device. . . . . . . . . . . . . .173
Figure E-1
Sample ASCII SPEC file for X/Y/Z/Theta Robot . . . . . . . . . . . . . . . . . . . . . . . . .187
Figure G-1
Single-ended Encoder Wiring Using Inverted Outputs – MI6 . . . . . . . . . . . . .192
Figure G-2
Single-ended Encoder Wiring Using Non-inverted Outputs – MI6 . . . . . . . . .192
Figure G-3
Open-collector Encoder Wiring – MI6. . . . . . . . . . . . . . . . . . . . . . . . . . . . . . . .193
Figure G-4
Encoder Timing Diagram . . . . . . . . . . . . . . . . . . . . . . . . . . . . . . . . . . . . . . . . . .194
AdeptMotion VME Developer’s Guide, Rev B
xiii
Table of Contents
List of Tables
Table 2-1
Specifications For Externally-Mounted Components. . . . . . . . . . . . . . . . . . . . 18
Table 3-1
VMEbus Address Switch Settings for MI6 Module . . . . . . . . . . . . . . . . . . . . . . . 20
Table 3-2
Delay Time Settings for MI6 . . . . . . . . . . . . . . . . . . . . . . . . . . . . . . . . . . . . . . . . . 21
Table 3-3
Encoder Input Settings for MI6 Board. . . . . . . . . . . . . . . . . . . . . . . . . . . . . . . . . 21
Table 3-4
Location of Encoder Terminating Resistors on MI6 Board . . . . . . . . . . . . . . . . 22
Table 3-5
MI6 Voltage Configuration Resistor Values for 12V or 5V Operation . . . . . . . 23
Table 3-6
Analog Power Source Jumper Settings . . . . . . . . . . . . . . . . . . . . . . . . . . . . . . . 24
Table 3-7
Additional MI6 Jumper Settings . . . . . . . . . . . . . . . . . . . . . . . . . . . . . . . . . . . . . 24
Table 3-8
Digital Input Specifications (MI6/MI3 module) . . . . . . . . . . . . . . . . . . . . . . . . . 38
Table 3-9
Digital Output Specifications for HPE and BR (Opto-22 module, typical) . . . 39
Table 3-10
MP6-M Connector Terminal Assignments (Typical, 1 of 6). . . . . . . . . . . . . . . . 41
Table 3-11
MP6-M Opto Power (Logic) Connectors (one per MP6-M). . . . . . . . . . . . . . . 41
Table 3-12
Digital Output Specifications for Drive Enable signal (MI6/MI3 module). . . . 42
Table 3-13
MP6-S Connector Pin Assignments (Typical, 1 of 6) . . . . . . . . . . . . . . . . . . . . . 43
Table 3-14
MP6-S Analog Power Connectors (one per MP6-S) . . . . . . . . . . . . . . . . . . . . . 44
Table 3-15
MP6-E Power Connectors (one per MP6-E). . . . . . . . . . . . . . . . . . . . . . . . . . . . 47
Table 3-16
Encoder Channel Pin Assignments (Channel 1 to 6) . . . . . . . . . . . . . . . . . . . . 47
Table 4-1
Zero and Pole Values in Corresponding Frequency, 1 KHz servo rate. . . . . . 62
Table 6-1
Motor Configuration . . . . . . . . . . . . . . . . . . . . . . . . . . . . . . . . . . . . . . . . . . . . . . 91
Table 7-1
Robot Initialization Specs. . . . . . . . . . . . . . . . . . . . . . . . . . . . . . . . . . . . . . . . . . 102
Table 7-2
Zero-Index Configuration Table . . . . . . . . . . . . . . . . . . . . . . . . . . . . . . . . . . . . 106
Table 7-3
Encoder Parameters . . . . . . . . . . . . . . . . . . . . . . . . . . . . . . . . . . . . . . . . . . . . . 108
Table 7-4
Machine Configuration Word. . . . . . . . . . . . . . . . . . . . . . . . . . . . . . . . . . . . . . 110
Table 7-5
Motor/Amplifier Parameters . . . . . . . . . . . . . . . . . . . . . . . . . . . . . . . . . . . . . . . 111
Table 7-6
Tuning Test Selections . . . . . . . . . . . . . . . . . . . . . . . . . . . . . . . . . . . . . . . . . . . . 113
Table 7-7
Servo Tuning Parameters, with Suggested Initial Values . . . . . . . . . . . . . . . . 116
Table 7-8
Effects of Servo Tuning Parameters . . . . . . . . . . . . . . . . . . . . . . . . . . . . . . . . . 120
Table 7-9
Calibration Parameters . . . . . . . . . . . . . . . . . . . . . . . . . . . . . . . . . . . . . . . . . . . 127
Table 7-10
Joint Motion Parameters . . . . . . . . . . . . . . . . . . . . . . . . . . . . . . . . . . . . . . . . . . 130
Table 7-11
Link Dimension Parameters . . . . . . . . . . . . . . . . . . . . . . . . . . . . . . . . . . . . . . . . 132
Table 7-12
Cartesian Motion Parameters. . . . . . . . . . . . . . . . . . . . . . . . . . . . . . . . . . . . . . 134
Table 7-13
General Motion Specifications . . . . . . . . . . . . . . . . . . . . . . . . . . . . . . . . . . . . . 135
Table 7-14
S-Curve Parameters . . . . . . . . . . . . . . . . . . . . . . . . . . . . . . . . . . . . . . . . . . . . . . 137
Table 7-15
Stop-on-Force Parameters . . . . . . . . . . . . . . . . . . . . . . . . . . . . . . . . . . . . . . . . 138
Table 8-1
Discrete Input Test Requirements . . . . . . . . . . . . . . . . . . . . . . . . . . . . . . . . . . . 141
Table 8-2
Discrete Output Test Requirements . . . . . . . . . . . . . . . . . . . . . . . . . . . . . . . . . 143
Table A-1
Motor Configuration (from Table 6-1) . . . . . . . . . . . . . . . . . . . . . . . . . . . . . . . 160
Table A-2
Robot Initialization Specs (from Table 7-1) . . . . . . . . . . . . . . . . . . . . . . . . . . . 161
xiv
AdeptMotion VME Developer’s Guide, Rev B
Table of Contents
Table A-3
Encoder Parameters (from Table 7-3). . . . . . . . . . . . . . . . . . . . . . . . . . . . . . . .162
Table A-4
Motor/Amplifier Parameters (from Table 7-5) . . . . . . . . . . . . . . . . . . . . . . . . .162
Table A-5
Servo Tuning Parameters, with Suggested Initial Values (from Table 7-7) . .163
Table A-6
Calibration Parameters (from Table 7-9) . . . . . . . . . . . . . . . . . . . . . . . . . . . . .164
Table A-7
Joint Motion Parameters (from Table 7-10) . . . . . . . . . . . . . . . . . . . . . . . . . . .165
Table A-8
Link Dimension Parameters (from Table 7-11) . . . . . . . . . . . . . . . . . . . . . . . . .166
Table A-9
Cartesian Motion Parameters (from Table 7-12) . . . . . . . . . . . . . . . . . . . . . . .167
Table A-10
General Motion Specifications (from Table 7-13) . . . . . . . . . . . . . . . . . . . . . .168
Table A-11
S-Curve Parameters (from Table 7-14) . . . . . . . . . . . . . . . . . . . . . . . . . . . . . . .169
Table A-12
Stop-on-Force Parameters (from Table 7-15). . . . . . . . . . . . . . . . . . . . . . . . . .169
Table F-1
Parts List, MI6 . . . . . . . . . . . . . . . . . . . . . . . . . . . . . . . . . . . . . . . . . . . . . . . . . . . .189
Table F-2
Parts List, MI3 . . . . . . . . . . . . . . . . . . . . . . . . . . . . . . . . . . . . . . . . . . . . . . . . . . . .190
Table F-3
Output Module Specifications and Part Numbers (MP6) . . . . . . . . . . . . . . . .190
Table I-1
Pinout for MP6-S . . . . . . . . . . . . . . . . . . . . . . . . . . . . . . . . . . . . . . . . . . . . . . . . . .204
Table I-2
Pinout for MP6-M . . . . . . . . . . . . . . . . . . . . . . . . . . . . . . . . . . . . . . . . . . . . . . . . .205
Table I-3
Pinout for MP6-E. . . . . . . . . . . . . . . . . . . . . . . . . . . . . . . . . . . . . . . . . . . . . . . . . .206
Table J-1
Standard Calibration Utility Routines. . . . . . . . . . . . . . . . . . . . . . . . . . . . . . . . .212
Table J-2
Parameter Options for ca.rd.cal.parm. . . . . . . . . . . . . . . . . . . . . . . . . . . . . . .213
AdeptMotion VME Developer’s Guide, Rev B
xv
part 1
Overview and Hardware
Reference
AdeptMotion VME Developer’s Guide, Rev B
1
Introduction and Safety
1.1
1
How to Use This Manual
This manual provides technical information required to design user-equipment to be
compatible with the AdeptMotion VME product.
Follow These Steps to Install and Configure AdeptMotion VME
Part 1 – Overview and Installation
1. Read Chapter 1 to learn about Safety and Customer Service issues and
Chapter 2 to get an overview of the product and its components.
2. Read Chapter 3 to learn the steps in installing the product. Pay particular
attention to the Emergency Stop circuitry in this chapter.
Part 2 – Software: Description and Configuration
3. Read Chapter 4 for a detailed discussion about the operation and architecture of
the AdeptMotion control system.
4. Read Chapters 5 through 9 to learn how to configure and test the system using
the CONFIG_C and SPEC programs.
5. Read Appendices A through J for supplemental and advanced information on
the AdeptMotion VME product.
Related Manuals
Adept products come with a set of documentation that is defined by the products you
have ordered. In addition, there are optional manuals available if you are going to be
programming the Adept system. This manual refers to both the standard and optional
manuals. The following sections give a brief description of the contents and organization
of the Adept documentation set.
Standard Manuals
In addition to this AdeptMotion VME Developer’s Guide the following manuals are shipped
with the system:
AdeptMotion VME Developer’s Guide, Rev B
3
Chapter 1 - Introduction and Safety
Manual
Material Covered
Adept MV Controller User's Guide
This manual details the installation, safety
features, configuration, and maintenance of
your Adept controller.
V+ Operating System User’s Guide
A description of the V+ operating system.
Loading, storing, and executing programs is
covered in this manual.
V+ Language User’s Guide
V+ is a complete high-level language as well
as an operating system. This manual covers
programming principles for creating V+
programs.
Instructions for Adept Utility Programs
Adept provides a series of programs for
configuring and calibrating various features
of your Adept system. These utility programs
are described in this manual.
V+ Release Notes
Descriptions of the changes to V+. These
documents are updated as each version of V+
is released.
Other Adept Product Manuals
When you order AdeptVision VME, AdeptForce VME, or any AIM software product, you
will receive manuals that cover those products. A partial list is shown below.
Manual
Material Covered
AdeptVision VME User's Guide
Concepts and strategies for programming the
AdeptVision VME system. (see also the
optional AdeptVision Reference Guide below)
AdeptForce VME User’s Guide
Installation, operation, and programming of
the AdeptForce VME product.
Optional V+ Developer’s Manuals
If you will be programming V+ applications, you should order the optional V+ developer’s manuals (first three in the list below). These manuals contain a complete description of the commands, instructions, functions, and other features available in the V+
language and operating system. These manuals are essential for advanced applications
programming.
If you will be programming vision applications, you should order the AdeptVision Reference
Guide (in addition to the V+ developer’s manuals).
4
AdeptMotion VME Developer’s Guide, Rev B
Warnings, Cautions, and Notes
1.2
Manual
Material Covered
V+ Operating System Reference Guide
Descriptions of the V+ operating system
commands (known as monitor commands).
V+ Language Reference Guide
A complete description of the keywords in the
basic V+ language system.
AdeptVision Reference Guide
Descriptions of the additional V+ keywords
available with the AdeptVision VME option.
Warnings, Cautions, and Notes
There are three levels of special notation used in this manual. They are:
WARNING: Injury or major equipment damage could result if the actions
indicated in a “WARNING” are not complied with. A warning statement
typically describes the hazard, its possible effect, and the measures that
must be taken to reduce the hazard.
!
CAUTION: Damage to your equipment could result if the action specified
in the “CAUTION” is not complied with.
NOTE: A “NOTE” provides supplementary information, emphasizes a
point or procedure, or gives a tip for easier operation.
1.3
Safety
WARNING: See the Adept MV Controller User's Guide for additional safety
information.
Reading and Training for Users and Operators
Adept systems can include computer-controlled mechanisms that are capable of moving
at high speeds and exerting considerable force. Like all robot and motion systems, and
most industrial equipment, they must be treated with respect by the user and the operator.
This manual should be read by all personnel who operate or maintain Adept systems, or
who work within or near the workcell.
AdeptMotion VME Developer’s Guide, Rev B
5
Chapter 1 - Introduction and Safety
We recommend you read the American National Standard for Industrial Robot Systems - Safety
Requirements, published by the Robotic Industries Association(RIA), in conjunction with
the American National Standards Institute. The publication, ANSI/RIA R15.06 - 1992,
contains guidelines for robot system installation, safeguarding, maintenance, testing,
start-up, and operator training.
We also recommend you read the European Standard EN 60204, Safety of Machinery –
Electrical Equipment of Machines, particularly if the country of use requires a CE-certified
installation. (Seethe Adept MV Controller User's Guide for ordering information for national
and international standards.)
This manual assumes that the user has attended an Adept training course and has a basic
working knowledge of the system. The user should provide the necessary additional
training for all personnel who will be working with the system.
There are several warnings in this manual that say only skilled or instructed persons
should attempt certain procedures. These are defined as:
• Skilled persons have technical knowledge or sufficient experience to enable them
to avoid the dangers which electricity may create (engineers and technicians).
• Instructed persons are adequately advised or supervised by skilled persons to
enable them to avoid the dangers which electricity may create (operating and
maintenance staff).
System Safeguards
Safeguards should be an integral part of robot or motion workcell design, installation,
operator training, and operating procedures.
Adept systems have various communication features to aid in constructing system
safeguards. These include the emergency stop circuitry and digital input and output lines.
Some of these features are described in the Adept MV Controller User's Guide.
Safety Features on External VME Front Panel (VFP)
The optional external VME Front Panel (VFP) has four important safety features, the HIGH
POWER and PROGRAM RUNNING indicators, the AUTO/MANUAL keyswitch, and the
EMERGENCY STOP switch. If you choose not to use the VFP, you should provide similar
safety features by using the Front Panel/MCP and Digital I/O connectors on the System
I/O module. Refer to the Adept MV Controller User's Guide for more information, or call
Adept Customer Service at the numbers listed in section 1.5 on page 9.
WARNING: Entering the workcell when either the HIGH POWER or the
PROGRAM RUNNING light is on can result in severe injury. This warning
applies to each of the next three sections.
6
AdeptMotion VME Developer’s Guide, Rev B
Safety
Computer Controlled Robots and Motion Devices
Adept systems are computer controlled, and the program that is currently running the
robot or motion device may cause it to move at times or along paths you may not
anticipate. When the HIGH POWER light and the PROGRAM RUNNING light on the
optional VFP are illuminated, do not enter the workcell because the robot or motion
device might move unexpectedly. (The LAMP TEST button on the VFP allows these lights
to be periodically checked.)
Manually Controlled Robots and Motion Devices
Adept robots and other motion devices can also be controlled manually when the HIGH
POWER light on the VFP is illuminated. When this light is lit, motion can be initiated from
the system keyboard or from the optional Manual Control Pendant (MCP). If you have to
enter the workcell when this light is lit, press the MAN/HALT button on the MCP. This will
prevent anyone else from initiating unexpected motion from the system keyboard.
Other Computer Controlled Devices
In addition, Adept systems can be programmed to control equipment or devices other
than the robot or main motion device. The program controlling these other devices may
cause them to operate unexpectedly. Make sure that safeguards are in place to prevent
personnel from entering the workcell when a program is running.
Adept Technology highly recommends the use of additional safety features such as light
curtains, safety gates, or safety floor mats to prevent entry to the workcell while HIGH
POWER is enabled. These devices can be connected using the emergency stop circuitry.
Program Security
Programs and data stored in memory can be changed by trained personnel using the V+
commands and instructions documented in the V+ manuals. To prevent unauthorized
alteration of programs, you should restrict access to the keyboard. This can be done by
placing the keyboard in a locked cabinet. Alternatively, the V+ ATTACH and FSET
instructions can be used in your programs to restrict access to the V+ command prompt.
Overspeed Protection
Overspeed protection for a robot or motion system has to be taken into account during
system integration by the integrator or end-user. Overspeed protection is not guaranteed
by the controller hardware alone. The V + system software offers some overspeed
protection capabilities.
Voltage Interruptions
If the AC supply to the controller is interrupted, the passive E-stop output will be
automatically turned on (opened). In addition, the High Power, Brake Release, and Drive
Enable signals will be turned off. You must ensure that these signals are used to prevent a
hazardous condition.
AdeptMotion VME Developer’s Guide, Rev B
7
Chapter 1 - Introduction and Safety
Inappropriate Uses of the Adept MV Controller
The Adept MV controller is intended for use as a component sub-assembly of a complete
industrial automation system. The Adept MV controller sub-assembly must be installed
inside a suitable enclosure. Installation and usage must comply with all safety instructions
and warnings in this manual. Installation and usage must also comply with all applicable
local or national statutory requirements and safety standards.The Adept MV controller
sub-assembly is not intended for use in any of the following situations:
• In hazardous (explosive) atmospheres
• In mobile, portable, marine, or aircraft systems
• In residential installations
• In situations where the Adept MV controller sub-assembly may come into contact
with liquids.
• In situations where the Adept MV controller sub-assembly will be subject to
extremes of heat or humidity. See specifications for allowable temperature and
humidity ranges.
See the Adept MV Controller User's Guide for any additional restrictions.
1.4
Standards Compliance
See the Adept MV Controller User's Guide for information regarding compliance with
European and other standards.
8
AdeptMotion VME Developer’s Guide, Rev B
How Can I Get Help?
1.5
How Can I Get Help?
Within the Continental United States
Adept Technology maintains a Customer Service Center at its headquarters in San Jose,
CA. The phone numbers are:
Service Calls
(800) 232-3378
5:00am - 5:00pm PST (24 hour emergency coverage, 7 days a week)
(408) 433-9462 FAX
NOTE: When calling with a controller related question, please have the
serial number of the controller. If your system includes an Adept robot,
also have the serial number of the robot. The serial numbers can be
determined by using the ID command (see the V+ Operating System User’s
Guide) .
Application Questions
Contact your regional Applications support center as shown below.
San Jose, CA
Cincinnati, OH
Southbury, CT
408-434-5033
Fax 408-434-6248
8:00am - 5:00pm PST
Western Region States:
513-792-0266
Fax 513-792-0274
8:00am - 5:00pm EST
Midwestern Region States:
203-264-0564
Fax 203-264-5114
8:00am - 5:00pm EST
Eastern Region States:
LA, AR, MO, TX, OK, KS, NE,
CO, WY, MT, NM, AZ, UT, NV,
ID, WA, OR, CA
MI, OH, West PA, West NY, IN,
KY, TN, AL, MS, IL, WI, IA, MN,
ND, SD
ME, NH, VT, MA, CT, RI, East
NY, East PA, NJ, DE, MD, VA,
WV, NC, SC, GA, FL
Training Information
For information regarding Adept Training Courses in the USA, please call (408) 474-3246.
You can see the Adept Training class schedule on the Adept Web site – see page 10.
AdeptMotion VME Developer’s Guide, Rev B
9
Chapter 1 - Introduction and Safety
Within Europe
For service calls, application questions, and training information in Europe, Adept
Technology maintains a Customer Service Center in Dortmund, Germany. The phone
numbers are:
(49) 231 /75 89 40 from within Europe (Monday to Friday, 8:00am to 5:00pm)
(49) 231/75 89 450 FAX
Outside Continental United States or Europe
For service calls, application questions, and training information, call the Adept Customer
Service Center in San Jose, California USA:
1 (408) 434-5000
1 (408) 433-9462 FAX (service requests)
1 (408) 434-6248 FAX (application questions)
Adept World Wide Web Site
Adept has a Web site at the following URL:
http://www.adept.com
You can find current information about Adept products and services. You can go to the
Technical Publications section in the Services area and find information about Adept’s
manuals, including a section on corrections and updates.
Adept Bulletin Board Service
Adept maintains a bulletin board service for Adept customers. Adept posts application
hints and utilities to this bulletin board and users may post their own hints and
application notes. There is no charge for access to the bulletin board. (You will, of course,
incur normal long-distance phone charges for the call to the BBS.) The BBS number is (203)
264-5590. The first time you call you will be able to set up an account right from the BBS. If
you have any questions, call (203) 264-0564 and ask about the BBS.
10
AdeptMotion VME Developer’s Guide, Rev B
Product Description
2.1
2
Introduction
The AdeptMotion VME product consists of a hardware and software package that
provides high performance coordinated motion control for industrial automation devices.
AdeptMotion VME includes a motion interface module that plugs into the backplane of
the Adept MV controller, thus permitting the use of Adept's powerful V+ programming
language and operating system. Completely integrated software provides the same
easy-to-use high-level motion instructions incorporated into Adept robots. The hardware
supports up to six axes of motion control per board, and multiple boards may be installed
in one controller.
2.2
Features and Capabilities
System Features
• High-performance electronics and advanced control algorithms to ensure
optimum motion control
• Digital servo loop eliminates analog adjustments and drift problems
• Capable of controlling multiple mechanisms simultaneously and with full
coordination as well as independent axes of motion
• Proven controller platform with available options such as integrated vision
guidance and a graphical user interface
• Supports advanced motion control techniques such as conveyor tracking and force
sensing
• Compatible with all standard Adept options
Hardware Features
• Interfaces directly to industry standard motors, amplifiers, and encoders
• High-speed position latches support high-performance vision guidance and
conveyor tracking
• Overtravel inputs provide automatic detection of certain mechanical problems
• Optical isolation provided for encoder interface and dedicated I/O for maximum
noise immunity, safety, and flexibility
• Continuous monitoring of encoder signal presence and validity to assist detection
of encoder noise or failure
AdeptMotion VME Developer’s Guide, Rev B
11
Chapter 2 - Product Description
Software Features
• High-level motion instructions simplify programming
• Auto-tuning of feedforward servo control gains
• Comprehensive diagnostics and debug tools
• Index pulse checking to help verify encoder integrity
• Complete setup and start-up utilities to tailor the system to your application
• Complex mechanism kinematic solutions available as an option
• Flexible calibration options support a variety of homing methods: index pulse,
hard stop, limit switch
2.3
System Overview
AdeptMotion VME has been designed to function as an integral part of Adept’s
controllers. AdeptMotion VME is based upon Adept’s standard control platform and may
be used in conjunction with Adept robot controllers, vision systems, or stand-alone
motion controllers.
Typical components include an Adept controller with the motion system installed, a
manual control pendant, a programming terminal or graphics monitor, and a
user-supplied mechanism with servomotors, encoders, and amplifiers. Additional options
such as Adept supplied robots, vision, and force sensing are available.
AdeptMotion VME is intended to provide complete motion control of user-supplied
mechanisms. Users retain the flexibility of selecting the drive components that are best
suited for their applications. AdeptMotion VME can interface to industry standard drive
components including most servo amplifiers and optical encoders. Motion-related I/O
signals can utilize voltage levels chosen by the user.
A detailed explanation of the system components and specifications are provided in
subsequent sections.
2.4
AdeptMotion VME Hardware Overview
There are two major hardware components of the system:
• AdeptMotion Interface Module (MI6 or MI3)
• AdeptMotion Motion-interface Panels (MP6 kit)
The MI6 and MI3 are plug-in modules for the Adept MV controller and they make
VMEbus connections via two backplane connectors. All external interface signals from the
MI6 and MI3 are routed out of the front of the controller via three shielded flexible cables
to the Motion-interface Panels.
A functional block diagram of the AdeptMotion VME hardware is shown in Figure 2-1.
12
AdeptMotion VME Developer’s Guide, Rev B
AdeptMotion VME Hardware Overview
Up to four MI6 modules can be installed in an Adept MV controller, space permitting, as
long as there is at least one 030 module for every six axes or one 040 module for every
twelve axes. (These are rough guidelines, contact Adept Applications if you need detailed
advice.)
MI6/MI3 AdeptMotion Hardware Components
MI6 AdeptMotion VME Interface Module
The MI6 AdeptMotion Interface module is a six-channel board used to run the
AdeptMotion VME product. The MI6 module is a single-slot 6U VME module designed to
control a total of six motion axes or external encoders. Each MI6 module has six servo
drive outputs, six incremental encoder inputs, and digital I/O for machine and amplifier
control. All external device inputs and outputs are opto-isolated.
MI3 AdeptMotion VME Interface Module
The MI3 AdeptMotion Interface module is a three-channel board used to run the
AdeptMotion VME product. The MI3 module is a single-slot 6U VME module designed to
control a total of three motion axes or external encoders. Each MI3 module has three servo
drive outputs, three incremental encoder inputs, and digital I/O for machine and
amplifier control. All external device inputs and outputs are opto-isolated.
AdeptMotion VME Interface Panels (MP6)
The three Motion-interface Panels (MP6-E, MP6-M, and MP6-S) serve as the interface
between the MI6 module and the customer’s hardware. The MP6 panels also provide
mounting sockets for some I/O modules used in conjunction with the dedicated discrete
input/output signals. The MP6 panels also provide detachable barrier-type screw
terminal strips and 9-Pin D connectors for all field wiring terminations. See Chapter 3 for
information on the MP6 panels.
AdeptMotion VME Developer’s Guide, Rev B
13
Chapter 2 - Product Description
Motion Interface Module (MI6)
Latch signal
from VMEbus
High-Speed
Position
Latches
Optical
Isolation
MP6-E
Encoder Ports
(Typical - 1 of 6)
Encoder Channel 1
A Channel
B Channel
Index
Encoder
Ports
4x
Decode
Encoder
Connectors
Position
Counter
Motion Interface Panels (MP6)
Encoder Channel 2
Encoder Channel 3
Encoder Channel 4
Encoder Channel 5
Encoder Channel 6
MP6-S
OptoIsolation
Drive Channels
(Typical - 1 of 6)
Digital to Analog
Converter
Axis 1
Analog
Axis 3
Axis 4
Analog
Drive Enable
Drive Fault
Drive
Interface
Servo
Connectors
Axis 2
Axis 5
Axis 6
Dedicated
Discrete
Inputs/Outputs
(Opto-Isolated)
MP6-M
Axis 1
Machine Channels
(Typical - 1 of 6)
Axis 2
Axis 3
Axis 5
Axis 6
Overtravel
Home
Brake Release
Bus Interface
To Adept
Controller
VMEbus
Dual-Port
RAM
High Power Enable
I/O Modules
Figure 2-1. AdeptMotion VME System Block Diagram
14
AdeptMotion VME Developer’s Guide, Rev B
Mechanism
Interface
Machine
Connectors
Axis 4
Encoder, Drive and I/O Requirements
2.5
Encoder, Drive and I/O Requirements
Encoder Input Specifications
Number of encoder inputs MI6:
MI3:
6 optically-isolated input channels
3 optically-isolated input channels
Required encoder signals
Incremental AB Quadrature with optional
zero-index channel
Decode mode
Quadrature (4x)
Compatible encoder output
circuits
Differential line driver (RS 422 format),
nominal 5 Volt signal levels. (See Appendix G
for other encoder configurations.)
Encoder power
Supplied by user, configurable as isolated or
common between each channel
Maximum encoder input
frequency
1 MHz pulse rate, 4 MHz edge rate
Common mode rejection
2000 Volts per microsecond
Common mode voltage limit
300 Volts
Encoder count latches (optional)
One high-speed latch per channel, accessible
from V+ programs
Analog Servo Amplifier Output
Number of analog outputs
MI6 = 6, MI3 = 3
Command type
Current (torque) or velocity style drives
Output type
Analog, with separate analog return and
shield connections provided
Output range
±10 Volts DC into 10K ohms load
Output impedance
100 ohms (approx.)
DAC resolution
12 bits
AdeptMotion VME Developer’s Guide, Rev B
15
Chapter 2 - Product Description
Dedicated Digital Inputs
Number of dedicated inputs
MI6:
MI3:
18 (3 per channel x 6)
9 (3 per channel x 3)
Function of inputs
Per channel
1 Overtravel limit
1 Home sensor
1 Drive Fault
Input type
MI6/MI3: Optically-isolated input channels
built into MI6 and MI3
Dedicated Digital Outputs
Number of dedicated outputs MI6:
MI3:
13 (2 per channel x 6, 1 additional per board)
7 (2 per channel x 3, 1 additional per board)
Function of outputs
Per channel
1 Drive Enable
1 Brake Release
Per board
1 High Power Enable
Output type
High Power Enable and Brake Release:
Optically-isolated output modules,
user-supplied (Opto 22 Generation 4 I/O
modules or equivalent; see Appendix F)
Drive Enable:
MI6/MI3: Optically isolated output
(onboard isolation built into MI6 and MI3)
16
AdeptMotion VME Developer’s Guide, Rev B
AdeptMotion VME Performance Specifications
2.6
AdeptMotion VME Performance Specifications
Hardware Specifications
Number of axes of control per
module
MI6:
MI3:
6
3
Maximum Motion Interface
Modules per controller
4 modules per one controller, subject to
backplane slot availability and power supply
limitations.
Position latch response time, max
5 µs (MI6) + 5 µs (SIO)
Position latch input
Via three fast DIO ports on SIO module
Position Resolution
± 1 encoder edge
Speed Range
Up to 4,000,000 encoder edges per second or 6
significant digits of axis units per second.
Optional user-selectable filtering provided
for operation at 1,000,000 edges/sec.
Software Specifications
Maximum axes (see also
hardware limitations above)
Per controller: 24
Servo Loop
PID (Proportional-Integral-Differential)
with Velocity and Acceleration Feedforward
Servo Loop Rate
1 kHz (default)
500 Hz (user-configurable)
Absolute Position Range
25 bits (± 16,777,216 encoder edges) or 7
significant digits of axis units (mm or deg)
Servo Gain Parameters
Proportional Gain
Proportional Pole
Proportional Zero
Integral Gain
Maximum Integrator Value
Maximum Integrator Step
Velocity Feedforward Gain
Acceleration Feedforward Gain
DAC Output Filter
Control loop rate
Default is 1000 Hz (each axis serviced every
1 millisecond). 500 Hz (2 msec) loop rate
available as a user-configurable option
Trajectory generation
Default is 16 ms (new setpoint sent to servo
loop every 16 ms). User-configurable to 2 ms,
4 ms, 8 ms with optional Enhanced Trajectory
Control software license.
Per robot: See Device Module documentation
AdeptMotion VME Developer’s Guide, Rev B
17
Chapter 2 - Product Description
2.7
Environmental Specifications
Internally Mounted AdeptMotion VME Components
All components of the AdeptMotion VME option that reside inside the Adept controller
are specifically designed to function within the operating conditions of that controller.
Internal components of the AdeptMotion VME option are governed by the controller's
specifications. Refer to the documentation of the controller for complete environmental
specifications.
Externally Mounted AdeptMotion VME Components
External components include the Motion-interface Panels (MP6), their associated
hardware, and the interconnect cables. The environmental specifications for these
components are listed in the table below.
Table 2-1. Specifications For Externally-Mounted Components
Operating Temperature
0° to 70° C
Operating Humidity
0 to 90% relative humidity, non-condensing
Storage Temperature
-65° to 100° C
Storage Humidity
0 to 90% relative humidity, non-condensing
18
AdeptMotion VME Developer’s Guide, Rev B
MI6 and MI3 Module
Technical Reference
3.1
3
Introduction
NOTE: Unless otherwise noted, every reference to the MI6 module in this
chapter is equally applicable to the MI3 module, except the number of
channels. The MI6 supports up to six channels; the MI3 has three
channels.
Configuring the AdeptMotion VME product with an MI6 or MI3 module is a process that
should be done step-by-step in the order described in this chapter. See Chapter 2 for MI6
and MI3 product description and specifications.
Multiple MI6 modules may be required, for example, an 8-axis robot could use six
channels on one MI6 and two channels on a second MI6. The six channels can be freely
mapped in software. For example, one MI6 can support one robot of up to 6-axes, a 2-axis
robot with a 4-axis robot, or a 4-axis robot with two conveyor-belt encoders.
Overview of Installation Process
1. Verify that the Adept MV controller is configured properly for your application.
See section 3.2 in this manual.
2. Inspect the MI6 module(s) to make sure switches and jumpers are set correctly
(section 3.3).
3. Review the proper field wiring practices (section 3.4).
4. Select an Emergency Stop wiring plan for your installation (section 3.5).
5. Install the controller in a suitable enclosure (section 3.6).
6. Install mounting rails in the same enclosure as the controller, then mount the
three MP6 modules on the rails (section 3.7).
7. Connect cables from the Adept MV controller to the MP6 modules (section 3.8).
8. Install wiring to customer equipment from the MP6-M and MP6-S. Also select
and install opto-modules (section 3.9 and section 3.10).
9. Install wiring to encoders from the MP6-E (section 3.11).
When the above process is complete, the next step is to use the CONFIG_C and the SPEC
utility programs to configure the software for your system. The information for doing this
is in Part 2 of this manual.
AdeptMotion VME Developer’s Guide, Rev B
19
Chapter 3 - MI6 and MI3 Module Technical Reference
3.2
Configuration of the Adept MV Controller
The Adept MV controller must be configured with the correct amount of memory
(DRAM) on the System Processor module for the application being performed. If you are
installing additional MI6 modules on an existing system, you must make sure there are
the correct number of 030 or 040 modules to perform the application. If you are uncertain
of these requirements, please contact Adept Customer Service. See section 3.6 on page 32
and the Adept MV Controller User's Guide for general information on controller installation
and setup.
3.3
Switches, Jumpers and Resistor-Packs on the MI6 Module
This module may be configured using switch, jumpers and moveable/replaceable
Resistor-packs. Check the settings in this section to see that they are configured correctly
for your application. The default settings from the factory will work for most situations,
but you may need to change something depending on your application and the type of
hardware you are using.
CAUTION: If you are not familiar with removing and installing VME
modules in the Adept MV controller, refer to the Adept MV Controller
User's Guide. You must turn off power to the controller before removing
or installing modules. Also, observe proper precautions against damage
from static electricity.
!
VMEbus Address Settings
Each motion interface module must have a unique VMEbus address. The information in
Table 3-1 shows how to set the address. The address is set at DIP Switch SW1 on the
MI3/MI6 PC board. To operate the switch, use a small insulated instrument, such as the
point of a pen. Each switch position is a miniature slide switch. To open a switch, slide the
switch to the side marked open (some switches may be marked On; On = Closed). See
Figure 3-1 for the location of SW1.
NOTE: If you have multiple motion interface modules, refer to the Adept
MV Controller User's Guide
Table 3-1. VMEbus Address Switch Settings for MI6 Module
20
Switch Position on Switch SW1
MI6 Module
Number
1
2
3
4
1
Closed
Closed
Closed
Closed
2
Closed
Closed
Closed
Open
3
Closed
Closed
Open
Closed
4
Closed
Closed
Open
Open
5
Closed
Open
Closed
Closed
6
Closed
Open
Closed
Open
AdeptMotion VME Developer’s Guide, Rev B
Switches, Jumpers and Resistor-Packs on the MI6 Module
Drive Fault Block Delay Time
The jumper locations shown in the table below control the delay time on responding to an
amplifier fault immediately after the amplifier has been enabled with a Drive Enable
signal. This delay allows a period of time for the drives to stabilize electrically. Each axis is
controlled by one jumper – the delay time for an axis can be either 0.5 sec (the default) or
1.0 sec. The default setting should be sufficient in almost all cases. See Table 3-2 for the
settings for the delay time durations. See Figure 3-1 for the location of the jumpers on the
MI6 board.
Table 3-2. Delay Time Settings for MI6
Encoder Channel
1
2
3
4a
5
6
Jumper Number
JP6
JP8
JP10
JP12
JP13
JP15
0.5 seconds (default)
On
On
On
On
On
On
1.0 seconds
Off
Off
Off
Off
Off
Off
a
Channels 4, 5, and 6 are not supported on the MI3 module.
Encoder Input Configuration (Differential vs. Single-Ended)
The MI6 board is shipped from the factory with the encoder circuitry set for differential
encoder input. Adept strongly recommends using encoders with differential outputs for
maximum noise immunity, and to support the “broken-wire”/encoder fault detection
circuit on the MI6. However, AdeptMotion VME can be configured for use with
single-ended encoders. See Table 3-3 for configuration details. See also Figure 3-1 for
resistor pack locations, and Figure 3-10 on page 48 for encoder circuit schematic.
WARNING: Installing the resistor pack in the position for “Single-ended
Output” will automatically disable the “broken-wire”/encoder fault
detection. This will override the software setting described in the section
“Encoder Broken-Wire Detection” on page 106. (The broken-wire
detection feature is not compatible with single-ended encoders.) If your
encoder fails, and the detection feature is disabled, damage or injury
could result.
Table 3-3. Encoder Input Settings for MI6 Board
Encoder Channel
Differential Output –
Default, 470 ohm SIP in these RP sockets
(signal failure detection enabled)
2
3
4a
5
6
RP3
RP6
RP9
RP12
RP15
RP18
RP2
RP5
RP8
RP11
RP14
RP17
➔
Single-ended Output –
move SIPs from above to these RP sockets
(signal failure detection disabled)
a
1
➔
Channels 4, 5, and 6 are not supported on the MI3 module.
AdeptMotion VME Developer’s Guide, Rev B
21
Chapter 3 - MI6 and MI3 Module Technical Reference
Encoder Terminating Resistors
The MI6 board is shipped from the factory with 330 ohm encoder input terminating resistors
installed to suit RS-422 style encoders; see Table 3-3. The resistors are socketed, 6-pin SIP
packages. In rare cases, if you are using encoders with non-RS-422 output, you can replace
the 330 ohm resistor with a different value (the value chosen would depend on the specific
encoder type).
Table 3-4. Location of Encoder Terminating Resistors on MI6 Board
Encoder Channel
1
2
3
4a
5
6
Line terminating resistor, default 330 ohm, for
RS-422 encoders, can be changed for
non-RS-422 encoders.
RP1
RP4
RP7
RP10
RP13
RP16
a
Channels 4, 5, and 6 are not supported on the MI3 module.
Encoder Configuration (Software Parameters)
In addition to the hardware-configured encoder options, certain additional
encoder-configuration features are specified by software parameters. See “Encoder
Configuration: Zero-Index, Error Reporting, and Filtering” on page 105.
Encoder Filtering
If your encoders are excessively noisy, or you have electrical interference to the encoder
power supply or wiring, you should first see “Proper Wiring and Electrical Design
Practices” on page 26. If, after reviewing your electrical installation, you need to filter out
noise on your encoder lines, you can use the Encoder Configuration value to select
additional hardware digital-filtering, as described on page 107. This will reduce the
maximum encoder count rate to 1 MHz.
22
AdeptMotion VME Developer’s Guide, Rev B
Switches, Jumpers and Resistor-Packs on the MI6 Module
MI6 Logic Voltage Configuration for Digital Input Signals
The MI6 can be configured to operate with either a 5V (min 3.0V, max 5.7V) or a 12/24V
(min 8.75V, max 27.5V) logic interface. You must configure the MI6 voltage option, and then
install the MP6 Machine and Servo panels accordingly. The MI6 is normally shipped
configured for 12V input, and must be reconfigured if you decide to operate at 5V.
(Alternative resistors, for 5V operation, are included in the MP6 kit.)
The input voltage is determined by the value of a 6-pin resistor pack. See Table 3-5 for
configuration details and Figure 3-1 for resistor pack locations.
The output voltage is not affected by this setting. All MI6 outputs will function from 5V to
24V without configuration. (See page 39 and page 42.)
Table 3-5. MI6 Voltage Configuration Resistor Values for 12V or 5V Operation
Channel (Home,
Overtravel, Drive
Fault)
1
2
3
4a
5
6
12V and 24V Logic
(min 8.75V, max
27.5V)
RP19 =
2.7K Ω
RP20 =
2.7K Ω
RP21 =
2.7K Ω
RP22 =
2.7K Ω
RP23 =
2.7K Ω
RP31 =
2.7K Ω
5V Logic
(min 3.0V, max 5.7V)
RP19 =
470 Ω
RP20 =
470 Ω
RP21 =
470 Ω
RP22 =
470 Ω
RP23 =
470 Ω
RP31 =
470 Ω
a
Channels 4, 5, and 6 are not supported on the MI3 module.
Analog Power Source Selection
The MI6 has six ±10V analog command outputs which are used to command the motor
drive amplifiers. The analog commands are generated by six Digital-to-AnalogConverters (DAC). The DAC's require +12V, –12V, and Power Return (ground). The MI6
may be configured to draw this ±12V dc supply from either the controller internal power
supply, or an external user-supplied voltage source.
In most installations you can use the factory-default setting, internal power. However, using the
external power option may be necessary if your Drive Amplifiers do not have a floating,
differential, analog Command Drive input. (Some drive amplifiers reference their analog
input to their own internal power supply. This can cause a voltage conflict or else a
ground loop when the Adept controller and the amplifier are connected.)
When using the external power option, the analog circuits on the MI6 (the DAC’s and the
analog output drivers) are fully optically-isolated from the digital circuits on the MI6. This
may also help to improve noise immunity when the Adept controller is being operated in
an electrically-noisy environment.
The MI6 is normally shipped from the factory configured for Internal Analog Power. The
user should verify this setting, and can change it using jumpers JP1, JP2, JP3, and JP19.
When the MI6 is set to external power, the user must provide ±12V dc power using the
+12VDC, -12VDC, and RTN connections on the MP6-S. (When the MI6 is set to internal
power, the user does not have to provide Analog Power to the MP6-S.)
AdeptMotion VME Developer’s Guide, Rev B
23
Chapter 3 - MI6 and MI3 Module Technical Reference
Jumpers JP1, JP2, and JP3 each consist of a 3-pin header, and a jumper that can be used to
link either pins 1 and 2 (internal power) or pins 2 and 3 (external power). Jumper JP1
controls the +12V source for all six channels of the MI6. Jumper JP2 controls the –12V
source for all six channels, and jumper JP3 controls the power return (ground reference)
for all six channels. Jumper JP19 connects the analog ground to the chassis ground. See
Table 3-6 for the jumper settings and Figure 3-1 for jumper locations.
WARNING: Jumpers JP1/2/3 must be changed together. You must either
set all three jumpers for internal power, or all three for external power.
You must not mix the settings, as this could cause unpredictable robot
motion.
Table 3-6. Analog Power Source Jumper Settings
JP1
JP2
JP3
JP19
Description
1–2
1–2
1–2
On
±12V power to analog section supplied by
MP6 module (default). Analog ground
connected to Chassis ground.
2–3
2–3
2–3
Off
User-supplied ±12V power to analog section.
Analog ground not connected to Chassis
ground.
Other Required Jumper Settings
The following jumper should be set as indicated below.
Table 3-7. Additional MI6 Jumper Settings
Jumper Number
Required Setting
JP4
Jumper installed
24
AdeptMotion VME Developer’s Guide, Rev B
Switches, Jumpers and Resistor-Packs on the MI6 Module
RP17
JP6
JP8
JP10
JP12
JP15
JP13
RP14
RP16
RP18
RP15
RP13
RP7
RP10
RP8
RP12
RP9
RP11
RP6
RP2
RP5
RP3
RP1
RP4
RP19
RP20
RP21
RP23
RP22
RP31
SW1
ON
1 2 3 4
3
2
1
JP3
JP2
JP1
JP19
Adept MI6 Board – Component Side
Figure 3-1. Switch, Jumper and Resistor-pack Locations on the MI6 Boards
AdeptMotion VME Developer’s Guide, Rev B
25
Chapter 3 - MI6 and MI3 Module Technical Reference
3.4
Proper Wiring and Electrical Design Practices
Designing a high performance servo system requires attention to electrical design.
AdeptMotion VME is designed to respond to high-resolution encoder inputs, up to 4
MHz. Most drive amplifiers, DC power supplies, and brush-type motors are potential
sources of high-frequency electrical noise. Other equipment in the workcell can also
generate noise. Proper system wiring, and especially grounding, is very important to a
successful installation. The function of proper grounding is two-fold: first, to reduce the
risk of electrical shock from faults in your high-voltage equipment; and second, to help
shield from electro-magnetic and radio frequency interference (EMI and RFI).
All connections of AdeptMotion VME signals to user-supplied hardware are made via
connectors on the three MP6 panels. For proper operation, you must use good wiring
practices. Follow the general guidelines presented below. In addition, observe all
applicable local and national safety codes.
Be sure to:
• Verify that all equipment, including motor drives (amplifiers), the robot
mechanism, and the Adept controller chassis, is properly grounded.
• Ensure that all three MP6 Ground terminals are connected to the user-supplied
ground point.
• Ensure that the MP6 DIN-mounting rail is connected to the user-supplied ground
point.
• Use only one ground point (star ground system) and keep all ground wires as
short as possible. For best results, use braided ground straps for ground
connections. (Braid has lower high-frequency impedance, for a given
cross-sectional area.)
• Use shielded twisted-pair cable for all encoder connections and analog drive
signals, and preferably for all signals.
• Use separate cables for every encoder and motor drive. Route digital signals,
motor power, and encoder signal cables separately from one another.
• Locate noise inducing devices away from the controller and other AdeptMotion
hardware.
• Provide noise-free regulated power for all AdeptMotion hardware.
• Maintain the integrity of optical isolation by using power sources other than the
Adept controller to power all signals from user-supplied equipment.
• Size all wire according to recognized electrical standards and applicable codes.
• Use proper arc suppression devices on all relay and solenoid coils.
• Adept recommends using power line filters to help prevent electrical noise from
the drive amplifiers “contaminating” the AC power lines, and vice-versa.
26
AdeptMotion VME Developer’s Guide, Rev B
Emergency Stop Circuit Wiring
3.5
Emergency Stop Circuit Wiring
VFP Options
Starting in 1996, Adept will offer two types of external front panels (VFP) intended for use
in CE-Certified1 Category 1 or Category 3 installations. The examples shown in this
chapter are typical of Category 1 installations. For more information about these VFPs, see
the Adept MV Controller User's Guide.
Circuit Configuration Options
The Emergency Stop (E-Stop) circuit must be used by the customer to include safety
devices in the design of the AdeptMotion VME workcell. Examples are light curtains,
safety gates, and pressure-sensitive mats that would open the E-Stop circuit when
activated. The three figures in this section cover different possible configurations:
• Figure 3-2 shows a typical E-Stop circuit including the MI6 (or MI3) module, but
with no external front panel (VFP) installed.
• Figure 3-3 shows a typical E-Stop circuit including the MI6 module with an
external VFP installed (can be either an Adept VFP or a user-supplied front panel).
• Figure 3-4 is an alternative to Figure 3-3 with a special user-supplied front panel.
For many situations, the circuits in Figure 3-2 and Figure 3-3 will be appropriate. These
two circuits include the hold-to-run button of the optional Manual Control Pendant
(MCP) in the controller E-Stop circuit.
The third circuit, Figure 3-4, is more complex. It uses the MCP hold-to-run button signal to
directly interrupt high power to the drive amplifiers, without operating the controller
E-Stop input. This circuit also requires the operator to press a push-button to complete the
power-on sequence. Some national regulations require this latter feature.
WARNING: All three circuits are designed to ensure that operation of
either an E-Stop or the hold-to-run button will remove power from drive
amps using only electro-mechanical means (switches, relays). It is your
responsibility to design a safe system, taking into account the special
circumstances of your application. These circuits may not be applicable in
all situations. Many applications will require additional external
interlock-relays to comply with local or national safety regulations.
Refer also to section 1.3 of this user’s guide for general safety information. For more
information on the operation and safety features of the VFP, see the Adept MV Controller
User's Guide. Also refer to all applicable local and national safety codes.
1
CE Certification is a procedure required by regulations of the EU (European Union)
countries.
AdeptMotion VME Developer’s Guide, Rev B
27
Chapter 3 - MI6 and MI3 Module Technical Reference
External E-Stop Input (On SIO Module)
Pins 42 and 44 on the Digital I/O connector on the SIO module must be connected
through a user-provided normally-closed (NC) safety circuit. Multiple external
emergency stop switches can be connected in series. The E-Stop circuit should also be
used to monitor other safety-critical items, including but not limited to, safety barriers and
encoder power supplies.
The external E-Stop input (pin 42) is used by the controller to disable the High Power
Enable output and to disable the Drive Enable outputs. The HPE output can be used to
control the user-supplied power contactor for the motor drives (see Figure 3-8). The
optional Manual Control Pendant (MCP) emergency-stop switch and hold-to-run switch
(also known as the operator’s palm-activated interlock) are also monitored by the
controller (see the MCP User’s Guide for details).
Designing the correct E-Stop circuit into your system will help ensure that servo power is
removed from the motor drive amplifiers in the event of an emergency. Make sure
sufficient E-Stop switches are provided in the workcell, so they can be easily reached in an
emergency.
See the Adept MV Controller User's Guide for more information about the SIO module.
Passive E-Stop Output (On SIO Module)
The passive E-Stop output from the SIO module is a vital part of your safety system. This
output consists of a normally-open, voltage-free, relay contact. It is controlled by signals
received from the external E-Stop devices, MCP and Front Panel E-Stops, and the system
High-Power Enable command. (System faults include power failure, and Overtravel and
Drive Fault signals monitored by the MI6.)
The MI6 HPE (High Power Enable) output is also controlled, indirectly, by the same
signals. However, the HPE output uses electronic logic circuits, whereas the passive
E-Stop output uses only electro-mechanical relays to monitor the E-Stop circuits. Many
safety codes do not permit electronic control of E-Stop signals, therefore the passive
E-Stop output must be used to ensure that the user's High Power contactor is opened if
the E-Stop circuit is activated. (The Passive E-Stop output from the SIO is usually
connected in series with the HPE output from the MI6 and MP6-M.)
The Passive E-Stop output should also be used to control any other user devices in the
workcell that need to be stopped in an Emergency. Such devices might include other
moving equipment such as conveyor belts, indexing or transfer devices, pneumatic
systems, etc.
The passive E-Stop output is rated at 10 VA, for example 0.8A at 12VDC or 0.4A at
24 VDC. This rating must not be exceeded. To protect the output relay, a commutating
diode (also known as a snubber or flywheel diode) should be used on any inductive loads,
such as relay or solenoid coils. (Typical applications may use a 1N4005 diode.)
28
AdeptMotion VME Developer’s Guide, Rev B
Emergency Stop Circuit Wiring
SIO Module
System Power
(Controller
Switch)
Remote System
Power Enable
Enable
Power
FP/MCP
E-Stop
Voltage
7
6
FP/MCP
Bypass Plug,
install if no
external Front
Panel (VFP) or
MCP in system.
14
16
44
Digital I/O
Connector
= Analog Return
FP/MCP Connector
To Power Relay
= Digital Return
19
(MV-8/MV-19 only)
43
41
System
Faults
User External
E-Stop Devices
42 External E-Stop Input
45
E-Stop Signal
to backplane
Passive E-Stop Output
46
(0.8 A at 12 VDC,
0.4 A at 24 VDC,
see text)
User
Power
Supply
MI6 or MI3 Module
HPE
Output
Drive
Fault
Input
– –
+
+
User
Power
Supply
MP6-M
HPE
+
–
+
Commutating
Diode, see
text
–
DF +
+
–
Drive
Fault
Output
DF –
MP6-S
L1
L2
L3
– +
User
Power
Amps
Figure 3-2. MI6 Motion E-Stop Diagram, No VFP
AdeptMotion VME Developer’s Guide, Rev B
29
Chapter 3 - MI6 and MI3 Module Technical Reference
External Front Panel – typical
SIO Module
System Power
(Controller
Switch)
Remote System
Power Enable
FP/MCP Connector
= Analog Return
System
Power
(VFP
Switch)
19
(MV-8/MV-19 only)
To Power Relay
= Digital Return
(Adept VFP or user-supplied)
E-Stop
Voltage
MCP
E-Stop
7
7
6
6
7
14
14
14
16
16
16
6
E-Stop
Hold-to-Run
6
7
Digital I/O
Connector
Enable
Power
14
16
44
MCP Bypass
Plug, install
if no MCP
in system
43
41
System
Faults
User External
E-Stop Devices
42 External E-Stop Input
45
E-Stop Signal
to backplane
Passive E-Stop Output
46
(0.8 A at 12 VDC,
0.4 A at 24 VDC,
see text)
User
Power
Supply
MI6 or MI3 Module
HPE
Output
Drive
Fault
Input
– –
+
+
User
Power
Supply
MP6-M
HPE
+
–
+
–
DF +
+
–
Drive
Fault
Output
DF –
MP6-S
L1
L2
L3
Figure 3-3. MI6 Motion E-Stop Diagram with VFP and/or MCP
30
Commutating
Diode, see
text
AdeptMotion VME Developer’s Guide, Rev B
– +
User
Power
Amps
Emergency Stop Circuit Wiring
External Front Panel (user-supplied)
SIO Module
System Power
(Controller
Switch)
Remote System
Power Enable
FP/MCP Connector
= Analog Return
19
(MV-8/MV-19 only)
To Power Relay
= Digital Return
System
Power
(VFP
Switch)
E-Stop
Voltage
MCP
E-Stop
7
7
6
6
7
14
14
14
16
16
16
6
On
E-Stop
Hold-to-Run
Off
6
7
Digital I/O
Connector
Enable
Power
14
16
44
MCP Bypass
Plug, install
if no MCP
in system
43
41
User External E-Stop Devices
System
Faults
42
External E-Stop Input
45
E-Stop Signal
to backplane
Passive E-Stop Output
46
(0.8 A at 12 VDC,
0.4 A at 24 VDC,
see text)
User
Power
Supply
MI6 or MI3 Module
HPE
Output
–
+
Drive
Fault
Input
+
–
–
+
User
Power
Supply
MP6-M
HPE
Commutating
Diode, see
text
+
–
+
–
DF +
Drive
Fault
Output
DF –
MP6-S
L1
L2
L3
– +
User
Power
Amps
Figure 3-4. MI6 Alternative Motion E-Stop Diagram with VFP and/or MCP
AdeptMotion VME Developer’s Guide, Rev B
31
Chapter 3 - MI6 and MI3 Module Technical Reference
3.6
Enclosure for the Adept MV Controller
The Adept MV controller should be installed in a suitable enclosure; see the Adept MV
Controller User's Guide for information on using mounting brackets to install the controller.
An enclosure can be very beneficial in helping protect the controller and associated
peripherals and wiring from noise problems and other hazards that are typical in many
industrial settings.
The enclosure must provide the internal environmental requirements (temperature,
humidity, etc.) required by the controller. The enclosure must also meet all local and
national safety codes after the controller is installed. The Emergency Stop circuitry
(discussed in the previous section) must be incorporated into the setup of the enclosure.
It is a good idea to select an enclosure that is large enough so the three MP6 panels can be
installed in the same enclosure as the controller. The enclosure is also a good place to
install additional user equipment such as power supplies, DIN mounting rails, wiring
terminal strips, etc.
NOTE: Make sure to keep low-voltage control signal wiring away from
high voltage wiring to avoid interference and noise problems.
3.7
MP6 Panel Technical Reference
The three 6-channel Motion-interface Panels (MP6-M, MP6-S, and MP6-E) serve as the
interface between the MI6 module and the customer’s hardware. The MP6-M panel also
provides mounting sockets for up to seven Opto-22 output modules. Figure 3-5,
Figure 3-6, and Figure 3-7 show the layout and dimensions of the MP6 panels. Figure 3-8
shows a typical system wiring for one axis of motion. One set of MP6 panels is required
for every MI6. The MP6 kit is also intended for use with the MI3 module. In this case, only
the first three channels of the MP6 panels will be used.
WARNING: The six removable connectors on the MP6-M are purposely
not keyed so they can be interchanged for diagnostic purposes. It is
imperative that these connectors are not interchanged during normal
operation. Doing so can cause unstable operation which could result in
serious equipment damage and injury to personnel.
Rail-Mounting the MP6 Panels
The MP6 panels are designed to be installed on DIN-style industrial mounting rails. The
MP6 panels will fit on these types of rails:
32
TS 35
Symmetrical
35mm x 7.5mm
TS 35
Symmetrical
35mm x 15mm
TS 32
Asymmetrical
32mm x 15mm
AdeptMotion VME Developer’s Guide, Rev B
MP6 Panel Technical Reference
DIN rail hardware is available from many vendors, including:
• Weidmüller
• Allen-Bradley
• Phoenix
Install the mounting rails in the workcell in a location that is easily accessible and close
enough to the Adept MV controller so the motion interface cables can reach between the
controller and the MP6 panels. One of the best places to install the mounting rails is in the
same enclosure as the controller.
A variety of other DIN-rail mountable hardware is available from the vendors listed
above, including terminal blocks, end brackets, opto-isolation systems (for voltage-level
shifting and additional current drive) and power supplies.
Panel-Mounting the MP6 Panels
If you do not want to use DIN-rail mounting, you can use panel (screw) mounting instead.
1. Remove and discard the MP6 mounting enclosures. This is done by removing two
screws on either end of each unit, then sliding out the printed circuit assembly
(PCA).
2. Use the four mounting holes provided on each MP6 panel to mount the PCA with
appropriate screws.
WARNING: Be sure to use suitable stand-offs or spacers and comply with
national and local electrical regulations regarding spacing and insulation.
Plug-In Opto Modules on the MP6-M
The plug-in opto-isolator output-modules are standard Opto-22 Generation-4 single-point
type, or equivalent. These modules have built-in indicator LED's and are individually
fused. The mounting panels are supplied from Adept without I/O modules so you can
choose the type of modules (AC, DC, voltage range) which best suit your particular
application. Some of these modules may be ordered directly from Adept.
See section 3.9 for more detailed information on the opto modules.
AdeptMotion VME Developer’s Guide, Rev B
33
Chapter 3 - MI6 and MI3 Module Technical Reference
P1
50
33
17
Motion-interface Panel - SERVO (MP6-S)
P1
S
E
R
V
O
108mm
(4.25")
CHAN2
CHAN4
CHAN6
SPARE
CHAN1
CHAN3
CHAN5
ANALOG
PWR
136.5mm
(5.375")
34
18
1
1 +12V
1
2 RTN
3 –12V
4 SHD/GND
6
DE1
CD1
ANALOG PWR
9
DF1
5
Figure 3-5. MP6-S Panel – Layout and Dimensions
P1
50
33
17
Motion-interface Panel - ENCODER (MP6-E)
P1
E
N
C
O
D
E
R
108mm
(4.25")
CHAN2 CHAN4 CHAN6 RESVD
CHAN1 CHAN3 CHAN5
34
18
ENC PWR
112mm
(4.4")
1
1 PWR
1
6
9
2 RTN
3 SHD
4 GND
ENC PWR
5
Figure 3-6. MP6-E Panel – Layout and Dimensions
34
AdeptMotion VME Developer’s Guide, Rev B
MP6 Panel Technical Reference
P1
34
50
18
33
1
17
108mm
(4.25")
GND
SHD
5VRTN
5V
P1
4
3
2
1
M
A
C
H
I
N
E
LOGIC PWR
LOGIC
PWR
CHAN1
SPARE
BRAKE-BR1
OVERTRAVEL
HOME
CHAN4
206.4mm
(8.125")
HOME
BRAKE-BR4
OVERTRAVEL
9
8
7
6
5
4
3
2
1
SHD
BR–
BR+
HM–
HM+
OT–
CHAN2
BRAKE-BR2
CHAN5
OVERTRAVEL
HOME
HOME
BRAKE-BR5
OVERTRAVEL
OT+
CHAN3
BRAKE-BR3
CHAN6
OVERTRAVEL
HOME
1
2
3
4
5
6
7
8
9
OT+
OT–
HM+
HM–
BR+
BR–
SHD
HOME
BRAKE-BR6
OVERTRAVEL
HPE
HIGH POWER ENABLE-HPE
HPE
4 SHD
3 GND
2 HPE–
1 HPE+
Figure 3-7. MP6-M Panel – Layout and Dimensions
AdeptMotion VME Developer’s Guide, Rev B
35
Chapter 3 - MI6 and MI3 Module Technical Reference
AdeptMotion VME Hardware
Customer's Hardware
+
Drive Amplifier
(Typical)
MP6-S
Drive
Enable
DE+ 1
Drive
Enable
Output
DE– 2
Typical
wiring for
one of six
axes
+
DF+ 4
Drive
Fault
Drive
Fault
Input
DF– 5
SHD 3
7
Analog Command CD+
CD–
1
2
3
4
+12VDC
RTN
–12VDC
SHD/GND
Motor
Output
Command
Signal
8
M
Analog
Power
(optional,
see text)
To Passive E-Stop
Output (SIO)
User Power
Supply
Note: Opto-modules shown
as simplified equivalent
circuit only.
MP6-M
Output
HPE+ 1
High Power
Enable
HPE– 2
+ –
*
Contactor
Line Filter
(recommended)
L1
Positive
Overtravel
OT+ 1
2
Input
Negative
Overtravel
3
Typical
wiring for
one of six
axes
OT–
L2
4
Home
HM+ 5
User I/O
Power Supply
+
Input
–
HM– 6
BR+
Output
BR–
7
Brake
Release
8
+ –
User Power Supply
*
diode must be
* Commutating
used on all inductive loads.
SHD 9
PWR
RTN
SHD
GND
Brake Solenoid
(typical 1N4005)
1
2
3
4
+
–
User Logic
Power Supply
Encoder
MP6-E
Pin numbers
typical for encoder
channels 1 to 6
A+
A–
B+
B–
I+
I–
PWR
RTN
SHD
PWR
RTN
SHD
GND
1
2
4
5
6
7
8
9
3
1
2
3
4
+
–
+
–
User
Power
Supply
for Encoders
Figure 3-8. Typical System Wiring for One Axis of Motion
36
AdeptMotion VME Developer’s Guide, Rev B
Installing Cables from the Controller to the MP6 Panels
Installing Cables from the Controller to the MP6 Panels
The MP6 accessory kit includes three cables for connecting between the MI6 or MI3
module in the Adept MV controller and the MP6 panels. There is one dedicated cable for
each of the three MP6 panels. The plugs on each end of the cables are labeled: Encoder,
Machine, or Servo. Figure 3-9 shows the cables installed.
The standard cables are 2.5 m long (approximately). Alternative 5 m cables are available
from Adept.
MI6
ES
HPE
F1
DE1
F2
DE2
F3
DE3
F4
DE4
F5
DE5
F6
DE6
E
N
C
O
D
E
R
M
A
C
H
I
N
E
S
E
R
V
O
Motion-interface Panel - ENCODER (MP6-E)
Motion-interface Panel - SERVO (MP6-S)
P1
P1
E
N
C
O
D
E
R
CHAN6
CHAN4
CHAN6
SPARE
CHAN1
CHAN3
CHAN5
ANALOG
PWR
HIGH POWER ENABLE-HPE
BRAKE-BR6
OVERTRAVEL
OVERTRAVEL
HOME
HOME
BRAKE-BR5
OVERTRAVEL
CHAN2
HPE
BRAKE-BR3
CHAN3
BRAKE-BR4
OVERTRAVEL
BRAKE-BR2
CHAN2
HOME
OVERTRAVEL
CHAN5
ENC PWR
HOME
CHAN4
HOME
OVERTRAVEL
CHAN1
BRAKE-BR1
M
A
C
H
I
N
E
HOME
SPARE
P1
S
E
R
V
O
CHAN2 CHAN4 CHAN6 RESVD
CHAN1 CHAN3 CHAN5
LOGIC
PWR
3.8
Figure 3-9. Cable Connections from MI6 to each MP6 panel
AdeptMotion VME Developer’s Guide, Rev B
37
Chapter 3 - MI6 and MI3 Module Technical Reference
3.9
MP6 Machine (MP6-M) Panel Wiring
The MP6-M is used to interface to the machine (robot or motion mechanism). It provides
two digital inputs and one digital output for each of six channels (Channels 1 to 6). See
Figure 3-7 for the location of the various connectors.
• digital input for Overtravel (OT)
• digital input for Home Switch (HM)
• digital output for Brake Release (BR)
The MP6-M also has one independent output for high power enable (HPE).
The function of the MP6-M is to provide convenient interconnect points and to perform
voltage level-shifting of some signals, for example, to interface 120VAC or 230VAC user
circuits to the HPE output.
Optical Isolation
All signals (input and output) are isolated inside the MI6 module. Additional isolation for
the output channels (6 for Brake Release (BR), one for High Power Enable) is provided on
the MP6-M, using Opto-22 modules. The main function of the Opto-22 modules on the
output channels of the MP6-M is to give enhanced current drive capability, and allow
flexibility in connecting to a variety of voltage levels.
Input Current Requirements (OT, HM)
The inputs on the MP6-M are connected directly to the MI6. Therefore, the input
specifications for the MP6-M are the same as for the MP6-S. See Table 3-8.
Table 3-8. Digital Input Specifications (MI6/MI3 module)
Operational voltage range
0 to 24 VDC
“Off” state voltage range
0 to 3 VDC
“On” state voltage range
10 to 24 VDC
Operational current rangea
0 to 20 mA
“Off” state current rangea
0 to 1.2 mA
“On” state current rangea
7 to 20 mA
Typical threshold current, per channela
10 mA
Impedance (Vin/Iin)
1.3 K Ω minimum
Current at Vin = +24 VDC
Iin ≤ 20 mA
Turn on response time (hardwareb)
5 µsec maximum
Turn off response time (hardwareb)
5 µsec maximum
a
the input current specifications are provided for reference; voltage sources are typically used
to drive the inputs.
b
Software scan rate depends on Servo rate: 1 ms or 2 ms.
38
AdeptMotion VME Developer’s Guide, Rev B
MP6 Machine (MP6-M) Panel Wiring
Input Voltage Configuration
See “MI6 Logic Voltage Configuration for Digital Input Signals” on page 23.
Output Current Requirements (MP6-M, HPE and BR, External)
The digital outputs (HPE and BR) on the MP6-M are optically-isolated via Opto-22
modules. (Therefore, the output specifications for the MP6-M are different than the
MP6-S.) Select an appropriate plug-in single-channel module from the “Generation 4”
(G4) range manufactured by Opto-22. (Compatible modules are also made by other
manufacturers.)
Modules are available for various external voltages to suit the user’s equipment,
including 12V DC and 24V DC, and 110VAC and 230VAC. See Appendix F for a list of
suitable modules. See Table 3-9 for specifications of some commonly-used modules. (See
the manufacturer’s documentation for any parameters or module types not listed.) You
must provide logic-power to connect to and from the Opto-22 modules. The logic input
current required depends on the number, voltage, and type of Opto-22 modules.
The Opto-22 DC output modules can each supply from 0.5 to 3 Amps to the user’s
external equipment. The total current actually required for outputs will depend on the
user-supplied external equipment (relays, solenoids, limit switches, etc.).
Table 3-9. Digital Output Specifications for HPE and BR (Opto-22 module, typical)
Opto-22 module type
G4ODC5
G4ODC5A
G4OAC5
G4OAC5A
Operating voltage range
5 - 60 VDC
5 - 200
VDC
12 - 140
VAC
24 - 280
VAC
Current rating @45°C ambient
@70°C ambient
3A
2A
1A
0.55 A
—
1.5 A
—
1.5 A
Output voltage drop maximum
1.6 V
1.6 V
1.6 V peak
1.6 V peak
Off-state leakage @max voltage
1 mA
1 mA
5 mA rmsa
5 mA rmsb
Turn-on time (hardware), maxc
100 µs
100 µs
1/2 cycle
1/2 cycle
Turn-off time (hardware), maxc
750 µs
750 µs
1/2 cycle
1/2 cycle
Logic voltage range (Vcc)
2.4-8 VDC
2.4-8 VDC
4-8 VDC
4-8 VDC
Logic input current
12mA@5V
12mA@5V
12mA@5V
12mA@5V
a
b
c
at 60 Hz, 140VAC
at 60 Hz, 280VAC (2.5 mA rms at 60 Hz, 120VAC)
Software scan rate depends on Servo rate: 1 ms or 2 ms.
User-Supplied Logic Power (Internal)
The Opto-22 opto-isolator modules also require logic voltage to interface with the Adept
MI6 module. This voltage must be provided by the user at the PWR terminals. The power
supply voltage should be the same as the logic voltage rating of the Opto 22 output
module. For example: 5V logic voltage Opto 22 requires 5V logic user-supplied power
supply. Use of shielded, twisted-pair cable is recommended. Allow 12mA per output
channel, total 0.1 A for a total of 7 modules, for each MP6-M.
AdeptMotion VME Developer’s Guide, Rev B
39
Chapter 3 - MI6 and MI3 Module Technical Reference
Overtravel Limit Switches (Input)
One Overtravel Limit switch input is provided for each axis. (Two normally closed
switches must be wired in series or normally open switches in parallel for one input.)
These inputs can be used to help protect the mechanical hardware when the end of axis
travel is reached. Each switch should be normally closed, and open only when an
overtravel condition is reached. If any of the overtravel switches are opened on an active
channel, the controller will disable High Power.
The input polarity for the overtravel inputs are configurable using the SPEC program; see
Chapter 7.
The presence of a Overtravel signal will prevent the successful completion of the Drive
Enable sequence. Any unused Overtravel inputs on active channels must be configured to
provide a “no fault” condition. In most industrial situations there will be considerable
electrical noise in the operating environment. An unterminated input may not function as
anticipated. Adept recommends that you install a shorting wire between the MP6-M
terminals of any unused overtravel inputs.
Home Switch (Input)
The Home Switch inputs are used during the calibration sequence of each axis. These
inputs can be placed anywhere within the travel of the axis, however, it is advantageous
to locate the home switch just inside one of the overtravel limit switches. The input
polarity of the Home input is configurable using the SPEC program. You should design
the home switch so that it remains active all the way through one of the overtravel limits,
then AdeptMotion VME will always be able to calibrate the axis. Complete details about
the calibration (homing) sequence are provided in Chapter 7.
Brake Release (Output)
The Brake Release (BR) signals are provided to control external safety brakes. These
signals are asserted after the drive has been successfully enabled to release the brakes. The
output modules are on (conduct) when in the “Brake Released” condition. Refer to
Chapter 7 for complete details on the power enable sequence and software-timing
parameters.
High Power Enable (Output)
One High Power Enable (HPE) signal is provided for the entire system. (If you have more
than one MI6 module, the signal is internally connected in parallel to every MI6.) The HPE
signal drives the user-supplied power contactor for the motor drive-amplifiers. The
output is controlled via the Emergency Stop circuitry in the controller. The High Power
Enable signal is accessible on the HPE terminal block of the MP6-M. This signal should
normally be connected in series with the Passive E-Stop output on the SIO, see page 28.
40
AdeptMotion VME Developer’s Guide, Rev B
MP6 Machine (MP6-M) Panel Wiring
Table 3-10. MP6-M Connector Terminal Assignments (Typical, 1 of 6)
Pin
Signal
Abbrev.
Description
Signal
Type
Default Mode of
Operation
1
OT+
Overtravel(+)
input
2
—
(Connected to terminal 3)a
—
Open on overtravel
(configurable using
SPEC program)
3
—
(Connected to terminal 2)a
—
4
OT–
Overtravel (return)
return
5
HM+
Home Switch(+)
input
6
HM–
Home Switch (return)
return
7
BR+
Brake Release (+)
output
8
BR–
Brake Release (return)
return
Closed in brake
released condition (not
configurable)
9
SHD
Shield
shield
——
a
Closed at home
(configurable using
SPEC program)
Terminals 2 and 3 are connected to each other to help you connect a normally closed switch in
series, if you have separate OT signals from the limit switches at each end of the axis. Use
them if you need, otherwise make no connection.
Table 3-11. MP6-M Opto Power (Logic) Connectors (one per MP6-M)
Pin
Signal
Abbrev.
Description
1
+PWR
If using Opto-22 G4ODC5 or G4OAC5 series modules: 5V.
2
RTN
Common (return) for the above voltage
3
SHD
Shield for power cable
4
GND
Ground for all MP6-M shield connections. Connect this to
your ground point.
AdeptMotion VME Developer’s Guide, Rev B
41
Chapter 3 - MI6 and MI3 Module Technical Reference
3.10 MP6 Servo (MP6-S) Panel Wiring
The MP6-S is used to interface to the Servo Drive amplifiers. It provides one digital input
(drive fault, DF) and one digital output (drive enable, DE) for each of six channels
(channels 1 to 6). It also provides one analog output (command drive, CD) for each of six
channels. The function of the MP6-S is to interconnect the signals from user circuits to the
Adept MV controller.
Drive Compatibility
The AdeptMotion VME motion control system is compatible with most industry standard
motor drives that accept a ±10 Volt analog input signal for current (torque) or velocity
commands. In addition, AdeptMotion VME provides two discrete I/O signals that are
dedicated to specific functions supported by most commercially available motor drives. In
summary, each motion channel supports the following drive signals:
• analog output (±10V) for Command Drive (CD)
• digital output (to the drive) for Drive Enable (DE)
• digital input (from the drive) to monitor for a Drive Fault (DF)
Optical Isolation
All signals are isolated inside the MI6 module. No additional isolation is required on the
MP6-S. The MP6-S does not use Opto-22 modules.
MP6-S Input Current Requirements (Drive Fault)
The digital inputs on the MP6-S are connected directly to the MI6. Therefore, the input
specifications for the MP6-S are the same as for the MP6-M. See Table 3-8 on page 38.
MP6-S Output Current Requirements (Drive Enable)
The digital outputs on the MP6-S are connected directly to the MI6. Therefore, the output
specifications for the MP6-S are different than the MP6-M. See Table 3-12.
Table 3-12. Digital Output Specifications for Drive Enable signal (MI6/MI3 module)
Operating voltage range
5 to 24 VDC
Operational current range, per channel
Iout ≤ 100 mA
Vdrop across output in on condition
Vdrop ≤ 0.85 V at 100 mA
Vdrop ≤ 0.80 V at 10 mA
Output off leakage current
Iout ≤ 600 µA
Turn-on response time (hardwarea)
3 µsec maximum
Turn-off response time (hardware a)
200 µsec maximum
a
42
Software scan rate depends on Servo rate: 1 ms or 2 ms.
AdeptMotion VME Developer’s Guide, Rev B
MP6 Servo (MP6-S) Panel Wiring
Analog Power
The MI6 can be jumper-configured to use either an internal or external analog power
source. When set to external power source, the Analog Pwr connection on the MP6-S is
used to provide user-supplied +12V, –12V, and common. See section 3.3 earlier in this
chapter for details. The default configuration is internal power; in this mode you do not
have to provide ±12 V analog power.
NOTE: If you are supplying external power, you must ensure that you
provide a clean, high-quality, well-regulated ±12V DC supply. To avoid
interference or contamination of the power supply, you should use a
separate supply that does not power any other 12V devices. You should
use a shielded, twisted-pair, power supply cable. The shield should
normally be connected at one end of the cable only, using the Shd
terminal on the MP6-S Analog Pwr connection.
If you are providing power, the analog Command Drive requires +12V at 175 mA and
–12V at 175 mA, total all channels. In addition, sufficient current must be supplied to suit
the command input of the user’s drive amplifier.
Connecting the Drives
Each channel (1 to 6) has a 9-pin female D-connector that connects to the user’s
equipment. All six connectors have the same pin assignments (see Table 3-10). Refer to
Figure 3-5 for the physical location of each connector. All signal nomenclature is defined
as viewed from the controller. Thus, an output is controlled by the Adept controller and
an input is monitored by the Adept controller.
Table 3-13. MP6-S Connector Pin Assignments (Typical, 1 of 6)
Pin
Signal
Abbrev.
Description
Signal
Type
1
DE+
Drive Enable (+)
output
2
DE–
Drive Enable (return)
return
4
DF+
Drive Fault (+)
input
5
DF–
Drive Fault (return)
return
7
CD+
DAC Command (+)
output
8
CD–
DAC Command (return)
return
3
SHD
Shielda
shield
6
Not connected
9
Not connected
a
Mode of Operation
Not configurable –
On to enable drive
Configurable using
SPEC program
±10V, configurable
using SPEC program
——
If two separate cables are used for Command signals and Drive signals, then their shields
should be tied together at Pin 3 SHD.
AdeptMotion VME Developer’s Guide, Rev B
43
Chapter 3 - MI6 and MI3 Module Technical Reference
Table 3-14. MP6-S Analog Power Connectors (one per MP6-S)
Pin
Signal
Abbrev.
Description
1
+12VDC
+12 VDC power
2
RTN
Common (return) for the above voltage
3
–12VDC
–12 VDC power
4
SHD
Shield for power cable
No connection
required if MI6
jumpered for
internal analog
power.
Drive Enable (Output)
The Drive Enable signals (DE+, DE–) are outputs to the drives which command the drives
to enable motor power. These signals are activated as part of the power enable sequence,
after the High Power Enable signal has been activated. Refer to Chapter 7 for complete
details on the power enable sequence and software-timing parameters.
The Drive Enable output logic is set to normally open (closed/on to enable drive). The
signal polarity is not user configurable. However, the user can provide an external circuit,
such as a relay, to change polarity if required.
Delay Time
Refer to section 3.3 for information on setting the delay time for responding to an
amplifier fault immediately after the amplifier has been enabled with a Drive Enable
signal.
Drive Fault (Input)
The Drive Fault input (DF+, DF–) is used to indicate a drive fault, such as
over-temperature, over-current, etc., and causes all drives to power down via the Drive
Enable signals. This input is configurable via software (SPEC program) so that a fault is
declared in either a voltage present or voltage absent condition. Thus, this input can also
be used to monitor a “drive ready” signal. Drive Fault inputs are only monitored while
Drive Enable is on, therefore, drive faults on unused channels are not monitored.
The presence of a drive fault will prevent the successful completion of the Drive Enable
sequence. Any unused Drive Fault inputs on active channels must be configured to
provide a “no fault” condition. In many industrial situations there will be considerable
electrical noise in the operating environment. An unterminated input may not function as
anticipated. Adept recommends that you install a shorting wire between the MP6-S pins
of any unused Drive Fault inputs.
Command Drive (Output)
The Command Drive outputs (CD+, CD–) provide a command signal to each of the
drives. Maximum output is ± 10 Volts into a 10K ohm input resistance. These analog
outputs are rated at 100 mA (max) per channel. Short-circuit protection is provided by a
100 ohm internal current limiting resistor. A separate tie point for the cable shield is
44
AdeptMotion VME Developer’s Guide, Rev B
MP6 Servo (MP6-S) Panel Wiring
provided to help minimize electrical noise. The shield should normally be left floating at
the amplifier end. For the shield to be effective, you must connect the GND terminal of the
MP6-M Opto Pwr connector to a suitable ground point. Refer to Chapter 7 for complete
details on configuring this signal.
Separate + and – outputs are provided for each of the six CD (Command Drive) outputs.
You should use a separate twisted-pair wire for each CD pair. Do not use a “common”
wire to connect the negative outputs as this will seriously reduce the noise-immunity of
the system.
NOTE: The six CD– outputs are commoned internally on the MI6, and
connected to either the controller internal power ground or to the user's
external power common (“Analog Pwr - 12VDC Com”), depending on
the setting of the Analog Power Source jumpers (JP1, JP2 and JP3 - see
section 3.3 earlier in this chapter).
AdeptMotion VME Developer’s Guide, Rev B
45
Chapter 3 - MI6 and MI3 Module Technical Reference
3.11 MP6 Encoder (MP6-E) Panel Wiring
Encoder Compatibility
The MP6-E is used to interface to the encoders. It supports up to six encoder channels,
with differential input (A, B and Index) for each encoder. Each channel is designed to
interface directly to encoders which use industry standard AB quadrature outputs and an
optional zero index channel. The encoder input circuitry is compatible with encoders
using differential line driver outputs (RS-422 signal, +5VDC). (Alternatively, 5V
single-ended outputs may be used, but they will be much more sensitive to external
electrical noise. For information on compatibility with other types of encoders, please
consult Adept Customer Service). Adept strongly recommends using differential
encoders, with index pulse.
Each of the six encoder channels has its own 9-pin female D-connector located on the
MP6-E. Refer to Figure 3-6 for the physical location of each connector.
Connecting Power to the Encoders
All encoder inputs are optically isolated at the MI6 module to provide maximum
protection and noise immunity. In order to maintain the integrity of the optical isolation,
all encoder power must be supplied by an external source. Power for each encoder can be
supplied from independent power supplies or from one common power supply. Encoder
power should be supplied from a source that remains on when High Power and/or Drive
Enable is off. This eliminates the need to re-calibrate the mechanism after High Power has
been cycled off.
Adept strongly recommends using shielded, twisted-pair cable for all encoder and power
connections. The MP6-E can be used to distribute power to the encoders. The power,
voltage, and current required depend upon the encoders chosen by the user. If one
common power supply is being used for all encoder channels, the power source is
connected to the “Encoder Pwr” terminal on the lower section of the MP6-E. The encoder
power supply should not be used to power other equipment, because this may cause
electrical interference to the encoder signals.
If separate power is desired for any of the encoder channels (for example, if any of your
encoders require different supply voltages), power connections must be made directly to
that encoder. The encoder input circuitry on the MP6-E does not require power from an
external supply.
Adept recommends using a linear power supply instead of a switching power supply. If a
switching power supply is used, make sure to meet the minimum current requirements.
46
AdeptMotion VME Developer’s Guide, Rev B
MP6 Encoder (MP6-E) Panel Wiring
Table 3-15. MP6-E Power Connectors (one per MP6-E)
Pin
Signal
Abbrev.
Description
1
PWR
Encoder voltage supply
2
RTN
Common (return) for the above voltage
3
SHD
Shield for power cable
4
GND
Ground for all MP6-E shield connections. Connect this to your
ground point.
Encoder Cable Length (User Supplied)
Because encoders are not supplied with the system and output circuitry varies between
different encoders, it is not possible for Adept to specify a maximum cable length.
However, it is good practice to keep the encoder cable length to a minimum. This practice
helps to improve noise immunity and reduces the risk of encoder signal problems. See
also section 3.4 for cable routing and grounding requirements.
Connecting the Encoders
Each encoder channel has its own 9-pin D-connector. The connectors are intentionally not
keyed and can be interchanged for diagnostic purposes, provided that no attempt is made
to enable the associated axis. The pin assignment for each connector is detailed in
Table 3-16. For best protection against noise, use shielded twisted pair cable. The shield
should encase only those signals associated with that particular encoder channel. A
separate terminal is provided for connection of the shield. To avoid creating a “ground
loop,” the shield should normally be left floating (not connected) at the encoder end,
unless the encoder body is electrically isolated from the equipment it is mounted to.
Table 3-16. Encoder Channel Pin Assignments (Channel 1 to 6)
Encoder Signal
Pin Number
A+
1
A–
2
Cable Shield
3
B+
4
B–
5
Index +
6
Index –
7
+Power
8
Power Com
9
AdeptMotion VME Developer’s Guide, Rev B
47
Chapter 3 - MI6 and MI3 Module Technical Reference
Encoder Input Circuitry
All incremental encoder input circuits are identical. Standard hardware configurations of
the MI6 support RS422 +5VDC signal levels in a differential mode. Adept strongly
recommends using differential encoder outputs for maximum noise immunity. Using
differential encoders also enables the Encoder failure detection system; see page 49.
However, AdeptMotion VME hardware is compatible with single-ended and open
collector outputs. Schematics to connect these types of encoders are located in
Appendix G.
The encoder signals pass directly through the MP6-E to the MI6 module. All encoder
inputs are optically isolated on the MI6 to provide a high common mode rejection.
Figure 3-10 illustrates the input circuit for each encoder channel. The A, B, and Index
signals are then digitally filtered to improve noise immunity.
For normal differential operation,
RP2 is not installed.
MI6
HCPL
2231
RP2
RP3
C1
RP1
MP6-E
A+
A–
HCPL
2231
RP2
RP3
C1
RP1
B+
B–
HCPL
2231
PWR
RP2
RP3
C1
RP1
Encoder
RTN
SHD
1
2
4
5
6
7
8
9
3
PWR
RTN
SHD
GND
1
2
3
4
A+
A–
B+
B–
I+
I–
+
–
I+
I–
Adept MI6/MP6-E
Cable
+PWR
+
–
User's
Encoder
Power
Supply
Pin numbers
typical for encoder
channels 1 to 6
RP1: 330Ω, 6-pin resistor pack, socketed
RP2: 470Ω, 8-pin resistor pack, socketed
RP3: 470Ω, 8-pin resistor pack, socketed
Install either RP2 or RP3, not both.
HCPL2231: Hewlett-Packard Opto-coupler
RP1/2/3 for channel 1 only. See table for channels 2 to 6.
C1: 0.01 µF. Not installed for normal operation. See text.
Figure 3-10. MI6 Encoder Input Circuitry
Encoder Power-Failure Detection
In the event of a total loss of power to the encoders, the controller would not be able to
detect axis motion. This could result in the affected joint(s) running away at high speed.
WARNING: You should use a fail-safe (normally-open) relay in series
with the Adept MV Controller External Emergency Stop input to monitor
the encoder power supply.
Thus, if the power failed externally to the encoder, the emergency stop system would be
activated. Ideally, the power should be monitored adjacent to the encoder, to detect wire
breakage between the power supply and the encoder. See page 109 for important
warnings about setting of the Envelope Error and Motor Stalled parameters.
48
AdeptMotion VME Developer’s Guide, Rev B
MP6 Encoder (MP6-E) Panel Wiring
Encoder Signal-Failure (“Broken-wire”) Detection
See “Encoder Broken-Wire Detection” on page 106 and “Encoder Input Configuration
(Differential vs. Single-Ended)” on page 21.
Encoder Fault Output/Lamp Status Output
Some encoders themselves offer a “lamp-fail”, “encoder-fault” or other status output. This
is recommended as a useful additional safety feature. When specifying encoders, we
recommend that you specify this feature if available. An encoder failure output should
normally be integrated with the Emergency Stop circuit. An alternative connection
method is to connect the encoder failure signal in series with the “overtravel” input.
Resolver to Digital Encoder (R/D) Converters
When connecting a mechanism equipped with absolute position resolvers to an
AdeptMotion system, you will need an external “Resolver to Digital encoder” converter,
sometimes referred to as an “R/D” converter. Some converters are equipped with an
optional “feedback failure” output, which will assist in detecting failure of the resolver or
associated cabling. When specifying R/D converters, we recommend that you specify this
feature, if available. The feedback failure output may be connected in the same way as an
encoder failure output.
Encoder Input Configuration
The AdeptMotion system is highly configurable to support a wide variety of encoder
types and applications. Please see the following cross-references.
Hardware configuration
Encoder input configuration (differential vs. single-ended)
page 21
Encoder terminating resistors
page 22
Encoder filtering
page 22
Software configuration
Encoder scale factor
page 103
Encoder counts per zero index
page 104
Zero index configuration
page 105
Broken wire detection
page 106
Encoder filtering, digital
page 107
AdeptMotion VME Developer’s Guide, Rev B
49
Chapter 3 - MI6 and MI3 Module Technical Reference
Conveyor Belt Tracking
Each of the encoder channels on the MI3/6 can be configured for either servo control of a
motion axis, or for conveyor belt tracking from an external encoder.
50
AdeptMotion VME Developer’s Guide, Rev B
part 2
Software: Description and
Configuration
AdeptMotion VME Developer’s Guide, Rev B
51
Theory and Overview
4.1
4
Introduction
After the system hardware has been installed, and the wiring completed and checked for
proper operation, you will be ready to apply power to the motors and tune each of them
for smooth, high-performance motion. AdeptMotion VME provides extensive manual
and automatic servo tuning support, simple for first-time users but also providing a
complete set of tools for advanced users. This chapter introduces the user to the
AdeptMotion control system, discusses the operation of a typical motor, presents the
variables that are adjusted during the tuning process, and discusses test procedures that
may be used to verify proper performance.
4.2
Control System Overview
During normal operation, the V+ operating system sends a stream of motor position
commands to each motor’s control system so that the overall mechanism will perform the
robot motions commanded by the user. Figure 4-1 shows a diagram of the command flow
from the user’s program, through V+, to each motor’s control system, and finally to the
motor itself.
Position
Error
+
–
DAC
Output
Control
System
Current Command
Motor
1
Amplifier
Actual Position
Channel 1
Encoder 1
Motor
Position
Commands
–
Control
System
Channel 2
V+
Channel 3
...
User
Program
Motor
2
Amplifier
Channel 6
Encoder 2
Motor 3
...
+
Motor 6
Robot Position Commands
Figure 4-1. AdeptMotion VME Command Flow
AdeptMotion VME Developer’s Guide, Rev B
53
Chapter 4 - Theory and Overview
V+ relies on the individual axis control systems to ensure that the motors accurately obey
their position commands. A control system does this by issuing a corrective torque
command to the motor based on any error in the motor’s position (the commanded
position minus the actual position). This is called “closed-loop control” or “feedback
control,” since the actual position of the motor is fed back to the controller and used to
compute the corrective torque. The position feedback is done 500 or 1000 times a second
by the AdeptMotion software, depending on the servo-rate selected by the user.
If the control system has been adjusted correctly, the motor can be made to behave like a
passive spring, mass, and damper system, as shown in Figure 4-2. As the position error of
the motor is increased, it will apply a corrective torque that also increases, exactly like a
spring being pulled off center. If the motor is then released, the resulting oscillation will be
damped out just as a damper would if attached to a spring and mass. This behavior is
called the “closed loop” response, because the control system's torque command to the
motor is determined by both the actual position of the motor and its commanded position,
and not just the commanded position alone. The control system is said to “close a loop”
around the motor by reading its actual position, comparing it to the position command,
and applying a corrective torque based on the error.
Actual Position
Command Position
(Spring Zero)
Position Error, e
Spring, k
Mass, M
Damper, b
Corrective Force, F
Idealized Spring-Mass-Damper System
Command
Position
Corrective Torque, T
e
Actual Position
Motor
Inertial Load, J
"Closed Loop" Motor Equivalent
Figure 4-2. Spring-Mass-Damper System Compared to a Closed Loop Motor
54
AdeptMotion VME Developer’s Guide, Rev B
Control System Overview
The goal of tuning a motor’s control system is to change the closed-loop dynamic
performance of the motor in such a way as to improve its ability to obey position
commands. The control system parameters need to be adjusted so that it will always issue
the “right” torque command to the motor to make it move to the desired location. In this
way, the system appears to behave like the spring and damper analogy, with the V+
position setpoint being the spring center.
There are two primary measures used when tuning a motor’s control system, both of
which are available with AdeptMotion VME’s tuning utility: time response and frequency
response.
Time response analysis measures how the motor behaves to a step-change in the position
setpoint. Following the analogy with a spring and damper system, this would be
equivalent to instantly moving the spring center by a certain amount, and watching the
resulting oscillation of the spring. Based on the motor’s performance, the control system
parameters are adjusted and the step test is repeated. Successive tests and adjustments
allow determination of appropriate control parameters without requiring an extensive
knowledge of control theory, simply by using an “if it works, go with it” technique.
Frequency response analysis (available with V+ 11.1 and later) measures how the system
responds to sine-wave setpoints at a variety of frequencies. At higher frequencies, the
magnitude of the response will diminish except at resonances. This method can also be
used for tuning control parameters, but it is less intuitive than time response analysis.
AdeptMotion VME Developer’s Guide, Rev B
55
Chapter 4 - Theory and Overview
4.3
Basic Operation of the Control System
Figure 4-3 shows a block diagram for the AdeptMotion VME control system. As discussed
earlier, the control system receives position commands from V +, shown entering the
diagram on the far left, and performs a number of calculations in the Feedforward,
Proportional, and Integral Paths to determine a final torque. This torque command is then
conditioned by the filter in the Amplifier Control Path, and sent to the DAC. The DAC
converts the digital torque command into an analog ±10 volt signal, which is wired to the
user’s amplifier and motor, as shown on the far right.
NOTE: AdeptMotion VME is designed to operate with amplifiers in
either “current” or “velocity” mode. This section discusses control with
current-style amplifiers — control with velocity-style amplifiers is similar,
but note the differences in Figure 4-3.
V+ Acceleration
Command
V+ Velocity
Command
Feedforward
Torque* Command
Feedforward
Path
Final Torque*
Command
(Digital)
Proportional
Torque* Command
Analog
±10 Volt
Signal
+
V+ Position
Command +
–
Proportional
Path
+
+
Amplifier
Control,
DAC
*Amplifier,
Motor
Position
Error
Integrator
Path
Encoder
Path
Integrator
Torque*
Command
*For velocity-style amplifiers,
velocity is commanded
instead of torque, and the
amplifier includes an integral
tachometer.
Actual Position
of Motor
Figure 4-3. Block Diagram of the AdeptMotion VME Control System
The actual position of the motor is compared against the next V+ position command, to
form a position error that is used to help calculate the next torque command. This loop
around the motor, from position command to position error to torque to motor position, is
performed many times a second by the control system.
56
AdeptMotion VME Developer’s Guide, Rev B
Basic Operation of the Control System
The control system measures all position variables (such as the commanded position, the
actual position, and the position error) in units of “encoder counts”. For a given encoder,
there will be 4 encoder counts per slot in the encoder, because of the quadrature decoding
of the encoder’s A and B phases. For example, a rotary encoder with 1000 lines will have
4000 counts per revolution.
Velocity and acceleration are specified in units of (encoder counts)/millisecond and
(encoder counts)/millisecond2, respectively.
All torque values are in units of “DAC output counts”. The AdeptMotion VME hardware
contains one Digital-to-Analog Converter (or DAC) per motor that accepts a digital input
value (in DAC output counts) and produces an analog output voltage proportional to the
input. A DAC command may range from –32767 to +32767, corresponding to a –10 volt to
+10 volt output, respectively. For example, a torque command of 16000 DAC output
counts would therefore correspond to 16000/32767 = 49% of maximum positive torque,
producing a voltage of 0.49 * 10 = 4.9 volts.
Since the output of the DAC is connected to the input of the motor’s amplifier, a current
(or voltage, depending upon the amplifier design) is then applied to the motor that is
proportional to the DAC command. The exact amount of current applied depends on the
“gain” of the amplifier.
The resulting shaft torque applied to the load will depend upon the design of the motor.
Electric motors generate a torque that is roughly proportional to current by an amount
called the “torque constant” of the motor. Because they are proportional to each other, this
manual often makes the simplifying assumption that it is torque, not current, that is
commanded by the DAC output from the control system.
AdeptMotion VME Developer’s Guide, Rev B
57
Chapter 4 - Theory and Overview
4.4
Description of Servo Parameters
Each of the blocks shown in the diagram of Figure 4-3 contains several parameters that
determine the behavior of the block. These parameters are adjusted by the user with the
aid of the AdeptMotion SPEC utility program. Some of the parameters are “active”, in that
they directly affect the performance of the motor. Active parameters are adjusted by the
user during the tuning process. Other parameters are “passive”, because they have no
direct affect on motor performance. For example, the variables that control the generation
of error conditions, such as the time-out on a *Motor Stalled* error, would be considered
passive. This section provides a description of all the active parameters in AdeptMotion
VME, and the affect that they have on motor stability and performance.
Amplifier Control Section
Figure 4-4 shows a detailed blow-up of the Amplifier control section of Figure 4-3. Three
parameters are shown that affect the final torque command before it is sent to the motor’s
amplifier.
Feedforward
Torque
+
Proportional
+
Torque
Integrator +
Torque
Maximum
DAC
Output
DAC
Output
Filter
Low
Pass
Filter
Motor
Sign
Invert
Sign?
±10 Volt Output
to Amplifier
DAC
Figure 4-4. Amplifier Control Section
1. The Maximum DAC Output specifies the maximum torque command that will
be sent to the amplifier. Torque commands whose absolute value is greater than
this value will be “chopped” or saturated against this maximum. It has units of
DAC output counts, and may therefore range from 0 to 32767. This will
correspond to voltages of 0 to 10 volts after the command is sent the DAC. This
parameter is most often used at a low value during initial tuning to limit the
amount of torque a motor can produce to a safe value, and then raised to a higher
value to attain peak performance.
It is also useful as a means of protecting a small motor that is being used with a
powerful amplifier, by preventing the amplifier from dumping too much current
to the motor. If the maximum DAC output is set too low, the control system will
not be able to exert enough torque to quickly correct for position errors and the
motor will behave as if it were underpowered for the application. This condition
may be detected by plotting the torque output to the motor and looking for
premature saturation.
2. The Motor Sign determines whether a positive digital torque command
corresponds to a positive or negative DAC output voltage. A value of zero
indicates no sign flip (positive torque implies positive DAC voltage). A non-zero
value will cause a sign flip.
58
AdeptMotion VME Developer’s Guide, Rev B
Description of Servo Parameters
!
CAUTION: It is VERY important to adjust the Motor Sign (and the
Encoder Sign) such that a positive torque command to the motor causes
the motor to go in a positive direction. Otherwise, the torque commanded
by the control system will tend to INCREASE the position error instead of
decreasing it, resulting in a runaway motor. This phenomenon is called
“positive feedback“. The Motor Sign and Encoder Sign must be adjusted
to produce “negative feedback” before ANY attempt is made to tune the
motor.
3. The DAC Output Filter is a low pass digital “smoothing” filter on the final torque
command. Progressively higher integer values will double the degree the output
is filtered, removing a larger portion of the high frequency components from the
torque command. This will cause the DAC output to change values more slowly
and smoothly. Smoothing can be useful in certain situations where the motor has
a resonant or vibration mode that is excited by higher frequencies. Such modes
are often caused by a flexible coupling between either the motor and encoder, or
between the motor and the load.
This vibration can usually be decreased by increasing either the Proportional Pole
or the DAC Output Filter to help smooth the torque output, keeping it from
changing rapidly enough to excite the resonance. Naturally, if the value is
increased too much, the system will not be able to apply corrective torques
quickly enough, and overall performance will be severely degraded. Keep the DAC
output filter at zero unless it is needed to help control a high-frequency resonant mode.
Typical values in this case would be 1 or 2.
Those users with a background in digital control theory will want to know that
the DAC filter is implemented as a unity gain digital filter with one pole. The pole
location in the Z plane may be calculated as:
(–Filter Value)
at 1 kHz: p = 1 – 2
at 500 Hz:
–Max(0, Filter Value – 1)
p=1–2
The frequency response of the DAC output filter is shown in Figure 4-5 for
various values of the pole parameter. If your system has a high-frequency
resonance that you cannot eliminate with the proportional pole, you may want to
invoke a low value (typically 1 or 2) for the filter. Note that the delay introduced
by the DAC output filter can cause low frequency resonances in the system that
are difficult to eliminate, so only use the DAC output filter when necessary. Note
also that the DAC output filter has slightly differing effects with different servo
loop rates. In particular, for a 500 Hz servo loop, the DAC output filter value of 1
has the same effect as output filter value 0: no filtering of the torque signal. So,
where DAC output filter 1 is the lowest active value for 1KHz servo loop rates,
DAC output filter 2 is the lowest active value for a 500 Hz servo loop rate system.
AdeptMotion VME Developer’s Guide, Rev B
59
Chapter 4 - Theory and Overview
101 Filter 1: 500Hz (solid), 1Khz (dashed)
101 Filter 2: 500Hz (solid), 1Khz (dashed)
100
100
10-1
100
101
102
103
10-1
100
Frequency (Hz)
101
102
103
Frequency (Hz)
101 Filter 3: 500Hz (solid), 1Khz (dashed)
101 Filter 4: 500Hz (solid), 1Khz (dashed)
100
100
10-1
100
101
102
Frequency (Hz)
103
10-1
100
101
102
Frequency (Hz)
Figure 4-5. Frequency Response of DAC Output Filter
Encoder Path
The Encoder Path controls the interpretation of the A and B phases of the encoder, and the
zero index pulse. Most of the parameters associated with this path are used to control the
interpretation of the zero index, which has no effect on closed loop motor performance.
The only parameter that does affect motor performance is the Encoder Sign.
The Encoder Sign is similar to the Motor Sign in the Amplifier Control section. It is used
to determine which direction of motor rotation will be considered positive by the control
algorithm.
!
CAUTION: Like the Motor Sign, the value for the Encoder Sign should be
determined before ANY attempt is made to tune the motor. As discussed
above, if either sign is set incorrectly, the control system will command
torques that INCREASE the position error instead of decrease it.
Typically, the signs are determined by first adjusting the Encoder Sign so that positive
rotation is defined in the direction desired, and then adjusting the Motor Sign to produce
negative feedback (so that a positive torque command generates motion of the motor in
the positive direction).
60
AdeptMotion VME Developer’s Guide, Rev B
103
Description of Servo Parameters
Proportional Path
Figure 4-6 shows a blowup of the Proportional Feedback Path shown in the block diagram
of Figure 4-3. It is the most important section of the block diagram and is controlled by
specifying the three values for the Proportional Gain, Zero, and Pole. This path accepts a
position error input and produces a torque command output that under normal operation
will dominate the overall response of the system.
Position
Error
Position
Command
from V +
+
Z – Zero
Z – Pole
–
Actual
Position
from
Encoder
Proportional
Gain
Proportional
Torque
To Integrator Path
Figure 4-6. Proportional Path
Those familiar with digital control theory will recognize from Figure 4-6 that the
Proportional Path consists of a digital filter with one zero and pole, and a separate gain
element. The overall affect of this filter is very similar to the proportional and derivative
feedback of a “PD” (Proportional-Derivative) feedback system. That is, the torque
command generated will be proportional to both the position error and the velocity error.
1. The Proportional Gain has units of DAC output units/encoder count. It causes
the control system to output a torque that is proportional to the position error
(commanded position minus actual position). This makes the motor behave like a
spring. As the motor is moved from its setpoint (increasing the position error) the
torque it develops in the direction of the setpoint increases just as a spring applies
a greater force the more it is moved from the spring center. Assuming that the
integrator gain is set to 0, if the position error is held at a constant value (perhaps
by holding the motor at a fixed distance from the setpoint), the resulting
corrective output torque can be calculated as follows:
Steady State torque (DAC output units) = PGain * Position Error
As an example, assume that all paths but the Proportional Path are disabled, and
the motor is held so that there is a constant position error of 100 encoder counts,
with a Proportional Gain of 150. Then it is easy to calculate that the torque
command that will be sent to the motor is 150*100 = 15000 DAC units. If the
Maximum DAC output is set to 32767, the motor will develop about 15000/32767
= 46% of the available torque trying to remove the 100 encoder count error.
Clearly, increasing the Proportional Gain will increase the stiffness of the servo
system by increasing the torque that is generated in response to a given position
error. Similarly, a Proportional Gain value which is too low will result in a
“spongy” or soft system. If the Proportional Gain is too high, it will begin to excite
high frequency vibration modes in the motor, coupling, or load, and lead to noisy,
rough operation.
AdeptMotion VME Developer’s Guide, Rev B
61
Chapter 4 - Theory and Overview
2. The Proportional Zero specifies the “zero” of the Proportional Path
compensation, and it is a unitless quantity. Typical values for the Zero range from
0.8 to 0.99. It will have a strong effect on the damping and rise time of the motor’s
response to a step command. Generally, the motor will have a longer rise time,
with less overshoot, the higher the value of the Zero. Table 4-1 relates the values
of Zero and Pole to frequency in Hertz. Note that large values of Zero correspond
to low frequencies. Readers familiar with the S-plane and Z-plane methods of
controls analysis will recall that a zero tends to attract the poles of the closed loop
system. One may expect, therefore, that a higher value of zero will tend to place
the poles of the closed loop system at relatively low frequencies (i.e., slow the
response).
Whereas the Proportional Gain dominates the “steady state” response of the
Proportional Path, the Zero (and Pole) affect the dynamic response, i.e., they are
useful because of the effect they have on the torque command when the position
error is rapidly changing. The Pole and Zero act to provide the control system
with some measure of “phase lead”, or derivative feedback. The effect is
equivalent to having a feedback loop based on the error in velocity, as well as
position.
Table 4-1. Zero and Pole Values in Corresponding Frequency, 1 KHz servo rate
Pole or Zero,
Z Plane
Pole or Zero,
S Plane
0
-×
0.1
Frequency,
Hz
Pole or Zero,
Z Plane
Pole or Zero,
S Plane
Frequency,
Hz
×
0.91
-94
15.01
-2303
366.46
0.92
-83
13.27
0.2
-1609
256.15
0.93
-73
11.55
0.3
-1204
191.18
0.94
-62
9.85
0.4
-916
145.83
0.95
-51
8.16
0.5
-693
110.31
0.96
-41
6.50
0.6
-511
81.30
0.97
-30
4.85
0.7
-357
56.77
0.98
-20
3.22
0.8
-223
35.51
0.99
-10
1.60
0.9
-105
16.77
0.999
-1
0.16
By looking not only at what the value of the position error is, but also at how fast
it is changing, the control system is able to get some “early warning” regarding
what the position error is likely to be in the future. The similarity to derivative (or
velocity) feedback explains the strong affect the Zero has on damping; just as the
Proportional Gain may be compared to the stiffness of a spring, so the value of the
Zero may be thought of as helping to control the damping of the spring.
In fact, if the Pole is set to the default value of zero, then the values of the
Proportional Gain and Zero may be related to the position error gain and velocity
error gain of an equivalent “PD” (Proportional and Derivative) feedback system
as follows:
62
AdeptMotion VME Developer’s Guide, Rev B
Description of Servo Parameters
position error gain = PGain
velocity error gain = PGain * Zero/(1-Zero)
From these equations it becomes clear that the Proportional Gain will affect both
stiffness and damping, since it affects both position and velocity feedback gains.
Increasing the Zero will increase the damping since it is proportional to the
equivalent velocity feedback gains. Higher inertia systems will typically benefit
from a higher value of Zero because they require more damping.
3. The Proportional Pole specifies the pole of the Proportional Path compensation.
Like the Zero, it is a unitless quantity. Typical values for the Pole range from 0 to
0.8, and it should always be kept less than the Zero. It is the least important of the
three Proportional Path parameters, and should be adjusted last. The Pole can
often be left at the default value of zero, although systems with high-frequency
resonances may benefit from having it increased. The Pole may be thought of as
controlling a low pass filter placed before the “PD” feedback of the Gain and
Zero. It is preferable to use the Proportional Pole than the DAC Output Filter,
since it is more easily adjustable.
Integrator Path
Figure 4-7 shows a blowup of the Integrator Path shown in the block diagram of
Figure 4-3. The Integrator is used to zero out steady state errors in motor position. It is
controlled by specifying three values: the Integral Gain, the Maximum Integrator Step,
and the Maximum Integrator Value. Like the Proportional Path, the integrator accepts a
position error input and produces a torque output. The “z–1” in the diagram means a
delay of one servo cycle, so the effect of the summing junction is to add the newest error to
the sum from the previous cycle.
+
V Position
Command
+
To Proportional Path
–
Actual
Position
from
Encoder
Position
Error
Maximum
Integrated
Value
Integrated
Error
Integral
Gain
+
Integrator
Torque
+
Maximum
Integrator
Step
Z
–1
Figure 4-7. Integrator Path
AdeptMotion VME Developer’s Guide, Rev B
63
Chapter 4 - Theory and Overview
The integrator’s only purpose is to keep a running sum of the position errors from all
previous servo cycles, and output a torque proportional to that sum. This is very useful if
there is a constant disturbance force, such as gravity, pushing the motor away from the
setpoint. With an integrator, the torque to the motor will continue to increase as the steady
state error is accumulated (or integrated), until finally the force applied by the motor is
enough to counteract the disturbance force.
While very useful in eliminating steady state error, integrators tend to have a
de-stabilizing affect on the overall response. Because of this, the Integrator Path should be
disabled (by setting the Integral Gain to zero) until initial values for the Proportional
parameters (Gain, Zero, and Pole) are found.
1. The Integral Gain has the same units as the Proportional Gain, that is, “DAC
output units”/encoder count. It causes the control system to output a torque that
is proportional to the integral of the position error (the sum of all past position
errors). Typical values of the Integral Gain are much smaller than those for the
Proportional Gain, because it multiplies with an integrated error, and not the
error itself. Values between 0.1 and 10 are typical. Too much Integral Gain will
increase overshoot, and may destabilize the system (causing oscillations that
never damp out). Too little Integral Gain, and it will take an excessively long
period of time to “null out” steady state errors.
2. The Maximum Integrator Value specifies the maximum value the accumulated
(integrated) error may achieve, and has units of DAC output counts. It is useful
for controlling the destabilizing affect of the Integrator Path by placing a limit on
the amount of torque that may be commanded to the motor due to integrated
errors. This value specifies the largest possible torque that will be output by the
Integrator Path.
Setting the Maximum Integrator Value too low may cause steady state errors to
occur. This value should be adjusted so that it is as small as possible while still
always allowing the motor to achieve zero (or an acceptably small) steady state
error. If the Maximum Integrator Value is set unnecessarily high, then the
integrator may begin to dominate the motor response and cause unnecessary
overshoot and oscillation.
3. The Maximum Integrator Step specifies the largest position error for a given
servo cycle that will be added to the accumulated or “integral” error. It has units
of encoder counts. The Integrator Step is useful for controlling the effect of the
integrator during rapid slewing motions, when the position error is largest. For
example, consider a step command to the motor. Immediately after the step, the
position error is quite large because the motor has not had time to move. In this
initial stage of the motion, it is not important to have the integrator attempting to
null out every last bit of position error; rather, the Proportional Path should be
allowed to dominate the motor's response. Specifying a small value for the Step
keeps the unusually large position error from driving up the integral error too
quickly, and therefore minimizes the relative effect of the Integrator Path until the
motor has time to get close to the setpoint.
The Maximum Integrator Step may be thought of as specifying a range around
the setpoint in which the integrator should act unimpeded. Beyond that range,
the integrator will build up more slowly. Since it will specify the maximum rate at
which the integrated error can build up, if the Step is too small, it will take too
long for the control system to null out steady state errors. If it is too large, the
integrator will dominate the motor's response even when the position error is
large, resulting in unnecessary overshoot and oscillation.
64
AdeptMotion VME Developer’s Guide, Rev B
Description of Servo Parameters
Feedforward Path
Figure 4-8 details the Feedforward Path. It generates a contribution to the final motor
torque command by examining the command stream only. The commanded velocity and
acceleration are multiplied by the Velocity Feedforward Gain and the Acceleration
Feedforward Gain and the result is added to the torque command. While the Proportional
and Integrator Paths require a non-zero position error to create a change in motor
command, the feedforward path can create a motor command without requiring position
error.
+
V acceleration
command
+
V velocity
command
Acceleration
Feedforward
Gain
+
Feedforward
Torque
Velocity
Feedforward
Gain
+
Figure 4-8. Feedforward Path
The feedforward gains can improve tracking accuracy but have little effect on stability, so
they are usually adjusted last, and in many cases can simply be left at their default values
of 0.
NOTE: Neither of these parameters may be “tuned” using the step
response method, because a step position command does not generate a
meaningful commanded velocity or acceleration. Appropriate
Feedforward values may be determined by commanding smooth motions
with the SPEC tuning utility, as discussed in Chapter 7. You can also use
the Feedforward Autotuning feature.
1. The Velocity Feedforward Gain is used to generate a torque command
proportional to the commanded velocity. It has units of “DAC output
counts”/[encoder counts/ms].
Velocity feedforward is useful in reducing the following error during long
slewing motions, especially in systems with friction. Figure 4-9 shows the
characteristics of a typical mechanism with both Coulomb and viscous friction. A
system with high Coulomb friction may take a large command “threshold” to get
it moving, but a command only slightly larger than the threshold will make it
reach high speed. A system with high viscous friction may start moving with very
low command, and will reach a terminal velocity directly proportional to the
command. The velocity feedforward in the feedback loop compensates for
viscous friction by adding a DAC output command proportional to the speed of
the motor. You cannot compensate for Coulomb friction using velocity
feedforward.
AdeptMotion VME Developer’s Guide, Rev B
65
Chapter 4 - Theory and Overview
Values for the Velocity Feedforward Gain cannot be determined by looking at the
motor’s step response, since the commanded velocity is always zero. Setting this
value too high will make the motor lead the setpoint, and cause significant
overshoot at the end of the motion. In low-friction mechanisms, excellent
performance can be obtained without using the Velocity Feedforward Gain at all.
Total Friction
Average
DAC
Command
Speed
Coulomb Friction
Average
DAC
Command
=
Speed
Viscous Friction
Average
DAC
Command
+
Speed
Figure 4-9. Friction Explanation
2. The Acceleration Feedforward Gain is similar in operation to its velocity
counterpart. It has units of “DAC output counts”/ [encoder counts/ms2] and is
used to generate a torque proportional to the commanded acceleration. This can
be useful to compensate for the mass of a mechanism in low-friction systems,
since the torque command in such systems should be proportional to acceleration
by the familiar F=ma equation.
Values for the Acceleration Feedforward Gain cannot be determined by looking at
the motor’s step response, since the commanded acceleration is always zero.
Setting this value too high will make the motor lead the setpoint during
acceleration. In many situations, the Acceleration Feedforward Gain may be left
at zero.
66
AdeptMotion VME Developer’s Guide, Rev B
Tuning Analysis Tools: Step and Frequency Response
4.5
Tuning Analysis Tools: Step and Frequency Response
Tuning refers to the process of adjusting the AdeptMotion control system parameters for a
particular amplifier, motor, and load. It is performed using the AdeptMotion Specification
Utility (SPEC) program, and must be done one motor at a time. Read this section thoroughly
before attempting to move the motors under program control.
!
CAUTION: Before attempting to tune the servo loop, it is imperative to
verify the proper operation of all motor, drive, and encoder hardware via
the diagnostic utilities provided. It is of particular importance to verify
proper operation of the Emergency Stop circuit.
During the early stages of any installation, it is easy to miss common hardware problems
such as miswired or intermittent connections. In many cases, the motor will run in spite of
such problems, but will perform very poorly. The user should be aware that many hours
can be spent trying to “tune away” what is really a simple difficulty with the hardware. If
a system appears very difficult to tune, it may therefore be worth double checking that the
hardware installation is problem-free.
Step Response Performance Measures
Figure 4-10 shows three typical motor responses to a step position command, with many
of the key features exaggerated for clarity. The figure should be used as guide to
understanding the displays provided by SPEC. Some of the key features are: Overshoot,
Rise Time, Settling Time, and Steady State Error. These terms are defined on the next page.
When under V+ control, the robot will be commanded with a trajectory considerably
smoother than the step command used during tuning. As a result, the motor response to
the step command should be considered a “worst case” response that is not likely to be
duplicated in the application. The step command is useful during tuning precisely
because it excites a full range of frequency responses from the motor.
AdeptMotion VME Developer’s Guide, Rev B
67
Chapter 4 - Theory and Overview
Position
Overshoot
Step
Position
Command
Under-damped Response
Steady
State
Error
Critically-damped Response
Over-damped Response
Rise
Time
Settling
Time
0
Time
Figure 4-10. Time Responses to a Step Command
1. Overshoot. This is defined as the distance the motor moves past the final setpoint.
It is indicative of an under-damped system, and can be undesirable because it
increases settling time. It does produce shorter rise times, however.
2. Rise Time. This is defined as the amount of time required to first reach some
percent of the final value. Rise time will increase with increased damping.
3. Settling Time. This is defined as the amount of time to get within some envelope
near the final value. Every attempt should be made to minimize this value, since it
directly affects robot cycle time.
4. Steady State Error. This is defined as the minimum error in position after settling.
Usually the Integrator Path can be used to bring this value to zero, but probably at
the expense of increasing overshoot somewhat.
68
AdeptMotion VME Developer’s Guide, Rev B
Tuning Analysis Tools: Step and Frequency Response
Frequency Response Performance Measures
The frequency response analysis tools in the SPEC utility program (V+ 11.2 and later) can
be used to understand the dynamics and performance limits of your mechanism. For
example, if you excite the mechanism with sine waves swept over a frequency range, any
resonances in the system should show up as peaks in the chart. If you then stiffen the
mechanism, you should see that peak increase in frequency. The frequency response
analysis selections available in the SPEC program are listed in the following sections.
Open-loop Frequency Response (Open-loop Excitation)
WARNING: An open or closed loop excitation will command a sinusoidal
torque or position to the axis. This may cause the axis to wave back and
forth violently, and bang into the axis hardstops. Use extreme care using
this feature and be sure to start with small amplitudes.
Be sure to take all precautions necessary to avoid equipment damage or
injury to personnel. Stand clear of all mechanisms and be prepared to
depress the Emergency Stop button. It is imperative that operation of the
Emergency Stop circuit be verified BEFORE attempting to start up the
system.
Sine wave excitation is applied directly to the DAC controlling the specified motor, and
motor position is measured as an output, as shown in Figure 4-11. This method usually
provides the cleanest measurement of the open-loop frequency response of the
mechanism; however, you have no control over the position of the mechanism during the
excitation stage, and you need to be careful to make sure it doesn’t hit anything during
this stage.
Measured
Input
DAC
Command
Mechanism
Measured
Output
Motor
Position
Figure 4-11. Open-loop Frequency Response with Open-loop Excitation
A typical plot of open-loop frequency response results is shown in Figure 4-12. As you
would expect at low frequencies, the oscillations for a given torque command are quite
large. As the frequency increases, the oscillations reduce. If the mechanism is flexible, a
small peak may occur at the resonant frequency.
AdeptMotion VME Developer’s Guide, Rev B
69
Chapter 4 - Theory and Overview
Log
Magnitude
Magnitude Plot
Phase Plot
-180°
Phase
Angle
-360°
Log Frequency
Figure 4-12. Typical Open-loop Frequency Response
Open-loop Frequency Response (Closed-loop Excitation)
Figure 4-13 below shows how the same open-loop results can be obtained by measuring
the input command and output position even during closed-loop control. This method
should yield the same plot as shown in Figure 4-12, but can be a safer method since the
robot remains under position control during the test period. However, the results tend to
be a bit noisier, since a clean sine wave position command does not mean the DAC
command will also be a clean sine wave.
Measured
Input
Position + Position
Command
– Error
Feedback
DAC
Controller Command
Mechanism
Measured
Output
Motor
Position
Figure 4-13. Open-loop Frequency Response with Closed-loop Excitation
Closed-loop Frequency Response (Closed-loop Excitation)
The ratio between the commanded position and the output position should ideally be 1,
but at higher frequencies this becomes impossible to achieve. The closed-loop frequency
response is useful for measuring the highest frequency that the mechanism can accurately
track, which is called the “bandwidth” of the system (Figure 4-15).
70
AdeptMotion VME Developer’s Guide, Rev B
Tuning Analysis Tools: Step and Frequency Response
Measured
Input
Measured
Output
Position + Position
Command
– Error
Feedback
DAC
Controller Command
Mechanism
Motor
Position
Figure 4-14. Closed-loop Frequency Response with Closed-loop Excitation
Log
Magnitude
0 dB
-3 dB
Magnitude Plot
Bandwidth
Phase Plot
0°
Phase
Angle
-180°
Log Frequency
Figure 4-15. Typical Closed-loop Frequency Response
AdeptMotion VME Developer’s Guide, Rev B
71
Software Configuration
Using CONFIG_C
5.1
5
Introduction
AdeptMotion VME provides the flexibility to control a variety of mechanisms with the
powerful V+ language. In order for V+ to control these mechanisms, it must know the
number and type of the mechanisms, and the values of parameters that describe each
mechanism and its interface. The information is then written to the system disk, so that
once the system is specified, it will always start up ready for action. This chapter describes
the procedure for installing the software device modules required for your system.
It is assumed throughout the software sections of this User's Guide that the user has a
working knowledge of the V+ language and operating system. Specific information about
V+ can be found in the V+ Language User’s Guide and the V+ Language Reference Guide.
Terminology
The following terms are referenced throughout this and the following chapters.
Understanding of these terms is crucial to successfully configuring a system.
• Device module – the software and data that are installed on the system disk to
allow V+ to understand the geometry and specifications of a particular class of
mechanism. For example, the X/Y/Z/Theta device module contains the software
and specifications used to control an XY table with a vertical and roll axis.
• Device-module file – a file that contains one or more device modules. For
example, a device-module file might contain two X/Y/Z/Theta device modules
and one external encoder device module.
• Drive or Amplifier – user-supplied hardware that converts a command signal into
motor current. “Drive” and “amplifier” are used interchangeably in this manual.
• Drive channel – one of the hardware ports on the motion interface board that are
responsible for interfacing with motors. A drive channel has digital I/O, a
Digital-to-Analog Converter (DAC) to command an amplifier, and support for a
position encoder to read motor position.
• Motor – the actuator associated with a drive channel. There must be at least one
motor for each joint of a robot, and usually joints and motors are identical.
However, some mechanisms contain “motor-to-joint coupling” such that the
motion of a given joint may involve the motion of more than one motor.
• Joint – a moving element of a robot. Joints can be either rotational or linear. An XY
table has two linear joints.
AdeptMotion VME Developer’s Guide, Rev B
73
Chapter 5 - Software Configuration Using CONFIG_C
• Axis – an element of the device module model of a mechanism. For example, the
X/Y/Z/Theta module has four axes – the X-axis, Y-axis, Z-axis, and Roll axis – but
a two-axis XY table uses only two of those axes as robot joints.
• Robot – refers to the mechanism you are controlling: Robot and mechanism are used
interchangeably in this chapter.
• System File – disk file that contains the software and data that comprise the V+
system. This file is read into memory when the V+ system is booted from a system
disk.
Adept Utility Disk
The Adept Utility Disk contains two program packages that are used to customize a
system disk for your particular robot configuration. These utility programs are:
1. System Configuration Program (CONFIG_C.V2)
This package configures the number and type of robots in your system. Each
different robot type, such as Cartesian or SCARA, has a special software file
(called a “device-module file”) that you must load into your system file in order
to use that robot. AdeptMotion VME supports multiple robots on each system,
which may be of the same or different types.
As an example, suppose you want to control two XY tables with your system. In
that case, you would need to use CONFIG_C to transfer two X/Y/Z/Theta
device modules to your system file. Once you use CONFIG_C to transfer modules
to your system file, you are ready to use the Robot Specification Utility (SPEC) to
fully define each robot’s characteristics.
2. Robot Specification Utility Program (SPEC.V2)
The Robot Specification Utility Program (we will refer to it as the SPEC program)
allows you to customize your system file with the required control parameters to
move a robot installed by CONFIG_C. It includes routines to interactively test
robot I/O such as signals from the amplifiers and encoders, and to teach robot
parameters such as servo gains and calibration specifications. The SPEC program
also stores these parameters to the system file, so that after the system boots from
the modified system disk, your custom robot(s) will be ready to run. See
Chapter 6 and Chapter 7 for information on using the SPEC program.
Device Module Documentation
For each type of device module, Adept has developed a document describing the
information that is required by the device module. This document is necessary for the
configuration procedure, since it informs the user how to answer some questions posed
by the SPEC program for that particular module. Documentation for the X/Y/Z/Theta,
External Encoder, and Coordinated-Joints Robot modules are included as Appendices B,
C, and D, respectively, in this guide; they describe such items as the definition of
“positive” joint directions and the configuration of optional axes. If you need this
information for other device modules, contact Adept Customer Service.
74
AdeptMotion VME Developer’s Guide, Rev B
Introduction
Software Installation Procedure for a New System
When configuring a new system, follow the recommended procedures in the order
described in this section. Once your hardware is installed as described earlier in this
guide, the steps for power-up and configuration are outlined in the following steps.
1. Copy the V+ system sent to you by Adept to the hard drive, or if you don’t have
the hard drive option, make a backup copy of the original Adept system disk.
Don’t make changes to the master copy that arrived with your system; after duplicating
it, put it somewhere safe and change only the copy. Use the DISKCOPY Utility
from the Adept Utility Disk to copy the master to either the hard drive or another
floppy disk. See your copy of Instructions for Adept Utility Programs, which is
included with every Adept system, for details.
2. Load the proper device modules to the working copy of the system disk using the
CONFIG_C utility.
3. Re-boot the system to allow V+ to recognize the new modules. You may see
initialization errors displayed by V+; they can be ignored at this point.
4. Use the SPEC program (see Chapter 6 and Chapter 7) to define the robot
specifications (link lengths, encoder type, tuning, etc.).
5. Finally, save the SPEC parameters to the system file, and also to a data file, using
SPEC.
If you are setting up two or more controllers with similar mechanisms, you can use the
DISKCOPY utility to copy the fully-configured System Files from the first controller to a
floppy disk, then use DISKCOPY to install the files into the second controller. You should
then only have to use SPEC to enter the correct serial number and calibration parameters
(encoder offsets) for the second system, providing each system is electrically and
mechanically identical.
Upgrade Procedure for an Existing System
You may at some time need to upgrade the revision level of your V+ system software. In
that case, you do not have to repeat the system specification process. You must, however,
carefully follow the procedure outlined in the appropriate V+ Release Notes to successfully
perform the upgrade.
It is important to follow the correct procedure, because the System Files contain all your
tuning parameters and mechanism specifications, which need to be carried forward to the
new V+ system. Correct use of CONFIG_C to install the new V+ system will completely
configure the new system to match the previous system.
AdeptMotion VME Developer’s Guide, Rev B
75
Chapter 5 - Software Configuration Using CONFIG_C
5.2
Robots and Device Modules
The Configuration utility program (CONFIG_C.V2) allows you to copy device modules
onto a system disk to make them available for use. You will need one device module for
each mechanism. Groups of one or more device modules are stored in disk files, and must
be copied as a group.
NOTE: This program modifies a system disk. Do NOT make these
changes to the original system disk sent by Adept. Instead, make changes
to a working copy of the system disk that you have transferred to the hard
drive or to a duplicate floppy made using Adept’s DISKCOPY Utility.
Figure 5-1 shows a graphical interpretation of the primary functions of the CONFIG_C
program. In this example, we assume the user wants three robots, two using device
module A (for example, an X/Y/Z/Theta module) and one using device module B (for
example, a SCARA robot module). Using the replace or append operations, Module A is
copied twice to the boot disk, and module B is copied once. The robot selection procedure
allows the desired modules to be selected and any undesired ones to be ignored.
Device-Module File
Device-Module File
Module A
Module B
V+ System File
V+ System File
V+ System File
Default Modules
Module A
Module A
Module B
Module A
Module A
Module B
Replace
or
Append
Select
Robots
Robot 2
Robot 3
Robot 1
Figure 5-1. Procedure for Copying Device Modules to a System File
Procedure to Load CONFIG_C
1. Insert the Adept Utility Disk containing CONFIG_C.V2 into drive A.
2. Load the utility program into system memory and start execution of the program
with the commands
load a:config_c
execute 1 a.config_c
3. Follow the prompts provided by the program (see below).
76
AdeptMotion VME Developer’s Guide, Rev B
Robots and Device Modules
4. When complete, you can clear the program from memory with the following
commands:
kill 1
delete a.config_c
Program Prompts
When you select “Robots and Device Modules” from the CONFIG_C main menu, you see
the “Robots and Device Modules” menu as shown in Figure 5-2. The following
paragraphs describe the menu items.
***
ROBOTS AND DEVICE MODULES
***
0
=>
Return to MAIN MENU
1
=>
LIST current CONFIGURATION of system file
2
=>
LIST device modules in a device-module FILE
3
=>
REPLACE device modules in system file
4
=>
APPEND device modules to system file
5
=>
SELECT device modules for robots
Enter selection and press RETURN:
Figure 5-2. Robots and Device Modules Menu
NOTE: If you want to exit the program at any prompt, you can enter ^Z
(that is, hold down the Ctrl key and press “Z”).
"Return to MAIN MENU"
Choose this item when you are ready to exit the menu and return to the main menu.
"LIST current CONFIGURATION of system file"
Select this item to see a display of the device modules in your system file and how they are
matched to robots. Figure 5-3 shows a typical display.
AdeptMotion VME Developer’s Guide, Rev B
77
Chapter 5 - Software Configuration Using CONFIG_C
DEVICE MODULES IN THE SYSTEM FILE
Enter the drive on which the V+ system resides (A/C, default is A):
c
Scanning the system file for device modules...
Reading configuration data from the system disk...
Robot 1:
[8,0]
X/Y/Z/Theta Robot Control Module.
Modules:
[8,0]
[8,0]
[8,0]
[0,0]
X/Y/Z/Theta Robot Control Module.
X/Y/Z/Theta Robot Control Module.
X/Y/Z/Theta Robot Control Module.
<End module>
Memory:
65.0 Kbytes of system memory are available
for additional device modules.
(3.7KB)
(3.7KB)
(3.7KB)
(0.1KB)
Press RETURN to continue.
Figure 5-3. Example System Disk Configuration in CONFIG_C
The module name, such as “X/Y/Z/Theta Robot Control Module,” is extracted from the
device module. When you first transfer a device module to your system file, it will have
the default module name such as those shown. Later, you can change these names with
the “Edit start-up message” menu selection in the SPEC program. The module name for
each selected device module is displayed whenever the system is booted up, as shown in
Figure 5-4.
Copyright (c) 1984-1995 by Adept Technology, Inc.
All rights reserved.
X/Y/Z/Theta Robot Control Module.
X/Y/Z/Theta Lift Robot
X/Y/Z/Theta Loader Robot
Software:
11.2 1-100 (Edit L)
Controller: 3302-599 0
Processor 1: 0.0 2-5 4Mb
Robot 1:
100-1 0-0 8
Robot 2:
100-2 0-0 8
Robot 3:
100-3 0-0 8
27-Mar-95 10:49:33
Figure 5-4. Typical Multi-robot System Initialization Messages
The module list in Figure 5-3 indicates that there are three copies of module #8, the
X/Y/Z/Theta robot, on this particular system disk. The module numbers, which are part
of the “Robot (number): (model#)-(serial#)...(module#)” display in the initialization
messages, as shown in the above figure, are listed in the documentation you receive with
your device modules.
78
AdeptMotion VME Developer’s Guide, Rev B
Robots and Device Modules
"LIST device modules in a device-module FILE"
In order to determine whether a device module file contains a device module you want
transferred to your system disk, you may want a list of the contents of that file. This menu
selection allows you to see such a list, which looks like the module list shown above.
"REPLACE device modules in system file"
To delete any device modules from your system file, you must use this selection to delete
ALL of them. It then allows you to replace the deleted ones with device modules taken
from your device-module disk file(s). Figure 5-5 shows a typical terminal session in which
the existing device modules are replaced with the contents of an X/Y/Z/Theta module
file.
"APPEND device modules to system file"
Select this menu item to add more device modules to your system file. If you already have
a robot (such as an Adept robot) installed in your system, you should normally use the
Append option instead of Replace.
"SELECT device modules for robots"
Choose this menu item to change which device module corresponds to each of the
available robots. Any module in the system file can be assigned to any robot. If you have
copied the external encoder device module to the system file, that module will be enabled
automatically if you have the V+ Extensions software license installed.
REPLACE DEVICE MODULES IN THE SYSTEM FILE
This procedure reads device modules from a disk file and uses them to replace
all the existing device modules in the system file.
Enter the drive on which the V+ system resides (A/C, default is A):
c
Scanning the system file for device modules...
Reading configuration data from the system disk...
Robot 1:
2:
3:
[8,0]
[8,0]
[8,0]
X/Y/Z/Theta Robot Control Module.
X/Y/Z/Theta Robot Control Module.
X/Y/Z/Theta Robot Control Module.
Modules:
[8,0]
[8,0]
[8,0]
[0,0]
X/Y/Z/Theta Robot Control Module.
X/Y/Z/Theta Robot Control Module.
X/Y/Z/Theta Robot Control Module.
<End module>
Memory:
65.0 Kbytes of system memory are available
for additional device modules.
(3.7KB)
(3.7KB)
(3.7KB)
(0.1KB)
(Figure 5-5 continued on next page.)
AdeptMotion VME Developer’s Guide, Rev B
79
Chapter 5 - Software Configuration Using CONFIG_C
You need to specify the disk file from which the device modules are to be read.
The current default disk/directory is "C:\SYSTEM\".
Just press RETURN to use this default.
Enter desired disk/directory:
You can enter "?" to see a list of device-module files available.
You can enter "??" to see a list of files available, with contents.
Just press RETURN to cancel the pending operation.
Writing the device module to the system file...
Writing configuration data to the system disk...
Do you want to add another device module (Y/N)?
Enter desired file name:
sca
Reading device-module file C:\SYSTEM\B2K00EOM.SYS...
Reading device-module file C:\SYSTEM\B2K00SCA.SYS...
Module in file:
General SCARA Robot Control Module.
** WARNING **
The system file will be corrupted if the replace operation
fails for any reason.
You should be working with a COPY of your V+ system.
Are you sure you want to continue (Y/N)?
Y
Figure 5-5. Example Device Module REPLACE Procedure
80
AdeptMotion VME Developer’s Guide, Rev B
Servo Loop Rate
5.3
Servo Loop Rate
The default rate is 1 kHz. This means the robot position is read from every channel once
every millisecond. New servo output commands are calculated, and then the DAC
outputs are updated, also once every millisecond. CONFIG_C can be used to reduce the
servo rate to 500 Hz. In many applications, there will be no detectable reduction in
performance. However, if your system includes an Adept robot, you must not change the
servo loop rate. Adept robots are designed to operate only at 1 kHz.
The benefit of choosing the 500 Hz rate is reduced processor demand. For example, at
1kHz rate, servoing 4 channels will occupy approximately 50% of the CPU time on an
Adept 030 processor. This leaves the other 50% for V + (operating system, language
interpreter, trajectory generator, kinematics, disk and serial drivers, etc.) and the user’s
application programs. At the 500 Hz rate, servoing 4 channels will occupy 25% of an
Adept 030, leaving 75% for V+ and user activity.
AdeptMotion VME Developer’s Guide, Rev B
81
SPEC Program: Overview and
Main Menu
6.1
6
Introduction
AdeptMotion VME provides the flexibility to control a variety of mechanisms with the
powerful V+ language. In order for V+ to control these mechanisms, it must “know” the
number and type of the mechanisms, and the values of parameters that describe each
mechanism and its interface. The information is then written to the system disk, so that
once the system is specified, it will always start up “ready for action.” This chapter
describes the procedure for configuring the specifications required for your system.
It is assumed throughout the software sections of this User's Guide that the user has a
working knowledge of the V+ language and operating system. Specific information about
V+ can be found in the V+ Language Reference Guide. See Section 5.1 on page 73 for a
definition of the following terms, as used in this chapter: Device module, Device-module
file, Drive, Amplifier, Drive channel, Motor, Joint, Axis, Robot.
6.2
Using the SPEC Program
After the devices have been interfaced to an Adept controller (see Chapter 3), and the
system boot disk has been configured with the CONFIG_C program for the correct
number and type of robots (see Chapter 5), the software specification for controlling each
device must be generated. This specification consists of a series of numerical values that
define such parameters as the lengths of the robot links, the servo tuning values, and the
joint motion speeds. All of this specification information is entered via the SPEC program.
The SPEC program allows the user to interactively edit each of the values that compose
the full software specification. In addition, this utility program provides facilities for
saving the specification information on the system boot disk, teaching servo control and
calibration parameters, and saving/restoring the specification information into/from a
disk file.
This chapter and Chapter 7 describe the use of the SPEC program and the definitions of
the required specification parameters. Unless otherwise noted, all of these parameters can
be altered on-line during the integration process and the effects of their new values can be
immediately evaluated.
AdeptMotion VME Developer’s Guide, Rev B
83
Chapter 6 - SPEC Program: Overview and Main Menu
Specification Worksheets
Appendix A contains a set of specification worksheets that are identical to the tables
presented in this section. Before executing the SPEC program, you should make sufficient
photocopies (one copy per motor). Fill out these worksheets as fully as possible based
upon the mechanical and electrical properties of your system. Update the tables with any
changes you make in the process of specifying the system.
System Parameter Categories
There are three distinct categories of system parameters:
• Robot Options and Motor Configuration Parameters (this chapter)
These parameters, including the number of motors a robot has and the servo
board and channel numbers assigned to each motor, must be set correctly before
any other parameters can be defined.
• Robot Parameters (next chapter)
Robot parameters apply to the mechanism as a whole, and refer to such items as
the robot model and serial numbers. There is only one robot parameter of each
type for the entire robot.
• Motor Parameters (next chapter)
These parameters, such as servo-control loop gains, must be specified for each
motor of the robot. There are at least as many motor parameters of each type as
there are joints in the robot.
WARNING: In order to configure the system software properly, it is
important that the functions of all configurable parameters are
understood. These parameters have a major impact on the performance
and operation of the system. Read and understand this user’s guide
before attempting to configure the system software.
Notes on SPEC Program Usage
Self-configuring Menus
The menus in the SPEC program are self-configuring; that is, some menu selections may
be suppressed if they are inappropriate to the circumstances or for your robot system. For
example, if your system has no external encoders, you are not shown menu selections
allowing you to edit their specifications. Do not be surprised if all the menu selections
described here are not on the screen when you execute the program; it simply means that
those selections are not appropriate to the situation.
Online Help
For most of the SPEC parameters, online help is available in the SPEC program. Simply
select the menu option for a parameter, for example Encoder Configuration or Motor Sign.
A brief description is displayed along with the current value, and the min/max range.
You can either enter a new value, or press ENTER to leave it unchanged.
84
AdeptMotion VME Developer’s Guide, Rev B
Using the SPEC Program
Viewing and Changing Parameter Values
In response to any prompt for specification data, you may simply press RETURN (or ENTER)
to leave the existing value unchanged. For most values, you can also enter an expression
that V+ will try to evaluate. This can save you the time of calculating a scale factor of
encoder counts per millimeter, for example, by allowing you to type “4096/20” instead of
“204.8” when you know that there are 4096 counts in 20 mm of motion.
If you want to exit the program at any prompt, you can enter ^Z (that is, hold down the
Ctrl key and press “Z”).
NOTE: None of the parameters set in the SPEC program are saved until
they are written to the system disk. Unless you write the specifications to
the system disk or to a disk file after an editing session, they will be lost
when the system is powered down. To avoid this, make sure you save
your changes periodically, both to the system disk and to a disk file.
Procedure to Load the SPEC Program
1. Insert the Adept Utility disk containing SPEC.V2 into drive A. (Alternatively, if
the up-to-date version of the SPEC program has been installed onto your hard
disk, you may load it from there. The suggested directory to install utility
programs is C:\UTIL\)
2. Load the utility program into system memory and start execution of the program
with the commands
load a:spec
execute 1 a.spec
3. Follow the prompts provided by the program (see the following sections).
NOTE: If you want to exit the program at any prompt, you can enter ^Z
(that is, hold down the Ctrl key and press “Z”).
4. When complete, you can clear the program from memory with the following
commands:
kill 1
delete a.spec
AdeptMotion VME Developer’s Guide, Rev B
85
Chapter 6 - SPEC Program: Overview and Main Menu
6.3
Overview of SPEC program
You should previously have used the CONFIG_C program to install the appropriate
Device Module(s), see Chapter 5. Then, use the SPEC program to complete the following
procedures, described in this and the following chapter:
• Make sufficient copies (one per motor) of each worksheet from Appendix A.
• "Robot Options and Motor Configuration" (Section 6.6): set the motor
configuration for each robot, including the number of motors and the mapping of
the drive and encoder channels to each motor.
• "Motion Hardware Diagnostics" (Section 6.7) and (Chapter 8): Verify proper
operation of digital I/O, encoders, amplifiers, and motors for all the axes
connected to the controller.
• "Robot Initialization Specifications" (Section 7.3)
• "Motor/Amp and Encoder Specifications" (Section 7.4): Configure the amplifier
and encoder parameters for all motors. Use the interactive test procedure in
Chapter 8 to ensure proper operation of encoder counts, zero-index pulses, motor
and encoder sign.
• "Motor Servo Tuning Parameters" (Section 7.5): Tune each motor, using the
interactive tuning aids provided in the SPEC program. See also Chapter 4 for
general information and instructions on servo tuning.
• "Motor Calibration Parameters" (Section 7.6): Define the calibration (homing)
parameters for each motor.
• "Joint Motion Parameters" (Section 7.7): Define the software joint limits, the motion
speed and acceleration parameters.
• "Link Dimensions" (Section 7.8)
• "Cartesian Motion Parameters" (Section 7.9)
• "General Motion Specifications" (Section 7.10)
• "S-Curve Trajectory Generation" (Section 7.11)
• "Stop-on-Force Parameters (for AdeptForce)" (Section 7.12)
• Test the specifications using the tests described in Section 8.2 on page 146.
• Save the robot specifications to the working copy of the system disk. Save a copy
of the robot specifications to a disk file (section 6.9). If your controller has a hard
drive, use the DISKCOPY utility to make a floppy backup of the configured system
files. If your controller does not have a hard drive, use DISKCOPY to make a disk
image copy of your floppy system disk. Store the copy in a safe place.
86
AdeptMotion VME Developer’s Guide, Rev B
SPEC Program Main Menu
6.4
SPEC Program Main Menu
The SPEC program starts by displaying a menu of main selections to the user. Figure 6-1
shows a typical start-up display for a system that has a single X/Y/Z/Theta robot. The
display you see may vary somewhat depending on your system configuration.
***
.
ADEPT ROBOT SPECIFICATION PROGRAM
(Version SPEC xx.xx)
***
Copyright (c) 1988-1995 by Adept Technology, Inc.
Servo code version: xx.xx.x Servo rate: 1000 Hz
ROBOT 1: X/Y/Z/Theta Robot Control Module.
Unrestricted Access Mode
0
1
2
3
4
5
6
=>
=>
=>
=>
=>
=>
=>
Exit to system monitor
Change robot options and motor configuration
Perform hardware diagnostics
Edit robot specifications
Load robot specifications from a disk file
Save robot specifications to a disk file
Save ALL specifications to system disk
Enter selection:
Figure 6-1. SPEC Program Main Menu (Non-protected Robot)
Variations to Main Menu
The above menu may vary and additional selections may appear depending on your
system configuration. These are described later in this chapter:
“Enter Password to Increase Access Level” on page 88
“Change Robot Number” on page 95
“Switch to External Encoder Specifications” on page 95
Restricted Access Mode
If you use SPEC to edit a “protected” robot (see below), the program will be in
restricted-access mode. In this mode, you can only change a few parameters (hand signals,
joint limits, nulling tolerance). The restricted-access mode of SPEC is described separately,
in the Instructions for Adept Utility Programs.
If you have both protected and unprotected robots connected to your system, the SPEC
access-level will depend on which robot you have selected. (See “Change Robot Number”
on page 95.)
Protected Adept Robots
All Adept robots are protected. When SPEC is used to edit an Adept robot, it is always in
restricted-access mode. The options “Change robot options and motor configuration” and
“Enter password to increase access level” are not displayed when editing an Adept robot.
If robot 1 is a protected Adept robot and you want to edit robot 2, select robot 2. If robot 2
is unprotected, you will then have full access to robot 2.
AdeptMotion VME Developer’s Guide, Rev B
87
Chapter 6 - SPEC Program: Overview and Main Menu
6.5
Enter Password to Increase Access Level
Password-Protected Robots
If the robot that you are trying to edit is protected by a password, you will see “Enter
Password to Increase Access Level” as menu option 1. If you enter the appropriate
password for that robot, you will be able to access all the parameters described in this user
guide.
Without the password, you will be in “Restricted access mode”, see above. See page 98 for
how to define or change a password. When the SPEC program is used on a
password-protected robot, it will function in restricted-access mode unless the user enters
the correct password for each robot. (Each robot can have its own password.)
6.6
Robot Options and Motor Configuration
Before control of any robot joint is possible, the system must be initialized with certain
motor configuration information: the number of motors in the robot, the mapping of
motors to hardware drive channels, and the relationship of the joints to the axes of the
device module.
The “Change motor configuration” selection from the Main SPEC menu (see Figure 6-1)
allows you to define all of these parameters. First, you are shown a description of the
current motor configuration, and then asked if you want to change it. Figure 6-2 shows
the Motor/Joint Configuration menu.
***
ROBOT OPTIONS, CONFIGURATION, AND MAPPING ***
ROBOT 1: X/Y/Z/Theta Robot Control Module.
Robot Option Bits.
Check your device module description for bit meanings.
Bit:
16 15 14 13 12 11 10
Value: 0 0 0 0 0 0 0
Joint:
Axis:
Motor:
Board:
Channel:
9
0
8
0
7
0
6
0
5
0
4
0
3
0
2
0
1
0
Joint number (1 to 3).
Axis number as defined in device module documentation.
Motor number (1 to 3).
Servo board number associated with a motor. '0' means disabled.
Channel number on servo board.
Joint
1
2
3
Axis
1
2
3
Type
Primary
Primary
Primary
Motor
1
2
3
Board
1
1
1
Channel
1
2
3
Do you want to change this configuration (Y/N)?
Figure 6-2. Motor/Joint Configuration Menu
If you respond “Y” (yes) to changing configuration, you will be asked if you want to
change various parameters as described below.
88
AdeptMotion VME Developer’s Guide, Rev B
Robot Options and Motor Configuration
1. Robot option bits.
Certain device modules may have optional features that you can turn on and off
with the robot option bits. The robot option word is interpreted by the V+ system
as a bit field indicating the presence or absence of various options. The
description of your device module will inform you whether the robot option
word is used, and if so, what values are valid.
In the XYZ robot example, the option bits are not normally used, so we can leave
the bit values at 0.
2. Number of joints.
For most devices, the number of axes is fixed and so no editing of this parameter
is permitted. However, for some devices (such as the X/Y/Z/Theta robot), a
variable number of joints can be configured (in that case from one to four) and
editing is allowed. Set the number of joints according to your mechanism design
as described in your device-module documentation.
For an X/Y/Z/Theta robot, you will be prompted in the following manner:
The following value specifies the number of joints that you have implemented.
PARAMETER (Range 1 to 4)
CURRENT VALUE
Number of joints
NEW VALUE
3
3. Mapping of motors to hardware drive channels.
In order for the system to be able to communicate with each motor, it is necessary
to relate each motor to a hardware channel (servo board and drive channel). This
process is known as motor mapping. Typically, the first robot in a system is
mapped to the first available servo board and drive channels, with subsequent
robots using the next available drive channels, either on the first or on additional
servo boards. The servo board numbers are related to the switch settings on the
board, as described in the installation chapters.
Normally, you will want to use all the motors in a mechanism, so they will all be
mapped to servo board 1 or higher. If, because of hardware problems with your
mechanism, you need to temporarily make V+ ignore a motor, you can map it to
board 0. When you do so, V+ will suppress all commands to that motor and
ignore all errors from it. You should re-enable the motor before completing your
system set-up. You should not move the robot under program control with any
motors mapped to Board 0. This may cause unexpected results.
The display shown in Figure 6-3 would be typical for setting the motor/axis
mapping for a three-joint X/Y/Z robot. The board and channel numbers for your
robot will depend on its hardware configuration.
AdeptMotion VME Developer’s Guide, Rev B
89
Chapter 6 - SPEC Program: Overview and Main Menu
The following values determine which servo boards and channels correspond
to which motors. If you change these values, the servos will be
automatically
restarted.
PARAMETER (Range 0 to 16)
CURRENT VALUE
Motor 1 servo board number
Motor 1 channel number
PARAMETER (Range 0 to 16)
1
1
CURRENT VALUE
Motor 2 servo board number
Motor 2 channel number
PARAMETER (Range 0 to 16)
NEW VALUE
NEW VALUE
1
2
CURRENT VALUE
Motor 3 servo board number
NEW VALUE
1
Figure 6-3. Motor/Axis Mapping Menu
4. Relationship of joints to axes in the robot model.
For many devices, the number of axes is fixed and so no editing of this parameter
is permitted. However, for some devices (such as the X/Y/Z/Theta device
module) in which fewer than the maximum number of axes can be used, it is
possible to match the joints to desired axes in the robot model. For example, if the
X/Y/Z/Theta device module is used to control a three-jointed robot with X, Y,
and rotational axes, then axes 1, 2, and 4 of the device module (X, Y, and Theta)
would be enabled as joints 1, 2, and 3.
Figure 6-4 shows is a dialog you might see to enable the X, Y, and Theta axes of a
three-joint X/Y/Z/Theta robot. Note that the fourth axis (Theta) is automatically
assumed enabled when you disable the Z-axis, since it must be enabled to give 3
enabled axes.
This robot supports up to 4 axes.
You have configured your system to contain 3 joints.
You must now select which of the axes are to be enabled.
Axis 1 is ENABLED.
Axis 2 is ENABLED.
Axis 3 is ENABLED.
Change it (Y/N)?
Change it (Y/N)?
Change it (Y/N)? Y
Figure 6-4. Joint-to-Axis Screen Example
Table 6-1 shows an example of how such a system would be configured. A blank
table is provided in Appendix A to record the motor configuration for your
system.
90
AdeptMotion VME Developer’s Guide, Rev B
Motion Hardware Diagnostics
Table 6-1. Motor Configuration
Motor Configuration for Robot Number __1__
Robot Option Bits __0__
Joint
Axis number and description
Motor
Servo board
Channel
1
1 (X-axis)
1
1
1
2
2 (Y-axis)
2
1
2
3
4 (Theta)
3
1
3
4
(unused)
6.7
Motion Hardware Diagnostics
When you first start up your system, it is important to know whether the hardware
interface to the robot is functioning properly. Select this menu item to allow you to check
such items as encoder connections, overtravel switches, and home switches.
If the system started up without motor configuration errors, this diagnostic menu allows
you to verify that the encoders are functional. It also allows you to apply high power to
the amplifiers and issue analog voltage commands to them. If the motor configuration is
incorrect or has been changed, you will have to correct the configuration before being
allowed to enable high power. Figure 6-5 shows the display when the POWER system
switch is not enabled.
Testing Encoders
It is a good idea to check that the encoders are functional before you enable High Power for
the first time. Before testing, write down the encoder position shown on the screen.
Slowly push each axis in turn by hand. If the mechanism has brakes, release them
manually. Be sure to support any gravity loaded axes before releasing the brakes. (Some
mechanisms can not be pushed by hand due to mechanical constraints. In this case you
must wait until you first turn on power. See Section 8.1 on page 141.)
NOTE: At this stage you will expect to see zero index errors. This is
because the default index configuration and spacing may not match your
encoders. You will adjust these parameters later; see page 105.
When you push the axis in the positive direction, the encoder position should increase on
the screen. When pushing in the negative direction, the encoder position should decrease.
See Figure B-1 on page 173 for link dimensions and definitions. If the +/– direction does
not match the axis definitions for the device module you are using, check your wiring. If
the wiring is correct, make note to correct the encoder sign; see page 107.
If you see no change in encoder position, you probably have a wiring fault, or a faulty
encoder or power supply. See Section 3.3 on page 20 and Section 3.11 on page 46.
AdeptMotion VME Developer’s Guide, Rev B
91
Chapter 6 - SPEC Program: Overview and Main Menu
Testing Overtravel and Home Sensor
If your mechanism has Home and Overtravel switches, verify that they work as expected
as you push each joint past the switch location. The signal state is displayed on the
diagnostic screen. If necessary, you can change the logic polarity (active high/low) using
the Machine Input polarity parameter. (See page 110.)
When the axis is not in Overtravel, the Overtravel signal should be Off on the screen.
The Home signal polarity may be set when calibration parameters are set in Section 7.6 on
page 121. Verify that the Home sensor switch functions correctly.
Testing Amp Fault Signal
This signal is also known as the Drive Fault signal. Some amplifier or motor drives may
call it the Drive Ready signal. V+ requires that the Amp Fault signal be off soon after the
amplifier is enabled. You may be able to simulate an Amp Fault by removing power from
the amplifiers.
***
Diagnostics: Robot 1 ***
Robot power is OFF
Press P to toggle power, Q or 0 to quit.
Motor/Board/Channel
Encoder position
Last zero-index
Zero-index delta
Home
Overtravel
Amp Fault
Amp enable
Brake release
DAC voltage
DAC count
1/B1/C1
10428
8924
2048
OFF
OFF
OFF
2/B1/C2
0
0
0
OFF
+ON
OFF
3/B1/C3
0
0
0
ON
–ON
OFF
4/B1/C4
0
0
0
OFF
+–ON
OFF
OFF
OFF
0.00
Max DAC
val is 0
OFF
OFF
0.00
0
OFF
OFF
0.00
0
OFF
OFF
0.00
0
Figure 6-5. Diagnostic Display with POWER Switch Off
Chapter 8 describes in detail how to use the Motion Hardware diagnostics to test discrete
inputs and outputs, encoder channels, analog (DAC) outputs, and the motor and encoder
sign, when power is turned on.
92
AdeptMotion VME Developer’s Guide, Rev B
Edit Robot Specifications
6.8
Edit Robot Specifications
The “Edit robot specifications” submenu selections are described in Chapter 7.
When you select the “Edit robot specifications” selection from SPEC’s main menu, you get
the submenu shown in Figure 7-1 on page 97.
6.9
Saving and Loading Specifications
Save Robot Specifications to a Disk File
This option creates a disk file that contains all of the specification data stored in memory
for the selected robot or external encoder. This disk file is used for archive, backup and
transfer of the data. It is not used by the V+ Operating System when the system is started.
Each robot or external encoder’s specifications must be stored in a separate file. The file is
written in either an unreadable binary format for maintaining data confidentiality or a
readable ASCII format that can be printed and kept as a hardcopy record of how the
system is configured. Some OEM’s will want to save the data in binary format to prevent
end-customers from being able to see or modify it. The file can be read back into memory
using the SPEC program to propagate the specification information to another robot
system or to a new version of the operating system.
On a password-protected robot, note that an ASCII file will only include the parameters
that the user has access to. If you enter the password, the ASCII file will contain all
parameters. A binary file will always contain all the parameters that SPEC can access.
Save one copy onto a floppy disk, and, if you have a hard drive, save another copy on the
hard drive.
When you select this function, you are asked whether to save data in binary or ASCII
format. Once you select data format, you will be prompted with the following question:
Disk file specification (unit:\dir\name.ext)
If the data is to be written to a floppy disk, before responding to this prompt you should
ensure that a formatted disk is inserted into the desired disk drive. You should then
respond to the question by typing in the disk drive unit (A or C), followed by an optional
subdirectory specification, followed by the disk file name and extension. Use meaningful
file names such as: ROBOT1.SPC, ROBOT2.SPC, ENCODER.SPC, TABLE.SPC, CLINCHER.SPC,
etc.
For example, to save the specification information in a file named XYZ.SPC on a floppy
diskette loaded into the A drive, you should respond with the string “A:XYZ.SPC”. If you
wish to skip the writing process, press RETURN without entering a file name.
The disk creation and writing operation takes only a few seconds to complete after which
a final message is displayed. A typical file created during this operation is shown in
Appendix E “Sample Specification File.”
AdeptMotion VME Developer’s Guide, Rev B
93
Chapter 6 - SPEC Program: Overview and Main Menu
Load Robot Specifications from a Disk File
This function reads a disk file that contains the specification information for a single robot
and writes over the data in memory for the currently selected robot. The file must be a
special-format data file (ASCII or binary), normally created using the data writing option
of this utility program (or the CONFIG_C program).
After the file has been read, the new specification data should normally be saved onto the
system disk (see next section).
When this function is selected, the operator is prompted with the following question:
Disk file specification (unit:\dir\name.ext):
As before, after you ensure that the proper disk is available for reading, you should
respond by typing in the disk drive unit, followed by an optional subdirectory
specification, followed by the disk file name and extension. If you wish to skip the reading
process, press RETURN without entering a file name.
The system reads the specified disk file’s header information and verifies that the file
contains the correct type of data and is for the proper type of robot. This header
information is displayed on the terminal. You are then prompted to provide a final
verification to proceed.
The disk reading operation takes only a few seconds to complete after which a message is
displayed. If you are satisfied that the data is correct, you should immediately execute the
data saving function.
If any error occurs during the specification loading process, a message will be displayed
indicating a “data section” number and the error that occurred. The data section number
is the number associated with a particular data item. Most of these are listed in
Appendix E.
Save ALL Specifications to System Disk
This function saves the specification information for all robots configured in the system.
The data is saved to a special area of the system file. After the specification information is
written, the data will automatically be in effect each time the system is rebooted.
NOTE: If you intend to update a floppy system disk, make a copy of the
system disk before you execute this procedure and only alter the copy of the
system disk.
When this function begins execution, it asks if you wish to update the system disk. If you
respond affirmatively, you are then asked:
Which disk drive contains the system disk (A/C)?
If you are updating a floppy disk, ensure that the disk is write-enabled and inserted into
the proper drive. The system disk updating procedure can only be utilized to modify a
system disk which is identical to that used to boot the currently executing system. If you
update a different disk, its contents may be damaged.
When the system disk is ready, respond with the disk drive designator. You are then asked
for final verification and the updating process will begin.
94
AdeptMotion VME Developer’s Guide, Rev B
Change Robot Number
6.10 Change Robot Number
If your system is configured for multiple robots, you will see the “Change robot number”
menu selection.
This menu choice allows you to change from one robot to another if you have more than
one robot or motion device installed on your system. When you execute SPEC, it will
initially select Robot 1. By selecting the “Change robot number” menu option, you can
edit the specifications for any robot in your system.
6.11 Switch to External Encoder Specifications
If your system is configured to have External Encoders, you will see the “Switch to
external encoder specifications” menu selection.
Because they have no drive channels, external encoders have fewer required specifications
than a robot, but otherwise the SPEC program treats them identically to a robot. The
wording of menu items differs slightly for external encoders. For example, “Change robot
options and motor configuration” becomes “Change encoder configuration” and “Edit
robot specifications” becomes “Edit encoder specifications”.
AdeptMotion VME Developer’s Guide, Rev B
95
SPEC Program: Robot
Specifications and Tuning
7.1
7
Introduction
Appendix A of this User’s Guide contains a set of specification worksheets that are
identical to the tables presented in this section. Before executing the SPEC program, you
should fill out these worksheets as fully as possible based upon the mechanical and
electrical properties of your system. Update the tables with any changes you make in the
process of specifying the system.
The remainder of this chapter is divided into separate sections to describe the
user-definable configuration parameters. The description of these parameters follows the
same order you should use in specifying your robot.
7.2
Robot Specifications
When you select the “Edit robot specifications” selection from SPEC’s main menu, you get
the submenu shown in Figure 7-1:
***
ROBOT SPECIFICATIONS
***
ROBOT 1: X/Y/Z/Theta Robot Control Module.
0
1
2
3
4
5
6
7
8
9
10
=>
=>
=>
=>
=>
=>
=>
=>
=>
=>
=>
Exit
Edit
Edit
Edit
Edit
Edit
Edit
Edit
Edit
Edit
Edit
to main menu
robot initialization specs
motor amp/encoder specs
motor tuning parameters
motor calibration parameters
joint motion specs
link dimensions
Cartesian motion specs
general motion specs
S-curve trajectory profiles
motor stop-on-force specs
Enter selection:
Figure 7-1. Robot Specification Submenu
The “Robot specifications” submenu selections are described in the following sections.
AdeptMotion VME Developer’s Guide, Rev B
97
Chapter 7 - SPEC Program: Robot Specifications and Tuning
7.3
Robot Initialization Specifications
This menu allows you to configure general robot specifications. These are generic
parameters that apply to the entire robot system, not one axis. For many systems, the
default values of these parameters will be adequate to operate the mechanism, but for
some amplifiers, the power sequence parameters will need to be changed. (See Table 7-1.)
Robot Start-up Message
The start-up message for each robot is displayed after booting from the system disk. It
should be a text string (up to 79 characters long) that describes the mechanism being
controlled. The default message is the name of the kinematic module being used (for
example, “X/Y/Z/Theta Robot Control Module”).
Module Password
If defined, the robot module password (up to 8 characters) must be entered before the user
is allowed to modify most of the parameters associated with the robot. By default, there is
no password associated with the robot, and you have full access to all parameters with
SPEC. This feature is commonly used by OEM’s to prevent end-customers from
modifying servo tuning and other parameters using the SPEC utility. Make sure you write
down the password when you set it; once you return to the main menu, you won’t be able
to change it without typing it again. We recommend that you make a backup SPEC data
file before you set the password. See section 6.9 on page 93.
When the SPEC program is used with a password-protected robot, it will function in
restricted-access mode unless the user enters the correct password for the robot. The
restricted-access mode is intended to allow the robot user to change only certain
parameters such as the FINE and COARSE nulling tolerances, hand (gripper) control
signal output channel numbers, and the “user” joint limits (see page 129). The
restricted-access mode of SPEC is described separately, in the Instructions for Adept Utility
Programs.
If you have more than one robot, you can give a different password to each robot if you
wish. Unless you have a good reason to do this, it is usually better to use the same
password for all your robots. If you do not need password-protection, do not define a
password. This allows you easy access to all parameters at any time.
The password forms part of the data for the robot, and is stored in the data file and on the
system disk along with the other SPEC parameters. The password is always stored in an
encrypted form, even when the other parameters are saved in readable (ASCII) format.
(See section 6.9 on page 93.)
Calibration File Name
A V+ program is automatically loaded and executed when you calibrate your robot.
Typically, the standard calibration program contained in the file “STANDARD.CAL” will
be sufficient for any normal calibration operations as described later in this chapter. Those
users with absolute encoders or other custom needs will need a special calibration
program, and should contact the Adept Applications department for more help.
See Appendix J for more information on custom calibration.
98
AdeptMotion VME Developer’s Guide, Rev B
Robot Initialization Specifications
Robot Model Number and Serial Number
This feature allows the user to tag each robot with a custom model number and serial
number. These numbers are provided in addition to the controller model and serial
number assigned by Adept Technology. All robot model and serial numbers can be read
using the ID monitor command and real-valued function. For details, see the V+ Operating
System Reference Guide and the V+ Language Reference Guide, respectively. The robot model
and serial numbers are not used by the Adept software, they are provided to help you
track and identify your robots after they have been shipped to your end-user.
Hand Signals
(This parameter can also be edited in the restricted-access mode of SPEC, as described in
Instructions for Adept Utility Programs.)
AdeptMotion provides support to control grippers/end-effector tooling with two discrete
digital output signals. These signals can be controlled via the OPEN, CLOSE, OPENI,
CLOSEI, RELAX, and RELAXI instructions, and also by the “T1” key on the MCP (Manual
Control Pendant). The signals are operated in a continuous-duty manner so that
spring-return pneumatic valves may be used. The signals may be specified as active high
or active low. (For active low, specify a negative channel number.) Any valid digital
output signals may be used.
Two channel numbers can be defined, one for Open and one for Closed. The OPEN and
OPENI instructions will turn on the Open signal, and turn off the Close signal. The
CLOSE/CLOSEI instructions have the opposite effect. The RELAX/RELAXI instructions
turn off both signals. WORLD, TOOL and JOINT modes of the MCP allow the gripper to
be opened and closed using “T1” and the speed-control potentiometer. In FREE mode, the
MCP “T1” key relaxes the gripper.
*Time-out nulling error* Limit
At the completion of a program generated motion, the deviation between the robot's
position and the commanded destination is compared against either the FINE or COARSE
tolerance limits. If the deviation is not reduced to less than the tolerance range in the time
specified by the nulling time-out value, robot power will be disabled and an error will be
generated.
Power Sequencing Parameters
The flow chart in Figure 7-2 depicts the power-on/power-off sequence. Several stages are
required, from controlling the relay to supply power to the amplifiers (toggling “high
power”), to toggling the brake signals. This sequence is governed by several
user-configurable parameters.
AdeptMotion VME Developer’s Guide, Rev B
99
Chapter 7 - SPEC Program: Robot Specifications and Tuning
ENABLE POWER
DISABLE POWER
Start of
Enable Power
Sequence
Engage brake. Start brake
engage delay timer.
Turn on HPE output
Is
FREE mode digital
output non-zero?
Brake engage delay expired?
Y
Y
Turn off servo control.
Disable amplifier.
Turn off high power.
Reset FREE mode output
N
Wait for "Time delay required
for clutch to engage"
Done
Y
Is
robot calibrated?
Wait for "Delay from High
Power On to Drive Enable"
N
Turn on Drive Enable output
Is
Drive Fault
input off?
Y
N
Has
Max time to wait
for Drive Enable
expired?
Start servo loop
Turn on break release
N
Y
Error: Time out enabling
expired
Wait for "Time Required for
Brake to Relase"
End of
Enable Power
Sequence
Figure 7-2. Power Sequencing
100
AdeptMotion VME Developer’s Guide, Rev B
N
Robot Initialization Specifications
The parameter “Time required for clutch to engage” is only appropriate if you have a
clutch that disengages the drive from the motor when a robot joint is in FREE manual
control mode. The clutch is operated by the “FREE Mode Digital Signal” defined in the
“Joint Motion Parameters” menu. This value is the time delay after the clutch is activated
to allow it to engage before the high-power sequence continues.
The parameter “Delay from high power on to amp enable” specifies the amount of time
that V+ will wait after successfully enabling high power before it enables the amplifiers.
The parameter “Max time to wait for amp enable” defines the maximum time that V+ will
wait after enabling the amplifiers for the servos to report that amp faults are clear and that
the amp is enabled.
The parameter “Time required for brakes to release” should indicate how long after
releasing the brake that V+ should wait before performing any motions. This avoids
moving the robot prematurely and dragging the brakes.
The parameter “Time required for brakes to engage” specifies delay from the time the
brakes are turned on until the amp is disabled. This is to allow the brakes time to engage
when disabling power.
If the robot is not calibrated, enabling power asserts the high power signal to the
amplifiers, but does not assert drive enable or brake release. This allows the system
builder to safely enable one drive at a time from within the interactive servo tuning menu
in the SPEC program.
Power-down sequencing in Adept controllers is controlled with a combination of
hardware and software interlocks. For safety reasons, an E-Stop, overtravel, or axis fault
immediately disables power (engaging the brakes and disabling the drives as well) via a
hardware interlock, while disabling the POWER system switch starts a disable sequence
through software. In the case of an overtravel or axis fault originating on the servo board,
this error is then reported to V+, which powers down any other servo boards in the
system. In the case of an E-Stop fault, all servo boards in the system power down
simultaneously. The hardware sequence is much more abrupt than the software sequence,
which disables power with a more controlled, step-by-step method as shown in
Figure 7-2.
When power is disabled under program control (i.e., via DISABLE POWER), the software
power-down sequence begins. In this sequence, the parameter “Time Required for Brakes
to Engage” indicates how long the robot should continue to servo in position after
engaging the brakes before disabling power to the amplifiers. This gives time for the
brakes to engage so that gravity-loaded joints don’t drop during power-down.
AdeptMotion VME Developer’s Guide, Rev B
101
Chapter 7 - SPEC Program: Robot Specifications and Tuning
Table 7-1. Robot Initialization Specs
Robot Initialization Specs for Robot Number __
Suggested
Value
Parameter
Units
Range
Robot start-up message
n/a
<= 79 char
Module password
n/a
n/a
Calibration file name
n/a
n/a
Robot model number
n/a
≥0
Robot serial number
n/a
≥0
Hand OPEN signal
n/a
any valid
output or
soft signal
Hand CLOSE signal
n/a
any valid
output or
soft signal
*Time-out nulling error* limit
Seconds
≥0
4 (depends on
amplifiers and
mechanism)
Time required for clutch to
engage
Seconds
≥0
0
Time required for brakes to
release
Seconds
≥0
0
Time required for brakes to
engage
Seconds
≥0
0
Delay from high power on to
amp enable
Seconds
≥0
1
Max time to wait for amp
enable
Seconds
≥0
1
102
standard.cal
AdeptMotion VME Developer’s Guide, Rev B
Your Value
Motor/Amp and Encoder Specifications
7.4
Motor/Amp and Encoder Specifications
The amplifier and encoder specifications define the relationship between the mechanism
and the control system. The encoder scale factor must be set properly to get maximum
system accuracy. The number of counts per zero-index and zero-index configuration
ensure proper encoder operation and calibration accuracy. The DAC limits protect the
motor and system hardware by limiting the output commands. Finally, the motor and
encoder signs must be set properly to get stable motion in the directions specified by the
device module documentation. The encoder and amplifier specifications are summarized
in Table 7-3 and Table 7-5.
Encoder Scale Factor
The AdeptMotion VME system supports coordinate systems which are calibrated in real
units (millimeters or degrees). To accomplish this, scale factors which relate encoder
counts to physical movements must be defined to the system. If a joint is rotary, the units
for this parameter are encoder counts per degree. If the joint is linear, then the units for
this parameter are encoder counts per millimeter. This parameter must take into account
all gearing which exists between the encoder and the joint.
Most mechanism kinematic modules contain only one motor for each joint. In these cases,
there is a single scale factor for each motor/joint, and SPEC will allow only a single value
to be entered for each motor.
Mechanisms that allow multiple motor-to-joint coupling require the specification of a
scale factor for each joint affected by the selected motor’s motion. In these cases, SPEC will
prompt for as many scale factors as necessary to characterize the coupling. Each scale
factor may be calculated by determining how much the selected motor moves when only
the indicated joint is allowed to move.
If a kinematic module allows motor-to-joint coupling, but none is desired, then set all the
scale factors to zero except those for which the motor number and joint number are the
same.
When multiple motor-to-joint coupling is present, the scale factors entered for each motor
form a row in a coupling matrix used internally by V+. This matrix must be invertible so
that V+ can determine how the joints move for a given motor motion, and also how the
motors should move given a desired joint motion. If the matrix cannot be inverted, SPEC
will warn the user of an inconsistency in the motor-to-joint coupling. If SPEC reports this
error, be sure to correct the inconsistency by entering the proper scale factors before any
attempt is made to control the affected joints from V+. V+ will not be able to move the
joints correctly without the proper scale factors.
Encoder specifications often state the number of lines per revolution. Because the
AdeptMotion hardware uses quadrature decode circuitry, it is necessary to multiply the
number of lines per revolution by four to calculate the number of counts per revolution.
When calculating and entering this parameter, it is very important to use as much
accuracy as possible. The value should be entered as an expression or the decimal portion
of the number should be entered to eight significant digits. This scale factor is critical to
achieve motions which are accurate.
AdeptMotion VME Developer’s Guide, Rev B
103
Chapter 7 - SPEC Program: Robot Specifications and Tuning
Sample scale factor calculations are shown below.
Example 1:
Linear motion achieved via the use of a lead-screw drive. The lead screw requires 2
revolutions per inch of travel. The encoder (800 lines per revolution) is mounted directly
to the back of the motor shaft and the lead screw is directly coupled (no gearing) to the
joint.
2 motor revs 800 × 4 counts
1 inch
251.9685 counts
------------------------------ × ----------------------------------- × --------------------- = --------------------------------------inch
motor revs
25.4 mm
mm
Example 2:
A jointed arm robot has a joint that rotates. The joint is driven through a harmonic drive
with a gear reduction ratio of 45 to 1. The encoder is mounted directly to the back of the
motor shaft and has 1000 lines per revolution.
45 motor rev 1000 × 4 counts 1 joint rev
500.0000 counts
------------------------------- × -------------------------------------- × ---------------------------- = --------------------------------------1 joint rev
motor rev
360 degrees
degree
Example 3:
A gantry mechanism contains five joints, and the last two contain multiple motor-to-joint
coupling. It is known that if joint 5 is held stationary and joint 4 is moved 1 degree, then
both motors 4 and 5 will move 400 counts. Also, if joint 4 is held stationary and joint 5 is
moved 1 degree, then motor 4 will not move, and motor 5 will move -1200 counts. The
scale factors are therefore as follows:
Joint 4 to motor 4 scale factor (counts/degree) = 400
Joint 5 to motor 4 scale factor (counts/degree) = 0
Joint 4 to motor 5 scale factor (counts/degree) = 400
Joint 5 to motor 5 scale factor (counts/degree) = -1200
Encoder Counts Per Zero Index
The “Encoder counts per zero index” parameter is defined as the number of encoder
counts between each zero-index on the encoder. Since there is normally only one index per
rotation of an encoder, it is usually the same as the number of counts per revolution (or
four times the number of lines per revolution).
Some linear encoders have only one zero-index in the entire range of motion. In such a
case, the number of encoder counts per zero-index should be set to any value greater than
the number of counts in the encoder from end to end. Zero-index checking will still
function: any stray index pulse will cause an *Unexpected zero index* error and failure to
detect the single index at the correct encoder count will cause a *No zero index* error.
Other encoders have no zero-index at all. In that case, set the number of encoder counts
per zero index to 0.
104
AdeptMotion VME Developer’s Guide, Rev B
Motor/Amp and Encoder Specifications
Encoder Configuration: Zero-Index, Error Reporting, and Filtering
The first three bits of the encoder configuration value define the zero-index configuration.
Bits four to six control the detection and reporting of certain encoder hardware errors. Bit
seven controls optional filtering of the encoder signal. (Bits six and seven are supported
only on the MI6 and MI3 modules. These options are not displayed by the SPEC program
unless your hardware supports these features.)
• The fourth bit disables Zero-Index error reporting
• The fifth bit disables Quadrature error reporting
• The sixth bit disables Broken-encoder-wire error reporting
• The seventh bit changes the filtering of the encoder signal to 1 MHz
(See the next page for a detailed description of these features.)
Zero-Index Configuration
The zero-index is often used as a calibration reference. (The “zero-index pulse” is also
sometimes known as the “Index Pulse”, the “Marker Pulse” or the “C-channel”.) It may
also be used, in conjunction with the “Encoder Counts per Zero Index” parameter, to help
detect certain encoder faults. The zero-index configuration defines the manner in which
the encoder circuitry reads the zero-index pulse from the encoder, and is set to match the
specific type of encoder in use. Zero-index pulses may be active low or active high, and an
active pulse transition may occur in conjunction with the rising or falling edge of either
the A or B channel. Most encoder manufacturers provide timing diagrams that describe
the relationship of the zero index pulse to the A and B channels. The timing diagram
indicates the most reliable point at which to set the zero-index configuration. By gating
the zero-index pulse near its center, you can be confident of its stability even at high
speeds.
Figure 7-3 shows an example encoder timing diagram. The example encoder has an active
high zero-index. From the chart in Table 7-2, this encoder would require a zero-index
configuration of either 4 (A phase low, B phase low, zero-index high) or 6 (A phase low, B
phase high, zero-index high.) Set the zero-index configuration to one of these values. If
you receive an *Unexpected zero index* or *No zero index* error message, then change to
the other zero-index configuration. Section 8.1 on page 141 details a procedure for setting
the correct zero-index configuration.
A Phase
B Phase
Index
Zero index detected here
using encoder configuration 6
Zero index detected here
using encoder configuration 4
Figure 7-3. Example Zero-Index Configuration
AdeptMotion VME Developer’s Guide, Rev B
105
Chapter 7 - SPEC Program: Robot Specifications and Tuning
Table 7-2. Zero-Index Configuration Table
Configuration Value (bits 1 to 3)
0
1
2
3
4
5
6
7
A Phase
Low
High
Low
High
Low
High
Low
High
B Phase
Low
Low
High
High
Low
Low
High
High
Index
Low
Low
Low
Low
High
High
High
High
Zero-Index Errors
If the encoder configuration is incorrect and the robot is moved, the robot will normally
power down with a *Unexpected zero index* or *No zero-index* error. If you are having
problems with the zero-index line on your encoder during the system setup and debug
stage, you may want to temporarily disable zero-index error-reporting from the “Encoder
configuration” menu selection. (Even if zero-index error-reporting is disabled, the correct
zero-index configuration will still be required if the zero-index is used for calibration.)
Quadrature Errors
An *Encoder quadrature error* can be generated if the A and B phases make an illegal
state change (for example, electrical noise might cause a transition from A-high/B-high to
A-low/B-low without an intermediate high/low state). If during debug, you find it
necessary to temporarily override this safeguard, you can disable quadrature error
reporting from the “Encoder configuration” menu selection.
Encoder Broken-Wire Detection
If the hardware detects total loss of the signal from the encoder, the error *Encoder
Failure* is generated. For a differential encoder using RS-422 type outputs, the differential
voltage across each signal pair (A+, A-; and B+, B-) should be either +5 or -5V (nominal) at
all times. If any of these signals drops to 0V, the hardware will detect an apparent fault
condition. Of course, this test will not detect all possible fault conditions. By definition,
this test cannot be performed for single-ended (non-differential) encoders. If you have
installed a single-ended encoder, installing the hardware-configuration resistors in the
position for Single-ended Output will automatically disable the “broken-wire”/encoder
fault detection. (See “Encoder Input Configuration (Differential vs. Single-Ended)” on
page 21.)
!
CAUTION: When using broken-wire detection, be careful when wiring
encoder signals. Noisy signals will report *Encoder failure* errors when
detection is turned on.
When the resistor packs on the MI6 are configured for single-ended encoders, reporting of
the broken-wire (*Encoder Failure*) error is always disabled, regardless of the setting of
bit six of the encoder configuration value.
106
AdeptMotion VME Developer’s Guide, Rev B
Motor/Amp and Encoder Specifications
If the resistor packs are configured for differential operation, but your encoders are not
providing true RS-422 signals, you may choose to disable broken-wire detection, by
setting bit six of the encoder configuration value. (Adept strongly recommends the use of
RS-422 differential encoders, so that you can use this feature.)
WARNING: It is important to restore the encoder configuration value to
the 0-7 range (or 64-71 if using the 1MHz filter option) during normal
execution; otherwise, selected errors will not be reported even if the
encoder is malfunctioning.
Encoder Filtering, Digital, 1 MHz/4 MHz
The encoder inputs are digitally sampled and filtered. The default filter value allows
encoder count rates up to 4MHz. If you are using a slower encoder, you can still use this
default value, unless your encoders are excessively noisy, or you have electrical
interference to the encoder power supply or wiring. (See “Proper Wiring and Electrical
Design Practices” on page 26.) If, after reviewing your electrical installation, you need to
filter out noise on your encoder lines, you can use bit seven of the encoder configuration
value to select additional digital filtering. This will reduce the maximum encoder count
rate to 1 MHz.
Encoder Sign
The encoder sign is used to define the relationship of the direction of the encoder relative
to the direction of the motor. It allows the encoder to be mounted on either end of the
motor shaft (which results in a reversal of the encoder rotation). A non-zero value for the
encoder sign causes the control system to invert the sign of the encoder position. When set
properly, the encoder count should increase when the axis is moved in a positive
direction. Refer to your device module documentation for a description of “positive
direction” for each axis of the robot.
WARNING: Improperly defining the encoder and motor signs can result
in an unstable (runaway) system. Exercise great caution when setting this
parameter.
Note that an improperly connected encoder (A and B phases reversed) will cause a
reversal in the encoder count direction. Ensure that all encoders are properly connected
before changing the encoder sign.
Perform the test described in Chapter 8 to confirm the correct encoder sign setting.
AdeptMotion VME Developer’s Guide, Rev B
107
Chapter 7 - SPEC Program: Robot Specifications and Tuning
Table 7-3. Encoder Parameters
Encoder Parameters for Robot Number __ Motor Number __
Parameter
Units
Range
Encoder scale factor
counts/rev
or
counts/mm
>0
Encoder counts per zero
index
counts
≥0
Encoder configuration
n/a
>0
Encoder sign
n/a
0 or –1
Suggested Value
Your
Value
0 if no zero index;
otherwise > 0
Motor Sign
The servo control loop will generate a torque command proportional to the position error.
If that torque command has the wrong sign, it sends the motor in the wrong direction,
increasing the position error, which increases the torque, which increases the position
error, and pretty soon you have a runaway motor. The motor sign allows you to make sure
the torque command acts in the proper direction to correct errors, not make them worse!
You simply have to make sure that a positive torque command causes motion in the
positive direction; if not, reverse the motor sign. A non-zero value for the motor sign tells
the control system to invert the torque commands before sending them to the DAC.
The motor sign can be tested with the “Perform hardware diagnostics” selection. Follow
the instructions in Chapter 8 to perform the test.
WARNING: If after finding the correct value for the motor sign, you need
to redefine which direction of motion is considered positive, be sure to
change both the encoder sign and the motor sign together. Changing only
the encoder sign or motor sign can lead to a runaway motor. Exercise
great caution when setting this parameter.
Maximum DAC Output
It is possible to limit the output of the analog DAC command using this parameter. This is
useful as a safety feature to limit the maximum torque or velocity (depending on the type
of drive). Setting this parameter defines both the positive and negative limit of the DAC.
The maximum DAC output is ± 10 VDC, which corresponds to a command of 32767. If
this parameter is set to zero, various errors (such as *Motor stalled*) will be generated if
any motion or calibration commands are executed. By initially setting this parameter
smaller than its eventual value, the DAC output limit can be used to limit any potential
damage to hardware during the specification procedures. An initial value of 10% of
full-scale is recommended, until you have completed servo tuning as described later in
this chapter.
108
AdeptMotion VME Developer’s Guide, Rev B
Motor/Amp and Encoder Specifications
Maximum DAC Output in Manual Mode
This value specifies the maximum output the servo can send to the DAC during Manual
Control mode. It should not exceed the maximum DAC output value.
*Duty-cycle Exceeded* DAC Limit
The duty-cycle limit is one of the safety features V+ provides to prevent overexerting your
motor or drive system. During operation, the root mean square (RMS) DAC output value
is fed into an averaging filter. If the filtered RMS value ever exceeds the value of this
parameter, a *Duty-cycle exceeded* error is generated and high power is disabled.
Typically, this value is about 2/3 of the maximum DAC output, and it can be disabled by
setting it to be zero, or greater than the maximum DAC output.
*Duty-cycle Exceeded* Filter Parameter
This value specifies the low-pass filter through which the root mean square (RMS) DAC
value is fed before comparing it to the above limit. By filtering the DAC output,
momentarily high torque commands will not cause an error. The more filtering, the longer
it will take for an error to be declared. In order to help you set this value, use the following
rule of thumb: assuming the DAC output is at a constant value, the “rise time” of the DAC
filter to 63% of the DAC output value is 2n milliseconds, where n is the filter parameter. A
value less than 5 will give a “hair-trigger” response, causing the *Duty-cycle exceeded*
error very soon after the “*Duty-cycle exceeded* DAC limit” is exceeded. A value of 9
(approximately 1/2 second rise time) is recommended.
*Motor Stalled* Timeout
To further protect the system from damage, motor-stall detection is incorporated at the
servo control level. When full torque is commanded for the specified amount of time, the
robot is assumed to be stalled, high power is disabled, and a *Motor stalled* error is
generated.
WARNING: Set this parameter to as low a value as possible to assist in
detecting encoder failure during operation.
*Soft Envelope Error* Limit
The envelope error, also known as the following error, is defined as the lag between the
commanded and actual position during a motion. This error value gives an indication of
how well the mechanism is following the commanded motions. The AdeptMotion
software monitors the envelope error during execution of motions and compares these
values against this parameter. If the specified limit is exceeded, a *Soft Envelope error*
message is generated. The motion comes to a controlled stop. However, the High Power
stays on. This parameter can also assist in detecting encoder failure during operation.
AdeptMotion VME Developer’s Guide, Rev B
109
Chapter 7 - SPEC Program: Robot Specifications and Tuning
*Hard Envelope Error* Limit
The Hard Envelope error differs from the Soft Envelope error in that if the specified limit
is exceeded, High Power is turned off immediately. It should be set to a value greater than
the Soft Envelope error value.
WARNING: Set this parameter to as low a value as possible to assist in
detecting encoder failure during operation.
Machine Input Polarity
You can control whether various signals are active-high or active-low using the machine
input polarity value. This allows you more flexibility in your choice of sensors. Table 7-4
shows the machine polarity selections for various sensor configurations.
Table 7-4. Machine Configuration Word
Value ––>
0
1
2
3
4
5
6
7
8
9
10
11
12
13
14
15
Home
L
H
L
H
L
H
L
H
L
H
L
H
L
H
L
H
Pos. Over.
L
L
L
L
H
H
H
H
L
L
L
L
H
H
H
H
Neg. Over.
L
L
H
H
L
L
H
H
L
L
H
H
L
L
H
H
Drive Fault
L
L
L
L
L
L
L
L
H
H
H
H
H
H
H
H
110
AdeptMotion VME Developer’s Guide, Rev B
Motor/Amp and Encoder Specifications
Table 7-5. Motor/Amplifier Parameters
Motor/Amplifier Parameters for Robot Number __ Motor Number __
Parameter
Units
Maximum
Range
Typical Value
Motor sign
n/a
0 or -1
depends on system
Maximum DAC
value
DAC
counts
0 to 32767
depends on
motor/ drive
10% of full
scale
Maximum DAC
output in Manual
mode
DAC
counts
0 to 32767
depends on
motor/ drive
1/3 of above
*Duty-cycle
exceeded* DAC limit
DAC
counts
0 to 32767
2/3 of maximum
DAC value
2/3 of above
*Duty-cycle
exceeded* filter
parameter
n/a
≥0
9 (about 0.5 sec
time constant)
8
*Motor stalled*
timeout
seconds
≥0
depends on system
(should be as low
as possible)
0.2 seconds
*Soft envelope error*
limit
enc.
counts
≥0
depends on system
(should be as low
as possible)
>3 times
square wave
step size
while
tuning. Must
be set to safe
value after
tuning.
*Hard envelope
error* limit
enc.
counts
> soft
envelope
error limit
depends on system
(should be as low
as possible)
>3 times
square wave
step size
while
tuning. Must
be set to safe
value after
tuning.
Machine Input
Polarity
n/a
AdeptMotion VME Developer’s Guide, Rev B
Suggested
Initial Value
Your
Value
111
Chapter 7 - SPEC Program: Robot Specifications and Tuning
7.5
Motor Servo Tuning Parameters
Tools and Techniques
The servo tuning parameters affect the performance and stability of the servo loop for
each motor. AdeptMotion VME offers the capability to interactively tune these parameters
and see how they influence robot motion graphically. This section is intended to inform
you how to use the tuning package; for a detailed analysis of servo tuning procedures,
refer to page 116.
When you select “Edit motor tuning parameters” from the “Robot specification” menu,
you will get a menu similar to the one shown in Figure 7-4.
***
ROBOT 1/MOTOR 1 SERVO TUNING
***
Robot power: OFF
0
1
2
3
4
5
6
7
=>
=>
=>
=>
=>
=>
=>
=>
Exit
Change motor num
Proportional gain...
Proportional zero...
Proportional pole...
Integral gain.......
Max integrator value
Max integrator step.
0
0.980
0.000
0
0
0
8 => Velocity feedforward
0
9 => Accel feedforward...
0
10 => DAC output filter...
0
11 => Select test........ Square Wv
12 => Test and plot
13 => Test and display
14 => Export results
Enter selection:
Figure 7-4. Servo Tuning Menu
The tuning process breaks the overall tuning task into two major subsections; first,
manual feedback gain tuning determines good values for the Proportional and Integral
paths. These parameters are critical for minimizing motion settling time and overshoot.
Second, automatic (or manual) feedforward gain tuning improves trajectory tracking by
estimating the motor command required to follow a trajectory and “feeding forward” or
adding that command to the motor.
WARNING: All tests require the motor to operate under closed-loop
control. If the control loop is unstable, the robot can “run away” when it
is commanded to begin moving. Make sure the motor and encoder signs
have been properly tested before initiating these tests, stay clear of the
robot, and keep your hand near an Emergency Stop button to stop the
system if it does appear to behave improperly.
From the servo tuning menu, you can change servo gains, select a test to perform or data
to display, or initiate a test. The servo gain (tuning) parameters are described in Chapter 4.
The tuning procedure is described on the following pages.
112
AdeptMotion VME Developer’s Guide, Rev B
Motor Servo Tuning Parameters
Select Test
If you choose the “Select test” menu item, you will move to the “Tuning Test
Configuration” menu, with selections as described in Table 7-6.
Table 7-6. Tuning Test Selections
Test Selection
Description
Square wave
Used for manually tuning feedback (never feedforward) parameters. You can
display any servo data during step response, as shown in Figure 7-6. You need
to specify the amplitude and period of the square wave, and the data that will
be collected and displayed. A step size of about 1/2 turn of the motor shaft is
typically used.
Move between
taught points
Moves the robot between taught points for manually tuning feedback and
feedforward parameters. The robot must be calibrated to perform this test, so it
is only performed during the later stages of tuning. You need to teach the
endpoints of the motion, speed and acceleration parameters, and the data that
will be collected and displayed.
Frequency
response
Uses “swept-sine” excitation to collect and display open-loop or closed-loop
frequency response information about the mechanism. With closed-loop
excitation, it commands a sinusoidal position setpoint; with open-loop
excitation a sinusoidal DAC output setpoint. You need to specify the frequency
range of interest, the number of test points, and the amplitude of the command.
See Warning on page 112.
Auto-tune to
refine existing
feedback gainsa
Refines the tuning of a roughly tuned motor. The motor tuning must already be
stable before invoking this test.
Auto-tune to find
feedforward
gainsa
Optimizes the Velocity and Acceleration Feedforward Gains by moving
between taught points and monitoring performance. The robot must be
calibrated to perform this test, so it is only performed during the later stages of
tuning.
Select Data to
Test and Display
If you select taught-point or square wave tests, you need to specify data that
will be collected when the test is performed. The data selection menu is shown
in Figure 7-5. The most useful measure of performance is “PosErr”, the motor
position error. You want to minimize this to get best servo performance. You
will also commonly select “Torque” from this menu to see when the control
loop is “saturating,” or giving the maximum output torque command. Up to
five data items may be selected for display.
a
These menu items appear only on A-Series controllers.
AdeptMotion VME Developer’s Guide, Rev B
113
Chapter 7 - SPEC Program: Robot Specifications and Tuning
***
0
1
2
3
4
5
6
7
8
9
10
11
12
13
=>
=>
=>
=>
=>
=>
=>
=>
=>
=>
=>
=>
=>
=>
MOTOR 1 DATA SELECTION
***
Exit
Change motor num
CmdPos: Commanded position (cts)
EncPos: Actual position (cts)
PosErr: Position error (cts)
CmdVel: Commanded velocity (cts/ms)
EncVel: Actual velocity (cts/ms)
VelErr: Velocity error (cts/ms)
MtrCmd: Motor command (DAC units)
IntErr: Integrator 'windup' (DAC units)
LatPos: Last latched position (cts)
LstIdx: Last zero index (cts)
DelIdx: Distance between zero indices (cts)
ErrIdx: Number of zero index errors
Enter selection:
Figure 7-5. Servo Tuning Data Collection Menu
Test and Plot
Returning to the “Servo Tuning Menu” and selecting “Test and plot”, the robot will move
to perform the test selected. There will be a few-second pause while the system collects
data, then you will see a display plot of the parameter(s) you requested. Figure 7-6 and
Figure 7-7 show typical displays of plots for square-wave and frequency response tests.
Figure 7-6. Tuning Plot for Square-Wave Response Test
114
AdeptMotion VME Developer’s Guide, Rev B
Motor Servo Tuning Parameters
Figure 7-7. Plant+Controller Frequency Response Test
Test and Display
This is similar to the above option, except that instead of capturing data during the test
and plotting it afterwards, it provides a continuously-updated live display of the selected
parameters.
Export Results
After using the Test and Plot option, you can export the results. There are three choices.
Output Data to Text File
This exports the raw data captured during the previous test to an ASCII file. It can then be
imported into a PC or Macintosh computer using a spreadsheet program, for plotting or
analysis.
Output Data to Screen
The data is sent to the screen for review. (Use scroll lock or Crtl-S and Crtl-Q to start and
stop the output.)
Save Plot to TIFF Graphics File
This option is only available if you have the Adept Graphics module (VGB). The currently
displayed plot (similar to Figure 7-6 or Figure 7-7) is saved to a TIFF format disk file. The
TIFF format is used by many PC and Macintosh graphics programs.
AdeptMotion VME Developer’s Guide, Rev B
115
Chapter 7 - SPEC Program: Robot Specifications and Tuning
Step-by-Step Tuning Procedure
Initial tuning should be done with the motor uncoupled from the load. This allows the
user to gain experience with the tuning parameters without risking hardware damage to
the mechanism. It also provides a useful reference for final tuning when the motors are
installed.
Start by setting the servo tuning parameters to the values listed in Table 7-7. The
suggested initial values represent a set of parameters that will probably allow stable
start-up of the servo loop, but system performance may be quite poor. You should also
ensure that the Motor/Amplifier values are set as recommended in Table 7-5 on page 111.
WARNING: The user should assume the worst when starting the system
for the first time. The system may be unstable and could produce
uncontrollable motion or severe vibration. Be sure to take all precautions
necessary to avoid equipment damage or injury to personnel. Stand clear
of all mechanisms and be prepared to depress the Emergency Stop
button. It is imperative that operation of the Emergency Stop circuit be
verified before attempting to start up the system.
Tuning is usually most efficiently performed by the step-by-step process outlined on the
following pages.
NOTE: The step response test process only enables that axis which is
being tuned.
Table 7-7. Servo Tuning Parameters, with Suggested Initial Values
Servo Tuning Parameters for Robot Number __ Motor Number __
Parameter
Units
Usual Range
Suggested
Initial Value
Proportional gain
(DC gain)
DAC_counts
enc_cnt
1 to 100
1
Proportional zero
none
0.8 to 0.99a
0.98
Proportional pole
none
0 to 0.8
0
Integral gain
DAC_counts
enc_cnts * ms
0.01 to 50
0
Maximum integrator value
DAC counts
0 to 32767
0
Maximum integrator step
enc_cnts/ms
0 to 1000
0
Velocity feedforward
DAC_counts
enc_cnts/ms
0 to 1000
0
Acceleration feedforward
DAC_counts
enc_cnts/ms2
0 to 100,000
0
DAC output filter
none
0, 1, 2
0 (disabled)
a
For velocity-style amplifiers, range can be 0 to 1.
116
AdeptMotion VME Developer’s Guide, Rev B
Your
Value
Motor Servo Tuning Parameters
Tuning Overview
• Set and verify Encoder and Motor signs, with motors disconnected from
mechanism (Step 1 to Step 2).
• Perform square-wave “pre-tuning”, with motors disconnected. Obtain initial
values for Proportional Gain and Zero (Step 3 and Step 4).
• Obtain initial values for Integrator parameters (Step 5).
• Connect motors to mechanism (Step 6).
• Repeat square wave tuning. Adjust Proportional Gain and Zero. Tune Pole and
Integrator Gain (Step 7).
• Define calibration parameters (Step 8).
• Define other specification parameters (Step 9).
• Test and refine tuning using the “Move between taught points” option (Step 10).
• Set feedforward gains (optional, Step 11).
Detailed Tuning Procedure
NOTE: See Chapter 4 for a detailed explanation of the servo-tuning
parameters (Section 4.4 on page 58), block diagrams of the servo loops,
and an overview of the objectives and methods of tuning (Section 4.5 on
page 67).
1. Encoder and Motor Signs: Disconnect the motor output shaft from the robot
mechanism. Define the values of the Encoder Sign and Motor Sign so that:
a) when the joint is pushed in the positive direction (as defined in the
axis-definition diagram for your robot device module), positive encoder motion is
obtained, and
b) a positive torque or velocity command (“U” in the hardware diagnostics menu)
generates positive encoder motion. If this is not the case, do not proceed until the
situation is corrected, because the control system will attempt to apply an output
that makes position errors worse instead of better.
2. Test Signs: With the motors still disconnected from the mechanism and the
tuning and motor parameters set as specified in Table 7-5 and Table 7-7, enable
High Power, the Amplifier, and Brake Release if necessary. Carefully move the
motor shaft, and verify that a weak corrective torque is generated. If the motor
runs uncontrollably, go back to step 1. If the motor starts to vibrate badly, lower
the Proportional Gain until it stops. At this point, the motor should feel very
“loose” or “soft” because of the very low settings of the Proportional Gain.
Nonetheless, it is critical that the weak torque generated tends to correct for any
induced position errors (see step 1 above).
3. Pre-tuning: Assuming performance was as expected in the previous step, the
stiffness of the motor may now be increased by increasing the Proportional Gain
and the Max DAC Output. The motor should become increasingly stiff. If the
Proportional Gain is increased too much, it will eventually begin to excite
resonances in the motor body. Motors with a particularly flexible coupling
between the motor and the encoder may start resonating prematurely when
perturbed. If this occurs, increase the Proportional Pole or enable the DAC output
filter by setting it to 1 or 2.
AdeptMotion VME Developer’s Guide, Rev B
117
Chapter 7 - SPEC Program: Robot Specifications and Tuning
4. Initialize Proportional Gain and Zero: The purpose of this step is to obtain initial
approximate values for the Gain and Zero. Enable the step command, and using
the motor’s step response as a guide, continue adjusting the Proportional Gain
and Zero until satisfactory performance is obtained. A step size of about 1/2 of a
revolution of the motor shaft is normally used. (Make sure that the amplitude of
the square wave is at least 25% smaller than the envelope error limit, or else that
error may be generated.) The motor shaft should make sharp movements with
little or no overshoot. The Zero can be adjusted up to increase damping, or down
to decrease it. Again, if a motor resonance is discovered at this point, it may be
necessary to enable the DAC output filter by setting it to a non-zero value. (The
DAC output filter will reduce performance, and should only be used as a “last
resort”. If you use it now, try to set it back to zero after connecting the
mechanism.)
For motors with no load connected, the Pole may almost always be left at zero,
but the user may experiment with it now if desired. Increasing the Pole will
usually only be required for systems with a high inertial load. This is an iterative
process. You can leave all other parameters set to zero for now, or you may want
to spend some time at this stage determining the effects of the various
Proportional Path parameters.
NOTE: The Feedforward parameters for Velocity and Acceleration cannot
be tuned during square wave tuning. (See Step 11.)
5. Integrator Gain: Once a satisfactory response to a step input has been achieved,
the integrator parameters can be slowly enabled to help eliminate any
steady-state error. With the motor disconnected from the load, the amount of
steady-state error will almost certainly be very small. Nonetheless, adjusting the
integrator parameters now, with the motor unloaded, will provide the user with
some valuable experience without risking the mechanism.
To explore the effects of a pure integrator (without the saturating elements) set the
Max Step and Max Value to very large values, and slowly increase the Integral
Gain from zero. Remember that the Integral Gain is much smaller numerically
than the Proportional Gain, because it multiplies with a sum of all past position
errors. Starting with the Integral Gain set to a small fraction, such as 0.01, is
usually safest. The maximum value for the Integral Gain is usually around 10.
In most systems, raising the Integral Gain will decrease damping, which causes
more oscillatory behavior. At some point, the motor will probably start oscillating
with increasing instead of decreasing amplitude, as the integrator starts to
dominate the response. Be prepared to disable power quickly if this occurs. Next,
lower the Integral Gain to a reasonable value and slowly lower both the Step and
the Max Value until they start to have an effect on the response. The best setting
for the Max Integrator Value will be the minimum that still allows the integrator
to remove all the steady state error. Remember the values that provide good
performance, for future reference when the motor is installed.
6. Connect to Mechanism: Once reasonable no-load performance is obtained,
connect the motors to the mechanism. The tuning parameters will require some
readjustment because the effective inertia seen by the motor will increase. Most
mechanisms will also increase the effective damping seen by the motor, so it may
be possible to decrease the Zero somewhat.
118
AdeptMotion VME Developer’s Guide, Rev B
Motor Servo Tuning Parameters
!
CAUTION: With the motors connected to the mechanism, a poorly tuned
system may now be capable of causing substantial damage. Adept
recommends that the user set the tuning parameters to conservative
values before enabling power for the first time. In particular, the
integrator should be disabled by setting the gain to zero, and the
Maximum DAC Output should be set to a small value so as to limit the
amount of energy the motors can expend.
7. Fine Tuning: Repeat square-wave tuning to arrive at appropriate values for all
active parameters, including Proportional Gain, Zero and Pole, and Integrator
Gain, Step and maximum value. Now that the motor is connected to the load,
experimentation should be done with the utmost caution. Change all values in
small increments.
8. Calibration: Define calibration (homing) parameters, then calibrate the robot. The
robot must be calibrated before you can use the “Move between taught points”
tuning option. See section 7.6.
9. Other Specification Parameters: Define all remaining mechanism and motion
parameters. (See section 7.7 through section 7.12.)
10. Point-to-Point Testing: After obtaining good performance with the square-wave
step command, verify that the motor runs well during normal V+ trajectory
generation (“Move between taught points”). This is especially important when
the motor is installed in the mechanism. Long slewing motions can sometimes
excite oscillations in systems with the gains set very high, especially if there is a
cyclic variation in load friction (which is common with lead screw drives). Also,
friction and gravity loads may vary from point to point in the working envelope,
and it should be verified that the steady state error remains below an acceptable
minimum in all areas of the workspace. If a problem is encountered with the
steady state error, adjust the Integral Gain or Max Integrator Value and repeat the
test.
11. Feedforward Tuning: Once all motors are tuned and the robot is calibrated, adjust
the Feedforward gains while moving the motor between taught points.
Remember, the Feedforward gains will have no effect on the motor’s response to a
step command, because a step command has no meaningful commanded velocity
or acceleration associated with it. As with all tuning parameters, start small and
increase the values slowly. You can also use the Feedforward autotuning test
selection.
12. Save all parameters. It is recommended that you save your parameters from
time-to-time as you work. When you have finished, save the final version and
make a backup copy. (See “Saving and Loading Specifications” on page 93.)
Auto-Tuning of Feedforward Parameters
The feedforward auto-tuning is performed by moving the mechanism back and forth
between two points and monitoring the average DAC command during the motions.
Best-fit calculations determine the optimal feedforward gains from the data. The robot
must be calibrated to perform feedforward auto-tuning. It is important when performing
this test that you teach two points far enough apart that the mechanism has time to
perform a sufficient amount of constant-velocity motion.
AdeptMotion VME Developer’s Guide, Rev B
119
Chapter 7 - SPEC Program: Robot Specifications and Tuning
Summary of Active Parameters
Table 7-8 summarizes the most important effects that each parameter has on various
system response characteristics.
Table 7-8. Effects of Servo Tuning Parameters
Servo Parameter
System Response
Raise
P-Gain
Raise
Int-Gain
Raise
Zero
Overshoot
increase
increase
decrease
Rise Time
decrease
decrease
increase
Settling Time
decrease
increase
Steady State Error
decrease
decrease
no effect
Stiffness
increase
increase
decrease
Following Error
decrease
decrease
Damping Factor
increase
decrease
a
Raise
Pole
Raise
AccFFwd
decreasea
decrease
decrease
decreasea
decreasea
no effect
no effect
no effect
increase
no effect
no effect
decreasea
decreasea
increase
when properly adjusted
120
Raise
VelFFwd
AdeptMotion VME Developer’s Guide, Rev B
Motor Calibration Parameters
7.6
Motor Calibration Parameters
Calibration is required to tell each robot motor where it is. This process is sometime also
known as “homing”. Because the encoders used with AdeptMotion VME are incremental,
they only report changes in position rather than absolute position. Calibration involves
locating an absolute reference point, usually a zero-index on the encoder near to a home
switch, from which all subsequent motion can be referenced.
The program file loaded when the robot is calibrated is specified in the “Robot
Initialization Specifications” menu. The default calibration program file for most robots is
“STANDARD.CAL”, which provides tremendous flexibility in calibrating robots with
incremental encoders. For example, a motor can calibrate to a zero index after locating
either a hard stop or a home switch, or it can simply calibrate to the stop or the switch
itself (which is typically less accurate). In addition, it can calibrate in either direction, and
if the home switch is placed properly, can guarantee that the proper zero index will be
located no matter where calibration begins. This section describes how to set the
calibration parameters assuming that STANDARD.CAL is used for calibration.
The motors calibrate in groups. All motors in a group complete calibrating and move to
user-defined positions before the next group starts to calibrate. The calibration grouping
(which motors calibrate first, which are second, etc.) is also user-definable. For a given
motor, once the calibration type has been defined by setting the homing configuration, the
calibration sequence can be defined interactively by selecting “Teach calibration specs”
from the calibration menu.
The calibration sequence is as shown in Figure 7-8, assuming High Power is on and the
CALIBRATE program instruction or monitor command is issued. See Table 7-9 for a list of
the calibration parameters.
AdeptMotion VME Developer’s Guide, Rev B
121
Chapter 7 - SPEC Program: Robot Specifications and Tuning
Search for hard stop?
Y
N
Search for home sensor?
Search for stop
Speed Vc
Y
Home sensor active?
Y
N
N
Search for edge
Speed –Vc
Max Search
Distance exceeded?
Max Search
Distance exceeded?
Y
N
*Calibration
sensor error*
N
N
Hard-stop found
Pos Err exceeded?
N
Y
Y
YY
Home Sensor
Width exceeded?
*Calibration
sensor error*
Edge found?
Y
Vf ==0?
N
Edge found?
N
Y
Search for edge
Speed Vf
N
Search for zero index?
Y
Speeds:
Vc: Calibration Search Speed (signed)
Vf: Fine calibration search speed (unsigned)
Search for index
speed Vc
*No zero
index* Y
Zero-index
spacing exceeded?
N
Index found?
N
Y
Move to Park
Position, speed Vc
Calibration complete
Figure 7-8. Motor Calibration Flow
122
AdeptMotion VME Developer’s Guide, Rev B
Motor Calibration Parameters
Homing Configuration
You can calibrate in various ways depending on the requirements of your system; this
parameter indicates which calibration method is to be used. It is a bit field with the bit
settings as described below. The homing configuration value is the sum of the mask
values of the desired options.
Bits 0,1
SEARCH TYPE
These bits define the target of the initial search performed during calibration, as defined
below:
Bit Setting
Mask Value
00
0
Search for home switch.
01
1
Search for hard stop.
10
2
No search (calibrate from the current position
of the motor). This is generally not used
because without a search it is difficult to
guarantee that the same zero index or
calibration position will always be found.
11
3
Absolute calibration. (reserved/not
implemented)
Bit 2
CALIBRATE WITHOUT ZERO INDEX
(Mask value 4)
This bit is set to calibrate to the position found at the end of the search (or to the current
position if no search is performed), without using a zero index. This type of calibration
tends to be less repeatable than using a zero index.
Bit 3
FINAL CALIBRATION DIRECTION
(Mask value 8)
This bit is ignored unless a home switch search has been selected (bits 0 and 1 both off). If
this bit is off (the default), the position of the home switch will be determined while
moving slowly OFF of the home switch, and the optional zero-index search will continue
in the same direction. If this bit is set, the position of the home switch will be determined
while moving slowly ON to the home switch, and the optional zero-index search will
continue in the same direction. It is usually desirable to leave the bit off, since the home
switch is usually placed close to an overtravel switch, and the zero index search will then
occur moving away from the overtravel.
NOTE: Depending on the configuration chosen, some of the following
parameters may not be required, and will not appear on the menu.
AdeptMotion VME Developer’s Guide, Rev B
123
Chapter 7 - SPEC Program: Robot Specifications and Tuning
Speed and Direction
This signed integer value specifies the direction and speed the motor moves during its
initial search for the home switch or hard stop, and the speed at which it moves to the
park position. Once it senses the home switch, if one is used, the motor also moves at this
speed in the opposite direction until it moves off the switch, if the speed for fine search is
set to zero. This guarantees that the home switch edge is found quickly whether the robot
begins calibration on the home switch or off it.
WARNING: In most installations, the speed specified here determines the
speed of the first robot motion after power up. Set this value low enough
so that a person unfamiliar with the robot’s operation will not be injured
if they are standing inside the work envelope.
Speed for Fine Search
This value determines the speed at which the motor searches for the precise home-switch
edge after coarsely locating it.
Motor Stalled Timeout During Cal
Since calibration is often the first motion a robot performs after powerup, it is advisable to
shorten the amount of time the motor command can saturate at the maximum DAC value
before declaring a Motor Stalled error. This parameter allows you to set a special timeout
value during calibration; a value of 100 ms is typically satisfactory.
Maximum Search Distance
This positive integer value specifies the maximum distance the motor will move without
finding the home switch or hard stop before it declares an error. This value should
generally be slightly greater than the motor range in counts to make sure it doesn’t stop
before reaching the home switch or hard stop.
Maximum Home Switch Width/ ‘Hard-stop Found’ Position Error
If the homing configuration specifies “search for home switch”, this value specifies the
maximum distance the motor will move on the home switch before declaring an error.
This value should generally be slightly greater than the number of encoder counts that the
home switch spans.
If the homing configuration specifies “search for hard stop”, this value specifies the
position error in counts at which the motor will declare that it has hit the hard stop. This
value should be much smaller than the envelope error limit, but big enough so it will not
give a false “hard-stop found” reading while simply moving to the stop. If it is set too big,
*motor stalled* errors will occur as the DAC saturates against the stop.
124
AdeptMotion VME Developer’s Guide, Rev B
Motor Calibration Parameters
Distance From Edge of Home Switch to First Zero Index
If the motor happens to have a zero index that almost perfectly coincides with the edge of
the home switch or the hard stop, the motor might sometimes catch it and sometimes
catch the next index during calibration. This value specifies the expected number of
counts from the home switch or hard stop to the first zero index. If the number of counts is
off by more than half the number of counts between zero indices, the system projects
where the desired zero index is and calibrates to it.
This value is difficult to calculate off-line. It is suggested that you use the interactive
teaching utility to help you define this value.
Motor Position at Zero Index/Hard Stop/Home Switch/Current Position
This is the value to which the motor position is reset once the calibration target (zero
index, hard stop, home switch, or current position, depending on the settings of the
homing configuration setting) is found.
While the other parameters do not require a high degree of accuracy, this parameter
should be specified as accurately as possible, since it can be critical to straight-line
tracking accuracy and positioning consistency from one robot to another of the same type.
If your device module contains motor-to-joint coupling (if motion of a given joint involves
moving more than one motor), you will need to refer to your device module
documentation to determine what joint position corresponds to the “Motor position at
zero index”.
If your module does not contain any motor-to-joint coupling, the corresponding joint
position can be obtained by multiplying the motor position (in encoder counts) by the
encoder scale factor for the joint.
This value and “Distance From Edge of Home Switch” above are usually different for
different robots of the same design, because it is very difficult to guarantee a precise
relationship between a zero index location and home switch closure. As a result, these
values should be customized for each version of a mechanism to guarantee consistent
calibration.
Motor Calibration Groups
For some robots, all the motors can be calibrated simultaneously, in which case all motors
should be put into calibration group 1. But depending on your robot’s mechanical design
and its workcell, it may be desirable to calibrate motors in a specific order. For example, a
vertical axis may need to be retracted to avoid gripper damage during calibration. Such a
motor should be in calibration group 1, and its park position such that it moves out of the
way of workcell collisions. Other motors can be put into calibration group 2. Motors can
appear in several calibration groups; sometimes this is useful when one motor has to be
moved to a particular position in order for another to calibrate, and then must itself be
calibrated later.
Park Position After Calibration
This is the position to which the motor moves after calibration is complete. It can be used
to move the motor out of the way, so that subsequent motors can calibrate.
AdeptMotion VME Developer’s Guide, Rev B
125
Chapter 7 - SPEC Program: Robot Specifications and Tuning
Teach Calibration Specs
This option appears only if STANDARD.CAL program file is selected for “calibration file
name” in “Robot initialization specifications” menu. This option provides an iterative
sequence to easily measure and record parameters such as home switch width, first zero
index position, park position, etc. You must first set the homing configuration, speeds,
and distances.
Calibrate Motor
This allows you to test the calibration sequence for the current motor.
Calibrate Robot
This option performs the complete calibration for all motors.
126
AdeptMotion VME Developer’s Guide, Rev B
Motor Calibration Parameters
Table 7-9. Calibration Parameters
Calibration Parameters for Robot Number __ Motor Number __
Parameter
Units
Range
Suggested Value
Homing
configuration
n/a
0 to 12
depends on the installation
Speed and direction
counts/msec
Speed for fine search
counts/ msec
>0
Typically less than 1
‘Motor stalled’
timeout during cal
msec
≥0
Shorter than normal ‘motor
stalled timeout’; start with 10
msec
Maximum search
distance
counts
>0
greater than the maximum
travel distance
Max home switch
width
counts
≥0
width of home switch in
encoder counts
‘Hard stop found’
position error
counts
>0
smaller than envelope error
in motor/encoder spec menu
Distance from edge
of home switch
(or hard stop or
current position) to
first zero index
counts
0 to number
of counts
between
indices
as close as possible to the
actual distance
Motor position at
zero index (or home
switch or hard stop
or current position)
counts
Calibration groups
n/a
Park position after
calibration
counts
Your
Value
Typically between -5 and 5
value that provides current
calibration of axis
0 to 16
Typically 1 or 2
position axis to minimize
mechanical interference with
other axes or other
equipment
AdeptMotion VME Developer’s Guide, Rev B
127
Chapter 7 - SPEC Program: Robot Specifications and Tuning
7.7
Joint Motion Parameters
Nulling Tolerances (FINE, COARSE, TIME REQUIRED)
(The FINE and COARSE parameters can also be edited in the restricted-access mode of
SPEC, as described in Instructions for Adept Utility Programs.)
The nulling tolerances are utilized at the end of a program generated motion to determine
when the mechanism actually reaches its final destination. When a BREAK or DELAY
instruction follows a motion instruction, each motor of the robot is required to settle
within the specified number of encoder counts for the specified time before the program
will continue executing. Note that the tolerances are specified in terms of motor position
and not joint location. The location of the encoder (motor mounted or joint mounted), and
the coupling between the encoder and the joint will determine the effective joint nulling
tolerance.
The FINE nulling tolerance range will be in effect after a FINE program instruction is
executed. These values are normally set slightly greater than the best repeatability that the
robot is expected to achieve.
The COARSE nulling tolerance range will be in effect after a COARSE program
instruction is executed. This tolerance range is normally set equal to 2 to 10 times the size
of the FINE tolerance nulling range.
READY Position
V+ provides a means to define and move to a predefined location called the READY
location at which the robot should be close to the middle of its workspace and safely away
from workcell hardware. When calibrated, the robot can be easily moved to the READY
position with a “READY” program instruction.
Joint Speed and Acceleration
These parameters define the joint speed and acceleration at which a joint will travel when
executing a joint interpolated move, as commanded by the MOVE or DRIVE program
instructions. The joint speed parameter defines the top speed at which the joint will move
at SPEED 100, and the acceleration parameter sets the acceleration rate at ACCEL 100,100.
Refer to section 7.9 on Cartesian motion parameters for straight-line motion parameters.
JOINT Pendant Increment and Speed
If the SLOW button on the manual control pendant (MCP) is pressed and the speed pot is
pressed close to its center (minimum plus or minus speed), the robot will move the
smallest specified increment and then stop. If the speed is increased, the robot will begin
to move at a continuous rate equal to five times the smallest incremental motion per
second. As the commanded speed is increased, the robot's speed will linearly increase
until the robot is moving at 25% of the maximum specified speed. If the SLOW button is
turned off, the robot's speed will be linearly interpolated between zero and the maximum
specified speed.
128
AdeptMotion VME Developer’s Guide, Rev B
Joint Motion Parameters
WARNING: RIA (Robot Industries of America, USA) safety standards
require that mechanical devices not exceed a tool tip speed of 76.2
millimeters per second (3 inches per second) when operated under
manual control. Some other national regulations may require an even
lower speed. Be sure to set both the maximum Cartesian translational and
the maximum joint manual control speeds so the tool tip cannot exceed
this limit even with the robot at full extension.
FREE Mode Configuration Parameters
Selecting FREE mode on the MCP “frees” the selected joint by zeroing the motor torque
and optionally releasing a clutch. This mode is intended to allow the mechanism to be
easily moved by hand during setup and location teaching. When a joint is gravity-loaded,
FREE mode may be undesirable since the joint could drop, causing damage to the payload
or the workspace. The FREE mode parameter can be used to disable FREE mode in this
situation.
Certain mechanical designs such as gearboxes, harmonic drives, etc., may not allow the
axis to be easily moved manually even when the motor torque is zeroed. The only way to
easily move such a joint manually is through the use of a mechanical clutch to disengage
the axis to the drive mechanics. The Free Mode Digital Signal parameter may be used to
specify which digital output controls the clutch. If a clutch is to be used, the encoder must
remain mechanically coupled to the joint so the system does not lose track of the joint
position when it is moved.
Velocity Servo
When an axis is placed into FREE manual control mode, the software commands a zero
output to the DAC. If the servo uses a current command amplifier, then this will in fact
free the joint. An axis which uses a velocity command amplifier (tachometer feedback
through the amplifier) will not be free when the DAC output is zero, since the tachometer
loop is still closed. If the Velocity Servo switch is enabled, then during FREE manual
control mode, Drive Enable will be disabled, thus freeing the axis. In a split axis system,
both amplifiers will be disabled.
Joint Limits
Software joint limits (soft stops) can be defined for each joint. After the robot is calibrated,
it is not possible to exceed the limits under program or pendant control. These limits are
often set just inside of the hardware limit switches. Even though V+ should prevent the
robot from moving beyond the soft stops during normal operation, safety considerations
require that hardware limit switches also be used.
WARNING: Be sure to properly set the software joint limits before
attempting to move the robot with a V+ program. It is especially
important for revolute axes to have proper software limits set before
attempting any motion instruction. If the limits are improperly set, a
revolute axis can rotate unexpectedly in order to stay in range.
V+ prevents you from moving outside the lower and upper joint limit during normal
operation. These joint limits can also be configured by the end customer using this
program in restricted-access mode (that is, without entering a password) to protect the
robot joints from colliding with custom workcell hardware. However, SPEC does not
AdeptMotion VME Developer’s Guide, Rev B
129
Chapter 7 - SPEC Program: Robot Specifications and Tuning
allow setting joint limits outside the range specified by the minimum and maximum joint
limits. These extremes should be set by the robot developer to prevent the robot from
damaging itself. On a password protected robot, the maximum and minimum joint limits
can only be changed after entering the correct password. (Instructions for Adept Utility
Programs describes the restricted-access mode of SPEC.)
Table 7-10. Joint Motion Parameters
Joint Motion Parameters for Robot Number __ Joint Number __
Parameter
Units
Range
FINE nulling tolerance
encoder
counts
>0
COARSE nulling tolerance
encoder
counts
> FINE
tolerance
Time required to be in
tolerance
seconds
>0
READY position
mm or
degrees
Joint speed at SPEED 100
mm/sec or
degrees/sec
>0
Joint accel at ACCEL 100
mm/sec2 or
degrees/sec2
>0
Minimum JOINT pendant
increment
mm or
degrees
>0
Maximum JOINT pendant
speed
mm/sec or
degrees/sec
>0
FREE mode
Enabled or
Disabled
FREE mode digital signal
(clutch)
n/a
Velocity Servo
Enabled or
Disabled
Minimum lower joint limit
mm or
degrees
Lower joint limit
mm or
degrees
≥ minimum
limit
Upper joint limit
mm or
degrees
<= maximum
limit
Maximum upper joint limit
mm or
degrees
130
Suggested
Value
0.008
any valid
output #
AdeptMotion VME Developer’s Guide, Rev B
Your Value
Link Dimensions
7.8
Link Dimensions
Definition of link dimensions are required for mechanisms of certain robot configurations.
The device modules supplied by Adept Technology have been generalized so that they do
not contain dimensional data for each link. This requires the user to define any necessary
link dimensions. For example, when controlling a SCARA type mechanism, the lengths of
the links are required. These link dimensions are user definable so that the user may
control different sizes of SCARA mechanisms without requiring a different device
module.
NOTE: When supplying this specification information, it is important
that the values be derived as accurately as possible. Deviations in these
values from the actual dimensions of the device will result in inaccurate
conversions between tool tip locations and joint angles.
Tool Z-Offset Distance
For robots which have a bending wrist, the tool offset distance defines the distance from
the center of the wrist to the tool mounting flange. For example, in a five axis AdeptOne
robot, the tool offset length is the distance from the intersection of axes 4 and 5 to the
center of the joint 5 mounting flange. If a force sensing or compliant wrist is added to the
robot, the tool offset length can be increased to account for the additional distance from
axis 5 to the final mounting flange. By correcting the tool offset length in this fashion, the
TOOL transformation can always be defined as the location of the tool tip relative to the
end effector mounting flange.
Another application of the tool offset distance is to change the apparent height of a robot's
tool flange. For example, with the X/Y/Z/Theta module, the Z-coordinate is initially
considered 0 when the joint is at its 0 position (often fully retracted). This causes the
robot's Z-coordinate to go negative as the Z-axis is extended. The tool offset distance can
be adjusted to keep the Z-coordinate positive throughout robot's range of motion.
Refer to the device module documentation that is supplied with each device module for
more specific information on the Tool Z-Offset distance.
Link Dimension Value #n
These specifications define the exact length of the robot's links and any other key
dimensional factors which may be required. For some mechanisms (such as an
X/Y/Z/Theta robot), no such dimensions need to be specified. In general, the number of
values required to define the robot’s size and their exact interpretation is a function of the
robot's geometry and of the software implementation. Also, for computational efficiency,
the required values may not always be pure kinematic parameters but may be values that
are computed from combinations of kinematic parameters.
The SPEC utility prompts for the correct number of required dimensions, but you must
use your device module documentation to see how to answer these prompts.
AdeptMotion VME Developer’s Guide, Rev B
131
Chapter 7 - SPEC Program: Robot Specifications and Tuning
Table 7-11. Link Dimension Parameters
Link Dimension Parameters for Robot Number ___
Parameter
Units
Tool Z-offset distance
mm
Link dimension value #1
See device
module doc.
See device
module doc.
Link dimension value #2
See device
module doc.
See device
module doc.
Link dimension value #3
See device
module doc.
See device
module doc.
Link dimension value #4
See device
module doc.
See device
module doc.
Link dimension value #5
See device
module doc.
See device
module doc.
Link dimension value #6
See device
module doc.
See device
module doc.
132
Range
Suggested
Value
AdeptMotion VME Developer’s Guide, Rev B
Your Value
Cartesian Motion Parameters
7.9
Cartesian Motion Parameters
The AdeptMotion VME controller provides a powerful feature allowing a mechanism to
move in a Cartesian reference frame by coordinating the motion of several axes. From the
manual control pendant, the robot can move in the modes called “WORLD” and “TOOL”
which moves in an X-Y-Z frame referenced to the robot base and the end of the arm,
respectively. From within a program, the motion instructions MOVES (pronounced
“move s”), APPROS, and DEPARTS accomplish the same thing. The parameters described
in this section govern the operation of the mechanism when driven in a Cartesian
reference frame.
After these parameters are entered, you should check them using the tests described in
Chapter 8.
Cartesian 100% Speed and Acceleration
This parameter defines the translational velocity at which the mechanism will travel when
moving in a straight line path, as commanded by the MOVES program instruction. The
Cartesian Translation Speed defines the velocity at which the mechanism will travel when
both the monitor speed and the program speed are set at 100%. The Cartesian Translation
Acceleration defines the acceleration of the tool tip when ACCEL 100, 100 is specified.
The number of specifiable Cartesian rotation speed and acceleration parameters depends
on the device module type. For example, an XYZT device module has only one possible
rotation (roll about the Z-axis), while a 6-axis articulated robot would have three possible
rotations. See your device module documentation for the meaning of the Cartesian
rotation speeds for your mechanism.
WORLD/TOOL Manual Control Parameters
If the SLOW button on the MCP is pressed and the speed pot is pressed close to its center
(minimum plus or minus speed), the robot will move the smallest specified increment and
then stop. If the speed is increased, the robot will begin to move at a continuous rate equal
to five times the smallest incremental motion per second. As the commanded speed is
increased, the robot's speed will linearly increase until the robot is moving at 25% of the
maximum specified speed. If the SLOW button is turned off, the robot's speed will be
linearly interpolated between zero and the maximum specified speed.
In addition to the speed specifications, a parameter is provided which defines the manual
control acceleration/deceleration rate.
WARNING: RIA (Robotic Industries Association, USA) safety standards
require that mechanical devices not exceed a tool tip speed of 76.2
millimeters per second (3 inches per second) when operated under
manual control. Some national regulations may require an even lower
speed. Be sure to set both the maximum Cartesian translational and the
maximum joint manual control speeds so the tool tip cannot exceed this
limit even with the robot at full extension.
AdeptMotion VME Developer’s Guide, Rev B
133
Chapter 7 - SPEC Program: Robot Specifications and Tuning
Table 7-12. Cartesian Motion Parameters
Cartesian Motion Parameters for Robot Number _____
Parameter
Units
Range
Cartesian translation speed at SPEED
100
mm/sec
>0
1st Cartesian rotation speed at SPEED
100
deg/sec
>0
2nd Cartesian rotation speed at
SPEED 100
deg/sec
>0
3rd Cartesian rotation speed at
SPEED 100
deg/sec
>0
Translational acceleration at ACCEL
100
mm/sec2
>0
1st Cartesian rotational acceleration at
ACCEL 100
deg/sec2
>0
2nd Cartesian rotational acceleration
at ACCEL 100
deg/sec2
>0
3rd Cartesian rotational acceleration
at ACCEL 100
deg/sec2
>0
Maximum WORLD/TOOL pendant
translation speed
mm/sec
>0
Maximum WORLD/TOOL pendant
rotation speed
deg/sec
>0
Time to reach max pendant speed
seconds
>0
Minimum WORLD/TOOL pendant
translation increment
mm
>0
Minimum WORLD/TOOL pendant
rotation increment
degrees
>0
134
Suggested
Value
≤ 76.2
AdeptMotion VME Developer’s Guide, Rev B
Your Value
General Motion Specifications
7.10 General Motion Specifications
These values (see Table 7-13) specify motion speed and acceleration limits and start-up
values. The maximum allowable values are used to help prevent users from placing
excessive demands on the system. The default start-up values allow you to control
accelerations and acceleration profiles used until user override.
Upper Speed Limit for SCALE.ACCEL
(This parameter can also be edited in the restricted-access mode of SPEC, as described in
Instructions for Adept Utility Programs.)
This speed defines the limit below which SCALE.ACCEL scales motion acceleration and
deceleration values in proportion to the program speed. For example, if this value is set to
100% and a program speed of 50% is specified, the desired acceleration and deceleration
will be internally set to half of what the user has specified. But, if the program speed is
higher than 100%, the user specified acceleration and deceleration will be utilized without
modification. If the SCALE.ACCEL limit value is set to a large number, SCALE.ACCEL
will always scale the acceleration and deceleration. For example, in this case, a speed of
200% would double the commanded acceleration and deceleration.
Table 7-13. General Motion Specifications
General Motion Specifications for Robot Number _____
Parameter
Units
Range
Maximum allowable acceleration
%
>0
Maximum allowable deceleration
%
>0
Maximum allowable program speed
%
>0
Maximum rate of change of monitor
speed
%/sec
>0
Minimum execution time for joint
motions
sec
>0
Minimum execution time for
Cartesian motions
sec
>0
Default S-curve profile at system
startup
>= 0
Default acceleration at system startup
>0
Default deceleration at system startup
>0
Upper speed limit for SCALE.ACCEL
Suggested
Value
Your Value
%
AdeptMotion VME Developer’s Guide, Rev B
135
Chapter 7 - SPEC Program: Robot Specifications and Tuning
7.11 S-Curve Trajectory Generation
While there are many different motion profiles that can be characterized as “S-curves”, in
V+ an S-curve is a trajectory that has a trapezoidal acceleration profile, giving an S-shaped
velocity profile. V+ also supports a square-wave acceleration profile, which gives a
trapezoidal velocity profile.
The benefit of a trapezoidal acceleration profile is that the rate of change of acceleration
(the “jerk”) can be controlled. (By comparison, the magnitude of the jerk for a
square-wave acceleration profile is always infinite.) For many mechanisms, controlling
the jerk is significant because high jerk values can cause the mechanical structure of the
robot to vibrate. Minimizing structural vibrations is especially important at the end of a
motion since such oscillations can adversely affect the settling time of the robot. This can
affect the cycle. However, for stiff, strong mechanisms, a square-wave profile may result
in shorter cycle times.
Speed
Max. speed
Max. accel
decel
ramp-up
time
Acceleration
accel
ramp-up
time
decel
ramp-down
time
accel
ramp-down
time
Time
Figure 7-9. S-Curve (Trapezoidal Acceleration) Profile
For a general trapezoidal profile, there are four acceleration values that can be specified,
as shown in Figure 7-9: the ramp up to maximum acceleration, the ramp down from
maximum acceleration, the ramp up to maximum deceleration, and the ramp down to
zero acceleration. In V+, each of these four acceleration values can be individually
specified, and a set of the four values defines a specific acceleration “profile”.
For each robot, there can be as many as nine different “profiles”. Profile 0 is always
defined to be a square-wave acceleration curve with all four ramp times set to zero.
Profiles 1 through 8 are defined by the robot manufacturer and are a function of the
mechanical design of the manipulator and the applications for which the robot was
designed. For instance, the manufacturer might define a general purpose profile that has
all of the ramp times set equal to a nominal value for the mechanism. This profile could be
used whenever smooth performance throughout the motion was more important than
minimum cycle time.
136
AdeptMotion VME Developer’s Guide, Rev B
S-Curve Trajectory Generation
In instances where cycle time is more important, a profile with high jerk values during the
acceleration and low jerk values during the deceleration might be more appropriate. If
you are using SPEC to set up a mechanism that you have built, then you are the “robot
manufacturer” and should choose ramp times to suit the capabilities of your mechanism.
For a given motion, the duration of the motion and the characteristics of the acceleration
profile depend on several parameters. These parameters are controlled by a number of V+
instructions and commands, including ACCEL, SPEED, and SCALE.ACCEL (see the V+
Language Reference Guide).
Table 7-14. S-Curve Parameters
S-Curve Parameters for Robot Number __
Acceleration Times (sec)
Deceleration Times (sec)
Accel Profile Number
Ramp-Up
Ramp-Down
Ramp-Up
Ramp-Down
0 (this is the standard
trapezoidal velocity profile
and is not editable)
0
0
0
0
1
2
3
4
5
6
7
8
AdeptMotion VME Developer’s Guide, Rev B
137
Chapter 7 - SPEC Program: Robot Specifications and Tuning
7.12 Stop-on-Force Parameters (for AdeptForce)
AdeptForce enables your AdeptMotion VME robot to perform a variety of
force-controlled tasks, from assembly to post-assembly verification and test. Among the
features of AdeptForce is the “guarded move” or “stop-on-force,” which allows any robot
in your system to stop extremely rapidly when a sensed force threshold is exceeded. You
can also record the robot’s position and force during a force operation using the “force
signature buffer.” See the AdeptForce User’s Guide for details. The stop-on-force parameters
described below can be used to give optimal performance during an abrupt stop-on-force.
Stop-on-Force Nulling Tolerance
This value temporarily overrides the motor’s normal nulling tolerance (either COARSE or
FINE, as set in the “Joint Motion Parameters” menu) during a stop-on-force. If you want
to do a “touch-and-go” type of motion, settling to within the normal FINE tolerance can
significantly increase cycle time. If you leave this parameter at its default value of 0, the
nulling tolerance for the current move will be used for stop-on-force. Increasing this value
will improve cycle time but give you less assurance that the robot is settled before
continuing motion.
Stop-on-Force *Envelope error* Limit
This value temporarily overrides the motor’s normal envelope error limit (as set in the
“Amplifier/Encoder Specs” menu) during a stop-on-force. A stop-on-force is so abrupt
that it might undesirably cause an envelope error. If you leave this parameter at its default
value of 0, the current envelope error threshold will be used for stop-on-force. By setting
this value larger than the normal envelope error limit, you can briefly relax the normal
envelope error requirements during a stop-on-force.
Stop-on-Force Integral Gain
This value temporarily overrides the motor’s normal integral gain (as set in the “Motor
Tuning Specs” menu) during a stop-on-force. The abruptness of a stop-on-force can cause
excessive oscillation of the tool tip. By decreasing the normal integral gain, you can
minimize the oscillation of the tool tip after a stop-on-force. If you leave this parameter at
its default value of 0, a value of 1/2 the normal integral gain will be used during a
stop-on-force.
Table 7-15. Stop-on-Force Parameters
Stop-on-Force Parameters for Robot Number __ Motor Number __
Parameter
Units
Range
Suggested Value
Stop-on-force nulling
tolerance
encoder
counts
≥0
0 (uses current
settling tolerance)
Stop-on-force *Envelope
error* limit
encoder
counts
≥0
0 (uses current
envelope error limit)
Stop-on-force integral gain
DAC count
enc cnt * ms
≥0
0 (uses half of current
integral gain)
138
AdeptMotion VME Developer’s Guide, Rev B
Your
Value
Saving and Testing Parameters
7.13 Saving and Testing Parameters
When you have defined all the robot specifications, you should save them as described in
“Saving and Loading Specifications” on page 93.
You should also test your parameters, as described in “Additional Parameter Tests” on
page 146.
AdeptMotion VME Developer’s Guide, Rev B
139
Test and Troubleshooting
8
This chapter is designed to help you quickly test and troubleshoot a mechanism during
development and after installation. Many of the tests in this chapter can provide
substantial performance improvements even if there are no obvious system problems.
If the encoders and inputs were not tested due to mechanical limitations, you will be able
to test them by turning on power to the system.
8.1
Diagnostic Tests
Discrete Inputs
After all required hardware connections have been made to the user supplied equipment,
each of the discrete input signals should be tested for proper operation. The steps
described below show how to perform this test.
1. Load and execute the SPEC program as described in Chapter 7. Select “Perform
hardware diagnostics” from the main menu and you will see a display such as
that shown in Figure 6-5 on page 92. This display is dynamic and will
immediately reflect any changes in the status of the hardware such as input
switches.
2. Check the operation of each input, using the guidelines presented in Table 8-1. If a
particular input does not appear to work on the diagnostic screen, confirm that
the input is actually getting to the input circuit by actuating the input while
looking at the corresponding LED. Check that the input states operate properly
on each motor, as described in Table 8-1. Unused channels are ignored. If your
system contains more than one robot, you can access other robots from the main
menu. Polarity of input signals can be changed by selecting “Machine Input
Polarity” from the “Edit Motor Amp/Encoder Specs” menu. Refer to Chapter 7.
Table 8-1. Discrete Input Test Requirements
Signal
Type
Diagnostic Display Status
Overtravel
Configurable via SPEC program
ON only when a positive overtravel
condition is present.
Home Switch
Configurable via SPEC program
ON only when the mechanism is
placed on the home switch.
Drive Fault
Configurable via SPEC program
OFF when the drive is enabled.
AdeptMotion VME Developer’s Guide, Rev B
141
Chapter 8 - Test and Troubleshooting
3. Make sure that all overtravels and fault inputs are OFF on all motors when the
robot is in position to be powered up. Figure 8-1 shows a display when the power
is turned on.
***
A: Toggle amp enable
U: Increase DAC quickly
D: Decrease DAC quickly
Diagnostics: Robot 1 ***
COMMAND LIST
R: Toggle Brake Release P: Disable power
+:Increase DAC slowly <ENTER>: Zero DCA, redraw
–:Decrease DAC slowly 1-4: Change selected motor
NOTE: Motor selected for I/O is marked by ‘*’. The DAC output voltage is
limited by the maximum DAC value set in the amplifier specifications menu.
Motor/Board/Channel
Encoder position
Last zero-index
Zero-index delta
Home
Overtravel
Amp Fault
Amp enable
Brake release
DAC voltage
DAC count
1/B1/C1
10428
8924
2048
OFF
OFF
OFF
2/B1/C2
0
0
0
OFF
+ON
OFF
3/B1/C3
0
0
0
ON
–ON
OFF
4/B1/C4
0
0
0
OFF
+–ON
OFF
OFF
OFF
0.00
0
OFF
OFF
0.00
0
OFF
OFF
0.00
0
OFF
OFF
0.00
0
Figure 8-1. Diagnostic Display with POWER Switch On
Discrete Outputs
The discrete output signals should be tested only after the input signals have been
successfully debugged. Check that the output states operate properly on each used
channel on each servo board, as described in Table 8-2. Follow the steps below to verify
the discrete output signals.
High Power Enable, Drive Enable, and Brake Outputs
1. Execute the SPEC utility program, and select “Perform hardware diagnostics”
from the main menu.
2. Enable High Power by pressing “P”, select the proper motor (by typing its
number) then enable the individual amplifier by typing “A”. Release the brake by
typing “R”. Check that all outputs are operating as described in Table 8-2.
WARNING: Any of these tests could cause the robot to move. Take
precautions to prevent damage or injury. For example, disconnect the
motors and brakes from the robot, and support the robot axes so they
cannot fall.
142
AdeptMotion VME Developer’s Guide, Rev B
Diagnostic Tests
Table 8-2. Discrete Output Test Requirements
Signal
Type
Requirements
High Power
Enable
Output - normally open
High power contactor must close when signal
is ON
Drive Enable
Output - configurable via
SPEC program
Drive must be enabled when signal is ON
Brake
Release
Output - normally open
Brake must release when output is ON
Analog (DAC) Outputs
In order to test the analog (DAC) output voltage command to the amplifiers, it is
necessary to change certain defaults in the “Motor amplifier/encoder specs” menu. These
are:
1. The “Maximum DAC value”, which should be set to some value sufficient to
cause motor motion but not high enough to cause damage if the motor is driven
into a stop (typically 5,000 to 20,000).
2. The “*Motor stalled* timeout”, which should be set high enough to prevent
spurious motor stall detection.
3. The “*Duty-cycle exceeded* limit”, which can be set to a value close to the
“Maximum DAC Value”.
The DAC outputs can be tested from the “Perform Hardware diagnostics” menu. This
menu provides the capability to increment or decrement the digital to analog convertors
manually.
Using the U (up) or D (down) keys, and the + or – keys, the DAC’s can be stepped
throughout their entire range. The diagnostic utility tests each bit of the DAC, one at a
time. The DAC voltage value displayed on the screen indicates the approximate voltage
that should appear at the analog output terminals. The DAC count display indicates the
integer representation of the enabled DAC bits. To test the each analog output channel,
follow the sequence listed below.
WARNING: Performing the following tests may cause motion to occur in
the attached mechanism(s). Dangerous voltage levels may be present.
These tests should only be conducted by qualified personnel who possess
a thorough knowledge of servo systems.
1. For safety, disconnect the analog output channel from the amplifier, and instead
connect a high impedance digital voltmeter to the output channel. Verify that the
output value on the display is set to zero. The voltmeter should read
approximately 0 volts.
AdeptMotion VME Developer’s Guide, Rev B
143
Chapter 8 - Test and Troubleshooting
2. Enable high power (type “P” at the hardware diagnostics display) and enable the
drive (type “A”).
3. Step the analog output through its positive and negative range, stopping at each
increment to note the correlation between the actual voltage and the value
displayed on the terminal. The voltage output is limited by the “Maximum DAC
value” setting in the “Motor amplifier/encoder specs” menu.
4. Disable power and reconnect the analog output to the amplifier. Make sure the
amplifier is properly connected to the motor. Again enable high power and the
drive. Increase the DAC command in each direction until motor motion occurs.
Encoder Channels
Before testing the encoders under power, be sure to set the encoder configuration
parameters in “Motor amp/encoder specs”, a sub-menu of main menu “Edit Robot
Specifications”.
NOTE: “Maximum DAC output parameters must be set in main menu
“Edit Robot Specifications” before performing any hardware diagnostic
tests. If it is left at zero (default value), error message “Max DAC Val is
zero” will appear on the screen.
1. Execute the SPEC program, and select “Perform hardware diagnostics” from the
main menu.
2. Write down the encoder position shown on the screen.
3. The joint should be in the middle of total travel. Increment the DAC by pressing
‘U’ or ‘+’ key. Be ready to hit the E-stop or ENTER key to stop the joint. Also,
decrement the DAC to verify the joint moves in either direction and the encoder is
functioning. The encoder counts on screen should change.
4. Check that the encoder A and B phases are functioning properly by displacing the
encoder a known distance (usually one revolution with a rotary encoder). The
display should count up or down, according to the direction of rotation.
5. If the encoder count doesn’t change at all, the encoder might not be getting power,
or neither the A nor B phase wiring are connected properly.
6. If the encoder reading only changes by 1 count, then one of the two phases is not
connected.
7. Check the zero index configuration. Usually, the documentation from the encoder
manufacturer should indicate the number of encoder counts or encoder lines (the
number of counts is 4 times the number of lines on the encoder) between zero
indices on the encoder. With most rotary encoders, the number of encoder counts
between zero indices is the same as the number of counts per revolution of the
encoder. In other words, there is one zero pulse per revolution.
Also, determine from the documentation (if possible) the sense of the encoder's
zero index pulse (active high or low), and the relationship of the zero index to the
A and B phases of the encoder. The sense and gating of the index by A and B are
used to determine the zero index configuration value. The number of counts
between indices and the zero index configuration should be entered in the “Motor
amplifier/encoder specs” menu.
144
AdeptMotion VME Developer’s Guide, Rev B
Diagnostic Tests
8. Returning to the motion hardware diagnostic display, displace the encoder in one
direction far enough to cross a zero index several times. If “Index Err” is
displayed for “Last zero-index,” then either the zero-index configuration is
incorrect or the spacing between zero indices is incorrect.
If “Index Err” is displayed and “Zero index delta” remains at 4, then the sense of
the zero-index pulse is incorrect. A value of 4 is displayed because the servo
board is seeing an index with every count of the encoder. The index is gated by a
particular combination of the A and B phases, and this combination repeats every
four encoder counts. To correct the sense, the value of the zero index
configuration must be changed. If the current zero index configuration has a
value between 0 and 3, try a configuration between 4 and 7, and vice versa.
Once the sense of the zero index is verified, rotate the encoder in one direction, far
enough to cross a zero index, and then back in the opposite direction until the
index is crossed again. If “Index Err” is displayed and “Zero index delta” was
near the correct value going forward, but changed to four when the index was
crossed in the opposite direction, the gating of the A and B phases is incorrect.
Since there are only four possible combinations of the A and B phases, the easiest
way to correct this problem is to try all four. Change the encoder configuration
value (be careful not to change the sense of the zero index) and repeat the test.
If “Index Err” is displayed and “Zero index delta” never changes, either the
number of counts between zero-indices is incorrect or you may not be getting a
valid zero-index pulse. Try another encoder configuration value. If necessary, use
an oscilloscope to determine if the A, B, and index pulses are all changing
properly.
Encoder and Motor Sign
1. Test the encoder sign by moving the joint in its positive direction and noting
whether the encoder count increases. The joint can either be moved by hand or
issuing DAC commands by pressing ‘U’ or ‘+’ after High Power enable.
Refer to your device module documentation to determine the positive direction
for the specified joint. If the encoder count decreases even though the joint is
moving in the positive direction, change the encoder sign (from 0 to -1 or from -1
to 0). Perform the test again until you are confident that the encoder count
increases when the joint is moved in the positive direction.
2. After the correct setting for the encoder sign is determined, set the motor sign by
issuing a positive torque command and noting whether the joint moves in the
positive direction. After enabling power, activating the drive and releasing the
brake, issue a positive torque command by pressing carefully on the “+” side of
the speed pot on the pendant (or pressing “U” on the diagnostic display).
Refer to your device module documentation to determine the positive direction
for the specified joint. If the joint moves in the negative direction even though the
DAC command is positive, change the motor sign (from 0 to -1 or from -1 to 0).
Perform the test again until you are confident that the joint moves in the positive
direction when a positive torque command is issued. Note that a motor sign of -1
will cause a positive DAC command to produce a negative voltage at the DAC.
AdeptMotion VME Developer’s Guide, Rev B
145
Chapter 8 - Test and Troubleshooting
8.2
Additional Parameter Tests
Calibration Sequence
After the calibration sequence for each motor is taught from the SPEC program, the
overall calibration sequence can be tested as follows.
1. At the monitor, type
DISABLE POWER
DISABLE DRY
PAR NOT.CAL = -1
ENABLE POWER
CALIBRATE
;Can only uncalibrate with power off
;Only type this if DRY.RUN is enabled
;Mark all robots as "uncalibrated"
;Re-enable power for calibration
;Calibrate all robots
2. If a V+ error message is displayed, check the “System Messages” appendix of the
V+ Language Reference Guide for details.
If the calibration is too slow or too fast on any motor, change the calibration speed
in the “Motor calibration specs” menu.
3. If you want to correct the calibration by teaching the robot a known position, you
can move it to that position, type “WHERE” at the monitor, and compare the joint
positions with the desired joint positions. Typically, all you have to do to correct
the calibration is change the “Motor position at zero-index (or home sensor or
hard stop)” value for each motor in the “Motor calibration specs” menu according
to this formula:
Mnew = Mold - SCALE x (Jact - J rep)
where Mnew and Mold are the new and old motor position values, SCALE is the
encoder scale factor, and J act and Jrep are the desired and reported joint angles,
respectively.
Software Joint Limits
Using the manual control pendant, move the robot to the limits of its motion on each joint.
If the joint contacts a limit switch or hard stop, adjust the software joint limits from the
“Joint motion parameters” menu.
READY Position
Create and execute a program that moves each robot to its READY position. Each robot
should move to a safe position in the workcell. If not, adjust the READY position in the
“Joint motion parameters” menu.
Manual Control Motion Parameters
Robot motion under all pendant control modes (WORLD, TOOL, and JOINT) should be
consistent. If the manual control speeds are improperly set, it is possible for the robot to
move quickly under one control mode and slowly under another.
146
AdeptMotion VME Developer’s Guide, Rev B
Additional Parameter Tests
To test the manual control speeds, simply move the robot under each control mode with a
similar speed setting on the speed pot. If the robot moves at the wrong speed in JOINT
control mode, change the pendant speed parameters in the “Joint motion parameters”
menu. If the robot moves at the wrong speed in WORLD or TOOL control modes, change
the pendant speed parameters in the “Cartesian motion parameters” menu.
If the robot does not move in a straight-line in WORLD or TOOL modes, either the
calibrated positions for the joints are incorrect and should be fixed from the “Motor
Calibration Parameters” menu, or the link lengths are incorrect and should be fixed from
the “Edit link dimensions” menu.
Program Control Motion Parameters
This test evaluates whether the robot moves in a consistent manner in both
joint-interpolated motion and straight-line motion.
1. Create and execute a program that moves the robot with joint interpolated
motions such as MOVE. For example:
.PROGRAM test
DETACH()
SELECT ROBOT=1
ATTACH()
TIMER 1 = 0
FOR i = 1 to 10
MOVE a[i]
BREAK
END
TYPE "Total cycle time:", TIMER(1), " seconds."
.END
2. Change the joint-interpolated MOVE to a straight-line MOVES in the above
program. Execute the program again and compare cycle times. If the cycle times
are not similar, adjust either the Cartesian or joint motion speeds from within the
SPEC program.
Remember that the joint-interpolated speeds have precedence over Cartesian
speeds. If, for example, the “Joint Speed at SPEED 100” is set to 1000 mm/sec but
the “Cartesian Translation 100% Speed” is set to 100 mm/sec on a translational
joint, the joint will move very fast in response to a MOVE (joint-interpolated)
command, but only 1/10th the speed in response to a MOVES (straight-line)
command. On the other hand, if the “Cartesian Translation 100% Speed” is set to
1000 mm/sec, but the “Joint Speed at SPEED 100” is set to 100 mm/sec on the
same joint, then that joint will move at the same speed to either a MOVE or a
MOVES, because the slow joint speed overrides the fast Cartesian motion speed.
Make sure these values are set so that joint and Cartesian motion are reasonably
consistent with one another.
AdeptMotion VME Developer’s Guide, Rev B
147
Chapter 8 - Test and Troubleshooting
8.3
Customizing “Move Between Taught Points” Test
The “Select test” option on the tuning menu allows you to select tests including
Square-Wave and “Move between Taught Points” (see page 113). The standard routine
built into SPEC will prompt you to enter two taught points, and specify a DURATION.
Then it will execute a simple sub-routine that makes a MOVE between the two points.
Some advanced users may want to customize the motion program, for example to move
along a series of points, instead of just between two points.
The following information is provided only for experienced users of SPEC, who are also
familiar with V+ programming. Adept recommends that you use the “standard” test
move first, and only attempt to customize it if you are sure that you need to.
Procedure to Use Custom Program
The procedure to use a custom test-move program is as follows:
1. Write a new program that uses the same input and output parameters as the
standard program, which is listed below.
2. Your new program should have the same name as the standard program,
“sp.tu.mov.test”.
3. Save a copy of your program to disk.
4. Load your program before you load SPEC. (If you have already loaded SPEC, you
will need to delete that program first.)
5. Load SPEC. (You may see an error message, *Program already exists*. This is
normal.)
6. Execute SPEC. Specify the items for data-collection, and select the “Move between
Taught Points” test. Teach the two positions using the SPEC (these will be stored
as #sp.tu.pt[0] and #sp.tu.pt[1]).
7. When you select the “Test and plot” option (or “Test and display”), your program
will be called. If there are any errors in your program, you may get some
unexpected results.
WARNING: As with any other test, be sure to keep your hand near to an
Emergency Stop button, and be ready to stop the robot as necessary.
Program Development Description
• Call sp.tu.config to configure the data buffer to collect the data specified in the
data collection menu of SPEC.
• When beginning the test, call sp.buf.enable to enable the data collection buffer in
single-sweep or wrap-around mode. If the buffer is configured for up to 10
seconds of data collection, single sweep mode will collect the first 10 seconds of
data, and wrap-around mode will collect the last 10 seconds of data. If the buffer is
disabled in less than 10 seconds, both modes are the same.
• When the test is complete, call sp.buf.enable with no arguments to stop data
collection.
148
AdeptMotion VME Developer’s Guide, Rev B
Customizing “Move Between Taught Points” Test
• To plot the resulting data, call sp.gr.plot to plot all the collected data. The top plot
will list the first argument to sp.gr.plot as the cycle time if it is non-zero.
Example Program
.PROGRAM sp.tu.mov.test(plot, $err)
; ABSTRACT: Performs programmed motion for taught-point tuning test.
; Assumes motion speeds and accelerations have already been set.
; Assumes points #sp.tu.pt[0] and #sp.tu.pt[1] have been defined.
;
; If the user creates a program with the same name and call
; arguments, and loads it before loading SPEC, that routine
; will be performed instead of this one. If SPEC is aborted
; via a ^Z, and routines similar to this one executed, the
; user can perform and plot any of a variety of tests. The
; data collected will be that configured in the data-collection
; menu before SPEC was aborted.
;
; INPUT PARM: plot Flag indicating whether to plot results
;
; OUTPUT PARM: $err Error string. If non-empty, then an error
;occurred that will be reported to the user.
;
; SIDE EFFECTS: None
;
; Copyright (c) 1994-1995 by Adept Technology, Inc.
AUTO time
CALL sp.tu.config(10) ;Configure 10 sec of data collection
COARSE
MOVE #sp.tu.pt[0]
DELAY 0.2
BREAK
;Don't bother to settle accurately
;Move to next point
;Allow some time for settling
;Complete settling time
FINE
MOVE #sp.tu.pt[1]
WAIT
;Perform motion accurately
;Initiate motion
;Allow motion to start
time = TIMER(0)
CALL bf.enable(1)
;Reset cycle timer
;Enable buffer, wrap-around, start now
BREAK
;Complete motion
MOVE #sp.tu.pt[0]
;Return to start position
BREAK
;Complete motion
time = TIMER(0)-time ;Record cycle time
WAIT.EVENT , 0.25
CALL bf.enable()
;Collect for a while longer
;Turn off buffer
IF plot THEN
CALL sp.tu.plot(time, $err) ;Plot results
END
RETURN
.END
AdeptMotion VME Developer’s Guide, Rev B
149
Chapter 8 - Test and Troubleshooting
Custom Data Collection and Plotting
The previous example also shows how custom data collection and plotting can be
performed. If you first configure data collection in either square-wave or taught-point
tuning mode, you can abort SPEC by typing ^Z and freely perform tests and plot results.
SPEC can be restarted by typing RETRY 1 (if it is running as task 1)_ if you want to export
the collected data or reconfigure data collection. Use the programs sp.tu.config,
sp.buf.enable, and sp.tu.plot as shown in the example to perform data collection and
plotting.
150
AdeptMotion VME Developer’s Guide, Rev B
V+ Programming for
Multiple Robots and
Latch/Trigger Functions
9.1
9
Introduction
AdeptMotion VME provides the capability for a custom-built robot to be programmed
exactly like a standard Adept robot, using Adept’s powerful V+ programming language
and operating system. One or more such robots can be connected to a single controller.
This chapter is intended to demonstrate the V+ features that are particularly useful for
controlling multiple robots. The instructions, commands and functions mentioned in this
chapter are documented more fully in the V+ Language Reference Guide.
9.2
ATTACHing and SELECTing a Robot
V+ is a multitasking environment, in which the tasks are numbered Task 0, Task 1, etc.
Only one robot can be controlled from a given program task. So if Task 1 is being used to
control robot number 2, it cannot at the same time move robot number 1.
The SELECT instruction specifies which robot is being controlled by a given task. In order
for a robot to be SELECTed, however, it must first be released from program control using
the DETACH instruction. For example, the following program will move the specified
robot to a specified location.
.PROGRAM robot(num, loc)
; ABSTRACT: Demonstration routine for moving specified robot.
; INPUT PARM:
num Robot number
;
loc Desired location to move to
;* Copyright (c) 1990 by Adept Technology, Inc.
DETACH ()
ATTACH ()
;Detach current robot to allow SELECTING
; another robot
;Select new robot for all MOVE,HERE,etc.,
; instructions.
;Attach new robot
MOVES loc
BREAK
;Move in a straight line to specified
; location and stop there
SELECT ROBOT = num
RETURN
.END
AdeptMotion VME Developer’s Guide, Rev B
151
Chapter 9 - V+ Programming for Multiple Robots and Latch/Trigger Functions
This program can be executed in any task with any robot. For example, the following
command lines move robot 2 to location “point.a” from Task 0, and robot 1 to “point.b”
from Task 3. Note that by not specifying a task number, task 0 is assumed in the first
EXECUTE command.
.EXECUTE robot(2, point.a)
.EXECUTE 3 robot(1, point.b)
By default, robot 1 is SELECTed by each task when it starts, so the entire DETACH/
SELECT/ATTACH sequence in the example does not need to be used if you want to move
robot 1.
The DO monitor command performs the specified instruction in the context of the
specified task, and can be used to move the robot SELECTed by that task. For example, if
the two EXECUTE commands above have been performed, the following commands
would move robot 2 to its READY position and cause robot 1 to move to “point.c”.
.DO READY
;”DO @0 READY” would work just as well
.DO @3 MOVE point.c
Not only can each task have a different robot selected, but the V+ monitor can as well. The
WHERE, HERE and TEACH monitor commands by default report and record positions
for robot 1, but the SELECT command can be used for other robots. For example, the
following commands would record the current positions of robot 1 and robot 2:
.SELECT ROBOT = 1
;Select robot 1
.HERE point.1
;Record position of robot 1
.SELECT ROBOT = 2
;Select robot 2
.HERE point.2
;Record position of robot 2
Note that there is a difference between using the SELECT command at the monitor and
the SELECT instruction in a program. For example, the following instructions record two
completely different positions if a different robot is SELECTed by the monitor and by
Task 0.
.HERE p[1]
;Record loc of robot SELECTed by monitor
.DO HERE p[1]
;Record loc of robot SELECTed by Task 0
In order to move robot 3 (with task 0) by issuing commands at the monitor, you would
typically issue the following set of commands:
.DO DETACH
;Release robot control
.DO SELECT ROBOT = 3
;Select robot 3
.DO ATTACH
;Regain robot control
.DO MOVE loc
;Move to desired location
This example assumes that robot 3 is not currently attached by any other task. If it is
attached by another task, the “DO ATTACH” command will hang until the other task
stops or detaches the robot.
152
AdeptMotion VME Developer’s Guide, Rev B
Calibrating
9.3
Calibrating
All robots in the system must be calibrated before any can be moved under program or
pendant control. The CALIBRATE program instruction and monitor command can be
used to calibrate any robots not currently calibrated. If a robot is currently calibrated, the
NOT.CAL parameter can be set to force it to recalibrate.
The following monitor command will force all robots to calibrate, in numerical order:
.CALIBRATE
If any of the robots fails to calibrate (for example, its travel is obstructed) calibration will
stop. After you have fixed the problem, use the CALIBRATE command again to calibrate
the remaining robots. Any robots that had already successfully calibrated will not be
re-calibrated.
Occasionally, you may wish to force a robot to go through the calibrate sequence a second
time, for example during setup. The NOT.CAL parameter is a bit field that indicates if any
robots are not currently calibrated, with bit 1 representing robot 1, bit 2 representing
robot 2, bit 3 representing robot 3, and so forth. For example, the following command lines
will force all robots to recalibrate even if they are currently calibrated:
.PARAMETER NOT.CAL = -1
.CALIBRATE
;Mark all robots “Not calibrated”
;Force robots to re-calibrate
The value -1 for the NOT.CAL value above is the binary value 1...111, which indicates that
all robots are not calibrated. Similarly, the value 6 (= binary 110) indicates that robot 1 is
calibrated, but robots 2 and 3 are not. The CALIBRATE command or instruction will
calibrate only uncalibrated robots.
Robots can also be calibrated from a program. The following program can be executed in
any program task to calibrate all robots and move them to their READY position. (The
program could be made to check that each robot successfully calibrated before attempting
to move that robot.)
.PROGRAM calibrate
; ABSTRACT:Demonstration routine for calibrating all robots
;
and moving them to their READY position.
;* Copyright (c) 1990, 1994 by Adept Technology, Inc.
AUTO r
DETACH ()
DISABLE DRY.RUN
CALIBRATE
;Detach current robot to allow SELECTING
; another robot
;CALIBRATE will have no effect if DRY.RUN
; switch is enabled.
;Calibrate all uncalibrated robots
; This will fail if any robots are
; attached in another task.
FOR r = 1 TO SELECT(ROBOT,–1) ;For all robots in the system...
SELECT ROBOT = r ;Select robot (no robot is yet ATTACHed)
ATTACH ()
;Gain robot control
READY
;Move to READY position
DETACH ()
;Release robot control
END
RETURN
.END
AdeptMotion VME Developer’s Guide, Rev B
153
Chapter 9 - V+ Programming for Multiple Robots and Latch/Trigger Functions
9.4
High-Speed Position Latch and Vision Trigger
The AdeptMotion VME system offers a high-speed position latch that records the
positions of all robots in the system when the latch is triggered. The latch can be triggered
in response to either an external signal, or a signal from the optional AdeptVision VME
module.
See the Adept MV Controller User's Guide for a description of these hardware features.
For vision triggering, see the AdeptVision VME User's Guide for details of the Vision
Trigger, and the AdeptVision Reference Guide for a description of the V+ keywords
VPICTURE and V.IO.WAIT.
Position Latch
To use the high-speed position latch, you must first enable the external trigger using the
CONFIG_C.V2 utility on the Adept Utility Disk. See Instructions for Adept Utility Programs.
The following program demonstrates using the latch to record the positions of the
currently SELECTed robot and belt encoder 1 when a probe input is received.
.PROGRAM position.latch(latch.loc, latch.jts[], latch.enc, loc.okay, enc.okay)
; ABSTRACT:Demonstration program for using encoder latches on both
;
robots and external encoders. The data are latched
;
when the probe input is triggered.
;
; INPUT PARM:
None
;
; OUTPUT PARM: latch.loc
location of the robot when probe was
;
triggered
;
latch.jts[]
array of robot joint angles when the probe
;
was triggered, starting with latch.jts[1]
;
latch.enc
latched position of external encoder #1
;
loc.okay
TRUE if there was a latched robot location
;
enc.okay
TRUE if there was a latched encoder location
;
;* Copyright (c) 1992, 1994 by Adept Technology, Inc.
; If there is a latched position, record the location, joint angles,
; and belt encoder count.
loc.okay = LATCHED(0)
;Is there robot data?
IF loc.okay THEN
;If so, record it.
SET latch.loc = LATCH()
;Record robot loc
DECOMPOSE latch.pic[1] = #PLATCH();Record joint angles
END
enc.okay = LATCHED(–1)
IF enc.okay THEN
latch.enc = DEVICE(0,0,,4)
END
RETURN
;Is there encoder data?
;If so, record it.
;Read external encoder 1
.END
154
AdeptMotion VME Developer’s Guide, Rev B
High-Speed Position Latch and Vision Trigger
Vision Position Latch
The vision position latch records the robot position when a vision picture is taken with the
V.STROBE system switch enabled. This feature allows vision pictures to be taken “on the
fly”, where a camera mounted on the arm is taking a picture of a stationary object or a
stationary camera is taking a picture of something held by the robot. Some strobe lights
can have a delay (latencies) of up to 50 µs before the light is activated, and a duration of 50
additional µs. To get the best correspondence of position latch to strobe firing, use strobes
that have short latencies and durations.
To use the vision position latch, you must first enable the external trigger using the
CONFIG_C.V2 utility on the Adept Utility Disk. See Instructions for Adept Utility Programs.
The following program demonstrates using the latch to record the position of the
currently SELECTed robot and belt encoder 1 when a picture is taken.
.PROGRAM vision.latch(cam, picloc, tol, actpic, actpic[], actenc)
; ABSTRACT: Demonstration routine for using encoder latches on
;
both robots and external encoders. In a real program, there
;
is usually no need to report the location, joint angles,
;
and external encoder position; typically, only one of these
;
is needed.
;
; INPUT PARM:
cam
Virtual camera number for picture
;
picloc
Desired picture taking location
;
tol
Tolerance (in mm) within which robot must
;
be before picture is taken.
;
; OUTPUT PARM: actpic
Picture-taking location within
;
microseconds of the strobe. The location
;
of the currently SELECTed robot is returned.
;
actpic[]
Array of robot joint angles of the picture;
taking location, beginning with actpic[1].
;
The joint angles of the currently SELECTed
;
robot are returned.
;
actenc
Latched position of external encoder #1, also
;
accurate to within microseconds of the strobe.
;
;* Copyright (c) 1990, 1994 by Adept Technology, Inc.
; Initialization (this is usually done only once in a separate program)
ENABLE V.STROBE[cam]
;Enable latching to occur when a
; picture is taken
; Move to picture-taking location and wait until robot is within
; desired tolerance. (When a strobe light is used, you can save time
; by not waiting for the robot to settle at the picture location.)
MOVE picloc
;Move to picture loc
DO
;Loop, waiting to
UNTIL DISTANCE(HERE,picloc) < tol; come close to camera
VPICTURE (cam) 2
;Take picture
CALL position.latch(actloc, actpic[], actenc) ;Get latched position
RETURN
.END
AdeptMotion VME Developer’s Guide, Rev B
155
Chapter 9 - V+ Programming for Multiple Robots and Latch/Trigger Functions
9.5
Using the Manual Control Pendant
Controlling More Than One Robot
Like the monitor and each program task, the Manual Control Pendant (MCP) can also
have a robot attached. When moving a robot from the MCP or displaying locations by
pressing the DISP key, only the currently selected robot is affected. The currently selected
robot is shown by the state of the “DEVICE” LED on the MCP as described below:
“DEVICE” LED state
Robot selected by
pendant
OFF
1
ON
2
FLASHING
3 (and above)
The MCP selection cycles from one robot to the next each time the DEV/F3 key is pressed.
Be careful when recording positions with the MCP; the position recorded by HERE or
TEACH commands depends on the robot that is currently SELECTed by the monitor or
program and not on the robot selected by the MCP. The following commands will allow
you to teach the position of robot 2 regardless of which robot is selected by the MCP.
.SELECT ROBOT = 2
;Choose robot to be accessed by Monitor
.TEACH p[1]
;Record location(s) of robot 2
Robots With Less Than Six Joints
The MCP has six axis/joint selection buttons. In Cartesian modes (WORLD, TOOL), these
correspond to all six possible Cartesian values: X, Y, Z, RX, RY, RZ. Not all mechanisms
can move in all of these coordinates. For example, a 4-axis SCARA robot can only move in
X, Y, Z and RZ. Buttons that have no effect on your robot are ignored and in some cases
cannot be selected.
156
AdeptMotion VME Developer’s Guide, Rev B
Using the Manual Control Pendant
Robots With More Than Six Joints
In JOINT mode, each of the six buttons is used to control a specific joint of the robot. If the
robot has more than six joints, the J7-J12/F2 key can be used to access the 7th to 12th
joints. Only the currently selected robot is affected. The currently selected joint is shown
by the state of the LED on the joint/axis key as described below. If you press the key for
joint 1, and the LED is steady, you are controlling Joint 1. If you press J7-J12/F2, then press
the key for joint 1, the LED will flash, indicating that you are controlling Joint 7.
“Jt/Axis” LED state
Joint range
OFF
None
STEADY
1 to 6
FLASHING
7 to 12
The MCP cycles from one range to the other each time the J7-12/F2 key is pressed.
AdeptMotion VME Developer’s Guide, Rev B
157
Specification Worksheets
A
The tables in this appendix are duplicates of the tables shown in Chapter 6 and Chapter 7.
You should photocopy the pages in this appendix and then use them as you go through
the SPEC program. Fill in the tables as completely as possible based on the mechanical
and electrical properties of your system. Always try to update the tables with any changes
you make in the process of specifying the system. Keep the worksheets for future
reference; they can be very helpful when you want to make a change to the system later
on.
AdeptMotion VME Developer’s Guide, Rev B
159
Appendix A - Specification Worksheets
Table A-1. Motor Configuration (from Table 6-1)
Motor Configuration for Robot Number ____
Joint
Axis number and description
Robot Option Bits ____
Motor
1
2
3
4
5
6
7
8
160
AdeptMotion VME Developer’s Guide, Rev B
Servo board
Channel
Appendix A - Specification Worksheets
Table A-2. Robot Initialization Specs (from Table 7-1)
Robot Initialization Specs for Robot Number __
Suggested
Value
Parameter
Units
Range
Robot start-up message
n/a
<= 79 char
Module password
n/a
n/a
Calibration file name
n/a
n/a
Robot model number
n/a
≥0
Robot serial number
n/a
≥0
Hand OPEN signal
n/a
any valid
output or
soft signal
Hand CLOSE signal
n/a
any valid
output or
soft signal
*Time-out nulling error* limit
Seconds
≥0
4 (depends on
amplifiers and
mechanism)
Time required for clutch to
engage
Seconds
≥0
0
Time required for brakes to
release
Seconds
≥0
0
Time required for brakes to
engage
Seconds
≥0
0
Delay from high power on to
amp enable
Seconds
≥0
1
Max time to wait for amp
enable
Seconds
≥0
1
Your Value
standard.cal
AdeptMotion VME Developer’s Guide, Rev B
161
Appendix A - Specification Worksheets
Table A-3. Encoder Parameters (from Table 7-3)
Encoder Parameters for Robot Number __ Motor Number __
Parameter
Units
Range
Encoder scale factor
counts/rev
or
counts/mm
>0
Encoder counts per zero
index
counts
≥0
Encoder configuration
n/a
>0
Encoder sign
n/a
0 or –1
Suggested Value
Your
Value
0 if no zero index;
otherwise > 0
Table A-4. Motor/Amplifier Parameters (from Table 7-5)
Motor/Amplifier Parameters for Robot Number __ Motor Number __
Parameter
Units
Maximum
Range
Typical Value
Motor sign
n/a
0 or -1
depends on system
Maximum DAC
value
DAC
counts
0 to 32767
depends on
motor/ drive
10% of full
scale
Maximum DAC
output in Manual
mode
DAC
counts
0 to 32767
depends on
motor/ drive
1/3 of above
*Duty-cycle
exceeded* DAC limit
DAC
counts
0 to 32767
2/3 of maximum
DAC value
2/3 of above
*Duty-cycle
exceeded* filter
parameter
n/a
≥0
9 (about 0.5 sec
time constant)
8
*Motor stalled*
timeout
seconds
≥0
depends on system
(should be as low
as possible)
0.2 seconds
*Soft envelope error*
limit
enc.
counts
≥0
depends on system
(should be as low
as possible)
>3 times
square wave
step size
while
tuning. Must
be set to safe
value after
tuning.
162
AdeptMotion VME Developer’s Guide, Rev B
Suggested
Initial Value
Your
Value
Appendix A - Specification Worksheets
Table A-4. Motor/Amplifier Parameters (from Table 7-5)
Motor/Amplifier Parameters for Robot Number __ Motor Number __
Parameter
Units
Maximum
Range
Typical Value
*Hard envelope
error* limit
enc.
counts
> soft
envelope
error limit
depends on system
(should be as low
as possible)
Machine Input
Polarity
n/a
Suggested
Initial Value
Your
Value
>3 times
square wave
step size
while
tuning. Must
be set to safe
value after
tuning.
Table A-5. Servo Tuning Parameters, with Suggested Initial Values (from Table 7-7)
Servo Tuning Parameters for Robot Number __ Motor Number __
Parameter
Units
Usual Range
Suggested
Initial Value
Proportional gain
(DC gain)
DAC_counts
enc_cnt
1 to 100
1
Proportional zero
none
0.8 to 0.99a
0.98
Proportional pole
none
0 to 0.8
0
Integral gain
DAC_counts
enc_cnts * ms
0.01 to 50
0
Maximum integrator value
DAC counts
0 to 32767
0
Maximum integrator step
enc_cnts/ms
0 to 1000
0
Velocity feedforward
DAC_counts
enc_cnts/ms
0 to 1000
0
Acceleration feedforward
DAC_counts
enc_cnts/ms2
0 to 100,000
0
DAC output filter
none
0, 1, 2
0 (disabled)
a
Your
Value
For velocity-style amplifiers, range can be 0 to 1.
AdeptMotion VME Developer’s Guide, Rev B
163
Appendix A - Specification Worksheets
Table A-6. Calibration Parameters (from Table 7-9)
Calibration Parameters for Robot Number __ Motor Number __
Parameter
Units
Range
Suggested Value
Homing
configuration
n/a
0 to 12
depends on the installation
Speed and direction
counts/msec
Speed for fine search
counts/ msec
>0
Typically less than 1
‘Motor stalled’
timeout during cal
msec
≥0
Shorter than normal ‘motor
stalled timeout’; start with 10
msec
Maximum search
distance
counts
>0
greater than the maximum
travel distance
Max home switch
width
counts
≥0
width of home switch in
encoder counts
‘Hard stop found’
position error
counts
>0
smaller than envelope error
in motor/encoder spec menu
Distance from edge
of home switch
(or hard stop or
current position) to
first zero index
counts
0 to number
of counts
between
indices
as close as possible to the
actual distance
Motor position at
zero index (or home
switch or hard stop
or current position)
counts
Calibration groups
n/a
Park position after
calibration
counts
164
Typically between -5 and 5
value that provides current
calibration of axis
0 to 16
Typically 1 or 2
position axis to minimize
mechanical interference with
other axes or other
equipment
AdeptMotion VME Developer’s Guide, Rev B
Your
Value
Appendix A - Specification Worksheets
Table A-7. Joint Motion Parameters (from Table 7-10)
Joint Motion Parameters for Robot Number __ Joint Number __
Parameter
Units
Range
FINE nulling tolerance
encoder
counts
>0
COARSE nulling tolerance
encoder
counts
> FINE
tolerance
Time required to be in
tolerance
seconds
>0
READY position
mm or
degrees
Joint speed at SPEED 100
mm/sec or
degrees/sec
>0
Joint accel at ACCEL 100
mm/sec2 or
degrees/sec2
>0
Minimum JOINT pendant
increment
mm or
degrees
>0
Maximum JOINT pendant
speed
mm/sec or
degrees/sec
>0
FREE mode
Enabled or
Disabled
FREE mode digital signal
(clutch)
n/a
Velocity Servo
Enabled or
Disabled
Minimum lower joint limit
mm or
degrees
Lower joint limit
mm or
degrees
≥ minimum
limit
Upper joint limit
mm or
degrees
<= maximum
limit
Maximum upper joint limit
mm or
degrees
Suggested
Value
Your Value
0.008
any valid
output #
AdeptMotion VME Developer’s Guide, Rev B
165
Appendix A - Specification Worksheets
Table A-8. Link Dimension Parameters (from Table 7-11)
Link Dimension Parameters for Robot Number ___
Parameter
Units
Tool Z-offset distance
mm
Link dimension value #1
See device
module doc.
See device
module doc.
Link dimension value #2
See device
module doc.
See device
module doc.
Link dimension value #3
See device
module doc.
See device
module doc.
Link dimension value #4
See device
module doc.
See device
module doc.
Link dimension value #5
See device
module doc.
See device
module doc.
Link dimension value #6
See device
module doc.
See device
module doc.
166
Range
Suggested
Value
AdeptMotion VME Developer’s Guide, Rev B
Your Value
Appendix A - Specification Worksheets
Table A-9. Cartesian Motion Parameters (from Table 7-12)
Cartesian Motion Parameters for Robot Number _____
Parameter
Units
Range
Cartesian translation speed at SPEED
100
mm/sec
>0
1st Cartesian rotation speed at SPEED
100
deg/sec
>0
2nd Cartesian rotation speed at
SPEED 100
deg/sec
>0
3rd Cartesian rotation speed at
SPEED 100
deg/sec
>0
Translational acceleration at ACCEL
100
mm/sec2
>0
1st Cartesian rotational acceleration at
ACCEL 100
deg/sec2
>0
2nd Cartesian rotational acceleration
at ACCEL 100
deg/sec2
>0
3rd Cartesian rotational acceleration
at ACCEL 100
deg/sec2
>0
Maximum WORLD/TOOL pendant
translation speed
mm/sec
>0
Maximum WORLD/TOOL pendant
rotation speed
deg/sec
>0
Time to reach max pendant speed
seconds
>0
Minimum WORLD/TOOL pendant
translation increment
mm
>0
Minimum WORLD/TOOL pendant
rotation increment
degrees
>0
Suggested
Value
Your Value
< 76.2
AdeptMotion VME Developer’s Guide, Rev B
167
Appendix A - Specification Worksheets
Table A-10. General Motion Specifications (from Table 7-13)
General Motion Specifications for Robot Number _____
Parameter
Units
Range
Maximum allowable acceleration
%
>0
Maximum allowable deceleration
%
>0
Maximum allowable program speed
%
>0
Maximum rate of change of monitor
speed
%/sec
>0
Minimum execution time for joint
motions
sec
>0
Minimum execution time for
Cartesian motions
sec
>0
Default S-curve profile at system
startup
>= 0
Default acceleration at system startup
>0
Default deceleration at system startup
>0
Upper speed limit for SCALE.ACCEL
168
Suggested
Value
%
AdeptMotion VME Developer’s Guide, Rev B
Your Value
Appendix A - Specification Worksheets
Table A-11. S-Curve Parameters (from Table 7-14)
S-Curve Parameters for Robot Number __
Acceleration Times (sec)
Deceleration Times (sec)
Accel Profile Number
Ramp-Up
Ramp-Down
Ramp-Up
Ramp-Down
0 (this is the standard
trapezoidal velocity profile
and is not editable)
0
0
0
0
1
2
3
4
5
6
7
8
Table A-12. Stop-on-Force Parameters (from Table 7-15)
Stop-on-Force Parameters for Robot Number __ Motor Number __
Suggested
Value
Parameter
Units
Range
Stop-on-force nulling
tolerance
encoder
counts
≥0
0 (uses
current
settling
tolerance)
Stop-on-force *Envelope
error* limit
encoder
counts
≥0
0 (uses
current
envelope
error limit)
Stop-on-force integral gain
DAC count
enc cnt * ms
≥0
0 (uses half
of current
integral gain)
AdeptMotion VME Developer’s Guide, Rev B
Your Value
169
X/Y/Z/Theta Device Module
B
The X/Y/Z/Theta device module file contains one X/Y/Z/Theta device module that
may be used to control up to four axes. Because of the flexibility and generality of the
X/Y/Z/Theta module, this file is supplied standard with all AdeptMotion systems.
B.1
Copying the Device Module File to a Boot Disk
In order to control a mechanism, the device module file must be installed in your V+
system file. Refer to Chapter 5 for details on using CONFIG_C to install this device
module file in your system file.
If you have a hard drive, the device module files will normally be already stored in the
C:\SYSTEM\ subdirectory. Answer “XYZ” to the prompt asking you to enter the name of
the device module you want to transfer to your system file.
B.2
X/Y/Z/Theta Device Module Description
An X/Y/Z/Theta device module can control up to a four degree-of-freedom mechanism
that consists of three orthogonal linear axes followed by a revolute axis. Typical examples
of such mechanisms are linear axes, rotational axes, X/Y tables, and gantry robots.
Module Specifications
Device Module Identification Number: 8
This number is displayed along with the robot serial and model number after the system
boots up and whenever the ID monitor command is issued.
Default Start-up Message: “X/Y/Z/Theta Robot Control Module”
The start-up message is displayed just after the system boots up.
AdeptMotion VME Developer’s Guide, Rev B
171
Appendix B - X/Y/Z/Theta Device Module
Default Joint Configuration:
Joint
Axis
Board/Channel
1
1 (X)
1/1
2
2 (Y)
1/2
3
3 (Z)
1/3
4
4 (Theta)
1/4
With multiple robots, it will be necessary to correct the joint configuration from the SPEC
program to avoid conflicts.
Robot Option Word
This module does not use any bits of the robot option word. You should leave its value
at 0.
Axis Configuration
Although the system is designed to support up to four axes, any combination of these
axes can be selectively disabled to provide control for a lesser degree-of-freedom device.
The directions of motion of the axes as described below will determine the setting of the
encoder sign specified in the SPEC utility program (see Figure B-1). The four axes of
motion are defined as follows:
1. Axis 1 is a linear axis that moves in the world X direction. A POSITIVE
displacement of the joint moves the robot in the POSITIVE world X direction.
2. Axis 2 is a linear axis that moves in the world Y direction. A POSITIVE
displacement of the joint moves the robot in the POSITIVE world Y direction.
3. Axis 3 is a linear axis that moves in the world Z direction. A POSITIVE
displacement of the joint moves the robot in the NEGATIVE world Z direction.
4. Axis 4 is a revolute axis (theta) about the world Z direction. A POSITIVE rotation
of the joint turns the robot's end effector in a NEGATIVE direction relative to the
world Z axis. The axis of rotation of joint 4 defines the nominal Z axis of the
robot's tool frame of reference. That is, if a NULL tool is defined, the Z axis of the
tool frame will be colinear with the axis of rotation of joint 4 and will be pointed in
the direction of the negative world Z axis.
As with all other robot modules, the standard V+ BASE and TOOL transformations can be
used in combination with the geometric model to specify and compute the end point of
the robot relative to the world coordinate frame.
NOTE: The maximum operating range of Joint 4 (Theta) is –359.9° to
+359.9°.
172
AdeptMotion VME Developer’s Guide, Rev B
X/Y/Z/Theta Device Module Description
Z
Joint 1
Y
x1
y1
X
Joint 2
Arrows indicate direction
of positive joint travel.
z1
Joint 3
Theta
Joint 4
Figure B-1. Link Definitions and Dimensions for an X/Y/Z/Theta Device
Variations in Axis Configuration
This module can be configured to control any combination of the four axes ranging from
any single joint on up to all four axes.
Geometric Dimensional Constants
There are no dimensional constants that can be specified for this device other than the tool
offset distance. By default, the world Z height is 0 when the Z-axis joint position is 0, and
as the Z-axis extends in the positive direction, the world Z-height becomes negative. The
tool offset distance can be used to change the default world Z-height of the robot.
The only geometric constraints of importance are that the base linear axes must be
mutually perpendicular. It is not important whether the mechanical drive axes that
implement the mechanism are intersecting or offset from one another. In fact, the origin of
the world coordinate system can be arbitrarily defined to be any point relative to the axes
drives so long as it is consistently defined from one working session to the next.
Cartesian Motion
During program generated straight line motions, the first Cartesian rotation speed
controls the rate at which joint 4 rotates and should be set to be consistent with the joint
interpolated speed for joint 4. If the Theta axis is not configured, the first Cartesian
rotation speed should be set to zero. The second and third Cartesian rotation angles are
not utilized and their speeds should likewise be set to zero.
AdeptMotion VME Developer’s Guide, Rev B
173
Appendix B - X/Y/Z/Theta Device Module
Because the joint axes align with the Cartesian axes, the specification parameters for joint
speeds and accelerations should be consistent with those for Cartesian speeds and
accelerations for both pendant and program control. For example, the Cartesian
translation speed and acceleration will normally be close to the average of the linear axes’
speeds and accelerations.
Coupling Between Robot Joints and Motors
This module does not allow multiple motors to couple into the motion of any single axis.
Robot Configuration Control Instructions
The following robot configuration-control program instructions do not have any effect
upon the operation of mechanisms controlled by this module:
ABOVE, BELOW, FLIP, NOFLIP, LEFTY, RIGHTY
Additional Restrictions
None
174
AdeptMotion VME Developer’s Guide, Rev B
External Encoder
Device Module
C
An external encoder is an encoder that is not part of a robot. The External Encoder device
module file contains software allowing the programmer to write V+ programs that
include instructions specifying motion endpoints that are automatically modified to
compensate for the instantaneous position of up to two conveyor belts. You can also use
the External Encoder device module for general applications other than conveyor belt
tracking. This may include monitoring a compliant wrist or an axis that is powered by
another system. This feature is provided as an option with AdeptMotion VME. The V+
Extensions Software License is required. (You can confirm whether V+ Extensions is
installed using the CONFIG_C program.)
C.1 Copying the External Encoder Device Module to a Boot
Disk
Most Adept system disks have the External Encoder device module pre-installed.
However, you must have the V+ Extensions license to use the module. To use the External
Encoder device module, the device module file must be installed in your V+ system file. If
necessary, refer to Chapter 5 for details on using CONFIG_C to install this device module
file in your system file.
If you have a hard drive, the device module files will normally be already stored in the
C:\SYSTEM\ subdirectory. Answer “ENC” to the prompt asking you to enter the name of
the device module you want to transfer to your system file. To verify that the External
Encoder module is installed, look for the message “Adept External Encoder Module” after
boot up. (This message is not displayed unless V+ Extensions is installed.)
Only one copy of the External Encoder module can be installed, any additional copies will
be ignored.
C.2 External Encoder Device Module
The External Encoder device module allows up to two external encoders to be connected
to an Adept system. If these encoders are used to track the motion of a conveyor belt,
robots connected to the system can also track the belt. Based on information from sensors,
the robot can then be used to perform pick and place operations, assembly operations,
dispensing, etc., while the conveyor is moving.
When connected to an AdeptMotion VME system, the hardware requirements on the
encoder are the same as those on the motor encoders (see the Installation chapter of this
guide for details).
AdeptMotion VME Developer’s Guide, Rev B
175
Appendix C - External Encoder Device Module
Module specifications
Start-up Message: “Adept External Encoder Module” or “External Encoder
Module”
The start-up message is displayed just after the system boots up. This message cannot be
changed by the user.
Default Encoder Configuration:
If you are using the copy of the module pre-installed on your system disk (or the one from
the “AS” device module file), the following defaults apply:
Encoder
1
Board/Channel
1/7
This configuration can be changed using the SPEC program.
If you are using the copy of the module from the “ENC” device module file, the defaults
will be different.
If your system includes an Adept robot (with a VJI or EJI module), “Board 1 Channel 7”
refers to the Belt 1 port on the VJI (or EJI) for robot 1.
If you do not have an Adept robot, you will need to change the default. For example, if
you have an MI6 and are using only channels 1 to 4 to control a robot, you may use
channel 5 or 6, or both, for external belt encoders.
Number of Encoder Channels
The External Encoder module can be configured to control from 1 to 6 encoders. The
default number is 1.
Hardware Connections
The external encoder(s) should be connected to an available MP6-E channel. Edit the
board/channel configuration mapping to match the channels you have chosen. Each
channel of a motion interface board (MI6 or MI3) can be used either for a servoed axis of a
robot, or for an external (belt) encoder, but not both.
For example, the MI6 has 6 channels. Valid configurations include (for a single MI6
board):
176
AdeptMotion VME Developer’s Guide, Rev B
External Encoder Device Module
• one 4-axis robot and two belt channels
• two 2-axis robots and two belt channels
• one 5-axis robot and one belt channel
• one 2-axis robot, one 3-axis robot, and one belt channel
V+Instructions and Functions for External Encoders
See the V+ Language User’s Guide and the V+ Language Reference Guide for information on
the following keywords.
For conveyor belt tracking, see BELT, BELT.MODE, BELT.ZERO, BSTATUS, DEFBELT,
SETBELT, WINDOW.
For general (non-tracking) applications, see DEVICE, SETDEVICE.
AdeptMotion VME Developer’s Guide, Rev B
177
Coordinated Joints
Robot Device Module
D
This is a special module that can be employed to control up to12 joints of any type when a
kinematic model is not required or does not exist.
D.1
Copying the Device Module File to a Boot Disk
In order to control a mechanism, the device module file must be installed in your V+
system file. Refer to Chapter 5 for details on using CONFIG_C to install this device
module file in your system file.
If you have a hard drive, the device module files will normally be already stored in the
C:\SYSTEM\ subdirectory. Answer “JTS” to the prompt asking you to enter the name of
the device module you want to transfer to your system file.
You can enter a “?” to the name prompt and the available device module names will be
displayed.
D.2
Coordinated Joints Robot Module Description
This module can control up to 12 joints of any type when a kinematic model is not
required or does not exist. This module permits the joints of the robot to be moved in a
coordinated fashion using precision point joint interpolated motions. An example is: MOVE
#loc. Since no kinematic model is included, destinations specified as transformations and
straight- line motions are not permitted and will generate a program error if utilized.
Examples that are not permitted: MOVE loc or MOVES loc.
Reading the robot’s joint angles via HERE or WHERE will return the positions of the
joints. Reading the robot’s Cartesian location will always return a NULL value
independent of the positions of the joints or the setting of the BASE and TOOL
transformations.
AdeptMotion VME Developer’s Guide, Rev B
179
Appendix D - Coordinated Joints Robot Device Module
Module Specifications
Device Module Identification Number: 15
This number is displayed along with the robot serial and model number after the system
boots up and whenever the ID monitor command is issued.
Default Start-up Message: “Coordinated Joint Control Robot”
The start-up message is displayed just after the system boots up.
Default Joint Configuration:
Axis
Joint
Board/Channel
1
1
1/1
2
2
1/2
3
3
1/3
4
4
1/4
5
5
2/1
6
6
2/2
Robot Option Word
This module does not use any bits of the robot option word. You should leave its value
at 0.
Variations in Axis Configuration
This module can be configured to control from 1 to 12 coordinated axes.
Geometric Dimensional Constants
There are no dimensional constants associated with this module since no kinematic model
exists.
Interpretation of Cartesian Rotations
There are no Cartesian rotation angles for this module since Cartesian motions are not
permitted.
Coupling Between Robot Joints and Motors
This module does not allow multiple motors to couple into the motion of any single axis.
180
AdeptMotion VME Developer’s Guide, Rev B
Coordinated Joints Robot Module Description
Robot Configuration Control Program Instructions
The following robot configuration-control program instructions do not have any effect
upon the operation of mechanisms controlled by this module:
ABOVE, BELOW, FLIP, NOFLIP, LEFTY, RIGHTY
Additional Restrictions
Only “Joint” and “Free” manual control modes are supported. “World” and “Tool”
manual control modes are inhibited.
AdeptMotion VME Developer’s Guide, Rev B
181
E
Sample Specification File
Figure E-1 illustrates the contents of a sample specification file that was created for a four
degree of freedom X/Y/Z/Theta robot. The data and the labels are consistent with the
specification information that is described in Chapter 6 and Chapter 7. Note that in
addition to the specification information, the file also contains some computed values that
were automatically derived from the robot specification data.
A typical data section within the specification data file looks like this:
.DATA
61 ;Counts per joint travel
711.1111, 444.4444, 533.3333,
277.7778
Following the word “.DATA” is the data section number, 61. This number indicates to the
motion system where the data is to be stored in system memory. The data section number
is followed by a descriptive comment about the data section. Ensuing lines contain the
values as stored in system memory. In this case, the values are stored in joint order. Other
data sections, such as link dimensions, are stored in an order particular to the robot.
.HEADER Robot Specification Data
Version 1.3
; Created by SPEC 11.1F on 09-May-94 16:34:54
; Software:
11.1 83-100 (Edit F, 28-Apr-1994)
; Controller: 3302-231 0
; Processor 1: 0.0 1-5 4Mb
Robot 1:
100-0 0 8
Title: "Motor Box: X/Y/Z/Theta Robot Control Module"
.DATA_SECTION
; OPTION WORD AND MOTOR CONFIGURATION
.DATA
230
.DATA
1
.DATA
2
.DATA
3
.DATA
4
;Robot option word
0
;Number of joints
4
;Motor to axis mapping
1, 1, 1, 0,
0, 0, 0, 1,
0, 0, 0, 0,
0, 0, 0, 0,
0, 0, 0, 0,
;Enabled axis mask
15
;Velocity servo enable mask
0,
2,
0,
0,
0,
0,
1,
0,
0,
0,
0,
0,
1,
0,
0,
0,
0,
3,
0,
0,
0,
0,
1,
0,
0,
0,
0,
0,
1,
0,
0,
0,
0,
4,
0,
AdeptMotion VME Developer’s Guide, Rev B
0,
0,
0,
1,
0
0,
0,
0,
0,
183
Appendix E - Sample Specification File
0
; ROBOT INITIALIZATION SPECIFICATIONS
.DATA
17
.DATA
20
.DATA
220
.DATA
221
;Module password
Null
;Hand OPEN/CLOSE signals
0, 0, 0, 0
;System timeout values (sec)
5.632, 3.008, 0.992, 0, 0
;Time required for clutch to engage
0
; AMPLIFIER AND ENCODER SPECIFICATIONS
.DATA
61
.DATA
62
.DATA 1017
.DATA 1016
.DATA 1015
.DATA 1009
.DATA 1010
.DATA 1012
.DATA 1013
.DATA 1014
.DATA 1018
.DATA 1032
.DATA 1042
.DATA 1045
;Counts per joint travel
1000, 1000, 1000, 1000, 1000, 1000
;Joint travel per count
1E-03, 1E-03, 1E-03, 1E-03, 1E-03,
1E-03
;Counts per zero index (zero = disable)
2048, 2048, 2048, 2048
;Zero-index configuration
6, 6, 6, 6
;Encoder sign (non-zero => flip sign)
0, 0, 0, 0
;Motor sign (non-zero => flip sign)
0, 0, 0, 0
;Maximum DAC value
32000, 32767, 32767, 32767
;*Duty cycle exceeded* DAC limit
0, 0, 0, 0
;*Duty cycle exceeded* filter pole
0, 0, 0, 0
;*Motor stalled* timeout (sec)
8, 8, 8, 8
;*Envelope error* limit (cts)
1000, 1000, 1000, 1000
;Machine input polarity
15, 15, 15, 15
;Default motion speed (cts/ms)
4, 4, 4, 4
;Counts per commutation cycle
0, 0, 0, 0
; SERVO TUNING PARAMETERS
.DATA 1048
.DATA 1049
.DATA 1050
.DATA 1003
.DATA 1005
.DATA 1004
184
;Proportional (DC) loop gain
800, 800, 800, 800
;Location of zero (mapped to S-plane)
-83.3836, -83.3836, -83.3836, -83.3836
;Location of pole (mapped to S-plane)
-1203.963, -1203.963, -1203.963,
-1203.963
;Integrator gain
10, 10, 10, 10
;Max value for integrator state
32767, 32767, 32767, 32767
;Max position error to integrate
AdeptMotion VME Developer’s Guide, Rev B
Appendix E - Sample Specification File
.DATA 1006
.DATA 1007
.DATA 1022
25, 25, 25, 25
;Velocity feed-forward gain
0, 0, 0, 0
;Acceleration feed-forward gain
0, 0, 0, 0
;DAC output filter pole
0, 0, 0, 0
; CALIBRATION PARAMETERS
.DATA 1023
.DATA 1040
.DATA 1041
.DATA 1034
.DATA 1036
.DATA 1037
.DATA 1035
.DATA
203
.DATA 1038
.DATA 1044
;Homing configuration
2, 2, 2, 2
;Speed and direction for search (cts/msec)
2, 2, 2, 2
;Speed for fine searches (cts/msec)
0.5, 0.5, 0.5, 0.5
;Max distance to search (cts)
0, 0, 0, 0
;Max width of home sensor (cts)
0, 0, 0, 0
;Distance from home sw to first zero index (cts)
1024, 1024, 1024, 1024
;Motor position at first index (cts)
0, 0, 0, 0
;Calibration order
1, 2, 3, 4, 0, 0, 0, 0
;Park position after homing (cts)
0, 0, 0, 0
;Saturation time during calibration (ms)
100, 100, 100, 100
; JOINT MOTION PARAMETERS
.DATA
180
.DATA
181
.DATA 1019
.DATA
202
.DATA
141
.DATA
142
.DATA
240
.DATA
22
;FINE nulling tolerance (cts)
640, 640, 640, 640
;COARSE nulling tolerance (cts)
64000, 64000, 64000, 64000
;Time to be in tolerance (sec)
0.016, 0.016, 0.016, 0.016
;READY location joint values (deg)
0, 0, 0, 0
;Min joint pendant increment (deg)
1E-03, 1E-03, 1E-03, 1E-03
;Max joint pendant speed (deg/sec)
6.4, 6.4, 6.4, 6.4
;Free mode enable bit field
-1
;Free mode signals
0, 0, 0, 0
; LINK DIMENSIONS (mm)
.DATA
80
.DATA
81
;Wrist to flange distance
0
;Link dimensions
0
; SOFTWARE JOINT LIMITS (deg)
AdeptMotion VME Developer’s Guide, Rev B
185
Appendix E - Sample Specification File
.DATA
120
.DATA
121
.DATA
122
.DATA
123
.DATA
124
;Lower joint travel limit
-100, -100, -100, -100
;Upper joint travel limit
100, 100, 100, 100
;Joint travel limit mid-values
0, 0, 0, 0
;Max lower joint travel limit
-100, -100, -100, -100
;Max upper joint travel limit
100, 100, 100, 100
; CARTESIAN MOTION SPECIFICATIONS
.DATA
144
.DATA
140
.DATA
143
;Cartesian speed (mm/sec)
6.4, 6.4, 0.1117011
;Rate of change of speed
0.16
;Cartesian tick step increment (mm)
1E-03, 1E-03, 1.74533E-05
; TRAJECTORY GENERATOR SPEED PARAMETERS
.DATA
162
.DATA
163
.DATA
164
.DATA
165
.DATA
166
.DATA
167
.DATA
168
.DATA
173
.DATA
169
.DATA
170
.DATA
171
.DATA
172
;Min motion times
0.016, 0.016
;Max joint speeds
60, 60, 60, 60
;Max Cartesian speeds
60, 60
;Max joint accelerations
180, 180, 180, 180
;Max Cartesian accelerations
180, 180
;Acceleration ramp times
-1, 0.1, 0.1, 0.1, 0.1, 0, 0, 0, 0, 0,
0, 0, 0, 0, 0, 0, 0, 0, 0, 0, 0, 0, 0,
0, 0, 0, 0, 0, 0, 0, 0, 0, 0, 0, 0, 0,
0, 0, 0, 0
;Max % acceleration
200
;Max % deceleration
200
;Max % program speed
1000
;Max rate of change in Mtr speed
50
;Startup S-curve profile
1
;Startup % accel and % decel
100, 100
; BACKLASH AND LINEAR COMPENSATION
; STOP-ON-FORCE SPECIFICATIONS
.DATA 1025
.DATA 1026
186
;Stop-on-force nulling tolerance
0, 0, 0, 0
;Stop-on-force envelope error limit
0, 0, 0, 0
AdeptMotion VME Developer’s Guide, Rev B
Appendix E - Sample Specification File
.DATA 1027
;Stop-on-force integrator gain
0, 0, 0, 0
.END
Figure E-1. Sample ASCII SPEC file for X/Y/Z/Theta Robot
AdeptMotion VME Developer’s Guide, Rev B
187
F
Parts List
Table F-1. Parts List, MI6
Description
Kit part number
AdeptMotion VME kit, 6-channel
90330A00410
VME Motion Interface, 6-channel (MI6)
10332-12400
MP6 Kit (MP6-E, MP6-M, MP6-S)
90332-12400
MP6 Encoder Panel (MP6-E)
30330-12450a
MP6 Machine Panel (MP6-M)
30330-12460a
MP6 Servo Panel (MP6-S)
30330-12470a
Cable Set, MI6/MI3-MP6, 2.5m (default)
90332-02000
Cable, MI6/MI3-MP6-E, 2.5m
10332-02000a
Cable, MI6/MI3-MP6-M, 2.5m
10332-02010a
Cable, MI6/MI3-MP6-S, 2.5m
10332-02020a
Cable Set, MI6/MI3-MP6, 5m (option)
a
Component
Part Number
90332-02001
Cable, MI6/MI3-MP6-E, 5m
10332-02001a
Cable, MI6/MI3-MP6-M, 5m
10332-02011a
Cable, MI6/MI3-MP6-S, 5m
10332-02021a
Part number shown for reference and identification only. Not sold separately
NOTE: Above part numbers subject to change.
AdeptMotion VME Developer’s Guide, Rev B
189
Appendix F - Parts List
Table F-2. Parts List, MI3
Description
Kit part number
AdeptMotion VME kit, 3-channel
90330A00420
Component
Part Number
VME Motion Interface, 3-channel (MI3)
10332-11400
MP6 Kit (MP6-E, MP6-M, MP6-S)
90332-12400
Cable Set, MI6/MI3-MP6, 2.5m (default)
90332-02000
Cable Set, MI6/MI3-MP6, 5m (option)
90332-02001
NOTE: Above part numbers subject to change.
Table F-3. Output Module Specifications and Part Numbers (MP6)
Type
Opto 22 Gen. 4
Part Number
Operating
Voltage Range
Adept
Part Number
For use with 12 V logic (default):
AC Output
G4OAC15
12 - 140 VAC
not available
DC Output
G4ODC15
5 - 60 VDC
not available
For use with 5 V logic (See Table 3-5 on page 23 for details on configuring MI6 for 5 V
operation):
AC Output
G4OAC5
12 - 140 VAC
24420-00001
DC Output
G4ODC5
5 - 60 VDC
24420-00003
190
AdeptMotion VME Developer’s Guide, Rev B
Encoder Wiring Diagrams
G
G.1 Introduction
This appendix covers the proper wiring of encoders with single-ended or open-collector
outputs. Refer to section 3.11 for instructions on connecting encoders with differential
outputs.
Adept strongly recommends using differential encoder outputs for maximum noise
immunity. This appendix is provided for applications such as retrofits where it may not be
practical to replace existing encoders.
AdeptMotion VME Developer’s Guide, Rev B
191
Appendix G - Encoder Wiring Diagrams
G.2 MI6/MP6-E Systems
MI6 or MI3
HCPL
2231
Encoder,
single-ended
RP2
RP3
C1
RP1
A+
HCPL
2231
RP2
RP3
C1
RP1
B+
B–
HCPL
2231
PWR
RP2
RP3
C1
RP1
A
MP6-E
A–
RTN
SHD
1
2
4
5
6
7
8
9
3
PWR
RTN
SHD
GND
1
2
3
4
A+
A–
B+
B–
I+
I–
B
I
+
–
I+
Adept MI6/MP6-E
Cable
I–
+PWR
RP1: 330Ω, 6-pin resistor pack, socketed
RP2: 470Ω, 8-pin resistor pack, socketed
+
–
User's
Encoder
Power
Supply
Pin numbers
typical for encoder
channels 1 to 6
RP3: 470Ω, 8-pin resistor pack, socketed
Install either RP2 or RP3, not both.
HCPL2231: Hewlett-Packard Opto-coupler
RP1/2/3 for channel 1 only. See table for channels 2 to 6.
C1: 0.01 µF. Not installed for normal operation. See text.
Figure G-1. Single-ended Encoder Wiring Using Inverted Outputs – MI6
MI6 or MI3
HCPL
2231
Encoder,
single-ended*
RP2
A
RP3
C1
RP1
A+
MP6-E
A–
HCPL
2231
RP2
RP3
C1
RP1
B+
B–
HCPL
2231
PWR
RP2
RP3
C1
RP1
RTN
SHD
1
2
4
5
6
7
8
9
3
PWR
RTN
SHD
GND
1
2
3
4
A+
A–
B+
B–
I+
I–
B
I
+
–
I+
Adept MI6/MP6-E
Cable
I–
+PWR
RP1: 330Ω, 6-pin resistor pack, socketed
RP2: 470Ω, 8-pin resistor pack, socketed
RP3: 470Ω, 8-pin resistor pack, socketed
Install either RP2 or RP3, not both.
HCPL2231: Hewlett-Packard Opto-coupler
RP1/2/3 for channel 1 only. See table for channels 2 to 6.
+
–
User's
Encoder
Power
Supply
Pin numbers
typical for encoder
channels 1 to 6
*Note: this configuration leads to inversion of the encoder channel
signals. Remember this when using the SPEC program to specify
the Zero-Index configuration.
C1: 0.01 µF. Not installed for normal operation. See text.
Figure G-2. Single-ended Encoder Wiring Using Non-inverted Outputs – MI6
192
AdeptMotion VME Developer’s Guide, Rev B
MI6/MP6-E Systems
MI6 or MI3
HCPL
2231
Encoder,
open-collector
RP2
RP3
C1
RP1
A+
MP6-E
A–
HCPL
2231
RP2
RP3
C1
RP1
B+
B–
HCPL
2231
PWR
RP2
RP3
C1
RP1
RTN
SHD
1
2
4
5
6
7
8
9
3
PWR
RTN
SHD
GND
1
2
3
4
A+
A–
B+
B–
I+
I–
A
B
I
I+
I–
Adept MI6/MP6-E
Cable
+PWR
Pin numbers
typical for encoder
channels 1 to 6
RP1: 330Ω, 6-pin resistor pack, socketed
RP2: 470Ω, 8-pin resistor pack, socketed
RP3: 470Ω, 8-pin resistor pack, socketed
Power
+
+
Ground
–
User's
Encoder
Power
Supply
Install either RP2 or RP3, not both.
HCPL2231: Hewlett-Packard Opto-coupler
RP1/2/3 for channel 1 only. See table for channels 2 to 6.
C1: 0.01 µF. Not installed for normal operation. See text.
Figure G-3. Open-collector Encoder Wiring – MI6
AdeptMotion VME Developer’s Guide, Rev B
193
Appendix G - Encoder Wiring Diagrams
G.3 Encoder Interface Technical Reference
The following detailed reference information is provided for advanced users. Most users
will not need this level of detail.
In the case of the MI6 and MI3, this description assumes that the encoder input digital
filtering is set to the default value of 4MHz (see page 107)
Encoder Timing Requirements
1. Each input channel (A, B, Index) must remain in each state (high, low) for at least
500ns.
2. The B channel must not change state for at least 250ns after a change in state of the
A channel. Similarly, the A channel must not change state for at least 250ns after a
change in state of the B channel.
3. The Index pulse must be at least 500ns wide. (It may be active high or active low,
user-configurable option).
4. The Index channel is validated (gated) with the A and B channels. The user may
specify any of the eight possible combinations (for example, A high, B high, I low,
etc.)
5. The Index pulse must remain stable for at least 500ns during the period that A
and B are in the user-specified condition (high, low, etc.).
These conditions are represented graphically below. (The example shows an index-pulse
configuration where all three channels are high together.)
t2
t1
A
t5
t6
t3
B
t7
I
t1, t2, t3, t4 >= 500ns
t5, t6 >= 250ns
t7 >= 500ns
Figure G-4. Encoder Timing Diagram
It follows from the above that:
194
AdeptMotion VME Developer’s Guide, Rev B
t4
Encoder Interface Technical Reference
1. The maximum count rate is 4 million counts/second, if the A and B channel are
perfect square waves, and the mark-space ratio (high vs. low) is 1:1. For
less-than-perfect encoders, the maximum pulse rate must be reduced
proportionally.
2. When operating at 4 million counts/second, the Index pulse must last at least for
the equivalent of one-half of a cycle on the A or B channel. (This is commonly
known as a 180° index pulse.)
3. When operating at 2 million counts/second, the Index pulse must last at least for
the equivalent of one-quarter of a cycle on the A or B channel. (This is commonly
known as a 90° index pulse.)
AdeptMotion VME Developer’s Guide, Rev B
195
Third-Party Suppliers
H
The companies listed typically make a wide range of products, and only some of those
products are Adept-compatible. Please read this manual, and then discuss your
requirements with the vendors listed below.
H.1
Encoders – North America
When selecting encoders, ask for Incremental Encoders, with Differential output (RS422
drivers), A-B Quadrature with index pulse. See section 3.11 for details.
Manufacturer
BEI Motion Systems Company
7476 Beachmont Ave
Suite 135
Cincinnati, OH 45255
(513) 232-4545
(513) 232-8125 FAX
EPC
1601 Dover Road
Highway 2
P.O. Box 1548
Sandpoint, ID 83864
(208)263-8541
(208)263-0541 FAX
Heidenhain Corporation
115 Commerce
Schaumburg IL 60173
(708) 490-1191
(708)490-3931 FAX
AdeptMotion VME Developer’s Guide, Rev B
197
Appendix H - Third-Party Suppliers
H.2
Motors/Drives – North America
When selecting an amplifier, ask for ±10V DC analog input. You may use either velocity or
torque (current) mode amplifiers. See section 3.10 for details. Most motor/amplifier
vendors can guide the user in selecting power ratings, etc. Many sell matched sets of
motors with suitable amplifiers.
Manufacturer
Robbins & Meyers/ Electro Craft
6950 Washington Avenue South
Eden Prairie, MN 55344
(612)942-3710
(612)942-3636 FAX
Baldor Motion Products
12955 State Highway 55
Plymouth, MN 55441
(612)557-9250
(612)557-9255 FAX
The Rexroth Corporation
Indramat Division
5150 Prairie Stone Parkway
Hoffman Estates, IL 60192
(708)645-3600
Pacific Scientific
P.O. Box 106
Rockford, IL 61105-0106
(815)226-3100
(815)226-3148 FAX
Yaskawa Electric America
2942 MacArthur Blvd.
Northbrook, IL 60062-1917
(708)291-2340
(708)498-2430
Moog Inc.
Electric Motion Controls Division
PO Box 180
East Aurora, NY 14052-0018
(716)652-2000
(716)687-4467
Motion Science, Inc.
830-6 Jury Court
San Jose, CA 95112
(408)993-0300
(408)993-0123
198
AdeptMotion VME Developer’s Guide, Rev B
Encoders – International
Manufacturer
Pittman
Division of Penn Engineering and Manufacturing Corporation
343 Godshall Dr.
Harleysville, PA 19438-003
(215)256-6601
(215)256-1338 FAX
Copley Controls Corp
410 University Ave
Westwood, MA 02090
(617) 329-8200
(617) 329-4055 FAX
H.3
Encoders – International
Manufacturer
BEI Motion Systems Company
Idea Code Atr., S.P.
Rue de Freres Lumiere
Z.A. Eckbolsheim
B.P. 2-67038 Strasbourg
Cedex, France
tel: 33 8876 1400
contact: Pierre Stephan
USA tel (513) 232-4545
US contact: Glyn Avolio
EPC
British Encoder Production Company (Manufacturing Facility)
WhiteGate Industrial Estate
Unit #30
Wrexham, Clwyd, Wales
LL13 8UG U.K.
tel: +44 (1978) 262 100
fax:+44 (1978) 262 101
contact: Peter Teire
USA tel: (208)263-8541
Heidenhain Corporation (Manufacturing facility)
Dr. Johann Heidenhain
Strasse 5 D-8225
Traunreut, Germany
Tel: 08 669 31-0
USA tel:(708) 490-1191
AdeptMotion VME Developer’s Guide, Rev B
199
Appendix H - Third-Party Suppliers
H.4
Motors/Drives – International
Manufacturer
Robbins & Meyers/ Reliance Motion Control-Electro Craft
4th Ave,
CW1 1XL
Crewe, England
tel: +44 (1270) 580 142
USA tel: (612)942-3710
Baldor Motion Products (Manufacturing Facility)
Diesel Strasse 22
85551 Kircheim
Munich, Germany
tel: +49 89 905 080
fax: +4989 905 08491
USA tel 501 646 4711 (main plant)
The Rexroth Corporation
Indramat GmbH
BGM-DR-NEBEL-STR 2
D-8770 Lohram
Main, Germany
tel: +49 89 093 52/40-0
USA tel: (708) 645-3600
Pacific Scientific
(contact Paul Coughlin for European distributors)
P.O. Box 106
Rockford, IL 61105-0106
(815)226-3100
(815)226-3148 FAX
Yaskawa Electric America
International Department
2942 MacArthur Blvd.
Northbrook, IL 60062-1917
(708)291-2340
(708)498-2430
Moog Inc.GmbH
Electric Motion Controls Division
D-7030
Hanns-Klemn Str.28
Boblingen, Germany
tel: 07 031 6220
US contact-Joe Citti
USA tel: (716)652-2000
200
AdeptMotion VME Developer’s Guide, Rev B
Motors/Drives – International
Manufacturer
Motion Science, Inc.
Dan McFarland
830-6 Jury Court
San Jose, CA 95112
(408)993-0300
(408)993-0123 FAX
Pittman
Division of Penn Engineering and Manufacturing Corporation
(contact Maurine Spanier, International Department)
Harleysville, PA 19438-003
(215)256-6601
(215)256-1338 FAX
AdeptMotion VME Developer’s Guide, Rev B
201
Cable Pinouts
I
The tables in this appendix show the pinouts for the three cables that connect from the
MI6 module to the MP6-S, MP6-M, and MP6-E panels.
AdeptMotion VME Developer’s Guide, Rev B
203
Appendix I - Cable Pinouts
I.1
MI6 to MP6 Cables
Table I-1 shows the pinout for the cable that connects between the Servo connector on the
MI6 module and the MP6-S panel.
Table I-1. Pinout for MP6-S
MI6 Pin
MP6-S
Pin
Signal
MI6 Pin
1
Signal
26
5
2
DE1+
36
27
DE4+
20
3
DE1–
37
28
DE4–
10
4
DF1+
12
29
DF4+
11
5
DF1–
13
30
DF4–
1
6
CD1+
3
31
CD4+
2
7
CD1–
4
32
CD4–
6
8
DE2+
7
9
DE2–
8
34
DE5+
25
10
DF2+
23
35
DE5–
26
11
DF2–
27
36
DF5+
16
12
CD2+
28
37
DF5–
17
13
CD2–
18
38
CD5+
21
14
DE3+
19
39
CD5–
22
15
DE3–
38
40
DE6+
40
16
DF3+
39
41
DE6–
41
17
DF3–
42
42
DF6+
31
18
CD3+
43
43
DF6–
33
19
CD3–
34
44
CD6+
35
45
CD6–
20
204
MP6-S
Pin
33
21
46
22
47
14
23
APR+
48
29
24
ARTN
9
49
SP1+
44
25
APR–
24
50
SP1–
Shell
Shell
AdeptMotion VME Developer’s Guide, Rev B
Shield
MI6 to MP6 Cables
Table I-2 shows the pinout for the cable that connects between the Machine connector on
the MI6 module and the MP6-M panel.
Table I-2. Pinout for MP6-M
MI6 Pin
MP6-M
Pin
Signal
1
MI6 Pin
MP6-M
Pin
Signal
8
26
OT4+
1
2
OT1+
9
27
OT4–
3
3
OT1–
23
28
HM4+
17
4
HM1+
24
29
HM4–
18
5
HM1–
38
30
BR4+
32
6
BR1+
39
31
BR4–
33
7
BR1–
32
4
8
OT2+
33
5
9
OT2–
34
19
10
HM2+
10
35
OT5+
20
11
HM2–
11
36
OT5–
34
12
BR2+
25
37
HM5+
35
13
BR2–
26
38
HM5–
6
14
OT3+
40
39
BR5+
7
15
OT3–
41
40
BR5–
21
16
HM3+
12
41
OT6+
22
17
HM3–
14
42
OT6–
36
18
BR3+
27
43
HM6+
37
19
BR3–
29
44
HM6–
20
42
45
BR6+
21
44
46
BR6–
22
47
23
48
15
24
HPE+
16
49
SP2+
30
25
HPE–
31
50
SP2–
Shell
Shell
AdeptMotion VME Developer’s Guide, Rev B
Shield
205
Appendix I - Cable Pinouts
Table I-3 shows the pinout for the cable that connects between the Encoder connector on
the MI6 module and the MP6-E panel.
Table I-3. Pinout for MP6-E
MI6 Pin
206
MP6-E
Pin
Signal
MI6 Pin
MP6-E
Pin
Signal
1
2
A1+
7
26
A4+
2
3
A1–
8
27
A4–
16
4
B1+
23
28
B4+
18
5
B1–
24
29
B4–
31
6
Z1+
37
30
Z4+
32
7
Z1–
38
31
Z4–
3
8
A2+
32
4
9
A2–
33
19
10
B2+
34
20
11
B2–
9
35
A5+
33
12
Z2+
10
36
A5–
34
13
Z2–
25
37
B5+
14
26
38
B5–
15
39
39
Z5+
16
40
40
Z5–
17
11
41
A6+
5
18
A3+
12
42
A6–
6
19
A3–
27
43
B6+
21
20
B3+
28
44
B6–
22
21
B3–
41
45
Z6+
35
22
Z3+
42
46
Z6–
36
23
Z3–
14
47
RXD+
13
24
EPWR
15
48
RXD–
43
25
EPWR
29
49
TXD+
44
50
TXD–
Shell
Shell
Shield
AdeptMotion VME Developer’s Guide, Rev B
Customizing Calibration
J.1
J
Introduction
To more easily support calibration for complex mechanisms and simplify customizing the
calibration process, changes to V+ version 11.2 (and later) and the SPEC utility have been
made that allow users to write calibration programs in the V+ language. A standard V+
application package can be used for calibration, or it may be customized by the user. The
application package includes utility programs that perform many of the primitive
functions of calibration, for example, searching for a limit switch or zero index.
The calibration utility package is available to all users of AdeptMotion VME. For users
who have no need to customize the calibration process, the changes to V+ and the use of
the calibration utility package is transparent.
J.2
When Customization May Be Required
For most mechanisms that calibrate to a nest location, or to some combination of
hardstops, home sensors, and zero indices, the standard calibration process can be used. It
is set up entirely through the SPEC utility program. The standard process and the SPEC
parameters that guide it are defined in Chapter 7. The standard calibration process is also
outlined in the next section.
Examples of mechanisms that may not be able to use the standard calibration process are:
• mechanisms with absolute encoders,
• mechanisms with unusual mechanical coupling between axes,
• mechanisms requiring a non-standard search pattern to determine the position of a
hardstop, home sensor, or zero index.
AdeptMotion VME Developer’s Guide, Rev B
207
Appendix J - Customizing Calibration
J.3
Standard Calibration Process
This section describes the process flow for calibration in V+ version 11.2, and how the
STANDARD.CAL utility is used for calibration.
Calibration Process Flow
When the CALIBRATE monitor command or program instruction is invoked, the disk file
CAL_UTIL.V2 is loaded. This file is normally present on every boot disk. It contains a
main routine that oversees robot calibration, and a number of utility routines that perform
primitive calibration functions. These “calibration primitives” may be used by custom
calibration programs.
Normally when the CALIBRATE monitor command or program instruction is invoked,
the main routine of CAL_UTIL is executed, and it performs the following operations:
1. The calibration file whose name is specified in SPEC (STANDARD.CAL by
default) is loaded from disk.
2. All uncalibrated robots are calibrated sequentially. For each robot:
a. the amps are disabled and the brakes engaged to put the robot in a known
state;
b. the calibration routine loaded in step 1 is executed;
c. if an error is returned from the calibration routine, power is disabled, the
error is reported to the monitor, and the error code is returned;
d. if no error is returned, the robot is marked as calibrated.
3. All calibration files are deleted from memory.
The CALIBRATE monitor command and program instruction can also perform a subset of
the above operations. For details refer to the V+Version 11.2 Release Notes.
How STANDARD.CAL Works
STANDARD.CAL is a package of routines that performs generic calibration of motors that
use hard stops, home sensors, and/or zero indices. It handles split-axis calibration,
self-commutating motors, and motors commutated by a servo board. Motors are
calibrated in the order defined by the calibration groups identified in the SPEC utility.
The main calling routine of STANDARD.CAL is “a.standard.cal”. This routine is called
when the CALIBRATE monitor command or program instruction is invoked. Its primary
purpose is to calibrate each motor in the proper order.
An unprotected version of the standard calibration program is available in the file
STANDARD.V2 in the \CALIB\ directory of Adept boot disks. This file can be copied and
modified as a starting point for all custom calibration procedures.
The sequence of operations in “a.standard.cal” is as follows:
208
AdeptMotion VME Developer’s Guide, Rev B
Creating a Custom Calibration Process
1. Determine the order of motor calibration based on the calibration groups defined
using the SPEC utility. Motors within a given group will be calibrated at the same
time. Note that a given motor may show up in more than one group, allowing it to
be calibrated more than once. This can be useful for mechanisms with kinematic
coupling between axes.
2. Power-up the motor to be calibrated. This involves enabling the amplifier,
releasing the brake, and determining a commutation reference (twanging) for
motors that are not self-commutating. The robot is now ready to move under
program control. Note that robot HIGH POWER has already been enabled before
the CALIBRATE monitor command or program instruction was issued.
3. For split-axis mechanisms, put the companion axis of a split-axis pair into slave
mode so it follows along while the primary axis calibrates.
4. Perform the standard homing sequence for the current calibration group of
motors. The homing sequence used for a given motor is defined by the homing
configuration entered in the SPEC utility. The homing operation is achieved by a
state machine that makes multiple calls to the low-level utility program
“ca.home()”. The motor is left with its calibrated flag set after successful
completion of the homing sequence. (The individual motor-calibrated flags are
internal and later used by V+ to determine if each robot is calibrated.)
Standard Homing Sequence
The standard homing sequence for a given motor is outlined below. Not all of the
operations may be required: the homing configuration defined for each motor will
determine which will be used.
1. Find one of the following calibration features:
a. home sensor
b. hard stop
c. current location (if calibrating in a nest.)
2. Find the zero index.
3. Move to a safe position.
If the order of the operations above needs to be rearranged, or if the algorithm to perform
the search for the calibration feature or zero index must be changed, a custom calibration
program is required.
J.4
Creating a Custom Calibration Process
This section describes the features of a custom calibration process and how calibration
primitives may be used to simplify writing the calibration program.
Features of a Custom Calibration Program
A custom calibration program must perform the following general tasks:
1. Prepare motors for motion under program control: enable amps, release brakes,
and enable position servoing.
AdeptMotion VME Developer’s Guide, Rev B
209
Appendix J - Customizing Calibration
2. For each motor, find the position of calibration features in uncalibrated encoder
counts. This is the central task of a custom calibration program.
3. For each motor, set the calibrated motor position based on the known position of
the calibration feature in encoder counts. This value is defined in SPEC. When the
calibration primitives are used, the calibrated flag is set for the motor.
Note that the NOT.CALIBRATED system parameter for the robot must NOT be
set by the custom calibration program. This parameter will be set at a higher level
of the calibration utility package after successful completion of the custom
calibration program.
4. If an error occurs at any time during calibration, return a standard V+ error code.
Robot HIGH POWER will automatically be disabled and the message
corresponding to the error code will be sent to the terminal or monitor window.
To make these tasks easier, the calibration primitives included in the calibration utility
package handle the details of robot motions and basic procedures for searching for
various calibration features. The calibration primitives are discussed in detail on page 211.
Procedure for Setting Up a Custom Calibration Program
The following procedure outlines the steps required to set up the V+ system to use a
custom calibration program.
1. Store the custom calibration program in a file in the same directory and on the
same disk as the CAL_UTIL.V2 file. This will normally be the \CALIB\ directory
on the boot disk for the system. The suggested suffix for the file name is “.CAL”.
The calibration primitives provided by Adept should not be stored in the file;
these will be loaded automatically from the CAL_UTIL.V2 file.
2. The main calling routine for the custom calibration package must have the same
name as the file in which it is stored, except with the prefix “a.” preceding the
name. For example, a custom calibration program stored in the file
CUSTOM.CAL must have a main calling routine named “a.custom.cal”.
3. Enter the name of the custom calibration file in the calibration menu of the SPEC
utility.
The routine for custom calibration will now be called whenever the CALIBRATE monitor
command or program instruction is invoked.
210
AdeptMotion VME Developer’s Guide, Rev B
Creating a Custom Calibration Process
Type
Parameter name
Description
Input
mtr_mask
Bit mask indicating which motors to calibrate. Bit
“n” (counting from 1) is set when motor “n”
should be calibrated. Normally all motors of a
robot will be calibrated; only if a motor has been
“deconfigured” in the SPEC motor configuration
menu will its bit not be set.
Output
mtr
If a motor-related error occurs during calibration
(stt > -1000,) this parameter contains the
corresponding motor number.
If no error occurs, or if the error is not
motor-related (stt <= -1000,) this parameter is not
used.
Output
Standard V+ error code. A custom calibration
routine should return a standard V+ error code as
defined in the V+ Language Reference Guide. Error
messages particularly useful for calibration have
predefined global variables that may be used - see
section J.7.
stt
Calibration Primitives
The utility routines in Table J-1 are used for standard calibration, and may be called by a
custom calibration to perform primitive calibration functions. Headers for these routines
defining their inputs and outputs are presented on page 220.
The primitives for searching for various calibration features are implemented as “state
machines”: repeated calls to the routine are required to step through the search algorithm.
This is useful because searches for multiple joints can be started at the same time, rather
than forcing searches to proceed sequentially on a joint-by-joint basis. For details of how
these state machines can be used, refer to the program listings for STANDARD.CAL, and
the example programs in section J.5.
AdeptMotion VME Developer’s Guide, Rev B
211
Appendix J - Customizing Calibration
Table J-1. Standard Calibration Utility Routines
Calibration
Primitive
Function
ca.clr.cala
Clears the calibrated flag for a particular motor. Before each motor is
calibrated, the calibrated flag should be cleared. When the motor
position is set using the calibration primitive “ca.set.pos,” the
calibrated flag will automatically be set.
ca.find.home
Finds a home sensor in the direction defined in SPEC. Implemented as
a state machine.
ca.find.index
Finds zero index in the direction defined in SPEC. After calling this
routine, the index position should be checked and corrected by calling
“ca.fix.index” (described below.) Implemented as a state machine.
ca.find.stop
Finds a hardstop according to the parameters defined in SPEC.
Implemented as a state machine.
ca.fix.index
Corrects index position based on “expected distance from sensor to
zero index” defined in SPEC. Normally “ca.fix.index” should always
be called after “ca.find.index” to ensure that the correct index has been
found.
ca.home
Performs standard calibration of a single motor, including finding a
hardstop or home sensor, finding a zero index, and moving to a safe
position. Implemented as a state machine.
ca.move
Start a motor motion
ca.move.safe
Move a motor to its safe position defined in SPEC.
ca.power
Prepare a motor for motion under program control.
ca.rd.pos
Reads current motor position in encoder counts.
ca.rd.cal.parma
Reads the calibration parameters entered using SPEC. See listing of
parameters that can be accessed in Table J-2.
ca.rd.cal.posa
Reads position of the calibration feature that will be used to calibrate
the motor. This value, in encoder counts, is defined in SPEC. It may be
the actual position of a hard stop, home sensor, zero index, or zero
position of an absolute encoder. The calibration feature actually used
depends on the “homing configuration” defined in SPEC.
ca.clr.cala
Clears the calibrated flag for a particular motor. Before each motor is
calibrated, the calibrated flag should be cleared. When the motor
position is set using the calibration primitive “ca.set.pos,” the
calibrated flag will automatically be set.
ca.set.posa
Sets motor position in encoder counts. This routine is used to set the
calibrated position of motor. It also sets the calibrated flag for the
motor.
a
Not available until V+ 11.3.
212
AdeptMotion VME Developer’s Guide, Rev B
Creating a Custom Calibration Process
The table below lists the parameter names that must be used with ca.rd.cal.parm to
retrieve the values set in SPEC for calibration.
Table J-2. Parameter Options for ca.rd.cal.parm
Parameter Type
Parameter Name
Motion Calibration Group
ca.calgrp
Homing Configuration
ca.homcfg
Homing Speed and Direction for initial search
for home switch or hard stop
ca.homvel
Speed and direction for fine search
ca.homslo
Maximum Search Distance
ca.homdst
'Motor Stalled' timeout during calibration
ca.satcal
Maximum Home switch width
ca.homwid
'Hard-stop Found' Position Error
ca.hrderr
Distance from edge of home switch (or hard
stop or current position) to first zero index
ca.homzid
Motor position at zero index (or home switch
or hard stop or current position)
ca.hompos
Park Position After Homing
ca.homsaf
Advanced Customization
There are some mechanisms for which the above calibration primitives cannot provide the
necessary degree of control over the motion of the robot or the algorithms used for
searching for calibration features. In these cases, the Advanced Servo Library should be
used to augment the capabilities of the calibration primitives. The Advanced Servo
Library gives access to many low-level functions and parameters of the servo code. For
example:
• Motion of individual motors may be commanded when the robot is not calibrated
• Dedicated Digital I/O channels on the motion interface module may be
manipulated or read directly (e.g. brakes and home sensors)
• Detailed SPEC parameters related to calibration may be read
The Advanced Servo Library must be purchased from Adept.
AdeptMotion VME Developer’s Guide, Rev B
213
Appendix J - Customizing Calibration
J.5
Examples of Custom Calibration
The following example programs illustrate how calibration primitives may be used to
write a custom calibration program.
Single-Axis Mechanism
The simplest case of calibration might be for a single-axis mechanism that calibrates based
on the position of a hardstop at one end of its work envelope. While this case is a subset of
standard calibration and thus does not require a custom calibration program, it shows
how to use calibration primitives.
.PROGRAM a.custom.cal(mtr_mask, mtr, stt)
; ABSTRACT: Custom calibration program to calibrate a single-axis
;
mechanism based on a hardstop.
;
; INPUT PARM:
;
mtr_mask
Bit mask indicating which motors to calibrate. Bit "n"
(counting
;
from 1) is set when motor "n" should calibrate.
;
; OUTPUT PARM:
;
mtr
If a motor-related error occurs (stt <= -1000,) contains the motor
;
number associated with the error. If no error occurs, or the error
;
is not motor-related (stt > -1000,) value may not be valid.
;
;
stt
Standard V+ error code.
AUTO motor.no, state, hardstop.pos, cal.pos
AUTO current.pos, correction, corrected.pos
motor.no = 1
;Motor number
; Check to make sure that the motor is selected for calibration. If so, mark it as
; "uncalibrated." If not, return an error.
IF mtr_mask BAND BMASK(motor.no) THEN
CALL ca.clr.cal(motor.no, stt)
IF stt < 0 GOTO 100
ELSE
stt = ca.er_cfg ;*Not configured as accessed*
GOTO 100
END
; Power up motor:
enable amp, release brakes, and begin servoing.
CALL ca.power(BMASK(motor.no), BMASK(motor.no), mtr, stt)
IF stt < 0 GOTO 100
; Search for the hardstop. The search direction and speed, and other search
; parameters, are defined in SPEC. The search routine is set up as a "state machine."
; It is called repeatedly as each step, or state, in the search is completed. The
current
; step is identified by the value of "state," which starts with a value of zero.
Each
; time the search routine is executed, "state" is incremented by one, stepping
; sequentially through the search algorithm. When the algorithm is complete, state
is
; again set to zero. The error flag is checked after each call to the search rou-
214
AdeptMotion VME Developer’s Guide, Rev B
Examples of Custom Calibration
tine.
; If an error occurs, this program is exited.
state = 0
;Initial value of state machine
DO
CALL ca.find.stop(motor.no, state, hardstop.pos, stt)
IF stt < 0 GOTO 100;Exit if error
UNTIL state == 0
; Read the nominal position of the hardstop. This will have been entered
; as the "Motor position at hardstop" in the calibration menu of SPEC.
CALL ca.rd.cal.pos(motor.no, cal.pos, stt)
IF stt < 0 GOTO 100
; Calculate and set the calibrated position of the motor. This will be based on
; three values: the "motor position at hardstop" defined in SPEC, the "uncalibrated"
; hardstop position determined in the search above, and the current position of
; the motor. When the motor position is set the "calibrated" flag for the motor
; is automatically set. Note that this is different than marking the entire
; robot as calibrated; this will be done at a higher level of the calibration
utility
; package upon successful completion of this program.
CALL ca.rd.pos(motor.no, current.pos, stt);Read current motor position
IF stt < 0 GOTO 100
correction = hardstop.pos-cal.pos
corrected.pos = current.pos-correction
CALL ca.set.pos(motor.no, corrected.pos, stt)
IF stt < 0 GOTO 100
;Set corrected motor pos
; Move motor to safe position as defined in SPEC. As with the hardstop search,
; this operation is implemented as a state machine: multiple calls are required to
; sequence through the steps in the operation.
state = 0
;Initial state
DO
CALL ca.move.safe(motor.no, state, stt)
IF stt < 0 GOTO 100
;Exit if error
UNTIL state ==0
100
.END
RETURN
Absolute Encoders
During normal robot motion, AdeptMotion VME uses incremental encoder information to
control the motors. Some encoders have a mode in which they can provide their absolute
position. To read the absolute position, special hardware and software provided by the
user is required.
The following example program assumes that custom hardware and software are present
that provide the absolute position in encoder counts of all the encoders on the robot. Even
though the encoders are “absolute,” it is still necessary to relate the absolute position of
the encoder to the absolute position of the robot. This is accomplished using the offset
between the zero position of the absolute encoder and the zero position of a given axis.
The offset can be defined in the SPEC calibration menu as “Motor position at nest
location.”
AdeptMotion VME Developer’s Guide, Rev B
215
Appendix J - Customizing Calibration
NOTE: The “Homing Configuration” in SPEC has an absolute setting.
This is reserved for use by Adept and not be selected.
For the example program to function properly, the absolute encoder offset must be
calculated as follows:
.PROGRAM a.absolute.cal(mtr_mask, mtr, stt)
; ABSTRACT: Custom calibration program to calibrate a robot with absolute
;
encoders. The robot will not be moved during the calibration process.
;
; INPUT PARM:
;
mtr_mask
Bit mask indicating which motors to calibrate. Bit "n" (counting
;
from 1) is set when motor "n" should calibrate.
;
; OUTPUT PARM:
;
mtr
If a motor-related error occurs (stt <= -1000,) contains the
motor
;
number associated with the error. If no error occurs, or the
error
;
is not motor-related (stt > -1000,) value may not be valid.
;
;
stt
Standard V+ error code.
AUTO mtrs, absolute.offset
mtrs = ID(3,8)
;Number of motors
; Loop through all motors, calibrating one at a time.
FOR mtr = 1 TO mtrs
; Check to see that this motor is selected for calibration. If not, skip it.
IF NOT mtr_mask BAND BMASK(mtr) THEN
NEXT
;Skip this motor
END
; Mark the motor as "uncalibrated."
CALL ca.clr.cal(mtr, stt)
IF stt < 0 GOTO 100
; Read absolute encoder offset defined in SPEC.
CALL ca.rd.cal.pos(mtr, absolute.offset, stt)
IF stt < 0 GOTO 100
; Read the current absolute encoder position. Note that the routine below
; that reads the absolute encoders must be provided by the user.
CALL read.abs.encoder(mtr, absolute.pos)
; Set the motor position based on the offset between "absolute encoder
; space" and "motor space." When the motor position is set, the
; "calibrated" flag for this motor will automatically be set.
motor.pos = absolute.position-absolute.offset
CALL ca.set.pos(mtr, motor.pos, stt);Set calibrated position
IF stt < 0 GOTO 100
END
216
AdeptMotion VME Developer’s Guide, Rev B
Program Listings For Calibration Utilities
100
.END
RETURN
J.6
Program Listings For Calibration Utilities
STANDARD.CAL Listing
.PROGRAM a.standard.cal(mtr_mask, mtr, stt)
; ABSTRACT:
Main calling program for standard robot calibration. This
;
program performs calibration of all specified motors using hardstops,
;
home sensors, and/or zero-index marks, as determined by the "homing
;
configuration" defined in SPEC. It handles split-axes, self-commutating
;
motors, and motors commutated by the servo board.
;
;
In order for this program to be called when a CALIBRATE monitor
;
command or program instruction is invoked, the STANDARD.CAL
;
file containing this program should be present in the /CALIB/ directory of
;
the boot disk, and the file name "STANDARD.CAL" should be entered
;
in the calibration menu of the SPEC utility.
;
; INPUT PARM:
;
mtr_mask
Bit mask indicating which motors to calibrate. Bit "n" (counting
;
from 1) is set when motor "n" should calibrate.
;
; OUTPUT PARM:
;
mtr
If a motor-related error occurs (stt <= -1000,) contains the
motor
;
number associated with the error. If no error occurs, or the
error
;
is not motor-related (stt > -1000,) value may not be valid.
;
;
stt
Standard V+ error code.
AUTO calgrp[12], group, mask, mtrs, state[12]
mtrs = ID(3,8)
;No. of motors in mechanism
; Read calibration groups defined in SPEC. Mark each motor as uncalibrated. Ignore
; those motors that are not to be calibrated, as determined by the bit mask
"mtr_mask."
FOR mtr = 1 TO mtrs
IF mtr_mask BAND BMASK(mtr) THEN
CALL ca.rd.cal.parm(mtr,ca.calgrp,calgrp[mtr],stt)
IF stt <0 GOTO 100
CALL ca.clr.cal (mtr,stt)
IF stt <0 GOTO 100
ELSE
calgrp[mtr] = 0
;Don't calibrate this motor
END
END
FOR group = 1 TO 16
AdeptMotion VME Developer’s Guide, Rev B
217
Appendix J - Customizing Calibration
;
;
;
;
Prepare for calibration by creating a bit mask indicating
motors to be calibrated in this group, and initializing
calibration state to 0. Motors within each group will be
calibrated at the same time.
mask = 0
;Initialize bit mask
FOR mtr = 1 TO mtrs
IF calgrp[mtr] BAND BMASK(group) THEN
state[mtr] = 0
mask = mask BOR BMASK(mtr)
END
END
IF NOT mask THEN
;If no motors in this group,
NEXT
; skip to next group
END
; Power up motors in current group: enable amps, release brakes, twang if
; necessary, and begin servoing.
CALL ca.power(mask, , mtr, stt)
IF stt < 0 GOTO 100
; If a motor is part of a split-axis pair, put the companion motor into
slave mode
; so it follows along as the primary motor calibrates.
FOR mtr = 1 TO mtrs
IF mask BAND BMASK(mtr) THEN
CALL ca.slave(mtr, ON, stt)
IF stt < 0 GOTO 100
END
END
;
;
;
;
;
;
;
;
Run through calibration state machine until calibration is complete
on all motors in this group. Each call to "ca.home" initiates one of the
steps below, or returns if not complete.
The steps are:
1) find calibration feature (home sensor, hard stop)
2) find zero index
3) set calibrated motor position,
4) move to safe position.
DO
FOR mtr = 1 TO mtrs
IF mask BAND BMASK(mtr) THEN
; Perform next step in calibration state machine.
CALL ca.home(mtr, state[mtr], stt)
IF stt < 0 GOTO 100
; Check if calibration is complete. If so, remove motor
; from calibration group, and disable split axes.
IF state[mtr] <= 0 THEN
mask = mask BXOR BMASK(mtr)
CALL ca.slave(mtr, OFF, stt)
IF stt < 0 GOTO 100
END
END
END
UNTIL NOT mask
END
218
AdeptMotion VME Developer’s Guide, Rev B
Program Listings For Calibration Utilities
100
.END
RETURN
AdeptMotion VME Developer’s Guide, Rev B
219
Appendix J - Customizing Calibration
Program Headers for Calibration Primitives
.PROGRAM ca.clr.cal(mtr, stt)
; ABSTRACT: This routine clears the "calibrated" flag of a particular motor. For
each
; motor to be calibrated, the flag should be cleared before calibration begins,
and set
; after successful calibration.
;
; INPUT PARM: mtr
motor number whose calibration flag is to be cleared
;
; OUTPUT PARM:stt
Standard V+ error code.
;
; SIDE EFFECTS: NONE
;
; Copyright (c) 1994, 1995 by Adept Technology, Inc.
.PROGRAM ca.find.home(mtr, state, pos, stt)
;
;
;
;
;
;
;
;
;
;
;
;
;
;
;
;
;
;
;
;
;
ABSTRACT: Calibration utility program for finding home sensor.
The home sensor search state machine is described in the
AdeptMotion User's Guide.
INPUT PARM:
mtr
state
OUTPUT PARM:
state
pos
stt
Motor number
State entering this routine
Set to 0 to start state machine.
State exiting this routine
Value is 0 if state machine complete.
Raw position at which home sensor was found
Standard V+ error code. Of special interest:
*Calibration sensor failure* if home sensor
is not detected after motion completes, or
if too many home sensor transitions are
detected between samples.
*Robot power off* if the POWER switch is off.
SIDE EFFECTS:Motor will be moved.
Copyright (c) 1994, 1995 by Adept Technology, Inc.
220
AdeptMotion VME Developer’s Guide, Rev B
Program Listings For Calibration Utilities
.PROGRAM ca.find.index(mtr, state, pos, stt)
;
;
;
;
;
;
;
;
;
;
;
;
;
;
;
;
;
;
;
;
;
;
;
;
ABSTRACT: Calibration utility program for finding zero index.
The motor will only be moved if "zero-index found" bit is
not set on entry. The zero-index search state machine is
described in the AdeptMotion Servo User's Guide.
INPUT PARM:
mtr
state
OUTPUT PARM:
state
pos
stt
Motor number
State entering this routine
Set to 0 to start state machine.
State exiting this routine
Value is 0 if state machine complete.
Raw position at which zero index was found
Standard V+ error code. Of special interest:
*Invalid argument* if homing configuration
specifies absolute calibration.
*No zero index* if no zero-index declared
after search completes.
*Robot power off* if the POWER switch is off.
*Unexpected zero index* if index errors
occurred during search.
SIDE EFFECTS: Motor may be moved.
Copyright (c) 1994, 1995 by Adept Technology, Inc.
.PROGRAM ca.find.stop(mtr, state, pos, stt)
;
;
;
;
;
;
;
;
;
;
;
;
;
;
;
;
;
;
;
;
ABSTRACT: Calibration utility program for finding hard stop.
The motor is left at the edge of the hard stop. To avoid
possible "Motor stalled" errors, it should be moved off
the hard stop to a safer location as soon as possible.
INPUT PARM:
mtr
state
OUTPUT PARM:
state
pos
stt
Motor number
Input state of state machine.
Set to 0 to start state machine.
State exiting this routine
Value is 0 if state machine complete.
Raw position at which hard stop was found
Standard V+ error code. Of special interest:
*Calibration sensor failure* if hard stop
is not detected after motion completes.
*Robot power off* if the POWER switch is off.
SIDE EFFECTS: Moves motor.
Motor is at edge of hard-stop.
Copyright (c) 1994, 1995 by Adept Technology, Inc.
AdeptMotion VME Developer’s Guide, Rev B
221
Appendix J - Customizing Calibration
.PROGRAM ca.fix.index(mtr, expected, raw, delta, stt)
;
;
;
;
;
;
;
;
;
;
;
;
;
;
;
;
;
;
;
;
;
;
;
ABSTRACT: Adds to the current calibration correction using the
actual and expected positions of the zero index.
This routine will never make a change of greater than
1/2 turn. If the difference between the expected and
actual positions is greater than 1/2 turn, then it is
assumed you found a different index than the expected
one, and it uses the predicted position of that index.
INPUT PARM:
mtr
expected
raw
delta
OUTPUT PARM:
delta
stt
Motor number to correct
Expected position for calibration feature
Actual position for calibration feature
Current calibration correction delta
Calibration correction delta, updated
to contain any zero-index correction.
This may vary by +/- turn/2 from
the value that was input.
Standard V+ error code. Of special interest:;S09
*Illegal value* if zero-index spacing <=0. ;S09
SIDE EFFECTS: None
Copyright (c) 1994, 1995 by Adept Technology, Inc.
.PROGRAM ca.home(mtr, state, stt)
;
;
;
;
;
;
;
;
;
;
;
;
;
;
;
;
;
;
ABSTRACT:
Standard calibration of a motor. Depending on the
homing configuration, this routine will use the home sensor,
hard-stop, and/or zero-index to calibrate a motor. If the
motor is not configured, it immediately returns with no error.
INPUT PARM:
mtr
state
OUTPUT PARM:
state
stt
Motor number
State entering this routine
Set to 0 to start state machine.
State exiting this routine
Value is 0 if state machine complete.
Standard V+ error code. Of special interest:
*Invalid argument* if homing configuration
specifies absolute calibration.
SIDE EFFECTS: Moves motor through calibration sequence.
Copyright (c) 1994, 1995 by Adept Technology, Inc.
222
AdeptMotion VME Developer’s Guide, Rev B
Program Listings For Calibration Utilities
.PROGRAM ca.move(mtr, abs, pos, speed, type, tol, stt)
;
;
;
;
;
;
;
;
;
;
;
;
;
;
;
;
;
;
;
;
;
;
;
;
;
;
;
;
;
;
;
;
ABSTRACT:
Use the servo trajectory generator to start a move
of the specified motor. The motion will start and stop with
the default acceleration time (in milliseconds) specified by
servo opcode 1054.
INPUT PARM:
Motor number
Flag:
Zero: perform move relative to current position
Non-zero: perform move to specified absolute position
pos
Commanded displacement, counts (signed)
speed
Commanded speed, counts/millisecond (unsigned)
A value of 0 will use the default motor motion
as specified by servo opcode 1042.
type
Type of search:
-1: Start motion with no monitoring
0: Stop at home sensor transition
1: Stop at hard stop
tol
Meaning depends on "type" as follows:
TYPE TOL MEANING
---- --------------1
0
Do not wait for motion to complete
other Wait for motion to complete
0
Unused
1
Position error at which hard-stop
will be declared
OUTPUT PARM:
mtr
abs
stt
Standard V+ error code. Of special interest:
*Robot power off* if the POWER switch is off.
SIDE EFFECTS:Moves motor.
Copyright (c) 1994, 1995 by Adept Technology, Inc.
.PROGRAM ca.move.safe(mtr, state, stt)
;
;
;
;
;
;
;
;
;
;
;
;
;
;
ABSTRACT:
Moves the motor to its safe position.
INPUT PARM:
mtr
state
OUTPUT PARM:
state
stt
Motor number
State entering this routine
Set to 0 to start state machine.
State exiting this routine
Value is 0 if state machine complete.
Standard V+ error code. Of special interest:
*Robot power off* if the POWER switch is off.
SIDE EFFECTS: Moves motor to safe position.
Copyright (c) 1994, 1995 by Adept Technology, Inc.
AdeptMotion VME Developer’s Guide, Rev B
223
Appendix J - Customizing Calibration
.PROGRAM ca.power(com_msk, pos_msk, mtr, stt)
;
;
;
;
;
;
;
;
;
;
;
;
;
;
;
;
;
;
;
;
;
;
;
;
;
;
;
;
;
;
;
;
;
;
;
;
;
;
;
;
;
;
;
;
;
;
;
;
;
ABSTRACT: Ensures that the power sequencing is performed on
the specified motors by enabling the drives, releasing
the brakes, twanging (if necessary), and putting the
motor into position control mode.
It is assumed that the POWER system switch is already ON.
Examples:
CALL ca.power(0, 0, , stt) ;Enable power and amps only
; but do not release brakes
CALL ca.power(, 0, , stt) ;Limp robot by starting
; commutation, releasing
; brakes, setting DAC to 0
CALL ca.power(0, , , stt) ;Start servoing all motors
; that are ready to commutate
; and release brakes
CALL ca.power(, , , stt)
;Starts commutating and
; servoing all motors,
; releasing brakes
INPUT PARM:
com_msk Bit mask indicating motors to start
commutating:
Undefined: all motors
0:
no motors
BMASK(n): motor n
pos_msk Bit mask indicating motors to put
into position control mode:
Undefined: all motors
0:
no motors
BMASK(n):motor n
OUTPUT PARM:
mtr
stt
If no error, unchanged
If error (stt < 0), motor number causing error
Standard V+ error code. Of special interest:
*Motor startup failure* if motor commutation
was not successfully started.
*Robot power off* if the POWER switch is off.
*Timeout enabling power* if "power-on" not
indicated by servos in proper timeout interval
*Timeout enabling amplifier* if "amp-on" not
indicated by servos in proper timeout interval
SIDE EFFECTS: If necessary, this routine enables power, drives,
commutation, and position control. Motors of this robot
will remain in V+ control if the robot is calibrated and
power sequencing is already complete. If not, the motors
may be left in servo control mode.
Copyright (c) 1994, 1995 by Adept Technology, Inc.
224
AdeptMotion VME Developer’s Guide, Rev B
Program Listings For Calibration Utilities
.PROGRAM ca.rd.cal.parm (mtr, param, value, stt)
;
;
;
;
;
;
;
;
;
;
;
ABSTRACT:
Reads value of calibration parameters entered through spec by user.
INPUT PARM:
mtr
param
OUTPUT PARM:
value
stt
Motor number
name of paramter value desired
value of desired parameter
Standard V+ error code.
SIDE EFFECTS: None.
Copyright (c) 1994, 1995 by Adept Technology, Inc.
.PROGRAM ca.rd.pos(mtr, pos, stt)
;
;
;
;
;
;
;
;
;
;
;
ABSTRACT: This routine reads the current motor position in encoder counts.
INPUT PARM: mtr
motor number to be read
OUTPUT PARM:pos
motor position in encoder counts
stt
Standard V+ error code.
SIDE EFFECTS: NONE
Copyright (c) 1994, 1995 by Adept Technology, Inc.
.PROGRAM ca.rd.cal.pos(mtr, cal.pos, stt)
; ABSTRACT: This routine reads the position of the calibration feature that will
;
be used to calibrate the motor. This value, in encoder counts, is
;
defined in SPEC. It may be the actual position of a hard stop, home
;
sensor, zero index, or zero position of an absolute encoder. The
;
calibration feature actually used depends on the "homing configuration"
;
defined in SPEC.
;
; INPUT PARM: mtr
motor number to be read
;
; OUTPUT PARM:cal.pos position of the calibration feature that will be used to
;
calibrate the motor in encoder counts
;
;
stt
Standard V+ error code.
;
; SIDE EFFECTS: NONE
;
; Copyright (c) 1994, 1995 by Adept Technology, Inc.
AdeptMotion VME Developer’s Guide, Rev B
225
.PROGRAM ca.set.pos(mtr, pos, stt)
;
;
;
;
;
;
;
;
;
;
;
;
;
;
ABSTRACT:
This routine sets the motor position in encoder counts. This routine
is used to set the calibrated position of the motor. It also sets
the "calibrated" flag for the motor.
INPUT PARM: mtr
motor number to be read
OUTPUT PARM:pos
motor position that will be used to calibrate the motor
in encoder counts
stt
Standard V+ error code.
SIDE EFFECTS: NONE
Copyright (c) 1994, 1995 by Adept Technology, Inc.
J.7
Error Codes
The V+ error codes below are returned by the standard calibration package. They can also
be referenced and returned by a custom calibration program.
Variable name
Value
Standard V+ error message
ca.er_dry
50
*Executing in DRY.RUN mode*
ca.er_arg
-407
*Invalid argument*
ca.er_nry
-508
*Device not ready*
ca.er_cfg
-544
*Not configured as accessed*
ca.er_pow
-604
*Robot power off*
ca.er_tmo
-659
*Device time-out*
ca.er_pto
-675
*Time-out enabling power*
ca.er_rge
-1002
*Position out of range*
ca.er_nul
-1003
*Time-out nulling errors*
ca.er_idx
-1004
*No zero index*
ca.er_ato
-1009
*Timeout enabling amplifier*
ca.er_mot
-1105
*Motor startup failure* Mtr
ca.er_cal
-1106
*Calibration sensor failure* Mtr
Index
A
absolute encoders 215
Acceleration Feedforward Gain 66
acceleration profiles, S-curve 136
analog power source
MI6 23
APPEND procedure 79
ATTACH instruction
used with multiple robots 151
auto tuning
feedforward parameters 119
axis
description 74
B
Brake Release
signals with MI6
40
C
calibration
customizing 207
calibration file name 98
calibration primitives
description 211
program headers 219
calibration sequence
diagnostic tests 146
with multiple robots 153
Cartesian motion parameters 133–134
change robot number
menu selection 95
COARSE nulling tolerance 128
Command Drive
signals on MP6-S 44
compliance
with international standards 8
CONFIG_C program
description 74
using 76
control system
basic operation 56–57
block diagram 56
overview 53–55
Coordinated joints robot device
module 179–181
Customer Service 9
customizing calibration 207–225
advanced customization 213
calibration primitives 211
examples 214
process to create 209
when required 207
D
DAC Output Filter
description 59
frequency response 60
DAC output, maximum 58
DAC outputs
diagnostic tests 143
data collection menu 114
DETACH instruction
used with multiple robots 151
device module
description 73
documentation 74
loading 76–80
REPLACE/APPEND procedure 80
device-module file
description 73
diagnostic tests 141–147
discrete inputs
diagnostic tests 141
test requirements 141
discrete outputs
diagnostic tests 142
test requirements 143
DISKCOPY Utility
using to make copies 75, 76
distance from edge of home switch 125
drive channels
description 73
drive compatibility for MI6 42
Drive Enable
diagnostic tests 142
output signals on MP6-S 44
Drive Fault
AdeptMotion VME Developer’s Guide, Rev B
227
Index
signals on MP6-S 44
drive fault delay time
MI6 21
Duty-cycle exceeded DAC limit
error message 109
Duty-cycle exceeded filter parameter
error message 109
E
EN 60204 6, 8
encoder
cable length, MP6-E 47
channel pin assignments on MP6E 47
compatibility with MI6 46
configuration, MI6 21, 22
connecting to MP6-E 47
diagnostic tests 144
digital filtering 107
external 95
filtering 22
input circuitry for MI6 48
open-collector output 193
power to MP6-E 46
power-failure detection on MI6 48
scale factor 103
single-ended output 192
timing requirements 194
wiring diagrams 191
Encoder Path, description 60
Encoder Sign
description 60
setting 107
encoder specifications 103–108
environmental specifications 18
error codes
returned by calibration 225
error messages
*Duty-cycle exceeded* DAC
limit 109
*Duty-cycle exceeded* filter
parameter 109
*Hard Envelope error* limit 110
*Motor stalled* Timeout 109
*Soft Envelope error* limit 109
E-stop circuit
MI6 module 27–31
External Encoder device module
file 175–176
external encoders 95
228
external E-stop input
MI6 28
F
feedforward parameters
auto tuning 119
Feedforward Path, description 65
FINE nulling tolerance 128
Force Sensing
used with motion 138
FREE mode configuration
parameters 129
frequency response, in servo tuning
69
H
hand signals 99
Hard envelope error limit
error message 110
High Power Enable
output with MI6 40
high speed position latch 154
Home Switch
inputs with MI6 40
homing configuration 123
I
Integrator Path, description
63
J
joint
description 73
joint limits 129
diagnostic tests 146
joint motion
FREE mode configuration
parameters 129
joint limits 129
joint pendant increment and
speed 128
joint speed and acceleration 128
nulling tolerances 128
READY position 128
velocity servo 129
joint motion parameters 128–130
joint pendant increment and speed 128
joint speed and acceleration 128
L
link dimension value 131
link dimensions 131–132
AdeptMotion VME Developer’s Guide, Rev B
Index
loading robot specs from a disk file
logic voltage configuration
MI6 23
94
M
machine input polarity 110
Manual Control Pendant (MCP)
use with multiple robots 156
manuals
related 3
maximum DAC output 58, 108
maximum home switch width 124
Maximum Integrator Step 64
Maximum Integrator Value 64
maximum search distance 124
MI6 module
analog power source 23
drive fault delay time 21
encoder configuration 21, 46–50
encoder power-failure detection 48
E-stop circuit 27–31
installation overview 19
logic voltage configuration 23
proper wiring practices 26
setting switches/jumpers 20
switch/jumper locations 25
system wiring diagram 36
VMEbus address 20
MI6 to MP6 cables
pinouts 204
module password 98
Motion Interface Panel (MIP)
description 13
motor
description 73
motor and encoder signs
diagnostic tests 145
motor and encoder specifications 103
motor calibration
distance from edge 125
groups 125
homing configuration 123
maximum home switch width 124
maximum search distance 124
motor position at Zero Index 125
motor stalled timeout during cal 124
park position after calibration 125
speed and direction 124
teach calibration specs 126
motor calibration parameters 121–127
motor configuration 88–90
mapping to drive channels 89
relationship of joints to axes 90
motor position at Zero Index 125
Motor Sign
description 58
setting 108
motor specifications 108–111
Motor stalled timeout
error message 109
motor stalled timeout during cal 124
motor-to-joint coupling 125
MP6 panels
cable installation 37
mounting information 32–35
MP6-E
configuration 46–50
MP6-M
configuration 38–41
connector terminal assignments 41
input/output current
requirements 38
MP6-S
analog power 43
configuration 42–45
input/output current
requirements 42
multiple robots
V+ programming 151–153
N
nulling tolerances
128
O
Overtravel Limit switches
installation with MI6 40
P
parameters, system
defined 84
parts list, MI6 189
passive E-stop
MI6 28
password-protected robots 88
position latch
high speed 154
power sequencing parameters 99
program control motion parameters
diagnostic tests 147
Proportional Gain, description 61
AdeptMotion VME Developer’s Guide, Rev B
229
Index
Proportional Path, description
Proportional Zero, description
61
62
R
READY position 128
diagnostic tests 146
related manuals 3
REPLACE procedure 79
REPLACE/APPEND procedure 80
restricted access mode 87
robot initialization specifications 98–102
robot model number 99
robot serial number 99
Robot specification
submenu 97
Robot Specification Utility (SPEC.V2) (see
SPEC program)
robot specifications
loading from a disk file 94
saving to disk file 93
robot startup message 98
Robotic Industries Association 6
Robotic safety 6
Robots and Device Modules
main menu 77
S
Safety 5
save plot to TIFF file 115
saving all specifications to system
disk 94
saving robot specs to a disk file 93
screen captures
save to TIFF file 115
S-curve
parameters 137
trajectory generation 136
SELECT instruction
used with multiple robots 151
servo board diagnostics 91–92, 141–147
servo loop rate, setting 81
servo parameters
Amplifier Control 58
Encoder Path 60
Feedforward Path 65
Integrator Path 63
Proportional Path 61
summary of active parameters 120
servo tuning
data collection menu 114
230
frequency response 69
graphical display 114
main menu 112
parameters, suggested values 116
step response 67
step-by-step procedure 116–120
test and display menu 115
test and plot menu 114
test configuration menu 113
servo tuning parameters 112–120
Soft envelope error limit
error message 109
software configuration
terminology 73
software installation
procedure for a new system 75
procedure for an existing system 75
SPEC program
description 74
loading 85
main menu 87
restricted access mode 87
using 83–85
specification (SPEC) file
sample 183
specifications
AdeptMotion VME performance 17
analog servo amplifier 15
dedicated digital inputs 16
dedicated digital outputs 16
encoder input 15
environmental 18
speed and direction 124
STANDARD.CAL
listing 217
utility 208
standards compliance 8
step response, in servo tuning 67
Stop-on-Force integral gain 138
Stop-on-Force parameters 138
system file
description 74
system overview 12
system parameters
defined 84
system safeguards 6
T
teach calibration specs
technical support 9
AdeptMotion VME Developer’s Guide, Rev B
126
Index
terminology
for software configuration 73
test and display menu 115
test and plot menu 114
test selections for servo tuning 113
TIFF file, saving plot to 115
Time-out nulling error limit
error message 99
tool Z-offset distance 131
trajectory generation
S-curve 136
V
V+ developer’s manuals 4
V+ programming
for multiple robots 151–153
velocity servo 129
velocity-style amplifiers 56, 116, 129
vision position latch
programming example 155
VMEbus address
MI6 20
W
wiring
proper practices for MI6 26
worksheets
specification 84, 159–169
World Wide Web site 10
X
X/Y/Z/Theta device module 171–174
axis configuration 172
Cartesian motion 173
description 171
geometric dimensional constants 173
specifications 171
Z
Zero-Index
configuration drawing 105
configuration table 106
AdeptMotion VME Developer’s Guide, Rev B
231
Adept User’s Manual
Comment Form
We have provided this form to allow you to make comments about this manual, to point
out any mistakes you may find, or to offer suggestions about information you want to see
added to the manual. We review and revise user’s manuals on a regular basis, and any
comments or feedback you send us will be given serious consideration. Thank you for
your input.
NAME__________________________________________ DATE______________________
COMPANY _________________________________________________________________
ADDRESS___________________________________________________________________
PHONE_____________________________________________________________________
MANUAL TITLE: ____________________________________________________________
PART NUMBER and REV level:________________________________________________
COMMENTS:
______________________________________________________________________________
______________________________________________________________________________
______________________________________________________________________________
______________________________________________________________________________
______________________________________________________________________________
______________________________________________________________________________
______________________________________________________________________________
______________________________________________________________________________
______________________________________________________________________________
MAIL TO: Adept Technology, Inc.
Technical Publications Dept.
150 Rose Orchard Way
San Jose, CA 95134
FAX: (408) 432-8707
AdeptMotion VME Developer’s Guide, Rev B
00961-00830, Rev B