1
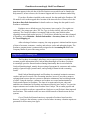
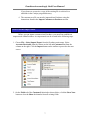
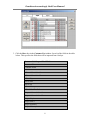
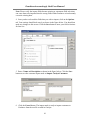
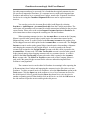
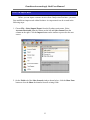
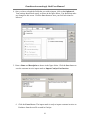
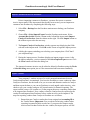
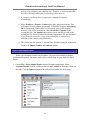
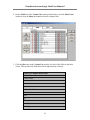
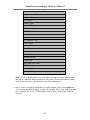
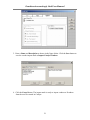
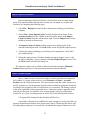
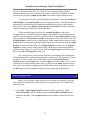
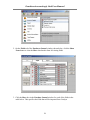
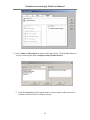
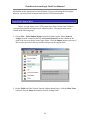
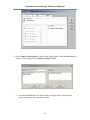
Peachtree Accounting® Link
User Manual1
Accelerating the Way
You Do Business™
1
Manufacturing Advisors, LLC
© Copyright 2002 - 2010
All Rights Reserved
Table of Contents
Peachtree Accounting Link Overview ............................................................................ 3
Setup Peachtree Accounting Link ................................................................................... 3
Using Peachtree Accounting Link ................................................................................... 4
Import Peachtree Data..................................................................................................... 5
Export Catalyst Data ....................................................................................................... 6
Export Customers........................................................................................................ 6
Create Customer Import Mask............................................................................... 7
Import Customers to Peachtree............................................................................ 11
Export Accounts Receivable..................................................................................... 11
Create A/R Import Mask...................................................................................... 13
Import Customer Invoices to Peachtree............................................................... 17
Export Vendors ......................................................................................................... 17
Create Vendor Import Mask ................................................................................ 18
Import Vendors to Peachtree ............................................................................... 22
Export Accounts Payable.......................................................................................... 22
Create A/P Import Mask ...................................................................................... 23
Import Vendor Invoices to Peachtree .................................................................. 27
Create COGS Journal Entries ................................................................................... 27
Create COGS Import Mask.................................................................................. 28
Import COGS Journal Entries.............................................................................. 31
Review Audit Reports................................................................................................... 31
Peachtree Data Path Instructions.................................................................................. 32
Peachtree Accounting® Link User Manual
Peachtree Accounting Link Overview
The role of Catalyst Manufacturing® with regard to financial and accounting
capabilities is the capture and storage of inventory and order transactions from
manufacturing operations so that they can be submitted to an accounting software
package for payment processing and posted to the proper account. This data can be
edited, maintained, and organized in the accounting software for financial reporting
purposes in much the same manner as native data. The Peachtree Accounting® Link is
intended to provide a mechanism to exchange data and facilitate this process in a manner
that is both easy to manage and reliable. It is recommended that authority and
responsibility for importing and exporting data between the two systems reside with a
sole individual, typically the person who currently manages and maintains Peachtree.
Catalyst interfaces with Peachtree Accounting® in two ways: through commaseparated value (CSV) text files and Dynamic Data Exchange (DDE). Any data that is
being collected by Catalyst from Peachtree is retrieved via DDE, while any data that is
flowing from Catalyst back to Peachtree is written to CSV files that are manually
imported into Peachtree. The import files ensure that the data is validated before
importing, and makes for a more reliable transfer of data. Regardless, it is recommended
that you always backup your Peachtree company before attempting to import any data
from the text files.
In order for the DDE link to function, you must have both Catalyst and Peachtree
installed on the same local machine and your Peachtree company must be open. The
Peachtree interface options in Catalyst cannot be performed otherwise. In addition, if data
security has been established in Peachtree, then you will need to create a system user in
Peachtree.
Setup Peachtree Accounting Link
The company information from your Peachtree Accounting® database can be
imported into Catalyst by selecting Peachtree > Setup Company Data from the Catalyst
main menu. The Peachtree Setup utility will import chart of accounts, customers,
vendors, and sales tax information using Dynamic Data Exchange (DDE). In order for
this DDE link to function, your Peachtree company must be open. The import can only be
performed on workstations with a local installation of Peachtree Accounting®. The
Peachtree Setup utility only needs to be run once to initialize Catalyst prior to running
any of the other Peachtree options such as exporting Accounts Receivable and Accounts
Payable records.
On the Peachtree Setup dialog box, select your Peachtree company from the dropdown list, then click OK to update the Catalyst database with your current Peachtree
information. If you are not sure of your Peachtree company’s data file name, refer to the
3
Peachtree Accounting® Link User Manual
name that appears in the title bar of the File Statistics screen which can be found in the
Help menu or, in later releases, the Customer Support and Service submenu under Help.
If you have Peachtree installed on the network, the data path in the Peachtree .INI
file needs to refer to the mapped drive location of the network server. Please refer to the
Peachtree Data Path Instructions for details on how to change the data path for each
Peachtree workstation.
Peachtree uses a default tax type for inventory items equal to 1 for regular tax
codes and 2 for exempt tax codes. The Tax Type is used to classify sales tax for state
reporting. The Catalyst Peachtree Accounting Link uses the same defaults when
exporting customer and vendor invoices. To verify these defaults have not been changed
in Peachtree, select Maintain > Default Information > Inventory Items and click on
the Taxes/Shipping tab.
After selecting a Peachtree company, the setup program is initiated and the import
of chart of accounts, customers, vendors, and sales tax codes and authorities begins. The
Peachtree company name is automatically assigned to the Accounting ID field in the
Company Master as part of the setup process.
Using Peachtree Accounting Link
The Peachtree Accounting Link allows you to export accounts receivable and
accounts payable information from Catalyst Manufacturing® to Peachtree. Peachtree
Accounting® provides financial and accounting functionality that is not included in
Catalyst Manufacturing®, namely the processing of payments for customers and vendors,
posting of general ledger journal entries, and reporting of financial and accounting
results.
Both Catalyst Manufacturing® and Peachtree Accounting® maintain customers,
vendors, and invoice records. The accounting interface, however, provides a means to
exchange data between the two systems to minimize maintenance and avoid duplication
of effort. Using the interface, customers and vendors are created and maintained in
Catalyst and exported to Peachtree. The chart of accounts and sales tax codes and
authorities are maintained in Peachtree and imported directly into Catalyst. You can also
import customers and vendors from Peachtree into Catalyst. The accounts payable and
accounts receivable records are exported from Catalyst to a text file that is then imported
into Peachtree. This method results in a more reliable transfer of data between the two
systems.
Cost of Goods Sold journal entries are exported to Peachtree based on sales;
however, Catalyst is the inventory system of record where inventory valuation reports are
generated for all inventory item types.
4
Peachtree Accounting® Link User Manual
Import Peachtree Data
Periodically, you will want to refresh your Catalyst database with the latest
information from Peachtree. The frequency depends on how often you make changes to
customers, vendors, chart of accounts, and sales tax information in Peachtree. The import
routine refreshes Catalyst with the latest information from Peachtree. The Import option
in the Peachtree menu offers four import options.
All
Importing all data refreshes Catalyst with the chart of accounts, customer, and
vendor data from Peachtree. Any sales tax information established in Peachtree is also
refreshed as part of the customer update. This is accomplished by selecting Peachtree >
Import > Chart of Accounts from the Catalyst main menu.
Chart of Accounts
If changes are made to the chart of accounts in Peachtree, the Catalyst database
needs to be refreshed. To do this, select Peachtree > Import > Chart of Accounts from
the Catalyst main menu. The chart of accounts table in Catalyst cannot be exported to
Peachtree so it is advisable to maintain the chart of accounts in Peachtree and periodically
update Catalyst in the manner described.
Customers
The Peachtree > Import > Customers option only imports new customers that
do not already exist in Catalyst. The import routine does not overwrite customer data in
Catalyst if the customer record already exists. The Accounting ID is used to determine
whether or not a match exists. If the Accounting ID does not exist in Catalyst, a new
customer record is added; otherwise the existing record remains the same. To minimize
duplicate data-entry, it is recommended that customer records be maintained in Catalyst
and exported to Peachtree as described in the Export Catalyst Data section. The sales
tax codes and authorities from Peachtree are imported automatically when customers are
imported.
Vendors
The Peachtree > Import > Vendors option only imports new vendors that do not
already exist in Catalyst. The import routine does not overwrite vendor data in Catalyst if
the vendor record already exists. The Accounting ID is used to determine whether or not
a match exists. If the Accounting ID does not exist in Catalyst, a new vendor record is
added; otherwise the existing record remains the same. To minimize duplicate data-entry,
it is recommended that vendor records be maintained in Catalyst and exported to
Peachtree as described in the Export Catalyst Data section.
5
Peachtree Accounting® Link User Manual
Export Catalyst Data
The export of customers, vendors, accounts receivable, and accounts payable data
to Peachtree from Catalyst requires two steps – first, export the data from Catalyst to a
text file, and second, import the text files into Peachtree. This two-step process ensures
data integrity through the use of Peachtree import masks. The setup of the import masks
is described as part of each process, but only needs to be performed for the initial import.
This section reviews the steps required to export the following data:
•
•
•
•
Customers
Accounts Receivable
Vendors
Accounts Payable
Export Customers
Your company’s customers are one of several common denominators between
Catalyst and Peachtree Accounting®. You have the flexibility to create customers in
either Catalyst or Peachtree, but the intent is for you to create and maintain customers in
Catalyst and then export the data so you can use Peachtree to track unpaid customer
invoices and post customer payments. The export routine creates a file (customer.csv) in
the program directory containing customer data to be imported into Peachtree. New
customers created in Catalyst must be exported to the customer file and imported into
Peachtree before customer invoices can be imported. The steps for exporting customers
from Catalyst to Peachtree are as follows:
1. Ensure that new Catalyst customers have been assigned an Accounting ID in
the Customer Master. Important: You are advised of missing customers
when exporting Accounts Receivable records, but, if you proceed to import
customer invoices into Peachtree before the new customers, the import
process will fail and you risk corrupting your company data. Therefore, it is
always advisable to resolve missing customers prior to exporting customer
invoices.
2. If you have not already done so, open your company in Peachtree
Accounting®.
3. Select Peachtree > Export > Customers from the Catalyst main menu. This
will export Catalyst customers not currently in Peachtree using the
Accounting ID for comparison. If the customer.csv file already exists in the
program directory, you will be prompted to either Overwrite or Append to
the existing text file. The Append option allows you to add new records to the
existing text file in case you have not already imported the file into Peachtree.
6
Peachtree Accounting® Link User Manual
If you choose to overwrite, a copy of the existing file is archived in a
subfolder in the Catalyst program directory.
4. The customer text file can now be imported into Peachtree using the
instructions found in the Import Customers to Peachtree section.
Create Customer Import Mask
Before you can import customers into Peachtree, you must first establish an
import mask within Peachtree. An import mask can be created in the following steps:
1. Choose File > Select Import/Export from the Peachtree main menu. Select
Accounts Receivable from the column on the left and Customer List from the
column on the right. Click the Import button on the toolbar to proceed to the next
screen.
2. On the Fields tab of the Customer List window shown below, click the Show None
button to clear the Show checkmarks from all existing fields.
7
Peachtree Accounting® Link User Manual
3. Click the Show box in the Customer List window for each of the fields in the table
below. This specifies the fields that will be imported from Catalyst.
Customer List Import Mask Fields
Customer ID
Customer Name
Inactive
Bill to Address-Line One
Bill to Address-Line Two
Bill to City
Bill to State
Bill to Zip
Bill to Country
Bill to Sales Tax Code
Ship to Address 1-Line One
Ship to Address 1-Line Two
Ship to City 1
Ship to State 1
Ship to Zipcode 1
Ship to Country 1
8
Peachtree Accounting® Link User Manual
Customer List Import Mask Fields
Ship to Sales Tax Code 1
Ship to Address 2-Line One
Ship to Address 2-Line Two
Ship to City 2
Ship to State 2
Ship to Zipcode 2
Ship to Country 2
Ship to Sales Tax Code 2
Ship to Address 3-Line One
Ship to Address 3-Line Two
Ship to City 3
Ship to State 3
Ship to Zipcode 3
Ship to Country 3
Ship to Sales Tax Code 3
Ship to Address 4-Line One
Ship to Address 4-Line Two
Ship to City 4
Ship to State 4
Ship to Zipcode 4
Ship to Country 4
Ship to Sales Tax Code 4
Ship to Address 5-Line One
Ship to Address 5-Line Two
Ship to City 5
Ship to State 5
Ship to Zipcode 5
Ship to Country 5
Ship to Sales Tax Code 5
Telephone 1
Fax Number
G/L Sales Account
Pricing Level
9
Peachtree Accounting® Link User Manual
Note: Please verify the import fields because missing or extraneous field selections
can cause data to be imported into the wrong fields within Peachtree or inadvertently
overwrite existing data.
4. Once you have selected the fields that you wish to import, click on the Options
tab. Your settings should look exactly as shown in the figure below. You should not
make any changes to this screen. Click the Save button to store your field selections
for later use.
5. Enter a Name and Description as shown in the figure below. Click the Save
button to save the customer import mask as Import Catalyst Customers.
6. Click the Cancel button. The import mask is ready to import customers to
Peachtree from the text file created in Catalyst.
10
Peachtree Accounting® Link User Manual
Import Customers to Peachtree
Prior to importing customers to Peachtree, you must first create a customer import
mask. If the import mask has already been created, you can import new customers into
Peachtree by completing the following steps.
1. Select File > Backup from the Peachtree main menu to backup your Peachtree
company.
2. Choose File > Select Import/Export from the Peachtree main menu. Select
Accounts Receivable from the column on the left and the import mask Import
Catalyst Customers from the column on the right. Click the Import button on
the toolbar to proceed to the next step.
3. The Import Catalyst Customers window appears next displaying the fields
selected on the import mask. Click OK on this screen to begin the import process.
4. A dialog box opens reminding you to backup your company data. Click Yes if
you completed step 1.
5. During the import process, Peachtree displays an import progress screen. After
the import completes, you are returned to the Select Import/Export screen. Click
the Close button to dismiss the dialog box.
The imported customers can be edited or deleted in Peachtree using the Maintain >
Customers/Prospects menu option just as if the transactions had been entered manually.
Export Accounts Receivable
Once a shipment confirmation has been entered in Catalyst, the customer invoice
is created and can be exported to an import file for Peachtree. To export customer
invoices, select Peachtree > Export > Accounts Receivable from the Catalyst main
menu. The export routine sends the invoices to a text file (sales.csv) in the program
directory which can then be imported to Peachtree. A backup of the original text file is
created before it is overwritten. The backup is placed in the archive subfolder of the
program directory. A date/time stamp is appended to the archived text file name. For
instance, if an accounts receivable export is performed on October 15, at 11:15am, it
would generate an archive file in the default path as follows:
C:\Program Files\Catalyst\Archive\sales10151115.csv
A procedure will need to be established by each company to verify export files are
properly imported into Peachtree after export from Catalyst. The backup file can be used
11
Peachtree Accounting® Link User Manual
for audit purposes and may be accessed if it is found that the original customer invoice
file was never imported to Peachtree. If a customer invoice could not be imported into
Peachtree and needs to be re-exported from Catalyst, unselect the ‘Exported’ check box
for the invoice using the Customer Shipment Edit screen and re-export customer
invoices.
You can also review the Accounts Receivable Audit Report by selecting
Peachtree > Audit Reports > Accounts Receivable from the Catalyst main menu. The
audit report will summarize all Accounts Receivable transactions included in the previous
export routine. Please refer to the section Import Customer Invoices to Peachtree for
more instructions on how to import the resulting text file into Peachtree.
When exporting customer invoices, the Accounts Recv. account on the Company
Master is used to make general ledger journal entries for transactions entered on the
Shipment Entry screen. A credit is posted to the Revenue Account on the product class
for the shipped item and a debit posted to the Accounts Recv. account code. The Freight
Income account is used to make general ledger journal entries when making a shipment
and charging the customer for the freight charges. A credit is posted to the income
account code assigned to the Freight Income account code and a debit is posted to the
Accounts Recv. account code. The Sales Tax Payable account is used to make general
ledger journal entries when charging customers tax on a customer invoice. A credit is
posted to the Sales Tax Payable account code and a debit is posted to the Accounts
Recv. account code. The Sales Tax Payable account code on the Company Master is
only used if the general ledger account for the sales tax authorities imported from
Peachtree is not populated.
The customer invoice can be edited in Peachtree Accounting® after exporting the
A/R transactions from Catalyst and importing the customer invoice file (sales.csv) into
Peachtree. To edit a customer invoice in Peachtree, select the Sales/Invoices option in the
Tasks menu. Click the Open icon in the toolbar to view a list of customer invoices for
the default period. Select a period from the Show drop-down list to view invoices in
another accounting period. Either double-click on the invoice or click the OK button on
the side toolbar to open the invoice and begin the edit process.
12
Peachtree Accounting® Link User Manual
Create A/R Import Mask
Before you can import customer invoices from Catalyst into Peachtree, you must
first establish an import mask within Peachtree. An import mask can be created in the
following steps:
1. Choose File > Select Import/Export from the Peachtree main menu. Select
Accounts Receivable from the column on the left and Sales Journal from the
column on the right. Click the Import button on the toolbar to proceed to the next
screen.
2. On the Fields tab of the Sales Journal window shown below, click the Show None
button to clear the Show checkmarks from all existing fields.
13
Peachtree Accounting® Link User Manual
3. Click the Show box in the Sales Journal window for each of the fields in the table
below. This specifies the fields that will be imported from Catalyst.
Sales Journal Import Mask Fields
Customer ID
Invoice #
Date
Quote
Quote #
Quote Good Thru Date
Drop Ship
Ship to Name
Ship to Address-Line One
Ship to Address-Line Two
Ship to City
Ship to State
Ship to Zipcode
Ship to Country
14
Peachtree Accounting® Link User Manual
Sales Journal Import Mask Fields
Customer PO
Ship Via
Ship Date
Date Due
Discount Amount
Discount Date
Displayed Terms
Sales Representative ID
Accounts Receivable Account
Sales Tax Code
Invoice Note
Note Prints After Line Items
Beginning Balance Transaction
Number of Distributions
Apply To Sales Order
Quantity
SO Number
Item ID
SO Distribution
Description
G/L Account
Unit Price
Tax Type
Amount
Job ID
Sales Tax Authority
Credit Memo
Note: Be sure to double-check your work when selecting the import fields because
missing or extraneous field selections can cause data to be imported into the wrong
fields within Peachtree or inadvertently overwrite existing data.
15
Peachtree Accounting® Link User Manual
4. Once you have selected the fields that you wish to import, click on the Options tab.
Your settings should look exactly as shown in the figure below. You should not make
any changes to this screen. Click the Save button to store your field selections for
later use.
5. Enter a Name and Description as shown in the figure below. Click the Save button to
save the customer invoice import mask as Import Catalyst Cust Invoices.
6. Click the Cancel button. The import mask is ready to import customer invoices to
Peachtree from the text file created in Catalyst.
16
Peachtree Accounting® Link User Manual
Import Customer Invoices to Peachtree
Prior to importing customers to Peachtree, you must first create a customer
invoice import mask. If the import mask has already been created, you can import new
customers into Peachtree by completing the following steps.
1. Select File > Backup from the Peachtree main menu to backup your Peachtree
company.
2. Choose File > Select Import/Export from the Peachtree main menu. Select
Accounts Receivable from the column on the left and the import mask Import
Catalyst Cust Invoices from the column on the right. Click the Import button on
the toolbar to proceed to the next step.
3. The Import Catalyst Cust Invoices window appears next displaying the fields
selected on the import mask. Click OK on this screen to begin the import process.
4. A dialog box opens reminding you to backup your company data. Click Yes if
you completed step 1.
5. During the import process, Peachtree displays an import progress screen. After
the import completes, you are returned to the Select Import/Export screen. Click
the Close button to dismiss the dialog box.
The imported customer invoices can be edited or deleted in Peachtree using the Tasks
> Sales/Invoicing menu option just as if the transactions had been entered manually.
Export Vendors
Your company’s vendors are one of several common denominators between
Catalyst and Peachtree Accounting®. You have the flexibility to create vendors in either
Catalyst or Peachtree, but the intent is for you to create and maintain vendors in Catalyst
and then export the data so you can use Peachtree to track unpaid vendor invoices, write
checks to pay your vendors, and post A/P journal entries for financial reporting. The
export routine creates a file (vendor.csv) in the program directory containing vendor data
to be imported into Peachtree. New vendors created in Catalyst must be exported to the
vendor file and imported into Peachtree before vendor invoices can be imported. The
steps for exporting vendors from Catalyst to Peachtree are as follows:
1. Ensure that new Catalyst vendors have been assigned an Accounting ID in
the Vendor Master. Important: You are advised of missing vendors when
exporting Accounts Payable records, but, if you proceed to import vendor
invoices into Peachtree before the new vendors, the import process will fail
17
Peachtree Accounting® Link User Manual
and you risk corrupting your company data. Therefore, it is always advisable
to resolve missing vendors prior to exporting vendor invoices.
2. If you have not already done so, open your company in Peachtree
Accounting®.
3. Select Peachtree > Export > Vendors from the Catalyst main menu. This
will export Catalyst vendors not currently in Peachtree using the Accounting
ID for comparison. If the vendor.csv file already exists in the program
directory, you will be prompted to either Overwrite or Append to the
existing text file. The Append option allows you to add new records to the
existing text file in case you have not already imported the file into Peachtree.
If you choose to overwrite, a copy of the existing file is archived in a
subfolder in the Catalyst program directory.
4. The vendor text file can now be imported into Peachtree using the instructions
found in the Import Vendors to Peachtree section.
Create Vendor Import Mask
Before you can import vendors into Peachtree, you must first establish an import
mask within Peachtree. An import mask can be created using the procedure described
below.
1. Choose File > Select Import/Export from the Peachtree main menu. Select
Accounts Payable from the column on the left and Vendor List from the column on
the right. Click the Import button on the toolbar to proceed to the next screen.
18
Peachtree Accounting® Link User Manual
2. On the Fields tab of the Vendor List window shown below, click the Show None
button to clear the Show checkmarks from all existing fields.
3. Click the Show box in the Vendor List window for each of the fields in the table
below. This specifies the fields that will be imported from Catalyst.
Vendor List Import Mask Fields
Vendor ID
Vendor Name
Inactive
Contact
Address-Line One
Address-Line Two
City
State
Zip
Country
Vend Type
1099 Type
19
Peachtree Accounting® Link User Manual
Vendor List Import Mask Fields
Telephone 1
Telephone 2
Fax Number
Vendor E-mail
Vendor Web Site
G/L Purchase Account
Tax ID Number
Account Number
Ship Via
Use Standard Terms
C.O.D. Terms
Prepaid Terms
Terms Type
Due Days
Discount Days
Discount Percent
Credit Limit
Due Month End Terms
Office Manager
Account Rep
Special Note
Note: Be sure to double-check your work when selecting the import fields because
missing or extraneous field selections can cause data to be imported into the wrong
fields within Peachtree or inadvertently overwrite existing data.
4. Once you have selected the fields that you wish to import, click on the Options tab.
Your settings should look exactly as shown in the figure below. You should not make
any changes to this screen. Click the Save button to store your field selections for
later use.
20
Peachtree Accounting® Link User Manual
5. Enter a Name and Description as shown in the figure below. Click the Save button to
save the vendor import mask as Import Catalyst Vendors.
6. Click the Cancel button. The import mask is ready to import vendors to Peachtree
from the text file created in Catalyst.
21
Peachtree Accounting® Link User Manual
Import Vendors to Peachtree
Prior to importing vendors to Peachtree, you must first create a vendor import
mask. If the import mask has already been created, you can import new vendors into
Peachtree by completing the following steps.
1. Select File > Backup from the Peachtree main menu to backup your Peachtree
company.
2. Choose File > Select Import/Export from the Peachtree main menu. Select
Accounts Payable from the column on the left and the import mask Import
Catalyst Vendors from the column on the right. Click the Import button on the
toolbar to proceed to the next step.
3. The Import Catalyst Vendors window appears next displaying the fields
selected on the import mask. Click OK on this screen to begin the import process.
4. A dialog box opens reminding you to backup your company data. Click Yes if
you completed step 1.
5. During the import process, Peachtree displays an import progress screen. After
the import completes, you are returned to the Select Import/Export screen. Click
the Close button to dismiss the dialog box.
The imported vendors can be edited or deleted in Peachtree using the Maintain >
Vendors menu option just as if the transactions had been entered manually.
Export Accounts Payable
Once a vendor invoice is entered in Catalyst, it can be exported to an import file
for Peachtree. To export vendor invoices, select Peachtree > Export > Accounts
Payable from the Catalyst main menu. The export routine sends the vendor invoices to a
text file (purchase.csv) in the program directory which can then be imported to Peachtree.
A backup of the original text file is created before it is overwritten. The backup is placed
in the archive subfolder of the program directory. A date/time stamp is appended to the
archived text file name. For instance, if an accounts payable export is performed on
October 20, at 2:15pm, it would generate an archive file in the default path as follows:
C:\Program Files\Catalyst\Archive\Purchase10201415.csv
A procedure will need to be established by each company to verify export files are
properly imported into Peachtree after export from Catalyst. The backup file can be used
for audit purposes and may be accessed if it is found that the original vendor invoice file
22
Peachtree Accounting® Link User Manual
was never imported to Peachtree. If a vendor invoice could not be imported into
Peachtree and needs to be re-exported from Catalyst, unselect the ‘Exported’ check box
for the invoice using the Vendor Invoice Edit screen and re-export vendor invoices.
You can also review the Accounts Payable Audit Report by selecting Peachtree >
Audit Reports > Accounts Payable from the Catalyst main menu. The audit report will
summarize all Accounts Payable transactions included in the previous export routine.
Please refer to the section Import Vendor Invoices to Peachtree for more instructions
on how to import the resulting text file into Peachtree.
When exporting vendor invoices, the Accounts Payable account on the
Company Master is used to make general ledger journal entries for transactions entered
on the A/P Invoice Receipts screen. A credit is posted to the Accounts Payable account
code and a debit to the Inventory Account on the product class for the invoice item. The
Freight Expense account is used to make general ledger journal entries when receiving a
shipment from a vendor and incurring freight charges. A credit is posted to the Accounts
Payable account code and a debit to the Freight Expense account code. The Sales Tax
Expense account is used to make general ledger journal entries when making taxable
purchases from vendors. A credit is posted to the Accounts Payable account code and a
debit to the Sales Tax Expense account code.
The vendor invoice can be edited in Peachtree Accounting® after exporting the
A/P transactions from Catalyst and importing the vendor invoice file (purchase.csv) into
Peachtree. To edit a vendor invoice in Peachtree, select the Purchases/Receive
Inventory option in the Tasks menu. Click the Open icon in the toolbar to view a list of
vendor invoices for the default period. Select a period from the Show drop-down list to
view invoices in another accounting period. Either double-click on the invoice or click
the OK button on the side toolbar to open the invoice and begin the edit process.
Create A/P Import Mask
Before you can import vendor invoices from Catalyst into Peachtree, you must
first establish an import mask within Peachtree. An import mask can be created in the
following steps:
1. Choose File > Select Import/Export from the Peachtree main menu. Select
Accounts Payable from the column on the left and Purchases Journal from the
column on the right. Click the Import button on the toolbar to proceed to the next
screen.
23
Peachtree Accounting® Link User Manual
2. On the Fields tab of the Purchases Journal window shown below, click the Show
None button to clear the Show checkmarks from all existing fields.
3. Click the Show box in the Purchase Journal window for each of the fields in the
table below. This specifies the fields that will be imported from Catalyst.
24
Peachtree Accounting® Link User Manual
Purchase Journal Import Mask Fields
Vendor ID
Invoice #
Date
Waiting on Bill
Ship to Name
Ship to Address-Line One
Ship to Address-Line Two
Ship to City
Ship to State
Ship to Zipcode
Date Due
Discount Date
Discount Amount
Accounts Payable Account
Ship Via
P.O. Note
Number of Distributions
Quantity
Description
G/L Account
Unit Price
Amount
Note: Be sure to double-check your work when selecting the import fields because
missing or extraneous field selections can cause data to be imported into the wrong
fields within Peachtree or inadvertently overwrite existing data.
4. Once you have selected the fields that you wish to import, click on the Options tab.
Your settings should look exactly as shown in the figure below. You should not make
any changes to this screen. Click the Save button to store your field selections for
later use.
25
Peachtree Accounting® Link User Manual
5. Enter a Name and Description as shown in the figure below. Click the Save button to
save the vendor import mask as Import Catalyst Vendor Invoice.
6. Click the Cancel button. The import mask is ready to import vendor invoices to
Peachtree from the text file created in Catalyst.
26
Peachtree Accounting® Link User Manual
Import Vendor Invoices to Peachtree
Prior to importing vendors to Peachtree, you must first create a vendor invoice
import mask. If the import mask has already been created, you can import new vendors
into Peachtree by completing the following steps.
1. Select File > Backup from the Peachtree main menu to backup your Peachtree
company.
2. Choose File > Select Import/Export from the Peachtree main menu. Select
Accounts Payable from the column on the left and the import mask Import
Catalyst Vendor Invoice from the column on the right. Click the Import button
on the toolbar to proceed to the next step.
3. The Import Catalyst Vendor Invoice window appears next displaying the fields
selected on the import mask. Click OK on this screen to begin the import process.
4. A dialog box opens reminding you to backup your company data. Click Yes if
you completed step 1.
5. During the import process, Peachtree displays an import progress screen. After
the import completes, you are returned to the Select Import/Export screen. Click
the Close button to dismiss the dialog box.
The imported vendor invoices can be edited or deleted in Peachtree using the Tasks >
Payments menu option just as if the transactions had been entered manually.
Create COGS Journal Entries
To create cost of goods sold journal entries that that can be imported into
Peachtree, select Peachtree > Create COGS Journal Entry from the Catalyst main
menu. The COGS Date Range window appears to capture the shipments that have
already been exported to Peachtree within a specified time period. The Cost of Goods
Sold (COGS) amount is calculated for each standard item or quote item by multiplying
the quantity shipped by the standard unit cost for the item or estimated unit cost for the
quote, respectively.
The COGS amount can be previewed by clicking the View Report button. When
you click the Create Journal Entry button, the detail shipment records are summarized
into offsetting inventory and COGS journal entries. The general journal entry transactions
are exported to a CSV file (general.csv) in the program directory for import into
Peachtree. Please refer to the section entitled Import COGS Journal Entries for more
27
Peachtree Accounting® Link User Manual
information on the import process into Peachtree. Prior to performing the first import,
however, you must create an import mask for the COGS journal entries.
Create COGS Import Mask
Before you can import your COGS journal entry from Catalyst into Peachtree,
you must first establish an import mask within Peachtree. The import mask can be
created in the following steps:
1. Choose File > Select Import/Export from the Peachtree menu. Select General
Ledger from the column on the left and General Journal from the column on the
right of the screen as shown in the figure below. Click the Import button at the top of
the screen to proceed to the next window and specify the import fields.
2. On the Fields tab of the General Journal window shown below, click the Show None
button to clear the Show checkmarks from all existing fields.
28
Peachtree Accounting® Link User Manual
3. Click the “Show” box in the General Journal window for each of the fields in the table
below. This specifies the fields that will be imported from Catalyst.
General Journal Import Mask Fields
Date
Reference
Date Clear in Bank Rec
Number of Distributions
G/L Account
Description
Amount
Note: Be sure to double-check your work when selecting the import fields because
missing or extraneous field selections can cause data to be imported into the wrong
fields within Peachtree or inadvertently overwrite existing data.
4. Once you have selected the fields that you wish to import, click on the Options tab.
Your settings should look exactly as shown in the figure below. You should not make
any changes to this screen. Click the Save button to store your field selections for
later use.
29
Peachtree Accounting® Link User Manual
5. Enter a Name and Description as shown in the figure below. Click the Save button to
save the COGS import mask as Import Catalyst COGS.
6. Click the Cancel button. The import mask is ready to import COGS journal
entries from the text file created in Catalyst.
30
Peachtree Accounting® Link User Manual
Import COGS Journal Entries
Before importing COGS journal entries to Peachtree, you must first create a
COGS import mask. If the import mask has already been created, you can import COGS
records into Peachtree by completing the following steps.
1. Select File > Backup from the Peachtree main menu to backup your Peachtree
company.
2. Choose File > Select Import/Export from the Peachtree main menu. Select
General Ledger from the column on the left and the import mask Import
Catalyst COGS from the column on the right. Click the Import button on the
toolbar to proceed to the next step.
3. The Import Catalyst COGS window appears next displaying the fields selected
on the import mask. Click OK on this screen to begin the import process.
4. A dialog box opens reminding you to backup your company data. Click Yes if
you completed step 1.
5. During the import process, Peachtree displays an import progress screen. After
the import completes, you are returned to the Select Import/Export screen. Click
the Close button to dismiss the dialog box.
The imported COGS journal entries can be edited or deleted in Peachtree using the
Tasks > General Journal Entry menu option just as if the transactions had been entered
manually.
Review Audit Reports
The Audit Reports consist of a Customer Invoice Log and an Accounts Payable
Log. These reports show all Accounts Receivable and Accounts Payable transactions
included in the previous Accounts Receivable and Accounts Payable export routines. The
audit reports are sorted by invoice number.
31
Peachtree Accounting® Link User Manual
Peachtree Data Path Instructions
Peachtree Accounting® refers to the data path stored in an .INI file on the
computer the software was installed. The name of this .INI file varies by release and
specialized versions of Peachtree. For instance, Peachtree Accounting for Manufacturing
uses the PPAM115.INI file. If you are unsure of your .INI file name, open the Technical
Support Information screen in the Help > Customer Support and Service submenu
where you will find the file name listed by a checkbox.
To access the .INI file, click Start | Run, then type the corresponding .INI file
name shown above. If Peachtree Accounting is installed on a network, the line
DATAPATH=X:\PEACHW in your .INI file should refer to your network drive. If your
data files reside on your hard drive, X will refer to your C drive. If your Peachtree .INI
file is not set correctly, you will not be able to establish a connection between Catalyst
and Peachtree.
32