1
NetIQ® Sentinel™
Installation and Configuration Guide
October 2014
Legal Notice
NetIQ Sentinel is protected by United States Patent No(s): 05829001.
THIS DOCUMENT AND THE SOFTWARE DESCRIBED IN THIS DOCUMENT ARE FURNISHED UNDER AND ARE
SUBJECT TO THE TERMS OF A LICENSE AGREEMENT OR A NON-DISCLOSURE AGREEMENT. EXCEPT AS EXPRESSLY
SET FORTH IN SUCH LICENSE AGREEMENT OR NON-DISCLOSURE AGREEMENT, NETIQ CORPORATION PROVIDES
THIS DOCUMENT AND THE SOFTWARE DESCRIBED IN THIS DOCUMENT "AS IS" WITHOUT WARRANTY OF ANY
KIND, EITHER EXPRESS OR IMPLIED, INCLUDING, BUT NOT LIMITED TO, THE IMPLIED WARRANTIES OF
MERCHANTABILITY OR FITNESS FOR A PARTICULAR PURPOSE. SOME STATES DO NOT ALLOW DISCLAIMERS OF
EXPRESS OR IMPLIED WARRANTIES IN CERTAIN TRANSACTIONS; THEREFORE, THIS STATEMENT MAY NOT APPLY
TO YOU.
For purposes of clarity, any module, adapter or other similar material ("Module") is licensed under the terms and conditions of
the End User License Agreement for the applicable version of the NetIQ product or software to which it relates or
interoperates with, and by accessing, copying or using a Module you agree to be bound by such terms. If you do not agree to
the terms of the End User License Agreement you are not authorized to use, access or copy a Module and you must destroy all
copies of the Module and contact NetIQ for further instructions.
This document and the software described in this document may not be lent, sold, or given away without the prior written
permission of NetIQ Corporation, except as otherwise permitted by law. Except as expressly set forth in such license
agreement or non-disclosure agreement, no part of this document or the software described in this document may be
reproduced, stored in a retrieval system, or transmitted in any form or by any means, electronic, mechanical, or otherwise,
without the prior written consent of NetIQ Corporation. Some companies, names, and data in this document are used for
illustration purposes and may not represent real companies, individuals, or data.
This document could include technical inaccuracies or typographical errors. Changes are periodically made to the
information herein. These changes may be incorporated in new editions of this document. NetIQ Corporation may make
improvements in or changes to the software described in this document at any time.
U.S. Government Restricted Rights: If the software and documentation are being acquired by or on behalf of the U.S.
Government or by a U.S. Government prime contractor or subcontractor (at any tier), in accordance with 48 C.F.R. 227.7202-4
(for Department of Defense (DOD) acquisitions) and 48 C.F.R. 2.101 and 12.212 (for non-DOD acquisitions), the government's
rights in the software and documentation, including its rights to use, modify, reproduce, release, perform, display or disclose
the software or documentation, will be subject in all respects to the commercial license rights and restrictions provided in the
license agreement.
© 2014 NetIQ Corporation and its affiliates. All Rights Reserved.
For information about NetIQ trademarks, see http://www.netiq.com/company/legal/.
Contents
About this Book and the Library
About NetIQ Corporation
9
11
Part I Understanding Sentinel
13
1 What is Sentinel?
15
1.1
1.2
Challenges of Securing an IT Environment . . . . . . . . . . . . . . . . . . . . . . . . . . . . . . . . . . . . . . . . . . . . 15
The Solution That Sentinel Provides . . . . . . . . . . . . . . . . . . . . . . . . . . . . . . . . . . . . . . . . . . . . . . . . . 16
2 How Sentinel Works
2.1
2.2
2.3
2.4
2.5
2.6
2.7
2.8
2.9
2.10
2.11
2.12
2.13
2.14
2.15
19
Event Sources . . . . . . . . . . . . . . . . . . . . . . . . . . . . . . . . . . . . . . . . . . . . . . . . . . . . . . . . . . . . . . . . . . 21
Sentinel Event . . . . . . . . . . . . . . . . . . . . . . . . . . . . . . . . . . . . . . . . . . . . . . . . . . . . . . . . . . . . . . . . . . 21
2.2.1
Mapping Service . . . . . . . . . . . . . . . . . . . . . . . . . . . . . . . . . . . . . . . . . . . . . . . . . . . . . . . . . 22
2.2.2
Streaming Maps. . . . . . . . . . . . . . . . . . . . . . . . . . . . . . . . . . . . . . . . . . . . . . . . . . . . . . . . . . 22
2.2.3
Exploit Detection (Mapping Service) . . . . . . . . . . . . . . . . . . . . . . . . . . . . . . . . . . . . . . . . . . 22
Collector Manager . . . . . . . . . . . . . . . . . . . . . . . . . . . . . . . . . . . . . . . . . . . . . . . . . . . . . . . . . . . . . . . 23
2.3.1
Collectors . . . . . . . . . . . . . . . . . . . . . . . . . . . . . . . . . . . . . . . . . . . . . . . . . . . . . . . . . . . . . . . 23
2.3.2
Connectors . . . . . . . . . . . . . . . . . . . . . . . . . . . . . . . . . . . . . . . . . . . . . . . . . . . . . . . . . . . . . 23
Agent Manager. . . . . . . . . . . . . . . . . . . . . . . . . . . . . . . . . . . . . . . . . . . . . . . . . . . . . . . . . . . . . . . . . . 23
NetFlow Collector Manager . . . . . . . . . . . . . . . . . . . . . . . . . . . . . . . . . . . . . . . . . . . . . . . . . . . . . . . . 24
Sentinel Data Routing and Storage . . . . . . . . . . . . . . . . . . . . . . . . . . . . . . . . . . . . . . . . . . . . . . . . . . 24
Correlation . . . . . . . . . . . . . . . . . . . . . . . . . . . . . . . . . . . . . . . . . . . . . . . . . . . . . . . . . . . . . . . . . . . . . 25
Security Intelligence . . . . . . . . . . . . . . . . . . . . . . . . . . . . . . . . . . . . . . . . . . . . . . . . . . . . . . . . . . . . . . 25
Incident Remediation . . . . . . . . . . . . . . . . . . . . . . . . . . . . . . . . . . . . . . . . . . . . . . . . . . . . . . . . . . . . . 25
iTrac Workflows . . . . . . . . . . . . . . . . . . . . . . . . . . . . . . . . . . . . . . . . . . . . . . . . . . . . . . . . . . . . . . . . . 25
Actions and Integrators . . . . . . . . . . . . . . . . . . . . . . . . . . . . . . . . . . . . . . . . . . . . . . . . . . . . . . . . . . . 26
Searching . . . . . . . . . . . . . . . . . . . . . . . . . . . . . . . . . . . . . . . . . . . . . . . . . . . . . . . . . . . . . . . . . . . . . . 26
Reports. . . . . . . . . . . . . . . . . . . . . . . . . . . . . . . . . . . . . . . . . . . . . . . . . . . . . . . . . . . . . . . . . . . . . . . . 26
Identity Tracking . . . . . . . . . . . . . . . . . . . . . . . . . . . . . . . . . . . . . . . . . . . . . . . . . . . . . . . . . . . . . . . . . 26
Event Analysis . . . . . . . . . . . . . . . . . . . . . . . . . . . . . . . . . . . . . . . . . . . . . . . . . . . . . . . . . . . . . . . . . . 27
Part II Planning Your Sentinel Installation
29
3 Implementation Checklist
31
4 Understanding License Information
33
4.1
4.2
Trial License . . . . . . . . . . . . . . . . . . . . . . . . . . . . . . . . . . . . . . . . . . . . . . . . . . . . . . . . . . . . . . . . . . . . 33
Enterprise Licenses . . . . . . . . . . . . . . . . . . . . . . . . . . . . . . . . . . . . . . . . . . . . . . . . . . . . . . . . . . . . . . 33
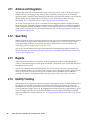
5 Meeting System Requirements
5.1
5.2
5.3
35
Supported Operating Systems and Platforms . . . . . . . . . . . . . . . . . . . . . . . . . . . . . . . . . . . . . . . . . . 35
Supported Database Platforms . . . . . . . . . . . . . . . . . . . . . . . . . . . . . . . . . . . . . . . . . . . . . . . . . . . . . 36
Supported Browsers. . . . . . . . . . . . . . . . . . . . . . . . . . . . . . . . . . . . . . . . . . . . . . . . . . . . . . . . . . . . . . 36
Contents
3
5.4
5.5
5.6
5.3.1
Prerequisites for Internet Explorer . . . . . . . . . . . . . . . . . . . . . . . . . . . . . . . . . . . . . . . . . . . 37
System Sizing Information . . . . . . . . . . . . . . . . . . . . . . . . . . . . . . . . . . . . . . . . . . . . . . . . . . . . . . . . 37
Connector and Collector System Requirements . . . . . . . . . . . . . . . . . . . . . . . . . . . . . . . . . . . . . . . . 47
Virtual Environment . . . . . . . . . . . . . . . . . . . . . . . . . . . . . . . . . . . . . . . . . . . . . . . . . . . . . . . . . . . . . . 47
6 Deployment Considerations
6.1
6.2
6.3
6.4
6.5
6.6
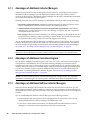
Advantages of Distributed Deployments . . . . . . . . . . . . . . . . . . . . . . . . . . . . . . . . . . . . . . . . . . . . . . 49
6.1.1
Advantages of Additional Collector Managers . . . . . . . . . . . . . . . . . . . . . . . . . . . . . . . . . . . 50
6.1.2
Advantages of Additional Correlation Engines . . . . . . . . . . . . . . . . . . . . . . . . . . . . . . . . . . 50
6.1.3
Advantages of Additional NetFlow Collector Managers. . . . . . . . . . . . . . . . . . . . . . . . . . . . 50
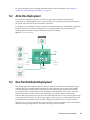
All-In-One Deployment . . . . . . . . . . . . . . . . . . . . . . . . . . . . . . . . . . . . . . . . . . . . . . . . . . . . . . . . . . . . 51
One-Tier Distributed Deployment. . . . . . . . . . . . . . . . . . . . . . . . . . . . . . . . . . . . . . . . . . . . . . . . . . . . 51
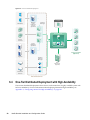
One-Tier Distributed Deployment with High Availability . . . . . . . . . . . . . . . . . . . . . . . . . . . . . . . . . . . 52
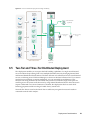
Two-Tier and Three-Tier Distributed Deployment . . . . . . . . . . . . . . . . . . . . . . . . . . . . . . . . . . . . . . . 53
Planning Partitions for Data Storage . . . . . . . . . . . . . . . . . . . . . . . . . . . . . . . . . . . . . . . . . . . . . . . . . 54
6.6.1
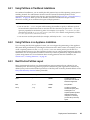
Using Partitions in Traditional Installations . . . . . . . . . . . . . . . . . . . . . . . . . . . . . . . . . . . . . 55
6.6.2
Using Partitions in an Appliance Installation . . . . . . . . . . . . . . . . . . . . . . . . . . . . . . . . . . . . 55
6.6.3
Best Practice Partition Layout . . . . . . . . . . . . . . . . . . . . . . . . . . . . . . . . . . . . . . . . . . . . . . . 55
6.6.4
Sentinel Directory Structure . . . . . . . . . . . . . . . . . . . . . . . . . . . . . . . . . . . . . . . . . . . . . . . . . 56
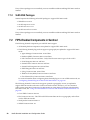
7 Deployment Considerations for FIPS140-2 Mode
7.1
7.2
7.3
7.4
8.2
8.3
8.4
4
63
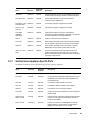
Sentinel Server Ports . . . . . . . . . . . . . . . . . . . . . . . . . . . . . . . . . . . . . . . . . . . . . . . . . . . . . . . . . . . . . 64
8.1.1
Local Ports . . . . . . . . . . . . . . . . . . . . . . . . . . . . . . . . . . . . . . . . . . . . . . . . . . . . . . . . . . . . . . 64
8.1.2
Network Ports . . . . . . . . . . . . . . . . . . . . . . . . . . . . . . . . . . . . . . . . . . . . . . . . . . . . . . . . . . . 64
8.1.3
Sentinel Server Appliance Specific Ports . . . . . . . . . . . . . . . . . . . . . . . . . . . . . . . . . . . . . . 65
Collector Manager Ports . . . . . . . . . . . . . . . . . . . . . . . . . . . . . . . . . . . . . . . . . . . . . . . . . . . . . . . . . . 66
8.2.1
Network Ports . . . . . . . . . . . . . . . . . . . . . . . . . . . . . . . . . . . . . . . . . . . . . . . . . . . . . . . . . . . 66
8.2.2
Collector Manager Appliance Specific Ports . . . . . . . . . . . . . . . . . . . . . . . . . . . . . . . . . . . . 66
Correlation Engine Ports . . . . . . . . . . . . . . . . . . . . . . . . . . . . . . . . . . . . . . . . . . . . . . . . . . . . . . . . . . 67
8.3.1
Network Ports . . . . . . . . . . . . . . . . . . . . . . . . . . . . . . . . . . . . . . . . . . . . . . . . . . . . . . . . . . . 67
8.3.2
Correlation Engine Appliance Specific Ports . . . . . . . . . . . . . . . . . . . . . . . . . . . . . . . . . . . . 67
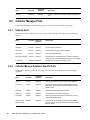
NetFlow Collector Manager Ports . . . . . . . . . . . . . . . . . . . . . . . . . . . . . . . . . . . . . . . . . . . . . . . . . . . 67
9 Installation Options
9.1
9.2
57
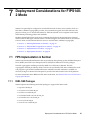
FIPS Implementation in Sentinel . . . . . . . . . . . . . . . . . . . . . . . . . . . . . . . . . . . . . . . . . . . . . . . . . . . . 57
7.1.1
RHEL NSS Packages . . . . . . . . . . . . . . . . . . . . . . . . . . . . . . . . . . . . . . . . . . . . . . . . . . . . . 57
7.1.2
SLES NSS Packages . . . . . . . . . . . . . . . . . . . . . . . . . . . . . . . . . . . . . . . . . . . . . . . . . . . . . 58
FIPS-Enabled Components in Sentinel . . . . . . . . . . . . . . . . . . . . . . . . . . . . . . . . . . . . . . . . . . . . . . . 58
Implementation Checklist . . . . . . . . . . . . . . . . . . . . . . . . . . . . . . . . . . . . . . . . . . . . . . . . . . . . . . . . . . 59
Deployment Scenarios . . . . . . . . . . . . . . . . . . . . . . . . . . . . . . . . . . . . . . . . . . . . . . . . . . . . . . . . . . . . 59
7.4.1
Scenario 1: Data Collection in Full FIPS 140-2 Mode . . . . . . . . . . . . . . . . . . . . . . . . . . . . . 59
7.4.2
Scenario 2: Data Collection in Partial FIPS 140-2 Mode . . . . . . . . . . . . . . . . . . . . . . . . . . . 60
8 Ports Used
8.1
49
69
Traditional Installation . . . . . . . . . . . . . . . . . . . . . . . . . . . . . . . . . . . . . . . . . . . . . . . . . . . . . . . . . . . . 69
Appliance Installation . . . . . . . . . . . . . . . . . . . . . . . . . . . . . . . . . . . . . . . . . . . . . . . . . . . . . . . . . . . . . 70
NetIQ Sentinel Installation and Configuration Guide
Part III Installing Sentinel
71
10 Installation Overview
73
11 Installation Checklist
75
12 Traditional Installation
77
12.1
12.2
12.3
12.4
12.5
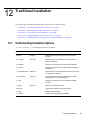
Understanding Installation Options . . . . . . . . . . . . . . . . . . . . . . . . . . . . . . . . . . . . . . . . . . . . . . . . . . 77
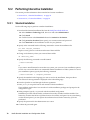
Performing Interactive Installation . . . . . . . . . . . . . . . . . . . . . . . . . . . . . . . . . . . . . . . . . . . . . . . . . . . 78
12.2.1 Standard Installation . . . . . . . . . . . . . . . . . . . . . . . . . . . . . . . . . . . . . . . . . . . . . . . . . . . . . . 78
12.2.2 Custom Installation . . . . . . . . . . . . . . . . . . . . . . . . . . . . . . . . . . . . . . . . . . . . . . . . . . . . . . . 79
Performing a Silent Installation . . . . . . . . . . . . . . . . . . . . . . . . . . . . . . . . . . . . . . . . . . . . . . . . . . . . . 80
Installing Sentinel as a Non-root User . . . . . . . . . . . . . . . . . . . . . . . . . . . . . . . . . . . . . . . . . . . . . . . . 81
Installing Collector Managers and Correlation Engines
. . . . . . . . . . . . . . . . . . . . . . . . . . . . . . 82
12.5.1 Installation Checklist . . . . . . . . . . . . . . . . . . . . . . . . . . . . . . . . . . . . . . . . . . . . . . . . . . . . . . 83
12.5.2 Installing Collector Managers and Correlation Engines . . . . . . . . . . . . . . . . . . . . . . . . . . . . 83
12.5.3 Adding a Custom ActiveMQ User for the Collector Manager or Correlation Engine . . . . . . 84
13 Appliance Installation
13.1
13.2
13.3
13.4
13.5
87
Installing the VMware Appliance . . . . . . . . . . . . . . . . . . . . . . . . . . . . . . . . . . . . . . . . . . . . . . . . . . . . 87
13.1.1 Installing Sentinel. . . . . . . . . . . . . . . . . . . . . . . . . . . . . . . . . . . . . . . . . . . . . . . . . . . . . . . . . 87
13.1.2 Installing Collector Managers and Correlation Engines . . . . . . . . . . . . . . . . . . . . . . . . . . . . 88
13.1.3 Installing VMware Tools. . . . . . . . . . . . . . . . . . . . . . . . . . . . . . . . . . . . . . . . . . . . . . . . . . . . 89
Installing the Xen Appliance . . . . . . . . . . . . . . . . . . . . . . . . . . . . . . . . . . . . . . . . . . . . . . . . . . . . . . . . 90
13.2.1 Installing Sentinel. . . . . . . . . . . . . . . . . . . . . . . . . . . . . . . . . . . . . . . . . . . . . . . . . . . . . . . . . 90
13.2.2 Installing Collector Managers and Correlation Engines . . . . . . . . . . . . . . . . . . . . . . . . . . . . 92
Installing the ISO Appliance . . . . . . . . . . . . . . . . . . . . . . . . . . . . . . . . . . . . . . . . . . . . . . . . . . . . . . . . 93
13.3.1 Prerequisites . . . . . . . . . . . . . . . . . . . . . . . . . . . . . . . . . . . . . . . . . . . . . . . . . . . . . . . . . . . . 93
13.3.2 Installing Sentinel. . . . . . . . . . . . . . . . . . . . . . . . . . . . . . . . . . . . . . . . . . . . . . . . . . . . . . . . . 93
13.3.3 Installing Collector Managers and Correlation Engines . . . . . . . . . . . . . . . . . . . . . . . . . . . . 94
Post-Installation Configuration for the Appliance . . . . . . . . . . . . . . . . . . . . . . . . . . . . . . . . . . . . . . . . 95
13.4.1 Configuring WebYaST . . . . . . . . . . . . . . . . . . . . . . . . . . . . . . . . . . . . . . . . . . . . . . . . . . . . . 96
13.4.2 Creating Partitions . . . . . . . . . . . . . . . . . . . . . . . . . . . . . . . . . . . . . . . . . . . . . . . . . . . . . . . . 96
13.4.3 Registering for Updates . . . . . . . . . . . . . . . . . . . . . . . . . . . . . . . . . . . . . . . . . . . . . . . . . . . . 97
13.4.4 Configuring the Appliance with SMT . . . . . . . . . . . . . . . . . . . . . . . . . . . . . . . . . . . . . . . . . . 97
Stopping and Starting the Server by Using WebYaST. . . . . . . . . . . . . . . . . . . . . . . . . . . . . . . . . . . . 98
14 NetFlow Collector Manager Installation
14.1
14.2
99
Installation Checklist . . . . . . . . . . . . . . . . . . . . . . . . . . . . . . . . . . . . . . . . . . . . . . . . . . . . . . . . . . . . . 99
Installing the NetFlow Collector Manager . . . . . . . . . . . . . . . . . . . . . . . . . . . . . . . . . . . . . . . . . . . . . 99
15 Installing Additional Collectors and Connectors
15.1
15.2
101
Installing a Collector . . . . . . . . . . . . . . . . . . . . . . . . . . . . . . . . . . . . . . . . . . . . . . . . . . . . . . . . . . . . . 101
Installing a Connector . . . . . . . . . . . . . . . . . . . . . . . . . . . . . . . . . . . . . . . . . . . . . . . . . . . . . . . . . . . 101
Contents
5
16 Verifying the Installation
103
Part IV Configuring Sentinel
105
17 Configuring Time
107
17.1
17.2
17.3
17.4
Understanding Time in Sentinel . . . . . . . . . . . . . . . . . . . . . . . . . . . . . . . . . . . . . . . . . . . . . . . . . . . . 107
Configuring Time in Sentinel . . . . . . . . . . . . . . . . . . . . . . . . . . . . . . . . . . . . . . . . . . . . . . . . . . . . . . 109
Configuring Delay Time Limit for Events . . . . . . . . . . . . . . . . . . . . . . . . . . . . . . . . . . . . . . . . . . . . . 109
Handling Time Zones . . . . . . . . . . . . . . . . . . . . . . . . . . . . . . . . . . . . . . . . . . . . . . . . . . . . . . . . . . . . 109
18 Modifying the Configuration after Installation
111
19 Configuring Out-of-the-Box Plug-Ins
113
19.1
19.2
Configuring the Solution Packs . . . . . . . . . . . . . . . . . . . . . . . . . . . . . . . . . . . . . . . . . . . . . . . . . . . . 113
Configuring the Collectors, Connectors, Integrators, and Actions . . . . . . . . . . . . . . . . . . . . . . . . . . 113
20 Enabling FIPS 140-2 Mode in an Existing Sentinel Installation
20.1
20.2
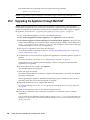
Enabling Sentinel Server to Run in FIPS 140-2 Mode . . . . . . . . . . . . . . . . . . . . . . . . . . . . . . . . . . 115
Enabling FIPS 140-2 Mode on Remote Collector Managers and Correlation Engines . . . . . . . . . . 115
21 Operating Sentinel in FIPS 140-2 Mode
21.1
21.2
21.3
21.4
21.5
21.6
21.7
6
115
117
Configuring the Advisor Service in FIPS 140-2 Mode . . . . . . . . . . . . . . . . . . . . . . . . . . . . . . . . . . . 117
Configuring Distributed Search in FIPS 140-2 Mode . . . . . . . . . . . . . . . . . . . . . . . . . . . . . . . . . . . . 117
Configuring LDAP Authentication in FIPS 140-2 Mode . . . . . . . . . . . . . . . . . . . . . . . . . . . . . . . . . . 118
Updating Server Certificates in Remote Collector Managers and Correlation Engines . . . . . . . . . 119
Configuring Sentinel Plug-Ins to Run in FIPS 140-2 Mode . . . . . . . . . . . . . . . . . . . . . . . . . . . . . . . 119
21.5.1 Agent Manager Connector. . . . . . . . . . . . . . . . . . . . . . . . . . . . . . . . . . . . . . . . . . . . . . . . . 120
21.5.2 Database (JDBC) Connector . . . . . . . . . . . . . . . . . . . . . . . . . . . . . . . . . . . . . . . . . . . . . . . 121
21.5.3 Sentinel Link Connector. . . . . . . . . . . . . . . . . . . . . . . . . . . . . . . . . . . . . . . . . . . . . . . . . . . 121
21.5.4 Syslog Connector . . . . . . . . . . . . . . . . . . . . . . . . . . . . . . . . . . . . . . . . . . . . . . . . . . . . . . . 122
21.5.5 Windows Event (WMI) Connector . . . . . . . . . . . . . . . . . . . . . . . . . . . . . . . . . . . . . . . . . . . 123
21.5.6 Sentinel Link Integrator . . . . . . . . . . . . . . . . . . . . . . . . . . . . . . . . . . . . . . . . . . . . . . . . . . . 123
21.5.7 LDAP Integrator . . . . . . . . . . . . . . . . . . . . . . . . . . . . . . . . . . . . . . . . . . . . . . . . . . . . . . . . . 124
21.5.8 SMTP Integrator . . . . . . . . . . . . . . . . . . . . . . . . . . . . . . . . . . . . . . . . . . . . . . . . . . . . . . . . 125
21.5.9 Using Non-FIPS Enabled Connectors with Sentinel in FIPS 140-2 Mode . . . . . . . . . . . . 125
Importing Certificates into FIPS Keystore Database . . . . . . . . . . . . . . . . . . . . . . . . . . . . . . . . . . . . 125
Reverting Sentinel to Non-FIPS Mode . . . . . . . . . . . . . . . . . . . . . . . . . . . . . . . . . . . . . . . . . . . . . . . 126
21.7.1 Reverting Sentinel Server to Non-FIPS mode . . . . . . . . . . . . . . . . . . . . . . . . . . . . . . . . . . 126
21.7.2 Reverting Remote Collector Managers or Remote Correlation Engines to Non-FIPS
mode . . . . . . . . . . . . . . . . . . . . . . . . . . . . . . . . . . . . . . . . . . . . . . . . . . . . . . . . . . . . . . . . . 126
NetIQ Sentinel Installation and Configuration Guide
Part V Upgrading Sentinel
127
22 Implementation Checklist
129
23 Prerequisite for Versions Prior to Sentinel 7.1.1
131
24 Upgrading Sentinel Traditional Installation
133
24.1
24.2
24.3
Upgrading Sentinel. . . . . . . . . . . . . . . . . . . . . . . . . . . . . . . . . . . . . . . . . . . . . . . . . . . . . . . . . . . . . . 133
Upgrading Sentinel as a Non-root User . . . . . . . . . . . . . . . . . . . . . . . . . . . . . . . . . . . . . . . . . . . . . . 134
Upgrading the Collector Manager or the Correlation Engine . . . . . . . . . . . . . . . . . . . . . . . . . . . . . . 135
25 Upgrading the Sentinel Appliance
25.1
25.2
25.3
137
Upgrading the Appliance by Using zypper . . . . . . . . . . . . . . . . . . . . . . . . . . . . . . . . . . . . . . . . . . . . 137
Upgrading the Appliance through WebYaST . . . . . . . . . . . . . . . . . . . . . . . . . . . . . . . . . . . . . . . . . . 138
Upgrading the Appliance by Using SMT . . . . . . . . . . . . . . . . . . . . . . . . . . . . . . . . . . . . . . . . . . . . . 139
26 Upgrading Sentinel Plug-Ins
141
Part VI Appendices
143
A Configuring Sentinel for High Availability
145
A.1
A.2
A.3
A.4
A.5
Concepts . . . . . . . . . . . . . . . . . . . . . . . . . . . . . . . . . . . . . . . . . . . . . . . . . . . . . . . . . . . . . . . . . . . . . 145
A.1.1
External Systems . . . . . . . . . . . . . . . . . . . . . . . . . . . . . . . . . . . . . . . . . . . . . . . . . . . . . . . . 146
A.1.2
Shared Storage . . . . . . . . . . . . . . . . . . . . . . . . . . . . . . . . . . . . . . . . . . . . . . . . . . . . . . . . . 146
A.1.3
Service Monitoring . . . . . . . . . . . . . . . . . . . . . . . . . . . . . . . . . . . . . . . . . . . . . . . . . . . . . . . 146
A.1.4
Fencing . . . . . . . . . . . . . . . . . . . . . . . . . . . . . . . . . . . . . . . . . . . . . . . . . . . . . . . . . . . . . . . 147
System Requirements . . . . . . . . . . . . . . . . . . . . . . . . . . . . . . . . . . . . . . . . . . . . . . . . . . . . . . . . . . . 147
Installation and Configuration. . . . . . . . . . . . . . . . . . . . . . . . . . . . . . . . . . . . . . . . . . . . . . . . . . . . . . 148
A.3.1
Initial Setup . . . . . . . . . . . . . . . . . . . . . . . . . . . . . . . . . . . . . . . . . . . . . . . . . . . . . . . . . . . . 149
A.3.2
Shared Storage Setup . . . . . . . . . . . . . . . . . . . . . . . . . . . . . . . . . . . . . . . . . . . . . . . . . . . . 150
A.3.3
Sentinel Installation . . . . . . . . . . . . . . . . . . . . . . . . . . . . . . . . . . . . . . . . . . . . . . . . . . . . . . 152
A.3.4
Cluster Installation . . . . . . . . . . . . . . . . . . . . . . . . . . . . . . . . . . . . . . . . . . . . . . . . . . . . . . . 155
A.3.5
Cluster Configuration . . . . . . . . . . . . . . . . . . . . . . . . . . . . . . . . . . . . . . . . . . . . . . . . . . . . . 156
A.3.6
Resource Configuration . . . . . . . . . . . . . . . . . . . . . . . . . . . . . . . . . . . . . . . . . . . . . . . . . . . 158
A.3.7
Secondary Storage Configuration . . . . . . . . . . . . . . . . . . . . . . . . . . . . . . . . . . . . . . . . . . . 159
Upgrading Sentinel in High Availability . . . . . . . . . . . . . . . . . . . . . . . . . . . . . . . . . . . . . . . . . . . . . . 160
A.4.1
Prerequisites . . . . . . . . . . . . . . . . . . . . . . . . . . . . . . . . . . . . . . . . . . . . . . . . . . . . . . . . . . . 160
A.4.2
Upgrading a Traditional Sentinel HA Installation . . . . . . . . . . . . . . . . . . . . . . . . . . . . . . . . 161
A.4.3
Upgrading a Sentinel HA Appliance Installation . . . . . . . . . . . . . . . . . . . . . . . . . . . . . . . . 162
Backup and Recovery . . . . . . . . . . . . . . . . . . . . . . . . . . . . . . . . . . . . . . . . . . . . . . . . . . . . . . . . . . . 165
A.5.1
Backup. . . . . . . . . . . . . . . . . . . . . . . . . . . . . . . . . . . . . . . . . . . . . . . . . . . . . . . . . . . . . . . . 165
A.5.2
Recovery . . . . . . . . . . . . . . . . . . . . . . . . . . . . . . . . . . . . . . . . . . . . . . . . . . . . . . . . . . . . . . 166
B Troubleshooting the Installation
B.1
B.2
167
Failed Installation Because of an Incorrect Network Configuration . . . . . . . . . . . . . . . . . . . . . . . . . 167
The UUID Is Not Created for Imaged Collector Managers or Correlation Engine . . . . . . . . . . . . . . 167
C Uninstalling
C.1
169
Uninstallation Checklist . . . . . . . . . . . . . . . . . . . . . . . . . . . . . . . . . . . . . . . . . . . . . . . . . . . . . . . . . . 169
Contents
7
C.2
C.3
8
Uninstalling Sentinel. . . . . . . . . . . . . . . . . . . . . . . . . . . . . . . . . . . . . . . . . . . . . . . . . . . . . . . . . . . . . 169
C.2.1
Uninstalling the Sentinel Server. . . . . . . . . . . . . . . . . . . . . . . . . . . . . . . . . . . . . . . . . . . . . 169
C.2.2
Uninstalling the Collector Manager and Correlation Engine . . . . . . . . . . . . . . . . . . . . . . . 170
C.2.3
Uninstalling the NetFlow Collector Manager . . . . . . . . . . . . . . . . . . . . . . . . . . . . . . . . . . . 170
Post-Uninstallation Tasks. . . . . . . . . . . . . . . . . . . . . . . . . . . . . . . . . . . . . . . . . . . . . . . . . . . . . . . . . 171
NetIQ Sentinel Installation and Configuration Guide
About this Book and the Library
The Installation and Configuration Guide provides an introduction to NetIQ Sentinel and explains how
to install and configure Sentinel.
Intended Audience
This guide is intended for Sentinel administrators and consultants.
Other Information in the Library
The library provides the following information resources:
Administration Guide
Provides administration information and tasks required to manage a Sentinel deployment.
User Guide
Provides conceptual information about Sentinel. This book also provides an overview of the
user interfaces and step-by-step guidance for many tasks.
About this Book and the Library
9
10
NetIQ Sentinel Installation and Configuration Guide
About NetIQ Corporation
We are a global, enterprise software company, with a focus on the three persistent challenges in your
environment: Change, complexity and risk—and how we can help you control them.
Our Viewpoint
Adapting to change and managing complexity and risk are nothing new
In fact, of all the challenges you face, these are perhaps the most prominent variables that deny
you the control you need to securely measure, monitor, and manage your physical, virtual, and
cloud computing environments.
Enabling critical business services, better and faster
We believe that providing as much control as possible to IT organizations is the only way to
enable timelier and cost effective delivery of services. Persistent pressures like change and
complexity will only continue to increase as organizations continue to change and the
technologies needed to manage them become inherently more complex.
Our Philosophy
Selling intelligent solutions, not just software
In order to provide reliable control, we first make sure we understand the real-world scenarios
in which IT organizations like yours operate — day in and day out. That's the only way we can
develop practical, intelligent IT solutions that successfully yield proven, measurable results.
And that's so much more rewarding than simply selling software.
Driving your success is our passion
We place your success at the heart of how we do business. From product inception to
deployment, we understand that you need IT solutions that work well and integrate seamlessly
with your existing investments; you need ongoing support and training post-deployment; and
you need someone that is truly easy to work with — for a change. Ultimately, when you succeed,
we all succeed.
Our Solutions
Identity & Access Governance
Access Management
Security Management
Systems & Application Management
Workload Management
Service Management
About NetIQ Corporation
11
Contacting Sales Support
For questions about products, pricing, and capabilities, contact your local partner. If you cannot
contact your partner, contact our Sales Support team.
Worldwide:
www.netiq.com/about_netiq/officelocations.asp
United States and Canada:
1-888-323-6768
Email:
[email protected]
Web Site:
www.netiq.com
Contacting Technical Support
For specific product issues, contact our Technical Support team.
Worldwide:
www.netiq.com/support/contactinfo.asp
North and South America:
1-713-418-5555
Europe, Middle East, and Africa:
+353 (0) 91-782 677
Email:
[email protected]
Web Site:
www.netiq.com/support
Contacting Documentation Support
Our goal is to provide documentation that meets your needs. If you have suggestions for
improvements, click Add Comment at the bottom of any page in the HTML versions of the
documentation posted at www.netiq.com/documentation. You can also email [email protected]. We value your input and look forward to hearing from you.
Contacting the Online User Community
Qmunity, the NetIQ online community, is a collaborative network connecting you to your peers and
NetIQ experts. By providing more immediate information, useful links to helpful resources, and
access to NetIQ experts, Qmunity helps ensure you are mastering the knowledge you need to realize
the full potential of IT investments upon which you rely. For more information, visit http://
community.netiq.com.
12
NetIQ Sentinel Installation and Configuration Guide
I
Understanding Sentinel
I
This section provides detailed information about what Sentinel is and how Sentinel provides an
event management solution for your organization.
Chapter 1, “What is Sentinel?,” on page 15
Chapter 2, “How Sentinel Works,” on page 19
Understanding Sentinel
13
14
NetIQ Sentinel Installation and Configuration Guide
1
What is Sentinel?
1
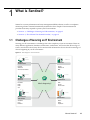
Sentinel is a security information and event management (SIEM) solution as well as a compliance
monitoring solution. Sentinel automatically monitors the most complex IT environments and
provides the security required to protect your IT environment.
Section 1.1, “Challenges of Securing an IT Environment,” on page 15
Section 1.2, “The Solution That Sentinel Provides,” on page 16
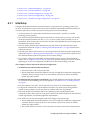
1.1
Challenges of Securing an IT Environment
Securing your IT environment is a challenge due to the complexity of your environment. There are
many different applications, databases, mainframes, workstations, and servers that all have logs of
events. You also have the security devices and network infrastructure devices that all contain logs of
what is happening in your IT environment.
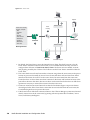
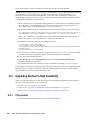
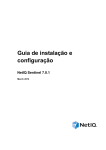
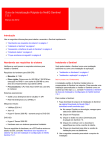
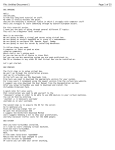
Figure 1-1 What Happens in Your Environment
SYS
LOGS
TABLES
Network
Infrastructure
Databases
Routers
Switches
VPN Concentrators
Oracle
SQLServer
DB2
LOGS
LOGS
Security
Devices
Applications
Firewalls
IDSs
IPSs
A/V
What's Happening?
SAP
Oracle
Home Grow
LOGS
LOGS
Workstations
and Servers
Mainframes
Windows
Unix
Netware
RACF
ACF2
TopSecre
What is Sentinel?
15
The challenges arise because of the following facts:
There are many devices in your IT environment.
The logs are in different formats.
The logs are stored in silos.
The amount of information generated in the logs.
You can’t determine who did what without manually analyzing all of the logs.
To make the information useful, you must be able to perform the following:
Collect the data.
Consolidate the data.
Normalize disparate data into events that you can easily compare.
Map events to standard regulations.
Analyze the data.
Compare events across multiple systems to determine if there are security issues.
Send notifications when the data is outside of the norms.
Take action on notifications to comply with business policies.
Generate reports to prove compliance.
After you understand the challenges of securing your IT environment, you need to determine how to
secure the enterprise for and from users without treating them like malicious users, or burdening
them to the point where it is impossible to be productive. Sentinel provides the solution.
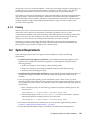
1.2
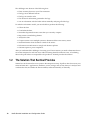
The Solution That Sentinel Provides
Sentinel acts as the central nervous system to the enterprise security. It pulls in data from across your
entire infrastructure—applications, databases, servers, storage, and security devices. It analyzes and
correlates the data, and makes the data actionable, either automatically or manually.
16
NetIQ Sentinel Installation and Configuration Guide
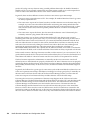
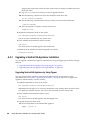
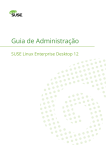
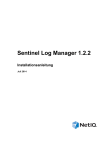
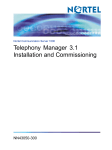
Figure 1-2 The Solution That Sentinel Provides
Exchange
Server
Sentinel
Log
Remediate
Mainframe
SAP
Firewall
The result is that you know what is happening in your IT environment at any given point, and you
have the ability to tie the actions taken on resources to the people taking those actions. This allows
you to determine user behavior and effectively monitor control. No matter if that person is an insider
or not, you can tie together all the actions they take so that unauthorized activities become clear
before they do damage.
Sentinel does this in a cost-effective way by:
Providing a single solution to address IT controls across multiple regulations.
Closing the knowledge gap between what should happen and what is actually happening in
your networked environment.
Demonstrating to auditors and regulators that your organization documents, monitors, and
reports on security controls.
Providing out-of-the-box compliance monitoring and reporting programs.
Gaining the visibility and control required to continually assess the success of your
organization’s compliance and security programs.
What is Sentinel?
17
Sentinel automates log collection, analysis, and the reporting processes to ensure that IT controls are
effective in supporting threat detection and audit requirements. Sentinel provides automated
monitoring of security events, compliance events, and IT controls allowing you to take immediate
action if there is a security breach or non-compliant event occurring. Sentinel also allows you to
easily gather summary information about your environment so you can communicate your overall
security posture to key stakeholders.
18
NetIQ Sentinel Installation and Configuration Guide
2
How Sentinel Works
2
Sentinel continuously manages security information and events throughout your IT environment to
provide a complete monitoring solution.
Sentinel does the following:
Gathers logs, events, and security information from all of the different event sources in your IT
environment.
Normalizes the collected logs, events, and security information into a common format.
Stores events in a file-based data store with flexible, customizable data retention policies.
Collects network flow data and helps you monitor network activities in detail.
Provides the ability to hierarchically link multiple Sentinel systems, including Sentinel Log
Manager.
Allows you to search for events not only on your local Sentinel server, but also on other Sentinel
servers distributed across the globe.
Performs a statistical analysis that allows you define a baseline and then compares it to what is
occurring to determine if there are unseen problems.
Correlates a set of similar or comparable events in a given period to determine a pattern.
Organizes events into incidents for efficient response management and tracking.
Provides reports based on real time and historical events.
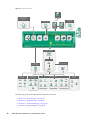
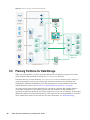
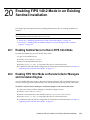
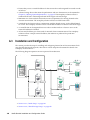
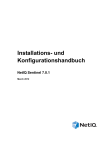
The following figure illustrates how Sentinel works:
How Sentinel Works
19
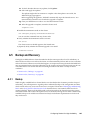
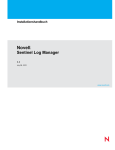
Figure 2-1 Sentinel Architecture
Data
Warehouse
Other Sentinel and
Sentinel Log Manager
Systems
Sentinel Web
Console
Correlation Engine
Primary
Storage
Incident
Remediation
Search
Reports
Correlation
Event
Routing
Secondary
Storage
Trending
and Analysis
iTRAC
Workflows
Actions and
Integrators
Sentinel Server
Collector Manager
Event Routing
NetFlow
Collector Manager
Agent Manager
Central Computer
Collector
Connector
NETWORK
DEVICES
VPN
Host IDS
Firewall
Asset Mgmt Patch Mgmt
Windows
Linux
ERP
Database
Router
Identity
Directory
Enterprise
SSO
Windows
iSeries
UNIX
Mainframe
OPERATING SYSTEMS
Financial
Application
Custom
Application
APPLICATION EVENTS
The following sections describe Sentinel components in detail:
Section 2.1, “Event Sources,” on page 21
Section 2.2, “Sentinel Event,” on page 21
Section 2.3, “Collector Manager,” on page 23
Section 2.4, “Agent Manager,” on page 23
20
SENTINEL
AGENTS
Antivirus
Configuration Vulnerability
Mgmt
Mgmt
Network IDS
EVENT SOURCES
REFERENTIAL
IT SOURCES
NetIQ Sentinel Installation and Configuration Guide
Identity
Access
Management Management
USER ACCESS CONTROL
UNIX
Section 2.5, “NetFlow Collector Manager,” on page 24
Section 2.6, “Sentinel Data Routing and Storage,” on page 24
Section 2.7, “Correlation,” on page 25
Section 2.8, “Security Intelligence,” on page 25
Section 2.9, “Incident Remediation,” on page 25
Section 2.10, “iTrac Workflows,” on page 25
Section 2.11, “Actions and Integrators,” on page 26
Section 2.12, “Searching,” on page 26
Section 2.13, “Reports,” on page 26
Section 2.14, “Identity Tracking,” on page 26
Section 2.15, “Event Analysis,” on page 27
2.1
Event Sources
Sentinel gathers security information and events from many different sources in your IT
environment. These sources are called event sources. The event sources can be many different items
on your network.
Security Perimeter: Security devices including hardware and software used to create a security
perimeter for your environment, such as firewalls, IDS, and VPNs.
Operating Systems: Events from the different operating systems running in the network.
Referential IT Sources: The software used to maintain and track assets, patches, configuration, and
vulnerability.
Application Events: Events generated from the applications installed in the network.
User Access Control: Events generated from applications or devices that allow users access to
company resources.
For more information about collecting events from event sources, see “Configuring Agentless Data
Collection”.
2.2
Sentinel Event
Sentinel receives information from devices, normalizes this information into a structure called an
event, categorizes the event, and then sends the event for processing. By adding category information
(taxonomy) to events, events are easier to compare across systems that report events differently. For
example, authentication failures. Events are processed by the real time display, correlation engine,
dashboards, and the back end server.
An event comprises more than 200 fields. Event fields are of different types and of different purposes.
There are some predefined fields such as severity, criticality, destination IP and destination port.
There are two sets of configurable fields: Reserved fields are for Sentinel internal use to allow future
expansion and Customer fields are for customer extensions.
Fields can be re-purposed by renaming them. The source for a field can either be external, which
means that it is set explicitly by the device or the corresponding Collector, or referential. The value of
a referential field is computed as a function of one or more other fields using the mapping service.
How Sentinel Works
21
For example, a field can be defined to be the building code for the building containing the asset
mentioned as the destination IP of an event. For example, a field can be computed by the mapping
service using a customer defined map using the destination IP from the event.
Section 2.2.1, “Mapping Service,” on page 22
Section 2.2.2, “Streaming Maps,” on page 22
Section 2.2.3, “Exploit Detection (Mapping Service),” on page 22
2.2.1
Mapping Service
The Mapping Service allows a sophisticated mechanism to propagate business relevance data
throughout the system. This data can enrich events with referential information that will provide
context that enables analysts to make better decisions, write more useful reports, and write wellthought out correlation rules.
You can enrich your event data by using maps to add additional information such as host and
identity details to the incoming events from your source devices. This additional information can be
used for advanced correlation and reporting. The system supports several built-in maps as well as
custom user-defined maps
Maps that are defined in Sentinel are stored in two ways:
Built-in maps are stored in the database, updated using APIs in Collector code, and
automatically exported to the Mapping service.
Custom maps are stored as CSV files and can be updated on the file system or via the Map Data
Configuration UI, then loaded by the Mapping service.
In both cases, the CSV files are kept on the central Sentinel server but changes to the maps are
distributed to each Collector Manager and applied locally. This distributed processing ensures that
mapping activity does not overload the main server.
2.2.2
Streaming Maps
The Map Service employs a dynamic update model and streams the maps from one point to another,
avoiding the buildup of large static maps in dynamic memory. The value of this streaming capability
is particularly relevant in a mission-critical real-time system such as Sentinel where there needs to be
a steady, predictive and agile movement of data independent of any transient load on the system.
2.2.3
Exploit Detection (Mapping Service)
Sentinel provides the ability to cross-reference event data signatures with Vulnerability Scanner data.
Users are notified automatically and immediately when an attack is attempting to exploit a
vulnerable system. This is accomplished through:
Advisor Feed
Intrusion detection
Vulnerability scanning
Firewalls
Advisor provides a cross-reference between event data signatures and vulnerability scanner data.
Advisor feed contains information about vulnerabilities and threats as well as a normalization of
event signatures and vulnerability plug-ins. For more information on Advisor, see “Detecting
Vulnerabilities and Exploits”in the NetIQ Sentinel Administration Guide.
22
NetIQ Sentinel Installation and Configuration Guide
2.3
Collector Manager
The Collector Manager manages data collection, monitors system status messages, and performs
event filtering as needed. The main functions of the Collector Manager include the following:
Transforming events.
Adding business relevance to events through the mapping service.
Routing events.
Determining real-time, vulnerability, asset, or non-real-time data.
Sending health message to the Sentinel server.
2.3.1
Collectors
The Collectors normalize and collect the information from the Connectors. Collectors are written in
JavaScript and they define the logic for the following:
Receiving raw data from the Connectors.
Parsing and normalizing the data.
Applying repeatable logic to the data.
Translating device-specific data into Sentinel specific data.
Formatting the events.
Passing the normalized, parsed, and formatted data to the Collector Manager.
Device-specific filtering of events.
For more information on Collectors, see Sentinel Plug-ins Web site.
2.3.2
Connectors
The Connectors provide connections from the event sources to the Sentinel system. Connectors use
industry-standard protocols to get events such as syslog, JDBC to read from database tables, WMI to
read from Windows Event Logs, and so on. Connectors provide:
Transportation of raw event data from the events sources to the Collector.
Connection specific filtering.
Connection error handling.
2.4
Agent Manager
Agent Manager provides host-based data collection that complements agentless data collection by
allowing you to:
Access logs not available from the network.
Operate in tightly-controlled network environments.
Improve security posture by limiting attack surface on critical servers.
Provide enhanced reliability of data collection during times of network interruption
How Sentinel Works
23
Agent Manager allows you to deploy agents, manage agent configuration, and act as a collection
point for events flowing into Sentinel. For more information about Agent Manager, see the Agent
Manager documentation.
2.5
NetFlow Collector Manager
The NetFlow Collector Manager collects network flow data (NetFlow, IPFIX, and so on) from
network devices such as routers, switches, and firewalls. Network flow data describes basic
information about all network connections between hosts including packets and bytes transmitted,
which helps you visualize the behavior of individual hosts or the entire network.
The NetFlow Collector Manager functionality includes the following:
Collects network flow data in bytes, flows, and packets from supported network devices.
Aggregates and sends the collected data to the Sentinel server for visualization and analysis of
network activities in your environment.
For more information about visualizing and analyzing network flow data, see “Visualizing and
Analyzing Network Flow Data” in the NetIQ Sentinel User Guide.
2.6
Sentinel Data Routing and Storage
Sentinel provides multiple options for routing, storing, and extracting the data collected. By default,
Sentinel receives two separate but related data streams from the Collector Managers: the parsed
event data and the raw data. The raw data is immediately stored in protected partitions to provide a
secure evidence chain. The parsed event data is routed according to rules you define, which you can
filter, send to storage, send to real-time analytics, and route to external systems. All event data sent to
storage is further matched to user-defined retention policies that determine the partition in which
data is placed, and defines the grooming policy under which the event data is retained and then
eventually deleted.
Sentinel data storage is based on a three-tier structure:
Online
Storage
Primary storage,
formerly known as
local storage.
Optimized for quick writes and fast retrieval. Stores the most recently
collected event data and the most frequently searched event data.
Secondary storage,
formerly known as
network storage.
(optional)
Optimized to reduce space usage on optionally less expensive storage
while still supporting fast retrieval. Sentinel automatically migrates data
partitions to the secondary storage.
NOTE: Using the secondary storage is optional. Data retention policies, searches, and reports
operate on event data partitions regardless of whether they are residing on primary or secondary
storage, or both.
Offline
Storage
Archival storage
When partitions are closed, you can back up the partition to offline storage
such as Amazon Glacier, and similar. If necessary, you can temporarily reimport partitions for use in long-term forensic analysis.
You can also configure Sentinel to extract the event data and event data summaries to an external
database by using data synchronization policies. For more information, see “Configuring Data
Storage” in the NetIQ Sentinel Administration Guide.
24
NetIQ Sentinel Installation and Configuration Guide
2.7
Correlation
A single event may seem trivial, but in combination with other events, it might warn you of a
potential problem. Sentinel helps you correlate such events by using the rules you create and deploy
in the Correlation engine, and take appropriate action to mitigate any problems.
Correlation adds intelligence to security event management by automating analysis of the incoming
event stream to find patterns of interest. Correlation allows you to define rules that identify critical
threats and complex attack patterns so that you can prioritize events and initiate effective incident
management and response. For more information, see “Correlating Event Data” in the NetIQ Sentinel
User Guide.
To monitor events according to the Correlation rules, you must deploy the rules in the Correlation
Engine. When an event occurs that satisfies the rule criteria, the Correlation Engine generates a
correlation event describing the pattern. For more information, see “Correlation Engine” in the NetIQ
Sentinel User Guide.
2.8
Security Intelligence
The correlation capability in Sentinel provides the ability to look for known patterns of activity,
whether it be for security, compliance, or other reasons. The Security Intelligence capability looks for
activity that is out of the ordinary, which may be malicious, but does not match any known pattern.
The Security Intelligence feature in Sentinel focuses on statistical analysis of time series data to enable
analysts to identify and analyze deviations (anomalies) either by an automated statistical engine or
by visual representation of the statistical data for manual interpretation. For more information, see
“Analyzing Trends in Data” in the NetIQ Sentinel User Guide.
2.9
Incident Remediation
Sentinel provides an automated incident response management system that enables you to document
and formalize the process of tracking, escalating, and responding to incidents and policy violations,
and provides two-way integration with trouble-ticketing systems. Sentinel enables you to react
promptly and resolve incidents efficiently. For more information, see “Configuring Incidents”in the
NetIQ Sentinel User Guide.
2.10
iTrac Workflows
iTRAC workflows are designed to provide a simple, flexible solution for automating and tracking an
enterprise’s incident response processes. iTRAC leverages Sentinel’s internal incident system to track
security or system problems from identification (through correlation rules or manual identification)
through resolution.
Workflows can be built using manual and automated steps. Advanced features such as branching,
time-based escalation, and local variables are supported. Integration with external scripts and plugins allows for flexible interaction with third-party systems. Comprehensive reporting allows
administrators to understand and fine-tune the incident response processes. For more information,
see “Configuring iTRAC Workflows”in the NetIQ Sentinel User Guide.
How Sentinel Works
25
2.11
Actions and Integrators
Actions either manually or automatically execute some type of action, such as sending an email, in
Sentinel. Actions can be triggered by routing rules, by manually executing an event or incident
operation, and by correlation rules. Sentinel provides a list of preconfigured Actions. You can use the
default Actions and reconfigure them as necessary, or you can add new Actions. For more
information, see “Configuring Actions” in the NetIQ Sentinel Administration Guide.
An Action can execute on its own, or it can make use of an Integrator instance configured from an
Integrator plug-in. Integrator plug-ins extend the features and functionality of Sentinel remediation
actions. Integrators provide the ability to connect to an external system, such as an LDAP, SMTP, or
SOAP server, to execute an action. For more information, see “Configuring Integrators”in the NetIQ
Sentinel Administration Guide.
2.12
Searching
Sentinel provides an option to perform a search on events. You can search data in the primary storage
or the secondary storage location. With the necessary configuration, you can also search system
events generated by Sentinel, and view the raw data for each event. For more information, see
“Performing a Search”in the NetIQ Sentinel User Guide.
You can also search Sentinel servers that are distributed across different geographic locations. For
more information, see “Searching and Reporting Events in a Distributed Environment”in the NetIQ
Sentinel Administration Guide.
2.13
Reports
Sentinel provides the ability to run reports on the data gathered. Sentinel is prepackaged with a
variety of customizable reports. Some reports are flexible, which allow you to specify the columns to
be displayed in the results.
You can run, schedule, and e-mail PDF reports. You can also run any report as a search and then
interact with the results as you would do with a search, such as refining the search or performing an
action on the results. You can also run reports on Sentinel servers distributed across different
geographic locations. For more information, see “Reporting” in the NetIQ Sentinel User Guide.
2.14
Identity Tracking
Sentinel provides an integration framework to identity management systems to track the identities of
for each user account and what events those identities have performed. Sentinel provides user
information such as contact information, user accounts, recent authentication events, recent access
events, permission changes, and so on. By displaying information about the people initiating a given
action or people affected by an action, incident response times are improved and behavior-based
analysis is enabled. For more information, see “Leveraging Identity Information”in the NetIQ Sentinel
User Guide.
26
NetIQ Sentinel Installation and Configuration Guide
2.15
Event Analysis
Sentinel provides a powerful set of tools to help you easily find and analyze critical event data. The
system is tuned and optimized for maximal efficiency in any particular type of analysis, and methods
to easily transition from one type of analysis to another are provided for seamless transitions.
Investigating events in Sentinel often starts with the near real-time Active Views. Although more
advanced tools are available, Active Views display filtered event streams along with summary charts
that can be used for simple, rough analysis of event trends, event data, and identification of specific
events. Over time, you build up tuned filters for specific classes of data, such as output from
correlation. You can use Active Views as a dashboard showing an overall operational and security
posture.
You can then use the interactive search to perform more detailed analysis of events. This allows you
to quickly and easily search for and find data related to a specific query, such as activity by a specific
user or on a particular system. By clicking on the event data or using the left-hand refinement pane,
you can quickly zero in on specific events of interest.
When analyzing hundreds of events, the reporting capabilities of Sentinel provide custom control
over event layout and can display larger volumes of data. Sentinel makes this transition easier by
allowing you to transfer the interactive searches built up in the Search interface into a reporting
template, which instantly creates a report that displays the same data but in a format better suited for
a larger number of events.
Sentinel includes many templates for this purpose. Some templates are tuned to display particular
types of information, such as authentication data or user creation, and some are general-purpose
templates that allow you to customize groups and columns on the report interactively.
Over time, you will develop commonly-used filters and reports that make your workflows easier.
Sentinel fully supports storing this information and distributing it with people in your organization.
For more information, see the NetIQ Sentinel User Guide.
How Sentinel Works
27
28
NetIQ Sentinel Installation and Configuration Guide
II
Planning Your Sentinel Installation
I
This section guides you through planning considerations before installing Sentinel. If you want to
install a configuration that is not identified in the sections that follow, or if you have any questions,
contact NetIQ Technical Support.
Chapter 3, “Implementation Checklist,” on page 31
Chapter 4, “Understanding License Information,” on page 33
Chapter 5, “Meeting System Requirements,” on page 35
Chapter 6, “Deployment Considerations,” on page 49
Chapter 7, “Deployment Considerations for FIPS140-2 Mode,” on page 57
Chapter 8, “Ports Used,” on page 63
Chapter 9, “Installation Options,” on page 69
Planning Your Sentinel Installation
29
30
NetIQ Sentinel Installation and Configuration Guide
3
Implementation Checklist
3
Use the following checklist to complete planning, installing, and configuring Sentinel:
Tasks
See
Review the product architecture information to learn
about Sentinel components.
Part I, “Understanding Sentinel,” on page 13.
Review the Sentinel licensing to determine whether
you need to use the trial license or the enterprise
license of Sentinel.
Chapter 4, “Understanding License Information,”
on page 33.
Assess your environment to determine the hardware
configuration. Ensure that the computers on which
you install Sentinel and its components meet the
specified requirements.
Chapter 5, “Meeting System Requirements,” on
page 35.
Review the Collector Manager and Correlation Engine Section 6.1, “Advantages of Distributed
events per second (EPS), and NetFlow Collector
Deployments,” on page 49.
Manager records per second (RPS).
Determine the number of Collector Managers,
Correlation Engines, and NetFlow Collector Managers
you need to install to improve performance and load
balancing.
Review the Sentinel release notes to understand the
new functionality and the known issues.
Sentinel Release Notes
Install Sentinel.
Part III, “Installing Sentinel,” on page 71.
Ensure that you configure the time on the Sentinel
server.
Chapter 17, “Configuring Time,” on page 107.
When you install Sentinel, the Sentinel plug-ins
Chapter 19, “Configuring Out-of-the-Box Plugavailable at the time of the Sentinel release are
Ins,” on page 113.
installed by default. Configure the out-of-the-box plugins for data collection and reporting purposes.
Install additional Collectors and Connectors as
needed in your environment.
Chapter 15, “Installing Additional Collectors and
Connectors,” on page 101.
Install additional Collector Managers and Correlation
Engines as needed in your environment.
Section 12.5, “Installing Collector Managers and
Correlation Engines,” on page 82.
Implementation Checklist
31
32
NetIQ Sentinel Installation and Configuration Guide
4
Understanding License Information
4
Sentinel has several licenses that you can use. By default, Sentinel comes with the trial license.
4.1
Trial License
The Sentinel default licensing allows you to use all the enterprise features of Sentinel for the
evaluation period of 90 days. A system running with the trial license displays an indicator on the
Web Interface indicating that the temporary license key is being used. It also displays the number of
days left before the functionality expires and indicates how to upgrade to a full license.
NOTE: The expiration date of the system is based on the oldest data in the system. If you restore old
events into your system, the expiration date will be adjusted accordingly.
After the 90-day trial period, most functionality is disabled, but you are still able to log in and update
the system to use an enterprise license key.
After you upgrade to an enterprise license, all functionality is restored. To prevent any interruption
in functionality, you must upgrade the system with an enterprise license before the expiration date.
4.2
Enterprise Licenses
When you purchase Sentinel, you receive a license key through the customer portal. Depending on
what you purchase, your license key enables certain features, data collection rates, and event sources.
There may be additional license terms that are not enforced by the license key, so please read your
license agreement carefully.
To make changes to your licensing, please contact your account manager. You can add the enterprise
license key during the installation. To add the license key during the evaluation period, see in the
NetIQ Sentinel Administration Guide.
Understanding License Information
33
34
NetIQ Sentinel Installation and Configuration Guide
5
Meeting System Requirements
5
This chapter provides information about the hardware, operating system, and browser requirements
for Sentinel. For the latest information about these requirements, see the NetIQ Sentinel Technical
Information Website.
Section 5.1, “Supported Operating Systems and Platforms,” on page 35
Section 5.2, “Supported Database Platforms,” on page 36
Section 5.3, “Supported Browsers,” on page 36
Section 5.4, “System Sizing Information,” on page 37
Section 5.5, “Connector and Collector System Requirements,” on page 47
Section 5.6, “Virtual Environment,” on page 47
5.1
Supported Operating Systems and Platforms
NetIQ Corporation supports the Sentinel server, Collector Manager, and Correlation Engine on the
following operating systems and platforms:
Category
Requirement
Operating System
Sentinel is supported on the following operating systems:
Non-FIPS mode:
SUSE Linux Enterprise Server (SLES) 11 SP3 64-bit *
Red Hat Enterprise Linux Server (RHEL) 6.4 64-bit
FIPS mode:
SUSE Linux Enterprise Server (SLES) 11 SP3 64-bit
Red Hat Enterprise Linux Server (RHEL) 6.3 64-bit
* Sentinel is not supported on the Open Enterprise Server installs of SLES.
For information about new functionality and known issues in the supported SLES 11
Service Pack, see the SUSE Release Notes.
Virtual Platform
NetIQ provides appliances that install a SLES 11 SP3 64-bit server and Sentinel on
the following virtual platforms:
VMWare ESX 4.0 and 5.0
Xen 4.0
Meeting System Requirements
35
Category
Requirement
DVD ISO
NetIQ provides a DVD ISO file that installs SLES 11 SP3 64-bit and Sentinel on:
Hyper-V Server 2012
Hardware without an operating system installed
IMPORTANT: For the ISO appliance to work properly, you must disable the EFI BIOS
and use the Legacy BIOS.
File System
Traditional Installations:
On SLES systems: Sentinel supports ext3 and XFS file systems.
On RHEL systems: Sentinel supports ext4 and XFS file systems.
Appliance Installations:
Sentinel uses the ext3 file system.
For more information on file systems, see Overview of File Systems in Linux (http://
www.novell.com/documentation/sles11/stor_admin/data/filesystems.html) in the SLES
11 Storage Administration Guide.
5.2
Supported Database Platforms
Sentinel includes an embedded file-based storage system and the PostgreSQL database, which is all
that is necessary to run Sentinel. However, if you use the optional data synchronization feature to
copy data to a data warehouse, Sentinel supports using PostgreSQL, Oracle version 11g R2, Microsoft
SQL Server 2008 R2, DB2, and Sybase as the data warehouse.
5.3
Supported Browsers
The Sentinel Web interface is optimized for viewing at 1280 x 1024 or higher resolution in the
following supported browsers:
NOTE: To load the Sentinel client applications properly, you must install the Java Webstart on your
system.
Platform
Windows 7
Browser
Google Chrome
Firefox version 5 and later
Internet Explorer 9 and 10*
*
See Section 5.3.1, “Prerequisites for Internet Explorer,” on
page 37.
SLES 11 SP3 and RHEL 6
36
Firefox version 5 and later
NetIQ Sentinel Installation and Configuration Guide
5.3.1
Prerequisites for Internet Explorer
If the Internet Security Level is set to High, a blank page appears after logging in to Sentinel and the
file download pop-up might be blocked by the browser. To work around this issue, you need to first
set the security level to Medium-high and then change to Custom level as follows:
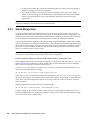
1. Navigate to Tools > Internet Options > Security and set the security level to Medium-high.
2. Make sure that the Tools > Compatibility View option is not selected.
3. Navigate to Tools > Internet Options > Security tab> Custom Level, then scroll down to the
Downloads section and select Enable under the Automatic prompting for file downloads
option.
5.4
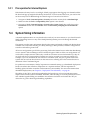
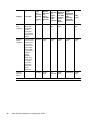
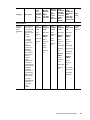
System Sizing Information
A Sentinel implementation can vary based on the needs of your environment, so you should consult
NetIQ Consulting Services or any of the NetIQ Sentinel partners prior to finalizing the Sentinel
architecture.
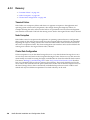
This section provides sizing information based on the testing performed at NetIQ with the hardware
available to us at the time of testing. It is likely that larger, more powerful, hardware configurations
exist that can handle a greater load.
All-in-one configurations put all of the processing load on the Sentinel server rather than distributing
it out to remote Collector Managers and Correlation Engines. While an all-in-one configuration can
work well for simple scenarios where only a small set of features are used in limited ways, they do
not scale well when a large number of features are used or are used in an extensive manner. For
example, if you use more than the out-of-the-box correlation rules, this puts a greater load on the
system and can result in other features on the same server suffering due to the increased resource
utilization of the Correlation Engine.
For production environments, NetIQ Corporation recommends setting up a distributed deployment
because it isolates data collection components on a separate machine, which is important for
handling spikes and other anomalies with maximum system stability. For more information about
distributed deployments, see Chapter 6, “Deployment Considerations,” on page 49.
The ability of the CPU to perform hyperthreading has been shown to have a significant positive
impact on the load the system can handle. Therefore, when deciding on a CPU to purchase, be sure to
note whether hyperthreading was enabled in the reference test below and ensure the CPU you
choose has as good or better hyperthreading capabilities.
Meeting System Requirements
37
Demo
All-inOne (not
intended
for
producti
on)
Medium
Distribut
ed
Agentless Data
Collectio
n
Large
Distribute
d Agentless Data
Collectio
n (Raw
Data
Stored)
Large
Distributed
Agent-less
Data
Collection
(Raw Data
Not Stored)
Extra
Large
Category
Description
Retained
EPS
Capability
The events per
second rate
processed by
real-time
components
and retained in
storage by the
system.
100 EPS
3000 EPS
2500
EPS
11000
EPS
13000 EPS
13000+
EPS
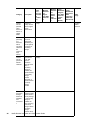
Operation
al EPS
Capability
The total events
per second rate
received by the
system from
event sources.
This includes
data dropped
by the system's
intelligent
filtering
capability
before being
stored and is
the number
used for the
purposes of
EPS-based
license
compliance.
100 EPS
3000+
EPS
2500+
EPS
11000+
EPS
13000+
EPS
13000+
EPS
300 FPM
60000
FPM
Not
Applicabl
e
60000
FPM
60000 FPM
60000+
FPM
Network
Flows per
Minute
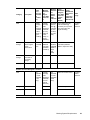
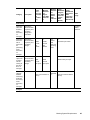
Sentinel Server Hardware
38
Medium
Distribut
ed
Agentbased
Data
Collectio
n
NetIQ Sentinel Installation and Configuration Guide
Category
Description
CPU
Medium
Distribut
ed
Agentbased
Data
Collectio
n
Large
Distribute
d Agentless Data
Collectio
n (Raw
Data
Stored)
Intel(R)
Xeon(R)
CPU
X5355 @
2.66GHz
(4 core)
CPUs (8
cores
total), no
hyperthreading
Two AMD
Opteron
2431 @
2.40 GHz
(6 cores
per CPU;
12 cores
total)
Two Intel(R) Xeon(R)
CPU E5-2680 0 @
2.70GHz (8 core) CPUs
(16 cores total), with
hyper-threading
Demo
All-inOne (not
intended
for
producti
on)
Medium
Distribut
ed
Agentless Data
Collectio
n
Intel(R)
Xeon(R)
CPU
E5420 @
2.50GHz
(4 CPU
cores), no
hyperthreading
Large
Distributed
Agent-less
Data
Collection
(Raw Data
Not Stored)
Primary
Storage
Locally cached
data for higher
search
performance.
500 GB
7.2k RPM
drive
5 x 300
GB SAS
15k RPM
(Hardwar
e RAID 0)
3 x 146
GB SAS
10K RPM
(RAID 0,
stripe
size
128k)
5 TB, 8 x 600 GB SAS
15k RPM (Hardware
RAID 0, stripe size 128k)
Secondary
Storage
Includes a copy
of the data in
the primary
storage.
Not Used
Not Used
Not Used
Not Used
4 GB
24 GB
16 GB
128 GB
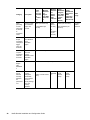
Intel(R)
Xeon(R)
CPU
E5450 @
3.00GHz,
4 cores
(virtual
machine)
Not
Applicabl
e (Local
Embedde
d CM
Only)
Same as Sentinel server
Memory
Extra
Large
Contact
NetIQ
Services
Remote Collector Manager # 1 Hardware
CPU
Not
Applicabl
e (Local
Embedde
d CM
Only)
Storage
50 GB
20 GB free space
Memory
4 GB
24 GB
Contact
NetIQ
Services
Remote Collector Manager # 2 Hardware
Meeting System Requirements
39
Category
Description
CPU
Demo
All-inOne (not
intended
for
producti
on)
Medium
Distribut
ed
Agentless Data
Collectio
n
Medium
Distribut
ed
Agentbased
Data
Collectio
n
Not Applicable
Large
Distribute
d Agentless Data
Collectio
n (Raw
Data
Stored)
Large
Distributed
Agent-less
Data
Collection
(Raw Data
Not Stored)
8 Core Intel(R) Xeon(R)
CPU X5570 @ 2.93GHz
(virtual machine)
Storage
50 GB
Memory
8 GB
Extra
Large
Contact
NetIQ
Services
NetFlow Collector Manager Hardware
CPU
4 Core Intel(R)
Xeon(R) CPU X5570
@ 2.93GHz (virtual
machine)
Not
Applicabl
e
4 Core Intel(R) Xeon(R)
CPU X5570 @ 2.93GHz
(virtual machine)
Storage
50 GB
50 GB
Memory
4 GB
4 GB
Contact
NetIQ
Services
Agent Manager Hardware
CPU
Not Applicable (Agentless collection only)
Two Intel
Xeon
5140 @
2.33 GHz
(2 cores
per CPU;
4 cores
total)
Storage
2 x 300
GB SAS
10K RPM
(RAID 0,
stripe
size
128k)
Memory
16 GB
Not Applicable (Agentless collection only)
Contact
NetIQ
Services
Remote Correlation Engine Hardware
CPU
Not Applicable (Local Embedded CE Only)
Storage
Memory
40
NetIQ Sentinel Installation and Configuration Guide
Contact
NetIQ
Services
Category
Demo
All-inOne (not
intended
for
producti
on)
Medium
Distribut
ed
Agentless Data
Collectio
n
Medium
Distribut
ed
Agentbased
Data
Collectio
n
Large
Distribute
d Agentless Data
Collectio
n (Raw
Data
Stored)
Large
Distributed
Agent-less
Data
Collection
(Raw Data
Not Stored)
Extra
Large
The number of
event sources
and events per
second load
placed on each
collector
manager.
Local
Embedde
d CM
Local
Embedde
d CM
Local
Embedd
ed CM
Local
Embedde
d CM
Local
Embedded
CM
Contact
NetIQ
Services
Event
Sources:
101
Not Used
Event
Sources:
5000
Not Used
Not Used
Remote
CM #1
Remote
CM #1
The filtered
percentage
indicates how
many
normalized
events were
filtered out
immediately
after collection,
without being
stored or
passed to
analytic
engines. Note
that the nonnormalized raw
log data that the
normalized
events are
based off of is
not affected by
filtering and is
always stored.
EPS: 103
Event
Sources:
350
Event
Sources:
350
EPS: 7000
EPS: 9000
Filtered:
0%
Filtered: 0%
Description
Data Collection
Collector
Manager
(CM)
Distributio
n
Filtered:
0%
Remote
CM #1
Event
Sources:
2000
EPS:
3000
Filtered:
0%
EPS:
2500
Filtered:
0%
Remote
CM #2
Event
Sources:
150
EPS: 4000
Filtered:
0%
Raw Data
Disabled
Remote
CM #2
Event
Sources:
150
EPS: 4000
Filtered: 0%
Raw Data
Disabled
The Local
Embedded CM
is located on
the Sentinel
Server
machine.
Meeting System Requirements
41
Category
Collectors
Used
Description
Demo
All-inOne (not
intended
for
producti
on)
Medium
Distribut
ed
Agentless Data
Collectio
n
Oracle
Solaris
2011.1r2
Each
collector
had its
own
syslog
server.
Sources:
100
EPS: 100
Juniper
Netscree
n
2011.1r1
Oracle
Solaris
2011.1r2
Sources:
1000
Sources:
1
EPS:
1500
EPS: 3
Microsoft
AD and
Windows
version
2011.1r2
Sources:
1000
EPS:
1500
Medium
Distribut
ed
Agentbased
Data
Collectio
n
Large
Distribute
d Agentless Data
Collectio
n (Raw
Data
Stored)
Custom
Testing
Collector
(no
parsing)
Each of
the
following
Collectors
had its
own
syslog
server,
parsing at
the
following
EPS rates:
Agent
Manager
Connect
or
Server 1
Sources:
5000
EPS:
2500
Microsoft
Active
Directory
2011.1r4
RCM #1:
2000
RCM #2:
2000
Oracle
Solaris
2011.1r2
RCM #1:
2000
RCM #2:
2000
Large
Distributed
Agent-less
Data
Collection
(Raw Data
Not Stored)
Each of the
following
Collectors
had its own
syslog
server,
parsing at
the
following
EPS rates:
Microsoft
AD and
Windows
version
2011.1r4
RCM #1:
2000
RCM #2:
2000
Oracle
Solaris
2011.1r2
RCM #1:
2000
RCM #2:
1000
NetIQ
Universal
Event
2011.1r2
NetIQ
Agent
Manager
version
2011.1r3
RCM #1:
2000
RCM #1:
2000
NetIQ
Agent
Manager
2011.1r3
Sourcefire
Snort
2011.1r1
RCM #1:
1000
RCM #1:
1000
NetIQ
Universal
Event
2011.1r2
RCM #1:
2000
42
NetIQ Sentinel Installation and Configuration Guide
Extra
Large
Contact
NetIQ
Services
Category
Total
Description
Demo
All-inOne (not
intended
for
producti
on)
Medium
Distribut
ed
Agentless Data
Collectio
n
Medium
Distribut
ed
Agentbased
Data
Collectio
n
Large
Distribute
d Agentless Data
Collectio
n (Raw
Data
Stored)
Event
Source:
101
Event
Source:
2000
Event
Source:
5000
Event
Source:
500
EPS: 103
EPS:
3000
EPS:
2500
EPS:
11000
Filtered:
0%
Filtered:
0%
Filtered:
0%
Filtered:
0%
Large
Distributed
Agent-less
Data
Collection
(Raw Data
Not Stored)
Event
Source: 500
EPS: 13000
Extra
Large
Contact
NetIQ
Services
Filtered: 0%
Data Storage
Meeting System Requirements
43
44
Demo
All-inOne (not
intended
for
producti
on)
Category
Description
How far
into the
past will
users
search for
data on a
regular
basis?
Amount of
locally cached
data for higher
search
performance.
7 Days
What
percentag
e of
searches
will be
over data
older than
the
number of
days
above?
Impacts the
amount of
input/output
operations per
second (IOPS)
for primary or
secondary
storage
10%
How far
into the
past must
data be
retained?
Impacts how
much disk
space is
needed to
retain all of the
data. If
secondary
storage is
enabled, this
impacts the size
of secondary
storage
needed.
Otherwise, it
impacts the size
of primary
storage
needed.
14 Days
Will a
secondary
Storage
device be
available
and
connected
?
Impacts
whether all data
will be stored in
primary storage
or if secondary
storage is
available for
lower-cost long
term online
storage. Data in
secondary
storage
remains online.
No
Medium
Distribut
ed
Agentless Data
Collectio
n
NetIQ Sentinel Installation and Configuration Guide
Medium
Distribut
ed
Agentbased
Data
Collectio
n
Large
Distribute
d Agentless Data
Collectio
n (Raw
Data
Stored)
Large
Distributed
Agent-less
Data
Collection
(Raw Data
Not Stored)
Extra
Large
Contact
NetIQ
Services
Category
Description
Demo
All-inOne (not
intended
for
producti
on)
Medium
Distribut
ed
Agentless Data
Collectio
n
Medium
Distribut
ed
Agentbased
Data
Collectio
n
Large
Distribute
d Agentless Data
Collectio
n (Raw
Data
Stored)
Large
Distributed
Agent-less
Data
Collection
(Raw Data
Not Stored)
Extra
Large
User Activity
How many
users will
be active
at the
same time,
on
average?
Impacts the
amount of IOPS
for primary and
secondary
storage and
other items.
1
How many
searches
will an
active user
be
performing
at the
same time,
on
average?
Impacts the
amount of IOPS
for primary and
secondary
storage.
1
1
100M
events
per
search
150M
events
per
search
How many
reports will
an active
user be
running at
the same
time, on
average?
Impacts the
amount of IOPS
for primary and
secondary
storage.
1
1
1
200k
events
per report
500k
events
per report
600k events per report
How many
real-time
NetFlow
monitoring
views will
be running
at the
same time,
on
average?
Contact
NetIQ
Services
2
(last 1 hour and last 12
hours)
Not
tested
with
search or
reporting
load
Not
Applicabl
e
1
1B events per search
2
(last 12 hours and last 24
hours)
Analytics
Meeting System Requirements
45
Medium
Distribut
ed
Agentless Data
Collectio
n
Category
Description
What
percentag
e of the
event data
is relevant
to
correlation
rules?
Amount of data
the correlation
engine will
process.
100% (out of the box)
How many
simple
correlation
rules (filter/
trigger
only) will
be used?
Impacts the
CPU utilization
of the
correlation
engine.
116 (out of the box)
How many
complex
correlation
rules will
be used?
Impacts the
CPU and
memory
utilization of the
correlation
engine.
0 (out of the box)
How many
sets of
data will
anomaly
detection
be
performed
on?
(3 correlations per
second)
Medium
Distribut
ed
Agentbased
Data
Collectio
n
Large
Distribute
d Agentless Data
Collectio
n (Raw
Data
Stored)
100%
(out of
the box)
100% (out of the box)
Large
Distributed
Agent-less
Data
Collection
(Raw Data
Not Stored)
(10 correlations per
second)
(0
correlatio
ns per
second)
Local Embedded CE (all rules)
Correlation
Engine
(CE)
Distributio
n
46
Demo
All-inOne (not
intended
for
producti
on)
The number of
Security
Intelligence
dashboards,
which impacts
the CPU,
primary storage
size, and
memory
utilization.
1
(100% of event stream
each)
NetIQ Sentinel Installation and Configuration Guide
Not
Applicabl
e
1 (20% of
event
stream
each)
1 (30% of
event
stream
each)
Extra
Large
Contact
NetIQ
Services
5.5
Category
Description
High
Availabilit
y
Not Used
Notes
Notable
functionality
disabled or
warnings of
what happens
when
exceeding the
system load
described
above.
Demo
All-inOne (not
intended
for
producti
on)
Medium
Distribut
ed
Agentless Data
Collectio
n
Medium
Distribut
ed
Agentbased
Data
Collectio
n
Large
Distribute
d Agentless Data
Collectio
n (Raw
Data
Stored)
Large
Distributed
Agent-less
Data
Collection
(Raw Data
Not Stored)
Raw Data
Disabled
Increasing
Retained
EPS will
eventually
cause
instability in
this system
configuratio
n
Extra
Large
Contact
NetIQ
Services
Connector and Collector System Requirements
Each Connector and Collector has its own set of system requirements and supported platforms. See
the Connector and Collector documentation on the Sentinel Plug-ins Web site.
5.6
Virtual Environment
Sentinel is extensively tested and fully supported on a VMware ESX server. When you set up a virtual
environment, the virtual machines must have 2 or more CPUs. To achieve comparable performance
results to the physical-machine testing results on ESX or in any other virtual environment, the virtual
environment should provide the same memory, CPUs, disk space, and I/O as the physical machine
recommendations.
For information about physical machine recommendations, see Chapter 5, “Meeting System
Requirements,” on page 35.
Meeting System Requirements
47
48
NetIQ Sentinel Installation and Configuration Guide
6
Deployment Considerations
6
Sentinel has a scalable architecture that can grow to handle the load you need to place on it. There are
several types of load that you can place on Sentinel. This chapter provides an overview of the most
important considerations to make when scaling a Sentinel deployment. A NetIQ Services or NetIQ
Partner Services professional can work with you to more thoroughly design the complete system for
your unique environment.
Section 6.1, “Advantages of Distributed Deployments,” on page 49
Section 6.2, “All-In-One Deployment,” on page 51
Section 6.3, “One-Tier Distributed Deployment,” on page 51
Section 6.4, “One-Tier Distributed Deployment with High Availability,” on page 52
Section 6.5, “Two-Tier and Three-Tier Distributed Deployment,” on page 53
Section 6.6, “Planning Partitions for Data Storage,” on page 54
6.1
Advantages of Distributed Deployments
By default, the Sentinel server includes the following components:
Collector Manager: Collector Manager provides a flexible data collection point for Sentinel. The
Sentinel installer installs a Collector Manager by default during installation.
Correlation Engine: Correlation Engine processes events from the real-time event stream to
determine whether they should trigger any of the correlation rules.
NetFlow Collector Manager: The NetFlow Collector Manager collects network flow data
(NetFlow, IPFIX, and so on) from network devices such as routers, switches, and firewalls.
Network flow data describes basic information about all network connections between hosts
including packets and bytes transmitted, which helps you visualize the behavior of individual
hosts or the entire network.
For production environments, NetIQ Corporation recommends distributed deployments because it
isolates data collection components on separate machines.
This section describes the advantages of distributed deployments.
Section 6.1.1, “Advantages of Additional Collector Managers,” on page 50
Section 6.1.2, “Advantages of Additional Correlation Engines,” on page 50
Section 6.1.3, “Advantages of Additional NetFlow Collector Managers,” on page 50
Deployment Considerations
49
6.1.1
Advantages of Additional Collector Managers
Sentinel server includes a Collector Manager by default. However, for production environments,
distributed Collector Managers provide much better isolation when large volumes of data is
received. In this situation, a distributed Collector Manager may become overloaded but the Sentinel
server will remain responsive to user requests.
Installing more than one Collector Manager in a distributed network provides several advantages:
Improved system performance: Additional Collector Managers can parse and process event
data in a distributed environment, which increases the system performance.
Additional data security and decreased network bandwidth requirements: If the Collector
Managers are co-located with event sources, then filtering, encryption, and data compression
can be performed at the source.
File caching: Additional Collector Managers can cache large amounts of data while the server is
temporarily busy archiving events or processing a spike in events. This feature is an advantage
for protocols such as syslog, which do not natively support event caching.
You can install additional Collector Managers at suitable locations in your network. These remote
Collector Managers run Connectors and Collectors, and forward the collected data to the Sentinel
server for storage and processing. For information about installing additional Collector Managers,
see Section 12.5, “Installing Collector Managers and Correlation Engines,” on page 82.
NOTE: You cannot install more than one Collector Manager on a single system. You can install
additional Collector Managers on remote systems, and then connect them to the Sentinel server.
6.1.2
Advantages of Additional Correlation Engines
You can deploy multiple Correlation Engines, each on its own server, without the need to replicate
configurations or add databases. For environments with large numbers of Correlation rules or
extremely high event rates, it can be advantageous to install more than one Correlation engine and
redeploy some rules to the new Correlation engine. Multiple Correlation engines provide the ability
to scale as the Sentinel system incorporates additional data sources or as event rates increase. For
information on installing additional Correlation Engines, see Section 12.5, “Installing Collector
Managers and Correlation Engines,” on page 82.
NOTE: You cannot install more than one Correlation Engine on a single system. You can install
additional Correlation Engines on remote systems, and then connect them to the Sentinel server.
6.1.3
Advantages of Additional NetFlow Collector Managers
NetFlow Collector Manager collects network flow data from network devices. However, you can
install additional NetFlow Collector Managers rather than using the NetFlow Collector Manager on
the Sentinel server to free up system resources to other important functions such as event storage and
searches.
You can install additional NetFlow Collector Managers in the following scenarios:
In environments with many network devices and high rates of network flow data, you can
install multiple NetFlow Collector Managers to distribute the load.
If you are in a multi-tenant environment, you should install individual NetFlow Collector
Manager for each tenant to collect separate network flow data per tenant.
50
NetIQ Sentinel Installation and Configuration Guide
For more information about installing additional NetFlow Collector Managers, see Chapter 14,
“NetFlow Collector Manager Installation,” on page 99.
6.2
All-In-One Deployment
The most basic deployment option is an all-in-one system that contains all of the Sentinel
components on a single machine. This is a good option if you are putting a relatively small load on
the system and don't need to monitor Windows machines.
For production environments, NetIQ Corporation recommends setting up a distributed deployment
because it isolates data collection components on a separate machine, which is important for
handling spikes and other anomalies with maximum system stability.
Figure 6-1 All-In-One Deployment
Sentinel Web
Console
Sentinel Server
Database
Event
Sources
Collector
Manager
Correlation
Engine
NetFlow
Collector
Manager
Network
devices
6.3
One-Tier Distributed Deployment
The one-tier deployment adds the ability to monitor Windows machines as well as handle a larger
load than the all-in-one deployment. Data collection and correlation can be scaled out by adding
Collector Manager, NetFlow Collector Manager, and Correlation Engine machines that off load
processing from the central Sentinel server. In addition to handling the load of events, correlation
rules and network flow data, remote Collector Managers, Correlation Engines, and NetFlow
Collector Managers also free up resources on the central Sentinel server to service other requests such
as event storage and searches. As the load gets higher on the system, the central Sentinel server will
eventually become a bottleneck and you need a deployment with more tiers to scale out further.
Optionally, you can configure Sentinel to copy event data to a data warehouse, which can be useful to
offload custom reporting, analytics, and other processing to another system.
Deployment Considerations
51
Figure 6-2 One-Tier Distributed Deployment
Sentinel Web
Console
Windows
Windows
Event
Collection
Services
(Optional)
Collector
Managers
Sentinel Server
Event
Sources
Agent
Managers
(Optional)
Scale Correlation
(Optional)
Agents
NetFlow
Collector
Managers
Data
Warehouse
(Optional)
Network
devices
Data Collection Tier
6.4
One-Tier Distributed Deployment with High Availability
The one-tier distributed deployment shows how it can be turned into a highly available system with
fail-over redundancy. For more information about deploying Sentinel in High Availability, see
Appendix A, “Configuring Sentinel for High Availability,” on page 145.
52
NetIQ Sentinel Installation and Configuration Guide
Figure 6-3 One-Tier Distributed Deployment with High Availability
Sentinel Web
Console
NetFlow
Collector
Managers
Scale Correlation
(Optional)
Network
devices
Collector
Managers
Sentinel
Server
Virtual IP
Active
Shared Primary
Storage
Shared Secondary
Storage
Sentinel
Server
Event
Sources
Passive
Agent Managers
(Optional)
Agents
Data Collection Tier
6.5
Data
Warehouse
(Optional)
Two-Tier and Three-Tier Distributed Deployment
This deployment enables you to surpass the load handling capabilities of a single central Sentinel
server and share the processing load across multiple Sentinel instance by leveraging Sentinel Link
and Sentinel Distributed Search features. The data collection is load-balanced across several Sentinel
servers, each having several Collector Managers, as shown in the Data Collection Tier. If you want to
perform event correlation or security intelligence, you can optionally forward data up to the
Analytics Tier using Sentinel Link. The Search Tier provides a convenient single access point for
searching across all systems in all other tiers by using Sentinel Distributed Search. Since the search
request is federated across several instances of Sentinel, this deployment also has search loadbalancing properties useful in scaling to handle a heavy search load.
Network flow data is stored in the Search Tier to enable easy navigation from search results to
contextual network traffic analysis.
Deployment Considerations
53
Figure 6-4 Two-Tier and Three-Tier Distributed Deployment
Sentinel Web
Console
Network
NetFlow
Collector
Managers
Search
Windows
Windows
Event
Collection
Services
(Optional)
Collector
Managers
Sentinel
Server
Search
Tier
Event
Sources
Agent
Managers
(Optional)
Analytics Tier
(Optional)
Agents
6.6
Data Collection Tier
Data
Warehouse
(Optional)
Planning Partitions for Data Storage
When you install Sentinel, you must mount the disk partition for primary storage in the location
where Sentinel will be installed, by default the /var/opt/novell directory.
The entire directory structure under the /var/opt/novell/sentinel directory must reside on a
single disk partition to ensure proper disk usage calculations. Otherwise, the automatic data
management capabilities might delete event data prematurely. For more information about the
Sentinel directory structure, see Section 6.6.4, “Sentinel Directory Structure,” on page 56.
As a best practice, ensure that this data directory is located on a separate disk partition than the
executables, configuration, and operating system files. The benefits of storing variable data
separately include easier backup of sets of files, simpler recovery in case of corruption, and provides
additional robustness if a disk partition fills up. It also improves the overall performance of systems
where smaller file systems are more efficient. For more information, see “Disk Partitioning”.
54
NetIQ Sentinel Installation and Configuration Guide
6.6.1
Using Partitions in Traditional Installations
On traditional installations, you can modify the disk partition layout of the operating system prior to
installing Sentinel. The administrator should create and mount the desired partitions to the
appropriate directories, based on the directory structure detailed in Section 6.6.4, “Sentinel Directory
Structure,” on page 56. When you run the installer, Sentinel is installed into the pre-created
directories resulting in an installation that spans multiple partitions.
NOTE:
You can use the --location option while running the installer to specify a different top-level
location than the default directories to store the file. The value that you pass to the --location
option is prepended to the directory paths. For example, if you specify --location=/foo, the
data directory will be /foo/var/opt/novell/sentinel/data and the config directory will be /
foo/etc/opt/novell/sentinel/config.
You must not use filesystem links (for example, soft links) for the --location option.
6.6.2
Using Partitions in an Appliance Installation
If you are using the DVD ISO appliance format, you can configure the partitioning of the appliance
filesystem during installation by following the instructions in the YaST screens. For example, you can
create a separate partition for the /var/opt/novell/sentinel mount point to put all data on a
separate partition. However, for other appliance formats you can configure the partitioning only after
installation. You can add partitions and move a directory to the new partition by using the SuSE YaST
system configuration tool. For information about creating partitions after the installation, see
Section 13.4.2, “Creating Partitions,” on page 96.
6.6.3
Best Practice Partition Layout
Many organizations have their own documented best-practice partition layout schemes for any
installed system. The following partition proposal is intended to guide organizations without any
defined policy, and considers Sentinel specific use of the filesystem. Generally, Sentinel adheres to the
Filesystem Hierarchy Standard where practicable.
partition
Mount point
Size
Notes
Root
/
100GB
Contains operating
system files and Sentinel
binaries/configuration.
Boot
/boot
150MB
Boot partition
Temp
/tmp
30GB
Location for OS and
Sentinel temporary files;
isolating this on a
separate partition protects
application data from
corruption if a runaway
process fills up the temp
space.
Deployment Considerations
55
6.6.4
partition
Mount point
Size
Notes
Primary storage
/var/opt/novell/
sentinel
Calculate using the
“System Sizing
Information” on page 37.
This area will contain the
primary Sentinel collected
data, plus other variable
data such as logfiles. This
partition can be shared
with other systems.
Secondary storage
Location based on the
type of storage, NFS,
CIFS, or SAN.
Calculate using the
“System Sizing
Information” on page 37.
This is the secondary
storage area, which can
be mounted locally as
shown or remotely.
Archival storage
Remote system
Calculate using the
“System Sizing
Information” on page 37.
This storage is for
archived data.
Sentinel Directory Structure
By default, the Sentinel directories are in the following locations:
The data files are in /var/opt/novell/sentinel/data and /var/opt/novell/sentinel/
3rdparty directories.
Executables and libraries are stored in the /opt/novell/sentinel directory
Log files are in the directory /var/opt/novell/sentinel/log
Configuration files are in the following directory /etc/opt/novell/sentinel
The process ID (PID) file is in the directory /var/run/sentinel/server.pid
Using the PID, administrators can identify the parent process of Sentinel server and monitor or
terminate the process.
56
NetIQ Sentinel Installation and Configuration Guide
7
Deployment Considerations for FIPS1402 Mode
7
Sentinel can optionally be configured to use Mozilla Network Security Services (NSS), which is a
FIPS 140-2 validated cryptographic provider, for its internal encryption and other functions. The
purpose of doing so is to ensure that Sentinel is ‘FIPS 140-2 Inside’ and is compliant with United
States federal purchasing policies and standards.
Enabling Sentinel FIPS 140-2 mode causes communication between the Sentinel Server, Sentinel
remote Collector Managers, Sentinel remote Correlation Engines, the Sentinel Web UI, the Sentinel
Control Center, and the Sentinel Advisor service to use FIPS 140-2 validated cryptography.
Section 7.1, “FIPS Implementation in Sentinel,” on page 57
Section 7.2, “FIPS-Enabled Components in Sentinel,” on page 58
Section 7.3, “Implementation Checklist,” on page 59
Section 7.4, “Deployment Scenarios,” on page 59
7.1
FIPS Implementation in Sentinel
Sentinel uses the Mozilla NSS libraries that are provided by the operating system. Red Hat Enterprise
Linux (RHEL) and SUSE Linux Enterprise Server (SLES) have different set of NSS packages.
The NSS cryptographic module provided by RHEL 6.3 is FIPS 140-2 validated. The NSS
cryptographic module provided by SLES 11 SP3 are not yet officially FIPS 140-2 validated, but work
is in progress to get the SUSE module FIPS 140-2 validated. Once the validation is available, no
necessary changes to Sentinel are anticipated to provide 'FIPS 140-2 Inside' on the SUSE platform.
For more information about RHEL 6.2 FIPS 140-2 certification, see Validated FIPS 140-1 and FIPS 140-2
Cryptographic Modules.
7.1.1
RHEL NSS Packages
Sentinel requires the following 64-bit NSS packages to support FIPS 140-2 mode:
nspr-4.9-1.el6.x86_64
nss-sysinit-3.13.3-6.el6.x86_64
nss-util-3.13.3-2.el6.x86_64
nss-softokn-freebl-3.12.9-11.el6.x86_64
nss-softokn-3.12.9-11.el6.x86_64
nss-3.13.3-6.el6.x86_64
nss-tools-3.13.3-6.el6.x86_64
Deployment Considerations for FIPS140-2 Mode
57
If any of these packages are not installed, you must install them before enabling FIPS 140-2 mode in
Sentinel.
7.1.2
SLES NSS Packages
Sentinel requires the following 64-bit NSS packages to support FIPS 140-2 mode:
libfreebl3-3.13.1-0.2.1
mozilla-nspr-4.8.9-1.2.2.1
mozilla-nss-3.13.1-0.2.1
mozilla-nss-tools-3.13.1-0.2.1
If any of these packages are not installed, you must install them before enabling FIPS 140-2 mode in
Sentinel.
7.2
FIPS-Enabled Components in Sentinel
The following Sentinel components provide FIPS 140-2 support:
All Sentinel platform components are updated to support FIPS 140-2 mode.
The following Sentinel plug-ins that support cryptography are updated to support FIPS 140-2
mode:
Agent Manager Connector 2011.1r1 and later
Database (JDBC) Connector 2011.1r2 and later
File Connector 2011.1r1 and later - Only if the file event source type is local or NFS.
LDAP Integrator 2011.1r1 and later
Sentinel Link Connector 2011.1r3 and later
Sentinel Link Integrator 2011.1r2 and later
SMTP Integrator 2011.1r1 and later
Syslog Connector 2011.1r2 and later
Windows Event (WMI) Connector 2011.1r2 and later
Check Point (LEA) Connector 2011.1r2 and later
For more information about configuring these Sentinel plug-ins to run in FIPS 140-2 mode, see
“Configuring Sentinel Plug-Ins to Run in FIPS 140-2 Mode” on page 119.
The following Sentinel Connectors that support optional cryptography are not yet updated to
support FIPS 140-2 mode at the time of release of this document. However, you can continue to
collect events using these Connectors. For instructions on using these Connectors with Sentinel in
FIPS 140-2 mode, see “Using Non-FIPS Enabled Connectors with Sentinel in FIPS 140-2 Mode” on
page 125.
Cisco SDEE Connector 2011.1r1
File Connector 2011.1r1 - The CIFS and SCP functionalities involve cryptography and will not
work in FIPS 140-2 mode.
NetIQ Audit Connector 2011.1r1
SNMP Connector 2011.1r1
58
NetIQ Sentinel Installation and Configuration Guide
The following Sentinel Integrators that support SSL are not updated to support FIPS 140-2 mode at
the time of release of this document. However, you may continue to use unencrypted connections
when these Integrators are used with Sentinel in FIPS 140-2 mode.
Remedy Integrator 2011.1r1 or later
SOAP Integrator 2011.1r1 or later
Any other Sentinel plug-ins that are not listed above do not use cryptography and are not affected by
enabling FIPS 140-2 mode in Sentinel. You do not need to perform any additional steps to use them
with Sentinel in FIPS 140-2 mode.
For more information about the Sentinel plug-ins, see Sentinel Plug-ins Web site. If you would like to
request that one of the plug-ins that has not yet been updated be made available with FIPS support,
please submit a request using Bugzilla.
7.3
Implementation Checklist
The following table provides an overview of the tasks required to configure Sentinel for operation in
FIPS 140-2 mode.
Tasks
For more information, see…
Plan the deployment.
Section 7.4, “Deployment Scenarios,” on page 59.
Determine whether you need to enable FIPS 140-2
mode during the Sentinel installation or you want to
enable it in future.
Section 12.2.2, “Custom Installation,” on page 79.
Section 12.3, “Performing a Silent Installation,” on
page 80
To enable Sentinel in FIPS 140-2 mode during the
installation, you need to select the Custom or Silent
installation method during the installation process.
Chapter 20, “Enabling FIPS 140-2 Mode in an
Existing Sentinel Installation,” on page 115
Configure Sentinel Plug-ins to run in FIPS 140-2
Mode.
Section 21.5, “Configuring Sentinel Plug-Ins to Run in
FIPS 140-2 Mode,” on page 119.
Import certificates into the Sentinel FIPS Keystore.
Section 21.6, “Importing Certificates into FIPS
Keystore Database,” on page 125
NOTE: NetIQ highly recommends taking a backup of your Sentinel systems before beginning the
conversion to FIPS mode. If for some reason the server must be reverted to non-FIPS mode, the only
supported method for doing so involves restoring from a backup. For more information about
reverting to non-FIPS mode, see “Reverting Sentinel to Non-FIPS Mode” on page 126.
7.4
Deployment Scenarios
This section provides information about the deployment scenarios for Sentinel in FIPS 140-2 mode.
7.4.1
Scenario 1: Data Collection in Full FIPS 140-2 Mode
In this scenario, data collection is done only through the Connectors that support FIPS 140-2 mode.
We assume that this environment involves a Sentinel server and data is collected through a remote
Collector Manager. You may have one or more remote Collector Managers.
Deployment Considerations for FIPS140-2 Mode
59
Sentinel Server
(In FIPS mode)
Agent Manager
Connector
Database (JDBC)
Connector
Sentinel Link
Connector
File Connector
(NFS or Local File
Event Source Types)
Syslog
Connector
Windows Event (WMI)
Connector
Sentinel Remote Collector Manager
(In FIPS mode)
You must perform the following procedure only if your environment involves data collection from
event sources using Connectors that support FIPS 140-2 mode.
1 You must have a Sentinel server in FIPS 140-2 mode.
NOTE: If your Sentinel server (freshly installed or upgraded) is in non-FIPS mode, you must
enable FIPS on Sentinel server. For more information, see “Enabling Sentinel Server to Run in
FIPS 140-2 Mode” on page 115.
2 You must have a Sentinel remote Collector Manager running in FIPS 140-2 mode.
NOTE: If your remote Collector Manager (freshly installed or upgraded) is running in non-FIPS
mode, you must enable FIPS on the remote Collector Manager. For more information, see
“Enabling FIPS 140-2 Mode on Remote Collector Managers and Correlation Engines” on
page 115.
3 Ensure that FIPS server and remote Collector Managers communicates with each other.
4 Convert Remote Correlation Engines if any to run in FIPS mode. For more information, see
“Enabling FIPS 140-2 Mode on Remote Collector Managers and Correlation Engines” on
page 115.
5 Configure the Sentinel plug-ins to run in FIPS 140-2 mode. For more information, see
“Configuring Sentinel Plug-Ins to Run in FIPS 140-2 Mode” on page 119.
7.4.2
Scenario 2: Data Collection in Partial FIPS 140-2 Mode
In this scenario, data collection is done using Connectors that support FIPS 140-2 mode and
Connectors that do not support FIPS 140-2 mode. We assume that this environment involves a
Sentinel server and data is collected through a remote Collector Manager. You may have one or more
remote Collector Managers.
60
NetIQ Sentinel Installation and Configuration Guide
Agent Manager
Connector
Database (JDBC)
Connector
Sentinel Link
Connector
File Connector
(NFS or Local File
Event Source Types)
Syslog
Connector
Windows Event (WMI)
Connector
Sentinel Remote Collector Manager
(In FIPS mode)
Sentinel Server
(In FIPS mode)
Audit
Connector
Check Point (LEA)
Connector
SDEE
Connector
File
Connector
(All File Event
Source Types)
SNMP
Connector
Sentinel Remote Collector Manager
(In non-FIPS mode)
To handle data collection using Connectors that support and those that do not support the FIPS 140-2
mode, you should have two remote Collector Managers - one running in FIPS 140-2 mode for FIPS
supported Connectors, and another running in non-FIPS (normal) mode for Connectors that do not
support the FIPS 140-2 mode.
You must perform the following procedure if your environment involves data collection from event
sources using Connectors that support FIPS 140-2 mode and Connectors that do not support FIPS
140-2 mode yet.
1 You must have a Sentinel server in FIPS 140-2 mode.
NOTE: If your Sentinel server (freshly installed or upgraded) is in non-FIPS mode, you must
enable FIPS on Sentinel server. For more information, see “Enabling Sentinel Server to Run in
FIPS 140-2 Mode” on page 115.
2 Ensure that one remote Collector Manager is running in FIPS 140-2 mode, and another remote
Collector Manager continues to run non-FIPS mode.
2a If you do not have a FIPS 140-2 mode enabled remote Collector Manager, you must enable
FIPS mode on the remote Collector Manager. For more information, see “Enabling FIPS 1402 Mode on Remote Collector Managers and Correlation Engines” on page 115.
2b Update the server certificate on the non-FIPS remote Collector Manager. For more
information, see “Updating Server Certificates in Remote Collector Managers and
Correlation Engines” on page 119.
3 Ensure that the two remote Collector Managers communicates with FIPS 140-2 enabled Sentinel
server.
Deployment Considerations for FIPS140-2 Mode
61
4 Convert Remote Correlation Engines if any to run in FIPS mode. For more information, see
“Enabling FIPS 140-2 Mode on Remote Collector Managers and Correlation Engines” on
page 115.
5 Configure the Sentinel plug-ins to run in FIPS 140-2 mode. For more information, see
“Configuring Sentinel Plug-Ins to Run in FIPS 140-2 Mode” on page 119.
5a Deploy Connectors that support FIPS 140-2 mode in the remote Collector Manager running
in FIPS mode.
5b Deploy the Connectors that do not support FIPS 140-2 mode in the non-FIPS remote
Collector Manager.
62
NetIQ Sentinel Installation and Configuration Guide
8
Ports Used
8
Sentinel uses different ports for external communication with other components. For the appliance
installation, the ports are opened on the firewall by default. However, for the traditional installation,
you must configure the operating system on which you are installing Sentinel to open the ports on
the firewall. The following figure illustrates the ports used in Sentinel:
Figure 8-1 Ports Used in Sentinel
Sentinel Server
TCP
TCP
5432
27017
Web console
HTTPS
TCP
TCP
1
2
8
9
8
4
4
3
PostgreSQL
Database
Audit
Event Source
Security Intelligence
Configuration Database
HTTPS
NetFlow
Collector Manager
TCP
UDP
SSL
TCP
1
4
6
8
1
5
1
4
1
4
4
3
6
1
6
1
6
Sentinel Server
Processes
Syslog
Event Sources
TCP
TCP
10013
1099 / 2000
Sentinel
Control Center
/Solution Designer
JMX Monitoring
Tools
ActiveMQ
Additional
Collector Manager
/Correlation Engine
Section 8.1, “Sentinel Server Ports,” on page 64
Section 8.2, “Collector Manager Ports,” on page 66
Section 8.3, “Correlation Engine Ports,” on page 67
Section 8.4, “NetFlow Collector Manager Ports,” on page 67
Ports Used
63
8.1
Sentinel Server Ports
The Sentinel server uses the following ports for internal and external communication.
8.1.1
Local Ports
Sentinel uses the following ports for internal communication with database and other internal
processes:
8.1.2
Ports
Description
TCP 27017
Used for the Security Intelligence configuration database.
TCP 28017
Used for the Web interface for Security Intelligence database.
TCP 32000
Used for internal communication between the wrapper process and the server process.
Network Ports
For Sentinel to work properly, ensure that the following ports are open on the firewall:
64
Required/
Optional
Ports
Direction
Description
TCP 5432
Inbound
Optional. By
default, this
port listens
only on
loopback
interface.
Used for the PostgreSQL database. You do not need to
open this port by default. However, you must open this port
when you develop reports by using the Sentinel SDK. For
more information, see the Sentinel Plug-in SDK.
TCP 1099 and
2000
Inbound
Optional
Used together by monitoring tools to connect to Sentinel
server process using Java Management Extensions (JMX).
TCP 1289
Inbound
Optional
Used for Audit connections.
UDP 1514
Inbound
Optional
Used for syslog messages.
TCP 8443
Inbound
Required
Used for HTTPS communication and incoming connections
from NetFlow Collector Managers.
TCP 1443
Inbound
Optional
Used for SSL encrypted syslog messages.
TCP 61616
Inbound
Optional
Used for incoming connections from Collector Managers
and Correlation Engines.
TCP 10013
Inbound
Required
Used by the Sentinel Control Center and Solution Designer.
TCP 1468
Inbound
Optional
Used for syslog messages.
TCP 10014
Inbound
Optional
Used by the remote Collector Managers to connect to the
server through the SSL proxy. However, this is uncommon.
By default, remote Collector Managers use the SSL port
61616 to connect to the server.
TCP 443
Outbound
Optional
ff Advisor is used, the port initiates a connection to the
Advisor service over the Internet to the Advisor Updates
URL (https://secure-www.novell.com/sentinel/download/
advisor/).
NetIQ Sentinel Installation and Configuration Guide
8.1.3
Ports
Direction
Required/
Optional
TCP 8443
Outbound
Optional
If distributed search is used, the port initiates a connection
to other Sentinel systems to perform the distributed search.
TCP 389 or 636
Outbound
Optional
If LDAP authentication is used, the port initiates a
connection to the LDAP server.
TCP/UDP 111 and Outbound
TCP/UDP 2049
Optional
If secondary storage is configured to use NFS.
TCP 137, 138,
139, 445
Outbound
Optional
If secondary storage is configured to use CIFS.
TCP JDBC
(database
dependent)
Outbound
Optional
If data synchronization is used, the port initiates a
connection to the target database using JDBC. The port that
is used is dependent on the target database.
TCP 25
Outbound
Optional
Initiates a connection to the email server.
TCP 1290
Outbound
Optional
When Sentinel forwards events to another Sentinel system,
this port initiates a Sentinel Link connection to that system.
UDP 162
Outbound
Optional
When Sentinel forwards events to the system receiving
SNMP traps, the port sends a packet to the receiver.
UDP 514 or TCP
1468
Outbound
Optional
This port is used when Sentinel forwards events to the
system receiving Syslog messages. If the port is UDP, it
sends a packet to the receiver. If the port is TCP, it initiates a
connection to the receiver.
Description
Sentinel Server Appliance Specific Ports
In addition to the above ports, the following ports are open for appliance.
Ports
Direction
Required/
Optional
Description
TCP 22
Inbound
Required
Used for secure shell access to the Sentinel appliance.
TCP 4984
Inbound
Required
Used by the Sentinel Appliance Management Console
(WebYaST). Also used by the Sentinel appliance for
the update service.
TCP 289
Inbound
Optional
Forwarded to 1289 for Audit connections.
TCP 443
Inbound
Optional
Forwarded to 8443 for HTTPS communication.
UDP 514
Inbound
Optional
Forwarded to 1514 for syslog messages.
TCP 1290
Inbound
Optional
Sentinel Link port that is allowed to connect through the
SuSE Firewall.
UDP and TCP
40000 - 41000
Inbound
Optional
Ports that can be used when configuring data collection
servers, such as syslog. Sentinel does not listen on
these ports by default.
TCP 443 or 80
Outbound
Required
Initiates a connect to the NetIQ appliance software
update repository on the Internet or a Subscription
Management Tool service in your network.
Ports Used
65
8.2
Ports
Direction
Required/
Optional
TCP 80
Outbound
Optional
Description
Initiates a connection to the Subscription Management
Tool.
Collector Manager Ports
The Collector Manager uses the following ports to communicate with other components.
8.2.1
Network Ports
For Sentinel Collector Manager to work properly, ensure that the following ports are open on the
firewall:
Ports
Direction
Required/
Optional
Description
TCP 1289
Inbound
Optional
Used for Audit connections.
UDP 1514
Inbound
Optional
Used for syslog messages.
TCP 1443
Inbound
Optional
Used for SSL encrypted syslog messages.
TCP 1468
Inbound
Optional
Used for syslog messages.
TCP 1099 and 2000 Inbound
Optional
Used together by monitoring tools to connect to Sentinel
server process using Java Management Extensions (JMX).
TCP 61616
8.2.2
Outbound Required
Initiates a connection to the Sentinel server.
Collector Manager Appliance Specific Ports
In addition to the above ports, the following ports are open for the Sentinel Collector Manager
appliance.
66
Ports
Direction
Required/
Optional
Description
TCP 22
Inbound
Required
Used for secure shell access to the Sentinel appliance.
TCP 4984
Inbound
Required
Used by the Sentinel Appliance Management Console
(WebYaST). Also used by the Sentinel appliance for the
update service.
TCP 289
Inbound
Optional
Forwarded to 1289 for Audit connections.
UDP 514
Inbound
Optional
Forwarded to 1514 for syslog messages.
TCP 1290
Inbound
Optional
This is the Sentinel Link port that is allowed to connect
through the SuSE Firewall.
UDP and TCP
40000 - 41000
Inbound
Optional
Ports that can be used when configuring data collection
servers, such as syslog. Sentinel does not listen on these
ports by default.
NetIQ Sentinel Installation and Configuration Guide
8.3
Ports
Direction
Required/
Optional
TCP 443
Outbound
Required
Initiates a connection to the NetIQ appliance software
update repository on the Internet or a Subscription
Management Tool service in your network.
TCP 80
Outbound
Optional
Initiates a connection to the Subscription Management
Tool.
Description
Correlation Engine Ports
The Correlation Engine uses the following ports to communicate with other components.
8.3.1
Network Ports
For Sentinel Correlation Engine to work properly, ensure that the following ports are open on the
firewall:
8.3.2
Ports
Direction
Required/Optional Description
TCP 1099 and 2000
Inbound
Optional
Used together by monitoring tools to connect to
Sentinel server process using Java Management
Extensions (JMX).
TCP 61616
Outbound
Required
Initiates a connection to the Sentinel server.
Correlation Engine Appliance Specific Ports
In addition to the above ports, the following ports are open on Sentinel Correlation Engine appliance.
8.4
Ports
Direction
Required/
Optional
Description
TCP 22
Inbound
Required
Used for secure shell access to the Sentinel appliance.
TCP 4984
Inbound
Required
Used by the Sentinel Appliance Management Console
(WebYaST). Also used by the Sentinel appliance for the update
service.
TCP 443
Outbound
Required
Initiates a connection to the NetIQ appliance software update
repository on the Internet or a Subscription Management Tool
service in your network.
TCP 80
Outbound
Optional
Initiates a connection to the Subscription Management Tool.
NetFlow Collector Manager Ports
The NetFlow Collector Manager uses the following ports to communicate with other components:
Ports Used
67
Required/
Optional
Description
HTTPS 8443 Outbound
Required
Initiates a connection to the Sentinel server.
3578
Required
Used for receiving network flow data from network devices.
Ports
68
Direction
Inbound
NetIQ Sentinel Installation and Configuration Guide
9
Installation Options
9
You can perform a traditional installation of Sentinel or install the appliance. This chapter provides
information about the two installation options.
9.1
Traditional Installation
The traditional installation installs Sentinel on an existing operating system, by using the application
installer. You can install Sentinel in the following ways:
Interactive: The installation proceeds with user inputs. During installation, you can record the
installation options (user inputs or default values) to a file, which you can use later for silent
installation.You can either perform a standard installation or a custom installation.
Standard Installation
Custom Installation
Uses the default values for the configuration. User
input is required only for the password.
Prompts you to specify the values for the configuration
setup. You can either select the default values or
specify the necessary values.
Installs with default 90-day evaluation key.
Allows you to install with the 90-day license key or with
a valid license key.
Allows you to specify the admin password and uses
the admin password as the default password for both
dbauser and appuser.
Allows you to specify the admin password. For
dbauser and appuser, you can either specify new
password or use admin password.
Installs the default ports for all the components.
Allows you to specify ports for different components.
Installs Sentinel in non-FIPS mode.
Allows you to install Sentinel in FIPS 140-2 mode.
Authenticates users with the internal database.
Provides the option set up LDAP authentication for
Sentinel in addition to the database authentication.
When you configure Sentinel for LDAP authentication,
users can log in to the server by using their Novell
eDirectory or Microsoft Active Directory credentials.
For more information about interactive installation, see Section 12.2, “Performing Interactive
Installation,” on page 78.
Silent: If you want to install multiple Sentinel servers in your deployment, you can record the
installation options during the standard or custom installation in a configuration file and then
use the file to run an unattended installation. For more information on silent installation, see
Section 12.3, “Performing a Silent Installation,” on page 80.
Installation Options
69
9.2
Appliance Installation
The appliance installation installs both the SLES 11 SP3 64-bit operating system and Sentinel.
The Sentinel appliance is available in the following formats:
A VMware appliance image
A Xen appliance image
A hardware appliance Live DVD image that is directly deployable to a hardware server
For more information on appliance installation, see Chapter 13, “Appliance Installation,” on page 87.
70
NetIQ Sentinel Installation and Configuration Guide
III
Installing Sentinel
I
This section provides information about installing Sentinel and additional components.
Chapter 10, “Installation Overview,” on page 73
Chapter 11, “Installation Checklist,” on page 75
Chapter 12, “Traditional Installation,” on page 77
Chapter 13, “Appliance Installation,” on page 87
Chapter 14, “NetFlow Collector Manager Installation,” on page 99
Chapter 15, “Installing Additional Collectors and Connectors,” on page 101
Chapter 16, “Verifying the Installation,” on page 103
Installing Sentinel
71
72
NetIQ Sentinel Installation and Configuration Guide
10
Installation Overview
10
The Sentinel installation installs the following components in the Sentinel server:
Sentinel server process: This is the primary component of Sentinel. The Sentinel server process
processes requests from other components of Sentinel and enables seamless functionality of the
system.The Sentinel server process handles requests, such as filtering data, processing search
queries, and managing administrative tasks that include user authentication and authorization.
Web server: Sentinel uses Jetty as its Web server to allow secure connection to the Sentinel Web
interface.
PostgreSQL database: Sentinel has a built-in database that stores Sentinel configuration
information, asset and vulnerability data, identity information, incident and workflow status,
and so on.
MongoDB database: Stores the Security Intelligence data.
Collector Manager: Collector Manager provides a flexible data collection point for Sentinel. The
Sentinel installer installs a Collector Manager by default during installation.
NetFlow Collector Manager: The NetFlow Collector Manager collects network flow data
(NetFlow, IPFIX, and so on) from network devices such as routers, switches, and firewalls.
Network flow data describes basic information about all network connections between hosts
including packets and bytes transmitted, which helps you visualize the behavior of individual
hosts or the entire network.
Correlation Engine: Correlation Engine processes events from the real-time event stream to
determine whether they should trigger any of the correlation rules.
Advisor: Advisor, powered by Security Nexus, is an optional data subscription service that
provides device-level correlation between real-time events, from intrusion detection and
prevention systems, and from enterprise vulnerability scan results. For more information about
Advisor, see “Detecting Vulnerabilities and Exploits”in the NetIQ Sentinel Administration Guide.
Sentinel plug-ins: Sentinel supports a variety of plug-ins to expand and enhance system
functionality. Some of these plug-ins are preinstalled. You can download additional plug-ins and
updates from the Sentinel Plug-ins Web site. Sentinel plug-ins include the following:
Collectors
Connectors
Correlation rules and actions
Reports
iTRAC workflows
Solution packs
Sentinel has a highly scalable architecture, and if high event rates are expected, you can distribute
components across several machines to achieve the best performance for the system. For production
environments, NetIQ Corporation recommends setting up a distributed deployment because it
isolates data collection components on a separate machine, which is important for handling spikes
and other anomalies with maximum system stability. For more information, see Section 6.1,
“Advantages of Distributed Deployments,” on page 49.
Installation Overview
73
74
NetIQ Sentinel Installation and Configuration Guide
11
Installation Checklist
1
Ensure that you have completed the following tasks before you start the installation:
Verify that your hardware and software meet the system requirements listed in Chapter 5,
“Meeting System Requirements,” on page 35.
If there was a previous installation of Sentinel, ensure that there are no files or system settings
remaining from a previous installation. For more information, see Appendix C, “Uninstalling,”
on page 169.
If you plan to install the licensed version, obtain your license key from the NetIQ Customer Care
Center.
Ensure that the ports listed in Chapter 8, “Ports Used,” on page 63 are opened in the firewall.
For the Sentinel installer to work properly, the system must be able to return the hostname or a
valid IP address. To do this, add the hostname to the /etc/hosts file to the line containing the
IP address, then enter hostname -f to make sure that the hostname is displayed properly.
Synchronize time by using the Network Time Protocol (NTP).
On RHEL systems: For optimal performance, the memory settings must be set appropriately for
the PostgreSQL database. The SHMMAX parameter must be greater than or equal to
1073741824.
To set the appropriate value, append the following information in the /etc/sysctl.conf file:
# for Sentinel Postgresql
kernel.shmmax=1073741824
For traditional installations:
The operating system for the Sentinel server must include at least the Base Server components of
the SLES server or the RHEL 6 server. Sentinel requires the 64-bit versions of the following
RPMs:
bash
bc
coreutils
gettext
glibc
grep
libgcc
libstdc
lsof
net-tools
openssl
python-libs
Installation Checklist
75
sed
zlib
76
NetIQ Sentinel Installation and Configuration Guide
12
Traditional Installation
12
This chapter provides information about the various ways to install Sentinel.
Section 12.1, “Understanding Installation Options,” on page 77
Section 12.2, “Performing Interactive Installation,” on page 78
Section 12.3, “Performing a Silent Installation,” on page 80
Section 12.4, “Installing Sentinel as a Non-root User,” on page 81
Section 12.5, “Installing Collector Managers and Correlation Engines,” on page 82
12.1
Understanding Installation Options
./install-sentinel --help displays the following options:
Options
Value
Description
--location
Directory
Specifies a directory other than the root (/) to install
Sentinel.
-m, --manifest
File name
Specifies a product manifest file to use instead of the
default manifest file.
--no-configure
Specifies to not configure the product after installation.
-n, --no-start
Specifies to not start or restart Sentinel after installation or
configuration.
-r, --recordunattended
Filename
Specifies a file to record the parameters that can be used
for unattended installation.
-u, --unattended
Filename
Uses the parameters from the specified file in order to
install Sentinel on unattended systems.
-h, --help
-l, --log-file
Displays the options that can be used while installing
Sentinel.
Filename
Records log messages to a file.
--no-banner
Suppresses the display of banner message.
-q, --quiet
Displays fewer messages.
-v, --verbose
Displays all messages during installation.
Traditional Installation
77
12.2
Performing Interactive Installation
This section provides information about standard and custom installation.
Section 12.2.1, “Standard Installation,” on page 78
Section 12.2.2, “Custom Installation,” on page 79
12.2.1
Standard Installation
Use the following steps to perform a standard installation:
1 Download the Sentinel installation file from the NetIQ Downloads Web site:
1a In the Product or Technology field, browse to and select SIEM-Sentinel.
1b Click Search.
1c Click the button in the Download column for Sentinel 7.2 Evaluation.
1d Click proceed to download, then specify your customer name and password.
1e Click download for the installation version for your platform.
2 Specify at the command line the following command to extract the installation file.
tar zxvf <install_filename>
Replace <install_filename> with the actual name of the install file.
3 Change to the directory where you extracted the installer:
cd <directory_name>
4 Specify the following command to install Sentinel:
./install-sentinel
or
If you want to install Sentinel on more than one system, you can record your installation options
in a file. You can use this file for an unattended Sentinel installation on other systems. To record
your installation options, specify the following command:
./install-sentinel -r <response_filename>
5 Specify the number for the language you want to use for the installation, then press Enter.
The end user license agreement is displayed in the selected language.
6 Press the Spacebar to read through the license agreement.
7 Enter yes or y to accept the license and continue with the installation.
The installation might take a few seconds to load the installation packages and prompt for the
configuration type.
8 When prompted, specify 1 to proceed with the standard configuration.
Installation proceeds with the 90-day evaluation license key included with the installer. This
license key activates the full set of product features for a 90-day trial period. At any time during
or after the trial period, you can replace the evaluation license with a license key you have
purchased.
9 Specify the password for the administrator user admin.
10 Confirm the password again.
78
NetIQ Sentinel Installation and Configuration Guide
This password is used by admin, dbauser, and appuser.
The Sentinel installation finishes and the server starts. It might take few minutes for all services
to start after installation because the system performs a one-time initialization. Wait until the
installation finishes before you log in to the server.
To access the Sentinel Web interface, specify the following URL in your Web browser:
https://<IP_Address_Sentinel_server>:8443.
The <IP_Address_Sentinel_server> is the IP address or DNS name of the Sentinel server and 8443 is the
default port for the Sentinel server.
12.2.2
Custom Installation
If you are installing Sentinel with a custom configuration, you can specify the license key, change the
password for different users, and specify values for different ports that are used to interact with the
internal components.
1 Download the Sentinel installation file from the NetIQ Downloads Web site:
1a In the Product or Technology field, browse to and select SIEM-Sentinel.
1b Click Search.
1c Click the button in the Download column for Sentinel 7.2 Evaluation.
1d Click proceed to download, then specify your customer name and password.
1e Click download for the installation version for your platform.
2 Specify at the command line the following command to extract the installation file.
tar zxvf <install_filename>
Replace <install_filename> with the actual name of the install file.
3 Specify the following command in the root of the extracted directory to install Sentinel:
./install-sentinel
or
If you want to use this custom configuration to install Sentinel on more than one system, you can
record your installation options in a file. You can use this file for an unattended Sentinel
installation on other systems. To record your installation options, specify the following
command:
./install-sentinel -r <response_filename>
4 Specify the number for the language you want to use for the installation, then press Enter.
The end user license agreement is displayed in the selected language.
5 Press the Spacebar to read through the license agreement.
6 Enter yes or y to accept the license agreement and continue with the installation.
The installation might take a few seconds to load the installation packages and prompt for the
configuration type.
7 Specify 2 to perform a custom configuration of Sentinel.
8 Enter 1 to use the default 90-day evaluation license key
or
Enter 2 to enter a purchased license key for Sentinel.
Traditional Installation
79
9 Specify the password for the administrator user admin and confirm the password again.
10 Specify the password for the database user dbauser and confirm the password again.
The dbauser account is the identity used by Sentinel to interact with the database. The password
you enter here can be used to perform database maintenance tasks, including resetting the
admin password if the admin password is forgotten or lost.
11 Specify the password for the application user appuser and confirm the password again.
12 Change the port assignments for the Sentinel services by entering the desired number, then
specifying the new port number.
13 After you have changed the ports, specify 7 for done.
14 Enter 1 to authenticate users using only the internal database.
or
If you have configured an LDAP directory in your domain, enter 2 to authenticate users by using
LDAP directory authentication.
The default value is 1.
15 If you want to enable Sentinel in FIPS 140-2 mode, press y.
15a Specify a strong password for the keystore database and confirm the password again.
NOTE: The password must be at least seven characters long. The password must contain at
least three of the following character classes: Digits, ASCII lowercase letters, ASCII
uppercase letters, ASCII non-alphanumeric characters, and non-ASCII characters.
If an ASCII uppercase letter is the first character or a digit is the last character, they are not
counted.
15b If you want to insert external certificates into the keystore database to establish trust, press
y and specify the path for the certificate file. Otherwise, press n
15c Complete the FIPS 140-2 mode configuration by following the tasks mentioned in
Chapter 21, “Operating Sentinel in FIPS 140-2 Mode,” on page 117.
The Sentinel installation finishes and the server starts. It might take few minutes for all services to
start after installation because the system performs a one-time initialization. Wait until the
installation finishes before you log in to the server.
To access the Sentinel Web interface, specify the following URL in your Web browser:
https://<IP_Address_Sentinel_server>:8443.
The <IP_Address_Sentinel_server> is the IP address or DNS name of the Sentinel server and 8443 is the
default port for the Sentinel server.
12.3
Performing a Silent Installation
The silent or unattended installation is useful if you need to install more than one Sentinel server in
your deployment. In such a scenario, you can record the installation parameters during the
interactive installation and then run the recorded file on other servers. You can record the installation
parameters while installing Sentinel with the standard configuration or a custom configuration.
To perform silent installation, ensure that you have recorded the installation parameters to a file. For
information on creating the response file, see Section 12.2.1, “Standard Installation,” on page 78 or
Section 12.2.2, “Custom Installation,” on page 79.
80
NetIQ Sentinel Installation and Configuration Guide
To enable Sentinel in FIPS 140-2 mode, ensure that the response file includes the following
parameters:
ENABLE_FIPS_MODE
NSS_DB_PASSWORD
To perform a silent installation, use the following steps:
1 Download the installation files from the NetIQ Downloads Web site.
2 Log in as root to the server where you want to install Sentinel.
3 Specify the following command to extract the install files from the tar file:
tar -zxvf <install_filename>
Replace <install_filename> with the actual name of the install file.
4 Specify the following command to install Sentinel in silent mode:
./install-sentinel -u <response_file>
The installation proceeds with the values stored in the response file.
5 (Conditional) If you chose to enable FIPS 140-2 mode, complete the FIPS 140-2 mode
configuration by following the tasks mentioned in Chapter 21, “Operating Sentinel in FIPS 140-2
Mode,” on page 117.
The Sentinel installation finishes and the server starts. It might take few minutes for all services to
start after installation because the system performs a one-time initialization. Wait until the
installation finishes before you log in to the server.
12.4
Installing Sentinel as a Non-root User
If your organizational policy does not allow you to run the full installation of Sentinel as root, you
can install Sentinel as another user. In this installation, a few steps are performed as a root user, then
you proceed to install Sentinel as another user created by the root user. Finally, the root user
completes the installation.
1 Download the installation files from the NetIQ Downloads Web site.
2 Specify the following command at the command line to extract the install files from the tar file:
tar -zxvf <install_filename>
Replace <install_filename> with the actual name of the install file.
3 Log in as root to the server where you want to install Sentinel as root.
4 Specify the following command:
./bin/root_install_prepare
A list of commands to be executed with root privileges is displayed. If you want the non-root
user to install Sentinel in non-default location, specify the --location option along with the
command. For example:
./bin/root_install_prepare --location=/foo
The value that you pass to the --location option foo is prepended to the directory paths.
This also creates a novell group and a novell user, if they do not already exist.
5 Accept the command list.
Traditional Installation
81
The displayed commands are executed.
6 Specify the following command to change to the newly created non-root novell user: novell:
su novell
7 (Conditional) To do an interactive installation:
7a Specify the following command:
./install-sentinel
To install Sentinel in non-default location, specify the --location option along with the
command. For example:.
./install-sentinel --location=/foo
7b Continue with Step 9.
8 (Conditional) To do a silent installation:
8a Specify the following command:
./install-sentinel -u <response_file>
The installation proceeds with the values stored in the response file.
8b Continue with Step 12.
9 Specify the number for the language you want to use for the installation.
The end user license agreement is displayed in the selected language.
10 Read the end user license and enter yes or y to accept the license and continue with the
installation.
The installation starts installing all RPM packages. This installation might take a few seconds to
complete.
11 You are prompted to specify the mode of installation.
If you select to proceed with the standard configuration, continue with Step 8 through
Step 10 in Section 12.2.1, “Standard Installation,” on page 78.
If you select to proceed with the custom configuration, continue with Step 7 through
Step 14 in Section 12.2.2, “Custom Installation,” on page 79.
12 Log in as a root user and specify the following command to finish installation:
./bin/root_install_finish
The Sentinel installation finishes and the server starts. It might take few minutes for all services
to start after installation because the system performs a one-time initialization. Wait until the
installation finishes before you log in to the server.
To access the Sentinel Web interface, specify the following URL in your Web browser:
https://<IP_Address_Sentinel_server>:8443.
The <IP_Address_Sentinel_server> is the IP address or DNS name of the Sentinel server and 8443 is the
default port for the Sentinel server.
12.5
Installing Collector Managers and Correlation Engines
By default, Sentinel installs a Collector Manager and a Correlation Engine. For production
environments, NetIQ Corporation recommends setting up a distributed deployment because it
isolates data collection components on a separate machine, which is important for handling spikes
82
NetIQ Sentinel Installation and Configuration Guide
and other anomalies with maximum system stability. For information about the advantages of
installing additional components, see Section 6.1, “Advantages of Distributed Deployments,” on
page 49.
IMPORTANT: You must install the additional Collector Manager or the Correlation Engine on
separate systems. The Collector Manager or the Correlation Engine must not be on the same system
where the Sentinel server is installed.
Section 12.5.1, “Installation Checklist,” on page 83
Section 12.5.2, “Installing Collector Managers and Correlation Engines,” on page 83
Section 12.5.3, “Adding a Custom ActiveMQ User for the Collector Manager or Correlation
Engine,” on page 84
12.5.1
Installation Checklist
Ensure that you have completed the following tasks before starting the installation.
Make sure that your hardware and software meet the minimum requirements. For more
information, see Chapter 5, “Meeting System Requirements,” on page 35.
Synchronize time by using the Network Time Protocol (NTP).
A Collector Manager requires network connectivity to the message bus port (61616) on the
Sentinel server. Before you start installing the Collector Manager, make sure that all firewall and
network settings are allowed to communicate over this port.
12.5.2
Installing Collector Managers and Correlation Engines
1 Launch the Sentinel Web interface by specifying the following URL in your Web browser:
https://<IP_Address_Sentinel_server>:8443.
The <IP_Address_Sentinel_server> is the IP address or DNS name of the Sentinel server and 8443
is the default port for the Sentinel server.
Log in with the username and password specified during the installation of the Sentinel server.
2 In the toolbar, click Downloads.
3 Click Download Installer under the required installation.
4 Click Save File to save the installer to the desired location.
5 Specify the following command to extract the installation file.
tar zxvf <install_filename>
Replace <install_filename> with the actual name of the install file.
6 Change to the directory where you extracted the installer.
7 Specify the following command to install the Collector Manager or the Correlation Engine:
For Collector Manager:
./install-cm
For Correlation Engine:
./install-ce
Traditional Installation
83
The install script first checks for the available memory and disk space. If the available memory is
less than 1.5 GB, the script automatically terminates the installation.
8 Specify the number for the language you want to use for the installation.
The end user license agreement is displayed in the selected language.
9 Press the Spacebar to read through the license agreement.
10 Enter yes or y to accept the license agreement and continue with the installation.
The installation might take a few seconds to load the installation packages and prompt for the
configuration type.
11 When prompted, specify 1 to proceed with the standard configuration.
12 Enter default Communication Server Hostname or IP Address of the machine on which Sentinel
is installed.
13 Specify the ActiveMQ user credentials for the Collector Manager or the Correlation Engine.
The ActiveMQ user credentials are stored in the /<install_dir>/etc/opt/novell/sentinel/
config/activemqusers.properties file located in the Sentinel server.
14 Accept the certificate permanently when prompted.
15 Enter yes or y to enable FIPS 140-2 mode in Sentinel and continue with the FIPS configuration.
16 Continue with the installation as prompted until the installation is complete.
12.5.3
Adding a Custom ActiveMQ User for the Collector Manager or
Correlation Engine
Sentinel recommends that you use the default ActiveMQ usernames for the remote Collector
Manager and Correlation Engine. However, if you have installed multiple remote Collector
Managers and you want to identify them separately, you can create new ActiveMQ users:
1 Log in to the server as the Sentinel user who has access to the installation files.
2 Open the activemqgroups.properties file.
This file is located in the /<install_dir>/etc/opt/novell/sentinel/config/ directory.
3 Add the new ActiveMQ usernames separated by comma as follows:
For Collector Manager, add the new users in the cm section. For example:
cm=collectormanager,cmuser1,cmuser2,...
For Correlation Engine, add the new users in the admins section. For example:
admins=system,correlationengine,ceuser1,ceuser2,...
4 Save and close the file.
5 Open the activemqusers.properties file.
This file is located in the /<install_dir>/etc/opt/novell/sentinel/config/ directory.
6 Add the password for the ActiveMQ user you created in Step 3.
The password can be any random string. For example:
For Collector Manager users:
system=c7f34372ecd20d831cceb29e754e5ac9
collectormanager=1c51ae56
cmuser1=1b51de55
cmuser2=1a51ce57
84
NetIQ Sentinel Installation and Configuration Guide
For Correlation Engine users:
system=c7f34372ecd20d831cceb29e754e5ac9
correlationengine=68790d7a
ceuser1=69700c6d
ceuser2=70701b5c
7 Save and close the file.
8 Restart the Sentinel server.
Traditional Installation
85
86
NetIQ Sentinel Installation and Configuration Guide
13
Appliance Installation
13
The Sentinel appliance is a ready-to-run software appliance built on SUSE Studio. The appliance
combines a hardened SLES 11 SP 3 operating system and the Sentinel software integrated update
service to provide an easy and seamless user experience that allows customers to leverage existing
investments. Before you install the Sentinel appliance, review new functionality and known issues in
the supported SLES 11 Service Pack Release Notes.
You can install the Sentinel appliance on the hardware or in a virtual environment.
Section 13.1, “Installing the VMware Appliance,” on page 87
Section 13.2, “Installing the Xen Appliance,” on page 90
Section 13.3, “Installing the ISO Appliance,” on page 93
Section 13.4, “Post-Installation Configuration for the Appliance,” on page 95
Section 13.5, “Stopping and Starting the Server by Using WebYaST,” on page 98
13.1
Installing the VMware Appliance
This section provides information about installing Sentinel, Collector Manager, and Correlation
Engine on a VMware ESX server.
Section 13.1.1, “Installing Sentinel,” on page 87
Section 13.1.2, “Installing Collector Managers and Correlation Engines,” on page 88
Section 13.1.3, “Installing VMware Tools,” on page 89
13.1.1
Installing Sentinel
Use the following steps to install Sentinel on a VMware ESX server:
1 Download the VMware appliance installation file from the NetIQ Download Web site.
The correct file for the VMware appliance has vmx in the filename. For example,
sentinel_server_7.2.0.0.x86_64.vmx.tar.gz
2 Establish an ESX datastore to which the appliance image can be installed.
3 Log in as Administrator to the server where you want to install the appliance.
4 Specify the following command to extract the compressed appliance image from the machine
where the VM Converter is installed:
tar zxvf <install_file>
Replace <install_file> with the actual filename.
5 To import the VMware image to the ESX server, use the VMware Converter and follow the on-
screen instructions in the installation wizard.
6 Log in to the ESX server machine.
Appliance Installation
87
7 Select the imported VMware image of the appliance and click the Power On icon.
8 Select the language of your choice, then click Next.
9 Select the keyboard layout, then click Next.
10 Read and accept the SUSE Linux Enterprise Server (SLES) 11 SP3 Software License Agreement.
11 Read and accept the NetIQ Sentinel End User License Agreement.
12 On the Hostname and Domain Name page, specify the hostname and domain name, then ensure
that the Assign Hostname to Loopback IP option is selected.
13 Click Next. The hostname configurations are saved.
14 Do one of the following:
To use the current network connection settings, select Use Following Configuration on the
Network Configuration II page, then click Next.
To change the network connection settings, select Change, make the desired changes, then
click Next.
The network connection settings are saved.
15 Set the time and date, then click Next.
To change the NTP configuration after installation, use YaST from the appliance command line.
You can use WebYast to change the time and date, but not the NTP configuration.
If the time appears out of sync immediately after the install, run the following command to
restart NTP:
rcntp restart
16 Set the root password, then click Next.
The installation checks for the available memory and disk space. If the available memory is less
than 2.5 GB, the installation will not let you proceed and the Next button is greyed out.
If the available memory is more than 2.5 GB but less than 6.7 GB, the installation displays a
message that you have less memory than is recommended. When this message is displayed,
click Next to continue with the installation.
17 Set Sentinel admin password, then click Next.
It might take few minutes for all services to start after installation because the system performs a
one-time initialization. Wait until the installation finishes before you log in to the server.
18 Make a note of the appliance IP address that is shown in the console.
19 Proceed with Section 13.4, “Post-Installation Configuration for the Appliance,” on page 95.
13.1.2
Installing Collector Managers and Correlation Engines
The procedure to install a Collector Manager or a Correlation Engine is the same except that you need
to download the appropriate file from the NetIQ Download Web site.
1 Download the VMware appliance installation file from the NetIQ Download Web site.
The correct file for the VMware appliance has vmx in the filename. For example,
sentinel_collector_manager_7.2.0.0.x86_64.vmx.tar.gz
2 Establish an ESX datastore to which the appliance image can be installed.
3 Log in as Administrator to the server where you want to install the appliance.
4 Specify the following command to extract the compressed appliance image from the machine
where the VM Converter is installed:
88
NetIQ Sentinel Installation and Configuration Guide
tar zxvf <install_file>
Replace <install_file> with the actual file name.
5 To import the VMware image to the ESX server, use the VMware Converter and follow the on-
screen instructions in the installation wizard.
6 Log in to the ESX server machine.
7 Select the imported VMware image of the appliance and click the Power On icon.
8 Specify the host name/IP address of the Sentinel server that the Collector Manager should
connect to.
9 Specify the Communication Server port number. The default message bus port is 61616.
10 Specify the ActiveMQ User Name, which is the Collector Manager or Correlation Engine
username. The default username is collectormanager for Collector Manager and
correlationengine for Correlation Engine.
11 Specify the password for the ActiveMQ User.
The ActiveMQ user credentials are stored in the /<install_dir>/etc/opt/novell/sentinel/
config/activemqusers.properties file, which is located in the Sentinel server.
12 (Optional) To verify the password, see the following line in the activemqusers.properties
For Collector Manager:
collectormanager=<password>
In this example, collectormanager is the username and the corresponding value is the
password.
For Correlation Engine:
correlationengine=<password>
In this example, correlationengine is the username and the corresponding value is the
password.
13 Click Next.
14 Accept the certificate.
15 Click Next to complete the installation.
When the installation is complete, the installer displays a message indicating that this appliance
is the Sentinel Collector Manager or the Sentinel Correlation Engine depending on what you
chose to install, along with the IP address. It also displays the Sentinel server user interface IP
address.
13.1.3
Installing VMware Tools
For Sentinel to work effectively on the VMware server, you need to install VMware Tools. VMware
Tools is a suite of utilities that enhances the performance of the virtual machine’s operating system. It
also improves management of the virtual machine. For more information on installing VMware
Tools, see VMware Tools for Linux Guests (https://www.vmware.com/support/ws55/doc/
ws_newguest_tools_linux.html#wp1127177).
For more information on the VMware documentation, see Workstation User’s Manual (http://
www.vmware.com/pdf/ws71_manual.pdf).
Appliance Installation
89
13.2
Installing the Xen Appliance
This section provides information about installing Sentinel, Collector Manager, and a Correlation
Engine on a Xen appliance image.
Section 13.2.1, “Installing Sentinel,” on page 90
Section 13.2.2, “Installing Collector Managers and Correlation Engines,” on page 92
13.2.1
Installing Sentinel
Use the following steps to install Sentinel on a Xen appliance image:
1 Download the Xen virtual appliance installation file from the NetIQ Download Web site to /
var/lib/xen/images.
The correct filename for the Xen virtual appliance has xen in the filename. For example,
Sentinel_7.2.0.0.x86_64.xen.tar.gz.
2 Specify the following command to unpack the file:
tar -zxvf <install_file>
Replace <install_file> with the actual name of the installation file.
3 Change to the new installation directory. This directory has the following files:
<file_name>.raw
<file_name>.xenconfig
4 Open the <file_name>.xenconfig file by using a text editor.
5 Modify the file as follows:
Specify the full path to .raw file in the disk setting.
Specify the bridge setting for your network configuration. For example, "bridge=br0" or
"bridge=xenbr0".
Specify values for the name and memory settings.
For example:
# -*- mode: python; -*name="Sentinel_7.2.0.0.x86_64"
memory=4096
Comment the following line:
vfb=["type=vnc,vncunused=1,vnclisten=0.0.0.0"]
Add the following line:
extra = "console=hvc0 xencons=tty"
The updated xenconfig file must be as follows:
# -*- mode: python; -*name=install_file_name
memory=4096
disk=["tap:aio:/var/lib/xen/images/install_directory/install_filename]
vif=[ "bridge=br0" ]
#vfb=["type=vnc,vncunused=1,vnclisten=0.0.0.0"]
extra = "console=hvc0 xencons=tty"
6 After you have modified the <filename>.xenconfig file, specify the following command to
create the VM:
90
NetIQ Sentinel Installation and Configuration Guide
xm create <file_name>.xenconfig
7 (Optional) To verify if the VM is created, specify the following command:
xm list
The VM appears in the list that is generated.
For example, if you have configured name="Sentinel_7.2.0.0.x86_64" in the .xenconfig
file, then the VM appears with that name.
8 To start the installation, specify the following command:
xm console <vm name>
Replace <vm_name> with the name specified in the name setting of the .xenconfig file, which is
also the value returned in Step 7. For example:
xm console Sentinel_7.2.0.0.x86_64
The installation first checks for the available memory and disk space. If the available memory is
less than 2.5 GB, the installation is automatically terminated. If the available memory is more
than 2.5 GB but less than 6.7 GB, the installation displays a message that you have less memory
than is recommended. Enter y if you want to continue with the installation, or enter n if you do
not want to proceed.
9 Select the language of your choice, then click Next.
10 Select the keyboard layout, then click Next.
11 Read and accept the SUSE Linux Enterprise Server (SLES) 11 SP3 Software License Agreement.
12 Read and accept the NetIQ Sentinel End User License Agreement.
13 On the Hostname and Domain Name page, specify the hostname and domain name, then ensure
that the Assign Hostname to Loopback IP option is selected.
14 Select Next. The hostname configurations are saved.
15 Do one of the following:
To use the current network connection settings, select Use the following configuration on
the Network Configuration II page.
To change the network connection settings, select Change, then make the desired changes.
16 Select Next. The network connection settings are saved.
17 Set the time and date, click Next.
To change the NTP configuration after installation, use YaST from the appliance command line.
You can use WebYast to change the time and date, but not the NTP configuration.
If the time appears out of sync immediately after the install, run the following command to
restart NTP:
rcntp restart
18 Set the SUSE Enterprise Server root password, then click Next.
19 Set Sentinel admin password, then click Next.
The Sentinel installation proceeds and completes. It might take few minutes for all services to
start up after installation as the system performs a one time initialization. Wait until the
installation finishes before you log in to the server.
Make a note of the appliance IP address that is shown in the console.
20 Proceed with Section 13.4, “Post-Installation Configuration for the Appliance,” on page 95.
Appliance Installation
91
13.2.2
Installing Collector Managers and Correlation Engines
The procedure to install a Collector Manager or a Correlation Engine is the same except that you need
to download the appropriate file from the NetIQ Download Web site.
1 Complete Step 1 through Step 14 in Section 13.2.1, “Installing Sentinel,” on page 90.
2 On the Network Configuration II screen, select Change and specify the IP address of the virtual
machine where you want to install the additional Collector Manager or Correlation Engine.
3 Specify the subnet mask of the specified IP.
4 Select Next. The network connection settings are saved.
5 Set the time and date, then select Next.
To change the NTP configuration after installation, use YaST from the appliance command line.
You can use WebYast to change the time and date, but not the NTP configuration.
If the time appears out of sync immediately after the install, run the following command to
restart NTP:
rcntp restart
6 Set the SUSE Enterprise Server root password, then select Next.
7 Specify the hostname/IP address of the Sentinel server to which the Collector Manager or
Correlation Engine should connect to.
8 Specify the communication server port number. The default message bus port is 61616.
9 Specify the ActiveMQ User Name, which is the Collector Manager or Correlation Engine
username.
10 Specify the password for the ActiveMQ User.
The ActiveMQ user credentials are stored in the /<install_dir>/etc/opt/novell/sentinel/
config/activemqusers.properties file located on the Sentinel server.
11 (Optional) To verify the password, see the following line in the activemqusers.properties
file:
For Collector Manager:
collectormanager=<password>
In this example, collectormanager is the username and the corresponding value is the
password.
For Correlation Engine:
correlationengine=<password>
In this example, correlationengine is the username and the corresponding value is the
password.
12 Select Next to complete the installation.
When the installation is complete, it displays a message that this appliance is the Sentinel
Collector Manager or the Correlation Engine depending on what you chose to install, along with
the IP address.
92
NetIQ Sentinel Installation and Configuration Guide
13.3
Installing the ISO Appliance
This section provides information about installing Sentinel, Collector Manager, and Correlation
Engine as an ISO appliance.
Section 13.3.1, “Prerequisites,” on page 93
Section 13.3.2, “Installing Sentinel,” on page 93
Section 13.3.3, “Installing Collector Managers and Correlation Engines,” on page 94
13.3.1
Prerequisites
Download the appliance ISO disk image from the support site, unpack the file, and make a
DVD.
Ensure that the system (bare metal and Hyper-V) where you want to install the ISO disk image
has a minimum memory of 4.5 GB for the installation to complete.
Ensure that the minimum hard disk space is 30 GB for the installer to make the automatic
partition proposal.
13.3.2
Installing Sentinel
Use the following steps to install the Sentinel ISO appliance:
1 Boot the physical machine from the DVD drive with the DVD.
2 Use the on-screen instructions of the installation wizard.
3 Run the Live DVD appliance image by selecting the top entry in the boot menu.
The installation first checks for the available memory and disk space. If the available memory is
less than 2.5 GB, the installation is automatically terminated. If the available memory is more
than 2.5 GB but less than 6.7 GB, the installation displays a message that you have less memory
than is recommended. Enter y if you want to continue with the installation, or enter n if you do
not want to proceed.
4 Select the language of your choice, then click Next.
5 Select the keyboard Configuration, then click Next.
6 Read and accept the SUSE Enterprise Server Software License Agreement. Click Next
7 Read and accept the NetIQ Sentinel End User License Agreement. Click Next
8 On the Hostname and Domain Name page, specify the hostname and domain name, then ensure
that the Assign Hostname to Loopback IP option is selected.
9 Click Next.
10 Do one of the following:
To use the current network connection settings, select Use the following configuration on
the Network Configuration II page.
To change the network connection settings, click Change, then make the desired changes.
11 Click Next.
12 Set the Time and Date, then click Next.
To change the NTP configuration after installation, use YaST from the appliance command line.
You can use WebYast to change the time and date settings, but not the NTP configuration.
Appliance Installation
93
If the time appears out of sync immediately after the install, run the following command to
restart NTP:
rcntp restart
13 Set the root password, then click Next.
14 Set the Sentinel admin password, then click Next.
Ensure that Install Sentinel appliance to hard drive (for Live DVD image only) is selected to
install the appliance on the physical server. This check box is selected by default.
If you deselect this check box, the appliance is not installed on the physical server and will run
only in the LIVE DVD mode, proceed to Step 22.
15 In the YaST2 live installer console, select Next.
The YaST2 live installer console installs the appliance to the hard disk. The YaST2 live installer
console repeats some of the earlier installation steps.
16 Set the Time and Date, then select Next.
17 The Suggested Partitioning screen displays the recommended partition setup. Review the
partition setup, configure the setup (if necessary), and then select Next. Modify these settings
only if you are familiar with configuring partitions in SLES.
You can configure the partition setup by using the various partitioning options on the screen.
For more information about configuring partitions, see Using the YaST Partitioner in the SLES
documentation and Section 6.6, “Planning Partitions for Data Storage,” on page 54.
18 Enter the root password and select Next.
19 The Live Installation Settings screen displays the selected installation settings. Review the
settings, configure the settings (if necessary), and then select Install.
20 Select Install to confirm the Installation.
Wait until the installation finishes. It might take few minutes for all services to start up after
installation because the system performs a one-time initialization.
21 Select OK to reboot the system.
22 Make a note of the appliance IP address that is shown in the console.
23 Enter the root username and password at the console to log in to the appliance.
The default value for the username is root and the password is the password you set in Step 18.
24 Proceed with Section 13.4, “Post-Installation Configuration for the Appliance,” on page 95.
13.3.3
Installing Collector Managers and Correlation Engines
The procedure to install a Collector Manager or a Correlation Engine is the same except that you need
to download the appropriate ISO appliance file from the NetIQ Download Web site.
1 Complete Step 1 through Step 13 in Section 13.3.2, “Installing Sentinel,” on page 93.
2 Specify the following configuration for the Collector Manager or the Correlation Engine:
Sentinel Server Hostname or IP Address: Specify the host name or IP address of the
Sentinel server that the Collector Manager or Correlation Engine should connect to.
Sentinel Communication Channel Port: Specify the Sentinel server communication
channel port number. The default port number is 61616.
Communication Channel User Name: Specify the communication channel user name,
which is the Collector Manager or Correlation Engine user name.
94
NetIQ Sentinel Installation and Configuration Guide
Communication Channel User Password: Specify the communication channel user
Password.
The communication channel user credentials are stored in the /<install_dir>/etc/opt/
novell/sentinel/config/activemqusers.properties file located on the Sentinel
server.
To verify the credentials, see the following line in the activemqusers.properties file:
For Collector Manager:
collectormanager=<password>
In this example, collectormanager is the username and the corresponding value is the
password.
For Correlation Engine:
correlationengine=<password>
In this example, correlationengine is the username and the corresponding value is the
password.
Install Sentinel appliance to hard drive (for Live DVD image only): Ensure you select
this check box to install the appliance on the physical server.
If you deselect this check box, the appliance will not be installed on the physical server and
will run only in the Live DVD mode.
3 Click Next.
4 Accept the certificate when prompted.
5 Complete Step 15 through Step 21 in Section 13.3.2, “Installing Sentinel,” on page 93.
6 Make a note of the appliance IP address that is shown in the console.
The console displays a message that this appliance is the Sentinel Collector Manager or
Correlation Engine depending on what you chose to install, along with the IP address. The
Console also displays the Sentinel server user interface IP address.
7 Complete Step 23 through Step 24 in Section 13.3.2, “Installing Sentinel,” on page 93.
13.4
Post-Installation Configuration for the Appliance
After you install Sentinel, you need to perform additional configuration for the appliance to work
properly.
Section 13.4.1, “Configuring WebYaST,” on page 96
Section 13.4.2, “Creating Partitions,” on page 96
Section 13.4.3, “Registering for Updates,” on page 97
Section 13.4.4, “Configuring the Appliance with SMT,” on page 97
Appliance Installation
95
13.4.1
Configuring WebYaST
The Sentinel appliance user interface is equipped with WebYaST, which is a Web-based remote
console for controlling appliances based on SUSE Linux Enterprise. You can access, configure, and
monitor the Sentinel appliances with WebYaST. The following procedure briefly describes the steps
to configure WebYaST. For more information on detailed configuration, see the WebYaST User Guide
(http://www.novell.com/documentation/webyast/).
1 Log in to the Sentinel appliance.
2 Click Appliance.
3 Configure the Sentinel Server to receive updates as described in Section 13.4.3, “Registering for
Updates,” on page 97.
4 Click Next to finish the initial setup.
13.4.2
Creating Partitions
As a best practice, ensure that you create separate partitions to store Sentinel data on a different
partition than the executables, configuration, and operating system files. The benefits of storing
variable data separately include easier backup of sets of files, simpler recovery in case of corruption,
and provides additional robustness if a disk partition fills up. For information about planning your
partitions, see Section 6.6, “Planning Partitions for Data Storage,” on page 54. You can add partitions
in the appliance and move a directory to the new partition by using the YaST tool.
Use the following procedure to create a new partition and move the data files from its directory to the
newly created partition:
1 Log in to Sentinel as root.
2 Run the following command to stop the Sentinel on the appliance:
/etc/init.d/sentinel stop
3 Specify the following command to change to novell user:
su - novell
4 Move the contents of the directory at /var/opt/novell/sentinel to a temporary location.
5 Change to root user.
6 Enter the following command to access the YaST2 Control Center:
yast
7 Select System > Partitioner.
8 Read the warning and select Yes to add the new unused partition.
For information about creating partitions, see Using the YaST Partitioner in the SLES 11
documentation.
9 Mount the new partition at /var/opt/novell/sentinel.
10 Specify the following command to change to novell user:
su - novell
11 Move the contents of the data directory from the temporary location (where it was saved in
Step 4) back to /var/opt/novell/sentinel in the new partition.
12 Run the following command to restart the Sentinel appliance:
/etc/init.d/sentinel start
96
NetIQ Sentinel Installation and Configuration Guide
13.4.3
Registering for Updates
You must register the Sentinel appliance with the appliance update channel to receive patch updates.
To register the appliance, you must first obtain your appliance registration code or the appliance
activation key from the NetIQ Customer Care Center.
Use the following steps to register the appliance for updates:
1 Log in to the Sentinel appliance.
2 Click Appliance to launch WebYaST.
3 Click Registration.
4 Specify the e-mail ID that you want to receive updates, then specify the system name and the
appliance registration code.
5 Click Save.
13.4.4
Configuring the Appliance with SMT
In secured environments where the appliance must run without direct Internet access, you can
configure the appliance with the Subscription Management Tool (SMT), which enables you to
upgrade the appliance to the latest versions of Sentinel as they are released. SMT is a package proxy
system that is integrated with NetIQ Customer Center and provides key NetIQ Customer Center
capabilities.
“Prerequisites” on page 97
“Configuring the Appliance” on page 98
“Upgrading the Appliance” on page 98
Prerequisites
Get the NetIQ Customer Center credentials for Sentinel to get updates from NetIQ. For
information on getting the credentials, contact NetIQ Support.
Ensure that SLES 11 SP3 is installed with the following packages on the machine where you
want to install SMT:
htmldoc
perl-DBIx-Transaction
perl-File-Basename-Object
perl-DBIx-Migration-Director
perl-MIME-Lite
perl-Text-ASCIITable
yum-metadata-parser
createrepo
perl-DBI
apache2-prefork
libapr1
perl-Data-ShowTable
perl-Net-Daemon
perl-Tie-IxHash
Appliance Installation
97
fltk
libapr-util1
perl-PIRPC
apache2-mod_perl
apache2-utils
apache2
perl-DBD-mysql
Install SMT and configure the SMT server. For more information, refer to the following sections
in the SMT documentation:
SMT Installation
SMT Server Configuration
Mirroring Installation and Update Repositories with SMT
Install the wget utility on the appliance computer.
Configuring the Appliance
For information on configuring the appliance with SMT, see the Subscription Management Tool
(SMT) for SUSE Linux Enterprise 11 documentation.
To enable the appliance repositories, execute the following command:
smt-repos -e Sentinel-Server-7.0-Updates sle-11-x86_64
smt-repos -e Sentinel-Collector-Manager-7.0-Updates sle-11-x86_64
smt-repos -e Sentinel-Correlation-Engine-7.0-Updates sle-11-x86_64
Upgrading the Appliance
For information about upgrading the appliance, see Section 25.3, “Upgrading the Appliance by Using
SMT,” on page 139.
13.5
Stopping and Starting the Server by Using WebYaST
You can start and stop the Sentinel server by using the Web interface as follows:
1 Log in to the Sentinel appliance.
2 Click Appliance to launch WebYaST.
3 Click System Services.
4 To stop the Sentinel server, click stop.
5 To start the Sentinel server, click start.
98
NetIQ Sentinel Installation and Configuration Guide
14
NetFlow Collector Manager Installation
14
You must install the NetFlow Collector Manager on a separate computer and not on the same
computer where the Sentinel server is installed.
14.1
Installation Checklist
Ensure that you have completed the following tasks before starting the installation.
Make sure that your hardware and software meet the minimum requirements. For more
information, see Chapter 5, “Meeting System Requirements,” on page 35.
Synchronize time by using the Network Time Protocol (NTP).
14.2
Installing the NetFlow Collector Manager
You can install NetFlow Collector Managers by using one of the following methods:
Standard: Uses the default values for the NetFlow configuration.
Custom: Allows you to customize the port number of the Sentinel server.
NOTE
To send network flow data to the Sentinel server, you must be an administrator, belong to the
NetFlow Provider role, or have the Send NetFlow data permission.
If you plan to install more than one NetFlow Collector Manager, you should create a new user
account for each NetFlow Collector Manager to send network flow data to Sentinel. Having
different user accounts for each NetFlow Collector Manager provides an additional level of
control over which NetFlow Collector Managers are allowed to send data to Sentinel.
To install the NetFlow Collector Manager:
1 Launch the Sentinel Web interface by specifying the following URL in your Web interface:
https://<IP_Address_Sentinel_server>:8443
The <IP_Address_Sentinel_server> is the IP address or DNS name of the Sentinel server and
8443 is the default port for the Sentinel server.
Log in with the user name and password specified during the installation of the Sentinel server.
2 In the toolbar, click Downloads.
3 Under the NetFlow Collector Manager heading, click Download Installer.
4 Click Save File to save the installer to the desired location.
5 In the command prompt, specify the following command to extract the installation file.
NetFlow Collector Manager Installation
99
tar zxvf <install_filename>
Replace <install_filename> with the actual name of the install file.
6 Change to the directory where you extracted the installer:
cd <directory_name>
7 Specify the following command to install the NetFlow Collector Manager:
./install-netflow
8 Specify the number for the language you want to use for the installation, then press Enter.
9 Press the Spacebar to read through the license agreement.
10 Enter yes or y to accept the license and continue with the installation.
The installation might take a few seconds to load the installation packages and prompt for the
configuration type.
11 Specify whether you want to proceed with Standard or Custom installation.
12 Specify the hostname or IP address of the Sentinel server that should receive network flow data.
13 (Conditional) If you chose Custom installation, specify the port number of the Sentinel server.
The default port number is 8443.
14 Specify the user name and password to authenticate to the Sentinel server.
NOTE: Ensure that the user credentials you specify have the Send NetFlow data permission or
administration privileges. Otherwise, the installation completes, but the authentication fails
when the NetFlow Collector Manager sends data to the Sentinel server.
The installation completes. It might take a few minutes for the NetFlow Collector Manager to
establish a connection to the Sentinel server.
15 (Optional) You can determine whether the NetFlow Collector Manager installation is successful
by performing one of the following:
Verify whether the NetFlow Collector Manager services are running:
/etc/init.d/sentinel status
Verify whether the NetFlow Collector Manager has established a connection with the
Sentinel server:
netstat -an |grep 'ESTABLISHED' |grep <HTTPS_port_number>
Verify whether the NetFlow Collector Manager appears in the Sentinel Web console by
clicking Collection > NetFlow.
16 Enable network flow traffic forwarding on the device from which you want to collect network
flow data.
As part of enabling NetFlow on the device, you must specify the IP address of the Sentinel
server and the port on which the NetFlow Collector Manager receives data from the NetFlow
enabled device. The default port number is 3578. For more information, refer to the specific
NetFlow enabled device documentation.
100
NetIQ Sentinel Installation and Configuration Guide
15
Installing Additional Collectors and
Connectors
15
By default, all released Collectors and Connectors are installed when you install Sentinel. If you want
to install a new Collector or Connector released after the Sentinel release, use the information in the
following sections.
Section 15.1, “Installing a Collector,” on page 101
Section 15.2, “Installing a Connector,” on page 101
15.1
Installing a Collector
Use the following steps to install a Collector:
1 Download the desired Collector from the Sentinel Plug-ins Web site.
2 Log in to the Sentinel Web interface at https://<IP address>:8443, where 8443 is the default port for
the Sentinel server.
3 Click applications in the toolbar, then click Applications.
4 Click Launch Control Center to launch the Sentinel Control Center.
5 In the toolbar, click Event Source Management > Live View, then click Tools > Import plugin.
6 Browse to and select the Collector file you downloaded in Step 1, then click Next.
7 Follow the remaining prompts, then click Finish.
To configure the Collector, see the documentation for the specific Collector on the Sentinel Plug-ins
Web site.
15.2
Installing a Connector
Use the following steps to install a Connector:
1 Download the desired Connector from the Sentinel Plug-ins Web site.
2 Log in to the Sentinel Web interface at https://<IP address>:8443, where 8443 is the default port for
the Sentinel server.
3 Click application in the toolbar, then click Applications.
4 Click Launch Control Center to launch the Sentinel Control Center.
5 In the toolbar, select Event Source Management > Live View, then click Tools > Import plugin.
6 Browse to and select the Connector file you downloaded in Step 1, then click Next.
7 Follow the remaining prompts, then click Finish.
Installing Additional Collectors and Connectors
101
To configure the Connector, see the documentation for the specific Connector on the Sentinel Plug-ins
Web site.
102
NetIQ Sentinel Installation and Configuration Guide
16
Verifying the Installation
16
You can determine whether the installation is successful by performing either of the following:
Verify the Sentinel version:
/etc/init.d/sentinel version
Verify whether the Sentinel services are up and running:
/etc/init.d/sentinel status
Verify whether the Web services are up and running:
netstat -an |grep 'LISTEN' |grep <HTTPS_port_number>
The default port number is 8443.
Access the Sentinel Web interface:
1. Launch a supported Web browser.
2. Specify the URL of the Sentinel Web interface:
https://<IP_Address/DNS_Sentinel_server:8443>
IP_Address/DNS_Sentinel_server is the IP address or DNS name of the Sentinel server and
8443 is the default port for the Sentinel server.
3. Log in with the administrator name and password specified during the installation. The
default username is admin.
Verifying the Installation
103
104
NetIQ Sentinel Installation and Configuration Guide
IV
Configuring Sentinel
IV
This section provides information about configuring Sentinel and the out-of-the-box plug-ins.
Chapter 17, “Configuring Time,” on page 107
Chapter 18, “Modifying the Configuration after Installation,” on page 111
Chapter 19, “Configuring Out-of-the-Box Plug-Ins,” on page 113
Chapter 20, “Enabling FIPS 140-2 Mode in an Existing Sentinel Installation,” on page 115
Chapter 21, “Operating Sentinel in FIPS 140-2 Mode,” on page 117
Configuring Sentinel
105
106
NetIQ Sentinel Installation and Configuration Guide
17
Configuring Time
17
The time of an event is very critical to its processing in Sentinel. It is important for reporting and
auditing purposes as well as for real-time processing. This section provides information about
understanding time in Sentinel, how to configure time, and handling time zones.
Section 17.1, “Understanding Time in Sentinel,” on page 107
Section 17.2, “Configuring Time in Sentinel,” on page 109
Section 17.3, “Configuring Delay Time Limit for Events,” on page 109
Section 17.4, “Handling Time Zones,” on page 109
17.1
Understanding Time in Sentinel
Sentinel is a distributed system that is made up of several processes distributed through out your
network. In addition, there can be some delay introduced by the event source. To accommodate this,
the Sentinel processes reorder events into a time-ordered stream before processing.
Every event has three time fields:
Event Time: This is the event time used by all analytical engines, searches, reports, and so on.
Sentinel Process Time: The time Sentinel collected the data from the device, which is taken
from the Collector Manager system time.
Observer Event Time: The time stamp the device put in the data. The data might not always
contain a reliable time stamp and can be quite different than the Sentinel Process Time. For
example, when the device delivers data in batches.
The following illustration explains how Sentinel does this:
Configuring Time
107
Figure 17-1 Sentinel Time
Active Views
Reports
2
Events from security
devices, example:
• IDS
• Firewalls
• O/S
• Routers
• Web Servers
• Databases
• Switches
• Mainframe
• Anti-Virus
Event
Routing
Reorder Buffer
4
Event Store
Collector
3
1
Reorder Buffer
Security Devices
Sentinel
Server
Correlation Engine
1. By default, the Event Time is set to the Sentinel Process Time. The ideal, however, is for the
Event Time to match the Observer Event Time, if it is available and trustworthy. It is best to
configure data collection to Trust Event Source Time if the device time is available, accurate,
and properly parsed by the Collector. The Collector sets the Event Time to match the Observer
Event Time.
2. The events that have an Event Time within a 5 minute range from the server time (in the past or
future) are processed normally by Active Views. Events that have an Event Time more than 5
minutes in the future do not show in the Active Views, but are inserted into the event store.
Events that have an Event Time more than 5 minutes in the future and less than 24 hours in the
past still are shown in the charts, but are not shown in the event data for that chart. A drill-down
operation is necessary to retrieve those events from the event store.
3. Events are sorted into 30-second intervals so that the Correlation Engine can process them in
chronological order. If the Event Time is more than 30 seconds older than the server time, the
Correlation Engine does not process the events.
4. If the Event Time is older than 5 minutes relative to the Collector Manager system time, Sentinel
directly routes events to the event store, bypassing real-time systems like Correlation, Active
Views, and Security Intelligence.
108
NetIQ Sentinel Installation and Configuration Guide
17.2
Configuring Time in Sentinel
The Correlation Engine processes time-ordered streams of events and detects patterns within events
as well as temporal patterns in the stream. However, sometimes the device generating the event
might not include the time in its log messages. To configure time to work correctly with Sentinel, you
have two options:
Configure NTP on the Collector Manager and deselect Trust Event Source Time on the event
source in the Event Source Manager. Sentinel uses the Collector Manager as the time source for
the events.
Select Trust Event Source Time on the event source in Event Source Manager. Sentinel uses the
time from the log message as the correct time.
To change this setting on the event source:
1 Log in to Event Source Management.
For more information, see “Accessing Event Source Management” in the NetIQ Sentinel
Administration Guide.
2 Right-click the event source you want to change the time setting for, then select Edit.
3 Select or deselect the Trust Event Source option on the bottom of the General tab.
4 Click OK to save the change.
17.3
Configuring Delay Time Limit for Events
When Sentinel receives events from event sources, there may be a delay between the time the event
was generated and the time Sentinel processes it. Sentinel stores the events with large delays in
separate partitions. If many events are delayed over a long period of time, it may be an indicator of an
incorrectly configured event source. This might also decrease the Sentinel performance as it attempts
to handle the delayed events. Since the delayed events may be the result of a misconfiguration and,
therefore, may not be desirable to store, Sentinel allows you to configure the acceptable delay limit
for the incoming events. The event router drops the events that exceed the delay limit. Specify the
delay limit in the following property in the configuration.properties file:
esecurity.router.event.delayacceptthreshold = <time in milliseconds>
You can also have a listing periodically logged to the Sentinel server log file showing the event
sources from which events are received that are delayed beyond a specified threshold. To log this
information, specify the threshold in the following property in the configuration.properties file:
sentinel.indexedlog.eventdelay.reportthreshold= <time in milliseconds>
17.4
Handling Time Zones
Handling time zones can become very complex in a distributed environment. For example, you
might have an event source in one time zone, the Collector Manager in another, the back-end Sentinel
server in another, and the client viewing the data in yet another. When you add concerns such as
daylight saving time and the many event sources that don't report what time zone they are set to
Configuring Time
109
(such as all syslog sources), there are many possible problems that need to be handled. Sentinel is
flexible so that you can properly represent the time when events actually occur, and compare those
events to other events from other sources in the same or different time zones.
In general, there are three different scenarios for how event sources report time stamps:
The event source reports the time in UTC. For example, all standard Windows Event Log events
are always reported in UTC.
The event source reports in local time, but always includes the time zone in the time stamp. For
example, any event source that follows RFC3339 in structuring time stamps include the time
zone as an offset; other sources report long time zone IDs such as Americas/New York, or short
time zone IDs such as EST, which can present problems because of conflicts and inadequate
resolutions.
The event source reports local time, but does not indicate the time zone. Unfortunately, the
extremely common syslog format follows this model.
For the first scenario, you can always calculate the absolute UTC time that an event occurred
(assuming that a time sync protocol is in use), so you can easily compare the timing of that event to
any other event source in the world. However, you cannot automatically determine what the local
time was when the event occurred. For this reason, Sentinel allows customers to manually set the
time zone of an event source by editing the Event Source node in the Event Source Manager and
specifying the appropriate time zone. This information does not affect the calculation of
DeviceEventTime or EventTime, but is placed into the ObserverTZ field, and is used to calculate the
various ObserverTZ fields, such as ObserverTZHour. These fields are always expressed in local time.
In the second scenario, if the long-form time zone IDs or offsets are used, you can convert to UTC to
get the absolute canonical UTC time (stored in DeviceEventTime), but you can also calculate the local
time ObserverTZ fields. If a short-form time zone ID is used, there is some potential for conflicts.
The third scenario requires the administrator to manually set the event source time zone for all
affected sources so that Sentinel can properly calculate the UTC time. If the time zone is not properly
specified by editing the Event Source node in the Event Source Manager, then the DeviceEventTime
(and probably the EventTime) can be incorrect; also, the ObserverTZ and associated fields might be
incorrect.
In general, the Collector for a given type of event source (such as Microsoft Windows) knows how an
event source presents time stamps, and adjusts accordingly. It is always good policy to manually set
the time zone for all Event Source nodes in the Event Source Manager, unless you know that the
event source reports in local time and always includes the time zone in the time stamp
Processing the event source presentation of the time stamp happens in the Collector and on the
Collector Manager. The DeviceEventTime and the EventTime are stored as UTC, and the ObserverTZ
fields are stored as strings set to local time for the event source. This information is sent from the
Collector Manager to the Sentinel server and stored in the event store. The time zone that the
Collector Manager and the Sentinel server are in should not affect this process or the stored data.
However, when a client views the event in a Web browser, the UTC EventTime is converted to the
local time according to the Web browser, so all events are presented to clients in the local time zone. If
the users want to see the local time of the source, they can examine the ObserverTZ fields for details.
110
NetIQ Sentinel Installation and Configuration Guide
18
Modifying the Configuration after
Installation
18
After installing Sentinel, if you want to enter the valid license key, change the password or modify
any of the assigned ports, you can run the configure.sh script to modify them. The script is
available in the /opt/novell/sentinel/setup folder.
1 Specify the following command at the command line to run the configure.sh script:
./configure.sh
2 Specify 1 to perform a standard configuration or specify 2 to perform a custom configuration of
Sentinel.
3 Press the Spacebar to read through the license agreement.
4 Enter yes or y to accept the license agreement and continue with the installation.
The installation might take a few seconds to load the installation packages.
5 Enter 1 to use the default 90-day evaluation license key
or
Enter 2 to enter a purchased license key for Sentinel.
6 Decide whether you want to keep the existing password for the admin administrator user.
If you want to keep the existing password, enter 1, then continue with Step 7.
If you want to change the existing password, enter 2, specify the new password, confirm the
password, then continue with Step 7.
The admin user is the identity used to perform administration tasks through the Sentinel
web console, including the creation of other user accounts.
7 Decide whether you want to keep the existing password for the dbauser database user.
If you want to keep the existing password, enter 1, then continue with Step 8.
If you want to change the existing password, enter 2, specify the new password, confirm the
password, then continue with Step 8.
The dbauser account is the identity that Sentinel uses to interact with the database. The
password you enter here can be used to perform database maintenance tasks, including
resetting the admin password if the admin password is forgotten or lost.
8 Decide whether you want to keep the existing password for the appuser application user.
If you want to keep the existing password, enter 1, then continue with Step 9.
If you want to change the existing password, enter 2, specify the new password, confirm the
password, then continue with Step 9.
The appuser account is an internal identity, which Sentinel java process uses to establish
connection and interact with the database. The password you enter here is used to perform
database tasks.
Modifying the Configuration after Installation
111
9 Change the port assignments for the Sentinel services by entering the desired number, then
specifying the new port number.
10 After you have changed the ports, specify 7 for done.
11 Enter 1 to authenticate users using only the internal database.
or
If you have configured an LDAP directory in your domain, enter 2 to authenticate users by using
LDAP directory authentication.
The default value is 1.
112
NetIQ Sentinel Installation and Configuration Guide
19
Configuring Out-of-the-Box Plug-Ins
19
By default, Sentinel comes with several plug-ins. This chapter provides information about how to
configure the out-of-the-box plug-ins.
Section 19.1, “Configuring the Solution Packs,” on page 113
Section 19.2, “Configuring the Collectors, Connectors, Integrators, and Actions,” on page 113
19.1
Configuring the Solution Packs
Sentinel ships with a wide variety of useful out-of-the-box content that you can use immediately to
meet many of your analysis needs. Much of this content comes from the pre-installed Sentinel Core
Solution Pack and Solution Pack for ISO 27000 Series. For more information, see “Using Solution
Packs” in the NetIQ Sentinel Administration Guide
Solution Packs allow categorization and grouping of content into controls or policy sets that are
treated as a unit. The controls in the Solution Packs are pre-installed to provide you with this out-ofthe-box content, but you have to formally implement or test those controls by using the Sentinel Web
console.
If a certain amount of rigor is desired to help show that your Sentinel implementation is working as
designed, you may use the formal attestation process built into the Solution Packs. This attestation
process implements and tests the Solution Pack controls just as you would implement and test
controls from any other Solution Pack. As part of this process, the implementer and tester will attest
that they have completed their work; these attestations will then become part of an audit trail that can
be examined to demonstrate that any particular control was properly deployed.
You can do the attestation process by using the Solution Manager. For more information on
implementing and testing the controls, see “Installing and Managing Solution Packs” in the NetIQ
Sentinel Administration Guide.
19.2
Configuring the Collectors, Connectors, Integrators, and
Actions
For information about configuring the out-of-the-box plug-ins, see the specific plug-in
documentation available on the Sentinel Plug-ins Web site.
Configuring Out-of-the-Box Plug-Ins
113
114
NetIQ Sentinel Installation and Configuration Guide
20
Enabling FIPS 140-2 Mode in an Existing
Sentinel Installation
20
This chapter provides information about enabling FIPS 140-2 mode in an existing installation of
Sentinel.
NOTE: These instructions assume that Sentinel is installed at the /opt/novell/sentinel directory.
The commands must be executed as the novell user.
Section 20.1, “Enabling Sentinel Server to Run in FIPS 140-2 Mode,” on page 115
Section 20.2, “Enabling FIPS 140-2 Mode on Remote Collector Managers and Correlation
Engines,” on page 115
20.1
Enabling Sentinel Server to Run in FIPS 140-2 Mode
To enable the Sentinel Server to run in FIPS 140-2 mode:
1 Log in to the Sentinel server.
2 Switch to novell user (su novell).
3 Browse to the Sentinel bin directory.
4 Run the convert_to_fips.sh script and follow the on-screen instructions.
5 Complete the FIPS 140-2 mode configuration by following the tasks mentioned in Chapter 21,
“Operating Sentinel in FIPS 140-2 Mode,” on page 117.
20.2
Enabling FIPS 140-2 Mode on Remote Collector Managers
and Correlation Engines
You must enable FIPS 140-2 mode on the remote Collector Manager and Correlation Engine if you
want to use FIPS-approved communications with the Sentinel server running in FIPS 140-2 mode.
To enable a remote Collector Manager or Correlation Engine to run in FIPS 140-2 mode:
1 Login to the remote Collector Manager or Correlation Engine system.
2 Switch to novell user (su novell).
3 Browse to the bin directory. The default location is /opt/novell/sentinel/bin.
4 Run the convert_to_fips.sh script and follow the on-screen instructions.
5 Complete the FIPS 140-2 mode configuration by following the tasks mentioned in Chapter 21,
“Operating Sentinel in FIPS 140-2 Mode,” on page 117.
Enabling FIPS 140-2 Mode in an Existing Sentinel Installation
115
116
NetIQ Sentinel Installation and Configuration Guide
21
Operating Sentinel in FIPS 140-2 Mode
21
This chapter provides information about configuring and operating Sentinel in FIPS 140-2 mode.
Section 21.1, “Configuring the Advisor Service in FIPS 140-2 Mode,” on page 117
Section 21.2, “Configuring Distributed Search in FIPS 140-2 Mode,” on page 117
Section 21.3, “Configuring LDAP Authentication in FIPS 140-2 Mode,” on page 118
Section 21.4, “Updating Server Certificates in Remote Collector Managers and Correlation
Engines,” on page 119
Section 21.5, “Configuring Sentinel Plug-Ins to Run in FIPS 140-2 Mode,” on page 119
Section 21.6, “Importing Certificates into FIPS Keystore Database,” on page 125
Section 21.7, “Reverting Sentinel to Non-FIPS Mode,” on page 126
21.1
Configuring the Advisor Service in FIPS 140-2 Mode
The Advisor service uses a secure HTTPS connection to download its feed from the Advisor server.
The certificate used by the server for secure communication needs to be added to the Sentinel FIPS
keystore database.
To verify successful registration with the Resource Management database:
1 Download the certificate from the Advisor server and save the file as advisor.cer.
2 Import the Advisor server certificate into the Sentinel FIPS keystore.
For more information about importing the certificate, see “Importing Certificates into FIPS
Keystore Database” on page 125.
21.2
Configuring Distributed Search in FIPS 140-2 Mode
This section provides information about configuring distributed search in FIPS 140-2 mode.
Scenario 1: Both the source and the target Sentinel servers are in FIPS 140-2 mode
To allow distributed searches across multiple Sentinel servers running in FIPS 140-2 mode, you need
to add the certificates used for secure communication to the FIPS keystore.
1 Log in to the distributed search source computer.
2 Browse to the certificate directory:
cd <sentinel_install_directory>/config
3 Copy the source certificate (sentinel.cer) to a temporary location on the target computer.
4 Import the source certificate into the target Sentinel FIPS keystore.
Operating Sentinel in FIPS 140-2 Mode
117
For more information about importing the certificate, see “Importing Certificates into FIPS
Keystore Database” on page 125.
5 Log in to the distributed search target computer.
6 Browse to the certificate directory:
cd /etc/opt/novell/sentinel/config
7 Copy the target certificate (sentinel.cer) to a temporary location on the source computer.
8 Import the target system certificate into the source Sentinel FIPS keystore.
9 Restart the Sentinel services on both the source and target computer.
Scenario 2: The source Sentinel server is in non-FIPS mode and the target Sentinel server is in
FIPS 140-2 mode
You must convert the Web server keystore on the source computer to the certificate format and then
export the certificate to the target computer.
1 Log in to the distributed search source computer.
2 Create the Web server keystore in certificate (.cer) format:
<sentinel_install_directory>/jre/bin/keytool -export -alias webserver keystore <sentinel_install_directory>/config/.webserverkeystore.jks -storepass
password -file <certificate_name.cer>
3 Copy the distributed search source certificate (Sentinel.cer) to a temporary location on the
distributed search target computer.
4 Log in to the distributed search target computer.
5 Import the source certificate into the target Sentinel FIPS keystore.
For more information about importing the certificate, see “Importing Certificates into FIPS
Keystore Database” on page 125.
6 Restart Sentinel services on the target computer.
Scenario 3: The source Sentinel server is in FIPS mode and the target Sentinel server is in nonFIPS mode
1 Log in to the distributed search target computer.
2 Create the Web server keystore in certificate (.cer) format:
<sentinel_install_directory>/jre/bin/keytool -export -alias webserver keystore <sentinel_install_directory>/config/.webserverkeystore.jks -storepass
password -file <certificate_name.cer>
3 Copy the certificate to a temporary location on the distributed search source computer.
4 Import the target certificate into the source Sentinel FIPS keystore.
For more information about importing the certificate, see “Importing Certificates into FIPS
Keystore Database” on page 125.
5 Restart the Sentinel services on the source computer.
21.3
Configuring LDAP Authentication in FIPS 140-2 Mode
To configure LDAP authentication for Sentinel servers running in FIPS 140-2 mode:
1 Get the LDAP server certificate from the LDAP administrator, or you can use a command. For
example,
118
NetIQ Sentinel Installation and Configuration Guide
openssl s_client -connect <LDAP server IP>:636
and then copy the text returned (between but not including the BEGIN and END lines) into a
file.
2 Import the LDAP server certificate into the Sentinel FIPS keystore.
For more information about importing the certificate, see “Importing Certificates into FIPS
Keystore Database” on page 125.
3 Log in to Sentinel Web console as a user in the administrator role and proceed with configuring
LDAP authentication.
For more information, see “Configuring LDAP Authentication”in the NetIQ Sentinel
Administration Guide.
NOTE: You can also configure LDAP authentication for a Sentinel server running in FIPS 140-2
mode by running the ldap_auth_config.sh script in the /opt/novell/sentinel/setup
directory.
21.4
Updating Server Certificates in Remote Collector Managers
and Correlation Engines
To configure existing remote Collector Managers and Correlation Engines to communicate with a
Sentinel server running in FIPS 140-2 Mode, you can either convert the remote system in FIPS 140-2
mode or you can update the Sentinel server certificate to the remote system and leave the Collector
Manager or Correlation Engine in non-FIPS mode. Remote Collector Managers in FIPS mode may not
work with event sources that do not support FIPS or that require one of the Sentinel Connectors that
are not yet FIPS-enabled.
If you do not plan to enable FIPS 140-2 mode on the remote Collector Manager or Correlation Engine,
you must copy the latest Sentinel server certificate to the remote system, so that the Collector
Manager or Correlation Engine, can communicate with the Sentinel server.
To update the Sentinel server certificate in the remote Collector Manager or Correlation Engine:
1 Log in to the remote Collector Manager or Correlation Engine computer.
2 Switch to novell user (su novell).
3 Browse to the bin directory. The default location is /opt/novell/sentinel/bin.
4 Run the updateServerCert.sh script and follow the on-screen instructions.
21.5
Configuring Sentinel Plug-Ins to Run in FIPS 140-2 Mode
This section provides information about configuring various Sentinel plug-ins to run in FIPS 140-2
mode.
NOTE: These instructions assume that Sentinel is installed at the /opt/novell/sentinel directory.
The commands must be executed as novell user.
Section 21.5.1, “Agent Manager Connector,” on page 120
Section 21.5.2, “Database (JDBC) Connector,” on page 121
Section 21.5.3, “Sentinel Link Connector,” on page 121
Section 21.5.4, “Syslog Connector,” on page 122
Operating Sentinel in FIPS 140-2 Mode
119
Section 21.5.5, “Windows Event (WMI) Connector,” on page 123
Section 21.5.6, “Sentinel Link Integrator,” on page 123
Section 21.5.7, “LDAP Integrator,” on page 124
Section 21.5.8, “SMTP Integrator,” on page 125
Section 21.5.9, “Using Non-FIPS Enabled Connectors with Sentinel in FIPS 140-2 Mode,” on
page 125
21.5.1
Agent Manager Connector
Follow the below procedure only if you have selected the Encrypted (HTTPS) option when
configuring the networking settings of the Agent Manager Event Source Server.
To configure the Agent Manager Connector to run in FIPS 140-2 mode:
1 Add or edit the Agent Manager Event Source Server. Proceed through the configuration screens
until the Security window is displayed. For more information, see the Agent Manager Connector
Guide.
2 Select one of the options from the Client Authentication Type field. The client authentication type
determines how strictly the SSL Agent Manager Event Source Server verifies the identity of
Agent Manager Event Sources that are attempting to send data.
Open: Allows all the SSL connections coming from the Agent Manager agents. Does not
perform any client certificate validation or authentication.
Strict: Validates the certificate to be a valid X.509 certificate and also checks that the client
certificate is trusted by the Event Source Server. New sources will need to be explicitly
added to Sentinel (this prevents rogue sources from sending unauthorized data).
For the Strict option, you must import the certificate of each new Agent Manager client into
the Sentinel FIPS keystore. When Sentinel is running in FIPS 140-2 mode, you cannot
import the client certificate using the Event Source Management (ESM) interface.
For more information about importing the certificate, see “Importing Certificates into FIPS
Keystore Database” on page 125.
NOTE: In FIPS 140-2 mode, the Agent Manager Event Source Server uses the Sentinel server key
pair; importing the server key pair is not required.
3 If server authentication is enabled in the agents, the agents must additionally be configured to
trust the Sentinel server or the remote Collector Manager certificate depending on where the
Connector is deployed.
Sentinel server certificate location: /etc/opt/novell/sentinel/config/sentinel.cer
Remote Collector Manager certificate location: /etc/opt/novell/sentinel/config/
rcm.cer
NOTE: When using custom certificates that are digitally signed by a certificate authority (CA),
the Agent Manager agent must trust the appropriate certificate file.
120
NetIQ Sentinel Installation and Configuration Guide
21.5.2
Database (JDBC) Connector
Follow the below procedure only if you have selected the SSL option when configuring the database
connection.
To configure the Database Connector to run in FIPS 140-2 mode:
1 Before configuring the Connector, download the certificate from the Database server and save it
as database.cert file into the /etc/opt/novell/sentinel/config directory of the Sentinel
server.
For more information, refer to the respective database documentation.
2 Import the certificate into the Sentinel FIPS keystore.
For more information about importing the certificate, see “Importing Certificates into FIPS
Keystore Database” on page 125.
3 Proceed with configuring the Connector.
21.5.3
Sentinel Link Connector
Follow the below procedure only if you have selected Encrypted (HTTPS) option when configuring
the networking settings of the Sentinel Link Event Source Server.
To configure the Sentinel Link Connector to run in FIPS 140-2 mode:
1 Add or edit the Sentinel Link Event Source Server. Proceed through the configuration screens
until the Security window is displayed. For more information, see the Sentinel Link Connector
Guide.
2 Select one of the options from the Client Authentication Type field. The client authentication type
determines how strictly the SSL Sentinel Link Event Source Server verifies the identity of
Sentinel Link Event Sources (Sentinel Link Integrators) that are attempting to send data.
Open: Allows all the SSL connections coming from the clients (Sentinel Link Integrators).
Does not perform any Integrator certificate validation or authentication.
Strict: Validates the Integrator certificate to be a valid X.509 certificate and also checks that
the Integrator certificate is trusted by the Event Source Server. For more information, refer
to the respective database documentation.
For the Strict option:
If the Sentinel Link Integrator is in FIPS 140-2 mode, you must copy the /etc/opt/
novell/sentinel/config/sentinel.cer file from the sender Sentinel machine to
the receiver Sentinel machine. Import this certificate into the receiver Sentinel FIPS
keystore.
NOTE: When using custom certificates that are digitally signed by a certificate
authority (CA), you must import the appropriate custom certificate file.
If Sentinel Link Integrator is in non-FIPS mode, you must import the custom Integrator
certificate into the receiver Sentinel FIPS keystore.
Operating Sentinel in FIPS 140-2 Mode
121
NOTE: If the sender is Sentinel Log Manager (in non-FIPS mode) and the receiver is
Sentinel in FIPS 140-2 mode, the server certificate to be imported on the sender is the /
etc/opt/novell/sentinel/config/sentinel.cer file from the receiver Sentinel
machine.
When Sentinel is running in FIPS 140-2 mode, you cannot import the client certificate using
the Event Source Management (ESM) interface. For more information about importing the
certificate, see “Importing Certificates into FIPS Keystore Database” on page 125.
NOTE: In FIPS 140-2 mode, the Sentinel Link Event Source server uses the Sentinel server key
pair. Importing the server key pair is not required.
21.5.4
Syslog Connector
Follow the below procedure only if you have selected the SSL protocol when configuring the
network settings of the Syslog Event Source Server.
To configure the Syslog Connector to run in FIPS 140-2 mode:
1 Add or edit the Syslog Event Source Server. Proceed through the configuration screens until the
Networking window is displayed. For more information, see the Syslog Connector Guide.
2 Click Settings.
3 Select one of the options from the Client Authentication Type field. The client authentication type
determines how strictly the SSL Syslog Event Source Server verifies the identity of Syslog Event
Sources that are attempting to send data.
Open: Allows all the SSL connections coming from the clients (event sources). Does not
perform any client certificate validation or authentication.
Strict: Validates the certificate to be a valid X.509 certificate and also checks that the client
certificate is trusted by the Event Source Server. New sources will have to be explicitly
added to Sentinel (this prevents rogue sources from sending data to Sentinel).
For the Strict option, you must import the certificate of the syslog client into the Sentinel
FIPS keystore.
When Sentinel is running in FIPS 140-2 mode, you cannot import the client certificate using
the Event Source Management (ESM) interface.
For more information about importing the certificate, see “Importing Certificates into FIPS
Keystore Database” on page 125.
NOTE: In FIPS 140-2 mode, the Syslog Event Source Server uses the Sentinel server key pair.
Importing the server key pair is not required.
4 If server authentication is enabled in the syslog client, the client must trust the Sentinel server
certificate or the remote Collector Manager certificate depending on where the Connector is
deployed.
The Sentinel server certificate file is in the /etc/opt/novell/sentinel/config/
sentinel.cer location.
The Remote Collector Manger certificate file is in /etc/opt/novell/sentinel/config/
rcm.cer location.
NOTE: When using custom certificates that are digitally signed by a certificate authority (CA),
the client must trust the appropriate certificate file.
122
NetIQ Sentinel Installation and Configuration Guide
21.5.5
Windows Event (WMI) Connector
To configure the Windows Event (WMI) Connector to run in FIPS 140-2 mode:
1 Add or edit the Windows Event Connector. Proceed through the configuration screens until the
Security window is displayed. For more information, see the Windows Event (WMI) Connector
Guide.
2 Click Settings.
3 Select one of the options from the Client Authentication Type field. The client authentication type
determines how strictly the Windows Event Connector verifies the identity of the client
Windows Event Collection Services (WECS) that are attempting to send data.
Open: Allows all the SSL connections coming from the client WECS. Does not perform any
client certificate validation or authentication.
Strict: Validates the certificate to be a valid X.509 certificate and also checks that the client
WECS certificate is signed by a CA. New sources will need to be explicitly added (this
prevents rogue sources from sending data to Sentinel).
For the Strict option, you must import the certificate of the client WECS into the Sentinel
FIPS keystore. When Sentinel is running in FIPS 140-2 mode, you cannot import the client
certificate using the Event Source Management (ESM) interface.
For more information about importing the certificate, see “Importing Certificates into FIPS
Keystore Database” on page 125.
NOTE: In FIPS 140-2 mode, the Windows Event Source Server uses the Sentinel server key pair.
Importing the server key pair is not required.
4 If server authentication is enabled in the Windows client, the client must trust the Sentinel server
certificate or the remote Collector Manager certificate depending on where the Connector is
deployed.
The Sentinel server certificate file is in the /etc/opt/novell/sentinel/config/
sentinel.cer location.
The remote Collector Manager certificate file is in the /etc/opt/novell/sentinel/config/
rcm.cer location.
NOTE: When using custom certificates that are digitally signed by a certificate authority (CA),
the client must trust the appropriate certificate file.
5 If you want to automatically synchronize the event sources or populate the list of event sources
using an Active Directory connection, you must import the Active Directory server certificate
into the Sentinel FIPS keystore.
For more information about importing the certificate, see “Importing Certificates into FIPS
Keystore Database” on page 125.
21.5.6
Sentinel Link Integrator
Follow the below procedure only if you have selected the Encrypted (HTTPS) option when
configuring the network settings of the Sentinel Link Integrator.
Operating Sentinel in FIPS 140-2 Mode
123
To configure the Sentinel Link Integrator to run in FIPS 140-2 mode:
1 When Sentinel Link Integrator is in FIPS 140-2 mode, server authentication is mandatory. Before
configuring the Integrator instance, import the Sentinel Link Server certificate into the Sentinel
FIPS keystore:
If Sentinel Link Connector is in FIPS 140-2 mode:
If the Connector is deployed in the Sentinel server, you must copy the /etc/opt/novell/
sentinel/config/sentinel.cer file from the receiver Sentinel machine to the sender
Sentinel machine.
If the Connector is deployed in a remote Collector Manager, you must copy the /etc/opt/
novell/sentinel/config/rcm.cer file from the receiver remote Collector Manager
machine to the receiver Sentinel machine.
Import this certificate into the sender Sentinel FIPS keystore.
NOTE: When using custom certificates that are digitally signed by a certificate authority
(CA), you must import the appropriate custom certificate file.
If Sentinel Link Connector is in non-FIPS mode:
Import the custom Sentinel Link Server certificate into the sender Sentinel FIPS keystore.
NOTE: When the Sentinel Link integrator is in FIPS 140-2 mode and the Sentinel Link
Connector is in non-FIPS mode, use the custom server key pair on the connector. Do not use
the internal server key pair.
For more information about importing the certificate, see “Importing Certificates into FIPS
Keystore Database” on page 125.
2 Proceed with configuring the Integrator instance.
NOTE: In FIPS 140-2 mode, the Sentinel Link Integrator uses the Sentinel server key pair.
Importing the Integrator key pair is not required.
21.5.7
LDAP Integrator
To configure the LDAP Integrator to run in FIPS 140-2 mode:
1 Before configuring the Integrator instance, download the certificate from the LDAP server and
save it as ldap.cert file into the /etc/opt/novell/sentinel/config directory of the Sentinel
server.
For example, use
openssl s_client -connect <LDAP server IP>:636
and then copy the text returned (between but not including the BEGIN and END lines) into a
file.
2 Import the certificate into the Sentinel FIPS keystore.
For more information about importing the certificate, see “Importing Certificates into FIPS
Keystore Database” on page 125.
3 Proceed with configuring the Integrator instance.
124
NetIQ Sentinel Installation and Configuration Guide
21.5.8
SMTP Integrator
The SMTP Integrator supports FIPS 140-2 from version 2011.1r2 and later. No configuration changes
are required.
21.5.9
Using Non-FIPS Enabled Connectors with Sentinel in FIPS 140-2 Mode
This section provides information about how to use non-FIPS enabled Connectors with a Sentinel
server in FIPS 140-2 mode. We recommend this approach if you have sources that do not support
FIPS or if you want to collect events from the non-FIPS Connectors in your environment.
To use non-FIPS connectors with Sentinel in FIPS 140-2 mode:
1 Install a remote Collector Manager in non-FIPS mode to connect to the Sentinel server in FIPS
140-2 mode.
For more information, see Section 12.5, “Installing Collector Managers and Correlation
Engines,” on page 82.
2 Deploy the non-FIPS Connectors specifically to the non-FIPS remote Collector Manager.
NOTE: There are some known issues when non-FIPS Connectors such as Audit Connector and File
Connector are deployed on a non-FIPS remote Collector Manager connected to a Sentinel server in
FIPS 140-2 mode. For more information about these known issues, see the Sentinel 7.1 Release Notes.
21.6
Importing Certificates into FIPS Keystore Database
You must insert certificates into the Sentinel FIPS keystore database to establish secure (SSL)
communications from the components that own those certificates to Sentinel. You cannot upload
certificates by using the Sentinel user interface as normal when FIPS 140-2 mode is enabled in
Sentinel. You must manually import the certificates into the FIPS keystore database.
For event sources that are using Connectors deployed to a remote Collector Manager, you must
import the certificates to the FIPS keystore database of the remote Collector Manager rather than the
central Sentinel server.
To import certificates to the FIPS Keystore Database:
1 Copy the certificate file to any temporary location on the Sentinel server or remote Collector
Manager.
2 Browse to the Sentinel bin directory. The default location is /opt/novell/sentinel/bin.
3 Run the following command to import the certificate into the FIPS keystore database, and then
follow the on-screen instructions:.
./convert_to_fips.sh -i <certificate file path>
4 Enter yes or y when prompted to restart the Sentinel server or remote Collector Manager.
Operating Sentinel in FIPS 140-2 Mode
125
21.7
Reverting Sentinel to Non-FIPS Mode
This section provides information about how to revert Sentinel and its components to non-FIPS
mode.
Section 21.7.1, “Reverting Sentinel Server to Non-FIPS mode,” on page 126
Section 21.7.2, “Reverting Remote Collector Managers or Remote Correlation Engines to NonFIPS mode,” on page 126
21.7.1
Reverting Sentinel Server to Non-FIPS mode
You can revert a Sentinel server running in FIPS 140-2 mode to non-FIPS mode only if you have taken
a backup of your Sentinel server before converting it to run in FIPS 140-2 mode.
NOTE: When you revert a Sentinel server to non-FIPS mode, you will lose the events, incident data,
and configuration changes made to your Sentinel server after converting to run FIPS 140-2 mode. The
sentinel system will be restored back to the last restoration point of non-FIPS mode. You should take
a backup of the current system before reverting to non-FIPS mode for future use.
To revert your Sentinel server to non-FIPS mode:
1 Log in to the Sentinel server as the root user.
2 Switch to the novell user.
3 Browse to the Sentinel bin directory. The default location is /opt/novell/sentinel/bin.
4 Run the following command to revert your Sentinel server to non-FIPS mode, and follow the on-
screen instructions:
./backup_util.sh -f <backup_file_name.tar.gz> -m 'restore'
For example, if non-fips2013012419111359034887.tar.gz is the backup file, run the
following command:
./backup_util.sh -f non-fips2013012419111359034887.tar.gz -m 'restore'
5 Restart the Sentinel server.
21.7.2
Reverting Remote Collector Managers or Remote Correlation Engines
to Non-FIPS mode
You can revert remote Collector Managers or remote Correlation Engines to non-FIPS mode.
To revert a remote Collector Managers or a remote Correlation Engine to non-FIPS mode:
1 Login to the remote Collector Manager or remote Correlation Engine system.
2 Switch to novell user (su novell).
3 Browse to the bin directory. The default location is /opt/novell/sentinel/bin.
4 Run the revert_to_nonfips.sh script and follow the on-screen instructions.
5 Restart the remote Collector Manager or remote Correlation Engine.
126
NetIQ Sentinel Installation and Configuration Guide
V
Upgrading Sentinel
V
This section provides information about upgrading Sentinel and other components.
Chapter 22, “Implementation Checklist,” on page 129
Chapter 23, “Prerequisite for Versions Prior to Sentinel 7.1.1,” on page 131
Chapter 24, “Upgrading Sentinel Traditional Installation,” on page 133
Chapter 25, “Upgrading the Sentinel Appliance,” on page 137
Chapter 26, “Upgrading Sentinel Plug-Ins,” on page 141
Upgrading Sentinel
127
128
NetIQ Sentinel Installation and Configuration Guide
22
Implementation Checklist
2
Before you upgrade Sentinel, review the following checklist to ensure a successful upgrade:
Table 22-1 Implementation Checklist
Tasks
See
Ensure that the computers on which you install Sentinel and its
components meet the specified requirements.
NetIQ Sentinel Technical
Information Website
Review the supported operating system release notes to
understand the known issues.
SUSE Release Notes
Review the Sentinel release notes to see new functionality and
understand the known issues.
Sentinel Release Notes
Implementation Checklist
129
130
NetIQ Sentinel Installation and Configuration Guide
23
Prerequisite for Versions Prior to
Sentinel 7.1.1
23
Sentinel 7.1.1 and later includes MongoDB version 2.4.1. MongoDB 2.4 requires removal of duplicate
user names in the database. If you are upgrading Sentinel versions prior to 7.1.1, verify whether there
are any duplicate users and then remove the duplicate users.
Perform the following steps to identify duplicate users:
1 Log in to the Sentinel server as the novell user.
2 Change to the following directory:
cd /opt/novell/sentinel/3rdparty/mongodb/bin
3 Run the following commands to verify duplicate users:
./mongo --port 27017 --host "localhost"
use analytics
db.system.users.find().count()
If the count is more than 1, it indicates there are duplicate users.
Perform the following steps to remove duplicate users:
1 Run the following command to list the users:
db.system.users.find().pretty()
The command lists users along with duplicate entries. The first user in the list is the original
user. You should keep the first user and delete the others in the list.
2 Run the following command to remove duplicate users:
db.system.users.remove({ _id : ObjectId("object_ID") })
3 Run the following command to verify whether the duplicate users have been removed:
db.system.users.find().pretty()
4 Switch to database admin user:
use admin
5 Repeat Step 1 through Step 3 to verify and remove duplicate dbausers in the admin database.
Prerequisite for Versions Prior to Sentinel 7.1.1
131
132
NetIQ Sentinel Installation and Configuration Guide
24
24.1
Upgrading Sentinel Traditional
Installation
24
Upgrading Sentinel
Use the following steps to upgrade the Sentinel server:
1 Make a backup of your configuration, then create an ESM export.
For more information on backing up data, see “Backing Up and Restoring Data” in the NetIQ
Sentinel Administration Guide.
2 Download the latest installer from the NetIQ download Web site.
3 Log in as root to the server where you want to upgrade Sentinel.
4 Specify the following command to extract the install files from the tar file:
tar xfz <install_filename>
Replace <install_filename> with the actual name of the install file.
5 Change to the directory where the install file was extracted.
6 Specify the following command to upgrade Sentinel:
./install-sentinel
7 To proceed with a language of your choice, select the number next to the language.
The end user license agreement is displayed in the selected language.
8 Read the end user license, enter yes or y to accept the license, then continue with the installation.
9 The installation script detects that an older version of the product already exists and prompts
you to specify if you want to upgrade the product. To continue with the upgrade, press y.
The installation starts installing all RPM packages. This installation might take a few seconds to
complete.
10 Clear your Web browser cache to view the latest Sentinel version.
11 Clear the Java Web Start cache on the client computers to use the latest version of Sentinel
applications.
You can clear the Java Web Start cache by either using the javaws -clearcache command or by
using Java Control Center. For more information, see http://www.java.com/en/download/help/
plugin_cache.xml.
12 (Conditional) If the PostgreSQL database has been upgraded to a major version (for example, 8.0
to 9.0 or 9.0 to 9.1), clear the old PostgreSQL files from the PostgreSQL database. For information
about whether the PostgreSQL database was upgraded, see the Sentinel Release Notes.
12a Switch to the novell user.
su novell
12b Browse to the bin folder:
Upgrading Sentinel Traditional Installation
133
cd /opt/novell/sentinel/3rdparty/postgresql/bin
12c Delete all the old postgreSQL files by using the following command:
./delete_old_cluster.sh
13 (Conditional) To upgrade Collector Manager systems and Correlation Engine systems, see
Section 24.3, “Upgrading the Collector Manager or the Correlation Engine,” on page 135.
24.2
Upgrading Sentinel as a Non-root User
If your organizational policy does not allow you to run the full upgrade of Sentinel as root, you can
upgrade Sentinel as another user. In this upgrade, a few steps are performed as a root user, then you
proceed to upgrade Sentinel as another user created by the root user.
1 Download the installation files from the NetIQ Downloads Web site.
2 Specify the following command at the command line to extract the install files from the tar file:
tar -zxvf <install_filename>
Replace <install_filename> with the actual name of the install file.
3 Log in as root to the server where you want to upgrade Sentinel.
4 Extract the squashfs RPM from the Sentinel install files.
5 Install the squashfs on the Sentinel server.
rpm -Uvh <install_filename>
6 Specify the following command to change to the newly created non-root novell user: novell:
su novell
7 (Conditional) To do an interactive upgrade:
7a Specify the following command:
./install-sentinel
To upgrade Sentinel in a non-default location, specify the --location option along with the
command. For example:.
./install-sentinel --location=/foo
7b Continue with Step 9.
8 (Conditional) To do a silent upgrade, specify the following command:
./install-sentinel -u <response_file>
The installation proceeds with the values stored in the response file. The Sentinel upgrade is
complete.
9 Specify the number for the language you want to use for the upgrade.
The end user license agreement is displayed in the selected language.
10 Read the end user license and enter yes or y to accept the license and continue with the upgrade.
The upgrade starts installing all RPM packages. This installation might take a few seconds to
complete.
11 Clear your Web browser cache to view the latest Sentinel version.
12 Clear the Java Web Start cache on the client computers to use the latest version of Sentinel
applications.
134
NetIQ Sentinel Installation and Configuration Guide
You can clear the Java Web Start cache by either using the javaws -clearcache command or by
using Java Control Center. For more information, see http://www.java.com/en/download/help/
plugin_cache.xml.
13 (Conditional) If the PostgreSQL database has been upgraded to a major version (for example, 8.0
to 9.0 or 9.0 to 9.1), clear the old PostgreSQL files from the PostgreSQL database. For information
about whether the PostgreSQL database was upgraded, see the Sentinel Release Notes.
13a Switch to the novell user.
su novell
13b Browse to the bin folder:
cd /opt/novell/sentinel/3rdparty/postgresql/bin
13c Delete all the old postgreSQL files by using the following command:
./delete_old_cluster.sh
24.3
Upgrading the Collector Manager or the Correlation Engine
Use the following steps to upgrade the Collector Manager or the Correlation Engine:
1 Make a backup of your configuration and create an ESM export.
For more information, see “Backing Up and Restoring Data” in the NetIQ Sentinel Administration
Guide.
2 Log in to the Sentinel Web interface as a user in the administrator role.
3 Select Downloads.
4 Click Download Installer in the Collector Manager Installer section.
A window is displayed with options to either open or to save the installer file on the local
machine.
5 Save the file.
6 Copy the file to a temporary location.
7 Extract the contents of the file.
8 Run the following script:
For Collector Manager:
./install-cm
For Correlation Engine:
./install-ce
9 Follow the on-screen instructions to complete the installation.
Upgrading Sentinel Traditional Installation
135
136
NetIQ Sentinel Installation and Configuration Guide
25
Upgrading the Sentinel Appliance
25
The procedures in this chapter guide you through upgrading the Sentinel appliance as well as
Collector Manager and Correlation Engine appliances.
Section 25.1, “Upgrading the Appliance by Using zypper,” on page 137
Section 25.2, “Upgrading the Appliance through WebYaST,” on page 138
Section 25.3, “Upgrading the Appliance by Using SMT,” on page 139
25.1
Upgrading the Appliance by Using zypper
To upgrade the appliance by using the zypper patch:
1 Back up your configuration, then create an ESM export. For more information, see “Backing Up
and Restoring Data” in the NetIQ Sentinel Administration Guide.
2 Log in to the appliance console as the root user.
3 Run the following command:
/usr/bin/zypper patch
4 (Conditional) If you are upgrading from Sentinel 7.0.1 or earlier, enter 1 to accept the vendor
change from Novell to NetIQ.
5 (Conditional) If you are upgrading from Sentinel versions prior to 7.2, the installer displays a
message that indicates to resolve dependency for some appliance packages. Enter 1 for
deinstallation of dependent packages.
6 Enter Y to proceed.
7 Enter yes to accept the license agreement.
8 Restart the Sentinel appliance.
9 Clear your Web browser cache to view the latest Sentinel version.
10 Clear the Java Web Start cache on the client computers to use the latest version of Sentinel
applications.
You can clear the Java Web Start cache by either using the javaws -clearcache command or by
using Java Control Center. For more information, see http://www.java.com/en/download/help/
plugin_cache.xml.
11 (Conditional) If the PostgreSQL database has been upgraded to a major version (for example, 8.0
to 9.0 or 9.0 to 9.1), clear the old PostgreSQL files from the PostgreSQL database. For information
about whether the PostgreSQL database was upgraded, see the Sentinel Release Notes.
11a Switch to the novell user.
su novell
11b Browse to the bin folder of PostgreSQL:
cd /opt/novell/sentinel/3rdparty/postgresql/bin
Upgrading the Sentinel Appliance
137
11c Delete all the old postgreSQL files by using the following command:
./delete_old_cluster.sh
NOTE: To upgrade the Collector Manager or Correlation Engine, follow Step 2 through Step 8.
25.2
Upgrading the Appliance through WebYaST
NOTE: Appliance upgrades from versions prior to Sentinel 7.2 must be done using the zypper
command line utility because user interaction is required to complete the upgrade. WebYaST is not
capable of facilitating the required user interaction. For information about using zypper to upgrade
the appliance, see Section 25.1, “Upgrading the Appliance by Using zypper,” on page 137.
1 Log in to the Sentinel appliance as a user in the administrator role.
2 If you want to upgrade the Sentinel Appliance, click Appliance to launch WebYaST.
3 If you want to upgrade a Collector Manager or Correlation Engine Appliance, specify the URL
of the Collector Manager or Correlation Engine computer using port 4984 to launch WebYaST as
https://<IP_address>:4984, where <IP_address> is the IP address of the Collector Manager
or Correlation Engine. Follow Step 5 through Step 8.
4 Back up your configuration, then create an ESM export.
For more information on backing up data, see “Backing Up and Restoring Data” in the NetIQ
Sentinel Administration Guide.
5 (Conditional) If you have not already registered the appliance for automatic updates, register for
updates.
For more information, see Section 13.4.3, “Registering for Updates,” on page 97.
If the appliance is not registered, Sentinel displays a yellow warning that indicates that the
appliance is not registered.
6 To check if there are any updates, click Updates.
The available updates are displayed.
7 Select and apply the updates.
The updates might take a few minutes to complete. After the update is successful, the WebYaST
login page is displayed.
Before upgrading the appliance, WebYaST automatically stops the Sentinel service. You must
manually restart this service after the upgrade is complete.
8 Restart the Sentinel service by using the Web interface.
For more information, see Section 13.5, “Stopping and Starting the Server by Using WebYaST,”
on page 98.
9 Clear your Web browser cache to view the latest Sentinel version.
10 Clear the Java Web Start cache on the client computers to use the latest version of Sentinel
applications.
You can clear the Java Web Start cache by either using the javaws -clearcache command or by
using Java Control Center. For more information, see http://www.java.com/en/download/help/
plugin_cache.xml.
138
NetIQ Sentinel Installation and Configuration Guide
11 (Conditional) If the PostgreSQL database has been upgraded to a major version (for example, 8.0
to 9.0 or 9.0 to 9.1), clear the old PostgreSQL files from the PostgreSQL database. For information
about whether the PostgreSQL database was upgraded, see the Sentinel Release Notes.
11a Switch to the novell user.
su novell
11b Browse to the bin folder of PostgreSQL:
cd /opt/novell/sentinel/3rdparty/postgresql/bin
11c Delete all the old postgreSQL files by using the following command:
./delete_old_cluster.sh
25.3
Upgrading the Appliance by Using SMT
In secured environments where the appliance must run without direct internet access, you can
configure the appliance with Subscription Management Tool (SMT) that allows you upgrade the
appliance to the latest available versions.
1 Ensure that the appliance is configured with SMT.
For more information, see Section 13.4.4, “Configuring the Appliance with SMT,” on page 97.
2 Log in to the appliance console as the root user.
3 Refresh the repository for upgrade:
zypper ref -s
4 Check whether the appliance is enabled for upgrade:
zypper lr
5 (Optional) Check the available updates for the appliance:
zypper lu
6 (Optional) Check the packages that include the available updates for the appliance:
zypper lp -r SMT-http_<smt_server_fqdn>:<package_name>
7 Update the appliance:
zypper up -t patch -r SMT-http_<smt_server_fqdn>:<package_name>
8 Restart the appliance.
rcsentinel restart
Upgrading the Sentinel Appliance
139
140
NetIQ Sentinel Installation and Configuration Guide
26
Upgrading Sentinel Plug-Ins
26
The upgrade installations of Sentinel do not upgrade the plug-ins unless a particular plug-in is not
compatible with the latest version of Sentinel.
New and updated Sentinel plug-ins, including Solution Packs, are frequently uploaded to the
Sentinel Plug-ins Web site. To get the latest bug fixes, documentation updates, and enhancements for
a plug-in, download and install the latest version of the plug-in. For information about installing a
plug-in, see the specific plug-in documentation.
Upgrading Sentinel Plug-Ins
141
142
NetIQ Sentinel Installation and Configuration Guide
VI
VI
Appendices
Appendix A, “Configuring Sentinel for High Availability,” on page 145
Appendix B, “Troubleshooting the Installation,” on page 167
Appendix C, “Uninstalling,” on page 169
Appendices
143
144
NetIQ Sentinel Installation and Configuration Guide
A
Configuring Sentinel for High
Availability
A
Many customers seek to install Sentinel into highly-available environments with the goal of ensuring
that critical enterprise event data is collected as consistently as possible. Many security and
compliance requirements depend on comprehensive data collection to demonstrate adherence to
those requirements - a few missed events could prevent detection of a threat or violation and cause
unacceptable risk to the organization. NetIQ Corporation has tested and certified Sentinel to work in
a high availability environment, and it supports disaster recovery architectures.
This appendix describes how to install the product in an Active-Passive High Availability mode,
which allows Sentinel to fail over to a redundant cluster node in case of hardware or software failure.
It does not cover Active-Active configurations, and does not guarantee any particular uptime target.
NetIQ Consulting and NetIQ partners can help you implement Sentinel high availability and disaster
recovery.
NOTE: High Availability (HA) configuration is supported only on the Sentinel server. However,
Collector Managers and Correlation Engines can still communicate with the Sentinel HA server.
Section A.1, “Concepts,” on page 145
Section A.2, “System Requirements,” on page 147
Section A.3, “Installation and Configuration,” on page 148
Section A.4, “Upgrading Sentinel in High Availability,” on page 160
Section A.5, “Backup and Recovery,” on page 165
A.1
Concepts
High availability refers to a design methodology that is intended to keep a system available for use as
much as is practicable. The intent is to minimize the causes of downtime such as system failures and
maintenance, and to minimize the time it will take to detect and recover from downtime events that
do occur. In practice, automated means of detecting and recovering from downtime events quickly
become necessary as higher levels of availability must be achieved.
Section A.1.1, “External Systems,” on page 146
Section A.1.2, “Shared Storage,” on page 146
Section A.1.3, “Service Monitoring,” on page 146
Section A.1.4, “Fencing,” on page 147
Configuring Sentinel for High Availability
145
A.1.1
External Systems
Sentinel is a complex multi-tier application that depends upon and provides a wide variety of
services. Additionally, it integrates with multiple external third-party systems for data collection,
data sharing, and incident remediation. Most HA solutions allow implementors to declare
dependencies between the services that should be highly available, but this only applies to services
running on the cluster itself. Systems external to Sentinel such as event sources must be configured
separately to be as available as required by the organization, and must also be configured to properly
handle situations where Sentinel is unavailable for some period of time such as a failover event. If
access rights are tightly restricted, for example if authenticated sessions are used to send and/or
receive data between the third-party system and Sentinel, the third-party system must be configured
to accept sessions from or initiate sessions to any cluster node (Sentinel should be configured with a
virtual IP for this purpose).
A.1.2
Shared Storage
All HA clusters require some form of shared storage so that application data can be quickly moved
from one cluster node to another, in case of a failure of the originating node. The storage itself should
be highly available; this is usually achieved by using Storage Area Network (SAN) technology
connected to the cluster nodes using a Fibre Channel network. Other systems use Network Attached
Storage (NAS), iSCSI, or other technologies that allow for remote mounting of shared storage. The
fundamental requirement of the shared storage is that the cluster can cleanly move the storage from a
failed cluster node to a new cluster node.
NOTE: For iSCSI, you should use the largest Message Transfer Unit (MTU) supported by your
hardware. Larger MTUs benefits the storage performance. Sentinel might experience issues if latency
and bandwidth to storage is slower than recommended.
There are two basic approaches that Sentinel can use for the shared storage. The first locates all
components (application binaries, configuration, and event data) on the shared storage. On failover,
the storage is unmounted from the primary node and moved the backup node; which loads the entire
application and configuration from the shared storage. The second approach stores the event data on
shared storage, but the application binaries and configuration reside on each cluster node. On
failover, only the event data is moved to the backup node.
Each approach has benefits and disadvantages, but the second approach allows the Sentinel
installation to use standard FHS-compliant install paths, allows for verification of the RPM
packaging, and also allows for warm patching and reconfiguration to minimize downtime.
This solution will guide you through an example of the process of installing to a cluster that uses
iSCSI shared storage and locates the application binaries/configuration on each cluster node.
A.1.3
Service Monitoring
A key component of any highly available environment is a reliable, consistent way to monitor the
resource(s) that should be highly available, along with any resource(s) that they depend on. The SLE
HAE uses a component called a Resource Agent to perform this monitoring - the Resource Agent's
job is to provide the status for each resource, plus (when asked) to start or stop that resource.
Resource Agents must provide a reliable status for monitored resources in order to prevent
unnecessary downtime. False positives (when a resource is deemed to have failed, but would in fact
recover on its own) can cause service migration (and related downtime) when it is not actually
necessary, and false negatives (when the Resource Agent reports that a resource is functioning when
in fact it is not operating properly) can prevent proper use of the service. On the other hand, external
146
NetIQ Sentinel Installation and Configuration Guide
monitoring of a service can be quite difficult - a web service port might respond to a simple ping, for
example, but may not provide correct data when a real query is issued. In many cases, self-test
functionality must be built into the service itself to provide a truly accurate measurement.
This solution provides a basic OCF Resource Agent for Sentinel that can monitor for major hardware,
operating system, or Sentinel system failure. At this time the external monitoring capabilities for
Sentinel are based on IP port probes, and there is some potential for false positive and false negative
readings. We plan to improve both Sentinel and the Resource Agent over time to improve the
accuracy of this component.
A.1.4
Fencing
Within an HA cluster, critical services are constantly monitored and restarted automatically on other
nodes in the case of failure. This automation can introduce problems, however, if some
communications problem occurs with the primary node; although the service running on that node
appears to be down, it in fact continues to run and write data to the shared storage. In this case,
starting a new set of services on a backup node could easily cause data corruption.
Clusters use a variety of techniques collectively called fencing to prevent this from happening,
including Split Brain Detection (SBD) and Shoot The Other Node In The Head (STONITH). The
primary goal is to prevent data corruption on the shared storage.
A.2
System Requirements
When allocating cluster resources to support an HA installation, consider the following
requirements:
(Conditional) For HA appliance installations, ensure that the Sentinel HA appliance with a
valid license is available. The Sentinel HA appliance is an ISO appliance that includes the
following packages:
SUSE Linux Enterprise Server (SLES) 11 SP3 operating system
SUSE Linux Enterprise Server High Availability Extension (SLES HAE) package
Sentinel software (including HA rpm)
(Conditional) For traditional HA installations, ensure that the Sentinel installer (TAR file) and
the SUSE Linux High Availability Extension (SLE HAE) ISO image with valid licenses are
available.
If you are using the SLES operating system with kernel version 3.0.101 or later, you must
manually load the watchdog driver in the computer. To find the appropriate watchdog driver for
your computer hardware, contact your hardware vendor. To load the watchdog driver, perform
the following:
1. In the command prompt, run the following command to load the watchdog driver in the
current session:
/sbin/modprobe -v --ignore-install <watchdog driver name>
2. Add the following line to the /etc/init.d/boot.local file to ensure that the computer
automatically loads the watchdog driver at every boot time:
/sbin/modprobe -v --ignore-install <watchdog driver name>
Each cluster node that hosts the Sentinel services must meet the requirements specified in
Chapter 5, “Meeting System Requirements,” on page 35.
Ensure that sufficient shared storage is available for the Sentinel data and application.
Configuring Sentinel for High Availability
147
Ensure that you use a virtual IP address for the services that can be migrated from node to node
on failover.
A shared storage device that meets the performance and size characteristics as documented in
Chapter 5, “Meeting System Requirements,” on page 35. The exemplary solution will use a
standard SUSE Linux VM configured with iSCSI Targets as shared storage.
Minimum two cluster nodes that meet the resource requirements for running Sentinel in the
customer environment. The exemplary solution will use two SUSE Linux VMs.
A method for the cluster nodes to communicate with the shared storage, such as FibreChannel
for a SAN. The exemplary solution will use a dedicated IP address to connect to the iSCSI Target.
A virtual IP that can be migrated from one node to another node in a cluster to serve as the
external IP address for Sentinel.
At least one IP address per cluster node for internal cluster communications. The exemplary
solution will use a simple unicast IP address, but multicast is preferred for production
environments.
A.3
Installation and Configuration
This section provides the steps for installing and configuring Sentinel in an HA environment. Each
step describes the general approach, then refer to a demo setup that documents the details of an
exemplary cluster solution.
The following diagram represents an active-passive HA architecture:
Cluster (SLE HAE, vMotion, etc)
Syslog, LEA, etc
Sentinel
config data
Sentinel
software
Network
Devices
Collector
Manager
Virtual IP
Syslog, JDBC, etc
Sentinel
event data
Servers
Virtual IP
Windows
Event
Collection
Service
WMI
Microsoft
Windows
Servers
HTTPS
Virtual IP
Sentinel
Client
Section A.3.1, “Initial Setup,” on page 149
Section A.3.2, “Shared Storage Setup,” on page 150
148
NetIQ Sentinel Installation and Configuration Guide
Section A.3.3, “Sentinel Installation,” on page 152
Section A.3.4, “Cluster Installation,” on page 155
Section A.3.5, “Cluster Configuration,” on page 156
Section A.3.6, “Resource Configuration,” on page 158
Section A.3.7, “Secondary Storage Configuration,” on page 159
A.3.1
Initial Setup
Configure the machine hardware, network hardware, storage hardware, operating systems, user
accounts, and other basic system resources per the documented requirements for Sentinel and local
customer requirements. Test the systems to ensure proper function and stability.
As a best practice, all cluster nodes should be time-synchronized - use NTP or a similar
technology for this purpose.
The cluster will require reliable hostname resolution. As a best practice, you may wish to enter
all internal cluster hostnames into the /etc/hosts file to ensure cluster continuity in case of
DNS failure. If any cluster node cannot resolve all other nodes by name, the cluster configuration
described in this section will fail.
The CPU, RAM, and disk space characteristics for each cluster node must meet the system
requirements defined in Chapter 5, “Meeting System Requirements,” on page 35 based on the
expected event rate.
The disk space and I/O characteristics for the storage nodes must meet the system requirements
defined in Chapter 5, “Meeting System Requirements,” on page 35 based on the expected event
rate and data retention policies for primary and secondary storage.
If you want to configure the operating system firewalls to restrict access to Sentinel and the
cluster, refer to Chapter 8, “Ports Used,” on page 63 for details of which ports must be available
depending on your local configuration and the sources that will be sending event data.
The exemplary solution will use the following configuration:
(Conditional) For traditional HA installations:
Two SUSE Linux 11 SP3 cluster node VMs.
The OS install need not install X Windows, but can if Graphical User Interface configuration
is desired. The boot scripts can be set to start without X (runlevel 3), which can then be
started only when needed.
(Conditional) For HA appliance installations: Two HA ISO appliance based cluster node VMs.
For information about installing the HA ISO appliance, see Section 13.3.2, “Installing Sentinel,”
on page 93.
The nodes will have two NICs: one for external access and one for iSCSI communications.
Configure the external NICs with IP addresses that allow for remote access through SSH or
similar. For this example, we will use 172.16.0.1 (node01) and 172.16.0.2 (node02).
Each node should have sufficient disk for the operating system, Sentinel binaries and
configuration data, cluster software, temp space, and so forth. See the SUSE Linux and SLE HAE
system requirements, and Sentinel application requirements.
One SUSE Linux 11 SP3 VM configured with iSCSI Targets for shared storage
The OS install need not install X Windows, but can if Graphical User Interface configuration
is desired. The boot scripts can be set to start without X (runlevel 3), which can then be
started only when needed.
The system will have two NICs: one for external access and one for iSCSI communications.
Configuring Sentinel for High Availability
149
Configure the external NIC with an IP address that allows for remote access using SSH or
similar. For example, 172.16.0.3 (storage03).
The system should have sufficient space for the operating system, temp space, a large
volume for shared storage to hold Sentinel data, and a small amount of space for an SBD
partition. See the SUSE Linux system requirements, and Sentinel event data storage
requirements.
NOTE: In a production cluster, you can use internal, non-routable IPs on separate NICs (possibly a
couple, for redundancy) for internal cluster communications.
A.3.2
Shared Storage Setup
Set up your shared storage and make sure that you can mount it on each cluster node. If you are
using FibreChannel and a SAN, this may involve physical connections and other configuration. The
shared storage will be used to hold Sentinel's databases and event data, so must be sized accordingly
for the customer environment based on the expected event rate and data retention policies.
A typical implementation might use a fast SAN attached using FibreChannel to all the cluster nodes,
with a large RAID array to store the local event data. A separate NAS or iSCSI node might be used for
the slower secondary storage. As long as the cluster node can mount the primary storage as a normal
block device, it can be used by the solution. The secondary storage can also be mounted as a block
device, or could be an NFS or CIFS volume.
NOTE: You should configure your shared storage and test mounting it on each cluster node, but the
actual mount of the storage will be handled by the cluster configuration.
For the exemplary solution, we will use iSCSI Targets hosted by a SUSE Linux VM:
The exemplary solution uses iSCSI Targets configured on a SUSE Linux VM. The VM is storage03 as
listed in Initial Setup. iSCSI devices can be created using any file or block device, but for simplicity
here we will use a file that we create for this purpose.
Connect to storage03 and start a console session. Use the dd command to create a blank file of any
desired size for Sentinel primary storage:
dd if=/dev/zero of=/localdata count=10240000 bs=1024
In this case, we create a 10GB file filled with zeros (copied from the /dev/zero pseudo-device). See
the info or man page for dd for details on the command-line options. For example, to create differentsized "disks". The iSCSI Target treats this file as if it were a disk; you could of course use an actual
disk if you prefer.
Repeat this procedure to create a file for secondary storage:
dd if=/dev/zero of=/networkdata count=10240000 bs=1024
For this example we use two files ("disks") of the same size and performance characteristics. For a
production deployment, you might put the primary storage on a fast SAN and the secondary storage
on a slower iSCSI, NFS, or CIFS volume.
150
NetIQ Sentinel Installation and Configuration Guide
Configuring iSCSI Targets
Configure the files localdata and networkdata as iSCSI Targets:
1 Run YaST from the command line (or use the Graphical User Interface, if preferred): /sbin/yast
2 Select Network Devices > Network Settings.
3 Ensure that the Overview tab is selected.
4 Select the secondary NIC from the displayed list, then tab forward to Edit and press Enter.
5 On the Address tab, assign a static IP address of 10.0.0.3. This will be the internal iSCSI
communications IP.
6 Click Next, then click OK.
7 On the main screen, select Network Services > iSCSI Target.
8 If prompted, install the required software (iscsitarget RPM) from the SUSE Linux 11 SP3
media.
9 Click Service, select the When Booting option to ensure that the service starts when the
operating system boots.
10 Click Global, and then select No Authentication because the current OCF Resource Agent for
iSCSI does not support authentication.
11 Click Targets and then click Add to add a new target.
The iSCSI Target will auto-generate an ID and then present an empty list of LUNs (drives) that
are available.
12 Click Add to add a new LUN.
13 Leave the LUN number as 0, then browse in the Path dialog (under Type=fileio) and select the /
localdata file that you created. If you have a dedicated disk for storage, specify a block device,
such as /dev/sdc.
14 Repeat steps 12 and 13, and add LUN 1 and /networkdata this time.
15 Leave the other options at their defaults. Click OK and then click Next.
16 Click Next again to select the default authentication options, then Finish to exit the
configuration. Accept if asked to restart iSCSI.
17 Exit YaST.
The above procedure exposes two iSCSI Targets on the server at IP address 10.0.0.3. At each cluster
node, ensure that it can mount the local data shared storage device.
Configuring iSCSI Initiators
You must also format the devices (once) to utilize them.
1 Connect to one of the cluster nodes (node01) and start YaST.
2 Select Network Devices > Network Settings.
3 Ensure that the Overview tab is selected.
4 Select the secondary NIC from the displayed list, then tab forward to Edit and press Enter.
5 Click Address, assign a static IP address of 10.0.0.1. This will be the internal iSCSI
communications IP.
6 Select Next, then click OK.
7 Click Network Services > iSCSI Initiator.
Configuring Sentinel for High Availability
151
8 If prompted, install the required software (open-iscsi RPM) from the SUSE Linux 11 SP3 media.
9 Click Service, select When Booting to ensure the iSCSI service is started on boot.
10 Click Discovered Targets, and select Discovery.
11 Specify the iSCSI Target IP address (10.0.0.3), select No Authentication, and then click Next.
12 Select the discovered iSCSI Target with the IP address 10.0.0.3 and then select Log In.
13 Switch to automatic in the Startup drop-down and select No Authentication, then click Next.
14 Switch to the Connected Targets tab to ensure that we are connected to the target.
15 Exit the configuration. This should have mounted the iSCSI Targets as block devices on the
cluster node.
16 In the YaST main menu, select System > Partitioner.
17 In the System View, you should see new hard disks (such as /dev/sdb and /dev/sdc) in the list
- they will have a type of IET-VIRTUAL-DISK. Tab over to the first one in the list (which should
be the primary storage), select that disk, then press Enter.
18 Select Add to add a new partition to the empty disk. Format the disk as a primary ext3 partition,
but do not mount it. Ensure that the option Do not mount partition is selected.
19 Select Next, then Finish after reviewing the changes that will be made. Assuming you create a
single large partition on this shared iSCSI LUN, you should end up with a /dev/sdb1 or similar
formatted disk (referred to as /dev/<SHARED1> below).
20 Go back into the partitioner and repeat the partitioning/formatting process (steps 16-19) for /
dev/sdc or whichever block device corresponds to the secondary storage. This should result in a
/dev/sdc1 partition or similar formatted disk (referred to as /dev/<NETWORK1> below).
21 Exit YaST.
22 (Conditional) If you are performing a traditional HA installation, create a mountpoint and test
mounting the local partition as follows (the exact device name might depend on the specific
implementation):
# mkdir /var/opt/novell
# mount /dev/<SHARED1> /var/opt/novell
You should be able to create files on the new partition and see the files wherever the partition is
mounted.
23 (Conditional) If you are performing a traditional HA installation, to unmount:
# umount /var/opt/novell
Repeat steps 1-15 (for HA appliance installations) or steps 1-15, 22, and 23 (for traditional HA
installations) in the procedure above to ensure that each cluster node can mount the local shared
storage. Replace the node IP in step 5 with a different IP for each cluster node (e.g. node02 > 10.0.0.2).
A.3.3
Sentinel Installation
There are two options to install Sentinel: install every part of Sentinel onto the shared storage (using
the --location option to redirect the Sentinel install to wherever you have mounted the shared
storage) or only the variable application data on the shared storage.
In this exemplary solution, we will follow the latter approach and install Sentinel to each cluster node
that can host it. The first time Sentinel is installed we will do a complete installation including the
application binaries, configuration, and all the data stores. Subsequent installations on the other
cluster nodes will only install the application, and will assume that the actual Sentinel data will be
available some time later (e.g. once the shared storage is mounted).
152
NetIQ Sentinel Installation and Configuration Guide
Exemplary Solution:
In this exemplary solution we install (for traditional HA installations) or configure (for HA appliance
installations) Sentinel to each cluster node, storing only the variable application data on shared
storage. This keeps the application binaries and configuration in standard locations, allows us to
verify the RPMs, and also allows us to support warm patching in certain scenarios.
First Node Installation
“Traditional HA Installation” on page 153
“Sentinel HA Appliance Installation” on page 153
Traditional HA Installation
1 Connect to one of the cluster nodes (node01) and open a console window.
2 Download the Sentinel installer (a tar.gz file) and store it in /tmp on the cluster node.
3 Execute the following commands:
mount /dev/<SHARED1> /var/opt/novell
cd /tmp
tar -xvzf sentinel_server*.tar.gz
cd sentinel_server*
./install-sentinel --record-unattended=/tmp/install.props
4 Run through the standard installation, configuring the product as appropriate. The installation
program installs the binaries, databases, and configuration files. The installation program also
sets up the login credentials, configuration settings, and the network ports.
5 Start Sentinel and test the basic functions. You can use the standard external cluster node IP to
access the product.
6 Shut down Sentinel and dismount the shared storage using the following commands:
rcsentinel stop
umount /var/opt/novell
This step removes the autostart scripts so that the cluster can manage the product.
cd /
insserv -r sentinel
Sentinel HA Appliance Installation
The Sentinel HA appliance includes the Sentinel software that is already installed and configured. To
configure the Sentinel software for HA, perform the following steps:
1 Connect to one of the cluster nodes (node01) and open a console window.
2 Navigate to the following directory:
cd /opt/novell/sentinel/setup
3 Record the configuration:
3a Execute the following command:
./configure.sh --record-unattended=/tmp/install.props --no-start
Configuring Sentinel for High Availability
153
This step records the configuration in the file install.props,which is required to
configure the cluster resources using the install-resources.sh script.
3b Specify the option to select the Sentinel Configuration type.
3c Specify 2 to enter a new password.
If you specify 1, the install.props file does not store the password.
4 Shut down Sentinel using the following command:
rcsentinel stop
This step removes the autostart scripts so that the cluster can manage the product.
insserv -r sentinel
5 Move the Sentinel data folder to the shared storage using the following commands. This
movement allows the nodes to utilize the Sentinel data folder through shared storage.
mkdir -p /tmp/new
mount /dev/<SHARED1>/tmp/new
mv /var/opt/novell/sentinel/tmp/new
umount /tmp/new/
6 Verify the movement of the Sentinel data folder to the shared storage using the following
commands:
mount /dev/<SHARED1>
/var/opt/novell/
umount /var/opt/novell/
Subsequent Node Installation
“Traditional HA Installation” on page 154
“Sentinel HA Appliance Installation” on page 155
Repeat the installation on other nodes:
The initial Sentinel installer creates a user account for use by the product, which uses the next
available user ID at the time of the install. Subsequent installs in unattended mode will attempt to use
the same user ID for account creation, but the possibility for conflicts (if the cluster nodes are not
identical at the time of the install) does exist. It is highly recommended that you do one of the
following:
Synchronize the user account database across cluster nodes (manually through LDAP or
similar), making sure that the sync happens before subsequent installs. In this case the installer
will detect the presence of the user account and use the existing one.
Watch the output of the subsequent unattended installs - a warning will be issued if the user
account could not be created with the same user ID.
Traditional HA Installation
1 Connect to each additional cluster node (node02) and open a console window.
2 Execute the following commands:
cd /tmp
scp root@node01:/tmp/sentinel_server*.tar.gz
154
NetIQ Sentinel Installation and Configuration Guide
scp root@node01:/tmp/install.props
tar -xvzf sentinel_server*.tar.gz
./install-sentinel --no-start --cluster-node --unattended=/tmp/install.props
cd /
insserv -r sentinel
Sentinel HA Appliance Installation
1 Connect to each additional cluster node (node02) and open a console window.
2 Execute the following command:
insserv -r sentinel
3 Stop Sentinel services.
rcsentinel stop
4 Remove Sentinel directory.
rm -rf /var/opt/novell/sentinel
At the end of this process, Sentinel should be installed on all nodes, but it will likely not work
correctly on any but the first node until various keys are synchronized, which will happen when we
configure the cluster resources.
A.3.4
Cluster Installation
You need to install the cluster software only for traditional HA installations. The Sentinel HA
appliance includes the cluster software and does not require manual installation.
Install the cluster software on each node, and register each cluster node with the cluster manager.
Procedures to do so will vary depending on the cluster implementation, but at the end of the process
each cluster node should show up in the cluster management console.
For our exemplary solution, we will set up SUSE Linux High Availability Extension and overlay
that with Sentinel-specific Resource Agents:
If you do not use the OCF Resource Agent to monitor Sentinel, you will likely have to develop a
similar monitoring solution for the local cluster environment. The OCF Resource Agent for Sentinel is
a simple shell script that runs a variety of checks to verify if Sentinel is functional. If you wish to
develop your own, you should examine the existing Resource Agent for examples (the Resource
Agent is stored in the Sentinelha.rpm in the Sentinel download package.)
There are many different ways in which a SLE HAE cluster can be configured, but we will select
options that keep it fairly simple. The first step is to install the core SLE HAE software; the process is
fully detailed in the SLE HAE Documentation. For information about installing SLES add-ons, see the
Deployment Guide.
You must install the SLE HAE on all cluster nodes, node01 and node02 in our example. The add-on
will install the core cluster management and communications software, as well as many Resource
Agents that are used to monitor cluster resources.
Once the cluster software has been installed, an additional RPM should be installed to provide the
additional Sentinel-specific cluster Resource Agents. The HA RPM can be found in the novellSentinelha-<Sentinel_version>*.rpm stored in the normal Sentinel download, which you
unpacked to install the product.
Configuring Sentinel for High Availability
155
On each cluster node, copy the novell-Sentinelha-<Sentinel_version>*.rpm into the /tmp
directory, then:
cd /tmp
rpm -i novell-Sentinelha-<Sentinel_version>*.rpm
A.3.5
Cluster Configuration
You must configure the cluster software to register each cluster node as a member of the cluster. As
part of this configuration, you can also set up fencing and STONITH resources to ensure cluster
consistency.
In our exemplary solution, we basically use the simplest configuration without additional
redundancy or other advanced features. We also use a unicast address (instead of the preferred
multicast address) because it requires less interaction with network administrators, and is sufficient
for testing purposes. We also set up a simple SBD-based fencing resource.
Exemplary Solution:
The exemplary solution will use private IP addresses for internal cluster communications, and will
use unicast to minimize the need to request a multicast address from a network administrator. The
solution will also use an iSCSI Target configured on the same SUSE Linux VM that hosts the shared
storage to serve as an SBD device for fencing purposes. As before, iSCSI devices can be created using
any file or block device, but for simplicity here we will use a file that we create for this purpose.
The following configuration steps are very similar to those in Shared Storage Setup:
SBD Setup
Connect to storage03 and start a console session. Use the dd command to create a blank file of any
desired size:
dd if=/dev/zero of=/sbd count=1024 bs=1024
In this case, we create a 1MB file filled with zeros (copied from the /dev/zero pseudo-device).
Configure that file as an iSCSI Target:
1 Run YaST from the command line (or use the Graphical User Interface, if preferred): /sbin/yast
2 Select Network Services > iSCSI Target.
3 Click Targets and select the existing target.
4 Select Edit. The UI will present a list of LUNs (drives) that are available.
5 Select Add to add a new LUN.
6 Leave the LUN number as 2. Browse in the Path dialog and select the /sbd file that you created.
7 Leave the other options at their defaults, then select OK then Next, then click Next again to
select the default authentication options.
8 Click Finish to exit the configuration. Restart the services if needed. Exit YaST.
NOTE: The following steps require that each cluster node be able to resolve the hostname of all other
cluster nodes (the file sync service csync2 will fail if this is not the case). If DNS is not set up or
available, add entries for each host to the /etc/hosts file that list each IP and its hostname (as
reported by the hostname command).
This procedure should expose an iSCSI Target for the SBD device on the server at IP address 10.0.0.3
(storage03).
156
NetIQ Sentinel Installation and Configuration Guide
Node Configuration
Connect to a cluster node (node01) and open a console:
1 Run YaST.
2 Open Network Services > iSCSI Initiator.
3 Select Connected Targets, then the iSCSI Target you configured above.
4 Select the Log Out option and log out of the Target.
5 Switch to the Discovered Targets tab, select the Target, and log back in to refresh the list of
devices (leave the automatic startup option and No Authentication).
6 Select OK to exit the iSCSI Initiator tool.
7 Open System > Partitioner and identify the SBD device as the 1MB IET-VIRTUAL-DISK. It will
be listed as /dev/sdd or similar - note which one.
8 Exit YaST.
9 Execute the command ls -l /dev/disk/by-id/ and note the device ID that is linked to the
device name you located above.
10 Execute the command sleha-init.
11 When prompted for the network address to bind to, specify the external NIC IP (172.16.0.1).
12 Accept the default multicast address and port. We will override this later.
13 Enter 'y' to enable SBD, then specify /dev/disk/by-id/<device id>, where <device id> is
the ID you located above (you can use Tab to auto-complete the path).
14 Complete the wizard and make sure no errors are reported.
15 Start YaST.
16 Select High Availability > Cluster (or just Cluster on some systems).
17 In the box at left, ensure Communication Channels is selected.
18 Tab over to the top line of the configuration, and change the udp selection to udpu (this disables
multicast and selects unicast).
19 Select to Add a Member Address and specify this node (172.16.0.1), then repeat and add the
other cluster node(s): 172.16.0.2.
20 Select Finish to complete the configuration.
21 Exit YaST.
22 Run the command /etc/rc.d/openais restart to restart the cluster services with the new
sync protocol.
Connect to each additional cluster node (node02) and open a console:
1 Run YaST.
2 Open Network Services > iSCSI Initiator.
3 Select Connected Targets, then the iSCSI Target you configured above.
4 Select the Log Out option and log out of the Target.
5 Switch to the Discovered Targets tab, select the Target, and log back in to refresh the list of
devices (leave the automatic startup option and No Authentication).
6 Select OK to exit the iSCSI Initiator tool.
7 Run the following command: sleha-join
8 Enter the IP address of the first cluster node.
Configuring Sentinel for High Availability
157
In some circumstances the cluster communications do not initialize correctly. If the cluster does not
start (the openais service fails to start):
Manually copy /etc/corosync/corosync.conf from node01 to node02, or run csync2 -x -v
on node01, or manually set the cluster up on node02 through YaST.
Run /etc/rc.d/openais start on node02
In some cases, the script might fail because the xinetd service does not properly add the new csync2
service. This service is required so that the other node can sync the cluster configuration files down to
this node. If you see errors like csync2 run failed, you may have this problem. To fix this, execute:
kill -HUP `cat /var/run/xinetd.init.pid and then re-run the sleha-join script.
At this point you should be able to run crm_mon on each cluster node and see that the cluster is
running properly. Alternatively you can use 'hawk', the web console - the default login credentials
are 'hacluster / linux'.
There are two additional parameters we need to tweak for this example; whether these will apply to a
customer's production cluster will depend on its configuration:
1 Set the global cluster option no-quorum-policy to ignore. We do this because we have only a
two-node cluster, so any single node failure would break quorum and shut down the entire
cluster: crm configure property no-quorum-policy=ignore
NOTE: If your cluster has more than two nodes, do not set this option.
2 Set the global cluster option default-resource-stickiness to 1. This will encourage the
resource manager to leave resources running in place rather than move them around:
crm configure property default-resource-stickiness=1.
A.3.6
Resource Configuration
As mentioned in the Cluster Installation, this solution provides an OCF Resource Agent to monitor
the core services under SLE HAE, and you can create alternatives if desired. The software also
depends on several other resources, for which Resource Agents are provided by default with SLE
HAE. If you do not want to use SLE HAE, you need to monitor these additional resources using some
other technology:
A filesystem resource corresponding to the shared storage that the software uses.
An IP address resource corresponding to the virtual IP by which the services will be accessed.
The Postgres database software that stores configuration and event metadata.
There are additional resources, such as MongoDB used for Security Intelligence and the ActiveMQ
message bus; for now at least these are monitored as part of the core services.
Exemplary Solution
The exemplary solution uses simple versions of the required resources, such as the simple Filesystem
Resource Agent. You can choose to use more sophisticated cluster resources like cLVM (a logicalvolume version of the filesystem) if required.
The exemplary solution provides a crm script to aid in cluster configuration. The script pulls relevant
configuration variables from the unattended setup file generated as part of the Sentinel installation. If
you did not generate the setup file, or you wish to change the configuration of the resources, you can
edit the script accordingly.
Connect to the original node on which you installed Sentinel (this must be the node on which you ran
the full Sentinel install) and do the following (<SHARED1> is the shared volume you created above):
158
NetIQ Sentinel Installation and Configuration Guide
mount /dev/<SHARED1> /var/opt/novell
cd /usr/lib/ocf/resource.d/novell
./install-resources.sh
There might be issues with the new resources coming up in the cluster; run /etc/rc.d/openais
restart on node02 if you experience this issue.
The install-resources.sh script will prompt you for a couple values, namely the virtual IP that
you would like people to use to access Sentinel and the device name of the shared storage, and then
will auto-create the required cluster resources. Note that the script requires the shared volume to
already be mounted, and also requires the unattended installation file which was created during
Sentinel install to be present (/tmp/install.props). You do not need to run this script on any but
the first installed node; all relevant config files will be automatically synced to the other nodes.
If the customer environment varies from this exemplary solution, you can edit the resources.cli
file (in the same directory) and modify the primitives definitions from there. For example, the
exemplary solution uses a simple Filesystem resource; you may wish to use a more cluster-aware
cLVM resource.
After running the shell script, you can issue a crm status command and the output should look like
this:
crm status
Last updated: Thu Jul 26 16:34:34 2012
Last change: Thu Jul 26 16:28:52 2012 by hacluster via crmd on node01
Stack: openais
Current DC: node01 - partition with quorum
Version: 1.1.6-b988976485d15cb702c9307df55512d323831a5e
2 Nodes configured, 2 expected votes
5 Resources configured.
Online: [ node01, node02 ]
stonith-sbd
(stonith:external/sbd):
Started node01
Resource Group: sentinelgrp
sentinelip
(ocf::heartbeat:IPaddr2):
Started node01
sentinelfs
(ocf::heartbeat:Filesystem):
Started node01
sentineldb
(ocf::novell:pgsql):
Started node01
sentinelserver
(ocf::novell:sentinel):
Started node01
At this point the relevant Sentinel resources should be configured in the cluster. You can examine
how they are configured and grouped in the cluster management tool, for example by running crm
status.
A.3.7
Secondary Storage Configuration
As the final step in this process, configure secondary storage so that Sentinel can migrate event
partitions to less-expensive storage. This is optional, and in fact the secondary storage need not be
made highly-available in the same way that the rest of the system has been - you can use any
directory (mounted from a SAN or not), or NFS or CIFS volume.
In the Sentinel web console, in the top menu bar, click Storage, then select Configuration, then select
one of the radio buttons under Secondary storage not configured to set this up.
Exemplary Solution
The exemplary solution will use a simple iSCSI Target as a network shared storage location, in much
the same configuration as the primary storage. In production implementations, these would likely be
different storage technologies.
Configuring Sentinel for High Availability
159
Use the following procedure to configure the secondary storage for use by Sentinel:
NOTE: Since we will be using an iSCSI Target for this exemplary solution, the target will be mounted
as a directory for use as secondary storage. Hence we will need to configure the mount as a
filesystem resource akin to the way the primary storage filesystem is configured. This was not
automatically set up as part of the resource installation script since there are other possible variations;
we will do the configuration manually here.
1 Review the steps above to determine which partition was created for use as secondary storage (/
dev/<NETWORK1>, or something like /dev/sdc1). If necessary create an empty directory on
which the partition can be mounted (such as /var/opt/netdata).
2 Set up the network filesystem as a cluster resource: use the web console or run the command:
crm configure primitive sentinelnetfs ocf:heartbeat:Filesystem params device="/
dev/<NETWORK1>" directory="<PATH>" fstype="ext3" op monitor interval=60s
where /dev/<NETWORK1> is the partition that was created in the Shared Storage Setup section
above, and <PATH> is any local directory on which it can be mounted.
3 Add the new resource to the group of managed resources:
crm resource stop sentinelgrp
crm configure delete sentinelgrp
crm configure group sentinelgrp sentinelip sentinelfs sentinelnetfs sentineldb
sentinelserver
crm resource start sentinelgrp
4 You can connect to the node currently hosting the resources (use crm status or Hawk) and make
sure that the secondary storage is properly mounted (use the mount command).
5 Log in to the Sentinel Web interface.
6 Select Storage, then select Configuration, then select the SAN (locally mounted) under
Secondary storage not configured.
7 Type in the path where the secondary storage is mounted, for example /var/opt/netdata.
The exemplary solution uses simple versions of the required resources, such as the simple Filesystem
Resource Agent - customers can choose to use more sophisticated cluster resources like cLVM (a
logical-volume version of the filesystem) if they wish.
A.4
Upgrading Sentinel in High Availability
When you upgrade Sentinel in an HA environment, you should first upgrade the passive nodes in
the cluster, then upgrade the active cluster node.
Section A.4.1, “Prerequisites,” on page 160
Section A.4.2, “Upgrading a Traditional Sentinel HA Installation,” on page 161
Section A.4.3, “Upgrading a Sentinel HA Appliance Installation,” on page 162
A.4.1
Prerequisites
Download the latest installer from the NetIQ download Web site.
160
NetIQ Sentinel Installation and Configuration Guide
If you are using the SLES operating system with kernel version 3.0.101 or later, you must
manually load the watchdog driver in the computer. To find the appropriate watchdog driver for
your computer hardware, contact your hardware vendor. To load the watchdog driver, perform
the following:
1. In the command prompt, run the following command to load the watchdog driver in the
current session:
/sbin/modprobe -v --ignore-install <watchdog driver name>
2. Add the following line to the /etc/init.d/boot.local file to ensure that the computer
automatically loads the watchdog driver at every boot time:
/sbin/modprobe -v --ignore-install <watchdog driver name>
A.4.2
Upgrading a Traditional Sentinel HA Installation
1 Enable the maintenance mode on the cluster:
crm configure property maintenance-mode=true
Maintenance mode helps you to avoid any disturbance to the running cluster resources while
you update Sentinel. You can run this command from any cluster node.
2 Verify whether the maintenance mode is active:
crm status
The cluster resources should appear in the unmanaged state.
3 Upgrade the passive cluster node:
3a Stop the cluster stack:
rcopenais stop
Stopping the cluster stack ensures that the cluster resources remain accessible and avoids
fencing of nodes.
3b Log in as root to the server where you want to upgrade Sentinel.
3c Extract the install files from the tar file:
tar xfz <install_filename>
3d Run the following command in the directory where you extracted the install files:
./install-sentinel --cluster-node
3e After the upgrade is complete, restart the cluster stack:
rcopenais start
Repeat Step 3 for all passive cluster nodes.
4 Upgrade the active cluster node:
4a Back up your configuration, then create an ESM export.
For more information about backing up data, see “Backing Up and Restoring Data” in the
NetIQ Sentinel Administration Guide.
4b Stop the cluster stack:
rcopenais stop
Configuring Sentinel for High Availability
161
Stopping the cluster stack ensures that the cluster resources remain accessible and avoids
fencing of nodes.
4c Log in as root to the server where you want to upgrade Sentinel.
4d Run the following command to extract the install files from the tar file:
tar xfz <install_filename>
4e Run the following command in the directory where you extracted the install files:
./install-sentinel
4f After the upgrade is complete, start the cluster stack:
rcopenais start
5 Disable the maintenance mode on the cluster:
crm configure property maintenance-mode=false
You can run this command from any cluster node.
6 Verify whether the maintenance mode is inactive:
crm status
The cluster resources should appear in the Started state.
7 (Optional) Verify whether the Sentinel upgrade is successful:
rcsentinel version
A.4.3
Upgrading a Sentinel HA Appliance Installation
You can upgrade a Sentinel HA appliance installation by using the Zypper patch and also through
WebYast.
“Upgrading Sentinel HA Appliance by Using Zypper” on page 162
“Upgrading Sentinel HA Appliance Through WebYast” on page 164
Upgrading Sentinel HA Appliance by Using Zypper
You must register all the appliance nodes through WebYast before the upgrade. For more
information, see Section 13.4.3, “Registering for Updates,” on page 97. If you do not register the
appliance, Sentinel displays a yellow warning.
1 Enable the maintenance mode on the cluster.
crm configure property maintenance-mode=true
Maintenance mode helps you to avoid any disturbance to the running cluster resources while
you update the Sentinel software. You can run this command from any cluster node.
2 Verify whether the maintenance mode is active.
crm status
The cluster resources should appear in the unmanaged state.
3 Upgrade the passive cluster node:
3a Download updates for the Sentinel HA appliance.
zypper -v patch -d
162
NetIQ Sentinel Installation and Configuration Guide
This command downloads updates for packages installed on the appliance including
Sentinel to /var/cache/zypp/packages.
3b Stop the cluster stack.
rcopenais stop
Stopping the cluster stack ensures that the cluster resources remain accessible and avoids
fencing of nodes.
3c After you download the updates, install the updates using the following command:
rpm -Uvh /var/cache/zypp/packages/sentinel_server_7000_x86_64-Updates/rpm/
noarch/*.rpm /var/cache/zypp/packages/sentinel_server_7000_x86_64-Updates/
rpm/x86_64/*.rpm /var/cache/zypp/packages/sentinel_server_7000_x86_64Updates/rpm/i586/*.rpm --excludepath=/var/opt/novell/
3d Run the following script to complete the upgrade process:
/var/adm/update-scripts/sentinel_server_ha_x86_64-update-<version>overlay_files.sh
3e After the upgrade is complete, restart the cluster stack.
rcopenais start
Repeat Step 3 for all the passive cluster nodes.
4 Upgrade the active cluster node:
4a Back up your configuration, then create an ESM export.
For more information on backing up data, see “Backing Up and Restoring Data” in the
NetIQ Sentinel Administration Guide.
4b Stop the cluster stack.
rcopenais stop
Stopping the cluster stack ensures that the cluster resources remain accessible and avoids
fencing of nodes.
4c Log in to the Sentinel appliance as an administrator.
4d To upgrade the Sentinel appliance, click Appliance to launch WebYaST.
4e To check whether there are any updates, click Updates.
4f Select and apply the updates.
The updates might take few minutes to complete. After the update is successful, the
WebYaST login page appears.
Before upgrading the appliance, WebYaST automatically stops the Sentinel service. You
must manually restart this service after the upgrade is complete.
4g Clear your Web browser cache to view the latest Sentinel version.
4h After the upgrade is complete, restart the cluster stack.
rcopenais start
5 Disable the maintenance mode on the cluster.
crm configure property maintenance-mode=false
You can run this command from any cluster node.
6 Verify whether the maintenance mode is inactive.
crm status
Configuring Sentinel for High Availability
163
The cluster resources should appear in the Started state.
7 (Optional) Verify whether the Sentinel upgrade is successful:
rcsentinel version
Upgrading Sentinel HA Appliance Through WebYast
You must register all the appliance nodes through WebYast before the upgrade. For more
information, see Section 13.4.3, “Registering for Updates,” on page 97. If you do not register the
appliance, Sentinel displays a yellow warning.
1 Enable the maintenance mode on the cluster.
crm configure property maintenance-mode=true
Maintenance mode helps you to avoid any disturbance to the running cluster resources while
you update the Sentinel software. You can run this command from any cluster node.
2 Verify whether the maintenance mode is active.
crm status
The cluster resources should appear in the unmanaged state.
3 Upgrade the passive cluster nodes:
3a Stop the cluster stack.
rcopenais stop
Stopping the cluster stack ensures that the cluster resources remain accessible and avoids
fencing of nodes.
3b Specify the URL of passive cluster node using port 4984 to launch WebYaST as https://
<IP_address>:4984, where <IP_address> is the IP address of passive cluster node. Log in
to the Sentinel appliance as an administrator.
3c To check whether there are any updates, click Updates.
3d Select and apply the updates.
The updates might take few minutes to complete. After the update is successful, the
WebYaST login page appears.
3e After the upgrade is complete, restart the cluster stack.
rcopenais start
Repeat Step 4 for all passive cluster nodes.
4 Upgrade the active cluster node:
4a Back up your configuration, then create an ESM export.
For more information on backing up data, see “Backing Up and Restoring Data” in the
NetIQ Sentinel Administration Guide.
4b Stop the cluster stack.
rcopenais stop
Stopping the cluster stack ensures that the cluster resources remain accessible and avoids
fencing of nodes.
4c Log in to the Sentinel appliance as an administrator.
4d To upgrade the Sentinel appliance, click Appliance to launch WebYaST.
164
NetIQ Sentinel Installation and Configuration Guide
4e To check whether there are any updates, click Updates.
4f Select and apply the updates.
The updates might take few minutes to complete. After the update is successful, the
WebYaST login page appears.
Before upgrading the appliance, WebYaST automatically stops the Sentinel service. You
must manually restart this service after the upgrade is complete.
4g Clear your Web browser cache to view the latest Sentinel version.
4h After the upgrade is complete, restart the cluster stack.
rcopenais start
5 Disable the maintenance mode on the cluster.
crm configure property maintenance-mode=false
You can run this command from any cluster node.
6 Verify whether the maintenance mode is inactive.
crm status
The cluster resources should appear in the Started state.
7 (Optional) Verify whether the Sentinel upgrade is successful:
rcsentinel version
A.5
Backup and Recovery
The highly available failover cluster described in this document provides a level of redundancy so
that if the service fails on one node in the cluster, it will automatically failover and recover on another
node in the cluster. When an event like this happens, it's important to bring the node that failed back
into an operational state so that the redundancy in the system can be restored and protect in the case
of another failure. This section talks about restoring the failed node under a variety of failure
conditions.
Section A.5.1, “Backup,” on page 165
Section A.5.2, “Recovery,” on page 166
A.5.1
Backup
While a highly available failover cluster like the one described in this document provides a layer of
redundancy, it is still important to regularly take a traditional backup of the configuration and data,
which would not be easy to recover from if lost or corrupted. The section “Backing Up and Restoring
Data” in the NetIQ Sentinel Administration Guide describes how to use Sentinel's built-in tools for
creating a backup. These tools should be used on the active node in the cluster because the passive
node in the cluster will not have the required access to the shared storage device. Other commercially
available backup tools could be used instead and may have different requirements on which node
they can be used.
Configuring Sentinel for High Availability
165
A.5.2
Recovery
“Transient Failure” on page 166
“Node Corruption” on page 166
“Cluster Data Configuration” on page 166
Transient Failure
If the failure was a temporary failure and there is no apparent corruption to the application and
operating system software and configuration, then simply clearing the temporary failure, for
example rebooting the node, will restore the node to an operational state. The cluster management
user interface can be used to fail back the running service back to the original cluster node, if desired.
Node Corruption
If the failure caused a corruption in the application or operating system software or configuration
that is present on the node's storage system, then the corrupted software will need to be reinstalled.
Repeating the steps for adding a node to the cluster described earlier in this document will restore
the node to an operational state. The cluster management user interface can be used to fail back the
running service back to the original cluster node, if desired.
Cluster Data Configuration
If data corruption occurs on the shared storage device in a way that the shared storage device can't
recover from, this would result in the corruption affecting the entire cluster in a way that cannot be
automatically recovered from using the highly available failover cluster described in this document.
The section “Backing Up and Restoring Data” in the NetIQ Sentinel Administration Guide describes
how to use Sentinel's built-in tools for restoring from a backup. These tools should be used on the
active node in the cluster because the passive node in the cluster will not have the required access to
the shared storage device. Other commercially available backup and restore tools could be used
instead and may have different requirements on which node they can be used.
166
NetIQ Sentinel Installation and Configuration Guide
B
Troubleshooting the Installation
B
This section contains some of the issues that might occur during installation, along with the actions to
work around the issues.
B.1
Failed Installation Because of an Incorrect Network
Configuration
During the first boot, if the installer finds that the network settings are incorrect, an error message is
displayed. If the network is unavailable, installing Sentinel on the appliance fails.
To resolve this issue, properly configure the network settings. To verify the configuration, use the
ifconfig command to return the valid IP address, and use the hostname -f command to return the
valid hostname.
B.2
The UUID Is Not Created for Imaged Collector Managers or
Correlation Engine
If you image a Collector Manager server (for example, by using ZENworks Imaging) and restore the
images on different machines, Sentinel does not uniquely identify the new instances of the Collector
Manager. This happens because of duplicate UUIDs.
You must generate a new UUID by performing the following steps on the newly installed Collector
Manager systems:
1 Delete the host.id or sentinel.id file that is located in the /var/opt/novell/sentinel/data
folder.
2 Restart the Collector Manager.
The Collector Manager automatically generates the UUID.
Troubleshooting the Installation
167
168
NetIQ Sentinel Installation and Configuration Guide
C
Uninstalling
C
This appendix provides information about uninstalling Sentinel and post-uninstallation tasks.
Section C.1, “Uninstallation Checklist,” on page 169
Section C.2, “Uninstalling Sentinel,” on page 169
Section C.3, “Post-Uninstallation Tasks,” on page 171
C.1
Uninstallation Checklist
Use the following checklist to uninstall Sentinel:
Uninstall the Sentinel server.
Uninstall the Collector Manager and Correlation Engine, if any.
Perform post-uninstallation tasks to complete the Sentinel uninstallation.
C.2
Uninstalling Sentinel
An uninstall script is available to help you remove a Sentinel installation. Before performing a new
installation, you should perform all of the following steps to ensure there are no files or system
settings remaining from a previous installation.
WARNING: These instructions involve modifying operating system settings and files. If you are not
familiar with modifying these system settings and files, please contact your system administrator.
C.2.1
Uninstalling the Sentinel Server
Use the following steps to uninstall the Sentinel server:
1 Log in to the Sentinel server as root.
NOTE: You cannot uninstall Sentinel server as a non-root user, if the installation is performed as
a root user. However, a non-root user can uninstall the Sentinel server if the installation was
performed by non-root user.
2 Access the following directory:
/opt/novell/sentinel/setup/
3 Run the following command:
./uninstall–sentinel
Uninstalling
169
4 When prompted to reconfirm that you want to proceed with the uninstall, press y.
The script first stops the service and then removes it completely.
C.2.2
Uninstalling the Collector Manager and Correlation Engine
Use the following steps to uninstall the Collector Manager and Correlation Engine:
1 Log in as root to the Collector Manager and Correlation Engine computer.
NOTE: You can not uninstall the remote Collector Manager or remote Correlation Engine as a
non-root user, if the installation was performed as a root user. However, a non-root user can
uninstall, if the installation was done as a non-root user.
2 Go to the following location:
/opt/novell/sentinel/setup
3 Run the following command:
./uninstall–sentinel
The script displays a warning that the Collector Manager or Correlation Engine, and all
associated data will be completely removed.
4 Enter y to remove the Collector Manager or Correlation Engine.
The script first stops the service and then removes it completely. However, the Collector
Manager and Correlation Engine icon is still displayed in inactive state in the Web interface.
5 Perform the following additional steps to manually delete the Collector Manager and
Correlation Engine in the Web interface:
Collector Manager:
1. Access Event Source Management > Live View.
2. Right-click the Collector Manager you want to delete, then click Delete.
Correlation Engine:
1. Log in to the Sentinel Web interface as an administrator.
2. Expand Correlation, then select the Correlation Engine that you want to delete.
3. Click the Delete button (garbage can icon).
C.2.3
Uninstalling the NetFlow Collector Manager
Use the following steps to uninstall the NetFlow Collector Manager:
1 Log in to the NetFlow Collector Manager computer.
NOTE: You must log in with the same user permission that was used to install the NetFlow
Collector Manager.
2 Change to the following directory:
/opt/novell/sentinel/setup
3 Run the following command:
./uninstall–sentinel
170
NetIQ Sentinel Installation and Configuration Guide
4 Enter y to uninstall the Collector Manager.
The script first stops the service and then uninstalls it completely.
C.3
Post-Uninstallation Tasks
Uninstalling the Sentinel server does not remove the Sentinel Administrator User from the operating
system. You must manually remove that user.
After you uninstall Sentinel, certain systems settings remain.These settings should be removed before
performing a “clean” installation of Sentinel, particularly if the Sentinel uninstallation encountered
errors.
To manually clean up the Sentinel system settings:
1 Log in as root.
2 Ensure that all Sentinel processes are stopped.
3 Remove the contents of /opt/novell/sentinel or wherever the Sentinel software was
installed.
4 Make sure no one is logged in as the Sentinel Administrator operating system user (novell by
default), then remove the user, the home directory, and the group.
userdel -r novell
groupdel novell
5 Restart the operating system.
Uninstalling
171
172
NetIQ Sentinel Installation and Configuration Guide