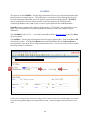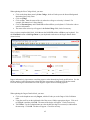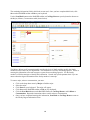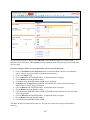
1
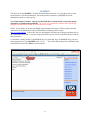
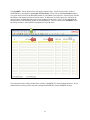
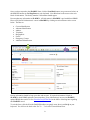
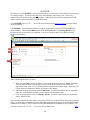
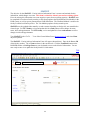
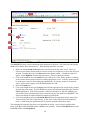
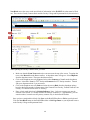
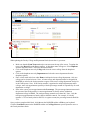
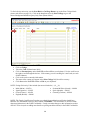
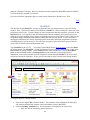
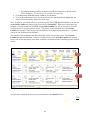
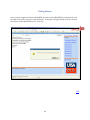
BANNER USER MANUAL
ENTERING AND VERIFYING
FACULTY INFORMATION
Table of Contents
INTRODUCTION ........................................................................................................................................ 3
THE ROLE OF THE BANNER COORDINATOR ..................................................................................... 3
LOGGING ON TO BANNER ...................................................................................................................... 4
SPAIDEN ...................................................................................................................................................... 6
SIAFPER .................................................................................................................................................... 10
SIAINST ..................................................................................................................................................... 11
SIAFDEG .................................................................................................................................................... 16
SIAASGN ................................................................................................................................................... 21
Exiting Banner ............................................................................................................................................ 23
2
INTRODUCTION
The purpose of this User Manual is to assist you in entering and verifying your faculty’s
information in BANNER. UTSA takes information from BANNER and places it into FAIR, the
faculty information data base. FAIR is an acronym that stands for Faculty Academic
Information Reporting. It relies solely on BANNER for its information.
To make sure that the information in FAIR can be relied on, it is critical that you enter
information into BANNER accurately, completely and in a timely manner. FAIR is used by
your department chair, dean and the Provost to review the credentials and accomplishments of
their faculty members. It is also used by the University to provide a wide variety of reports to
the federal government, the Texas Legislature, the Texas Higher Education Coordinating Board,
The University of Texas System, the Southern Association of Colleges and Schools Commission
on Colleges (UTSA’s most critical accrediting agency), other college and discipline accrediting
agencies, and the general public.
For the information to be reliable and to comply with laws and regulations, the information must
be entered in time for it to appear on reports. If it is missing the reports will be inaccurate. This
can cost UTSA financial support as well as other forms of important support. Information for
faculty who are new to UTSA should be completed at least one month prior to the first day of
classes in the semester in which they begin their appointment. Changes in information for
existing faculty, such as completion of a new degree or an official name change, should be
completed as soon as you are informed of the change.
As you can see, a wide variety of people rely on your work in BANNER. We hope this manual
will help make your task easier.
TOP
THE ROLE OF THE BANNER COORDINATOR
The BANNER Coordinator plays a key role in making sure our faculty data is complete and
accurate. The Coordinator serves as a teacher, a mentor, and a liaison between the college and/or
department and the Provost’s Office. The role involves several important skills and activities.
The Coordinator is:
•
•
•
•
•
The BANNER expert for the college. He/she is asked to train new staff members in the
college and/or department to accurately work in BANNER.
The primary contact for BANNER problems that staff members have. Staff members
should contact the BANNER Coordinator for assistance.
The person responsible for making sure that BANNER class assignments are completed
in a timely manner.
The supervisor for BANNER-related issues. This includes following up with department
staff when copied on messages from the Provost’s offices regarding missing instructors,
wrong percent of class assignment responsibility, or other issues, to make sure that
BANNER work is completed.
A college representative at meetings related to BANNER updates, security issues and
who then shares this information with your departments.
**Contact your Dean’s office to find out who the BANNER Coordinator is for your college.
TOP
3
LOGGING ON TO BANNER
To log onto BANNER, you must first have a user account. To establish a user account or to modify your
existing account, you must fill out a BANNER Account Request Form. To do so, click on Internet
Explorer on your computer desktop and type (or click on) the following link into the address line:
http://utsa.edu/registrar/bansec/
This link will take you to the Banner Security website where more information regarding BANNER is
available. To access the BANNER Account Request Form, click on Forms, shown in the screenshot
below.
4
Next, click on the Account Request Form Directions (Directions) on the Registrar BANNER
information page. Print out the Directions to make sure you complete the form correctly.
Click on the Account Request Form link to download a copy of the form and fill it out. We are in the
process of updating our Account Form Directions, so they may be a bit out of date. Forms can be campus
mailed, delivered by hand, or emailed to [email protected]. If the Department Custodian has not
signed, the form is forwarded to the proper person for authorization by Banner Security. Banner Support
will notify you via email when they have set up your user account in BANNER. To enter faculty data,
you must complete the BANNER General Navigation Training once you gain access to BANNER.
TOP
5
SPAIDEN
The objective for the SPAIDEN – General Person Identification Form is to verify the accuracy of the
faculty member’s personal information. All faculty members must have a BANNER ID for our
information systems to work properly.
No account request is needed. Network and BANNER IDs are automatically created when faculty
information is submitted through HRMS. The system will automatically send an email to the hiring
manager with instructions on how to activate the new accounts.
NOTE: If new faculty do not have an HRMS assignment but need access to UTSA systems, detailed
instructions can be found on the Office of Information Technology (OIT) website:
http://www.utsa.edu/oit. Click on the “Services and Support” tab at the top of the page and then click on
the “Internet/Network” link. Click the “Request Network Account” link for a Quick Reference Guide on
these procedures.
To search for a faculty member’s BANNER ID once it is generated, log in to BANNER using your user
name and password. Type SPAIDEN in the “Go To . . .” box of the General Menu Form indicated in the
screenshot below and select Enter on your keyboard.
6
The SPAIDEN – General Person Identification Form will appear (shown below). Click on the drop down
arrow by the ID box.
A search box will appear with an Option List (shown below). Click on Person Search.
7
The SOAIDEN - Person Search Form will appear (shown below). Search for the faculty member’s
BANNER ID by entering their Last Name and First Name. Then, click on the Execute Query button
(see green arrow below) on the BANNER toolbar or select F8 on your keyboard. Execute Query searches
the database and displays matches to search criteria. If duplicates of a name appear, the search can be
narrowed down by birth date and social security number as a last resort. Once you have identified the
faculty member’s BANNER ID, double click on the ID field. This will return you to SPAIDEN where
the faculty member’s name and ID will populate the top of the form.
If you determine that a faculty member does not have a BANNER ID, contact Human Resources. If you
determine that a faculty member may have multiple BANNER IDs, contact BANNER Security.
8
Once you have returned to the SPAIDEN form, click the Next Block button (see green arrow below) on
the BANNER toolbar or Ctrl PageDown on your keyboard. Next Block moves the cursor to the next
block of information. The faculty member’s information should appear.
Do not update any information in SPAIDEN. All information in SPAIDEN is pre-loaded from HRMS.
Please verify that all information is correct in SPAIDEN by clicking on each tab shown in the screen
below. The tabs are:
•
•
•
•
•
•
•
•
Current Identification
Alternate Identification
Address
Telephone
Biographical
E-mail
Emergency Contact
Additional Identification
Faculty information should be kept up-to-date and accurate. If required information is blank in
SPAIDEN, check HRMS and make corrections there. If any information is incorrect in SPAIDEN,
update HRMS, then email Cié Gee ([email protected]) in the Office of the Registrar regarding
the SPAIDEN record.
To exit this form, click the X on the BANNER toolbar (see purple arrow above) or Ctrl Q on your
keyboard. You will now be back at the “Go To . . .” box of the General Menu Form.
9
SIAFPER
The objective for the SIAFPER – Faculty Personnel Form is to enter tenure code and the primary activity
of a faculty member. This form is the only place in BANNER to add a tenure code. This is very
important for federal, state and accreditation reports. Additionally, this form also populates the FAIR
system and any reports generated from FAIR Data Marts.
Type SIAFPER in the “Go To . . .” box of the General Menu Form (shown on page 6) and select Enter
on your keyboard.
The SIAFPER – Faculty Personnel Form will appear (shown below). Enter in the Banner ID of the
faculty member. Click the Next Block button on the BANNER toolbar or Ctrl Page Down on your
keyboard to move to the block of information. You are now ready to enter in or update the faculty
member’s information.
When completing this form, you must:
•
•
•
Make sure the Tenure field is completed. Click on the drop down arrow by Tenure and make a
selection from the menu. Consult with your department chair to make sure you select the
appropriate tenure code. If a new faculty member completes the terminal degree during the year,
consult with your department chair to see if tenure code changes.
Add the date tenure was granted under Tenure Date. You should consult with your department
chair prior to the beginning of each year to determine the appropriate date.
Click on the appropriate circle for Primary Activity. You must consult with your department
chair to determine this.
The remaining information in this form is not used by UTSA, so you do not need to fill out the remaining
fields. Once you have completed this form, click Save (see green arrow above) on the BANNER toolbar
or F10 on your keyboard. Then click the X on the BANNER toolbar or Ctrl Q on your keyboard. You
will now be back at the “Go To . . .” box of the General Menu Form.
TOP
10
SIAINST
The objective for the SIAINST – Faculty/Advisor Information Form is to enter and maintain faculty
information, which changes over time. This form is critical for federal, state and accrediting reports.
Errors in entering this information can create negative reports from accrediting agencies. SIAINST must
be completed for each new faculty member, as this form populates the Workload and Vita Modules in the
FAIR system, as well as reports generated from FAIR Data Marts. The Workload Module is used for the
faculty workload verification process. The Vita Module populates faculty annual reports.
SIAINST must be updated either annually or each semester depending on faculty title, one month before
classes begin. For T/TT faculty, review and update this form each year to reflect changes in tenure
status, titles and appointments. For NTT faculty, review and update this form each semester to reflect
changes in titles and appointments.
Type SIAINST in the “Go To . . .” box of the General Menu Form (shown on page 6) and select Enter
on your keyboard.
The SIAINST – Faculty/Advisor Information Form will appear (shown below). Enter in the Banner ID
of the faculty member. Tab to Term and enter in the current term. Click the Next Block button on the
BANNER toolbar or Ctrl Page Down on your keyboard to move to the block of information. You are
now ready to enter in or update the faculty member’s information.
TOP
11
The SIAINST form has several information blocks that must be filled out. The first block is the Faculty
Member Base Details block (shown above). When updating this block, you must:
•
•
•
•
•
Make sure that the From Term matches the current term at the top of the screen. This is an
effective term, and the faculty member will now be able to be assigned to a course from this term
forward. To update the term, select Record from the Banner toolbar. A dropdown menu will
appear. Select Duplicate from the dropdown menu. The terms should now match.
Click on the dropdown arrow by Status and select AC (active) if the faculty member is teaching
in the current semester and has an active teaching appointment. Note: A faculty member should
be made inactive once his/her teaching appointment ends. If a faculty member is not marked
Active, he/she will not appear in the Workload Module in FAIR.
Select the Faculty box.
Click on the dropdown arrow by Category and select the appropriate title for the faculty member
from the drop down menu. The title should be a faculty title and should match the title of his/her
HRMS appointment. If the faculty member is fulltime staff and has a staff title in HRMS, you
will need to consult your department chair on what the faculty title should be in BANNER. The
faculty title should correspond with his/her teaching qualifications.
Click on the dropdown arrow by Workload Rule and select the appropriate tenure status (NonTenure Faculty, Full Time Tenure Faculty, or Part Time Tenure Faculty) from the dropdown
menu. Consult with your department chair if you have questions about tenure status.
The remaining information in this form is not completed for faculty. Once you have completed this
block, click Save on the BANNER toolbar or F10 on your keyboard. Click the Next Block button on the
BANNER toolbar or Ctrl PageDown.
12
Next Block moves the cursor to the next blocks of information in the SIAINST form that must be filled
out. These are the Faculty Contract block and the Faculty College and Department block (shown below).
When updating the Faculty Contract block, you must:
•
•
•
•
Make sure that the From Term matches the current term at the top of the screen. To update the
term, select Record from the Banner toolbar. A dropdown menu will appear. Select Duplicate
from the dropdown menu. The terms should now match.
Click on the dropdown arrow by Type and select either Semester or Year from the dropdown
options. It should be Year for T/TT faculty and Semester for NTT faculty members. Consult
with your department chair if you are unsure.
Click on the dropdown arrow by Rule and select the correct Rule from the dropdown options
based on the faculty member’s tenure status (Non-Tenured Tract Faculty, Tenured/Tenured Tract
Faculty, or Tenured/Tenured Tract PT Faculty).
Place a check mark in the box by Default Indicator. Note: Only one contract type must be
checked as the default. If a faculty member has multiple contracts (i.e., appointments), you can
enter them here, but make sure the primary contract only is checked as the default.
Once you have completed this block, click Save on the BANNER toolbar or F10 on your keyboard.
Click the Next Block button on the BANNER toolbar or Ctrl Page Down on your keyboard to move
to the Faculty College and Department block.
13
When updating the Faculty College and Department block (shown above), you must:
•
•
•
•
•
Make sure that the From Term matches the current term at the top of the screen. To update the
term, select Record from the Banner toolbar. A dropdown menu will appear. Select Duplicate
from the dropdown menu. The terms should now match.
Click on the dropdown arrow by College and select the correct college from the dropdown
options.
Click on the dropdown arrow by Department and select the correct department from the
dropdown options.
Place a check mark in the box under Home to indicate the home college/department. Only one
college can be selected as home. Note: A home college and department must be designated in
BANNER in order for the faculty member to appear in the correct college/department faculty list
in the FAIR system. Note: If the faculty member is appointed to multiple departments and/or
colleges, enter each appointment separately with the percentage amount of responsibility for each
department or college.
Enter in the correct percent appointment under Percentage. The percent appointment must match
the percent of the faculty member’s current appointment on faculty salaries within that
department/college in HRMS. The total percentage cannot be more than 100. Note: Only the
total percent appointments on faculty salaries should be entered. For example, if a faculty
member is 75% on faculty salaries and 25% on a grant account, the percentage entered should be
75%.
Once you have completed this block, click Save on the BANNER toolbar or F10 on your keyboard.
Click the Next Block button on the BANNER toolbar or Ctrl Page Down on your keyboard to move to
the Faculty Attributes block.
14
The Faculty Attributes block (shown below) is optional. You may enter additional titles here if
appropriate. Consult with your department chair before doing this.
If your department chair would like the Faculty Attributes block updated, you must:
•
•
Make sure that the From Term matches the current term at the top of the screen. To update the
term, select Record from the Banner toolbar. A dropdown menu will appear. Select Duplicate
from the dropdown menu. The terms should now match.
Click on the dropdown arrow by Code and select the appropriate title.
Once you have completed this block, click Save on the BANNER toolbar or F10 on your keyboard.
The Faculty Comments block (shown above) is not used. You have now completed all of the necessary
information in the SIAINST form.
TOP
15
SIAFDEG
The objective for the SIAFDEG – Faculty Degree Information Form is to provide information about the
faculty member’s academic degrees. This information is a critical piece for accrediting the University.
Errors in entering this information can create negative reports from accrediting agencies. SIAFDEG
must be completed for each new faculty member, as this form populates the Vita and Faculty
Credentialing Modules in the FAIR system, as well as reports generated from FAIR Data Marts.
SIAFDEG must be completed for each new faculty member, T/TT and NTT, one month before classes
begin. This form should be reviewed and updated each semester to reflect any changes in degree
information.
Type SIAFDEG in the “Go To . . .” box of the General Menu Form (shown on page 6) and select Enter
on your keyboard.
The SIAFDEG – Faculty Degree Information Form will appear (shown below). Enter in the Banner ID
of the faculty member. Click the Next Block button on the BANNER toolbar or Ctrl Page Down on
your keyboard to move to the Prior Colleges block (shown below). You are now ready to enter or update
the faculty member’s information.
Use the Prior Colleges block to enter the college code for the university from which a degree was earned.
Only university-granted degrees are entered on this screen. Associates degrees and certificates are not
used.
16
When updating the Prior College block, you must:
•
•
•
•
•
Click on the drop down arrow by Prior College, which will take you to the Source/Background
Institution Query-Only Form.
Click on College.
Click on City. Enter the name of the city where the college or university is located. For
example, San Antonio or College Station.
Click on Execute Query on the BANNER toolbar or F8 on your keyboard. Click on the code to
enter the information.
The name of the university will appear in the Prior College field, check for accuracy.
Once you have completed this block, click Save on the BANNER toolbar or F10 on your keyboard. Use
the Next Block button or Ctrl Page Down on your keyboard to advance to the Degree Details block
(shown below).
Degree information is important to accrediting agencies when determining faculty qualifications. Use the
faculty member’s official transcripts to determine the correct name of the degrees he/she has earned.
Errors in entering this information can create negative reports from accrediting agencies.
When updating the Degree Details block, you must:
•
•
•
Click on the dropdown arrow by Degree, which will take you to the Degree Code Validation
table.
Using the scroll bar on the right hand side of the screen, find the appropriate degree. Click on it
to highlight it and then click OK. The name of the degree will appear. Check for accuracy.
Tab to Date. Use the Calendar button to select the date the degree was earned, as indicated on
the transcript. Click OK. The date will appear. Check for accuracy.
17
The remaining information fields in this block are not used. Once you have completed this block, click
Save on the BANNER toolbar or F10 on your keyboard.
Use the Next Block button on the BANNER toolbar or Ctrl Page Down on your keyboard to advance to
the Majors, Minors, Concentrations table (shown below).
The Majors, Minors and Concentration table provides the level of detail needed to qualify the faculty
member to teach courses in your department. This information is used by accrediting agencies. Errors in
entering this information can result in negative reports from accrediting agencies. Use the faculty
member’s official transcripts to identify this information. Consult with your department chair if you are
unsure about the degree information on the faculty member’s transcript.
To enter a major, minor or concentration, you must:
•
•
•
•
•
•
Click on the drop down arrow by Major to find the major.
Select the major.
Click Enter on your keyboard. The major will appear.
Click Save on the BANNER toolbar or F10 on your keyboard.
Click the Next Block button on the BANNER toolbar or Ctrl Page Down to add a Minor or
Concentration. Repeat the instructions above to add a minor or concentration.
Once you have completed entering this information, Next Block or Ctrl Page Down to return to
the Faculty Degree Information Form.
18
To enter another college or degree, click on Record in the BANNER toolbar (see red arrow above). A
dropdown menu will appear. Choose Insert from the dropdown menu and repeat the process listed on the
previous pages.
In order to change or delete incorrect information, you have to work backward.
•
•
•
•
•
•
•
•
•
•
•
•
Click on Next Block or Ctrl Page Down until you reach the Majors, Minors, Concentrations
table to remove any major, minor or concentration information.
Click on the Major field.
Click on Record in the BANNER toolbar. A dropdown menu will appear.
Choose Remove from the dropdown menu.
Click Save on the BANNER toolbar or F10 on your keyboard.
Next Block or Ctrl Page Down. BANNER will automatically take you back to the Degree
Details block to remove degree information.
Click on Record in the BANNER toolbar. A dropdown menu will appear.
Choose Remove from the dropdown menu.
Click Save on the BANNER toolbar or F10. BANNER will automatically take you back to the
Prior College block.
Click on Record in the BANNER toolbar. A dropdown menu will appear.
Choose Remove from the dropdown menu.
Click Save on the BANNER toolbar or F10.
The entire incorrect record should be removed. You can now reenter correct degree information if
necessary.
19
To find a foreign university, use the Next Block or Ctrl Page Down to go to the Prior Colleges block
(shown with arrows on page 16). Click on the dropdown arrow by Prior College to go to the
Source/Background Institution Query-Only Form (shown below).
•
•
•
•
•
•
Click on College.
Tab to the Code field and enter 999%.
Click on Execute Query on the BANNER toolbar or F8 on your keyboard. Use the scroll bar on
the right to scroll through the choices. If the country you are searching for is not listed, use code
99998 Unknown.
Click on the code to enter the information.
The name of the country will appear in the Prior College field, check for accuracy.
Click Save on the BANNER toolbar or F10 on your keyboard.
NOTE: Foreign University Codes include (but are not limited to) – (%__%):
•
•
•
•
•
•
•
India (Indian) – 999530
Japan (Japanese) – 999565
China (Chinese) – 999450
England (British) – 999490
Scotland & Wales (Scotch) – 999690
Spain (Spanish) – 999695
Germany (German) - 999500
NOTE: The Faculty Qualification Form that you submit for accreditation certification should have
IDENTICAL information to that you have entered in SIAFDEG. This information is used to load the
education information in the FAIR Vita Module. Faculty can make changes to this information on their
official UTSA vita (such as adding more details or spelling out abbreviations) in the FAIR Vita Module
20
under the “Education” category. However, drop down menus supplied by BANNER cannot be modified
to reflect the faculty member’s preferences.
If you do not find the appropriate degree or major listed, contact Janice Kramer at ext. 4314.
TOP
SIAASGN
The objective for the SIAASGN – Faculty Assignment Form is to assign courses to a specific faculty
member. Note: The form for entering class schedules, SSASECT, is only available for a three-four week
period, three times a year. To make changes in course assignments after this timeframe, you must use the
SIAASGN form. It is imperative that this information be entered completely and correctly at least one
month prior to the beginning of the semester in which the courses are being offered. Only if there are late
assignment changes should this information be added later than this time period. If errors are made in
entering this information, the faculty workload reported to the state and faculty assignments reported to
accrediting agencies will be incorrect. This will result in negative reports from those agencies and will
create extra work for the dean and department chair.
Type SIAASGN in the “Go To . . .” box of the General Menu Form (shown on page 6) and select Enter
on your keyboard. The SIAASGN – Faculty Assignment Form will appear (shown below). Enter in the
Banner ID of the faculty member. Tab to Term and enter in the current term. Click the Next Block
button on the BANNER toolbar or Ctrl Page Down on your keyboard to move to the block of
information. If the faculty member has been assigned to sections through SSASECT, the courses and
sections will already be listed here. If not, you are now ready to assign a course to the faculty member.
To assign a course to a faculty member:
•
•
Enter the five-digit CRN or Course Number. The remainder of the information for that course
will generate automatically from the course information system in BANNER.
Select the Primary Instructor box. If two instructors are assigned to the same course,
o Only one must be checked as primary instructor;
21
Percent Responsibility must be divided between the two instructors so that the total is
100%. Examples: 70% and 30%; 50% and 50%; 90% and 10%.
Click Save on the BANNER toolbar or F10 on your keyboard.
If you wish to add another course, use the down arrow on your keyboard to highlight the next
empty field of information. Repeat the above steps.
o
•
•
Note: In order for cross-listed courses to calculate correctly in the FAIR Workload Module, you must use
the Override Conflicts box (shown in the screen below) in SIAASGN. When cross-listed courses are
assigned to a faculty member in BANNER, the Override Conflicts box must be checked for all of the
cross-listed courses except the primary course. The primary course should not have the Override
Conflicts box checked. The primary course should be the one of highest workload value (i.e., graduate
class or the one with the most credit hours).
The example in the screenshot below shows that CRN 13525 is the primary course. The Override
Conflicts box has been left blank. CRN’s 13524 and 13523 have the Override Conflicts box checked,
so they will roll into the primary class when workload is calculated instead of calculating as three separate
classes.
You have now completed all of the necessary information in the SIAASGN form.
TOP
22
Exiting Banner
Once you have completed all forms in BANNER, you can log off of BANNER by clicking the X in the
top right corner of the screen (see red arrow below). A message will appear asking if you are sure that
you want to exit this BANNER session. Click Yes.
TOP
23