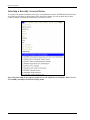
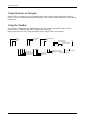
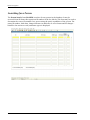
1
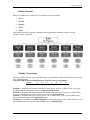
Banner Navigation
Banner Navigation
Confidential Business Information
This documentation is proprietary information of SunGard SCT and New Mexico State
University (NMSU) and is not to be copied, reproduced, lent or disposed of, nor used for any
purpose other than that for which it is specifically provided without the written permission of
SunGard SCT or NMSU.
Portions of this manual © 1992-1995, 1997, 1999-2002, 2003, 2006 SunGard SCT.
Portions of the Glossary © 2004 by Fitchburg State University. Used with permission.
All rights reserved. The unauthorized possession, use, reproduction, distribution, display, or
disclosure of this material or the information contained herein is prohibited.
“SCT,” SunGard SCT, the SCT logo, “Banner” and the Banner logo are trademarks of SunGard
SCT. Third-party hardware and software product names and trademarks are owned by their
respective third-party owners/providers, and SunGard SCT makes no claim to such names or
trademarks.
Use of this material is solely for the support of SunGard SCT Banner products and New Mexico
State University.
2
February 2010
Banner Navigation
Table of Contents
Information Non-disclosure at NMSU .................................................... Error! Bookmark not defined.
Account Structure ........................................................................................................................................... 5
Banner Navigation ......................................................................................................................................... 6
Getting Started ..................................................................................................................................................................... 6
Logging on to Banner ......................................................................................................................................................... 8
Introducing the Banner Interface ................................................................................................................................. 10
Accessing Forms in Banner ........................................................................................................................................... 12
Navigating Using the Main Menu ................................................................................................................................. 13
Navigating Using the Form Name ................................................................................................................................ 14
Searching for a Form ....................................................................................................................................................... 15
Selecting a Recently Accessed Form ........................................................................................................................... 16
Using the Menu Bar .......................................................................................................................................................... 17
File Menu ............................................................................................................................................................................. 17
Edit Menu ............................................................................................................................................................................ 18
Options Menu .................................................................................................................................................................... 18
Block Menu ......................................................................................................................................................................... 18
Item Menu ........................................................................................................................................................................... 19
Record Menu ...................................................................................................................................................................... 19
Query Menu ........................................................................................................................................................................ 20
Tools Menu ......................................................................................................................................................................... 20
Help Menu........................................................................................................................................................................... 21
Using Shortcuts to Navigate .......................................................................................................................................... 22
Using the Toolbar ............................................................................................................................................................. 22
Keyboard Equivalents...................................................................................................................................................... 23
Keyboard Equivalent Chart ............................................................................................................................................ 24
Identifying Blocks ............................................................................................................................................................. 25
Key Block ............................................................................................................................................................................ 26
Other Blocks....................................................................................................................................................................... 26
Tabs/Next Block/Options .............................................................................................................................................. 27
Querying Information ..................................................................................................................................................... 29
Defining Query Functions .............................................................................................................................................. 29
Using Wildcards in a Search .......................................................................................................................................... 30
Common Search Forms ................................................................................................................................................... 30
Common Search Fields ................................................................................................................................................... 31
Searching for a Person .................................................................................................................................................... 32
Changing Display Preferences ...................................................................................................................................... 33
Setting the Display Options........................................................................................................................................... 33
Creating Personal Menus ................................................................................................................................................ 34
Adding Forms from the Objective List ....................................................................................................................... 36
Adding Forms by the Seven Character Identifier .................................................................................................... 36
Adding Forms by Query ................................................................................................................................................. 37
Deleting selected objects from a personal menu.................................................................................................... 37
Help................................................................................................................................................................... 38
Glossary ........................................................................................................................................................... 39
Appendix A: Form Name Structure ............................................................................................................................. 43
Notes: ................................................................................................................................................................ 45
February 2010
3
Banner Navigation
Information Non-disclosure at NMSU
New Mexico State University maintains the confidentiality and security of records in compliance
with the Family Educational Rights and Privacy Act of 1974 (FERPA), the Health Insurance
Portability and Accountability Act (HIPPA), and the Gramm-Leach-Bliley Act GLBA), in addition
to other federal and state laws. These laws pertain to the security and privacy of personal
academic, medical and financial information, along with identifying information such as social
security numbers.
Family Educational Rights and Privacy Act of 1974 (FERPA) Policy:
http://research.nmsu.edu/compliance/IRB/resources.html#3
FERPA protects students’ records. FERPA requires post-secondary educational institutions and
agencies to conform to fair information practices in their handling of student data. Among the
provisions of the act are the requirements that data be used only for intended purposes and
that those responsible for student data take reasonable precautions to prevent misuse of it.
Examples include Social Security Numbers, grades, date of birth, etc.
Health Information and Portability Accountability Act (HIPAA):
http://research.nmsu.edu/compliance/IRB/resources.html#7
HIPPA protects all medical records and other individually identifiable health information used
or disclosed in any form, whether electronically, on paper, or orally.
Gramm-Leach-Bliley (GLB) Act:
http://www.nmsu.edu/manual/documents/07-29-09-policy-manual-final020110.pdf
GLBA protects private, non-public information of individuals. Private, non-public information
consists of information such as name, Social Security Number, date and location of birth,
gender, credit card numbers and driver’s license numbers.
Within NMSU, employees are authorized access to University records only to the extent
necessary to perform their official university duties, and are responsible for protecting such
information against unauthorized access or disclosure.
The New Mexico State University Policy Manual, Chapter 2 General Operating Policies, Section
2.90 contains specific information related to disclosure of records and information.
4
February 2010
Banner Navigation
Account Structure
What is FOAPAL?
FOAPAL is the acronym for the account number within the Banner system. Each letter
represents a piece of the account number: Fund, Organization, Account, Program,
Activity, and Location. FOAPAL is the key used for entering financial transactions.
Required Segments
Chart
C
Fund
F
Organization
O
Account
A
Optional Segments
Program
P
Activity
A
Location
L
The shortcut…
To process accounting transactions, departments will need to use an Index Code and an
Account Code.
Index
The charge center where the payroll expenditures related to the employee will be posted
for each pay period. Entry of the index will automatically populate the corresponding
Fund, Organization, Program, and in some cases Activity and/or Location.
Account Code
Type of expenditure transactions. For payroll related transactions, these values are
automatically generated from the Banner Human Resources System.
Example
The Index number 100839 was entered. This is what is displayed:
February 2010
5
Banner Navigation
Banner Navigation
Getting Started
In this section you are given some background information that you will need before you can
start using Banner, including understanding how to access the system and a basic
understanding of the system design.
Terminology
Understanding the terms provided in this manual help you to understand the explanations and
instructions presented in this manual and to present clear, specific questions that you may
have about the information provided.
This table defines the basic components of the Banner suite.
Suite
System
Modules
Forms
Fields
Validation
Tables
Blocks
6
The SunGard Higher Education Banner suite is an administrative software
application developed specifically for higher education institutions by SunGard.
The software acts as an interface between users and an Oracle database containing
New Mexico State University administrative data.
The NMSU Banner suite is composed of six systems: General, Student,
Advancement, Financial, Human Resources, and Financial Aid.
Each system is composed of specific modules that “break out” components of the
system.
Forms are screens that contain fields.
Fields are areas in a form that are used either to display specific data (such as a
last name, address, or NMSU ID number), or to insert data.
Validation tables contain Lists of Values (LOVs) that are pre-defined for a specific
field.
Blocks are groups of related fields within a form.
February 2010
Banner Navigation
Banner Structure
Banner is organized as a hierarchy. The Banner hierarchy includes:
•
Suite
•
Systems
•
Modules
•
Forms
•
Fields.
This image shows the structure of Banner Suite components including sample systems,
modules, forms, and fields.
Naming Conventions
All Banner forms, reports, jobs, and tables have seven character names that follow the structure
rules outlined below.
Using the Student Person Identification or PPAIDEN form as an example:
Name:
P
P
A
I
D
E
N
Position:
1
2
3
4
5
6
7
Position 1—identifies the product owning the form, report, process or table. In the case of the
PPAIDEN form, the first letter P refers to HR/Payroll/Personnel.
Position 2—identifies the application module owning the form, report, process or table. In the
case of the PPAIDEN form, the second letter P refers to General Person.
Position 3—identifies the type of form, report, job, or table. In the case of the PPAIDEN form,
the third letter A refers to an Application form.
Positions 4, 5, 6, and 7—are unique identifiers for the form, report, job, or table. In the case of
the PPAIDEN form, the last four letters IDEN refers to Identification.
February 2010
7
Banner Navigation
Logging on to Banner
Banner supports authenticated user access, meaning that the system verifies your credentials
and you are given access to the system based on your assigned security. To use Banner as an
authenticated user, you must successfully log on by providing your credentials: NMSU
Username, and Banner Password.
Banner can be accessed from any Internet browser such as Internet Explorer, Netscape, or
Mozilla Firefox.
1. Type http://www.nmsu.edu/erp/ in the address bar of your web browser and press Enter.
The Production Banner Environments page will appear.
2
2. Click on the Banner link.
You can create a bookmark in your browser for quick access to Banner.
8
February 2010
Banner Navigation
The Logon screen will be displayed.
3
4
5
3. Enter Username and Password.
4. Database field remains blank.
5. Click on the Connect button.
The General Menu form, GUAGMNU, will be displayed.
February 2010
9
Banner Navigation
Introducing the Banner Interface
Internet Native Banner (INB) is the Web version of the new Enterprise Resource Plan (ERP)
system NMSU employees use to access vital university administrative information. You must
access INB through a Web browser. Once you have logged onto Banner you will be presented
with the Main Menu. This menu is the starting point for navigating throughout Banner.
Menu Bar
Tool
Title Bar
Auto Hint
Status Line
Menu Bar
Using the menu bar at the top of every form, you can access an option using a drop-down menu
at any time, except when you are working with a dialog box, alert box, or List of Values (LOVs).
If a menu item is dimmed, the item is unavailable.
Tool Bar
Toolbars are sets of buttons that perform common functions.
Note: When you move your cursor to a button and pause for a second or two, a yellow
rectangle appears with text that describes the function of the button.
To use a button function, click the appropriate button. You can click a button any time, except
when you are working within a dialog box, alert box, or List of Values (LOV). A dimmed button
is disabled and cannot be clicked.
10
February 2010
Banner Navigation
Title Bar
The title bar shows the descriptive form name, the seven-character form name (FOAIDEN), the
release number of the form software, and the name of the database you’re logged into.
Auto Hint
The auto hint at the bottom of the form can contain the following information for the field
where the cursor is located:
• Brief field description
• Error and processing messages
• Keyboard equivalents, if you can access other blocks, windows, or forms from the field.
Status Line
The status line directly under the auto hint line can contain one or more of the following
messages:
Record: n/n
List of Values
Enter Query
Shows the number of the current record followed by the total number
of records in the current block. If there are more records than fit in the
window, the total appears as a question mark (for example, 3/?) until
you scroll to the last record in the block. Once the last record is
displayed, the total appears as a number (for example, 3/15).
Indicates the field has a List of Values.
Indicates the form is in query mode.
My Links
The My Links section of the Main Menu allows you to customize the menu to meet your needs.
You can also access outside Web pages. One of the standard links is to the NMSU home page.
There are six Personal Links that allow you to choose certain Web pages to access.
February 2010
11
Banner Navigation
Accessing Forms in Banner
In the Banner Suite, the term “forms” can be thought of as “screens.” The five-form types below
are the most common:
Main Menu
Application
forms
Validation
forms
Used to navigate through Banner.
Used to enter, update, and query information.
Used to define values. When you look up a code or select the list
function, these values appear.
Query forms
Used to look up existing information. You must access these forms
from another form.
Inquiry forms
Used to look up existing information. They can be accessed from the
Main Menu, from another form with Direct Access, or with Object
Search.
Although there are several ways to navigate in Banner, you must navigate to a form to be able
to look up or process information.
In this section, you will be introduced ways of navigating in Banner:
• Using the Main Menu
• By Form Name
• Searching for a Form
• Selecting a Recently Accessed Form
12
February 2010
Banner Navigation
Navigating Using the Main Menu
The Main Menu allows you to select forms in Banner. Each system in Banner is represented by a
folder, which can be expanded to view nested folders or forms in that system.
You can easily navigate through the system by expanding the nested folders. Once you see the
item you want listed, open it by double-clicking.
February 2010
13
Banner Navigation
Navigating Using the Form Name
You can navigate to a form by using the seven-letter form name in the Direct Access Go To
field. Direct Access can be used from either the Main Menu or a form. Once you are accustomed
to Banner’s interface and the form names, Direct Access is very convenient.
Using Direct Access from the Main Menu
The Main Menu has the option of Direct Access from the Go To field.
1.
In the Go To field, type the seven-character name of the form.
2.
Press ENTER.
The form displays.
14
February 2010
Banner Navigation
Using Direct Access from a Form
You can also use Direct Access while a form is open.
3.
From the File menu, click Direct Access.
The Go To menu will display at the top of your current form.
4.
Type the seven-character name of the form in the field next to Go To.
5.
Press ENTER.
Note: When you use Direct Access from a form, the current form remains open. When you
exit the requested form, job, or Quick Flow, you are returned to the original calling form.
Searching for a Form
You can search for a form using Object Search if you know part of the name, description, or
type. If you do not know the exact form name, this is a very useful search tool.
There are three ways to access Object Search:
•
On the Main Menu, double-click the Go To field
•
On the Main Menu, select the Search button
•
On the File menu, click Object Search
The Object Search form displays.
next to the Go To field.
6.
Type your search criteria in the Name, Description or Type fields.
7.
.
Click the Execute Query button
A list of the forms matching your criteria displays.
8.
Scroll through the list and double-click the form name.
The form displays.
February 2010
15
Banner Navigation
Selecting a Recently Accessed Form
To reopen a form that you had used in your current Banner session, the File menu lists the last
10 recently used forms at the bottom of the drop-down menu. You can reopen any of these
forms by simply selecting the form name you wish to access.
Note: The forms that do not appear in this list are the QuickFlow (GUAQFLW), Direct Access
(GUAPARM), and Object Search (GUIOBJS) forms.
16
February 2010
Banner Navigation
Using the Menu Bar
The menu bar comprises several option menus. These menus give you the commands you will
need to use while working in Banner. The following menus are available in the Banner menu
bar:
•
File menu
•
Edit menu
•
Options menu
•
Block menu
•
Item menu
•
Record menu
•
Query menu
•
Tools menu
•
Help menu
File Menu
The File menu contains standard SunGard SCT Banner and Oracle functions. Some of the menu
items call other forms. When you exit the called form, you return to the form you were
previously using.
Direct Access
Object Search
QuickFlow
Displays the Direct Access form (GUAPARM), which is used to access a
form by its seven character name.
Displays the Object Search form (GUIOBJS), which is used to search for a
menu, form, job, or QuickFlow with part of the name, description, or
type.
Displays the QuickFlow form (GUAQFLW), which is used to access a
QuickFlow.
Select
Returns you to the calling form and enters the selected value into the
field that called the form.
Rollback
On Application and Inquiry forms:
Clears all information (except key information) and returns the cursor to
the first field in the key block.
On Validation and Query forms:
Returns the cursor to the first field on the form.
Save
Refresh
Print
February 2010
Saves all changes entered since the last time you saved.
Clears the Auto Hint line.
Prints the current window with the date and time in the title bar.
17
Banner Navigation
Exit
On forms and windows:
Exits you from the form, window, or Banner if you are located at the Main
Menu.
On Main Menu:
Exits you from Banner.
In Query mode:
Cancels the query and takes the form out of query mode.
Exit QuickFlow
Preferences
Exits you from a QuickFlow.
Displays the Personal Preferences Maintenance form (GUAUPRF), which
is used to customize your view of Banner.
Accessed forms
List the recently accessed forms in the current logged on session and
allows you to quickly re-access forms that were previously viewed in your
current session (up to ten).
Edit Menu
This pull-down menu contains the functions used to edit text items.
Cut
Copy
Paste
Cuts selected text and places it on the clipboard.
Copies selected text to the clipboard.
Pastes text from the clipboard to the spot where the cursor is located.
Edit
Displays the Editor window, used to enter or update text. You can
display this window from most fields. It is particularly useful in long
data fields.
Options Menu
This pull-down menu contains navigation options. Navigation options vary from form to form
and depend on where the cursor is currently located. Some options take you to other blocks
within the current form. Other options take you outside the current form to related forms.
Block Menu
This pull-down menu contains the functions used to navigate among the blocks of information
on a form.
Previous
Next
Clear
View
Supplemental
Data
18
Moves the cursor to the previous block that has at least one enterable
field. If the previous block is in another window, that window is
opened.
Moves the cursor to the next block that has at least one field where
data can be entered or edited. If that area is in another window, that
window is opened.
Clears all information from the current block on your display
(information is not removed from any records or tables).
View additional data available on the form. This feature is not
available on all forms.
February 2010
Banner Navigation
Item Menu
This pull-down menu contains the functions used to navigate among the fields or items on a
form.
Previous
Next
Clear
Duplicate
Moves the cursor to the previous enterable field in the current block.
Moves the cursor to the next enterable field in the current block.
Occasionally, Next field moves the cursor to the first enterable field in
the next block.
Clears all information from the current field on your display
information is not removed from any records or tables).
In a blank row of a repeating record, copies the contents of the same
field in the previous record into the new record. This is different from
using “copy and paste.”
Record Menu
This pull-down menu contains the functions used to work with records on a form.
Previous
Next
Scroll Up
Scroll Down
Clear
Remove
Insert
Duplicate
Lock
February 2010
Moves the cursor to the first enterable field in the previous record.
Moves the cursor to the first enterable field in the next record of the
current block. If the cursor is in the last record, a new record is created.
Scrolls up the list of repeating records, putting the first displayed record
near the bottom of the list.
Scrolls down the list of repeating records, putting the last displayed
record near the top of the list.
Clears all information from the current record on your display
(information is not removed from any records or tables).
Removes all information from the current record. When you click Save, the
removed information is deleted. There is NO undo for Remove, so any
Remove action is permanent.
Inserts a new blank record into the list of existing records.
Duplicates the contents of all fields in the record and copies them into a
new record.
Temporarily locks the contents of the record so no other Banner user can
update or alter it. Save, Rollback, and Exit release the lock.
19
Banner Navigation
Query Menu
This pull-down menu contains the functions used to query information in the database based
on specified criteria.
Enter
Execute
Last Criteria
Cancel
Count Hits
Fetch Next Set
Puts the form into query mode so you can enter search criteria to see
what information is already in the database.
Searches the database and displays the first set of records that match
the search criteria.
Enters the criteria from the last search (enabled only when one is in
Query mode).
Cancels the query and takes the form out of Query mode.
Counts the number of records that match the search criteria and
displays that number in the Auto Hint line. This is a special function
that depends on the query to work.
If more records meet the search criteria than fit in the window,
replaces the current set of displayed records with the next set.
Tools Menu
This pull-down menu contains Banner Document Management Suite (Extender) and Workflow. If
you are able to access these tools, you will be trained by a representative from within your
department.
Banner
Document
Management
Suite
Workflow
20
An integrated document imaging and electronic document
management system for SCT Banner applications. It is designed to
meet the imaging and document management requirements of higher
education.
An SCT solution that automates, simplifies, directs, and manages the
flow of information through an entire organization. SCT Workflow can
pass electronic documents, information, and tasks from one role player
to the next for action, according to NMSU business rules.
February 2010
Banner Navigation
Help Menu
This pull-down menu contains a number of forms of help.
Online Help
Displays new online information for the current field.
Note: Disable if online help is not available for the form.
Dynamic Help
Query
Dynamic Help
Edit
Help
Show Keys
Displays the Dynamic Help form (GUAHELP) in query mode, which is
used to display help for a field, block, or form.
Displays the Dynamic Help form (GUAHELP) in edit mode, which is used
to edit traditional help for a field, block, or form.
Displays the Oracle Item Properties window for the current field.
Displays the Keys list, which lists the functions and their equivalent
keystrokes available for the current form, window, and field.
List
Displays the List of Values (valid entries for the current field) if one is
available.
Note: The field name will be highlighted in blue, and “List of Values” is
indicated in the Status Line.
Display Error
Display ID Image
Calendar
Calculator
Extract Data with
Key
Extract Data No
Key
Technical
Support
If an Oracle error occurs, displays the code that is in error.
With the cursor in an ID field, the image associated with the ID will be
displayed, if available.
Displays the calendar.
Displays the calculator.
This allows you to Extract Data with Key information to a .csv file.
Allows you to Extract Data without Key Information to a .csv file.
Allows you to do the following:
•
Turn SQL Trace On
•
Turn SQL Trace Off
•
Set Query Optimizer to…
•
About Banner
February 2010
o
All rows
o
First rows
o
First rows (1)
o
First rows (10)
o
First rows (100)
o
Rule
Reconnect to Database.
Displays the About Banner form (GUAABOT), which identifies the
current form, release number, date, and time.
21
Banner Navigation
Using Shortcuts to Navigate
Banner offers you many ways to accomplish most tasks. When using a form there are three
ways to execute commands: through the menu bar, the toolbar standard buttons, and keyboard
equivalents.
Using the Toolbar
The toolbar is comprised of Standard Buttons used to execute commands. Many of these
buttons have a command that can be found in the menu bar.
When you need to use one of the standard buttons, simply click on the button.
Previous Block
Next Block
Save
Rollback
Select
Next Record
Previous Record
Remove Record
Insert Record
22
View/Send Message
Print
Exit
Workflow Submit
Workflow Release
Broadcast Message
Fine Grain Access
BDMS Add Document
BDMS Display Document
Cancel Query
Execute Query
Enter Query
View Supplemental Data
Multi-Institution not Enabled
February 2010
Banner Navigation
Keyboard Equivalents
In many cases, you can use combinations of keyboard keys to access a form, window, block, or
field.
To access a form with keyboard equivalents:
1. Read the Auto Hint message to determine whether a predefined function lets you
navigate to another form, (Count Query Hits, Duplicate Field, Duplicate Record, Exit with
Value, and List are the most commonly predefined functions).
2. If a predefined function is available, use Show Keys (from the toolbar or the help pulldown menu) to find the keyboard equivalent for the predefined function.
To access a tab or block with keyboard equivalents:
Use the keyboard equivalents for Next Block (CTRL + PAGE DOWN) and Previous Block (CTRL
+ PAGE UP) to move among blocks or tabs. If the Next and Previous Blocks are in another tab,
these keys take you to the other window. Sometimes there are actually two blocks that visually
appear to be one, making it seem as though you are moving within the same block.
To access a field with keyboard equivalents:
Use the TAB key (Next Field) and SHIFT + TAB keys (Previous Field) to move among fields. If a
field has the auto-skip feature, the cursor automatically moves to the next field as soon as you
enter the required number of characters.
Program Functions and Keyboard Equivalent Commands
Click on the Show Keys toolbar icon, select Help, and then choose Show Keys from the menu
bar (or press CTRL+F1) to acquire a list of program functions and their keyboard equivalents.
Note: Available keys change from screen to screen. In addition, not all keyboard commands
are available from every form.
February 2010
23
Banner Navigation
Keyboard Equivalent Chart
Function
Cancel
Clear Block
Clear Field
Commit, Save
Count Query Hits
Clear Form, Rollback
Clear Record
Debug Mode
Delete Forward
Delete Backward
Delete Record
Duplicate Field Entry
Duplicate Record
Edit
Enter Application Parameters
Enter Menu Parameters
Help, Item Properties
24
Key(s)
ESC
SHIFT+F5
CTRL+U
F10
SHIFT+F2
SHIFT+F7
SHIFT+F4
CTRL+?
DELETE
Backspace
SHIFT+F6
F3
F4
CTRL+E
CTRL+F6
CTRL+F5
F1
Function
Insert Record
Left
List, List Of Values
New Record
Next Block
Next Field
Next Record
Previous Block
Previous Field
Previous Menu
Previous Record
Query - Execute
Query - Start New
Return
Right
Show Keys
Key(s)
F6
LEFT
F9
F6
CTRL+PAGE DOWN
TAB
↓
CTRL+PAGE UP
SHIFT+TAB
CTRL+ENTER
↑
F8
F7
ENTER
RIGHT
CTRL+F1
February 2010
Banner Navigation
Identifying Blocks
A block is a section of a form or window that contains related information. There are two types
of blocks:
•
Key Block – contains identifying information such as an ID, or record identifier.
•
Other Blocks – contain information pertaining to the key block information.
A form contains at least two blocks, one key block, and one other block. Each other block can
be identified by the bordered edge.
Most blocks have a title. There are three exceptions:
•
A key block does not have a title.
•
If a form or window has only one block, the block does not have a title.
•
If a form has a key block and only one other block, the second block has no title.
Key
Other
Other
Other
February 2010
25
Banner Navigation
Key Block
The first block (key block) on most forms contains key information like an ID number or record
identifier. The key block determines what is entered or displayed on the rest of the form. All
information on the form references the key block.
The key block has at least one field and sometimes more. For example, a form that maintains
population selection information may have key block fields for both an application and a
selection ID (population selection).
The key block stays on the form as subsequent blocks appear. Occasionally, another window
may appear on top of the key block if the window is unusually large or if the key block is not
pertinent to the window.
When the cursor is in the key block, enterable fields in the key block are enabled. When you
leave the key block, enterable fields in the key block are disabled.
Other Blocks
Other blocks contain additional details pertaining to the key block information. Each block
contains information related to the key block and is usually enclosed in an outlined box. The
number of other blocks will vary from form to form and often contain optional fields.
26
February 2010
Banner Navigation
Tabs/Next Block/Options
Often a form will have more information than can be displayed on one screen. When this is the
case, you can view additional information by clicking on the page tabs, by using the Next Block
button
, or by using the Options menu.
2
1
To use the page tabs:
1. Click on the tab for the information you need.
To use the Next Block button
:
.
2. Click on the Next Block button
• On a form with tabs, the information for the tab to the right of the current one
will be displayed.
• On a form without tabs, the next block of information will be displayed.
*Note: personal identification data has been blacked out for privacy considerations.
February 2010
27
Banner Navigation
1
2
To use the Options menu:
1. Click on the Options menu to display the list of additional information which can be
accessed from the form.
2. Highlight and click on your selection.
*Note: personal identification data has been blacked out for privacy considerations.
28
February 2010
Banner Navigation
Querying Information
Querying is the process of searching for information already entered in the database. You can
use inquiry forms, query forms, and most application forms to perform queries.
Some forms automatically open in query mode, usually because a large number of records
related to the form have to be retrieved. When a form opens in query mode, the status line
displays Enter Query. You can immediately specify search criteria to narrow the search. If a
form does not open in query mode, you must put the form into query mode before you can
enter search criteria.
In this section we will cover:
•
Defining Query Functions
•
Using Wildcards in a Search
•
Common Search Forms
•
Common Search Fields
•
Searching for a Person
•
Searching for an Entity
•
Searching Phonetically
•
Searching with More Detail
Defining Query Functions
The following functions are query functions that can be used in Banner. All of these functions
are located in the Query menu on the Menu Bar. These functions are active only when the form
or field you are in is available for a query.
Enter
Puts the form into query mode so you can enter search criteria to see
what information is already in the database. “Enter Query” appears in
the status line.
Execute
Searches the database and displays the first set of records that match
your search criteria. This function is enabled only if you are in query
mode.
Last Criteria
Enters the criteria from your last search. You can change any of the
criteria. This function is enabled only if you are in query mode.
Cancel
Cancels the query and takes the form out of query mode.
Count Hits
Counts the number of records that match the search criteria and
displays that number in the auto hint.
Fetch Next Set
Replaces the current set of displayed records with the next set of
records if more records match the search criteria than fit in the
window. This function is enabled only if you are in query mode.
February 2010
29
Banner Navigation
Using Wildcards in a Search
You may not always know the exact wording or spelling for which you are searching. You can
use wildcards to help with your search. A wildcard is a symbol that represents one or many
characters in a word.
You can use the following wildcards in the search criteria:
•
Percent sign (%)
•
Underscore (_)
The character (%) represents any number of unspecified characters. The character (_) represents
one occurrence of an unspecified character.
The following examples illustrate the use of wildcards:
To get these results:
All entries that contain “ma”
All entries that begin with “ma”
All entries that have “ma” as the last two characters
All entries that have “m” as the second character
Enter these criteria:
%ma%
ma%
%ma
_m%
Common Search Forms
Performing an extensive ID/Name search for a person/entity’s record in Banner is crucial. For a
thorough search, the following common search forms should be used:
30
•
SOAIDEN: Person Search
•
SOACOMP: Non-Person Search
•
GUIALTI: Alternate ID Search
•
FTIIDEN: Entity Name /ID Search.
February 2010
Banner Navigation
Common Search Fields
There are common Search Fields in Banner that allow you to search for a person/entity by
either a partial or full ID/Name:
•
ID
•
Last Name
•
First Name.
To search by a partial name/ID, remember to use the wildcards.
Examples of Partial Name Searches:
smith, M%
This search will return all ID’s with the last name “smith”, first names
starting with “M”.
%, Barbara
This search will return all ID’s with first name “Barbara”.
%onz%, Mary
This search will return all ID’s with the last name containing ”onz” and
the first name Mary.
Jone_, Cindy
This search will return all ID’s with the last name that starts with Jone
and have any one letter at the end, and the first name Cindy.
Examples of Partial ID Searches:
21%
This search will return all ID’s starting with 21.
12345678_
This search will return all ID’s beginning in 12345678.
123%89
This search will return all ID’s that begin with 123 and end in 89.
February 2010
31
Banner Navigation
Searching for a Person
The Person Search form (SOAIDEN) searches for any person in the database. It may be
accessed from all forms that require an ID number in the key blocks. This form may be used to
determine the correct ID number for a person using the query capabilities of the system. The
name, ID number, birth date, change indicator (an indicator to record name and ID changes—
blank for the current record), and name type are displayed.
32
February 2010
Banner Navigation
Changing Display Preferences
When logging into Banner you will be presented with the Main Menu. This menu is the starting
point for navigating throughout Banner. To see the seven character form descriptions in the
title bar, the Display Options properties must be set.
Setting the Display Options
1.
From the File menu, select Preferences.
The General User Preferences Maintenance (GUAUPRF) form is displayed.
2.
In the Display Options area, select the checkbox next to Display Form Name on Menu.
3.
.
Click the Save button
A SCT Banner dialog box appears stating you must exit your Banner session and log on
again before the preference changes will be seen.
4.
Click OK.
February 2010
33
Banner Navigation
Creating Personal Menus
In Banner, users can establish a personal menu that allows you to organize forms that are most
important in your workday. The personal menu is located under the My Banner folder on the
Main Menu.
The My Banner Maintenance form (GUAPMNU) is used to create and change your personal
menu your personal menu.
You can access your personal menu from the Main Menu. A personal menu is tied to your
Banner username, which means that no matter where you log on to Banner, your personal menu
will be available.
34
February 2010
Banner Navigation
The field above the right pane shows the Banner username associated with the person logged
on to the system.
There are three ways to add items to your personal menu:
•
Scroll through the object list to find and select objects.
•
Enter the name of the object.
•
Query the object list to narrow your search.
Changes will only be seen after you exit and log back into Banner.
February 2010
35
Banner Navigation
Adding Forms from the Objects List
You can add items from the object list by scrolling to find the item you need.
1.
Access the Personal Menu Maintenance form (GUAPMNU).
2.
In the left pane, select each object you want to add to the menu.
When you select an object, the name is highlighted.
3.
(Optional) Repeat steps 2 and 3 for each object type you want to add to the menu.
Note: You can select objects from multiple object types and insert them together.
4.
Click in the right pane where you want to place the new menu items.
5.
in the middle of the form.
Click the Insert Selection button
The selected objects are added to the right pane below the place you clicked.
6.
(Optional) Customize the object descriptions.
7.
Click the Save button
.
Note: If you try to enter or drag an object which you are not permitted to access, the system
will display an alert box. In order to proceed, you must delete the name of the object from
the list by pressing the DELETE key.
Adding Forms by the Seven Character Identifier
If you have become familiar with the forms and their seven-character identifier, you can simply
type the identifier to add the item to your menu.
8.
Access the My Banner Maintenance form (GUAPMNU).
9.
Place the cursor in a blank Object field in the right pane.
10.
Enter the object’s seven-character name.
11.
Press ENTER. The object’s type, description, and name appear in the right pane.
12.
(Optional) Customize the object description.
13.
Click the Save button
36
.
February 2010
Banner Navigation
Adding Forms by Query
If you are not sure of the full identifier for an item, you can query all the items in Banner.
1.
Access the My Banner Maintenance form (GUAPMNU).
2.
Use the pull-down list above the left pane to select the object type you want to query.
3.
Place the cursor in the left pane.
4.
Click the Enter Query button
The object list disappears.
5.
Enter the search criteria.
6.
You can use the wildcards (%) and (_).
The search is case-sensitive. Data is matched against the search criteria exactly as you
enter them.
7.
.
Click the Execute Query button
The left pane lists the matching objects.
8.
To add all matches to the menu (if there are 20 matches or less), click in the right pane
where you want to place the new menu items.
9.
Click the Insert All button
.
in the middle of the form.
10.
To add selected matches to the menu, select the objects in the left pane.
Click in the right pane where you want to place the new menu items.
11.
Click the Insert Selection button
in the middle of the form.
Deleting selected objects from a personal menu
1.
Access the My Banner Maintenance form (GUAPMNU).
2.
In the right pane, select each object you want to delete.
When you select an object, the name is highlighted.
3.
in the middle of the form.
Click the Delete button
The selected objects are deleted.
4.
Click the Save button
.
Deleting all objects from a personal menu:
5.
Access the My Banner Maintenance form (GUAPMNU).
6.
Click the Delete All button
7.
Click the Save button
February 2010
in the middle of the form.
.
37
Banner Navigation
Help
If you need HELP with Banner Navigation, Web-Time and Leave Entry, or Self Service:
• Call the ICT HelpDesk at 646-HELP (4357)
• E-mail [email protected]
• For online help, documentation and interactive online
training demos, go to:
http://hr.nmsu.edu/hrs/documents--demos.html
38
February 2010
Banner Navigation
Glossary
The following information describes standard terms used within the Banner System.
Alert Box
A type of dialog box that pops up to notify you of a condition that may affect how you
can enter information or the kind of information you can enter. It requires you to
acknowledge the message before you can continue.
Application form
Form used to enter, update, or query information. (An application form will have the
letter “A” in the third position of the form name.)
Block
An information area on a form separated by a solid line.
Calling form
Form from which you accessed another form.
Cancel
Exits you from an Option List, List of Values, Editor window, or Dynamic Help.
Clear form
Clears all information and returns you to the first enterable field in the key information
area.
Commit
Saves all changes entered since the last time you saved.
Count Hits
In query mode, counts the number of records that meet the search criteria and displays
that number in the Auto Help Line.
Count Query Hits
In query mode, counts the number of records that meet the search criteria and displays
that number in the Auto Help Line. To retrieved records, select the Execute Query
Function.
Dialog Box
A box containing information. Requires you to respond to it before you can continue.
Down
Use the key. Moves the cursor to the first enterable field in the next record, moves you
lower on a List of Values, and moves you lower in a pull-down list.
Drop-down List
Shows three or more values for a field. Any field with a down arrow icon contains a
drop-down list.
February 2010
39
Banner Navigation
Edit
Displays a window you can use to add, change, or delete text; especially useful in
entering and updating Dynamic Help.
Enter Query
Puts the form into query mode and lets you enter search criteria to see what
information is already in the database. ENTER QUERY appears in the Status Line.
Execute Query
In query mode, searches the database and displays data that matched the search
criteria.
Exit
From forms and windows, exits you from the form or window. From menus, exits you
from the Banner system. From query mode, cancels the query and takes the form out of
query mode.
Exit with Value
From a called form, returns you to the calling form and enters the highlighted value into
the field that called the form. From a List of Values (LOV), returns you to the calling
form and enters the highlighted value into the field that called the form.
Exit without Value
From forms and windows, exits you from the form or window. From menus, exits you
from the Banner system. From query mode, cancels the query and takes the form out of
query mode.
Field
Form
Help
Area in a form where you can enter query, change information, or where existing
information is displayed. Banner describes fields as: enabled, disabled, enterable, or
display only.
Screen allowing the display/update of information.
Displays the Oracle help window for the current field.
Inquiry Form
Form used to look up existing information on the database. Allows you to view but not
update (An inquiry form will have the letter “I” in the third position of the form name.)
List of Values (LOV)
Window containing valid items available for entry into a field. Displays a list of values
for the current field if appears in the status line.
Menu
More
40
A list of options you can access with the mouse or keyboard.
The More indicator appears in the lower right corner of each window of a series of
related forms (even the last form). It tells you that there are additional forms that can be
accessed to complete a process.
February 2010
Banner Navigation
Next Block
To move the cursor to the next information area (block) that has at least one enterable
field.
Next Field
The next enterable field in the current information area.
Next Item
The next enterable field in the current information area.
Next Primary Key
From a called form, returns you to the calling form and enters the highlighted value into
the field that called the form. From a List of Values (LOV), returns you to the calling
form and enters the highlighted value into the field that called the form.
Next Record
To move the cursor to the first enterable field in the next record of the current
information area. If the cursor is in the last record, a new record is created.
Object
An object can be a form, job, menu or QuickFlow used in Banner.
Option List
Dialog box displaying two or more items to choose from.
Pop-Up Window
Dialog box, alert box, or list of values that appear in a separate window.
Previous Block
The previous information area that has at least one enterable field. If the previous area
is another window, then that window is opened.
Previous Field
To move the cursor to the previous enterable field in the current information area.
Previous Item
To move the cursor to the previous enterable field in the current information area.
Previous Record
To move the cursor to the first enterable field in the previous record.
Query Form
Form used to look up existing information on the database. (A query form has the letter
“Q” in the third position of the form name.)
Quick Flow
A set of forms that are linked together in order to help you complete a process within
Banner. When you use Quick Flow, it opens the first form in the set and the next form is
automatically opened until the process is complete.
Record
All information displayed in the window for an item.
February 2010
41
Banner Navigation
Rollback
From an application or inquiry form, clears all information and returns you to the key
block area. Rollback is a standard button and appears on forms. From validation forms,
rollback will return you to the first enterable field on the calling form.
Save
To permanently record changes to the database.
Scroll Down
The process of moving down repeating records or lists of information that cannot all be
displayed in one window.
Select
Choose an item by highlighting it or clicking it with mouse.
Show Keys
Display the list of keyboard options.
Up
Use the key. To move the cursor the first enterable field in the previous record moves
you upward on a List of Values or drop-down list.
Validation Form
Form used to define the values that can be entered in specified fields on application
forms. (A validation form will have the letter “V” in the third position of the form name.
Window
An information area being displayed.
42
February 2010
Banner Navigation
Appendix A: Form Name Structure
Position 1 identifies the primary system owning the form, report, job, or table.
A
B
C
D
F
G
I
K
Alumni/Development
Property Tax
Courts
Cash Drawer
Finance
General
Information Access
Work Management
L
N
O
P
Q
R
S
T
Occupational Tax/License
Position Control
Customer Contact
HR/Payroll/Personnel
Electronic Work Queue
Financial Aid
Student
Accounts Receivable
U
V
X
W
Y
Z
Utilities
Voice Response
Records Indexing
Reserved for client
applications that
co-exist with Banner2000
Position 2 identifies the module owning the form, report, job, or table.
General (G)
E
Event Management
J
Job Submission
L
Letter Generation
O Overall
P
Purge
S
Security
T Validation form/table
U Utility
X Cross product
Accounts Receivable (T)
Finance Accounts
F
Receivable
General Accounts
G Receivable
O Overall
Student Accounts
S
Receivable
T Validation form/table
U Utility
Student (S)
A Admissions
C Catalog
E Support Services
Registration/Fee
F Assessment
G General Student
H Grades/Academic History
I
Faculty Load
K Reserved for SCT Intl.-UK
L Location Management
M CAPP
Finance (F)
A Accounts Payable
B
Budget Development
C Cost Accounting
E
F
G
I
O
P
R
Electronic Data Interchange
Fixed Assets
General Ledger
Investment Management
Operations
Purchasing/Procurement
Research Accounting
O
Overall
S
Stores Inventory
P
R
Person
Recruiting
T
U
Validation form/table
Utility
S
Schedule
T Validation form/table
U Utility
HR/Payroll/Personnel (P)
Position Control (N)
A Application
B Budget
C COBRA
D Benefit/Deductions
E Employee
H Time Reporting/History
O Overall
P General Person
R Electronic Approvals
S
Security
T Validation/rule table
U Utility
X Tax Administration
X Archive/Purge
Alumni/Development (A)
A Membership
Financial Aid (R)
D Designation
B
E
Budgeting
Event Management
C Record Creation
F
Campaign
E
G Pledge and Gift/
Electronic Data Exchange
F
Funds Management
Pledge Payment
H History and Transcripts
M Prospect Management
J
O Organization
Student Employment
L
P
Logging
Constituent/Person
N Need Analysis
S
Solicitor Organization
O Common Functions
T Validation form/table
P
U Utility
Packaging & Disbursements
R Requirements Tracking
X Expected Matching Gift
S
Information Access (I)
Student System Shared Data
T Validation form/table
S
Student
U Utility
R Financial Aid
All Products
W Reserved for client forms or modules used within a Banner2000 application (character in position
Y 1 does not equal W, Y, or Z)
Z
Banner Navigation
Position 3 identifies the type of form, report, job, or table.
General (G)
A
Application form
B
Base table
Batch COBOL process
I
Inquiry form
O
Online COBOL process
Q
Query form
R
Rule table
Repeating table
T
V
A
I
Report/process
General maintenance
Temporary table
Validation form/table
View
Application form
Inquiry form
Financial Aid (R)
A
Application form
B
Base table
I
Inquiry form
P
Process/report
R
Rule table
Repeating rules table
Report
T
V
Temporary table
Validation form/table
View
Student (S)
A
Application form
B
Base table
I
Inquiry form
P
Process
Q
Query form
R
Rule table
Repeating table
Report/process
Validation form/table
V
View
P
Q
Accounts Receivable (T)
Process
Query form
HR/Payroll/Personnel (P)
Position Control (N)
A
Application form
B
Base table
Batch COBOL process
I
Inquiry form
P
Process
R
Rule table
Repeating table
Report/process
V
Finance (F)
A
Application form
B
Base table
I
Inquiry form
M
Maintenance form
Q
Query form
R
Rule table
Repeating table
Report/process
Validation form/table
V
View
R
V
Report
Validation form/table
Alumni/Development (A)
A
Application form
B
Base table
C
Called/list form
I
Inquiry form
P
Process/report
R
Repeating rules table
T
Temporary table
Validation form/table
V
View
Validation form/table
Information Access
R
Report
Positions 4, 5, 6, and 7 uniquely identify the form, report, job, or table.
Examples:
SPAIDEN
S
P
A
IDEN
44
Student
Person
Application
Identification
ADPFEED
A
Alumni/Development
D
Designation
P
Process
FEED Feed to Finance
PTVESKL
P
Personnel
T
Validation form/Table
V
Validation form/Table
ESKL
Employee Skill
February 2010
Banner Navigation
Notes:
February 2010
45
Banner Navigation
Notes:
46
February 2010