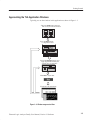
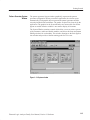
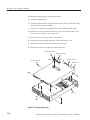
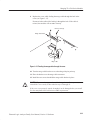
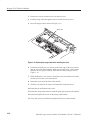
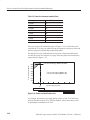
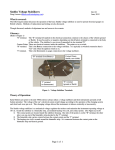
1
User Manual Tektronix Logic Analyzer Family Version 3.2 Software 071-0729-00 Copyright © Tektronix, Inc. All rights reserved. Licensed software products are owned by Tektronix or its suppliers and are protected by United States copyright laws and international treaty provisions. Use, duplication, or disclosure by the Government is subject to restrictions as set forth in subparagraph (c)(1)(ii) of the Rights in Technical Data and Computer Software clause at DFARS 252.227-7013, or subparagraphs (c)(1) and (2) of the Commercial Computer Software – Restricted Rights clause at FAR 52.227-19, as applicable. Tektronix products are covered by U.S. and foreign patents, issued and pending. Information in this publication supercedes that in all previously published material. Specifications and price change privileges reserved. Tektronix, Inc., 14200 SW Karl Braun Drive, Beaverton, OR 97077 TEKTRONIX and TEK are registered trademarks of Tektronix, Inc. HARDWARE WARRANTY Tektronix warrants that the products that it manufactures and sells will be free from defects in materials and workmanship for a period of one (1) year from the date of shipment. If a product proves defective during this warranty period, Tektronix, at its option, either will repair the defective product without charge for parts and labor, or will provide a replacement in exchange for the defective product. In order to obtain service under this warranty, Customer must notify Tektronix of the defect before the expiration of the warranty period and make suitable arrangements for the performance of service. Customer shall be responsible for packaging and shipping the defective product to the service center designated by Tektronix, with shipping charges prepaid. Tektronix shall pay for the return of the product to Customer if the shipment is to a location within the country in which the Tektronix service center is located. Customer shall be responsible for paying all shipping charges, duties, taxes, and any other charges for products returned to any other locations. This warranty shall not apply to any defect, failure or damage caused by improper use or improper or inadequate maintenance and care. Tektronix shall not be obligated to furnish service under this warranty a) to repair damage resulting from attempts by personnel other than Tektronix representatives to install, repair or service the product; b) to repair damage resulting from improper use or connection to incompatible equipment; c) to repair any damage or malfunction caused by the use of non-Tektronix supplies; or d) to service a product that has been modified or integrated with other products when the effect of such modification or integration increases the time or difficulty of servicing the product. THIS WARRANTY IS GIVEN BY TEKTRONIX IN LIEU OF ANY OTHER WARRANTIES, EXPRESS OR IMPLIED. TEKTRONIX AND ITS VENDORS DISCLAIM ANY IMPLIED WARRANTIES OF MERCHANTABILITY OR FITNESS FOR A PARTICULAR PURPOSE. TEKTRONIX’ RESPONSIBILITY TO REPAIR OR REPLACE DEFECTIVE PRODUCTS IS THE SOLE AND EXCLUSIVE REMEDY PROVIDED TO THE CUSTOMER FOR BREACH OF THIS WARRANTY. TEKTRONIX AND ITS VENDORS WILL NOT BE LIABLE FOR ANY INDIRECT, SPECIAL, INCIDENTAL, OR CONSEQUENTIAL DAMAGES IRRESPECTIVE OF WHETHER TEKTRONIX OR THE VENDOR HAS ADVANCE NOTICE OF THE POSSIBILITY OF SUCH DAMAGES. SOFTWARE WARRANTY Tektronix warrants that the media on which this software product is furnished and the encoding of the programs on the media will be free from defects in materials and workmanship for a period of three (3) months from the date of shipment. If a medium or encoding proves defective during the warranty period, Tektronix will provide a replacement in exchange for the defective medium. Except as to the media on which this software product is furnished, this software product is provided “as is” without warranty of any kind, either express or implied. Tektronix does not warrant that the functions contained in this software product will meet Customer’s requirements or that the operation of the programs will be uninterrupted or error-free. In order to obtain service under this warranty, Customer must notify Tektronix of the defect before the expiration of the warranty period. If Tektronix is unable to provide a replacement that is free from defects in materials and workmanship within a reasonable time thereafter, Customer may terminate the license for this software product and return this software product and any associated materials for credit or refund. THIS WARRANTY IS GIVEN BY TEKTRONIX IN LIEU OF ANY OTHER WARRANTIES, EXPRESS OR IMPLIED. TEKTRONIX AND ITS VENDORS DISCLAIM ANY IMPLIED WARRANTIES OF MERCHANTABILITY OR FITNESS FOR A PARTICULAR PURPOSE. TEKTRONIX’ RESPONSIBILITY TO REPLACE DEFECTIVE MEDIA OR REFUND CUSTOMER’S PAYMENT IS THE SOLE AND EXCLUSIVE REMEDY PROVIDED TO THE CUSTOMER FOR BREACH OF THIS WARRANTY. TEKTRONIX AND ITS VENDORS WILL NOT BE LIABLE FOR ANY INDIRECT, SPECIAL, INCIDENTAL, OR CONSEQUENTIAL DAMAGES IRRESPECTIVE OF WHETHER TEKTRONIX OR THE VENDOR HAS ADVANCE NOTICE OF THE POSSIBILITY OF SUCH DAMAGES. Table of Contents General Safety Summary . . . . . . . . . . . . . . . . . . . . . . . . . . . . . . . . . . . . Preface . . . . . . . . . . . . . . . . . . . . . . . . . . . . . . . . . . . . . . . . . . . . . . . . . . . xiii xv Service Offerings . . . . . . . . . . . . . . . . . . . . . . . . . . . . . . . . . . . . . . . . . . . . . . . . . Service Options . . . . . . . . . . . . . . . . . . . . . . . . . . . . . . . . . . . . . . . . . . . . . . . . . . Contacting Tektronix . . . . . . . . . . . . . . . . . . . . . . . . . . . . . . . . . . . . . . . . . . . . . . xv xvi xviii TLA 600 Series Logic Analyzer Description . . . . . . . . . . . . . . . . . . . . . . . . . . . TLA 700 Series Logic Analyzer Description . . . . . . . . . . . . . . . . . . . . . . . . . . . Initial Launch of the TLA Application . . . . . . . . . . . . . . . . . . . . . . . . . . . . . . . . Approaching the TLA Application Windows . . . . . . . . . . . . . . . . . . . . . . . . . . . Approaching the Windows in the TLA 700 Series Pattern Generator Application . . . . . . . . . . . . . . . . . . . . . . . . . . . . . . . . . . . . . . . . . . . . . . . . . . Backing Up User Files . . . . . . . . . . . . . . . . . . . . . . . . . . . . . . . . . . . . . . . . . . . . . Installing Microprocessor and Bus Support Software . . . . . . . . . . . . . . . . . . . . . Getting Help . . . . . . . . . . . . . . . . . . . . . . . . . . . . . . . . . . . . . . . . . . . . . . . . . . . . . Connecting Logic Analyzer Probes to the TLA 600 Series . . . . . . . . . . . . . . . . . Turning On the TLA 600 Series Logic Analyzer . . . . . . . . . . . . . . . . . . . . . . . . . TLA 61X and TLA 62X Logic Analyzer Front Panel Controls . . . . . . . . . . . . . TLA 600 Series External Connectors . . . . . . . . . . . . . . . . . . . . . . . . . . . . . . . . . TLA 600 Series Chassis Ground Connections . . . . . . . . . . . . . . . . . . . . . . . . . . . Connecting Logic Analyzer Probes to the TLA 700 Series . . . . . . . . . . . . . . . . . Configuring the P6470 Pattern Generator Probe . . . . . . . . . . . . . . . . . . . . . . . . . Connecting Pattern Generator Probes to the TLA 700 Series . . . . . . . . . . . . . . . Turning On the TLA 700 Series Logic Analyzer . . . . . . . . . . . . . . . . . . . . . . . . . Turning On the TLA 7XM Expansion Mainframe . . . . . . . . . . . . . . . . . . . . . . . Turning Off the TLA 700 Series Mainframe . . . . . . . . . . . . . . . . . . . . . . . . . . . . Turning Off the TLA 7XM Expansion Mainframe . . . . . . . . . . . . . . . . . . . . . . . TLA 704 and TLA 714 Front Panel Controls . . . . . . . . . . . . . . . . . . . . . . . . . . . TLA 700 Series External Connectors . . . . . . . . . . . . . . . . . . . . . . . . . . . . . . . . . Connecting Accessories to the TLA 700 Series . . . . . . . . . . . . . . . . . . . . . . . . . . TLA 700 Series Chassis Ground Connections . . . . . . . . . . . . . . . . . . . . . . . . . . . Connecting Probes to the Target System . . . . . . . . . . . . . . . . . . . . . . . . . . . . . . . 1–1 1–3 1–4 1–5 Getting Started 1–14 1–21 1–21 1–21 1–23 1–23 1–25 1–26 1–27 1–28 1–28 1–30 1–31 1–33 1–33 1–34 1–34 1–35 1–37 1–38 1–39 TLA 600 Series Installation Installing a TLA 600 Series Logic Analyzer . . . . . . . . . . . . . . . . . . . . 2–1 Check the Shipping List . . . . . . . . . . . . . . . . . . . . . . . . . . . . . . . . . . . . . . . . . . . . Site Considerations . . . . . . . . . . . . . . . . . . . . . . . . . . . . . . . . . . . . . . . . . . . . . . . . Initial Launch of the TLA Application . . . . . . . . . . . . . . . . . . . . . . . . . . . . . . . . Performing the Incoming Inspection . . . . . . . . . . . . . . . . . . . . . . . . . . . . . . . . . . Creating an Emergency Startup Disk . . . . . . . . . . . . . . . . . . . . . . . . . . . . . . . . Backing Up User Files . . . . . . . . . . . . . . . . . . . . . . . . . . . . . . . . . . . . . . . . . . . . . 2–1 2–2 2–2 2–3 2–4 2–4 In Case of Problems . . . . . . . . . . . . . . . . . . . . . . . . . . . . . . . . . . . . . . . . 2–5 Diagnostics . . . . . . . . . . . . . . . . . . . . . . . . . . . . . . . . . . . . . . . . . . . . . . . . . . . . . . Software Problems . . . . . . . . . . . . . . . . . . . . . . . . . . . . . . . . . . . . . . . . . . . . . . . . Hardware Problems . . . . . . . . . . . . . . . . . . . . . . . . . . . . . . . . . . . . . . . . . . . . . . . 2–5 2–5 2–6 Tektronix Logic Analyzer Family User Manual, Version 3.2 Software i Table of Contents Check for Common Problems . . . . . . . . . . . . . . . . . . . . . . . . . . . . . . . . . . . . . . . TLA Startup Sequence . . . . . . . . . . . . . . . . . . . . . . . . . . . . . . . . . . . . . . . . . . . . . 2–6 2–7 Installing Software on the TLA 600 Series . . . . . . . . . . . . . . . . . . . . . . 2–9 Installing Software . . . . . . . . . . . . . . . . . . . . . . . . . . . . . . . . . . . . . . . . . . . . . . . . Flashing the Controller BIOS . . . . . . . . . . . . . . . . . . . . . . . . . . . . . . . . . . . . . . . Setting Up the Controller BIOS . . . . . . . . . . . . . . . . . . . . . . . . . . . . . . . . . . . . . Reformatting the Hard Disk Drive . . . . . . . . . . . . . . . . . . . . . . . . . . . . . . . . . . Installing Windows 98 SE . . . . . . . . . . . . . . . . . . . . . . . . . . . . . . . . . . . . . . . . . Installing the Firmware Hub Driver . . . . . . . . . . . . . . . . . . . . . . . . . . . . . . . . . . . Installing the Video Drivers . . . . . . . . . . . . . . . . . . . . . . . . . . . . . . . . . . . . . . . Installing Audio, PCI, and Front Panel Drivers . . . . . . . . . . . . . . . . . . . . . . . . . . Installing Windows 98 SE Patches . . . . . . . . . . . . . . . . . . . . . . . . . . . . . . . . . . . . Installing QAPlus and TLA Application Software . . . . . . . . . . . . . . . . . . . . . . Setting Up the Display Properties . . . . . . . . . . . . . . . . . . . . . . . . . . . . . . . . . . . . Setting Up the Screen Saver . . . . . . . . . . . . . . . . . . . . . . . . . . . . . . . . . . . . . . . . . Setting Up Power Management . . . . . . . . . . . . . . . . . . . . . . . . . . . . . . . . . . . . . . Setting Up Virtual Memory . . . . . . . . . . . . . . . . . . . . . . . . . . . . . . . . . . . . . . . . . Restoring User Files . . . . . . . . . . . . . . . . . . . . . . . . . . . . . . . . . . . . . . . . . . . . . . . Initial Launch of the TLA Application . . . . . . . . . . . . . . . . . . . . . . . . . . . . . . . . Uninstalling TLA Application Software . . . . . . . . . . . . . . . . . . . . . . . . . . . . . . . 2–9 2–10 2–10 2–13 2–14 2–15 2–15 2–16 2–17 2–18 2–19 2–20 2–20 2–21 2–21 2–21 2–21 TLA 700 Series Installation ii Installing a TLA 700 Series Logic Analyzer . . . . . . . . . . . . . . . . . . . . 3–1 Check the Shipping List . . . . . . . . . . . . . . . . . . . . . . . . . . . . . . . . . . . . . . . . . . . . Site Considerations . . . . . . . . . . . . . . . . . . . . . . . . . . . . . . . . . . . . . . . . . . . . . . . . Installing Modules . . . . . . . . . . . . . . . . . . . . . . . . . . . . . . . . . . . . . . . . . . . . . . . . Covering Empty Slots . . . . . . . . . . . . . . . . . . . . . . . . . . . . . . . . . . . . . . . . . . . . . Initial Launch of the TLA 700 Series Application . . . . . . . . . . . . . . . . . . . . . . . Performing the Incoming Inspection . . . . . . . . . . . . . . . . . . . . . . . . . . . . . . . . . . Creating an Emergency Startup Disk . . . . . . . . . . . . . . . . . . . . . . . . . . . . . . . . . . Backing Up User Files . . . . . . . . . . . . . . . . . . . . . . . . . . . . . . . . . . . . . . . . . . . . . Removing the Replaceable Hard Disk Drive from the Portable Mainframe . . . . Removing the Replaceable Hard Disk Drive from the Benchtop Mainframe . . . 3–1 3–2 3–3 3–8 3–9 3–9 3–10 3–11 3–12 3–14 Merging TLA 700 Series Logic Analyzer Modules . . . . . . . . . . . . . . . 3–17 Logic Analyzer Merged Modules . . . . . . . . . . . . . . . . . . . . . . . . . . . . . . . . . . . . Logic Analyzer Module Merging Rules . . . . . . . . . . . . . . . . . . . . . . . . . . . . . . . Two Way Logic Analyzer Merge Procedure . . . . . . . . . . . . . . . . . . . . . . . . . . . Three Way Logic Analyzer Merge Procedure . . . . . . . . . . . . . . . . . . . . . . . . . . Installing the Merged Logic Analyzer Modules in the Mainframe . . . . . . . . . . . Calibrating the Merged Modules . . . . . . . . . . . . . . . . . . . . . . . . . . . . . . . . . . . . . Removing Merged Logic Analyzer Modules from the Mainframe . . . . . . . . . . . Storing the Logic Analyzer Module Merge Cable . . . . . . . . . . . . . . . . . . . . . . . . 3–17 3–17 3–19 3–24 3–24 3–25 3–25 3–25 Merging TLA 700 Series Pattern Generator Modules . . . . . . . . . . . . . 3–27 Pattern Generator Merged Modules . . . . . . . . . . . . . . . . . . . . . . . . . . . . . . . . . . . Pattern Generator Module Merging Rules . . . . . . . . . . . . . . . . . . . . . . . . . . . . . . 3–27 3–27 Tektronix Logic Analyzer Family User Manual, Version 3.2 Software Table of Contents Installing a TLA 700 Series Expansion Mainframe . . . . . . . . . . . . . . . 3–29 Expansion Mainframe Rules . . . . . . . . . . . . . . . . . . . . . . . . . . . . . . . . . . . . . . . . Expansion Module Installation . . . . . . . . . . . . . . . . . . . . . . . . . . . . . . . . . . . . . . Expansion Cable Installation . . . . . . . . . . . . . . . . . . . . . . . . . . . . . . . . . . . . . . . . Turning On the Mainframes . . . . . . . . . . . . . . . . . . . . . . . . . . . . . . . . . . . . . . . . . Turning Off the Mainframes . . . . . . . . . . . . . . . . . . . . . . . . . . . . . . . . . . . . . . . . 3–29 3–29 3–32 3–33 3–33 In Case of Problems . . . . . . . . . . . . . . . . . . . . . . . . . . . . . . . . . . . . . . . . 3–35 Diagnostics . . . . . . . . . . . . . . . . . . . . . . . . . . . . . . . . . . . . . . . . . . . . . . . . . . . . . . Software Problems . . . . . . . . . . . . . . . . . . . . . . . . . . . . . . . . . . . . . . . . . . . . . . . . Hardware Problems . . . . . . . . . . . . . . . . . . . . . . . . . . . . . . . . . . . . . . . . . . . . . . . Check for Common Problems . . . . . . . . . . . . . . . . . . . . . . . . . . . . . . . . . . . . . . . TLA Startup Sequence . . . . . . . . . . . . . . . . . . . . . . . . . . . . . . . . . . . . . . . . . . . . . Isolating System Problems . . . . . . . . . . . . . . . . . . . . . . . . . . . . . . . . . . . . . . . . Expansion Mainframe Troubleshooting . . . . . . . . . . . . . . . . . . . . . . . . . . . . . . . . 3–35 3–36 3–36 3–37 3–40 3–42 3–44 Installing Software on the TLA 700 Series . . . . . . . . . . . . . . . . . . . . . . 3–47 Installing Software . . . . . . . . . . . . . . . . . . . . . . . . . . . . . . . . . . . . . . . . . . . . . . . . Flashing the Controller BIOS . . . . . . . . . . . . . . . . . . . . . . . . . . . . . . . . . . . . . . . Setting Up the Controller BIOS . . . . . . . . . . . . . . . . . . . . . . . . . . . . . . . . . . . . . . Reformatting the Hard Disk Drive . . . . . . . . . . . . . . . . . . . . . . . . . . . . . . . . . . Installing Windows 98 SE . . . . . . . . . . . . . . . . . . . . . . . . . . . . . . . . . . . . . . . . . Installing the Video Driver . . . . . . . . . . . . . . . . . . . . . . . . . . . . . . . . . . . . . . . . Installing the Tek PCI Bridge Driver . . . . . . . . . . . . . . . . . . . . . . . . . . . . . . . . . . Installing Windows 98 SE Patches . . . . . . . . . . . . . . . . . . . . . . . . . . . . . . . . . . . . Installing Tektronix Pattern Generator Application Software . . . . . . . . . . . . . . . Installing QAPlus and TLA Application Software . . . . . . . . . . . . . . . . . . . . . . Setting Up the Display Properties . . . . . . . . . . . . . . . . . . . . . . . . . . . . . . . . . . . . Setting Up the Screen Saver . . . . . . . . . . . . . . . . . . . . . . . . . . . . . . . . . . . . . . . . . Removing Advanced Power Management . . . . . . . . . . . . . . . . . . . . . . . . . . . . . . Setting Up the Mainframe Utilities . . . . . . . . . . . . . . . . . . . . . . . . . . . . . . . . . . . Setting Up the Virtual Memory . . . . . . . . . . . . . . . . . . . . . . . . . . . . . . . . . . . . . . Updating Module Firmware . . . . . . . . . . . . . . . . . . . . . . . . . . . . . . . . . . . . . . . . . Restoring User Files . . . . . . . . . . . . . . . . . . . . . . . . . . . . . . . . . . . . . . . . . . . . . . . Initial Launch of the TLA Application . . . . . . . . . . . . . . . . . . . . . . . . . . . . . . . . Uninstalling TLA Application Software . . . . . . . . . . . . . . . . . . . . . . . . . . . . . . . 3–47 3–48 3–48 3–52 3–53 3–54 3–54 3–55 3–55 3–56 3–57 3–57 3–58 3–58 3–58 3–59 3–61 3–61 3–61 Power Cord and Line Fuse Requirements for the Benchtop Mainframe . . . . . . . . . . . . . . . . . . . . . . . . . . . . . . . . . . . . Power Cord and Line Fuse Requirements for the Expansion Mainframe . . . . . . . . . . . . . . . . . . . . . . . . . . . . . . . . . . . 3–63 3–67 Appendices Appendix A: TLA 600 Series Logic Analyzer Specifications . . . . . . . A–1 Characteristic Tables . . . . . . . . . . . . . . . . . . . . . . . . . . . . . . . . . . . . . . . . . . . . . . A–1 Appendix B: TLA 714 and TLA 720 Logic Analyzer Specifications . B–1 Characteristic Tables . . . . . . . . . . . . . . . . . . . . . . . . . . . . . . . . . . . . . . . . . . . . . . TLA 714 Color Portable Mainframe Characteristics . . . . . . . . . . . . . . . . . . . . . . TLA 720 Color Benchtop Chassis Characteristics . . . . . . . . . . . . . . . . . . . . . . . . TLA 720 Color Benchtop Controller Characteristics . . . . . . . . . . . . . . . . . . . . . TLA 7Nx and TLA 7Px Logic Analyzer Module Characteristics . . . . . . . . . . . . B–1 B–9 B–15 B–19 B–21 Tektronix Logic Analyzer Family User Manual, Version 3.2 Software iii Table of Contents TLA 7Dx and TLA 7Ex DSO Module Characteristics . . . . . . . . . . . . . . . . . . . . TLA 7PG2 Pattern Generator Module Characteristics . . . . . . . . . . . . . . . . . . . . PG Pattern Generator Module Timing Diagrams . . . . . . . . . . . . . . . . . . . . . . . . . B–29 B–37 B–49 Appendix C: TLA 7XM Expansion Mainframe Specifications . . . . . C–1 Characteristic Tables . . . . . . . . . . . . . . . . . . . . . . . . . . . . . . . . . . . . . . . . . . . . . . TLA 7XM Expansion Mainframe Characteristics . . . . . . . . . . . . . . . . . . . . . . . . C–1 C–5 Appendix D: TLA 704 and TLA 711 Logic Analyzer Specifications . D–1 Characteristic Tables . . . . . . . . . . . . . . . . . . . . . . . . . . . . . . . . . . . . . . . . . . . . . . TLA 704 Color Portable Mainframe Characteristics . . . . . . . . . . . . . . . . . . . . . . TLA 711 Color Benchtop Chassis Characteristics . . . . . . . . . . . . . . . . . . . . . . . . TLA 711 Color Benchtop Controller Characteristics . . . . . . . . . . . . . . . . . . . . . TLA 700 Series Logic Analyzer Module Characteristics . . . . . . . . . . . . . . . . . . D–1 D–9 D–13 D–17 D–19 Appendix E: TLA Symbol File Format . . . . . . . . . . . . . . . . . . . . . . . . . E–1 TSF Headers . . . . . . . . . . . . . . . . . . . . . . . . . . . . . . . . . . . . . . . . . . . . . . . . . . . . . TSF Pattern Symbols . . . . . . . . . . . . . . . . . . . . . . . . . . . . . . . . . . . . . . . . . . . . . . TSF Range Symbols . . . . . . . . . . . . . . . . . . . . . . . . . . . . . . . . . . . . . . . . . . . . . . . E–2 E–3 E–4 Appendix F: PG Physical–Logical Conversion . . . . . . . . . . . . . . . . . . . Appendix G: TLA Logic Analyzer Family User Service . . . . . . . . . . . F–1 G–1 General Care . . . . . . . . . . . . . . . . . . . . . . . . . . . . . . . . . . . . . . . . . . . . . . . . . . . . . Module Self Calibration . . . . . . . . . . . . . . . . . . . . . . . . . . . . . . . . . . . . . . . . . . . . Preventive Maintenance . . . . . . . . . . . . . . . . . . . . . . . . . . . . . . . . . . . . . . . . . . . . In Case of Problems . . . . . . . . . . . . . . . . . . . . . . . . . . . . . . . . . . . . . . . . . . . . . . . Repacking for Shipment . . . . . . . . . . . . . . . . . . . . . . . . . . . . . . . . . . . . . . . . . . . . G–1 G–1 G–2 G–4 G–4 Glossary Index iv Tektronix Logic Analyzer Family User Manual, Version 3.2 Software Table of Contents List of Figures Figure 1–1: TLA 600 series logic analyzers . . . . . . . . . . . . . . . . . . . . . . Figure 1–2: TLA 700 series logic analyzers . . . . . . . . . . . . . . . . . . . . . . Figure 1–3: Window usage control flow . . . . . . . . . . . . . . . . . . . . . . . . Figure 1–4: System window on a TLA 600 series . . . . . . . . . . . . . . . . . Figure 1–5: System window on a TLA 700 series . . . . . . . . . . . . . . . . . Figure 1–6: LA Setup window . . . . . . . . . . . . . . . . . . . . . . . . . . . . . . . . Figure 1–7: LA Trigger window . . . . . . . . . . . . . . . . . . . . . . . . . . . . . . . Figure 1–8: DSO Trigger window . . . . . . . . . . . . . . . . . . . . . . . . . . . . . Figure 1–9: Comparing regular and MagniVu data . . . . . . . . . . . . . . Figure 1–10: DSO Setup dialog box . . . . . . . . . . . . . . . . . . . . . . . . . . . . Figure 1–11: Window usage control flow . . . . . . . . . . . . . . . . . . . . . . . Figure 1–12: System window . . . . . . . . . . . . . . . . . . . . . . . . . . . . . . . . . Figure 1–13: Module Info Setup window . . . . . . . . . . . . . . . . . . . . . . . Figure 1–14: Channel Setup window . . . . . . . . . . . . . . . . . . . . . . . . . . . Figure 1–15: Probe Setup window . . . . . . . . . . . . . . . . . . . . . . . . . . . . . Figure 1–16: Signals Setup window . . . . . . . . . . . . . . . . . . . . . . . . . . . . Figure 1–17: Block Definition Screen window . . . . . . . . . . . . . . . . . . . Figure 1–18: Sequence Definition Screen window . . . . . . . . . . . . . . . . Figure 1–19: Sub Sequence Screen window . . . . . . . . . . . . . . . . . . . . . Figure 1–20: Event Screen window . . . . . . . . . . . . . . . . . . . . . . . . . . . . Figure 1–21: Listing window . . . . . . . . . . . . . . . . . . . . . . . . . . . . . . . . . Figure 1–22: Pattern Generator Run Properties dialog box . . . . . . . . Figure 1–23: Connecting the logic analyzer probes . . . . . . . . . . . . . . . Figure 1–24: Line fuse and power cord connector locations . . . . . . . . Figure 1–25: On/Standby switch locations . . . . . . . . . . . . . . . . . . . . . . Figure 1–26: Logic analyzer front panel . . . . . . . . . . . . . . . . . . . . . . . . Figure 1–27: TLA 600 series external connectors . . . . . . . . . . . . . . . . Figure 1–28: Location of ground connections . . . . . . . . . . . . . . . . . . . . Figure 1–29: Connecting the logic analyzer probes . . . . . . . . . . . . . . . Figure 1–30: Reconfiguring the P6470 TTL/CMOS probe . . . . . . . . . Figure 1–31: Connecting the pattern generator probes . . . . . . . . . . . . Figure 1–32: Line fuse and power cord connector locations . . . . . . . . Figure 1–33: On/Standby switch locations . . . . . . . . . . . . . . . . . . . . . . Figure 1–34: Portable mainframe front panel . . . . . . . . . . . . . . . . . . . Figure 1–35: GlidePoint pad . . . . . . . . . . . . . . . . . . . . . . . . . . . . . . . . . Tektronix Logic Analyzer Family User Manual, Version 3.2 Software 1–1 1–3 1–5 1–6 1–7 1–7 1–8 1–9 1–12 1–13 1–14 1–15 1–16 1–16 1–17 1–17 1–18 1–18 1–19 1–19 1–20 1–20 1–23 1–24 1–24 1–25 1–26 1–27 1–28 1–29 1–30 1–32 1–33 1–34 1–35 v Table of Contents Figure 1–36: TLA 700 series external connectors . . . . . . . . . . . . . . . . Figure 1–37: Locations of external connectors . . . . . . . . . . . . . . . . . . . Figure 1–38: Location of ground connections . . . . . . . . . . . . . . . . . . . . 1–36 1–37 1–39 Figure 2–1: TLA startup sequence . . . . . . . . . . . . . . . . . . . . . . . . . . . . 2–8 Figure 3–1: Logical address switches . . . . . . . . . . . . . . . . . . . . . . . . . . . 3–4 Figure 3–2: Module keying . . . . . . . . . . . . . . . . . . . . . . . . . . . . . . . . . . . 3–6 Figure 3–3: Installing modules . . . . . . . . . . . . . . . . . . . . . . . . . . . . . . . . 3–7 Figure 3–4: Installing panel covers on the portable mainframe . . . . . 3–8 Figure 3–5: Installing panel covers on the benchtop mainframe . . . . 3–9 Figure 3–6: Depress the hard disk drive latch . . . . . . . . . . . . . . . . . . . 3–12 Figure 3–7: Unlatching the hard disk drive cartridge . . . . . . . . . . . . . 3–13 Figure 3–8: Removing the hard disk drive cartridge . . . . . . . . . . . . . . 3–13 Figure 3–9: Depress the hard disk drive latch . . . . . . . . . . . . . . . . . . . 3–14 Figure 3–10: Unlatching the hard disk drive cartridge . . . . . . . . . . . . 3–15 Figure 3–11: Removing the hard disk drive cartridge . . . . . . . . . . . . . 3–15 Figure 3–12: Location of modules in a two way merge . . . . . . . . . . . . 3–18 Figure 3–13: Location of modules in a three way merge . . . . . . . . . . 3–19 Figure 3–14: Removing the cover . . . . . . . . . . . . . . . . . . . . . . . . . . . . . 3–20 Figure 3–15: Feeding the merge cable through the cover . . . . . . . . . . 3–21 Figure 3–16: Seating the cover on the chassis . . . . . . . . . . . . . . . . . . . . 3–22 Figure 3–17: Lining up the two modules . . . . . . . . . . . . . . . . . . . . . . . . 3–23 Figure 3–18: Dressing the merge cable before installing the cover . . 3–26 Figure 3–19: Benchtop mainframe and one expansion mainframe . . 3–30 Figure 3–20: Benchtop mainframe and two expansion mainframes . 3–30 Figure 3–21: Portable mainframe shown with two expansion mainframes . . 3–31 Figure 3–22: TLA startup sequence . . . . . . . . . . . . . . . . . . . . . . . . . . . 3–41 Figure 3–23: Example ResMan32 program output . . . . . . . . . . . . . . . 3–44 Figure 3–24: Flash programming pins . . . . . . . . . . . . . . . . . . . . . . . . . 3–59 Figure 3–25: Power cord identification chart . . . . . . . . . . . . . . . . . . . . 3–64 Figure 3–26: Power cord identification chart . . . . . . . . . . . . . . . . . . . . 3–68 vi Figure A–1: Dimensions of the TLA 600 series logic analyzer . . . . . . A–10 Figure B–1: Dimensions of TLA 714 portable mainframe . . . . . . . . . Figure B–2: Dimensions of the benchtop chassis . . . . . . . . . . . . . . . . . Figure B–3: Dimensions of the benchtop chassis with rackmount option . . . . . . . . . . . . . . . . . . . . . . . . . . . . . . . . . . . . . . . . . . . . . . . . . B–13 B–18 B–18 Tektronix Logic Analyzer Family User Manual, Version 3.2 Software Table of Contents Figure B–4: P6470/6471 clock and strobe timing diagram . . . . . . . . . Figure B–5: P6470 inhibit timing diagram . . . . . . . . . . . . . . . . . . . . . . Figure B–6: External event for inhibit timing diagram . . . . . . . . . . . . Figure B–7: P6470/P6471 external event for jump timing diagram . . Figure B–8: External event for half channel advance timing diagram Figure B–9: External event for full channel advance timing diagram B–49 B–50 B–50 B–50 B–51 B–51 Figure C–1: Dimensions of the expansion mainframe . . . . . . . . . . . . . Figure C–2: Dimensions of the expansion mainframe with rackmount option . . . . . . . . . . . . . . . . . . . . . . . . . . . . . . . . . . . . . . . Figure D–1: Front and side views of TLA 704 portable mainframe . Figure D–2: Benchtop chassis dimensions . . . . . . . . . . . . . . . . . . . . . . Figure D–3: Benchtop chassis with rackmount option dimensions . . C–8 Tektronix Logic Analyzer Family User Manual, Version 3.2 Software C–8 D–12 D–15 D–16 vii Table of Contents List of Tables Table 1–1: TLA 600 series family . . . . . . . . . . . . . . . . . . . . . . . . . . . . . Table 1–2: TLA 700 series line fuses . . . . . . . . . . . . . . . . . . . . . . . . . . . Table 1–3: Additional accessory connection information . . . . . . . . . . 1–2 1–31 1–38 Table 2–1: Additional accessory connection information . . . . . . . . . . Table 2–2: Failure symptoms and possible causes . . . . . . . . . . . . . . . . Table 2–3: Software not covered by the TLA software setup . . . . . . . Table 2–4: TLA 600 Controller BIOS setup . . . . . . . . . . . . . . . . . . . . 2–2 2–6 2–9 2–11 Table 3–1: Failure symptoms and possible causes . . . . . . . . . . . . . . . . Table 3–2: Command line options for ResMan32 . . . . . . . . . . . . . . . . Table 3–3: Software not covered by the TLA software setup . . . . . . . Table 3–4: TLA 714 and TLA 720 Controller BIOS setup . . . . . . . . . Table 3–5: Power for instrument modules . . . . . . . . . . . . . . . . . . . . . . Table 3–6: Power for instrument modules . . . . . . . . . . . . . . . . . . . . . . 3–37 3–42 3–47 3–49 3–63 3–67 Table A–1: Atmospheric characteristics . . . . . . . . . . . . . . . . . . . . . . . . Table A–2: Input Parameters . . . . . . . . . . . . . . . . . . . . . . . . . . . . . . . . Table A–3: External signal interface . . . . . . . . . . . . . . . . . . . . . . . . . . Table A–4: Logic Analyzer Charisteristics . . . . . . . . . . . . . . . . . . . . . Table A–5: Internal controller . . . . . . . . . . . . . . . . . . . . . . . . . . . . . . . . Table A–6: Display system . . . . . . . . . . . . . . . . . . . . . . . . . . . . . . . . . . . Table A–7: Front-panel interface . . . . . . . . . . . . . . . . . . . . . . . . . . . . . Table A–8: Rear-panel interface . . . . . . . . . . . . . . . . . . . . . . . . . . . . . . Table A–9: AC power source . . . . . . . . . . . . . . . . . . . . . . . . . . . . . . . . . Table A–10: Cooling . . . . . . . . . . . . . . . . . . . . . . . . . . . . . . . . . . . . . . . . Table A–11: Certifications and compliances: TLA 600 series logic analyzer . . . . . . . . . . . . . . . . . . . . . . . . . . . . . . . . . . . . . . . . . . . . . . . Table A–12: Logic analyzer mechanical . . . . . . . . . . . . . . . . . . . . . . . . A–1 A–2 A–3 A–5 A–5 A–6 A–7 A–7 A–8 A–8 Table B–1: Atmospheric characteristics . . . . . . . . . . . . . . . . . . . . . . . . Table B–2: Backplane interface . . . . . . . . . . . . . . . . . . . . . . . . . . . . . . . Table B–3: External signal interface . . . . . . . . . . . . . . . . . . . . . . . . . . . Table B–4: Certifications and compliances: TLA 700 series logic analyzer . . . . . . . . . . . . . . . . . . . . . . . . . . . . . . . . . . . . . . . . . . . . . . . Table B–5: Internal controller . . . . . . . . . . . . . . . . . . . . . . . . . . . . . . . . viii A–9 A–10 B–2 B–3 B–5 B–7 B–9 Tektronix Logic Analyzer Family User Manual, Version 3.2 Software Table of Contents Table B–6: Portable mainframe display system . . . . . . . . . . . . . . . . . Table B–7: Portable mainframe front-panel interface . . . . . . . . . . . . Table B–8: Portable mainframe rear-panel interface . . . . . . . . . . . . . Table B–9: Portable mainframe AC power source . . . . . . . . . . . . . . . Table B–10: Portable mainframe secondary power . . . . . . . . . . . . . . . Table B–11: Portable mainframe cooling . . . . . . . . . . . . . . . . . . . . . . . Table B–12: Portable mainframe mechanical . . . . . . . . . . . . . . . . . . . Table B–13: Benchtop chassis AC power source . . . . . . . . . . . . . . . . . Table B–14: Benchtop chassis secondary power . . . . . . . . . . . . . . . . . Table B–15: Benchtop chassis cooling . . . . . . . . . . . . . . . . . . . . . . . . . Table B–16: Benchtop chassis mechanical . . . . . . . . . . . . . . . . . . . . . . Table B–17: Benchtop controller characteristics . . . . . . . . . . . . . . . . . Table B–18: Benchtop controller mechanical characteristics . . . . . . Table B–19: LA module channel width and depth . . . . . . . . . . . . . . . Table B–20: LA module clocking . . . . . . . . . . . . . . . . . . . . . . . . . . . . . Table B–21: LA module trigger system . . . . . . . . . . . . . . . . . . . . . . . . Table B–22: LA module input parameters with P6417 or P6418 probes . . . . . . . . . . . . . . . . . . . . . . . . . . . . . . . . . . . . . . . . . . . . . . . . Table B–23: LA module input parameters (with P6434 probe) . . . . . Table B–24: LA module MagniVu feature . . . . . . . . . . . . . . . . . . . . . . Table B–25: LA module data handling . . . . . . . . . . . . . . . . . . . . . . . . . Table B–26: LA module mechanical . . . . . . . . . . . . . . . . . . . . . . . . . . . Table B–27: DSO module signal acquisition system . . . . . . . . . . . . . . Table B–28: DSO module timebase system . . . . . . . . . . . . . . . . . . . . . Table B–29: DSO module trigger system . . . . . . . . . . . . . . . . . . . . . . . Table B–30: DSO module front-panel connectors . . . . . . . . . . . . . . . . Table B–31: DSO module certifications and compliances . . . . . . . . . Table B–32: DSO module mechanical . . . . . . . . . . . . . . . . . . . . . . . . . Table B–33: P6470 TTL/CMOS probe and P6471 ECL probe . . . . . Table B–34: PG module electrical specification, operational mode . Table B–35: PG module electrical specification, output pattern . . . . Table B–36: PG module, internal clock . . . . . . . . . . . . . . . . . . . . . . . . Table B–37: PG module external clock input . . . . . . . . . . . . . . . . . . . Table B–38: PG module event processing . . . . . . . . . . . . . . . . . . . . . . Table B–39: PG module inter-module interactions . . . . . . . . . . . . . . Table B–40: PG module merged PG modules . . . . . . . . . . . . . . . . . . . Table B–41: PG module P6470 TTL/CMOS probe . . . . . . . . . . . . . . . Table B–42: PG module, P6471 ECL probe . . . . . . . . . . . . . . . . . . . . Table B–43: PG module mechanical . . . . . . . . . . . . . . . . . . . . . . . . . . . Tektronix Logic Analyzer Family User Manual, Version 3.2 Software B–10 B–11 B–11 B–11 B–12 B–12 B–13 B–15 B–16 B–16 B–17 B–19 B–20 B–21 B–21 B–23 B–26 B–27 B–28 B–28 B–28 B–29 B–32 B–32 B–34 B–34 B–35 B–37 B–37 B–37 B–38 B–38 B–38 B–39 B–39 B–40 B–44 B–48 ix Table of Contents Table B–44: P6470 TTL/CMOS probe and P6471 ECL probe mechanical . . . . . . . . . . . . . . . . . . . . . . . . . . . . . . . . . . . . . . . . . . . . Table B–45: Probe cable . . . . . . . . . . . . . . . . . . . . . . . . . . . . . . . . . . . . . Table B–46: Twisted lead set . . . . . . . . . . . . . . . . . . . . . . . . . . . . . . . . . x B–49 B–49 B–49 Table C–1: Atmospheric characteristics . . . . . . . . . . . . . . . . . . . . . . . . Table C–2: Backplane interface . . . . . . . . . . . . . . . . . . . . . . . . . . . . . . Table C–3: AC power source . . . . . . . . . . . . . . . . . . . . . . . . . . . . . . . . . Table C–4: Secondary power . . . . . . . . . . . . . . . . . . . . . . . . . . . . . . . . . Table C–5: Cooling . . . . . . . . . . . . . . . . . . . . . . . . . . . . . . . . . . . . . . . . . Table C–6: Mechanical . . . . . . . . . . . . . . . . . . . . . . . . . . . . . . . . . . . . . . Table C–7: Certifications and compliances: TLA 7XM expansion mainframe . . . . . . . . . . . . . . . . . . . . . . . . . . . . . . . . . . . . . . . . . . . . . C–2 C–2 C–5 C–6 C–6 C–7 Table D–1: Atmospheric characteristics . . . . . . . . . . . . . . . . . . . . . . . . Table D–2: Backplane interface . . . . . . . . . . . . . . . . . . . . . . . . . . . . . . Table D–3: External signal interface . . . . . . . . . . . . . . . . . . . . . . . . . . Table D–4: Certifications and compliances: TLA 704 and TLA 711 mainframes . . . . . . . . . . . . . . . . . . . . . . . . . . . . . . . . . . . . . . . . . . . . Table D–5: Portable mainframe internal controller . . . . . . . . . . . . . . Table D–6: Portable mainframe display system . . . . . . . . . . . . . . . . . Table D–7: Portable mainframe front-panel interface . . . . . . . . . . . . Table D–8: Portable mainframe rear-panel interface . . . . . . . . . . . . . Table D–9: Portable mainframe AC power source . . . . . . . . . . . . . . . Table D–10: Portable mainframe secondary power . . . . . . . . . . . . . . . Table D–11: Portable mainframe cooling . . . . . . . . . . . . . . . . . . . . . . . Table D–12: Portable mainframe mechanical . . . . . . . . . . . . . . . . . . . Table D–13: Benchtop chassis AC power source . . . . . . . . . . . . . . . . . Table D–14: Benchtop chassis secondary power . . . . . . . . . . . . . . . . . Table D–15: Benchtop chassis cooling . . . . . . . . . . . . . . . . . . . . . . . . . Table D–16: Benchtop chassis mechanical . . . . . . . . . . . . . . . . . . . . . . Table D–17: Benchtop controller characteristics . . . . . . . . . . . . . . . . Table D–18: Benchtop controller mechanical characteristics . . . . . . Table D–19: LA module channel width and depth . . . . . . . . . . . . . . . Table D–20: LA module clocking . . . . . . . . . . . . . . . . . . . . . . . . . . . . . Table D–21: LA module trigger system . . . . . . . . . . . . . . . . . . . . . . . . Table D–22: LA module input parameters (with P6417 probe) . . . . . Table D–23: LA module MagniVu feature . . . . . . . . . . . . . . . . . . . . . . Table D–24: Merged LA modules . . . . . . . . . . . . . . . . . . . . . . . . . . . . . D–2 D–3 D–5 C–9 D–7 D–9 D–9 D–10 D–10 D–11 D–11 D–12 D–12 D–13 D–13 D–14 D–14 D–17 D–18 D–19 D–19 D–21 D–24 D–24 D–25 Tektronix Logic Analyzer Family User Manual, Version 3.2 Software Table of Contents Table D–25: LA module data handling . . . . . . . . . . . . . . . . . . . . . . . . Table D–26: LA module mechanical . . . . . . . . . . . . . . . . . . . . . . . . . . . D–25 D–25 Table F–1: For Signal 1, 2, and 3, 4, (logical function AND) . . . . . . . Table F–2: For Signal 3, 4 (logical function OR) . . . . . . . . . . . . . . . . . F–1 F–1 Tektronix Logic Analyzer Family User Manual, Version 3.2 Software xi Table of Contents xii Tektronix Logic Analyzer Family User Manual, Version 3.2 Software General Safety Summary Review the following safety precautions to avoid injury and prevent damage to this product or any products connected to it. To avoid potential hazards, use this product only as specified. Only qualified personnel should perform service procedures. To Avoid Fire or Personal Injury Use Proper Power Cord. Use only the power cord specified for this product and certified for the country of use. Connect and Disconnect Properly. Do not connect or disconnect probes or test leads while they are connected to a voltage source. Ground the Product. This product is grounded through the grounding conductor of the power cord. To avoid electric shock, the grounding conductor must be connected to earth ground. Before making connections to the input or output terminals of the product, ensure that the product is properly grounded. Observe All Terminal Ratings. To avoid fire or shock hazard, observe all ratings and marking on the product. Consult the product manual for further ratings information before making connections to the product. The common terminal is at ground potential. Do not connect the common terminal to elevated voltages. Do not apply a potential to any terminal, including the common terminal, that exceeds the maximum rating of that terminal. Use Proper AC Adapter. Use only the AC adapter specified for this product. Do Not Operate Without Covers. Do not operate this product with covers or panels removed. Use Proper Fuse. Use only the fuse type and rating specified for this product. Avoid Exposed Circuitry. Do not touch exposed connections and components when power is present. Do Not Operate With Suspected Failures. If you suspect there is damage to this product, have it inspected by qualified service personnel. Do Not Operate in Wet/Damp Conditions. Do Not Operate in an Explosive Atmosphere. Keep Product Surfaces Clean and Dry. Provide Proper Ventilation. Refer to the manual’s installation instructions for details on installing the product so it has proper ventilation. Tektronix Logic Analyzer Family User Manual, Version 3.2 Software xiii General Safety Summary Symbols and Terms Terms in this Manual. These terms may appear in this manual: WARNING. Warning statements identify conditions or practices that could result in injury or loss of life. CAUTION. Caution statements identify conditions or practices that could result in damage to this product or other property. Terms on the Product. These terms may appear on the product: DANGER indicates an injury hazard immediately accessible as you read the marking. WARNING indicates an injury hazard not immediately accessible as you read the marking. CAUTION indicates a hazard to property including the product. Symbols on the Product. The following symbols may appear on the product: WARNING High Voltage xiv Protective Ground (Earth) Terminal CAUTION Refer to Manual Double Insulated Tektronix Logic Analyzer Family User Manual, Version 3.2 Software Preface This manual contains operating information for your Tektronix Logic Analyzer. Service Offerings Tektronix provides service to cover repair under warranty as well as other services that are designed to meet your specific service needs. Whether providing warranty repair service or any of the other services listed below, Tektronix service technicians are well equipped to service the TLA logic analyzers. Services are provided at Tektronix Services Centers and on-site at your facility, depending on your location. Warranty Repair Service Tektronix warrants this product for one year from date of purchase. (The warranty appears behind the title page in this manual.) Tektronix technicians provide warranty service at most Tektronix service locations worldwide. The Tektronix product catalog lists all service locations worldwide or you can visit us on our Customer Services World Center web site at: www.tektronix.com/Measurement/Service Calibration and Repair Service In addition to warranty repair, Tektronix Service offers calibration and other services which provide cost-effective solutions to your service needs and qualitystandards compliance requirements. Our instruments are supported worldwide by the leading-edge design, manufacturing, and service resources of Tektronix to provide the best possible service. The following services can be tailored to fit your requirements for calibration and/or repair of the TLA logic analyzers: Service Options. Tektronix Service Options can be selected at the time you purchase your instrument. You select these options to provide the services that best meet your service needs. These service options are listed on the Tektronix Service Options page following the title page of this manual. Service Agreements. If service options are not added to the instrument purchase, then service agreements are available on an annual basis to provide calibration services or post-warranty repair coverage for the TLA logic analyzers. Service agreements may be customized to meet special turn-around time and/or on-site requirements. Tektronix Logic Analyzer Family User Manual, Version 3.2 Software xv Preface Service on Demand. Tektronix also offers calibration and repair services on a “per-incident” basis that is available with standard prices for many products. Self Service. Tektronix supports repair to the replaceable-part level by providing for circuit board (module) exchange. Use this service to reduce down-time for repair by exchanging faulty circuit boards for remanufactured ones. Tektronix ships updated and tested exchange boards. Each board comes with a 90-day service warranty. For More Information. Contact your local Tektronix service center or sales engineer for more information on any of the calibration and repair services. Service Options Tektronix offers the following service options. These options are modular, flexible, and easy to order with your instrument. Designed to ease installation and startup, to support tracking of calibration to requirements of ISO9000, and to provide for extended repair coverage, these options help fix your long-term maintenance costs and eliminate unplanned expenditures. These options can be converted from service at Tektronix service depots to service on-site (see Option S1 and S3), which helps keep downtime to a minimum. TLA 600 Series Service Options The following service options are available for your TLA 600 series logic analyzer. Please contact your local Tektronix service center or sales engineer for more information on any of the service options. Tektronix Service Options are available at the time you order your instrument. Contact your local Tektronix Sales Office for more information. Three years repair coverage Option R3 Extends product repair warranty to a total of three years. Three years of calibration services Option C3 Provides factory calibration certification on delivery, plus two more years of calibration coverage. Throughout the coverage period the instrument will be calibrated according to its Recommended Calibration Interval. xvi Tektronix Logic Analyzer Family User Manual, Version 3.2 Software Preface Test data Option D1 Provides initial Test Data Report from factory on delivery. Test data Option D3 Provides test data on delivery plus a Test Data Report for every calibration performed during 3 years of coverage – requires Option C3. TLA 700 Series Service Options The following service options are available for your TLA 700 series logic analyzer. Please contact your local Tektronix service center or sales engineer for more information on any of the service options. Tektronix Service Options are available at the time you order your instrument. Contact your local Tektronix Sales Office for more information. Three years repair coverage Option R3 Extends product repair warranty to a total of three years. One year upgrade to on-site service1, 2 Option S1 Upgrades the standard one year, “return to depot” warranty to an on-site warranty. Three year upgrade to on-site service1, 2 Option S3 Upgrades any C3, D3, and R3 options purchased to on-site coverage for three years Three years of calibration services Option C3 Provides factory calibration certification on delivery, plus two more years of calibration coverage. Throughout the coverage period the instrument will be calibrated according to its Recommended Calibration Interval. Test data Option D1 Provides initial Test Data Report from factory on delivery. Test data Option D3 Provides test data on delivery plus a Test Data Report for every calibration performed during 3 years of coverage – requires Option C3. Product installation service Option IN Provides initial product installation/configuration and start-up training session including front panel and product familiarization. 1 Availability of installation and on-site services depends on the type of product and may vary by geography. 2 Upgrade options are ordered with the mainframe products and cover individual modules. Tektronix Logic Analyzer Family User Manual, Version 3.2 Software xvii Preface Contacting Tektronix Product Support For questions about using Tektronix measurement products, call toll free in North America: 1-800-833-9200 6:00 a.m. – 5:00 p.m. Pacific time Or contact us by e-mail: [email protected] For product support outside of North America, contact your local Tektronix distributor or sales office. Service support Tektronix offers a range of services, including Extended Warranty Repair and Calibration services. Contact your local Tektronix distributor or sales office for details. For a listing of worldwide service centers, visit our web site. xviii Toll-free Number In North America: 1-800-833-9200 An operator can direct your call. Postal Address Tektronix, Inc. Department or name (if known) P.O. Box 500 Beaverton, OR 97077 USA Web site www.tektronix.com Tektronix Logic Analyzer Family User Manual, Version 3.2 Software Getting Started Getting Started The Tektronix Logic Analyzer family consists of the TLA 600 series and the TLA 700 series, and all of the accessories and supports that can be used with them. For more information about availability, contact your Tektronix representative and view the Tektronix website at: www.tektronix.com. This section contains information about the logic analyzer and introductory information about how to operate it. If your logic analyzer has not been installed and set up, refer to the installation section that starts on page 3–1. TLA 600 Series Logic Analyzer Description The TLA 600 series is a high-performance line of logic analyzers. There are two basic styles: one style has an internal display, and the other uses an external display as shown in Figure 1–1. Internal and external display External display only Figure 1–1: TLA 600 series logic analyzers Tektronix Logic Analyzer Family User Manual, Version 3.2 Software 1–1 Getting Started The TLA 600 series is comprised of 12 logic analyzers as listed in Table 1–1. Table 1–1: TLA 600 series family 1–2 Logic analyzer Description TLA 601 34 channel, 2 GHz timing, 100 MHz state, 64 K depth, 256 K depth and/or 200 MHz optional, external display only. TLA 602 68 channel, 2 GHz timing, 100 MHz state, 64 K depth, 256 K depth and/or 200 MHz optional, external display only. TLA 603 102 channel, 2 GHz timing, 100 MHz state, 64 K depth, 256 K depth and/or 200 MHz optional, external display only. TLA 604 136 channel, 2 GHz timing, 100 MHz state, 64 K depth, 256 K depth and/or 200 MHz optional, external display only. TLA 611 34 channel, 2 GHz timing, 100 MHz state, 64 K depth, 256 K depth and/or 200 MHz optional, internal and external display. TLA 612 68 channel, 2 GHz timing, 100 MHz state, 64 K depth, 256 K depth and/or 200 MHz optional, internal and external display. TLA 613 102 channel, 2 GHz timing, 100 MHz state, 64 K depth, 256 K depth and/or 200 MHz optional, internal and external display. TLA 614 136 channel, 2 GHz timing, 100 MHz state, 64 K depth, 256 K depth and/or 200 MHz optional, internal and external display. TLA 621 34 channel, 2 GHz timing, 100 MHz state, 1 M depth, 200 MHz optional, internal and external display. TLA 622 68 channel, 2 GHz timing, 100 MHz state, 1 M depth, 200 MHz optional, internal and external display. TLA 623 102 channel, 2 GHz timing, 100 MHz state, 1 M depth, 200 MHz optional, internal and external display. TLA 624 136 channel, 2 GHz timing, 100 MHz state, 1 M depth, 200 MHz optional, internal and external display. Tektronix Logic Analyzer Family User Manual, Version 3.2 Software Getting Started TLA 700 Series Logic Analyzer Description The TLA 700 series logic analyzer combines a high-performance logic analyzer module with an optional digitizing storage oscilloscope module and pattern generator module. There are two mainframe styles: the color portable mainframe and the color benchtop mainframe, as well as an expansion mainframe that looks identical to a benchtop mainframe. The color portable mainframe and the color benchtop mainframe are shown in Figure 1–2. Several logic analyzers modules are available in various combinations of channel width and memory depth. All of the logic analyzer modules provide simultaneous state and timing measurements through a single probe. The logic analyzer module implements a feature called MagniVu, an acquisition technology that enables each of the logic analyzer modules to offer 500 picosecond timing resolution on all channels. MagniVu data is always available for all channels and requires no additional probing. Portable mainframe Benchtop mainframe Figure 1–2: TLA 700 series logic analyzers The DSO module incorporates digital real-time signal acquisition. The DSO module data is time correlated with data from other modules for displays and intermodule triggering and signalling. Tektronix Logic Analyzer Family User Manual, Version 3.2 Software 1–3 Getting Started The pattern generator module provides multi-channel signals for use in applications such as simulation of missing system elements, erroneous signals for stress testing or extended analysis for stimulating a device under test. The user interface is built on the Windows operating system allowing you to install any PC-compatible, third-party hardware and software on the instrument. For information on operating the mainframe, logic analyzer module, DSO module, or pattern generator module, refer to the online help. Initial Launch of the TLA Application The first time your logic analyzer is turned on, you will see a TLA Final Setup icon on your desktop. Double click the icon to launch the application for the first time. The TLA application will autolaunch every time thereafter. If the pattern generator software and module are installed in a TLA 700 series logic analyzer, the pattern generator application will also autolaunch. 1–4 Tektronix Logic Analyzer Family User Manual, Version 3.2 Software Getting Started Approaching the TLA Application Windows Typically you use the windows in this application as shown in Figure 1–3. 1 Go to the System window. This is the main access point to the other windows. 2 Use the Setup windows to configure the modules. 3 From the LA Trigger window, load a trigger program from the library and customize it for your application. 4 Click Run to acquire data. 5 View data in the data windows. Figure 1–3: Window usage control flow Tektronix Logic Analyzer Family User Manual, Version 3.2 Software 1–5 Getting Started System Window The System window is your point-of-entry into the logic analyzer and functions as the overall control center. The System window on a TLA 600 series logic analyzer (Figure 1–4) is almost identical to the System window on the TLA 700 series logic analyzer (Figure 1–5). The only difference between the two System windows is that the TLA 700 series System window reflects the card-modular and expansion mainframe capabilities of the TLA 700 series. You can perform the following functions from the System window: H Open module and data windows by clicking their buttons. To select a module without opening its window, click inside the icon. H Create new data windows through the New Data Window wizard. You can create Histogram windows for performance analysis operations, and Source windows to track the execution of source code. You can also create additional Listing and Waveform windows. H Use the System window for an overview of how the modules and data windows relate to one another. Relationships between modules (if any) are always shown; to view which modules are associated with a data window, you must select the module icon. H View which modules provide data to each window by clicking the window name. H Enable and disable modules by clicking their On/Off buttons. H Save and load files containing setup, trigger, and data information using the File menu. Figure 1–4: System window on a TLA 600 series 1–6 Tektronix Logic Analyzer Family User Manual, Version 3.2 Software Getting Started Figure 1–5: System window on a TLA 700 series Setup Windows Before you acquire and display data, you must first configure the modules using the module Setup windows. Each module has its own Setup and Trigger window or dialog box, and each module is set up individually. Configure the Setup window before configuring the Trigger window because the Setup window settings affect the Trigger window selections. An example of a logic analyzer Setup window is shown in Figure 1–6. Figure 1–6: LA Setup window Tektronix Logic Analyzer Family User Manual, Version 3.2 Software 1–7 Getting Started Trigger Windows Modules have their own Trigger windows. The primary purposes of the Trigger windows are to specify the trigger conditions. LA Trigger Window. The logic analyzer (LA) Trigger window is the heart of the logic analyzer. Use the Trigger window to define the conditions when the logic analyzer acquires and stores data. You can define simple or complex trigger programs one step at a time to determine how the logic analyzer finds the data you are interested in. Another common method for setting up a trigger program is to load a trigger program from the trigger library. You can then alter the trigger program details as necessary. Figure 1–7 shows an example of a LA trigger window. Figure 1–7: LA Trigger window 1–8 Tektronix Logic Analyzer Family User Manual, Version 3.2 Software Getting Started DSO Trigger Window. The DSO Trigger window lets you define how to trigger the DSO on analog and digital signals. See Figure 1–8. Figure 1–8: DSO Trigger window Data Windows You can use data windows to display and analyze acquired data from the logic analyzer or DSO modules. The most common data windows are the Listing windows and Waveform windows. These are the two default windows. To display and evaluate complex logic analyzer data, you can create other types of data windows using the New Data Window wizard (such as the Histogram window and the Source window). For more information refer to the online help. You can have as many data windows as you want to display different data or different views of the same data. Listing Windows. Listing windows display logic analyzer data in lists or columns. Some of the Listing window features are described in the following list. H Sample suppression. H Place user marks to flag specific data samples for evaluation. H Use the scroll bars to move through the data or jump to a specific point in the data by clicking the Go To toolbar button and selecting a mark. H Search for a data event by clicking the Define Search button in the toolbar. Tektronix Logic Analyzer Family User Manual, Version 3.2 Software 1–9 Getting Started H Move columns by clicking on their labels to select them, and then dragging them to a new location. H Split the window into two panes for viewing data that is off screen. H Click and drag column resizing. Waveform WIndows. Waveform windows display DSO or LA waveform data. Some of the Waveform window features are described in the following list. H Use the cursors to take time or voltage measurements. H Place user marks to flag specific data samples for evaluation. H Sample suppression. H Busform expansion and contraction. H Move waveforms by clicking on their labels to select them, and then dragging them to a new location. H Click and drag waveform resizing. H Split the window into two panes for viewing data that is off screen. H View collections of logic analyzer module waveforms as busforms. H View the value of a logic analyzer module waveform group versus time using magnitude mode. Histogram Window. Histogram windows display logic analyzer data as histograms. You use Histogram windows to evaluate the performance of software, and is also known as performance analysis. You can perform the following functions in Histogram windows are described in the following list. 1–10 H Use the scroll bars to move through the data. H Sort histogram data by ranges, counts, or percentages. H Change the magnification of histogram bars to view the data in greater detail. H Split the window into two panes for viewing data that is off screen. H View various statistics on the acquired data. Tektronix Logic Analyzer Family User Manual, Version 3.2 Software Getting Started Source Windows. Source windows display source data. You can track the execution of source code based on the data displayed in a Listing window. You can perform the following functions in Source windows are described in the following list. MagniVu Data H Step through source code statements. H Turn source code line numbers on or off. H Place user marks to flag specific data samples for evaluation. H Use the scroll bars to move through the data, or jump to a specific point in the data by clicking the Go To toolbar button and selecting a mark. H Search for source code statements by clicking the Define Search button in the toolbar. H Determine whether there is any acquired data for the corresponding source file displayed in the Source window. The logic analyzer modules have MagniVu data acquisition as a standard feature. MagniVu acquisition offers 500 ps high-resolution timing simultaneous with either 100 MHz or 200 MHz state on all channels through the same probes with no double-probing required. The example shown in Figure 1–9 shows regular data and MagniVu data for the same channels. You can add MagniVu data with the Add Waveform toolbar button. Tektronix Logic Analyzer Family User Manual, Version 3.2 Software 1–11 Getting Started Figure 1–9: Comparing regular and MagniVu data Saving and Loading Setups and Data Once you set up the logic analyzer to your satisfaction you will probably want to save the setup for future use. You can save setup information in two ways, as a saved system file or as a saved module file. Saved system files contain setup and trigger information for each module as well as system level information (such as repetitive properties) and data windows for the logic analyzer. Saved module files contain setup and trigger information for only the module specified. In both cases you have the option of saving acquired data with the files. Execute Save and Load operations from the File menu. For module Save or Load operations, you must first go to the module Setup or Trigger window. Save the setups and data in a folder where you can easily retrieve them. For example, you may want to save the data in the My Documents folder or within a folder of your own choosing. You should not save the data in a location that may be difficult to find or in a location (such as the Windows System folder) that may cause problems with your operating system. Avoid using file name extensions other than the default ones supplied by the system. The logic analyzer may not recognize saved setups with nonstandard file name extensions. Saved system and module files both contain trigger program information. When you load a trigger from the LA Trigger window, you can select a saved system or module file as the source. When you do so, the logic analyzer extracts only the trigger information from the file and loads it to the module. 1–12 Tektronix Logic Analyzer Family User Manual, Version 3.2 Software Getting Started Customizing the Display You can customize your data windows. Using property sheets, you can control data window display parameters. Many screen elements, such as waveforms, columns, and marks, have their own property sheets. Open data window property sheets by clicking the Properties toolbar button on the data window. Open screen element property sheets by double-clicking on the element or its label. DSO Setup Dialog Box The DSO Setup dialog box allows you to select the settings of the DSO module. See Figure 1–10. The DSO module is only available with the TLA 700 series logic analyzer. Figure 1–10: DSO Setup dialog box Tektronix Logic Analyzer Family User Manual, Version 3.2 Software 1–13 Getting Started Approaching the Windows in the TLA 700 Series Pattern Generator Application Typically you use the windows in this application as shown in Figure 1–11. 1 Go to the System Window. This is the main access point to the other windows. 3 Use the Program Window to generate the Block, Sequence, Sub Sequence and event Press the Program button Press the Setup button 2 Use the Setup Window to configure the module From Block Page 4 Use the Listing Window to generate the pattern data for each block 5 Click the Run toolbar button to send the program to the hardware 6 1. Run the TLA software and click Run toolbar to acquire the data 2. View the pattern generated in Listing and Waveform Windows Figure 1–11: Window usage control flow 1–14 Tektronix Logic Analyzer Family User Manual, Version 3.2 Software Getting Started Pattern Generator System Window The pattern generator System window graphically represents the pattern generator configuration. When you start the application, the window opens automatically. Each graphic object represents the pattern generator modules currently installed in the mainframe. The modes are placed in slot order by the application. The graphics in the System Window are not movable. Scroll bars appear as needed when the window is too small to display all elements. The System Window contains controls which allow you to set various system– wide parameters, enable and disable modules, and access the Setup and pattern Editing windows for each module. This window functions as the main application window and provides a familiar starting point for TLA users. Figure 1–12: System window Tektronix Logic Analyzer Family User Manual, Version 3.2 Software 1–15 Getting Started Setup Windows Before you can generate data, you must first configure the modules using the module Setup windows. The module setup screen allows you to set various parameters pertaining to the current pattern generator module. The channel setup screen allows you to set the speed/width of each logical module. The probe setup screen allows you to specify the probe details corresponding to that module. Figure 1–13: Module Info Setup window Figure 1–14: Channel Setup window 1–16 Tektronix Logic Analyzer Family User Manual, Version 3.2 Software Getting Started Figure 1–15: Probe Setup window Figure 1–16: Signals Setup window Tektronix Logic Analyzer Family User Manual, Version 3.2 Software 1–17 Getting Started Program Windows The Program Window provides access to the Block Definition and its corresponding Pattern Editing Window, Sequence Definition, Sub-Sequence Definition, Event Definition. The Program Window allows the user to write the Sequence and its related Blocks, SubSequences and Events, what is used to output the longer pattern than the physical pattern memory. Figure 1–17: Block Definition Screen window Figure 1–18: Sequence Definition Screen window 1–18 Tektronix Logic Analyzer Family User Manual, Version 3.2 Software Getting Started Figure 1–19: Sub Sequence Screen window Figure 1–20: Event Screen window Tektronix Logic Analyzer Family User Manual, Version 3.2 Software 1–19 Getting Started Listing Windows The Listing Window allows the vector data to be edited, by block, in numeric format. You can open multiple pattern editing windows to allow selected data to be easily moved from one block to another using copy/paste. Figure 1–21: Listing window Pattern Generator Run Properties Dialog Box The pattern generator (PG) run properties dialog box selections determine if the logic analyzer Run button will start and stop the pattern generator (PG) modules. See Figure 1–22. The pattern generator module is only available with the TLA 700 series logic analyzer. Figure 1–22: Pattern Generator Run Properties dialog box 1–20 Tektronix Logic Analyzer Family User Manual, Version 3.2 Software Getting Started Backing Up User Files Back up your user files on a regular basis. Use the Windows Back Up tool to back up files stored on the hard disk. The Back Up tool is located in the System Tools folder in the Accessories folder. Start the tool and determine which files and folders you want to back up. Use the Windows online help for information on using the Back Up tool. Frequently back up your user-generated files. For the logic analyzer, the user-generated files consist of saved system and module files, which have a “.tla” file name extension. Installing Microprocessor and Bus Support Software Refer to the documentation that was shipped with your support package. Getting Help This section lists sources for you to get more information. Online Help The online help gives detailed information about the logic analyzer and its modules. Look in the online help for details about user interface selections that are not described in this manual. The online help also has basic operating information for microprocessor support products. To access online help, go to the Help menu, or click the toolbar buttons shown: Click for Topic help. Click for What’s This? help on selected object. Help Topics. Help topics tell you how to perform tasks and describe software features and selections shown on the screen. There are two types of help topics: overview topics and task topics. Overview topics describe application features, such as the different application windows. Overview topics also describe concepts. Overview topics are available through the Help menu and through Help buttons in dialog boxes. From the Help menu, click Help Topics, and locate the topic using the Contents or Index tab. The Help on Window selection in the Help menu provides overview help for the currently-selected window. Tektronix Logic Analyzer Family User Manual, Version 3.2 Software 1–21 Getting Started Task topics provide procedure information about how to perform specific tasks. Task topics are available through the Help menu. From the Help menu, click Help Topics, and locate the topic using the Contents or Index tab. What’s This? Help. What’s This? help provides a short description of the control or screen feature selected. First click the What’s This? button on the toolbar, and then click the item of interest. For further information about the item, go to the Topic help. TPI Online Help. Select Help on TPI from the drop-down help menu for information on using the TLA Programmatic Interface. Pattern Generator Online Help. Select Help on TLA 7PG2 from the drop-down help menu for information on using the TLA Pattern Generator. PPI Online Help. Select Help on the TLA 7PG2 PPI from the drop-down help menu for information on using the TLA Pattern Generator. Windows Online Help. Information about Windows features is available through the Windows help system. Access Windows help as you would with any Windows application. Release Notes The online Release Notes contain information about this release of the logic analyzer application. Check the Release Notes for information such as software compatibility and software version differences from last release. To access the Release Notes, click Start, point to Programs, point to Tektronix Logic Analyzer, and click TLA Release Notes. 1–22 Tektronix Logic Analyzer Family User Manual, Version 3.2 Software Getting Started Connecting Logic Analyzer Probes to the TLA 600 Series Connect the logic analyzer probes and the optional retaining brackets as shown in Figure 1–23. Attach optional probe retainer brackets Probes Match color-coded labels Figure 1–23: Connecting the logic analyzer probes Turning On the TLA 600 Series Logic Analyzer Follow these steps to turn on the logic analyzer for the first time: CAUTION. Connect the keyboard, mouse, and other accessories before applying power to the logic analyzer. Connecting the accessories after turning on the logic analyzer can damage the accessories. 1. Connect the power cord. See Figure 1–24. 2. If you have an external monitor, connect the power cord and turn on the monitor. Tektronix Logic Analyzer Family User Manual, Version 3.2 Software 1–23 Getting Started Power Switch Fuse (2 required) AC Power Figure 1–24: Line fuse and power cord connector locations 3. Turn on the logic analyzer as follows: a. Press the On/Off switch to turn on the logic analyzer (see Figure 1–25 for the switch location). b. Wait for the logic analyzer to complete power-on self-tests, start Windows, and start the TLA application. On/Stand by switch Figure 1–25: On/Standby switch locations 1–24 Tektronix Logic Analyzer Family User Manual, Version 3.2 Software Getting Started TLA 61X and TLA 62X Logic Analyzer Front Panel Controls For the TLA 61X and TLA 62X you can use the front panel keys as an alternative to an external keyboard. Most keys and key combinations are available using the front panel. See Figure 1–26. Horizontal + Vertical General–Purpose Knob Run/Stop Qwerty Keypad Figure 1–26: Logic analyzer front panel For key combinations, it is not necessary to hold down more than one key at a time. For example, you can press the SHIFT key in the hexadecimal keypad, and then press a keypad key to accomplish a Shift+key combination. The same is true for other key combinations, such as CTRL and ALT keys. Tektronix Logic Analyzer Family User Manual, Version 3.2 Software 1–25 Getting Started TLA 600 Series External Connectors The external connectors on the rear panel of the TLA 600 series logic analyzer are shown in Figure 1–27. Description..........................Icon/Label Locations Monitor............... Printer.......................... RS-232................. Network............................. Mouse.................................... Keyboard........................ USB.................................... Audio Line In........................... Audio Line Out........................ CDDrive......................... EXTERNAL SIG OUT EXTERNAL SIG IN SYSTEM TRIG OUT SYSTEM TRIG IN Card Slot........... Figure 1–27: TLA 600 series external connectors 1–26 Tektronix Logic Analyzer Family User Manual, Version 3.2 Software Getting Started TLA 600 Series Chassis Ground Connections Figure 1–28 shows chassis ground connections. Use the chassis ground connections to connect the grounds of one or more instruments to the logic analyzer to ensure a common ground connection between instruments. WARNING. Do not remove the safety ground screw from the logic analyzer because a dangerous grounding condition may result. The safety ground screw must always be in place to ensure proper grounding of the power supply to the logic analyzer. Ground connections Figure 1–28: Location of ground connections Tektronix Logic Analyzer Family User Manual, Version 3.2 Software 1–27 Getting Started Connecting Logic Analyzer Probes to the TLA 700 Series Connect the logic analyzer probes and the optional retaining brackets as shown in Figure 1–29. Match color-coded labels Attach optional probe retainer brackets Figure 1–29: Connecting the logic analyzer probes Configuring the P6470 Pattern Generator Probe The P6470 TTL/CMOS probe comes standard with a 75 W series termination resistor pack. This provides impedance matching for the pattern generator and the system under test. To change the series termination resistors, use the optional 015–A095–00 kit with 2 each of 43 W, 75 W, 100 W, and 150 W resistor packs. To change the packs, do the following: 1. Turn off the logic analyzer. 2. Disconnect the probe from the logic analyzer. 3. Unscrew the 4 screws holding together the probe’s case. 4. Push in the holes at both sides of the probe case with a small screwdriver to unlock the latches and pull apart the two sides of the case. 1–28 Tektronix Logic Analyzer Family User Manual, Version 3.2 Software Getting Started 5. Remove the two blue resistor packs, R910 and R900 on Figure 1–30. 6. Insert the two replacement resistor packs. 7. Put together the case and secure it with the 4 screws. Push here R910 R900 ew ew ed Figure 1–30: Reconfiguring the P6470 TTL/CMOS probe Tektronix Logic Analyzer Family User Manual, Version 3.2 Software 1–29 Getting Started Connecting Pattern Generator Probes to the TLA 700 Series Turn off the logic analyzer before connecting the pattern generator probe. Connect the pattern generator probe as shown in Figure 1–31. The probe cable is reversible. You can connect the probe cable in either direction. CAUTION. To prevent damage to the pattern generator module or probe, do not connect or disconnect the pattern generator cables to or from the pattern generator module or probe while the logic analyzer is on. The pattern generator probe cable is not compatible with a SCSI cable, do not use a SCSI cable with the pattern generator module or use the pattern generator probe cable with a SCSI instrument. The probe is fragile, handle carefully Figure 1–31: Connecting the pattern generator probes Only one module in the system can drive Signal 1 and only one module can drive Signal 2. When used with the expansion mainframe, all modules which drive Signal 3 should be in the same mainframe and all modules which drive Signal 4 should be in the same mainframe. The logic analyzer and DSO modules use a logical expression (True/False) for Signals 1, 2, 3, and 4. However, the pattern generator module uses a physical 1–30 Tektronix Logic Analyzer Family User Manual, Version 3.2 Software Getting Started expression (High/Low) for these signals. Please use the tables in Appendix E to convert physical expressions to logical expressions or vice versa. Turning On the TLA 700 Series Logic Analyzer Follow these steps to turn on the logic analyzer for the first time: CAUTION. Connect the keyboard, mouse, and other accessories before applying power to the mainframe. Connecting the accessories after turning on the mainframe can damage the accessories. 1. Check that the line fuse is correct for your application. See Table 1–2. 2. Connect the power cord. See Figure 1–32. 3. If you have an external monitor, connect the power cord and turn on the monitor. Table 1–2: TLA 700 series line fuses Line voltage Rating Tektronix part number 90 V to 132 V operation 8 A, fast blow, 250 V 159-0046-00 207 V to 250 V operation 6.3 A, fast blow, 250 V 159-0381-00 90 V to 132 V operation 20 A, slow blow, 250 V 159-0379-00 103 V to 250 V operation 15 A, fast blow, 125 V 159-0256-00 207 V to 250 V operation 6.3 A, fast blow, 250 V 159-0381-00 Portable mainframe Benchtop mainframe Tektronix Logic Analyzer Family User Manual, Version 3.2 Software 1–31 Getting Started AC power and fuse Figure 1–32: Line fuse and power cord connector locations CAUTION. Although the benchtop mainframe can use the power cord with the 15 A plug, mainframes operating at low line (90 VAC) with four or more instrument modules may require the power cord with the 20 A plug. If you have four or more modules in your mainframe, you must determine the correct fuse and power cord combination to avoid overloading the power distribution system. See Power Cord and Line Fuse Requirements for the Benchtop Mainframe for further information. 4. Turn on the mainframe as follows: a. Press the On/Standby switch to turn on the mainframe (see Figure 1–33 for the switch location). b. Wait for the mainframe to complete power-on self-tests, start Windows, and start the TLA 700 application. 1–32 Tektronix Logic Analyzer Family User Manual, Version 3.2 Software Getting Started Figure 1–33: On/Standby switch locations Turning On the TLA 7XM Expansion Mainframe The expansion mainframe is powered on remotely when you power on the benchtop or portable mainframe. Turning Off the TLA 700 Series Mainframe Both the TLA 714 portable mainframe and the TLA 720 benchtop mainframe have a built-in soft power-down function that safely powers down the mainframe when you press the On/Standby switch. The TLA 711 benchtop mainframe does not have a built-in soft power-down function; you must turn off the mainframe using the standard Windows shutdown process before depressing the On/Standby switch. You can set the shutdown mode in the Mainframe Utilities tool in the Windows control panel. CAUTION. When turning off the TLA 711 benchtop mainframe, use the Windows shut down procedure. Turning off the TLA 711 benchtop mainframe prematurely can corrupt the software. Tektronix Logic Analyzer Family User Manual, Version 3.2 Software 1–33 Getting Started Turning Off the TLA 7XM Expansion Mainframe The expansion mainframe is powered down remotely when you power down the benchtop or portable mainframe. TLA 704 and TLA 714 Front Panel Controls The portable mainframe has front panel controls that operate the logic analyzer without an external mouse or keyboard. Changes the value in a selected box (such as sample rate or memory depth). With a cursor selected, the knob controls cursor position. Does not scroll data. Scrolls data vertically. Changes the height of selected waveform (Waveform window only). Moves the display pointer and selects objects. See GlidePoint Pad for more information. Scrolls data horizontally. Changes Time/Div in the Waveform window. Figure 1–34: Portable mainframe front panel Keys For the portable mainframe, you can use the front panel keys as an alternative to an external keyboard. Most keys and key combinations are available using the front panel. For key combinations, it is not necessary to hold down more than one key at a time. For example, you can press the SHIFT key in the hexadecimal keypad, and then press a keypad key to accomplish a Shift+key combination. The same is true for other key combinations, such as CTRL and ALT keys. 1–34 Tektronix Logic Analyzer Family User Manual, Version 3.2 Software Getting Started GlidePoint Pad The Color Portable Mainframe has a GlidePoint pad as an alternative to the mouse. To move the pointer, slide your finger lightly over the surface of the pad. Tap the surface to simulate a click of the left mouse button, or use the control buttons to select the type of operation. Figure 1–35: GlidePoint pad TLA 700 Series External Connectors The mainframe external connectors are shown in Figure 1–36. The following connections are available: H System Trigger In and System Trigger Out, used to receive or send a trigger from/to an external source. H External Signal In and External Signal Out, used to receive or send a signal from/to an external source. H Accessory connections. Tektronix Logic Analyzer Family User Manual, Version 3.2 Software 1–35 Getting Started PC cards (2) SVGA OUT port SYSTEM TRIG IN SYSTEM TRIG OUT COM port EXTERNAL SIG IN LPT printer port EXTERNAL SIG OUT Portable mainframe (rear view) Indicator PC cards (2) Floppy drive CD-ROM Disc SVGA OUT port HARD DRIVE COM port USB Mouse SYSTEM TRIG IN SYSTEM TRIG OUT EXTERNAL SIG IN Keyboard EXTERNAL SIG OUT LPT printer port Benchtop mainframe (front view) Figure 1–36: TLA 700 series external connectors 1–36 Tektronix Logic Analyzer Family User Manual, Version 3.2 Software Getting Started Connecting Accessories to the TLA 700 Series The accessory connections are the same as those you would make on a personal computer. The connection points are shown in Figure 1–37. Use the icons that appear in the circled areas as a guide. See Table 1–3 for additional connection information. Icon Description Monitor RS-232 Printer USB Mouse Keyboard Floppy disk drive PC card (LAN or other) Figure 1–37: Locations of external connectors Tektronix Logic Analyzer Family User Manual, Version 3.2 Software 1–37 Getting Started Table 1–3: Additional accessory connection information Item Description Monitor If you use a non-standard monitor, you may need to change the the Windows display settings to achieve the proper resolution for your monitor. See Set the Display Driver or Adjust the Display Desktop Settings for an External Monitor. Printer Connect the printer to the EPP (enhanced parallel port) connector directly. If your printer has a DB–25 connector, use the adapter cable that came with your logic analyzer to connect to the EPP connector. Rackmount See the TLA 720 Benchtop Mainframe Rackmount Installation Instructions for information on installing the rackmount kit. TLA 700 Series Chassis Ground Connections Figure 1–38 shows chassis ground connections. Use the chassis ground connections to connect the grounds of one or more instruments to the mainframe to ensure a common ground connection between instruments. WARNING. Do not remove the safety ground screw from the benchtop mainframe. A dangerous grounding condition may result. The safety ground screw must always be in place to ensure proper grounding of the power supply to the mainframe. 1–38 Tektronix Logic Analyzer Family User Manual, Version 3.2 Software Getting Started Chassis ground Safety ground screw (Benchtop mainframe only) Figure 1–38: Location of ground connections Connecting Probes to the Target System The logic analyzer connects to the target system through probes. The logic analyzer probes allow you to connect to the target system in several different ways as shown in the following illustrations. You can use the color-coded probe channels to map the hardware connections to the channel settings in the LA Setup window. Each logic analyzer probe group consists of eight channels that can be individually named in the LA Setup menu. Connect the probes to the logic analyzer by matching the color-coded label to the label on the logic analyzer module. To provide a secure connection to the logic analyzer module when using the P6417 probe, use the probe retainer bracket with the probe connector. General Purpose Connections The P6417 and P6418 probes provide a means to connect to the target system for most applications. For more information on the P6417 and P6418 probes and how to connect it to your target system, refer to the P6417 & P6418 Probe Instruction Manual. High-Density Probe Connections The P6434 Mass Termination Probe allows you to connect 34 logic analyzer channels to a microprocessor probe adapter or directly to the target system. To connect to the target system directly, you must include compatible Mictor connectors in your circuit board design. Tektronix Logic Analyzer Family User Manual, Version 3.2 Software 1–39 Getting Started For more information on the P6434 Mass Termination Probe and how to connect it to your target system, refer to the P6434 Mass Termination Probe Instructions. Microprocessor Connections 1–40 The P6417, P6418 and the P6434 probes can be connected to microprocessor adapters. Refer to the documentation that comes with your microprocessor disassembler package for details about connecting the probes to your target system. Tektronix Logic Analyzer Family User Manual, Version 3.2 Software TLA 600 Series Installation Installing a TLA 600 Series Logic Analyzer This chapter describes all of the steps needed to install your TLA 600 series logic analyzer for the first time. It is written from the perspective that you purchased most of the items uninstalled and you intend to install all of the different items. This chapter deals mainly with hardware installation. The basic operating software is already installed on the hard disk. If you ordered additional software, such as microprocessor or bus support, you will need to install it. Refer to the installation instructions that are shipped with that product. Check the Shipping List Verify that you have received all of the parts of your logic analyzer. Use the shipping list to compare against the actual contents of your order. You should also verify the following: H Verify that you have the correct power cords for your geographical area. H Verify that you have backup copies of the installed software. Store the backup software in a safe location where you can easily retrieve the software for maintenance purposes. H Verify that you have the correct probes. H Verify that you have all the standard and optional accessories that you ordered. NOTE. Keep the software packaging available because you will need it to enter the Windows software registration number when you first turn on the logic analyzer. Fill out and send in the customer registration card which is packaged with this manual. Tektronix Logic Analyzer Family User Manual, Version 3.2 Software 2–1 Installing a TLA 600 Series Logic Analyzer Site Considerations Read this section before attempting any installation procedures. This section describes site considerations, power requirements, and ground connections for your logic analyzer. The TLA 600 series logic analyzer is designed to operate on a bench or on a cart in the normal position (on the bottom feet). For proper cooling, at least two inches (5.1 cm) of clearance is recommended on the rear and sides of the logic analyzer. You can also operate the logic analyzer while it rests on the rear feet. If you operate the logic analyzer while it is resting on the rear feet, make sure that you properly route any cables coming out of the rear of the logic analyzer to avoid damaging them. CAUTION. Keep the bottom of the logic analyzer clear of obstructions to ensure proper cooling. Table 2–1: Additional accessory connection information Item Description Monitor If you use a non-standard monitor, you may need to change the the Windows display settings to achieve the proper resolution for your monitor. Printer Connect the printer to the ECP (enhanced parallel port) connector directly. If your printer has a DB–25 connector, use the adapter cable that came with your logic analyzer to connect to the ECP connector. Initial Launch of the TLA Application The first time the logic analyzer is turned on, there will be a TLA Final Setup icon on your desktop. Double click the icon to launch the application for the first time. The TLA application will autolaunch every time thereafter. 2–2 Tektronix Logic Analyzer Family User Manual, Version 3.2 Software Installing a TLA 600 Series Logic Analyzer Performing the Incoming Inspection Incoming inspection consists of verifying the basic operation of the logic analyzer. The power-on diagnostics check the basic functionality. These diagnostics run every time you turn on the logic analyzer. You can also verify more detailed functionality by running the self calibration and extended diagnostics. NOTE. Allow the logic analyzer to warm up for 30 minutes before running the self calibration. Disconnect all attached probes. Select the System menu, and point to Calibration and Diagnostics. Run the self calibration followed by the extended diagnostics by selecting the proper tab. Results of the tests display on the individual property page. NOTE. The time required to run the self calibration on the logic analyzer modules depends on the number of acquisition channels. A logic analyzer with a large number of channels may take several minutes to run the self calibration. Checking the Logic Analyzer Probes (Optional) Connect the logic analyzer probes to a signal source, start an acquisition, and verify that the acquired data is displayed in either the listing or waveform windows. Checking the Logic Analyzer (Optional) To check the logic analyzer diagnostics not covered by the TLA application software, run the QA+Win32 diagnostics or the TLA mainframe diagnostics located under the Windows Start menu (under the Tektronix TLA programs). Quit theTLA application before running the external diagnostics. Tektronix Logic Analyzer Family User Manual, Version 3.2 Software 2–3 Installing a TLA 600 Series Logic Analyzer Creating an Emergency Startup Disk To create an emergency startup disk that you can use to restart your logic analyzer in case of a major hardware or software failure, create this disk and then store it in a safe place. The emergency startup disk contains basic files to restart your logic analyzer. It also contains files to check and format the hard disk. Follow these steps to create the emergency startup disk: 1. Exit the TLA application. 2. Click the Windows Start button, point to Settings, and click Control Panel. 3. Double-click Add/Remove Programs. 4. Select the Startup Disk property page. 5. Insert a floppy disk into the disk drive and follow the on-screen instructions to create the startup disk. Backing Up User Files You should always back up your user files on a regular basis. Use the Windows Back Up tool to back up files stored on the hard disk. To locate the Back Up tool click Start, point to Programs, Accessories, System Tools and click Backup. 2–4 Tektronix Logic Analyzer Family User Manual, Version 3.2 Software In Case of Problems This chapter provides information that addresses problems you may encounter while installing your TLA 600 series logic analyzer. Diagnostics The following diagnostic tools are available with your logic analyzer: Power-On Diagnostics. Power-on diagnostics run when you first turn on the logic analyzer, or when you first start the TLA application. If any diagnostic failures occur during turn on, the Calibration and Diagnostics property page appears. Extended Diagnostics. Extended diagnostics test the logic analyzer more thoroughly than the power-on diagnostics. Before running the extended diagnostics, disconnect any attached probes. TLA Mainframe Diagnostics. The TLA mainframe diagnostics program is a stand alone Windows application. These diagnostics check operation of the logic analyzer beyond the basic PC circuitry. These diagnostics also check the front panel knobs of the logic analyzer. QA+Win32 Diagnostics. The QA+Win32 diagnostics are a separate Windows application located in the Windows Start Programs menu. The diagnostics check the basic operation of the controller. Software Problems Your TLA logic analyzer comes with most software already installed. Before running any of the diagnostics, you should check the online release notes to verify the logic analyzer software is compatible with the firmware. Run the QA+Win32 diagnostics software to identify hardware or software problems. Follow the QA+Win32 online help instructions for running the diagnostics software. The diagnostics are located in the Start menu under: \Programs\QA+Win32 Many software problems can be due to corrupted or missing software files. In most cases the easiest way to solve software problems is to reinstall the software and follow the on-screen instructions. Refer to Upgrading Software for instructions on reinstalling or upgrading software. Tektronix Logic Analyzer Family User Manual, Version 3.2 Software 2–5 In Case of Problems Refer to Table 2–2 on page 2–6 for a list of software and hardware troubleshooting information and recommended action. If you suspect problems with the TLA software, contact your local Tektronix representative. Hardware Problems If you are certain that you have installed the logic analyzer correctly, run the TLA extended diagnostics (located under the System menu) to identify any problems. If your logic analyzer powers up so that you have access to the desktop, run the QA+Win32 diagnostics software to identify possible controller hardware problems. Follow the QA+Win32 online help instructions for running the diagnostics software. The diagnostics are located in the Start menu. You can also run the external TLA mainframe diagnostics to identify problems not covered by other diagnostics. The TLA mainframe diagnostics are located under the Start menu under the Tektronix Logic Analyzer programs. Check for Common Problems Use Table 2–2 to help isolate problems. This list is not exhaustive, but it may help you eliminate problems that are quick to fix, such as a blown fuse. Table 2–2: Failure symptoms and possible causes Symptom Possible causes and recommended action Logic analyzer does not turn on Verify that all power cords are connected to the logic analyzer and to the power source. Check that the logic analyzer receives power when you press the On/Standby switch. Check that fans start and that front-panel indicators light. Check that power is available at the power source. Check for failed fuses. Logic analyzer failure: contact your local Tektronix service center. Monitor does not turn on Check the monitor power cord connection. Check for failed fuse. Monitor failure: contact the vendor of your monitor for corrective action. 2–6 Tektronix Logic Analyzer Family User Manual, Version 3.2 Software In Case of Problems Table 2–2: Failure symptoms and possible causes (Cont.) Symptom Possible causes and recommended action Monitor display is blank Check that the monitor is connected to the logic analyzer; replace the cable if necessary. If logic analyzer display is blank, try connecting external monitor; if both displays are blank, contact your local Tektronix service center. External monitor controls turned down; adjust monitor controls for brightness and contrast. Check the controller BIOS setups for the monitor. Faulty monitor; contact the vendor of your monitor for corrective action. Logic analyzer turns on but Check for disk in floppy disk drive; make sure logic analyzer boots from the hard disk drive. does not complete the power-on Possible software failure or corrupted hard disk; see Software Problems at the beginning of this sequence chapter. Logic analyzer does not recognize accessories such as monitor, printer, or keyboard Check that accessories are properly connected or installed. Try connecting other standard PC accessories or contact your local Tektronix service center. Windows comes up but the TLA application does not Logic analyzer not set up to start TLA application at power-on. Start application from the desktop, by double-clicking on the TLA Final Setup icon located on the desktop. Faulty or corrupt software; reinstall the TLA application software. Windows comes up in Safe mode Exit the Safe mode and restart the logic analyzer. Incompatible hardware and hardware driver software. Either install the hardware driver or remove the incompatible hardware. TLA Startup Sequence The following information is intended to provide troubleshooting hints in case the logic analyzer fails to complete the startup sequence. Refer to Figure 2–1 on the next page while reading the following paragraphs. At power-on, the logic analyzer software starts the logic analyzer and kernel tests. If the logic analyzer passes the kernel tests, it attempts to boot the Windows operating system. If the logic analyzer fails the kernel tests, it displays the error code(s), beeps, and terminates the startup sequence. The Windows operating system starts the resource manager. The resource manager (ResMan32) performs the following tasks: H Runs logic analyzer power-on self tests. H Verifies the power-on self test status. H Records the power-on self test failures. H Determines the logic analyzer configuration. Tektronix Logic Analyzer Family User Manual, Version 3.2 Software 2–7 In Case of Problems H Executes the system controller power-on diagnostics. After completing all of the above tasks (if you have performed the TLA Final Setup), the logic analyzer starts the TLA application which performs the following tasks: H Runs power-on diagnostics. H Runs power-on diagnostics on the TLA system. H Records the Pass/Fail status in the Calibration and Diagnostics property sheet. If no failures occur, the application is ready to use for regular tasks. Turn on Logic analyzer kernel test Terminate and display error code Fail Acquisition kernel test Pass/Fail Pass/Fail ? Verify kernel self test status Log failures and build configuration Pass MS Windows boot Start TLA application Start resource manager System controller tests TLA acquition board power-on diagnostics TLA system power-on diagnostics Records failures in Calibration and Diagnostic property sheet Ready Figure 2–1: TLA startup sequence 2–8 Tektronix Logic Analyzer Family User Manual, Version 3.2 Software Installing Software on the TLA 600 Series This section describes procedures for installing software or firmware on the TLA 600 series logic analyzer. NOTE. If you have any files that you want to keep, back up, copy and save the files before you proceed. This procedure will reformat the hard disk drive, and all files will be lost. NOTE. You should perform all of the procedures in this section in sequence. Installing Software This section provides information for installing software in your logic analyzer. In addition to the TLA application software, there are other software programs that are installed separately; Table 2–3 lists some of the software and installation information. Table 2–3: Software not covered by the TLA software setup Software Installation information Microsoft Windows Operating System1 Refer to the Windows documentation or contact your local Microsoft representative. QA+Win32 Diagnostic Software Refer to the QA+Win32 online documentation or to Reinstall the QA+Win32 Diagnostic Software on page 2–18. Microprocessor or bus support Refer to the manual that was shipped with the microprocessor software or bus support. PC Card Software Refer to the instructions that come with your PC Card. Other Software Refer to the instructions that come with your software. 1 For information on installing Microsoft Windows software not available on the Windows backup CD, refer to the Microsoft Web site at: www.microsoft.com Tektronix Logic Analyzer Family User Manual, Version 3.2 Software 2–9 Installing Software on the TLA 600 Series Flashing the Controller BIOS To flash the BIOS, complete the following steps: 1. Exit all applications and turn the logic analyzer off. 2. Insert the floppy disk labeled Tektronix Logic Analyzer Family, Controller BIOS, Version SU81010A.86A.0005.P05, For TLA 600 Controllers. 3. Turn the logic analyzer on. The system will boot up from the floppy disk and automatically flash the BIOS. Wait for the procedure to complete. 4. After the flash procedure has completed, turn the logic analyzer off. 5. Remove the floppy disk. Setting Up the Controller BIOS This procedure is necessary after replacing the hard disk or when the CMOS settings are corrupted or lost. To configure the Controller BIOS, complete the following steps: 1. Turn on the logic analyzer and press function key F2 before the logic analyzer boots the Windows operating system.. 2. Default the settings (F9) and verify the hard disk was auto-recognized and that the correct size of the hard disk is displayed in the Primary Master setting. 3. Verify that all of the settings are the same as the settings in Table 2–4. 4. Press function key F10 to exit and save the BIOS setup. 2–10 Tektronix Logic Analyzer Family User Manual, Version 3.2 Software Installing Software on the TLA 600 Series Table 2–4: TLA 600 Controller BIOS setup Parameter Setting/Description 2nd Field setting Memo Main Processor Type Intel (R) Celeron No active selections Processor Speed 500 MHz No active selections Cache RAM 128 KB No active selections Total Memory 64 MB 64 MB or 128 MB Memory Bank 0 64 MB Memory Bank 1 Not Installed System Time [##:##:##] System Date [Day ##/##/####] Will be installed as an option Advanced " Boot Configuration Plug & Play O/S [No] Reset Configuration Data [No] Numlock [Off] " Peripheral Configuration Serial Port A [Auto] Serial Port B [Disabled] Parallel Port [Auto] Mode [ECP] Audio Device [Enabled] LAN Device [Enabled] Legacy USB Port [Enabled] " IDE Configuration IDE Controller [Both] Hard Disk Pre-Delay [Disabled] " Primary IDE Master [Mfg. name – model] (CD ROM) [Auto] " Primary IDE Slave [Not installed] [Auto] " Secondary IDE Master [Mfg. name – model] (HDD) [Auto] " Secondary IDE Slave [Not installed] [Auto] Tektronix Logic Analyzer Family User Manual, Version 3.2 Software ie: [CD–540E ] ie: [IBM–DARA–206000 ] 2–11 Installing Software on the TLA 600 Series Table 2–4: TLA 600 Controller BIOS setup (Cont.) Parameter Setting/Description 2nd Field setting Memo " Diskette Configuration Diskette Controller [Enabled] Floppy A [1.44/1.25 MB 3 1/2 Diskette Write Protect [Disabled] " Event Log Configuration Event Log [Space Available] Not Active Selections Event Log Validity [Valid] Not Active Selections " View Event Log Event Log: Pre-Boot Error: CMOS Checksum Error Clear Event Log [No] Event Logging [Enabled] " Mark Events as Read On the 2nd attempt reading “No unread events” [Yes] " Video Configuration Primary Video Adapter [PCI] PCI = Internal Display AGP = External Monitor Supervisor Password Is [Not Installed] Not Active Selections User Password Is [Not Installed] Not Active Selections " Security " Set Supervisor Password Enter Password " Set User Password Enter Password " Power Power Management [Enabled] Inactivity Timer [Off] Hard Drive [Enabled] Video Power Down [Disabled] ACPI Suspend State [S1 State] " Boot Quiet Boot [Enabled] Quick Boot [Enabled] Scan Upper Flash Area [Disabled] After Power Failure [Last State] On Modem Ring [Stay Off] On LAN [Power On] 2–12 Tektronix Logic Analyzer Family User Manual, Version 3.2 Software Installing Software on the TLA 600 Series Table 2–4: TLA 600 Controller BIOS setup (Cont.) Parameter Setting/Description On PME [Stay Off] 1st Boot Device [Floppy] 2ed Boot Device [IDE-HDD] 3ed Boot Device [ATAPI CDROM] 4th Boot Device [Intel UNDI, PXE-2.0 (b)] 5th Boot Device [Disabled] 2nd Field setting Memo " IDE Drive Configuration " Primary IDE Master [1st IDE] " Primary IDE Slave [2nd IDE] " Secondary IDE Master [3ed IDE] " Secondary IDE Slave [4th IDE] " Exit " Exit Saving Changes Yes or No " Exit Discarding Changes Yes or No " Load Setup Defaults Yes or No " Load Custom Defaults Yes or No " Save Custom Defaults Yes or No " Discard Changes Yes or No Reformatting the Hard Disk Drive You should not reformat the hard disk drive unless it is absolutely necessary. If you find that you need to format the hard disk, (if possible) make sure that you have backup copies of your user files so that you can reinstall them later. You must perform the following procedure after you replace the hard disk, or when the partitioning or the format of the hard disk has been damaged. You will use the fdisk and format programs on the Windows 98 SE boot floppy disk to partition and format the hard disk. Complete the following steps to format the hard disk: 1. Insert the Windows 98 SE Boot floppy disk in the floppy disk drive. This floppy disk is used to install Windows. Tektronix Logic Analyzer Family User Manual, Version 3.2 Software 2–13 Installing Software on the TLA 600 Series 2. Turn on the logic analyzer so that it boots from the floppy disk. 3. Select option 5 on the Startup menu to start the logic analyzer without CD ROM support. 4. At the prompt, enter the command FDISK. You must execute the FDISK command before loading windows. 5. Enter Y when you are asked if you want to select Large Disk Support. 6. Select option 3 to delete any existing partitions. 7. Select option 1 to create a new partition on the hard disk. 8. Select option 1 again to specify that the new partition is to be the primary DOS partition. 9. Enter Y to use the maximum available size for the DOS partition. 10. Press the ESC key to exit the FDISK utility. 11. Press the CTRL, ALT, and Delete keys simultaneously to reboot. 12. Select option 1 on the Startup menu to select internal CD ROM support. 13. Enter FORMAT C: to format the hard disk drive. Installing Windows 98 SE The following procedure requires the hard disk drive to be properly formatted. To reinstall the Windows 98 SE (Second Edition) operating system software, complete the following steps: 1. Start the logic analyzer from the Windows 98 SE Boot floppy disk. 2. Insert the Windows 98 SE CD into the CD ROM drive. Select option 1 on the Startup menu. 3. Change the drive to the CD ROM drive. 4. Enter “Setup /p j” The /p j switch will cause ACPI support to be installed. 2–14 Tektronix Logic Analyzer Family User Manual, Version 3.2 Software Installing Software on the TLA 600 Series 5. Remove the Windows 98 SE Boot floppy disk. 6. Follow the instructions to set up Windows 98 SE. Refer to the Microsoft Windows 98 SE documentation for additional information. When prompted, choose “Typical” for the installation type. 7. Restart the logic analyzer when prompted. The logic analyzer should start up in Windows 98 SE. You are now ready to install the TLA application software. Installing the Firmware Hub Driver To install the firmware hub driver, complete the following steps: 1. Install the CD labeled “Disc1-Logic Analyzer Software.” 2. Using the Windows Explorer, locate and execute: D:\Drivers\TLA600\Intel SU810 firmware hub\setup.exe 3. Click the default buttons to install the SU810 Firmware Hub Driver. 4. When the script completes, click Restart Later. Installing the Video Drivers To install the video drivers you must have an external monitor connected, preferably, a PnP (plug-and-play) monitor, and complete the following steps: 1. Reboot the system and press the F2 function key before the Windows system boots to enter Setup. 2. In Setup, select Advanced, Video Configuration, and Primary Video Adapter, and then set the value to AGP. 3. Press the F10 function key to exit and save the settings. 4. When the system boots up it will autodetect the PnP monitor and and prompt you for a driver. Click Next and select Search for a better driver than the one your device is using now (Recommended). Click Next. 5. Uncheck the Floppy Disk box and and check the Specify a location box. 6. Browse to: C:\Windows\Options\Cabs, and click Next. 7. Click Next, then click Finish. 8. Using the Windows Explorer, locate and execute: D:\Drivers\TLA600\Intel SU810 video\Graphics\setup.exe Tektronix Logic Analyzer Family User Manual, Version 3.2 Software 2–15 Installing Software on the TLA 600 Series 9. Click default buttons to install the SU810 Video Driver. 10. When prompted to reboot, select Yes to restart your computer now. 11. Press the F2 function key before Windows loads to enter Setup. 12. In Setup select Advanced, Video Configuration, and Primary Video Adapter, and then set the value to PCI. 13. Press the F10 function key to exit and save the settings. 14. Using the Windows Explorer, locate and execute: D:\Drivers\TLA600\C&T 69000 video\w98600.exe 15. Click default buttons to install the C&T 69000 video driver. 16. When prompted to reboot, select No, I will restart my computer later. Installing Audio, PCI, and Front Panel Drivers To install the audio, PCI, and front panel drivers, complete the following steps: 1. Install the CD labeled “Disc1-Logic Analyzer Software.” 2. Using the Windows Explorer, locate and execute: D:\Drivers\TLA600\Intel SU810 audio\setup.exe 3. Click default buttons to install the SU810 Audio driver. 4. When prompted to reboot, select No, I will restart my computer later. 5. On your desktop right click My Computer and select Properties from the menu, and select the Device manager tab. 6. Select View devices by type. 7. Under Other Devices, right-click the first PCI Bridge icon and select Properties. Verify that it is Hardware version 002. 8. Select the Driver tab and click Update Driver. 9. When the Update Device Driver Wizard appears, click Next. 10. Click Search for a better driver than the one your device is using now (Recommended), and click Next. 11. Click only Specify a location, then browse to the location: D:\Drivers\TLA600\PCI-VXI Bridge. 12. Click Next, Next, then click Finish to install the PCI-VXI driver. 2–16 Tektronix Logic Analyzer Family User Manual, Version 3.2 Software Installing Software on the TLA 600 Series 13. When prompted to reboot, select No don’t restart. Close the PCI-VXI Bridge Properties page. 14. Return to the Device Manager and right click the other PCI device icon, and select Properties. Verify that it is Hardware version 003. 15. Select the Driver tab and click Update Driver. 16. When the Update Device Driver Wizard appears, click Next. 17. Click Search for a better driver than the one your device is using now (Recommended), and click Next. 18. Click only Specify a location, then browse to the location: D:\Drivers\TLA600\PCI-ISA Bridge. 19. Click Next, Next, then click Finish to install the PCI-ISA driver. 20. Return to the Device Manager and right click Other Devices/USB device icon, and select Properties. 21. Click Reinstall Driver. 22. When the Update Device Driver Wizard appears, click Next. 23. Click Search for a better driver than the one your device is using now (Recommended), and click Next. 24. Click only Specify a location and then browse to the location: D:\Drivers\TLA600\Front Panel. 25. Click Next, Next, then click Finish to install the Front Panel driver. 26. Close the USB device Properties page. 27. Click OK to close the Properties dialog. 28. When prompted to reboot, select Yes to restart your computer now. Installing Windows 98 SE Patches The following patches to the Windows 98 SE operating system are normally installed on the logic analyzer. You should go to the Microsoft web site (http://windowsupdate.microsoft.com), download the following patches, or updated versions, and install them on the logic analyzer: H Windows 98 Second Edition Shutdown Supplement H Windows Security Update, November 12, 1999 Tektronix Logic Analyzer Family User Manual, Version 3.2 Software 2–17 Installing Software on the TLA 600 Series Earlier versions of the Windows operating system included a utility called dcomcnfg.exe that was used to help configure systems for distributed comm applications, such as the TPI application for Tektronix logic analyzers. Microsoft no longer includes this utility with Windows, but it can be downloaded for free from the Microsoft web site at: http://www.microsoft.com/com/dcom/dcom98/download.asp Look for the link entitled “Dcom98 for Windows 98 configuration utility.” This utility is normally installed on new Tektronix logic analyzers. Installing QAPlus and TLA Application Software To install QAPlus and the TLA application software, complete the following steps: 1. Install the CD labeled “Disc1-Logic Analyzer Software.” 2. Use the Windows Explorer locate and execute: D:\QA Plus\Qawin32.exe 3. The QAPlus install program will prompt you that a directory will be created, click Next to approve. 4. When prompted to accept a folder name of Sykes Diagnostics, Change the folder name to QA+Win32. Click Next then click Finish. 5. Click Start, point to Programs and click MS DOS Prompt. The next few steps must be done in an MS DOS Window. 6. To add a Start Menu shortcut to the QAPlus manual, in the MS DOS window type the following: copy D:\IQA PlusI\*.lnk C:\Windows\IStart MenuI\Programs\IQA+Win32I 7. To remove the QAPlus link from the desktop, in the MS DOS window type the following: erase C:\Windows\Desktop\IQA+Win32.lnkI 8. To copy the customized test scripts into the QAPlus directory, in the MS DOS window type the following: copy /y D:\IQA PlusI\*.dat C:\IProgram FilesI\QAWin32 9. Close the MS DOS Window. 2–18 Tektronix Logic Analyzer Family User Manual, Version 3.2 Software Installing Software on the TLA 600 Series The next group of instructions installs the TLA application software. 10. Use Windows Explorer to locate and execute the following: D:\TLA Application SW\Disk1\Setup.exe 11. When prompted to reboot the system; click Yes to reboot. Setting Up the Display Properties To set up the display properties, follow these procedures. Internal Monitor To set up the internal LCD display, complete the following steps: 1. Right-click the Windows desktop and click properties. 2. Select the Settings tab. 3. Click the icon for display 1 to select it and verify that it is set to High Color [16 bit] with a screen area of 800 by 600 pixels. 4. Click Advanced and select the Monitor tab. Click Change and select Standard Monitor Types on the left, and Laptop Display Panel [800 by 600] on the right. Click OK. 5. Select the Adapter tab and set the refresh rate to Optimal. Click Close, click OK, and select Yes to accept the changes. External Monitor To set up the external monitor, complete the following steps: 1. Right-click the Windows desktop and click properties. 2. Select the Settings tab. 3. Click the icon for display 2 to select it and answer Yes to enable the second monitor. 4. Set monitor 2 to High Color [16 bit]. 5. Using the slider set the screen area to 800 by 600 pixels. 6. Click Apply and select Apply the new color settings without restarting. Click OK, click OK, and click Yes to approve the changes. 7. Click Advanced and select the Monitor tab. Click Change, click Next and select search for a better driver than the one your device is using now [Recommended]. Click Next. 8. Click Specify a location and browse to: Tektronix Logic Analyzer Family User Manual, Version 3.2 Software 2–19 Installing Software on the TLA 600 Series C:\Windows\Options\Cabs\ 9. Click Next. Click next to approve. Click Finish. 10. Select the Adapter tab and set the refresh rate to Optimal. Click Close, click OK, and select Yes to accept the changes. 11. In the Display properties page uncheck the box marked Extend my Windows desktop onto this monitor. Click OK. Setting Up the Screen Saver The screen saver includes the option of reducing the intensity of the LCD display backlight to help prolong the life of the display. Select this recommended screen saver unless you will always use an external monitor. 1. Right-click the Windows desktop and click Properties. 2. Select the Screen Saver tab. 3. Select Tektronix LCD Saver from the list of screen savers. 4. Set the Wait period for 10 minutes. 5. Under Screen Saver click Settings. Set the speed to Fast and the Intensity to Reduced (60%). Click OK, and then click OK again. Setting Up Power Management To set up power management on your logic analyzer, complete the following steps: 1. Right-click the Windows desktop and click properties. 2. Select the Screen Saver tab and under Energy saving features to monitor click Settings. 3. Set Power schemes to Always On. 4. Set System Standby to Never. 5. Set Turn off monitor to Never. 6. Set Turn off hard disks to Never. 7. Click OK. 2–20 Tektronix Logic Analyzer Family User Manual, Version 3.2 Software Installing Software on the TLA 600 Series Setting Up Virtual Memory To set up the virtual memory, complete the following steps: 1. Click Start, point to Settings, and click Control Panel and double-click the System icon and select the Performance tab. 2. Click Virtual memory. 3. Click Let me specify my own virtual memory settings. 4. Set Minimum to 100, and Maximum to 500. 5. Click OK, click Yes to confirm your settings, and click Close. 6. When prompted, select Yes to reboot your computer now. Restoring User Files After you have reinstalled all of the application software files, you should restore any backed-up user files. Use the Windows Back Up tool to restore any saved files from floppy disks. Use the online help for instructions on restoring the files. Initial Launch of the TLA Application The first time the logic analyzer is powered up, there will be a TLA Final Setup icon on your desktop. Double click the icon to launch the application for the first time. The TLA application will autolaunch every time thereafter. Uninstalling TLA Application Software You can also remove the TLA software using the Uninstall program. Use the Add/Remove Programs tool under the Control Panel to uninstall software. Tektronix Logic Analyzer Family User Manual, Version 3.2 Software 2–21 Installing Software on the TLA 600 Series 2–22 Tektronix Logic Analyzer Family User Manual, Version 3.2 Software TLA 700 Series Installation Installing a TLA 700 Series Logic Analyzer This chapter describes all of the steps needed to install your TLA 700 Series Logic Analyzer for the first time. It is written from the perspective that you purchased most of the items uninstalled and you intend to install all of the different items. If you purchased a mainframe with modules already installed, you should still review all of the information in this chapter and perform those steps that apply to your specific situation. This chapter deals mainly with hardware installation. The basic operating software is already installed on the hard disk. If you ordered additional software, such as microprocessor or bus support, you will need to install it. Refer to the installation instructions that are shipped with that product. Check the Shipping List Verify that you have received all of the parts of your logic analyzer. Use the shipping list to compare against the actual contents of your order. You should also verify the following: H Verify that you have the correct power cords for your geographical area. H Verify that you have backup copies of the installed software. Store the backup software in a safe location where you can easily retrieve the software for maintenance purposes. H Verify that you have the correct module types and probes. H Verify that you have all the standard and optional accessories that you ordered. NOTE. Keep the software packaging available because you will need it to enter the Windows software registration number when you first turn on the mainframe. Please fill out and send in the customer registration card which is packaged with this manual. Tektronix Logic Analyzer Family User Manual, Version 3.2 Software 3–1 Installing a TLA 700 Series Logic Analyzer Site Considerations Read this section before attempting any installation procedures. This section describes site considerations, power requirements, and ground connections for your logic analyzer. Portable Mainframe The portable mainframe is designed to operate on a bench or on a cart in the normal position (on the bottom feet). For proper cooling, at least two inches (5.1 cm) of clearance is recommended on the rear and sides of the mainframe. You can also operate the portable mainframe while it rests on the rear feet. If you operate the mainframe while it is resting on the rear feet, make sure that you properly route any cables coming out of the rear of the mainframe to avoid damaging them. CAUTION. Keep the bottom of the mainframe clear of obstructions to ensure proper cooling. Benchtop Mainframe The benchtop mainframe is designed to operate on a bench or in a rackmount environment. For proper cooling, at least two inches (5.1 cm) of clearance is recommended on the rear and sides of the mainframe. Expansion Mainframe The expansion mainframe is designed to operate on a bench or in a rackmount environment. For proper cooling, at least two inches (5.1 cm) of clearance is recommended on the rear and sides of the mainframe. Do not stack more then one expansion mainframe on top of the benchtop mainframe or stack more than one expansion mainframe on top of another expansion mainframe. WARNING. Because of the size and weight of the benchtop and expansion mainframes use care when lifting or moving the mainframe to avoid personal injury while performing the installation procedures. For safety always use two people to lift or move the mainframes. 3–2 Tektronix Logic Analyzer Family User Manual, Version 3.2 Software Installing a TLA 700 Series Logic Analyzer Installing Modules CAUTION. Do not install or remove any modules while the mainframe is powered on. The modules are not hot swapable, doing so can damage the modules and the mainframe. Always power down the mainframe before removing or inserting modules. If your mainframe does not have the modules preinstalled, the following is a suggestion to take advantage of airflow cooling. The following does not necessarily apply if you intend to merge modules. If you intend to merge the modules, refer to the merging modules rules in the online help or on page 3–17. Setting the Logical Address Every module in the mainframe must have a unique logical address; no two modules can have the same address. Two rotary switches on the rear panel select the logical address. Although Figure 3–1 shows an LA module, the address switches are identical for all TLA modules. The factory default and recommended switch setting is FF. A logical address setting of FF allows the controller to dynamically assign a logical address to the module. This is also known as Dynamic Auto Configuration. You can also select any static addresses between 01 and FE hexadecimal (1 to 254 decimal). Read the following descriptions before changing the logical address. NOTE. Do not set any module to logical address to 00. Logical address 00 is reserved exclusively for the controller. Dynamic Logical Address Autoconfiguration. With dynamic logical address auto configuration selected (a switch setting of FF), the mainframe automatically sets the address to an unused value. For example, if there are modules set to addresses 01 and 02 already in your system, the resource manager will automatically assign the module an address other than 01 or 02. This allows you to freely move the modules around without reconfiguring the logical address. Static Logical Address. Static logical address selections set the address to a fixed static logical address value. If you choose to set the logical address switches to any other setting then FF, you must verify that no two modules (or devices) share the same address. Tektronix Logic Analyzer Family User Manual, Version 3.2 Software 3–3 Installing a TLA 700 Series Logic Analyzer Least-significant digit Most-significant digit Flash programming jumper pins Figure 3–1: Logical address switches Module Address Problems All modules are shipped with the logical address switch set to FF. This includes the the fan controller board (located in the benchtop mainframe) which also requires a unique logical address. Having the module logical address switch set to FF allows the mainframe to dynamically set the address to an unused value. If two modules (including the fan controller board) are set to the same address, the system will not work properly. The most common symptom of conflicting logical addresses is that a module will not show up in the system window. 3–4 Tektronix Logic Analyzer Family User Manual, Version 3.2 Software Installing a TLA 700 Series Logic Analyzer Portable Mainframe You can install any of the modules in any slot that the module key will allow; see Figure 3–2. If you intend to merge the modules, disregard the following suggestions and refer to the merging modules rules in the online help or on page 3–17. If you are not merging the modules, and for air flow considerations, you should follow these guidelines: H If a single LA module is to be installed, install it in slots 3–4. Place a double width slot cover over slots 1–2. H If an LA module is to be installed with a DSO module, install the DSO module in slots 1–2, and the LA module in slots 3–4. H If two LA modules are to be installed, install the module with the highest channel count in slots 1–2. Install the module with the lower channel count in slots 3–4. H If two LA modules are to be installed, install the module with the largest memory in slots 3–4. Install the module with the lower memory in slots 1–2. Use a screwdriver to tighten the retaining screws to 2.5 in-lbs after seating the modules in place. See Figure 3–3. Benchtop Mainframe You must install the benchtop controller in the benchtop mainframe in slots 0–2. You can install any of the modules in any slot that the module key will allow; see Figure 3–2. If you intend to merge the modules, disregard the following suggestions and refer to the merging modules rules in the online help, or on page 3–17. If you are not merging the modules, and for air flow considerations, you should follow these guidelines: H If a single LA module is to be installed, install it in slots 3–4. Place a double width slot cover over slots 5–6, 7–8, 9–10 and 11. H If an LA module is to be installed with a DSO module, install the LA module in slots 3–4, and the DSO module in slots 5–6. Place double width slot covers over slots 7–8, 9–10 and 11. H If two or more LA modules are to be installed, install the module with the highest channel count in slots 3–4. Install the module with the lower channel count in slots 5–6. Place double width slot covers over slots 7–8, 9–10 and 11. H If two or more LA modules are to be installed, install the module with the largest memory in slots 3–4. Install the module with the lower memory in slots 5–6. Place double width slot covers over slots 7–8, 9–10 and 11. Use a screwdriver to tighten the retaining screws to 2.5 in-lbs after seating the modules in place. See Figure 3–3. Tektronix Logic Analyzer Family User Manual, Version 3.2 Software 3–5 Installing a TLA 700 Series Logic Analyzer Expansion Mainframe The information on the benchtop mainframe applies to the expansion mainframe with the exception that the TLA 7XM Expansion Module must be located in slot 0. See page 3–29 for more information on installing an expansion module. Module Keying Each module has a key that will only allow certain modules to be installed next to other modules. For example, you can install a TLA 7Dx DSO module to the left of a TLA 7XM Expansion module, but you can not install a TLA 7Nx LA module to the immediate left of a TLA 7XM Expansion module. See Figure 3–2. Key Key TLA 720 BT CTRL TLA 7XM Exp. Module Key TLA 7Dx DSO Module TLA 7XM Exp. Module TLA 7Nx LA Module TLA 7XM Exp. Module Key TLA 7XM Exp. Module TLA 7Nx LA Module Figure 3–2: Module keying 3–6 Tektronix Logic Analyzer Family User Manual, Version 3.2 Software Installing a TLA 700 Series Logic Analyzer Portable mainframe Benchtop mainframe Retaining screws Injector/ejector handles Figure 3–3: Installing modules Tektronix Logic Analyzer Family User Manual, Version 3.2 Software 3–7 Installing a TLA 700 Series Logic Analyzer Covering Empty Slots If you have any unused (empty) slots in your mainframe, you must install blank slot panel covers to meet EMC specifications. Install a blank slot panel cover for each empty slot as shown in Figure 3–4 or 3–5. Make sure that the EMI shielding is in contact with the adjacent panel or module cover, and that the airflow shutter activation arms protrude through the holes in the blank shield. CAUTION. Use only Tektronix TLA slot panel covers on the benchtop mainframe. Do not use non-Tektronix covers, otherwise the mainframe may not meet cooling and EMC requirements. EMI shielding strip Double slot panel cover Figure 3–4: Installing panel covers on the portable mainframe 3–8 Tektronix Logic Analyzer Family User Manual, Version 3.2 Software Installing a TLA 700 Series Logic Analyzer EMI shielding strip Single slot panel cover Double slot panel cover Figure 3–5: Installing panel covers on the benchtop mainframe Initial Launch of the TLA 700 Series Application The first time the mainframe is turned on, there will be a TLA 700 application icon on your desktop. Double click the icon to launch the application for the first time. The TLA 700 Series application will autolaunch every time thereafter. Performing the Incoming Inspection Incoming inspection consists of verifying the basic operation of the logic analyzer. The power-on diagnostics check the basic functionality. These diagnostics run every time you turn on the logic analyzer. You can also verify more detailed functionality by running the self calibration and extended diagnostics. NOTE. Allow the mainframe and modules to warm up for 30 minutes before running the self calibration. Disconnect any attached probes from the modules. Then select the System menu, and point to Calibration and Diagnostics. Run the self calibration followed by the extended diagnostics by selecting the proper tab. Results of the tests display on the individual property page. Tektronix Logic Analyzer Family User Manual, Version 3.2 Software 3–9 Installing a TLA 700 Series Logic Analyzer If you are using a pattern generator, select the Pattern Generator System menu and point to Calibration and Diagnostics. Run the self calibration followed by the extended diagnostics by selecting the proper tab. Results of the tests display on the individual property page. NOTE. The time required to run the self calibration on the logic analyzer modules depends on the number of acquisition channels. Modules with a large number of channels may take several minutes to run the self calibration. Checking the Logic Analyzer Probes (Optional) Checking the DSO Probes (Optional) Checking the Mainframe (Optional) Connect the logic analyzer probes to a signal source, start an acquisition, and verify that the acquired data is displayed in either the listing or waveform windows. Connect the oscilloscope probes to the Probe Compensation connector on the front panel of the DSO module. You can then run the Calibrate Probe function in each vertical setup page for the module. To check the mainframe diagnostics not covered by the TLA Application software. Run the QA+Win32 diagnostics or the TLA 700 Mainframe Diagnostics located under the Windows Start menu under the Tektronix TLA 700 programs. Exit the TLA Application before running the external diagnostics. Creating an Emergency Startup Disk Now that you have completed the basic installation process, you should create an emergency startup disk that you can use to restart your logic analyzer in case of a major hardware or software failure. You should create this disk and then store it in a safe place. The emergency startup disk contains basic files to restart your logic analyzer. It also contains files to check and format the hard disk. Follow these steps to create the emergency startup disk: 1. Exit all applications. 2. Click the Windows Start button, point to Settings, and click Control Panel. 3. In the Control Panel window, double-click Add/Remove Programs. 4. Select the Startup Disk property page. 3–10 Tektronix Logic Analyzer Family User Manual, Version 3.2 Software Installing a TLA 700 Series Logic Analyzer 5. Insert a floppy disk into the disk drive and follow the on-screen instructions to create the startup disk. Backing Up User Files You should always back up your user files on a regular basis. Use the Windows Back Up tool to back up files stored on the hard disk. The Back Up tool can be located in the following path: Start → Programs → Accessories → System Tools Start the tool and determine which files and folders that you want to back up. Use the Windows online help for information on using the Back Up tool. Tektronix Logic Analyzer Family User Manual, Version 3.2 Software 3–11 Installing a TLA 700 Series Logic Analyzer Removing the Replaceable Hard Disk Drive from the Portable Mainframe CAUTION. Do not remove the replaceable hard disk drive when the mainframe is powered on. The replaceable hard disk drive may be permanently damaged if it is removed while the mainframe is powered on. Always power down the mainframe before removing the replaceable hard disk drive. Verify that the chassis is turned off. The replaceable hard disk drive cartridge is removed by depressing it to release the latch. Pull on the replaceable hard disk drive cartridge to remove it from the chassis. See Figures 3–6, 3–7 and 3–8. Figure 3–6: Depress the hard disk drive latch 3–12 Tektronix Logic Analyzer Family User Manual, Version 3.2 Software Installing a TLA 700 Series Logic Analyzer Figure 3–7: Unlatching the hard disk drive cartridge Figure 3–8: Removing the hard disk drive cartridge Tektronix Logic Analyzer Family User Manual, Version 3.2 Software 3–13 Installing a TLA 700 Series Logic Analyzer Removing the Replaceable Hard Disk Drive from the Benchtop Mainframe CAUTION. Do not remove the replaceable hard disk drive when the mainframe is powered on. The replaceable hard disk drive can be permanently damaged if it is removed while the mainframe is powered on. Always power down the mainframe before removing the replaceable hard disk drive. Verify that the controller is powered down. The replaceable hard disk drive cartridge is removed by depressing it to release the latch. Pull on the replaceable hard disk drive cartridge to remove it from the chassis. See Figure 3–9, 3–10 and 3–11. Figure 3–9: Depress the hard disk drive latch 3–14 Tektronix Logic Analyzer Family User Manual, Version 3.2 Software Installing a TLA 700 Series Logic Analyzer Figure 3–10: Unlatching the hard disk drive cartridge Figure 3–11: Removing the hard disk drive cartridge Tektronix Logic Analyzer Family User Manual, Version 3.2 Software 3–15 Installing a TLA 700 Series Logic Analyzer 3–16 Tektronix Logic Analyzer Family User Manual, Version 3.2 Software Merging TLA 700 Series Logic Analyzer Modules This section describes how to merge TLA 700 series logic analyzer modules to form a module with a wider channel width. Logic Analyzer Merged Modules A merged logic analyzer module set consists of a master logic analyzer module and one or two slave logic analyzer modules physically connected together by a merge cable, and merged in software. Logic Analyzer Module Merging Rules The following LA module merging rules must be followed: H Only LA modules with 102 channels or more can be merged. H LA modules must be physically adjacent and physically connected. H LA modules may not be merged across mainframes (between the benchtop mainframe and one or more expansion mainframes), because the modules must be physically adjacent and physically connected. H LA modules of unequal synchronous clock rate can not be merged. H Merging LA modules of unequal memory depths will result in the merged modules assuming the depth of the shallowest LA module. H When merging LA modules of unequal channel widths, use the LA module with the higher number of channels as the master module. H The LA modules should have the same firmware version. H Two or three TLA 7Nx and TLA 7Px LA modules may be merged together. Two TLA 7Lx and TLA 7Mx LA modules may be merged together. TLA 7Nx and TLA 7Px LA modules may not be merged with TLA 7Lx and TLA 7Mx LA modules. (Even if they are connected together.) H Merging operations may not be destructive to an established merged LA module set. To merge an LA module to an established merged set, the established merged set must first be unmerged through software. Unmerged LA modules are the only potential candidates to add to a merged configuration. Tektronix Logic Analyzer Family User Manual, Version 3.2 Software 3–17 Merging TLA 700 Series Modules Two Way Logic Analyzer Merge In a two way merge, the master module is on the left and the slave module is on the right as shown in Figure 3–12. Master Module Slave Module Figure 3–12: Location of modules in a two way merge 3–18 Tektronix Logic Analyzer Family User Manual, Version 3.2 Software Merging TLA 700 Series Modules Three Logic Analyzer Way Merge In a three way merge (TLA 7Nx and TLA 7Px LA module only), the master module is in the center. Slave module 1 is to the right of the master module. Slave module 2 is on the left of the master module as shown in Figure 3–13. Slave Module 2 Master Module Slave Module 1 Figure 3–13: Location of modules in a three way merge Two Way Logic Analyzer Merge Procedure The following procedure is used for merging two logic analyzer modules to form a merged set with a higher logic analyzer channel count. In a two way merge, the master module is on the left and the slave module is on the right as shown in Figure 3–12 on page 3–18. For information on merging three modules, see page 3–24. CAUTION. Static discharge can damage any semiconductor component in the logic analyzer module. Discharge the static voltage from your body by wearing a grounded antistatic wrist strap while performing the Merge Procedure. Tektronix Logic Analyzer Family User Manual, Version 3.2 Software 3–19 Merging TLA 700 Series Modules Perform the following steps to merge two modules: 1. Turn the mainframe off. 2. Determine which module will be designated as the slave module and which module will be the master module. 3. Lay the slave module on the right side (as viewed from the front panel). 4. Remove the screws from the module cover with a screwdriver with a T-10 Torx tip; refer to Figure 3–14 on page 3–20. 5. Remove the screws near the front of the module. 6. Remove the screws holding the merge cable bracket to the cover. 7. Remove the top part of the cable bracket and set it aside. 8. Remove the module cover and locate the merge cable. Merge cable bracket Remove screws (2) Remove screws (8) Remove screws (4) Module cover Chassis Figure 3–14: Removing the cover 3–20 Tektronix Logic Analyzer Family User Manual, Version 3.2 Software Merging TLA 700 Series Modules 9. Replace the cover while feeding the merge cable through the hole in the cover (see Figure 3–15). Do not twist the cable while feeding it through the hole. If the cable is twisted, the modules will not mate correctly. Remove screws (2) Merge cable bracket Merge cable Figure 3–15: Feeding the merge cable through the cover 10. Turn the merge cable bracket over so that the guide pins point up. 11. Place the bracket over the merge cable connector. 12. Install the two screws that hold the merge cable bracket in place. CAUTION. To prevent damage to the module during the installation process, reinstall the cover exactly as described in steps 14 through 19. If the cover is not properly seated, the module can be damaged when you install it in the mainframe and it will not meet EMC requirements. Tektronix Logic Analyzer Family User Manual, Version 3.2 Software 3–21 Merging TLA 700 Series Modules 13. Replace the logic analyzer module cover. 14. Push forward on the cover so the tab on the front edge of the cover inserts into the rear of the front subpanel. Make sure that the cover is fully seated (no gaps) against the front and rear chassis flanges. Make sure tab inserts into slot on rear of front panel Leave no vertical gap Figure 3–16: Seating the cover on the chassis 15. While holding the cover in place, install the screws nearest the front of the module (two on the top and two on the bottom), to secure the cover to the chassis. 16. Install the screws near the front of the module. 17. Slide the rear panel on the chassis and install the rear panel screws. 3–22 Tektronix Logic Analyzer Family User Manual, Version 3.2 Software Merging TLA 700 Series Modules 18. Install the top and bottom rear screws. 19. Check and tighten all screws. 20. Place the master module adjacent to the slave module so that the two guide pins from the Slave module line up with the guide pin holes in the master module. Guide pins Master module Slave module Figure 3–17: Lining up the two modules 21. Gently push the two modules together so that the merge connector of the slave module mates with the merge connector on the master module. Tektronix Logic Analyzer Family User Manual, Version 3.2 Software 3–23 Merging TLA 700 Series Modules Three Way Logic Analyzer Merge Procedure The following procedure is used for merging three logic analyzer modules together to form a merged set with a higher logic analyzer channel count. In a three way merge (TLA 7Nx and TLA 7Px logic analyzer modules only), the master module is in the center. Slave module 1 is to the right of the master module. Slave module 2 is on the left of the master module as shown in Figure 3–13 on page 3–19. CAUTION. Static discharge can damage any semiconductor component in the LA module. Discharge the static voltage from your body by wearing a grounded antistatic wrist strap while performing the Merge Procedure. Perform the Two Way Logic Analyzer Merge Procedure that starts on page 3–19. Perform the following steps to merge the second slave module: 1. Lay the two merged module set on their right hand side (as viewed from the front panel). 2. Follow the procedure that starts on page 3–19 to merge the second slave module to the left of the center master module. Installing the Merged Logic Analyzer Modules in the Mainframe After merging the modules, perform the following steps to install the merged modules in the mainframe: 1. Hold the merged modules such that the modules do not become separated and line up the modules with the slot guides in the mainframe. 2. Push the merged modules into the mainframe until they rest against the rear panel connector. 3. Use the injector/ejector handles to fully seat the modules one at a time. Tighten the module retainer screws. 4. Verify that the modules are fully seated before powering on the mainframe. 3–24 Tektronix Logic Analyzer Family User Manual, Version 3.2 Software Merging TLA 700 Series Modules Calibrating the Merged Modules Always calibrate each module separately, then calibrate the merged set. After powering on the mainframe, calibrate the merged modules by following these steps: 1. Select the System window. If you are calibrating pattern generator modules, select the System window from the pattern generator application. 2. From the menu bar, select System. 3. Select Calibration and Diagnostics. 4. Select the Self Calibration tab. 5. Select (highlight) the modules to be calibrated. 6. Press the Run button in the merge calibrate dialog box. Removing Merged Logic Analyzer Modules from the Mainframe Perform the following steps to remove merged modules from the mainframe: 1. Identify the modules that you want to remove. 2. Loosen the retainer screws for the modules (top and bottom). NOTE. Use the ejector handles to just loosen the modules from the rear panel connector before sliding the merged modules out of the mainframe. 3. Use the ejector handles to disconnect the modules from the rear panel connector one at a time. 4. Slide the modules out of the mainframe at the same time. 5. Gently pry the modules apart. Storing the Logic Analyzer Module Merge Cable Perform the following steps to store the logic analyzer merge cable inside the logic analyzer module: 1. Use the screwdriver with the T-10 Torx tip to remove the screws that hold the merge cable bracket in place. 2. Remove the merge cable bracket. Tektronix Logic Analyzer Family User Manual, Version 3.2 Software 3–25 Merging TLA 700 Series Modules 3. Remove the screws from the side cover and rear cover. 4. Push the merge cable through the side cover and remove the cover. 5. Dress the merge cable as shown in Figure 3–18. Merge cable Figure 3–18: Dressing the merge cable before installing the cover 6. Push forward on the cover so the tab on the front edge of the cover inserts into the rear of the front subpanel. Make sure that the cover is fully seated and there are no gaps between the front and rear chassis flanges; refer to Figure 3–16. 7. While holding the cover in place, install the screws nearest the front of the module to secure the cover to the chassis. 8. Install the screws near the front of the module. 9. Slide the rear panel on the chassis and install the rear panel screws. 10. Install the top and bottom rear screws. 11. Install the merge cable bracket so that the guide pins point into the module. 12. Install and tighten the screws on the merge cable bracket. 13. Verify that you have installed and tightened all screws on the module. 3–26 Tektronix Logic Analyzer Family User Manual, Version 3.2 Software Merging TLA 700 Series Pattern Generator Modules This section describes how to merge TLA 700 series pattern generator modules to form a module with a wider channel width. Pattern Generator Merged Modules A merged pattern generator module set consists of a master pattern generator module and up to four slave pattern generator modules merged in software. Pattern Generator Module Merging Rules The following pattern generator module merging rules must be followed: H The pattern generator modules are merged through software. H The pattern generator modules must be physically adjacent. H The pattern generator modules may not be merged across mainframes. H Merging pattern generator modules of unequal memory depths will result in the merged set assuming the depth of the shallowest pattern generator module. H The pattern generator modules must have the same firmware version. H When merged, the left most pattern generator module is the master. Refer to the pattern generator online help for additional help in merging pattern generator modules. Tektronix Logic Analyzer Family User Manual, Version 3.2 Software 3–27 Merging TLA 700 Series Modules 3–28 Tektronix Logic Analyzer Family User Manual, Version 3.2 Software Installing a TLA 700 Series Expansion Mainframe This section describes how to install a TLA 7XM expansion mainframe. Expansion Mainframe Rules The following expansion mainframe rules must be followed: H Do not stack more than one mainframe on top of another mainframe. H The expansion module must be installed in slot 0 of the expansion mainframe. H Logic analyzer modules can not be merged across mainframes. Expansion Module Installation Verify that both the mainframe and the expansion mainframe are turned off. Installing in a TLA 720 or TLA 711 Mainframe The expansion module can be installed in any slot of the benchtop mainframe except 0–2, which is reserved for the benchtop controller module. If you are only installing one expansion mainframe, you can install the expansion module in slot 12 to keep the expansion cables out of your way as shown in Figure 3–19 on page 3–30. If you are installing two expansion mainframes, consider installing the two expansion modules next to the benchtop controller module to maximize the number of open slots as shown in Figure 3–20 on page 3–30. If the TLA 7XM expansion module was not already installed in slot 0 of your expansion mainframe, install the expansion module now. CAUTION. Do not use the retaining screws to seat the expansion module. The retaining screws are only for securing the module and reinforcing the grounding. Attempting to seat the expansion module with the retaining screws will result in damage to the chassis. Tektronix Logic Analyzer Family User Manual, Version 3.2 Software 3–29 Installing a TLA 700 Series Expansion Mainframe After seating the modules in place, use a screwdriver to tighten the retaining screws (maximum of 2.5 in-lbs). See Figure 3–3 on page 3–7. TLA 720 TLA 7XM Figure 3–19: Benchtop mainframe and one expansion mainframe Place the EXPANSION 1 label in the outlined area on the upper right side of the expansion mainframe. TLA 7XM TLA 720 TLA 7XM Figure 3–20: Benchtop mainframe and two expansion mainframes The TLA software determines which expansion chassis is expansion 1 and which is expansion 2 by the order in which the expansion modules are installed. The expansion module in the lowest number slot will be expansion 1, and the expansion module in the next highest slot will be expansion 2. 3–30 Tektronix Logic Analyzer Family User Manual, Version 3.2 Software Installing a TLA 700 Series Expansion Mainframe For the setup in Figure 3–20 place the EXPANSION 1 label in the outlined area on the upper right side of the expansion mainframe to the left of the benchtop mainframe. Place the EXPANSION 2 label in the outlined area on the upper right side of the expansion mainframe to the right of the benchtop mainframe. For information on installing modules see page 3–3. Installing in a TLA 714 or TLA 704 Mainframe The expansion module can be installed in any slot of the portable mainframe. If you are installing one or two expansion mainframes, you can install the expansion module in slot 1 as shown in Figure 3–21. If the expansion module was not already installed in slot 0 of your expansion mainframe, install it now. CAUTION. Do not use the retaining screws to seat the expansion module. The retaining screws are only for securing the module and reinforcing the grounding. Attempting to seat the expansion module with the retaining screws will result in damage to the chassis. After seating the modules in place, use a screwdriver to tighten the retaining screws (maximum of 2.5 in-lbs). See Figure 3–3 on page 3–7. TLA 7XM TLA 7XM TLA 714 Figure 3–21: Portable mainframe shown with two expansion mainframes The TLA software determines which expansion chassis is expansion 1 and which is expansion 2 by the order in which the expansion modules are installed. The Tektronix Logic Analyzer Family User Manual, Version 3.2 Software 3–31 Installing a TLA 700 Series Expansion Mainframe expansion module installed in the lowest number slot will be expansion 1, and the expansion module installed in the next highest slot will be expansion 2. For the setup in Figure 3–21 on page 3–31 place the EXPANSION 1 label in the outlined area on the upper right side of the expansion mainframe to the left of the portable mainframe. Place the EXPANSION 2 label in the outlined area on the upper right side of the expansion mainframe to the right of the portable mainframe. For information on installing modules see page 3–3. Expansion Cable Installation There are three cables that connect the expansion modules together. To connect the expansion modules together, perform the following procedures. Gray Expansion Cable 1. Examine the gray expansion cable to determine if the connectors were labeled. If the connectors were not labeled, apply the C labels to each connector. 2. Connect one end of the gray expansion cable to connector C of the expansion module on the expansion mainframe side. Connect the other end of the gray expansion cable to connector C of the expansion module on the benchtop or portable mainframe side. Fasten the expansion cable connector to the expansion module by tightening the two hold down screws. CAUTION. Do not use the hold down screws to seat the expansion cable. The hold down screws screws are only for securing the cable to the module and reinforcing the grounding. Attempting to seat the expansion cable with the hold down screws will result in damage to the connectors on the chassis. Blue Expansion Cables 3. Examine the two blue expansion cables to determine if the connectors are labeled A and B. If the cables are labeled A and B, select the B cable and proceed to step 5. 4. If the cables were not labeled than select either blue expansion cable and label each connector with the B label. Select the other cable and apply the A labels to each connector. 3–32 Tektronix Logic Analyzer Family User Manual, Version 3.2 Software Installing a TLA 700 Series Expansion Mainframe 5. Connect one end of the blue expansion cable to connector B of the expansion module on the expansion mainframe side. Connect the other end of the blue expansion cable to connector B of the expansion module on the benchtop or portable mainframe side. Fasten the expansion cable connector to the expansion module by tightening the two hold down screws. 6. Connect one end of the blue expansion cable to connector A of the expansion module on the expansion mainframe side. Connect the other end of the blue expansion cable to connector A of the expansion module on the benchtop or portable mainframe side. Fasten the expansion cable connector to the expansion module by tightening the two hold down screws. Turning On the Mainframes Turn on only the benchtop or portable mainframe. The expansion mainframe will automatically power up when the the power switch of the benchtop or portable mainframe is turned on. If everything is connected and operational, you will see the expansion mainframe and the installed modules show up in the TLA System window. If the expansion mainframe and the installed modules do not show up in the TLA System window, see the Problems section on page 3–35. NOTE. You must have a module installed in the expansion mainframe in order for the expansion mainframe to be recognized by the resource manager and show up in the System window. Turning Off the Mainframes Turn off only the benchtop or portable mainframe. The expansion mainframe will automatically power down when the the power switch of the mainframe is turned off. Tektronix Logic Analyzer Family User Manual, Version 3.2 Software 3–33 Installing a TLA 700 Series Expansion Mainframe 3–34 Tektronix Logic Analyzer Family User Manual, Version 3.2 Software In Case of Problems This chapter provides information that addresses problems you may encounter while installing your TLA 700 series logic analyzer. This chapter does not identify module specific problems relating to performance verification or adjustments. Diagnostics The following diagnostic tools are available with your logic analyzer: Power-On Diagnostics. Power-on diagnostics run when you first turn on the logic analyzer, or when you first start the TLA or the pattern generator application. If any diagnostic failures occur during turn on, the Calibration and Diagnostics property page appears. Extended Diagnostics. Extended diagnostics test the logic analyzer more thoroughly than the power-on diagnostics. The extended diagnostics test the modules in the benchtop mainframe as well as the modules in the expansion mainframe(s). You can use the extended diagnostics to isolate problems to an individual module. Before running the extended diagnostics, disconnect any attached probes. Some items in the pattern generator extended diagnostics menu will fail if a logic analyzer or DSO is running. Stop all logic analyzer and DSO modules before performing the extended pattern generator diagnostics. Some items in the logic analyzer and DSO extended diagnostics menu will fail if a pattern generator is running. Stop all pattern generator modules before performing the extended LA and DSO diagnostics. TLA 700 Mainframe Diagnostics. The TLA mainframe diagnostics program is a stand alone Windows application. These diagnostics check operation of the mainframe beyond the basic PC circuitry. These diagnostics also check the front panel knobs of the portable mainframe. Expansion Mainframe Diagnostics. At power-on, the expansion mainframe runs two power-on diagnostics: “Power, Cables A & B and config”, and “Cable C Connection Test”. If either of these power-on diagnostics fail, none of the modules associated with the expansion mainframe, and possibly the expansion mainframe itself, will be recognized. The result will be as if the expansion mainframe was not connected. Tektronix Logic Analyzer Family User Manual, Version 3.2 Software 3–35 In Case of Problems Turn off the mainframes. Remove the two blue expansion cables and the gray expansion cable. Examine the connectors for bent or missing pins. Reconnect the two blue expansion cables and the gray expansion cable, and tighten the two connector screws. Turn on the mainframes and try again. QA+Win32 Diagnostics. The QA+Win32 diagnostics are a separate Windows application located in the Windows Start Programs menu. The diagnostics check the basic operation of the controller. Software Problems Your TLA 700 series logic analyzer comes with most software already installed. Before running any of the diagnostics, you should check the online release notes to verify the logic analyzer software is compatible with the module firmware. Run the QA+Win32 diagnostics software to identify hardware or software problems. Follow the QA+Win32 online help instructions for running the diagnostics software. The diagnostics are located in the Start menu under: \Programs\QA+Win32 Many software problems can be due to corrupted or missing software files. In most cases the easiest way to solve software problems is to reinstall the software and follow the on-screen instructions. Refer to Upgrading Software for instructions on reinstalling or upgrading software. Refer to Table 3–1 on page 3–37 for a list of software and hardware troubleshooting information and recommended action. If you suspect problems with the TLA software, contact your local Tektronix representative. Hardware Problems If you are certain that you have installed your logic analyzer correctly, run the TLA extended diagnostics (located under the System menu) to identify any problems with the individual modules. If your logic analyzer powers up so that you have access to the desktop, run the QA+Win32 diagnostics software to identify possible controller hardware problems. Follow the QA+Win32 online help instructions for running the diagnostics software. The diagnostics are located in the Start menu. You can also run the external TLA Mainframe diagnostics to identify problems not covered by other diagnostics. The TLA Mainframe diagnostics are located under the Start menu under the Tektronix logic analyzer programs. 3–36 Tektronix Logic Analyzer Family User Manual, Version 3.2 Software In Case of Problems Check for Common Problems Use Table 3–1 to help isolate problems. This list is not exhaustive, but it may help you eliminate problems that are quick to fix, such as a blown fuse, loose cable, or defective module. CAUTION. Do not install or remove any modules while the mainframe is turned on. The modules are not hot swapable. Installing or removing modules when the mainframe is turned on can damage the modules and the mainframes. Always turn off the mainframe before attempting to install or remove modules. Table 3–1: Failure symptoms and possible causes Symptom Possible causes and recommended action Mainframe does not turn on Verify that all power cords are connected to the mainframe and to the power source. Check that the mainframe receives power when you press the On/Standby switch. Check that fans start and that front-panel indicators light. Check that power is available at the power source. Check for failed fuses. Mainframe failure: contact your local Tektronix service center. Expansion mainframe does not turn on Verify that all power cords are connected to the expansion mainframe and to the power source. Check that all of the TLA 7XM expansion modules are firmly seated, and that the mounting screws on the TLA 7XM expansion modules are tightened. Check that the cables between the mainframe and the expansion mainframe are correctly connected: A → A, B → B, and C → C. Check that the TLA 7XM expansion module is in slot 0 of the TLA 7XM expansion chassis. Check that power is available at the power source. Check for failed fuses. Expansion mainframe failure: contact your local Tektronix service center. Monitor does not turn on Check the monitor power cord connection. Check for failed fuse. Monitor failure: contact the vendor of your monitor for corrective action. Tektronix Logic Analyzer Family User Manual, Version 3.2 Software 3–37 In Case of Problems Table 3–1: Failure symptoms and possible causes (Cont.) Symptom Possible causes and recommended action Monitor display is blank Check that the monitor is connected to the mainframe; replace the cable if necessary. If portable mainframe display is blank, try connecting external monitor; if both displays are blank, contact your local Tektronix service center. External monitor controls turned down; adjust monitor controls for brightness and contrast. Check the controller BIOS setups for the monitor. Faulty monitor; contact the vendor of your monitor for corrective action. Mainframe turns on but does not complete the power-on sequence Turn off the mainframe and check that all of the modules are fully inserted. If the mainframe is a benchtop mainframe, check the status of the SYSTEM FAIL and TEST LEDs on the benchtop controller. If either LED stays on, contact your local Tektronix service center. Check the status of the READY and ACCESSED LEDs on the front panel of the application modules. The READY LED turns on when the module passes the power-on diagnostics and when the module is ready to communicate with the controller. The ACCESSED LED turns on any time the controller accesses the module. Check for disk in floppy disk drive; make sure mainframe boots from the hard disk drive. Check for faulty module. Remove modules one at a time and turn on the mainframe. If mainframe completes the power-on sequence, replace faulty module. Possible software failure or corrupted hard disk; see Software Problems at the beginning of this chapter. Power-on diagnostics fail Isolate problem to faulty mainframe or to faulty module. Multiple diagnostic failures across modules indicate a faulty mainframe. Diagnostic failures confined to an single module most likely indicate a faulty module. Contact your local Tektronix service center. Mainframe does not recognize accessories such as monitor, printer, or keyboard Check that accessories are properly connected or installed. Try connecting other standard PC accessories or contact your local Tektronix service center. LA Module merge not allowed in TLA 700 Application Merge cable between LA modules not installed. LA modules are not compatible: TLA 7Nx and TLA 7Px LA modules may not be merged with TLA 7Lx and TLA 7Mx LA modules. Refer to the Merge Rules on page 3–17. Windows comes up but the TLA or pattern generator application does not Mainframe not set up to start the TLA application at power-on. Start application from the desktop, by double-clicking on the TLA Final Setup icon located on your desktop. Windows comes up in Safe mode Exit the Safe mode and restart the mainframe. 3–38 Faulty or corrupt software. Reinstall the TLA or pattern generator application software. Incompatible hardware and hardware driver software. Either install hardware driver or remove the incompatible hardware. Tektronix Logic Analyzer Family User Manual, Version 3.2 Software In Case of Problems Table 3–1: Failure symptoms and possible causes (Cont.) Symptom Possible causes and recommended action TLA application starts but modules do not display in System window Module firmware has not been updated. The flash jumper was not removed after the module firmware was updated. Turn off the mainframe and check that all modules are fully inserted. Module address switches not set correctly. Turn off mainframe and remove module. Set address switches to FF and reinstall module (refer to Figure 3–24 on page 3–59 for address switch locations). Module failure; replace with known-good module or contact your local Tektronix service center. Mainframe failure; contact your local Tektronix service center. Automatic merging sometimes looks like a missing module. Expansion mainframe is not recognized by the system. Note: If there is not a DSO or LA module installed in the expansion mainframe, the expansion mainframe will not show up in the System window. If modules are installed, follow these instructions: Expansion mainframe does not show up in the system window. Turn off the benchtop mainframe and the expansion mainframe(s). Check that both of the TLA 7XM expansion modules are firmly seated, and that the mounting screws on the TLA 7XM expansion modules are tightened. Remove the two blue expansion cables and the gray expansion cable. Examine the connectors on the cables for bent or broken pins. Examine the connectors on the expansion mainframe. Reconnect the two blue expansion cables and the gray expansion cable and tighten the screws on the connectors. Verify that the cables are not crossed; verify that the cables are connected: A → A, B → B, and C → C. Turn on the benchtop mainframe and the expansion mainframe(s). (The mainframe power must be recycled in order for the ResMan32 (resource manager) application to correctly configure.) Expansion mainframe failure; contact your local Tektronix service center. Expansion mainframe is recognized by the system, but installed modules are not. Turn off the benchtop mainframe. Turn on the benchtop mainframe. The mainframe power must be recycled in order for the ResMan32 (resource manager) application to correctly configure. Module address switches not set correctly. Turn off the benchtop mainframe and remove the module(s) from the expansion mainframe. Set address switches to FF and reinstall module (refer to Figure 3–24 on page 3–59 for address switch locations). Turn off the benchtop mainframe, install a known good module from the benchtop mainframe into the expansion mainframe (the expansion mainframe where the modules were not recognized). Turn on the benchtop mainframe and retry. Module failure; contact your local Tektronix service center. Tektronix Logic Analyzer Family User Manual, Version 3.2 Software 3–39 In Case of Problems Table 3–1: Failure symptoms and possible causes (Cont.) Symptom Possible causes and recommended action Portable Mainframe will not turn off with On/Standby switch. The mainframe utilities may be set up to disable hard power-off. Check the setting of the mainframe utilities (the mainframe utilities are located in the Windows Control Panel). This is a Windows operating system problem. Try turning off the mainframe using the Windows shutdown procedure. If the mainframe still does not turn off, disconnect power cord and reconnect after 10 seconds to reboot the mainframe. Expansion Mainframe will not turn off with On/Standby switch. If the expansion mainframe was incorrectly shut down (for example, the power cord was disconnected while the expansion mainframe was running) the expansion mainframe utility still registers the expansion mainframe as in the powered on condition. To correct this condition, press and hold the expansion mainframe power switch for three to four seconds. The expansion mainframe will turn off on its own. Turn off the benchtop mainframe. Turn on the benchtop mainframe; the expansion mainframe will turn on normally. TLA Startup Sequence The following information is intended to provide troubleshooting hints in case the logic analyzer fails to complete the startup sequence. Refer to Figure 3–22 on page 3–41 while reading the following paragraphs. At power-on, the mainframe software starts the mainframe and module kernel tests. If the mainframe passes the kernel tests, it attempts to boot the Windows operating system. If the mainframe fails the kernel tests, it displays the error code(s), beeps, and terminates the startup sequence. The Windows operating system starts the resource manager. The resource manager (ResMan32) performs the following tasks: H Runs mainframe power-on self tests. H Runs expansion mainframe power-on self tests. H Verifies the power-on self test status. H Inhibits any failed modules. H Records the power-on self test failures. H Determines the logic analyzer configuration. H Executes the system controller power-on diagnostics. After completing all of the above tasks (if you have performed the TLA Final Setup), the logic analyzer starts the TLA application which performs the following tasks: H 3–40 Runs power-on diagnostics on all installed modules. Tektronix Logic Analyzer Family User Manual, Version 3.2 Software In Case of Problems H Runs power-on diagnostics on the TLA system. H Records the Pass/Fail status in the Calibration and Diagnostics property sheet. If no failures occur, the application is ready to use for regular tasks. Turn on Mainframe kernel test Terminate and display error code Fail Pass/Fail ? Pass MS Windows boot Start resource manager System controller tests Module 1 kernel test Pass/Fail Module 2 kernel test Pass/Fail Module 3 kernel test Pass/Fail Module n kernel test Pass/Fail Verify kernel self test status Inhibit failed modules Log failures and build configuration Start the TLA and pattern generator application TLA Module power-on diagnostics TLA system power-on diagnostics Records failures in Calibration and Diagnostic property sheet Ready Figure 3–22: TLA startup sequence Tektronix Logic Analyzer Family User Manual, Version 3.2 Software 3–41 In Case of Problems Isolating System Problems If you have completed all of the troubleshooting procedures up to this point and the application fails to display any modules in the System window, you may have a system problem. Do the following: H Verify that all modules are properly installed. H Verify that the module address switches are set correctly. Turn off the mainframe and remove the modules. Set the address switches to FF and reinstall the modules. H Verify that the modules do not have the flash programming jumper installed on the rear of the module. Turn off the mainframe and remove the modules. Remove the jumper and reinstall the modules. H Try placing a suspected module in a different slot to verify slot dependency problems. For example, if you have a single module in slots 2 and 3, turn off the mainframe, move the module to slots 3 and 4, and try the tests again. If the module works in the new location, you have identified a faulty slot in the mainframe. H Check for bent or broken pins on the backplane of the mainframe. You can execute the internal resource manager program (ResMan32.exe) to identify if any of the installed modules are being identified in the mainframe slots. Table 3–2 lists some of the command line options for executing ResMan32. Table 3–2: Command line options for ResMan32 3–42 Option Description –a, –A, –o ,–O ResMan32 will not close the text window after executing and displaying the results the major functions (default). –p, –P ResMan32 will not execute the mainframe power-on self test diagnostics (default). –v, –V ResMan32 records the resource manager actions in the text window in a short form or nonverbose mode. +a, +A, +o ,+O ResMan32 will terminate the tests and display the resultant action information in the text window. +p, +P ResMan32 will perform the mainframe power-on self test diagnostics. +v, +V ResMan32 records all actions in a text window in the verbose mode (default). Tektronix Logic Analyzer Family User Manual, Version 3.2 Software In Case of Problems Table 3–2: Command line options for ResMan32 (Cont.) Option Description +t, +T ResMan32 will not display the text window and the tests will terminate after executing regardless of the error conditions. +m, +M ResMan32 displays in a minimized window. 1. Exit all applications. 2. Click the Windows Start button and select Run. 3. In the dialog box enter the following path: C:\Program Files\TLA 700\System\ResMan32.exe 4. Click OK. The ResMan32 (resource manager) program will check all of the installed modules and their address locations. The program will print out data similar to that in Figure 3–23. In this example the mainframe has two logic analyzer modules installed. If resource manager encounters any errors (such as an unsupported module), the resource manager will stop further communications and display information on why or at what point the module was disabled. #Resource Mgr #09/09/97 08:48:49 Auto Exit - Off Identify Static Configure Devices Found a device at LA 1 Found a device at LA 2 Identify Dynamic Configure Devices Matching Devices to Slots match la=1 to slot=1 match la=2 to slot=3 Setting VISA Attributes la 1, slot 1: device_class 2, manf_id 0xffd, model_code 0x7f4, addr_spc 0 la 2, slot 3: device_class 2, manf_id 0xffd, model_code 0x7f1, addr_spc 0 Setting VISA Address Maps A24 device @ la 1 - starting address 200000x, size 65536 A24 device @ la 2 - starting address 210000x, size 65536 Enabling Events & Responses la 1: Int ID 1 assigned to IRQ 4 Enabling Events: 16-32 124-125 127 la 1: Asynchronous Enable succeeded **Responses are unsupported by this device la 2: Int ID 1 assigned to IRQ 4 Enabling Events: 16-32 124-125 127 la 2: Asynchronous Enable succeeded **Responses are unsupported by this device Begin Normal Operation slot 1, LA 1, started successfully slot 3, LA 2, started successfully Tektronix Logic Analyzer Family User Manual, Version 3.2 Software 3–43 In Case of Problems VISA Data la_1=1,1,4093,2036,2,0,1,7,2097152 la_2=2,3,4093,2033,2,0,1,7,2162688 Figure 3–23: Example ResMan32 program output Expansion Mainframe Troubleshooting Because the expansion mainframe adds a level of complexity to troubleshooting problems, this section will concentrate on tips and tricks to aid you in troubleshooting expansion mainframe related problems. If you have exhausted all of the failure symptoms and possible causes that start on page 3–37, try some of the troubleshooting tips that follow. Look and Listen for the Expansion Mainframe Power-On Sequence There are certain signs that the expansion mainframe is not powering up correctly. By looking and listening to these “signs of life” you can determine if the expansion mainframe is not powering up because the expansion mainframe is not receiving a signal from the expansion module. Upon powering up the benchtop mainframe, a signal is sent from the expansion module in the benchtop mainframe, to the expansion module in the expansion mainframe via the three expansion cables. If the expansion mainframe does not receive this signal, the expansion mainframe will not be prompted to power up. If the power on signal is received by the expansion mainframe the fan will start and the lamp on the mainframe will light. Further indications that the mainframe is receiving signals from the expansion module is that the lights on the expansion module and any other installed modules will blink, indicating that signals are being received. Substitute a Known Good Expansion Module If you have available a known good expansion module, perform the following procedure: 1. Remove the suspect expansion module from the expansion mainframe. First verify that the expansion module is installed in slot 0 and that the logical address switches on the back of the module are set to FF. Also try swapping the expansion module from the benchtop mainframe with the expansion module from the expansion chassis. This sometimes works because one module is a sender while the other module is a receiver. The single-wide expansion module requires up to 60 lbs. of insertion force to engage it into the back plane. 3–44 Tektronix Logic Analyzer Family User Manual, Version 3.2 Software In Case of Problems CAUTION. Do not use the mounting screws to engage the module into the backplane of the chassis. The mounting screws will not provide enough force to seat the expansion module, and you can easily strip the threads. 2. Install the known good expansion module in slot 0 of the expansion chassis. 3. Turn on the benchtop mainframe and check for normal operation. 4. If the failure symptoms are still present with the known good expansion module installed, the problem is most likely in the expansion mainframe, not in the expansion module. 5. If your expansion mainframe operates normally with the known good expansion module installed, then the suspect expansion module needs to be serviced. Check the Expansion Mainframe If you do not have a known good expansion module, perform the following procedure to make sure the expansion mainframe is not the source of the failure: 1. Remove all plug-in modules from the expansion mainframe except the expansion module. 2. Turn on the benchtop mainframe and determine if the expansion mainframe is recognized by the TLA system. Replace the Expansion Module with a Benchtop Controller Module Another way to isolate problems is to make the expansion mainframe simulate a benchtop mainframe. You can do this by removing the expansion module from the slot 0 position in the expansion mainframe and replacing it with a known good TLA 720 Benchtop Controller module from your benchtop mainframe. Because the expansion mainframe is set up to power on from a signal from the expansion module (which is no longer present) you will have to press the power switch on the expansion mainframe. If the expansion mainframe powers on correctly, the problem can be isolated to either the expansion module(s) or the expansion cable(s). Tektronix Logic Analyzer Family User Manual, Version 3.2 Software 3–45 In Case of Problems 3–46 Tektronix Logic Analyzer Family User Manual, Version 3.2 Software Installing Software on the TLA 700 Series This section describes procedures for installing software or firmware on the TLA 714 and TLA 720 logic analyzer. For information on installing software or firmware on the TLA 704 or TLA 711 logic analyzer, refer to the TLA 700 Series Installation Manual (070-9774-02). NOTE. If you have any files that you want to keep, back up, copy and save the files before you proceed. This procedure will reformat the hard disk drive, and all files will be lost. NOTE. You should perform all of the procedures in this section in sequence. Installing Software This section provides information for installing software in your logic analyzer. In addition to the TLA software, there are other software programs that are installed separately; Table 3–3 lists some of the software and installation information. Table 3–3: Software not covered by the TLA software setup Software Installation information Microsoft Windows operating system2 Refer to the Windows documentation or contact your local Microsoft representative. Logic analyzer, pattern generator, or DSO module performance verification and adjustment Refer to the TLA Family Performance Verification and Adjustment Technical Reference Manual for instructions on installing and using the PV/Adjust software. Microprocessor or bus support Refer to the manual that was shipped with the microprocessor software or bus support. PC card software Refer to the instructions that come with your PC card. Other software Refer to the instructions that come with your software. 2 For information on installing Microsoft Windows software not available on the Windows backup CD, refer to the MS Web Site at: www.microsoft.com Tektronix Logic Analyzer Family User Manual, Version 3.2 Software 3–47 Installing Software on the TLA 700 Series Flashing the Controller BIOS To flash the Controller BIOS, complete the following steps: 1. Turn on the mainframe. While booting, press the F8 key and select Safe Mode with the Command Prompt only. 2. Insert the BIOS floppy disk and type: a:\phlash 3. When the BIOS has finished the flash program, remove the BIOS floppy disk. 4. Turn the mainframe off. Turn the mainframe on and press F2 to enter the BIOS setup utility. NOTE. After flashing the controller BIOS, you must ensure that the BIOS settings are correct. Some changes may be required. Continue with the next procedures to verify the BIOS settings. Setting Up the Controller BIOS The logic analyzer has a built-in setup program which lets you set basic input and output characteristics. In most cases, there is no need to access the setup program. If you need to access the setup program, turn on the logic analyzer and press function key F2 on the keyboard (ALT, CTRL, F2 keys simultaneously on the portable mainframe front panel) before the logic analyzer boots the Windows operating system. Table 3–4 on page 3–49 lists the default settings for the BIOS setup. You may need to refer to this information after updating the software or making other changes. CAUTION. Do not change any of the settings if you are unfamiliar with the setup program. Selecting an incorrect setup can cause the logic analyzer to malfunction. If you need to change any of the settings to match those listed in Table 3–4 on page 3–49, follow the on-screen instructions. 3–48 Tektronix Logic Analyzer Family User Manual, Version 3.2 Software Installing Software on the TLA 700 Series NOTE. If you need to upgrade the Controller BIOS version, refer to the Maintenance chapter of the TLA 720 Color Benchtop Controller Service Manual or the TLA 714 Color Portable Mainframe Service Manual for the upgrade instructions. 1. Turn on the mainframe and press function key F2 before the mainframe boots the Windows operating system.. 2. Default the settings (F9) and verify the hard disk was auto-recognized and that the correct size of the hard disk is displayed in the Primary Master setting. 3. Verify that all of the settings are the same as the settings in Table 3–4. 4. Press function key F10 to exit and save the BIOS setup. Table 3–4: TLA 714 and TLA 720 Controller BIOS setup Parameter Factory setting Submenu parameter Factory setting Type [Auto] Cylinders Set by Autotype Heads Set by Autotype Sectors Set by Autotype Maximum Capacity Set by Autotype Multi-sector transfers Set by Autotype LBA Mode Control Set by Autotype 32-Bit I/O [Disabled] Transfer Mode Set by Autotype Ultra DMA Mode Set by Autotype Main System Time Set to current date System Date Set to current time Legacy Diskette A [1.44/1.25 MB, 3 1/2”] " Primary Master hard disk drive size " Primary Slave [None] " Secondary Master [CD–ROM] " Secondary Slave [None] Enable SimlScan [Disabled] Summary Screen [Disabled] " Memory Cache Tektronix Logic Analyzer Family User Manual, Version 3.2 Software 3–49 Installing Software on the TLA 700 Series Table 3–4: TLA 714 and TLA 720 Controller BIOS setup (Cont.) Parameter Factory setting System Memory 640 KB Extended Memory Installed memory – 640 K Submenu parameter Factory setting Memory Cache [Enabled] External Cache [Disabled] Cache System BIOS area: [Enabled] Cache Video BIOS area: [Disabled] Cache D000 – D3FF: [Disabled] Cache D400 – D7FF: [Disabled] Cache D800 – DBFF: [Disabled] Local Bus IDE Adapter [Both] Serial port A [Enabled] Base I/O Address [3F8] Interrupt [IRQ4] Serial port B [Enabled] Mode [Normal] Base I/O Address [2F8] Interrupt [IRQ3] Parallel Port [Enabled] Mode [ECP] Base I/O Address [378] Interrupt [IRQ7] DMA Channel [DMA 1] Floppy disk controller [Enabled] Base I/O Address [Primary] DRAM Speed [60 ns] DMA Aliasing [Enabled] 16 Bit I/O Recovery [4.5] 8 Bit I/O Recovery [4.5] Advanced " I/O Device Configuration " Advanced Chipset Control Plug & Play O/S [Yes] Reset Configuration Data [No] 3–50 Tektronix Logic Analyzer Family User Manual, Version 3.2 Software Installing Software on the TLA 700 Series Table 3–4: TLA 714 and TLA 720 Controller BIOS setup (Cont.) Parameter Factory setting PS/2 Mouse [AutoDetect] Large Disk Access Mode: [Other] Secured Setup Configurations [No] Submenu parameter Factory setting ISA graphics device installed [No] " PCI Configuration " PCI/PNP ISA UMB Region Exclusion C800 – CBFF [Available] CC00 – CFFF [Available] D000 – D3FF [Available] D400 – D7FF [Available] D800 – DBFF [Available] DC00 – DFFF [Available] " PCI/PNP ISA IRQ Resource Exclusion IRQ3 [Available] IRQ4 [Available] IRQ5 [Available] IRQ7 [Available] IRQ9 [Available] IRQ10 [Available] IRQ11 [Available] IRQ14 [Available] IRQ15 [Available] Power Power Savings [Disabled] Standby Timeout: [Off] Auto Suspend Timeout [Off] Resume On Time [Off] IDE Drive 0 Monitoring [Disabled] IDE Drive 1 Monitoring [Disabled] IDE Drive 2 Monitoring [Disabled] IDE Drive 3 Monitoring [Disabled] Tektronix Logic Analyzer Family User Manual, Version 3.2 Software 3–51 Installing Software on the TLA 700 Series Table 3–4: TLA 714 and TLA 720 Controller BIOS setup (Cont.) Parameter PCI Bus Monitoring Factory setting Submenu parameter Factory setting 1. Currently installed drive ID 2. [Bootable add in card] CMOS Restore Condition [Never] [Disabled] Boot 1. [Diskette Drive] 2. [Removable Devices] 3. [Hard Drive] 4. [ATAPI CD–ROM Drive] " Hard Drive " Removable Devices Exit " CMOS Save & Restore Reformatting the Hard Disk Drive You should not reformat your hard disk drive unless it is absolutely necessary. If you find that you need to format the hard disk, (if possible) make sure that you have backup copies of your user files so that you can reinstall them later. You must perform the following procedure after you replace the hard disk, or when the partitioning or the format of the hard disk has been damaged. You will use the fdisk and format programs on the Windows 98 SE boot floppy disk to partition and format the hard disk. If your mainframe has both a replaceable hard disk drive and a fixed hard disk drive, pay close attention to which hard disk drive you are reformatting. Complete the following steps to format the hard disk: 1. Insert the Windows 98 SE Boot floppy disk in the floppy disk drive. This floppy disk is used to install Windows. 2. Turn on the logic analyzer so that it boots from the floppy disk. 3. Select option 5 on the Startup menu to start the mainframe without CD ROM support. 3–52 Tektronix Logic Analyzer Family User Manual, Version 3.2 Software Installing Software on the TLA 700 Series 4. At the prompt, enter the command FDISK. You must execute the FDISK command before loading Windows. 5. Enter Y when you are asked if you want to select Large Disk Support. 6. Select option 3 to delete any existing partitions. 7. Select option 1 to create a new partition on the hard disk. 8. Select option 1 again to specify that the new partition is to be the primary DOS partition. 9. Enter Y to use the maximum available size for the DOS partition. 10. Press the ESC key to exit the FDISK utility. 11. Press the CTRL, ALT, and Delete keys simultaneously to reboot. 12. Select option 1 on the Startup menu to select internal CD ROM support. 13. Enter FORMAT C: to format the master hard disk drive or FORMAT D: to format the slave hard disk drive. Installing Windows 98 SE The following procedure requires the hard disk drive to be properly formatted. To reinstall the Windows software, complete the following steps: 1. Start the logic analyzer from the Windows 98 SE Boot floppy disk. 2. Insert the Windows 98 SE CD into the CD ROM drive. Select option 1 on the Startup menu. 3. Change the drive to the CD ROM drive. 4. Enter Setup. 5. Remove the Windows Setup Boot floppy disk. 6. Follow the instructions to set up Windows. Refer to the Microsoft Windows documentation for additional information. 7. Choose the default directory of C:\Windows as the Windows directory. 8. Choose “Typical” for the setup options. Tektronix Logic Analyzer Family User Manual, Version 3.2 Software 3–53 Installing Software on the TLA 700 Series 9. If you are prompted for a location of Windows driver files, specify D:\Win98. 10. If during Windows configuration you are prompted for a driver for “PCI Bridge,” follow steps 5 through 9 under Installing the Tek PCI Bridge Driver. 11. Restart the logic analyzer when prompted. The logic analyzer should start up in Windows. You are now ready to install the TLA application software. Installing the Video Driver After setting up the Windows software, you must install the video driver. To install the video driver, complete the following steps: 1. Install the CD labeled “Disc1-Logic Analyzer Software.” 2. Using the Windows Explorer browse to: D:\Drivers\TLA700\C&T 69000 video\w98600.exe 3. Double click on w98000.exe 4. Click the default buttons to install the C&T 69000 Video driver. 5. When the prompt appears asking you if you want to reboot now, click No, I will restart my computer later. Installing the Tek PCI Bridge Driver To install the Tektronix PCI bridge driver, complete the following steps: 1. Click Start, point to Settings click Control Panel and double-click System icon. 2. Click the Device Manager tab. 3. Under Other devices right click on PCI Bridge and click Properties. 4. Select the Driver tab, click Update Driver and click Next. 5. Click Display a list of all the drivers in a specific location, then click Next. 6. Click Other Devices and click Next. 7. Click Have Disk, click Browse and browse to: 3–54 Tektronix Logic Analyzer Family User Manual, Version 3.2 Software Installing Software on the TLA 700 Series D:/Drivers\TLA700\Tek PCI Bridge 8. Click Next, click Next, then click Finish. 9. Click Yes to reboot the system. Installing Windows 98 SE Patches The following patches to the Windows 98 SE operating system are normally installed on the logic analyzer. You should go to the Microsoft web site (http://windowsupdate.microsoft.com), download the following patches, or updated versions, and install them on the logic analyzer: H Windows 98 Second Edition Shutdown Supplement H Windows Security Update, November 12, 1999 Earlier versions of the Windows operating system included a utility called dcomcnfg.exe that was used to help configure systems for distributed comm applications, such as the TPI application for Tektronix logic analyzers. Microsoft no longer includes this utility with Windows, but it can be downloaded for free from the Microsoft web site at: http://www.microsoft.com/com/dcom/dcom98/download.asp Look for the link entitled “Dcom98 for Windows 98 configuration utility.” This utility is normally installed on new Tektronix logic analyzers. Installing Tektronix Pattern Generator Application Software To install the pattern generator application software execute the setup.exe program located on the Tektronix Pattern Generator application software CD in the path: \Pattern Generator Application SW\Disk1, or perform the following steps. NOTE. The following instructions assume that you are reinstalling the pattern generator application software only. 1. Exit all applications before continuing. 2. Install the CD labeled “Disc1-Logic Analyzer Software.” 3. Click Start, point to Settings and click Control Panel. 4. In the Control Panel window, double-click Add/Remove Programs. Tektronix Logic Analyzer Family User Manual, Version 3.2 Software 3–55 Installing Software on the TLA 700 Series 5. Click Install and follow the on screen instructions. The application software is located on the CD in the following directory: \Tektronix Pattern Generator Application SW\Disk1 The setup program will replace old versions of the software after you have confirmed your choice. The program also offers to delete shared files which appear to be no longer needed by any application. You can safely delete these files if you are sure you no longer need them. The program will not remove saved pattern generator files. Installing QAPlus and TLA Application Software To install QAPlus and the TLA application software, complete the following steps: 1. Install the CD labeled “Disc1-Logic Analyzer Software.” 2. Use the Windows Explorer locate and execute: D:\QA Plus\Qawin32.exe 3. The QAPlus install program will prompt you that a directory will be created, click Next to approve. 4. When prompted to accept a folder name of Sykes Diagnostics, Change the folder name to QA+Win32. Click Next then click Finish. 5. Click Start, point to Programs and click MS DOS Prompt. The next few steps must be done in an MS DOS Window. 6. To add a Start Menu shortcut to the QAPlus manual, in the MS DOS window type the following: copy D:\IQA PlusI\*.lnk C:\Windows\IStart MenuI\Programs\IQA+Win32I 7. To remove the QAPlus link from the desktop, in the MS DOS window type the following: erase C:\Windows\Desktop\IQA+Win32.lnkI 8. To copy the customized test scripts into the QAPlus directory, in the MS DOS window type the following: copy /y D:\IQA PlusI\*.dat C:\IProgram FilesI\QAWin32 9. Close the MS DOS Window. 3–56 Tektronix Logic Analyzer Family User Manual, Version 3.2 Software Installing Software on the TLA 700 Series The next group of instructions installs the TLA application software. 10. Use Windows Explorer to locate and execute the following: D:\TLA Application SW\Disk1\Setup.exe 11. When prompted to reboot the system; click Yes to reboot. Setting Up the Display Properties To set up the display, complete the following steps: 1. Right click on the Windows desktop and select Properties. 2. Select the Settings tab and click Advanced. 3. Select the Monitor tab and click Change. 4. Select Standard Monitor Types on the left and Plug & Play Monitor on the right. Click OK, and then click Close. 5. Set the Color Palette to 16 Bit Color and set the Desktop Area to 800 X 600. 6. Click OK to accept the new settings, and Yes to accept the new desktop size. Setting Up the Screen Saver The screen saver includes the option of reducing the intensity of the LCD display backlight to help prolong the life of the display. Select this recommended screen saver unless you will always use an external monitor. 1. Click Start, point to Settings and click Control Panel. Double-click Display. 2. Select the Screen Saver tab. 3. Select Tektronix LCD Saver from the list of screen savers. 4. Set the Wait period for 10 minutes. 5. Under Screen Saver click Settings. Set the speed to Fast and the Intensity to Reduced (60%) (LCD Display only). Click OK, and then click OK again. Tektronix Logic Analyzer Family User Manual, Version 3.2 Software 3–57 Installing Software on the TLA 700 Series Removing Advanced Power Management To remove advanced power management, follow these steps: 1. Click Start, point to Settings and click Control Panel. Double-click System. 2. Select Device Manager tab. 3. Click View devices by connection. 4. Find the Advanced Power management item, select it, and click Remove. 5. When prompted to reboot, click No to reboot later. 6. Click View devices by type. Click Close. Setting Up the Mainframe Utilities The Mainframe Utilities provide additional settings for your logic analyzer (the LCD utilities can only be used with the portable mainframe). 1. Click Start, point to Settings and click Control Panel. Double-click the Mainframe Utilities icon. 2. Select the Shutdown Mode tab. 3. Click Enable Soft Power Off. 4. Select the LCD Mode tab. 5. Click LCD Full On. Click OK. (LCD Display only) Setting Up the Virtual Memory The following virtual memory settings ensure optimal performance of the TLA application software. 1. Click Start, point to Setting and click Control Panel. Double-click System. 2. Select the Performance tab and click Virtual Memory. 3. Click Let me specify my own virtual memory settings. 4. Enter 100 for Minimum and 500 for Maximum. Click OK. 5. Select Yes to confirm settings. Click Close. 6. When prompted to reboot now, click Yes. 3–58 Tektronix Logic Analyzer Family User Manual, Version 3.2 Software Installing Software on the TLA 700 Series Updating Module Firmware Perform the following steps if you need to reinstall or update the flash ROMbased firmware on your modules. You can update multiple modules and module types during a single firmware update session. 1. Turn off the logic analyzer. 2. Disconnect the power cord. 3. Disconnect any probes on the modules that you want to upgrade. 4. Remove the module from the logic analyzer. 5. Refer to Figure 3–24 and locate the flash programming pins on the rear of the module. Flash programming pins Figure 3–24: Flash programming pins Tektronix Logic Analyzer Family User Manual, Version 3.2 Software 3–59 Installing Software on the TLA 700 Series 6. Install a jumper on the flash programming pins (use one of the spare jumpers that came with your logic analyzer software). 7. Reinstall the module(s) in the logic analyzer. 8. Reconnect the power cord and turn on the logic analyzer. NOTE. Any modules with the flash programming jumper installed will not display in the System window. 9. Exit the TLA application. 10. Click Start, point to Programs, point to Tektronix Logic Analyzer, and click TLA Firmware Loader. 11. Select the modules that you want to update from the list of modules displayed in the Supported list box near the top of the menu. If you are updating more than one module at a time, note the slot location of the module in the selection box. 12. Select Load Firmware from the Execute menu. 13. Click the proper .LOD file for the module in the: C:\Program Files\TLA 700 Firmware directory, or the C:\Program Files\Tektronix Pattern Generator Firmware directory. If you are updating more than one module make sure that you select the proper firmware file for the module in the listed slot number. 14. Click OK. You will be asked to confirm your action; click Yes when prompted. NOTE. The program will not allow you to load firmware to an incompatible module. For example, the program will not load DSO firmware to a logic analyzer module. 15. If you are updating another module, select the proper .LOD file for the module. 16. Click OK. You will be asked to confirm your action; click Yes when prompted. The program will load the firmware for each module one at a time. The process takes approximately five minutes per module. 17. Exit the program. 3–60 Tektronix Logic Analyzer Family User Manual, Version 3.2 Software Installing Software on the TLA 700 Series 18. Turn off the logic analyzer and disconnect the power cord. 19. Remove the module from the logic analyzer and remove the jumper from the Flash programming pins on the rear of the module. Keep the jumper for future updates. 20. Attach a new label with the new firmware version to the module. 21. Reinstall the module in the logic analyzer and reconnect the probes. 22. Reconnect the power cord and turn on the logic analyzer. 23. Verify that the power-on diagnostics pass. 24. Run the self calibration on each module after a 30-minute warm-up. Restoring User Files After you have reinstalled all of the application software files, you should restore any backed-up user files. Use the Windows Back Up tool to restore any saved files from floppy disks. Use the online help for instructions on restoring the files. Initial Launch of the TLA Application The first time the mainframe is powered up, there will be a TLA Final Setup icon on your desktop. Double click the icon to launch the application for the first time. The TLA application will autolaunch every time thereafter. Uninstalling TLA Application Software You can also remove the TLA software using the Uninstall program. Use the Add/Remove Programs tool under the Control Panel to uninstall software. Tektronix Logic Analyzer Family User Manual, Version 3.2 Software 3–61 Installing Software on the TLA 700 Series 3–62 Tektronix Logic Analyzer Family User Manual, Version 3.2 Software Power Cord and Line Fuse Requirements for the Benchtop Mainframe The benchtop mainframe comes with two power cords and three fuses (one fuse is already installed). You must determine the correct fuse and power cord for your configuration. This is important to avoid overloading the power distribution system and ensures that you comply with the National Electrical Code. The power consumption depends on the number and type of instrument modules installed in the benchtop mainframe. Table 3–5 lists the power consumed for each module. To determine the total power consumption, perform the following steps: 1. Use Table 3–5 to determine the power consumption for each module in the benchtop mainframe. 2. Add the power for each module to determine the total power consumption. 3. Determine at which line voltage you will be operating the benchtop mainframe. 4. Refer to Figure 3–25 on page 3–64 to determine the proper power cord and line fuse for your benchtop mainframe. Table 3–5: Power for instrument modules Module type Power (Watts) TLA 720 Benchtop Controller 50 TLA 7XM Expansion Module 20 TLA 7P2 82 TLA 7P4 108 TLA 7N1 70 TLA 7N2 82 TLA 7N3 74 TLA 7N4 108 TLA 7L1 55 TLA 7L2 73 TLA 7L3 94 TLA 7L4 109 Tektronix Logic Analyzer Family User Manual, Version 3.2 Software 3–63 Power Cord and Line Fuse Requirements for the Benchtop Mainframe Table 3–5: Power for instrument modules (Cont.) Module type Power (Watts) TLA 7M1 57 TLA 7M2 76 TLA 7M3 99 TLA 7M4 115 TLA 7D1 56 TLA 7D2 81 TLA 7E1 56 TLA 7E2 81 For power usage in the nonshaded region of Figure 3–25, use either the power cord with the 15 A plug (two parallel prongs and ground) or the power cord with the 20 A plug (two perpendicular prongs and ground). For high power usage combined with low input line voltages (shaded region), use only the power cord with the 20 A plug. Select the proper fuse based on the ranges shown in Figure 3–25. Power Cord with 20A plug (NEMA 5–20P) ONLY! Power Consumption (Watts) 800 700 600 500 Power Cord with 15A plug (NEMA 5–15P) Power Cord with 20A plug (NEMA 5–20P) 400 300 200 100 0 90 110 130 115 150 170 190 Input Line Voltage (Volts AC) 210 230 250 20AT Fuse 15AF Fuse 6.3AF Fuse Figure 3–25: Power cord identification chart For example, assume that your configuration consists of four TLA 7M4 Logic Analyzer Modules and one TLA 7E2 DSO Module. Also assume that you will be operating the mainframe at 90 VAC. 3–64 Tektronix Logic Analyzer Family User Manual, Version 3.2 Software Power Cord and Line Fuse Requirements for the Benchtop Mainframe Add 50 Watts (for the benchtop controller) + 20 Watts (for the expansion module) + 81 Watts (for the DSO Module) + 4 X 115 Watts (for the logic analyzer modules) to come up with a total value of 601 Watts. Because the power consumption (at 90 VAC) is approaching the shaded area of the graph in Figure 3–25, you should consider using the 20A power cord. Tektronix Logic Analyzer Family User Manual, Version 3.2 Software 3–65 Power Cord and Line Fuse Requirements for the Benchtop Mainframe 3–66 Tektronix Logic Analyzer Family User Manual, Version 3.2 Software Power Cord and Line Fuse Requirements for the Expansion Mainframe The expansion mainframe comes with two power cords and three fuses (one fuse is already installed). You must determine the correct fuse and power cord for your configuration. This is important to avoid overloading the power distribution system and ensures that you comply with the National Electrical Code. The power consumption depends on the number and type of instrument modules installed in the expansion mainframe. Table 3–6 lists the power consumed for each module. To determine the total power consumption perform the following steps: 1. Use Table 3–6 to determine the power consumption for each module in the expansion mainframe. 2. Add the power for all modules to determine the total power consumption. 3. Determine at which line voltage you will be operating the expansion mainframe. 4. Refer to Figure 3–26 to determine the proper power cord and line fuse for your expansion mainframe. Table 3–6: Power for instrument modules Module type Power (Watts) TLA 7XM Expansion Module 20 TLA 7P2 82 TLA 7P4 108 TLA 7N1 70 TLA 7N2 82 TLA 7N3 74 TLA 7N4 108 TLA 7L1 55 TLA 7L2 73 TLA 7L3 94 TLA 7L4 109 Tektronix Logic Analyzer Family User Manual, Version 3.2 Software 3–67 Power Cord and Line Fuse Requirements for the Expansion Mainframe Table 3–6: Power for instrument modules (Cont.) Module type Power (Watts) TLA 7M1 57 TLA 7M2 76 TLA 7M3 99 TLA 7M4 115 TLA 7D1 56 TLA 7D2 81 TLA 7E1 56 TLA 7E2 81 For power usage in the nonshaded region of Figure 3–26, use either the power cord with the 15 A plug (two parallel prongs and ground) or the power cord with the 20 A plug (two perpendicular prongs and ground). For high power usage combined with low input line voltages (shaded region), use only the power cord with the 20 A plug. Select the proper fuse based on the ranges shown in Figure 3–26. Power Cord with 20A plug (NEMA 5–20P) ONLY! Power Consumption (Watts) 800 700 600 500 Power Cord with 15A plug (NEMA 5–15P) Power Cord with 20A plug (NEMA 5–20P) 400 300 200 100 0 90 110 130 115 150 170 190 Input Line Voltage (Volts AC) 210 230 250 20AT Fuse 15AF Fuse 6.3AF Fuse Figure 3–26: Power cord identification chart For example, assume that your configuration consists of four TLA 7M4 Logic Analyzer Modules and one TLA 7E2 DSO Module. Also assume that you will be operating the mainframe at 90 VAC. 3–68 Tektronix Logic Analyzer Family User Manual, Version 3.2 Software Power Cord and Line Fuse Requirements for the Expansion Mainframe Add 20 Watts (for the expansion module) + 81 Watts (for the DSO Module) + 4 X 115 Watts (for the logic analyzer modules) to come up with a total value of 561 Watts. Because the power consumption (at 90 VAC) is approaching the shaded area of the graph in Figure 3–26, you should consider using the 20A power cord. Tektronix Logic Analyzer Family User Manual, Version 3.2 Software 3–69 Power Cord and Line Fuse Requirements for the Expansion Mainframe 3–70 Tektronix Logic Analyzer Family User Manual, Version 3.2 Software Appendices Appendix A: TLA 600 Series Logic Analyzer Specifications This chapter lists the specifications for the TLA 600 series logic analyzer. Characteristic Tables All specifications are guaranteed unless noted Typical. Typical characteristics describe typical or average performance and provide useful reference information. Specifications that are check marked with the n symbol are checked directly (or indirectly) in the TLA Series Performance Verification and Adjustment Technical Reference Manual. The specifications apply to all versions of the TLA 600 series logic analyzer unless otherwise noted. The performance limits in this specification are valid with these conditions: H The logic analyzer must be in an environment with temperature, altitude, humidity, and vibration within the operating limits described in these specifications. H The logic analyzer must have had a warm-up period of at least 30 minutes. Table A–1: Atmospheric characteristics Characteristic Description Temperature: Operating and nonoperating Operating (no media in floppy disk drive): +5_C to +50_C, 15_C/hr maximum gradient, non-condensing (derated 1_C per 1000 ft above 5000 foot altitude) Nonoperating (no media in floppy disk drive): –20_C to +60_C, 15_C/hr maximum gradient, non-condensing. Relative Humidity: Operating and nonoperating Operating (no media in floppy disk drive): 20% to 80% relative humidity, non-condensing. Maximum wet bulb temperature: +29_C (derates relative humidity to approximately 22% at +50_C). Nonoperating (no media in floppy disk drive): 8% to 80% relative humidity, non-condensing. Maximum wet bulb temperature: +29_C (derates relative humidity to approximately 22% at +50_C). Altitude: Operating and nonoperating Operating: To 10,000 ft (3040 m), (derated 1_C per 1000 ft (305 m) above 5000 ft (1524 m) altitude) Nonoperating: 40,000 ft (12190 m). Tektronix Logic Analyzer Family User Manual, Version 3.2 Software A–1 Appendix A: TLA 600 Series Logic Analyzer Specifications Table A–2: Input Parameters Characteristic Description Threshold accuracy ±100 mV Threshold range and step size Threshold is setable from +5.0 V to –2 V The step size is 50mV per step Threshold channel selection There are 16 groups of thresholds assigned to channels. Channel to channel skew Maximum: ≤ 1.6 ns Minimum: ≤ 1.0 ns Sample uncertainty Asynchronous: Sample period Synchronous: 500 ps Probe input resistance 20 KW Probe input capatance 2 pF clock and data inputs (P6417) 1.4 pF data input and 2 pF clock input (P6418) Minimum slew rate 0.2 V/ns Maximum operating signal swing 6.5 V peak-to-peak –3.5 V absolute input voltage minimum +6.5 V absolute input voltage maximum System Trigger and External Signal Input Latencies2 (Typical) External Signal Input to LA Probe Tip via Signal 3, 43 –212 ns + Clk External Signal Input to LA Probe Tip via Signal 1, 23, 4 –208 ns + Clk System Trigger and External Signal Output Latencies (Typical) LA Probe Tip to External System Trigger Out1 376 ns + SMPL LA Probe Tip to External Signal Out via Signal 3, 41 OR function 366 ns + SMPL AND function 379 ns + SMPL LA Probe Tip to External Signal Out via Signal 1, 21, 4 normal function A–2 364 ns + SMPL Tektronix Logic Analyzer Family User Manual, Version 3.2 Software Appendix A: TLA 600 Series Logic Analyzer Specifications Table A–2: Input Parameters (Cont.) Characteristic Description inverted logic on backplane 364 ns + SMPL 1 SMPL represents the time from the event at the probe tip inputs to the next valid data sample. In the Normal Internal clock mode, this represents the delta time to the next sample clock. In the MagniVu Internal clock mode, this represents 500 ps or less. In the External clock mode, this represents the time to the next master clock generated by the setup of the clocking state machine, the system-under-test supplied clocks, and the qualification data. 2 All system trigger and external signal input latencies are measured from a falling-edge transition (active true low) with signals measured in the wired-OR configuration. 3 “Clk” represents the time to the next master clock at the destination logic analyzer. In the asynchronous (or internal) clock mode, this represents the delta time to the next sample clock beyond the minimum async rate of 4 ns. In the synchronous (or external) clock mode, this represents the time to the next master clock generated by the setup of the clocking state machine and the supplied system under test clocks and qualification data. 4 Signals 1 and 2 (ECLTRG0, 1) are limited to a “broadcast” mode of operation, where only one source is allowed to drive the signal node at any one time. That single source may be utilized to drive any combination of destinations. Table A–3: External signal interface Characteristic Description System Trigger Input TTL compatible input via rear panel mounted BNC connectors Input Levels VIH VIL TTL compatible input. ≥ 2.0 V ≤ 0.8 V Input Mode Falling edge sensitive, latched (active low) Minimum Pulse Width 12 ns Active Period Accepts system triggers during valid acquisition periods via real-time gating, resets system trigger input latch between valid acquisition periods Maximum Input Voltage 0 to +5 V peak External Signal Input TTL compatible input via rear panel mounted BNC connectors Input Destination Signal 1, 2, 3, 4 Input Levels VIH VIL TTL compatible input. ≥ 2.0 V ≤ 0.8 V Input Mode Active (true) low, level sensitive Input Bandwidth1 Signal 1, 2 Signal 3, 4 50 MHz square wave minimum 10 MHz square wave minimum Active Period Accepts signals during valid acquisition periods via real-time gating Maximum Input Voltage 0 to +5 V peak System Trigger Output TTL compatible output via rear panel mounted BNC connectors Tektronix Logic Analyzer Family User Manual, Version 3.2 Software A–3 Appendix A: TLA 600 Series Logic Analyzer Specifications Table A–3: External signal interface (Cont.) Characteristic Description Source Mode Active (true) low, falling edge latched Active Period Outputs system trigger state during valid acquisition period, resets system trigger output to false state between valid acquisitions Output Levels VOH 50 W back terminated TTL-compatible output ≥4 V into open circuit ≥ 2 V into 50 W to ground VOL Output Protection External Signal Output ≥ 0.7 V sinking 10 ma Short-circuit protected (to ground) TTL compatible outputs via rear panel mounted BNC connectors Source Selection Signal 1, 2, 3, 4, or 10 MHz clock Output Modes Level Sensitive User definable Active (true) low or active (true) high Output Levels VOH 50 Ohm back terminated TTL output ≥ 4 V into open circuit ≥ 2 V into 50 W to ground VOL ≤ 0.7 V sinking 10 ma Output Bandwidth2 Signal 1, 2 Signal 3, 4 Active Period 50 MHz square wave minimum 10 MHz square wave minimum Outputs signals during valid acquisition periods, resets signals to false state between valid acquisitions Outputs 10 MHz clock continuously Output Protection Short-circuit protected (to ground) Intermodule Signal Line Bandwidth Signal 1, 2 (ECLTRG 0,1) Signal 3, 4 (ECLTRG 0,1) Minimum bandwidth up to which the signals are specified to operate correctly 50 MHz square wave minimum 10 MHz square wave minimum 1 The Input Bandwidth specification only applies to signals to the modules; it does not apply to signals applied to the External Signal Input and sent back to the External Signal Output. 2 The Output Bandwidth specification only applies to signals from the modules; it does not apply to signals applied to the External Signal Input and sent back to the External Signal Output. A–4 Tektronix Logic Analyzer Family User Manual, Version 3.2 Software Appendix A: TLA 600 Series Logic Analyzer Specifications Table A–4: Logic Analyzer Charisteristics Characteristic Description Maximum operating signal swing 6.5 V peak-to-peak Probe overdrive ± 200 mV or ± 25% of signal swing minimum required beyond threshold, whichever is greater ± 4 V maximum beyond threshold Maximum nondestructive input signal ± 15 V to probe Minimum input pulse width (single channel) 2 ns Delay time from probe tip to input connector 7.33 ns Probe cable length P6417: 1.8 m (6 ft) P6418: 1.93 m (6 ft, 4 in) Channel width and depth Number of data channels There is a maximum of 128 + 8 stroed clock/qualifier channels. Channel widths of 96 + 6, 64 + 4 and 32 + 2 are also supported. Acquisition memory depth 256 K per channel The acquisition board has 64 X 32 Sync-SRAM Synchronious clocking. Number of clock channels 32 + 2 64 +4 96 + 6 128 + 8 Unused clock channels may be used as qualifier channels. Any or all of the clock channels can be enabled. For an enabled clock channel eiather rising, falling or both, the edges can be selected as active clock edges. All clock channels are stored. Number of qualifier channels 32 + 2 64 +4 96 + 6 128 + 8 All qualifier channels are stored. For custom clocking there are an additional 4 qualifier channels on C2 3:0 regardless of channel width. Table A–5: Internal controller Characteristic Description Operating System Microsoft Windows 98 Second Edition Microprocessor Intel Celron , 500 MHz Main Memory SDRAM Tektronix Logic Analyzer Family User Manual, Version 3.2 Software A–5 Appendix A: TLA 600 Series Logic Analyzer Specifications Table A–5: Internal controller (Cont.) Characteristic Description Style 168 pin SO DIMM, 2 Sockets Speed 66 MHz Installed Configurations Minimum Maximum 64 MB loaded in one socket 128 MB with both sockets loaded Real-Time Clock and CMOS Setups, Plug & Play NVRAM Retention Time Battery life is typically > 3 years when the logic analyzer is not connected to line voltage. When connected to line voltage the life of the battery is extended. Lithium battery, CR3032 Hard Disk Drive Standard PC compatible IDE (Integrated device Electronics) hard disk drive residing on an EIDE interface. Size Minimum Maximum 6 GByte 12 GByte Continually subject to change due to the fast-moving PC component environment. These storage capacities valid at product introduction. CD ROM Drive Standard PC compatible IDE (Integrated device Electronics) 40X (minimum) CD ROM drive residing on an EIDE interface. Continually subject to change due to the fast-moving PC component environment. Floppy Disk Drive Standard 3.5 inch 1.44-MB PC compatible high-density, double-sided floppy disk drive. Table A–6: Display system Characteristic Description Classification Standard PC graphics accelerator technology (bitBLT-based); capable of supporting both internal color LCD display and external color SVGA/XGA monitor Display Memory DRAM-based frame-buffer memory Size Display Selection 2 MB Hardware sense of external SVGA monitor during BIOS boot sequence; defaults to internal color LCD display; automatically switches to external SVGA monitor, if attached Dual (simultaneous) display of external SVGA monitor and internal color LCD is possible via special “simulscan” CMOS setup, as long as internal and external displays operate at same resolution (limited to 800x600 on current TFT LCD) and display rates Dynamic Display Configuration (DDC2 A and B) support for external SVGA monitor is provided. External Display Drive A–6 One SVGA/XGA-compatible analog output port Tektronix Logic Analyzer Family User Manual, Version 3.2 Software Appendix A: TLA 600 Series Logic Analyzer Specifications Table A–6: Display system (Cont.) Characteristic Display Size Description User selected via Windows 98 Plug and Play support for DDC1 and DDC2 A and B Resolution (Pixels) 640 x 480 640 x 480 640 x 480 800 x 600 800 x 600 800 x 600 1024 x 768 1280 x 1024 Colors 256 64,000 16,800,000 256 64,000 16,800,000 256 256 Internal Display Classification Thin Film Transistor (TFT) 10.4 inch active-matrix color LCD display; CCFL backlight; intensity controllable via software Resolution 800 x 600 pixels Color Scale 262,144 colors (6-bit RGB) Table A–7: Front-panel interface Characteristic Description QWERTY Keypad ASCII keypad to support naming of files, traces, and keyboard equivalents of pointing device inputs for menus Special Function Knobs Various functions Table A–8: Rear-panel interface Characteristic Description Parallel Interface Port (LPT) 36-pin high-density connector supports standard Centronics mode, Enhanced Parallel Port (EPP), or Microsoft high-speed mode (ECP) Serial Interface Port (COM 1) 9-pin male sub-D connector to support RS-232 serial port Single USB Ports One USB (Universal Serial Bus) compliant port SVGA Output Port (SVGA OUT) 15-pin sub-D SVGA connector Mouse Port PS/2 compatible mouse port utilizing a mini DIN connector Keyboard Port PS/2 compatible keyboard port utilizing a mini DIN connector Type I and II PC Card Port Standard Type I and II PC-compatible PC card slot Type I, II, and III PC Card Port Standard Type I, II, and III PC-compatible PC card slot Tektronix Logic Analyzer Family User Manual, Version 3.2 Software A–7 Appendix A: TLA 600 Series Logic Analyzer Specifications Table A–9: AC power source Characteristic Description Source Voltage and Frequency 90–250 VRMS, 45–66 Hz, continuous range CAT II 100–132 VRMS, 360–440 Hz, continuous range CAT II Fuse Rating 90 V – 250 V Operation (2 required) UL198/CSA C22.2 0.25 in × 1.25 in, Fast Blow, 8 A, 250 V Tektronix part number: 159-0046-00 Bussman part number: ABC–8 Littlefuse part number: 314008 90 V - 250 V Operation (2 required) IEC 127/Sheet 1 5 mm × 20 mm, Fast Blow, 6.3 A, 250 V Tektronix part number: 159-0381-00 Bussman part number: GDA–6.3 Littlefuse part number: 21606.3 Maximum Power Consumption 600 Watts line power maximum Steady-State Input Current 6 ARMS maximum Inrush Surge Current 70 A maximum Power Factor Correction Yes On/Standby Switch and Indicator Front Panel On/Standby switch, with indicator. The power cord provides main power disconnect. Table A–10: Cooling Characteristic Description Cooling System Forced air circulation (negative pressurization) utilizing six fans operating in parallel Cooling Clearance 2 in (51 mm), sides and rear; unit should be operated on a flat, unobstructed surface A–8 Tektronix Logic Analyzer Family User Manual, Version 3.2 Software Appendix A: TLA 600 Series Logic Analyzer Specifications Table A–11: Certifications and compliances: TLA 600 series logic analyzer EC Declaration of Conformity – EMC Meets intent of Directive 89/336/EEC for Electromagnetic Compatibility. Compliance was demonstrated to the following specifications as listed in the Official Journal of the European Communities: EN 61326–1 IEC 1000–4–2 IEC 1000–4–3 IEC 1000–4–4 IEC 1000–4–5 IEC 1000–4–6 IEC 1000–4–11 EN 61000–3–2 EC Declaration of Conformity – Low Voltage EMC requirements for Class A electrical equipment for measurement, control and laboratory use. Electrostatic Discharge Immunity (Performance Criterion B) RF Electromagnetic Field Immunity (Performance Criterion A) Electrical Fast Transient / Burst Immunity (Performance Criterion B) Power Line Surge Immunity (Performance Criterion B) Conducted RF Immunity (Performance Criterion A) Power Line Dips and Interruptions Immunity (Performance Criterion B) AC Power Line Harmonic Emissions Compliance was demonstrated to the following specification as listed in the Official Journal of the European Communities: Low Voltage Directive 73/23/EEC EN 61010-1:/A2 1995 Approvals Safety requirements for electrical equipment for measurement, control, and laboratory use UL3111–1 – Standard for electrical measuring and test equipment CAN/CSA C22.2 No. 1010.1 – Safety requirements for electrical equipment for measurement, control and laboratory use Installation Category Descriptions IEC Characteristics Terminals on this product may have different installation category designations. The installation categories are: CAT III Distribution-level mains (usually permanently connected). Equipment at this level is typically in a fixed industrial location. CAT II Local-level mains (wall sockets). Equipment at this level includes appliances, portable tools, and similar products. Equipment is usually cord-connected. CAT I Secondary (signal level) or battery operated circuits of electronic equipment. Equipment type: Test and Measuring Installation Category II Pollution Degree 2 Safety Class I Tektronix Logic Analyzer Family User Manual, Version 3.2 Software A–9 Appendix A: TLA 600 Series Logic Analyzer Specifications Table A–12: Logic analyzer mechanical Characteristic Description Overall Dimensions See Figure A–1 for overall chassis dimensions Weight Includes empty accessory pouch and front cover TLA 614, TLA 624, TLA 613 and TLA 623 18.1 Kg (40 lbs) TLA 612, TLA 622, TLA 611 and TLA 621 18 Kg (39.75 lbs) TLA 604 and TLA 603 17.6 Kg (38.75 lbs) TLA 602 and TLA 601 17.5 Kg (38.5 lbs) 457.20 mm (18.00 in) 421.64 mm (16.60 in) 281.94 mm (11.10 in) 457.20 mm (18.00 in) 414.02 mm (16.30 in) 281.94 mm (11.10 in) Figure A–1: Dimensions of the TLA 600 series logic analyzer A–10 Tektronix Logic Analyzer Family User Manual, Version 3.2 Software Appendix B: TLA 714 and TLA 720 Logic Analyzer Specifications This chapter lists the specifications for the TLA 714 Color Portable Mainframe and the TLA 720 Color Benchtop Mainframe and its modules. The first section lists specifications that are common to the mainframes or modules. The following sections list specifications that are specific to individual logic analyzer components. Characteristic Tables All specifications are guaranteed unless noted Typical. Typical characteristics describe typical or average performance and provide useful reference information. Specifications that are marked with the n symbol are checked directly (or indirectly) in the TLA 700 Series Performance Verification and Adjustment Technical Reference Manual. The specifications apply to all versions of the logic analyzer mainframe or module unless otherwise noted. For mainframes and modules, the performance limits in this specification are valid with these conditions: H The logic analyzer must be in an environment with temperature, altitude, humidity, and vibration within the operating limits described in these specifications. H The logic analyzer must have had a warm-up period of at least 30 minutes. For modules, the performance limits in this specification are valid with these conditions: H The modules must be installed in a TLA Logic Analyzer Mainframe. H The module must have been calibrated/adjusted at an ambient temperature between +20_C and +30_C. H The module must have had its signal-path-compensation routine (self calibration) last executed after at least a 30 minute warm-up period. H After the warm-up period, the DSO module must have had its signal-pathcompensation routine (self cal) last executed at an ambient temperature within ±5_C of the current ambient temperature. Tektronix Logic Analyzer Family User Manual, Version 3.2 Software B–1 Appendix B: TLA 714 and TLA 720 Logic Analyzer Specifications Table B–1: Atmospheric characteristics Characteristic Description Temperature: Operating and nonoperating Operating (no media in floppy disk drive): +5_C to +50_C, 15_C/hr maximum gradient, non-condensing (derated 1_C per 1000 ft above 5000 foot altitude) Nonoperating (no media in floppy disk drive): –20_C to +60_C, 15_C/hr maximum gradient, non-condensing. Relative Humidity: Operating and nonoperating Operating (no media in floppy disk drive): 20% to 80% relative humidity, non-condensing. Maximum wet bulb temperature: +29_C (derates relative humidity to approximately 22% at +50_C). Nonoperating (no media in floppy disk drive): 8% to 80% relative humidity, non-condensing. Maximum wet bulb temperature: +29_C (derates relative humidity to approximately 22% at +50_C). Altitude: Operating and nonoperating Operating: To 10,000 ft (3040 m), (derated 1_C per 1000 ft (305 m) above 5000 ft (1524 m) altitude) Nonoperating: 40,000 ft (12190 m). B–2 Tektronix Logic Analyzer Family User Manual, Version 3.2 Software Appendix B: TLA 714 and TLA 720 Logic Analyzer Specifications Table B–2: Backplane interface Characteristic Description Slots Portable mainframe 4 Benchtop mainframe 13 n CLK10 Frequency 10 MHz ±100 PPM Relative Time Correlation Error1,2 (Typical) LA to LA “MagniVu” data 2 ns LA to LA “normal” data utilizing an internal clock3 1 LA sample – 0.5 ns LA to LA “normal” data utilizing an external clock 2 ns LA “MagniVu” to DSO data 3 ns LA to DSO “normal” data utilizing an internal clock3,4 1 LA sample + 1 ns LA to DSO “normal” data utilizing an external clock4 3 ns DSO to DSO4 3 ns System Trigger and External Signal Input Latencies5,6 (Typical) External System Trigger Input to LA Probe Tip7 –266 ns External Signal Input to LA Probe Tip via Signal 3, 48 –212 ns + Clk External Signal Input to LA Probe Tip via Signal 1, 28, 9 –208 ns + Clk External System Trigger Input to DSO Probe Tip7 –25 ns System Trigger and External Signal Output Latencies6 (Typical) LA Probe Tip to External System Trigger Out3 376 ns + SMPL LA Probe Tip to External Signal Out via Signal 3, 43 OR function 366 ns + SMPL AND function 379 ns + SMPL LA Probe Tip to External Signal Out via Signal 1, 23,9 normal function 364 ns + SMPL inverted logic on backplane 364 ns + SMPL DSO Probe Tip to External System Trigger Out 68 ns DSO Probe Tip to External Signal Out via Signal 3, 4 OR function 65 ns AND function 75 ns DSO Probe Tip to External Signal Out via Signal 1, 29 normal function 68 ns inverted logic on backplane 71 ns Tektronix Logic Analyzer Family User Manual, Version 3.2 Software B–3 Appendix B: TLA 714 and TLA 720 Logic Analyzer Specifications Table B–2: Backplane interface (Cont.) Characteristic Description Inter-Module Latencies6 (Typical) LA to DSO Inter-module System Trigger3,7 358 ns + SMPL LA to LA Inter-module System Trigger3,7 66 ns + SMPL LA to DSO Inter-Module ARM3 360 ns + SMPL LA to LA Inter-Module ARM3,8 108 ns + SMPL + Clk LA to LA Inter-Module via Signal 1, 23,8, 9 116 ns + SMPL + Clk LA to LA Inter-Module via Signal 3, 43,8 116 ns + SMPL + Clk DSO to DSO Inter-module System Trigger7 50 ns DSO to LA Inter-module System Trigger7 –240 ns DSO to LA Inter-Module ARM8 –192 ns + Clk DSO to DSO Inter-Module ARM 59 ns DSO to LA Inter-Module via Signal 1, 28, 9 –179 ns + Clk DSO to LA Inter-Module via Signal 3, 48 –184 ns + Clk 1 Includes typical jitter, slot-to-slot skew, and probe-to-probe variations to provide a “typical” number for the measurement. Assumes standard accessory probes are utilized. 2 For time intervals longer than 1 ms between modules, add 0.01% of the difference between the absolute time measurements to the relative time correlation error to account for the inaccuracy of the CLK10 source. 3 SMPL represents the time from the event at the probe tip inputs to the next valid data sample of the LA module. In the Normal Internal clock mode, this represents the delta time to the next sample clock. In the MagniVu Internal clock mode, this represents 500 ps or less. In the External clock mode, this represents the time to the next master clock generated by the setup of the clocking state machine, the system-under-test supplied clocks, and the qualification data. 4 The DSO module time correlation is measured at the maximum sample rate on one channel only. 5 All system trigger and external signal input latencies are measured from a falling-edge transition (active true low) with signals measured in the wired-OR configuration. 6 Latencies are based on typical portable mainframe configurations consisting of two LA modules or an LA module plus a DSO module. Latencies are system-configuration-dependent and may vary slightly with module loading. 7 In the Waveform window, triggers are always marked immediately except when delayed to the first sample. In the Listing window, triggers are always marked on the next sample period following their occurrence. 8 “Clk” represents the time to the next master clock at the destination logic analyzer. In the asynchronous (or internal) clock mode, this represents the delta time to the next sample clock beyond the minimum async rate of 4 ns. In the synchronous (or external) clock mode, this represents the time to the next master clock generated by the setup of the clocking state machine and the supplied system under test clocks and qualification data. 9 Signals 1 and 2 (ECLTRG0, 1) are limited to a “broadcast” mode of operation, where only one source is allowed to drive the signal node at any one time. That single source may be utilized to drive any combination of destinations. B–4 Tektronix Logic Analyzer Family User Manual, Version 3.2 Software Appendix B: TLA 714 and TLA 720 Logic Analyzer Specifications Table B–3: External signal interface Characteristic Description System Trigger Input TTL compatible input via rear panel mounted BNC connectors (portable mainframe) or front panel mounted SMB connectors (benchtop mainframe) Input Levels VIH VIL TTL compatible input. ≥ 2.0 V ≤ 0.8 V Input Mode Falling edge sensitive, latched (active low) Minimum Pulse Width 12 ns Active Period Accepts system triggers during valid acquisition periods via real-time gating, resets system trigger input latch between valid acquisition periods Maximum Input Voltage 0 to +5 V peak External Signal Input TTL compatible input via rear panel mounted BNC connectors (portable mainframe) or front panel mounted SMB connectors (benchtop mainframe) Input Destination Signal 1, 2, 3, 4 Input Levels VIH VIL TTL compatible input. ≥ 2.0 V ≤ 0.8 V Input Mode Active (true) low, level sensitive Input Bandwidth1 Signal 1, 2 Signal 3, 4 50 MHz square wave minimum 10 MHz square wave minimum Active Period Accepts signals during valid acquisition periods via real-time gating Maximum Input Voltage 0 to +5 V peak System Trigger Output TTL compatible output via rear panel mounted BNC connectors (portable mainframe) or front panel mounted SMB connectors (benchtop mainframe) Source Mode Active (true) low, falling edge latched Active Period Outputs system trigger state during valid acquisition period, resets system trigger output to false state between valid acquisitions Output Levels VOH 50 W back terminated TTL-compatible output ≥4 V into open circuit ≥ 2 V into 50 W to ground VOL Output Protection ≥ 0.7 V sinking 10 ma Short-circuit protected (to ground) Tektronix Logic Analyzer Family User Manual, Version 3.2 Software B–5 Appendix B: TLA 714 and TLA 720 Logic Analyzer Specifications Table B–3: External signal interface (Cont.) Characteristic Description External Signal Output TTL compatible outputs via rear panel mounted BNC connectors (portable mainframe) or front panel mounted SMB connectors (benchtop mainframe) Source Selection Signal 1, 2, 3, 4, or 10 MHz clock Output Modes Level Sensitive User definable Active (true) low or active (true) high Output Levels VOH 50 Ohm back terminated TTL output ≥ 4 V into open circuit ≥ 2 V into 50 W to ground VOL ≤ 0.7 V sinking 10 ma Output Bandwidth2 Signal 1, 2 Signal 3, 4 Active Period 50 MHz square wave minimum 10 MHz square wave minimum Outputs signals during valid acquisition periods, resets signals to false state between valid acquisitions Outputs 10 MHz clock continuously Output Protection Short-circuit protected (to ground) Intermodule Signal Line Bandwidth Signal 1, 2 (ECLTRG 0,1) Signal 3, 4 (ECLTRG 0,1) Minimum bandwidth up to which the intermodule signals are specified to operate correctly 50 MHz square wave minimum 10 MHz square wave minimum 1 The Input Bandwidth specification only applies to signals to the modules; it does not apply to signals applied to the External Signal Input and sent back to the External Signal Output. 2 The Output Bandwidth specification only applies to signals from the modules; it does not apply to signals applied to the External Signal Input and sent back to the External Signal Output. B–6 Tektronix Logic Analyzer Family User Manual, Version 3.2 Software Appendix B: TLA 714 and TLA 720 Logic Analyzer Specifications Table B–4: Certifications and compliances: TLA 700 series logic analyzer EC Declaration of Conformity – EMC Meets intent of Directive 89/336/EEC for Electromagnetic Compatibility. Compliance was demonstrated to the following specifications as listed in the Official Journal of the European Communities: EN 61326–1 IEC 1000–4–2 IEC 1000–4–3 IEC 1000–4–4 IEC 1000–4–5 IEC 1000–4–6 IEC 1000–4–11 EN 61000–3–2 EC Declaration of Conformity – Low Voltage EMC requirements for Class A electrical equipment for measurement, control and laboratory use. Electrostatic Discharge Immunity (Performance Criterion B) RF Electromagnetic Field Immunity (Performance Criterion A) Electrical Fast Transient / Burst Immunity (Performance Criterion B) Power Line Surge Immunity (Performance Criterion B) Conducted RF Immunity (Performance Criterion A) Power Line Dips and Interruptions Immunity (Performance Criterion B) AC Power Line Harmonic Emissions Compliance was demonstrated to the following specification as listed in the Official Journal of the European Communities: Low Voltage Directive 73/23/EEC EN 61010-1:/A2 1995 Approvals Safety requirements for electrical equipment for measurement, control, and laboratory use UL3111–1 – Standard for electrical measuring and test equipment CAN/CSA C22.2 No. 1010.1 – Safety requirements for electrical equipment for measurement, control and laboratory use Installation Category Descriptions Terminals on this product may have different installation category designations. The installation categories are: CAT III Distribution-level mains (usually permanently connected). Equipment at this level is typically in a fixed industrial location. CAT II Local-level mains (wall sockets). Equipment at this level includes appliances, portable tools, and similar products. Equipment is usually cord-connected. CAT I Secondary (signal level) or battery operated circuits of electronic equipment. Tektronix Logic Analyzer Family User Manual, Version 3.2 Software B–7 Appendix B: TLA 714 and TLA 720 Logic Analyzer Specifications Table B–4: Certifications and compliances: TLA 700 series logic analyzer (Cont.) Conditions of Approval Safety Certifications/Compliances are made for the following conditions: Temperature (operation): +5_C to +40_C Altitude (maximum operation): 2000 meters IEC Characteristics Equipment type: Test and Measuring Installation Category II Pollution Degree 2 Safety Class I B–8 Tektronix Logic Analyzer Family User Manual, Version 3.2 Software Appendix B: TLA 714 and TLA 720 Logic Analyzer Specifications TLA 714 Color Portable Mainframe Characteristics Table B–5: Internal controller Characteristic Description Operating System Microsoft Windows 98 Microprocessor Intel Pentium PC-AT configuration with a 266 MHz Intel Pentium MMX microprocessor Main Memory SDRAM Style 144 pin SO DIMM, 2 Sockets Speed 66 MHz Installed Configurations Minimum Maximum 64 MB loaded in one socket 128 MB with both sockets loaded Cache Memory 512 KB Level 2 (L2) write-back cache Flash BIOS 512 KB Provides PC plug-and-play services with and without Microsoft Windows 98 PnP operating system. Flash based BIOS field upgradable via a floppy disk. Real-Time Clock and CMOS Setups NVRAM Real-Time clock/calendar, with typical 10-year life. Standard and advanced PC CMOS setups. Bootable Replaceable Hard Disk Drive Standard PC compatible IDE (Integrated device Electronics) hard disk drive residing on an EIDE interface. Size Minimum Maximum 2.1 GByte 6.4 GByte Continually subject to change due to the fast-moving PC component environment. These storage capacities valid at product introduction. Interface ATA -4/Enhanced IDE (EIDE) Average seek time Read 13 ms I/O data-transfer rate 33.3 MB/s max (U-DMA mode 2) CD ROM Drive Standard PC compatible IDE (Integrated device Electronics) 24X (minimum) CD ROM drive residing on an EIDE interface. Continually subject to change due to the fast-moving PC component environment. Floppy Disk Drive Standard 3.5 inch 1.44-MB PC compatible high-density, double-sided floppy disk drive. Tektronix Logic Analyzer Family User Manual, Version 3.2 Software B–9 Appendix B: TLA 714 and TLA 720 Logic Analyzer Specifications Table B–6: Portable mainframe display system Characteristic Description Classification Standard PC graphics accelerator technology (bitBLT-based); capable of supporting both internal color LCD display and external color SVGA/XGA monitor Display Memory DRAM-based frame-buffer memory Size Display Selection 2 MB Hardware sense of external SVGA monitor during BIOS boot sequence; defaults to internal color LCD display; automatically switches to external SVGA monitor, if attached Dual (simultaneous) display of external SVGA monitor and internal color LCD is possible via special “simulscan” CMOS setup, as long as internal and external displays operate at same resolution (limited to 800x600 on current TFT LCD) and display rates Dynamic Display Configuration (DDC2 A and B) support for external SVGA monitor is provided. External Display Drive Display Size One SVGA/XGA-compatible analog output port User selected via Windows 98 Plug and Play support for DDC1 and DDC2 A and B Resolution (Pixels) 640 x 480 640 x 480 640 x 480 800 x 600 800 x 600 800 x 600 1024 x 768 1280 x 1024 1600 x 1200 Colors 256 64,000 16,800,000 256 64,000 16,800,000 256 256 256 Internal Display Classification Thin Film Transistor (TFT) 10.4 inch active-matrix color LCD display; CCFL backlight; intensity controllable via software Resolution 800 x 600 pixels Color Scale 262,144 colors (6-bit RGB) B–10 Tektronix Logic Analyzer Family User Manual, Version 3.2 Software Appendix B: TLA 714 and TLA 720 Logic Analyzer Specifications Table B–7: Portable mainframe front-panel interface Characteristic Description QWERTY Keypad ASCII keypad to support naming of files, traces, and keyboard equivalents of pointing device inputs for menus HEX Keypad HEX keypad supporting standard DSO and LA entry functions Special Function Knobs Various functions Integrated Pointing Device GlidePoint touchpad Dual USB Ports Two USB (Universal Serial Bus) compliant ports Mouse Port PS/2 compatible mouse port utilizing a mini DIN connector Keyboard Port PS/2 compatible keyboard port utilizing a mini DIN connector Table B–8: Portable mainframe rear-panel interface Characteristic Description Parallel Interface Port (LPT) 36-pin high-density connector supports standard Centronics mode, Enhanced Parallel Port (EPP), or Microsoft high-speed mode (ECP) Serial Interface Port (COM A) 9-pin male sub-D connector to support RS-232 serial port SVGA Output Port (SVGA OUT) 15-pin sub-D SVGA connector Type I and II PC Card Port Standard Type I and II PC-compatible PC card slot Type I, II, and III PC Card Port Standard Type I, II, and III PC-compatible PC card slot Table B–9: Portable mainframe AC power source Characteristic Description Source Voltage and Frequency 90–250 VRMS, 45–66 Hz, continuous range CAT II 100–132 VRMS, 360–440 Hz, continuous range CAT II Fuse Rating 90 V - 250 V Operation (159-0046-00) UL198/CSA C22.2 0.25 in × 1.25 in, Fast Blow, 8 A, 250 V 90 V - 250 V Operation (159-0381-00) IEC 127/Sheet 1 5 mm × 20 mm, Fast Blow, 6.3 A, 250 V Maximum Power Consumption 600 W line power maximum Steady-State Input Current 6 ARMS maximum Inrush Surge Current 70 A maximum Tektronix Logic Analyzer Family User Manual, Version 3.2 Software B–11 Appendix B: TLA 714 and TLA 720 Logic Analyzer Specifications Table B–9: Portable mainframe AC power source (Cont.) Characteristic Description Power Factor Correction Yes On/Standby Switch and Indicator Front Panel On/Standby switch, with LED indicator located next to switch The power cord provides main power disconnect. Table B–10: Portable mainframe secondary power Characteristic Description n DC Voltage Regulation (Combined System, voltage available at each slot) Voltage Vmin, Vnom, Vmax +24 V 23.28 V, 24.24 V, 25.20 V +12 V 11.64 V, 12.12 V, 12.60 V +5 V 4.875 V, 5.063 V, 5.250 V –2 V –2.10 V, –2.00 V, –1.90 V –5.2 V –5.460 V, –5.252 V, –5.044 V –12 V –12.60 V, –12.12 V, –11.64 V –24 V –25.20 V, –24.24 V, –23.28 V Table B–11: Portable mainframe cooling Characteristic Description Cooling System Forced air circulation (negative pressurization) utilizing six fans operating in parallel Cooling Clearance 2 in (51 mm), sides and rear; unit should be operated on a flat, unobstructed surface Slot Activation Installing a module activates the cooling for the corresponding occupied slots by opening the air flow shutter mechanism. Optimizes cooling efficiency by only applying airflow to modules that are installed. B–12 Tektronix Logic Analyzer Family User Manual, Version 3.2 Software Appendix B: TLA 714 and TLA 720 Logic Analyzer Specifications Table B–12: Portable mainframe mechanical Characteristic Description Overall Dimensions (See Figure B–1 for overall chassis dimensions.) Height (with feet) 9.25 in (235 mm) Width 17.0 in (432 mm) Depth 17.5 in (445 mm) Weight (Typical) Shipping configuration (Typical) 30 lbs 12 oz (13.9 kg) with no modules installed, 2 dual-wide slot covers, and empty pouch 88 lbs (26.3 kg) minimum configuration (no modules or probes), with all standard accessories 87 lb (39.5 kg) full configuration, with 2 TLA 7P4 modules and standard accessories (including probes) 17 in (43.18 cm) 17.5 in (44.45 cm) 9.25 in (23.5 cm) Figure B–1: Dimensions of TLA 714 portable mainframe Tektronix Logic Analyzer Family User Manual, Version 3.2 Software B–13 Appendix B: TLA 714 and TLA 720 Logic Analyzer Specifications B–14 Tektronix Logic Analyzer Family User Manual, Version 3.2 Software Appendix B: TLA 714 and TLA 720 Logic Analyzer Specifications TLA 720 Color Benchtop Chassis Characteristics Table B–13: Benchtop chassis AC power source Characteristic Description Source Voltage 90–250 VRMS, 45–66 Hz, continuous range CAT II 100–132 VRMS, 360–440 Hz, continuous range CAT II Maximum Power Consumption 1450 W line power (the maximum power consumed by a fully loaded 13-slot instrument) Fuse Rating (Current and voltage ratings and type of fuse used to fuse the source line voltage) 90 V – 132 VACRMS Operation High-power/Low Line (159-0379-00) Safety: UL198G/CSA C22.2 Size: 0.25 in × 1.25 in Style: Slow acting Rating: 20 A/250 V 103 V – 250 VACRMS Operation (159-0256-00) Safety: UL198G/CSA C22.2 Size: 0.25 in × 1.25 in Style: No. 59/Fast acting Rating: 15 A/250 V 207 V – 250 VACRMS Operation (159-0381-00) Safety: IEC 127/Sheet 1 Size: 5 mm × 20 mm Style: Fast acting “F”, high-breaking capacity Rating: 6.3 A/250 V Inrush Surge Current 70 A maximum Steady State Input Current 16.5 ARMS maximum at 90 VACRMS 6.3 ARMS maximum at 207 VACRMS Power Factor Correction Yes ON/Standby Switch and Indicator Front Panel On/Standby switch with integral power indicator Tektronix Logic Analyzer Family User Manual, Version 3.2 Software B–15 Appendix B: TLA 714 and TLA 720 Logic Analyzer Specifications Table B–14: Benchtop chassis secondary power Characteristic Description n DC Voltage Regulation (Combined System, voltage available at each slot) Voltage Vmin, Vnom, Vmax +24 V 23.28 V, 24.24 V, 25.20 V +12 V 11.64 V, 12.12 V, 12.60 V +5 V 4.875 V, 5.063 V, 5.250 V –2 V –2.10 V, –2.00 V, –1.90 V –5.2 V –5.460 V, –5.252 V, –5.044 V –12 V –12.60 V, –12.12 V, –11.64 V –24 V –25.20 V, –24.24 V, –23.28 V Table B–15: Benchtop chassis cooling Characteristic Description Cooling System Forced air circulation system (positive pressurization) utilizing a single low-noise centripetal (squirrel cage) blower configuration with no filters. Blower Speed Control Rear panel switch selects between full speed and variable speed. Slot exhaust temperature and ambient air temperature are monitored such that a constant delta temperature is maintained across the module with the highest exit air temperature at the minimum operational blower speed. Slot Activation Installing a module activates the cooling for the corresponding occupied slots by opening the air flow shutter mechanism. Optimizes cooling efficiency by only applying airflow to modules that are installed. Slot Airflow Direction P2 to P1, bottom of module to top of module. Mainframe Air Intake Lower fan-pack rear face and bottom. Mainframe Air exhaust Top-sides and top-rear back. Top rear-back exhaust redirected to the sides by the fan pack housing to minimize reentry into the intake. ∆ Temperature Readout Sensitivity 100 mV/°C with 0°C corresponding to 0 V output. Temperature Sense Range –10°C to +90°C, delta temperature ≤ 50°C Clearance 2 in (51 mm), rear, top, and sides of chassis. B–16 Tektronix Logic Analyzer Family User Manual, Version 3.2 Software Appendix B: TLA 714 and TLA 720 Logic Analyzer Specifications Table B–16: Benchtop chassis mechanical Characteristic Description Overall Dimensions (See Figure B–2 for overall chassis dimensions.) Standard Chassis Height (with feet) 13.7 in (362.0 mm) including feet Width 16.7 in (425.5 mm) Depth 26.5 in (673.1 mm) Chassis with Rackmount Height 13.25 in (355.6 mm) Width 18.9 in (480.1 mm) Depth 28.9 in to 33.9 in (746.8 mm to 873.8 mm) in 0.5 in increments, user selectable Weight Chassis with slot fillers (Typical) 52 lbs (23.6 kg) Chassis with benchtop controller and slot fillers (Typical) 58 lbs 11 oz (26.6 kg) Shipping configuration (Typical) 115 lbs (52.2 kg) minimum configuration with benchtop controller and all standard accessories (no modules or probes) 187 lbs (84.8 kg) fully configured with benchtop controller, 4 LA modules, 1 DSO modules, and all standard accessories including probes. Rackmount kit adder Module Size 20 lbs (9.1 kg) 13 plug-in slots Tektronix Logic Analyzer Family User Manual, Version 3.2 Software B–17 Appendix B: TLA 714 and TLA 720 Logic Analyzer Specifications 16.7 in (42.6 cm) 26.5 in (70 cm) 13.7 in (35 cm) 13.3 in (34 cm) Figure B–2: Dimensions of the benchtop chassis 18.9 in (480.1 mm) 28.9 in (746.7 mm) Min to 33.9 in (873.8 mm) Max 13.25 in (355.6 mm) Figure B–3: Dimensions of the benchtop chassis with rackmount option B–18 Tektronix Logic Analyzer Family User Manual, Version 3.2 Software Appendix B: TLA 714 and TLA 720 Logic Analyzer Specifications TLA 720 Color Benchtop Controller Characteristics Table B–17: Benchtop controller characteristics Characteristic Description Processor Intel Pentium 266 MHz PC-AT configuration with an Intel chip-set Main Memory SDRAM Style Two 144 pin SODIMM sockets support one or two SDRAM modules Installed Configuration 128 MB Two 64 MB SDRAM modules installed Speed 60 ns Cache Memory 256 K, level 2 (L2) write-back cache Flash BIOS 512 KB Provides PC plug-and-play services with and without Microsoft Windows 98 PnP operating system. Flash based BIOS field upgradable via a floppy disk. Real-Time Clock and CMOS Setups NVRAM (Typical) Real-Time clock/calendar, with typical 7-year life. Standard and advanced PC CMOS setups: see BIOS specification. Year 2000 compliant. Floppy Disk Drive Standard 3.5 inch, 1.44 MB, double-sided, PC-compatible high-density floppy disk drive Bootable Replaceable Hard Disk Drive Standard PC compatible IDE (Integrated device Electronics) hard disk drive residing on an EIDE interface. Size Minimum Maximum 2.1 GByte 6.4 GByte Continually subject to change due to the fast-moving PC component environment. These storage capacities valid at product introduction. Interface ATA -4/Enhanced IDE (EIDE) Average seek time Read 13 ms I/O data-transfer rate 33.3 MB/s maximum (U-DMA mode 2) CD ROM Drive Standard PC compatible IDE (Integrated device Electronics) 24X (minimum) CD ROM drive residing on an EIDE interface. Continually subject to change due to the fast-moving PC component environment. Tektronix Logic Analyzer Family User Manual, Version 3.2 Software B–19 Appendix B: TLA 714 and TLA 720 Logic Analyzer Specifications Table B–17: Benchtop controller characteristics (Cont.) Characteristic Description Display Classification Standard PC graphics accelerator technology (bitBLT based) capable of driving external color VGA, SVGA, or XGA monitors Display Memory DRAM based frame-buffer memory Size Display Drive Display Size 2 MB One VGA, SVGA, or XGA compatible analog output port User selected via Windows 95. Plug and Play support for DDC1 and DDC2 A and B Resolution (Pixels) 640 x 480 640 x 480 640 x 480 800 x 600 800 x 600 800 x 600 1024 x768 1280 x 1024 1600 x 1200 Colors 256 64,000 16,800,000 256 64,000 16,800,000 256 256 256 SVGA Output Port (SVGA) The SVGA port utilizing a 15-pin sub-D SVGA connector Dual USB Ports Two USB (Universal Serial Bus) compliant ports Mouse Port Front panel mounted PS2 compatible mouse port utilizing a mini DIN connector Keyboard Port Front panel mounted PS2 compatible keyboard port utilizing a mini DIN connector Parallel Interface Port (LPT) 36-pin high-density connector supports standard Centronics mode, Enhanced Parallel Port (EPP), or Microsoft high-speed mode (ECP) Serial Interface Port (COM) The serial port utilizing a 9-pin male sub-D connector to support an RS232 serial port Type I and II PC Card Port Standard Type I and II PC compatible PC card slot Type I, II, and III PC Card Port Standard Type I, II, and III PC compatible PC card slot Table B–18: Benchtop controller mechanical characteristics Characteristic Description Weight (Typical) 6 lb. 10 oz. (2.9 kg) Size Three slots wide Overall dimensions Height 10.32 in (262 mm) Width 3.6 in (83 mm) Depth 14.7 in (373 mm) B–20 Tektronix Logic Analyzer Family User Manual, Version 3.2 Software Appendix B: TLA 714 and TLA 720 Logic Analyzer Specifications TLA 7Nx and TLA 7Px Logic Analyzer Module Characteristics Table B–19: LA module channel width and depth Characteristic Description Number of channels Product Channels TLA 7N1 32 data and 2 clock TLA 7N2 64 data and 4 clock TLA 7P2 64 data and 4 clock TLA 7N3 96 data, 4 clock, and 2 qualifier TLA 7N4 128 data, 4 clock, and 4 qualifier TLA 7P4 128 data, 4 clock, and 4 qualifier Product Memory depth TLA 7N1 64 K or 256 K or 1 M or 4 M samples1 TLA 7N2 64 K or 256 K or 1 M or 4 M samples1 TLA 7N3 64 K or 256 K or 1 M or 4 M samples1 TLA 7N4 64 K or 256 K or 1 M or 4 M samples1 TLA 7P2 16 M TLA 7P4 16 M Acquisition memory depth 1 PowerFlex options Table B–20: LA module clocking Characteristic Description Asynchronous clocking n Internal sampling period1 4 ns to 50 ms in a 1–2–5 sequence n Minimum recognizable word2 (across all channels) Channel-to-channel skew + sample uncertainty Example: for a P6417 or a P6418 Probe and a 4 ns sample period = 1.6 ns + 4 ns = 5.6 ns Synchronous clocking Number of clock channels3 Product Clock channels TLA 7N1 2 TLA 7N2 4 TLA 7N3 4 TLA 7N4 4 TLA 7P2 4 TLA 7P4 4 Tektronix Logic Analyzer Family User Manual, Version 3.2 Software B–21 Appendix B: TLA 714 and TLA 720 Logic Analyzer Specifications Table B–20: LA module clocking (Cont.) Characteristic Description Number of qualifier channels Product Qualifier channels TLA 7N1 0 TLA 7N2 0 TLA 7N3 2 TLA 7N4 4 TLA 7P2 0 TLA 7P4 4 n Setup and hold window size (data and qualifiers) Maximum window size = Maximum channel-to-channel skew + (2 x sample uncertainty) + 0.4 ns Maximum setup time = User interface setup time + 0.8 ns Maximum hold time = User interface hold time + 0.2 ns Maximum setup time for slave module of merged pair = User Interface setup time + 0.8 ns Maximum hold time for slave module of merged pair = User Interface hold time + 0.7 ns Example: for P6417 or a P6418 probe and user interface setup and hold of 2.0/0.0 typical Maximum setup time = UI setup time + 0.6 ns Typical setup time = 1.0 ns + 1.0 ns + 0.0 ns = 2.0 ns Maximum hold time = UI hold time + 0.4 ns Setup and hold window size (data and qualifiers) (Typical) Channel-to-channel skew (typical) + (2 x sample uncertainty) Setup and hold window range The setup and hold window can be moved for each channel group from +8.5 ns (Ts) to –7.0 ns (Ts) in 0.5 ns steps (setup time). Hold time follows the setup time by the setup and hold window size. n Maximum synchronous clock rate4 200 MHz in full speed mode (5 ns minimum between active clock edges) Example: for P6417 Probe = 1 ns + (2 x 500 ps) = 2 ns 100 MHz in half speed mode (10 ns minimum between active clock edges) Demux clocking Demux Channels TLA 7N3, TLA 7N4 and TLA 7P4 Channels multiplex as follows: A3(7:0) to D3(7:0) A2(7:0) to D2(7:0) A1(7:0) to D1(7:0) A0(7:0) to D0(7:0) TLA 7N1, TLA 7N2 and TLA 7P2 Channels multiplex as follows: A3(7:0) to C3(7:0) A2(7:0) to C2(7:0) A1(7:0) to D1(7:0) TLA 7N2 and TLA 7P2 only A0(7:0) to D0(7:0) TLA 7N2 and TLA 7P2 only Time between DeMux clock edges4 (Typical) 5 ns minimum between DeMux clock edges in full-speed mode 10 ns minimum between DeMux clock edges in half-speed mode B–22 Tektronix Logic Analyzer Family User Manual, Version 3.2 Software Appendix B: TLA 714 and TLA 720 Logic Analyzer Specifications Table B–20: LA module clocking (Cont.) Characteristic Description Time between DeMux store clock edges4 (Typical) 10 ns minimum between DeMux master clock edges in full-speed mode 20 ns minimum between DeMux master clock edges in half-speed mode Data Rate (Typical) 400 MHz (200 MHz option required) half channel. (Requires channels to be multiplexed.) These multiplexed channels double the memory depth. Clocking state machine Pipeline delays Each channel group can be programmed with a pipeline delay of 0 through 3 active clock edges. 1 It is possible to use storage control and only store data when it has changed (transitional storage). 2 Applies to asynchronous clocking only. Setup and hold window specification applies to synchronous clocking only. 3 Any or all of the clock channels may be enabled. For an enabled clock channel, either the rising, falling, or both edges can be selected as the active clock edges. The clock channels are stored. 4 Full and half speed modes are controlled by PowerFlex options and upgrade kits. Table B–21: LA module trigger system Characteristic Description Triggering Resources Word/Range recognizers 16 word recognizers. The word recognizers can be combined to form full width, double bounded, range recognizers. The following selections are available: 16 word recognizers 13 word recognizers 10 word recognizers 7 word recognizers 4 word recognizers Range recognizer channel order 0 range recognizers 1 range recognizer 2 range recognizers 3 range recognizers 4 range recognizers From most-significant probe group to least-significant probe group: C3 C2 C1 C0 E3 E2 E1 E0 A3 A2 D3 D2 A1 A0 D1 D0 Q3 Q2 Q1 Q0 CK3 CK2 CK1 CK0 Missing channels for modules with fewer than 136 channels are omitted. When merged, the range recognition extends across all the modules; the master module contains the most-significant groups. The master module is to the left of a merged pair. The master module is in the center when three modules are merged. Slave module 1 is located to the right of the master module, and slave module 2 is located to the left of the master module. Glitch detector5,6 Each channel group can be enabled to detect a glitch Minimum detectable glitch pulse width (Typical) 2.0 ns (single channel with P6417 or a P6418 probe) Tektronix Logic Analyzer Family User Manual, Version 3.2 Software B–23 Appendix B: TLA 714 and TLA 720 Logic Analyzer Specifications Table B–21: LA module trigger system (Cont.) Characteristic Description Setup and hold violation detector5,7 Each channel group can be enabled to detect a setup and hold violation. The range is from 8 ns before the clock edge to 8 ns after the clock edge. The range can be selected in 0.5 ns increments. The setup and hold violation of each window can be individually programmed. Transition detector5, 8 Each channel group can be enabled or disabled to detect a transition between the current valid data sample and the previous valid data sample. Counter/Timers 2 counter/timers, 51 bits wide, can be clocked up to 250 MHz. Maximum count is 251. Maximum time is 9.0076 seconds or 104 days. Counters and timers can be set, reset, or tested and have zero reset latency. Signal In 1 A backplane input signal Signal In 2 A backplane input signal Trigger In A backplane input signal that causes the main acquisition and the MagniVu acquisition to trigger if they are not already triggered Active trigger resources 16 maximum (excluding counter/timers) Word recognizers are traded off one-by-one as Signal In 1, Signal In 2, glitch detection, setup and hold detection, or transition detection resources are added. Trigger States 16 n Trigger State sequence rate Same rate as valid data samples received, 250 MHz maximum Trigger Machine Actions Main acquisition trigger Triggers the main acquisition memory Main trigger position Trigger position is programmable to any data sample (4 ns boundaries) Increment counter Either of the two counter/timers used as counters can be incremented. Start/Stop timer Either of the two counter/timers used as timers can be started or stopped. Reset counter/timer Either of the two counter/timers can be reset. When a counter/timer is used as a timer and is reset, the timer continues in the started or stopped state that it was in prior to the reset. Signal out A signal sent to the backplane to be used by other modules Trigger out A trigger out signal sent to the backplane to trigger other modules B–24 Tektronix Logic Analyzer Family User Manual, Version 3.2 Software Appendix B: TLA 714 and TLA 720 Logic Analyzer Specifications Table B–21: LA module trigger system (Cont.) Characteristic Description Storage Control Global storage Storage is allowed only when a specific condition is met. This condition can use any of the trigger machine resources except for the counter/timers. Storage commands defined in the current trigger state will override the global storage control. Global storage can be used to start the acquisition with storage initially turned on (default) or turned off. By event Storage can be turned on or off; only the current sample can be stored. The event storage control overrides any global storage commands. Block storage When enabled, 31 samples are stored before and after the valid sample. Block storage is disallowed when glitch storage or setup and hold violation is enabled. Glitch violation storage The acquisition memory can be enabled to store glitch violation information with each data sample when asynchronous clocking is used. The probe data storage size is reduced by one half (the other half holds the violation information). The fastest asynchronous clocking rate is reduced to 10 ns. 5 Each use of a glitch detector, setup and hold violation detector, or transition detector requires a trade-off of one word recognizer resource. 6 Any glitch is subject to pulse width variation of up to the channel-to-channel skew specification + 0.5 ns. 7 Any setup value is subject to variation of up to 1.8 ns; any hold value is subject to variation of up to 1.2 ns. 8 This mode can be used to create transitional storage selections where all channels are enabled. Tektronix Logic Analyzer Family User Manual, Version 3.2 Software B–25 Appendix B: TLA 714 and TLA 720 Logic Analyzer Specifications Table B–22: LA module input parameters with P6417 or P6418 probes Characteristic Description n Threshold Accuracy ±100 mV Threshold range and step size Setable from +5 V to –2 V in 25 mV steps Threshold channel selection 16 threshold groups assigned to channels. Each probe has two threshold settings, one for the clock/qualifier channel and one for the data channels. n Channel-to-channel skew ≤ 1.6 ns maximum (When merged, add 0.5 ns for the slave module.) Channel-to-channel skew (Typical) ≤ 1.0 ns typical (When merged, add 0.3 ns for the slave module.) Sample uncertainty Asynchronous: Sample period Synchronous: 500 ps Probe input resistance (Typical) 20 kW P6417 Probe input capacitance (Typical) 2 pF P6418 Probe input capacitance (Typical) 1.4 pF data channels 2 pF CLK/Qual channels Minimum slew rate (Typical) 0.2 V/ns Maximum operating signal 6.5 Vp-p –3.5 V absolute input voltage minimum 6.5 V absolute input voltage maximum Probe overdrive ±250 mV or ±25% of signal swing minimum required beyond threshold, whichever is greater ±4 V maximum beyond threshold Maximum nondestructive input signal to probe ±15 V Minimum input pulse width signal (single channel) (Typical) 2 ns Delay time from probe tip to input probe connector (Typical) 7.33 ns B–26 Tektronix Logic Analyzer Family User Manual, Version 3.2 Software Appendix B: TLA 714 and TLA 720 Logic Analyzer Specifications Table B–23: LA module input parameters (with P6434 probe) Characteristic Description n Threshold Accuracy ±100 mV Threshold range and step size Setable from +5 V to –2 V in 25 mV steps Threshold channel selection 16 threshold groups assigned to channels. Each probe has two threshold settings, one for the clock/qualifier channel and one for the data channels. n Channel-to-channel skew ≤ 1.6 ns maximum (When merged, add 0.5 ns for the slave module.) Channel-to-channel skew (Typical) ≤ 1.0 ns typical (When merged, add 0.3 ns for the slave module.) Sample uncertainty Asynchronous: Sample period Synchronous: 500 ps Probe input resistance (Typical) 20 kW Probe input capacitance (Typical) 2 pF Minimum slew rate (Typical) 0.2 V/ns Maximum operating signal 6.5 Vp-p –3.5 V absolute input voltage minimum 6.5 V absolute input voltage maximum Probe overdrive ±300 mV or ±25% of signal swing minimum required beyond threshold, whichever is greater ±4 V maximum beyond threshold Maximum nondestructive input signal to probe ±15 V Minimum input pulse width signal (single channel) (Typical) 2 ns Delay time from probe tip to input probe connector (Typical) 7.33 ns Tektronix Logic Analyzer Family User Manual, Version 3.2 Software B–27 Appendix B: TLA 714 and TLA 720 Logic Analyzer Specifications Table B–24: LA module MagniVu feature Characteristic Description MagniVu memory depth 2016 samples per channel MagniVu sampling period Data is asynchronously sampled and stored every 500 ps in a separate high resolution memory. Table B–25: LA module data handling Characteristic Description Nonvolatile memory retention time (Typical) Battery is integral to the NVRAM. Battery life is > 10 years. Table B–26: LA module mechanical Characteristic Description Slot width Requires 2 mainframe slots Weight (Typical) 5 lbs 10 oz. (2.55 kg) for TLA 7N4 and TLA 7P4 8 lbs (3.63 kg) for TLA 7N4 and TLA 7P4 packaged for domestic shipping Overall dimensions Height 10.32 in (262 mm) Width 2.39 in (61 mm) Depth 14.7 in (373 mm) Probe cables P6417 length 1.8 m (6 ft) P6418 length 1.8 m (6 ft) P6434 length 1.6 m (5 ft 2 in) Mainframe interlock B–28 1.4 ECL keying is implemented Tektronix Logic Analyzer Family User Manual, Version 3.2 Software Appendix B: TLA 714 and TLA 720 Logic Analyzer Specifications TLA 7Dx and TLA 7Ex DSO Module Characteristics Table B–27: DSO module signal acquisition system Characteristic Description n Accuracy, DC Gain ±1.5% for full scale ranges from 20 mV to 100 V ±2.0% for full scale ranges <19.9 mV n Accuracy, Internal Offset1 n Analog Bandwidth, DC–50 W Coupled Full Scale Range Setting Offset Accuracy 10 mV – 1 V ±[(0.2% × | offset |) + 1.5 mV + (6% × full scale range)] 1.01 V – 10 V ±[(0.25% × | offset |) + 15 mV + (6% × full scale range)] 10.1 V – 100 V ±[(0.25% × | offset |) + 150 mV + (6% × full scale range)] Full Scale Range Setting Bandwidth 2 10.1 V – 100 V DC – 500 MHz (TLA7E1 and TLA7E2) DC – 500 MHz (TLA7D1 and TLA7D2) 100 mV – 10 V DC – 1 GHz (TLA7E1 and TLA7E2) DC – 500 MHz (TLA7D1 and TLA7D2) 50 mV – 99.5 mV DC – 750 MHz (TLA7E1 and TLA7E2) DC – 500 MHz (TLA7D1 and TLA7D2) 20 mV – 49.8 mV DC – 600 MHz (TLA7E1 and TLA7E2) DC – 500 MHz (TLA7D1 and TLA7D2) 10 mV – 19.9 mV DC – 500 MHz (TLA7E1 and TLA7E2) DC – 500 MHz (TLA7D1 and TLA7D2) Bandwidth, Analog, Selections 20 MHz, 250 MHz, and FULL on each channel Calculated Rise Time (Typical)3 Full Scale Range Setting TLA7E1 and TLA7E2 TLA7D1 and TLA7D2 Typical full-bandwidth rise times are shown in the chart to the right 10.1 V – 100 V 900 ps 900 ps 100 mV – 10 V 450 ps 900 ps 50 mV – 99.5 mV 600 ps 900 ps 20 mV – 49.8 mV 750 ps 900 ps 10 mV – 19.9 mV 900 ps 900 ps Crosstalk (Channel Isolation) ≥300:1 at 100 MHz and ≥100:1 at the rated bandwidth for the channel’s sensitivity (Full Scale Range) setting, for any two channels having equal sensitivity settings Digitized Bits, Number of 8 bits Effective Bits, Realtime Sampling (Typical) Input Frequency TLA7E1 and TLA7E2 5 GS/s (each Channel) TLA7D1 and TLA7D2 2.5 GS/s (each Channel) 10.2 MHz 6.2 bits 6.2 bits Tektronix Logic Analyzer Family User Manual, Version 3.2 Software B–29 Appendix B: TLA 714 and TLA 720 Logic Analyzer Specifications Table B–27: DSO module signal acquisition system (Cont.) Characteristic Description 98 MHz 6.1 bits 6.1 bits 245 MHz 6.0 bits 6.0 bits 490 MHz 5.7 bits 5.7 bits 990 MHz 5.2 bits N/A Frequency Limit, Upper, 20 MHz Bandwidth Limited (Typical) 20 MHz Frequency Limit, Upper, 250 MHz Bandwidth Limited (Typical) 250 MHz Input Channels, Number of Product Channels TLA7E2 Four TLA7D2 Four TLA7E1 Two TLA7D1 Two Input Coupling DC, AC, or GND4 Input Impedance, DC–1 MW Coupled 1 MW ±0.5% in parallel with 10 pF ±3 pF Input Impedance Selections 1 MW or 50 W Input Resistance, DC–50 W Coupled 50 W ±1% Input VSWR, DC–50 W Coupled ≤1.3:1 from DC – 500 MHz, ≤1.5:1 from 500 MHz – 1 GHz Input Voltage, Maximum, DC–1 MW, AC–1 MW, or GND Coupled 300 VRMS but no greater than ±420 V peak, Installation category II, derated at 20 dB/decade above 1 MHz Input Voltage, Maximum, DC–50 W or AC–50 W Coupled 5 VRMS, with peaks ≤ ±25 V Lower Frequency Limit, AC Coupled (Typical) ≤10 Hz when AC–1 MW Coupled; ≤200 kHz when AC–50 W Coupled5 n Random Noise Bandwidth Selection RMS Noise Full ≤(350 mV + 0.5% of the full scale Setting) 250 MHz ≤(165 mV + 0.5% of the full scale Setting) 20 MHz ≤(75 mV + 0.5% of the full scale Setting) Full Scale Range Setting Offset Range 10 mV – 1 V ±1 V 1.01 V – 10 V ±10 V 10.1 V – 100 V ±100 V Range, Internal Offset Range, Sensitivity (Full Scale Range), All Channels B–30 10 mV to 100 V6 Tektronix Logic Analyzer Family User Manual, Version 3.2 Software Appendix B: TLA 714 and TLA 720 Logic Analyzer Specifications Table B–27: DSO module signal acquisition system (Cont.) Characteristic Description Step Response Settling Errors (Typical)7 The maximum absolute difference between the value at the end of a specified time interval mid level crossing of the step, step and after the mid-level the value one second after the mid-level crossing of the step, expressed as a percentage of the step amplitude. See IEEE std. 1057, Section 4.8.1, Settling Time Parameters. Full Scale Range Setting ± Step Response Maximum Settling Error (%) at 20 ns 100 ns 20 ms 10 mV – 1 V ≤2 V 0.5% 0.2% 0.1% 1.01 V – 10 V ≤20 V 1.0% 0.5% 0.2% 10.1 V – 100 V ≤200 V 1.0% 0.5% 0.2% 1 Net offset is the nominal voltage level at the digitizing oscilloscope input that corresponds to the center of the A/D Converter dynamic range. Offset accuracy is the accuracy of this voltage level. 2 The limits given are for the ambient temperature range of 0_C to +30_C. Reduce the upper bandwidth frequencies by 5 MHz for each _C above +30_C. The bandwidth must be set to FULL. 3 Rise time (rounded to the nearest 50 ps) is calculated from the bandwidth when Full Bandwidth is selected. It is defined by the following formula: Rise Time (ns) = 450 BW (MHz) GND input coupling disconnects the input connector from the attenuator and connects a ground reference to the input of the attenuator. 4 5 The AC Coupled Lower Frequency Limits are reduced by a factor of 10 when 10X passive probes are used. 6 The sensitivity ranges from 10 mV to 100 V full scale in a 1–2–5 sequence of coarse settings. Between coarse settings, you can adjust the sensitivity with a resolution equal to 1% of the more sensitive coarse setting. For example, between the 500 mV and 1 V ranges, the sensitivity can be set with 5 mV resolution. 7 The Full Bandwidth settling errors are typically less than the percentages from the table. Tektronix Logic Analyzer Family User Manual, Version 3.2 Software B–31 Appendix B: TLA 714 and TLA 720 Logic Analyzer Specifications Table B–28: DSO module timebase system Characteristic Description Range, Extended Realtime Sampling Rate 5 S/s to 10 MS/s in a 1–2.5–5 sequence Range, Realtime Sampling Rate Products Limits TLA7E1 and TLA7E2 25 MS/s to 5 GS/s on all channels simultaneously in a 1–2.5–5 sequence TLA7D1 and TLA7D2 25 MS/s to 2.5 GS/s on all channels simultaneously in a 1–2.5–5 sequence Record Length 512, 1024, 2048, 4096, 8192, and 15000 n Long Term Sample Rate ±100 ppm over any ≥ 1 ms interval Table B–29: DSO module trigger system Characteristic Description n Accuracy (Time) for Pulse Glitch or P l Width Triggering Pulse Ti i Time Range Accuracy 2 ns to 500 ns ±(20% of Setting + 0.5 ns) 520 ns to 1 s ±(104.5 ns + 0.01% of Setting) n Accuracy (DC) for Edge Trigger Level, DC Coupled ±( ( 2% × | Setting) | ) + 0.03 of Full Scale Range + Offset Accuracy) for signals having rise and fall times ≥20 ns Range (Time) for Pulse Glitch and Pulse Width Triggering 2 ns to 1 s Range, Trigger Level Source Range Any Channel ±100% of full scale range Range, Trigger Point Position Minimum: 0% Maximum: 100% Resolution, Trigger Level 0.2% of full scale for any Channel source Resolution, Trigger Position One Sample Interval at any Sample Rate Sensitivities, Pulse-Type Runt Trigger (Typical) 10% of full scale, from DC to 500 MHz, for vertical settings >100 mV full scale and ≤10 V full scale at the BNC input Sensitivities, Pulse-Type Trigger Width and Glitch (Typical) 10% of full scale for vertical settings >100 mV full scale and ≤10 V full scale at the BNC input B–32 Tektronix Logic Analyzer Family User Manual, Version 3.2 Software Appendix B: TLA 714 and TLA 720 Logic Analyzer Specifications Table B–29: DSO module trigger system (Cont.) Characteristic Description n Sensitivity, Edge-Type Trigger, DC Coupled The minimum signal levels required for stable edge triggering of an acquisition when the trigger source is DC-coupled Sensitivity, Edge-Type Trigger, Not DC C Coupled l d (T (Typical) i l) Time, Minimum Pulse or Rearm, and Minimum T Transition iti Ti Time, ffor P Pulse-Type l T T Triggering i i (Typical) (Ty ical) Trigger Position Error, Edge Triggering (T i l) (Typical) 1 Products Trigger Source Sensitivity TLA7E1 and TLA7E2 Any Channel 3.5% of Full Scale Range from DC to 50 MHz, increasing to 10% of Full Scale Range at 1 GHz TLA7D1 and TLA7D2 Any Channel 3.5% of Full Scale Range from DC to 50 MHz, increasing to 10% of Full Scale Range at 500 MHz Trigger Coupling Typical Signal Level for Stable Triggering AC Same as the DC-coupled limits for frequencies above 60 Hz; attenuates signals below 60 Hz High Frequency Reject One and one-half times the DC-coupled limits from DC to 30 kHz; attenuates signals above 30 kHz Low Frequency Reject One and one-half times the DC-coupled limits for frequencies above 80 kHz; attenuates signals below 80 kHz Noise Reject Three times the DC-coupled limits For vertical settings >100 mV and ≤10 V at the BNC input Pulse Class Minimum Pulse Width Minimum Rearm Width Glitch 1 ns 2 ns + 5% of Glitch Width Setting Width 1 ns 2 ns + 5% of Width Upper Limit Setting Acquisition Mode Trigger Position Error 1 Sample ±(1 Sample Interval + 1 ns) The trigger position errors are typically less than the values given here. These values are for triggering signals having a slew rate at the trigger point of ≥5% of full scale/ns. Tektronix Logic Analyzer Family User Manual, Version 3.2 Software B–33 Appendix B: TLA 714 and TLA 720 Logic Analyzer Specifications Table B–30: DSO module front-panel connectors Characteristic Description n Probe Compensator, Output Voltage The Probe Compensator output voltage in peak-to-peak Volts 0.5 V (base–top) ± 1% into a ≥ 50 W load Table B–31: DSO module certifications and compliances EC Declaration of Conformity – Low Voltage Compliance was demonstrated to the following specification as listed in the Official Journal of the European Communities: Low Voltage Directive 73/23/EEC EN 61010-1:/A2 1995 Approvals Safety requirements for electrical equipment for measurement, control, and laboratory use UL3111-1 – Standard for electrical measuring and test equipment CAN/CSA C22.2 No. 1010.1 – Safety requirements for electrical equipment for measurement, control and laboratory use Safety Certification of Plug-in or VXI Modules For modules (plug-in or VXI) that are safety certified by Underwriters Laboratories, UL Listing applies only when the module is installed in a UL Listed product. For modules (plug-in or VXI) that have cUL or CSA approval, the approval applies only when the module is installed in a cUL or CSA approved product. Installation Category Descriptions Terminals on this product may have different installation category designations. The installation categories are: CAT III Distribution-level mains (usually permanently connected). Equipment at this level is typically in a fixed industrial location CAT II Local-level mains (wall sockets). Equipment at this level includes appliances, portable tools, and similar products. Equipment is usually cord-connected CAT I Conditions of Approval Secondary (signal level) or battery operated circuits of electronic equipment Safety Certifications/Compliances are made for the following conditions: Temperature (operation): +5_C to +40_C Altitude (maximum operation): 2000 meters IEC Characteristics Equipment type: Test and Measuring Installation Category II Pollution Degree 2 Safety Class I B–34 Tektronix Logic Analyzer Family User Manual, Version 3.2 Software Appendix B: TLA 714 and TLA 720 Logic Analyzer Specifications Table B–32: DSO module mechanical Characteristic Description Slot width Requires 2 mainframe slots Weight ( (Typical) ) Products Weight TLA7D1 and TLA7E1 2.44 kg (5.38 lbs) TLA7D2 and TLA7E2 2.55 kg (5.63 lbs) Products Weight TLA7D1 and TLA7E1 6.35 kg (14 lbs) TLA7D2 and TLA7E2 7.71 kg (17 lbs) Shipping Weight ( (Typical) ) Overall Dimensions Height: 262.05 mm (10.32 in) Width: 60.66 mm (2.39 in) Depth: 373.38 mm (14.70 in) Tektronix Logic Analyzer Family User Manual, Version 3.2 Software B–35 Appendix B: TLA 714 and TLA 720 Logic Analyzer Specifications B–36 Tektronix Logic Analyzer Family User Manual, Version 3.2 Software Appendix B: TLA 714 and TLA 720 Logic Analyzer Specifications TLA 7PG2 Pattern Generator Module Characteristics Table B–33: P6470 TTL/CMOS probe and P6471 ECL probe Characteristic Description Vibration Operating: 0.31 Grms, 5 to 500 Hz Nonoperating: 2.46 Grms, 5 Hz to 500 Hz Shock Nonoperating: 294 m/s2 (30G), half-sine, 11 ms duration, 3 shocks per axis in each direction (18 shocks total) Table B–34: PG module electrical specification, operational mode Characteristic Description Normal Pattern data output is synchronized by the internal/external clock input Step Pattern data output is synchronized by the software command Table B–35: PG module electrical specification, output pattern Characteristic Description n Maximum Operating Clock Frequency 134 MHz in Full Channel Mode 268 MHz in Half Channel Mode Pattern length 40 to 262,140 (218 – 4) in Full Channel Mode (standard) 80 to 524,280 (219 – 8) in Half Channel Mode (standard) 40 to 1,048,572 (220 – 4) in Full Channel Mode (option 1M or PowerFlex upgrade) 80 to 2,097,144 (221 – 8) in Half Channel Mode (option1M or PowerFlex upgrade) Number of channels 64 channels in Full Channel Mode 32 channels in Half Channel Mode The pattern memory for the following data channel will be shared with strobe control/internal inhibit control Probe D data output channel control D0:0 STRB0 D0:1 STRB1 D0:2 STRB2 D0:3 STRB3 D0:4 Inhibit probe A D0:5 Inhibit probe B Tektronix Logic Analyzer Family User Manual, Version 3.2 Software B–37 Appendix B: TLA 714 and TLA 720 Logic Analyzer Specifications Table B–35: PG module electrical specification, output pattern (Cont.) Characteristic Description D0:6 Inhibit probe C D0:7 Inhibit probe D Sequences Maximum 4,000 Number of Blocks Maximum 4,000 Number of Sub-Sequences Maximum 50 Sub-Sequences Maximum 256 steps Repeat Count 1 to 65,536 or infinite Table B–36: PG module, internal clock Characteristic Description Clock Period 2.0000000 s to 7.462865 ns in Full Channel Mode 1.0000000 s to 3.7313432 ns in Half Channel Mode Period Resolution 8 digits Frequency Accuracy ± 100 PPM Table B–37: PG module external clock input Characteristic Description Clock Rate DC to 134 MHz in Full Channel Mode DC to 267 MHz in Half Channel Mode Polarity Normal or Invert Threshold Range –2.56 V to +2.54 V Resolution 20 mV Input Impedance 1 kW terminated to GND Sensitivity 500 mVp-p Table B–38: PG module event processing Characteristic Description Event Action Advance, Jump and Inhibit Number of Event Inputs 8 External Event Inputs (2 per each probe) B–38 Tektronix Logic Analyzer Family User Manual, Version 3.2 Software Appendix B: TLA 714 and TLA 720 Logic Analyzer Specifications Table B–38: PG module event processing (Cont.) Characteristic Description Number of Event Definitions 8 (A maximum of 256 event input patterns can be OR’d to define an event) Event Mode for Advance Edge or Level for Jump Edge or Level Event Filter None or 50 ns Table B–39: PG module inter-module interactions Characteristic Description Signal Input Input from backplane Selectable from Signal 1, 2, 3, and 4 Used to define the Event Signal Output Output to backplane Selectable from Signal 1, 2, 3, and 4 Specified as High or Low in each Sequence line Table B–40: PG module merged PG modules Characteristic Description Number of modules that can be merged together 5 External Event Input for merged module For Jump and Advance, only the External Event Input of the leftmost module is used. For Inhibit, each module uses its own External Event Input as a source Tektronix Logic Analyzer Family User Manual, Version 3.2 Software B–39 Appendix B: TLA 714 and TLA 720 Logic Analyzer Specifications Table B–41: PG module P6470 TTL/CMOS probe All timing values are specified, at probe connector, under the conditions listed below unless otherwise noted: Output Voltage setting: +5 V Series Termination Resistor: 75 W Load: 510 W + 50 pF Characteristic Description Maximum Clock Frequency ( ith series (with i termination t i ti resistor: i t 75 W) Output Level (Vcc ) Full Channel mode Half Channel mode Vcc <= 3.3 V 134 MHz 268 MHz 3.3 V < Vcc <= 5 V 62.5 MHz 125 MHz Vcc > 5 V 52.5 MHz 105 MHz Output Level (Vcc ) Full Channel mode Half Channel mode Vcc <= 5.5 V 134 MHz 268 MHz Maximum Clock Frequency (with series termination resistor: 75 W, load: 10 kW + 15 p, sam sample le out output ut pattern: attern: 8 bit counter) Typical Output Level (Vcc) 2.0 V to 5.5 V, 25 mV step, into 1 MW Maximum Resistive Load 220 W Maximum Capacitive Load 50 pF Output Type HD74LVC541A for Data Output HD74LVC244A for Clock/Strobe Output Series Termination Resistor 75 W standard. 43, 100 and 150 W as optional accessories (18 pin DIP socket)) Supported Channel Mode Half and Full Number of External Inhibit Input 1 Rise/Fall Time (20% to 80% load: 1 MW +< 1 pF) Typical Clock/Strobe Output Rise 640 ps Fall 1.1 ns Data Output Rise 680 ps Fall 2.9 ns Rise/Fall Time (20% to 80% load: 510 W + 51 pF) Typical Clock/Strobe Output Rise 6.5 ns Fall 6.3 ns Data Output Rise 5.2 ns Fall 4.5 ns Data Output Skew Typical < 570 ps between all data output pins of all modules in the mainframe after intermodule skew is adjusted manually < 480 ps between all data output pins of all probes of single module < 440 ps between all data output pins of single probe Data Output to Strobe Output Delay Typical B–40 + 1.7 ns when strobe delay set to zero. (Td3 in Figure B–4 on page B–49) Tektronix Logic Analyzer Family User Manual, Version 3.2 Software Appendix B: TLA 714 and TLA 720 Logic Analyzer Specifications Table B–41: PG module P6470 TTL/CMOS probe (Cont.) All timing values are specified, at probe connector, under the conditions listed below unless otherwise noted: Output Voltage setting: +5 V Series Termination Resistor: 75 W Load: 510 W + 50 pF Characteristic Description Data Output to Clock Output Delay Typical +2.4 ns (Td2 in Figure B–4) External Clock Input to Clock Output Delay Typical Full Channel mode: 61.5 ns (Td1 in Figure B–4 on page B–49) Half Channel mode: 61.5 ns External Inhibit Input to Output Enable Delay Typical 34 ns for Data Output (Td4 in Figure B–5 on page B–50) External Inhibit Input to Output Disable Delay Typical 86 ns for Data Output (Td5 in Figure B–5 on page B–50) Probe D Data Output to Output Enable Delay (for Internal Inhibit) Typical 7 ns for Data Output (Td4 in Figure B–5 on page B–50) Probe D Data Output to Output Disable Delay (for Internal Inhibit0 Typical 8 ns for Data Output (Td5 in Figure B–5 on page B–50) External Event Input to Clock Output Setup (for inhibit) (event-filter: off) Typical Full Channel mode: 1.5 Clocks + 160 ns Half Channel mode: 2 Clocks + 160 ns (Td6 in Figure B–6 on page B–6) External Event Input and Inhibit Input Input Type Minimum Pulse Width 74LVC14A, Positive True, 1 kW to GND 200 ns (event filter: off) External Event Input Number of Inputs Setup Time of Event Typical Input for Event Jump Setup Time of Event Input for Event Advance Typical Mainframe External Signal Input to PG Probe data output for Advance via Signal 1, 2 Typical via Signal 3, 4 Typical 2 in Half Channel Mode 54 to 61 clocks + 145 ns before the next block in Full Channel Mode 27.5 to 31 clocks + 145 ns before the next block (Td9 in Figure B–7 on page B–50) In Half Channel Mode, 160 ns before the rising edge of 5th clock output pulse from the last of the previous block (Td10 in Figure B–8 on page B–51) In Full Channel Mode, 160 ns before the rising edge of 3rd clock output pulse from the last of the previous block (Td11 in Figure B–9 on page B–51) 194 ns + 1 to 2 CLK2 225 ns + 1 to 2 CLK2 (CLK2 is from 2.5 ns to 5 ns when Internal Clock is used. It is the same as one clock period when External Clock is used) Tektronix Logic Analyzer Family User Manual, Version 3.2 Software B–41 Appendix B: TLA 714 and TLA 720 Logic Analyzer Specifications Table B–41: PG module P6470 TTL/CMOS probe (Cont.) All timing values are specified, at probe connector, under the conditions listed below unless otherwise noted: Output Voltage setting: +5 V Series Termination Resistor: 75 W Load: 510 W + 50 pF Characteristic for Inhibit (Output Enable) via Signal 1, 2 Typical via Signal 3, 4 Typical for Inhibit (Output Disable) via Signal 1, 2 Typical via Signal 3, 4 Typical PG Probe Clock Output to Mainframe External Signal Output via Signal 1, 2 Typical via Signal 3, 4 Typical Description 91 ns + 2 to 3 CLK (Half Channel Mode) 91 ns + 1.5 to 2.5 CLK (Full Channel Mode) 126 ns + 2 to 3 CLK (Half Channel Mode) 126 ns + 1.5 to 2.5 CLK (Full Channel Mode) 96 ns + 2 to 3 CLK (Half Channel Mode) 96 ns + 1.5 to 2.5 CLK (Full Channel Mode) 133 ns + 2 to 3 CLK (Half Channel Mode) 133 ns + 1.5 to 2.5 CLK (Full Channel Mode) 18 ns – 5 CLK (Half Channel Mode) 18 ns – 3 CLK (Full Channel Mode) 29 ns – 5 CLK (Half Channel Mode) 29 ns – 3 CLK (Full Channel Mode) Number of Data Outputs 16 in Full Channel Mode 8 in Half Channel Mode Number of Clock Outputs 1 Number of Strobe Outputs 1 (Only one Clock Output or Strobe Output can be enabled at one time per probe) Number of External Event Inputs 2 Clock Output Polarity Positive Strobe Type RZ only Strobe Delay Zero or Trailing Edge B–42 Tektronix Logic Analyzer Family User Manual, Version 3.2 Software Appendix B: TLA 714 and TLA 720 Logic Analyzer Specifications Table B–41: PG module P6470 TTL/CMOS probe (Cont.) All timing values are specified, at probe connector, under the conditions listed below unless otherwise noted: Output Voltage setting: +5 V Series Termination Resistor: 75 W Load: 510 W + 50 pF Characteristic P6470 TTL/CMOS Probe Input/Output Circuit Description P6470 TTL/CMOS Probe 75 W Data Output 74LVC541A 75 W Clock/Strobe Output 74LVC244A Event/Inhibit Input 74LVC14A 1 kW GND Tektronix Logic Analyzer Family User Manual, Version 3.2 Software B–43 Appendix B: TLA 714 and TLA 720 Logic Analyzer Specifications Table B–41: PG module P6470 TTL/CMOS probe (Cont.) All timing values are specified, at probe connector, under the conditions listed below unless otherwise noted: Output Voltage setting: +5 V Series Termination Resistor: 75 W Load: 510 W + 50 pF Characteristic P6470 TTL/CMOS Probe Dimensions Description P6470 TTL/CMOS Probe 137.2 mm (5.402 in) 114.0 mm (4.488 in) 130.0 mm (5.118 in) 33.0 mm (1.299 in) Table B–42: PG module, P6471 ECL probe All timing values are specified with a load condition of 51 W terminated to –2 V, at probe connector Characteristic Description Maximum Clock Frequency 134 MHz in Full Channel mode 268 MHz in Half Channel mode Output Level ECL B–44 Tektronix Logic Analyzer Family User Manual, Version 3.2 Software Appendix B: TLA 714 and TLA 720 Logic Analyzer Specifications Table B–42: PG module, P6471 ECL probe (Cont.) All timing values are specified with a load condition of 51 W terminated to –2 V, at probe connector Characteristic Description Output Type 100E151 for data output 100EL16 for strobe output 100EL04 for clock output all outputs are unterminated Supported Channel Mode Half and Full Rise/Fall Time (20% to 80%) Typical Clock Output Rise 320 ps Fall 330 ps Data Output Rise 1,200 ps Fall 710 ps Strobe Output Rise 290 ps Fall 270 ps Data Output Skew Typical < 255 ps between all data output pins of all modules in the mainframe after intermodule skew is adjusted manually < 240 ps between all data output pins of all probes of single module < 210 ps between all data output pins of a single probe Data Output to Strobe Output Delay Typical +2.94 ns when strobe delay set to zero. (Td3 in Figure B–4 on page B–49) Data Output to Clock Output Delay Typical +780 ps (Td2 in Figure B–4 on page B–49) External Clock Input to Clock Output Delay Typical 51 ns (Td1 in Figure B–4 on page B–49) External Event Input Input Level Input Type Minimum Pulse Width ECL 10H116 with 75 kW to –2V 150 ns (Event filter : off) External Event Input Number of Inputs Setup Time of Event Input for Event Jump Typical 2 in Half Channel Mode, 54 to 61 clocks + 80 ns before the next block in Full Channel Mode, 27.5 to 31 clocks + 80 ns before the next block (Td9 in Figure B–7 on page B–50) Setup Time of Event Input for Event Advance Typical in Half Channel Mode, 80 ns before the rising edge of 5th clock output pulse from the last of the previous block (Td10 in Figure B–8 on page B–51) in Full Channel Mode, 80 ns before the rising edge of 3rd clock output pulse from the last of the previous block (Td11 in Figure B–9 on page B–51) Tektronix Logic Analyzer Family User Manual, Version 3.2 Software B–45 Appendix B: TLA 714 and TLA 720 Logic Analyzer Specifications Table B–42: PG module, P6471 ECL probe (Cont.) All timing values are specified with a load condition of 51 W terminated to –2 V, at probe connector Characteristic Mainframe External Signal Input to PG Probe data output for Advance via Signal 1, 2 Typical via Signal 3, 4 Typical PG Probe Clock Output to Mainframe External Signal Output via Signal 1, 2 Typical via Signal 3, 4 Typical Description 185 ns + 1 to 2 CLK2 217 ns + 1 to 2 CLK2 (CLK2 from 2.5 ns to 5 ns when Internal Clock is used. It is same as one clock period when External Clock is used.) 28 ns – 5 CLK (Half Channel Mode) 28 ns – 3 CLK (Full Channel Mode) 38 ns – 5 CLK (Half Channel Mode) 38 ns – 3 CLK (Full Channel Mode) Number of Data Outputs 16 in Full Channel Mode 8 in Half Channel Mode Number of Clock Outputs 1 Number of Strobe Outputs 1 (Only one Clock Output or one Strobe Output can be enabled at one time per probe) Number of External Event Inputs 2 Clock Output Polarity Positive Strobe Type RZ only Strobe Delay Zero or Trailing Edge B–46 Tektronix Logic Analyzer Family User Manual, Version 3.2 Software Appendix B: TLA 714 and TLA 720 Logic Analyzer Specifications Table B–42: PG module, P6471 ECL probe (Cont.) All timing values are specified with a load condition of 51 W terminated to –2 V, at probe connector Characteristic P6471 ECL Probe Input/Output Circuit Description P6471 ECL Probe Data Output 100E151 Strobe Output 100EL16 Clock Output 100EL04 Event Input 10H116 75 kW VBB –2V Tektronix Logic Analyzer Family User Manual, Version 3.2 Software B–47 Appendix B: TLA 714 and TLA 720 Logic Analyzer Specifications Table B–42: PG module, P6471 ECL probe (Cont.) All timing values are specified with a load condition of 51 W terminated to –2 V, at probe connector Characteristic P6471 ECL Probe Dimensions Description P6471 ECL Probe 137.2 mm (5.402 in) 114.0 mm (4.488 in) 130.0 mm (5.118 in) 33.0 mm (1.299 in) Table B–43: PG module mechanical Characteristic Description Slot width Requires 2 mainframe slots Weight (Typical) 2.5 kg (5 lbs. 4 oz.) Overall dimensions (excluding connectors) Height 10.32 in (262 mm) Width 2.39 in (61 mm) Depth 14.7 in (373 mm) Mainframe interlock B–48 1.4 ECI keying is implemented Tektronix Logic Analyzer Family User Manual, Version 3.2 Software Appendix B: TLA 714 and TLA 720 Logic Analyzer Specifications Table B–44: P6470 TTL/CMOS probe and P6471 ECL probe mechanical Characteristic Dimensions Length Width Height Weight Description 137.2 mm (5.402 inches) with hooks and connectors 130.0 mm (5.118 inches) without hooks and connectors 114.0 mm (4.488 inches) 30.0 mm (1.181 inches) without foot 33.0 mm (1.299 inch) with foot 250 g (8.8 oz.) Table B–45: Probe cable Characteristic Description Dimensions Length 1.5 m (5 feet) Table B–46: Twisted lead set Characteristic Description Dimensions Length 25.4 cm (10 inches) PG Pattern Generator Module Timing Diagrams External clock Input Td1 Clock Output Td2 Data Output Td3 Strobe Output (strobe delay = zero) Figure B–4: P6470/6471 clock and strobe timing diagram Tektronix Logic Analyzer Family User Manual, Version 3.2 Software B–49 Appendix B: TLA 714 and TLA 720 Logic Analyzer Specifications Inhibit Input or Probe D data Output Td5 Td4 10% Data Output 90% Figure B–5: P6470 inhibit timing diagram Event Input Td6 Td6 Clock Output Data Output Figure B–6: External event for inhibit timing diagram Event Input Td9 Data Output Current Block Jump Target Block Figure B–7: P6470/P6471 external event for jump timing diagram B–50 Tektronix Logic Analyzer Family User Manual, Version 3.2 Software Appendix B: TLA 714 and TLA 720 Logic Analyzer Specifications Event Input Td10 Clock Output End of previous block Block Output after the event Figure B–8: External event for half channel advance timing diagram Event Input Td11 Clock Output End of previous block Block Output after the event Figure B–9: External event for full channel advance timing diagram Tektronix Logic Analyzer Family User Manual, Version 3.2 Software B–51 Appendix B: TLA 714 and TLA 720 Logic Analyzer Specifications B–52 Tektronix Logic Analyzer Family User Manual, Version 3.2 Software Appendix C: TLA 7XM Expansion Mainframe Specifications This chapter lists the specifications for the TLA 7XM Expansion Mainframe. Characteristic Tables All specifications are guaranteed unless noted Typical. Typical characteristics describe typical or average performance and provide useful reference information. Specifications that are marked with the n symbol are checked directly (or indirectly) in the TLA 700 Series Performance Verification and Adjustment Technical Reference Manual. The specifications apply to all versions of the expansion mainframe unless otherwise noted. For expansion mainframes, the performance limits in this specification are valid with these conditions: H The logic analyzer must be in an environment with temperature, altitude, humidity, and vibration within the operating limits described in these specifications. H The logic analyzer must have had a warm-up period of at least 30 minutes. For modules, the performance limits in this specification are valid with these conditions: H The modules must be installed in a TLA Logic Analyzer Mainframe. H The module must have been calibrated/adjusted at an ambient temperature between +20_C and +30_C. H The module must have had its signal-path-compensation routine (self calibration) last executed after at least a 30 minute warm-up period. H After the warm-up period, the DSO module must have had its signal-pathcompensation routine (self cal) last executed at an ambient temperature within ±5_C of the current ambient temperature. Tektronix Logic Analyzer Family User Manual, Version 3.2 Software C–1 Appendix C: TLA 7XM Expansion Mainframe Specifications Table C–1: Atmospheric characteristics Characteristic Description Temperature: Operating and nonoperating Operating: +5_C to +50_C, 15_C/hr maximum gradient, non-condensing (derated 1_C per 1000 ft above 5000 foot altitude) Nonoperating: –20_C to +60_C, 15_C/hr maximum gradient, non-condensing. Relative Humidity: Operating and nonoperating Operating: 20% to 80% relative humidity, non-condensing. Maximum wet bulb temperature: +29_C (derates relative humidity to approximately 22% at +50_C). Nonoperating: 8% to 80% relative humidity, non-condensing. Maximum wet bulb temperature: +29_C (derates relative humidity to approximately 22% at +50_C). Altitude: Operating and nonoperating Operating: To 10,000 ft (3040 m), (derated 1_C per 1000 ft (305 m) above 5000 ft (1524 m) altitude) Nonoperating: 40,000 ft (12190 m). Table C–2: Backplane interface Characteristic Description Slots Expansion mainframe 13 n CLK10 Frequency 10 MHz ±100 PPM Relative Time Correlation Error1,2 (Typical) LA to LA “MagniVu” data 2 ns LA to LA “normal” data utilizing an internal clock3 1 LA sample – 0.5 ns LA to LA “normal” data utilizing an external clock 2 ns LA “MagniVu” to DSO data 3 ns LA to DSO “normal” data utilizing an internal clock3,4 1 LA sample + 1 ns LA to DSO “normal” data utilizing an external clock4 3 ns DSO to DSO4 3 ns C–2 Tektronix Logic Analyzer Family User Manual, Version 3.2 Software Appendix C: TLA 7XM Expansion Mainframe Specifications Table C–2: Backplane interface (Cont.) Characteristic Description System Trigger and External Signal Input Latencies5,6 (Typical) External System Trigger Input to LA Probe Tip7 –230 ns External Signal Input to LA Probe Tip via Signal 3, 48 –176 ns + Clk External Signal Input to LA Probe Tip via Signal 1, 28, 9 –187 ns + Clk External System Trigger Input to DSO Probe Tip7 –11 ns System Trigger and External Signal Output Latencies6 (Typical) LA Probe Tip to External System Trigger Out3 412 ns + SMPL LA Probe Tip to External Signal Out via Signal 3, 43 OR function 402 ns + SMPL AND function 415 ns + SMPL LA Probe Tip to External Signal Out via Signal 1, 23,9 normal function 385 ns + SMPL inverted logic on backplane 385 ns + SMPL DSO Probe Tip to External System Trigger Out 104 ns DSO Probe Tip to External Signal Out via Signal 3, 4 OR function 101 ns AND function 111 ns DSO Probe Tip to External Signal Out via Signal 1, 29 normal function 89 ns inverted logic on backplane 92 ns Tektronix Logic Analyzer Family User Manual, Version 3.2 Software C–3 Appendix C: TLA 7XM Expansion Mainframe Specifications Table C–2: Backplane interface (Cont.) Characteristic Description Inter-Module Latencies6 (Typical) LA to DSO Inter-module System Trigger3,7 394 ns + SMPL LA to LA Inter-module System Trigger3,7 102 ns + SMPL LA to DSO Inter-Module ARM3 396 ns + SMPL LA to LA Inter-Module ARM3,8 144 ns + SMPL + Clk LA to LA Inter-Module via Signal 1, 23,8, 9 137 ns + SMPL + Clk LA to LA Inter-Module via Signal 3, 43,8 152 ns + SMPL + Clk DSO to DSO Inter-module System Trigger7 86 ns DSO to LA Inter-module System Trigger7 –204 ns DSO to LA Inter-Module ARM8 –156 ns + Clk DSO to DSO Inter-Module ARM 95 ns DSO to LA Inter-Module via Signal 1, 28, 9 –158 ns + Clk DSO to LA Inter-Module via Signal 3, 48 –148 ns + Clk 1 Includes typical jitter, slot-to-slot skew, and probe-to-probe variations to provide a “typical” number for the measurement. Assumes standard accessory probes are utilized. 2 For time intervals longer than 1 ms between modules, add 0.01% of the difference between the absolute time measurements to the relative time correlation error to account for the inaccuracy of the CLK10 source. 3 SMPL represents the time from the event at the probe tip inputs to the next valid data sample of the LA module. In the Normal Internal clock mode, this represents the delta time to the next sample clock. In the MagniVu Internal clock mode, this represents 500 ps or less. In the External clock mode, this represents the time to the next master clock generated by the setup of the clocking state machine, the system-under-test supplied clocks, and the qualification data. 4 The DSO module time correlation is measured at the maximum sample rate on one channel only. 5 All system trigger and external signal input latencies are measured from a falling-edge transition (active true low) with signals measured in the wired-OR configuration. 6 Latencies are based on typical portable mainframe configurations consisting of two LA modules or an LA module plus a DSO module. Latencies are system-configuration-dependent and may vary slightly with module loading. 7 In the Waveform window, triggers are always marked immediately except when delayed to the first sample. In the Listing window, triggers are always marked on the next sample period following their occurrence. 8 “Clk” represents the time to the next master clock at the destination logic analyzer. In the asynchronous (or internal) clock mode, this represents the delta time to the next sample clock beyond the minimum async rate of 4 ns. In the synchronous (or external) clock mode, this represents the time to the next master clock generated by the setup of the clocking state machine and the supplied system under test clocks and qualification data. 9 Signals 1 and 2 (ECLTRG0, 1) are limited to a “broadcast” mode of operation, where only one source is allowed to drive the signal node at any one time. That single source may be utilized to drive any combination of destinations. C–4 Tektronix Logic Analyzer Family User Manual, Version 3.2 Software Appendix C: TLA 7XM Expansion Mainframe Specifications TLA 7XM Expansion Mainframe Characteristics Table C–3: AC power source Characteristic Description Source Voltage 90–250 VRMS, 45–66 Hz, continuous range CAT II 100–132 VRMS, 360–440 Hz, continuous range CAT II Maximum Power Consumption 1450 W line power (the maximum power consumed by a fully loaded 13-slot instrument) Fuse Rating (Current and voltage ratings and type of fuse used to fuse the source line voltage) 90 V – 132 VACRMS Operation High-power/Low Line (159-0379-00) Safety: UL198G/CSA C22.2, Size: 0.25 in × 1.25 in, Style: Slow acting, Rating: 20 A/250 V 103 V – 250 VACRMS Operation (159-0256-00) Safety: UL198G/CSA C22.2, Size: 0.25 in × 1.25 in, Style: No. 59/Fast acting, Rating: 15 A/250 V 207 V – 250 VACRMS Operation (159-0381-00) Safety: IEC 127/Sheet 1, Size: 5 mm × 20 mm, Style: Fast acting “F”, high-breaking capacity, Rating: 6.3 A/250 V Inrush Surge Current 70 A maximum Steady State Input Current 16.5 ARMS maximum at 90 VACRMS 6.3 ARMS maximum at 207 VACRMS Power Factor Correction Yes ON/Standby Switch and Indicator Front Panel On/Standby switch with integral power indicator Tektronix Logic Analyzer Family User Manual, Version 3.2 Software C–5 Appendix C: TLA 7XM Expansion Mainframe Specifications Table C–4: Secondary power Characteristic Description n DC Voltage Regulation (Combined System, voltage available at each slot) Voltage Vmin Vnom Vmax +24 V +23.28 V +24.24 V +25.20 V +12 V +11.64 V +12.12 V +12.60 V +5 V +4.875 V +5.063 V +5.250 V –2 V –2.10 V –2.00 V –1.90 V –5.2 V –5.460 V –5.252 V –5.044 V –12 V –12.60 V –12.12 V –11.64 V –24 V –25.20 V –24.24 V –23.28 V Table C–5: Cooling Characteristic Description Cooling System Forced air circulation system (positive pressurization) utilizing a single low-noise centripetal (squirrel cage) blower configuration with no filters Blower Speed Control Rear panel switch selects between full speed and variable speed. Slot exhaust temperature and ambient air temperature are monitored such that a constant delta temperature is maintained across the module with the highest exit air temperature at the minimum operational blower speed Slot Activation Installing a module activates the cooling for the corresponding occupied slots by opening the air flow shutter mechanism. Optimizes cooling efficiency by only applying airflow to modules that are installed Slot Airflow Direction P2 to P1, bottom of module to top of module Mainframe Air Intake Lower fan-pack rear face and bottom Mainframe Air exhaust Top-sides and top-rear back. Top rear-back exhaust redirected to the sides by the fan pack housing to minimize reentry into the intake. ∆ Temperature Readout Sensitivity 100 mV/°C with 0°C corresponding to 0 V output Temperature Sense Range –10° C to +90° C, Delta temperature ≤ 50° C Clearance 2 in (51 mm), rear, top, and sides of mainframe C–6 Tektronix Logic Analyzer Family User Manual, Version 3.2 Software Appendix C: TLA 7XM Expansion Mainframe Specifications Table C–6: Mechanical Characteristic Description Overall Dimensions (See Figure B–2 for overall mainframe dimensions) Standard mainframe Height (with feet) 13.7 in (362.0 mm) including feet Width 16.7 in (425.5 mm) Depth 26.5 in (673.1 mm) mainframe with Rackmount Height 13.25 in (355.6 mm) Width 18.9 in (480.1 mm) Depth 28.9 in to 33.9 in (746.8 mm to 873.8 mm) in 0.5 in increments, user selectable Weight mainframe with slot fillers (Typical) 52 lbs (23.6 kg) mainframe with benchtop controller and slot fillers (Typical) 58 lbs 11 oz (26.6 kg) Shipping configuration (Typical) 115 lbs (52.2 kg) minimum configuration with benchtop controller and all standard accessories (no modules or probes) 187 lbs (84.8 kg) fully configured with benchtop controller, 4 LA modules, 1 DSO modules, and all standard accessories including probes. Rackmount kit adder Module Size 20 lbs (9.1 kg) 13 plug-in slots Tektronix Logic Analyzer Family User Manual, Version 3.2 Software C–7 Appendix C: TLA 7XM Expansion Mainframe Specifications 16.7 in (42.6 cm) 26.5 in (70 cm) 13.7 in (35 cm) 13.3 in (34 cm) Figure C–1: Dimensions of the expansion mainframe 18.9 in (480.1 mm) 28.9 in (746.7 mm) Min to 33.9 in (873.8 mm) Max 13.25 in (355.6 mm) Figure C–2: Dimensions of the expansion mainframe with rackmount option C–8 Tektronix Logic Analyzer Family User Manual, Version 3.2 Software Appendix C: TLA 7XM Expansion Mainframe Specifications Table C–7: Certifications and compliances: TLA 7XM expansion mainframe EC Declaration of Conformity – EMC Meets intent of Directive 89/336/EEC for Electromagnetic Compatibility. Compliance was demonstrated to the following specifications as listed in the Official Journal of the European Communities: EN 61326–1 IEC 1000–4–2 IEC 1000–4–3 IEC 1000–4–4 IEC 1000–4–5 IEC 1000–4–6 IEC 1000–4–11 EN 61000–3–2 EC Declaration of Conformity – Low Voltage EMC requirements for Class A electrical equipment for measurement, control and laboratory use. Electrostatic Discharge Immunity (Performance Criterion B) RF Electromagnetic Field Immunity (Performance Criterion A) Electrical Fast Transient / Burst Immunity (Performance Criterion B) Power Line Surge Immunity (Performance Criterion B) Conducted RF Immunity (Performance Criterion A) Power Line Dips and Interruptions Immunity (Performance Criterion B) AC Power Line Harmonic Emissions Compliance was demonstrated to the following specification as listed in the Official Journal of the European Communities: Low Voltage Directive 73/23/EEC EN 61010-1:/A2 1995 Approvals Safety requirements for electrical equipment for measurement, control, and laboratory use UL3111-1 – Standard for electrical measuring and test equipment CAN/CSA C22.2 No. 1010.1 – Safety requirements for electrical equipment for measurement, control and laboratory use Installation Category Descriptions Terminals on this product may have different installation category designations. The installation categories are: CAT III Distribution-level mains (usually permanently connected). Equipment at this level is typically in a fixed industrial location CAT II Local-level mains (wall sockets). Equipment at this level includes appliances, portable tools, and similar products. Equipment is usually cord-connected CAT I Secondary (signal level) or battery operated circuits of electronic equipment Tektronix Logic Analyzer Family User Manual, Version 3.2 Software C–9 Appendix C: TLA 7XM Expansion Mainframe Specifications Table C–7: Certifications and compliances: TLA 7XM expansion mainframe (Cont.) Conditions of Approval Safety Certifications/Compliances are made for the following conditions: Temperature (operation): +5_C to +40_C Altitude (maximum operation): 2000 meters IEC Characteristics Equipment type: Test and Measuring Installation Category II Pollution Degree 2 Safety Class I C–10 Tektronix Logic Analyzer Family User Manual, Version 3.2 Software Appendix D: TLA 704 and TLA 711 Logic Analyzer Specifications This chapter lists the specifications for the TLA 704 Color Portable Mainframe and the TLA 711 Color Benchtop Mainframe and its modules. The first section lists specifications that are common to the mainframes or modules. The following sections list specifications that are specific to individual logic analyzer components. Characteristic Tables All specifications are guaranteed unless noted Typical. Typical characteristics describe typical or average performance and provide useful reference information. Specifications that are marked with the n symbol are checked directly (or indirectly) in the TLA 700 Series Performance Verification and Adjustment Technical Reference Manual. The specifications apply to all versions of the logic analyzer mainframe or module unless otherwise noted. For mainframes and modules, the performance limits in this specification are valid with these conditions: H The logic analyzer must be in an environment with temperature, altitude, humidity, and vibration within the operating limits described in these specifications. H The logic analyzer must have had a warm-up period of at least 30 minutes. For modules, the performance limits in this specification are valid with these conditions: H The modules must be installed in a TLA Logic Analyzer Mainframe. H The module must have been calibrated/adjusted at an ambient temperature between +20_C and +30_C. H The module must have had its signal-path-compensation routine (self calibration) last executed after at least a 30 minute warm-up period. H After the warm-up period, the DSO module must have had its signal-pathcompensation routine (self cal) last executed at an ambient temperature within ±5_C of the current ambient temperature. Tektronix Logic Analyzer Family User Manual, Version 3.2 Software D–1 Appendix D: TLA 704 and TLA 711 Logic Analyzer Specifications Table D–1: Atmospheric characteristics Characteristic Description Temperature: Operating and Non-Operating Operating (no media in floppy disk drive) +5_C to +50_C, 15_C/hour maximum gradient, non-condensing (derated 1_C per 1000 feet above 5000 foot altitude) Non-operating (no media in floppy disk drive) –20_C to +60_C, 15_C/hour maximum gradient, non-condensing. Relative Humidity: Operating and Non-Operating Operating (no media in floppy disk drive) 20% to 80% relative humidity, non-condensing. Maximum wet bulb temperature: +29_C (derates relative humidity to approximately 22% at +50_C). Non-operating (no media in floppy disk drive) 8% to 80% relative humidity, non-condensing. Maximum wet bulb temperature: +29_C (derates relative humidity to approximately 22% at +50_C). Altitude: Operating and Non-Operating Operating: To 10,000 feet (3040 meters), (derated 1_C per 1000 feet (305 meters) above 5000 feet (1524 meters) altitude) Non-operating: 40,000 feet (12190 meters). D–2 Tektronix Logic Analyzer Family User Manual, Version 3.2 Software Appendix D: TLA 704 and TLA 711 Logic Analyzer Specifications Table D–2: Backplane interface Characteristic Description Slots Portable mainframe 4 Benchtop mainframe 13 n CLK10 Frequency 10 MHz ±100 PPM Relative Time Correlation Error1,2 (Typical) LA to LA “MagniVu” data 2 ns LA to LA “normal” data utilizing an internal clock3 1 LA sample – 0.5 ns LA to LA “normal” data utilizing an external clock 2 ns LA “MagniVu” to DSO data 3 ns LA to DSO “normal” data utilizing an internal clock3,4 1 LA sample + 1 ns LA to DSO “normal” data utilizing an external clock4 3 ns DSO to DSO4 3 ns System Trigger and External Signal Input Latencies5,6 (Typical) External System Trigger Input to LA Probe Tip7 –271 ns External Signal Input to LA Probe Tip via Signal 3, 48 –212 ns + Clk External Signal Input to LA Probe Tip via Signal 1, 28, 9 –208 ns + Clk External System Trigger Input to DSO Probe Tip7 –27 ns System Trigger and External Signal Output Latencies6 (Typical) LA Probe Tip to External System Trigger Out3 380 ns + SMPL LA Probe Tip to External Signal Out via Signal 3, 43 OR function 371 ns + SMPL AND function 383 ns + SMPL LA Probe Tip to External Signal Out via Signal 1, 23,9 normal function 381 ns + SMPL inverted logic on backplane 384 ns + SMPL DSO Probe Tip to External System Trigger Out 70 ns DSO Probe Tip to External Signal Out via Signal 3, 4 OR function 68 ns AND function 78 ns DSO Probe Tip to External Signal Out via Signal 1, 29 normal function 71 ns inverted logic on backplane 71 ns Tektronix Logic Analyzer Family User Manual, Version 3.2 Software D–3 Appendix D: TLA 704 and TLA 711 Logic Analyzer Specifications Table D–2: Backplane interface (Cont.) Characteristic Description Inter-Module Latencies6 (Typical) LA to DSO Inter-module System Trigger3,7 358 ns + SMPL LA to LA Inter-module System Trigger3,7 68 ns + SMPL LA to DSO Inter-Module ARM3 360 ns + SMPL LA to LA Inter-Module ARM3,8 108 ns + SMPL + Clk LA to LA Inter-Module via Signal 1, 23,8, 9 120 ns + SMPL + Clk LA to LA Inter-Module via Signal 3, 43,8 116 ns + SMPL + Clk DSO to DSO Inter-module System Trigger7 50 ns DSO to LA Inter-module System Trigger7 –236 ns DSO to LA Inter-Module ARM8 –192 ns + Clk DSO to DSO Inter-Module ARM 59 ns DSO to LA Inter-Module via Signal 1, 28, 9 –179 ns + Clk DSO to LA Inter-Module via Signal 3, 48 –184 ns + Clk 1 Includes typical jitter, slot-to-slot skew, and probe-to-probe variations to provide a “typical” number for the measurement. Assumes standard accessory probes are utilized. 2 For time intervals longer than 1 ms between modules, add 0.01% of the difference between the absolute time measurements to the relative time correlation error to account for the inaccuracy of the CLK10 source. 3 SMPL represents the time from the event at the probe tip inputs to the next valid data sample of the LA module. In the Normal Internal clock mode, this represents the delta time to the next sample clock. In the MagniVu Internal clock mode, this represents 500 ps or less. In the External clock mode, this represents the time to the next master clock generated by the setup of the clocking state machine, the system-under-test supplied clocks, and the qualification data. 4 The DSO module time correlation is measured at the maximum sample rate on one channel only. 5 All system trigger and external signal input latencies are measured from a falling-edge transition (active true low) with signals measured in the wired-OR configuration. 6 Latencies are based on typical portable mainframe configurations consisting of two LA modules or an LA module plus a DSO module. Latencies are system-configuration-dependent and may vary slightly with module loading. 7 In the Waveform window, triggers are always marked immediately except when delayed to the first sample. In the Listing window, triggers are always marked on the next sample period following their occurrence. 8 “Clk” represents the time to the next master clock at the destination logic analyzer. In the asynchronous (or internal) clock mode, this represents the delta time to the next sample clock beyond the minimum async rate of 4 ns. In the synchronous (or external) clock mode, this represents the time to the next master clock generated by the setup of the clocking state machine and the supplied system under test clocks and qualification data. 9 Signals 1 and 2 (ECLTRG0, 1) are limited to a “broadcast” mode of operation, where only one source is allowed to drive the signal node at any one time. That single source may be utilized to drive any combination of destinations. D–4 Tektronix Logic Analyzer Family User Manual, Version 3.2 Software Appendix D: TLA 704 and TLA 711 Logic Analyzer Specifications Table D–3: External signal interface Characteristic Description System Trigger Input TTL compatible input via rear panel mounted BNC connectors (portable mainframe) or front panel mounted SMB connectors (benchtop mainframe) Input Levels VIH VIL TTL compatible input. ≥ 2.0 V ≤ 0.8 V Input Mode Falling edge sensitive, latched (active low) Minimum Pulse Width 12 ns Active Period Accepts system triggers during valid acquisition periods via real-time gating, resets system trigger input latch between valid acquisition periods Maximum Input Voltage 0 to +5 Volt peak External Signal Input TTL compatible input via rear panel mounted BNC connectors (portable mainframe) or front panel mounted SMB connectors (benchtop mainframe) Input Destination Signal 1, 2, 3, 4 Input Levels VIH VIL TTL compatible input. ≥ 2.0 V ≤ 0.8 V Input Mode Active (true) low, level sensitive Input Bandwidth1 Signal 1, 2 Signal 3, 4 50 MHz square wave minimum 10 MHz square wave minimum Active Period Accepts signals during valid acquisition periods via real-time gating Maximum Input Voltage 0 to +5 Volt peak System Trigger Output TTL compatible output via rear panel mounted BNC connectors (portable mainframe) or front panel mounted SMB connectors (benchtop mainframe) Source Mode Active (true) low, falling edge latched Active Period Outputs system trigger state during valid acquisition period, resets system trigger output to false state between valid acquisitions Output Levels VOH 50 Ohm back terminated TTL-compatible output ≥4 V into open circuit ≥ 2 V into 50 Ohm to ground VOL Output Protection ≥ 0.7 V sinking 10 ma Short-circuit protected (to ground) Tektronix Logic Analyzer Family User Manual, Version 3.2 Software D–5 Appendix D: TLA 704 and TLA 711 Logic Analyzer Specifications Table D–3: External signal interface (Cont.) Characteristic Description External Signal Output TTL compatible outputs via rear panel mounted BNC connectors (portable mainframe) or front panel mounted SMB connectors (benchtop mainframe) Source Selection Signal 1, 2, 3, 4, or 10 MHz clock Output Modes Level Sensitive User definable Active (true) low or active (true) high Output Levels VOH 50 Ohm back terminated TTL output ≥ 4 V into open circuit ≥ 2 V into 50 Ohm to ground VOL ≤ 0.7 V sinking 10 ma Output Bandwidth2 Signal 1, 2 Signal 3, 4 Active Period 50 MHz square wave minimum 10 MHz square wave minimum Outputs signals during valid acquisition periods, resets signals to false state between valid acquisitions Outputs 10 MHz clock continuously Output Protection Short-circuit protected (to ground) Intermodule Signal Line Bandwidth Signal 1, 2 (ECLTRG 0,1) Signal 3, 4 (ECLTRG 0,1) Minimum bandwidth up to which the intermodule signals are specified to operate correctly 50 MHz square wave minimum 10 MHz square wave minimum 1 The Input Bandwidth specification only applies to signals to the modules; it does not apply to signals applied to the External Signal Input and sent back to the External Signal Output. 2 The Output Bandwidth specification only applies to signals from the modules; it does not apply to signals applied to the External Signal Input and sent back to the External Signal Output. D–6 Tektronix Logic Analyzer Family User Manual, Version 3.2 Software Appendix D: TLA 704 and TLA 711 Logic Analyzer Specifications Table D–4: Certifications and compliances: TLA 704 and TLA 711 mainframes EC Declaration of Conformity – EMC Meets intent of Directive 89/336/EEC for Electromagnetic Compatibility. Compliance was demonstrated to the following specifications as listed in the Official Journal of the European Communities: EN 55011 Class A Radiated and Conducted Emissions EN 50081-1 Emissions: EN 60555-2 AC Power Line Harmonic Emissions EN 50082-1 Immunity: IEC 801-2 IEC 801-3 IEC 801-4 IEC 801-5 Electrostatic Discharge Immunity RF Electromagnetic Field Immunity Electrical Fast Transient/Burst Immunity Power Line Surge Immunity The following modules meet the intent of EMC Directive 89/336/EEC when they are used with the above named mainframes: TLA 700 Series Logic Analyzer Modules (TLA 7L1, TLA 7L2, TLA 7L3, TLA 7L4, TLA 7M1, TLA 7M2, TLA 7M3, TLA 7M4) TLA 700 Series Digitizing Oscilloscope Modules (TLA 7D1, TLA 7D2, TLA 7E1, TLA 7E2) EC Declaration of Conformity – Low Voltage Compliance was demonstrated to the following specification as listed in the Official Journal of the European Communities: Low Voltage Directive 73/23/EEC EN 61010-1:/A2 1995 Approvals Safety requirements for electrical equipment for measurement, control, and laboratory use UL3111-1 – Standard for electrical measuring and test equipment CAN/CSA C22.2 No. 1010.1 – Safety requirements for electrical equipment for measurement, control and laboratory use Installation Category Descriptions Terminals on this product may have different installation category designations. The installation categories are: CAT III Distribution-level mains (usually permanently connected). Equipment at this level is typically in a fixed industrial location CAT II Local-level mains (wall sockets). Equipment at this level includes appliances, portable tools, and similar products. Equipment is usually cord-connected CAT I Secondary (signal level) or battery operated circuits of electronic equipment Tektronix Logic Analyzer Family User Manual, Version 3.2 Software D–7 Appendix D: TLA 704 and TLA 711 Logic Analyzer Specifications Table D–4: Certifications and compliances: TLA 704 and TLA 711 mainframes (Cont.) Conditions of Approval Safety Certifications/Compliances are made for the following conditions: Temperature (operation): +5_C to +40_C Altitude (maximum operation): 2000 meters IEC Characteristics Equipment type: Test and Measuring Installation Category II Pollution Degree 2 Safety Class I D–8 Tektronix Logic Analyzer Family User Manual, Version 3.2 Software Appendix D: TLA 704 and TLA 711 Logic Analyzer Specifications TLA 704 Color Portable Mainframe Characteristics Table D–5: Portable mainframe internal controller Characteristic Description Processor Intel 133 MHz Pentium PC-AT configuration, with an Intel 82430HX (Triton II) chip set Main Memory EDO DRAM Style Two 72-pin SIMMs, gold-plated Loading Symmetric, 2-SIMM minimum (64 bits) Speed 60 ns Installed Configurations 16-MByte minimum, 32-MByte maximum Cache Memory 256 Kbyte, level 2 (L2) write-back cache Flash BIOS 512 Kbyte Real-Time Clock and CMOS Setups NVRAM (Typical) Real-Time clock/calendar, with typical 10-year life. Standard and advanced PC CMOS setups: see BIOS specification. Year 2000 compliant. Floppy Disk Drive Standard 3.5 inch, 1.44 Mbyte, double-sided PC-compatible high-density floppy disk drive Hard Disk Drive Standard PC-compatible with ATA/Enhanced Integrated Device Electronics (EIDE) interface Capacity MIN configuration: 1.4 GByte MAX configuration: 2.1 GByte Subject to change; these are the storage capacities valid at product introduction Table D–6: Portable mainframe display system Characteristic Description Classification Standard PC graphics accelerator technology (bitBLT-based); capable of supporting both internal color LCD display and external color SVGA/XGA monitor Display Memory DRAM-based frame-buffer memory Size 1 MByte Width 32-bit Display Selection Hardware sense of external SVGA monitor during BIOS boot sequence; defaults to internal color LCD display; automatically switches to external SVGA monitor, if attached Dual (simultaneous) display of external SVGA monitor and internal color LCD is possible via special “simulscan” CMOS setup, as long as internal and external displays operate at same resolution (limited to 640x480 on current TFT LCD) and display rates Dynamic Display Configuration 1 (DDC1) support for external SVGA monitor is provided External Display Drive 1 SVGA/XGA-compatible analog output port Tektronix Logic Analyzer Family User Manual, Version 3.2 Software D–9 Appendix D: TLA 704 and TLA 711 Logic Analyzer Specifications Table D–6: Portable mainframe display system (Cont.) Characteristic Display Size Description User selected via Windows 95 Resolution (Pixels) 640x480 640x480 640x480 800x600 800x600 1024x768 Colors 256 64K 16.8M 256 64K 256 DDC1 yes yes no yes yes yes Internal Display Classification Thin Film Transistor (TFT) 10.4 inch active-matrix color LCD display; CCFL backlight; intensity controllable via software Resolution 640 pixels horizontal by 480 pixels Color Scale 262,144 colors (6-bit RGB) Table D–7: Portable mainframe front-panel interface Characteristic Description QWERTY Keypad ASCII keypad to support naming of files, traces, and keyboard equivalents of pointing device inputs for menus HEX Keypad HEX keypad supporting standard DSO and LA entry functions Special Function Knobs Various functions Integrated Pointing Device GlidePoint touchpad Mouse Port PS/2 compatible mouse port utilizing a mini-DIN connector Keyboard Port PS/2 compatible keyboard port utilizing a mini-DIN connector Table D–8: Portable mainframe rear-panel interface Characteristic Description Parallel Interface Port (LPT) 36-pin high-density connector supports standard Centronics mode, Enhanced Parallel Port (EPP), or Microsoft high-speed mode (ECP) Serial Interface Port (COM A) 9-pin male sub-D connector to support RS-232 serial port. SVGA Output Port (SVGA OUT) 15-pin sub-D SVGA connector Type I and II PC Card Port Standard Type I and II PC-compatible PC card slot Type I, II, and III PC Card Port Standard Type I, II, and III PC-compatible PC card slot D–10 Tektronix Logic Analyzer Family User Manual, Version 3.2 Software Appendix D: TLA 704 and TLA 711 Logic Analyzer Specifications Table D–9: Portable mainframe AC power source Characteristic Description Source Voltage and Frequency 90–250 VRMS, 45–66 Hertz, continuous range CAT II 100–132 VRMS, 360–440 Hertz, continuous range CAT II Fuse Rating 90 V - 250 V Operation (159-0046-00) UL198/CSA C22.2 0.25 in × 1.25 in, Fast Blow, 8 A, 250 V 90 V - 250 V Operation (159-0381-00) IEC 127/Sheet 1 5 mm × 20 mm, Fast Blow, 6.3 A, 250 V Maximum Power Consumption 600 W line power maximum Steady-State Input Current 6 ARMS maximum Inrush Surge Current 70 A maximum Power Factor Correction Yes On/Standby Switch and Indicator Front Panel On/Standby switch, with LED indicator located next to switch The power cord provides main power disconnect. Table D–10: Portable mainframe secondary power Characteristic Description n DC Voltage Regulation (Combined System, voltage available at each slot) Voltage Vmin, +24 V 23.28 V, 24.24 V, 25.20 V +12 V 11.64 V, 12.12 V, 12.60 V +5 V 4.875 V, 5.063 V, 5.250 V –2 V –2.10 V, –2.00 V, –1.90 V –5.2 V –5.460 V, –5.252 V, –5.044 V –12 V –12.60 V, –12.12 V, –11.64 V –24 V –25.20 V, –24.24 V, –23.28 V Tektronix Logic Analyzer Family User Manual, Version 3.2 Software Vnom, Vmax D–11 Appendix D: TLA 704 and TLA 711 Logic Analyzer Specifications Table D–11: Portable mainframe cooling Characteristic Description Cooling System Forced air circulation (negative pressurization) utilizing six fans operating in parallel Cooling Clearance 2 inches (51 mm), sides and rear; unit should be operated on a flat, unobstructed surface Table D–12: Portable mainframe mechanical Characteristic Description Overall Dimensions (See Figure B–1 for overall chassis dimensions) Height (with feet) 9.25 in (235 mm) Width 17.0 in (432 mm) Depth 17.5 in (445 mm) Weight Shipping configuration 30 lbs 12 oz (13.9 kg) with no modules installed, 2 dual-wide slot covers, and empty pouch 60 lbs 13 oz (27.58 kg) minimum configuration (no modules), with all standard accessories 86 lbs 9 oz (39.26 kg) full configuration, with 2 TLA 7M4 modules and standard accessories (including probes) 17.0 in (432 mm) 17.5 in (445 mm) 9.25 in (235 mm) Figure D–1: Front and side views of TLA 704 portable mainframe D–12 Tektronix Logic Analyzer Family User Manual, Version 3.2 Software Appendix D: TLA 704 and TLA 711 Logic Analyzer Specifications TLA 711 Color Benchtop Chassis Characteristics Table D–13: Benchtop chassis AC power source Characteristic Description Source Voltage 90–250 VRMS, 45–66 Hertz, continuous range CAT II 100–132 VRMS, 360–440 Hertz, continuous range CAT II Maximum Power Consumption 1350 W line power (the maximum power consumed by a fully loaded 13-slot instrument) Fuse Rating (Current and voltage ratings and type of fuse used to fuse the source line voltage) 90 V – 132 VACRMS Operation High-power/Low Line (159-0379-00) Safety: UL198G/CSA C22.2 Size: 0.25 in × 1.25 in Style: Slow acting Rating: 20 A/250 V 103 V – 250 VACRMS Operation (159-0256-00) Safety: UL198G/CSA C22.2 Size: 0.25 in × 1.25 in Style: No. 59/Fast acting Rating: 15 A/250 V 207 V – 250 VACRMS Operation (159-0381-00) Safety: IEC 127/Sheet 1 Size: 5 mm × 20 mm Style: Fast acting “F”, high-breaking capacity Rating: 6.3 A/250 V Inrush Surge Current 70 A maximum Steady State Input Current 15 ARMS maximum at 90 VACRMS 6.3 ARMS maximum at 207 VACRMS Power Factor Correction Yes ON/Standby Switch and Indicator Front Panel On/Standby switch with integral power indicator Table D–14: Benchtop chassis secondary power Characteristic Description n DC Voltage Regulation (Combined System, voltage available at each slot) Voltage Vmin, +24 V 23.28 V, 24.24 V, 25.20 V +12 V 11.64 V, 12.12 V, 12.60 V +5 V 4.875 V, 5.063 V, 5.250 V –2 V –2.10 V, –2.00 V, –1.90 V Tektronix Logic Analyzer Family User Manual, Version 3.2 Software Vnom, Vmax D–13 Appendix D: TLA 704 and TLA 711 Logic Analyzer Specifications Table D–14: Benchtop chassis secondary power (Cont.) Characteristic Description –5.2 V –5.460 V, –5.252 V, –5.044 V –12 V –12.60 V, –12.12 V, –11.64 V –24 V –25.20 V, –24.24 V, –23.28 V Table D–15: Benchtop chassis cooling Characteristic Description Cooling System Forced air circulation system (positive pressurization) utilizing a single low-noise centripetal (squirrel cage) blower configuration with no removable filters Blower Speed Control Rear panel switch selects between full speed and variable speed. Slot exhaust temperature and ambient air temperature are monitored such that a constant delta temperature is maintained across the module with the highest exit air temperature at the minimum operational blower speed Slot Activation Installing a module activates the cooling for the corresponding occupied slots by opening the air flow shutter mechanism. Optimizes cooling efficiency by only applying airflow to modules that are installed Delta Temperature Readout Sensitivity 100 mV/°C with 0°C corresponding to 0 V output Temperature Sense Range –10°C to +90°C, Delta temperature ≤ 50°C Clearance 2 in (51 mm), rear, top, and sides of chassis Table D–16: Benchtop chassis mechanical Characteristic Description Overall Dimensions (See Figure B–2 for overall chassis dimensions) Standard Chassis Height (with feet) 14.25 in (362.0 mm) Width 16.75 in (425.5 mm) Depth 26.5 in (673.1 mm) Chassis with Rackmount D–14 Height 14.0 in (355.6 mm) Width 18.9 in (480.1 mm) Depth 29.4 in to 34.4 in (746.8 mm to 873.8 mm) Tektronix Logic Analyzer Family User Manual, Version 3.2 Software Appendix D: TLA 704 and TLA 711 Logic Analyzer Specifications Table D–16: Benchtop chassis mechanical (Cont.) Characteristic Description Weight Minimum configuration with benchtop controller and slot covers 62 lbs 2 oz (28.18 kg) Typical configuration with 2 LA, 1 DSO, and controller 77 lbs 14 oz (35.32 kg) Shipping configuration 118 lbs (53.52 kg) minimum configuration (no modules) with benchtop controller and all standard accessories 175 lbs (79.38 kg) fully configured with benchtop controller, 3 LA modules, 2 DSO modules, and all standard accessories Rackmount kit adder 20 lbs (9.1 kg) Module Size 13 plug-in slots 16.75 in (425.5 mm) 26.5 in (673.1 mm) 14.25 in (362.0 mm) Figure D–2: Benchtop chassis dimensions Tektronix Logic Analyzer Family User Manual, Version 3.2 Software D–15 Appendix D: TLA 704 and TLA 711 Logic Analyzer Specifications 29.4 in (746.7 mm) Min to 34.4 in (873.8 mm) Max 18.9 in (480.1 mm) 14.0 in (355.6 mm) Figure D–3: Benchtop chassis with rackmount option dimensions D–16 Tektronix Logic Analyzer Family User Manual, Version 3.2 Software Appendix D: TLA 704 and TLA 711 Logic Analyzer Specifications TLA 711 Color Benchtop Controller Characteristics Table D–17: Benchtop controller characteristics Characteristic Description Processor Intel Pentium 133 MHz PC-AT configuration with an Intel 82430HX (Triton II) chip-set Main Memory EDO DRAM Style 2-72 pin SIMMs, gold plated Loading Symmetrical, 2-SIMM minimum (64-Bits) Speed 60 ns Installed Configuration 16 MByte minimum configuration 32 MByte maximum configuration Cache Memory 256 Kbyte, level 2 (L2) write-back cache Flash BIOS 512 Kbyte Real-Time Clock and CMOS Setups NVRAM (Typical) Real-Time clock/calendar, with typical 10-year life. Standard and advanced PC CMOS setups: see BIOS specification. Year 2000 compliant. Floppy Disk Drive Standard 3.5 inch, 1.44 Mbyte, double-sided, PC-compatible high-density floppy disk drive Hard Disk Drive Standard PC-compatible with ATA/Enhanced Integrated Device Electronics (EIDE) interface Capacity Minimum configuration: 1.4 GByte Maximum configuration: 2.1 GByte Subject to change; these are the storage capacities valid at product introduction Display Classification Standard PC graphics accelerator technology (bitBLT based) capable of driving external color VGA, SVGA, or XGA monitors Display Memory DRAM based frame-buffer memory. Width 32 Bit Size 1 MByte Display Drive Display Size One VGA, SVGA, or XGA compatible analog output port User selected via Windows 95 Resolution (Pixels) 640x480 640x480 640x480 800x600 800x600 1024x768 Colors 256 64 K 16.8 M 256 64 K 256 DDC1 yes yes no yes yes yes Mouse Port Front panel mounted PS2 compatible mouse port utilizing a mini-DIN connector Keyboard Port Front panel mounted PS2 compatible keyboard port utilizing a mini-DIN connector Tektronix Logic Analyzer Family User Manual, Version 3.2 Software D–17 Appendix D: TLA 704 and TLA 711 Logic Analyzer Specifications Table D–17: Benchtop controller characteristics (Cont.) Characteristic Description Parallel Interface Port (LPT) 36-pin high-density connector supports standard Centronics mode, Enhanced Parallel Port (EPP), or Microsoft high-speed mode (ECP) Serial Interface Port (COM) The serial port utilizing a 9-pin male sub-D connector to support an RS232 serial port SVGA Output Port (SVGA) The SVGA port utilizing a 15-pin sub-D SVGA connector Type I and II PC Card Port Standard Type I and II PC compatible PC card slot Type I, II, and III PC Card Port Standard Type I, II, and III PC compatible PC card slot Table D–18: Benchtop controller mechanical characteristics Characteristic Description Weight 5 lb. 3 oz. (2.34 kg) Size Standard dual-wide, VXI C-size enclosure Overall dimensions Height 10.32 in (262 mm) Width 2.39 in (61 mm) Depth 14.7 in (373 mm) D–18 Tektronix Logic Analyzer Family User Manual, Version 3.2 Software Appendix D: TLA 704 and TLA 711 Logic Analyzer Specifications TLA 700 Series Logic Analyzer Module Characteristics Table D–19: LA module channel width and depth Characteristic Description Number of channels Product Channels TLA 7L1 and TLA 7M1 32 data and 2 clock TLA 7L2 and TLA 7M2 64 data and 4 clock TLA 7L3 and TLA 7M3 96 data, 4 clock, and 2 qualifier TLA 7L4 and TLA 7M4 128 data, 4 clock, and 4 qualifier Product Memory depth TLA 7L1, TLA 7L2, TLA 7L3, TLA 7L4 32 K1 TLA 7M1, TLA 7M2 ,TLA 7M3, TLA 7M4 512 K Acquisition memory depth 1 PowerFlex configurable to 128 K Table D–20: LA module clocking Characteristic Description Asynchronous clocking n Internal sampling period1 4 ns to 50 ms in a 1–2–5 sequence n Minimum recognizable word2 (across all channels) Channel-to-channel skew + sample uncertainty Example: for a P6417 Probe and a 4 ns sample period = 1.6 ns + 4 ns = 5.6 ns Synchronous clocking Number of clock channels3 Number of qualifier channels Product Clock channels TLA 7L1 and TLA 7M1 2 TLA 7L2 and TLA 7M2 4 TLA 7L3 and TLA 7M3 4 TLA 7L4 and TLA 7M4 4 Product Qualifier channels TLA 7L1 and TLA 7M1 0 TLA 7L2 and TLA 7M2 0 TLA 7L3 and TLA 7M3 2 TLA 7L4 and TLA 7M4 4 Tektronix Logic Analyzer Family User Manual, Version 3.2 Software D–19 Appendix D: TLA 704 and TLA 711 Logic Analyzer Specifications Table D–20: LA module clocking (Cont.) Characteristic Description n Setup and hold window size (data and qualifiers) Maximum window size = Maximum channel-to-channel skew + (2 x sample uncertainty) + 0.4 ns Maximum setup time = User interface setup time + 0.8 ns Maximum hold time = User interface hold time + 0.2 ns Maximum setup time for slave module of merged pair = User Interface setup time + 0.8 ns Maximum hold time for slave module of merged pair = User Interface hold time + 0.7 ns Example: for P6417 Probe and user interface setup & hold of 2.0/0.0 typical Maximum setup time = 2.0 ns + 0.6 ns = 2.6 ns Maximum hold time = 0.0 ns + 0.4 ns = 0.4 ns Setup and hold window size (data and qualifiers) (Typical) Channel-to-channel skew (typical) + (2 x sample uncertainty) Setup and hold window range The setup and hold window can be moved for each channel group from +8.5 ns (Ts) to –7.0 ns (Ts) in 0.5 ns steps (setup time). Hold time follows the setup time by the setup and hold window size. n Maximum synchronous clock rate4 200 MHz in full speed mode (5 ns minimum between active clock edges) Example: for P6417 Probe = 1 ns + (2 x 500 ps) = 2 ns 100 MHz in half speed mode (10 ns minimum between active clock edges) Demux clocking Demux Channels (TLA 7L3 ,TLA 7L4, TLA 7M3, TLA 7M4) Channels multiplex as follows: A3(7:0) to D3(7:0) A2(7:0) to D2(7:0) A1(7:0) to D1(7:0) A0(7:0) to D0(7:0) (TLA 7L1, TLA 7L2, TLA 7M1, TLA 7M2) Channels multiplex as follows: A3(7:0) to C3(7:0) A2(7:0) to C2(7:0) A1(7:0) to D1(7:0) TLA 7L2 and TLA 7M2 only A0(7:0) to D0(7:0) TLA 7L2 and TLA 7M2 only Time between DeMux clock edges4 (Typical) 5 ns minimum between DeMux clock edges in full-speed mode 10 ns minimum between DeMux clock edges in half-speed mode Time between DeMux store clock edges4 (Typical) 10 ns minimum between DeMux master clock edges in full-speed mode 20 ns minimum between DeMux master clock edges in half-speed mode Clocking state machine D–20 Tektronix Logic Analyzer Family User Manual, Version 3.2 Software Appendix D: TLA 704 and TLA 711 Logic Analyzer Specifications Table D–20: LA module clocking (Cont.) Characteristic Description Pipeline delays Each channel group can be programmed with a pipeline delay of 0 through 3 active clock edges. 1 It is possible to use storage control and only store data when it has changed (transitional storage). 2 Applies to asynchronous clocking only. Setup and hold window specification applies to synchronous clocking only. 3 Any or all of the clock channels may be enabled. For an enabled clock channel, either the rising, falling, or both edges can be selected as the active clock edges. The clock channels are stored. 4 Full and half speed modes are controlled by PowerFlex options and upgrade kits. Table D–21: LA module trigger system Characteristic Description Triggering Resources Word/Range recognizers 16 word recognizers. The word recognizers can be combined to form full width, double bounded, range recognizers. The following selections are available: 16 word recognizers 13 word recognizers 10 word recognizers 7 word recognizers 4 word recognizers Range recognizer channel order 0 range recognizers 1 range recognizer 2 range recognizers 3 range recognizers 4 range recognizers From most-significant probe group to least-significant probe group: C3 C2 C1 C0 E3 E2 E1 E0 A3 A2 D3 D2 A1 A0 D1 D0 Q3 Q2 Q1 Q0 CK3 CK2 CK1 CK0 Missing channels for modules with fewer than 136 channels are omitted. When merged, the range recognition extends across the two modules; the master1 module contains the most-significant groups. Glitch detector2, 3 Each channel group can be enabled to detect a glitch Minimum detectable glitch pulse width (Typical) 2.0 ns (single channel with P6417 probe) Setup and hold violation detector4, 5 Each channel group can be enabled to detect a setup and hold violation. The range is from 8 ns before the clock edge to 8 ns after the clock edge. The range can be selected in 0.5 ns increments. The setup and hold violation of each window can be individually programmed. Transition detector5 Each channel group can be enabled or disabled to detect a transition between the current valid data sample and the previous valid data sample. Counter/Timers5, 6 2 counter/timers, 51 bits wide, can be clocked up to 250 MHz. Maximum count is 251 Maximum time is 9.0076 seconds or 104 days Signal In 1 A backplane input signal Signal In 2 A backplane input signal Tektronix Logic Analyzer Family User Manual, Version 3.2 Software D–21 Appendix D: TLA 704 and TLA 711 Logic Analyzer Specifications Table D–21: LA module trigger system (Cont.) Characteristic Description Trigger In A backplane input signal that causes the main acquisition and the MagniVu acquisition to trigger if they are not already triggered Active trigger resources7 16 maximum (excluding counter/timers) Trigger States 16 n Trigger State sequence rate Same rate as valid data samples received, 250 MHz maximum Trigger Machine Actions Main acquisition trigger Triggers the main acquisition memory Main trigger position Trigger position is programmable to any data sample (4 ns boundaries) Increment counter Either of the two counter/timers used as counters can be incremented. Start/Stop timer Either of the two counter/timers used as timers can be started or stopped. Reset counter/timer Either of the two counter/timers can be reset. When a counter/timer used as a timer and is reset, the timer continues in the started or stopped state that it was in prior to the reset. Signal out A signal sent to the backplane to be used by other modules Trigger out A trigger out signal sent to the backplane to trigger other modules Storage Control Global storage Storage is allowed only when a specific condition is met. This condition can use any of the trigger machine resources except for the counter/timers. Storage commands defined in the current trigger state will override the global storage control. Global storage can be used to start the acquisition with storage initially turned on (default) or turned off. By event Storage can be turned on or off; only the current sample can be stored. The event storage control overrides any global storage commands. Block storage8 When enabled, 31 samples are stored before and after the valid sample. D–22 Tektronix Logic Analyzer Family User Manual, Version 3.2 Software Appendix D: TLA 704 and TLA 711 Logic Analyzer Specifications Table D–21: LA module trigger system (Cont.) Characteristic Description Glitch violation storage The acquisition memory can be enabled to store glitch violation information with each data sample when asynchronous clocking is used. The probe data storage size is reduced by one half (the other half holds the violation information). The fastest asynchronous clocking rate is reduced to 10 ns. 1 For merged modules, the master module is the module installed in the lower-numbered slot. 2 Each use of a glitch detector, setup and hold violation detector, or transition detector requires a trade-off of one word recognizer resource. 3 Any glitch is subject to pulse width variation of up to the channel-to-channel skew specification + 0.5 ns. 4 Any setup value is subject to variation of up to 1.6 ns; any hold value is subject to variation of up to 1.4 ns. 5 Counters and timers can be set, reset, or tested and have zero reset latency. 6 Timers can be tested with TLA 7Lx and TLA 7Mx Modules with serial numbers B020000 and higher and TLA 700 Series Software Version 1.10 and higher. 7 Word recognizers are traded off one-by-one as Signal In 1, Signal In 2, glitch detection, setup and hold detection, or transition detection resources are added. 8 Block storage is disallowed when glitch storage or setup and hold violation is enabled. Tektronix Logic Analyzer Family User Manual, Version 3.2 Software D–23 Appendix D: TLA 704 and TLA 711 Logic Analyzer Specifications Table D–22: LA module input parameters (with P6417 probe) Characteristic Description n Threshold Accuracy ±100 mV Threshold range and step size Setable from +5 V to –2 V in 50 mV steps Threshold channel selection 16 threshold groups assigned to channels. Each probe has two threshold settings, one for the clock/qualifier channel and one for the data channels. n Channel-to-channel skew ≤ 1.6 ns maximum (When merged, add 0.5 ns for the slave module.) Channel-to-channel skew (Typical) ≤ 1.0 ns typical (When merged, add 0.3 ns for the slave module.) Sample uncertainty Asynchronous: Sample period Synchronous: 500 ps Probe input resistance (Typical) 20 kW Probe input capacitance (Typical) 2 pF maximum Minimum slew rate (Typical) 0.2 V/ns Maximum operating signal 6.5 Vp-p –3.5 V absolute input voltage minimum 6.5 V absolute input voltage maximum Probe overdrive ±250 mV or ±25% of signal swing minimum required beyond threshold, whichever is greater ±4 V maximum beyond threshold Maximum nondestructive input signal to probe ±15 V Minimum input pulse width signal (single channel) (Typical) 2 ns Delay time from probe tip to input probe connector (Typical) 7.33 ns Table D–23: LA module MagniVu feature Characteristic Description MagniVu memory depth 2016 samples per channel MagniVu sampling period Data is asynchronously sampled and stored every 500 ps in a separate high resolution memory. D–24 Tektronix Logic Analyzer Family User Manual, Version 3.2 Software Appendix D: TLA 704 and TLA 711 Logic Analyzer Specifications Table D–24: Merged LA modules Characteristic Description Number of modules that can be merged together Two adjacent modules regardless of channel widths and memory depths (TLA 7L3, TLA 7L4, TLA 7M3, TLA 7M4 only) Number channels after merge The sum of the data channels of both modules plus the CLK/QUAL channels (active clocks for the merge system) of the master module plus the CLK/QUAL channels (nonactive stored clock channels to the merge system) Merge system acquisition depth Channel depth is equal to the smaller depth of the two modules. Number of clock and qualifier channels after merge Same number of clock and qualifier channels on the master module. The clock and qualifier channels on the slave module have no effect on clocking and are only stored. Merge system triggering resources Triggering resources are the same as a single module except that the widths of the word/range recognizers, setup and hold violation detector, glitch detector, and transition detector are increased to the merged channel width. Table D–25: LA module data handling Characteristic Description Nonvolatile memory retention time (Typical) Battery is integral to the NVRAM. Battery life is > 10 years. Table D–26: LA module mechanical Characteristic Description Slot width Requires 2 mainframe slots Weight 5 lbs 10 oz. (2.55 kg) for TLA 7L4 or TLA 7M4 8 lbs (3.63 kg) for TLA 7L4 or TLA 7M4 packaged for domestic shipping Overall dimensions Height 10.32 in (262 mm) Width 2.39 in (61 mm) Depth 14.7 in (373 mm) Probe cables P6417 length Mainframe interlock 6 ft (1.8 m) 1.4 ECL keying is implemented Tektronix Logic Analyzer Family User Manual, Version 3.2 Software D–25 Appendix D: TLA 704 and TLA 711 Logic Analyzer Specifications D–26 Tektronix Logic Analyzer Family User Manual, Version 3.2 Software Appendix E: TLA Symbol File Format The logic analyzer can extract range symbol information directly from object files. The following is some of the formats. Check with your Tektronix representative for a complete listing of available formats. OMF51, OMF86, OMF166, OMF286, OMF386, IEEE695, COFF, ELF/DWARF, and ELF/STABS Users whose code-generation tools do not generate these file formats can use TLA Symbol File (TSF) format (a text format). The TSF format is used by the logic analyzer when it exports symbol files. The logic analyzer can also read files in this format. TLA symbol files consist of alphanumeric symbol names and associated data values. The files contain a header line and lines defining the symbol names and values. Fields on a line are separated with white space (blank spaces or tabs). The formats for the pattern symbol files and the various range symbol files differ; if you need to use pattern symbols and range symbols, use separate files. Both TLA range and pattern symbol files have a .tsf file name extension (filename.tsf). The first few lines of a TSF symbol file are typically comment lines describing when and how the file was generated. # TLA Symbol File # Created on Friday, May 29, 1998 at 09:52:03 # From file: "c:\quickstart\tla7qs.x" All lines in a TSF file that begin with a number sign (#) character are treated as comments, unless the very next character is a plus sign (+). The plus sign signifies a file reader directive. (An example of a file reader directive “#+” can be seen in the TSF header definition on the next page.) The number sign character can also initiate a comment on the end of a symbol definition or other uncommented lines. All text between the number sign and the end of the line is treated as a comment and ignored. Tektronix Logic Analyzer Family User Manual, Version 3.2 Software E–1 Appendix E: TLA Symbol File Format TSF Headers A TSF header identifies the file format version to potential file readers. It specifies whether the file contains pattern or range symbols, the radix used to specify symbol values, and an optional offset amount to be added to each symbol value (for range symbol files). The TSF Header is a file directive which means that the following information begins with the special character combination of a number sign character followed immediately by a plus sign (#+). This is not a comment line. The special character sequence is used to mark instructions to the file reader; these instructions are called file directives. The following examples show sample file headers for a pattern symbol file and a range symbol file. The first two lines are comments included for readability; they are not required as part of the file header. # TSF Format Type Display Radix File Radix # =============== ======= ============= ========== #+ Version 2.1.0 PATTERN HEX HEX # TSF Format Type Display Radix File Radix Offset # =============== ===== ============= ========== ======== #+ Version 2.1.0 RANGE HEX HEX 00000000 The File Format Version number contains three fields. The first two fields are the format major and minor version numbers. The logic analyzer will only read TSF files where the major and minor version number of the file is less than or equal to that of the TLA TSF symbol file reader. The third field is used to denote minor format changes which do not impact the file reader. The File Format Version number is followed by a key word, PATTERN or RANGE, which signifies the type of symbols to be found in the file. TSF files can contain either type of symbols, but no single file can contain both. The header specifies the type for all symbols in the file. The Display Radix field sets the default radix that will be used to display the numeric symbol value. For range symbol files this field must be one of the key words: HEX, DEC, OCT, or BIN. For pattern symbol files, only the key words: HEX, OCT, or BIN are allowed. The File Radix field specifies the radix used by the symbol values in this file. Like the Display Radix field, the File Radix field must be one of the key words: HEX, DEC, OCT, or BIN for range symbol files, or HEX, OCT, or BIN for pattern symbol files. E–2 Tektronix Logic Analyzer Family User Manual, Version 3.2 Software Appendix E: TLA Symbol File Format The Offset field specifies an offset value and is applicable only to range symbol files. The offset value is specified in the radix indicated by the File Radix field. This offset value will be added to the lower and upper bounds of each range symbol that is read from the file. The offset is a 32-bit value, so it can have any value between 0x00000000 and 0xFFFFFFFF. If the sum of the offset and a range symbol bound value exceeds the 32-bit limit of 0xFFFFFFFF, the overflow bit is discarded. Negative offsets are specified by using a twos complement value for the offset. TSF Pattern Symbols Each pattern symbol in a TSF pattern file consists of two fields. The first field is the symbol name, and the second is the symbol pattern. The symbol name is a sequence of ASCII characters of up to 220 characters in length, although it is impractical to display symbol values much longer than 32 characters. Symbol names longer than 220 characters will be truncated during loading. The characters in a symbol name can be any character with an ASCII value between 0x21 (the exclamation point character, !) and 0x7E (the tilde character, ~). You can use symbol names with embedded spaces by enclosing the Symbol Name in double quotes. # Symbol # Name # ====== NUL SOH STX "ETX 0x03" Symbol Pattern ======== X0000000 X0000001 X0000010 X0000011 Optional Foreground and Background Color ==================== @red @yellow The symbol pattern consists of numerals in the radix specified by the File Radix field in the header, and Xs signifying “don’t-care” values. The number of bits represented by each character position in the pattern depends on the selected radix. For a radix of HEX, each character represents 4 bits. For an OCT radix, each character represents 3 bits; and for a BIN radix, each character represents one bit. Symbol order in a TSF pattern file is important. When selecting the symbol to display for a particular value, the logic analyzer scans the list of pattern symbols from top to bottom. It selects the first symbol for which all non-don’t-care bits of the symbol match the corresponding bits of the target symbol. Tektronix Logic Analyzer Family User Manual, Version 3.2 Software E–3 Appendix E: TLA Symbol File Format TSF Range Symbols There are four different types of range symbols: H function H variable H source H color Each of these types define a range of 32-bit addresses associated with some entity. Variable range symbols define the beginning and ending addresses where the value of a variable is located in memory. Function range symbols define the beginning and ending addresses where instructions that implement a function are located in memory. Source range symbols are similar to function range symbols, except that the address range for a source symbol describes the location of the instructions that implement just one source statement. (Source symbols also contain file name, line number, and an optional column range that define the location of the source code associated with the symbol.) Color range symbols define a display color for any value that falls within a range. Each of the types of range symbols appear in a separate section of the file. Each section begins with a file directive indicating the type of symbols that follow. The sections may appear in any order, and can be broken up and separated by other sections if necessary. The first section might be variables, followed by functions, then followed by another variable section. Each section is also optional, however some logic analyzer applications are unable to use the symbol file if the appropriate type of symbols are not present. For example, the source window is only able to correlate with a listing window if the symbol file contains source symbols. Range symbol names follow the same rules as pattern symbol names. The symbol name is a sequence of ASCII characters of up to 220 characters in length, even though it is impractical to display symbol values much longer than 32 characters. Symbol names longer than 220 characters will be truncated during loading. The characters in a symbol name can be any character with an ASCII value between 0x21 (the exclamation point character, !) and 0x7E (the tilde character, ~). You can use symbol names with embedded spaces by enclosing the Symbol Name in double quotes. E–4 Tektronix Logic Analyzer Family User Manual, Version 3.2 Software Appendix E: TLA Symbol File Format Range symbol address ranges can overlap. This overlap sometimes produces unexpected results. When overlaps occur, and the logic analyzer needs to convert a numeric value to a symbol, it must to choose between the overlapping symbols. When choosing between overlapping symbols, the logic analyzer assigns a precedence order to the symbol types. Function symbols have the highest precedence, followed by variable symbols, and then source symbols. TSF Function Symbols The file directive “#+ Function” introduces the function symbol section of a TSF Range file. The file directive tells the file reader that the following symbols represent functions, as opposed to variables or source statements. If no symbol type file directive is given, the function symbol type is assumed. #+ Function # Symbol Name # ============================== displayBanner buildMenus displayLCDmenu Low ======== 006035ba 00603676 006036e6 High ======== 00603675 006036e5 0060372f Function symbols consist of three fields: the symbol name, the lower bound, and the upper bound. The lower and upper bound values are each 32-bit values, defined by numerals in the radix specified by the File Radix field in the file header. These values define the lower and upper limits of the range of addresses occupied by the instructions which implement a function. Both values are inclusive, which means that the specified range includes both of the bound values, as well as all of the addresses between them. TSF Variable Symbols The file directive “#+ Variable” introduces the variable symbol section of a TSF Range file. The file directive tells the file reader that the following symbols represent variables, as opposed to functions or source statements. If no symbol type file directive is given, the function symbol type is assumed. #+ Variable # Symbol Name # ============================== menu userMenu1 binBits Low ======== 00000100 000004c0 000004d4 High ======== 00000102 000004c2 000004d6 Variable symbols consist of three fields: the symbol name, the lower bound, and the upper bound. Variable symbols are just like function symbols except that they define the address range occupied by a variable, instead of function. The lower and upper bound values of a variable symbol are inclusive, meaning that they are themselves a part of the range. For variables occupying only a single byte in memory, the lower and upper bound values are equal. Tektronix Logic Analyzer Family User Manual, Version 3.2 Software E–5 Appendix E: TLA Symbol File Format TSF Source Symbols The file directive “#+ Source” introduces the source symbol section of a TSF range file. The file directive tells the file reader that the following symbols represent source statements, as opposed to functions or variables. The source file directive must be followed by a file name, which specifies the name of the source file containing the following source statements. Each new set of symbols for a unique source file must be introduced with an additional source file directive to specify the file name for those symbols. If no symbol type file directive is given, the function symbol type is assumed. #+ Source stoplite # Line Low High # ==== ======== ======== 27 006043ec 006043ef 35 006043f0 006043f5 47 006043f6 006043ff 48 00604400 00604409 49 0060440a 00604413 50 00604414 0060441d 51 0060441e 00604427 52 00604428 00604431 56 00604432 00604437 59 00604438 00604439 60 0060443a 00604445 61 00604446 0060444d 59 0060444e 0060444f 59 00604450 00604455 71 00604456 00604457 74 00604458 0060445f 77 00604460 00604467 80 00604468 0060446f 83 00604470 0060447b 87 0060447c 00604483 71 00604484 0060448d 84 0060448e 00604490 Beg === 0 0 0 0 0 0 0 0 0 0 0 0 35 19 0 0 0 0 0 0 0 0 End === 25 23 30 30 30 30 30 30 17 18 37 33 39 34 37 35 36 36 43 34 37 29 Symbol Name =========== # stoplite_27_25 # stoplite_35_23 # stoplite_47_30 # stoplite_48_30 # stoplite_49_30 # stoplite_50_30 # stoplite_51_30 # stoplite_52_30 # stoplite_56_17 # stoplite_59_18 # stoplite_60_37 # stoplite_61_33 # stoplite_59_35 # stoplite_59_19 # stoplite_71_37 # stoplite_74_35 # stoplite_77_36 # stoplite_80_36 # stoplite_83_43 # stoplite_87_34 # stoplite_71_37 # stoplite_84_29 The source symbols section consists of five fields for each source statement: line number, lower address bound, upper address bound, beginning column value, and ending column value. Source symbols do not have a name in the same sense as function or variable symbols, because there is no name associated with each of the executable statements in a source file. Instead, a source symbol has a file name, specified in the source directive, and a line number. The line number specifies the line of the source file that contains the source statement. Line numbers are always in decimal regardless of the file radix in the header. E–6 Tektronix Logic Analyzer Family User Manual, Version 3.2 Software Appendix E: TLA Symbol File Format The lower and upper bound values for a source symbol are similar to those of function and variable symbols. For source symbols, these bounds represent the range of addresses occupied by the instructions that implement a single source statement. The bound values are defined in the file radix specified in the header and can range in value from 0x00000000 to 0xFFFFFFFF. The lower and upper bound addresses are inclusive, just like other symbols. A source symbol for an instruction occupying a single memory location has matching lower and upper bound values. The beginning and ending column fields of a source statement are optional. When present, and non-zero, they define the beginning and ending column position for the source statement. The beginning and ending column values define the location of the statement in the line. This is especially useful when there are multiple statements on a single line, because it makes it possible to define a separate symbol for each statement. When the column information is not present, or is set to zero, the symbol is assumed to correspond to the entire line. Only a few compilers generate column information, but when the information is present in the symbol file, the logic analyzer uses the column information to provide highly accurate source code correlation. The example source symbols on the previous page show typical column values. In most cases only one of the column values is non-zero. This is because those lines contain only one statement, and the compiler specified only the column at which the statement ended. Some compilers specify only the beginning column position for such lines, in which case the beginning value would be non-zero and the ending value zero. Note that there are three symbols corresponding to line 59 of the file. Line 59 of the original source file contains the following statement: for (i = 0; i < NUM_STATES; i++) This one line contains three separate statements. The first statement is the initialization (i = 0), the second statement is the test (i < NUM_STATES), and the third statement is the increment (i++). Although all three statements appear on the same line, each generates a separate set of instructions, and the symbols in the example define unique address ranges for each. This enables the Source window to accurately indicate which of the three statements on the line is associated with any given address. Tektronix Logic Analyzer Family User Manual, Version 3.2 Software E–7 Appendix E: TLA Symbol File Format Each of the source symbols in the example includes a comment at the end of the line showing a symbol name. Since this is a comment, it is ignored by the symbol file reader, and is optional. When symbol files are exported by the logic analyzer, they contain comments that show the derived symbol name created by the logic analyzer itself. The name is a concatenation of the symbol file name, line number, and column number (if present). This is the symbol value that the logic analyzer will display for addresses that fall within the lower and upper bounds of a source symbol. TSF Color Symbols Color range symbols define the beginning and ending group values where a color is displayed. Any group value in the acquisition falling within this range will be shown in the defined color. The value range of a color symbol can overlap with the set of ranges defined by one or more Function, Variable, or Source symbols. In many instances a Color symbol will use exactly the same range bounds as a Function or Variable symbol. A partial range file with colors is shown below: #+ Color # Color # ============================== @magenta @yellow @navy @default @green Low ======== 006035ba 00603541 006036e6 High ======== 00603640 00603675 0060372f The first line tells the file reader that the following symbols represent colors. The next two lines are comments used as headers. The first color name specifies the foreground color, and the second optional color name specifies the background color. The available color names (keywords) are: @black, @blue, @cyan, @lime, @magenta, @red, @yellow, @white, @navy, @teal, @green, @purple, @maroon, @olive, @gray, and @silver. The special color name @default gives the default text coloring specified by choosing a color in the Column tab of the Listing Window Property Sheet or the Waveform tab of the Waveform Window Property Sheet. The Low and High columns describe the lower and upper bounds. The bounds are expressed as 32–bit values; the radix is specified in the header. The bounds are inclusive; the specified range includes both bound values, as well as all values between the bounds. There is a different TSF symbol file syntax for adding color to range and pattern symbol files. For pattern symbol files, color is an attribute of existing pattern symbols. It is placed on the same line as the rest of the symbol, and to the right of the pattern definition. For range symbol files, color symbols are added in a separate section of the symbol file, just like Function, Variable, and Source E–8 Tektronix Logic Analyzer Family User Manual, Version 3.2 Software Appendix E: TLA Symbol File Format symbols. This allows the color information to be independent of the other defined range symbols. A partial TSF Pattern Symbols file is shown below: # Symbol Name # ============== NUL SOH STX SBZ Pattern Color ========= ============ X000 0000 X000 0001 @blue X000 0010 @white @red X000 0100 @default @teal Each Pattern symbol in a TSF Pattern file, consists of three fields. The first field is the Symbol Name, the second is the Symbol Pattern, and the third is Symbol Color. The Symbol Color specification may contain zero, one, or two color keywords. If only one color is given, it specifies the foreground color of the data. If two colors are given, they specify the foreground color followed by the background color. To supply a background color, you must give a foreground color. If you want to use the group’s defined color from the Column or Waveform Property Page, you can use @default as the foreground color. Tektronix Logic Analyzer Family User Manual, Version 3.2 Software E–9 Appendix E: TLA Symbol File Format E–10 Tektronix Logic Analyzer Family User Manual, Version 3.2 Software Appendix F: PG Physical–Logical Conversion The logic analyzer and DSO modules handle signals 1, 2, 3, and 4 with a logical expression (True/False). However, the pattern generator module handles these signals with a physical expression (High/Low). Select whether to use the signals as AND or OR from the TLA application’s Signals property page of the System Configuration window. Use Tables F–1 and F–2 to convert physical expressions to logical expressions or vice versa. Table F–1: For Signal 1, 2, and 3, 4, (logical function AND) LA/DSO expression Logical True Logical False Pattern generator signal output High Low Pattern generator event definition 1 0 Table F–2: For Signal 3, 4 (logical function OR) LA/DSO expression Logical True Logical False Pattern generator signal output Low High Pattern generator event definition 0 1 Only one module in the system can drive Signal 1. Only one module in the system can drive signal 2. When used with an expansion mainframe, all modules which drive Signal 3 should be in the same mainframe, and all modules which drive Signal 4 should be in the same mainframe. Tektronix Logic Analyzer Family User Manual, Version 3.2 Software F–1 Appendix E: PG Physical–Logical Conversion F–2 Tektronix Logic Analyzer Family User Manual, Version 3.2 Software Appendix G: TLA Logic Analyzer Family User Service This appendix describes general care and service procedures for the TLA family of logic analyzers. Mainframe and module service troubleshooting procedures are located in the service manuals (see the Preface for a list of manuals). General Care Protect the instrument from adverse weather conditions. The instrument is not waterproof. Do not store or leave the portable mainframe where the LCD display will be exposed to direct sunlight for long periods of time. CAUTION. To avoid damage to the instrument, do not expose it to sprays, liquids, or solvents. Module Self Calibration Use the Self Calibration property page to run self calibration procedures for installed modules and merged modules. For all modules, you should run these procedures after repair. At a minimum, you should run these procedures once a year. For the DSO module you should also run these procedures if the ambient operating temperature has changed more than 5_C since last calibration or once a week if vertical settings of 50 mV full scale or less are used. Perform self calibration after a 30 minute warm up. H To run the self-calibration procedure, go to the System menu and select Calibration and Diagnostics. Click Self Calibration. NOTE. For merged modules, you should run the self-calibration procedure on the modules as a merged set. Tektronix Logic Analyzer Family User Manual, Version 3.2 Software G–1 Appendix F: TLA Logic Analyzer Family User Service Preventive Maintenance Once a year the electrical performance should be checked and the instrument accuracy certified (calibrated). This service should be performed by a qualified service technician using the procedures outlined in the TLA Logic Analyzer Family Performance Verification and Adjustment Technical Reference. Preventive maintenance mainly consists of periodic cleaning. Periodic cleaning reduces instrument breakdown and increases reliability. You should clean the instrument as needed, based on the operating environment. Dirty conditions may require more frequent cleaning than computer room conditions. Flat Panel Display Cleaning The LCD flat panel is a soft plastic display and must be treated with care during cleaning. CAUTION. Improper cleaning agents or methods can damage the flat panel display. Do not use abrasive cleaners or commercial glass cleaners to clean the display surface. Do not spray liquids directly on the display surface. Do not scrub the display with excessive force. Clean the flat panel display surface by gently rubbing the display with a clean-room wipe (such as Wypall Medium Duty Wipes, #05701, available from Kimberly-Clark Corporation). If the display is very dirty, moisten the wipe with distilled water or a 75% isopropyl alcohol solution and gently rub the display surface. Avoid using excess force or you may damage the plastic display surface. Exterior Mainframe G–2 Clean the exterior surfaces of the mainframe with a dry, lint-free cloth or a soft-bristle brush. If dirt remains, use a cloth or swab dampened with a 75% isopropyl alcohol solution. A swab is useful for cleaning in narrow spaces around the controls and connectors. Do not use abrasive compounds on any part of the mainframe. Tektronix Logic Analyzer Family User Manual, Version 3.2 Software Appendix F: TLA Logic Analyzer Family User Service CAUTION. Avoid getting moisture inside the mainframe during external cleaning; and use only enough solution to dampen the cloth or swab. Do not wash the front-panel On/Standby switch. Cover the switch while washing the mainframe. Use only deionized water when cleaning. Use a 75% isopropyl alcohol solution as a cleanser and rinse with deionized water. Do not use chemical cleaning agents; they may damage the instrument. Avoid chemicals that contain benzene, toluene, xylene, acetone, or similar solvents. Floppy Disk Drive The floppy disk drive requires routine maintenance to operate at maximum efficiency. The disks can be damaged if dirt and dust accumulate on the recording surfaces. To prevent damage, the disks should be properly stored in their protective containers where they will not be exposed to dust or dirt. In addition, the head should be cleaned periodically. You will need a 3.5-inch floppy disk head-cleaning kit for routine maintenance. Perform the routine maintenance as follows: H Clean the face of the floppy disk drive monthly with a dampened cloth. CAUTION. Do not allow moisture to enter the disk drive. When power is applied, the internal components may be damaged. H External Monitor, Keyboard, and Mouse Clean the head monthly. Follow the instructions provided with the headcleaning kit. Clean the exterior surfaces of the monitor, keyboard, and mouse with a dry, lint-free cloth or a soft-bristle brush. A swab is useful for cleaning in narrow spaces around the controls and connectors. Do not use abrasive compounds on any part of the instrument. CAUTION. Avoid getting moisture inside the terminal during external cleaning; and use only enough solution to dampen the cloth or swab. Use only deionized water when cleaning. Use a 75% isopropyl alcohol solution as a cleanser and rinse with deionized water. Do not use chemical cleaning agents; they may damage the instrument. Avoid chemicals that contain benzene, toluene, xylene, acetone, or similar solvents. Tektronix Logic Analyzer Family User Manual, Version 3.2 Software G–3 Appendix F: TLA Logic Analyzer Family User Service In Case of Problems The logic analyzer runs power-on diagnostics every time you power on the instrument. You can view the results of the diagnostics by selecting Calibration and Diagnostics from the System menu. You can run more detailed diagnostics by selecting Extended diagnostics. Here you can run all tests, loop on one or more tests, or loop on a test until a failure occurs. Repacking for Shipment If a mainframe or module is to be shipped to a Tektronix field office for repair, attach a tag to the mainframe or module showing the owner’s name and address, the serial number, and a description of the problem(s) encountered and/or service required. If you are returning a module, always return both the module and the probes so that the entire unit can be tested. When packing an instrument for shipment, use the original packaging. If it is unavailable or not fit for use, contact your Tektronix representative to obtain new packaging. G–4 Tektronix Logic Analyzer Family User Manual, Version 3.2 Software Glossary Glossary AC coupling A DSO mode that blocks the DC component of a signal but passes the dynamic (AC) component of the signal. Useful for observing an AC signal that is normally riding on a DC signal. Acquisition The process of sampling signals from input channels, processing the results, and displaying the data. Active module The module highlighted by the pointer in the System window. Aliasing The condition that occurs when data is sampled at a rate slower than the rate at which data changes. When this happens, misleading data is displayed because the instrument misses the changes in data that occurred between sample points. Data pulses that fall between samples meet the technical definition of a glitch and are stored and displayed as glitches. See also asynchronous acquisition and glitch. For DSO data, the displayed waveform may appear to be untriggered and much lower in frequency. For complex waveforms, distortion occurs due to the impact of aliasing on the high-order harmonics. All samples A Histogram window term. The total number of data samples analyzed. Arm To specify when the module should begin looking for a trigger. Assert To cause a signal or line to change from its logic false state to its logic true state. Asynchronous acquisition An acquisition that is made using a clock signal generated internally by the logic analyzer. This clock is unrelated to the clock in the system under test, and you can set it to a different rate. You should use an asynchronous clock rate that is five to ten times faster than your data rate to avoid aliasing. See also Aliasing. Tektronix Logic Analyzer Family User Manual, Version 3.2 Software Glossary–1 Glossary Attenuation The degree the amplitude of a signal is reduced when it passes through an attenuating device such as a DSO probe or attenuator (the ratio of the input measure to the output measure). For example, a 10X probe attenuates, or reduces, the input voltage of a signal by a factor of 10. Benchtop Chassis A benchtop chassis is a benchtop mainframe without a benchtop controller installed. Chassis A chassis is a mainframe without a controller or expansion module installed. Clause A trigger program term. The combination of one or more events (If statements) or actions (Then statements). When the Event is satisfied, the action is performed. See also State. Clock cycle A clock sequence that includes both high- and low-going transitions. Clock equation The Boolean combination of events needed to generate a storage clock. You can define a variety of clock inputs and link them using Boolean operators. Data will be sampled and stored in memory only when this clock equation is true. Clock qualification The process of filtering out irrelevant data by combining an acquisition clock with one or more bus signals. Clock qualifier An external signal that acts as a gate for the acquisition clock. When the external signal is false, the acquisition clock is not allowed to load acquired data into the acquisition memory. COFF file formats The COFF (Common Object File Format) format contains a number of variations and extensions, such as ECOFF and XCOFF. This flexibility enables it to be used with a wide variety of different microprocessors. Some code-generation tool vendors also extend this format in nonstandard ways that may make their files unreadable by the TLA logic analyzers. Color range symbols Color range symbols define the beginning and ending group values where color is displayed. Counter A trigger program device that records occurrences of an event. Glossary–2 Tektronix Logic Analyzer Family User Manual, Version 3.2 Software Glossary Cursors Paired markers that you can use to make measurements between two data locations. Custom clocking Custom clocking is used only with microprocessor support packages. Custom clocking can enable and disable a variety of microprocessor-specific clock cycle types (such as DMA cycles). Data differences Highlighted data in a Listing or Waveform window that indicate that there are differences between the acquired data and saved data during a compare operation. Data equalities Highlighted data in a Listing or Waveform window that indicate that there are no differences between the acquired data and saved data during a compare operation. Data sample The data logged in during one occurrence (or one cycle) of the acquisition clock. A data sample contains one bit for every channel. Data window A window used to display acquired data. There are two types of data windows, Listing windows and Waveform windows. DC coupling A DSO mode that passes both AC and DC signal components to the DSO circuit. Available for both the trigger system and the vertical system. Delta measurement The difference between two points in memory. For example, the voltage difference between the two cursors in a selected waveform. Demultiplex To identify and separate multiplexed signals (for instance, some signals from a microprocessor). To separate different signals sharing the same line and organize those signals into useful information. Digital real-time signal acquisition A digitizing technique that samples the input signal with a sample frequency of four to five times the DSO bandwidth. Combined with sin(x)/x interpolation, all frequency components of the input up to the bandwidth are accurately displayed. Digitizing The process of converting a continuous analog signal such as a waveform to a set of discrete numbers representing the amplitude of the signal at specific points in time. Tektronix Logic Analyzer Family User Manual, Version 3.2 Software Glossary–3 Glossary Don’t care A symbol (X) used in place of a numeric character to indicate that the value of a channel or character is to be ignored. Edge A signal transition from low to high, or high to low. Edge trigger Triggering that occurs when the module detects the source passing through a specified voltage level in a specified direction (the trigger slope). Event condition Event conditions are a logical combination of trigger events within a single clause. If you set up a logical AND statement, all event conditions in the clause must be fulilled before the clause can execute the action. If you set up a logical OR statement, any one of the event conditions can be fulfilled before the clause can execute the action. Expansion Chassis An expansion chassis is an expansion mainframe without an expansion module installed. External clock A clock external to the logic analyzer and usually synchronous with the system under test. Internal signal An internal communication line that can be set as a marker. An internal signal can be used as either an event or an action in a trigger program. When used as an event, the internal signal is tested for true/false value like any other event; when used as an action, the signal can simply be set or cleared as the result of a condition being satisfied. Glitch An unintentional signal that makes a transition through the threshold voltage two or more times between successive sample clock cycles. Noise spikes and pulse ringing are examples of glitches. Ground (GND) coupling A DSO coupling option that disconnects the input signal from the vertical system. Histogram window A data window used to observe the performance of software routines. IEEE695 file format This object file format refers to the IEEE695 specification. This format is used primarily by compilers for a wide variety of Motorola microprocessors and compatible microprocessors from other vendors. This format provides Glossary–4 Tektronix Logic Analyzer Family User Manual, Version 3.2 Software Glossary for the inclusion of column information in source symbols, but not all compilers use this capability. Internal clock A clock mode in which the sampling of input logic signals occurs asynchronously to the activity of the system under test. Interpolation Display method used to connect the sample points acquired and display them as a continuous waveform. The logic analyzer uses sin(x)/x interpolation to display DSO signals. Linear generation A Histogram window term. The histogram ranges are evenly distributed from the highest range boundary to the lowest range boundary. Listing window A data window used to observe the data flow in the system under test. The acquired data is displayed in a listing (tabular text) format. Log generation A Histogram window term. The histogram ranges are distributed over a logarithmic scale. MagniVu data High-speed data stored in a special memory. Matched samples A Histogram window term. The total number of data samples analyzed that matched a defined range. These samples exclude any samples outside of the defined ranges. Merge modules To physically or logically join LA modules together to form a single module with greater channel width. Microprocessor support Optional microprocessor support software that allows the logic analyzer to disassemble data acquired from microprocessors. Mnemonic disassembly A display format for data acquired from a microprocessor or a data bus. A logic analyzer decodes bus activity and displays it in formats such as: cycle types, instruction names, and interrupt levels. Advanced forms of mnemonic disassembly can detect queue flushes, and provide a display that resembles the original assembly language source code listing. Module The unit that plugs into a mainframe, providing instrument capabilities such as logic analysis. Tektronix Logic Analyzer Family User Manual, Version 3.2 Software Glossary–5 Glossary Module trigger (trigger) A trigger specific to a single module. When a module trigger occurs, the module continues to acquire data until the specified amount of posttrigger data is acquired, and then stops. OMF51 file format This format holds symbolic information and executable images for a 8051 or equivalent microprocessor. OMF86 file format A file format that holds symbolic information and executable images for an 8086 or equivalent microprocessor. It is also used for code intended to run on 80286, 80386, or higher-level microprocessors in real or 8086-compatible mode. OMF166 file format This format holds symbolic information and executable images for the Siemens (Infinion) C166 microprocessor family, or equivalent microprocessor. OMF286/386 file formats These file formats hold symbolic informaton and executable images for 80286 80386, or equivalent microprocessors. They are also used for executable images intended to run on the 8086 or other microprocessors in the 80x86 families. PCMCIA An acronym for Personal Computer Memory Card Industry Association. Podlet A circuit contained in a flex lead and attached to a probe that provides square-pin connections to the circuit under test for one data acquisition channel and a ground pin. Pretrigger The specified portion of the data record that contains data acquired before the trigger event. Probe adapter A microprocessor-specific lead set that connects the LA module probe to a system under test. Qualification gap Qualification gaps indicate that data samples were not stored due to storage qualification or Don’t Store trigger actions. In a Listing window, qualification gaps are indicated by a horizontal gray line. In a Waveform window, qualification gaps are indicated by a blank vertical gap. Glossary–6 Tektronix Logic Analyzer Family User Manual, Version 3.2 Software Glossary Range recognizer A trigger term. Use range recognizers to trigger the logic analyzer on ranges of data. Record length The specified number of samples in an acquisition. Sample clock The clock signal that determines the points in time when the module samples data. A sample clock can be set up to occur at regular intervals specified by an internal clock (asynchronous acquisition), or to occur when a Boolean expression combining an external clock and qualifier signals is “true” (synchronous acquisition). Sample rate The frequency at which data is logged into the logic analyzer. Sampling The process of capturing an input signal, such as a voltage, at a discrete point in time and holding it constant so that it can be quantized. Skew The relative time difference between input channels, specified in terms of one edge relative to another. Also, the misrepresentation of data caused by parallel channels with different propagation delays. Source Window A data window where you can view the execution of source code. Standby (STBY) The off-like state when the instrument in not in use. Some circuits are active even while the instrument is in the standby state. State A trigger program term. A step in a trigger program, made up of one or more clauses. See also clause. Storage qualification The process of filtering out data that has been acquired but which you do not want to store in acquisition memory. This allows you to avoid filling up your module’s acquisition memory with irrelevant data samples. Symbolic range generation A Histogram window term. The histogram ranges are defined in a range symbol file. The highest and lowest ranges depend on the maximum and minimum boundaries for the ranges defined in the symbol file. Symbolic radix A format that allows you to substitute mnemonics (names) for radix numbers in the Trigger and data windows. Tektronix Logic Analyzer Family User Manual, Version 3.2 Software Glossary–7 Glossary Synchronous acquisition An acquisition that is made using a clock signal generated external to the logic analyzer. This clock is usually the clock in the system under test. The external clock is usually synchronous with the system under test and may or may not be periodic. System trigger (trigger all) An overriding command to all modules that causes them to stop looking for a trigger, and to acquire their posttrigger data, regardless of whether they have been armed or have fulfilled their own trigger conditions. The system trigger also functions as the primary reference point for the entire data acquisition. In data windows, timing and location information is relative to the system trigger. Time correlation The tracking of independent events captured by different modules and indicating how they relate to each other in time. Specifically, the chronological interleaving of data from different modules into a single display. Shows real-time interactions between independently clocked circuits. Time stamp A separate clock value stored with each acquisition cycle. Timer A trigger program device that records elapsed time. Threshold voltage The voltage to which the input signals are compared. Trigger An event or condition that leads to the end of an acquisition cycle. When started, the instrument continuously acquires data from a system under test until the trigger occurs. After triggering, the instrument continues to acquire data until the post-fill requirement is met. Trigger library A collection of predefined trigger programs for the LA module. You can load an individual program into the Trigger window and modify it for your requirements. Trigger position Where the trigger resides in acquisition memory. Electing to place the trigger in the center of memory means that half of the acquisition consists of data that occurred after the trigger. Trigger program A series of conditions, similar to software code, that defines the data you want to capture and view. The trigger program also specifies actions for data events. The trigger program filters acquired data to find a specific data event Glossary–8 Tektronix Logic Analyzer Family User Manual, Version 3.2 Software Glossary or series of data events. The trigger program can accept information from other modules or send signals external to the logic analyzer. TSF TLA Symbol File (TSF) format (a text format). The TSF format is used by the logic analyzer when it exports symbol files. Unassert To cause a signal or line to change from its logic true state to its logic false state. Waveform window A data window used to observe timing relationships in the system under test. The acquired data is displayed as a series of waveforms. Word recognizer A trigger term. Word recognizers are specific patterns of data or words. Use word recognizers to trigger the logic analyzer on specific data combinations. Tektronix Logic Analyzer Family User Manual, Version 3.2 Software Glossary–9 Glossary Glossary–10 Tektronix Logic Analyzer Family User Manual, Version 3.2 Software Index Index A AC coupling, Glossary–1 Accessories additional TLA 600 series, 2–2 TLA 700 series, 1–38 connecting, TLA 700 series, 1–37 Acquisition, Glossary–1 asynchronous, Glossary–1 synchronous, Glossary–8 Active module, Glossary–1 Address, Tektronix, xviii Advanced power management, removing, TLA 700 series, 3–58 Aliasing, Glossary–1 All samples, Glossary–1 Application, autolaunch, 1–4, 2–2, 3–9 TLA, 3–61 TLA 600 series, 2–21 Applying power TLA 600 series, 1–23 TLA 700 series, 1–31 Arm, Glossary–1 Assert, Glossary–1 Asynchronous acquisition, Glossary–1 See also Internal clock Attenuation, Glossary–2 Audio drivers, installing on a TLA 600, 2–16 Autoconfiguration, module, TLA 700 series, 3–3 B Back up user files, creating TLA 600 series, 2–4 TLA 700 series, 3–11 Basic installation, 2–1, 3–1 Battery, real time clock, A–6 Benchtop chassis, Glossary–2 AC power source, B–15 cooling, B–16 dimensions, B–18 mechanical, B–17 secondary power, B–16 BIOS configuring, TLA 600 series, 2–10 flashing, TLA 600 series, 2–10 flashing for the TLA 714, 3–48 flashing for the TLA 720, 3–48 setup, TLA 700 series, 3–48 setup table TLA 600 series, 2–11 TLA 700 series, 3–49 Bus and microprocessor support software, installing, 1–21 C Calibrating, merged modules, 3–25 Calibration. See Self calibration Calibration service, xv Characteristics TLA 600 series logic analyzer, A–1 TLA 704 portable mainframe, D–1, D–9 TLA 711 benchtop chassis, D–13 TLA 711 benchtop controller, D–17 TLA 711 benchtop mainframe, D–1 TLA 714 portable mainframe, B–1, B–9 TLA 720 benchtop chassis, B–15 TLA 720 benchtop controller, B–19 TLA 720 benchtop mainframe, B–1 TLA 7Dx DSO module, B–29 TLA 7Ex DSO module, B–29 TLA 7Lx logic analyzer module, D–19 TLA 7Mx logic analyzer module, D–19 TLA 7Nx logic analyzer module, B–21 TLA 7Px logic analyzer module, B–21 TLA 7XM expansion mainframe, C–5 Chassis, Glossary–2 Chassis ground location TLA 600 series, 1–27 TLA 700 series, 1–38 Checking the shipping list TLA 600 series, 2–1 TLA 700 series, 3–1 Clause, Glossary–2 Cleaning, G–2 LCD display, G–2 Clock cycle, Glossary–2 equation, Glossary–2 external, Glossary–4 internal, Glossary–5 qualification, Glossary–2 qualifier, Glossary–2 sample clock, Glossary–7 COFF file formats, Glossary–2 Color range symbols, Glossary–2 Tektronix Logic Analyzer Family User Manual, Version 3.2 Software Index–1 Index Color symbols, E–8 Condition trigger, Glossary–8 Configuring, P6470 pattern generator probes, 1–28 Connecting accessories, TLA 700 series, 1–37 LA probes TLA 600 series, 1–23 TLA 700 series, 1–28 pattern generator probes, TLA 700 series, 1–30 Connectors See also External signals external TLA 600 Series, 1–26 TLA 700 Series, 1–35 Controller BIOS setup table TLA 600 series, 2–11 TLA 700 series, 3–49 TLA 700 series, 3–48 Correlation. See Time correlation Counter, Glossary–2 Cover plate installation, 3–8 Creating back up user files TLA 600 series, 2–4 TLA 700 series, 3–11 emergency startup disk TLA 600 series, 2–4 TLA 700 series, 3–10 Cursors, Glossary–3 Custom clocking, Glossary–3 Customer registration card, 2–1, 3–1 Customer Service web address, xv D Data differences, Glossary–3 Data equalities, Glossary–3 Data rate, logic analyzer module, B–23 Data sample, Glossary–3 Data window, 1–9, Glossary–3 Data, saving and loading. See Saved files DC coupling, Glossary–3 Deleting. See Cutting Delta measurement, Glossary–3 Demultiplex, Glossary–3 Diagnostics, G–4 expansion mainframe, 3–35 TLA 700 series, 3–35 extended TLA 600 series, 2–5 TLA 700 series, 3–35 Index–2 installing QA+Win32 TLA 600 series, 2–18 TLA 700 series, 3–56 Logic analyzer, TLA 600 series, 2–5 mainframe TLA 600 series, 2–5 TLA 700 series, 3–35 modules, TLA 700 series, 3–35 power on TLA 600 series, 2–5 TLA 700 series, 3–35 QA+Win32, 2–5, 3–36 start up sequence, 3–40 TLA 600 series, 2–7 start up sequence tree TLA 600 series, 2–8 TLA 700 series, 3–41 Differences. See Data differences Digital real-time signal acquisition, Glossary–3 Digitizing, Glossary–3 Digitizing storage oscilloscope module. See DSO module Display adjusting TLA 600 series, 2–19, 2–20 TLA 700 series, 3–57 desktop settings TLA 600 series, 2–19 TLA 700 series, 3–57 external monitor TLA 600 series, 2–19 TLA 700 series, 3–57 power management, TLA 600 series, 2–20 screen saver, TLA 600 series, 2–20 Display driver setting, TLA 600 series, 2–15 setup TLA 600 series, 2–15 TLA 700 series, 3–54 Don’t care, Glossary–4 Driver, video, installing on a TLA 600, 2–15 Drivers audio, TLA 600 series, 2–16 display driver, TLA 600 series, 2–15 front panel, TLA 600 series, 2–16 PCI installation TLA 600 series, 2–16 TLA 700 series, 3–54 video driver, TLA 700 series, 3–54 DSO module description, 1–3 self calibration, G–1 Tektronix Logic Analyzer Family User Manual, Version 3.2 Software Index setup dialog box, 1–13 updating firmware, TLA 700 series, 3–59 DSO setup dialog box, DSO module, 1–13 DSO Trigger window, 1–9 Dynamic autoconfiguration, TLA 700 series, 3–3 External monitor, settings TLA 600 series, 2–19 TLA 700 series, 3–57 E File format COFF, Glossary–2 IEEE695, Glossary–4 OMF166, Glossary–6 OMF286, Glossary–6 OMF386, Glossary–6 OMF51, Glossary–6 OMF86, Glossary–6 TSF, Glossary–9 File name extension, symbol files, E–1 Firmware updating module firmware, TLA 700 series, 3–59 updating the BIOS, TLA 700 series, 3–48 Firmware hub driver, enabling, 2–15 Front panel controls TLA 600 Series, 1–25 TLA 711 Portable Mainframe, 1–34 TLA 714 Portable Mainframe, 1–34 Front panel drivers, installing on a TLA 600, 2–16 Function symbols, E–5 Fuse location TLA 600 series, 1–24 TLA 700 series, 1–32 part number, A–8 requirements, TLA 700 series, 1–31 type, A–8 fuse, specification, A–8 Fuse requirements benchtop mainframe, 3–64 expansion mainframe, 3–68 ECOFF. See COFF file formats Edge, Glossary–4 Edge trigger, Glossary–4 Email address Service, xviii Tektronix, xviii Emergency disk creation TLA 600 series, 2–4 TLA 700 series, 3–10 Emergency startup disk, creating TLA 600 series, 2–4 TLA 700 series, 3–10 Equalities. See Data equalities Equation. See Clock, equation Event condition, Glossary–4 Event trigger, Glossary–8 Expansion cables, installing, 3–32 Expansion chassis, Glossary–4 mechanical, C–7 Expansion mainframe AC power source, C–5 characteristics, C–5 cooling, C–6 diagnostics, 3–35 dimensions, C–8 installing, 3–29 secondary power, C–6 specifications, C–1 troubleshooting, 3–44 turning off, 3–33 turning on, 3–33 Expansion module, installing, 3–29 in a TLA 704, 3–31 in a TLA 711, 3–29 in a TLA 714, 3–31 in a TLA 720, 3–29 Extended diagnostics, G–4 External clock, Glossary–4 signal connectors TLA 600 Series, 1–26 TLA 700 Series, 1–35 F G Gap, qualification, Glossary–6 General maintenance, G–1 General safety summary, xiii symbols and terms, xiv to avoid fire, xiii to avoid personal injury, xiii GlidePoint pad, 1–35 Glitch, Glossary–4 Tektronix Logic Analyzer Family User Manual, Version 3.2 Software Index–3 Index K Ground chassis TLA 600 series, 1–27 TLA 700 series, 1–38 safety TLA 600 series, 1–27 TLA 700 series, 1–38 Ground (GND) coupling, Glossary–4 Guidelines, for merging modules, 3–17 Keypad, 1–25, 1–34 L H Hard disk drive reformatting TLA 600 series, 2–13 TLA 700 series, 3–52 removal for TLA 714, 3–12 removal for TLA 720, 3–14 Hardware problems TLA 600 series, 2–6 TLA 700 series, 3–36 Help, online, 1–21 High-speed timing. See MagniVu data Histogram window, 1–10, Glossary–4 I IEEE695 file format, Glossary–4 Incoming inspection checking probes TLA 600 series, 2–3 TLA 700 series, 3–10 checking the mainframe, 2–3, 3–10 performing TLA 600 series, 2–3 TLA 700 series, 3–9 Installing expansion cables, 3–32 expansion mainframe, 3–29 expansion module, 3–29 in a TLA 704, 3–31 in a TLA 711, 3–29 in a TLA 714, 3–31 in a TLA 720, 3–29 merged modules, 3–24 microprocessor and bus support software, 1–21 TLA 600 Series Logic Analyzer, 2–1 TLA 700 Series Logic Analyzer, 3–1 Internal clock, Glossary–5 Internal signal, Glossary–4 Interpolation, Glossary–5 Isolating system problems, TLA 700 series, 3–42 Index–4 LA module description, 1–3 self calibration, G–1 LA Trigger window, 1–8 Label. See Naming Linear generation, Glossary–5 Listing window, 1–9, 1–20, Glossary–5 See also Data window Log generation, Glossary–5 Logic analyzer back up user files, TLA 600 series, 2–4 BIOS configuration, TLA 600 series, 2–10 BIOS setup, TLA 700 series, 3–48 chassis ground, TLA 600 series, 1–27 checking probes, TLA 600 series, 2–3 connecting LA probes TLA 600 series, 1–23 TLA 700 series, 1–28 connecting pattern generator probes, TLA 700 series, 1–30 diagnostics, TLA 600 series, 2–5 emergency disk creation, TLA 600 series, 2–4 incoming inspection, 2–3 installing PCI driver, TLA 700 series, 3–54 installing PCI drivers, TLA 600 series, 2–16 installing QA+Win32 TLA 600 series, 2–18 TLA 700 series, 3–56 installing software TLA 600 series, 2–9 TLA 700 series, 3–47 installing Windows 98 SE TLA 600 series, 2–14 TLA 700 series, 3–53 installing Windows 98 SE patches TLA 600 series, 2–17 TLA 700 series, 3–55 power cord location, TLA 600 series, 1–24 powering on, TLA 600 series, 1–23 reformatting the hard disk drive TLA 600 series, 2–13 TLA 700 series, 3–52 restoring user files TLA 600 series, 2–21 TLA 700 series, 3–61 set the display driver, TLA 600 series, 2–15 Tektronix Logic Analyzer Family User Manual, Version 3.2 Software Index set the video driver, TLA 700 series, 3–54 shipping list, TLA 600 series, 2–1 site considerations, TLA 600 series, 2–2 TLA 600 Series description, 1–1 TLA 700 Series description, 1–3 uninstalling TLA application software TLA 600 series, 2–21 TLA 700 series, 3–61 updating module firmware, TLA 700 series, 3–59 utilities, TLA 700 series, 3–58 virtual memory, TLA 700 series, 3–58 Logic analyzer module See also LA module merge cable location, 3–20 merging, 3–17 merging guidelines, 3–17 updating firmware, TLA 700 series, 3–59 Logic analyzer probes, connecting TLA 600 series, 1–23 TLA 700 series, 1–28 Logical address module, TLA 700 series, 3–3 module switch location, TLA 700 series, 3–4 setting, TLA 700 series, 3–3 troubleshooting problems, TLA 700 series, 3–4 M MagniVu data, 1–11, Glossary–5 Mainframe back up user files, TLA 700 series, 3–11 basic installation, 2–1, 3–1 BIOS setup, TLA 700 series, 3–48 calibrating merged modules, 3–25 chassis ground, TLA 700 series, 1–38 checking probes, TLA 700 series, 3–10 configuring P6470 pattern generator probes, 1–28 connecting accessories, TLA 700 series, 1–37 connecting LA probes, TLA 700 series, 1–28 connecting pattern generator probes, TLA 700 series, 1–30 diagnostics TLA 600 series, 2–5 TLA 700 series, 3–35 emergency disk creation, TLA 700 series, 3–10 equipment required to merge modules, 3–20 fuse location, TLA 700 series, 1–31 fuse requirements for the benchtop mainframe, 3–63 for the expansion mainframe, 3–67 TLA 700 series, 1–31 incoming inspection, TLA 700 series, 3–9 installation, 2–1, 3–1 installing merged modules, 3–24 installing PCI driver, TLA 700 series, 3–54 installing Windows 98 SE, TLA 700 series, 3–53 merging modules rules, 3–17 module installation for TLA 700 Series, 3–3 in the benchtop mainframe, 3–5 in the expansion mainframe, 3–6 in the portable mainframe, 3–5 keying, 3–6 panel cover, 3–8 power cord location, TLA 700 series, 1–32 power cord requirements for the benchtop mainframe, 3–63 for the expansion mainframe, 3–67 powering on, TLA 700 series, 1–31 reformatting the hard disk drive, TLA 700 series, 3–52 reinstalling pattern generator application software, 3–55 removing merged modules, 3–25 restoring user files, TLA 700 series, 3–61 set the video driver, TLA 700 series, 3–54 shipping list, TLA 700 series, 3–1 site considerations, TLA 700 series, 3–2 storing the merge cable, 3–25 uninstalling TLA application software, TLA 700 series, 3–61 updating module firmware, TLA 700 series, 3–59 utilities, TLA 700 series, 3–58 virtual memory, TLA 700 series, 3–58 Mainframe utilities, 1–33 TLA 700 series, 3–58 Maintenance back up user files TLA 600 series, 2–4 TLA 700 series, 3–11 BIOS configuration, TLA 600 series, 2–10 BIOS setup, TLA 700 series, 3–48 calibrating merged modules, 3–25 checking probes TLA 600 series, 2–3 TLA 700 series, 3–10 common problem check list TLA 600 series, 2–6 TLA 700 series, 3–37 diagnostics, TLA 700 series, 3–35 emergency disk creation TLA 600 series, 2–4 TLA 700 series, 3–10 equipment required to merge modules, 3–20 Tektronix Logic Analyzer Family User Manual, Version 3.2 Software Index–5 Index expansion mainframe troubleshooting, 3–44 fuse requirements for the benchtop mainframe, 3–63 for the expansion mainframe, 3–67 incoming inspection TLA 600 series, 2–3 TLA 700 series, 3–9 installing merged modules, 3–24 installing PCI driver, TLA 700 series, 3–54 installing PCI drivers, TLA 600 series, 2–16 installing QA+Win32 TLA 600 series, 2–18 TLA 700 series, 3–56 installing software TLA 600 series, 2–9 TLA 700 series, 3–47 installing Windows 98 SE TLA 600 series, 2–14 TLA 700 series, 3–53 installing Windows 98 SE patches TLA 600 series, 2–17 TLA 700 series, 3–55 isolating system problems, TLA 700 series, 3–42 merging modules rules, 3–17 power cord requirements for the benchtop mainframe, 3–63 for the expansion mainframe, 3–67 reformatting the hard disk drive TLA 600 series, 2–13 TLA 700 series, 3–52 reinstalling pattern generator application software, 3–55 removing merged modules, 3–25 restoring user files TLA 600 series, 2–21 TLA 700 series, 3–61 set the display driver, TLA 600 series, 2–15 set the video driver, TLA 700 series, 3–54 storing the merge cable, 3–25 uninstalling TLA application software TLA 600 series, 2–21 TLA 700 series, 3–61 updating module firmware, TLA 700 series, 3–59 Matched samples, Glossary–5 Memory TLA 600, A–5 TLA 714, B–9 TLA 720, B–19 virtual, TLA 700 series, 3–58 Memory depth. See Storage qualification Index–6 Merge cable, storing, 3–25 Merge modules, Glossary–5 self calibration, G–1 Merged modules calibrating, 3–25 guidelines, 3–17 installing, 3–24 removing, 3–25 theory of operation for logic analyzer modules, 3–17 for pattern generator modules, 3–27 Merging modules, 3–17, 3–27 equipment required, 3–20 installation, 3–24 merge cable location, 3–20 three way merge procedure, 3–24 two way merge procedure, 3–19 Microprocessor and bus support software, installing, 1–21 Microprocessor support, Glossary–5 Mnemonic disassembly, Glossary–5 Module, Glossary–5 dynamic autoconfiguration of address, TLA 700 series, 3–3 installing in the benchtop mainframe, 3–5 in the expansion mainframe, 3–6 in the portable mainframe, 3–5 installing in a TLA 700 Series, 3–3 joining LA modules. See Merge modules keying, 3–6 logical address, TLA 700 series, 3–3 logical address switch location, TLA 700 series, 3–4 merge cable location, 3–20 merging, 3–17, 3–27 merging guidelines, 3–17 not showing up in the System window, TLA 700 series, 3–4 power requirements, 3–63 expansion mainframe, 3–67 self calibration, G–1 static logical address, TLA 700 series, 3–3 three way merge procedure, 3–24 two way merge procedure, 3–19 updating firmware, TLA 700 series, 3–59 Module trigger, Glossary–6 Monitor, settings TLA 600 series, 2–19, 2–20 TLA 700 series, 3–57 Tektronix Logic Analyzer Family User Manual, Version 3.2 Software Index O Object file format COFF, Glossary–2 IEEE695, Glossary–4 OMF166, Glossary–6 OMF286, Glossary–6 OMF386, Glossary–6 OMF51, Glossary–6 OMF86, Glossary–6 TSF, Glossary–9 Offset, range symbols, E–2 OMF166 file format, Glossary–6 OMF286/386 file formats, Glossary–6 OMF51 file format, Glossary–6 OMF86 file format, Glossary–6 On/Standby switch benchtop mainframe, 1–32 expansion mainframe, 1–33, 1–34 portable mainframe, 1–32 TLA 600 series, 1–24 Online help, 1–21 help topics, 1–21 pattern generator help, 1–22 PPI help, 1–22 TPI online help, 1–22 What’s This? help, 1–22 Windows online help, 1–22 P Panel cover installation, 3–8 Pattern Generation, Physical logical conversion, F–1 Pattern generator module description, 1–4 merging, 3–27 merging guidelines, 3–27 run properties dialog box, 1–20 Pattern generator probes configuring P6470, 1–28 connecting, TLA 700 series, 1–30 Pattern generator software installation, 3–55 Pattern symbols, E–3 PC card connector TLA 600 Series, 1–26 TLA 700 Series, 1–35 PCI driver installation TLA 600 series, 2–16 TLA 700 series, 3–54 PCMCIA, Glossary–6 Phone number, Tektronix, xviii Podlet, Glossary–6 Pointing device, 1–35 Power cord, identification chart benchtop mainframe, 3–64 expansion mainframe, 3–68 Power management, setting up, 2–20 Power requirements benchtop mainframe, 3–63 expansion mainframe, 3–67 Power-down procedure expansion mainframe, 1–34 TLA 714, 1–33 TLA 720, 1–33 TLA 7XM, 1–34 Power-off procedure, TLA 711, 1–33 Power-on diagnostics, G–4 Power-on procedure benchtop mainframe, 1–32 expansion mainframe, 1–33 portable mainframe, 1–32 TLA 600 series, 1–24 TLA 714, 1–32 TLA 720, 1–32 Pretrigger, Glossary–6 Preventive maintenance, G–2 cleaning, G–2 disks, floppy disk drive, G–3 LCD display, G–2 Probe adapter, Glossary–6 Probe podlet, Glossary–6 Probes configuring P6470 pattern generator probes, 1–28 connecting LA probes TLA 600 series, 1–23 TLA 700 series, 1–28 connecting pattern generator probes, TLA 700 series, 1–30 Problem check list TLA 600 series, 2–6 TLA 700 series, 3–37 Problems hardware TLA 600 series, 2–6 TLA 700 series, 3–36 software TLA 600 series, 2–5 TLA 700 series, 3–36 Product support, contact information, xviii Program window, 1–18 Tektronix Logic Analyzer Family User Manual, Version 3.2 Software Index–7 Index Q S QA+Win32, 2–5, 3–36 installing TLA 600 series, 2–18 TLA 700 series, 3–56 Qualification clock, Glossary–2 gaps, Glossary–6 storage, Glossary–7 Qualifier, clock, Glossary–2 Sample clock, Glossary–7 data, Glossary–3 rate, Glossary–7 Sampling, Glossary–7 Saved files, 1–12 backing up, 1–21 Saving setups, triggers, or data. See Saved files Screen saver, setting up, 2–20 TLA 700 series, 2–20, 3–57 Self calibration, G–1 Service back up user files TLA 600 series, 2–4 TLA 700 series, 3–11 BIOS configuration, TLA 600 series, 2–10 BIOS setup, TLA 700 series, 3–48 calibrating merged modules, 3–25 checking probes TLA 600 series, 2–3 TLA 700 series, 3–10 common problem check list TLA 600 series, 2–6 TLA 700 series, 3–37 contacting Tektronix, xviii diagnostics TLA 600 series, 2–5 TLA 700 series, 3–35 emergency disk creation TLA 600 series, 2–4 TLA 700 series, 3–10 equipment required to merge modules, 3–20 expansion mainframe diagnostics, 3–35 expansion mainframe troubleshooting, 3–44 for more information, xvi fuse requirements for the benchtop mainframe, 3–63 for the expansion mainframe, 3–67 incoming inspection TLA 600 series, 2–3 TLA 700 series, 3–9 installing merged modules, 3–24 installing PCI driver, TLA 700 series, 3–54 installing PCI drivers, TLA 600 series, 2–16 installing QA+Win32 TLA 600 series, 2–18 TLA 700 series, 3–56 installing software TLA 600 series, 2–9 TLA 700 series, 3–47 installing Windows 98 SE R Radix, symbolic, Glossary–7 Range recognizer, Glossary–7 Range symbols color, E–4, Glossary–2 function, E–4 source, E–4 variable, E–4 Record length, Glossary–7 Reformatting the hard disk drive fixed hard disk drive, TLA 700 series, 3–53 replaceable hard disk drive, TLA 700 series, 3–53 TLA 600 series, 2–13 TLA 700 series, 3–52 Registration card, 2–1, 3–1 Reinstalling software, 3–55 Release notes, 1–22 Renaming. See Naming Repacking for shipment, G–4 Repair service, xv Requirements, site consideration TLA 600 series, 2–2 TLA 700 series, 3–2 ResMan (resource manager) TLA 600 series, 2–7 TLA 700 series, 3–40 Resource manager (ResMan) TLA 600 series, 2–7 TLA 700 series, 3–40 Restoring user files TLA 600 series, 2–21 TLA 700 series, 3–61 Rules, for merging modules, 3–17 Run properties dialog box, pattern generator module, 1–20 Index–8 Tektronix Logic Analyzer Family User Manual, Version 3.2 Software Index TLA 600 series, 2–14 TLA 700 series, 3–53 installing Windows 98 SE patches TLA 600 series, 2–17 TLA 700 series, 3–55 isolating system problems, TLA 700 series, 3–42 mainframe diagnostics TLA 600 series, 2–5 TLA 700 series, 3–35 merging modules rules, 3–17 options for the TLA 600 series, xvi for the TLA 700 series, xvii power cord requirements for the benchtop mainframe, 3–63 for the expansion mainframe, 3–67 reformatting the hard disk drive TLA 600 series, 2–13 TLA 700 series, 3–52 reinstalling pattern generator application software, 3–55 removing merged modules, 3–25 restoring user files TLA 600 series, 2–21 TLA 700 series, 3–61 self service, xvi service on demand, xvi set the display driver, TLA 600 series, 2–15 set the video driver, TLA 700 series, 3–54 storing the merge cable, 3–25 uninstalling TLA application software TLA 600 series, 2–21 TLA 700 series, 3–61 updating module firmware, TLA 700 series, 3–59 Service offerings, xv calibration and repair service, xv for more information, xvi self service, xvi service agreements, xv service on demand, xvi service options, xv warranty repair service, xv Service support, contact information, xviii Service, user, preventive maintenance, G–2 Setting the logical address, TLA 700 series, 3–3 Setup window, 1–7, 1–16 See also DSO Setup window; LA Setup window Setups, saving and loading. See Saved files Shipping, G–4 weight TLA 704 portable mainframe, D–12 TLA 711 benchtop chassis, D–15 TLA 711 benchtop controller, D–18 TLA 714 portable mainframe, B–13 TLA 720 benchtop chassis, B–17 TLA 720 benchtop controller, B–20 TLA 7XM expansion mainframe, C–7 Shipping list, checking TLA 600 series, 2–1 TLA 700 series, 3–1 Skew, Glossary–7 Slot covers, 3–8 Slot fillers, 3–8 Software autolaunching the application, 1–4, 2–2, 3–9 TLA, 3–61 TLA 600 series, 2–21 BIOS configuration, TLA 600 series, 2–10 BIOS setup, TLA 700 series, 3–48 diagnostics TLA 600 series, 2–5 TLA 700 series, 3–35 expansion mainframe diagnostics, 3–35 extended diagnostics TLA 600 series, 2–5 TLA 700 series, 3–35 installing TLA 600 series, 2–9 TLA 700 series, 3–47 installing microprocessor and bus support, 1–21 installing pattern generator application, 3–55 installing PCI driver, TLA 700 series, 3–54 installing PCI drivers, TLA 600 series, 2–16 installing QA+Win32 TLA 600 series, 2–18 TLA 700 series, 3–56 installing the firmware hub driver, TLA 600 series, 2–15 installing TLA application TLA 600 series, 2–18 TLA 700 series, 3–56 installing Windows 98 SE TLA 600 series, 2–14 TLA 700 series, 3–53 installing Windows 98 SE patches TLA 600 series, 2–17 TLA 700 series, 3–55 launching the application, 1–4, 2–2, 3–9 TLA, 3–61 TLA 600 series, 2–21 mainframe diagnostics TLA 600 series, 2–5 TLA 700 series, 3–35 mainframe utilities, TLA 700 series, 3–58 power on diagnostics TLA 600 series, 2–5 Tektronix Logic Analyzer Family User Manual, Version 3.2 Software Index–9 Index TLA 700 series, 3–35 problems TLA 600 series, 2–5 TLA 700 series, 3–36 reinstalling, 3–55 removing advanced power management, TLA 700 series, 3–58 restoring user files TLA 600 series, 2–21 TLA 700 series, 3–61 screen saver, TLA 700 series, 2–20, 3–57 setting up virtual memory, TLA 700 series, 3–58 uninstalling TLA application TLA 600 series, 2–21 TLA 700 series, 3–61 Source symbols, E–6 Source window, 1–11, Glossary–7 Specifications expansion mainframe, C–1 LA acquisition memory depth, B–21 LA channel width, B–21 LA clock channels, B–21 LA data rate, B–23 LA qualifier channels, B–22 P6417 probe capacitance, B–26 P6418 probe capacitance, B–26 shipping weight TLA 704 portable mainframe, D–12 TLA 711 benchtop chassis, D–15 TLA 711 benchtop controller, D–18 TLA 714 portable mainframe, B–13 TLA 720 benchtop chassis, B–17 TLA 720 benchtop controller, B–20 TLA 7XM expansion mainframe, C–7 TLA 600 series, A–1 TLA 600 series logic analyzer operating humidity, A–1 operating temperature, A–1 TLA 704 and TLA 711, D–1 operating temperature, D–2 TLA 714 and TLA 720, B–1 operating humidity, B–2 operating temperature, B–2 TLA 7XM, C–1 TLA 7XM expansion mainframe operating humidity, C–2 operating temperature, C–2 Standby (STBY), Glossary–7 Startup sequence TLA 600, 2–7 TLA 700, 3–40 State, Glossary–7 State display. See Listing window Index–10 Static logical address problems, TLA 700 series, 3–4 switch location, TLA 700 series, 3–4 TLA 700 series, 3–3 Storage qualification, Glossary–7 Support package. See Microprocessor support Symbol files color symbols, E–8 function symbols, E–5 pattern symbols, E–3 range, E–4 source symbols, E–6 variable symbols, E–5 Symbolic radix, Glossary–7 Symbolic range generation, Glossary–7 Symbols color symbols, E–8 function symbols, E–5 pattern symbols, E–3 range, E–4 source symbols, E–6 variable symbols, E–5 Symbols and symbol files file name extension, E–1 TLA 700 symbol file format (TSF), E–1 Symbols and terms, xiv Synchronous acquisition, Glossary–8 See also External clock System expansion mainframe troubleshooting, 3–44 isolating problems, TLA 700 series, 3–42 System trigger, Glossary–8 System window, 1–6, 1–15 T Tektronix email address, xviii how to contact, xviii mail address, xviii World Wide Web address, xviii Three way merge procedure, 3–24 Threshold voltage, Glossary–8 Time correlation, Glossary–8 Time stamp, Glossary–8 Timer, Glossary–8 Timing display. See Waveform window TLA 600 series logic analyzer description, 1–1 specifications, A–1 TLA 600 series logic analyzer operating humidity, A–1 Tektronix Logic Analyzer Family User Manual, Version 3.2 Software Index operating temperature, A–1 TLA 600 startup sequence, 2–7 TLA 700 Series, logic analyzer description, 1–3 TLA 700 startup sequence, 3–40 TLA 700 symbol file format, E–1 TLA 704 and TLA 711, specifications, D–1 TLA 704 portable mainframe, operating temperature, D–2 TLA 711 Benchtop Chassis AC power source, D–13 cooling, D–14 dimensions, D–15 mechanical, D–14 secondary power, D–13 TLA 711 benchtop mainframe, operating temperature, D–2 TLA 714 and TLA 720 specifications, B–1 TLA 714 mainframe, removing the hard disk drive, 3–12 TLA 714 portable mainframe operating humidity, B–2 operating temperature, B–2 TLA 720 Benchtop Chassis AC power source, B–15 cooling, B–16 dimensions, B–18 mechanical, B–17 secondary power, B–16 TLA 720 benchtop mainframe operating humidity, B–2 operating temperature, B–2 TLA 720 mainframe, removing the hard disk drive, 3–14 TLA 7XM installing, 3–29 installing the expansion cables, 3–32 installing the expansion module, 3–29 in a TLA 704, 3–31 in a TLA 711, 3–29 in a TLA 714, 3–31 in a TLA 720, 3–29 turning off, 3–33 turning on, 3–33 TLA 7XM Expansion Chassis, mechanical, C–7 TLA 7XM Expansion mainframe AC power source, C–5 characteristics, C–5 cooling, C–6 dimensions, C–8 secondary power, C–6 specifications, C–1 TLA 7XM expansion mainframe operating humidity, C–2 operating temperature, C–2 TLA 7XM specifications, C–1 TLA application software, installing TLA 600 series, 2–18 TLA 700 series, 3–56 TLA application window, overview, 1–5 Touch pad, 1–35 Trigger, Glossary–8 clause, Glossary–2 position, Glossary–8 program, Glossary–8 system, Glossary–8 external signal, 1–26, 1–35 Trigger library, Glossary–8 Trigger program, saving and loading. See Saved files Trigger window. See DSO Trigger window; LA Trigger window Troubleshooting, G–4 common problem check list TLA 600 series, 2–6 TLA 700 series, 3–37 expansion mainframe, 3–44 isolating system problems, TLA 700 series, 3–42 module address problems, TLA 700 series, 3–4 TSF, file formats, E–1 TSF color symbols, E–8 TSF file formats, Glossary–9 TSF function symbols, E–5 TSF pattern file header, E–2 TSF range file header, E–2 TSF Range Symbols color, E–4 function, E–4 source, E–4 variable, E–4 TSF source symbols, E–6 TSF variable symbols, E–5 Turning on TLA 600 series, 1–23 TLA 700 series, 1–31 Two way merge procedure, 3–19 U Unassert, Glossary–9 URL, Tektronix, xviii User service general maintenance, G–1 preventive maintenance, G–2 Tektronix Logic Analyzer Family User Manual, Version 3.2 Software Index–11 Index V Variable symbols, E–5 Video driver, setting, TLA 700 series, 3–54 Video drivers, installing, on a TLA 600, 2–15 Virtual memory, setting up, TLA 700 series, 3–58 W Warranty repair service, xv Waveform window, 1–10, Glossary–9 See also Data window Web site address, Tektronix, xviii Weld modules. See Merge modules Window data window, 1–9, Glossary–3 DSO Trigger window, 1–9 Histogram window, 1–10 LA Trigger window, 1–8 Index–12 Listing window, 1–9, 1–20, Glossary–5 overview, 1–14 Program window, 1–18 Setup window, 1–7, 1–16 Source window, 1–11 System window, 1–6, 1–15 Waveform window, 1–10, Glossary–9 Windows 98 SE, installing TLA 600 series, 2–14 TLA 700 series, 3–53 Windows 98 SE patches, installing TLA 600 series, 2–17 TLA 700 series, 3–55 Word recognizer, Glossary–9 World Wide Web address, Customer Service, xv X XCOFF. See COFF file formats Tektronix Logic Analyzer Family User Manual, Version 3.2 Software