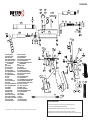
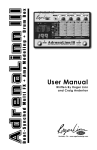
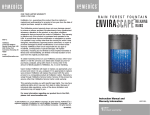
1
BASIC MAINTENANCE INSTRUCTIONS
Basic Maintenance should be carried out after each game, failure to do so will void your
Manufactures Warranty. A full strip of the gun should be done when your marker is
subjected to adverse conditions.
Stage 1
Remove the cocking
handle (part No. 0034) from
the main body (Part No.1310).
Stage 2
Remove the main bolt
from Inferno, (Part No.0045)
should slide out esaily.
Stage 3
Squeegee the inferno with a
Powerball Bow Tie Squeegee
making sure it removes all dirt.
Stage 4
Using Inferno lube squirt a few
drops on the long bolt.
Stage 5
Place long bolt back into the
inferno marker. Make sure that
the holes are facing up and
transfer port downward.
Stage 6
Push the cocking handle back
into the long bolt. The knurled
part should be facing up. It
should click into hammer.
NO ALKALINE OR SOAP CLEANERS ARE TO BE USED AS THIS ATTACKS THE ALUMINIUM PARTS
WIPE CLEAN THE EXTERIOR WITH AN OILY RAG
OR MOISTENED SPONGE. DO NOT IMMERSE MARKERS IN WATER!
2
YEAR
WARRANTY
Extended warranty - 2 year Manufactures Warranty
All Inferno markers now come with a 2 year warranty. The warranty covers markers
purchased from 1st January 2008 onwards.
The warranty is subject to necessary maintenance of marker’s as specified in the Inferno manual, supplied
with your marker.
Arrow Precision Limited, Unit 7, Elliott Industrial Park, Eastern Road, Aldershot, Hampshire, GU12 4TF
Tel:01252 408 550 Fax:01252 408 551 Email:[email protected] Web:www.arrow-precision.com
Instruction manual
2008 Version
INFERNO INSTRUCTION MANUAL 1.3.3
TROUBLESHOOTING
PRECAUTIONS/SAFETY INSTRUCTIONS
If you break a ball:
Please read this manual carefully before using this paintgun.
Always treat the “Inferno” (and any other firearm) as if it were loaded, this will avoid unpleasant “surprises”. The “Inferno” paintball gun is not
a toy, it can cause injury or death if misused. Always use a barrel plug when not playing. When using the “Inferno” you must make sure that
yourself and anyone who is within range is wearing approved eye and ear protection.
Please make sure that this manual is included with the gun if you sell this paintgun. Read these instructions prior to use.
Always make sure that both you and anyone within range is wearing approved eye protection. Always store the paintgun with the gas tank
and loader removed.
If you need to make sure that the paintgun is un-loaded then do this by removing the loader and then tipping any remaining balls out of the
breech and then firing the gun twice while pointed in a SAFE direction and then removing the gas source.
WARNING - Never look into the barrel while it is installed on the marker.
If using compressed air as a propellant then only use the correct lubricants as recommended by the air system manufacturer. Whatever
propellant gas you use make sure that only approved experts work on any part of the cylinder or air regulator. Remember, compressed gases
can kill, they must be treated with respect.
If you break a ball in the barrel then all that is needed in most cases is to squeegee out the barrel with a barrel cleaner.You can do this without
removing the barrel if you are careful not to damage the ball retainer. If you break a ball in the breech then proceed as follows:
All Infernos
First clear any jam by pulling the cocking handle back (if it has jammed then a sharp tap will free it quicker than a steady pull)
then de-cock the gun by tipping the gun sideways so that the ball in the breech rolls back into the feeder, remove hopper/loader
and cap with ‘hopper stopper’ then grasp the cocking handle and pull the trigger at the same time, Be careful to only let the
cocking handle come forward slowly until it is all the way forwards.
Inferno with Quick-Strip Bolt
Hold the gun tipped back slightly (to stop the bolt sliding forward) and remove the cocking handle.
Grasp the grooved portion of the bolt that protrudes from the back of the gun and pull the bolt rearwards from the gun.
WARNING -The “Inferno” may sometimes fire spontaneously if energised with a gas source without first cocking the hammer, so
always wear safety goggles.
WARNING - Do not attempt to dismantle the Inferno beyond removing the barrel and bolt without first
making sure that it is unloaded and de-gassed.
OPERATING INSTRUCTIONS
Section 1 - Preparing For Use
Make sure that you and everyone else within range is wearing approved eye and ear protection. Make sure that the safety catch is set to “safe”
by pressing the safety catch in from the left side of the gun (viewed from the rear) and install a barrel safety plug into the barrel before cocking
the gun by pulling the cocking handle to the rear until it locks backwards. Install the gas supply and the feed system, then check the muzzle
velocity as in section 4 below. You are now ready to play paintball.
Section 2 - Making the Gun Safe
Install a barrel safety plug in the barrel, tip the gun sideways so that the ball in the breech rolls back into the feeder. Then grasp the cocking
handle and pull the trigger at the same time, be careful to only let the cocking handle come forward slowly until it is all the way forwards. Then
push the safety catch to “safe”. The gun is now safe and if you are finishing for the day you can remove the gas tank and feeder. (Never store
the gun with the feeder or the tank installed as this can be dangerous and/or cause damage to the gun).
Section 3 - Firing
First carry out the instructions as in “Preparing for Use” as above. Then push the safety catch to the fire position and pull the trigger when you
are ready, the “Inferno” will fire every time you pull the trigger.
Section 4 - Velocity Adjustment
Because the firing velocity of your gun is dependant on such things as temperature, weather and altitude, you must test the velocity before
use (and subsequently before every day of use) .You must use a chronograph to measure the firing velocity of your gun. The velocity must not
exceed 300 feet per second (the limit at some fields may be less). At the rear of the gun you will find the velocity adjustment screw. Turning
this clockwise will increase the velocity and turning it anti-clockwise will decrease the velocity. (TIP- When using CO2) In cold weather the
velocity adjuster may not seem to do very much, don’t wind it in all the way.
Section 5 - Exhaust Valves
Attention-There are two different exhaust valves available for the inferno, with characteristics as follows:
(CO2 ONLY) Black (soft) seal: Used for temperatures below 80° Fahrenheit (26° Celsius) and input pressures below 1,000 psi, this seal exhibits
good sealing characteristics at very low temperatures and pressures. Its resilience means that leakage caused by dirt or grit can usually be cured
by cleaning the sealing surface.
(When using Air) White (hard) seal: Used for temperatures above 80° Fahrenheit (26° Celsius) and input pressures above 1,000 psi, this seal
is extra hard to resist extreme pressure and temperature, but may not seal properly at lower temperatures.
The exhaust valve installed in your gun depends on the model type and the country in which you live. Some models of Inferno are supplied
with a spares kit.
Clean all of the paint and shell from the bolt and breech area then re-lubricate the bolt.Replace the bolt (the correct side
up with the gas transfer hole at the bottom, if you replace it up-side down then the gun will not fire any balls and you may
damage the ball retainer) and push the cocking handle back through the bolt and hammer (the easiest way to do this is to
push it through until it touches the top of the hammer and then slide it back until it engages the hole
in the hammer).
Gun will not fire even though tank is installed:
1/ Some tank valves are opened by screwing the tank onto the gun, make sure that the tank is screwed in all the way. If the gun still will not work then the valve may be faulty or incompatible with your gun.
If the velocity is too low and will not turn up then it could mean:
1/ Inlet gas pressure too low, below 500 psi inlet pressure (CO2) gun may not achieve 300 fps. This could be because the tank is either too cold or empty.
2/ Inlet gas pressure too high, above 1200 psi inlet pressure gun will not achieve maximum velocity and may not
re-cock reliably.
3/ Hammer speed too slow, caused by dirt or something else. Strip gun, clean all moving parts and assemble after lubricating with Inferno-lube. Make sure that the hammer and bolt are an easy sliding fit in the bores, if not then replace the hammer O-ring.
4/ Mainspring worn out.
5/ Poor flow of gas in system, could be a bad valve on tank or other blockage.
6/ Bolt installed upside down.
If the gun does not re-cock properly (goes fully-auto or burps) then it could be:
1/ I n l e t p r e s s u r e t o o l o w, b e l o w 3 0 0 p s i t h e g u n w i l l n o t c o c k r e l i a b l y. R e - f i l l t a n k o r w a r m t a n k u p
(with lukewarm water, not heat).
2/ Inlet pressure too high, cool tank down or use a regulator.
3/ Hammer speed too slow, see above.
4/ Mainspring worn out.
If the gun double feeds (fires two balls at once) then:
1/ Check the ball retainer by unscrewing the cover plate and removing the retainer, inspect it for damage, especially any cuts or cracks around the base of the rubber “spike”. replace part if necessary.
If you experience loss of performance in warm conditions, then please make sure that a white seal is installed
in your gun.
1
6
TROUBLESHOOTING
TIPS/MAINTENANCE (CLEANING GUIDE ON BACK PAGE)
If you experience ball breakage in the barrel then:
1/ Bad paintballs, buy better quality next time.
2/ Velocity too high, reduce velocity.
3/ Liquid CO2 entering gun, have an anti-siphon tube fitted to your tank.
Given the correct treatment the Inferno will perform reliably for many years. Cleaning dirt and contamination from the working parts will
reduce wear rates considerably, so always clean your gun after use. A well maintained gun will shoot more consistently and more accurately,
for longer. Therefore your target will receive more paintballs, this is what you want!
If you experience ball breakage in the breech then:
1/ Poor feeding, make sure that balls can enter breech as fast as you can fire them. Make sure hopper and elbow are clean. If you fire long bursts very fast then you may need a motorised loader. Also make sure that the balls are not breaking in the loader, this could be because
they are too brittle or because you are shaking the hell out of them!
2/ Liquid CO2 entering gun causing gas to be blown up into the feeder, make sure your cylinder is fitted with an anti-liquid device.
Always start any work on the gun by removing the CO² or air cylinder and any paintball hopper.
To field clean the gun, cock the gun and apply the safety, this stops hammer from being able to rotate if trigger is accidentally pulled and exposes
more area for lubrication.Then remove the cocking handle by pulling upwards, this will allow the bolt to be removed, backwards, from the breech
chamber. Wipe any residual paint from the feed stub and then clean the bolt using an oiled lint free cloth. Using a “squeegee,” clean straight
through, from rear of the marker out of barrel, do not go from barrel end as this will drag contaminants into marker internals. Ensure the barrel
is clean by inspection, any paint, water or oil residue in the barrel will cause extreme inaccuracy. Then squirt some “Inferno-lube” oil (available
from Arrow-Precision Ltd) down through the cocking handle slot so lubricant reaches the hammer assembly.The bolt can then be replaced into
the breech after a light spray of oil, rotate once to spread oil and ensure the transfer port is facing down towards trigger. After aligning the hole
in the bolt and the hammer, insert the cocking handle and check by cycling the action. Wipe over external surfaces with an oiled lint free cloth.
If you experience poor accuracy then it could be:
1/ Poor paint.
2/ Paint or oil in barrel, clean it out.
3/ Velocity too high.
Leaks from barrel:
1/ Exhaust valve is dirty or worn out, clean or replace.
Gun will fire single shots OK but drops off or goes fully auto under rapid fire:
1/ Poor flow causing gas starvation under rapid fire, check tank valve is flowing enough gas and there are no other obstructions in gas supply.
Poorly fitted expansion systems etc. are usually the worst culprits.
Instructions for fitting anti-siphon tubes
We recommend that any work that is carried out on the gas cylinder is carried out by a qualified professional, and the information
in this chapter is intended to be used by such a person. PLEASE DO NOT ATTEMPT TO SERVICE YOUR GAS
CYLINDER YOURSELF.
1/
2/
3/
4/
5/
6/
Screw valve into bottom-line all the way on.
Install anti-siphon tube into valve until it is tight.
Bend tube up so that it is within 1/16” of touching the
top of the tank, around halfway down the length of the tank.
Then mark the valve at the top when it is installed on the
gun (with a punch mark or something similar).
Then have the valve installed by a professional at Arrow Precision.
Ensure cylinders and valve/regulator is Pi marked and in test.
NB. 0038
MAWP@STP300BAR
ARROW-PRECISION LTD
Anti-Siphon tube
Now when your tank is installed on your gun, the mark should appear at the top
of the valve and the tube will then only draw gas CO2 from the top of the cylinder.
Instructions For Full Disassembly of the Inferno
1/ Before starting make sure that the Inferno is unloaded and de-gassed by removing the loader and cylinder and then unscrewing the barrel.
Then point the gun in a safe direction and cock and fire it once to verify that it is de-gassed.
2/ Pull the cocking handle up this will allow you to remove the long bolt. Tip the gun up and the bolt should side out the back
of the Inferno.
3/ Using a 1/8 allen wrench, remove the two button head screws that retain the velocity adjuster, then withdraw the velocity adjuster and then the mainspring guide and bumber.
4/ Using a 3/16 allen wrench remove the cap head screw that holds the grip and bottom-line to the grip frame and then remove
those parts.
5/ Then using a 1/8 allen wrench, remove the front and rear grip frame retaining screws and remove the grip frame.
6/ Using a 1/8 allen wrench, remove the two button head screws and washers that hold the valve body in place and slide out the valve body
from the front.
7/ Using a 9/64 allen wrench, remove the top cap retaining screw and then remove the top cap.
8/ If you need to remove the ball retainer then use a 5/64 allen wrench to remove the screws and washers and lift of the cover.
The retainer can then be picked out with a fine piece of wire or something similar.
9/ If you need to dismantle the valve body, unscrew the valve guide and then remove the exhaust valve and spring.
10/Re-assembly is the reversal of the above.
5
TIPS
It is a legal obligation to ensure your Inferno is not producing velocities over 300 feet per second, Chronograph your gun to be certain it
isn’t. Then re-check after a few minutes.
1/ Playing in cold weather you may notice it becomes difficult to achieve velocities near 300 fps. The velocity adjuster can be used to com
pensate, but do not wind it all the way in an attempt to get the best velocity. This will cause the Inferno to use even more gas and reduce the temperature of the tank further, making the problem worse. CO² needs to “boil off ” into a gas and absorbs heat to do so, so warming
the tank slightly will help, placing in warm room or water for a hour or so will be sufficient to allow the gun to function properly again.
2/ Conversely in very hot weather the Inferno may not be able to fire when using CO², as the pressure will have increased to beyond
operatinglimits.
3/ If you experience either situation demonstrating the limitations of CO², using an air system may be a better propellant source. Air systems offer some advantages over CO² - Air gives better shot to shot consistency as it is delivered at a fixed pressure to the gun. The pressure of CO² changes considerably as the temperature changes, air is not affected by temperature changes nearly as much. Arrow-Precision Ltd can supply the correct “PI” marked “Airborn” regulators and high pressure air cylinders to achieve this safely.
4/ The “Inferno-lube” is recommended for use in the Inferno because it has been specifically formulated- It will not adversely affect seals
and O rings like other lubricants might and is the optimal grade to ensure correct functioning. Always use a tank fitted with an internal “anti-siphon”, this ensures no liquid CO² enters the gun in use. This gives better general consistency and avoids undesirable effects like accelerated wear, poor accuracy and ball breakage.
THINGS NOT TO DO
1/ Do not dry fire (that is, fire the gun without any gas supply), as this allows all the working parts to “slam” into each other. If this happens excessively, then serious dam
age will result.
2/ Do not use liquid CO2 (i.e. a siphon tank), this can cause accelerated wear on the work
ing parts and undesirable side effects such as poor accuracy and ball breakage.
3/ If the “Inferno” goes fully auto when
fing, then it could possibly be because
the cocking handle has with drawn from the hammer, if this is the case then “catching” the cocking handle will not stop the gun from firing. In this case the gun can
be stopped from firing by turning the gas
supply off. Be careful not to push the cocking handle down while the gun is “running away”, as this may cause damage to the gun.
Cocking Handle
Pull back to cock gun
Safety Catch
Press in from left side
(Looking from back of gun
when firing) to make safe
Velocity Adjuster
Using 3/16th Allen Key turn
clockwise to raise velocity and
anti-clockwise to lower velocity
Bottom Line
Cylinder screws in clockwise to install
(make sure it is screwed all the way in)
- hand tight only DO NOT OVER
TIGHTIGHTEN.
2
INFERNO MK2
38
38
37
37
45
32
242
36
6
80
1330
35
23
34
1315
24
26
28
29
27
30
52
1320
1305
2
3
1310
4
30
1301
5
22
6
8
8
7
7
46
47
6
49
49
16
9
16
25
0002
0003
0004
0005
0006
0007
0008
0009
0010
0011
0012
0013
0014
0015
0016
0017
0018
0019
0020
0021
0022
0023
0024
0025
0026
0027
0028
0029
0030
0032
0034
VALVE SPRING
EXHAUST VALVE
VALVE GUIDE
O RING-VALVE GUIDE
O RING-VALVE GUIDE
RETAINER SCREW
SPLIT WASHER
TRIGGER
SAFETY CATCH
SAFETY BALL
SAFETY SPRING
FRAME SCREW-FRONT
DOWEL PIN 1/8
FRAME SCREW-REAR
SEAR
GRIP
BOTTOM LINE
HOSE HI-PRESSURE
ELBOW
GRIP RETAINING SCREW
O RING-HAMMER (RED)
HAMMER
BUMPER
SEAR SPRING
MAIN SPRING
SPRING GUIDE
VELOCITY ADJ.BODY
VELOCITY ADJ.INSERT
O RING-VEL ADJ. INSERT
BOLT PLUNGER
COCKING HANDLE
0032
0034
0035
0036
0037
0038
0040
0043
0045
0046
0047
0049
0052
0080
0099
0100
0121
0122
0155
0160
0161
0200
0220
0225
0242
1301
1305
1310
1315
1320
1330
BOLT PLUNGER
COCKING HANDLE
BALL RETAINER
COVER PLATE-BALL RETAINER
SPLIT WASHER-SMALL
RETAINER SCREW-COVER PLATE
TRIGGER SPRING
GRIP FRAME
LONG BOLT
DOUBLE TRIGGER
DOUBLE TRIGGER SHOE
GRUB SCREW-TRIGGER SHOE
ONE PIECE VELOCITY INSERT
RAIN COVER
45 GRIP FRAME SCREW
45 GRIP ADAPTOR
TOURNAMENT VELOCITY ADJ.INSERT
GRUB SCREW-TOURNAMENT ADJ.
DOUBLE TRIGGER FRAME- 45 GRIP
45 GRIP - LEFT HAND
45 GRIP - RIGHT HAND
SCREW- 45 GRIP
DUMPY BOTTOM LINE
DUMPY BOTTOM LINE SCREW
O-RING RAIN COVER
FORE GRIP
VALVE BODY
BODY
BARREL
FORE GRIP SCREW
O-RING FEED BOWL
25
11
40
10
12
14
14
40
43
14
10
155
8
8
8
15
14
13
17
200
200
14
14
220
18
200
99
21
225
100
19
225
20
Important Technical Note
When converting any Inferno marker from CO2 to air you must use The Air Conversion kit
These parts must be changed: 26: MAIN SPRING 4:VALVE GUIDE
22: HAMMER O-RING (RED) 3: EXHAUST VALVE O-ring is the largest O-ring in the parts kit
© 1997-2008 Arrow Precision, Llc. All rights reserved. Inferno and Terminator are trademarks of Arrow Precision Limited.
200
8
15
14
13
14
Old velocity adjuster still ok for converting to Air You must use a chronograph to measure the
firing velocity of your gun. The velocity must not exceed 300 feet per second (the limit at some fields may be less).
161
160