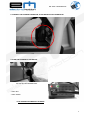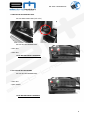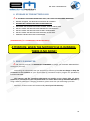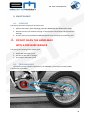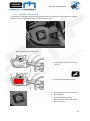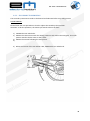
1
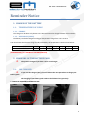
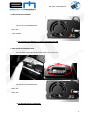
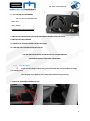
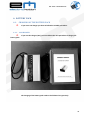
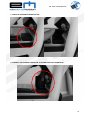
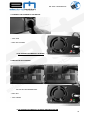
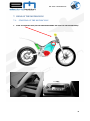
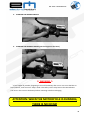
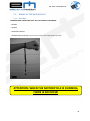
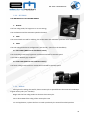
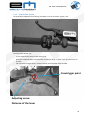
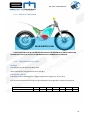
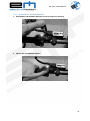
EM TRIAL–USER MANUAL EM – USER MANUAL CONGRATULATIONS! You have just purchased and electric motorcycle EM. We welcome you in our customers! The motorcycle EM trial results from trial passion, the nature and the green technologies. It has been designed and developed with the experience and the knowhow of our team. Riding and using this motorcycle need warning and recommendations to benefit fully of the advantages offered by this green alternative. It is essential to read carefully this manual because it contains, firstly the information needed to handle, drive and the starting of this motorcycle. Secondly, it contains the information relatives to the maintenance and the control of the bike. This manual will allow you to keep your good in a perfect working state in the safer way possible. If you have any question or any doubt, please contact us by phone or email 0033 467 411 090 [email protected] Electric Motion’s team wishes you to enjoy riding this motorcycle. 2 EM TRIAL–USER MANUAL Reminder Notice 1. CHARGE OF THE BATTERY 1.1. TEMPERATURES OF USING 1.1.1. CHARGE The charge can be done only above 10°C. We recommend to charge between 10°C and 40°C 1.1.2. DISCHARGE (USING) The battery can be discharged on a bigger temperature range from -15°C to 55°C You must know that the time range is really affected by the temperature. See the chart below: TEMPERATURE (°C) RANGE REDUCTION -15 -30% -10 -25% 0 -15% 10 -10% 25 -0% 40 -3% 55 -4% (USER MANUAL// 3.2. RIDING OF THE MOTORCYCLE) 2. CHARGING OF THE BATTERY PACK V 2.1. The process changes if you have a 10 or a 15 charger. 10A CHARGER V If you use this charger (10a), you must follow the next procedure to charge your battery pack. The charging of the battery pack needs to be followed very precisely. 1- OPEN THE CHARGING CONNECTOR TAP 3 EM TRIAL–USER MANUAL 2- CONNECT THE CHARGER CONNECTOR TO THE BATTERY PACK CONNECTOR 3- CONNECT THE CHARGER TO THE OUTLET -- LED1: RED - LED2: NOT LIGHING =>THE CHARGER IS CORRECTLY PLUGGED 4 EM TRIAL–USER MANUAL 4- SWITCH ON THE CHARGER THE LED OF THE CHARGER ARE: - LED1: RED - LED2: GREEN =>THE CHARGER IS CORRECTLY PLUGGED AND SWITCHED ON 5- SWTICH ON THE BATTERY PACK THE LED INDICATOR ONT THE BATTERY PACK LIGHT (red circle) THE LED OF THE CHARGER ARE: - LED1: RED - LED2: RED =>THE BATTERY PACK IS CHARGING 5 EM TRIAL–USER MANUAL 6- - AT THE END OF THE CHARGE THE LED OF THE CHARGER ARE: - LED1: RED - LED2: GREEN =>THE BATTERY PACK IS CHARGED 7- SWITCH OFF THE BATTERY PACK (THE LED INDICATOR MUST STOP TO LIGHT) 8- SWITCH OFF THE CHARGER 9- UNPLUG THE CHARGER FROM THE BATTERY PACK 10- UNPLUG THE CHARGER FROM THE OUTLET THE BATTERY PACK CAN BE CHARGED OUT OF THE MOTORCYCLE FOLLOWING EXACTLY THE SAME PROCEDURE. 2.1.1. 15A CHARGER V If you use this charger (54.6v 15a), you must follow the next procedure to charge your battery pack. The charging of the battery pack needs to be followed very precisely 1- OPEN THE CHARGING CONNECTOR TAP 6 EM TRIAL–USER MANUAL 2- CONNECT THE CHARGER CONNECTOR TO THE BATTERY PACK CONNECTOR 3- PLUG THE CHARGER TO THE OUTLET THE LED OF THE CHARGER ARE: - LED1: RED - LED2: GREEN =>THE CHARGER IS CORRECTLY PLUGGED 7 EM TRIAL–USER MANUAL 4- SWITCH ON THE BATTERY PACK THE LED INDICATOR LIGHT (red circle) THE LED OF THE CHARGER ARE: - LED1: RED - LED2: RED =>THE BATTERY PACK IS CHARGING 5- AT THE END OF THE CHARGE THE LED OF THE CHARGER ARE: - LED1: RED - LED2: GREEN =>THE BATTERY PACK IS CHARGED 8 EM TRIAL–USER MANUAL 6- SWITCH OFF THE BATTERY PACK (THE LED INDICATOR MUST STOP TO LIGHT) 7- UNPLUG THE CHARGER FROM THE OUTLET 8- UNPLUG THE CHARGER FROM THE BATTERY PACK THE BATTERY PACK CAN BE CHARGED OUT OF THE MOTORCYCLE FOLLOWING EXACTLY THE SAME PROCEDURE THE CHARGER MUST BE UNPLEGGED FROM THE OUTLET BETWEEN 2 CHARGING PROCEDURES. THE CHARGING PROCEDURE OF THE BATTERY PACK IS FINISHED (USER MANUAL// 2.1.CHARGING OF THE BATTERY PACK) 3. USE OF THE BATTERY V After use your battery, be sure that it is switch off: - Indicator of the battery on the battery pack = Switch off, Indicator of the general commuter on the handlebar. = Switch off V This indicator will switch off when your motorcycle AND your battery will be switch off. The extinction of this indicator will occur after several minutes. (USER MANUAL// 1.5. STEERING ELEMENTS AND INFORMATION LIGHT) 9 EM TRIAL–USER MANUAL 4. STORAGE OF THE BATTERY PACK V IF YOU WANT TO STORE THE BATTERY PACK, YOU HAVE TO TAKE SOME MEASURES: 1234567- BEFORE STORAGE, THE BATTERY PACK MUST BE CHARGED BE SURE 100% THE BATTERY PACK IS SWITCHED OFF RECHARGE THE BATTERY PAC EVERY 4 WEEK, EVEN IT IS NOT USED DO NOT STORE THE BATTERY PACK UNDER 10°C OR OVER 40°C DO NOT STORE THE BATTERY PACK IN WET ATMOSPHERE. DO NOT STORE THE BATTERY PACK EXPOSED TO THE SUN. REMOVE THE BATTERY PACK IF NECESSARY (USER MANUAL// 2.3. STORAGE OF THE BATTERY PACK) ATTENTION: WHEN THE MOTORCYCLE IS RUNNING, THERE IS NO NOISE! 5. BIKE’S PARAMETER V We remind you that it is ABSOLUTELY FORBIDDEN to change your ELECTRIC MOTION bike's settings on your own. Concerning the information that you could find on Internet, please do not change or adapt the parameters or the software of your electric bike by parameters and/or program not provided by ELECTRIC MOTION. The software and the parameters adjustment are specifics to our electric bike, all others softwares or parameters are not compatible with our electric bike made by ELECTRIC MOTION. By using a different software or changing parameters, please note that you will damage your bike. Moreover, all those actions will automatically cancel your bike warranty. 10 EM TRIAL–USER MANUAL SUMMARY 1. 2. GENERAL INFORMATION ..................................................................................................... 12 1.1. RECEPTION ........................................................................................................................................... 12 1.2. BATTERY PACK ..................................................................................................................................... 13 1.3. CHARGER ............................................................................................................................................. 14 1.4. MOTORCYCLE ...................................................................................................................................... 15 1.5. STEERING ELEMENTS AND INFORMATION LIGHT ............................................................................... 16 1.5.1. STEERING ELEMENTS .................................................................................................................. 16 1.5.2. SETTING BOX ............................................................................................................................... 17 1.5.1. INFORMATION LIGHTS ................................................................................................................ 18 BATTERY PACK .................................................................................................................... 20 2.1. 2.1.1. 10A CHARGER ............................................................................................................................. 20 2.1.2. 15A CHARGER ............................................................................................................................. 25 2.2. 4. MOUNTING AND REMOVING OF THE BATTERY PACK ......................................................................... 29 2.2.1. MOUNTING OF THE BATTERY PACK ............................................................................................ 29 2.2.2. REMOVING OF THE BATTERY PACK ............................................................................................. 33 2.3. 3. CHARGING OF THE BATTERY PACK ...................................................................................................... 20 STORAGE OF THE BATTERY PACK ........................................................................................................ 37 USING OF THE MOTORCYCLE ............................................................................................... 38 3.1. STARTING OF THE MOTORCYCLE ......................................................................................................... 38 3.2. RIDING OF THE MOTORCYCLE ............................................................................................................. 40 3.2.1. SECURITY ..................................................................................................................................... 40 3.2.2. SETTINGS ..................................................................................................................................... 41 3.2.3. RIDING......................................................................................................................................... 41 3.2.4. ELECTRONIC CLUCH ..................................................................................................................... 42 3.2.5. RIDING IN THE WATER ................................................................................................................ 43 3.2.6. TEMPERATURES OF USING.......................................................................................................... 43 3.2.7. STOPPING OF THE MOTORCYCLE ................................................................................................ 44 MAINTENANCE ................................................................................................................... 46 4.1. CLEANING ............................................................................................................................................ 46 4.2. TRANSMISSIONS .................................................................................................................................. 46 4.2.1. PRIMARY TRANSMISSION ........................................................................................................... 47 4.2.2. SECONDARY TRANSMISSION ....................................................................................................... 48 1. 11 EM TRIAL–USER MANUAL 1. 5.1. GENERAL INFORMATION RECEPTION If you receive the motorcycle and the battery pack separately, please follow the procedures: REMOVING THE COVER and MOUNTINGTHE BATTERY PACK. If you receive the motorcycle on a palette, the footrests and the handlebar are not assembled on the motorcycle. - FOOTRESTS The footrests are on the cartoon box with your motorcycle. You must assemble the footrests following the following picture: - HANDLEBAR The handlebar needs to be assembled following the following picture; a plastic strip fastens the rubber protection: 12 EM TRIAL–USER MANUAL 5.2. BATTERY PACK MAIN CONNECTOR BATTERY SWITCH CHARGING CONNECTOR BATTERY LEVEL LED INDICATOR HANDLE Once you receive the motorcycle and the battery pack, you must charge it. Please follow the procedure CHARGING BATTERY PACK The first charge will be quite quick (30 min to 1 h). The entire range will be reached after around 10 charging/discharging cycles. The standard charging time will be around 2 h (if the battery pack is fully discharged). 13 EM TRIAL–USER MANUAL 5.3. CHARGER The charger providen with the motorcycle will permit you to recharge your battery pack. V Please select, on the charger, the voltage used in the country you are using the charger (115V or 230V). CHARGER CHARGING CONNECTOR INLET CABLE ON/OFF SWITCH INLET CONNECTOR 115V/230V SWITCH WORKING LEDS 14 EM TRIAL–USER MANUAL 5.4. MOTORCYCLE RemovableBattery+ BMS 4 Maps Controller BrushlessMot or The serial number of the motorcycle is noticed on the steering pipe, on the front part of the frame. 15 EM TRIAL–USER MANUAL 5.5. STEERING ELEMENTS AND INFORMATION LIGHT 5.5.1. STEERING ELEMENTS FRONT BRAKE ELECTRONIC CLUTCH MAIN CONTACTOR & MOTOR BRAKE SECURITY SWITCH THROTTLE TRIAL MAP SWITCH REAR BRAKE LIQUID TANK REAR BRAKE PEDAL 16 EM TRIAL–USER MANUAL 5.5.2. SETTING BOX The motorcycle has a setting box with 4 riding modes. It is located inside the front part of the frame. It can be adjusted by the right side. (More detailed explanations in the part 4.2.2 SETTINGS) 17 EM TRIAL–USER MANUAL 5.5.1. INFORMATION LIGHTS - STANDARD MAIN COMMUTER On the left of the handlebar, the general commuter has a green light, which indicates the motorcycle is working. V This indicator will switch off when your motorcycle AND your battery will be switch off. The extinction of this indicator will occur after several minutes. Ignition indicator Circuit breaker Engine brake - HOMOLOGATION MAIN COMMUTER The operating of the ignition indicator is the same as the Standard commuter. Ignition indicator Dimmed headlights, full head lights Horn Turn signal Circuit breaker In front Engine brake Behind Hand position to activate the brake engine 18 EM TRIAL–USER MANUAL - BATTERY LED INDICATOR The battery pack has a led indicator, which shows the remaining energy capacity. There are 10 LEDS: - The 7 first are GREEN, - The 3 last are RED. V The decreasing of energy can be very quick in the 3 last red ones. INDICATOR EXTINCTION MAY TAKE SOMETIME (MINUTES) 19 EM TRIAL–USER MANUAL 6. BATTERY PACK 6.1. CHARGING OF THE BATTERY PACK V If you use a 15a charger you have to follow the suitable procedure. 6.1.1. 10A CHARGER V If you use this charger (10a), you must follow the next procedure to charge your battery pack. The charging of the battery pack needs to be followed very precisely. 20 EM TRIAL–USER MANUAL 1- OPEN THE CHARGING CONNECTOR TAP 2- CONNECT THE CHARGER CONNECTOR TO THE BATTERY PACK CONNECTOR 21 EM TRIAL–USER MANUAL 3- CONNECT THE CHARGER TO THE OUTLET -- LED1: RED - LED2: NOT LIGHING =>THE CHARGER IS CORRECTLY PLUGGED 4- SWITCH ON THE CHARGER THE LED OF THE CHARGER ARE: - LED1: RED - LED2: GREEN =>THE CHARGER IS CORRECTLY PLUGGED AND SWITCHED ON 22 EM TRIAL–USER MANUAL 5- SWTICH ON THE BATTERY PACK THE LED INDICATOR ONT THE BATTERY PACK LIGHT (red circle) THE LED OF THE CHARGER ARE: - LED1: RED - LED2: RED =>THE BATTERY PACK IS CHARGING 6- - AT THE END OF THE CHARGE THE LED OF THE CHARGER ARE: - LED1: RED - LED2: GREEN =>THE BATTERY PACK IS CHARGED 23 EM TRIAL–USER MANUAL 7- SWITCH OFF THE BATTERY PACK (THE LED INDICATOR MUST STOP TO LIGHT) 8- SWITCH OFF THE CHARGER 9- UNPLUG THE CHARGER FROM THE BATTERY PACK 10- UNPLUG THE CHARGER FROM THE OUTLET THE BATTERY PACK CAN BE CHARGED OUT OF THE MOTORCYCLE FOLLOWING EXACTLY THE SAME PROCEDURE. 24 EM TRIAL–USER MANUAL 6.1.2. 15A CHARGER V If you use this charger (54.6v 15a), you must follow the next procedure to charge your battery pack. The charging of the battery pack needs to be followed very precisely 25 EM TRIAL–USER MANUAL 1- OPEN THE CHARGING CONNECTOR TAP 2- CONNECT THE CHARGER CONNECTOR TO THE BATTERY PACK CONNECTOR 26 EM TRIAL–USER MANUAL 3- PLUG THE CHARGER TO THE OUTLET THE LED OF THE CHARGER ARE: - LED1: RED - LED2: GREEN =>THE CHARGER IS CORRECTLY PLUGGED 4- SWITCH ON THE BATTERY PACK THE LED INDICATOR LIGHT (red circle) THE LED OF THE CHARGER ARE: - LED1: RED - LED2: RED THE BATTERY PACK IS CHARGING 27 EM TRIAL–USER MANUAL 5- AT THE END OF THE CHARGE THE LED OF THE CHARGER ARE: - LED1: RED - LED2: GREEN =>THE BATTERY PACK IS CHARGED 6- SWITCH OFF THE BATTERY PACK (THE LED INDICATOR MUST STOP TO LIGHT) 7- UNPLUG THE CHARGER FROM THE OUTLET 8- UNPLUG THE CHARGER FROM THE BATTERY PACK THE BATTERY PACK CAN BE CHARGED OUT OF THE MOTORCYCLE FOLLOWING EXACTLY THE SAME PROCEDURE THE CHARGER MUST BE UNPLEGGED FROM THE OUTLET BETWEEN 2 CHARGING PROCEDURES. THE CHARGING PROCEDURE OF THE BATTERY PACK IS FINISHED 28 EM TRIAL–USER MANUAL 6.2. MOUNTING AND REMOVING OF THE BATTERY PACK 6.2.1. MOUNTING OF THE BATTERY PACK 1- TAKE THE BATTERY PACK BY THE STRAP WITH ON HAND 2- HELP THE MOVING WITH THE OTHER HAND DO NOT HOLD THE BATTERY PACK BY THE POWER CABLES! 29 EM TRIAL–USER MANUAL 3- PUT THE BATTERY PACK IN PLACE 4- VERIFY THE ALIGNMENT OF THE 3 FIXING HOLES 5- SCREW THE FRONT SCREW 30 EM TRIAL–USER MANUAL 6- SCREW THE LATERAL SCREWS AND VERIFY THE TIGHTENING OF THE 3 FIXING SCREWS 7- PLUG THE BATTERY PACK TO THE MOTORCYCLE 31 EM TRIAL–USER MANUAL 8- IMPLEMENTATION OF THE COVER Put the cover in place on the motorcycle The cover is fixed by 3 screws (red circles) Screws the 3 fixing screws, start with the 2 rear ones. THE MOUNTING PROCEDURE OF THE BATTERY PACK IS FINISHED 32 EM TRIAL–USER MANUAL 6.2.2. REMOVING OF THE BATTERY PACK 1- REMOVE THE COVER - Unscrew the 3 screws (start with the front one and finish by the rear right and left) - Remove the cover 33 EM TRIAL–USER MANUAL 2- VERIFY THE BATTERY PACK IS SWITCHED OFF (THE LED INDICATOR MUST STOP TO LIGHT) V BE SURE THAT THE LIGHT ON THE HANDLEBAR IS OFF If it is not : - Wait minutes if it remains lighting after minutes: - Repeat the procedure SWITCH ON / SWITCH OFF of the battery pack until it switches off. INDICATOR EXTINCTION MAY TAKE SOMETIME (MINUTES) 34 EM TRIAL–USER MANUAL UNPLUG THE MAIN CONNECTOR DO NOT PULL THE POWER CABLES OF THE BATTERY PACK 3- REMOVE THE FRONT FIXATION SCREW 4- UNSCREW THE LATERAL FIXATION SCREWS (around 5 mm) 35 EM TRIAL–USER MANUAL 5- TAKE THE BATTERY WITH THE STRAP WITH ONE HAND DO NOT HOLD THE BATTERY PACK BY THE POWER CABLES! 6- HELP THE MOVING WITH THE OTHER HAND THE REMOVING PROCEDURE OF THE BATTERY PACK IS FINISHED 36 EM TRIAL–USER MANUAL 6.3. STORAGE OF THE BATTERY PACK IF YOU WANT TO STORE THE BATTERY PACK, YOU HAVE TO TAKE SOME MEASURES: 891011121314- BEFORE STORAGE, THE BATTERY PACK MUST BE CHARGED BE SURE 100% THE BATTERY PACK IS SWITCHED OFF RECHARGE THE BATTERY PAC EVERY 4 WEEK, EVEN IT IS NOT USED DO NOT STORE THE BATTERY PACK UNDER 10°C OR OVER 40°C DO NOT STORE THE BATTERY PACK IN WET ATMOSPHERE. DO NOT STORE THE BATTERY PACK EXPOSED TO THE SUN. REMOVE THE BATTERY PACK IF NECESSARY 37 EM TRIAL–USER MANUAL 7. USING OF THE MOTORCYCLE 7.1. STARTING OF THE MOTORCYCLE 1- START THE BATTERY PACK (THE LED INDICATOR SHOWS THE LEVEL OF THE BATTERY PACK) 38 EM TRIAL–USER MANUAL 2- STARTING THE GENERAL SWITCH 3- STARTING THE SECURITY SWITCH (put the magnet on the base) V WARNING V If you happen by mistake, forgetting to turn off the battery after use or not to use the bike on for15 minutes, it will turn into "sleep" mode. This safety cut the relay but not the LED indicator. You must in this case cut the battery before restarting or before recharging. ATTENTION: WHEN THE MOTORCYCLE IS RUNNING, THERE IS NO NOISE! 39 EM TRIAL–USER MANUAL 7.2. RIDING OF THE MOTORCYCLE 7.2.1. SECURITY BEFORE RIDING, CHECK YOU HAVE ALL THE SECURITY EQUIPMENT: - HELMET - GLOVES - ADAPTED CLOTHES - SECURITY SWITCH (fixed to your wrist to secure the motorcycle if you fall) ATTENTION: WHEN THE MOTORCYCLE IS RUNNING, THERE IS NO NOISE! 40 EM TRIAL–USER MANUAL 7.2.2. SETTINGS THE MOTORCYCLE HAS 4 RIDING MODES 1- NOVICE The first riding mode, for beginners or to save energy The acceleration and the maximum speed are limited 2- TREK The second mode is made for trekking, the acceleration and maximum speed are more important 3- TRIAL The trial riding mode has to configurations, wet and dry. (switch on the handlebar) 3.1- WET TRIAL (MAP1 on the handlebar switch) The third riding mode has progressive acceleration and 95% maximum speed It is made for difficult grip conditions. 3.2- DRY TRIAL (MAP2 on the handlebar switch) The fourth riding mode has direct acceleration and 100% maximum speed. 7.2.3. RIDING During the first ridings, be careful, electric motorcycle is quite different than Internal Combustion Engine motorcycles (2 or 4 strokes). Begin with the first riding modes to discover this motorcycle. Go to other MAPS if the riding of the motorcycle is OK. For trial application, replace the front 11 teeth sprocket by the 9 teeth furnished sprocket. 41 EM TRIAL–USER MANUAL 7.2.4. ELECTRONIC CLUCH To be perfectly adapted to trial driving, the EM 5.7 has an electronic system : ELS. The ELS system allows you: - To cut instantly the power of the motorcycle. With the combined effect of the throttle and the ELS lever, to have a very precise action of throttle. Like a thermical engine cluch, to have instantly the full power when needed. Crewtrigger point Adjusting screw Distance of the lever 42 EM TRIAL–USER MANUAL 7.2.5. RIDING IN THE WATER MAX WATER LEVEL IF DICCULTIES OR STOP IN THE WATER, SWITCH OFF THE MOTORCYCLE (MAIN CONTACTOR AND BATTERY PACK) TO AVOID THE MOTORCYCLE FALLS RUNNING IN THE WATER 7.2.6. TEMPERATURES OF USING CHARGE The charging can be done only above 10°C We recommend to charge between 10°C and 40°C DISCHARGE (USING) The battery can be discharged on a bigger temperature range from -15°C to 55°C You must know that the time range is really affected by the temperature. See the chart below: TEMPERATURE (°C) RANGE REDUCTION -15 -30% -10 -25% 0 -15% 10 -10% 25 -0% 40 -3% 55 -4% 43 EM TRIAL–USER MANUAL 7.2.7. STOPPING OF THE MOTORCYCLE 1- DISCONNECT THE SECURITY SWITCH (remove the magnet of the base) 2- SWITCH OFF THE GENERAL SWITCH 44 EM TRIAL–USER MANUAL 3- SWITCH OFF THE BATTERY PACK : THE LED INDICATOR MUST STOP TO LIGHT During the first using sessions, it is possible the battery pack do not switch off correctly. To avoid this problem, repeat the operations SWITCH ON/SWITCH OFF of the battery pack until it switch off. AFTER USING, YOU MUST RECHARGE THE BATTERY PACK. EVEN MORE IF YOU DEEPLY DISCHARGED IT 45 EM TRIAL–USER MANUAL 8. MAINTENANCE 8.1. CLEANING Concerning the water cleaning of the motorcycle: 1- Remove the battery pack (following procedure REMOVING OF THE BATTERY PACK) 2- Wash the motorcycle without focusing on the electrical components and the externals bearings. 3- Dry the motorcycle (ELECTRICAL CONTACTS) before the mounting of the battery pack. V DO NOT CLEAN THE HANDLEBAR WITH A PRESSURE WASHER Concerning the cleaning of the battery pack: 1- Switch OFF the battery pack. 2- Use only a wet cloth or sponge. 3- Dry properly the battery pack. 8.2. TRANSMISSIONS The motorcycle has 2 direct transmissions, the PRIMARY (circle red) one and the FINAL transmission (circle blue) 46 EM TRIAL–USER MANUAL 8.2.1. PRIMARY TRANSMISSION It is necessary to regularly check the state of the primary transmission. This transmission is located between the two transmission plates, under the battery pack. Please, follow the next procedure: Unscrew the 4 transmission carter screws Remove the transmission carter Check the state of the transmission Check the belt Once the checking is done, reassemble the transmission carter with its 4 screws 47 EM TRIAL–USER MANUAL 8.2.2. SECONDARY TRANSMISSION The secondary transmission needs to be cleaned and lubricated after every riding session CHAIN TENSION: Please follow the next procedure to check or adjust the secondary chain tension. Attention: To do this operation, the motorcycle needs to be on the floor. 1) LOOSEN the rear wheel axle. 2) ADJUST the chain tension with the setting cranks on each side of the swingarm. The crank position needs to be the same on the 2 sides. 3) ADJUST the tension following the next picture. 4) 5) When the tension of the rear wheel is OK, TIGHTEN the rear wheel axle. 48 EM TRIAL–USER MANUAL After reading this document, you can ride your EM. Take the time to adapt your riding to the motorcycle behavior. I will allow you to ride this motorcycle in the best conditions to discover all its capacities! If you have any question or any doubt, please contact us by phone or email 0033 467 411 090 [email protected] Electric Motion’s team wishes you to enjoy riding your electric motorcycle. 49