1
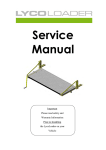
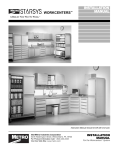
Nu-Clear Filters Making Things Crystal Clear FILTER SET-UP INSTRUCTIONS The various 500 Series Nu-Clear Filters come with different media. Please note that all Nu-Clear media is interchangeable. Model 500: An empty filter for biological or mechanical filtration. Includes a Full Flow Grid. Model 522: For mechanical and chemical filtration. Includes an 18 sq. ft. 100 Micron Poly-Screen Cartridge (IS02418), 1.5 lbs Inland Seas Premium Pelletized Activated Carbon (IS02456) & a Pressure Gauge (IS01962). Model 530: For ultra fine mechanical filtration. Includes a 30 sq. ft. 25 Micron Poly-Screen Cartridge (IS02330). Model 533: For ultra fine mechanical and chemical filtration. Includes a 30 sq. ft. 25 Micron Poly-Screen Cartridge (IS02330), 1.5 lbs bagged Inland Seas Premium Pelletized Activated Carbon (IS02456) & a Pressure Gauge (IS01962). Model 547: For biological filtration. Includes 3 gallons of premium bio balls Model 566: For chemical filtration. Includes 7 lbs of Inland Seas Premium Pelletized Activated Carbon (IS02497). RECOMMENDED PUMP Use with a pressure rated water pump rated at 7 to 15 PSI, or at least capable of handling 14 ft of head pressure with the desired flow rate. Suggested flow rates are a minimum of two times tank volume per hour for freshwater tanks and four times tank volume per for saltwater tanks. The pump should be able to supply the desired flow rate at a nominal head height of 12 ft. Pumps should always be installed in line before the filter(s). OTHER INCLUDED EQUIPMENT Inlet and Outlet Hose Adaptors for both 1” I.D and ¾” I. D. flexible tubing. Stainless Steel Hose Clamps for the Adaptors. USING YOUR NU-CLEAR FILTER Nu-Clear Filters are used with ponds, fountains and numerous other applications, but they are most commonly used with aquariums. DIAGRAM #2 shows Nu-Clear Filters installed in a typical closed loop filtration setup for an aquarium. Ball valves should be installed before and after Nu-Clear Filters for isolation during cleaning. We strongly suggest that any bulkhead tank adaptors penetrating the tank should have a ball valve coupled directly to them. Nu-Clear Filters can also easily be added to sump system, ponds, fountains, ETC. Simply use a submersible pump in the sump or basin to supply water the Nu-Clear Filter and then return the water back to the sump or basin. DIAGRAM #1 Item # 1 2 3 4 5 6 7 8 9 10 11 Description Housing O-Ring Filter Lid Stainless Steel Clamp Ring Cartridge (100 Micron for Model 522) Cartridge (25 Micron for Models 530 & 533) 1.5 lbs Activated Carbon Vent Knob Drain Valve Clamp Knob T-Bolt T-Bolt Nut Part# IS02580 IS02419 IS02584 IS02552 IS02418 IS02330 IS02456 IS02445 IS01950 IS02554 IS02553 IS02432 SET-UP STEPS (REFER TO DIAGRAM #1) 1. Remove the Vent Knob (7) and Clamp Knob (9) from the parts bag. 2. Thread the Vent Knob (7) into the threaded hole in the top of the Filter Lid (3). 3. Firmly push the Clamp Knob (9) over the T-Bolt Nut (11) on the Stainless Steel Clamp Ring (4). 4. Remove the Stainless Steel Clamp Ring (4) by turning the Clamp Knob (9) counter-clockwise until the TBolt (10) can be released from the Clamp Ring Latch. 5. Remove the Filter Lid (3). 6. Rinse the inside of the Housing (1) and Cartridge (if included) (5) or any other media. 7. For models with Carbon: Remove the Activated Carbon (6) and discard the outer plastic wrap. Gently rinse the Carbon to remove any carbon dust. Re-install the Cartridge (if included) (5) and replace the (6) Activated Carbon (6) in the center of the filter Cartridge (5). 8. Make sure the O-Ring (2) is seated evenly in the groove in the Housing (1), and then re-install the Filter Lid (3). Make sure the O-Ring (2) is seated evenly in the groove in the Filter Lid (3). 9. Reinstall the Stainless Steel Clamp Ring (4) around Filter Lid (3) and Housing (1). Engage the T-Bolt (10) in the Clamp Ring Latch and tighten with the Clamp Knob (9) until the clamp is snug. After the filter is running check for leaks and tighten as necessary. 10. Remove the Teflon Tape and Hose Adaptors from the parts bag. Apply 3 or 4 wraps of Teflon Tape to the threads of two Hose Adaptors (you can use either the ¾” or 1” provided). Also apply the Teflon Tape to the pipe threads on the Drain Valve (8). 11. Thread the Elbow Hose Adaptor into the upper (inlet) port on the left side of the filter. Thread the Straight Hose Adaptor into the lower (outlet) port on the right side of the filter. Thread the Drain Valve (8) into the ¾” port at the bottom of the center of the filter. 12. For Models 522 & 533 only: Remove the black plug from the Pressure Gauge and then thread the Pressure Gauge into the ¼” port until it contacts the small o-ring inside the boss (do not over tighten). 13. Connect the pressurized dirty water line from the pump discharge to the Elbow Hose Adaptor in the upper inlet spout, then secure with the Metal Hose Clamp (provided in the parts bag). 14. Connect your return hose to the lower (outlet) port and secure with the Metal Hose Clamp. 15. Start your pump to flow water thru the Nu-Clear Filter. 16. To purge air trapped under the lid (once the pump is running), turn Vent Knob (7) counter-clockwise until the air escapes and the water is even with the top of the cartridge (then re-tighten). 17. Refer to the FILTER CARTRIDGE CLEANING section for info on cleaning your cartridge. DIAGRAM #2 FILTER CARTRIDGE CLEANING WHEN SHOULD YOU CLEAN YOUR FILTER? Depending on the volume of your tank, the amount of fish, and your feeding habits, the cartridge could need to be cleaned anywhere from once a week to every two months. If you notice a significant reduction in the water flow through the filter, or a significant build-up of detritus on the filter cartridge, it is time to clean the cartridge. If you notice yellowing of the water or an objectionable smell to the water, it is time to replace the carbon. HOW TO CLEAN YOUR FILTER 1. Stop the pump to stop the water flow to the Nu-Clear Filter. Shut off any valves. 2. Drain water as need from the filter and plumbing by connecting a short piece of garden hose to the Drain Valve (8) at the bottom of the front of the filter. Place the end of the garden hose in a bucket or basin below the filter and any plumbing. Open the Vent Knob (7) and the valve on the Drain Valve (8) and allow the water to drain out of the plumbing as well as several inches below the top of the filter body. 3. Remove the Stainless Steel Clamp Ring (4) by turning the Clamp Knob (9) until the Clamp Ring Latch releases from the T-Bolt (10). If the Stainless Steel Clamp Ring (4) has not released, then insert a blade screw driver under the U-segment of the Clamp Ring Latch and twist to loosen the Ring. 4. Pull firmly (straight up) on the Vent Knob (7) to remove the Filter Lid (3). 5. Remove the Cartridge (5). 6. Remove the Premium Activated Carbon (6) from center of cartridge. Replace the Premium Activated Carbon (6) if needed. 7. Rinse the Cartridge (5) using a strong stream of tap water directed between pleats. If your filter cartridge is not that dirty, or if you have a Model 522 Nu-Clear Filter (100 Micron Cartridge), this will be sufficient and you can skip the next step. 8. If you have a Model 530 or Model 533 Nu-Clear Filter (25 Micron Cartridge), small particles can become trapped in the 25 micron size holes. You will need to bleach the Cartridge to completely clean it. Place the cartridge in a three to five gallon bucket with two gallons of water and one cup of bleach (enough bleach/water solution to fully cover the cartridge). Let the Cartridge soak for at least 8 hours and then rinse the Cartridge well with tap water. Make sure that the Cartridge dries completely before reusing it. Keeping a spare Cartridge on hand will make this process easier. 9. Replace the Cartridge (5) in the Nu-Clear Filter and press down firmly to seat it over the bottom pilot. 10. Replace the Premium Activated Carbon (6) in the center of the Cartridge (5). 11. Make sure the O-Ring (2) is seated evenly in the groove in the Housing (1) and then re-install the Filter Lid (3). 12. Reinstall the Stainless Steel Clamp Ring (4) around the Filter Lid (3). Engage the T-Bolt (10) in the Clamp Ring Latch and tighten with the Clamp Knob (9). 13. Open any in/out valves and start pump so water flows thru the Nu-Clear Filter while using the Vent Knob (7) to purge any air trapped under the lid (then re-tighten). TROUBLESHOOTING 1. Problem: Filter leaks around the Filter Lid (3) Solution: Remove the Stainless Steel Clamp Ring (4), Filter Lid (3), and O-Ring (2). Clean the groove in the Housing (1) and Filter Lid (3) with a clean, dry, lint-free towel. Clean the O-Ring (2) with a clean, dry, lint-free towel. Re-lubricate the O-Ring (2) with a very light coating of any silicone-based lubricant (such as Lifegard Aquatics Silicone O-Ring Lubricant) and re-install the O-Ring (2) in the Filter and install and tighten the Stainless Steel Clamp Ring (4). Wiping a very light coating of the silicone-based lubricant on the inside faces of the Stainless Steel Clamp Ring (4) and on the threads of the T-Bolt (10) will make assembly much easier. 2. Problem: Filter leaks around the Hose Adaptor inlet or outlet fittings Solution: Remove the Hose Adaptor fittings, wrap with more Teflon Tape and re-install the fittings. 3. Problem: Pressure Gauge shows little to no pressure Solution: We suggest the Nu-Clear Filter(s) be installed in the manner shown in DIAGRAM #2, with half the water bypassing the filter and returning to the tank separately. This allows water to bypass a really dirty cartridge and continue to keep water flowing in the tank. This will also protect your pump. Plumbed in this manner, the Pressure Gauge will not register much pressure. This is normal. Basically, if you plumb your system with some water bypassing the Nu-Clear Filter, the Pressure Gauge is not functional. If the Nu-Clear Filter is plumbed so that all of the water from the pump passes through the filter, then the Pressure Gauge will reflect the back pressure the Cartridge (5) is putting on the pump. To use your Pressure Gauge as a tool to determine when to clean your filter, do the following. -Mark the Pressure Gauge where the pressure reading is with a clean Cartridge is installed. -Then mark the Pressure Gauge where the pressure reading is when the ball valve after the filter is completely closed (so that water is not flowing back to the tank). This will mark the maximum pressure. -When the Pressure Gauge reaches the midpoint between these two readings, it’s time to clean the Cartridge. 4. Problem: Cartridge plugs up rapidly If the cartridge is plugging up rapidly, and you have tried bleaching the cartridge (see FILTER CARTRIDGE CLEANING), you probably have too much detritus in your tank for the filter to handle. Solution: Install an additional Nu-Clear Filter or a Nu-Clear Filter Extension Kit to your existing Nu-Clear Filter. REPLACEMENT PARTS & MEDIA Inland Seas Nu-Clear Filter replacement parts and media, including bulk premium Inland Seas Premium Pelletized Activated Carbon, are available from your local dealer or online from various online retailers. If you are having trouble finding parts or media they are available at: www.aquariumpart.com. CUSTOMER SERVICE www.inlandseasproducts.com Email: [email protected] Toll Free: 800-777-4458 Fax: 480-829-8141