1
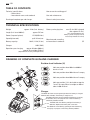
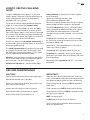
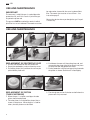
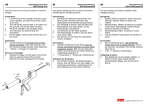
Krøger - B600
GB
DE
FR
DK
FI
RU
Battery Operated Caulking Gun / Operating and Safety Instructions
Batterie Fugenpistole / Bedienungs- und Sicherheitshinweise
Pistolet d’étanchéité à batterie / Mode d’emploi et instructions de sécurité
Batteri fugepistol / Betjenings- og sikkerhedsvejledning
Akkutoiminen saumauspistooli / Käyttö- ja turvallisuusohjeet
Аккумуляторный пистолет для заделки швовИнструкции по
эксплуатации и безопасности
ES
Pistola de calafatear a pilas / Instrucciones de funcionamiento y de
seguridad
PL
Pistolet do mas uszczelniających z napędem bateryjnym / Instrukcja
obsługi i bezpieczeństwa
IT
JP
Pistola per sigillanti a batteria / Istruzioni per l’uso e di sicurezza
バッテリー式コーキング・ガン / 操作および安全上の注意
/ GB
TABLE OF CONTENTS
Technical specifications
- General data
- International norms and standards
How to use the caulking gun?
Drawing of complete gun and charger
General safety instructions
Use and maintenance
TECHNICAL SPECIFICATIONS
Weight:
approx. 2 kilos (incl. battery)
Length (incl. barrel 600 ml):
approx. 525 mm
Power (impact of piston):
2.5 kN(250 kilos)
Speed (piston rod):
up till 10 mm/sec
Battery capacity:
10.8V / 1.1Ah (Li-Ion)
Charger:
Battery recharging time:
max. 45 min (80% charged
after approx. 25 min.)
(It is recommended that the
battery is pulse-charged, and not
necessarily drained each time)
Manufactured according
to international standards:
CE
220V (110V)
Operations per charging:
approx. 30 tubes (600 ml)
approx. 50 cartridges (310 ml)
(dependent on viscosity and temperature)
DRAWING OF COMPLETE GUN AND CHARGER
Residue-level indicator (6)
6
Indicator position when 400 ml and 600 ml
barrels are full
7
11
Indicator position when 400 ml barrel is empty
Indicator position when 600 ml barrel is empty
2
Indicator position, if it is desirable to stop the
”recoil” to empty 310 ml cartridges or 400 ml
tubes in 600 ml barrel
1
8
3
10
4
5
Charger
The diode will show constant green light when the battery is charged
between 80% and 100%. The battery is ready for use.
The diode will show constant red light if the battery is too hot ,
or too cold (< 0 ºC). Charging will start when the battery is
sufficiently cooled or heated.
The diode will show blinking red light if the battery is
defective. Replace the battery with a new one.
The diode will show blinking green light when the battery
charging is in progress and running without problems.
2
GB /
HOW TO USE THE CAULKING
GUN?
The gun is active when the trigger (1) is activated
(diode is green). The piston is quickly driven forward
to the starting position, then the driving speed is
adjusted to the user’s settings.
The piston (8) is driven slightly backwards when the
trigger (1) is released (ensures minimal reflux).
When the gun is active (diode is green), the return
button (2) is pressed and held for at least 2 seconds
(gear shall engage), then it is fully returned. The piston
(8) is driven all the way back and stops automatically
(if full return is interrupted, the trigger (1) is activated
and the piston (8) is driven forward again).
If not in use, the gun will close down automatically after 20 seconds (ensures that the battery is not drained
during the standby period).
The speed regulator wheel (3) can be easily operated
by using the ring or little finger simultaneously with
the index finger activating the trigger (1). This allows
for easy adjustment of speed during work.
Charging: when the charger is blinking green the battery is at least 80% charged, the battery will endure
pulse-charging – see description page 2
Residue-level indicator (6) - see description page 2
Battery indicator (5) indicates the amount of power
left in the battery:
Constantly showing green light > 50%
Shifting between red/green > 20%
Constantly showing red light< 20% (charge or replace
battery) (red/green blink = the gun is overloaded)
The white tube piston (8) is easily clicked off and on
when changing from tube to cartridge or for replacement. When the white tube piston is clicked off,
cartridges may be used for caulking – see instruction
page 4
The barrel (9) is threaded, and is easily unscrewed
for cleaning or changing to shorter barrel (e.g. 310 ml
cartridge or 400 ml tube).
Important! It is recommended to use a short barrel
when using 310 ml cartridges
The end cap (10) is threaded and will fit most jets.
The battery (4) is removed from the gun by applying
gentle pressure to both sides of the battery, and it may
then be pulled out. .
Replacement of the protective cuff (11) - see instruction page 4
USE AND MAINTENANCE
CAUTION!
IMPORTANT!
Always remove the battery prior to cleaning the gun.
Wipe off the tool with a dry, soft cloth.
When the gun is blinking red/green light, it indicates
that it is overloaded (continued use at red/green blinks
will reduce the working life of the gun considerably)
Do not use a wet cloth or solvents, because this may
harm and discolour the gun.
The gun (the butt-end itself) must NOT be opened or
taken apart
Inspect and clean the gun at regular intervals
Piston rod joints must NOT be taken apart or broken
Recharge the battery at least every six months
The protective cuff (8) must NOT be removed from the
gun, but may be replaced
Oil the interior of the cylinder before use.
ONLY use original parts
Do NOT expose the gun to rain or moisture
The guarantee will be void if the above mentioned
points are not observed
3
/ GB
USE AND MAINTENANCE
IMPORTANT!
The warranty is void if the gun is used without the
protective cuff, and if this results in joint filler getting onto the piston rod.
The gun must NOT be used with a nozzle in which
joint filler has set or hardened. The nozzle must then
be replaced or cleaned of the set or hardened joint
filler. The nozzle size must be at least 3.5mm – see
instruction page 5.
Contact the dealer where you bought the gun if repair
is necessary.
USE AND MAINTENANCE
REPLACEMENT OF PROTECTIVE CUFF
1. Pull the cuff backwards over the piston rod
2. Reveal the toothed bar, and unscrew the screw.
3. Pull off the piston joint, and then the cuff may be
pulled off the piston rod
4. Push down the new cuff along the piston rod, and
reassemble the piston joint by pushing it into place
on the piston rod and tighten the screw.
5. Put the protective cuff in place by pushing it towards
the piston as shown. Check that it is fitted tightly.
REPLACEMENT OF PISTON
(TUBE/CARTRIDGE)
3. The tube piston can be clicked on and off when the
piston rod is fully returned
1. When the gun is used for cartridges the tube
piston should not be fitted
2. The tube piston is clicked off the piston joint as
shown in the picture. When the gun is used for
tubes, the tube piston must be fitted
4
GB /
USE AND MAINTENANCE
Smallest nozzle size:
3.5mm –4mm
NOZZLE SIZE:
To ensure problem-free caulking, it is recommended
that the nozzle size is as big as possible.
If caulking is done with a smaller nozzle size, the
speed of the gun should be adjusted down to ensure
a) that the cartridge/tube does not leak or break, and
b) that the gun is not overloaded.
For further reference please see the chapter: ”How to
use the gun/the speed regulator wheel/battery indicator.
GENERAL SAFETY
INSTRUCTIONS
Read all safety instructions before you start using
the tool, and store them in your files after you have
finished reading.
FOR SAFE USE:
WARNING: When using cordless tools, the following
basic safety regulations must always be followed to
minimize the risk of fire, leaking batteries and personal
injuries:
Keep the work site clean. An untidy working area may
easily lead to personal injuries.
Create a good working environment. Do not expose
the electric tool to rain. Do not use the electric tool in
damp or wet places. Always make sure that the work
site is well lit. WARNING: Do not use the electric tool
in the proximity of flammable liquids or gas.
Avoid electric shock. Avoid physical contact with
earthed implements, e.g. pipes, radiators, stoves, and
refrigerators.
Keep children away. Do not allow unauthorized persons to come in contact with tools or extension wires.
Make sure that no unauthorized persons are present
at the work site.
Always return the tool and the battery to their proper
place after use. When the tool and the battery are
not in use, they must be individually stored in a dry
place, which is elevated or locked – out of children’s
reach. Make sure that the battery’s poles are not
short-circuited by metal parts, for instance screws,
nails etc.
Do not overload the tool. It will perform better and
with greater safety at the intended ratio.
Use the right tool. Do not use a smaller tool or accessories for a job requiring a heavier tool. Never use a
tool for a job it is not intended for.
Use safety goggles. Also use facial or dust mask if
necessary.
Keep the tool in good condition. Keep the tool clean;
this will make the work safer. Follow the instructions
regarding lubrication and replacement of accessories.
Make sure that the handles are dry, clean, and free
from oil and grease.
Unplug tool/batteries when the tool is not in use, i.e.
before repair and while changing accessories such as
piston and barrel.
Check damaged parts. If the protective cuff or another
part is damaged, it must be thoroughly checked to
ascertain whether it will function properly and as
intended. Check whether the movable parts are in
the correct position, whether the movable parts can
move freely, whether the parts are intact, whether the
assembly is correctly done, as well as whether other
conditions influencing the tool’s functions are in order.
A piston or another part that has been damaged shall
be repaired according to regulations or replaced by
an authorized dealer, unless otherwise indicated in
these safety regulations. Make sure that defective
switches are replaced by an authorized supplier.
Never use the tool if it cannot be started and stopped
with the switch.
5
/ GB
GENERAL SAFETY
INSTRUCTIONS
Warning: Use of accessories or equipment other
than those recommended in this user manual may
entail a risk of personal injury. Make sure to use only
original batteries meant for use with the tool. Before
connecting the charger, make sure that the surfaces
of the battery or the tool are clean and dry. Make
sure that the batteries are charged with original MK
parts. Incorrect use may entail a risk of electric shock,
superheating or leakage of corrosive liquids from the
battery.
Unplug the charger by pulling at the plug instead of at
the wire itself. This will minimize the risk of damaging
the plug as well as the wire.
Have the tool repaired by a qualified professional.
This power-tool fulfils the requirements of the relevant
safety regulations. Repair should only be carried out
by qualified persons, and only original spare parts
should be used. Failure to comply with the aforementioned safety regulations may constitute a serious risk
of injury for the user of the tool.
Do not take the charger apart. If it needs checking or
repair, deliver it to a qualified repair shop. If it is incorrectly reassembled it may result in a risk of electric
shock and/or fire.
Disposal of battery: Make sure that the battery is
disposed of in a safe manner and in accordance with
national regulations.
Check that the wire lies in such a way as to prevent
anyone to step on it, trip over it, or in other ways
subject it to damage or pressure.
Avoid contact with liquid from the battery. Should any
person by mistake come in contact with the liquid, it is
necessary to rinse with clean water. If liquid gets into
a person’s eye, seek medical help immediately.
The charger and the battery are specially made to
work together. Avoid charging other cordless tools or
batteries with this charger. Avoid charging the battery
with other chargers.
BATTERY CHARGER & BATTERY PACK
Avoid separating the battery charger and the battery
itself.
Save these safety instructions. This user manual
contains important safety instructions for the battery
charger.
Read all safety instructions and warnings concerning
the battery charger and the battery pack before you
start using the battery charger.
WARNING: only charge battery of the correct type.
Other types of batteries may explode and cause
personal injuries and other damages.
Do not subject the charger to rain or snow, and avoid
using it in damp places.
The use of non-recommended spare parts may constitute a risk of fire, electric shock, and/or personal
injury.
6
Do not use the charger if the wire or plug are damaged – replace them as soon as possible.
Do not use the charger if it has been subject to a
heavy blow, has fallen down on the floor, or in any
other way has been damaged – deliver it to a qualified
repair shop.
To minimize the risk of electric shock, the charger
must be unplugged before it is subject to maintenance
or cleaning.
Do not put the tool and the battery pack in a place
where the temperature may exceed 50° C (e.g. a metal
tool shed or a car in the summer). This may cause
deterioration of the battery’s capacity and damage to
the battery.
Do not charge the battery if the temperature is below
0°C or over 40°C.
Do not burn the battery as it may explode.
The charger is made for use with a regular electricity
network. Only charge the voltage indicated on the
name plate. Avoid using any other voltage value.
Handle the wire with care. The charger must never be
carried by the wire or unplugged with a vigorous pull.
Keep the wire at a good distance from heat, oil, and
sharp edges.
GB /
GENERAL SAFETY
INSTRUCTIONS
Charge the battery pack in a well-ventilated place.
Do not cover the charger and the battery pack with a
cloth or similar during the charging process.
Avoid short-circuiting the battery. Short-circuiting may
constitute heavy loss of effect, superheating, and fire.
NOTE: If the power supply wire of this component
has been damaged it must be replaced by a service
personnel authorized by the manufacturer, because
special tools must be used.
WARNING: If leakage of electrolytic liquid occurs,
rinse with water/ a neutralizing agent. If the liquid
has come in contact with the eyes, seek medical aid
immediately.
The device is not meant to be used by children or
impaired persons without supervision.
Small children should be supervised to ensure that
they do not play with the device.
7