1
PL
INSTRUKCJA
OBSŁUGI
OWNER MANUAL
GB
DE
PT
BATTERIESPRITZE
АККУМУЛЯТОРНЫЙ
ОПРЫСКИВАТЕЛЬ НА КОЛЕСАХ
RU
Table of Contents
Application of the sprayer ................................................................................................ 16
Standard equipment
16
Charging the battery ........................................................................................................ 16
Preparation for work and precautions .............................................................................. 17
Preparing for work .................................................................................................... 17
Sprayer’s operation .................................................................................................. 17
Usage recommendations .......................................................................................... 17
Equipment maintenance .................................................................................................. 18
General Comments ......................................................................................................... 18
Safety Information ........................................................................................................... 19
Technical information and symbols of the elements .........................................................20
Construction and maintenance of APS telescopic lance .......................................... 21
Construction and maintenance of the feeding valve integrated with handle ............. 21
The control panel .......................................................................................................22 G B
Troubleshooting ......................................................................................................... 22-23
Removal and Disposal .................................................................................................... 23
Terms of repairs and guarantees .................................................................................... 24
List of schema elements ................................................................................................. 25
Thank You for buying our sprayer.
Before using the sprayer, this manual should be read carefully and kept for future reference.
To ensure long-term operation of the device, the safety, operation and maintenance
recommendations enclosed in the manual should be strictly observed.
15
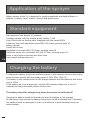
Application of the sprayer
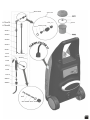
Battery sprayer trolley V)( is designed for spraying pesticides and liquid fertilizers in
gardens, orchards, parks, forests, nurseries and greenhouses.
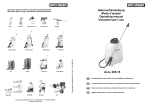
Standard equipment
Each packing of the Sprayer V)( contains:
Complete sprayer with the wheels, pump, battery 7,2Ah
Hose 250cm with the feeding valve integrated with the handle R020j
Telescopic lance with adjustable nozzle MR1.5 Ø1.5mm, spraying angle 45
Battery charger
Funnel with a sieve
Regulated cone nozzle MR1.0 Ø1.0mm, spraying angle 45
Flatstreem nozzle (for herbicides) MF3,110, Ø 3mm, spraying angle 110
Seals, a vial of silicone lubricant and other parts
User manual and warranty card
GB
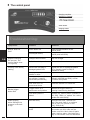
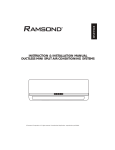
Charging the battery
To charge the battery, plug in the enclosed charger to the charging socket on the control
panel and then connect with the power supply of 230V 50Hz. (Site: 22)
The battery is fully charged when all LED charge indicators are illuminated as well as the
control 100%.
If the battery has a low charge level, and the LEDs indicators light only in red, it’s
necessary to charge the battery before further work.
The battery should be charged only when the sprayer is switched off!
Charging the battery should be finished only when the battery is fully charged.
At least every three months the battery charge level should be checked and if necessary
the battery should be recharged in order not to allow to its total discharge which can
cause damage.
16
Preparing and operating instructions
Preparing for work
Remove the sprayer from the carton
Connect the lance with the feeding valve integrated with handle R020j
Open the cap RP11 and fill in the sprayer with clean water to check the operation of the device
Switch on the button on the control panel and press the trigger on the handle.
If the sprayer works and the battery is sufficiently charged for work then we can start preparing
for spraying
The charge level is displayed on the control panel
In a separate container prepare a liquid according to the recommendations on the packing of
the pesticide
Pour the liquid into a container using the sieve with funnel RP22
Sprayer’s operation
GB
NOTE ! After finishing all operations, make sure that the battery is sufficiently charged
to store (store the sprayer with a charged battery), and the sprayer was turned off
using the button on the control panel.
Usage recommendations
Do not store the sprayer in sunlight or in temperatures below +4ºC.
It is not recommended to fill in the tank above the working capacity.
During operation, do not put the sprayer on one side, because instead of liquid the air
can be sucked.
If you observed increased resistance in the feeding valve, lubricate the seals with
silicone lubricant or they can get damaged.
When working with plant protection chemicals, it is necessary to comply with safety
rules, and strictly follow the instructions on the packaging of chemicals.
If you leave some liquid in the lance during winter, expanding ice may damage the valve
and the handle.
17
Equipment Maintenance
After finishing work, cleaning the sprayer and blowing air through it, you should:
Unscrew hose connected to the handle, remove R40 filter, and clean it (preferably under
running water).
Unscrew the bottom nut R50 from the feeding valve - R020j, remove the valve piston
with a spring, clean it, lubricate with silicon lubricant, put it back into the valve and screw in the
nut tight.
Unscrew the yellow nozzle cap R115, then unscrew the black nozzle nut R64, take
out the nozzle core, wash it, lubricate the O-ring on the core and reassemble it again.
Unscrew the cap of the tank RP11, take out the funnel RP22, take out the diaphragm
tank cap R322 without removing it from the hose, then take out the o-ring and wash or exchange
the filter. When it’s done, put the filter and the o-ring back into the cap R322. Then put the
diaphragm tank cap R322 inside the tank. When placed in a tank, make sure that the cap touches
the bottom of the tank.
GB
Note!
All repairs, replacements or maintenance of the pump, battery or control panel
can be done only in the Marolex premises or by authorized services.
Repairing, replacing or maintenance of the elements mentioned above on their
own results in loss of warranty.
General Comments
In the lance’s handle there’s a filter (R40) installed, designed to protect nozzles from clogging. All
Marolex lances are interchangeable (the same thread in all of them). It is possible to use additional
extensions (60 and 100 cm) produced by Marolex. With MAROLEX sprayers a wide range of nozzles
can be used: cone-shaped, deflecting, flatstream, with adjustable stream angle and with different
output. The construction of Marolex lances allows the use of nozzles produced also by other
manufacturers.
18
Safety Information
Children, pregnant women, people taking drugs or drinking alcohol should not operate the
sprayer. The operation of the sprayer should be tested with clean water first.
When working with plant protection chemicals (including preparation of the formula
and utilization of the packaging), it is necessary to use special protective clothing:
rubber boots, gloves, coat, cap, goggles, mask or respirator.
It’s forbidden to work on an empty stomach and eat, drink or smoke while spraying. The alcohol
shouldn’t be drunk before or just after spraying.
Residual liquid must not be released into the open water or biological waste water treatment
plant. Observe the applicable Ordinance of the Minister of Agriculture and Rural Development of
24 June 2002 on hygiene and safety when working with plant protection chemicals. These
comments also apply to rinsing the tank and other elements of the sprayer.
The used sprayer should be utilized in chemical waste plant.
In case of poisoning, contact your doctor immediately.
Prepare spraying liquid in a special container strictly following rules given by its manufacturer.
It’s forbidden to operate the sprayer, if there are any damages or leakages.
Repairs must be done when the sprayer is decompressed and not contaminated.
Thoroughly wash sprayer after each use and before service.
Do not use the sprayer for other purposes than those specified in the manual.
The sprayer must be stored empty without any liquid in the container or lance.
The only device for making pressure in the container is the sprayer’s
pump. Iit’s forbidden to use any other equipment for this purpose!
GB
Company Marolex does not allow the use of fluids defined as: explosive, extremely flammable,
highly flammable, flammable (in case when the maximum allowable temperature is above
flashpoint), very toxic, toxic, oxidising.
Unauthorized changes to the sprayer and using it against its purpose can lead to poisoning of
humans and animals, environmental contamination, damage to the sprayer or serious accidents.
After finishing work, change clothes (clean protective clothing), wash your hands and face, rinse
the mouth and throat, clean the nose.
After finishing spraying, water down the remaining liquid at least 10 times and spray it on the same
area again.
After finishing work, wash the sprayer few times with water, then pour the water out and blow air
through it by pumping through it a few times with the feeding valve R020j open.
For the damages caused by not complying to the rules in this manual the user is fully responsible.
Storing of the sprayer filled with a liquid or air under pressure in forbidden.
It’s forbidden to block the safety valve as it may cause damages.
After the compression the container must not be hit or dropped.
We recommend that you fill in the tank using our funnel with strainer - built in filter additionally
prevents clogging of the nozzles.
During use and storage, the sprayer must be protected against using it by unauthorized persons,
especially children.
Sprayer once used for plant protection chemicals can not be used for other purposes!
19
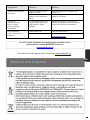
Sign
Pb
Description
Location
Sign indicating possibility of unspecified danger.
On the container
Sign indicating that a users manual should
be read before starting work
On the container
Warning against poisoning by toxic substances
On the container
Devices may not be disposed of with household
waste, used sprayer should be disposed of
through a recycling center
On the container
The battery used in this product contains lead,
the used or damaged battery must be disposed
of through a recycling center
On the battery
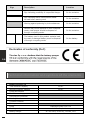
Declaration of conformity (DoC)
GB
Technical information and symbols of the elements
Battery sprayer VX
Total container capacity
22.00 l
Working container capacity
20.00 l
Pump performance
Maximum working pressure
Overpressure protection
Net weight
Container material
Battery
Pump
20
Diaphragm pump 12V 0.7A
Working mode
Interval operation
Battery charger
AC 100-240V, 50-60 Hz, / DC18V, 15.A
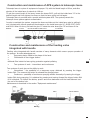
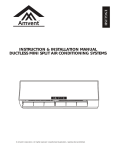
Construction and maintenance of APS system in telescopic lance
Telescopic lance is a piece of equipment of sprayer VX, with the folded length of 60cm, and after
ejection of the inside lance it extends to 108 cm.
To get the correct length of the lance, loosen the sleeve R103, pull out the inside lance "A" to the
desired length and then tighten the sleeve so that the lance could not fold again.
Telescopic lance is provided with a special antidust system APS. The system protects the
telescopic lance system against contamination.
In order to maintain the system, unscrew the sleeve and take out the inside lance pipe by pulling it
out. Lubricate with silicone grease all the elements on the inside lance pipe 'A”: R106, R107, R108
and R109. When it’s done, put back the pipe 'A” inside the outer lance pipe ”B” and screw in the
sleeve.
R103
R106 R108 R109 R107
R73nx50
A
B
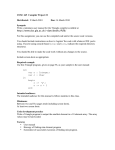
Construction and maintenance of the feeding valve
integrated with handle
Feeding valve integrated with handle consists of many elements which ensure proper operation of
the sprayer. Its main advantages are:
Ergonomic design fitted to the shape of the hand
Comfortable to use trigger button
dditional filter inside the lance giving protection against polluting
Two systems of work - intermittent and continuous
A
GB
Two systems of work give us the ability to work:
Intermittent - the possibility of a temporary spray obtained by pressing the trigger
button R44. The moment the button is released the spraying stops.
Continuous - possibility of continuous spraying without necessity of pressing the trigger
button R44 during spraying. It is obtained by pressing and moving forward the trigger button R44
till it is blocked. To unblock the button, press it and move backward until the brass element is at
the end of the button hole.
Maintenance is described in the section "Equipment maintenance"
R44
R40
R81e R80e
R020j
21
The control panel
charging complete
charging in progress
switch button
charging socket
Troubleshooting:
Symptoms:
Reason:
Solution:
Sprayer does not
work
Swich button off
Press the switch button on the
control panel
Charge the battery ("process" on the
control panel will show)
Discharged battery
GB
Despite charging
the sprayer, the
control panel does
not light up
Charger does not work
Buy new charger
Defect in control panel
Contact Marolex service
Feeding valve R020j
leaking
Loose hose nut R80e or
damaged gasket R47c
Tighten the nut or replace the gasket
R47c (found in repair kit Z08j or
washers kit Z08u)
Replace the valve & handle – R020j
Freezing water ruptured
handle or valve.
Damaged valves cylinder
top gasket (it wasn’t
lubricated periodically)
Blocked trigger
button R44
Weak spraying
action although the
pressure in the tank
is high
22
Replace the piston with the o-rings
(found in kits Z08j and Z08z) or even
the entire R020j valve
Lost seal R47c or
unscrewed lance
Insert the seal R47c or screw the
Trigger button is in
continuous work position
Unblock the trigger button by
pressing it and moving backward
The valve’s piston is
seized
Replace the valve’s piston (included in
kits Z08j, Z08z) or replace the entire
handle with valve R020j.
R40 filter dirty
Unscrew the hose, remove the
R40 filter and clean it or replace
with a new one (found in kits
Z08j, Z08b,R40)
Unscrew the nozzle cap R115, then
the nozzle nut R64, take out the
nozzle core R114 and rinse all parts
under running water; lubricate the oring on the nozzle core and assemble
Clogged nozzle in the
lance
Symptoms:
Reason:
Solution:
Leaks in the joints of
the lance
Lost R47c seal or loose
nozzle nut R64
Unsealed or incomplete
system of the telescope
lance
Insert the seal R47c or tighten the
nozzle nut
Tighten or repair the telescope
system in the lance
There’s air
appearing in the
hose or liquid
stream is being
interrupted
In the pump there is air
mixed with a liquid (too
little liquid or tilted
sprayer
Repeatedly turned on and off the
sprayer by pressing the switch button
or add the liquid to the container
Not possible to
reach the maximum
pressure
Dirty sieve R322
Dirty pressure pump
Clean the sieve R322
Contact Marolex service:
[email protected]
In case of other symptoms preventing proper operation of the
sprayer please contact MAROLEX service at:
[email protected]
We offer technical support and on-line help: serwis.marolex.pl
GB
Removal and Disposal
Pb
23
Terms of repairs and guarantees
GB
date of the repair
24
description of the fault
stamp of the retailer and the date
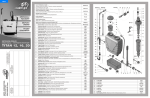
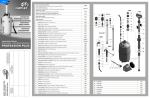
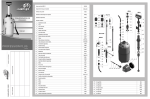
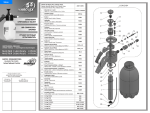
List of schema elements
Telescopic lance with handle
R010mx
Telescopic lance without handle
R01mx
Z12/15
Feeding valve integrated with handle
R020j
GB
25
R010mx
Z12/15
M80
R73nx50
R115_1.5
R73mx60
R112
R114R116 R64
R47c
R103
R106
R108
R109
R107
M11
R 01m x
R47c
R020j
R44
R02j
R40
R47c
R81e
R80e
R42
R43 R48a R47c R50
65
MAROLEX Sp.z o.o.
ul. Reymonta 2
05-092 Dziekanów Leśny
POLAND
www.marolex.pl
077/PL,GB,DE,PT,RUS/2014/A