1
User's Manual
Version 6.3
©2010 Split Infinity Music
User's Guide and Help File
for Worship LIVE! version 6.3
Contents
I
Table of Contents
Foreword
0
Part I Welcome to Worship LIVE!
6
1 What Is Worship
...................................................................................................................................
LIVE!?
6
2 The Basics
................................................................................................................................... 7
3 Terminology ................................................................................................................................... 8
4 Recent Changes
................................................................................................................................... 8
5 Frequently Asked
...................................................................................................................................
Questions
10
6 License Agreement
................................................................................................................................... 12
Part II Working With...
15
1 Song Database/Library
................................................................................................................................... 15
About Databases
.......................................................................................................................................................... 15
The Song Library
..........................................................................................................................................................
screen
16
Special Tools..........................................................................................................................................................
on the Library Screen
16
The Stage Mode
.......................................................................................................................................................... 18
Opening a Database
.......................................................................................................................................................... 19
Creating a Database
.......................................................................................................................................................... 20
Adding Songs.......................................................................................................................................................... 20
Saving Databases
.......................................................................................................................................................... 20
Exporting the..........................................................................................................................................................
Database
20
Searching the..........................................................................................................................................................
Database
20
Library Sorting
.......................................................................................................................................................... 21
Library Filters.......................................................................................................................................................... 23
2 Individual Songs
................................................................................................................................... 24
Song Basics .......................................................................................................................................................... 24
General Song..........................................................................................................................................................
Information
24
About Songs
......................................................................................................................................................... 24
Song Properties
......................................................................................................................................................... 25
Song Contents
......................................................................................................................................................... 25
Chord Formats
......................................................................................................................................................... 25
Chording .........................................................................................................................................................
Styles
26
Song File Management
.......................................................................................................................................................... 27
Opening Songs
......................................................................................................................................................... 27
Creating Songs
......................................................................................................................................................... 27
Song title.........................................................................................................................................................
case
27
Saving Songs
......................................................................................................................................................... 27
Deleting Songs
......................................................................................................................................................... 28
Exporting.........................................................................................................................................................
Songs
28
Comparing
.........................................................................................................................................................
Songs
28
Starting the Comparison
......................................................................................................................................... 29
Comparison Dialog
......................................................................................................................................... 29
Editing Songs.......................................................................................................................................................... 30
Editing Songs
......................................................................................................................................................... 30
Changing.........................................................................................................................................................
Song Properties
30
The Sequence
.........................................................................................................................................................
sidebar
32
Changing.........................................................................................................................................................
Multiple Songs
33
Formatting
.........................................................................................................................................................
Songs
34
Transposing
.........................................................................................................................................................
Songs
34
©2010 Split Infinity Music
II
Worship LIVE! version 6 User's Manual
Verse Breaks
......................................................................................................................................................... 35
Page Breaks
......................................................................................................................................................... 35
Smart Chord
.........................................................................................................................................................
Wrapping
36
Smart Font
.........................................................................................................................................................
Changes
36
Auto Syntax
.........................................................................................................................................................
Formatting
36
Displaying Songs
.......................................................................................................................................................... 36
Printing Songs
......................................................................................................................................................... 36
Projecting.........................................................................................................................................................
Songs
37
Exporting.........................................................................................................................................................
to Clipboard or RichText
37
CCLI Support.......................................................................................................................................................... 37
Finding Songs
..........................................................................................................................................................
Online
38
CCLI Summaries
......................................................................................................................................................... 38
CCLI SongSelect
.........................................................................................................................................................
Files
39
CCLI Lookups
......................................................................................................................................................... 40
IWillWorship
.........................................................................................................................................................
Searches
40
DelicateFade
.........................................................................................................................................................
Searches
41
Importing and..........................................................................................................................................................
Exporting Songs
42
Importing.........................................................................................................................................................
Basics
43
Import Dialog
.........................................................................................................................................................
Options
43
Exporting.........................................................................................................................................................
From Other Software
44
Importing.........................................................................................................................................................
songs from Word files
44
Importing.........................................................................................................................................................
songs from Powerpoint files
45
Importing.........................................................................................................................................................
Worship LIVE! files
46
3 Announcements
................................................................................................................................... 46
About Announcements
.......................................................................................................................................................... 47
Selecting Announcements
.......................................................................................................................................................... 47
Creating Announcements
.......................................................................................................................................................... 47
Editing Announcements
.......................................................................................................................................................... 47
Saving Announcements
.......................................................................................................................................................... 48
Projecting Announcements
.......................................................................................................................................................... 48
Deleting Announcements
.......................................................................................................................................................... 48
4 Scripture
................................................................................................................................... 48
About Scripture
..........................................................................................................................................................
Support
49
The Scripture..........................................................................................................................................................
Dialog
49
Parallel views..........................................................................................................................................................
of Scripture
49
Selecting Scripture
.......................................................................................................................................................... 50
Searching Scriptures
.......................................................................................................................................................... 51
Printing Scripture
.......................................................................................................................................................... 51
Projecting Scripture
.......................................................................................................................................................... 51
Copying Scripture
.......................................................................................................................................................... 51
5 Images
................................................................................................................................... 51
About Images.......................................................................................................................................................... 51
Adding Images
..........................................................................................................................................................
to the PlayList
52
Projecting Images
.......................................................................................................................................................... 52
Image Captions
.......................................................................................................................................................... 52
Selecting a Different
..........................................................................................................................................................
Image
52
6 Audio
................................................................................................................................... 52
About Audio .......................................................................................................................................................... 53
Adding Audio..........................................................................................................................................................
to the PlayList
53
Playing Audio.......................................................................................................................................................... 53
Selecting a Different
..........................................................................................................................................................
Audio File
53
7 Videos
................................................................................................................................... 54
About Videos.......................................................................................................................................................... 54
Adding Videos
..........................................................................................................................................................
to the PlayList
54
Projecting Videos
.......................................................................................................................................................... 54
©2010 Split Infinity Music
Contents
III
Text-over-Video
.......................................................................................................................................................... 55
Selecting a Different
..........................................................................................................................................................
Video
55
8 Playlists
................................................................................................................................... 55
About Playlists
.......................................................................................................................................................... 55
The Playlist display
.......................................................................................................................................................... 56
The Mini-Library
..........................................................................................................................................................
Pane
57
Opening Playlists
.......................................................................................................................................................... 59
Creating Playlists
.......................................................................................................................................................... 59
Arranging Playlist
..........................................................................................................................................................
Items
60
Saving Playlists
.......................................................................................................................................................... 60
Projecting Playlists
.......................................................................................................................................................... 60
Printing Playlists
.......................................................................................................................................................... 61
Playlist Notes.......................................................................................................................................................... 61
Exporting Playlists
.......................................................................................................................................................... 62
9 Projection
................................................................................................................................... 63
About Projection
.......................................................................................................................................................... 63
Single versus..........................................................................................................................................................
Dual Screens
64
Even More Screens
..........................................................................................................................................................
- the Lyric display
64
Projecting From
..........................................................................................................................................................
a Playlist
66
Projecting an..........................................................................................................................................................
Item Directly
67
Projecting Custom
..........................................................................................................................................................
Text
69
Keyboard Shortcuts
.......................................................................................................................................................... 70
Projecting Web
..........................................................................................................................................................
Pages
70
Visual Paging.......................................................................................................................................................... 71
Configuring the
..........................................................................................................................................................
Display
72
Customizing Playlist
..........................................................................................................................................................
Items
73
Blanking and ..........................................................................................................................................................
Freezing
74
Automation .......................................................................................................................................................... 74
Automation
.........................................................................................................................................................
on the Playlist
75
Setting Up.........................................................................................................................................................
A Song For Automation
75
Setting Up.........................................................................................................................................................
Non-Song Automation
76
Controlling
.........................................................................................................................................................
the Flow of Automation
77
Setting Automation
.........................................................................................................................................................
Defaults
78
10 Printing
................................................................................................................................... 78
Printer Setup .......................................................................................................................................................... 78
Page Setup .......................................................................................................................................................... 79
Print Confirmation
.......................................................................................................................................................... 79
Previewing Printouts
.......................................................................................................................................................... 81
Printing Colors
.......................................................................................................................................................... 81
11 Multimedia ................................................................................................................................... 82
Multimedia Control
..........................................................................................................................................................
Window
82
Audio Files and
..........................................................................................................................................................
Songs
83
Keyboard Shortcuts
.......................................................................................................................................................... 83
Metronome .......................................................................................................................................................... 83
Click-to-Play Chords
.......................................................................................................................................................... 84
Chord Diagrams
..........................................................................................................................................................
display
84
Chord Dictionary
..........................................................................................................................................................
Editing
85
12 Preferences ................................................................................................................................... 87
General
.......................................................................................................................................................... 87
Page Setup .......................................................................................................................................................... 88
Print Options.......................................................................................................................................................... 89
Chord Format.......................................................................................................................................................... 90
Syntax Styles.......................................................................................................................................................... 91
Ignored Terms
.......................................................................................................................................................... 92
Fonts
.......................................................................................................................................................... 94
©2010 Split Infinity Music
IV
Worship LIVE! version 6 User's Manual
Projection .......................................................................................................................................................... 95
Multimedia .......................................................................................................................................................... 95
Stage Mode .......................................................................................................................................................... 96
Default Folders
.......................................................................................................................................................... 97
Unlock
.......................................................................................................................................................... 98
13 Miscellaneous
................................................................................................................................... 99
Countdown Timers
.......................................................................................................................................................... 99
Creating.........................................................................................................................................................
a timer
100
Configuring
.........................................................................................................................................................
the timer
101
Other timer
.........................................................................................................................................................
options
101
PowerPoint ..........................................................................................................................................................
Presentations
102
About PowerPoint
.........................................................................................................................................................
support
102
Adding PowerPoint
.........................................................................................................................................................
presentations to the PlayList
102
Projecting
.........................................................................................................................................................
PowerPoint presentations
103
Online Synchronization
.......................................................................................................................................................... 103
What Online
.........................................................................................................................................................
Sync Does
104
How Sync
.........................................................................................................................................................
Works
104
Setting Up
.........................................................................................................................................................
Online Sync
105
Server Settings
......................................................................................................................................................... 107
Using Online
.........................................................................................................................................................
Sync
107
Manual Sync
.........................................................................................................................................................
Configuration
108
Change Colors
..........................................................................................................................................................
Dialog
109
Spell Checking
.......................................................................................................................................................... 109
Part III Setup and Troubleshooting
112
1 Installation ................................................................................................................................... 112
2 Troubleshooting
...................................................................................................................................
Startup
112
3 Images, videos,
...................................................................................................................................
and PowerPoint
112
4 Updating
................................................................................................................................... 113
5 Purchasing................................................................................................................................... 113
6 Unlocking ................................................................................................................................... 113
7 Bug Reporting
................................................................................................................................... 114
8 Contacting ...................................................................................................................................
Us
115
9 Online Features
................................................................................................................................... 115
10 Uninstalling................................................................................................................................... 116
Part IV Miscellaneous Functions
118
1 How Transposition
...................................................................................................................................
Works
118
2 DDE Interface
................................................................................................................................... 118
3 Registry Entries
................................................................................................................................... 118
4 Backing Up...................................................................................................................................
Your Data
119
5 Restoring Your
...................................................................................................................................
Data
119
6 System Files
................................................................................................................................... 120
Index
121
©2010 Split Infinity Music
Part
I
6
1
Worship LIVE! version 6 User's Manual
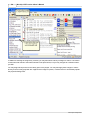
Welcome to Worship LIVE!
Welcome to Worship LIVE, the multimedia tool for worshippers.
Worship LIVE! Basics
·
·
·
·
·
·
·
Worship LIVE! helps you organize, print, display, and transpose songs.
A song contains lyrics and chords. Worship LIVE! can transpose the chords into any key.
Songs are displayed in separate windows, where you can edit the song and its properties.
Each song is stored as a separate file.
Songs are stored in "databases", or collections of songs in folders.
"Playlists" help you select a group of songs from a database, and choose the keys in which they will be
printed and displayed. You can also add scriptures and announcements to the playlist.
Playlists, as well as individual songs, scripture and announcements, can be displayed in a special format, the
Projection view, optimized for digital projector displays and even for on-stage use with laptop computers.
Copyright ©2011 Split Infinity Music
All Rights Reserved.
(last update 2011/04)
1.1
What Is Worship LIVE!?
Worship LIVE! is an essential tool for worship leaders and musicians. It
is also an excellent tool for church projection systems, able to quickly
display song lyrics, chords, Scripture verses, announcements, and video
and image files with only moments of preparation.
Churches that use a variety of songs from contemporary Christian artists and publishers often deal with many
challenges finding the perfect song for a worship service, and this task is often complicated by hunting through a
large binder of printed songs with duplicates in various keys to accomodate various services and leaders.
Worship LIVE! simplifies finding, transposing, and printing your own songs. The software also includes a wealth
of features for modern churches that use digital projectors to present scripture and song.
©2010 Split Infinity Music
Welcome to Worship LIVE!
1.2
7
The Basics
Worship LIVE! has several windows which may open as you work. Most have toolbars, or collections of buttons
that are shortcuts to various actions available for that window.
Worship LIVE! also uses status bars at the bottom of various windows. These status bars contain useful
information for that particular window. In some cases you can click or double-click on the status bar panels to
activate various features.
Worship LIVE! uses ToolTips in almost all its dialog boxes and windows. If you need help with a button or control,
hold the mouse cursor over it for a second, and a ToolTip should appear giving you extra information about that
setting. You can disable all the tooltips from most windows in the Views preferences.
From time to time, tips will appear to give you useful hints. These tips have a checkbox labeled "Do not show this
message again". If you get tired of being reminded, just check this box before clicking "OK". If you wish to see the
tips again, click the Reset Tips button on the Views preferences.
Click or double-click on status bar panels for shortcuts to various actions, such as changing the sorting
method, or opening a playlist. Some panels will have no actions.
Right-click on song titles for a popup menu of various actions available for songs, such as printing,
deleting or renaming.
You can find out what various buttons do by holding the mouse pointer over the button until a tooltip
appears.
©2010 Split Infinity Music
8
1.3
Worship LIVE! version 6 User's Manual
Terminology
Chord
Transpose
Chord sheet
Projection
Song
Database
Library
Playlist
Scripture
Announcement
1.4
A chord is a written representation of a set of musical notes. When written in text format (as
opposed to musical notation, or sheet music), a chord usually looks like these examples: A,
Bm, C7, Dsus, Eb, F#, Gdim. A chord can also indicate its "voicing" by showing which
notes should be played by bass instruments or the left hand on a piano, like this: A/E,
Cm/Eb, G7/D.
To transpose (the process of "transposition") is the process of changing the root key of a
song to a different chord (also known as "modulating" when it is done in the middle of playing
a song).
A text-based method of displaying the lyrics and chords of a song by placing a written chord
name above the syllable of the lyric where it would be played during the song
Showing a song, scripture or announcement in a format optimized for display on a digital
projector.
A single file on disk, containing header information such as title and tempo, and which
includes a chord sheet rendition of a particular song. Songs are stored in files with the *.sng
extension.
A collection of songs used by Worship LIVE. Databases are stored in files with the *.sdb
extension.
Another term for "database" - a collection of songs.
A subset of a database, containing a set of songs, scriptures and announcements intended
to be used as a group. Playlists are stored in files with the *.ppl extension.
This program can select, display and project Bible verses, up to a chapter at a time.
This program can select, edit, display and project announcements. The announcements are
stored separately from the songs, and can be separated into pages that are projected
separately.
Recent Changes
The following changes have been made between version 6.0 and version 6.3. They are detailed as appropriate in
each section of this help file.
Announcements Changes
Added the ability to save projection formats for announcements.
Announcements now have large projection previews too.
Find Songs Changes
Added support for searching the DelicateFade.com database for songs. Look under the Find menu for this new
option.
The Find Songs dialog now has "whole word" option.
The Find Songs dialog now has a column showing matches for found items.
The Find Songs functionality was improved to search ALL songs, not just the current filtered list of songs.
Library / Database Changes
Added "Change title case" feature to library window's [File:Database] submenu; this allows changing all song
titles to UPPERCASE or Mixed Case with a single menu selection.
Added [Archive song] function to library window's [File] menu; this allows sending the song to an inactive folder
instead of completely deleting it from disk.
Added [Open last playlist] toolbar button for easy access to most recent playlist.
Added left/right split to main library window (just click the Split button on the toolbar to cycle). Previously the
window could only be split vertically.
Added transpose buttons to the main library window (see the item under the [View] menu).
Filter now includes "On playlist" as a filterable item.
Playlist Changes
Added a "loop to self" automation item.
Added a Playlist export helper dialog, to make it easier to understand the various export options.
Added ability to export a playlist to a Powerpoint presentation.
Added ability to toggle the playlist preview pane on and off when in projection mode.
©2010 Split Infinity Music
Welcome to Worship LIVE!
9
Added an "auto-add to playlist" option when a song is quick-projected from the library.
Added image view of the playlist contents, so that when in projection mode you can quickly see slide thumbnails.
Added option to only show checked playlist items in the icon view.
It is now possible to adjust brightness/contrast and other details for images added to playlist.
Improved handling of playlist files when launched from the desktop.
Large-sized playlist projection previews for ALL items.
Made improvements to keypress and mouseclick navigation during projection.
MIDI control of the playlist and projection was dramatically improved.
Prevented icon (image) view with automation; you must switch back to list view since the automation uses the list
and is not compatible with the icon view.
Prevented loading a new playlist while projection is open.
When playlist is closed, the complete layout, including docked controls and maximized window, is used for the
next playlist.
Printout Changes
Changed the Print Preview function to make the cancel button always return to the Confirmation dialog when
printing songs.
Major improvements to the Print Preview dialog, including thumbnail views of each page and quickly zoomable
previews.
Projection Display Changes
Added ability to pick a separate size for projection title and footer.
Added ability to select MP4 video file types for projection and text backgrounds.
Added video playback speed change capability (feature depends on video codec capabilities; some videos do not
support this).
Added visual previews of video-background items and videos on the playlist.
Can now select whether background images zoom or crop if they have a different aspect ratio from the screen.
Increased maximum projection font size to 96 points.
Added an option on the projection screen (Ctrl L) to pop up a quick playlist menu.
Minor tweaks to projection quick song find (Ctrl F) and quick key change (Ctrl K) functions.
Replaced the "Do you want this change to apply to all verses" question with a checkbox on the projection format
dialog, to eliminate that repetitive question.
Item titles are now hidden when the [Show extended info] projection formatting checkbox is cleared.
Scripture Dialog Changes
Added scripture verse auto-select option (up to 5 verses). When set to more than one, when you click a single
scripture verse the program will automatically select the specified number of verses. (You can then select a
smaller number if you wish.)
Added scripture verse drag-select option (drag across several verse numbers to select the entire range).
Improved the Search function in the Scripture window to allow specifying different search ranges (OT, NT,
Gospels, etc.).
New "Lyrics" Projection Screen
Added third-screen support for a lyrics-only window, to show lyrics to worship teams (See the monitor selection
on the [Projection] tab of the preferences).
Added "send a page to the stage" function so that visual pages can be shown to either the congregation OR the
stage; see the [Send Visual Page] dialog.
New "Stage Mode" on main Library window
Added "Stage mode" for on-stage use of a playlist by a worship leader. Includes touchscreen buttons for easier
control on-stage, easier single-key controls, a metronome, etc. (Create a playlist and hit the F8 key to see it
in action).
Added hotkeys to the stage mode; see the tooltips of the touchscreen controls: m for metronome,
Left/Right/Up/Down to go between adjacent songs, Pgup/Pgdn/Home/End to scroll text, 1-9 to select song by
playlist position +/- to zoom text.
Added visual metronome by toggling touchscreen control background color.
Changed the functionality of the F8 shortcut key to toggle on-off the stage mode, instead of jumping to a currently
open playlist window.
Closing the playlist automatically switches back to the non-stage view.
In stage mode, the playlist order is added to song titles (e.g. "1 Amazing Grace", "2 Holy Holy Holy", etc.).
The stage mode includes an optional metronome that clicks and flashes for songs with numerical tempos
©2010 Split Infinity Music
10
Worship LIVE! version 6 User's Manual
assigned. It automatically tracks the currently showing song, so if you change songs the tempo also changes.
The library song preview can be zoomed using the touchscreen panel, to make small font songs easier to read.
The touchscreen panel includes a "play audio" feature in case you're using audio files like singalong trax, or
karaoke, or drum loops.
When you switch to stage view, the song LIST font size is increased comparable to your preview zoom (but
limited between 130% and 200%). It assumes you need at least a slightly larger font, but tries to track your
zoom preference otherwise.
Server Synchronization Features
The server sync functionality was completely overhauled and major changes were made for ease of use and
clarity.
Added a "Save to disk" button to the synchronization dialog, to download a playlist file to disk without opening it.
Added version checking to server sync dialog to verify that the server software version is compatible with the
desktop version.
Changed server sync setup so that the main library folder or its subfolders will be the target for all downloaded
songs.
Improved server sync handling of sync process interruptions.
Made the server sync dialog show local time instead of Greenwich Mean Time for files.
Server synchronize feature now properly handles daylight savings time changes.
Miscellaneous Changes
Added "Last Message Shown" function to Help menu, to re-display the last-shown popup message.
Added ability to force a registration name during projection for certain specially coded user names (specific to
high-piracy locales).
Added code to detect and (if requested) fix write-protected file errors during save.
Added popup option (using Windows popup) for certain messages (see General preferences for this setting),
instead of only "modal" messages that must be cleared before continuing.
Added preference to alternately shade rows on the library and playlist, for clarity.
Changed logic so audio file playback will not stop so often.
File open/save routines default to the My Documents folder, not the program folder.
Improved the internet connection features for IWillWorship and DelicateFade searches.
Major improvements to internet connecting features, including improved error handling and timeouts.
Refined the preferences to remove low-priority items and improve default selections.
1.5
Frequently Asked Questions
·
·
·
How can I move a song between two different computers?
How can I copy the entire database for another user?
How can I back up my database?
All of these questions have a similar answer. The entire database is saved on disk, one file per song. At the
bottom of the library, on the status bar, is the folder of the currently open database - which contains the path
on disk where the songs can be found. Open that folder from Windows. You can copy an entire folder full of
song files to a floppy or CD-R or any suitable media, move it to any other location on your hard disk, etc.
Note: make sure Worship LIVE! isn't running if you move or delete files; you may confuse Worship LIVE! if
you try to use a deleted song! Also, see this note 119 for information on CD backups.
·
How come I cannot copy my entire database to a single floppy or CD-R? There is still plenty of disk space
left!
Windows itself only allows a certain number of files (about 120) to be placed in the topmost level of a disk
folder. All you need to do is create a subfolder or folder, and copy the files into that folder instead. Now the
only limit is disk space.
·
·
I moved my database to a new computer, and now all my MIDI files won't play. Why?
The program can't seem to find some of my MIDI files anymore. Why?
Probably because you told Worship LIVE! where to find those files on your hard disk, and then you moved
them. You need to re-associate the MIDI files, or (if you're moving the files to a new computer) make sure
the folder structure is identical to the old computer.
©2010 Split Infinity Music
Welcome to Worship LIVE!
11
·
I can't get my audio files to play in Worship LIVE.
First, make sure you've properly associated a multimedia file with the song. Second, Worship LIVE! uses the
Windows built-in multimedia player to handle multimedia files; if Windows is not configured for multimedia
files, Worship LIVE! can't play them either. You may need to check your multimedia setup in Windows. If you
can double-click the multimedia file from Windows, and it plays properly, Worship LIVE! should handle the
multimedia file just fine also - as long as it can find the desired file.
·
I can't get my video files to play in Worship LIVE.
The program uses the Windows built-in video support. If you can double-click a video file and it plays properly
in Windows Media Player, then this program should also be able to play it. If not, this program will be unable
to play it. Some AVI files are actually MPEG files (*.mpg) with the wrong file extension - you may want to try
changing the file extension to "mpg" instead of "avi" and trying again.
·
Hey! I'm a registered user. Worship LIVE! was running fine, completely unlocked, and now it's suddenly
locked again.
Did you change the network name of your computer under the Network:Identification:Computer Name control
panel tab? Worship LIVE! uses this information to verify the registration information. You need to re-unlock
Worship LIVE! (you DID save the unlock key and username, right?) and this will not happen again unless you
change the computer name.
Did you reinstall Windows? The Worship LIVE! preferences, saved in the Windows Registry, may have been
lost. Dig out that unlock key and user name (you DID save it, right?) and re-unlock.
When you unlock Worship LIVE, a copy of the unlock code is stored in the My Documents folder.
·
I have a computer at my house, and another at the church, and my worship leader also uses a home
computer for preparing worship. Do I REALLY need to buy three copies of Worship LIVE! to feel honest?
If you use Worship LIVE! with the projection features, no you don't. Read the license agreement 12 carefully.
Roughly stated, it specifically gives you permission to use Worship LIVE! on up to five computers,
PROVIDED they are all used by members of the same church, for church purposes.
If you have not purchased the Projection Features, then YES, you do need to purchase separate copies.
·
When I transpose a song lots of times, the chords move around.
This program uses spaces to maintain chord positioning, especially when newly transposed chords have a
different length than the starting chord, such as "A" to "Bb". But when you transpose the song more than a
couple times, the chords are no longer at exactly the same starting positions - so on the next transposition
they may end up even farther away. Ideally, you would begin with a fresh copy of the song for each
transposition - but what if you edit the song between transpositions? You would lose the editing if the program
started afresh. Since the program cannot easily resolve this quandary, it is designed to simply use the current
text of the song for each transposition. So if you need to go up eight or nine half steps, you probably should
select the correct key from the Transpose song menu, rather than using the Up or Down buttons many times.
Note that if you don't save the transposed song, you will start with a fresh copy the next time you open the
song.
·
I'd really prefer not to have a footer or icon on each printout.
No problem - go to the Page Setup 88 tab of the Preferences dialog, and select which items you want on the
printout, and in which orders. You can even select a custom icon.
·
When I print one of my songs, the song font gets too small to read.
If your song is very wide or long, you may need to uncheck the Auto-fit to page height or Auto-fit to page
width options in the Print dialog. Otherwise the program will shrink the font down until the song fits on a single
page.
·
The chords shift when I transpose a song. Why?
To maintain proper chord positioning, the program uses tabs and spaces to try to properly position your
chords. But a space has a finite (and in some fonts, large) width - preventing a perfect alignment.
·
I'd really prefer to hide some items on the Projection display. Can I do that?
Yes; there are many options for formatting the projection display. Go to the Projection
©2010 Split Infinity Music
95
preferences, click
12
Worship LIVE! version 6 User's Manual
the Format Default Projection Display
73
button.
·
Why can't I transpose from A to Am?
Because it's not musically possible to transpose from a minor to a major key, or vice versa.
·
I'd really prefer it if the program always started up with the same database; we have two other users and
every time I start it up, it's in the wrong database.
No problem; select the Views 87 preferences, and (with the correct database loaded) click the Locked
Startup Database checkbox. Until you uncheck it, the locked database will always be loaded at startup.
·
The startup time is taking too long. Can I speed it up any?
If your database is getting large (over a few hundred songs) the load time will increase, since the program
needs to load a longer index of all the songs at startup. You should consider moving infrequently used songs
into a separate database.
·
Several people use the church copy of Worship LIVE, but I'd really prefer that only I could add or delete
songs.
Easy enough - set a Song Editing Password in the Unlock 98 preferences. This is not really secure, since
anyone can delete the password, but it is a strong indication that you want some control over the database.
Remember, anyone can edit or delete the song files stored on disk without using Worship LIVE, so this
password is merely a deterrent.
·
I just imported a hundred songs and would like to change the default font for each one.
Sorry; there is no function to do this. Instead, you should change the default font in the Fonts preferences,
and then re-import all the songs. This will cause all the newly imported song files to use the new default font.
·
Can I use bold, underline, or italics in a song?
Certainly. Any formatting you can enter from the song menus is acceptable. Almost all formatting will also be
transferred when you cut-and-paste from your word processor software.
·
Can I print to an RTF or text file?
Yes, you can! Open the song you wish to save as RTF, and select File:Export:Rich Text. You can also export
to the clipboard, and then paste it into any word processor or Windows Notepad.
·
Can I archive all my songs to a single file?
Yes. Select Edit:Export:Entire Database for Sharing. A single file will be generated, which can be imported
using Edit:Import:Entire Database for Sharing. This makes it very simple to transfer a database to another
computer. Be aware, however, that multimedia files are NOT included in this compiled database.
·
I just upgraded from an older version of Worship LIVE!. Can I import my existing database, or my old playlist
files?
Sure enough. In fact, Worship LIVE! can open songs from versions 2 through 5 directly. ("Parse" is just an
older name for the Worship LIVE! software.) There are some important differences, however. For one thing,
Worship LIVE! has some new song properties compared to the older versions. When you open older version
songs, any missing properties will assume default values.
1.6
License Agreement
SOFTWARE LICENSE AGREEMENT
*** IMPORTANT-READ CAREFULLY ***
This License Agreement is a legal agreement between you (either an individual or a single entity) and Split Infinity
Music ("SUPPLIER") for the software accompanying this license agreement, which includes computer software
and may include associated media, printed materials, and "online" or electronic documentation ("SOFTWARE").
By exercising your rights to make and use copies of the SOFTWARE PRODUCT, you agree to be bound by the
terms of this license agreement. If you do not agree to the terms of this license agreement, you may not use the
SOFTWARE.
©2010 Split Infinity Music
Welcome to Worship LIVE!
13
Basic Features:
As a registered user of the basic features, you are entitled to have only ONE copy of the SOFTWARE installed.
If you need more than one copy of the SOFTWARE you must purchase an additional copy for each additional
computer, or you may wish to upgrade to the Worship LIVE! for Churches package.
Projection Features / Site License:
IF AND ONLY IF the projection features have been purchased, then you have explicit permission to use this
software on more than one computer. Up to ten total copies of this software may be unlocked for use by
members of a single local organization (within a 50 mile radius). Of those ten copies, NO MORE THAN TWO
computers may use the Projection features. This "site license" does NOT apply to the basic features version of
this program. Contact Split Infinity Music if you need additional licenses.
This SOFTWARE is distributed as a demo version. You may install this program to test and evaluate for 30 days;
after that time you must either register this program or delete it from your computer hard drive. Once the software
has been registered and unlocked, you are no longer required to remove it.
You may not alter this SOFTWARE in any way, including changing or removing any messages or windows. You
may not reverse-compile or reverse-engineer the SOFTWARE.
NO WARRANTIES. SUPPLIER expressly disclaims any warranty for the SOFTWARE. The SOFTWARE and any
related documentation is provided "as is" without warranty of any kind, either express or implied, including,
without limitation, the implied warranties or merchantability, fitness for a particular purpose, or noninfringement.
The entire risk arising out of use or performance of the SOFTWARE remains with you. THE SUPPLIER WILL
NOT BE LIABLE FOR DATA LOSS, DAMAGES, LOSS OF PROFITS OR ANY OTHER KIND OF LOSS WHILE
USING OR MISUSING THIS SOFTWARE.
You are hereby licensed to make and distribute as many copies of the original installation file of this SOFTWARE
as you wish, via electronic means, provided no form of payment or compensation is requested or accepted.
If you choose to register the SOFTWARE, and receive a software key to unlock any functionality of the
SOFTWARE which was disabled without such key, you may not share, copy, distribute, or otherwise transfer
such key in any fashion.
All copyrights to the SOFTWARE are exclusively owned by the SUPPLIER (Split Infinity Music).
Installing and using the SOFTWARE signifies acceptance of these terms and conditions of this license. If you do
not agree with the terms of this license you must remove all copies of the SOFTWARE, either installed or
uninstalled, from your storage devices and cease to use the product.
End of License Agreement
©2010 Split Infinity Music
Part
II
Working With...
2
15
Working With...
The following topics are available:
The list of songs
Databases 15 : what they are, and what is important about them
Songs 24 : the most important element of the software
Preparing for worship
Playlists 55 : a way to organize your worship service
CCLI Support 37 : how this software can smoothly integrate with CCLI
Printing 78 : getting your worship prep on paper
Things (other than songs) which you can add to playlists
Announcements 46 : a tool to display basic announcements as part of your worship projection
Scripture 48 : getting Bible verses on paper and on the projection
Images 51 : adding color to your worship
Audio 52 : adding sound to your worship
Videos 54 : adding motion to your worship
PowerPoint Presentations 102 : integrating with a popular Microsoft software program
Using this program for digital presentation
Projection 63 : how to get your worship on the big screen
Multimedia 82 : bringing your worship "to life" with added flair
Other good stuff
Options 87 : how to customize the software to your own needs
Setup and Troubleshooting 112 : getting up and running, and working through problems
Miscellaneous Functions 118 : other good information to know for this program
2.1
Song Database/Library
The following topics are available:
·
·
·
·
·
·
·
·
About databases 15 : what a database is, and how it is essential to this softare
Opening a database 19 : how to find and open a database on disk
Creating a database 20 : how to create a new database
Adding songs to a database 20 : how to make this software your own: create your own songs!
Saving databases 20 : when you need to save a database (and why you usually don't)
Searching the database 20 : how to quickly find a song
Library Sorting 21 : how to sort the database list
Library Filters 23 : how to thin down the list to only the songs you want
2.1.1
About Databases
A database (also called the song library) is a collection of songs. Specifically, it is the contents of one or more
folders of song files. A listing of the songs is stored in a file on disk, which helps the program to load and run
more quickly than if each song was indexed every time.
A single database can contain more than one folder of songs. You can sort your songs by type if you wish, into
different folders. Since you can sort the songs by folder (add the Folder as a column in the library and click on
that column), this may be useful in organizing and selecting songs for a worship service.
All the songs in a folder are loaded by a database. You cannot only add a portion of the songs in a folder.
Worship LIVE! can use the same song files from the same folders in different databases. This way, you can have
different collections of songs for different purposes, without forcing you to duplicate your song files.
©2010 Split Infinity Music
16
2.1.2
Worship LIVE! version 6 User's Manual
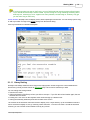
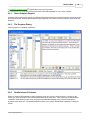
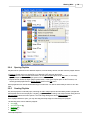
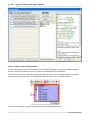
The Song Library screen
The main screen for all of Worship LIVE! is the song library. You'll spend most of your time in this window, and
it's loaded with well-sorted, carefully positioned information.
You can select what information you wish to see in the library. The View menu has various options to help you
refine the list, including:
· Customizing the columns
· Customizing the tooltips
· Sorting the list
· Filtering the list
There are also a number of other useful options related to the library view in the General preferences 87 .
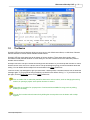
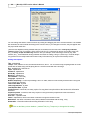
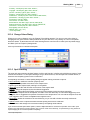
2.1.3
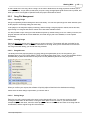
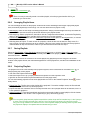
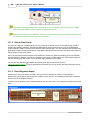
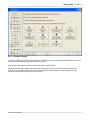
Special Tools on the Library Screen
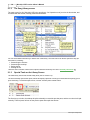
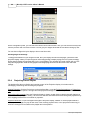
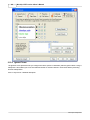
The main library screen has several handy tools (new to version 6.3).
The first is a handy split screen option, which will display a preview of a song's contents without requiring you to
open each song. To show the split screen, click the "Preview pane" toolbar button.
The first time you do this, the window will split horizontally to reveal the preview pane, and the next time it will split
vertically. The third press will turn off the preview pane and unsplit the window.
©2010 Split Infinity Music
Working With...
17
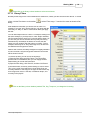
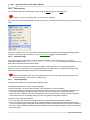
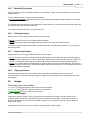
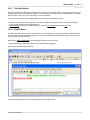
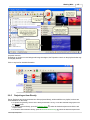
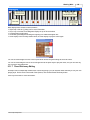
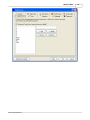
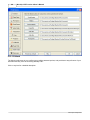
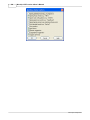
The second handy tool on the preview pane is the transpose buttons along the bottom edge. From the preview
pane, you can transpose the song immediately. This does NOT change the saved copy of the song.
When a song containing chords is showing, just like in the song window, you can click any chord to play it using
your PC's audio system.
You can zoom the preview pane text by selecting [Preview Zoom] from the [View] menu. This setting will
be remembered between sessions.
©2010 Split Infinity Music
18
2.1.4
Worship LIVE! version 6 User's Manual
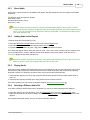
The Stage Mode
When a playlist is open, there is a special view available in the Library screen. If you want to use Worship LIVE!
on a laptop on the stage in real time during a set, the Stage Mode is designed for you.
Some of the special features in Stage Mode are larger fonts for the song list, easy-access buttons for navigating
between songs, a zoomable preview pane, a visual and aural metronome, and a list of songs filtered to only show
songs on the playlist and sorted according to playlist order.
Remember, even though the Stage Mode works with the playlist contents, this is still the Library screen - it just
shows a few new buttons and adds some special keyboard shortcuts.
Accessing Stage Mode
To enter the Stage mode, use the F8 key, or select [Playlist Stage View] from the main library display or the
playlist. The playlist remains open but you'll be working only with the library window at this time. If you close the
©2010 Split Infinity Music
Working With...
19
playlist, the library display will change back to the normal appearance.
Ease of Access
We know that whatever instrument you're using, you probably don't have a lot of time to mouse around during a
worship service. So we have added the touchscreen buttons and shortcut keys to make it easier to control the
software.
Touchscreen features
Stage Mode is especially well suited for a touchscreen laptop or tablet computer. The buttons on the right side
(which are optional, and can be hidden by clicking the [Hide] button and restored from the [View] menu) are
deliberately large, making it easy to hit them on a touchscreen laptop/tablet. However, you may wish to leave
them visible, so you can see the metronome function.
Shortcuts
The Stage Mode has been very carefully designed to allow you to quickly and easily navigate the playlist without
needing a mouse, and using the quickest of keypresses for most features.
The keypresses are completely customizable, under the [Stage Mode] tab of the preferences. A few shortcuts are
"hard coded" however, and cannot be changed.
Specifically, hitting a number key (1 thru 9) jumps to that numbered song, zooming the preview uses +/- keys to
zoom in and out, and the 0 key resets to 100% zoom.
If you need a quick reminder of these shortcuts, just hit the [?] button below the large buttons.
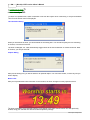
Metronome
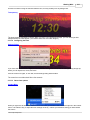
The metronome is both aural and visual. When you're viewing a song for which you've set a numeric tempo
(instead of Fast, Medium or Slow), the metronome will click and also the background of the stage buttons will
flash red-black-red at the same tempo (so you can avoid clicking that might be audible to the congregation).
Play Audio
If you're working with accompaniment tracks, and you've associated audio files with your songs, you can use the
[Play audio] button to start and stop the audio playback.
Zooming
When you enter stage mode, the song list font size will be increased. The font size will be affected by your
preview pane zoom setting, so that the larger your zoom, the larger the font the next time you enter stage mode.
You can zoom the preview pane even when not in Stage Mode, by selecting the [Preview Zoom] option
from the [View] menu.
2.1.5
Opening a Database
A database can be opened two different ways. From within Worship LIVE, click the Open Database option on the
File menu, or click the Open Database toolbar button. From the Windows Explorer, you can also click on the
database file on disk, and Worship LIVE! will start and then load the requested database.
Worship LIVE! normally remembers the database you used last, and reopens it the next time you launch the
program. If you wish, you can force the program to always open the current database, by changing the Locked
Startup Database setting in the General preferences.
©2010 Split Infinity Music
20
2.1.6
Worship LIVE! version 6 User's Manual
Creating a Database
Select the New Database option on the File menu. The program will ask you to choose between creating an
entirely new folder, or using existing songs.
· New Folder: If you select this option, the program will ask you to specify a new location. Then it will create a
new folder on disk and place a new, blank song there. You can start by editing that song, or creating other new
songs.
· Existing Songs: If you select this option, the program will ask you to specify a folder containing the songs you
want added to the database. The songs will then be indexed, and the program will ask you to specify a name
for the new database file.
2.1.7
Adding Songs
You can add songs to an existing database several different ways.
· Add Songs to Database (on the File menu): This option essentially adds a new folder of songs to the existing
database. All the songs in that folder will be indexed and added to the library.
· Import Songs (on the Edit menu): This option allows you to bring in song data from other sources, and add
them to the primary folder for the current database (instead of opening a new folder). You can import songs
from older versions of Worship LIVE!, songs from this version of Worship LIVE! from a folder other than the
current database, CCLI SongSelect (*.usr) files, or even generic text files.
2.1.8
Saving Databases
A database rarely needs to be saved manually. Worship LIVE! always saves the contents of the currently loaded
database when you quit. Each time you import or add song files, the program again saves the database. If you
wish, you can save the current database file to a new filename or location, using the Save Database As option on
the File menu.
When the database is saved to a new location, the song files are NOT duplicated there - only the
database index file (*.sdb) is saved. This way, you can use various combinations of song folders in
various databases - perhaps one for the Sunday service, one for the Wednesday service, etc..
2.1.9
Exporting the Database
The database can be exported as a single file to make it easier to transfer to another computer. Select the
Export:Entire Database for Sharing option from the Edit menu.
The program will ask you for a location to save this exported file, and then write all the songs in the current
database to this new file.
You can later import this file into another copy of Worship LIVE! by selecting the Import:Entire Database for
Sharing option from the Edit menu. All the song files will be extracted and placed into a folder of your choosing.
When the database is exported in this manner, associated multimedia files are NOT included. The
program will ask you if you wish it to strip out the references to these files. This will NOT affect your
existing database, only the exported copy.
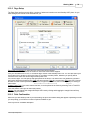
2.1.10 Searching the Database
If you want to find a song file but don't remember its details, select the Find Songs option on the Find menu. The
Find Songs dialog will appear, and you can search through the current database for almost anything that Worship
LIVE! knows about a song. You can specify what to search, including title, lyrics and chords, and various other
song properties. Worship LIVE! displays a list of the songs it finds, and you can open the song from this list, or
add it to a playlist.
©2010 Split Infinity Music
Working With...
21
If you don't get what you want on the first try, you may find that shorter search requests will work better.
Try to choose short and unique search criteria. If you're looking for a song containing something about
brotherly love, searching for "love" might find too many matches, but searching for "brotherly" may get
you the exact song on the first try.
Search Results: Worship LIVE! will display a list of titles containing the search text. You can directly open a song,
or add any number of songs to the playlist directly from the Search dialog.
Click any item below for a detailed description.
2.1.11 Library Sorting
Worship LIVE! always shows the list of songs in the main window. All the songs in the current database are
shown here, (unless you have chosen to filter the list 23 ). This list can be sorted as you wish.
You can change the sorting method:
· from the View menu
· clicking the header of the library column you wish to sort upon. If you click this column header again, the sort
direction will be reversed.
· Clicking Ctrl-1 thru Ctrl-5 on the keyboard. Each number brings up a different sort.
· clicking the Sorted By status bar panel at the bottom of the screen
The contents of the first three columns are fixed to display Title, Tempo and Key. Up to five additional columns
can be selected for display or sort, by choosing "Select Columns..." from the view menu. As with the first three
columns, you can click the column header to sort by any column.
©2010 Split Infinity Music
22
Worship LIVE! version 6 User's Manual
You can change the width of various columns by clicking and dragging the end of a column header. The software
will remember the column width according to the column name; if you change the columns, they will appear with
the proper width each time.
There are two additional sorting methods that you must select from the View menu: sort by Key and then
Tempo and then Title (for example, all the songs in the key of A, subsorted by tempo, then all the songs in B,
etc.), or sort by Tempo and then Key and then Title (for example, all the fast songs, sorted by key, then
medium, etc.). These additional sorting methods are useful for finding a song in a close key in a similar tempo very practical for a worship leader who wants to stay in the same key for a part of the worship service.
Sorting descriptions
Title - alphabetical
Tempo - Slow, Medium or Fast, sometimes shown as S, M or F. For a numeric tempo, anything below 70 will be
sorted with the Slow songs, and anything above 110 will be sorted with the Fast songs.
Key - alphabetical; A then Ab etc.
Topic - alphabetical
Comment - alphabetical
Words By - alphabetical
Music By - alphabetical
CCLI Number - numerical)
Copyright - alphabetical
Relative Popularity - a numeric percentage, from 0 to 100%, based on how recently and how often a song has
been printed and projected
Last Printed Date - by date
Last Projected Date - by date
Last Modified Date - by date
Copies Printed - numerical; how many copies of a song have been printed since the last time this information
was reset
Copies Projected - numerical; how many copies of a song have been projected since the last time this
information was reset
User Info - 3 possible fields
Folder - alphabetical; refers to the folder in which the songs are located on disk
Multimedia - the name of the MIDI, wave, MP3 or WMA file associated with the song, if any
Automation - information about stored timing information in the song
Click on the library column headers - (marked Title, Key, Tempo etc.) to change the list sorting.
©2010 Split Infinity Music
Working With...
23
Right-click on the library column headers to select new columns.
2.1.12 Library Filters
Normally all the songs in the current database are shown here, unless you have chosen to filter the list. To create
a filter, click the Filter button on the toolbar:
dialog:
or select "Filter songs..." from the View menu to show the filter
Enter whatever information you wish to use as a filter. For
example, if you type "holy" into the title box, only songs with the
word "holy" or "Holy" or "HOLY" will be shown when you apply
the filter.
You can add multiple items to a filter. For example, starting from
the above example, if you also click he "Fast" tempo checkbox,
only fast songs with the word "holy" in the title will be shown. As
you can see, you can use this filter tool to quickly find a song
with almost any combination of details. Of course, this also
means you may create a filter that returns no results - for this
example, there may be no "holy" fast songs! If so, the filter will
be cleared and all songs will be shown.
When a filter is active, the library background is lightly shaded in
red as a reminder. Only the songs that match the current filter
will be shown in the list.
To remove the filter, you can do one of two things.
1) Open the filter dialog and click Cancel. The current filter
specifics will be remembered; later you can reapply the filter
without having to re-enter the information.
2) Open the filter dialog, click Clear All, and then click Cancel.
In the filter window, notice the yellow shading on various items.
This is just a quick visual reference to show which items are
currently selected. In the image to the right, the filter would only
show songs with "Jesus" in the title, in a Medium tempo, and
currently on the playlist.
Click on the library column headers (marked Title, Key, Tempo etc.) to change the list sorting.
©2010 Split Infinity Music
24
Worship LIVE! version 6 User's Manual
2.2
Individual Songs
2.2.1
Song Basics
The song dialog is the heart of the Worship LIVE! software. This is where you create and edit songs.
Beyond the song dialog, there are numerous ways to manage your song information. The following topics are
available:
General Song Information
About songs 24
Song properties 25
Song contents 25
Chord Formats 25
Chording styles 26
Song File Management
Opening songs 27
Creating songs 27
Saving songs 27
Deleting songs 28
Exporting songs 37
Editing Songs
Editing songs 30
Changing Song Properties
Formatting songs 34
Transposing songs 34
Verse breaks 35
Smart chord wrapping 36
Smart font changes 36
Auto Syntax Formatting 36
Displaying Songs
Printing songs 36
Projecting songs 37
Exporting to Clipboard or RichText
30
2.2.2
General Song Information
2.2.2.1
About Songs
Importing Songs
How to import songs
37
42
Songs are stored as individual files on disk. Song files contain header information such as title and tempo, and
include a chord sheet rendition of that particular song.
Songs are stored in files with the *.sng extension.
A song can contain any text or character formatting you choose to add. The maximum length of a song is about
©2010 Split Infinity Music
Working With...
25
32,000 characters. Songs use Rich Text Format (RTF) formatting codes, and can include most of the formatting
available in average word processors, but some items are special or restricted. For example, tables and images
are not allowed, and the paragraph mark (¶) has special meaning as the beginning of a song verse. Otherwise,
anything you can type or paste is acceptable.
2.2.2.2
Song Properties
A song has several properties which help distinguish it from other songs. All these properties are stored both in
the song file and also in the database index file.
The only required information is a title, tempo and key; the tempo and key will default to Medium and A.
Some of these properties include:
·
·
·
·
·
·
·
·
·
·
·
·
·
·
·
·
·
Title (the common title of the song, freely editable)
Key (the standard set of major and minor keys)
Tempo (Slow, Medium or Fast, sometimes shown as S, M or F)
Topic (useful for arranging songs in the library; freely editable)
Comment (only appears on printouts; freely editable)
Music By (shown on printouts and projection; freely editable)
Words By (shown on printouts and projection; freely editable)
Copyright (shown on printouts and projection; freely editable)
CCLI License Number (shown on printouts and projection; must be numeric)
Chording Style (either English, Latin, or Jazz)
Wrap Text (whether the song text is automatically wrapped to fit the display or printout, or rather scaled in size
to fit)
Copies Printed (automatically incremented when the song is printed)
Last Printed (automatically incremented when the song is printed)
Copies Projected (automatically incremented when the song is projected)
Last Projected (automatically incremented when the song is projected)
Multimedia File (the associated multimedia file for this song; only a reference to the location on disk)
Sequence (the order in which verses/choruses are intended to be played or sung)
2.2.2.3
Song Contents
Aside from the properties of a song, the contents can contain any information you choose to enter. However,
usually a song will contain lyrics and chords, and sometimes headers for various verses or choruses. The song
contents can be formatted or not as you choose.
There is no special requirement for formatting chords, other than that the chords must be on separate lines from
the lyrics.
2.2.2.4
Chord Formats
The following rules apply to formatting chords:
(1) acceptable characters and groups of characters are:
A B C D E F G (in English chords)
Do Re Mi Fa Sol La Si (in Latin/Spanish chords)
I II III IV V VI VII (in Jazz/Nashville chords)
m min dim 7 maj sus / b # 2 (chord modifiers)
(2) A "b" denotes a flat, and "#" denotes a sharp. The flat symbol is NOT case-sensitive; AB, Ab, aB and ab will
all be read as "A flat".
(3) A "m" or "min" denotes a minor chord. For a major seventh, use "Maj7". "m7" or "M7" is a minor seventh.
(4) The / character is used between two chords to denote a bass chord. For example, the chord "C/G" would use
©2010 Split Infinity Music
26
Worship LIVE! version 6 User's Manual
C as the root chord and G as the bass guitar's note.
The following chords are acceptable examples:
A Bb C# Dmin E7 F#maj7 Gsus A/F Ebdim La Si# do i iv# VIIb
The program can also accept a number of other symbols in chord lines, including:
- (dash)
\ (backslash)
/ (forward slash, if not between two chords)
| (the "pipe" or vertical bar)
() (parenthesis)
tab characters
You can also specify a set of additional words that will be ignored when you transpose a song. In the Ignored
Terms preferences, you can add, change or remove terms. If, for example, you often use the word "Tag:" at the
beginning of an ending line of chords, you may wish to add this to the ignored terms. If a term is found here, even
if it is not otherwise recognized as a chord, the program will simply ignore it when transposing a song.
When a song is printed in its original key, no chord error checking is performed, so if you do not need a
song transposed you may use any chord patterns you wish, even if the program does not support them.
2.2.2.5 Chording Styles
There are three chording styles available for songs: English, Spanish (Latin), and Nashville (Jazz, or Roman
numeral).
·
·
·
·
English: Chords begin with A B C D E F G
Spanish: Chords begin with Do Re Mi Fa Sol La Si
Jazz: Chords begin with I II III IV V VI VII
Nashville Number System: Chords begin with 1 2 3 4 5 6 7
English chords are most commonly used in non-Spanish-speaking countries.
Spanish chords can be shown in either uppercase or mixed-case formats; some countries prefer all uppercase
chords (DO RE MI) and others prefer mixed case (Do Re Mi).
Jazz and Nashville Number System (NNS) chords are not transposable, and the root of the song is always "I" or
1. For a song in the root key of C, the Nashville equivalent for a chord progression of C-F-G would be I-IV-V or 14-5. This chord format is often preferred by professional musicians, because it requires no transposition to
change keys; you simply have to remember the root key and understand a little music theory.
Lower-case minors are also supported; some musicians prefer to annotate minor keys with the letter "m" and
others simply write the chords in lowercase. For example,
C Em F G Am (or) Do Mim Fa Sol Lam (or) I IIIm IV V Vim
and
C e F G a (or) Do mi Fa Sol la (or) I iii IV V vi
are all equivalent.
The Nashville Number System also supports the use of these special marks:
· the carat (^) for a major 7th chord
· a degree symbol (°) for diminished chords
· a dash (-) for minor chords (e.g., D-)
You can change the default chord format on the Chord Format preferences. This determines how a new song will
be created. However, you may have mixed formats in a database, and each song will be saved, printed, and
transposed in its own chording format, regardless of the default.
You can also convert a song from one chording format to another, by selecting the Convert Chording Style option
©2010 Split Infinity Music
Working With...
27
on the Format menu of a song. When a song is in the Jazz or NNS format, the song properties still allow you to
select a root chord. This is useful so that when you print a song, the appropriate guitar chords can be printed, and
when you convert it to English or Spanish format, the proper chords will be shown.
2.2.3
Song File Management
2.2.3.1
Opening Songs
Songs are opened by double-clicking their titles in the library. You can also open songs from other windows (such
as the playlist or Find Songs dialog) the same way.
In the playlist, if the Projection display is showing, double-clicking a song will project it instead, and in this case,
right-clicking on a song title will show a context menu with other available actions.
It is also possible to open a song from the Windows Explorer by double-clicking on its icon. When you do this, the
program will start and load the current database, and if that song is part of the database, it will be opened
immediately.
2.2.3.2
Creating Songs
Select the New Song option on the Song menu to create a new song. The program will open a window for the
song, and then ask you to enter some basic information for the song. Once you've entered this info and closed
the Song Information dialog, you can edit the song contents.
2.2.3.3
Song title case
The library screen has a special feature to quickly change the capitalization of ALL the song titles. If your
database has a mix of "ALL CAPS SONG TITLES" and "Mixed Case Song Titles", you can use the [Make all titles
UPPERCASE] or [Make all titles Mixed Case] items from the [Database] submenu of the [File] menu.
When you confirm your request, the software will quickly adjust all the titles in the database accordingly.
Please note: the titles change is permanent; you cannot undo it.
2.2.3.4
Saving Songs
Each time you edit a song it needs to be saved, or the changes will be lost. You can save a song by simply
clicking the Save button on the toolbar, or using the Save option on the File menu. If you wish to save the
modified song to a new name, select the Save As option on the File menu. This will create a new song with the
new filename, and the original song will not be affected.
©2010 Split Infinity Music
28
2.2.3.5
Worship LIVE! version 6 User's Manual
Deleting Songs
You can delete songs from the database only by using the Delete option on the Song menu.
Deleting a song is a permanent step – you cannot undo a deletion.
If you don't want to permanently delete the song from disk, you can instead select [Archive Song] from the [Song]
menu.
Archiving a song will move it to a new folder named [Archive], stored within the default [Worship Songs] folder.
This way, if you change your mind later, you can import the song 46 back into the database.
2.2.3.6 Exporting Songs
If you want to export certain songs to another database, perhaps to make backup copies, or to build a
customized database, select Edit:Export:Songs to other database. The songs currently selected in the
library will be duplicated into the selected folder.
You can also move or copy songs outside of the program. Each song is stored in a separate file with the
extension *.sng. You can move or copy song files between their folders; when you next start the program the
library will be rebuilt with whatever songs exist in the database folder.
Make sure Worship LIVE! is not running when you do this; you may confuse the program and cause
errors while trying to use a moved or deleted song.
2.2.3.7 Comparing Songs
Worship LIVE! includes a tool to help identify duplicate songs.
Two different techniques are used to look for duplicates.
· Direct Comparison - an exact match is sought. This comparison is not case-sensitive.
· Heuristic Comparison - the program uses so-called heuristic techniques to look for similarity between songs.
The number and lengths of each word and the number of lines in the song are combined into a set of
numerical scores, which are cross-checked against scores from other songs. This helps identify songs with
minor differences, such as spelling changes, but this may produce false positive matches.
Two parts of each song are compared.
· Title - titles are cross-checked for possible duplication, using both direct and heuristic methods.
· Contents - Song lyrics are cross-checked for possible duplication, using both direct and heuristic methods.
Lines of chords are ignored during the content checking, so that songs in different keys will still show matches.
Also, the heuristic matching will identify possible matches even when spelling changes or other minor changes
have been made.
©2010 Split Infinity Music
Working With...
Starting the Comparison
Comparison Dialog 29
29
29
2.2.3.7.1 Starting the Comparison
First you need to select which songs you wish to compare against the rest of the database. If you want to search
the entire database for any possible duplicates, you must first select all the songs. If you only want to look for
duplicates of a few songs, select just those songs.
Comparing the entire database will be slow - every song must be cross-checked against every other
song. Whenever possible, you should select the fewest possible songs for comparison.
Once you've selected the songs to compare, select Find Duplicates... from the main window File menu. The
Comparing Songs dialog 29 will appear.
2.2.3.7.2 Comparison Dialog
The Comparing Songs dialog includes two columns, one for the songs being searched, and the other for possible
matches. After the search is complete, songs that have been identified as possible matches will be shown in the
left column. When you select any of these songs, the possible matches for that song will be shown in the right
column. In the two bottom panes are the actual contents of the selected songs, allowing you to quickly determine
whether the match is real or not.
Since both title and contents are compared, the list of matched songs on the right column include the reason for
the match - either "Title" or "Contents".
If you identify a certain song that is a duplicate and you'd like to delete it, click the "Mark Song for Deletion" button
underneath that song's column. When you do this, nothing is actually deleted - the title is merely changed to
include ">>>DELETE<<<" at the beginning. Once you've finished identifying duplicates and you exit the
Comparing Songs dialog, you can sort the songs by title 21 and delete the songs 28 yourself.
Some amusing "matches" will be likely if you use this tool for the entire database. The heuristic matching
is fairly imprecise - it will find almost every match, but it will also find a number of false matches. The
matching was deliberately skewed to find the most possible matches, at the expense of instant accuracy.
Click any part of the dialog below for detailed information on its functions.
©2010 Split Infinity Music
30
Worship LIVE! version 6 User's Manual
2.2.4
Editing Songs
2.2.4.1
Editing Songs
Editing a song is much like using any word processor. Type or paste in your song lyrics and chords. You can cut,
paste, copy and delete text to and from other sources. You can also use the commands on the song Edit and
Format menus to change the formatting, add color, change text alignment, and more.
On the song Edit menu are several commands for verse markers. These commands add paragraph marks (¶) to
the text. A paragraph mark has special meaning as the beginning of a song verse, and any line starting with a
paragraph mark will be used as a header for a verse when the song is added to the playlist or projected.
One special feature of editing a song in Worship LIVE! is quite different from a word processor. The
"smart chord wrapping 36 " feature is designed to make it easier to work with alternating lines of chords and
lyrics. It is enabled if "Intelligently wrap chord lines above lyric lines" is selected in the Chord Format preferences.
Whenever you manually wrap a line of chords by hitting the enter key, and the line immediately above the edited
line contains only chords, both the lyrics and chords will be wrapped together at the same horizontal location. The
chords will be kept with the lyrics, so the two lines are treated as a unit instead of two separate lines.
2.2.4.2
Changing Song Properties
You use the Change Song Information dialog to set most of the properties of each song. Select the Song Info
option on the song Edit menu, or click the Change Song Information icon on the song toolbar.
Some of this information is shown only when the song is printed or projected, such as Words By, Lyrics By, CCLI
Number, and Copyright Info. The comment can be optionally printed. The topic is only used to help sort songs in
the library, and is never printed or projected.
©2010 Split Infinity Music
Working With...
31
The song properties are also displayed in the drop-down lists at the right of the library and song view toolbars.
Click any item for a detailed description.
The following properties can be changed from the Change Song Information dialog.
Title
Root Key
Tempo
Metronome
Topic
CCLI Number
Music By
Words By
Copyright Info
Comment
Sequence
Multimedia File
The common title of the song, freely editable
The standard set of major and minor keys
Slow, Medium or Fast - or you may enter a number from 30 to 280 (beats per minute) to
enable the song metronome 83 .
If you'd prefer to use a numeric tempo for this song, you can easily set it by simply tapping
this button in time to the music. Using a numeric tempo (instead of Fast/Medium/Slow) will
allow you to click a similar metronome on the main song window and have the computer click
the tempo for you.
Useful for arranging songs in the library; freely editable
Shown on printouts and projection; must be numeric. Used to help track CCLI licensing fees
Shown on printouts and projection; freely editable
Shown on printouts and projection; freely editable
Shown on printouts and projection; freely editable
Only appears on printouts; freely editable
Data which you use to communicate the flow of a song, such as Verse 1, then Chorus, then
Verse 2, etc.
The associated multimedia file for this song; only a reference to the location on disk. Click
©2010 Split Infinity Music
32
Worship LIVE! version 6 User's Manual
Filename
Printed
Projected
Set Timings
the X button to remove this association, or the Browse button to select a new file.
The name of the song file stored on disk. Click the Rename button to pick a new file name.
Automatically incremented when the song is printed; count can be reset by exporting a CCLI
Year-End Summary from the main Edit menu or by clicking the Reset Printed button.
Automatically incremented when the song is projected; count can be reset by exporting a
CCLI Year-End Summary from the main Edit menu or by clicking the Reset Projected button.
Set this song's automatic timing information. For any song with a multimedia audio file attached, you
can preselect actions to occur during projection of this song. For example, you can specify times
where the screen will be blanked, text removed, or various verses shown. Timings will not have any
effect until you start them from the playlist projection controls.
User Data Fields
2.2.4.3
Set this song's user-definable properties. You can enter any text you wish in the three text
areas. You can change the name of these three fields by clicking the button next to them;
this change will apply to the entire program, not just this song.
The Sequence sidebar
When you are editing a song, you may choose to display or hide the Sequence sidebar on the right of the song
window.
"Sequence" is a song property that is saved within the song file. It is essentially a text element for song printouts,
which helps you convey to singers or musicians the intended order of the verses and choruses.
For example, you may wish to repeat a chorus twice before continuing to a second verse. The Sequence tool
allows you to enter this information into a song, and it will be printed with the song.
To show or hide the Sequence sidebar, click the Sequence button at right end of the ruler.
The Sequence information appears in the same basic position on a song printout - at the upper right side.
©2010 Split Infinity Music
Working With...
33
You can change the printout color for Sequence data from the Print Options tab of the Preferences dialog.
2.2.4.4 Changing Multiple Songs
If you want to edit the information for multiple songs, you can do this from the song library. Select whichever
songs you wish to edit (with the Shift or Ctrl keys), then open the song information dialog:
· Select Song Info... from the Song menu of the library
· Hit Alt-Enter in the song library
· Right-click on one of the songs and select Song Info... from the popup menu.
The normal Song Information dialog will appear, but will have some extra controls.
You cannot edit certain items for a group of songs - such as title, key, CCLI number, etc. These controls are
disabled.
The main difference from the single-item Song Information dialog is the addition of checkboxes next to each item
you may edit. Any properties that are already identical between the selected songs will be highlighted in yellow
with the checkboxes set. Any items that vary from song to song will be blank and the checkboxes unset.
If you wish to edit any information on the group of songs, you must set the checkbox for that item before you click
OK. Basically, if it's yellow, it will be overwritten.
In the example below, the Tempo, Topic, Words By, Music By, and Copyright Info properties of this group of
songs will be changed. None of the other properties will be changed, even if they are different from song to song.
None of the songs' contents will be affected.
Click on any item below for more details. More information about the various song properties can be found
here 30 .
©2010 Split Infinity Music
34
2.2.4.5
Worship LIVE! version 6 User's Manual
Formatting Songs
You can use the commands on the song Edit and Format menus to change the formatting, add color, change text
alignment, and more. Any text pasted in from a word processor should retain the formatting it had in the word
processor, except for certain restricted features (tables and images, for instance).
The Auto Syntax Colorize option on the Format menu will evaluate the song contents and apply formatting you
have selected in the Syntax Styles preferences. This command can help a musician quickly identify titles, lyrics,
chords by making them a different color or format.
2.2.4.6
Transposing Songs
A song can be quickly and easily transposed into any key by simply selecting the desired new key from the song
Transpose menu. Using the Key Up or Key Down menu items or toolbar buttons, you can also change the key by
one half-step at a time.
You can also simply click the key buttons across the bottom of any song:
©2010 Split Infinity Music
Working With...
35
Whenever you transpose a song, the program does the best possible job of maintaining chord spacing. Because
the chords become longer or shorter (for example, A becoming Bb, or C#m becoming Fm) there may be shifting.
The program rearranges the number of spaces and tabs between the chords, to try and preserve the spacing that
was there originally. However, some fonts affect the program's ability to do this; for example, a monospaced font
like Courier is easy for the program to adjust, but certain fonts like Arial Black are very difficult for the program to
maintain, and the spacing may vary slightly. Your results may vary, and you should experiment with the fonts and
transposition to find the best font for your use.
You can permanently transpose a song in the database. Simply transpose a song from the song view,
and then save it.
2.2.4.7
Verse Breaks
Songs can be divided into verses for the purposes of printing and projection. Using verse markers, you can
specify that only certain verses of a song on the playlist will be printed, or that the Next and Previous buttons will
skip over unselected verses when the song is being projected.
When the song is added to the playlist, the text on the verse marker line is used as a name for that verse.
Any line that begins with the Paragraph symbol (¶) will be treated as a verse marker. You can add verse markers
while editing a song, using options in the Edit menu. There are three options.
· Make line a verse marker: this simply inserts a ¶ symbol at the beginning of the line containing the cursor.
· Insert a verse marker: this inserts a new line before the cursor, along with the ¶ symbol and the word "Verse".
· Insert a chorus marker: this inserts a new line before the cursor, along with the ¶ symbol and the word
"Chorus".
There is no difference between "Verse" and "Chorus" marks, other than the word that is automatically inserted.
The program treats these lines the same way, and the two options are simply for your convenience. You can
change the text on a verse marker line to whatever you wish.
To remove a verse marker, simply delete the ¶ symbol. The line will no longer be used to split up the song.
2.2.4.8
Page Breaks
If you wish to specify that a song prints out on multiple pages, you can use a page break. You can add a page
break while editing a song, by opening the Edit menu and selecting Insert Page Break.
Page break lines do NOT affect the projection display of a song - they do NOT cause the song to be split at that
point. To break up a song on the projection display, use the Verse Break 35 features.
Any line that begins with the Section symbol (§) will be treated as a page break. To remove a page
break, simply delete the line containing the § symbol, or just the symbol itself. The line will no longer be
used to split up the song printout. You can change the text on a page break line to whatever you wish the line will never be projected or printed.
©2010 Split Infinity Music
36
2.2.4.9
Worship LIVE! version 6 User's Manual
Smart Chord Wrapping
Worship LIVE! can help edit song chord sheets more efficiently by intelligently wrapping lines of chords together
with lyrics. Select the Intelligently wrap chord lines check box in the Chord Format preferences. When active, the
program will keep chords and lyrics together.
· Any time a line break is entered in a line of lyrics, and the line above contains chords, the line of chords will
also be wrapped at the same location so that the chords remain in the same place above the lyrics.
· If a lyrics line is "unwrapped", the chords above it will also be wrapped back up to the preceding chord line, in a
reverse of the smart wrapping.
Some minor shifting of the relocated chords may occur, within the width of a single space, because spaces are
used to reposition the chords.
2.2.4.10 Smart Font Changes
If you change the font in a song, you might cause the chords to shift because of differing character widths in the
new font. The program will offer to maintain the chord positions for you, whenever the font change exceeds about
10% of the song contents. This will take a few seconds to complete, as the software must calculate the widths
and locations of every chord in the song, and every word in the song, and rearrange spaces and tabs to maintain
the relative positions of chords-to-lyrics. Some minor shifting may occur, and is unavoidable, within the width of a
single space, because spaces are used to reposition the chords.
2.2.4.11 Auto Syntax Formatting
The text of songs can be automatically colored and formatted. Click the Auto Syntax Format option on the song
Format menu. The program will evaluate the current song, and apply formatting based on the following rules.
· Colors and bold, italic and underline formatting are based on settings in the Syntax Styles preferences.
· The Title style is applied to the first line of a song, unless it is chords or a verse marker.
· The Headings style is based on the terms listed in the Heading Search Text list. Lines that begin with any of
those terms, other than chord lines or verse markers, will be formatted as headings.
· Any transposable lines of chords will be formatted in the Chords style.
· All other text will be formatted in the Lyrics style.
· You can deactivate any of these four styles by unchecking the box next to that style.
Auto syntax formatting does NOTHING at the time a song is printed - it only changes the song formatting
when you click the option from the Song menu. Whatever formatting is present in a song is what will be
printed - no coloring or formatting changes are made at print time.
2.2.5
Displaying Songs
2.2.5.1
Printing Songs
There are many different ways to print songs.
· From the library: select the Print option on the Song menu, or click the Print toolbar button. This prints any
currently selected songs, in their original keys.
· From a song display: select the Print option or toolbar button. This prints the song, in its current key.
©2010 Split Infinity Music
Working With...
37
· From a playlist: Select the Print Playlist option on the File menu, or click the Print toolbar button. This prints the
entire playlist, with each song printed in its playlist key.
When you print a song, the print confirmation dialog will appear.
2.2.5.2
Projecting Songs
Songs can be projected from the playlist, from the library, or from a song itself. These methods of projection have
some minor differences.
· From the playlist: This is the preferred way of projecting a song, as it offers you the most flexibility. You have
full control of the Projection display from the playlist window, including the Blank and Freeze buttons, and you
can select which verses of the song to display or hide. You can even project the entire song here.
· From the library: You can select the Project Selected Song option on the View menu to immediately project a
song. This will only project the first verse of a song, not the entire song. To show the rest of the song, you'll
need to add it to the playlist. This is a good way to get a song displayed quickly, such as when the worship
team goes "spontaneous".
· From the song: You can select the Test in Projection Window option on the Format menu. The entire song will
be displayed, even if there are verses. This does not increment the Times Projected and Most Recently
Projected counters in the song. This option is useful to help verify how the song will look when you're projecting
it, without affecting the CCLI copyright license tracking.
When a song is projected, the chords can be hidden just as in the printouts. To show or hide the chords, simply
click the note icon on the playlist toolbar. This way, you can use the same songs for musician printouts,
congregational lyric sheets, and digital projection. There's no need for multiple copies for different purposes.
You can customize the way a song looks on the projection display. Please refer to the Projection Customizing
information for more details.
2.2.5.3
Exporting to Clipboard or RichText
You can export a song to either the clipboard or to a Rich Text file (compatible with many word processors).
· Clipboard: to send the song to the Windows clipboard, click the Export button on the toolbar, or use the
appropriate Export option on the song File menu. Please note that some email programs use HTML formatting,
not true Rich Text (RTF) formatting, and pasting songs into an email may result in chord shifts and line spacing
changes. If you need to do this, we suggest pasting it into a word processor first, and then copying it from there
to your email program.
· Rich Text file: to save the song as a RTF file, with formatting included, select the appropriate Export option on
the song File menu. After you select a name, a new RTF file will be created, and the original song will not be
affected.
The export option does not save all the song properties; the result is very similar to a printout and includes the
title, contents, comments, and copyright/composer information.
2.2.6
CCLI Support
Worship LIVE! has support for various features of the Christian Copyright Licensing International (CCLI)
organization. Many churches use CCLI to help track copyrighted music usage and to be sure that appropriate
royalties are paid to the composers of the music they use.
Split Infinity Music is NOT affiliated with CCLI or SongSelect. To use the CCLI features, you may need to enter
into a separate agreement with CCLI. Please visit http://www.ccli.com for more information. CCLI also offers a
program called SongSelect, and uses a file format that Worship LIVE! can import. You do NOT need to purchase
the SongSelect software to use the SongSelect Online features.
The following topics are available:
· CCLI Lookups 40 : how to look up songs on the CCLI web site
· CCLI SongSelect Files 39 : how to use CCLI files in this software
©2010 Split Infinity Music
38
Worship LIVE! version 6 User's Manual
· CCLI Summaries
CCLI
2.2.7
38
: how to best use this software to speed your end-of-period song usage reporting with
Finding Songs Online
Worship LIVE! has support for using various websites to find and import songs directly into this software.
fSplit Infinity Music is NOT directly affiliated with IWillWorship, DelicateFade, CCLI or SongSelect. To use some
of these features, you may need to enter into a separate agreement with these companies.
The following topics are available:
· CCLI Lookups 40 : how to look up songs on the CCLI web site
· CCLI SongSelect Files 39 : how to use CCLI files in this software
· CCLI Summaries 38 : how to best use this software to speed your end-of-period song usage reporting with
CCLI
2.2.7.1 CCLI Summaries
CCLI is a company that helps churches pay appropriate royalties to song copyright holders. For churches that are
signed up with CCLI, periodic reports of song usage are required.
Please visit http://www.ccli.com for more information.
To assist you with this process, this program includes a song usage calendar feature (this replaces the previous
CCLI export function from version 6.3 and older).
To open the calendar, select [Song usage summary] from the [Edit:Export] menu. A dialog like this will open and
the song usage information will be indexed.
The calendar shows one month at a time, but you can select a longer range to display; simply click any individual
day or pick a date range from the top right buttons. If you wish, you may export this information using the [Export
Data] button at lower right after you have selected the date range.
©2010 Split Infinity Music
Working With...
39
The calendar window can be resized to provide a better view.
You can also reset the Copies Printed and Copies Projected fields in an individual song. Open the song's Edit
menu, and select Song Info. At the bottom next to the Copies Printed and Copies Projected counts are [x] buttons
allowing you to reset these counters.
Note for users of Worship LIVE! version 6.3 and previous: more song tracking information has been added to
this version; some data will only be tracked from the point at which you installed version 6.4 or newer.
2.2.7.2 CCLI SongSelect Files
Worship LIVE! supports importing CCLI SongSelect files (*.usr). These files can be downloaded from the CCLI
web site, if you have a SongSelect Online subscription.
Please visit http://www.ccli.com for more information. CCLI also offers a program called SongSelect, and uses a
file format that Worship LIVE! can import. You do NOT need to purchase the SongSelect software to use the
SongSelect Online features.
Obtaining CCLI SongSelect Files
If you have the SongSelect software, you probably have a large library of SongSelect files on your computer
already.
If not, SongSelect Online offers you the ability to search a library of more than 70,000 songs, and each song
contains full lyrics (but no chords), topics, copyright, composer, and other information. When you have found a
particular song, you can save the song to a SongSelect file using this button on the CCLI search results web
page:
After you click this button, your browser will ask you where to save the file. If you are importing the file for use with
Worship LIVE, we recommend that you create and use a folder for the SongSelect files that you download, so
you can find them again easily.
Using SongSelect files in Worship LIVE!
There are three ways to use SongSelect files in Worship LIVE.
· Simply drag them from your Windows desktop into the library. Worship LIVE! will offer to import them, or:
· From the library, select Edit:Import:CCLI SongSelect Files.
Both of these two methods will allow you to import these files as new songs in Worship LIVE. All the song
properties will be included - lyrics (chords are not currently included), writer and composer, copyright information,
topics, root key, and more. You can choose to import either one song or all the songs in a folder.
· From the Edit Song Information dialog, you can update or replace the song properties, by clicking the "Get from
CCLI..." button. After you select a SongSelect file to import, the program will read the file and offer to either
update or replace the files.
If you select Update, then any missing information will be filled in, but no existing data will be replaced.
If you select Replace, all the relevant information will be replaced - including the title.
Please note that some information is not updated or replaced: the root key is not affected, since you may
already have chords in the song; copies printed and projected are not affected, tempo is not affected, and the
multimedia file association is not affected.
©2010 Split Infinity Music
40
2.2.7.3
Worship LIVE! version 6 User's Manual
CCLI Lookups
PLEASE NOTE: CCLI searches no longer work properly in the Worship LIVE! software. CCLI disabled the
features which supported the search, making it impossible for our software to properly connect and find the songs
you want. You may still log in to the CCLI website manually, search for songs, and save the SongSelect files to
disk, but it must be done outside the Worship LIVE! software. Please contact CCLI and request that they make it
possible once again!
The information below is retained for historical purposes, and in case CCLI changes their policy in the future.
Worship LIVE! makes it easy to look up songs on the CCLI web site.
In order to use the CCLI web features, you must be a member of CCLI SongSelect Online. Please visit
the CCLI web site at http://www.ccli.com or the SongSelect web site at http://www.songselect.com for
details on signing up.
If you want to find a new song, from the library, open the Find menu and select Songs on the CCLI Web Site.
If you want to look up an existing song, such as to verify the song's lyrics or determine the composer or other
song properties, open the song first. Then open the song's Help menu and select Find this Song on CCLI...
In both cases, Worship LIVE! will ask your system's default web browser to open a web page (an HTML file) on
your computer that will then contact the CCLI web site.
When you first use the CCLI web site each time you run this program, you will be required to log in with
your CCLI user ID and password. Once you do this, you can simply repeat your request from this
program and it will work as usual.
IMPORTANT: From time to time, CCLI may modify their own web site, which may affect this program's
ability to use the CCLI features automatically. Split Infinity Music is not related to CCLI, and therefore has
no control over the CCLI web features. For these reasons the CCLI web interface is not guaranteed to
operate properly. If the CCLI web features suddenly stop working, we suggest that you use the Check for
CCLI Update option on the Help menu, or visit http://www.simusic.com or http://www.worship-live.com
and see if an updated web page template is available that may fix such a problem.
2.2.7.4
IWillWorship Searches
You can search on the IWillWorship.com website using the tool in the Worship LIVE! software. IWillWorship is a
freely searchable database of popular praise and worship choruses. They are supported by user donations, so
please consider making a donation. (Split Infinity Music is not affiliated with IWillWorship in any way, but we do
believe in supporting those who serve our interests.)
Click on any item below to learn more about it.
©2010 Split Infinity Music
Working With...
41
To do a search, enter the search text and select a type of search, then click the [Search] button. If songs are
found that match your criteria, their titles will be shown in the dropdown to the right of the search button. Select
one, then click the [Get Contents] button to load its details.
Once you've found the song you want, clicking the [Open as Song] button will create a new song in Worship LIVE
using the displayed information.
2.2.7.5 DelicateFade Searches
You can search on the DelicateFade.com website using the tool in the Worship LIVE! software. DelicateFade has
an extensive user-contributed library of praise and worship choruses, but an account is required to fully search
their libraries. Split Infinity Music has an agreement with DelicateFade to use the Worship LIVE! software to
search the DelicateFade library directly.
Click on any item below to learn more about it.
©2010 Split Infinity Music
42
Worship LIVE! version 6 User's Manual
To do a search, enter the search text and select a type of search, then click the [Search] button. If songs are
found that match your criteria, their titles will be shown in the dropdown to the right of the search button. Select
one, then click the [Get Contents] button to load its details.
Once you've found the song you want, clicking the [Open as Song] button will create a new song in Worship LIVE
using the displayed information.
2.2.8
Importing and Exporting Songs
Worship LIVE! can import songs from some other programs, including previous versions of Worship LIVE. Only
text file import is supported. Worship LIVE! cannot import MIDI files, musical notation files from programs such
as MusicTime or Finale, native word processing files from programs such as Word or Wordperfect, or other
database programs such as FileMaker. You can also import CCLI SongSelect files 39 !
However, most other programs can export their data files into a text format - and the program will help you import
these text files. All you need to do is find a suitable export format that the program can read.
To start importing your song data, select the Import option from the main Edit menu. Please read the entire
section of this help file on Importing first. You may need to provide additional information for imported songs,
such as Composer, Lyricist, copyright, CCLI number, etc. Also, you will need to make sure the chords are in the
correct positions over the lyrics following an import.
Now, read the following topics.
Importing Basics 43
Import Dialog Options 43
Preparing to Import 44
Importing Worship LIVE! and Parse Songs
Importing CCLI SongSelect files 39
46
©2010 Split Infinity Music
Working With...
2.2.8.1
43
Importing Basics
Worship LIVE! can attempt to import anything stored in a text file. Text files usually have extensions like ".txt",
".csv", ".tab", ".mus", ".crd", ".dat", or ".asc". If you are exporting songs from another program so the program can
import them, carefully review the import dialog before you begin, to get a feel for the best way to export your
songs.
The description of importing refers to "items" and "fields". An item would be any given property of a song, such as
title, tempo, key, or lyrics. A field is a portion of the imported file that contains either the name of the item, such as
"Title", or the item itself, such as "Holy Holy Holy".
2.2.8.2 Import Dialog Options
The various options from the Import dialog are detailed below.
· The headers for each item From this list, select the option that best describes how your input file is
arranged. There are three options: defined on the first line of the file, where the first line might contain a list of
fields, such as "Title", "Key", "Tempo", etc; defined on the first field of each line, where each line is a
separate item, such as "Title = The Victory is the Lord's"; and do not exist; fields are in the order below,
where the items are simply in a particular order for the song.
· Field-delimiting character Fields can be separated by certain characters. Common characters are tabs,
spaces, equal signs, commas, line breaks, or colon characters. The program needs to know how to break up
the imported data so it can find the items of each song.
· Fields are quoted
Some data file formats place quote marks around each item, like this: Title="Holy Holy
Holy". Checking this box tells the program to remove quote marks from each item.
· Convert line breaks to carriage returns
Some programs, when exporting text, convert the normal endof-line characters (carriage returns) to line breaks. If your imported data is appearing as one long line, try
checking this option.
· This header item
The nine text blocks below this heading allow you to define how each item is titled. For a
line like "Writer=John Doe", a valid header item would be "Writer". These text blocks are not available for all
import types.
· Is imported into this song variable The nine lists below this heading allow you to choose to which song
property a given item is assigned. For instance, "Writer=John Doe" would suggest that you assign Writer to
the song property called Words By or perhaps Composer, or maybe "Speed=125" would suggest you assign
Speed to the song property called Tempo. At the bottom of each list are two special cases: Discard, and
Ignore. Discard literally throws away the field associated with a given header. Ignore adds any field with a given
header to the "Add everything else to" setting (see below).
· Add everything else to
After all defined fields are added, any remaining data, including any fields
marked "Ignore", is added to this song property. Usually this will be the lyrics and chords.
· Multiple songs per File, delimited by
The data to be imported may have more than one song in the
file. This setting tells Worship LIVE! how to know when a new song is starting.
· Save template
Once you get a useful setup on the import dialog, click this button to save all the Import
settings for later use.
· Load template
Click this button to load a previously stored setup for the Import dialog.
· Open button:
Click this button to select a source file (or all files in a source folder) to import.
· Save button: Click this button to select a destination folder where the program will save the imported
file(s).
· Import all files in folder
Check this option to import all the files of the selected type in the source
folder.
· Song Data as Imported
From this list and text area, you can see how the selected file and settings will
work. The song properties are shown in the list, and the text area contains the imported lyrics and
chords.
· Test When you click Test, the selected file will be imported using the current settings, and the results shown in
the Song Data as Imported sample. Nothing is saved to disk.
· Import Now When you click Import Now, the program imports all the songs from the source folder or file, and
saves them to the destination folder.
Before you import a song, set the default font from the Fonts tab of the Preferences dialog. This way, you
will not have to open each song and change its font later.
©2010 Split Infinity Music
44
2.2.8.3
Worship LIVE! version 6 User's Manual
Exporting From Other Software
If your database is already on disk, converting to Worship LIVE! is easy. With some editing of whatever data is
already available, this program should make the life of a worship leader much easier. If your church's music is not
already on disk, then your initial data entry work will pay off very quickly.
To use a data file from another program with Worship LIVE, you need to first review the program's database
format. If you currently have a database in some electronic format, converting it for Worship LIVE! to use is fairly
easy with a word processing program.
Save each song as text-only, in a separate file, with the extension ".sng". Worship LIVE! does not use MIDI data,
music notation, or other data. Now edit the text file (for example, with Windows Notepad) to conform with the
Worship LIVE! file format. Finally, put the song in your song database folder. Then run Worship LIVE. Open the
song, and you can continue editing the song there, including selecting a font, rearranging the chords, etc.
Before you import a text file, set the default font from the Fonts tab of the Preferences dialog to a nonproportional font such as Courier or Lucida Console (any font where all the letters have the same widths).
This way, you will not have to open each song and change its font later.
2.2.8.4
Importing songs from Word files
Song contents can be imported directly from a Word file, which will help you migrate to Worship LIVE! if you're
currently using Word for organizing song lyrics. (You can only import the text from a document - NOT the images
or other contents.)
The process is as follows.
Select [Select Word files] from the main library [Import] submenu under the [Edit] menu.
If you select multiple files, each one will be loaded and added to the preview area, all in a row.
Next, find each song element you wish to highlight. You don't have to pick any, but if you don't at least select a
title you will need to change the generically assigned titles later. Select the text you wish to assign, and click one
of the seven colored buttons at the top of the dialog. The selected text will be marked with similarly colored
highlighting. When the songs are imported, the associated text will be used to automatically populate the song
properties - as much as you choose to assign.
Use the [Next Song] button to put breaks between individual song, if more than one song exists in the preview
area.
Unlike the Powerpoint import function, the song text formatting like font styles and sizes (except for the colored
highlighting) will be preserved when you import from Word.
Note that you may edit the text shown in the preview area as you're doing the import. You can add a tempo or key
or other information you wish to assign, and then mark it so it will be captured during import.
In the example shown below, various song elements have already been highlighted, and the import is ready to
begin.
©2010 Split Infinity Music
Working With...
2.2.8.5
45
Importing songs from Powerpoint files
Song contents can be imported directly from a Powerpoint file, which will help you migrate to Worship LIVE! if
you're currently using Powerpoint for projecting song lyrics. (You can only import the text on a slide - NOT the
images or other contents.)
The process is as follows.
Select [Powerpoint file] from the main library [Import] submenu under the [Edit] menu.
Click the [Select PPT file] button to pick a file to import. Once it has been loaded, you will need to assign each
slide to an appropriate song. Once you have properly assigned the various slides, click the [Accept and Import]
button to proceed.
To assign slides to songs, you will have one of three basic setups in your Powerpoint file. Either you have one file
per song, or you have many songs in a single file, either one or multiple slides per song.
If you have one file per song, click the "Assign all slides to a single song" button.
If you have multiple songs per file, you will need to select the first slide for each new song, and click the [This
slide is first in a song] button. This will indent the following slides to be part of that song. If another song begins
below, repeat the process until each new song has been identified. Each slide that remains left-justified will
be used to create a new Worship LIVE! song file.
If you use the verse, chorus and other buttons, the song parts will be appropriately tagged when the song is
imported. This is optional but will help you identify the song parts later.
The title will normally be automatically selected according to the slide contents but you may change it by clicking
the button at upper right where the title is shown.
When you click the [Accept and Import] button, this dialog will remain open but one or more song files will be
created and shown, containing all the song text from that you have selected for each song. If you like the results,
save each new song and close the Import dialog. Or you can close the songs without saving them, and adjust the
setup and try again.
In the example shown below, the 2nd and 3rd slides have been indented to show that they are part of the same
©2010 Split Infinity Music
46
Worship LIVE! version 6 User's Manual
song. The first item has been marked as a Verse (the [V] indication), the 2nd as some other song element, and
the third as a chorus.
2.2.8.6
Importing Worship LIVE! files
Worship LIVE! / Parse versions 2 through 5 all share the same basic file format, with some minor additions with
each new version. For this reason, Worship LIVE! 5 will directly open songs from these versions without any
import. You can simply copy the *.sng files into your database folder (when Worship LIVE! is not running) or you
can use the Edit:Import:Worship LIVE! Song Files menu item to help you move them all at once, or individually if
you wish.
NOTE: Once you have edited or printed version 2 through 4 songs in Worship LIVE! 5, you should not re-edit
them in the older software, as this version adds some properties to the song files that may be lost.
You can import Parse version 1 only by importing it like any other text file. Select the database file (it will have the
extension *.asc) and change the import settings to suit the file format.
Before you import a text file, set the default font from the Fonts tab of the Preferences dialog to a nonproportional font such as Courier or Lucida Console (any font where all the letters have the same widths).
This way, you will not have to open each song and change its font later.
2.3
Announcements
The following topics are available:
·
·
·
·
·
·
·
About Announcements 47 : What they're for
Selecting Announcements 47 : how to pick an announcement
Creating Announcements 47 : how to create new announcements
Editing Announcements 47 : how to edit announcements
Saving Announcements 48 : very easy to save!
Projecting Announcements 48 : how to get your announcements on the big screen
Deleting Announcements 48 : when you don't need them anymore...
©2010 Split Infinity Music
Working With...
2.3.1
47
About Announcements
Announcements are similar to songs in Worship LIVE, but they are stored in a separate folder and do not contain
chords. Like songs, they can contain multiple pages distinguished by the with the ¶ symbol, and shown separately
on the Projection display. Also like songs, the verses can be set to automatically advance in the Projection
display, so you can create a slide show of announcements for each week's playlist.
Click on any item below for more details.
2.3.2
Selecting Announcements
Click the Announcements icon
to show the Announcements dialog. To view and/or edit a particular
announcement file, click its title in the list of announcements.
2.3.3
Creating Announcements
Click the New Announcements option on the File menu, or the New Announcement toolbar button
comment and text areas will be cleared, and you can begin entering a new announcement.
2.3.4
. The title,
Editing Announcements
Editing an announcement is just like editing a song or any other word processing file. The announcement Edit
and Format menus contain many options to help change the contents of the message. You can also enter a
unique title and/or comment that will be saved with the announcement.
If you want the announcement to be displayed in separate pages on the Projection display, use the Make line a
©2010 Split Infinity Music
48
Worship LIVE! version 6 User's Manual
header, or Insert header, options on the Edit menu. Any line that begins with a ¶ paragraph symbol will be used
as a header, just as a song uses that symbol to mark the beginning of a verse. Similarly, any such line will be
used as the title for that page on the playlist window.
2.3.5
Saving Announcements
When you've created or modified an announcement, click the Save button
options from the announcement File menu.
2.3.6
or select the Save or Save As
Projecting Announcements
Announcements can be projected either directly or from the playlist.
· Directly: click the Project icon
on the Announcement dialog. This is a great way to get an announcement
on-screen very quickly. When an announcement is displayed this way, only the first page will be shown. The
dialog will remain open so you can add it to the playlist to show the remainder of the pages.
· Playlist: any announcement added to the playlist will be projected just like songs and Scriptures. The format of
projected announcement can be customized just like songs and Scriptures. You can specify the font and
colors, and background images. Also, you can click the Cycle button to automatically advance through the
pages of the current announcement.
2.3.7
Deleting Announcements
You can delete announcement files by using the Delete option on the File menu, or by selecting the Delete button
on the Announcements toolbar.
Deleting an announcement is a permanent step – you cannot undo a deletion.
2.4
Scripture
The following topics are available:
·
·
·
·
·
About Scriptures in Worship LIVE! 49 : Some general thoughts...
The Scripture Dialog 49 : how the dialog looks and works
Selecting Scripture verses 50 : how to quickly select the verse you want
Searching the Scriptures 51 : how to find a verse you want
Printing Scripture verses 51 : getting the verse on paper
©2010 Split Infinity Music
Working With...
49
· Projecting Scripture verses 51 : getting the verse on the big screen
· Copying Scripture verses 51 : moving verses to the Windows clipboard for use in other software
2.4.1
About Scripture Support
Worship LIVE! includes broad support for viewing and projecting Scriptures, and also inserting verses into songs
and announcements. Multiple Bible translations are supported, and a search function helps you quickly find any
Scripture.
2.4.2
The Scripture Dialog
Click any option for a detailed explanation.
2.4.3
Parallel views of Scripture
When you select a Bible passage to add to a playlist, insert into a song or announcement, or project on the
screen, you have the option to use two Bible translations at the same time - often called using a Parallel Bible
Translation. With Worship LIVE!, when you project a parallel Bible passage, both versions will be shown
onscreen at the same time. The parallel projection makes it very easy to handle Bible scriptures in a bilingual
church.
©2010 Split Infinity Music
50
Worship LIVE! version 6 User's Manual
To use parallel projection, simply select a secondary translation from the Parallel dropdown on the Scripture
Selection dropdown. You may also select an orientation using the dropdown next to the translation selection. Both
versions will be projected in the selected orientation if you use the projection feature. If you add the passage to a
song or announcement, they will always be inserted one after the other.
2.4.4
Selecting Scripture
From almost anywhere in the program, you can type Ctrl-G ("Get Scripture") to pop up the Scripture Selection
dialog. You can also hit F-11 to bring up the dialog for different purposes (like immediate projection of a scripture,
or inserting Scripture verses into a song or announcement).
In the Scripture Selection dialog, you can find a particular scripture through several means.
· Quick Entry: simply start typing a verse reference, like this format: John 3:16-19. As you type, the selected
verse will be displayed.
· Manual Selection: click on the appropriate translation, book, chapter and verse, and the selected verse will be
displayed.
· Search: to search the Bible, click the Search icon to show (or hide) the search pane.
· Quick-select: to select a range of verses, simply drag up-and-down across more than one verse number to pick
the entire range.
Once you've found the correct verses, you have several options.
· Add to Playlist: click the Add to Playlist button to add the selected Scripture to the current playlist, or to create a
new playlist if required. If the Title box includes any text, it will be used as the title on the playlist; otherwise the
word "Scripture" will be used.
· Copy: click the Copy to Clipboard icon to make the text available on the Windows clipboard.
· Project Scripture: click the Project icon to immediately project the displayed Scripture. If the Title box includes
any text, it will be used as the title on the Projection display; otherwise the title will remain blank. You can also
blank the projection display with the Blank Projection icon.
· OK: If the Scripture Selection dialog appeared because you selected Add Scripture to playlist or Project
Scripture, clicking OK will perform the requested action. Otherwise, the dialog will simply close.
©2010 Split Infinity Music
Working With...
2.4.5
51
Searching Scriptures
The entire scripture can be searched for partial or exact matches. Type in the desired search term, and select a
range to search.
· Look in: Select a range to search using this dropdown.
· Find only exact matches: If selected, only whole words with exact capitalization will be matched. For example,
Levite and Levi will not match.
The matches found will be shown in the list below the search controls. Up to 50 matches will be shown, with both
the verse reference and the text of that verse.
To see the verses that were found, click them in the list.
2.4.6
Printing Scripture
Scripture verses can be printed either directly or from the playlist.
· Directly: click the Print icon on the Scripture Selection dialog.
· Playlist: any scripture added to the playlist will be printed just like songs and announcements.
The format of printed scripture verses can be customized just like songs and announcements. You can specify
the font and colors.
2.4.7
Projecting Scripture
Scripture verses can be projected either directly or from the playlist.
· Directly: click the Project icon on the Scripture Selection dialog. (You can also blank the Projection display by
clicking the Blank Projection icon.) This is a great way to follow along a sermon and get verses on-screen very
quickly. The dialog will remain open, so you can keep up with the sermon and change verses at any time.
· Playlist: any scripture added to the playlist will be projected just like songs and announcements. The format of
projected scripture verses can be customized just like songs and announcements. You can specify the font and
colors, and background images.
2.4.8
Copying Scripture
Selected scripture verses (up to one chapter) can be copied to the clipboard for later use in songs or
announcements, or even other Windows programs. Simply click the Clipboard icon to copy the contents of the
verse display.
2.5
Images
The following topics are available:
· About Images 51 : what kinds of images are useful in this software
· Projecting Images 52 : how to get your images on the big screen
· Image Captions 52 : how to add text to your images
2.5.1
About Images
Image files in bitmap (*.BMP) or JPEG (*.jpg) format can be added to the playlist, and then shown on the
Projection display. When they are projected, they will be resized to fit the display, but the aspect ratio will be
preserved (the image will be resized proportionally). Captions can be added to images and shown along the
bottom of the image.
Using these features, it's very easy to create a simple slide show of digital images.
©2010 Split Infinity Music
52
Worship LIVE! version 6 User's Manual
Images can only be added to the playlist when Projection Features are enabled/unlocked. Images cannot be
printed with playlists, so there is no benefit to adding them to playlists other than for projection purposes.
2.5.2
Adding Images to the PlayList
To add an image to the playlist, you can:
· Select the Add Image to Playlist option from the main window Playlist menu
· Select the Add Image option from the playlist window View menu
· Click the Add toolbar button (a green + sign) and select the Add Image File option
A file dialog will appear and any bitmap (*.BMP) or JPEG (*.jpg) files on the computer may be selected. If there
are multiple files in the selected location, Worship LIVE! will ask if you wish to add all the files. Once you have
selected the files, they will be added to the end of the playlist. Once on the playlist, the files can be rearranged 60
just like any other playlist items. You can also add captions to the images 52 .
Image files are NOT embedded into playlists - the playlist simply references the file on disk. If you move,
delete or rename an image file, the playlist will not be able to find it later.
2.5.3
Projecting Images
Images must be added to the playlist before they can be projected. Once on the playlist, they can be
projected just like any other playlist item 66 .
· If the projection display is not open, then select the desired image and click the Project toolbar button or click
F12.
· If the projection display is already open, simply double-click the desired image.
2.5.4
Image Captions
To show a caption along the bottom of the projected image, enter a playlist comment for the image, by selecting
the Add Comment option from the Projection Item menu. The caption will be shown using the Title font settings
for the playlist.
Just as with any other playlist item, you can customize the font color by selecting the Customize Projection
Format option from the Projection Item menu. The Title font style (font face, font size, and bold/italic/underline
settings) can be changed for the entire program under the Fonts preferences tab.
2.5.5
Selecting a Different Image
If you want to select a different image file for the playlist, you can do so without deleting and re-adding it.
· Select the image you want to change. From the Playlist Item menu, select the Change Image option.
· Right-click the image you want to change, and select the Change Image option from the popup menu that
appears.
A file selection dialog will appear, and you can select a different image file. The original caption/comment will be
preserved.
2.6
Audio
The following topics are available:
·
·
·
·
About Audio 53 : kinds of audio files that this software supports
Adding Audio to the playlist 53 : how to get it into your playlists
Playing Audio 53 : making it play, either on or off the playlist
Selecting a Different Audio File 53 : changing a selected audio file to something different
©2010 Split Infinity Music
Working With...
2.6.1
53
About Audio
Audio files in various formats can be added to the playlist, and then played back over the system's multimedia
equipment.
The following audio file types are allowed:
MP3 audio (*.mp3)
Windows Media audio (*.wma)
Wave files (*.wav)
Audio file support is limited to what the computer's Windows Media Player is able to open. If a audio
"codec" has not been installed or enabled by WMP, then Worship LIVE! will not be able to play the audio
either. If you can successfully open and play an audio file using WMP, you should also be able to play it
from within Worship LIVE!
2.6.2
Adding Audio to the PlayList
To add an audio file to the playlist, you can:
· Select the Add Audio to Playlist option from the main window Playlist menu
· Select the Add Audio option from the playlist window View menu
· Click the Add toolbar button (a green + sign) and select the Add Audio File option
A file dialog will appear and any audio files (such as .mp3, .wma, .wav) on the computer may be selected. Once
you have selected a file, it will be added to the end of the playlist. Once on the playlist, audio files can be
rearranged 60 just like any other playlist items.
Audio files are NOT embedded into playlists - the playlist simply references the file on disk. If you move,
delete or rename a audio file, the playlist will not be able to find it later.
2.6.3
Playing Audio
Audio files must be added to the playlist before they can be played back. Once on the playlist, they can be used
almost like any other playlist item. Since an audio file has no visual component, they are not strictly speaking
projected. However, the projection controls function very much the same with audio files.
· If the projection display is not open, then select the desired audio file and click the Project toolbar button or
click F12.
· If the projection display is already open, simply double-click the desired audio file.
Once a file is playing, you can control its playback using the Multimedia control window
2.6.4
82
.
Selecting a Different Audio File
If you want to select a different audio file for the playlist, you can do so without deleting and re-adding it.
· Select the audio file you want to change. From the Playlist Item menu, select the Change Audio option.
· Right-click the audio file you want to change, and select the Change Audio option from the popup menu that
appears.
A file selection dialog will appear, and you can select a different audio file.
©2010 Split Infinity Music
54
2.7
Worship LIVE! version 6 User's Manual
Videos
The following topics are available:
·
·
·
·
About Videos 54 : what kinds of video is supported in this software
Adding Videos to the playlist 54 : how to get the videos into your playlist
Projecting Videos 55 : how to show the videos on the big screen
Selecting a Different Video 55 : how to change a selected video to something else
2.7.1
About Videos
Video files in various formats can be added to the playlist, and then shown on the Projection display. When they
are projected, they will be resized to fit the display, but the aspect ratio will be preserved (the video will be resized
proportionally).
The following video file types are allowed:
MPEG Videos (*.mpg, *.mpe, *.mpeg)
AVI Videos (*.avi)
QuickTime Videos (*.qt, *.mov)
Windows Media Videos (*.wmv)
MPEG-4 (*.mp4)
Video file support is limited to what the computer's Windows Media Player is able to open. If a video
"codec" has not been installed or enabled by WMP, then Worship LIVE! will not be able to play the video
either. If you can successfully open and play a video using WMP, you should also be able to play it from
within Worship LIVE!
Videos can only be added to the playlist when Projection Features are enabled/unlocked. Videos cannot be printed
with playlists, so there is no benefit to adding them to playlists other than for projection purposes.
2.7.2
Adding Videos to the PlayList
To add a video to the playlist, you can:
· Select the Add Video to Playlist option from the main window Playlist menu
· Select the Add Video option from the playlist window View menu
· Click the Add toolbar button (a green + sign) and select the Add Video File option
A file dialog will appear and any video files on the computer may be selected. Once you have selected a file, it will
be added to the end of the playlist. Once on the playlist, video files can be rearranged 60 just like any other
playlist items.
Video files are NOT embedded into playlists - the playlist simply references the file on disk. If you move,
delete or rename a video file, the playlist will not be able to find it later.
2.7.3
Projecting Videos
Videos must be added to the playlist before they can be projected. Once on the playlist, they can be
projected just like any other playlist item 66 .
· If the projection display is not open, then select the desired video and click the Project toolbar button or click
F12.
· If the projection display is already open, simply double-click the desired video.
©2010 Split Infinity Music
Working With...
2.7.4
55
Text-over-Video
This version of the Worship LIVE! software supports using video clips as backgrounds for projection. You can
use any video clip that you may otherwise project from the software.
To select a video background, use the same techniques as for any other projection formatting, including setting
the default projection formatting.
When you switch between items with different background videos, there will be a delay while the first video is
stopped and the second video is started. This is normal.
You may find that the smooth fade transition type between items with the same background video does not
produce pleasing results. The Transitions control on the playlist allows you to select a video-background-specific
transition type.
2.7.5
Selecting a Different Video
If you want to select a different video file for the playlist, you can do so without deleting and re-adding it.
· Select the video you want to change. From the Playlist Item menu, select the Change Video option.
· Right-click the video you want to change, and select the Change Video option from the popup menu that
appears.
A file selection dialog will appear, and you can select a different video file.
2.8
Playlists
The following topics are available:
·
·
·
·
·
·
·
·
About Playlists 55 : what are playlists?
Opening Playlists 59 : how to open saved playlists
Creating Playlists 59 : how to create a new playlist
Arranging Playlist Items 60 : how to change the order of playlist items
Saving Playlists 60 : how to save playlists for later use
Projecting Playlists 60 : how to get your playlists on the big screen
Printing Playlists 61 : how to get your playlists on paper
Exporting Playlists 62 : how to get your playlists onto the Windows clipboard for use with other software
2.8.1
About Playlists
A playlist is simply a group of songs, Scriptures and announcements, and other file types such as videos, images,
and Powerpoint files. You can add these in any order, select the keys for playlist songs, rearrange them,
customize the colors and background images for each item, and save the playlist for later use.
©2010 Split Infinity Music
56
2.8.2
Worship LIVE! version 6 User's Manual
The Playlist display
The playlist display contains numerous options for rearranging the playlist, and also for Projection display of the
playlist. Click on an item for detailed information.
When the Projection display is showing, there are additional controls shown on the right side of the playlist
window. Click on an item for detailed information.
When a background image is showing, some of the controls are disabled. Specifically, you cannot scroll the text
vertically with a background image showing.
The playlist also has an icon (or thumbnail) view; when in projection mode, a small thumbnail image of each slide
will be available. Click the appropriate option in the View menu.
©2010 Split Infinity Music
Working With...
57
Notes:
· If projection is not running, or the preview images have not yet been created, only generic images will be
shown.
· If you select the "Hide unchecked items in icon view", then only checked items will be visible.
2.8.3
The Mini-Library Pane
Once a playlist is open, you can continue to add items from the main song library. However, to speed your work,
there is also a mini-library pane available.
When you select a song in the library pane, you can click-and-drag it to the playlist, or you can hit the F9 key (like
anywhere else in the software) to add the selected song to the playlist.
©2010 Split Infinity Music
58
Worship LIVE! version 6 User's Manual
In addition to showing the song library contents, you may also select a library of images or videos. The location
for these files will default to the folders selected in the preferences, but you may navigate to a different folder if
you wish.
You may drag-and-drop files from the library pane to the playlist. You may also apply these images or videos
directly to the currently projected item. Right-click an image for options, or double-click it to immediately update
the projection background.
©2010 Split Infinity Music
Working With...
2.8.4
59
Opening Playlists
Playlists can be opened from the Windows Explorer, from the library window, and also from the playlist window.
· Explorer: Double-click on a playlist file to run Worship LIVE! and open the playlist.
· Library: Select the Open Playlist toobar button, or the Open Playlist option on the File menu, or a recently
opened playlist from the Recent Files option on the File menu.
· Playlist window: Select the Open Playlist toobar button, or the Open Playlist option on the File menu, or a
recently opened playlist from the Recent Playlist option on the File menu.
Some playlist files can include embedded songs or media files. You will be asked what you'd like to do in this
case.
2.8.5
Creating Playlists
Any time a playlist is not already open, selecting an Add to Playlist option will immediately create a playlist and
then add that item to the new playlist. The library, Scripture Selection dialog, and Announcement dialog all have
Add to Playlist buttons and menu options. The Find Songs dialog also has an Add to Playlist button.
Once a playlist window is open, you may also drag-and-drop songs from the library to the playlist.
The following items can be added to playlists:
· Songs 24
· Announcements 46
· Scripture 48
· Images 52
©2010 Split Infinity Music
60
·
·
Worship LIVE! version 6 User's Manual
Videos 54
PowerPoint Presentations 102
There is no way to manually create a new blank playlist, since the program handles this for you
whenever you add an item.
2.8.6
Arranging Playlist Items
You can rearrange the items on the playlist, customize the colors and background images of projected playlist
items, and select playlist keys for the songs. You can also select items to project or skip.
· Rearranging: There are two ways to rearrange playlist items. Simply click-and-drag the items up and down the
list, or select an item and click the Up and Down buttons on the playlist toolbar.
· Selecting Keys: Select a playlist item, then either click the Transpose toolbar buttons, or select the Playlist Key
option on the Playlist Item menu, and the pick the desired key from the submenu.
· Customizing Projection: Either select the Customize Projection Format option on the Playlist menu, or click the
Customize toolbar button.
· Selecting Items to Project: To mark an item for projection, check the box next to that item. Each verse of a
song or page of an announcement can be so marked. If the item is not marked, the Next and Prev projection
control buttons will skip over that item, and the Cycle auto-advance feature will also skip it.
2.8.7
Saving Playlists
Select the Save Playlist or Save Playlist As options from the File menu, or click the Save or Save As toolbar
buttons. If you select Save As or you have not already saved the current playlist, you will be asked to select a file
name and location.
When a playlist is saved, the contents of the current playlist, any playlist keys for the songs, the on-screen
location of the playlist window, the customized appearance of each playlist item, and the source database are all
saved.
2.8.8
Projecting Playlists
The playlist is the heart of the Worship LIVE! projection system, which is described in more detail here
start projecting the current playlist:
· click select the Project toolbar button
· select the Project from Top or Project Selected Item options from the Projection menu
· right click an item and select Project Selected Item from the popup menu.
You can also instantly project the most recent playlist with one click on the "Instant Projection" button
library screen.
63
. To
on the
· Project from Top: The first item on the playlist will be projected. If it contains multiple verses, the first selected
item (with a check mark next to it) will be projected.
· Project Selected Item: Whatever item is currently selected on the list of playlist items will be selected, even if it
is not marked for projection.
· Instant Projection: To load and immediately project the most recently loaded or saved playlist, click the Instant
Project button on the main toolbar. This is a great way to get up and running quickly.
You can quickly jump between playlist items with the number keys and Ctrl-number keys. 1 thru 9 jump to
a verse of the currently selected song, and Ctrl-1 thru Ctrl-9 jump to that song. 0 jumps to the entire
song, if the song contains more than one verse. If the Projection display is showing, these keys will cause
the projection display to be updated with the selected song or verse.
©2010 Split Infinity Music
Working With...
2.8.9
61
Printing Playlists
Printing the playlist is a great way to compile a set of material for a worship service. You can preselect a group of
songs, Scripture and announcements, select the desired keys for each song to print, rearrange them, and finally
print the entire list to give to your musicians, or even for handouts.
You can print the playlist from the playlist display, or even from the Windows Explorer.
· Explorer: If you right-click on a playlist file, one of the available options will be Print. This will start Worship
LIVE, load the playlist, and immediately print it.
· Playlist display: Click the Print toolbar button, or select the Print Playlist option on the File menu.
2.8.10 Playlist Notes
"Playlist notes" are a special class of playlist item. They are designed to help you customize the playlist printout,
and only appear on the playlist summary page. They save and load with the playlist file. Notes do not print with
the songs, and they do not project.
Notes can be up to 3 lines long, and contain any formatting you wish to use.
To add a playlist note, select that option from the Add menu of the playlist.
Click any item on this image for details.
When the playlist is printed, this is what the playlist summary will look like:
©2010 Split Infinity Music
62
Worship LIVE! version 6 User's Manual
2.8.11 Exporting Playlists
You can export a playlist to either the clipboard or to a Rich Text file (compatible with many word processors).
You can also export the playlist in a file that makes it easier to share with other Worship LIVE! users. From the
[File] menu, select [Export playlist...] to show the [Export Playlist Options] dialog.
The first two options are intended for use with other copies of the Worship LIVE! software:
· For use on another computer with the Worship LIVE! software: to save the playlist to share with another
Worship LIVE! user, select the appropriate Export option on the song File menu. Normally, a playlist file
includes information on the filenames and databases of the included songs. When you give a playlist to another
Worship LIVE! user, he may not have his songs stored in the same folders as you, and the program would be
unable to load the playlist properly. The Export for Sharing option skips the filenames so the file will load more
easily, but this also forces the program to rely on matching song titles (which can be duplicated in a database,
so it's not a guaranteed match). Also, announcements are not saved in an exported playlist.
· To the web server set up for your organization: Please review the help file information on
Server Synchronization 103 to learn about this option. When you use this selection, the playlist will be
immediately uploaded to your server, and available for download by remote users.
The next two options apply to both of the preceding export types:
· Include Worship LIVE! song files: if you're not certain that the computer which will be using the exported
playlist has a current copy of all the songs on your playlist, use this option. The song files will be included in the
©2010 Split Infinity Music
Working With...
63
single playlist file that is exported, and when Worship LIVE! opens this playlist file, the user will have the option
to import those songs into the database before the playlist is opened.
· Include images and multimedia files: If you need to move your playlist, plus audio and video and image files,
to another computer, this is a good option. It will create a single (and probably very large) file with not only the
playlist, but any multimedia files also embedded within the playlist. This will include any image files which are
referenced by playlist projection formatting.
· When you open this playlist file, the software will ask if you would like to extract the media files. You will be
asked to select a destination folder. Then the media files will be written to the selected folder. The media
filenames will be adjusted automatically, so that once the playlist is open it will be properly linked to all the
media files. If any media files already exist, you will be asked if you'd like to overwrite them.
· Note that the generated file will be at least as large as the sum of all the media files. This can obviously get
very big very quickly.
There are some additional export options for other software:
· To the Windows clipboard: use this option to send the playlist to the Windows clipboard as rich text with all
formatting included. Please note that some email programs use HTML formatting, not true Rich Text (RTF)
formatting, and pasting RTF into an email may result in chord and line spacing changes. If you need to do this,
we suggest pasting it into a word processor first, and then copying it from there to your email program.
· For use in word processing software: this option will save the playlist as a "Rich Text File" with formatting
included. These files can be used by most word processing programs, and will include most of the formatting
you would see in a printout.
· As a Powerpoint slideshow: this option will export a series of bitmap images and create a Powerpoint
slideshow, one slide per stanza or page of your playlist presentation. You must have Powerpoint installed,
since this export uses the Powerpoint software to do the work.
The clipboard and rich text file exports are very similar to a printout and include a playlist summary, and the title,
contents, comments, and copyright/composer information of each song.
2.9
Projection
The following topics are available:
·
·
·
·
·
·
·
·
·
About Projection 63 : what is projection?
Single versus Dual Screens 64 : the benefits of more than one monitor
Projecting From a Playlist 66 : how to get things from the playlist onto the big screen
Projecting Without a Playlist 67 : in a hurry? How to avoid using the playlist
Keyboard Shortcuts 70 : controlling projection with quick key shortcuts
Visual Paging 71 : sending simple text messages to the congregation
Configuring the Display 72 : how to customize the various projection settings
Customizing Playlist Items 73 : how to fine-tune the appeance of projected items
Blanking and Freezing 74 : controlling what the congregation sees, and when
2.9.1
About Projection
The Projection display helps to position Worship LIVE! on the leading edge of the church digital projection
revolution. When instant projection of any song, Bible verse or announcements is combined with customizable
background images and rich text formatting, there's no comparison with other church worship packages. Songs,
Scripture, announcements and "visual paging" text messages can be projected, each item can be customized,
and the display can be completely controlled from the playlist without the congregation ever seeing the control
functions. All this adds up to a very flexible and professional presentation system.
Since many home users and small churches might not need the exceptional capabilities of the Projection
features, they are available as a separate unlock from the rest of the program's song database and transposition
features.
©2010 Split Infinity Music
64
2.9.2
Worship LIVE! version 6 User's Manual
Single versus Dual Screens
The projection features have been optimized for a dual screen computer system. The playlist display contains
many features designed to control the projection display, navigate between songs, and even customize its
appearance. The projection features will also work well with a single screen system, but with some limitations.
· Dual screen: The playlist (which becomes the projection control window) can be placed on one screen, and the
projection display shown on the other screen. This way, the output from the second video card can be
dedicated to a digital projection device, so that the congregation never sees the mouse cursor or other
windows, and the projector mute/blank functions are not necessary. Setting up (or upgrading to) a dual-screen
system is simple and inexpensive for most up-to-date computers; visit the Split Infinity Music web site for some
suggested setups and considerations.
· Single Screen: The playlist can still be shown on a single screen system, but it naturally covers all the other
windows. For this reason, a number of simple keyboard commands have been included to fully control the
display. For example, the spacebar quickly moves to the next song. In this mode, the program can be quite
useful with a portable computer located on the podium or piano, providing full (even searchable) access to the
entire database of music, along with a large-font display of the current song. With additional monitors showing
the same image, all the musicians and singers can see the same thing, and one person can handle all the
page-turning.
2.9.3
Even More Screens - the Lyric display
Beyond even the projection features, a Stage Lyrics display screen is available.
If you have a PC with three video card outputs, you can assign a special lyrics display to the third screen. The
purpose of this screen is to display information to your singers or band members, not to the main congregation. In
fact, you cannot configure the Lyrics display with fancy formatting or backgrounds - only solid colors. What is
shown on the Lyrics display is a function of what you show on the projection display.
· For songs, the Lyrics display will always follow the projection display - whatever verse of whatever item is
showing on the main projection display will also show on the Lyrics display if it has been enabled.
· Images and scriptures will also show on the lyrics display.
· Videos will NOT display, only a single static frame of the video.
· Powerpoints will not display completely - only a low-resolution, static image of each slide.
©2010 Split Infinity Music
Working With...
65
Depending on the song and font sizes you select, the screen might look like this:
In this view, notice that the Prechorus is currently projected (and is therefore highlighted), and you'll also see
parts of the verse and Chorus 1. In addition, in the upper right corner is the Lyrics screen configuration panel.
Whenever you move the mouse over the lyrics screen, the Close and Configure icons will appear. Click the
[Configure] icon, and the configuration panel will appear. If you don't do anything, the icons will disappear after a
few seconds.
©2010 Split Infinity Music
66
Worship LIVE! version 6 User's Manual
On the configuration panel, you can select the various colors and font sizes. Also, you can select how many lines
from the previous and next verse to show. This can give your singers and band an idea what's coming up next.
You can also configure the lyrics display to show a real-time clock.
Sending Pages to the Stage
To help get the attention of your singers or band, the Lyrics display can show visual pages, just like the main
projection display. When you open the [Show Visual Page] dialog to display a page, there is a [Send to Stage]
button that will display the message ONLY to the Lyrics display. The message will remain visible until you click
the [Hide Pages] button. Both the Congregation and Stage page functions use the same colors and Flash
settings.
2.9.4
Projecting From a Playlist
The playlist offers the most flexible and complete control of the Projection display. It includes tools for
rearranging, customizing and controlling the projection.
Starting Projection: Click the Project icon on the playlist toolbar, or use the Project Selected Item or Project from
Top (F5 or F12) menu options. The right half of the playlist will change to show the Projection control functions.
Moving through the playlist: Once the Projection display is shown, double-clicking a playlist item will display that
item, rather than opening it for editing. The Prev Item and Next Item buttons will move through the playlist item by
item, skipping items that are not marked for projection.
Keyboard Shortcuts: For quick navigation through the Projection display, whether or not the playlist window is
visible, press 1 through 9 to jump to that verse of the currently projected item, or 0 to project the entire song, or
click Ctrl-1 through Ctrl-9 to switch to the playlist item in that position.
©2010 Split Infinity Music
Working With...
67
Projection Controls
Depending on whether or not a background image is assigned, the Projection controls on the playlist window may
look slightly different.
Click on any item for detailed information.
2.9.5
Projecting an Item Directly
Songs, Scriptures and announcements can all be projected directly, without addition to a playlist, but there are
some limitations on this ability.
· To show a song directly, select it in the library and hit the F12 key, or use the Selected Song option from
the Project menu.
· To show a scripture directly, open the Scripture dialog 49 , select the desired scripture and click the red
Project button.
· To show an announcement directly, open the Announcement dialog 47 , select the desired scripture and
©2010 Split Infinity Music
68
Worship LIVE! version 6 User's Manual
click the red Project button.
Songs and announcements will initially only show their first verse or page, and the appearance cannot be
customized from the defaults selected in the Projection preferences. If you need to customize the format, add it to
a playlist first.
If you wish, the software can automatically add instant-projected items to a playlist. Look on the [Projection] tab of
the preferences for the option titled "When song projected from library, also add to playlist". If no playlist is
presently open, then a new one will be created.
Special Projection Tools for Single Monitor Use
Quick Find:
If you are using the projection tools to instant-project songs, especially on a single-monitor computer, and you
want to find another song to project, hit Ctrl-F (think "find a song"), and the Find helper will appear in the lower
right corner of the display:
Start typing a song title, and the list will follow your typing. Once you find the song you wish, use the cursor keys
or mouse to select the appropriate title, then hit Enter or double-click the title with the mouse. The selected song
will immediately be projected, just as if you had selected it for projection from the main list or the playlist. Please
note that if the song has multiple verses, only the first verse will be projected.
To make the find helper disappear if you decide not to project another song, simply hit Ctrl-F again.
Playlist:
Similarly, you can hit Ctrl-L (think, "playList") to pop up a short summary of items on the playlist. You can pick one
of these items to project it immediately.
©2010 Split Infinity Music
Working With...
69
Quick transpose:
You can also hit Ctrl-K (think, "key change") to pop up a list of keys into which you can instantly transpose the
projected song.
2.9.6
Projecting Custom Text
There may be times when you wish to project a simple message without the trouble of creating a new song or
announcement, and you don't want the bare-bones style of a Visual Page message. In this case, use the Custom
Text tool.
The dialog is very simple:
©2010 Split Infinity Music
70
Worship LIVE! version 6 User's Manual
Enter the text you wish to project, and then click the red Project button to show it using the default formatting on
the projection screen. If you wish, you may customize the format with the palette icon. You can also blank the
screen directly from this dialog.
When you're finished, click the Done button to close this dialog.
The custom text tool will always remember your most recent message and include it in the text area.
2.9.7
Keyboard Shortcuts
All features of the projection display can be controlled from the playlist window, but a number of features are also
available on the projection display itself. If the projection window is clicked with the mouse, a small toolbar with
essential controls will appear. These controls mirror identical buttons on the playlist toolbar. These are available
for controlling the projection display if a single-screen setup is used, such as on a laptop computer on-stage.
There are also keyboard equivalents of all the buttons:
·
·
·
·
·
·
·
·
·
·
·
·
·
·
·
Next Song: space bar, or page-down key
Prev Song: page-up key
Hide chords: Insert key
Transpose Up: right arrow
Transpose Down: left arrow
Play multimedia: F2
Pause multimedia: F3
Stop multimedia: F4
Close projection display: Esc key
Jump to a song, scripture or announcement: Ctrl-1 through Ctrl-9
Jump to a song or announcement page: 1 through 9 (shows the selected page of the current item)
Jump to the entire song or announcement: 0 (shows ALL pages of the current item)
Find a song to instantly project: Ctrl-F (pops up the find manager in the lower right corner)
Change the key: Ctrl-K (pops up the transpose selector in the lower right corner)
Pick an item from the playlist: Ctrl-L (pops up a playlist summary in the lower right corner)
2.9.8
Projecting Web Pages
New to version 6.4, you can add web links to the playlist, and the projection screen can directly those show
web pages in a full screen/minimal controls mode.
Compatibility: The software uses Windows Internet Explorer to render and display the pages. Any site that works
in IE should work in the Worship LIVE! projection display, although tabbed browsing and popup or pop-out
windows are intentionally disabled so that all links remain framed in the projection display. You should preview
required web pages, and if you want to navigate to a page that doesn't link properly, add it as a new link in the
playlist and nagivate to it that way.
©2010 Split Infinity Music
Working With...
71
To project a web page:
Add a web link to the playlist by selecting that option from the Add menu of the playlist, or the Playlist menu of the
song library. A small dialog will appear:
If you add a link to a standard YouTube or Vimeo video, you will have some additional options to enable fullscreen and/or auto-playback as appropriate.
The projected webpage features a very minimal top header with a title/status bar and some useful controls:
Close, "home" (go back to the initially-projected link), back and forward navigation, reload, stop loading, and add
current page to the playlist. This controls are normally dimmed until you move the mouse over them, to minimize
distractions to your congregation.
2.9.9
Visual Paging
Visual Paging is a tool for sending quick, customizable text messages to the congregation, such as "Parent #3 to
the nursery", or "A blue Ford, license 123-ABC, has lights on". You can also send messages to the singers or
band, if you use the Stage Lyrics option 64 with a third video output.
These pages can be sent from the playlist in Projection mode, or from the library:
· Anywhere in the software: Hit Ctrl-F12 from almost any screen in the software to pop up the Visual Paging
dialog.
· Playlist: with the projection display active, click the triangle next to the Visual Paging text, to expand the visual
paging panel. Enter the desired text in the paging text area, and click the [Send to Congregation] or [Send to
Stage] button (depending on where you wish the text to appear). Or select a recently-used message from the
dropdown list.
©2010 Split Infinity Music
72
Worship LIVE! version 6 User's Manual
To quickly launch a visual page, from anywhere in the program: Select Ctrl-F12 to pop up the Create
Visual Page dialog.
The seven most recently sent pages will be available on the paging dropdown list on both the Projection
control and the Create Visual Page, for quick and easy recall.
You can determine where the visual paging text appears on the screen. Simply click-and-drag the display
(once it has stopped moving, if you selected [Congregation page files to final position]), and this is the
location to which the visual page will move if you check the [Congregation page files to final position]
option.
If the [Send to Stage] button is disabled, it's because you haven't selected a monitor for the stage lyrics
display. See the [Projection] tab of the preferences to select monitor outputs.
2.9.10 Configuring the Display
The projection display is highly customizable. Select the Projection preferences
A summary of the features (more detail and a visual guide is available here
95
95
to configure the display.
):
· Enable Projection Features: If you don't want to use the features and would prefer that many of them be
completely disabled or hidden, check this box. If you have not unlocked the Projection features, this box will be
locked as unchecked.
· Show Projection On: If you have multiple monitors set up, you can select which monitor will hold the Projection
display.
· Force idle Projection display to black screen: With this checked, the selected Projection monitor will be blanked
whenever Worship LIVE! is the foreground application, hiding all other windows.
· Fade to black: Allows a more graceful fade-out when Blank! is selected on the playlist display.
· Show by verse: Defaults the playlist to marking verses of songs and pages of announcements, rather than the
entire song or announcement.
· Show CCLI Info: If a CCLI license number has been entered in the General preferences, or a song has a CCLI
song number, this information will be shown at the bottom right of the Projection display, in accordance with
CCLI license regulations.
· Show header/footer lines: a solid line across the top and bottom of the projection display can be hidden or
shown.
· Hide chords: when a song is projected, the chords will not be shown.
· Wrap text to window: When a song exceeds the width of the display, there are two possible ways to handle
this. The text can either be wrapped to fit the window width (which may not be desirable for a song with chords
above each line) or the font can be made smaller until the text fits the width of the display. This option toggles
©2010 Split Infinity Music
Working With...
73
between those two behaviors.
· Force lyrics to use default font: This option, and the Default Projection Font below it, select the font into which
all songs, scriptures, and announcements will be forced for Projection display. If this option is not selected, the
items will be shown in their natural fonts (as selected in the song or announcement editing windows, or the
default scripture font).
· Format Default Projection Display: This button brings up the Customize Projection Format dialog, where you
can change how every projected item will look. You can customize individual playlist items' appearances, but
this will allow you to set the defaults.
· Visual Paging: Flash Colors: If selected, a visual page will flash alternate colors for several seconds when it
first appears.
· Visual Paging: Fly center to corner: If selected, a visual page will appear in the center of the screen, before
smoothly flying to the bottom right corner, before finally sliding off screen-right. If not selected, the page
appears and stays in the bottom right corner, until it smoothly slides off to the right.
2.9.11 Customizing Playlist Items
The Customize Projection Format dialog allows you to configure the Projection display; this same dialog is used
both for setting the defaults, and for customizing individual playlist items.
In addition to customizing items one-by-one, you can copy and paste formatting between playlist items. Try rightclicking on a playlist item and using the Copy this format and Paste Format options.
Click on any item for a detailed description.
You can click-and-drag the margins on the sample projection display to quickly set the margins.
©2010 Split Infinity Music
74
Worship LIVE! version 6 User's Manual
You can right-click-and-drag on the sample projection display to quickly set the brightness and contrast. If you
initially move the mouse vertically, the brightness will change; if you initially move the mouse horizontally, the contrast will
change.
2.9.12 Blanking and Freezing
Click the Blank! button turn the projection display black. In the Projection preferences, you can choose between
instant black and a fade-out function.
Click the Freeze button to freeze the current display on-screen. Even if you select a new playlist item to display,
or change the formatting and redisplay the item, the projected image will not change.
If you switch programs, Worship LIVE! may not be able to maintain the frozen or blanked screen. But as
long as you stay in Worship LIVE, the display should remain fixed.
Once you're ready to resume "live" display, deselect the Blank! or Freeze buttons.
From almost any place in the program, you can hit the F11 key to blank or unblank the Projection display.
You can also hit Ctrl-F11 to close the projection display.
2.9.13 Automation
Automation is a powerful tool for any church that frequently conducts "canned worship" or needs to provide
worship audio and visuals for situations where live music is not feasible.
Using the automation features built into the Worship LIVE! software, you can actually set up a playlist to display
any included item, in almost any order, launched by just one mouse-click. Audio and video files will be started at
the right time, lyrics and scripture and announcements will be displayed at the right moment, and the flow can
even be interrupted at preselected moments, just waiting for your mouse click to continue.
During the automation playback, you have total control over the flow, with the ability to skip ahead, stop and
resume at any time, repeat parts of a song, and more.
The following topics are available:
·
·
·
·
·
Automation on the Playlist 75
Setting Up A Song For Automation 75
Setting Up Non-Song Automation 76
Controlling the Flow of Automation 77
Setting Automation Defaults 78
©2010 Split Infinity Music
Working With...
75
2.9.13.1 Automation on the Playlist
The playlist is the heart of the automation tools, which is a natural extension of the projection features. When you
want to use automation, make sure the Automation column is selected in the playlist (select View:Select
Columns).
Any playlist item can be automated. Only song files can include timing data within the song, such as jumping to a
specific verse, or wiping text and only leaving the background image. However, ALL playlist items can be set to
either play to completion, or end after a specific time.
Powerpoint files are a special case for automation. Some Powerpoint files contain built-in timing data, so that the
slide show automatically advances. You can override this behavior, and choose to force the slide show to end
early.
The following illustrated screen shot shows how automation details appear on the playlist.
2.9.13.2 Setting Up A Song For Automation
Song timing information is saved within a song file.
When you edit a song's properties, you can preselect the time for various events within a song to occur during
projection. For example, you can set a song to blank or wipe the text, to display any desired verse or even the
entire song, and to jump to the next or previous song in the playlist. These events are time-based, and will occur
during playback of an audio file.
The only requirements for using song timings are: 1) projection features must be active, and 2) the song must
have an associated multimedia file 83 .
Song timings are created in the Set Song Timings dialog. Open a song and click the "Song Timings" button on
the toolbar
description.
. To learn more about the features on the Song Timings dialog, click on items below for a popup
©2010 Split Infinity Music
76
Worship LIVE! version 6 User's Manual
2.9.13.3 Setting Up Non-Song Automation
For items other than songs, automation details are set directly in the playlist. To set the automation options for
any item, simply click on either the icon or the text of the automation column for that item.
If you click on the icon, the Action menu will pop up. Select an action to occur. Depending on how many items
(songs, audio and video files, etc.) are on the playlist, this menu may have more or fewer choices.
If you click on the text, the Timings menu will pop up. Select the appropriate timing.
©2010 Split Infinity Music
Working With...
77
Note that you can override a song or Powerpoint slide show's internal timing data by selecting a fixed duration. If
you do this, the selected action will occur, no matter what other data is inside the song or slide show.
If a song does not have timing data, you can still add it to the playlist. However, you will only be able to select
"Play to completion" if the song has an associated audio file to play back while the song is shown. Otherwise, you
will simply be able to set a fixed duration.
2.9.13.4 Controlling the Flow of Automation
During projection when timings are in use, the Automation pane of the playlist window will look similar to this. The
timer in the top middle shows the remaining time until the next event. Along the bottom are markers showing
upcoming events: B for blank, W for wipe text, numbers for which song verse, and N and P for next song or
previous song.
At the left edge of the Automation pane is a block which changes periodically, to show that automation is running.
This is called a "tally lamp", like the red flashing lamp on the front of a professional videocamera that lets you
know you are being videotaped.
You can also select an alternate tally lamp style, simply by clicking on it.
The "+1.0 sec" dropdown at the lower right of the Automation pane allows you to advance the automation timing
up to 3 seconds. If your computer requires a couple extra seconds to display a new verse, or if you want to give
your congregation a little extra time to read the lyrics, you may wish to lead each event by a few seconds.
You can stop the automation at any time, without affecting the playback of an audio file. The only change will be
that the automation no longer controls the display on the projector.
You can also start the automation at any time, even if a song's audio file is already playing; if so, the appropriate
verse for that moment of audio playback will immediately be shown.
Finally, you can control the playback of an audio file by dragging the progress indicator in the Multimedia pane. If
you do this, the automation will jump to follow the new playback time; if a different verse is required, it will
immediately be shown.
©2010 Split Infinity Music
78
Worship LIVE! version 6 User's Manual
2.9.13.5 Setting Automation Defaults
The default timing and action for automation on newly added playlist items can be set in the Projection tab of the
preferences.
Note that you cannot choose whether default items play to completion or have a fixed time. The following defaults
will apply:
· Songs with timing data - Play to completion
· Songs without timing data, but with audio files - Play to completion
· Powerpoint slide shows with automatic actions - Play to completion (will play automatically)
· Powerpoint slide shows without automatic actions - Play to completion (but you must manually advance
the slide show)
· Audio and video files - Play to completion
· Images - Fixed duration
· Songs without audio files or automation - Fixed duration.
2.10
Printing
The following topics are available:
·
·
·
·
·
Printer Setup 78 : how to select a printer and paper sizes
Page Setup 79 : how to customize the basic page settings that this software can control
Print Confirmation 79 : after you select a printout, this dialog gives you a number of additional options
Previewing Printouts 81 : seeing the pages before you commit to paper
Printing Colors 81 : how to select the colors of various elements on the printouts
2.10.1 Printer Setup
To make some basic selections about how Worship LIVE! will handle printouts, select the Printer Setup option on
the main File menu. The standard Windows printer setup dialog will appear, and you can select which printer will
be used, and the paper size, source and orientation.
©2010 Split Infinity Music
Working With...
79
2.10.2 Page Setup
The Page Setup preferences tab offers a number of advanced controls over how Worship LIVE! prints. As you
make changes, the results will be illustrated for you.
Print footer on each page: if unchecked, the usual footer will be skipped.
Box around footer: if unchecked, the usual box around the footer will be skipped.
Icon: you can select from no icon, or a small or large version of the Worship LIVE! icon. You can also select your
own custom icon or picture to print in the footer. If you select a custom picture, whatever you specify will be
resized to fit the same size as the Large Worship LIVE! icon.
Left, Center, Right: You can specify what gets printed in the footer. The choices are Text (whatever is shown in
the text box below this dropdown list), Page (the page number), Date (the current date), CCLI (the CCLI License
Number from the General preferences), Text/CCLI, Page/CCLI, Date/CCLI, and of course (blank) for nothing in
that location.
Custom Footer Text: If you enter custom text here, it can be printed in the footer by selecting Text or Text/CCLI
from the dropdown lists.
Font: this selects a font style for the footer printout.
Margins: You can change the margins Worship LIVE! uses by clicking and dragging the margin lines until they
are in the proper location.
2.10.3 Print Confirmation
Each time you ask Worship LIVE! to print something, the print confirmation dialog will appear. Depending on what
you are printing, you will have a number of options available to you.
Click any item for a detailed description.
©2010 Split Infinity Music
80
Worship LIVE! version 6 User's Manual
Copies: selects how many copies (1 to 99) will be printed.
From and To: determines which pages or songs will be printed; if you are printing a group of selected songs you
can only specify which of the songs will print. If you are printing the playlist, Scripture, or an announcement, you
can select which pages will print.
Print chords with lyrics: if this option is not selected, the chords will be hidden on the printout.
Print root key with title: if this option is selected, the song key will be printed to the left of the song title.
Auto-fit to page width: this forces a song to be fit within the width of a page. The song is fit by shrinking down the
font until it is narrow enough.
Auto-fit to page height: this forces a song to be fit within the height of a page. The song is fit by shrinking down
the font until it is narrow enough.
If you want to ensure that a song fits completely on a page, and none of the right side of a song is cut off, select
both Auto-fit options.
Print guitar fingering: at the bottom of a song, the standard guitar fingerings for each chord in a song (up to ten
chords) will be printed.
Format for overheads: a special printout style designed to look best for copying onto transparencies for overhead
projectors.
Multiple songs per page: when more than one song (or a playlist) is printed, this will allow more than one song to
be fit on a page if space allows. Otherwise, each song will be printed on a separate page.
Preview: If you want to see how the printout will look before sending it to the printer, click the Preview button.
Print: if you're satisfied with the options, click this button to send the printout to the printer.
Repaginate: if you make changes to the options which affect the number of pages to be printed, such as
changing the Multiple songs per page setting, the Print button will change to Repaginate, which will prepare the
printout again with the new print layout. Once the printout has been repaginated, the Print and Preview options
will reappear.
©2010 Split Infinity Music
Working With...
81
2.10.4 Previewing Printouts
If you preview a printout, the selected pages will appear in the Print Preview window. You can zoom in or out, and
scroll through the printout page by page.
Some items of interest on this preview screen:
· On the left are thumbnails of each page. Click any of these thumbnails to jump to that page.
· In the center is the preview. You can click and drag this with the mouse to scroll through the printout.
· At the bottom are details about the pending print process.
On the right part of the screen:
· A [Print Now] button (does just what it sounds like)
· The [Cancel] button will completely cancel the print process. (In older versions, the [Cancel] button would return
to the print settings dialog; this function has been changed to allow you to have more control.)
· A [Settings] button that returns to the print settings dialog
· The [Prev] and [Next] buttons scroll page-by-page through the printout
· The zoom slider allows you to change the scale of the preview. The [100] button resets to 100% zoom, and the
[Fit] button changes the scale to fit one entire page on the screen.
2.10.5 Printing Colors
Worship LIVE! can print in either greyscale or full color. Any colored text in a song, Scripture or announcement
will be reproduced on the printer. Titles, keys, copyright information, and comments can also be printed in color.
The boxes around printout items, and the footer text colors, can also be printed in color. All these colors can be
selected in the Print Colors preferences. The Use color on color printers option can be turned off to save inkjet
colored ink, and any items printed will be sent as greyscale instead of color.
©2010 Split Infinity Music
82
Worship LIVE! version 6 User's Manual
To change a color in the Print Colors preferences, click on any of the items in the sample illustration. You can
also quickly set either pure black-and-white or the default colors by clicking the appropriate button.
In addition to setting print colors, you can select which song properties will be printed in the footer of each song.
2.11
Multimedia
The following topics are available.
·
·
·
·
·
Multimedia Control Window 82 : the dialog which controls media playback
Multimedia Files 83 : how media files relate to songs
Keyboard Shortcuts 83 : playback shortcuts
Metronome 83 : how to keep good time using this software
Click-to-Play Chords 84 : how this software simplifies checking accuracy of chords in your songs
2.11.1 Multimedia Control Window
Music files of various kinds can be associated with songs, and played back by the program as part of the song
display, playlist, or projection display.
The following multimedia audio file types are supported: wave (.WAV) files, MP3 files, Windows Media Player
(.WMA) files, and MIDI (.MID) files.
A list of supported multimedia video file types is here 54 .
The Multimedia Control window is available to help control audio and video playback. Select the Multimedia
Control option on the View menu of the library. If projection is open, expand the Multimedia dock to show the
same controls.
Click any item for a detailed description.
©2010 Split Infinity Music
Working With...
83
The following controls are available:
· Volume control: sets the computer system volume
· When an audio or video file is selected for playback, the following controls are available.
· Progress bar: shows the current playback position for the file
· Play, Pause, Stop, and Rewind buttons: allow tape-deck style control of the playback
· Loop: causes the currently playing file to loop
· Mute Video: causes the currently playing video to play silently (useful for video backgrounds)
Older versions of this software showed the fingering for click-to-play chords in this window. Those functions are now
located in a separate Chord Diagrams display.
2.11.2 Audio Files and Songs
You can associate audio files to any song. When you do this, the program stores the filename of the audio file,
not the file contents itself, inside the song file, and when you request that the audio file be played, uses Windows'
own built-in multimedia capabilities to start and stop the playback.
Click the Play icon from the song view toolbar to play the selected audio file. By default, the program will play an
attached audio file when you view a song. You can turn off this behaviour in the Multimedia preferences.
The playlist, song, Multimedia Control, and Projection displays all have play, pause and stop buttons.
If no audio file has been selected for a song, clicking the Play icon from the song view toolbar will show
the Attach multimedia file dialog.
Since the audio file data is not added to the song file, you should consider placing your audio files inside
the same folder as the rest of your Worship LIVE! songs. The files will not be indexed when Worship
LIVE! loads the database, but this will make it easier for you to keep track of the files.
2.11.3 Keyboard Shortcuts
When you are viewing or projecting a song with an associated multimedia audio file, you can use the following
keyboard shortcuts:
F2: play associated multimedia file
F3: pause playback
F4: stop playback
2.11.4 Metronome
When you set the tempo for a song using the Song Properties dialog, you may either enter a relative tempo
(Slow, Medium or Fast), or a numeric tempo from 30 to 280 beats per minute.
If you enter a numeric tempo, the Metronome icon on the song toolbar will turn on or off a metronome feature,
which will click off the approximate tempo you have entered, using the PC's system speaker.
©2010 Split Infinity Music
84
Worship LIVE! version 6 User's Manual
The speaker will be played using the root key of the song - for example, if the key is set to A, a 220Hz
tone (an A below middle C) will be used for the metronome sound.
Metronome accuracy is not guaranteed - if your PC is very busy the tempo will be affected. However, this
tool should give a fairly accurate idea of the true tempo.
2.11.5 Click-to-Play Chords
Any chord in a song can be played when you click on that chord with the mouse. If Use MIDI to play chords is
selected in the MIDI preferences, the Windows MIDI settings will be used to play the chord. If the Multimedia
Control window is visible, the notes of the chord will also be shown there. You can customize how Worship LIVE!
plays these chords in the MIDI preferences. If Use MIDI to play chords is not selected, the notes of the chord will
still be shown, but will not be played.
Also, you may specify whether Worship LIVE! handles the chords in a guitar-like chording (using only standard
guitar fingerings) or whether it uses a more traditional 1/3/5 triad (in a piano-player style, with some emphasis on
the bass note) to play each chord. Use the [in guitar style] checkbox for this option.
You can edit how Worship LIVE! handles the various guitar-style chords in your music by
editing the chord dictionary 85 . (If you deselect the guitar style click-to-play chords, the chord dictionary choices
will be ignored.)
2.11.6 Chord Diagrams display
Whenever you click on a chord in Worship LIVE! (if the click-to-play option is active in the multimedia
preferences) a chord will be played using the computer's audio system. The fingering for that chord can also be
shown in the Chord Diagrams window.
From the main song library, select "Chord Diagrams" from the View menu. Two displays are available: guitar and
piano.
©2010 Split Infinity Music
Working With...
85
Both displays have several common features.
· Quick help: click the (?) help icon for more information.
· A Pin icon to lock the Chord Diagrams display on top of other windows
· A Guitar/Piano toggle button
· A hideable guitar diagram showing the fingering in a traditional diagram box
· A text display of the currently-shown chord; click this display to play the chord again
You can click-and-drag the mouse cursor up and down across the guitar strings to strum the notes.
You can click-and-drag the mouse cursor left-right across the piano keys to play the notes, and you can click any
key to play the associated note.
2.11.7 Chord Dictionary Editing
Worship LIVE! is installed with a default set of chord fingerings. You can edit this chord dictionary to suit your own
playing style. On the Chord Format tab of the Options, click the Edit Chord Dictionary button.
Click any item below for more information.
©2010 Split Infinity Music
86
Worship LIVE! version 6 User's Manual
©2010 Split Infinity Music
Working With...
2.12
87
Preferences
The Preference (options) dialog has several categories of settings available. Click any topic
header for more information.
2.12.1 General
The General preferences contain a broad range of selections controlling (mostly) how Worship LIVE! shows you
information, and what it remembers between sessions.
Click on any item for a detailed description.
©2010 Split Infinity Music
88
Worship LIVE! version 6 User's Manual
2.12.2 Page Setup
The Page Setup preferences contain selections controlling how Worship LIVE! lays out the printed page, and
options for the printed page footer.
Click on any item for a detailed description.
©2010 Split Infinity Music
Working With...
2.12.3 Print Options
The Print Colors preferences allow you to customize the colors used to print songs, Scripture, and
announcements..
Click on any item for a detailed description.
©2010 Split Infinity Music
89
90
Worship LIVE! version 6 User's Manual
2.12.4 Chord Format
The Chord Format preferences let you configure the default chord format of new songs you create. Please note
that the format is specific to each song - you can have some songs in each chording format, and that format will
be retained at all times, and you can display, print and transpose any song in its own format, even if you have a
different default format selected.
There is also an option for intelligently wrapping chord lines above lyric lines. Click this item for further
information.
Click on any item for a detailed description.
©2010 Split Infinity Music
Working With...
91
2.12.5 Syntax Styles
The Syntax Styles preferences let you configure how formatting is applied to songs, and what terms are used to
help find the parts of the song, when you select the Auto Syntax Format option from the song Format menu.
Click on any item for a detailed description.
©2010 Split Infinity Music
92
Worship LIVE! version 6 User's Manual
2.12.6 Ignored Terms
The Ignored Terms preferences let you configure the terms (words or characters) that are ignored when a song is
transposed. This enables you to use non-standard chords or musical notation in chord lines without preventing
accurate transposition.
Click on any item for a detailed description.
©2010 Split Infinity Music
Working With...
©2010 Split Infinity Music
93
94
Worship LIVE! version 6 User's Manual
2.12.7 Fonts
The Fonts preferences let you select the preferred font for various printed and onscreen items.
Click on any item for a detailed description.
©2010 Split Infinity Music
Working With...
95
2.12.8 Projection
The Projection preferences let you configure the appearance and operation of the Projection display.
Click on any item for a detailed description.
2.12.9 Multimedia
The Multimedia preferences let you configure how MIDI and multimedia files are handled. The Multimedia control
window has other options, more related to how that window looks and functions.
Click on any item for a detailed description.
©2010 Split Infinity Music
96
Worship LIVE! version 6 User's Manual
2.12.10 Stage Mode
The Stage Mode preferences let you configure stage mode options, and customize the shortcut keystrokes used
when in stage mode.
Click on any item for a detailed description.
©2010 Split Infinity Music
Working With...
97
2.12.11 Default Folders
The Default Folders preferences let you configure the default location on your hard drive where various items are
saved. (You can always override these options if you wish.)
Click on any of the buttons to select a new default folder for that category.
Please note that during a session with the Worship LIVE! software, you may manually open a file from any
location on disk. Worship LIVE! will remember that location during that session, but will always revert to the
folders shown here at the beginning of a new session.
©2010 Split Infinity Music
98
Worship LIVE! version 6 User's Manual
2.12.12 Unlock
The Unlock preferences let you configure song editing password options, and provides an easy reference of your
Username and Key Code for unlocking Worship LIVE.
Click on any item for a detailed description.
©2010 Split Infinity Music
Working With...
2.13
99
Miscellaneous
The Worship LIVE! software has some added capabilities that will enhance your ability to manage your database
and projection.
The following topics are available:
·
·
·
·
·
·
Countdown Timers 99
PowerPoint Presentations 102
Online Synchronization 103
CCLI Support 37
Spell Checking 109
Change Colors Dialog 109
2.13.1 Countdown Timers
This timer is an essential tool if you need to display a countdown timer on a visual projection system. Rather than
paying for countdown timer videos, the display is created on-the-fly, by overlaying the text onto whatever video or
image background is already available. There's no more need to purchase ready-to-use countdown videos because now ANY video or picture can be your countdown video!
·
·
·
·
·
TimeToStart displays a countdown timer.
You can configure the time, caption, font, colors, and on-screen position of the display.
You can configure the timer's transparency (whether the text has a background or appears by itself).
You can configure the timer's translucency (whether you can partially see through the text).
You can configure the timer's motion (it can automatically drift around on screen).
The following topics are available:
· Creating a timer 100
©2010 Split Infinity Music
100
Worship LIVE! version 6 User's Manual
· Configuring the timer 101
· Other timer options 101
2.13.1.1 Creating a timer
To create a countdown timer, select Countdown Timer from the Project menu of the library, or Project Countdown
Timer from the Screen menu of the playlist.
Time Selection Dialog
When you first launch the timer, you will be asked for the ending time. You can either specify the time remaining
in minutes, or an actual clock time.
The timer is intelligent, too: it will automatically suggest times to the next reasonable 15-minute increment. Most
of the time, you can just click OK.
Caption Dialog
After pick the ending time, you will be asked for an optional caption. You can leave it blank, or enter any text you
wish to display.
Basic Timer
After you've provided the basic information for this session, the timer will appear on the projection screen.
The timer remembers previous display settings: it will appear in the same screen location as it was previously
located, using your selected font and colors and transparency settings.
©2010 Split Infinity Music
Working With...
101
All fonts are outlined using the selected shadow color, for easy visibility over any background.
Transparency
The timer supports transparency effects. When you use it over a background image, you can decide just how
transparent the clock will appear. (This feature works best over static images.)
2.13.1.2 Configuring the timer
Settings Dialog
If you move the mouse over the digits, a small control box will appear. Click it, and the settings dialog will pop up,
where you can adjust font, colors, and more.
Click the control box again, or click OK, and the settings dialog will be hidden.
The control box even hides itself after a few seconds.
2.13.1.3 Other timer options
Context Menu
When you right-click the Windows Taskbar icon for the timer, you will find a few convenient options in the context
menu. This makes it easy to adjust the timer settings on-the-fly - without your audience seeing you work behind
the scenes.
©2010 Split Infinity Music
102
Worship LIVE! version 6 User's Manual
The taskbar icon also shows the time remaining at all times - so you don't need to see the projection screen to
know what's going on.
2.13.2 PowerPoint Presentations
Worship LIVE! offers limited support for including PowerPoint presentations (*.ppt) and slideshows (*.pps) in
playlists.
Split Infinity Music is NOT affiliated with Microsoft or PowerPoint. "PowerPoint" and "Microsoft" and "Microsoft
Office" are trademarks of the Microsoft Corporation, Redmond, WA. Split Infinity Music does not offer any support
for Microsoft Office or the PowerPoint program, its installation, or usage. Support is limited to the interface to
PowerPoint from Worship LIVE!
The following topics are available:
· About PowerPoint support 102
· Adding PowerPoint presentations to the playlist 102
· Projecting PowerPoint presentations 103
2.13.2.1 About PowerPoint support
PowerPoint files can be added to the playlist, and then shown on the Projection display.
The following PowerPoint file types are allowed:
Presentation files (*.ppt)
Slide show files (*.pps)
Powerpoint file support is limited to what the installed version of PowerPoint will support. This program
manages the projection of the slideshows and presentations using the installed copy of PowerPoint, and
therefore depends on a proper installation to function. If PowerPoint has not been installed on a
computer, the PowerPoint features will not work. It is strongly recommended that Office 2000 or newer
be used for these features, for the greatest compatibility.
Some advanced slideshow features may not function correctly using the PowerPoint remote control
window from Worship LIVE!, such as various complicated animations, or starting/stopping video clips.
The remote control window can only change slides, and some features may need to be controlled more
directly. In this case, simply clicking with the mouse on the PowerPoint slide show (to activate that
window) will allow you more control over the animations.
PowerPoint files can only be added to the playlist when Projection Features are enabled/unlocked. PowerPoint files
cannot be printed with playlists, so there is no benefit to adding them to playlists other than for projection purposes.
2.13.2.2 Adding PowerPoint presentations to the PlayList
To add a presentation to the playlist, you can:
· Select the Add PowerPoint to Playlist option from the main window Playlist menu
· Select the Add PowerPoint option from the playlist window View menu
· Click the Add toolbar button (a green + sign) and select the Add PowerPoint File option
A file dialog will appear and any PowerPoint presentation or slideshow files on the computer may be selected.
Once you have selected a file, it will be added to the end of the playlist. Once on the playlist, presentations can be
rearranged 60 just like any other playlist items.
(You cannot rearrange the slides within a presentation - but you can move the entire presentation within the
playlist. To rearrange the slides, edit the file in Powerpoint and THEN add it to the playlist.)
©2010 Split Infinity Music
Working With...
103
PowerPoint files are NOT embedded into playlists - the playlist simply references the file on disk. If you
move, delete or rename a presentation, the playlist will not be able to find it later.
If you want to select a different PowerPoint file for the playlist, you can do so without deleting and re-adding it.
· Select the presentation you want to change. From the Playlist Item menu, select the Change PowerPoint
option.
· Right-click the presentation you want to change, and select the Change PowerPoint option from the popup
menu that appears.
A file selection dialog will appear, and you can select a different presentation file.
2.13.2.3 Projecting PowerPoint presentations
Powerpoint presentations must be added to the playlist before they can be projected. Once on the playlist, they
can be projected just like any other playlist item 66 .
· If the projection display is not open, then select the desired presentation and click the Project toolbar button or
click F12.
· If the projection display is already open, simply double-click the desired presentation.
Powerpoint presentations behave almost the same as any other playlist item, with a few exceptions.
· Preview images will be built when projection is activated. This may take a few moments to complete.
· If a presentation has embedded timings and actions, you will need to enable the timings in the Powerpoint
control window within the playlist for them to take place automatically. Otherwise, you will have total control
over the timings, and it will NOT be automatic.
· If the presentation does not have the focus (if you have clicked on another window), timings may not work.
· You can click the action buttons in the Powerpoint control window to advance between presentation timings.
· Some advanced timing items (such as embedded videos) may require you to click them with the mouse to
activate them.
· There may be small delay when you switch between Powerpoint and other types of projected items, since the
Powerpoint software must be started or stopped.
2.13.3 Online Synchronization
If you have multiple users of the Worship LIVE! software,
and you want to be able to keep all the databases
synchronized, the online "server synchronization" tool will be valuable for you.
Online synchronization is designed for churches with:
- A website under the church's complete control
- Multiple users of the Worship LIVE! software
- A need to maintain a common database between the multiple users
The following topics are available:
·
·
·
·
·
What online sync does 104
How it works 104
Setting it up 105
Using it 107
Manual configuration 108
Notes for version 6.3: Some essential sync functions were changed from version 6.0. The software now assumes
that all downloaded songs will be placed in the main library folder or its subfolders. You cannot specify another
location for the downloaded songs. This reduces confusion and complexity. Also, the sync tool now displays all
file time/date stamps by local PC time, and it also handles Daylight Savings Time changes automatically. Finally,
the software automatically compares its own version and the server software version; the two versions must be
compatible or the sync tool will refuse to work.
©2010 Split Infinity Music
104
Worship LIVE! version 6 User's Manual
2.13.3.1 What Online Sync Does
If you have multiple users of the Worship LIVE! software,
and you want to be able to keep all the databases
synchronized, the online sync tool will be valuable for you.
Online synchronization is designed for churches with:
- A website under the church's complete control
- Multiple users of the Worship LIVE! software
- A need to maintain a common database between the multiple users
Once the website components are set up properly, and the individual computers are configured properly, the
Worship LIVE! software handles all the details of ensuring that all the users of the software have access to a
single common database, and that song changes are properly flowed to other users.
The online sync tool will:
- Allow you to determine who has the "master" database
- Allow you to determine which direction changes will occur (upload, download, or both)
- Allow you to specify whether songs are added or deleted or modified
- Allow your users to view the church song database through the church website
The online sync tool will not do the following:
- Does not sync with Split Infinity Music's servers. Everything it does is your own song lyric text files on your own
computers.
- Does not copy media files such as images, videos, and audio files between computers
- Does not manage your permission to use or share music; you are responsible for ethical handling of copyright
regulations and rules
- Does not automatically synchronize anything. Users must initiate synchronization.
Specific requirements:
- All users must be able to browse the internet, while their computer is running the Worship LIVE! software
(For firewall compatibility, all communication uses HTML port 80)
- The web site must have PHP version 5 or newer installed
- The web site must support a MySQL database
- The sysadmin must be able to upload several files and verify the operation of a PHP file
- The sysadmin must be able to create MySQL tables, and provide an appropriate login and password with full
access to the database
2.13.3.2 How Sync Works
Server synchronization works by assigning a unique identifer to each song. All the songs on a server are paired
with a GUID (Global Unique IDentifier) when they are first uploaded. This GUID is a random code, practically
guaranteed to never be repeated. From that point on, the GUID is used by the sync tool to identify a song.
When you ask the desktop software to get the server song list and compare it against its own list, it starts by
comparing all the GUIDs and looking for matches. It then takes a look at the song titles, and makes sure that the
titles are at least similar for these songs.
(If there are very few complete matches, the desktop software offers to run a comprehensive analysis, where the
song's contents are also compared.)
Finally, the modification date and time of the songs are compared between server and desktop, to determine
which files are more recent.
Once all the differences between the desktop database and the server database have been identified, Worship
LIVE! presents you with its recommendations. The list includes a set of colored icons, representing possible
actions.
- this song matches the server copy, and no action is required
- this song does not exist on the server, and needs to be uploaded
©2010 Split Infinity Music
Working With...
105
- this song does not exist on the desktop, and needs to be downloaded
- this song exists in both locations, but the desktop copy is newer, so it should be uploaded
- this song exists in both locations, but the server copy is newer, so it should be downloaded
- this song needs to be deleted because it doesn't exist on the master database
- this song does not match, but the synchronization method doesn't allow any action to take place
Based on these recommendations, you may simply click the [Synchronize] button and allow Worship LIVE! to
handle all the details, or you may be selective about what happens.
· You may click any of the action icons next to any individual song to change the action for that song.
· You may click any of the [No Upload], [No Download], [No Delete], [Transfer All], or [Clear Action] buttons
to change the queued actions. (These buttons do NOT cause any transfers to take place - they only
change the actions that are scheduled and would take place if you click [Synchronize].
· You may click the [Reset Actions] button to reset all the actions to the default.
Note that some of these options may be disabled based on whether you have administrator (read AND
write) access to the server database.
2.13.3.3 Setting Up Online Sync
Setting up the online synchronization tool requires several basic steps.
1) Create a MySQL database on the website.
2) Upload several files to your website.
3) Run the PHP file for the first time to set up some important parameters.
4) Configure each copy of Worship LIVE! with the appropriate login information.
5) Upload the master database from whichever computer you designate as the master database.
©2010 Split Infinity Music
106
Worship LIVE! version 6 User's Manual
1) Create MySQL Database
The website system administrator will need to create a MySQL database and
provide you with a username and password with full read/write access priviliges
to the database. The configuration software will handle creating the proper table
structure by itself.
2) Upload the PHP files and a few images
We recommend installing this code in a subfolder on your website, NOT the
main root folder. Since the main file is named "index.php", most web servers
will send this page to the user when they access that folder. For example, if you
upload it to a folder named "worshiplive", if you visited
http://www.yourserver.com/worshiplive/ in your browser, the database would be
available. However, for the same reason, if you upload these files to your main
web folder, it will probably overwrite or replace your main page!
3) Run the configuration file
Launch the main synchronization web page (for example
http://www.yourserver.com/worshiplive/). If the settings have not been
configured properly, the web page itself will directly you to run the configuration
routine. When you submit the form with the required security settings, the
software will proceed to build the required tables in the database.
ONCE THIS FILE HAS COMPLETED SUCCESSFULLY AND YOU HAVE
CONFIRMED THAT YOU CAN ACCESS THE DATABASE FROM THE
WORSHIP LIVE! DESKTOP SOFTWARE, WE STRONGLY RECOMMEND
THAT YOU DELETE OR OTHERWISE DISABLE THIS CONFIGURATION
SCRIPT (worshiplive_configure.php). OTHERWISE, ANYONE CAN RUN IT
AND CHANGE YOUR SETTINGS, AND LEARN YOUR DATABASE ACCESS
PASSWORD.
4) Configure the desktop software
Now you need to configure the desktop copy of Worship LIVE! to use the
correct information. Select "Synchronize database to server" from the
File:Database menu of the library. When the sync database appears, click the
"Setup>>" button at top right.
The "Complete server path" will include your website address plus the folder
and script name. If you placed the script in a folder named "worshiplive" and the
name is "index.php", your information may look like
"http://www.myserver.com/worshiplive/index.php". The password depends on
the role. If the computer you are setting up is the master database, or you want
this user to be able to edit songs, enter the master password. Otherwise enter
the user password so that this computer will not be able to edit or delete songs.
Finally enter a name. This is shown on the web interface, so that you can tell
who made the most recent edits.
You also need to pick a role for this user.
When you are done with configuring the desktop software, click the "Test server settings" button to make sure
that Worship LIVE! can successfully connect to the server.
5) Upload the master database
From whichever computer will be the master database to which the other computers will be matched, upload the
entire database, by clicking the [Transfer All] button until all the icons change to the Upload icon. This first upload
©2010 Split Infinity Music
Working With...
107
may take a while, depending on the speed of your internet connection. On a broadband connection, a 300 song
database will probably take 5-10 minutes for the first complete upload. A modem connection may take longer.
Subsequent synchronizations will be much faster.
2.13.3.4 Server Settings
Before you use Worship LIVE! to connect to the server, you need to give the software the information it needs to
find and log in to the server software.
The dialog looks like this:
The "Server Information" field is your own website. The software does NOT run on Split Infinity Music servers you are responsible for your own server and its configuration.
The "Editing Permission" field is the password for accessing the songs. If you are the administrator, you already
will have selected two different passwords - one for read AND write access, and one for read-only access. If you
are a user, you will have been given one of these passwords to enter here.
The "Song Synchronization Method" is where you select a role. Your administrator should tell you which to use;
some of these roles require read/write access.
The "Your Name" field is only for the reference of other users; when you upload a song it will be tagged so that
the administrator can see who submitted the most recent copy. It does not affect the song files when you
download them later.
2.13.3.5 Using Online Sync
The basic steps in syncing your computer to the server, once you've done the setup, are:
1) Open the sync dialog
2) Review the automatically-selected actions
3) Click the [Synchronize] button
Click any item on the dialog box to learn more.
©2010 Split Infinity Music
108
Worship LIVE! version 6 User's Manual
2.13.3.6 Manual Sync Configuration
If you wish, you may manually edit the settings in the worshiplive_settings.php file yourself before uploading it.
The file contains several lines that have different functions. ONLY edit the items between quote marks!!!!
$churchname = "Your Church of God"; // This determines what will appear on the title of your online access to
the database
$host = "mysql01.yourserver.com"; // Set this to the host name of your MySQL server
$securityusername = "SQLusername"; // Set this to the login name for your MySQL server
$securitypassword = "SQLpassword"; // Set this to the login password for your MySQL server
$db_name = "worshiplive"; // This is the database name in which the song data will be stored on your MySQL
server
$db_table = "wl_songs"; // This is the table name for the song data to be stored on your MySQL server
$leaderpassword = "worshipper"; // This is the administrator password for your song data. It gives full
read/write/delete permission.
$userpassword = "user"; // This password is for general user access, where song data can only be
read/downloaded but not written.
If you wish to set up the database table manually, you can use a MySQL query like this to do the job:
$query = "CREATE TABLE `worshiplive_songs` (
`uid` varchar(40) NOT NULL default '',
`title` varchar(128) NOT NULL default '',
`key` char(3) NOT NULL default '',
`tempo` varchar(12) NOT NULL default '',
`topic` varchar(128) NOT NULL default '',
`comment` varchar(255) NOT NULL default '',
`userinfo1` varchar(255) NOT NULL default '',
`userinfo2` varchar(255) NOT NULL default '',
`userinfo3` varchar(255) NOT NULL default '',
`lastprinted` varchar(16) NOT NULL default '',
`lastprojected` varchar(16) NOT NULL default '',
`musicby` varchar(255) NOT NULL default '',
©2010 Split Infinity Music
Working With...
109
`wordsby` varchar(255) NOT NULL default '',
`copyright` varchar(255) NOT NULL default '',
`cclinum` varchar(12) NOT NULL default '',
`filename` varchar(255) NOT NULL default '',
`filedatetime` varchar(32) NOT NULL default '0000-00-00',
`textdatetime` varchar(32) NOT NULL default '',
`filecontents` text NOT NULL,
`textcontents` text NOT NULL,
`datemodified` date NOT NULL default '0000-00-00',
`datesynchronized` date NOT NULL default '0000-00-00',
`editorname` varchar(64) NOT NULL default '',
`backupdata` text NOT NULL,
UNIQUE KEY `uid` (`uid`)
) TYPE=MyISAM;";
2.13.4 Change Colors Dialog
Whenever you ask to change a color, the Change Colors dialog appears. You can set a new color either by
changing the red, green and blue slider positions to mix your own color, or by clicking on a color in the palette
below the sliders. At the bottom are two views showing how the color will look on white (such as printed songs)
and black (such as Projection) backgrounds.
Click any item below for a detailed description.
2.13.5 Spell Checking
The song and announcement windows feature a built-in spell checker, including a chord dictionary aware of most
common chord names. To start spell checking a song or announcement, click the Spell check toolbar button, or
select the Check Spelling option on the Format menu.
If misspellings are noted, a Check Spelling dialog will appear offering a number of options.
· Not in dictionary: shows the unknown (suspect) word.
· Suggestions: lists possible corrections to the suspect word
· Ignore: ignore the suspect word, marking it as acceptable
· Ignore All: ignore this and all further occurrences of the suspect word
· Change: change the suspect word to the selected suggestion
· Change All: change this and all further occurrences of the suspect word to the select suggestion
· Add: mark the suspect word as acceptable, and add it to the user dictionary so it will not be flagged any more.
· Suggest: look for suggestions for possible corrections to the suspect word. You can edit the suspect word, and
click suggest to see if a more acceptable match might be found.
· Dictionaries: shows the contents of the user dictionary, so you can add or delete commonly used words
manually.
· Options: shows a set of options that affect how the spelling check will be conducted
· Undo: undo the last change to the document made by the spelling check features
If you need to edit the Spell Check options, click the Options button to customize the operation of the built-in spell
checking tool. Note that this program includes many common chords in the dictionary, so spell-checking a song should not
require skipping all the chords as possible misspellings.
©2010 Split Infinity Music
110
Worship LIVE! version 6 User's Manual
©2010 Split Infinity Music
Part
III
112
3
Worship LIVE! version 6 User's Manual
Setup and Troubleshooting
The following topics are available:
Installation 112 : how to properly install the software
Troubleshooting Startup 112 : possible problems with launching the software, and how to correct them
Images, videos, and PowerPoint 112 : how the software plays and displays files that are not "native" to Worship
LIVE!
Updating 113 : how to make sure you have the latest version of the software
Purchasing 113 : how to purchase the software, if you have not already done so
Unlocking 113 : once you've purchased the software, how to enable all its features
Bug Reporting 114 : if you find a problem, how to report it to Split Infinity Music
Contacting Us 115 : various ways to contact Split Infinity Music
Uninstalling 116 : how to properly uninstall the software
3.1
Installation
To install Worship LIVE, simply run the installer program you downloaded, or received by mail as a CD-ROM. All
the appropriate files will be installed, and you will have several choices about where to install various items. If
you're reading this help file, you've probably already taken this step.
3.2
Troubleshooting Startup
Each time Worship LIVE! starts, it immediately checks to see if all the required files are installed. There are a
couple dozen essential files, in both the program folder and the Windows system folder. If the program refuses to
run because the required files are not installed properly, a log file is generated showing which files are missing
and which are present. The easiest way to correct any problems is simply to reinstall the software. If you uninstall
first, you will erase all your personalized settings, including your unlock information, so this is not recommended
until you have tried simply reinstalling over the original installation (into the same location as before).
3.3
Images, videos, and PowerPoint
Video files and PowerPoint files are handled using "external helper" programs - not by Worship LIVE! directly. For
this reason, most issues with displaying videos or presentations need to be resolved outside of the Worship LIVE!
program. Specifically:
· Powerpoint file support is limited to what the installed version of PowerPoint will support. This program
manages the projection of the slideshows and presentations using the installed copy of PowerPoint, and
therefore depends on a proper installation to function. If PowerPoint has not been installed on a computer, the
PowerPoint features will not work. It is strongly recommended that Office 2000 or newer be used for these
features, for the greatest compatibility.
· Some advanced slideshow features may not function correctly using the PowerPoint remote control window
from Worship LIVE!, such as various complicated animations, or starting/stopping video clips. The remote
control window can only change slides and step through actions that can be controlled within Powerpoint using
the up/down arrow keys, so some features may need to be controlled more directly. In this case, simply clicking
with the mouse on the PowerPoint slide show (to activate that window) will allow you more control over the
animations.
· Video file support is limited to what the computer's Windows Media Player is able to open. If a video "codec"
has not been installed or enabled by WMP, then Worship LIVE! will not be able to play the video either. If you
can successfully open and play a video using WMP, you should also be able to play it from within the Worship
LIVE! software.
©2010 Split Infinity Music
Setup and Troubleshooting
3.4
113
Updating
Minor Updates
Updates to the Worship LIVE! software are periodically released by Split Infinity Music. The program can check
for updates on the Split Infinity Music web site. Select Check for Updates from the Help menu. After asking your
permission, the program will look check the web site for the most recent version, and if it is newer than the
version you are running, the response web page will provide you with a link to download the most recent version.
Minor upgrades (such as 5.0.23 to 5.0.25, or anything less than a full version upgrade like 5.x to 6.x) will not
require that Worship LIVE! be unlocked again.
When you update, the program may rebuild certain preferences when you first run the upgraded version, to make
sure that no outdated settings or incorrect information remains in the Worship LIVE! area of the Windows
registry. Most of your settings will be preserved.
Updating to version 6
When you update from version 5 to 6, the Guardian will pull in most of your Version 5 settings, to minimize the
time required to get up and running with version 6. However, some settings cannot be saved, and please note
that version 6 requires a different unlock key than versions 5 or previous.
3.5
Purchasing
If you are using Worship LIVE! as a demo version, consider upgrading to the full version. A number of key
features will be unlocked as soon as you enter the appropriate unlock code. You can pay for Worship LIVE!
online at the Split Infinity Music web store at http://www.simusic.com/catalog or via the Kagi Shareware company,
using secure web technology and major credit cards, at http://www.kagi.com
3.6
Unlocking
When Worship LIVE! is first installed, it will run as a demo, with certain features disabled or restricted. When you
purchase the program, you will be provided an unlock code or "key code", that is specially keyed to your user
name. You can purchase two separate unlock codes, one for the main, or "basic" functions, and another for the
projection features.
While Worship LIVE! is still in demo mode, each time you start the splash screen will include an unlock area. If
the program is already running, select the Unlock Worship LIVE! option on the Help menu. Whenever you're
ready to unlock the program, enter the user name and key code here, using the exact punctuation and
capitalization as in the purchase notice. The click Unlock and the program will be immediately unlocked.
You cannot unlock the Projection features without first unlocking the basic features. To unlock
the Projection features, select the Unlock Projection Features option on the Help menu. The normal
unlock splash screen will appear, and you need to enter the projection unlock information. PLEASE
NOTE: the unlock username may be different than the general username - be sure to double-check the
information emailed to you when you purchased the program.
Be sure to print out and save your unlock information. Worship LIVE! stores this information in the
Windows registry, and if you reinstall Windows, or move the program to another computer, you will have
to unlock it again. Also, the saved unlock information is keyed to your computer name in the file sharing
setup, so making certain uncommon changes to your Windows settings may require you to unlock again.
There may be a fee charged to look up and resupply your original unlock information!
©2010 Split Infinity Music
114
3.7
Worship LIVE! version 6 User's Manual
Bug Reporting
From time to time you may encounter a problem with Worship LIVE. If you do, the program will present you with
some basic information about what just happened, and ask if you'd like to report the bug directly to Split Infinity
Music via our web page.
The error dialog initially appears with minimal information. Click on any item for details.
If you click the "More Details>>>" button, you can look at some extended error information. Click on any item for
details.
We encourage you to click "Submit Error Report" whenever possible. Either way, the program will continue
running, although depending on the bug you encountered you may not be able to complete some actions.
However, whenever possible, you should allow the program to log on to our web page and report the bug directly.
When you click Submit, the program will simply ask your web browser to link to our bug report form. The form will
fill in the error details automatically.
Worship LIVE! does NOT send any personal data to Split Infinity Music that you do not type in yourself. Please do
give as much background information as you can, to help us troubleshoot the problem, and include an email
address and phone number so we can contact you if necessary. When you submit the web form, the information
is emailed directly to us, and a copy is emailed to you as confirmation. Of course, this may require dialing your
modem to your internet service provider.
©2010 Split Infinity Music
Setup and Troubleshooting
115
Any bugs which are found are logged to a disk file. You can review this file by clicking the appropriate buttons on
the error dialog. If you contact us via email, please include this file to further help our troubleshooting.
You can also report a bug manually, if you feel you've found something that requires our attention. Select the
Report a Bug option on the Help menu, which will link to the same bug report form as described above. Enter the
relevant information and submit the form, and we'll be in touch if we need further info or if you request a
response.
3.8
Contacting Us
Any suggestions? Please pass them on! Worship LIVE! is continually being improved, and your suggestion may
make it into the next version or upgrade.
If you have not registered (purchased and unlocked 113 ) the program, you are not eligible for full technical
support. However we would be happy to answer any questions you might have regarding installing the locked
demo version, features you would like added, how to purchase Worship LIVE, etc., as well as any issues with the
installation and demo process.
You may contact us by mail or phone at the following address:
Split Infinity Music
Post Office Box 382
Great Mills, MD 20634
Toll free 1-800-994-0382
If possible, please call from 10am-9pm EST. If there is no answer, please leave a message with your name and
phone number. Split Infinity Music is a home-based business and your call will be returned as soon as possible.
Visit Split Infinity Music's World Wide Web page at:
http://www.simusic.com
Visit the Worship LIVE! web page at:
http://www.worship-live.com
Send email to:
3.9
Online Features
This software includes several ways to use internet resources.
The first, which you should use periodically, is the Check for Updates 113 feature.
The second is bug reporting. You can report a bug by selecting the appropriate item from the Help menu.
The third is connecting to the CCLI SongSelect web site
40
to seach for songs.
There are also a few other times where the software will suggest a web site.
Worship LIVE! handles these online requests by asking your system's browser to connect to the appropriate web
site. Before it does so, it will ask if you would like to connect to the required web site. This gives you a chance to
ensure your own privacy and computer security.
©2010 Split Infinity Music
116
3.10
Worship LIVE! version 6 User's Manual
Uninstalling
Should you need to uninstall Worship LIVE, either select the Uninstall shortcut from the
Start:Programs:WorshipLIVE folder, or select Start:Settings:Control Panel, and open the
Add/Remove Programs icon. Find the Worship LIVE! program, and click the Add/Remove button.
When you uninstall, any files you did not modify will be removed. However, any song files you have modified or
added will not be deleted, and in this case the Worship LIVE! folder on your hard disk will not be removed. If you
wish you can manually delete these files and the Worship LIVE! folder.
The Uninstaller depends on several files stored in the Worship LIVE! folder. Three files, with names starting in
irunin.*, tell Uninstall how to remove the files. If these three files have been damaged, deleted or moved,
Uninstall will not be able to automatically remove Worship LIVE. In this case, if you wish, you can reinstall the
program and then immediately uninstall it. Or, you can manually remove the program by deleting the
C:\Program Files\WorshipLIVE folder, and any files installed there. You will also need to remove the links
to the program, usually stored in the C:\Windows\Start Menu\Programs\Worship LIVE! folder. Delete
this entire folder. Manually uninstalling will not remove entries from the Windows Registry, and will not remove
files added to the C:\Windows\System folder, but this will not negatively affect operation of your computer.
©2010 Split Infinity Music
Part
IV
118
4
Worship LIVE! version 6 User's Manual
Miscellaneous Functions
You can learn more about the various extra functions with these topics:
Spell checking 109 : a built-in tool for checking your song and announcement editing
Change Colors dialog 109 : the built-in tool for picking new colors for printing and projection
How transposition works 118 : a basic description of how songs are transposed and how this may affect your use
of the software
DDE interface 118 : how this software communicates with other software
Registry entries 118 : how this software stores its settings within the Windows Registry
Backing up your data 119 : how to back up your songs and playlists
Restoring your data 119 : how to restore (or move) your songs and playlists from backups
System files 120 : a description of additional files required by this software
4.1
How Transposition Works
When you view or print a song, the program first examines each line of the song. If all of the "words" on a given
line are recognizable as chords, that line is determined to be a line of chords.
If a line is not fully transposable, but it recognizes MOST of the character groups as chords, the program
presumes that there is a chording error, and will show the suspected error when you try to transpose the song.
The line will be treated as lyrics if the song is transposed.
If the program recognizes as chords less than half of the words on a line, the line is marked as lyrics and will not
be transposed.
4.2
DDE Interface
Several of Worship LIVE's features can be activated by other programs using DDE (Dynamic Data Exchange).
Windows can use DDE to direct a program to carry out certain actions, such as open and print files. The DDE
commands are typically entered under the "View:Folder Options:File Types" dialog in Windows. You
can also use certain other programs to send DDE commands to the program. Worship LIVE! understands the
following DDE commands:
OPEN %1
This opens the selected song file or playlist file in Worship LIVE, just as if it had been opened
from within the program. Opening a song file will cause Worship LIVE! to open the database in
the song file's folder first, then open and display the song. Opening a playlist will open the
database on which the playlist is based first, before adding all the selected songs to the playlist.
PRINT %1
This opens the selected song file or playlist file in Worship LIVE, and then prepares to print the
song or playlist. You must still click the Print button to confirm you want the file printed.
PLAYLIST %1 This adds the selected song files to the playlist already open in Worship LIVE. If no playlist is
open, a new one will be created. If the song is already on the playlist, no change will be made.
PROJECT %1 This loads and projects the specified item.
QUIT or EXIT This tells Worship LIVE! to exit, if it can do so automatically. If a playlist or song that are open
have not been saved, the program will ask before exiting.
To use these commands from Windows, right-click a database, song, announcement or playlist file. The popup
menu that appears should contain options to use these files in Worship LIVE. The program automatically tells
Windows how to use these functions for Worship LIVE! files. If the popup menu choices do not appear when you
right-click a Worship LIVE! file from Windows, or if they do not work properly, then open the General preferences,
and click the Register file types with Windows button at the lower left.
4.3
Registry Entries
Should you need to manually delete the program, or modify the installation, these registry branches are installed
and used by Worship LIVE:
HKEY_CURRENT_USER\Software\VB and VBA Program Settings\Worship LIVE 6\
HKEY_CLASSES_ROOT\.sng (song files)
©2010 Split Infinity Music
Miscellaneous Functions
HKEY_CLASSES_ROOT\.ppl
HKEY_CLASSES_ROOT\.sdb
HKEY_CLASSES_ROOT\.pnc
HKEY_CLASSES_ROOT\.usr
119
(playlist files)
(song databases)
(announcements)
(SongSelect files)
HKEY_CLASSES_ROOT\WorshipLIVE_Playlist
HKEY_CLASSES_ROOT\WorshipLIVE_SongFile
HKEY_CLASSES_ROOT\WorshipLIVE_SongDataBase
HKEY_CLASSES_ROOT\WorshipLIVE_Announcement
HKEY_CLASSES_ROOT\SongSelectFiles
Any time you edit the registry, be sure to back it up first. If you do not know how, you shouldn't try this!
4.4
Backing Up Your Data
A Worship LIVE! installation includes the software, your customized settings, and your song and playlist files.
Although we recommend that all computer users back up their entire hard drive regularly, we recognize that this
is impractical for some users. To preserve your Worship LIVE! data, you should consider backing up at least your
song and playlist files, and if possible you can also back up your customized settings. You should not need to
back up your Worship LIVE! software (in the Program Files folder), because it is simplest and most reliable to
simply reinstall the software from your CD or downloaded files.
To back up your song files and playlist files, you should copy those to some external device, such as a writeable
CD, a thumb drive, or a USB hard drive. You can quickly back up your main database by running Worship LIVE!
and selecting Edit:Export:Entire Database for Sharing. You can later restore this single file into a complete
database by selecting a similar option from the Edit:Import menu. However, this will only back up songs in the
current database, and will not back up your playlist files.
Your settings are stored in the Windows Registry, and we do not recommend that non-expert computer users
attempt to access the Registry directly. If you understand the risks and wish to do this manually, you can read
this topic about registry entries 118 made by the Worship LIVE! software.
However, in addition to the Registry, our software copies all its registry settings to a backup file each time you exit
the program. You can find this file quickly by opening the program, selecting Edit:Preferences and clicking the
General tab, and clicking "Open Log Folder". In that folder you will find a file titled
"WorshipLIVE6_Settings_Backup.reg"; this is a Registry-compatible file containing all of the settings used by the
program. You can back up this file just like any other file.
To restore your Worship LIVE! settings, you can simply double-click this file; Windows will ask you if you want to
enter all this information into the Windows Registry. If you click Yes, all your settings will be restored to their
values as of the time this file was created. (Note that the unlock information stored in this file is specific to your
computer: you cannot transfer this file to another computer or restore it to a new Windows installation without
needing to unlock again. Also note that this procedure will OVERWRITE all your current Worship LIVE! settings
with the settings stored in the file.)
4.5
Restoring Your Data
SOFTWARE
To restore a Worship LIVE! installation, the fastest and most reliable way is to simply reinstall the software from
your CD or downloaded installation program. We do not recommend that you try to back up and restore your
Program Files folder, as the software will not run properly without a formal installation routine.
SONGS AND PLAYLISTS
If you used the Export:Entire Database for Sharing option to back up your song files, you can restore this single
file into a complete database by selecting Edit:Import:Entire Database for Sharing. This will restore any songs
from that database - but only that database.
If you copied your songs and playlists to a CD or other external media, simply copy them back to your My
Documents folder, or wherever else you want them. You may need to open a database from the File menu inside
the Worship LIVE! software after you have restored the files.
©2010 Split Infinity Music
120
Worship LIVE! version 6 User's Manual
NOTE: if you are restoring song files or playlists from a writeable CD, you may experience difficulties with saving
or printing songs or playlists. This is because Windows typically marks files written to CD as "Read Only", and will
not let Worship LIVE! (or any other program) change them after they are restored. To fix this problem, find your
song database folder, right-click on it, select "Properties", and click the "Read Only" checkbox until it is not
shaded or checked, and click "OK". Windows will then ask if you want to apply that change to this folder only;
click "Apply changes to this folder, subfolders and files" and click "OK". This will remove the "Read Only"
attribute. You can also use this technique on any playlists or individual song files.
SETTINGS
You can restore your Worship LIVE! settings from a backed up "WorshipLIVE5_Settings_Backup.reg" file, by
simply double-clicking this file; Windows will ask you if you want to enter all this information into the Windows
Registry. If you click Yes, all your settings will be restored to their values as of the time this file was created. (Note
that the unlock information stored in this file is specific to your computer: you cannot transfer this file to another
computer or restore it to a new Windows installation without needing to unlock again. Also note that this
procedure will OVERWRITE all your current Worship LIVE! settings with the settings stored in the file.)
4.6
System Files
The following DLL and system files are required by Worship LIVE, and may be installed in the Windows System
folder when the program is installed (existing up-to-date files will not be re-installed or overwritten):
Special Worship LIVE! files:
ptrue.dll (PhotoTrue DLL)
ptrue52.dll (PhotoTrue wrapper DLL)
ccrpbds5.dll (CCRP Browse Dialog Server ActiveX Control)
ccrpprg.ocx (CCRP Progress Bar ActiveX Control)
ccrptmr.dll (CCRP Precision Timer library)
wspell.ocx (WSpell ActiveX Spelling Checker Control)
midiio32.ocx (MIDI input control)
midiio32.oca (MIDI input control)
Standard Microsoft files:
richtx32.ocx (Microsoft Rich Text Box ActiveX Control)
riched20.dll (Microsoft Rich Text Box DLL)
mscomctl.ocx (Microsoft Common Controls library ActiveX Control)
comdlg32.ocx( Microsoft Common Dialog 32 ActiveX Control)
mci32.ocx (Microsoft Multimedia Controls ActiveX Control)
msvcrt.dll (Microsoft Visual C Runtime library)
mfc42.dll (Microsoft Foundation Classes library)
olepro32.dll (Microsoft Object Linking and Embedding library)
picclp32.ocx (Microsoft Picture Clip 32 ActiveX Control)
MSVBVM50.DLL (Microsoft Visual Basic 5 Virtual Machine DLL)
These files (even the ones installed by Worship LIVE!) may be used by other programs (perhaps installed after
Worship LIVE!) and if you uninstall the program, should only be removed if you are certain they are not needed.
©2010 Split Infinity Music
Index
Index
-C-
-Aadding songs to the database 20
all caps 27
announcements 46, 47, 48, 109
about 47
creating 47
deleting 48
editing 47
opening 47
projecting 48
saving 48
selecting 47
spell checking 109
answers 10
audio 52, 53
about 53
adding 53
changing 53
projecting 53
auto syntax formatting 36
auto syntax highlight 91
automation 74, 75, 76, 77, 78
controls 77
defaults 78
setting up a song's timings 75
setting up non-song automation
-Bbackground 6
backing up settings 119
Bible 48, 49, 50, 51
about 49
copying 51
dialog 49
exporting 51
parallel 49
printing 51
projecting 51
searching 51
selecting 50
window 49
blanking projection 74
bug reporting 114
©2010 Split Infinity Music
76
caps 27
CCLI summary 38
CCLI support 37, 38, 39, 40
chord formats 25, 90
chord shifts 36
chording styles 26
chords 84, 85, 95
click-to-play 84, 85, 95
custom 85
editing 85
colors 36, 72, 73, 81, 89, 91, 109
auto syntax formatting 36
change color dialog 109
defaults 89
print colors 89
projection display 73
sequence printout 32
syntax styles 91
visual paging 72
comment 25, 30, 33
comparing 28, 29
contacting Split Infinity Music 115
countdown timer 99
configuring the display 101
context menu 101
creating a timer 100
options 101
creating 20, 27, 47, 59
announcements 47
databases 20
playlists 59
songs 27
-Ddatabases 15, 19, 20, 21, 23
about 15
adding songs 20
creating 20
exporting 20
new 20
opening 19
saving 20
searching 20
sharing 20
sorting 21, 23
121
122
Worship LIVE! version 6 User's Manual
databases 15, 19, 20, 21, 23
view options 21, 23
default folders 97
deleting 28, 48
announcements 48
songs 28
DLLs 112
dual screens 64
duplicates 28, 29
-Kkey 25, 30, 33
keyboard shortcuts 66, 70, 83
multimedia 83
projecting 66, 70
-L-
-E-
libraries 112
license agreement 12
linking online 115
list filtering 23
list sorting 21
editing 30, 47
announcements 47
songs 30
email addresses 115
exporting 28, 37, 42, 62
Bible 51
playlists 62
scripture 51
songs 28, 37
-Mmetronome 83
MIDI 82, 83
MP3 82, 83
multimedia 82, 83, 84, 85
click-to-play 84, 85
file types 83
keyboard shortcuts 83
metronome 83
multimedia control window
multiple computers 12
-FFAQ 10
features 7
filters 23
font 36
font color 89
freezing projection 74
frequently asked questions
-N-
10
new 20, 27, 47, 59
announcements 47
database 20
playlists 59
songs 27
-Iimages 51, 52
about 51
adding 52
captions 52
changing 52
projecting 52
importing 42, 43, 44, 45, 46
basics 43
exporting from other software
import dialog options 43
old databases 46
importing from Powerpoint 45
importing from Word 44
installation 112
82
-O44
online features 115
online tools 103
opening 19, 27, 50
Bible 50
databases 19
scripture 50
songs 27
options 87, 88, 89, 90, 91, 92, 94, 95, 96, 97, 98
automation 78
©2010 Split Infinity Music
Index
options 87, 88, 89, 90, 91, 92, 94, 95, 96, 97, 98
chord formats 90
colors 89
default folders 97
fonts 94
ignored terms 92
MIDI 95
multimedia 95
page setup 88
print colors 89
projecting 95
stage mode 96
syntax styles 91
transposing 92
unlocking 98
views 87
-Ppage breaks 35
page preview 81
page setup 79
parallel Bible versions 49
phone numbers 115
playlists 55, 59, 60, 61, 62
about 55
audio 53
automation 75
comments 52
creating 52, 53, 54, 59
custom cover pages 61
exporting 62
images 52
notes 61
opening 59
printing 61
projecting 60
rearranging song order 60
saving 60
transposing 60
videos 54, 55
playlists and automation 75
PowerPoint 102, 103
about 102
adding 102
animations 102
projecting 103
removing 102
troubleshooting 112
videos 102
©2010 Split Infinity Music
123
preferences 87, 88, 89, 90, 91, 92, 94, 95, 96, 97,
98
automation 78
chord formats 90
colors 89
default folders 97
fonts 94
ignored terms 92
MIDI 95
multimedia 95
page setup 88
print colors 89
projecting 95
stage mode 96
syntax styles 91
transposing 92
unlocking 98
views 87
printed since 25, 30, 33
printing 32, 36, 51, 61, 78, 79, 81
Bible 51
colors 81
confirmation dialog 79
page setup 79
playlists 61
previewing 81
printer setup 78
scripture 51
sequence 32
songs 32, 36
printouts 61
customizing 61
projected since 25, 30, 33
projecting 37, 48, 51, 60, 63, 64, 66, 67, 70, 71, 72,
73, 74, 95
about 63
announcements 48
Bible 51
blanking and freezing 74
configuring 72
customizing each item 73
dual screen 64
finding songs 67
from the PlayList 66
goto 67
keyboard shortcuts 70
options 95
playlists 60
preferences 95
scripture 51
songs 37
124
Worship LIVE! version 6 User's Manual
projecting 37, 48, 51, 60, 63, 64, 66, 67, 70, 71, 72,
73, 74, 95
visual paging 71
without the PlayList 67
projection 63
automating 74
properties 25, 30, 33
songs 25, 30, 32, 33
purchasing 113
-QQ&A
10
-Rrestoring settings 119
rich text files 37
-Ssaving 20, 27, 48, 60
announcements 48
database 20
playlists 60
songs 27
scripture 48, 49, 50, 51
about 49
copying 51
dialog 49
exporting 51
parallel 49
printing 51
projecting 51
searching 51
selecting 50
window 49
searching 20, 51
Bible 51
database 20
scripture 51
sequence 30, 32
settings 87
sharing Worship LIVE! 12
shifting chords 36
slide show 51
smart chord wrapping 36
smart font changes 36
song 32
sequence property 32
song editing 24
songs 20, 24, 25, 26, 27, 28, 29, 30, 33, 34, 35, 36,
37, 38, 39, 40, 90, 92, 109
about 24
adding to the database 20
auto syntax formatting 36
backing up 119
CCLI support 38, 40
changing properties 30, 33
chord formats 25, 90
chording styles 26
comparing 28, 29
contents 25
deleting 28
editing 30
exporting 37, 42
formatting 34
importing 42
new 27
opening 27
page breaks 35
printing 36
projecting 37
properties 25
restoring 119
saving 27
smart chord wrapping 36
smart font changes 36
song window 24
spell checking 109
transposing 34, 92
verse breaks 35
SongSelect 39
sorting databases 21, 23
special topics 118, 119, 120
backing up 119
DDE interface 118
how transposition works 118
registry entries 118
restoring 119
system files 120
spell checking 109
stage mode 96
startup issues 112
synchronization 103, 104, 105, 107, 108
configuration 107
how it works 104
manual configuration 108
©2010 Split Infinity Music
Index
synchronization 103, 104, 105, 107, 108
setting up 105
using sync tools 107
what it does 104
-Ttempo 25, 30, 33, 83
terminology 8
text paging 71
text-over-video 55
timer (see also countdown timer)
title 25, 30, 33
topic 25, 30, 33
transposing 34, 60, 92, 118
how it works 118
playlist songs 60
songs 34
troubleshooting 112
bug reporting 114
getting help 115
PowerPoint 112
startup 112
updates 113
videos 112
-Uuninstalling 116
unlocking 98, 113
updates 113
-Vverse breaks 35
verses of the Bible 48
version 113
video backgrounds 55
videos 54, 55
about 54
adding 54
changing 55
projecting 54, 55
troubleshooting 112
visual paging 71
-Wweb features
115
©2010 Split Infinity Music
99
WMA 82, 83
wrap text 36
125